

Page 1

Quick Start Instructions
Contents
Description ............................................................................................................................. 1
OceanOptics Contact Information .......................................................................................... 2
Installing OceanView ............................................................................................................. 2
OceanView Minimum System Requirements .................................................................... 2
Installation .......................................................................................................................... 2
Product Activation .................................................................................................................. 6
Licensing ............................................................................................................................ 6
Starting Your 10 Day Free Trial ......................................................................................... 7
Using Your Product Key to Activate Your Software ......................................................... 7
Deactivating Your Product Key for Software Installation on another Computer .............. 7
Frequently Asked Questions ................................................................................................... 8
How do I navigate the new OceanView user interface? ..................................................... 8
How do I get into Scope mode? ....................................................................................... 10
Where are my Acquisition Controls? ............................................................................... 11
How do I get into Scope – Dark mode? ........................................................................... 13
Where did my S, A, T, R and I and light bulb buttons go? .............................................. 13
How do I find my Peaks? ................................................................................................. 14
What is the Schematic View? ........................................................................................... 16
How do I Using the Schematic View? ............................................................................. 16
How do I Splice spectral data? ......................................................................................... 17
Description
Ocean Optics has taken Java-based spectroscopy software to the next level with OceanView. This next
logical step in the evolution of spectrometer software provides good stability, persistence of user
settings, a broad scope of device features, and consistent file saving and loading procedures.
OceanView operates on 32- and 64-bit Windows, Macintosh and Linux operating systems. The
software can control any Ocean Optics USB spectrometer.
000-20000-310-01-201305 1
Page 2

OceanView Quick Start Instructions
OceanOptics Contact Informati on
To speak to a Technical Support represen tativ e or an Ocean Opt ic s Applic at ions Scien ti st, please ca ll
(727) 733-2447. Our office hours are 8 a.m.– 8 p.m. (Mon-Thu), 8 a.m.– 6 p.m. (Fri) ET.
You can access complete documentation for Ocean Optics products on the Software and Tech nical
Resources CD or by visiting our website at http://www.oceanoptics.com
Operating Instructions. Choose the appropriate document from the drop-down lists or use the Search
by Model Number field.
. Select Technical |
Installing OceanView
OceanView Minimum System Requirements
Monitor resolution: 1024 X 768 or higher
RAM: 1.5 GB or higher
Processor: Intel Core II Duo @ 1.4 GHz or better
Intel Core Duo @ 2.0 GHz or better
AMD Athlon Neo X2 @ 1.6 GHz or better
Intel Atom @ 2.13 GHz or better
AMD Athlon 64 x2 @ 1.7 GHz or better
HD Space: 300 MB free space
Note
Most processors produced in 2010 and later should work well with OceanView.
Caution
Do NOT connect the spectrometer to the computer until you install the
OceanView software. Follow the instructions below to properly connect and
configure your system.
Installation
Download OceanView from the link you received in your email.
Installation instructions are included below for installing OceanView on each of the following
operating systems:
• Microsoft Windows – XP, Vista, 7, 8; 32-bit and 64-bit
• Apple Macintosh – OSX 10.5 or higher on Intel processor
• Linux – Any version released for an x86 or amd64 platform since 2010 Example:
CentOS(Version 5.5), and Ubuntu (version 10.4LTS)
2 000-20000-310-01-201305
Page 3

OceanView Quick Start Instructions
Installing on a Wind ows Platform
Total download is approximately 64 MB (32-bit) or 71 MB (64-bit).
► Procedure
1. Close all other applications running on the computer.
2. Start Internet Explorer.
3. Navigate to the link you received to the OceanView software in your email and click on the
OceanView software appropriate for your Windows operating system.
4. Save the software to the desired location. The default installation directory is \Program
Files\Ocean Optics\OceanView.
5. The installer wizard guides you through the installation process. The OceanView icon location
is Start | Programs | Ocean Optics | OceanView | OceanView and the current user’s desktop.
Device Driver Issues with Windows 64-Bit
Hardware device driver installation is seamless on Microsoft Windows 32-bit operating systems when
you connect your spectrometer to your computer. However, 64-bit Windows systems require a bit
more care when connecting your spectrometer for the first time.
If your spectrometer is not recognized by OceanView running on a 64-bit computer, you need to
manually install the spectrometer drivers using the procedure below.
Windows 64-bit Driver Installation Process
Use the following procedure when connecting your spectrometer to a Windows 64-bit system. Steps
may vary slightly depending on the version of Windows.
► Procedure
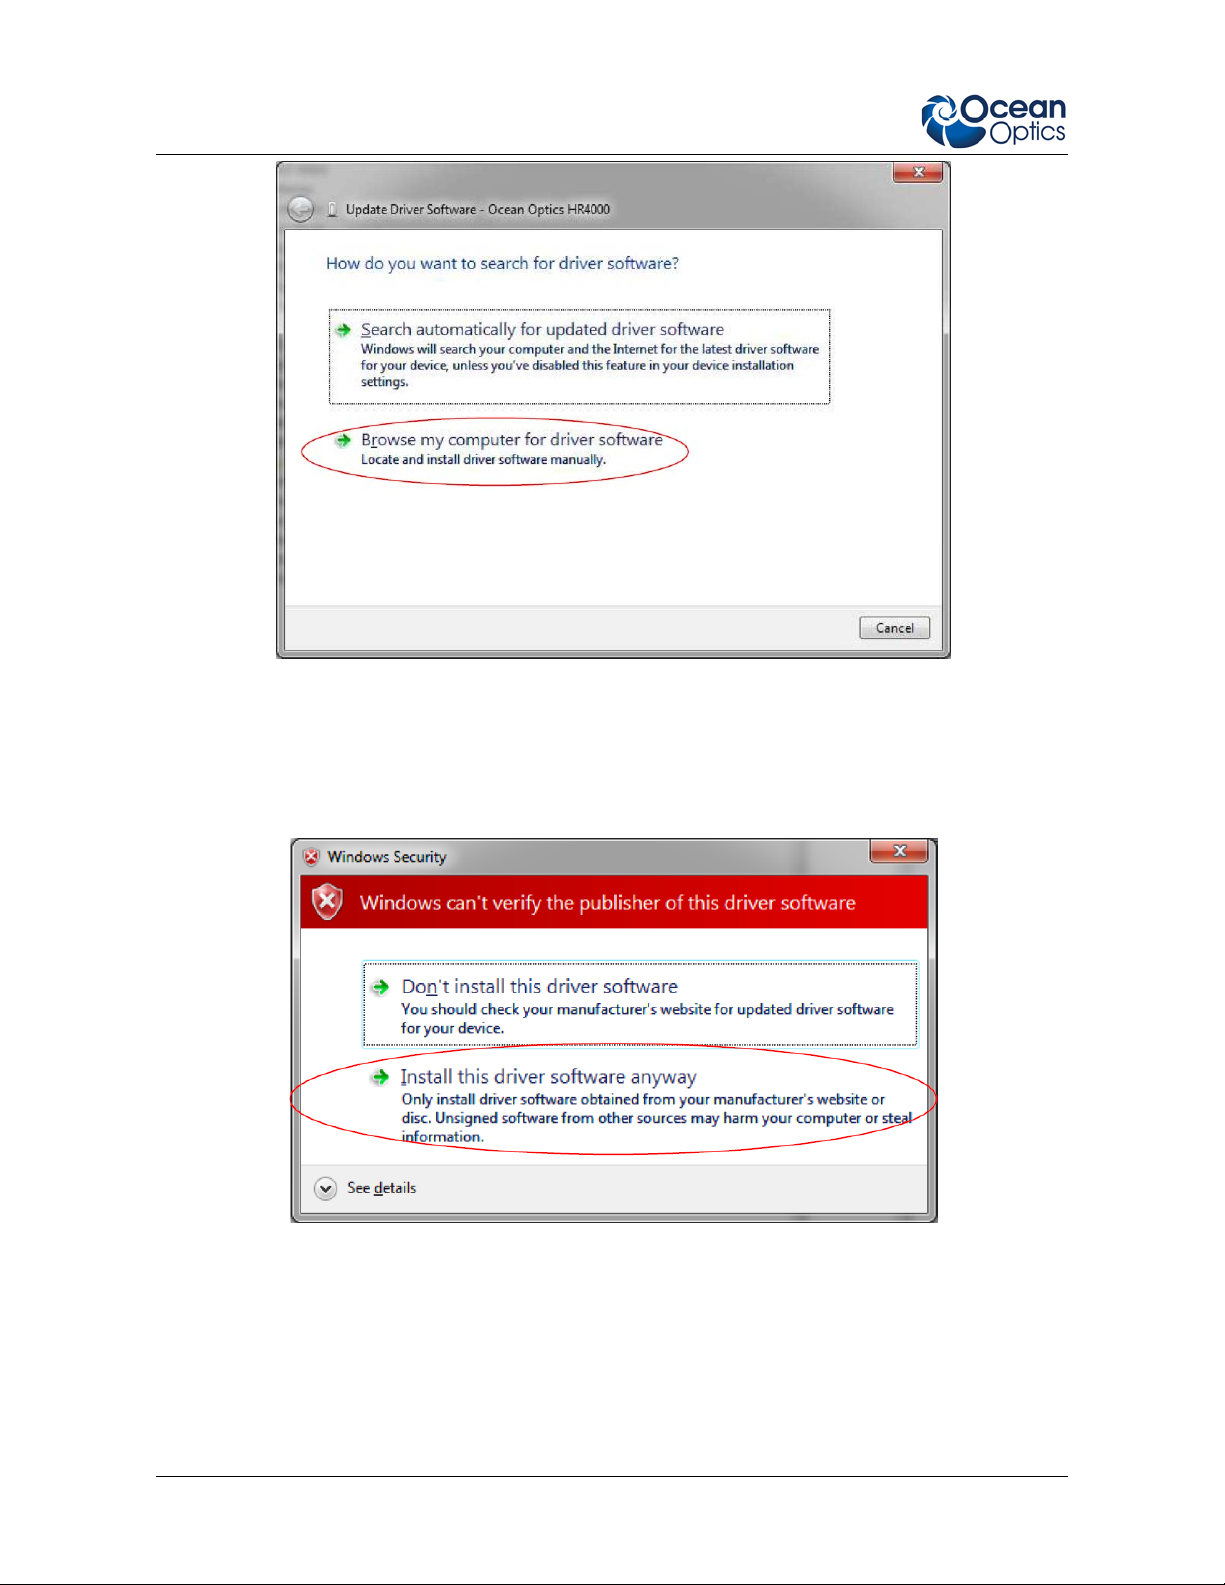
1. Open the Control Panel and click Device Manager.
2. Under Other devices, right-click on the Ocean Optics spectrometer and choose update driver
software. The following screen app ea rs:
000-20000-310-01-201305 3
Page 4
OceanView Quick Start Instructions
3. Choose Browse my computer for driver software.
4. Navigate to C:\Program Files\Ocean Optics\OceanView\SystemFiles and click OK. Then
click Next.
5. When the following pop-up screen appears, choose Install this driver software anyway.
When the driver installation is successful, the software will recognize your spectrometer.
4 000-20000-310-01-201305
Page 5
OceanView Quick Start Instructions
Installing on a Macintosh Platform
You must be logged on as an administrative user to install OceanView on your Mac. Total download
is approximately 35 MB.
Note
Newer versions of MacOSX do not ship with Java so you may need to manually
install a recent Java release before installin g Ocean View . Instructions to download a
recent Java release for different versions of OSX can be found at:
http://support.apple.com/kb/HT5648
There is also a direct link for the Java for OSX 10.7.3 and newer at
http://www.java.com/en/download/manual.jsp#mac
► Procedure
1. Navigate to the link you received to the OceanView software and download the installer
(OceanViewSetup_Mac.dmg).
2. Double-click the OceanViewSetup_Mac.dmg file to mount the disk image. A new OceanView
icon resembling a disk drive appears on your desktop. The new icon should open
automatically (if it doesn’t, double-click it).
3. Drag the OceanView.app icon to the Applications folder icon to install. OceanView can then
be launched from the Applications folder. If desired, double-click the Applications folder and
drag the OceanView icon from Applications to the Dock to be able to launch it more
conveniently.
4. When the installation is complete, drag the OceanView drive icon to the trash can.
Installing on a Linux P la tf or m
Total download is approximately 75 MB (32-bit) or 67 MB (64-bit).
► Procedure
1. Navigate to the link you received to the OceanView software in your email and download the
appropriate Linux OceanView installer.
Note
The example below is for a 64 bit installer downloaded to the desktop. Change 64 to
32 and the file location as needed for your installation.
2. Start a terminal window and enter the following commands:
chmod 755 ~/Desktop/OceanViewSetup_Linux64.bin
sudo ~/Desktop/OceanViewSetup_Linux64.bin
000-20000-310-01-201305 5
Page 6

OceanView Quick Start Instructions
You are prompted for your password, which allows you to execute the setup as root. Contact
your system administrator if you do not have the password. If the sudo command does not
work (it may not be set up for your user account), then enter the following:
su
(enter password for ro o t)
~/Desktop/OceanViewSetup_Linux64.bin
The Linux version of OceanView requires some libraries that may not be installed by default,
depending on the Linux distribution. The following are libraries are required and are not
provided as part of OceanView:
o libstdc++ version 6 or newer
o libXp version 6 or newer
o libusb version 0.1.10 or newer (should be provided in a libusb package or can be
downloaded from http://libusb.sourceforge.net/download.html#stable)
3. It may be necessary to modify SELinux (Security Enhanced Linux) restrictions bef ore
OceanView will run. It is possible to remove SELinux auditing by running 'setenforce
Permissive' as root or by customizing your SELinux policies. The OceanView installer does
not modify system security settings.
Note
The default ins ta lla tion directory is /usr/local/OceanOptics/OceanView.
A symbolic link is put in /usr/bin so that you can enter OceanView on any command line to
start the program.
The OceanView icon
or Other under the Application Launcher menu.
location varies by installation, but will be under either Applications
Product Activation
Licensing
You can activate your OceanView software conveniently online by selecting Help --> Licensing and
entering the product key in the OceanView Licensing dialog box that you received when you
purchased the software.
If you do not have an Internet connection, click Offline Registration to display the Product Activation
wizard. Using this wizard, you can then save an activation request file and send it to Ocean Optics via
an Internet-connected device. Ocean Optics will then reply with your Activation Request file that you
must apply using Step 3 of the Product Activation wizard.
The OceanView Licensing dialog box also allows you to deactivate your software license.
6 000-20000-310-01-201305
Page 7

OceanView Quick Start Instructions
Starting Your 10 Day Free Trial
All data and projects saved during your 10 day free trial will be available when the software is
activated using a valid product key. Contact info@oceanoptics.com
1. Double-click the OceanView icon on your Desktop to start the software.
2. Click the Cancel button in the OceanView Product Activation dialog box that opens to start
your 10 day free trial with a fully functional version of OceanView.
to purchase OceanView licenses.
Using Your Product Key to Activate Your Software
Note
An Internet connection is required to activate your software using a valid product key.
If an Internet connection is not available, contact info@oceanoptics.com
offline activa t ion procedure.
► Procedure
1. Double-click the OceanView icon ( ) on your Desktop to start the software.
for the
2. Click Next in the OceanView Product Activation dialog box to enter your product key.
3. Copy the product key from the email you received and paste it into the product key box.
4. Click the Register Software button to validate your product key.
5. Click Finish to complete the software registration.
If you see the message below, check your Internet connection and click the Register Software button
again. If the computer is connected to the Internet and you still cannot register your software, contact
info@oceanoptics.com
for assistance.
Deactivating Your Product Key for Software Installation on another Computer
With the exception of multi-license packs, your product key is only valid for use on two computers at
a time. A deactivation option is available in OceanView if you want to deactivate your product key on
one computer so you can use it on another computer.
►
Procedure
1. Go to Help | Licensing.
2. Click Deactivate. The following warning will appear:
000-20000-310-01-201305 7
Page 8

OceanView Quick Start Instructions
3. Click Yes to deactivate the license. OceanView closes and the license will be available for use
on another computer.
Frequently Asked Questions
How do I navigate the new OceanView user interface?
When you start OceanView, a Welcome screen appears asking what you would like to do.
The options are as follows:
• Run a Wizard: Asks you to select your data source (spectrometer), and then allows you to
choose the type of spectral analysis you want to perform:
o Spectroscopy
- Quick View Minus Background (formerly Scope Minus Dark)
- Absorbance
- Reflection
- Transmission
- Raman
- Quick View Fluorescence
- Relative Irradiance
- Absolute Irradiance
8 000-20000-310-01-201305
Page 9

OceanView Quick Start Instructions
o Color
o Photometry
o Concentration
o Energy, Power, Photons
• Load Project: Loads a previously saved project.
• Restore Previous Session: Reloads the Schematic and view window configurations as they
were when the software was closed.
• Quick View: Displays the spectrum in Quick View mode showing raw, unprocessed data
(previously referred to as Scope mode).
Note
OceanView has extensive context sensitive help. Click the Help button in any dialog
box for more details. Tooltips are also available by hovering over a button or window
for more information. Help is also availabl e using the Help option in the top menu.
Run a Wizard
► Procedure
1. Select Run a Wizard and click OK to open the Wizard selection dialog box.
2. Click Spectroscopy to open the Select Spectroscopy Wizard dialog box.
3. Select the processed mode you want to enter and click Next. The wizard will take you through
all the necessary steps to optimize your acquisition and enter the desired processing mode.
The wizards can also be accessed by clicking the Create a new spectroscopy application button
) or by selecting the File | Create a new spectroscopy application menu item.
(
Load Project
With the new persistence functionality and ability to save and reload projects, you can quickly enter a
processed mode by reloading a previously saved method.
►
Procedure
1. Select Load Project to view the list of previously saved projects.
2. Select the project you want to load and click OK. Your project will reload and even warn you
if you are reloading Reference or Background data that should be updated to ensure accurate
measurements.
Note
To load a project, you must have the same spectrometer(s) that were used to create the
project connected to the computer before you can load the project. The project will not
load if the spectrometers used to create it are not connected to the computer.
000-20000-310-01-201305 9
Page 10

OceanView Quick Start Instructions
You can also load a project by clicking the Open Project button ( ) or by selecting the File | Open
Project menu item.
Save projects by clicking the Save project button (
item.
) or selecting the File | Save Project menu
Restore Previous Session
Select Restore Previous S essio n and cl ick OK to open the software just as you left it when you last
closed it. The settings and customization from the previous session will reload. If the previous session
included Reference and Dark data, you will be warned that you are reloading data that should be
updated to ensure accurate measurements.
Note
To restore a previous session, you must have the same spectrometer(s) that were
connected when you last closed OceanView attached to the computer before you can
reload the session. The session will not load if the spectrometers used to create it are
not connected to the computer.
Quick View
Select Quick View to display spectra for all the attached devices in a raw, unprocessed data view
useful for setting acquisitions parameters and troubleshooting. This mode was previously referred to as
Scope mode in SpectraSuite and OOIBase32 software.
How do I get into Scope mode?
Scope mode has been renamed Quick View in OceanView. To display a Quick View spectrum for all
the attached devices, do one of the following:
• Select the Quick View option from the Welcome Screen and click OK.
• Click the x in the upper right hand corner of the Welcome Screen.
Tip
Remove the checkmark from the “Show on startup” option in the Welcome Screen
and the software will also start in Quick View.
10 000-20000-310-01-201305
Page 11

OceanView Quick Start Instructions
Where are my Acquisition Controls?
To provide a cleaner, more relevant user interface and easier selection of an acquisition when multiple
acquisitions are running, all the acquisition controls have been moved to the Acquisition Control Panel
accessed in the Graph View window by clicking the Acquisition Controls button (
).
The Acquisition Control Panel can also be accessed in the Schematic window by clicking the
Acquisition Controls node (
).
When you click the Acquisition Controls button in the Graph or Schematic View, the Main Controls
tab of the Acquisition Parameters Controls opens.
000-20000-310-01-201305 11
Page 12

OceanView Quick Start Instructions
Note
Different types of acquisitions are available for different devices including
Spectrometer, I²C, SPI, Board Temperature, Thermo-Electric Cooling and Analog In.
The controls available in the Acquisition Parameters Controls vary based on the
type of acquisition is selected.
Add additional acquisition controls to the Main Controls tab by clicking the Add/Remove Controls
tab and checking the boxes next to the desired feature. When check ed, the con tro ls for these fea tures
will show up on the Main Controls tab. Unchecking a feature does not disable the feature. It only
hides the controls on the Main Controls tab. The spectrometer type will determine which controls are
available in the Add/Remove Controls tab. The Spectrometer feature is already checked and grayed
out. This feature places certain necessary spectrometer control s on the Main Controls tab and cannot
be removed.
Note
If a control is shown in the Main Controls tab, by selecting it in the Add/Remove
Controls tab, that setting will be pushed to the device before every update. If multiple
acquisitions have visible controls for the same feature on the same device, the device
will alternate between them, possibly resulting in rapid changes of state (e.g., lamp
control).
12 000-20000-310-01-201305
Page 13

OceanView Quick Start Instructions
How do I get into Scope – Dark mode?
Background subtraction (formerly Dark subtraction) is done to eliminate any extraneous light that
might compromise useful data. Light from sources other than the designated reference lamp including
ambient light, stray reflections or scatter will be accounted for by storing a Background. Other
undesired effects such as thermal noise and hot pixels can also be measured and eliminated with a
proper background spectrum.
Scope Minus Dark has been renamed to Quick View Minus Background in OceanView. Quick View
Minus Background mode is entered using the Quick View Minus Background Wizard to set your
acquisition parameters and store a Background spectrum. When the Background spectrum is stored, a
Background button (
) is added to the Graph View to enable a Background update as needed.
Tip
Save your Quick View minus Background experiment as a Project and reload it using
the Open Project button to quickly enter Quick View minus Background mode.
Where did my S, A, T, R and I and light bulb buttons go?
The processed modes available in SpectraSuite by clicking on the A, T, R and I buttons are available
in the new software through the Spectroscopy Wizard or by loading a previously saved experiment
created for one of these processed modes.
►
Procedure
To access the Spectroscopy Wizards,
1. Click the Create new spectroscopy application button (
spectroscopy application button (
) from the File menu to open the Wizards dialog box.
) or select the Create new
000-20000-310-01-201305 13
Page 14

OceanView Quick Start Instructions
2. Click Spectroscopy to open the Select Spectroscopy Wizard dialog box.
3. Select the processed mode you want to enter and click Next. The wizard will take you through
all the necessary steps to optimize your acquisition and enter the desired processing mode.
Tip
Save your Absorbance, Transmission, Reflection or Irradiance experiment as a Project
and reload it using the Open Project button
Project menu option. When you load a project, Reference (
or by selecting the File | Open
) and Background ( )
buttons will be available in your Graph View for updating the Reference and
Background spectra.
How do I find my Peaks?
Find the peaks in your spectrum by clicking the View Spectrum Peaks button ( ) in your Graph
View.
The Configure Peak Metrics wizard takes you through a few quick steps to setup your peak finding
parameters.
14 000-20000-310-01-201305
Page 15

OceanView Quick Start Instructions
► Procedure
1. Set baseline level.
2. Choose your peak finding method and set peak finding criteria and optional spatial filtering.
3. Select which peak parameters to display them on the graph, in a table or both.
4. Make adjustments to peak finding param eters and crit e ria in the new Peak menu that opens.
000-20000-310-01-201305 15
Page 16

OceanView Quick Start Instructions
5. Close the peak menu and remove peak information from the graph by clicking the View
Spectrum Peaks button (
).
What is the Schematic View?
The Schematic View is a window that shows icons representing the different devices and processes in
your project as nodes and links between the nodes. In the Schematic, you can view and manipulate the
flow of data from your spectrometer through your processing steps. Data flow is represented by the
use of arrows and lines that connect different nodes. The nodes represent points where data is
processed or manipulated.
The Schematic provides you all the functionality of the Graph View window, plus the following
enhanced capabilities:
• Algorithm nodes – allow for math functions such as ratios, adding multiple spectra, and
adding a constant to spectra.
• Setting a subrange – ability to focus on a specific subset of the spectrum
• Interpolating spectral data – evenly space data from two or more spectra to analyze them
mathematically
• Retrieving device properties such as serial number, firmware version, wavelength and total
number of pixels
• Sending a single value (such as TEC temperature, integral, average over a specific wavelength
range) from the device to the Scalar view to analyze the value over time
• Previewing spectra in graphs at every step in your process
• Easily adding new Graph and Table Views
How do I Using the Schematic View?
Spectrometers:
• All spectrometers detected by the software are automatically placed on the Schematic.
• Add new devices to the Schematic using the Device Manager button (
key. Click Rescan to scan and connect to new devices.
• Double-click the spectrometer icon to open the Devic e F eatures window and view all avail abl e
device characteristics (serial number and firmware version).
Acquisitions:
• Start a new acquisition for a spectrometer by right-clicking the spectrometer icon and selecting
New Acquisition to choose from the list of available acquisitions.
• Double-click the Acquire node to open the Acquisition Parameter Controls menu and
configure the acquisition.
Adding Nodes to the Schematic:
• Add a data view (Graph, Scalar or Table view windows) or processing nodes to the Schematic
by right-clicking on an empty region of the Schematic and selecting a node from the menu.
• To connect nodes:
) or pressing the F5
16 000-20000-310-01-201305
Page 17

OceanView Quick Start Instructions
o For PC users, hold down the Control key and left-click on the first node. While
still holding the mouse button, drag a wire from the first node to the second node.
When the cursor is over the second node, release the mouse button and the
Control button: Control + Clic k + Drag
o For Mac users, hold both the Shift key and the Control key while wiring a
connection: Control + Shift + Click + Drag
• Double-click a node to view available feature controls and access context sensitive help.
• Delete a connection between node by moving the cursor over the wire, right-clicking on it and
selecting Delete Connection. Right-click the node to Rename, Duplicate or Delete it.
• Double-click a View node to go to the Data View window for that node
• If two nodes cannot be connected, OceanView will not allow you to make the connection.
View the context sensitive help for the node to determine the proper connection by doubleclicking the node and clicking the Help button.
Tip
Use the Wizards to create your Schematic and customize as desired using more than
70 algorithm nodes.
How do I Splice spectral data?
OceanView has a post-processing mode that allows you to splice spectral data from multiple
spectrometers into a single spectrum . Note that spectral splicing can only be done with processed
spectra -- Absorbance, Reflection, Transmission, Relative Irradiance or Absolute Irradiance.
►
Procedure
1. Open the Splice Spectra dialog box by clicking the Splice Spectra button ( ) in the Graph
View window.
2. Click the Add Range button to select sources of processed data for the spliced spectrum.
000-20000-310-01-201305 17
Page 18

OceanView Quick Start Instructions
3. Adjust the spectral ranges for the sources and click Apply to splice the spectra into a single
spectrum.
For additional help, click the Help buttons available in most OceanView dialog boxes for extensive
context sensitive help. Help is also available by selecting the menu item Help | Help Contents at top
of your software window.
18 000-20000-310-01-201305
 Loading...