


™
|
TABLE OF CONTENTS |
ENGLISH |
02-13 |
ESPAÑOL |
14-25 |
FRANCAIS |
26-37 |
ITALIANO |
38-49 |
PORTUGUÊS |
50-61 |
DEUTSCH |
62-73 |
MAGYAR |
74-85 |
JAPANESE |
86-97 |
©2006 Oakley, Inc. U.S. Patent Pending

2 OAKLEY INSTRUCTION MANUAL
Imagine a true Swiss Made chronograph with the precision of 13-jewel movement to optimize accuracy. Combine it with the comfort of a lightweight titanium case and the authenticity of Oakley design. Engineer it with quartz accuracy and an intuitive analog display with three sub dials. And give it the ability to measure cumulative time, intermediate time and split time, all down to a tenth of a second.
Introducing a precision instrument that blends the heritage of Swiss watchmaking with the innovation of Oakley art and technology. The hardest crystal utilized in the industry, pure sapphire protects the six-hand display. Luminous phosphors on the minute and hour hands improve visibility in low light, and the large date display can be read at a glance. Computer Numeric Control (CNC) machining forms the case sculpture from durable titanium, one of the lightest metals on the planet. A screwdown crown protects the case against water pressure equivalent to 330 feet (100 meters) beneath the surface. Optimized with a 48-month battery, the Oakley chronograph is available with a genuine leather strap or a titanium bracelet with the fit of microadjusting links and the flex of self-lubricating thrust washers, reinforced with carbon fiber.
INSTRUCTION MANUAL 3
SETTING THE DATE AND TIME
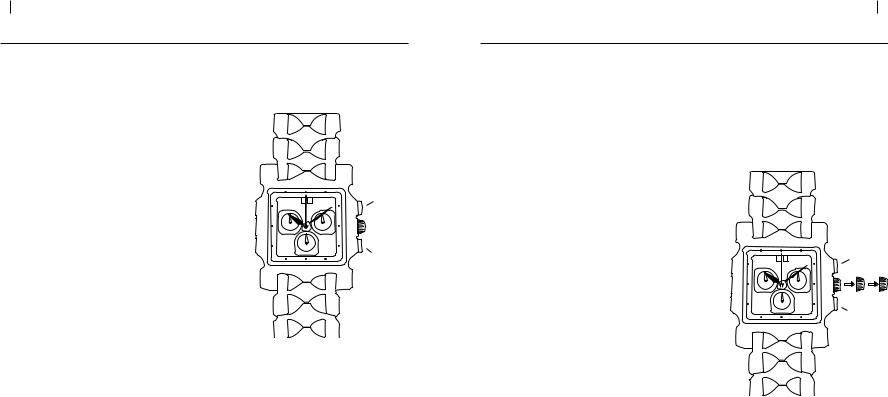
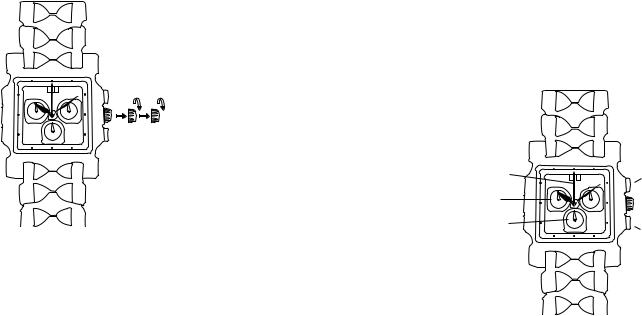
Your Oakley Timepiece features a screw-down crown for added protection against moisture. After it is unscrewed from the case, the crown can be pulled out to two click positions for setting the date and time.
To set the time and date the first time (or to reset the time and date after the battery is changed), do the following: 1. Pull the crown out to the first click position (a).
2. Turn the crown until yesterday’s date appears.
3.Pull the crown out to the second click position (b).
4.Turn the hands forward until today’s date appears, then
continue forward until the current time is reached. If |
|
|
the current time is in the afternoon or evening, move |
|
|
the hour hand all the way around the dial to pass 12 |
|
|
o’clock noon. |
|
|
5. Push the crown back down. For added protection |
|
|
against moisture, gently turn the crown until it screws |
A |
B |
into the case. |
|
|
To set the exact second, wait until the hand in the secondcounting sub dial (at the right of the main dial face) reaches “60” before you pull out the crown. Set the time then wait until the exact second is reached before pushing the crown back down.

4 |
INSTRUCTION MANUAL |
|
|
|
|
|
|
|
|
|
|
|
|
INSTRUCTION MANUAL 5 |
|
SETTING THE DATE AND TIME |
|
|
|
|
|
|
|
|
|
|
|
|
USING THE CHRONOGRAPH |
||
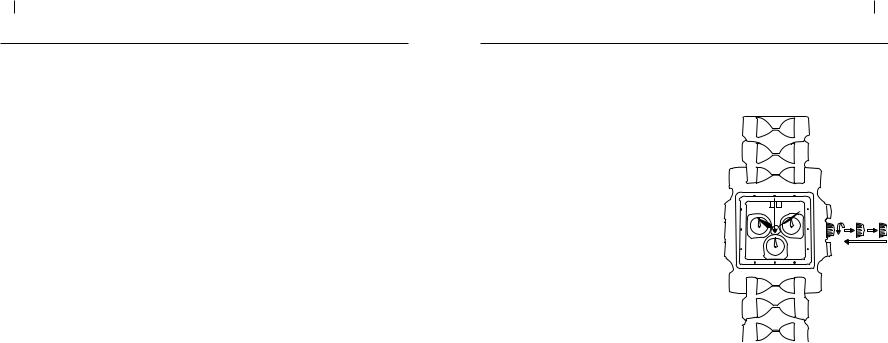
To adjust the time and date for subsequent settings, use these short procedures: |
|
|
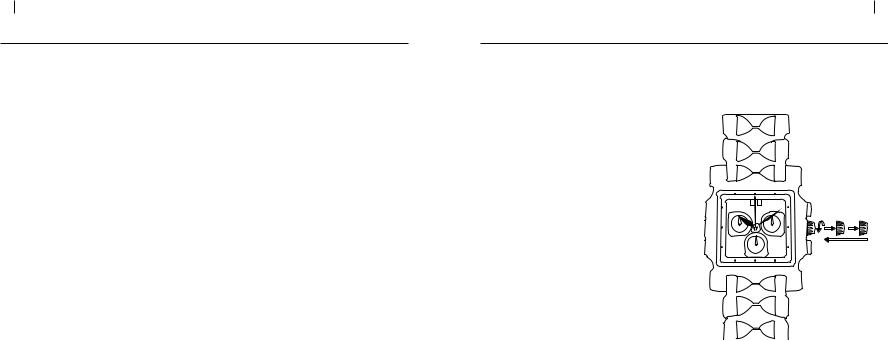
The chronograph includes three separate hands: |
|
|
|
|
|
|||||||
|
|
|
|
• |
The hand on the main dial face counts seconds. One full rotation is 60 seconds. |
|
|
||||||||
TO SET THE TIME: |
|
|
• |
The hand on the sub dial at the left counts minutes. One full rotation is 30 minutes. |
|
|
|||||||||
1. Pull the crown out to the second click position (b). |
|
|
• |
The hand on the sub dial at the bottom counts 1/10 seconds. One full rotation is 1 second. After 30 minutes, this hand works |
|||||||||||
2. Turn the crown until you reach the correct time. |
|
|
|
as an hour counter. |
|
|
|
|
|
|
|
|
|
||
3. Push the crown back down. For added protection against |
|
|
The chronograph is controlled with two push buttons: |
|
|
|
|
|
|||||||
|
moisture, gently turn the crown until it screws into the |
|
|
|
|
|
|
|
|||||||
|
|
|
• |
Button “A” stops and starts the timer. |
|
|
|
|
|
|
|||||
|
case. |
|
|
|
|
|
|
|
|
||||||
|
|
|
• |
Button “B” has four functions. In addition to pausing the display at the current intermediate time, it allows the chronograph |
|||||||||||
|
|
|
|
||||||||||||
TO SET THE DATE: |
|
|
|
hands to catch up to the ongoing time being measured; it displays a second time total; and it resets the chronograph hands |
|||||||||||
|
|
|
to the zero position. |
|
|
|
|
|
|
|
|
||||
1. Pull the crown out to the first click position (a). |
|
|
|
|
|
|
|
|
|
|
|
||||
|
|
|
|
|
|
|
|
|
|
|
|
|
|
||
2. |
Turn the crown until you reach the correct date. |
|
|
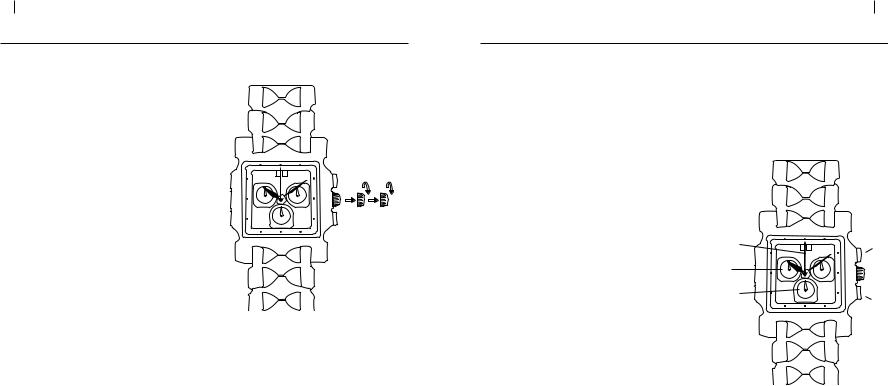
Before using the chronograph functions, ensure that the crown is |
|
|
|
|
|||||||
|
If the current time is between 9 PM and midnight, set |
A |
B |
fully against the case and not at one of the click positions used |
|
|
|
|
|||||||
|
the date to the following day. (This is necessary because |
|
|
for setting time and date. The three chronograph hands should |
|
|
|
|
|||||||
|
the automatic date change function will not occur at |
|
|
align precisely at the zero position. If they do not, see the section |
|
|
|
|
|||||||
|
midnight in this case.) |
|
|
below on Adjusting the Chronograph Hands. |
|
|
|
|
|
|
|||||
3. |
Push the crown back down. For added protection against |
|
|
TO MEASURE CUMULATIVE TIME: |
|
|
|
C |
nograph |
B |
on A |
||||
|
moisture, gently turn the crown until it screws into the |
|
|
|
|
|
S |
nd Hand |
|||||||
|
|
|
1. |
Press button “A” to start timing. |
|
|
|
|
|
|
|
||||
|
case. |
|
|
|
|
|
Minutes |
|
|
||||||
|
|
|
2. |
Press button “A” again to stop timing. |
|
|
|
|
|||||||
|
|
|
|
|
|
|
|
|
|
||||||
|
|
|
|
3. |
Press |
button |
“A” |
again |
to |
restart |
timing. |
1 |
Sec |
|
|
|
|
|
|
|
Continue to use button “A” to add |
time intervals to |
o |
Hours |
B |
on B |
|||||
|
|
|
|
|
|
|
|
|
|||||||
|
|
|
|
|
the total measure of time. When using button “A” only, |
|
|
|
|
||||||
|
|
|
|
|
“intermediate time” (the time that occurs while the |
|
|
|
|
||||||
|
|
|
|
|
chronograph hands are not moving) is not added to the |
|
|
|
|
||||||
|
|
|
|
|
total measure of time. |
|
|
|
|
|
|
|
|
||
|
|
|
|
4. |
While timing is stopped, press button “B” to reset the |
|
|
|
|
||||||
|
|
|
|
|
chronograph hands to the zero position. |
|
|
|
|
|
|
||||
6 INSTRUCTION MANUAL
USING THE CHRONOGRAPH
TO MEASURE INTERMEDIATE TIME:
1.Press button “A” to start timing.
2.Press button “B” to pause the chronograph hands at any time. Although the chronograph hands are no longer moving, time is still being measured.
3.Press button “B” again to move the chronograph hands to the currently running time total. Continue to use button “B” to pause the chronograph hands when desired.
4.While the chronograph hands are moving, press button “A” to fully stop timing and display the total measured time.
5.Use button “A” to restart and stop timing as desired.
6.While timing is stopped, press button “B” to reset the chronograph hands to the zero position.
TO MEASURE A SECOND TIME TOTAL (“SPLIT TIME”):
1.Press button “A” to start timing.
2.Use button “B” to pause the chronograph hands as desired.
3.While the chronograph hands are moving, press button “B” to display the first time total. Although the chronograph hands are no longer moving, time is still being measured.
4.Press button “A” when you reach the moment for marking the second time total, then press button “B” to display it.
5.Press button “B” to reset the chronograph hands to the zero position.
Button A
Button B
INSTRUCTION MANUAL 7
POWER SAVING MODE
When the timepiece is not in use, the battery life can be prolonged by pulling the crown out to the second click position (b). This will stop the hands and reduce power consumption.
ADJUSTING THE CHRONOGRAPH HANDS
When the chronograph is reset with button “B,” the three chronograph hands return to the zero position. If the chronograph hands do not align precisely with the zero position (such as after a battery change), use the following procedure to adjust them.
TO ADJUST THE CHRONOGRAPH HANDS:
1. If the chronograph hands currently show a measured time, use button “B” to reset them near the zero position. Note that the hands must be stopped with button “A” for button
“B” to reset them.
2.Pull the crown out to the second click position (b).
3.Press button “A” and button “B” at the same time and
|
keep them pressed for at least two seconds. This puts the |
|
|
|
||||
|
chronograph in Correction Mode. |
|
|
|
|
|
|
|
4. |
Press button “A” to adjust the chronograph hand that |
|
|
|
||||
|
measures seconds. Each press moves the hand one |
short |
B |
on A |
|
|||
|
step; press and hold the button for continuous movement. |
|
|
|
|
|||
5. |
Press button “B” then use button “A” to adjust the |
|
|
|
||||
|
chronograph hand |
that measures |
1/10 |
seconds. |
Each |
|
A |
B |
|
press of button “A” |
moves the hand |
one |
short step; |
press |
B |
on B |
|
|
|
|
|
|||||
and hold the button for continuous movement.
6.Press button “B” then use button “A” to adjust the chronograph hand that measures minutes. Each press of button “A” moves the hand one short step; press and hold the button for continuous movement.
7.Push the crown back down. For added protection against moisture, gently turn the crown until it screws into the case.

8 INSTRUCTION MANUAL
BATTERY REPLACEMENT
The miniature battery that powers the chronograph is designed to last approximately four years. However, because the battery is inserted at the factory for extensive performance checks, its actual life, once in your possession, may be less.
Battery replacement may be performed only by an Authorized Oakley Timepiece Dealer. Any attempt to open the watch case by persons other than Authorized Oakley Service Professionals will void the product warranty.
Within the United States, call Oakley global headquarters at 1-800-403-7449 to find an Authorized Oakley Timepiece Dealer or Service Professional near you. Customers outside the United States should contact their local Authorized Oakley Timepiece Dealer or visit the Oakley website at www.oakley.com for the number of the nearest Oakley distributor.
BAND ADJUSTMENT
Titanium Bracelet Model
If links need to be added or removed from the bracelet, the adjustment should be done by an Authorized Oakley Timepiece Dealer. Do not attempt to shorten the bracelet by removing links yourself, as this may result in damage to the bracelet.
Leather Strap Model
The natural leather of the strap may stretch slightly during break-in, so adjust the fit accordingly.
CLEANING
Failure to keep the case and band clean may result in a skin rash. The titanium bracelet version will become soiled with dust and perspiration due to contact with skin. Use a soft, clean cloth to wipe off any moisture that adheres to the case or band.
LEATHER CARE
Even the highest quality leather has a finite lifespan that may be reduced by excess wear and tear, exposure to the natural acids in perspiration, and exposure to the environment. To maximize the longevity of leather components, avoid direct contact with solvents and other chemicals; avoid prolonged exposure to sunlight; and avoid soaking the components in water.
INSTRUCTION MANUAL 9
COMPOSITION
CASE BODY . . . . . . . . . . . . . . . . . . . . . . . . . . . . . . . . . . . . . . . . . . . . . . . . . . . . . . . . . . . . . . . . . . . . . . . . . . . . . . . . . . . . . . Titanium CASE BACK . . . . . . . . . . . . . . . . . . . . . . . . . . . . . . . . . . . . . . . . . . . . . . . . . . . . . . . . . . . . . . . . . . . . . . . . . . . . . . . . . . . . . . Titanium MANUFACTURING . . . . . . . . . . . . . . . . . . . . . . . . . . . . . . . . . . . . . . . . . . . . . . . . . . . Impact forged, high-precision CNC machined CRYSTAL. . . . . . . . . . . . . . . . . . . . . . . . . . . . . . . . . . . . . . . . . . . . . . . . . . . . . . . . . . . . . . . . . . Sapphire with anti-reflective coating CROWN . . . . . . . . . . . . . . . . . . . . . . . . . . . . . . . . . . . . . . . . . . . . . . . . . . . . . . . . . Screw-down design for high-pressure resistance
Titanium Bracelet Model
BRACELET COMPOSITION . . . . . . . . . . . . . . . . . . . . . . . . . . . . . . . . . . . . . . . . . . . . . . . . . . . . . . . . . . . . . . . . . . . . . . . . . . . Titanium KINETICS . . . . . . . . . . . . . . . . . . . . . . . . . . . . . . . . . . . . . . . . . . . . . . . . . . . Carbon fiber reinforced self-lubricating thrust washers FLEXIBILITY . . . . . . . . . . . . . . . . . . . . . . . . . . . . . . . . . . . . . . . . . . . . . . . . . . . . . . . . . . . . . . . . . . . . . . . . . . . Micro adjustment links CLOSURE. . . . . . . . . . . . . . . . . . . . . . . . . . . . . . . . . . . . . . . . . . . . . . . . . . . . . . . Stainless Steel deployment clasp / titanium cover
Leather Strap Model
STRAP COMPOSITION . . . . . . . . . . . . . . . . . . . . . . . . . . . . . . . . . . . . . . . . . . . . . . . . . . . . . . . . . . . . . . . . . . . . . . . . Genuine leather ATTACHMENT . . . . . . . . . . . . . . . . . . . . . . . . . . . . . . . . . . . . . . . . . . . . . . . . . . . . . . . . . . . . . . . . . . . . . . . Articulating titanium link KINETICS (STRAP/CASE INTERFACE) . . . . . . . . . . . . . . . . . . . . . . . . . . . . . Carbon fiber reinforced self-lubricating thrust washers CLOSURE . . . . . . . . . . . . . . . . . . . . . . . . . . . . . . . . . . . . . . . . . . . . . . . . . . . . . . . . . . . . . . . . . . . . . . . Impact forged titanium buckle

10 INSTRUCTION MANUAL
SPECIFICATIONS
MOVEMENT ................................................................................................................................. |
Swiss Made, 13-jewel, gold finish |
TYPE OF OSCILLATOR............................................................................................................................................. |
Quartz Tuning Fork |
FREQUENCY OF OSCILLATOR........................................................................................................................... |
32,768 cycles per sec. |
DRIVE SYSTEM................................................................................................................................ |
Two-Pole Step Motor (180º/sec.) |
ACCURACY ........................................................................................................................................................ |
-10 /+20 sec. per mo. |
THERMAL OPERATING MIN ................................................................................................................................................. |
0ºC (32ºF) |
THERMAL OPERATING MAX. ........................................................................................................................................... |
50ºC (122ºF) |
WATER RESISTANCE ..................................................................................................... |
10 bar; equivalent to depth of 100m / 330ft |
BATTERY................................................................................................................................................................................. |
No. 395 |
BATTERY ENDURANCE.......................................................................................................................................... |
Approx. 48 months |
INSTRUCTION MANUAL 11
SAFEGUARDING
WATER EXPOSURE
Rated at 10-bar hydrophobic, the timepiece may be worn during bathing, swimming and shallow diving. It is not designed for scuba or saturation diving. Before exposing the timepiece to moisture, be sure the crown is fully screwed into the
case. Do not pull out the crown if the timepiece is wet. If used in seawater, rinse the timepiece with fresh water and dry completely. For the leather strap version, avoid prolonged exposure to water, as this may damage the strap.
TEMPERATURE
For precision timekeeping, normal operating temperature is 0°C to 50°C (32°F to 122°F).
MAGNETISM
Strong magnetic fields can have an adverse affect on the timepiece. Keep it away from magnetic objects.
CHEMICALS
The timepiece may become discolored or damaged if exposed to cosmetic spray, detergents, adhesives, solvents, or paints.
SHOCK WAVE
Although the timepiece resists shock damage, impact against a hard surface may cause damage to the movement or crystal.
PERIODIC MAINTENANCE
To ensure that the case, crown, crystal seal, and gasket remain resistant to water exposure, it is recommended that the timepiece be inspected once every 2 to 3 years by an Authorized Oakley Service Center.

12 INSTRUCTION MANUAL
OAKLEY WARRANTY POLICY
All authentic Oakley timepieces are warranted for two years from the date of purchase against manufacturer’s defects. Coverage is valid only with proof of purchase from an Authorized Oakley Timepiece Dealer.
IMPORTANT
This limited warranty does not cover the crystal, strap/band/bracelet, or attachments. The deterioration of leather components is not covered, nor are scratches to the case caused by use, nor is moisture damage if the timepiece is a non-hydrophobic model, nor is damage caused by natural disaster such as fire, flood, or earthquake. We reserve the right to relinquish all responsibility under this guarantee for repair of damage when misuse or abuse is evident, including defects related to tampering or servicing done by agents other than Authorized Oakley Service Facilities. This warranty does not affect specific legal rights of the consumer.
To qualify for service under the above guarantee, valid proof of purchase — which clearly shows the purchase date and the name of the Authorized Oakley Timepiece Dealer — must be presented if a repair claim is made during the warranty period.
REGISTRATION
The cutting-edge technology within each Oakley timepiece serves as validation of its authenticity. By registering your timepiece via mail or online at www.oakley.com, you provide further credentials by allowing us to document your purchase.
INSTRUCTION MANUAL 13
HOW TO MAKE A WARRANTY CLAIM
Within the United States, call the Oakley Global Headquarters number listed below. Please have your purchase information ready. Customers outside the United States should contact their local Authorized Oakley Timepiece Dealer or use the list below to call the nearest Oakley headquarters.
Swiss Movement
Swiss Made
Oakley Global Headquarters, USA: 1 (800) 403-7449
Oakley Africa: +27 41 501 0200
Oakley Brasil Ltda.: 0800-770-7822 ou 0xx11-4197-9999 (Grande São Paulo e celular)
Oakley Canada: 1-877-625-5396
Oakley Europe: Benelux, France, Italia, Scandinavia: 00 800 62 55 39 00 • España: 900 953 398 • Portugal: 800 833 121
• Sverige: 020 79 1037
Oakley GMBH: Germany, Austria and Poland: +49-89-99650-4181
Oakley Japan: 0120 009 146
Oakley México: 52) 55 59503643
Oakley South Pacific (Australia): 1 800 637 001
Oakley South Pacific (New Zealand): 0800 696 255
Oakley UK: 01462 475400 Eire customers: 00 353 4439557
14 MANUAL DE INSTRUCCIONES DE OAKLEY
Imagine un verdadero cronógrafo hecho en Suiza con la precisión de su mecanismo de 13 rubíes en el que se utiliza oro puro para conseguir una precisión óptima. Combínelo con el confort de su caja de titanio de peso ligero y la autenticidad del diseño Oakley. Diséñelo con la precisión del cuarzo y un display analógico intuitivo con tres subesferas. Y déle la capacidad de medir tiempos acumulados, tiempos intermedios y tiempos partidos, todos hasta décimas de segundo.
Presentamos un instrumento de precisión que combina el legado de los relojeros suizos con el arte innovador de Oakley. Zafiro puro, el cristal más duro utilizado en la industria, protege el display de seis manecillas. El fósforo luminoso aplicado a las manecillas del minutero y de las horas mejora la visibilidad en situaciones de poca luz y el gran display con la fecha se puede ver de un vistazo. La forma de la caja esculpida en titanio sólido, uno de los metales más ligeros del planeta, ha sido mecanizada por Control Numérico Computerizado (CNC). Una corona de rosca protege la caja contra una presión de agua equivalente a 100 metros de profundidad. Equipado con una pila con una duración de 48 meses, el cronógrafo Oakley se puede conseguir con una correa de auténtico cuero o con una pulsera de titanio, formada por eslabones microajustables y con la flexibilidad que le proporcionan las arandelas de empuje autolubricadas, reforzadas con fibra de carbono.
MANUAL DE INSTRUCCIONES DE OAKLEY 15
AJUSTE DE FECHA Y HORA
Vuestra reloj Oakley está provisto de una corona de rosca que lo protege además de la humedad. Para ajustar la fecha y hora, desenrosque la corona de la caja y luego tire de ella hacia fuera a través de las dos posiciones de ajuste.
Para ajustar la fecha y hora por primera vez (o para reajustar la fecha y hora después de cambiar la pila), haga lo siguiente:
1.Tire de la corona hacia fuera hasta la primera posición de ajuste (a).
2. Gire la corona hasta que aparezca la fecha del día de ayer.
3.Tire de la corona hacia fuera hasta la segunda posición de ajuste (b).
4. Gire las manecillas hacia delante hasta que aparezca la fecha |
|
|
actual, luego continúe hacia delante hasta alcanzar la hora |
|
|
actual. Si la hora actual es por la tarde o la noche, mueva la |
|
|
manecilla horaria una vuelta completa alrededor de la esfera |
|
|
hasta pasar de las 12 en punto del mediodía. |
A |
B |
5. Apriete hacia atrás la corona. Para proteger además el cronógrafo de la humedad, gire con suavidad la corona hasta que quede atornillada a la caja.
Para ajustar con exactitud los segundos, espere hasta que la manecilla de la subesfera que indica los segundos (situada a la derecha de la esfera principal) llegue a “60” antes de tirar hacia fuera de la corona. Ajuste la hora y luego espere hasta alcanzar el segundo exacto antes de empujar de nuevo la corona hacia atrás.
16 MANUAL DE INSTRUCCIONES DE OAKLEY |
|
|
|
|
|
MANUAL DE INSTRUCCIONES DE OAKLEY |
|
17 |
||||
AJUSTE DE FECHA Y HORA |
|
|
|
|
|
|
USO DEL CRONÓGRAFO |
|||||
Para ajustar la fecha y hora en ocasiones posteriores, utilice los siguientes procedimientos abreviados: |
|
|
El cronógrafo consta de tres manecillas independientes: |
|
|
|
|
|||||
PARA AJUSTAR LA HORA: |
|
|
|
|
• La manecilla de la esfera principal cuenta los segundos. Una vuelta completa corresponde a 60 segundos. |
|
|
|||||
|
|
|
|
• La manecilla de la subesfera situada a la izquierda cuenta los minutos. Una vuelta completa corresponde a 30 minutos. |
|
|||||||
|
|
|
|
|
|
|
|
|
||||
1. Tire de la corona hacia fuera hasta la segunda posición |
|
|
• La manecilla de la subesfera de la parte inferior cuenta décimas de segundo. Una vuelta completa corresponde a 1 segundo. |
|||||||||
|
de ajuste (b). |
|
|
|
|
|
Transcurridos 30 minutos, esta manecilla actúa como indicador horario. |
|
|
|
||
2. |
Gire la corona hasta alcanzar la hora correcta. |
|
|
|
El cronógrafo se controla con dos botones: |
|
|
|
|
|||
3. Apriete hacia atrás la corona. Para proteger además el |
|
|
• El botón “A” detiene y pone en marcha el cronógrafo. |
|
|
|
|
|||||
|
|
• El botón “B” tiene cuatro funciones. Además de detener la indicación del tiempo intermedio real, permite que las manecillas |
||||||||||
|
cronógrafo de la humedad, gire con suavidad la corona |
|
|
|||||||||
|
|
|
del cronógrafo alcancen la hora actual; este botón indica un |
|
|
|
|
|||||
|
hasta que quede atornillada a la caja. |
|
|
|
|
|
|
|
||||
|
|
|
|
segundo tiempo total y luego repone a cero las manecillas del |
|
|
|
|
||||
|
|
|
|
|
|
|
|
|
|
|
|
|
PARA AJUSTAR LA FECHA: |
|
|
|
|
cronógrafo. |
|
|
|
|
|||
|
|
|
|
|
|
|
|
|
||||
1. Tire de la corona hacia fuera hasta la primera posición |
|
|
Antes de utilizar las funciones del cronógrafo, hay que asegurarse |
|
|
|
|
|||||
|
|
de que la corona está totalmente ajustada contra la caja y no en |
|
|
|
|
||||||
|
de ajuste (a). |
|
|
|
A |
B |
|
|
|
|
||
|
|
|
|
una de las posiciones utilizadas para ajustar fecha y hora. Las tres |
|
|
|
|
||||
|
|
|
|
|
|
|
|
|
|
|
|
|
2. |
Gire la corona hasta alcanzar la fecha correcta. |
|
|
|
manecillas del cronógrafo deberán estar alineadas exactamente en |
S |
ndero |
|
|
|||
|
|
|
|
|
|
|
|
la posición cero. Si no es así, vea más adelante la sección Ajuste |
B |
n A |
||
Si |
la hora |
actual |
está entre las 9 |
de la tarde y |
la |
|
|
d |
onómetro |
|||
|
|
de las manecillas del cronógrafo. |
|
|
|
|
||||||
medianoche, |
ponga |
la fecha del día |
siguiente. (Esto |
es |
|
|
|
|
|
|
||
|
|
|
Mi |
os |
|
|
||||||
necesario porque la función de cambio automático de la |
|
|
PARA MEDIR EL TIEMPO ACUMULADO: |
|
|
|
|
|||||
fecha no actuará a medianoche en este caso). |
|
|
|
1. Pulse el botón “A” para iniciar el cronometraje. |
D |
as de |
|
|
||||
|
|
|
|
|
|
|
|
segundo |
B |
n B |
||
|
|
|
|
|
|
|
|
|
||||
3. |
Apriete hacia atrás la corona. Para proteger además el |
|
o Horas |
|
2. |
Pulse el botón “A” de nuevo para detener el cronometraje. |
|||
|
cronógrafo de la humedad, gire con suavidad la corona |
|||
|
3. |
Pulse el botón “A” de nuevo para reanudar el cronometraje. |
||
|
hasta que quede atornillada a la caja. |
|||
|
|
|
||
|
|
Continúe utilizando el botón “A” para añadir intervalos de tiempo al |
||
|
|
tiempo total medido. Utilizando solamente el botón “A”, el “tiempo |
||
|
|
intermedio” (tiempo que transcurre mientras las manecillas del |
||
|
|
cronógrafo están detenidas) no es añadido al tiempo total medido. |
||
|
|
4. |
Con el cronometraje detenido, pulse el botón “B” para reponer a cero las manecillas del cronógrafo. |
|
18 OMANUAL DE INSTRUCCIONES DE OAKLEY
USO DEL CRONÓGRAFO
PARA MEDIR EL TIEMPO INTERMEDIO:
1.Pulse el botón “A” para iniciar el cronometraje.
2.Pulse el botón “B” para detener las manecillas del cronógrafo en cualquier momento.
Aunque las manecillas del cronógrafo ya no están en movimiento, el tiempo continúa midiéndose.
3.Pulse el botón “B” de nuevo para llevar las manecillas del cronógrafo hasta el tiempo total que está transcurriendo actualmente.
Continúe utilizando el botón “B” para detener las manecillas del cronógrafo cuando lo desee.
4. Mientras las manecillas del cronógrafo están en movimiento, pulse el botón “A” para detener completamente el cronometraje y ver el tiempo total medido.
5.Utilice el botón “A” para reiniciar y detener el cronometraje a voluntad.
6. Con el cronometraje detenido, pulse el botón “B” para reponer a
B n A
cero las manecillas del cronógrafo.
PARA MEDIR UN SEGUNDO TIEMPO TOTAL (“TIEMPO PARTIDO”):
1. Pulse el botón “A” para iniciar el cronometraje.
2. Pulse el botón “B” para detener las manecillas del cronógrafo |
B n B |
|
|
cuando lo desee. |
|
3. Mientras las manecillas del cronógrafo están en movimiento, pulse el botón “B” para ver el primer tiempo total.
Aunque las manecillas del cronógrafo ya no están en movimiento, el tiempo continúa midiéndose.
4.Pulse el botón “A” cuando llegue el instante de marcar el segundo tiempo total, luego pulse el botón “B” para verlo.
5.Pulse el botón “B” para reponer a cero las manecillas del cronógrafo.
MANUAL DE INSTRUCCIONES DE OAKLEY 19
MODO DE AHORRO DE ENERGÍA
Cuando no esté utilizando el reloj, puede prolongar la duración de la pila tirando de la corona hacia fuera hasta la segunda posición de ajuste
(b). De este modo detendrá las manecillas y reducirá el consumo de energía.
AJUSTE DE LAS MANECILLAS DEL CRONÓGRAFO
Cuando el cronógrafo se repone a cero con el botón “B”, sus tres manecillas vuelven a la posición cero. Si las manecillas del cronógrafo no se alinean exactamente con la posición cero (tal y como ocurre después de cambiar la pila), utilice el siguiente procedimiento para ajustarlas:
PARA AJUSTAR LAS MANECILLAS DEL CRONÓGRAFO:
1. Si las manecillas del cronógrafo están indicando en este momento una medida de tiempo, pulse el botón “B” para reponerlas a una posición cercana a cero.
Hay que tener en cuenta que las manecillas deben detenerse con el botón “A” para poder reponerlas a cero con el botón “B”.
2. Tire de la corona hacia fuera hasta la segunda posición de ajuste (b).
B n A
3. Pulse los botones “A” y “B” al mismo tiempo y manténgalos presionados
durante al menos dos segundos. Con esta acción pondrá el cronógrafo en
el Modo de Corrección.
A B
4. Pulse el botón “A” para ajustar la manecilla del cronógrafo que mide los |
B n B |
segundos. Cada pulsación provoca un breve avance de la manecilla; si |
|
desea que la manecilla se mueva de forma constante, mantenga |
|
presionado el botón. |
|
5.Pulse el botón “B” y luego utilice el botón “A” para ajustar la manecilla del cronógrafo que mide décimas de segundo. Cada pulsación del botón “A” provoca un breve avance de la manecilla; si desea que la manecilla se mueva de forma constante, mantenga presionado el botón.
6.Pulse el botón “B” y luego utilice el botón “A” para ajustar la manecilla
del cronógrafo que mide los minutos. Cada pulsación del botón “A” provoca un breve avance de la manecilla; si desea que la manecilla se mueva de forma constante, mantenga presionado el botón.
7.Apriete hacia atrás la corona. Para proteger además el cronógrafo de la humedad, gire con suavidad la corona hasta que quede atornillada a la caja.

20 MANUAL DE INSTRUCCIONES DE OAKLEY
SUSTITUCIÓN DE LA PILA
La pila miniatura que alimenta el cronógrafo está prevista para durar aproximadamente cuatro años. Sin embargo, puesto que la pila es insertada en fábrica para extensas pruebas de funcionamiento, su duración real, una vez en poder del usuario, puede ser menor.
La sustitución de la pila sólo puede ser llevada a cabo por un Distribuidor Autorizado de Relojes Oakley. Cualquier intento de abrir la caja del reloj por personas que no sean profesionales de un Servicio Técnico autorizado de Oakley invalidará la garantía del producto.
Dentro de los Estados Unidos, llame a la Sede Central de Oakley para todo el mundo al 1-800-403-7449 para localizar al Distribuidor Autorizado de Relojes Oakley o al Servicio Técnico autorizado de Oakley más cercanos a Ud. Los clientes de fuera de Estados Unidos deberán dirigirse a su Distribuidor Local Autorizado de Relojes Oakley o visitar la página web de Oakley en www.oakley.com para encontrar el número del distribuidor Oakley más cercano.
AJUSTE DE LA CORREA Modelo con pulsera de titanio
Si fuese necesario añadir o quitar eslabones a la pulsera, el ajuste deberá ser hecho por un Distribuidor Autorizado de Relojes Oakley. No intente acortar la pulsera quitando los eslabones Ud. mismo, ya que podría estropearla.
Modelo con correa de cuero
El cuero natural de la correa puede estirar ligeramente al ponérsela, con el fin de que quede adecuadamente ajustada.
LIMPIEZA
La falta de limpieza de la caja y de la correa del reloj podría causar lesiones cutáneas. La pulsera de titanio se ensucia con el polvo y la transpiración debido al contacto con la piel. Utilice un paño suave y limpio para quitar cualquier indicio de humedad adherida a la caja o a la correa del cronógrafo.
CUIDADOS DEL CUERO
Incluso el cuero de la más alta calidad tiene una duración limitada que puede verse reducida por un desgaste natural excesivo, la exposición a los ácidos naturales de la transpiración y la exposición a los elementos. Para extender al máximo la duración de los componentes del cuero, evite el contacto directo con disolventes y otros productos químicos, la exposición prolongada a la luz del sol y la inmersión de los componentes en agua.
|
MANUAL DE INSTRUCCIONES DE OAKLEY |
21 |
|
COMPOSICIÓN |
|
|
|
|
CAJA ........................................................................................................................................................................................ |
Titanio |
|
TAPA POSTERIOR ...................................................................................................................................................................... |
Titanio |
|
FABRICACIÓN .............................................................................. |
Forjado por estampación, mecanizado por CNC de alta precisión |
|
CRISTAL .............................................................................................................................. |
Zafiro con revestimiento antirreflectante |
|
CORONA .............................................................................................................. |
Diseño roscado para resistencia a altas presiones |
|
Modelo con pulsera de titanio |
|
|
COMPOSICIÓN DE LA PULSERA .............................................................................................................................................. |
Titanio |
|
CINÉTICA .............................................................................. |
Arandelas de empuje autolubricadas reforzadas con fibra de carbono |
|
FLEXIBILIDAD ............................................................................................................................................ |
Eslabones microajustables |
|
CIERRE ........................................................................................................ |
Broche desplegable de acero inoxidable/tapa de titanio |
|
Modelo con correa de cuero |
|
|
COMPOSICIÓN DE LA CORREA .................................................................................................................................. |
Cuero auténtico |
|
ENGANCHE ............................................................................................................................................ |
Eslabón articulado de titanio |
|
CINÉTICA (CONTACTO CORREA/CAJA)................................ |
Arandelas de empuje autolubricadas reforzadas con fibra de carbono |
|
CIERRE ............................................................................................................................ |
Hebilla de titanio forjada por estampación |
|

22 MANUAL DE INSTRUCCIONES DE OAKLEY
ESPECIFICACIONES
MECANISMO ................................................................................................................ |
Hecho en Suiza, 13 rubíes, acabado en oro |
TIPO DE OSCILADOR .......................................................................................................................................... |
Diapasón de cuarzo |
FRECUENCIA DEL OSCILADOR .............................................................................................................................. |
32.768 ciclos/seg. |
SISTEMA DE ACCIONAMIENTO ............................................................................................ |
Motor paso a paso bipolar (180º/seg.) |
PRECISIÓN........................................................................................................................................................ |
-10 /+20 seg. por mo. |
TEMPERATURA MÍNIMA DE SERVICIO ........................................................................................................................................ |
0ºC |
TEMPERATURA MÁXIMA DE SERVICIO. .................................................................................................................................... |
50ºC |
RESISTENCIA AL AGUA ........................................................................................ |
10 bar; equivalente a una profundidad de 100 m |
PILA ........................................................................................................................................................................................ |
Nº 395 |
DURACIÓN DE LA PILA ............................................................................................................................................ |
Aprox. 48 meses |
MANUAL DE INSTRUCCIONES DE OAKLEY 23
CONSERVACIÓN
EXPOSICIÓN AL AGUA
Dimensionado para una presión hidrofóbica de 10 bar, el reloj puede llevarse puesto durante el baño, natación y buceo a poca profundidad. No está diseñado para submarinismo ni buceo de saturación. Antes de exponer el reloj a la humedad, asegúrese de que la corona está totalmente roscada a la caja. No tire hacia fuera de la corona estando el reloj húmedo. Si lo utiliza en el agua del mar, aclare el reloj en agua dulce y séquelo completamente. Para el modelo con correa de cuero, evite la exposición prolongada al agua, pues podría estropear la correa.
TEMPERATURA
Para un cronometraje de precisión, la temperatura nominal de servicio es de 0°C a 50°C.
MAGNETISMO
Los campos magnéticos fuertes pueden tener un efecto adverso sobre el reloj. Manténgalo alejado de objetos magnéticos.
AGENTES QUÍMICOS
El reloj podría llegar a decolorarse o resultar dañado si se expone a pulverizadores de cosméticos, detergentes, adhesivos, disolventes o pinturas.
ONDAS DE CHOQUE
Aunque el reloj resiste los daños por golpes, el impacto contra una superficie dura podría causar daños en el mecanismo o en el cristal.
MANTENIMIENTO PERIÓDICO
Para asegurarse de que la caja, corona, sello y junta de estanqueidad del cristal conserven su resistencia a la exposición al agua, se recomienda hacer revisar el reloj una vez cada 2 o 3 años por un Centro de Servicio Técnico Autorizado de Oakley.

24 MANUAL DE INSTRUCCIONES DE OAKLEY
GARANTÍA OAKLEY
Todos los auténticos relojes Oakley Time Tank están garantizados contra defectos de fabricación durante dos años a partir de la fecha de adquisición. La cobertura tendrá validez solamente presentando la prueba de compra de un Distribuidor Autorizado de Relojes Oakley.
IMPORTANTE
Esta garantía limitada no cubre el cristal, correa/pulsera ni uniones. El deterioro de los componentes de cuero no está cubierto, ni los arañazos en la caja causados por el uso, ni los daños causados por la humedad si el reloj no es un modelo hidrofóbico, ni los daños causados por desastres naturales como incendios, inundaciones o terremotos. Oakley se reserva el derecho a renunciar a toda responsabilidad de reparación de daños bajo esta garantía cuando existan evidencias de mal uso o abuso, incluyendo defectos debidos a manipulaciones o reparaciones hechas por agentes no autorizados por los Servicios Técnicos de Oakley. Esta garantía no afecta a los derechos legales específicos del consumidor.
Para tener derecho a la asistencia técnica cubierta por la garantía anterior, deberá presentarse una prueba válida de compra — que indique claramente la fecha de adquisición y el nombre del Distribuidor Autorizado de Relojes Oakley — al reclamar una reparación durante el período de garantía.
REGISTRO
La tecnología de vanguardia integrada en cada reloj Oakley sirve para convalidar su autenticidad. Registrando su reloj por correo o por la red en www.oakley.com, nos proporcionará más referencias que nos permitirán documentar su compra.
MANUAL DE INSTRUCCIONES DE OAKLEY 25
CÓMO RECLAMAR UNA GARANTÍA
Desde dentro de los Estados Unidos, llame a nuestra Sede Central para todo el mundo al 1 (800) 403-7449 con su información de compra. Los clientes de fuera de los Estados Unidos deben ponerse en contacto con su Distribuidor Autorizado de Relojes Oakley, visitar la página web de Oakley en www.oakley.com para encontrar el número del distribuidor Oakley más cercano, o referirse a la lista abajo para llamar a su sede central Oakley.
Maquinaria suiza
Fabricado en Suiza
Oakley Global Headquarters, USA: 1 (800) 403-7449
Oakley Africa: +27 41 501 0200
Oakley Brasil Ltda.: 0800-770-7822 ou 0xx11-4197-9999 (Grande São Paulo e celular)
Oakley Canada: 1-877-625-5396
Oakley Europe:Benelux, France, Italia, Scandinavia: 00 800 62 55 39 00 • España: 900 953 398 • Portugal: 800 833 121 • Sverige: 020 79 1037
Oakley GMBH: Germany, Austria and Poland: +49-89-99650-4181
Oakley Japan: 0120 009 146
Oakley México: 52) 55 59503643
Oakley South Pacific (Australia): 1 800 637 001
Oakley South Pacific (New Zealand): 0800 696 255
Oakley UK: 01462 475400 Eire customers: 00 353 4439557
26 MANUEL D'INSTRUCTIONS OAKLEY
Imaginez un chronographe « Swiss Made » (Fabriqué en Suisse) doté de la précision d’un mouvement doré à l’or pur comportant treize rubis pour une exactitude optimale. Ajoutez-lui le confort d’un boîtier ultraléger en titane et l’authenticité de la conception Oakley. Ajoutez-lui la précision du quartz et un écran analogique intuitif à trois cadrans. Dotez-le enfin de fonctions de calcul des temps cumulés et des temps intermédiaires, au dixième de seconde près.
Voici un instrument de précision qui associe l’héritage de l’horlogerie suisse à l’innovation et l’expertise d’Oakley. Le cristal le plus dur utilisé dans l’industrie, du saphir pur, protège l’écran à six aiguilles. Des phosphores lumineux placés sur l’aiguille des minutes et l’aiguille des heures améliorent la visibilité dans l’obscurité, et le grand écran permet de lire la date en un clin d’oeil. Le boîtier est sculpté par une machine à commande numérique dans du titane résistant, l’un des métaux les plus légers de la planète. Une couronne de serrage protège le boîtier jusqu’à une pression équivalente à une profondeur de 100 mètres. Commandé par une pile offrant 4 ans d'autonomie, le chronographe Oakley est disponible avec un bracelet en cuir véritable ou un bracelet en titane doté de maillons de micro-réglage et d'anneaux de butée autolubrifiants, renforcés par de la fibre de carbone.
MANUEL D'INSTRUCTIONS OAKLEY 27
REGLAGE DE LA DATE ET DE L'HEURE
Votre montre Oakley est doté d'une couronne de serrage qui protège le boîtier de l’humidité. Après avoir dévissé la couronne, vous pouvez la tirer d’un à deux crans pour régler la date et l’heure.
Pour le premier réglage de l’heure et de la date (ou après changement de la pile), procédez comme suit :
1.Tirez le remontoir jusqu’au premier cran (a).
2.Tournez le remontoir jusqu’à affichage de la date de la veille.
3.Tirez le remontoir jusqu’au deuxième cran (b).
4. Faites avancer les aiguilles jusqu’à l’affichage de la date du jour, puis continuez jusqu’à afficher l’heure actuelle. Si l’heure est après midi, faites faire un tour complet de cadran à l’aiguille des heures pour dépasser midi.
5. Enfoncez le remontoir dans sa position initiale. Pour une
meilleure protection contre l’humidité, vissez doucement
A B
le remontoir dans le boîtier.
Pour régler les secondes, attendez que l’aiguille de la fenêtre des secondes (à droite du cadran principal) atteigne « 60 » avant de tirer sur le remontoir. Réglez l’heure, puis attendez la seconde exacte avant de remettre le remontoir en place.
28 |
|
MANUEL D'INSTRUCTIONS OAKLEY |
MANUEL D'INSTRUCTIONS OAKLEY |
29 |
||
REGLAGE DE LA DATE ET DE L'HEURE |
UTILISATION DU CHRONOGRAPHE |
|||||
|
|
|
|
|
||
Pour les réglages suivants de l’heure et de la date, utilisez les procédures rapides suivantes : |
Le chronographe comprend trois aiguilles distinctes : |
|||||
POUR REGLER L’HEURE : |
• L’aiguille du cadran principal compte les secondes. Un tour complet correspond à 60 secondes. |
|||||
• L’aiguille de la fenêtre de gauche compte les minutes. Un tour complet correspond à 30 minutes. |
||||||
1. |
Tirez le remontoir jusqu’au deuxième cran (b). |
• L’aiguille de la fenêtre du bas compte les dixièmes de secondes. Un tour complet correspond à 1 seconde. Après 30 minutes, |
||||
cette aiguille sert de compteur d'heures. |
||||||
|
|
|
|
|||
2. |
Tournez le remontoir jusqu’à atteindre l’heure exacte. |
Le chronographe est commandé par deux boutons poussoirs : |
||||
3. |
Remettez le remontoir en place. Pour une meilleure |
• Le bouton « A » permet d’arrêter et de démarrer le chronomètre. |
||||
• Le bouton « B » a quatre fonctions. Il permet d’arrêter l'affichage à une durée intermédiaire, de faire rattraper aux aiguilles |
||||||
|
protection contre l’humidité, vissez doucement le |
du chronographe la durée en cours mesurée. Il affiche en outre un deuxième total de durée et remet à zéro les aiguilles du |
||||
|
remontoir dans le boîtier. |
chronographe. |
||||
POUR REGLER LA DATE : |
|
|
|
Avant d’utiliser |
les |
fonctions du chronographe, vérifiez que |
le |
|
|
|
|
|||||||
|
|
|
remontoir est complètement enfoncé dans le boîtier et qu’il ne se |
|
|
|
|
|||||||||||
1. |
Tirez le remontoir jusqu’au premier cran (a). |
|
|
|
|
|
|
|||||||||||
|
|
trouve pas dans l’une des deux positions de réglage de l’heure et |
|
|
|
|
||||||||||||
2. Tournez le remontoir jusqu’à atteindre la date exacte. |
|
|
de |
la date. Les |
trois |
aiguilles |
du |
chronographe |
doivent être |
|
|
|
|
|||||
A |
B |
parfaitement alignées sur la position zéro. Dans le cas contraire, |
|
|
|
|
||||||||||||
|
|
|
|
|
|
|
||||||||||||
Si l’heure actuelle se situe entre 21 heures et minuit, réglez |
|
|
reportez vous |
à |
la |
section |
« |
Réglage des |
aiguilles |
du |
|
|
|
|
||||
|
|
chronographe ». |
|
|
|
|
|
|
|
|
|
|
|
|||||
sur la date du lendemain (dans ce cas, la fonction de |
|
|
|
|
|
|
|
|
|
|
|
|
|
|||||
|
|
|
|
|
|
|
|
|
|
|
|
|
|
|
|
|||
changement automatique de la date ne fonctionne pas à |
|
|
POUR MESURER LE TEMPS CUMULE : |
|
|
A |
ille des |
|
|
|||||||||
minuit). |
|
|
|
1. |
Appuyez sur le bouton « A » pour commencer |
le |
secondes du |
B |
on A |
|||||||||
|
|
|
chronomètre |
|
|
|||||||||||||
3. |
Remettez le remontoir en place. Pour |
une meilleure |
|
|
|
|
chronométrage. |
|
|
|
|
|
|
Minutes |
|
|
||
|
|
2. |
|
Appuyez de |
nouveau sur le bouton « A » pour arrêter |
le |
|
|
||||||||||
|
|
|
|
|
|
|
||||||||||||
|
protection contre l’humidité, vissez |
doucement le |
|
|
|
|
chronométrage. |
|
|
|
|
|
|
|
|
|
|
|
|
remontoir dans le boîtier. |
|
|
|
3. |
|
Appuyez encore une fois sur le bouton « A » pour relancer le |
D |
èmes |
|
|
|||||||
|
|
|
|
|
de seconde |
B |
on B |
|||||||||||
|
|
|
|
|
|
|
chronométrage. |
|
|
|
|
|
|
|||||
|
|
|
|
|
|
|
|
|
|
|
|
|
ou H |
|
|
|||
|
|
|
|
|
Continuez à utiliser le bouton « A » pour ajouter des intervalles de |
|
|
|
|
|||||||||
|
|
|
|
|
temps à la mesure totale de durée. Si vous utilisez uniquement le |
|
|
|
|
|||||||||
|
|
|
|
|
bouton « A », la « durée intermédiaire » (durée atteinte à l’arrêt |
|
|
|
|
|||||||||
|
|
|
|
|
des aiguilles du chronographe) n’est pas ajoutée à la mesure |
|
|
|
|
|||||||||
|
|
|
|
|
totale de durée. |
|
|
|
|
|
|
|
|
|
|
|
||
|
|
|
|
|
4. |
A l’arrêt du chronométrage, appuyez sur le bouton « B » pour |
|
|
|
|
||||||||
|
|
|
|
|
|
|
remettre les aiguilles du chronographe en position zéro. |
|
|
|
|
|
||||||
 Loading...