


®
|
|
TABLE OF CONTENTS |
ENGLISH |
02-17 |
|
ESPAÑOL |
18-33 |
|
FRANCAIS |
34-49 |
|
ITALIANO |
50-65 |
|
PORTUGUÊS |
66-81 |
|
MAGYAR |
82-97 |
|
DEUTSCH |
98-113 |
|
JAPANESE |
114-129 |
|
©2007 Oakley, Inc. U.S. Patent D509444S

02 HOLESHOT INSTRUCTION MANUAL
HOLESHOT
The technology of performance becomes the art of style with Oakley Holeshot, an invention that brings sport into life. This true Swiss Made timepiece optimizes accuracy with the precision of Swiss movement. It features an onboard chronograph that conveniently measures cumulative time, intermediate time and split time down to a tenth of a second.
Rugged meets refined in a durable chassis of 316L stainless steel that cradles a six-hand analog display, shielded by a pure sapphire crystal. A band of supple Unobtainium® offers a comfortable fit. The date display can be read at a glance, and luminous phosphors on the minute and hour hands improve visibility in low light. Water resistance is 10 bar, equivalent to the pressure at a depth of 330 feet (100 meters).

HOLESHOT INSTRUCTION MANUAL 03
SETTING THE TIME
The crown can be pulled out to two click positions for setting the date and time. To set the date and time the first time (or to reset the date and time after the battery is changed), do the following:
TO SET THE TIME
1.Pull the crown out to the first click position (a).
2.Turn the crown until yesterday’s date appears.
3.Pull the crown out to the second click position (b).
4.Turn the hands forward until today’s date appears, then continue forward until the current time is reached. If the current time is in the afternoon or evening, move the hour hand all the way around the dial to pass 12 o’clock noon.
5.Push the crown back down. To set the exact second, wait until the hand in the second-counting sub dial (at the bottom of the main dial face) reaches “60” before you pull out the crown. Set the time then wait until the exact second is reached before pushing the crown back down.
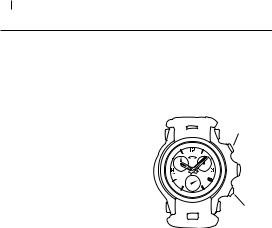
Button A
Crown
A B
Button B
Date

04 HOLESHOT INSTRUCTION MANUAL
TO ADJUST THE TIME AND DATE FOR SUBSEQUENT SETTINGS, USE THESE SHORT PROCEDURES
TO SET THE TIME
1.Pull the crown out to the second click position (b).
2.Turn the crown until you reach the correct time.
3.Push the crown back down.
Chronograph
Minutes
TO SET THE DATE
1. Pull the crown out to the first click position (a).
2. Turn the crown until you reach the correct date. If the current time is between 9 PM and midnight, set the date to the following day. (This is necessary to ensure the date display will normally change at midnight instead of 12 noon.)
3. Push the crown back down.
Chronograph
Second Hand
Chronograph
1/10 Second
Button A
Crown
A B
Button B
Date
Seconds

HOLESHOT INSTRUCTION MANUAL 05
USING THE CHRONOGRAPH
The chronograph includes three separate hands:
•The narrow hand on the main dial face counts seconds. One full rotation is 60 seconds.
•The hand on the sub dial at the left counts minutes. One full rotation is 30 minutes.
•The hand on the sub dial at the right counts 1/10 seconds. One full rotation is 1 second.
The chronograph is controlled with two push buttons:
•Button “A” stops and starts the timer.
•Button “B” has several functions. In addition to pausing the display at the current intermediate or “split” time, it allows the chronograph hands to catch up to the ongoing time being measured, and it resets the chronograph hands to the zero position.
Before using the chronograph functions, make sure the crown is fully against the case and not at one of the click positions used for setting time and date. The three chronograph hands should align precisely at the zero position. If they do not, see the section on Adjusting the Chronograph Hands.
06 HOLESHOT INSTRUCTION MANUAL
TO MEASURE CUMULATIVE TIME
START TIMING
Press button “A”.
STOP TIMING TEMPORARILY
Press button “A” to stop timing temporarily.
Press button “A” again to restart timing.
Continue to use button “A” to add
additional time intervals to the total
Button A
measure of time. When using button
“A” only, the time that occurs while the chronograph hands are not moving IS
NOT ADDED to the total measure of time. See the section on “To measure intermediate time” if you wish to
include this “intermediate time” in the
Button B
total measure of time.
RESET
While timing is stopped, press button “B”.

HOLESHOT INSTRUCTION MANUAL 07
TO MEASURE INTERMEDIATE TIME / SPLIT TIMEGUARDING
START TIMING
Press button “A”.
PAUSE HANDS BUT CONTINUE TIMING
Press button “B” to pause the chronograph hands and read the current time total.
Although the hands are no longer moving, time is still being measured.
Press button “B” again to move the hands to the currently running time total.
Continue to use button “B” to pause the hands when desired. Time continues to be measured.
STOP TIMING AND DISPLAY THE FINAL TIME TOTAL
While the hands are moving, press button “A” to fully stop timing and display the total time measured.
RESET
While timing is stopped, press button “B”.

08 HOLESHOT INSTRUCTION MANUAL
USING THE TACHYMETER
The number scale around the rim of the dial face can be used to compute speed based on travel time. Only speeds above “60” can be measured, but they can be in miles per hour, kilometers per hour, or another unit of measure per hour.
TO MEASURE SPEED
START TIMING AT MARKER
When you reach a distance marker (such as a mile or kilometer marker), press button “A”.
STOP TIMING AT NEXT MARKER When you reach the next marker, press button “A” to stop timing.
The hand that counts seconds now points to your speed on the tachymeter scale. (Example: If mile markers were used and the hand now points to “65,” your speed is 65 mph.)
|
Tachymeter |
|||
|
|
|
|
Button A |
60 |
TACHY |
|
|
|
5 |
ME |
|
|
|
6 |
T |
|
|
|
|
|
ER |
|
|
70 |
|
500 |
0 |
|
|
|
4 |
|
|
|
|
0 |
||
5 |
|
|
|
300 |
7 |
|
|
|
|
0 |
|
|
|
2 |
|
|
|
4 |
|
8 |
|
|
|
0 |
|
|
|
|
00 |
90 |
|
|
1 |
2 |
|
|
80 |
||
|
|
0 |
|
|
100 |
|
16 |
|
|
140 |
|
|
|
|
120 |
|
|
|
|
|
|
|
|
|
|
|
|
|
Button B |
Chronograph |
|
|
|
|
Second Hand |
|
|
|
|
RESET
While timing is stopped, press button “B”.

HOLESHOT INSTRUCTION MANUAL 09
POWER SAVING MODE
When the timepiece is not in use, the battery life can be prolonged by pulling the crown out to the second click position (b). This will stop the hands and reduce power consumption.
10 HOLESHOT INSTRUCTION MANUAL
ADJUSTING THE CHRONOGRAPH HANDS
When the chronograph is reset with button “B,” the three chronograph hands return to the zero position. If these hands do not align precisely with the zero position (such as after a battery change), use the following procedure to adjust them.
TO ADJUST THE CHRONOGRAPH HANDS
1.If the chronograph hands currently show a measured time, use button “B” to reset them near the zero position.
Note that the hands must be stopped before using button “B” to reset them. If necessary, use button “A” to stop the hands.
2.Pull the crown out to the first click position
(a). Press button “A” to adjust the chronograph hand that counts 1/10 seconds. (Press and hold the button for continuous movement.)
Press button “B” to adjust the chronograph hand that counts seconds. (Press and hold the button for continuous movement.)
3.Pull the crown out one more click, to the second click position (b).
Press button “A” to adjust the chronograph hand that counts minutes. (Press and hold the button for continuous movement.)
4.Push the crown back down.
Chronograph
Minutes
Chronograph
Second Hand
Chronograph
1/10 Second
Button A
Crown
A B
Button B

HOLESHOT INSTRUCTION MANUAL 11
BATTERY REPLACEMENT
The miniature battery that powers the timepiece is designed to last approximately 38 months. However, because the battery is inserted at the factory for extensive performance checks, its actual life, once in your possession, may be less.
Battery replacement may be performed only by an Authorized Oakley Service Center . Any attempt to open the watch case by persons other than Authorized Oakley Service Professionals will void the product warranty.
Within the United States, call Oakley global headquarters at 1-800-403-7449 to find an Authorized Oakley Timepiece Dealer or Service Professional near you. Customers outside the United States should contact their local Authorized Oakley Timepiece Dealer or visit the Oakley website at www.oakley.com for the number of the nearest Oakley distributor.
CLEANING
Failure to keep the case and band clean may result in a skin rash. Use a soft, clean cloth to wipe off any moisture that adheres to the case or band.

12 HOLESHOT INSTRUCTION MANUAL
COMPOSITION
CASE BODY ............................................................................................ |
Stainless steel |
CASE BACK ............................................................................................ |
Stainless steel |
MANUFACTURING ................................ |
Impact forged, high-precision CNC machined |
CRYSTAL.............................................................. |
Sapphire with anti-reflective coating |
CROWN...................................................................... |
Double seal for water resistance |
BRACELET COMPOSITION .............................................. |
Oakley Unobtainium® rubber |
CLOSURE .................................................................................... |
Stainless steel buckle |
|
HOLESHOT INSTRUCTION MANUAL |
13 |
|
SPECIFICATIONS |
|
MOVEMENT ................................................................................ |
Swiss Made, 4-jewel |
|
TYPE OF OSCILLATOR ........................................................................ |
Quartz tuning fork |
|
FREQUENCY OF OSCILLATOR .................................................... |
32,768 cycles per sec. |
|
DRIVE SYSTEM .......................................................... |
Two-pole step motor (180º/sec.) |
|
ACCURACY .................................................................................... |
-7 /+15 sec. per mo. |
|
THERMAL OPERATING MIN............................................................................ |
0ºC (32ºF) |
|
THERMAL OPERATING MAX....................................................................... |
50ºC (122ºF) |
|
WATER RESISTANCE................................ |
10 bar; equivalent to depth of 100m / 330ft |
|
BATTERY .................................................................. |
Silver oxide: No. 394, SR 936 SW |
|
BATTERY ENDURANCE .................................................................... |
Approx. 38 months |
|

14 HOLESHOT INSTRUCTION MANUAL
SAFEGUARDING
WATER EXPOSURE
Rated at 10-bar hydrophobic, the timepiece may be worn during bathing, swimming and shallow diving. It is not designed for scuba or saturation diving. Do not pull out the crown or use the buttons if the timepiece is wet. If used in seawater, rinse the timepiece with fresh water and dry completely.
TEMPERATURE
For precision timekeeping, normal operating temperature is 0°C to 50°C (32°F to 122°F).
MAGNETISM
Strong magnetic fields can have an adverse affect on the timepiece. Keep it away from magnetic objects.
CHEMICALS
The timepiece may become discolored or damaged if exposed to cosmetic spray, detergents, adhesives, solvents, or paints.
SHOCK WAVE
Although the timepiece resists shock damage, impact against a hard surface may cause damage to the movement or crystal.
PERIODIC MAINTENANCE
To ensure that the case, crown, crystal seal, and gasket remain resistant to water exposure, it is recommended that the timepiece be inspected once every 2 to 3 years by an Authorized Oakley Service Center.

HOLESHOT INSTRUCTION MANUAL 15
OAKLEY WARRANTY POLICY
All authentic Oakley timekeeping instruments are warranted against manufacturer’s defects for two full years from the date of purchase. Coverage is valid only with proof of purchase from an Authorized Oakley Timepiece Dealer.
IMPORTANT
This limited warranty does not cover the crystal, strap/band/bracelet, or attachments. The deterioration of leather components is not covered, nor are scratches to the case caused by use, nor is moisture damage if the timepiece is a non-hydrophobic model, nor is damage caused by natural disaster such as fire, flood, or earthquake. We reserve the right to relinquish all responsibility under this guarantee for repair of damage when misuse or abuse is evident, including defects related to tampering or servicing done by agents other than Authorized Oakley Service Facilities. This warranty does not affect specific legal rights of the consumer.
To qualify for service under the above guarantee, valid proof of purchase — which clearly shows the purchase date and the name of the Authorized Oakley Timepiece Dealer — must be presented if a repair claim is made during the warranty period.

16 HOLESHOT INSTRUCTION MANUAL
OAKLEY WARRANTY POLICY
REGISTRATION
The cutting-edge technology within each Oakley timepiece serves as validation of its authenticity. By registering your timepiece via mail or online at www.oakley.com, you provide further credentials by allowing us to document your purchase.
HOW TO MAKE A WARRANTY CLAIM
Within the United States, telephone our global headquarters at 1 (800) 403-7449 with your purchase information. Customers outside the United States should contact their local Authorized Oakley Timepiece Dealer or visit the Oakley website at www.oakley.com for the number of the nearest Oakley distributor.
Swiss Movement
Swiss Made

HOLESHOT INSTRUCTION MANUAL 17
HOW TO MAKE A WARRANTY CLAIM
Oakley Global Headquarters, USA: 1 (800) 403-7449
Oakley Africa: +27 41 501 0200
Oakley Brasil Ltda.: 0800-770-7822 ou 0xx11-4197-9999 (Grande São Paulo e celular) Oakley Canada: 1-877-625-5396
Oakley Europe: Belgium: 0800 10 464 • Danmark: 800 10 631 • España: 900 993 385
•Finland: 0 800 11 33 80 • France: 0 800 037 619 • Nederland: 0800 022 9086
•Island: 800 83 82 • Italia: 800 343 467 • Luxemburg: 800 22 957
•Norge: 800 11 268 • Portugal: 800 833 011 • Sverige: 020 795 467
Oakley GMBH: Germany, Austria and Poland: +49-89-99650-4181
Oakley Japan: 0120 009 146
Oakley México: 52) 55 59503643
Oakley South Pacific (Australia): 1 800 637 001
Oakley South Pacific (New Zealand): 0800 696 255
Oakley UK: 01462 475400 Eire customers: 00 353 4439557

18 HOLESHOT MANUAL DE INSTRUCCIONES
HOLESHOT
La innovación tecnológica se convierte en arte con Oakley Holeshot, un invento que introduce el deporte en nuestras vidas. Este verdadero reloj suizo optimiza la exactitud con la precisión de un mecanismo suizo. Está provisto de un cronógrafo que mide el tiempo acumulado, los tiempos parciales y el tiempo dividido en décimas de segundo.
Lo resistente y lo refinado se unen en un chasis resistente de acero inoxidable 316L con una pantalla analógica de seis manecillas, protegida por un cristal de zafiro puro. La correa de Unobtainium® flexible resulta muy cómoda. La pantalla con la fecha se puede ver de un vistazo y el fósforo luminoso del minutero y del horario mejora la visibilidad cuando hay poca luz. Tiene una resistencia al agua de 10 bar, equivalente a la presión a una profundidad de 100 m.

HOLESHOT MANUAL DE INSTRUCCIONES 19
AJUSTE DE FECHA Y HORA
La corona se puede extraer hasta dos posiciones indicadas por un click para ajustar la fecha y la hora.
Para ajustar la fecha y la hora por primera vez (o para reajustar la fecha y la hora después de cambiar la pila), haga lo siguiente:
PARA AJUSTAR LA HORA
1.Tire de la corona hasta la posición del primer click (a).
2.Gire la corona hasta que aparezca la fecha del día de ayer.
3.Tire de la corona hasta la posición del segundo click (b).
4.Gire las manecillas hacia delante hasta que aparezca la fecha de hoy, luego continúe hacia delate hasta situarlas en la fecha actual. Si la hora actual es por la tarde o tarde / noche, mueva la manecilla horaria alrededor de la esfera hasta pasar las 12:00 del mediodía.
5.Presione la corona de nuevo hacia dentro. Para ajustar el segundo exacto, espere hasta que el segundero de la subesfera (en la parte inferior de la esfera principal) alcance “60” antes de extraer la corona. Ajuste la hora y luego espere hasta que sea alcanzado el segundo exacto, antes de volver a presionar la corona hacia dentro.
Botón A
Corona
A B
Botón B
Fecha
20 HOLESHOT MANUAL DE INSTRUCCIONES
PARA AJUSTAR LA FECHA Y HORA EN OCASIONES POSTERIORES, UTILICE LOS SIGUIENTES PROCEDIMIENTOS ABREVIADOS
PARA AJUSTAR LA HORA
1.Tire de la corona hasta la posición del segundo click (b).
2.Gire la corona hasta alcanzar la hora correcta.
3.Presione la corona de nuevo hacia dentro.
Minutero
PARA AJUSTAR LA FECHA
1. Tire de la corona hasta la posición del primer click (a).
2. Gire la corona hasta alcanzar la fecha correcta. Si la hora actual está entre las 21:00 y la medianoche, ajuste la fecha al día siguiente. (Esto es necesario para asegurarse de que la pantalla de la fecha cambia normalmente a medianoche en vez de hacerlo a las 12:00 del mediodía.)
3. Presione la corona de nuevo hacia dentro.
Segundero
Décimas de segundo
Botón A
Corona
A B
Botón B
Fecha
Segundos

HOLESHOT MANUAL DE INSTRUCCIONES 21
USO DEL CRONÓGRAFO
El cronógrafo incluye tres manecillas independientes:
•La manecilla estrecha de la esfera principal es el segundero. Una vuelta completa equivale a 60 segundos.
•La manecilla de la subesfera de la izquierda es el minutero. Una vuelta completa equivale a 30 minutos.
•La manecilla de la subesfera de la derecha indica décimas de segundo. Una vuelta completa equivale a 1 segundo.
El cronógrafo se controla con dos botones:
•El botón “A” detiene y pone en marcha el cronometraje.
•El botón “B” tiene varias funciones. Además de detener la pantalla en un tiempo parcial o un tiempo “partido”, permite a las manecillas del cronógrafo marcar el tiempo en curso que se está midiendo y poner a cero las manecillas del cronógrafo.
Antes de usar las funciones del cronógrafo, asegúrese de que la corona está completamente presionada contra la caja y no en una de las posiciones indicadas por un click y que se utilizan para ajustar la fecha y hora. Las tres manecillas del cronógrafo deberían quedar exactamente alineadas en la posición cero. Si no es así, vaya al capítulo de más adelante Ajuste de las manecillas del cronógrafo.

22 HOLESHOT MANUAL DE INSTRUCCIONES
PARA MEDIR EL TIEMPO ACUMULADO
INICIO DEL CRONOMETRAJE
Presione el botón “A”.
DETENCIÓN TEMPORAL DEL CRONOMETRAJE Presione el botón “A” para detener temporalmente el cronometraje.
Presione el botón “A” de nuevo para reiniciar el cronometraje.
Continúe utilizando el botón “A” para añadir intervalos de tiempo adicionales a la medida total del tiempo. Si se utiliza solamente el botón “A”, el tiempo que transcurre mientras las manecillas del cronógrafo están detenidas NO SE AÑADE a la medida total de tiempo. Lea más abajo si quiere incluir este “tiempo parcial” en la medida total de tiempo.
PUESTA A CERO
Mientras el cronometraje está detenido, presione el botón “B”.
Botón A
Botón B

HOLESHOT MANUAL DE INSTRUCCIONES 23
PARA MEDIR EL TIEMPO PARCIAL / TIEMPO PARTIDO
INICIO DEL CRONOMETRAJE
Presione el botón “A”.
DETENCIÓN DE LAS MANECILLAS, PERO CONTINÚA EL CRONOMETRAJE Presione el botón “B” para detener las manecillas del cronógrafo y ver el tiempo actual total.
Aunque las manecillas ya no se mueven, el tiempo aún sigue siendo medido.
Presione el botón “B” de nuevo para llevar las manecillas al tiempo total actualmente en curso.
Continúe utilizando el botón “B” para detener las manecillas cuando lo desee. El tiempo continúa siendo medido.
DETENCIÓN DEL CRONOMETRAJE E INDICACIÓN DEL TIEMPO FINAL TOTAL Mientras las manecillas están en movimiento, presione el botón “A” para detener totalmente el cronometraje y ver indicado el tiempo total medido.
PUESTA A CERO
Mientras el cronometraje está detenido, presione el botón “B”.

24 HOLESHOT MANUAL DE INSTRUCCIONES
USO DEL VELOCÍMETRO
La escala numerada alrededor del borde de la esfera puede utilizarse para calcular la velocidad en función del tiempo de recorrido. Sólo se pueden medir velocidades superiores a “60”, aunque pueden ser millas por hora, kilómetros por
hora u otra unidad de medida por hora.
Velocímetro
PARA MEDIR LA VELOCIDAD
INICIO DEL CRONOMETRAJE
EN UNA MARCA
Cuando llegue a la siguiente marca, presione el botón “A” para detener el cronometraje.
65
7 0
75
0 8
Botón A
60 |
TACHY |
|
MET |
|
ER |
|
5 |
|
00 |
|
4 |
|
00 |
|
3 |
|
0 |
|
0 |
|
2 |
|
4 |
|
0 |
|
00 |
|
2 |
90 |
|
|
1 8 |
0 |
DETENCIÓN DEL CRONOMETRAJE EN |
|
160 |
|
|
100 |
|
|
||
140 |
|
|
||
120 |
|
|
||
LA SIGUIENTE MARCA |
|
|
|
Botón B |
Cuando llegue a la siguiente marca, |
|
|
|
|
presione el botón “A” para detener |
|
|
|
|
el cronometraje. |
Segundero |
|
|
|
La manecilla que cuenta los segundos
señala ahora su velocidad en la escala del velocímetro. (Ejemplo: si se utilizan las marcas de millas y la manecilla está señalando “65,” su velocidad es de 65 mph.).
PUESTA A CERO
Con el cronometraje detenido, presione el botón “B”.

HOLESHOT MANUAL DE INSTRUCCIONES 25
MODO DE AHORRO DE ENERGÍA
Cuando no esté utilizando el reloj, podrá prolongar la duración de la pila tirando de la corona hasta alcanzar la posición del segundo click. Esto detendrá las manecillas y reducirá el consumo de energía.

26 HOLESHOT MANUAL DE INSTRUCCIONES
AJUSTE DE LAS MANECILLAS DEL CRONÓGRAFO
Al poner el cronógrafo a cero con el botón “B,” las tres manecillas del cronógrafo vuelven a la posición cero. Si las manecillas no se alinean exactamente con la posición cero (por ejemplo, después de cambiar la pila), utilice el siguiente procedimiento para ajustarlas.
PARA AJUSTAR LAS MANECILLAS DEL CRONÓGRAFO
1.Si las manecillas del cronógrafo están indicando actualmente un tiempo medido, utilice el botón “B” para acercarlas a la posición cero.
Hay que tener en cuenta que las manecillas deben |
Minutero |
|
estar detenidas antes de utilizar el botón “B” para |
|
|
ponerlas a cero. Si es necesario, utilice el botón “A” |
|
|
para detenerlas. |
|
|
2. Tire de la corona hasta la posición del primer |
|
|
click (a). |
|
|
Presione el botón “A” para ajustar la manecilla |
|
|
del cronógrafo que marca décimas de segundo. |
|
|
(Mantenga el botón presionado para un |
|
|
desplazamiento constante.) |
|
|
Presione el botón “B” para ajustar el segundero del |
|
|
cronógrafo. (Mantenga el botón presionado para un |
|
|
desplazamiento constante.) |
|
|
3. Tire de la corona hasta la posición del segundo |
|
|
click (b). |
Segundero |
|
Presione el botón “A” para ajustar el minutero |
||
|
||
del cronógrafo. (Mantenga presionado el botón |
|
|
para un desplazamiento constante.) |
|
4. Presione la corona hacia dentro a su posición original.
Décimas de segundo
Botón A
Corona
A B
Botón B

HOLESHOT MANUAL DE INSTRUCCIONES 27
SUSTITUCIÓN DE LA PILA
La pila miniatura que alimenta el reloj está diseñada para durar aproximadamente 38 meses. No obstante, debido a que la pila es insertada en fábrica para pruebas exhaustivas de funcionamiento, su duración real, una vez en posesión del usuario, podría ser menor.
La sustitución de la pila solamente puede ser llevada a cabo por un distribuidor autorizado de relojes Oakley. Cualquier intento de abrir la caja del reloj por personas ajenas a los profesionales de un Servicio Técnico autorizado de Oakley invalidará la garantía del producto.
Desde dentro de los Estados Unidos, llame a la Sede Central de Oakley para todo el mundo al 1-800-403-7449 para encontrar un distribuidor autorizado de relojes Oakley o el servicio Técnico más cercano. Los clientes de fuera de Estados Unidos deberán dirigirse a su distribuidor local autorizado de relojes Oakley o visitar el sitio web de Oakley en www.oakley.com para averiguar el número del distribuidor de Oakley más cercano.
LIMPIEZA
La falta de limpieza de la caja y la correa podría causar lesiones cutáneas. Utilice un paño suave y limpio para la humedad adherida a la caja o a la correa.

28 HOLESHOT MANUAL DE INSTRUCCIONES
COMPOSICIÓN
CUERPO DE LA CAJA |
............................................................................ |
Acero inoxidable |
TAPA POSTERIOR .................................................................................. |
|
Acero inoxidable |
FABRICACIÓN ................ |
Mecanizado por CNC de alta precisión, forjado contra golpes |
|
CRISTAL .......................................................... |
|
Zafiro con revestimiento antirreflectante |
CORONA ........................................................ |
|
Doble sellado estanco resistente al agua |
COMPOSICIÓN DE LA ..............................................PULSERA |
Unobtainium® de Oakley |
|
CIERRE .................................................................................. |
|
Broche de acero inoxidable |
|
HOLESHOT MANUAL DE INSTRUCCIONES |
29 |
|
ESPECIFICACIONES |
|
MECANISMO ........................................................................ |
mecanismo suizo, 4 rubíes |
|
TIPO DE OSCILADOR ........................................................................ |
Diapasón de cuarzo |
|
FRECUENCIA DEL OSCILADOR........................................................ |
32.768 ciclos / seg.. |
|
SISTEMA DE ACCIONAMIENTO ............................ |
Motor bipolar de pasos (180º/seg.) |
|
PRECISIÓN.......................................................................................... |
-7 /+15 seg. / mes |
|
TEMPERATURA MÍN. DE USO.......................................................................... |
0ºC (32ºF) |
|
TEMPERATURA MÁX. DE USO..................................................................... |
50ºC (122ºF) |
|
RESISTENCIA EN EL AGUA ............ |
10 bar; equivalentes a una profundidad de 100 m |
|
PILA.......................................................................... |
Óxido de plata: nº 394, SR 936 SW |
|
DURACIÓN DE LA PILA ........................................................................ |
Aprox. 38 meses |
|
 Loading...