

NuTone LA203WH, LA203RWH, LA204WH, LA204RWH, LA205WH Installation Manual
...
WIRELESS DOOR
CHIME PUSHBUTTON
THIS PACKAGE INCLUDES:
Wireless Pushbutton and Battery
n
INSTALLATION & OPERATING INSTRUCTIONS
READ AND SAVE THESE INSTRUCTIONS
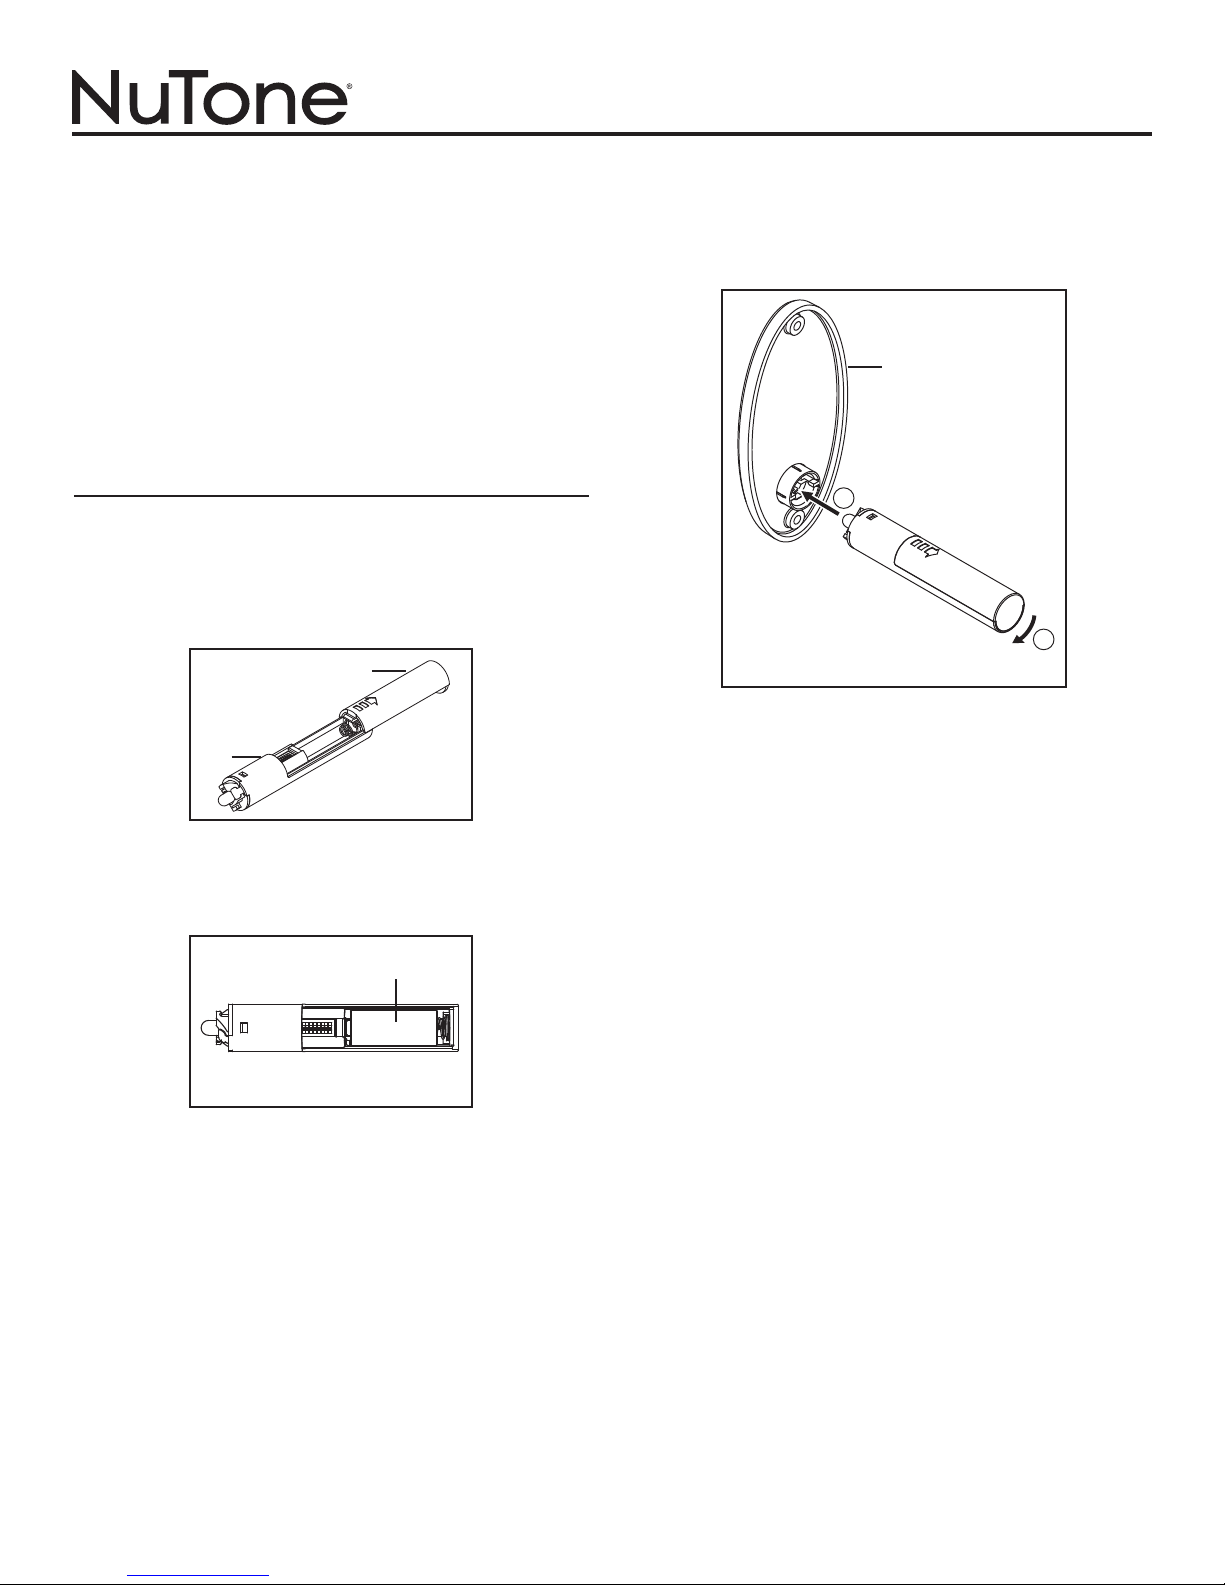
3. Insert wireless pushbutton mechanism into escutcheon as shown.
(Figure 3)
ESCUTCHEON
(NOT INCLUDED)
INSTALLATION
The wireless pushbutton (A) is compatible with NuTone wireless
chimes. (Purchase separately) Refer to installation instructions
provided with wireless chime.
1. Open battery cover (B) by sliding it in direction indicated by arrow.
(Figure 1)
B
A
FIGURE 1
2. Install battery (C) into wireless pushbutton. (Figure 2)
C
+ -
1
2
FIGURE 3
4. Test operation. Hold wireless pushbutton near chime and press
pushbutton. If chime does not sound - see a. through c. on page 2.
FIGURE 2
1
If chime does not sound when wireless pushbutton is pushed:
NuTone puts everything within reach.
Check out the collection of RV hardware we offer.
a. Confirm that code settings on chime mechanism and wireless
pushbutton are the same. (Figure 4)
WIRELESS PUSHBUTTON - EXAMPLE CODE SETTING
CODE SET
SWITCHES 1-6
1 8
{
BATTERY REPLACEMENT
Wireless Chime
Replace batteries following door chime instructions.
Wireless Pushbutton
Remove wireless pushbutton / escutcheon assembly from wall and follow
Step 1. Replace battery with one N Cell, 1.5V alkaline battery. Close
battery cover and re-install wireless pushbutton / escutcheon assembly
with hardware.
{
CODE SET
SWITCHES 1-6
WIRELESS CHIME - EXAMPLE CODE SETTING
(Chime will have jumpers or switches)
WIRELESS
CHIME
JUMPERS
JUMPERS REMOVED (OFF) FROM 2, 4, 6
WIRELESS
SWITCHES
SWITCHES 2, 4, 6 IN OFF POSITION
b. Verify proper installation batteries in chime mechanism and
pushbutton. (Figure 2)
c. Check condition of batteries in chime mechanism and pushbutton.
Replace if required.
6. Close battery cover on wireless pushbutton.
7. To install wireless pushbutton / escutcheon assembly, drill a straight
and level 3/4” diameter x 3-1/2” deep hole.
8. Insert wireless pushbutton / escutcheon assembly into hole and
secure to wall using hardware provided.
More than one pushbutton can be used with NuTone wireless chimes.
Refer to Figure 5 to assign a door or tune to each wireless pushbutton.
1 2 3 4 5 6ON7 8
SWITCHES 2, 4, 6
IN OFF POSITION
{
ON
{
CHIME
123456
FIGURE 4
ADDITIONAL WIRELESS DOOR
CHIMES & PUSHBUTTONS
When installing other Wireless Door Chime sets, select different code
settings to avoid interference. If you want all chimes to ring at the same
time, set chimes to the same code settings.
TROUBLESHOOTING FOR WIRELESS
INSTALLATIONS
The range of the door chime depends on location, temperature and battery
condition. If you are having problems with this product, please try the
solutions listed below.
Chime rings on its own:
• A neighbor may have a wireless chime set with the same code settings.
Change the chime and pushbutton code settings. (Figure 4)
Chime doesn’t sound:
• Make sure the pushbutton and the chime code settings are the same.
• Check the batteries in the chime and wireless pushbutton. (Figure 2, 4)
Batteries are OK, but chime does not work when installed:
• Mounting the chime or pushbutton directly on metal, concrete or near
metal studs reduces the range.
• Do not mount the chime too close to ground level concrete slabs which
may also reduce the range. Mount the chime away from the floor.
• Try different locations for the chime closer to the pushbutton. Also, try
to orient the chime at a different angle to increase the range. Range is
most effective to the sides of the pushbutton.
Regulatory Information
The user is cautioned that changes or modifications not expressly
approved by the party responsible for regulatory compliance
could void the user’s authority to operate this equipment.
WIRELESS PUSHBUTTON - ASSIGN TUNE(S) OR DOOR(S)
1 8
CODE SET SWITCHES 7 & 8
ON
Models
LA203WH
LA203RWH
LA204WH
LA204RWH
LA205WH 1 Note 2 Note 3 Note 4 Note
LA206WH
LA522WH
LA532WH
LA533WH
LA600WH Front Back Front Back
7 8
{
7 8 7 8 7 8
FIGURE 5
2
99528456B
 Loading...