

Page 1
User Guide
English
V2.0.0
Page 2

Table of Contents
Introduction ............................................................................... 4
Box Contents ..................................................................................... 4
Support .............................................................................................. 4
Product Registration ......................................................................................... 4
Devices & File Analysis ...................................................................... 5
Configuration ..................................................................................... 5
Features .................................................................................... 6
Top Panel ........................................................................................... 6
Front Panel ........................................................................................ 9
Rear Panel ......................................................................................... 9
Operation ................................................................................ 10
Touchscreen Overview ..................................................................... 10
Performance View ........................................................................................... 10
Track Overview & Waveform ......................................................................................... 10
Central Library Preview .................................................................................................... 11
Toolbar................................................................................................................................ 11
Library View .................................................................................................... 12
2
Page 3

Performing ........................................................................................ 14
Loading Tracks ................................................................................................ 14
Searching & Filtering Tracks ............................................................................ 15
Editing Playlists ................................................................................................ 16
Playlist Deck .................................................................................................... 17
Playback & Cueing .......................................................................................... 18
Syncing & Pitch Adjustment ............................................................................ 18
Pad Modes ...................................................................................................... 19
Cue Mode ......................................................................................................................... 19
Saved Loop Mode ........................................................................................................... 19
Auto Loop Mode .............................................................................................................. 19
Roll Mode .......................................................................................................................... 19
Control Center ................................................................................. 20
Parameters ..................................................................................................... 20
User Profile...................................................................................................... 21
Settings ........................................................................................................... 23
Source ............................................................................................................. 25
Wi-Fi ................................................................................................................ 25
Record ............................................................................................................ 26
Engine Lighting ................................................................................................ 27
Settings ............................................................................................................................. 28
Appendix ................................................................................ 29
Technical Specifications ................................................................... 29
Trademarks & Licenses .................................................................... 31
3
Page 4

Introduction
Thank you for purchasing the Mixstream Pro. At Numark, we know how serious music is to you. That’s why we
design our equipment with only one thing in mind—to make your performance the best it can be. We’re honored and
excited to play a part in your musical & creative DJ journey!
Box Contents
Mixstream Pro
Power Supply
USB Cable
Engine DJ Software Download Card
Display Cleaning Cloth
Quickstart Guide
Safety & Warranty Manual
Important: Visit enginedj.com/downloads to download the Engine DJ software.
Support
For the latest information about this product (documentation, technical specifications, system requirements,
compatibility information, etc.) and product registration, visit numark.com.
For additional product support, visit numark.com/support.
Product Registration
Your product may include exclusive software and/or promotions which can only be accessed by registering your new
product on the Numark website.
To check eligibility and access the available content, please register your product by following the instructions below.
1. Visit numark.com.
2. Click “My Account” to access your existing account or to create a new account.
3. Once signed in, click “Register A Product”.
4. Complete the form and click “Submit Registration”.
5. Upon successful registration, any applicable software downloads, exclusive content, and promotional offers will
be shown in your account.
4
Page 5

A
A
A
Devices & File Analysis
Mixstream Pro can play music files from USB drives, SD cards, or connected streaming and cloud services. Make
sure you are using only the supported file systems (for USB drives or SD cards) and file formats (for music files) listed
below.
Supported file systems:
exFAT (recommended), FAT32
Supported file formats:
Although Mixstream Pro can play tracks that have not been analyzed yet, pre-analyzing them allows its features to
work most effectively. You can analyze tracks in one of two ways:
• On Mixstream Pro, load the track: When you load a track to play, Mixstream Pro will automatically analyze
it (if it has not already been analyzed). This may take a moment to complete, depending on the length of the
track. You can start playing the track from the beginning immediately, though you will need to wait a
moment for the analysis to finish.
• Use Engine DJ software: The included Engine DJ software can pre-analyze your music library to use with
Mixstream Pro. You can also use it to organize your library and manage your Mixstream Pro hardware
preferences (see Operation to learn more about this).
Visit enginedj.com/downloads and find the Software section to download the Engine DJ software.
To eject a USB drive or SD card:
1. Press Source. A list of connected devices will appear in the touchscreen.
2. Tap the eject icon for the device you would like to eject. If a track on the device is currently playing, you will be
asked if you want to continue ejecting, which will stop the track. Tap Cancel to cancel ejecting the device, or tap
Eject Anyway to eject it.
AC/M4A
IF/AIFF (44.1–192 kHz, 16–32-bit)
LAC
FLAC
MP3 (32–320 kbps)
MP4
Ogg Vorbis
WAV (44.1–192 kHz, 16–32-bit)
To eject additional devices, repeat Step 3.
To return to the previous screen, press Source again, or tap the X in the upper-right corner.
Configuration
Mixstream Pro has several settings that you can customize in the User Profile and Settings menus. See Operation
> Control Center to learn about these settings.
5
Page 6
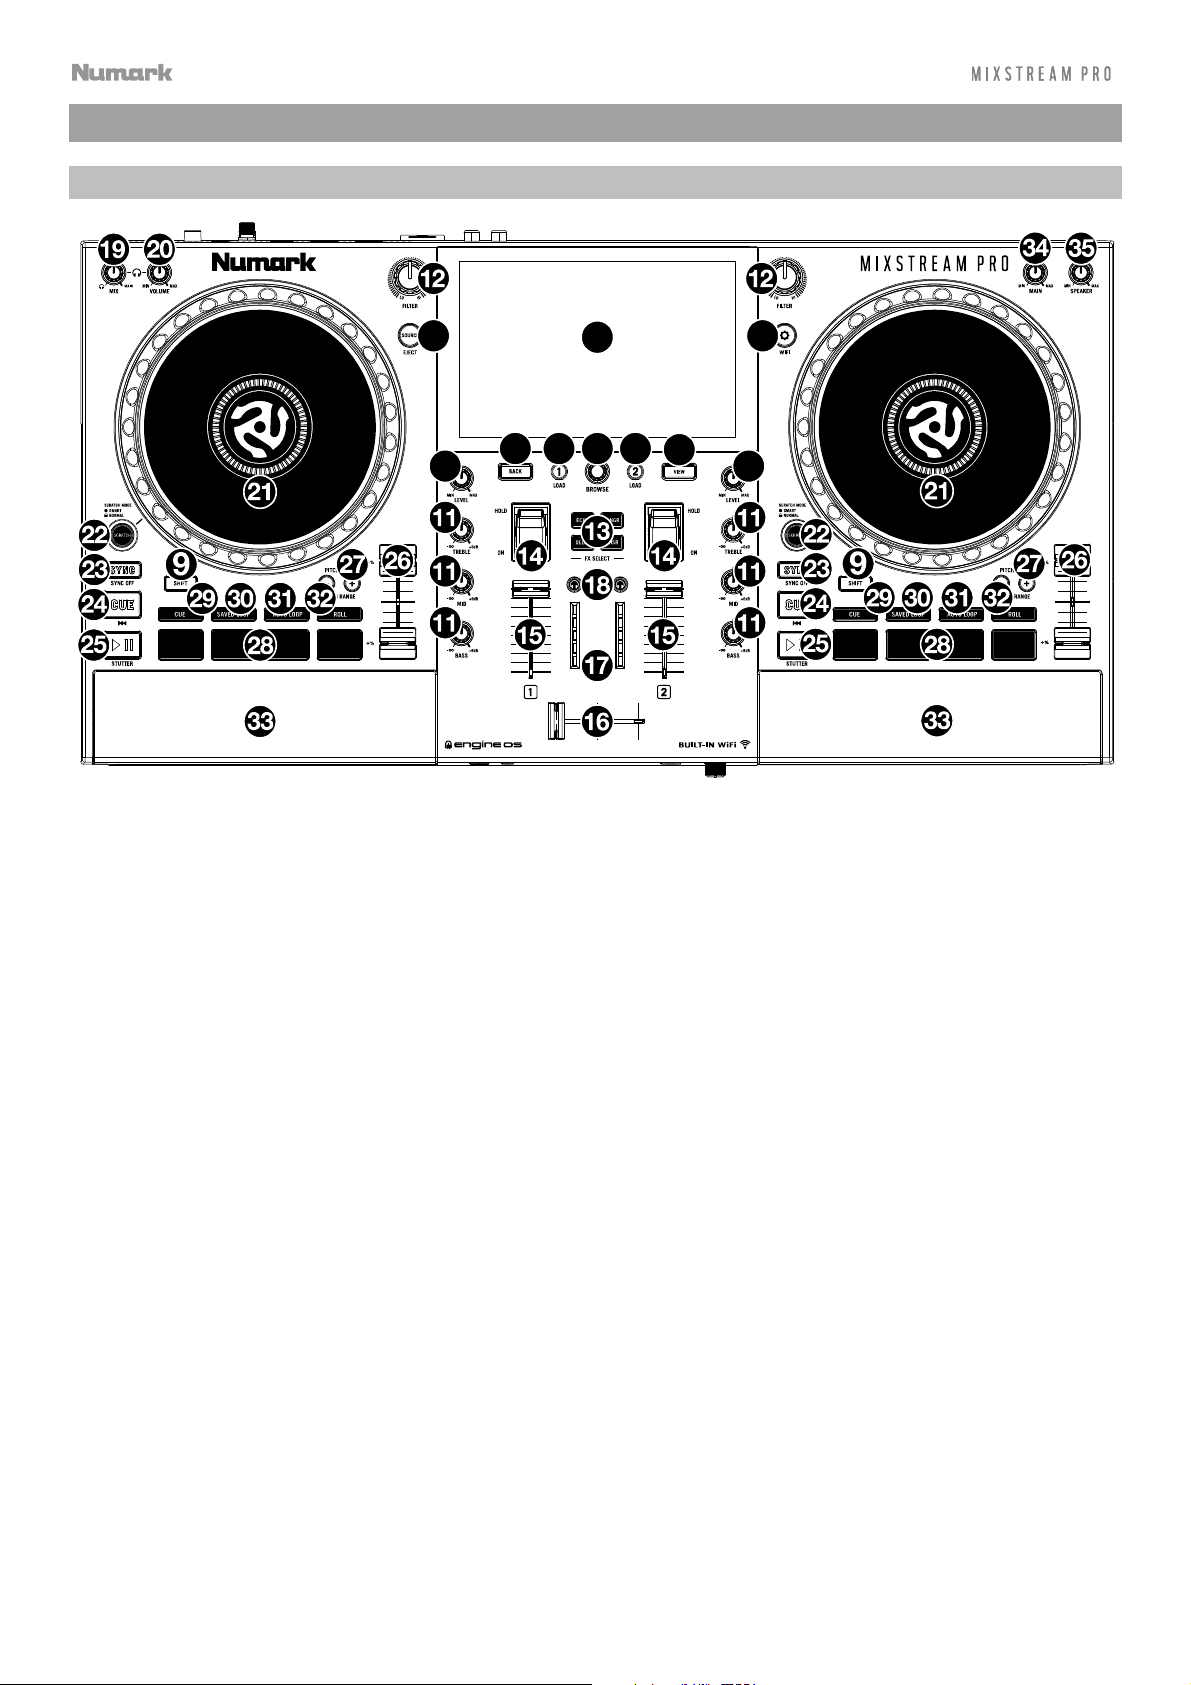
Features
Top Panel
7
214
3
10 10
1. Touchscreen: This full-color, multi-touch display shows information relevant to Mixstream Pro's current
operation. Touch the touchscreen (and use the hardware controls) to control the Mixstream Pro interface.
2. Browse Knob: Turn this knob to navigate through lists. Press the knob to move forward in the touchscreen or
select a song to load on either deck.
5
6
8
Press and hold Shift and press this knob to load the selected track to the Prepare list.
3. Load 1: Press this button to load the selected track to Deck 1.
Quickly double-press this button to instant double the track currently playing on Deck 2 to Deck 1.
4. Load 2: Press this button to load the selected track to Deck 2.
Quickly double-press this button to instant double the track currently playing on Deck 1 to Deck 2.
5. Back: Press this button to move back in the touchscreen.
6. View: Press this button to cycle between the Library and Performance views.
Hold Shift and press the View button to switch between simple view or horizontal and vertical waveform views in
Performance Mode.
7. Source / Lighting: Press this button to open the Source menu.
Press and hold Shift and press this button to open the Engine Lighting menu.
8. Control Center: Press this button to open the Control Center menu, where you can quickly adjust commonly
used settings and navigate to the User Profile, Settings, Source, Wi-Fi, Record, and Engine Lighting menus.
9. Shift: Press and hold this button to access secondary functions of other controls.
10. Channel Level:
11. Channel EQ: Turn these knobs to boost or cut the high, mid-range, and low frequencies for the channel.
12. Filter: Turn this knob to apply a filter to the channel. Starting from the center (12:00) position, turn it counterclockwise to apply a low-pass filter, or turn it clockwise to apply a high-pass filter.
Turn this knob to adjust the level of the pre-fader, pre-EQ audio signal for the channel.
6
Page 7
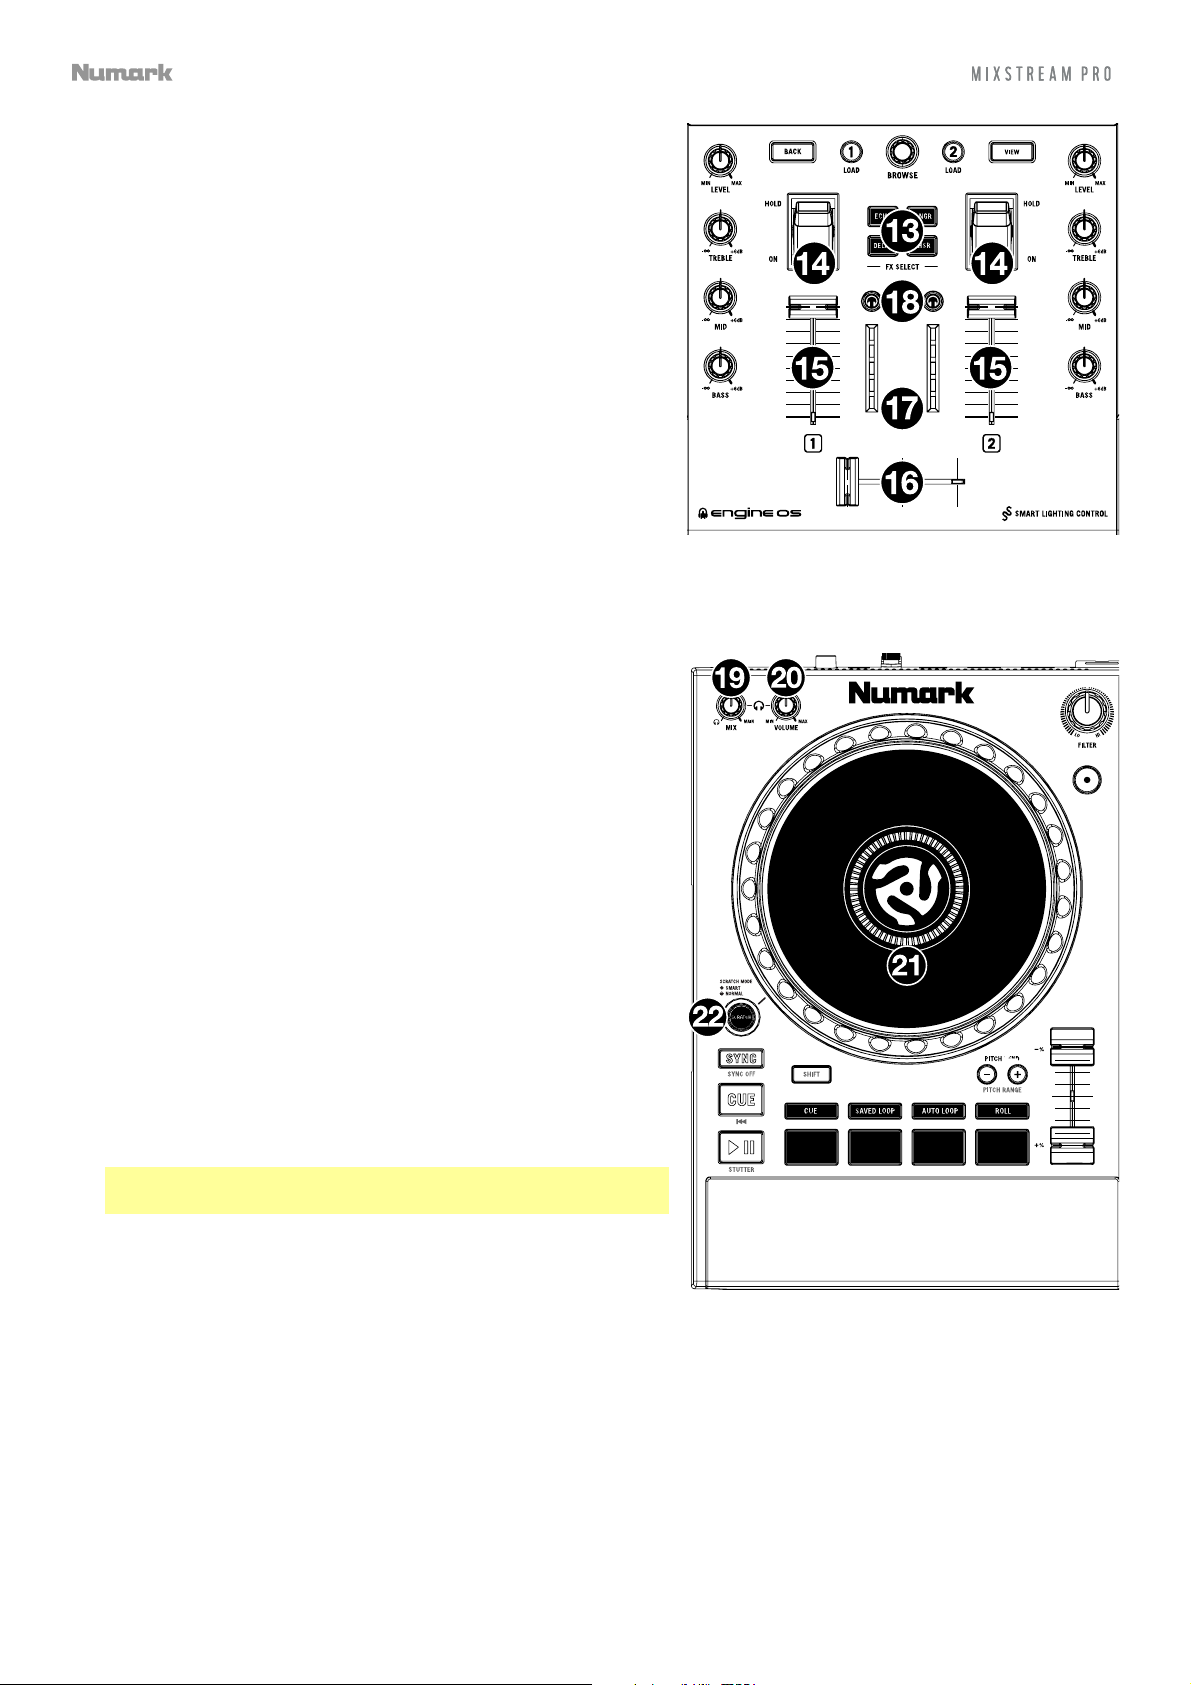
13. FX Select: Press these buttons to enable or disable the
selected effect: Echo, Delay, Flanger or Phaser.
14. Effects Toggle: Move this toggle switch away from you to
activate the selected effect—the toggle will latch to that
position. Pull the toggle back to the center position to
deactivate the effects.
Pull and hold this toggle toward you to activate the selected
effect momentarily, and release the toggle to deactivate the
effect—the toggle will return to the center position.
15. Channel Fader: Use this fader to adjust the channel’s volume
level.
16. Crossfader: Use the crossfader to mix between Deck 1 and
Deck 2.
17. Main Level Meters: These LEDs display the audio signal level
of the main mix (sent out of the Main Outputs).
18. Headphone Preview: Press this button to preview the
channel in the headphones. Use the Headphone Mix knob to
adjust the mix between the channel’s pre-fader signal and the
headphones’ cue channel.
19. Headphone Mix: Turn this knob to adjust the blend of the
headphone cue and main channels together in the headphones.
20. Headphone Volume: Adjusts the volume for headphone
cueing.
21. Platter: This capacitive, touch-sensitive platter controls the
audio playhead when the wheel is touched and moved.
22. Smart Scratch: When this button is enabled, Smart Scratch
mode will be active. In this mode, the track's timeline
continues (the lower half of the waveform in the display will
continue moving forward) when you use the platter to
"scratch" the track. When you release the platter, the track will
resume normal playback from where it would have been if you
had never moved the platter.
When Smart Scratch is enabled, press and hold Shift and press
this button to enable jog mode. In this mode, touch the platter
and move it to temporarily adjust the track’s speed.
Press this button again to disable Smart Scratch and enable
vinyl mode for the platter. You can use the platter to
“scratch” the track as you would with a vinyl record.
Note: Smart Scratch is enabled by default and can be
adjusted in the Settings menu.
Press and hold Smart Scratch to enter/exit Grid Edit Mode.
7
Page 8

23. Sync / Sync Off: Press this button to activate sync.
Press and hold Shift and press this button to deactivate Sync.
You can also set Sync to deactivate without using Shift by
changing the Sync Button Action setting in the User Profile
menu.
24. Cue / Previous: When the Deck is paused, you can set a
Temporary Cue Point by moving the platter to place the
playhead at the desired location and then pressing the Cue
Button.
During playback, you can press the Cue Button to return the
track to this Temporary Cue Point. (If you did not set a
Temporary Cue Point, then it will return to the beginning of the
track.)
If the Deck is paused, you can press and hold the Cue Button
to play the track from the Temporary Cue Point. Releasing the
Cue Button will return the track to the Temporary Cue Point
and pause it. To continue playback without returning to the
Temporary Cue Point, press and hold the Cue Button, then
press and hold the Play Button, and then release both
buttons.
Press and hold Shift and then press this button to return to
the beginning of the track.
25. Play/Pause: This button pauses or resumes playback.
Press and hold Shift and then press this button to “stutterplay” the track from the initial cue point.
26. Pitch Fader: Move this fader to adjust the speed (pitch) of the track.
Press and hold Shift and then press one of the Pitch Bend buttons to adjust the total range.
27. Pitch Bend –/+: Press and hold one of these buttons to momentarily reduce or increase (respectively) the speed
of the track.
Press and hold Shift and then press one of these buttons to set the range of the pitch fader.
28. Performance Pads: These pads have different functions on each deck depending on the current pad mode. See
Performing > Pad Modes for more information.
29.
Cue: Press this button to enter Cue mode. Press the button again to enter a second bank of cues. To assign a
cue to a pad, press a pad at the desired location in the track. To clear a cue from a pad, press Shift and the
desired pad.
30. Saved Loop: Press this button to enter Saved Loop mode. Press the button again to enter a second bank of
saved loops. To assign a loop to a pad and activate it, press a pad to create a Loop In point at the current
location, and then press it again to create the Loop Out point at another location. To deactivate or reactivate a
loop, press the corresponding pad. To delete a loop, press Shift and the desired pad.
31. Auto Loop: Press this button to enter Auto Loop mode. Press the button again to enter a second bank of auto
loop lengths. To activate an auto loop, press a pad. To deactivate an auto loop, press the pad again.
32. Roll: Press this button to enter Roll Mode. Press the button again to enter a second bank of roll lengths. To
trigger a roll, press a pad.
33. Speakers: These speakers will play the same current audio as the Main Outputs. Use the Speaker Level knob
to adjust the volume of the speakers.
34. Main Level: Turn this knob to adjust the volume level of the Main Outputs.
35. Speaker Level: Turn this knob to adjust the volume level of the speakers.
8
Page 9
Front Panel
1
1. Headphones (1/4”, 1/8”) (6.35 mm, 3.5 mm): Connect your 1/4” or 1/8” (6.35 mm or 3.5 mm) headphones to
this output for cueing and mix monitoring. The headphone volume is controlled using the Cue Gain knob.
2. Mic Input (1/4” / 6.35 mm): Use a standard 1/4” (6.35 mm) cable (not included) to connect a standard dynamic
microphone to this input.
3. Mic Level: Turn this knob to adjust the volume level of the microphone input. You can adjust the microphone
attenuation and routing in the Settings menu.
2
3
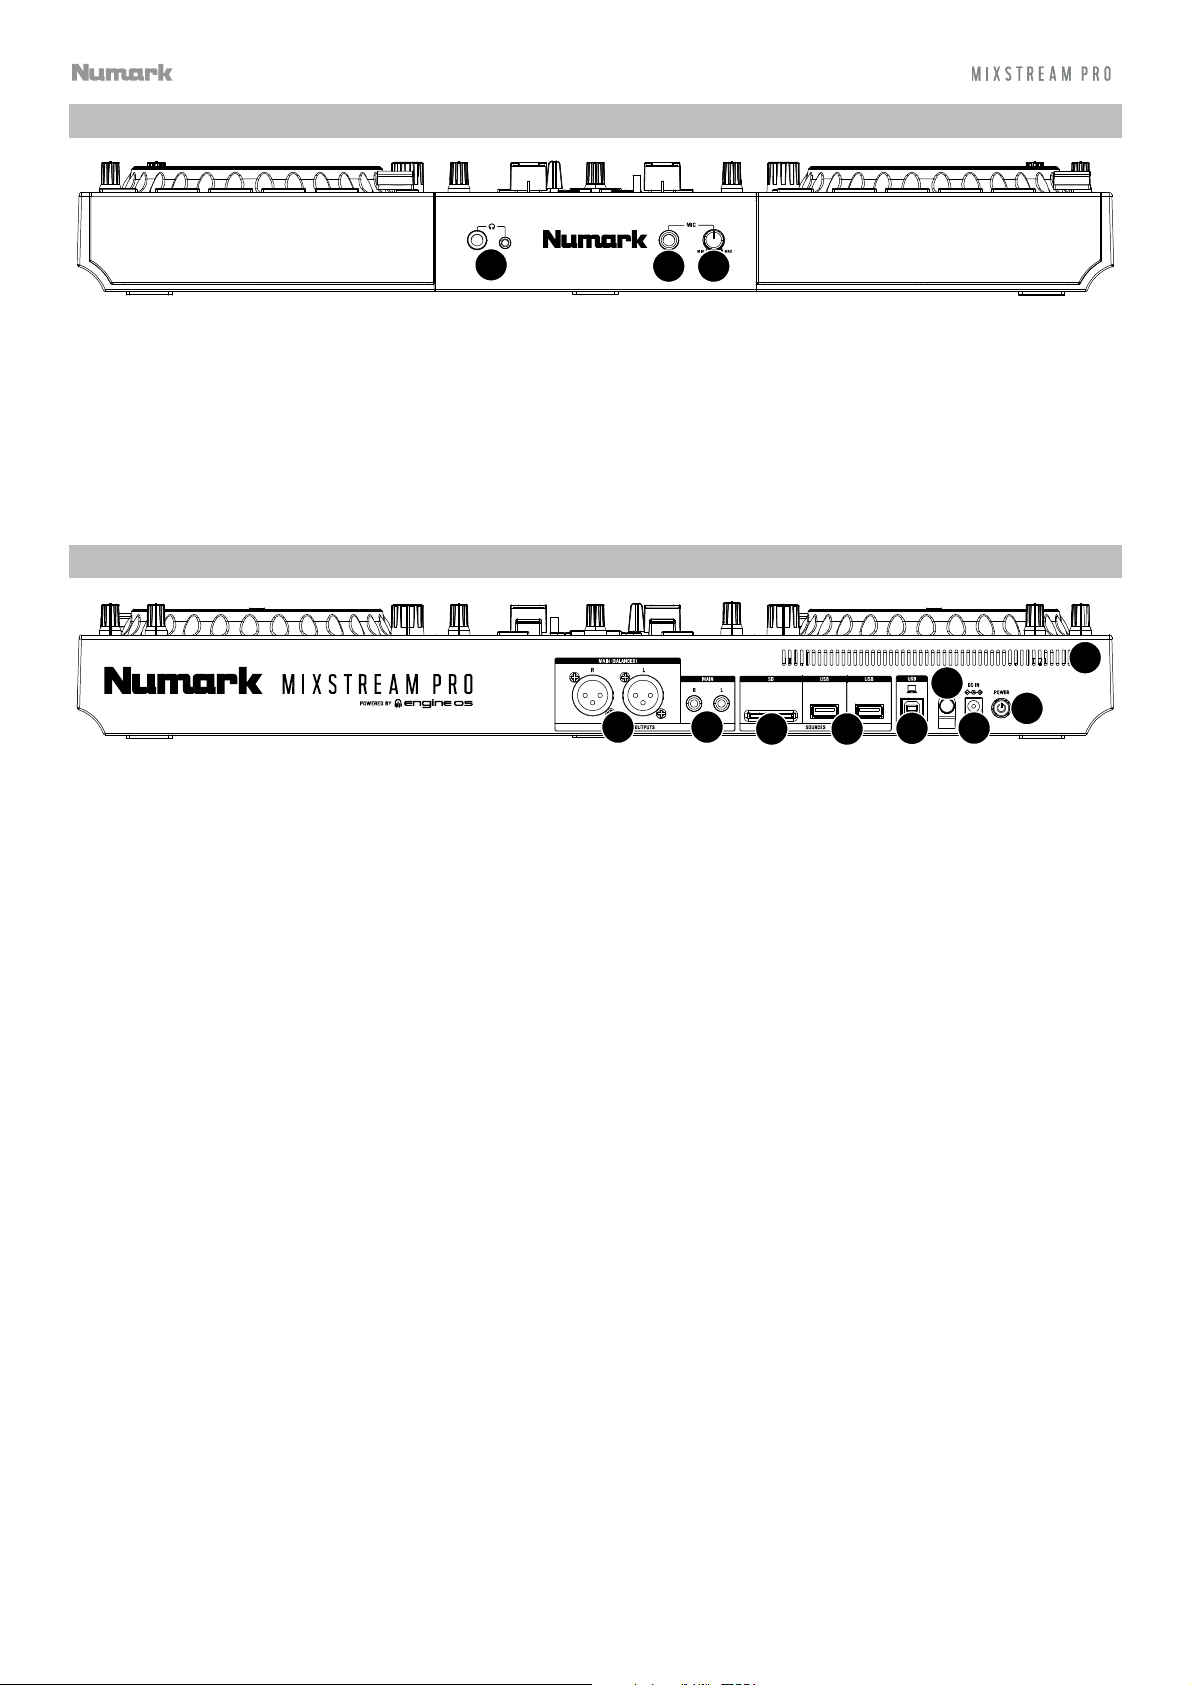
Rear Panel
9
8
21
1. Main Outputs (XLR, balanced): Use standard XLR cables to connect these outputs to loudspeakers or an
amplifier system. Use the Main knob on the top panel to control the volume level.
2. Main Outputs (RCA, unbalanced): Use standard RCA cables to connect these outputs to loudspeakers or an
amplifier system. Use the Main knob on the top panel to control the volume level.
45673
3. SD Card Slot: Insert a standard SD card to this slot. You can use the touchscreen to select and load tracks from
your SD card.
4. USB-A Ports: Connect standard USB drives to these USB ports. When you select a USB drive as a source, you
can use the touchscreen to select and load tracks from your USB drive. You can also connect a keyboard to
these ports to easily search through your library.
5. PC USB-B Port: Use a standard USB cable (included) to connect this USB port to an available USB port on your
computer.
6. Power Adapter Restraint: Secure the power adapter cable to this restraint to prevent it from accidentally
unplugging.
7. Power Input: Use the included power adapter to power the unit.
8. Power Button: Press this button to power Mixstream Pro on. Power on Mixstream Pro only after you have
connected all of your input devices and before you power on your amplifiers and loudspeakers.
To power off Mixstream Pro, press this button and follow the prompts on the touchscreen. Power off your
amplifiers and loudspeakers before powering off Mixstream Pro.
9. Vent: Make sure this vent is unobstructed while using Mixstream Pro.
9
Page 10
Operation
Touchscreen Overview
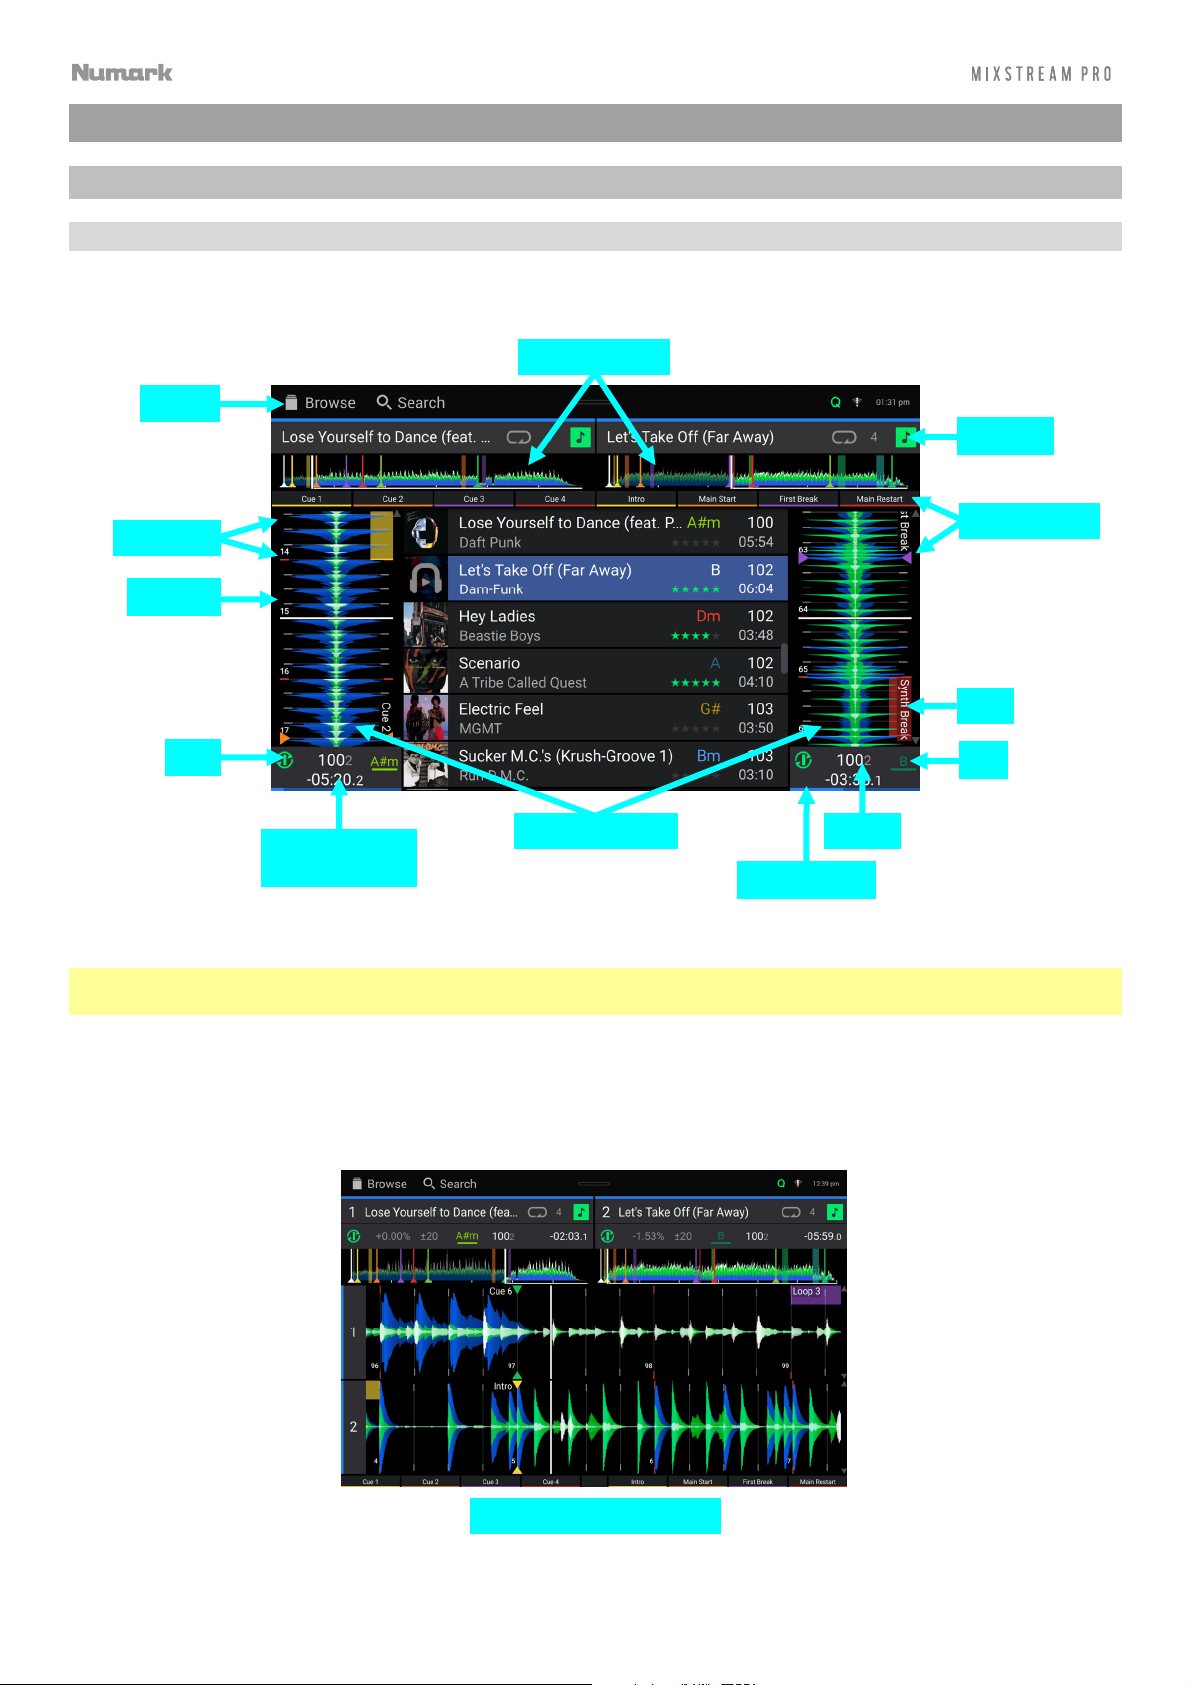
Performance View
Track Overview & Waveform
Toolbar
Track Overviews
Key Lock
Beat Points
Playhead
Sync
Hot Cue Points
Loop
Key
Time Remaining/
Elapsed
Track Waveforms
Tempo
Track Progress
Swipe left or right on the track overview to scan through the track while the track is paused.
Note: You can use this feature during playback if Needle Lock is off. If Needle Lock is on, stopping the platter with
your hand or palm will allow you to swipe through the track overview. See User Profile to learn about Needle Lock.
Spread or pinch your fingers on a waveform to zoom in or out of it, respectively.
Tap the time to switch between the elapsed time and remaining time.
Tap the key when Key Lock is on to change the key.
Hold Shift and press View to toggle between vertical and horizontal waveform views:
Horizontal Waveform View
10
Page 11

y
Central Library Preview
Tap to Preview
Swipe Left to
Load to Left Deck
Swipe Right to
Load to Right Deck
Tap and Drag to
Quickl
Scroll
Swipe up or down to browse tracks.
Tap and drag the scroll bar to quickly browse through tracks.
Swipe right to load a track to the right deck.
Swipe left to load a track to the left deck.
Double-tap to load a track to a selected deck.
Tap the track art to preview the track. Tap again to stop previewing. While previewing, tap along the track entry to
scan through the track.
Toolbar
The toolbar at the top of the touchscreen features shortcuts to Library view and displays the status of certain
hardware and feature settings. Swipe down from this area to open the Control Center.
Browse: Tap here to open the full Library screen.
Search: Tap here to search for tracks using the keyboard that appears in the display.
Q: Indicates Quantization is enabled. When enabled, time-based features like triggering cues and loops will snap to
the beat-grid according to the Cue/Loop Quantization setting in your User Profile.
Continue: The figure-eight icon indicates Continue is enabled, which will keep playing the next track when the active
track has ended.
Wi-Fi: Shows the current Wi-Fi connection status.
Link: Shows the current Ableton Link status. Enabling Ableton Link will synchronize the beat, phase, and tempo of
Ableton Live and your Engine OS hardware over a wireless or wired network.
Time: Displays the current local time. You can adjust the Time in the Settings menu.
11
Page 12

Library View
Use the full Library View to view your music library and load a track to the deck. You can also search through
playlists, add tracks to the Prepare list, and search through your tracks using sorting and filtering features.
Important: Visit enginedj.com/downloads to download the Engine DJ software.
Sources
Playlists
Prepare
History
Files
Search
Use the six icons on the left side to navigate while in Library View:
• Source: Use this option to select the source device to view tracks from, including your connected media
devices and available streaming and cloud services. Tap the Source icon to show the list of available sources,
and then tap to select. To enable streaming and cloud services, use the Settings menu.
• Playlists: Your playlists are your collections of tracks, including lists of tracks arranged in a specific order.
You may have playlists for different types of clubs or events, for specific genres, etc. You can use the
included Engine DJ software to create playlists to use here.
• Prepare: You can load tracks to the Prepare list so that you can refer to them later when you want to play
them during your performance (rather than searching through your entire library for the next track to play).
• History: Use this option to view your playback history.
• Files: Use this option to browse the list of all files on a USB drive or SD card.
• Search: Use this option to search through your tracks by keyword. See Searching & Filtering Tracks for
more information.
12
Page 13

Swipe Right to Load Standard/Expanded Track View
Tap and Drag to
Quickly Scroll
Tap and Hold
to Show Info
Double-tap to
Load to a
Selected Deck
Tap to Preview Track
Swipe Left to Prepare
Tap the list icon at the top of the display to toggle between standard and expanded list views.
Swipe a list up or down to browse through it (e.g., your list of playlists or your list of tracks). Alternatively, press the
Back or Forward buttons to select a list, and then turn the Browse knob.
Tap and drag the scroll bar to quickly browse through tracks.
Tap an icon or item in a list to select it (e.g., the icons for Playlists, Prepare List, Files, or Search on the left side of
the Library). Alternatively, press the Browse knob.
Swipe a track to the right and tap Load to load it to the deck. Alternatively, press the Browse knob or double-tap
the track. Tap the deck number, or turn and press the Browse knob, to select the desired deck.
Swipe a track to the left to add it to the Prepare list. Alternatively, press and hold Shift and press the Browse knob.
Swipe a track to the left in the Prepare list to remove it.
Tap and hold your finger on a track to show its information window. Tap the information window to close it.
Tap the track art to preview the track. Tap again to stop the preview. While previewing, tap along the track entry to
needle drop through the track.
Tap Play As Playlist to send the currently selected track list to a selected deck. See Playlist Deck to learn more.
13
Page 14

Performing
Loading Tracks
To load a track to a deck, do any of the following:
• In the Central Library Preview, swipe the track to
the left or right to load the track to the deck on
that side.
• In Library View, swipe the track to the right, and
then tap the desired Deck number.
• Highlight the track using the encoder, and then
press the Load 1/2 buttons to load the track to
the deck on that side.
• Highlight the track using the encoder, then press
the encoder to bring up the deck selection screen.
Turn the encoder to select the desired deck, and
then press the encoder to load the track to that
deck.
• Double-tap the track to bring up the deck
selection screen. Tap to select the desired deck.
To add a track to the Prepare list, swipe the track to the
left while in Library View. Alternatively, press and hold
Shift and press the Browse knob.
To show a track’s information, tap and hold your finger
on it.
Swipe Right or Left to Load
Tap and Hold
to Show Info
While viewing the Prepare list:
Swipe left to remove the track from the Prepare list.
Tap the clear button in the upper-right corner of the
touchscreen to remove all tracks from the Prepare
list.
Swipe Left to Prepare
Swipe Right to Load
14
Page 15

Searching & Filtering Tracks
To search, tap the Search field and use the keyboard
that appears on the touchscreen. The search results
can be based on the following criteria: title, artist,
album, length, key, comment, BPM, genre, label, year,
date added or filename. By default, only Title and Artist
are selected. Use the dropdown menu next to the
search bar to select other categories, or to Search All
categories.
Note: To reduce search time, only select fields in
which you wish to search.
To hide the keyboard, tap the keyboard icon in the
lower-right corner of the virtual keyboard. Alternatively,
tap anywhere on the screen other than the keyboard or
the Search field.
To filter your tracks, tap Genre, Artist, Album, BPM or
Key, and then tap one of the available options. Only
tracks tagged with that genre, album, artist, BPM, or
key will be shown. (By default, the key is notated using
the Camelot system.) You can also use the Search
field while tracks are filtered to refine your results.
Note: You can also use the User Profile to set whether
you want to show tracks with the same key only or
tracks with compatible keys as well as adjust the
“tolerance” of the BPM filter (to include tracks with
tempos within 1–15 BPM of the selection). See User
Profile to learn more.
Tap to Select Search Criteria
Tap to Search
Tap to Filter Tracks
To sort the list of results, tap the Sort By icon in the
upper-right corner, and then tap one of the available
options. Tap the arrow icon next to this to toggle
between ascending and descending order.
Tap to Toggle Ascending/Descending
Tap to Choose Sort Preference
15
Page 16

y
Editing Playlists
Tap the edit button at the top of the display while
viewing the playlist screen. While editing is active, you
can do any of the following:
To make a new playlist, tap + Create Playlist in
Playlist view.
To make a new folder, tap + Create Folder in
Playlist view.
To add tracks to your playlist, tap a track to select
it, and the open circle will become filled. After
selecting tracks, tap and hold to move the tracks.
You can drag the tracks over a playlist or folder
and release your finger to instantly add them.
To reorder tracks in a playlist, tap and hold on the
track name (while editing mode is still active), then
move your finger up or down to change the track
order. You can also reorder playlists in the same
way.
Tap to Enable
Editing
Tap to Create New
list or Folder
Pla
Tap to Select
Tracks
Tap, Hold & Drag
to Move Tracks
16
Page 17

Playlist Deck
While in Library View, you can send the currently viewed file list to its own deck to play as a playlist.
To enable Playlist Deck, tap Play As Playlist in Library view. When enabled, the playlist on deck will play through
the selected track list and automatically crossfade between each track according to the Playlist Deck Crossfade
Time parameter in the Settings menu.
Note: In Performance view, playlist decks are only available in vertical view.
To enable playlist deck playback, press Play on the selected deck.
To change tracks within the playlist, use the track backward and track forward buttons in the track overview area.
To remove the playlist from the deck, tap the X in the track overview area.
17
Page 18

Playback & Cueing
To play or pause a track, press Play/Pause (/).
To scratch a track, move the platter when the Scratch button is set to On and audio is playing. Smart Scratch
Mode is enabled by default, which the track's timeline continues (the lower half of the waveform in the display will
continue moving forward) when you use the platter to scratch the track. When you release the platter, the track
will resume normal playback from where it would have been if you had never moved the platter.
When Smart Scratch is enabled, press and hold Shift and press this button to enable jog mode. In this mode, touch
the platter and move it to temporarily adjust the track’s speed.
Press this button again to disable Smart Scratch and enable vinyl mode for the platter. You can use the platter to
“scratch” the track as you would with a vinyl record.
To set the initial cue point, press Cue at the desired location while the track is paused.
To return to the initial cue point and stop, press Cue while the track is playing. The button will flash while the unit
is paused at the initial cue point.
To return to the initial cue point and “stutter” playback, press and hold Shift and press Play/ Pause (/).
To return to the beginning of a track, press and hold Shift and press Cue in the middle of a paused track.
To jump to a specific location in the track:
• If Needle Lock is disabled: tap the desired location in the track overview.
• If Needle Lock is enabled: pause playback and then tap the desired location in the track overview.
Alternatively, make sure the platter is in Normal scratch mode, touch the top of the platter and tap the desired
location in the track overview.
See User Profile to learn about Needle Lock.
To zoom in and out of the waveform, place two fingers on the touchscreen and spread them apart or pinch them
together.
Syncing & Pitch Adjustment
To activate sync, press Sync on the deck that you want to control the BPM, which becomes the “primary.” After
Sync is activated on that deck, press Sync on any additional decks. The tempo of each deck will immediately
synchronize to match the tempo of the primary deck.
The Sync state icon on the touchscreen will indicate the current status:
Sync Off: Sync is deactivated.
Tempo Sync: Only the tempo is synced (the BPM will match that of the primary deck).
Bar/Beat Sync: The tempo will be synced, and the track will be automatically beat-matched with the track
on the primary deck, depending on the Sync Mode setting.
To deactivate sync on a deck, press Sync again, or press and hold Shift and press Sync, depending on the
setting of Sync Button Action in the User Profile menu.
To adjust the track’s pitch, move the pitch fader.
To adjust the track’s pitch momentarily, press and hold one of the Pitch Bend –/+ buttons.
To adjust the range of the pitch fader, press and hold Shift and press one of the Pitch Bend –/+ buttons to select
±4%, 8%, 10%, 20%, 50%, or 100%.
To lock or unlock the track’s key, press Key Lock/Key Sync. When Key Lock is activated, the track’s key will
remain the same even if you adjust its speed.
18
Page 19

Pad Modes
The 4 performance pads on each deck have different functions in each pad mode.
To enter each pad mode, press the corresponding button: Cue, Saved Loop, Auto Loop, or Roll.
Cue Mode
In “hot” Cue Mode, you can use each pad to jump to an assigned hot cue point.
Tip: You can use the Engine DJ software to set, name, and assign colors to your hot cue points. The names and
colors will appear on the touchscreen for reference.
To assign a hot cue to a pad, press a pad at the desired location in the track.
To jump to a hot cue point, press the corresponding pad.
To enter a second bank of hot cues, press the Cue button a second time.
To clear a hot cue from a pad, press Shift and the desired pad.
Saved Loop Mode
In Saved Loop Mode, you can use each pad to activate an assigned loop.
Tip: You can use the Engine DJ software to set and name your loops. The names will appear on the touchscreen for
reference.
To assign a loop to a pad and activate it, press a pad to create a Loop In point at the current location, and
then press it again to create the Loop Out point at another location. The loop will activate immediately.
To deactivate or reactivate a loop, press the corresponding pad. Once a loop has been created, the loop will
deactivate or retrigger depending on the Saved Loop Behavior setting in the User Profile.
To enter a second bank of saved loops, press the Saved Loop button a second time.
To delete a loop, press Shift and the desired pad.
Auto Loop Mode
In Auto Loop Mode, you can use each pad to create and activate an auto loop.
To activate an auto loop, press a pad. The touchscreen will show the length of the auto loop for each pad.
To enter a second bank of auto loops, press the Auto Loop button a second time.
To deactivate an auto loop, press the pad again.
Roll Mode
In Roll Mode, you can press and hold each pad to trigger a “loop roll” of a certain length while the track’s timeline
continues (the lower half of the waveform on the touchscreen will continue moving forward). When you release the pad,
the track will resume normal playback from where it would have been if you had never done anything (i.e., as if the track
had been playing forward the whole time).
To trigger a roll, press the corresponding pad.
To enter a second bank of roll lengths, press the Roll button a second time.
19
Page 20

Control Center
Press and hold the View button or swipe down from the toolbar to open the Control Center. Here, you can
quickly adjust commonly used Parameters using the widgets in the center of the screen. You can also access the
following pages. Click the links below to jump to that part of the guide:
• User Profile – This menu is used to edit your performance preferences.
• Settings – This menu is used to edit the settings of the Mixstream Pro hardware.
• Source – This menu is used for selecting your source media device.
• Wi-Fi – This menu is used for connecting to and configuring your Wi-Fi network.
• Record – This menu is used for recording and saving your performances.
• Engine Lighting – This menu is used for working with the SoundSwitch Engine Lighting integration.
Parameters
Quantize: Tap this to enable or disable quantization. When enabled, time-based features like triggering cues and
loops will snap to the beat-grid according to the Cue/Loop Quantization setting in your User Profile.
Continue: Tap this to enable or disable continuous playback, which will keep playing the next track when the active
track has ended.
Stop Time: Use this slider to adjust the stop time, or how long the track takes to stop playing after the pause button
is pressed.
Split Cue: Tap to enable or disable split cueing. When enabled, the headphone audio will be “split” such that the
headphone cue preview signal is summed to mono and sent to the left headphone channel and the main mix is
summed to mono and sent to the right channel. When disabled, the cue channel and main mix will be “blended”
together.
X Fader Contour: Use this slider to adjust the slope of the crossfader curve. Slide towards the left for a smooth fade
(mixing) or slide to the right for a sharp cut (scratching). The center position is a typical setting for club performances.
20
Page 21

User Profile
Tap the Save To My Drive button to save your settings to a connected drive. User profiles can be loaded when a
media device with an Engine DJ profile is connected to Mixstream Pro.
Playback
• Track Start Position: This setting determines where the beginning of a track is after it loads. Select the actual
start of the file (Track Start) or the automatically detected beginning of an audio signal (Cue Position).
• Default Speed Range: This setting determines the range of the pitch fader. Select ±4%, 8%, 10%, 20% or
50%.
• Sync Mode: This setting determines the degree of synchronization applied when you press the Sync button on
Mixstream Pro:
o Bar: The tempo will be synced, and the track will be automatically bar-matched with the track on the primary
deck (the downbeats of each bar will be aligned).
o Beat: The tempo will be synced, and the track will be automatically beat-matched with the track on the
primary deck.
o Tempo: Only the tempo will be synced (the BPM will match that of the primary deck).
• Sync Button Action: This setting determines how the Sync button will act when pressed.
o Toggle: This mode allows you to toggle sync on and off without having to hold Shift.
o Shift Disable: This mode requires Shift to be held in order to turn off sync.
• Pitch Control Type: This setting determines the primary function of the Pitch Bend buttons. Select Pitch Bend
to keep the primary function as momentarily reducing or increasing the pitch, or select Range to set the primary
function to adjusting the range of the pitch fader. The function not used as the primary will still be available by
holding Shift and using the Pitch Bend buttons.
Cues/Loops
• Cue/
Loop Quantization: This setting determines the degree of quantization for time-based features. Select 1/8
beat, 1/4 beat, 1/2 beat, 1 beat or 4 beats.
• Paused Hot Cue Behavior: This setting determines how pads will play their hot cue points. When set to
Momentary, playback will start from a hot cue point when you press and hold its pad—release the pad to return
to the hot cue point. When set to Trigger, playback will start from a hot cue point (and continue) when you press
and release its pad.
• Smart Loops: This setting determines whether or not a manual loop will be automatically expanded or reduced
to a conventional length (e.g., 2 beats, 4 beats, 8 beats, etc.) when you set it. Select On or Off. This setting
works independently of the quantization setting.
• Move Cue To Loop In: This setting determines whether the song's initial Cue Point will automatically be moved
to the start of a loop (On), or remain at its current point (Off).
21
Page 22

Display
• Track Title: This setting determines whether track titles are shown as the track's Filename or its embedded
Metadata (tags).
• Time Format: This setting determines whether or not pitch adjustment affects how the track time is displayed.
When set to Static, the track’s time corresponds to locations in the track as usual; adjusting the pitch does not
affect it. When set to Dynamic, the track’s time will automatically adjust to account for changes in pitch. For
instance, if you set the pitch fader to -8%, the track time will increase so it is 8% longer.
• Track End Warning: This setting determines how long before the end of a track Mixstream Pro will warn you
that it is nearing the end by flashing the track overview on the touchscreen.
Safety
• Lock Playing Deck: This setting determines whether or not you will be able to load a track to the deck as it is
playing. Select On or Off. When this setting is on, the deck must be paused in order to load a track to it.
• Needle Lock: This setting determines whether or not you can tap the track overview on the touchscreen to jump
to that location in the track during playback. Select On or Off. You can use the track overview while playback is
stopped regardless of this setting.
• Pad Lock: This setting determines whether the pads and pad mode buttons are always enabled (Off) or disabled
(On). When disabled, the pads and pad mode buttons will not be lit.
Library
• Key Notation: This setting determines how the track key is notated on the touchscreen. You can view the key as
all Sharps, all Flats, Open Key or Camelot.
• Key Filter: This setting determines whether the Key filter shows tracks with the same key only (Match) or tracks
with compatible keys (Compatible).
• BPM Range: This setting determines the lowest- and highest-possible BPM values that will be used when tracks
are analyzed: 58
–115, 68–135, 78–155, 88–175 or 98–195 BPM.
• BPM Filter Tolerance: This setting determines the “tolerance” of the BPM filter so you can include tracks with
tempos that are within a small range of the selected tempo. Select ±0, 1, 2, 3, 5, 10, or 15.
• Collection Browse Behavior: This setting determines browsing behavior when using the Library. When set to
Select, tapping a playlist or folder will select it, and a double-tap is required to open it. When set to Open, tapping
a playlist or folder will open it.
• Demo Content: Use this option to enable or disable the pre-installed demo content.
Deck Colors
To change the deck color, tap the color box under the name of the deck, and then tap the color to select.
22
Page 23

Settings
Device
• Wi-Fi: This determines whether Wi-Fi connectivity is enabled (On) or disabled (Off). Tap the gear icon to open
the Wi-Fi settings. See Control Center > Wi-Fi for more information about the Wi-Fi menu.
• Time/Date: This displays the current local time and date. Tap Sync Time when connected to the internet to
automatically sync the time.
• Time Zone: Displays the current time zone, formatted as Continent / City.
• Set time zone manually: Enable this setting and then tap the gear icon to manually set your local time zone.
• Nudge Sensitivity: This determines the level of sensitivity when moving the platters: Low, Mid, High, or Max.
• Default Scratch Mode: This determines the default platter scratch behavior. Select Normal to default the
platters to vinyl mode, allowing you to “scratch” normally as you would with a vinyl record. Select Smart to
default the platters to Smart Scratch mode, where the track will continue playing as you scratch the platters and
resume normal playback from where it would have been if you had never moved the platter.
• Track Preview: When active, Track Preview will reveal a play button for each song in the library, allowing the
songs to be auditioned in the cue without loading a song to the deck. Select On or Off.
• Preview Volume: Use this slider to set the volume level of the track preview.
• Screen Brightness: This setting determines the brightness of the touchscreen: Low, Mid, High, or Max.
Mixer
• Playlist Deck Crossfade Time:
Use this slider to adjust the amount of crossfade between tracks when using the
playlist deck.
• VU Meter Mode: This setting determines which signal is represented by Mixstream Pro’s Main Level Meters.
Select Main to use view the Main output level, or select Channel to use the Channel level.
• Filter Resonance: This setting determines the amount of resonance of the filter, from 0 to 15.
Mic
• Send to Speakers: This setting determines whether the microphone signal is sent to the onboard speakers (On)
or not (Off).
Services
• Engine Lighting: This determines whether SoundSync Engine Lighting is enabled (On) or disabled (Off). Tap the
gear icon to open the lighting control interface. See Engine Lighting to learn more.
• Sync: This determines whether Ableton Link is enabled (On) or disabled (Off). Ableton Link synchronizes beat,
phase, and tempo of Ableton Live and Ableton Link-enabled applications over a wireless or wired network. You
must be connected to the internet to use Ableton Link.
• Streaming: Use these options to enable or disable connections to streaming service partners. When set to On,
the selected service will be available in the Source menu.
• Cloud: Use this option to retrieve your Engine library database from a cloud storage service. You must first use
the Engine DJ software to back up your database. Then, when this option is set to On, the selected service will
be available in the Source menu and you can access these files over an established internet connection.
Note: We recommend using only high-quality, name brand USB 3.0 or Class U1 or U3 SD cards as source
drives, especially when cloud services are enabled.
23
Page 24

About / Update
This page displays the product name, current firmware version, and other device information.
• Update Firmware Version: If you are not running the latest firmware, tap Reboot to restart Mixstream Pro in
Update Mode, which enables you to update its firmware. Follow the firmware update instructions included with
the firmware update package you downloaded.
• Settings: Tap Reset to default to restore the default factory settings for your device.
• Send Anonymous Usage Statistics: This determines whether or not your usage statistics will be sent
occasionally to us, enabling us to improve the Mixstream Pro experience.
• Legal: Tap here to view the Numark EULA and patent list.
24
Page 25

Source
The Source menu allows you to select a connected media
device, streaming service or cloud service for use with
Mixstream Pro. All connected media sources will be shown in
the top part of the display, and available streaming and cloud
service partners at the bottom of the display.
Tap the device name to select it as your media source. The
currently selected source device, if any, will show Source
next to its name. The currently selected recording device, if
any, will show Rec next to its name.
Tap the streaming or cloud service name to select it as your
media source. If you have not set up a connection to the
service yet, you will be prompted to sign in with your
username and password or given a web link and code in
order to activate your device. Once signed in or activated,
you can use the streaming or cloud service to browse and
add tracks. Streaming and cloud services may be enabled or
disabled in the Settings menu.
Tap the computer icon at the top of the touchscreen to switch Mixstream Pro to computer mode. In computer
mode, you can use Mixstream Pro to send and receive MIDI messages to and from your computer.
Tap the Wi-Fi icon at the top of the touchscreen at the top of the display to open the Wi-Fi
Tap the eject icon next to a drive name to eject that source. If a track from the selected source is currently in use, an
alert will appear to note that the tracks will be unloaded. Tap Eject Anyway to continue or tap Cancel to return to
the Source menu.
connection menu.
Tap the X to exit the Source menu.
Wi-Fi
The Wi-Fi menu allows you to connect to a local internet network so you can browse connected streaming and cloud
services.
Tap the Wi-Fi icon at the top of the page to enable Wi-Fi. Once enabled, a list of local networks will appear on the
display.
Tap the desired network name to establish a connection. If a password is required, you will be prompted to enter it.
Once a connection is established, Connected will appear next to the network name.
Tap the gear icon next to the network name to view information about the network.
Tap the Auto Connect On/Off buttons to enable or disable automatic connection to the network
Tap Forget to forget the network login credentials.
Tap Close or anywhere outside the menu to close the Wi-Fi information menu.
You can also disable Wi-Fi from within this menu by tapping the icon at the top of the display again.
25
Page 26

Record
Select the media device destination that you will use to save
your recording. The currently selected source device will show
Source next to its name. Once you have selected the
recording device, you can begin recording your session.
Tap Start to begin recording. The timer on the touchscreen
will show the total length of time recorded.
Tap Pause to pause recording.
Tap Resume to resume recording when paused. Mixstream
Pro will continue recording your session from where you
pressed pause.
Tap Stop to stop recording. Once recording is stopped, you
will have the option of saving the file to your device.
Tap Clear to clear the recording. A warning screen will be
shown before the file is deleted. Tap Yes to continue, or
No to return to the previous page to save the recording.
Tap Save As to save it to your drive. A keyboard will appear
where you can title your file. Tap Done to finish and save
your file, or tap Cancel to return to the previous page. A
success message will be shown on the touchscreen when
the operation is complete. Tap OK to continue, or wait a
few seconds and you will be returned to the Record menu.
Recorded files will be saved in a folder called Sessions on
your media device. You can access these recordings from
your Mixstream Pro under the Files section of the Library.
Tap the back arrow (<) to move back a page or return to the
previous page.
Tap the X to exit the Record menu.
26
Page 27

Engine Lighting
The Engine Lighting menu allows you to control connected
lighting devices such as DMX fixtures and Smart Lights using
SoundSwitch to seamlessly sync your music and lights.
To enable Engine Lighting, make sure the Engine Lighting
option in Settings > Services is set to On. Once Engine Lighting
is enabled, you can tap the gear icon in the Settings menu to
open the lighting control menu. You can also access this menu
after enabling it by pressing the View button to cycle between it
and the Library and Performance views.
The first time you use Engine Lighting, you can select a Basic or
Pro layout for performing:
Basic: A simple interface for controlling Smart Lights, Control
Color, Blackout and Strobe Lighting FX.
Pro: Full control of all lighting effects for both DMX and Smart
Lights, Control Movements, Strobe and more.
You will also be prompted if you want to connect Philips Hue
Smart Lights when you first use Engine Lighting. This can also be
configured later through the Engine Lighting Settings menu.
Visit soundswitch.com for more information on using SoundSwitch
lighting controls with your hardware.
Basic View
Pro View
27
Page 28

Settings
Tap the gear icon in the top-right corner of the touchscreen to open the Engine Lighting settings.
General
• Engine Lighting Status: This setting displays the current connection status to Engine Lighting devices. When
Running is shown, Engine Lighting is active. Tap Stop to deactivate Engine Lighting. Tap Start to reactivate.
• Connection Status: These indicators will show whether Engine Lighting is receiving signal from up to four
connected players.
• Sync Offset: Use this slider to apply a time offset for syncing your connected lights, from -1 to 0 to +1 seconds.
• Show Advanced Controls: Enable this option to toggle between the Basic and Pro controls.
• Randomize Autoloops: This setting determines whether autoloops are randomized or play in order.
• Override Scripted Tracks: This setting determines whether a scripted track that is paired with an audio file is
used (Off) or whether you can override it using the onboard controls (On).
• Loop Auto Strobe: This setting allows you to automatically generate strobe effects when a Loop Roll is engaged.
• Broadcast Art-Net: This setting allows you to enable or disable sending Art-Net protocol to control DMX
interfaces over a network connection.
• Strobes: This setting determines whether strobe effects are enabled or disabled.
• Philips Hue: Enable this option to connect to available Philips Hue smart devices.
• Fader Mode: This setting determines whether the light show changes continuously when both the crossfader
and channel faders are moved (Blend) or only by the position of the channel faders (Upfader Only).
• Active Faders: This setting allows you to enable or disable Engine Lighting control on up to four channels at a
time. Tap the CH1–CH4 names to activate each channel.
DMX Interfaces
Use this screen to view connected DMX interfaces and their Universe Assignments.
Philips Hue
Use this screen to set up Philips Hue devices.
28
Page 29

Appendix
Technical Specifications
Main Outputs
Frequency Response
Dynamic Range
Signal-to-Noise Ratio
Headroom Mic
Outputs
Channel Separation
T.H.D. Line
Microphone
20 Hz – 20 kHz +/- 1 dB
> 114 dB (A-weighted)
> 94 dB (A-weighted)
> 16 dB
> 16 dB
< -110 dB (1 kHz, unity)
< 0.01% (1 kHz, unity)
< 0.05% (1 kHz, unity)
Speakers
Frequency Response
20 Hz – 20 kHz +/- 1 dB
General
Analog Input Microphone
Analog Output Main, Balanced
-40 dBu (unity)
-60 dBu (minimum)
+20 dBu (maximum)
+4 dBu (unity)
Main, Unbalanced
Headphone Output
Playable Media Type
File Systems
File Formats
+16 dBu (maximum)
0 dBu (unity)
< 30 mW
SD, SDHC, SDXC card
USB mass-storage devices (flash memory,
external HDD enclosures)
exFAT (recommended)
FAT32
AAC/M4A
AIF/AIFF (44.1–192 kHz, 16–32-bit)
ALAC
FLAC
MP3 (32–320 kbps)
MP4
Ogg Vorbis
WAV (44.1–192 kHz, 16–32-bit)
29
Page 30

/
Connections Audio Outputs 2 XLR outputs (main left/right, balanced)
1 RCA output pair (main left/right,
unbalanced)
1 1/4” (6.35 mm) stereo output (headphones)
1 1/8” (3.5 mm) stereo output (headphones)
Audio Inputs 1 1/4” (6.35 mm) microphone input
Other 2 USB port (for USB drives)
1 USB port (to computer)
1 SD card slot
1 power adapter input
Display
Full color LED-backlit display with touch interface
7"
178 mm (diagonal)
Power Connection: DC, Center Positive
Voltage: 12.0 V 3.0 A
Dimensions
(width x depth x height)
Weight
22.3” x 11.2” x 2.9”
566 x 284 x 74 mm
8.11 lbs. / 3.68 kg
Specifications are subject to change without notice.
30
Page 31

Trademarks & Licenses
Numark is a trademark of inMusic Brands, Inc., registered in the U.S. and other countries.
Engine DJ incorporates élastique Pro V3 and [tONaRT] V2 by zplane.development.
macOS is a trademark of Apple Inc., registered in the U.S. and other countries.
SD, SDHC and SDXC are registered trademarks of SD-3C, LLC.
Windows is a registered trademark of Microsoft Corporation in the United States and other countries.
All other product names, company names, trademarks, or trade names are those of their respective owners.
This product uses software and technology under license. Please visit enginedj.com/product-legal for a complete list.
31
Page 32

 Loading...