

Page 1

OmniPage Direct
OmniPage Direct adds the power of OCR directly to any Macintosh wordprocessing, spreadsheet, or communications program. Working within
your application, you simply choose OmniPage Direct in the Apple menu.
Scanned text then appears in your document just as if you had typed it
yourself. Direct is the world's easiest OCR. It is virtually automatic: just
point and click to recognize a single paragraph or multiple pages.
Chapter 1 Installation . . . . . . . . . . . . . . . . . . . . . . . . . . . . . . . . p. 1
After running the Installer program on Disk 1, Direct will appear in the
Macintosh Apple menu.
Chapter 2 How to Scan Text . . . . . . . . . . . . . . . . . . . . . . . . . . . p. 7
Scanning text is as easy as pulling down the Apple menu and choosing
Direct. The Scan text dialog box lets you scan immediately or set options
for special features such as recognizing parts of a page or different
languages.
This tutorial guides you through the simplest scan and also explains how
to use the Partial Page features.
Chapter 3 Commands and Settings . . . . . . . . . . . . . . . . . . . . . . p. 15
This chapter explains every command and setting within Direct. Topics
are listed alphabetically.
Chapter 4 How to Improve Performance . . . . . . . . . . . . . . . . . . p. 25
This chapter tells you the tricks for speeding up Direct and for improving
text-recognition accuracy. It explains how to recognize text from poorquality documents such as multiple-generation copies and newspaper
pages. Adjusting the Brightness setting is the easiest way to improve textrecognition accuracy.
Page 2

Chapter 5 Technical Information . . . . . . . . . . . . . . . . . . . . . . . . . p. 31
This chapter includes a list of supported scanners, a list of error messages
and solutions and data about AppleEvents commands. A section of special
topics explains how Direct works and other technical aspects. Caere
Product Support information is also included.
Caere Corporation
100 Cooper Court
Los Gatos, California 95030
Caere GmbH
Ismaninger Strasse 17-19
81675 Munich, Germany
Fax: 49 89 41 30 06 23
OmniPage Direct 2.0 Macintosh Version
Copyright© 1992-1995 Caere Corporation. All rights reserved. CAERE®, OmniPage®, OmniPage Direct, and
Transitional Editor are trademarks of Caere Corporation. Many of the designations used by manufacturers and
sellers to distinguish their products are claimed as trademarks. Such designations appearing in this manual
have been printed in initial caps.
Printed in the USA
0 OmniPage Direct
Page 3

Chapter 1
Installation
This chapter describes how to install Direct. The chapter has five sections:
• System Requirements
• What’s in the Package
• Installing the Software
• Selecting Your Scanner
• Upgrading to OmniPage Professional
Installation 1
Page 4

System Requirements
System Requirements
To run Direct, you’ll need the following system:
Computer
• Macintosh II (68020) or higher that reads 1.44MB floppies
• Hard disk with at least 4MB available space
• Total System memory of 8MB RAM
• System 7 or higher
Scanner
Direct supports most full-page scanners. For a complete list, see Chapter 5.
Be sure your scanner is installed according to the manufacturer’s
instructions and is working on your system. Use the scanning software
supplied by your scanner manufacturer to be sure the scanner is working
on your system before you install Direct.
What’s in the Package
Check the Direct package to be sure it contains the following items:
• Direct Release Notes
• Warranty Registration Card
• One or more 1.44MB 3.5” program disks
2 Installation
If any of the above items are missing, contact your dealer for replacement.
For convenience, jot down your warranty registration number (printed on
the diskette labels) on the first page of this manual.
Please fill out the warranty registration card and send it to Caere
Corporation. Once registered, you’ll have access to product support —
support is
available to registered users.
only
Page 5

Installing the Software
Direct is installed in your Apple Menu Items folder. Several Direct files are
also installed in the System Folder. Direct must be installed on the startup
disk and that startup disk must contain a valid System Folder. The
Installer program automatically selects the startup disk when you install
from the installation disks.
Installing Chooser Extension(s) for Your Scanner(s)
During installation, you must install the Chooser extension(s) for the
scanner(s) you plan to use with Direct. These Chooser extensions,
supplied by Caere, are drivers that allow supported scanners to work with
Direct. Easy Installation lets you install Chooser extensions to support one
type of scanner. For example, if you select
required by supported Ricoh scanners will be installed. Custom
Installation lets you install Chooser extensions to support as many
scanners as you want.
Your scanner and the driver supplied by its manufacturer, if any, must be
installed on your system according to the manufacturer's instructions.
Chooser extensions
Ricoh,
Installing the Software
After installation, you must select the required extension for your scanner
in the Chooser.
Easy Installation
1 Disable any virus protection software.
This is often a Control Panel device; refer to your virus protection
software manual for more information.
2 Insert the OmniPage Direct disk #1 in the disk drive.
3 Double-click the Installer icon and click OK to continue.
The Easy Install dialog box appears and displays the name of the
disk where Direct will be installed.
4 Click
to begin installation.
Install
Installation 3
Page 6

Installing the Software
An installation screen displays the progress and you may be
asked to insert other disks. A dialog box will ask you to select a
scanner.
5 Select the type of scanner you plan to use with Direct in the pop-
up menu.
Chooser extension(s) for the selected scanner type will be
installed.
6 Insert the other installation disks when you are requested to do
so.
Direct notifies you when installation is complete.
7 After installation,
menu.
Custom Installation
It is recommended that you install all files using the Easy Installation
method. However, if you are an advanced user, you can click the
Customize
install.
Use the Custom Installation method if you need to install Chooser
extensions for additional scanners.
button in the Easy Install window and select which items to
OmniPage Direct
will appear in the Apple
4 Installation
Page 7

Selecting Your Scanner
Your scanner and the driver supplied by its manufacturer, if any, must be
installed on your system according to the manufacturer's instructions.
Before using your scanner with Direct, make sure it’s working on your
system by using the scanning software supplied by the manufacturer.
During installation, Chooser extension(s) must be installed for the
scanner(s) you plan to use with Direct. For information on Chooser
extension installation, see page 3.
Before using your scanner with Direct, you must select its required
extension in the Chooser. An error message appears if you try to scan a
page before selecting it in the Chooser.
To select a scanner for Direct:
Selecting Your Scanner
1 Choose
The Chooser appears; icons for each installed scanner extension
are displayed.
2 Click the icon of the extension that your scanner requires.
Some extensions, such as Apple Scan, support multiple scanners;
select your scanner model in the list that appears. Depending on
the make of your scanner, you may have to select other scanner
driver parameters such as the SCSI ID number.
The
display additional information and/or options for your scanner.
3 Close the Chooser.
You must close the Chooser in order to complete the scanner
selection.
Chooser
More...
in the Apple menu.
button may appear for some scanners. Click
More...
to
Installation 5
Page 8

Upgrading to OmniPage Professional
Chooser extensions for a few scanners supported by this version of Direct
are not yet included with OmniPage Professional. Your Chooser
Extension is already installed on your system. When you subsequently
install OmniPage Professional, a scanner installation dialog will appear: if
your scanner is not listed, select
and then click
None
Install
.
6 Installation
Page 9

Chapter 2
How to Scan Text
This chapter guides you through the basic steps of using Direct to scan and
recognize text.
We assume you have installed Direct according to the instructions in
Chapter 1 and that you know how to work in the Macintosh environment.
Not all Direct features are described here; for a complete description of
any command or setting, see Chapter 3, Commands and Settings.
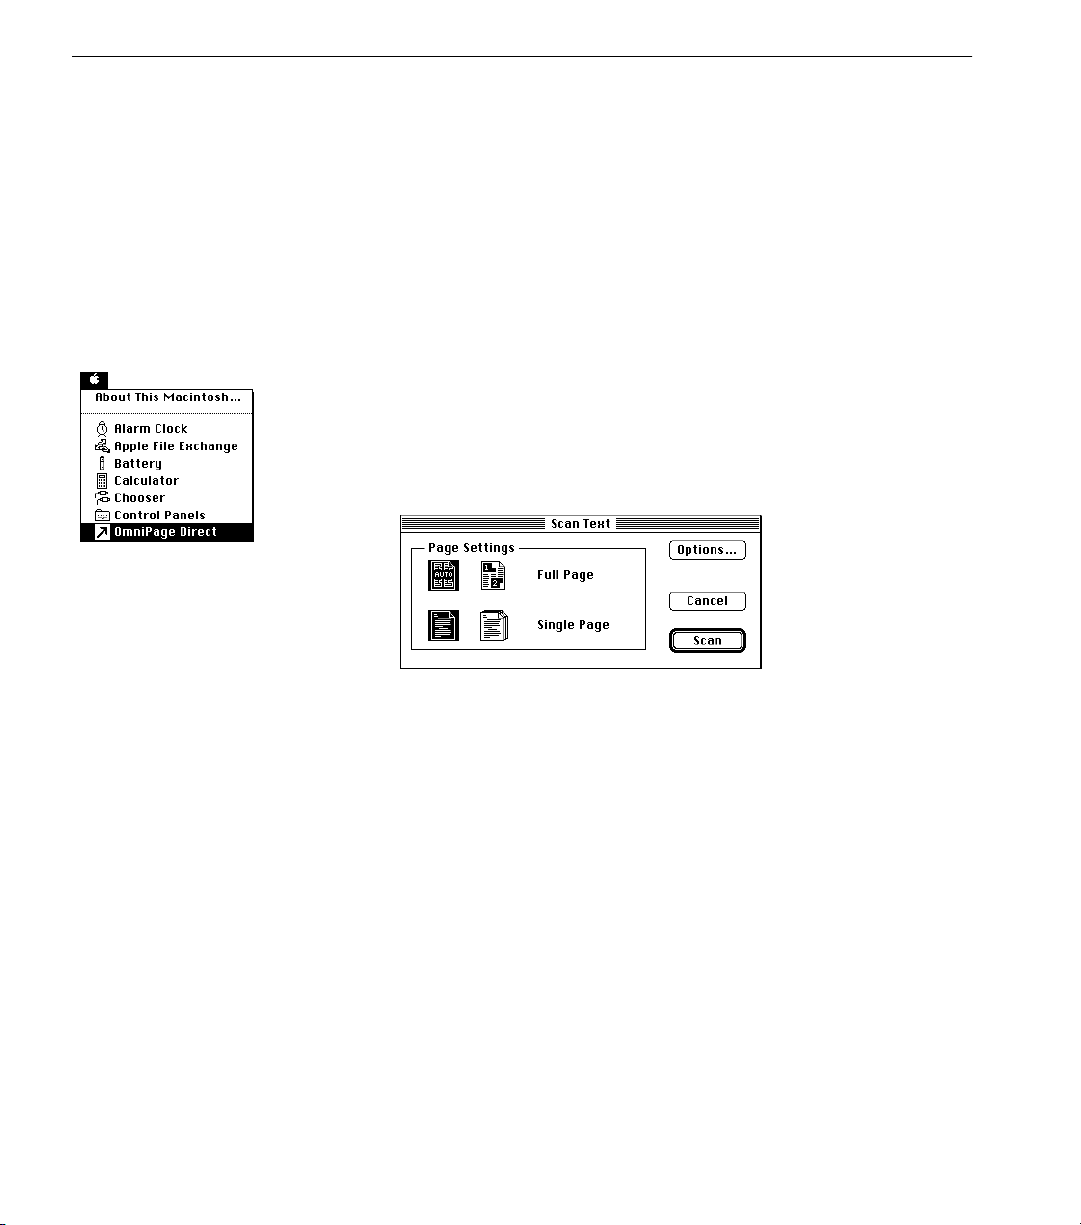
To use Direct, follow these steps:
1 Open your word-processing, spreadsheet, or other application.
2 Choose OmniPage Direct in the Apple menu.
3 Adjust settings and click
4 Select parts of a page (optional).
5 Check the brightness setting.
After recognition, the scanned text appears in your application.
Unrecognized characters are represented in your text file with a tilde (~).
in the Scan Text dialog box.
Scan
How to Scan Text 7
Page 10
Step 1 Open Your Application and Prepare to Scan
Step 1 Open Your Application and Prepare to Scan
To start the scanning process, open your application and prepare to scan a
page.
1 Open your word-processing, spreadsheet, or other application.
2 Place a page in your scanner.
If you don’t know how to orient the page correctly, check your scanner’s
manual. Be sure your scanner is turned on.
Step 2 Choose
OmniPage Direct
If Direct is properly installed, OmniPage Direct appears in your Macintosh
Apple menu.
1 Be sure you have selected your scanner in the Apple Chooser.
(See <$paratext> on page 1-4)
2 Choose
OmniPage Direct
in the Apple Menu
. The Scan Text dialog box appears.
8 How to Scan Text
Page 11
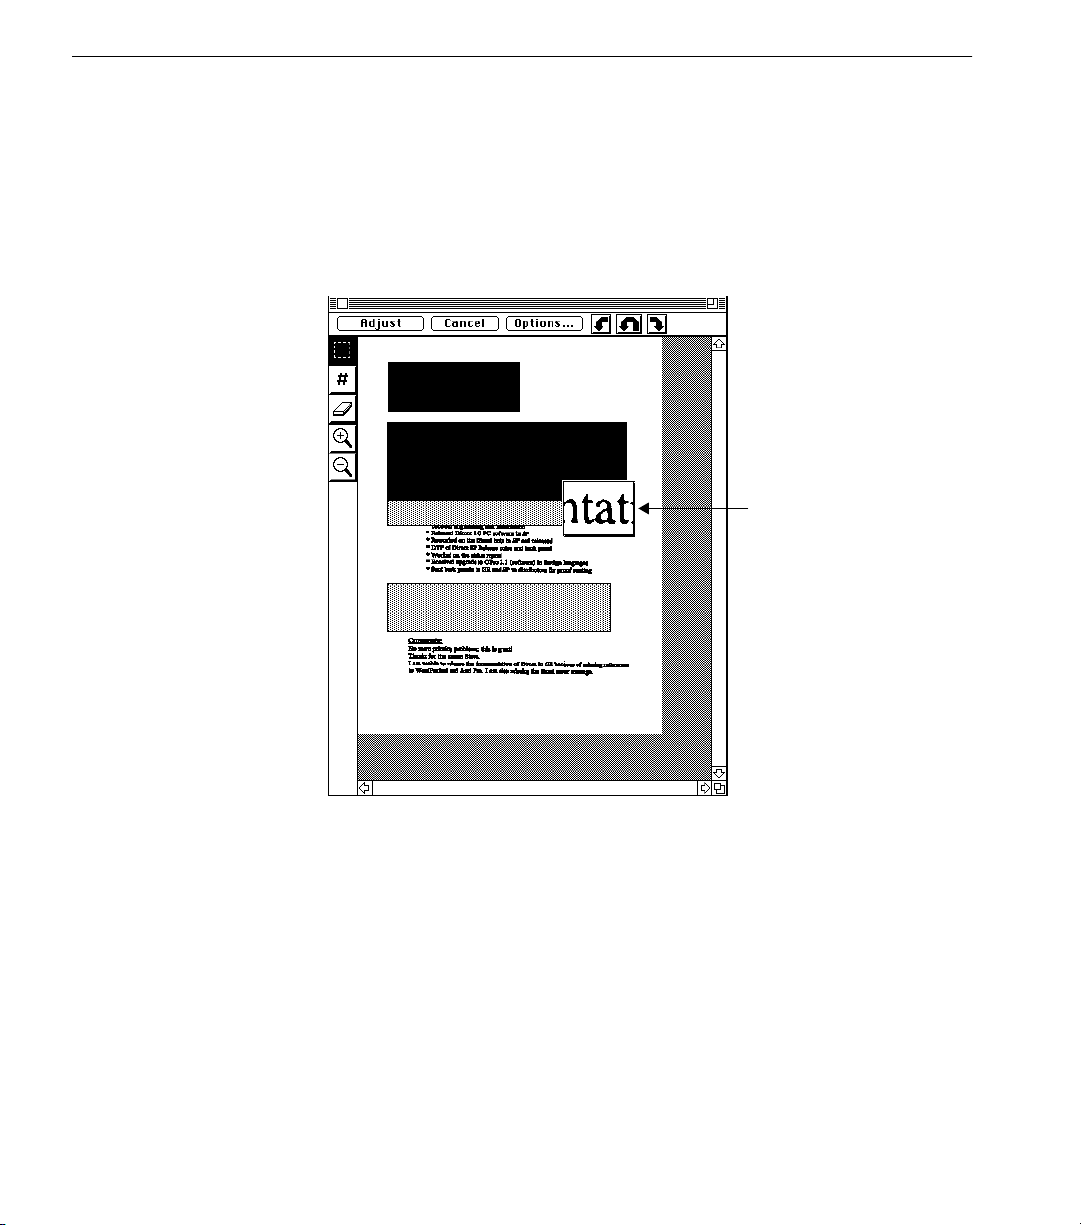
Step 3 Adjust Settings and Click Scan
Step 3 Adjust Settings and Click
Direct is designed to automatically determine the best way to scan a page.
You can simply click Scan and the default settings will accommodate most
scanning situations.
Settings in this dialog box and in the Options dialog box let you customize
Direct for scanning your particular documents. This step explains how to
use the Partial Page feature, which lets you select parts of a page for
recognition. Other settings are described in Chapter 3.
1 Highlight the Partial Page icon.
2 If you wish to manually adjust the Brightness control, click
Options...
select
Manually adjusting Brightness can improve recognition accuracy
and speed; see Chapter 4, Improving Performance.
• If a page has sharp, distinct characters printed on good-qual-
• If a page has thin, broken characters, darken the Brightness
• If a page has thick, run-together characters, if it is printed on
. The Options dialog box will appear. If necessary, de-
Auto Intensity
ity non-reflective paper, set the brightness slide to the middle,
normal setting.
setting.
porous paper such as newsprint, or if it is printed on glossy
paper, lighten the Brightness setting.
to activate the brightness control.
Scan
3 If desired, adjust other settings in the Options dialog box. If you
want to save the Options settings for your next scan, click
4 Click
in the Scan Text dialog box.
Scan
How to Scan Text 9
Save
.
Page 12
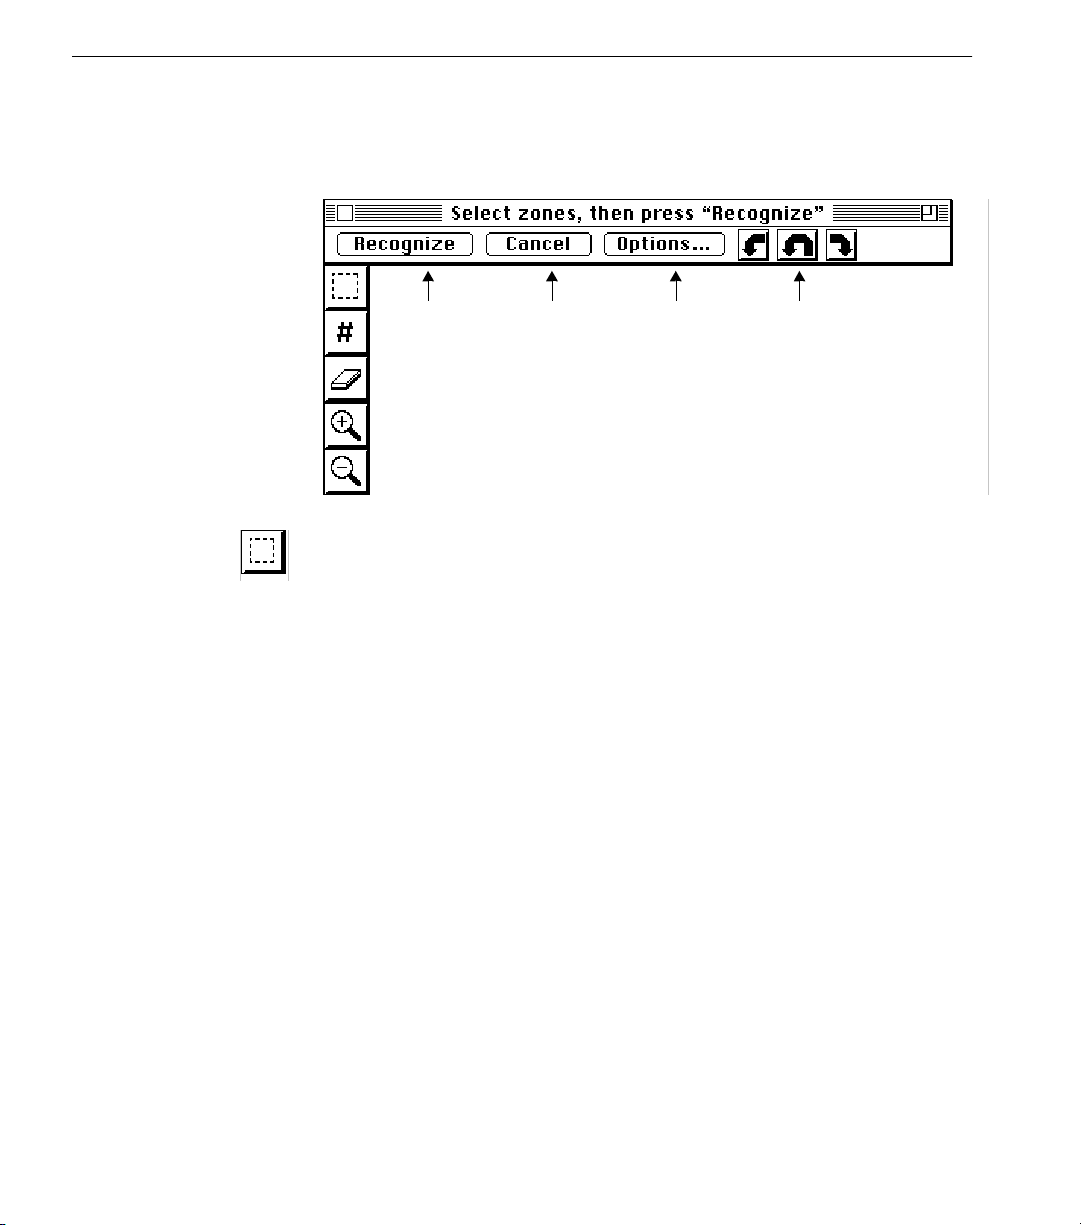
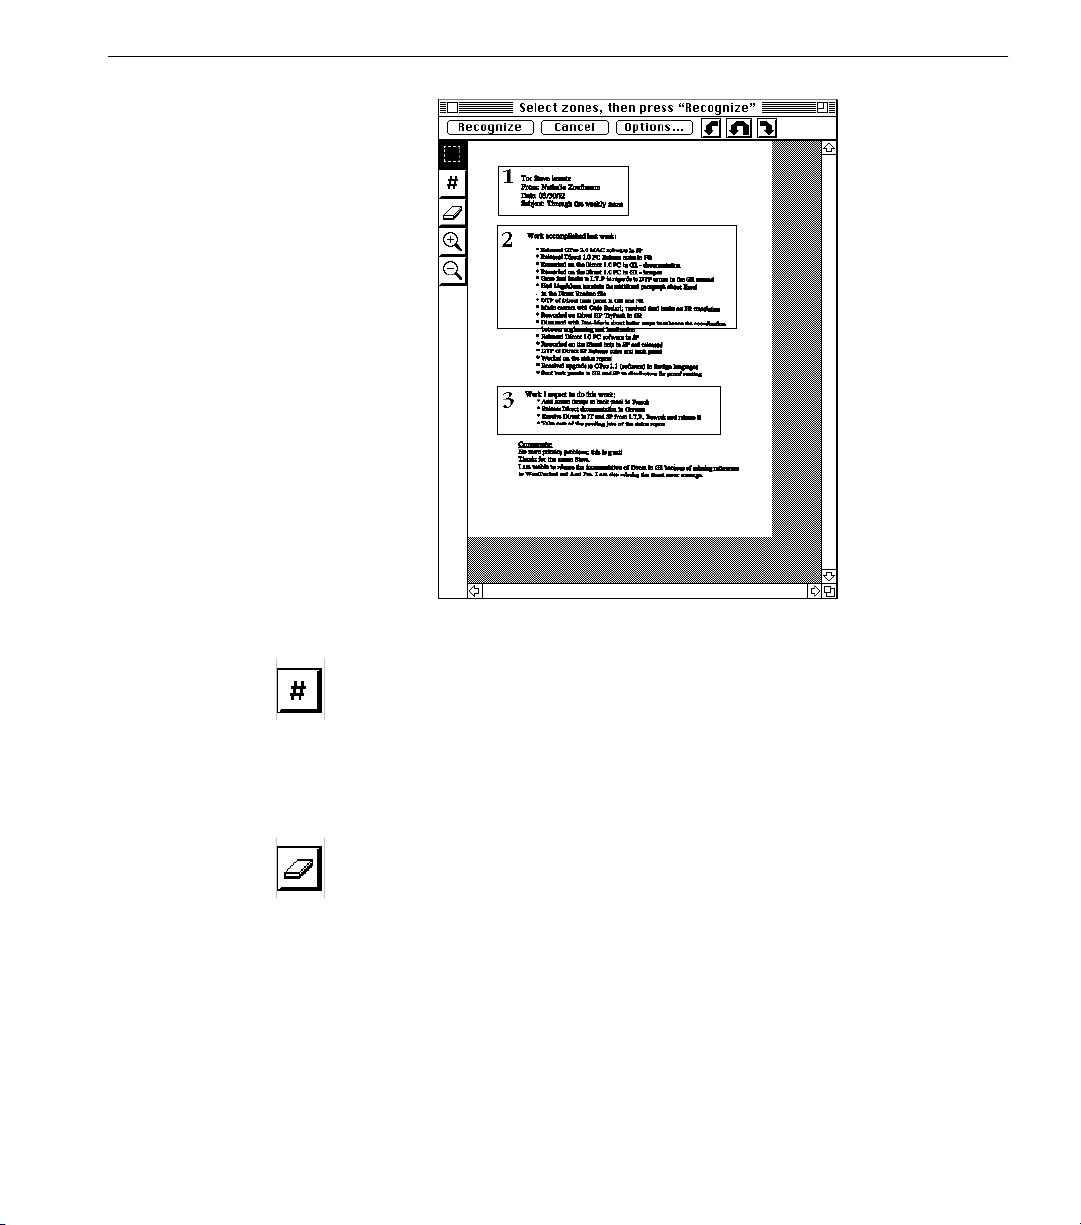
Step 4 Select Parts of a Page
Step 4 Select Parts of a Page
Draw zones
Order zones
Erase zones
Zoom in
Zoom out
If you highlighted
Partial Page
, an image of your page and a set of tools will
appear after the page is scanned. The tools let you draw zones around
parts of the page, order the zones for recognition, and zoom in or out.
Start recog-
nition, or
Adjust
stop recog-
nition and
return to this
window.
to
Stop recogni-
tion and
return to the
Direct appli-
cation.
Open the
Options
dialog box.
Rotate image
90°, 180°, or
270°.
1 Click on the Draw zones tool and then enclose each area you
want recognized with a selection box by holding the mouse button down and dragging the mouse.
Zones will be recognized in the order you select them unless you
use the Order zones tool (the # symbol). To adjust a zone, first
select it by clicking on the Draw zones tool and then clicking on
the zone. Then move the mouse pointer to a selection box handle, hold the mouse button down, and move the mouse.
10 How to Scan Text
Page 13
Step 4 Select Parts of a Page
The window will look like this:
A number appears in each zone indicating the order in which the
zone will be recognized. You may draw up to 99 separate zones.
2 Click on the Order zones tool (the # symbol) to change the order
in which the zones will be recognized. The numbers in the zones
will disappear.
To reorder the zones, click on the zone you want recognized first.
The number 1 will appear in the zone. Then click on the next zone
you want recognized; the number 2 will appear. Continue until
the zones are appropriately ordered.
3 Click on the Erase zones tool and then click on a zone selection
box. The contents of the zone will not be removed; only the selection box will go away.
4 Click
Recognize
to start recognition.
During recognition, text blocks are painted gray and then black on the
screen as Direct works.
If, during recognition, you want to change the way you drew or ordered
zones, click Adjust. The Partial Page window will reappear and you can
use the tools again. After recognition the text will appear in your
application just as if you had typed it yourself.
How to Scan Text 11
Page 14
Step 5 Check Brightness
Step 5 Check Brightness
The Character Window appears while Direct performs recognition; it
displays small samples of the scanned image. If the Character Window
does not appear during recognition, maximize the size of your
application’s window and the Direct image window.
The Character Window helps you adjust the correct Brightness setting if
Auto Intensity is de-selected. It also shows you if you put the page in the
scanner skewed or upside-down.
The Character Window
12 How to Scan Text
If text characters appear thick and run-together, re-scan the page after
adjusting the Brightness control towards Lighten. If characters appear thin
and broken, adjust the control towards Darken.
If characters appear at an angle, rescan the document after straightening
the page in the scanner.
Page 15

Step 5 Check Brightness
The following figure shows how well-formed characters appear in the
Character Window. No special brightness adjustment is needed.
The following figure shows how thin, broken characters appear in the
Character Window. Try adjusting the brightness toward Darken.
The following figure shows how thick, run-together characters appear in
the Character Window. Try adjusting the brightness toward Lighten.
How to Scan Text 13
Page 16

14 How to Scan Text
Page 17

Chapter 3
Commands and Settings
This chapter explains how to use Direct commands and settings. It is
organized alphabetically. Settings within a Direct selection box are
explained under the title of the selection box. For example, you can find
descriptions of Letter and Legal page-size settings under the Size heading.
Adjust
Clicking
recognition is complete.
For example, imagine you selected several parts of a page for recognition
and clicked Recognize. During recognition, you notice that you forgot to
select a particular part and that the Recognize button has turned into the
Adjust button. You click
correctly without having to re-scan the page.
Auto Intensity
Select this to let Direct automatically set an optimal brightness setting
using Caere AnyPage or HP AccuPage technology. This feature is
available with grayscale scanners.
lets you change settings after a scan has started but before
Adjust
; recognition stops and you can select parts
Adjust
This feature is especially useful when you scan text printed on a colored
background. It also works well when you scan “copies of copies” that have
large gray areas.
Recognition is faster with this option turned off. If you scan high-quality
documents with crisp, black letters printed on white paper, deselect Auto
Intensity and use the manual Brightness control.
The manual Brightness control is available only when Auto Intensity is
deselected.
Commands and Settings 15
Page 18

Balloon Help
Balloon help is available by clicking Show Balloons in the Macintosh ?
menu. When you move the mouse pointer to a command or setting, a short
explanation of the command or setting appears. To turn off Balloon help,
click Hide Balloons in the Macintosh ? menu.
Brightness
Select different brightness settings to lighten or darken a scanned image.
This manual control is available in the Options dialog box if Auto Intensity
is deselected.
The Brightness setting is the most important means you have to affect the
accuracy of text recognition. It’s needed to account for variations in paper
quality, print quality, and scanner peculiarities. It acts like the brightness
setting on a copier.
Set brightness by moving the mouse arrow to the square in the slide,
holding the mouse button down, and moving the square toward the
desired setting. Or, click on the arrows to the left or right of the slide. Use
the numbers in the square as references for future documents.
If a page has sharp, distinct characters printed on good-quality nonreflective paper, set the brightness slide to the middle, normal setting.
16 Commands and Settings
If a page has thin, broken characters, darken the brightness setting.
Page 19

If a page has thick, run-together characters or if it is printed on porous
paper such as newsprint, or if it is printed on glossy paper, lighten the
brightness setting.
To evaluate brightness settings, watch the Character Window as Direct
performs text recognition. For a description of the Character Window, see
Chapter 4, How to Improve Performance.
<CR> at end of line
Select this if you want a hard carriage return inserted at the end of each
line of text.
Use this setting if you’re scanning lists, lines of code, or other text where
you want each line to be an individual paragraph when it appears in your
word processor.
When this is deselected, Direct will look for extra space between lines of
text on the scanned page and interpret space as a paragraph break. It will
insert a hard carriage return at the paragraph break. If text is continuous,
it will assume that the continuous text is one paragraph.
File Menu
Full Page
Help
The File menu contains the Quit command. Select Quit to exit the Direct
program and remove the program from memory.
Click the Full Page icon to let Direct recognize all the text on a scanned
page. Direct will determine column structure according to the Page
Layout setting in the Options dialog box.
If you want Direct to only recognize parts of a page, click the Partial Page
icon. After the scan, you’ll be able to select specific parts you want
recognized. See Chapter 2, How to Scan Text.
See the Balloon Help topic in this chapter.
Commands and Settings 17
Page 20

Languages
Select this to choose one or more languages for text recognition.
Direct will recognize additional characters (such as circumflexes, umlauts,
etc.) unique to a particular language. You may select more than one
language by Shift-clicking on different selections; however, for faster
recognition, select only the minimum number of languages you need.
Multiple Pages
Select this icon if you want to scan more than one page.
After a flatbed scanner scans a page, a prompt will appear asking you if
you want to scan more pages. If you use an automatic document feeder
(ADF), the prompt will appear when the ADF is empty.
Options
Click this to display the Options dialog box. This dialog box lets you
indicate the size page you’re scanning, the column structure, the type of
characters printed on your page, and other options. Usually, you won’t
need to use these advanced features; Direct will automatically handle
most of your documents. However, manually adjusting these settings may
speed up recognition.
Orientation
18 Commands and Settings
Look up any of the settings in the Options dialog box in this chapter. They
are arranged alphabetically.
The Orientation selection box lets you select the orientation of the
document you are scanning.
Page 21

Auto
Select this if you want Direct to automatically determine page orientation.
Direct will automatically flip the image if text-recognition accuracy is very
poor; it assumes you placed the page wrongly in the scanner.
Portrait
Select this if vertical is the long dimension as with a business letter.
Landscape
Select this if horizontal is the long dimension as with a spreadsheet.
When scanning landscape-oriented pages, be sure you load them in your
scanner correctly. See your scanner’s manual for instructions on how to
place landscape pages.
Flipped
Select this if a portrait-oriented page is placed upside down in the scanner.
Flipscape
Select this if a landscape-oriented page is placed upside down in the
scanner.
If Portrait, Landscape, Flipped, or Flipscape is selected, Direct will not
automatically flip an image if text-recognition accuracy is very poor.
Page Layout
Page layout modes describe how blocks of text on a page will be ordered
for recognition. For text recognition, Direct usually divides a page into a
series of text blocks and strips out graphics. For example, if two text blocks
are separated by white space (gutters), Direct will assume there are two
Portrait
Landscape
Commands and Settings 19
Page 22

columns of text. The left column will appear first in your word processor
and then the right column will appear.
Auto
Select this if you want Direct to automatically determine column structure.
Direct will look for regular vertical separations of text (gutters) to define
columns. It then recognizes column-wide text blocks. It starts at the top of
the first column, moves to the bottom, and then continues to the top of the
next column, snaking through the text. The resulting text file displays the
text in one column from beginning to end.
Do not use this setting for tables and financial forms. Although these kinds
of documents have multiple columns, snaking will destroy their
spreadsheet format.
Single column
Select this when there is one column on a page as with correspondence
such as business letters.
Direct will treat the entire page as one column. It starts at the top of the
page and moves to the bottom outlining page-wide text blocks. If there are
tables, Direct will use spaces as delimiters between columns.
Spreadsheet/Tables
Select this when scanning a table or financial form and you are putting the
text into a spreadsheet. Direct will insert tabs instead of spaces as
delimiters between columns and each column of text will go into a
different column of cells.
20 Commands and Settings
No parsing
Select this to have Direct recognize the entire document as a single text
block.
Direct will not divide the text into separate text blocks or strip out
graphics. The document will be recognized as one text block; if there are
graphics on the page, Direct will attempt to recognize them as text
elements.
This feature is useful if you are scanning pleading pages or small text that
might appear as graphics to Direct: for example, telephone book pages.
Also, use No parsing if you are scanning very small or narrow zones.
Page 23

Partial Page
Highlight this icon when you want specific sections, or areas, of a page
recognized. If the Full Page icon is highlighted, the entire page will be
recognized.
After Direct scans your page, you’ll be able to draw selection boxes around
specific parts of the page that you want recognized. You can also specify
the order in which you want the zones’ text to appear in your word
processor, zoom your view of the page in or out, and rotate the image if
you placed it incorrectly in the scanner.
For tutorial-like instructions on how to use the Partial Page feature, see
Chapter 2, How to Scan Text.
If you highlight Partial Page, the tools window will appear after the scan.
The Partial Page Tools
These tools let you select and order zones and zoom the view in or out. The
buttons on the button bar let you start and cancel the recognition process
and adjust settings in the Options dialog box.
Draw zones
Order zones
Erase zones
Zoom in
Zoom out
Start recog-
nition, or
Adjust
to
stop recog-
nition and
return to this
window.
Stop recogni-
tion and
return to the
Direct appli-
cation.
Open the
Options
dialog box.
Rotate image
90°, 180°, or
270°.
Draw zones
Click this tool and then enclose each area you want recognized with a
selection box by holding the mouse button down and dragging the mouse.
Zones will be recognized in the order you select them unless you use the
Order zones tool (the # symbol).
A number appears in each zone indicating the order in which the zone will
be recognized. You may draw up to 99 separate zones.
Once you have drawn a zone, you can adjust its size. First, click on the
zone to select it. Handles will appear on the edge of the selection box. Then
Commands and Settings 21
Page 24

move the mouse pointer to a handle, hold the mouse button down, and
move the mouse. To move the entire zone, move the pointer inside the
zone, hold down the mouse button, and move the mouse.
Order zones
Normally, zones are recognized in the order you select them. To change
the order in which the zones will be recognized, click on the Order zones
tool. The numbers in the zones will disappear.
To reorder the zones, click on the zone you want recognized first. The
number 1 will appear in the zone. Then click on the next zone you want
recognized; the number 2 will appear. Continue until the zones are
appropriately ordered.
Erase zones
If you want to remove a selection box, click on the Erase zones tool and
then click on the box you want removed. The contents of the zone will not
be removed; only the selection box will go away.
Zoom in/out
If you want a close-up view of an area, click the Zoom in tool and then click
on the area of the page you want enlarged. Click the Zoom out tool and
then click on the area to zoom to a wider view.
The levels of zoom are Fit in Window, 25%, 50%, and 100%. The 100% view
gives you a pixel-for-pixel view of the scanned image.
22 Commands and Settings
Recognize
Click this button to start recognition.
If you highlighted the
not select
Pause after every page
Multiple Pages
and
Partial Page
icons (and you did
in the Options dialog box) the same zones
will be recognized on each page that is scanned. For example, if you select
a zone on a form, and then scan five forms, the same zone will be
recognized on each form. If you selected Pause after every page, you’ll be
able to draw different zones for each page.
This turns into the Adjust button after recognition has started.
Adjust
Click this button to change settings after a scan has started but before
recognition is complete. The Recognize button turns into the Adjust
button after recognition has started.
For example, imagine you selected several zones on a page for recognition
and clicked Recognize. During recognition, you notice that you forgot to
Page 25

select a particular zone. You click Adjust; recognition stops and you can
select zones correctly or adjust settings without having to re-scan the page.
Cancel
Click this button to stop a scan and return to the Direct application.
Options
Click this button to display the Options dialog box so you can change
settings. All settings are explained in alphabetical order in this chapter.
Rotate Tools
Click these tools if you placed a page incorrectly in your scanner. You can
rotate the image 180
need to replace the page in your scanner; Direct will recognize the text if it
appears correctly oriented in the image window.
0
or 900 clockwise or counter-clockwise. You don’t
Pause after every page
Select this if you are scanning multiple pages and you may want to change
settings for different pages.
For example, imagine you are scanning a magazine article that stretches
over several pages. You select Partial Page because you don’t want to
recognize all the advertisements that are on the page. You also select Pause
after every page because each page has a different text/ad layout and you
will have to select different parts of each page. After each page is scanned,
you’ll be able to draw different zones or change settings in the Options
dialog box.
Quit
Select this to exit the Direct program and remove the OCR portion of the
program from memory.
Quit after n minutes of inactivity
Select this if you want to automatically exit the Direct program when
Direct is not used for a period of time. This will free memory for other
applications if you are not using Direct often. “n” stands for a number of
minutes from 1 to 99.
Recognize
Click this button to start the recognition process after you have selected
zones.
Commands and Settings 23
Page 26

This turns into the Adjust button if you want to change the zones or
settings after recognition has started.
Reject character
This edit box lets you choose a character to mark unrecognized characters
in your text. For example, if Direct could not recognize the J in REJECT,
and the tilde (~) was the reject character, the characters RE~ECT would
appear in your text.
Retain text style
Select this to keep text character attributes such as size, bold, italic, and
underlined when recognized text is pasted into an application. The text
will be pasted as plain ASCII with no formatting if this is not selected.
Direct does not retain formatting when you save text to a file.
Save text to file
Select this to save recognized text as a text file rather than having the text
pasted into an application. A dialog box will appear after recognition
allowing you to name the text file and save it in an appropriate folder.
Direct does not retain formatting when you save text to a file.
Single Page
Highlight this icon if you are scanning a single page. Highlight Multiple
Pages if you’re scanning more than one page with an automatic document
feeder or by changing pages in the scanner by hand.
Size
Tilde Character
24 Commands and Settings
This selection box lets you select the dimensions of the page you are scanning.
Auto
Letter
A4
Legal
Select this to allow Direct to automatically determine the size of the
page.
Select this for standard US 8.5” by 11” size pages.
Select this for 21cm by 29.7cm European-size pages.
Select this for US 8.5” by 14” size pages.
The tilde character appears in your text file if Direct could not recognize a
character. You can change the tilde to another character by choosing a
different “reject” character in the Options dialog box. To display this
window, click
Options
in the Scan Text window.
Page 27

Chapter 4
How to Improve
Performance
You can make Direct run faster and recognize text more accurately by
learning how to use a few different settings.
• Speed up Direct by deselecting
adjusting other options instead of using the default Auto settings.
• Improve text-recognition accuracy by using the Character Window (described later in this chapter) to adjust the Brightness setting and by taking into account scanning angle and paper
transparency.
Auto Intensity
and by manually
How to Improve Performance 25
Page 28

Improving Speed
Improving Speed
Direct is designed to run automatically — making text recognition easy
and effortless. However, the automatic features take longer to work. Deselecting
Direct run much faster.
Auto Intensity
The Auto Intensity feature uses Caere AnyPage or HP AccuPage
technology to improve accuracy considerably if your page is dirty, if text
is printed on a colored background, or if the page has shading from a copy
machine. This feature is available on grayscale scanners.
However, if you scan high-quality documents with crisp, black letters
printed on white paper, recognition is much faster with this setting turned
off. Deselect
Options dialog box.
Page Layout
Select
correspondence. Select
form, or spreadsheet.
Auto Intensity
Auto Intensity
Single column
and manually setting other options will make
to activate the manual Brightness control in the
when there is one column on a page as with
Spreadsheet/Tables
when scanning a table, financial
Partial Page
26 How to Improve Performance
The Partial Page feature lets you draw selection boxes around just the
parts of a page you want recognized. Using this feature, you don’t need to
wait while Direct recognizes unnecessary text.
For tutorial-like instructions on how to use the Partial Page feature, see
Chapter 2, How to Scan Text.
Page 29

Improving Accuracy
If you scan typeset, high-quality printed pages, you will probably find that
Direct recognizes text perfectly: the text that appears in your word
processor matches the text in the scanned page letter-for-letter.
With lesser-quality pages, text-recognition accuracy will be poorer. These
factors most affect text-recognition accuracy:
• Document Quality
• The Brightness Setting
• Scanner Glass Clarity
• Paper Transparency
Document Quality
Direct recognizes characters in almost any font from 6 to 72 points in size.
However, keep the following in mind when using Direct:
• The print should be reasonably clean and crisp. Characters must
• The document should be free of notes, lines, or doodles. Any-
• The document font must be non-stylized; for example, the Zapf
• It’s hard to recognize underlined text accurately; the underline
Improving Accuracy
be distinct: separated from each other and not blotched together
or run-on.
thing that is not a printed character will slow Direct considerably,
and any character distorted by a mark will be unrecognizable.
Chancery font is too fancy for Direct.
changes the shape of descenders on the letters q, g, y, p, and j.
The Brightness Setting
The Brightness setting is your most powerful means to improve textrecognition accuracy. It is available in the Options dialog box if you deselect
Auto Intensity
Manually adjusting the Brightness control allows for differences in paper
and print quality for all kinds of pages: newsprint, glossy paper, thickly
inked, etc. The following image shows a lower-case e printed on glossy
paper as it might appear to Direct. Notice the thin, horizontal line in the
middle. Is this character an e or a c? It may be hard for Direct to tell.
.
How to Improve Performance 27
Page 30

Improving Accuracy
The following image shows the same character, as it appears to Direct,
when the brightness control is set to Darken.
Direct will always read this character as an e.
To adjust the Brightness control, either click on the left or right arrows or
move the mouse pointer to the box, hold the mouse button down, and
slide the control left or right. The number in the control’s box is a reference
you can use when you scan other documents. If you find that a particular
brightness setting is effective with a certain quality of document, use that
setting the next time you scan that type of page.
Auto Intensity
Select this to let Direct automatically set the optimal brightness using
Caere AnyPage or HP AccuPage technology. This feature is especially
useful if your page is dirty, if text is printed on a colored background, or
if the page has shading from a copy machine.
Direct will use HP AccuPage if you select HP AccuPage as the scanner
extension in the Apple Chooser. Direct will use Caere AnyPage if you
choose other grayscale scanner extensions.
The Character Window
28 How to Improve Performance
The Character Window appears while Direct performs text recognition on
a page; it displays small portions of the scanned image. If text characters
appear thick and run-together, adjust the Brightness setting towards
Lighten. If characters appear thin and broken, adjust the setting towards
Page 31

Improving Accuracy
Darken. If characters appear at an angle, rescan the document after
straightening the page in the scanner.
The Character Window
If the Character Window does not appear during recognition, maximize
the size of your application’s window and the Direct image window.
The following figure shows how well-formed characters appear in the
Character Window. No special brightness adjustment is needed.
How to Improve Performance 29
Page 32

Improving Accuracy
The following figure shows how thin, broken characters appear in the
Character Window. Try adjusting the Brightness control toward Darken.
The following figure shows how thick, run-together characters appear in
the Character Window. Try adjusting the Brightness control toward
Lighten.
Scanner Glass Clarity
The sheet of glass on the flatbed of the scanner must be clear. If it gets
dirty, wipe it gently with a soft, damp, lint-free cloth or tissue. Be sure it is
completely dry before you put pages on it.
Paper Transparency
30 How to Improve Performance
Some paper is thin enough that the scanner sees text printed on the
opposite side of the scanned page. This is often the case with telephonebook pages. To correct this problem, put a black piece of paper behind the
page between the page and the lid of the scanner.
Page 33

Chapter 5
Technical Information
This chapter has five sections:
• Supported Scanners — a list of scanners that will work with this
version of Direct.
• Error Messages — a list of Direct error messages and solutions.
• AppleEvents — information about how to integrate Direct with
the System 7 AppleEvents capability.
• Special Topics — general information about how Direct works
and special problems you may encounter.
• Caere Product Support — how to contact and what information
to have ready.
Technical Information 31
Page 34

Supported Scanners
Supported Scanners
The following is a list of supported scanners for Direct and their required
Chooser extensions. This list is subject to change; other scanners may also
work with Direct but have not been tested by Caere. If your scanner is not
on the list, call and ask your scanner manufacturer if they have tested the
scanner with OmniPage Direct.
Your scanner and the driver supplied by its manufacturer, if any, must be
installed on your system according to the manufacturer's instructions.
Scanner Model Chooser Extension
Abaton Scan 300GS* Apple Scan
Abaton Transcribe 300* Apple Scan
Agfa Arcus, II Agfa Scan
Agfa StudioScan I, II Studio Scan
Apple Scanner* Apple Scan
Apple OneScanner, Color OneScanner* Apple Scan
Canon IX-3010, -4015 Canon Scan
Epson ES-300C, ES-600C, ES-800C Epson
Epson 4000 GT Epson
Fujitsu 3096G, 3097G Fujitsu Scan
Fujitsu ScanPartner 10, ScanPartner Jr. Fujitsu Scan
HP ScanJet HP Scan 2
HP ScanJet IIc, IIcx, IIp, Plus HP Scan 2, HP AccuPage**
Microtek MSF-300GS, -300ZS* Microtek Scan
Microtek ScanMaker 600ZS* Microtek Scan
Microtek ScanMaker IIhr, IIg, IIsp Microtek Scan
Microtek ScanMaker III Microtek Scan
Nikon Scantouch AX-1200 Nikon Scan
Panasonic FX-RS506, -RS307* Apple Scan
Relisys VM 3530/RELI 2400* Apple Scan
Relisys VM 4530/AVEC 4800* Apple Scan
Relisys VM 6530/RELI 9600, 9624* Apple Scan
Ricoh IS-410 Ricoh 410 Scan
Ricoh IS-50 Ricoh 50 Scan
Ricoh IS-60 Ricoh 60 Scan
Umax UG 80, UC300 Umax Scan
* ADF support may not be available for these scanners.
** Select the HP Scan 2 extension to scan with AnyPage. Select the HP AccuPage
extension to scan with HP AccuPage.
32 Technical Information
Page 35

Apple Scanners
If you have difficulty scanning, first check that you turned on your scanner
before starting your Macintosh and that the extension “Scanner” version
3.0 is in your extensions folder. If you still have difficulty, download a
different “Apple Scan” chooser extension from the Caere sections of
CompuServe or America Online or from the Caere BBS. If you don’t have
access to one of these services, contact Caere product support.
Microtek Scanners
ScanMaker 600ZS
Direct will prompt you to insert each page rather than scan until empty.
Supported Scanners
When using an automatic document feeder (ADF),
ScanMaker IIhr
distorted, please contact Microtek and upgrade your scanner ROMs to
version 1.2.
Power Macs and ScanMaker IIhr, III
Mac if you select the
Microtek III&hr
the Direct installation process and then selected in the Chooser before
scanning. The ScanMaker III running with a Power Mac will only work
with
Auto Brightness
Please check with Caere product support for an updated chooser
extension.
If images scanned in grayscale mode with an ADF appear
Microtek Scan
chooser extension. Chooser extensions are installed during
(the default) selected in the Direct Options dialog box.
Scanners Soon to be Supported
Agfa’s Focus, Arcus Plus and II, and Microtek’s MS-II scanners are not
supported in this release. Please check with Caere product support for
updated chooser extensions.
The ScanMaker IIhr will run on a Power
chooser extension rather than the
Technical Information 33
Page 36

Error Messages
Error Messages
Scanner-related Errors
There are many scanner-related error messages, although resolving
scanner problems usually involves the same procedures. This section
discusses scanner problems and then provides a list of error messages and
solutions in alphabetical order.
Make sure that the correct scanner Chooser extension is installed and that
you have chosen that scanner in the Chooser. See Selecting Your Scanner
in Chapter 1.
Most scanner-related problems occur because of loose cable connections
or SCSI ID number conflicts. Check the following:
• All connections between the scanner and your Macintosh are
tight.
• The scanner is turned on.
• The SCSI ID number of your scanner does not conflict with the
SCSI ID number of another device connected to your Macintosh.
All peripheral SCSI devices such as scanners and external hard disks have
an assigned SCSI ID number. Usually, there is a small indicator on the
back of the SCSI device that shows a number. This is the device’s SCSI ID
number. SCSI ID numbers 0-6 are "legal;" internal hard disks are often set
at 0.
34 Technical Information
To find your scanner’s SCSI ID number, look for the indicator on the back
of the scanner near the cable connections. If you can’t find it, consult your
scanner’s documentation.
All SCSI devices must have a unique ID number. If you receive an error
message when you try to scan that indicates a conflict, check to make sure
that your SCSI devices do not have the same ID number.
Make sure that your scanner is working with the imaging software that
came with the scanner. If the scanner works with other applications, the
scanner is selected in the Chooser, and Direct still fails to scan, please call
product support.
Page 37

Other Error Messages
The following section explains error messages that may appear while
using Direct.
Cannot create the Direct Preferences file. Please restart your
Macintosh.
Direct creates a "Preferences" file to save information about your setup.
This data includes information such as the last scan settings. If there is no
Preferences file, Direct will create one. Rarely, an existing Preferences file
is opened or used by another application. In this case, it’s easiest to simply
restart your Macintosh so the file is freed.
Direct requires System 7.0 or above.
Direct does not run on any version of System 6.
Not enough memory for recognition. Try increasing the amount
of memory allocated to the Direct program by your Macintosh.
Direct needs at least 2.5MB of system RAM to run; very densely printed
pages may require more. Your text-handling application needs RAM also.
To check the amount of memory allocated to Direct, highlight the
OmniPage Direct application icon in your Apple Menu Items folder. Then
click Get info... in the System File menu. See the Memory section at the
bottom of the Get info... window; Current size: shows the amount of RAM
allocated for Direct. Edit this figure so that it is above the Suggested size:
amount directly above it.
Error Messages
Not enough memory for recognition.
Try increasing the amount of memory allocated to the Direct program by
your Macintosh; scanning a higher-quality copy or original of the page; or,
selecting Partial Page and recognizing smaller parts of the page.
You may not be able to recognize all of a legal-size page or a page that has
very small, dense type. If you have more than 5MB RAM, you can try
increasing the amount of memory allocated to Direct. (See the instructions
for the preceding error message.) Or, reduce the memory requirement by
breaking the job up and recognizing smaller parts of the page at time.
Not enough memory for recognition. You need at least 8MB of
physical RAM.
Direct needs 2.5MB of system RAM to run; your text-handling application
needs RAM also. Virtual memory will not lessen the basic requirement for
8MB of physical RAM. Physical RAM is memory in the form of single in-
Technical Information 35
Page 38

Error Messages
line memory modules (SIMMs). See your Apple dealer for instructions on
how to add memory to your Macintosh.
Not enough memory to keep formatting information. Try
increasing the amount of memory allocated to the Direct program
by your Macintosh.
Direct can pass on formatting information such as font size and style of a
scanned page to some applications. However, if memory is at a premium,
this formatting information will not be saved, and only the text will be
pasted into your application.
To check the amount of memory allocated to Direct, highlight the
OmniPage Direct application icon in your Apple Menu Items folder. Then
click
Get info...
in the System File menu. See the Memory section at the
bottom of the Get info... window; Current size: shows the amount of RAM
allocated for Direct. Edit this figure so that it matches or exceeds the
Suggested size: amount directly above it.
Please close all Direct windows before changing the scanner
type.
To change scanner or SCSI ID number information, first close the Scan
Text, Options, and Partial Page windows.
Please unlock your system volume.
36 Technical Information
This message will appear if you try to run Direct from a locked Syquest™
or Bernoulli™ drive. These cartridges have write-protection devices that
must be open; Direct must be able to write to the Direct Preferences file.
You cannot scan more than 100 pages.
If you scan multiple pages, break the job down into portions smaller than
100 pages such as 20-25 pages.
Page 39

AppleEvents
AppleEvent Messages
AppleEvents
This section describes the AppleEvent hooks into Direct. AppleEvents is a
protocol embedded within System 7 allowing applications to
communicate with each other. Any System 7-savvy application that
supports AppleEvents can talk to Direct, allowing users to scan text
directly into their target application.
There are two portions of an AppleEvent link: one resides within the
Direct application and the other within the target application such as
Microsoft Word, Microsoft Excel, MacWrite II, etc. Direct supports specific
AppleEvent messages and commands required to scan and perform OCR.
The following sections describe the various AppleEvent messages that are
supported by Direct and the AppleEvent commands (embedded within
the AppleEvent Execute message) that set various scanning and
recognition parameters.
A knowledge of the AppleEvents protocols is required to fully understand
these messages and commands. You may want to review the AppleEvents
chapter in Inside Macintosh Volume VI before proceeding.
There are a number of AppleEvent interchange messages. Only three are
processed by Direct since they are the only ones that apply to an OCR
session. The next section describes actual commands that are embedded
within these messages.
The supported messages are:
Initiation of an AppleEvent conversation
The Finder determines if an application is AppleEvent aware from the
application resource information . If an application wants to converse with
Direct, it can send the standard "core" AppleEvents which will
automatically be understood by Direct. To launch Direct, the application
sends the AppleEvent Launch Application command.
Execution of AppleEvent commands
Since Direct is now active, applications can send AppleEvent messages to
it. See the AppleEvent Commands section for a description of the
supported commands.
Termination of an AppleEvent conversation
To end the link, an AppleEvent Quit Application message is sent to Direct
indicating that the link needs to be terminated.
Technical Information 37
Page 40

AppleEvents
AppleEvent Commands
AppleEvent_Launch_Application
Initiates the AppleEvent conversation with Direct and makes Direct the
active application.
AppleEvent_Quit_Application
Tells Direct to exit to the Finder.
38 Technical Information
Page 41

Special Topics
Applications Without the Command-V
Using Direct with Foreign Operating Systems
Special Topics
Direct works as a standalone application; it is not a DA or an INIT.
After recognizing text, Direct fills the Clipboard and then pastes the
Clipboard contents to the application that was open before Direct was
invoked. Anything in the Clipboard when Direct was invoked is lost.
Direct saves formatting information such as font size and style for
Microsoft Word, MacWrite, Acta, and WordPerfect 2.0.
Direct relies on the Command-V mechanism to paste text into a document.
Applications that don’t use this keyboard equivalent won’t automatically
receive scanned text from Direct. With these applications, use the mouse
to invoke the application’s Paste command after recognition is complete.
If an application has no paste capability, it will not work with Direct.
Each translated version of Direct is designed to work with the operating
system for that language. If you use Direct with an operating system for
which it was not intended, make sure that whatever keyboard equivalent
used in the operating system matches the one used by Direct.
For example, the US version of Direct uses the Command-V keyboard
equivalent to paste text. If you use the US version with a French operating
system, you’ll need to change the operating system’s Paste command to
respond to Command-V. If you are a programmer or experienced
Macintosh user, you can use a program editor such as ResEdit to do this.
Naturally, you should obtain a localized version of Direct.
AccuPage and Caere AnyPage
AccuPage and AnyPage are special recognition technologies that
automatically compute the ideal brightness settings for different parts of a
page. AccuPage and AnyPage are available with some HP and grayscale
scanners. With these scanners, an Auto Intensity checkbox is available
next to the Brightness control.
Direct will use HP AccuPage if you select an HP scanner with AccuPage
as the scanner extension in the Apple Chooser. Direct will use Caere
AnyPage if you choose other grayscale scanner extensions.
This feature is especially useful when you scan text printed on a colored
background. It also works well when you scan "copies of copies" that have
large gray areas.
Technical Information 39
Page 42

Special Topics
Recognition is faster with this option turned off. If you scan high-quality
documents with crisp, black letters printed on white paper, deselect
Intensity
and use the manual Brightness control.
Upgrading to OmniPage Professional
Chooser extensions for a few scanners supported by this version of Direct
are not yet included with OmniPage Professional. Your Chooser Extension
is already installed on your system. When you subsequently install
OmniPage Professional, a scanner installation dialog will appear: if your
scanner is not listed, select
and then click
None
If No Text Appears...
If text does not appear in your document after recognition, choose
your application's Edit menu. You may have accidentally clicked on the
desktop before you scanned; Direct places text in the Clipboard if your
application was not active immediately before you scanned.
Scanning Long Documents
If you scan more than 15-20 pages at a time, you may need to allocate more
memory to your word-processing application. You'll know that memory is a
problem if, after scanning many pages, no text transfers to your application.
To solve this problem, increase your application's memory size. Highlight
your application's icon and choose
In the
Memory
you don't have enough RAM to increase the memory allocation, you may
be unable to scan long documents all at once; try scanning five or six pages
at a time into your application. Or, use the
box at the bottom, increase the number to 4000 (4000K). If
Get info...
.
Install
Paste
in the Macintosh File menu.
Save Text to File
feature.
Auto
in
Scanning Text into Graphics Applications
MacPaint 2.0
Excel 3.0
40 Technical Information
You can scan one page at a time into a graphics application such as Adobe
Illustrator, MacDraw, SuperPaint, etc.
Direct will not automatically paste text into this application. After you
scan and recognition is complete, select the MacPaint text tool, place the
cursor, and choose
Direct will replace any highlighted data in your spreadsheet. To prevent
this, click outside a highlighted area, deselecting the data, before you scan
text in with Direct.
in the MacPaint Edit menu.
Paste
Page 43

Caere Product Support
Product support is available if you need help. This chapter describes
common problems you may encounter. Check the index or table of
contents to find the information you need.
Dial-up Services
Product support and information are available through the following
services:
Service How to Contact Service Provided
CompuServe GO CAERE forum/updates
America Online Keyword CAERE forum/updates
Caere BBS 408-395-1631 text/help files/updates
Internet support@caere.com email help
You must be registered in order to receive Product Support!
Complete and send in the registration card included in your OmniPage
package. If you need to call before you have registered, be sure to have
your serial number ready.
Caere Product Support
Registered users in North America who need further assistance can also
call Caere Product Support at 408-395-8319. See the next page for
international support numbers.
Information We Need From You
For the most efficient response, please have the following information on
hand and be near your computer when you call:
• The error message text if there was an error message.
• Details about what you were doing before the problem occurred.
• Direct software serial number.
Locate this information on Program Disk 1.
• Direct software version number.
Single-click the OmniPage icon in the Apple Menu Items folder
and choose
• Devices attached to the SCSI port of your Macintosh.
• Scanner driver version if there is one.
Consult your scanner manual.
Get Info
in the File menu in the Finder.
Technical Information 41
Page 44

Caere Product Support
International Support
• Amount of free disk space.
Check the number in the upper right corner of your hard drive
window in the Finder. You may need to choose
Small Icon
• Your system version number, your Macintosh model, and the
amount of memory installed: choose
Apple menu in the Finder.
These numbers are for registered international users.
United Kingdom only
(44) 01-442-22-7411 — Phone
(44) 01-442-22-7412 — Fax
(44) 01-442-22-7413 — BBS
Belgium, the Netherlands, and Luxembourg
(49) (0) 2208 71491 — Phone
(49) (0) 2208 71737 — Phone
(49) (0) 2208 71731 — Fax
in the View menu.
About This Macintosh...
By Icon
or
By
in the
42 Technical Information
Other International
Please contact your local distributor or dealer.
 Loading...