

Page 1

OmniForm Filler Reference
Version 2 for Windows 95/NT/3.1
CAERE CORPORATION
100 Cooper Court
Los Gatos, California 95030
European Offices:
Caere GmbH
Innere Wiener Strasse 5
81667 Munich
Germany
Page 2

Please Note
In order to use this program, you should know how to work in the Microsoft Windows environment.
Please refer to your Windows documentation if you have questions about how to use menu
commands, dialog boxes, scroll bars, edit boxes, and so on.
OmniForm Filler Reference
Version 2 for Windows 95/NT/3.1
Copyright© 1996 Caere Corporation. All rights reserved. CAERE®, Logical Form Recognition, and
OmniForm® are trademarks of Caere Corporation.
Formonix is a trademark of Formonix, Inc.
Many of the designations used by manufacturers and sellers to distinguish their products are claimed
as trademarks. Such designations appearing in this manual have been printed in initial caps.
Product Serial Number:
_______________________________________________
(from Disk #1 label)
2
Page 3

Chapter 1
Introduction
OmniForm Filler is the easy way to manage forms electronically. Use
OmniForm Filler to fill forms, manage information databases, and print,
fax, and mail forms to other users.
This chapter gives an overview of the form filling and information
management capabilities OmniForm Filler provides, as well as an
explanation of how to use the documentation.
This chapter contains the following sections:
• OmniForm Filler Features
• Using the Documentation
Introduction - 3
Page 4

OmniForm Filler Features
OmniForm Filler, an easy-to-use environment for working with forms,
includes the following features:
Form Filling
You can fill a form with the information you need and print, fax, or mail
it. Information entered can easily be searched and sorted in the
OmniForm Filler database.
OmniForm Filler Database
All information you enter into a form is stored as a part of an OmniForm
Filler database. You can create, duplicate, search, and sort records, and
import and export database information to and from other databases.
Field Validation
OmniForm Filler Features
A form can be set up by the person who created it to
field automatically. For example, the validation could specify that a field
must contain a specific type of information. OmniForm Filler would
display a prompt if you tried to enter incorrect information.
Field Calculations
A form can be set up by the person who created it to perform
calculations automatically and display the correct value as you fill the
appropriate field(s) in the form. This automates data entry and reduces
the possibility of errors.
Form Printing, Faxing, and Mailing
You can print forms or fax forms from OmniForm Filler. You have a
choice of printing or faxing just the form, just the data entered in a form,
or both the form and its information. If you choose to print just a form’s
data, you can print it over a pre-printed form placed in your printer.
Form Mailing
Use electronic mail to send your forms to other users if you have
Microsoft Exchange/Mail or Lotus cc:Mail/Notes installed. Microsoft
Exchange/Mail users can also add routing slips to mailed forms.
validate
a fillable
Introduction - 4
Page 5

Using the Documentation
This section explains the various instructional and formatting
conventions used in this manual.
Screenshots and Instructions
Most screenshots in this manual were taken in Windows 95. Your dialog
boxes and windows may look slightly different if you are using
Windows NT or Windows 3.1. For example, dialog box titles in
Windows 95 appear in the top left of the box. Dialog box titles in
Windows NT and Windows 3.1 appear in the top middle of the box.
Both screenshot versions are displayed when they differ significantly.
Instructions appropriate to each version of Windows are given where
necessary — for example, double-clicking an icon in a program group
(Windows 3.1 and NT) versus using the Taskbar (Windows 95). Any
instruction specific to Windows NT and 3.1 appears immediately after
the Windows 95 instruction.
Online Help
OmniForm Filler has both online help and context-sensitive help. Use
the commands in the Help menu to find information on OmniForm
Filler topics and on using Help itself.
Using the Documentation
Click the Help button in the OmniForm Filler standard toolbar to turn
your cursor into a question mark icon. Click any command, button, or
portion of the window to open context-sensitive help for that topic.
Formatting
Two formatting conventions are used throughout the manual.
Italicized Text
• Labeled buttons, menu commands, dialog box text, and any text
in an onscreen form are italicized; for example, “Choose
the File menu.”
Menu titles, icon names, dialog box names, and unlabeled
buttons are not italicized.
• A new term may be italicized the first time it is used; for example,
“This is a
Glossary section of the manual.
• Variable entries are italicized; for example, “The entry n must be
between 4 and 18.”
field.” These terms and others are defined in the
fill text
Introduction - 5
Open
in
Page 6

Courier font
Symbols
Using the Documentation
• The Courier font indicates text that you are supposed to enter; for
example, “Type Sample1 in the
• The Courier font is also used to distinguish file paths and file and
folder names from the rest of the text; for example, “Locate the
Sample form in the OmniForm folder.”
Two symbols are used in this manual to highlight text.
File Name
text box and click
OK.
”
This symbol means
This symbol means
It introduces a tip or an item of note.
Note.
Warning.
It introduces cautionary text.
Introduction - 6
Page 7
Chapter 2
Installation and Setup
This chapter describes how to install OmniForm Filler and begin using
it. It contains the following sections:
• System Requirements
• Registering OmniForm Filler
• Installing OmniForm Filler
• Starting OmniForm Filler
Screenshots in this chapter were taken in Windows 95. Your dialog
boxes and windows may look slightly different if you are using
Windows NT or 3.1.
Installation and Setup - 7
Page 8

System Requirements
To install and run OmniForm Filler, you need the following setup:
• Computer with an 80386 or higher processor.
• VGA or SVGA monitor.
• Windows-compatible mouse.
• 1.44MB high-density floppy disk drive and internal hard disk.
• A minimum of 7MB hard disk space for the US version; 10MB for
the International English version.
• Total system memory of at least 4MB RAM for Windows 95 and
Windows 3.1; 12MB for Windows NT (version 3.51 or later).
• At least a 4MB permanent swap file for Windows 3.1.
• MS-DOS 5.0 or above for Windows 3.1.
• To be able to scan graphics into a form, you need a TWAINcompatible scanner.
Install your scanner and test it in Windows according to the
manufacturer’s instructions
using it with OmniForm.
before
System Requirements
OmniForm Filler 2.01 for Windows 95 and Windows NT will not run on
earlier versions of Windows.
Registering OmniForm Filler
Registering your copy of OmniForm Filler entitles you to technical
support, notification of special offers and upgrades, and the lowest price
offered on the next OmniForm Filler upgrade.
Please complete and send in the registration card included in your
OmniForm Filler package.
See “Caere Product Support” on page 79 for information on technical
support.
Installation and Setup - 8
Page 9

Installing OmniForm Filler
This section describes how to install OmniForm Filler on Windows 95,
and on Windows NT and 3.1.
OmniForm Filler automatically decides which version of the program to
install. If you are running Windows 3.1, for example, OmniForm Filler
installs the 16-bit Windows 3.1 version of OmniForm Filler.
Close all applications — including screen savers and mail applications
— to free up memory before installing OmniForm Filler.
Installing on a Windows 95 System
1 Start Windows 95.
Installing OmniForm Filler
2 Click
The Control Panel appears.
3 Double-click
The Add/Remove Programs Properties dialog box appears.
4 Click
5 Insert OmniForm Filler disk #1 in your computer’s floppy
drive and follow the instruction in the dialog boxes.
Windows fills the
automatically and the InstallShield Wizard appears to guide
you through the setup process.
6 Follow the instructions in each dialog box that appears, and
insert other installation disks as prompted. (Installation may
not require all the disks provided.)
OmniForm Filler installs by default to the location
c:\Program Files. You can select another location if you
wish.
in the Taskbar and choose
Start
Add/Remove Programs.
Install...
in the
Install/Uninstall
Command line for installation program
Settings
tab.
Control Panel
text box
.
Installation and Setup - 9
Page 10

Installing on a Windows NT or 3.1 System
1 Start Windows NT or 3.1 and open the Program Manager
window.
2 Insert OmniForm Filler disk #1 in drive a: (or b:) of your
computer.
Installing OmniForm Filler
3 Choose
The Run dialog box appears.
4Type a:\setup (or b:\setup) in the
and click OK.
The InstallShield Wizard appears to guide you through the
setup process.
5 Follow the instructions in each dialog box that appears.
OmniForm Filler creates a Caere Applications folder if
necessary. You can select another folder in the Select Program
Folder dialog box if you wish.
6 Insert other installation disks as prompted. (Installation may
not require all the disks provided.)
An OmniForm Filler icon is added to the Caere Applications
program group when installation is complete.
in the Program Manager File menu.
Run
Command Line
text box
Installation and Setup - 10
Page 11
Starting OmniForm Filler
This section describes how to launch OmniForm Filler and open a form.
To start OmniForm Filler:
Starting OmniForm Filler
1 Windows 95 users: click
Programs
Windows NT and 3.1 users: double-click the OmniForm Filler
icon in the Caere Applications folder.
The OmniForm Filler window appears.
2 Click the Open button or choose
The Open dialog box appears.
OmniForm Filler
in the Taskbar and choose
Start
.
Open...
in the File menu.
3 Select a form to open and click
4 Press the Tab key to place the cursor in the first fillable field
and type information in that field.
See Chapter 3, Working With Forms, for detailed information on what
you can do with your form.
Open.
Installation and Setup - 11
Page 12

Chapter 3
Working With Forms
This chapter describes the basics of working with forms.
This chapter contains the following sections:
• Opening a Form
• The OmniForm Filler Window
• Moving Through Fields
• Filling Fields
• Spell Checking
• Saving Your Form
• Printing or Faxing a Form
• Mailing a Form
• Form Usage Options
• Menu Commands
Most screenshots in this chapter were taken in Windows 95. Your dialog
boxes and windows may look slightly different if you are using
Windows NT or Windows 3.1.
Working With Forms - 12
Page 13
Opening a Form
This section describes how to open a form. You can open multiple forms
in OmniForm Filler.
To open a form:
Opening a Form
1 Windows 95 users: click
Programs
Windows NT and 3.1 users: double-click the OmniForm Filler
icon in the Caere Applications folder.
2 Click the Open button in the standard toolbar or choose
in the File menu.
The Open dialog box appears.
3Make sure
Files of Type
4 Locate and select a file.
OmniForm Filler
OmniForm Form
in Windows NT and 3.1) drop-down list.
in the Taskbar and choose
Start
.
is selected in the
Files of Type (List
Open...
5 Click
The form opens.
You can have a maximum of 20 forms open at one time.
Open
.
Working With Forms - 13
Page 14
The OmniForm Filler Window
This section describes the OmniForm Filler window and its standard
toolbar.
A full standard toolbar appears in the OmniForm Filler window after
you open a form. Use the toolbar’s buttons as shortcuts to commonly
used menu commands.
The standard toolbar
The OmniForm Filler Window
Fillable fields
Status bar: displays
current activity and
settings.
A form contains
You can enter information in a field, such as text
fields.
in a Name field or a check mark in a check box field.
By default, fillable fields are highlighted in yellow. Choose
in the View menu to turn field highlighting on and off.
Areas
Highlight Fill
How the form appears in the window depends on how it was created.
See “Form Usage Options” on page 35 for more information.
Working With Forms - 14
Page 15
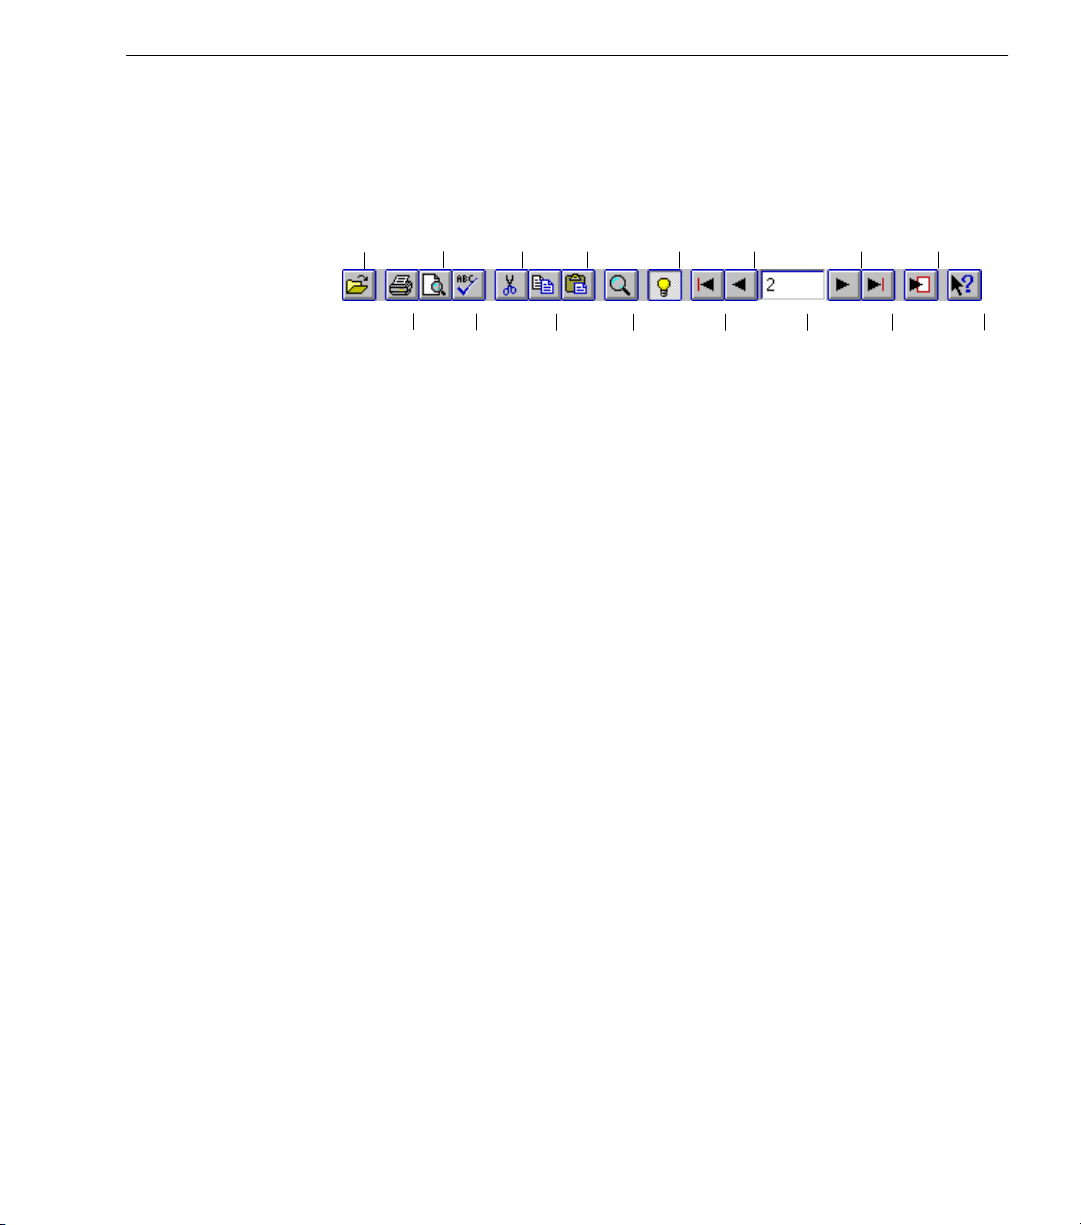
The Standard Toolbar
All buttons in the standard toolbar correspond to menu commands of
the same name. Clicking a button is the same as choosing its
corresponding menu command.
The OmniForm Filler Window
Open
Preview
Print
Print
Cut
Paste
Copy
Highlight
Fill Areas
Zoom
In Windows 95, you can drag the standard toolbar to any other location
in the OmniForm Filler window.
The Standard Toolbar Commands
This section gives a quick explanation of each button’s function. See
“Menu Commands” on page 37 for information on other commands.
Open
— Click the Open button to open an OmniForm Form.
Print
— Click the Print button to print the current form on a printer or
to disk as a file. If you have a fax modem, you can use the
command to send faxes as well.
Print Preview
will look before you print it.
Spelling
— Click the Spelling button to perform a spell check of
information entered in the form.
Cut
— Click the Cut button to remove the current selection and copy it
to the Clipboard.
— Click the Print Preview button to see how your form
Previous
Record
First
Record
Record
Number
Next
Record
Record
Last
Print...
New
Record
HelpSpelling
Copy
— Click the Copy button to copy the current selection to the
Clipboard.
Paste
— Click the Paste button to place the current contents of the
Clipboard at the cursor location.
Zoom
Highlight Fill Areas
— Click the Zoom button to zoom in or out of a page.
— Click the Highlight Fill Areas button to turn
field highlighting on and off.
First Record
— Click the First Record button to move to the first record
in a database.
Working With Forms - 15
Page 16

The OmniForm Filler Window
Previous Record — Click the Previous Record button to move to the
record before the one you are viewing.
Record Number — This text box displays the current record number.
Highlight the number in the Record Number text box, type a new one,
and press Enter to move to that record.
Next Record — Click the Next Record button to move to the record
after the one you are viewing.
Last Record — Click the Last Record button to move to the last record
in a database.
New Record — Click the New Record button to create a new record
with empty fields.
Help — Click the Help button to turn your cursor into a question mark
icon. Click on any command, button, or portion of the window to open
context-sensitive help for that topic.
Working With Forms - 16
Page 17

Moving Through Fields
You can click in any field to place the cursor there or you can use the
following keyboard commands to move the cursor within a form.
Place the cursor in a field:
When a form first opens, press the Tab or Enter key to place the cursor
in the first field.
Next field:
Press the Tab or Enter key.
Previous field:
Press Shift-Tab or Shift-Enter.
Next line in a fill text field:
Press Ctrl-Enter to move to the next line in a multiple-line fill text field.
End of a line in a fill text field:
Press the End key.
Beginning of a line in a fill text field:
Press the Home key.
Moving Through Fields
End of all text in a fill text field:
Press Ctrl-End.
Beginning of all text in a fill text field:
Press Ctrl-Home.
Next word in a field:
Press Ctrl-right arrow.
Previous word in a field:
Press Ctrl-left arrow.
Select text in a field:
Double-click a word to select it or hold down the mouse button and drag
the cursor over the text to select. You can use the
commands in the Edit menu when text in fields is highlighted.
Delete
Text in a filled field is also highlighted when you tab to that field.
Copy, Cut, Paste,
Working With Forms - 17
and
Page 18

Filling Fields
Filling Fields
This section describes each type of fillable field in OmniForm Filler, how
to fill it, and how to check spelling. It contains the following topics:
• Fill Text
•Comb
•Check Box
•Circle Text
•Table
• Fill Graphic
• List Fields
• Fields Defined by a Calculation
• Field Validation
• OLE Objects
These instructions assume that the cursor is already in a field.
The way information is displayed in a field depends on the current form
language selection. See “Checking the Form Language Selection” on
page 26.
Fill Text
Comb
Enter characters in a fill text field: letters, numbers, symbols, dates, and
so forth. Fill text fields can contain any sort of textual information. The
example below shows
Enter characters in a comb field: letters, numbers, or symbols
appropriate to the field. Phone numbers and zip or postal codes are
commonly used comb fields. A comb field consists of individual comb
elements.
prefill
element
Each element can contain a different number of characters.
3-character
element
First Name
prefill
element
and
Last Name
8-character
element
fill text fields.
Working With Forms - 18
Page 19
You do not have to tab from element to element in a comb field. Just type
the required amount of information and OmniForm Filler automatically
moves the cursor to the next element as appropriate.
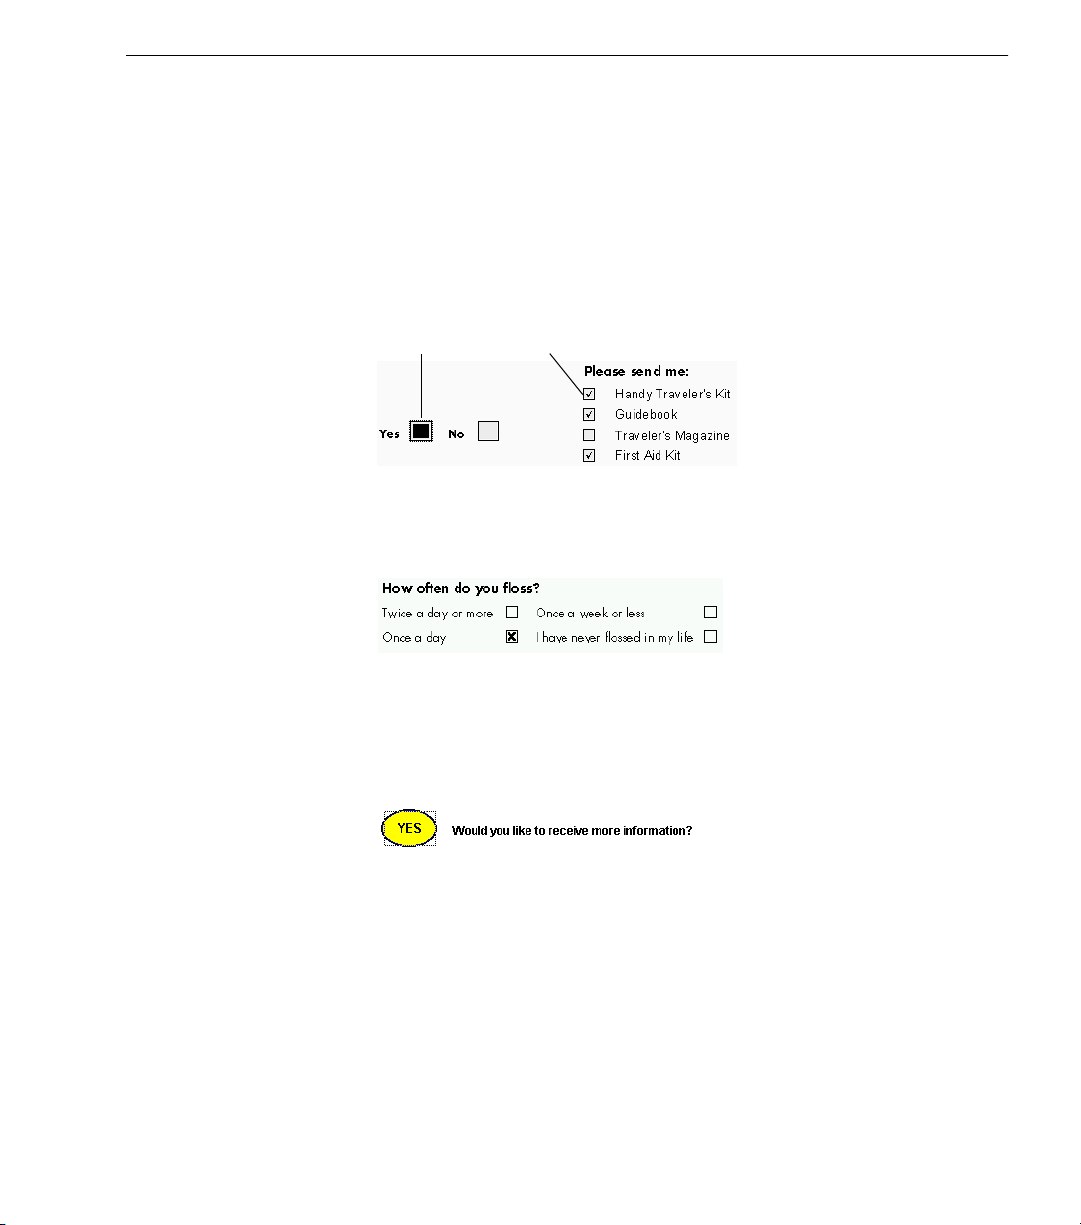
Check Box
Click a check box field to fill it. A check box field can contain one of three
marks: a check mark, an X, or a fill.
Filling Fields
Check boxes are commonly used for
an item in a group, as in the two examples below:
Check boxes may be
Selecting one check box automatically deselects another checked box in
the group as in the example below.
Circle Text
Click a circle text field to fill it. A border appears around the filled field.
A circle text field can contain text and other characters, or it can function
much like a check box (see “Check Box,” above).
Check Fill
grouped;
questions and for selecting
Ye s/ N o
this means that only one can be selected.
Table
A table field consists of individual
default. Enter characters in these cells just as you would in fill text fields.
. Table cells are fill text fields by
cells
Working With Forms - 19
Page 20
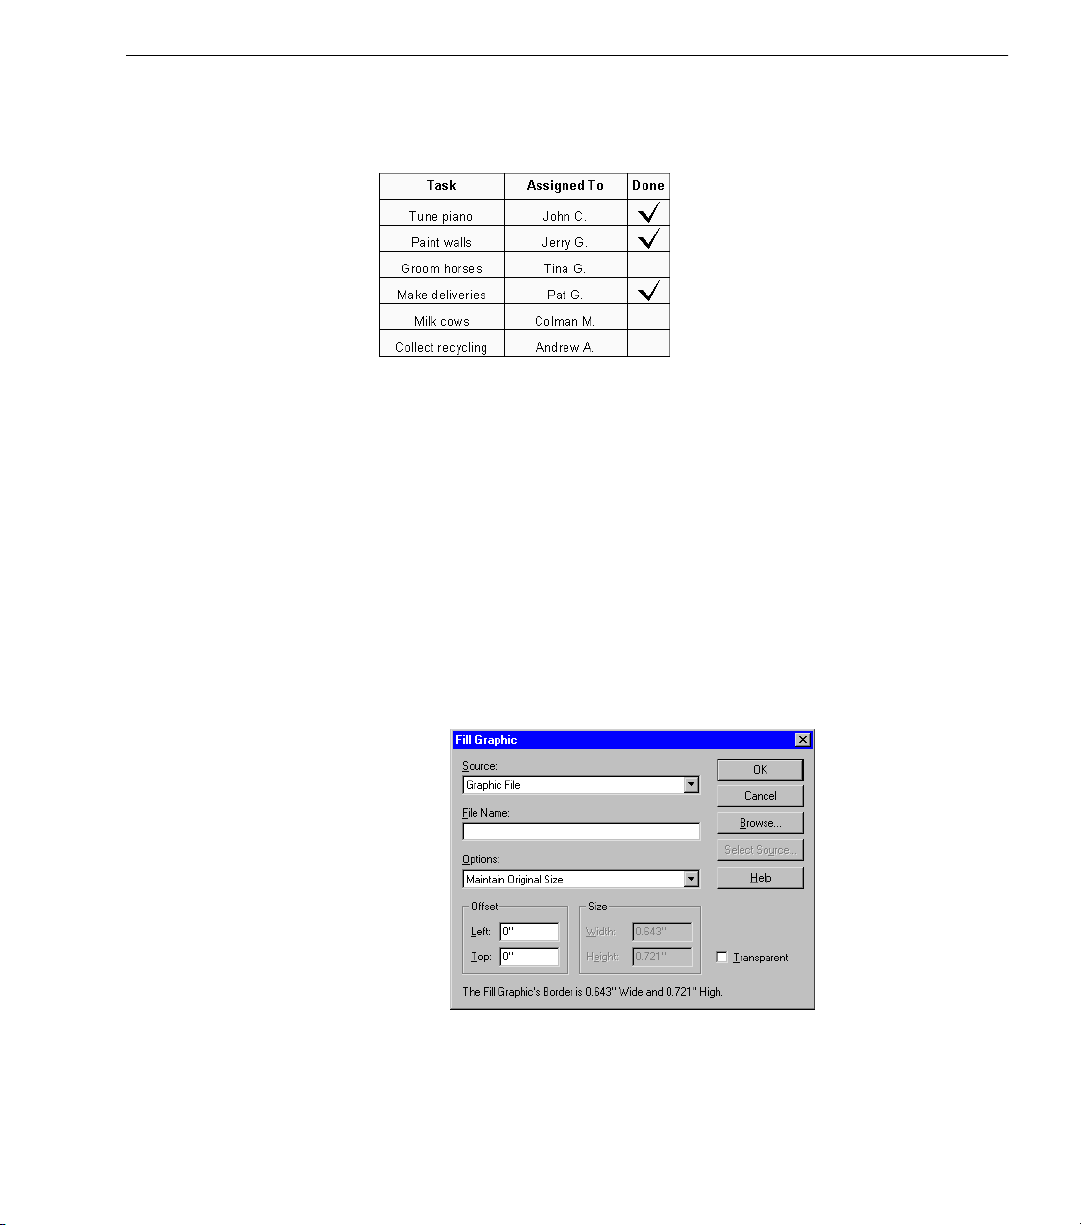
A table cell can also contain any other type of field, even multiple fields
of the same or different types. In the example below, the table cells on the
right contain check box fields.
You would click this cell to fill it in the same way as a check box field.
Fill Graphic
A fill graphic field contains a graphic you select. You can import an
existing graphic, or you can use a TWAIN-compatible scanner to scan an
image directly into the fill graphic field. This section describes both
options, as well as how to delete an imported graphic from a form.
To import an existing graphic:
Filling Fields
1 Click the fill graphic field or tab to the field and press the Space
bar.
The
Fill Graphic
dialog box appears.
2Select
3 Enter a file name in the
• Click
Graphic File
Browse
in the
if you need to locate a file.
drop-down list.
Source
File Name
text box.
Working With Forms - 20
Page 21
Filling Fields
• Select a file format in the
Files of Type
drop-down list.
• Select a file and click OK to return to the Fill Graphic dialog
box.
The file name appears in the
4 Select an option in the
•Select
Maintain Original Size
Options
File Name
drop-down list.
to import the graphic without
text box.
changes.
•Select
Scale Proportionally
to fit the graphic in the fill graphic
field while keeping its exact proportions.
•Select
Stretch to Fit
to change your graphic’s original shape
and size to fit in the fill graphic field.
Depending on the shape of the fill graphic field, your graphic
may be stretched or compressed. You might want to use this
for special effects.
•Select
Specify Width & Height
Enter measurements for your graphic in the
text boxes under
The size of the fill graphic field is
Size.
to specify the graphic’s size.
and
Width
Height
displayed at the bottom of the Fill Graphic dialog box.
Working With Forms - 21
Page 22
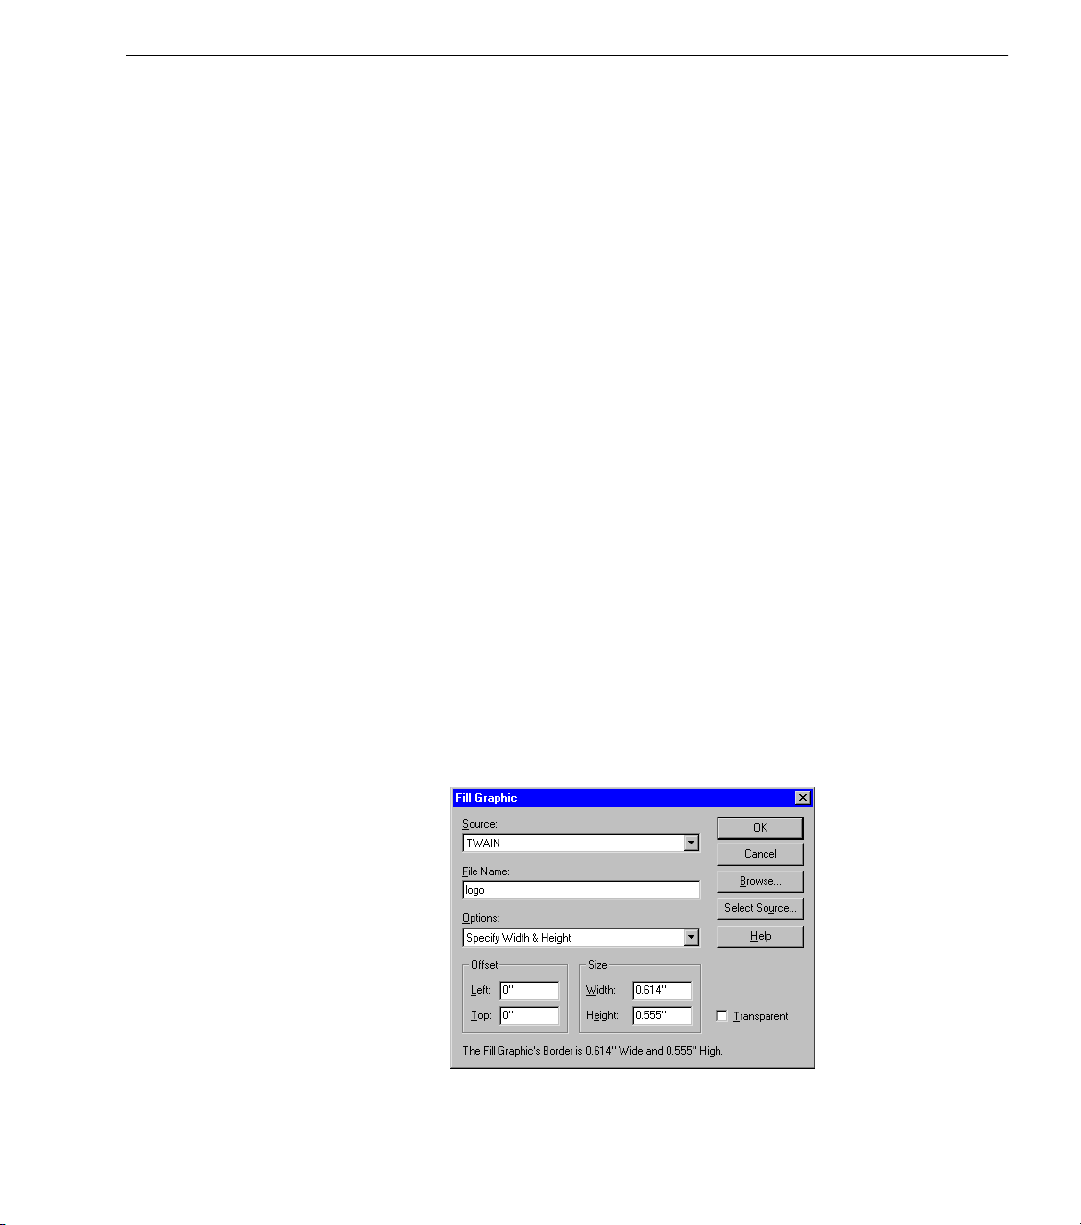
Filling Fields
If you enter a size larger than the fill graphic field, only part of
the graphic will be visible.
5 Enter offset measurements under
Offset
if you want
.
This is useful if you want to position a graphic exactly in the
field, crop a large graphic, or move the graphic away from a
field border that would interfere with its design.
• Enter a number in
to specify how far away from the left
Left
side of the field to place the graphic.
• Enter a number in
to specify how far away from the top of
To p
the field to place the graphic.
6 Select or deselect
•Select
Transparent
Transparent.
if you want to be able to see information
behind the graphic.
Whether a graphic prints transparently depends on your
printer driver. See your printer documentation for
information.
• Deselect
Transparent
if you want the graphic to be opaque.
You will not be able to see information behind the graphic.
7 Click
OK.
OmniForm Filler imports the graphic and displays it in the fill
graphic field.
To import a graphic from a TWAIN source:
1 Click the fill graphic field or tab to the field and press the Space
bar.
The Fill Graphic dialog box appears.
2Select
TWAIN
in the
drop-down list.
Source
Working With Forms - 22
Page 23
Filling Fields
List Fields
3 Click
4 Select your TWAIN source and click
5 Type a file name in the
6 Follow steps 4–6 beginning on page 21 and then return to step 7
7 Place the page with the graphic you want in your scanner,
8 Click
To delete an existing graphic:
Select
None
graphic field empty.
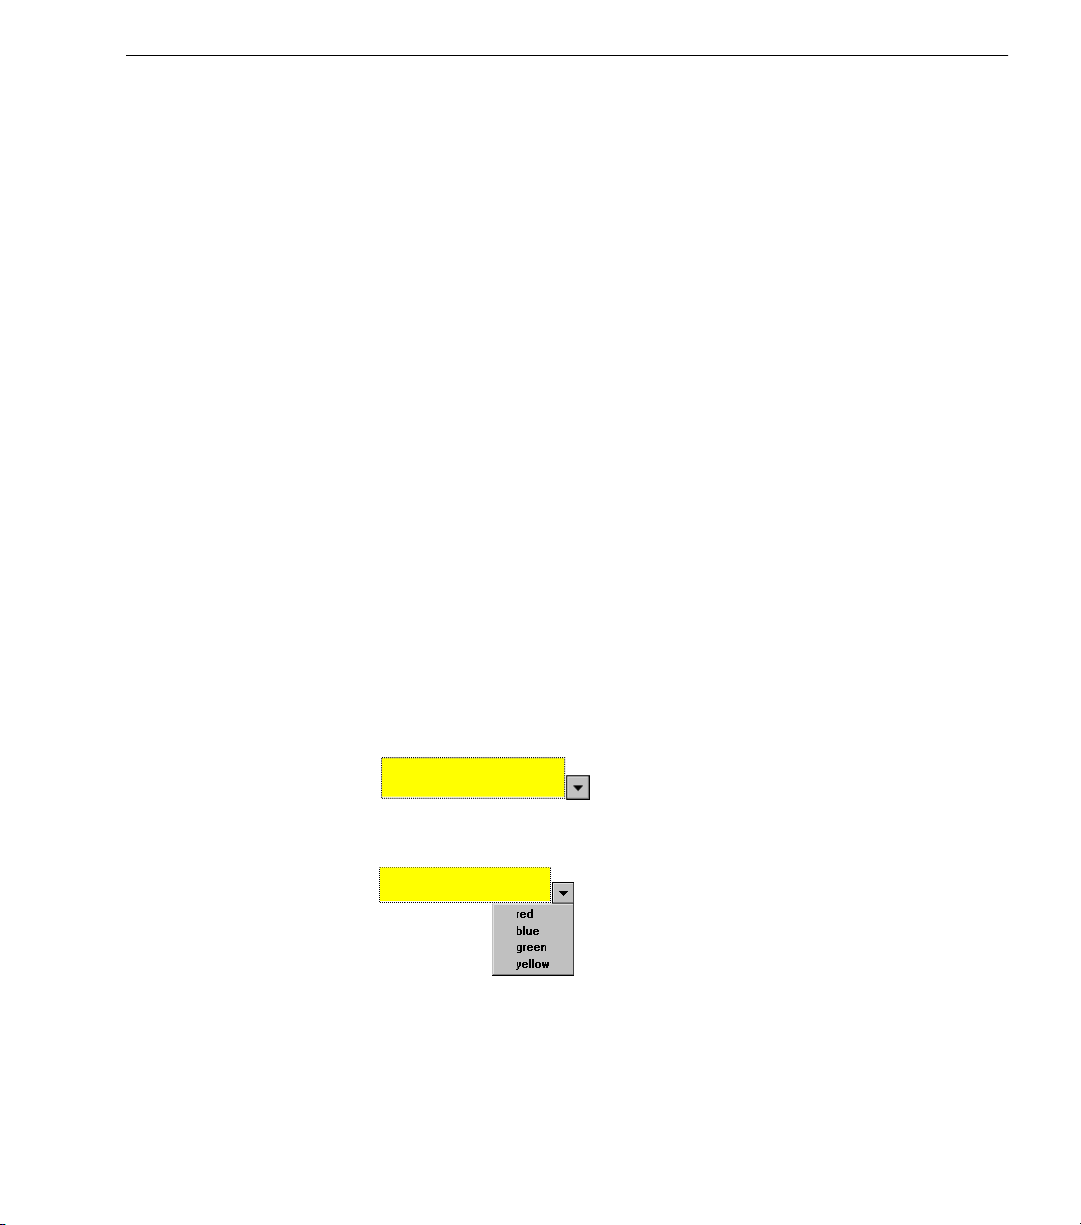
Fields can contain a list of selectable entries. A drop-down list arrow
appears when the cursor is in the field.
Select Source
Graphic dialog box.
This is the file name the graphic will have after it is scanned
and saved automatically by OmniForm Filler.
• Click
• Set a path in the Browse dialog box, type a name for the file,
on this page.
making sure it is aligned correctly.
OmniForm Filler scans the graphic and displays it in the fill
graphic field.
Browse
and click OK to return to the Fill Graphic dialog box.
OK.
to delete an existing graphic from the form and leave the fill
to open the Select Source dialog box.
to return to the Fill
OK
File Name
if you need to locate a path for the file.
text box.
Click the arrow to open the list
Select an entry. The entry appears in the field.
Working With Forms - 23
Page 24
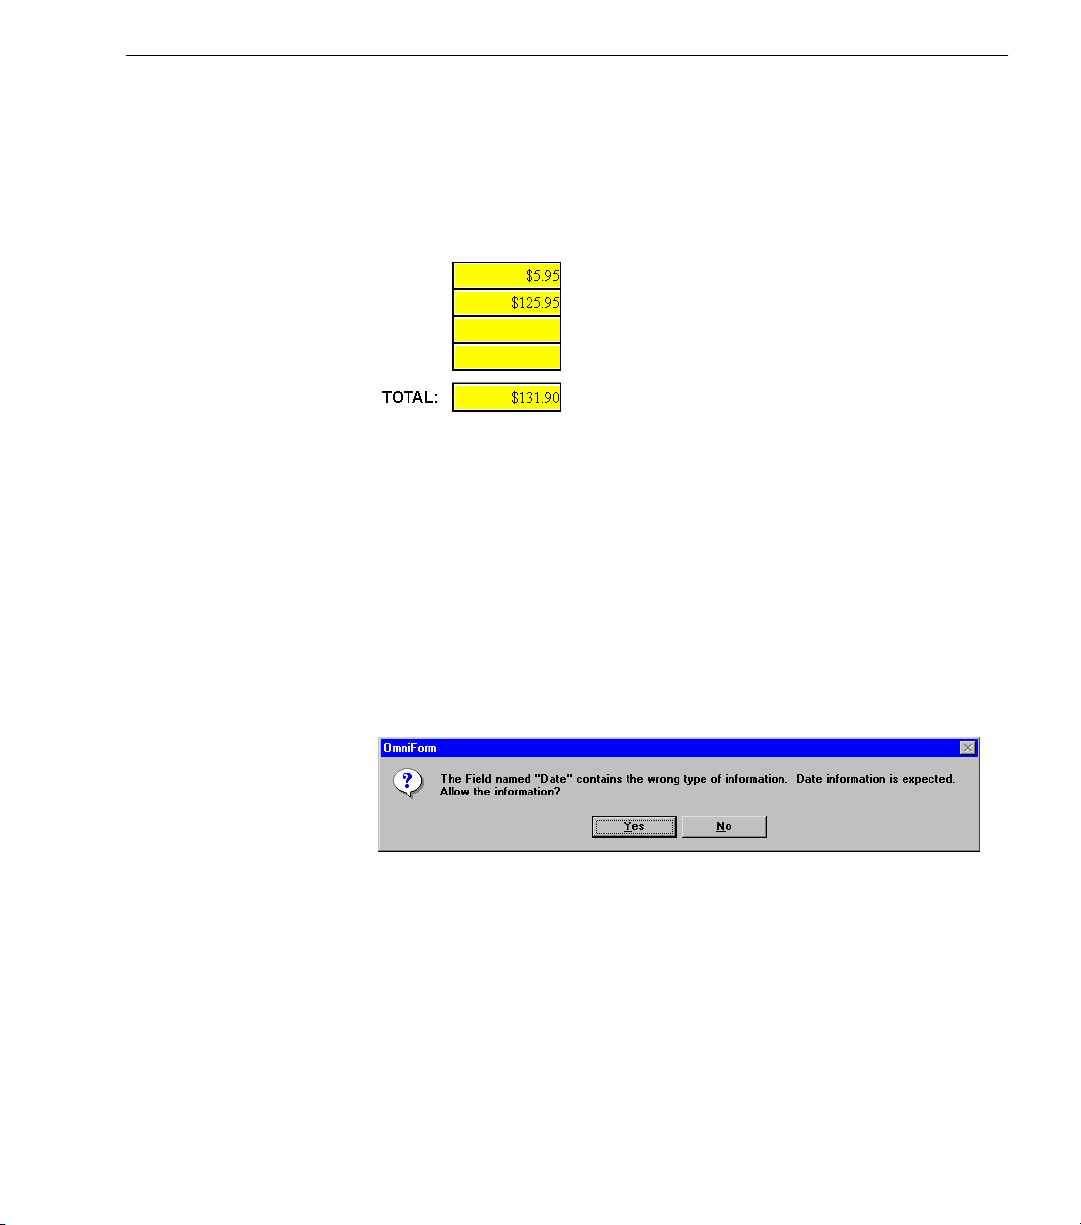
Fields Defined by a Calculation
The only time you would notice a calculation in fill view is when a field
fills in automatically.
Filling Fields
In the example below, the
amounts entered in the first and second fields. The
increase if the third and fourth fields were filled as well.
Field Validation
Fill text fields can be configured by the creator to:
• Require that you enter information in a field and do not leave it
blank.
• Require that you enter specific information in a field.
• Require both of the above.
This is
consistent. For example, you may be required to enter a date in a
validated
OmniForm Filler if you attempted to enter anything other than a date.
field validation
TOTAL
and ensures that information entered in a form is
field. You would receive a reminder prompt from
Date
field automatically added the
TOTAL
would
• Click No to return to the field and enter the expected information.
• Click
to override field validation.
Ye s
Working With Forms - 24
Page 25

OLE Objects
Your form’s creator may have inserted OLE objects in the form. OLE
stands for
usually will appear as icons, pictures, or text. Usually, these objects have
been inserted to provide the form with more information. For example,
you may see an icon in your form such as the one pictured below.
In the OmniForm program, this object could be launched as a document
in Microsoft Word. You can only view the icon in OmniForm Filler,
however. See the OmniForm
you want to know more about OLE objects.
object linking and embedding.
Reference
Filling Fields
In OmniForm Filler, OLE objects
manual or your form’s creator if
Working With Forms - 25
Page 26
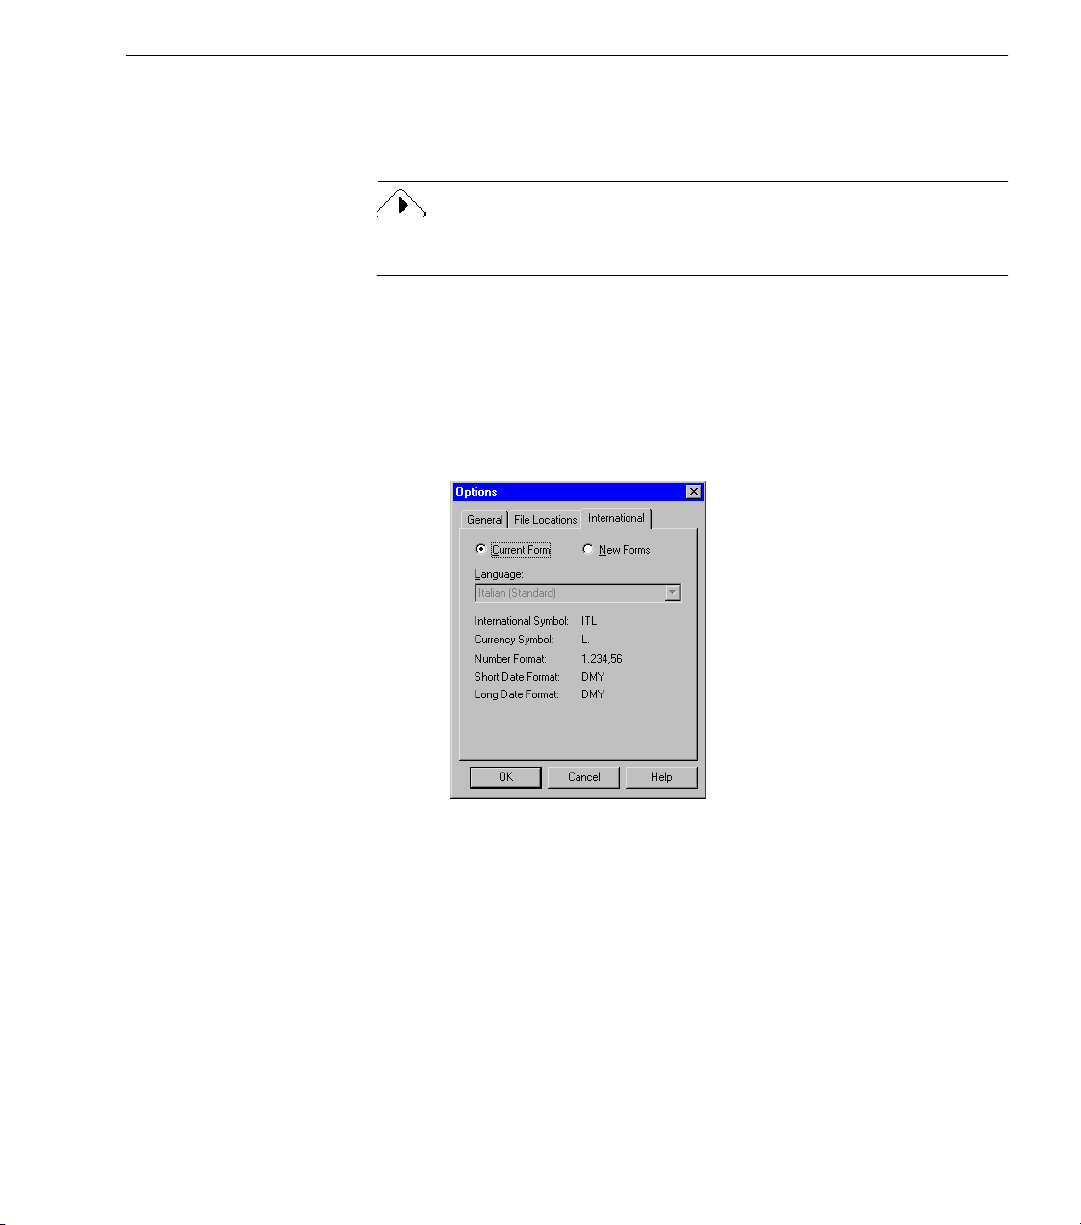
Spell Checking
Checking the Form Language Selection
Spell Checking
Use the spell-checking feature to verify that field entries are correct.
Before you check spelling make sure you have the correct dictionary for
the form’s language as described below.
1 Choose
The Options dialog box appears.
Options...
in the Tools menu.
2 Click the
The
Dictionaries for all supported languages are included in the
International English version of OmniForm Filler. The United
States version has a standard English dictionary. You can call
800-654-1187 to order additional dictionaries. You must have a
dictionary that matches the language of a form to spell check it.
3 Click OK to close the Options dialog box.
International
Language
selection is grayed out but readable.
tab.
Working With Forms - 26
Page 27

Changing the Form Language
You can change the selected language for a form in the full version of
OmniForm. You may want to do this if:
• The form language does not match the selected language for the
form. See the previous section for information.
• You have a form with more than one language.
Contact your forms administrator if you have one, or see the OmniForm
Reference
for more information.
Spell Checking
Changing the
reformat data already entered.
Current Form
Spell Checking Your Form
1 Click the Spelling button in the standard toolbar or choose
Spelling...
The Spelling dialog box appears with the first questionable
word after
• The suggested spelling, if there is one, appears in the
to
• Other suggested spellings appear in the
2 Select one of the following options:
• Click
continue the spell check.
• Click
in the form and continue the spell check.
• Change the word in the
You can retype this word or select a word in the
list to place it in the
in the Tools menu.
Unknown Word
text box.
to allow the questioned word to remain as is and
Ignore
Ignore All
selection could cause OmniForm Filler to
.
Change
Suggestions
to ignore all instances of the questioned word
Change to
Change to
text box.
text box.
list box.
Suggestions
Working With Forms - 27
Page 28

Saving Your Form
Saving Your Form
You will notice that if you close a form after making data entries that
OmniForm Filler does not prompt you to save the changes. This is
because OmniForm Filler saves automatically in fill view. There is no
save command but there is a
Use the
different file name.
• Click
• Click
• Click
• Click
• Click
3 Click OK in the dialog box that tells you the spell check is done.
Save As...
Change
and continue the spell check.
Change All
box, change all instances of the questioned word in the form,
and continue the spell check.
Add
the spell check. The added word will not be questioned again
in the current form or in any other form.
Suggest
in the
Change to
to offer a list of the closest matches to that word.
Close
to accept the spelling in the
to accept the spelling in the
to add the word to the user dictionary and continue
to place the first word in the
text box. The list of suggestions may change
to end the spell check.
Save As...
command to save a form to another location or with a
command.
Change to
Suggestions
text box
Change to
text
list box
Working With Forms - 28
Page 29

Printing or Faxing a Form
This section describes how to print or fax a form and how to print a form
as a macro.
You must have fax hardware and software installed in order to fax a form.
Refer to your fax documentation for instructions on how to set up your
equipment for faxing. Faxing uses the
these instructions describes both printing and faxing.
Printing or Faxing a Form
command. The word
Print
print
in
1 Click the Print button in the standard toolbar or choose
in the File menu.
The Print dialog box appears.
This is how the dialog box looks in Windows NT and 3.1.
This dialog box contains the
option to:
• Print forms faster.
• Achieve a smaller file size when using the
See the online help for detailed information about the
option.
Print
Quick Print
option. Select this
Print to File
Print...
option.
Quick
Working With Forms - 29
Page 30

Printing or Faxing a Form
This is how the dialog box looks in Windows 95.
2 Select an option in the
•Select
Form and Data
Form/Data
to print all text, graphics, and any
drop-down list.
information in fillable fields.
•Select
Data Only
to print just the information you have typed
in the fillable fields. This is useful if you want to print data
over a pre-printed form.
•Select
Form Only
to print the form as it would appear without
any information in fillable fields.
3 Select an option in the
This option is only available if
selected in the
•Select
•Select
Form/data
Current Record Only
Current Record Set
drop-down list.
Data
Form and Data or Data Only
drop-down list.
to print just the current record.
to print the current found set of
records.
•Select
4Select
Collate
All Records
to print every record in the database.
to assemble multiple printed copies in the proper
sequence.
This option is available if your form has more than one page
and your printer supports collating.
Working With Forms - 30
is
Page 31

Printing or Faxing a Form
5 Enter offset measurements under
want
.
This is useful if you want to position data in a specific place on
the page. This option is only available if
the
Form/Data
6Select
7 Select any other print options you want.
8 Click
Use macro to print form
utility installed and want to print a stored print file. This option
is only available if the form was set up with a macro number.
See “Printing Your Form as a Macro” on this page.
OK.
OmniForm Filler prints or faxes your form with the selected
settings.
• Depending on your fax software, more dialog boxes may
appear after you click OK in the Print dialog box. See your fax
documentation for information.
• The Print to File dialog box appears after you click
selected the
location for the file, type a file name in the
and click
drop-down list.
Print to file
OK.
Printing Your Form as a Macro
OmniForm Filler supports macro programming utilities, such as Kelly
FlashSIMM, that translate print files to macros and download them to a
Flash storage device in a printer.
Print offsets for data
Data Only
if you have a macro programming
option in the Print dialog box. Select a
File Name
if you
is selected in
if you
OK
text box,
In order for you to print your form as a macro, a macro number must
have been assigned to the form in the OmniForm program. Consult your
OmniForm administrator or the form’s creator if you need to assign a
macro number to a form.
Print a Macro
1 Launch OmniForm Filler and open the form you want to print.
2 Choose
3Select
4 Select any other options you want and click
Use macro to print form.
See your macro programming utility documentation for an
explanation of the way a stored macro is printed.
in the File menu to open the Print dialog box.
Print...
OK.
Working With Forms - 31
Page 32

Mailing a Form
Selecting a Mail System
Mailing a Form
This section describes how to select a mail system and mail a form from
OmniForm Filler.
You must have either Lotus cc:Mail, Lotus Notes, or a MAPI-compliant
mail system such as Microsoft Exchange installed to mail a form.
1 Choose
The Options dialog box appears.
Options...
in the Tools menu.
Using the
2 Click the
OmniForm Filler selects your installed mail application by
default if you have only one installed.
3 Select the program to use if you have more than one installed.
4 Click
Send...
1 Open the form to send.
2 Choose
General
OK.
Command
Send...
tab.
in the File menu.
Working With Forms - 32
Page 33

The Send/Route Options dialog box appears.
Mailing a Form
3 Select an option
•Select
Form and Data
.
to send all text, graphics, and any
information in fillable fields.
•Select
Data Only
to send just the information you have typed
in the fillable fields.
•Select
Form Only
to send the form as it would appear without
any information in fillable fields.
4 Click
Range...
to open the Record Range dialog box if you want
to specify a range of records to send.
OmniForm Filler sends all records by default otherwise.
•Select
•Select
All Records
Current Record Set
to send all records in the current database.
to send the current found set of
records. This option is available after a search.
Type the first record number to send in the
From
the last record number to send in the To text box to specify a
range of records.
• Click OK to return to the Send/Route Options dialog box.
text box and
5 Click
OK.
Working With Forms - 33
Page 34

Mailing a Form
6 Enter log-in information if the application requires it.
A messaging interface appears after you log in. The appearance
of the dialog box depends on the selected mail application.
7 Enter a subject line and message.
Refer to the program’s documentation for more information.
8 Click
Send
Adding a Routing Slip
Microsoft Exchange/Mail users can add a routing slip to mail. See the
Microsoft Exchange/Mail documentation for detailed information.
To add a routing slip:
1 Open the form to send.
2 Choose
The Add Routing Slip dialog box appears.
3 Select the recipients and other routing information.
4 Send the document now or later.
• Click
•Click
Add Routing Slip...
Route
Add Slip
to mail the information as specified.
in the File menu.
to route the document.
to close the dialog box without routing the form.
Working With Forms - 34
Page 35

Form Usage Options
This section describes form usage: what is it and how to change it.
What is Form Usage?
Form usage affects how a form appears and the way you can use it in
OmniForm Filler. The forms you use were created in the OmniForm
program and designed according to the wishes of the creator. A form
may appear in one of three ways:
•As a
This is a fully designed form. You can fill in highlighted fields.
The form can be edited in the OmniForm program as well.
Graphics on the original form do not appear on a designed form
unless the creator placed them there manually.
•As an
This is a partially designed form. You can fill in highlighted
fields. Some of the form can be edited in the OmniForm program.
An original form maintains its original look and graphics.
•As a
This form has no fillable fields unless the form’s creator added
some. Otherwise, it is just a picture on your computer. You can
print, fax, or mail a non-designed form.
original
form
form
designed
non-designed
Form Usage Options
form image
Changing Form Usage
Choose
form. For example:
Form Usage...
• You have an original form but decide to use it as it was designed
in OmniForm by another person.
You would change the form to a
• You have a form designed in OmniForm by another person but
decide to fax the original form to someone.
You would change the form to an
in the View menu to change the way you can use a
original
form.
form.
Working With Forms - 35
designed
Page 36

To change form usage:
Form Usage Options
1 Choose
Form Usage...
in the View menu.
The Form Usage dialog box appears.
2 Select a form usage option.
•Select
Use Designed Form
to view the form as it was designed
by another person.
•Select
Use Original Form
to view the form as it looked
originally.
This option is not available if the form was created in the
OmniForm program, rather than having been imported or
scanned in.
3 Click
OK.
Your form changes to reflect the selected option.
Working With Forms - 36
Page 37

Menu Commands
This section explains each OmniForm Filler command. The menu
command information is listed in the same order as commands appear
in the menus. Cross-references in some sections point you to more
detailed information for a command or set of commands.
Use a right-mouse-button click anywhere in a form to access the
OmniForm Filler shortcut menu. The menu contains the
and
as you would in the regular menu bar.
The File Menu
Open...
Go To Page...
— Open an OmniForm Filler file.
commands. Select a command in a shortcut menu just
Menu Commands
Cut, Copy, Paste,
Close
Save As...
change the name or location of an open form.
Import...
OmniForm Filler database. See “Importing Information” on page 63.
Export...
Filler database to a supported database file format. See “Exporting
Information” on page 57.
Print...
macro. See “Printing or Faxing a Form” on page 29.
Print Preview
Page Setup...
Send...
available if you have Microsoft Exchange/Mail or Lotus cc:Mail/Notes
installed and selected. See “Mailing a Form” on page 32.
Add Routing Slip...
is only available if you have Microsoft Exchange/Mail installed and
selected as the current mail application. See “Mailing a Form” on page
32. This command changes to
1, 2, 3, 4 Commands
forms.
— Close the current form but remain in OmniForm Filler.
— Select a name and location for a newly imported form, or
— Import information from another database source into an
— Export information from your currently open OmniForm
— Print the current form on a printer, to disk as a file, or as a
— View a form before printing it.
— Set paper size, margins, and orientation for a form.
— Mail the currently open form. This command is only
— Add a routing slip to your mail. This command
Edit Routing Slip...
— Open one of the four most recently opened
after a slip is created.
Exit
— Close all open forms and quit OmniForm Filler. OmniForm
Filler prompts you to save any unsaved changes.
Working With Forms - 37
Page 38

The Edit Menu
Undo
cannot be undone.
Cut
— Remove the current selection and copy it to the Clipboard.
Menu Commands
— Cancel the last action. Some actions, such as deleting records,
Copy
Paste
Delete
— Copy the current selection to the Clipboard.
— Place the current contents of the Clipboard on your form.
— Remove the current selection.
The View Menu
Form Usage...
Usage Options” on page 35.
Zoom
Go to Page...
Click OK to have OmniForm Filler open that page.
You can also click a page icon in the status bar at the bottom right of the
window to move to that page.
Highlight Fill Areas
— Choose a page view in the cascading menu.
• Choose
page at the selected percentage.
• Choose
window. This is useful if you resize the window but want to view
the whole width of the page.
• Choose
This is useful to get an idea of what your overall form looks like.
— Select how to view and use your form. See “Form
50%, 75%, 100%, 150%, 200%, 300%, or 400%
Page Width
Whole Page
— Enter a page number in the Go To Page dialog box.
to have the width of the page always fit in the
to have the entire page appear in the window.
— Turn field highlighting on and off.
to view the
Toolbars...
OmniForm Filler window.
•Select
•Select
— Select whether toolbars and ToolTips appear in the
Standard
window.
Show ToolTips
commands in the toolbars when the cursor is held over a button
without clicking.
to display the standard toolbar at the top of the
to display the corresponding menu
Working With Forms - 38
Page 39

The Records Menu
d
Use the Records menu commands to work with an OmniForm Filler
database. See Chapter 4, Managing an OmniForm Filler Database, for
detailed information on procedures.
Menu Commands
Go To
— View a record in the cascading menu. You can also click the
buttons in the standard toolbar.
First Record Previous Record Next RecordRecord Number Last Record New Recor
•Select
•Select
to move to the first record in your database.
First
Previous
to move to the record before the one you are
viewing. If record 3 is on view, for example, record 2 is the
previous record.
• The Record Number text box displays the number of the record
you are viewing. Highlight the number, type in a new number,
and press Enter to move to that record.
•Select
to move to the record after the one you are viewing. If
Next
record 3 is on view, for example, record 4 is the next record.
•Select
•Select
to move to the last record in your database.
Last
to create a new, blank record. You must have a form
New
open and at least one field filled manually to create a new record.
Search...
Sort...
— Search for information in your database records.
— Sort database records by a selected field in ascending,
descending, or creation order.
Duplicate Record
— Make an exact copy of the current record,
including all information in the record. You must have an open form
with at least one field filled manually to duplicate a record.
Recalculate...
— Apply new or changed calculations in your database
to the selected records. Otherwise, new or changed calculations apply
only to new records.
This command reapplies
existing calculations to the selected records.
all
Make sure you know which calculations are in your database before
using this command.
Working With Forms - 39
Page 40

Menu Commands
Delete Record — Delete the record being viewed. OmniForm Filler
prompts you to confirm your action. Export information from a record
first to delete the record but save its data.
You cannot undo the
Delete All Records — Delete all records in your database or delete a
found set of records. OmniForm Filler prompts you to confirm your
action. Export information from records first if you want to delete the
records but save the data.
You cannot undo the
The Tools Menu
Spelling... — Check the spelling in your filled fields. See “Spell
Checking” on page 26 for more information.
Options... — Select various OmniForm Filler options in the Options
dialog box.
General
•Select
window.
• Select a mail system under
installed.
• Select a measurement unit in the
list.
File Locations
•Select
Location
See “Exported Data and Shared Forms” on page 62.
International
Click this tab to see the selected language for the current form.
Delete Record
Delete All Records
Status Bar
Shared Forms
tab to set a default location for shared forms.
to display status text at the bottom of the
in the
command.
command.
Mail System
Measurement Units
File Types
if you have more than one
drop-down list in the
drop-down
File
Below the
international symbol for the selected language (which appears in the
status bar); and currency, number, and date conventions specific to that
language.
Language
selection, OmniForm displays readouts: the
Working With Forms - 40
Page 41

The readouts show:
• How OmniForm expects data to be entered in fill view.
• How OmniForm will format data in fill view if it is not entered
correctly. (Formatting takes place after you move the cursor out
of a field.)
The Window Menu
Cascade
bars showing.
Tile
area.
— Arrange open windows one on top of the other with title
— Resize the open windows so they fit side by side in the window
Menu Commands
Arrange Icons
window icons at the bottom of the screen. Click the Minimize button in
the upper-right corner of the window to iconize open windows.
1, 2, 3, 4... Commands
forms.
The Help Menu
Contents
list of available help topics.
Search for Help on...
tab to search for information on a specific topic.
How to Use Help
About OmniForm Filler
OmniForm Filler version, any copyrights in effect, the program’s
licensee, company name, and serial number.
— Choose
— Open the Help Topics window to the Contents tab to see a
— Open instructions on using the Help program.
Arrange Icons
— Make active one of the currently open
— Open the Help Topics window to the Index
— See information about the current
to organize minimized
Working With Forms - 41
Page 42

Chapter 4
Managing a Database
This chapter introduces basic database concepts. It explains what a
database is, how to create and maintain records in a database, and how
to move through a database.
This chapter contains the following sections:
• What is a Database?
• Managing Database Records
Most screenshots in this chapter were taken in Windows 95. Your dialog
boxes and windows may look slightly different if you are using
Windows NT or Windows 3.1.
Managing a Database - 42
Page 43

What is a Database?
What is a Database?
The user who designed
this daily planner
creates a new record
each day. So far, this
user has a database
containing three
records.
The user can sort these
records by date or
other entries and
search for information
in any field.
A database is a collection of information stored as individual
records.
Each record uses the same form design but can contain different
information in its fields.
OmniForm Filler automatically creates a database when you open a
form. As soon as you fill in the form, it becomes the first record in a new
database. Any user of this database can create a new, blank form using
the record as a template and then fill in new information to create
another record. This makes it possible to store a large amount of similar
information and retrieve it quickly and easily.
Record 1
Record 2
Record 3
Managing a Database - 43
Page 44

Managing Database Records
This section tells you how to create a database of records and manage its
information. It contains the following topics:
• Creating New Records
• Duplicating Records
• Moving Through a Database
• Searching Records for Information
•Sorting Records
• Recalculating Records
• Deleting Records
• Exporting Information
• Exported Data and Shared Forms
• Importing Information
The form you open becomes the first record of a new database as soon
as you fill in a field. You can then create new records with the same
layout and fields and fill them with different information.
Creating New Records
If you have a form open and fill at least one field in the current record,
you can create new records.
Managing Database Records
You cannot create a new record if data protection was turned on in the
form in the OmniForm Filler program. Contact your OmniForm Filler
administrator or the form’s creator if you need data protection turned
off.
Managing a Database - 44
Page 45

Managing Database Records
To create a new record:
1Open a form.
2 Click in a field with the cursor or press Tab to place the cursor
in the first fillable field.
3 Enter information in the field.
OmniForm Filler cannot create a new record until you fill at least
one field in an empty form. A form with fields filled only by
automatic calculations (such as a date field) is still considered empty
by OmniForm Filler. You must fill at least one field manually before
you can create a new record.
4 Press Tab to move to the next field.
Because a field is filled, you now have a database with one
record in it.
Managing a Database - 45
Page 46

5 Fill in as many fields as you like.
Managing Database Records
6 Click the New button in the standard toolbar or choose
the Records menu and
OmniForm Filler creates and displays a new, empty record
with the same form design as the first one.
7 Fill in this record with the appropriate information.
8 Continue to create new records in this way as you need.
Duplicating Records
You can duplicate any record in a database as long as it has information
entered in at least one field. This is useful if you want to create records
that will contain much of the same information.
A form with fields filled only by automatic calculations (such as a date
field) is still considered empty by OmniForm Filler. You must fill at least
one field manually before you can duplicate a record.
You cannot duplicate a record if data protection was turned on in the
form in the OmniForm program. Contact your OmniForm administrator
or the form’s creator if you need data protection turned off.
in its cascading menu.
New
in
Go To
Managing a Database - 46
Page 47

To duplicate a record:
d
1Open a form.
2 Fill in the information you want duplicated.
Managing Database Records
3 Choose
Duplicate Record
OmniForm Filler duplicates and displays the new record.
To change an entry in a filled field, tab to a field or drag your cursor over
the entry to highlight it and then type a new entry.
Moving Through a Database
Once you have multiple records, use the Record buttons in the standard
toolbar or the commands in the Records menu to move through a
database.
First Record Previous Record Next RecordRecord Number Last Record New Recor
First Record
Click the First Record button or choose
in its cascading menu to move to the first record in your database.
First
Previous Record
Click the Previous Record button or choose
and
Previous
you are viewing. If you are viewing record 3, for example, the previous
record is record 2.
in its cascading menu to move to the record before the one
in the Records menu.
in the Records menu and
Go To
in the Records menu
Go To
Record Number
The Record Number text box displays the number of the current record.
Follow these steps to move to another record:
1 Highlight the number in the Record Number text box.
2 Type a new number.
3 Press Enter to move to that record.
Managing a Database - 47
Page 48

Next Record
Managing Database Records
Click the Next Record button or choose
in its cascading menu to move to the record after the one you are
Next
viewing. If you are viewing record 3, for example, the next record is
record 4.
Last Record
Click the Last Record button or choose
in its cascading menu to move to the last record in your database.
Last
New Record
Click the New Record button or choose
in its cascading menu to create and move to a new record.
New
Searching Records for Information
A database can contain a tremendous amount of information. If you had
to search manually through hundreds of records in your database to
find a particular record, it could take hours. An OmniForm Filler search,
however, can retrieve records with the information you need in seconds.
These retrieved records are called a
export the found set if you wish.
To search for information:
1 Choose
Search...
The Search dialog box appears.
in the Records menu.
Go To
Go To
Go To
found set.
in the Records menu and
in the Records menu and
in the Records menu and
You can print, fax, mail, or
The field to search
How to search
What to search for
Which records to search
2 Select a field name in the
Field Name
drop-down list.
This is the field that contains the information you want to find.
All the fields in your form are listed here.
Managing a Database - 48
Page 49

Managing Database Records
3 Select a condition in the
Condition
drop-down list.
A condition describes how to look for information entered in
the
Franich & Halsey in the
text box. For example, suppose you entered the words
Value
text box.
Value
The following bulleted items show the results of a search using
each available condition option. Proceed to step 4 on page 4-51
if you already know which condition to select.
•
is equal to:
This finds records that have
in the
•
is not equal to:
This finds records that have anything but
the
•
is greater than:
find an exact match of the
Customer
field.
find anything but the
Customer
field.
find records of greater value than the
Value
Franich & Halsey
entry.
Value
Franich & Halsey
entry.
and nothing else
entry.
This finds records that have entries in the
Customer
in the alphabet than the entry, for example,
Gallatron, Inc
.
field later
Franklin or
Value
in
•
is greater than or equal to:
than the
Value
entry.
This search finds records that have entries in the
find records of equal or greater value
Customer
field beginning with the entry name itself up to the letter Z.
•
is less than:
This finds records that have entries in the
find records of lesser value than the
Customer
Value
field
entry.
beginning with a symbol, a number, or letters earlier in the
alphabet than the entry, for example,
France or Dharma Dogs
Managing a Database - 49
.
Page 50

Managing Database Records
•
is less than or equal to:
the
Va lu e
entry.
This finds records that have entries in the
find records of equal or lesser value than
Customer
field
beginning with a symbol, a number, or the letter A up to the
entry name itself.
•
begins with:
This search finds records that have
entry or at the beginning of an entry in the
•
does not begin with:
Value
This search finds records that do not have
the beginning of the entry in the
do not contain
•
ends with:
find records that begin with the
Franich & Halsey
entry.
Value
Customer
as the
field
find records that do not begin with the
entry or that do not contain the value entry at all.
Franich & Halsey
Customer
Franich & Halsey
at all.
find records that have the
field or records that
entry at the end of
Value
the selected field.
This search finds records that have
entry or at the end of an entry in the
Franich & Halsey
Customer
as the
field.
.
as
•
does not end with:
find records that do not have the
Va lu e
at the end of the selected field or records that do not contain
the value entry at all.
This search finds records that do not have
the end of an entry in the
Customer
field.
Franich & Halsey
Managing a Database - 50
entry
at
Page 51

Managing Database Records
•
contains:
This search finds records that have
anywhere in the
•
does not contain:
find records that contain the
Franich & Halsey
Customer
field.
find records that do not contain the
entry.
This search finds records that do not have
entered anywhere in the
•
is empty:
The
•
is not empty:
find records that have no entry in the selected field.
text box is disabled if this is selected.
Value
find records that have an entry of any sort in the
Customer
field.
selected field.
The
text box is disabled if this is selected.
Value
entry.
Value
Franich & Halsey
entered
Value
4 Type the text to find in the
Value
text box.
Information is not case-sensitive. Typing Los Gatos is the
same as typing los gatos.
How OmniForm Filler searches for the information in the
text box depends on the selection in the
Condition
list as described in the previous step.
5 Select an option under
•Select
Search All Records in the Database
Scope of Search.
to search the entire
record set.
•Select
Only Search Current Record Set
to search a subset of
records. This option is only available when you have a found
set open from a previous search.
6 Click
OK.
Managing a Database - 51
Value
drop-down
Page 52

Click
Clear Search
to the full record set.
Search information: the
found set contains
seven records.
to return
Managing Database Records
OmniForm Filler searches for and retrieves all records that
contain the information you specified in the Search dialog box.
Under the standard toolbar, OmniForm Filler displays the
search information and number of records in the found set. If
you need to narrow the search further, choose
Search...
again.
You might, for example, want to search the Franich & Halsey
record set for invoices from a specific month. You can search
each new subset of records as many times as you need to find
the specific information you want.
OmniForm Filler maintains the current found set if it retrieves
no records during a search.
7 Click
Clear Search
under the standard toolbar to return to the
full record set when you are done.
Managing a Database - 52
Page 53

Sorting Records
You can sort records in OmniForm Filler in ascending, descending, or
original order entry. This is useful for many situations. If you wanted to
export mailing information, for example, you could sort records by
postal code to reduce bulk mailing costs. Or, you might want to sort
invoices by date to find the most delinquent accounts.
You can print, fax, mail, or export this information in the order in which
it is sorted.
To sort records:
Managing Database Records
1 Choose
The Sort dialog box appears.
2 Select the field by which to sort in the
list.
All the fields in your form are listed here.
3 Select a sort order.
•Select
for example, from A–Z or from 0–100. Symbols precede
numbers which precede letters: $40, 40, Forty
•Select
for example, from Z–A or from 100–0. Letters precede
numbers which precede symbols: Forty, 40, $40
•Select
which you originally entered information in the selected field.
This is useful to view the history of information entered.
4 Click
OK.
OmniForm Filler sorts the records in the order indicated.
in the Records menu.
Sort...
Ascending Order
Descending Order
Original Order Entered
to sort records from least to greatest;
to sort records from greatest to least;
Field Name
to sort records in the order in
drop-down
.
.
Managing a Database - 53
Page 54

Recalculating Records
Recalculating records applies any new or changed calculations to
selected records in a database. Until you use the
new or changed calculations apply only to new records.
Managing Database Records
Recalculate...
command,
This command reapplies
You may not always want this to happen.
For example, suppose the mileage calculation in an expense form was
changed to reflect the latest rate. (The person who created the form in
the OmniForm program would do this.)
All new records would use the new calculation and reflect this rate. You
do not want older records to use the new calculation because the
original rate was correct at the time.
If another new calculation was added to the same expense form and you
recalculated all records, the mileage rates on your old records would
also change. They would then be incorrect. To prevent this, you could
search the records for those records newer than the date that you
changed the mileage calculation, and apply the new calculation only to
the newer records.
See “Searching Records for Information” on page 48 for information on
searching.
You cannot recalculate records if data protection was turned on in the
form in the OmniForm program. Contact your OmniForm administrator
or the form’s creator if you need data protection turned off.
existing calculations to the selected records.
all
Managing a Database - 54
Page 55

To recalculate records:
Managing Database Records
1 Choose
Recalculate...
in the Records menu.
The Recalculate dialog box appears.
2 Select the records to recalculate.
•Select
All Records
to apply the new or changed calculation to
either the current found set or to every record in the database
if the entire record set is open.
•Select
Current Record Only
to apply the new or changed
calculation to just the record you are viewing.
•Select
From/To
to apply the new or changed calculation to a
range of records.
Enter a number in the
in the
text box and 5 in the To text box, for example,
From
and To text boxes. If you entered 1
From
OmniForm Filler would recalculate the first five records in
your database or found set.
3 Click
OK.
OmniForm Filler recalculates the records according to your
specifications.
4 Click OK in the dialog box that informs you how many records
were recalculated successfully.
You cannot undo a recalculation!
Managing a Database - 55
Page 56

Deleting Records
This section describes how to delete one or more records in a database.
Do this to get rid of old, unwanted, or duplicate records.
You can export information from a record first if you want to delete a
record but save its data. See “Exporting Information” on page 57 for
instructions.
You cannot delete a record if data protection was turned on in the form
in the OmniForm program. Contact your OmniForm administrator or
the form’s creator if you need data protection turned off.
To delete the current record:
Managing Database Records
1 Choose
A warning dialog box appears.
2 Click
You cannot undo a record deletion!
To delete all records:
1 To delete a found set of records instead of all records, click
Search...
See “Searching Records for Information” on page 48 for more
information.
2 Choose
A warning dialog box appears.
3 Click
You cannot undo a record deletion!
Delete Record
to delete the current record permanently.
Ye s
in the Records menu to find the records to delete.
Delete All Records
to delete all records or the found set permanently.
Ye s
in the Records menu.
in the Records menu.
Managing a Database - 56
Page 57

Exporting Information
This section explains the benefits of exporting information and how to
export information from an open OmniForm Filler database.
See “Importing Information” on page 63 for information on how to
import information into a database.
The Benefits of Exporting Information
Export information from records to:
• Share information with other OmniForm Filler databases.
Information exported as a database file takes up considerably less
disk space than the database itself. It can be copied or mailed
more quickly than the entire database.
• Share information from different databases.
For example, you might have a FoxPro database and decide that
you need information already entered in an OmniForm Filler
database. Simply export the needed information from OmniForm
Filler in the appropriate format and use FoxPro’s commands to
import it.
• Save other database users the time of entering data manually by
sending them an OmniForm Filler Data or other database file.
Managing Database Records
To export information:
1 Choose
The Export Setup dialog box appears.
2 Select a database file type in the
•Select
•Select
Export...
OmniForm Database
OmniForm Filler Data file.
ODBC Database
Data Sources
in the File menu.
list box.
Export To
to export information to an
to select a data source in the
drop-down list.
Managing a Database - 57
Available
Page 58

Managing Database Records
See “ODBC Options” on page 60 for more information on this
dialog box.
3 Click
OK.
The Export As dialog box appears.
This is how the dialog box looks in Windows 3.1 and NT.
This is how the dialog box looks in Windows 95.
• A file name appears in the
File name
text box.
The file is named by default with the name of the currently
open database. You can change the file name if you want.
• The database file type you selected in the previous dialog box
appears in the
4Use the
Save in
Save as type
(or
Directories
(or
Save File as Type)
drop-down list.
) drop-down list to select a
location for the file.
5 Click
Save.
Managing a Database - 58
Page 59

Managing Database Records
The Export dialog box appears.
All the fields in your currently open database appear in the
Fields in
list box.
6 Select each field that contains the information to export and
click
to move it to the
Add>>
Fields to Export
list box.
• Shift-click to select or deselect multiple adjacent records, or
hold down the mouse button and drag the cursor over
adjacent records.
• Ctrl-click to select or deselect multiple non-adjacent records.
• Select a field on the right and click
<<Remove
if you decide not
to export its information.
7 Click
Range...
to open the Record Range dialog box if you want
to specify a range of records to import.
Managing a Database - 59
Page 60

Managing Database Records
Otherwise, OmniForm Filler exports all records by default.
•Select
•Select
All Records
Current Record Set
to export all records in the current database.
to export the current found set of
records. This option is available after a search.
Type the first record number to export in the
From
text box
and the last record number to export in the To text box.
• Click OK to return to the Export dialog box.
8 Click
OK.
OmniForm Filler exports the information in the selected fields
to the specified file.
9 Click OK in the dialog box that tells you how many records
were successfully exported.
ODBC Options
Installed ODBC database drivers appear in the
box when you select
• Select a source and click
ODBC Database
in the
Setup...
that program.
Enter information in the Setup dialog box and click OK to return
to the Export Setup dialog box.
• Click
to remove a selected source from the list.
Delete
Available Data Sources
Export To
drop-down list.
to open a setup dialog box for
list
Managing a Database - 60
Page 61

Managing Database Records
• Click
to select an ODBC database driver in the Add Data
Add
Source dialog box.
Drivers were installed automatically by default during
installation. Select one and click
A setup dialog box for that
OK.
program opens. Enter information in the Setup dialog box and
click OK to return to the Export Setup dialog box.
Managing a Database - 61
Page 62

Exported Data and Shared Forms
This section explains how to use OmniForm Filler Data files to open
shared forms and how to set up a shared form location. A shared form
is one other users can access.
When you export OmniForm Filler data from a form, the form’s file
name is stored inside the Data file. OmniForm Filler uses the file name
information as well as pathway information in the Options dialog box to
locate and open a copy of the original form. The form automatically
imports information from the Data file. This is useful for sharing data,
especially if you want to send another user just part of a database.
To set up the shared form location:
1 Select or create a folder for your shared OmniForm Filler forms.
Managing Database Records
2 In OmniForm Filler, choose
The Options dialog box appears.
3 Click the
4Select
5 Type the path to your shared form(s) folder in the
box.
6 Click
To export the data:
• Use the
OmniForm Filler Data file. See “Exporting Information” on page
57 for information.
•Use the
(as an attached OmniForm Filler Data file) to another user. See
“Mailing a Form” on page 32 for information.
File Locations
Shared Forms
OK.
Export...
command in the File menu in fill view to mail data
Send...
in the
command in the File menu to create an
Options...
tab.
File Types
in the Tools menu.
drop-down list.
Location
text
Managing a Database - 62
Page 63

Managing Database Records
To use an OmniForm Filler Data file to open a shared form:
1 Locate the OmniForm Filler Data file to use.
2 Double-click the file or select it and choose
File menu.
A copy of the shared OmniForm Filler Form from which the
OmniForm Filler Data file was exported opens. OmniForm
Filler automatically imports the information in the OmniForm
Filler Data file into the form.
Importing Information
This section explains how to import field data (information) into an
OmniForm Filler database from another database source. You can
import data from three sources:
• Another OmniForm Filler Form.
The selected form must be closed.
• An OmniForm Filler Data file.
This contains information exported from an OmniForm Filler
database.
• Any supported database source, such as FoxPro.
Available sources depend on the installed database drivers.
Data consists of information entered in fields, such as text, check marks,
and calculations. Importing data saves you the time of entering the same
data manually and allows you to share data with other database users.
You must first export data from another database in order to import it
into OmniForm Filler. See “Exporting Information” on page 57 for
information. See your database documentation if you are exporting
from another database program.
in its folder’s
Open
You cannot import information if data protection was turned on in the
form in the OmniForm program. Contact your OmniForm administrator
or the form’s creator if you need data protection turned off.
To import field information:
1Open a form.
2 Choose
Import...
in the File menu.
Managing a Database - 63
Page 64

The Import Setup dialog box appears.
Managing Database Records
3 Select the type of database information to import in the
drop-down list.
From
•Select
OmniForm Database
to import information from an
OmniForm Form or from an OmniForm Data file.
• Select a data source in the
Available Data Sources
list box to
import files from another database source.
You can also add, delete, and set up data sources.
4 Click
OK.
The type of dialog box that appears next depends on the type of
database file you selected.
The Select Import Files dialog box appears if you selected
OmniForm Database
.
This is how the dialog box looks in Windows 3.1 and NT.
Import
Managing a Database - 64
Page 65

Managing Database Records
This is how the dialog box looks in Windows 95.
An OmniForm Data (OFD) file has a different icon than a Form
(OFM) file. The first New Address file in the picture above is a
data file.
5 Locate and select a Data file to import.
6 Click
OK.
Depending on the database source you chose, more dialog
boxes may appear. Select the appropriate options.
The Import dialog box appears after you select a file.
• Fields in the open OmniForm Filler database appear on the
left.
• Fields you can import from the other database appear on the
right.
Managing a Database - 65
Page 66

Managing Database Records
7 Link fields on the left to fields on the right.
This tells OmniForm Filler which field data to import from the
other database and where to import it in the current database.
• To link individual fields, select a field on the left, select its
corresponding field on the right, and click
• Click
to automatically link all fields with the same name.
Auto
Link
.
Some fields will not have matching names but contain the
same information. Or, you may not want to import all fields.
Linked fields appear in the
Links
list box.
• Select a link in the
• Click
•Select
Calculations
Unlink All
Recalculate Imported Records According to Form’s
to unlink all fields.
when it is selectable to apply existing calculations
list box and click
Links
Unlink
to the imported records.
8 Click
Range...
to open the Record Range dialog box to specify a
range of records to import.
Otherwise, OmniForm Filler imports all records by default.
• Type the first record number to import in the
From
the last record number of the range to import in the To text box.
• Click OK to return to the Import dialog box.
Managing a Database - 66
to unlink it.
text box and
Page 67

Managing Database Records
9 Click OK when you are done linking fields.
OmniForm Filler imports the information into the selected
fields, creating as many new records as necessary in the
process.
10 Click OK in the dialog box that tells you how many records
were imported successfully.
Managing a Database - 67
Page 68

Chapter 5
Technical Information
This chapter explains how to troubleshoot common problems you may
encounter. It also provides technical information on such topics as
program operation and compatible file formats.
This chapter contains the following sections:
• Before You Begin
• OmniForm Filler Setup Issues
• Scanning Graphics into OmniForm Filler
• Operation
• OmniForm Filler Compatibility
• Error Messages
• Caere Product Support
Technical Information - 68
Page 69

Before You Begin
If you have a problem with OmniForm Filler, first check that your
computer, scanner, and other applications are functioning properly.
Make backups of OmniForm Filler files regularly, preferably in a
location other than your hard drive. This could save you hours or days
of work if the unexpected happens: file deletion or corruption caused by
disk crashes, viruses, or user error.
Try this First
It may help to try either of the following:
System Setup Checklist
Before You Begin
• Turn off your computer, restart your scanner, and then restart
your computer.
• Reinstall OmniForm Filler.
• Make sure that your system meets all requirements as listed in
“System Requirements” on page 8.
• If you are using a scanner, make sure the scanner is plugged in
and turned on, and that all cable connections are secure.
• Use the software that came with your scanner to verify that it
works properly in Windows before using it with OmniForm
Filler.
• Fix Windows problems before using OmniForm Filler again.
• Run virus-checking software regularly.
• Defragment your hard disk occasionally. In Windows 95, click
in the Taskbar and choose
Start
Disk Defragmenter.
Tools
you need to install this utility.
Windows 3.1 and NT users: check your Windows documentation
for information on defragmenting your hard disk.
• Scan your disk for errors if you experience a recurring problem.
In Windows 95, click
Programs
Windows documentation if you need to install this utility.
Windows 3.1 and NT users: run the DOS utilities CHKDSK or
ScanDisk if you have either one.
AccessoriesSystem ToolsScanDisk.
Start
Programs
See your Windows documentation if
in the Taskbar and choose
AccessoriesSystem
See your
Technical Information - 69
Page 70

OmniForm Filler Setup Issues
This section contains information on some common installation
problems and information on how to optimize the installation process:
• Memory and Installation
• Setup Program Requests the Same Disk
• Installing OmniForm Filler 2.01 over Older Versions
• Uninstalling OmniForm Filler
Memory and Installation
Close all applications — including screen savers and mail applications
— to free up memory before starting the OmniForm Filler setup
program.
Setup Program Requests the Same Disk
Exit the program and restart your computer if the Setup program
repeatedly requests the same disk.
If this does not solve the problem and the correct disk is in the disk drive,
the disk may be damaged. Contact Caere Product Support for a
replacement. See page 79 for information.
OmniForm Filler Setup Issues
Installing OmniForm Filler 2.01 over Older Versions
Select your current OmniForm Filler folder during installation to install
OmniForm Filler 2.01 over a 2.0 or 1.x version. OmniForm Filler prompts
you to confirm that you want to overwrite the previous version.
You will no longer be able to run an older version of OmniForm Filler in
this case.
Technical Information - 70
Page 71

Uninstalling OmniForm Filler
Follow these steps to remove OmniForm Filler
system.
The steps listed here remove all OmniForm Filler files from your
computer. Back up files and records outside your Omnifill folder if
you want to save them.
To uninstall OmniForm Filler in Windows 95:
1 Exit from OmniForm Filler.
OmniForm Filler Setup Issues
permanently
from your
2 Click
in the Taskbar and choose
Start
Settings
Control Panel
The Control Panel appears.
3 Double-click
Add/Remove Programs.
The Add/Remove Programs Properties dialog box appears.
4 Click the
5Select
Caere
Install/Uninstall
®
OmniForm Filler
tab.
in the text box and click
Remove.
6 Click
in the confirmation dialog box.
OK
Windows removes OmniForm Filler from your system.
To uninstall OmniForm Filler in Windows 3.1 or NT:
1 Double-click the Uninstall OmniForm Filler icon in the Caere
Applications program group.
2 Follow the instructions in the dialog box that appears.
Windows removes OmniForm Filler from your system.
.
Add/
Technical Information - 71
Page 72

Scanning Graphics into OmniForm Filler
Scanning Graphics into OmniForm Filler
This section describes common scanning problems that may occur if you
use a scanner to import a graphic into a fill graphic field:
• System Hang During Scan
• Scanner Compatibility
System Hang During Scan
A system hang during a scan could have several possible causes:
• An interrupt conflict between your scanner and another device
such as a bus mouse or network card.
Check interrupt addresses for a possible conflict. See your device
documentation.
• A SCSI termination problem.
Make sure the scanner is terminated properly. See your scanner
documentation.
• A memory-related problem.
Try closing open windows and applications to free up memory.
Scanner Compatibility
If you experience a problem between OmniForm Filler and your
scanner, make sure your scanner is a TWAIN-compatible scanner such
as Canon, Epson, or Microtek.
Select setup options for TWAIN-compliant scanners in the TWAIN
dialog box that appears before scanning. Select 200, 300, or 400 dots per
inch (dpi) for the resolution. Select line art, bi-tone, or black-and-white
line drawing for the image type. OmniForm Filler cannot process
grayscale or color scans.
Technical Information - 72
Page 73

Operation
OmniForm Filler Limits
Inserting OmniForm Filler Forms as OLE Objects
Operation
This section provides troubleshooting techniques for potential
operational problems as well as additional technical information:
• OmniForm Filler Limits
• Inserting OmniForm Filler Forms as OLE Objects
•Low Memory
• Low Disk Space
• Right Mouse Button Functions
The following limits apply in OmniForm Filler:
• Pages in a form: 100.
• Open forms: 20.
• Records in a database: 10,000 or approximately 5.4 MB of data
across all records.
You can insert an OmniForm Filler form in most programs that support
object linking and embedding (OLE).
If you create a new object rather than creating one from a file, OmniForm
Filler launches and the Open dialog box appears. Select an OmniForm
form in the dialog box and click
documentation for more information about using OLE objects in that
program.
Low Memory
Low memory can cause a number of problems, from persistent lowmemory error messages to system hangs. You need a minimum of 8MB
RAM for Windows 95 and Windows 3.1 and 12MB for Windows NT.
You also need at least a 4MB permanent swap file in Windows 3.1.
More memory is recommended if you run multiple applications.
Close Open Applications and Windows
You may receive out-of-memory error messages or find that OmniForm
Filler works slowly and accesses the hard drive frequently. Try closing
open OmniForm Filler windows and other applications to free up
memory.
See the other program’s
Open.
Technical Information - 73
Page 74

Amount of Memory Available
You can find out how much memory you have and how much is
currently available.
To check available memory in Windows 95:
1 Click the Start button in the Taskbar and choose
Settings
2 Double-click
Control Panel.
System
in the Control Panel.
The System Properties dialog box appears.
Operation
3 Click the
Performance
tab.
All memory information appears in this tab. See your Windows
documentation or the Windows online help for more
information.
You can click
Virtual Memory...
if you want to change virtual
memory settings but it is recommended that users let Windows
manage the virtual memory settings.
4 Click
to close the System Properties dialog box and return
OK
to the Control Panel.
Technical Information - 74
Page 75

Operation
To check available memory in Windows 3.1 or NT:
Type mem at the prompt after starting your computer. DOS displays
your total memory and other information.
Check free memory available in Windows by choosing
Manager...
Virtual Memory
OmniForm Filler uses virtual memory when memory runs low.
Windows uses disk space to simulate the RAM it does not have
available. Your system runs more slowly when it has to use virtual
memory.
Try closing any other open applications and restarting your computer or
Windows to free up memory so OmniForm Filler does not use virtual
memory. If you often work with long, complex forms or need to have
many forms open at a time, add more RAM to your system.
in the Program Manager’s Help menu.
Low Disk Space
Check your Temp folder for unnecessary files if you seem to be running
out of disk space too quickly. Files are stored here especially after a
system hang or crash. Usually the path to this folder is:
c:\Win95\Temp (Windows 95)
c:\windows\temp (Windows 3.1 or NT)
Right Mouse Button Functions
Some programs allow you to reconfigure your right mouse button for
various functions. This may prevent you from using certain OmniForm
Filler functions, such as the right-mouse-button click to open the
shortcut menu. Use your other software to return the right mouse button
to its default state if you wish to use these right-mouse-button
OmniForm Filler functions.
About Program
Technical Information - 75
Page 76

OmniForm Filler Compatibility
This section provides OmniForm Filler compatibility lists.
Database Information Exchange
OmniForm Filler uses industry-standard ODBC to exchange
information with the following databases:
• Microsoft Access 1.0, 1.1, 2.0; 7.0 (Windows 95 only)
• dBase III and IV
• Excel 3.0, 4.0, 5.0
• FoxPro 2.0, 2.5, 2.6
• Paradox 3.x, 4.x, 5.x
• text-based and CSV files
E-mail Programs
• MAPI-compliant mail systems such as Microsoft Exchange and
Microsoft Mail
• Lotus cc:Mail/Notes 2.0 and above
Graphic Formats
OmniForm Filler can import the following file types into a fill graphic
field:
•BMP
•GIF
•JPEG
•PCX
• TIFF
• Macintosh PICT
OmniForm Filler Compatibility
Scanners
TWAIN-compliant scanners such as Canon, Epson and Microtek.
Technical Information - 76
Page 77

Error Messages
Low Memory or Disk Space Errors
Scanner Errors
Other Error Messages
Printer error. Unable to use macro to print form. Make sure you
have assigned a Macro Number. If this has been assigned, then
the current printer may not support macros.
Error Messages
Where possible, OmniForm Filler error messages attempt to pinpoint a
problem and offer a solution. Sometimes one solution may not work or
there may be more information that does not fit into the dialog box.
If an error message contains the instruction “Close open windows and
applications to free up memory” see “Low Memory” on page 73. If an
error message says you are low on disk space, see “Low Disk Space” on
page 75.
If a scanner error message appears, always check scanner connections,
and make sure the scanner is not in use by another application. Test your
scanner in Windows with the manufacturer’s software to make sure that
it works properly.
The following messages are listed alphabetically.
See “Printing Your Form as a Macro” on page 31 for information on this
feature.
The current word cannot be added to the dictionary because it
contains invalid characters.
The word contains a character such as a caret (^) that OmniForm Filler
does not allow in the dictionary.
This form is protected. Turn off form or data protection to make
changes.
Form and/or data protection is active. Contact your OmniForm
administrator or the form’s creator to turn off data protection.
Technical Information - 77
Page 78

Error Messages
This program has performed an illegal operation and will be
shut down. If the problem persists, contact the program vendor.
This is a Windows-generated message. Click
to close the dialog
Close
box and exit OmniForm Filler. You will lose any unsaved changes in
your form.
Contact Caere Product Support if the problem is
reproducible;
sequence of events. Click
that is, you can always make it occur with the same
Details>>
to see technical information about
persistent and
the error before calling. A technician may ask you for this information.
Technical Information - 78
Page 79

Caere Product Support
Product support is available if you need help. First, please check this
manual to find the information you need, or look in the online help if
you can run OmniForm Filler. You may save yourself a phone call.
World Wide Web
Caere’s home page is located at:
http://www.caere.com
Our Web site contains product information, lists of common questions
and answers, and all known issues regarding Caere products.
Product Support Information
Your OmniForm Filler package contains two pages with the most up-todate support information for the United States, Canada, and the
European Community. Please refer to these pages if you need product
support.
Registered users in North America can call Caere Product Support at
408-395-8319.
You must be registered to receive product support! Complete and send
in the registration card in your OmniForm Filler package. If you need to
call before registering, please have your serial number ready.
Caere Product Support
Information We Need From You
For the most efficient response, please have the following information
on hand and be near your computer if you call:
• OmniForm Filler serial number
• OmniForm Filler version
• Windows version
• Network operating system, if applicable
• DOS operating system version
• Scanner manufacturer and model
• Amount of RAM in your system
• Listing of the autoexec.bat file, if applicable
• Listing of the config.sys file, if applicable
• Make and model of your computer system and peripheral
devices (printers, monitors, and so forth), if applicable
Technical Information - 79
Page 80

Glossary
active window The foremost window on the desktop; the window
where the next action will take place. An active window’s title bar is
highlighted.
ADF See
automatic document feeder (ADF) A device that allows you to scan
multiple pages without having to place each page in the scanner. Some
ADFs are built into scanners; others are add-on products.
back up To make a spare copy of a disk or of a file on a disk. Backing up
your files and disks ensures that you will not lose information if the
original is lost or damaged.
bitmapped image A collection of bits (dots or pixels) in memory that
represent a scanned image. The display on the screen is a visible
bitmapped image.
calculation In OmniForm, a mathematical, comparative, logical, or
textual operation that returns a value based on an existing formula.
OmniForm calculates the result automatically as you fill the form.
Cancel button A button in a dialog box that you can click to cancel the
current process or operation.
cell The basic unit of a table field. You can fill each cell separately.
comb element The basic unit of a comb field. You can fill each element
separately.
configuration The total combination of hardware components (central
processing unit, video display device, keyboard, and peripheral
devices) that make up a computer system. Configuration can also refer
to the software settings that allow various hardware components of a
computer system to communicate with each other.
automatic document feeder
.
cursor A symbol, displayed on the screen, marking where the next
action will take effect or where the next typed character will appear.
data The plural of datum; used here to refer to any information entered
in a field such as text and numbers.
Glossary - 80
Page 81

database A collection of similar information stored as records. Each
record in an OmniForm database contains the same fields but the
fields in each record can contain different information.
default A preset response to a question or prompt. The default is
automatically used by the computer if you do not supply a different
response or setting.
designed form A form with fillable fields that can be edited in the
OmniForm program. This type of form does not retain graphics from
the original form.
device driver A program that manages the transfer of information
between the computer and a peripheral device.
dialog box A box that contains a message requesting more information
from the computer user.
download To receive information from another computer using a
modem.
embedding To place an object in a form so that it becomes part of the
form.
error message A displayed or printed message that tells you of an error
or problem in the execution of a program or in the communication
with your system.
execute To perform the actions specified by a program command or
sequence of commands.
expansion slot A narrow socket into which you can install a peripheral
or coprocessor board. Sometimes called a peripheral slot.
fax Short for facsimile machine. Faxes scan a page, convert the image to
digital data, and send the data over a phone line to another fax
machine or computer. The receiving machine then recreates the fax
image on paper or stores the data on disk as a fax file.
field A form element in fill view into which you can enter information.
A field might contain text, such as your name in a
Name
field, or
preformatted OmniForm information, such as a check that appears
when you click a check box field.
field validation In OmniForm, a feature that prompts a user to enter
specific data in a field or to not leave a specific field empty.
file Any named, ordered collection of information stored on a disk.
Application programs and operating systems on disks are examples of
Glossary - 81
Page 82

files. You make a file when you create text or graphics, give the
material a name, and save it to disk.
file name The name that identifies a file. The maximum character
length of a file name and the rules for naming a file vary under
different operating systems.
form usage In OmniForm, how you can view and use a form.
found set A subset of records in a database retrieved during a search.
Each record contains at least one piece of information that matches
criteria set during a search such as the same name in a
Customer
field.
hang A term indicating that the system has stopped working and must
be rebooted.
highlight To make something visually distinct. Generally, highlighting
reverses the image on screen or otherwise makes it stand out from the
rest of the page. Highlighting is used to select an object or segment of
a page upon which to perform an editing function such as
or
Paste
.
Copy, Cut
image An electronic picture of text and/or graphics such as a scanned
document or graphic file.
interface The point at which independent systems or diverse groups
interact. The devices, rules, or conventions by which one component
of a system communicates with another. Also, the point of
communication between a person and a computer.
,
link To match field data exported from a database to corresponding
fields in the import database. This ensures that OmniForm imports the
proper information into the proper fields.
Also, to place an OLE object in a form so that it retains a connection to
the original source file.
main memory The portion of a computer’s memory with contents
directly accessible to the microprocessor; usually synonymous with
random-access memory (RAM).
menu A list of choices in a program from which you can select a
command. In Windows, menus appear when you click menu titles in
the menu bar. Dragging through the menu and releasing the mouse
button while a command is highlighted chooses that command.
mouse A small, hand-held device used to control a pointer on the
screen. The pointer can select items, initiate commands, and perform
other functions in the control and operation of various programs.
Glossary - 82
Page 83

mouse pointer A small shape on the screen that follows the movement
of the mouse or shows where your next action will take place. The
pointer can take the shape of an arrow, an l-beam, an hourglass, or
other graphic character depending on the current state of an
application’s activity.
non-designed form A form in OmniForm Filler that is just an image
without fillable fields. You can print, fax, or mail this type of form.
Object Linking and Embedding (OLE) A feature that enables users to
insert and use objects created in other applications into a form.
ODBC An acronym for
Open Data Base Connectivity.
OmniForm uses an
ODBC data source, such as FoxPro, to import and export information
to and from a database. Database drivers are installed during
OmniForm installation.
open To retrieve a file from storage and load it into the computer’s
working memory (RAM). Files must be open in order to work with
them.
original form A form that retains both graphics and its original look
when in OmniForm Filler.
path The full name by which an operating system identifies a file. This
is a sequence of names, each preceded by a slash, that specifies the path
— from volume directory to file — by which the operating system
locates a file. For example: c:\worddocs\memos\report
PCX A graphic file format produced by some scanners.
peripheral Something that is at or outside the boundaries of the
computer itself either physically (as a peripheral device) or logically
(as a peripheral card).
processor The integrated circuit chip component within the computer
that directly executes instructions. Sometimes referred to as the CPU
(Central Processing Unit) or microprocessor.
prompt A message on the screen that tells you of some need for
response or action. A prompt usually takes the form of a symbol, a
message, a dialog box, or a menu of choices.
random-access memory (RAM) Memory in which information can be
referred to in an arbitrary or random order. Generally, the work space
within the computer, temporary in nature, is sustained only while the
power is on.
read-only memory (ROM) Memory in which information can be read
but not changed. Information is placed into read-only memory once
Glossary - 83
Page 84

during manufacture; it remains there as part of the computer’s
permanent instruction set even when the computer’s power is turned
off.
read/write access The ability to display and make changes to a
designated file.
recalculate To reapply new or changed calculations to all selected
records in a database.
record In OmniForm, a collection of all the information on a form.
Whenever you import or open a new form and fill it in, you have a new
database that consists of one record. You can create a new, blank
record using the first form as a template. The record looks exactly like
the first record, but it can be filled with different information.
save To store information by transferring it from main memory (RAM)
to a storage device. Work not saved disappears when you turn off the
computer or when the power is interrupted.
smart naming An OmniForm feature that automatically defines fields
as a part of Logical Form Recognition and places them in a logical
order on the form. If you scanned in an blank form, for example,
OmniForm would recognize a
Customer
would automatically assign the name
field to be a fill text field. It
Customer
to this field.
sort To arrange records by a field category, in ascending, descending, or
creation order. You might, for example, sort invoices by an Amount
Owed field to facilitate billing.
standard toolbar The toolbar that contains buttons for basic file
operation such as saving and printing, and for moving through
records in a database.
system software Software required for the proper operation of a
computer system; it supports application programs by managing
system resources such as memory and
input/output (I/0) devices.
text file A file containing information in text form; its contents are
interpreted as characters encoded using the ASCII (or comparable)
format.
TIFF An abbreviation for tagged image file format. This is a standard
graphic file format for grayscale and high-resolution bitmapped
images. (OmniForm only import black-and-white images.)
user interface The rules and conventions by which a computer system
interacts with the person operating it.
Glossary - 84
Page 85

window The area that displays a file’s contents on the screen within the
Windows environment. It is possible to have several windows open on
screen at once; however, only one will be active at a time.
write permission The ability to make changes to the designated file. A
file that does not give a user write permission is
read-only.
Glossary - 85
 Loading...