

Page 1

OmniForm
User’s Manual
For Windows 95 and NT
CAERE CORPORATION
100 Cooper Court
Los Gatos, California
95032-3321 USA
Page 2

Caere GmbH
Innere Wiener Strasse 5
81667 München, Germany
Caere UK Information Centre
Abbey House
4 Abbey Orchard Street
Westminster, London SW1P 2JJ
Centre d’informations Caere
50 rue des Archives
75004 Paris, France
Please Note
To use this program, you should know how to work in the Microsoft Windows environment. Please
refer to Windows documentation if you have questions about how to use menu commands, dialog
boxes, scroll bars, edit boxes, and so on.
OmniForm User’s Manual
for Windows 95 and NT (Version 3.0)
800-1281-030, A
Copyright© 1998 Caere Corporation.
All rights reserved. CAERE®, Logical Form Recognition, and OmniForm
are trademarks of Caere
Corporation.
Many of the designations used by manufacturers and sellers to distinguish their products are claimed
as trademarks. Such designations appearing in this manual have been printed in initial caps.
2
Page 3

Chapter 1
Introduction
OmniForm is the easy way to convert your paper forms to electronic
forms. Use OmniForm to edit, design, and fill forms, manage
information databases, and print and mail forms among other functions.
This chapter gives an overview of the form creation and information
management capabilities OmniForm provides, as well as an explanation
of how to use the documentation.
This chapter contains the following sections:
• OmniForm Features
• Using the Documentation
Introduction 3
Page 4

OmniForm Features
OmniForm Features
OmniForm, an easy-to-use environment for working with forms, is
more than just form-recognition software. OmniForm includes the
following features:
Form Input
OmniForm uses Logical Form Recognition™ to convert your scanned
paper forms or imported image files into electronic, editable forms.
Design View
Use OmniForm’s
forms. A variety of toolbars make formatting easy and convenient. Use
the scrapbook to store or copy form objects.
Fill View
Use OmniForm’s
Information entered can easily be searched and sorted. In this view, you
can take advantage of OmniForm’s validation and calculation features.
Save as a Mailable Filler
You can save your form as a mailable filler. This option is useful if you
want your form to be filled out by a user who does not have OmniForm
installed.
OmniForm Database
All information you enter into a form is stored as a part of an OmniForm
database. You can create, duplicate, sort, and search records, and import
and export database information.
Field Validation
You can set up OmniForm to
OmniForm displays a prompt if you enter incorrect information.
design view
fill view
to design your own forms or edit existing
to fill a form with the information you need.
validate
a fillable field automatically.
Field Calculations
OmniForm’s built-in operators and functions let you define calculations
that display the correct value as you fill the appropriate field(s) in a
form. This automates data entry and reduces the possibility of errors.
Save to Microsoft Word
You can save your form to Microsoft Word format: either Word 95 or
Word 97.
4 Introduction
Page 5

Form Printing and Mailing
You can print forms from OmniForm. You have a choice of printing just
the form, or just the data entered in a form (useful when you have a
preprinted form in your printer), or both the form and its information.
Use electronic mail to send forms to other users if you have Microsoft
Outlook/Exchange or Lotus cc:Mail/Notes installed. Microsoft Outlook/
Exchange users can also add routing slips to mailed forms.
Using the Documentation
This section explains the various instructional and formatting
conventions used in this manual.
Online Help
OmniForm has both online help and context-sensitive help. There are
also four online tutorials to step you through the basics, especially if you
have never used OmniForm before (the tutorials are located in the Help
menu under
information on OmniForm topics.
Contents)
Using the Documentation
. Use the commands in the Help menu to find
Click the Help button in the OmniForm standard toolbar to turn your
cursor into a question mark icon. Click any command, button, or portion
of the window to open context-sensitive help for that topic.
Formatting
Two formatting conventions are used throughout the manual.
Italicized Text
• Labeled buttons, menu commands, dialog box text, and any
text in an onscreen form are italicized; for example, “Choose
in the File menu.”
Open
Menu titles, icon names, dialog box names, and unlabeled buttons are not italicized.
• A new term may be italicized the first time it is used; for example, “This is a
in the Glossary section of the manual.
• Variable entries are italicized; for example, “The entry n must
be between 4 and 18.”
fill text
field.” These terms and others are defined
Introduction 5
Page 6

Using the Documentation
Symbols
Courier font
• The Courier font indicates text that you are supposed to enter;
for example, “Type Sample1 in the
”
OK.
File Name
• The Courier font is also used to distinguish file paths and file
and folder names from the rest of the text; for example, “Locate
the Sample form in the OmniForm folder.”
Two symbols are used in this manual to highlight text.
This symbol means Note. It introduces a tip or an item of note.
This symbol means Warning. It introduces cautionary text.
text box and click
6 Introduction
Page 7

Chapter 2
Installation and Setup
This chapter describes how to install OmniForm and begin using it. It
contains the following sections:
• System Requirements
• Installing OmniForm and OmniForm Filler
• Registering OmniForm
• Starting OmniForm
Installation and Setup 1
Page 8
System Requirements
System Requirements
To install and run OmniForm, you need the following setup:
• Computer with an 80486 or higher processor
• VGA or SVGA monitor
• Windows-compatible mouse
• CD-ROM drive
• A minimum of 10MB hard disk space for OmniForm and up to
a maximum of 36MB
• A minimum of 4MB hard disk space for OmniForm Filler and
up to a maximum of 16MB
• A compatible scanner if you plan to scan documents
Please see
Form package, for a list of tested scanners
• Total system memory of at least 8MB RAM for Windows 95
(16MB recommended) and 12MB for Windows NT 4.0 (32MB
recommended).
Scanner Setup Notes
, which are included in the Omni-
OmniForm 3.0 for Windows 95 and Windows NT 4.0 is a 32-bit
application and will not run on earlier versions of Windows. A 16-Bit
version of OmniForm 2.01C is on your CD.
Installing OmniForm and OmniForm Filler
This section describes how to install OmniForm and OmniForm Filler on
Windows 95 and on Windows NT 4.0.
Close all applications — including screen savers, virus checkers, and
mail applications — to free up memory before installing OmniForm.
Installing on a Windows 95 or Windows NT 4.0 System
1 Start Windows 95 or Windows NT 4.0.
2 Insert OmniForm’s CD-ROM in the CD-ROM drive.
The Setup program should start automatically. If it does not,
click Start in the Taskbar and choose
The Control Panel appears.
Settings
Control Panel
.
2 Installation and Setup
• Double-click
Add/Remove Programs.
Page 9

Registering OmniForm
The Add/Remove Programs Properties dialog box appears.
• Click
• Click
3Select
4 Follow all the instructions in the dialog boxes that appear. Dur-
ing installation, you will be prompted to enter a serial number.
You can find the serial number on the label of the CD-ROM.
OmniForm installs by default to the location c:\Program
Files. You can select another location if you wish.
5 To install the OmniForm Filler repeat the preceding instruc-
tions, but select
appears instead of
Registering OmniForm
Registering your copy of OmniForm entitles you to technical support,
notification of special offers and upgrades, and the lowest price offered
on the next OmniForm upgrade.
You can use OmniForm for 25 sessions without registering it. The
Register dialog box appears the 26th time you launch OmniForm, and
the program exits if you do not register at that time.
Install...
Next>
The OmniForm install screen appears.
OmniForm
in the
Install/Uninstall
and then
.
OmniForm Filler
OmniForm
Finish
.
.
when the install screen
tab.
If you purchased your product directly from Caere or if you are already
a registered user, you should not be prompted to register again.
Installation and Setup 3
Page 10
Registering OmniForm
You will be asked to provide
your serial and key numbers.
When you get your registration
number, enter it here.
To register OmniForm by telephone:
1 Click the Register menu to open the Register dialog box.
This dialog box appears automatically the first time you start
OmniForm.
Closes the Register
dialog box without
registering.
Prints out your
registration
information.
2 Locate the phone number for your country in the drop-down
list.
3 Call the phone number and ask for a registration number.
You will be asked to provide your serial and key numbers that
are listed in the Register dialog box.
4 Enter the registration number in the Register Number text box
and click OK.
The Registration menu disappears from the menu bar after you
register.
See “Caere Product Support” on page 9-14 for information on technical
support.
4 Installation and Setup
Page 11

Starting OmniForm
To register OmniForm at Caere’s Web site:
1 Click the Register menu to open the Register dialog box.
2 Open your Web browser and go to the following address:
http://www.caere.com/registration
3 Enter the requested information in the fields provided.
You will need to enter your serial number and key numbers
that are listed in the Register dialog box.
4 Click
5 Enter the registration number in the Registration Number text
Starting OmniForm
This section describes how to launch OmniForm after it is installed.
Install your scanner and test it in Windows
OmniForm. Consult your scanner documentation or the scanner
manufacturer to resolve any scanner problems that may occur.
To start OmniForm:
1 Click
Submit Information
information.
You will be given a registration number.
box and click OK.
The Register menu disappears from the menu bar after you
register.
in the taskbar and choose
Start
tions
OmniForm 3.0
when you are finished entering the
using it with
before
Programs
.
Caere Applica-
Installation and Setup 5
Page 12

Starting OmniForm
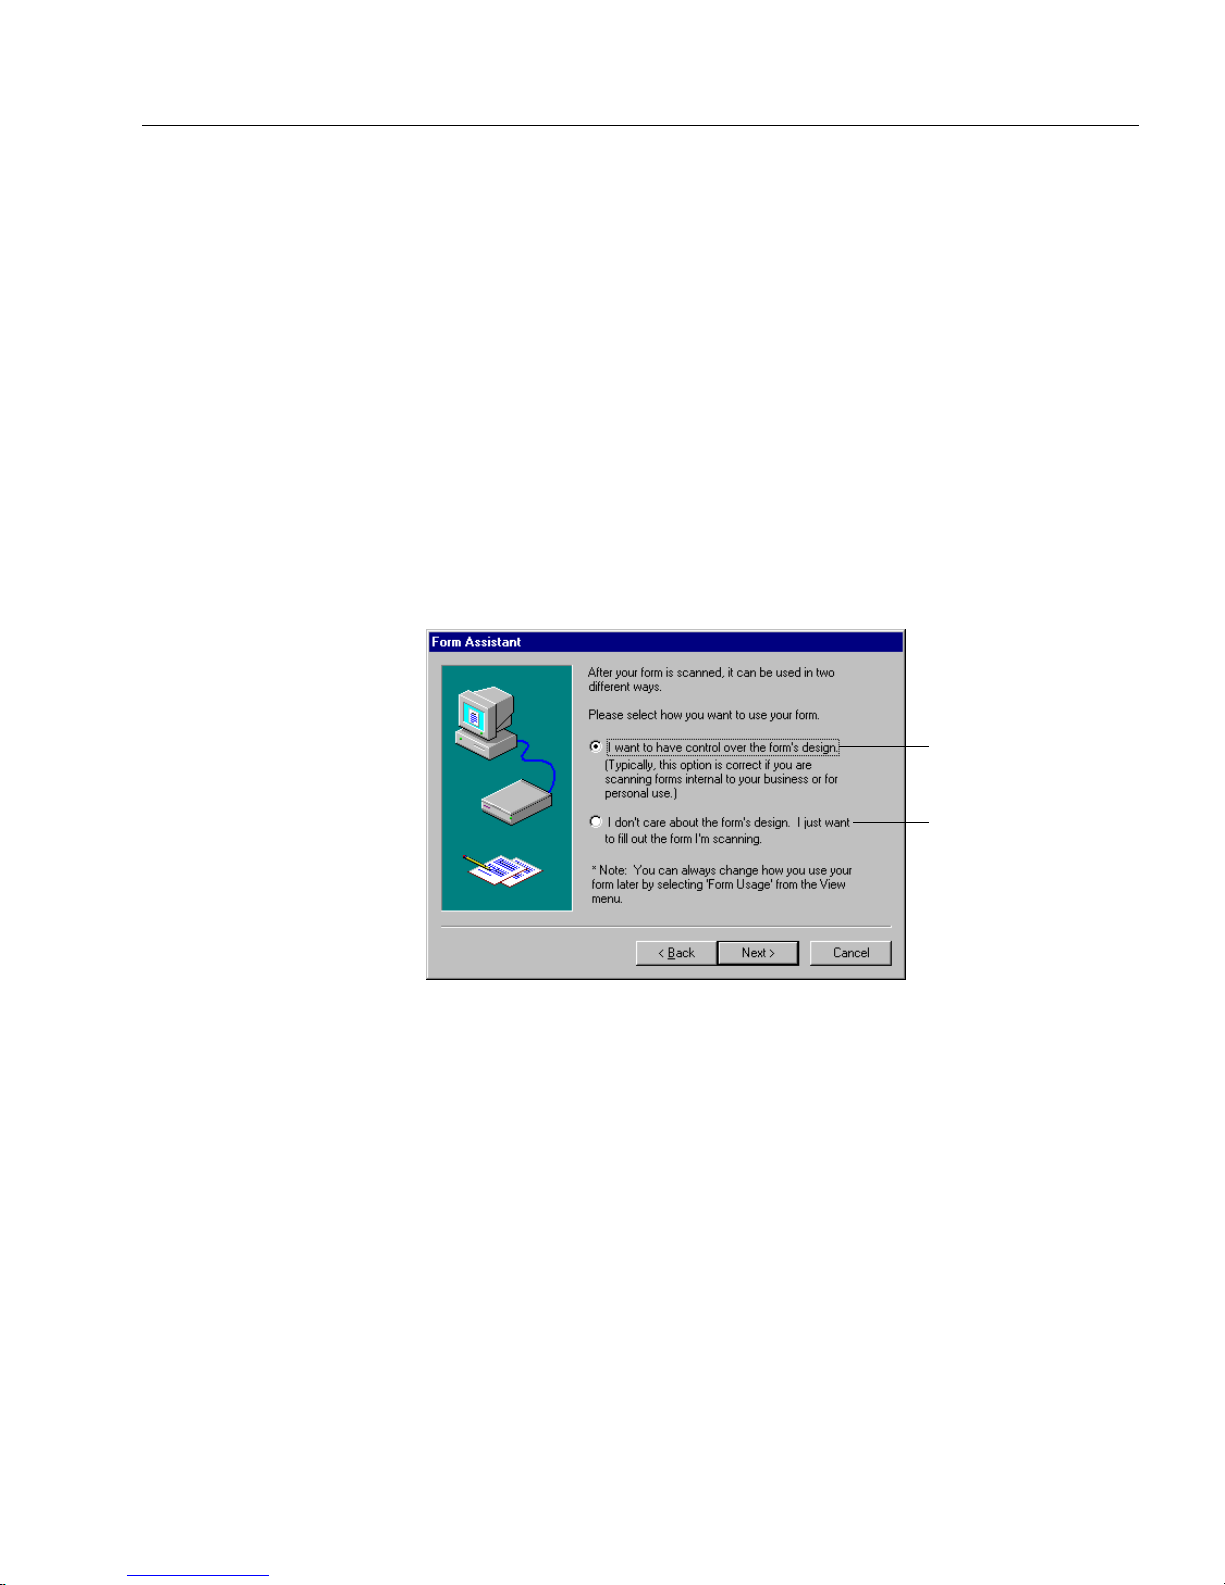
The Form Assistant dialog box appears. It contains six options.
Each is a basic OmniForm procedure.
2 Select an option and click
Next>.
Proceed to Chapter 4, OmniForm Procedures, for detailed
information on the basic OmniForm procedures. Or, if you are
new to OmniForm try the online tutorial.
Click
Cancel
to close Form Assistant if you do not want to
choose a particular option.
6 Installation and Setup
Page 13

Chapter 3
Form Usage
This chapter describes basic OmniForm concepts you should know
before scanning, importing or designing a new form, including the
following sections:
• Using Form Assistant
• Form Usage Options
• International Settings
Form Usage 1
Page 14
Using Form Assistant
Using Form Assistant
This section describes Form Assistant and its basic OmniForm functions.
Form Assistant is a dialog box that appears when launching OmniForm.
If you are new to OmniForm, you might prefer to use the Form
Assistant, which makes decision-making easy when processing a form.
Later, you might choose to use the commands in the standard toolbar or
menu. See Chapter 4, “OmniForm Procedures” for more information
about using the commands.
This section contains the following topics:
• Opening Form Assistant
• The Form Assistant Options
• Setting the Form Assistant Startup Option
Opening Form Assistant
There are several ways to open Form Assistant.
• Form Assistant opens automatically the first time you open
OmniForm.
Click
Applications
• If Form Assistant is not open, you can either click the Form
Assistant button in the standard toolbar at the top of the window,
or choose
in the Taskbar and choose
Start
OmniForm
Form Assistant...
.
in the File menu.
Programs
Caere
2 Form Usage
The Form Assistant dialog box contains six options for basic OmniForm
procedures as described in the next section. You can also select or
deselect the option
Form Assistant dialog box appears on startup.
Show on StartUp
, which determines whether the
Page 15

The Form Assistant Options
This section gives a brief description of each option in Form Assistant.
Through a series of dialog boxes, the Form Assistant easily steps you
through the process of converting your form into an electronic form.
Scan a Form or Image File
Using Form Assistant
Select
Scan a form or image file
to scan a paper form or import an image
file and to determine how you will work with the form in OmniForm.
Fill in a Form
Select
Fill in a form
to fill the currently open form or to open a form and
fill it. See Chapter 6, Filling a Form, for more information.
Print a Form
Select
Print a form
to print the currently open form or to open a form and
print it.
Search a Form for Information
Select
Search a form for information
to search the currently open form for
information or to open a form and search it.
Work on a Form’s Design
Select
Work on a form’s design
to redesign the currently open form or to
open a form in design view. See Chapter 5, Designing a Form, for more
information.
Create a New, Blank Form
Select
Create a new, blank form
to open a blank page in design view.
Setting the Form Assistant Startup Option
You can enable or disable Form Assistant at startup. You can deselect
the
Show on StartUp
OmniForm will open a blank form the next time you launch it.
Or, if you want the Form Assistant dialog box to show each time you
launch OmniForm, then make sure that the
Assistant dialog box is selected.
on the Form Assistant dialog box and click
Show on StartUp
Close>
on the Form
Form Usage #
.
Page 16
Form Usage Options
Form Usage Options
This section describes form usage: how it affects the forms you scan in
or import as image files, how to select form usage, and how to change it.
This section contains the following topics:
• Choosing a Form Usage Option
• Where to Select Form Usage Options
• Changing Form Usage
Choosing a Form Usage Option
Form usage affects the way you can use a form once it is in OmniForm.
Decide how you will use a form in OmniForm
it: as a
as described below.
OmniForm uses
rectangles, lines, fillable areas, and graphics when it designs a form
during scanning or import. The following table provides the three usage
options — designed, original, and nondesigned form — and
recommendations for your choice.
Choose Designed
Form when you
want:
full control over a form’s
design
to edit all form elements
in design view
designed
form, as an
Logical Form Recognition
Choose Original
Form when you
want:
partial control over a
form’s design
to maintain a form’s
original look
original
you scan or import
before
form, or as a
nondesigned
(LFR) to identify text,
Choose
Nondesigned Form
when you want:
to input a form of such
poor quality that it
would cause recogni-
tion problems
to draw new fillable
objects on the form in
design view
form image
to create new objects in
design view
to fill fields in fill view to fill fields in fill view
4 Form Usage
to create new fillable
objects on the form in
design view
print or mail the form
only
Page 17
See Chapter 5, Designing a Form, for information on importing
graphics, creating objects, and using other design techniques.
See Chapter 6, Filling a Form, for information on filling fields in fill view.
Where to Select Form Usage Options
Different form usage options are available depending on whether you
open Form Assistant or choose
If you use Form Assistant, you can choose between the designed form
and original form options.
Scan Form...
Form Usage Options
in the File menu.
If you use the
Scan Form...
command, you can choose between the
designed form and nondesigned form options.
Form Assistant
You can choose to scan in or import either a designed form or an original
form in Form Assistant.
Designed form option
Original form option
This dialog box is one of several in Form Assistant; it appears during the
scanning or import process.
Form Usage #
Page 18

Form Usage Options
Scan Form Dialog Box
You can choose to scan in or import either a designed form or a
nondesigned form in the Scan Form dialog box after choosing
Form...
in the File menu.
Changing Form Usage
Scan
Select this option for a
designed form. Deselect it
for a nondesigned form.
Choose
Form Usage...
in the View menu to change the way you can use a
form. For example:
•If you have an
original
form but decide to change the design, then
you would change the form to a designed form.
•If you have a
designed
form that you have edited but want to mail
the original form to someone, then you would change the form to
an original form.
There is no original view for a form that you design yourself in
OmniForm.
To change form usage:
1 Choose
Form Usage...
in the View menu.
The Form Usage dialog box appears.
6 Form Usage
Page 19
2 Select a form usage option.
International Settings
•Select
by OmniForm on import along with any changes you have
made to the form’s design.
You can edit all text and fields, and add graphics to the form.
•Select
originally, before you scanned or imported it to OmniForm.
You can create, resize, move, delete, define, or change the
appearance of fillable fields with this option. Changes you
make to text, graphics, and nonfillable objects are not visible
until you select
3 Click
Your form changes to reflect the selected option.
You can change the form usage from a
form. However, the form will be blank except for any fillable objects you
may have added.
International Settings
Use Designed Form
Use Original Form
Use Designed Form.
OK.
to view the form as it was designed
to view the form as it looked
nondesigned
form to a designed
OmniForm supports different language and cultural conventions. You
can choose from 45 different
dialog box. A locale — as defined for OmniForm usage — is a
combination of a language and a region. The language you select for a
particular region affects how your form displays currency, numbers,
and dates.
locales
in the
Selecting a Language for Your Form(s)
1 If you are in fill view, click the Design button in the standard
toolbar or choose
2 Choose
3 Click the
There are two options:
Options...
International
Design
in the Tools menu.
in the View menu.
tab.
Current Form
International
and
New Forms.
tab in the Options
Form Usage #
Page 20

International Settings
4 Click
Current Form.
The
Language
drop-down list displays the language being used
for the currently open form. If you have the International
English or German version of OmniForm or multiple
dictionaries, a dictionary in this language will also be used
during a spell check.
You cannot change the language for this option if you open the
Options dialog box in fill view.
5 Select a language for the current form.
Changing the language of the current form could cause OmniForm
to misinterpret any data already entered in that form. OmniForm
warns you of this if at least one field is filled and you change the
Current Form
6 Click
The
selection.
New Forms.
Language
drop-down list displays the default language that
will be used for the next form you open, scan, or import.
The language selected for a new form will also become the
Current Form
selection when that form opens in OmniForm.
7 Select a language for new forms.
8 Click
OK.
8 Form Usage
Page 21

How OmniForm Uses Language Selections
International Settings
The
Current Form
language selection affects:
• The formatting of currency, number, and date entries in the
currently open form.
• Which dictionary is used for spell checking. (The International
English version contains all available dictionaries. Other users
can call 800-654-1187 to order additional dictionaries.)
• The international symbol that appears in the status bar when a
form is currently open.
The
New Form
language selection affects:
• The formatting of currency, number, and date entries in new
forms you create by scanning or importing, or by choosing
in the File menu.
• The international symbol that appears in the status bar when a
form is not open.
Control Panel Selections
Selections made in the
the
Regional Settings
Only the
List Separator
control panel.
displayed in OmniForm.
New
International
tab do not affect selections made in
option in these control panels affects how data is
The Options Dialog Box Readouts
Below the
Language
selection, OmniForm displays readouts: the
international symbol for the selected language (which appears in the
status bar); and currency, number, and date conventions specific to that
language.
The readouts show:
• How OmniForm expects data to be entered in fill view.
• How OmniForm will format data in fill view if it is not entered
correctly. (Formatting takes place after you move the cursor out
of a field.) See the next section for formatting examples.
Formatting Examples
Currency
If you select
German (Austrian)
as the
Current Form
language, the
numbers 123456 entered in an appropriately defined currency field
would display as öS 1.234,56.
If you select
German (Liechtenstein)
as the
Current Form
language, the
numbers would display as CHF 1’234.56.
Form Usage #
Page 22

International Settings
Date
If you select
English (United States)
as the
Current Form
language, the date
2/5/96 entered in an appropriately defined date field would display as
February 5, 1996.
If you select
German (Standard)
would display as 2. Mai 1996.
The Scan Form Dialog Box
The
New Form
This becomes the
• Click
language selection appears in the Scan Form dialog box.
Current Form
Options...
to change the language for your new form.
You cannot change the
to Current Form
is checked because a language is already
associated with the current form. A form can have only one
language.
as the
Current Form
New Forms
selection.
Click Options... to change the
New Forms
selection.
language, the date
You cannot change the
Forms
language if you select
this option.
language
language
New
language after the form is in OmniForm.
New Form
language selection if
Add Page(s)
10 Form Usage
• If you select
changes to reflect the
The Object Definition Dialog Box Options
The
Current Form
language selection affects available formatting options
for fillable objects defined as
Definition dialog box. For example, the long-date format for English
(United States) is MMMM dd, yyyy. The long-date format for German
(Standard) is d.MMMM yyyy.
Allow Multiple Languages
The
How it Works
You can select
Allow Multiple Languages
multiple-language forms. OmniForm then recognizes all characters in
all languages that it supports. The setting does not affect the language(s)
selected for your form in the Options dialog box and vice versa.
Add Page(s) to Current Form
Current Form
language if it is different.
Number, Date, or Currency
Option
in the Scan dialog box for
, the
Language
display
in the Object
Page 23

International Settings
When you select
Allow Multiple Languages,
OmniForm turns off
dictionaries during optical character recognition (OCR) so that
recognizable characters are allowed. If dictionaries were on, special
characters such as umlauts might be discarded or questionable words in
one language could be mistaken for words in another language.
Do not select
Allow Multiple Languages
for a single-language form. OCR
may not be as efficient with dictionaries turned off.
Selecting the
New Forms
Language
Determine which language composes the majority of your form and
select that as the
Options...
in the Scan Form dialog box.
New Form
s language before scanning. To do so, click
Remember that the selected language affects sort order and how dates,
numbers, and currency are formatted in fill view. See “Multiple
Languages” on page 6-13 for information on spell-checking a form with
multiple languages.
all
Form Usage #
Page 24

International Settings
12 Form Usage
Page 25

Chapter 4
OmniForm Procedures
This chapter describes basic OmniForm procedures, including the
following sections:
• Scanning a Paper Form
• Importing an Image File
• Filling a Form
• Printing a Form
• Importing an Existing Electronic Form
• Searching a Form
• Creating a New Form
• Opening a Form
• Mailing a Form
• Saving a Form
OmniForm Procedures 1
Page 26
Scanning a Paper Form
Scanning a Paper Form
This section describes how to use the
paper form into an electronic form. You can also use the Form Assistant
dialog box to scan a form. See “Using Form Assistant” on page 3-2.
You can scan paper forms directly into OmniForm if you have a scanner.
Forms should be blank with crisp, dark text on a white background for
best results.
You can use the Sample Form included with your OmniForm package
as a test page.
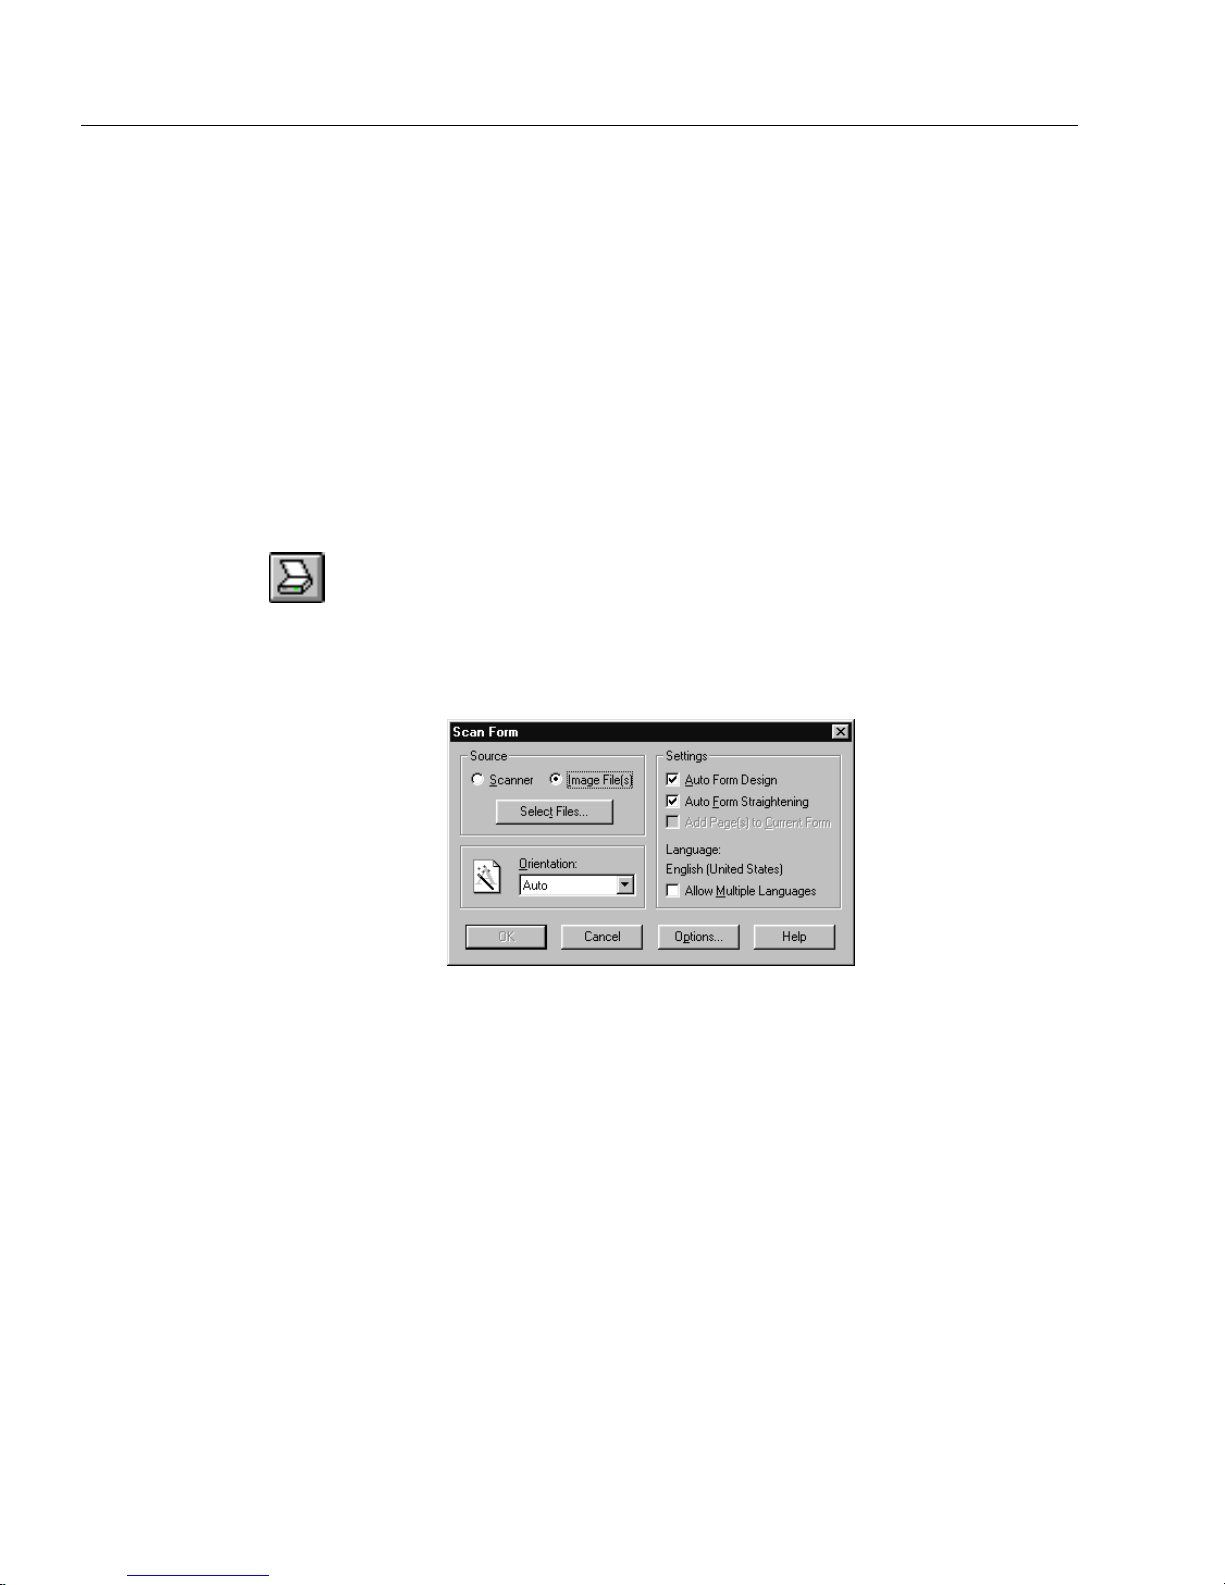
Using the
Scan Form...
Scan Form...
1 Click the Scan button in the standard toolbar or choose
Form...
The Scan Form dialog box appears.
Command
in the File menu.
command to turn your
Scan
2 OmniForm Procedures
2Select
3 Click
brightness.
Scanner
Set Up Scanner...
in the Source box.
to choose a page size and adjust scanning
Page 27
Scanning a Paper Form
Text on a shaded
background. Select
Auto (AccuPage).
• Select an option under
Select
Select
if the form is 8.5 by 11 inches.
Letter
if the form is 8.5 by 14 inches.
Legal
Page Size
.
Select A4 if the form is 21 by 29.7 centimeters (European).
• Select how light or dark the scanned image will be under
Brightness.
Select
Auto (AccuPage)
if your scanner supports HP AccuPage
and your form is printed on colored, shaded, or smudged
paper, or if it has very small type.
Select
Lighten
or if the background is smudged, shaded, or colored
Select
Normal
if the form has very thick or run-together text,
.
if the form has crisp, black text and objects are
on a white background.
Select
Darken
if the form has very thin or broken text such as
a poor-quality fax or a copy of a copy.
Thick, dark text.
Lighten.
Select
Crisp, black text
Select
Normal
.
.
Thin, broken text
Select
Darken
.
.
4 Click OK to return to the Scan Form dialog box.
5 Select an option in the
•Select
to have OmniForm determine orientation
Auto
Orientation
drop-down list.
automatically.
•Select
•Select
•Select
Portrait
Landscape
Flipped
for a vertically oriented page.
for a horizontally oriented page.
to automatically rotate a portrait page 180
degrees during the scan.
•Select
Flipscape
to automatically rotate a landscape page 180
degrees during the scan.
The
Flipped
and
Flipscape
options are useful for scanning pages in a
book that needs to be turned upside down or sideways.
OmniForm Procedures 3
Page 28

Scanning a Paper Form
6 Select import options under the
•Select
Auto Form Design
to use Logical Form Recognition in
Settings
options.
order to recognize text and fillable fields in the form.
This gives you full control over a form’s design. Graphics are
not retained but you can import them.
• Deselect
Auto Form Design
to scan a form without recognizing
form design. Text and fillable fields are not recognized.
This is useful if you just want to print or mail a form, or if the
form is of such poor quality that it would cause recognition
problems.
•Select
Auto Form Straightening
to have OmniForm
automatically straighten a crooked page.
This is useful if you scan a page in a large, unevenly cut, or
thick document that is difficult to position correctly.
•Select
Add Page(s) to Current Form
to make the newly scanned
page the next page in the current form.
This option is only available if a form is open.
7 Verify that the selected language under
Language
want for your new form.
• To change the default language for the new form, click
Options...
to open a modified Options dialog box.
is the one you
• Select a language in the
Language
drop-down list.
See “International Settings” on page 4-7 for more information
on the international options.
• Click OK to return to the Scan Form dialog box.
8 If your form contains more than one language that you want
OmniForm to recognize, select
Allow Multiple Languages
.
This setting does not affect the selected language for your form
set in the previous step.
Do not select this setting for a single-language form as optical
character recognition (OCR) may not be as efficient.
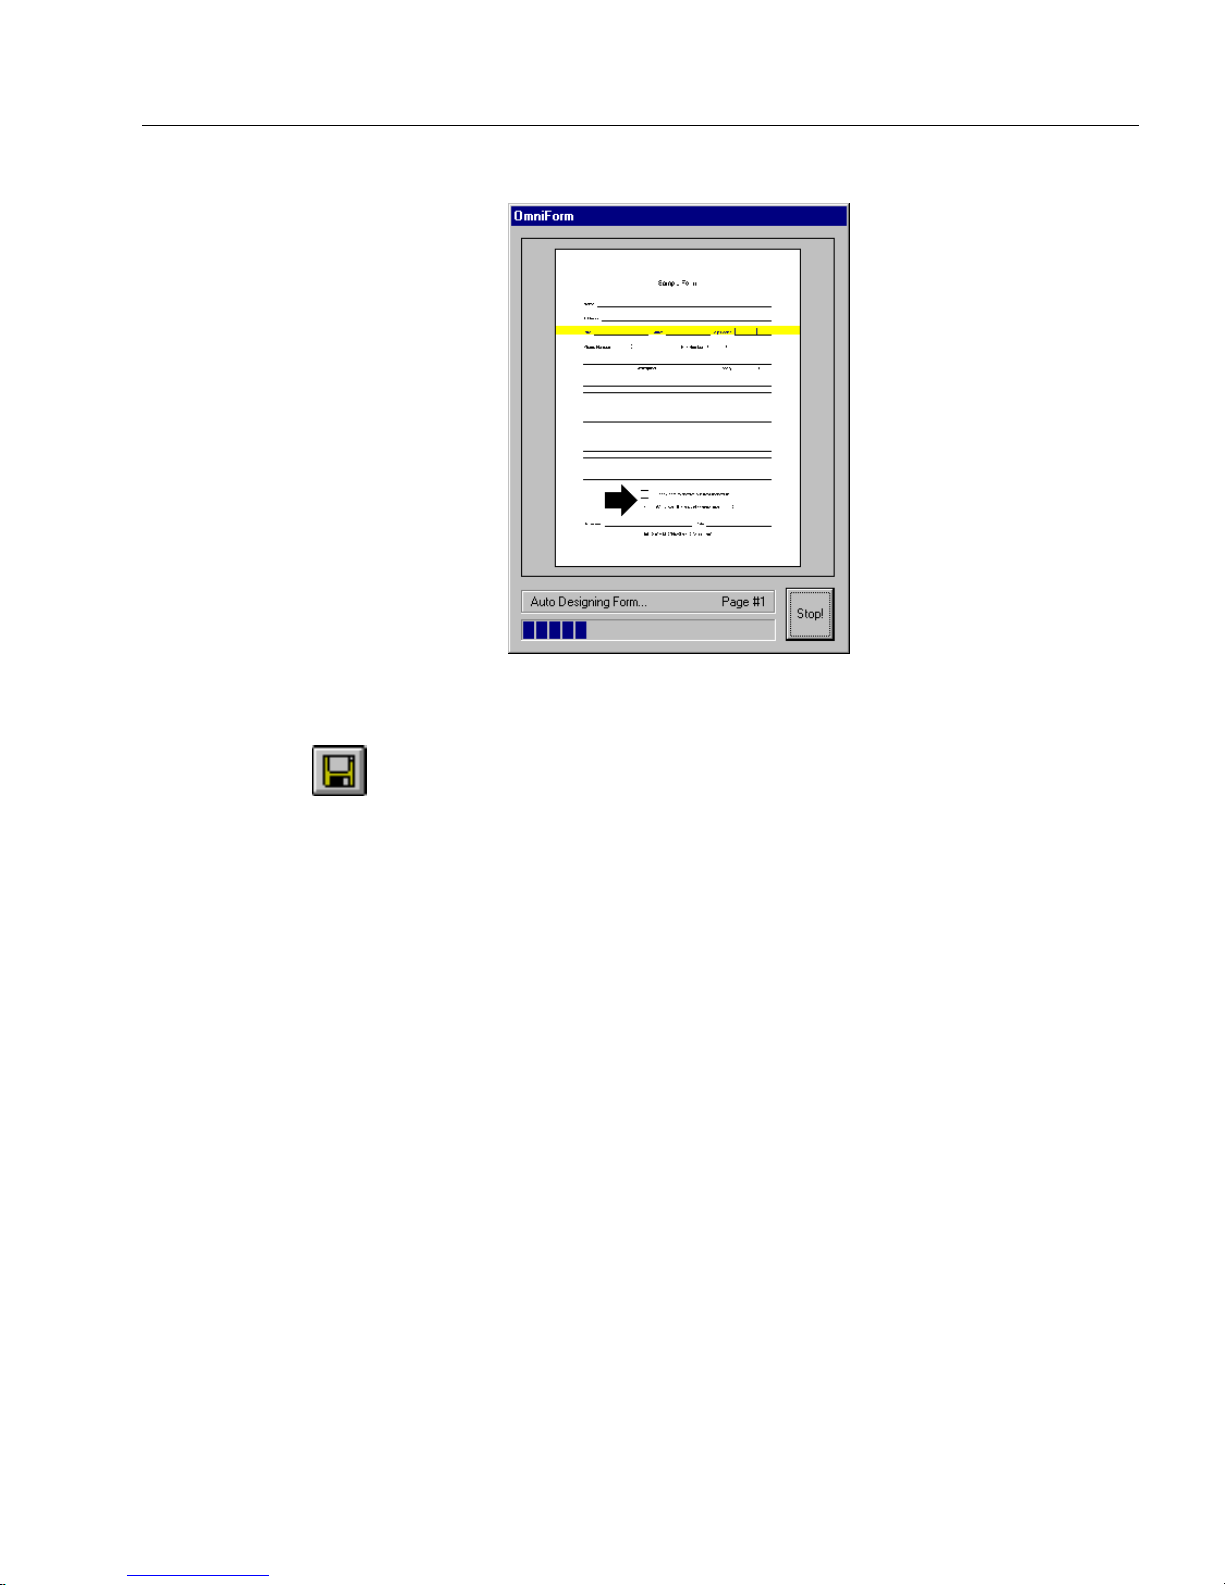
9 Click OK in the Scan Form dialog box to begin scanning.
OmniForm scans the form. The OmniForm window displays
the scanning, designing, and straightening progress if you
selected those options.
4 OmniForm Procedures
Page 29
Scanning a Paper Form
How your form appears depends on whether you chose
Form Design
in the Scan Form dialog box.
10 Click the Save button in the standard toolbar or choose
Auto
Save...
in the File menu to name and save your file.
11 Begin to fill or edit your form.
See Chapter 5, Designing a Form, for detailed information on defining,
moving, resizing, and creating fields, as well as other design functions.
See Chapter 6, Filling a Form, for detailed information on the kinds of
fields you may find on a form and how to fill them.
OmniForm Procedures 5
Page 30
Importing an Image File
Importing an Image File
This section describes how to use the
image file as a recognized OmniForm form. You can also use the Form
Assistant dialog box to import a form. See “Using Form Assistant” on
page 3-2.
OmniForm can import and recognize black-and-white forms in either
PCX or TIFF format. Image resolution must be 200, 300, or 400 dots per
inch (dpi). If you have a fax modem, for example, you can receive a
faxed form and use the fax program’s software to save the file in PCX or
TIFF format. OmniForm offers the same import options for image files
as it does for scanned forms.
Using the
Scan Form...
Scan Form...
1 Click the Scan button in the standard toolbar or choose
Form...
The Scan Form dialog box appears.
2Select
supported image format.
Command to Import
in the File menu.
Image File(s)
in the Source box to recognize a form in a
command to import an
Scan
3 Click
4 Follow steps 5 through 8 in the preceding section “Using the
6 OmniForm Procedures
This could be a form created in another program or one
received as a fax file.
Select Files
The Select Files dialog box appears.
• Locate and select a file.
• Click
• Click OK to return to the Scan Form dialog box when you are
Scan...
Add File
done.
Form Command.”
.
to add the file to the
Files to Process
list box.
Page 31

Filling a Form
5 Click OK.
OmniForm imports the form. The OmniForm window displays
the scanning, designing, and straightening progress if you have
selected these options.
How your form appears depends on whether you chose to
have OmniForm design the form during import.
Filling a Form
Using the
6 Click the Save button in the standard toolbar or choose
in the File menu to name and save your file.
7 Begin to fill or edit your form.
See Chapter 5, Designing a Form, for detailed information on defining,
moving, resizing, and creating fields, as well as other design functions.
See Chapter 6, Filling a Form, for detailed information on the kinds of
fields you may find on a form and how to fill them.
This section describes how to use the
fill it. You can also use the Form Assistant dialog box to fill a form. See
“Using Form Assistant” on page 3-2.
Command
Fill
1 If you have a form open and are in design view, click the Fill
button in the standard toolbar or choose
2 Click in a field to place the cursor in the first field.
3 Type the information you want to enter.
command to open a form and
Fill
in the View menu.
Fill
Save...
4 Press the Tab key to move to the next field.
Press Shift-Tab to move to the previous field.
5 Continue to fill fields in this way.
See Chapter 6, Filling a Form, for more information.
OmniForm Procedures 7
Page 32

Printing a Form
Printing a Form
This section describes how to use the
how to print to OmniForm, and how to print a form as a macro. You can
also use the Form Assistant dialog box to print a form. See “Using Form
Assistant” on page 3-2.
Using the
Print...
Print...
1 Click the Print button in the standard toolbar or choose
Command
in the File menu.
The Print dialog box appears.
This is how the dialog box looks in fill view.
command to print a form,
Print...
2 Select an option in the
8 OmniForm Procedures
Form/Data
•Select
information in fillable fields.
•Select
in the fillable fields. This is useful if you want to print data
over a preprinted form.
•Select
Form and Data
Data Only
Form Only
to print all text, graphics, and any
to print just the information you have typed
to print a blank form.
drop-down list.
Page 33

Printing a Form
3 Select an option in the
This option is only available if
selected in the
•Select
•Select
Form/Data
Current Record Only
Current Record Set
drop-down list.
Data
Form and Data or Data Only
drop-down list.
to print just the current record.
to print the current found set of
records.
•Select
4Select
Collate
All Records
to assemble multiple printed copies in the proper
to print every record in the database.
sequence.
This option is only available if your form has more than one
page and your printer supports collating.
5 Enter offset measurements under
wish
.
Print offsets for data
if you
This is useful if you want to position data in a specific place on
the page. This option is only available if
the
Form/Data
6Select
Use macro to print form
drop-down list.
if you have a macro programming
Data Only
is selected in
utility installed and want to print a stored print file. This option
is only available if you have set a macro number.
See “Printing Your Form as a Macro” on page 4-10 for
information.
is
7 Select any other print options you want.
8 Click
OK.
OmniForm prints your form with the selected settings.
The Print to File dialog box appears after you click
have selected the
Print to file
option in the Print dialog box.
Select a location for the file, type a file name in the
box, and click
OK.
Importing an Existing Electronic Form
Using the print to OmniForm driver, you can print an electronic form
(created from any application) to OmniForm. OmniForm adds this
driver as a printer to the Windows Printer Group during installation. If
you do not have this feature, reinstall OmniForm and make sure that the
Print to OmniForm Support
Components dialog box. Then, follow these instructions:
To print your Form to OmniForm
1 Open the form in the application in which it was created.
Remove any colored or shaded background from the form.
2 Choose
Print
option is selected in the Additional
from the File menu.
if you
OK
File name
text
OmniForm Procedures 9
Page 34

Printing a Form
3Select
OmniForm
from the
4 Click OK.
OmniForm automatically scans in the form. The OmniForm
window displays the scanning progress of the form.
Your form opens in OmniForm. To make any corrections to the
form, see Chapter 5, Designing a Form.
Printing Your Form as a Macro
OmniForm forms can be saved as a macro and then called as an overlay
from a printer’s memory, flash memory, or hard disk. OmniForm forms
are compatible with the Kelly FlashSIMM for Hewlett-Packard laser
printers. Please contact Kelly Computer Systems at (415) 960-1010 for
more information.
Set up a Form as a Macro
1 Open or scan in the form you want to translate to a macro.
2 If the form opens in fill view, click the Design button in the
standard toolbar or choose
to design view.
3 Choose
Print...
The Print dialog box appears.
See “Using the Print... Command” on page 4-8 for detailed
information on the Print dialog box.
in the File menu.
drop-down list.
Name
Design
in the View menu to switch
4 Type a number in the
5Select
6 Use your macro program to locate the file and assign it the
same macro number that you entered in the Print dialog box.
7 Download the file to the flash device in your printer.
See your utility program’s documentation for detailed
instructions.
Print a Macro
1 Launch OmniForm and open the form that you want to print.
2 Choose
3Select
4 Select any other options that you want and click
See your macro programming utility documentation for an
explanation of the way a stored macro is printed.
Macro Number
Print to File
Print...
and click
in the File menu to open the Print dialog box.
Use macro to print form.
text box.
OK.
OK.
10 OmniForm Procedures
Page 35

Searching a Form
Searching a Form
This section describes how to use the
in fill view and perform a search. You can also use the Form Assistant
dialog box to search a form. See “Using Form Assistant” on page 3-2.
Using the
The field to search
How to search
What to search for
Which records to search
Search...
Search...
1 If you have a form open and are in design view, click the Fill
button in the standard toolbar or choose
2 Choose
The Search dialog box appears
3 Select the field to search in the
4 Select how to search for the information in the
down list.
Command
Search...
in the Records menu.
Field Name
command to open a form
in the View menu.
Fill
drop-down list.
Condition
drop-
5 Type the information to find in the
6 Select which records to search.
•Select
the current database.
•Select
found set of records. This option is only available after a
search.
7 Click
OmniForm searches the records and finds any that contain the
information you specified.
See “Searching Records for Information” on page 7-7 for detailed
information on searching.
Search All Records in the Database
Only Search Current Record Set
OK.
text box.
Val ue
to search all records in
to search the current
OmniForm Procedures 11
Page 36

Creating a New Form
Creating a New Form
This section describes how to use the
form. You can also use the Form Assistant dialog box to create a form.
See “Using Form Assistant” on page 3-2.
See Chapter 5, Designing a Form, for detailed information on form design.
Using the
command to create a new
New
New
Command
1 Click the New button in the standard toolbar or choose
the File menu.
OmniForm opens a blank form in design view.
New
in
Opening a Form
This section describes how to use the
To open a form:
12 OmniForm Procedures
2 Use the design view tools to create fields and objects on your
new form.
Open...
1 Click
Applications
Click
2 Click the Open button in the standard toolbar or choose
in the File menu.
in the Taskbar and choose
Start
OmniForm 3.0
Cancel
in the Form Assistant dialog box if it appears.
.
command to open a form.
Programs
Caere
Open...
Page 37

The Open dialog box appears.
Mailing a Form
Mailing a Form
3Make sure
down list.
4 Locate and select a file.
5 Click
The form opens in the last view in which it was saved: design
or fill. You can switch the view if you wish.
6 If you are in design view and want to switch to fill view, click
the fill view button on the standard toolbar.
See Chapter 5, Designing a Form, for detailed information on
defining, moving, resizing, and creating fields, as well as other
design functions.
7 If you are in fill view and want to switch to design view, click
the design view button on the standard toolbar.
See Chapter 6, Filling a Form, for detailed information on the
kinds of fields you may find on a form and how to fill them.
This section describes how to select a mail system and use the
command to mail a form from OmniForm.
OmniForm Form
.
Open
is selected in the
Files of type
drop-
Send...
Selecting a Mail System
You must have either Lotus cc:Mail (2.0 and above)/Lotus Notes or
Microsoft Exchange/Outlook installed to mail a form.
1 Choose
Options...
in the Tools menu in either fill or design view.
OmniForm Procedures 13
Page 38

Mailing a Form
The Options dialog box appears.
Using the
2 Click the
Select either
Outlook
OmniForm selects your installed mail application by default if
you have only one installed.
3 Click
Send...
1 Open or scan in the form that you want to send.
2 Click either the design or fill view button in the standard tool
bar. (You can also choose
design view you have two options: you can send only the form
or send the form as a mailable filler. In fill view you have
several options: you can send only the form, only the data,
form and data, or send the form as a mailable filler.
3 Choose
The following Mail Options dialog box is for fill view.
General
.
OK.
Command
Send
tab and select an option under
or
or
Fill
Lotus cc: Mail/Lotus Notes
Design
in the File menu.
Mail System
Microsoft Exchange/
in the View menu.) In
.
4 Select an option.
14 OmniForm Procedures
Page 39
Mailing a Form
•Select
Send the Form and Data
to send all text, graphics, and any
information in fillable fields. This option is available only in
fill view.
•Select
Send the Data only
to send just the information you have
typed in the fillable fields. This option is available only in fill
view.
•Select
Send the Form only
to send the form as it would appear
in design view, without any information in the fillable fields.
•Select
Send as a Mailable Filler
to send the current form and
have it filled out by a user who does not have OmniForm.
•Select
Include the current record
to include the current record
that you have open. This option is available only in fill view.
5 If you are in design view or you are sending a mailable filler
proceed to step 8.
6 If you are in fill view and not sending a mailable filler you can
also specify a range of records to send.
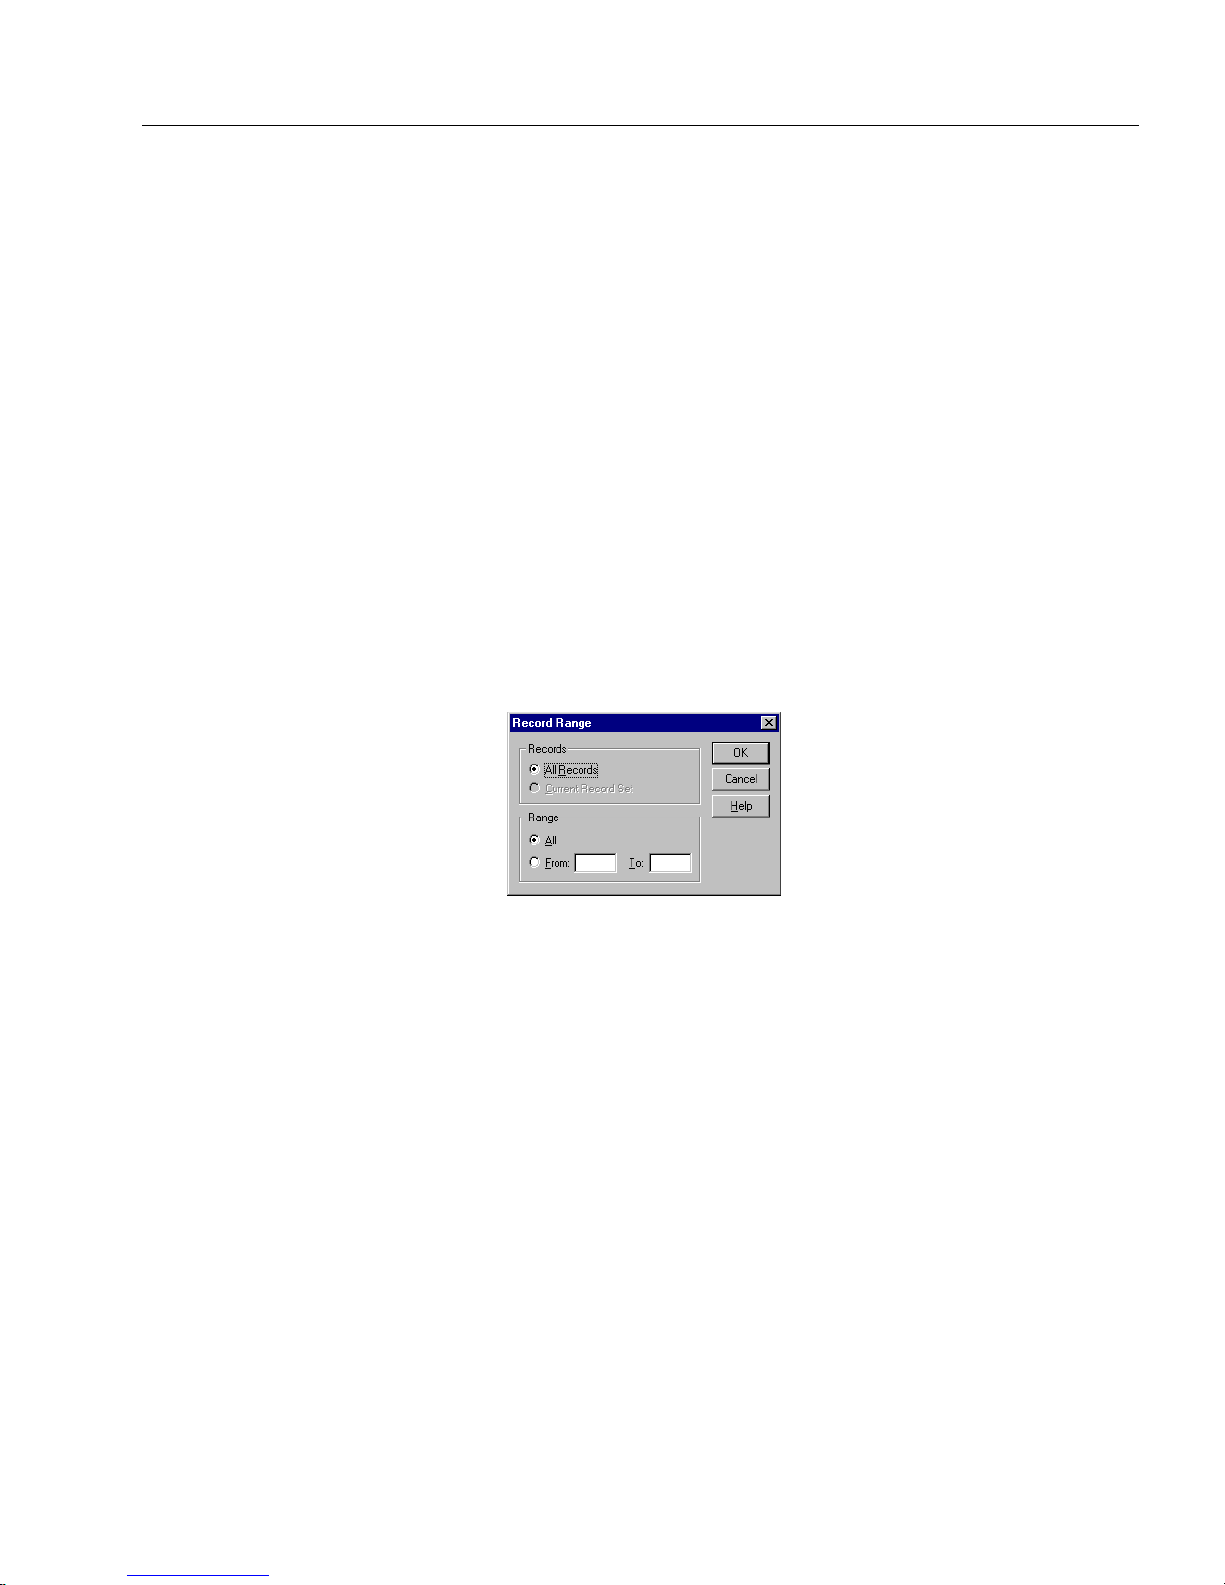
Click
Range...
to open the Record Range dialog box and specify
a range of records to send.
If you do not specify a range, OmniForm will send all records
by default.
7 Specify a range.
•Select
•Select
All Records
Current Record Set
to send all records in the current database.
to send the current found set of
records. This option is available after a search.
Type the first record number to send in the
text box and
From
the last record number to send in the To text box to specify a
range of records.
• Click OK to return to the Mail Options dialog box.
8 Click OK in the Mail Options dialog box.
A dialog box with your mail application program (either Lotus
CC: Mail/Notes or Microsoft Exchange/Outlook) appears.
OmniForm Procedures 15
Page 40

Saving a Form
9 Enter the appropriate information in your mail program’s
dialog box. Refer to your mail program’s documentation for
more information.
The following box shows the Lotus CC: Mail application dialog
box.
Adding a Routing Slip
Saving a Form
10 Click
Microsoft Exchange/Outlook users can add a routing slip to mail. See
the Microsoft Exchange/Outlook documentation for detailed
information.
To add a routing slip:
1 Open or scan in the form to send.
2 Choose
The Add Routing Slip dialog box appears.
3 Select the recipients and other routing information.
4 You can either send the document now or later.
• Click
•Click
This section explains how to save your form and how to use the
and
As...
an OmniForm Form, as a Word formatted form, or as a mailable filler.
Save As Mailable Filler...
to mail your information as specified.
Send
Add Routing Slip...
to route the document.
Route
Add Slip
to close the dialog box without routing the form.
in the File menu.
commands. You can save your form as
Save
Saving the Form
16 OmniForm Procedures
Click the Save button or choose
save your form at any time and in either fill or design View.
OmniForm saves your form in the default format: OmniForm
Form.
in the File menu. You can
Save
Page 41

Saving a Form
Using the
1 Choose
2 Select an option from the
3 Type the name of your file in the
4 Click
Save As...
Command
Save As...
in the File menu.
The Save As dialog box appears.
drop-down list.
•Select
•Select
Save as type
OmniForm Form
to save to OmniForm’s default format.
OmniForm 2.0 Form
to save to OmniForm’s 2.0 version.
This is useful if you have users with a 16-bit Filler. You save
your form in 2.0 so that users of the 16-bit Filler can access the
form. However, some features available in OmniForm 3.0
may not be displayed or printed in the 2.0 version.
•Select
Microsoft Word (RTF)
to save the form in the Microsoft
Word format.
text box if necessary.
or
OmniForm 2.0
,
.
Save
• If you have selected
File name
OmniForm Form
OmniForm saves the form to your chosen format.
• If you have selected
Microsoft Word
format, the Word
Converter Settings dialog box appears. Proceed to step 5.
5 Select an option under
•Select
if you do not want the converter to change the text
None
to fit the lines.
•Select
Size line by Scaling
width of the characters to fit the lines.
Line Retention
.
(Word 97 only) in order to change the
OmniForm Procedures 17
Page 42

Saving a Form
•Select
Size line by Character Spacing
in order to change the
amount of space between the characters to fit the lines.
6 Click OK.
OmniForm converts your form to the Microsoft Word format.
Open the converted form in Microsoft Word and select
Layout
in the View menu. You can now modify the form’s
design. To fill in the form’s fields, you must protect your form.
To do so, first select
then select
Forms
in the
Protect Document
Protect Document For
in the Tools menu, and
text box. If you
decide to modify the protected form’s design, you must select
Unprotect Document
in the Tools menu before you can modify
the form. Please refer to your Microsoft Word documentation
for more information.
Saving as a Mailable Filler
The mailable filler option is a
limited
function filler that allows other
users who do not have OmniForm installed to receive and fill out
OmniForm forms. This option is also a limited license usage, that is, you
can use it for up to 100 licenses (and each license can be used once for a
specific form).
1 Choose
Save As Mailable Filler...
in the File menu.
Page
• The Save As dialog box appears.
2Select
OmniForm Mailable Filler
3 Type the name of your file in the
4 Click
Save
.
in the
File name
Save as type
text box.
text box if necessary.
OmniForm saves the form as a mailable filler. You can then
send it electronically to a user to fill out and have the user
return it to you in the same manner.
18 OmniForm Procedures
Page 43

Chapter 5
Designing a Form
This chapter discusses how to design new forms and edit existing ones
in OmniForm. OmniForm contains numerous tools in design view that
let you create fields and objects, define calculations, and decide how
your form will look.
This chapter contains the following sections:
• The Design Process
• The Design View Window
• The Design View Toolbars
• Creating Objects
• Defining Objects
• Changing Object Appearance
• Redesigning Your Form
• Using the Scrapbook
• Inserting OLE Objects in a Form
The OmniForm\Sample Forms folder contains several sample forms
that you can use or redesign for your needs.
Designing a Form 1
Page 44

The Design Process
The Design Process
This section gives a brief overview of how to design a new form. A form
can be as simple as you need or as complex as OmniForm allows.
Although the steps below are not required, they are recommended.
See “Redesigning Your Form” on page 5-34 for information on how you
can change existing forms.
To design a new form:
1 Choose
2 Choose
3 Select page size, orientation, and margins, and click
4 Choose
5 Assign your form a name and location, and then click
Remember to save periodically so you do not lose any work.
6 Use the drawing toolbar to create objects on the form. See page
5-5 for more information.
7 Choose
objects that you have created.
You can assign unique names, filling, and validation properties
for each object.
8 Choose
object’s appearance if necessary.
You can set borders, background color, and other properties.
9 Use the font/text toolbar to format both text objects and fillable
objects. See page 5-5 for more information.
Text entered in fill view will take on the formatting that you
specify in design view.
in the File menu to open a new, blank form.
New
Page Setup...
Save As...
Object Definition...
Object Appearance...
in the File menu.
in the File menu.
in the Format menu to define the
in the Format menu to set the new
OK.
OK.
10 Drag the objects where you want them on the form and use the
11 Choose
12 Test your form in fill view.
2 Designing a Form
arrange toolbar to align them. See page 5-6 for more information.
Tab Or de r. ..
order for filling the form when it is in fill view.
in the Tools menu to set a logical tabbing
Page 45

The Design View Window
This section provides an overview of the design view window.
If a form is open in fill view, click the Design button in the standard
toolbar or choose
Design
The Design View Window
in the View menu to switch to design view.
Standard toolbar
Font/text toolbar
Drawing toolbar
To open a shortcut menu, click the right mouse button and choose
Design
in this menu.
The design view window (after registration) contains four toolbars and
seven menus. If you have not registered, the window will have eight
menus, including one for registration.
Arrange toolbar
Status bar: displays current
activity and settings.
The design view window also contains the calculation toolbar. Choose
Calculation
in the Tools menu to display this toolbar.
Use design view to edit and create fields on an existing form or to create
an entirely new form.
Designing a Form 3
Page 46

The Design View Toolbars
The Design View Toolbars
This section describes each toolbar in design view and defines its
buttons. There are five toolbars:
• The standard toolbar
• The font/text toolbar
• The drawing toolbar
• The arrange toolbar
• The calculation toolbar (See Chapter 8, Using Calculations, for
information on this toolbar and its functions.)
You can drag these toolbars to any other location in the OmniForm
window.
The Standard Toolbar in Design View
Use the standard toolbar for basic file operations such as saving and
printing. Use it also to define and format the fields you create.
All buttons correspond to menu commands of the same name. Refer to
the online help for an explanation of each button/menu command.
New
Open
Save
Form
Assistant
Scan
Preview
Print
Print
Spelling
Cut
Copy
Paste
Design
Fill
Highlight
Fill Areas
Zoom
Object
Definition
Object
Appearance
Calculation
Size and
Position
Help
Ta b
Order
4 Designing a Form
Page 47

The Font/Text Toolbar
Use the font/text toolbar to format text. This toolbar is only active when
a fill text, comb, comb element, circle text, or table cell object is selected.
The Design View Toolbars
Font
drop-down list
The drop-down lists and buttons correspond to options in the Font or
Text dialog boxes (choose
button displays a thumbnail example of how it formats text.
Text entered in fill view displays the formatting that you specify in
design view.
Refer to online help for an explanation of each button/menu command.
See “Formatting Text” on page 5-36 for detailed information on each
formatting option
The Drawing Toolbar
Use the drawing toolbar to create and select objects. Below is the toolbar
and a brief explanation of each tool’s function. See “Creating Objects” on
page 5-6 for detailed information on using the drawing tools.
Font Size
drop-down list
Bold Underline
Italic Left
Alignment
Font... or Tex t.. .
Center
Alignment
Horizontal
Right
Alignment
Center
Alignment
Justify
Ver tical
Top
Alignment
Bottom
Alignment
in the Format menu). Each
Selection tool — Select, move, and resize objects.
Text tool — Create a nonfillable text object.
Line tool — Create lines.
Oval tool — Create circles and ovals.
Rectangle tool — Create squares and other rectangles.
Graphic tool — Place graphics in your form in design view.
Fill Text tool — Create fillable text objects.
Comb tool — Create fillable comb objects.
Check Box tool — Create fillable check boxes.
Circle Text tool — Create fillable ovals or circles.
Table tool — Create fillable tables.
Fill Graphic tool — Create graphic fields that you fill in fill view.
Lock On/Off — Lock the currently selected tool so you can use it more
than once without reverting to the Selection tool.
Designing a Form 5
Page 48

Creating Objects
The Arrange Toolbar
Use the arrange toolbar to arrange and align objects on a form. Below is
the toolbar and a brief explanation of each button’s function. These
buttons correspond to the
Align, Bring to Front,
commands in the Format menu.
The last six buttons on the toolbar are only active when multiple objects
are selected. Each button gives a thumbnail example of how it aligns
objects.
Bring to Front — Move selected object(s) in front of other objects.
Send to Back — Move selected object(s) behind other objects.
Align Left — Align selected objects by their left edges. Objects align to the
outermost selected object.
Align Right — Align selected objects by their right edges. Objects align to the
outermost selected object.
Center Horizontally — Align selected objects by their horizontal centers.
Align Top — Align selected objects by their top edges. Objects align to the
outermost selected object.
Align Bottom — Align selected objects by their bottom edges. Objects align
to the outermost selected object.
Center Vertically — Align selected objects by their vertical centers.
and
Send to Back
Creating Objects
This section explains how to create objects. You can create fillable objects
that a user fills in fill view, and nonfillable objects such as lines and
rectangles that contribute to a form’s design.
This section discusses general creation guidelines and then lists all
objects in the same order as they appear in the drawing toolbar. All
instructions assume that you are in design view using either a new form
or a designed form.
See “Defining Objects” on page 5-16 for information on how to define
objects after you create them.
See Chapter 6, Filling a Form, for detailed information on how to fill
objects (fields) in fill view.
General Creation Guidelines
Use the same basic steps to create most objects. Some require more steps
as described in the following sections.
To create an object:
1 Click a tool in the drawing toolbar.
6 Designing a Form
Page 49

Creating Objects
2 Click anywhere on the form to create an object of a default size,
or hold down the mouse button and drag the tool to make the
object the size that you want.
3 While drawing, hold down the Shift key to:
• Make a rectangular object a square.
• Make an oval object a circle.
• Make a horizontal, vertical, or 45-degree angle line object.
4 With the object still selected, you can:
• Type text if it is a text or a circle text object.
• Choose
object. See “Defining Objects” on page 5-16 for detailed information.
• Choose
ject’s appearance. See “Changing Object Appearance” on
page 5-29 for detailed information.
• Hold down the Ctrl key and drag the object to copy it.
5 Drag the object where you want it on the form.
When the object is complete and no longer selected, the drawing tool reverts to the Selection tool unless the Lock On/Off is
on.
Creating a Text Object
A text object is most often used as a title, label, or header.
Text object used as label
1 Click the Text tool in the drawing toolbar.
2 Draw the text object.
3 With the object still selected, type the text that you want to
replace the word
Object Definition...
Object Appearance...
Label.
in the Format menu to define the
in the Format menu to set the ob-
The State fill text field
Creating a Line Object
Use a line object to separate sections of a form or as a design element.
1 Click the Line tool in the drawing toolbar.
2 Draw a line.
To make sure a line is horizontal or vertical, hold down the Shift key
while you draw.
Designing a Form 7
Page 50

Creating Objects
To rotate a line:
1 Click the Selection tool and select the line to edit.
A handle appears on each end of the line.
2 Place the cursor over one handle.
3 When the cursor turns into a crosshair, hold down the mouse
key and drag the end of line where you want it.
To rotate the line in 45-degree increments, hold down the Shift
key while pulling one of the handles in the desired direction.
Creating an Oval Object
Use an oval object to highlight areas on a form or as a design element.
1 Click the Oval tool in the drawing toolbar.
2 Draw an oval.
To create a circle, hold down the Shift key as you draw.
Creating a Rectangle Object
Use a rectangle object to highlight areas on a form or as a design
element.
1 Click the Rectangle tool in the drawing toolbar.
2 Draw a rectangle.
To create a square, hold down the Shift key as you draw.
8 Designing a Form
Page 51

Creating a Graphic Object
Use the Graphic tool to create a rectangular object for your graphics. You
can copy, import, or scan graphics into this object. This is useful when
you want the same graphic (such as a company logo) to appear in every
copy of the form.
To Copy a Graphic into a Graphic Object
This command is only available when you want to copy a graphic from
your original scanned in form. It is not available for forms that you
design in OmniForm. You must scan in a form before you begin the
following steps.
Creating Objects
Designed form without graphic
Horizontal bar
Original form with graphic
1 Choose
Form Image
in the View menu.
The screen splits to show the form both as it was designed with
Logical Form Recognition and as it was originally scanned.
Each view window has its own scroll bar so that you can scroll
to the same place in each form. You can also use the horizontal
bar in-between the two windows to resize the view, where your
cursor turns into a resize cursor over the bar.
2 Click the Graphic tool in the drawing toolbar.
Your cursor changes to a graphic tool shape in the top window
and a crosshair in the bottom.
3 Use the crosshair to draw a box around a graphic in the top
window.
Designing a Form 9
Page 52

Creating Objects
Graphic box where
graphic will be placed
Graphic in original form
A corresponding box appears in the bottom window.
4 With the object still selected, click the Object Definition button
in the standard toolbar or choose
Object Definition...
in the For-
mat menu.
The Graphic Definition dialog box appears.
5Select
Form Image
in the
Source
drop-down list.
6 Proceed to “Graphic Definition Options” on page 5-12 to con-
tinue.
A Shorter Way to Copy a Graphic into a Graphic Object
This command is only available when you want to copy a graphic from
your original scanned in form. You must scan in a form before you begin
the following steps.
1 Choose
10 Designing a Form
Form Image
in the View menu.
Page 53
Designed form without graphic
Horizontal bar
Original form with graphic
Creating Objects
The screen splits to show the form both as it was designed with
Logical Form Recognition and as it was originally scanned.
Each view window has its own scroll bar so that you can scroll
to the same place in each form.You can use the horizontal bar
in-between the two windows to resize the view. Your cursor
turns into a resize cursor over the bar.
2 Click the Graphic tool in the drawing toolbar.
3 Select the graphic that you want to copy (in the bottom win-
dow) by holding down the mouse button and slowly dragging
the cursor across the graphic. Your cursor changes to a graphic
tool shape in this window.
4 Let go of the mouse button and your graphic appears in your
designed form (the top window) in the same place as in the
original form (the bottom window).
5 The Graphic Definition dialog box automatically appears. Pro-
ceed to “Graphic Definition Options” on page 5-12 to continue.
To Import a Graphic into a Graphic Object
1 Click the Graphic tool in the drawing toolbar.
2 Draw a graphic object.
Designing a Form 11
Page 54

Creating Objects
To create a square graphic object, hold down the Shift key as you
draw.
The Graphic Definition dialog box appears.
3Select
Graphic File
4 Type a file name in the
Or, click
Browse...
in the
Source
File Name
drop-down list.
text box.
if you need to locate a file.
• Locate and select a file.
• Click OK to return to the Graphic Definition dialog box.
The name of the selected file appears in the
5 Proceed to “Graphic Definition Options” on page 5-12 to con-
tinue.
To Scan a Graphic into a Graphic Object
1 Click the Graphic tool in the drawing toolbar.
2 Draw a graphic object.
To create a square graphic object, hold down the Shift key as you
draw.
The Graphic Definition dialog box appears
3Select
Twai n
in the
Source
drop-down list.
File Name
text box.
12 Designing a Form
4 Proceed to the next section ”‘Graphic Definition Options” to
continue.
Graphic Definition Options
1 Select an option for the graphic.
•Select
Maintain Original Size
is.
to import the graphic exactly as it
Page 55

Creating Objects
•Select
Scale Proportionally
to fit the graphic in the fill graphic
field while maintaining its exact proportions.
•Select
Stretch to Fit
to change your graphic’s original shape
and size to fit in the fill graphic field.
This option does not maintain a graphic’s original proportions. Depending on the shape of the fill graphic field, your
graphic may be stretched or compressed. You might want to
use this for special effects.
•Select
Just Change the Options for this Graphic
ject already contains a graphic.
This changes how the graphic appears without reimporting it.
•Select
Store a Copy of the Graphic with the Form
of the graphic directly in the form. This increases form size depending on graphic file size. Otherwise, OmniForm loads the
graphic each time you open the form. If you move the original
graphic, OmniForm cannot load it and it will not appear in the
form until you reimport it.
This option only appears if
drop-down list.
2 Click
OK.
OmniForm scans or loads the graphic, depending on the
selected source. The graphic appears in the Graphic object box.
Creating a Fill Text Object
Use a fill text field wherever you want to enter text in fill view. Fill text
fields are commonly used for information such as name, company,
address, comments, and so forth.
1 Click the Fill Text tool in the drawing toolbar.
Graphic File
if the graphic ob-
to place a copy
is selected in the
Source
2 Draw the fill text object.
Designing a Form 13
Page 56

Creating Objects
To create a square field, hold down the Shift key as you draw.
Creating a Comb Object
Use a comb field to separate information into separate groups of
elements while maintaining the field as a whole. For example, United
States forms typically require that you enter zip code numbers in five or
nine separate boxes.
1 Click the Comb tool in the drawing toolbar.
2 Either click anywhere on the form to create a four-element
comb field, or move the cursor to anyplace on the form and
hold down the mouse button as you slowly drag the cursor.
The number of elements in the comb field increases as you drag
the mouse. Let go of the mouse button when the comb field
contains the number of elements that you want.
Many sample forms included with your OmniForm package, such as the
Objects form, contain comb objects that you can copy and paste into
your own form.
Creating a Check Box Object
Use check boxes for
choices on a form.
1 Click the Check Box tool in the drawing toolbar.
2 Draw a check box.
To create a square check box, hold down the Shift key as you draw.
Ye s /N o
Creating a Circle Text Object
questions and for selecting one or more
Use circle text objects for
choices on a form.
14 Designing a Form
Yes/No
questions and for selecting one or more
Page 57

1 Click the Circle Text tool in the drawing toolbar.
2 Draw a circle text object.
To create a circle instead of an oval, hold down the Shift key as you
draw.
3 With the object still selected, type the text that you want to
replace the number in the object.
Creating a Table Object
Use a table to enter information for order forms, invoices, comparison
charts, purchase orders, and so forth.
A table consists of cells. Each cell contains a fill text object by default,
with the exception of the header. The header cells contain text objects by
default.
Creating Objects
You can convert these objects to any other kind of object. You can insert
any object in a table cell. Cells can contain multiple objects.
See “Redesigning a Table” on page 5-38, “Placing Objects in Table Cells”
on page 5-43, and “Breaking a Table Apart” on page 5-39 for more
information on tables.
To create a table object:
1 Click the Table tool in the drawing toolbar.
2 Either click anywhere on the form to create a table, or move the
cursor to anyplace on the form and hold down the mouse but-
ton as you slowly drag the cursor.
The number of rows and columns in the comb field increase as
you drag the mouse. Let go of the mouse button when the table
contains the number of rows and columns that you want.
Designing a Form 15
Page 58

Defining Objects
To create a square table, hold down the Shift key as you draw.
Creating a Fill Graphic Object
Use a fill graphic object as a way to illustrate text (such as a diagram), or
as a design element (such as a company logo). You can only fill a fill
graphic in fill view.
A fill graphic can be different for every copy of a form in your file
because it is filled in fill view. If you want the same graphic to appear in
every copy of the form, then create a graphic object instead.
To create a fill graphic object:
1 Click the Fill Graphic tool in the drawing toolbar.
2 Draw the fill graphic object.
Defining Objects
This section describes the options in the Object Definition dialog box
and how they affect a selected object. The dialog box varies according to
the selected object and form language. Each definable object is described
in this section in the order it appears in the drawing toolbar.
When you define an object you can:
See the previous section, “Creating Objects” on page 5-6 to learn how to
create objects. See “International Settings” on page 3-7 for information
on selecting a form language.
To define an object:
To create a square, hold down the Shift key as you draw.
• Give it a unique name that is useful when sorting or searching
records, arranging tab order, or defining calculations.
• Provide filling options such as a list of possible entries and help
messages that appear in fill view.
• Set validation options such as whether a field must be filled or
can be skipped.
1 Select a fillable object on your form, a fillable object in a table
16 Designing a Form
cell, or a comb element in design view.
You cannot define nonfillable objects such as lines.
Page 59

2 Click the Object Definition button in the standard toolbar or
choose
Object Definition...
To open a shortcut menu, click the right mouse button over the
selected object. Choose
The dialog box that appears varies depending on the selected object. See
the following sections for descriptions of the definition options available
for each type of fillable object in a form.
Defining a Graphic Object
Click the Object Definition button in the standard toolbar (or choose
Object Definition...
in the Format menu) to open the Graphic Definition
Dialog box when a graphic object is selected. This dialog box lets you
select how you want the graphic object to appear in the fill graphic field.
See “Creating a Graphic Object” on page 5-9 for detailed information.
Defining a Fill Text Object
in the Format menu.
Object Definition...
Defining Objects
in this menu.
Click the Object Definition button in the standard toolbar (or choose
Object Definition...
in the Format menu) to open the Fill Text Definition
dialog box when a fill text object is selected. This dialog box allows you
to set property, filling, and validation options. The properties tab allows
you to:
• Provide a name for your field.
• Select a field type.
• Select a data format and define the format further.
Set Property Options
1 Click the
Properties
tab.
Designing a Form 17
Page 60

Defining Objects
2 Type a unique name in the
Name
text box.
Each object must have a unique name. A descriptive name such
as
Address
makes a field easy to find when sorting, searching,
defining calculations, and so forth.
3 Select a field type in the
drop-down list.
Typ e
The field type will be displayed in the status bar in fill view
when the cursor is in that field. This information helps the user
know what kind of entry is expected in each field. Field type
also helps OmniForm match data when sorting records and
when importing and exporting information.
4 Select a display format in the
Format
drop-down list.
The format you select affects how field information is displayed in fill view. Options vary according to the
• If you select
select
$0.00
Currency
as the format. If you enter 7889 in the field,
as the
for example, you might
Ty pe ,
Ty pe
selection.
OmniForm would format the entry as $7889.00.
Formatting takes effect in fill view after you move the
cursor out of the field.
•A
General
format leaves the field entry exactly as it is
entered. In the previous example, 7889 entered in the field
would be displayed as 7889.
• Field type also affects field validation. You can require that
the field entry match the field type. See “Set Validation
Options” on page 5-20 for information.
5 The next two options are enabled when
Percentage
•Select
with a separator specific to the form’s language.
See “International Settings” on page 3-7 for detailed informa-
tion on selecting a language for a form.
•Select
numbers within parentheses in the field; for example, -123
would display as (123).
Set Filling Options
1 Click the
• Enter a list of possible field entries so that the user can select
from a drop-down list in fill view.
• Designate whether a field can be filled.
• Set tab stops to allow the user to automatically move to the
next field.
is selected in the
Use 1000’s Separator
drop-down list.
Typ e
to separate a series of three digits
Enclose Negatives in Parentheses
Filling
tab. The Filling tab allows you to:
Number, Currency,
to display negative
or
18 Designing a Form
Page 61

Defining Objects
• Enter help messages that will appear in the status bar in fill
view.
2Select
List of Choices
if you want to be able to select a field entry
from a drop-down list of choices in fill view.
• Type an entry in the text box below the option and click
to place it in the list box.
You can enter up to 500 entries. Each entry can be up to 100
characters long.
• Select an entry in the list and click
Move Up or Move Down
reorder it.
• Select an entry in the list and click
Remove
to remove it.
• A field with a list of choices looks like this in fill view:
A drop-down list arrow appears when the cursor is in the field.
Click the arrow to open the list and select an entry. The entry
appears in the field.
3 Deselect or select
Can be Filled
.
Add
to
• If you deselect
Can be Filled
, then an empty field cannot be
filled and a filled field cannot be changed in fill view.
This option is particularly useful for fields such as calcula-
tions where you do not want the person who fills out the form
to be able to change it.
Designing a Form 19
Page 62

Defining Objects
• If you select
Can be Filled,
then an empty field can be filled and
a filled field can be changed in fill view.
The
Can be Filled
option when it is selected in the
in
4 You can either select or deselect the
option, when deselected, overrides the
Validation
tab.
Tab St op
. Select
Must be Filled
Tab St op
that the cursor automatically moves to the selected field when
the user presses the Tab key. Deselect
Tab Sto p
so that the cursor
tabs past the selected field.
5Select a
Maximum Length
option from the drop-down list. This
option lets you set the length of allowable characters in a field.
You can set the length from 5 to 100, or select
6Select
Help Message
and type a message in the field box if you
Unlimited
wish. This message will appear in the status bar in fill view
when the cursor is in that field.
In the example below, the help message tells the user how to fill
the field.
so
.
Set Validation Options
1 Click the
20 Designing a Form
A help message can be up to 100 characters long.
Validation
tab.
The validation option allows you to:
• Select whether a field must be filled in, the data must match
the field type, or the data must be in the list of choices.
Page 63

Defining Objects
• Select the highest and lowest number to specify the highest
and lowest number that a user can enter.
2Select
Must be Filled in
to display a prompt in fill view if the
user does not fill the field.
The
Can be Filled
the
Must be Filled in
3Select
option in the
Filling
option when it is selected.
Data Must Match Field Type
tab, when deselected, overrides
to display a prompt in fill
view if the user enters incorrect information in the field.
If the selected field type is
Number,
enter text in the field; 5 is acceptable but
4Select
Data Must be in List of Choices
choice from the field’s drop-down list. (Use the
for example, the user cannot
is not.
five
to force the user to enter a
Filling
create a List of Choices.)
5 Select the options under
Number Checking
to set parameters for
lowest and highest allowable numbers in a field.
Omniform displays a prompt in fill view if a user enters num-
bers outside the set range.
Number Checking
is the selected type in the
age
is enabled when
Properties
Number, Currency,
tab.
tab to
or
Percent-
•Select
Lowest Number
and enter a number in the text box.
Numbers entered in the selected field must be equal to or
greater than this number.
•Select
Highest Number
and enter a number in the text box.
Numbers entered in the selected field in fill view must be
equal to or lesser than this number.
Designing a Form 21
Page 64

Defining Objects
6 Select or deselect
this option then you force the user to enter data in the selected
field. Otherwise, users can choose to override the warning that
appears if they enter either no or inappropriate information in
a field (such as
7 Click OK to apply the changes and close the dialog box.
Defining a Comb Object
Choose
Definition dialog box when a comb object is selected.
Object Definition...
Allow user to override validation.
instead of 5 in a Number field).
five
If you deselect
in the Format menu to open the Comb
This dialog box contains most of the same options as the Fill Text
Definition dialog box, but with these additions:
• It contains an
Interpret As
drop-down list instead of a
Format
drop-down list.
• It contains an
• It contains a
Elements
Fill Right to Left
section.
option.
These options are described in this section. See “Defining a Fill Text
Object” on page 5-17 for detailed information on the other options.
Interpret As
The
Drop-Down List
Interpret As
selection determines the way information entered in the
comb field will be used when searching, sorting, importing, and
exporting. Available options vary according to the
For example, suppose you select
0.00
in the
Interpret As
drop-down list. If you enter 1234 in the field in
Number
in the
Type
selection.
Type
drop-down list and
fill view, OmniForm would interpret this number as 12.34 even if the
comb did not contain a decimal point as a
element. A search for
prefill
12.34 would return this record.
22 Designing a Form
Page 65

Defining Objects
A specific
Interpret As
setting is not necessary when you define the
correct prefill elements in a comb object, such as a decimal point.
OmniForm would know the entry in this case is a decimal number even
if you select the
Element
Options
General
option in the
Interpret As
drop-down list.
You have three element options: number of elements, width of elements,
and inter-element spacing:
1 Click the
Properties
2 Type a number in the
tab.
Number of Elements
text box.
A zip code field for the United States, for example, would have
either five or nine elements.
3 Type a number in the
Width of Elements
text box to set how wide
all comb elements will be.
You can resize individual elements later if you want to change
their width.
4 Type a number in the
Inter-Element Spacing
text box to set the
amount of space between each comb element.
You can resize individual elements later if you want to change
inter-element spacing.
Fill Right to Left
The
Fill Right to Left
Option
option allows you to designate whether you want
the user to fill the comb elements from right to left.
1 Click the
2Select
Fill Right to Left
Filling
tab.
if you want the first character in the
comb field to appear in the rightmost element and move left as
other characters are added.
You would still read this entry from left to right.
This is useful for entering decimal numbers, such as percentage
and currency amounts, in fields with a prefill decimal point element. When entering $598.07 in a field, for example, 07
would always appear after the decimal point. This would not
always happen if the numbers were entered from left to right.
3 Click OK to apply the changes and close the dialog box.
See “Defining a Comb Element Object” in the next section for
information on prefill elements.
Designing a Form 23
Page 66

Defining Objects
Defining a Comb Element Object
Choose
Object Definition...
in the Format menu to open the Comb
Element Definition dialog box when a comb element is selected.
This dialog box allows you to:
• Designate the border height of the element.
• Create a prefill element.
• Enter a number to designate the amount of allowable numbers
for each element.
To define a comb element:
1 Select left and right border measurements under
Border Height.
This sets the left and right border height of each element. You
might, for example, select
to use the popular half-border
1/2
height often seen on forms. See “Changing Object Appearance”
on page 5-29 for more information.
24 Designing a Form
2Select
Prefill element
to place a hyphen (the default character) or
other characters, such as a period, comma, or parenthesis in the
selected element. You will need to delete the hyphen and type
the character that you want.
This is useful for phone numbers and other hyphenated numbers. You can select this element in design view and change it
to another character such as a parenthesis.
3 Type a number in the
Length
text box.
This tells OmniForm how many characters to allow in the
selected element before moving to the next element. In some
countries, for example, the length of the area code element in a
phone number is 3.
4 Click OK to apply the changes.
Page 67

Defining a Check Box Object
Defining Objects
Choose
Object Definition...
in the Format menu to open the Check Box
Definition dialog box when a check box object is selected.
This dialog box allows you to set property, filling, and validation
options for your selected check box.
Set Property Options
1 Click the
Properties
2 Type a unique name in the
tab.
Name
text box.
Each object must have a unique name. A descriptive name such
as
Yes Ch ec k Bo x
makes a field easy to find when sorting, search-
ing, defining calculations, and so forth.
3 Type a group name in the
Option Group
drop-down list if the
check box belongs to an option group.
Creating an option group restricts you to one selection per
check box group. Selecting a check box in an option group
automatically deselects any checked box in the same group.
The group name you enter automatically appears in the
drop-down list of the next check box you create. Select
Group
this name to include the check box in the group.
4 Select or enter an option in the
On-Value
drop-down list.
The on-value is stored in the database when the check box is
selected. It is exported along with other information during
export. It can also be used in calculations. Grouped check boxes
must have unique on-values. You can let OmniForm create a
unique on-value for each new check box added to a group.
5 Select or enter an option in the
Off-Value
drop-down list.
The off-value is stored in the database when the check box is
deselected. It is exported along with other information during
export. It can also be used in calculations. This option is not
available for grouped check boxes.
Option
Designing a Form 25
Page 68

Defining Objects
Set Filling Options
1 Click the
2 Select a mark for the check box: a check mark, an X, or a fill.
Filling
tab.
3 Deselect
Can be Filled
filled field cannot be changed in fill view.
4Select
Tab St op
so that the cursor automatically moves to the
selected field when the user presses the Tab key.
Deselect
5Select
Tab St op
Help Message
bar in fill view when the cursor is in that field.
See page 5-20 for an example of a help message.
6 Click OK to apply the changes and close the dialog box.
Set Validation Options
There are two validation options:
override validation
1Select
.
Must be Filled in
box.
2 Select or deselect
this option then you force the user to enter data in the selected
field.
Otherwise, users can choose to override the warning that
appears if they enter either no or inappropriate information in
a field (such as
five
so an empty field cannot be filled and a
so that the cursor tabs past the selected field.
to type a message that appears in the status
Must be Filled in
and
Allow user to
to require that the user fill in the check
Allow user to override validation.
If you deselect
instead of 5 in a Number field).
Defining a Circle Text Object
26 Designing a Form
Choose
Object Definition...
in the Format menu to open the Circle Text
Definition dialog box when a fill circle object is selected.
This dialog box has the same options as the Check Box Definition dialog
box. See “Defining a Check Box Object” on page 5-25 for information.
Page 69

Defining a Table Object
Defining Objects
Choose
Object Definition...
in the Format menu to open the Table
Definition dialog box when a table object is selected. This dialog box lets
you:
• Set tabbing properties so that you can tab either from left to right
or top to bottom.
• Select the amount and width of columns.
• Select the amount and height of rows.
1 Define the table object. Click the
unique name in the
Name
text box.
Properties
tab and type a
Each table object must have a unique name. A descriptive
name such as
Order Information
makes a field easy to find when
sorting, searching, changing tab order, and so forth.
2 Select the
Bottom
3 Click the
Ta bb in g
. Click OK to apply the option.
Columns
want in the table in the
option that you want:
Left to Right
or
tab. Type the number of columns that you
Number of Columns
text box.
4 Set column width:
• Type the column width in the
Width of Columns
text box.
• If you have unequal column widths and would like them to be
the same width, select
Make Columns Equal Width
.
OmniForm resizes columns to an equal width without chang-
ing table size. If you had two columns, one four centimeters
wide and the other two centimeters wide, for example, each
would be resized to three centimeters wide.
5 Click OK to apply the option.
6 Click the
the table in the
tab. Type the number of rows that you want in
Rows
Number of Rows
text box.
7 Set row height:
Type the row height in the
Height of Rows
text box.
Top to
Designing a Form 27
Page 70

Defining Objects
If you have unequal row height and would like all the rows to
be the same height, then select
OmniForm resizes rows to an equal height without changing
table size. If you had two rows, one four centimeters high and
the other two centimeters high, for example, each would be
resized to three centimeters high.
8 Click OK to apply the option.
Defining a Table Cell
A table cell contains a fill text object by default. See “Defining a Fill Text
Object” on page 5-17 for more information. See any relevant entry in this
section if the table cell contains another type of object.
A table cell can contain more than one object. It can also contain
graphics. See “Placing Objects in Table Cells” on page 5-43 for
information.
Defining a Fill Graphic Object
Make Rows Equal Height
.
Choose
Object Definition...
in the Format menu to open the Fill Graphic
Definition dialog box when a fill graphic object is selected.
1 Type a unique name in the
Name
text box.
Each graphic object must have a unique name. A descriptive
name such as
makes a fill graphic field easy to find when
Logo
importing, exporting, and changing tab order.
2 You can either select or deselect the
Tab St op
. Select
that the cursor automatically moves to the selected field when
the user presses the Tab key. Deselect
Tab Sto p
so that the cursor
tabs past the selected field.
3Select
Help Message
and type a message in the text box. This
message will appear in the status bar in fill view when the cursor is in that field.
See page 5-20 for an example of a help message.
Tab St op
so
4 Click OK to apply the changes.
28 Designing a Form
Page 71

Changing Object Appearance
This section describes the options in the Object Appearance dialog box
and how they affect a selected object. See the section “Creating Objects”
on page 5-6 to learn how to create objects.
To change object appearance:
1 Select an object or objects in design view.
2 Click the Object Appearance button in the standard toolbar or
choose
To open a shortcut menu, click the right mouse button over the
selected object. Choose
The Object Appearance dialog box appears. The next four sections describe
Available options depend on the selected object.
Object Appearance...
Background, Border, Fill Line,
in the Format menu.
Object Appearance...
Changing Object Appearance
in this menu.
and
Visible
options.
Set the Background
1 Click the
2 For background color of the object, select a color from the
drop-down list.
3 For background pattern of the object, select a pattern from the
Pattern
drop-down list.
Background
tab.
Color
4 For a color for the background pattern, select a pattern color
from the
Pattern Color
drop-down list.
Designing a Form 29
Page 72

Changing Object Appearance
5 Make sure that
is deselected so that your selected colors
Clear
and pattern appear as the object’s background.
See “Paint Order” on page 5-32 for a description of how paint order
affects color and pattern display.
Set the Border
1 Click the
Border
tab.
2 For a border color, select a color in the
3 To change a line style, select
from the drop-down list.
Style
4 To change the border thickness, select
drop-down list.
Color
Weight
from the drop-
down list.
5Select
to hide the border and OmniForm will display any
Clear
paint layers beneath it.
See“Paint Order” on page 5-32 for an explanation of how paint
order affects border display.
6The
Borders
The rectangle in the
your object selected, click each side of the
section lets you remove borders from your object.
Borders
section represents your object. With
Borders
rectangle that
you want to remove.
7 To round the corners of the border, select
Rounded
.
To round or square individual corners, click the corners of the
rectangle after selecting
Rounded.
8 To indicate the degree of border curve, enter a measurement
from 0 to 14 in the
Rounded
9 For a shadow effect, select an option in the
list in the
Shadow
section.
text box.
Location
drop-down
30 Designing a Form
Page 73

Changing Object Appearance
10 To offset the shadow from the border, select the amount of
points in the
drop-down list.
Offset
11 Click
to apply the changes.
OK
Set Fill Lines
Options in this tab are only active for selected fill text objects. Text
alignment must be set to
Left
and
To p
or
Exactly
in the Text dialog box
before fill lines can be set. See “Formatting Text” on page 5-36 for
information.
1 Click the
Fill Lines
tab.
Fill lines appear inside the object much like lines appear on
writing paper.
2 Select a color for the fill lines in the
3 Select a line style in the
4 Select line thickness in the
5 Deselect
to display the fill lines.
Clear
drop-down list.
Style
Weight
drop-down list.
drop-down list.
Color
See “Paint Order” on page 5-32 for information on how paint
order affects fill line display.
Designing a Form 31
Page 74

Changing Object Appearance
The
6Select
Start Fill Line at First Line Indentation
to indent the first fill
line the same amount as the first line of text entered in the field.
See “The Text... Command” on page 5-37 for more information.
7 Click OK to apply the changes and close the dialog box.
Visible
Tab
1 Click the
Visible
tab.
2 Select how you want the selected object to appear to the user.
•Select
Always
if you want the field/object to always appear on
screen and when printed.
•Select
if you do not want the field/object to appear in
Never
fill view. However as the designer of the form, you can see the
object in design view.
•Select
Print Only
if you want the field/object to appear on the
printed form, but not on the screen.
•Select
Screen Only
when you want the field/object to appear
on the screen, but not when printed.
3 Click OK to close the dialog box when you are done.
Paint Order
OmniForm uses a specific paint order. For example, a table object itself
is painted first, then the cells inside the table, and then objects inside the
cell. This makes it possible to have three layers of paint. The last layer
painted in an object overrides all other layers. Because objects inside a
cell are painted last, they will cover up the cells and portions of the table.
If an object’s background or border is
however, then that part of
Clear,
the object is transparent and an object painted below can show through.
32 Designing a Form
Page 75

The Shared Form Property
You can use the
menu to change paint order.
Send to Back
The Shared Form Property
You can set up a shared form whenever you need to do so. By creating
a shared form, you allow other users to have access to the form. You also
allow multiple uses to open and fill the form at the same time.
To set up a shared form:
1 Open a form to design view.
2 From the File menu, select
A Properties dialog box appears.
Select the
Sharing
and
Bring to Front
Properties...
tab and click
Shared
commands in the Format
.
.
3 Click OK to apply the change.
The shared form settings are not applied until the form is saved and
closed.
Designing a Form 33
Page 76

Redesigning Your Form
Redesigning Your Form
This section describes how to redesign a form using the design view
tools and commands. Once you have created objects, you may want to
move, resize, or convert them. You may also want to make changes to a
newly scanned or imported form.
This section contains the following topics:
• Selecting an Object
• Moving an Object
• Resizing an Object
• Deleting an Object
• Formatting Text
• Merging Text
• Redesigning a Table
• Breaking a Table Apart
• Aligning Objects
• Sending Objects Front or Back
• Changing Tab Order
• Placing Objects in Table Cells
• Converting an Object
Selecting an Object
You can select one or more objects in several ways.
• Click an object to select it.
• Shift-click to select multiple objects.
• Click an object such as a table once to select it, and then click
again to select an individual table cell. Do the same to select an
individual comb element.
• Hold down the mouse button and drag the cursor around or
through all objects to select them.
• Choose
Select All
in the Edit menu to select all objects on a form.
34 Designing a Form
Page 77

Redesigning Your Form
• Choose
same type.
Moving an Object
You can move a selected object or objects in several ways.
• Hold down the mouse button and drag the selected object to
another location.
• Choose
selected object precisely on the form.
• Use the
ing button in the arrange toolbar to align selected objects.
Select Special...
Size and Position...
commands in the Format menu or the correspond-
Align
in the Edit menu to select all objects of the
in the Format menu to position the
• Use the
menu or the corresponding buttons in the arrange toolbar to
layer overlapping objects.
• Hold down the Shift Key and drag a line handle to rotate it in
45-degree increments.
• Use the nudge/arrow keys to move the object(s).
Resizing an Object
You can resize a selected object in one of two ways.
Click any handle on the selected object, hold down the mouse button
and resize the object as needed.
Hold down the Shift key before clicking a handle to:
• Constrain an oval or a fill circle object to a circle shape
• Keep a line object straight
• Constrain any other object to a square shape.
Or, choose
measurements for an object’s size.
Size and Position...
Bring to Front
and
Bring to Back
commands in the Format
in the Format menu to enter exact
Designing a Form 35
Page 78

Redesigning Your Form
Deleting an Object
Choose
Delete
to delete one or more selected objects.
Formatting Text
Use the
corresponding buttons in the font/text toolbar to format selected
objects. See “The Font/Text Toolbar” on page 5-5 for information about
each button in the toolbar.
The
Font...
Font...
Command
1 Select the text/fill objects that you want to format.
Text entered in fill view takes on formatting assigned to fill
objects in design view.
2 Choose
The Font dialog box appears.
in the Edit menu or press the Delete key on your keyboard
and
Font...
commands in the Format menu or the
Text...
in the Format menu.
3 Select a font in the
4 Select a style for the selected font in the
5 Select a point size for the selected font in the
6 You can also select two options in the
7 Click OK to apply the formatting.
36 Designing a Form
list.
Font
Font style
box.
Effects
• To place a line through all characters, select
• To underline all characters, select
A preview of your choices appears in the
Underline
Sample
list.
list.
Size
Strikeout
.
box.
.
Page 79

The
Text...
Command
1 Select the text/fill objects that you want to format.
Text entered in fill view takes on formatting assigned to fill
objects in design view.
Redesigning Your Form
2 Choose
in the Format menu.
Te xt .. .
The Text dialog box appears.
3 Click the
Alignment
4 Select a horizontal alignment option:
.
tify
5 Select a vertical alignment option:
Exactly
6 Click the
Lines, Double
.
Spacing
, or
tab.
Left, Center, Right
To p, Center, Bottom
tab and select a line-spacing option:
Exactly
.
, or
Single, 1.5
You can change the vertical spacing between paragraph lines.
Vertical spacing is dependent on selected font size. A singlespaced paragraph with 12-point text, for example, would have
12 points between each line in the paragraph.
, or J
us-
7 If you want to indent the first line of each paragraph, type a
measurement in the
8 Click the
Margins
Left, Right, Top,
Paragraph Indentation
tab and enter margin measurements in the
and
Bottom
text boxes.
text box.
This measurement is the amount a paragraph will be offset
within its
bounding box.
You may want to use margins if you
have field borders that would interfere with reading the text.
9 Click the
Tex t F lo w
tab and select how you want text to flow
within the set margins of a field.
This option is available only for text and circle text objects.
Designing a Form 37
Page 80

Redesigning Your Form
Each line can be selected
separately and resized.
OmniForm uses the
scanning and importing. Generally, you would want to use the
Across Lines
•Select
Flow Text Across Lines
to enter text in a field with auto-
matic word-wrapping.
•Select
Make Text Fit to Lines
to fit text to the size of the line. This
can alter the appearance of text.
Press Enter to create a new line of text. Each new line can be
resized separately from other lines.
Make Text Fit to Lines
option to design forms during
Flow Text
option when formatting your text and circle text objects.
•In the
Orientation
box, select how you want the text posi-
tioned:
Select the first box to position the text from left to right.
Select the middle box to position the text from bottom to
top.
Select the last box to position the text from top to bottom.
10 Click
OK
Merging Text
You can merge text objects by choosing
This option is useful if you want to combine text from different locations
on your form.
To merge text:
1 Shift-click each text object that you want to combine.
2 Choose
Your selected text merges. The merged text will acquire the
attributes of the top-left selected text (except for the font type
and size).
Redesigning a Table
Use the
selected table.
Table AutoFormat...
to apply the changes.
Merge Text
in the Format menu.
command in the Format menu to format a
Merge Text
in the Format menu.
38 Designing a Form
Page 81

To format a table:
1 Select a table.
Redesigning Your Form
2 Choose
Table AutoFormat...
in the Format menu.
The Table AutoFormat dialog box appears.
3 Select the
option to enable the
Ye s
Appearance
4 Select an appearance option for your table.
5 Click
if it is available to open the
Next>
Naming
Depending on your appearance selection, the
may not be available. In that case, click
Finish.
list box.
window.
Naming
window
6Select
Yes, change the column names
want to change the column names.
• Select a column name, click
• Repeat these steps for each column name to change.
7Select
Yes, change the row names
change the row names.
• Select a row name, click
• Repeat these steps for each row name to change.
8 Click
Finish
See “Placing Objects in Table Cells” on page 5-43 for additional
information on tables.
Breaking a Table Apart
Use
Break Table Apart
sections. This option is useful if you need to rearrange the elements of
your table.
if it is available and you
Rename,
and type in a new name.
if it is available and you want to
Rename,
and type in a new name.
to apply the changes to your table.
in the Format menu to break a selected table in
Designing a Form 39
Page 82

Redesigning Your Form
You cannot regroup the objects once you break them apart. For this
reason, you might want to save your table before you break it apart; and
if you do not like what you have created, you can always revert to the
saved copy.
To break a table apart:
1 Select a table in your form.
2 Choose
You can now select and drag sections of your table to rearrange
in the order that you want.
Aligning Objects
Use the Align commands in the Format menu or the corresponding
buttons in the arrange toolbar to move and align multiple selected
objects. See “The Drawing Toolbar” on page 5-5 for information about
each button in the toolbar.
Each selected object aligns to the edge of its bounding box, the
imaginary box that surrounds all objects. A bounding box appears when
you select an object and hold down the mouse button. Objects align to
the outermost selected object.
To align objects:
Break Table Apart
Bounding box
in the Format menu.
1 Select the objects to align.
2 Choose
40 Designing a Form
in the Format menu and an alignment command
Align
in its cascading menu, or click the appropriate button in the
align toolbar.
•Select
•Select
to align all selected objects by their left edges.
Left
to align all selected objects by their right edges.
Right
Page 83

Redesigning Your Form
•Select
Center Horizontally
horizontal centers.
Horizontal centers’
alignment midpoint
•Select
•Select
to align all selected objects by their top edges.
To p
Bottom
to align all selected objects by their bottom edg-
es.
•Select
Center Vertically
vertical center.
Vertical centers
to align the selected objects by their
Horizontal centers
to align the selected objects by their
The objects align according to the chosen command.
Sending Objects Front or Back
You can use the
menu to layer overlapping objects.
Choose
Bring to Front
objects on a form.
Choose
Send to Back
objects on a form.
Bring to Front
to move one or more selected objects in front of all
to move one or more selected objects behind all
Vertical centers’ alignment midpoint
or
Send to Back
commands in the Format
Designing a Form 41
Page 84

Redesigning Your Form
Changing Tab Order
Tab order is the order in which the cursor moves from field to field on a
form in fill view. You may want to change tab order if you have added,
deleted, or moved fillable objects in design view.
To change tab order:
1 Click the Tab Order button in the standard toolbar or choose
Tab Order...
in the Tools menu.
The Tab Order window appears to the right of the form and
numbers appear by each object on the form. Both indicate current tab order.
2 Select the field to reorder.
3 Reorder the field in one of the following ways:
42 Designing a Form
Note that the corresponding object on the form is selected.
• Select a field in the window and drag it up or down to change
its tab order.
• Click the
Move Up
button to move the selected field up. Click
as many times as needed to move it into place.
• Click the
Move Down
button to move the selected field down.
Click as many times as needed to move it into place.
Page 85

Redesigning Your Form
• Click
Auto Order
to place all fields in the original creation order on a form designed by OmniForm during scanning or import.
If you created the form in OmniForm, the program uses
“smart” auto ordering. OmniForm generally reorders fields
from left to right and top to bottom.
• You can also change the tab order within a cell if it contains
multiple fillable fields. To do so, click a field with a plus sign
in front of it to display its list of contained fields. Select one of
the objects within the cell and either drag it or use the
or
Move Down
buttons.
4 The corresponding tab order numbers on the field change
when you reorder a field in the Tab Order dialog box.
5 Click the Tab Order button in the standard toolbar or choose
Tab Order...
in the Tools menu to close the Tab Order window.
Placing Objects in Table Cells
Each table cell contains one fill text object by default (except for column
headers which contain a text object). A cell can contain more than one
object, fillable or nonfillable.
Move Up
To place objects in a table cell:
1 Select a tool in the drawing toolbar.
2 Your cursor changes to reflect that object.
3 Move the cursor over the cell to fill so that it highlights the cell.
4 Click to place the object in the cell, or hold down the mouse
button and draw an object to the size that you want.
To resize an object to fit a cell exactly:
1 With the object in the table cell still selected, choose
Position
in the Format menu.
Size and
The Size and Position dialog box appears.
2Select
Snap Object(s) to Fit Table Cell.
3 Click
OK.
Designing a Form 43
Page 86

Using the Scrapbook
4 The object resizes to fit the cell exactly.
Converting an Object
You can convert any selected object to another type of object. You might,
for example, want to convert objects in table cells to check boxes.
Be careful when converting objects in an existing form. If the old object
contained information, you will permanently lose that object’s
information in every record.
You can also convert objects that were not defined properly during
import; for example, OmniForm might define a line with space above it
as a fill text field. You could convert this to a line.
To convert a selected object:
1 Choose
The Convert dialog box appears.
2 Select an object type in the
The object is converted.
Use the
a specific type.
Select Special...
Using the Scrapbook
This section describes the OmniForm scrapbook and how to use it.
What Is the Scrapbook?
The scrapbook is a convenient place to store frequently used or complex
objects. Objects stored in the scrapbooks are called
these scraps into any form. You can use one of the several scrapbook
files provided with OmniForm or create your own.
Convert...
in the Edit menu.
Convert Object(s) To
command in the Edit menu to select all objects of
list and click
scraps.
You can copy
OK.
44 Designing a Form
Page 87

Opening a Scrapbook
Using the Scrapbook
Stored graphic file
(a scrap)
1 Choose
Scrapbook
in the Tools menu.
The scrapbook opens to the left of the OmniForm window.
Scrapbook Commands iconCurrent scrapbook
2 Select a scrapbook to view in the
create your own.
See “Creating a New Scrapbook” on page 5-46 for information.
Copying Objects to the Scrapbook
1 Open the desired scrapbook.
2 Select one or more objects on your form and drag them into the
scrapbook.
Or, select one or more objects and choose
Scrapbook Commands icon menu.
Small thumbnail sketches of the objects appear as
forth in the scrapbook.
You cannot store an OLE object in the scrapbook.
Scrapbook
Scrap 1, Scrap 2,
drop-down list, or
Paste Scrap
in the
and so
Designing a Form 45
Page 88

Using the Scrapbook
Placing Scraps in a Form
1 Open the desired scrapbook.
2 Select a scrap and drag it into your form.
Or, select a scrap and choose
mands icon menu.
You can select only one scrap at a time. The selected scrap appears as the
original object in your form.
Renaming a Scrap
1 Select a scrap.
Copy Scrap
in the Scrapbook Com-
2 Choose
3 Type a new name for the scrap and press Enter to accept the
name.
Press Esc to cancel the command and leave the name as it is.
Rename Scrap
Deleting a Scrap
1 Select a scrap.
2 Choose
You can also press the Delete key to delete a selected scrap.
You cannot undo the
3 OmniForm prompts you to confirm your choice.
Delete Scrap
Creating a New Scrapbook
in the Scrapbook Commands icon menu.
in the Scrapbook Commands icon menu.
Delete Scrap
command!
1 Choose
2 Type a name in the
3 Click
46 Designing a Form
New Scrapbook...
The New Scrapbook dialog box appears.
OK.
in the Scrapbook icon drop-down list.
Scrapbook Name
text box.
Page 89

A new, empty scrapbook appears.
Renaming a Scrapbook
1 Open the scrapbook to rename.
Using the Scrapbook
2 Choose
menu.
3 The Rename Scrapbook dialog box appears.
4 Type a name in the
5 Click
The new scrapbook name appears in the
list.
Rename Scrapbook...
OK.
Deleting a Scrapbook
1 Open the scrapbook to delete.
2 Choose
Delete Scrapbook
in the Scrapbook Commands icon
New Name
in the Scrapbook Commands icon menu.
text box.
Scrapbook
drop-down
You cannot undo the
3 OmniForm prompts you to confirm your choice.
You can also delete a scrapbook file directly from the hard drive.
Scrapbook files are stored in the location c:\OmniForm\Scrapbooks.
Always close OmniForm before deleting any OmniForm files from the
hard drive.
Delete Scrapbook
Changing the Scrapbook View
1 Choose
2 Select a view in its cascading menu.
• Choose
stored objects.
• Choose
Scraps are listed in the order they were created in both
views.
List
in the Scrapbook Commands icon menu.
View
to view the scraps as thumbnail sketches of the
Icons
to view the scraps as a list.
List
command!
and
Icon
Designing a Form 47
Page 90

Inserting OLE Objects in a Form
Inserting OLE Objects in a Form
This section describes how to use
insert objects in a form.
Inserting objects is a convenient way to place information from other
sources in OmniForm. OmniForm supports objects created in a variety
of applications.
For example, instead of scanning a page of text into OmniForm, you
could create a Microsoft Word Document object and insert it in the form
either as fully displayed text or as a launchable icon. This saves you
scanning and editing time. An OLE object displayed as an icon also
saves form and disk space.
Linking and Embedding
You can either link or embed an object when you insert it. This section
describes both methods.
Object Linking
A linked object retains a connection, or
file is the file you select to insert as an OLE object.
The source file stores the linked data. The OmniForm form stores the
location of the source file and displays the linked object. Changes to the
source file are reflected in the linked object.
object linking and embedding
to the source file. The source
link,
(OLE) to
Use linking when:
• The source file is likely to change.
• The source file is on a network or needs to be accessed by others.
• The source file is shared by more than one document.
• The source file is very large and you do not want to increase your
form’s file size significantly.
Object Embedding
An embedded object becomes part of the OmniForm form. It is not
linked to the source document.
Use embedding when:
• It is unlikely the object will need to be changed or updated.
• The source document is unavailable for linking.
• You are not concerned about the file size of your OmniForm
form.
48 Designing a Form
Page 91

How to Insert OLE Objects
Inserting OLE Objects in a Form
1 Choose
Insert New Object...
in the Edit menu.
The Insert Object dialog box appears.
2 Select an object type in the
Object Type
list box.
3 Select one of the following.
• To create a new object of the type selected and embed it in
your form, select
Create New
. Proceed to step 4.
• To import a file of the type selected and either embed it or link
it to your form, select
Create From File
. The dialog box changes.
Proceed to “Creating an OLE Object From a File” on page
5-51.
4Select
Display As Icon
to display the object as an icon, rather
than displaying its actual content.
The
Change Icon...
button appears when
selected. Click it to select a new icon for the object or to change
the icon’s name. By default, an object appears with the object
type name if it is unlinked and the source file name if it is
linked.
5 Click
OK.
How the object appears depends on the options that you
selected. See “Creating a New OLE Object” on page 5-50 for
detailed information.
You cannot store an OLE object in the scrapbook.
Display As Icon
is
Designing a Form 49
Page 92

Inserting OLE Objects in a Form
Creating a New OLE Object
See the previous section, “How to Insert OLE Objects” on page 5-49 if
you need to insert an object. How your object appears depends on the
options you selected in the Insert Object dialog box.
Source application
menus
OmniForm form
If you selected
Display As Icon
in step 4 in the previous section, the
source application launches. Use its commands and tools to create your
object. Choose
If you did not select
in the File menu to insert the object as an icon.
Exit
Display As Icon,
an OLE window appears (some
applications do not support OLE windows and the object will launch in
the application itself). The OmniForm window changes to reflect the
application window for the selected object type:
• The name in the title bar changes to that of the source application.
• The embedded object appears as an empty OLE window within
the application window. Create your object here.
• All menus but the File and Windows menus change to those of
the source application.
• All toolbars change to those of the source application.
If you selected
Bitmap Image,
for example, you can use the Microsoft
Paint menu commands and tools and some OmniForm commands.
OLE window
with newly created bitmap image to be
embedded
Paint tools
used to create
object
50 Designing a Form
Create your object in the available window. Click outside the window or
press the Esc key to embed the object in your form when you are done.
Page 93

Creating an OLE Object From a File
See steps 1–3 in the section “How to Insert OLE Objects” on page 5-49 if
you need to create an object. The Insert Object dialog box changes when
you select
Create from File.
Inserting OLE Objects in a Form
1 Type a file name in the
Or, click
Browse
to locate a file. Select a file, and click OK to
return to the Insert Object dialog box.
2Select
if you want to link the object to its source file.
Link
Otherwise, the object will be embedded.
3Select
Display As Icon
than displaying its actual content.
The
Change Icon...
button appears when
selected. Click it to select a new icon for the object or to change
the icon’s name. By default, an object appears with the object
type name if it is unlinked and the source file name if it is
linked.
4 Click
OK.
The object appears in your form.
Pasting a Linked OLE Object
You can paste information from another application into OmniForm as
a linked OLE object. For example, you could copy cells from an Excel
spreadsheet to the Clipboard. When you open OmniForm, the
command in the Edit menu will be active. The object, once pasted, is
linked to the copied cells.
text box.
File
to display the object as an icon, rather
Display As Icon
is
Paste Link
To paste a linked OLE object:
1 Open a document in an application that supports links to its
documents.
2 Select the portion to link and leave it selected.
Designing a Form 51
Page 94

Inserting OLE Objects in a Form
3 Open a form in OmniForm.
Use the
linked object. See the next section for information.
Using the
This section describes the
active if you have linked objects in the current form. Use the
command to update or break links, open an OLE object, or change an
OLE source file.
To use the
4 Choose
OmniForm pastes the information as a linked OLE object.
Links...
Links...
Paste Link
command in the Edit menu to set linking options for any
Command
Links...
1 Choose
2 The Links dialog box appears.
Links...
in the Edit menu.
Links...
command:
in the Edit menu.
command. This command is only
Links...
52 Designing a Form
3 Select a link and click
•Select
each time you open a form.
This is useful if the source file is updated frequently by you or
other users and you want to keep the linked object current.
•Select
date Now
This is useful if you do not want the linked object to reflect all
changes made to the source file.
4 Select a link and click a button to perform a linking procedure:
• To update the selected link to reflect any changes made to its
source file, click
• To launch the selected link in its source application, click
Source
Automatic
Manual
.
to update only the selected link by using the
button in the Links dialog box.
Automatic or Manual.
to update the selected link automatically
Update Now
.
Open
Up-
Page 95

Inserting OLE Objects in a Form
• To change the source file to which the object is linked, click
Change Source
The Change Source dialog box appears.
.
Using the
The
object is selected. It changes according to the selected object. The
commands in its cascading menu change as well. This section describes
each command.
Select a new source file for the object and a file type in the
of type
the server application, if one exists.
Click OK to return to the Links dialog box. You can use the
Convert...
source has changed. See “Convert...” on page 5-54 for information.
• To permanently unlink an object from its source file and convert it to a static OLE object, click
An object converted to a static OLE object cannot be edited, opened,
reconverted, or played.
The
procedure.
5 Click
Object
Object
drop-down list.
command to assign a new name to the object after its
Cancel
button changes to
when you are done.
Close
Item Name
Commands
command in the Edit menu is only available when an OLE
is assigned automatically by
Break Link
after you complete a linking
Close
.
Files
Designing a Form 53
Page 96

Inserting OLE Objects in a Form
Open
Edit
Choose
in the Object cascading menu to view a selected OLE object
Open
in its source application.
• Linked objects and objects displayed as icons open in the source
application. Choose
in the File menu when you are done.
Exit
• Unlinked objects not displayed as icons open in the window in
which you created them. Click outside this window when you
are done.
Choose
in the Object cascading menu to edit a selected OLE object
Edit
in its source application or in the OLE window in which it was created.
Or, double-click the OLE object to open it.
• Linked objects and objects displayed as icons open in the source
application. Edit the object and choose
in the File menu
Exit
when you are done.
• Unlinked objects not displayed as icons open in the window in
which you created them. Edit the object and click outside the
window when you are done.
Convert...
Use the
Convert...
command to convert a selected OLE object to another
type of object or to an icon, to choose a different icon, or to rename an
icon.
1 Select the object and choose
Convert...
in the Object cascading
menu.
The Convert dialog box appears.
An object converted to a static OLE object cannot be edited, opened,
reconverted, or played.
2 Select an option in the
Object Type
list box.
The available options depend on the selected object. There may
be no available options.
3Select
Display As Icon
if you want to display the object as an
icon, rather than displaying its actual content.
54 Designing a Form
Page 97

Inserting OLE Objects in a Form
4 Click
Change Icon...
when
Display As Icon
is selected if you want
to select a new icon or change its name.
The
Change Icon...
button appears when
Display As Icon
selected. Click it to select a new icon for the object or to change
the icon’s name. By default, an object appears with the object
type name if it is unlinked and the source file name if it is
linked.
5 Click
OK.
The object is converted.
Play
Choose
in the Object cascading menu to play a selected OLE object
Play
in its source application or in the OLE window in which it was created.
This command is only available for video clip, media clip, and MIDI
sequence objects.
• Linked objects and object displayed as icons open in the source
application. Play the object and choose
in the File menu
Exit
when you are done.
• Unlinked objects not displayed as icons open in the window in
which you created them. Play the object and click outside the
window when you are done.
is
Designing a Form 55
Page 98

Inserting OLE Objects in a Form
56 Designing a Form
Page 99

Chapter 6
Filling a Form
This chapter describes what kinds of fields a form can contain, how to
fill those fields, how to move through fields on a form, and how to use
the standard toolbar.
This chapter contains the following sections:
• The Fill View Window
• Moving Through Fields
• Filling Fields
• Spell Checking
• Saving in Fill View
You must first open, scan, or import a form to fill it.
Filling a Form 1
Page 100

The Fill View Window
The Fill View Window
This section provides an overview of the fill view window.
If you are in design view, click the Fill button in the standard toolbar or
choose
in the View menu to switch to fill view.
Fill
Standard toolbar
To open a shortcut menu, click the right mouse button and choose
this menu.
The fill view window contains a toolbar and seven menus.
Fill
in
Status bar: displays current
activity and settings.
2 Filling a Form
Use fill view to enter data in fields, create a records database, import and
export information to and from records, and print or mail forms.
See Chapter 7, Managing an OmniForm Database, for detailed
information on database creation and management.
 Loading...