


OS 4.1 AND AUTOMAP UNIVERSAL 2.0
Rev-02

ReMOTE SL USER GUIDE FOR ReMOTE SL
OS 4.1 AND AUTOMAP UNIVERSAL 2.0
CONTENTS
1INTRO
2REGISTRATION
3HARDWARE OVERVIEW
3.1FRONT PANEL OVERVIEW
3.2REAR PANEL CONNECTIONS AND OTHER FEATURES
4GETTING STARTED WITH THE REMOTE SL
4.1POWERING THE REMOTE SL
4.2INSTALLATION - PC
4.3INSTALLATION - MAC
4.4CONNECTING THE REMOTE SL
4.5USING THE REMOTE SL AS A MIDI INTERFACE
4.6MODES AND MENUS OVERVIEW
4.7TEMPLATES
5AUTOMAP OVERVIEW
5.1AUTOMAP UNIVERSAL
5.2SEQUENCER AUTOMAP
5.3AUTOMAP AND THE REMOTE SL’S MIDI PORTS
5.4AUTOMAP TEMPLATES AND STANDARD TEMPLATES – WHAT IS THE DIFFERENCE?
5.5RECORDING PARAMETER AUTOMATION WHEN USING AUTOMAP
6AUTOMAP UNIVERSAL
6.1AUTOMAP UNIVERSAL TERMINOLOGY
6.2THE AUTOMAP SERVER
6.3THE AUTOMAP SETTINGS
6.4THE PLUG-IN MANAGER
7CONTROLLING PLUG-INS WITH AUTOMAP UNIVERSAL
7.1AUTOMAP-WRAPPED PLUG-INS
7.2THE AUTOMAP UNIVERSAL TEMPLATE
7.3THE AUTOMAP UNIVERSAL WINDOW
7.4CONTROL MAP OPTIONS
7.5PLUG-IN PARAMETER LAYOUT
7.6DEFAULT AND INSTANCE CONTROL MAPS
7.7EDITING A CONTROL MAP
7.8CONTROL SETTINGS – NAME, RANGE AND STEP SIZE
7.9SAVING A CONTROL MAP

8 CONTROLLING A SEQUENCER MIXER WITH AUTOMAP UNIVERSAL
8.1CUBASE/NUENDO SETUP
8.2SONAR SETUP
8.3TRACKTION SETUP
9 THE AUTOMAP MIDI CLIENT
9.1MIDI PORTS
9.2MIDI CONTROL MAPS
9.3ASSIGNING MIDI MESSAGES
9.4USING LEARN MODE TO ASSIGN MIDI MESSAGES
9.5SAVING A MIDI CONTROL MAP
10 SEQUENCER AUTOMAP
10.1LOGIC
10.2ABLETON LIVE
10.3PRO TOOLS
10.4DIGITAL PERFORMER
10.5REASON
10.6VJAMM
11 THE GLOBAL MENU
11.1 SAVING GLOBAL SETTINGS
12 STANDARD TEMPLATES
13 PLAY MODE
13.1 THE DATA/SELECT ENCODER
14 EDIT MODE
14.1CONTROL CHANGE (CC)
14.2NON-REGISTERED PARAMETER NUMBER (NRPN)
14.3REGISTERED PARAMETER NUMBER (RPN)
14.4SYSTEM EXCLUSIVE (SYSEX)
14.5MIDI MACHINE CONTROL (MMC)
14.6NOTE ON/OFF (NOTE)
14.7PROGRAM CHANGE (PROG CHG)
14.8BANK CHANGE (BANK CHG)
14.9DRUM PAD NOTE (DRUMNOTE)
14.10TEMPLATE
14.11SYSTEM REAL TIME (REALTIME)
14.12PITCH BEND (PITCHBND)
15 THE TEMPLATE MENU
16 KEYBOARD ZONES

17 SAVING AND NAMING TEMPLATES
17.1 RESTORING TEMPLATES
APPENDIX
I SPECIFICATIONS
II LIST OF FACTORY TEMPLATES
III GUIDE TO FACTORY STANDARD TEMPLATES
IV STANDARD SYNTH PARAMETER LAYOUT FOR FACTORY STANDARD TEMPLATES

1 INTRO
Welcome to the Novation ReMOTE SL User Guide! This guide is designed to help you get started with the controller, as well as to provide comprehensive information about its operational features and Automap software. The content is structured in a way that should allow you to read only as far as you need to. Basic and essential information is covered early on whilst the latter sections deal with more advanced features.
We are constantly developing the ReMOTE SL and Automap Universal, and software updates will be made available as free downloads on the Novation website. We suggest checking the ReMOTE SL product page regularly to ensure you have the latest update and documentation.
No troubleshooting section has been included in this guide. If you require further guidance or technical support after reading this guide, please visit the Novation Answerbase, which can be found in the support area at www.novationmusic. com. The Novation Answerbase contains troubleshooting articles for all Novation products and a technical support contact form that you can use to get in touch with us if you cannot find the information you are after.
2 REGISTRATION
To register your ReMOTE SL, visit www.novationmusic.com and click the ‘Register’ link in the main menu at the top of the home page, then fill in the required details. Once you have registered, your one-year product warranty will become active, providing a ‘no compromise’ service solution. In addition to this you can sign up to receive Novation e-zines, which are e-mail newsletters (sent once every two or three months) containing product update news, competitions, freebies and tips from signed artists. Registering your ReMOTE SL is the best way to ensure you are aware of updates, and receive help with any technical enquires you may make.

3 HARDWARE OVERVIEW
3.1 FRONT PANEL OVERVIEW
9 |
|
|
|
9 |
|
|
4 |
3 |
|
|
|
|
||
|
1 |
11 |
|
|
10 |
|
4 |
4 |
10 |
2 |
12 |
|
||
|
|
|
|
|
|
|
5 |
13 |
6 |
|
|
14 |
||
|
|
|
|
|
7 |
|
|
|
|
8
Assignable controls - Numbers 1-8:
These are controls that can be assigned to parameters of the software or hardware you are controlling.
1.8 detented endless rotary encoders
2.8 pots
3.8 35mm sliders
4.32 buttons
5.8 velocity-sensitive drum pads
6.6 transport buttons
7.Pitch/mod joystick
8.X-Y touchpad
System controls - Numbers 9-14:
These controls are not assignable. They have fixed functions.
9.SCROLL buttons: Use these to scroll through pages of options when in a menu or through pages of additional control info when in Play mode. These buttons have other functions when using Automap (see sections 7 to 10 for further info).
10.ROW-SELECT buttons: Use these to select which row of controls has its info shown on the display. These buttons can have other functions when using Automap (see sections 7 to 10 for further info).
11.Mode/Menu buttons (WRITE, TEMPLATE, EDIT, GLOBAL and PLAY): Use these to access the different modes and menus of the ReMOTE SL.
12.TAP TEMPO button: Press this repeatedly to set the tempo.
13.OCTAVE UP/DOWN buttons: Use these to transpose the keyboard up/down in octave steps.
14.DATA/SELECT encoder: Use this to select templates, send bank or program change messages or set the tempo. Press the encoder to change its current function, indicated by the LEDs to the right of it.
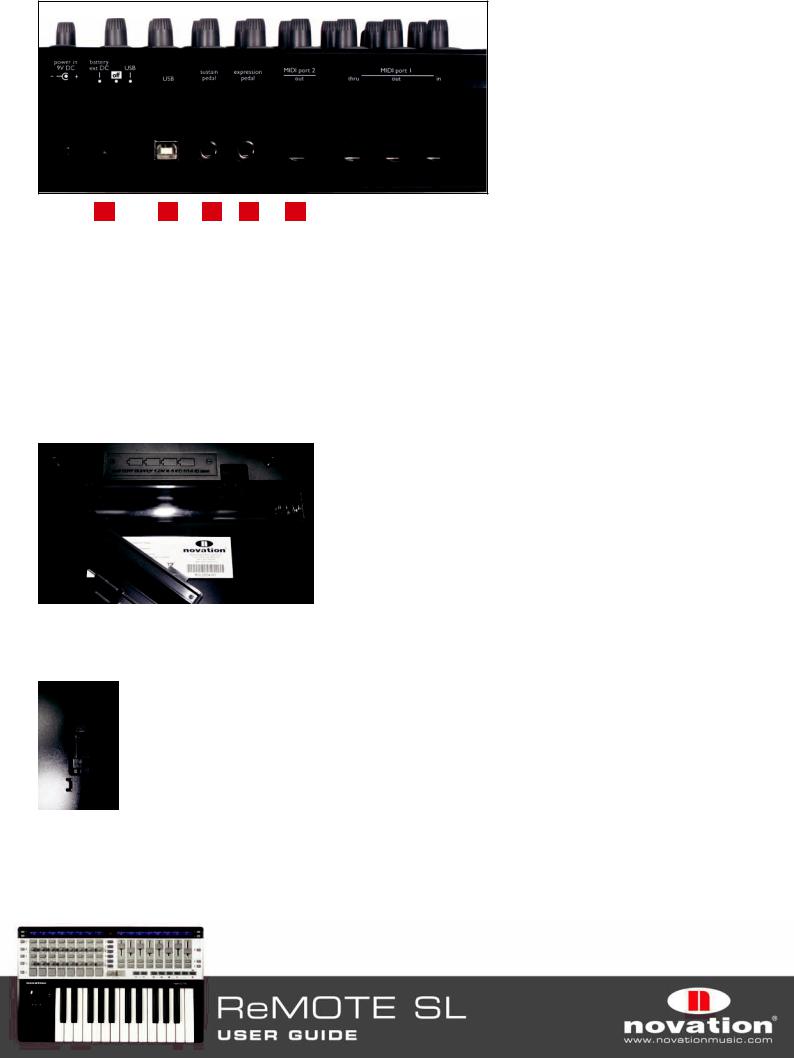
3.2 REAR PANEL CONNECTIONS AND OTHER FEATURES
1 |
2 |
3 |
4 |
5 |
6 |
1.PSU Connector: This allows a power supply unit (not supplied with the ReMOTE SL) to be connected for powering the ReMOTE SL from a mains supply.
2.Power select switch: This sets the power supply between Battery/DC, Off and USB.
3.USB connector: This allows the ReMOTE SL to be connected to a computer using the supplied USB cable. The USB connection provides power as well as data flow.
4.Sustain pedal input: This allows connection of a damper-style sustain pedal or footswitch to the ReMOTE SL.
5.Expression pedal input: This allows connection of an expression pedal to the ReMOTE SL.
6.5-pin DIN MIDI Connectors: These allow the ReMOTE SL to be connected to other hardware MIDI devices. Four connectors are provided in total – one IN, one THRU and two OUT connectors.
Battery Compartment: Found on the bottom of the unit, this compartment holds four 1.5V IEC R14 (C size) batteries for powering the ReMOTE SL.
Pitch/Mod Joystick Spring Selector: Found on the bottom of the ReMOTE SL, this slider selects whether the pitch/mod joystick springs to the bottom or moves freely in the vertical (mod) direction. Slide it towards the back of the ReMOTE SL to enable the spring or towards the front for free movement. The raised end (opposite the slider) must be gently pushed in before the slider is moved backwards or forwards.

4 GETTING STARTED WITH THE REMOTE SL
4.1 POWERING THE REMOTE SL
The ReMOTE SL can be powered in one of three ways:
USB: Connect the ReMOTE SL to a computer using the supplied USB cable and set the power select switch to ‘USB’.
PSU: Connect a mains PSU to the ReMOTE SL and set the power select switch to ‘Battery/Ext DC’. The required PSU output specs are 9V, 600-1000mA d.c., centre pin positive.
Battery: Insert four 1.5V IEC R14 (C size) batteries into the battery compartment of the ReMOTE SL and set the power select switch to ‘Battery/Ext DC’.
4.2 INSTALLATION - PC
The latest ReMOTE SL installer is compatible with Windows XP SP2, XP X64 and Vista (32 and 64 bit editions).
1.Connect the ReMOTE SL to your computer via USB and ensure it is switched on. If the Windows Found New Hardware Wizard opens, click ‘Cancel’ to close it. If you already have an older version of Automap Universal installed, make sure the Automap Server is NOT running.
2.Double-click on ‘ReMOTESLSetup.exe’ to run the installer.
3.Whilst the driver is installing, the following message may appear:
Win XP |
Win Vista |
Click ‘Continue Anyway’ (Win XP) or ‘Install’ (Win Vista) to continue installation.
4.Once the driver is installed, you will be prompted to select whether you have a keyboard version of the ReMOTE SL or a ReMOTE SL ZeRO.
The installer will then guide you through updating your ReMOTE SL with on-screen instructions. Please read and follow these instructions carefully to ensure the unit gets updated correctly.

5. Towards the end of installation, the Automap Plug-in Manager will open automatically.
Select the plug-ins you want to use with Automap by dragging them from the left-hand list to the right-hand list, then click ‘OK’ to close the Plug-in Manager window and complete the installation.
4.3 INSTALLATION - MAC
The latest ReMOTE SL installer is compatible with OS X 10.3.9 or later.
1.Connect the ReMOTE SL to your computer via USB and ensure it is switched on. If you already have an older version of Automap Universal installed, make sure the Automap Server is NOT running.
2.Mount ‘ReMOTESLInstaller.dmg’ and double click on ‘Setup ReMOTE SL’ to run the installer.

3.During installation, the Automap Plug-in Manager will open automatically. Select the plug-ins you want to use with Automap by dragging them from the left-hand list to the right-hand list, then click ‘OK’ to close the Plug-in Manager window.
4.The ReMOTE SL Sysex Upgrade application will also run automatically and prompt you to select whether you have a keyboard version of the ReMOTE SL or a ReMOTE SL ZeRO (watch out - this window may open behind the Plug-in Manager and Installer windows!):
The Sysex Upgrade application will guide you through updating your ReMOTE SL with on-screen instructions. Please read and follow these instructions carefully to ensure the unit gets updated correctly.
4.4 CONNECTING THE REMOTE SL
If you want to control software using the ReMOTE SL, connect it to your computer using the supplied USB cable:
10
If you want to control hardware MIDI devices using the ReMOTE SL, connect them to the MIDI OUT ports on the back of the unit:
Sound Module 1
Midi cable |
Midi In |
|
|
|
|
|
|
|
|
|
|
|
|
|
|
|
|
|
|
|
|
Midi Out 1
It is possible to use the ReMOTE SL to control hardware MIDI devices in this way without it being connected to a computer. However, if there is no USB connection, the ReMOTE SL must be powered using batteries or a PSU.
4.5 USING THE REMOTE SL AS A MIDI INTERFACE
As well as being able to control software and hardware, the ReMOTE SL can be used as a MIDI interface, i.e. it can route MIDI data between your computer and hardware MIDI devices. For this, the ReMOTE SL must be connected to your computer via USB and to your hardware MIDI devices via the MIDI connectors on the back of the unit:
USB cable
USB port
Midi cable |
Midi In |
|
|
|
|
|
|
|
|
|
|||
|
|
|
|
|
|
|
Midi Out 1 |
Midi In |
Midi Out |
|
|
|
|
|
|
|
|
|||
|
|
|
|
|
||
|
|
|
|
|
|
|
Computer |
Sound Module 1
The ReMOTE SL has two physical MIDI ports. Port 1 has IN, OUT and THRU connectors and port 2 has an OUT connector only. These ports are labelled as M1 and M2 in the menus on the ReMOTE SL where you set how MIDI data is routed in, out or through the unit.
The ReMOTE SL has a further three virtual ports over the USB connection. These ports are labelled as U1, U2 and U3 in the menus on the ReMOTE SL where you set how MIDI data is routed in, out or through the unit. Because there are three virtual USB ports, the ReMOTE SL will appear three times in the MIDI input and output device lists in your software as follows:
ReMOTE SL Port 1
ReMOTE SL Port 2
ReMOTE SL Port 3
11

If you use Windows Vista, the ReMOTE SL will appear as:
Input: |
Output: |
ReMOTE SL |
ReMOTE SL |
MIDIIN2 (ReMOTE SL) |
MIDIOUT2 (ReMOTE SL) |
MIDIIN3 (ReMOTE SL) |
MIDIOUT3 (ReMOTE SL) |
The Global menu on the ReMOTE SL contains options that allow you to set which ports incoming MIDI data is routed to (see section 11 for further info). The following diagram shows how data can be routed through the ReMOTE SL between the physical MIDI and virtual USB ports:
Midi Out 2 Midi Out 1 Midi In
|
In |
|
USB Port 1 |
|
Out |
|
In |
|
USB Port 2 |
|
Out |
Reserved |
In |
for Automap |
USB Port 3 |
Universal |
Out |
12

4.6 MODES AND MENUS OVERVIEW
The WRITE, TEMPLATE, EDIT, GLOBAL and PLAY buttons in the centre of the ReMOTE SL are the mode and menu buttons. They allow access to settings that affect individual controls within a template (EDIT), general template settings (TEMPLATE) and the overall keyboard settings (GLOBAL). Whilst accessing any of the menus, the left-hand display will show the available settings. The encoder, pot and buttons aligned with each setting on the left-hand side of the ReMOTE SL can be used to edit the settings as follows:
Use the SCROLL buttons to scroll through all pages of available settings when accessing a menu.
Play Mode: This is the default mode for the ReMOTE SL and the one that will be active when it powers up. In this mode you can use the ReMOTE SL to control software and hardware MIDI devices. The ReMOTE SL can be put into Play mode at any time by pressing the PLAY mode button.
Template Menu: This menu allows access to settings that affect the currently selected template. Press the TEMPLATE menu button to access this menu and then use the SCROLL buttons to scroll between the two pages of settings. Pressing the TEMPLATE menu button a second time will access the Template Keyboard Zones menu, where the keyboard can be split into zones for playing different instruments from different areas of the keyboard (see section 16 for further info). Subsequent presses of the TEMPLATE menu button will switch between the Template menu and Template Keyboard Zones menu.
Edit Mode: This mode allows access to the individual settings for any assignable control within the currently selected template. Controls that can be edited in this mode are encoders, pots, sliders, buttons, drum pads, transport controls, sustain pedal, expression pedal, pitch/mod joystick and the X-Y touchpad. To access the settings for a control, press and hold the EDIT mode button and operate the control whose settings you want to edit, then release the EDIT mode button. Use the SCROLL buttons to scroll through the pages of settings for the currently selected control (where available).
Global Menu: This menu allows access to the general device settings on the ReMOTE SL such as memory protect and joystick calibration. Press the GLOBAL menu button to access the Global menu and use the SCROLL buttons to scroll through the seven pages of global settings. Pressing the GLOBAL menu button a second time will access the Global Keyboard Zones menu, where the keyboard can be split into zones for playing different instruments from different areas of the keyboard (see section 16 for further info). Subsequent presses of the GLOBAL menu button will switch between the Global Menu and Global Keyboard Zones menu.
Write Button: The WRITE button allows you to save settings on the ReMOTE SL. Whilst in Play, Edit or Template modes, pressing WRITE will save all changes to the currently selected template (see section 17 for further info on saving templates). Whilst in the Global menu, pressing WRITE saves all global settings.
13

4.7 TEMPLATES
All the settings for every individual control accessed in Edit mode and the settings accessed in the Template menu can be saved to the ReMOTE SL’s internal memory and recalled at any time. A group of saved settings is called a ‘template’.
As an example of using templates, you may have two synths (software or hardware) that you want to control from the ReMOTE SL. You can set the ReMOTE SL up to control one of the synths and save all the settings as a template. Then you can set the ReMOTE SL up to control the other synth and save the settings as a separate template. Now to switch between controlling the two synths from the ReMOTE SL, you can simply switch between the separate templates you have created for them.
There is space for 40 templates on the ReMOTE SL. Templates 1-33 are pre-programmed standard templates, designed to work with popular software instruments. Templates 35-36 are blank user templates and templates 34, 37-40 are Automap templates (see section 5.4 for more info on Automap templates). You cannot delete templates so that there are less than 40 stored on the ReMOTE SL, however you can overwrite any template by re-saving one that is already stored on the unit or by uploading one from your computer.
There are three ways to switch between the 40 templates:
DATA/SELECT Encoder: Ensure that the DATA/SELECT encoder is set to ‘template’ (press the encoder to change its current function) and then rotate it to select different templates.
Quick-Jump: Press and hold the PLAY mode button and then press the TEMPLATE button to use Quick-Jump to select a different template. The names of 16 templates will appear on the left-hand ReMOTE SL display. The upper left-hand row of buttons on the ReMOTE SL can be pressed to jump to one of the 8 templates shown on the top line of the display and the lower left-hand row of buttons can be pressed to jump to one of the 8 templates shown on the bottom line of the display. Templates 33-40 always appear on the bottom line of the display so that the Automap templates are always available to jump to. Use the SCROLL buttons whilst in Quick-Jump mode to switch the top line between templates 1-8, 9-16, 17-24 and 25-32.
Use Any Assignable Button or Drum Pad: It is possible to set any assignable button (this excludes the ROW-SELECT, SCROLL, OCTAVE and mode/menu buttons) or drum pad to switch to a different template. See section 14 for further info on how to do this.
When you switch to a different template, the name and number of the template will appear briefly on the ReMOTE SL displays before they switch to showing control names and values. To see the name and number of the currently selected template, you can press and hold the PLAY mode button at any time - the number and name of the currently selected template will show for as long as the button is held down.
The ReMOTE SL will start up on template 1 by default from the factory. To change the ‘start up’ template, select the template you want the unit to load on start up, then press the GLOBAL menu button to access the Global menu and press the WRITE button to save the global settings.
14

5 AUTOMAP OVERVIEW
Automap is a revolutionary system for controlling software plug-ins and sequencers using the ReMOTE SL. Certain templates on the ReMOTE SL are reserved for use with Automap. These are templates 34 and 37-40. To avoid problems when using Automap, we suggest that, unless instructed, you do not edit these templates.
Automap works in two different ways, ‘Automap Universal’ and ‘Sequencer Automap’.
5.1 AUTOMAP UNIVERSAL
Automap Universal is a pioneering system that allows automatic mapping of software parameters to the ReMOTE SL. It also provides a quick and simple learn system which you can use to create your own custom control maps. Automap
Universal can be used to control any VST, AU or Pro Tools (RTAS or TDM) format plug-in in any sequencer (note Pro Tools plug-in format support is only currently available on Mac). It can also be used to control the mixer in Cubase, Nuendo, Sonar and Tracktion. It is also possible to control software or hardware MIDI devices with Automap Universal using the Automap MIDI client.
To use Automap Universal you must select the Automap Universal template (template 38) on the ReMOTE SL and run the Automap Server software on your computer. The Automap Server handles communication between the ReMOTE SL and the software you are controlling. When you run the Server, the Automap Universal window will appear. This is a resizable, semi-transparent, heads-up display from which you can view and edit control assignments, select a different client to control and view the interactive help.
To control a plug-in you must first enable it for Automap control in the Plug-in Manager. Once enabled, it will be “wrapped”, meaning that a new version of the plug-in will be created which is contained within the Automap software. The new Automap-wrapped plug-in will appear in your sequencer with “(Automap)” after its original name. Load the Automapwrapped plug-in in your sequencer to allow Automap control over it. The plug-in will look exactly the same as before but with the addition of an Automap border at the bottom of the window, from which you can access Automap functions.
When you load an Automap-wrapped plug-in, the plug-in parameters will be automatically mapped to the ReMOTE SL controls. You can open as many Automap-wrapped plug-ins as you like (up to a limit of 253) but you can only control one at a time from the ReMOTE SL. To select a plug-in for control, click on the Automap logo in the bottom-left hand corner of the plug-in window so that it turns red.
To control the mixer in Cubase, Nuendo, Sonar or Tracktion, first follow the relevant set up instructions in section 8.
5.2 SEQUENCER AUTOMAP
There are separate Automap templates on the ReMOTE SL to allow control over sequencers that do not use Automap Universal for mixer control. These are Pro Tools (template 34), Reason (template 37), Logic (template 39), Ableton Live (template 40) and Digital Performer (installed as template 34 instead of Pro Tools if selected during installation). These work differently to Automap Universal in that the ReMOTE SL communicates directly with the sequencer when using these templates, rather than through the Automap Server software.
Each sequencer has its own set up procedure, detailed in section 10 of this guide. Once the set up procedure is complete, the ReMOTE SL will automatically switch to the relevant template each time you open your sequencer. You are free to switch from this template to any other on the unit (to control other software or hardware) and back again. This includes the Automap Universal template for when you want to control Automap-wrapped plug-ins. If you select a Sequencer Automap template for a program which is not running on your computer, you will see an OFFLINE message appear on the ReMOTE SL displays.
The Pro Tools, Logic and Ableton Live Sequencer Automap templates include some means for controlling plug-ins. This can be used where it is not possible to use Automap Universal for plug-in control i.e. for those that use a proprietary plug-in format, or where you find it easier than using Automap Universal.
15

5.3 AUTOMAP AND THE REMOTE SL’S MIDI PORTS
The ReMOTE SL has three virtual MIDI ports over the USB connection. USB ports 2 and 3 are used for transfer of Automap data between the ReMOTE SL and the computer. Port 2 is used for transferring Automap data between a sequencer program and the ReMOTE SL (i.e. Sequencer Automap). Port 3 is used for transferring Automap data between the Automap Server software and the ReMOTE SL. If you are using Automap, it is important to only select port 2 or 3 in your software where instructed in this guide.
USB Port 1 is used for transfer of all non-Automap data between the ReMOTE SL and your computer. This includes keyboard note and aftertouch, pitch bend, modulation, expression and sustain pedals, and program/bank change data. All factory standard (non-Automap) templates send data on USB Port 1 too. Ensure only ReMOTE SL Port 1 is selected as the input to MIDI tracks in your sequencer.
When controlling plug-ins using Automap Universal, it is important to remember that the keyboard, joystick and pedal inputs on the ReMOTE SL will NOT follow the currently selected Automap-wrapped plug-in. They will always send data to whichever MIDI track is record enabled in your sequencer, meaning you can simultaneously play a soft-synth from the keyboard and use the controls to tweak the parameters of a different plug-in. If you select an Automap-wrapped instrument plug-in for control then you must also record enable the corresponding MIDI or instrument track in your sequencer before the keyboard, joystick and pedals will control it.
5.4 AUTOMAP TEMPLATES AND STANDARD TEMPLATES – WHAT IS THE DIFFERENCE?
Templates 1-33, 35 & 36 on the ReMOTE SL are ‘standard’ templates, so called because when they are selected the ReMOTE SL functions as a standard MIDI controller. A standard MIDI controller allows you to set what MIDI message each of its controls sends. If you want to control software or hardware that responds to MIDI then you need to know what messages it responds to. This information can usually be found in the documentation for the software or hardware. Once you know this, you can set up the controls on a standard MIDI controller to send those messages.
We have used this method to program the standard templates on the ReMOTE SL to work with popular software instruments (except templates 35 and 36, which are blank user standard templates). These templates can be used where it is not possible or desirable to use Automap Universal for controlling software instruments, for example when using a software instrument as a stand-alone program rather than a plug-in within a sequencer.
With standard templates there is only one-way communication from the ReMOTE SL to the software or hardware you are controlling and the ReMOTE SL has no way of knowing when a parameter is changed from the software or hardware itself. For example, if you change a parameter on a software instrument with the mouse, the parameter value displayed on the ReMOTE SL will not update to reflect that change.
The Automap templates have been set up such that the controls send MIDI messages that are recognised by the Automap software i.e. the Automap Server or Sequencer Automap implementation. The Automap software then “automatically maps” those MIDI messages to different plug-in or sequencer parameters, depending on what you select to control. Because Automap incorporates two-way communication between your computer and the ReMOTE SL, the Automap software can send display data back to the ReMOTE SL to automatically name the controls and let you know which parameter each control is currently assigned to. Additionally you can see the current value of each parameter, even if it is being changed using the mouse.
5.5 RECORDING PARAMETER AUTOMATION WHEN USING AUTOMAP
To record control movements from the ReMOTE SL in a sequencer when using a standard template, you must record enable a MIDI track and then put the sequencer into record. MIDI control data will then be recorded onto the MIDI track when you operate a control on the ReMOTE SL.
When using an Automap template, MIDI control data is converted into Automation data by the Automap software i.e. the Automap Universal Server or Sequencer Automap implementation, to allow control over software parameters. This means that control movements will not be recorded as MIDI data.
16

To record control movements from the ReMOTE SL in a sequencer when using an Automap template, you must set the Automation mode on the relevant instrument or audio track to ‘write’ (some sequencers have a number of different write modes) and then put the sequencer into playback (not record). Automation data will then be written when you operate a control on the ReMOTE SL. Remember to set the Automation mode for the track back to ‘read’ when you have finished recording control movements. Note that some sequencers use different methods for writing Automation data compared with this so check the documentation for your sequencer.
17

6 AUTOMAP UNIVERSAL
6.1 AUTOMAP UNIVERSAL TERMINOLOGY
Before you start to use Automap Universal we recommend getting to know the terminology associated with it:
Clients
“Client” is the term used for anything you can control using Automap Universal. This could be one of the following:
Automap-wrapped plug-in (VST, AU or Pro Tools format)
Sequencer mixer
Automap MIDI Client
Clients connect to the Automap Server and tell it what parameters they have available to control. The Server assigns these parameters to controls on the ReMOTE SL. A maximum number of 253 clients can be connected to the Server at one time.
At present only Cubase, Nuendo, Sonar and Tracktion support Automap Universal mixer control. For other sequencers, mixer control may be possible using Sequencer Automap. Automap Universal mixer control for other sequencers will be included in future updates so keep an eye out on www.novationmusic.com for update news.
The Automap MIDI client can be used to control software or hardware that responds to MIDI control change (CC) messages. More information on the Automap MIDI client can be found in section 9.
Control Maps
“Control Map” is the term used for the arrangement of parameters across the ReMOTE SL’s controls. It is possible to assign the parameters of whatever you are controlling to the physical controls on the ReMOTE SL however you like. For example, if you are controlling a software synthesizer you may wish to assign filter cutoff to encoder 1, filter resonance to encoder 2, filter envelope decay to encoder 3 etc. Once you have assigned parameters in the way you want, you can save the arrangement of parameters as a control map that can be recalled when you next control that software or device so that the ReMOTE SL’s controls still control those same parameters.
Pages
Although there is a finite number of assignable controls on the ReMOTE SL, you are not limited to assigning only that same number of parameters. A control map can have more than one “page” of controls. You can create a new page and assign all the controls to different parameters, then switch between the new and original pages to access double the number of parameters. It is possible to create as many pages as you like, or remove them if you have too many. The LEFTHAND SCROLL buttons can be used to navigate through pages within a control map. It is possible to assign more than one control on the ReMOTE SL to the same parameter, meaning the same physical control can be assigned to the same parameter on different pages of a control map.
Control Map Groups
Each control map will belong to one of four groups, according to the type of client it controls. The four groups are User, FX, Instrument and Mixer. A control map will be automatically assigned to a group, however you can change the group that it belongs to from the Automap Universal window (see section 7.3).
The group system allows quicker selection of control maps. If you want to control a certain effect plug-in then you know it will be in the FX group and you will only have to look through the FX control maps to find it, not all control maps. We have given the groups useful names, however, since you can assign a control map to any group you like, there is nothing to stop you from using them differently to the way they are labelled. For example, you may wish to control the plug-ins on only four of the tracks in your session, in which case you could assign the control maps such that they are separated between the four groups on a track-by-track basis rather than according to the type of client.
18

6.2 THE AUTOMAP SERVER
The Automap Server software is the bridge between the ReMOTE SL and the software you are controlling. It runs in the background, handling communication between your software and the ReMOTE SL. However, it allows access to all the features of Automap.
If the Server is not already running on your computer then it will open up automatically when you open an Automapwrapped plug-in or run a sequencer which is set up for Automap Universal mixer control. The ReMOTE SL will automatically switch to the Automap Universal template (template 38) when the Server starts. This template must be selected to use Automap Universal. If it is selected but the Server is not running, ‘Automap is OFFLINE’ will appear on the ReMOTE SL displays. If it is selected and the Server is running then, unless a client is selected for control, the ReMOTE SL displays will look as follows:
The Automap Server can be launched manually by running it from:
Windows: Start -> All Programs -> Novation -> Automap Universal -> Launch Server
Mac OSX: /Applications/AutomapServer
After launching the Automap Server, you will see the following window:
This is the Automap Universal window. You can resize, maximize and minimize the Automap Universal window but it will not go to the background when you give another window focus. When open, it will remain visible in front of all other windows, however you can set it to be semi-transparent so that you can see what is going on behind it (see section 6.3). Press the VIEW button on the ReMOTE SL (button 2 in the bottom right-hand row) to open and close the Automap Universal window.
19

6.3 THE AUTOMAP SETTINGS
Once the Automap Server is running, you can access the Automap settings as follows:
Windows: Click on the Automap logo in the system tray.
Mac OSX: Click on the Automap logo in the dock and then select the ‘Settings’ menu.
The following options are available:
Enable Pot Pickup: This option only applies to the pots and sliders on the ReMOTE SL. If this is active then the pot/ slider will not affect the parameter it is assigned to until the physical position of the pot/slider matches the current value of the parameter. This stops the parameter value ‘jumping’ to the position of the pot/slider after selecting a different control map.
Automap Focus Follows Plug-in UI: This option applies to controlling Automap-wrapped plug-ins in your sequencer. If this is active then the ReMOTE SL will automatically map to whichever plug-in you select in your sequencer. If this is not active then you must manually select a different plug-in to control, either by clicking the Automap logo in the bottom left-hand corner of a plug-in window or selecting one from the Browser View of the Automap Universal window.
Encoder Acceleration: This option only applies to the endless rotary encoders on the ReMOTE SL and is used to set the encoder acceleration i.e. the relationship between how fast you rotate an encoder and the magnitude of its effect over the parameter you are controlling. The default setting is Medium but this can also be set to Fast (for coarser control) or Off (for finer control).
20
Show View Window On Startup: This option allows you to select whether or not the Automap Universal window appears when you launch the Automap Server.
Window Transparency: This option is used to set the transparency of the Automap Universal window.
MIDI Input Port, MIDI Output Port & MIDI Channels: These options relate to the Automap MIDI Client. See section 9 for further information on using the Automap MIDI Client.
Control Map Options: The options contained in the Control Map sub-menu relate to control maps. These options are found under the ‘File’ menu on Mac OSX and more information on them is given in section 7.4.
Plug-in Manager: This option opens a separate window, the Plug-in Manager, where you can select which plug-ins you want to enable for Automap control.
6.4 THE PLUG-IN MANAGER
It is possible to control any VST, AU or Pro Tools (RTAS & TDM) format plug-in using Automap Universal, however a plug-in must first be enabled for Automap control in the Plug-in Manager (note Pro Tools plug-in format support is only currently available on Mac). Once enabled it will be “wrapped”, meaning that a new version of the plug-in will be created which is contained within the Automap software.
The left-hand list in the Plug-in Manager window shows all plug-ins installed on your system and the right-hand list shows all plug-ins that have been wrapped. To select a plug-in to be wrapped for Automap control, simply drag it from the lefthand list to the right-hand list. You can ctrl-click (PC) or command-click (Mac) to select multiple plug-ins in either list. Once you have dragged all plug-ins that you want to wrap, click ‘OK’ to close the Plug-in Manager window. You can wrap as many VST or RTAS plug-ins as you like, but only a maximum of 256 AU plug-ins can be wrapped. If you wrap a plug-in whilst your sequencer is running then you will need to restart your sequencer before the wrapped version will be available to use.
Mac OSX |
Windows |
When running in Windows, the Plug-in Manager has the option to add or remove VST folders. Use these options to make sure all of your VST plug-in folders appear in the ‘VST plug-in folders’ list so that all plug-ins are scanned by the Plug-in Manager. On Windows computers only, once a VST plug-in has been wrapped, a new *.dll file will be created for that plug-in in the same folder as the original plug-in *.dll file. You can move the new *.dll file to any location you like on your computer, e.g. to a separate VST plug-ins folder or a subfolder in your current VST plug-ins folder.
21

7 CONTROLLING PLUG-INS WITH AUTOMAP UNIVERSAL
The following sub-sections of this guide focus on using Automap Universal to control plug-ins, however much of the information is relevant to controlling sequencer mixers and the Automap MIDI client. Therefore we suggest becoming familiar with plug-in control before moving on to the next sections of this guide.
7.1 AUTOMAP-WRAPPED PLUG-INS
An Automap-wrapped plug-in will appear in the list of plug-ins in your sequencer with “(Automap)” after its original name. Load the Automap-wrapped version of a plug-in into your sequencer to allow Automap control over it. The plug-in will look exactly the same as the original version but with an additional Automap border at the bottom of the window.
The Automap border allows access to Automap functions as follows:
Automap logo switch: This indicates which plug-in currently has ‘Automap focus’ i.e. which plug-in can currently be controlled from the ReMOTE SL. It will be red for the plug-in which has Automap focus and white for all other plug-ins. Click it when it is white to turn it red and give Automap focus to that plug-in. It will then automatically turn white on the plug-in that previously had Automap focus. Note that if ‘Automap Focus Follows Plug-in UI’ is enabled (see section 6.3) then simply selecting a different plug-in within your sequencer, with the mouse, will change which plug-in has
Automap focus.
Learn switch (crosshair): This indicates whether learn mode is currently active or not. It will be red when either Learn Once or Learn Latch is active and white when learn mode is turned off. When it is red you can click it to disable learn mode. When it is white you can click it to activate Learn Once. Learn mode is described in more detail in section 7.7.
 Novation Logo: When clicked, this opens up a drop-down menu from which you can access some Control Map options. More information is given on these in section 7.4.
Name Text Box: This serves two functions. Firstly, immediately after loading a plug-in or giving it Automap focus, it displays the ‘instance name’ for that plug-in. Every instance of an Automap-wrapped plug-in will have its own instance name that you can use for identification when selecting a control map. You can change the instance name by clicking on the box, typing in a new name and pressing enter.
Secondly, once a control on the ReMOTE SL has been operated, it displays the control name. Once again you can change the control name by clicking on the box, typing in a new name and pressing enter.
22

 Max Number Box: Displays the max value of the last control operated on the ReMOTE SL. To edit the max value click on the box, type in a new value and press Enter.
Min Number Box: Displays the min value of the last control operated on the ReMOTE SL. To edit the min value click on the box, type in a new value and press Enter.
Step Size Number Box: Displays the step size value of the last control operated on the ReMOTE SL. To edit the step size value click on the box, type in a new value and press Enter.
 “Pot” Button: Sets the max, min and step values for the last control operated on the ReMOTE SL to max=127, min=0 and step size=1 so that it has a continuous pot-type response.
“Button” Button: Sets the max, min and step values for the last control operated on the ReMOTE SL to max=1, min=0 and step size=1 so that it has a toggle (on/off) button-type response.
7.2 THE AUTOMAP UNIVERSAL TEMPLATE
The Automap Universal template (template 38) must be selected on the ReMOTE SL to use Automap Universal. When using Automap Universal, it is only possible to assign software parameters to the controls highlighted in green below:
The bottom right-hand row of buttons on the ReMOTE SL is not assignable in Automap mode and instead has been set aside for activating Automap functions, the purpose of which will become clearer as you continue to read through this guide. Press the ROW-SELECT button next to that row of buttons to show the available Automap functions on the righthand ReMOTE SL display. There are two pages of functions available: the Main Menu and the Control Map Menu.
Page 1 – Main Menu
Button 1 - Learn: Toggles the learn mode state between Off, Learn Once and Learn Latch.
Button 2 - View: Opens the Automap Universal window in Control Map View.
Button 3 - User: Opens the Automap Universal window in Browser View and shows all user control maps.
Button 4 - FX: Opens the Automap Universal window in Browser View and shows all FX control maps.
Button 5 - Inst.: Opens the Automap Universal window in Browser View and shows all instrument control maps.
Button 6 - Mixer: Opens the Automap Universal window in Browser View and shows all mixer control maps.
Buttons 7 & 8 - Control Map Menu: Press these to access the Control Map Menu (2nd page of options).
23

Page 2 – Control Map Menu
Buttons 1 & 2 - Main Menu: Press these to return to the Main Menu (1st page of options).
Button 3 - Add Page: Creates another page of assignable controls for the selected control map. You can create as many pages as you like.
Button 4 - Remove Page: Removes the currently selected page.
Button 6 - Clear All: Clears all controls of their current assignment.
Button 7 - Set As Default: Saves the current control map as the default control map for that client.
Button 8 - Rebuild Map: Reverts the parameter mapping to the default order exported by the client.
Other functions available on the Automap Universal template are:
LEFT-HAND SCROLL Buttons: Press these to scroll through the different pages of assignable controls for the currently selected control map. Also press and hold the DRUM PAD ROW-SELECT button and then press the LEFTHAND SCROLL buttons to scroll through all available control maps and select a different one for Automap control. The available control maps will appear on the left-hand ReMOTE SL display in the order of most recently used, from the left.
RIGHT-HAND SCROLL Buttons: Press these to select different plug-in presets. Preset navigation will only work where a plug-in uses the host preset navigation system, rather than its own built-in one.
Transport Buttons: These buttons will control the transport in your sequencer. The Automap Server uses ReWire to allow transport control and you may need to enable the Automap Server as a ReWire input in your sequencer before the transport buttons will work (instructions for this are given later in this guide where necessary). Note that the record button will not work, as the record function is not available though ReWire.
If you use Cubase, Nuendo, Sonar or Tracktion and have set up Automap Universal mixer control then the record button will work since, in this case, transport commands are sent directly to the host rather than using ReWire.
TAP TEMPO Button and DATA/SELECT Encoder: The Automap Universal Server also uses ReWire to allow tempo control over your sequencer. Use the TAP TEMPO button or the DATA/SELECT encoder (set to tempo mode) to control the tempo in your sequencer. The ‘BPMPort’ setting in the Global menu on the ReMOTE SL must be set to ‘ON’ for tempo control to work (this ensures the ReMOTE SL sends ReWire tempo messages when you change tempo – see section 11). You can use these controls to set the tempo in your sequencer regardless of which template is selected on the ReMOTE SL, however if the Automap Universal Server is not running the tempo controls will not work.
7.3 THE AUTOMAP UNIVERSAL WINDOW
The Automap Universal Window allows viewing of control assignments, control maps and help information. This window can be opened by:
•Launching the Automap Server (if ‘Show View Window On Startup’ is enabled in the Automap settings menu)
•Selecting ‘Interactive Help’ from the Automap Universal Help menu (Mac) or Automap settings menu (PC)
•Pressing either the VIEW, USER, FX, INST. or MIXER button on the ReMOTE SL
The window opens over all other currently open windows. It cannot be moved to the background, however you can set it to be semi-transparent from the Automap settings menu. The window can be closed by:
•Clicking the close icon in the top corner of the window
•Pressing the VIEW button on the ReMOTE SL
The window can be resized to be as big or small as you like. There are three different views – Control Map View, Browser View and Help View.
24

Control Map View
To open the Automap Universal window in Control Map view, ensure an Automap-wrapped plug-in has Automap focus and then press the VIEW button on the ReMOTE SL. The Automap Universal window will open and show the current control map, as shown above. The window is divided into three sections: the control map info at the top, the control layout in the middle and the control settings at the bottom:
Control Map Info
This section shows the following info about the control map:
Instance Name: This is the name of the control map as it will appear in Browser View and on the ReMOTE SL displays when selecting a control map. The instance name defaults to the name of the plug-in, however you can change the instance name by clicking on it, typing in a new one and then pressing enter. The instance name is unique to each instance of an Automap-wrapped plug-in in a session, allowing you to easily identify the correct control map for the plugin you want to control when in Browser View (see section 7.8 for more info on instance names).
Group: This is the ‘control map group’ to which the control map belongs. There are four control map groups – User, FX, Instrument and Mixer. You can assign a control map to any one of these you like by clicking on the group and selecting a different one from the drop-down menu. Control maps for FX plug-ins will automatically be put in the FX group and control maps for instrument plug-ins in the instrument group.
Client name: This is shown in the middle of the info section and tells you what the ReMOTE SL is currently controlling.
Preset name and number: This is shown below the client name, where available.
Learn: This indicates whether learn mode is Off, Learn Once or Learn Latch. You can change the learn mode state by clicking on the learn mode box and selecting a different option from the drop-down menu. The info section will change colour when learn mode is active (dark red for Learn Once and bright red for Learn Latch).
Page: This shows the number of the currently displayed page and the total number of pages of the selected control map.
When you operate a control on the ReMOTE SL, the client name and preset name will change to show the control name and parameter value:
25

Control Layout
This shows the controls on the hardware, their names and current values. To rename a control simply click on the control name, type in a new one and press Enter to confirm, or Escape to cancel. To clear a control of its current parameter assignment, click on it and press Backspace or Delete.
The sliders or pots may appear red instead of white. Red indicates that the current physical control position does not match the value of the parameter it is assigned to (see ‘Enable Pot Pickup’ in section 6.3).
Control Settings
This section shows the settings for the currently selected control (also available from the Automap border in the plug-in window). Click on a control to bring its settings up in this section. You can enter new max, min and step values by clicking on the current value, typing in a new one and pressing Enter to confirm, or Escape to cancel. It is also possible to change which parameter the currently selected control is assigned to by clicking on the parameter name and selecting a different one from the drop-down menu.
Browser View
To open the Automap Universal window in Browser View, press one of the control map group buttons (USER, FX, INST. or MIXER) on the ReMOTE SL. The Automap Universal window will then appear as shown above. All available control maps in the selected group are shown in the order of most recently used, from the left. The currently selected control map, if in that group, will be highlighted red. You can select a control map by clicking on it with the mouse or by using the upper and lower rows of buttons on the left-hand side of the ReMOTE SL. Selection from the hardware allows you to switch between different control maps without using the mouse at all.
26

Help View
To open the Automap Universal window in Help View, select ‘Interactive Help’ from the Automap Universal ‘Help’ menu (Mac) or from the Automap settings menu (PC). Also if you press the VIEW button on the ReMOTE SL when no control map is selected, the Automap Universal window will open in Help View. Click on the linked red words to navigate to other pages of the interactive help.
7.4 CONTROL MAP OPTIONS
The control map options can be accessed as follows:
Windows: click on the Automap logo in the system tray and select the ‘Control Map’ sub-menu:
Mac OSX: click on the Automap logo in the dock and then select the ‘File’ menu:
27
 Loading...