


 Loading...

Caution:
The normal operation of this product may be affected by a strong electrostatic discharge (ESD). In the event of this happening, simply reset the unit by removing and then replugging the USB cable. Normal operation should return.
Trade Marks
The Novation trade mark is owned by Focusrite Audio Engineering Ltd. All other brand, product and company names and any other registered names or trade marks mentioned in this manual belong to their respective owners.
Disclaimer
Novation has taken all possible steps to ensure that the information given here is both correct and complete. In no event can Novation accept any liability or responsibility for any loss or damage to the owner of the equipment, any third party, or any equipment which may result from use of this manual or the equipment which it describes. The information provided in this document may be modified
at any time without prior warning. Specifications and appearance may differ from those listed and illustrated.
Copyright and Legal Notices
Novation is a registered trade mark of Focusrite Audio Engineering Limited. Launchkey MK3 is a trademark of Focusrite Audio Engineering Plc.
2019 © Focusrite Audio Engineering Limited. All rights reserved.
Novation
A division of Focusrite Audio Engineering Ltd. |
Tel: +44 1494 462246 |
|
Fax: +44 1494 459920 |
||
Windsor House, Turnpike Road |
||
e-mail: sales@novationmusic.com |
||
Cressex Business Park , High Wycombe |
||
Web: www.novationmusic.com |
||
Buckinghamshire , HP12 3FX |
||
|
||
United Kingdom |
|
User Guide version V1.01
2
Contents |
|
|
1.0 Introduction......................................................................................................................... |
5 |
|
1.1 |
Key Features............................................................................................................................. |
5 |
1.2 |
Box Contents............................................................................................................................ |
6 |
1.3 |
Getting Started......................................................................................................................... |
6 |
1.4 |
Support..................................................................................................................................... |
7 |
1.5 |
Model Specific Features........................................................................................................... |
7 |
1.6 |
Hardware Overview.................................................................................................................. |
7 |
1.7 |
Getting Connected................................................................................................................. |
10 |
1.7.1 Connecting Launchkey with a Computer.......................................................................... |
10 |
|
1.7.2 Connecting Launchkey with External MIDI Enabled Instruments..................................... |
10 |
|
2.0 Working with Ableton Live............................................................................................... |
11 |
|
2.0.1 Installation......................................................................................................................... |
11 |
|
2.0.2 Setup................................................................................................................................. |
11 |
|
2.1 |
Session Mode......................................................................................................................... |
13 |
2.1.1 Launching Clips ............................................................................................................... |
15 |
|
2.1.2 Launching Scenes ............................................................................................................ |
16 |
|
2.1.3 Stop, Solo, Mute .............................................................................................................. |
16 |
|
2.1.4 Record............................................................................................................................... |
17 |
|
2.1.5 Capture MIDI.................................................................................................................... |
17 |
|
2.1.6 Quantise........................................................................................................................... |
17 |
|
2.1.7 Click.................................................................................................................................. |
17 |
|
2.1.8 Undo................................................................................................................................. |
17 |
|
2.1.9 Arm/ Select (61 & 49 Key Models Only)................................................................................. |
18 |
|
2.2 Drum Mode - Playing and Recording Drums............................................................................... |
18 |
|
2.3 |
Using Ableton Live’s Mixer ..................................................................................................... |
19 |
2.3.1 Pots................................................................................................................................... |
19 |
|
2.3.2 Faders (49 & 61 Key Models Only).......................................................................................... |
20 |
|
2.4 |
Device Mode - Navigating and Controlling Devices................................................................... |
20 |
2.4.1 Device Select....................................................................................................................... |
21 |
|
2.4.2 Device Lock....................................................................................................................... |
22 |
|
2.5 |
Transport Functions................................................................................................................ |
23 |
3.0 Standalone Features.......................................................................................................... |
24 |
|
3.1 |
Grid......................................................................................................................................... |
24 |
3.1.1 Drum Mode...................................................................................................................... |
24 |
|
3.2 Chord Modes.......................................................................................................................... |
24 |
|
3.2.1 Scale Chord Mode............................................................................................................ |
24 |
|
3.2.2 User Chord Mode............................................................................................................. |
25 |
|
3.2.3 Fixed Chord...................................................................................................................... |
27 |
|
3.3 |
Scale Mode............................................................................................................................. |
28 |
3
3.4 Custom Modes....................................................................................................................... |
29 |
3.4.1 Pads.................................................................................................................................. |
30 |
3.4.2 Pots................................................................................................................................... |
30 |
3.4.3 Faders (49 and 61 key models only)........................................................................................ |
30 |
3.5 Arpeggiator............................................................................................................................ |
30 |
3.5.1 Arpeggiator Rotary Pots .................................................................................................. |
31 |
3.5.2 Arp Modes........................................................................................................................ |
31 |
3.5.3 Arp Rates ......................................................................................................................... |
32 |
3.5.4 Arp Octaves...................................................................................................................... |
33 |
3.5.5 Arp Rhythms .................................................................................................................... |
33 |
3.5.6 Latch ................................................................................................................................ |
34 |
3.5.7 Arp Control Lock .............................................................................................................. |
34 |
3.6 Octave Buttons....................................................................................................................... |
35 |
3.7 Settings................................................................................................................................... |
35 |
3.8 Pot Pickup............................................................................................................................... |
36 |
3.9 Navigation Mode - ([...] Button) .................................................................................................... |
36 |
4.0 Working with Other DAWs............................................................................................... |
37 |
4.1 Logic....................................................................................................................................... |
37 |
4.1.1 Setup................................................................................................................................. |
37 |
4.1.2 Session Mode................................................................................................................... |
38 |
4.1.3 Pots (Knobs).............................................................................................................................. |
39 |
4.1.3 Faders (49 & 61 Key Models Only).......................................................................................... |
40 |
4.1.4 Arm/ Select (61 & 49 Key Models Only)................................................................................. |
41 |
4.1.5 Transport Functions.......................................................................................................... |
41 |
4.1.6 Navigation........................................................................................................................ |
41 |
4.2 Reason.................................................................................................................................... |
42 |
4.2.1 Setup................................................................................................................................. |
42 |
4.2.2 Transport Control.............................................................................................................. |
43 |
4.2.3 Rotary Knobs..................................................................................................................... |
43 |
4.2.4 Pads Session Mode........................................................................................................... |
43 |
4.2.5 Navigation........................................................................................................................ |
43 |
4.2.6 Preset Browsing................................................................................................................ |
43 |
4.3 Working with HUI (Pro Tools, Cubase, Studio One etc.)............................................................. |
44 |
4.3.1 Setup ................................................................................................................................ |
44 |
4.3.1.1 Pro Tools........................................................................................................................ |
44 |
4.3.1.1 Cubase........................................................................................................................... |
44 |
4.3.1.1 Studio One..................................................................................................................... |
44 |
4.3.2 Pad Session Mode............................................................................................................ |
44 |
4.3.3 Navigation ....................................................................................................................... |
44 |
4.3.4 Controlling the Mixer........................................................................................................ |
44 |
4.3.5 Faders and Fader Buttons (49 & 61 Key Models Only)......................................................... |
45 |
4.3.6 Transport Buttons.............................................................................................................. |
45 |
5.0 Custom Modes and Components ..................................................................................... |
46 |
4
1.0 Introduction
Launchkey [MK3] is Novation’s intuitive and fully integrated MIDI keyboard controller for making tracks in Ableton Live, designed to give you everything you need to create and play your music. Made for creators of all abilities, Launchkey gives you inspirational tools to expand your musical vocabulary.
Launchkey gives you unrivalled access to Ableton Live’s functions, including Capture MIDI, track arm, quantise, click and loop controls. Not using Ableton Live? No problem, Launchkey also has full
integration with Logic and Reason, plus out of the box functionality with other DAWs including Studio One, Cubase and Pro Tools, via HUI.
Inspirational features include Scale and Chord modes and a powerful arpeggiator, which together extend your musical capabilities and let you create in new ways. Scale Mode transposes keys and pads played to notes in the scale selected; chord modes let you trigger complex chords with one finger, while the powerful arpeggiator gets melodies moving.
Launchkey also works in standalone; the full-size five-pin MIDI output works with any MIDI-compatible device. Use Novation Components to configure Custom Modes, which map Launchkey’s knobs, faders and pads to all things MIDI.
1.1 Key Features
•Designed for Ableton Live: immediate access to all the controls you need.
•Additional DAW support: Full integration with Logic and Reason, out of the box functionality with Studio One, Cubase, Pro Tools and more via HUI.
•Produce and perform: 25, 37, 49 or 61-note velocity sensitive keyboard and 16 velocity sensitive RGB backlit pads
•Shape your sound: tweak instruments and effects to perfection using eight rotary encoders - and 9 faders (Launchkey 49 and 61 only)
•Automatically map scales to the keys: never hit a wrong note
•Get creative: three chord modes allow you to trigger chords with one finger, the
powerful arpeggiator gets melodies moving
•Transport and mixer control: directly operate playback, recording, pans, mutes and sends
•Connect to your hardware: 5-pin MIDI Out works with any MIDI-compatible device
•Control anything MIDI: create custom mappings for any performance or studio rig using Novation Components
•Make music immediately: Ableton Live Lite, virtual instruments and effects plugins and sample packs included
5

1.2 Box Contents
•Launchkey 25, 37, 49 or 61
•USB Type-A to B cable (1.5 meters)
•Safety Instructions
1.3 Getting Started
The ‘Easy Start Tool’ provides a step-by-step guide to setting up your Launchkey. This simple online tool will guide you through the process of registering the device and accessing the software bundle.
When connecting Launchkey to your computer, it will appear as a Mass Storage Device (MSD), just like a USB drive. Open the drive and then open ‘Click Here to Get Started.url’. This will open the Easy Start Tool in your web browser.
Alternatively, visit our website to register your Launchkey and access the software bundle.
6
1.4 Support
For additional information and support visit the Novation Help Centre.
1.5 Model Specific Features
There are 25, 37, 49 and 61 key versions of Launchkey. The differences between the devices are outlined below and model specific features are noted throughout this guide.
Model |
Launchkey 25 |
Launchkey 37 |
Launchkey 49 |
Launchkey 61 |
Velocity Sensitive keys |
25 |
37 |
49 |
61 |
Faders |
- |
- |
9 |
9 |
Fader/ Track Buttons |
- |
- |
9 |
9 |
Arm/ Select Button |
- |
- |
|
|
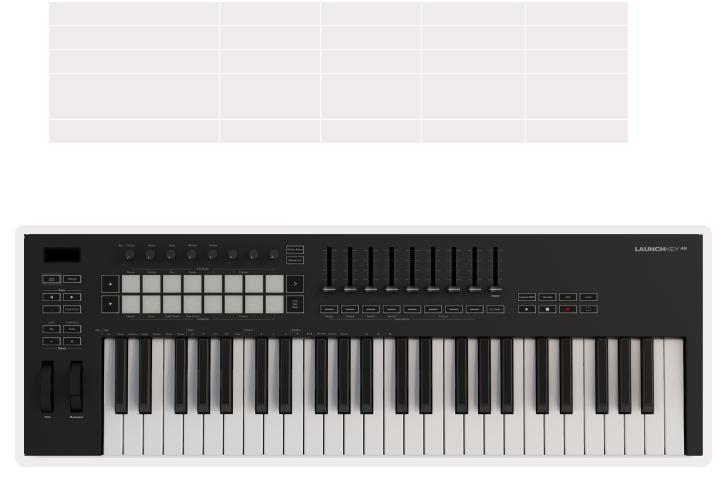
1.6 Hardware Overview
7

|
|
1 |
LED Display |
Shows the device status, parameter values, |
1 |
|
|
|
and lets you navigate through menus. |
|
2 |
Shift Button |
Enables access to secondary Shift functions |
|
|
|
|||
|
|
|
|
which are shown in grey text on the hardware. |
2 |
3 |
3 |
Settings Button |
Opens the settings menu on the screen. (A |
4 |
|
reference table of Settings options can be |
||
|
|
|
|
found in section 3.7) |
5 |
|
4 |
▲▼ Buttons |
Navigates up and down through rows of pads. |
6 |
7 |
|
|
Used for clips and drum racks in Live, chords, |
|
|
and more. |
||
|
|
5 |
Track ◄ ►Buttons |
Navigates through tracks in your DAW. |
8 |
9 |
6 |
… Button |
Pressing the “...” button will put the |
10 |
|
|
(Navigation Mode) |
Launchkey into a navigation mode useful for |
|
|
|
browsing samples and presets. |
|
|
|
|
|
|
|
|
7 |
Fixed Chord |
Stores a chord that can be played anywhere on |
11 |
|
12 |
Button |
the keyboard. While holding the button, press |
|
|
and release the keys that you wish to be part |
||
|
|
|
|
of the ‘fixed’ chord. |
|
|
8 |
Arp Button |
Turns on and off Launchkey’s inbuilt |
|
|
|
|
arpeggiator. Long press also locks the pot Arp |
|
|
|
|
controls to on. |
|
|
9 |
Scale Button |
Turns on and off Launchkey’s Scale Mode. |
|
|
10 |
Octave - + |
Transposes the keyboard up or down across 8 |
|
|
|
Buttons |
octaves (C-2 to C5). Pressing both buttons sets |
|
|
|
|
the transposition amount back to 0. |
|
|
11 |
Pitch Wheel |
Bends the pitch of the note being played. |
|
|
12 |
Modulation Wheel |
Modulates software/ hardware parameters. |
8
13 |
15 |
|
16 |
||
|
||
14 |
17 |
|
|
18 |
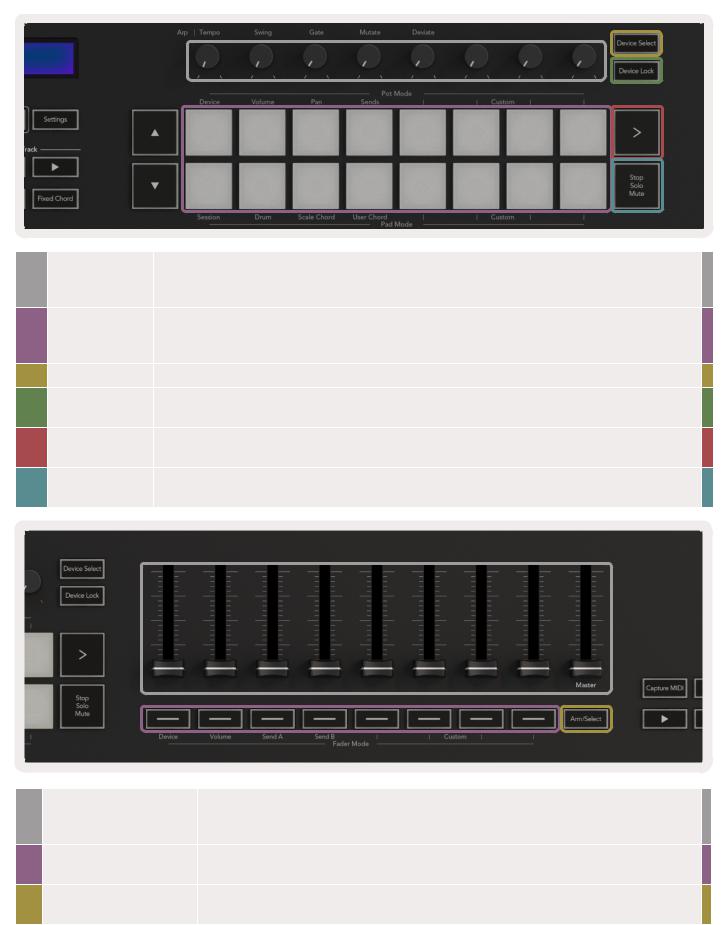
13 |
Pots |
Controls various parameters using 8 available modes: Device, Volume, Pan, Sends |
|
|
and four Custom Modes. The first five pots also control Arp parameters as secondary |
|
|
functions. |
14 |
Pads |
Triggers clips and play drum racks in Ableton Live using Session and Drum Modes. Send |
|
|
custom MIDI messages using four available Custom Modes. Trigger chords in Scale Chord |
|
|
and User Chord Modes. |
15 |
Device Select |
Selects the device you want to control in Ableton Live using the pads. |
16 |
Device Lock |
Locks the currently selected device controls to the pots in Ableton Live, even when you |
|
|
navigate to a different track. |
17 |
> Button |
Launches full rows of clips in Ableton Live. |
|
(Scene Launch) |
|
18Stop/ Solo/ Turns the bottom row of pads into track stop, solo or mute buttons.
Mute Button
19
20 |
21 |
19 |
Faders (Launchkey 49 |
Control various parameters using 8 available modes: Device, Volume, Send A, |
|
and 61 only) |
Send B and 4 Custom Modes. The 9th fader controls Master volume in your DAW |
|
|
(excluding HUI). |
20 |
Fader Buttons (49 & 61 |
Control various parameters using 8 available modes: Device, Volume, Send A, |
|
key models only) |
Send B and 4 Custom Modes. |
21 |
Arm/ Select Button (49 |
Changes the functionality of the Fader Buttons in your DAW to let you select and |
|
& 61 Key Models Only) |
record arm tracks. |
9
22 |
23 |
24 |
25 |
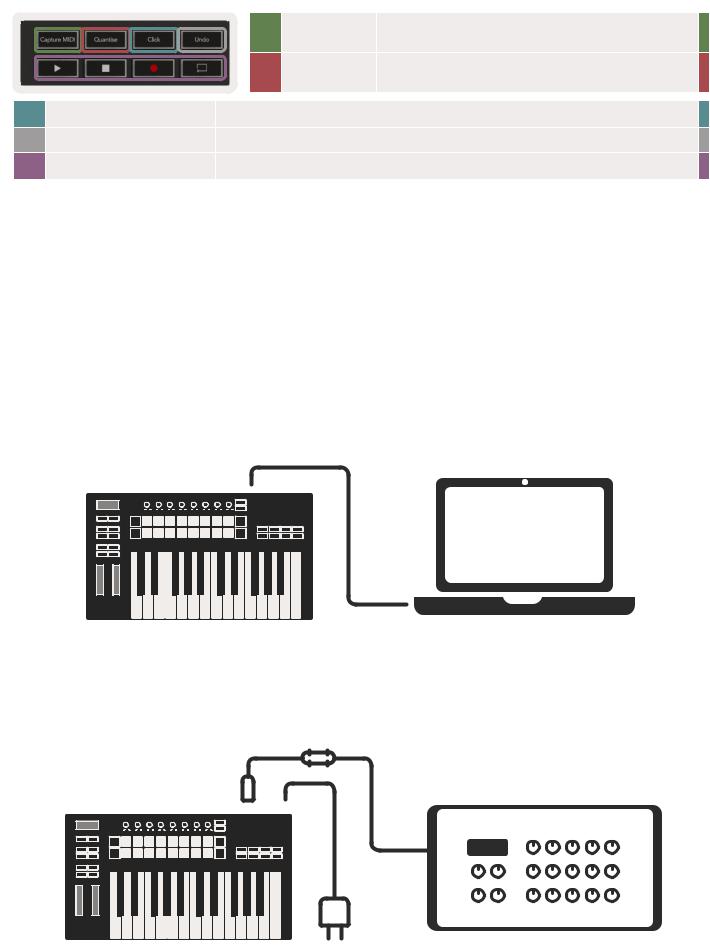
22 |
Capture Midi |
Capture any recently played MIDI notes in your |
|
|
|
DAW (supported by Ableton Live and Logic). |
|||||
26 |
|
|
|
|
|
||
|
|
|
23 |
Quantise |
Triggers the quantise function in Ableton Live and |
||
|
|
|
|
|
|
|
Logic, to snap notes to the grid. |
24 |
Click |
|
|
|
Toggles Logic and Live’s metronome on and off. |
||
25 |
Undo |
|
|
Triggers Logic and Live’s undo function. |
|||
26Play, Record, Stop, Loop Controls the playback in your DAW.
1.7Getting Connected
1.7.1 Connecting Launchkey with a Computer
Your Launchkey is USB bus-powered, meaning it turns on as soon as you connect it to your computer with a USB cable. When connecting Launchkey for the first time, visit Components to make sure you have the latest firmware. This will make sure you have all the latest features enabled.
Note: When connecting Launchkey to a Mac you may be shown the Keyboard Setup Assistant. This is because Launchkey also functions as a computer keyboard device in order to enable the Navigate functionality. The Keyboard Setup Assistant can simply be dismissed.
1.7.2 Connecting Launchkey with External MIDI Enabled Instruments
If you want to use the 5-pin DIN socket for MIDI output on your Launchkey without a computer, you can power the unit with a standard USB power supply (5V DC, minimum 500mA).
10
2.0 Working with Ableton Live
Your Launchkey is designed to work seamlessly with Ableton Live, offering deep integration through powerful production and performance controls right out of the box. In addition, you can modify your Launchkey to suit your needs with Custom Modes. Launchkey’s functionality with Ableton Live is detailed below.
2.0.1 Installation
If you already own Ableton Live 10 then all you need to do is open the program and plug in your Launchkey. If you don’t yet own Ableton Live 10, register your Launchkey at novationmusic.com/ register to download and install your included copy of Ableton Live 10 Lite. If you have never used Ableton Live before, we recommend visiting our Easy Start Tool (see ‘Getting Started’). There you’ll find videos covering installation, the software’s basic features, and how to get started making music with your Launchkey.
2.0.2 Setup
With Ableton Live installed, plug your Launchkey into your Mac or PC’s USB port. When you open Live your Launchkey will be automatically detected and enter Session Mode.
If you press Shift on your Launchkey your pad lights should look like the image below. The top row of pads (blue) select behaviour or “Mode” of the Pots above, while the lower row of pads (green) select the behaviour or mode of the pads. If a pad is red then that mode is assigned to the faders (49 & 61 key models only).
If your pads do not resemble the image above you’ll need to configure Live’s Control Surface Preferences. To do this, find the ‘Link/MIDI’ Preferences menu in Ableton Live:
11

Windows: Options > Preferences > Link/MIDI
Mac: Live > Preferences > Link/MIDI
In the Link/MIDI tab you’ll need to copy the settings shown above. First, select your Launchkey MK3 from the Control Surface menu. Then, under Input select “Launchkey MK3 [...] (LKMK3 DAW OUT)” or Launchkey MK3 MIDI IN2 (Windows) for output select “Launchkey MK3 [...] (LKMK3 DAW IN)”. Finally, match the Track, Sync and Remote settings.
If you’re having trouble getting your Launchkey working with Ableton Live, be sure to visit our Easy Start Tool for video explanations.
12
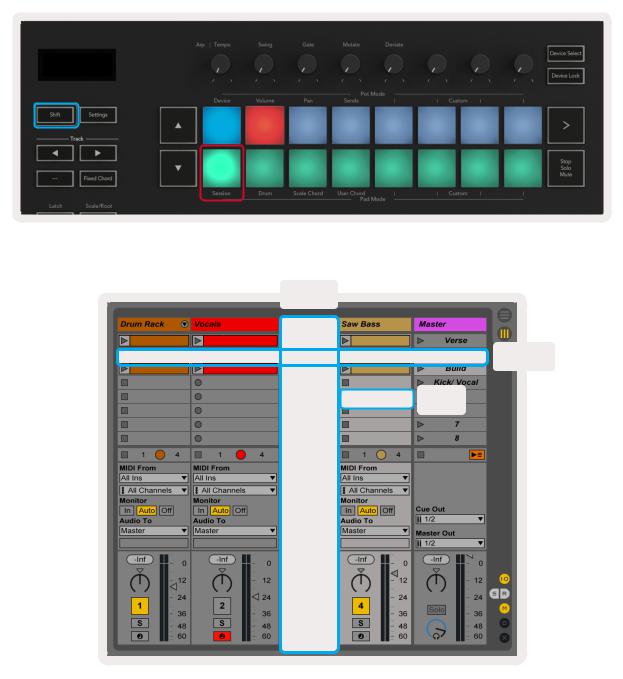
2.1 Session Mode
Session mode is designed to control Ableton Live’s Session View. To access Session mode on your Launchkey hold Shift and press the “Session” pad (bottom left pad). The Session pad should brighten like this:
Session View is a grid that consists of clips, tracks and scenes (shown below).
Track
Scene
Clip
13

Launchkey’s Session mode provides an 8x2 grid of the clips in your Session View. Example of Launchkey’s pads in Session mode:
Clips are typically loops that contain MIDI notes or audio.
Tracks represent virtual instruments or audio tracks. MIDI clips placed on instrument tracks will play back on the instrument that is assigned to that track.
Scenes are rows of clips. Launching a scene will launch all clips in that row. This means that you can arrange clips into horizontal groups (across tracks) to form a song structure, launching scene after scene to progress through a song.
Again, access Session mode on your Launchkey by holding Shift and pressing the Session pad (the bottom left pad).
In Session mode, the pads represent the grid of clips found inside the coloured rectangle in Ableton Live’s Session View. The image below shows such a rectangle (orange) extending from the left-most track to the Master track:
14
Loading...