

Novation REMOTELE User Manual

Contents
Introduction
Introduction....................................................................................... 1
Using this manual.........................................................................1
Main features ................................................................................2
Conventions used in this manual............................................. 2
Quick Start Guide ............................................................................ 3
Connecting the ReMOTE LE.................................................... 3
Connecting to a computer using the USB Port...................3
Driver Installation........................................................................3
Playing and controlling software synthesizers from the
ReMOTE LE ..................................................................................3
Controlling a sequencer ............................................................ 4
Power supply or battery operation........................................ 4
Connecting to equipment using the MIDI Out port .......... 4
Connecting to equipment using the MIDI Out port AND
connecting to a computer using the USB port .................... 4
What is a Template? ...................................................................5
MIDI Tutorial ....................................................................................5
Introduction ..................................................................................5
MIDI ports.....................................................................................5
MIDI messages.............................................................................. 6
Main Features and Operation .......................................................8
Front panel layout .......................................................................8
Rear panel connections.............................................................. 9
Modes and menus........................................................................ 9
Using menus – PLAY mode ....................................................10
Using menus – EDIT mode .....................................................11
Individual Template Edit 'CC' menu options......................11
Individual Template Edit 'NRPN' menu options................13
Individual Template Edit 'RPN' menu options....................13
Individual Template Edit 'MMC' menu options..................14
Individual Template Edit 'Note On/Off' menu options....14
Individual Template Edit 'Program Change' menu options
........................................................................................................15
Individual Template Edit 'Pitch Bend' menu options ........15
Individual Template Edit 'Aftertouch' menu options........15
Common Template Edit menu options (e.g. setting
keyboard velocity).....................................................................16
Using the X/Y touchpad ..........................................................17
Using a sustain pedal.................................................................18
Using the transport buttons ...................................................18
Using the OCTAVE UP/DOWN buttons...........................18
Saving a Template to memory ...............................................18
Advanced Settings ..........................................................................20
GLOBAL edit mode..................................................................20
Updating the operating system ..............................................20
Troubleshooting .............................................................................21
Appendix I – Specifications..........................................................22
Appendix I1 – MIDI Implementation Chart ............................23
Appendix III – Approvals Information ......................................24
Thank you for purchasing the Novation ReMOTE LE
controller keyboard. This device may be used to control
sequencers, popular software virtual instrument applications
(on a computer) or traditional hardware instruments via
either a USB connection or a standard MIDI interface. The
ReMOTE LE front panel provides nine knobs and nine
buttons (with a Group B switch that doubles the controls
for each template), along with an X/Y touchpad and
pitch/mod joystick, all of which can be easily configured
exactly the way you want and saved/instantly recalled using
the onboard Template Memories.
Whether used live or in the studio to control virtual or
hardware instruments, its comprehensive range of controls
may be used to dynamically alter any sound parameters
precisely and in real time.
Using this manual
This manual consists of six sections: Introduction, Quick
Start Guide, MIDI Tutorial, Main Features and Operation,
Advanced Settings and Troubleshooting. An Appendix is
also provided containing reference data.
It is assumed that the reader already has a basic knowledge
of MIDI in order to configure Templates. Those with limited
MIDI experience may find the MIDI Tutorial useful.
However, very little MIDI knowledge is required to use the
ReMOTE LE with the factory preset Templates. It is simply
a case of importing the relevant files from the resource CD
(only required for software without a fixed MIDI spec) then
selecting the Template that corresponds to the
software/hardware being used (if one is available either
onboard or on the website) and tweaking away.
In order to become familiar with the many useful features of
the ReMOTE LE and get the most out of its MIDI
controlling capabilities, it is recommended that this manual
be read in its entirety. For anyone wanting simple and
speedy instructions before delving deeper, the Quick Start
Guide provides brief information on setting up the ReMOTE
LE and a quick overview on selecting and using factory
preset Templates.
Enjoy!
1

Main features
• Two-octave semi-weighted velocity-sensitive keyboard
with combined pitch bend and modulation joystick. The
keyboard is transposable up or down across the entire
MIDI note range.
•
MIDI or USB operation. USB and MIDI may be used
simultaneously. A MIDI Out port and a sustain pedal
socket are both available.
•
Can be powered by the USB port, batteries or a 9V
DC adaptor (not supplied).
•
Generous selection of front panel controls including an
X/Y touchpad, nine knobs and nine buttons (Group A
and B; 18 knobs and 18 buttons in total), all of which
can be individually configured.
•
Comprehensive MIDI specification. Any front panel
control may be configured to transmit on any MIDI
channel to any destination. Available options include
Controller numbers, NRPNs, RPNs, MMC commands,
Note On/Off and Program Change messages.
•
16 onboard Template memories – 12 preset with more
available on the Novation website. Each Template
contains definitions for all front panel controls.
Templates may be individually named for easy
reference.
•
Template memories may be saved as System Exclusive
bulk dumps to an external sequencer, MIDI data filer or
the Template Editor.
Conventions used in this manual
The word 'Template' refers to a collection of knob and
button settings (all assigned with specific MIDI data) and the
function of the pedal and X/Y touchpad. Each Template is
individually named and numbered from 1 to 16 and can be
saved in the ReMOTE LE's onboard memory.
The word 'preset' refers to a Template configured at the
factory to showcase some of the ReMOTE LE's powerful
control possibilities. Preset Templates may be overwritten
by new settings.
The word 'control' refers to any of the front panel knobs,
assignable buttons, user's sustain pedal (not supplied),
joystick or the X/Y touchpad. Within a single Template,
each control may be individually configured to transmit
various types of MIDI information to the USB port and/or
MIDI Out.
Text in CAPITALS refers to a front panel control or legend
(even though the name of the control may actually be in
lower case on the front panel). It could be a knob, button
or rotary encoder.
2
Quick Start Guide
Connecting the ReMOTE LE
The ReMOTE LE may be connected to a system in three
different ways:
1.
Connection to a computer using the USB port.
2.
Connection to MIDI equipment using the MIDI Out
port.
3.
Connection to MIDI equipment using the MIDI Out
port AND to a computer using the USB port.
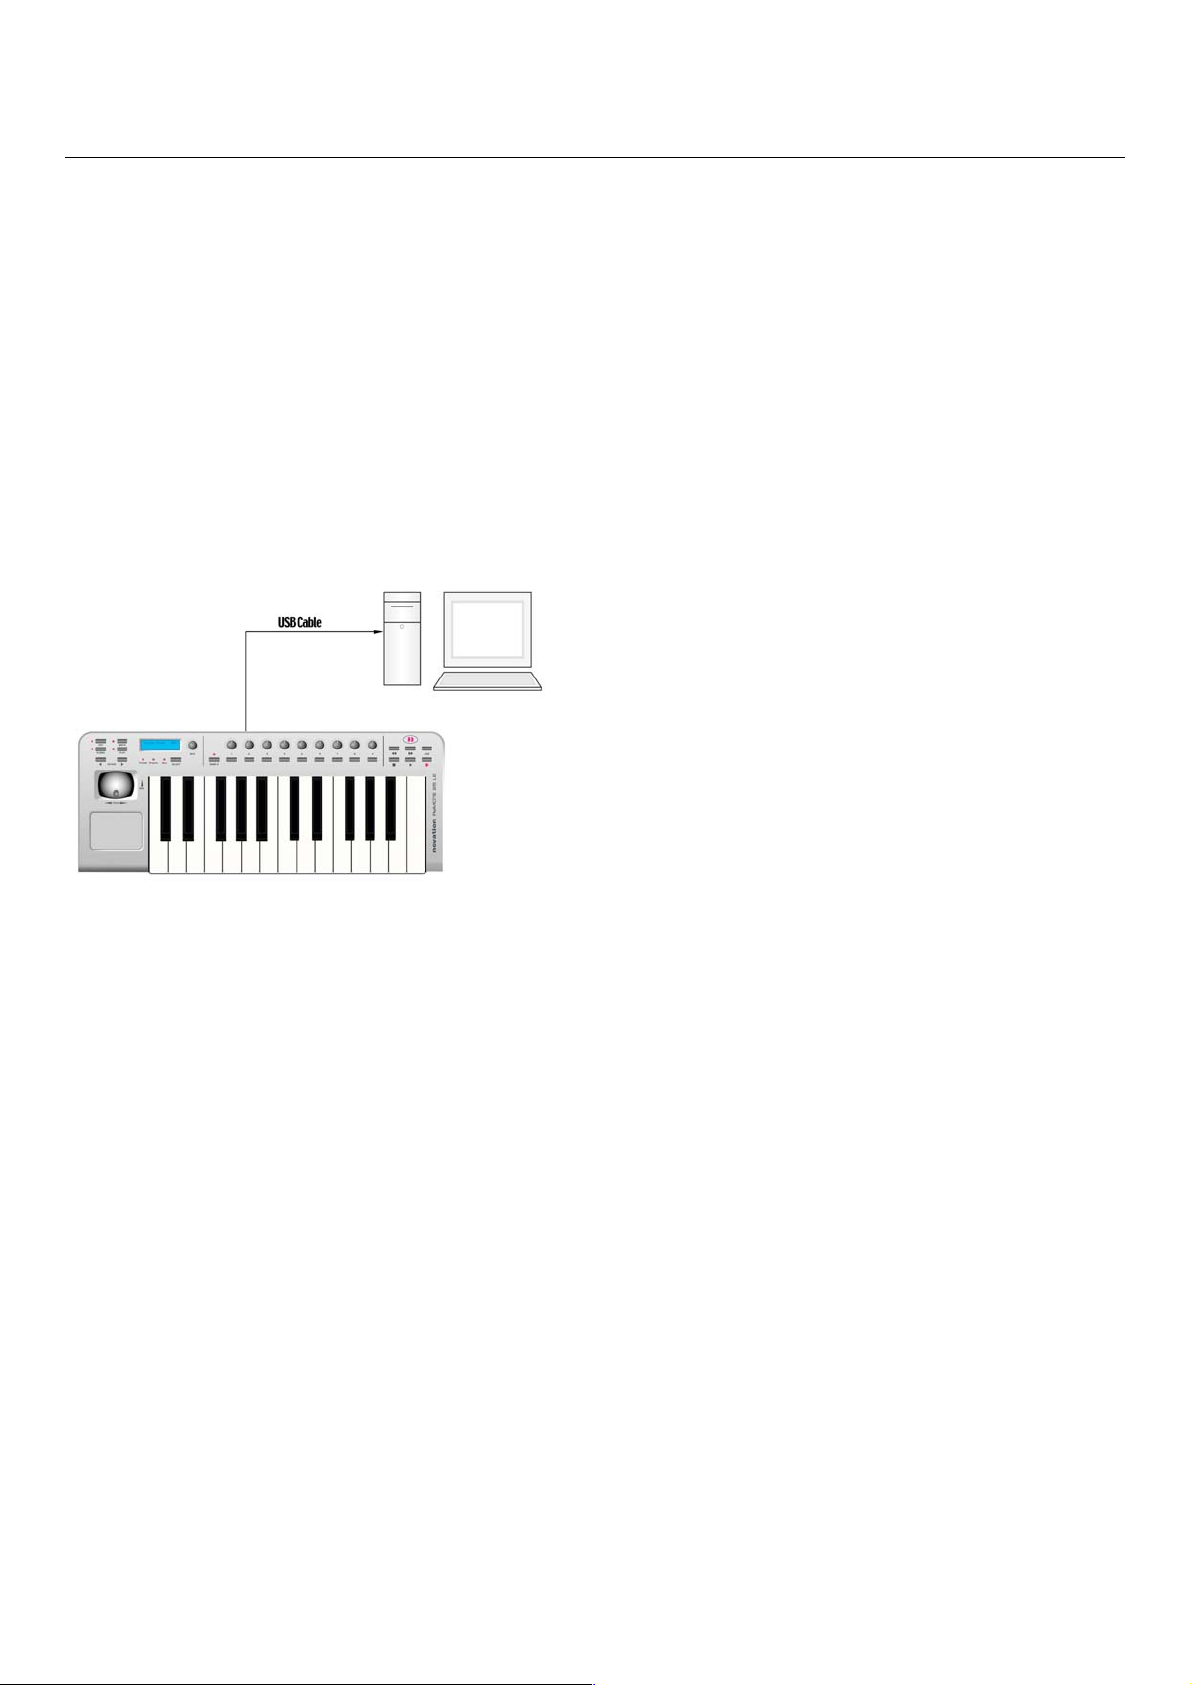
Connecting to a computer using the
USB Port
The illustration below shows a typical arrangement:
NB: The computer must be running Mac OS X or Windows
XP.
Connect the ReMOTE LE to the computer using the
supplied USB cable. Connect a sustain pedal (not supplied) if
required. Since power is being supplied from the computer
via the USB cable, it is not necessary to have batteries or an
external PSU fitted.
Driver Installation
Before the ReMOTE LE can be used to control sequencers
and software synthesizers, the ReMOTE LE MIDI drivers
must be installed on the computer.
Windows XP Installation
Insert the Novation driver CD into the CD-ROM drive of
the computer. Connect the ReMOTE LE to the computer
(if this has not already been done) using the supplied USB
cable. A small pop-up box will appear at first followed by a
large dialogue box titled ‘Found New Hardware Wizard’. If
using SP2, the first screen will ask, 'Can Windows connect
to Windows Update to search for software?'. Click, 'No,
not this time' followed by the 'Next' button. The remainder
of the process is identical to the process for SP1 users, now
asking what you want the wizard to do. Select 'Install from a
list or specific location (advanced)' then click 'Next'. The
next screen asks to choose your search and installation
options, click 'Don't search, I will choose the driver to
install' then click 'Next'. The next screen allows you to
select the driver from a list, ignore the list and click 'Have
disk'. A separate install from disk float window will now
open, click the 'Browse' button to search for the driver file
on the Novation CD yourself. Browse to the CD and select
the ReMOTE LE driver folder and open the file inside by
clicking 'Open' once the file is selected. Now click 'OK' in
the install from disk window. The process then returns back
to the driver select window. The next screen will inform
that the USB logo has not been tested by Microsoft, click
‘Continue Anyway’. Do not be alarmed by the message
since the driver has been tested. Windows will now confirm
that the installation is complete. Click the ‘Finish’ button.
Then reboot the computer.
Mac OSX Installation
Insert the Novation driver CD into the CD-ROM drive of
the computer. Drag the driver install file (ending .pkg) onto
the desktop. Double click the icon once on your desktop
and the installation will be carried out. You can delete the
.pkg file once the drivers have been installed.
Now, all that is required is to open up the recording
software/sequencer you wish to control and then ensure
that the ReMOTE LE is selected within the MIDI
preferences of that software application. Consult the
documentation supplied with the software package if unsure
of how to set up a MIDI controller for it.
Playing and controlling software
synthesizers from the ReMOTE LE
Numerous software synthesizers may be controlled using
the ReMOTE LE. To make this straightforward, Templates
(memories that contain the specific control information for
individual synthesizers assigned to the ReMOTE LE's
controls) have already been constructed for most popular
software/hardware. The ReMOTE LE has 12 preset
Templates onboard and additional Templates available at
www.novationmusic.com. See page 22 for a list of preset
Templates.
To select a Template for a particular software synthesizer,
make sure that the ReMOTE LE is in PLAY - Template
Select Mode (PLAY LED and Template LED both lit). This
mode will be active when the unit is powered up but if
another mode is active then press the PLAY button (Menu
not Transport) on the left of the unit so that the LED
beside it is lit and then press the SELECT button below the
ReMOTE LE screen (repeatedly if necessary) until the
Template LED is lit. Now the DATA encoder can be used
to scroll to the desired Template. If some or all of the
controls on the ReMOTE LE don’t seem to work when the
correct Template is selected then the software synthesizer
may not have a defined MIDI spec. In this case the relevant
file will need to be imported from the resource CD (see
‘controlling a sequencer’ section for details).
3
If a template for the software synthesizer is not available
then one can easily be constructed either on the hardware
(see EDIT Mode section on page 11 for details) or using the
Template Editor (available for download from
novationmusic.com). Even without a template, the ReMOTE
LE keyboard and pitch/mod joystick can be used to play
sounds and the Program and Bank modes within PLAY
mode can be used to call up a different sound on the
software synth (see page 10 for details).
Controlling a sequencer
Even though the ReMOTE LE contains a Template for a
sequencer such as Cubase, simply calling up the Template
using the DATA encoder will not mean that all controls are
automatically mapped to the sequencer (e.g. the Transport
controls will not work). This is because, when software
does not have a defined MIDI spec, the MIDI data assigned
to the controls on the ReMOTE LE needs to be learned by
the software, which may be simple or complex depending
on the software. To overcome this and make it a simple
process, Novation provide a learn/resource file on an
accompanying CD-ROM to import into the relevant
software. Read the text file in the relevant software folder
on the CD-ROM for instructions on how to do this. This
may also apply to some software synthesizers, for example
the Pro-53.
FOR MORE INFO ON THE ONBOARD
TEMPLATES VISIT NOVATIONMUSIC.COM
Power supply or battery operation
The ReMOTE LE may be powered by an external power
supply (Novation PSU6, not supplied) or by 6 x 'AA'
batteries.
Fitting batteries
Turn the ReMOTE LE upside down and unclip the battery
compartment by squeezing the two clips and gently raising
the lid. Observe the connection diagram imprinted on the
plastic casing for 6 x 'AA' cells and fit the cells as shown.
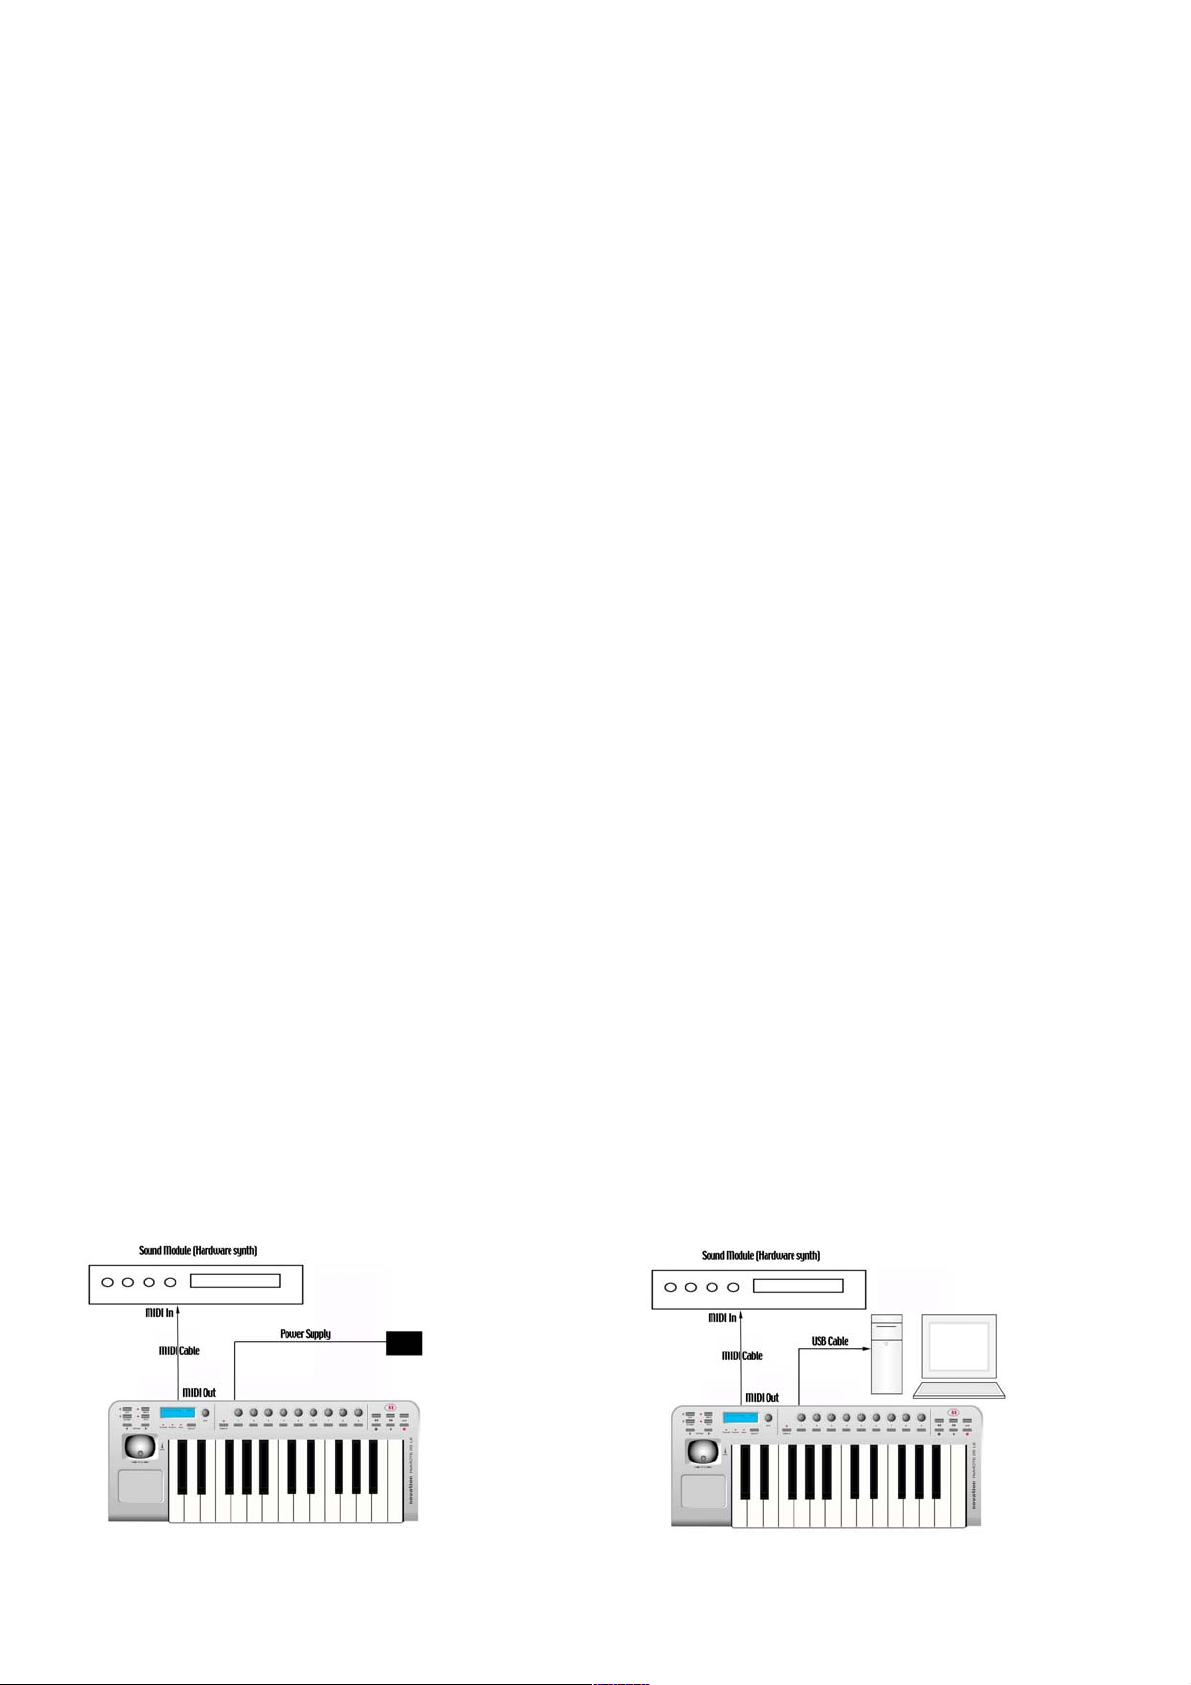
Connecting to equipment using the
MIDI Out port
This is referred to as the 'stand alone' or 'live' set-up. The
illustration below shows a typical arrangement:
Ensure power is off on all equipment. Connect the MIDI
Out of the ReMOTE LE to the MIDI In of a suitable sound
module. If batteries are not fitted then an external power
supply (Novation PSU6) must be connected - see previous
section for information. Connect any other equipment such
as a sustain pedal to the ReMOTE LE. Switch on the power
to all devices.
Playing a sound module or hardware
synthesizer from the ReMOTE LE
Set the receiving MIDI channel of the sound module to
Channel 1 or OMNI (this should be the default). The
keyboard and pitch/modulation joystick will be active and
the sound module will respond to the MIDI information
being sent from the ReMOTE LE.
To select a Template for a particular hardware synthesizer,
make sure that the ReMOTE LE is in PLAY - Template
Select Mode (PLAY LED and Template LED both lit). This
mode will be active when the unit is powered up but if
another mode is active then press the PLAY button (Menu
not Transport) on the left of the unit so that the LED
beside it is lit and then press the SELECT button below the
ReMOTE LE screen (repeatedly if necessary) until the
Template LED is lit. Now the DATA encoder can be used
to scroll to Template No. 10 'General MIDI 2' or the
corresponding Template for that sound module (if one is
available, check the website for hardware Templates). With
the Template selected, the ReMOTE LE's knobs and buttons
will map to relevant controls on the sound module. If a
Template for the hardware synthesizer is not available then
one can easily be constructed either on the hardware (see
EDIT Mode section on page 11 for details) or using the
Template Editor (available for download from
novationmusic.com). Even without a template, the ReMOTE
LE keyboard and pitch/mod joystick can be used to play
sounds and the Program and Bank modes within PLAY
mode can be used to call up a different sound on the
hardware synth (see page 10 for details).
Connecting to equipment using the
MIDI Out port AND connecting to a
computer using the USB port
This is an advanced setup where the ReMOTE LE is
connected to an external sound module/hardware
synthesizer using the MIDI Out port as well as being
connected to a computer via USB:
4

NB: The computer must be running Mac OS X or Windows
XP
This setup provides a flexible system. The MIDI port is used
to control the hardware synth, which gives 16 channels of
available MIDI. The MIDI data sent from the computer via
the USB port can control the sound module as well as
events (such as slider or knob movements and key presses)
from the ReMOTE LE. The ReMOTE LE can also
simultaneously control the sequencer and any software
synths or samplers running within the computer. See earlier
sections for how to load up Templates to control
software/hardware.
What is a Template?
A Template is the name given to a collection of knob and
button settings (all assigned MIDI data of some kind), in
addition to the settings of the joystick and Touchpad. The
way that the controls (knobs, buttons...etc.) have been set
up is dependent on what the Template is for. For example,
a Template for controlling Novation's V-Station software
synthesizer has all the ReMOTE LE controls mapped to
appropriate locations within the V-Station software so that
rotating/pushing a dial/button on the ReMOTE LE changes
various parameters on the V-Station. If this is still confusing,
here is a more specific example of what Templates are for:
If you were using the Novation V-Station and you wanted to
control the V-Station parameters using the knobs and
buttons on the ReMOTE LE, you could get the V-Station
manual and look in the back to see what MIDI messages
control which V-Station parameters and then program each
control on the ReMOTE LE to control a different V-Station
parameter by making it send the corresponding MIDI
message. Then, if you were using the V-Station in Cubase
and you wanted to use the ReMOTE LE to control the
Cubase mixer, you would have to reprogram all of the
controls on the ReMOTE LE so that they send MIDI
messages which Cubase can understand. Every time you
wanted to switch between controlling Cubase and the VStation, you would have to reprogram all the knobs and
buttons. Templates mean that you don't have to continually
reprogram the ReMOTE LE controls because you can save
all the settings onboard the unit and then instantly recall
them by selecting the saved Template. A preset Template is
a Template that has already been constructed by Novation
so that you don't need to construct one yourself, all you
have to do is select the preset Templates for V-Station and
Cubase to easily switch between controlling them both!
There are 12 preset Templates onboard the ReMOTE LE
(for various sequencers and software synthesizers) meaning
that the ReMOTE LE can be used to control many different
applications as soon as it has been purchased without having
to perform complex setup procedures. Simply rotating the
DATA encoder below the LCD screen once the ReMOTE
LE has first been powered up will scroll through the
onboard Templates. You will notice that there are actually
16 Template memories, this is because there are 4 spare
slots for building your own Templates. In addition to these,
you will find many more Templates available for free at the
Novation website www.novationmusic.com. To find out
how to construct your own Templates or edit the preset
Templates onboard the ReMOTE LE, simply consult the
relevant sections of the manual. If confused as to why a
Template for a particular sequencer (or some VST
Instruments) does not appear to be working then read the
'Controlling a Sequencer' section earlier in the Getting
Started Guide, which explains why.
MIDI Tutorial
Introduction
MIDI is an acronym for Musical Instrument Digital Interface.
The MIDI standard was devised in the early 80's as a means
for allowing digital musical instruments to communicate
with each other as well as with other devices such as
sequencers and computers. Before the advent of MIDI, it
was often very difficult (if not impossible) for instruments to
effectively communicate with each other, especially if they
had been made by different manufacturers. Nowadays,
virtually all digital instruments are equipped with a MIDI
interface as standard, including synthesizers, drum machines,
samplers, sequencers, computers and even some effects
units and mixers.
The MIDI standard allows many different instruments to be
controlled at once (say from a sequencer or a controller
keyboard such as the ReMOTE LE) using the same network
of MIDI cables. Each instrument in the MIDI chain is usually
assigned its own unique MIDI channel and will only respond
to information that it may receive on that particular
channel. The MIDI standard allows for sixteen different
channels to be assigned to the various instruments in a MIDI
network. This means that it is possible to have up to sixteen
instruments playing simultaneously within a MIDI system.
Some people may feel that being restricted to just sixteen
MIDI channels might be a little limiting, especially if they are
composing very complex pieces of music. However, some
sequencers, MIDI ports for computers and master
keyboards offer a neat way around this problem. They can
offer several different MIDI outputs, each of which is
treated as a separate MIDI system in its own right with its
own set of sixteen MIDI channels. The ReMOTE LE may use
its MIDI OUT to gain access to 16 MIDI channels with the
USB port commanding the same 16 within the computer.
MIDI ports
The ReMOTE LE has one standard MIDI port (MIDI Out),
which transmits MIDI data to external MIDI instruments.
For example, if a note was played on the ReMOTE LE's
keyboard or one of the controls were moved on the front
panel, this data could be used to control the MIDI
5

Instrument. Similarly, the MIDI Out port will transmit any
MIDI data received at the USB port from the sequencer.
The USB port acts in a manner similar to a combined MIDI
In/MIDI Out. It can be regarded as a special port that can
send and receive MIDI information simultaneously. It is a
convenient way of connecting to a computer without having
to connect two sets of standard MIDI cables (it is not
possible to send MIDI data in two directions using one
standard MIDI cable). The information that flows through
the USB connection does however conform to the same
message format as standard MIDI.
MIDI messages
The ReMote LE is capable of transmitting various types of
MIDI events. These are as follows:
Note messages
A note message is transmitted every time a key on the
ReMOTE LE's keyboard is pressed down or released. When
a keyboard note is pressed down, the MIDI message also
includes velocity information. This represents how hard the
key was pressed down and translates to the volume of the
sound produced by the MIDI instrument. This velocity value
can therefore be used to add dynamics to the sound. It is
also possible to configure buttons on the front panel to
transmit note messages, such as a Note On message when
the button is pressed and a Note Off message when the
button is released. This is detailed on page 14.
Continuous Controller messages
These messages are commonly used to alter synthesizer
parameters by MIDI. In many of the Templates, it is
Continuous Controller messages that are sent when the
front panel controls are moved. The MIDI specification
allows for 128 different types of controller message. These
are often referred to as Continuous Controllers, or CC
numbers, and run from 0 to 127 inclusively. Some CC
numbers have specific functions rigidly defined by the MIDI
standard. For example, CC No1 is always used for the
modulation wheel. Therefore, whenever you move the
ReMOTE LE's pitch/modulation joystick upwards, it will
transmit MIDI Continuous Controller information using
CC1. All makes of synthesizers will also use CC1 for
modulation wheel data.
Many CC numbers have no set purpose within the MIDI
specification. For example, whenever a Novation K-Station's
Filter FREQUENCY knob is moved, it will transmit using
CC105. There is no guarantee, however, that other makes
of synthesizer will use this CC number for the same
purpose.
A CC MIDI message contains a fixed data value anywhere in
the range 0 to 127 (the CC number) along with a variable
amount (e.g. the position of the knob). Use of CC messages
is detailed on pages 11 to 13.
Non-Registered Parameter messages
Some synthesizers (such as the Novation K-Station) actually
have many more than 128 different parameters that can be
transmitted by MIDI, but because the number of different
types of Continuous Controller message is limited to just
128, a more complicated arrangement for transmitting
additional parameters is used. This arrangement is known as
Non-Registered Parameter Numbers (NRPNs for short).
NRPNs actually consist of three MIDI Continuous
Controller messages grouped together, rather than a single
MIDI Continuous Controller message which is normally
used. The first two CC messages define the NRPN number
of the message. CC98 is used to specify the least significant
byte (LSB) of the NRPN number and CC99 is used to
specify the most significant byte (MSB) of the NRPN
number.
Registered Parameter messages
These are known as RPNs and are similar in format to
NRPN messages. CC100 is used to define the RPN LSB and
CC101, the RPN MSB (usually zero). As for NRPNs, CC6
contains the actual data value. RPN numbers assigned by the
MIDI specification are:
0 Pitch Bend sensitivity
1 Fine Tuning
2 Coarse Tuning
3 Tuning Program Select
4 Tuning Bank Select
Many synthesizers do not use RPNs. Consult your
synthesizer manual for details of which RPNs are
recognised. The use of RPNs is detailed on page 13.
Pitch bend messages
These messages are transmitted whenever the ReMOTE
LE's joystick is moved along the X-axis (from left to right). It
is also possible to assign the X/Y touchpad to transmit pitch
bend. As the name implies, pitch bend messages are used to
move sounding notes up or down in pitch.
Program Change & Bank Select messages
These messages are used to remotely select sounds on a
software/hardware synthesizer. The MIDI specification only
allows a MIDI Program Change message to select one of
128 different sounds. When the MIDI specification was
originally designed, this was rarely a problem since
synthesizers seldom had more than 128 memories. Modern
synthesizers such as the Novation K-Station offer many
more memories than this (the K-Station for example,
actually has 400 memories divided into four 'Banks' of 100
memories each), so it is often convenient to send a MIDI
Program Change preceded by an additional MIDI message
which specifies which 'Bank' of sounds the following
Program Change message will select from.
The Bank Select MIDI message used for this purpose is
actually a MIDI Continuous Controller message. CC32 is
the Continuous Controller number used by Novation and
most manufacturers, but a few manufacturers may use CC0
instead. Consult the synthesizer manual for details on the
Bank Select CC number used. For example to select
Program A100 on the Novation Supernova, the following
MIDI messages would be needed:
CC32: 5 (5 selects Program Bank A on the Novation
Supernova)
Prog Change: 100
6

Synthesizers that implement Bank Select usually require that
the appropriate Bank Select message be sent before a
following Program Change message. Synthesizers not
implementing Bank Select need only receive a Program
Change message.
Warning: many synthesizers will only accept a Program Change
message if a Bank Select message has been received first!
Bank Select Messages may be sent from the ReMOTE LE by
either using the DATA encoder from within PLAY Mode
with the Bank LED active (CC32 is always sent) or by
defining a control within a Template to transmit CC0 or
CC32 as appropriate. Program Change messages may be
sent from the ReMOTE LE by either using the DATA
encoder from within PLAY Mode with the Program LED
active or by defining a control within a Template to transmit
Program Change. See page 15 for more information on
using the ReMOTE PLAY modes to send Program Change
and Bank Select messages.
Channel messages
All of the different types of MIDI messages outlined so far
include information detailing which MIDI channel was used
when the message was transmitted. MIDI channel messages
will only affect receiving devices using the same MIDI
channel. For example, a Pitch Bend message sent using MIDI
channel 1 would have no effect at all if it were received on a
synthesizer set to respond on MIDI channel 2. Some MIDI
messages do not include any MIDI channel information
defined in them. Some examples of these are:
System Exclusive messages
This is special type of MIDI message, often referred to as
'sysex'. System Exclusive messages can contain any type of
data, depending what the synthesizer manufacturer decides
to put in it! The only constraint with system exclusive
messages is that they always contain certain header
information that is exclusively used by the manufacturer
(and usually the relevant synth model as well). What this
effectively means is that a MIDI device will only accept a
system exclusive message designed especially for it. For
example, if the Novation K-Station should receive a system
exclusive message transmitted by a different make of
synthesizer, the message would simply be ignored. Similarly,
other makes of synthesizer will ignore any system exclusive
messages originally sent by a Novation K-Station.
Unlike other types of MIDI message, System Exclusive
messages do not have a fixed length. The MIDI specification
allows any number of data bytes (each with a value between
0 to 127) between a Sysex Start byte and a Sysex End byte.
The first data bytes in a sysex message always contain the
manufacturer ID. This is unique to each synthesizer
manufacturer.
The ReMOTE LE employs system exclusive messages for
two distinct purposes. Firstly, they can be used to back up
all of the ReMOTE LE's Template memories to the
Template Editor. This feature is extremely useful in building
up a Template library on a computer or for making a safety
copy of data in case the worst should happen. Data backup
is discussed in detail on page 20 in the Advanced Settings
chapter.
Secondly, Novation also use system exclusive messages to
enable a ReMOTE LE to update its entire operating system
via MIDI. The latest operating system for the ReMOTE LE is
always available free of charge at the Novation web site
novationmusic.com.
MIDI Machine Control (MMC) messages
These are a range of messages designed to communicate
with sequencers and recording devices. In reality, MMC
commands are actually specialised forms of System
Exclusive messages (termed 'Universal'), which are designed
to be recognised by any manufacturer supporting MMC.
When MMC commands are assigned to ReMOTE LE
controls, only the MMC command need be specified.
The remainder of the MMC Universal System Exclusive
message is automatically constructed by the ReMOTE LE.
See page 14 for details on assigning MMC.
A MIDI Implementation Chart provides a concise way of
telling at a glance which MIDI messages an instrument will
transmit and respond to. A MIDI Implementation Chart for
the ReMOTE LE can be found on page 23.
7
Main Features and Operation
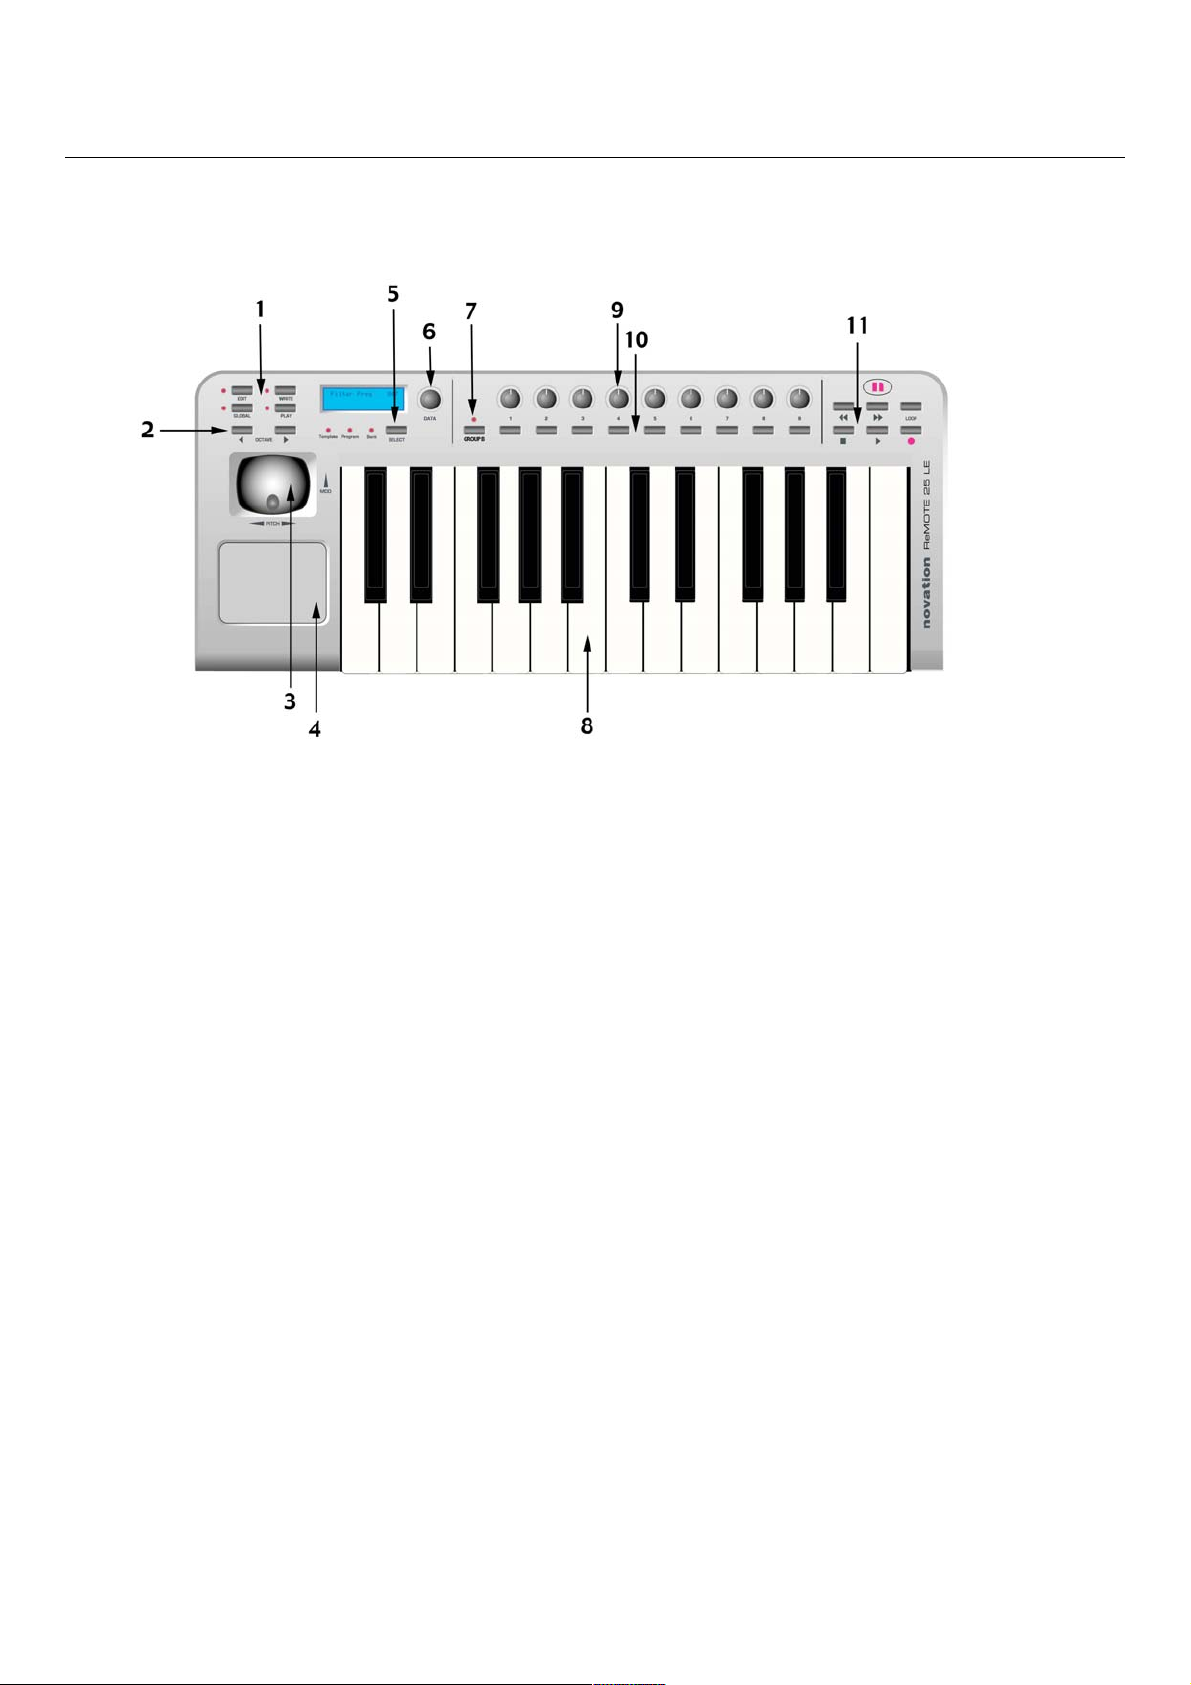
Front panel layout
1. Mode Select buttons
Contains the buttons used to select the various modes of
operation and the WRITE button, which is used to save
settings.
2. Keyboard Octave buttons
Can transpose the keyboard up and down across the entire
MIDI note range. Also used to step through menu options
in GLOBAL or EDIT mode.
3. Combined modulation/pitch bend joystick
4. Programmable X/Y touchpad
5. PLAY Mode SELECT button
Steps through Template Select, MIDI Bank Select and
Program Change modes (when in PLAY Mode).
6. DATA encoder
7. GROUP B button
Alternates between two Groups of Template controls;
meaning a total of 18 knobs and 18 buttons are available for
each Template.
8. 2-octave keyboard
9. Nine programmable knobs
10. Nine programmable buttons
11. Transport controls
Controls an external sequencer in a similar manner to
domestic tape deck transport controls.
8
 Loading...