

Page 1
Nokia WiFi user guide
Page 2

Table of Contents
Welcome 4
What this guide provides 4
Get to know your Nokia WiFi components 5
Nokia WiFi Gateway 3 5
Nokia WiFi Beacons 6
Understanding the LED colors 7
Download the Nokia WiFi app 9
Setup your Nokia WiFi | Enter network credentials via QR code 10
Setup your Nokia WiFi | Enter network credentials manually 21
Expand your Nokia WiFi | Add a Beacon 32
Client devices on your network 38
View client device details 39
Change a client device's name 40
Nokia WiFi devices on your network 41
View Nokia WiFi device details 41
Enable a guest network 42
Enable a password-protected guest network 42
Enable an open guest network 43
Share a guest network 44
Settings 45
Network | Change WiFi 45
Network | WAN 46
Parental controls | Device access 47
Firmware Updates 48
Other | Account details | Change password 48
Troubleshoot your Nokia WiFi 50
Can't find your Nokia WiFi device 50
Wi-Fi connection required 50
Page 3

Beacon not found 51
Unable to access the Internet 51
Use Ethernet to increase reliability of Nokia WiFi connections 52
Factory reset a Nokia WiFi device 52
Technical specifications 53
Beacon 3 specs 53
Manufacturer information 53
Warranties and repair of Nokia WiFi devices 54
Page 4

Welcome
Thank you for purchasing Nokia WiFi, and welcome to the world of self-healing, self-optimizing
network coverage—where problems are solved before they're even detected.
Nokia WiFi is a true mesh solution, which means your network devices know about one another,
are interconnected, and are always communicating.
Nokia WiFi creates an intelligent mesh solution that monitors channels and links in real-time, so
you're getting great bandwidth and fast, seamless roaming—without buffering.
Nokia WiFi can help you unlock the full potential of your digital home because it understands
the people, devices, and applications it serves.
What this guide provides
• An introduction to the physical features of your Gateway (optional) and Beacons.
• Instructions for downloading the Nokia WiFi app, setting up your network, and expanding
network coverage by adding Beacons.
• Instructions for managing your Nokia WiFi through such features as enabling a guest
network and restricting client device access.
We are excited about the opportunity to help you expand your carefree residential WiFi.
So, let's get started!
Page 5
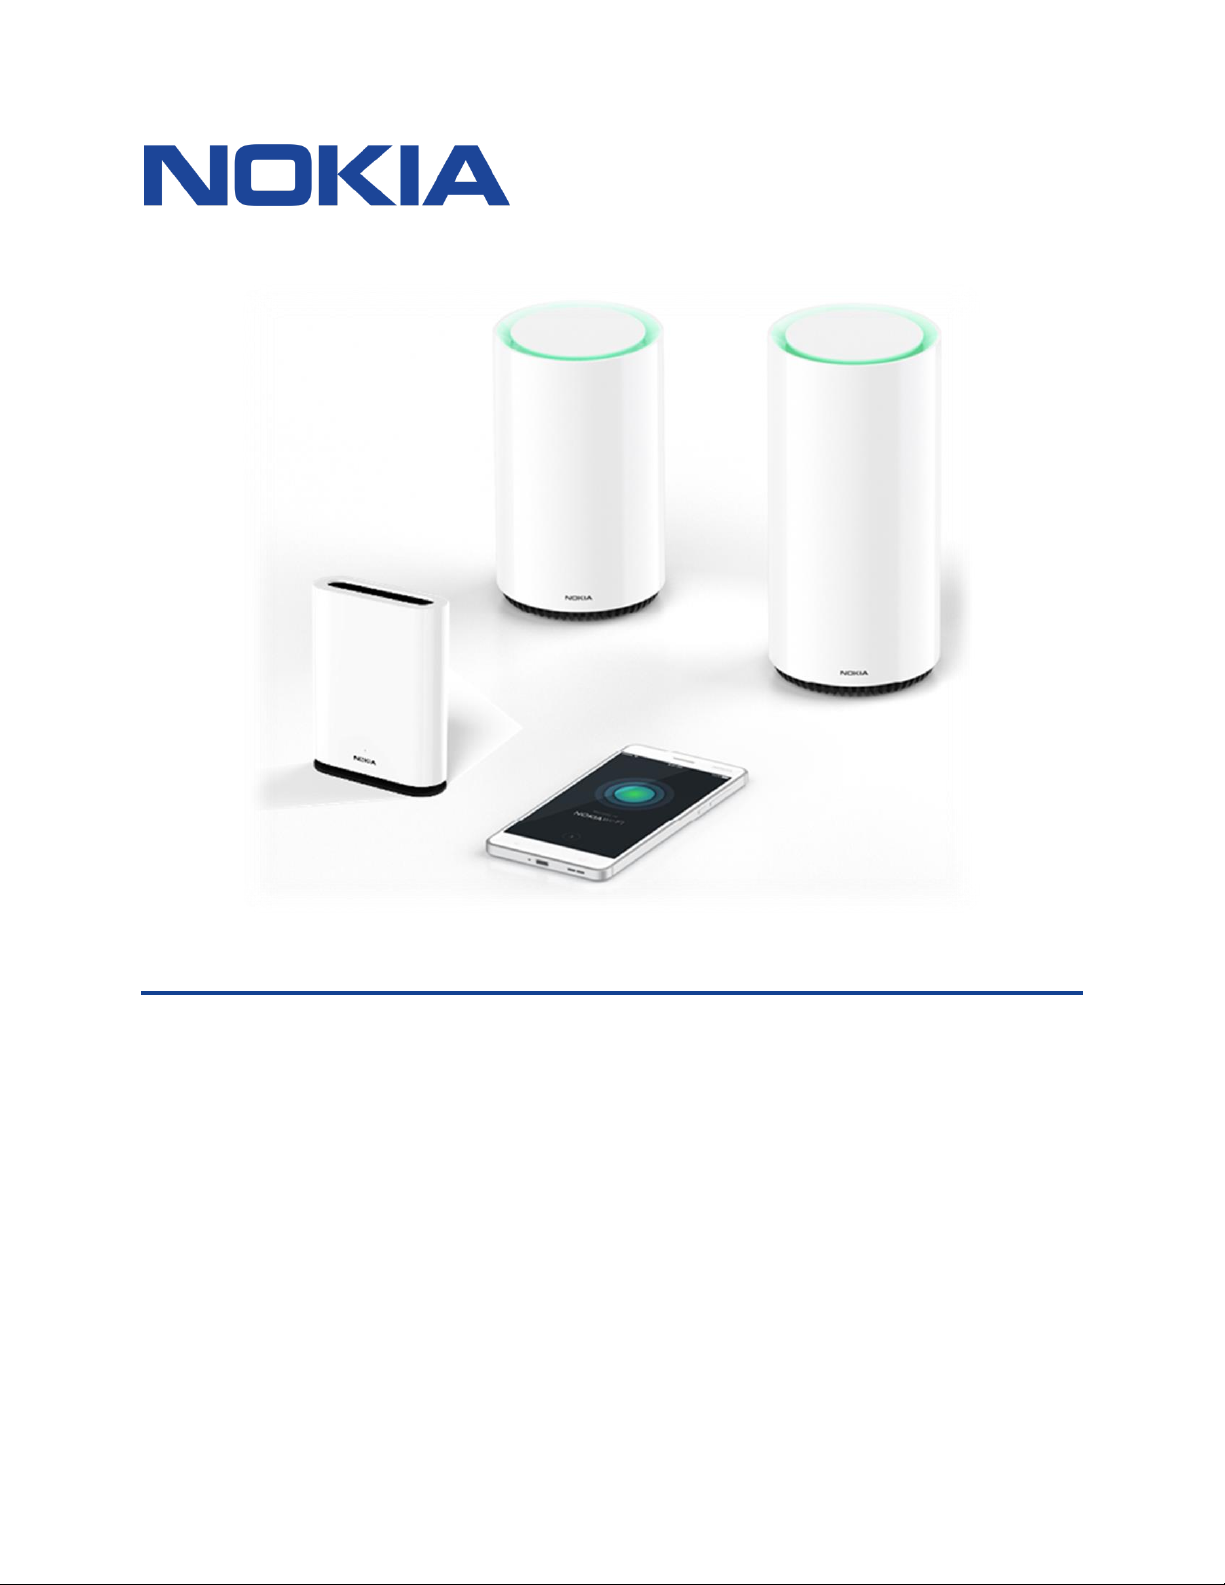
Get to know your Nokia WiFi components
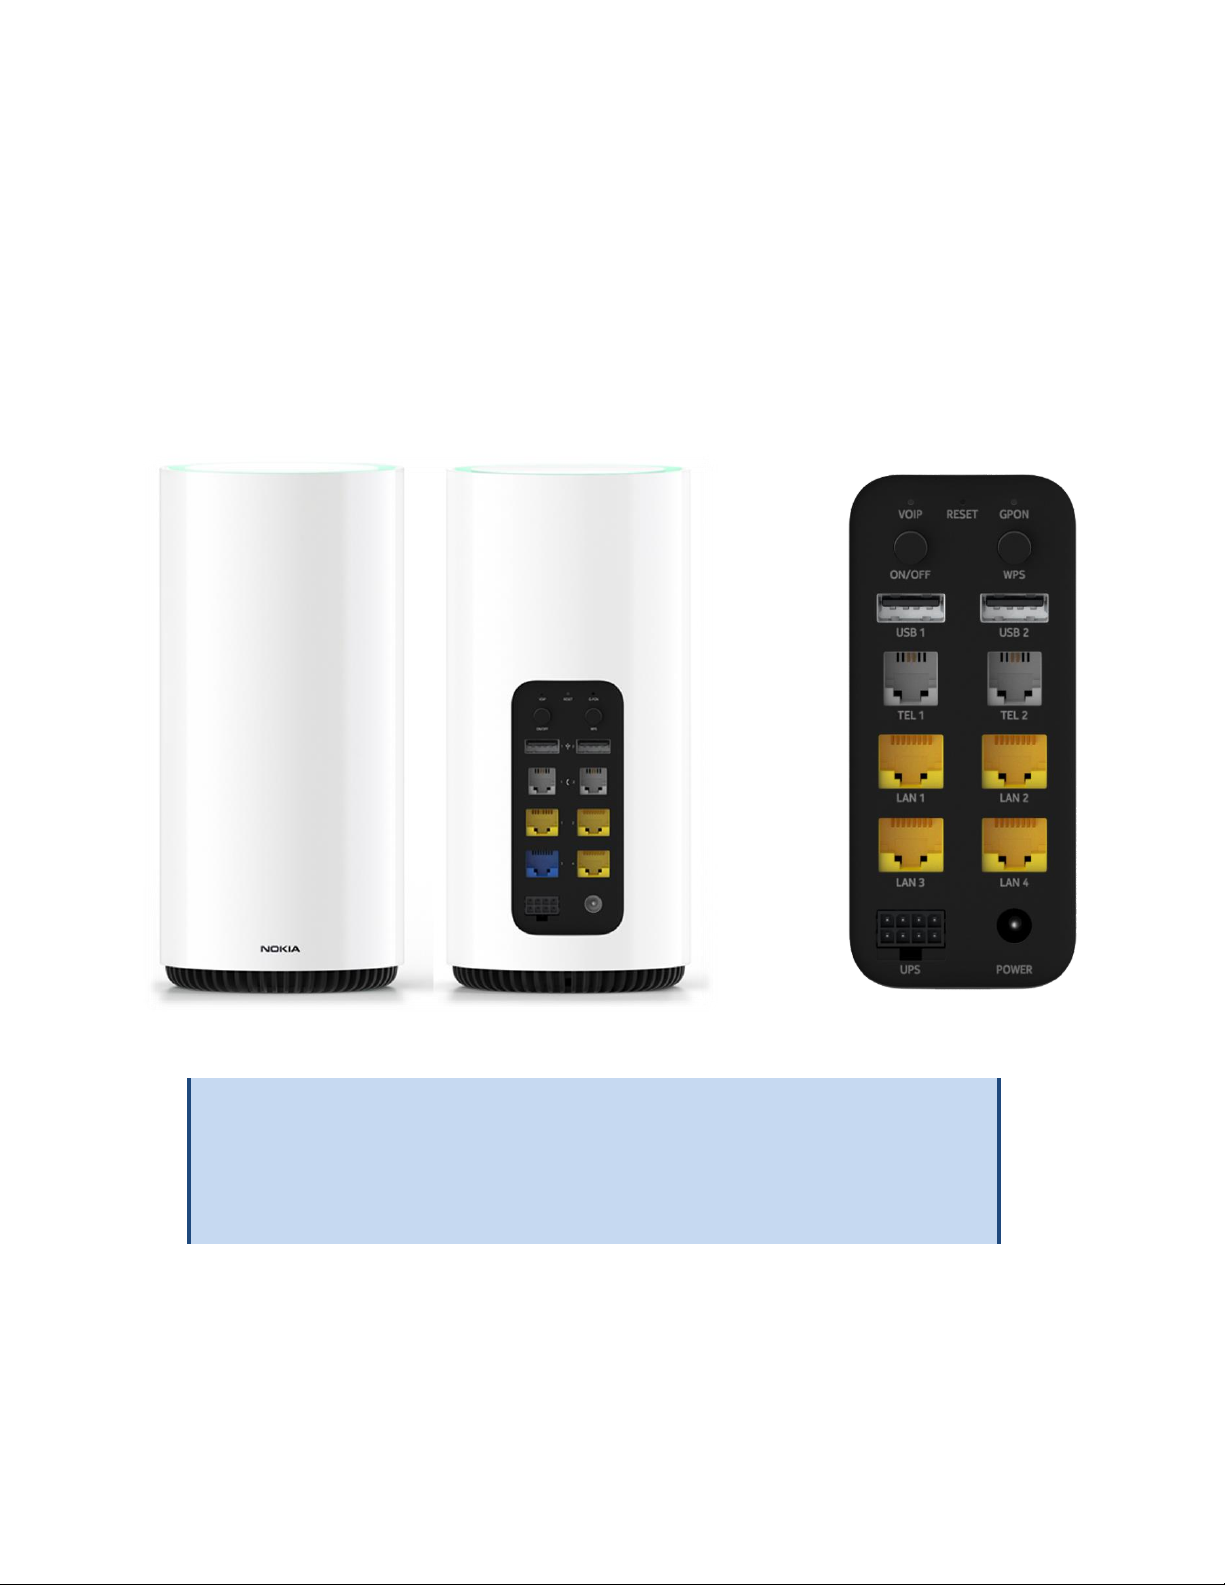
Nokia WiFi Gateway 3
The Nokia WiFi Gateway 3 establishes the foundation for fiber-based network coverage in your
residence, ensuring you have ready access to the applications and services you need most.
The Gateway 3 must be installed by a representative from your fiber internet provider. The
device and a close-up of its back-panel ports are shown below.
NOTE
You do not need a Gateway 3 to install Nokia WiFi. The majority of Nokia WiFi
networks will be built using only Beacon devices, which are discussed on the next
page.
Page 6

Nokia WiFi Beacons
The Nokia WiFi Beacon is available in two form factors: Beacon and Beacon 3. Both extend
internet coverage throughout your residence, ensuring you have ready access to the
applications and services you need most.
The Beacons can be purchased through select online retailers and are installed by customers
(that's you!), using the Nokia WiFi app.
The devices and a close-up of their back-panel ports are shown below.
Beacon
Beacon
3
Page 7

Understanding the LED colors
The top of the Gateway 3 device illuminates and displays various solid/blink cycles to indicate
its current state. The following table describes those states, what they mean, and what you
should do in response.
GATEWAY LED COLORS
LED
Color
LED behavior
What it means
What you should do
Off
Off
No power
No action
BlueGreen
Solid
Good connection to the
internet
No action
Red
Solid
Bad connection to the
internet
Check your internet connection and
ensure it is enabled
White
Slow pulse
WPS* mode enabled
Wait; devices are pairing
OR
Wait; backhaul link is being set up
White
Fast pulse for 3secs,
then non-WPS state
WPS successful
OR
Backhaul link established
Refer to the mobile app for next
steps
Red
Fast pulse
Reset to factory reboot
has been triggered
Wait; device will proceed to boot-up
phase
White
Solid
Booting up
Wait; device in boot-up phase
Yellow
Slow pulse
In configuration mode
Prepare to add device to mesh
network
*Wi-Fi Protected Setup (WPS) is a network security standard that creates a secure wireless home
network. Nokia WiFi devices used to depend on this method for paring with one another and forming
mesh links, and some of the enclosures still has a WPS button. However, the devices no longer use this
pairing method.
Page 8

Depending on what Beacon model you have, either the top (Beacon 3) or the bottom front
(Beacon) of the devices illuminate and display various solid/blink color cycles to indicate their
current state. The following table describe what they mean and what you should do in
response.
BEACON LED COLORS
LED
Color
LED behavior
What it means
What you should do
Off
Off
No power
No action
BlueGreen
Solid
Good connection to next
Nokia WiFi device
No action
Yellow
Solid
Sub-optimal connection
to next Nokia WiFi device
Refer to mobile app or care portal
for next steps
Red
Solid
Bad connection to next
Nokia WiFi device
Refer to mobile app or care portal
for next steps
White
Slow pulse
WPS* mode enabled
(Beacon 3 only)
Wait; devices are pairing
OR
Wait; backhaul link is being set up
White
Fast pulse for 3secs
Backhaul link established
Refer to the mobile app for next
steps
Red
Fast pulse
Reset to factory reboot
has been triggered
Wait; device will proceed to boot-up
phase
White
Solid
Booting up
Wait; device in boot-up phase
Yellow
Slow pulse
In configuration mode
Prepare to add device to mesh
network
*Wi-Fi Protected Setup (WPS) is a network security standard that creates a secure wireless home
network. Nokia WiFi devices used to depend on this method for paring with one another and forming
mesh links, and some of the enclosures still have a WPS button. However, the devices no longer use this
pairing method.
Page 9
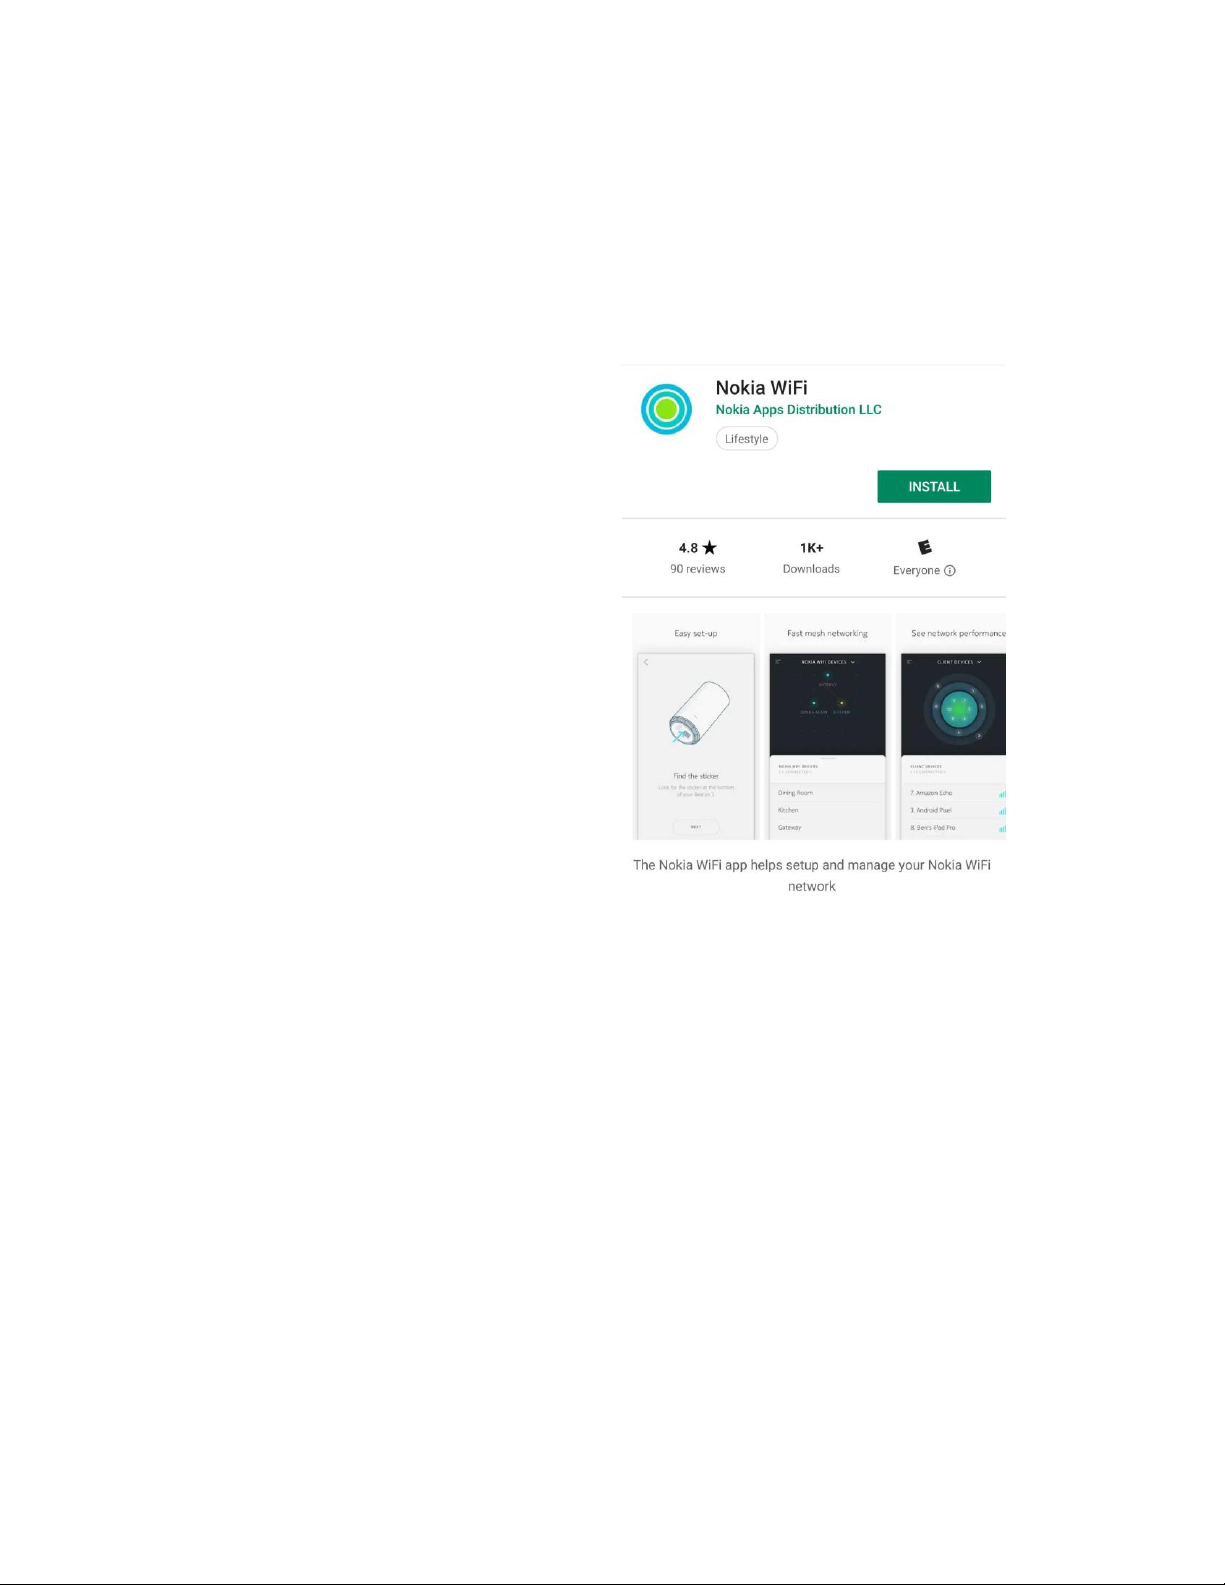
Download the Nokia WiFi app
PREREQUISITE
Smartphone that's running Android 7 / iOS 11 or greater
From either the Play Store (Android) or the
App Store (iOS), install the Nokia WiFi app
Page 10
Setup your Nokia WiFi | Enter network credentials via QR code
PREREQUISITES
• Existing wireless network provided by internet-connected modem or router
• 1 Nokia Beacon or Beacon 3, plus its power and Ethernet cables
• 1 smartphone running the Nokia WiFi app that also is connected to your existing wireless
network
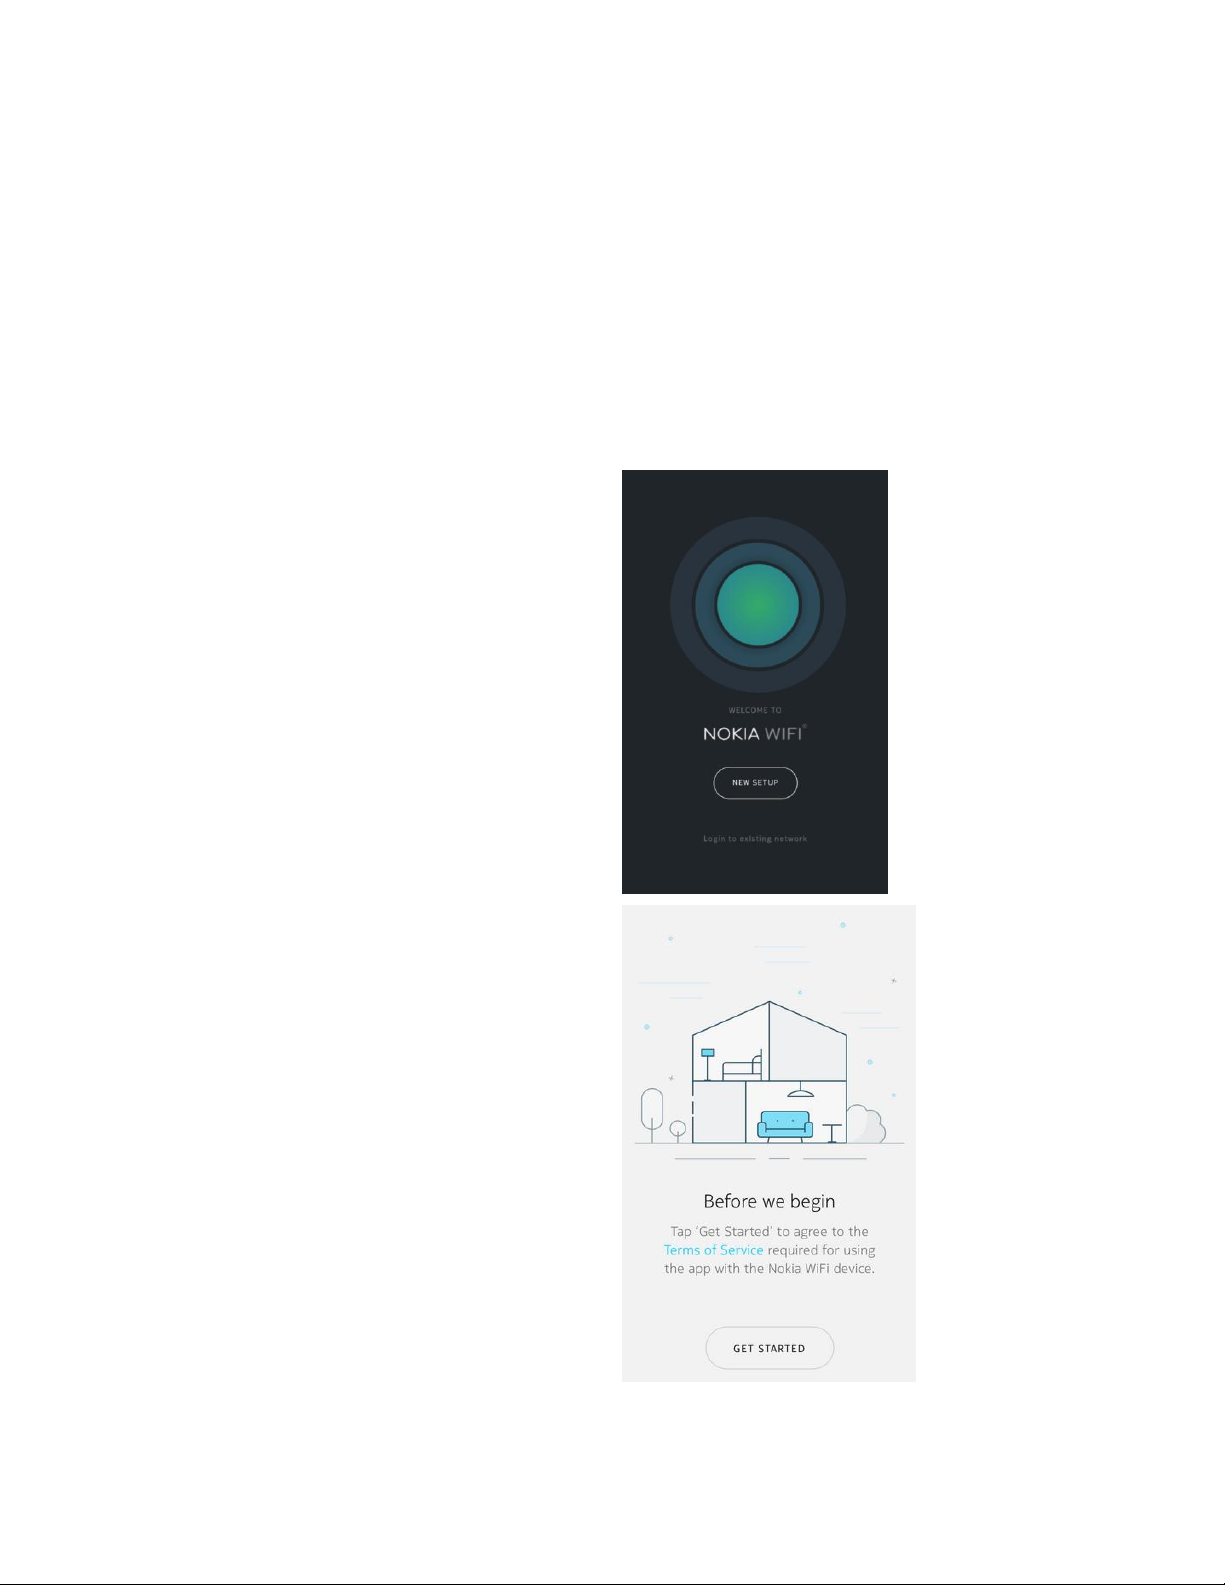
Welcome
• Launch the Nokia WiFi app
• Tap New Setup
Before we begin
You must agree to the Nokia WiFi Terms of
Service
• Tap Terms of Service to read the terms
• When you are finished, tap <
• From the Before we begin screen, tap Get
Started
Page 11
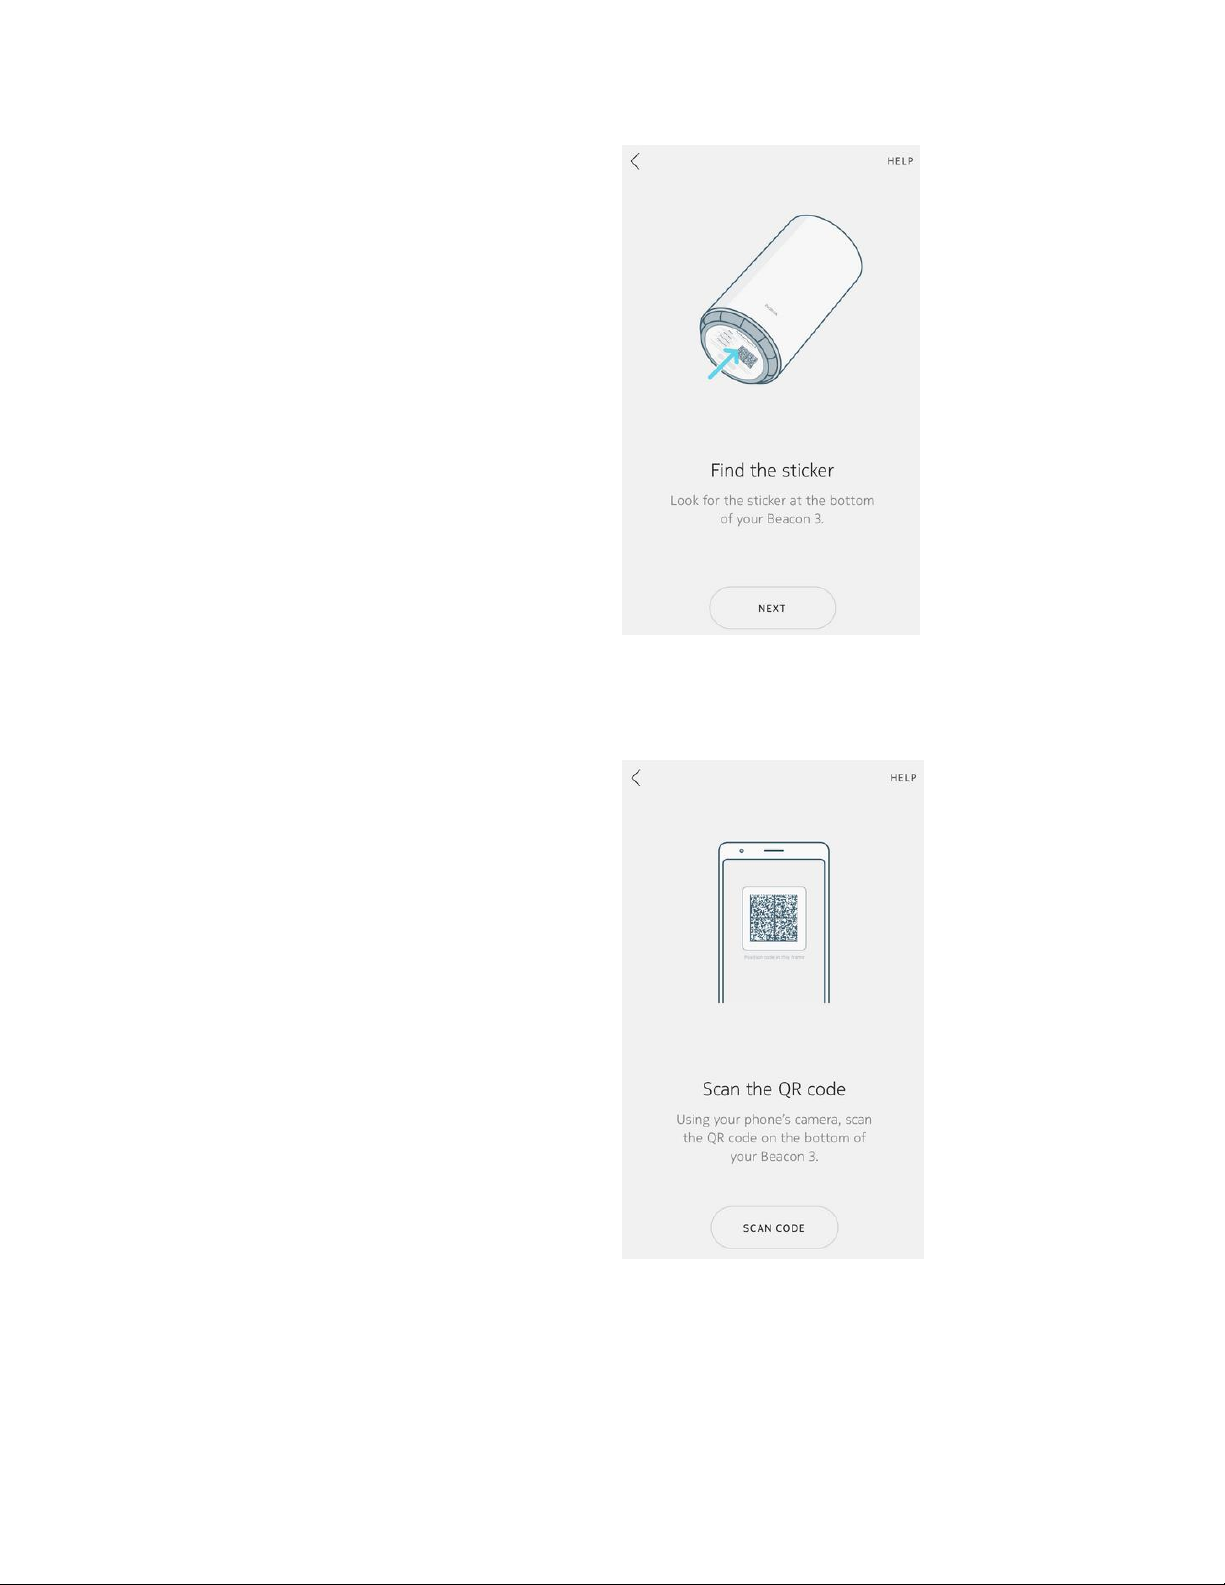
Find the Sticker
• You are instructed to find the sticker on
the bottom of your Beacon
• Tap Next
Scan the QR code
• You are instructed to scan the QR code on
the bottom of the Beacon using your
phone's camera; tap Scan Code
• You are prompted to allow Nokia WiFi
access to take pictures/record video; tap
Allow
• This opens the camera app and a frame,
and you see the message
Position QR
code in this frame
• Point your smartphone at the code and
hold it steady
• You see a scanning line move vertically
across the code
When the code is successfully scanned you
see the message
QR code scan successful
• Tap Continue
Page 12
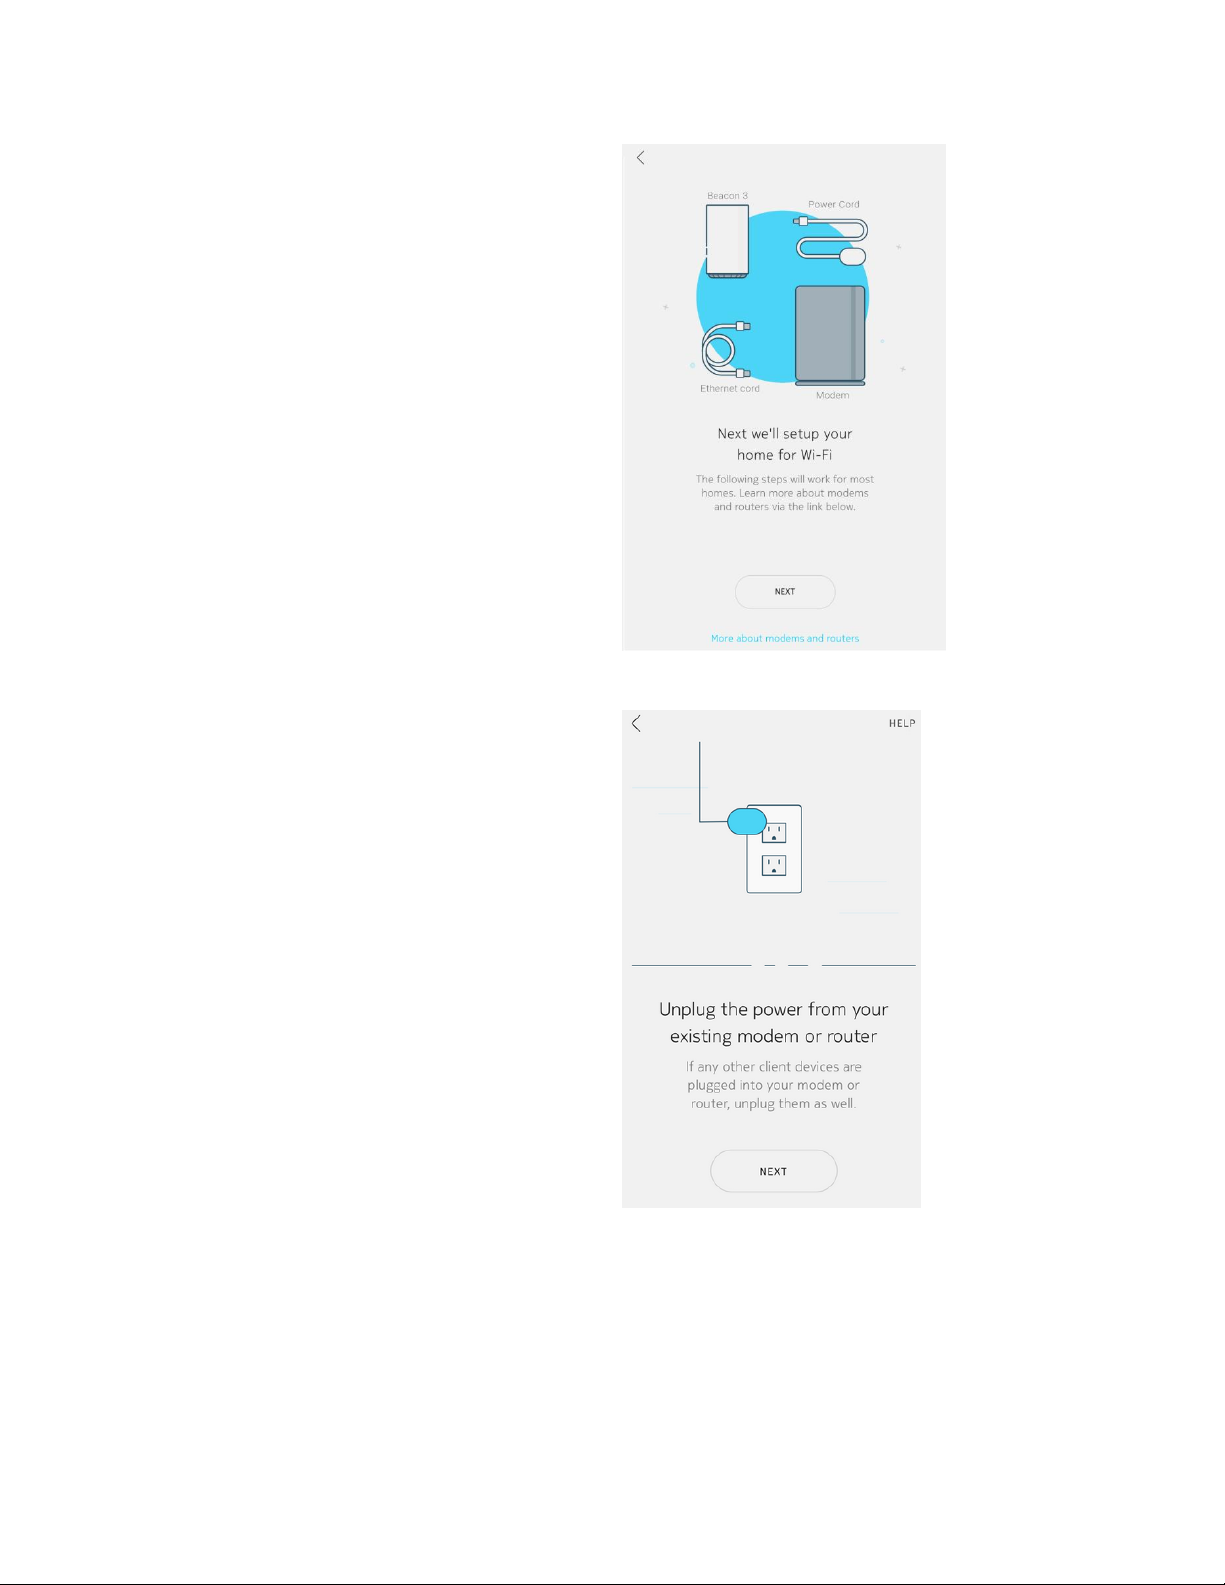
Physical device connections
The next few screens walk you through
connecting power and Ethernet cables
between your modem or router and the
Beacon.
• If you want to learn more about modems
and routers, from the Next we'll setup
your home for WiFi screen, tap More about
modems and routers
• When you are finished, tap <
• Tap Next
Unplug power
• You are instructed to unplug the power
from your existing modem or router
• You also should disconnect any client
devices that are plugged into the modem
or router
• Tap Next
Page 13
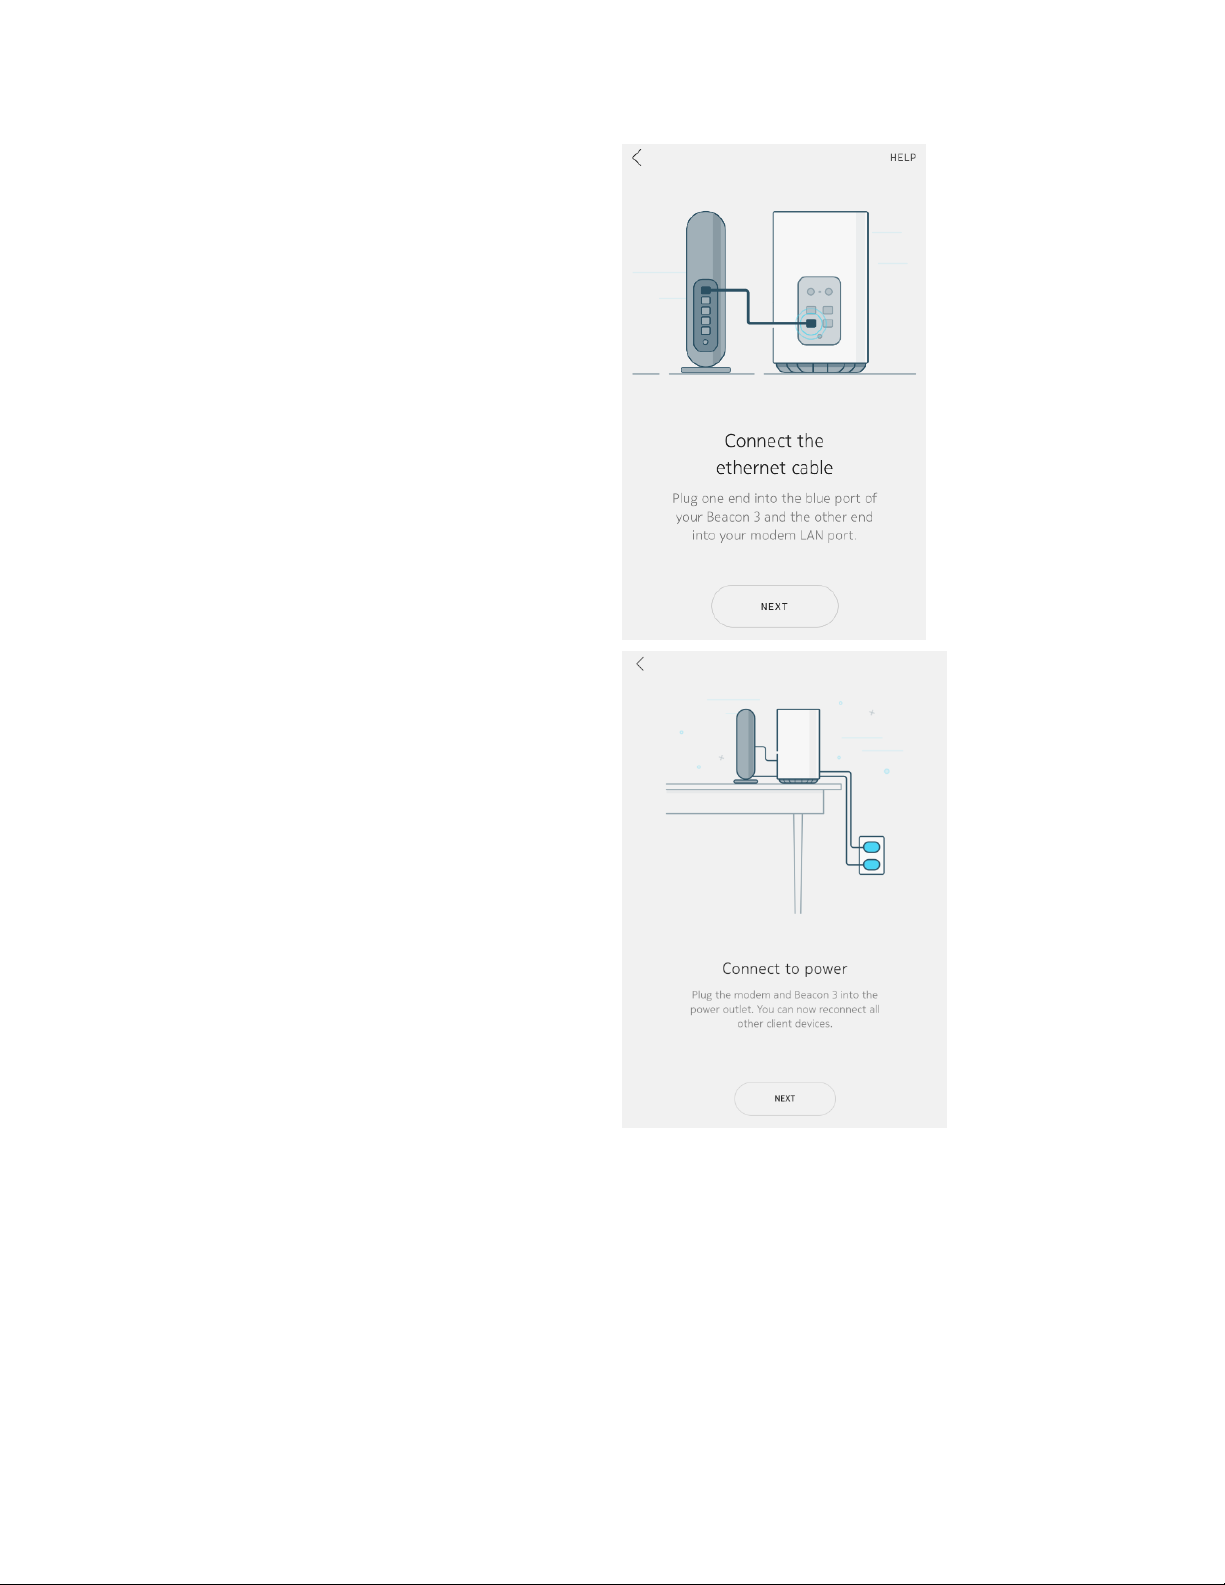
Connect Ethernet
• Plug one end of the provided Ethernet
cable into the blue port on your Beacon
• Plug the other end of the cable into a LAN
port on your modem
• Tap Next
Connect Power
• Connect your Beacon to power by plugging
it into a wall outlet
• Ensure your modem or router is also
connected to power
• If you have wired client devices, you may
connect them to the Beacon's LAN ports
• Tap Next
Page 14
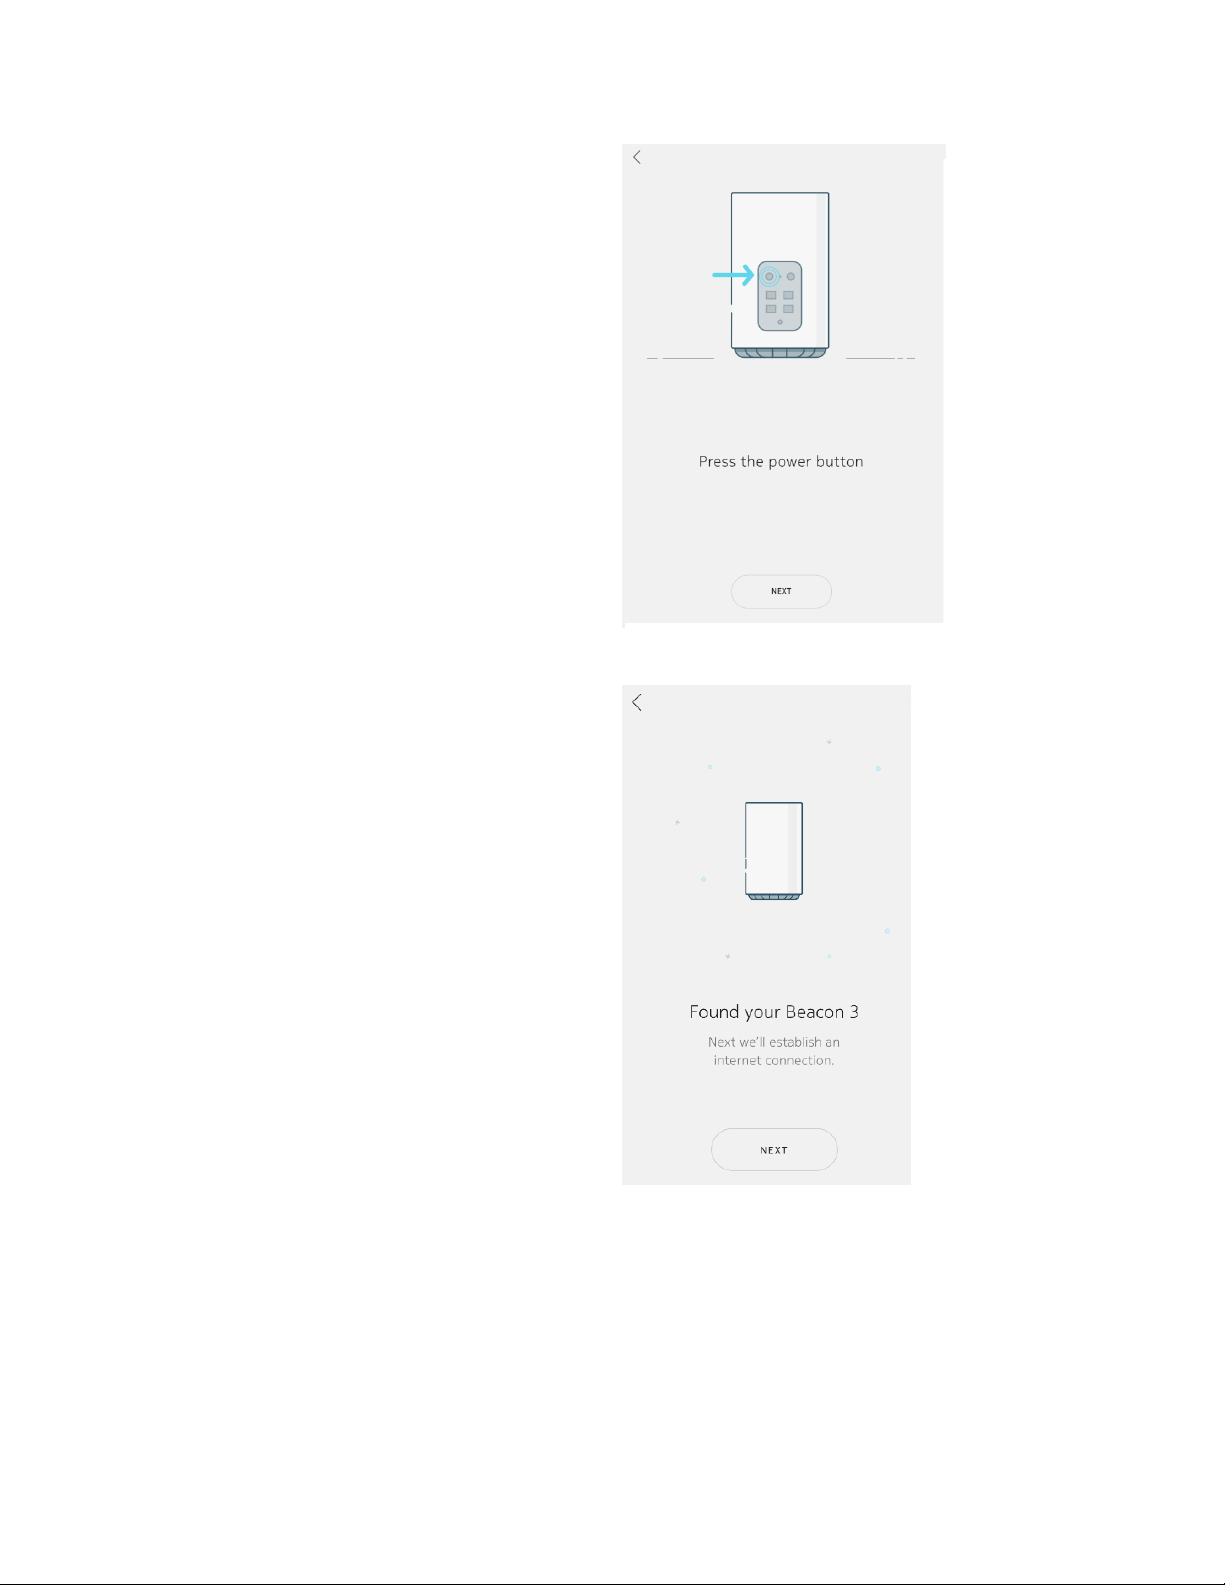
Power on the Beacon
• On the Beacon's back panel, press the
Power button
• Tap Next
Found your Beacon 3
• Once your Beacon is found, you are
prompted to establish an internet
connection
• Tap Next
Page 15
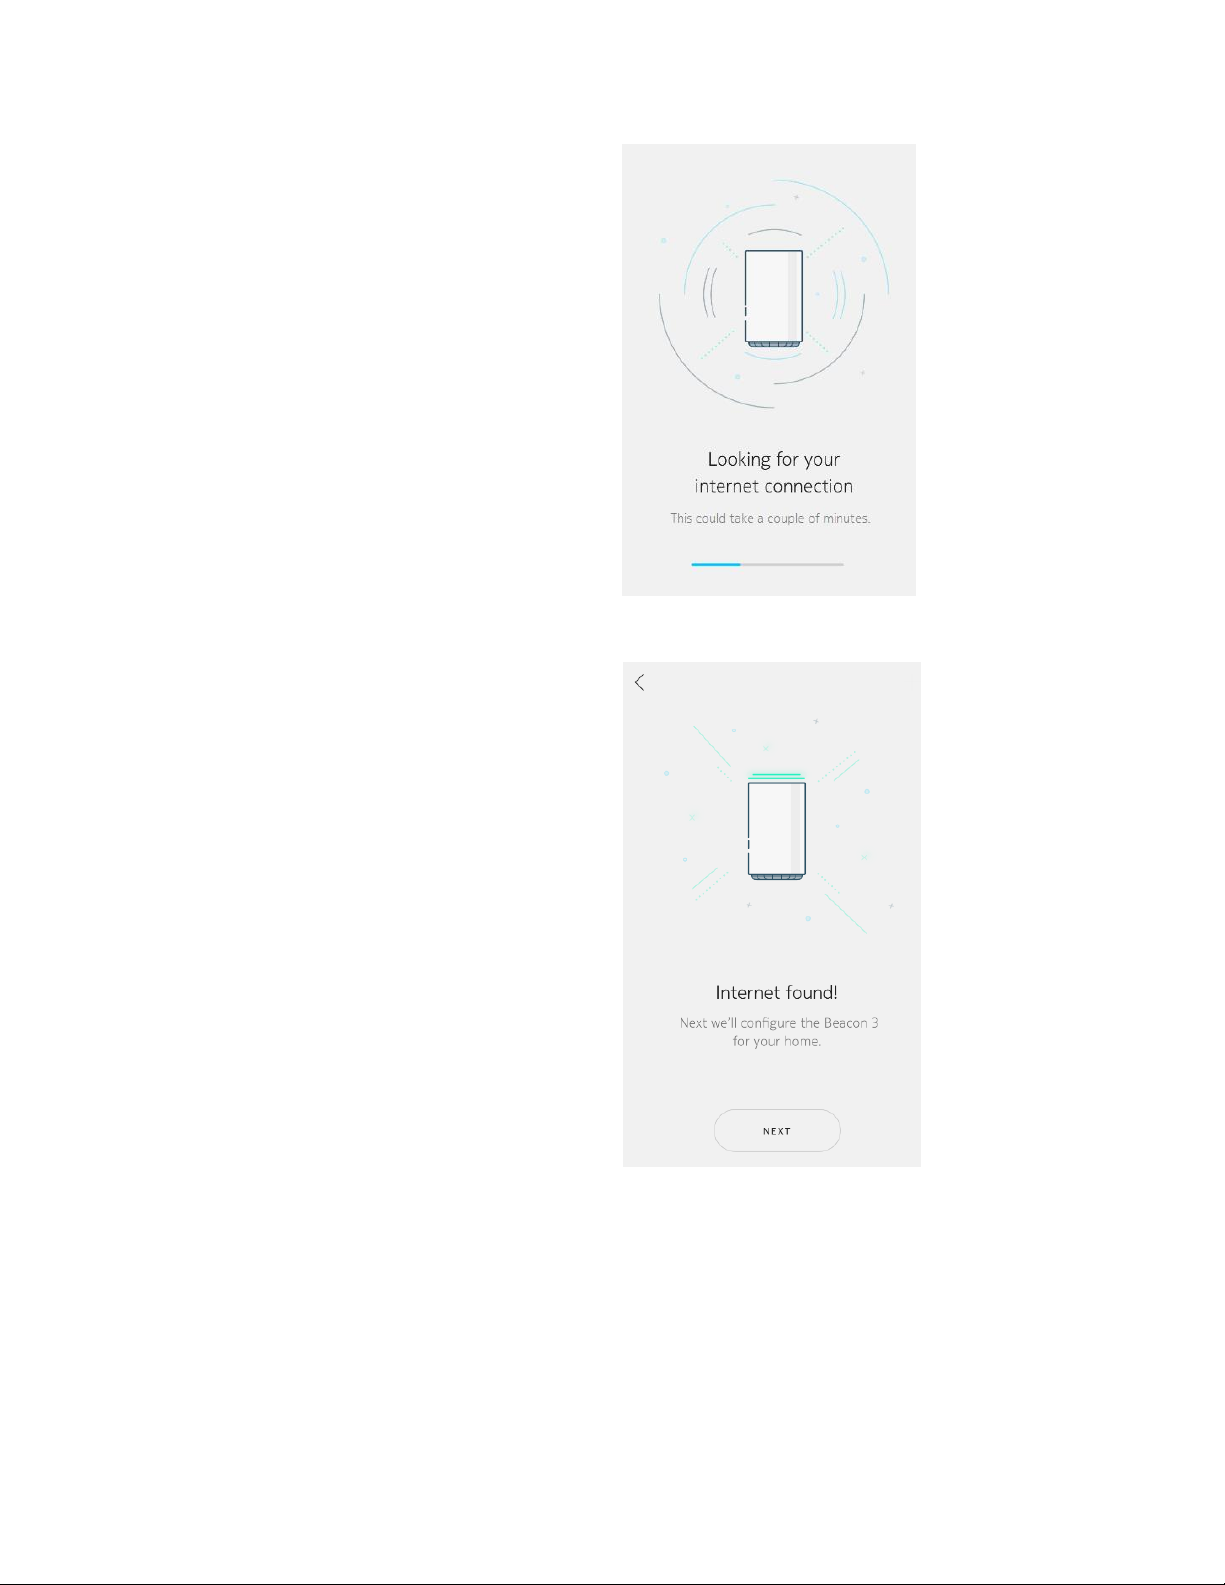
Looking for your internet connection
The Nokia WiFi app begins confirming the
presence of an internet connection
Internet found!
• Once your internet connection is
confirmed, you see the message
Internet
found!
• Now you configure the Beacon for your
home environment
• Tap Next
Page 16
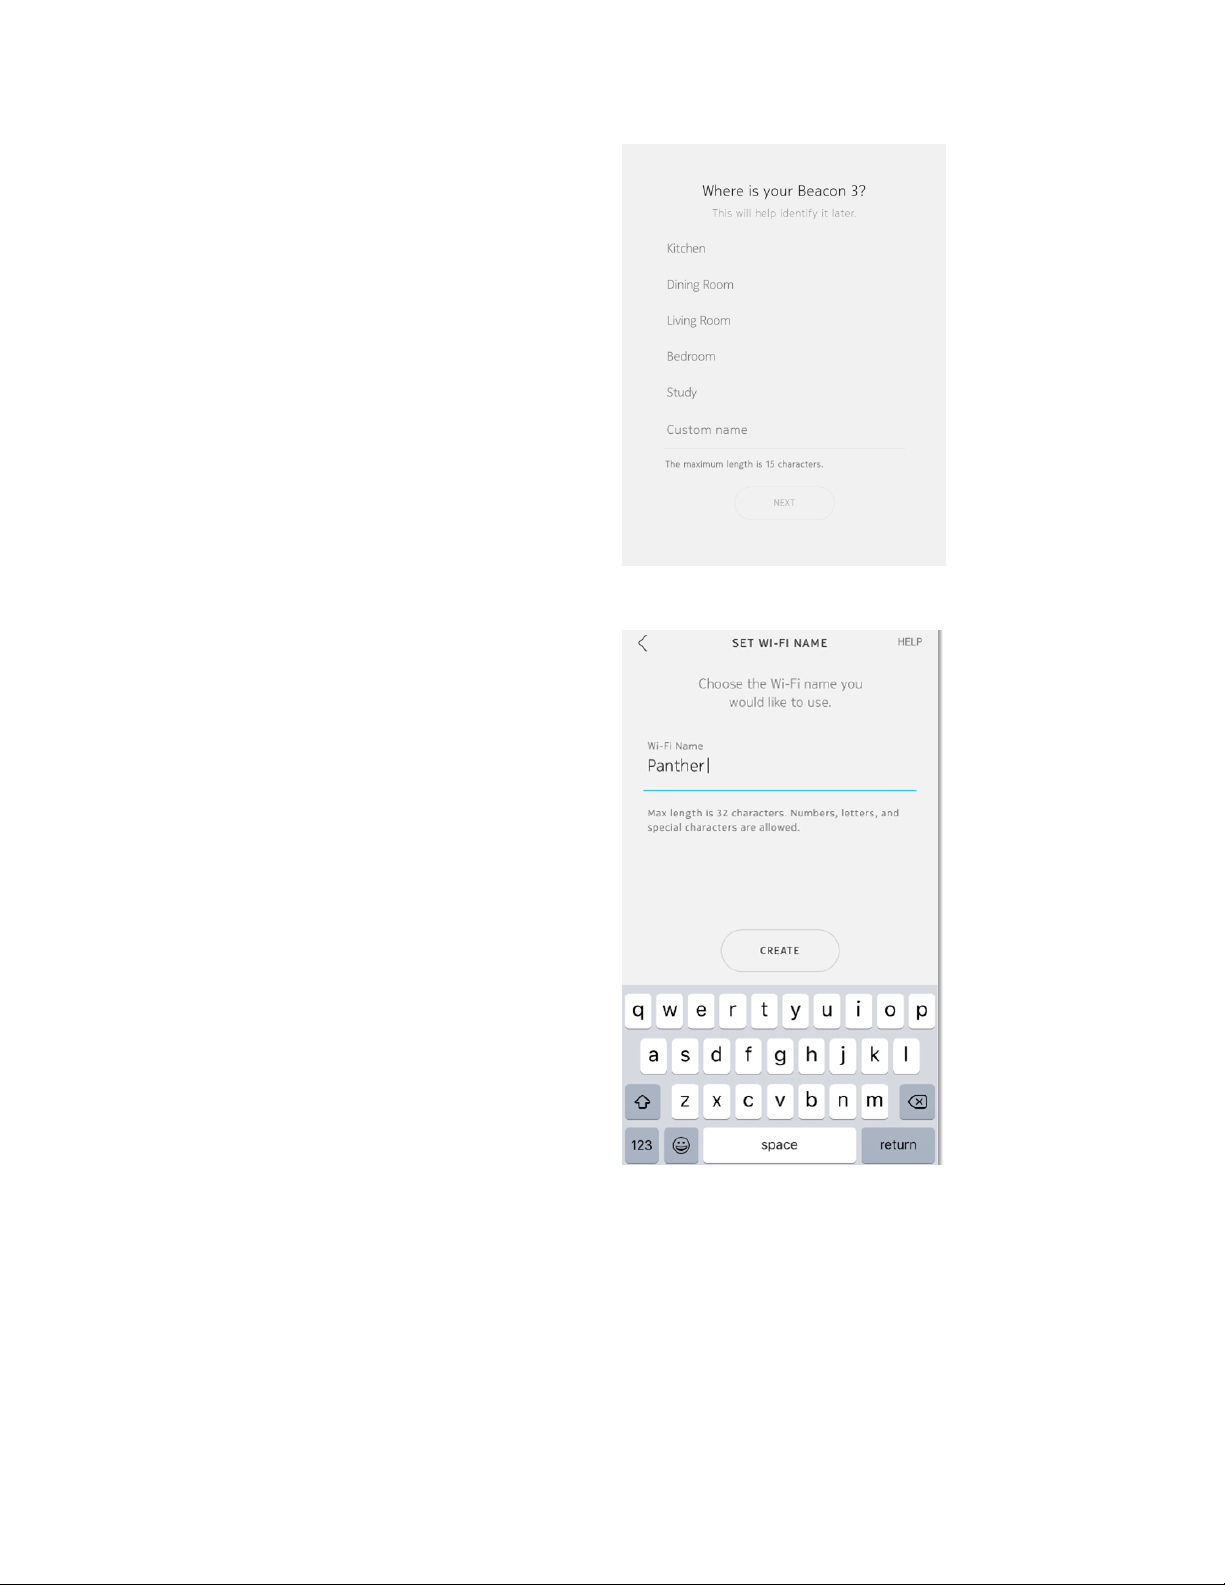
Where is your Beacon?
• Associate your Beacon with a room so it's
easy to identify later; select either:
a provided room name
OR
tap Custom name and enter your own
Note The maximum length for a custom room
name is 15 characters, and the first and last
characters cannot be spaces
• Tap Next
Set WiFi name
Now you provide a custom name for your
Nokia WiFi network. The default value is
displayed; for example
NOKIA-DC10.
• Tap the Wi-Fi Name text field; this enables
the keyboard
• Using 1–32 alphanumeric or special
characters—the first and last characters
cannot be spaces—enter your network's
name; for example,
PantherNet
• Tap Create
Page 17
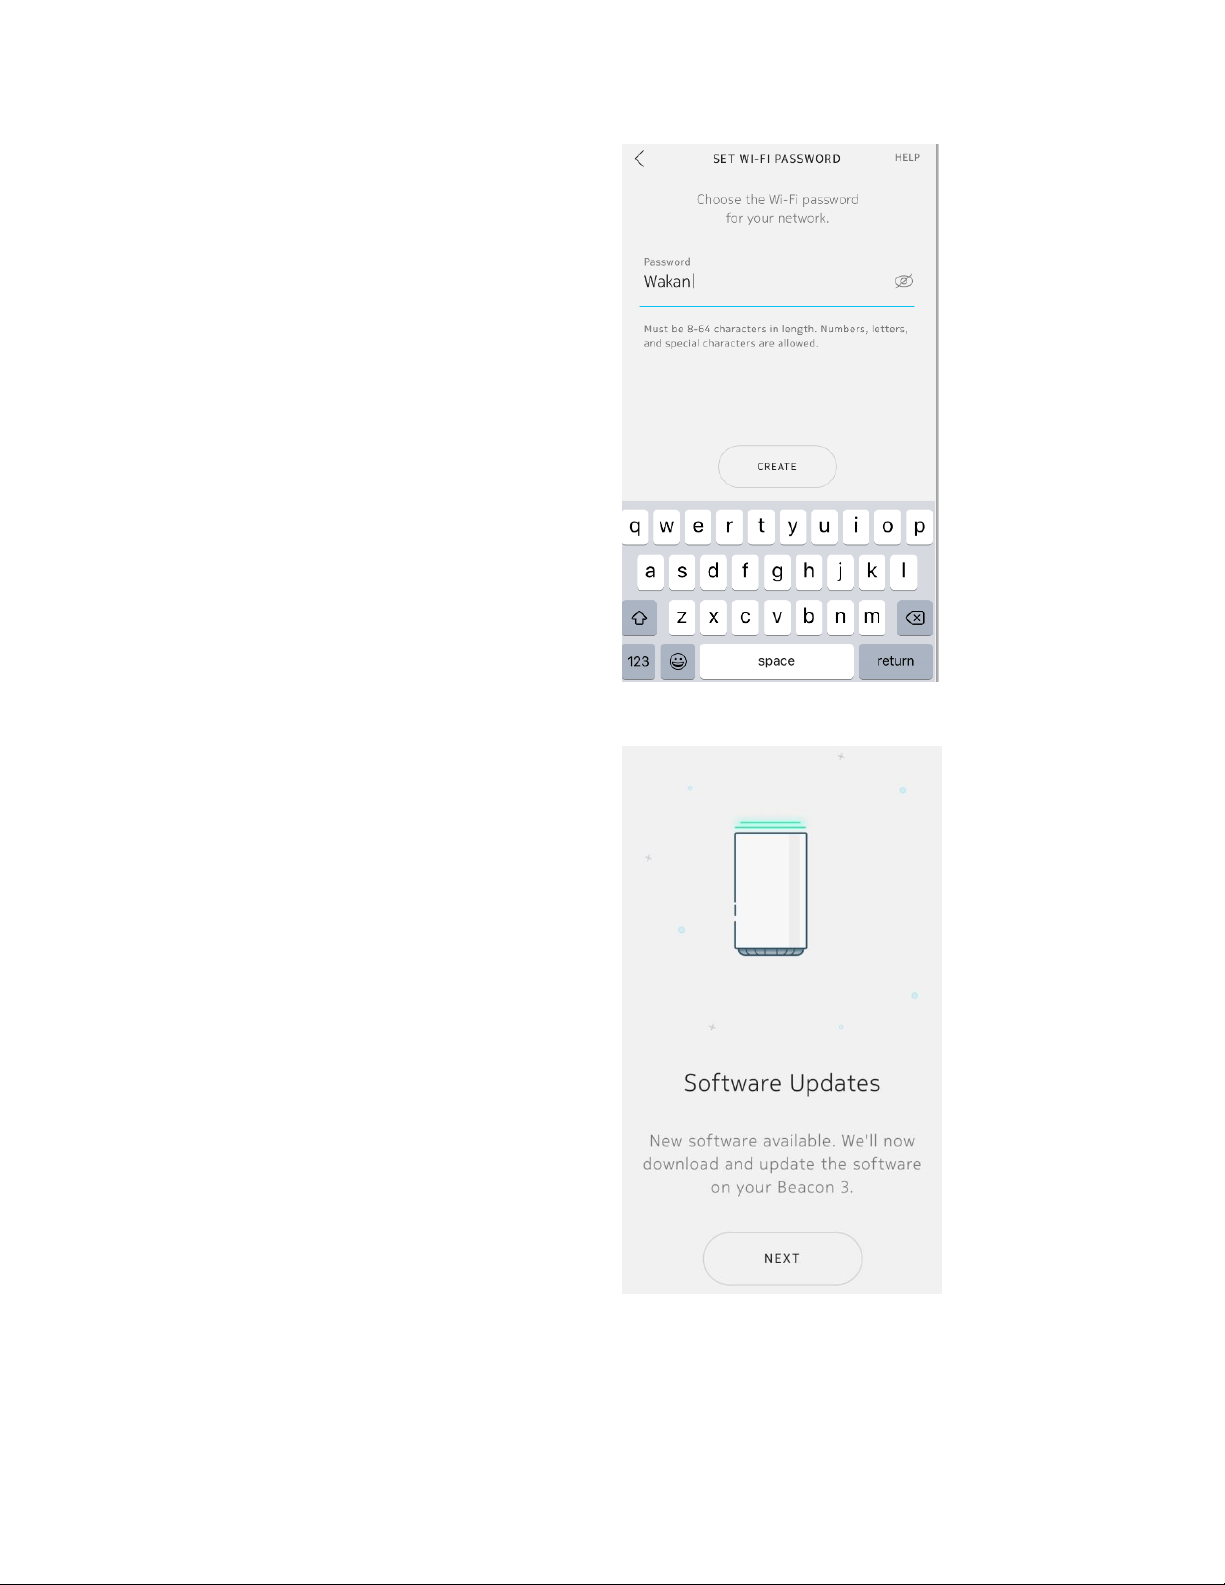
Set WiFi password
Now you set a password for your Nokia WiFi
network. The default value is not displayed; to
show it, tap the eye symbol.
• Tap the Password text field; this enables
the keyboard
• Using 8–63 alphanumeric or special
characters—the first and last characters
cannot be spaces—enter your network's
password; for example,
Wakand@4ever
• Tap Create
Software Updates (potentially)
Depending on the state of your Beacons, and
whether new software is available, you may be
prompted to allow Nokia WiFi to access the
device's location; tap Always Allow
Note selecting this option configures your
Beacon to receive over-the-air upgrades
automatically from Nokia when available
• You are prompted to download and
update new software; tap Next
• You see the
Updating Software
and the
Restarting your Beacon
screens—do not
power down the Beacon during upgrade
Page 18

Configuring your Beacon 3
Your Beacon is configured to act as the
gateway on your new Nokia WiFi network
Setup complete!
When your Beacon is configured and setup is
complete, you are prompted to create an
account
Tap Create Account
On the Account Creation screen, you are
prompted to enter the following:
• First Name
• Last Name
• Email Address
• Password
Page 19

Email address requirements
• The first and last characters cannot be
spaces
• Value also must follow standard email
address conventions: @ occurs after 1 or
more characters, and period occurs after 1
or more characters after @
Password requirements
Must use between 8–24 alphanumeric
characters
• Special characters can include only
! # + , - . / : = @ _
• First character cannot be a special
character
• Must contain at least two letters and one
special character
• Same character cannot occur
consecutively 8 times
When all account parameters have been
provided, tap Create
Verify account
Follow the steps in the provided email to
verify your email address.
Alternately, you can Verify later or Resend the
verification email
Page 20

Account created
Your Nokia WiFi setup is complete. Depending
on whether you bought a Beacon multi-pack
or the size of your residence, you may either:
• Tap Add Beacon to expand your coverage
• Tap Finish to view the Home screen along
with any connected client devices
If you choose to add a Beacon, go to "Expand
your Nokia WiFi | Add a Beacon."
If you are Done and would like to interact with
your Nokia WiFi, go to "Client devices on your
network"
Page 21

Setup your Nokia WiFi | Enter network credentials manually
PREREQUISITES
• Existing wireless network provided by internet-connected modem or router
• 1 Nokia Beacon or Beacon 3, plus its power and Ethernet cables
• 1 smartphone running the Nokia WiFi app that also is connected to the existing wireless
network
Welcome
• Launch the Nokia WiFi app
• Tap New Setup
Before we begin
You must agree to the Nokia WiFi Terms of
Service
• Tap Terms of Service to read the terms
• When you are finished, tap <
• From the Before we begin screen, tap Get
Started
Page 22

Find the Sticker
• You are instructed to find the sticker on
the bottom of your Beacon
• Tap Next
Scan the QR code
You are instructed to scan the QR code on the
bottom of the Beacon using your phone's
camera.
If you do not wish to give Nokia WiFi access to
your camera, you may enter the default
network credentials manually
• Tap Enter manually
Page 23

Connect Power
• Connect your Beacon to power by plugging
it into a wall outlet
• Ensure your modem or router is also
connected to power
• If you have wired client devices, you may
connect them to the Beacon's LAN ports
• Tap Next
For details about modems and routers, tap
More about modems and routers
Connect Ethernet
• Plug one end of the provided Ethernet
cable into the blue port on your Beacon
• Plug the other end of the cable into a LAN
port on your modem
• Tap Next
Page 24

Power on the Beacon
• On the Beacon's back panel, press the
Power button
• Tap Next
Find the SSID and WiFi Key
• You are instructed to find the sticker on
the bottom of your Beacon
• Tap Next
• On the sticker, find the SSID and WiFi Key
• Tap Next
Page 25

Connect to Beacon 3
• You are instructed to join the network
NOKIA-XXXX
from your phone's Wi-
Fi/WLAN Settings
• Tap Go to Settings
• From your phone's Wi-Fi/WLAN settings,
select the wireless network that matches
the SSID on the bottom of your Beacon;
for example,
NOKIA-DC10
• You are prompted for a password; enter
the WiFi Key from the bottom of your
Beacon
• Tap Connect
Found your Beacon 3
• Once your Beacon is found, you are
prompted to establish an internet
connection
• Tap Next
• You are instructed to find the username
and password on the sticker
• Tap Next
Page 26

Username and Password
• You are instructed to enter the username
and password from the bottom of your
Beacon
• Tap the Username text field; this enables
the keyboard
Enter the value from the Beacons's sticker;
for example,
admin
• Tap the Password text field
Enter the value from the Beacon's sticker;
for example,
Pszv6ri4ei
• Tap Next
Looking for your internet connection
The Nokia WiFi app begins confirming the
presence of an internet connection
Page 27

Internet found!
• Once your internet connection is
confirmed, you see the message
Internet
found!
• Now you configure the Beacon for your
home environment
• Tap Next
Where is your Beacon?
• Associate your Beacon with a room so it's
easy to identify later; select either:
a provided room name
OR
tap Custom name and enter your own
Note The maximum length for a custom room
name is 15 characters, and the first and last
characters cannot be spaces
• Tap Next
You are prompted to allow Nokia WiFi to
access this device's location
• Tap Always Allow
Page 28

Set WiFi name
Now you configure a custom name for your
Nokia WiFi network. The default value is
displayed; for example
NOKIA-DC10
.
• Tap the Wi-Fi Name text field; this enables
the keyboard
• Using 1–32 alphanumeric or special
characters—the first and last characters
cannot be spaces—enter your network's
name; for example,
PantherNet
• Tap Create
Set WiFi password
Now you set a password for your Nokia WiFi
network. The default value is not displayed; to
show it, tap the eye symbol.
• Tap the Password text field; this enables
the keyboard
• Using 8–63 alphanumeric or special
characters—the first and last characters
cannot be spaces—enter your network's
password; for example,
Wakand@4ever
• Tap Create
Page 29

Configuring your Beacon 3
Your Beacon is configured to act as the
gateway on your new Nokia WiFi network.
Setup complete!
When your Beacon is configured and setup is
complete, you are prompted to create an
account
Tap Create Account
On the Account Creation screen, you are
prompted to enter the following:
• First Name
• Last Name
• Email Address
• Password
Page 30

Email address requirements
• The first and last characters cannot be
spaces
• Value also must follow standard email
address conventions: @ occurs after 1 or
more characters, and period occurs after 1
or more characters after @
Password requirements
Must use between 8–24 alphanumeric
characters
• Special characters can include only
! # + , - . / : = @ _
• First character cannot be a special
character
• Must contain at least two letters and one
special character
• Same character cannot occur
consecutively 8 times
When all account parameters have been
provided, tap Create
Verify account
Follow the steps in the provided email to
verify your email address.
Alternately, you can Verify later or Resend the
verification email
Page 31

Account created
Your Nokia WiFi setup is complete. Depending
on whether you bought a Beacon multi-pack
or the size of your residence, you may either:
• Tap Add Beacon to expand your coverage
• Tap Finish to view the Home screen along
with any connected client devices
If you choose to add a Beacon, go to "Expand
your Nokia WiFi | Add a Beacon."
If you are Done and would like to interact with
your Nokia WiFi, go to "Client devices on your
network"
Page 32

Expand your Nokia WiFi | Add a Beacon
PREREQUISITES
• Existing Nokia WiFi network; refer to the section "Setup your Nokia WiFi"
• Smartphone loaded with the Nokia WiFi app that also is connected to your Nokia WiFi
network
• 1–2 Nokia WiFi Beacons (either Beacon or Beacon 3 models)
Add a Beacon
• From the Nokia WiFi app home screen, in
the upper-left corner, open the Settings
menu
• Tap Add Beacon
Page 33

Find the Sticker
• You are instructed to find
the sticker on the
bottom of your Beacon
• Tap Next
Scan the QR code
• You are instructed to scan the QR code on the
bottom of the Beacon using your phone's
camera; tap Scan Code
• Point your smartphone at the code and hold it
steady
• You see a scanning line move vertically across
the code
When the code is successfully scanned you see
the message
QR code scan successful
• Tap Continue
Page 34

Place Beacon
• Place your Beacon in
an open space no
more than two rooms
away from the Beacon
that serves as your
gateway
• Tap Next
Connect Power
• Connect your Beacon
to power by plugging it
into a wall outlet
• Tap Next
Page 35

Power on the Beacon
• On the Beacon's
panel, press the Power
button
• Tap Next
Connection successful
• Once your Beacon is found and its network
connection established, you test the
quality of that connection
• Tap Next
Page 36

Connection strength
You see a message regarding the quality of
the connection between the two Nokia WiFi
devices currently on your network.
If the connection is optimal, you see the
message
Your WiFi is fantastic!
If the connection is not optimal, you see
either yellow or red variations, along with
instructions for repositioning the Beacon and
trying again.
• When you are satisfied with your WiFi
connection, tap Next
Where is your Beacon?
• Associate your Beacon with a room so it's
easy to identify later; select either:
a provided room name
OR
tap Custom name and enter your own
Note The maximum length for a custom room
name is 15 characters, and neither the first
nor the last characters can be a space.
• Tap Next
Page 37

All done!
When your Beacon is configured and your
network range expanded, you may either:
• Tap Add Beacon to expand your coverage
• Tap Done to view the Home menu along
with any connected client devices
If you choose to add a Beacon, proceed to the
beginning of this section
If you are Done and would like to interact with
your Nokia WiFi, proceed to the section "Client
devices on your network"
Page 38

Client devices on your network
The heat map
The Home screen gives you a view of the
entire Nokia WiFi network from the
perspective of connection strength currently
experienced by connected client devices, as
represented by the concentric circles of the
heat map.
The inner circle represents the area of
strongest connectivity; the second and third
circles represent areas of progressively less
connectivity.
All client devices connected to the network are
shown both as numeric points on the heat
map and in numeric list form below the heat
map.
This mesh shows 3 connected client devices.
Connection strength
To the left of each client device in the list
view, you see a circle that is green, orange, or
red. These colored circles represent the
strength of the client device's best connection
to a Nokia WiFi device.
To the right of each client device in the list
view, you see a WiFi icon that also represents
the client's connection strength.
Client names
When a client device first joins the network, it
displays its default name value; for example,
android-ef661b3b0d8
.
You can give each device a more easilyrecognizable name, such as
Work Laptop
.
Refer to the section "Change a client device's
name."
Page 39

View client device details
From the client device list, tap the device you
wish to view. At top of the screen, you see the
name of your client device.
Connected to Which Nokia WiFi device your
client device is connected to.
Connection The type of connection between
your client and the Nokia WiFi device; options
include
Wireless 5 GHz, Wireless 2.4 GHz
, and
Wired
Band Selection Set to
Automatic
by default,
this value reflects how your Nokia WiFi devices
select the band (2.4 GHz or 5 GHz) that gives
your device the best possible connection.
Note This setting can be configured only by a
Care Agent Portal operator.
TX Rate and RX Rate This is presented from
the Beacon's point of view and reports the
client device's connection speed to its
connected Beacon in Megabytes per second
(Mbps).
• TX = transmission speed from Beacon to
device
• RX = receive speed from device to Beacon
CONFIGURATION
Internet Control a device's ability to access
the Internet; enabled by default. When
disabled, you prevent that device from
accessing the internet.
Note You cannot disable this option for the
device that is running your instance of the
Nokia WiFi app, as shown to the right.
Alert Me of Issues Receive alerts if client
device marked as a
critical device
loses
connectivity.
Page 40

CLIENT DEVICE DETAILS
Client device details include:
• MAC Address
• IP Address (as assigned by your Nokia WiFi
network)
Change a client device's name
• From the client device details view, tap the
edit icon
• You see the Edit Device Name screen
The name shown is what you see when looking
at the list of client devices in the app. It is
retrieved by default from the client device, as
specified in its Settings menu.
To edit the client device's name:
• Tap the Device Name text field
• Using 1–64 alphanumeric characters—the
first and last characters cannot be
spaces—enter a new client device name
• Tap Save
You return to the client device details screen
and see an updated client device name.
Page 41

Nokia WiFi devices on your network
To view Nokia WiFi devices on your network:
• From the top of the Home screen, tap the
Client Devices drop-down menu
• Select Nokia WiFi Devices
What you see changes from the heat map to a
tree view of the Nokia WiFi devices that
currently comprise your network.
Below the tree view, there also is a list view
that shows connected Nokia WiFi devices.
View Nokia WiFi device details
From the Nokia WiFi device list, tap the device
you wish to view. At top of the screen, you see
the device name.
The Nokia WiFi device's LED status is also
shown.
CONFIGURATION
LED Light Enabled by default, selecting this
option turns off the LED on top of the Nokia
WiFi device
CONNECTED CLIENT DEVICES
A list of the client devices that currently are
connected to this Nokia WiFi device. In this
case, the devices are
Bianca Mobile
and
Work
Laptop
.
You may tap a client device to view its details.
Page 42

NOKIA WIFI DEVICE DETAILS
Nokia WiFi device details include:
• Serial Number This value is also shown on
the Beacon's sticker
• MAC Address The device's unique
hardware identification number
• IP Address The device's communication
address
• Version The version of Nokia WiFi
firmware running on the device
Enable a guest network
Your guest network is not enabled by default. Once you enable it, your guests can reach the
internet without accessing your primary Nokia WiFi network.
The access type of your guest network can be either:
• Password guests must enter a password to connect (default)
• Open no password is required, but you need to grant internet access
Enable a password-protected guest network
• From the Home screen, tap the menu icon
• From the Settings menu, tap Guest
Access
You see the Guest Access screen.
Page 43

• Tap the Guest Access toggle; this enables
options including Access Type, Network
Name, Network Password, and Expires
• Tap the Network Name text field; this
enables the keyboard
You can either accept the default—which is
based on the name of your Nokia WiFi
network—or provide a custom name
• Tap the Network Password text field
You can either accept the default value
12345678
, or provide a custom value
• Tap the Expires field; this presents you
with eight options: Never, 1 Hr, 4 HRs,
8Hrs, 1 Day, 1 Week, 1 Month, and 1 Year
• When you've made your choice, tap <
• Tap Save
• You see the message
Saved successfully
Enable an open guest network
• Tap the Guest Access toggle; this enables
options including Access Type, Network
Name, Network Password, and Expires
• Tap the Open radio button; the Network
Password pane disappears
• Tap the Network Name text field; this
enables the keyboard
You can either accept the default, which is
based on the name of your Nokia WiFi
network, or provide a custom name
• Tap the Expires field; this presents you
with eight options: Never, 1 Hr, 4 HRs,
8Hrs, 1 Day, 1 Week, 1 Month, and 1 Year
• When you've made your choice, tap <
Page 44

• Tap Save
• You see the message
Saved successfully
Share a guest network
• From the Guest Access screen, tap Share
You are presented with supported
mediums on your client device that will
allow you to share access credentials; for
example, text message, email, and
Bluetooth
• Select your medium and follow the
prompts
• Your guest receives the Network Name
and Password (if a password-protected
network) values via the medium you
selected
Page 45

Settings
Network | Change WiFi
You can change the name and password of
your Nokia WiFi network
• From the Network portion of the Settings
screen, tap Change WiFi
You see the values you chose during Nokia
WiFi setup
• Tap the WiFi Name field; this enables the
keyboard
Enter the new WiFi name
• Tap the WiFi Password field and enter the
new WiFi password
• Once you change either value, the Save
button is enabled; tap Save
You see the message
You will experience a
brief WiFi disconnection and reconnection
• Tap OK
You see the message
Configuring the changes
and then the message
Saved successfully
Page 46

Network | WAN
You can specify the WAN type of your Nokia
WiFi network, which affects how it connects to
the internet. Your WAN connection type
generally is determined by your Internet
Service Provider (ISP).
From the Network portion of the Settings
screen, tap WAN. You see the options DHCP,
Static, and PPPoE.
• DHCP Dynamic Host Configuration
Protocol allows your Beacon to get an IP
address automatically. This is the Nokia
WiFi default.
• Static This address does not change
automatically and has been reserved by
your ISP specifically for you.
• PPPoE Point-to-Point Protocol over
Ethernet requires a specific username and
password from your ISP and typically is
used with DSL connections.
Select Static and you must provide the
following:
• IP Address
• Subnet Mask
• Default Gateway
• Primary DNS (mandatory)
• Secondary DNS (optional)
Select PPPOE and you are instructed to
contact your ISP for the username and
password required to set configure this WAN
type.
Page 47

Parental controls | Device access
Parental controls allow you to manage which
client devices can access the internet.
• From the Settings menu, tap the Device
Access pane
You see the client devices connected to
your Nokia WiFi, and they are all afforded
access by default
• To deny a client device access, tap the
radio button next to its name
IMPORTANT
You cannot deny access to the device
that runs the Nokia WiFi mobile app
After a moment, the device's radio button
turns white, indicating it can no longer access
your Nokia WiFi.
Confirm this from the Home screen, where the
disallowed device is shown as
Offline
and is
grayed out.
Page 48

Firmware Updates
Nokia WiFi performs firmware updates (when
they are available) at a time that you specify.
The default value is 3:00 AM.
• To change the default value, from the
Settings menu, tap the Scheduled Time
pane
You are presented with a time selection
dialog, from which you can select a
different time
• Once you have selected the time, tap
Done
Your new scheduled time is displayed on the
Settings menu.
Other | Account details | Change password
Account details include your First Name, Last
Name, Email, and Password
Change username
• Tap the Edit pencil to change the First or
Last Name; and then tap Save
Change password
• Tap the Password field
• You are prompted to enter your current
password
• Tap Continue
• You are prompted to enter your new
password
Page 49

• Tap Continue
• You see the message
Password Changed!
and are prompted to log into your network
• Tap Log In
• Enter your email address and new
password
• Tap Login
You see the Home screen
Page 50

Troubleshoot your Nokia WiFi
Can't find your Nokia WiFi device
When using the mobile app to configure your
network, you must be connected to your
Nokia WiFi.
• If you have already setup a Nokia WiFi
network and you see this message, your
device may not be connected to a Nokia
WiFi SSID.
1. Verify your Wi-Fi connection
2. Log into your existing account
• If you have not previously setup Nokia
WiFi, tap Setup new network and refer to
one of the "Setup your Nokia WiFi"
sections
You also may see this screen in cases of DNS
failure, in which case you may need to perform
further troubleshooting via the Nokia WiFi
online GUI or with a Portal support agent.
Wi-Fi connection required
To access Nokia WiFi using the Nokia WiFi
mobile app, you must be connected to a
wireless network.
• Ensure your local wireless network is
enabled
• Ensure that WiFi is enabled on your client
device and you are associated with the
local wireless network
Page 51

Beacon not found
During setup of Nokia WiFi and when adding
Beacons, you may encounter the Beacon not
found message. This means the Nokia WiFi
app was unable to connect with the Beacon
you're trying to add to the network.
• Tap Try Again
• If you get the message again, your Beacon
LED should be solid red or solid blue-
green. Refer to "Understanding the LED
colors"
• If the Beacon still cannot be found, go to
"Factory reset a Nokia WiFi device"
Unable to access the Internet
During setup of Nokia WiFi, when looking for
your internet connection, you may encounter
the Unable to access the internet message.
This means the Nokia WiFi app was unable to
verify the existence of a live internet
connection.
• Check all cable connections and ensure
they are solid
• Tap Try Again
• If you get the message again, and you're
confident in the security of your cable
connections, tap WAN Settings
• Refer to the section "Network | WAN" for
further instruction
Page 52

Use Ethernet to increase reliability of Nokia WiFi connections
In their default configuration, Nokia WiFi devices connect to one another using Wi-Fi
connections. They use these connections to communicate and share information about both
the network and its connected clients. If you have the infrastructure support necessary to do
so, you may choose to connect your Nokia WiFi devices using Ethernet cables, which would
result in wired connections. These can offer faster speeds, lower latency, and no interference—
all characteristics that are common to wireless connections.
IMPORTANT
The Ethernet cables must not pass through an Ethernet switch or other router
Factory reset a Nokia WiFi device
This procedure returns your Nokia WiFi device to its "out-of-box" state. You may elect to
factory reset devices on your own or as directed by a Nokia Care Agent. There are two
scenarios where factory resetting a Nokia WiFi device may be warranted:
1. Incomplete device configuration during Nokia WiFi setup/onboarding.
2. Re-deployment of your Nokia WiFi network to a new location.
IMPORTANT
The need to factory reset one Nokia WiFi device means that ALL your devices
must be factory reset, starting with the device acting as the gateway and
followed by any extender devices. Failure to do so will generate a wireless
network with incomplete or mismatched configuration data.
FACTORY RESET PROCEDURE
1. Using a paper clip or SIM tray removal tool, on the back of each powered-on Beacon,
press the Reset button for ~10 seconds, or until the LED flashes red.
2. The LED turns solid white, which indicates the Beacon has entered boot-up phase.
3. The LED flashes yellow, which indicates the Beacon has been factory reset and is ready
for configuration.
4. Once all Beacons are factory reset, refer to one of the "Setup your Nokia WiFi" sections
and setup your Nokia WiFi from scratch.
Page 53

Technical specifications
Beacon 1
Beacon dimensions
150 mm (5.9 in) x 115mm (4.5 in) x 42 mm (1.6 in)
Software
Nokia WiFi Intelligent Mesh
WiFi connectivity
AC3000
Supports 2x2 802.11b/g/n 2.4 GHz WLAN
Supports 2x2 802.11n/ac 5 GHz WLAN
Ethernet interfaces
1x Gigabit Ethernet WAN port
3x Gigabit Ethernet LAN ports
Security
64-bit and 128-bit WEP support
WPA support including WPA-PSK and WPA2
Beacon 3
Beacon dimensions
160 mm (6.3 in) x 94 mm (3.7 in) x 94 mm (3.7 in)
Software
Nokia WiFi Intelligent Mesh
WiFi connectivity
AC3000
Supports 3x3 802.11b/g/n 2.4 GHz WLAN
Supports 4x4 802.11ac 5 GHz WLAN with MU-MIMO
Ethernet interfaces
1x Gigabit Ethernet WAN port
3x Gigabit Ethernet LAN ports
Security
64-bit and 128-bit WEP support
WPA support including WPA-PSK and WPA2
Manufacturer information
Manufacturer
Nokia Solutions and Networks Oy
Address
Karaportti 3, 02160 Espoo, Finland
Email Address
wifi.care@nokia.com
Page 54

Warranties and repair of Nokia WiFi devices
For information on the hardware Limited Warranty and/or repair, or replacement of the
produce, please go to www.nokia.com/wifi/legal/warranty
 Loading...