

Page 1

Quick guide
Accessories guide
9357169
ISSUE 3 EN
Page 2

Copyright © Nokia Mobile Phones 1999. All rights reserved.
Nokia and Nokia Connecting People are registered trademarks of Nokia Corporation.
Other product and company names mentioned herein may be trademarks or trade names of their respective owners.
Nokia Mobile Phones operates on a policy of continuous development. Therefore we reserve the right to make
changes and improvements to any of the products described in this guide without prior notice.
The availability of particular accessories may vary by region. Please check with the Nokia dealer nearest to you.
Please dispose of batteries properly.
Nokia Mobile Phones is not re sponsible for any loss of data, income or any consequentia l damage howsoever caused.
Page 3

Table of contents
Quick guide 1
First start-up 2
Communicator 5
To connect to a PC 6
Contacts 7
Telephone 8
Fax 9
Short messages 9
Internet 10
Notes 12
Calendar 13
System 13
Extras 15
Help 15
Phone 16
Accessories guide 18
Memory Card 18
Headset 19
Advanced Desktop Stand 19
Advanced HF Car Kit 21
Carrying Case 23
Mobile Charger 24
Other available accessories 24
Nokia Wireless Data Forum 25
Club Nokia Careline 25
Care and maintenance 27
Important safety information 28
Page 4

Page 5

Quick guide
FOR YOUR SAFETY Read these simple guidelines. Breaking the rules may be
dangerous or illegal. Further detailed information is given in this manual.
ROAD SAFETY COMES FIRST Do not use the communicator while driving;
park the vehicle first.
INTERFERENCE All wireless phones may get interference which could affect
performance.
SWITCH OFF IN HOSPITALS Follow any regulations or rules. Switch off the
phone near medical equipment.
SWITCH OFF IN AIRCRAFT Wireless phones can cause interference. Using
them on aircraft is illegal.
SWITCH OFF WHEN REFUELLING Do not use the phone at a refuelling point.
Do not use near fuel or chemicals.
SWITCH OFF NEAR BLASTING Do not use the phone where blasting is in
progress. Observe restrictions, and follow any regulations or rules.
USE SENSIBLY Use only in the normal position (to ear). Do not touch the
antenna unnecessarily.
USE QUALIFIED SERVICE Only qualified service personnel must install or
repair equipment.
ACCESSORIES AND BATTERIES Use only approved accessories and batteries.
Do not connect incompatible products.
MAKING CALLS VIA THE PHONE Close the cover and ensure the phone is
switched on and in service. Enter the phone number, including the area code,
then press . To end a call press . To answer a call press .
EMERGENCY CALLS Close the device cover. Ensure the phone is switched on
and in service. Hold for several seconds, to clear the display. Enter the
emergency number, then press . Give your location. Do not end the call
until told to do so.
MAKE BACKUP COPIES Remember to make backup copies of all important
data.
CONNECTING TO OTHER DEVICES When connecting to any other device, read
its user’s guide for detailed safety instructions. Do not connect incompatible
products.
INFRARED PRECAUTIONS Do not point the IR beam at anyone’s eye or allow it
to interfere with other IR devices.
1
Quick guide
Page 6
2
First start-up
The Nokia 9110 Communicator can send and receive calls and messages only
Quick guide
when the phone is switched on, has a valid SIM card fitted, and is located in
the service area of the cellular network. However, emergency calls to the
international emergency number 112 may be made without the SIM card in
some networks. Please, check with your network operator.
Note: Keep all miniature SIM
cards out of small children’s
reach.
1 Close the device cover and ensure that the phone is switched off. If it is on,
press .
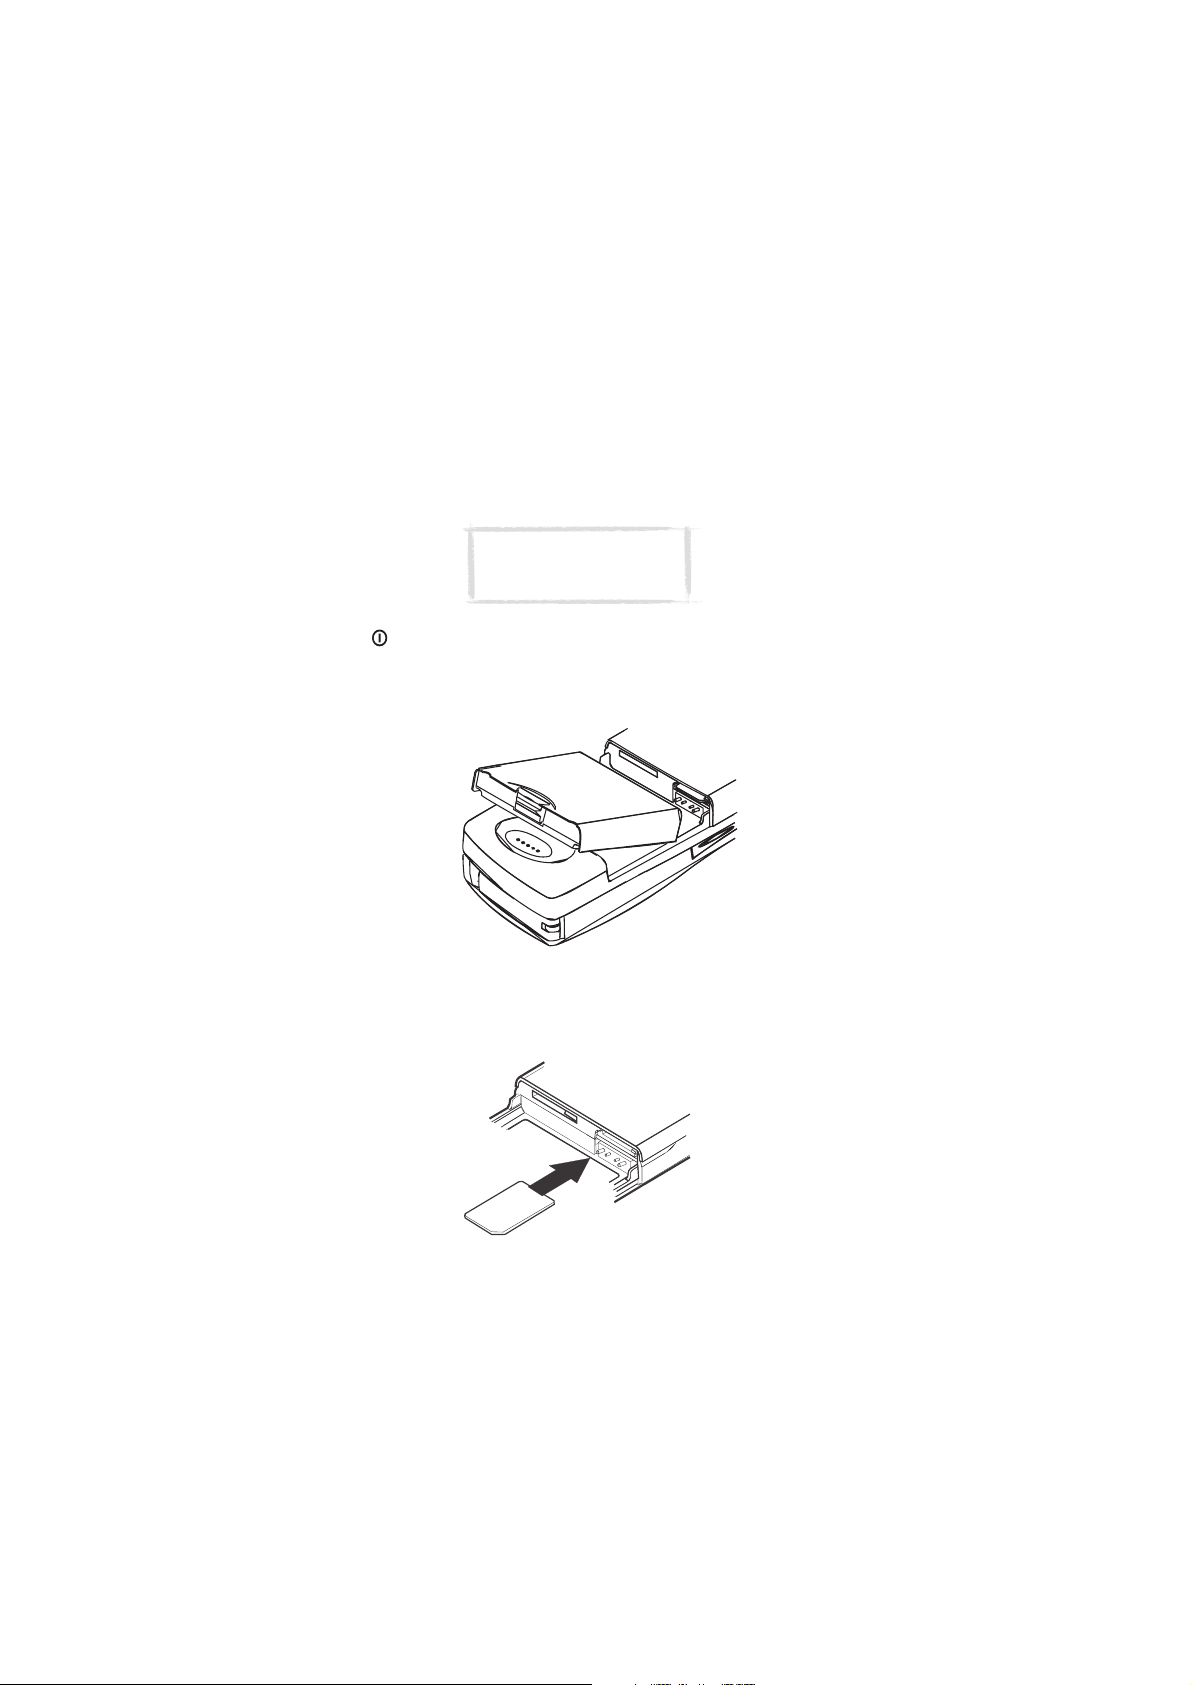
2 If the battery is connected to the communicator, remove the battery: press
the catch at the top of the battery and lift the battery away from the
battery cavity.
Figure 1
3 Slide the SIM card into the SIM card slot: ensure that the gold contacts of
the SIM card are facing down and that the bevelled corner of the card is on
the right. See figure 2.
Figure 2
Page 7
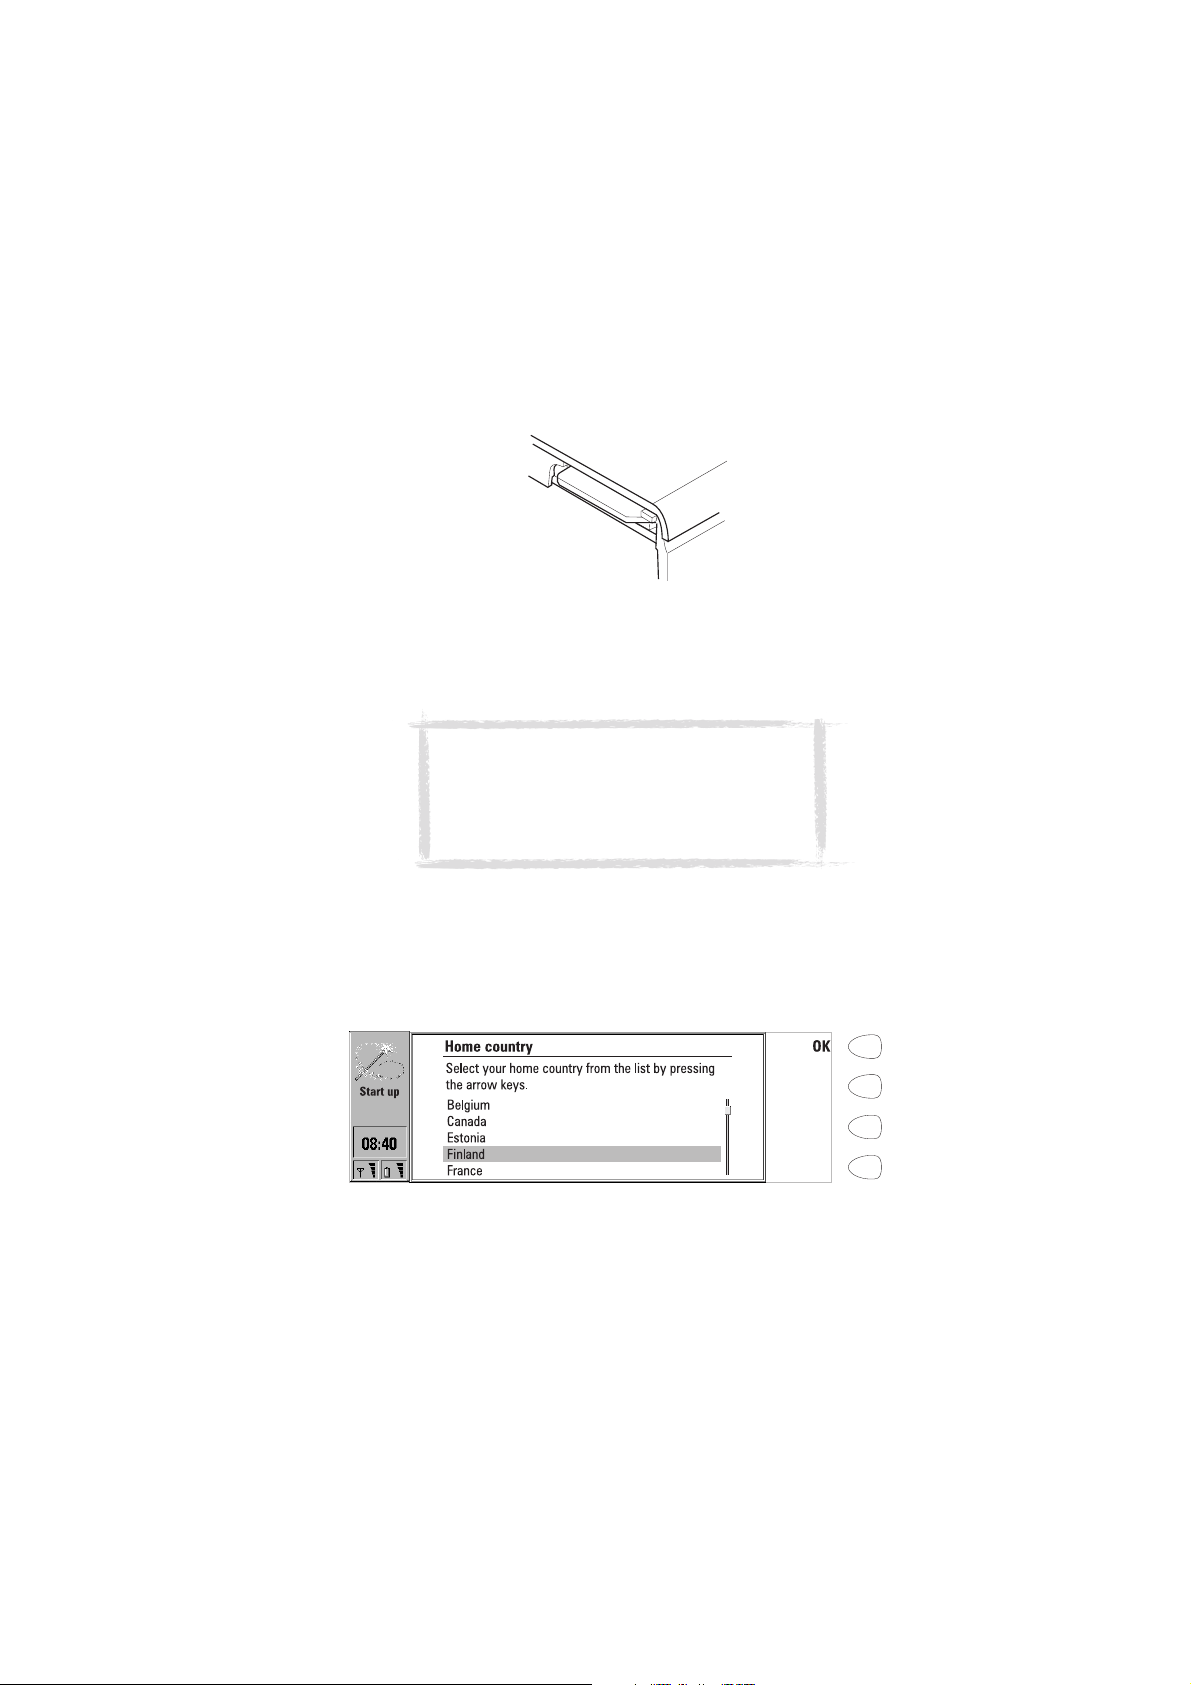
4 When the SIM card is properly inserted into the SIM card slot, the bevelled
corner will remain visible. See figure 3.
Figure 3
5 When you are sure that the SIM card is correctly installed, replace the
battery. If there is little or no charge in the battery, it is recommended that
you connect the communicator to the charger and start charging the
battery before continuing with the start-up procedure. See below.
Note: The battery does not fit into place if the SIM
card is not correctly installed. Do not force the battery
into place! Check that you have inserted the SIM card
into the slot as described above. If the SIM card is
incorrectly installed, remove it by pulling it away from
the slot, and insert it again.
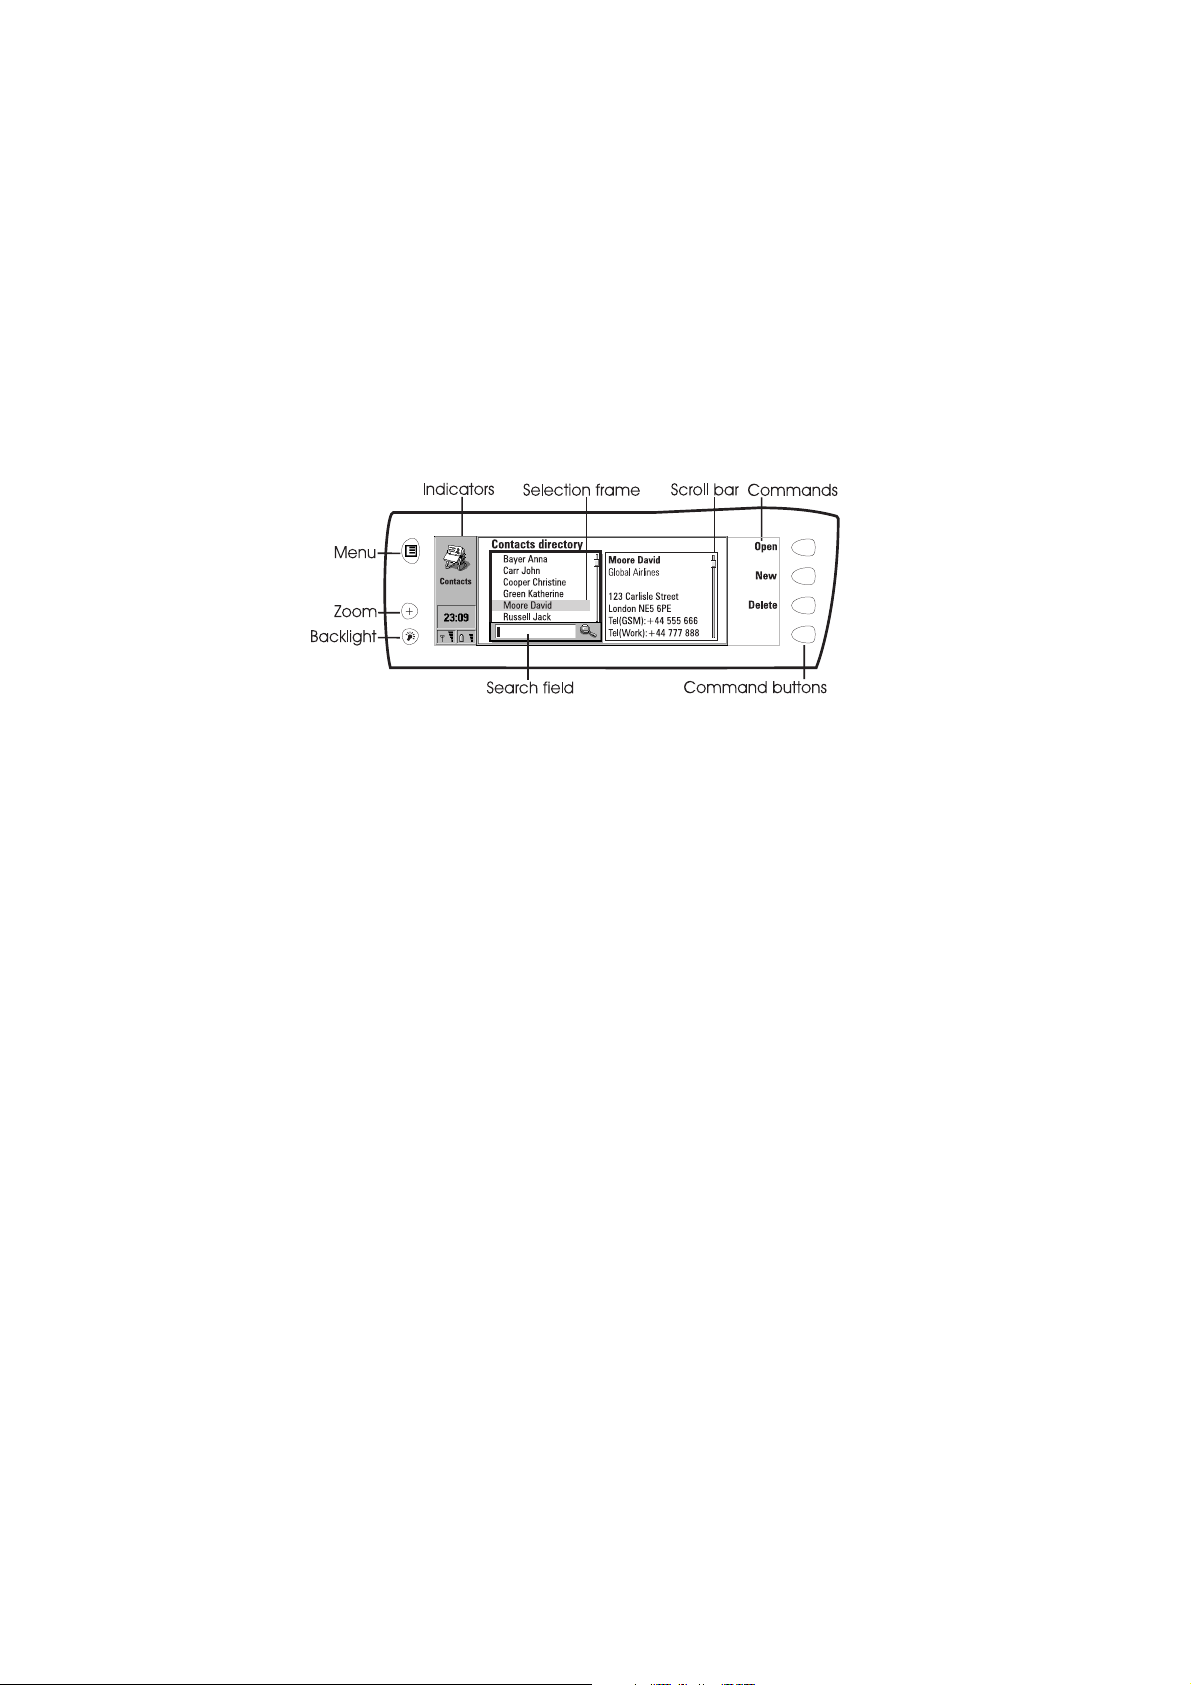
6 Open the cover of the communicator. You will see a welcome screen while
the communicator performs a self-test.
7 After the self-test is complete, you will see a list of countries on the
display, see figure 4. Scroll the dark grey selection frame using the arrow
keys on the keyboard over the name of your home country. Press the
button on the right side of the display next to the command OK. The
capital of your home country will be set as your home city.
3
Quick guide
Figure 4
8 Write the current date in the input field using the format dd.mm.yy, for
example 22.03.98, and press OK.
Page 8

4
9 Write the current time using the 24-hour format hh:mm, for example
17:25, and press OK.
10 Enter your contact information in the user data card and press OK.
Quick guide
The first start-up is now completed.
After the start-up, do not immediately remove the battery, as the battery
charges the backup battery that supplies power to the real-time clock of the
communicator.
To charge the battery
1 Connect the charger lead to the bottom of the communicator:
Figure 5
2 Connect the charger to the proper voltage AC wall outlet. While charging
is in progress, the battery charge indicator scrolls on the display.
Note: The communicator can
be used normally during
charging.
To use the battery
Use only batteries approved by the communicator manufacturer and recharge
the battery only with the chargers approved by the manufacturer. With
approved chargers and accessories, the battery can be charged continuously.
The battery need not be fully discharged before recharging. When a charger is
not in use, disconnect it from the power source. Do not leave the battery
connected to a charger for longer than a week, since excessive charging may
shorten its life. If left unused, a fully charged battery will discharge itself over
time.
The battery can be charged and discharged hundreds of times, but it will
eventually wear out. When the operating time (talk-time and standby time) is
noticeably shorter than normal, it is time to buy a new battery.
Page 9

Temperature extremes will affect the ability of your battery to charge: allow it
to cool down or warm up first.
Battery operation time is affected by the following: whether both the phone
and the communicator interface are on, radio signal strength, various phone
settings, the use of the backlight, and the length of the screen blanker period.
It is recommended always to keep a charged battery in the communicator.
Keeping the battery charged maximises the lifetime of the backup battery
supplying power to the real-time clock of the communicator. In case the
backup battery is drained, it will be automatically charged the next time a
charged battery is reconnected to the communicator.
Always close the device cover before removing the battery. Closing the cover
will save all data.
Note
Use the battery only for its intended purpose.
Never use any charger or battery that is damaged or worn out.
Do not short-circuit the battery. Accidental short-circuiting can occur when a
metallic object (coin, clip or pen) causes direct connection of the + and terminals of the battery (metal strips on the back of the battery), for example,
when you carry a spare battery in your pocket or purse. Short-circuiting the
terminals may damage the battery or the connecting object.
Leaving the battery in hot or cold places, such as in a closed car in summer or
winter conditions, will reduce the capacity and lifetime of the battery. Always
try to keep the battery between +15°C (+59°F) and +25°C (+77°F). A
communicator with a hot or cold battery may temporarily not work, even
when the battery is fully charged. The performance of Lithium-ion batteries is
particularly limited in temperatures below 0°C (+32°F).
Do not dispose of batteries in a fire!
Batteries must be recycled or disposed of properly. Batteries must not
be disposed of in municipal waste.
5
Quick guide
Communicator
To switch on the communicator interface
The communicator interface is switched on simply by opening the cover. The
application that was active the last time the communicator was used is
shown on the display.
When you close the cover, the communicator interface switches off its display
and saves all data.
Page 10
6
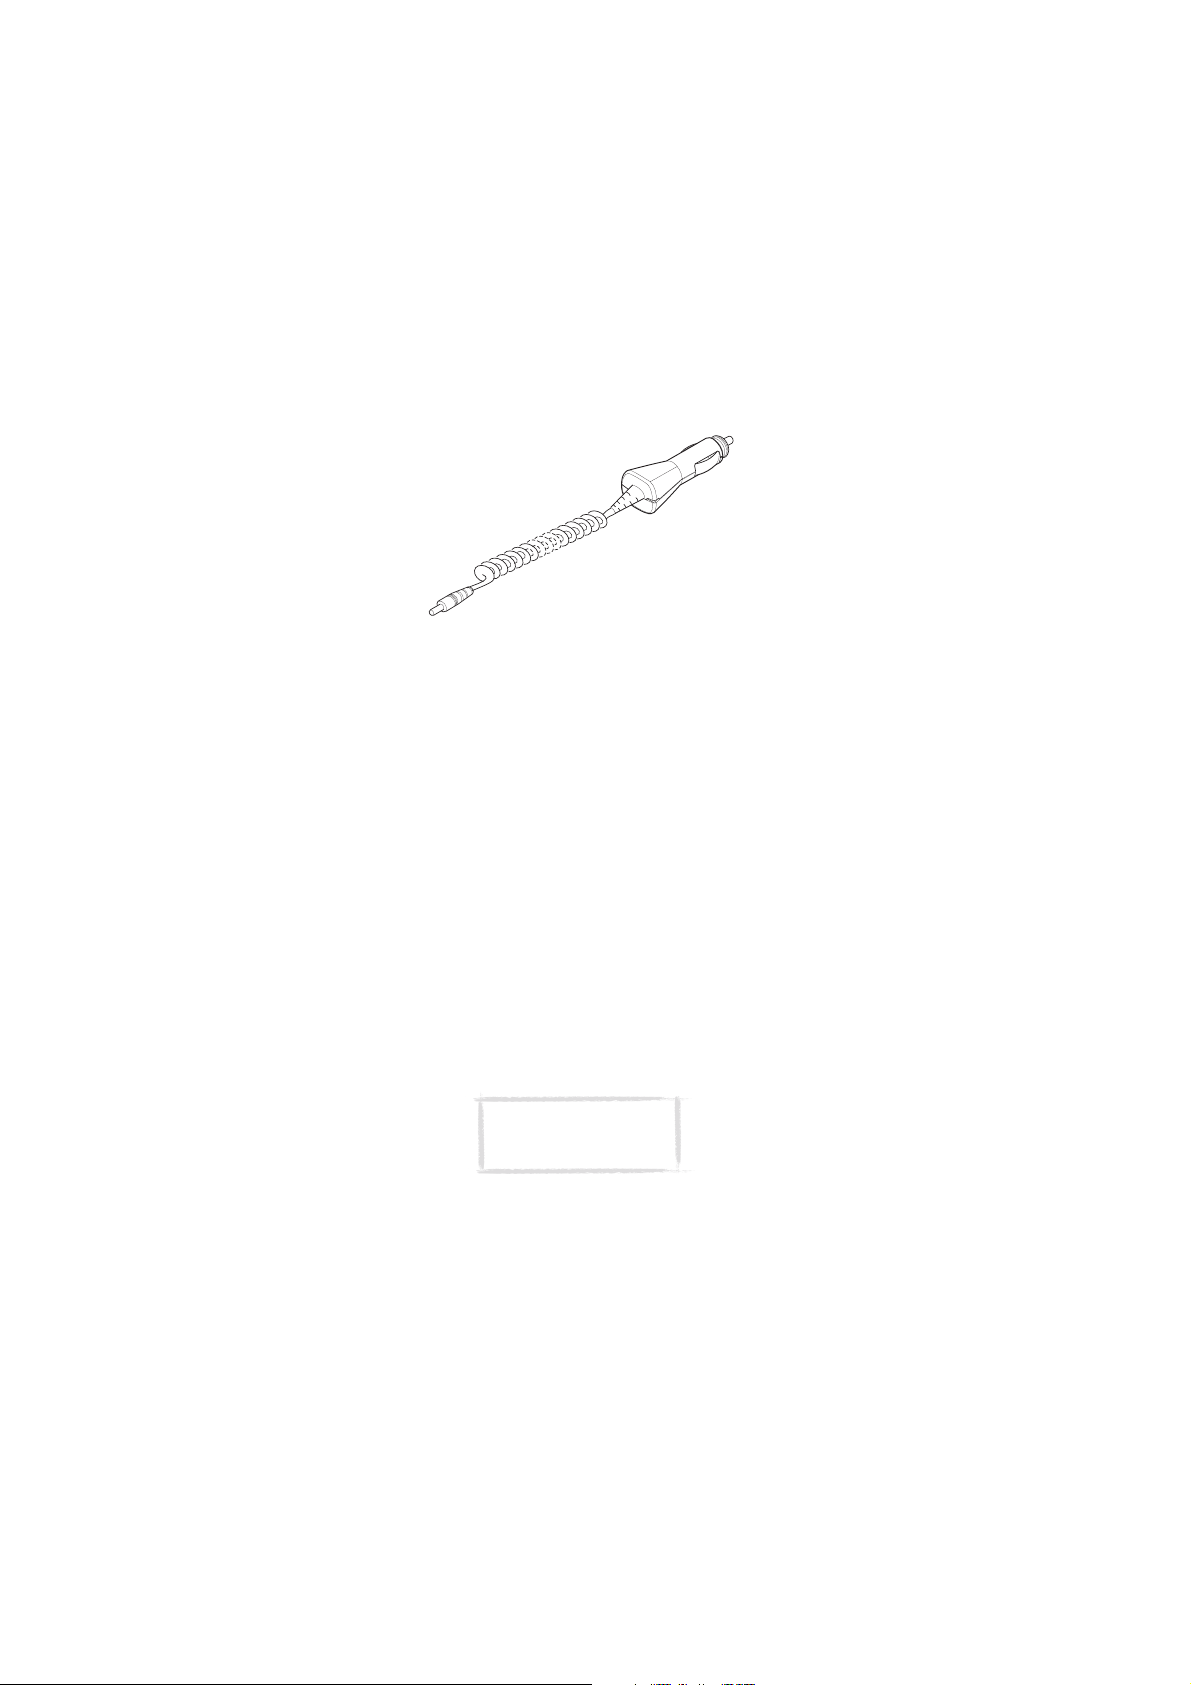
Display elements
The indicators (figure 6) show the currently active application along with
other information about the communicator, e.g. battery level and field
Quick guide
strength.
Figure 6
The commands always relate to the four command buttons. In this guide,
commands are in bold and items shown on the display are in italics.
When this guide instructs you, for example, to press Open, it means that you
must press the command button next to the command name.
When the search field is shown at the bottom of the display, you can search
for items by using the keyboard to enter text into the search field.
The scroll bar indicates that there are more items than currently shown on the
display. You can scroll the display with the arrow keys of the keyboard.
When the selection frame is shown, one item is always automatically
selected. You can select other items by moving the selection frame with the
arrow keys on the keyboard. After the correct item has been selected, press
the command you wish to apply to the item, for example, Open or Delete.
The Menu button opens up a new set of options.
The Zoom button magnifies the view on the display.
The Backlight button switches the display light on and off.
To connect to a PC
You can connect your communicator to a suitable PC using the PC Suite for
Nokia 9110 Communicator program, which is found on the CD-ROM supplied
in the communicator sales package. With the PC Suite you can synchronise
contact information, calendar and To-do list between your communicator and
a PC, transfer and backup data, and install various software on your
communicator. You need only to connect your communicator to a PC;
everything else is done on the PC.
Page 11

The PC Suite for Nokia 9110 Communicator works with Windows 95/98 and NT.
When connecting your communicator to a PC, you can also select whether to
use the infrared or the cable connection.
Caution: Beware of viruses. Only
install on the communicator
software you have obtained from
sources that offer adequate
protection against viruses.
To use the PC Suite with an infrared connection
1 Make sure that the infrared port of the communicator faces the infrared
port of the PC.
2 Start the PC Suite software on the PC.
3 Start the Infrared activation application on your communicator and press
Activate. See ”System” on page 13 of this guide.
To use the PC Suite with a cable connection
1 Connect the 9-pin end of the RS-232 cable to the COM port of the PC, and
the other end to the connector at the bottom of the communicator.
2 Start the PC Suite software on the PC.
To use the Nokia Communicator Server
If you have Windows 3.11 or Apple Macintosh, use the Nokia Communicator
Server program for PC connectivity. The Windows version of the Nokia
Communicator Server is found on the diskette in the sales package, and the
Apple Macintosh version is on the CD-ROM.
With the Nokia Communicator Server you can use the communicator
applications that require PC connectivity. You need to connect your
communicator to a PC and start the necessary application on the
communicator.
7
Quick guide
Contacts
Contacts is used to manage contact information, such as phone numbers and
addresses. The entries in the Contacts directory are called contact cards. The
Contacts directory is used by all the communications applications: Telephone,
Fax, SMS and Mail.
To make a contact card
1 Press the Contacts application button on the communicator keyboard to
start the Contacts application.
2 Press New and write the necessary contact information in the empty
contact card.
Page 12

8
Telephone
Telephone is used for making and receiving voice calls and adjusting the
Quick guide
Telephone settings. To start the Telephone application, press the Tel.
application button on the keyboard.
To make a call
There are two ways to make a call via the communicator interface:
1 Select a contact from the Telephone directory by moving the selection
frame over the contact’s name, and press Call. If the contact has only one
phone number, the number is called directly.
If the contact has several phone numbers, a pop-up box opens, listing the
phone numbers. Choose a number from the list and press Call. Or,
2 Type the phone number in the search field with the keyboard and press
Call.
To answer a call
You can answer a call either via the phone or the communicator interface.
When you receive a phone call, a note appears on the communicator interface
display. Press Answer to answer the call, or press End call to dismiss the call.
Flight profile
The flight profile prevents you from accidentally turning on your phone in an
aircraft.
To set on the flight profile
1 Press Settings in the Telephone main view.
2 Choose Profiles and press Change.
3 Select Profile in use, press Change and scroll to Flight.
4 Press OK.
With the flight profile active, you may read previously downloaded mail, write
mail, notes, short messages, faxes, or update your calendar. Once you have left
the aircraft, you can turn off the flight profile by pressing Exit profile, turn on
the phone by pressing , and your short messages, faxes and mail will be
sent automatically.
When the communicator is in the flight profile, emergency calls must be made
from the phone:
1 Press . The phone display will read FLIGHT PROFILE ACTIVE.
2 While the FLIGHT PROFILE ACTIVE text is visible (for approximately five
seconds) you can dial the emergency number, e.g. 112.
3 Press .
Page 13

IMPORTANT! Never use the phone when in an aircraft. If the aircraft
personnel allow use of the communicator interface, you MUST activate
the flight profile. The flight profile will allow use of the communicator
interface only and will prevent use of the phone.
Be aware that all communications applications, Telephone, Fax, SMS,
Mail, and Internet, require use of the phone.
Fax
To start the Fax application, press the Fax button on the communicator
keyboard.
Fax sending and receiving requires that fax calls are supported by the network
you are using and that the fax service is activated for your SIM card. Contact
your service provider for details.
To send a fax
1 Press Write fax, and write the fax message.
2 Press Recipient. The Fax directory opens.
3 Select a recipient and press Select.
4 Press Send to send the fax.
To read a received fax
Faxes are received automatically. There are two ways to read a received fax:
1 When you receive a note informing you that you have received a fax, press
View. To read the fax later, press Cancel. Or,
2 Select the Received faxes folder and press Open. Select the fax and press
Open.
Use the arrow keys to scroll up and down in the fax, or from left to right. To
zoom the fax, press View, and then Zoom in or Zoom out.
9
Quick guide
Short messages
To start the short message application, press the SMS application button on
the communicator keyboard.
Short message sending and receiving requires that the Short Message Service
(SMS) is available in the network you are using and activated for your SIM
card. Contact your service provider for details.
Before you can send short messages, you must store the SMS message centre
number in the settings of the SMS application.
To send a message
1 Press Write message and write the message contents.
2 Press Recipient. The SMS directory opens.
Page 14

10
3 Select a recipient and press Select.
4 Press Send. If your message is longer than 160 characters, it will be sent as
several short messages, provided that your network support this function.
Quick guide
To read a received message
There are two ways to read a received message:
1 When you receive a note informing you that you have received a message,
press View. To read the message later, press Cancel. Or,
2 Select the Received messages folder and press Open. Select the message
and press Open.
Internet
Internet access requires that you have obtained an Internet access point from
an Internet service provider and configured the Internet settings correctly.
Contact your dealer for details.
1 Press the Internet application button on the communicator keyboard.
2 Choose one of the applications and press Select.
The connection to the Internet is established via a data call. This requires that
data calls are supported by the network you are using and that this service is
activated for your SIM card. Contact your service provider for details.
To close the connection to the Internet, press Hang up in the Internet main
view.
Mail
Mail enables you to send and receive e-mail. Mail is compliant with the
Internet standards SMTP, IMAP4, POP3, MIME1 and MIME2. Before using this
application, be sure to enter the correct Mail settings.
To send mail
1 Press Write mail and write the message.
2 Press Recipient. The Mail directory opens.
3 Select a contact and press Select. If the contact has several mail
addresses, choose the address from the pop-up box and press Select.
4 The Mail envelope opens. In the Mail envelope you can check the sending
information and add more recipients by pressing Add recipient or entering
addresses manually.
5 Press Send.
To read mail
The Mail application main view shows the Remote mailbox. The Remote
mailbox, which receives all your mail, is located on a remote computer.
1 Move the selection frame over the Remote mailbox and press Connect. The
Page 15

communicator connects to the Remote mailbox. All mail in the Remote
mailbox is shown. An unread message has the icon next to it.
2 Fetch all new mail by pressing Fetch new, or fetch individual messages by
selecting the message(s) and pressing Fetch selected. All fetched mail
goes to the Received mail folder of the communicator.
3 When you have fetched all the mail messages you want, disconnect from the
Remote mailbox by pressing Hang up. If you have pressed Fetch new, the
connection is closed automatically after the message(s) have been fetched.
4 In the Mail application, select the Received mail folder and press Open.
Select a message and press Open again to read the message.
World Wide Web
The World Wide Web application is a hypertext-based system for finding and
accessing resources on the Internet.
To open a WWW page
1 Write the URL address of the page in the input field, or select a page from
the Bookmarks list in the WWW main view.
2 Press Go.
3 A data call is made to your Internet access point. After a connection has
been established, the chosen page is fetched from the Internet and shown
on the display.
4 To follow a hyperlink, select it with the selection frame and press Go.
Telnet and Terminal
These applications allow your communicator to connect to computers, like
mainframe computers, which provide terminal services through the Internet
(Telnet) or direct dial-in terminal services (Terminal). Both applications
emulate the VT100 terminal.
11
Quick guide
Note: The Telnet application can
be installed to your
communicator from the CD-ROM
included in the sales package.
To connect to a Telnet or Terminal host
1 Press Define and define a new host (press New) or edit an existing host
(press Edit).
2 Return to the Telnet or Terminal main view, select a host and press
Connect.
3 To send or copy texts between the host computer and the communicator,
press Send text or Capture text. The command is available once you have
connected to the host.
4 To disconnect from the host, press Hang up.
Page 16

12
Text Web
With Text Web you can fetch information from the Internet, using SMS. You
can also access services provided by your network operator and Nokia.
Quick guide
To define services
1 Press Settings in the Text Web main view.
2 Press New to open an empty service information card, or press Edit to
modify an existing service. Enter the title of the service, the server number,
and the service number.
To fetch information
1 In the Text Web main view, scroll to one of the service access points that
you have defined and press Select.
2 Enter in the space provided a keyword that describes the type of
information you are looking for.
3 Press Send. When you receive a reply from the service provider, the TTML
browser opens up. Press the arrow keys on the keyboard to move from one
hotspot to another. To follow a hyperlink, press Fetch.
Notes
Notes is used for writing texts and managing documents stored on the
communicator.
To start the Notes application, press the Notes application button on the
communicator keyboard.
To write a note
1 Press Write note in the Notes main view. If you want to format the text,
press Style.
To read documents
1 Select a folder in the Notes main view and press Open.
2 Select a document and press Open.
To send a document
1 Press Send in the opened Note editor.
2 Select one of the following options and press Select:
To send as a fax, select Send as fax.
To send as a short message, select Send as short message.
To send as e-mail, select Send as mail.
Page 17

Calendar
To start the Calendar application, press the Calendar application button on
the communicator keyboard.
Monthly schedule
The monthly schedule is the main view of the Calendar. The daily events list on
the right side of the display can be edited in the daily schedule.
Weekly schedule
To check the weekly schedule, press Week in the monthly or the daily
schedule. The weekly schedule shows the timetable of the selected week.
Daily schedule
The daily schedule is opened by pressing Day in the monthly or the weekly
schedule. The daily schedule displays the events of the selected day. To adjust
the details of the selected event, press Details.
To book events
You can book events in other communicators or remote calendar servers.
1 Select an event in the daily schedule or write a new one.
2 Press Calendar booking in the Details view and select whether to make
the booking as a request or a reservation.
3 Press Send as SMS to open the SMS directory where you can select the
recipient.
4 Press Send to send the booking.
13
Quick guide
System
To start one of the System applications, press the System application button
on the communicator keyboard, choose an application and press Select.
The Install/Remove software and Backup/restore applications require the use
of either the PC Suite or the Nokia Communicator Server.
To lock the communicator
1 Open the Security application and press Lock system.
2 Enter your lock code if prompted.
To unlock the communicator
1 Enter your lock code in the input field.
2 Press OK.
Page 18

14
Infrared activation
If you want to use the PC Suite for Nokia 9110 Communicator program with
the infrared connection, or you want to transfer data between your
Quick guide
communicator and another device via the infrared, you need to use the
Infrared activation application.
1 Make sure that the infrared port of the communicator faces the infrared
port of the PC or another device.
2 Open the Infrared activation application on the communicator.
3 Press Activate. When transferring data between two communicators, the
activation is done in the communicator that receives the data.
4 To end the infrared connection, press Disable.
Digital camera connectivity
The Digital camera connectivity application enables you to transfer images
between your communicator and a digital still camera via the infrared
connection.
1 Open the Digital camera connectivity application and press Image list.
2 If you are transferring files from your communicator, select the UPF
image(s) you want to transfer.
3 Make sure that the infrared port of your communicator faces the infrared
port of the other device.
4 Press Send to send the images from your communicator, or press Receive
to start transferring images from the other device to your communicator.
To use the communicator as a fax modem
The communicator can be used as a PC fax modem. This requires that data
calls are supported by the network you are using and that this service is
activated for your SIM card. Contact your service provider for details.
1 Open the Fax modem application, press Settings and select either the
cable or the infrared connection. The infrared connection is recommended.
2 Connect the communicator to a PC.
3 Press Activate. When the communicator is used as a fax modem, the
communications features of the communicator are disabled.
4 To stop using the communicator as a fax modem, press Disable.
To remove data
Data removal enables you to remove data from your communicator.
1 Select one of the data groups: All device data, Calendar data, Documents,
Contacts and speed dials.
2 Press Delete. Before the data is removed, you will be prompted for your
lock code.
Page 19

Extras
To start one of the Extras applications, press the button on the
communicator keyboard, select an application and press Select.
Calculator
Write the calculation in the input field with the keyboard. Press Enter to
perform the calculation. Previous calculations are shown in the list above the
input field.
Clock
The Clock shows the time and date in your home city and country, as well as in
several other cities and countries throughout the world. The time and date
can be adjusted in the Clock settings.
Alarm clock
Press Alarm clock in the Clock main view to access the Alarm clock. Adjust
the alarm time with the + and - command buttons. The alarm occurs
according to the home city time.
Composer
The Composer enables you to compose ringing tones. To compose a new tune,
press Compose.
Voice recorder
The Voice recorder enables you to record telephone conversations, voice
memos, and other sounds. You can also listen to your recordings and other
sound files.
15
Quick guide
Help
Press the button on the communicator keyboard. The application icon in
the indicator area on the left side of the screen remains in view, reminding
you of the application from where the help was launched.
To view the help topics for the current application, press Application help.
To view general help topics about the communicator, press General help.
To exit the help, press Close.
Page 20

16
Phone
Quick guide
To switch on the phone
1 Close the device cover, if it is open.
2 Press and hold to switch on the phone.
If you are prompted for the PIN code, enter your PIN code, which is
provided with the SIM card, and press the key directly under the OK
text on the display.
Figure 7
IMPORTANT! Do not switch on the
phone when wireless phone use is
prohibited or when it may cause
interference or danger.
As with any other radio transmitting device, do not touch the antenna
unnecessarily when the phone is switched on. Contact with the antenna
affects call quality and may cause the phone to operate at a higher power
level than otherwise needed.
To make and answer calls
To make a call, enter the area code and the phone number, then press .
To answer a call press .
To end a call press .
Page 21

Keys
— Switches between different operating environments.
— Scroll through menus, submenus or settings. When a call is
active, pressing the scroll keys adjusts the volume level.
0 ... 9 — The number and alphabet keys. To call your voice mailbox, press
and hold 1.
— Used for special purposes in certain functions.
— The function of these two selection keys depends on the text
shown on the bottom line of the display.
Note: The microphone
and earpiece are on the
rear of the device.
17
Quick guide
Page 22

18
Accessories guide
The Nokia 9110 Communicator accessories have been designed for different
Accessories guide
users and communication needs. For availability of approved accessories,
please check with your local dealer.
Use only batteries, chargers, and accessories approved by the communicator
manufacturer for use with this particular communicator model. The use of any
other types will invalidate any approval or warranty applying to the
communicator, and may be dangerous.
Memory Card
Figure 8
The postage stamp sized Memory Card DTS-8 provides 8 MB of removable
storage for the communicator. The memory card increases the available
memory for data and software applications. For further information, see
chapter 3 “Special features” of the User’s manual.
Note: Keep all memory
cards out of small
children’s reach.
Page 23

Headset
Figure 9
The Headset HDC-8 offers private headset audio operation. With the remote
control button, which is located in the microphone part of the headset, you
can answer and later end a call. The Headset connects directly to the
connector at the bottom of the communicator.
Advanced Desktop Stand
19
Accessories guide
Figure 10
The Advanced Desktop Stand DCH-7 enables charging of the battery of the
communicator, when the communicator is placed in the stand. The advanced
feature of the stand is the easy connection to a computer. The stand also has a
slot for charging batteries separately from the communicator. This is
especially convenient for charging spare batteries.
Page 24

20
To charge the communicator battery with the desktop stand
1 Plug the Performance Travel Charger into the stand.
2 Place the communicator in the desktop stand connector end first.
3 Plug the charger into a mains outlet.
Accessories guide
To charge a spare battery with the desktop stand
1 Plug the Performance Travel Charger into the stand.
2 Insert the battery in the second slot the golden contacts first. Push the
battery slightly backwards, see figure 11. Ensure that the battery clicks
into place.
Figure 11
3 Plug the charger into a mains outlet. Check that the light on the left of the
stand is on. The red light indicates charging, and the steady green light
indicates that the battery is charged.
Note: If the communicator is also
charging in the desk stand, the charging
of the spare battery will cease until the
battery in the communicator is charged.
4 To remove the battery, reverse the procedure shown in figure 11.
To connect to a PC
With the communicator in the desktop stand, you can connect to a PC with
the RS-232 adapter cable DLR-2.
1 Plug the adapter cable into the connector at the back of the stand.
2 Connect the other end of the cable to the PC.
Page 25

3 Place the communicator in the desktop stand connector end first.
4 Start the PC Suite for Nokia 9110 Communicator program on the PC.
Convenient data transfer
You can also synchronise data between your communicator and a compatible
PC organiser program with a single press of the button. For more
information, see the CD-ROM supplied with your communicator.
Note: For correct button
operation, the ACP-9 charger must
be connected to the desk stand.
Advanced HF Car Kit
21
Accessories guide
Figure 12
The Advanced HF Car Kit CARK-99 offers a convenient handsfree option for
using the communicator in a car. The handsfree microphone and external
loudspeaker are always on when the communicator is placed in its holder. The
car kit provides automatic charging and improves network reception for your
communicator. Battery charging times are the same as those for the charger
ACP-9. The car kit must be installed by qualified personnel.
Page 26

22
Note: The car kit does not
include an antenna. Ask your car
Accessories guide
To place the communicator in the holder
1 Close the cover of the communicator and turn the antenna to a closed
position.
2 Insert the communicator in the car kit holder connector end first, as shown
in figure 12.
3 In order not to damage the connectors, press the communicator down
gently until it is securely held by the locking mechanism.
Handset Kit
The optional Handset Kit HSU-1 is a simple handset with no display or keypad.
It provides privacy for conversation and comfort in a car environment while
your communicator is connected to the car antenna for better reception.
However, do not use the handset while in motion.
To make a call with the car kit
1 Key in the desired number with the keypad.
2 Press . For a private call, lift the handset if installed.
To answer a call
1 Press , or, if the handset is installed, lift the handset.
If you set the Automatic answer feature on in the Car profile, the
communicator will automatically answer incoming calls.
kit dealer for available products.
To switch from handset operation to handsfree operation
Press the Options selection key once and replace the handset in 5 seconds. If
you do not press Options before replacing the handset, the call will end.
To end a call
Press , or, if the handset is installed, replace the handset.
To connect to a computer
With the RS-232 adapter cable DLR-2 you can connect the communicator to
a laptop computer for fax modem use or PC Suite operation.
1 Close the device cover and place the communicator securely in the car kit
holder.
2 Insert the plug of the adapter cable into the connector of the holder. The
connector is located at the bottom of the holder.
Page 27

3 Connect the other end of the adapter cable to the serial port of the
computer.
4 Start the necessary application on the computer. If you want to use the
communicator as a fax modem, see chapter 11 “System: Fax modem” of
the User’s manual.
Ignition sense
The ignition sense feature allows the communicator to be automatically
switched on or off whenever the communicator is in the charging holder and
the vehicle is started or switched off. This prevents the communicator from
draining the car battery, if accidentally left on for a long period of time.
If installed, the ignition sense is always available. If you do not wish to enable
the ignition sense, ask your dealer to leave it uninstalled.
When the ignition is turned off, the message Phone will power off, if not used
is displayed. The communicator will be switched off after 15 seconds unless
you press any key or take the communicator from the holder during this time.
Car radio mute
This feature mutes the car radio during a phone call, if supported by the car
radio. Ask your dealer to connect the car radio mute during installation.
Antenna motor control
If installed, this feature will activate the electrical motor of the mobile
antenna.
Carrying Case
23
Accessories guide
Figure 13
The convenient Carrying Case (CBR-4, CBR-5) protects the communicator
wherever you are, and keeps the communicator always at hand.
Page 28
24
Mobile Charger
Accessories guide
Figure 14
The Mobile Charger LCH-9 provides an easy and convenient way to charge the
communicator battery in a vehicle. It is suitable for most vehicles’ cigarette
lighter sockets. Plug the lead from the Mobile Charger into the bottom
connector of the communicator.
Other available accessories
High Power Battery BLN-3 — This is a powerful slim Lithium-ion battery. It
provides the same capacity as the battery supplied with your communicator.
RS-232 Adapter Cable DLR-2 — The cable provides a convenient way to
connect your communicator to a PC or to a printer.
Performance Travel Charger ACP-9 — This charger is a lightweight and
durable charger which functions over most mains voltages. The
communicator can be operated normally during charging.
Charging time is typically 2 hours, depending on how drained the battery is.
To charge the communicator, connect the charger lead to the bottom
connector of the communicator and plug the charger into the mains.
Upgrade HF Car Kit — The Upgrade HF Car Kit CARK-102 offers an easy way
to upgrade from CARK-74, which is compatible with the Nokia 8100 series
and 3110 wireless phones, to CARK-99.
Note: Use only the ACP-9
and LCH-9 chargers with
the communicator.
Page 29

Nokia Wireless Data
25
Forum
The Nokia Wireless Data Forum is a Web service that is mainly targeted at
third parties developing applications and services for Nokia platforms. The
Web site provides information on different development possibilities as well
as marketing support programs available for developers, system integrators
and other Nokia partners.
The Nokia Wireless Data Forum offers also product support for the Nokia 9110
Communicator and other Nokia wireless data products. The Web site contains
documents, drivers, quick guides, information on compatibility issues, etc.
For those interested in data transmissions in mobile networks, the Web site
provides documents concerning different technologies related to wireless
data.
The Nokia Wireless Data Forum can be found at http://www.forum.nokia.com
Club Nokia Careline
You can contact the Club Nokia Careline for help or questions you may have
concerning the Nokia 9110 Communicator and its functions.
Free support is available for Club Nokia members for the first membership
year. Before calling you have to register with Club Nokia either via http://
club.nokia.com or by sending the invitation, enclosed in the sales package, to
Club Nokia. Please look up the serial number of your device prior to the call. It
is visible when you remove the battery from the device. The serial number
appears on the sticker attached to the device. You also need to note your Club
Nokia membership number.
The Club Nokia Careline is available Monday-Friday 9.00 am to 5.30 pm local
time, but not on national holidays. Nokia reserves the right to make changes
without prior notice.
Accessories guide
Page 30

26
Club Nokia Careline phone numbers
Please visit http://club.nokia.com to find the current numbers for the
following countries.
Country Tariff per minute
Accessories guide
Austria charge for local call
Belgium charge for local call
Czech Republic charge for international call
Denmark charge for local call
Finland charge for local call
France charge for local call
Germany charge for local call
Greece charge for local call
Hungary charge for local call
Ireland charge for local call
Italy charge for local call
Luxembourg charge for local call
Netherlands charge for local call
Norway charge for local call
Poland charge for local call
Portugal charge for local call
Spain charge for local call
Sweden charge for local call
Switzerland charge for local call
Turkey charge for local call
UK charge for local call
Page 31

Non-members
If you are not a member of Club Nokia, you can call an international number
(charge for international call) from all the countries mentioned above. Please
visit http://www.forum.nokia.com to find the current number.
Care and maintenance
Your Nokia 9110 Communicator is a product of superior design and
craftsmanship and should be treated with care. The suggestions below will
help you fulfil any warranty obligations and enjoy this product for many years.
When using your communicator, battery, charger OR any accessory:
Keep it and all its parts and accessories out of small children’s reach.
Keep it dry. Precipitation, humidity and liquids contain minerals that will
corrode electronic circuits.
Do not use or store it in dusty, dirty areas. Its moving parts can be damaged.
Do not store it in hot areas. High temperatures can shorten the life of
electronic devices, damage batteries, and warp or melt certain plastics.
Do not store it in cold areas. When the communicator warms up (to its normal
temperature), moisture can form inside the communicator, which may
damage electronic circuit boards.
Do not attempt to open it. Non-expert handling of the device may damage it.
Do not drop, knock or shake it. Rough handling can break internal circuit
boards.
Do not use harsh chemicals, cleaning solvents, or strong detergents to clean
it. Wipe it with a soft cloth slightly dampened in a mild soap-and-water
solution.
Do not paint it. Paint can clog the device’s moving parts and prevent proper
operation.
Use only the supplied or an approved replacement antenna. Unauthorised
antennas, modifications or attachments could damage the communicator and
may violate regulations governing radio devices.
If the communicator, battery, charger or any accessory is not working properly,
take it to your nearest qualified service facility. The personnel there will assist
you and, if necessary, arrange for service.
27
Accessories guide
Page 32

28
Important safety
Accessories guide
information
Traffic safety
Do not use a communicator while driving a vehicle. If using a communicator,
park the vehicle first. Always secure the communicator in its holder; do not
place the communicator on the passenger seat or where it can break loose in a
collision or sudden stop.
The use of an alert device to operate a vehicle’s lights or horn on public roads
is not permitted.
Remember, road safety always comes first!
Operating environment
Remember to follow any special regulations in force in any area and always
switch off the phone of your communicator whenever it is forbidden to use it,
or when it may cause interference or danger.
When connecting the communicator or any accessory to another device, read
its user’s guide for detailed safety instructions. Do not connect incompatible
products.
As with other mobile radio transmitting equipment, users are advised that for
the satisfactory operation of the equipment and for the safety of personnel, it is
recommended that the equipment should only be used in the normal operating
position (held to your ear with the antenna pointing over your shoulder).
Do not point the infrared beam at anyone’s eye or allow it to interfere with
other infrared devices.
Electronic devices
Most modern electronic equipment is shielded from radio frequency (RF)
signals. However, certain electronic equipment may not be shielded against
the RF signals from your communicator.
Pacemakers: Pacemaker manufacturers recommend that a minimum
separation of 20 cm (6 inches) be maintained between a handheld wireless
phone and a pacemaker to avoid potential interference with the pacemaker.
These recommendations are consistent with the independent research by and
recommendations of Wireless Technology Research. Persons with pacemakers:
Should always keep the communicator more than 20 cm (6 inches) from their
pacemaker when the phone is switched on;
Should not carry the communicator in a breast pocket;
Page 33

Should use the ear opposite the pacemaker to minimise the potential for
interference.
If you have any reason to suspect that interference is taking place, switch off
the phone of your communicator immediately.
Hearing aids: Some digital wireless phones may interfere with some hearing aids.
In the event of such interference, you may want to consult your service provider.
Other medical devices: Operation of any radio transmitting equipment,
including communicators, may interfere with the functionality of
inadequately protected medical devices. Consult a physician or the
manufacturer of the medical device to determine if they are adequately
shielded from external RF energy or if you have any questions. Switch off the
phone of your communicator in health care facilities when any regulations
posted in these areas instruct you to do so. Hospitals or health care facilities
may be using equipment that could be sensitive to external RF energy.
Vehicles: RF signals may affect improperly installed or inadequately shielded
electronic systems in motor vehicles (e.g. electronic fuel injection systems,
electronic anti-skid (anti-lock) braking systems, electronic speed control
systems, air bag systems). Check with the manufacturer or its representative
regarding your vehicle. You should also consult the manufacturer of any
equipment that has been added to your vehicle.
Posted facilities: Switch off the phone of your communicator in any facility
where posted notices so require.
Potentially explosive atmospheres
Switch off the phone of your communicator when in any area with a potentially
explosive atmosphere and obey all signs and instructions. Sparks in such areas
could cause an explosion or fire resulting in bodily injury or even death.
Users are advised to switch off the phone when at a refuelling point (service
station). Users are reminded of the need to observe restrictions on the use of
radio equipment in fuel depots (fuel storage and distribution areas), chemical
plants or where blasting operations are in progress.
Areas with a potentially explosive atmosphere are often but not always clearly
marked. They include below deck on boats; chemical transfer or storage
facilities; vehicles using liquified petroleum gas (such as propane or butane);
areas where the air contains chemicals or particles, such as grain, dust or
metal powders; and any other area where you would normally be advised to
turn off your vehicle engine.
Vehicles
Only qualified personnel should service the communicator, or install the
communicator in a vehicle. Faulty installation or service may be dangerous
and may invalidate any warranty which may apply to the unit.
Check regularly that all wireless phone equipment in your vehicle is mounted
and operating properly.
29
Accessories guide
Page 34

30
Do not store or carry flammable liquids, gases or explosive materials in the
same compartment as the communicator, its parts or accessories.
For vehicles equipped with an air bag, remember that an air bag inflates with
great force. Do not place objects, including both installed or portable wireless
equipment in the area over the air bag or in the air bag deployment area. If in-
Accessories guide
vehicle wireless equipment is improperly installed and the air bag inflates,
serious injury could result.
Switch off the phone of your communicator before boarding an aircraft. The
use of wireless telephones in an aircraft may be dangerous to the operation of
the aircraft, disrupt the wireless telephone network and may be illegal.
Failure to observe these instructions may lead to suspension or denial of
telephone services to the offender, or legal action or both.
Emergency calls
IMPORTANT!
The Nokia 9110 Communicator, like any wireless phone, operates using radio
signals, wireless and landline networks as well as user-programmed functions
which cannot guarantee connection in all conditions. Therefore you should
never rely solely upon any wireless phone for essential communications (e.g.
medical emergencies).
Remember, to make or receive any calls the phone must be switched on and in
a service area with adequate signal strength. Emergency calls may not be
possible on all wireless phone networks or when certain network services and/
or phone features are in use. Check with local service providers.
To make an emergency call
1 If the device cover is open, close the cover.
2 If the phone is not on, switch it on (press the key). Some networks may
require that a valid SIM card is properly inserted in the communicator.
3 Press and hold the key for several seconds to ready the phone for calls
and to end possible active data or fax calls.
4 Key in the emergency number for your present location (e.g. 112 or other
official emergency number). Emergency numbers vary by location.
5 Press the key.
If certain features are in use (call barring, fixed dialling, closed user group,
system lock, etc.), you may first need to turn those features off before you can
make an emergency call. Consult the User’s manual and your local cellular
service provider.
When making an emergency call, remember to give all the necessary
information as accurately as possible. Remember that your communicator
may be the only means of communication at the scene of an accident - do not
cut off the call until given permission to do so.
Page 35

To use this guide
The wireless phone described in this guide is approved for use in the GSM
networks.
A number of features included in this manual are called network services.
They are special services provided by wireless service providers. Before you can
take advantage of any of these network services, you must subscribe to the
service(s) you require from your home service provider and obtain instructions
for their use. You can then activate these functions as described in this
manual. The manual activation commands for various services are not
presented in this manual (e.g. using the and characters for activating
or deactivating services). The Nokia 9110 Communicator is, nevertheless,
capable of handling commands given in that form. For these commands,
please consult with your service providers.
WARNING! This apparatus is intended for use when supplied with power
from a Lithium-ion battery and chargers ACP-9E, ACP-9X and ACP-9A.
Other usage will invalidate any approval given to this apparatus and may
be dangerous.
31
Accessories guide
Page 36

32
Accessories guide
 Loading...