

nsm1nyen.frm Page 1 Thursday, July 2, 1998 5:56 PM
User’s Guide
9351609
Issue 1

nsm1nyen.frm Page 2 Thursday, July 2, 1998 5:56 PM
Nokia is a registered trademark of Nokia Corporation, Finland.
©1998. Nokia Mobile Phones. All rights reserved.
Nokia Mobile Phones operates a policy of continuous development.
Therefore, we reserve the right to make changes and improvements
to any of the products described in this guide without prior notice.
nsm1nyen.frm Page 3 Thursday, July 2, 1998 5:56 PM
Quick and Easy
Congratulations for choosing this Nokia phone! These pages provide
some basic tips on using your phone. For more detailed information,
read through the User’s Guide.
Making your first call
1 With the phone battery removed, insert your SIM card. Install
and charge the battery. See Chapter ‘Getting Started’ for details.
2 Switch on your phone by pressing and holding . Wait until the
operator name appears on the display.
3 Key in the area code and phone number and press .
4 End the call by pressing .
Call Functions
Answering a call Press .
Ending a call Press .
Redial When the display is clear, press
to access the last dialled
numbers. Press to dial the
desired number.
Adjusting the Earpiece Volume Press the volume keys on the side
of the phone.
Phone Book Functions
Quick Save Key in the phone number and
press Save. Key in the name and
press OK.
Quick Find When the display is clear, press
, (key in the first letter of the
name), scroll with or to
the desired name.
!

nsm1nyen.frm Page 4 Thursday, July 2, 1998 5:56 PM
Using Phone Book during a Call To access Phone Book during a
call, press Options, select
Names.
Speed Dialling Press a number key - ,
press .
If the Speed Dialling function in Menu 4-3-3 is activated,
press and hold the corresponding
number key - until the
call is started.
Calling your voicemailbox Press and hold . If the phone
requests for your voice mailbox
number, key it in and press
Essential Shortcuts
Locking the Keypad
Unlocking the Keypad Press Menu then (within 3
seconds) / Press Unlock, then
.
Changing Ringing Tone Press Menu, choose Profiles, press
Select, choose the desired pro-
file, press Options, choose Personalise, press OK.
To change the ringing tone,
choose
Ringing tone,
press Select, choose the desired setting, press OK
Writing & Sending a Message Press Menu , , Key in a
message, (press to change
between upper and lower case
characters, press and hold
for numbers, press for special characters), press Options,
choose Send, press OK, enter the
phone number, press OK.
OK
.
.
!

nsm1nyen.frm Page 5 Thursday, July 2, 1998 5:56 PM
Contents
About Labels and
Security Code ....................................9
Using This Guide .............................10
Accessories .......................................10
1. Your Phone.....................11
The Display Indicators ...................12
The Selection Keys .........................12
Protection Cap of the Antenna Con-
nector ................................................13
2. Getting Started..............14
Installing the SIM Card ................14
Removing the SIM Card ...............15
Charging the Battery ..................... 15
Switching the Phone On and Off 17
3. Call Functions.................18
Making and Answering Calls ......18
Making Calls..................................18
Answering a Call ..........................20
In-Call Options..............................21
Adjusting the Earpiece Volume 21
Keypad Lock (Keyguard) .............22
4. Phone Book..................... 23
About the Phone Book (Names) .23
Entering the Phone Book ........... 23
Selecting the Phone Book
(Memory in Use)...........................23
Setting the Type of View for
Stored Names and
Phone Numbers ............................24
Recalling a Name and Phone
Number ...........................................26
Erasing a Name and Phone
Number............................................27
Assigning a Phone Number as a
Speed Dial Number ......................27
Caller Groups .................................28
Phone Book Status.......................29
Service Numbers (Service Nos).30
Copying and Printing via IR.......31
5. Using the Menu..............32
Accessing a Menu Function by
Scrolling ............................................32
Accessing a Menu Function by Using
Its Shortcut .......................................33
List of Menu Functions .................34
6. Messages (Menu 1) .......38
About Messages ..............................38
Reading a Text Message
(Inbox - Menu 1-1)......................38
Sending a Text Message (OutboxMenu 1-2 and Write Messages -
Menu 1-3) ......................................39
Message Settings (Menu 1-4) ..40
Info Service (Menu 1-5) .............41
Fax or Data Call (Menu 1-6) .....42
Service Command Editor
(Menu 1-7).....................................42
Voice Messages (Menu 1-8)......42
7. Call Register (Menu 2)..44
About Call Register ........................44
Missed Calls (Menu 2-1) ............44
Received Calls (Menu 2-2).........44
Dialled Numbers (Menu 2-3) ....45
5

nsm1nyen.frm Page 6 Thursday, July 2, 1998 5:56 PM
Erase Recent Call Lists
(Menu 2-4) ....................................45
Show Call Duration (Menu 2-5)45
Show Call Costs (Menu 2-6)..... 46
Call Cost Settings (Menu 2-7) .46
8. Profiles
(Menu 3) .............................47
What You Can Do with Profiles .47
Selecting Different Profiles....... 47
Customising Profiles ...................47
Settings for Profiles.....................48
Renaming Profiles........................ 50
9. Settings
(Menu 4) .............................51
Alarm Clock (Menu 4-1) ..............51
Clock (Menu 4-2) ...........................51
Setting the Clock: ........................ 52
Call Settings (Menu 4-3) .............52
Anykey Answer (Menu 4-3-1)..52
Automatic Redial
(Menu 4-3-2)................................52
Speed Dialling (Menu 4-3-3) ...53
Call Waiting Options
(Menu 4-3-4)................................53
Own Number Sending
(Menu 4-3-5)................................53
Phone Line in Use
(Menu 4-3-6)................................53
Phone Settings (Menu 4-4) .........54
Language (Menu 4-4-1) ............54
Cell Info Display (Menu 4-4-2) 54
List of Own Numbers
(Menu 4-4-3)................................54
Welcome Note (Menu 4-4-4) ..54
Network Selection
(Menu 4-4-5)................................54
Security Settings (Menu 4-5) ..... 55
PIN-Code Request
(Menu 4-5-1) ................................55
Call Barring Service
(Menu 4-5-2) ................................55
Fixed Dialling (Menu 4-5-3) .....56
Closed User Group
(Menu 4-5-4) ................................56
Security Level (Menu 4-5-5).....57
Change Access Codes
(Menu 4-5-6) ................................57
Phone Line Change
(Menu 4-5-7) ................................57
Restore Factory Settings
(Menu 4-6) .......................................58
10. Call divert (Menu 5)....59
11. Games
(Menu 6) .............................61
12. Calculator
(Menu 7) .............................64
Using the Calculator ......................64
To Make a Currency Conversion .65
13. Calendar (Menu 8)......66
14. Infrared (Menu 9)........69
Receiving Data via the IR Port ....69
Sending Data via the IR Port .......70
Checking the Status of an IR Con-
nection ...............................................70
15. Smart Messaging
Services................................71
Using Nokia and Operator
Services .............................................72
Storing Access Numbers ............72
6

nsm1nyen.frm Page 7 Thursday, July 2, 1998 5:56 PM
Downloading the List of
Services...........................................72
Saving a Service Message as a
Bookmark........................................73
Using a Service Saved as a
Bookmark........................................73
An Example of Downloading and
Using a Nokia Service .................74
Other Services .................................75
Saving a Service Address ...........75
Accessing a Service .....................75
16. Reference Information 77
Access Codes ...................................77
Security Code (5 digits)..............77
PIN Code (4 to 8 digits)..............77
PIN2 Code (4 to 8 digits) ...........77
PUK Code (8 digits)......................77
PUK2 Code (8 digit).....................78
Barring Password .........................78
Battery Information .......................78
Charging and Discharging the
Battery.............................................78
7
nsm1nyen.frm Page 8 Thursday, July 2, 1998 5:56 PM
For Your Safety
Read these simple guidelines. Breaking the rules may be danger-
ous or illegal. Further detailed information is given in this manual.
ROAD SAFETY COMES FIRST
Don’t use a hand-held phone while driving; park the vehicle first.
INTERFERENCE
All wireless phones may get interference which could affect performance.
SWITCH OFF IN HOSPITALS
Follow any regulations or rules. Switch phone off near medical
equipment.
SWITCH OFF IN AIRCRAFT
Wireless phones can cause interference. Using them on aircraft is
illegal.
SWITCH OFF WHEN REFUELING
Don’t use phone at a refuelling point. Don’t use near fuel or chemicals.
SWITCH OFF NEAR BLASTING
Don’t use phone where blasting is in progress. Observe restrictions,
and follow any regulations or rules.
USE SENSIBLY
Use only in normal position (to ear). Don’t touch the antenna unnecessarily.
USE QUALIFIED SERVICE
Only qualified service personnel must install or repair equipment.
ACCESSORIES AND BATTERIES
Use only approved accessories and batteries. Do not connect incompatible products.
8
nsm1nyen.frm Page 9 Thursday, July 2, 1998 5:56 PM
CONNECTING TO OTHER DEVICES
When connecting to any other device, read its user’s guide for detailed safety instructions. Do not connect incompatible products.
Remember to make backup copies of all important data.
MAKING CALLS
Ensure the phone is switched on and in service. Enter the phone
number, including the area code, then press . To end a call
press . To answer a call press .
EMERGENCY CALLS
Ensure the phone is switched on and in service. If the word “Clear”
appears on the display above the key, press and hold
to clear the display. Enter the emergency number, then press
Give your location. Do not end the call until told to do so.
Clear
INFRARED PRECAUTIONS
Do not point the IR beam at anyones’s eyes or allow it to interfere
with other IR devices.
Using This Guide
.
The wireless phone described in this guide is a dual band phone approved for use on the GSM900, GSM1800 and GSM900/1800 networks. A number of features included in this guide are called
network services. They are special services provided by wireless
service providers. Before you can take advantage of any of these
network services, you must subscribe to these service(s) from your
home service provider and obtain instructions for their use.
9

nsm1nyen.frm Page 10 Thursday, July 2, 1998 5:56 PM
About Labels and Security Code
IMPORTANT! Your phone has labels on it. These are impor-
tant for service and related purposes, so be careful not to
lose the label or the information it contains.
IMPORTANT! The security code 12345 is supplied with your
phone. Change the code in Menu 4-5-6, ‘Change Access
Codes’. Keep the new code secret and in a safe place which
is separate from the phone.
Accessories
The following manufacturer-approved rechargeable batteries are
available for your phone: NiMH batteries BMS-2V, BMS-2S and
BMS-2, and Li-Ion batteries BLS-2, BLS-2H, BLS-4 and BLS-5.
This apparatus is intended for use when supplied with power from
ACP-7, ACP-9, LCH-9 and DCH-9. Other usage will invalidate any
approval given to this apparatus and may be dangerous.
Belt Clip
Use only the belt clip BCH-16.
WARNING! Use only batteries, chargers and accessories
approved by the phone manufacturer for use with this particular phone model. The use of any other types will invalidate any approval or warranty applying to the phone, and
may be dangerous.
For availability of approved accessories, please check with
your dealer.
When you disconnect the power cord of any accessory,
grasp and pull the plug, not the cord.
10

nsm1nyen.frm Page 11 Thursday, July 2, 1998 5:56 PM
Your Phone
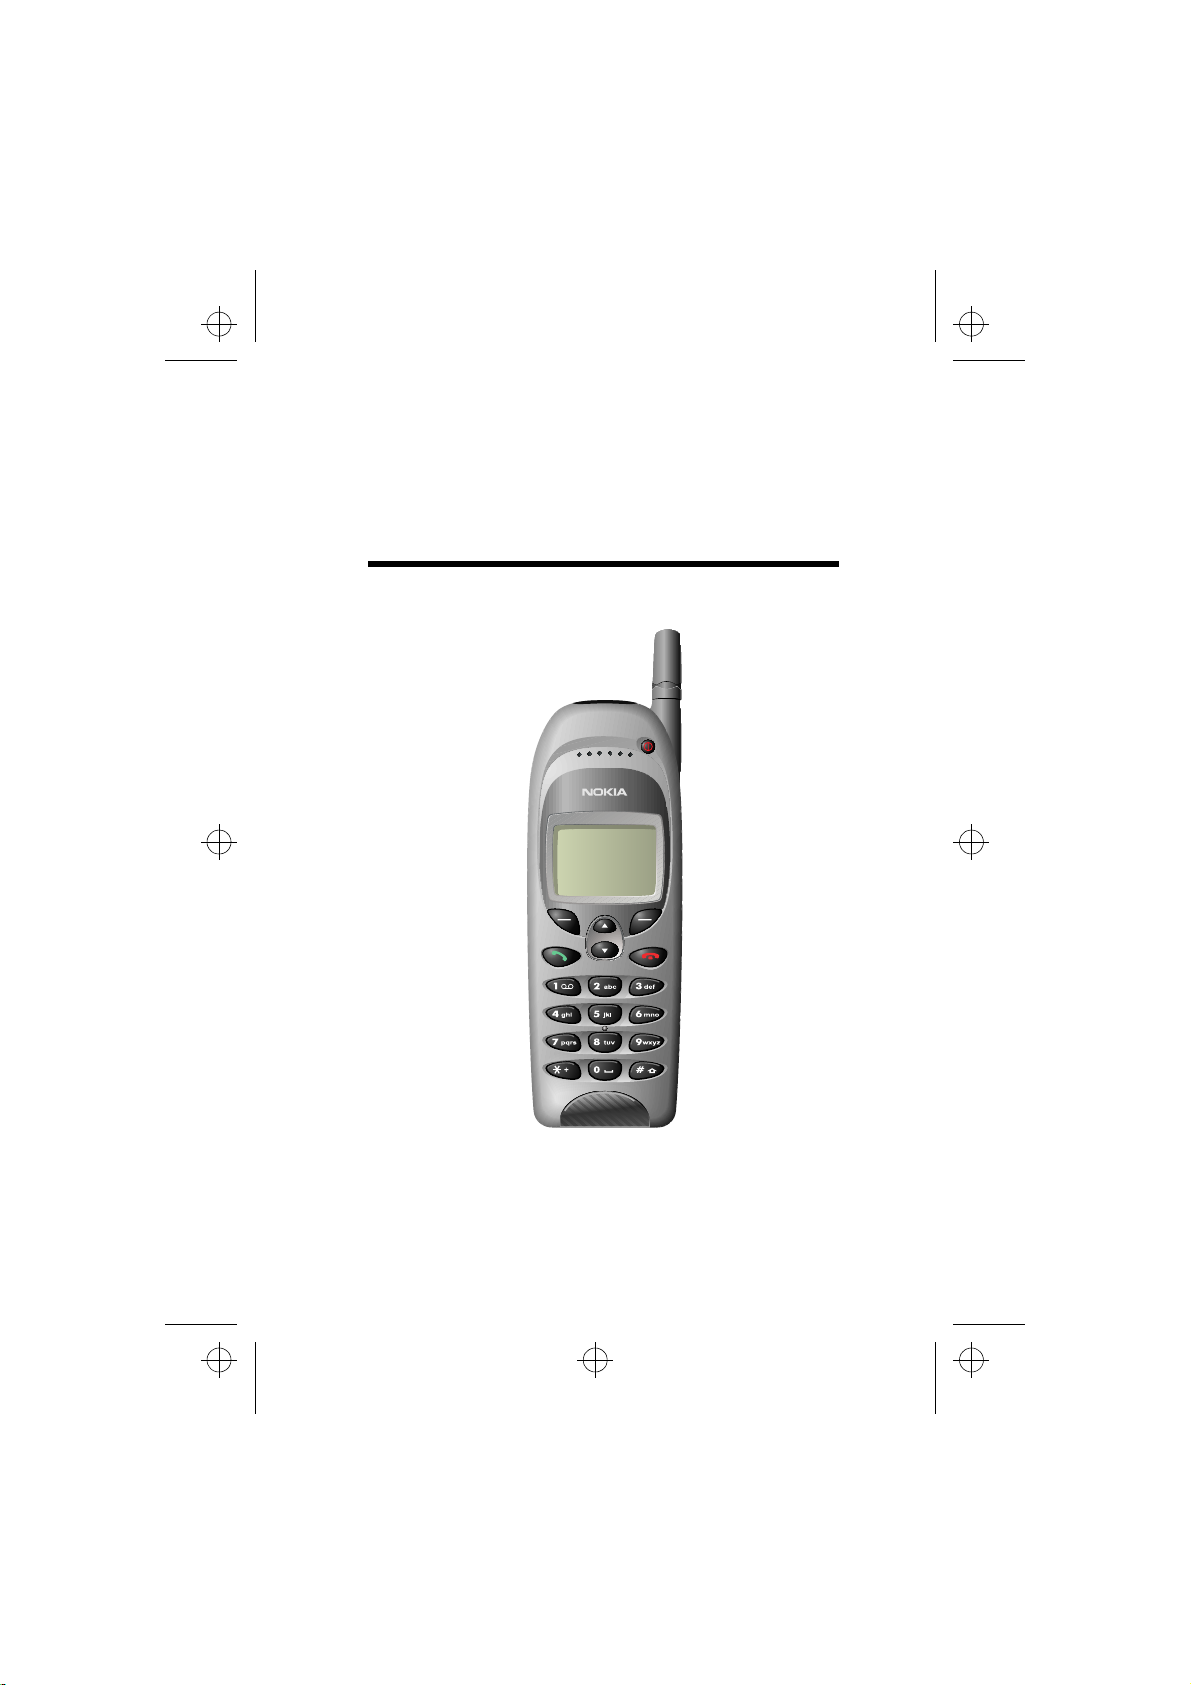
1. Your Phone
The phone is equipped with the keys given below. Throughout this
guide, all key presses are represented by icons such as and
1. Power key
2. Infrared (IR) port
3. Volume keys
4. Connectors for
external devices
Power key
Switches the phone on or off. Pressing this key briefly while the display
is clear or during a call will result in
the list of profiles being displayed.
Pressing the power key briefly while
in the Phone Book or menu functions
will turn the phone’s display light on
for 15 seconds.
Selection keys
Each of these keys performs the
function indicated by the text shown
on the display immediately above it.
Scroll keys
Use these keys to scroll through
names, phone numbers, menus or
setting options.
Dials a phone number and answers
a call.When the display is clear:
shows the most recently dialled
number.
Ends or rejects a call. Also exits
from any function at any time.
Enter numbers and characters.
calls your voice mailbox when
pressed and held.
Used for various purposes in differ-
ent functions.
Volume keys
The upper key increases and the
lower key decreases the earpiece
volume.
.
11
nsm1nyen.frm Page 12 Thursday, July 2, 1998 5:56 PM
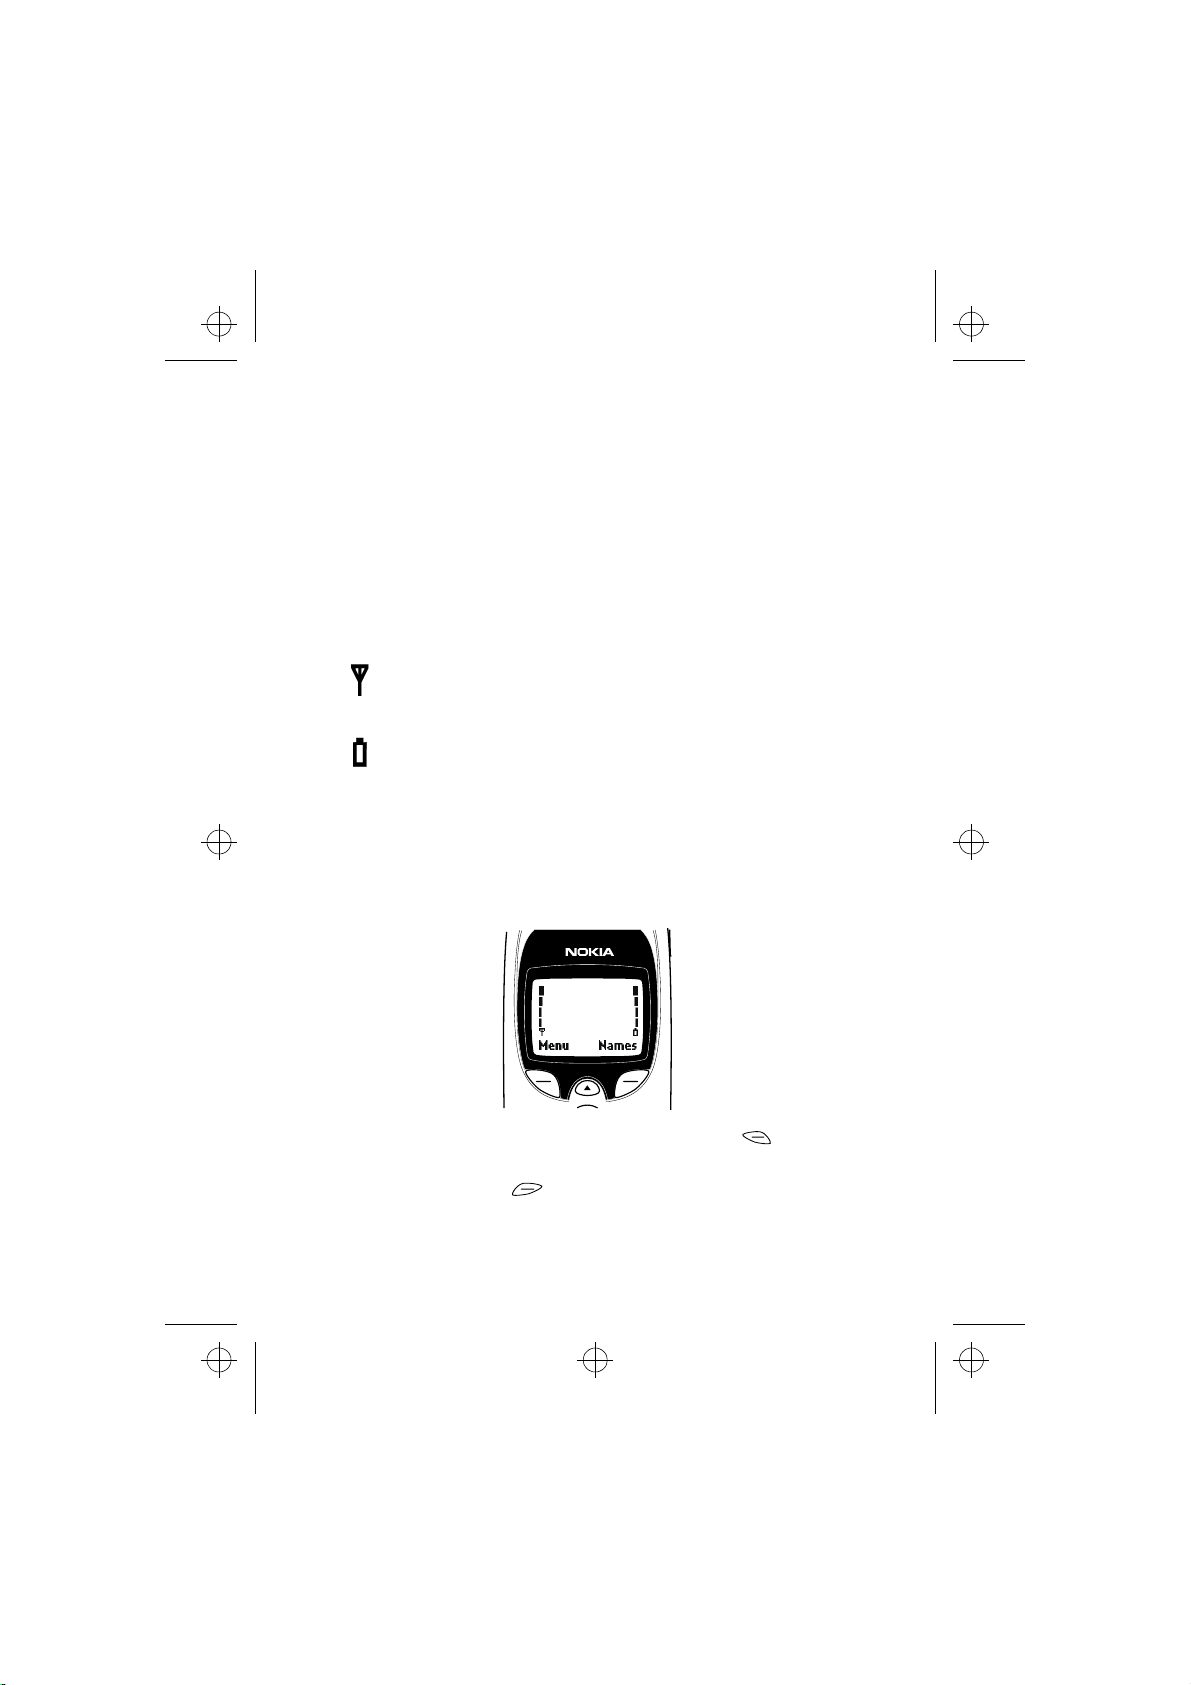
The Display Indicators
Display indicators and icons inform you about the operation of the
phone. Indicators and icons related to the different phone functions
are explained later in this User’s Guide.
Clear Display
The indicators described below are shown when the phone is ready
for use, and no characters have been entered by the user. This screen
is also called idle mode. The name of the current cellular network
operator will be shown on the display.
and bar Shows the signal strength of the cellular network at
your current location. The higher the bar, the stronger
the signal.
and bar Shows the battery charge level. The higher the bar, the
more power there is in the battery.
The Selection Keys
Below the display you can find two so-called selection keys. Their
functions depend on the guide texts shown on the display above the
keys.
For example, when there is the word ‘Menu’ above the key,
pressing this key enters the menu functions.
Similarly, pressing the key under the word ‘Names’ allows access to the Phone Book functions.
12

nsm1nyen.frm Page 13 Thursday, July 2, 1998 5:56 PM
Your Phone
In this User Guide, the selection keys are indicated by the relevant
guiding text appearing in bold (e.g. Menu or Names).
Protection Cap of the Antenna
Connector
At the back of the phone below the antenna there is a connector for
an external antenna.
The connector is protected by a rubber cap. To attach an external
antenna to the phone, first remove the cap and then connect the
antenna.
After removing the external antenna, remember to replace the cap.
NOTE: Keep the cap out of small children’s reach.
13

nsm1nyen.frm Page 14 Thursday, July 2, 1998 5:56 PM
2. Getting Started
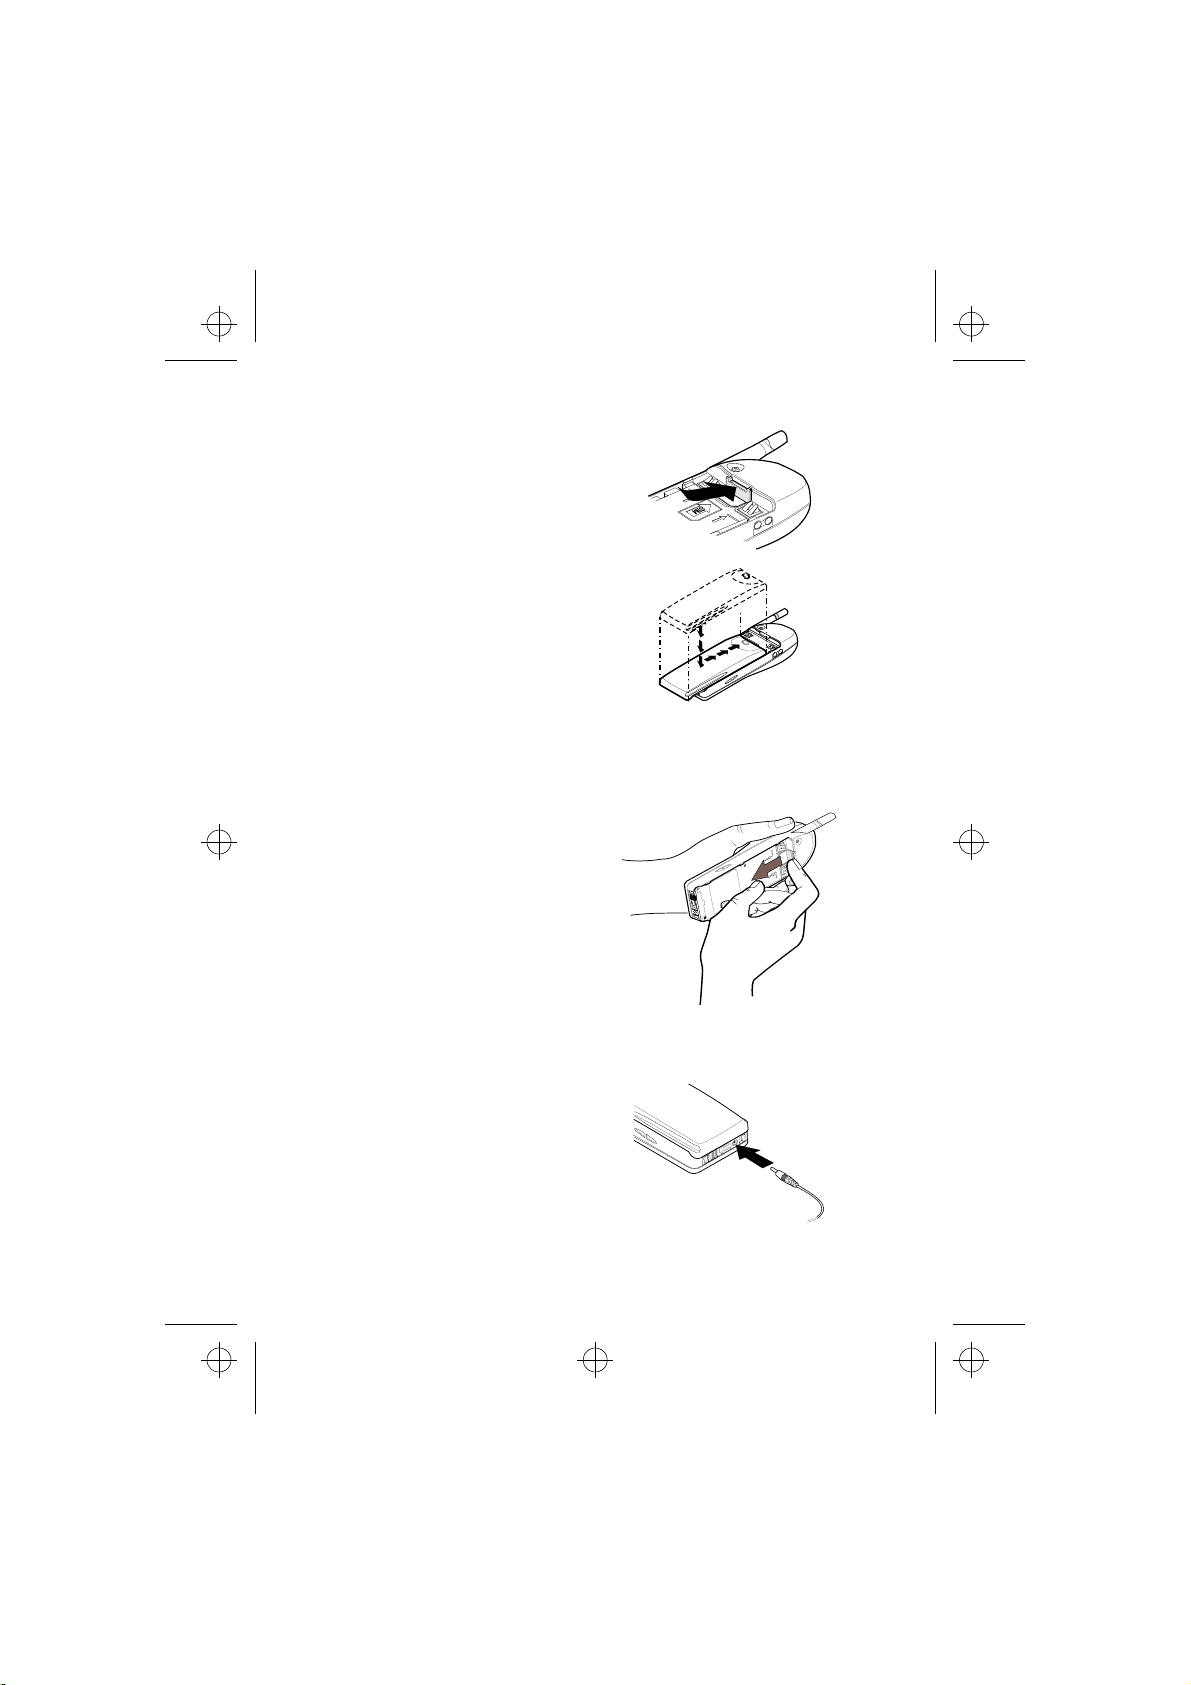
Installing the SIM card
• Keep all miniature SIM cards out of the reach of small children.
• The SIM card and its contacts can easily be damaged by scratches or bending, so be careful when handling, inserting or removing the card.
• Before installing the SIM card, always make sure that the phone
is switched off and then remove the battery.
1 With the back of the phone
facing you, press the locking
catch of the battery downwards(1.), and lift the battery
off the phone (2.).
2 Release the SIM card holder by
drawing it in the direction of
the arrow.
3 Insert the SIM card ensuring
that the bevelled corner is on
the right side and that the
golden connectors are downwards. Follow the directions on
the phone.
14
nsm1nyen.frm Page 15 Thursday, July 2, 1998 5:56 PM
Getting Started
4 Slide the SIM card holder back
to keep the card in its place.
5 Place the battery onto the
back of the phone as shown
below. Slide the battery up the
body of the phone until the
catch engages (a click is
heard).
Removing the SIM Card
Lift the battery off the phone as
described on page 14. Keep the
phone on its side and release the
SIM card holder. Then remove the
SIM card.
Charging the
Battery
1 Connect the lead from the
charger to the bottom of the
phone.
15

nsm1nyen.frm Page 16 Thursday, July 2, 1998 5:56 PM
2 Connect the charger to an AC wall outlet. The battery
indicator bar will start to scroll.
The text Charging is briefly displayed if the phone is switched
on. You can use the phone while charging it is charging.
NOTE: If the battery is totally flat, it may take a
few minutes before the charging indication appears on the display or any calls can be made.
The charging time depends on the charger and battery used. For example, charging a BLS-2 battery
takes about 4 hours.
3 The battery is fully charged when the battery indicator bar stops
scrolling, and the text Battery full is briefly displayed (if
the phone is on). Charging time depends on the charger and battery used.
4 Disconnect the charger from the AC outlet and the phone.
If the text Not charging is displayed, charging has been sus-
pended. Wait for a while, disconnect the charger, plug it in again
and retry. If charging still fails, contact your dealer.
For more information, see chapter ‘Reference Information’ - ‘Battery
Information’.
16
nsm1nyen.frm Page 17 Thursday, July 2, 1998 5:56 PM
Getting Started
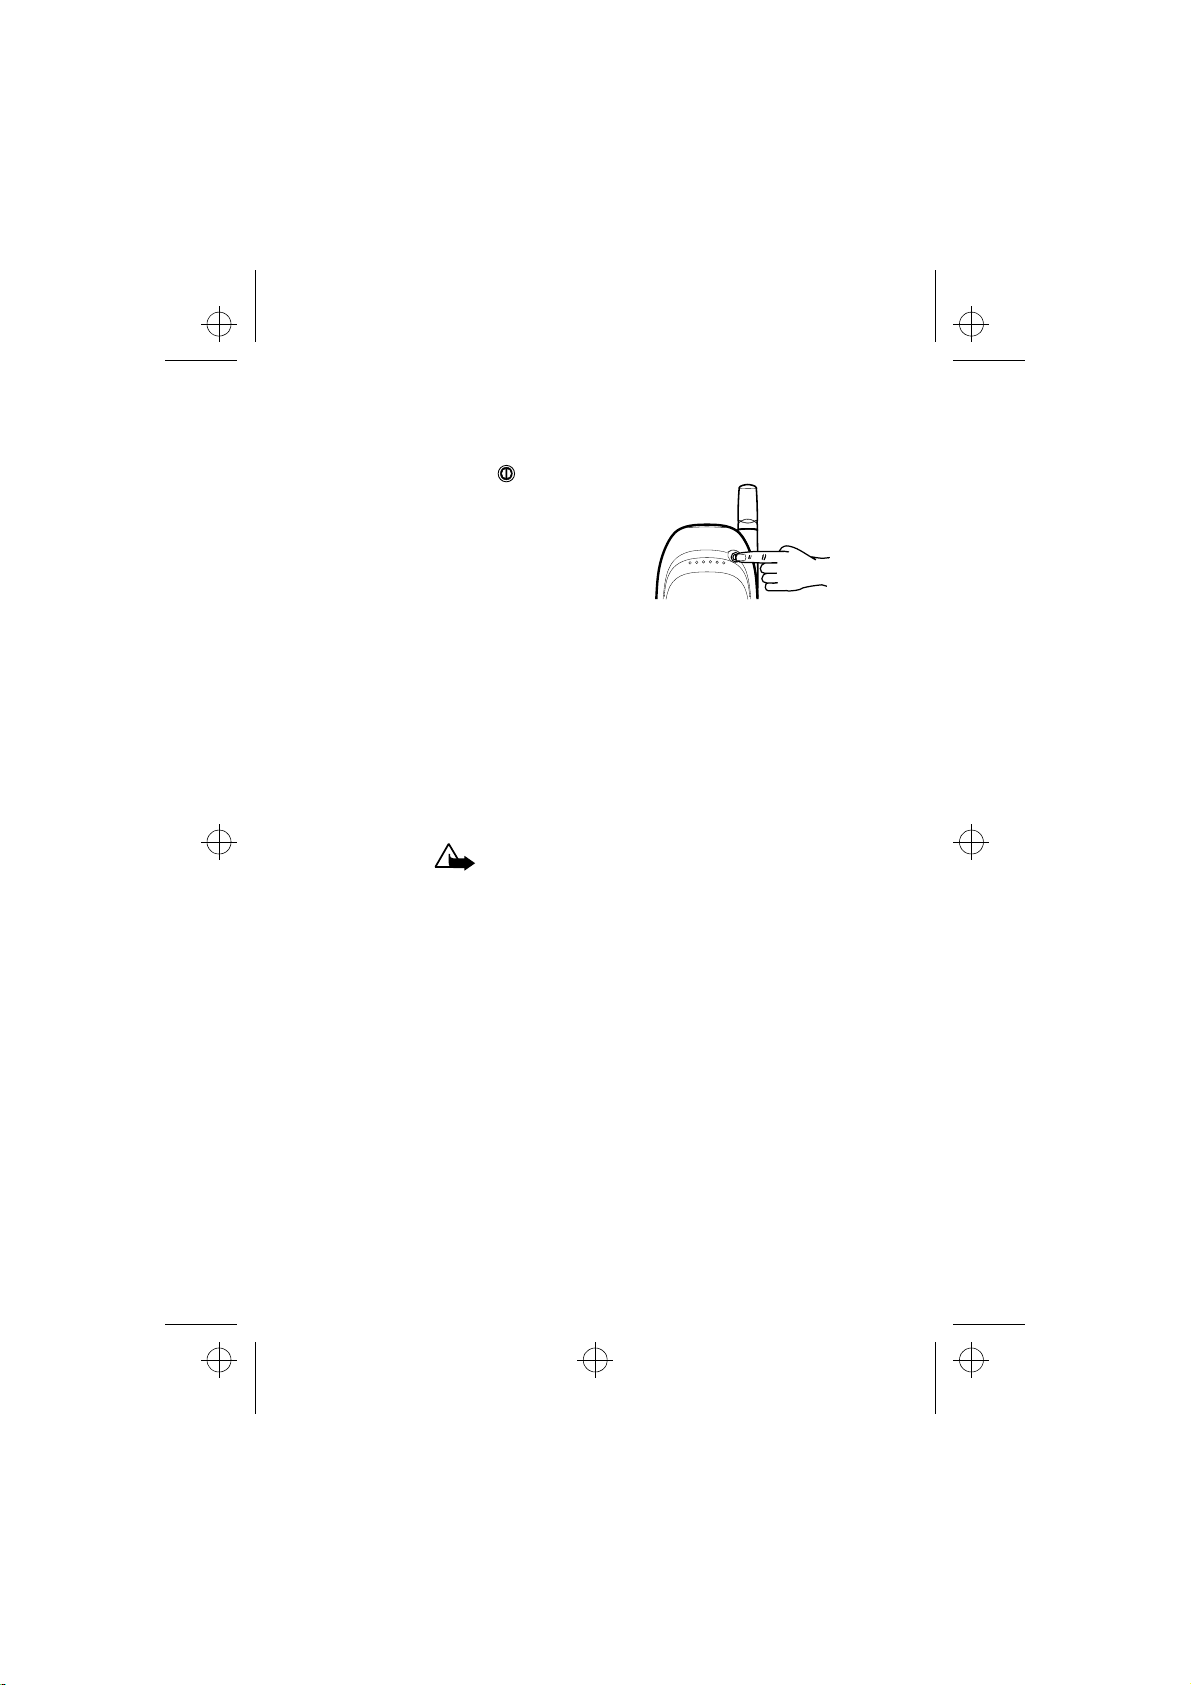
Switching the Phone On and Off
Press and hold the key for a second.
If the phone asks for a PIN code:
The PIN code is usually supplied with
the SIM card.
• Key in the PIN code, which is displayed as asterisks, and press
OK.
See also ‘Reference Information - Access Codes’.
If the phone asks for a security code:
• Key in the security code, which is displayed as asterisks, and
press OK.
See also ‘Reference Information - Access Codes’.
WARNING! Do not switch on the phone when
wireless phone use is prohibited or when it may
cause interference or danger.
TIPS ON EFFICIENT OPERATION: As with any other radio transmitting device, do not touch the antenna unnecessarily when the
phone is switched on. Contact with the antenna affects call quality
and may cause the phone to operate at a higher power level than
otherwise needed.
17

nsm1nyen.frm Page 18 Thursday, July 2, 1998 5:56 PM
3. Call Functions
Making and Answering Calls
Making Calls
1 Key in the phone number including the area code.
To edit a number on the display, press to move the cursor to
the right and to move it to the left. Press Clear to delete
the character to the left of the cursor.
2 Press to call the number.
3 Press to end the call (or to cancel the call attempt).
Normal position: Hold the phone as you would any other telephone
with the antenna pointed up and over your shoulder.
NOTE: If you accidentally select phone line 2 and
your SIM card does not support this function, you
cannot make any calls. You can get back to phone
line 1 by pressing and holding when the display is clear.
NOTE: When you are using the phone with the car
kit CARK-91, you can switch from handsfree mode
to privacy mode by picking up the external handset HSU-1. To switch back to handsfree, first press
Options and then put down the handset within
15 seconds.
International Calls
1 Press twice for the international prefix (+ character replac-
es the international access code).
2 Enter the country code, area code and phone number.
3 To call the number, press .
18

nsm1nyen.frm Page 19 Thursday, July 2, 1998 5:56 PM
Call Functions
Making a Call Using the Phone Book
1 Press Names.
2 When Search is highlighted press Select.
3 Key in the first letter of the name and press OK.
You can skip this step if you wish.
4 Use and to reach the desired name.
5 Press .
Last Number Redial
The last ten phone numbers you called or attempted to call are
stored in the phone’s memory. To redial one of these last-dialled
numbers:
1 With display clear, press once to access the list of the last-
dialled numbers.
2 Use or to reach the desired number or name.
Calling Your Voice Mailbox
1 Press and hold when the display is clear.
2 If the phone asks for the voice mailbox number, key it in and
press OK. You obtain this number from your service provider.
To edit this number at a later time, see ‘Voice mailbox number
(Menu 1-8-2)’.
Speed Dialling a Phone Number
If you have assigned a phone number to one of the speed dialling
keys ( to ), you can call that phone number in either of the
following ways:
• Press the corresponding speed dialling key and press .
19

nsm1nyen.frm Page 20 Thursday, July 2, 1998 5:56 PM
• If the Speed Dialling function is set to on (see Menu 4-3-3):
Press and hold the corresponding speed dialling key ( to
) until the call is started.
dials your voice mailbox number.
Note: Pressing and holding
Answering a Call
1 To answer the call, press .
2 Press to end the call.
TIP:
To reject an incoming call, press . If the
‘Divert when busy’ function is activated to
divert the calls, for example to your voice mailbox,
rejecting an incoming call will also divert the call.
See chapter 10 - ‘Call Divert (Menu 5)’.
NOTE: If more than one name is found in the
Phone Book with the same last seven digits as the
caller’s phone number, only the caller’s phone
number will be displayed, if this is available.
Call Waiting
This network service allows you to answer an incoming call while
you have a call in progress if you have activated the menu function
Call Waiting Options (Menu 4-3-4).
1 Press Answer or . The first call is put on hold. To reject the
new call, press Options, choose Reject and press Select.
2 To switch between the two calls, press Swap or .
3 To end the active call, press .
20

nsm1nyen.frm Page 21 Thursday, July 2, 1998 5:56 PM
Call Functions
In-Call Options
Your phone provides a number of control functions that you can use
during a call. You cannot utilise all of these functions at all times.
Many of the In-Call options are network services. By pressing Op-
tions during a call the following In-Call options may be available:
Hold or Unhold to hold or release a call
New Call to make a call when you have a call in progress
Send DTMF to send DTMF tones
End all calls to end all calls
Names to access the Phone Book
Menu to access menu functions
Mute to mute the phone’s microphone
Making a Conference Call
This feature allows up to six persons to take part in a conference call
(network service).
1 While in a call, press Sele ct and choose New Call. The first
call is put on hold.
2 To join the first conference participant into the call, press Op-
tions, choose Conference and press Select.
3 To add a new participant to the call, repeat steps 1 and 2.
4 To drop a single participant from the call, press Options,
choose Private and press Select. Select the participant
that you want to drop and press OK. Then press .
5 To end the conference call, press .
Adjusting the Earpiece Volume
You can adjust the volume of the phone’s earpiece (this can also be
done during a call). Use the keys on the side of the phone. The upper
key increases the volume and the lower key decreases the volume.
21

nsm1nyen.frm Page 22 Thursday, July 2, 1998 5:56 PM
Keypad Lock (Keyguard)
This feature locks the keypad to prevent keys being pressed by accident (for example when your phone is in your pocket or in your
purse).
To lock the keypad:
While the display is clear, press Menu and
then within three seconds.
When the keypad is locked, appears at
the top of the display.
To unlock the keypad:
Press Unlock and then within three
seconds.
When the keyguard is on:
To answer a call, press . To end or reject a call, press .
During a call, the phone can be operated in the normal way.
NOTE: When Keyguard is on, calls may be possible
to the emergency number programmed into your
phone (e.g. 112 or other official emergency
number).
Key in the emergency number and press . The number is dis-
played only after you have keyed in its’ last digit.
22

nsm1nyen.frm Page 23 Thursday, July 2, 1998 5:56 PM
Phone Book
4. Phone Book
About the Phone Book (Names)
You can store phone numbers and their associated names in the
memory of the phone (internal Phone Book) or the SIM card (SIM
Phone Book). The internal Phone Book can store 150 names (each of
which can have up to 20 characters) and phone numbers (each of
which can have up to 30 digits) at a time. The phone supports SIM
cards which can store up to 250 names and phone numbers.
In addition to storing names and phone numbers, Phone Book also
offers a wide range of functions for managing them.
Entering the Phone Book
1 While the display is clear: Press Names or press or .
During a call: Press Options, scroll with or to Names,
and press Select.
Selecting the Phone Book
(Memory in Use)
1 While the display is clear, press Names.
2 Scroll with or to Options and press Select.
3 Scroll to Memory in use and press Select.
4 Scroll to SIM card or Phone and press Select.
NOTE: After the SIM card is changed, the SIM
Phone Book is automatically selected.
23
nsm1nyen.frm Page 24 Thursday, July 2, 1998 5:56 PM
Setting the Type of View for Stored
Names and Phone Numbers
The phone can show the stored phone numbers and names in three
different ways, called ‘Types of view’. You can select:
Name list
shows three names at a time:
Name, number
shows a single name and phone number together:
Large font
shows just one name at a time:
To Set the ‘Type of View’
1 While the display is clear, press Names.
2 Scroll with or to Options and press Select.
3 Scroll with or to Type of view and press Select.
4 Scroll with or to Name List or Name, Number or
Large font and press OK to select the option.
Storing a Phone Number with a Name
(Add Entry)
You can store phone numbers and their associated names in the internal or the SIM Phone Book.
1 With the display clear, press Names.
2 Scroll with or to Add entry and press Select.
24

nsm1nyen.frm Page 25 Thursday, July 2, 1998 5:56 PM
Phone Book
3 Key in a name and press OK.The characters available are listed
below:.
. , ? ! - & 1
A B C 2 Ä À Á Â Ã ÆÇ
D E F 3 È É Ë Ê
G H I 4 Î Ï Ì Í Ý Ð
J K L 5 £
M N O 6 Ö Ô Ò Ó Ø Ñ
P Q R S 7 $ ß
T U V 8 Ü Ù Û Ú
W X Y Z 9
space, 0
special characters, e.g. +
and %
upper or lower case
• If the next letter is located on the same key as the present one,
press or (or wait until the cursor appears again) and then
key in the letter.
• To switch between upper case and lower case, press quickly. The symbol ABC or abc shown at the top of the display indicates the selected case.
• To insert a number, press and hold the key labelled with the desired number. To switch between letters and numbers, press and
hold .
• To insert a space, press .
• Pressing brings up a list of special characters. Move
through the list to the desired character with or and
press Use to insert it in the name.
• If the character list continues on to another screen, you can
scroll between the screens by pressing .
25

nsm1nyen.frm Page 26 Thursday, July 2, 1998 5:56 PM
• If you make a mistake, you can remove characters to the left of
the cursor by pressing Clear as many times as necessary. Pressing and holding Clear will clear the screen.
• and move the cursor left and right, respectively.
4 Key in an area code and phone number, and press OK.
TIP: If you key in the + character for the interna-
tional prefix (press twice) in front of the
country code, you will be able to use the same
phone number when you are calling from abroad.
TIP: QUICK SAVE: With the display clear, key in
the phone number and press Save. Key in the
name and press OK.
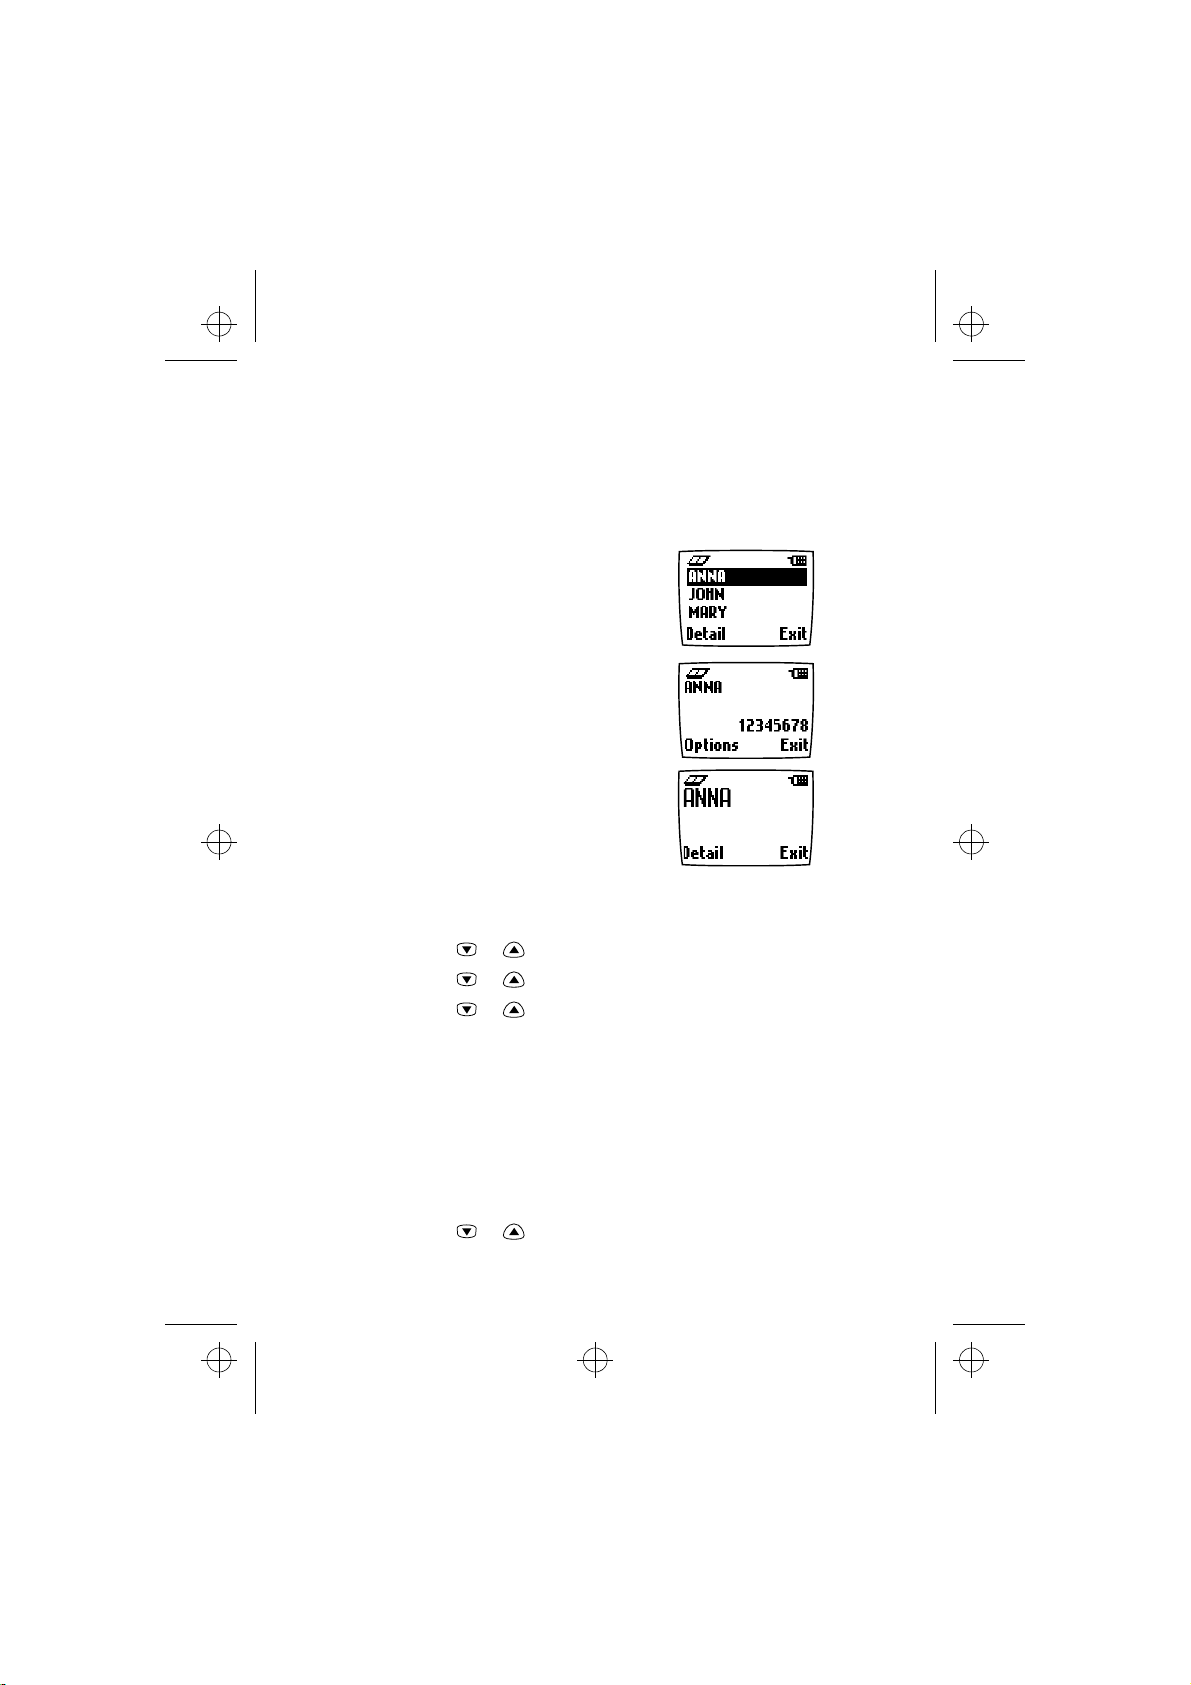
Recalling a Name and Phone Number
1 While the display is clear, press Names.
2 Choose Search and press Select.
3 Key in the first character of the name you are searching for.
4 Press OK or for the first name, or for the last name be-
ginning with the character you keyed in Step 3 above.
5 Press or until the desired name appears.
TIP: QUICK SEARCH: Press Names, key in the first
letter, for example A, and scroll with or until the desired name appears.
Erasing a Name and Phone Number
You can remove names and phone numbers from the selected Phone
Book one by one or all at once.
One by One
1 Recall the name and the number that you want to erase.
2 Press Options.
26
 Loading...