

Page 1
User’s manual
9357168
ISSUE 3 EN
Electronic user's guide released subject to
"Nokia User's Guides Terms and Conditions, 7th June, 1998".
Page 2
Nokia is a registered trademark of Nokia Corporation, Finland.
Copyright. © 1995-1998 Nokia Mobile Phones. All rights reserved.
Nokia Mobile Phones operates a polic y of continuous improvement. Therefore, we reserve the right to make changes
and improvements to any of the products described in this guide without prior notice.
Nokia Mobile Phones is not responsible for any loss of data, income or any consequential damage howsoever caused.
Geoworks ® application software and GEOS® operating system software copyright © 1990-1998 Geoworks. All rights
reserved. United States Patent 5,327,529.
Hardware and software floating point math library copyright © 1984-1991 Dimensions Research, Inc.
This product includes software developed by the University of California, Berkeley and its contributors. Copyright
1979, 1980, 1983, 1986, 1988, 1989, 1991, 1992, 1993, 1994 The Regents of the University of California. All rights
reserved. The software is provided by The Regents and contributors “as is” and any express or implied warranties,
including, but not limited to, the implied warranties of merchantability and fitness for a particular purpose are
disclaimed. In no event shall The Regents or contributors be liable for any direct, indirect, incidental, special,
exemplary, or consequential damages (including, but not limited to, procurement of substitute goods or services; loss
of use, data, or profits; or business interruption) however caused and on any theory of liability, whether in contract,
strict liability, or tort (including negligence or otherwise) arising in any way out of the use of this software, even if
advised of the possibility of such damage.
The GEOS® software of this product includes N imbus Q from Digital Typeface Corp. and typefaces from URW, GmbH.
This device contains Embedded DOS-ROM (R), Embedded BIOS (R) software licensed from General Software, Inc.
Copyright © 1998 General Software, Inc. General Software, Embedded DOS, and Embedded BIOS are trademarks or
registered trademarks of General Software, Inc.
Portions of this work are derived from the Standard C Library, © 1992 by P.J. Plaguer, published by Prentice-Hall, a nd
are used with permission.
HP Database Engine Version 1.0 copyright © Hewlett-Packard Company 1994. All rights reserved.
The PPP software is copyright © 1991, 1992, 1993, 1994 Morning Star Technologies, all rights reserved. It contains
software developed at Carnegie Mellon University, which is copyright © 1989 Carnegie Mellon University, all rights
reserved. It contains software developed at the University of California, Berkeley, which is copyright © 1989 Regents
of the University of California, all rights reserved. It contains software that is copyright © 1990, RSA Data Security,
Inc., all rights reserved.
C-client Internet mail routines original version copyright 1988 by the Leland Stanford Junior University, copyright
1995 by the University of Washington. The University of Washington and the Leland Stanford Junior University
disclaim all warranties, express or implied, with regard to this software, including without limitation all implied
warranties of merchantability and fitness for a particular purpose, and in no event shall the University of Washington
or the Leland Stanford Junior University be liable for any special, indirect or consequential damages or any damages
whatsoever resulting from loss of use, data or profits, whether in an action of contract, tort (including negligence)
or strict liability, arising out of or in connection with the use or performance of this software.
This product includes software based in part on the work of the independent JPEG group.
CellularWare is a trademark of Nokia Mobile Phones.
AT is a trademark of Hayes Microcomputer Products, Inc.
Hayes is a registered trademark of Hayes Microcomputer Products, Inc.
Microsoft and MS-DOS are registered trademarks and Windows is a trademark of Microsoft corporation.
Geoworks® and GEOS® are Registered Trademarks of Geoworks, and GeoDOS is a Trademark of Geoworks in the
United States of America and other countries.
Intellisync is a trademark of Puma Technology, Inc.
All other brand and product names are trademarks or registered trademarks of their respective holders.
This product contains the RSA Software.
The products described in this manual conform to the European Council directives EMC Directive (89/336/EEC) and
TTE Directive (91/263/EEC).
1999 Nokia Mobile Phones. All Rights Reserved.
Page 3

END USER LICENSE AGREEMENT FOR SECURITY SOCKETS LAYER -SOFTWARE (“SSL”)
READ THE FOLLOWING TERMS AND CONDITIONS CAREFULLY BEFORE USING THE SSL. USE OF THE SSL SOFTWARE
INDICATES YOUR ACCEPTANCE OF THESE TERMS AND CONDITIONS.
In this license agreement ("License Agreement"), you, the purchaser of the license rights granted by this Agreement,
are referred to as "Licensee." In accordance with the terms and conditions of this License Agreement, Nokia Mobile
Phones Ltd. ("Licensor") grants Licensee a non-exclusive sublicense to use SSL Software (“Software”), which contai ns
the RSA Software licensed to Licensor by RSA Data Security, Inc. ("RSA").
This License Agreement is effective until terminated. Licensor may terminate this License Agreement if Licensee
breaches any of the terms and conditions. In the event of termination by Licensor, Licensee will return the
communicator device of Licensor to Licensee for removal of the Software. All provisions of this Agreement relating
to disclaimers of warranties, limitation of liability, remedies, or damages, and Licensor's proprietary rights shall
survive termination.
The Software is delivered in object code only.
Licensor shall utilize the Software solely as part of the communica tor device from Licensor and solely for personal
or internal use and without right to license, assign or otherwise transfer such Software to any other person or entity.
Licensee shall not modify, translate, reverse engineer, decompile or disassemble the Software or any part thereof.
Licensee agrees not to remove or destroy any proprietary, trademark or copyright markings or notices placed upon
or contained within the Software or any related materials or documentation.
By reason of this Agreement or the performance hereof, Licensee shall acquire no rights of any kind in any trademark,
trade name, logo or product designation under which the Software was or is marketed and Licensee shall not make
any use of the same for any reason.
IN NO EVENT WILL LICENSOR OR RSA BE LIABLE TO LICENSEE FOR INDIRECT, INCIDENTAL, SPECIAL, CONSEQUENTIAL
OR EXEMPLARY DAMAGES ARISING OUT OF OR RELATED TO THIS AGREEMENT, INCLUDING BUT NOT LIMITED TO
LOST PROFITS, BUSINESS INTERRUPTION OR LOSS OF BUSINESS INFORMATION, EVEN IF SUCH PARTY HAS BEEN
ADVISED OF THE POSSIBILITY OF SUCH DAMAGES AND REGARDLESS OF WHETHER ANY ACTION OR CLAIM IS BASED
ON WARRANTY, CONTRACT, TORT OR OTHERWISE. UNDER NO CIRCUMSTANCES SHALL LICENSOR'S OR RSA'S TOTAL
LIABILITY ARISING OUT OF OR RELATED TO THIS AGREEMENT EXCEED THE TOTAL AMOUNT PAID BY LICENSEE.
THIS AGREEMENT IS EXPRESSLY MADE SUBJECT TO ANY LAWS, REGULATIONS, ORDERS OR OTHER RESTRICTIONS
ON THE EXPORT FROM THE UNITED STATES OF AMERICA OF THE SOFTWARE OR OF INFORMATION ABOUT THE
SOFTWARE WHICH MAY BE IMPOSED FROM TIME TO TIME BY THE GOVERNMENT OF THE UNITED STATES OF
AMERICA. NOTWITHSTANDING ANYTHIN G CONTAINED IN THIS AGREEMENT TO TH E CONTRARY, LICENSEE SHALL
NOT EXPORT OR REEXPORT, DIRECTLY OR INDIRECTLY, ANY SOFTWARE OR INFORMATION PERTAINING THERETO TO
ANY COUNTRY TO WHICH SUCH EXPORT OR REEXPORT IS RESTRICTED OR PROHIBITED, OR AS TO WHICH SUCH
GOVERNMENT OR ANY AGENCY THEREOF REQUIRES AN EXPORT LICENSE OR OTHER GOVERNMENTAL APPROVAL AT
THE TIME OF EXPORT OR REEXPORT WITHOUT FIRST OBTAINING SUCH LICENSE OR APPROVAL.
1999 Nokia Mobile Phones. All Rights Reserved.
Page 4

1999 Nokia Mobile Phones. All Rights Reserved.
Page 5
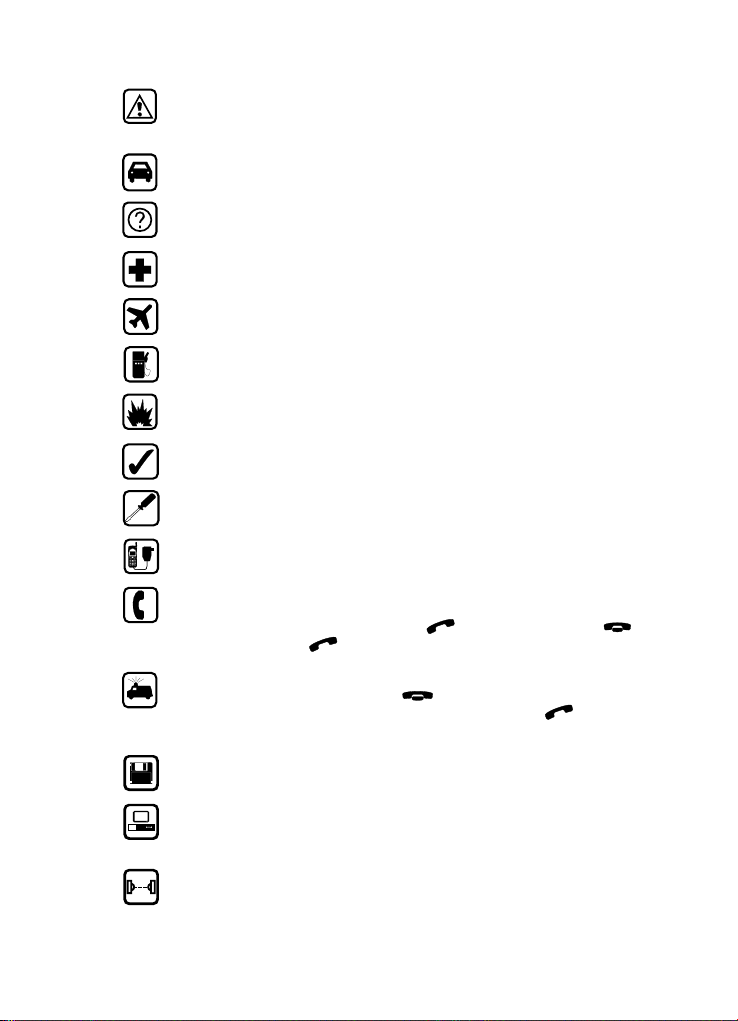
FOR YOUR SAFETY Read these simple guidelines. Breaking the rules
may be dangerous or illegal. Further detailed information is given in
this manual.
ROAD SAFETY COMES FIRST Do not use the communicator while
driving; park the vehicle first.
INTERFERENCE All wireless phones may get interference which could
affect performance.
SWITCH OFF IN HOSPITALS Follow any regulations or rules. Switch
off the phone near medical equipment.
SWITCH OFF IN AIRCRAFT Wireless phones can cause interference.
Using them on aircraft is illegal.
SWITCH OFF WHEN REFUELLING Do not use the phone at a
refuelling point. Do not use near fuel or chemicals.
SWITCH OFF NEAR BLASTING Do not use the phone where blasting
is in progress. Observe restrictions, and follow any regulations or rules.
USE SENSIBLY Use only in the normal position (to ear). Do not touch
the antenna unnecessarily.
USE QUALIFIED SERVICE Only qualified service personnel must
install or repair equipment.
ACCESSORIES AND BATTERIES Use only approved accessories and
batteries. Do not connect incompatible products.
MAKING CALLS VIA THE PHONE Close the cover and ensure the
phone is switched on and in service. Enter the phone number,
including the area code, then press . To end a call press . To
answer a call press .
EMERGENCY CALLS Close the device cover. Ensure the phone is
switched on and in service. Hold for several seconds, to clear the
display. Enter the emergency number, then press . Give your
location. Do not end the call until told to do so.
MAKE BACKUP COPIES Remember to make backup copies of all
important data.
CONNECTING TO OTHER DEVICES When connecting to any other
device, read its user’s guide for detailed safety instructions. Do not
connect incompatible products.
INFRARED PRECAUTIONS Do not point the IR beam at anyone’s eye
or allow it to interfere with other IR devices.
1999 Nokia Mobile Phones. All Rights Reserved.
Page 6

Table of Contents
Table of Contents
Introduction 11
About this manual 12
Facts about your communicator 13
Facts about cellular data transmission 14
Getting started 17
First start-up 17
Communicator display 20
Communicator keyboard 24
Communicator applications 25
Connectors 26
Battery 27
Special features 31
Communicator features 31
Document features 34
To transfer data from older communicator models 37
Computer connectivity 39
To use the PC Suite 39
To use the Nokia Communicator Server 46
Nokia Communicator Server for MacOs 47
Contacts 49
Contacts directory 49
To make contact cards 51
Contact groups 55
Logs 56
1999 Nokia Mobile Phones. All Rights Reserved.
Page 7

Telephone 59
To make a call 59
To answer a call 60
Handsfree mode 61
Multiple calls 62
Telephone settings 65
Flight profile 69
Fax 71
To send faxes 71
To receive faxes 73
Fax settings 74
Short messages 77
To send short messages 78
To receive messages 79
Standard messages 80
Business cards 81
SMS settings 82
Internet 85
Internet settings 86
Mail 89
Mail settings 89
To send mail 92
To fetch mail 94
To read mail 95
World Wide Web 97
WWW settings 97
Bookmarks 98
To navigate in WWW 101
Terminal 104
Telnet 107
Text Web 109
Table of Contents
1999 Nokia Mobile Phones. All Rights Reserved.
Page 8

Notes 111
To edit documents 113
Downloaded files and read-only documents 114
Table of Contents
Notes settings 115
Calendar 117
Monthly schedule 117
Weekly schedule 118
Daily schedule 119
Calendar booking 121
Alarms 123
To-do list 123
System 125
System settings 125
Security 127
User data 130
Memory 130
Infrared activation 131
Digital camera connectivity 131
Remote synchronisation 132
Fax modem 133
Data removal 134
Install/Remove software 134
Backup/Restore 135
Memory card tool 135
About this product 135
Extras 137
Calculator 137
Clock 138
Composer 141
Voice recorder 144
1999 Nokia Mobile Phones. All Rights Reserved.
Page 9

Phone 147
Display indicators 148
To make a call 149
To answer a call 150
To manage calls 150
To search for phone numbers 151
To use speed dialling 151
To send DTMF tones 152
Keypad lock 152
Help 153
To use the menus 153
Messages (Menu 1) 155
Call register (Menu 2) 156
Profiles (Menu 3) 158
Settings (Menu 4) 159
Call divert (Menu 5) 163
Recorder (Menu 6) 164
Troubleshooting 165
Care and maintenance 171
Important safety information 173
Glossary 177
Table of Contents
Index 181
1999 Nokia Mobile Phones. All Rights Reserved.
Page 10

Table of Contents
1999 Nokia Mobile Phones. All Rights Reserved.
Page 11
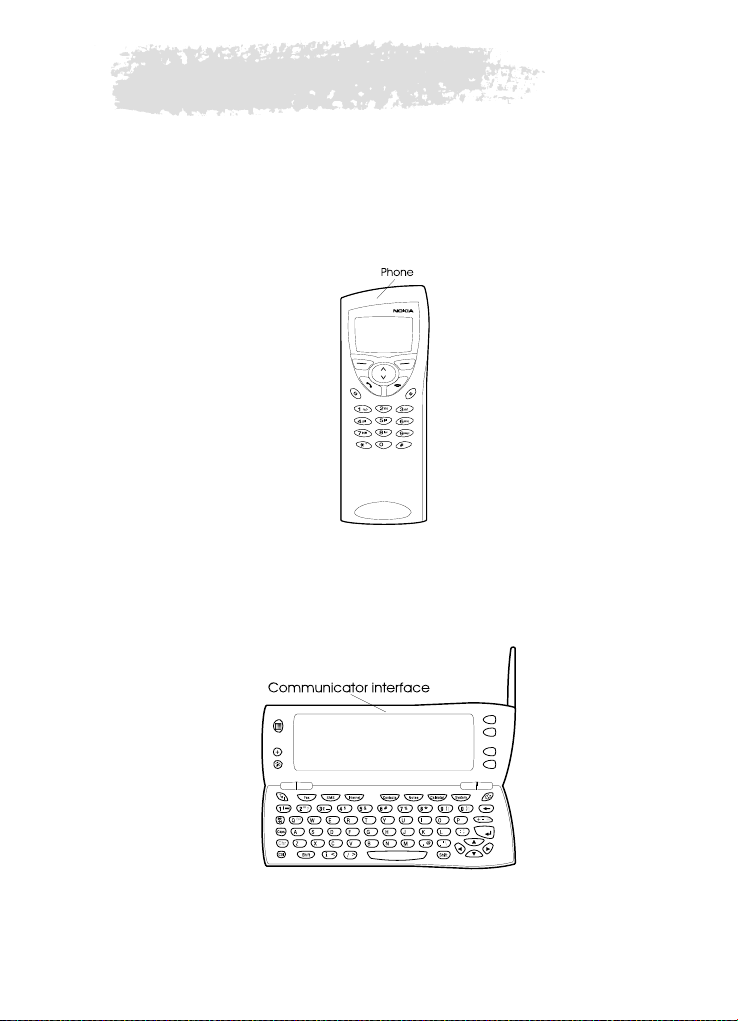
1. Introduction
Congratulations on purchasing the Nokia 9110 Communicator. The Nokia 9110
Communicator is a complete communications tool: it is a wireless phone,
messaging device, access terminal and a palmtop organiser in one pocketable
package.
Figure 1
The Nokia 9110 Communicator consists of two parts: the phone and the
communicator interface. The phone is on the device cover (figure 1) and the
communicator interface is under the cover (figure 2).
11
Introduction
Figure 2
1999 Nokia Mobile Phones. All Rights Reserved.
Page 12
12
Both of these parts use the same resources and work closely together – they
are not separate devices. For example, the phone uses the names and phone
numbers stored in the Contacts directory of the communicator interface, and
the communicator interface uses the phone for communicating with the
Introduction
“outside world”, for example, when sending or receiving faxes and connecting
to the Internet.
The communicator interface contains many organiser and communications
applications. The large keyboard, command buttons and display make using
the applications easy. The communicator interface has no power on/off
button – it switches itself on when you open the cover and switches off when
you close the cover.
Tip: Press the button on the
communicator interface keyboard to
find basic information about the
communicator applications.
The phone is designed for making and answering calls quickly. It looks and
operates like other Nokia wireless phones, except that the earpiece and
microphone are on the rear of the device. The phone is switched on and off by
pressing the button on the cover.
IMPORTANT! Do not switch on the
phone when wireless phone use is
prohibited or when it may cause
interference or danger.
About this manual
This chapter explains how the Nokia 9110 Communicator operates. The
following chapter, "Getting started", helps you begin using the Nokia 9110
Communicator. It explains the start-up procedure and gives information
about the various aspects of the device, such as the keyboard and the display.
"Special features" explains special functions, and "Computer connectivity"
shows how to connect your communicator to a PC.
The rest of this manual deals with the communicator applications and the
phone. There is a short glossary of Internet and cellular terms and
abbreviations at the back of this manual.
If you are switching from the Nokia 9000 Communicator or the Nokia 9000i
Communicator to the Nokia 9110 Communicator, please, see ”To transfer data
from older communicator models” on page 37.
1999 Nokia Mobile Phones. All Rights Reserved.
Page 13

Note: In this manual, the names of
the commands on the display are in
bold and the settings and options
are in italics.
Facts about your communicator
Services
The GSM system provides a number of various wireless services, but they are
not automatically enabled to the wireless phone user. Even though the Nokia
9110 Communicator represents the latest development in wireless phone
technology, using its various communications applications requires that you
have subscribed to these services and that your network operator has
activated these services for you. Services that need to be subscribed to are
typically the short message service, Internet and fax.
Because the number of special services depends on what services are available
in your home network, it is, unfortunately, impossible to provide a
comprehensive list of the services and settings you need in this manual.
Therefore, this manual gives general information about the additional
services. Please, contact your network operator for further information about
the availability and the details of services in your home network.
If a service requires a separate phone number or specific settings, they must
be stored in the settings of the communicator. For example:
Sending and receiving short messages requires that this service is supported
by the network you are using and activated for your SIM card, and that the
phone number of the message centre is stored in the settings of the SMS
application.
Internet access requires that data service is supported by the network you are
using and activated for your SIM card. In addition, you must have obtained an
Internet access point from an Internet service provider.
Access codes
The Nokia 9110 Communicator uses several access codes to protect against
unauthorised use of your communicator and SIM card. The access codes you
need most often are the lock code, which is provided in the sales package, and
the PIN code, which is provided with the SIM card.
You can change access codes that are used by both the phone and the
communicator interface via either of them, provided that the code can be
changed. For more details on the access codes, see ”Security” on page 127.
The Internet applications of the communicator use passwords and user names
to protect from unauthorised use of the Internet and its services. These
passwords are changed in the settings of the Internet applications.
13
Introduction
1999 Nokia Mobile Phones. All Rights Reserved.
Page 14

14
Contact information
All contact information, such as names, addresses, phone numbers, that you
store, goes into the Contacts directory. The phone, the communicator
Introduction
interface, and each of the applications have their own views of the Contacts
directory. The information shown depends on the information the selected
application can use. For example, when you are making a call via the phone,
you can view the name and the phone number(s) of the contact. Possible fax
numbers, e-mail addresses, job titles, etc., are not shown.
Facts about cellular data transmission
The Nokia 9110 Communicator employs the data transmission capabilities of
the GSM network to send faxes, short messages and e-mail, and to establish
connections with remote computers.
Cellular data connections can be made from most locations where your
wireless phone operates. However, it is recommended that you move the
communicator to a location where the strongest possible cellular signal can
be obtained. When the signal is strong, data transmission is efficient. In
general, you should not expect the same performance from cellular data
communications as from landline communications due to the inherent
characteristics of the cellular environment. The following factors may impair
cellular connections:
Noise
Radio interference from electronic appliances and equipment, as well as from
other wireless phones in metropolitan areas where wireless phones are
prevalent.
Handover
As the wireless phone user moves from one network cell to another, the signal
strength of the channel drops and the cellular telephone exchange may hand
the user over to a different cell and frequency, where the signal is stronger. A
cell handover may also occur when the user is stationary due to varying
cellular traffic loads. Such handovers may cause slight delays.
Electrostatic discharge
A discharge of static electricity from a finger or a conductor may cause
erroneous functions in electric devices. The discharge may result in “garbled”
display and unstable software operation. Cellular connections may become
unreliable, data may be corrupted, and the transmission halted. In this case
you need to end the existing call (if any), switch off the phone (if on) and
remove the battery. Then replace the battery and establish a new cellular
connection.
1999 Nokia Mobile Phones. All Rights Reserved.
Page 15

Dead spots and dropouts
Dead spots are areas where radio signals cannot be received. Dropouts occur
when the wireless phone user passes through an area where the radio signal is
blocked or reduced by geographic or structural obstructions.
Signal impairment
Distance and obstacles can cause out-of-phase reflected signals that result in
a loss of signal strength.
Low signal strength
Due to either distance or obstacles, the radio signal strength from a cell site
may not be strong or stable enough to provide a reliable cellular connection
for communication. Therefore, to ensure the best possible communication,
remember to consider the following points:
The data connection works best when the communicator is in a stationary
position. Attempting cellular communication while in a moving vehicle is not
recommended. Fax transmission is more easily impaired than data or short
message transmission.
Do not place the communicator on a metal surface.
Check that the cellular signal strength on the communicator displays is
sufficient. See ”Communicator display” on page 20 and ”To make a call” on
page 149. Moving the communicator within a room especially towards a
window, may result in a stronger signal. If the cellular signals are not strong
enough to support a voice call, data connection should not be attempted until
you can find a location with better signal reception.
Note: When the
antenna is up, the
signal is stronger.
15
Introduction
1999 Nokia Mobile Phones. All Rights Reserved.
Page 16

16
Introduction
1999 Nokia Mobile Phones. All Rights Reserved.
Page 17
2. Getting started
This chapter explains how to start up your communicator and install a SIM
card, how the communicator operates, and how to supply power to the
communicator.
When you open the sales package, check that it contains the following:
• Nokia 9110 Communicator
• This User’s manual, the combined Quick guide and Accessories guide, and
the Solution guide
• High Power Battery
•AC charger
• RS-232 Adapter Cable
• Diskette package
• CD-ROM with PC connectivity software
• Stickers with the serial number and the lock code of the communicator
For information about the Nokia 9110 Communicator accessories, see the
Accessories guide.
First start-up
1 Close the device cover and make sure that the phone is switched off. If it is
on, press .
A valid miniature SIM card is required for sending and receiving calls and
messages. The card is supplied by your network operator or service provider. If
you do not have a SIM card yet, go to step 6.
17
Getting started
Note: Keep all miniature
SIM cards out of small
children’s reach.
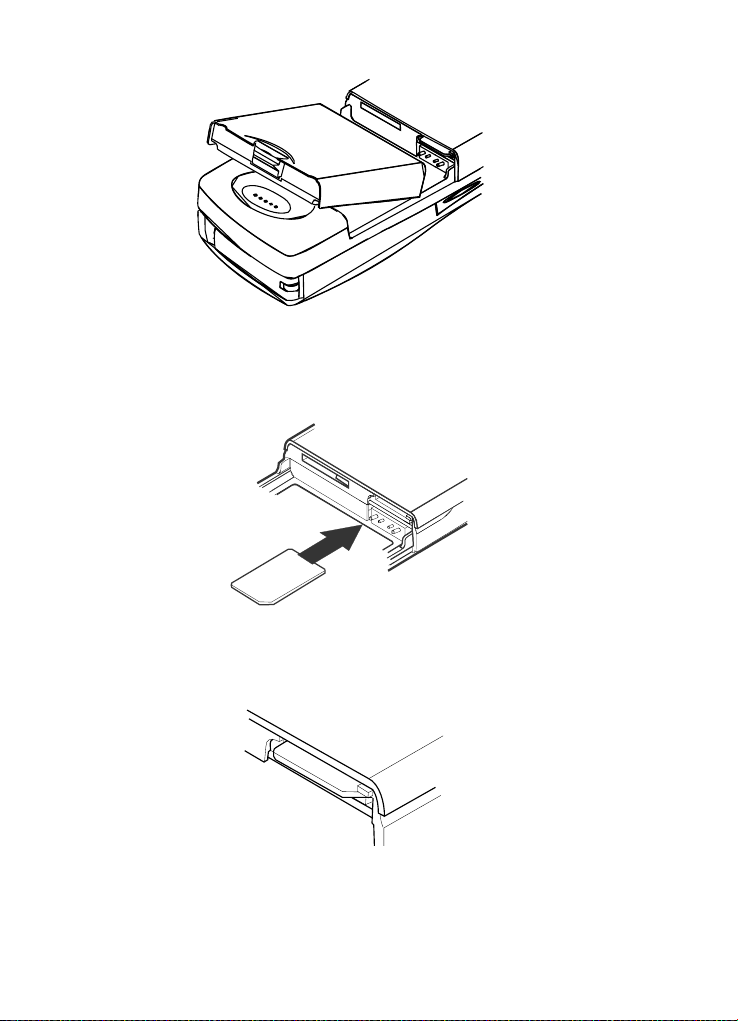
2 If the battery is connected to the communicator, remove the battery: press
the catch at the top of the battery and lift the battery away from the
battery cavity. See figure 1.
1999 Nokia Mobile Phones. All Rights Reserved.
Page 18
18
Getting started
Figure 1
3 Slide the SIM card into the SIM card slot: make sure that the gold contacts
of the SIM card are facing down and that the bevelled corner of the card is
on the right. See figure 2.
Figure 2
4 When the SIM card is properly inserted into the SIM card slot, the bevelled
corner will remain visible. See figure 3.
Figure 3
1999 Nokia Mobile Phones. All Rights Reserved.
Page 19
Note: If an unacceptable SIM card is
inserted, the message INVALID SIM CARD
will be displayed. Should this happen,
contact your dealer or network operator.
5 When you are sure that the SIM card is correctly installed, replace the
battery.
Note: The battery does not fit into place if the SIM
card is not correctly installed. Do not force the battery
into place! Check that you have inserted the SIM card
into the slot as described above. If the SIM card is
incorrectly installed, remove it by pulling it away from
the slot, and insert it again.
6 If there is little or no charge in the battery, it is recommended that you
connect the communicator to the charger and start charging the battery
before continuing with the start-up procedure. See ”Battery” on page 27.
7 Open the cover of the communicator. You will see a welcome screen while
the communicator performs a self-test.
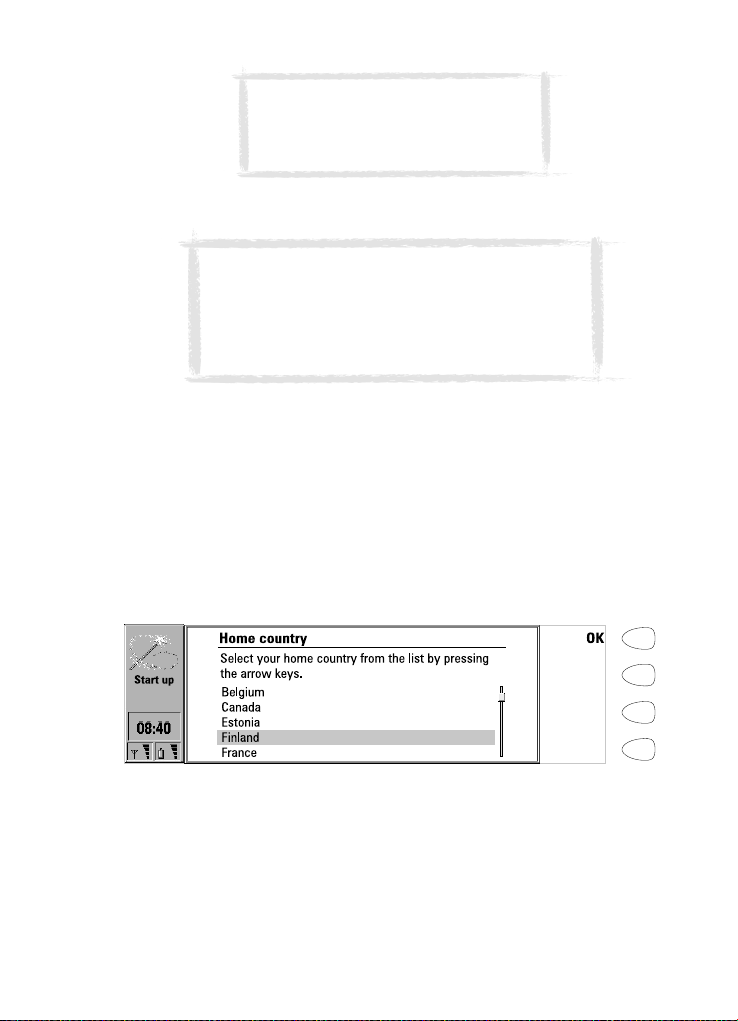
8 After the self-test is complete, you will see a list of countries on the
display, see figure 4. Scroll the dark grey selection frame using the arrow
keys on the keyboard over the name of your home country. Press the
button on the right side of the display next to the command OK. The
capital of your home country will be set as your home city. You can change
your home city later in the Clock application, see ”Clock” on page 138.
19
Getting started
Figure 4
9 Write the current date in the input field using the format dd.mm.yy, for
example 22.03.98. Press OK. You can later change the date format in the
System settings. Time and date can be changed in the settings of the Clock
application.
1999 Nokia Mobile Phones. All Rights Reserved.
Page 20

20
10 Write the current time using the 24-hour format hh:mm, for example
17:25, and press OK. You can later change the time format in the System
settings.
11 Enter your contact information in the user data card and press OK. You can
Getting started
later change the information in the User data application under System.
The first start-up is now completed.
After the start-up, do not immediately remove the battery, as the battery
charges the backup battery that supplies power to the real-time clock of the
communicator.
Note: When taking the phone
into use, observe the instructions
given by your network operator.
To copy the SIM card contents to the Contacts directory
If the installed SIM card contains names or numbers, you will be asked after
the start-up procedure if you want to copy the SIM card contents into the
memory of your communicator. If the phone is switched off, the question will
be asked the next time the phone is on and you open the cover of the
communicator.
If you want to do the copying later, press Cancel, and do it in the Contacts
application, see ”Contacts directory” on page 49.
All phone numbers copied from the SIM card to the communicator memory
will go to the Tel field of the contact cards. Therefore, you must move all
wireless phone numbers manually into the Tel(GSM) field. See ”To make
contact cards” on page 51. The quickest way to copy a phone number is to
select the number with the key combination Shift-Ctrl-left arrow, cut it with
Ctrl-X, and paste it to the right contact card field with Ctrl-V.
Communicator display
The communicator interface is switched on by opening the cover. See figure 5.
The applications are run in the middle of the display. The indicators (figure 6)
show application and system-related information. The commands always
correspond to the column of four command buttons on the right side of the
display. The functions of the Menu, Zoom and Backlight buttons are explained
in ”Communicator features” on page 31.
The scroll bar indicates that there are more items than currently shown on the
display. The display can be scrolled with the up and down arrow keys.
Whenever the selection frame is shown, you can select items by moving the
selection frame over the desired item with the up and down arrow keys.
1999 Nokia Mobile Phones. All Rights Reserved.
Page 21
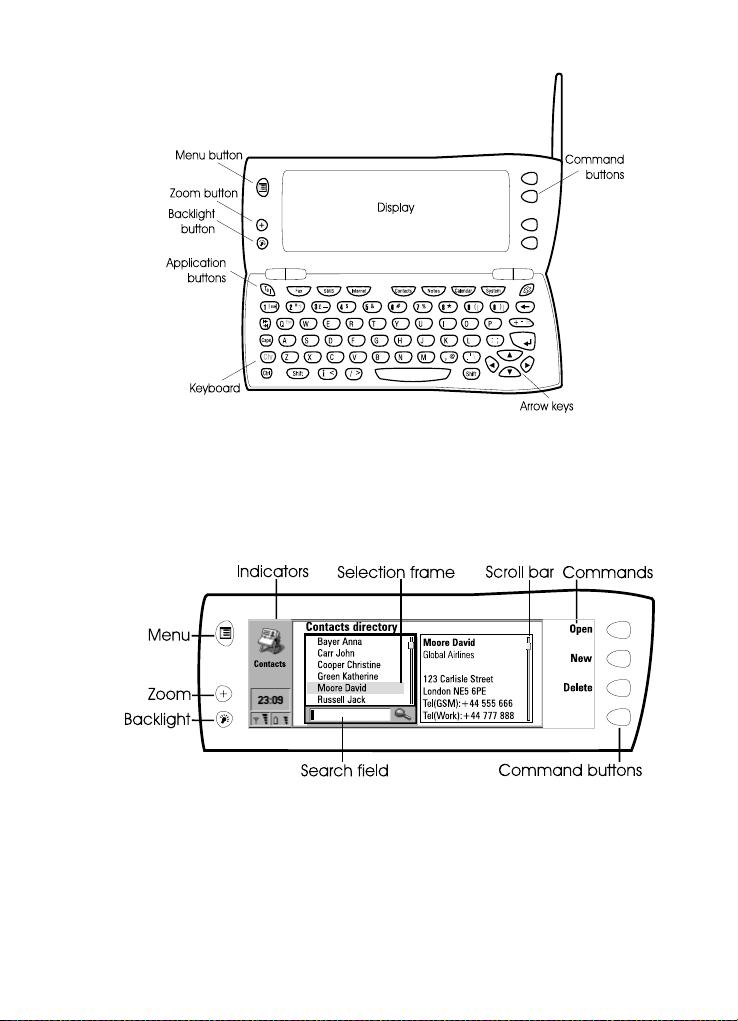
Figure 5
When the search field appears at the bottom of the display, you can search for
items by entering text into the search field with the keyboard.
After the correct item has been selected, press the command button next to
the command you wish to apply to the item, for example, Open.
21
Getting started
Figure 6
The following figures illustrate certain communicator conventions:
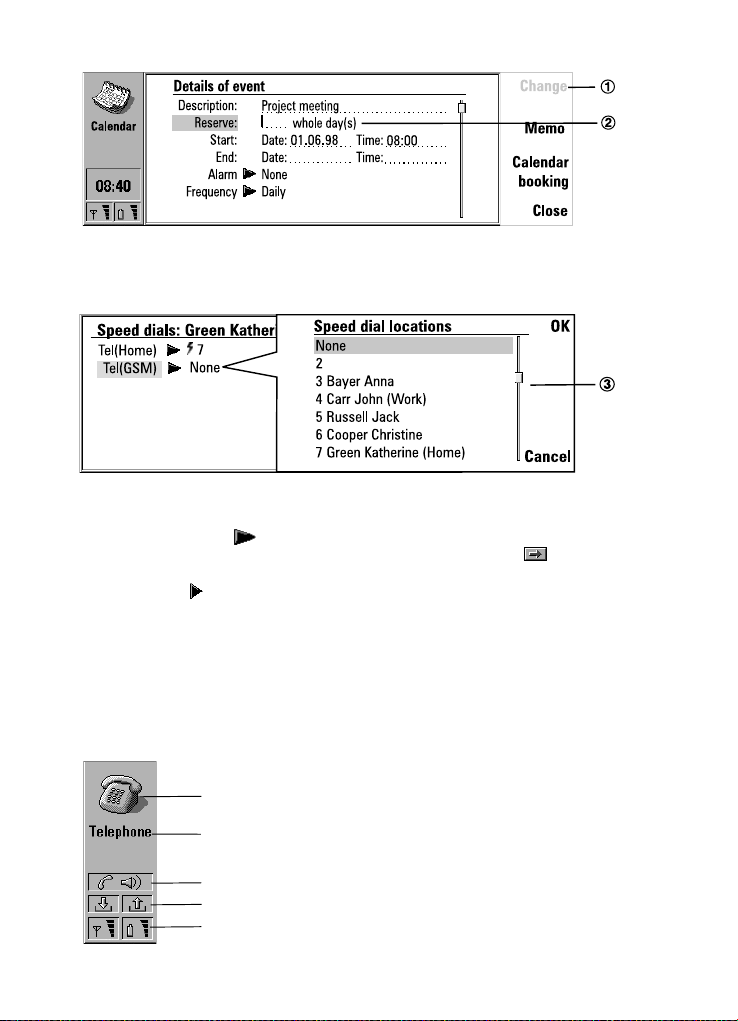
1 When a command is dimmed, it cannot be used, see figure 7.
2 When a cursor appears on a dotted line, enter a value with the keyboard, see
figure 7.
1999 Nokia Mobile Phones. All Rights Reserved.
Page 22
22
Getting started
Figure 7
3 A pop-up box. Select an item and press OK or Cancel, see figure 8.
Figure 8
When a setting with next to it is selected, pressing Change toggles the
value or opens a pop-up box. See figure 8. When a setting with next to it
is selected, pressing Change opens a new settings view. When you press a
command with next to it, the commands change.
Indicators
The application icon and the application name in the indicator area show the
application you are in at the moment.
The icons that appear on the Call status and Inbox/Outbox indicator rows
change according to the application and current situation. The battery level
and field strength indicators are the same as shown on the phone display
when the phone is on.
Application icon
Application name
Call status
Inbox/Outbox
Field strength and battery level
1999 Nokia Mobile Phones. All Rights Reserved.
Page 23
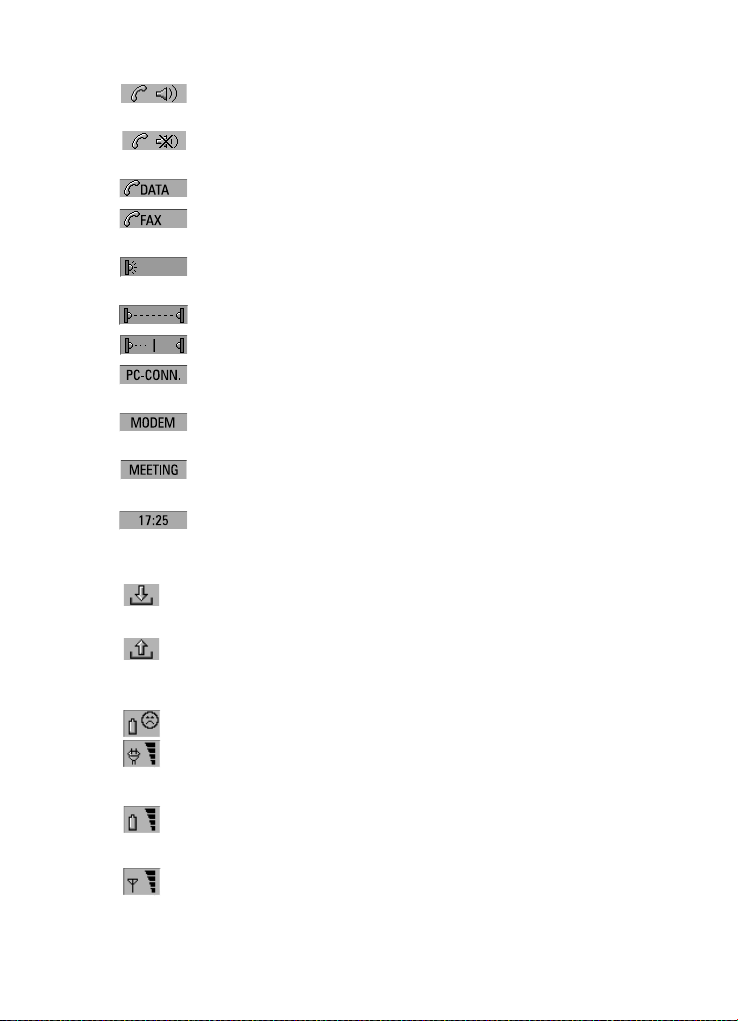
Call status
– You have a voice call, and the handsfree loudspeaker and
microphone are on. See ”Handsfree mode” on page 61.
– A voice call with the handsfree off. The loudspeaker and
microphone are muted.
– An open data connection, see chapter 9 "Internet" on page 85.
– The communicator is receiving or sending a fax, see chapter 7
"Fax" on page 71.
– The communicator is trying to establish an infrared connection,
see chapter 4 "Computer connectivity" on page 39.
– An infrared connection has been established.
– The infrared connection is obstructed.
– The communicator is connected to a PC, see chapter 4 "Computer
connectivity" on page 39.
– The communicator is being used as a fax modem, see ”Fax
modem” on page 133.
– The communicator is in a special operating environment, in this
case in the meeting profile. See ”Telephone settings” on page 65.
– Time can be adjusted in the Clock application, see ”Clock” on page
138.
Inbox/Outbox
– The inbox indicator informs you that you have received a fax,
short message or mail.
– The Document outbox contains unsent messages, see
”Communicator features” on page 31.
Battery level
– The battery is low and should be recharged.
– The battery is charging. The bar scrolls until the battery is fully
charged. The outlet plug icon indicates that the communicator is
connected to an external power source.
– The battery is fully charged. All the four bars are displayed.
Field strength
– The communicator is connected to a cellular network. When all
the four bars are shown, the cellular signal reception is good. If
the signal is weak, make sure the antenna is up. You can also try
23
Getting started
1999 Nokia Mobile Phones. All Rights Reserved.
Page 24

24
to improve the reception by moving the communicator slightly
or by using it in the handsfree mode.
– The phone is on, but it is outside network coverage.
Getting started
– The phone is off. The communicator cannot send or receive calls
or messages.
Communicator keyboard
Figure 9
In addition to the normal character and number keys, the keyboard has a
number of special keys, as shown in figure 9.
Application buttons
The buttons at the top of the keyboard start the corresponding applications.
ESC
To cancel an action, you can either press Cancel or Chr-Q. The Chr-Q key
combination can only be used when Cancel is among the available
commands. All information notes shown on the display can also be dismissed
by pressing Chr-Q instead of OK.
Tabulator
When writing or editing documents, the tabulator key moves the cursor to the
next tabulator stop. In settings, for example, the tabulator key can be used to
move the cursor to the next field.
Character (Chr)
The character key is used to generate characters not on the communicator
keyboard. A single press of the character key opens a table of special
1999 Nokia Mobile Phones. All Rights Reserved.
Page 25

characters. Some special characters are also printed on a key as the third
character. These, and certain other characters can be generated by pressing
and holding the character key while pressing the corresponding key, see ”To
edit documents” on page 113.
Control (Ctrl)
Pressed together with certain keyboard keys, the control key generates
shortcut commands which can be used in viewing and writing text, see
”Document features” on page 34.
and Shift
When you press the Shift key and then a letter key, an uppercase letter is
inserted in front of the cursor. The Shift key does not need to be held down
when pressing a key: once you have pressed Shift, the next key press always
generates a shifted character. In writing and editing text, Shift and the arrow
keys () can be used to select text, see ”Document features” on page 34.
Arrow keys
The arrow keys can be used to move the cursor or the selection frame. In some
applications, the arrow keys have special functions, see ”Document features”
on page 34.
Enter
When the cursor is shown, pressing Enter moves the cursor to the beginning
of the next line or adds a new line. Enter can also be used to select contacts in
the Contacts directory and to open folders and documents. When information
notes are shown, you may press Enter instead of OK. In options and settings,
when a value can be toggled, you may press Enter instead of Change.
25
Getting started
Communicator applications
The coloured application buttons on the communicator keyboard are used to
start the corresponding applications.
Telephone — Used for managing voice calls.
Fax — Enables you to send any of your own documents as a fax. Received
faxes can be read or forwarded.
SMS — Enables you to send short messages. Received short messages can be
read, replied, or forwarded.
Internet — Includes Internet and modem-based applications.
Contacts — Used for managing contact information, such as names, numbers
and addresses. You can exchange contact information as business cards via
the SMS application.
Notes — Used for writing and storing documents.
1999 Nokia Mobile Phones. All Rights Reserved.
Page 26
26
Calendar — Contains an appointment book and a to-do list. You can book
events in other calendars and set alarms to events.
System — Contains PC connectivity, security and other system-related
applications.
Getting started
Extras ( ) — Includes various items, such as Calculator, Clock, and
Composer.
To use the applications
When the cover is opened, the application that was on the display when you
closed the cover, appears in the same state. However, if you have made or
answered a voice call via the phone and switch to the communicator interface
by opening the cover, the Telephone application starts automatically.
To switch to another application, press the corresponding application button.
You can do this even during a call. You need not exit any application before
starting another. All inactive applications remain in the background until you
start them again.
To send or receive calls or messages with any of the communications
applications, remember that the phone must be switched on and in a service
area with adequate cellular signal strength.
Note: Information needs not be specifically
saved. When you press Close, switch to
another application, or close the device
cover, the Nokia 9110 Communicator saves
all data.
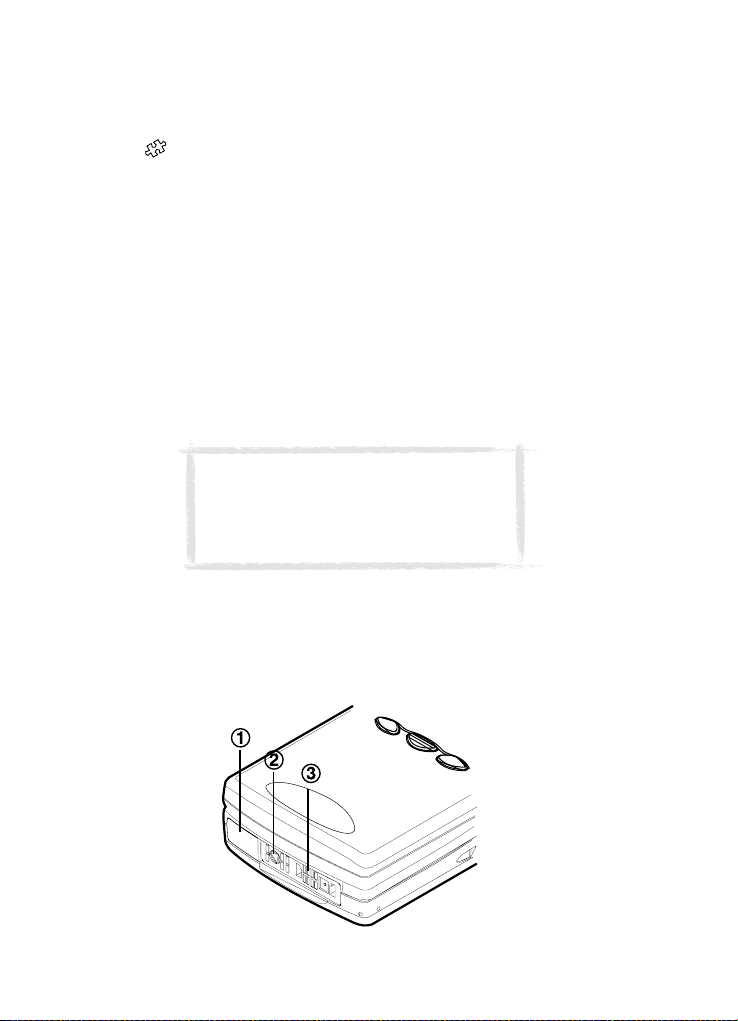
Connectors
The Nokia 9110 can be connected to a variety of devices. The connectors are
(figure 10):
Figure 10
1999 Nokia Mobile Phones. All Rights Reserved.
Page 27
1 IrDA-SIR infrared port for connecting to a PC, a printer, a digital camera, or
another communicator. For information on infrared connection, see chapter 4
"Computer connectivity" on page 39.
2 Connector for the charger plug.
3 Connector for the RS-232 cable plug and the headset plug.
Battery
The Nokia 9110 Communicator is powered by a rechargeable Lithium-ion
battery. The High Power Battery provides 3 to 6 hours of talk/fax/terminal
time or 60 to 170 hours of standby time. Furthermore, up to 400 hours of
standby time may be achieved when the phone is off.
Use only batteries and accessories approved by the communicator
manufacturer for use with this particular communicator model. Use only
chargers approved by the communicator manufacturer for charging a
Lithium-ion battery.
Note: The communicator
can be used normally
during charging.
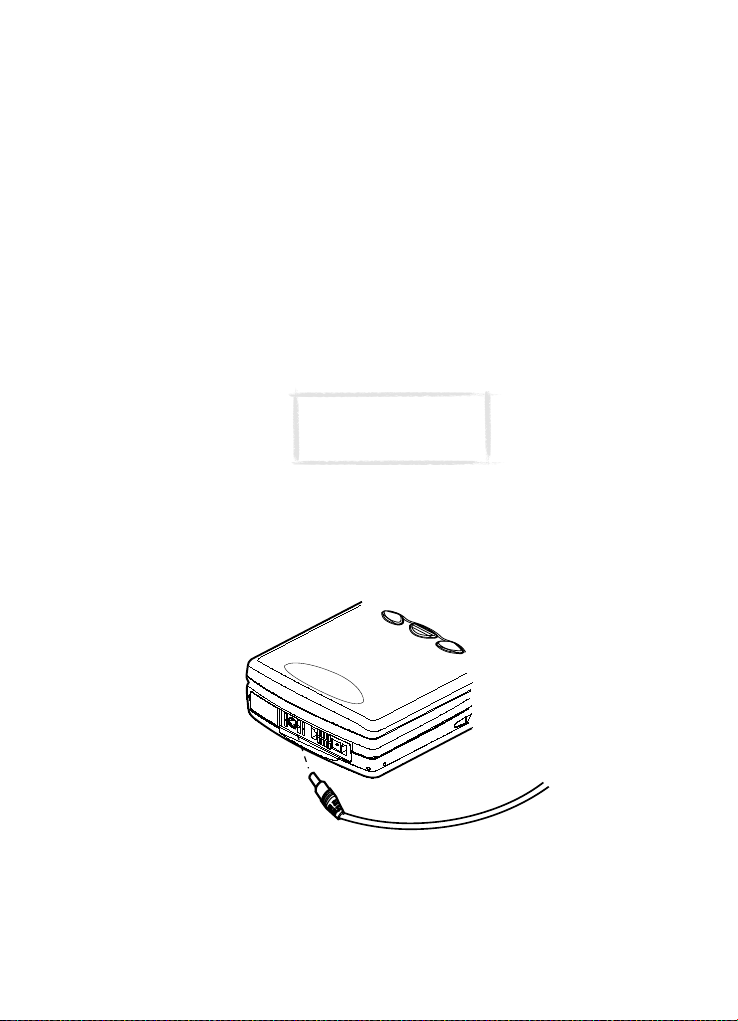
To charge a battery
1 Make sure that the battery is properly installed in the battery
compartment.
2 Connect the charger lead to the connector at the bottom of the
communicator, as shown in figure 11.
27
Getting started
Figure 11
3 Connect the charger to an AC wall outlet. If the phone is switched on, the
CHARGING message appears on the display and the segments of the battery
indicator bar on the right side of the phone display will start scrolling.
1999 Nokia Mobile Phones. All Rights Reserved.
Page 28

28
4 When the battery is fully charged, the bars stop scrolling and four bars are
displayed. You may now remove the charger plug from the communicator.
When the charge in the battery is low and only a few minutes of operation
time remain, a warning tone will sound, and the message BATTERY IS LOW will
Getting started
be repeated at regular intervals on the phone display. When the charge level
becomes too low for operation, the RECHARGE BATTERY message will be
displayed, accompanied by a warning tone. If you do not connect the
communicator to a charger, the communicator switches itself off.
Note: If the battery is fully discharged, it will
take 30 - 60 seconds before the CHARGING
message appears on the display and the battery
indicator bar starts scrolling. After that, it may
take 10-30 seconds before you can switch the
phone on.
To use the battery
Use only batteries approved by the communicator manufacturer and recharge
the battery only with the chargers approved by the manufacturer. With
approved chargers and accessories, the battery can be charged continuously.
The battery need not be fully discharged before recharging. When a charger is
not in use, disconnect it from the power source. Do not leave the battery
connected to a charger for longer than a week, since excessive charging may
shorten its life. If left unused, a fully charged battery will discharge itself over
time.
The battery can be charged and discharged hundreds of times, but it will
eventually wear out. When the operating time (talk-time and standby time) is
noticeably shorter than normal, it is time to buy a new battery.
Temperature extremes will affect the ability of your battery to charge: allow it
to cool down or warm up first.
Battery operation time is affected by the following: whether both the phone
and the communicator interface are on, radio signal strength, various phone
settings, the use of the backlight, and the length of the screen blanker period,
see ”System settings” on page 125.
It is recommended always to keep a charged battery in the communicator.
Keeping the battery charged maximises the lifetime of the backup battery
supplying power to the real-time clock of the communicator. In case the
backup battery is drained, it will be automatically charged the next time a
charged battery is reconnected to the communicator.
Always close the device cover before removing the battery. Closing the cover
will save all data.
1999 Nokia Mobile Phones. All Rights Reserved.
Page 29
Note
Use the battery only for its intended purpose.
Never use any charger or battery which is damaged or worn out.
Do not short-circuit the battery. Accidental short-circuiting can occur when a
metallic object (coin, clip or pen) causes direct connection of the + and terminals of the battery (metal strips at the bottom of the battery), for
example, when you carry a spare battery in your pocket or purse. Shortcircuiting the terminals may damage the battery or the connecting object.
Leaving the battery in hot or cold places, such as in a closed car in summer or
winter conditions, will reduce the capacity and lifetime of the battery. Always
try to keep the battery between +15°C (+59°F) and +25°C (+77°F). A
communicator with a hot or cold battery may temporarily not work, even
when the battery is fully charged. The performance of Lithium-ion batteries is
particularly limited in temperatures below 0°C (+32°F).
Do not dispose of batteries in a fire!
Batteries must be recycled or disposed of properly. Batteries must not
be disposed of in municipal waste.
29
Getting started
1999 Nokia Mobile Phones. All Rights Reserved.
Page 30

30
Getting started
1999 Nokia Mobile Phones. All Rights Reserved.
Page 31

3. Special features
This chapter explains functions that are common to most of the applications.
”Communicator features” on page 31 goes through various features of the
device, and ”Document features” on page 34 explains functions that apply to
writing and viewing of documents.
Communicator features
Figure 1
To use the Menu button
1 Press the button on the left of the communicator display to open up a
set of options which depend on the application you are in.
2 Move the selection frame over the desired option and press Select.
The chosen option affects only the document, card or item that is currently
selected, open, or being sent. The Menu may also contain the option Settings
with which you can change the settings of the application. The values of these
settings will be used as defaults for that application.
To use the Zoom button
Press the button on the left of the display to magnify the view on the
display. Zooming is not available on every occasion.
To use the Backlight button
Press the button on the left of the display to turn the backlight of the
communicator display on and off. The backlight can be adjusted in the System
settings. See ”System settings” on page 125.
31
Special features
1999 Nokia Mobile Phones. All Rights Reserved.
Page 32

32
To use the Help button
Press the button on the communicator keyboard to open up a help text on
the current function. The application icon in the indicator area on the left side
of the display reminds you of the application where you requested help.
Special features
The help deals with issues relating to the item that was on the display when
you pressed the Help button. If no special help is available for the current
item, a list of available help topics is shown instead.
To view the list of all help topics for the current application, press Application
help. The following commands become available:
Open — Opens the selected topic.
General help — Shows the common help topics.
Close — Closes the help.
To view the list of general communicator topics, press General help. The
following commands become available:
Open — Opens the selected topic.
Application help — Returns to the help topics list of the current item.
Close — Closes the help.
If the help topic you wanted was not among the help topics of the current
item or in the general help, close the help, start the correct application and
press the Help button again.
To use the memory card
A memory card may contain documents, contact databases, applications,
backups, printer drivers, etc. When a memory card is inserted in the
communicator, the memory card contents are marked with the memory card
icon in the corresponding applications. For example, the documents on the
memory card are located in a folder shown in the folders list of the Notes
application.
The items on the memory card can be used in the same way as corresponding
items in the communicator. You can for example install and remove software
to and from the memory card with the Install/Remove software application,
and send messages to contacts in the contacts directory of the memory card.
Note: The memory card is not
included in the sales package,
but can be purchased separately.
To insert the memory card
1 Close the device cover and make sure that the phone is switched off. If it is
on, press .
2 Remove the battery: press the catch at the top of the battery and lift the
battery away from the battery cavity.
1999 Nokia Mobile Phones. All Rights Reserved.
Page 33

3 Open the hatch at the back of the communicator: carefully open the lid by
easing it up from the ridges on both sides.
4 Slide the memory card under the memory card holder. Make sure that the
gold contacts of the card are facing down and that the bevelled corner of
the card is on the right. See figure 2.
Figure 2
5 When the card is securely in place, close the hatch, and replace the battery.
IMPORTANT! Keep all memory cards out of small children’s reach.
Make sure that the hatch is closed before replacing the battery!
Do not remove the memory card in the middle of an operation. Be
sure to close all memory card applications before removing the card.
If you are installing an application to the memory card and you need
to reboot the communicator, do not remove the card until the reboot
is complete. Otherwise the application files may be lost.
If you have an application or a tone on both the memory card and the
communicator, the one in the communicator is used.
To select several items
Where multiselection is available, you can select several items at once. The
commands you use affect all the selected items. Multiselection works in most
lists. For example, you can select several contacts and remove them at once in
the Contacts directory, or select several documents and copy them to a
memory card at the same time in the Notes application.
There are two ways to select several items:
1 Scroll to the item and press Ctrl-space bar. Or,
2 Press and hold Shift and move up or down the list with the arrow keys to
the last selected item.
To remove an item from the selection, scroll to the item and press Ctrl-space
bar again.
To cancel the entire selection, press Chr-Q.
If you want to select every item in a list, press Ctrl-A. If you want to cancel the
selection, press Ctrl-A again.
33
Special features
1999 Nokia Mobile Phones. All Rights Reserved.
Page 34

34
Document features
To name a document
Every time you close a new document for the first time, you will be asked to
Special features
enter a name for the document in the input field. The highlighted name in the
input field is the communicator’s suggestion for the name.
To use shortcuts
There are several shortcuts you can use in the document applications. The
following table lists the available shortcuts:
Shortcut Function
Ctrl-A
Ctrl-C
Ctrl-X
Ctrl-V
Ctrl-Z
Ctrl-B
Ctrl-I
Ctrl-U
Ctrl-T
Ctrl-D
Ctrl-M
Ctrl-H
Ctrl-E
Ctrl-N
Ctrl-P
Chr-left or right arrow Moves the cursor to the beginning or end of the line
Chr-up or down arrow Scrolls the list or document view up or down
Shift-Ctrl-left or right
arrow
Shift-right/left/up/
down arrow
Shift-Chr-up or down
arrow
Selects all
Copies selected text
Cuts selected text
Pastes selected text
Cancels the most recent operation
Applies bold
Applies italics
Applies underlining
Adds current time
Adds current date
Adds user’s name
Moves the cursor to the beginning or the end of the
document
Opens the next item
Opens the previous item
Selects the previous or the next word
While Shift is held down, each press of an arrow key
selects one text character or line
Selects text page by page inside a document
1999 Nokia Mobile Phones. All Rights Reserved.
Page 35

To print
Press the Menu button and select Print. You can print various items, such as
documents, pictures, and SMS messages.
The connection type, header, paper size and the default printer must be
defined in advance in the System settings. See ”System settings” on page 125.
Note: For information on supported printers, see
the Documentation section on the CD-ROM
supplied in the communicator sales package, or see
the Nokia Wireless Data Forum home page in the
World Wide Web at http://www.forum.nokia.com.
Please, refer to the user’s guide of the printer for detailed safety instructions
on the device.
To change the printing options, press Options in the printing view. The
available options depend on the application you are in.
To print using the infrared connection
1 Go to the System application and set infrared as the connection type. See
”System settings” on page 125.
2 Make sure the infrared port of the communicator faces the infrared port of
the printer. Keep the infrared connection clear. If the connection is
obstructed for too long, for example, if something is moved between the
infrared sensors or the communicator is moved, printing is interrupted.
3 After the communicator has checked that you do not already have an
active connection, it starts to scan for a printer. This means that you
cannot print while you are, for example, transferring files from the
communicator to a PC.
4 If the printer cannot be found, a failure note is shown and the active
application returns to the display.
If the correct printer is found, the printer driver is selected automatically
and the display shows the name of the document and the selected printer.
If the printer found is not recognised, press Printers and select the correct
printer driver.
If the communicator does not have the correct driver for the printer, you
can try printing the document using one of the available printer drivers.
5 Press Start to start printing.
35
Special features
Tip: More printer drivers can be installed with
the PC Suite for Nokia 9110 Communicator
program or from the CD-ROM included in the
communicator sales package. See ”To use the
PC Suite” on page 39.
1999 Nokia Mobile Phones. All Rights Reserved.
Page 36

36
To print using the cable connection
1 Go to the System application and set cable as the connection type. See
”System settings” on page 125.
2 Connect the communicator to a serial printer with the RS-232 adapter
Special features
cable DLR-2.
3 Press Printers and select the correct printer driver.
4 Press Start to start printing.
Document outbox
When you send faxes, short messages and mail, they always go first to the
Document outbox. The outbox prepares your document and then sends it via
the phone. If the phone is off, or the cellular signal strength is inadequate, the
document will not be sent until the phone is switched on and the signal
strength is sufficient. If the phone or fax called is off or busy during the first
attempt, the Document outbox attempts to send the document nine more
times. If the sending still fails, the communicator informs you of this with a
note.
The Document outbox can be accessed in the main views of the Fax, SMS, Mail
and Notes applications, where it is shown at the bottom of the folders list. To
open the Document outbox, select it from the folders list and press Open.
Figure 3
The main statuses that documents can have in the outbox are:
Sending — The document is currently being sent.
Waiting — The document is waiting for sending to become possible, e.g. when
the phone is switched on, cellular signal strength becomes adequate, previous
phone call ends.
Retry [time] — Sending of the document failed and it will be sent again at the
time specified in the square brackets.
At [time] — The fax is waiting to be sent at the time you have specified. See
”Fax settings” on page 74.
Sending [current page/total pages] — The number of the fax page that is being
sent and the total number of the pages.
1999 Nokia Mobile Phones. All Rights Reserved.
Page 37

Upon request — E-mail messages may have this status if the Send mail setting
has been set to Upon request in the Mail settings. See “Mail settings” on
page 89. These messages will not be sent until you select one and press Start.
All mail with the Upon request status will be sent during the same connection.
To speed up manually the sending of documents that have the Waiting, Retry,
At [time] or Upon request status, select the document and press Start. The
document(s) will be sent as soon as possible.
A document is removed from the Document outbox if sending succeeds or you
cancel the sending by pressing Cancel sending.
Received communication note
When you open the cover of the communicator and have missed calls,
received faxes, short messages or mail, or there are unsent documents in the
Document outbox, a note will be shown, see figure 4. The note can be
dismissed by pressing Cancel.
To read the received documents or to check who has made the missed calls,
select the corresponding item on the list and press View.
Figure 4
37
Special features
To transfer data from older communicator models
You can make backups of the data in the Nokia 9000 Communicator or the
Nokia 9000i Communicator with the Nokia Communicator Server program,
and then restore the data to a same language version of the Nokia 9110
Communicator. You can transfer data in a similar way between the same
language versions, e.g. from a Finnish version of the Nokia 9000i
Communicator to a Finnish version of the Nokia 9110 Communicator.
Note: You will not be able to restore
the settings from Nokia 9000 or
9000i communicators to the Nokia
9110 Communicator.
1999 Nokia Mobile Phones. All Rights Reserved.
Page 38

38
To transfer data between different language versions
1 If the languages are not compatible, e.g. if you want to transfer data from
a Finnish version of the Nokia 9000i Communicator to a French version of
the Nokia 9110 Communicator, move your contacts and calendar data
with the Nokia Communicator Server program onto a PC using the Import/
Special features
Export contacts and Import/Export calendar data applications.
2 Move your documents with the Nokia Communicator Server program onto
a PC using the File transfer application.
3 Start the PC Suite for Nokia 9110 Communicator program on the PC and
transfer the contacts, calendar data, and documents to the Nokia 9110
Communicator.
1999 Nokia Mobile Phones. All Rights Reserved.
Page 39

4. Computer connectivity
39
This chapter explains how to install the PC connectivity software on a PC, how
to connect your communicator to the PC or an Apple Macintosh computer,
and how to use the connectivity programs.
To use the PC Suite
Figure 1
You can connect your communicator to a suitable PC with the PC Suite for
Nokia 9110 Communicator program.
The PC Suite and its user’s guide are found on the CD-ROM supplied in the
communicator sales package.
The PC Suite works with Windows 95/98 and NT 4.0, and requires IBMcompatible 486 PC or higher.
When using the PC Suite, you only need to connect your communicator to a
PC; everything else is done on the PC.
Computer connectivity
Note: Making or answering phone
calls during a PC connection is not
recommended as it might disrupt the
operation.
1999 Nokia Mobile Phones. All Rights Reserved.
Page 40

40
To install the PC Suite on a PC
The CD-ROM should launch itself automatically after you have inserted it into
the CD drive of your PC. If not, please, follow these steps:
1 Click the Windows “Start” button; then click “Run”.
2 If your PC has Windows 95, 98 or NT 4.0 (or later), type d:\9110.exe in the
command line. If your PC has Windows 3.x, type d:\data\9110_31.exe.
Computer connectivity
Substitute the letter “d” with the letter of the CD drive.
3 Press Enter.
4 Follow the instructions shown on the screen.
Note: The PC Suite for Nokia 9110
Communicator program can be found
in the Menu under the heading “PC
and Macintosh software”.
To use the PC Suite with an infrared connection
1 The IrDA software must be installed and running on the PC. To check if the
IrDA driver is already installed on the PC, go to the Control Panel. If there is
an icon called Infrared, the driver has been installed.
2 Make sure that the infrared port of the communicator faces the infrared port
of the PC. Keep the infrared link clear: check the infrared indicators in the
indicator area, see ”Communicator display” on page 20. If the infrared link is
obstructed for too long, for example, if something is moved between the
infrared sensors or the communicator is moved, the operation is interrupted.
3 Start the PC Suite software on the PC. In the Preference dialog, select IR as
the data transfer protocol, and the correct COM port.
4 Start the Infrared activation application on your communicator and press
Activate. See ”Infrared activation” on page 131.
To use the PC Suite with a cable connection
1 Connect the 9-pin end of the RS-232 adapter cable DLR-2 to the COM port
of the PC, and the other end to the connector at the bottom of the
communicator. See ”Connectors” on page 26.
2 Start the PC Suite software on the PC.
Note: Remember to make
backup copies of all
important data!
Tip: You can also use the optional
deskstand for easy PC connectivity.
See the Accessories guide.
1999 Nokia Mobile Phones. All Rights Reserved.
Page 41

Contacts
The Contacts function of the PC Suite lets you create, edit and update contact
cards on your Nokia 9110 Communicator, and transfer them between a PC and
your communicator. To start the Contacts application, click on the Contacts
icon in the main screen.
41
Computer connectivity
Figure 2
Intellisync
With the Intellisync function you can synchronise data between your
communicator and a PC.
1 Connect your communicator to the PC.
2 Start the PC Suite program on the PC and click the Intellisync icon in the
main screen.
3 The Local (i.e. PC) tab is automatically selected. Click the Settings button.
1999 Nokia Mobile Phones. All Rights Reserved.
Page 42

42
Note: You may be presented with a dialog containing the
tabs Format and File. In the Format tab, select the address
format that you are using for addresses in your
communicator. The Contacts Format 5 is recommended. In
Computer connectivity
4 This displays the PC Suite Configuration dialog with the Calendar,
5 Click on the communicator application you want to configure.
6 Click the Choose button to enter the Choose Translator dialog. The Choose
7 Click the OK button in the Choose Translator dialog to return to the
8 Specify the application and, if necessary, the file you want to synchronise.
the File tab, indicate if you want to synchronise Contacts
on the communicator memory, or on the memory card.
After this, click OK.
Contacts, and To-do list applications of your communicator.
Translator dialog lists all the PC applications that are compatible with the
communicator application you selected.
Configuration dialog. Now the PC application you selected appears next to
the name of the communicator application.
Note: The first time you select Microsoft
Outlook in the Choose Translator dialog, use the
Browse button to locate the data in your
Outlook folder which you wish to synchronise.
Note: In order to synchronise data successfully between
your communicator and a PC application, click on the
Advanced button after selecting the application with
which to do the synchronisation.
In the Advanced settings dialog, click on Field Mapping
and match the fields of the PC application with those
fields of the communicator that have been marked with
asterisks, see figure 3.
1999 Nokia Mobile Phones. All Rights Reserved.
Page 43

Figure 3
9 When you are ready to perform the operation, click the OK button at the
bottom of the Configuration dialog.
10 Click the Synchronise button on the PC Suite opening screen.
11 If prompted, resolve data conflicts.
12 A confirmation prompt appears, showing you how many adds, changes,
and deletes will be applied to each of your systems if you proceed with the
operation. Click Accept to proceed, or Cancel to discontinue.
Note: If you have a very large contact database in your
communicator, you might not have enough free memory in the
communicator to complete the synchronisation operation. In order to
overcome this limitation, contacts can be divided into several contact
databases on memory card. Each contact database can then be
synchronised separately. The maximum amount of contacts that can
be successfully synchronised, depending on the amount of free
memory in the communicator, is about 1000 contacts in each
database. Refer to "Quick Start Tutorial" in Chapter 3 of the PC Suite
for Nokia 9110 Communicator User Guide found on the CD-ROM for
instructions on how to synchronise contacts on the memory card.
File transfer
The File Transfer application lets you move, copy, paste, rename, and remove
communicator and PC files.
43
Computer connectivity
1999 Nokia Mobile Phones. All Rights Reserved.
Page 44

44
Note: Faxes are transferred from the
communicator to a PC in TIFF format; this
means that you need to use Windows Imaging
to view more than the first page of a fax.
Computer connectivity
1 Establish a connection between your communicator and a PC. See above.
2 Start the PC Suite program on the PC and click the File Transfer icon in the
main screen.
3 Select an item by clicking on it in the File Transfer screen with the mouse
and drag and drop it to the appropriate PC directory or communicator folder.
Backup / Restore
Figure 4
1999 Nokia Mobile Phones. All Rights Reserved.
Page 45

The Backup/Restore function enables you to create backups of your
communicator data on a PC and later restore the data in the communicator.
1 Establish a connection between your communicator and a PC, see above.
2 Start the PC Suite program on the PC and click the Backup/Restore icon in
the main screen.
3 Click on the Backup tab and select one of the following options: All device
data backs up all of the data in your communicator, Selected device data
allows you to select whether to backup your Calendar data, Contacts,
Documents, or Settings, or select Memory card data to backup the
information on your memory card.
4 In the “Backup Path” box, specify the location where you want the backups
to be stored. The backup name is assigned automatically.
5 Enter a number between 1 and 99 in the ”Number of backup stores” box.
6 Click the Backup button.
To restore data, click on the Restore tab. Specify the location of the backup in
the ”Backup stored in” box. In the lower box, click on the data you want to
restore. Click Restore to restore the backup to your communicator.
Install / Remove
The Install/Remove Software function lets you install and remove software
from your communicator.
Note: If you install to the Nokia 9110 Communicator
software made for the older communicator models, be
aware that the greyscales of the devices are different.
Therefore, the display may seem lighter. Although this
difference does not affect the functioning of the
software, always try to install the version made especially
for the Nokia 9110 Communicator.
45
Computer connectivity
1 Establish a connection between your communicator and a PC, see above.
2 Start the PC Suite program on the PC and click the Install/Remove icon in
the main screen.
3 Click the Install tab and enter the location of the software you want to
install in the ”Select Path” box.
4 Click on the software you want to install in the box below.
5 Click the Install button.
To remove software from your communicator, click the Remove tab. Select the
software you want to remove in the box and click the Remove button.
1999 Nokia Mobile Phones. All Rights Reserved.
Page 46

46
Import / Export
The Import/Export function can be used to transfer calendar and contacts files
between your communicator and a PC.
1 Establish a connection between your communicator and a PC, as shown
above.
2 Start the PC Suite program on the PC and click the Import/Export icon in
Computer connectivity
the main screen.
3 Click the Export tab and choose one of three options: Calendar data;
Contacts; Contacts File on Memory Card.
4 In the ”Select the PC file to create” box, specify the name and path of the
PC file you want to create.
5 Click the Export button.
To import a file from a PC to your communicator, click the Import tab and
select which items to import. Specify the PC file that you want to transfer to
your communicator and click the Import button.
To use the Nokia Communicator Server
For Windows 3.11 and Apple Macintosh users the CD-ROM in the
communicator sales package contains the Nokia Communicator Server
program. With the Nokia Communicator Server you can install and use the
communicator applications that require PC connectivity, see chapter 12
"System" on page 125. You need to connect your communicator to a PC and
start the necessary application on the communicator.
Note: The English version of the File transfer,
Import/export contacts, and Import/Export
calendar data applications that can be used with
the Nokia Communicator Server can be installed to
your communicator from the diskette included in
the sales package. Other language versions are
found on the CD-ROM.
The Nokia Communicator Server also works with Windows 95 and NT.
Tip: You do not need this software if you
use the PC Suite for Nokia 9110
Communicator. See ”To use the PC Suite”
on page 39.
To install the Nokia Communicator Server on a PC
1 Insert the diskette into the diskette drive.
1999 Nokia Mobile Phones. All Rights Reserved.
Page 47

2 In the Windows Program Manager, click on the “File” menu.
3 Click on menu item “Run” and type a:\server in the command line.
Substitute the letter “a” with the letter of the diskette drive.
4 Press Enter.
5 Follow the instructions shown on the screen.
To use the Nokia Communicator Server with an infrared connection
1 Follow the first two steps for installing the PC Suite.
2 Start the Nokia Communicator Server software on the PC.
3 Start the desired PC connectivity application on your communicator.
Remember to set infrared as the connection type.
To use the Nokia Communicator Server with a cable connection
1 Connect the 9-pin end of the RS-232 adapter cable DLR-2 to the COM port
of the PC, and the other end to the connector at the bottom of the
communicator. See ”Connectors” on page 26.
2 Start the Nokia Communicator Server software on the PC. Check that the
COM port reported by the software is correct.
3 Start the desired PC connectivity application on your communicator.
Remember to set cable as the connection type.
Tip: For information on how to install new
software on your communicator with the
Nokia Communicator Server, see ”Install/
Remove software” on page 134.
47
Computer connectivity
Nokia Communicator Server for MacOs
To connect to an Apple Macintosh, you must have the Nokia Communicator
Server application running on the Macintosh and a cable connection
established between the communicator and the Macintosh.
The Nokia Communicator Server application is compatible with MacOS 7.5 or
newer versions, provided that they are equipped with a RS-422 serial port.
Macs equipped with a USB port can be connected to a communicator using a
USB to serial adapter.
To connect to an Apple Macintosh RS-422 serial port, you need to have an Apple
Mac modem cable (not provided by Nokia) connected to your Mac. To connect
the modem cable to the DLR-2 cable (included in the sales package), you need
to have an 9M25F adapter (not provided by Nokia), because the Mac modem
cable has 25 pins and the DLR-2 RS cable has only 9 pins. With this cable
combination you can use the Nokia Communicator Server software for MacOs.
The PC suite connectivity software does not support MacOS.
1999 Nokia Mobile Phones. All Rights Reserved.
Page 48

48
Computer connectivity
1999 Nokia Mobile Phones. All Rights Reserved.
Page 49

49
5. Contacts
The Contacts application is used for creating, editing, and managing all
contact information, such as phone numbers, addresses and speed dials, and
for viewing logs of all incoming and outgoing voice, data and fax calls and
SMS messages.
The Telephone, Fax, SMS, Calendar and Mail applications all use information
found in the Contacts directory.
Tip: You will find the Club Nokia Careline
contact card in the Contacts directory.
Club Nokia Careline answers questions
and offers instructions over the phone.
Contacts directory
The Contacts main view shows two windows: on the left is the Contacts
directory, which is a list of all contact cards, and on the right is the currently
selected contact card. The active window is surrounded by a dark frame. You
can toggle between the windows with the Tab key. The contact cards are listed
in the Contacts directory in alphabetical order according to the name in the
Name field of each card.
Contacts
Figure 1
To find contact cards
1 Move the selection frame in the Contacts directory with the arrow keys
until the contact you are searching for is shown within the selection
frame. Or,
2 Enter text into the search field. The search looks for matches in the Name,
Company and Address fields. The search results can be cleared by removing
characters one by one from the search field with the backspace key.
1999 Nokia Mobile Phones. All Rights Reserved.
Page 50

50
To open the selected contact card, press Open.
To remove the selected contact card, press Delete.
Contacts
Note: If you hav e a memory c ard insert ed in the
communicator, the memory card contact
databases are shown as folders in the Contacts
main view. When you open a folder, you can
only call and send messages to the contacts in
that database.
To use the Menu button
Pressing the Menu button in the Contacts directory opens a new set of
options:
Individual log — Opens the Individual log of the selected contact, see ”Logs” on
page 56.
General log — Opens the General log.
Duplicate card — Creates a duplicate of the selected card.
SIM card memory — Shows the contents of your SIM card.
Copy to SIM — Copies the selected contact(s) to the SIM card memory.
Create group — Creates a new contact group, see ”Contact groups” on page 55.
List groups — Opens a list of all contact groups.
New contacts database — Creates a new contacts database to the memory card.
Rename contacts database — You can give the memory card contacts
database a new name.
Copy contacts — You can copy contacts to and from your memory card.
Move contacts — You can move contacts to and from your memory card.
Contact info — Shows the number of contacts and the amount of contact data.
Settings — Enables you to change the following settings:
Contact card template — You can define which fields are included in all
new contact cards you create. Changes made to the template affect all
new, but not existing contact cards. You cannot enter text into the fields
of the template.
Log length — You can define how recent contacts will be listed in the
General and Individual logs. Select the new log length and press OK. The
possible values are: Zero / 10 days / 30 days / 1 year / User defined: days (0 –
365 days).
To create a new contacts database on your memory card
To create a new contacts database on your memory card, press the Menu
button and select New contacts database.
1999 Nokia Mobile Phones. All Rights Reserved.
Page 51

To copy and move contacts to and from the new database, select the
contact(s) you want and press the Menu button again. Then scroll down to
select either Copy contacts or Move contacts.
To view the contacts database, press Open. To make a call to a contact on the
database, select the contact and go to the Telephone application.
To make contact cards
1 To make a new contact card, press New in the Contacts main view.
2 When the new contact card opens, enter the contact information in the
various fields. Use the arrow keys to move from one field to another. You
can add lines to the Address and Note fields with the Enter key.
3 To return to the Contacts directory, press Close.
Tip: When entering phone numbers into
the Tel fields, storing a + character in
front of the country code will allow you
to use the same phone number abroad.
When storing phone numbers or DTMF sequences, you can use hyphens and
spaces to arrange the appearance of the strings. This will not affect the way
the numbers or DTMF tones will be dialled.
Tip: It is possible to import contacts from a
PC or certain handheld devices by using the
IntelliMigrate program on the CD-ROM
supplied in the sales package of the
communicator.
51
Contacts
To add new fields to a contact card
1 Press Fields in the currently opened contact card. See figure 2.
2 Press Add field. A pop-up box opens, listing the available fields.
1999 Nokia Mobile Phones. All Rights Reserved.
Page 52

52
3 Select a field and press OK. There can only be one Name, Job title,
Company, Note and Password field.
Contacts
Figure 2
Note: The Tel/Fax field is for alternating calls, the
Tel(Server) field for sending bookings to remote
calendar servers, and the Password field for the
calendar booking password. See ”Multiple calls” on
page 62, and ”Calendar booking” on page 121.
To customise the label of a field
1 Press Fields in the currently opened contact card.
2 Select a field and press Change label.
3 Select one of the predefined labels or scroll down to the field with a dotted
line and write the label text, e.g. Modem, and press OK.
To remove the selected field, press Delete field. The Name field cannot be
removed.
Note: Remember to put wireless phone
numbers into the Tel(GSM) fields of the
contact cards. Otherwise you cannot
send SMS messages to these numbers.
Contact card options
When you press Options in an opened contact card, the following options
become available:
Ringing tone — You can set a specific ringing tone for each contact in the
Contacts directory. Select a tone from the list, and press Select. The icon
appears at the top of the contact card. See figure 2. In order to use this
1999 Nokia Mobile Phones. All Rights Reserved.
Page 53

function, however, the Individual ringing tones setting must first be set on.
See ”Telephone settings” on page 65.
Note: If the communicator cannot find the
relevant contact card within three seconds
from receiving an incoming call, the default
ringing tone Grande Valse will replace the
selected individual ringing tone. This may
happen if you have many hundreds of contacts
cards stored in your communicator.
Attached image — You can attach a picture of the contact to the contact card.
You can then send the picture with a business card, and the picture is shown
on the display when the person calls you.
The picture must first be stored in JPEG format in the Contact images
subfolder of the Downloaded files folder, where it is then selected. Choose a
picture and press OK.
When a picture is attached to a contact card, it is automatically adjusted to
the proper size. If there is an old picture in the contact card, it will be replaced
by the new picture. If you want to keep the original picture, make a copy of it
and give it a different name, or move the copy to another folder, before you
attach the new picture.
Note: If you want to attach a picture to a
contact card located in the contacts
database of the memory card, the picture
must first be stored in the Contact
images folder of the memory card.
53
Contacts
Speed dials — You can set a speed dial number for the selected contact card.
To set speed dials
Speed dialling is a quick way to call frequently used phone numbers. You can
assign speed dials to eight phone numbers. Number 1 is reserved for calling
your voice mailbox. For information on how to use the speed dials, see ”To use
speed dialling” on page 151.
1 Press Options in an opened contact card and select Speed dials. All phone
number fields of the contact card are shown.
2 Select a field to which you want to assign a speed dial and press Change.
3 Select a number and press OK. The speed dial number will be shown in the
contact card with the icon . See figure 2.
1999 Nokia Mobile Phones. All Rights Reserved.
Page 54

54
To change or remove speed dials
1 Select the speed dial you want to change or remove and press Change.
Contacts
2 Move the selection frame to the new location and press OK. If you want to
remove a speed dial location, choose None.
To store DTMF tones
For information on how to send DTMF tones, see ”Multiple calls” on page 62,
or ”To send DTMF tones” on page 152.
If you need both a voice and a DTMF phone number for the contact, store the
DTMF sequence in the Tel field, in which case the phone number and the DTMF
sequence must be separated by one of the special characters in table 1. Or add
a DTMF field to the contact card with the Add field command.
Character Function
* and # May be used if the DTMF service requires them.
p (pause)
w (wait)
To use the Menu button
Pressing the Menu button in an opened contact card opens a new set of
options:
Duplicate card — Creates a copy of the current card.
Copy contents — Copies the contents of the card to a clipboard. You can add
this information to documents by pressing Ctrl-V.
Next card — Opens the next contact card in the directory.
Previous card — Opens the previous contact card in the directory.
Fetch — If you have selected the URL field of a contact card with the selection
frame, pressing Fetch starts the WWW application and opens a connection to
the first URL address in the field.
Belongs to groups — Shows all the groups of which the current contact is a
member.
To view the contact information on your SIM card
1 Press the Menu button in the Contacts directory, and select the SIM card
memory option.
2 Select the contact with the selection frame and press Open.
Inserts a pause of 2.5 seconds in front of, or between,
DTMF digits.
When the “w” character is stored in a sequence, the rest
of the sequence is not sent until you press Send again in
the Telephone application.
Table 1
1999 Nokia Mobile Phones. All Rights Reserved.
Page 55

To add a new contact to the SIM card memory, press New.
To remove the selected contact(s) from the SIM card memory, press Clear.
To return to the Contacts main view, press Close.
If you press the Menu button in the SIM contents view, the following options
become available:
Sort by name/Sort by location — Arranges the contacts in alphabetical order or
in the order of their memory location.
Copy SIM contacts — Copies the selected contact(s) to the Contacts directory.
SIM info — Shows the amount of data in the SIM card memory.
Note: The SIM card cannot be
accessed if the Fixed dialling
function is on. See ”Settings
(Menu 4)” on page 159.
Contact groups
You can create contact groups in order to be able to send mail or short
messages to a group of people at the same time. See figure 3.
To create a group
1 Use multiselection in the Contacts directory to select the contacts you
want to include in the group.
2 Press the Menu button and select the Create group option
You can also create an empty group by pressing the Menu button and
selecting Create group, and add members later. See below.
When you close a new group contact card for the first time, you will be asked
to enter the name of the group.
To add new contacts to a group
1 Open the group contact card and press Add. A list of contacts opens.
2 Select the contact(s) you want and press Add.
55
Contacts
1999 Nokia Mobile Phones. All Rights Reserved.
Page 56

56
To remove contacts from a group, open the group contact card, select the
contact(s) to be removed and press Remove.
Contacts
Figure 3
To use the Menu button
When you press the Menu button in an opened group contact card, the
following options become available:
Rename group — Allows you to give the group a new name.
Belongs to groups — Shows all the groups to which the selected contact
belongs.
List of groups — Opens a list of all contact groups.
Logs
The Contacts application shows all communication events as two logs: the
General log shows all, or certain types of, communication events in
chronological order. The Individual log shows a list of all communication
events relating to the selected contact.
Note: Remote mailbox, Terminal
and Internet connections are
logged as data calls.
To access the logs
1 Press the Menu button in the Contacts directory.
2 Select either Individual log or General log.
To erase the contents of the log
1 Press Clear list.
2 A pop-up box opens to let you define how old communications you want
to remove. The clearing procedure reflects on the other log as well.
To make a new contact card
1 Open the General log.
1999 Nokia Mobile Phones. All Rights Reserved.
Page 57

2 Select a log event and press Create card. If the contact card already exists,
the command is dimmed.
To view only certain communication types
1 Open the General log and press Filter.
2 Select the communication type you want to view and press OK.
57
Contacts
1999 Nokia Mobile Phones. All Rights Reserved.
Page 58

58
Contacts
1999 Nokia Mobile Phones. All Rights Reserved.
Page 59

59
6. Telephone
The Telephone application is started by pressing the Tel. application button on
the keyboard. Some of the operations explained here can also be made via the
phone.
You can have two separate phone lines, see ”Telephone settings” on page 65.
Note: Opening or closing the cover does not affect
active phone calls. If you have made a voice call via the
phone and you open the cover, the Telephone
application starts automatically. You can continue the
call after pressing Audio on. See ”Handsfree mode” on
page 61.
To make a call
In order to make phone calls, a valid SIM card must be inserted and the phone
must be switched on. There are three ways to make a call.
Note: When making a call,
make sure that the antenna at
the top of the communicator
is up.
To make the call manually
1 Enter the telephone number in the search field.
2 Press Call.
To call a number in the Telephone directory
When you have no active voice calls, the Telephone main view shows the
Telephone directory, see figure 1. Contact cards that do not contain any phone
numbers appear dimmed in the directory and cannot be selected.
1 Select a contact in the Telephone directory either by scrolling or by using
the search field.
2 Press Call. If the contact has more than one phone number, a pop-up box
opens, listing all the contact’s phone numbers. Choose a number from the
list and press Call.
Telephone
1999 Nokia Mobile Phones. All Rights Reserved.
Page 60

60
Telephone
Figure 1
To call a number in the Recent calls list
1 Press the Recent calls command.
2 Select the Dialled, Received or Missed calls list and press Open.
3 Select a number from the list and press Call.
Tip: When you open the Dialled,
Received or Missed calls list and
select a contact, Create card enables
you to make a contact card for the
contact.
Once you have made the call, you can close the cover and continue the call
with the phone, unless you want to use the handsfree option, see ”Handsfree
mode” on page 61.
To call a number on the SIM card
1 Press the Menu button in the Telephone directory.
2 Select SIM card memory and press Select.
If you wish to return to the Telephone directory, press the Menu button again
and select Telephone directory.
To check call costs
1 Press the Menu button in the Telephone directory.
2 Select Show call costs and press Select.
To answer a call
1 When you receive a call while having the communicator cover open, a note
about the incoming call is shown on the display. If you are called by a
person who has a contact card in your Contacts directory, as in the figure
2, the caller’s name is shown on the note, if this feature is supported by the
network. To answer the call, press Answer. Or,
1999 Nokia Mobile Phones. All Rights Reserved.
Page 61

2 Close the device cover and answer the call via the phone by pressing .
61
Note: You cannot have two active calls at
the same time. If the Call waiting network
service is activated in your SIM card, the
active call is automatically put on hold
when you answer the new incoming call.
If you do not want to take the call, press End call or . The caller will hear
the alerting tone change to a “line busy” tone.
Tip: If you do not want your communicator to
alert, a quick way to make the communicator
silent is to close the cover and press the key on
the phone. Press the key again until the selection
frame is on the Silent profile. To select the profile,
press and hold .
To use the Menu button
If you press the Menu button while having a call active, the following options
become available:
Send DTMF — Allows you to send DTMF tones. Select one of the predefined
sequences, or enter a new sequence in the input field.
Voice recorder — Enables you to record voice memos. See ”Voice recorder” on
page 144.
More info — Allows you to view the other party’s contact card and individual log.
Settings — Enables you to change the Telephone settings, see ”Telephone
settings” on page 65.
Telephone
Handsfree mode
When you have a call, the handsfree mode allows you to speak and listen to
the communicator from a short distance when the cover is open. This function
is not available when the cover is closed.
The Telephone setting Audio when cover opened determines whether the
handsfree mode is activated automatically after you open the cover. To set the
handsfree mode on manually, press Audio on.
After the audio has been set on, the command changes to Volume. Press
Volume to adjust the speaker volume or to turn the audio off. The indicator
shows the chosen volume level.
1999 Nokia Mobile Phones. All Rights Reserved.
Page 62

62
Multiple calls
When you have made a call, information about the call is shown on the
Telephone
display. In addition to the active call, you can have a call on hold and a waiting
call at the same time. The conference call, which can accommodate up to five
remote participants, is handled as a single call.
To switch between multiple calls, use the arrow keys. The command buttons
change according to the status of the selected call. For example, a call on hold
can be changed to an active call by pressing Activate.
Figure 2
The call information may include the following (see figure 2):
The name or phone number of the caller and a picture, if available.
The status of the call: active, on hold, waiting, or conference, and whether the
audio is off.
The call timer displays how much time has expired since the beginning of the
call. The timer also counts the time spent on hold.
The call cost counter shows the cumulative cost of the call, if this network
service is available and the call cost setting is on. You can determine whether
to calculate the call costs in currency or charging units in the Telephone
settings, see ”Telephone settings” on page 65.
To end a call, select the call with the arrow keys and press End call.
Note: The actual invoice for calls and
services from your service provider may
vary, depending upon network
features, rounding-off for billing, taxes
and so forth.
1999 Nokia Mobile Phones. All Rights Reserved.
Page 63

To make a new call
1 If you already have an active call and a call on hold, drop one of the calls or
merge them into a conference call.
2 Press New call and make the new call normally. The previous call will be
put on hold.
To make a conference call
The conference call is a network service. Contact your network operator to
check if this service is available. In a conference call, you and up to five
remote persons can hear each other simultaneously.
1 Make the first call normally.
2 Once this person has answered, make a call to the second participant by
pressing New call. The first call is put on hold.
3 Wait until the second person answers the call.
4 To include the first participant in the call, press Conference call. If you
want to include a new person in the conference call, repeat this operation.
5 When all participants have been included in the conference call, the best
voice quality is achieved by closing the cover and continuing the call via
the phone.
63
Telephone
Figure 3
To end the call with a conference call participant
1 Press Conference commands.
2 Select the caller from the list of participants (figure 3) and press Drop.
To talk privately with one of the conference call participants
1 Press Conference commands.
2 Select a participant from the list and press One to one. The call is now split
into two: the conference call is on hold and the one-to-one call is active.
3 Once you have finished the private conversation, you can connect the
person back into the conference call by pressing Conference call.
1999 Nokia Mobile Phones. All Rights Reserved.
Page 64

64
To transfer calls
The call transfer is a network service which enables you to connect two calls
Telephone
together and disconnect yourself from both calls.
1 When you have one call on hold, and another call active or an outgoing
call alerting, press Transfer to connect the calls together.
Note: Calls can be transferred only
if all calls are voice calls, not fax or
data calls, and none of the calls is a
conference call.
To answer a waiting call
Call waiting is a network service to which you must subscribe before you can
use it. Call waiting is set on in the Telephone settings, see ”Telephone settings”
on page 65.
1 When you receive a new call while you already have an active call, you will
hear a sound and see a note informing you of the new incoming call.
2 Press Answer. The previous call will be put on hold.
To send DTMF tones when you have an active call
1 Key in the digits from the communicator keyboard. Each keystroke will
generate a DTMF tone which will be transmitted directly.
Besides the numbers 0 - 9, you can also use the characters p, w, * and #
when sending DTMF tones. For information on the functions of these
characters, see ”To make contact cards” on page 51.
Or alternatively,
1 Press the Menu button and select Send DTMF. The DTMF sequences stored
in the other party’s contact card are shown. For information on how to
store DTMF sequences, see ”To make contact cards” on page 51.
2 Select a DTMF sequence. You can edit the sequence, or, if there are no
stored sequences, you can write a new DTMF sequence into the input field.
3 Press Send.
Tip: You cannot access the stored DTMF
sequences during a conference call.
However, you can send DTMF tones
during a conference call by keying in the
digits from the keyboard.
To make alternating calls
An alternating call is made as a voice call, but it changes into a fax call. An
alternating call can be made to a fax box, for example: you initiate the call as
1999 Nokia Mobile Phones. All Rights Reserved.
Page 65

a voice call, but it changes into a fax call when your fax box starts to send you
your faxes.
To make alternating calls, you need to add a special Tel/Fax field to the
contact cards of the recipients of your alternating calls. See ”To make contact
cards” on page 51.
You can also change the mode of the call from voice to fax manually by
pressing Change call mode.
Alternating calls cannot be put on hold or incorporated into a conference call.
Telephone settings
Press Settings in the Telephone main view to open a list of several settings
groups.
To change the settings
1 Select a settings group and press Change to open it.
2 Select a setting and press Change. The current value of the setting is
displayed after the setting name, unless the setting is one the network
services: call diverting, barring or waiting. See the following sections.
Profile settings
The profile settings are used for selecting the operating environment for the
communicator, and for modifying the profile features. One profile is always in use.
65
Telephone
Figure 4
Profile in use — Press Change and select the profile you want to use. Press OK.
Profiles — With this setting you can modify the profiles. The available profiles are:
General — The normal profile of the communicator.
Silent — You can set this profile on when you want all the alert tones to
remain silent.
Meeting — You can specify how the communicator operates when you are
in a meeting.
Outdoor — You can specify how the communicator operates when you are
outdoors.
1999 Nokia Mobile Phones. All Rights Reserved.
Page 66

66
Pager — You can set this profile on when you want the communicator to
act as a pager, i.e. the ringing tone sounds only once and received SMS
messages alert.
Telephone
Flight — Sets on the flight profile, see ”Flight profile” on page 69.
Car — The car profile is set on automatically when the communicator is
connected to a car kit.
Headset — The headset profile is set on automatically when a headset is
connected to the communicator.
Press Rename to change the names of the profiles.
Press Edit to modify the following features of a profile:
All alert tones — You can set the incoming call alert and other alarms to:
Ringing — The normal alert tone is used.
Ascending — The normal alert tone is used, but the volume of the tone
increases gradually.
Ring once — The alert tone sounds only once.
Beep once — A single beep is heard when you receive a call or a message.
Caller groups — The alert tone will only sound when you receive a call from
a member of the selected caller group. See below.
Silent — All the sounds, except the alarm clock, are turned off.
Whatever the chosen setting, an incoming call is always indicated by a note.
Ringing volume — Adjusts the ringing volume: 1 is the lowest, 5 the highest.
Ringing tone — Determines the ringing tone. To compose your own ringing
tones, see ”Composer” on page 141, and to record a ringing tone with the
Digital voice recorder, see ”Voice recorder” on page 144.
Communicator key click — Sets the communicator keyboard sound to Off, Type
1 or Type 2 .
Phone key click — Adjusts the phone keypad sound: 1 is the lowest, 3 the
highest, Off turns off the keypad sound.
Divert all voice calls — You can divert all your incoming voice calls to another
phone number. The option Default diverts uses the diverts set in the Network
settings. See below.
Phone lights — The phone display and keypad lights are either permanently on,
or they remain on for the pre-set time period. Available in the car profile only.
Automatic answer — All calls are automatically answered. Available in the car
profile only.
Caller groups — Set one or several contact groups to Yes, and only those calls
that come from people belonging to these groups, alert. All the other sounds
1999 Nokia Mobile Phones. All Rights Reserved.
Page 67

are turned off, which also means that you won’t be alerted if you receive an
SMS or a fax from a member of a caller group.
Call settings
Own number sending — You can select whether to keep your phone number
hidden from the recipients of your phone calls. Do not use this function unless
it has been activated for your SIM card.
On — Your number is shown to all the recipients of your calls.
Off — Your number is hidden from all the recipients of your calls.
Preset — The value stored in the network is used.
Next on — Your number is shown to the recipient of your next call.
Next off — Your number is hidden from the recipient of your next call.
Call cost settings — You can set on the call cost counter and modify its
settings. Changing the settings requires the PIN2 code.
Audio when cover opened — Determines whether the handsfree mode is set on
automatically after you open the cover.
Call timer display — If set to On, the call timer is shown during calls.
Automatic redialling — When this function is set on and you call a number
that is busy or does not answer, the communicator will attempt to call the
number until the call is connected.
Phone line in use — If your network and SIM card support this feature, you can
have two different subscriptions for voice calls. These subscriptions are
referred to as Line 1 and Line 2. Each line may have separate settings for some
functions. With this setting, you can determine which phone line is currently
in use for all outgoing calls.
Default call mode — In some networks you have the same phone number for
all your voice, fax and data calls. If you want to receive any calls, you must set
your phone to some answering mode. The available modes are Voice, Fax, Data
and Voice/Fax.
Network settings
The network services may not be supported by all operators, or you may have
to subscribe to them.
Information about the status of these services is stored in the network.
Therefore, the current settings are not shown until you request the
information from the network by pressing Get status.
While the communicator is making a request to the network, a query note is
shown on the display. After a successful request, the new status now appears
in the settings list.
To cancel all call diverts or barrings, press Cancel call diverts or Cancel call
barrings.
67
Telephone
1999 Nokia Mobile Phones. All Rights Reserved.
Page 68

68
Voice call diverting — This network service allows you to direct your incoming
voice calls to another phone number.
1 Choose a divert option:
Telephone
Divert all calls — All incoming calls are diverted.
Divert when phone is busy — Incoming calls are diverted when the phone is
busy.
Divert when not answered — Incoming calls are diverted when you do not
answer them. Delay allows you to choose the time period after which the
call is diverted. The available time periods are 5, 10, 15, 20, 25 and 30
seconds.
Divert if not reachable — Incoming calls are diverted when the phone is
switched off or outside the network service area.
2 Press Change, and select one of the following options:
To — Enter the number to which you want to divert the calls.
To voice mailbox — Calls will be diverted to your voice mailbox. The phone
number of the voice mailbox must be set in Other settings.
Off — Calls are not diverted.
Note: If you have subscribed to the
Alternate phone line service, this
setting applies only to the selected
phone line.
Voice call barring — This network service enables you to restrict outgoing and
incoming voice calls. If you take the call barring into use or change the barring
settings, you will need the barring password, which you obtain from the
network operator. The available options are:
All outgoing calls — Calls cannot be made.
All international calls — Calls cannot be made to foreign countries.
International except home country — Calls can be made only within the
current country and to your home country, i.e. the country where your
network operator is located.
All incoming calls — Calls cannot be received.
Incoming calls when abroad — Calls cannot be received when you are
outside your home country.
Note: When sec ur it y feat ur es whi ch r es tr ic t
calls are in use (call barring, call diverting),
calls may be possible to certain emergency
numbers in some networks (e.g. 112 or
other official emergency number).
1999 Nokia Mobile Phones. All Rights Reserved.
Page 69

Call waiting — When this network service is set on, the network will notify you
of a new incoming voice call while you have an active call. You will hear a
sound and see the caller’s name or phone number, and the text WAITING on
the display.
Other settings
Voice mailbox number — Set a new or change the phone number of your voice
mailbox. You can call your voice mailbox by pressing Voice mailbox in the
Telephone main view.
Note: Your network operator may be
able to update your voice mailbox
number via a special SMS message.
Contact your network operator for
details.
Individual ringing tones — You can set the individual ringing tones function on
or off. See ”To make contact cards” on page 51.
Flight profile
The flight profile prevents you from accidentally turning on your phone in an
aircraft.
To set on the flight profile
1 Press Settings in the Telephone main view.
2 Choose Profiles and press Change.
3 Scroll to Profile in use, press Change and select Flight.
4 Press OK.
With the flight profile active, you may read previously downloaded mail, write
mail, notes, short messages, faxes, or update your calendar. Once you have left
the aircraft, you can turn off the flight profile by pressing Exit profile, turn on
the phone by pressing , and your short messages, faxes and mail will be
sent automatically.
When the communicator is in the flight profile, emergency calls must be made
from the phone:
1 Press . The phone display will read FLIGHT PROFILE ACTIVE.
2 While the FLIGHT PROFILE ACTIVE text is visible (for approximately five
seconds) you can dial the emergency number, e.g. 112.
3 Press .
69
Telephone
1999 Nokia Mobile Phones. All Rights Reserved.
Page 70

70
Telephone
IMPORTANT! Never use the phone when in an aircraft. If the aircraft
personnel allow use of the communicator interface, you MUST activate
the flight profile. The flight profile will allow use of the communicator
interface only and will prevent use of the phone.
Be aware that all communications applications, Telephone, Fax, SMS,
Mail, and Internet, require use of the phone.
Figure 5
1999 Nokia Mobile Phones. All Rights Reserved.
Page 71

71
7. Fax
Fax is started by pressing the Fax application button on the communicator
keyboard.
To send and receive faxes, the phone must be on; the network you are using
must support fax calls; and the fax service must be activated for your SIM
card. Contact your home service provider for details.
When a fax is being sent or received, the FAX indicator appears in the
indicator row of the display.
Note: Voice calls cannot be
made or received when a fax is
being sent or received.
The Fax main view shows:
Own texts folder — Contains all created faxes, short messages, memos, notes
and mail stored on the communicator.
Received faxes folder — Contains all received faxes.
Document outbox — See ”Document features” on page 34.
To send faxes
To write a new fax
1 Press Write fax in the Fax main view.
2 Write the fax.
3 Press Recipient. The Fax directory opens.
To send your own text as a fax
1 Select the Own texts folder in the Fax main view and press Open.
2 Select a document and press Open.
3 Press Recipient to access the Fax directory.
To forward a received fax
1 Select the Received faxes folder in the Fax main view and press Open.
2 Select a fax and press Open.
3 Press Forward to access the Fax directory.
Fax
1999 Nokia Mobile Phones. All Rights Reserved.
Page 72

72
Fax
Tip: Forward options allows you to select the
specific pages you want to send: All, This page, or
Pages. Choose Pages to enter the page numbers,
first through last, e.g. 3-5, that you want to
forward.
To select a recipient
1 Select a contact in the Fax directory and press Select. See figure 1. The
names of contacts who have no fax number are dimmed and cannot be
selected.
2 If the selected contact has several fax numbers, a pop-up box opens.
Choose a number from the list and press Select.
Figure 1
If there is no contact card in the Contacts directory for the recipient to whom
you are sending the fax, press Enter number to enter the fax number
manually, or obtain the information from the Recent numbers list by pressing
Recent numbers. The list contains the fax numbers with which you have
recently had contact. Choose a number and press Select.
Tip: If you press Clear both lists in the Recent
numbers view, all information in the lists is
removed. When you open one of the lists and
select a contact, Create card enables you to
create a contact card for the contact.
Fax cover page and send options
The fax cover page contains three fields, see figure 2. You can edit the entries in
all the cover page fields. The From field is always filled automatically according
to the User data card in the System application. See ”User data” on page 130.
To adjust the fax sending options, press Send options. The send options are:
Cover page, Send resolution, Logo file, Signature file, Begin sending, Resend,
and ECM. For more information, see ”Fax settings” on page 74. To change an
option, select it and press Change.
1999 Nokia Mobile Phones. All Rights Reserved.
Page 73

Figure 2
To send the fax, press Send. The fax is handed over to the Document outbox,
which will send the fax as soon as possible.
Note: In case the sending
fails, be sure to save all your
important faxes.
To receive faxes
Faxes are received automatically, provided that this service is available and
that the phone is on and within cellular coverage. All received faxes go to the
Received faxes folder.
If you do not wish to receive the fax, close the cover and press .
When a new fax has been received, you will hear a tone - unless the system is
set to a silent profile - and an information note is shown on the display.
To read a received fax
There are two ways to read a received fax:
1 When you receive a note informing you that you have received a fax, press
View. Or,
2 Press Cancel to dismiss the note. You can then open the Received faxes
folder, where unread faxes are marked with . Select the fax and press
Open. The fax viewer opens.
You can use the up and down arrow keys to scroll the fax. The left and right
arrow keys can be used for horizontal scrolling.
To remove the viewed fax, press Delete.
73
Fax
Tip: A list of shortcuts for viewing
faxes and other operations can be
found in ”Document features” on page
34.
1999 Nokia Mobile Phones. All Rights Reserved.
Page 74

74
Fax
Figure 3
To zoom the viewed fax
1 Press View. A new set of commands becomes available. See figure 3.
2 Each press of Zoom in enlarges the document on the display. The fax can
be scrolled horizontally with the left and right arrow keys.
Each press of Zoom out reduces the image.
Each press of Rotate rotates the fax 90 degrees clockwise with each press
of the command button.
To return to the previous commands, press Back.
Tip: You can also use the Zoom
button to magnify the fax on the
display.
To print the viewed fax
1 Press the Menu button.
2 Select Print.
Tip: You can transfer received faxes to a PC with
the PC Suite program. Please note, however, that
these faxes will be converted to the TIFF format.
To view all the pages of a fax on a PC, use a
graphics program (e.g. Windows Imaging).
Fax settings
Press Settings in the Fax main view to change the settings of all your faxes.
Cover page — Provides you with the following options:
Header — The cover page contents will be attached to the beginning of the
first fax page.
1999 Nokia Mobile Phones. All Rights Reserved.
Page 75

Separate page — Only the cover page contents are shown on the first page
of the fax.
None — No cover page information will be attached to the fax. The first
page of the document will be the first page of the fax.
Begin sending — Lets you choose when the fax is sent:
Immediately — The fax is sent right away.
At [time] — You can determine the time when the fax is sent. Use the time
format hh:mm. This option enables you to take advantage of cheaper
calling times.
Receive resolution:
Standard — The fax will be received using 200 (width) x 100 (height) dots
per inch (dpi) resolution.
Fine — (200 x 200 dpi). Receiving faxes with fine resolution will take longer
and requires approximately twice as much memory as with standard
resolution.
Send resolution:
Standard — 200 x 100 dpi.
Fine — (200 x 200 dpi). Sending faxes with fine resolution takes longer and
temporarily requires more free memory than when using standard
resolution.
Logo file — Enables you to add for example the logo of your company to the
fax cover page. The logo file must first be stored in the GIF or JPEG format in
the Downloaded files folder. The logo is not shown on the display.
No image — No logo is attached to the fax.
[File name] — All the available files in the Downloaded files folder are listed
in the pop-up box. Select the one you want to attach to the fax.
Signature file — Allows you to add your signature to the fax cover page. The
signature file must first be stored in GIF or JPEG format in the Downloaded
files folder. The signature is placed under the Remarks field, but not shown on
the display.
No image — No signature is attached to the fax.
[File name] — All the available files in the Downloaded files folder are listed
in the pop-up box. Select the one you want to attach to the fax.
Fax call barring — This network service allows you to place restrictions on
outgoing and incoming faxes.
Fax call diverting — This network service allows you to divert incoming faxes
to another fax machine. For more information and instructions on how to
change diverting and barring settings, see ”Telephone settings” on page 65.
75
Fax
1999 Nokia Mobile Phones. All Rights Reserved.
Page 76

76
Resend — Allows you to choose which pages will be sent again if the fax
Fax
sending has failed and the Document outbox tries to send the fax again.
All pages — All pages are resent.
Missed pages — Only the pages which were not sent completely are resent.
ECM — When the Error Correction Mode is On, any pages containing errors are
automatically received again, until the defects are corrected.
Fax polling — Some networks provide this service which allows you to make a
fax call to a fax machine, then receive information by fax. Contact your
network service provider for further details.
Note: When you set Fax polling to
On, Fax polling becomes one of
the commands in the Fax main
view.
Alternate fax receiving — As a default, this setting must be set to As fax. If
your network requires you to receive alternate voice/fax calls, you must set
this to As voice/fax. This setting applies also to the Fax modem application.
1999 Nokia Mobile Phones. All Rights Reserved.
Page 77

8. Short messages
The Short Messages application is started by pressing the SMS application
button on the keyboard.
The Short Message Service (SMS) enables you to send and receive short text
messages of up to 160 characters over the digital cellular network. If the
message is longer, it will be sent as several short messages.
To send and receive short messages, the Short Message Service must be
supported by the network you are using and activated for your SIM card; the
SMS message centre number must be stored in the settings of the SMS
application; and the phone must be on. Contact your home service provider
for details.
SMS messages can be sent or received even during a voice or data call.
Messages can be read in any wireless phone that has the capability. If the
receiving phone is off at the time of sending, the SMS message centre
continues to attempt to send the message until the validity period allowed by
the network expires.
The SMS main view shows the following folders:
Own texts — Texts that you have written.
Received messages — Messages that you have received.
Standard messages — Predefined message templates.
Business cards — All contact cards in the Contacts directory.
Info messages — Informative messages sent by the network.
Delivery reports — Information about the status of sent messages.
Document outbox — See ”Document features” on page 34.
77
Short messages
Figure 1
1999 Nokia Mobile Phones. All Rights Reserved.
Page 78

78
To send short messages
To write a new short message
1 Press Write message in the SMS main view to open the short message
Short messages
editor, which resembles a postcard. A character counter showing how
many characters you have typed and in how many messages they will be
sent appears at the top of the postcard, see figure 1.
2 Write the message.
3 When the message is ready to be sent, press Recipient. The SMS directory
opens.
Note: You can only send short
messages to wireless phone numbers
stored in the Tel(GSM) field of
contact cards.
To send a previously written document
1 Select the Own texts folder and press Open.
2 Select a document and press Open. When you open a text containing
formatting, you will be asked whether you wish to make a copy of the text
(press Copy), or edit the original text (press Edit). Editing will lose the
formatting of the original text.
3 When the message is ready to be sent, press Recipient. The SMS directory
opens.
Figure 2
To select a recipient
There are three ways to select a recipient for your short message:
1 Select a contact in the SMS directory, and press Select. Or,
2 Press Enter number and enter the phone number manually. Or,
3 Press Recent numbers to get a list of recent short message numbers, open
one of the lists, select a contact, and press Select.
1999 Nokia Mobile Phones. All Rights Reserved.
Page 79

Tip: If you press Clear both lists in the Recent
numbers view, all information in the lists is
removed. When you open one of the lists and
select a contact, Create card enables you to
create a contact card for the contact.
If you want to add more recipients to the message, press Add recipient.
If you want to select the recipients from your SIM card, press the Menu
button, select SIM card memory, and choose the recipients.
Tip: To send the message to several recipients,
use multiselection, see ”To select several
items” on page 33, or create a contact group,
see ”Contact groups” on page 55.
To send the message
1 If necessary, adjust the sending options for the current message by
pressing Send options. Press Change to set a new value for the current
message. The send options, Reply via same centre, Validity period, Message
centre in use, Message conversion and Request delivery report, are the
same as in the SMS settings, see ”SMS settings” on page 82.
2 Press Send. If your message is longer than 160 characters, it will be sent as
several short messages, provided that your network supports this feature.
To receive messages
Short messages are received automatically, provided that this service is
available and that the phone is on and within network coverage. A received
short message can be a normal short message, business card or a service card.
All received short messages go to the Received messages folder.
When a new short message has arrived, a tone will sound – unless the device
is set to a silent profile – and an information note is shown on the display.
When you open a received message, the stamp on the right half of the
message is postmarked, and the time and date the message was sent are
shown below the sender’s name or number.
To read a message
There are two ways to read a received message:
1 When you receive a note informing you of a received short message, press
View to read the message. Or,
2 Press Cancel to dismiss the note. You can then open the Received
messages folder where unread received messages are marked with
79
Short messages
1999 Nokia Mobile Phones. All Rights Reserved.
Page 80

80
and unread received business cards with . Select the message and
press Open.
To reply to a received message
1 Select the Received messages folder and press Open.
Short messages
2 Open the selected document and press Reply. The contents of the received
message are not included in the new message automatically. If you want
to include them, press the Menu button and choose the Reply (include
text) option.
3 Write the message and press Send.
To forward a received message
1 Select the Received messages folder and press Open.
2 Open the selected document, press Forward. The contents of the received
message are included in the new message.
3 Press Recipient and select a recipient from the SMS directory.
4 To send the message, press Send.
To use the Menu button
When you press the Menu button in an opened received message, you can also
use the following options:
Find number — If the message contains phone numbers, press Next number
to toggle between these numbers and to select one of them. Press Call to
make a phone call to the number.
Reply (include text) - Replies to a SMS message and includes the received SMS
in your reply.
Find URL — If the message contains URL addresses, press Next URL to toggle
between these addresses and to select one of them. Press Fetch to start the
WWW application and to open a connection to the selected address.
Print — Prints the message.
Service cards
A DTMF service provider may send DTMF sequences to its subscribers in the
form of a service card that can be stored in the Contacts directory. For more
information on DTMF tones, see ”To send DTMF tones” on page 152.
Standard messages
You can store frequently used short messages as standard messages, and send
them instead of writing a new message every time. Standard messages are
stored in the Standard messages folder.
To write a new standard message, open the Standard messages folder and
press Write message. The commands in a new standard message are:
1999 Nokia Mobile Phones. All Rights Reserved.
Page 81

Recipient— Opens the SMS directory.
Delete — Removes the standard message from the Standard messages list.
Close — Returns to the Standard messages folder.
Business cards
Figure 3
A business card is a special short message containing personal information
about a contact, just like a normal business card. You can send your own
business card or any contact card as a business card.
Business cards sent from a device that supports the Nokia 9110
Communicator contact card format can be saved directly as new contact
cards in the Contacts directory. Just open the received business card and press
Create card.
Tip: When you have received a
business card, press Reply to
send your own business card to
the sender.
81
Short messages
To send a contact card as a business card
1 Open the Business cards folder.
2 Select a business card and press Open.
3 Press Options to define which fields to include in the business card.
Change toggles the fields on or off. If you are sending the business card to
a Nokia 9000 Communicator, Nokia 9000i Communicator, or a wireless
phone, select Compact. This makes the business card to a compatible
format. When sending the business card to another Nokia 9110
Communicator, select Generic.
4 Press Recipient to select a recipient for the business card. Or, if you want
to send the business card to another communicator via the infrared link,
press Transfer via IR (be sure to activate the Infrared activation
application in the receiving communicator).
5 Press Send.
1999 Nokia Mobile Phones. All Rights Reserved.
Page 82

82
Note: Sending a business card
with an attached picture makes
Short messages
the message very long and may
be expensive.
SMS settings
Press Settings in the SMS application main view to change the settings. The
settings you define here are used until you change them again.
Message centre settings — In order to be able to send short messages, you
must have stored the number of the message centre in this setting and
selected which message centre you want to use in Message centre in use. You
can add new or edit existing message centre numbers in Message centres.
Note: The message centre number may be
included in some SIM cards. If you use
several SIM cards in your communicator,
make sure that this setting contains the
appropriate message centre number.
Reply via same centre: Yes / No — This network service allows the recipient of
your short message to reply using your short message centre. By setting this
option to Yes, you allow the recipient to reply to your message, even if the
recipient does not subscribe to the Short Message Service, provided that the
recipient has the means to type a reply message.
Validity period: 1 h / 6 h / 24 h / One week / Maximum — If the recipient of a
message cannot be reached within the set validity period, the message is
removed from the message centre. If Maximum is chosen, the validity period
is set to the maximum value allowed by the message centre. Note that the
network must support this feature.
Message conversion: None (sent as a normal short message) / Fax / X.400 /
Paging / E-mail / ERMES / Speech (message synthesised from a short message)
— In order to receive a converted message, the recipient must have an
appropriate device available, and the network must support this feature. For
example, if you choose Fax, the recipient must have a telefax machine or
similar device connected to the number.
Request delivery report: Yes/No/Show immediately — When this network
service is set to Yes, the status of the sent message (Delivered, Pending, Failed)
is shown in the Delivery reports folder. When set to Show immediately, you
will receive a note when the message has been delivered to the recipient.
Send long messages: Yes/No — If set to No, messages that are longer than 160
characters are sent as several SMS messages. If set to Yes, messages that are
longer than 160 characters are sent as several messages, but if the recipient
1999 Nokia Mobile Phones. All Rights Reserved.
Page 83

has a Nokia 9110 Communicator or a Nokia 9000i Communicator, the
messages are received as one long message.
Receive info messages: Yes/No/View index — If your network supports this
feature, it will send you information about various topics. If you choose View
index, the network will send you a list of topics, and you can select those
topics on which you wish to receive information.
Info service mode: Display and save/ Display only/Save only — If this is set to
Display and save, messages are displayed and saved in the Info messages
folder. If you select Save only, info messages are not displayed but saved in the
folder. If you select Display only, messages are displayed but not saved.
Info service language — You can select in which languages you want to receive
info messages. Select either All, or a maximum of four languages.
Info service topics — Message topics vary according to the operator. You can
define here what type of messages you want to receive. For more information
about the Info service, contact your service provider.
83
Short messages
1999 Nokia Mobile Phones. All Rights Reserved.
Page 84

84
Short messages
1999 Nokia Mobile Phones. All Rights Reserved.
Page 85

85
9. Internet
To obtain access to the Internet, the cellular network you use must support
data calls; the data service must be activated for your SIM card; you must
have obtained an Internet Access Point (IAP) from an Internet service
provider; and you must have entered the proper Internet settings.
Your service provider will give you instructions on how to configure the
Internet settings. Follow the instructions carefully.
Tip: With one Internet application active,
you can quickly switch to another by
pressing the Internet application button.
In this way you do not have to make a new
data call.
To start an Internet application
1 Press the Internet application button on the communicator keyboard.
2 Select an application with the selection frame and press Select.
3 To close an application, press Close.
4 To disconnect from the Internet, press Hang up. The “Disconnecting” note
will be shown on the display and the data call will end.
Note: Depending on the network
configuration and load, establishing
an Internet connection may take up
to one minute or even longer.
Internet
Internet applications
Mail — An electronic mail application which lets you send and receive e-mail
all over the world using the Internet.
World Wide Web (WWW) — A hypertext-based system for finding and
accessing resources on the Internet.
Telnet — Allows your communicator to connect to computers that provide
terminal services through the Internet.
Terminal — Allows your communicator to connect to computers, such as
mainframe computers, that provide direct dial-in terminal services. Both
Telnet and Terminal emulate the VT100 terminal.
Text Web — Used for obtaining information from the Internet via SMS.
1999 Nokia Mobile Phones. All Rights Reserved.
Page 86

86
Internet
Tip: There is a glossary of
Internet terms and abbreviations
at the back of this manual.
To set up your Internet access point
If you do not already have an internet access point (IAP) or you want a new one,
this service provides you a convenient way to set up the internet connection.
Before being able to use the Internet services, you need to configure an
Internet connection. You can subscribe to the Internet services of selected
providers in your country directly with your Nokia 9110 Communicator,
provided that the data service is activated for your SIM card. See the
instructions below.
1 Open the WWW application.
2 Select the bookmark "Internet setup" and press Go.
3 Select your home country in the list with the arrow keys and press Go.
4 Confirm the operation by pressing Accept.
5 Select the hyperlink to the Internet service providers and press Go. You will
be connected to the WWW site where you can select your preferred service
provider. The connection is established via a data call.
6 When the connection has been made, follow the instructions on the display
to select a service provider and to subscribe to their Internet services.
Internet settings
Information concerning the settings must be obtained from your Internet
service provider. The service provider may be able to configure the access
point for you via a special SMS message, or a WWW page, which sets all the
necessary Internet access settings.
To define the Internet settings manually, press Settings in the main view of
the Internet application.
Note: The Internet settings
apply to Mail, WWW and
Telnet.
To define an Internet access point
1 In the Internet settings main view choose Internet access and press
Change.
2 To define a new Internet access point, press New. To modify or change an
existing IAP, press Edit.
1999 Nokia Mobile Phones. All Rights Reserved.
Page 87

87
Note: The exact values of the
settings are provided by your
Internet service provider.
The Internet settings are:
Modem initialisation — Enables you to define the modem settings of your
communicator:
Autobauding — The data transmission rate is determined automatically.
Most networks support this option.
Fixed 9600 b/s — A fixed data transmission rate is used. If you have
problems with making a data call, try this option.
Fixed 14400 b/s — Can be used if supported by the network. Do not use this
option, unless you are sure your network supports it.
Custom — When a data call is established, the modem is initialised
according to the string you enter here.
Figure 1
Autodisconnect time: None/2/5/10 minutes — The connection to the Internet
will automatically close after the inactivity period defined here.
V.42bis compression: On/Off — Speeds up data transfer, e.g. sending or
receiving mail, when supported by the cellular network. Set this to Off, unless
you are sure your network supports this option.
Data call barring — You can restrict your data calls in the same way as your
voice calls, see ”Telephone settings” on page 65. To see the current barring
mode, press Get status. To cancel all barrings, press Cancel data barrings.
Internet access — Lists the defined Internet access points. You can configure
the communicator differently for each Internet access point. Press Edit to
change the settings of an existing access point. Press New to define a new
access point. Press Delete to remove an access point.
Internet
Provider name — The name of the Internet service provider. If you define
the access point manually, the name can be edited freely.
1999 Nokia Mobile Phones. All Rights Reserved.
Page 88

88
Internet
Phone number — The telephone number of the Internet access point.
User name — Enter your user name if required by the Internet service
provider. The user name may be needed in the PPP authentication process.
Prompt password: Yes / No — If you must enter a new password every time you
log on to a server, or you do not want to save your password, set this to Yes.
Password — Enter your password if required by the Internet service
provider. The password may be needed in the PPP authentication process.
Advanced settings — Opens a new set of options with which you can
further adjust the Internet access point, if required:
Modem initialisation — Enter any modem initialisation string
containing AT commands here, if needed. This initialisation string is
executed after the initialisation string you define in the Modem
initialisation: Custom option of the Internet settings.
Login customisation: None/Manual — Some Internet access points do
not automatically enable PPP. In such cases you need to choose either
Manual, as it allows you to enter your login name and password
manually in a terminal connection, or press New in the pop-up box, to
write and save a new login script.
If you choose None, your password and user name are automatically
taken from the Internet access point settings.
For more information on login scripts, see the scripts.txt file on the
diskette supplied with the communicator.
PPP compression: On/Off — Speeds up data transfer when supported by
the remote PPP server. If you have problems with establishing a
connection, try setting this to Off.
IP address — The IP address of the communicator.
Default gateway — The IP address of the system that is a gateway out of
the local network.
Network mask — Shows which portion of the IP address of the
communicator identifies the network.
Primary nameserver — The IP address of the primary nameserver.
Secondary nameserver — The IP address of the secondary nameserver.
Tip: Some Internet service
providers refer to these
nameservers as DNS1 and DNS2.
1999 Nokia Mobile Phones. All Rights Reserved.
Page 89

The Nokia 9110 Communicator mail system is compliant with the Internet
standards SMTP, IMAP4, POP3, MIME1 and MIME2.
Mail is started in the Internet main view by selecting Mail and pressing the
Select command button. The Mail main view shows the following folders:
Own texts — Contains the documents you have written with the
communicator. The documents may contain formatted text, but the text will
appear in the editor without formatting.
Received mail — Contains mail fetched from the Remote mailbox. See ”To
fetch mail” on page 94.
Document outbox — The outgoing communications manager of the communicator.
Remote mailbox — Your electronic mailbox service which receives all your
mail. This service may be offered by a network operator, your company, or an
Internet service provider. The required mailbox and Internet access point
settings are described in ”Mail settings” on page 89.
Mail settings
Be sure to define your Internet access point as described in ”Internet settings”
on page 86.
To define the mail settings
1 Press Settings in the Mail main view.
2 Select the item you want to change, and press Change.
89
Internet
Figure 2
Show header fields — The term header field refers to the information given at
the top of an e-mail message. This setting controls which header fields within
the received message will be shown when the message is opened:
None — Shows no header fields, although the sender and the subject of the
message are still shown in the name of the message.
Basic — Shows the Date, From, To and Subject fields.
All — Shows all possible fields.
1999 Nokia Mobile Phones. All Rights Reserved.
Page 90

90
Editor and viewer font: URW Mono / URW Roman / URW Sans — Determines
the font used in the mail editor and viewer.
Internet
Remote mailbox in use — Determines the mailbox to which the connection is made.
Remote mailboxes — Press Change to open the Remote mailboxes view, where
you can add new mailboxes, and edit and remove existing ones. When you
press New or Edit in the Remote mailboxes view, the following options
become available:
Remote mailbox name — Enter the name of the remote mailbox. The name
can be entered freely.
Internet access — Select which Internet access point you want to use for
connecting to this mailbox.
Sending settings — Press Change to define the settings of the mail
messages you send from this mailbox. The settings are:
Own mail address — You must enter the e-mail address given to you by
your Internet service provider. The address must contain the @
character. Replies to your messages will be sent to this address.
Note: E-mail addresses
cannot contain accented
characters, such as é or ä.
Sending host — The IP address or host name of the computer that sends
your Internet mail.
Send mail: Immediately / Upon request / During next connection —
Choose Immediately to send mail automatically; Upon request if you
want to write several mail messages and send them at your
convenience; or During next connection if you want your mail sent the
next time you make a connection to the Internet access point that your
mailbox uses. See ”To send mail” on page 92.
Copy to own mail address: Yes / No — If set to Yes, a copy of the mail will
be automatically sent to the address defined in Own mail address.
MIME character encoding: On / Off — Allows another MIME-compliant
mail system to read the character set used in your communicator. Only
when text containing special characters, e.g. á, ä, ß, is sent to a nonMIME-compliant mail system, should the MIME character encoding be
turned off. When the MIME character encoding is off, special characters
are automatically converted to ASCII characters: á becomes a and so on.
Signature file — Allows you to add your signature to the mail message.
The signature file must first be stored as a text file in the Own texts
folder, where it is then selected.
1999 Nokia Mobile Phones. All Rights Reserved.
Page 91

Receiving settings — Press Change to define the settings of the mail
messages you receive to this mailbox. Your remote mailbox service
provider will supply you with the required information. The settings are:
User name and Password — These may be required to connect to the
server and to open your mailbox.
The password characters appear as asterisks (*) on the display. The user
name and password stored here will automatically be offered to the
server. If you enter your user name and password incorrectly, you will be
prompted to enter them again when you connect to the Remote mailbox.
If you enter your user name and password incorrectly three times, the
connection to the Remote mailbox will end. For information on how to
change the password, contact your remote mailbox service provider.
Receiving host — The IP address or host name of the computer that
receives your e-mail.
Folder — INBOX is the default folder for your incoming mail. Do not
change this setting without consulting your remote mailbox service
provider. This setting is only available when the mail protocol is IMAP4.
Protocol: IMAP4 / POP3 — Choose the mail protocol your remote
mailbox service provider recommends.
Fetch headers: All / Recent — Determines whether all mail or just the mail
received since the last connection will be shown in the Remote mailbox.
It is possible to have old or unread mail in the Remote mailbox.
Fetch attachments: Yes / No — Determines whether possible mail
attachments are fetched or not. This option is only available if the mail
protocol is IMAP4. Note that text attachments are always fetched.
91
Internet
Delete fetched: Yes / No — Determines whether fetched mail will be
automatically removed from the Remote mailbox. All fetched mail goes
to the Received mail folder.
Timed fetching settings — With this setting you can set your communicator
to fetch mail automatically.
Timed fetching: On/Off — Determines whether the timed fetching
function is in use or not.
Start at: Date and Time — You can specify the date and time when the
communicator starts to fetch your mail. Use the date and time formats
specified in the System settings.
Time limit: None/5/10/30/60 min — You can set the time limit for the
fetching operation. This way your communicator will not fetch too
large messages, which would take too much time.
1999 Nokia Mobile Phones. All Rights Reserved.
Page 92

92
Frequency: None/ Daily/ Weekly/ Working days/ Every other week/
Internet
Monthly — Determines how often mail is fetched.
Size limit: None/5/10/50/100/250 kB — You can set the size limit for the
mail to be fetched. This way your communicator will not fetch too large
messages, which would take too much time and occupy too much memory.
To send mail
To write new mail
1 Press Write mail in the Mail main view. An empty mail editor opens.
2 Write the message. You can change the font within the Mail settings.
3 When the message is ready to be sent, press Recipient. The Mail directory
opens.
To send previously written documents
1 Select the Own texts folder in the Mail main view and press Open.
2 Select a document and press Open. If the document contains text
formattings, you will be asked if you want to edit the original and lose all
formattings, or create a copy in the Own texts folder and edit the copy
instead.
3 When the document is ready to be sent, press Recipient to open the Mail
directory.
To select a recipient
There are two ways to select a recipient for your mail message:
1 Select the contact(s) in the Mail directory with the selection frame and
press Select. If a contact has several mail addresses, a pop-up box opens,
listing the available mail addresses. Select an address and press Select. Or,
2 Enter the recipient’s address manually by pressing Enter address.
Remember that the mail address must contain the @ character, and that
the address cannot contain accented characters.
The Mail envelope opens whenever you are about to send mail, see figure 3.
All the field entries are editable.
Figure 3
1999 Nokia Mobile Phones. All Rights Reserved.
Page 93

To add addresses to the To or Cc fields of the Mail envelope
1 Select whether to add a new recipient to the To or the Cc field by scrolling
to the appropriate field.
2 Press Add recipient.
3 Select the recipients as described above.
Note: Multiple addresses in
the To and Cc fields must be
separated by a comma.
To determine how the current mail message will be sent
Press the Menu button in the mail envelope and select Send options. To
change a setting, press Change. The possible options are:
Send mail: Immediately/ Upon request/ During next connection
Copy to own mail address: Yes / No
MIME character encoding: On/ Off
For more information, see ”Mail settings” on page 89.
To send mail upon request
When you have several mail messages to send, you may want to use the Upon
request option. This way you may send all your mail during the same data call.
1 Write your mail, select the recipient, press the Menu button and select
Send options.
2 Select the Send mail: Upon request option and then press Send to send the
mail.
3 Go to the Document outbox and press Open.
4 Press Start to send your mail.
You can also select the During next connection option, with which your mail
will be sent automatically the next time you make a connection to the
Internet access point your Remote mailbox uses.
To add attachments to the message
1 Press Attachments.
2 A list of attachments opens. To add documents to the list, press Add.
3 Select the document(s) from the Own texts and Downloaded files folders
and press Select.
4 When all the desired attachments are in the list, press Close.
5 To send the message, press Send.
93
Internet
1999 Nokia Mobile Phones. All Rights Reserved.
Page 94

94
To fetch mail
Internet
E-mail addressed to you is not automatically received by your communicator,
but by a Remote mailbox, see figure 4. This is to let you determine which
messages you want to read and when. To read your mail, you must first
connect to your Remote mailbox and then select the messages you wish to
fetch onto your communicator. Connection to the Remote mailbox is
established via a data call.
If your Remote mailbox server is capable of sending you special short
messages, you will hear a tone - unless the system is set to a silent profile and see a note when new mail arrives in your Remote mailbox. The message
may also contain information about the mail message, in which case you can
either fetch or remove the mail by pressing Fetch or Delete in this SMS
message.
Figure 4
To connect to the Remote mailbox
The Mail and Internet access point settings must be configured correctly. Read
”Mail settings” on page 89, and follow the instructions given by your Remote
mailbox and Internet service providers.
1 Move the selection frame in the Mail main view over the Remote mailbox
and press Connect.
Unread messages in the Remote mailbox are marked with , unread
messages with attachments with and deleted messages with .
To fetch all new mail
1 Once you have connected to the Remote mailbox, press Fetch new.
2 All mail with the icon is fetched to the Received mail folder.
3 After all new mail has been fetched, connection to the Remote mailbox is
closed and the Received mail folder opens.
To fetch a selected message
1 Select the mail message(s) you want to fetch and press Fetch selected.
2 After the mail has been fetched, the Remote mailbox view returns.
1999 Nokia Mobile Phones. All Rights Reserved.
Page 95

To remove a mail message
1 Set the Delete fetched setting to Yes in the Mail settings. All fetched
messages are removed from the Remote mailbox. Or,
2 Select the message(s) you want to remove with the selection frame, and
press Delete. If you want to cancel the removing, press Undelete.
The messages will be removed when you exit the Remote mailbox. However,
all fetched messages will be retained in the Received mail folder.
To use the Menu button
If you press the Menu button in the Remote mailbox, the following options
become available:
Change folder — Opens another mail folder.
Create folder — Creates a new folder.
Copy — Copies the selected mail message(s) to another folder.
Move — Moves the selected mail message(s) to another folder.
Remove folder — Removes the selected folder and its contents and subfolders.
Rename folder — Gives the folder a new name.
Off-line — Ends the data call.
On-line — Re-establishes the data call.
To disconnect from the Remote mailbox
1 Press Hang up.
2 If you have messages marked as deleted, you will be prompted to confirm
the deletion.
3 The connection to the Remote mailbox closes, and the Mail application
main view returns to the display. If you have fetched messages, the
Received mail folder opens on the display.
95
Internet
To read mail
Mail that you fetch from your Remote mailbox is stored in the Received mail
folder.
To read a mail message
1 Select the Received mail folder in the Mail main view and press Open. Mail
messages that have not yet been opened in the communicator are marked
with .
2 Select the message, and press Open.
When you open a received mail, the following commands become available:
Attachments — Lists all MIME attachments: text, image, audio, video or
application. If the message does not contain any attachments, this command
1999 Nokia Mobile Phones. All Rights Reserved.
Page 96

96
is dimmed. When viewing the list of attachments, you may select an
attachment and choose from the following options:
Internet
View — Opens the attachment if there is enough memory and if the
message can be opened in the communicator.
Save — Saves the attachment in the Downloaded files folder.
Close — Returns you to the previous screen.
Delete — Removes the open mail message.
Close — Returns you to the Received mail folder.
Figure 5
To use the Menu button
If you press the Menu button in an opened mail message, the following
options become available:
Reply (include text) — Replies to a mail message and includes the received
mail in your reply. If the received mail message is a MIME document, only the
first text part is copied to the message and may be edited. Attachments
cannot be included in the reply message
Reply — Replies to a mail message without including the received mail in your
reply.
Reply all (include text) — Replies to all the persons who received the mail and
includes the received mail in your reply.
Reply all — Replies to all the persons who received the mail without including
the received mail in your reply.
Forward — Forwards the received mail and the possible mail attachments.
Find URL — This option searches for a URL address in the message. If there is a
URL, you can open a connection to the selected address by pressing Fetch.
Hierarchical structure — Shows the hierarchical structure of the mail
message.
Print — Prints the message.
Scroll to any of these and press Select.
1999 Nokia Mobile Phones. All Rights Reserved.
Page 97

World Wide Web
The Nokia 9110 Communicator supports HTML 3.2, with the exception of some
features. SSL, the security protocol, is also supported. See ”Glossary” on page
177. SSL provides export grade encryption, which means that it is not secure
enough for highly confidential purposes. The WWW browser does not support
Java or Java script.
To connect to the World Wide Web, the Internet service must be activated for
your SIM card, and you need an account with an Internet service provider.
To open the World Wide Web application, select WWW in the Internet main
view, and press Select.
To exit the WWW, press Close or Hang up in the Bookmarks list, which is the
main view of the application. This ends the data call and closes the WWW
application.
For information on how to create tailored WWW pages for the Nokia 9110
Communicator, see the documents on the CD-ROM.
WWW settings
To change the WWW settings:
1 Open the WWW application and press the Menu button.
2 Select Settings.
3 To change a setting, select it and press Change.
The WWW settings are:
Autoload images: Yes / No — If set to Yes, the communicator automatically
fetches the inline JPEG or GIF images on a WWW page. When set to No, WWW
pages are fetched without images and shown much faster.
Clear cache on exit: Yes / No — Most recently fetched WWW pages are kept in
the temporary memory of the communicator, the “cache”. If set to Yes , the
cache, history list and cookie file are automatically emptied after you close
the WWW application. If set to No, the cache stores as much information as
possible. When you restart the WWW application, the most recently stored
information is fetched from the cache without making a new data call.
Accept all cookies: Yes / No — Determines whether the cookies functionality is
enabled. See "Glossary" on page 177.
Default access point — Defines the Internet access point used as a default in
the WWW application.
Proxies — To change the proxy settings, press Change.
Internet access point — You can select an IAP to be used for this particular
WWW page.
HTTP prox y— The hostname of the HTTP proxy server used with the selected IAP.
97
Internet
1999 Nokia Mobile Phones. All Rights Reserved.
Page 98

98
HTTP proxy port — The proxy port of the proxy server.
Security proxy — The proxy that is used with SSL secure connections.
Internet
Security proxy port — The security proxy port of the proxy server.
No proxy for — You may define domains for which the HTTP proxy is not
needed. Domain names are separated with commas, for example
nokia.com, edu.fi. You may specify the domains as accurately as you wish.
Bookmarks
The WWW main view shows the Bookmarks list. When you select a bookmark
from the list, the name of the Internet access point used for connecting to the
bookmark is shown on the top right corner. The date when the bookmark was
last fetched is shown beside the name of the bookmark. See figure 6.
Below the Bookmarks list is the address field where you can enter the URL
address of the WWW page you want to fetch. If you select a bookmark from
the list, the address field shows the URL address of the bookmark.
Figure 6
To fetch a WWW page
1 Select an entry in the Bookmarks list or enter a URL in the address field.
2 Press Go.
Tip: To fetch WWW pages stored in the
Own texts or Downloaded files folders of
the communicator or the memory card,
use the prefix “file:///” (note: three
slashes) instead of “http://”.
To add a new bookmark
1 Press Add, or if you want to modify an existing bookmark, press Edit.
2 Enter the name you want for the bookmark in the Name field.
1999 Nokia Mobile Phones. All Rights Reserved.
Page 99

3 Enter the URL address of the bookmark, e.g. www.nokia.com, in the
Address field.
To set advanced bookmark properties
Select Details and press Change. The advanced settings are:
User name — If a user name is needed to fetch the bookmark, enter your user
name here.
Password — If a password is needed to fetch the bookmark, enter your
password here.
Internet access selection: Automatic/Manual — If you select Automatic, the
current or the default IAP is used for this bookmark. If you set this to Manual,
only the IAP defined in the following setting is used.
Internet access — This setting is available only if the previous setting is set to
Manual. You can select which IAP to use for the bookmark.
To fetch items with a page already open
You can fetch a WWW page even if you have a page already open:
1 Press the Menu button and select Bookmarks. A simplified form of the
Bookmarks list opens.
2 Select an entry in the Bookmarks list or enter the URL in the address field.
3 Press Go.
To close the Bookmarks list, press Close.
To use the Menu button
If you press the Menu button in the Bookmarks list, the following options
become available:
History — Contains a list of browsed documents. To fetch a page from the list,
select the page and press Go. To empty the history list and the cache, press
Clear history.
Find — You can search for names and addresses in the Bookmarks list.
Open file — You can open files from the Own texts and Downloaded files folders.
Move — You can move the selected bookmark from one folder to another.
Delete — Removes the selected bookmark or bookmark folder.
Create folder — Creates a new bookmark folder.
Import bookmarks — Imports a bookmark file from the Own texts or
Downloaded files folder to the Bookmarks list.
Export bookmarks — Converts the bookmark file to the HTML format and saves
it to the Own texts folder.
Clear cache — Empties all caches and temporary files.
Settings — Opens the WWW settings. See ”WWW settings” on page 97.
99
Internet
1999 Nokia Mobile Phones. All Rights Reserved.
Page 100

100
To make a smart bookmark
A smart bookmark contains a WWW page which your communicator fetches
Internet
at certain time. These WWW pages can only consist of text or images, and
they cannot be SSL secure.
1 Create a new bookmark folder by pressing the Menu button and selecting
Create folder.
2 When the new folder is ready, press Edit. The following options become
available:
Figure 7
Timed fetching: On/Off — When this is set to On, a clock symbol appears in
the folder, and the WWW pages in the folder are fetched according to the
settings defined below.
Fetch at — You can define the time and date when the pages are fetched.
The date and time formats are set in the System settings.
Time limit: None/5/10/30/60 min — You can set a time limit for the
fetching process. This way the data call will not last too long and thus
become very expensive.
Frequency: None/Daily/Weekly/Working days/Every other week/Monhtly —
This setting enables frequent fetching of the WWW pages.
Fetch inline images: Yes/No — You can decide whether the inline images in
the WWW pages are fetched.
Fetch links: Yes/No — If set to Yes, all links to other texts and images in the
defined WWW pages are fetched. If set to No, only the WWW pages are fetched.
3 Press Close.
4 Select the page(s) you want to fetch with the selection frame and press the
Menu button.
5 Select Move and then choose the folder which you just created. The
bookmark(s) will be moved to that folder.
Pages fetched with the smart bookmarks function are stored in a folder cache.
To empty the cache, press the Menu button in the smart bookmarks view and
1999 Nokia Mobile Phones. All Rights Reserved.
 Loading...