

Page 1
OWNER’S
OWNER’S
MANUAL
MANUAL
Page 2
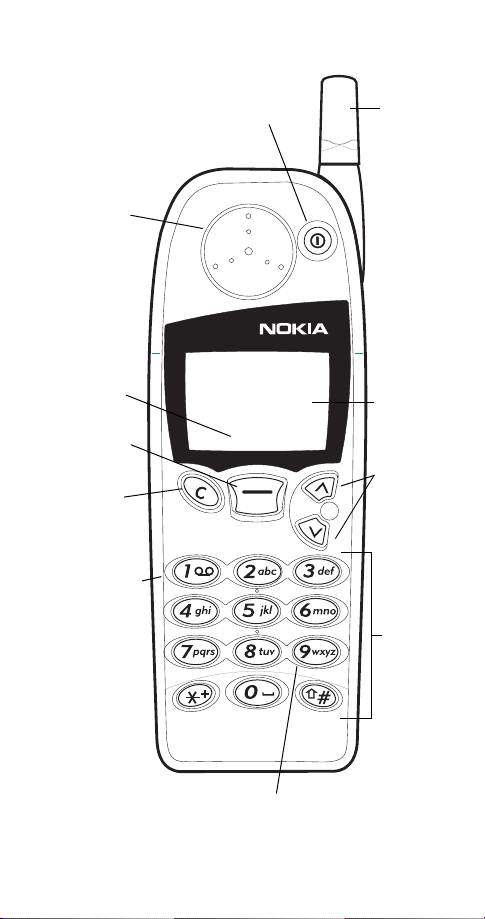
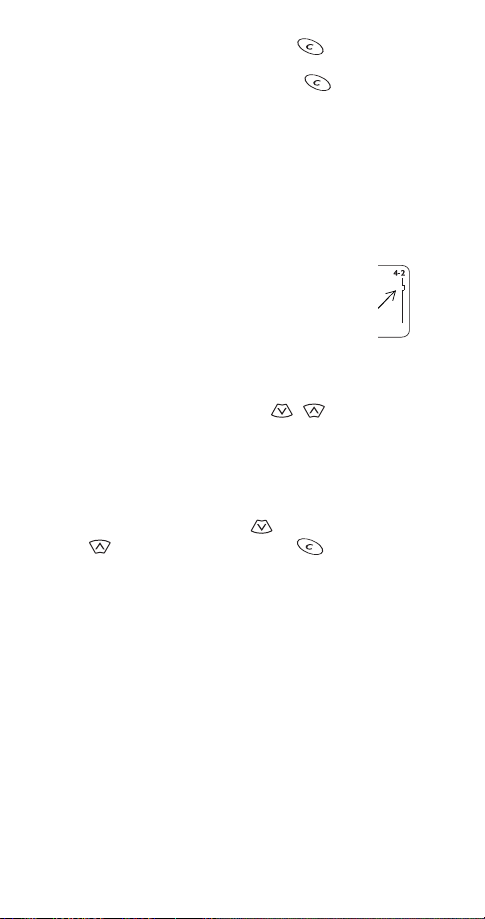
Keys
Earpiece
See p. 15.
Current
function of
Navi™ key
Navi™ key
See p. 6.
Clear key
See p. 7.
Voice mail key
See p. 24.
Power key
See p. 6.
Menu
Menu
MenuMenu
Fixed-length
antenna
See p. 14.
Do not
attempt to
extend or
remove!
Screen
Scroll keys
See p. 6.
Number keys
See p. 11.
Emergency 9 key
See p. 26.
Page 3
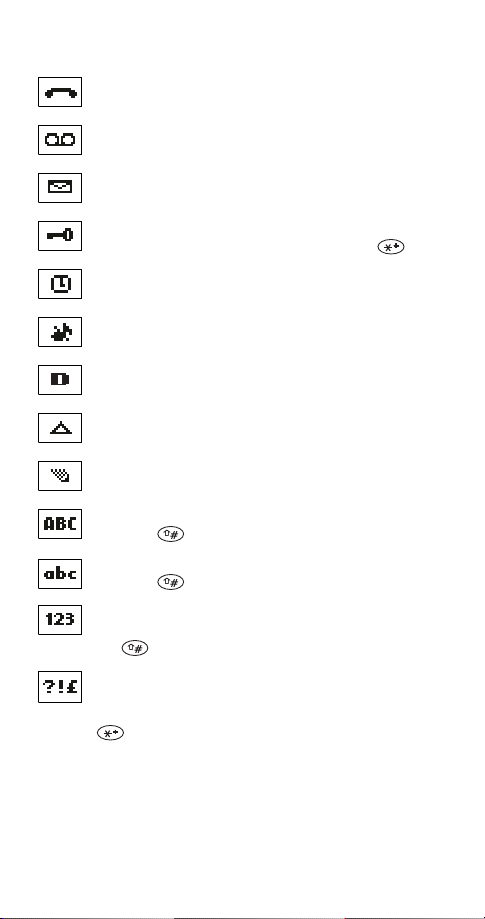
Indicators and icons
You have an active call.
You have one or more new voice messages.
You have one or more new text messages.
Keyguard is on. Your phone will not accept any
keypresses. To turn it off, press
The alarm clock is set.
Unlock
, then .
The ringing option is set to
Digital service is available.
Your phone is roaming outside its home system.
The phone is ready for you to enter a response.
Characters entered will be upper-case letters.
Press the key to switch letter case.
Characters entered will be lower-case letters.
Press the key to switch letter case.
Characters entered will be numbers. (When entering
letters, switch to numbers by pressing and holding
the key.)
You are in “special character” mode; select a
character, then press
switch to special characters by pressing the
key.)
Use
.
Silent
. (When entering letters,
Page 4

Contents
1. For your safety 1
FCC/Industry Canada Notice . . . . . . . . . . . . . . . . 2
Using this Guide . . . . . . . . . . . . . . . . . . . . . . . . . . 2
2. Battery installation and charging 3
Attaching the battery. . . . . . . . . . . . . . . . . . . . . . 3
Battery charging . . . . . . . . . . . . . . . . . . . . . . . . . . 3
Removing the battery. . . . . . . . . . . . . . . . . . . . . . 5
Important battery information . . . . . . . . . . . . . . 5
3. About the phone, keys and menu 6
Power key . . . . . . . . . . . . . . . . . . . . . . . . . . . . . . . 6
Nokia Navi™ key . . . . . . . . . . . . . . . . . . . . . . . . . . 6
Scroll keys . . . . . . . . . . . . . . . . . . . . . . . . . . . . . . . 6
Clear key . . . . . . . . . . . . . . . . . . . . . . . . . . . . . . . . 7
Lights . . . . . . . . . . . . . . . . . . . . . . . . . . . . . . . . . . . 7
External antenna jack . . . . . . . . . . . . . . . . . . . . . 7
Start screen . . . . . . . . . . . . . . . . . . . . . . . . . . . . . . 7
Menu . . . . . . . . . . . . . . . . . . . . . . . . . . . . . . . . . . . 8
Entering letters and numbers . . . . . . . . . . . . . . 11
Special characters in names . . . . . . . . . . . . . . 12
Special characters in phone numbers. . . . . . . 12
Keyguard (locking the keypad) . . . . . . . . . . . . . 13
4. Basic functions 14
Turning the phone on or off. . . . . . . . . . . . . . . .14
About the antenna . . . . . . . . . . . . . . . . . . . . . . .14
Checking signal strength . . . . . . . . . . . . . . . . . .14
Making a call . . . . . . . . . . . . . . . . . . . . . . . . . . .15
Volume adjustment (earpiece) . . . . . . . . . . . . . .15
Muting the microphone . . . . . . . . . . . . . . . . . . .15
Ending a call . . . . . . . . . . . . . . . . . . . . . . . . . . . . 15
Last number redial . . . . . . . . . . . . . . . . . . . . . . . 16
Saving a name and number . . . . . . . . . . . . . . . .16
Finding a name and number . . . . . . . . . . . . . . .16
Answering a call . . . . . . . . . . . . . . . . . . . . . . . . .16
Silencing an incoming call. . . . . . . . . . . . . . . . . 17
i
Page 5

5. Settings 18
Automatic redial . . . . . . . . . . . . . . . . . . . . . . . . .18
Calling card set-up . . . . . . . . . . . . . . . . . . . . . . .18
Clock . . . . . . . . . . . . . . . . . . . . . . . . . . . . . . . . . .20
Language . . . . . . . . . . . . . . . . . . . . . . . . . . . . . . .21
Lights . . . . . . . . . . . . . . . . . . . . . . . . . . . . . . . . . . 21
Tones . . . . . . . . . . . . . . . . . . . . . . . . . . . . . . . . . .21
Quick alert settings . . . . . . . . . . . . . . . . . . . . .23
Voice mailbox number . . . . . . . . . . . . . . . . . . . .24
Voice privacy . . . . . . . . . . . . . . . . . . . . . . . . . . . .24
Welcome note. . . . . . . . . . . . . . . . . . . . . . . . . . .24
6. Emergency calls 25
Emergency key 9 . . . . . . . . . . . . . . . . . . . . . . . . .26
7. Advanced functions 27
Network feature setting . . . . . . . . . . . . . . . . . . .27
Adding feature activation codes
to the menu . . . . . . . . . . . . . . . . . . . . . . . . . . .27
Adding feature cancellation codes
to the menu . . . . . . . . . . . . . . . . . . . . . . . . . . .27
In-call menu . . . . . . . . . . . . . . . . . . . . . . . . . . . . 28
Making/receiving multiple calls . . . . . . . . . . . .28
Call forwarding . . . . . . . . . . . . . . . . . . . . . . . . . .30
Digital/analog selection . . . . . . . . . . . . . . . . . . . 31
1-touch dialing . . . . . . . . . . . . . . . . . . . . . . . . . . 31
Choosing your phone number
(NAM selection) . . . . . . . . . . . . . . . . . . . . . . . . .32
Send own number. . . . . . . . . . . . . . . . . . . . . . . . 32
Calling card calls . . . . . . . . . . . . . . . . . . . . . . . .33
System selection . . . . . . . . . . . . . . . . . . . . . . . . .34
Public system selection . . . . . . . . . . . . . . . . . .34
Automatic answer . . . . . . . . . . . . . . . . . . . . . . .35
Touch tones . . . . . . . . . . . . . . . . . . . . . . . . . . . . .35
Restore factory settings . . . . . . . . . . . . . . . . . . .36
ii
Page 6

8. Phone book 37
Saving names and numbers . . . . . . . . . . . . . . . . 37
Finding names and numbers . . . . . . . . . . . . . . .38
Editing names and numbers . . . . . . . . . . . . . . . 39
Erasing names and numbers . . . . . . . . . . . . . . .39
Scrolling view . . . . . . . . . . . . . . . . . . . . . . . . . . . 39
Checking available memory . . . . . . . . . . . . . . . . 39
9. Call log 40
Missed calls. . . . . . . . . . . . . . . . . . . . . . . . . . . . .40
Received calls . . . . . . . . . . . . . . . . . . . . . . . . . . . 41
Dialed calls . . . . . . . . . . . . . . . . . . . . . . . . . . . . . 41
Clearing call lists . . . . . . . . . . . . . . . . . . . . . . . .41
Call timers . . . . . . . . . . . . . . . . . . . . . . . . . . . . . . 41
10. Voice mes sages 43
Saving your voice mailbox number . . . . . . . . . .43
Listening to new voice messages . . . . . . . . . . .43
Calling your voice mailbox at any time . . . . . .43
11. Text messages 44
Reading messages. . . . . . . . . . . . . . . . . . . . . . . .44
Storage of incoming messages . . . . . . . . . . . . .45
Erasing all text messages . . . . . . . . . . . . . . . . . . 45
Additional features for the 5120i . . . . . . . . . . . 46
Writing and sending text messages . . . . . . . . . 46
Forwarding and replying to a message . . . . . . .47
12. Extra features 49
Alarm clock . . . . . . . . . . . . . . . . . . . . . . . . . . . . . 49
Games . . . . . . . . . . . . . . . . . . . . . . . . . . . . . . . . . 50
13. Security features 52
Access codes overview . . . . . . . . . . . . . . . . . . . . 52
Lock code . . . . . . . . . . . . . . . . . . . . . . . . . . . . .52
Security code . . . . . . . . . . . . . . . . . . . . . . . . . .52
Restricting calls . . . . . . . . . . . . . . . . . . . . . . . . . 52
Phone lock. . . . . . . . . . . . . . . . . . . . . . . . . . . . . .54
iii
Page 7

14. Accessories 56
Nokia Xpress-on™ color covers . . . . . . . . . . . . .56
Batteries . . . . . . . . . . . . . . . . . . . . . . . . . . . . . . .59
Chargers and other accessories . . . . . . . . . . . . . 60
15. Reference information 64
Important safety information . . . . . . . . . . . . . .64
Emergency calls . . . . . . . . . . . . . . . . . . . . . . . . . 66
Radio frequency (RF) signals . . . . . . . . . . . . . . . 67
Care and maintenance . . . . . . . . . . . . . . . . . . . .68
16. Technical information 69
17. NOKIA One-Year Limited Warranty 70
18. Index 74
iv
Page 8
1. For your safety
Read these simple guidelines before using your phone.
Failure to comply with these guidelines may be dangerous
or illegal.
Road Safety Comes First
Don’t use a hand-held phone while driving; park the
vehicle first.
Switch Off In Hospitals
Follow any regulations or rules. Switch phone off near
medical equipment.
Switch Off On Aircraft
Wireless phones can cause interference. Using them on
aircraft is illegal.
Switch Off When Refueling
Don’t use phone at a refueling point. Don’t use near fuel or
chemicals.
Switch Off Near Blasting
Do not use the phone where blasting is in progress.
Observe restrictions, and follow any regulations or rules.
Interference
All wireless phones may get interference which could
affect performance.
Use Sensibly
Use only in the normal position (to ear). Don’t touch the
antenna unnecessarily.
Qualified Service
Only qualified service personnel must install or repair
equipment.
Accessories and Batteries
Use only approved accessories and batteries. Do not
connect incompatible products.
1
Page 9

FCC/Industry Canada Notice
Your phone may cause TV or radio interference (for example,
when using a telephone in close proximity to receiving
equipment). The FCC or Industry Canada can require you
to stop using your telephone if such interference cannot
be eliminated. If you require assistance, contact your local
service facility.
This device complies with part 15 of the FCC rules.
Operation is subject to the condition that this device
does not cause harmful interference.
Using this Guide
The wireless phone described in this guide is approved for
use in TDMA 800 and AMPS networks.
Network services
A number of features included in this guide are called
network services. They are special services provided by
wireless service providers. Before you can take advantage
of any of these network services, you must subscribe to
the service(s) from your home service provider and obtain
instructions for their use.
Updates
The latest version of this Owner’s Manual may be found on
Nokia’s World Wide Web site at
www.NokiaUSA.com
.
Interactive manual
Now, Nokia has a great new way for you to learn how to use
all of your phone features. Go to
access the Nokia Interactive Owner’s Manual. It provides an
interactive way to get step-by-step instructions for any of
your phone’s features.
www.NokiaHowTo.com
2
to
Page 10
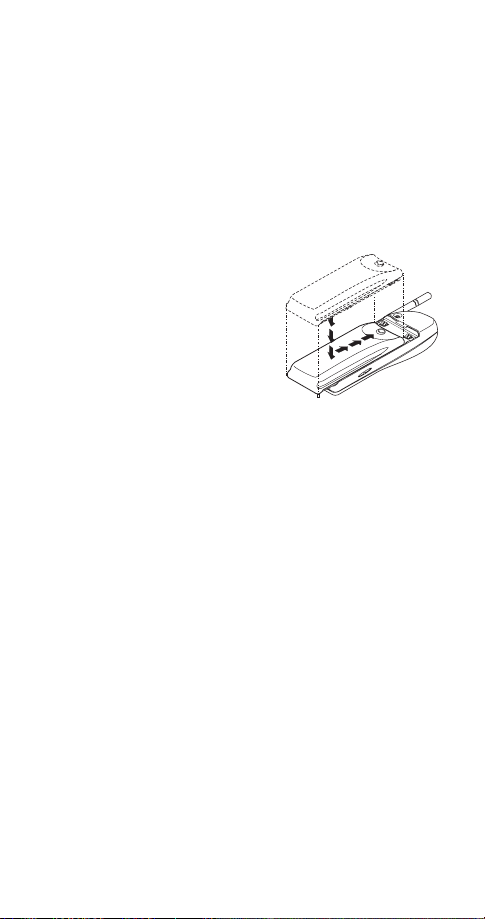
2. Battery installation and charging
Before you can use your new phone, you need to attach and
charge the battery.
Attaching the battery
To attach the battery, place it
on the back of the phone as
shown and slide it toward the
top of the phone until it clicks
into place.
Battery charging
Your phone is powered by a rechargeable NiMH or Li-Ion
battery. Note that a new NiMH battery’s full performance is
achieved only after two or three complete charge and
discharge cycles. For charging times, see ‘Charging times’ on
page 59.
How to charge your battery
Connect the lead from the charger to the bottom of your
phone or to a charging stand. Then plug the charger into a
standard wall outlet.
When the battery is charging, the battery strength indicator
on the right side of the display scrolls.
Note: When you charge the battery for the first time, the
battery strength indicator will not scroll the entire time; this
is normal.
3
Page 11

Problems charging
If your phone displays
Check that the battery is connected to an approved
charging device. If the battery is very hot or cold, wait for a
while; charging will automatically resume after the battery
is restored to its normal operating state. If charging still
fails, contact your dealer.
Not charging
, charging is suspended.
When is charging complete?
When the charge indicators stop scrolling, your
phone is considered fully charged. However, a
slight increase in charge may occur if you leave
your phone connected to the charger.
When is a good time to charge?
You can charge anytime, but remember that when your
phone displays
minutes of talk time left.
Battery low
, you only have a couple of
Can I make calls while charging?
Yes, but depending on the charger used, your battery may
not charge during a call.
Discharging NiMH batteries
For good operation times, discharge NiMH batteries from
time to time by leaving your phone switched on until it
turns itself off (or by using the battery discharge facility of
any approved accessory available for your phone). Do not
attempt to discharge the battery by any other means.
4
Page 12
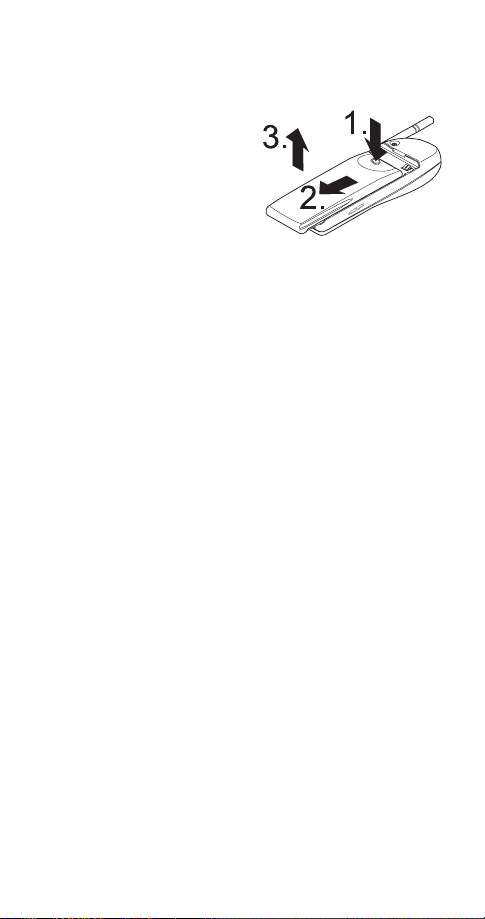
Removing the battery
Note: Switch off the phone before removing the battery!
Press and hold the
1
button at the top of the
battery.
Slide the battery toward
2
the bottom of the phone.
Lift the battery off the
3
phone.
Important battery information
• The battery can be charged and discharged hundreds of times
but it will eventually wear out. When the operating time (talk
time and standby time) is noticeably shorter than normal, it is
time to buy a new battery.
• Use only batteries approved by the phone manufacturer and
recharge your battery only with the chargers approved by the
manufacturer. When a charger is not in use, disconnect it from the
power source. Do not leave the battery connected to a charger for
longer than a week, since overcharging may shorten its life. If left
unused a fully charged battery will discharge itself over time.
• Temperature extremes will affect the ability of your battery to
charge: allow it to cool down or warm up first.
• Use the battery only for its intended purpose.
• Never use any charger or battery which is damaged or worn out.
• Do not short circuit the battery. Accidental short circuiting can
occur when a metallic object (coin, clip, or pen) causes direct
connection of the + and - terminals of the battery (metal strips
on the back of the battery), for example when you carry a spare
battery in your pocket or purse. Short circuiting the terminals
may damage the battery or the connecting object.
• Leaving the battery in hot or cold places, such as in a closed car
in summer or winter conditions, will reduce the capacity and
lifetime of the battery. Always try to keep the battery between
59º F and 77º F (15º C and 25º C). A phone with a hot or cold
battery may temporarily not work, even when the battery is fully
charged. NiMH batteries’ performance is particularly limited in
temperatures below 14º F (-10º C). Li-Ion batteries’ performance
is particularly limited in temperatures below 32º F (0º C).
• Do not dispose of batteries in a fire!
• Dispose of used batteries in accordance with any local
regulations.
5
Page 13
3. About the phone, keys and menu
Power key
You can use the power key to:
• turn the phone on or off (press and hold)
• turn the phone’s lights on for 15 seconds
• select a quick alert setting (see page 23) (if Keyguard is
off and the phone is not connected to a headset or
handsfree car kit)
• silence the ringing of an incoming call
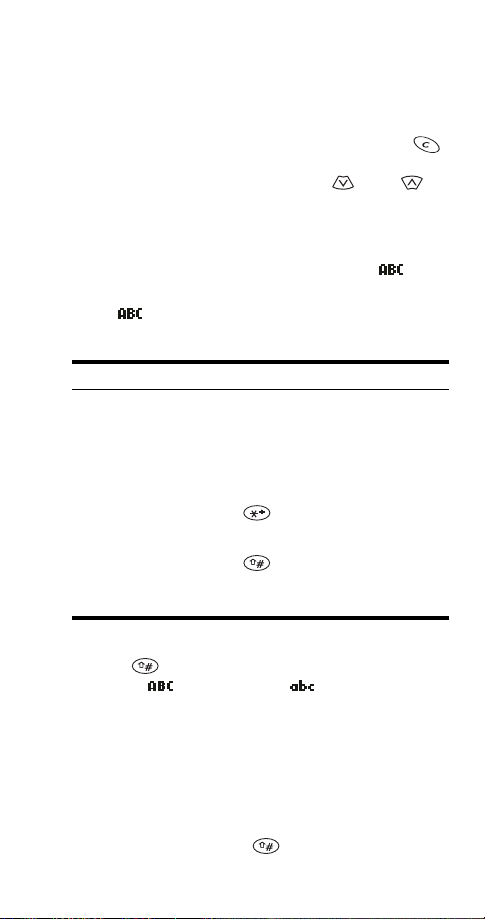
Nokia Navi™ key
Your phone’s Navi™ key appears
below the display. Its current function
is indicated by the word that appears
above it (for example,
press the Navi™ key to perform the
function.
Throughout this guide, when you see “press
,” etc., press the Navi™ key when that word appears
Listen
above it.
Menu
). Simply
Menu
,” “press
Scroll keys
The scroll keys are located to the right of the
Navi™ key. Use the scroll keys to:
• browse menus
• move the cursor (see page 11) to the right or the left
• adjust the earpiece volume while in a call
• access your phone book (press from the start screen)
• access the dialed calls list (press from the start screen)
6
Page 14
Clear key
Use the clear key to:
• delete a character to the left of the cursor
• clear all characters from the display (press and hold)
• return to the previous menu level
• return from the menu to the start screen (press and hold)
• access the in-call menu while in a call
Lights
To turn your phone’s lights on for 15 seconds:
• if Keyguard is off, press any key
• if Keyguard is on, you must press the key briefly
(this conserves battery power by keeping the lights from
turning on when the phone is in a pocket or purse)
For information about controlling your phone’s lights when
the phone is in a car kit, see page 21.
External antenna jack
At the back of the phone, below the antenna, there is a
connector for an external antenna. The connector may be
protected by a rubber cap. Remove the cap before
connecting an external antenna. After removing the
antenna, replace the cap.
Note: Keep the cap out of the reach of small children.
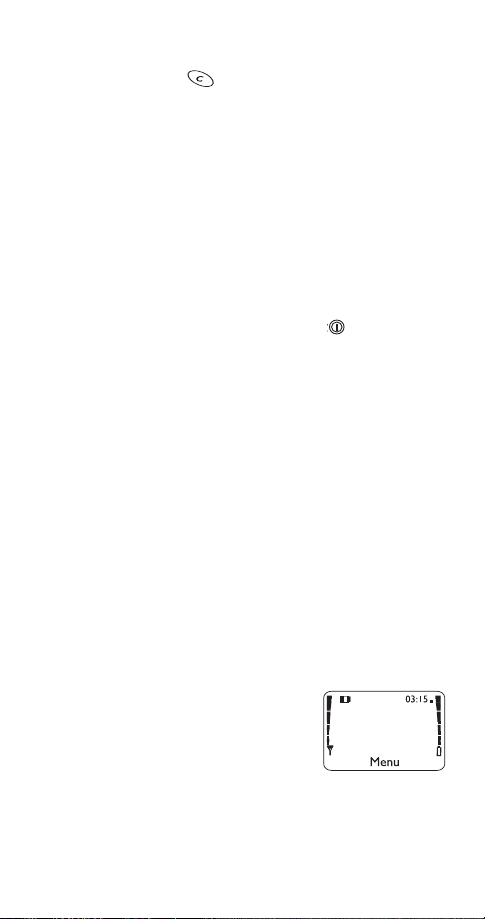
Start screen
The start screen appears when you first
turn on your phone.
above the Navi™ key so you can access
your phone’s menu. Several features
can be used only when the phone is at
the start screen.
Menu
appears
7
Page 15
To get to the start screen, press and hold for a second.
(If there are characters on the display this clears the
characters, then you must press and hold again.)
Menu
Your phone’s menu allows you to easily access the many
powerful features in your phone.
Scroll bar
When you use your phone’s menu, a scroll bar
appears at the far right of the screen. This bar
indicates where you are in the menu; each tab
location on the bar represents a different menu
item.
For example, press
the first (top) tab displayed. A different tab appears each
time you press one of the scroll keys .
Help text
Many menu items have brief help text. To view the help text,
scroll to the menu item and wait for about 10 seconds for
the text to appear. Press
of text, to see the previous page, or to return to
the menu.
once. The scroll bar appears with
Menu
or to see the next page
More
8
Page 16

Menu shortcuts
When you select a menu item, numbers appear on
the display above the scroll bar. If you become
familiar with these numbers, you can use them as
shortcuts for accessing different menu items. For
example, to access the
can simply press
in that menu,
Phone settings
4 2. The phone displays the first item
Menu
Touch tones
.
Note: (1) Menu items in your phone vary depending on the
network and accessories used. (2) This is not a complete list;
see entries about individual features for more information.
menu, you
1 Phone book
Search
11
Add new
12
Edit
13
Erase
14
141 One by one
142 Erase all
Options
15
151 Scrolling view
152 Memory status
1-touch dialing
16
2 Messages
Text messages
21
211 Inbox
212 Sa ved
215 Erase all
Voice messages
22
221 Listen to voice
messages
222 Voice mailbox
number
Welcome note
23
3 Call log
31
32
33
34
35
9
Missed calls
Received calls
Dialed calls
Clear call lists
341 All
342 Missed
343 Received
344 Dialed
Call timers
351 Last call
352 All calls
353 Life timer
354 Clear timers
Page 17

4 Settings
Call settings
41
411 Emergency key 9
412 Automatic redial
413 Calling card
414 Automatic answer
Phone settings
42
421 Touch tones
422 Language
423 Restore factory
settings
424 Lights
Security settings
43
431 Restrict calls
432 Access codes
Network services
44
441 Digital/analog
442 Public system
443 Voice privacy
444 Network feature
445 Call forwarding
446 Call waiting
447 Send own number
NAM selection
45
c
selection
selection
setting
5System
Automatic
51
Manual
52
New search
53
6Games
Memory
61
Snake
62
Logic
63
c
Visible only when used with car kit
h
Visible only when used with headset or car kit
m
Must be added to the menu manually; see ‘Network feature setting’ on page 27
v
Visible only when vibrating battery is attached
m
h
m
m
7Clock
Alarm clock
71
Clock settings
72
721 Display/Hide clock
722 Adjust time
723 Time format
8My tones
Ringing options
81
811 Ring
812 Ascen ding
813 Ring once
814 Beep once
815 Silent
Ringing tone
82
(30 tones)
Ringing volume
83
831 Level 1
832 Level 2
833 Level 3
834 Level 4
835 Level 5
Message alert tone
84
841 No tone
842 Standard
843 Special
844 Beep once
845 Long & loud
Keypad tones
85
851 Off
852 Level 1
853 Level 2
854 Level 3
Warning and game
86
tones
861 On
862 Off
Vibrating alert
87
871 On
872 Off
9 Keyguard
v
10
Page 18
Entering letters and numbers
Cursor
The cursor is a blinking vertical line that appears on the
screen when you are entering text or numbers. Characters
you enter appear to the right of the cursor. Pressing the
key deletes the character to the left of the cursor. Use the
scroll keys to move the cursor to the right or left .
ABC mode
When your phone is ready for you to enter text, such as a
name or message, it switches to ABC mode. The icon
shows that it is in ABC mode.
When is displayed, you can enter these characters by
pressing the indicated key repeatedly:
Key Characters Key Characters
1. , ? ! - 17PQRS7
2ABC2 8TUV8
3 DEF3 9 WXYZ9
4GHI4 0space, 0
5 JKL5 See ‘Special characters
6 MNO6 Changes letter case,
in names’ on page 12.
switches between
letters and numbers
Changing letter case
Press the key to switch between upper- and lower-case
letters. The icon switches to to indicate that you
are using lower case.
Entering numbers
To enter numbers while in ABC mode, you can:
• press and hold the corresponding key until the number
appears, or
• switch between ABC mode and number mode by
pressing and holding the key.
11
Page 19
Special characters in names
In ABC mode you can press the key to view the special
characters below. You can use these characters when saving
names in your phone book. Simply press or to
highlight the one you want, then press
. , ? ! : ; - + # * ( ) ‘ “ _ @ & $ % / < > ¿ ¡ =
To choose a character that appears near the end
Tip:
of the list, immediately press to go to the end of
the list.
Use
.
Special characters in phone numbers
You can use special characters to dial or save phone
numbers of automated services such as bank account
information. When entering numbers, press the key
repeatedly until you see the character you want.
Character Use
This character is used to request services
*
from the network. Contact your service
provider for details.
This character is not currently used.
+
This character creates a
p
right of the p are sent as touch tones after a
2.5-second pause.
Use this character to save phone numbers of
automated services that require you to enter
a password or other information after the
call is answered. For example, if your voice
mail number at work is 555-1212 and you
need to enter your extension (1234) and then
a password (5678) in order to listen to your
messages, you could save this phone number
as
5551212p1234p5678
This character creates a
w
similarly to the pause character except that
digits to the right of the w are not sent until
you press
Send
.
pause
.
wait
. It works
. Digits to the
12
Page 20

Keyguard (locking the keypad)
The Keyguard feature allows you to
“lock” your phone’s keypad so that
accidental keypresses have no effect.
This is handy when your phone is in a
pocket or purse.
Note: Keyguard is not a security feature and will not prevent
unauthorized use of your phone.
To lock the keys
Press
To unlock the keys
Press
Notes about Keyguard
• When Keyguard is on, the only way to answer a call is to
• When Keyguard is on, calls may be possible to the
• Keyguard is automatically turned off when the phone is
9 or
Menu
.
Unlock
press
Answer
emergency number programmed into your phone
(e.g. 911 or other official emergency number). However,
one-touch emergency dialing (‘emergency key 9’) does
not operate.
connected to a car kit.
Menu
.
.
13
Page 21

4. Basic functions
Turning the phone on or off
Press and hold the key for one second.
Note: If the phone asks for a lock code, see ‘Lock code’ on
page 52. If the phone asks for a security code, see ‘Security
code’ on page 52.
WARNING! Do not switch on the phone when wireless phone
use is prohibited or when it may cause interference or danger.
About the antenna
Your Nokia phone has a fixed-length antenna. Do not
attempt to extend or remove it.
Normal position
Hold the phone as you would any other telephone, with the
antenna pointed up and over your shoulder.
Tips on efficient operation
As with any other radio transmitting device, do not touch
the antenna unnecessarily when the phone is switched on.
Contact with the antenna affects call quality and may cause
the phone to operate at a higher power level than otherwise
needed.
Checking signal strength
Your phone operates on radio waves. Radio signal coverage
is maintained by a wireless network, and the quality of calls
on your phone depends on the strength of the wireless radio
signal.
14
Page 22
Get a strong signal
When you are at the start screen (see page 7) or in
a call, the strength of the radio signal is indicated
by the signal indicators on the left side of your
phone’s display. These indicators scroll as the
signal strength increases and decreases.
To improve your phone’s reception, try moving your phone
slightly. If you’re inside a building, move toward a window.
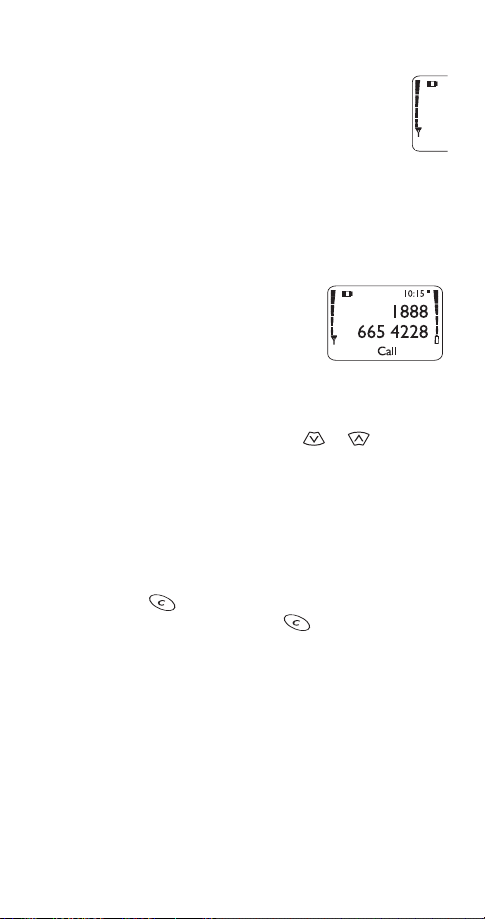
Making a call
Enter the area code and phone
1
number. (
Press
2
Call
party to answer.
changes to
Menu
and wait for the other
Call
.)
Volume adjustment (earpiece)
To adjust the earpiece volume, press or during a
call. If an accessory with its own loudspeaker is connected
to your phone, the scroll keys will adjust the volume for that
accessory.
Muting the microphone
When you are in a call, you can mute the phone’s microphone
by pressing , pressing
To unmute the microphone, press , press
select
Note: For more information about the in-call menu,
see page 28.
Unmute
.
Options
, and selecting
Options
Mute
.
, and
Ending a call
Press
End
.
15
Page 23

Last number redial
The last 10 numbers you dialed are stored in the dialed calls
list. Use this list to redial a number you have called recently.
From the start screen, press to access the dialed
1
calls list.
Scroll to the desired number.
2
Press
3
Call
.
Saving a name and number
See ‘Saving names and numbers’ on page 37.
Finding a name and number
Press to access your phone book.
1
Scroll to the number you want. (To skip ahead quickly in
2
the list, press the number key that corresponds to the
first letter of the name.)
Press
3
For other ways to find names and numbers, see ‘Finding
names and numbers’ on page 38.
Call
.
Answering a call
When someone calls, the phone will alert you (see ‘Tones’ on
page 21) and
call, press any key except .
Note: To prevent accidental answering when the phone is in
a pocket or purse, the phone will not answer the call if you
press the key for longer than one second.
For information on setting your phone to answer incoming
calls automatically, see ‘Automatic answer’ on page 35.
will flash on the display. To answer the
Call
16
Page 24

Caller ID
Caller ID is a network service that can display the name and
phone number of the person calling you, if the information
is available. Contact your service provider for details.
If the caller can be identified, the
phone may display the caller's name
and phone number. The information
displayed depends on the information
available through the network and
your phone book. It is possible that only the name or the
number will appear.
Call - caller ID unavailable will display when the wireless
network does not recognize the calling number. Also, Call caller ID blocked may display if the calling party has blocked
caller ID.
Silencing an incoming call
To silence the ringing of the incoming call, press briefly.
17
Page 25
5. Settings
This section describes some phone settings that allow you to
customize your phone to suit your preferences and that you
probably won’t change very often.
Automatic redial
Use
feature is on and the wireless network is busy, your phone
will redial a number up to three times. This feature will not
redial to a busy phone number.
To stop the call attempts, press
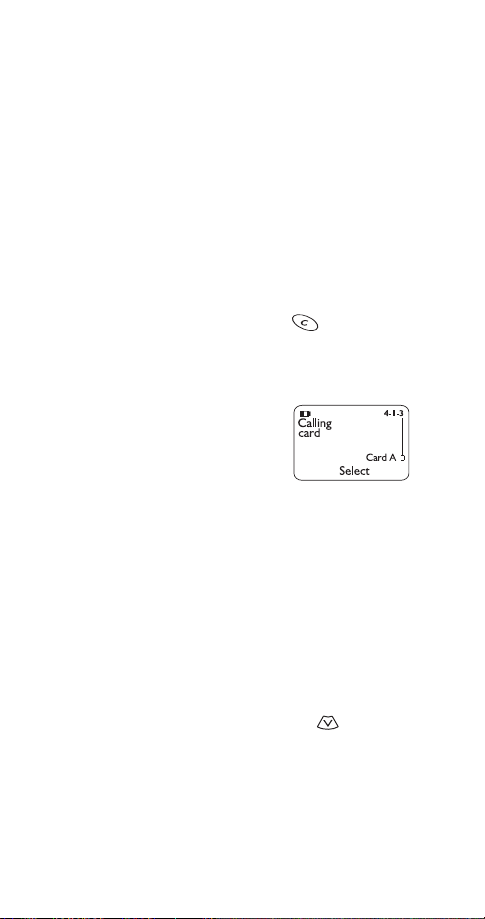
Calling card set-up
If you wish to use a calling card for
long distance calls, you must first save
your calling card information into your
phone. Your phone can save
information about two calling cards.
To learn how to make calling card calls, see ‘Calling card
calls’ on page 33.
Saving calling card information
1
2
3
4
5
4 1 2 to turn this feature on or off. When this
Menu
or .
Quit
Press
Scroll to the desired calling card, then press
Scroll to
Enter your security code (see page 52), then press OK.
At
the dialing sequence your card uses, then press
4 1 3.
Menu
, then press OK.
Edit
Dialing sequence
, press
. Press to choose
Select
Options
Select
.
.
18
Page 26

Dialing
sequence
Access no.
+ phone no.
+ card no.
Access no.
+ card no.
+ phone no.
Prefix
+ phone no.
+ card no.
Note: The order of the following steps may vary, depending
on which dialing sequence your card uses.
Enter access number (usually the 1-800 number listed
6
on the back of the calling card), then press OK.
Enter your card number and/or PIN, then press OK. Your
7
phone will display
Press to reach
8
the card name using your phone’s keypad, then press OK.
Note: This procedure might not work with all calling cards.
Please look at the back of your calling card or contact your
long distance company for more information.
Use for cards that
require you to:
Dial 1-800 access number,
then phone number, then
card number (+ PIN if
required)
Dial 1-800 access number,
then card number (+ PIN
if required), then phone
number
Dial the prefix (any
numbers that must precede
the phone number) and
phone number you want to
dial, then card number
(+ PIN if required)
Save changes?
Card name
Press OK.
, then press
Cards using
this sequence
MCI, AT&T True
Choice, Sprint
Canada, Unitel
networkMCI,
WorldPhone
MCI
GTE, PacBell,
AT&T, Stentor
. Enter
Select
Choosing a calling card to use
To select a calling card to use, press
card you want, then press
press OK. Enter your security code, then press OK.
Options. Select
19
4 1 3, scroll to the
Menu
is highlighted;
Page 27

Clock
Your phone has an internal clock that
can be displayed on the start screen.
The clock must be set in order for call
times to be recorded (see ‘Call log’ on
page 40).
If you remove the battery for longer than a couple of
seconds, the time will be lost. The next time you turn on the
phone, you will be asked to enter the time.
Selecting time format
Use
am/pm
Setting the time
Use
both hours and minutes (for example, enter 1:30 as
If the clock’s time format is set to
to choose am or pm.
Note: The key does not work on this screen. If you
make a mistake, re-enter all four digits.
Displaying or hiding the clock
Press
if it is currently hidden, or vice versa.
When the clock is displayed and the
time format is set to
square will appear next to the time
indicating a.m. or p.m.
7 2 3 to set the clock’s format to
Menu
.
7 2 2 to enter the current time. Use two digits for
Menu
am/pm
7 2 1 to display the clock on the phone’s screen
Menu
, a black
am/pm
24-hour
, you will be asked
36=48
36=48
or
0130
3:15 a.m.
3:15 p.m.
).
20
Page 28

Language
Use
your phone’s display. You can choose
from English, French, Spanish,
Portuguese, Russian, and Hebrew.
The shortcut for choosing English is to
press
4 2 2 to set the language of
Menu
42 21.
Menu
Lights
If you’re using your phone with a car kit, use
set your phone’s lights to On (lights stay on) or
(after 15 seconds, lights turn off until the next key is
pressed, phone rings, etc.).
For information about turning your phone’s lights on at any
time, see page 7.
Menu
Automatic
4 2 4 to
Tones
Use Menu 8, My tones, to change the six sound settings in
your phone: ringing option, ringing tone, ringing volume,
message alert tone, keypad tones, and warning and game
tones.
The quick alert settings feature (see page 23) allows you to
select a fixed combination of these settings to suit your
current environment.
Ringing option
Use
have a call.
Note: If you choose
will only sound a quiet beep.
Ring
ringing tone.
8 1 to tell your phone how to notify you that you
Menu
Beep once
The phone rings normally using the currently selected
or
21
, the alarm clock
Silent
Page 29

Ascending
ringing tone. The ringing volume starts low and increases
with successive rings.
Ring once
selected ringing tone.
Beep once
Silent
The icon appears at the start screen.
The phone rings using the currently selected
The phone rings once using the currently
The phone beeps once.
The phone makes no sound when you receive a call.
Ringing tone
Your phone plays a ringing tone when someone calls you
and the ringing option is set to
. Use
once
Scroll to a tone to hear how it sounds.
Note: If the ringing option is set to
phone won’t play sample tones.
8 2 to choose one of 30 ringing tones.
Menu
Ring, Ascending
Silent
or
Beep once
, or
Ring
, the
Ringing volume
Use
your phone’s ringing and of message
alert tones.
Note: If your phone does not ring
loudly enough at maximum volume, try
a different ringing tone; some tones are louder than others.
8 3 to control the volume of
Menu
Message alert tone
Use
text message. Scroll to a tone to hear how it sounds.
8 4 to choose the tone played when you receive a
Menu
Keypad tones
Use
makes when you press its keys.
8 5 to adjust the volume of the tones your phone
Menu
22
Page 30

Warning and game tones
Use
on or off. Warning tones are created by events such as confirmations, errors, power on, battery low, and recharge battery.
8 6 to turn your phone’s warning and game tones
Menu
Vibrating alert
If your phone has a vibrating battery attached, use
7 to set your phone to vibrate when you receive a voice call.
If you turn vibrating alert on, your phone will vibrate even if
its ringing option is set to
Note: The vibrating battery does not vibrate when your
phone is connected to or placed in any charging device.
Silent
.
Menu
8
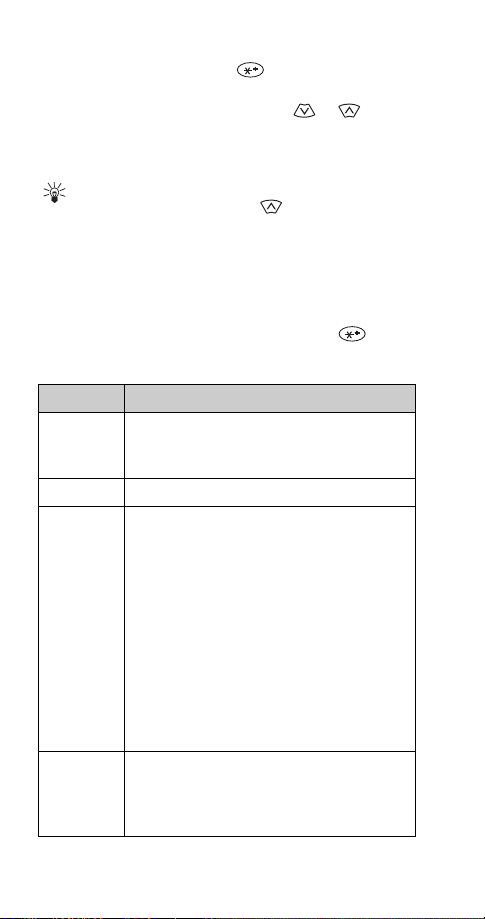
Quick alert settings
You can quickly adjust your phone’s
sound settings when you go into a
meeting, go outdoors, etc. To choose a
quick alert setting, briefly press the
key, scroll to the setting you want,
then press OK.
Instead of using the scroll keys, you can press the
Tip:
key repeatedly to scroll through this menu. After you
reach the setting you want, press and hold the key.
Note: If you choose
only sound a quiet beep.
My tones
tones.
Silent
Quiet
text message. Other tones are turned off.
Loud
Headset
connected to a headset. Remembers any changes you make
to settings in Menu 8, My tones, and uses them the next
time you connect the phone to a headset.
Uses the settings you have made in Menu 8, My
All sound is turned off.
Your phone beeps once when you receive a call or
Your phone rings loudly. Other tones are not affected.
Automatically selected when your phone is
Silent
or
, the alarm clock will
Quiet
23
Page 31

Automatically selected when your phone is connected
Car
to a car kit. Remembers any changes you make to settings in
Menu 8, My tones, and uses them the next time you connect
the phone to a car kit.
Note: If the
chosen and you change a setting in Menu 8, My tones, the
phone switches the current quick alert setting to
Silent, Quiet
, or
quick alert setting is
Loud
My tones
Voice mailbox number
If you have a voice mail subscription, use
save the voice mailbox number given to you by your service
provider. This number may be up to 32 digits long. Once you
save your voice mailbox number, you can press and hold the
key to dial your voice mailbox. (You can also press
briefly and then press
For more information on voice mail, see ‘Voice messages’ on
page 43.
Call
.)
Menu
2 2 2 to
Voice privacy
Available only in digital networks, voice privacy encrypts the
voice channel so it is more difficult for anyone to eavesdrop
on your conversations. Use
on or off.
This feature may not be available in all areas; contact your
service provider for details. If voice privacy becomes inactive,
the phone beeps and displays
4 4 3 to turn voice privacy
Menu
Voice privacy not active
.
.
Welcome note
Use
welcome note for your phone. This
note is displayed briefly each time you
turn on your phone. It can be your
name, a reminder, etc. To save the
note, press
Options
2 3 to create or change the
Menu
, then
Options
, then
Erase
.
. To erase the note, press
Save
24
Page 32

6. Emergency calls
If the phone is not on, switch it on.
1
Press and hold the key for several seconds to
2
ready the phone for calls.
Key in the emergency number for your present location
3
(e.g. 911 or other official emergency number). Emergency
numbers vary by location.
Press
4
IMPORTANT!
This phone, like any wireless phone, operates using radio
signals, wireless and landline networks as well as userprogrammed functions which cannot guarantee connection
in all conditions. Therefore you should never rely solely upon
any wireless phone for essential communications
(e.g. medical emergencies).
Remember, to make or receive any calls the phone must be
switched on and in a service area with adequate signal
strength. Emergency calls may not be possible on all wireless
phone networks or when certain network services and/or
phone features are in use. Check with local service providers.
If certain features are in use (Keyguard, call restrictions, etc.),
you may first need to turn those features off before you can
make an emergency call. Consult this document and your
local cellular service provider.
When making an emergency call, remember to give all the
necessary information as accurately as possible.
Remember that your wireless phone may be the only means
of communication at the scene of an accident - do not cut
off the call until given permission to do so.
Call
.
25
Page 33

Emergency key 9
Use
on, the phone attempts to make an emergency call when
you:
• press and hold the 9 key, or
• press 9, then press
Note: When Keyguard is active, the only way to make an
emergency call is to dial the emergency number, then press
Call
IMPORTANT!
Official emergency numbers (for example, 911) vary by
location. Only one number is dialed automatically by
Emergency Key 9, and it might not be the proper number in
all circumstances.
4 1 1 to turn on this feature. When this feature is
Menu
.
Call
.
26
Page 34

7. Advanced functions
Network feature setting
Call forwarding, call waiting, and send own number are
network services available through your service provider.
These features do not appear in your phone’s
menu until you save the related feature code(s)
services
given to you by your service provider. After you save the
feature activation or cancellation code, the feature appears
in the phone’s menu and you can use the menu to turn the
feature on or off.
Note: Feature codes can be saved only when your primary
phone number (NAM 1) is selected. See page 32.
Adding feature activation codes to the menu
To save a feature activation code, press
Feature code:
then press OK. Scroll to the feature that the code applies to,
then press
one of the four types of call forwarding.) Finally, scroll to
Activate
Activate
prompt, enter the feature activation code,
. (If the feature is call forwarding, choose
Select
, then press OK.
will now appear in the menu for that feature.
Adding feature cancellation codes to the menu
To save a feature cancellation code, press
At the
Feature code:
code, then press OK. Scroll to the feature that the code
applies to, then press
choose one of the four types of call forwarding.) Finally,
scroll to
Cancel
will now appear in the menu for that feature.
Cancel
prompt, enter the feature cancellation
. (If the feature is call forwarding,
Select
, then press OK.
Menu
Menu
Network
4 4 4. At the
4 4 4.
27
Page 35

In-call menu
When you are in a call, the function of the Navi™ key is
. However, your phone has an in-call menu that allows
End
you to perform several functions while in a call. To use the
in-call menu, press while you are in a call, then press
. Press to scroll to the first item in the menu, or
Options
to scroll to the last item in the menu.
The in-call menu is:
Answer
Swap
End
New call
Connect all
Phone book
Menu
Touch tones
Mute/End mute
answer a waiting call
switch between two calls
end all calls
make a call when you have one in progress
connect all active calls
access the phone book
access your phone’s menu
send touch tones
mute/unmute the phone’s microphone
Making/receiving multiple calls
Making a new outgoing call
While you are in a call, select
menu. Enter the number (or press
number in the phone book), then press
automatically put on hold while you are in your new call.
Note: This feature might not be supported in your network.
Contact your service provider for details.
New call
Search
from the in-call
to locate the
. The first call is
Call
Three-way calling
Note: This feature might not be supported in your network
or might work differently than described. For more
information, contact your service provider.
To create a three-way call, call the first person. Then select
from the in-call menu, enter or find the phone
New call
number of the second person, press OK and then press
The first person is put on hold. After the second person
answers, choose
three of you can talk to each other at the same time.
Connect all
from the in-call menu. Now all
28
Call
.
Page 36

Ending calls
Press
Note: The wireless network does not support ending
individual calls when more than one call is in progress.
End
or select
from the in-call menu.
End
Call waiting
Call waiting is a network service that allows you to receive
an incoming call when you’re already in a call. Contact your
service provider for details.
Answering a waiting call
Note: Call waiting is a network service that requires a
subscription from your service provider.
If you are in a call with someone and another person calls
you, the function of the Navi™ Key changes from
. Press
Options
selected. Press OK.
Answer
Swapping between calls
When you are in a call and you receive an indication of a
waiting call, select
call will be put on hold. To swap back to the first call, select
from the in-call menu.
Swap
Cancelling call waiting: standard method
To cancel call waiting before making a call, you must get
the call waiting cancellation code from your service
provider.
Dial the code for cancelling call waiting followed by the
1
phone number you want to call.
Press
2
Example: If the code for cancelling call waiting is *810 and
the number you want to call is (214) 555-1234, dial
*8102145551234
Call
.
. The in-call menu appears with
Options
from the in-call menu. Your first
Answer
, then press
Call
.
End
to
29
Page 37

Cancelling call waiting: menu method
You can save the code for cancelling call waiting given by
your service provider and then use
call waiting. See ‘Adding feature cancellation codes to the
menu’ on page 27.
4 4 6 2 to cancel
Menu
Call forwarding
Call forwarding is a network service that lets you forward
your incoming calls to another phone number. Check with
your service provider for details and feature codes.
Activating call forwarding
Standard method
To activate call forwarding, you must get the call forwarding
activation code from your service provider.
Dial the code for activating call forwarding followed by
1
the phone number to which you want to forward your
calls.
Press
2
Example: If the call forwarding activation code is *71 and
the number you want to forward calls to is (214) 555-1234,
dial
Menu method
You can save the code for activating call forwarding and
then use the menu to activate call forwarding. See ‘Adding
feature activation codes to the menu’ on page 27.
.
Call
*712145551234
, then press
Call
.
Cancelling call forwarding
Standard method
To cancel call forwarding, you must get the call forwarding
cancellation code from your service provider.
Dial the code for cancelling call forwarding (for example,
1
*710).
Press
2
Call
.
30
Page 38

Menu method
You can save the code for cancelling call forwarding and
then use the menu to cancel call forwarding. See ‘Adding
feature cancellation codes to the menu’ on page 27.
Digital/analog selection
Use
Digit. & analog
analog networks. The phone tries to find a digital network but
selects an analog network if no digital network is available.
Analog
Digital
4 4 1 to choose a mode for your phone.
Menu
means the phone will work in digital or
forces the phone to use AMPS analog networks only.
forces the phone to use TDMA digital networks only.
1-touch dialing
This feature allows you to make phone calls quickly and
easily with the touch of a button. Once you have assigned a
phone number to a number key (2 through 8), you can press
and hold that key to dial the number. (You can also press the
number key briefly and then press
Note: Keys 1 and 9 are used exclusively for dialing your voice
mailbox and for attempting emergency calls, respectively
(see ‘Voice messages’ on page 43 and ‘Emergency calls’ on
page 25).
Assigning numbers to keys
Before you can assign a phone number to a key, the phone
number must be saved in your phone book (see page 16).
Then follow the steps below.
Press
1
Scroll to the desired key, then press
2
Press or to choose the name you want to assign
3
to the selected key, then press
If a key already has a number assigned to it, you can press
Options
1 6.
Menu
and then view, change, or erase the number assignment.
Call
Select
.)
Assign
.
.
31
Page 39

Making calls using one-touch dialing
Press and hold a number key (2 through 8) for a few seconds
to call the number assigned to it. Your phone finds the
phone number, displays it briefly, then dials it.
You can also enter the number of the 1-touch dialing key
(for example, 2) and press
Call
.
Choosing your phone number
(NAM selection)
Your service provider can set up your phone to have two
phone numbers that are activated in different service
areas—for example, one number for the Dallas area and one
number for the Chicago area.
A number assignment module, or NAM, consists of a phone
number and network information that the service provider
programs into your phone. When you select a NAM, you’re
not only selecting a phone number, you’re also selecting a
home system in which you will not be charged roaming fees.
For more information about home systems, see ‘Public
system selection’ on page 34.
Both NAMs are not equal. Some features, such as system
selection (see page 34) and network feature setting
(see page 27), are available only when the primary NAM is
selected.
Use
4 5 to select a NAM.
Menu
Send own number
This network service allows you to hide your phone number
from a person you are calling who has Caller ID. (If for some
reason your network prevents phone numbers from being
displayed, you may be able to use this feature to
number to the person you are calling.) Contact your service
provider for feature codes for showing/hiding your phone
number.
32
show
your
Page 40

Standard method
Dial the feature code followed by the number you want
1
to call.
Press
2
Example: If the feature code to hide your number is *67 and
the number you want to dial is (214) 555-1234, dial
*672145551234
Call
.
, then press
Call
.
Menu method
You can save the feature code given by your service provider
so that
Send own number
and then use
feature setting’ on page 27.
This feature must be activated before each call.
displays your number to the person you are calling.
Yes
prevents your number from being shown to the person
No
you are calling.
Menu
appears in your phone’s menu,
4 4 7 to use this feature. See ‘Network
Calling card calls
Before you can make a call using a calling card, you have to
enter your calling card information into the phone. See
‘Calling card set-up’ on page 18.
To make a call using a calling card:
Enter the phone number, including any prefix (such as 0
1
or 1) that your calling card may require when you make
a calling card call. See your calling card for instructions.
Press and hold
2
displays
Card call
Your phone displays
3
Wait for the tone, then press OK.
Your phone displays
4
Wait for the tone again, then press OK.
for a few seconds until your phone
Call
.
Wait for tone, then press OK
Wait for tone, press OK again
.
.
33
Page 41

System selection
Your phone is capable of working in residential, private, and
public systems. You can choose how your phone selects a
network to use.
This feature is
Automatic
searches for networks available to you and chooses the
appropriate one. Every time you switch on your phone,
Automatic
If you choose
and unavailable networks. (You can’t use unavailable
networks.) Scroll through the choices and press OK when
you reach the one you want.
If you choose
for new private and residential systems. When it finds the
best new system, it displays it. You can then select it or start
another search by pressing
Note: The
only when your primary phone number (NAM1) is selected.
See page 32.
, which means your phone automatically
is selected.
Manual
To switch from private to public
If you are in a private system and want access to a public
system, press and hold
Your phone will display
and your phone will use the public system for the next
outgoing call. After the call it will revert to
system selection
5 in your phone. The default is
Menu
, your phone displays a list of available
Manual
New Search
, your phone begins a new search
.
Next
and
New search
Menu
Search public systems?
.
features can be used
when you are not in a call.
Press OK
Automatic
Public system selection
When your phone leaves its home system, it is roaming. Like
other public systems, your home system is either type A or B.
When your phone is roaming, it can search for home-type
systems (same type as your home system) or non-hometype systems (opposite type as your home system).
34
Page 42

Also, your service provider has programmed a list of
preferred systems into your phone. These are systems with
which your service provider has roaming agreements.
Use
system (network). Your selection remains active until you
change it.
Any system
system, the phone searches for a preferred system of either
type, then a home-type system, then a non-home-type
system.
Home type
system, the phone searches for a home-type system,
preferred first.
Nonhome type
system only, preferred first (home system is not used).
Home only
will not roam).
4 4 2 to tell your phone how to choose a public
Menu
When service is not available in your home
When service is not available in your home
The phone searches for a non-home-type
The phone uses its home system only (that is, it
Automatic answer
This feature is available only when your phone is connected
to a headset or to an approved handsfree car kit equipped
with the ignition sense option, with the ignition on.
When automatic answer is turned on, your phone answers
incoming voice calls after one ring. Use
this feature on or off.
Menu
4 1 4 to turn
Touch tones
Your phone can generate various sounds, called touch tones,
when the keys are pressed.
Touch tones can be used for many automated services such
as checking voice mail, movie times, and airline arrival/
departure times.
Note: Sending confidential information over the air using
touch tones is not recommended.
35
Page 43

Setting manual touch tone length
Use
when you press a key:
Continuous
and hold the key.
Fixed
regardless of how long you press and hold the key.
Off
press the keys.
4 2 1 1 to set the length of touch tones created
Menu
means the tone sounds for as long as you press
sets the tone length to one tenth of a second,
turns off touch tones. No tones will be sent when you
Setting automatic touch tone length
Use
automatically by the phone to
or
4 2 1 2 to set the length of touch tones sent
Menu
(half a second).
Long
(one tenth of a second)
Short
Saving touch tone strings
Touch tone strings can be used for sending and receiving
information with your phone. Save touch tone strings the
same way you save phone numbers (see page 16).
For example, you can save your office voice mailbox number
along with your password for easy access to your messages.
See ‘Special characters in phone numbers’ on page 12.
Sending touch tone strings
During a call, press to clear any numbers from the
1
display.
Press
2
Scroll to
3
Enter or find the touch tone string, then press OK.
4
Options
Touch tones
.
, then press OK.
Restore factory settings
You can use
your phone to their factory defaults (as in a new phone).
You will be required to enter the security code.
Note: The phone book, language setting, call timers, security
code, and lock code are not affected.
4 2 3 to reset many of the settings in
Menu
36
Page 44

8. Phone book
Your phone allows you to save 100 phone numbers and
associated names so they are right at your fingertips for
easy dialing.
Saving names and numbers
Saving a name and number is easy!
Just enter the phone number,
press or , then press
Enter a name if you wish, then press
.
OK
Saving a number quickly
To save a number quickly, enter the phone number,
press or , then press and hold
saved to your phone book and you can add a name to it later
(see ‘Editing names and numbers’ on page 39).
Saving a name and number while in a call
To save a name and number while in a call:
Press .
1
Press
2
Scroll to
3
Scroll to
4
Enter a name if you like, then press OK.
5
Enter the phone number, then press OK.
6
The entry is displayed in your phone list. Press
the number or to clear the screen (the current call
will not be affected).
Options
Phone book
Add new
.
, then press
.
Save
, then press OK.
Select
. The number is
Save
.
Call
to call
37
Page 45

Notes about saving names
• A name may appear only once in memory. If you try to
save a name that already exists in memory, the phone
asks if you want to replace the existing name.
• If you try to save a phone number and your phone book
is full, you are given the option to replace an existing
entry. Scroll to the entry you want to replace and press
, or press to cancel.
OK
Finding names and numbers
There are several ways to find names and numbers in your
phone book.
From the start screen
Press to access your phone book, then scroll to the
desired name/number.
You can also press the number key that
Tip:
corresponds to the first letter of the name. The first
matching entry is displayed at the top of the screen.
Using the Phone book menu
Press
letters of the name, then press OK.
Your phone displays the first matching
entry at the top of the screen.
1 1, enter the first few
Menu
While performing other functions
Say you want to forward your phone
calls to a number that is saved in your
phone book. When you are prompted
to enter the phone number, you can
find it instead—simply press
access your phone book.
Search
38
to
Page 46

Editing names and numbers
To edit phone book entries, press
entry you want to edit, then press
number as needed.
1 3, scroll to the
Menu
. Edit the name and
Edit
Erasing names and numbers
Use
by one
Erase all
to enter your security code first).
1 4 to erase entries from your phone book.
Menu
lets you select one entry at a time to be erased.
erases your entire phone book (you will be required
One
Scrolling view
Use
book (
1 5 1 to choose a scrolling view for your phone
Menu
Name list, Name+number
If your phone book’s scrolling view is set to
Tip:
Name list
number associated with a name by pressing and
holding the key.
or
Name only
, or
Name only
, you can view the phone
).
Checking available memory
Use
and how many are being used. (Each memory location holds
one phone number and associated name.)
1 5 2 to see how many memory locations are free
Menu
39
Page 47

9. Call log
For your convenience, the call log (Menu 3) saves a list of
phone numbers you have dialed, and can show you how
much time you have spent on the phone. If you subscribe to
the caller ID network service, the call log also records the
phone numbers of missed calls and received calls. Contact
your service provider for details.
The Options key
When you access
and press
calls
phone’s display.
dials the number.
Call
Call time
clock must be set; see page 20.)
Edit number
allows you to enter a name for the number, edit the
Save
number if needed, and save both to your phone book.
erases the number from the call list.
Erase
View number
the name is currently displayed.
Missed calls, Received calls
, a list of options appears on your
Options
shows the time of the last call. (Your phone’s
allows you to edit the number.
displays the associated phone number if only
Missed calls
If you subscribe to the caller ID network service, your phone
automatically stores the last 10 numbers that have tried
unsuccessfully to reach you (as long as the caller allowed
his or her number to be shown to you).
, or
Dialed
When the display says Missed calls
Press
. If you have missed more than one call, you can
List
scroll through the list of numbers. To dial the displayed
number, press
Options
, then choose
40
Call
.
Page 48

Viewing the missed calls list at any time
Use
To dial a number, press
3 1 to view the missed calls list at any time.
Menu
Options
, then choose
Call
.
Received calls
If you subscribe to the caller ID network service, your phone
automatically stores the phone numbers of the 10 most
recent calls you’ve answered. Use
received calls list. To dial a number, press
choose
Call
.
Menu
3 2 to view the
, then
Options
Dialed calls
Your phone automatically stores the last 10 numbers you’ve
dialed. From the start screen, press to access the dialed
calls list. Scroll to the desired number, then press
Note: To perform any of the options listed on page 40, access
the dialed calls list by pressing
Menu
33.
Call
.
Clearing call lists
Use
call lists.
3 4 to clear the missed, received, and/or dialed
Menu
Call timers
Use
time you’ve spent in calls. Times are for
the currently selected phone number;
your phone has a separate timer for
each phone number, or NAM
(see page 32).
Note: The actual time invoiced for calls by your service
provider may vary, depending upon network features,
rounding-off for billing, and so forth.
3 5 to see the amount of
Menu
41
Page 49

Viewing call timers
Use
Last call
applicable.
All calls
reset.
Life timer
your phone and cannot be reset.
3 5 to view the various call timers.
Menu
is the duration of the last call, or current call if
is the duration of all calls since the timers were last
displays the duration of all calls for the life of
Setting timers back to 0
Use
enter your security code.
3 5 4 to clear call timers. You will be required to
Menu
Displaying the current call timer during calls
Press
1
Press
2
Press
3
Scroll to On, then press OK.
4
During a call, the amount of time spent in that call will be
displayed.
Menu
Details
Select
3 5 1.
.
.
42
Page 50

10. Voice messages
Voice mail is a network service that allows callers to record
a message when you cannot be reached. You can then call
your voice mailbox and retrieve your messages.
Saving your voice mailbox number
When you subscribe to voice mail, your service provider will
give you a voice mailbox number. You should save this number
so you can call your voice mailbox by pressing and holding
the key. See ‘Voice mailbox number’ on page 24.
Listening to new voice messages
When you receive a voice message,
you by beeping, displaying the voice message indicator
, and displaying
display the number of messages if there is more than one.
Note: The method of notification depends on your service
provider.
When your phone notifies you that you have a new voice
message, press
number, if you have saved it.
New voice message
. Your phone dials your voice mailbox
Listen
Calling your voice mailbox at any time
Once you have saved your voice mailbox number, you can
press and hold the key to dial your voice mailbox.
your
phone may notify
. The phone may
43
Page 51

11. Text messages
The text message network service allows you to receive text
messages from a variety of sources, such as a Web page set
up by your service provider. Contact your service provider for
more information.
Reading messages
When you receive a text message, the phone displays the
indicator, either
(if an emergency message has been received), and
message
makes a sound (depending on the message alert tone;
see page 22).
To read the message, press
Inbox, with the new message selected. Press
If necessary, use the scroll keys to read the entire message.
After reaching the end of the message, use the scroll keys to
view the sender’s name or phone number, and the date and
time the message was received.
Message received
Read
Options when reading messages
Several options are available while you’re reading a
message. Just press
then press OK.
Read next
Erase
(or to cancel).
Save
Call back
message. If more than one number was included, a list of
numbers is displayed. Choose one and press
When you’ve seen the last new message, the indicator
disappears.
allows you to read the next message.
deletes the message. Press OK to confirm the deletion
saves the message in the
calls any displayed phone number included in the
, scroll to the one you want,
Options
or
New emergency
. This takes you to the
Read
folder.
Saved
.
Call
again.
44
Page 52

About the Inbox
The Inbox holds text messages that have not been deleted or
saved. Use
You will see a list of message headers. The icon in front
of the header indicates that a message has been read. The
icon indicates that a message has not been read. Scroll
to the desired message, then press
2 11 to access the Inbox at any time.
Menu
Read
.
About the Saved folder
The Saved folder holds up to 30 saved text messages.
Use
messages.
2 1 2 to access the Saved folder and read saved
Menu
Storage of incoming messages
When you have an incoming text message and your phone’s
memory is full, one or more low-priority messages, which
have been read, will automatically be deleted in order to
receive the new text message. Messages are usually deleted
from your Inbox, but an emergency message may cause
messages to be deleted from the Saved folder.
If the message memory is still full, your phone will display
No space: message waiting
by pressing OK. You should delete one or more old messages
to make room for the new message. The network will
re-send the message at a later time.
. You can clear this notification
Erasing all text messages
Use
messages. Erase all
messages from one of the following categories:
All read
All in inbox
All saved
All in outbox
2 1 5 to access the
Menu
Erases all read messages in the inbox
Erases all messages in the inbox
Erases all messages stored in the Saved folder
Erases all messages in the outbox (5120i only)
option for
allows you to permanently erase all
Erase all
45
Text
Page 53

Additional features for the 5120i
If you have the Nokia 5120i, you have the capability to
write, send, forward and reply to text messages. Your phone
must be a 5120i to perform these functions, and you must
subscribe to the text messaging network service.
Note: The availability of writing and sending text messages
may vary according to your wireless service provider. Please
contact your service provider for details.
Writing and sending text messages
The 5120i allows you to write a text message using your
keypad. Once you have written a message on your screen,
you will have options for sending your message.
Writing a text message
Press
1
Write your text message by entering letters and numbers
2
from your keypad
The function of the Navi™ key will change to
3
Your
Options
Send
Back
Clear screen
Settings
Save
2 1 3 and select
Menu
menu is:
send the message
return to the
clear all entered text from the screen
choose a setting for your message
store the text message to
Write new
Text messages
Options
menu
Saved
Sending a text messages
Write a text message and press
1
To send the message, highlight
2
Enter the phone number (or press
3
number in the phone book), then press
46
Options
Send
Search
and press
to locate the
Send
OK
Page 54

Message settings
This network feature allows you to mark your text message
as urgent, place your number within the text message, or
request a read receipt. This is a network feature. Contact
your service provider for more information.
Message settings are located in the
menu as
settings by pressing
Urgent
Read receipt
Callback no.
. You may select or deselect the following
Settings
notify recipient that your message is
important
notify you that the recipient has
opened your message
place your phone number within the
message
Mark
or
Unmark
Write new
.
options
Received
exclamation mark (!) in front of the message.
Note:
Callback no.
messages are indicated with an
Urgent
is the default setting for your phone.
About the Outbox
Use Menu 2 1 4 to access the Outbox. The Outbox stores
messages that were sent successfully as well as messages
that were sent unsuccessfully. The icon in front of a
message heading shows that you have sent the message to
the text message center. The icon shows that you
attempted to send the message, but your attempt was
unsuccessful.
Press Read to read the selected message.
Forwarding and replying to a message
You can forward or reply to messages which are located in
the
Inbox, Saved
the message and press
folder or
Read
of your 5120i. Highlight
Outbox
. The
Options
47
menu appears.
Page 55

Forwarding a text message
Highlight the message that you want to forward
1
Press
2
Scroll to
3
Send the message as you normally would
4
Read
Forward
, then press
, press
Options
OK
Replying to a text message
Highlight the message that you want to reply to
1
Press
2
Scroll to
3
Send the message as you normally would
4
Read
Reply,
, then press
press
Options
OK
48
Page 56

12. Extra features
Alarm clock
The alarm clock feature is based on
your phone’s internal clock and sounds
an alert at a time you specify.
Setting the alarm clock
Use
Note that when you’re entering the alarm time, use two
digits for both hours and minutes (for example, enter 1:30
as
am/pm
Note: The key does not work on this screen. If you
make a mistake, re-enter all four digits.
Alarm volume
The alarm volume is determined by the current ringing
volume. However, if you have manually set the ringing
option (see page 21) to
the
phone only sounds a quiet beep.
When the alarm sounds
• To shut off the alarm, press any key except
•If you press
• If you let the alarm sound for one minute without
7 1 to turn the alarm clock on or off.
Menu
). If the clock’s time format (see page 20) is set to
0130
, you will be asked to choose am or pm.
or
Silent
or
Silent
minutes. To turn off the alarm before then, press
pressing a key, it stops for 10 minutes, then starts again.
quick alert setting (see page 23), the
Quiet
Snooze
Beep once
, the alarm sounds again in 10
or have selected
.
Snooze
Stop
.
If you turn off the phone
If you turn off the phone and the alarm is set, the phone
switches itself on at alarm time, then the alarm sounds.
49
Page 57

• To shut off the alarm, press any key except
The phone displays
keep it on or to switch it off.
•If you press
minutes, then the alarm sounds again.
REMEMBER! Do not switch on the phone when wireless
phone use is prohibited or when it may cause interference or
danger.
Keep the phone on?
, the phone turns itself off for 10
Snooze
Press
Snooze
Yes
.
to
Games
Use
fun games in your phone. To pause a game, press .
To resume, choose
REMEMBER! Your phone must be switched on to use this
function. Do not switch on the phone when wireless phone
use is prohibited or when it may cause interference or danger.
Memory
Reveal pictures to find pairs in as few tries as possible. Move
the cursor with the 2 (up), 4 (left), 6 (right), and 8 (down)
keys. Press the 5 key to reveal pictures. Once found, pairs
stay visible. Press the key to jump to the right over
revealed pictures or to move from the bottom right of the
screen to the top left. Press the key to jump to the left
over revealed pictures or to move from the top left of the
screen to the bottom right.
6 to challenge yourself or a friend to the three
Menu
.
Continue
Snake
Feed the snake with as many goodies as possible and watch
it grow. Use keys 2, 4, 6, and 8 to turn the snake toward
food. The longer the snake’s tail grows, the higher your
score. If the snake hits its own tail or the surrounding wall,
the game is over.
50
Page 58

Logic
Find the secret combination of figures in a column. Possible
figures are shown at the top of the display. Press the 5 key
repeatedly to select a figure and the 2, 4, and 8 keys to
move the cursor. Once you think you have the right
combination, press the key. The result appears as a set
of marks above the column. A correct figure in the right
place gets a full mark; a correct figure in the wrong place
gets a half mark. The game ends when the correct figures
are in the right place.
To copy a figure from the previous column, move
Tip:
the cursor over it using the 2, 4, or 8 key, then press
the 5 key.
51
Page 59

13. Security features
Access codes overview
Access codes consist of the lock code and security code.
When you get your phone, you should change these codes
from their defaults, write down the new codes, and keep
them in a safe place away from the phone. Avoid using
access codes that are similar to emergency numbers, such as
911, to prevent accidental dialing of the emergency number.
Lock code
Your phone’s lock code is used to lock and unlock your
phone. The default lock code is 1234. Use
change the lock code.
When the phone requires the lock code, it displays
lock code:
If you enter a wrong lock code five times in succession, your
phone prompts you for the security code.
Enter the code, then press OK.
Security code
The security code is required to restrict calls and to restore
factory settings. The default security code is 12345.
Use
When the phone requires the security code, it displays
Security code:
If you enter an incorrect security code five times in
succession, the phone will not accept any input for the next
five minutes.
4 3 2 4 to change the security code.
Menu
Enter the code, then press OK.
Menu
4 3 2 3 to
Enter
Restricting calls
Use
This is handy if you want to lend your phone to someone but
don’t want them to make long-distance or other expensive
calls.
4 3 1 to restrict outgoing or incoming calls.
Menu
52
Page 60

Restricting incoming calls
Choose
Restrict incoming calls
receiving incoming calls. Enter your security code, then
press OK. Press
this change (or to cancel).
Note: This feature requires the caller ID network service, and
the caller’s ID must be available to the phone in order for the
restriction to work.
Allowing incoming calls
To allow incoming calls once again, choose
and enter your security code. Press
calls
. Press
, then press . Press
Mark
to save this change (or to cancel).
Yes
to prevent your phone from
to save
Yes
Restrict incoming
, then press
Unmark
Restricting outgoing calls
You can create a list of numbers to which outgoing calls
cannot be made. A call restriction can consist of an entire
phone number, an area code, etc. When the restriction is
selected, calls cannot be made to any number beginning
with those digits. For example, entering
block calls to (214) 555-1234 only. 1 will block all calls
starting with 1, including long distance calls and 1-800
calls.
Adding numbers to the restricted outgoing calls list
To prevent your phone from making outgoing calls, choose
Restrict outgoing calls
OK
1
will block 1-800 calls only.
1800
. Continue with the steps illustrated below.
Add restriction
. Enter your security code, then press
is selected. Press OK.
2145551234
will
Enter the phone number, area code,
2
etc. to which you want to restrict
calls, then press OK.
53
Page 61

If you want, give a name of up to
3
10 characters to the restriction
(such as
Joey, Long dist
), then press OK.
#s
The entry is added to your list of
restricted numbers.
Allowing calls to a number on the list
If you later decide to allow calls to a
restricted number, press
your list of numbers. Press
remove the restriction. (The number
remains in the list so that you can
restrict it again later by pressing
press . Press
cancel).
Making changes to the restricted outgoing calls list
To edit or completely erase an entry in the list, choose
or
, select the entry you want to edit or erase, and
Erase
follow the instructions on the screen.
, or
1-800
to see
Select
to save your changes (or to
Yes
Unmark
to
.) When you’re done,
Mark
Edit
Phone lock
You can prevent unauthorized use of your phone by locking
it. When your phone is locked, only incoming calls and calls
to the unlocked phone number (see below) are allowed.
The memory and menu are unavailable.
Note: Calls may still be possible to emergency numbers.
How to lock your phone
Press
press OK. Scroll to On, then press OK.
4 3 2 1. Enter the lock code (see page 52), then
Menu
How to unlock your phone
Press
, enter the lock code, then press OK.
Menu
54
Page 62

Answering a call when the phone is locked
Press
Answer
.
Saving the unlocked phone number
Use
when your phone is locked. You will be required to enter the
lock code.
4 3 2 2 to save a number that may be called even
Menu
Calling the unlocked phone number
Press or , or manually enter the number exactly as it
is saved, then press
Call
.
55
Page 63

14. Accessories
An extensive range of accessories
is available for your phone. You
can select the accessories that best
suit your specific communication
needs. For availability, see your
local authorized Nokia dealer.
A few practical rules for accessory
operation:
• Keep accessories out of small children's reach.
• When you disconnect the power cord of any accessory,
grasp and pull the plug, not the cord.
• Check regularly that all wireless phone equipment in
your vehicle is mounted and operating properly.
• Installation of complex car equipment must be
completed by qualified personnel only.
WARNING!
Use only batteries, chargers and accessories approved by
the phone manufacturer for use with this particular phone
model. The use of any other types may invalidate any
approval or warranty applying to the phone, and may be
dangerous.
Nokia Xpress-on™ color covers
Your phone’s Xpress-on™ cover is available in several
fashion colors. Extra covers may be purchased from your
authorized Nokia dealer.
Note: Always store the phone with cover attached.
56
Page 64

Changing covers
When changing covers, don’t use the phone’s antenna as
leverage!
Switch off the power and disconnect the phone from
1
the charger or any other device.
Using a coin, depress the
2
colored tab on the top of
the phone and slide the
color cover forward.
Remove the cover.
3
Remove the rubber
4
keypad from the back of
the cover. Place it into
the back of the new
cover.
57
Page 65

Place the bottom of the
5
cover against the
bottom of the phone.
Make sure all three sets
of plastic tabs line up
with their respective
slots, as shown at left.
Close the cover and snap
it shut all the way
around the edge of the
phone.
58
Page 66

Batteries
Several batteries are available for your phone:
• BPS-1 Ultra Slim Li-Polymer 600 mAh
• BLS-2N Extended Li-Ion 900 mAh
• BMS-2S Extended NiMH 900 mAh
• BMS-2V Vibrating NiMH 900 mAh
• BLS-4 Ultra Extended Li-Ion 1500 mAh
Charging times
The table below displays approximate battery charging
. These charging times will charge your phone to
times
about 80% of its capacity, and the battery strength
indicator will stop scrolling. If you wish to obtain 100%
battery capacity, please allow another two hours for
“maintenance” charge.
Battery
BPS-1 Ultra Slim
Li-Polymer 600 mAh
BLS-2N Extended Li-Ion
900 mAh
BMS-2S Extended NiMH
900 mAh
BMS-2V Vibrating NiMH
900 mAh
BLS-4 Ultra Extended
Li-Ion 1500 mAh
Standard
Travel Charger
ACP-7U
2 hrs, 30 min 1 hr, 20 min
4 hrs
5 hrs 3 hrs, 30 min
Rapid Travel
Charger
ACP-9U
1 hr, 30 min
2 hrs
59
Rapid Mobile
Charger
LCH-8
Page 67

Talk and standby times
The table below displays approximate talk and standby times.
Variations will occur depending on network settings and usage.
Battery
BPS-1 Ultra Slim
Li-Polymer 600 mAh
BLS-2N Extended
Li-Ion 900 mAh
BMS-2S Extended
NiMH 900 mAh
BMS-2V Vibrating
NiMH 900 mAh
BLS-4 Ultra Extended
Li-Ion 1500 mAh
Talk Time Standby Time
Digital Analog Digital Analog
1 hr, 20 min 2 hrs, 10 min
2 hrs -
3 hrs, 15 min
3 - 5 hrs
40 min -
1 hr, 15 min
1 hr -
1 hr, 50 min
1 hr 30 min -
2 hrs, 50 min
66 - 133
hrs
100 - 200
hrs
170 - 335
hrs
20 - 33
hrs
30 - 50
hrs
50 - 83
hrs
Chargers and other accessories
WARNING!
This apparatus is intended for use when supplied with power
from the Standard Travel Charger (ACP-7U), Rapid Travel
Charger (ACP-9U), or Rapid Mobile Charger (LCH-8). Other
usage will invalidate any approval given to this apparatus
and may be dangerous.
The following chargers and other accessories are available
for your phone; please see your dealer for details. Also, refer
to any accessory options manual that may have been
included in your sales package for the entire line of
authentic Nokia accessories.
Note: When a charger is not in use, disconnect it from the
power source. Do not leave the battery connected to a charger
for longer than a week, since overcharging may shorten its
life. If left unused, a fully charged battery will discharge itself
over time.
60
Page 68

ACP-7U Standard Travel Charger
Use this durable and economical
charger to charge all battery options.
Plug the charger into a wall outlet
and connect the connector to the
bottom of your phone. Check the
charging status on the phone display.
Calls can be made during charging,
but charging will stop for the
duration of the call.
Note: If the battery is completely empty, you cannot use the
phone until it has enough charge to operate.
The Standard Travel Charger is available for different voltage
levels and can also be used with the DCH-9 Compact Desktop
Charging Stand.
ACP-9U Rapid Travel Charger
The extremely light, functionally
designed Rapid Travel Charger charges
your phone battery quickly.
Plug the charger into a wall outlet and
connect the connector to the bottom of
your phone. Check the charging status
on the phone display. You can use your
phone while charging.
Operating within a voltage range of 100V-240V AC
(50Hz-60Hz), the Rapid Travel Charger is practically
voltage-independent in normal office and household use.
Like the Standard Travel Charger, the Rapid Travel Charger is
compatible with all battery options. The Rapid Travel
Charger can also be used with the DCH-9 Compact Desktop
Charging Stand.
61
Page 69

LCH-8 Rapid Mobile Charger
The multivoltage Rapid
Mobile Charger allows you to
charge your phone when you
travel. The small charger's
functional design fits well
with most car lighters and
interiors.
Charging times are the same as for the Rapid Travel Charger
ACP-9U. Calls can be made during charging.
A green light indicates that the Rapid Mobile Charger is
ready to charge. Check the charging status on the phone
display. The input voltage is 12 or 24 V DC, negative
grounding.
The Rapid Mobile Charger can be used with all accessories
available for your phone.
Avoid prolonged charging with the Rapid Mobile Charger
when the car engine is not running. This may cause the
battery of your car to drain.
Note: In some cars the cigarette lighter plug is not provided
with power when the ignition is switched off. Verify that the
green LED light is lit.
DCH-9 Compact Desktop Charging Stand
Compatible with all
battery options, the
Compact Desktop
Charging Stand can be
used with the Standard
Travel Charger ACP-7U
or the Rapid Travel
Charger ACP-9U. The
Compact Desktop Charging Stand provides mounting for
both the phone and a spare battery. Plug the charger into a
wall outlet and connect the connector to the back of the
Compact Desktop Charging Stand. Place your phone and/or
a spare battery in the stand to begin battery charging.
62
Page 70

When the phone is charging, no lights are displayed on the
stand; check the charging status of the phone battery on
the phone display.
Charging moves to the rear slot once the front battery is
100% charged.
When the spare battery is charging, check the status indicator
on the left side of the charging stand. A red light indicates
that the battery is charging; a green light indicates that the
battery is charged to at least 80% of its capacity.
DCH-9 Rear Slot Charging Times
Battery
BPS-1 Ultra Slim
Li-Polymer 600 mAh
BLS-2N Extended
Li-Ion 900 mAh
BMS-2S Extended
NiMH 900 mAh
BMS-2V Vibrating
NiMH 900 mAh
BLS-4 Ultra Extended
Li-Ion 1500 mAh
Using ACP-7U Using ACP-9U
Front slot
30 minutes
empty
4 hrs,
6 hrs,
30 min
12 hrs
Front slot
occupied
6 hrs,
30 minutes
8 hrs,
30 min
15 hrs,
45 min
Front slot
empty
3 hrs
4 hrs,
30 min
8 hrs
Front slot
occupied
4 hrs,
30 minutes
5 hrs,
30 min
10 hr s,
30 min
The phone has the built-in intelligence to maintain the
battery, so there is no need for a discharge feature on the
stand.
63
Page 71

15. Reference information
Important safety information
Traffic safety
Do not use a hand-held telephone while driving a vehicle. If using a
hand-held phone park the vehicle before conversing.
Always secure the phone in its holder; do not place the phone on the
passenger seat or where it can break loose in a collision or sudden stop.
The use of an alert device to operate a vehicle’s lights or horn on
public roads is not permitted.
Remember, road safety always comes first!
Operating environment
Remember to follow any special regulations in force in any area and
always switch off your phone whenever it is forbidden to use it, or
when it may cause interference or danger.
When connecting the phone or any accessory to another device, read
its user’s guide for detailed safety instructions. Do not connect
incompatible products.
As with other mobile radio transmitting equipment, users are advised
that for the satisfactory operation of the equipment and for the
safety of personnel, it is recommended that the equipment should
only be used in the normal operating position (held to your ear with
the antenna pointing over your shoulder).
Electronic devices
Most modern electronic equipment is shielded from radio frequency
(RF) signals. However, certain electronic equipment may not be
shielded against the RF signals from your wireless phone.
Pacemakers
Pacemaker manufacturers recommend that a minimum separation of
6 inches (20 cm.) be maintained between a handheld wireless phone
and a pacemaker to avoid potential interference with the pacemaker.
These recommendations are consistent with the independent research
by and recommendations of Wireless Technology Research.
Persons with pacemakers:
• Should always keep the phone more than 6 inches (20 cm) from
their pacemaker when the phone is switched on;
• Should not carry the phone in a breast pocket;
• Should use the ear opposite the pacemaker to minimize the
potential for interference.
• If you have any reason to suspect that interference is taking
place, switch off your phone immediately.
64
Page 72

Hearing aids
Some digital wireless phones may interfere with some hearing aids.
In the event of such interference, you may want to consult your
service provider.
Other medical devices
Operation of any radio transmitting equipment, including cellular
phones, may interfere with the functionality of inadequately
protected medical devices. Consult a physician or the manufacturer
of the medical device to determine if they are adequately shielded
from external RF energy or if you have any questions. Switch off your
phone in health care facilities when any regulations posted in these
areas instruct you to do so. Hospitals or health care facilities may be
using equipment that could be sensitive to external RF energy.
Vehicles
RF signals may affect improperly installed or inadequately shielded
electronic systems in motor vehicles (e.g. electronic fuel injection
systems, electronic anti-skid (anti-lock) braking systems, electronic
speed control systems, air bag systems). Check with the manufacturer
or its representative regarding your vehicle. You should also consult the
manufacturer of any equipment that has been added to your vehicle.
Posted facilities
Switch your phone off in any facility where posted notices so require.
Potentially explosive atmospheres
Switch off your phone when in any area with a potentially explosive
atmosphere and obey all signs and instructions. Sparks in such areas
could cause an explosion or fire resulting in bodily injury or even death.
Users are advised to switch off the phone while at a refueling point
(service station). Users are reminded of the need to observe restrictions
on the use of radio equipment in fuel depots (fuel storage and
distribution areas), chemical plants or where blasting operations are
in progress.
Areas with a potentially explosive atmosphere are often but not
always clearly marked. They include below deck on boats; chemical
transfer or storage facilities; vehicles using liquefied petroleum gas
(such as propane or butane); areas where the air contains chemicals
or particles, such as grain, dust or metal powders; and any other area
where you would normally be advised to turn off your vehicle engine.
Vehicles
Only qualified personnel should service the phone, or install the
phone in a vehicle. Faulty installation or service may be dangerous
and may invalidate any warranty which may apply to the unit.
Check regularly that all wireless phone equipment in your vehicle is
mounted and operating properly.
65
Page 73

Do not store or carry flammable liquids, gases or explosive materials
in the same compartment as the phone, its parts or accessories.
For vehicles equipped with an air bag, remember that an air bag
inflates with great force. Do not place objects, including both installed
or portable wireless equipment, in the area over the air bag or in the
air bag deployment area. If in-vehicle wireless equipment is improperly
installed and the air bag inflates, serious injury could result.
Switch off your phone before boarding an aircraft. The use of wireless
telephones in an aircraft may be dangerous to the operation of the
aircraft, disrupt the wireless telephone network and may be illegal.
Failure to observe these instructions may lead to the suspension or
denial of telephone services to the offender, or legal action, or both.
Emergency calls
IMPORTANT!
This phone, like any wireless phone, operates using radio signals,
wireless and landline networks as well as user- programmed
functions which cannot guarantee connection in all conditions.
Therefore, you should never rely solely upon any wireless phone for
essential communications (e.g. medical emergencies).
Remember, to make or receive any calls the phone must be switched
on and in a service area with adequate signal strength. Emergency
calls may not be possible on all wireless phone networks or when
certain network services and/or phone features are in use. Check
with local service providers.
Making an emergency call
If the phone is not on, switch it on.
1
Press and hold the key for several seconds to
2
ready the phone for calls.
Key in the emergency number for your present location
3
(e.g. 911 or other official emergency number). Emergency
numbers vary by location.
Press
4
Call
If certain features are in use (Keyguard, call restrictions, etc.), you
may first need to turn those features off before you can make an
emergency call. Consult this document and your local cellular service
provider.
When making an emergency call, remember to give all the necessary
information as accurately as possible. Remember that your wireless
phone may be the only means of communication at the scene of an
accident - do not cut off the call until given permission to do so.
66
Page 74

Radio frequency (RF) signals
THIS MODEL PHONE MEETS THE GOVERNMENT’S REQUIREMENTS
FOR EXPOSURE TO RADIO WAVES.
Your wireless phone is a radio transmitter and receiver. It is designed
and manufactured not to exceed the emission limits for exposure
to radiofrequency (RF) energy set by the Federal Communications
Commission of the U.S. Government. These limits are part of comprehensive guidelines and establish permitted levels of RF energy for the
general population. The guidelines are based on standards that were
developed by independent scientific organizations through periodic
and thorough evaluation of scientific studies. The standards include a
substantial safety margin designed to assure the safety of all persons,
regardless of age and health.
The exposure standard for wireless mobile phones employs a unit
of measurement known as the Specific Absorption Rate, or SAR.
The SAR limit set by the FCC is 1.6 W/kg.* Tests for SAR are conducted
using standard operating positions accepted by the FCC with the
phone transmitting at its highest certified power level in all tested
frequency bands. Although the SAR is determined at the highest
certified power level, the actual SAR level of the phone while operating
can be well below the maximum value. This is because the phone is
designed to operate at multiple power levels so as to use only the
power required to reach the network. In general, the closer you are to
a wireless base station antenna, the lower the power output.
Before a phone model is available for sale to the public, it must be
tested and certified to the FCC that it does not exceed the limit
established by the government-adopted requirement for safe exposure.
The tests are performed in positions and locations (e.g., at the ear) as
required by the FCC for each model. The highest SAR value for this
model phone when tested for use at the ear is 1.25 W/kg. While there
may be differences between the SAR levels of various phones and at
various positions, they all meet the government requirement.
The FCC has granted an Equipment Authorization for this model phone
with all reported SAR levels evaluated as in compliance with the FCC
RF exposure guidelines. SAR information on this model phone is on
file with the FCC and can be found under the Display Grant section
of http://www.fcc.gov/oet/fccid after searching on FCC ID LJPNSC-1NX.
_____________________________________________________
*In the United States and Canada, the SAR limit for mobile phones
used by the public is 1.6 watts/kg (W/kg) averaged over one gram of
tissue. The standard incorporates a substantial margin of safety to
give additional protection for the public and to account for any
variations in measurements.
67
Page 75

Care and maintenance
Your phone is a product of superior design and craftsmanship and
should be treated with care. The suggestions below will help you to
fulfill any warranty obligations and allow you to enjoy this product
for many years. When using your phone, battery, charger, OR any
accessory:
• Keep it and all its parts and accessories out of small children’s
reach.
• Keep it dry. Precipitation, humidity and liquids contain minerals
that will corrode electronic circuits.
• Do not use or store it in dusty, dirty areas as its moving parts can
be damaged.
• Do not store it in hot areas. High temperatures can shorten the
life of electronic devices, damage batteries, and warp or melt
certain plastics.
• Do not store it in cold areas. When the phone warms up (to its
normal operating temperature), moisture can form inside the
phone, which may damage the phone's electronic circuit boards.
• Do not attempt to open it. Non-expert handling of the device
may damage it.
• Do not drop, knock or shake it. Rough handling can break
internal circuit boards.
• Do not use harsh chemicals, cleaning solvents, or strong
detergents to clean it. Wipe it with a soft cloth slightly
dampened in a mild soap-and-water solution.
• Do not paint it. Paint can clog the device’s moving parts and
prevent proper operation.
• Use only the supplied or an approved replacement antenna.
Unauthorized antennas, modifications or attachments could
damage the phone and may violate regulations governing radio
devices.
• If the phone, battery, charger, or any accessory is not working
properly, take it to your nearest qualified service facility.
The personnel there will assist you, and if necessary, arrange for
service.
68
Page 76

16. Technical information
Transmitting power: Up to 600 mW nominal
Operating voltage: 3.6 V nominal
Frequency band: 824.040 - 848.970 MHz (TX)
Number of channels: 831 lowband
Number of NAMs 2
Memory locations: 100
Memory capacity: 16 characters per name
Part No. 9352559 Printed in Canada 01/01
Nokia, Connecting People and the Original Accessories logos are
trademarks of Nokia Corporation and/or its affiliates.
The information contained in this User Guide was written for Nokia
phone NSC-1NX.
The right to make changes and improvements to any of the products
described in this guide without prior notice is reserved.
Phase 3 Issue No. 4 © 1999–2001 Nokia Inc. All rights reserved.
These commodities are authorized by the U.S. Government for export
only to Canada, Mexico, or the United States. They may not be resold,
diverted, transferred, or otherwise disposed of in any other country,
either in their original form or after being incorporated through an
intermediate process into other end-items, without the written
approval of the U.S. Department of State.
869.040 - 893.970 MHz (RX)
32 characters per number
69
Page 77

17. NOKIA One-Year Limited
Warranty
Nokia Inc. (“Nokia”) warrants that this cellular phone (“Product”) is
free from defects in material and workmanship that result in Product
failure during normal usage, according to the following terms and
conditions:
1. The limited warranty for the Product extends for ONE (1) year
beginning on the date of the purchase of the Product.
2. The limited warranty extends to the original purchaser of the
Product (“Consumer”) and is not assignable or transferable to any
subsequent purchaser/end-user.
3. The limited warranty extends only to Consumers who purchase the
Product in the United States.
4. During the limited warranty period, Nokia will repair, or replace, at
Nokia's option, any defective parts, or any parts that will not properly
operate for their intended use with new or factory rebuilt replacement
items if such repair or replacement is needed because of product
malfunction or failure during normal usage. No charge will be made to
the Consumer for any such parts. Nokia will also pay for the labor
charges incurred by Nokia in repairing or replacing the defective parts.
The limited warranty does not cover defects in appearance, cosmetic,
decorative or structural items, including framing, and any nonoperative parts. Nokia's limit of liability under the limited warranty
shall be the actual cash value of the Product at the time the Consumer
returns the Product for repair, determined by the price paid by the
Consumer for the Product less a reasonable amount for usage. Nokia
shall not be liable for any other losses or damages. These remedies are
the Consumer’s exclusive remedies for breach of warranty.
5. Upon request from Nokia, the Consumer must prove the date of
the original purchase of the Product by a dated bill of sale or dated
itemized receipt.
6. The Consumer shall bear the cost of shipping the Product to Nokia
in Melbourne, Florida. Nokia shall bear the cost of shipping the
Product back to the Consumer after the completion of service under
this limited warranty.
7. The Consumer shall have no coverage or benefits under this
limited warranty if any of the following conditions are applicable:
a) The Product has been subject to abnormal use, abnormal conditions,
improper storage, exposure to moisture or dampness, unauthorized
modifications, unauthorized connections, unauthorized repair, misuse,
neglect, abuse, accident, alteration, improper installation, or other
acts which are not the fault of Nokia, including damage caused by
shipping.
70
Page 78

b) The Product has been damaged from external causes such as
collision with an object, or from fire, flooding, sand, dirt, windstorm,
lightning, earthquake or damage from exposure to weather conditions,
an Act of God, or battery leakage, theft, blown fuse, or improper use of
any electrical source, or damage caused by the connection to other
products not recommended for interconnection by Nokia.
c) Nokia was not advised by the Consumer in writing of the alleged
defect or malfunction of the Product within fourteen (14) days after
the expiration of the applicable limited warranty period.
d) The Product serial number plate or the accessory data code has
been removed, defaced or altered.
e) The defect or damage was caused by the defective function of the
cellular system or by inadequate signal reception by the external
antenna.
8. If a problem develops during the limited warranty period, the
Consumer shall take the following step-by-step procedure:
a) The Consumer shall return the Product to the place of purchase for
repair or replacement processing.
b) If “a” is not convenient because of distance (more than 50 miles)
or for other good cause, the Consumer shall ship the Product prepaid
and insured to:
Nokia Inc.
Attn: Repair Department
795 West Nasa Blvd.
Melbourne, FL. 32901
c) The Consumer shall include a return address, daytime phone
number and/or fax number, complete description of the problem,
proof of purchase and service agreement (if applicable). Expenses
related to removing the Product from an installation are not covered
under this limited warranty.
d) The Consumer will be billed for any parts or labor charges not
covered by this limited warranty. The Consumer will be responsible
for any expenses related to reinstallation of the Product.
e) Nokia will repair or authorize the repair of the Product under the
limited warranty within 30 days after receipt of the Product by Nokia
or an Nokia authorized service center. If Nokia cannot perform repair
covered under this limited warranty within 30 days, or after a
reasonable number of attempts to repair the same defect, Nokia at
its option, will provide a replacement Product or refund the purchase
price of the Product less a reasonable amount for usage.
f) If the Product is returned to Nokia during the limited warranty
period, but the problem with the Product is not covered under the
terms and conditions of this limited warranty, the Consumer will be
notified and given an estimate of the charges the Consumer must
pay to have the Product repaired, with all shipping charges billed to
71
Page 79

the Consumer. If the estimate is refused, the Product will be returned
freight collect. If the Product is returned to Nokia after the expiration
of the limited warranty period, Nokia's normal service policies shall
apply and the Consumer will be responsible for all shipping charges.
9. The Product consists of newly assembled equipment that may
contain used components that have been reprocessed to allow
machine compliance with Product performance and reliability
specifications.
10. ANY IMPLIED WARRANTY OF MERCHANTABILITY, OR FITNESS
FOR A PARTICULAR PURPOSE OR USE, SHALL BE LIMITED TO THE
DURATION OF THE FOREGOING LIMITED WRITTEN WARRANTY.
OTHERWISE, THE FOREGOING LIMITED WARRANTY IS THE CONSUMER'S
SOLE AND EXCLUSIVE REMEDY AND IS IN LIEU OF ALL OTHER
WARRANTIES, EXPRESS OR IMPLIED. NOKIA SHALL NOT BE LIABLE
FOR SPECIAL, INCIDENTAL OR CONSEQUENTIAL DAMAGES,
INCLUDING BUT NOT LIMITED TO, LOSS OF ANTICIPATED BENEFITS
OR PROFITS, LOSS OF SAVINGS OR REVENUE, PUNITIVE DAMAGES,
LOSS OF USE OF THE PRODUCT OR ANY ASSOCIATED EQUIPMENT,
COST OF CAPITAL, COST OF ANY SUBSTITUTE EQUIPMENT OR
FACILITIES, DOWNTIME, THE CLAIMS OF ANY THIRD PARTIES,
INCLUDING CUSTOMERS, AND INJURY TO PROPERTY, RESULTING
FROM THE PURCHASE OR USE OF THE PRODUCT OR ARISING FROM
BREACH OF THE WARRANTY, BREACH OF CONTRACT, NEGLIGENCE,
STRICT TORT, OR ANY OTHER LEGAL OR EQUITABLE THEORY, EVEN IF
NOKIA KNEW OF THE LIKELIHOOD OF SUCH DAMAGES. NOKIA SHALL
NOT BE LIABLE FOR DELAY IN RENDERING SERVICE UNDER THE
LIMITED WARRANTY, OR LOSS OF USE DURING THE PERIOD THAT THE
PRODUCT IS BEING REPAIRED.
11. Some states do not allow limitation of how long an implied
warranty lasts, so the above one-year warranty limitation may not
apply to you (the Consumer). Some states do not allow the exclusion
or limitation of incidental and consequential damages, so certain of
the above limitations or exclusions may not apply to you (the
Consumer). This limited warranty gives the Consumer specific legal
rights and the Consumer may also have other rights which vary from
state to state.
12. Nokia neither assumes nor authorizes any authorized service
center or any other person or entity to assume for it any other
obligation or liability beyond that which is expressly provided for in
this limited warranty including the provider or seller of any extended
warranty or service agreement.
13. This is the entire warranty between Nokia and the Consumer, and
supersedes all prior and contemporaneous agreements or
understandings, oral or written, and all communications relating to
the Product, and no representation, promise or condition not
contained herein shall modify these terms.
72
Page 80

14. This limited warranty allocates the risk of failure of the Product
between the Consumer and Nokia. The allocation is recognized by
the Consumer and is reflected in the purchase price of the Product.
15. Any action or lawsuit for breach of warranty must be
commenced within eighteen (18) months following delivery of the
Product.
16. Questions concerning this limited warranty may be directed to:
Nokia Customer Care Center, USA
Nokia Inc.
7725 Woodland Center Boulevard, Suite #150
Tampa, FL 33614
Telephone: 1-888-NOKIA2U (1-888-665-4228)
Facsimile: (813) 249-9619
TTY Users: 1-800-24NOKIA (1-800-246-6542)
17. The limited warranty period for Nokia supplied attachments and
accessories is specifically defined within their own warranty cards
and packaging.
© Nokia is a registered trademark of Nokia Corporation.
73
Page 81

18. Index
A
ABC mode 11
accessories 56
batteries 59
chargers 60
covers 56
alarm clock 49
answering a call 16
automatic answer 35
antenna 14
external jack 7
automatic answer 35
B
batteries 59
attaching 3
charging 3
discharging 4
removing 5
blocking calls see restricting
calls
C
call block see restricting
calls
call forwarding
activating 30
cancelling 30
call log 40
clearing lists 41
dialed calls 41
missed calls 40
Options key 40
received calls 41
call restrictions
see restricting calls
call timers 41
call waiting 29
answering a waiting call 29
cancelling 29
caller ID 17
showing/hiding number 32
calling card
making calls 33
set-up 18
calls
answering 16
answering automatically 35
answering with call
waiting 29
ending 29
forwarding 30
initiating a second 28
making 15
muting 15, 28
silencing an incoming call 17
switching between 28
three-way calling 28
unmuting 15, 28
care and maintenance 68
chargers 60
clear key 7
clearing call lists 41
clock 20
alarm clock 49
displaying/hiding 20
setting 20
time format 20
conference calls
see three-way calling
covers, changing 56
cursor 11
D
dialed calls 41
digital/analog selection 31
directory see phone book
74
Page 82

E
editing names/numbers 39
emergency calls 25, 66
emergency key 9 26
erasing names/numbers 39
external antenna jack 7
F
factory settings, restoring 36
G
games 50
H
help text 8
I
Inbox 45
in-call menu 28
K
Keyguard 13
keypad lock 13
keys
clear key 7
TM
key 6
Navi
power key 6
scroll keys 6
L
language 21
lights 7
in car kit 21
lock code 52
locking the keypad 13
locking your phone 54
M
making a call 15
memory 39
menu 8
shortcuts 9
messages
text see text messages
voice mail 43
missed calls 40
muting the microphone 15, 28
N
NAM selection 32
names
editing 39
entering 11
erasing 39
finding 16, 37
saving 37
TM
key 6
Navi
network feature setting 27
new call 28
numbers
editing 39
entering 11
erasing 39
finding 16, 37
saving 37
showing/hiding your own 32
O
on/off 14
one-touch dialing 31
P
phone book 37
available memory 39
scrolling view 39
phone lock 54
phone number, choosing
see NAM selection
power key 6
profiles see quick alert
settings
Q
quick alert settings 23
75
Page 83

R
reading text messages 44
received calls 41
redial
automatic 18
last number 16
restore factory settings 36
restricting calls 52
ringing see tones
S
safety guidelines 1, 64
safety information 64
Saved folder 45, 47
scroll keys 6
scrolling view 39
security code 52
security features 52
send own number 32
signal strength 14
silencing an incoming call 17
sound see tones
special characters 12, 12
speed dialing see one-touch
dialing
start screen 7
system selection 34
T
technical information 69
text messages 44
forwarding 47
Inbox 45
reading 44
replying 48
Saved folder 45, 47
storage 45
writing 46
three-way calling 28
timers 41
tones 21
keypad 22
message alert 22
quick alert settings 23
ringing option 21
ringing tone 22
ringing volume 22
warning and game 23
touch tones 35
saving touch tone strings 36
setting automatic length 36
setting manual length 36
U
unmuting the microphone
15, 28
V
vibrating alert 23
voice mail messages 43
voice mailbox number 24
voice privacy 24
volume
earpiece 15
ringing 22
W
warranty 70
welcome note 24
writing text messages 46
76
Page 84

NOTES
77
Page 85

Para obtener un manual del usuario en español favor de
llamar o enviar un fax al teléfono 1-888-NOKIA2U
(1-888-665-4228), fax 813-249-9619.
For alternate formats of this owner’s manual, call our
Customer Care center at 1-888-665-4228 (NOKIA2U).
78
 Loading...