

Page 1

User Guide
Manual del Usuario
Page 2

Nokia 3600 slide User Guide
9209959
Issue 1
Page 3
DECLARATION OF CONFORMITY
Hereby, NOKIA CORPORATION declares that this RM-352 product is in compliance with the
essential requirements and other relevant provisions of Directive 1999/5/EC. A copy of the
Declaration of Conformity can be found at http://www.nokia.com/phones/
declaration_of_conformity/.
© 2008 Nokia. All rights reserved.
Nokia, Nokia Connecting People, and Navi are trademarks or registered trademarks of N okia Corporation. Nokia tune
is a sound mark of Nokia Corporation. Other product and company names mentioned herein may be trademarks or
tradenames of their respective owners.
Reproduction, transfer, distribution, or storage of part or all of the contents in this document in any form without
the prior written permission of Nokia is prohibited.
US Patent No 5818437 and other pending patents. T9 text input software Copyright © 1997-2008. Tegic
Communications, Inc. All rights reserved.
Includes RSA BSAFE cryptographic or security protocol software from RSA Security.
Java and all Java-based marks are trademarks or registered trademarks of Sun Microsystems, Inc.
Portions of the Nokia Maps software are ©1996-2008 The FreeType Project. All rights reserved.
This product is licensed under the MPEG-4 Visual Patent Portfolio License (i) for personal and noncommercial use in
connection with information which has been encoded in compliance with the MPEG-4 Visual Standard by a consumer
engaged in a personal and noncommercial activity and (ii) for use in connection with MPEG-4 video provided by a
licensed video provider. No license is granted or shall be implied for any other use. Additional information, including
that related to promotional, internal, and commercial uses, may be obtained from MPEG LA, LLC. See http://
www.mpegla.com
Nokia operates a policy of ongoing development. Nokia reserves the right to make changes and improvements to
any of the products described in this document without prior notice.
TO THE MAXIMUM EXTENT PERMITTED BY APPLICABLE LAW, UNDER NO CIRCUMSTANCES SHALL NOKIA OR ANY OF ITS
LICENSORS BE RESPONSIBLE FOR ANY LOSS OF DATA OR INCOME OR ANY SPECIAL, INCIDENTAL, CONSEQUENTIAL OR INDIRECT
DAMAGES HOWSOEVER CAUSED.
THE CONTEN TS OF T HIS DOC UMENT A RE PRO VIDED " AS IS". EXCEP T AS REQ UIRED BY APPL ICABL E LAW, N O WARRA NTIES OF
ANY KIND, EITHER EXPRESS OR IMPLIED, INCLUDING, BUT NOT LIMITED TO, THE IMPLIED WARRANTIES OF MERCHANTABILITY
AND FITNESS FOR A PARTICULAR PURPOSE, ARE MADE IN RELATION TO THE ACCURACY, RELIABILITY OR CONTENTS OF THIS
DOCUMENT. NOKIA RESERVES THE RIGHT TO REVISE THIS DOCUMENT OR WITHDRAW IT AT ANY TIME WITHOUT PRIOR
NOTICE.
The availability of particular products and applications and services for these products may vary by region. Please
check with your Nokia dealer for details, and availability of language options.
The availability of some features may vary by region. Please contact your operator for more details.
Export controls
This device may contain commodities, technology or software subject to export laws and regulations from the US
and other countries. Diversion contrary to law is prohibited.
Page 4

FCC NOTICE
Your device may cause TV or radio interference (for example, when using a telephone in close proximity to receiving
equipment). The FCC can require you to stop using your telephone if such interference cannot be eliminated. If you
require assistance, contact your local service facility. This device complies with part 15 of the FCC rules. Operation is
subject to the following two conditions: (1) This device may not cause harmful interference, and (2) this device must
accept any interference received, including interference that may cause undesired operation. Any changes or
modifications not expressly approved by Nokia could void the user's authority to operate this equipment.
Model number: 3600s
9209959/Issue 1
Page 5

Contents
Safety...........................................7
1. General information................8
About your device......................................8
Network services.......................................8
Access codes...............................................8
Configuration setting service...................9
My Nokia.....................................................9
Download content.....................................9
Helpful hints.............................................10
Software updates....................................10
Nokia support..........................................10
Digital rights management....................11
2. Get started.............................11
Install SIM card and battery....................11
Insert a memory card..............................12
Remove the memory card......................13
Charge the battery..................................13
Antenna....................................................13
Headset.....................................................14
Strap.........................................................14
AV cable....................................................14
Keys and parts.........................................15
Switch the phone on and off..................15
Standby mode..........................................16
Display...................................................16
Power saving.........................................16
Active standby.......................................16
Shortcuts in the standby mode...........17
Indicators..............................................17
Flight mode..............................................17
Keypad lock..............................................18
Functions without a SIM card.................18
3. Calls.......................................18
Make a call................................................18
Incoming call...........................................19
Dialing shortcuts.....................................19
Voice dialing............................................19
Options during a call...............................19
4. Write text..............................20
Text modes...............................................20
Traditional text input..............................20
Predictive text input...............................20
5. Navigate the menus..............21
6. Messaging..............................21
Text and multimedia messages.............21
Text messages......................................21
Multimedia messages..........................22
Create a text or multimedia
message.................................................22
Read a message and reply...................22
Send messages......................................22
E-mail........................................................23
E-mail setup wizard..............................23
Write and send an e-mail....................23
Read an e-mail and reply.....................23
New e-mail notifications.....................24
Flash messages........................................24
Nokia Xpress audio messages................24
Instant messaging...................................24
Info messages, SIM messages, and
service commands...................................25
Voice messages........................................25
Message settings.....................................25
7. Contacts.................................26
Manage contacts......................................26
Business cards..........................................27
Assign dialing shortcuts.........................27
8. Call log ..................................27
9. Position log...........................28
10. Connectivity.........................28
Bluetooth wireless technology..............28
Packet data..............................................29
USB data cable.........................................29
Synchronization and backup..................29
Nokia PC Suite..........................................30
11. Settings...............................30
Profiles......................................................30
Page 6

Themes.....................................................30
Tones........................................................30
Lights........................................................30
Display......................................................31
Date and time..........................................31
My shortcuts.............................................31
Left and right selection keys...............31
Other shortcuts.....................................32
Call.............................................................32
Phone........................................................32
Voice commands.....................................33
Enhancements.........................................33
Configuration...........................................33
Software updates over the air...............34
Security.....................................................35
Restore factory settings..........................35
12. Operator menu....................35
13. Gallery.................................36
Folders and files......................................36
Print images.............................................36
Memory card............................................36
14. Media...................................37
Camera and video....................................37
Take a picture.......................................37
Record a video clip...............................37
Camera and video options...................37
Music player.............................................38
Music menu...........................................38
Play music tracks..................................38
Change the music player look.............39
Radio.........................................................39
Tune in to radio stations.....................39
Radio features.......................................40
Voice recorder..........................................40
Equalizer...................................................40
Stereo widening......................................41
15. Web ....................................41
Connect to a service................................41
Appearance settings...............................41
Cache memory.........................................42
Browser security......................................42
16. Maps....................................42
Download maps.......................................42
Maps and GPS...........................................43
Extra services...........................................44
17. Organizer.............................44
Alarm clock...............................................44
Calendar....................................................44
To-do list..................................................45
Notes.........................................................45
Calculator.................................................45
Countdown timer....................................45
Stopwatch................................................45
18. Applications.........................46
Launch an application.............................46
Download an application.......................46
19. SIM services.........................47
Enhancements...........................48
Battery.......................................48
Battery and charger information...........48
Nokia battery authentication
guidelines.................................................49
Authenticate hologram........................49
What if your battery is not
authentic?..............................................49
Care and maintenance..............50
Disposal....................................................51
Additional safety
information...............................51
Small children..........................................51
Operating environment..........................51
Medical devices........................................51
Implanted medical devices..................51
Hearing aids..........................................52
Vehicles.....................................................52
Potentially explosive
environments...........................................52
Emergency calls.......................................53
Certification information (SAR)..............53
Page 7

Index.........................................55
Page 8
Safety
Read these simple guidelines. Not following them may be dangerous or illegal. Read
the complete user guide for further information.
SWITCH ON SAFELY
Do not switch the device on when wireless phone use is prohibited or when
it may cause interference or danger.
ROAD SAFETY COMES FIRST
Obey all local laws. Always keep your hands free to operate the vehicle while
driving. Your first consideration while driving should be road safety.
INTERFERENCE
All wireless devices may be susceptible to interference, which could affect
performance.
SWITCH OFF IN RESTRICTED AREAS
Follow any restrictions. Switch the device off in aircraft, near medical
equipment, fuel, chemicals, or blasting areas.
QUALIFIED SERVICE
Only qualified personnel may install or repair this product.
ENHANCEMENTS AND BATTERIES
Use only approved enhancements and batteries. Do not connect incompatible
products.
WATER-RESISTANCE
Your device is not water-resistant. Keep it dry.
© 2008 Nokia. All rights reserved. 7
Page 9

1. General information
About your device
The wireless device described in this guide is approved for use on the GSM 850, 900,
1800, and 1900 MHz networks. Contact your service provider for more information about
networks.
When using the features in this device, obey all laws and respect local customs, privacy
and legitimate rights of others, including copyrights.
Copyright protection may prevent some images, music, and other content from being
copied, modified, or transferred.
Your device may have preinstalled bookmarks and links for third-party internet sites.
You may also access other third-party sites through your device. Third-party sites are
not affiliated with Nokia, and Nokia does not endorse or assume liability for them. If
you choose to access such sites, you should take precautions for security or content.
Warning: To use any features in this device, other than the alarm clock, the
device must be switched on. Do not switch the device on when wireless device use may
cause interference or danger.
Remember to make back-up copies or keep a written record of all important information
stored in your device.
When connecting to any other device, read its user guide for detailed safety instructions.
Do not connect incompatible products.
Network services
To use the phone you must have service from a wireless service provider. Many of the
features require special network features. These features are not available on all
networks; other networks may require that you make specific arrangements with your
service provider before you can use the network services. Your service provider can give
you instructions and explain what charges will apply. Some networks may have
limitations that affect how you can use network services. For instance, some networks
may not support all language-dependent characters and services.
Your service provider may have requested that certain features be disabled or not
activated in your device. If so, these features will not appear on your device menu. Your
device may also have a special configuration such as changes in menu names, menu
order, and icons. Contact your service provider for more information.
Access codes
To set how your phone uses the access codes and security settings, select Menu >
Settings > Security > Access codes.
● The PIN (UPIN) code, supplied with the SIM (USIM) card, helps to protect the card
against unauthorized use.
© 2008 Nokia. All rights reserved.8
Page 10

● The PIN2 (UPIN2) code, supplied with some SIM (USIM) cards, is required to access
certain services.
● PUK (UPUK) and PUK2 (UPUK2) codes may be supplied with the SIM (USIM) card. If you
enter the PIN code incorrectly three times in succession, you are asked for the PUK
code. If the codes are not supplied, contact your service provider.
● The security code helps to protect your phone against unauthorized use. You can
create and change the code, and set the phone to request the code. Keep the code
secret and in a safe place separate from your phone. If you forget the code and your
phone is locked, your phone will require service and additional charges may apply.
For more information, contact a Nokia Care point or your phone dealer.
● The restriction password is required when using the call restriction service to restrict
calls to and from your phone (network service).
● To view or change the security module settings for the web browser, select Menu >
Settings > Security > Security module sett..
Configuration setting service
To use some of the network services, such as mobile internet services, the multimedia
messaging service (MMS), Nokia Xpress audio messaging, or remote internet server
synchronization, your phone needs the correct configuration settings. For more
information on availability, contact your service provider or the nearest authorized
Nokia dealer, or visit the support area on the Nokia website.
support," p. 10.
When you have received the settings as a configuration message and the settings are
not automatically saved and activated, Configuration settings received is displayed.
To save the settings, select Show > Save. If required, enter the PIN code supplied by
the service provider.
See "Nokia
My Nokia
Receive free tips, tricks, and support for your Nokia phone, plus free trial content,
interactive demonstrations, a personalized web page, and news about the latest Nokia
products and services.
Get the most out of your Nokia phone and register to My Nokia today! For more
information and availability in your region, see www.nokia.com/mynokia.
Download content
You may be able to download new content (for example, themes) to your phone
(network service).
Important: Use only services that you trust and that offer adequate security and
protection against harmful software.
For the availability of different services and pricing, contact your service provider.
© 2008 Nokia. All rights reserved. 9
Page 11
Helpful hints
If you have queries with your phone, or you are unsure how your phone should function,
refer to the user guide. If this does not help, try the following:
● Reset the phone: switch off the phone, and remove the battery. After a few seconds,
insert the battery, and switch on the phone.
● Restore the factory settings.
● Update your phone software with the Nokia Software Updater application, if
available.
● Visit a Nokia website, or contact Nokia Care.
If a query remains unresolved, contact your local Nokia Care point for repair options.
Before sending your phone for repair, always back up or make a record of data in your
phone.
See "Software updates," p. 10.
See "Restore factory settings," p. 35.
See "Nokia support," p. 10.
Software updates
Nokia may produce software updates that may offer new features, enhanced functions,
or improved performance. You may be able to request these updates through the Nokia
Software Updater PC application. To update the device software, you need the Nokia
Software Updater application and a compatible PC with Microsoft Windows 2000, XP or
Vista operating system, broadband internet access, and a compatible data cable to
connect your device to the PC.
To get more information and to download the Nokia Software Updater application, visit
www.nokia-latinoamerica.com/nsu or your local Nokia website.
If software updates over the air are supported by your network, you may also be able
to request updates through the phone.
Important: Use only services that you trust and that offer adequate security and
protection against harmful software.
See "Software updates over the air," p. 34.
Nokia support
Check www.nokia.com/support or www.nokia-latinoamerica.com/soporte or your
local Nokia website for the latest version of this guide, additional information,
downloads, and services related to your Nokia product.
You may find additional detailed information in the Nokia Care Services and Warranty
Conditions booklet.
Configuration settings service
Download free configuration settings such as MMS, GPRS, e-mail, and other services for
your phone model at www.nokia-latinoamerica.com/soporte.
Nokia PC Suite
You may find PC Suite and related information on the Nokia website at www.nokia.
com/support or www.nokia-latinoamerica.com/pcsuite. To determine the features
© 2008 Nokia. All rights reserved.10
Page 12

that PC Suite offers for your phone, consult the compatibility list for PC Suite on the
Nokia website www.nokia-latinoamerica.com/soporte.
Nokia Care services
If you need to contact Nokia Care services, check the list of local Nokia
Care contact centers at www.nokia-latinoamerica.com/contactenos.
Maintenance
For maintenance services, check your nearest Nokia Care point at www.nokia.com/
repair or www.nokia-latinoamerica.com/centrosdeservicio.
Digital rights management
Content owners may use different types of digital rights management (DRM)
technologies to protect their intellectual property, including copyrights. This device uses
various types of DRM software to access DRM-protected content. With this device you
can access content protected with WMDRM 10, OMA DRM 1.0, OMA DRM 1.0 forward lock,
and OMA DRM 2.0. If certain DRM software fails to protect the content, content owners
may ask that such DRM software's ability to access new DRM-protected content be
revoked. Revocation may also prevent renewal of such DRM-protected content already
in your device. Revocation of such DRM software does not affect the use of content
protected with other types of DRM or the use of non-DRM-protected content.
Digital rights management (DRM) protected content comes with an associated
activation key that defines your rights to use the content.
If your device has OMA DRM-protected content, to back up both the activation keys and
the content, use the backup feature of Nokia PC Suite. Other transfer methods may not
transfer the activation keys which need to be restored with the content for you to be
able to continue the use of OMA DRM-protected content after the device memory is
formatted. You may also need to restore the activation keys in case the files on your
device get corrupted.
If your device has WMDRM-protected content, both the activation keys and the content
will be lost if the device memory is formatted. You may also lose the activation keys and
the content if the files on your device get corrupted. Losing the activation keys or the
content may limit your ability to use the same content on your device again. For more
information, contact your service provider.
2. Get started
Install SIM card and battery
Always switch the device off and disconnect the charger before removing the battery.
This phone is intended for use with a BL-4S battery. Always use original Nokia batteries.
See "Nokia battery authentication guidelines," p. 49.
The SIM card and its contacts can be easily damaged by scratches or bending, so be
careful when handling, inserting, or removing the card.
© 2008 Nokia. All rights reserved. 11
Page 13
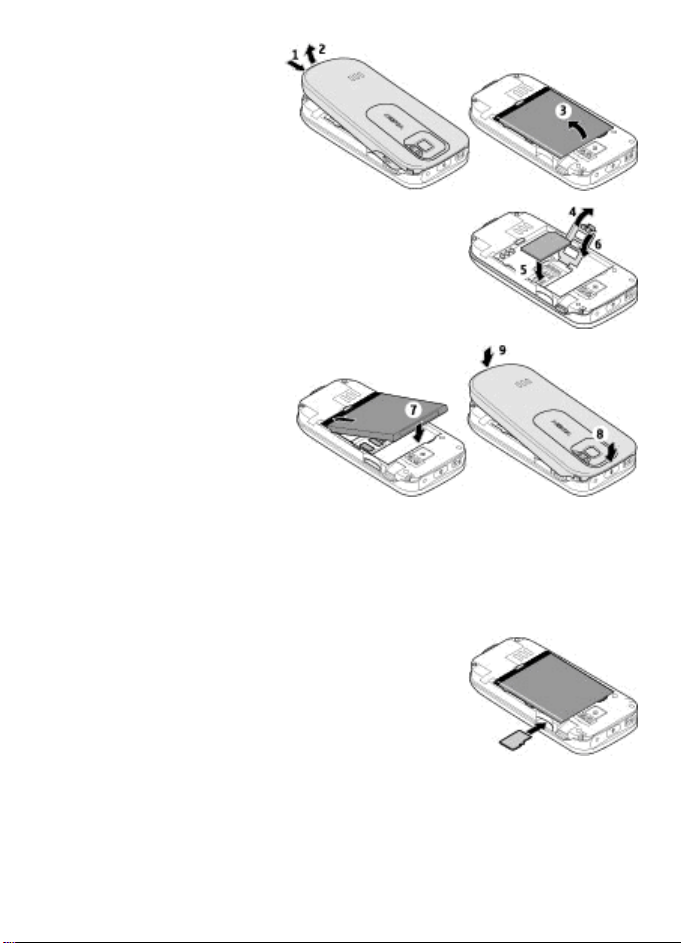
1. Press the release button to lift
the back cover, and remove it.
Remove the battery.
2. Open the SIM card holder, and
insert the SIM card with the
contact surface facing down
into the holder. Close the SIM
card holder.
3. Observe the battery contacts,
and insert the battery.
Replace the back cover.
Insert a memory card
Use only compatible microSD cards approved by Nokia for use with this device. Nokia
uses approved industry standards for memory cards, but some brands may not be fully
compatible with this device. Incompatible cards may damage the card and the device
and corrupt data stored on the card.
Your phone supports microSD cards of up to 4 GB.
1. Remove the back cover.
2. Insert the memory card into the memory card slot with the
contact surface facing down, and press it until it locks into
place.
3. Replace the back cover.
© 2008 Nokia. All rights reserved.12
Page 14
Remove the memory card
Important: Do not remove the memory card in the middle of an operation when
the card is being accessed. Removing the card in the middle of an operation may damage
the memory card as well as the device, and data stored on the card may be corrupted.
You can remove or replace the memory card during phone operation without switching
the device off.
1. Ensure that no application is currently accessing the memory card.
2. Remove the back cover.
3. Press the memory card slightly in to release the lock and remove it.
4. Replace the back cover.
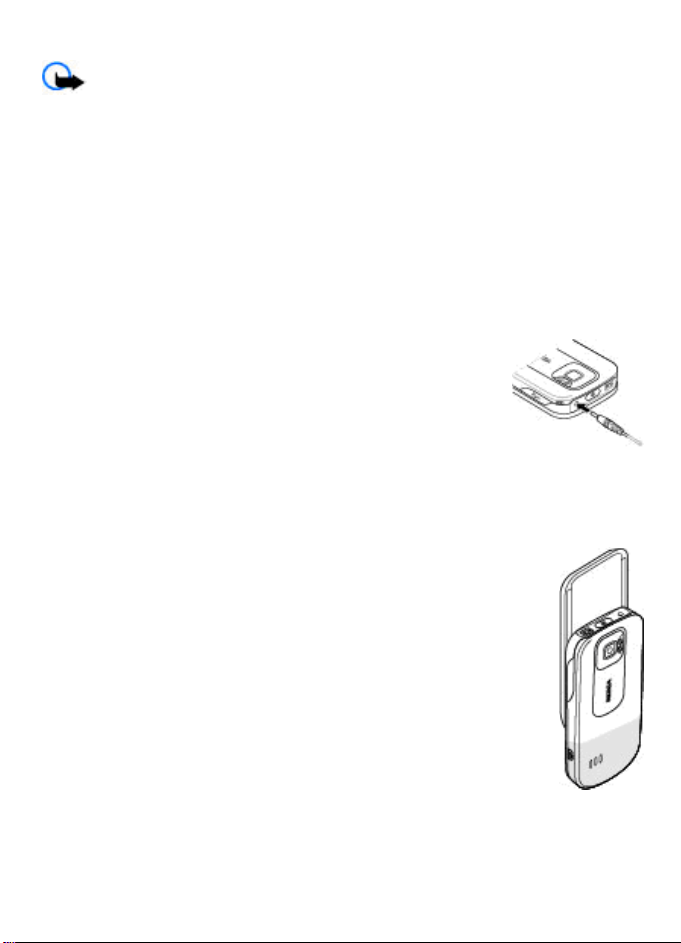
Charge the battery
1. Connect the charger to a wall outlet.
2. Connect the lead from the charger to the charger connector of
your phone.
If the battery is completely discharged, it may take a few minutes
before the charging indicator appears on the display or before any
calls can be made.
The charging time depends on the charger used. Charging a BL-4S
battery with the AC-4E charger takes approximately 1 hour 30
minutes while the phone is in the standby mode.
Antenna
Your device may have internal and external antennas. As with any radio
transmitting device, avoid touching the antenna area unnecessarily while
the antenna is transmitting or receiving. Contact with such an antenna
affects the communication quality and may cause the device to operate at
a higher power level than otherwise needed and may reduce the battery
life.
The figure shows the antenna area marked in grey.
© 2008 Nokia. All rights reserved. 13
Page 15
Headset
Warning: Listen to music at a moderate level. Continuous exposure to high
volume may damage your hearing. Do not hold the device near your ear when the
loudspeaker is in use, because the volume may be extremely loud.
Warning: When you use the headset, your ability to hear outside sounds may
be affected. Do not use the headset where it can endanger your safety.
When connecting any external device or any headset, other than those approved by
Nokia for use with this device, to the Nokia AV Connector, pay special attention to volume
levels.
Do not connect products that create an output signal as this may cause damage to the
device. Do not connect any voltage source to the Nokia AV Connector.
Strap
1. Open the back cover.
2. Hook a strap behind the clamp, and close the back cover.
AV cable
To display images from the Gallery and instant
messages on a TV screen, connect a Nokia Video-Out
Cable CA-92U to the AV connector of your phone.
Observe the color code when you connect the cable to
your TV. This function is not designed to view video
clips.
Color code
Signal
© 2008 Nokia. All rights reserved.14
Page 16
white analog channel left
red analog channel right
yellow composite video
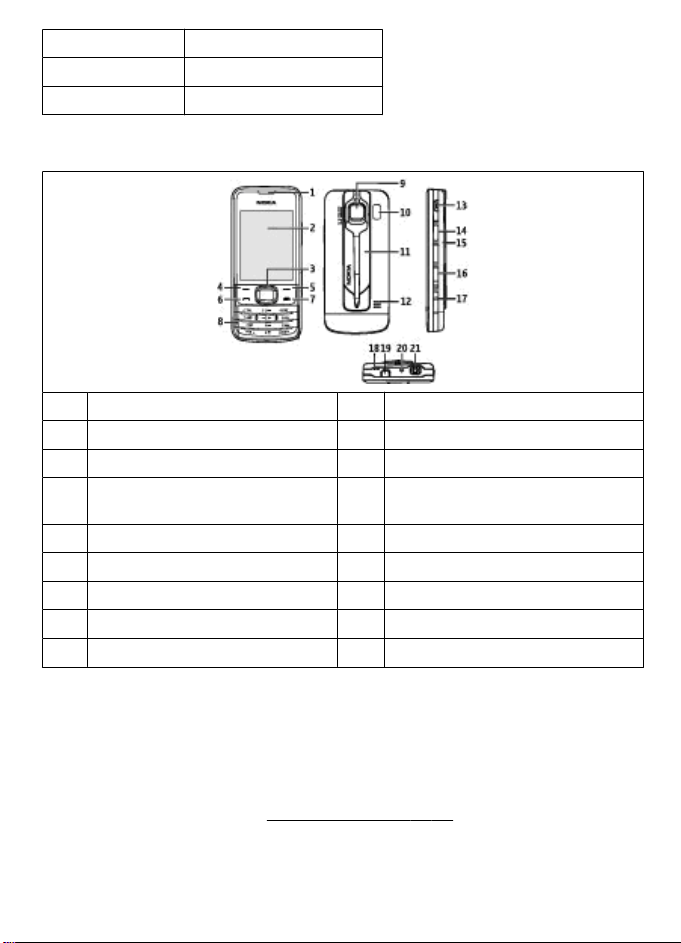
Keys and parts
1 Earpiece 2 Micro USB cable connector
3 Left selection key 4 Call key
5 Keypad 6 Display
7 Navi™ key; hereafter referred to as
scroll key
9 End key 10 Camera key
11 Volume down key 12 Volume up key
13 Nokia AV Connector (2.5 mm) 14 Power key
15 Charger connector 16 Camera flash
17 Camera lens 18 Loudspeaker
8 Right selection key
Switch the phone on and off
To switch the phone on or off, press and hold the power key.
If the phone prompts for a PIN code, enter the code (displayed as ****).
If the phone prompts you for the time and date, enter the local time, select the time
zone of your location in terms of the time difference with respect to Greenwich Mean
Time (GMT), and enter the date.
When you switch on your phone for the first time, you may be prompted to get the
configuration settings from your service provider (network service). For more
© 2008 Nokia. All rights reserved. 15
See "Date and time," p. 31.
Page 17
information, refer to Connect to support. See "Configuration", p. 33, and
"Configuration setting service", p. 9.
Standby mode
When the phone is ready for use, and you have not entered any characters, the phone
is in the standby mode.
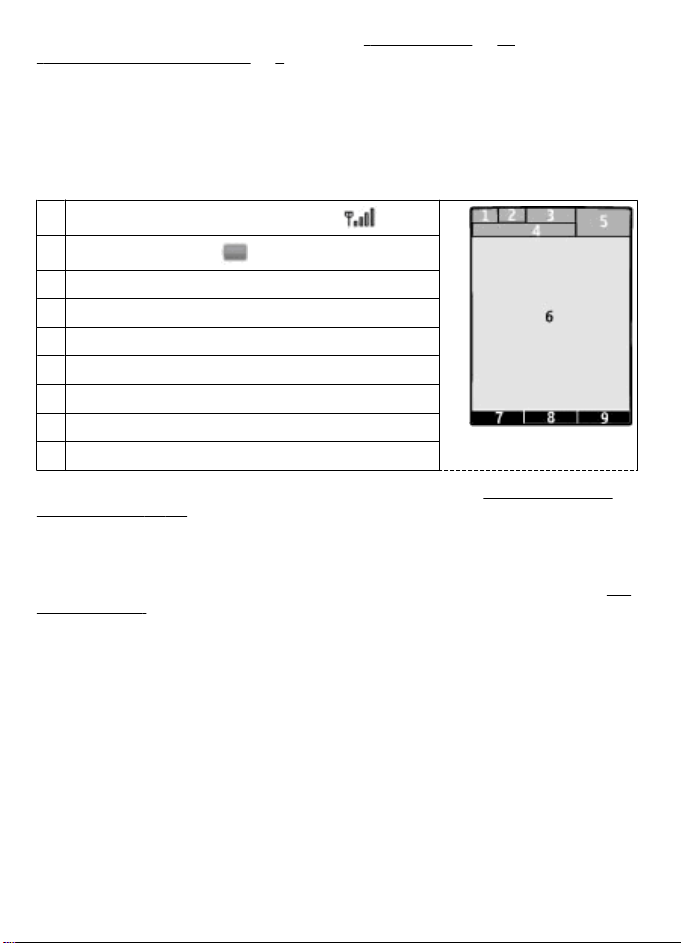
Display
1
Signal strength of the cellular network
2
Battery charge status
3 Indicators
4 Name of the network or the operator logo
5 Clock
6 Display
7 Function of the left selection key
8 Function of the Navi key
9 Function of the right selection key
You may change the function of the left and right selection key. See "Left and right
selection keys," p. 31.
Power saving
Your phone has a Power saver and a Sleep mode feature in order to save battery power
in the standby mode when no keys are pressed. These features may be activated.
"Display," p. 31.
See
Active standby
The active standby mode displays a list of selected phone features and information that
you can directly access.
To activate or deactivate the active standby mode, select Menu > Settings >
Display > Active standby > Active standby mode.
In the active standby mode, scroll up or down to navigate in the list, and choose
Select or View. The arrows indicate that further information is available. To stop
navigation, select Exit.
To organize and change the active standby mode, select Options and from the available
options.
© 2008 Nokia. All rights reserved.16
Page 18
Shortcuts in the standby mode
To access a list of numbers you have dialed, press the call key once. To call a number
from the list, scroll to the number or name, and press the call key.
To open the web browser, press and hold 0.
To call your voice mailbox, press and hold 1.
You can use keys as shortcuts.
See "Dialing shortcuts," p. 19.
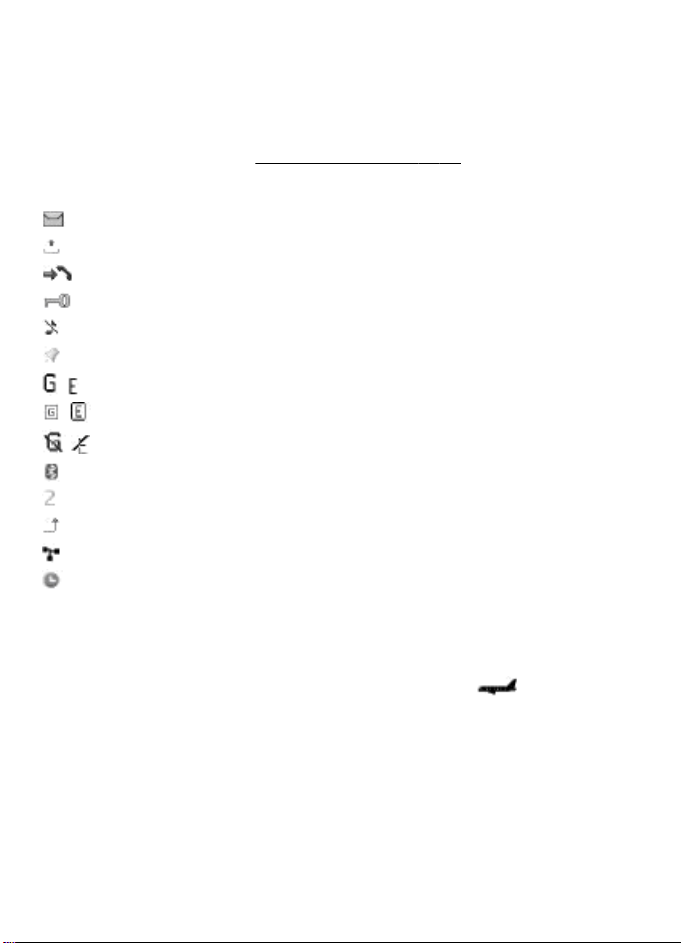
Indicators
You have unread messages.
You have unsent, canceled, or failed messages.
You have missed calls.
The keypad is locked.
The phone does not ring for incoming calls or text messages.
An alarm is set.
/ The phone is registered to the GPRS or EGPRS network.
/ The phone has an open GPRS or EGPRS connection.
/ The GPRS or EGPRS connection is suspended (on hold).
Bluetooth is activated.
If you have two phone lines, the second phone line is selected.
All incoming calls are forwarded to another number.
Calls are limited to a closed user group.
The currently active profile is timed.
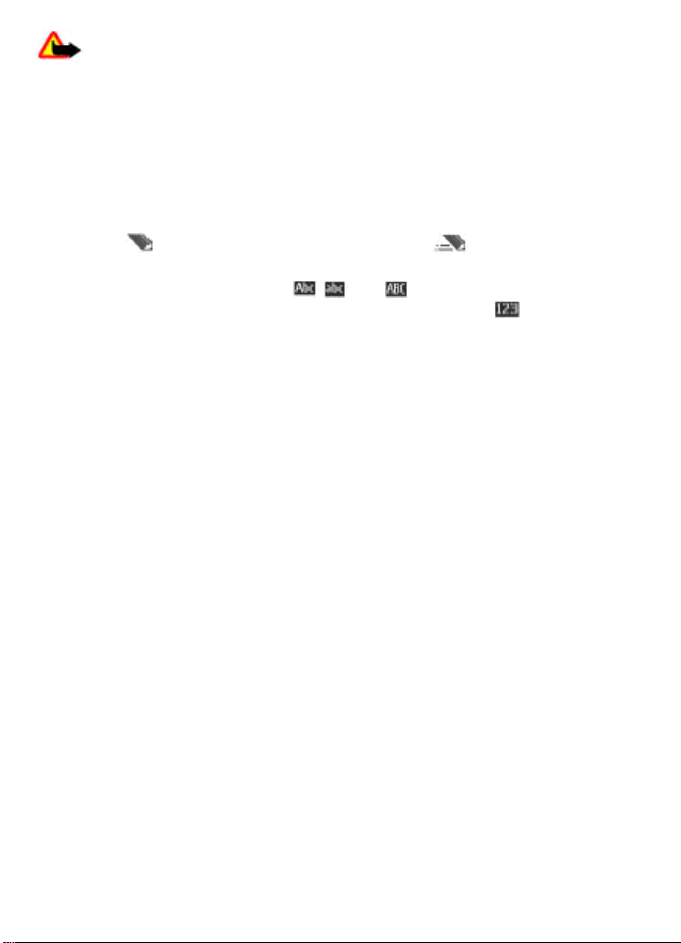
Flight mode
Use the flight mode in radio sensitive environments—on board aircraft or in hospitals
—to deactivate all radio frequency functions. You still have access to offline games, the
calendar, and phone numbers. When the flight mode is active,
To activate or set up the flight mode, select Menu > Settings > Profiles > Flight >
Activate or Customize.
To deactivate the flight mode, select any other profile.
Make an emergency call in flight mode
Enter the emergency number, press the call key, and when Exit flight profile? is
displayed, select Yes.
© 2008 Nokia. All rights reserved. 17
is displayed.
Page 19

Warning: With the flight profile you cannot make or receive any calls, including
emergency calls, or use other features that require network coverage. To make calls,
you must first activate the phone function by changing profiles. If the device has been
locked, enter the lock code. If you need to make an emergency call while the device is
locked and in the flight profile, you may be also able to enter an official emergency
number programmed in your device in the lock code field and select 'Call'. The device
will confirm that you are about to exit flight profile to start an emergency call.
Keypad lock
To lock the keypad to prevent accidental keypresses, select Menu, and press * within
3.5 seconds.
To unlock the keypad, select Unlock, and press * within 1.5 seconds. If requested, enter
the lock code.
To answer a call when the keypad is locked, press the call key. When you end or decline
the call, the keypad locks automatically.
Further features are Automatic keyguard and Security keyguard.
"Phone," p. 32.
When the device or keypad is locked, calls may be possible to the official emergency
number programmed into your device.
See
Functions without a SIM card
Some functions of your phone may be used without inserting a SIM card, such as
Organizer functions and games. Some functions appear dimmed in the menus and
cannot be used.
3. Calls
Make a call
You can start a call in several ways:
● Enter the phone number, including the area code, and press the call key.
For international calls, press * twice for the international prefix (the + character
replaces the international access code), enter the country code, the area code without
the leading 0, if necessary, and the phone number.
The + character as replacement for the international access code may not work in all
regions. In this case, enter the international access code directly.
● To access the list of dialed numbers, press the call key once in the standby mode.
Select a number or name, and press the call key.
● Search for a name or phone number that you saved in Contacts.
contacts," p. 26.
To adjust the volume in a call, press the volume key up or down.
See "Manage
© 2008 Nokia. All rights reserved.18
Page 20
Incoming call
To answer an incoming call, press the call key, or open the slide. To end the call, press
the end key, or close the slide.
To reject an incoming call, press the end key. To mute the ringing tone, select Silence.
Dialing shortcuts
First assign a phone number to one of the number keys, 2 to 9. See "Assign dialing
shortcuts," p. 27.
Use a dialing shortcut to make a call in one of the following ways:
● Press a number key, then the call key.
● If Menu > Settings > Call > 1-touch dialing > On is selected, press and hold a
number key.
Voice dialing
Make a phone call by saying the name that is saved in Contacts.
As voice commands are language-dependent, before voice dialing, you must select
Menu > Settings > Phone > Language settings > Recognition lang. and your
language.
Note: Using voice tags may be difficult in a noisy environment or during an
emergency, so you should not rely solely upon voice dialing in all circumstances.
1. In the standby mode, press and hold the right selection key or the volume down key.
A short tone sounds, and Speak now is displayed.
2. Speak the name of the contact you want to dial. If the voice recognition is successful,
a list with matches is shown. The phone plays the voice command of the first match
on the list. If it is not the correct command, scroll to another entry.
Options during a call
Many of the options that you can use during a call are network services. For availability,
contact your service provider.
During a call, select Options. The available options may include the following:
Call options are Mute or Unmute, Contacts, Menu, Lock keypad, Record, Voice
clarity, Loudspeaker or Handset.
Network options are Answer or Decline, Hold or Unhold, New call, Add to
conference, End call, End all calls, and the following:
● Touch tones — to send tone strings
● Swap — to switch between the active call and the call on hold
● Transfer calls — to connect a call on hold to an active call and disconnect yourself
● Conference — to make a conference call
● Private call — to have a private discussion in a conference call
© 2008 Nokia. All rights reserved. 19
Page 21
Warning: Do not hold the device near your ear when the loudspeaker is in use,
because the volume may be extremely loud.
4. Write text
Text modes
To enter text (for example, when writing messages) you can use traditional or predictive
text input.
When you write text, press and hold Options to toggle between traditional text input,
indicated by
supported by predictive text input.
The character cases are indicated by
press #. To change from the letter to number mode, indicated by
#, and select Number mode. To change from the number to the letter mode, press and
hold #.
To set the writing language, select Options > Writing language.
Traditional text input
Press a number key, 2 to 9, repeatedly until the desired character appears. The available
characters depend on the selected writing language.
If the next letter you want is located on the same key as the present one, wait until the
cursor appears and enter the letter.
To access the most common punctuation marks and special characters, repeatedly press
the number key 1 or press * to select a special character.
Predictive text input
Predictive text input is based on a built-in dictionary to which you can also add new
words.
1. Start writing a word, using the keys 2 to 9. Press each key only once for one letter.
2. To confirm a word, scroll right or add a space.
● If the word is not correct, press * repeatedly, and select the word from the list.
● If the ? character is displayed after the word, the word you intended to write is
not in the dictionary. To add the word to the dictionary, select Spell. Enter the
word using traditional text input, and select Save.
● To write compound words, enter the first part of the word, and scroll right to
confirm it. Write the last part of the word, and confirm the word.
3. Start writing the next word.
, and predictive text input, indicated by . Not all languages are
, , and . To change the character case,
, press and hold
© 2008 Nokia. All rights reserved.20
Page 22

5. Navigate the menus
The phone offers you an extensive range of functions that are grouped into menus.
1. To access the menu, select Menu.
2. Scroll through the menu, and select an option (for example, Settings).
3. If the selected menu contains further submenus, select one (for example, Call).
4. If the selected menu contains further submenus, repeat step 3.
5. Select the setting of your choice.
6. To return to the previous menu level, select Back.
To exit the menu, select Exit.
To change the menu view, select Options > Main menu view > List, Grid, Grid with
labels, or Tab.
To rearrange the menu, scroll to the menu to be moved, and select Options >
Organize > Move. Scroll to where you want to move the menu, and select OK. To save
the change, select Done > Yes.
6. Messaging
You can read, write, send and save text and multimedia messages, e-mail, audio and
flash messages. The messaging services can only be used if they are supported by your
network or service provider.
Text and multimedia messages
You can create a message and optionally attach, for example, a picture. Your phone
automatically changes a text message to a multimedia message when a file is attached.
Text messages
Your device supports text messages beyond the limit for a single message. Longer
messages are sent as two or more messages. Your service provider may charge
accordingly. Characters with accents or other marks, and characters from some
language options, take up more space, and limit the number of characters that can be
sent in a single message.
An indicator at the top of the display shows the total number of characters left and the
number of messages needed for sending.
Before you can send any text or SMS e-mail messages, you must save your message center number. Select Menu > Messaging > Message settings > Text messages > Message centers > Add center, enter a name, and the number from the service provider.
© 2008 Nokia. All rights reserved. 21
Page 23
Multimedia messages
A multimedia message can contain text, pictures, sound clips, and video clips.
Only devices that have compatible features can receive and display multimedia
messages. The appearance of a message may vary depending on the receiving device.
The wireless network may limit the size of MMS messages. If the inserted picture exceeds
this limit the device may make it smaller so that it can be sent by MMS.
Important: Exercise caution when opening messages. Messages may contain
malicious software or otherwise be harmful to your device or PC.
To check the availability of, and to subscribe to the multimedia messaging service (MMS),
contact your service provider. You may also download the configuration settings.
"Nokia support," p. 10.
See
Create a text or multimedia message
1. Select Menu > Messaging > Create message > Message.
2. To add recipients, scroll to the To: field, and enter the recipient’s number or e-mail
address, or select Add to select recipients from the available options. Select
Options to add recipients and subjects and to set sending options.
3. Scroll to the Text: field, and enter the message text.
4. To attach content to the message, scroll to the attachment bar at the bottom of the
display and select the desired type of content.
5. To send the message, press Send.
The message type is indicated at the top of the display and changes automatically
depending on the content of the message.
Service providers may charge differently depending on the message type. Check with
your service provider for details.
Read a message and reply
Important: Exercise caution when opening messages. Messages may contain
malicious software or otherwise be harmful to your device or PC.
Your phone issues a notification when you receive a message. Select View to display
the message. If more than one message was received, to display a message, select the
message from the Inbox and Open. Use the scroll key to view all parts of the message.
To create an answer message, select Reply.
Send messages
Message sending
To send the message, select Send. The phone saves the message in the Outbox folder,
and the sending starts.
© 2008 Nokia. All rights reserved.22
Page 24

Note: The me ssa ge s en t ic on or text on yo ur de vice scre en do es no t in di cat e th at
the message is received at the intended destination.
If message sending is interrupted, the phone tries to resend the message a few times.
If these attempts fail, the message remains in the Outbox folder. To cancel the sending
of the messages in the Outbox folder, select Options > Cancel sending.
To save the sent messages in the Sent items folder, select Menu > Messaging >
Message settings > General settings > Save sent messages.
Organize your messages
The phone saves received messages in the Inbox fo lder. Organize your messages in the
saved items folder.
To add, rename, or delete a folder, select Menu > Messaging > Saved items >
Options.
Access your POP3 or IMAP4 e-mail account with your phone to read, write and send
e-mail. This e-mail application is different from the SM
Before you can us
To check the availability and the settings of your e-mail account, contact your e-mail
service provider. You may receive the e-mail configuration settings as a configuration
message.
e e-mail, you must have an e-mail account and the correct settings.
See "Configuration setting service," p. 9.
E-mail setup wizard
The e-mail setup wizard starts automatically if no e-mail settings are defined in the
phone. To start the setup wizard for an additional e-mail account, select Menu >
Messaging and the existing e-mail account. Select Options > Add mailbox to start
the e-mail setup wizard. Follow the instructions on the display.
Write and send an e-mail
You may write your e-mail before connecting to the e-mail service.
1. Select Menu > Messaging > Create message > E-mail message.
2. If more than one e-mail account is defined, select the account from which you want
to send the e-mail.
3. Enter the recipient’s e-mail address, the subject, and the e-mail message. To attach
a file, select Options > Insert and from the available options.
4. To send the e-mail, select Send.
S e-mail function.
Read an e-mail and reply
Important: Exercise caution when opening messages. Messages may contain
malicious software or otherwise be harmful to your device or PC.
© 2008 Nokia. All rights reserved. 23
Page 25

1. To download e-mail message headers, select Menu > Messaging and your e-mail
account.
2. To download an e-mail and its attachments, select the e-mail and Open or
Retrieve.
3. To reply to or forward the e-mail, select Options and from the available options.
4. To disconnect from your e-mail account, select Options > Disconnect. The
connection to the e-mail account automatically ends after some time without
activity.
New e-mail notifications
Your phone can automatically check your e-mail account in time intervals and issue a
notification when new e-mail is received.
1. Select Menu > Messaging > Message settings > E-mail messages > Edit
mailboxes.
2. Select your e-mail account, Downloading sett., and the following options:
● Mailbox upd. interval — to set how often your phone checks your e-mail
account for new e-mail
● Automatic retrieval — to retrieve new e-mail automatically from your e-mail
account
3. To enable the new e-mail notification, select Menu > Messaging > Message
settings > E-mail messages > New e-mail notif. > On.
Flash messages
Flash messages are text messages that are instantly displayed upon reception.
1. To write a flash message, select Menu > Messaging > Create message > Flash
message.
2. Enter the recipient’s phone number, write your message (maximum 70 characters),
and select Send.
Nokia Xpress audio messages
Create and send an audio message using MMS in a convenient way.
1. Select Menu > Messaging > Create message > Audio message. The voice
recorder opens.
2. Record your message.
3. Enter one or more phone numbers in the To: field, or select Add to retrieve a number.
4. To send the message, select Send.
See "Voice recorder," p. 40.
Instant messaging
With instant messaging (IM, network service) you can send short text messages to online
users. You must subscribe to a service and register with the IM service you want to use.
© 2008 Nokia. All rights reserved.24
Page 26

Check the availability of this service, pricing, and instructions with your service provider.
The menus may vary depending on your IM provider.
To connect to the service, select Menu > Messaging > IMs and follow the instructions
on the display.
Info messages, SIM messages, and service commands
Info messages
You can receive messages on various topics from your service provider (network
service). For more information, contact your service provider.
Select Menu > Messaging > Info messages and from the available options.
Service commands
Service commands allow you to write and send service requests (USSD commands) to
your service provider, such as activation commands for network services.
To write and send the service request, select Menu > Messaging > Serv.
commands. For details, contact your service provider.
SIM messages
SIM messages are specific text messages that are saved to your SIM card. You can copy
or move those messages from the SIM to the phone memory, but not vice versa.
To read SIM messages, select Menu > Messaging > Options > SIM messages.
Voice messages
The voice mailbox is a network service to which you may need to subscribe. For more
information, contact your service provider.
To call your voice mailbox, press and hold 1.
To edit your voice mailbox number, select Menu > Messaging > Voice messages >
Voice mailbox no..
Message settings
Select Menu > Messaging > Message settings and from the following:
● General settings — to save copies of sent messages in your phone, to overwrite
old messages if the message memory becomes full, and to set up other preferences
related to messages
● Text messages — to allow delivery reports, to set up message centers for SMS and
SMS e-mail, to select the type of character support, and to set up other preferences
related to text messages
● Multimedia messages — to allow delivery reports, to set up the appearance of
multimedia messages, to allow the reception of multimedia messages and
advertisements, and to set up other preferences related to multimedia messages
● E-mail messages — to allow e-mail reception, to set the image size in e-mail, and
to set up other preferences related to e-mail
© 2008 Nokia. All rights reserved. 25
Page 27

● Service messages — to activate service messages and to set up preferences related
to service messages
7. Contacts
You can save names, phone numbers as contacts in the phone memory and on the SIM
card memory and search and recall them to make a phone call or to send a message.
Manage contacts
Select the memory for contacts
The phone memory can save contacts with additional details, such as various phone
numbers and text items. You can also save an image, a tone, or a video clip for a limited
number of contacts.
The SIM card memory can save names with one phone number attached to them. The
contacts saved in the SIM card memory are indicated by
Select Menu > Contacts > Settings > Memory in use. When you select Phone and
SIM, contacts will be saved in the phone memory.
Save names and numbers
To save a name and phone number, select Menu > Contacts > Names > Options >
Add new contact.
The first number you save is automatically set as the default number and is indicated
with a frame around the number type indicator (for example,
name from contacts (for example, to make a call), the default number is used unless
you select another number.
Search for a contact
Select Menu > Contacts > Names, and scroll through the list of contacts, or enter the first characters of the contact's name.
Add and edit details
To add or change a detail to a contact, select the contact and Details > Options >
Add detail and from the available options.
Copy or move a contact between the SIM card and phone memory
1. Select Menu > Contacts > Names.
2. Select the contact to copy or move and Options > Copy contact or Move
contact.
Copy or move several contacts between the SIM card and phone memory
1. Select the first contact to copy or move and Options > Mark.
2. Mark the other contacts, and select Options > Copy marked or Move marked.
Copy or move all contacts between the SIM card and phone memory
Select Menu > Contacts > Copy contacts or Move contacts.
.
). When you select a
© 2008 Nokia. All rights reserved.26
Page 28

Delete contacts
Select the contact and Options > Delete contact.
To delete all the contacts from the phone or SIM card memory, select Menu >
Contacts > Del. all contacts > From phone memory or From SIM card.
To delete a number, text item, or an image attached to the contact, search for the
contact, and select Details. Scroll to the desired detail, and select Options > Delete
and from the available options.
Create a contact group
Arrange contacts into caller groups with different ringing tones and group images.
1. Select Menu > Contacts > Groups.
2. To create a new group, select Add or Options > Add new group.
3. Enter the group name, select an image and a ringing tone if you want to add them
to the group, and select Save.
4. Select the group and View > Add to add contacts to the group.
Business cards
You can send and receive a person’s contact information from a compatible device that
supports the vCard standard.
To send a business card, search for the contact, and select Details > Options > Send
business card.
When you receive a business card, select Show > Save to save the business card in the
phone memory.
Assign dialing shortcuts
Create shortcuts by assigning phone numbers to the number keys 2-9.
1. Select Menu > Contacts > 1-touch dialing, and scroll to a number key.
2. Select Assign, or, if a number has already been assigned to the key, select
Options > Change.
3. Enter a number or search for a contact.
8. Call log
To view the information on your calls, messages, data, and synchronization, select
Menu > Log and from the available options.
Note: The actual invoice for calls and services from your service provider may
vary, depending on network features, rounding off for billing, taxes, and so forth.
© 2008 Nokia. All rights reserved. 27
Page 29

9. Position log
The network may send you a position request (network service). Contact your service
provider to subscribe and to agree upon the delivery of positioning information.
To accept or reject the position request, select Accept or Reject. If you miss the request,
the phone automatically accepts or rejects it according to what you have agreed with
your network operator or service provider.
To view the information on the 10 most recent privacy notifications and requests, select
Menu > Log > Positioning > Position log.
10. Connectivity
Your phone provides several features to connect to other devices to transmit and receive
data.
Bluetooth wireless technology
Bluetooth technology allows you to connect your phone, using radio waves, to a
compatible Bluetooth device within 10 meters (32 feet).
This device is compliant with Bluetooth Specification 2.0 + EDR supporting the following
profiles: 2.0 + EDR generic access, network ac
audio distribution, aud
transfer, dial-up networking, SIM access, and serial port. To ensure interoperability
between other devices supporting Bluetooth technology, use Nokia approved
enhancements for this model. Check with the manufacturers of other devices to
determine their compatibility with this device.
Features using Bluetooth technology increase the demand on battery power and reduce
the battery life.
io video remote control, handsfree, headset, object push, file
Set up a Bluetooth connection
Select Menu > Settings > Connectivity > Bluetooth and take the following steps:
1. Select My phone's name and enter a name for your phone.
2. To activate Bluetooth connectivity select Bluetooth > On.
Bluetooth is active.
3. To connect your phone with an audio enhancement, select Search audio enhanc.
and the device to which you want to connect.
4. To pair your phone with any Bluetooth device in range, select Paired devices >
Add new device.
Scroll to a found device, and select Add.
Enter a passcode (up to 16 characters) on your phone and allow the connection on
the other Bluetooth device.
cess, generic object change, advanced
indicates that
© 2008 Nokia. All rights reserved.28
Page 30

If you are concerned about security, turn off the Bluetooth function, or set My phone's
visibility to Hidden. Accept Bluetooth communication only from those you trust.
PC connection to the internet
Use Bluetooth technology to connect your compatible PC to the internet without PC Suite
software. Your phone must have activated a service provider that supports internet
access, and your PC has to support Bluetooth personal area network (PAN). After
connecting to the network access point (NAP) service of the phone, and pairing with
your PC, your phone automatically opens a packet data connection to the internet.
Packet data
General packet radio service (GPRS) is a network service that allows mobile phones to
send and receive data over an internet protocol (IP)-based network.
To define how to use the service, select Menu > Settings > Connectivity > Packet
data > Packet data conn. and from the following options:
● When needed — to set the packet data connection to established when required
by an application. The connection will be cut when the application is closed.
● Always online — to automatically connect to a packet data network when you
switch the phone on
You can use your phone as a modem by connecting it to a compatible PC using Bluetooth
technology or a USB data cable. For details, see Nokia PC Suite documentation.
"Nokia support," p. 10.
See
USB data cable
You can use the USB data cable to transfer data between the phone and a compatible
PC or a printer supporting PictBridge.
To activate the phone for data transfer or image printing, connect the data cable and
select the mode:
● PC Suite — to use the cable for PC Suite
● Printing & media — to use the phone with a PictBridge compatible printer or with
a compatible PC
● Data storage — to connect to a PC that does not have Nokia software and use the
phone as data storage
To change the USB mode, select Menu > Settings > Connectivity > USB data
cable and the desired USB mode.
Synchronization and backup
Select Menu > Settings > Sync and backup and from the following:
● Phone switch — Synchronize or copy selected data between your phone and
another phone using Bluetooth technology.
● Create backup — Create a backup of selected data to the memory card or to an
external device.
© 2008 Nokia. All rights reserved. 29
Page 31

● Restore backup — S elect a ba cku p fi le sto red on t he m emo ry c ard or on a n ex terna l
device and restore it to the phone. Select Options > Details for information about
the selected backup file.
● Data transfer — Synchronize or copy selected data between your phone and
another device, PC, or network server (network service).
Nokia PC Suite
With Nokia PC Suite, you can manage your music, synchronize contacts, calendar, notes,
and to-do notes between your phone and a compatible PC or a remote internet server
(network service). You may find more information and PC Suite on the Nokia website.
See "Nokia support," p. 10.
11. Settings
Profiles
Your phone has various setting groups called profiles, which you can customize with
ringing tones for different events and environments.
Select Menu > Settings > Profiles, the desired profile, and from the following
options:
● Activate — to activate the selected profile
● Customize — to change the profile settings
● Timed — to set the profile to be active for a certain time. When the time set for the
profile expires, the previous profile that was not timed becomes active.
Themes
A theme contains elements for customizing your phone.
Select Menu > Settings > Themes and from the following options:
● Select theme — Open the Themes folder, and select a theme.
● Theme downloads — Open a list of links to download more themes.
Tones
You can change the tone settings of the selected active profile.
Select Menu > Settings > Tones. You can find the same settings in the Profiles menu.
If you select the highest ringing tone level, the ringing tone reaches its highest level
after a few seconds.
Lights
To activate or deactivate light effects associated with different phone functions, select
Menu > Settings > Lights.
© 2008 Nokia. All rights reserved.30
Page 32

Display
Select Menu > Settings > Display and from the available options:
● Wallpaper — to add a background image for the standby mode
● Active standby — to activate, organize, and customize the active standby mode
● Standby font color — to select the font color for the standby mode
● Navigation key icons — to display the icons of the scroll key shortcuts in the
standby mode when active standby is off
● Notification details — to display details in missed call and message notifications
● Transition effects — to activate a smoother and more organic navigation
experience
● Slide animation — to display an animation and sound a tone when you open or
close the slide
● Screen saver — to create and set a screen saver
● Power saver — to dim the display automatically and to display a clock when the
phone is not used for a certain time
● Sleep mode — to switch off the display automatically when the phone is not used
for a certain time
● Font size — to set the font size for messaging, contacts, and web pages
● Operator logo — to display the operator logo
● Cell info display — to display the cell identity, if available from the network
Date and time
To change the clock type, time, time zone, or date, select Menu > Settings > Date
and time.
When traveling to a different time zone, select Menu > Settings > Date and time >
Date & time settings > Time zone:, and scroll left or right to select the time zone of
your location. The time and date are set according to the time zone and enable your
phone to display the correct sending time of received text or multimedia messages.
For example, GMT -3 denotes the time zone for Buenos Aires (Argentina), 3 hours west
of Greenwich, London (UK).
My shortcuts
With personal shortcuts you get quick access to frequently used phone functions.
Left and right selection keys
To change the function assigned to the left or right selection key, select Menu >
Settings > My shortcuts > Left selection key or Right selection key and the
function.
In the standby mode, if the left selection key is Go to, to activate a function, select Go
to > Options and from the following options:
● Select options — to add or remove a function
● Organize — to rearrange the functions
© 2008 Nokia. All rights reserved. 31
Page 33

Other shortcuts
Select Menu > Settings > My shortcuts and from the following options:
● Navigation key — to assign other functions from a predefined list to the navigation
key (scroll key).
● Active standby key — to select the movement of the navigation key to activate the
active standby mode
Call
Select Menu > Settings > Call and from the following options:
● Call forwarding — to forward your incoming calls (network service). You may not
be able to forward your calls if some call restriction functions are active.
"Security," p. 35.
● Anykey answer — to answer an incoming call by briefly pressing any key, except
the power key, the left and right selection keys, or the end key
● Automatic redial — to automatically redial the number if a call fails. The phone
tries to call the number 10 times.
● Voice clarity — to enhance speech intelligibility, especially in noisy environments
● 1-touch dialing — to dial the names and phone numbers assigned to the number
keys (2 to 9) by pressing and holding the corresponding number key
● Call waiting — to have the network notify you of an incoming call while you have
a call in progress (network service)
● Call duration display — Select On to display the duration of the call in progress
● Summary after call — to briefly display the approximate duration after each call
● Send my caller ID — to show your phone number to the person you are calling
(network service). To use the setting agreed upon with your service provider, select
Set by network.
● Outgoing call line — to select the phone line for making calls, if your SIM card
supports multiple phone lines (network service)
● Slide call handling — to answer a call by opening the slide and to end a call by
closing the slide
See
Phone
Select Menu > Settings > Phone and from the following options:
● Language settings — To set the display language of your phone, select Phone
language. Automatic selects the language according to the information on the SIM
card. To set a language for the voice commands, select Recognition lang..
● Memory status — to check the memory consumption
● Automatic keyguard — to lock the keypad automatically after a preset time delay
when the phone is in the standby mode and no function has been used.
● Security keyguard — to ask for the security code when you unlock the keyguard
● Voice recognition —
● Flight query — to be asked whether to use the flight mode when you switch the
phone on. With the flight mode, all radio connections are switched off.
See "Voice commands," p. 33.
© 2008 Nokia. All rights reserved.32
Page 34

● Phone updates — to re cei ve s oftw are u pdat es from your service provider (network
service). This option may not be available, depending on your phone.
updates over the air," p. 34.
● Operator selection — to set a cellular network available in your area
● Help text activation — to select whether the phone shows help texts
● Start-up tone — to play a tone when you switch the phone on
● Confirm SIM actions —
See "SIM services," p. 47.
See "Software
Voice commands
Call contacts and use your phone by speaking a voice command.
Voice commands are language-dependent. To set the language, select Menu >
Settings > Phone > Language settings > Recognition lang. and your language.
To train the voice recognition of your phone to your voice, select Menu > Settings >
Phone > Voice recognition > Voice recog. training.
To activate a voice command for a function, select Menu > Settings > Phone > Voice
recognition > Voice commands, a feature, and the function.
voice command is activated.
To activate the voice command, select Add. To play the activated voice command, select
Play.
To use voice commands, see
To manage the voice commands, scroll to a function, and select Options and from the
following:
● Edit or Remove — to rename or deactivate the voice command
● Add all or Remove all — to activate or deactivate voice commands for all functions
in the voice commands list
"Voice dialing", p. 19.
indicates that the
Enhancements
This menu and its various options are shown only if the phone is or has been connected
to a compatible mobile enhancement.
Select Menu > Settings > Enhancements. Select an enhancement, and an option
depending on the enhancement.
Configuration
You can configure your phone with settings that are required for certain services. Your
service provider may also send you these settings.
service," p. 9.
Select Menu > Settings > Configuration and from the following options:
● Default config. sett. — to view the service providers saved in the phone and set a
default service provider
● Act. def. in all apps. — to activate the default configuration settings for supported
applications
© 2008 Nokia. All rights reserved. 33
See "Configuration setting
Page 35

● Preferred access pt. — to view the saved access points
● Connect to support — to download the configuration settings from your service
provider
● Device manager sett. — to allow or prevent the phone from receiving software
updates. This option may not be available, depending on your phone.
updates over the air," p. 34.
● Personal config. sett. — to manually add new personal accounts for various
services and to activate or delete them. To add a new personal account, select Add
new, or Options > Add new. Select the service type, and enter the required
parameters. To activate a personal account, scroll to it, and select Options >
Activate.
See "Software
Software updates over the air
Your service provider may send phone software updates over the air directly to your
phone (network service). This option may not be available, depending on your phone.
Downloading software updates may involve the transmission of large amounts of data
through your service provider's network. Contact your service provider for information
about data transmission charges.
Make sure that the device battery has enough power, or connect the charger before
starting the update.
Warning: If you install a software update, you cannot use the device, even to
make emergency calls, until the installation is completed and the device is restarted. Be
sure to back up data before accepting installation of an update.
Software update settings
This option may not be available, depending on your phone.
To allow or disallow software and configuration updates, select Menu > Settings >
Configuration > Device manager sett. > Serv. softw. updates.
Request a software update
1. Select Menu > Settings > Phone > Phone updates to request available software
updates from your service provider.
2. Select Current softw. details to display the current software version and check
whether an update is needed.
3. Select Downl. phone softw. to download and install a software update. Follow the
instructions on the display.
4. If the installation was canceled after the download, select Install softw. update to
start the installation.
The software update may take several minutes. If there are problems with the
installation, contact your service provider.
© 2008 Nokia. All rights reserved.34
Page 36

Security
When security features that restrict calls are in use (such as call restriction, closed user
group, and fixed dialing), calls may be possible to the official emergency number
programmed into your device.
Select Menu > Settings > Security and from the following options:
● PIN code request or UPIN code request — to request for your PIN or UPIN code
every time the phone is switched on. Some SIM cards do not allow the code request
to be turned off.
● PIN2 code request — to select whether the PIN2 code is required when using a
specific phone feature which is protected by the PIN2 code. Some SIM cards do not
allow the code request to be turned off.
● Call restrictions — to restrict incoming calls to and outgoing calls from your phone
(network service). A restriction password is required.
● Fixed dialing — to restrict your outgoing calls to selected phone numbers if
supported by your SIM card. When the fixed dialing is on, GPRS connections are not
possible except while sending text messages over a GPRS connection. In this case,
the recipient’s phone number and the message center number must be included in
the fixed dialing list.
● Closed user group — to specify a group of people whom you can call and who can
call you (network service)
● Security level — Select Phone to request the security code whenever a new SIM
card is inserted into the phone. Select Memory, to request the security code when
the SIM card memory is selected, and you want to change the memory in use.
● Access codes — to change the security code, PIN code, UPIN code, PIN2 code, or
restriction password
● Code in use — to select whether the PIN code or UPIN code should be active
● Authority certificates or User certificates — to view the list of the authority or user
certificates downloaded into your phone.
● Security module sett. — to view Secur. module details, activate Module PIN
request, or change the module PIN and signing PIN.
See "Browser security," p. 42.
See "Access codes," p. 8.
Restore factory settings
To restore the phone back to factory conditions, select Menu > Settings > Rest.
factory sett. and from the following options:
● Restore settings only — to reset all preference settings without deleting any
personal data
● Restore all — to reset all preference settings and delete all personal data, such as
contacts, messages, media files, and activation keys
12. Operator menu
Access a portal to services provided by your network operator. For more information,
contact your network operator. The operator can update this menu with a service
message.
© 2008 Nokia. All rights reserved. 35
Page 37

13. Gallery
Manage images, video clips, music files, themes, graphics, tones, recordings, and
received files. These files are stored in the phone memory or on a memory card and may
be arranged in folders.
Folders and files
To view the list of folders, select Menu > Gallery. To view the list of files in a folder,
select a folder and Open. To view the folders of the memory card when moving a file,
scroll to the memory card, and press the scroll key right.
Print images
Your phone supports Nokia XpressPrint to print images that are in the jpeg format.
1. To connect your phone to a compatible printer, use a data cable or send the image
by Bluetooth to a printer supporting Bluetooth technology.
technology," p. 28.
2. Select the image you want to print and Options > Print.
Memory card
Use a memory card to store your multimedia files, such as video clips, music tracks,
sound files, images, and messaging data.
Some of the folders in Gallery with content that the phone uses (for example,
Themes) may be stored on the memory card.
Format the memory card
Some supplied memory cards are preformatted; others require formatting. When you
format a memory card, all data on the card is permanently lost.
1. To format a memory card, select Menu > Gallery or Applications, the memory card
folder
2. When formatting is complete, enter a name for the memory card.
Lock the memory card
To set a password (maximum 8 characters) to lock your memory card against
unauthorized use, select the memory card folder
The password is stored in your phone, and you do not have to enter it again while you
are using the memory card on the same phone. If you want to use the memory card on
another device, you are asked for the password.
To remove the password, select Options > Delete password.
, and Options > Format mem. card > Yes.
and Options > Set password.
See "Bluetooth wireless
© 2008 Nokia. All rights reserved.36
Page 38

Check memory consumption
To check the memory consumption of different data groups and the available memory
to install new software on your memory card, select the memory card
Options > Details.
and
14. Media
Camera and video
Take pictures or record video clips with the built-in camera.
Take a picture
To use the still picture function, press the camera key; or, if the video function is on,
scroll left or right.
To zoom in and out in the camera mode, scroll up and down, or press the volume keys.
To take a picture, press the camera key. The phone saves the pictures on the memory
card, if available, or in the phone memory.
Select Options > Flash > Flash on to take all pictures with the camera flash; or
Automatic to activate the flash automatically when the light conditions are dim. Keep
a safe distance when using the flash. Do not use the flash on people or animals at close
range. Do not cover the flash while taking a picture.
To display a picture immediately after you take it, select Options > Settings > Image
preview time and the preview time. During the preview time, select Back to take
another picture, or Send to send the picture as a multimedia message.
Your device supports an image capture resolution of 2048 x 1536 pixels .
Record a video clip
To activate the video function, press and hold the camera key; or, if the camera function
is on, scroll left or right.
To start the video recording, select Record or press the camera key; to pause the
recording, select Pause or press the camera key; to resume the recording, select
Continue or press the camera key; to stop the recording, select Stop.
The phone saves the video clips on the memory card, if available, or in the phone
memory.
Camera and video options
To use a filter, select Options > Effects.
To adapt the camera to the light conditions, select Options > White balance.
To change other camera and video settings and to select the image and video storage,
select Options > Settings.
© 2008 Nokia. All rights reserved. 37
Page 39

Music player
Your phone includes a music player for listening to music tracks or other MP3 or AAC
sound files that you have downloaded from the web or transferred to the phone with
Nokia PC Suite.
downloaded video clips.
Music and video files stored in the music folder in the phone memory or on the memory
card are automatically detected and added to the music library.
To open the music player, select Menu > Media > Music player.
Music menu
Use the Music menu to access your music and video files stored in the phone memory
or on the memory card, download music or video clips from the web, or view compatible
video streams from a network server (network service).
To listen to music or play a video clip, select a file from Playlists, Artists, Albums, or
Genres, and select Play.
To download files from the web, select Options > Downloads and a download site.
To update the music library after you have added files, select Options > Update
library.
Create a playlist
To create a playlist with your selection of music, do the following:
1. Select Playlists > Create playlist, and enter the name of the playlist.
2. Add music or video clips from the displayed lists.
3. Select Done to store the playlist.
Configure a streaming service
You may receive the streaming settings as a configuration message from the service
provider.
manually.
To activate the settings, do the following:
1. Select Options > Downloads > Streaming settings > Configuration.
2. Select a service provider, Default, or Personal config. for streaming.
3. Select Account and a streaming service account from the active configuration
settings.
See "Nokia PC Suite," p. 30. You can also view your recorded or
See "Configuration setting service," p. 9. You can also enter the settings
See "Configuration," p. 33.
Play music tracks
Warning: Listen to music at a moderate level. Continuous exposure to high
volume may damage your hearing. Do not hold the device near your ear when the
loudspeaker is in use, because the volume may be extremely loud.
To adjust the volume level, press the volume keys of the phone.
© 2008 Nokia. All rights reserved.38
Page 40

Operate the music player with the virtual keys on the display.
To start playing, select
To pause playing, select
To skip to the next track, select
select
To fast forward the current track, select and hold
and hold
To switch to the music menu, select
To switch to the current playlist, select
To close the music player menu and to continue music playback in the background, press
the end key.
To stop the music player, press and hold the end key.
twice.
. Release the key at the position you want to continue the music playback.
.
.
. To skip to the beginning of the previous track,
. To rewind the current track, select
on the display.
on the display.
Change the music player look
Your phone provides several themes to change the look of the music player.
Select Menu > Media > Music player > Go to Music player > Options >
Settings > Music player theme and one of the listed themes. The virtual keys may
change depending on the theme.
Radio
The FM radio depends on an antenna other than the wireless device antenna. A
compatible headset or enhancement needs to be attached to the device for the FM radio
to function properly.
Warning: Listen to music at a moderate level. Continuous exposure to high
volume may damage your hearing. Do not hold the device near your ear when the
loudspeaker is in use, because the volume may be extremely loud.
Select Menu > Media > Radio.
To adjust the volume, press the volume keys.
To use the graphical keys
desired key, and select it.
, , , or on the display, scroll left or right to the
Tune in to radio stations
Search and save stations
1. To start the search, select and hold or . To change the radio frequency in 0.05
MHz steps, briefly press
2. To save a station to a memory location, select Options > Save station.
3. To enter the name of the radio station, select Options > Stations > Options >
Rename.
© 2008 Nokia. All rights reserved. 39
or .
Page 41

Select Options and from the following:
● Search all stations — to automatically search for the available stations at your
location
● Set frequency — to enter the frequency of the desired radio station
● Stations — to list and rename or delete saved stations
Change stations
Select or , or press the number key corresponding to the number of the station
in the station list.
Radio features
To swap between headset and loudspeaker, and switch between stereo and mono
output, select Options > Settings. To display information from the radio data system
of the tuned in station, select RDS on. To enable the automatic switch to a frequency
with the best reception of the tuned in station, select Auto-freq. change on.
Voice recorder
Record speech, sound, or an active call, and save them in Gallery.
Select Menu > Media > Voice recorder. To use the graphical keys
the display, scroll left or right.
, , or on
Record sound
1. Select , or, during a call, select Options > Record. While recording a call, all
parties to the call hear a faint beeping. To pause the recording, select
2. To end the recording, select
Gallery.
Select Options to play or send the last recording, to access the list of recordings, or to
select the memory and the folder to store the recordings.
. The recording is saved in the Recordings folder in
.
Equalizer
Adjust the sound when using the music player.
Select Menu > Media > Equalizer.
To activate a predefined equalizer set, scroll to one of the sets, and select Activate.
Create a new equalizer set
1. Select one of the last two sets in the list and Options > Edit.
2. Scroll left or right to access the virtual sliders and up or down to adjust the slider.
3. To save the settings and create a name for the set, select Save and Options >
Rename.
© 2008 Nokia. All rights reserved.40
Page 42

Stereo widening
Stereo widening creates a wider stereo sound effect when you are using a stereo
headset.
To activate, select Menu > Media > Stereo widening.
15. Web
You can access various internet services with your phone browser. The appearance of
the internet pages may vary due to screen size. You may not be able to see all the details
on the internet pages.
Important: Use only services that you trust and that offer adequate security and
protection against harmful software.
For the availability of these services, pricing, and instructions, contact your service
provider.
You may receive the configuration settings required for browsing as a configuration
message from your service provider.
To set up the service, select Menu > Web > Web settings > Configuration sett., a
configuration, and an account.
Connect to a service
To make a connection to the service, select Menu > Web > Home; or in the standby
mode, press and hold 0.
To select a bookmark, select Menu > Web > Bookmarks.
To select the last URL, select Menu > Web > Last web addr..
To enter an address of a service, select Menu > Web > Go to address. Enter the
address, and select OK.
After you make a connection to the service, you can start browsing its pages. The
function of the phone keys may vary in different services. Follow the text guides on the
phone display. For more information, contact your service provider.
Appearance settings
While browsing the web, select Options > Settings. The available options may include
the following:
● Display — Select the font size, whether images are shown, and how the text is
displayed.
● General — Select whether web addresses are sent as Unicode (UTF-8), the encoding
type for the contents, and whether JavaScript is enabled.
© 2008 Nokia. All rights reserved. 41
Page 43

Cache memory
A cache is a memory location that is used to store data temporarily. If you have tried to
access or have accessed confidential information requiring passwords, empty the cache
after each use. The information or services you have accessed are stored in the cache.
A cookie is data that a site saves in the cache memory of your phone. Cookies are saved
until you clear the cache memory.
To clear the cache while browsing, select Options > Tools > Clear the cache. To allow
or prevent the phone from receiving cookies, select Menu > Web > Web settings >
Security > Cookies; or, while browsing, select Options > Settings > Security >
Cookies.
Browser security
Security features may be required for some services, such as banking services or online
shopping. For such connections you need security certificates and possibly a security
module, which may be available on your SIM card. For more information, contact your
service provider.
To view or change the security module settings, or to view a list of authority or user
certificates downloaded to your phone, select Menu > Settings > Security >
Security module sett., Authority certificates, or User certificates.
Important: Even if the use of certificates makes the risks involved in remote
connections and software installation considerably smaller, they must be used correctly
in order to benefit from increased security. The existence of a certificate does not offer
any protection by itself; the certificate manager must contain correct, authentic, or
trusted certificates for increased security to be available. Certificates have a restricted
lifetime. If "Expired certificate" or "Certificate not valid yet" is shown, even if the
certificate should be valid, check that the current date and time in your device are
correct.
16. Maps
You can browse maps for different cities and countries, search for addresses and points
of interest, plan routes from one location to another, save locations as landmarks, and
send them to compatible devices.
Almost all digital cartography is inaccurate and incomplete to some extent. Never rely
solely on the cartography that you download for use in this device.
To use the Maps application, select Menu > Maps and from the available options.
Download maps
Your phone may contain pre-installed maps on the memory card. You can download a
new set of maps through the internet using Nokia Map Loader PC software.
© 2008 Nokia. All rights reserved.42
Page 44

Nokia Map Loader
To download the Nokia Map Loader on your PC and for further instructions, see
www.maps.nokia.com.
Before you download new maps for the first time, make sure that you have a memory
card inserted in the phone, and select Menu > Maps to do an initial configuration.
To change the selection of maps on your memory card, use the Nokia Map Loader to
delete all maps on the memory card and download a new selection, to ensure that all
maps are from the same release.
Network service
You can set your phone to automatically download maps that you do not have in your
phone when needed. Select Menu > Maps > Settings > Network settings > Allow
network usage.
To prevent automatic download of maps, select No.
Downloading maps may involve the transmission of large amounts of data through your
service provider’s network. Contact your service provider for information about data
transmission charges.
Maps and GPS
You can use the global positioning system (GPS) to support the Maps application. Find
out your location, or measure distances and coordinates.
Before you can use the GPS function with your phone, you must pair your phone with a
compatible external GPS receiver using Bluetooth wireless technology. For more
information, see the user guide for your GPS device.
After pairing the Bluetooth GPS device with the phone, it may take several minutes for
the phone to display the current location. Subsequent connections should be faster, but
if you have not used GPS for several days, or are very far away from the last place you
used it, it may take several minutes to detect and display your location.
The Global Positioning System (GPS) is operated by the government of the United States,
which is solely responsible for its accuracy and maintenance. The accuracy of location
data can be affected by adjustments to GPS satellites made by the United States
government and is subject to change with the United States Department of Defense civil
GPS policy and the Federal Radionavigation Plan. Accuracy can also be affected by poor
satellite geometry. Availability and quality of GPS signals may be affected by your
location, buildings, natural obstacles, and weather conditions. The GPS receiver should
only be used outdoors to allow reception of GPS signals.
Any GPS should not be used for precise location measurement, and you should never
rely solely on location data from the GPS receiver and cellular radio networks for
positioning or navigation.
© 2008 Nokia. All rights reserved. 43
Page 45

Extra services
You can upgrade Maps with a full voice-guided navigation, which requires a regional
license. To use this service, you need a compatible external GPS device that supports
Bluetooth wireless technology.
To purchase a navigation service with voice guidance, select Menu > Maps > Extra
services > Purchase navigation, and follow the instructions.
To use navigation with voice guidance, you must allow the Maps application to use a
network connection.
The navigation license is connected to your SIM card. If you insert another SIM card in
your phone, you are asked to purchase a license when starting navigation. During the
purchase procedure, you are offered to transfer the existing navigation license to the
new SIM card without extra charge.
17. Organizer
Alarm clock
To sound an alarm at a desired time.
Set the alarm
1. Select Menu > Organizer > Alarm clock.
2. Set the alarm on, and enter the alarm time.
3. To issue an alarm on selected days of the week, select Repeat: > On and the days.
4. Select the alarm tone. If you select the radio as the alarm tone, connect the headset
to the phone.
5. Set the snooze time-out, and select Save.
Stop the alarm
To stop the sounding alarm, select Stop. If you let the alarm sound for a minute or select
Snooze, the alarm stops for the snooze time-out, then resumes.
Calendar
Select Menu > Organizer > Calendar.
The current day is framed. If there are any notes set for the day, the day is in bold type.
To view the day notes, select View. To view a week, select Options > Week view. To
delete all notes in the calendar, select Options > Delete notes > Delete all notes.
To edit settings related to date and time, select Options > Settings and from the
available options. To delete old notes automatically after a specified time, select
Options > Settings > Auto-delete notes and from the available options.
Make a calendar note
Scroll to the date, and select Options > Make a note. Select the note type, and fill in
the fields.
© 2008 Nokia. All rights reserved.44
Page 46

To-do list
To save a note for a task that you must do, select Menu > Organizer > To-do list.
To make a note if no note is added, select Add; otherwise, select Options > Add. Fill
in the fields, and select Save.
To view a note, scroll to it, and select View.
Notes
To write and send notes, select Menu > Organizer > Notes.
To make a note if no note is added, select Add; otherwise, select Options > Make a
note. Write the note, and select Save.
Calculator
Your phone provides a standard, a scientific, and a loan calculator.
Select Menu > Organizer > Calculator, and, from the available options, the calculator
type and the operating instructions.
This calculator has limited accuracy and is designed for simple calculations.
Countdown timer
Normal timer
1. To activate the timer, select Menu > Organizer > Countd. timer > Normal
timer, enter a time, and write a note that is displayed when the time expires. To
change the time, select Change time.
2. To start the timer, select Start.
3. To stop the timer, select Stop timer.
Interval timer
1. To have an interval timer with up to 10 intervals started, first enter the intervals.
2. Select Menu > Organizer > Countd. timer > Interval timer.
3. To start the timer, select Start timer > Start.
To select how the interval timer should start the next period, select Menu >
Organizer > Countd. timer > Settings > Contin. to next period and from the
available options.
Stopwatch
You can measure time, take intermediate times, or take lap times using the stopwatch.
Select Menu > Organizer > Stopwatch and from the following options:
● Split timing — to take intermediate times. To reset the time without saving it, select
Options > Reset.
● Lap timing — to take lap times
© 2008 Nokia. All rights reserved. 45
Page 47

● Continue — to view the timing that you have set in the background
● Show last time — to view the most recently measured time if the stopwatch is not
reset
● View times or Delete times — to view or delete the saved times
To set the stopwatch timing in the background, press the end key.
18. Applications
Your phone may have some games or applications installed. These files are stored in
the phone memory or on a memory card and may be arranged in folders.
card," p. 36.
Launch an application
Select Menu > Applications > Games, Memory card, or Collection. Scroll to a game
or an application, and select Open.
To set sounds, lights, and shakes for a game, select Menu > Applications > Options > Application settings.
Other available options may include the following:
● Update version — to verify that a new version of the application is available for
download from the web (network service)
● Web page — to provide further information or additional data for the application
from an internet page (network service), if available
● Application access — to restrict the application from accessing the network
Download an application
Your phone supports J2ME JavaTM applications. Ensure that the application is compatible
with your phone before downloading it.
Important: Only install and use applications and other software from trusted
sources, such as applications that are Symbian Signed or have passed the Java
Verified™ testing.
You can download new applications and games in different ways.
● Select Menu > Applications > Options > Downloads > App. downloads or
Game downloads; the list of available bookmarks is shown.
● Use the Nokia Application Installer from PC Suite to download the applications to
your phone.
For the availability of different services and pricing, contact your service provider.
See "Memory
© 2008 Nokia. All rights reserved.46
Page 48

19. SIM services
Your SIM card may provide additional services. You can access this menu only if it is
supported by your SIM card. The name and contents of the menu depend o n the available
services.
To show the confirmation messages sent between your phone and the network when
you are using the SIM services, select Menu > Settings > Phone > Confirm SIM
actions
Accessing these services may involve sending messages or making a phone call for which
you may be charged.
© 2008 Nokia. All rights reserved. 47
Page 49

Enhancements
Warning: Use only batteries, chargers, and enhancements approved by Nokia
for use with this particular model. The use of any other types may invalidate any
approval or warranty, and may be dangerous.
For availability of approved enhancements, please check with your dealer. When you
disconnect the power cord of any enhancement, grasp and pull the plug, not the cord.
Battery
Battery and charger information
Your device is powered by a rechargeable battery. The battery intended for use with
this device is BL-4S. This device is intended for use when supplied with power from the
following chargers: AC-4E. The battery can be charged and discharged hundreds of
times, but it will eventually wear out. When the talk and standby times are noticeably
shorter than normal, replace the battery. Use only Nokia approved batteries, and
recharge your battery only with Nokia approved chargers designated for this device.
Use of an unapproved battery or charger may present a risk of fire, explosion, leakage,
or other hazard.
The exact charger model number may vary depending on the type of plug. The plug
variant is identified by one of the following: E, EB, X, AR, U, A, C, or UB.
If a battery is being used for the first time or if the battery has not been used for a
prolonged period, it may be necessary to connect the charger, then disconnect and
reconnect it to begin charging the battery. If the battery is completely discharged, it
may take several minutes before the charging indicator appears on the display or before
any calls can be made.
Always switch the device off and disconnect the charger before removing the battery.
Unplug the charger from the electrical plug and the device when not in use. Do not leave
a fully charged battery connected to a charger, since overcharging may shorten its
lifetime. If left unused, a fully charged battery will lose its charge over time.
Always try to keep the battery between 15°C and 25°C (59°F and 77°F). Extreme
temperatures reduce the capacity and lifetime of the battery. A device with a hot or cold
battery may not work temporarily. Battery performance is particularly limited in
temperatures well below freezing.
Do not short-circuit the battery. Accidental short-circuiting can occur when a metallic
object such as a coin, clip, or pen causes direct connection of the positive (+) and
negative (-) terminals of the battery. (These look like metal strips on the battery.) This
might happen, for example, when you carry a spare battery in your pocket or purse.
Short-circuiting the terminals may damage the battery or the connecting object.
Do not dispose of batteries in a fire as they may explode. Batteries may also explode if
damaged. Dispose of batteries according to local regulations. Please recycle when
possible. Do not dispose as household waste.
© 2008 Nokia. All rights reserved.48
Page 50

Do not dismantle, cut, open, crush, bend, deform, puncture, or shred cells or batteries.
In the event of a battery leak, do not allow the liquid to come in contact with the skin
or eyes. In the event of such a leak, flush your skin or eyes immediately with water, or
seek medical help.
Do not modify, remanufacture, attempt to insert foreign objects into the battery, or
immerse or expose it to water or other liquids.
Improper battery use may result in a fire, explosion, or other hazard. If the device or
battery is dropped, especially on a hard surface, and you believe the battery has been
damaged, take it to a service center for inspection before continuing to use it.
Use the battery only for its intended purpose. Never use any charger or battery that is
damaged. Keep your battery out of the reach of small children.
Nokia battery authentication guidelines
Always use original Nokia batteries for your safety. To check that you are getting an
original Nokia battery, purchase it from an authorized Nokia dealer, and inspect the
hologram label using the following steps:
Successful completion of the steps is not a total assurance of the authenticity of the
battery. If you have any reason to believe that your battery is not an authentic, original
Nokia battery, you should refrain from using it, and take it to the nearest authorized
Nokia service point or dealer for assistance. Your authorized Nokia service point or
dealer will inspect the battery for authenticity. If authenticity cannot be verified, return
the battery to the place of purchase.
Authenticate hologram
1. When you look at the hologram on the label, you should see the
Nokia connecting hands symbol from one angle and the Nokia
Original Enhancements logo when looking from another angle.
2. When you angle the hologram left, right, down and up, you
should see 1, 2, 3 and 4 dots on each side respectively.
What if your battery is not authentic?
If you cannot confirm that your Nokia battery with the hologram on the label is an
authentic Nokia battery, please do not use the battery. Take it to the nearest authorized
Nokia service point or dealer for assistance. The use of a battery that is not approved
© 2008 Nokia. All rights reserved. 49
Page 51

by the manufacturer may be dangerous and may result in poor performance and
damage to your device and its enhancements. It may also invalidate any approval or
warranty applying to the device.
For additional information, refer to the warranty and reference leaflet included with
your Nokia device.
Care and maintenance
Your device is a product of superior design and craftsmanship and should be treated
with care. The following suggestions will help you protect your warranty coverage.
● Keep the device dry. Precipitation, humidity, and all types of liquids or moisture can
contain minerals that will corrode electronic circuits. If your device does get wet,
remove the battery, and allow the device to dry completely before replacing it.
● Do not use or store the device in dusty, dirty areas. Its moving parts and electronic
components can be damaged.
● Do not store the device in hot areas. High temperatures can shorten the life of
electronic devices, damage batteries, and warp or melt certain plastics.
● Do not store the device in cold areas. When the device returns to its normal
temperature, moisture can form inside the device and damage electronic circuit
boards.
● Do not attempt to open the device other than as instructed in this guide.
● Do not drop, knock, or shake the device. Rough handling can break internal circuit
boards and fine mechanics.
● Do not use harsh chemicals, cleaning solvents, or strong detergents to clean the
device.
● Do not paint the device. Paint can clog the moving parts and prevent proper
operation.
● Use a soft, clean, dry cloth to clean any lenses, such as camera, proximity sensor, and
light sensor lenses.
● Use only the supplied or an approved replacement antenna. Unauthorized antennas,
modifications, or attachments could damage the device and may violate regulations
governing radio devices.
● Use chargers indoors.
● Always create a backup of data you want to keep, such as contacts and calendar notes.
● To reset the device from time to time for optimum performance, power off the device
and remove the battery.
These suggestions apply equally to your device, battery, charger, or any enhancement.
If any device is not working properly, take it to the nearest authorized service facility
for service.
© 2008 Nokia. All rights reserved.50
Page 52

Disposal
The crossed-out wheeled-bin symbol on your product, literature, or packaging
reminds you that all electrical and electronic products, batteries, and accumulators
must be taken to separate collection at the end of their working life. This
requirement applies to the European Union and other locations where separate
collection systems are available. Do not dispose of these products as unsorted municipal
waste.
By returning the products to collection you help prevent uncontrolled waste disposal
and promote the reuse of material resources. More detailed information is available
from the product retailer, local waste authorities, national producer responsibility
organizations, or your local Nokia representative. For the product Eco-Declaration or
instructions for returning your obsolete product, go to country-specific information at
www.nokia.com.
Additional safety information
Small children
Your device and its enhancements may contain small parts. Keep them out of the reach
of small children.
Operating environment
This device meets RF exposure guidelines when used either in the normal use position
against the ear or when positioned at least 1.5 centimeters (5/8 inches) away from the
body. When a carry case, belt clip, or holder is used for body-worn operation, it should
not contain metal and should position the device the above-stated distance from your
body.
To transmit data files or messages, this device requires a quality connection to the
network. In some cases, transmission of data files or messages may be delayed until
such a connection is available. Ensure the above separation distance instructions are
followed until the transmission is completed.
Medical devices
Operation of any radio transmitting equipment, including wireless phones, may
interfere with the functionality of inadequately protected medical devices. Consult a
physician or the manufacturer of the medical device to determine if they are adequately
shielded from external RF energy or if you have any questions. Switch off your device
in health care facilities when any regulations posted in these areas instruct you to do
so. Hospitals or health care facilities may be using equipment that could be sensitive to
external RF energy.
Implanted medical devices
Manufacturers of medical devices recommend that a minimum separation of 15.3
centimeters (6 inch) should be maintained bet
© 2008 Nokia. All rights reserved. 51
ween a wireless device and an implanted
Page 53

medical device, such as a pacemaker or implanted cardioverter defibrillator, to avoid
potential interference with the medical device. Persons who have such devices should:
● Always keep the wireless device more than 15.3 centimeters (6 inches) from the
medical
device when the wireless device is turned on.
t carry the wireless device in a breast pocket.
● No
● Hold the wireless device to the ear opposite the medical device to minimize the
potential for interference.
● Turn the wireless device off immediately if there is any reason to suspect that
interference is taking place.
● Read and follow the directions from the manufacturer of their implanted medical
device.
If you have any questions about using your wireless device with an implanted medical
device, consult your health care provider.
Hearing aids
Some digital wireless devices may interfere with some hearing aids. If interference
occurs, consult your service provider.
Vehicles
RF signals may affect improperly installed or inadequately shielded electronic systems
in motor vehicles such as electronic fuel injection systems, electronic antiskid (antilock)
braking systems, electronic speed control systems, and air bag systems. For more
information, check with the manufacturer, or its representative, of your vehicle or any
equipment that has been added.
Only qualified personnel should service the device or install the device in a vehicle. Faulty
installation or service may be dangerous and may invalidate any warranty that may
apply to the device. Check regularly that all wireless device equipment in your vehicle
is mounted and operating properly. Do not store or carry flammable liquids, gases, or
explosive materials in the same compartment as the device, its parts, or enhancements.
For vehicles equipped with an air bag, remember that air bags inflate with great force.
Do not place objects, including installed or portable wireless equipment in the area over
the air bag or in the air bag deployment area. If in-vehicle wireless equipment is
improperly installed and the air bag inflates, serious injury could result.
Using your device while flying in aircraft is prohibited. Switch off your device before
boarding an aircraft. The use of wireless teledevices in an aircraft may be dangerous to
the operation of the aircraft, disrupt the wireless telephone network, and may be illegal.
Potentially explosive environments
Switch off your device when in any area with a potentially explosive atmosphere, and
obey all signs and instructions. Potentially explosive atmospheres include areas where
you would normally be advised to turn off your vehicle engine. Sparks in such areas
could cause an explosion or fire resulting in bodily injury or even death. Switch off the
device at refueling points such as near gas pumps at service stations. Observe
© 2008 Nokia. All rights reserved.52
Page 54

restrictions on the use of radio equipment in fuel depots, storage, and distribution
areas; chemical plants; or where blasting operations are in progress. Areas with a
potentially explosive atmosphere are often, but not always, clearly marked. They include
below deck on boats, chemical transfer or storage facilities and areas where the air
contains chemicals or particles such as grain, dust, or metal powders. You should check
with the manufacturers of vehicles using liquefied petroleum gas (such as propane or
butane) to determine if this device can be safely used in their vicinity.
Emergency calls
Important: This device operates using radio signals, wireless networks, landline
networks, and user-programmed functions. If your device supports voice calls over the
internet (internet calls), activate both the internet calls and the cellular phone. The
device will attempt to make emergency calls over both the cellular networks and
through your internet call provider if both are activated. Connections in all conditions
cannot be guaranteed. You should never rely solely on any wireless device for essential
communications like medical emergencies.
To make an emergency call:
1. If the device is not on, switch it on. Check for adequate signal strength. Depending
on your device, you may also need to complete the following:
● Insert a SIM card if your device uses one
● Remove certain call restrictions you have activated in your device.
● Change your profile from offline or flight profile mode to an active profile.
2. Press the end key as many times as needed to clear the display and ready the device
for calls.
3. Enter the official emergency number for your present location. Emergency numbers
vary by location.
4. Press the call key.
When making an emergency call, give all the necessary information as accurately as
possible. Your wireless device may be the only means of communication at the scene
of an accident. Do not end the call until given permission to do so.
Certification information (SAR)
This mobile device meets guidelines for exposure to radio waves.
Your mobile device is a radio transmitter and receiver. It is designed not to exceed the
limits for exposure to radio waves recommended by international guidelines. These
guidelines were developed by the independent scientific organization ICNIRP and
include safety margins designed to assure the protection of all persons, regardless of
age and health.
The exposure guidelines for mobile devices employ a unit of measurement known as
the Specific Absorption Rate or SAR. The SAR limit stated in the ICNIRP guidelines is 2.0
watts/kilogram (W/kg) averaged over 10 grams of tissue. Tests for SAR are conducted
© 2008 Nokia. All rights reserved. 53
Page 55

using standard operating positions with the device transmitting at its highest certified
power level in all tested frequency bands. The actual SAR level of an operating device
can be below the maximum value because the device is designed to use only the power
required to reach the network. That amount changes depending on a number of factors
such as how close you are to a network base station. The highest SAR value under the
ICNIRP guidelines for use of the device at the ear is 0.69 W/kg.
Use of device accessories and enhancements may result in different SAR values. SAR
values may vary depending on national reporting and testing requirements and the
network band. Additional SAR information may be provided under product information
at www.nokia.com.
Your mobile device is also designed to meet the requirements for exposure to radio
waves established by the Federal Communications Commission (USA) and Industry
Canada. These requirements set a SAR limit of 1.6 W/kg averaged over one gram of
tissue. The highest SAR value reported under this standard during product certification
for use at the ear is 1.01 W/kg and when properly worn on the body is 0.78 W/kg.
© 2008 Nokia. All rights reserved.54
Page 56

Index
Symbols/Numerics
1-touch dialing 19, 27, 32
A
access codes 8
active standby 16, 31
anykey answer 32
applications 46
AV cable 14
B
battery 13
battery charge status 16
browser 41
business cards 27
C
cache memory 42
calculator 45
call forwarding 32
call log 27
call waiting 32
caller id 32
camera 37
configuration 33
configuration setting service 9
cookies 42
D
data cable 29
dialing shortcuts 19, 27
display 16, 31
downloads 9
E
e-mail 23
enhancements 33
equalizer 40
F
factory settings 35
flash messages 24
flight mode 17
flight query 32
font size 31
G
games 46
general packet radio service 29
GPRS 29
GPS 43
H
handsfree 19
headset 14
help text 33
helpful hints 10
I
IM 24
in-call timer 32
indicators 17
info messages 25
instant messaging 24
internet 41
K
keyguard 32
keypad lock 18
keys 15
L
language 32
lights 30
location information 28
loudspeaker 19
M
Maps 42
memory card 12, 36
message center number 21
message sending 22
microSD card 12
music player 38
My Nokia 9
© 2008 Nokia. All rights reserved. 55
Page 57

N
navigation 21
Nokia Care 10
notes 45
number mode 20
O
offline mode 18
operator menu 35
P
packet data 29
parts 15
PC Suite 30
phone software updates 33
PictBridge 29
picture 37
PIN 8
position log 28
power saver 31
power saving 16
predictive text input 20
print images 36
profiles 30
PUK 8
R
radio 39
recorder 40
redial 32
restriction password 8
software update 10, 34
start up tone 33
status indicators 16
stereo widening 41
stopwatch 45
strap 14
T
take a picture 37
text modes 20
themes 30
tones 30
traditional text input 20
U
UPIN 8
USB data cable 29
V
video clips 37
voice clarity 32
voice commands 33
voice dialing 19
voice recognition 33
voice recorder 40
W
wallpaper 31
web 41
write text 20
S
screen saver 31
scrolling 21
security code 8
security module 8
service commands 25
settings 30
shortcuts 17, 31
signal strength 16
SIM
services 47
SIM card 11, 18
SIM messages 25
sleep mode 31
© 2008 Nokia. All rights reserved.56
Page 58

Manual del Usuario para Nokia 3600 slide
9209959
Edición 1
Page 59

DECLARACIÓN DE CONFORMIDAD
Mediante la presente, NOKIA CORPORATION declara que el producto RM-352 cumple con
los requisitos esenciales y otras disposiciones pertinentes de la Directiva 1999/5/EC. Se
puede consultar una copia de la Declaración de Conformidad, en inglés, en http://
www.nokia.com/phones/declaration_of_conformity/.
© 2008 Nokia. Todos los derechos reservados.
Nokia, Nokia Connecting People y Navi son marcas comerciales o marcas registradas de Nokia Corporation. Nokia
tune es una marca de sonido de Nokia Corporation. Otros nombres de productos y compañías aquí mencionados
pueden ser marcas comerciales o nombres comerciales de sus respectivos propietarios.
Se prohíbe la duplicación, la transferencia, la distribución o el almacenamiento parcial o total del contenido de este
documento, de cualquier manera, sin el consentimiento previo por escrito de Nokia.
Número de patente de los EE. UU. 5818437 y otras patentes pendientes. Software de ingreso de texto T9. Copyright
© 1997-2008. Tegic Communications, Inc. Todos los derechos reservados.
Incluye software de protocolo de seguridad o criptográfico RSA BSAFE de RSA Security.
Java y todas las marcas basadas en Java son marcas comerciales o marcas registradas de Sun Microsystems,
Inc.
Algunas partes del software Nokia Maps son © 1996-2008 The FreeType Project. Todos los derechos reservados.
This product is licensed under the MPEG-4 Visual Patent Portfolio License (i) for personal and noncommercial use in
connection with information which has been encoded in compliance with the MPEG-4 Visual Standard by a consumer
engaged in a personal and noncommercial activity and (ii) for use in connection with MPEG-4 video provided by a
licensed video provider. No license is granted or shall be implied for any other use. Additional information, including
that related to promotional, internal, and commercial uses, may be obtained from MPEG LA, LLC. See http://
www.mpegla.com.
Este producto está autorizado en virtud de la Licencia en Cartera de Patentes MPEG-4 Visual I) para uso personal y no
comercial en relación con la información codificada por un consumidor que se dedica a una actividad personal y no
comercial, de acuerdo con el Estándar Visual MPEG-4 y II) para uso en relación con el video MPEG-4 provisto por un
proveedor de videos autorizado. No se otorga ninguna licencia para otro tipo de uso ni se la considerará implícita.
Se puede obtener información adicional de MPEG LA, LLC, incluida la información acerca de usos promocionales,
internos y comerciales. Visite http://www.mpegla.com
Nokia cuenta con una política de desarrollo continuo. Nokia se reserva el derecho de introducir cambios y mejoras
en cualquiera de los productos descritos en este documento sin previo aviso.
SEGÚN EL MÁXIMO ALCANCE PERMITIDO POR LA LEGISLACIÓN VIGENTE, EN NINGUNA CIRCUNSTANCIA, NOKIA O SUS
LICENCIANTES SERÁN RESPONSABLES DE LAS PÉRDIDAS DE DATOS O DE GANANCIAS NI DE LOS DAÑOS ESPECIALES,
(en inglés).
INCIDENTALES, RESULTANTES O INDIRECTOS, INDEPENDIENTEMENTE DE CÓMO HAYAN SIDO CAUSADOS.
EL CONTENIDO DE ESTE DOCUMENTO SE PROVEE “TAL COMO ESTÁ”. A MENOS QUE LO REQUIERA LA LEGISLACIÓN VIGENTE,
NO SE OTORGARÁ NINGUNA GARANTÍA, SEA EXPRESA O IMPLÍCITA, EN RELACIÓN CON LA PRECISIÓN, LA CONFIABILIDAD O
EL CONTENIDO DE ESTE DOCUMENTO, INCLUIDAS, CON MERO CARÁCTER ENUNCIATIVO, LAS GARANTÍAS IMPLÍCITAS DE
COMERCIALIZACIÓN Y DE IDONEIDAD PARA UN FIN DETERMINADO. NOKIA SE RESERVA EL DERECHO DE MODIFICAR ESTE
DOCUMENTO O DISCONTINUAR SU USO EN CUALQUIER MOMENTO SIN PREVIO AVISO.
Page 60

La disponibilidad de productos específicos y de aplicaciones y servicios para dichos productos puede variar de una
región a otra. Comuníquese con su distribuidor Nokia para obtener información adicional y consultar la disponibilidad
de opciones de idiomas.
La disponibilidad de algunas funciones puede variar de una región a otra. Comuníquese con su operador para obtener
más información.
Controles de exportación
Este dispositivo puede contener materias primas, tecnología o software sujetos a leyes y regulaciones de exportación
de los Estados Unidos y otros países. Se prohíbe su desvío contraviniendo las leyes.
Aviso de la FCC
Su dispositivo puede causar interferencia radioeléctrica o televisiva (por ejemplo, cuando se utiliza un teléfono en
las cercanías de equipos receptores). La FCC puede exigirle que deje de usar su teléfono si no se puede eliminar tal
interferencia. Si necesita ayuda, comuníquese con el centro de servicio local. Este dispositivo cumple con lo
establecido en la sección 15 de las normas de la FCC. El funcionamiento de este dispositivo está sujeto a las siguientes
dos condiciones: I) este dispositivo no debe causar interferencia perjudicial, y II) este dispositivo debe aceptar
cualquier interferencia recibida, incluso una interferencia que pueda causar un funcionamiento no deseado.
Cualquier cambio o modificación que no haya sido expresamente aprobado por Nokia puede anular la legitimación
del usuario de utilizar este equipo.
Número de modelo: 3600s
9209959/Edición 1
Page 61

Contenido
Seguridad....................................7
1. Información general...............8
Acerca de su dispositivo............................8
Servicios de red..........................................8
Códigos de acceso......................................9
Servicio de ajustes de
configuración.............................................9
My Nokia...................................................10
Descargar contenido...............................10
Sugerencias útiles...................................10
Actualizaciones de software..................10
Soporte Nokia..........................................11
Administración de derechos
digitales....................................................11
2. Inicio......................................12
Instalar la tarjeta SIM y la batería..........12
Insertar una tarjeta de memoria...........13
Retirar la tarjeta de memoria................13
Cargar la batería......................................13
Antena......................................................14
Auricular...................................................14
Correa.......................................................14
Cable AV....................................................15
Teclas y partes.........................................16
Encender y apagar el teléfono...............16
Modo en espera ......................................17
Pantalla..................................................17
Ahorro de energía................................17
Espera activa.........................................17
Accesos directos en el modo
en espera...............................................18
Indicadores............................................18
Modo de vuelo.........................................18
Bloqueo del teclado................................19
Funciones sin una tarjeta SIM................19
4. Escribir texto.........................21
Modos de texto........................................21
Ingreso de texto tradicional...................21
Ingreso de texto predictivo....................22
5. Navegación por los
menús........................................22
6. Mensajería.............................22
Mensajes de texto y multimedia............23
Mensajes de texto.................................23
Mensajes multimedia...........................23
Crear un mensaje de texto o mensaje
multimedia............................................23
Leer un mensaje y responderlo...........24
Enviar mensajes....................................24
E-mail........................................................24
Asistente de configuración de
e-mail.....................................................25
Escribir y enviar un e-mail...................25
Leer un e-mail y contestarlo................25
Notificaciones de e-mail nuevo...........25
Mensajes flash..........................................26
Mensajes de audio Nokia Xpress............26
Mensajería instantánea..........................26
Mensajes de información, mensajes SIM
y comandos de servicio..........................26
Mensajes de voz.......................................27
Configuraciones de mensajes................27
7. Contactos ..............................28
Administrar contactos.............................28
Tarjetas de negocios...............................29
Asignar accesos directos de
marcación.................................................29
8. Registro de llamadas ............30
3. Llamadas...............................19
Realizar una llamada..............................19
Llamadas entrantes.................................20
Accesos directos de marcación..............20
Marcación por voz...................................20
Opciones durante una llamada..............21
9. Registro de posición..............30
10. Conectividad........................30
Tecnología inalámbrica
Bluetooth.................................................30
Paquete de datos....................................31
Page 62

Cable de datos USB..................................31
Sincronización y copias de
seguridad.................................................32
Nokia PC Suite..........................................32
Funciones de radio...............................43
Grabadora de voz....................................43
Ecualizador...............................................44
Ampliación estéreo.................................44
11. Configuraciones...................32
Perfiles......................................................32
Temas.......................................................33
Tonos........................................................33
Luces.........................................................33
Pantalla.....................................................33
Fecha y hora.............................................34
Mis accesos directos................................34
Teclas de selección izquierda y
derecha..................................................34
Otros accesos directos..........................34
Llamar.......................................................34
Teléfono...................................................35
Comandos de voz....................................35
Accesorios................................................36
Configuración...........................................36
Actualizaciones de software por
aire............................................................37
Seguridad.................................................37
Restaurar configuración de
fábrica.......................................................38
12. Menú Operador....................38
13. Galería.................................39
Carpetas y archivos..................................39
Imprimir imágenes.................................39
Tarjeta de memoria................................39
14. Multimedia..........................40
Cámara y video........................................40
Tomar una fotografía...........................40
Grabar un videoclip..............................40
Opciones de cámara y video................40
Reproductor de música...........................41
Menú de música....................................41
Reproducir pistas de música...............42
Cambiar la apariencia del reproductor
de música..............................................42
Radio.........................................................42
Sintonizar estaciones de radio............43
15. Web ....................................44
Conectarse a un servicio.........................44
Configuración de la apariencia..............45
Memoria caché.........................................45
Seguridad del explorador.......................45
16. Mapas..................................46
Descargar mapas.....................................46
Mapas y GPS..............................................47
Servicios adicionales...............................47
17. Organizador.........................47
Alarma......................................................47
Agenda.....................................................48
Lista de tareas..........................................48
Notas.........................................................48
Calculadora...............................................49
Temporizador..........................................49
Cronómetro..............................................49
18. Aplicaciones ........................50
Abrir una aplicación................................50
Descargar una aplicación........................50
19. Servicios SIM........................50
Accesorios..................................52
Batería.......................................52
Información sobre baterías y
cargadores...............................................52
Normas de autenticación de baterías
Nokia.........................................................53
Autenticación del holograma..............53
¿Qué ocurre si la batería no es
auténtica?..............................................54
Cuidado y mantenimiento........54
Eliminación..............................................55
Page 63

Información adicional de
seguridad..................................55
Niños pequeños.......................................55
Entorno operativo...................................55
Dispositivos médicos...............................56
Dispositivos médicos
implantados..........................................56
Auxiliares auditivos..............................56
Vehículos..................................................56
Zonas potencialmente explosivas..........57
Llamadas de emergencia........................57
INFORMACIÓN DE CERTIFICACIÓN
(SAR)..........................................................58
Índice.........................................60
Page 64

Seguridad
Lea estas sencillas indicaciones. Su incumplimiento puede ser peligroso o ilegal. Lea
todo el manual del usuario para obtener más información.
ENCIENDA EL TELÉFONO EN FORMA SEGURA
No encienda el dispositivo donde el uso de teléfonos móviles esté prohibido
o pueda causar interferencia o peligro.
LA SEGURIDAD VIAL ANTE TODO
Obedezca las leyes locales. Mantenga siempre las manos libres para
maniobrar el vehículo mientras conduce. La seguridad vial debe ser su
prioridad cuando conduce.
INTERFERENCIA
Todos los dispositivos móviles pueden ser sensibles a interferencias que
pueden afectar su rendimiento.
APAGUE EL DISPOSITIVO EN ÁREAS RESTRINGIDAS
Respete todas las restricciones existentes. Apague el dispositivo cuando se
encuentre en una aeronave o cerca de equipos médicos, combustibles,
productos químicos o áreas donde se realizan explosiones.
SERVICIO TÉCNICO CALIFICADO
Sólo personal calificado puede instalar o reparar este producto.
ACCESORIOS Y BATERÍAS
Utilice sólo baterías y accesorios aprobados. No conecte productos
incompatibles.
RESISTENCIA AL AGUA
Su dispositivo no es resistente al agua. Manténgalo seco.
© 2008 Nokia. Todos los derechos reservados. 7
Page 65

1. Información general
Acerca de su dispositivo
El dispositivo móvil descrito en este manual está aprobado para su uso en redes GSM
de 850, 900, 1800 y 1900 MHz . Comuníquese con su proveedor de servicios para obtener
más información acerca de las redes.
Cuando use las funciones de este dispositivo, obedezca las leyes y respete las
costumbres locales, la privacidad y los derechos legítimos de los demás, incluidos los
derechos de propiedad intelectual.
Es posible que la protección de los derechos de propiedad intelectual impida la copia,
la modificación o la transferencia de determinadas imágenes, música y otros
contenidos.
El dispositivo puede tener preinstalados favoritos y enlaces a sitios de Internet de
terceros. Usted también podrá acceder a otros sitios de terceros mediante su dispositivo.
Los sitios de terceros no están afiliados a Nokia
responsabilidad alguna por ellos. Si opta por acceder a dichos sitios, deberá tomar
precauciones de seguridad o contenido.
Aviso: Para utilizar cualquier función de este dispositivo, excepto la alarma,
es necesario que el teléfono esté encendido. No encienda el dispositivo cuando el uso
de dispositivos móviles pueda causar interferencia o peligro.
Recuerde hacer copias de seguridad o llevar un registro escrito de toda la información
importante almacenada en su dispositivo.
Antes de conectar el teléfono a otro dispositivo, lea el manual del usuario para ver las
instrucciones de seguridad detalladas. No conecte productos incompatibles.
Servicios de red
Para usar el teléfono, debe estar suscrito a un proveedor de servicios móviles. Muchas
de las funciones requieren características de red especiales. Estas funciones no están
disponibles en todas las redes; otras redes pueden requerirle acuerdos específicos con
su proveedor de servicios antes de que pueda utilizar los servicios de red. Su proveedor
de servicios puede darle instrucciones y explicarle los cargos que se aplicarán. Algunas
redes pueden tener limitaciones que afectan el uso de los servicios de red. Por ejemplo,
es posible que algunas redes no admitan todos los servicios y los caracteres que
dependen del idioma.
Su proveedor de servicios puede haber solicitado la desactivación o no activación de
ciertas funciones de su dispositivo. Der ser así, éstas no aparecerán en el menú del
dispositivo. Es posible que el dispositivo también tenga una configuración especial,
como cambios en los nombres de menús, en el orden de los menús y en los iconos.
Comuníquese con su proveedor de servicios para obtener más información.
y Nokia no los patrocina ni asume
© 2008 Nokia. Todos los derechos reservados.8
Page 66

Códigos de acceso
Para configurar cómo el teléfono usa los códigos de acceso y las configuraciones de
seguridad, seleccione Menú > Configuraciones > Seguridad > Códigos de
acceso.
● El código PIN (UPIN), incluido en la tarjeta SIM (USIM), ayuda a proteger la tarjeta
contra el uso no autorizado.
● El código PIN2 (UPIN2), incluido en algunas tarjetas SIM (USIM), es necesario para
acceder a determinados servicios.
● Los códigos PUK (UPUK) y PUK2 (UPUK2) pueden estar incluidos con la tarjeta SIM
(USIM). Si ingresa el código PIN en forma incorrecta tres veces seguidas, se le solicitará
el cód
servicios.
● El código de seguridad ayuda a proteger el teléfono contra el uso no autorizado.
Puede crear y cambiar el código y configurar el teléfono para que solicite el código.
Mantenga en secreto el nuevo código de bloqueo, en un lugar seguro y apartado del
teléfono. Si olvidó el código y el teléfono está bloqueado, el teléfono requerirá
servicio, lo que puede tener cargos adicionales. Para obtener más información,
comuníquese con un centro de atención Nokia o con el dist
● La contraseña de bloqueo se requiere cuando usa el servic
llamadas para restringir llamadas entrantes y salientes de su teléfono (servicio de
red).
● Para ver o cambiar los ajustes del módulo de seguridad para el explorador de
Internet, seleccione Menú > Configuraciones > Seguridad > Config. módulo
seg..
Si los códigos no están incluidos, comuníquese con el proveedor de
igo PUK.
ribuidor de teléfonos.
io de restricción de
Servicio de ajustes de configuración
Para utilizar algunos de los servicios de red, como los servicios de Internet móvil, el
servicio de mensajería multimedia (MMS), mensajería de voz Nokia Xpress o
sincronización con el servidor de Internet remoto, el teléfono necesita los ajustes de
configuración correctos. Para obtener más información sobre la disponibilidad,
comuníquese con el proveedor de servicios o con el distribuidor autorizado de Nokia
más cercano, o visite el área de soporte del sitio Web de Nokia.
Nokia", pág. 11.
Cuando haya recibido los ajustes como un mensaje de configuración y éstos no se
guarden ni se activen automáticamente, aparecerá Ajustes de configuración
recibidos.
Para guardar las configuraciones, seleccione Mostrar > Guardar. Ingrese el código PIN
proporcionado por el proveedor de servicios, si se le solicita hacerlo.
Consulte "Soporte
© 2008 Nokia. Todos los derechos reservados. 9
Page 67

My Nokia
Reciba sugerencias, trucos y soporte gratuitos para su teléfono Nokia, además de
contenido de evaluación gratuito, demostraciones interactivas, una página Web
personalizada y noticias acerca de los últimos productos y servicios Nokia.
¡Saque el máximo provecho de su teléfono Nokia y regístrese hoy en My Nokia! Para
obtener más información y conocer la disponibilidad en su región, visite
www.nokia.com/mynokia (en inglés)..
Descargar contenido
Puede descargar contenido nuevo (por ejemplo, temas) en el teléfono (servicio de red).
Importante: Use solamente servicios confiables y que ofrecen niveles adecuados
de seguridad y protección contra software perjudicial.
Comuníquese con el proveedor de servicios para conocer la disponibilidad y los precios
de distintos servicios.
Sugerencias útiles
Si tiene dudas sobre el teléfono, o no está seguro de cómo debe funcionar, consulte el
manual del usuario. Si esto no es de ayuda, intente lo siguiente:
● Restaure el teléfono: apague el teléfono y retire la batería. Después de unos
segundos, inserte la batería y encienda el teléfono.
● Restaure las configuraciones de fábrica.
fábrica", pág. 38.
● Actualice el software del teléfono con la aplicación Nokia Software Updater, si está
disponible.
● Visite el sitio Web de Nokia o comuníquese con Nokia Care.
Nokia", pág. 11.
Si aún tiene dudas, comuníquese con su centro de atención local de Nokia Care para
conocer las opciones
siempre haga copias de seguridad de la información del teléfono.
Consulte "Actualizaciones de software", pág. 10.
de reparación. Antes de enviar el teléfono para reparación,
Consulte "Restaurar configuración de
Consulte "Soporte
Actualizaciones de software
Nokia puede producir actualizaciones de software que ofrezcan funcionalidades nuevas,
funciones mejoradas o un mejor desempeño. Puede solicitar estas actualizaciones
mediante la aplicación Nokia Software Updater PC. Para actualizar el software del
dispositivo, necesita la aplicación Nokia Software Updater y una PC compatible con
sistema operativo Microsoft Windows 2000, XP o Vista, acceso a Internet por banda
ancha y un cable de datos compatible para conectar el dispositivo a la PC.
Para obtener más información y descargar la aplicación Nokia Software Updater, visite
www.nokia-latinoamerica.com/nsu para Latinoamérica.
© 2008 Nokia. Todos los derechos reservados.10
Page 68

Si su red admite actualizaciones de software por aire, también podrá solicitar
actualizaciones a través del dispositivo.
aire", pág. 37.
Importante: Use solamente servicios confiables y que ofrecen niveles adecuados
de seguridad y protección contra software perjudicial.
Consulte "Actualizaciones de software por
Soporte Nokia
Visite www.nokia.com/support o www.nokia-latinoamerica.com/soporte o su sitio
Web local de Nokia para obtener la version más reciente de este manual,
información adicional, descargas y servicios relacionados con su producto Nokia.
Puede encontrar información detallada adicional en el el folleto de Servicios de
asistencia de
Servicio de ajustes de configuración
Descargue ajustes de configuración gratuitos como MMS, GPRS, e-mail y otros servicios
para su modelo de teléfono en www.nokia-latinoamerica.com/soporte.
Nokia PC Suite
Puede encontrar información sobre PC Suite e información relacionada en el sitio Web
de Nokia www.nokia-latinoamerica.com/soporte. A fin de determinar las funciones que
PC Suite ofrece para su teléfono, consulte la lista de compatibilidad para PC Suite en el
sitio Web de Nokia www.nokia-latinoamerica.com/soporte.
Servicios de Nokia Care
Si necesita ponerse en contacto con el servicio de atención al cliente,
consulte la lista de centros Nokia Care locales en www.nokia.com/
customerservice o www.nokia-latinoamerica.com/contactenos.
Mantenimiento
Para obtener información acerca de los servicios de mantenimiento, consulte cuál es el
centro de Nokia Care más cercano en www.nokia-latinoamer
Nokia y condiciones de la garantía.
ica.com/centrosdeservicio.
Administración de derechos digitales
Los propietarios de contenido pueden emplear distintos tipos de tecnologías de
administración de derechos digitales (DRM) para proteger su propiedad intelectual,
incluidos los derechos de copyright. Este dispositivo usa variados tipos de software DRM
para acceder a contenidos protegidos con DRM. Con este dispositivo, puede acceder a
contenidos protegidos con WMDRM 10, OMA DRM 1.0, bloqueo de desvío OMA DRM 1.0,
y OMA DRM 2.0. Si cierto software DRM no brinda protección adecuada de contenido, los
propietarios del contenido pueden solicitar la revocación de la capacidad de dicho
software DRM de acceder a nuevos contenidos protegidos con DRM. Esa revocación
también puede impedir la renovación de dicho contenido protegido con DRM que ya
está en su dispositivo. La revocación de ese software DRM no afecta el uso del contenido
protegido con otros tipos de DRM ni el uso de contenidos no protegidos con DRM.
© 2008 Nokia. Todos los derechos reservados. 11
Page 69

El contenido protegido con administración de derechos digitales (DRM) viene con una
clave de activación asociada que define sus derechos de uso del contenido.
Si su dispositivo tiene contenido protegido por OMA DRM, para hacer una copia de
seguridad de las claves de activación y del contenido, use la función de copia de
seguridad de Nokia PC Suite. Otros métodos de transferencia podrían no transferir las
claves de activación, que se deben restaurar con el contenido para que pueda continuar
usando el contenido protegido con OMA DRM, después de formatear la memoria del
dispositivo. También podría ser necesario restaurar las claves de activación si se dañan
los archivos de su dispositivo.
Si su dispositivo tiene contenido protegido con WMDRM, al formatear la memoria del
dispositivo se perderán tanto las claves de activación como el contenido. También se
podrían perder las claves de activación y el contenido si se dañan los archivos de su
dispositivo. La pérdida de las claves de activación o del contenido podría impedir que
usted siga utilizando el mismo contenido de su dispositivo. Comuníquese con su
proveedor de servicios para obtener más información.
2. Inicio
Instalar la tarjeta SIM y la batería
Apague siempre el dispositivo y desconecte el cargador antes de retirar la batería.
Este teléfono está diseñado para su uso con una batería BL-4S. Utilice siempre baterías
originales Nokia.
La tarjeta SIM y sus contactos pueden dañarse fácilmente al rayarse o doblarse, así que
tenga cuidado al manipular, insertar y retirar la tarjeta.
1. Presione el botón de
liberación para levantar la
cubierta posterior, y retírela.
Retire la batería.
2. Abra el soporte para la tarjeta
SIM e inserte la tarjeta SIM en
el soporte con la superficie de
contacto hacia abajo. Cierre el
soporte para tarjeta SIM.
Consulte "Normas de autenticación de baterías Nokia", pág. 53.
© 2008 Nokia. Todos los derechos reservados.12
Page 70

3. Con los contactos en la posición
correcta, inserte la batería.
Vuelva a colocar la cubierta
posterior.
Insertar una tarjeta de memoria
Utilice sólo tarjetas microSD aprobadas por Nokia con este dispositivo. Nokia utiliza
estándares industriales aprobados para las tarjetas de memoria, pero algunas marcas
podrían no ser totalmente compatibles con este dispositivo. Las tarjetas incompatibles
pueden dañar la tarjeta y el dispositivo, además de los datos almacenados en la tarjeta.
Su teléfono admite tarjetas microSD de hasta 4 GB.
1. Retire la cubierta posterior.
2. Inserte la tarjeta de memoria en la ranura para tarjetas de
memoria con la superficie de contacto hacia abajo y
presiónela hasta que encaje en su lugar.
3. Vuelva a colocar la cubierta posterior.
Retirar la tarjeta de memoria
Importante: No retire la tarjeta de memoria en medio de una operación cuando
se esté accediendo a la tarjeta. Si la retira durante una operación, se pueden dañar la
tarjeta y el dispositivo, y se pueden alterar los datos almacenados.
Puede retirar o cambiar la tarjeta de memoria durante la operación del dispositivo sin
apagarlo.
1. Asegúrese de que ninguna aplicación esté accediendo a la tarjeta de memoria.
2. Retire la cubierta posterior.
3. Presione la tarjeta de memoria suavemente para soltarla de la traba y extraerla.
4. Vuelva a colocar la cubierta posterior.
Cargar la batería
1. Conecte el cargador a un tomacorriente de pared.
© 2008 Nokia. Todos los derechos reservados. 13
Page 71

2. Conecte el cable del cargador al conector del cargador del
teléfono.
Si la batería está completamente descargada, es posible que pasen
varios minutos antes de que el indicador de carga aparezca en la
pantalla o antes de poder hacer alguna llamada.
El tiempo de carga depende del cargador que utilice. Cargar una
batería BL-4S con el cargador AC-4E tarda aproximadamente 1 hora
30 minutos mientras el teléfono está en el modo en espera.
Antena
Su dispositivo puede tener una antena interna y una externa. Al igual que
con otros dispositivos de radiotransmisión, evite el contacto innecesario
con el área de la antena cuando esté en uso. El contacto con la antena
af
ecta la calidad de la comunicación y puede hacer que el dispositivo
requiera más energía de la necesaria para funcionar, lo que reduce la
vida útil de la batería.
La figura exhibe el área de
la antena marc
ada de color gris.
Auricular
Aviso: Escuche música a un volumen moderado. La exposición prolongada a un
nivel de volumen alto puede perjudicar su capacidad auditiva. Cuando use el altavoz,
no sostenga el dispositivo cerca del oído, ya que el volumen puede resultar demasiado
alto.
Aviso: Cuando utilice el auricular, su capacidad para oír los sonidos exteriores
puede verse afectada. No use el auricular en condiciones que pongan su seguridad en
peligro.
Cuando conecte al Conector Nokia AV algún dispositivo externo o auricular que no sean
los aprobados por Nokia para este dispositivo, preste especial atención a los niveles de
volumen.
No conecte productos que emitan una señal de salida, porque puede dañar el
dispositivo. No conecte ninguna fuente de tensión al Conector Nokia AV.
Correa
1. Abra la cubierta posterior.
© 2008 Nokia. Todos los derechos reservados.14
Page 72

2. Enganche la correa detrás de la grapa y cierre la cubierta
posterior.
Cable AV
Para ver imágenes en la Galería y mensajes
instantáneos en la pantalla de TV, conecte un Cable
CA-92U de salida de video Nokia en el conector AV del
teléfono. Fíjese en el código de color cuando conecte el
cable a la TV. Esta función no está diseñada para ver
videoclips.
Código de color
blanco canal análogo a la
rojo canal análogo a la derecha
amarillo video compuesto
© 2008 Nokia. Todos los derechos reservados. 15
Señal
izquierda
Page 73

Teclas y partes
1 Audífono 2 Conector del cable USB micro
3 Tecla de selección izquierda 4 Tecla Llamar
5 Teclado 6 Pantalla
7 Tecla Navi™ ; en adelante,
denominada tecla de
desplazamiento
9 Tecla Finalizar 10 Tecla cámara
11 Tecla para bajar el volumen 12 Tecla para subir el volumen
13 Conector Nokia AV (2,5 mm) 14 Tecla Encender/Apagar
15 Conector para cargador 16 Flash de la cámara
17 Lente de la cámara 18 Altavoz
8 Tecla de selección derecha
Encender y apagar el teléfono
Para encender o apagar el teléfono, mantenga pulsada la tecla Encender/Apagar.
Si el teléfono solicita un código PIN, ingréselo (aparece como ****).
Si el teléfono le solicita la hora y la fecha, ingrese la hora local, seleccione la zona horaria
de su ubicación en términos de la diferencia horaria respecto de la hora del meridiano
de Greenwich (GMT) e ingrese la fecha.
Cuando encienda el teléfono por primera vez, se le solicitará que obtenga los ajustes de
configuración de su proveedor de servicios (servicio de red). Para obtener más
información, consulte Conectar con soporte. Consulte
servicio de ajustes de configuración", pág. 9.
Consulte "Fecha y hora", pág. 34.
"Configuración", pág. 36 y "
© 2008 Nokia. Todos los derechos reservados.16
Page 74

Modo en espera
El teléfono se encuentra en el modo en espera cuando está listo para utilizar, y no se ha
ingresado ningún carácter.
Pantalla
1
Intensidad de señal de la red celular
2
Estado de carga de la batería
3 Indicadores
4 Nombre de la red o logotipo del operador
5 Reloj
6 Pantalla
7 Función de la tecla de selección izquierda
8 Función de la tecla Navi
9 Función de la tecla de selección derecha
Puede cambiar la función de la tecla de selección izquierda y derecha. Consulte "Teclas
de selección izquierda y derecha", pág. 34.
Ahorro de energía
El teléfono tiene una característica Ahorro de energía y una Modo pausa para ahorrar
energía en el modo en espera cuando no se pulsan
funciones.
Consulte "Pantalla", pág. 33.
Espera activa
El modo en espera activa muestra una lista de funciones seleccionadas del teléfono e
información a la que puede acceder directamente.
Para activar o desactivar el modo en espera activa, seleccione Menú >
Configuraciones > Pantalla > Espera activa > Modo espera activa.
En el modo en espera activa, desplácese hacia arriba o hacia abajo para navegar en la
lista y elija Selec. o Ver. Las flechas indican que hay más información disponible. Para
detener la navegación, seleccione Salir.
Para organizar y cambiar el modo en espera activa, seleccione Opciones y una de las
opciones disponibles.
las teclas. Es posible activar estas
© 2008 Nokia. Todos los derechos reservados. 17
Page 75

Accesos directos en el modo en espera
Para acceder a una lista de números que ha marcado, pulse la tecla Llamar una vez. Para
llamar a un número de la lista, desplácese hasta el número o el nombre y pulse la tecla
Llamar.
Para abrir el explorador Web, mantenga pulsada la tecla 0.
Para llamar al buzón de voz, mantenga pulsada la tecla 1.
Puede utilizar las teclas como accesos directos.
marcación", pág. 20.
Consulte "Accesos directos de
Indicadores
Tiene mensajes no leídos.
Tiene mensajes sin enviar, cancelados o con fallas.
Tiene llamadas perdidas.
El teclado está bloqueado.
El teléfono no suena para las llamadas entrantes o mensajes de texto.
Hay una alarma configurada.
/ El teléfono está registrado en la red GPRS o EGPRS.
/ El teléfono tiene una conexión GPRS o EGPRS abierta.
/ La conexión GPRS o EGPRS está suspendida (retenida).
Bluetooth está activado.
Si tiene dos líneas telefónicas, la segunda línea está seleccionada.
Todas las llamadas entrantes serán desviadas a otro número.
Las llamadas se limitan a un grupo cerrado de usuarios.
El perfil actualmente activo está programado.
Modo de vuelo
Utilice el modo de vuelo en entornos sensibles a la radio, como a bordo de un avión o
en hospitales, para desactivar todas las funciones de radiofrecuencia. Seguirá teniendo
acceso a los juegos, la agenda y los números telefónicos sin conexión. Cuando el modo
de vuelo está activo, en la pantalla aparece
Para activar o configurar el modo de vuelo, seleccione Menú > Configuraciones >
Perfiles > Vuelo > Activar o Personalizar.
Para desactivar el modo de vuelo, seleccione cualquier otro perfil.
.
© 2008 Nokia. Todos los derechos reservados.18
Page 76

Realizar una llamada de emergencia en modo de vuelo
Ingrese el número de emergencia, pulse la tecla Llamar y cuando aparezca ¿Salir de
perfil de vuelo?, seleccione Sí.
Aviso: En el perfil de vuelo no es posible realizar ni recibir llamadas, incluidas
las llamadas de emergencia, ni es posible usar otras funciones que requieren cobertura
de red. Para realizar llamadas, primero debe cambiar los perfiles para activar la función
telefónica. Si el dispositivo está bloqueado, ingrese el código de bloqueo. Si debe
realizar una llamada de emergencia mientras el dispositivo está bloqueado, y está
establecido el perfil de vuelo, también puede marcar el número de emergencia oficial
programado en su dispositivo en el campo del código de bloqueo y seleccionar 'Llamar'.
El dispositivo confirmará que saldrá del perfil de vuelo establecido para realizar una
llamada de emergencia.
Bloqueo del teclado
Para bloquear el teclado para impedir la pulsación accidental de las teclas, seleccione
Menú y pulse * antes de 3,5 segundos.
Para desbloquear el teclado, seleccione Desbloq. y pulse * antes de 1,5 segundos. Si se
solicita, ingrese el código de bloqueo.
Para contestar una llamada cuando el teclado está bloqueado, pulse la tecla Llamar.
Cuando finaliza o rechaza la llamada, el teclado se bloquea automáticamente.
Otras funciones son Bloqueo automático y Bloqueo seguridad.
"Teléfono", pág. 35.
Cuando el dispositivo o el teclado están bloqueados, es posible realizar llamadas al
número de emergencia oficial programado en su dispositivo.
Consulte
Funciones sin una tarjeta SIM
Puede usar algunas funciones de su teléfono sin insertar una tarjeta SIM, como funciones
del Organizador y juegos. Algunas funciones aparecen oscurecidas en los menús y no se
pueden utilizar.
3. Llamadas
Realizar una llamada
Puede iniciar una llamada de varias maneras:
● Ingrese el número de teléfono, con el código de área y pulse la tecla Llamar.
Para realizar llamadas internacionales, pulse la tecla * dos veces para indicar el prefijo
internacional (el carácter + reemplaza el código de acceso internacional) y luego
ingrese el código del país, el código de área sin anteponer el número 0, si es
necesario, y el número de teléfono.
© 2008 Nokia. Todos los derechos reservados. 19
Page 77

Puede que el carácter + como reemplazo del código de acceso internacional no
funcione en todas las regiones. En este caso, ingrese directamente el código de acceso
internacional.
● Para acceder a la lista de números marcados, pulse la tecla Llamar una vez en el modo
en espera. Seleccione un número o nombre y pulse la tecla Llamar.
● Busque un nombre o número de teléfono guardado en Contactos.
"Administrar contactos", pág. 28.
Para ajustar el volumen durante una llamada, pulse la tecla de volumen hacia arriba o
hacia abajo.
Consulte
Llamadas entrantes
Para contestar una llamada entrante, pulse la tecla Llamar o abra la tapa. Para finalizar
la llamada, pulse la tecla Finalizar o cierre la tapa.
Para rechazar una llamada entrante, pulse la tecla Finalizar. Para silenciar el tono de
timbre, seleccione Silencio.
Accesos directos de marcación
Primero, asigne un número de teléfono a una de las teclas numéricas, del 2 al 9. Consulte
"Asignar accesos directos de marcación", pág. 29.
Use un acceso directo de marcación para hacer una llamada en alguna de las siguientes
formas:
● Pulse una tecla numérica y luego la tecla Llamar.
● Si selecciona Menú > Configuraciones > Llamada > Marcación rápida >
Activar, mantenga pulsada una tecla numérica.
Marcación por voz
Realice una llamada telefónica con sólo pronunciar un nombre guardado en Contactos.
Como los comandos de voz dependen del idioma, antes de utilizar la marcación por voz
debe seleccionar Menú > Configuraciones > Teléfono > Config. de idioma >
Idioma reconocim. y su idioma.
Nota: El uso de etiquetas de voz puede resultar difícil en un entorno ruidoso o
durante una situación de emergencia, por lo que no se debe depender sólo de la
marcación por voz en todas las circunstancias.
1. En el modo en espera, mantenga pulsada la tecla de selección derecha o la tecla para
bajar el volumen. Sonará un tono corto y aparecerá Hable ahora.
2. Pronuncie el nombre del contacto que desea llamar. Si la función de reconocimiento
de voz tiene éxito, aparecerá una lista con coincidencias. El teléfono reproduce el
comando de voz de la primera coincidencia de la lista. Si no es el comando correcto,
desplácese hasta otro ingreso.
© 2008 Nokia. Todos los derechos reservados.20
Page 78

Opciones durante una llamada
Muchas de las opciones que puede usar durante una llamada son servicios de red.
Comuníquese con su proveedor de servicios para obtener información acerca de la
disponibilidad.
Durante una llamada, seleccione Opciones. Las opciones disponibles pueden incluir lo
siguiente:
Las opciones de llamada son Silenciar micrófono o Activar micrófono, Contactos,
Menú, Bloquear teclado, Grabar, Claridad de la voz, Altavoz o Teléfono.
Las opciones de red son Contestar o Rechazar, Retener o Atender, Llamada nueva,
Agregar a conferenc., Finalizar llamada, Finalizar llamadas y las siguientes:
● Enviar DTMF — para enviar cadenas de tonos
● Intercambiar — para alternar entre la llamada activa y la llamada retenida
● Transferir — para conectar una llamada retenida con una activa y desconectarse
● Conferencia — para realizar una llamada de conferencia
● Llamada privada — para sostener una discusión privada en una llamada de
conferencia
Aviso: Cuando use el altavoz, no sostenga el dispositivo cerca del oído, ya que
el volumen puede resultar demasiado alto.
4. Escribir texto
Modos de texto
Para ingresar texto (por ejemplo, cuando escribe mensajes) puede usar el ingreso de
texto tradicional o el ingreso de texto predictivo.
Cuando escriba texto, mantenga pulsada Opciones para cambiar entre ingreso de texto
tradicional, indicado por
los idiomas pueden usar el ingreso de texto predictivo.
Las mayúsculas/minúsculas se indican con
o minúsculas, pulse #. Para cambiar del modo alfabético al numérico, indicado por
, mantenga pulsada la tecla # y seleccione Modo numérico. Para cambiar del modo
numérico al alfabético, mantenga pulsada la tecla #.
Para configurar el idioma de escritura, seleccione Opciones > Idioma escritura.
, e ingreso de texto predictivo, indicado por . No todos
, y . Para cambiar entre mayúsculas
Ingreso de texto tradicional
Pulse una tecla numérica repetidamente de 2 a 9, hasta que aparezca el carácter
deseado. Los caracteres disponibles dependen del idioma de escritura seleccionado.
Si la siguiente letra que desea ingresar está localizada en la misma tecla de la que acaba
de ingresar, espere hasta que aparezca el cursor, e ingrese la letra.
© 2008 Nokia. Todos los derechos reservados. 21
Page 79

Para acceder a los caracteres especiales y signos de puntuación más comunes, pulse
varias veces la tecla numérica 1 o pulse * para seleccionar un carácter especial.
Ingreso de texto predictivo
La función de ingreso de texto predictivo se basa en un diccionario incorporado al cual
también se le puede agregar palabras.
1. Empiece a escribir una palabra usando las teclas de 2 a 9. Pu
vez
para una letra.
2. Para confirmar una palabra, desplácese hacia la derecha o agregue un espacio.
● Si la palabra no es correcta, pulse la tecla * varias veces y seleccione la palabra en
la lista.
● Si aparece el carácter ? después de la palabra, significa que esa palabra no está
en el diccionario. Para agregar la palabra al diccionario, seleccione Deletrear.
Ingrese el texto usando el ingreso de texto tradicional y seleccione Guardar.
● Para escribir palabras compuestas, ingrese la primera parte de la palabra y
desplácese hacia la derecha para confirmarla. Escriba la última parte de la palabra
y confirme la palabra.
3. Comience a escribir la palabra siguiente.
lse cada tecla sólo una
5. Navegación por los menús
El teléfono ofrece una amplia gama de funciones agrupadas en menús.
1. Para acceder al menú, seleccione Menú.
2. Desplácese por el menú y seleccione una opción (por ejemplo, Configuraciones).
3. Si el menú seleccionado contiene más submenús, seleccione uno (por ejemplo,
Llamada).
4. Si el menú seleccionado contiene más submenús, repita el paso 3.
5. Seleccione la configuración que prefiera.
6. Para retroceder al menú anterior, seleccione Atrás.
Para salir del menú, seleccione Salir.
Para cambiar la vista del menú, seleccione Opciones > Vista menú princip. > Lista,
Cuadrícula, Cuadrícula con etiq. o Lengüeta.
Para volver a organizar el menú, desplácese al menú que desea mover y seleccione
Opciones > Organizar > Mover. Desplácese hacia donde desea mover el menú y
seleccione OK. Para guardar el cambio, seleccione Listo > Sí.
6. Mensajería
Puede leer, escribir, enviar y guardar mensajes de texto y multimedia, mensajes de
e-mail, audio y flash. Los servicios de mensajería sólo se pueden usar s
proveedor de servicios los admite.
© 2008 Nokia. Todos los derechos reservados.22
i su red o el
Page 80

Mensajes de texto y multimedia
Puede crear un mensaje y adjuntarle, por ejemplo, una imagen. El teléfono cambia
automáticamente un mensaje de texto a un mensaje multimedia al adjuntarle un
archivo.
Mensajes de texto
Su dispositivo puede enviar mensajes de texto que excedan el límite de caracteres para
un único mensaje. Los mensajes más largos se envían como una serie de dos o más
mensajes. Es posible que su proveedor de servicios le cobre los cargos correspondientes.
Los caracteres con tilde u otros signos, y los caracteres especiales de algunos idiomas
ocupan más espacio, lo que limita el número de caracteres que se pueden enviar en un
solo mensaje.
El indicador que aparece en la parte superior de la pantalla exhibe el número total de
caracteres restantes y la cantidad de mensajes que se necesita para el envío.
Antes de enviar cualquier mensaje de texto o de e-mail SMS, debe guardar el número
de su centro de mensajes. Seleccione Menú > Mensajería > Config. mensajes >
Mensajes de texto > Centros de mensajes > Agregar centro, ingrese un nombre
y el número del proveedor de servicios.
Mensajes multimedia
Un mensaje multimedia puede incluir texto, imágenes, clips de sonido y videoclips.
Sólo los dispositivos con funciones compatibles pueden recibir y mostrar mensajes
multimedia. La apariencia de un mensaje podrá variar dependiendo del dispositivo
receptor.
La red celular puede limitar el tamaño de los mensajes MMS. Si la imagen insertada
excede ese límite, el dispositivo podrá reducir su tamaño para enviarla por MMS.
Importante: Tenga precaución al abrir los mensajes. Los mensajes pueden
contener software malicioso o dañar de alguna manera el dispositivo o la PC.
Para comprobar la disponibilidad y suscribirse al servicio de mensajería multimedia
(MMS), comuníquese con su proveedor de servicios. También puede descargar los
ajustes de configuración.
Consulte "Soporte Nokia", pág. 11.
Crear un mensaje de texto o mensaje multimedia
1. Seleccione Menú > Mensajería > Crear mensaje > Mensaje.
2. Para agregar destinatarios, desplácese hasta el campo Para: e ingrese el número o
la dirección de e-mail del destinatario o seleccione Agregar para seleccionar
destinatarios de las opciones disponibles. Seleccione Op
destinatarios y
3. Desplácese hasta el campo Texto: e ingrese el texto del mensaje.
4. Para adjuntar contenido al mensaje, desplácese hasta la barra de archivos adjuntos
en la parte inferior de la pantalla y seleccione el tipo de contenido deseado.
© 2008 Nokia. Todos los derechos reservados. 23
asuntos y para configurar las opciones de envío.
ciones para agregar
Page 81

5. Para enviar el mensaje, pulse Enviar.
El tipo de mensaje se indica en la parte superior de la pantalla y cambia de manera
automática dependiendo del contenido del mensaje.
Los proveedores de servicios pueden cobrar de maneras diferentes según el tipo de
mensaje. Para obtener más detalles, consulte a su proveedor de servicios.
Leer un mensaje y responderlo
Importante: Tenga precaución al abrir los mensajes. Los mensajes pueden
contener software malicioso o dañar de alguna manera el dispositivo o la PC.
El teléfono emite una notificación cuando recibe un mensaje. Seleccione Ver para
mostrar el mensaje. Si recibió más de un mensaje, para mostrar un mensaje, seleccione
el mensaje desde el buzón de entrada y Abrir. Use la tecla de desplazamiento para ver
todo el mensaje.
Para crear un mensaje de respuesta, seleccione Respond..
Enviar mensajes
Envío de mensaje
Para enviar el mensaje, seleccione Enviar. El teléfono guarda el mensaje en la carpeta
Buzón de salida y se inicia el envío.
Nota: El icono de mensaje enviado o el texto en la pantalla de su dispositivo no
indican que el mensaje haya sido recibido por el destinatario deseado.
Si se interrumpe el envío del mensaje, el teléfono intenta reenviar el mensaje unas pocas
veces. Si estos intentos fallan, el mensaje permanece en la carpeta Buzón de salida.
Para cancelar el envío de los mensajes en la carpeta Buzón de salida, seleccione
Opciones > Cancelar envío.
Para guardar los mensajes enviados en la carpeta Elem. enviados, seleccione Menú >
Mensajería > Config. mensajes > Configurac. generales > Guard. mens.
enviad..
Organizar los mensajes
El teléfono guarda los mensajes recibidos en la carpeta Buzón entrada. Organice los
mensajes en la carpeta de elementos guardados.
Para agregar, renombrar o eliminar una carpeta, seleccione Menú > Mensajería >
Elem. guardados > Opciones.
Acceda a su cuenta de e-mail POP3 o IMAP4 con el teléfono para leer, escribir y enviar
e-mail. Esta aplicación de e-mail difiere de la función del e-mail SMS.
Antes de usar e-mail, debe tener una cuenta de e-mail y las configuraciones correctas.
Para comprobar la disponibilidad y las configuraciones de su cuenta de e-mail, póngase
© 2008 Nokia. Todos los derechos reservados.24
Page 82

en contacto con el proveedor de servicios de e-mail. Puede recibir los ajustes de
configuración de e-mail como un mensaje de configuración.
ajustes de configuración", pág. 9.
Consulte "Servicio de
Asistente de configuración de e-mail
El asistente de configuración de e-mail se inicia automáticamente si no se ha definido
la configuración de e-mail en el teléfono. Para iniciar el asistente de configuración para
una cuenta de e-mail adicional, seleccione Menú > Mensajería y la cuenta de e-mail
existente. Seleccione Opciones > Agregar buzón para abrir el asistente de
configuración de e-mail. Siga las instrucciones que aparecen en la pantalla.
Escribir y enviar un e-mail
Puede escribir el e-mail antes de conectarse al servicio de e-mail.
1. Seleccione Menú > Mensajería > Crear mensaje > Mensaje de e-mail.
2. Si hay más de una cuenta de e-mail definida, seleccione la cuenta con la cual desea
enviar el e-mail.
3. Ingrese la dirección de e-mail del destinatario, el asunto y el mensaje del e-mail.
Para adjuntar un archivo, seleccione Opciones > Insertar y una de las opciones
disponibles.
4. Para enviar el e-mail, seleccione Enviar.
Leer un e-mail y contestarlo
Importante: Tenga precaución al abrir los mensajes. Los mensajes pueden
contener software malicioso o dañar de alguna manera el dispositivo o la PC.
1. Para descargar encabezados de e-mail, seleccione Menú > Mensajería y la cuenta
de e-mail.
2. Para descargar un e-mail y sus archivos adjuntos, seleccione e-mail y Abrir o
Recuper..
3. Para responder o reenviar el e-mail, seleccione Opciones y alguna de las opciones
disponibles.
4. Para desconectarse de la cuenta de e-mail, seleccione Opciones > Desconectar. La
conexión a la cuenta de e-mail finaliza automáticamente luego de un tiempo sin
actividad.
Notificaciones de e-mail nuevo
El teléfono puede verificar automáticamente su cuenta de e-mail en intervalos de
tiempo y emitir una notificación cuando se reciban nuevos e-mail.
1. Seleccione Menú > Mensajería > Config. mensajes > Mensajes e-mail >
Editar buzones.
2. Seleccione la cuenta de e-mail, Config. de descarga y las siguientes opciones:
© 2008 Nokia. Todos los derechos reservados. 25
Page 83

● Inter. actualiz. buzón — para establecer la frecuencia con la que el teléfono
verifica la cuenta para ver si hay nuevos e-mail
● Recuperación auto. — para recuperar nuevos e-mail en forma automática de su
cuenta de e-mail
3. Para activar la notificación de nuevos e-mail, seleccione Menú > Mensajería >
Config. mensajes > Mensajes e-mail > Notific. nuevo e-mail > Activar.
Mensajes flash
Los mensajes flash son mensajes de texto que aparecen instantáneamente en la pantalla
después de su recepción.
1. Para escribir un mensaje flash, seleccione Menú > Mensajería > Crear
mensaje > Mensaje Flash.
2. Ingrese el número de teléfono del destinatario, escriba su mensaje (máximo 70
caracteres) y seleccione Enviar.
Mensajes de audio Nokia Xpress
Cree y envíe un mensaje de audio mediante MMS en una forma cómoda.
1. Seleccione Menú > Mensajería > Crear mensaje > Mensaje de voz. El grabador
de voz se abre.
2. Grabe el mensaje.
3. Ingrese uno o más números de teléfono en el campo Para: o seleccione Agregar
para recuperar un número.
4. Para enviar el mensaje, seleccione Enviar.
Consulte "Grabadora de voz", pág. 43.
Mensajería instantánea
Con la mensajería instantánea (MI, servicio de red), puede enviar mensajes cortos de
texto a usuarios en línea. Debe suscribirse a un servicio y registrarse en el servicio de
MI que desea usar. Verifique la disponibilidad de este servicio, los precios y las
instrucciones con el proveedor de servicios. Los menús pueden variar dependiendo del
proveedor de MI.
Para conectarse al servicio, seleccione Menú > Mensajería > MI y siga las
instrucciones de la pantalla.
Mensajes de información, mensajes SIM y comandos de servicio
Mensajes de información
El proveedor de servicios puede enviarle mensajes sobre diversos temas (servicio de
red). Comuníquese con su proveedor de servicios para obtener más información.
Seleccione Menú > Mensajería > Mensajes info. y una de las opciones disponibles.
© 2008 Nokia. Todos los derechos reservados.26
Page 84

Comandos de servicio
Los comandos de servicio le permiten escribir y enviar solicitudes de servicio (comandos
USSD) al proveedor de servicios, tales como comandos de activación para servicios de
red.
Para escribir y enviar la solicitud de servicio, seleccione Menú > Mensajería >
Comandos serv.. Para obtener detalles, comuníquese con el proveedor de servicios.
Mensajes SIM
Los mensajes SIM son mensajes de texto específicos que se guardan en la tarjeta SIM.
Puede copiar o transferir esos mensajes desde la tarjeta SIM a la memoria del teléfono,
pero no viceversa.
Para leer mensajes SIM, seleccione Menú > Mensajería > Opciones > Mensajes
SIM.
Mensajes de voz
El buzón de voz es un servicio de red al que tal vez deba suscribirse. Comuníquese con
su proveedor de servicios para obtener más información.
Para llamar al buzón de voz, mantenga pulsada la tecla 1.
Para editar el número del buzón de voz, seleccione Menú > Mensajería > Mensajes
de voz > Número buzón voz.
Configuraciones de mensajes
Seleccione Menú > Mensajería > Config. mensajes y una de las siguientes opciones:
● Configurac. generales — para guardar copias de los mensajes enviados en el
teléfono, para sobrescribir mensajes antiguos si la memoria de mensajes se llena y
para configurar otras preferencias relacionadas con los mensajes
● Mensajes de texto — para permitir informes de entrega, para configurar centros
de mensajes para SMS y e-mail de SMS, para seleccionar el tipo de soporte de
caracteres y para configurar otras preferencias relacionadas con los mensajes de
texto
● Mensajes multimedia — para permitir informes de entrega, para configurar la
apariencia de los mensajes multimedia, para permitir la recepción de mensajes
multimedia y publicidad y para configurar otras preferencias relacionadas con los
mensajes multimedia
● Mensajes e-mail — p ara permitir la recepción de e-m ail, para configurar el tamaño
de las imágenes en el e-mail y para configurar otras preferencias relacionadas con
el e-mail
● Mensajes de servicio — para activar mensajes de servicio y para configurar
preferencias relacionadas con los mensajes de servicio
© 2008 Nokia. Todos los derechos reservados. 27
Page 85

7. Contactos
Puede guardar nombres, números de teléfono como contactos en la memoria del
teléfono o en la memoria de la tarjeta SIM y buscarlos y recuperarlos para realizar una
llamada telefónica o para enviar un mensaje.
Administrar contactos
Seleccionar la memoria para los contactos
La memoria del teléfono puede guardar contactos con detalles adicionales, como
diferentes números telefónicos y elementos de texto. También es posible guardar una
imagen, un tono o un videoclip para una cantidad limitada de contactos.
La memoria de la tarjeta SIM puede guardar nombres con un número de teléfono
adjunto a los nombres. Los contactos guardados en la memoria de la tarjeta SIM se
indican con
Seleccione Menú > Contactos > Configuraciones > Memoria en uso. Cuando
seleccione Teléfono y SIM, los contactos se almacenarán en la memoria del teléfono.
Guardar nombres y números
Para guardar un nombre y número de teléfono, seleccione Menú > Contactos >
Nombres > Opciones > Agr. nvo. contacto.
El primer número que guarda se configura automáticamente como el número
predeterminado y se indica con un marco alrededor del indicador del tipo de número
(por ejemplo,
realizar una llamada), se usa el número predeterminado a no ser que usted seleccione
otro.
Buscar un contacto
Seleccione Menú > Contactos > Nombres y desplácese por la lista de contactos o ingrese los primeros caracteres del nombre del contacto.
Agregar y editar detalles
Para agregar o cambiar un detalle de un contacto, seleccione el contacto y Detalles >
Opciones > Agregar detalles y alguna de las opciones disponibles.
Copiar o mover un contacto entre la tarjeta SIM y la memoria del teléfono
1. Seleccione Menú > Contactos > Nombres.
2. Seleccione el contacto para copiar o mover y Opciones > Copiar contacto o Mover
contacto.
Copiar o mover varios contactos entre la tarjeta SIM y la memoria del
teléfono
1. Seleccione el primer contacto para copiar o mover y Opciones > Marcar.
.
). Cuando selecciona un nombre de contactos (por ejemplo, para
© 2008 Nokia. Todos los derechos reservados.28
Page 86

2. Marque los otros contactos y seleccione Opciones > Copiar marcado(s) o Mover
marcado(s).
Copiar o mover todos los contactos entre la tarjeta SIM y la memoria del
teléfono
Seleccione Menú > Contactos > Copiar contactos o Mover contactos.
Eliminar contactos
Seleccione el contacto y Opciones > Borrar contacto.
Para borrar todos los contactos del teléfono o de la tarjeta de memoria SIM, seleccione
Menú > Contactos > Elim. todos cont. > De memoria teléfono o De tarjeta SIM.
Para eliminar un número, elemento de texto o una imagen adjunto al contacto, busque
el contacto y seleccione Detalles. Desplácese al detalle deseado y seleccione
Opciones > Eliminar y alguna de las opciones disponibles.
Crear un grupo de contactos
Organizar contactos en grupos de llamantes con diferentes tonos de timbre e imágenes
de grupo.
1. Seleccione Menú > Contactos > Grupos.
2. Para crear un nuevo grupo, seleccione Agregar u Opciones > Agregar nvo.
grupo.
3. Ingrese el nombre del grupo, seleccione una imagen y un tono de timbre si desea
agregarlos al grupo
4
. Seleccione el grupo y Ver > Agregar para agregar contactos al grupo.
y seleccione Guardar.
Tarjetas de negocios
Puede enviar y recibir la información de contacto de una persona de un dispositivo
compatible que admita el estándar vCard.
Para enviar una tarjeta de negocios, busque el contacto y seleccione Detalles >
Opciones > Enviar tarj. negocios.
Cuando reciba una tarjeta de negocios, seleccione Mostrar > Guardar para guardar la
tarjeta de negocios en la memoria del teléfono.
Asignar accesos directos de marcación
Cree accesos directos asignando números de teléfono a las teclas numéricas del 2 al 9.
1. Seleccione Menú > Contactos > Marcación ráp. y desplácese hasta una tecla
numérica.
2. Seleccione Asignar, o, si ya se le ha asignado un número a la tecla, seleccione
Opciones > Cambiar.
3. Ingrese un número o busque un contacto.
© 2008 Nokia. Todos los derechos reservados. 29
Page 87

8. Registro de llamadas
Para ver la información de sus llamadas, mensajes, datos y sincronización, seleccione
Menú > Registro y alguna de las opciones disponibles.
Nota: La facturación real de las llamadas y los servicios de parte de su proveedor
puede variar según las funciones de red, el redondeo de la facturación, los impuestos,
etc.
9. Registro de posición
La red le puede enviar una solicitud de posición (servicio de red). Comuníquese con el
proveedor de servicios para suscribirse y para acordar la entrega de información de
posición.
Para aceptar o rechazar la solicitud de posición, seleccione Aceptar o Rechazar. Si
pierde la solicitud, el teléfono la aceptará o rechazará automáticamente conforme a lo
acordado con el operador de la red o el proveedor de servicios.
Para ver información acerca de las diez notificaciones y solicitudes de privacidad más
recientes, seleccione Menú > Registro > Posicionamiento > Registro de
posición.
10. Conectividad
El teléfono cuenta con varias funciones para conectarse a otros dispositivos para
transmitir y recibir datos.
Tecnología inalámbrica Bluetooth
La tecnología Bluetooth permite conectar el teléfono mediante ondas de radio a un
dispositivo Bluetooth compatible que esté a una distancia de hasta 10 metros (32 pies).
Este dispositivo cumple con la especificación 2.0 + EDR de Bluetooth que admite los
siguientes perfiles: 2.0 + EDR acceso genérico, acceso de red, cambio de objeto genérico,
distribución de audio avanzada, control remoto de audio y video, manos libres,
auricular, objeto push, transferencia de archivo, red de marcación telefónica, acceso SIM
y puerto serial Para asegurar el funcionamiento con otros dispositivos que admiten
tecnología Bluetooth, utilice los accesorios aprobados por Nokia para este modelo.
Consulte a los fabricantes de otros dispositivos para determinar la compatibilidad entre
esos dispositivos y el suyo.
Las funciones que usan tecnología Bluetooth aumentan la demanda de energía de la
batería y reducen su vida útil.
Configurar una conexión Bluetooth
Seleccione Menú > Configuraciones > Conectividad > Bluetooth y realice lo siguiente:
© 2008 Nokia. Todos los derechos reservados.30
Page 88

1. Seleccione Nombre mi teléfono e ingrese un nombre para el teléfono.
2. Para activar la conectividad Bluetooth seleccione Bluetooth > Activado.
que Bluetooth está activada.
3. Para conectar su teléfono con un accesorio de audio, seleccione Conectar acces.
audio y el dispositivo al que desea conectarse.
4. Para vincular el teléfono con cualquier dispositivo Bluetooth dentro del alcance,
seleccione Disposit. acoplados > Agreg. nvo disp..
Desplácese hasta un dispositivo que haya encontrado y seleccione Agregar.
Ingrese un código (hasta 16 caracteres) en su teléfono y permita la conexión en el
otro dispositivo Bluetooth.
Si le preocupa la seguridad, desactive la función Bluetooth o configure Visibilidad mi
teléf.. en Oculto. Acepte comunicaciones Bluetooth solamente de los usuarios de su
confianza.
Conexión PC a Internet
Use la tecnología Bluetooth para conectar su PC compatible a Internet sin el software
PC Suite. El teléfono debe tener activado un proveedor de servicio que admita el acceso
a Internet y la PC debe admitir una red de área personal (PAN) Bluetooth. Después de
conectarse a un servicio de punto de acceso de red (NAP) del teléfono y de vincularlo
con la PC, el teléfono abre de manera automática una conexión de paquete de datos a
Internet.
indica
Paquete de datos
El servicio general de radio por paquetes (GPRS), es un servicio de red que permite que
los teléfonos móviles envíen y reciban datos sobre una red basada en el protocolo de
Internet (IP).
Para definir cómo usar el servicio, seleccione Menú > Configuraciones >
Conectividad > Paquete de datos > Conexión paq. datos y una de las siguientes
opciones:
● Cuando necesario — para definir la conexión de paquete de datos que se debe
establecer cuando una aplicación la requiere. La conexión se cerrará cuando se cierre
la aplicación.
● Siempre en línea — para conectarse automáticamente a una red de paquete de
datos al encender el teléfono.
Puede utilizar el teléfono como un módem al conectarlo a una PC compatible mediante
la tecnología Bluetooth o un cable de datos USB. Para obtener detalles, consulte la
documentación de Nokia PC Suite.
Consulte "Soporte Nokia", pág. 11.
Cable de datos USB
Puede utilizar el cable de datos USB para transferir datos entre el teléfono y una PC
compatible o una impresora que admita PictBridge.
© 2008 Nokia. Todos los derechos reservados. 31
Page 89

Para activar el teléfono para la transferencia de datos o la impresión de imágenes,
conecte el cable de datos y seleccione el modo:
● PC Suite — para utilizar el cable para PC Suite
● Impresión y medios — para utilizar el teléfono con una impresora compatible con
PictBridge o con una PC compatible
● Almacenam. datos — para conectarse a una PC que no tenga software Nokia y
utilizar el teléfono como un dispositivo de almacenamiento de datos
Para cambiar el modo USB, seleccione Menú > Configuraciones > Conectividad >
Cable de datos USB y el modo USB deseado.
Sincronización y copias de seguridad
Seleccione Menú > Configuraciones > Sinc. y respaldar y una de las siguientes
opciones:
● Alt
ernar teléfono — Sincronice o copie los datos seleccionados entre el teléfono y
otro dispositivo usando la tecnología Bluetooth.
● Crear copia seg. — Cree una copia de seguridad de datos seleccionados en la tarjeta
de memoria o en un dispositivo externo.
● Rest. copia seg. — Seleccione un archivo de copia de seguridad almacenado en la
tarjeta de memoria o en un dispositivo externo y restáurelo en el teléfono. Seleccione
Opciones > Detalles para obtener información acerca del archivo de copia de
seguridad seleccionado.
● Transferen. datos — Sincronice o copie los datos seleccionados entre el teléfono y
otro dispositivo, PC o servidor de red (servicio de red).
Nokia PC Suite
Con Nokia PC Suite, puede administrar la música, sincronizar contactos, agenda, notas
y notas de tareas entre el teléfono y la PC compatible o un servidor de Internet remoto
(servicio de red). Puede encontrar más información y PC Suite en el sitio Web de Nokia.
Consulte "Soporte Nokia", pág. 11.
11. Configuraciones
Perfiles
El teléfono tiene diversos grupos de configuraciones, denominados perfiles, los que se
pueden personalizar con tonos de timbre para distintos eventos y entornos.
Seleccione Menú > Configuraciones > Perfiles, el perfil deseado y una de las
siguientes opciones:
● Activar — para activar el perfil seleccionado.
● Personalizar — para cambiar las configuraciones del perfil.
● Programado — para configurar el perfil para que esté activo por un tiempo
determinado. Cuando la hora configurada para el perfil expira, se activa el perfil
anterior que no fue programado.
© 2008 Nokia. Todos los derechos reservados.32
Page 90

Temas
Un tema contiene elementos para personalizar el teléfono.
Seleccione Menú > Configuraciones > Temas y una de las siguientes opciones:
● Seleccionar tema — Abra la carpeta Temas y seleccione un tema.
● Descarga de tema — Abra una lista de enlaces para descargar más temas.
Tonos
Puede cambiar las configuraciones de tono para el perfil activo seleccionado.
Seleccione Menú > Configuraciones > Tonos. Puede encontrar las mismas
configuraciones en el menú Perfiles.
Cuando seleccione el nivel más alto de tono de timbre, éste alcanzará su volumen
máximo en pocos segundos.
Luces
Para activar o desactivar efectos de luz asociados con distintas funciones del teléfono,
seleccione Menú > Configuraciones > Luces.
Pantalla
Seleccione Menú > Configuraciones > Pantalla y una de las opciones disponibles:
● Imagen fondo — para agregar una imagen de fondo en el modo en espera.
● Espera activa — para activar, organizar y personalizar el modo en espera activa.
● Color fuente en esp. — para seleccionar el color de fuente para el modo en espera.
● Iconos tecla navegac. — para ver los iconos de los accesos directos de las teclas de
desplazamiento en el modo en espera cuando la espera activa está desactivada.
● Detalles notificación — para mostrar detalles en las notificaciones de llamadas
perdidas y mensajes.
● Efectos de transición — para experimentar una navegación más fluida y orgánica.
● Animación de tapa — para reproducir una animación y un tono cuando abre o
cierra la tapa
● Protector de pantalla — para crear y configurar un protector de pantalla.
● Ahorro de energía — para atenuar la pantalla automáticamente y mostrar un reloj
cuando el teléfono no esté en uso por un período de tiempo.
● Modo pausa — para apagar la pantalla en forma automática cuando el teléfono no
esté en uso por un período de tiempo.
● Tamaño de letra — para definir el tamaño de letra para mensajería, contactos y
páginas Web.
● Logo de operador — para mostrar el logotipo del operador.
● Ver info. de célula — para ver la identidad de la célula, si está disponible desde la
red.
© 2008 Nokia. Todos los derechos reservados. 33
Page 91

Fecha y hora
Para cambiar el tipo de reloj, la hora, zona horaria o la fecha, seleccione Menú >
Configuraciones > Fecha y hora.
Al viajar a otra zona horaria, seleccione Menú > Configuraciones > Fecha y hora >
Config. fecha y hora > Zona horaria: y desplácese a la izquierda o la derecha para
seleccionar la zona horaria de su ubicación. La hora y fecha se configuran según la zona
horaria y permiten que el teléfono muestre la hora correcta de envío de los mensajes
de texto o multimedia recibidos.
Por ejemplo, GMT -3 indica la zona horaria de Buenos Aires (Argentina), 3 horas al oeste
de Greenwich, Londres (Reino Unido).
Mis accesos directos
Con los accesos directos personales, puede acceder rápidamente a las funciones del
teléfono que usa con más frecuencia.
Teclas de selección izquierda y derecha
Para cambiar la función asignada a la tecla de selección izquierda o derecha, seleccione
Menú > Configuraciones > Mis acces. direc. > Tecla selec. izquie rda o Tecla selec.
derecha y la función.
En el modo en espera, si la tecla de selección izquierda
función, seleccione Ir a > Opciones y
cionar opciones — para agregar o eliminar una función.
● Selec
● Organizar — para reordenar las funciones.
una de las siguientes opciones:
Otros accesos directos
Seleccione Menú > Configuraciones > Mis acces. direc. y una de las siguientes
opciones:
● Tecla de navegación — para asignar otras funciones desde una lista predefinida a
la tecla de navegación (tecla de desplazamiento).
● Clave espera activa — para seleccionar el movimiento de la tecla de navegación
para activar el modo en espera activo.
es Ir a, para activar una
Llamar
Seleccione Menú > Configuraciones > Llamada y una de las siguientes opciones:
● Desvío de llamadas — para desviar las llamadas entrantes (servicio de red). Tal vez
no pueda desviar las llamadas si están activadas algunas funciones de restricción de
llamadas.
● Cualq. tecla contesta — para contestar una llamada entrante al pulsar brevemente
cualquier tecla, excepto la tecla Encender/Apagar, las teclas de selección izquierda y
derecha o la tecla Finalizar.
● Remarcado auto. — para remarcar automáticamente el número si la llamada falla.
El teléfono intenta llamar al número diez veces.
Consulte "Seguridad", pág. 37.
© 2008 Nokia. Todos los derechos reservados.34
Page 92

● Claridad de la voz — para mejorar la inteligibilidad de la voz, en especial en
entornos ruidosos
● Marcación rápida — para marcar los nombres y números de teléfono asignados a
las teclas numéricas (de la 2 a la 9) al mantener pulsada la tecla numérica
correspondiente
● Llamada en espera — para que la red le notifique una llamada entrante mientras
tiene una llamada en curso (servicio de red)
● Pantalla durac. llam. — seleccione Activar para ver la duración de la llamada en
curso
● Resumen tras llam. — para mostrar brevemente la duración aproximada tras cada
llamada
● Enviar mi ID — para mostrar su número de teléfono a la persona que está llamando
(servicio de red). Para usar la configuración acordada con el proveedor de servicios,
seleccione Definido por la red.
● Línea llam. salientes — para seleccionar la línea telefónica para realizar llamadas,
si la tarjeta SIM admite varias líneas telefónicas (servicio de red)
● Man. llam. aper. desl. — para responder una llamada al abrir la tapa o para finalizar
una llamada al cerrarla
Teléfono
Seleccione Menú > Configuraciones > Teléfono y una de las siguientes opciones:
● Config. de idioma — para definir el idioma de la pantalla del teléfono, seleccione
Idioma del teléfono. Automático selecciona el idioma según la información de la
tarjeta SIM. Para definir un idioma para los comandos de voz, seleccione Idioma
reconocim..
● Estado memoria — para verificar el consumo de memoria
● Bloqueo automático — para bloquear el teclado automáticamente después de un
período de espera predefinido cuando el teléfono esté en modo en espera y no se ha
utilizado ninguna función.
● Bloqueo seguridad — para que solicite el código de seguridad al desbloquear las
teclas
● Reconocimiento voz —
● Perfil de vuelo — para que se le pregunte si desea utilizar el modo de vuelo al
encender el teléfono. Con el modo de vuelo, todas las conexiones de radio se
desactivan.
● Actualiz. teléfono — para recibir actualizaciones de software del proveedor de
servicios (servicio de red). Dependiendo del teléfono, puede que esta opción no esté
disponible.
● Seleccione operador — para configurar una red celular disponible en su área
● Activac. textos ayuda — para decidir si el teléfono muestra textos de ayuda
● Tono de inicio — para reproducir un tono al encender el teléfono
● Confirm. accion. SIM —
Consulte "Actualizaciones de software por aire", pág. 37.
Consulte "Comandos de voz", pág. 35.
Consulte "Servicios SIM", pág. 50.
Comandos de voz
Llame a los contactos y utilice el teléfono pronunciando un comando de voz.
© 2008 Nokia. Todos los derechos reservados. 35
Page 93

Los comandos de voz dependen del idioma. Para definir el idioma, seleccione Menú >
Configuraciones > Teléfono > Config. de idioma > Idioma reconocim. y el
idioma.
Para entrenar el reconocimiento de voz del teléfono con su propia voz, seleccione
Menú > Configuraciones > Teléfono > Reconocimiento voz > Entren. reconoc.
voz.
Para activar un comando de voz para una función, seleccione Menú >
Configuraciones > Teléfono > Reconocimiento voz > Comandos de voz, una
característica y la función.
Para activar el comando de voz, seleccione Agregar. Para reproducir el comando de voz
activado, seleccione Reprod..
Para utilizar comandos de voz, consulte
Para administrar los comandos de voz, desplácese a una función, seleccione
Opciones y una de las siguientes opciones:
● Editar o Eliminar — para renombrar o desactivar el comando de voz.
● Agregar todos o Eliminar todos — para activar o desactivar los comandos de voz
para todas las funciones de la lista de comandos de voz.
indica que el comando de voz está activado.
"Marcación por voz", pág. 20.
Accesorios
Este menú y sus distintas opciones aparecen sólo si el teléfono está o ha sido conectado
a un accesorio móvil compatible.
Seleccione Menú > Configuraciones > Accesorios. Seleccione un accesorio y una
opción dependiendo del accesorio.
Configuración
Puede configurar su teléfono con ajustes requeridos para ciertos servicios. Su proveedor
de servicios también puede enviarle estas configuraciones.
de configuración", pág. 9.
Seleccione Menú > Configuraciones > Configuración y una de las siguientes
opciones:
● Ajustes config. pred. — para ver los proveedores de servicios guardados en el
teléfono y definir un proveedor de servicios predeterminado.
● Act pred en tod aplic — para activar los ajustes de configuración predeterminados
para las aplicaciones admitidas
● Punto acceso prefer. — para ver los puntos de acceso guardados
● Conectar con soporte — para descargar los ajustes de configuración del proveedor
de servicios
● Config. admin. disp. — para permitir o impedir que el teléfono reciba
actualizaciones de software. Según el tipo de teléfono, puede que esta opción no
esté disponible.
● Ajustes config. pers. — para agregar manualmente nuevas cuentas personales para
diversos servicios y para activarlas o eliminarlas. Para agregar una nueva cuenta
Consulte "Actualizaciones de software por aire", pág. 37.
Consulte "Servicio de ajustes
© 2008 Nokia. Todos los derechos reservados.36
Page 94

personal, seleccione Agregar u Opciones > Agregar nuevo. Seleccione el tipo de
servicio e ingrese los parámetros requeridos. Para activar una cuenta personal,
desplácese hasta ella y seleccione Opciones > Activar.
Actualizaciones de software por aire
El proveedor de servicios puede enviar actualizaciones de software por aire
directamente al teléfono (servicio de red). Según el tipo de teléfono, puede que esta
opción no esté disponible.
La descarga de actualizaciones de software puede ocasionar la transmisión de grandes
volúmenes de datos a través de la red de su proveedor de servicios. Comuníquese con
su proveedor para obtener información acerca de los costos de transmisión de datos.
Asegúrese de que la batería del dispositivo tenga energía suficiente o conecte el
cargador antes de comenzar la actualización.
Aviso: Cuando instale una actualización de software, no podrá utilizar el
dispositivo, ni para realizar llamadas de emergencia, hasta que concluya la instalación
y se reinicie el dispositivo. Asegúrese de hacer una copia de seguridad de sus datos antes
de autorizar la instalación de una actualización.
Configuración de actualizaciones de software
Según el tipo de teléfono, puede que esta opción no esté disponible.
Para permitir o impedir las actualizaciones de software y de configuración, seleccione
Menú > Configuraciones > Configuración > Config. admin. disp. > Actualiz.
softw. serv..
Solicitar una actualización de software
1. Seleccione Menú > Configuraciones > Teléfono > Actualiz. teléfono para
solicitar actualizaciones de software disponibles a su proveedor de servicios.
2. Seleccione Det. software actual para ver la versión actual del software y comprobar
si se requiere una actualización.
3. Seleccione Desc. software teléf. para descargar e instalar una actualización de
software. Siga las instrucciones en pantalla.
4. Si canceló la instalación después de la descarga, seleccione Inst. actual. software
para comenzar la instalación.
La actualización de software puede tardar varios minutos. Si la instalación tiene
problemas, póngase en contacto con el proveedor de servicios.
Seguridad
Cuando se usan las funciones de seguridad que restringen llamadas (por ejemplo,
bloqueo de llamadas, grupo cerrado de usuarios y marcación fija), es posible llamar al
número de emergencia oficial programado en su dispositivo.
Seleccione Menú > Configuraciones > Seguridad y una de las siguientes opciones:
© 2008 Nokia. Todos los derechos reservados. 37
Page 95

● Solicitud código PIN o Solicitud código UPIN — para solicitar el código PIN o UPIN
cada vez que encienda el teléfono. Algunas tarjetas SIM no permiten desactivar la
función de petición del código.
● Solicitud código PIN2 — para decidir si se requiere el código PIN2 cuando se usa
una función específica del teléfono protegida por este código. Algunas tarjetas SIM
no permiten desactivar la función de petición del código.
● Restricción llamadas — para restringir llamadas entrantes y salientes desde el
teléfono (servicio de red). Se requiere una contraseña de bloqueo.
● Marcación fija — para restringir llamadas salientes a ciertos números de teléfono,
en caso de que la tarjeta SIM admita esta función. Cuando la marcación fija está
activada, las conexiones GPRS no son posibles, salvo durante el envío de mensajes
de texto a través de este tipo de conexión. En este caso, el número telefónico del
destinatario y el número del centro de mensajes deben estar incluidos en la lista de
marcación fija.
● Grupo usuar. cerrado — para especificar un grupo de personas a las que puede
llamar y de quienes puede recibir llamadas (servicio de red)
● Nivel de seguridad — Seleccione Teléfono para solicitar el código de seguridad
cada vez que se inserte una nueva tarjeta SIM en el teléfono. Seleccione Memoria
para solicitar el código de seguridad cuando se selecciona la memoria de la tarjeta
SIM y desee cambiar la memoria en uso.
● Códigos de acceso — para cambiar el código de seguridad, el código PIN, el código
UPIN, el código PIN2 o la contraseña de bloqueo
● Código en uso — para decidir si el código PIN o el código UPIN debe estar activo
● Certificad. autoridad o Certificados usuario — para ver la lista de certificados de
autoridad o de usuario descargados al teléfono.
explorador", pág. 45.
● Config. módulo seg. — para ver Detalles módulo seg., active Solicitid PIN
módulo o cambie el PIN del módulo y el PIN de firma.
acceso", pág. 9.
Consulte "Seguridad del
Consulte "Códigos de
Restaurar configuración de fábrica
Para restaurar el teléfono a las condiciones de fábrica, seleccione Menú >
Configuraciones > Rest. conf. orig. y una de las siguie
● Restaur. s
sin eliminar datos personales.
● Restaurar todo — para restaurar todas las configuraciones de preferencias y
eliminar todos los datos personales, como contactos, mensajes, archivos de medios
y teclas de activación.
ólo config. — para restaurar todas las configuraciones de preferencias
ntes opciones:
12. Menú Operador
Acceda a un portal de los servicios proporcionados por su operador de red. Para obtener
más informaciones, comuníquese con el operador de red. El operador puede actualizar
este menú con un mensaje de servicio.
© 2008 Nokia. Todos los derechos reservados.38
Page 96

13. Galería
Administre imágenes, videoclips, archivos de música, temas, gráficos, tonos,
grabaciones y archivos recibidos. Estos archivos se almacenan en la memoria del
teléfono o en una tarjeta de memoria y se pueden organizar en carpetas.
Carpetas y archivos
Para ver la lista de carpetas, seleccione Menú > Galería. Para ver la lista de archivos
en una carpeta, seleccione una carpeta y Abrir. Para ver las carpetas de la tarjeta de
memoria cuando mueve un archivo, desplácese a la tarjeta de memoria y pulse la tecla
de desplazamiento a la derecha.
Imprimir imágenes
Su teléfono admite Nokia XpressPrint para imprimir imágenes en formato .jpeg.
1. Para conectar el teléfono a una impresora compatible, use un cable de datos o envíe
la imagen a una impresora que admita la tecnología Bluetooth.
inalámbrica Bluetooth", pág. 30.
2. Seleccione la imagen que desea imprimir y Opciones > Imprimir.
Tarjeta de memoria
Use una tarjeta de memoria para almacenar archivos multimedia como videoclips,
pistas de música, archivos de sonido, imágenes y datos de mensajes.
Algunas de las carpetas en Galería con contenido que utiliza el teléfono (por ejemplo,
Temas) se pueden almacenar en la tarjeta de memoria.
Formatear la tarjeta de memoria
Algunas tarjetas de memoria vienen preformateadas de fábrica; otras necesitan
formateo. Cuando se formatea la tarjeta de memoria, todos los datos en la tarjeta se
borran permanentemente.
1. Para formatear una tarjeta de memoria, seleccione Menú > Galería o
Aplicaciones, la carpeta de la tarjeta de memoria
tarjeta > Sí.
2. Cuando el formateo esté completo, ingrese un nombre para la tarjeta de memoria.
Bloquear la tarjeta de memoria
Para definir una contraseña (máximo 8 caracteres) para bloquear su tarjeta de memoria
y así evitar el uso no autorizado, seleccione la carpeta de la tarjeta de memoria
Opciones > Fijar contraseña.
La contraseña se guarda en su teléfono y no tiene que volver a ingresarla mientras use
la tarjeta de memoria en el mismo teléfono. Si desea usar la tarjeta de memoria en otro
teléfono, se le solicitará la contraseña.
Consulte "Tecnología
y Opciones > Formatear
y
© 2008 Nokia. Todos los derechos reservados. 39
Page 97

Para eliminar la contraseña, seleccione Opciones > Eliminar contraseña.
Verificar el consumo de memoria
Para verificar el consumo de la memoria de distintos grupos de datos en la memoria
disponible para instalar software nuevo en su tarjeta de memoria, seleccione la tarjeta
de memoria
y Opciones > Detalles.
14. Multimedia
Cámara y video
Tome imágenes o grabe videoclip con la cámara incorporada.
Tomar una fotografía
Para usar la función de fotografía, pulse la tecla de cámara o, si la función de video está
activada, desplácese a la izquierda o derecha.
Para acercar o alejar la imagen en el modo cámara, desplácese hacia arriba o abajo o
pulse las teclas de volumen.
Para tomar una foto, pulse la tecla de cámara. El teléfono guarda las fotografías en la
tarjeta de memoria, si hay espacio disponible, o en la memoria del teléfono.
Seleccione Opciones > Flash > Activar flash para tomar todas las fotografías con el
flash de la cámara; o Automático para activar el flash en forma automática cuando la
iluminación sea escasa. Mantenga una distancia segura cuando use el flash. No use el
flash para tomar fotos de personas o animales a corta distancia. No cubra el flash
mientras toma una foto.
Para ver una fotografía inmediatamente después de tomarla, seleccione Opciones >
Configuraciones > Tpo. vta. previa imag. y el tiempo de vista previa. Durante el
tiempo de vista previa, seleccione Atrás para tomar otra fotografía o Enviar para enviar
la imagen como mensaje multimedia.
Su dispositivo admite una resolución de captura de imágenes de 2048
x 1536 píxeles.
Grabar un videoclip
Para activar la función de video, mantenga pulsada la tecla de la cámara; o si la función
de la cámara está activada, desplácese hacia la izquierda o la derecha.
Para iniciar la grabación de video, seleccione Grabar o pulse la tecla de la cámara; para
poner en pausa la grabación, seleccione Pausa o pulse la tecla de la cámara; para
reanudar la grabación, seleccione Continuar o pulse la tecla de la cámara; para detener
la grabación, seleccione Parar.
El teléfono guarda los videoclips en la tarjeta de memoria, si está disponible, o en la
memoria del teléfono.
Opciones de cámara y video
Para usar un filtro, seleccione Opciones > Efectos.
© 2008 Nokia. Todos los derechos reservados.40
Page 98

Para adaptar la cámara a las condiciones de iluminación, seleccione Opciones >
Equilibrio de blancos.
Para cambiar otras opciones de la cámara y del video y para seleccionar el
almacenamiento de imágenes y de video, seleccione Opciones > Configuraciones.
Reproductor de música
El teléfono incluye un reproductor de música para escuchar pistas de música u otros
archivos de sonido MP3 o AAC que haya descargado desde la Web o que haya transferido
al teléfono con Nokia PC Suite.
los videoclips grabados o descargados.
Los archivos de música y video guardados en la carpeta de música en la memoria del
teléfono o en la tarjeta de memoria se detectan y agregan automáticamente a la
biblioteca de música.
Para abrir el reproductor de música, seleccione Menú > Multimedia > Reprod.
música.
Menú de música
Acceda a los archivos de música y video almacenados en la memoria del teléfono o en
la tarjeta de memoria, descargue música o videoclips de la Web o vea streaming de
video compatibles desde un servidor de red (servicio de red).
Para escuchar música o reproducir un videoclip, seleccione un archivo de Listas
reproduc., Artistas, Álbumes o Géneros y seleccione Reprod..
Para descargar archivos desde la Web, seleccione Opciones > Descargas y un sitio de
descarga.
Para actualizar la biblioteca de música después agregar archivos, seleccione
Opciones > Actualizar bibl..
Crear una lista de reproducción
Para crear una lista de reproducción con su selección de música, haga lo siguiente:
1. Seleccione Listas reproduc. > Crear lista reprod. e ingrese el nombre de la lista
de reproducción.
2. Agregue música o videoclips de las listas que se muestran.
3. Seleccione Listo para guardar la lista de reproducción.
Configuración de un servicio de streaming
Puede recibir las configuraciones de streaming como un mensaje de configuración del
proveedor de servicios.
puede ingresarlas manualmente.
Para activar las configuraciones, realice lo siguiente:
1. Seleccione Opciones > Descargas > Config. de streaming > Configuración.
2. Seleccione un proveedor de servicios, Predeterminadas o Ajuste personal para
streaming.
Consulte "Nokia PC Suite", pág. 32. También puede ver
Consulte "Servicio de ajustes de configuración", pág. 9. También
Consulte "Configuración", pág. 36.
© 2008 Nokia. Todos los derechos reservados. 41
Page 99

3. Seleccione Cuenta y una cuenta de servicio de streaming desde los ajustes de
configuración activos.
Reproducir pistas de música
Aviso: Escuche música a un volumen moderado. La exposición prolongada a un
nivel de volumen alto puede perjudicar su capacidad auditiva. Cuando use el altavoz,
no sostenga el dispositivo cerca del oído, ya que el volumen puede resultar demasiado
alto.
Para ajustar el volumen, pulse las teclas de volumen del teléfono.
Maneje el reproductor de música con las teclas virtuales que aparecen en pantalla.
Para comenzar a reproducir, seleccione
Para hacer una pausa en la reproducción, seleccione
Para pasar a la pista siguiente, seleccione
anterior, seleccione
Para adelantar la pista actual, seleccione y mantenga pulsada
la pista actual, seleccione y mantenga pulsada
desee para continuar la reproducción de música.
Para cambiar al menú de música, seleccione
Para cambiar a la lista de reproducción actual, seleccione
Para cerrar el menú del reproductor de música y continuar la reproducción de música
en segundo plano, pulse la tecla Finalizar.
Para detener el reproductor de música, mantenga pulsada la tecla Finalizar.
dos veces.
.
.
. Para saltar al comienzo de la pista
. Para retroceder en
. Suelte la tecla en la posición que
en la pantalla.
en la pantalla.
Cambiar la apariencia del reproductor de música
El teléfono cuenta con varios temas para cambiar la apariencia del reproductor de
música.
Seleccione Menú > Multimedia > Reprod. música > Ir a Repr. música >
Opciones > Configuraciones > Tema reprod. música y uno de los temas de la lista.
Las teclas virtuales pueden cambiar dependiendo del tema.
Radio
La radio FM depende de una antena distinta a la antena del dispositivo móvil. Para que
la radio FM funcione adecuadamente, conecte al dispositivo un auricular o un accesorio
compatible.
Aviso: Escuche música a un volumen moderado. La exposición prolongada a un
nivel de volumen alto puede perjudicar su capacidad auditiva. Cuando use el altavoz,
no sostenga el dispositivo cerca del oído, ya que el volumen puede resultar demasiado
alto.
© 2008 Nokia. Todos los derechos reservados.42
Page 100

Seleccione Menú > Multimedia > Radio.
Para ajustar el volumen, pulse las teclas de volumen.
Para utilizar las teclas gráficas
o a la derecha y selecciónela.
, , o en la pantalla, desplácese a la izquierda
Sintonizar estaciones de radio
Buscar y guardar estaciones
1. Para iniciar la búsqueda, seleccione y mantenga pulsada o . Para cambiar la
frecuencia de radio en pasos de 0.05 Mhz, pulse brevemente
2. Para guardar una estación en una ubicación de memoria, seleccione Opciones >
Guardar estación.
3. Para ingresar el nombre de la estación de radio, seleccione Opciones >
Estaciones > Opciones > Renombrar.
Seleccione Opciones y
● Buscar todas estac. — para buscar automáticamente las estaciones disponibles en
su ubicación
● Fijar frecuencia — para ingresar la frecuencia de la estación de radio que desee
● Estaciones — para enumerar y renombrar o eliminar las estaciones guardadas
una de las siguientes opciones:
o .
Cambiar estaciones
Seleccione o , o pulse las teclas numéricas que corresponden al número de la
estación en la lista de estaciones.
Funciones de radio
Para apagar la radio, pasar del auricular al altavoz y cambiar entre salida estéreo y mono,
seleccione Opciones > Configuraciones. Para mostrar información del sistema de
datos de radio de la estación sintonizada, seleccione RDS activado. Para permitir el
intercambio automático a una frecuencia con la mejor recepción de la estación
sintonizada, seleccione Camb. frec. auto. act..
Grabadora de voz
Grabe un mensaje, un sonido o una llamada activa y guárdelos en Galería.
Seleccione Menú > Multimedia > Grabador voz. Para utilizar las teclas gráficas
o en la pantalla, desplácese hacia la derecha o la izquierda.
Grabar sonido
1. Seleccione o, durante una llamada, seleccione Opciones > Grabar. Mientras
esté grabando una llamada, todos los participantes de la llamada escucharán un
sonido discreto. Para hacer una pausa en la grabación, seleccione
2. Para finalizar la grabación, seleccione
Grabaciones de la Galería.
© 2008 Nokia. Todos los derechos reservados. 43
. Las grabaciones se guardan en la carpeta
.
,
 Loading...