

Page 1
Electronic user´s guide released subject to “Nokia User´s Guides Terms and Conditions, 7th June, 1998”.
User’s Guide
English
9351411
Issue 1
def
pqrs
abc
3
mno
jklghi
tuv
wxyz
9
8
+
0
12
456
7
Page 2

Nokia and the Arrows logo are registered trademarks of Nokia Corporation, Finland.
1997 Nokia Mobile Phones. All rights reserved.
Nokia Mobile Phones operates a policy of continuous development; therefore we reserve
the right to make changes and improvements to any of the products described in this
guide without prior notice.
Page 3
User’s guide
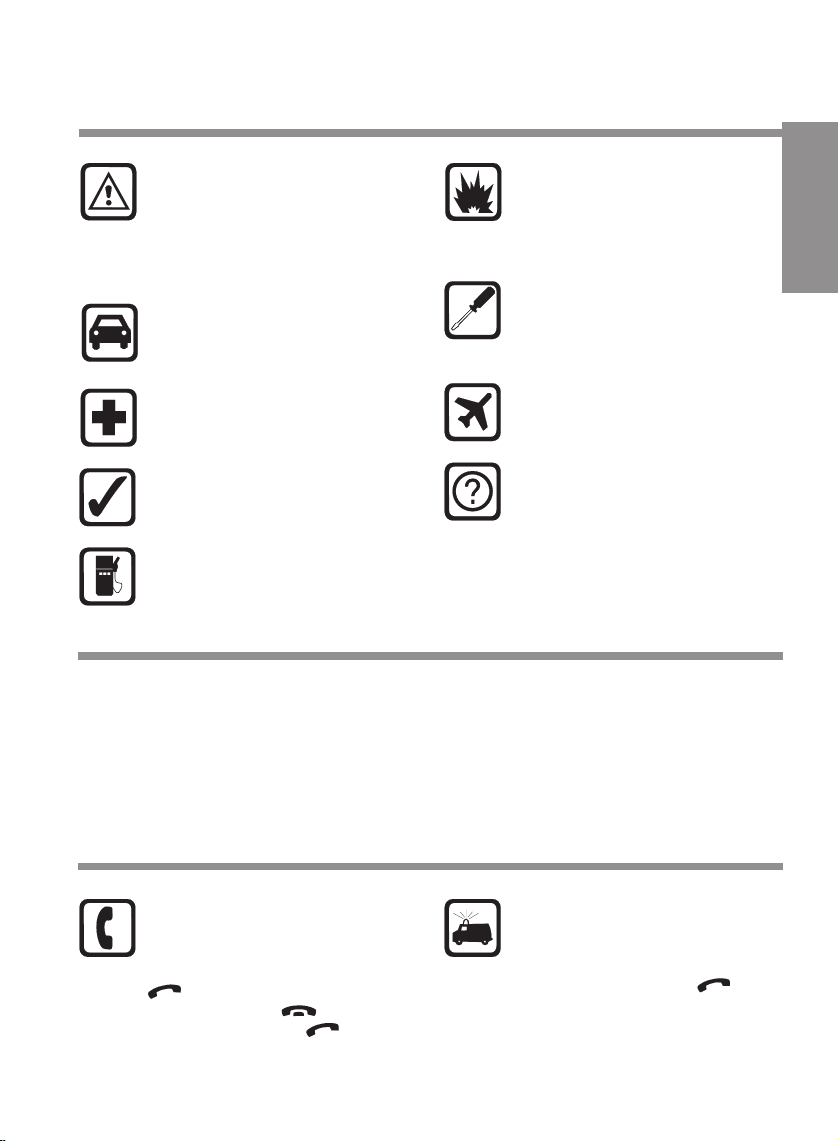
FOR YOUR SAFETY
Read these simple guidelines
Breaking the rules may be dangerous
or illegal.
Further detailed information is given in
this manual.
ROAD SAFETY COMES FIRST
Don’t use a hand-held telephone
while driving; park the vehicle first.
SWITCH OFF IN HOSPITALS
Follow any regulations or rules.
Switch off near medical equipment.
USE SENSIBLY
Use only in the normal position (to ear).
Don’t touch the antenna unnecessarily.
SWITCH OFF WHEN
REFUELING
Don’t use phone at a refueling point.
Don’t use near fuel or chemicals.
Contents
Basic Steps to Use Your Phone............ 2
Battery Information................................ 3
Keys and Display Indicators .................. 4
Access Codes....................................... 7
Basic Functions..................................... 8
Using the Memory................................. 9
Using Additional Memory .................... 10
SWITCH OFF NEAR BLASTING
Don’t use phone where blasting is in
progress.
Observe restrictions, and follow any
regulations or rules.
QUALIFIED SERVICE
Only qualified service personnel must
install or repair equipment. Use only
approved accessories and batteries.
SWITCH OFF IN AIRCRAFT
Mobile phones can cause interference.
Using them on aircraft is illegal.
INTERFERENCE
All mobile phones may get interference which could affect performance.
Sending DTMF Tones .......................... 11
The Menu Facility................................. 11
The Menu Map .................................... 12
Menu Functions .................................. 14
Care and Maintenance......................... 27
Important Safety Information................ 28
English
MAKING CALLS
Ensure the phone is switched on and
in service. Enter the phone number,
including the area code, then press
.
To end a call press .
To answer a call press .
EMERGENCY CALLS
Ensure the phone is switched on and
in service. Hold C for several seconds,
to clear the display. Enter the emergency number, then press . Give
your location. Do not end the call until
told to do so.
3 1998. Nokia Mobile Phones. All Rights Reserved.
Page 4
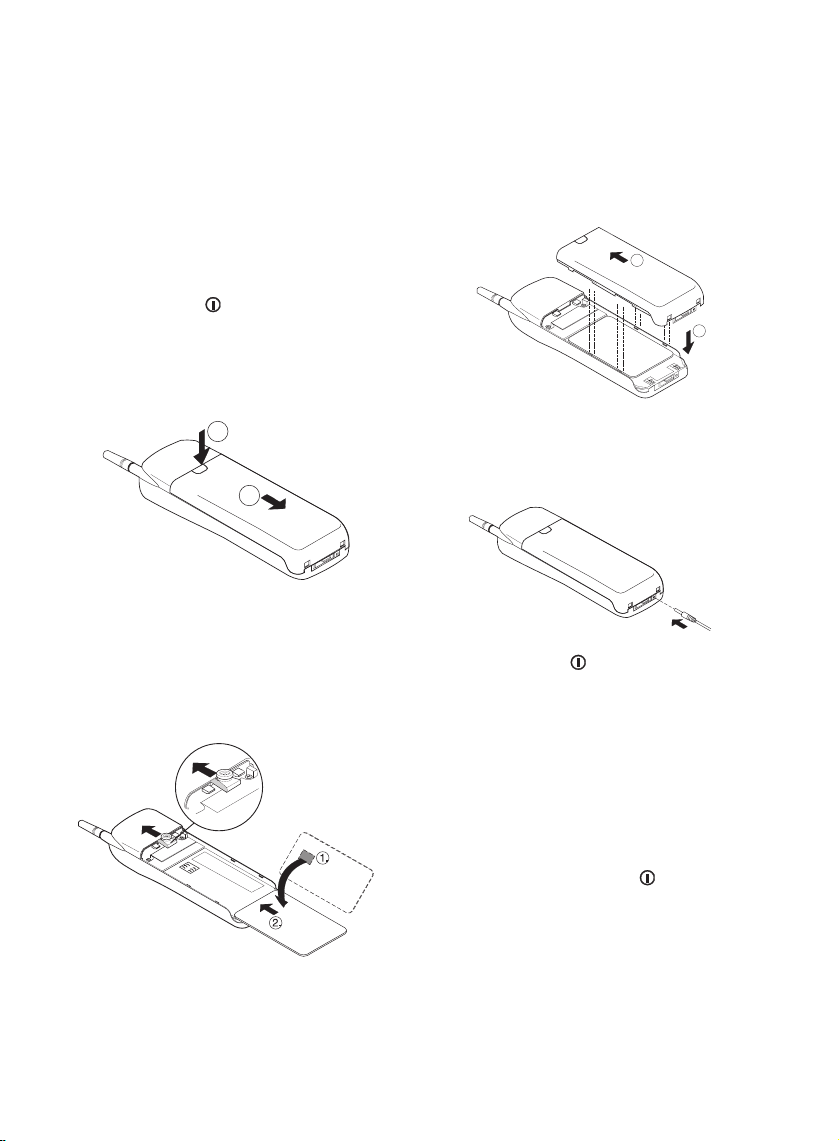
Basic Steps to Use Your Phone
The phone can make and receive calls only
when it is switched on, has a valid SIM
card inserted and is located in the service
area of the cellular network.
To insert the SIM card into the phone:
Press and hold to switch off your
➀
phone. Always switch off the power before removing the battery.
• Press the locking catch, slide the battery downwards and lift it off the phone.
1.
2.
• Ensure that the golden connectors on
the SIM card are facing the connectors
on the phone.
Place the card into the back of the
phone and slide it upwards.
• You can now also insert the metal clip
supplied with the Belt Clip Kit accessory into the slot under the cover of the
phone.
• Attach the battery by placing it on the
back of the phone and slide it upwards
until the locking catch snaps into place.
2.
1.
To charge the battery, connect the
➁
phone to the charger. Connect the
charger to the proper voltage AC
power supply.
Press and hold to switch on your
phone. If the phone displays the
prompt PIN CODE ?,enterthePIN
code provided with the SIM card and
press M.
While charging is in progress, the battery charge indicator scrolls on the display.
Note:
If the battery is totally empty, the text
POWERING UP and the indicator will
appear on the display. Charging is in
progress but the phone cannot be
used until the battery charge is high
enough.
If needed, change the display texts into
➂
English by pressing MENU499.
4 1998. Nokia Mobile Phones.All Rights Reserved.
Page 5

Battery Information
Charging and Discharging
Note that a new battery’s full performance
is achieved only after two or three complete charge and discharge cycles!
The battery can be charged and discharged hundreds of times but it will eventually wear out. When the operating time
(talk-time and standby time) is noticeably
shorter than normal, it is time to buy a new
battery.
When the charge drops to approximately
5% of the maximum battery capacity, the
message BATTERY LOW will warn you at
regular intervals. When there is no battery
capacity left, the message RECHARGE
BATTERY is displayed and the phone will
automatically be switched off to discharging mode when a charger is not connected. During discharging, the message
DISCHARGING is blinking, and the phone
cannot be used. When the battery is discharged, connect the phone to a charger
and CHARGING will be displayed for two
seconds when charging process is started.
Discharging can be interrupted by connecting the phone to the charger.
While charging is in progress and the
powerisswitchedoff,thebatterycharge
indicator bar scrolls from clear to a full bar
on the phone display. When the indicator
disappears and the display is empty, charging is completed.
When the power is on during charging, the
battery indicator bar scrolls, and the phone
can be used.
Note:
If the battery is totally empty, the text POWERING UP and the indicator appear on
the display. Charging is in progress but no
actions can be done until the battery
charge is high enough.
Use only batteries approved by the phone
manufacturer and recharge your battery
only with the chargers approved by the
manufacturer. When a charger is not in
use, disconnect it from the power source.
Do not leave the battery connected to a
charger for longer than a week, since overcharging may shorten its life. If left unused
a fully charged battery will discharge itself
over time.
For good operation times, discharge the
battery from time to time as described (or
by using the battery discharge facility of
any approved accessory available for your
phone). Do not attempt to discharge the
battery by any other means.
Temperature extremes will affect the ability
of your battery to charge: it may require
cooling or warming first.
Note:
Use the battery only for its intended purpose.
Never use any charger or battery which is
damaged or worn out.
Always switch the power off before removing the battery.
Note:
However, the battery can be removed
when the phone is discharging (DIS-
CHARGING is flashing on the display).
English
5 1998. Nokia Mobile Phones. All Rights Reserved.
Page 6
Do not short circuit the battery. Accidental
short circuiting can occur when a metallic
object (coin, clip or pen) causes direct connection of the + and - terminals of the battery (metal strips on the back of the
battery) for example when you carry a
spare battery in your pocket or purse.
Short circuiting the terminals may damage
the battery or the connecting object.
Leaving the battery in hot or cold places,
such as in a closed car in summer or winter conditions, will reduce the capacity and
lifetime of the battery. Always try to keep
the battery between 15°C and 25°C (59F
and 77F). A phone with a hot or cold battery may temporarily not work, even when
the battery is fully charged. NiMH batteries
performance is particularly limited in temperatures below -10°C (14F).
Dispose of used batteries in accordance
with local regulations. Recycle!
Do not dispose of batteries in a fire!
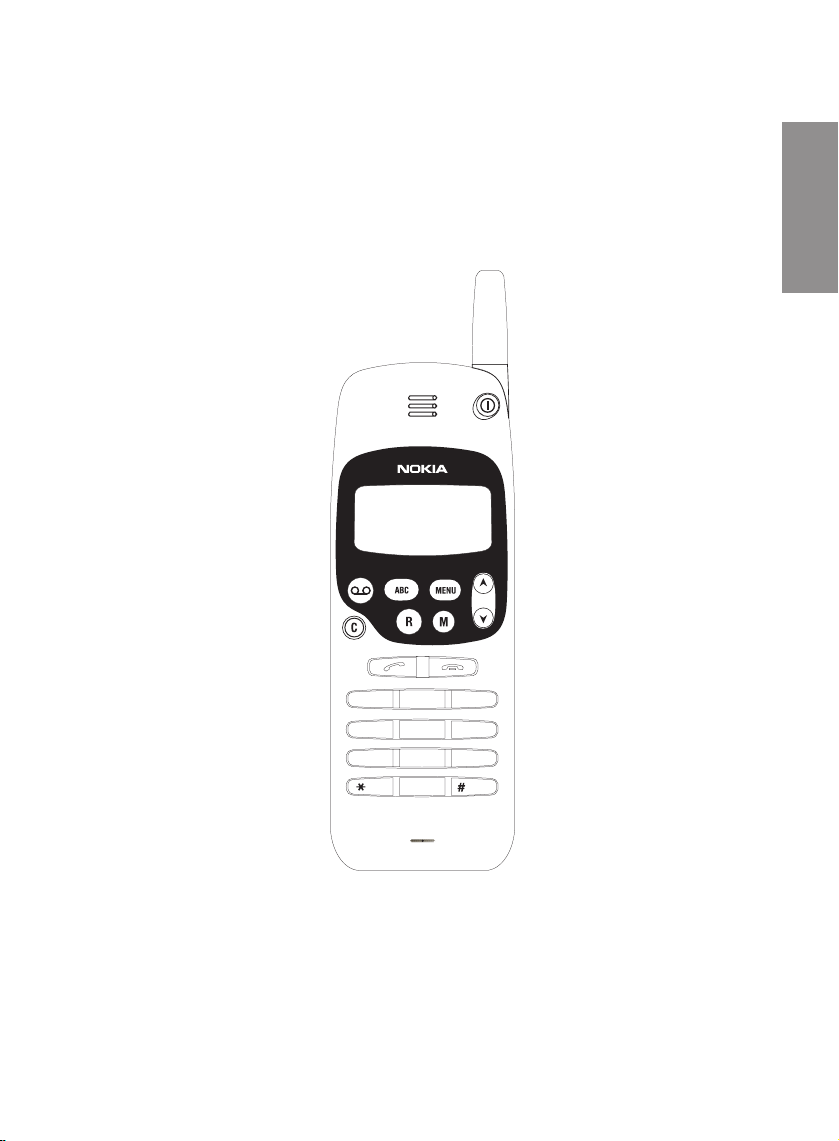
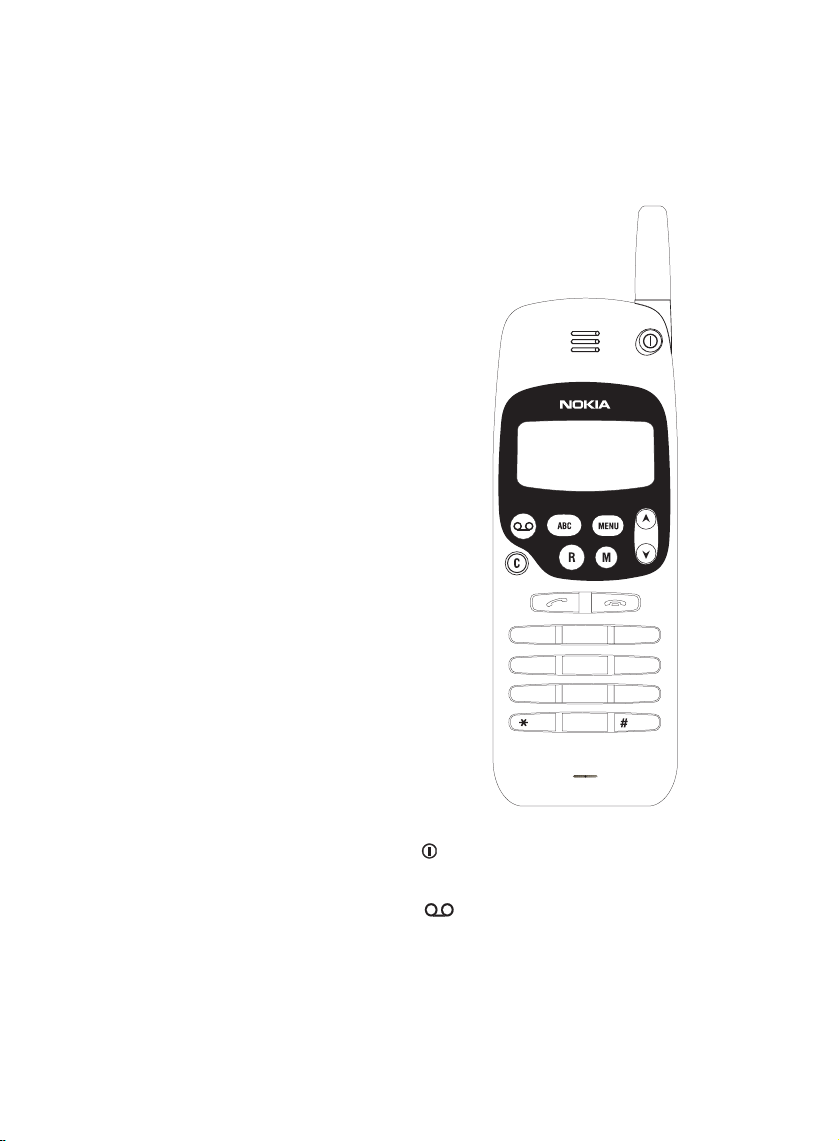
Keys and Display
Indicators
Keys
pqrs
abc
8
+
0
12
456
7
def
3
mno
jklghi
tuv
wxyz
9
Press and hold to switch the phone
on and off.
Press to dial the voice mailbox
number.
ABC Press to switch between alpha and
numeric mode.
6 1998. Nokia Mobile Phones.All Rights Reserved.
Page 7

MENUPress to enter the menu.
Also used in shortcuts to individual
menu features.
Used with the key for automatic DTMF transmission.
Used with the ✱ key to activate/deactivate the keyguard.
C Press to delete characters one
by one.
Press and hold to clear the whole
display.
Press to quit the menu without
changing any settings.
Press to delete a message.
R Press to recall information from the
memory.
Press and hold to check hidden digits in a long telephone number.
M Press to store information in the
memory.
Press to select an option in the
menu and also to confirm a setting.
/ Press to scroll backwards/forwards
through the menu, submenus or
settings.
Press to scroll backwards/forwards
through the memory.
Press to increase/to decrease the
earpiece volume when a call is in
progress.
Press toread the message(s)
when MESSAGES RECEIVED is
shown on the display.
Press when ... CALLS MISSED is
on the display to show the phone
number(s) of the missed call(s)
(max. five numbers).
Press to make or answer a call.
When the display is clear, press to
show the last dialled number and
press toscroll through the dialled
numbers list (max. five numbers).
When you have a call in progress,
you can put it on hold by pressing
.
Press to end a call.
Ends the call in progress and also
anycallonhold.
0-9 Number keys.
In the alpha mode they are used to
key in letters and other characters.
✱ Used in network manual activation
commands.
In the number mode, press ✱✱✱✱
to enter the wait character ‘w’,
press ✱✱✱ to enter the pause character ‘p’ and press ✱✱ to enter the
international prefix ‘+’.
In the alpha mode, moves the cursor to the next position.
# Used in network manual activation
commands.
In the alpha mode, enters a blank
space.
English
7 1998. Nokia Mobile Phones. All Rights Reserved.
Page 8
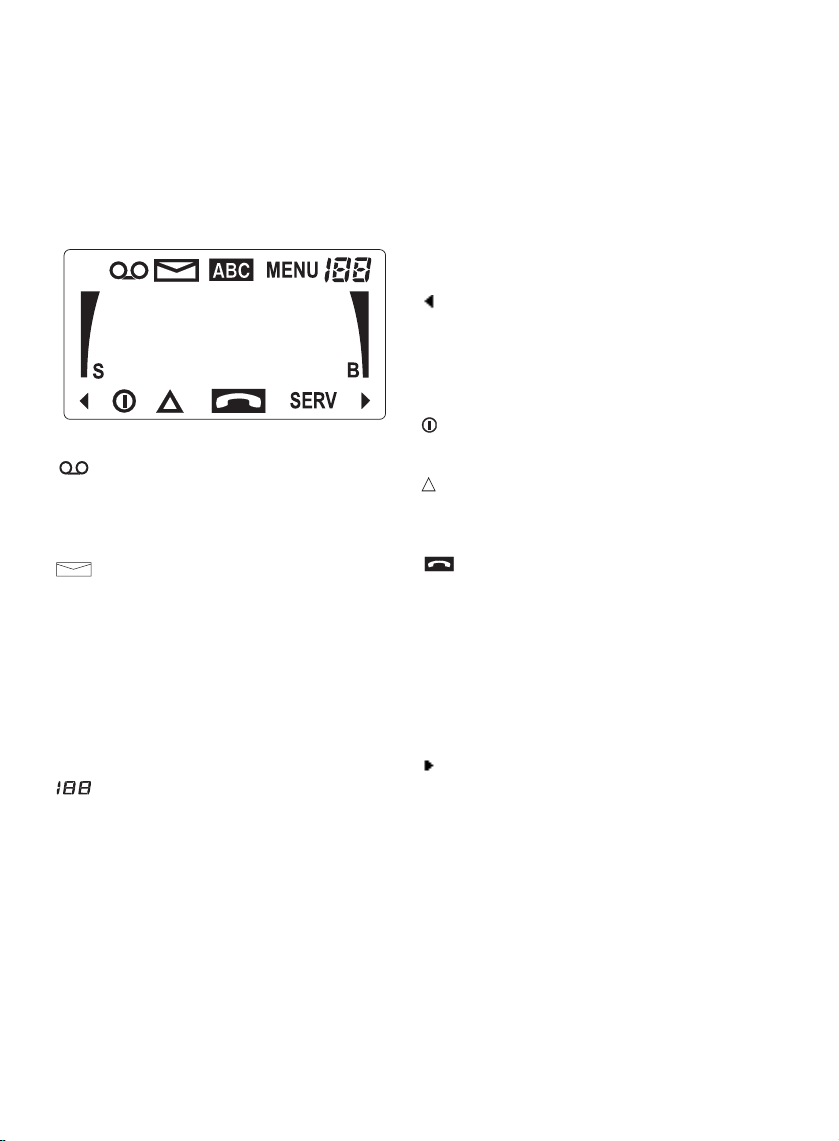
Display Indicators
The phone has a series of fixed display indicators which inform you about the operation of the phone.
When on it indicates that a voice
message is waiting.
Whether this indicator is used depends on the network operator.
When on it indicates that a short
message has been received.
When flashing, it indicates that the
message memory is full.
ABC The phone is in alpha mode and let-
ters can be keyed in and displayed.
MENU Indicates that you have entered the
menu.
Indicates the index number of a menu
function or a setting.
Indicates a memory location
number.
Indicates the message number in
the Message mode.
B and bars
Indicates the charge of the battery.
Themorebars,thebetterthebattery charge.
A scrolling bar indicates that charging in progress.
Indicates information overflow on the
display, e.g. the front part of the
phone number is not shown on the
display. Press and hold the R key
to check the rest of the number.
Indicates that the phone is switched
on.
Indicates that the phone is using a
network other than the home network.
Appears when you are making a call
and is on during a call.
The indicator flashes when you
have a call on hold.
SERV Shows that the phone is registered
on the cellular network. If it does
not light up, the phone is outside
the network coverage area.
Indicates information overflow on the
display, e.g. the end of the phone
number is not shown on the display
or, during number editing, indicates
that there are more than 16 digits in
the phone number.
S and bars
Indicates the current cellular signal
strength at the location of your
phone. The more bars, the better
the signal in the area.
8 1998. Nokia Mobile Phones.All Rights Reserved.
Page 9

Access Codes
Your phone and the network incorporate
several levels of security function to prohibit unauthorised use of your phone.
These functions require different numeric
codes.
Avoid choosing access codes similar to the
emergency numbers to prevent accidental
emergency calls.
Phone Codes
Security Code (5 digits)
The security code is supplied with the
phone (in a red envelope or on an Identification Sticker) in the sales package of your
phone.
If the prompt SECURITY appears on the
display, key in your security code (appears
as stars on the display) and press M.
If you enter an incorrect security code five
times, the phone will not accept any further
entries for the next five minutes.
Card Codes
PIN Code (Personal Identification
Number, 4-8 digits)
The PIN code for SIM card is supplied with
the SIM card.
If the prompt PIN CODE appears on the
display, key in your PIN code and press M.
If you enter an incorrect PIN code three
times in succession, the SIM card will be
blocked. The SIM card can be unblocked
by using the PUK code.
PIN2 Code (4-8 digits)
The PIN2 code is supplied with some SIM
cards. Its use can be explained by your
SIM card provider or network operator.
PUK Code (Personal Unblocking Key,
8 digits)
The PUK code may be supplied with your
SIM card. Use the PUK code to unblock
your SIM card. For more information, consult your SIM card provider or network operator.
PUK2 Code (8 digits)
The PUK2 code is supplied with some SIM
cards. Its use can be explained by your
SIM card provider or network operator.
Network Password (4 digits)
A Network Password may be provided
with the SIM card for the barring services
of your network. Its use can be explained
by your SIM card provider or network operator.
The SIM lock
Your phone may be programmed to operate only with certain SIM cards. This feature may be activated upon request of the
network operator. If the phone does not
work after insertion of a new SIM card, consult your network operator or service
provider.
English
9 1998. Nokia Mobile Phones. All Rights Reserved.
Page 10

Basic Functions
As with any other radio-transmitting device, avoid unnecessary contact with the
antenna when the phone is switched on.
Making a Call
Key in the phone number including the
area code and press .
To finish the call, press .
You can adjust the volume of the earpiece
by pressing the and keys during a call.
International Calls
Press ✱ twice in rapid succession (for the
international prefix ‘+’), enter the country
code and the subscriber number and
press .
Correcting Keying Mistakes
Delete the last character on the display by
pressing C.
Clear the whole display by pressing and
holding C.
Last Number Redial
With the display clear, press twice.
Speed Dialling
Key in the memory location number 1-9
where the desired telephone number is
stored. Call the number by pressing .
Receiving a Call
Press key to answer the call.
End the call by pressing .
Anykey Answer
You can answer incoming calls by briefly
pressing any key except the or key.
To hold / unhold a call
When you have a call in progress, you can
put it on hold by pressing , which
means that the person you are calling cannot hear you. When you have a call on
hold, the indicator on the display will
flash. Press again to unhold the call
and the person can hear you again.
For subscription to this function, contact
your network operator.
Keyguard
The keypad lock, keyguard, prevents key
from being accidentally pressed when, for
example, the phone is in your pocket.
Note:
When keyguard is active, calls may be
possible to the emergency number programmed in your phone (e.g. 112 or other
official emergency number), but the emergency number will be shown on the display
only when all the digits have been keyed in.
To activate/deactivate the keyguard:
Press MENU ✱.
10 1998. Nokia Mobile Phones.All Rights Reserved.
Page 11

Using the Memory
You can store phone numbers and their
corresponding contact names in a memory
located on the SIM card.
Cards’ memory storage capacity varies.
The phone is able to handle 199 SIM card
memory locations, even if a card can hold
more.
Each memory location can hold a name
and a phone number.
In the numeric mode only numbers can be
keyed in or displayed.
In the alpha mode, you can key in or display letters and numbers.
Digits keyed in during the alpha mode can
not be used as telephone numbers to
make calls.
Keying in Names
Press ABC to select the alpha mode.
➀
Select the key labelled with the letter
➁
you want.
Press it once for the first letter, twice
(before the cursor appears to the right
of the letter) for the second letter and
so on.
Select the other letters in the same way.
➂
When entering the same letter (or a letter on same key) twice, you do not
need to wait for the cursor to appear
but press the ✱ key and select the next
letter.
E.g. to select P, R, T, press when in
the alpha mode the keys 7 ✱ 7778
without any pause.
To find the characters you want, repeatedly press the keys 1 - 9:
Key Alpha mode
1 -?!,.:“‘&$£()/%@1
2 ABC2ДЕАБГЖЗ
3 DEF3ÈÉËÊ
4 GHI4Ð ÌÍÎÝ
5 JKL5
6 MNO6СЦТУФШÕ
7 PQRS7ßÞ
8 TUV8ÜÙÚÛÛ
9 WXYZ9
0 0
# a blank space
Exit alpha mode by pressing ABC
➃
again.
Storing Information
The following sequence of entries should
be used to store information into memory:
Telephone number, ABC, name, M,(location number), M
Recalling Information
Recalling by Name:
Press R, key in the name - or first letters of
the name - you want to recall, press R.
To check the phone number, press ABC.
Or:
In alpha mode, press or to scroll
through the names in alphabetical order.
Recalling by Memory Location Number:
Memory location number, R.
Or:
To scroll through the memory location numbers, press or .
English
11 1998. Nokia MobilePhones. All Rights Reserved.
Page 12

Using Additional Memory
Welcome Greeting
You can store a personal welcome greeting into your phone. The greeting will appear on the display when you switch the
phoneonandkeyinthePINcode,ifrequested.
To store:
Press ABC,keyin
the welcome text,
press MM999M.
To recall:
Press 999R.PressABC to check the
text.
To erase the welcome greeting from
the memory:
With the display clear, press MMM999
MM.
S
SERV
Temporary Memory
To store:
Duringacall,keyinatelephonenumber
and name on the display. End the call by
pressing , the information will be
stored in the temporary memory location.
To recall :
Press 0R.
B
Temporary memory will be cleared when
the phone is switched off.
Voice Mailbox Number
To store:
Key in the telephone number of your voice
mailbox, press M and press .
To recall :
Press R .
12 1998. Nokia Mobile Phones.All Rights Reserved.
Page 13

Sending DTMF Tones
The Menu Facility
DTMF (Dual Tone Multi Frequency) tones allow you to communicate with answering machines, computerized telephony systems, etc.
DTMF tones can be transmitted even when
the keypad tones are switched off.
I Manual Method
Make a call to a desired telephone
➀
number.
Key in the digits. Each digit is sent di-
➁
rectly as a DTMF tone. The length of
thetonedependsonhowlongyou
press the key.
II Automatic Transmission
In automatic transmission you can send
number sequences already stored in the
memory.
Note:
In some SIM cards the storing of sequences
containing characters ‘w’, ‘p’, ‘+’, ‘#’ or ‘✱‘
may not be possible.
When sending a sequence, after a ‘w’ character the key has to be pressed to
send the rest of the sequence.
The phone has a set of functions arranged
in menus and submenus. You can check
or change the setting of a particular function. The menus as well as the submenus
can be entered by using either ‘The Menu
Method’ or ‘The Shortcut Method’.
The Menu Method
Press MENU to enter the menu.
➀
Press or to find the menu you
➁
want.
Press M to select the menu.
➂
If the menu contains submenus, press
or to reach the desired submenu.
Press M to select the submenu.
Press the and keys to scroll
➃
through the setting options.
Press M to select the setting.
➄
Note:
Press C to exit the menu facility any time
during the procedure, and the function will
not be changed.
English
Make a call to the desired telephone
➀
number.
Recall the number sequence from the
➁
memory.
Press MENU to send the sequence.
➂
After the sequence is sent, it will disappear
from the display.
During the sequence transmission, only the
keys , and C are active.
The Shortcut Method
Press MENU followed by the number of
the menu function, e.g. MENU 8 to enter
the Ringing Option menu. The current setting is displayed.
The shortcut option also applies to submenus and settings as well, e.g. MENU 4
42; MENU 4 for Phone Settings and then
4 for selecting the Lights and then 2 for se-
lecting lights off.
13 1998. Nokia MobilePhones. All Rights Reserved.
Page 14

The Menu Map
➀ Memory Options
Options for controlling memory functions.
➀ Dialled Calls
➁ Received Calls *)
➂ Missed Calls *)
➃ Erase Calls
➄ Erase Memory
➀ One by One
➁ All at Once
➅ Voice Mail No.
➆ Own Number
➁ Messages *)
Use to read and write short messages (SMS).
➀ Read Messages
➁ Write Messages
➂ Message Settings
➀ Message Centre
➁ Message Format
➂ Call Divert *)
Use to divert incoming calls.
➀ Divert All
➀ Activate Divert
➁ Cancel Divert
➂ Check Status
➁ If Busy
➀ Activate Divert
➁ Cancel Divert
➂ Check Status
➂ If No Reply
➀ Activate Divert
➁ Cancel Divert
➂ Check Status
➃ If Not Available
➀ Activate Divert
➁ Cancel Divert
➂ Check Status
➄ Cancel All
*) For availability and subscription, contact
your network operator or service provider.
➃ Phone Settings
Selectvarioussettingsofthephone.
➀ Ringing Volume
➀ Ringing Level 1
...
➁ Ringing Type
➀ Ringing Type 1
...
➂ Keypad Tones
➀ Key Tone Level 1
...
➃ Key Tone Off
➃ Lights
➀ Lights On
➁ Lights Off
➄ One Key Calling
➀ One Key Call On
➁ One Key Call Off
➅ Auto(matic) Redial
➀ Redial On
➁ Redial Off
➆ Auto(matic) Answer
➀ Answer On
➁ Answer Off
➇ Keyguard
➀ Keypad locked
➈ Language **)
➀ Magyar (Hungarian)
➁ Suomi (Finnish)
➂ Norsk (Norwegian)
➃ Svenska (Swedish)
➄ Dansk (Danish)
➅ Nederlands (Dutch)
➆ Deutsch (German)
➇ Auto Select
➈ English
➀ Français (French
➀➀ Italiano (Italian)
➀➁ Español (Spanish)
➀➂ Português (Portuguese)
➀➃ ЕллзнйкЬ (Greek)
➀➄ АгббЪШЩ (Russian)
➀➅ Türkçe (Turkish)
➀➆ Polski (Polish)
➀➇ Èe¹tina (Czech)
**) All languages may not be available in your
phone.
14 1998. Nokia Mobile Phones.All Rights Reserved.
Page 15

➄ Security Options
Set PIN code request, security level, and
change codes, and restore factory settings.
➀ PIN Code Request
➀ Request On
➁ Request Off
➁ Security Level
➀ No Security
➁ Phone Security
➂ Change Codes
➀ Change Security
➁ Change PIN Code
➂ Change PIN2 *)
➃ Change Password *)
➃ Restore Settings
➅ Call Info
Shows call durations and costs.
➀ Call Timers
➀ Last
➁ Total
➂ Clear Timers
➁ Call Costs *)
➀ Last
➁ Total
➂ Clear Counters
➂ Cost Limit *)
➀ Set Limit
➁ No Limit
➃ Costs Display *)
➀ CostsinCurrency
➁ CostsinUnits
➄ Cell Info *)
➀ Cell Info On
➁ Cell Info Off
➆ Network Select
Manual or automatic network selection.
➀ Auto Select
➁ Manual Select
English
➇ Ringing Options
Select an indication option for an incoming
call.
➀ Ring
➁ Beep Once
➂ Silent Function
➈ Number Editor
Edit a phone number currently on the display.
*) For availability and subscription, contact
your network operator or service provider.
15 1998. Nokia MobilePhones. All Rights Reserved.
Page 16

Menu Functions
Network Services
Some of the menu functions are network
services. These functions can be used only
if provided by your network operator. Before you can take advantage of any of
these Network Services, you must subscribe to the service(s) you required from
your network operator. Note that a network service is specific for the SIM card for
which you have subscribed.
For availability and subscription, contact
your network operator.
Memory Options (MENU 1)
Dialled Calls (MENU 1 1)
The phone stores the last five numbers
that you called or attempted to call in the
Dialled Calls memory locations indexed as
L0 - L4. The latest number is stored in location 0 and the older numbers are moved
back. If the name is found in the SIM card
memory, the location will also include a
name for the displayed number.
To search through the numbers:
Note:
If a new SIM card, which is not recognised
as an owner card, is inserted into the
phone, the dialled calls list will be erased.
See also menu 5 2, Security Level.
Received Calls (MENU 1 2)
The phone stores the last five different telephone numbers of the incoming calls in the
Received Calls memory locations, indexed
as A0-A4. The phone number of a received
call is only stored if the network supports
this function and if the calling phone provides its identity. When a new call comes
in, the other numbers move back in the list.
The location will also include a name for
the displayed number if the name and
number are stored in the SIM card memory.
To search through the numbers:
Press MENU 1 2. The phone number
➀
of the most recent caller appears on
the display.
Press to scroll to the next number.
➁
Use the key ABC to see if there is any
name with the number.
Press MENU 1 1 (or press ). The
➀
number of your last call appears on the
display.
Press to scroll to the next number.
➁
Press to dial the number displayed.
➂
Press to dial the number dis-
➂
played.
Note:
If a new SIM card, which is not recognised
as an owner card, is inserted into the
phone, the received calls list will be erased.
See also menu 5 2, Security Level.
16 1998. Nokia Mobile Phones.All Rights Reserved.
Page 17

Missed Calls (MENU 1 3)
The Missed Calls memory locations, indexed as U0-U4,containsuptofivetelephone numbers/-names of the people who
have tried to call you without getting any
answer. The phone number of a missed
call is only stored if the network supports
this function and if the calling phone provides its identity. When a new call comes
in, the older numbers move back in the list.
Only five different numbers can be stored
in the memory even if there had been more
call attempts.
If the name and number are stored in the
SIM card memory, the location will also include a name for the displayed number.
To search through the numbers:
Press or when the ... CALLS
➀
MISSED is on the display or press
MENU 1 3. A display message shows
the number of missed calls. The phone
number of the most recent caller then
appears on the display.
Press to scroll to the next number.
➁
Use the key ABC to see if there is
name with the number.
Press to dial the number dis-
➂
played.
Note:
If a new SIM card, which is not recognised
as an owner card, is inserted into the
phone, the missed calls list will be erased.
See also menu 5 2, Security Level.
Erase Calls (MENU 1 4)
With the Erase Calls function you can reset
the dialled, received and missed calls lists
and temporary memory.
Press MENU 1 4, and the number lists and
temporarymemorywillbeerased.
Erase Memory (MENU 1 5)
With the Erase Memory function you can
clear memory locations.
To erase the information from the memory:
Press MENU 1 5.
➀
Press or to select one of the alter-
➁
natives ONE BY ONE or ALL AT ONCE
and press M to confirm.
• If you select ONEBYONE,theprompt
NAME? is displayed. Key in the name
to be erased and press M.
To confirm, press M again.
Or:
Press ABC and the prompt LOCATION? is displayed. Key in the memory
location number to be erased and
press M.
To confirm, press M again.
• If you select ALL AT ONCE,theprompt
ARE YOU SURE? is shown. Press M to
confirm.
English
17 1998. Nokia MobilePhones. All Rights Reserved.
Page 18

Voice Mailbox Number (MENU 1 6)
You can store the telephone number of
your voice mailbox here.
Press MENU 1 6.
➀
Keyinthevoicemailboxnumber,or
➁
edit the phone number displayed.
Press M.
➂
Messages (MENU 2)
You can send and receive short text messages through the Short Message Service,
SMS if your network operator supports
these services.
SMS Messages
Your phone is able to send and receive
short text messages of up to 160 characters in length.
Own Number (MENU 1 7)
You can check the phone number assigned to the SIM card. Note that this function is not available with all SIM cards.
Press MENU 1 7,pressABC to see if
there is an associated name.
Before you can send messages, you must
have the phone number of your message
service centre. You can store the number
in the memory, menu 2 3 1. Contact your
network operator for details.
When you send an SMS message from
your phone and the recepient’s phone is
not on the network, or is switched off, the
message service will continue trying to
send it for a week.
You may also ask the message centre to
convert an ordinary SMS message into
some other format, such as fax or Email,
menu 2 3 2
When your phone receives an SMS message, it is stored in the area reserved for
SMS messages in the SIM card memory.
Most of the SIM cards have memory space
for storing messages.
Contact your network operator for more information.
18 1998. Nokia Mobile Phones.All Rights Reserved.
Page 19

Read Messages (MENU 2 1)
When the phone is switched on and you
have received new message(s), the indicator and the text MESSAGES RE-
CEIVED appear on the display.
To read the messages, press when
➀
MESSAGES RECEIVED is on the display or press MENU 2 1.
The number of new messages is displayed.
Wait for the header of the first message
➁
to be displayed.
The header shows the message status,
NEW (unread message) or OLD (read
message) and the time and date the
message was received.
Press or to read all messages in
➂
sequence. If is pressed repeatedly,
the messages are displayed in the order which they are stored in the memory. The index display shows the
memory location where the message is
stored.
Write Messages (MENU 2 2)
Enter the Write Messages menu by
➀
pressing MENU 2 2.
You can also edit an old message by
pressing M while reading the message.
Key in the message of up to 160 char-
➁
acters.
You can make changes in the
message. Use and to move the
cursor right and left, respectively, and
C to delete a single character.
To insert a space, press # in alpha
mode.
Press ABC to select the numeric mode
for keying in numbers.
When the message is ready, you can
➂
store it by pressing M, e.g., if you want
to send the message later.
To send the message, press and
➃
the phone asks for the phone number.
Key in the recipient’s phone number
➄
and press M or .
English
Press and hold C to quit the message
➃
function.
When the indicator is flashing, the
message memory is full. New incoming
messages are rejected until the message
memory is cleared.
To clear a message, press C while the
message or its header is on the display
and press M to confirm.
You can only send one message at a time.
Sending takes a little time and if successful, it will be confirmed by MESSAGE SENT.
If the transmission fails for any reason, the
phone will report e.g. SENDING FAILED,
NO NET SUPPORT.
If you try to send another message while
the previous one is still being sent, SEND-
ING PREVIOUS will appear on the display.
19 1998. Nokia MobilePhones. All Rights Reserved.
Page 20

Message Settings (MENU 2 3)
Under this submenu, you can set the message centre number and select in which
format the message is to be sent.
Message Centre (MENU 2 3 1)
In order to send SMS messages, the
phone must know the phone number of
your Short Message Service Centre.
Youwillobtainthephonenumberfrom
your network operator upon your subscription to the SMS message service.
Press MENU 2 3 1 to enter the Mes-
➀
sage Centre menu.
Message Format (MENU 2 3 2)
Thenetworkmaybeabletoconvertyour
text messages into one of the following formats: FORMAT TEXT (normal text message), FORMAT FAX, FORMAT PAGER or
FORMAT EMAIL message.
Press MENU232.
➀
Press or to select the desired for-
➁
mat for messages.
Press M to confirm.
➂
Key in the phone number of the mes-
➁
sage service centre, or edit the phone
number displayed.
Press M to confirm.
➂
Cut Number
You can copy a phone number that appears in a message onto the display and
then store it in a desired memory location.
The phone number must be at least three
digits long. An international prefix (+),
hyphen (-) and spaces between digits are
allowed in the number.
To copy the number, press R when reading the message and the phone number
appears on the display.
Press to call the number, or
store the phone number in the memory.
20 1998. Nokia Mobile Phones.All Rights Reserved.
Page 21

Call Divert (MENU 3)
The phone offers you a possibility to divert
your incoming calls to another telephone
number when you do not want to be disturbed, or when the phone is switched off
or outside the network service area. Contact your network operator for more information.
Press MENU 3 to enter the Call Divert
➀
function.
Press or to scroll through the alter-
➁
natives. More than one alternative can
be active at the same time.
DIVERT ALL
diverts all incoming calls
IF BUSY
diverts incoming calls if your phone is
busy
IF NO REPLY
diverts incoming calls if you do not answer them
IF NOT AVAILABLE
diverts incoming calls when your phone
is outside the network service area or is
switched off.
CANCEL ALL
switches all divert modes off.
Press or to scroll the alternatives
➃
ACTIVATE DIVERT
Press M to activate call diverting.
Key in the number to which the calls
will be diverted, or edit the phone
number displayed. Press M.
The phone sends the request to the
network, REQUESTING...
CANCEL DIVERT
Press M to cancel call diverting. The
phone sends the request to the network.
CHECK STATUS
Press M to review whether the network
has received and accepted your request.
Press or to check the diverted call
types (e.g. voice calls), and press ABC
to check the telephone number.
Note:
If you want to exit the call divert function
without changing the current setting, press C.
English
Press M to select the displayed alterna-
➂
tive.
21 1998. Nokia MobilePhones. All Rights Reserved.
Page 22

Phone Settings (MENU 4)
Ringing Volume (MENU 4 1)
A ringing tone is heard when there is an incoming call.
The ringing volume is ascending. You can
set the highest ringing volume level.
Keys to set ringing volume level:
MENU 4 1,or,M
When the phone is used with accessories,
the ringing volume level can be set individually for some of the accessories. Connect
the phone to the accessory before changing the setting.
Ringing Type (MENU 4 2)
You can select different types of ringing
tone.
Lights (MENU 4 4)
The phone’s keypad and display are fitted
with backlights to make them easy to see.
The lights come on when you press a key
and go off 15 seconds after you last
pressed a key or after the phone has
stopped ringing (LIGHTS ON)orarepermanently off (LIGHTS OFF).
Keys to set the lights:
MENU 4 4,or,M
When phone is in a Car Kit, the lights are
permanently on (LIGHTS ON)orgooff15
seconds after you pressed a key (LIGHTS
OFF).
When the phone is used with accessories,
the lights can be set individually for some
of the accessories. Connect the phone to
the accessory before changing the setting.
Keys to set the types of ringing tone:
MENU 4 2,or,M
Keypad Tones (MENU 4 3)
A tone is heard each time a key is pressed.
You can switch the keypad tones off or set
them at different volume levels.
Keys to set the keypad tones:
MENU 4 3,or,M.
When the phone is used with accessories,
the keypad tones can be set individually for
some of the accessories. Connect the
phone to the accessory before changing
the setting.
One Key Calling (MENU 4 5)
Store frequently used phone numbers in
the memory, and activate the One Key Calling function. Then with the display clear,
phone numbers in memory locations 1-9
can be rapidly dialled by pressing and holding the respective number key.
Keys to activate one key calling function:
MENU 4 5,or,M
22 1998. Nokia Mobile Phones.All Rights Reserved.
Page 23

Automatic Redial (MENU 4 6)
The number you are trying to call or the cellular network may be busy. You can set the
phone to redial a number automatically.
The phone will make a maximum ten retries. You can end the call attempts by
pressing or restart the redialing by
pressing .
Keys to activate automatic redial:
MENU 4 6,or,M
Automatic Answer (MENU 4 7)
When the phone is connected to a HF Car
Kit or to a Headset, you can set the phone
to answer a call automatically after one ring.
Keys to activate automatic answer:
MENU 4 7,or,M
Keyguard (MENU 4 8)
The keypad lock, keyguard, prevents key
from being accidentally pressed when, for
example, the phone is in your pocket.
When the keyguard is On, calls may be
possible to the emergency number programmed into your phone (e.g. 112 or
other official emergency number), but the
emergency number will be shown on the
display only when all the digits have been
keyed in.
prompt will appear. You can answer
an incoming call in the normal way by
pressing . During a call the keyguard is not active and you can operate the phone as usual. When the call
is finished, the keyguard becomes active again.
Press MENU and ✱ to deactivate the keyguard.
Language (MENU 4 9)
You can select the language for the display
texts. The alternative languages are
Hungarian, Finnish, Norwegian, Swedish,
Danish, Dutch, German, English, French,
Italian, Spanish, Portuguese, Greek, Russian, Turkish, Polish and Czech.
If you choose AUTO SELECT,thephone
will set the language according to the information in the SIM card inserted into the
phone.
Keys to set language:
MENU 4 9,or,M
Note:
All the languages may not be available in
your phone.
English
To activate the keyguard:
Press MENU 4 8 (or press MENU ✱).
When any key is pressed when keyguard is active, the PRESS MENU ✱
23 1998. Nokia MobilePhones. All Rights Reserved.
Page 24

Security Options (MENU 5)
PIN Code Request (MENU 5 1)
You can select whether or not the phone,
with the SIM card inserted, asks for the
PIN code when you switch the phone on.
PHONE SECURITY
the security code is required if you insert a SIM card that the phone does
not recognise as an owner card. After
the correct security code is keyed in,
the card is recognised as an owner
card.
However, the network operator may configure the SIM card so that you can not disable the PIN code request. If that is the
case, the message NOT ALLOWED will be
shown on the display when you select PIN
Code Request.
Key press sequency:
MENU 5 1, key in your PIN code, M,or
to select REQUEST ON or REQUEST
OFF, M
Security Level (MENU 5 2)
The phone can be set at two different security levels. When the security level setting is
active, the security code will be required
whenever you insert a new SIM card.
Press MENU 5 2.
➀
Key in your security code and press M
➁
to confirm it.
Press or to select a security level
➂
option
NO SECURITY
no security code is needed when the
phoneisswitchedonwithanewSIM
card inserted.
Press M to confirm your choice.
➃
When you change the security level, the list
of dialled calls, received calls and missed
calls will be erased.
Change Codes (MENU 5 3)
Change Security (MENU 5 3 1)
To change the security code:
Press MENU 5 3 1,
key in the current security code and press
M,
key in the new code and press M,
key in the new code again and press M
Change PIN Code (MENU 5 3 2)
When the PIN Code Request is set ON,
you can change your PIN code.
Press MENU 5 3 2,
key in the current PIN and press M,
key in the new PIN and press M,
key in the new PIN again and press M
If you have forgotten your PIN, use your
PUK code to enter a new PIN. See section
‘4. Getting Started - Access Codes’.
24 1998. Nokia Mobile Phones.All Rights Reserved.
Page 25

Change PIN2 Code (MENU 5 3 3)
Call Info (MENU 6)
To change your PIN2 code:
Press MENU 5 3 3,
key in the current PIN2 and press M,
key in the new PIN2 and press M,
key in the new PIN2 again and press M
Change Password (MENU 5 3 4)
A network password is required when you
wish to use the barring services of your network. You can change the network password provided that the phone is registered
on the network.
Press MENU 5 3 4,
key in the current password and press M,
key in the new password and press M,
key in the new password again and press
M
Restore Settings (MENU 5 4)
You can reset the menu functions to the
original factory settings if you have lost
track of your customised settings. The
memory, timers, counters and language
are not reset.
Press MENU 5 4,
key in security code and press M
Call Timers (MENU 6 1)
The phone shows the duration of the last
call and the duration of all the calls (in
hours, minutes and seconds) made and received after you last reset the timer. You
can set call duration timers to zero.
Inserting a new SIM card does not clear
the call timers.
Press MENU 6 1.
➀
Press or to reach the option you
➁
require
LAST:
indicates the duration of the last
or current call,
TOTAL:
indicates the duration of all the calls or
CLEAR TIMERS
sets both call timers to zero. You are
prompted to enter your security code,
SECURITY. Key in your security code,
and press M to confirm it.
Note:
The actual time invoiced for calls by your
service provider may vary, depending upon
network features, rounding-off for billing,
and so forth.
English
25 1998. Nokia MobilePhones. All Rights Reserved.
Page 26

Call Costs (MENU 6 2)
This network function allows you to check
the cost of your last call and the total cost
of all the calls. The costs are shown in
charging units or units of the currency if
given in the menu ‘Costs Display’. You can
also set the call costs counters to zero.
Press MENU 6 2.
➀
Press or to reach your choice.
➁
LAST:
indicates the costs of the last
or current call
TOTAL:
indicates the total cost of all calls
CLEAR COUNTERS
sets both call counters to zero.
The phone prompts for your PIN2
code. Key in the code, and press M to
confirm it.
Note:
All actual invoice for calls and services from
your service provider may vary, depending
upon network features, rounding-off for billing, taxes and so forth.
Press MENU 6 3.
➀
Key in your PIN2 code.
➁
Press M to confirm it.
➂
Press or to select
➃
SET LIMIT
for limitation of call costs. Press M and
set the currency value by using the
number keys. The decimal point is created with the key ✱ or #.E.g.for
23.40, key in 23✱40.
NO LIMIT
no limitation for call costs
Press M to confirm.
➄
Costs Display (MENU 6 4)
This network function allows you to select
the currency mode, that is to set a call
charging unit price and a currency name.
The maximum length for a currency name
is three characters, e.g. £, FIM.
Press MENU 6 4.Thephoneprompts
➀
you to enter the PIN2 code.
Cost Limit (MENU 6 3)
This network function allows you to set a
cost limit for the calls with your SIM card.
The phone will display the amount of available units or currency. When the cost limitation is active, calls can be made as long
as the limit is not exceeded. If the Costs
Display is set to COSTS IN UNITS,the
cost limit must be set as call charging units.
Key in the PIN2 code.
➁
Press M to confirm.
➂
Use or to select COSTS IN CUR-
➃
RENCY or COSTS IN UNITS and
press M.
If you select COSTS IN CURRENCY,
the phone prompts you for a unit price
for the call charging, PRICE.
26 1998. Nokia Mobile Phones.All Rights Reserved.
Page 27

Key in the price e.g. 1✱04 for 1.04.
Press M. The phone prompts you for
the currency, CURRENCY.
Key in the currency e.g. £ or FIM and
press M.
Cell Info (MENU 6 5)
Micro Cellular Network, MCN, provides
GSM service in densely populated areas
by using small cells and offering potentially
lower costs to MCN subscribers. As cost
charging within MCN cell may differ from
the regular GSM cell, the phone can be set
to display which kind of cell it is using.
To set the Cell Info display ON:
Press MENU 6 5.
➀
Use or to select INFO ON.
➁
Press M to confirm.
➂
Network Select (MENU 7)
In the automatic network selection mode
the phone will automatically attempt to register on the network it was last registered
on. If the phone does not find that network, it will search for the home network
which is the network run by the operator
whose SIM card is in your phone. If the
home network is not found, the phone will
search for another available network which
has a valid roaming agreement with your
home operator, and it will then register on
that network.
Selecting a Network Manually
In the manual network selection, the phone
will show a list of available networks from
which you can select. When the network is
selected manually, the phone will not
change to another network if it loses contact with the selected one. The phone will
stay in manual mode until the automatic
mode is selected or another SIM card is inserted in the phone.
Press MENU 7.
➀
Press or to select MANUAL SE-
➁
LECT,andpressM. The phone scans
for available networks. During the
search the message SEARCH ACTIVE
will be displayed. Do not press any key
while this takes place as it may terminate the search.
Press or to scroll through the list
➂
of available networks.
Press M to register on the network se-
➃
lected.
If your home operator does not have a
roaming agreement with the selected
network, the message NO ACCESS is
displayed and another network must
be selected.
English
27 1998. Nokia MobilePhones. All Rights Reserved.
Page 28

Ringing Options (MENU 8)
You can select a different ringing tone for
incoming calls.
Press MENU 8.
➀
Press or to select from the follow-
➁
ing options:
RING
ringing tone is heard
BEEP ONCE
only a short alerting tone is heard.
The display lights and the indicator
CALL are blinking.
SILENT FUNCTION
only the lights and the indicator CALL
or caller’s phone number or name are
blinking, no ringing tone is heard
Press M to confirm.
➂
Number Editor (MENU 9)
Using the number editing function allows
you to edit the content of a number currently displayed.
Press MENU 9 to activate the Number
➀
Editor. A blinking pointer appears at the
first digit position of the telephone number.
The pointer can be moved to the left or
➁
right by pressing or .
Press C and the digit to the left of the
➂
pointer will be deleted.
The added digits will appear also on
the left side of the pointer.
Press M to confirm when the number
➃
has been edited.
28 1998. Nokia Mobile Phones.All Rights Reserved.
Page 29

Care and Maintenance
Your phone is a product of superior design
and craftmanship and should be treated
with care. The suggestions below will help
you to fulfil any warranty obligations and to
enjoy this product for many years.
Keep the phone and all its parts and accessories out of small children’s reach.
Keep the phone dry. Precipitation, humidity
and liquids contain minerals that will corrode electronic circuits.
Do not use or store the phone in dusty,
dirty areas. Its moving parts can be damaged.
Do not store the phone in hot areas. High
temperatures can shorten the life of electronic devices, damage batteries, and
warp or melt certain plastics.
Do not store the phone in cold areas.
When the phone warms up (to its normal
temperature), moisture can form inside the
phone, which may damage electronic circuit boards.
Do not attempt to open the phone. Non-expert handling of the phone may damage it.
Do not drop, knock or shake the phone.
Rough handling can break internal circuit
boards.
Do not use harsh chemicals, cleaning solvents, or strong detergents to clean the
phone. Wipe it with a soft cloth slightly
dampened in a mild soap-and-water solution.
If the phone or any of its accessories are
not working properly, take it to your nearest qualified service facility. The personnel
there will assist you, and if necessary, arrange for service.
English
29 1998. Nokia MobilePhones. All Rights Reserved.
Page 30

Important Safety Information
Traffic Safety
Do not use a hand-held telephone while driving
a vehicle. If using a hand-held phone park the
vehicle before conversing.
Always secure the phone in its holder; do not
place the phone on the passenger seat or where
it can break loose in a collision or sudden stop.
Theuseofanalertdevicetooperateavehicle’s
lights or horn on public roads is not permitted.
Remember road safety always comes first!
Operating Environment
Remember to follow any special regulations in
force in any area and always switch off your
phone whenever it is forbidden to use it, or
when it may cause interference or danger.
Operation of any radio transmitting equipment,
including cellular phones, may interfere with the
functionalityof inadequately protected medical
devices. Consult a physician or the manufacturer of the medical device if you have any questions. Other electronic equipment may also be
subject to interference.
As with other mobile radio transmitting equipment, users are advised that for the satisfactory
operation of the equipment and for the safety of
personnel, it is recommended that the equipment should only be used in the normal operating position.
Users are advised to switch off the phone when
at a refuelling point (service station). Users are reminded of the need to observe restrictions on
the use of radio equipment in fuel depots (fuel
storage and distribution areas), chemical plants
or where blasting operations are in progress.
Do not store or carry flammable liquids, gases or
explosive materials in the same compartment as
the phone, its parts or accessories.
Only qualified personnel should install or service
the phone in a vehicle. Faulty installation or service may be dangerous and may invalidate any
warranty which may apply to the unit.
Electronic fuel injection systems, electronic antiskid braking systems, electronic cruise control
systems and other electronic systems can malfunction due to the lack of protection from radio
signals. Check regularly that all cellular phone
equipment in your vehicle is m ounted and operating properly.
Switch off your cellular phone when in an aircraft. The use of cellular telephones in an aircraft
may be dangerous to the operation of the aircraft, disrupt the cellular network and is illegal.
Failure to observe these instructions may lead to
suspension or denial of cellular telephone services to the offender, or legal action or both.
Emergency Calls
IMPORTANT!
This phone, like any cellular phone, operates us-
ing radio signals, cellular and landline networks
as well as user-programmed functions which
cannot guarantee connection in all conditions.
Therefore you should never rely solely upon any
cellular phone for essential communications (e.g.
medical emergencies).
Remember, to make or receive any calls the
phone must be switched on and in a service
area with adequate cellular signal strength.
Emergency calls may not be possible on all cellular phone networks or when certain network
services and/or phone features are in use.
Check with local cellular service providers.
30 1998. Nokia Mobile Phones.All Rights Reserved.
Page 31

To make an emergency call:
If the phone is not on, switch it on.
➀
Some networks may require that a valid SIM
card is properly inserted in the phone.
Press and hold the C key for several sec-
➁
onds to ready the phone for calls.
Key in the emergency number for your pre-
➂
sent location (e.g. 112 or other official emergency number). Emergency numbers vary
by location.
Press the key.
➃
If certain features are in use (Keyguard, Call Restricting etc.), you may first need to turn those
features off before you can make an emergency
call. Consult this document and your local cellular service provider.
When making an emergency call, remember to
give all the necessary information as accurately
as possible. Remember that your cellular phone
may be the only means of communication at the
scene of an accident - do not cut off the call until given permission to do so.
Using This Guide
The cellular phone described in this guide is approved for use in GSM network.
A number of features included in this guide are
called Network Services. They are special services provided by cellular service providers. Before your can take advantage of any of these
Network Services, you must subscribe to the
service(s) you require from your home service
provider. You can then activate these functions.
The manual activation commands for various
services are not presented in this guide (e.g. using ✱ and # characters for activating or deactivating services). The phone nevertheless is
capable of handling commands given in that
form. For these commands please consult with
your service providers.
WARNING!
This apparatus is intended for use when
supplied with power from ACH-8E/X/A,
LCH-6, LCM-1, CGH-1, CGH-2 or ACH6E/X/A. Other usage will invalidate any approval given to this apparatus and may be
dangerous.
English
IMPORTANT!
Use only accessories approved by the phone
manufacturer. The use of any other types will invalidate any approval or warranty applying to the
phone, and may be dangerous.
31 1998. Nokia MobilePhones. All Rights Reserved.
 Loading...