

Page 1
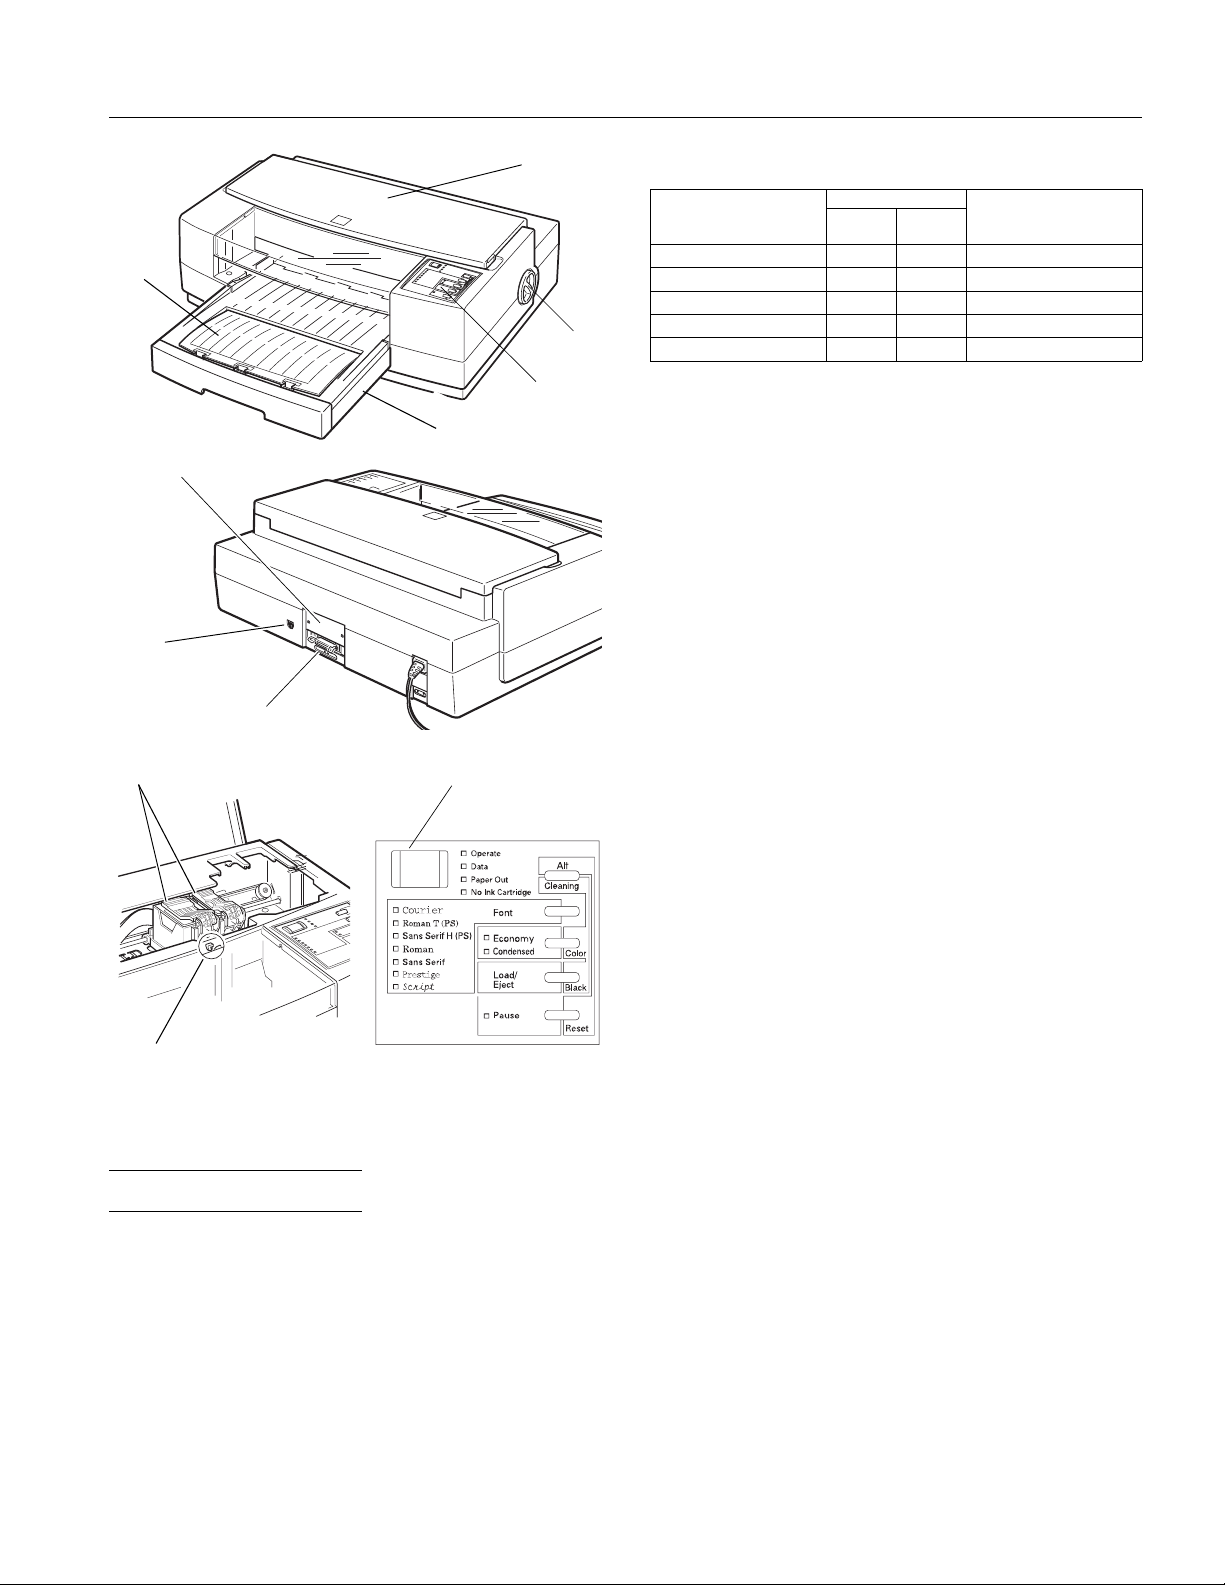
EPSON Stylus Pro and Pro XL
output
tray
interface
card cover
serial
interface
parallel interface
ink cartridge clamps
printer
cover
control
panel
paper tray
Operate button
knob
Printable columns and printing speed*:
Character pitch
(characters per inch)
10 80 127 200
12 96 152 240
15 120 190 300
17 (10 condensed) 137 218 340
20 (12 condensed) 160 254 400
* Print speeds vary depending on system configuration, software
application, resolution, and amount of page covered. Figures are
based on letter-size paper with color printing.
Resolution:
Paper feed speed:
Printable columns LQ printing speed
(characters per
second)Pro Pro XL
Maximum 720 × 720 dpi
89 milliseconds per
1
⁄6-inch line;
2.2 inches per second
Input buffer: 64KB
Print direction: Bidirectional with logic seeking
Control code: ESC/P 2 and expanded raster graphics
code
Paper feeding: Auto sheet feeder
Line spacing:
1
⁄6-inch (default), programmable to
1
⁄8-inch or in 1⁄
-inch increments using
360
control codes
Character tables: 1 Italic and 20 graphics character tables
Character sets: 14 International and 1 legal character
sets
paper thickness lever
Printer Specifications
Printing
Printing method: On-demand ink jet
Nozzle
configuration:
64 monochrome (black) nozzles
(16 × 4 staggered)
48 color nozzles
(16 × 3, cyan, magenta, yellow)
Paper
Note:
Since the quality of any particular brand or type of paper may be
changed by the manufacturer at any time, EPSON cannot
guarantee the use of any particular brand or type of paper. Always
test samples of paper stock before purchasing large quantities or
printing large jobs.
Paper path: Sheet feeder, front entry
2
Paper tray
capacity:
Paper size:
100 sheets at 17 lb (64 g/m
70 sheets of EPSON special coated paper
50 sheets of EPSON transparency films
30 sheets of EPSON high-quality glossy
paper
10 envelopes
Letter (8.5 × 11 inches)
A4 (210 × 297 mm)
Legal (8.5 × 14 inches)
US B (11 × 17 inches)*
Super A3/B (13 × 9 inches)*
A3 (297 × 420 mm)*
Statement (8.5 × 5.5 inches)
Executive (7.5 × 10 inches)
* Stylus Pro XL only
) paper
Ink Jet Printers 8/1/95 EPSON Stylus Pro and Pro XL-1
Page 2

EPSON Stylus Pro and Pro XL
Paper types: Plain paper and special papers
distributed by EPSON (special coated
paper, high-quality glossy paper, and
transparencies)
Paper thickness: 0.003 to 0.004 inch (0.08 to 0.11 mm)
Paper weight: 17 to 24 lb (64 to 90 g/m2)
Use 24 lb (90 g/m
2
) paper under normal
temperature and humidity conditions
Transparencies:
Size
Letter (8.5 × 11 inches)
A4 (210 × 297 mm)
Thickness 0.003 to 0.0033 inch (0.075 to 0.085 mm)
Envelopes:
Size
No. 10 9.5 × 4.1 inches (241 × 104 mm)
DL 8.7 × 4.3 inches (220 × 110 mm)
Paper types Plain, bond, or air mail paper
Paper thickness Less than 0.020 inch (0.52 mm)
Paper weight 20 to 24 lb (75 to 90 g/m
2
)
Note:
❏ Poor quality paper may reduce print quality and cause paper
jams and other problems. If you encounter problems, switch to a
higher grade of paper.
❏ Print on special coated paper, high-quality glossy paper,
envelopes, and transparency films only under these normal
conditions:
Temperature 59 to 77°F (15 to 25°C)
Humidity 40 to 60% RH
❏ Store high-quality glossy paper under the following conditions:
Temperature 59 to 77°F (15 to 25°C)
Humidity 20 to 60% RH
❏ Use envelopes that do not curl.
❏ The following EPSON genuine papers are available:
S041062 Special coated paper for 720 dpi printing (Letter)
S041067 Special coated paper for 720 dpi printing (Legal)
S041068 Special coated paper for 720 dpi printing (A3)
S041070 Special coated paper for 720 dpi printing (B)
S041069 Special coated paper for 720 dpi printing (Super A3/B)
S041060 Special coated paper for 360 dpi printing (Letter)
S041066 Special coated paper for 360 dpi printing (Super A3/B)
S041065 Special coated paper for 360 dpi printing (A3)
S041072 High-quality glossy paper (Letter)
S041074 High-quality glossy paper (Super A3/B)
S041073 High-quality glossy paper (A3)
S041075 High-quality glossy paper (B)
S041064 Transparency film (Letter)
Printable area:
Single sheets
A
BL
BR
C
Envelopes
A
BL
A The minimum top margin is 0.12 inch (3 mm).
BL The minimum left margin is 0.12 inch (3 mm).
BR The minimum right margin is:
C The minimum bottom margin is 0.55 inch (14 mm)
For Stylus Pro:
3.8 mm (0.15 inch) for A4 size paper
3 mm (0.12 inch) for Statement and Executive size paper
9.7 mm (0.38 inch) for Letter and Legal size paper and transparencies
13.8 mm (0.54 inch) for DL envelopes
35.1 mm (1.38 inch) for No. 10 envelopes
For Stylus Pro XL:
3 mm (0.12 inch) for all paper sizes, and envelopes
Ink Cartridges
Black ink cartridge (S020034):
Color Black
Print capacity* Approximately 1.5 million characters
(315 dots/char, Roman 10)
Cartridge life* 2 years from production date and up to
6 months after opening the package, at
77°F (25°C); based on letter size paper
Temperature Storage: –22 to 104° F (–30 to 40° C)
1 month at 104° F (40° C)
Transit: –22 to 140° F (–30 to 60° C)
1 month at 104° F (40° C)
120 hours at 140° F (60° C)
Freezing:** 24.8° F (–4° C)
Dimensions
1.1 inches (W) × 2.7 inches (D) × 1.7 inches (H)
(26.9 mm × 67.4 mm × 41.8 mm)
BR
C
EPSON Stylus Pro and Pro XL-2 8/1/95 Ink Jet Printers
Page 3

EPSON Stylus Pro and Pro XL
Color ink cartridge (S020036):
Colors Cyan, magenta, and yellow
Print capacity* In each color, approximately 1.2 million
characters (670 sheets/color, letter, 5%
duty at 360 dpi)
Cartridge life* 2 years from production date and up to
6 months after opening the package at
77° F (25° C); based on letter size paper
Temperature
Dimensions
* The cartrid ge lif e may var y. If you of ten prin t larg e graphi cs and den se
text, you will use up ink cartridges faster than if you print pages with
less ink coverage. Cleaning the print heads more often than
necessary will also consume ink.
** The ink thaws in approximately 2 hours at 77°F (25°C).
Caution:
c
Use only genuine EPSON ink cartridges and do not refill
❏
them. Other products may cause damage to your printer
that is not covered by EPSON’s warranties.
Do not use an ink cartridge after the expiration date on the
❏
package.
Storage: −22 to 104° F (−30 to 40° C)
1 month at 104° F (40° C)
Transit: −22 to 140° F (−30 to 60° C)
1 month at 104° F (40° C)
120 hours at 140° F (60° C)
Freezing:** 21.2° F (−6° C)
2.1 inches (W) × 2.7 inches (D) × 1.7 inches (H)
(54 mm × 67.4 mm × 41.8 mm)
Mechanical
Paper feed method: Friction with auto sheet feeder
Print head life: 1 billion dots per nozzle
Total print volume: 75,000 pages
Dimensions and
weight:
Stylus Pro
Width 19.0 inches (482 mm)
Depth 20.9 inches (530 mm)
Height 7.2 inches (182 mm)
Weight 16.7 lb (7.5 kg)
Stylus Pro XL
Width 22.8 inches (580 mm)
Depth 23.5 inches (597 mm)
Height 7.2 inches (182 mm)
Weight 22.1 lb (10 kg)
Electrical
Input voltage
range:
Rated frequency
range:
Input frequency
range:
Rated current: 0.6 A
Power
consumption:
103.5 to 132 V
50 to 60 Hz
49.5 to 60.5 Hz
Approx. 20 W (during self test,
LQ at 10 cpi)
Environmental
Temperature: Operation 50 to 95° F (10 to 35° C)
Storage* –4 to 140° F (−20 to 60° C)
1 month at 104° F (40° C)
120 hours at 140° F (60° C)
Humidity: Operation 20 to 80% RH
Storage* 5 to 85% RH
(without condensation)
* Stored in shipping container
Safety Approvals
Safety standards: UL 1950 with D3, CSA 22.2 950 with D3
R.F.I.: FCC part 15 subpart B class B
Fonts
The printer comes with an installed set of fonts, which are
selectable with the
However, the printer always uses the fonts selected through
the software program. The only time you need to select the
printer’s installed fonts is when the software program does
not allow you to select fonts.
button on the control panel.
Font
Interface Specificat i ons
The printer is equipped with an 8-bit parallel interface and a
serial interface.
Parallel Interface
Data format: 8-bit parallel, IEEE P1284 mode
compatible
Synchronization: STROBE pulse
Handshake timing: BUSY and ACKNLG signals
Signal level: TTL compatible
Connector: 36-pin, Centronics compatible
Ink Jet Printers 8/1/95 EPSON Stylus Pro and Pro XL-3
Page 4
EPSON Stylus Pro and Pro XL
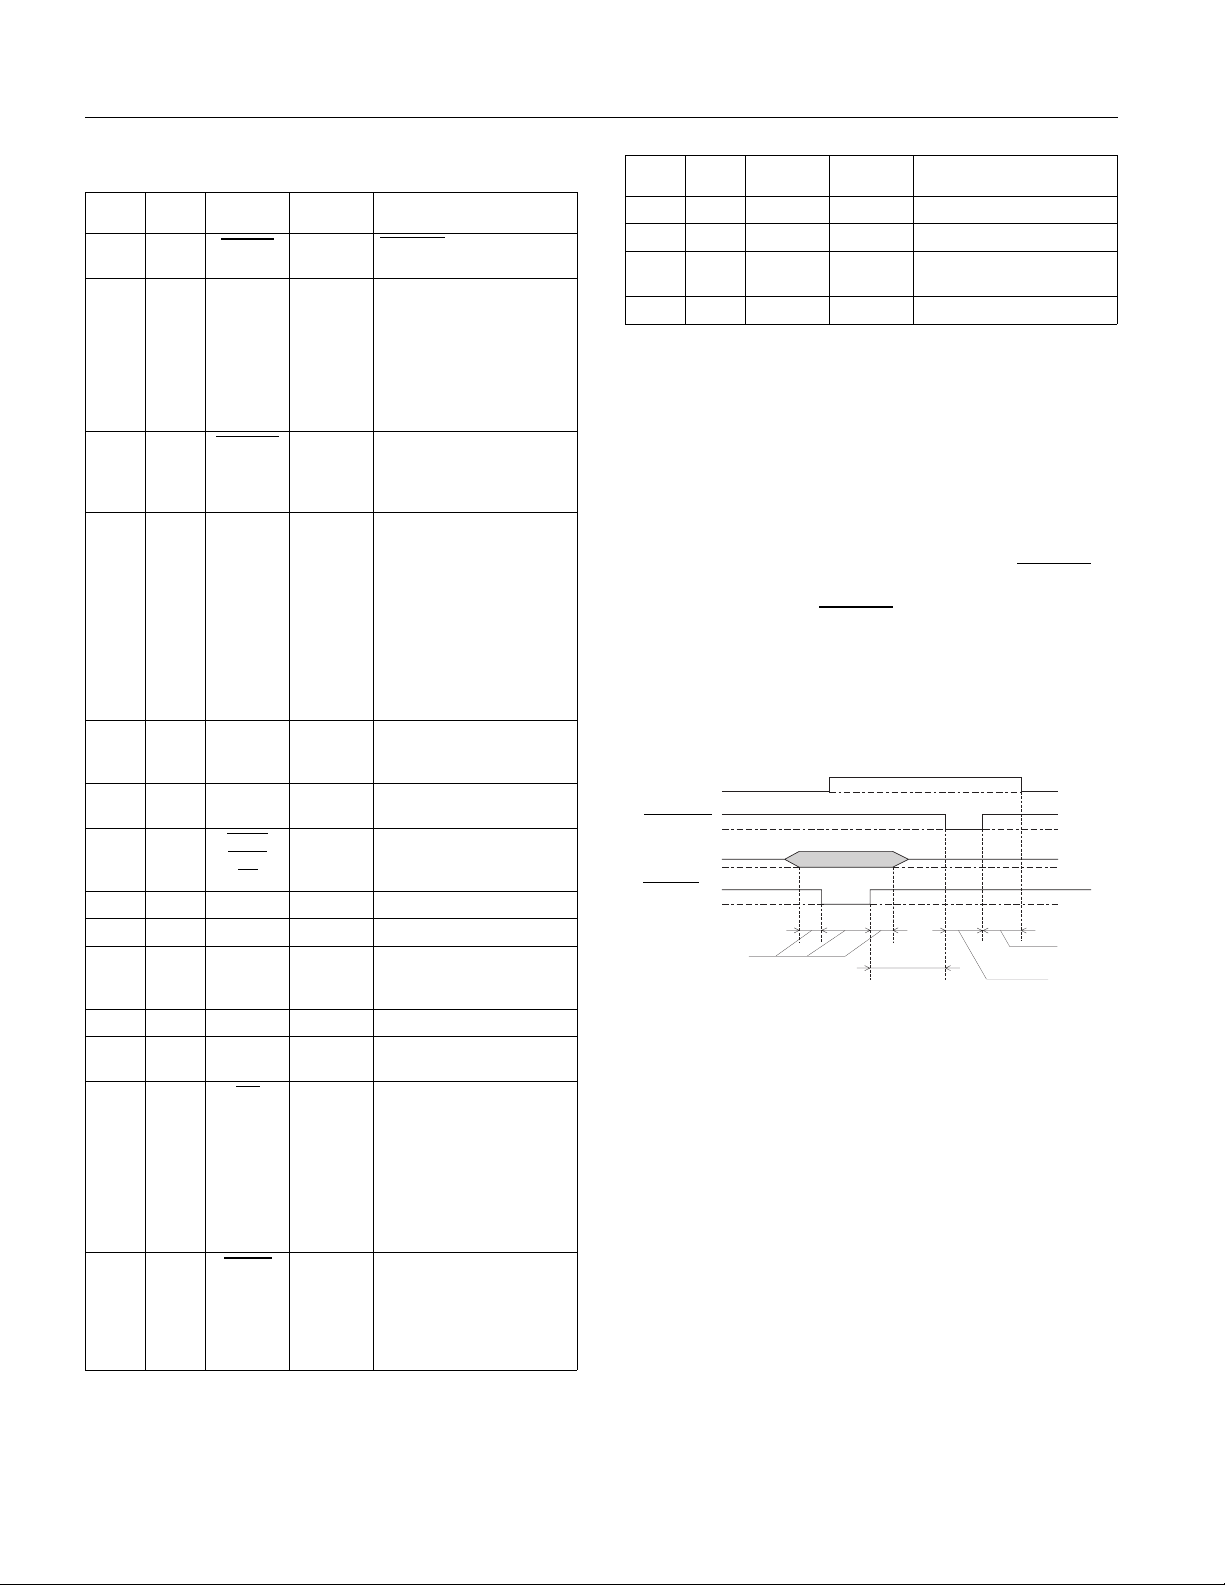
Pin assignments
Signal
Return
pin
pin Signal Direction D escription
119STROBE IN
2
20
21
22
23
24
25
26
27
DATA 1
DATA 2
DATA 3
DATA 4
DATA 5
DATA 6
DATA 7
DATA 8
FEED
XT
GND
3
4
5
6
7
8
9
10 28 ACKNLG OUT
11 29 BUSY OUT
12 30 PE OUT
13 - SLCT OUT
14 - AUTO
15 - NC 16 - GND 17 - CHASSIS
18 - NC -
19-30 - GND -
31 16 INIT IN
32 - ERROR OUT
STROBE
data.
These signal s repres ent
IN
information in bits 0 to 7 of
IN
parallel data respectively.
IN
Each signal is at HIGH level
IN
when data is lo gical 1 an d
IN
LOW when it is logical 0.
IN
IN
IN
About a 5-µs pulse. L OW
indicates data has be en
received an d the prin ter is
ready to accept more data.
A HIGH sig nal indi cate s th e
printer cannot receive data.
The signal goe s HIGH i n th e
following cases:
1) During data entry
(for each character)
2) During initialization
3) During self test and
default-setting printing
4) During a printer-error
state
A HIGH sig nal indi cate s th e
printer is in a paper-out
state or in an error state
Pulled up to +5 V thr ough
1 kΩ resistance
When this signal is LOW,
IN
the paper is automatically
fed one line after printing
Not used
Logic ground level
Printer’s chas sis grou nd,
-
which is connected to the
logic ground
Not used
Twisted-pa ir ret urn sign al
ground level
When this signal goes LOW,
the printer controller is reset
to its state when the power
is first turn ed o n an d th e
print buffer is cleared. This
level is normally HIGH; its
pulse width must be more
than 50 µs at the receiv ing
terminal.
This signal level goes L OW
when the printe r:
1) Is out of paper
2) Is in an error state
3) Has no ink cartridges
installed
pulse to r ead
Signal
Return
pin
pin Signal Direction D escription
33 - GND 34 - NC 35 - +5 V OUT
36 - NC -
Same as for pins 19-30
Not used
Pulled up to +5 V thr ough
1 KΩ resistance
Not used
Notes:
❏ The column heading “Direction” refers to the direction of signal
flow as viewed from the printer.
❏ “Return pin” denotes the twisted-pair return pin to be
connected at signal ground level. For the interface wiring, be
sure to use a twisted-pair cable for each signal and to complete
the connection on the return side.
❏ All interface conditions are based on TTL level. Both the rise
and fall times of each signal must be less than 0.2 microseconds.
❏ Data transfer must be carried out by observing the
ACKNLG or
BUSY signal. Data transfer to this printer can be carried out
only after receipt of the ACKNLG signal or when the level of the
BUSY signal is LOW.
Timing chart
The figure below shows the timing chart for the parallel
interface.
BUSY
ACKNLG
DATA
STROBE
0.5 µs (Min.)
0 µs (Min.)
5 µs (Typ.)
0 µs (Min.)
Transition ti me (b oth the ri se and the fall) of ev ery si gnal mu st be less
than 0.2 µs.
Serial Interface
The printer’s built-in serial interface is based on the RS-422
standard to allow the printer to be connected to an Apple
Macintosh.
Standard: Based on RS-422
Synchronization: Asynchronous
Bit rate: 57.6 Kbps/230.4 Kbps
Handshaking: DTR and XON/XOFF protocol
EPSON Stylus Pro and Pro XL-4 8/1/95 Ink Jet Printers
Page 5
EPSON Stylus Pro and Pro XL
Word format:
Data bit
Parity bit
Start bit
Stop bit
8 bits
None
1 bit
1 bit
Connector: 8-pin mini-circular connector
Recommended
cable:
Apple System/Peripheral-8 (part
number M0197) or equivalent
Optional Interfaces
Please refer to the specifications in the user’s guide packed
with the optional interface card.
Initialization
The printer can be initialized (returned to a fixed set of
conditions) in these ways:
Hardware
initialization
Software
initialization
Control panel
initialization
∗
The printe r is t urne d on .
∗
The printe r re ceiv es an
parallel int erface : pin 31 goes LOW.
∗
Software sends the ESC @ (initialize the printer)
command. The last panel settings are kept.
∗
Hold down the Alt button and press the Pause
button (buffer clear). The last panel settings are
kept.
INIT
signal fr om the
Item Default setting
Special printing effects Cancelled (except condensed and economy
User-defined
character set
Graphic mode
assignment
printing)
Hardware/control pane l initiali zation: cl eared
Software initialization: deselected only
ESC K = ESC ∗ 0, ESC L = ESC ∗ 1,
ESC Y = ESC ∗ 2, ESC Z = ESC ∗ 3
In addition, hardware and control panel initialization erases
any text in the data buffer.
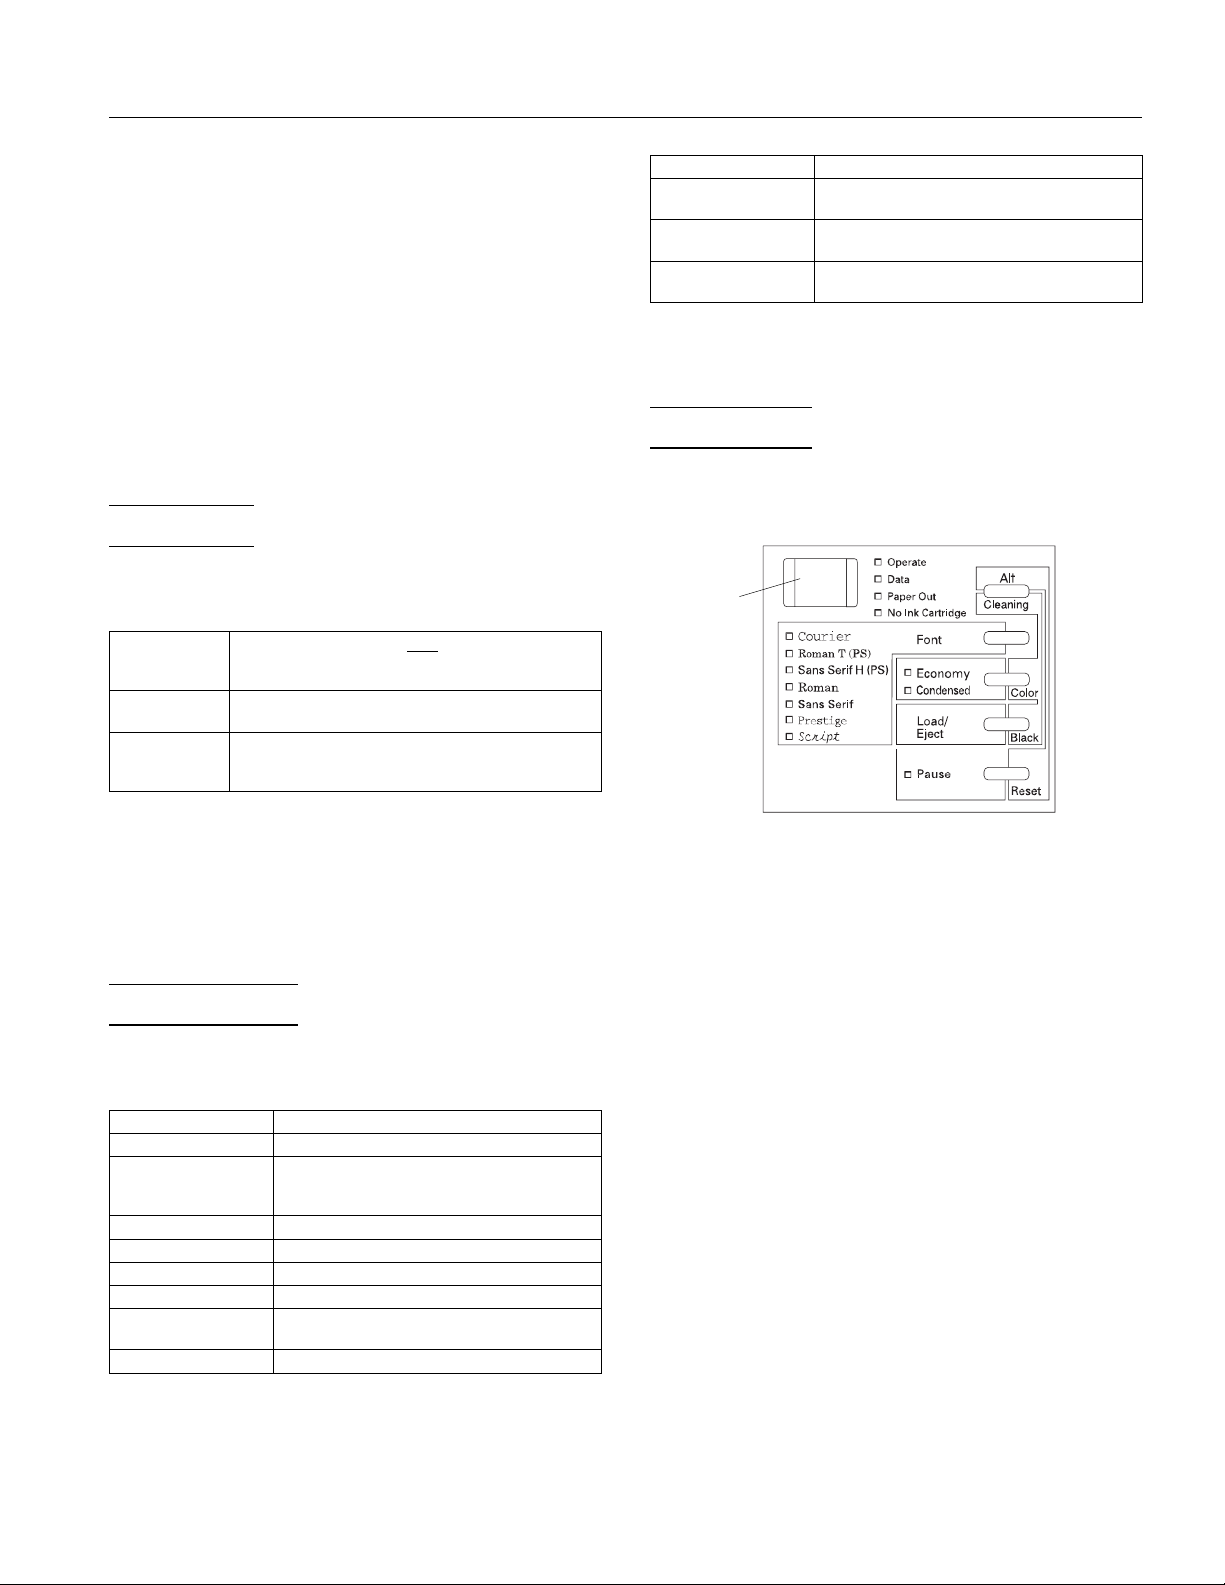
Control Panel
The printer’s front control panel contains lights for
displaying the printer status and buttons for controlling
certain settings.
Operate
button
All three initialization methods reset the font according to
the default settings selected using the control panel.
However, ESC @ does not initialize the printer mechanism,
clear the input data buffer, or clear the user-defined character
set. The control panel initialization does not initialize the
printer mechanism or clear the user-defined character set.
Default Settings
The table below shows the default settings that take effect
when the printer is initialized.
Item Default setting
Top-of-form position Current paper position
Page length Single sheets:
Left and right m argins Cancell ed
Line spacing
Character pitch Last font selected on control panel
Vertical tab position Cleared
Horizontal tab
positions
Font selection Last font selected on control panel
61 lines for le tter-s ize pa per
65 lines for A4-size paper
1
⁄
-inch line s paci ng
6
Every eight ch aracte rs
Since most printer settings can be controlled from software,
you do not often need to use the control panel. This section
describes how to read the lights and the buttons on the
control panel.
Lights
Operate
Data
Paper Out
No Ink
Cartridge
Font
Economy
On when the printer is on. Flashes when the
printer is turned on or off.
On when data is being received by the printer
or when data remains in printer memory.
On when the printer runs out of paper. Rapid
flashing indicates a paper jam.
On when one or both ink cartridges are not
installed. The printer will not work unless
both cartridges are installed.
Indicates the font selected through the control
panel. Because you normally choose fonts
from your software, ignore this light.
On when economy printing mode is selected.
In economy mode the printer uses less ink by
printing fewer dots per character. Use this
mode for rough drafts of text only.
Ink Jet Printers 8/1/95 EPSON Stylus Pro and Pro XL-5
Page 6

EPSON Stylus Pro and Pro XL
Condensed
On when condensed mode is selected. In this
mode, the printer prints selected fonts at 60%
of their width so that more characters can fit
on a page.
Pause
On when printing is paused. This light flashes
when you clean the print heads or replace ink
cartridges, or when an error occurs. Never
turn off the printer when the
Pause
light is
flashing.
Buttons
Operate
Caution:
c
❏
❏
Font
Load/Eject
(or
Black)
Pause
(or
Reset
Economy/Condensed
Alt/Cleaning
Using special button combinations
The functions listed below are available when you hold
down a combination of buttons when turning on the printer.
Self test
Checks the paper length and performs a self test by printing
fonts and colors. Hold down the
press the
Turns the printer on and off.
Always turn off the printer by pressing the
button. Then wait until the
Operate
light stops flashing
before unplugging the printer.
Never turn off the printer while the
Pause
flashing.
Controls the fonts available on the printer.
Normally you should use your software to
select fonts.
Loads or ejects a sheet of paper. The printer
normally loads and ejects paper
automatically. When pressed with
the black print head.
Stops printing temporarily. Press it again to
)
resume printing. When pressed with
clears the printer’s buffer and resets the
printer settings to their factory defaults.
(or
Color
)
Selects economy or condensed mode. In
economy mode, the printer uses less ink to
produce text and images. Condensed printing
reduces the size of characters to
approximately 60% of their normal width. It is
best to use your software to select character
size, however. When pressed with
the color print head.
Used in combination with other buttons to
reset the printer, clean the print heads, or
adjust the paper thickness lever.
(Operate + Load/Eject)
button and then
Operate
Load/Eject
button for 2 or 3 seconds.
Operate
light is
, cleans
Alt
Alt
, cleans
Alt
,
Hex dump
(Operate + Font + Load/Eject)
On a PC, prints data in hexadecimal code for troubleshooting
analysis.
Default setting mode
(Operate + Economy/Condensed)
Enters the Default setting mode.
Note:
To exit the hex dump or Default setting mode, press the
button and then the
Reset printer
(Alt + Pause)
Operate
button to turn off the printer.
Pause
Clears the printer’s buffer and resets the printer settings to
their factory defaults. Hold down both buttons for about 5
seconds.
Black print head cleaning
(Alt + Load/Eject)
Runs a cleaning cycle for the black print head.
Color print head cleaning
(Alt + Economy/Condensed)
Runs a cleaning cycle for the color print head.
Default Setting Mode
Additional printer functions are available through the
Default setting mode. Because the printer’s factory defaults
are designed to meet the needs of almost all users, you rarely
need to change the printer functions described in this section.
If necessary, however, you can turn on the Default setting
mode and change the settings using the control panel buttons.
The table below lists the settings you can select in the Default
setting mode. Default values are shown in bold type.
Setting Options
Print direction
Network interface mode On,
Auto line feed On,
Loading position
Interface mode
Auto interface wait mode
Character tab le Italic U.S.A ., Ital ic Fran ce, Ital ic
Print direction.
Specifies how the print head moves across
the page. The options are Uni-D, Bi-D, and Auto (default).
When Uni-D is on, the print head prints in only one direction
to provide the most precise alignment for graphics and text.
In Bi-D printing, the print head prints in both directions. Bi-D
is faster, but the vertical alignment may not be as precise as
Uni-D. When Auto is selected, the printer switches
automatically between Uni-D and Bi-D as necessary when it
receives data.
Auto
, Bi-D, Uni-D
Off
Off
3 mm
,
Auto I/F mode
Option I/F
10 seconds
Germany, Italic U.K., Italic Denmark,
Italic sw eden , It al ic Ita ly , It al ic S pai n I,
PC437
PC861, PC437, Greek, PC853, PC855,
PC852, PC 857, PC 866, PC 86 9, B RA SCI I,
Abicomp, MAZOWIA, Code MJK, ISO
8859-7, ISO Latin 1T, or Bulgaria
, Parallel I/F, Serial I/F,
, 30 seconds
, PC850, PC860, PC863, PC865,
EPSON Stylus Pro and Pro XL-6 8/1/95 Ink Jet Printers
Page 7
EPSON Stylus Pro and Pro XL
Network interface mode.
when the printer is connected to multiple computers, turn on
network interface mode. By default, network interface mode
is off.
Auto line feed.
encountered in the print file be accompanied by a line feed
command. By default, auto line feed is off. If text lines print
on top of one another, turn on auto line feed.
Loading position
how close to the paper edge the first line can print. The
loading position can be 3 mm (default) or 8.5 mm. Normally
you should use your software to adjust your top margin.
Interface mode.
receives print data. By default, the printer automatically
switches as needed between the parallel, serial, and optional
interfaces. However, if you are experiencing communication
problems, you might want to set the interface mode to one of
the following: Parallel, Serial, or Optional.
Auto interface wait mode.
period, either 10 or 30 seconds, when the Auto I/F mode is
selected for the Interface mode option. The printer does not
accept data from another interface for the period defined.
Character table.
that can be printed. The default is the U.S.A. character table.
If you commonly use a language containing accents,
symbols, or other characters not available in the U.S.A.
character table, change to a different character table.
Specifies that a carriage return character
. Determines the top margin by defining
Determines from which interface the printer
Selects the set of characters and symbols
If you’re having trouble printing
Determines the interface timeout
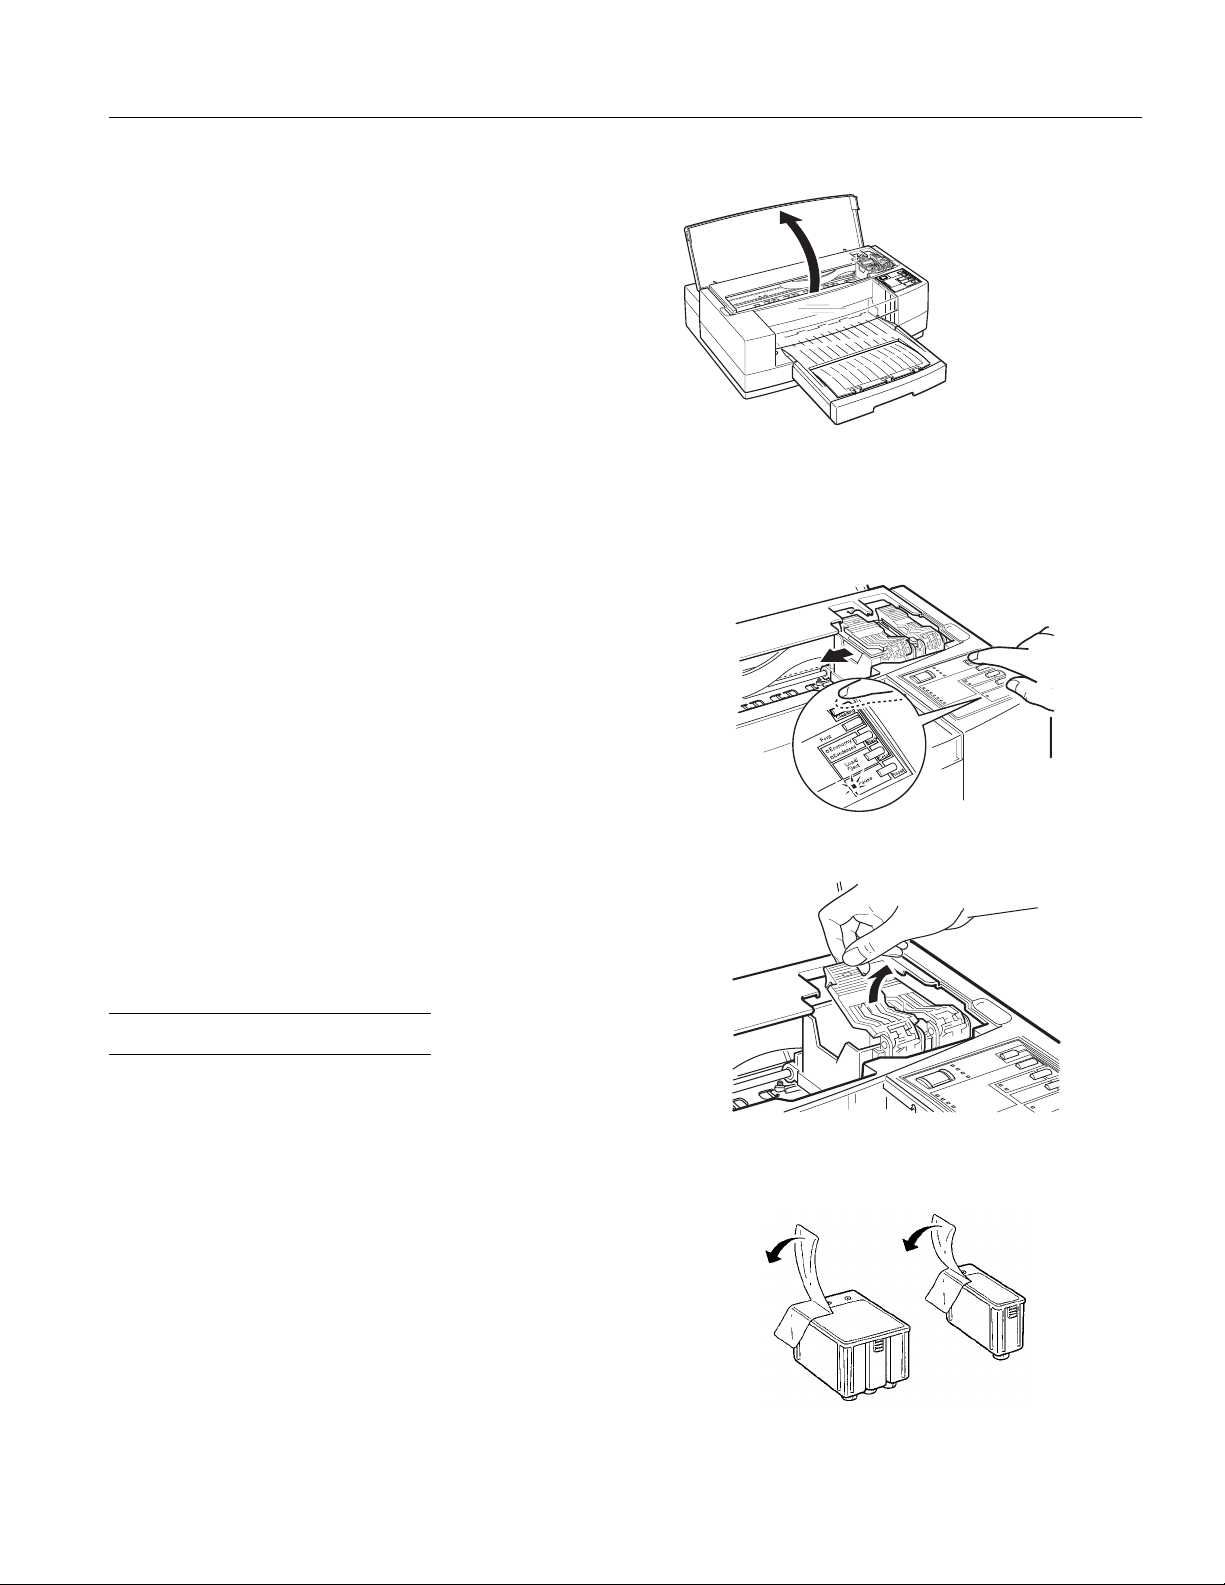
2. Open the printer cover.
3. Press the
control panel comes on.
4. Hold down the
print head moves slightly left, to the the ink cartridge
install position. The
button. Make sure the
Pause
button for about five seconds until the
Alt
Pause
Pause
light begins flashing.
light on the
To turn on Default setting mode and print instructions, turn
off the printer. Then hold down the
button while you turn the printer back on. Follow the
instructions that describe how to change the default settings
by pressing the buttons on the control panel. When you are
finished, press
Default setting mode.
and turn off the printer to exit the
Pause
Economy/Condensed
Installing the Ink Cartridges
Follow the steps below to install the printer’s ink cartridges.
Warning:
w
The ink cartridges are self-contained units. Under ordinary
use, ink will not leak from a cartridge. If ink gets on your
hands, wash them thoroughly with soap and water. If ink gets
into your eyes, flush them immediately with water.
Caution:
c
Do not open the ink cartridge packages until just before you
install them or they may become too dry.
1. Make sure the printer is turned on.
5. Pull up each of the ink cartridge clamps to open them.
6. Open the foil ink cartridge packages and remove the
cartridges. Then remove the tape seal from each ink
cartridge as shown below.
black cartridge
color cartridge
Ink Jet Printers 8/1/95 EPSON Stylus Pro and Pro XL-7
Page 8
EPSON Stylus Pro and Pro XL
Caution:
c
You must remove the tape seal from the cartridges. Leaving
the tape on will permanently damage them.
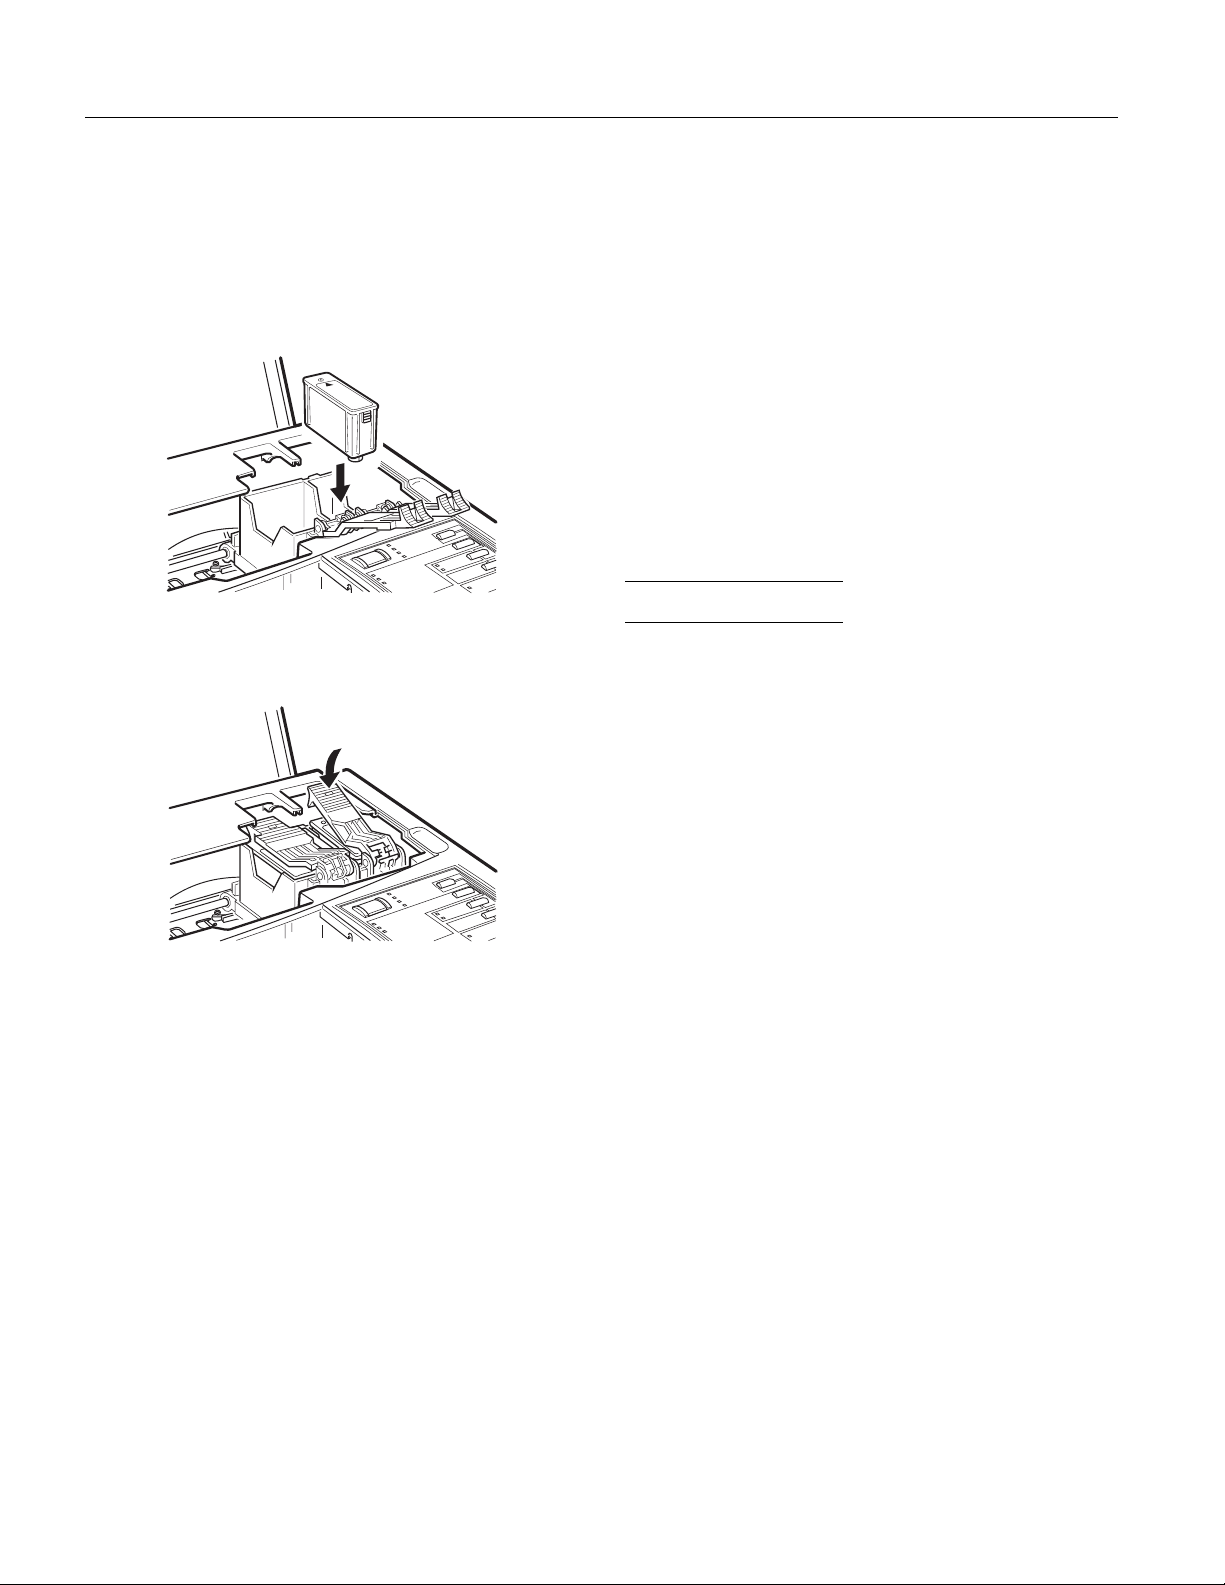
7. Lower the cartridges into their holders with the label facing
up and the arrow on top of the cartridge pointing toward
the back of the printer. The color cartridge, which is
larger, goes on the left. Install the black ink cartridge on
the right.
Be sure to install both ink cartridges. The printer will not
work if only one cartridge is installed.
8. Push down the ink cartridge clamps until they lock in place.
10.Press the
11.Close the printer cover.
In order to maintain optimum print quality, the printer
periodically performs a cleaning operation. You may notice
the cleaning cycle being performed when the printer has
been on for a while without being used or when you turn it
on after it has been off for a while.
You may sometimes need to manually activate a cleaning
cycle to clean the print heads if you notice a decline in print
quality.
Note:
When you need to replace ink cartridges, be sure to use only
genuine EPSON ink cartridges and do not refill them. Other
products may cause damage to your printer that is not covered by
EPSON’s warranties.
Pause
button.
Testing the Printer
For the self test, use paper that is at least 8.25 inches
(210 mm) wide if you have the Stylus Pro, or 11.7 inches
(297 mm) wide if you have the Stylus Pro XL. Otherwise, ink
sprays directly onto the platen and can smear subsequent
pages. (See “Loading Plain Paper” below for instructions on
loading paper.)
Caution:
c
Once you install the ink cartridges, do not open the clamps
or remove the cartridges except to replace them with new
ones. Once you remove a cartridge, do not reuse it; this
may damage the print head.
9. Press the
home position. (Even if you do not press
head moves back to its home position about 60 seconds
after you close the clamps.)
After you install the ink cartridges, the printer charges the
ink delivery system. This takes about one minute. During
this time, the
finished charging, the
flashing.
Caution:
c
Never turn off the printer while the
flashing.
button again to return the print head to its
Alt
, the print
Alt
light flashes. When the printer is
Pause
light stays on without
Pause
light is
Pause
1. Press the
c
2. While holding down the
Operate
The self test begins by printing on the first and last lines
of the first sheet of paper to measure the page length.
Then it prints character samples on the next sheet using
the available fonts and colors.
3. To end the self test, press the
off the printer. Otherwise, the test continues until the
paper in the paper tray runs out.
Caution:
c
Do not turn off the printer before pressing the
If the quality of the test output is not good, clean the print
heads.
Operate
Caution:
Never turn off the printer by unplugging it or turning off a
power strip. Always turn off the printer by pressing the
Operate
button for 2-3 seconds.
button to turn off the printer.
button.
Load/Eject
button and then turn
Pause
button, press the
button.
Pause
EPSON Stylus Pro and Pro XL-8 8/1/95 Ink Jet Printers
Page 9

EPSON Stylus Pro and Pro XL
Calibrating the Printer
The printer is calibrated at the factory so that vertical lines in
your text and graphics are properly aligned. If you notice
misaligned images in printouts, however, calibrate the
printer with the Bi-D Calibration Utility. You may need to do
this after moving the printer to a new location, for example.
Using a PC
Follow these steps to calibrate the printer using a PC:
1. If you did not install the Bi-D Calibration Utility on the
hard disk, insert the Windows printer driver diskette in
your computer’s diskette drive.
2. Make sure Windows Program Manager is running.
3. Choose
appears.
4. Type the directory name where the utility is located. For
example, type
on your hard disk). Then press
5. When you see the Calibration Utility screen, make sure
Stylus Pro or Pro XL
↑ or ↓ to select it.
Also make sure
bottom of the screen. (Use the
necessary.)
6. Press
7. The next screen prompts you to align the black and color
heads. Press
print head, press
from the File menu. The Run dialog box
Run
A:CALIBRAT
Print calibration pattern
Enter
to start calibrating.
Enter
Tab
is selected as the printer. If it isn’t, use
to choose
to select No.)
C:\
(or
directory
Enter
.
Tab
key to move down, if
. (To align only the black
Yes
\CALIBRAT
is selected at the
if
Using a Macintosh
Follow these steps to calibrate the printer using a Macintosh:
1. Open the Stylus COLOR folder and double-click
Bi-D Calibration Utility
2. You see a prompt asking you to choose the interface type.
Click
3. You see the Bi-D Calibration Utility screen. First specify
whether you connected the printer to the modem or
printer port by clicking the appropriate icon.
4. Click the
the first pattern page.
Wait for about two minutes while the printer prints a page
containing multiple patterns of vertical lines, each
assigned with an offset value. In most patterns, the
vertical lines are slightly misaligned. Look for the pattern
that is most closely aligned.
Aligned Not aligned
5. Enter the offset value of the pattern that is most closely
aligned in the
confirmation page.
6. Repeat steps 4 and 5, selecting the
Pattern 5
pattern that is most closely aligned on each pattern page.
7. When you finish, click
If you notice later that the vertical alignment of your printed
pages is off, repeat the calibration procedure.
or
Serial
Network
Pattern 1
||
| |
No.
buttons and entering the offset value of the
.
, as appropriate.
button to align the print heads using
box and click OK. The printer prints a
through
Quit
Pattern 2
.
Wait for 1 minute while the printer prints a page of
multiple patterns of vertical lines, each identified by an
offset value. In most patterns, the vertical lines are slightly
misaligned. Look for the pattern that is most closely
aligned.
||
| |
Aligned Not aligned
8. Enter the offset value of the pattern that is most closely
aligned. The printer prints a confirmation sheet with the
offset value for the pattern you selected.
9. If the lines are not aligned, press
Done
Enter
to repeat the calibration.
.
then press
10.When you are satisfied with the alignment, press
select
Tab
to move to
Re-Align
Enter
to
Loading Plain Paper
The following procedure describes how to load plain bond
paper. You can load up to 100 sheets of plain paper. For
information on loading oversized paper or special types of
media, see the next sections.
Always load paper with the printable surface down. The
printable surface is marked with an arrow on most plain
paper packaging.
;
Ink Jet Printers 8/1/95 EPSON Stylus Pro and Pro XL-9
Page 10
EPSON Stylus Pro and Pro XL
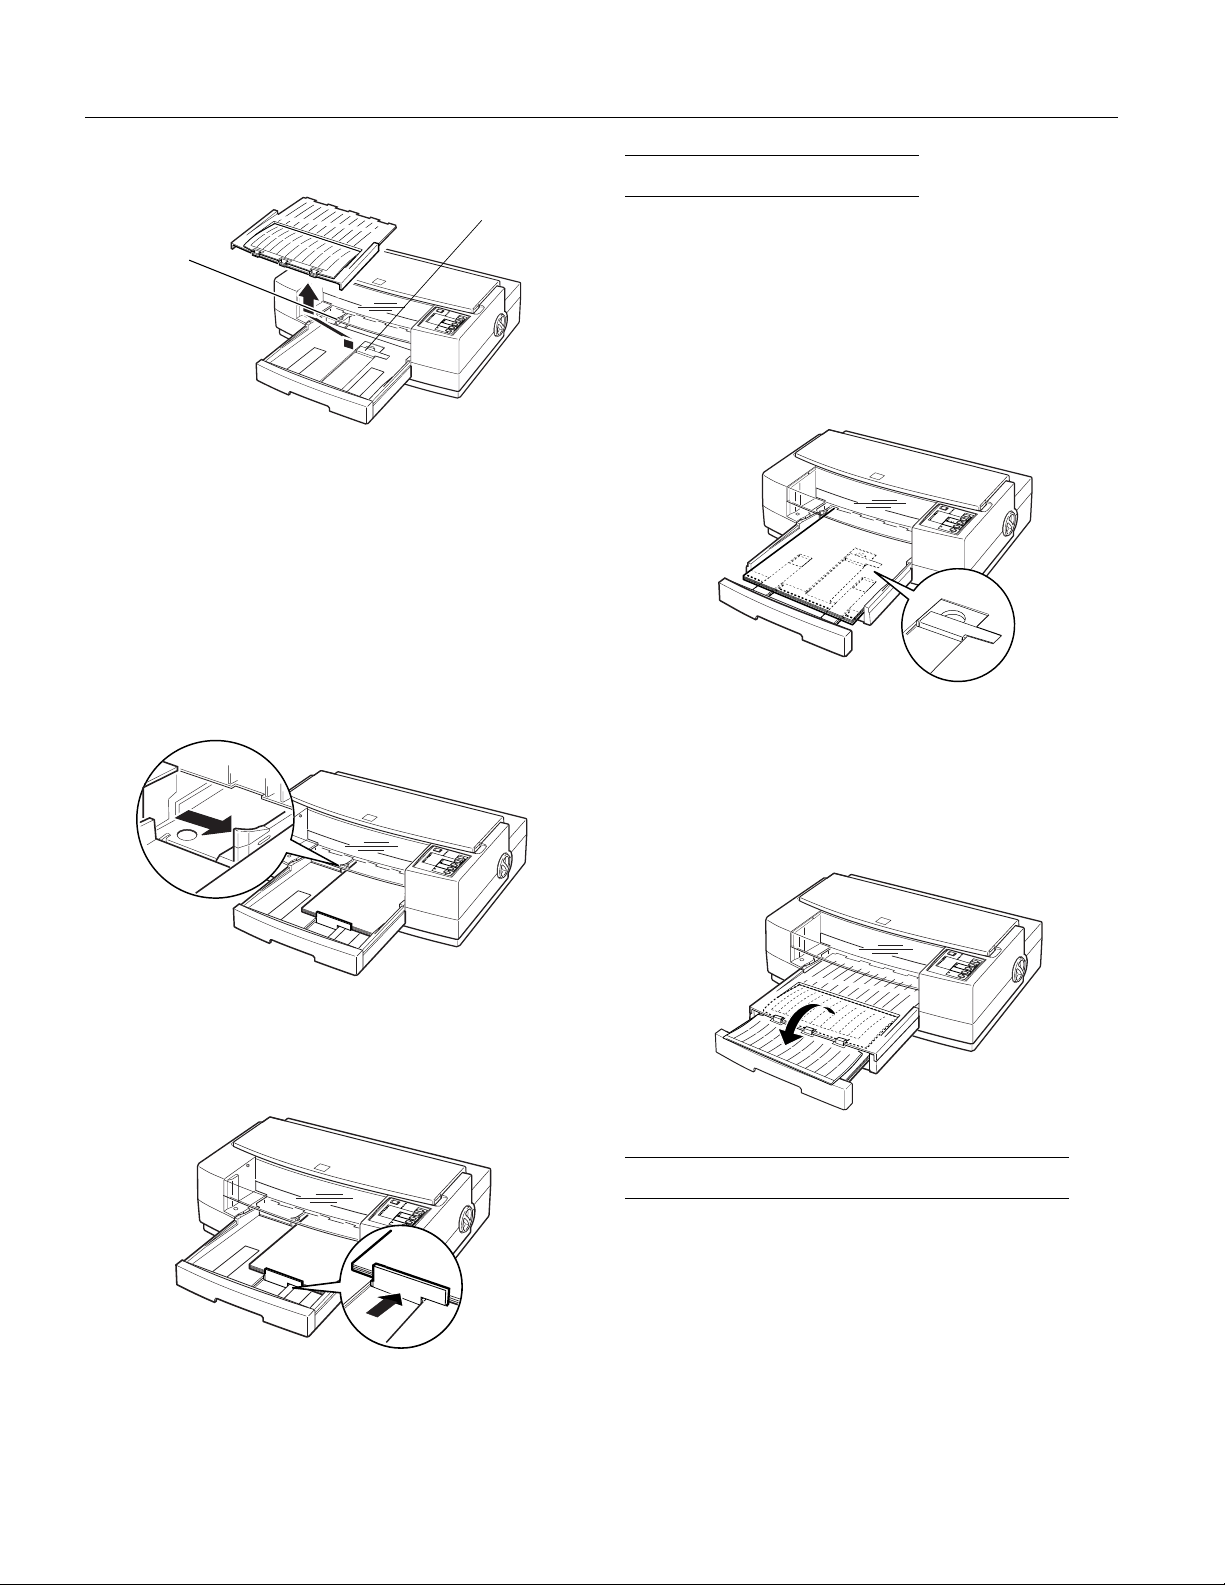
1. Remove the output tray from the top of the paper tray.
rear edge guide
left edge
guide
2. Slide the left edge guide inside the paper tray to the left as
far as it will go.
3. Flip up the rear edge guide and slide it toward you as far as
it will go.
4. Fan a stack of paper; then tap it on a flat surface to even the
edges.
5. Load the stack of paper, printable side down, so that its
right edge rests against the right side of the paper tray.
Slide the stack into the tray until you feel some resistance.
Then slide the left edge guide against the left edge of the
paper as shown below.
Loading Oversized Paper
If you are loading paper that is larger than the paper tray,
you need to pull out the paper tray extension. Follow these
steps:
1. Remove the output tray and remove any paper in the
paper tray.
2. The paper tray extension acts as the rear edge guide, so
make sure the built-in rear edge guide is folded down as
shown in the illustration below.
paper tray
extension
3. Gently pull the extension out using both hands—one to
hold the paper tray in position and the other to pull out
the extension.
You can load up to 100 sheets of plain bond paper, but do
not load paper above the arrow mark on the left edge
guide.
6. Slide the rear edge guide against the rear edge of the paper.
7. Place the output tray on top of the paper tray.
4. Load the stack of paper in the tray and then slide in the
extension until it meets the edge of the paper stack.
5. Replace the output tray and fold out its extension.
Using Special Papers and Other Media
This section explains how to use and load special coated
paper, glossy paper, transparencies, and envelopes in the
printer. When using these special types of media, keep the
following in mind:
❏ Use special coated paper and glossy papers within one
year of purchase. Use transparencies within six months.
❏ Do not touch the printable surface of the paper. The
moisture and oils on your hands can reduce print quality.
Hold sheets by their edges.
EPSON Stylus Pro and Pro XL-10 8/1/95 Ink Jet Printers
Page 11
EPSON Stylus Pro and Pro XL
❏ Be sure to load paper with the printable surface face
down. The printable side is whiter than the other, and is
usually identified on the package.
❏ When printing on high-quality glossy paper or
transparencies, remove each sheet from the output tray
immediately after it is printed. Make sure each sheet is
dry before stacking.
❏ Return unused sheets to their original package as soon as
possible after you finish printing. Unfavorable storage
conditions—especially high temperature, humidity, and
direct sunlight—can damage the media.
❏ Remember to select the appropriate setting in the driver
software before you print.
❏ If the paper doesn’t feed properly or jams, see the later
section on clearing and preventing paper jams.
Loading Special Papers and Transparencies
Follow these guidelines when printing on coated paper,
glossy paper, or transparencies:
❏ Use special coated paper for 360 or 720 dpi or
transparencies only under these normal operating
conditions:
Temperature: 59° to 77° F (15° to 25° C)
Humidity: 40% to 60% RH
❏ When printing on glossy paper, remove each sheet from
the output tray as soon as it is printed and do not stack
sheets until they are completely dry.
The paper tray can hold 70 sheets of coated paper, 30 sheets
of high-quality glossy paper, or 50 transparencies.
Follow these steps to load special papers and transparencies:
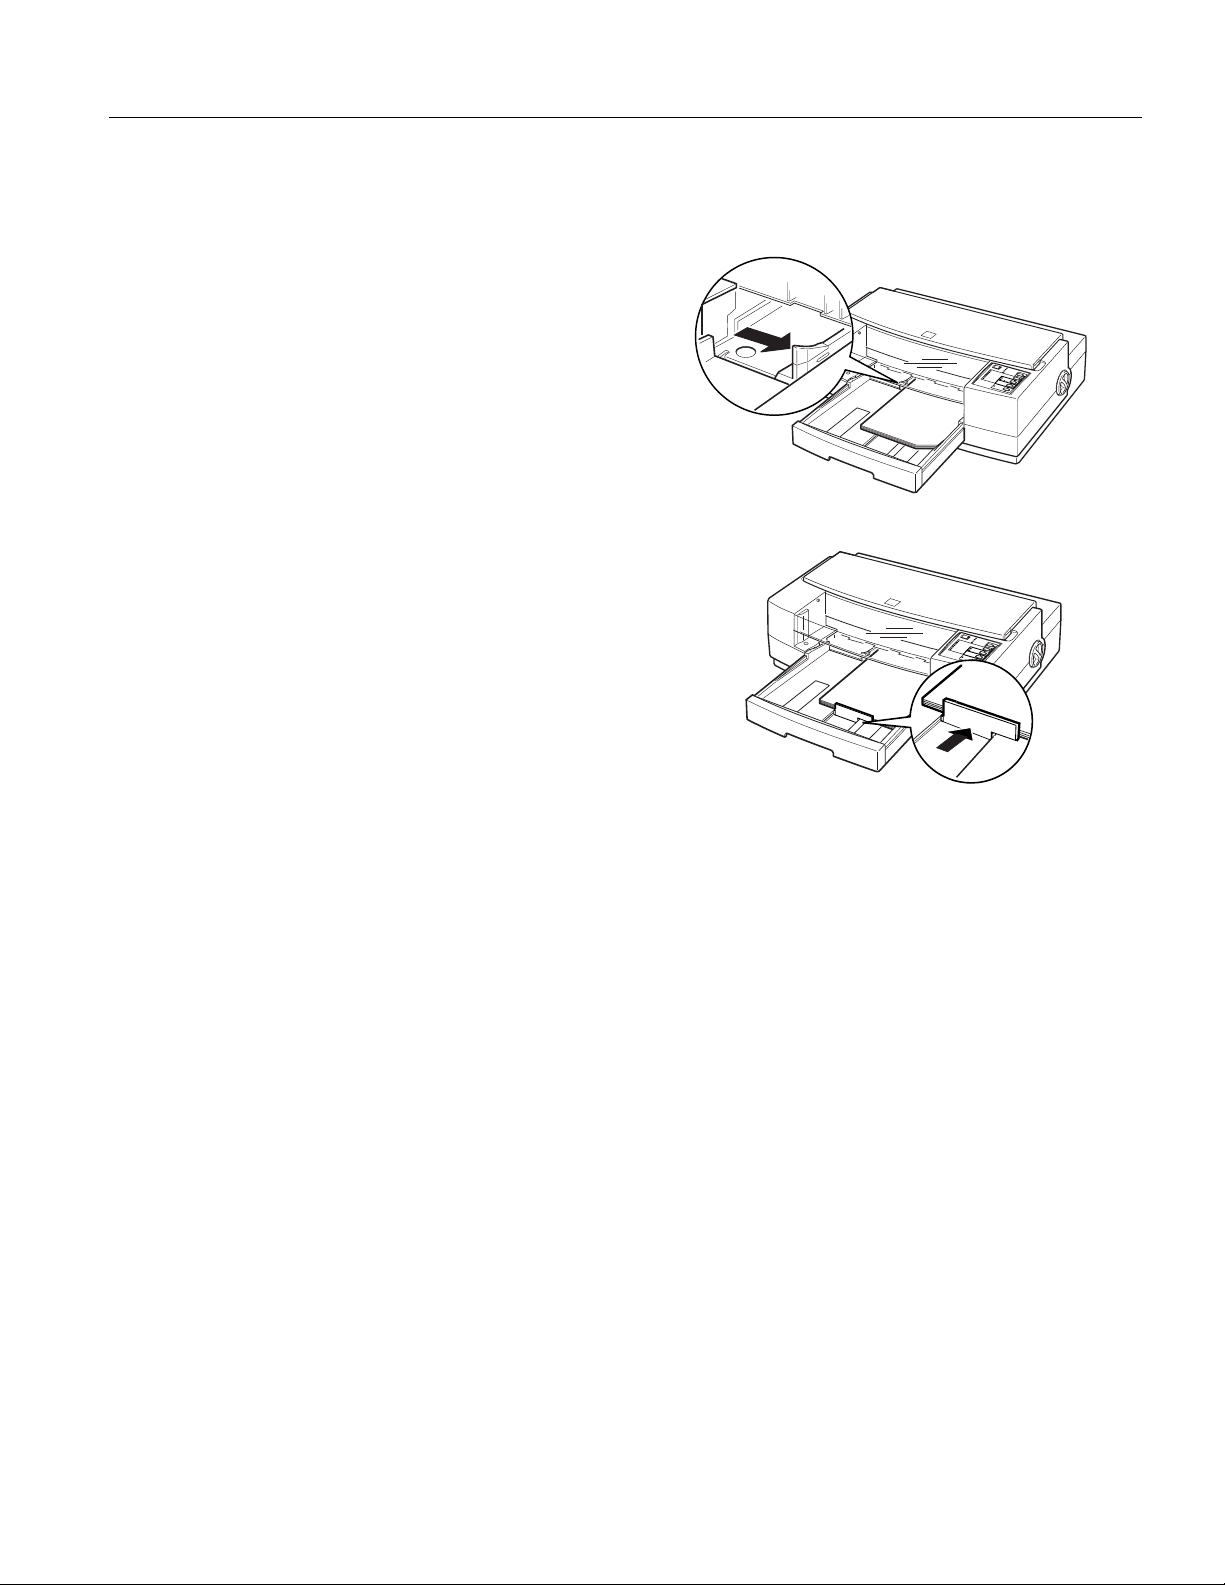
1. Remove the output tray from the top of the paper tray.
2. Slide the left edge guide inside the paper tray to the left as
far as it will go and slide the rear edge guide toward the
front of the printer as far as it will go.
3. Fan a stack of paper; then tap it on a flat surface to even the
edges.
4. Before you load paper, make sure the printable surface is
face down. For coated papers, the printable side is whiter
than the other side. For glossy paper and transparencies,
the printable side is face down when the cut corner is
positioned as shown in the following illustration.
Load the paper or transparencies firmly against the right side
of the paper tray. Slide the stack into the tray until you
feel some resistance. Then slide the left edge guide against
the left edge of the paper stack.
5. Slide the rear edge guide against the rear edge of the paper.
6. Change the printer driver settings to match the paper
or transparencies you loaded.
Loading Envelopes and Heavy Paper
This section explains how to load envelopes and heavy
paper. When printing, follow these guidelines:
❏ Do not use envelopes that are curled, folded, or bent.
❏ Do not use envelopes that are too thin; they may curl
during printing.
❏ Do not choose 720 dpi resolution for envelope printing.
❏ If you are using a DOS application, you may be able to
select 720 dpi if your DOS program supports 720 dpi
printing. You can select from Bi-D, Uni-D, or Auto print
directions using the Default setting mode. The Uni-D
setting is recommended when printing at 720 dpi.
❏ When loading heavy paper (paper that is thick or stiff), it
is recommended that you load one sheet at a time.
Ink Jet Printers 8/1/95 EPSON Stylus Pro and Pro XL-11
Page 12
EPSON Stylus Pro and Pro XL
Adjusting the paper thickness lever
When printing on envelopes or heavy paper, you need to
adjust the paper thickness lever to compensate for the extra
paper weight.
1. Make sure the printer is turned on. Then press the
button and open the cover.
2. While holding down the
and then release both buttons. The carriage moves to the
lever-adjusting position and the
loaded in the printer is ejected when you adjust this lever.
3. Rotate the paper thickness lever clockwise as far as it will
go.
4. Press the
5. Close the printer cover.
button. Then press
Alt
button, press the
Alt
Data
Pause
light flashes. Paper
.
Font
Pause
button,
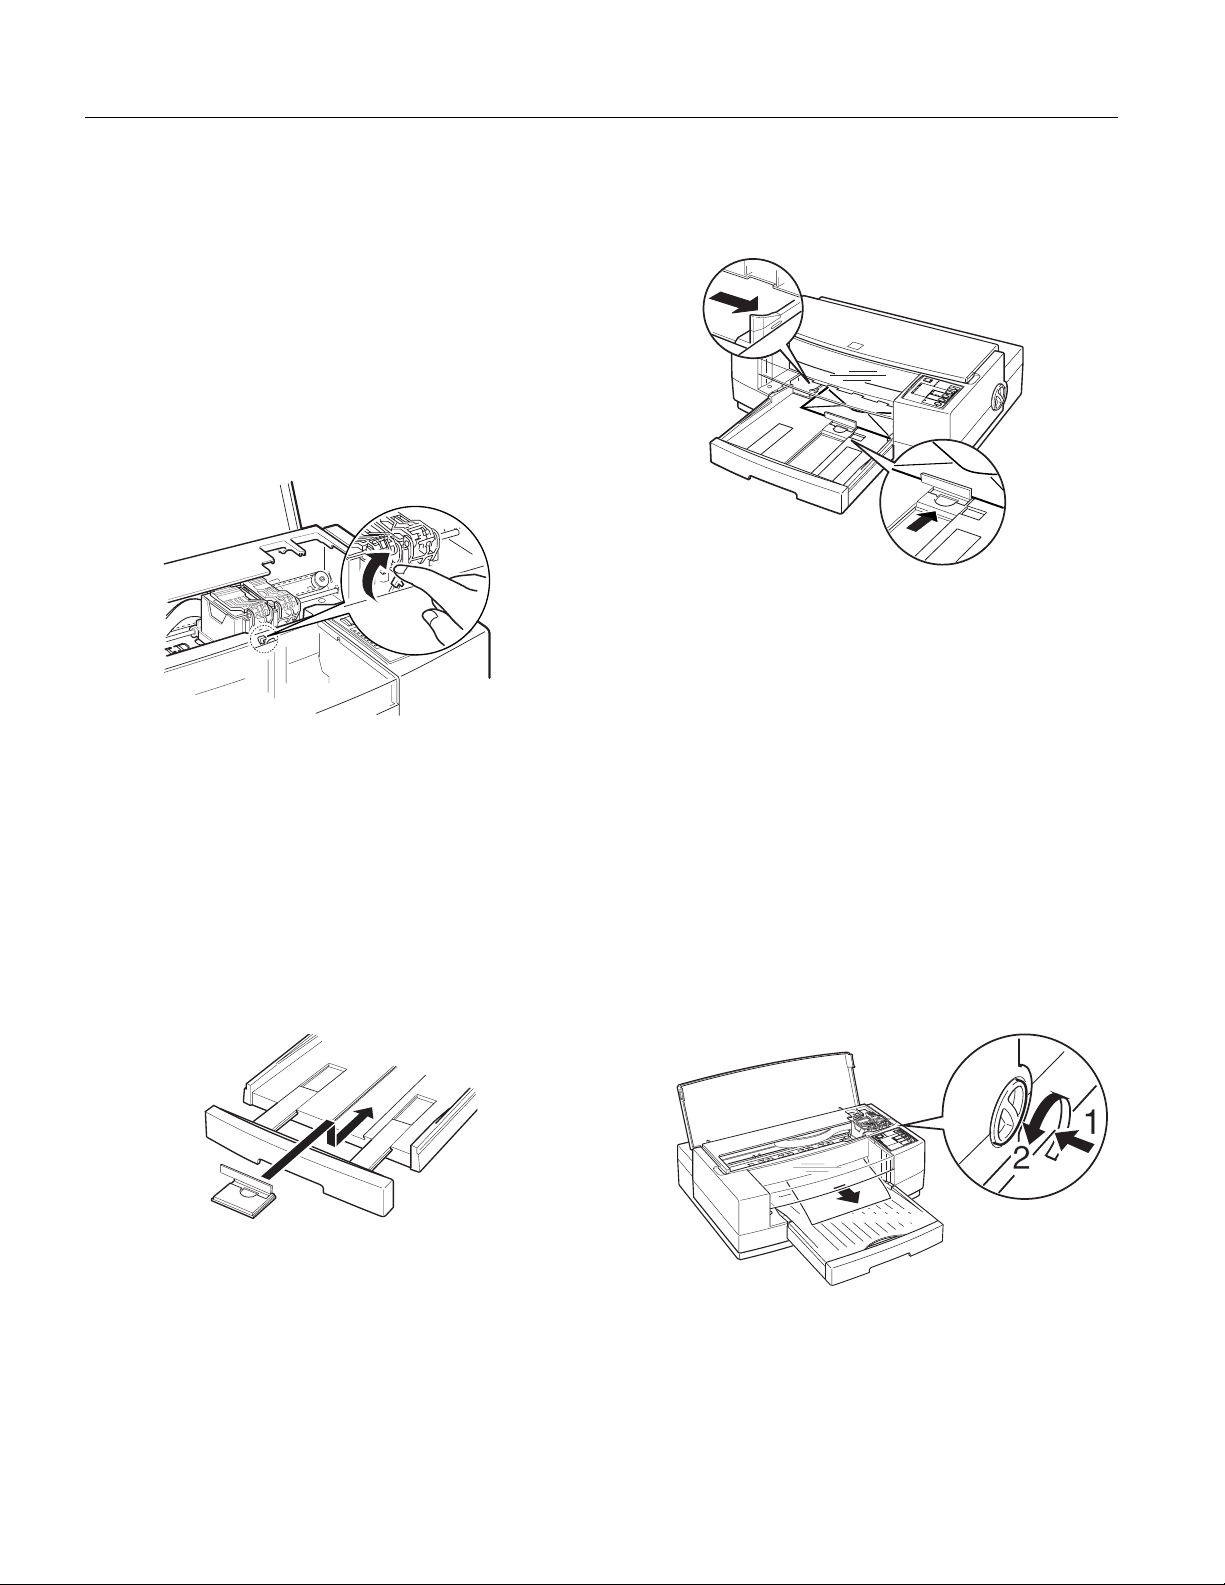
3. Insert the paper or envelopes into the paper tray. It is best
to load sheets of heavy paper one at a time. If you’re
loading envelopes, insert them as shown. You can load up
to 10 envelopes.
4. Adjust the rear and left edge guides as shown above so the
media feeds straight into the paper path.
5. Change the printer driver settings so they are appropriate
for the media you loaded.
After you are finished printing on heavy paper or envelopes,
rotate the paper thickness lever by turning it
counterclockwise to its original position. Also return the rear
edge guide to its paper position, if necessary.
Loading the paper tray
After adjusting the paper thickness lever, follow these steps
to load the paper tray:
1. Remove the output tray and remove any paper from the
paper tray.
2. If you are printing on envelopes, pull back the paper tray
extension. Then remove the rear edge guide, turn it
around, and reinstall it as shown.
Clearing and Preventing Paper Jams
If paper has jammed inside the printer, clear the jam as
follows:
1. Turn off the printer.
2. Open the printer cover.
3. Push in the knob on the right side of the printer and turn it
counterclockwise as shown below.
Be sure to turn the knob in the direction shown; otherwise
ink from the printed sheet can come off on the printer and
smear other sheets.
EPSON Stylus Pro and Pro XL-12 8/1/95 Ink Jet Printers
Page 13

EPSON Stylus Pro and Pro XL
4. Pull the paper out carefully. If it tears, make sure you
remove any remaining pieces.
5. If paper is caught in the paper eject area, gently pull it out
of the printer.
6. Close the printer cover.
7. Turn on the printer to move the print heads to the correct
positions.
If paper jams frequently, try the following:
❏ Use a higher quality paper, one that is not too thin, too
thick, or rough. Make sure it is suitable for ink jet printers.
For best quality, use EPSON special coated and highquality glossy papers.
❏ Fan the stack of paper before you load it.
❏ Do not load too many sheets in the input tray. You can
load up to 100 sheets of plain paper, 70 sheets of special
coated paper, 30 sheets of high-quality glossy paper,
50 sheets of transparency film, or 10 envelopes. For heavy
paper, it is best to load sheets one at a time.
Cleaning the Print Heads
The printer periodically cleans its print heads, so normally
you should not need to manually activate a cleaning cycle.
However, if print quality diminishes, run a print head
cleaning cycle to enable the nozzles to deliver ink properly.
It can sometimes take up to five cleaning cycles to improve
print quality. If it does not improve after you clean the print
heads five times, replace one or both ink cartridges as
described in the next section.
Replacing an Ink Cartridge
You need to replace an ink cartridge when it runs out of ink
(the printer stops printing that color) or if print quality
declines and cleaning the print head did not improve it. You
can check print quality by doing a printer self test.
Use only these EPSON ink cartridges:
Black ink cartridge S020034
Color ink cartridge S020036
Caution:
c
Use only genuine EPSON cartridges and do not refill
❏
them. Other products may cause damage to your printer
that is not covered by EPSON’s warranties.
Leave the old cartridge installed in the printer until you are
❏
ready to replace it with a new one. Attempting to print
without a cartridge installed can damage the printer.
Once you install the ink cartridges, do not open the clamps
❏
or remove the cartridges except to replace them with new
ones. Once you remove a cartridge, you cannot reuse it.
Any paper in the paper path is ejected automatically when
you replace the cartridge.
Note:
Because the cleaning cycle uses ink, do not clean the print head(s)
unless you notice a decline in print quality.
You must clean the print heads one at a time. Each cleaning
cycle takes about one minute. During the cleaning cycle, the
carriage moves and you can hear the printer recharging the
print heads. The
cycle and then stays on when the cycle is finished.
Follow these steps to clean either or both print heads:
1. Make sure the printer is turned on and open the cover.
2. Press the
on.)
3. To clean the color print head, hold down the
press
cycle begins and the
cycle is over when the
To clean the black print head, hold down the
press
and the
when the
4. Press the
Pause
Economy/Condensed
Load/Eject
Pause
Pause
Pause
light flashes throughout the cleaning
Pause
button. (Make sure the
(or
Color
light flashes. The cleaning
Pause
light stops flashing.
Pause
(or
light flashes. The cleaning cycle is over
light stops flashing.
button and close the printer cover.
). The cleaning cycle begins
Black
light comes
Pause
button and
Alt
). The cleaning
button and
Alt
Follow these steps to replace either or both ink cartridges:
1. Make sure the printer is on and open the printer cover.
2. Press the
comes on.
3. Hold down the
print head moves slightly left, to the ink cartridge install
position. The
The carriage returns to the home position after 60 seconds
if no ink cartridge is removed.
4. Pull up the cartridge clamp to open it. The cartridge rises
partially out of the printer.
button and check that the
Pause
button for about five seconds until the
Alt
light begins flashing.
Pause
Pause
light
Ink Jet Printers 8/1/95 EPSON Stylus Pro and Pro XL-13
Page 14
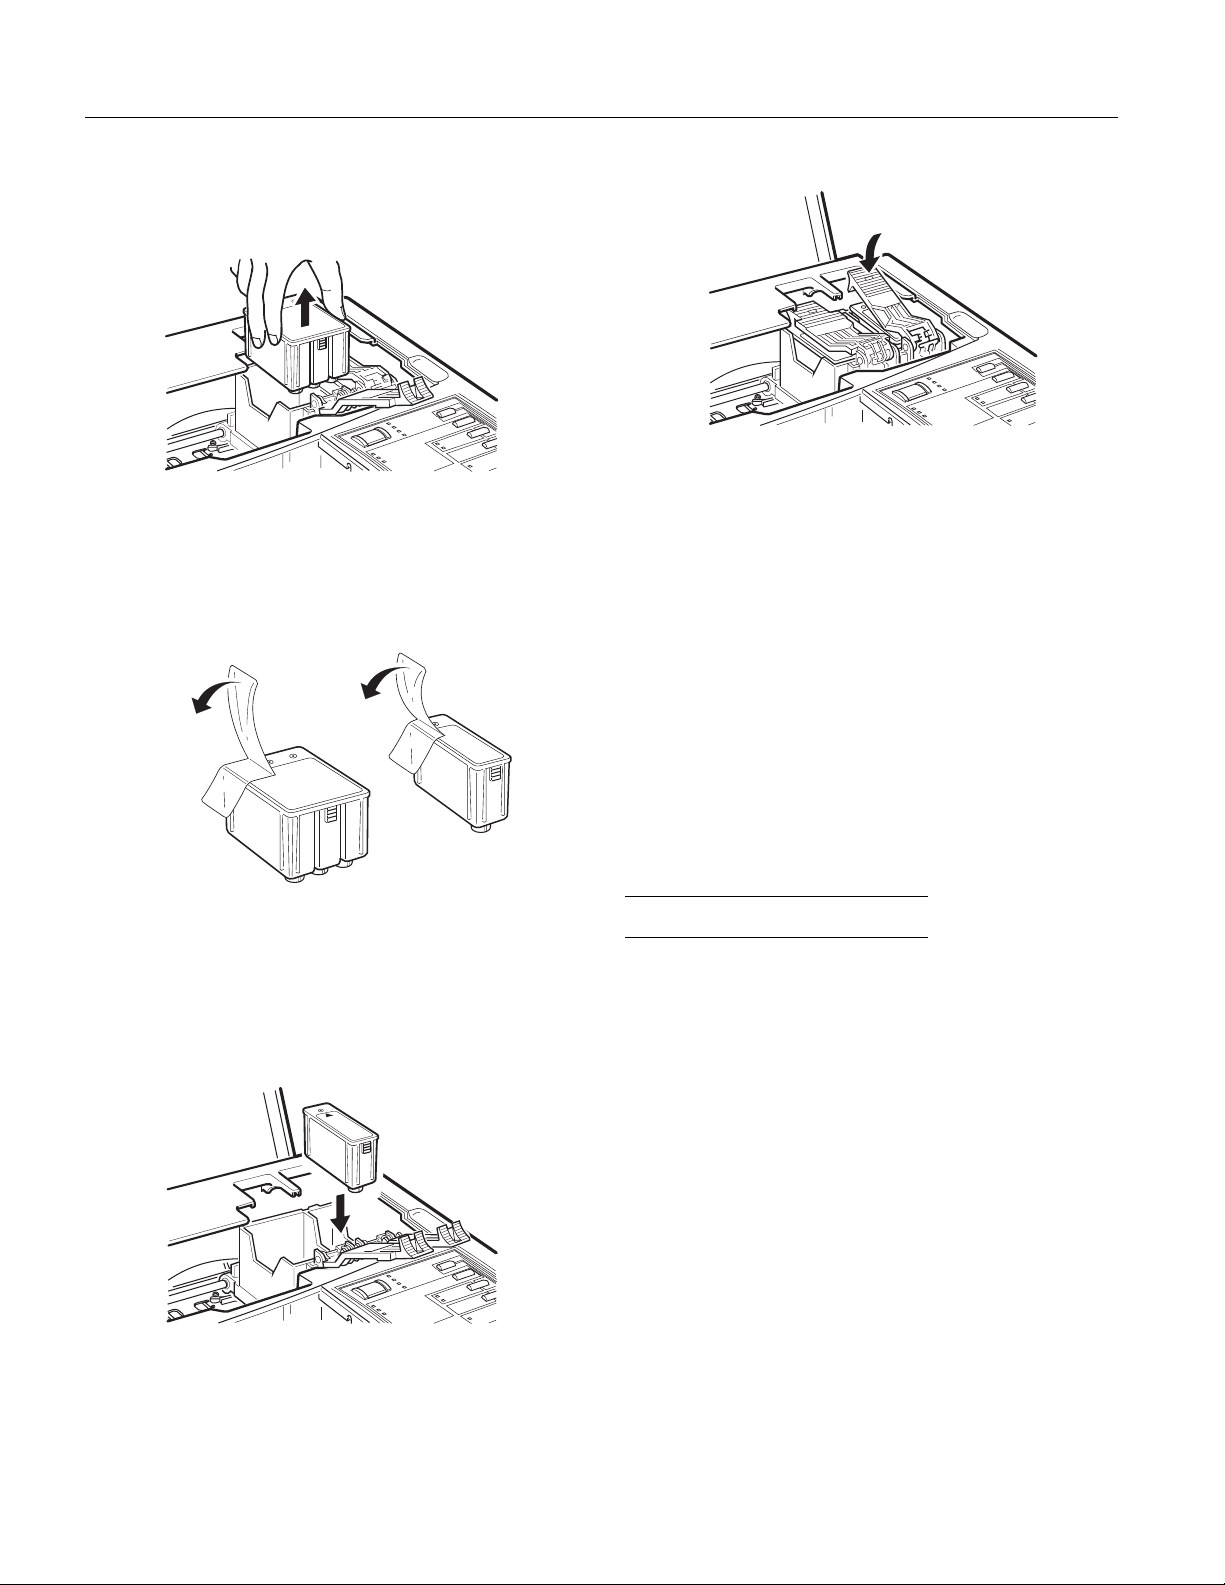
EPSON Stylus Pro and Pro XL
5. Lift the cartridge out of the printer and dispose of it
carefully so any excess ink does not spill. Do not take the
used cartridge apart or try to refill it.
Warning:
w
If ink gets on your hands, wash them thoroughly with soap
and water. If ink gets into your eyes, flush them
immediately with water.
6. Remove the new ink cartridge from its foil package and
remove the tape seal from the top of the cartridge.
8. Push down the ink cartridge clamp until it locks in place.
9. Clean the print heads to ensure that ink is properly
delivered to each nozzle. Cleaning is recommended but
not required.
If you replaced the black cartridge, hold down the
button while you press the
This cleans the black print head.
If you replaced the color cartridge, hold down the
button while you press the
) button. This cleans the color print head.
Color
After you clean the print head(s), skip to step 11.
10.If you did not clean the print heads, press the
charge the printer’s ink delivery system. The
flashes during the process.
Load/Eject
Economy/Condensed
(or
Black
Alt
Pause
Alt
) button.
Alt
(or
button to
light
color
cartridge
Caution:
c
You must remove the tape seal from the cartridge. Leaving
the tape on will permanently damage it.
7. Lower the ink cartridge into its holder with the label facing
up and the arrow on the top of the cartridge pointing to
the back of the printer. The larger (color) cartridge goes on
the left.
black
cartridge
11.Close the printer cover. When the charging cycle finishes,
the
Pause
light stops flashing and stays on. Press the
Pause
button to turn off the light and resume printing.
Information Reference List
Engineering Change Notices
None
Product Support Bulletins
None
Technical Information Bulletins
None
Related Documentation
TM-STYLUSPRO EPSON Stylus Pro Service Manual
TM-STYLUS-XL EPSON Stylus Pro XL Service Manual
PL-STYLUSPRO EPSON Stylus Pro Parts Price List
PL-STYLUS-XL EPSON Stylus Pro XL Parts Price List
4004918 EPSON Stylus Pro and Pro XL Reference Guide
4004920 EPSON Stylus Pro and Pro XL Setup Guide
for the PC
4004919 EPSON Stylus Pro and Pro XL Setup Guide
for the Macintosh
EPSON Stylus Pro and Pro XL-14 8/1/95 Ink Jet Printers
 Loading...