

Page 1

2018 NISSANCONNECT
OWNER’S MANUAL
For your safety, read carefully and keep in this vehicle.
®
Page 2

Owner’s Manual supplement
The information contained within this supplement updates the 2018
NissanConnect® Owner’s Manual to provide the software license information for
the telecommunications control unit for the following vehicles:
∙ 2018 NISSAN Altima
∙ 2018 NISSAN Armada
∙ 2018 NISSAN Maxima
∙ 2018 NISSAN Murano
∙ 2018 NISSAN Pathfinder
Read carefully and keep in vehicle
Printing: May 2018
Publication No.: SU18EA 0NC1U0
Page 3

TELEMATIC CONTROL UNIT GEN2K
A. INTRODUCTION
This product Telematic Control Unit Gen2K
incorporates the following software:
1. the software developed by, or developed for, Ficosa International, S.A. (“Ficosa”),
2. the software owned by third party and
licensed to Ficosa,
3. the software licensed under the GNU
GENERAL PUBLIC LICENSE, Version 2
(“GPL”),
4. the software licensed under the GNU
LIBRARY GENERAL PUBLIC LICENSE,
Version 2.0 or the GNU LESSER GENERAL PUBLIC LICENSE, Version 2.1 (collectively “LGPL”), the Mozilla Public license v2 (“MPL”), the GPL-2.0 license
with-OpenSSL-exception
(GPLOpenSSL”) and GNU GENERAL
PUBLIC LICENSE, Version 3 with GCC exception (together with the GPL software, jointly (“Copyleft Software”),
and/or
5. open sourced sof tware licensed under
terms and conditions other than
Copyleft Software.
For the software classified as (3) or (4)
above, a copy of the license text is included
with the source code in the URL indicated
below, and please also refer to the terms
and conditions of Copyleft Software licenses at the websites listed below:
GPL: http://www.gnu.org/licenses/
old-licenses/gpl-2.0.html and
https://www.gnu.org/licenses/
gpl-3.0.en.html
LGPL: http://www.gnu.org/licenses/
old-licenses/lgpl-2.1.html and
http://www.gnu.org/licenses/
old-licenses/lgpl-2.0.html
MPL: https://www.mozilla.org/
en-US/MPL/2.0/
GPL-2.0-with-OpenSSL-exception:
https://gitlab.com/cryptsetup/
cryptsetup/blob/master/COPYING
GPLv3 GCC Exception:
https://www.gnu.org/licenses/
gcc-exception-3.1.en.html
The software classified as (3) and (4) above
are copyrighted by multiple people.
Please refer to the websites below regarding the copyright notices of those people:
https://www.ficosa.com/software/
opensource/
The software licensed under the licenses
indicated in (3) and (4) above (“Copyleft
Software”) is distributed in the hope that it
will be useful, but WITHOUT ANY WARRANTY,
without even the implied warranty of MERCHANTABILITY or FITNESS FOR A PARTICULAR PURPOSE.
For at least three (3) years from delivery of a
device embedding the above product, Ficosa will give to any third party who contacts us at the Contact Information provided below, for a charge no more than our
cost of physically performing source code
distribution, a complete machine-readable
copy of the source code corresponding to
the Copyleft Software indicated above.
When requesting this source code, please
specify Product: Telematic Control Unit
Gen2K and version Cx9.
Page 4

Furthermore, source code and licenses
corresponding to the Copyleft Software
listed above is freely available to you and
any member of the public at the website
listed below:
https://www.ficosa.com/software/
opensource/
Contact Information
For enquiries about open source software
at FICOSA, please contact Ficosa’s Compliance Officer by email:
FOSS@ficosa.com
Please note that we are unable to answer
any queries regarding source code details,
etc.
In addition, it is necessary for end users to
provide their own internet connection.
The end user is responsible for any connection or line charges incurred through
browsing websites or downloading.
B. LICENSING AND COPYRIGHT NOTICE INFORMATION
The software classified as (5) above contains various open sourced software
(“OSS”) listed in the below website. Please
see the website indicted next for the terms
and conditions of the licenses (OSS Licenses) and other information regarding
the OSS contained this Product:
https://www.ficosa.com/software/
opensource/
Page 5

Prologue
Foreword
NISSAN CONSUMER AFFAIRS DEPARTMENT
For assistance or inquiries about the
NISSAN warranty, service or general questions, contact the NISSAN Consumer Affairs Department at:
For U.S. customers
Nissan North America, Inc.
Consumer Affairs Department
P.O. Box 685003
Franklin, TN 37068-5003
1-800-NISSAN-1
(1-800-647-7261)
For Canadian customers
Nissan Canada Inc.
5290 Orbitor Drive
Mississauga, Ontario L4W 4Z5
1-800-387-0122
UG5NJN1-251BEBC1-23DC-4665-B405-18A0830C57B1
UG5NJN1-0A572194-58C0-4CCD-A796-B7907E2D317D
NISSAN NAVIGATION SYSTEM
HELPDESK CONTACT INFORMATION
For assistance or inquiries about the
NissanConnect
or to order updated map data, contact the
NISSAN NAVIGATION SYSTEM HELPDESK
at:
. E-MAIL: nissan-navi-info@here.com
. WEBSITE: www.NissanNavigation.com
. PHONE: 1-888-661-9995
UG5NJN1-7E109BAF-7F49-429A-8CC5-3267D2E74C0F
SM
with Navigation system,
NISSANCONNECTSMSERVICES
AND APPS HELPDESK CONTACT
INFORMATION
For assistance or inquiries about the
NissanConnect
tact Nissan Owner Services helpdesk at:
. E-MAIL: nissanownerservices@nissan-
usa.com
. WEBSITE: https://www.nissanusa.
com/connect/support
. PHONE: 1-855-426-6628
GUID-B5FFE7C1-2C07-493F-9AB5-498221E1E8E0
SM
Services or Apps, con-
Page 6

FOREWORD
Thank you for purchasing a NISSAN vehicle.
This user’s manual is for NissanConnect
with Navigation, Apps and Services offered in your NISSAN vehicle.
Operation instructions for the following
systems are included in this manual.
. Audio
. Hands-Free Phone
. NissanConnect
. NissanConnect
. Navigation
. Voice Recognition
. Information and settings viewable on
NissanConnect
Please read this manual carefully to ensure safe operation of NissanConnect
with Navigation, Apps and Services.
. Because of possible specification
changes and optional equipment,
some sections of this manual may
not apply to your vehicle.
. All information, specifications and il-
lustrations in this manual are those in
effect at the time of printing. NISSAN
SM
Apps
SM
Services
SM
SM
SM
reserves the right to change specifications or design at any time without
notice.
. Do not remove this manual from the
vehicle when selling this vehicle. The
next user of this system may need the
manual.
Page 7

Page 8

Table of Contents
1 Introduction
How to use this manual.... 1-2
Safety information................ 1-3
Trademarks................................ 1-4
Regulatory information .... 1-5
2 Getting Started
Control buttons and touch
screen display
(center display)........................ 2-2
Starting system.................... 2-12
Touch
panel operation ................... 2-12
System status screen ..... 2-14
Shortcut menu ..................... 2-15
Map menu (models with
navigation system)............ 2-16
Display View Bar
(models with navigation
system) ....................................... 2-16
How to input letters
and numbers ......................... 2-18
System settings................... 2-19
Functions disabled
while driving ........................... 2-28
Additional
system information .......... 2-29
3 Audio system
Audio
operation precautions....... 3-2
Names and functions
of audio control
buttons ....................................... 3-14
Audio operations ................ 3-17
Audio settings....................... 3-39
Disc/USB memory
device care
and cleaning........................... 3-42
Gracenote® End User
License Agreement........... 3-42
Mobile Entertainment
System (MES)
(if so equipped)..................... 3-43
4 Bluetooth® Hands-Free Phone
Bluetooth® Hands-Free
Phone System.......................... 4-2
Bluetooth®
information.............................. 4-12
5 Information
Information menu................. 5-2
SiriusXM Traffic
information
(if so equipped)........................ 5-4
SiriusXM Travel Link®
(if so equipped)........................ 5-8
NissanConnect
Services
(if so equipped)..................... 5-14
NissanConnect
Apps .............................................. 5-25
SM
SM
Page 9

6 Navigation (if so equipped)
8 Troubleshooting guide
Safety information................ 6-3
Map
data authentication............. 6-3
Map operation ......................... 6-4
Setting destination............ 6-15
Route guidance.................... 6-30
Storing
a location/route.................. 6-45
Navigation settings........... 6-54
General information......... 6-57
7 Voice Recognition
Voice
Recognition System ............ 7-2
Customer assistance.......... 8-2
System unit................................ 8-3
Audio system............................ 8-4
Bluetooth® Hands-Free
Phone System....................... 8-14
Navigation (if
so equipped)........................... 8-18
Voice recognition ............... 8-26
Page 10

1 Introduction
How to use this manual .......................................................... 1-2
For safe operation ................................................................. 1-2
Reference symbols ................................................................ 1-2
Screen illustrations ............................................................... 1-2
Safety information ....................................................................... 1-3
Trademarks ...................................................................................... 1-4
Regulatory information ........................................................... 1-5
Laser product ......................................................................... 1-5
Bluetooth® devices ............................................................. 1-5
Page 11
1. Introduction
HOW TO USE THIS MANUAL
This manual uses special words, symbols,
icons and illustrations organized by function.
Please refer to the following items and
familiarize yourself with them.
FOR SAFE OPERATION
WARNING
This is used to indicate the presence
of a hazard that could cause death or
serious personal injury. To avoid or
reduce this risk, the procedures must
be followed precisely.
CAUTION
This is used to indicate the presence
of a hazard that could cause minor or
moderate personal injury or damage
to your vehicle. To avoid or reduce this
risk, the procedures must be followed
carefully.
NOTE:
This indicates items that help you understand and maximize the performance of your vehicle. Ignoring them
may lead to a malfunction or poor
performance.
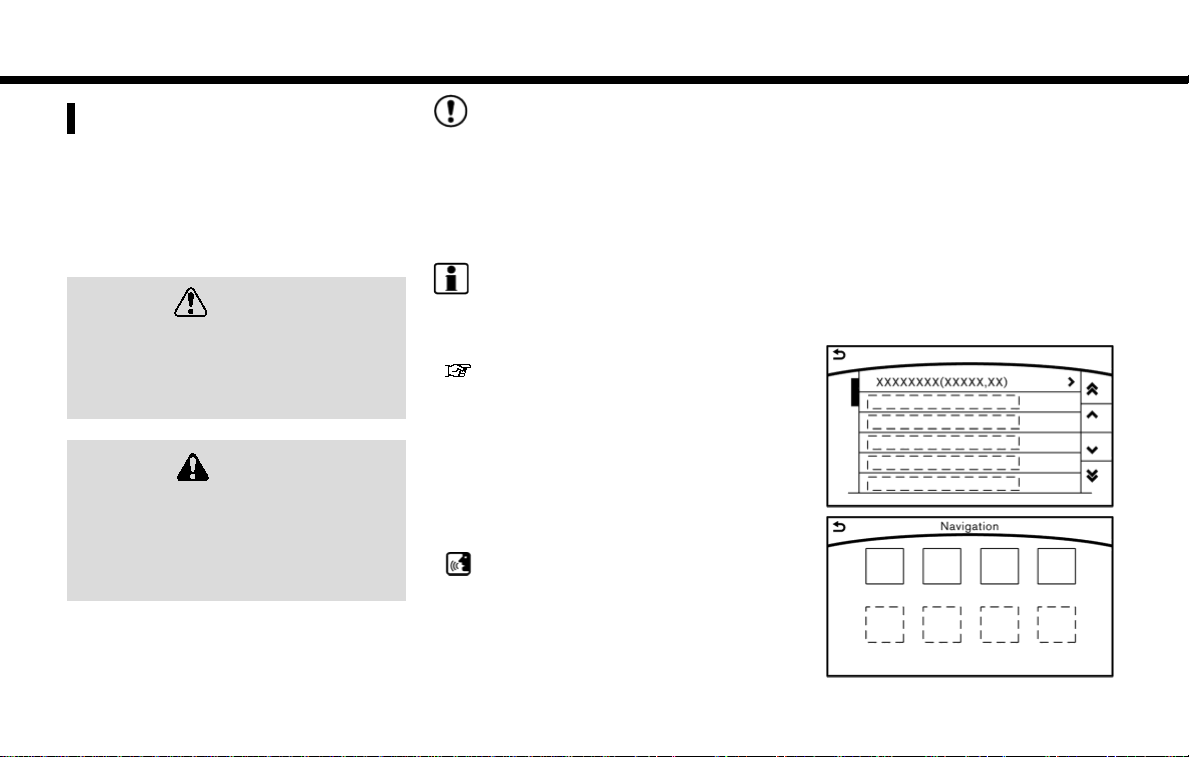
REFERENCE SYMBOLS
INFO:
This indicates information that is necessary for efficient use of your vehicle or
accessories.
Reference page:
This indicates the title and page that you
should refer to.
<>:
This indicates a control button or a switch.
[]:
This indicates a key/item displayed on the
screen.
Voice Command:
This indicates an operation by voice
command.
SCREEN ILLUSTRATIONS
. The illustrations in this manual are
representatives of various models
and may not be identical with the
design and specifications of your vehicle.
. Icons and menu items displayed on
the screen may be abbreviated or
omitted from the screen illustrations
when appropriate. The omitted icons
and menu items are described as
dotted lines as illustrated.
1-2
Page 12
1. Introduction
SAFETY INFORMATION
This system is primarily designed to help
you support pleasant driving as outlined
in this manual. However, you, the driver,
must use the system safely and properly.
Information and the availability of services
may not always be up to date. The system
is not a substitute for safe, proper and
legal driving.
Before using the system, please read the
following safety information. Always use
the system as specified in this manual.
WARNING
. To operate the system, first park
the vehicle in a safe location and
set the parking brake. Operating
the system while driving can distract the driver and may result in a
serious accident.
. Exercise extreme caution at all
times so full attention may be
given to vehicle operation. If the
system does not respond immediately, please be patient and keep
your eyes on the road. Inattentive
driving may lead to a crash resulting in serious injuries or death.
. Do not disassemble or modify this
system. Doing so may result in an
accident, fire or electrical shock.
. If you notice any foreign objects in
the system hardware, spill liquid
on the system or notice smoke or a
smell coming from it, stop using
the system immediately and contact a NISSAN dealer. Ignoring such
conditions may lead to an accident, fire or electrical shock.
CAUTION
. Some jurisdictions may have laws
limiting the use of video screens
while driving. Use this system only
where it is legal to do so.
. Extreme temperatures [below −4°F
(−20°C) and above 158°F (70°C)]
could affect the performance of
the system.
. The display screen may break if it
is hit with a hard or sharp object. If
the glass screen breaks, do not
touch it. Doing so could result in an
injury.
NOTE:
Do not keep the system running with
the engine stopped. Doing so may discharge the vehicle battery. When you
use the system, always keep the engine
running.
1-3
Page 13

1. Introduction
TRADEMARKS
HD Radio Technology manufactured under license from iBiquity Digital Corporation. U.S. and Foreign Patents. For patents
see http://patents.dts.com/. HD Radio
and the HD, HD Radio, and “ARC” logos
are registered trademarks or trademarks
of iBiquity Digital Corporation in the United States and/or other countries.
SiriusXM services require a subscription
after trial period and are sold separately
or as a package. Our satellite service is
available only to those at least 18 and
older in the 48 contiguous United States
and DC. For more information visit www.
siriusxm.com.
Required SiriusXM Satellite Radio and
1-4
SiriusXM Traffic monthly subscriptions
are sold separately. SiriusXM Traffic are
only available in select markets. For more
information, see www.siriusxm.com/
siriusxmtraffic.
Required SiriusXM Satellite Radio and
SiriusXM Travel Link monthly subscriptions are sold separately. SiriusXM Travel
Link is only available in select markets. For
more information, see www.siriusxm.
com/travellink.
“Made for iPod®” and “Made for iPhone®”
mean that an electronic accessory has
been designed to connect specifically to
iPod® or iPhone®, respectively, and has
been certified by the developer to meet
Apple performance standards. Apple is
not responsible for the operation of this
device or its compliance with safety and
regulatory standards. Please note that the
use of this accessory with iPod® or
iPhone® may affect wireless performance.
Apple, the Apple logo, iPhone®, iPod®, iPod
classic®, iPod nano®, and iPod touch® are
trademarks of Apple Inc., registered in the
U.S. and other countries. Lightning is a
trademark of Apple Inc. App Store is a
service mark of Apple Inc.
Music and video recognition technology
and related data are provided by Gracenote®. Gracenote is the industry standard
in music recognition technology and related content delivery. For more information visit www.gracenote.com.
CD, DVD, Blu-ray Disc, and music and
video-related data from Gracenote, Inc.,
copyright © 2000 to present Gracenote.
Gracenote Software, copyright © 2000 to
present Gracenote. One or more patents
owned by Gracenote apply to this product
and service. See the Gracenote website
for a non-exhaustive list of applicable
Gracenote patents. Gracenote, CDDB, MusicID, MediaVOCS, the Gracenote logo and
logotype, and the “Powered by Gracenote”
logo are either registered trademarks or
Page 14
1. Introduction
trademarks of Gracenote in the United
States and/or other countries.
REGULATORY INFORMATION
LASER PRODUCT
This NissanConnectSMwith Navigation (if
so equipped), Apps and Services (if so
equipped) is certified as a Class 1 laser
The Bluetooth® word mark and logos are
registered trademarks owned by Bluetooth SIG, Inc. and any use of such marks
by DENSO CORPORATION is under license.
Other trademarks and trade names are
those of their respective owners.
App Store
Apple and the Apple logo are trademarks
of Apple Inc., registered in the U.S. and
other countries. App Store is a service
mark of Apple Inc.
Google Play
Google Play is a trademark of Google Inc.
Google
© 2012 Google Inc. All rights reserved.
Google Calendar
tion is a trademark of Google Inc.
SM
TM
TM
calendaring applica-
product.
The system complies with DHHS Rules 21
CFR Chapter 1, Subchapter J.
WARNING
. Do not disassemble or modify this
system. There are no user serviceable parts in the system.
. If maintenance, adjustments and
operations other than those specified in this manual are attempted, injury due to laser
radiation and exposure could occur.
BLUETOOTH® DEVICES
FCC Regulatory information
FCC ID: HYQDNNS086
NOTE
This device compiles with part 15 of the
FCC Rules. Operation is subject to the
following two conditions: (1) This device
may not cause harmful interference, and
(2) this device must accept any interference received, including interference that
may cause undesired operation.
FCC WARNING
Changes or modifications not expressly
approved by the party responsible for
compliance could void the user’s authority
to operate the equipment.
CAUTION: Radio Frequency Radiation Exposure
This equipment complies with FCC radiation exposure limits set forth for uncontrolled environment and meets the FCC
radio frequency (RF) Exposure Guidelines.
This equipment has very low levels of RF
energy that it deemed to comply without
maximum permissive exposure evaluation (MPE). But it is desirable that it should
be installed and operated with at least 20
cm and more between the radiator and
person’s body.
1-5
Page 15

1. Introduction
Co-location: This transmitter must not be
co-located or operated in conjunction
with any other antenna or transmitter.
IC Regulatory information
The antenna cannot be removed (and
changed) by user.
NOTE
This device complies with Industry Canada license-exempt RSS standard(s). Operation is subject to the following two
conditions: (1) This device may not cause
interference, and (2) this device must
accept any interference, including interference that may cause undesired operation of the device.
CAUTION: Radio Frequency Radiation Exposure
This equipment complies with IC radiation
exposure limits set forth for uncontrolled
environment and meets RSS-102 of the IC
radio frequency (RF) Exposure rules. This
equipment has very low levels of RF
energy that it deemed to comply without
maximum permissive exposure evaluation (MPE). But it is desirable that it should
be installed and operated with at least
20cm and more between the radiator and
person’s body.
Co-location: This transmitter must not be
co-located or operated in conjunction
1-6
with any other antenna or transmitter.
This Class B digital apparatus meets all
requirements of the Canadian Interference- Causing Equipment Regulations.
For Canadian customers:
L’antenne ne peut être enlevée (et modifié) par l’utilisateur.
NOTE
Le présent appareil est conforme aux CNR
d’Industrie Canada applicables aux appareils radio exempts de licence. L’exploitation est autorisée aux deux conditions
suivantes: (1) l’appareil ne doit pas produire de brouillage, et (2) l’utilisateur de
l’appareil doit accepter tout brouillage
radioélectrique subi, même si le brouillage
est susceptible d’en compromettre le
fonctionnement.
Page 16

2 Getting Started
Control buttons and touch screen display
(center display) ............................................................................... 2-2
Liquid crystal display ........................................................... 2-2
Center multi-function control panel (Type A)
(if so equipped) ........................................................................ 2-3
Center multi-function control panel (Type B)
(if so equipped) ........................................................................ 2-6
Center multi-function control panel (Type C)
(if so equipped) ........................................................................ 2-7
Multi-function controller .................................................. 2-8
Steering wheel switches (Type A) (if
so equipped) .............................................................................. 2-9
Steering wheel switches (Type B) (if
so equipped) ........................................................................... 2-10
Audio accessories ............................................................... 2-11
Starting system ........................................................................... 2-12
Start-up warning ................................................................. 2-12
Touch panel operation .......................................................... 2-12
How to use touch screen ............................................. 2-12
Operating menu screen ................................................. 2-13
Scrolling list or message ............................................. 2-13
Selecting item ...................................................................... 2-14
Adjusting settings ............................................................ 2-14
System status screen ............................................................ 2-14
Shortcut menu ............................................................................ 2-15
Edit shortcut menu ......................................................... 2-15
Map menu (models with navigation system) ...... 2-16
Display View Bar (models with
navigation system) .................................................................. 2-16
Customizing the Display View Bar ...................... 2-18
How to input letters and numbers ............................. 2-18
Alphanumeric character (letters and
numbers) input screen ................................................. 2-18
System settings .......................................................................... 2-19
Settings menu ..................................................................... 2-19
Pairing Bluetooth® device .......................................... 2-27
Functions disabled while driving .................................. 2-28
Additional system information ....................................... 2-29
Additional help .................................................................... 2-30
Page 17
2. Getting Started
CONTROL BUTTONS AND
TOUCH SCREEN DISPLAY (center display)
Designs and button layout may vary
depending on models and specifications.
LIQUID CRYSTAL DISPLAY
The display is a liquid crystal display and
should be handled with care.
WARNING
. Never disassemble the display.
Some parts utilize extremely high
voltage. Touching them may result
in serious personal injury.
. ALWAYS give your full attention to
driving.
. Avoid using vehicle features that
could distract you. If distracted,
you could lose control of your
vehicle and cause an accident.
CAUTION
The glass screen on the liquid crystal
display may break if it is hit with a
hard or sharp object. If the glass
screen breaks, do not touch it. Doing
so could result in an injury.
Characteristics of liquid crystal
display
. If the temperature inside the vehicle is
especially low, the display will stay
relatively dim or the movement of the
images may be slow. These conditions
are normal. The display will function
normally when the interior of the
vehicle has warmed up.
. Some pixels in the display are darker or
brighter than others. This condition is
an inherent characteristic of liquid
crystal display, and it is not a malfunction.
. A remnant of the previous display
image may remain on the screen. This
screen burn is inherent in this type of
display, and it is not a malfunction.
Maintenance of display
To clean the display screen, use a dry, soft
cloth. If additional cleaning is necessary,
use a small amount of neutral detergent
with a soft cloth. Never spray the screen
with water or detergent. Dampen the
cloth first, then wipe the screen.
CAUTION
. To clean the display, stop the
vehicle in a safe location.
. Clean the display with the ignition
switch in the OFF position. If the
display is cleaned while the ignition switch is in the ON position,
unintentional operation may occur.
. When cleaning the display, never
use a rough cloth, alcohol, benzine,
thinner or any kind of solvent or
paper towel with a chemical cleaning agent. Doing so will cause
scratches or deterioration of the
panel.
. Do not splash any liquid such as
water or car fragrance on the display. Contact with liquid will cause
the system to malfunction.
2-2
Page 18
2. Getting Started
CENTER MULTI-FUNCTION CONTROL PANEL (Type A) (if so equipped)
Models with Intelligent Around View Monitor:
<CLIMATE>:
Push to display the screen for air
conditioner operations.
For additional information, refer to
the vehicle Owner’s Manual.
<CAMERA>:
Push to operate the Intelligent
Around View Monitor.
For additional information, refer to
the vehicle Owner’s Manual.
Push and hold <CAMERA> to switch
the display brightness to the daytime
mode or the nighttime mode, and to
adjust the display brightness level
using the multi-function controller
while the indicator is displayed.
<APPS>:
Push to display the available Apps.
“NissanConnectSMApps”
(page 5-25)
<NAVI>:
When a route is not set, push to
display the destination menu screen.
“Setting destination” (page 6-15)
When a route is set, push to display
route information and route editing
screen.
“Route menu screen” (page 6-35)
Multi-function controller:
Use to select an item on the screen,
select the highlighted item, or scroll
the map on the screen, etc.
“Multi-function controller”
(page 2-8)
<STATUS>:
Push to display the current setting of
the vehicle information, air conditioner, audio and navigation route
information.
“System status screen”
(page 2-14)
<INFO>:
Push to display the information menu.
“Information menu” (page 5-2)
< >:
Push to operate the hands-free
phone system.
“4. Bluetooth® Hands-Free
Phone”
< >:
Push to switch the display brightness
to the daytime mode or the nighttime
mode, and to adjust the display
brightness level using the multi-function controller while the indicator is
displayed. Push and hold to turn the
display on/off.
<AUDIO>:
Push to operate the audio system.
“Audio main operations”
(page 3-17)
2-3
Page 19
2. Getting Started
< BACK>:
Push to return to the previous screen.
In a settings screen, this button is also
used to apply the setting.
<MAP>:
Push to display the current location
map screen.
“Displaying current vehicle location” (page 6-6)
Push again to display the Display View
Bar.
“Display View Bar (models with
navigation system)” (page 2-16)
<SETTING>:
Push to access the system settings.
“Settings menu” (page 2-19)
<VOICE>:
Push to repeat the voice guidance for
a guide point.
< >:
Push to display the fuel economy
information.
“Information menu” (page 5-2)
Models without Intelligent Around View Monitor:
<CLIMATE>:
Push to display the screen for air
conditioner operations.
For additional information, refer to
the vehicle Owner’s Manual.
< >:
Push to operate the hands-free
phone system.
“4. Bluetooth® Hands-Free
Phone”
<APPS>:
Push to display the available Apps.
“NissanConnectSMApps”
(page 5-25)
<NAVI>:
When a route is not set, push to
display the destination menu screen.
“Setting destination” (page 6-15)
When a route is set, push to display
route information and route editing
screen.
“Route menu screen” (page 6-35)
Multi-function controller:
Use to select an item on the screen,
select the highlighted item, or scroll
the map on the screen, etc.
“Multi-function controller”
(page 2-8)
<STATUS>:
Push to display the current setting of
the vehicle information, air conditioner, audio and navigation route
information.
2-4
Page 20
2. Getting Started
“System status screen”
(page 2-14)
<INFO>:
Push to display the information menu.
“Information menu” (page 5-2)
< >, <+>/<->:
Push <
brightness to the daytime mode or
the nighttime mode, and to adjust the
display brightness level using the
multi-function controller while the
indicator is displayed. Push and hold
<
The display brightness can also be
adjusted using <+>/<−>.
<AUDIO>:
Push to operate the audio system.
< BACK>:
Push to return to the previous screen.
In a settings screen, this button is also
used to apply the setting.
<MAP>:
Push to display the current location
map screen.
> to switch the display
> to turn the display on/off.
“Audio main operations”
(page 3-17)
“Displaying current vehicle loca-
tion” (page 6-6)
Push again to display the Display View
Bar.
“Display View Bar (models with
navigation system)” (page 2-16)
<SETTING>:
Push to access the system settings.
“Settings menu” (page 2-19)
<VOICE>:
Push to repeat the voice guidance for
a guide point.
2-5
Page 21
2. Getting Started
CENTER MULTI-FUNCTION CONTROL PANEL (Type B) (if so equipped)
<CLIMATE>:
Push to display the screen for air
conditioner operations.
For additional information, refer to
the vehicle Owner’s Manual.
<CAMERA > (models with Intelli-
gent Around View Monitor):
Push <CAMERA
Intelligent Around View Monitor. For
additional information, refer to the
vehicle Owner’s Manual.
Push and hold <CAMERA
switch the display brightness to the
daytime mode or the nighttime mode,
and to adjust the display brightness
level using the multi-function controller while the indicator is displayed.
> to operate the
> to
OFF> (models without Intelligent
<
Around View Monitor):
Push <
brightness to the daytime mode or
the nighttime mode, and to adjust the
display brightness level using the
multi-function controller while the
indicator is displayed.
Push and hold <
display on/off.
Multi-function controller:
Use to select an item on the screen,
select the highlighted item, etc.
OFF> to switch the display
OFF> to turn the
“Multi-function controller”
(page 2-8)
2-6
<APPS>:
Push to display the available Apps.
“NissanConnectSMApps”
(page 5-25)
<INFO>:
Push to display the information menu.
“Information menu” (page 5-2)
<AUDIO>:
Push to operate the audio system.
“Audio main operations”
(page 3-17)
< BACK>:
Push to return to the previous screen.
In a settings screen, this button is also
used to apply the setting.
<STATUS>:
Push to display the current setting of
the vehicle information, air conditioner and audio system.
“System status screen”
(page 2-14)
<SETTING>:
Push to access the system settings.
“Settings menu” (page 2-19)
Page 22
2. Getting Started
CENTER MULTI-FUNCTION CONTROL PANEL (Type C) (if so equipped)
<CAMERA > (models with Intelligent Around View Monitor):
Push <CAMERA
Intelligent Around View Monitor. For
additional information, refer to the
vehicle Owner’s Manual.
Push and hold <CAMERA
switch the display brightness to the
daytime mode or the nighttime mode,
and to adjust the display brightness
level using the multi-function controller while the indicator is displayed.
OFF> (models without Intelli-
<
gent Around View Monitor):
Push <
play brightness to the daytime mode
or the nighttime mode, and to adjust
OFF> to switch the dis-
> to operate the
> to
the display brightness level using the
multi-function controller while the
indicator is displayed.
Push and hold <
display on/off.
<NAVI>:
When a route is not set, push to
display the destination menu screen.
“Setting destination” (page 6-15)
When a route is set, push to display
route information and route editing
screen.
“Route menu screen” (page 6-35)
Multi-function controller:
Use to select an item on the screen,
select the highlighted item, or scroll
OFF> to turn the
the map on the screen, etc.
“Multi-function controller”
(page 2-8)
<APPS>:
Push to display the available Apps.
“NissanConnectSMApps”
(page 5-25)
<STATUS>:
Push to display the current setting of
the vehicle information, air conditioner, audio and navigation route
information.
“System status screen”
(page 2-14)
<AUDIO>:
Push to operate the audio system.
“Audio main operations”
(page 3-17)
<MAP/VOICE>:
Push to display the current location
map screen. Push and hold to repeat
the voice guidance for a guide point.
“Displaying current vehicle loca-
tion” (page 6-6)
Push again to display the Display View
Bar.
“Display View Bar (models with
navigation system)” (page 2-16)
2-7
Page 23
2. Getting Started
< BACK>:
Push to return to the previous screen.
In a settings screen, this button is also
used to apply the setting.
<SETTING>:
Push to access the system settings.
“Settings menu” (page 2-19)
<INFO>:
Push to display the information menu.
“Information menu” (page 5-2)
<CLIMATE>:
Push to display the screen for air
conditioner operations.
For additional information, refer to
the vehicle Owner’s Manual.
2-8
MULTI-FUNCTION CONTROLLER
With directional buttons
Models with navigation system:
<ENTER>:
Push to select the highlighted item on
the screen.
If this button is pushed while a map is
displayed, the shortcut menu or the
map menu screen is displayed.
“Shortcut menu” (page 2-15)
“Map menu (models with navigation system)” (page 2-16)
Main directional buttons:
Push to move across the map, high-
light an item on the screen or adjust a
setting (volume, brightness, etc.).
Additional directional buttons:
Push to move across the map or
select an item on the character input
screen.
Center dial:
Turn to highlight an item on the
screen or adjust a setting.
The center dial can also be used to
adjust the map scale.
Models without navigation system:
<ENTER>:
Push to select the highlighted item on
the screen.
If this button is pushed while the
climate screen or status screen is
displayed, the shortcut menu screen
is displayed.
Page 24
2. Getting Started
“Shortcut menu” (page 2-15)
Main directional buttons:
Push to highlight an item on the
screen or adjust a setting (volume,
brightness, etc.).
Center dial:
Turn to highlight an item on the
screen or adjust a setting.
Without directional buttons
<ENTER> :
Push to select the highlighted item on
the screen.
If this button is pushed while a map is
displayed, the shortcut menu or the
map menu screen is displayed.
“Shortcut menu” (page 2-15)
“Map menu (models with naviga-
tion system)” (page 2-16)
Center dial/slide switch:
Turn to highlight an item on the
screen, to adjust a setting, or to adjust
the map scale.
Slide (push upward/downward/leftward/rightward) to highlight an item
on the screen or to adjust a setting
(volume, brightness, etc.). The map
can be scrolled in 8 directions by
sliding this switch.
STEERING WHEEL SWITCHES (Type
A) (if so equipped)
<ENTER>:
Tilt to highlight an item on the screen
or adjust a setting. Push to select the
highlighted item.
Audio operations are possible by tilting the switch.
“Steering wheel mounted audio
control buttons (Type A)”
(page 3-16)
Models with navigation system:
If this button is pushed while a map is
displayed, the shortcut menu or the
map menu screen is displayed.
“Shortcut menu” (page 2-15)
“Map menu (models with navigation system)” (page 2-16)
2-9
Page 25
2. Getting Started
Models without navigation system:
If this button is pushed while the
climate screen or status screen is
displayed, the shortcut menu screen
is displayed.
“Shortcut menu” (page 2-15)
< >:
Push this switch to go back to the
previous screen.
< >:
Push to adjust the volume.
<SOURCE>:
Push to switch the audio mode
(source).
“Steering wheel mounted audio
control buttons (Type A)”
(page 3-16)
< >:
Push to start a voice recognition
session. During a voice recognition
session, pushing this button cancels
the voice guidance and you can speak
a voice command immediately.
Push and hold this button to end a
voice recognition session.
“7. Voice Recognition”
< >:
Push to operate the hands-free
2-10
phone system.
“4. Bluetooth® Hands-Free
Phone”
< >:
This button is used for the vehicle
information display operation.
For additional information, refer to
the vehicle Owner’s Manual.
NOTE:
You are unable to operate the touch
screen display using the switches on the
steering wheel whenever the vehicle
information display shows the setting
display.
STEERING WHEEL SWITCHES (Type
B) (if so equipped)
<SOURCE>:
Push to switch the audio mode
(source).
“Steering wheel mounted audio
control buttons (Type B)”
(page 3-16)
<ENTER>:
Tilt to highlight an item on the screen
or adjust a setting. Push to select the
highlighted item.
Audio operations are possible by tilting the switch.
“Steering wheel mounted audio
control buttons (Type B)”
(page 3-16)
If this button is pushed while a map is
Page 26
2. Getting Started
displayed, the shortcut menu or the
map menu screen is displayed.
“Shortcut menu” (page 2-15)
“Map menu (models with naviga-
tion system)” (page 2-16)
< >:
Push this switch to go back to the
previous screen.
< >:
Push to adjust the volume.
< >:
Push to start a voice recognition
session. During a voice recognition
session, pushing this button cancels
the voice guidance and you can speak
a voice command immediately.
Push and hold this button to end a
voice recognition session.
“7. Voice Recognition”
< >:
Push to operate the hands-free
phone system.
“4. Bluetooth® Hands-Free
Phone”
AUDIO ACCESSORIES
The vehicle is equipped with the USB
connection ports and the auxiliary input
jacks (if so equipped). When connected,
the in-vehicle audio system can play audio
contents from the compatible device.
INFO:
. Even when iPod® and/or iPhone® are
connected to both of the two USB/
iPod® connection ports, the system
recognizes only one of the connected
iPod® or iPhone® at a time.
. Only one of the two connected USB
memory devices can be operated by
the Voice Recognition System.
“Voice recognition settings”
(page 7-14)
. The rear media interface for the Mobile
Entertainment System (if so equipped)
which includes the ports for USB and
HDMI is located at the rear of the
center console box.
“Rear media interface” (page 3-58)
Type A (if so equipped):
The USB connection ports and the auxiliary input jacks are located in the center
console box.
Auxiliary audio input jack:
Connect an audio player that accepts
a 1/8 in (3.5 mm) TRS connector (such
as an MP3 player etc.) to play music.
Auxiliary video input jack:
Connect a video player to play a video.
SD card slot (if so equipped):
The card slot is for the map SD card
for the navigation system.
“SD card slot” (page 6-64)
USB/iPod® connection ports:
Connect to play media from an iPod®,
iPhone® or a USB memory device.
Refer to the device manufacturer’s
owner information regarding the
proper use and care of the device.
2-11
Page 27
2. Getting Started
NOTE:
Depending on the size and shape of USB
memory device, the console lid may not
fully close. Do not force the console lid
closed as this may damage the USB
memory device.
Type B (if so equipped):
The USB connection ports are located on
the lower instrument panel.
Example
USB/iPod® connection ports:
Connect to play media from an iPod®,
iPhone® or a USB memory device.
Refer to the device manufacturer’s
owner information regarding the
proper use and care of the device.
STARTING SYSTEM
The system starts when the ignition
switch is placed in the ACC or ON position.
START-UP WARNING
When the ignition switch is placed in the
ACC or ON position, the start-up screen is
displayed.
Touch [OK] after reading and agreeing
with the message. If you do not agree to
the message, some of the functions will be
disabled.
NOTE:
Do not keep the NissanConnect
tem turned on with the engine stopped.
Doing so may discharge the vehicle
battery. When you use NissanCon-
SM
, always keep the engine running.
nect
SM
sys-
TOUCH PANEL OPERATION
This system is mainly operated with the
touch screen display.
HOW TO USE TOUCH SCREEN
Basic operations can be done by touching,
swiping and dragging on the screen.
. Touch
Select and execute the selected key on
the screen.
2-12
Page 28
2. Getting Started
. Swipe
Menu screen pages will skip to the
next page.
. Drag
Drag the scroll bar up or down to scroll
the menu screen.
Models with navigation system:
More various operations are possible for a
map screen.
“Map operation” (page 6-4)
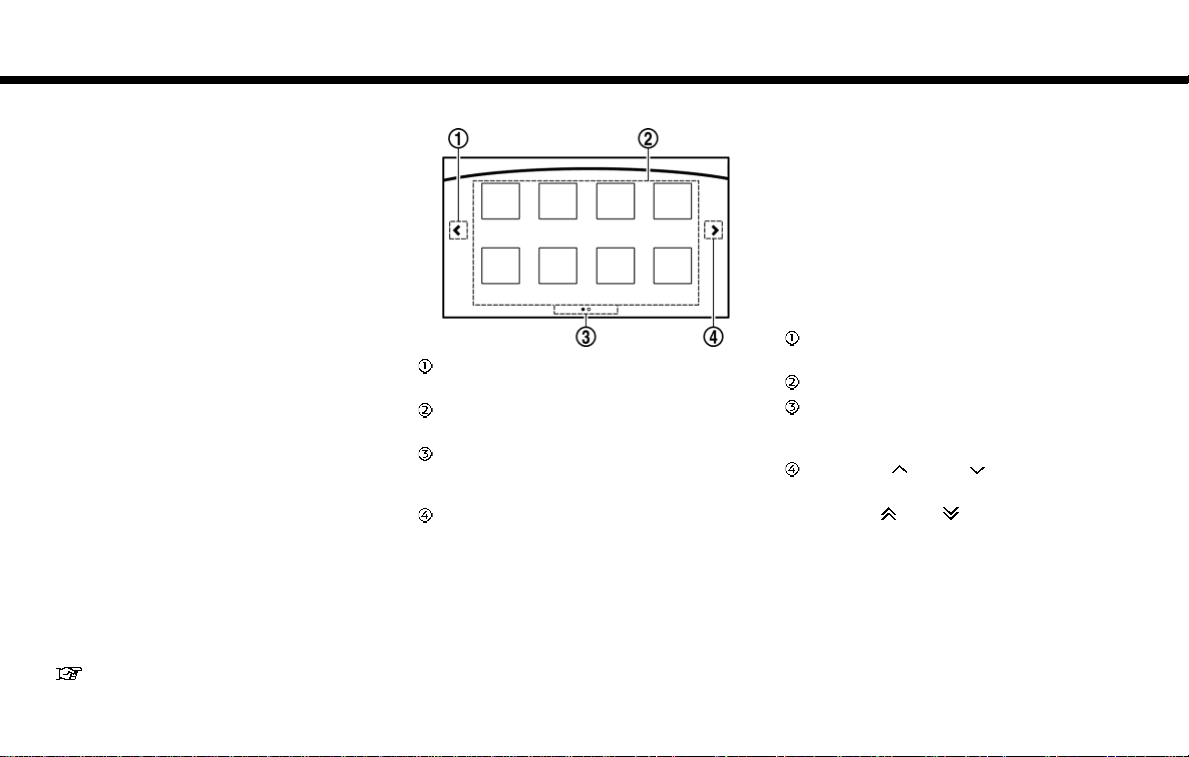
OPERATING MENU SCREEN
Touch [<] to scroll to the previous
page.
Touch the preferred icon to execute a
function and display the next screen.
Indicates the position of the currently
displayed page out of the total number of available pages.
Touch [>] to scroll to the next page.
A swipe gesture can also be used to move
quickly between pages.
SCROLLING LIST OR MESSAGE
Drag the scroll bar up or down to
scroll the message or list up or down.
Touch the preferred item.
If a listed item name is not completely
displayed (due to length), touch [>]to
display the hidden part of the name.
Touch [ ]or[ ] to scroll the
message or list one item at a time.
Touch [
page.
]or[ ] to skip to the next
2-13
Page 29

2. Getting Started
SELECTING ITEM
When an item is touched, it is executed
and the next screen is displayed.
Touch [
screen.
] to return to the previous
ADJUSTING SETTINGS
The level of volume, brightness, etc. can be
adjusted.
Touch the adjustment keys, such as [+]/[-],
[L]/[R], etc., to adjust each item. Each time
a key is touched, the indicator moves
2-14
along the bar.
SYSTEM STATUS SCREEN
By pushing <STATUS>, the current status
of the system can be displayed.
INFO:
There are different status screens displayed depending on various factors, such
as the currently active mode, whether a
destination (models with navigation system) has been set or not, etc.
Touching [<]/[>] can switch air conditioner
status screen, navigation route information screen (models with navigation system) and information screen.
Models with navigation system:
When no route is set, a compass and the
current location is displayed instead of the
route information.
Page 30

2. Getting Started
SHORTCUT MENU
Models with navigation system:
To display the shortcut menu, push
<ENTER> or touch [
location map screen is displayed.
The items on the shortcut menu can be
customized to your preference.
Available items:
. [Audio Source]
. [Audio List]
. [Call History]
. [Phonebook]
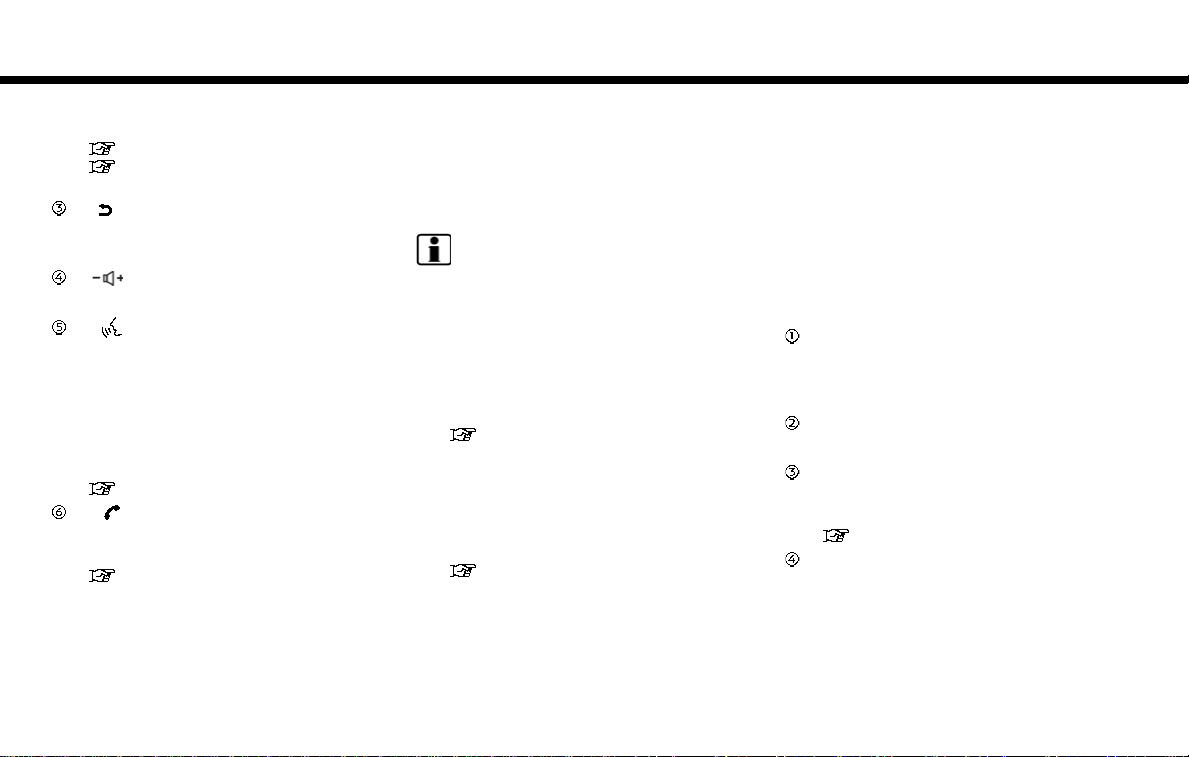
. [Cancel Route]
. [Nearby Places]
. [Store Location]
. [View Settings]
] while the current
. [Select Add/Edit]
Models without navigation system:
To display the shortcut menu, push
<ENTER> or touch [
or status screen is displayed.
Available items:
. [Audio Source]
. [Audio List]
. [Call History]
. [Phonebook]
. [Select Add/Edit]
] while the climate
EDIT SHORTCUT MENU
The following procedure can be used to
edit or sort the shortcut menu.
1. Select [Select Add/Edit] to register a
new item to the menu, or to change an
existing menu item.
2. Select the preferred setting.
. [Change Order]
Change the order in which shortcut
menu items are shown. Touch and
] displayed next to the item
hold [
you wish to relocate. Drag the icon
to the position in the list where you
wish to insert it.
. [Edit Shortcut Items]
Select items to be displayed in the
shortcut menu.
2-15
Page 31

2. Getting Started
MAP MENU (models with navigation system)
While scrolling the map screen, push
<ENTER> or touch [
Map Menu.
. [New Destination]
. [Show Current Location]
. [Store Location]
. [Nearby Places]
. [Delete Stored Location]
INFO:
[Delete Stored Location] is available only
when the cross pointer is aligned over the
stored location.
] to display the
DISPLAY VIEW BAR (models
with navigation system)
Various information screens can be
shown by selecting from the Display View
Bar.
Available views may vary depending on
models and specifications.
When the screen displays the current
location map, push <MAP>/<MAP/VOICE>
to show the Display View Bar.
Select an icon in the Display View Bar. The
current view will change and the Display
View Bar will be closed.
The following display views are available.
Viewing Split Map:
The map can be displayed on the split
screen. Map settings can be adjusted
independently.
Viewing Junction/Intersection:
The next junction/intersection is always
displayed.
When no route is set, the junction/intersection screen is not displayed and the
map is displayed in full screen.
2-16
Page 32

2. Getting Started
Viewing Turn List:
This displays the turn list on the left
screen. When approaching a guide point,
the left screen automatically switches to
an enlarged view of the intersection.
When no route is set, the turn list screen is
not displayed and the map is displayed in
full screen.
Viewing Where am I ?:
This displays the information about the
vehicle location.
Viewing Turn by Turn:
This displays a turn point when driving
according to route guidance.
When no route is set, the turn by turn
screen is not displayed and the map is
displayed in full screen.
Viewing Fuel Economy:
This displays the fuel economy information.
Viewing Eco Drive Report:
Your driving score will be displayed in real
time, with 100 points designated as the
score for ideal eco-driving.
To improve your score:
. When starting off, depress the accel-
erator gently.
2-17
Page 33

2. Getting Started
. When cruising, accelerate and decele-
rate as little as possible.
. When decelerating, release the accel-
erator early.
CUSTOMIZING THE DISPLAY VIEW
BAR
The menu icons on the Display View Bar
can be set to your preference.
1. Push <SETTING> and touch [Navigation] to display the navigation setting
screen.
2. Touch [Map & Display View] and touch
[Change Order].
3. Change the order of the icons to be
displayed on the Display View Bar.
Touch and hold the [
to the item you wish to relocate. Drag
the icon to the position in the list
where you wish to insert the item.
] displayed next
HOW TO INPUT LETTERS AND
NUMBERS
The keyboard screen differs depending on
the model and specification.
ALPHANUMERIC CHARACTER (letters and numbers) INPUT SCREEN
Alphanumeric characters can be entered
using the keyboard. The designs and the
displayed items may vary depending on
the type of screen.
Touch a character on the displayed
keyboard. The selected character is
entered.
Entered characters are displayed
here.
Touch [Delete] to delete the last
character entered.
Touch and hold [Delete] to delete all
the characters entered.
The symbol keys are displayed by
touching [Symbols]. The alphabet
keys are displayed by touching [A-Z].
Touch [Space] to enter a space.
Touch [OK] or [List] to finalize your
input.
INFO:
. Touch [CAPS] to toggle uppercase and
lowercase characters on the keyboard
screen.
. Touch [
character input position.
]or[ ] to move the
2-18
Page 34

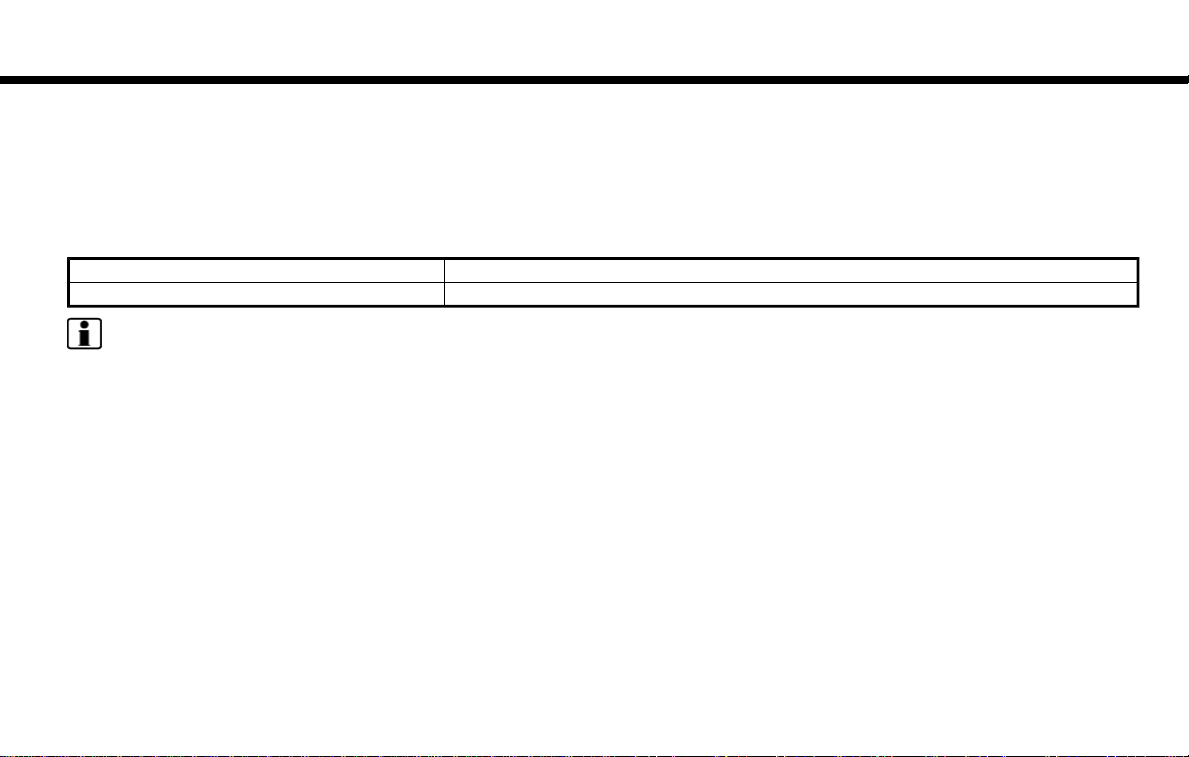
SYSTEM SETTINGS
SETTINGS MENU
The system settings can be changed to your preference.
Available setting items may vary depending on models and specifications.
Push <SETTING> to display the Settings menu and touch a setting item you wish to adjust.
Menu item Result
[Bluetooth] Sets the Bluetooth® streaming audio and phone.
[Phone/Mail] Displays the phone/mail setting screen.
[Vehicle] Displays the vehicle settings screen.
[Navigation] Displays the navigation settings screen.
[Audio] Displays the audio settings screen.
[Screen] Displays the touch screen display setting screen.
[Volume Adjustment] Displays the volume adjustment setting screen.
[Clock] Displays the clock setting screen.
[NissanConnect Services] Displays the NissanConnect
[Voice Recognition] Displays the voice recognition function setting screen.
“Bluetooth® settings” (page 2-27)
“Phone and text message settings” (page 4-9)
“Vehicle settings” (page 2-21)
“Navigation settings” (page 6-54)
“Audio settings” (page 3-39)
“Screen settings” (page 2-22)
“Volume settings” (page 2-23)
“Clock settings” (page 2-26)
“NissanConnectSMServices settings” (page 5-24)
“Voice recognition settings” (page 7-14)
SM
Services setting screen.
2. Getting Started
2-19
Page 35

2. Getting Started
Menu item Result
[Camera/Sonar] Displays the camera/parking sensor (sonar) system setting screen.
[Driver Assistance] Displays the Driver Assistance setting screen.
[Other] [Language] Displays the language setting screen.
[Language & Units] Displays the language and units setting screen.
[Keyboard Type] Sets the keyboard type to [ABC] or [QWERTY] .
[Low on Fuel Alert] Sets the fuel low notification to on/off.
[Software Information] Displays the software information.
For additional information, refer to the vehicle Owner’s Manual.
For additional information, refer to the vehicle Owner’s Manual.
“Language settings” (page 2-24)
“Language & Units settings” (page 2-25)
2-20
Page 36

2. Getting Started
Vehicle settings (if so equipped)
This menu changes the vehicle settings.
Available setting items may vary depending on models and specifications.
1. Push <SETTING>.
2. Touch [Vehicle].
Setting item Result
[Lamp ON When Door Unlocks] When this item is set to on, the interior lights illuminate when any door is unlocked.
[Light Sensitivity] Sets the auto light sensitivity.
[Light Off Delay] Sets the auto light delay timer.
[Speed Sensing Wiper Interval] Sets the wiper interval to be adjusted automatically according to the vehicle speed.
[Selective Door Unlock] Sets the selective door unlock.
[Intelligent Key Lock/Unlock] When this item is turned on, door lock/unlock function by pushing the door handle request
[Lift Steering Wheel on Exit] Sets the lift steering wheel on exit.
[Slide Driver’s Seat Back on Exit] Sets the driver’s seat back on exit.
[Reset Settings] Returns all vehicle setting values to default.
switch will be activated.
2-21
Page 37

2. Getting Started
Screen settings
This menu turns the display on/off and adjusts the image quality of the screen.
Available setting items may vary depending on models and specifications.
1. Push <SETTING>.
2. Touch [Screen].
Setting item Action
[Display Settings] [Brightness] Adjusts the brightness.
[Contrast] Adjusts the contrast.
[Black Level] Adjusts the black level.
[Display OFF] Turns the screen on/off.
[Day/Night] Adjusts the screen brightness.
[Change Map Color] Toggles the screen color between the daytime mode and the night time mode.
[Reset Settings] This restores the screen settings to default.
Push and hold <CAMERA>/<
turn the screen on.
Toggles the screen color between the day screen and the night screen.
>/<CAMERA >/< OFF> for more than 2 seconds to
2-22
Page 38

2. Getting Started
Volume settings
This menu turns on/off and adjusts the volume for various functions and system beeps.
Available setting items may vary depending on models and specifications.
1. Push <SETTING>.
2. Touch [Volume Adjustment].
Setting item Action
[Audio Volume] Adjusts the volume of the audio system.
[Voice Guidance] Toggles the voice guidance on/off.
[Guidance Volume] Adjusts the volume level of the guidance volume.
[Ringtone Volume] Adjusts the volume level of the ringtone.
[Incoming Call Vol.] Adjusts the incoming call volume.
[Outgoing Call Vol.] Adjusts the outgoing call volume.
[RDS Volume] Adjusts the volume level of the RDS announcement.
[NissanConnect Svcs. Vol] Adjust the volume level of the NissanConnect
[Sonar Volume] Adjusts the volume level of the sonar warning volume.
[Button Beep sound] Toggles the button beep sound and alarm for a prohibited operation between on and off.
SM
Services information channel.
2-23
Page 39
2. Getting Started
Language settings (if so equipped)
This changes the language used in the system.
Available setting items may vary depending on models and specifications.
1. Push <SETTING>.
2. Touch [Other].
3. Touch [Language].
Setting item Action
[System Language] Select the language of the display, voice announcements, and voice recognition functions.
INFO:
. Do not change the ignition switch position while changing the language.
. The Voice Recognition System can be used only if the language is supported by the Voice Recognition System.
. Depending on the language selected, available voice commands for the Voice Recognition System may differ.
2-24
Page 40

2. Getting Started
Language & Units settings (if so equipped)
This changes the language and measurement unit used in the system.
Available setting items may vary depending on models and specifications.
1. Push <SETTING>.
2. Touch [Other].
3. Touch [Language & Units].
Setting item Action
[System Language] Select the language of the display, voice announcements, and voice recognition
[Fuel Economy Unit Settings] Select the preferred fuel economy unit.
[Tire Pressure Units] Select the preferred tire pressure unit.
[Temperature Units] Select the preferred temperature unit.
INFO:
. Do not change the ignition switch position while changing the language.
. The Voice Recognition System can be used only if the language selected in this setting is supported by the system.
. Depending on the language selected, available voice commands for the Voice Recognition System may differ.
functions.
2-25
Page 41

2. Getting Started
Clock settings
This changes the clock settings.
Available setting items may vary depending on models and specifications.
1. Push <SETTING>.
2. Touch [Clock].
Setting item Action
[On-Screen Clock] Sets the clock display on/off. When this item is on, the clock display appears.
[Daylight Savings Time] Select the setting for the daylight savings time from ON and OFF.
[Clock Format (24h)] Select the clock format between 12–hour and 24–hour times. When the indicator light
[Time Zone] Select an appropriate time zone from the list. When selecting [AUTO], the system selects
[Offset Adjustment] Adjusts the offset value (hour and minutes).
[>] [Time Adjustment] Adjusts the time by increasing or decreasing the value.
[Calendar Adjustment] Adjusts the year, month and day.
illuminates, the clock is set to the 24–hour format.
the time zone automatically.
2-26
Page 42

2. Getting Started
PAIRING BLUETOOTH® DEVICE
Your vehicle is equipped with a Bluetooth®
Hands-Free Phone System and Bluetooth® streaming audio. If you are an
owner of a compatible Bluetooth® enabled cellular phone or Bluetooth®
streaming audio module, you can set up
the wireless connection between your
cellular phone and the in-vehicle phone
module, or Bluetooth® streaming audio
device and the in-vehicle audio module.
With Bluetooth® wireless technology, you
can make or receive a telephone call with
your cellular phone in your pocket and
listen to music on your Bluetooth®
streaming audio device via the in-vehicle
system.
Pairing cellular phone/audio device
1. Push <SETTING>.
2. Touch [Bluetooth] and touch [Connect
Device].
3. Touch [Add New (X/5 Free)] to register
a device.
4. When a PIN code appears on the
screen, operate the compatible Bluetooth® cellular phone to enter the PIN
code.
The pairing procedure for cellular
phones varies depending on the model of cellular phone. Refer to the owner’s manual for the cellular phone for
details.
If the registered device has both audio
and phone functions, the system displays a message asking if you would
like to register the device for another
function.
The procedure for connecting a cellular phone/audio device varies depending on the Bluetooth® device. Refer to
the owner’s manual for the Bluetooth®
device for details.
NOTE:
Some cellular phones or other devices
may cause interference or a buzzing
noise to be emitted from the audio
system speakers. Storing the device in
a different location may reduce or eliminate the noise.
INFO:
It is recommended that you visit a NISSAN
dealer for compatibility, or call NISSAN
Consumer Affairs Department for instructions on pairing NISSAN recommended
cellular phones or audio devices.
Bluetooth® settings
The Bluetooth® settings can be set in
detail according to the user’s preference.
1. Push <SETTING>.
2. Touch [Bluetooth].
3. Touch the preferred item.
. [Bluetooth]
Turn the Bluetooth® connection to
the vehicle on/off.
. [Connect Device]
Touch this item to connect to the
Bluetooth® device. You can also
delete a registered device and display information for the registered
device.
. [Select Phone]
Registered Bluetooth® Hands-Free
Phones are shown on the list. Select
a device from the list to disconnect
or connect a Bluetooth® device.
. [Select Audio Device]
Registered Bluetooth® streaming
audio players are shown on the list.
Select a device from the list to
disconnect or connect a Bluetooth®
device.
. [Vehicle Bluetooth Device Info.]
The registered device name and the
2-27
Page 43

2. Getting Started
PIN code can be changed.
FUNCTIONS DISABLED WHILE
DRIVING
To help ensure safe driving, some functions cannot be operated or have limited
operation while the vehicle is in motion.
The on-screen text and keys for these
restricted functions will be "grayed-out"
or muted and cannot be selected while
driving. In some cases, a screen message
will appear indicating a restricted function.
Restricted functions while driving include:
. Character (letter and number) input
screen.
. Scrolling and viewing of certain list
screens.
. Displaying detail information and
touching item on the information
screen.
. Adding/editing home location, ad-
dress book entries and current route.
(models with navigation system)
. Making a call by dialing number and
using handset phonebook.
. Setting phone, NissanConnect
vices (if so equipped) and Bluetooth®
functions.
SM
Ser-
These functions will become available
again when the vehicle is not in motion.
Some of the destination setting functions
(models with navigation system) that
become unavailable while driving can be
operated by Voice Recognition System.
Available voice commands may differ
depending on the language setting.
2-28
Page 44

2. Getting Started
ADDITIONAL SYSTEM INFORMATION
NissanConnectSMwith Navigation (if so
equipped), Apps and Services (if so
equipped) uses an operating system like
those found on many computers, tablets
and cellular phones. Like these devices,
processing speed may vary, and system
response delays or resets may occur
intermittently. This does not indicate a
malfunction, and further information on
system operation can be found below.
System Start-Up
Due to the large number of features and
capabilities that the system needs to load
on start-up, it may take up to a minute for
all functions (such as Apps) to be available.
System Response Delay
The system uses an operating system like
those found on many computers, tablets
and cellular phones. Like these devices,
sometimes programs do not respond
immediately and this may temporarily
delay system use.
In most situations, simply waiting a few
moments longer should be sufficient for
the pending operations to complete.
If the system temporarily does not respond to commands, the system can be
easily reset. Simply push and hold <VOL/
ON·OFF> on the audio system for at least
5 seconds. The system will turn off and
restart.
After restarting, all functions should be
available.
System Reset
As noted above, intermittent system resets may occur during normal operation.
You may also wish to reset the system if
you find that a particular feature is not
loading or responding. Often, a quick
system reset will resolve any issue you
may be experiencing. After restarting, all
functions will be available as described
above.
System Updates
Like many digital devices, the system is
designed to allow for software updates as
enhancements are developed and additional features added. If you have questions about system performance, it is
recommended that you contact a NISSAN
dealer to ensure that your vehicle has had
the latest available software installed.
Operating Tips
The system provides several methods of
operation to suit your preferences. The
following are suggested operating tips.
. Operating the control panel, steering
wheel controls, or other controls too
quickly can cause a lag between the
control and the display. Operate the
controls carefully and allow the system to respond to your request.
. NISSAN recommends using Voice Re-
cognition whenever possible to select
options while driving. Some touch
screen functionality is intentionally
unavailable during driving. Please view
the available voice commands by
pushing <
category on the display.
. Models with navigation system:
When looking for a street address or
Points of Interest (POI), remember that
you can use Connected Search and
Assisted Search features within NissanConnect
your search methods and results. The
Voice Recognition System recognizes
a defined set of commands. These
commands can be viewed in the display by pushing <
ing a category from the displayed list.
The commands can also be found in
the Voice Recognition section under
the command list.
“Command list” (page 7-7)
> and then selecting a
SM
Services to expand
> and then select-
2-29
Page 45

2. Getting Started
. In some situations, the system may
not be able to recognize your command even if you say the exact command. This can be due to noise
conditions or an accent.
. In some unique cases, the system may
expect a word to be spoken as it is
spelled as opposed to the way it is
normally pronounced.
ADDITIONAL HELP
For additional technical information, it is
recommended that you contact a NISSAN
dealer for troubleshooting help.
2-30
Page 46

3 Audio system
Audio operation precautions .............................................. 3-2
Radio ................................................................................................ 3-2
Compact Disc (CD) player ................................................ 3-4
Digital Versatile Disc (DVD) player (if
so equipped) .............................................................................. 3-5
USB (Universal Serial Bus) connection port ....... 3-8
Compressed audio files (MP3/WMA/AAC) .......... 3-9
Bluetooth® streaming audio ...................................... 3-13
Names and functions of audio
control buttons ........................................................................... 3-14
Audio main buttons (Type A) (if
so equipped) ........................................................................... 3-14
Audio main buttons (Type B) (if
so equipped) ........................................................................... 3-15
Steering wheel mounted audio control
buttons (Type A) (if so equipped) ........................... 3-16
Steering wheel mounted audio control
buttons (Type B) (if so equipped) ........................... 3-16
Audio operations ........................................................................ 3-17
Audio main operations ................................................... 3-17
Radio ............................................................................................. 3-19
Compact Disc (CD) player ............................................. 3-24
Digital Versatile Disc (DVD) player (if
so equipped) ........................................................................... 3-26
USB memory device player ....................................... 3-29
iPod® player .......................................................................... 3-32
Bluetooth® streaming audio .................................... 3-35
Auxiliary (AUX) devices (if so equipped) ........... 3-37
Audio settings .............................................................................. 3-39
Disc/USB memory device care and cleaning ...... 3-42
Discs ............................................................................................ 3-42
USB memory device ....................................................... 3-42
Gracenote® End User License Agreement ............ 3-42
Mobile Entertainment System (MES) (if
so equipped) ................................................................................. 3-43
Precautions ........................................................................... 3-44
Technical Information ................................................... 3-44
Remote controller and headphones ................. 3-53
Rear media interface ..................................................... 3-58
Activating rear displays ............................................... 3-58
Operations on rear displays ..................................... 3-59
Setting and information .............................................. 3-60
Controlling the rear system on the
front display .......................................................................... 3-61
Operating tips ..................................................................... 3-62
Care and maintenance ................................................ 3-64
Page 47
3. Audio system
AUDIO OPERATION PRECAUTIONS
WARNING
. The driver must not attempt to
operate the audio system while
the vehicle is in motion, so that full
attention may be given to the
vehicle operation.
. Park the vehicle in a safe location
and apply the parking brake before operating the audio system
and playing movies (if so
equipped).
CAUTION
. Operate the audio system only
when the vehicle engine is running. Operating the audio system
for extended periods of time with
the engine turned off can discharge the vehicle battery.
. Do not allow these systems to get
wet. Excessive moisture, such as
spilled liquids, may cause the system to malfunction.
3-2
RADIO
Place the ignition switch in the ACC or ON
position before turning on the radio. If you
listen to the radio with the engine not
running, the ignition switch should be
placed in the ACC position.
Radio reception is affected by station
signal strength, distance from radio transmitter, buildings, bridges, mountains and
other external influences. Intermittent
changes in reception quality normally
are caused by these external influences.
Using a cellular phone in or near the
vehicle may influence radio reception
quality.
Radio reception
Your radio system is equipped with stateof-the-art electronic circuits to enhance
radio reception. These circuits are designed to extend reception range, and to
enhance the quality of that reception.
However there are some general characteristics of both FM and AM radio signals
that can affect radio reception quality in a
moving vehicle, even when the finest
equipment is used. These characteristics
are completely normal in a given reception area, and do not indicate any malfunction in your radio system.
Reception conditions will constantly
change because of vehicle movement.
Buildings, terrain, signal distance and
interference from other vehicles can work
against ideal reception. Described below
are some of the factors that can affect
your radio reception.
Some cellular phones or other devices
may cause interference or a buzzing noise
to come from the audio system speakers.
Storing the device in a different location
may reduce or eliminate the noise.
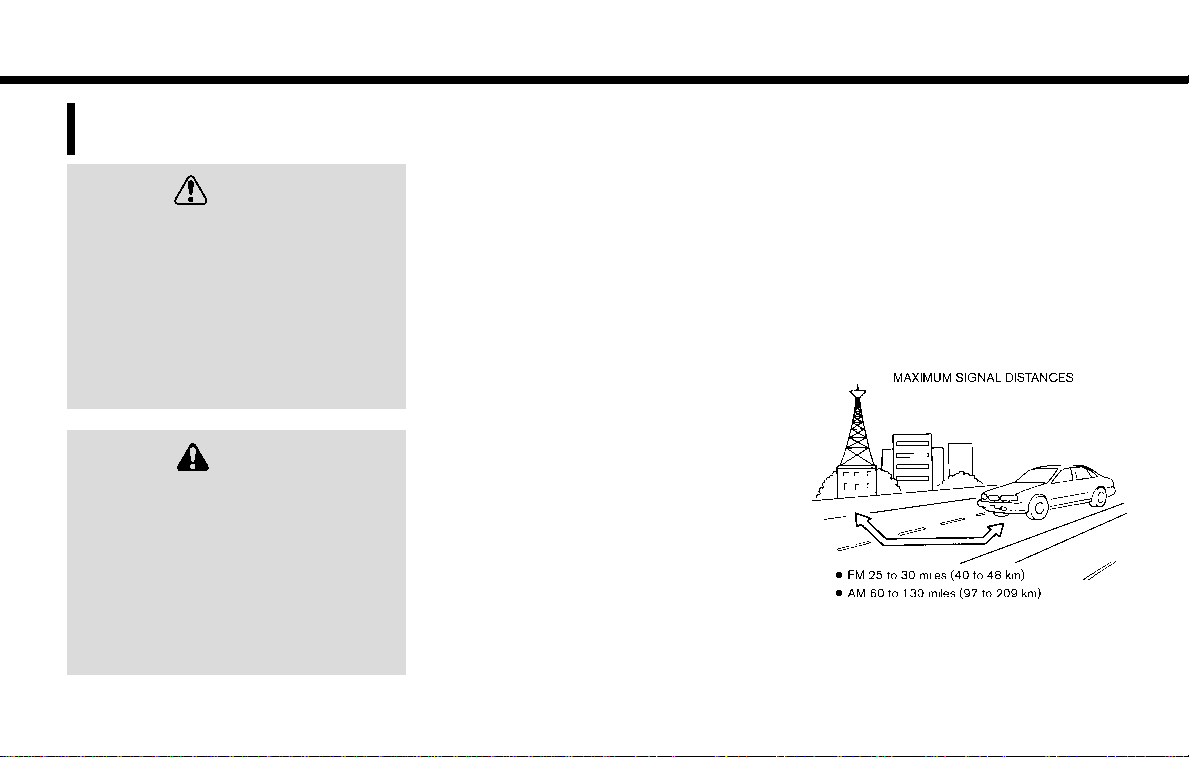
FM radio reception
Range: the FM range is normally limited to
25 to 30 miles (40 to 48 km), with
monaural (single station) FM having
Page 48

3. Audio system
slightly more range than stereo FM. External influences may sometimes interfere
with FM station reception even if the FM
station is within 25 miles (40 km). The
strength of the FM signal is directly related
to the distance between the transmitter
and receiver. FM signals follow a line-ofsight path, exhibiting many of the same
characteristics as light. For example they
will reflect off objects.
Fade and drift: As your vehicle moves
away from a station transmitter, the
signals will tend to fade and/or drift.
Static and flutter: During signal interference from buildings, large hills or due to
antenna position, usually in conjunction
with increased distance from the station
transmitter, static or flutter can be heard.
This can be reduced by lowering the treble
setting to reduce the treble response.
Multipath reception: Because of the reflective characteristics of FM signals, direct and reflected signals reach the
receiver at the same time. The signals
may cancel each other out, resulting in
momentary flutter or loss of sound.
AM radio reception
AM signals, because of their low frequency, can bend around objects and skip
along the ground. In addition, the signals
can bounce off the ionosphere and be
bent back to earth. Because of these
characteristics, AM signals are also subject to interference as they travel from
transmitter to receiver.
Fading: Occurs while the vehicle is passing
through freeway underpasses or in areas
with many tall buildings. It can also occur
for several seconds during ionospheric
turbulence even in areas where no obstacles exist.
Static: Caused by thunderstorms, electrical power lines, electric signs and even
traffic lights.
HD RadioTMTechnology reception
(if so equipped)
HD RadioTMTechnology reception needs
to be activated to receive HD Radio
broadcasts.
“Audio settings” (page 3-39)
This enables you to receive radio broadcasts digitally (where available), providing
a better quality sound with clear reception. When this feature is not activated or
HD Radio broadcasts are not available,
you will receive analog radio (AM/FM)
broadcasts.
Satellite radio reception
When the satellite radio is used for the first
time or the battery has been replaced, the
satellite radio may not work properly. This
is not a malfunction. Wait more than 10
minutes with the satellite radio ON and
the vehicle outside of any metal or large
building for the satellite radio to receive all
of the necessary data.
The satellite radio mode requires an active
SiriusXM Satellite Radio subscription. The
satellite service is available only to those
at least 18 and older in the 48 contiguous
United States and DC.
The satellite radio performance may be
affected if cargo carried on the roof blocks
the satellite radio signal.
If possible, do not put cargo near the
satellite antenna.
A buildup of ice on the satellite radio
antenna can affect satellite radio performance. Remove the ice to restore satellite
radio reception.
3-3
Page 49
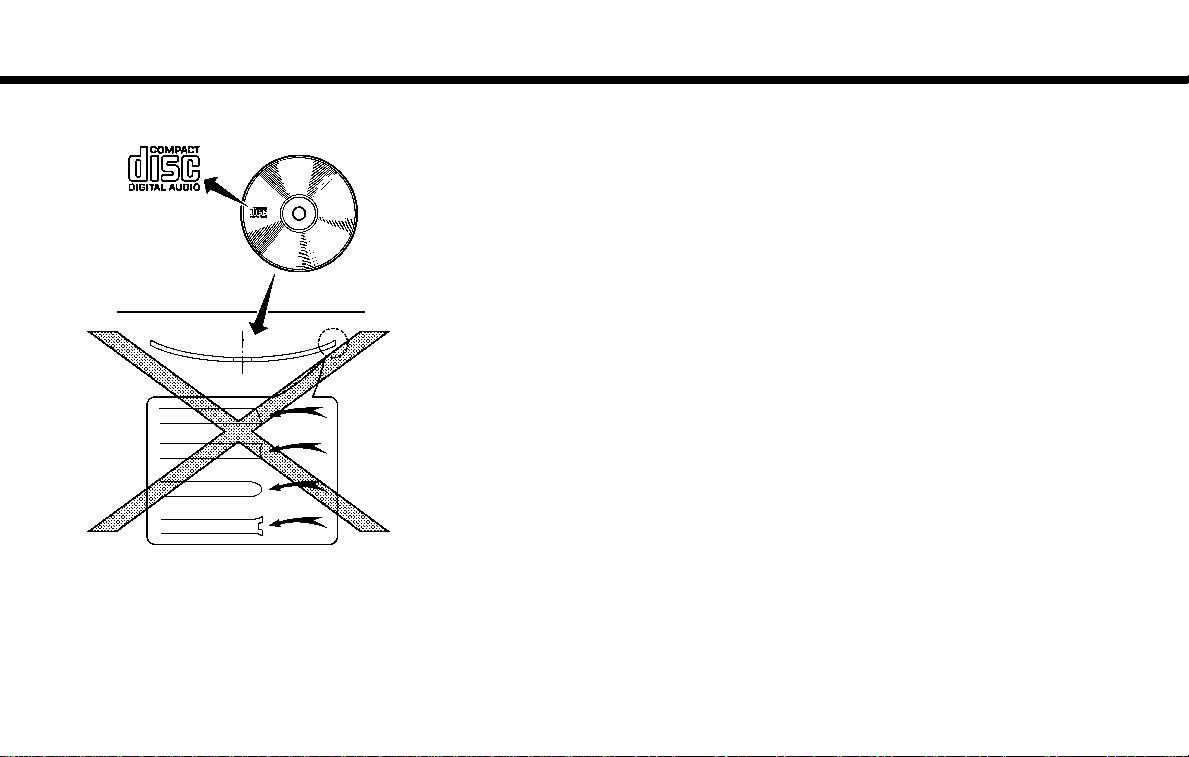
3. Audio system
COMPACT DISC (CD) PLAYER
. Do not force a compact disc into the
CD insert slot. This could damage the
CD and/or CD player.
. Trying to load a CD with the CD door
closed could damage the CD and/or
CD player.
3-4
. During cold or rainy weather, the
player may malfunction due to the
humidity. If this occurs, remove the CD
and dehumidify or ventilate the player
completely.
. The player may skip while driving on
rough roads.
. The CD player sometimes cannot
function when the passenger compartment temperature is extremely
high. Decrease the temperature before
use.
. Only use high quality 4.7 in (12 cm)
round discs that have the “COMPACT
disc DIGITAL AUDIO” logo on the disc or
packaging.
. Do not expose the CD to direct sun-
light.
. CDs that are of poor quality, are dirty,
scratched, or covered with fingerprints, or that have pin holes may not
work properly.
. The following CDs may not work
properly:
— Copy control compact discs (CCCD)
— Recordable compact discs (CD-R)
— Rewritable compact discs (CD-RW)
. Do not use the following CDs as they
may cause the CD player to malfunction.
— 3.1 in (8 cm) discs
— CDs that are not round
— CDs with a paper label
— CDs that are warped, scratched, or
have abnormal edges
. This audio system can only play pre-
recorded CDs. It has no capabilities to
record or burn CDs.
. If a CD cannot be played, error mes-
sages similar to the following may be
displayed.
— Disc read error:
Indicates a CLV/Focus, TOC or Access error. Check and re-insert the
CD. Make sure that it is inserted
correctly.
— Eject disc, please:
Indicates a mechanism error. If the
CD can be ejected, eject and reinsert the CD. If the CD cannot be
ejected, it is recommended that you
contact a NISSAN dealer.
— Unplayable error:
Indicates that no readable files are
found on the inserted CD. Check the
data on your CD.
Page 50

3. Audio system
DIGITAL VERSATILE DISC (DVD)
PLAYER (if so equipped)
Copyright and trademark
. The technology protected by the U.S.
patent and other intellectual property
rights owned by Macrovision Corporation and other right holders is adopted
for this system.
. This copyright protected technology
cannot be used without a permit from
Macrovision Corporation. It is limited
to be personal use, etc., as long as the
permit from Macrovision Corporation
is not issued.
. Modifying or disassembling is prohib-
ited.
. Dolby digital is manufactured under
license from Dolby Laboratories, Inc.
. Dolby and the double D mark
trademarks of Dolby Laboratories, Inc.
. DTS is a registered trademark of DTS,
Inc. and DTS 2.0 “
DTS, Inc.
. DTS and DTS Digital Surround “
registered trademarks of DTS, Inc.
” is a trademark of
” are
Parental level (parental control)
DVDs with the parental control settings
can be played with this system. Please use
your own judgement to set the parental
control with the system.
Disc selection
You can play the following disc formats
with the DVD drive:
. DVD-Video
. DVD-VR
. Video-CD
. DTS-CD
re
Use DVDs with the region code “ALL” or the
code applicable to your DVD player. (The
region code
symbol printed on the DVD
vehicle-installed DVD player can only play
DVDs with an applicable region code.
Do not use the following DVDs as they
may cause the DVD player to malfunc-
is displayed as a small
.) This
3-5
Page 51

3. Audio system
tion:
. 3.1 in (8 cm) discs
. DVDs with incompatible region code
. DVDs that are not round
. DVDs with a paper label
. DVDs that are warped, scratched, or
have unequal edges
The following DVDs may not work properly:
. Recordable digital video discs (DVD-R)
. Rewritable digital video discs (DVD-RW)
Specification chart for DVD
Playable media:
The following media can be played on the
system.
. DVD+RW
. DVD+R
. DVD+R DL
. DVD-RW (corresponds to CPRM)
. DVD-R (corresponds to CPRM)
. DVD-R DL (corresponds to CPRM)
. DVD-ROM
. Dual DISC (not guaranteed)
Video codec:
The following video codecs are supported
by the system.
Video file format
DVD Video
DVD-VR with CPRM
VIDEO CD Ver. 1.0
Ver. 1.1
Ver. 2.0
DTS CD
3-6
Page 52

3. Audio system
Audio codec:
The following combinations of audio codecs support video formats.
Sound format DVD-Video DVD-VR Video-CD DTS-CD
LPCM Supported Supported Not supported Not supported
Dolby Digital Supported Supported Not supported Not supported
Dolby Digital EX Supported with limited output*1Not supported Not supported Not supported
Dts Supported Not supported Not supported Supported
dts-ES Supported with limited output*2Not supported Not supported Not supported
dts 96/24 Supported with limited output*3Not supported Not supported Not supported
MPEG1 Layer3 Supported Supported Supported Not supported
MPEG2 Layer3 Supported with limited output*4Supported with limited output Not supported *5 Not supported
*1 A back surround channel is assigned to the LS and RS channels and output.
*2 A surround centre channel is assigned to the LS and RS channels and output.
*3 Output in 48kHz / 24bit.
*4 A back surround channel of DVD-Video and DVD-VR/MPEG2 is assigned to the LS and RS channels and output.
*5 MPEG2 Layer3 of VIDEO CD indicates SVCD. SVCD may play but its performance is not guaranteed. The 2ch output is utilized for the
audio output of SVCD.
3-7
Page 53

3. Audio system
USB (Universal Serial Bus) CONNECTION PORT
WARNING
Do not connect, disconnect or operate
the USB memory device while driving.
Doing so can be a distraction. If distracted you could lose control of your
vehicle and cause an accident or
serious injury.
CAUTION
. Do not force the USB memory
device into the USB connection
port. Inserting the USB memory
device tilted or upside down into
the port may damage the port.
Make sure that the USB memory
device is connected correctly into
the USB connection port.
. Do not grab the USB connection
port cover (if so equipped) when
pulling the USB memory device out
of the port. This could damage the
port and the cover.
. Do not leave the USB cable in a
place where it can be pulled unintentionally. Pulling the cable may
damage the port.
The vehicle is not equipped with a USB
memory device. USB memory devices
should be purchased separately as necessary.
This system cannot be used to format
USB memory devices. To format a USB
memory device, use a personal computer.
In some areas, the USB memory device for
the front seats plays only sound without
images for regulatory reasons, even when
the vehicle is parked.
This system supports various USB memory devices, USB hard drives and iPod®
players. Some USB memory devices may
not be supported by this system.
. Partitioned USB memory devices may
not play correctly.
. Some characters used in other lan-
guages (Chinese, Japanese, etc.) may
not appear properly in the display.
Using English language characters
with a USB memory device is recommended.
General notes for USB use
Refer to your device manufacturer’s owner information regarding the proper use
and care of the device.
Notes for iPod® use
“Made for iPod®” and “Made for iPhone®”
mean that an electronic accessory has
been designed to connect specifically to
iPod® or iPhone®, respectively, and has
been certified by the developer to meet
Apple performance standards. Apple is
not responsible for the operation of this
device or its compliance with safety and
regulatory standards. Please note that the
use of this accessory with iPod® or
iPhone® may affect wireless performance.
Apple, the Apple logo, iPhone®, iPod®, iPod
classic®, iPod nano®, and iPod touch® are
trademarks of Apple Inc., registered in the
U.S. and other countries. Lightning is a
trademark of Apple Inc. App Store is a
service mark of Apple Inc.
. Improperly plugging in an iPod® may
cause a check-mark to be displayed
on/off (flickering). Always make sure
that the iPod® is connected properly.
. An iPod nano® (1st generation) may
remain in fast-forward or rewind mode
if it is connected during a seek operation. In this case, please manually reset
the iPod®.
. An iPod nano® (2nd generation) will
continue to fast-forward or rewind if it
is disconnected during a seek opera-
3-8
Page 54

3. Audio system
tion.
. An incorrect song title may appear
when the Play Mode is changed while
using an iPod nano® (2nd generation).
. Audiobooks may not play in the same
order as they appear on an iPod®.
. Large video files cause slow responses
in an iPod®. The in-vehicle touch
screen display may momentarily black
out, but will soon recover.
. If an iPod® automatically selects large
video files while in the shuffle mode,
the in-vehicle touch screen display
may momentarily black out, but will
soon recover.
COMPRESSED AUDIO FILES (MP3/
WMA/AAC)
Explanation of terms
. MP3 — MP3 is short for Moving Pictures
Experts Group Audio Layer 3. MP3 is
the most well known compressed
digital audio file format. This format
allows for near “CD quality sound, but
at a fraction of the size of normal
audio files. MP3 conversion of an audio
track can reduce the file size by
approximately a 10:1 ratio (sampling:
44.1 kHz, bit rate: 128 kbps) with
virtually no perceptible loss in quality.
The compression reduces certain
parts of the sound that seem inaudible
to most people.
. WMA — Windows Media Audio (WMA) is
a compressed audio format created by
Microsoft as an alternative to MP3. The
WMA codec offers greater file compression than the MP3 codec, enabling
storage of more digital audio tracks in
the same amount of space when
compared to MP3s at the same level
of quality.
This product is protected by certain
intellectual property rights of Microsoft Corporation and third parties. Use
or distribution of such technology
outside of this product is prohibited
without a license from Microsoft or an
authorized Microsoft subsidiary and
third parties.
. AAC — Advanced Audio Coding (AAC) is
a compressed audio format. AAC offers greater file compression than MP3
and enables music file creation and
storage at the same quality as MP3.
. Bit rate — Bit rate denotes the number
of bits per second used by a digital
music file. The size and quality of a
compressed digital audio file is determined by the bit rate used when
encoding the file.
. Sampling frequency — Sampling fre-
quency is the rate at which the samples of a signal are converted from
analog to digital (A/D conversion) per
second.
. Multisession — Multisession is one of
the methods for writing data to media.
Writing data once to the media is
called a single session, and writing
more than once is called a multisession.
. ID3/WMA Tag — The ID3/WMA tag is
the part of the encoded MP3 or WMA
file that contains information about
the digital music file such as song title,
3-9
Page 55

3. Audio system
artist, album title, encoding bit rate,
and track time duration, etc. ID3 tag
information is displayed on the Album/Artist/Track title line on the display.
* Windows® and Windows Media® are
registered trademarks or trademarks of
Microsoft Corporation in the United States
of America and/or other countries.
Playback order
Root folder
Folder
Audio file
. The folder names of folders not con-
taining compressed audio files are not
shown on the display.
. If there is a file in the top level of a disc/
USB, the root folder is displayed.
. The playback order is the order in
which the files were written by the
writing software, so the files might not
play in the desired order.
. The music playback order of com-
pressed audio files is as illustrated.
3-10
Page 56

3. Audio system
Specification chart for CD
Supported media CD, CD-R, CD-RW
Supported file systems CD, CD-R, CD-RW
Supported
versions*1
Tag information (Song title, Artist name
and Album name)
Folder levels CD, CD-R, CD-RW: Folder levels: 8, Folders: 255 (including root folder), Files: 510 (Max. 255 files for one
Displayable character codes*4 01: SHIFT-JIS, ASCII, ISO–8859–1, UTF-8, UTF-16 BOM, UTF-16 Big Endian, UTF-16 Little Endian, 02:
*1 Files created with a combination of 48 kHz sampling frequency and 64 kbps bit rate cannot be played.
*2 Protected WMA files (DRM) cannot be played.
*3 Made by iTunes®.
*4 Available codes depend on what kind of media, versions, and information are going to be displayed.
MP3 Version MPEG1 Audio Layer3, MPEG2 Audio Layer3, MPEG2.5 Audio Layer3
Sampling frequency
Bit rate 8 kbps - 320 kbps, VBR
WMA*2 Version WMA7, WMA8, WMA9.1, WMA9.2
Bit rate / Sampling frequency
AAC*3 Bit rate / Sam-
pling frequency
MPEG2.5 Audio Layer3: 8kHz, 11.025kHz, 12kHz
MPEG2 Audio Layer3: 16kHz, 22.05kHz, 24kHz
MPEG1 Audio Layer3: 32kHz, 44.1kHz, 48kHz
Bit rate: Ver7, Ver8: 32–192kbps Ver9, Ver9.1, Ver9.2: 32–192kbps, VBR
Sampling frequency: Ver7, Ver8: 8k/11.025k/16k/22k/32k/44.1k Ver9, Ver9.1, Ver9.2: 8k/11.025k/16k/
22k/32k/44.1k/48 kHz
Bit rate: 8–320 kbps, VBR
Sampling frequency: 11.025–48kHz
ID3 tag VER1.0, VER1.1, VER2.2, VER2.3, VER2.4 (MP3 only)
WMA Tag (WMA only)
AAC Tag (AAC only)
folder)
UNICODE, 03: UTF-16
3-11
Page 57
3. Audio system
Specification chart for USB
Supported media USB2.0
Supported file systems FAT32
Folder levels Folder levels: 8, Folders: 512 (including the root folder), Files: 5000
Format Sampling rate Supported/Not supported
MPEG1 Layer-1 - Not supported
Layer-2 - Not supported
Layer-3 44.1, 48, 32 kHz Supported (32–320 kbps)
MPEG2 Layer-1 - Not supported
Layer-2 - Not supported
Layer-3 22.05, 24, 16 kHz Supported (16–160 kbps)
MPEG2.5 Layer-1 - Not supported
Layer-2 - Not supported
Layer-3 11.025, 12, 8 kHz Supported (16–160 kbps)
WMA*1 32, 44.1, 48 kHz Supported VER.7/8 (48–192 bps)
AAC (MPEG4)*2
(Extension “m4a” only)
8, 11.025, 12, 16, 22.05, 24, 32, 44.1, 48 kHz Supported (16–320 kbps)
*1 Professional (voice, lossless, multichannel) is not supported.
*2 AAC (MPEG-2) is not supported.
VER.9/9.1/9.2 (48–320 bps)
3-12
Page 58

3. Audio system
Windows Media Player
This product is protected by certain
intellectual property rights of Microsoft.
Use or distribution of such technology
outside of this product is prohibited without a license from Microsoft.
BLUETOOTH® STREAMING AUDIO
. Some Bluetooth® streaming audio de-
vices may not be recognized by the invehicle audio system.
. It is necessary to set up the wireless
connection between a compatible
Bluetooth® streaming audio device
and the in-vehicle Bluetooth® module
before using the Bluetooth® streaming
audio.
. The Bluetooth® streaming audio may
be stopped under the following conditions:
— When receiving a hands-free call
— When checking the connection to
the hand-free phone
— When connecting the hands-free
phone or audio device
— When downloading a phonebook
memory from a connected cellular
phone
. Do not place a Bluetooth® streaming
audio device in an area surrounded by
metal or far away from the in-vehicle
Bluetooth® module to prevent tone
quality degradation and wireless connection disruption.
. While an audio device is connected
through Bluetooth® wireless connection, the battery of the device may
discharge quicker than usual.
. This system supports the Bluetooth®
Advanced Audio Distribution Profile
(A2DP) and Audio/Video Remote Control Profile (AVRCP).
. Wireless LAN (Wi-Fi) and the Blue-
tooth® functions share the same frequency band (2.4 GHz). Using the
Bluetooth® and the wireless LAN functions at the same time may slow down
or disconnect the communication and
cause undesired noise. It is recommended that you turn off the wireless
LAN(Wi-Fi) when using the Bluetooth®
functions.
3-13
Page 59
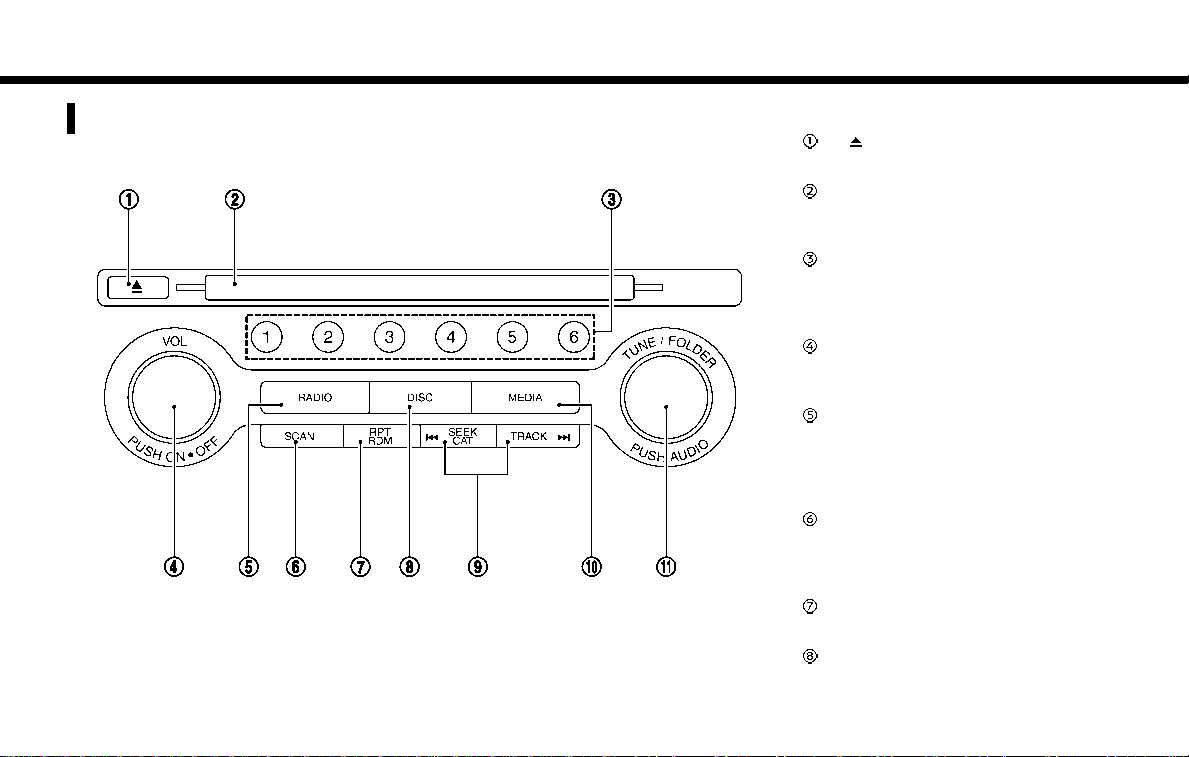
3. Audio system
NAMES AND FUNCTIONS OF AUDIO CONTROL BUTTONS
AUDIO MAIN BUTTONS (Type A) (if so equipped)
< >:
Push to eject a disc.
Disc slot:
Insert a disc with the label side facing
up.
Radio memory buttons:
Using the buttons, up to 6 preferred
stations can be registered in the
preset list for each band.
<VOL/ON·OFF>:
Push to turn the audio system on/off.
Turn to adjust the volume.
<RADIO>:
Push to switch to the radio mode. The
radio band will shift in the order of AM,
FM and SXM (SiriusXM) each time the
button is pushed.
<SCAN>:
Push to scan when scannable source
is playing. Touch again to stop scanning.
<RPT·RDM>:
Push to change the play mode.
<DISC>:
Plays the CD or DVD (if so equipped).
3-14
Page 60

3. Audio system
<SEEK·CAT>/<TRACK>:
Functions to seek radio stations, se-
lect SXM channel categories or to skip
and fast-forward/rewind through
tracks.
<MEDIA>:
Each time the button is pushed, an
available audio source will be selected.
<TUNE/FOLDER AUDIO>:
Bass, treble, balance and fade can be
adjusted by pushing this button and
turning the knob to select the item to
adjust.
Also, functions to manually tune the
radio stations/channels and to select
MP3/WMA/AAC folders.
INFO:
The audio system settings can be linked
and memorized for each of the Intelligent
Keys (if so equipped). For additional information, refer to the vehicle Owner’s
Manual.
AUDIO MAIN BUTTONS (Type B) (if so equipped)
<VOL/ON·OFF>:
Push to turn the audio system on/off.
Turn to adjust the volume.
<DISC>:
Plays the CD or DVD.
<RADIO>:
Push to switch to the radio mode. The
radio band will shift in the order of AM,
FM and SXM (SiriusXM) each time the
button is pushed.
<MEDIA>:
Each time the button is pushed, an
available audio source will be selected.
<SCAN>:
Push to scan when scannable source
is playing. Touch again to stop scanning.
<SEEK·CAT>/<TRACK>:
Functions to seek radio stations, se-
lect SXM channel categories or to skip
and fast-forward/rewind through
tracks.
<RDM·RPT>:
Push to change the play mode.
<TUNE/FOLDER AUDIO>:
Bass, treble, balance and fade can be
adjusted by pushing this button and
turning the knob to select the item to
adjust.
3-15
Page 61

3. Audio system
Also, functions to manually tune the
radio stations/channels and to select
MP3/WMA/AAC folders.
< >:
Push to eject a disc.
Disc slot:
Insert a disc with the label side facing
up.
Radio memory buttons:
Using the buttons, up to 6 preferred
stations can be registered in the
preset list for each band.
INFO:
The audio system settings can be linked
and memorized for each of the Intelligent
Keys (if so equipped). For additional information, refer to the vehicle Owner’s
Manual.
STEERING WHEEL MOUNTED
AUDIO CONTROL BUTTONS (Type
A) (if so equipped)
<ENTER>:
While the display is showing a map (if
so equipped), status or audio screen,
tilt this switch upward or downward
to select a station/channel, track or
folder. For most audio sources, tilting
the switch up/down for more than 1.5
seconds provides a different function
than tilting up/down for less than 1.5
seconds.
< >:
Push to go back to the previous
screen or cancel the selection if it is
not completed.
< >:
Push to adjust the volume.
<SOURCE>:
With the ignition switch in the ACC or
ON position, push this button to turn
the audio system on. Push to change
the audio source.
NOTE:
You are unable to operate the touch
screen display using the switches on the
steering wheel whenever the vehicle
information display shows the setting
display.
STEERING WHEEL MOUNTED
AUDIO CONTROL BUTTONS (Type
B) (if so equipped)
3-16
Page 62
3. Audio system
<SOURCE>:
With the ignition switch in the ACC or
ON position, push this button to turn
the audio system on. Push to change
the audio source.
<ENTER>:
While the display is showing a map,
status or audio screen, tilt this switch
upward or downward to select a
station/channel, track or folder. For
most audio sources, tilting the switch
up/down for more than 1.5 seconds
provides a different function than
tilting up/down for less than 1.5 seconds.
< >:
Push to go back to the previous
screen or cancel the selection if it is
not completed.
< >:
Push to adjust the volume.
AUDIO OPERATIONS
AUDIO MAIN OPERATIONS
Turning audio system on/off
The ignition switch must be in the ACC or
ON position to turn on the audio system.
Push <VOL/ON·OFF> on the audio system
to turn on the last audio source which was
playing immediately before the system
was turned off. To turn off the audio
system, push <VOL/ON·OFF> again.
Displaying audio screen
Push <AUDIO> on the control panel to
display the current audio screen.
Selecting audio source
1. Turn on the audio source menu screen
by touching [Source] on the upper left
corner of the audio screen.
2. Select an item from the audio source
menu screen.
INFO:
. Pushing <RADIO>, <DISC>, <MEDIA> or
<SOURCE> can also change the audio
source.
“Names and functions of audio
control buttons” (page 3-14)
. If the audio system has been turned
off while one of the audio sources was
playing, turning the audio system back
on will play the audio source that was
playing when the system was turned
3-17
Page 63

3. Audio system
off.
. The audio source can also be changed
with the source bar on top of the audio
screen.
Audio source bar
The audio source can be changed with
the source bar on top of the audio screen.
The source bar display can be turned on/
off.
Example
Turning source bar on/off:
You can select whether the source bar on
top of the audio screens is displayed or
not.
1. Touch [Source] on the upper left
corner of the audio screen.
2. Touch [Show Source Bar] to turn the
indicator on/off.
Editing source bar:
The audio sources to be displayed on the
source bar can be changed.
1. Touch [Source] on the upper left
corner of the audio screen.
2. Touch [Edit Source Bar].
3. Touch one of the keys on the source
bar and then touch one of the audio
sources from the source list to register
the audio source in the source bar.
3-18
Page 64

3. Audio system
RADIO
How to view radio operation screen
The radio screen can be viewed and
operated on the touch screen display.
Designs and items displayed on the
screen may vary depending on models
and specifications.
Radio mode indicator:
The current radio mode is displayed.
[Source]:
Touch to switch to the source select
screen.
“Selecting audio source”
(page 3-17)
[Control]:
Touch to display the control screen.
“Radio controls” (page 3-22)
Radio band indicator:
Current radio band (AM, FM or SXM) is
displayed.
Reception information display:
Reception information available at
the time such as frequency, station/
channel name, etc. are displayed.
On the SXM screen, touch this area to
display the category list.
HD Radio reception status indicator
(for AM and FM) (if so equipped):
The icon is displayed when HD Radio
3-19
Page 65

3. Audio system
digital signal is received. The icon
flashes when the radio is acquiring
the digital signal but the sound output is not yet in the HD Radio mode.
Preset list:
36 stations/channels (FM/AM/SXM)
can be registered in the preset list.
“Radio operation” (page 3-20)
INFO:
HD Radio (if so equipped) reception needs
to be activated to receive HD Radio
broadcasts. This enables you to receive
radio broadcasts digitally (where available), providing a better quality sound
with clear reception. When this feature is
not activated or HD Radio broadcasts are
not available, you will receive analog radio
(AM/FM) broadcasts.
Radio operation
Available functions and items displayed
on the screen may vary depending on
models and specifications.
Radio activation and band selection:
Push <RADIO> or select the preferred
radio band (AM, FM or SXM) from the
audio source list to turn on the radio.
Each time <RADIO> is pushed, the radio
3-20
band will change.
“Selecting audio source” (page 3-17)
INFO:
When the stereo broadcast signal is weak,
the radio will automatically change from
stereo to monaural reception.
Seeking stations/channels:
AM and FM radio
Push <SEEK·CAT>/<TRACK> to tune from
low to high or high to low frequencies and
to stop at the next broadcasting station.
Tilting and holding <ENTER> on the steering wheel will also seek up/down to the
next station.
SiriusXM Satellite Radio
Push <SEEK·CAT>/<TRACK> to tune to
the first channel of the next or previous
category.
Tilting and holding <ENTER> on the steering wheel will also fast tune the channels.
Scan tuning:
To scan tune the stations/channels,
touch [Control] on the display and touch
[Scan]. The stations/channels will be
tuned from low to high frequencies and
stop at each broadcasting station/channel for 5 seconds. Touching [Scan] again
during this 5 seconds period will stop scan
tuning and the radio will remain tuned to
that station/channel.
Pushing <SCAN> can also scan tune the
stations/channels.
Presetting:
Up to 36 stations/channels can be registered for AM, FM and SXM in the preset list.
1. Select a radio band (AM, FM or SXM).
2. Tune to the station/channel you wish
to store in the preset list.
3. Touch and hold one of the preset
numbers in the preset list or push
and hold the desired radio memory
buttons.
4. The information such as frequency
(AM/FM), channel number (SXM), etc.
will be displayed on the preset list.
INFO:
. To change the preset stations/chan-
nels, touch and hold one of the preset
numbers. You can select whether to
change the station/channel or to delete the preset setting.
. Tilt <ENTER> on the steering wheel to
scroll up/down the preset stations/
channels.
Page 66

Alert Notification (SXM only):
Favorite artists and songs can be registered to receive an alert notice when a
song of the registered conditions is on the
radio. To tune to the respective channel,
touch [Listen to be consistent]. The alert
can be ignored by touching [Cancel].
“Radio controls” (page 3-22)
INFO:
Satellite Radio:
. The satellite mode requires an active
SiriusXM Satellite Radio subscription.
The satellite service is available only to
those at least 18 and older in the 48
contiguous United States and DC.
. It may take some time to receive the
activation signal after the initiation of
the SiriusXM Satellite Radio subscription. After receiving the activation
signal, an available channel list will
automatically be updated in the radio.
Change the ignition switch position
from LOCK to ACC to update the
SiriusXM channel list.
3. Audio system
3-21
Page 67

3. Audio system
Radio controls
Touch [Control] on the AM, FM or SXM screen to display the control screen.
The following items are available.
Available setting items may vary depending on the models and specifications.
FM/AM:
[Station List] Touch to display the available station list.
[Scan] Touch to scan tune the stations.
[HD Radio Mode] When this item is turned on, the analog and digital reception switches automatically.
[HD Radio Info] Touch to display the HD Radio information such as name of song, artist and album.
[Tag]
(HD Radio broadcasts only)
[RDS-Info] (FM only) Touch to display the RDS information.
SXM:
[Categories] Touch to display the category list.
[Direct Tune] Touch to display the keypad to enter the frequency and directly tune to the channel.
[Scan] Touch to scan tune the channels.
[Instant Replay] Up to 30 minutes of the broadcast of the channel that has been tuned in to can be
3-22
While listening to FM radio, Auto Update is not performed.
“Radio operation” (page 3-20)
When this item is turned off, the reception is fixed in the analog mode.
This item is available when [RDS-Info] is not active.
Touch to register the tag information for iTunes® Tagging. If an iPod® is plugged in
after the registration, the tag information can be stored in an iPod® and be used to
purchase the songs via iTunes®.
This item is available when [HD Radio Info] is not active.
“Radio operation” (page 3-20)
“Radio operation” (page 3-20)
replayed. Touch to select from [
], [ ], [ ], [ ], [ ] and [ ].
Page 68

3. Audio system
[Tag] Touch to register the tag information for iTunes® Tagging. If an iPod® is plugged in
[Other] [Favorite Artists] Touch to set a favorite artists alert notification. Up to 8 artists can be registered. While
[Favorite Songs] Touch to set a favorite songs alert notification. Up to 8 songs can be registered. While
[Customize Channel List] Touch to customize the channel list. Only the selected channels will be tuned in to
[Artist Alert History] Touch to display the artist list for an alert notice.
[Song Alert History] Touch to display the song list for an alert notice.
[Favorite Alert Settings] Touch to turn on/off the alert notice for the registered favorite artists and songs.
[Channel Locking Settings] Touch to select or unselect the channel that you wish to lock out. A passcode is
after the registration, the tag information can be stored in an iPod® and be used to
purchase the songs via iTunes®.
a song of your favorite artist is playing, touch the list and touch [Add]/[Update]. To
receive the alert notification, select [Notify Alert ON].
your favorite song is playing, touch the list and touch [Add]/[Update]. To receive the
alert notification, select [Notify Alert ON].
when you seek or scan the channels. You can select each item or select [All Select]/
[Deselect All].
required to change the settings. The default passcode is 1234.
3-23
Page 69

3. Audio system
COMPACT DISC (CD) PLAYER
How to view CD operation screen
[Source]:
Touch to switch to the source list
screen.
“Selecting audio source”
(page 3-17)
[Scan]:
Touch to play the first 10 seconds of
the tracks. Touch again to stop scanning.
Track information:
Track information such as the song
title, artist name, and album name is
displayed.
Audio source indicator:
Indicates that CD is currently selected.
Play time:
The play time of the track is displayed.
Track number:
This indicates the current track num-
ber and the total number of tracks.
CD menu:
CD menu items are displayed. Touch
an icon to display the list or to change
the setting.
- [Track]
- [Play Mode]
- [Folder] (for MP3, WMA, AAC)
Play Mode indicator:
This indicates the current play mode.
Touch to change the play mode.
For CDs without compressed audio files:
Mode Screen display
[Disc Repeat]
[1 Track Repeat]
[Disc Random]
Disc
1 Track
Disc
3-24
Page 70
3. Audio system
For CDs with compressed audio files:
Mode Screen display
[Disc Repeat]
[1 Folder Repeat]
[1 Track Repeat]
[Disc Random]
[1 Folder Random]
Folder number (for MP3, WMA, AAC):
This indicates the folder number
when a CD with compressed audio
files is loaded.
Disc
1 Folder
1 Track
Disc
1 Folder
CD player operation
Loading:
Insert the CD into the slot with the label
side facing up. The CD will be guided
automatically into the slot and starts
playing.
After loading the CD, the CD screen will
appear on the display.
Activation and playing:
The CD mode can be selected from the
source list or by pushing <DISC> with a CD
loaded to play the CD.
“Names and functions of audio control buttons” (page 3-14)
“Selecting audio source” (page 3-17)
If the system has been turned off while the
CD was playing, pushing <VOL/ON·OFF>
will start the audio system set to the CD
screen.
Selecting track/folder:
Touch [Track] or [Folder] in the CD menu
and select a preferred track or folder from
the list.
Push <SEEK·CAT>/ <TRACK> or tilt
<ENTER> on the steering wheel up/down
briefly to move to the next or previous
track.
For CDs with compressed audio files, turn
<TUNE/FOLDER AUDIO> or tilt and hold
<ENTER> on the steering wheel to move
to the next or previous folder.
“Names and functions of audio control buttons” (page 3-14)
Fast-forwarding or rewind:
Push and hold <SEEK·CAT>/<TRACK> to
fast-forward or rewind the track. Release
<SEEK·CAT>/<TRACK> to play the track at
normal speed.
Scanning:
Touch [Scan] on the display or push
<SCAN> to scan the tracks in the CD. While
scanning, the CD will play the first 10
seconds of each track and move on to
the next track. Touching [Scan] or pushing
<SCAN> again within the 10 seconds will
stop scanning.
Changing play mode:
Touch [Play Mode], [
the play mode. Pushing <RPT·RDM>/
<RDM·RPT> can also change the play
mode.
Ejecting CD:
Push <
ejected and left unremoved, it will be
reloaded into the slot to protect the CD.
> to eject the CD. If the CD is
]or[ ] to select
3-25
Page 71
3. Audio system
DIGITAL VERSATILE DISC (DVD)
PLAYER (if so equipped)
Precautions
. Use DVDs with the region code “ALL” or
the code applicable to the DVD player.
(The region code is displayed as a
small symbol printed on the top of
the DVD). This vehicleinstalled DVD
player can only play DVDs with the
applicable region code.
. Images cannot be displayed when the
ignition switch is in the ON position.
. Some VIDEO-CD functions may not be
supported with this system.
. Available menus and functions may
vary depending on the type of disc.
How to view DVD operation screen
DVD operation menu:
DVD menu items are displayed. Touch
a key to operate the DVD.
- [Play]/[Pause]
- [Stop]
- [Skip <<]
- [Skip >>]
-[
- [CM >>]
- [CM <<]
- [Top Menu]
- [Title List]
- [Title Menu]
- [10 Key Search]
Key]
- [Select No.]
- [Previous Title]
- [Next Title]
- [Default Position]
- [Display Settings]
- [Play Mode]
Title/chapter number:
This indicates the DVD title/chapter
number currently selected.
Play time:
The play time of the track is displayed.
Play mode indicator:
This indicates the current play mode.
3-26
Page 72

3. Audio system
Mode Screen display
[OFF]
[1 Disc Repeat]
[1 Chapter Repeat]
[Disc Random]
[Change Audio Source]
Touch to display the source select
screen.
“Selecting audio source”
(page 3-17)
[Select Rear Source] (if so equipped):
Touch to display the Mobile Entertain-
ment System screen.
“Controlling the rear system on
the front display” (page 3-61)
INFO:
. The DVD menu list will appear when
the screen is touched while a movie is
playing.
. The availability of the DVD menu items
depend on the type of DVD.
OFF
Disc
1 Chapter
Disc
DVD player operation
Loading:
Insert the DVD into the slot with the label
side facing up. The DVD will be guided
automatically into the slot and start playback.
When a DVD is loaded, the DVD operation
screen is displayed on the display.
Activation and playing:
Inserting the DVD into the slot will activate
the DVD mode. The DVD mode can also be
selected from the source list or by pushing
<DISC> with a DVD loaded.
“Names and functions of audio control buttons” (page 3-14)
“Selecting audio source” (page 3-17)
Touch [Play] in the DVD menu to start
playing. Touch [Pause] to pause and touch
[Stop] to stop playing the DVD.
Skipping:
Touch [Skip <<] or [Skip >>] in the DVD
menu to skip to the next or previous
track/chapter.
Displaying keys:
Touch [
display operation keys such as [Enter] or
Key] in the DVD menu to
[Return], etc. on the display.
Skipping commercial messages:
Touch [CM <<] or [CM >>] in the DVD menu
to skip commercials.
Displaying top menu:
Touch [Top Menu] in the DVD menu to
display the top menu specific to each disc.
For additional information, refer to the
disc instructions.
Displaying title list:
Touch [Title List] in the DVD menu to
display the title list.
Displaying title menu:
Touch [Title Menu] in the DVD menu to
display the title menu specific to each disc.
For additional information, refer to the
disc instructions.
Selecting track/chapter/menu number:
Touch [10 Key Search] or [Select No.] in the
DVD menu to display the keyboard screen.
Enter the track/chapter or menu number
you wish to play.
Viewing next/previous title:
Touch [Next Title] or [Previous Title] in the
DVD menu to shift to the next title or
3-27
Page 73

3. Audio system
return to the previous title.
Viewing from default list:
Touch [Default Position] in the DVD menu
to view from the default list.
Adjusting the display:
Touch [Display Settings] in the DVD menu
to adjust the display settings of the display.
[Brightness] Adjusts the display
[Contrast] Adjusts the display con-
[Black Level] Adjusts the display black
[Tint] Adjusts the tint level.
[Color] Adjusts the color.
[Reset Set-
tings]
brightness.
trast.
level.
Resets all the display settings to default.
Changing play mode:
Touch [Play Mode] in the DVD menu to
select the play mode.
Available modes:
. DVD Video
— OFF
— 1 Chapter Repeat
. DVD VR
— 1 Disc Repeat
— 1 Chapter Repeat
. Video CD 1.1
— 1 Disc
— 1 Track Repeat
— 1 Disc Random
. DTS-CD
— 1 Disc Repeat
— 1 Track Repeat
— 1 Disc Random
3-28
Page 74
3. Audio system
USB MEMORY DEVICE PLAYER
Connecting USB memory device
WARNING
Do not connect, disconnect or operate
the USB memory device while driving.
Doing so can be a distraction. If distracted, you could lose control of your
vehicle and cause an accident or
serious injury.
CAUTION
. Do not force the USB memory
device into the USB connection
port. Inserting the USB memory
device tilted or upside down into
the port may damage the port.
Make sure that the USB memory
device is connected correctly to
the USB connection port.
. Do not grab the USB connection
port cover (if so equipped) when
pulling the USB memory device out
of the port. This could damage the
port and the cover.
. Do not leave the USB cable in a
place where it can be pulled unintentionally. Pulling the cable may
damage the port.
Refer to your device manufacturer’s owner information regarding the proper use
and care of the device.
When compatible storage devices are
plugged into the jack, compatible audio
files on the storage devices can be played
through the vehicle’s audio system.
USB connection port location:
“Audio accessories” (page 2-11)
3-29
Page 75

3. Audio system
How to view USB operation screen
[Source]:
Touch to switch to the source list
screen.
“Selecting audio source”
(page 3-17)
Play time:
The play time of the track is displayed.
Track information:
Track information such as the song
title, artist name and folder name is
displayed.
3-30
Audio source indicator:
Indicates which of the two USB mem-
ory devices is selected.
[USB1]/[USB2]:
Touch to switch to the other con-
nected USB memory device.
Album artwork:
An image of the CD cover is displayed
when available.
Track number:
This indicates the track number and
the total number of tracks.
[ ]/[ ]:
Touch to play or pause the track.
USB menu:
USB menu items are displayed. Touch
an icon to display the list or to change
the setting.
- [Folder/Track]
- [Artists]
- [Albums]
- [Previous List]
- [Play Mode]
- [Scan]
Play mode indicator:
This indicates the current play mode.
Touch to change the play mode.
Page 76

3. Audio system
Mode Screen display
[All Track Repeat]
[1 Folder Repeat]
[1 Track Repeat]
[All Random]
[1 Folder Random]
Folder number:
This indicates the folder, artist or
album number and the total number
of folders/lists.
All
1 Folder
1 Track
All
1 Folder
USB memory device player operation
Activation and playing:
USB memory device mode can also be
activated from the audio source list and
the audio source bar by the touch panel
operation or by pushing <MEDIA>.
“Names and functions of audio control buttons” (page 3-14)
“Selecting audio source” (page 3-17)
To play the USB memory device, touch
], and to pause the USB memory,
[
touch [
] on the USB operation screen.
Selecting play list:
Select a play list by touching an icon on
the USB menu.
. [Folder/Track]
. [Artist]
. [Album]
. [Previous List]
Skipping tracks/folders:
Push <SEEK·CAT>/ <TRACK> or tilt
<ENTER> on the steering wheel up/down
briefly. To skip to the next or previous
track.
To skip to the next or previous folder, turn
<TUNE/FOLDER AUDIO> or tilt and hold
<ENTER> on the steering wheel.
Fast-forwarding or rewinding:
Push and hold <SEEK·CAT>/<TRACK> to
fast-forward or rewind the track. Release
<SEEK·CAT>/<TRACK> to play the track at
normal speed.
Scanning:
Touch [Scan] on the display or push
<SCAN> to scan the tracks in the USB
memory device. While scanning, the USB
memory device will play the first 10
seconds of each track and move on to
the next track. Touching [Scan] or pushing
<SCAN> again within the 10 seconds will
stop scanning.
Changing play mode:
Touch [Play Mode], [
the play mode. Pushing <RPT·RDM>/
<RDM·RPT> can also change the play
mode.
]or[ ] to select
3-31
Page 77
3. Audio system
iPod® PLAYER
Connecting iPod®
WARNING
Do not connect, disconnect or operate
the iPod® while driving. Doing so can
be a distraction. If distracted, you
could lose control of your vehicle and
cause an accident or serious injury.
CAUTION
. Do not force the iPod® device into
the USB connection port. Inserting
the iPod® cable tilted or upside
down into the port may damage
the port. Make sure that the iPod®
cable is connected correctly to the
USB connection port.
. Do not grab the USB connection
port cover (if so equipped) when
pulling the iPod® cable out of the
port. This could damage the port
and the cover.
. Do not leave the iPod® cable in a
place where it can be pulled unintentionally. Pulling the cable may
damage the port.
Refer to your device manufacturer’s owner information regarding the proper use
and care of the device.
The battery of the iPod® will be charged
while the device is connected to the
vehicle if the iPod® supports USB connection charging.
Depending on the model and firmware
version of the iPod®, the display on the
iPod® shows a NISSAN or Accessory Attached screen when the connection is
completed. When the iPod® is connected
to the vehicle, the iPod® music library can
only be operated using the vehicle audio
controls.
USB connection port location:
“Audio accessories” (page 2-11)
Compatibility:
Made for
. iPod touch® (5th generation)
. iPod touch® (4th generation)
. iPod touch® (3rd generation)
. iPod touch® (2nd generation)
. iPod touch® (1st generation)
. iPod touch®
. iPod® with video
. iPod classic®
. iPod nano® (7th generation)
. iPod nano® (6th generation)
. iPod nano® (5th generation)
. iPod nano® (4th generation)
. iPod nano® (3rd generation)
. iPod nano® (2nd generation)
. iPod nano® (1st generation)
. iPhone® 5s
. iPhone® 5
. iPhone® 4S
. iPhone® 4
. iPhone® 3GS
. iPhone® 3G
. iPhone®
INFO:
. The iPod touch® may not respond
quickly with the system in some cases.
. Make sure that the iPod® firmware is
updated.
. The Lightning
iPhone® 5, iPhone® 5s, iPod touch® (5th
generation) and iPod nano® (7th gen-
TM
connector works with
3-32
Page 78
3. Audio system
eration).
. The 30–pin connector works with
iPhone® 4S, iPhone® 4, iPhone® 3GS,
iPhone® 3G, iPhone®, iPod touch® (1st
through 4th generation), iPod classic®
and iPod nano® (1st through 6th generation).
. USB works with iPhone® 5, iPhone® 4S,
iPhone® 4, iPhone® 3GS, iPhone® 3G,
iPhone®, iPod touch® (1st through 5th
generation), iPod classic® and iPod
nano® (1st through 7th generation).
How to view iPod® operation screen
Search condition indicator:
This indicates the current search
condition.
[Source]:
Touch to switch to the source list
screen.
“Selecting audio source”
(page 3-17)
Play time:
The play time of the track is displayed.
Track information:
Track information such as the song
title, artist name and album name is
displayed.
Audio source indicator:
This indicates that the iPod® is cur-
rently selected.
Album artwork:
An image of the CD cover is displayed
when available.
3-33
Page 79
3. Audio system
Track number:
This indicates the current track num-
ber and the total number of tracks.
Shuffle mode indicator:
Touch to change the shuffle mode.
Mode Screen display
[Shuffle Albums]
[All Songs]
[Shuffle Off]
Albums
Songs
Off
[ ]/[ ]:
Touch to play or pause the track.
iPod® menu:
- [Previous List]
- [Playlists]
- [Artists]
- [Songs]
- [Albums]
- [Genres]
- [Composers]
- [Podcasts]
- [Audiobooks]
- [Shuffle]
- [Repeat]
3-34
Repeat mode indicator:
Touch to change the repeat mode.
Mode Screen display
[All Track Repeat]
[1 Track Repeat]
[Repeat Off]
All
1 Track
Off
iPod® player operation
Activation and playing:
Inserting the iPod® cable into the connection port will activate the iPod® mode.
iPod® can also be selected from the audio
sources list and the source bar by touch
panel operation or by pushing <MEDIA>.
“Names and functions of audio control buttons” (page 3-14)
“Selecting audio source” (page 3-17)
To play and pause the iPod®, touch
]/[ ] in the iPod® menu.
[
Selecting search method:
A list of search methods is displayed in the
iPod® menu. Touch and select an item to
play the iPod® in your preferred settings.
Fast-forwarding or rewinding:
Push and hold <SEEK·CAT>/<TRACK> to
fast-forward or rewind the song. Release
<SEEK·CAT>/<TRACK> to play the song at
normal speed.
Changing play mode:
Touch [Shuffle], [Repeat], [
]or[ ]to
select the play mode. Pushing
<RPT·RDM>/<RDM·RPT> can also change
the play mode.
Skipping songs:
Push <SEEK·CAT>/ <TRACK> or tilt
<ENTER> on the steering wheel to skip
to the next or previous song.
Even when iPod® and/or iPhone® are
inserted into both of the two USB connection ports, the system recognizes only
one of the connected iPod® and/or
iPhone® at a time.
Page 80

3. Audio system
BLUETOOTH® STREAMING AUDIO
Your vehicle is equipped with Bluetooth®
streaming audio.
If you have a compatible Bluetooth®
device with streaming audio (A2DP profile), you can set up a wireless connection
between your Bluetooth® device and the
in-vehicle audio system. This connection
allows you to listen to the audio from the
Bluetooth® device using your vehicle
speakers. It may also allow basic control
of the device for playing and skipping
audio files using the AVRCP Bluetooth®
profile. Not all Bluetooth® devices have the
same level of controls for AVRCP. Please
consult the manual for your Bluetooth®
device for more details.
Wireless LAN (Wi-Fi) and the Bluetooth®
functions share the same frequency band
(2.4 GHz). Using the Bluetooth® and the
wireless LAN functions at the same time
may slow down or disconnect the communication and cause undesired noise. It
is recommended that you turn off the
wireless LAN (Wi-Fi) when using the Bluetooth® functions.
Connecting Bluetooth® streaming
audio device
Bluetooth® streaming audio device must
be connected to the vehicle before opera-
tion.
“Pairing Bluetooth® device”
(page 2-27)
How to view Bluetooth® streaming audio operation screen
[Source]:
Touch to switch to the source list
screen.
“Selecting audio source”
(page 3-17)
Track information:
Track information such as the song
title, artist name and folder name is
displayed.
Audio source indicator:
This indicates that Bluetooth®
streaming audio is currently selected
among other sources.
Play time:
The play time of the track is displayed.
3-35
Page 81

3. Audio system
[Control]:
Touch to display the control screen.
“Bluetooth® streaming audio
controls” (page 3-37)
Track number:
This indicates the track number.
Repeat mode indicator:
Touch to change the repeat mode.
Mode Screen display
[All Track Repeat]
[1 Folder Repeat]
[1 Track Repeat]
[Repeat Off]
Bluetooth® streaming audio menu:
- [Play]
- [Pause]
- [Folder/Track]
- [Repeat]
- [Random]
Random mode indicator:
Touch to change the random mode.
All
1 Folder
1 Track
Off
Mode Screen display
[All Random]
[1 Folder Random]
[Random Off]
INFO:
Depending on the audio device that is
connected to the vehicle, track information may not be displayed.
All
1 Folder
OFF
Bluetooth® streaming audio operation
The ability to pause, change tracks, fastforward, rewind, randomize and repeat
music may be different between devices.
Some or all of these functions may not be
supported on each device.
. Depending on the Bluetooth® stream-
ing audio device that is connected, it
may not be possible to perform audio
operations.
. Depending on the Bluetooth® stream-
ing audio device that is connected, a
time lag may occur before music is
played back.
Activation and playing:
Bluetooth® streaming audio device can be
selected from the audio sources list by
touching [Source] or by pushing <MEDIA>.
“Names and functions of audio control buttons” (page 3-14)
“Selecting audio source” (page 3-17)
To play the Bluetooth® streaming audio
device, touch [Play] and to pause the
Bluetooth® streaming audio device, touch
[Pause] in the Bluetooth® steaming audio
menu.
Selecting folder/track:
Touch [Folder/Track] to select a folder/
track.
Changing play mode:
Touch [Repeat], [Random], [
select the play mode. Pushing
<RPT·RDM>/<RDM·RPT> can also change
the play mode.
Fast-forwarding or rewinding:
Push and hold <SEEK·CAT>/<TRACK> to
fast-forward or rewind the song. Release
<SEEK·CAT>/<TRACK> to play the song at
normal speed.
]or[ ]to
3-36
Page 82

3. Audio system
Skipping songs/folders:
Push <SEEK·CAT>/ <TRACK> or tilt
<ENTER> on the steering wheel to skip
to the next or previous song.
To skip to the next or previous folder, turn
<TUNE/FOLDER AUDIO>.
Bluetooth® streaming audio controls
Touch [Control] on the Bluetooth®
streaming audio operation screen to display the control screen.
[Select
Audio Device]
[Connect
Device]
Touch to select a different
Bluetooth® streaming audio
device from a list of registered
Bluetooth® devices.
“Bluetooth® settings”
(page 2-27)
Touch to connect a new
Bluetooth® device.
AUXILIARY (AUX) DEVICES (if so
equipped)
Connecting auxiliary devices
The auxiliary audio input jack accepts any
standard analog audio input such as from
a portable cassette player, CD player or
MP3 player.
A video player can be connected to the
auxiliary video input jack to play movies.
Auxiliary audio input jack location:
“Audio accessories” (page 2-11)
INFO:
Insert a 1/8 in (3.5 mm) stereo mini plug in
the audio input jack. If a cable with a mono
plug is used, the audio output may not
function normally.
How to view AUX operation
screen
Touch [Display Settings] to adjust the
display settings. Touch [Change Audio
Source] to display the source select
screen.
“Selecting audio source” (page 3-17)
Designs and items displayed on the
screen may vary depending on models
and specifications.
AUX operation
Activation and playing:
Turn on an AUX device.
Connecting an AUX device into the jack
will activate the AUX mode.
AUX can be selected from the other audio
sources by touching [Source] or by pushing <MEDIA>.
“Names and functions of audio con-
3-37
Page 83

3. Audio system
trol buttons” (page 3-14)
“Selecting audio source” (page 3-17)
3-38
Page 84

3. Audio system
AUDIO SETTINGS
Audio settings can be adjusted or audio related functions can be turned on/off using the following procedure.
Some of the setting items may not be displayed when the audio system is turned off.
Available setting items may vary depending on the models and specifications.
1. Push <SETTING>.
2. Touch [Audio].
The following setting items are available:
. [Sound Settings]
Setting Items Action
[Bass] Adjust the speaker tone quality and sound balance by touching [+]/[-], [L]/[R] or [R]/[F].
[Treble]
[Balance]
[Fade]
[Bose® Centerpoint] When this item is turned on, surround sound playback is generated from a traditional stereo
[Surround Vol] Touch [+]/[-] to adjust [Surround Vol] level if Bose® Centerpoint is turned on.
[Speed Sensitive Vol] This automatically adjusts the volume depending on the vehicle speed. Touch [+]/[-] to change the
[Driver’s Audio Stage] When this item is turned on, a better sound quality will be provided to the driver’s position. The driver
recording. Turn on this item to activate Bose® Centerpoint and to change its effect level with the
[Surround Vol].
sensitivity level.
can enjoy a more crisp and clear sound that is specialized for the driver’s seat position. The
prominence of the effect of this feature depends on the type of music that is played. For some music,
it may be difficult to recognize the effect of this feature.
. [Display Album Cover Art]
Turn this item on to display image files from the media device. If the media device does not contain images, no image will be
3-39
Page 85

3. Audio system
displayed.
. [Radio Settings]
Setting Items Action
[HD Radio Mode (AM)] When this item is turned on, the analog and digital reception switches automatically.
[HD Radio Mode (FM)]
. [DVD Settings]
Setting Items Action
[Angle] Images and movies can be viewed in different angles if the DVD contains this data. Switch the angle
[CM Skip] Select commercial skip length from 15, 30, and 60 seconds.
[DRC] Select the DRC (Dynamic Range Compression) setting from OFF, 1 and 2. DRC allows tuning of the
[Angle Mark] Turn the angle mark display on/off. When this item is turned on, [Multi Angle] will be displayed on the
[Menu Skip] DVD menus are automatically configured and the contents will be played directly when this item is
[DOWN MIX] When this item is turned on, a multi-channel recording will be converted to a traditional two channel
[DVD Language] Enter the language code of the preferred language.
[Language] Changeable items will vary depending on the type of DVD.
[Subtitle] The subtitle language can be changed by touching [+]/[-].
3-40
When this item is turned off, the reception is fixed in the analog mode.
number by touching [+]/[-].
dynamic range of sound recorded in the Dolby Digital format.
DVD screen.
turned on. Note that some discs may not be played directly even if this item is turned on.
(stereo) recording.
For DVD-V:
Audible language can be changed by touching [+]/[-].
For Video CD:
Select the sound setting from Main audio, Sub audio and Main/Sub audio.
For DVD VR:
Select the sound setting from Main audio 1, Sub audio 1, Main/Sub audio 1, Main audio 2, Sub audio 2,
and Main/Sub audio 2.
Page 86

3. Audio system
[DVD Screen Settings] Touch to adjust the DVD aspect ratio.
[PG/PL Mode] Touch to switch the PG/PL mode setting.
INFO:
The Available setting items differ depending on the DVD.
. [AUX settings]
Setting Items Action
[Image ON]/[Image OFF] The image display on the display can be turned on/off.
[AUX Image Display] The image display size setting can be selected from [Normal], [Wide] and [Cinema].
[Volume Setting] The volume setting can be selected from [Low], [Medium] and [High].
3-41
Page 87

3. Audio system
DISC/USB MEMORY DEVICE
CARE AND CLEANING
DISCS
. Handle a disc by its edges. Never touch
the surface of the disc. Do not bend
the disc.
. Always place discs in their storage
cases when they are not being used.
. To clean a disc, wipe the surface from
the center to the outer edge using a
clean, soft cloth. Do not wipe the disc
using a circular motion.
Do not use a conventional record
cleaner or alcohol intended for indus-
trial use.
. The inner and outer edges of a new
disc may be rough. Remove the rough
edges by rubbing the inner and outer
edges with the side of a pen or pencil
as illustrated.
USB MEMORY DEVICE
. Never touch the terminal portion of
the USB memory device.
. Do not place heavy objects on the USB
memory device.
. Do not store the USB memory device
in very humid locations.
. Do not expose the USB memory device
to direct sunlight.
. Do not spill any liquids on the USB
memory device.
Refer to the owner’s manual for the USB
memory device for details.
GRACENOTE® END USER LICENSE AGREEMENT
This application or device contains software from Gracenote, Inc. of Emeryville,
California (“Gracenote”).The software from
Gracenote (the “Gracenote Software”) enables this application to perform disc and/
or file identification and obtain musicrelated information, including name, artist, track, and title information (“Gracenote Data”) from online servers or
embedded databases (collectively, “Gracenote Servers”) and to perform other functions. You may use Gracenote Data only
by means of the intended End-User functions of this application or device.
You agree that you will use Gracenote
Data, the Gracenote Software, and Gracenote Servers for your own personal noncommercial use only. You agree not to
assign, copy, transfer, or transmit the
Gracenote Software or any Gracenote
Data to any third part. YOU AGREE NOT
TO USE OR EXPLOIT GRACENOTE DATA,
THE GRACE SOFTWARE, OR GRACENOTE
SERVERS, EXCEPT WHEN EXPRESSLY PERMITTED HEREIN.
You agree that your non-exclusive license
to use the Gracenote Data, the Gracenote
Software, and Gracenote Servers will ter-
3-42
Page 88

3. Audio system
minate if you violate these restrictions. If
your license terminates, you agree to
cease any and all use of the Gracenote
Data, the Gracenote Software, and Gracenote Servers. Gracenote reserves all rights
in Gracenote Data, the Gracenote Software, and the Gracenote Servers, including all ownership rights. Under no
circumstances will Gracenote become
liable for any payment to you for any
information that you provide. You agree
that Gracenote, Inc. may enforce its rights
under this Agreement against you directly
in its own name.
The Gracenote service uses a unique
identifier to track queries for statistical
purposes. The purpose of a randomly
assigned numeric identifier is to allow
the Gracenote service to count queries
without knowing anything about who you
are. For more information, see the web
page for the Gracenote Privacy Policy for
the Gracenote service.
The Gracenote Software and each item of
Gracenote Data is licensed to you “AS IS”.
Gracenote makes no representations or
warranties, express or implied, regarding
the accuracy of any Gracenote Data from
the Gracenote Servers. Gracenote reserves the right to delete data from the
Gracenote Servers or to change data
categories for any cause that Gracenote
seems sufficient. No warranty is made
that the Gracenote Software or Gracenote
Servers are error-free or that functioning
of Gracenote Software or Gracenote Servers will be uninterrupted. Gracenote is
not obligated to provide you with new
enhanced or additional data types or
categories that Gracenote may provide
in the future and is free to discontinue its
services at any time.
GRACENOTE DISCLAIMS ALL WARRANTIES
EXPRESS OR IMPLIED, INCLUDING, BUT
NOT LIMITED TO, IMPLIED WARRANTIES
OF MERCHANTABILITY, FITNESS FOR A
PARTICULAR PURPOSE, TITLE, AND NONINFRINGEMENT. GRACENOTE DOES NOTWARRANT THE RESULTS THAT WILL BE
OBTAINED BY YOUR USE OF THE GRACENOTE SOFTWARE OR ANY GRACENOTE
SERVER. IN NO CASE WILL GRACENOTE
BE LIABLE FOR ANY CONSEQUENTIAL OR
INCIDENTAL DAMAGES OR FOR ANY LOST
PROFITS OR LOST REVENUES.
© Gracenote, Inc. 2009
MOBILE ENTERTAINMENT SYSTEM (MES) (if so equipped)
If your vehicle is equipped with the Mobile
Entertainment System (MES), you can
enjoy playing audio and movie files on
the rear displays with images and sound.
Playable source:
. DVD (if so equipped)
. AUX device (if so equipped)
. USB memory device (connected to the
rear USB connection port)
. HDMI device
The front and left/right rear displays can
show different sources individually.
CD/DVD (if so equipped) slot location:
“Names and functions of audio control buttons” (page 3-14)
Auxiliary input jack location (if so
equipped):
“Audio accessories” (page 2-11)
Rear media interface (USB and HDMI
connection ports) location:
“Rear media interface” (page 3-58)
3-43
Page 89

3. Audio system
WARNING
The driver must not attempt to operate the Mobile Entertainment System
while driving so full attention may be
given to vehicle operation.
CAUTION
. Do not attempt to use the system
in extremely high or low temperature conditions [below -4°F (-20°C)
or above 158°F (70°C)].
. To avoid draining the vehicle bat-
tery, do not operate the system for
more than 15 minutes without
starting the engine.
The front display is designed to not show
images during driving, as the driver’s
attention must be given to vehicle operation for safety. Sounds are still audible. To
show images on the front display, stop the
vehicle in a safe location, move the shift
lever to the “P” (Park) position and apply
the parking brake.
PRECAUTIONS
Start the engine when using the Mobile
Entertainment System.
WARNING
The driver must not attempt to operate the Mobile Entertainment System
or wear the headphones while the
vehicle is in motion so that full attention may be given to vehicle operation.
Park the vehicle in a safe location and
apply the parking break to view the
images on the front center display
with the Mobile Entertainment System.
CAUTION
. Only operate the Mobile Entertain-
ment System while the engine is
running. Operating the Mobile Entertainment System for extended
periods of time with the engine
turned off can discharge the vehicle battery.
. Do not allow the system to get wet.
Excessive moisture, such as spilled
liquids, may cause the system to
malfunction.
. While playing VIDEO-CD media,
this DVD player does not guarantee complete functionality of all
VIDEO-CD formats.
TECHNICAL INFORMATION
USB media support
Supported USB media:
USB 1.1 Low Speed (1.5 Mbps), Full
Speed (12 Mbps)
USB 2.0 Low Speed (1.5 Mbps), Full
Speed (12 Mbps), High Speed
(480 Mbps)
Mass Storage Support:
The Mobile Entertainment System recognizes the connected USB media as a mass
storage device.
Supported file systems and partition:
The first partition of the following file
systems are supported.
. NTFS
. FAT32
3-44
Page 90

3. Audio system
. FAT16
. HFS+
Supported folder structure:
Folders 1,000 folders maximum
Files 10, 000 files maximum
Pass length 3072 characters maximum
Full name
length
Folder levels 11 levels maximum (when
Supported format and decode:
Video codec:
Codec Profile Maximum Resolution/Frame Rate Notes
DivX DivX 3.11/4/5/6 SD (720 x 576)/30 Only single-instance playback is supported
Flash - 1080 p/30 H.263 - 1080 p/30 H.264 BP/MP/HP 1080 p/30 Extended file is not supported.
MPEG-1 - 1080 p/30 MPEG-2 MP@ML 1080 p/30 MPEG-4 SP/ASP 1080 p/30 Real Video RV8/9/10 1080 p/30 XviD - SD (720 x 576)/30 -
232 characters maximum
root is regarded as level 0)
for DivX 3.11.
3-45
Page 91

3. Audio system
Codec Profile Maximum Resolution/Frame Rate Notes
WMV7/8 - D1/30 HD version is not provided.
WMV9/VC-1 SP/MP/AP 1080 p/30 Complex Profile is not supported.
Audio codec:
Codec Supported Bitrates Sampling Frequency Channels Codec Features Supported
AAC (MPEG4 AAC-LC) 8 kbps - 320 kbps 8, 11.025, 16, 22.05, 24, 32,
44.1, 48 KHz
AAC+ (ENHANCED AAC+)Up to 264 kbps Up to 48 KHz Mono/Stereo - Modes: Mono, Stereo, Dual
Linear PCM - Up to 48 KHz Stereo Max 16bit only
RealAudio (3, 6, 9, 10) 6 to 96 kbps 8, 11.025, 22.05, 44.1 KHz Mono/Stereo Downmixing is not sup-
Dolby Digital 64 to 640 kbps 48 KHz Mono/Stereo/ 5.1 -> Stereo
Mono/Stereo/ 5.1 -> Stereo
Downmixing
Downmixing
Only single instance playback is supported
for WMV7/8.
- Complies with ISO/IEC
13818-7
- ADTS/ADIF Output
- Modes: Mono, Stereo, Dual
Mono, Joint Stereo (Intensity
Stereo (IS) and Mid-side
Stereo (MS))
- All tools of 13818-7 LC + PNS
are supported.
- CRC check is supported.
- Header formats: AAC, ADIF,
ADTS
Mono
- Header formats: ADIF,
ADTS
ported.
Modes: Mono, Stereo, 5.1 ->
Stereo Downmixing
3-46
Page 92

3. Audio system
Codec Supported Bitrates Sampling Frequency Channels Codec Features Supported
MP3 32 to 320 kbps
OGG Vorbis Up to 128 kbps 8 to 48 KHz Mono/Stereo WMA v9 (std)
WMA v10 (std)
Depending on the combination of video codec, audio codec, and format, some files cannot be played with the Mobile Entertainment
System.
Combinations of video/audio codecs and playable file extensions:
Video Audio Codec Extenstion
H.263 AAC “.3gp”, “.3g2”
H.264 AAC “.avi”, “.3gp”, “.3g2”, “.mp4”, “.m4v”, “.divx”, “.mov”
(MPEG-1 Layer 1,2,3)
8 to 160 kbps
(MPEG-2 Layer 1,2,3)
Up to 384 kbps Up to 48 KHz Mono/Stereo - Decodes WMA streams
AAC+ “.avi”, “.3gp”, “.3g2”, “.mp4”, “.m4v”, “.divx”, “.mov”
Linear PCM “.avi”, “.divx”
Dolby Digital “.avi”, “.mp4”, “.m4v”, “.divx”, “.mov”, “.m2ts”, “.mts”
MP3 “.avi”, “.flv”, “.mp4”, “.m4v”, “.divx”, “.mov”
WMA “.avi”, “.divx”
8/11.025/12 KHz (MPEG-2.5)
16/22.05 /24 KHz (MPEG-2)
32/44.1/48 KHz (MPEG-1)
Mono/Stereo - Complies with ISO 11172-3
and ISO 13818-3
- Modes: Mono, Stereo, Dual
Mono, Joint Stereo (Intensity
Stereo (IS) and Mid-side
Stereo (MS))
- CRC check is supported.
generated using encoder v2,
v7, v8, v9, v10 content.
- Supports all L1, L2, and L3
profiles.
3-47
Page 93

3. Audio system
Video Audio Codec Extenstion
Divx AAC “.avi”, “.divx”
Linear PCM “.avi”, “.divx”
Dolby Digital “.avi”, “.divx”
MP3 “.avi”, “.divx”
WMA “.avi”, “.divx”
XviD AAC “.avi”, “.mp4”, “.m4v”, “.divx”, “.mov”
AAC+ “.avi”, “.mp4”, “.m4v”, “.divx”, “.mov”
Linear PCM “.avi”, “.divx”
Dolby Digital “.avi”, “.mp4”, “.m4v”, “.divx”, “.mov”
MP3 “.avi”, “.mp4”, “.m4v”, “.divx”, “.mov”
WMA “.avi”, “.divx”
MPEG-1 AAC “.avi”, “.mp4”, “.m4v”, “.divx”, “.mov”
AAC+ “.avi”, “.mp4”, “.m4v”, “.divx”, “.mov”
Linear PCM “.avi”, “.divx”
Dolby Digital “.avi”, “.mp4”, “.m4v”, “.mpg”, “.divx”, “.mov”
MP3 “.avi”, “.mp4”, “.m4v”, “.mpg”, “.mpeg”, “.divx”, “.mov”
WMA “.avi”, “.divx”
MPEG-2 AAC “.avi”, “.mp4”, “.m4v”, “.divx”
AAC+ “.avi”, “.mp4”, “.m4v”, “.divx”
Linear PCM “.avi”, “.divx”
Dolby Digital “.avi”, “.mp4”, “.m4v”, “.mpg”, “.divx”
MP3 “.avi”, “.mp4”, “.m4v”, “.mpg”, “.divx”
WMA “.avi”, “.divx”
3-48
Page 94

Video Audio Codec Extenstion
MPEG-4 AAC “.avi”, “.3gp”, “.mp4”, “.m4v”, “.divx”, “.mov”
AAC+ “.avi”, “.3gp”, “.mp4”, “.m4v”, “.divx”, “.mov”
Linear PCM “.avi”, “.divx”
Dolby Digital “.avi”, “.mp4”, “.m4v”, “.divx”, “.mov”
MP3 “.avi”, “.mp4”, “.m4v”, “.divx”, “.mov”
WMA “.avi”, “.divx”
WMV7/8 AAC “.avi”, “.divx”
Linear PCM “.avi”, “.divx”
Dolby Digital “.avi”, “.divx”
MP3 “.avi”, “.divx”
WMA “.avi”, “.wmv”, “.divx”
WMV9/VC-1 Linear PCM “.avi”, “.divx”
Dolby Digital “.avi”, “.divx”
MP3 “.avi”, “.divx”
WMA “.avi”, “.wmv”, “.divx”
Flash MP3 “.flv”
Real Video Real Audio “.rmvb”, “.rm”
Without Picture (Audio
only)
AAC “.m4a”, “.aac”
AAC+ “.m4a”, “.aac”
Linear PCM “.wav”, “.aiff”
Dolby Digital “.m4a”, “.ac3”
MP3 “.mp3”, “.m4a”
Ogg Vorbis “.ogg”
WMA “.wma”
3. Audio system
3-49
Page 95

3. Audio system
Apple support
When an iPhone®, iPad®, or iPod® is connected, the Mobile Entertainment System
will play music with the iPod® technology
and initiate quick charging (up to 2.1 A).
The following Apple products are supported:
. iPhone® 5s (iOS 7.0.4)
. iPhone® 5c (iOS 7.1)
. iPhone® 5 (iOS 6.1.4)
. iPhone® 4S (iOS 5.1.1)
. iPhone® 4 (iOS 7.1)
. iPhone® 3GS (iOS 6.1.6)
. iPhone® 3G (iOS 4.2.1)
. iPad® (4th generation) (iOS 7.0.4)
. iPad® (3rd generation) (iOS 6.0)
. iPad® (2nd generation) (iOS6.0)
. iPad® (1st generation) (iOS 5.1.1)
. iPad Air® (iOS 7.0.4)
. iPad mini
. iPad mini
. iPod touch® (5th generation) (iOS 6.1.3)
. iPod touch® (4th generation) (iOS 6.1.3)
TM
(2nd generation) (iOS 7.0.4)
TM
(1st generation) (iOS 7.0.4)
. iPod touch® (3rd generation) (iOS 5.1.1)
. iPod touch® (2nd generation) (iOS 4.2.1)
. iPod touch® (1st generation) (iOS 3.1.3)
. iPod nano® (7th generation) (Firmware
version 1.0.2)
. iPod nano® (6th generation) (Firmware
version 1.2)
. iPod nano® (5th generation) (Firmware
version 1.0.2)
. iPod nano® (4th generation) (Firmware
version 1.0.3)
. iPod nano® (3rd generation) (Firmware
version 1.1.2)
. iPod nano® (2nd generation) (Firm-
ware version 1.1.3)
. iPod nano® (1st generation) (Firmware
version 1.3.1)
. iPod classic® (160 GB) (End 2009)
(Firmware version 2.0.4)
. iPod classic® (120 GB) (Firmware ver-
sion 2.0.1)
. iPod classic® (Firmware version 1.1.2)
“Made for iPod®”, “Made for iPhone®”, and
“Made for iPad®” mean that an electronic
accessory has been designed to connect
specifically to iPod®, iPhone®, or iPad®,
respectively, and has been certified by
the developer to meet Apple performance
standards. Apple is not responsible for the
operation of this device or its compliance
with safety and regulatory standards.
Please note that the use of this accessory
with iPod®, iPhone®, or iPad® may affect
wireless performance.
iPad®, iPhone®, iPod®, iPod classic®, iPod
nano®, iPod touch®, and Retina are trademarks of Apple Inc., registered in the U.S.
and other countries. iPad Air® and iPad
TM
are trademarks of Apple Inc.
mini
Licenses
Dolby:
Manufactured under license from Dolby
Laboratories. Dolby and the double-D
symbol are trademarks of Dolby Laboratories.
3-50
Page 96

3. Audio system
DivX:
This DivX Certified® device has passed
rigorous testing to ensure it plays DivX®
video. To play purchased DivX movies, first
register your device at vod.divx.com. Find
your registration code in the DivX VOD
section of your device setup menu.
DivX®, DivX Certified® and associated logos are trademarks of DivX, LLC and are
used under license. Covered
by one or more of the following U.S. patents: 7,295,673;
7,460,668; 7,515,710; 8,656,183;
8,731,369; RE45,052.
RMVB:
Portions of this software are included
under license from RealNetworks, Inc.
Copyright 1995-2011, RealNetworks, Inc.
All rights reserved.
HDMI:
The terms HDMI and HDMI High-Definition
Multimedia Interface, and the HDMI Logo
are trademarks or registered trademarks
of HDMI Licensing LLC in the United States
and other countries.
MPEG4–AVC (H.264):
THIS PRODUCT IS LICENSED UNDER THE
AVC PATENT PORTFOLIO LICENSE FOR
THE PERSONAL AND NON-COMMERCIAL
USE OF A CONSUMER TO (i) ENCODE
VIDEO IN COMPLIANCE WITH THE AVC
STANDARD (“AVC VIDEO”) AND/OR (ii) DECODE AVC VIDEO THAT WAS ENCODED BY
A CONSUMER ENGAGED IN A PERSONAL
AND NON-COMMERCIAL ACTIVITY AND/
OR WAS OBTAINED FROM A VIDEO PROVIDER LICENSED TO PROVIDE AVC VIDEO.
NO LICENSE IS GRANTED OR SHALL BE
IMPLIED FOR ANY OTHER USE. ADDITIONAL
INFORMATION MAY BE OBTAINED FROM
MPEG LA, L.L.C. SEE HTTP://WWW.MPEGLA.
COM
VC-1:
THIS PRODUCT IS LICENSED UNDER THE
VC-1 PATENT PORTFOLIO LICENSE FOR
THE PERSONAL AND NON-COMMERCIAL
USE OF A CONSUMER TO (i) ENCODE
VIDEO IN COMPLIANCE WITH THE VC-1
STANDARD (“VC-1 VIDEO”) AND/OR (ii) DECODE VC-1 VIDEO THAT WAS ENCODED BY
A CONSUMER ENGAGED IN A PERSONAL
AND NON-COMMERCIAL ACTIVITY AND/
OR WAS OBTAINED FROM A VIDEO PROVIDER LICENSED TO PROVIDE VC-1 VIDEO.
NO LICENSE IS GRANTED OR SHALL BE
IMPLIED FOR ANY OTHER USE. ADDITIONAL
INFORMATION MAY BE OBTAINED FROM
MPEG LA, L.L.C. SEE HTTP://WWW.MPEGLA.
COM
MPEG-4 VISUAL:
USE OF THIS PRODUCT IN ANY MANNER
THAT COMPLIES WITH THE MPEG-4 VISUAL
STANDARD IS PROHIBITED, EXCEPT FOR
USE BY A CONSUMER ENGAGING IN PERSONAL AND NON-COMMERCIAL ACTIVITIES.
MP3:
MPEG Layer-3 audio coding technology
licensed from Fraunhofer IIS and Thomson.
WMA/WMV:
This product includes technology owned
by Microsoft Corporation and under a
license from Microsoft Licensing, GP. Use
or distribution of such technology outside
of this product is prohibited without a
license from Microsoft Corporation and/
or Microsoft Licensing, GP as applicable.
Sorenson Spark Video decoder:
This product contains an officially licensed
Sorenson Spark optimized video decoder
licensed from Sorenson Media, Inc.
3-51
Page 97

3. Audio system
Natune surround sound:
Natune surround sound is
a general term for the
family of the latest acoustic signal processing technology produced by
DiMAGIC Co., Ltd.
3-52
Page 98

3. Audio system
REMOTE CONTROLLER AND HEADPHONES
Remote controller
A remote controller is provided with the Mobile Entertainment System.
The remote controller is for the rear display operation and cannot be used to control
portable devices.
The following buttons/switches are on the remote controller.
< >:
The rear displays can be activated or
deactivated individually.
<HOME>:
Push to display the HOME screen.
Select the media from the DVD (if so
equipped), AUX (if so equipped), USB
and HDMI interface device.
< >, < >, < >, < > (Select buttons):
Push the select buttons to select the
items displayed on the rear screens.
<BACK>:
Push to go back to the previous
screen.
Keypad:
Push the keys below for operations.
3-53
Page 99

3. Audio system
< > Push to play or pause the
<
> Push to stop playing the mo-
<
> Push to select the next
<
> Push once to return to the
<
> Push to fast-forward skipping
<
> Push to rewind skipping a
movie.
vie.
chapter. Push and hold to
fast-forward the movie.
beginning of the current
chapter. Push again to select
the previous chapter. Push
and hold to rewind the current movie.
a number of seconds (for
DVD-VIDEO).
number of seconds (for DVDVIDEO).
<SPEAKER>:
Push to turn on all of the in-vehicle
speakers.
Volume control button < >/< >:
Push to adjust the speaker volume.
<DISPLAY SELECT>:
Slide the switch to the side corre-
sponding to the screen you wish to
operate (L or R).
<MENU>:
Push to display the operation screen
for the source that is being played.
“Menus” (page 3-59)
<ENTER>:
Push to execute the selected item.
<SET UP>:
Push to display the rear seat display
settings.
“Setting and information”
(page 3-60)
<HEADPHONE>:
Push to turn on the sound from the
headphones and turn off the speakers.
< >:
Push to turn on the backlighting of
the remote controller buttons.
Battery replacement:
CAUTION
. An improperly disposed battery
can harm the environment. Always
confirm local regulations for battery disposal.
. When changing the batteries, do
not let dust or oil get on the
components.
NOTE:
Change the batteries of the remote
controller when it does not function
properly.
3-54
Page 100

. Replacement of the batteries is
needed when the remote controller
only functions at extremely close
distances to the Mobile Entertainment System or when is does not
function at all.
Headphones
To replace the battery:
1. Open the lid as illustrated above.
2. Replace both batteries with new ones.
. Recommended battery: Size AA x 2
. Be careful not to touch the battery
terminal.
. Make sure that the + and 7 ends
on the batteries match the markings inside the compartment.
3. Close the lid securely.
. If you will not be using the remote
controller for long periods of time,
remove the batteries.
Two wireless headphones are provided
with the Mobile Entertainment System.
The headphones can only be used in the
rear seats.
3. Audio system
<MODE>:
Push to select a surround audio mode
optimal for the media. Three types of
virtual surround modes supported by
Natune surround sound technology
are available. When the surround
3-55
 Loading...