

Page 1

Intelli-SenseTM
Blender Duo
TM
Intelli-SenseMC
Melangeur Duo
CT640C
Series
INSTRUCTIONS
MC
ninjakitchen.com
1-877-646-5288
Page 2

THANK YOU
for purchasing the Ninja® Intelli-Sense™ Blender Duo™
CONTENTS
ENGLISH
TIP: You can find the
model and serial numbers
on the QR code label
located on the back of the
motor base.
REGISTER YOUR PURCHASE
registeryourninja.com
1-877-646-5288
Scan QR code using mobile device
RECORD THIS INFORMATION
Model Number:
Serial Number:
Date of Purchase (Keep receipt):
Store of Purchase:
TECHNICAL SPECIFICATIONS
Voltage: 120V, 60Hz
Watts: 1200W
Important Safety Instructions � � � � � � � � � � � � � � � � � � � � � � � � � � � 3
Getting to Know Your
Ninja® Intelli-Sense™ Blender Duo™ � � � � � � � � � � � � � � � � � � � � � � 7
Before First Use � � � � � � � � � � � � � � � � � � � � � � � � � � � � � � � � � � � � � � 9
Features � � � � � � � � � � � � � � � � � � � � � � � � � � � � � � � � � � � � � � � � � � � � � 10
Total Crushing™ Pitcher � � � � � � � � � � � � � � � � � � � � � � � � � � � � � � � � � � �10
Single-Serve Cup � � � � � � � � � � � � � � � � � � � � � � � � � � � � � � � � � � � � � � � � �10
Using Your Total Crushing Pitcher � � � � � � � � � � � � � � � � � � � � � � �11
Using Your Single-Serve Cup � � � � � � � � � � � � � � � � � � � � � � � � � � � 15
Care & Maintenance � � � � � � � � � � � � � � � � � � � � � � � � � � � � � � � � � � � 19
Cleaning � � � � � � � � � � � � � � � � � � � � � � � � � � � � � � � � � � � � � � � � � � � � � � � �19
Storing � � � � � � � � � � � � � � � � � � � � � � � � � � � � � � � � � � � � � � � � � � � � � � � � � � 19
Resetting the Motor Thermostat � � � � � � � � � � � � � � � � � � � � � � � � � � �19
Ordering Replacement Parts � � � � � � � � � � � � � � � � � � � � � � � � � � � � � �19
Troubleshooting Guide � � � � � � � � � � � � � � � � � � � � � � � � � � � � � � � � 20
Warranty � � � � � � � � � � � � � � � � � � � � � � � � � � � � � � � � � � � � � � � � � � � � 22
PLEASE READ CAREFULLY AND KEEP FOR FUTURE
REFERENCE�
These instructions are designed to help youget a complete
understanding of your newNinja Intelli-Sense Blender Duo.
If you have any questions, please call our customer service line
at 1-877-646-5288.
1 21- 877-64 6-5288 ninjakitchen.com
Page 3

IMPORTANT SAFETY INSTRUCTIONS
PLEASE READ CAREFULLY BEFORE USE • FOR HOUSEHOLD USE ONLY
WARNING
When using electrical appliances, basic safety precautions should always be
followed, including the following:
ENGLISH
1 Read all instructions prior to using the
appliance and its accessories.
2 Carefully observe and follow all warnings
and instructions. This unit contains
electrical connections and moving parts
that potentially present risk to the user.
3 This product is provided with a Stacked
Blade Assembly and a Chopping Blade
Assembly. ALWAYS exercise care when
handling blade assemblies. The blade
assemblies are sharp and are NOT locked
in place in their containers. The blade
assemblies are designed to be removable
to facilitate cleaning and replacement if
needed. ONLY grasp the blade assembly
by the top of the shaft. Failure to use care
when handling the blade assemblies will
result in a risk of laceration.
4 ALWAYS exercise care when handling
the Pro extractor blades™ Assembly. The
blades are sharp. ONLY grasp the Pro
Extractor Blades Assembly by the outer
perimeter of the blade assembly base.
Failure to use care when handling the blade
assembly will result in a risk of laceration.
5 Take your time and exercise care during
unpacking and appliance setup. This
appliance contains sharp, loose blades that
can cause injury if mishandled.
6 Take inventory of all contents to ensure
you have all parts needed to properly and
safely operate your appliance.
7 Unplug the appliance from the outlet
when not in use, before assembling or
disassembling parts, and before cleaning.
To unplug, grasp the plug by the body and
pull from the outlet. NEVER unplug by
grasping and pulling the flexible cord.
8 Before use, wash all parts that may contact
food. Follow washing instructions covered
in this instructionmanual.
9 To protect against the risk of electric
shock, DO NOT submerge the appliance
or allow the power cord to contact any
form of liquid.
10 DO NOT use this appliance outdoors. It is
designed for indoor household use only.
11 This appliance has a polarized plug (one
prong is wider than the other). To reduce
the risk of electric shock, this plug will fit
in a polarized outlet only one way. If the
plug does not fit fully in the outlet, reverse
the plug. If it still does not fit, contact a
qualified electrician. DO NOT modify the
plug in any way.
12 DO NOT operate any appliance with
a damaged cord or plug, or after the
appliance malfunctions or is dropped or
damaged in any manner. This appliance
has no user-serviceable parts. If damaged,
contact SharkNinja for servicing.
13 This appliance has important information
on the plug prong. The power cord is not
suitable for replacement. If damaged,
contact SharkNinja for servicing in order to
avoid a hazard.
14 Extension cords should NOT be used with
this appliance.
15 DO NOT allow young children to operate
this appliance or use as a toy. Close
supervision is necessary when any
appliance is used near children.
16 This appliance is NOT intended to be used
by people (including children) with reduced
physical, sensory, or mental capabilities,
or lack of experience and knowledge,
unless they have been given supervision or
instruction concerning use of the appliance
by a person responsible for their safety.
17 Before each use, inspect blade assemblies
for damage. If a blade is bent or damage is
suspected, contact SharkNinja to arrange
for replacement.
18 DO NOT attempt to sharpen blades.
19 DO NOT allow the cord to hang over the
edges of tables or counters. The cord may
become snagged and pull the appliance off
the work surface.
20 DO NOT allow the unit or the cord to
contact hot surfaces, including stoves and
other heating appliances.
21 ALWAYS use the appliance on a dry and
level surface.
22 NEVER place a blade assembly on the
motor base without it first being attached
to its corresponding container (pitcher or
cup) and lid.
CONTINUED ON PAGE 5
SAVE THESE INSTRUCTIONS
3 41-877- 646 -528 8 ninja kitchen.com
Page 4

IMPORTANT SAFETY INSTRUCTIONS
PLEASE READ CAREFULLY BEFORE USE • FOR HOUSEHOLD USE ONLY
WARNING
When using electrical appliances, basic safety precautions should always be
followed, including the following:
ENGLISH
23 Keep hands, hair, and clothing out of the
container when loading and operating.
24 ONLY use attachments and accessories
that are provided with the product or are
recommended by SharkNinja. The use of
attachments not recommended or sold by
SharkNinja may cause fire, electric shock
or injury.
25 During operation and handling of the
appliance, avoid contact with moving
parts.
26 DO NOT operate the appliance with an
empty container.
27 DO NOT fill containers past the MAX FILL
or MAX LIQUID lines.
28 DO NOT microwave any containers or
accessories provided with the appliance.
29 DO NOT perform grinding operations with
the Single-Serve Cup and Pro extractor
blades™ Assembly.
30 Before operation, ensure all utensils are
removed from containers. Failure to remove
utensils can cause containers to shatter
and potentially result in personal injury and
property damage.
31 Keep hands and utensils out of containers
while chopping to reduce the risk of severe
personal injury or damage to the blender.
A scraper may ONLY be used when the
blender is not running.
32 NEVER operate the appliance without lids
and caps in place. DO NOT attempt to
defeat the interlock mechanism. Ensure
the container and lid are properly installed
before operation.
33 DO NOT expose the containers and
accessories to extreme temperature
changes. They may experience damage.
34 NEVER leave the appliance unattended
while in use.
35 DO NOT open pour spout cap while
blender is operating.
36 DO NOT blend hot liquids. Doing so
may result in pressure buildup and steam
exposure that can pose a risk of the user
being burned.
37 If you find unmixed ingredients sticking to
the sides of the pitcher, stop the appliance,
remove the lid, and use a spatula to
dislodge ingredients. NEVER insert your
hands into the pitcher, as you may contact
one of the blades and experience a
laceration.
38 DO NOT attempt to remove the container
or lid from the motor base while the
blade assembly is still spinning. Allow the
appliance to come to a complete stop
before removing lids and containers.
39 Upon completion of processing, ensure
that the blade assembly is removed
BEFORE emptying container’s contents.
Remove the blade assembly by carefully
grasping the top of the shaft and lifting
it from the container. Failure to remove
the blade assembly before emptying the
container results in a risk of laceration.
40 Remove the Pro extractor blades™
Assembly from the Single-Serve Cup upon
completion of blending. DO NOT store
ingredients before or after blending them in
the cup with the blade assembly attached.
Some foods may contain active ingredients
or release gases that will expand if left in
a sealed container, resulting in excessive
pressure buildup that can pose a risk of
injury. For ingredient storage in the cup,
use only Spout Lid to cover.
41 If the appliance overheats, a thermal switch
will activate and temporarily disable the
motor. To reset, unplug the appliance
and allow it to cool for approximately 30
minutes before using again.
42 The maximum wattage rating for this
appliance is based on the configuration
of the Pro Extractor Blades Assembly and
Single-Serve Cup. Other configurations
may draw less power or current.
43 DO NOT process dry ingredients without
adding liquid to the Single-Serve Cup. The
Single-Serve Cup is not intended for dry
blending.
44 DO NOT submerge the motor base or
touchscreen in water or other liquids. DO
NOT spray motor base or touchscreen
with any liquid. Turn off and unplug the
motor base before cleaning.
SAVE THESE INSTRUCTIONS
5 61-87 7- 6 46-5288 ninjakitchen. com
Page 5

GETTING TO KNOW YOUR NINJA®
INTELLI-SENSE™ BLENDER DUO™
WELCOME!
Congratulations on
your purchase. Use this
instruction manual to
learn about the great
features of your Ninja
Intelli-Sense Blender
Duo. From assembly to
use to maintenance, you
will find it all in here.
ENGLISH
A
B
There are a variety of
accessories that are
compatible with this
blenderseries.
NOTE: The top flap of
your box shows the select
accessories that are
included with your model�
If you have any questions,
concerns, or feedback, we’d
love to hear from you. Give us
a call at 1-877-646-5288 or
visit ninjakitchen.com
To find great recipes and
purchase more accessories,
visit ninjaaccessories.com
* 1.9 L (64 oz.) max liquid
capacity.
MAIN UNIT
A Pitcher Lid
B 2.1 L (72 oz.) Total Crushing
C Stacked Blade Assembly
D Motor Base with Smart Vessel Recognition
E 710 ml (24 oz.) Single-Serve Cup
F Spout Lid
G Pro Extractor Blades™ Assembly
™
Pitcher*
C
D
E
F
G
7 81-877-646-52 88 ninjakitchen.com
Page 6
BEFORE FIRST USE
FEATURES
IMPORTANT: Review all
warnings on pages 3–6
before proceeding.
DID YOU KNOW?
• You can take your drinks
on the go using the
Spout Lid.
• All containers, blade
assemblies, and lids are
BPA free and dishwasher
safe.
1 Remove all packaging materials from the appliance.
Exercise care when unpacking blade assemblies a. All
blade assemblies are sharp.
2 The Chopping Blade Assembly and Stacked Blade
Assembly are NOT locked in place in their containers.
Handle the Chopping Blade Assembly and Stacked Blade
Assembly by grasping the top of the shaft.
3 Handle the Pro extractor blades™ Assembly by grasping
around the perimeter of the blade assembly base.
4 Wash containers, lids, and blade assemblies in warm,
soapy, water using a dishwashing utensil with a handle to
avoid direct contact with the blades. Exercise care when
handling blade assemblies, as the blades are sharp.
5 Thoroughly rinse and air-dry all parts.
6 All attachments are dishwasher safe. It is recommended
that the containers, lids, and blade assemblies be placed
on the top rack of the dishwasher. Ensure blade assemblies
are removed from their containers before placing in the
dishwasher. Exercise care when handling blade assemblies.
7 Wipe touchscreen with a soft cloth. Allow it to dry
completely before using.
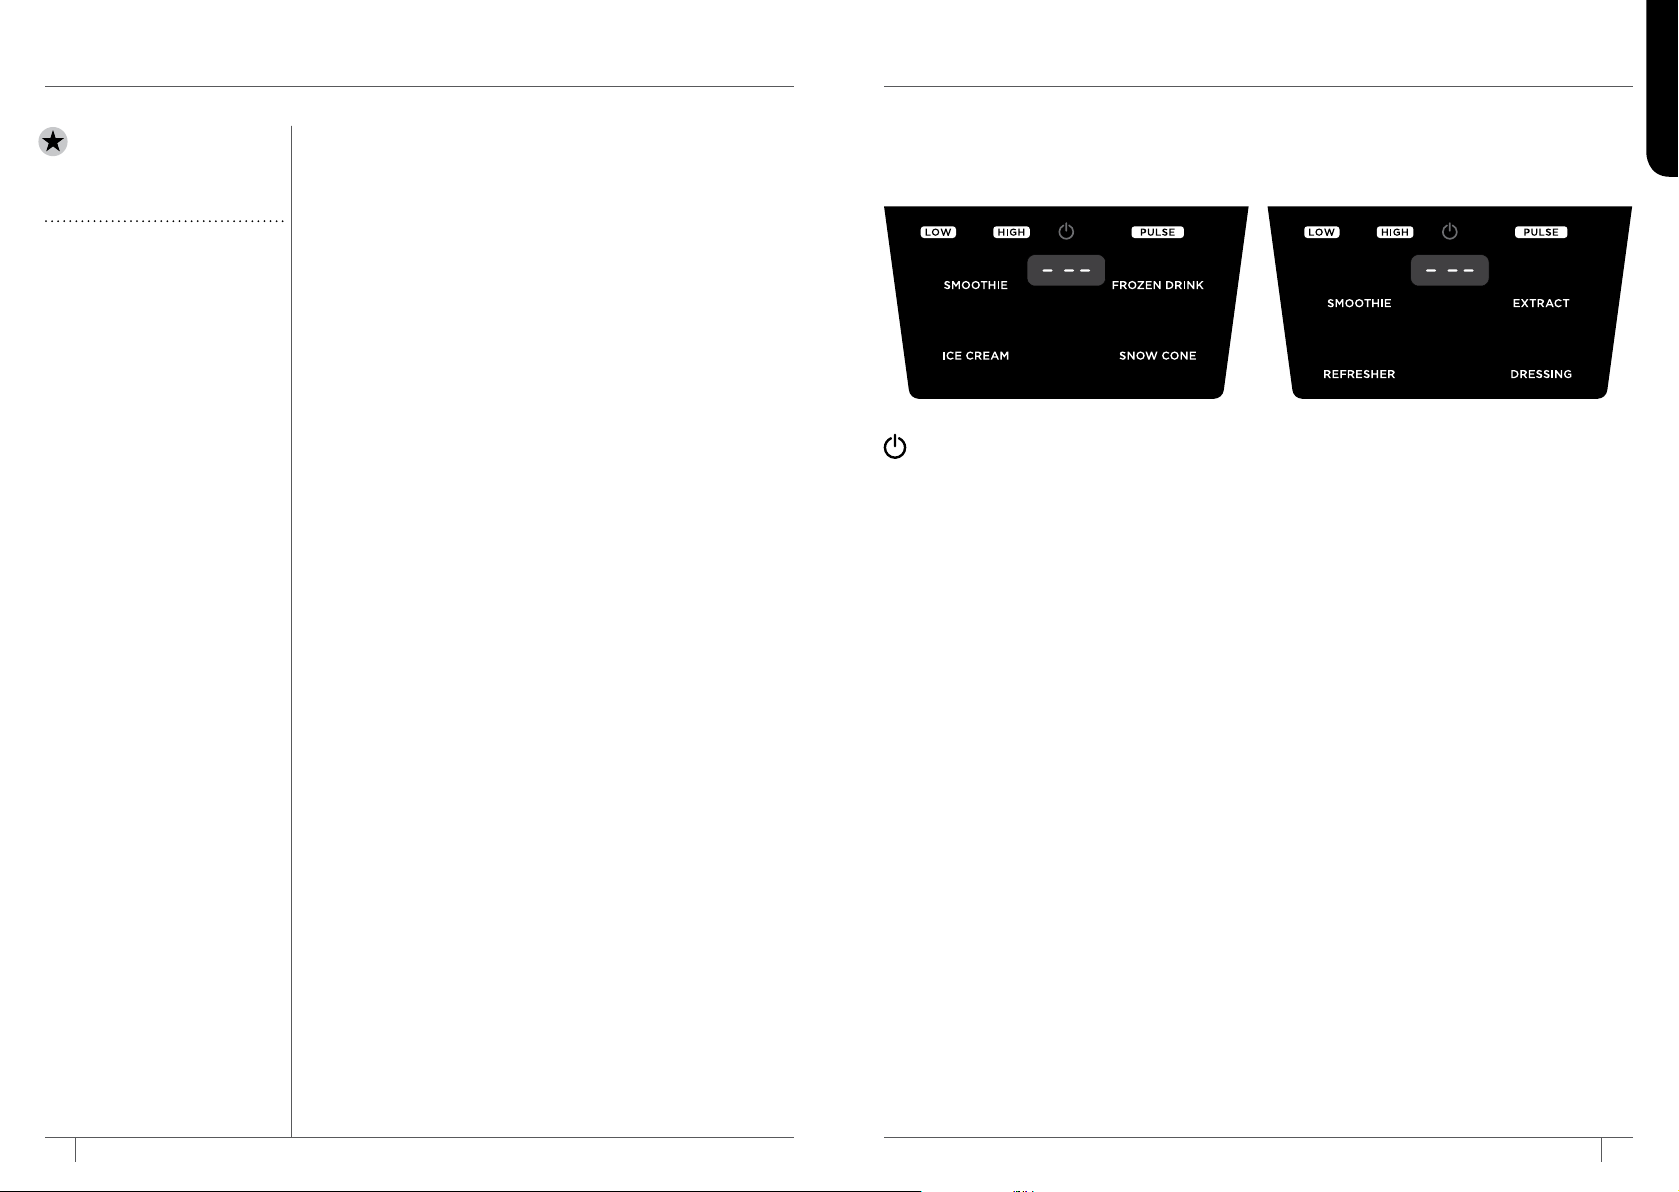
SMART PROGRAMS FOR THE
TOTAL CRUSHING™ PITCHER
The power symbol should be used to turn your appliance on or off.
Intelligent pre-set programs combine unique blending and pausing patterns that do the work for
you. Once a pre-set program is selected, it will start immediately and automatically stop when
blending is complete. To stop blending before the end of the program, press the currently active
button again.
SMOOTHIE
Make a batch of super-smooth, sippable
drinks and shakes from fresh or frozen fruit,
liquids, and ice.
SMOOTHIE
Make super-smooth, sippable drinks and
shakes in your cup, using fresh or frozen fruit,
liquids, and ice.
SMART PROGRAMS FOR
THE SINGLE-SERVE CUP
ENGLISH
FROZEN DRINK
Turn ice, juices, and fruit into expertly blended
frozen drinks.
ICE CREAM
Create delicious and scoopable frozen
desserts like ice cream or sorbet.
SNOW CONE
Pulverize ice into frozen creations like snow
cones, slushies, or granitas.
LOW, HIGH, and PULSE
When selected, each of these programs runs continuously until turned off. They do not work in
conjunction with any Auto-iQ programs.
9 101- 877-64 6-5288 ninjakitchen.com
EXTRACT
Ideal for tough, leafy, or fibrous whole fruits
and vegetables, including their skins, seeds,
andstems.
REFRESHER
Add natural veggie, fruit, and herb flavors to
yo u r wate r.
DRESSING
Create fresh marinades, dressings, and
sauces.
Page 7

USING YOUR TOTAL CRUSHING™ PITCHER
IMPORTANT: Review all
warnings on pages 3–6
before proceeding.
TIP: If the Stacked
Blade Assembly is not
fully seated, you will not
be able to install and
lock the lid.
TIP: To learn more about
the unit’s programs, refer
to page 10.
NOTE: Pre-set programs
have pauses and changes in
speed throughout the cycle.
NOTE: DO NOT add
ingredients before completing
installation of the Stacked
Blade Assembly.
NOTE: The pitcher can only
be installed in one orientation.
The handle must be
positioned on the front-right
corner of the motor base to
operate the appliance.
1 Place the unplugged motor
base on a clean, dry, and
level surface such as a
countertop or table. Press
downward on the motor
base to adhere the suction
cups to the work surface.
Plug the motor base into a
wall outlet.
2 Lower the Total Crushing
Blender pitcher onto the
motor base. The handle
should be aligned slightly
to the right and the pitcher
should be oriented so the
LOCK symbols are visible
on the motor base. Rotate
the pitcher clockwise until
it clicks into place.
3 Exercising care, grasp the
Stacked Blade Assembly
by the top of the shaft and
place it onto the drive gear
inside the pitcher. Note
that the blade assembly
will fit loosely onto the drive
gear.
ENGLISH
4 Add ingredients to the pitcher. DO NOT add ingredients
past the MAX LIQUID line on the pitcher.
5 Place the lid on the pitcher, aligning the triangle symbol
located on the lid with the triangle symbol located on the
pitcher’s handle. Press down on the handle until it clicks
into place. The triangle symbols MUST be aligned for the lid
to lock onto place and for the unit to operate. When the unit
is connected to power and the container is correctly locked
onto the motor base, press the Power symbol to turn unit
on. The available program buttons will illuminate and the
unit will be ready for use.
11 121- 877-64 6-5288 ninjakitchen.com
Page 8

USING YOUR TOTAL CRUSHING™ PITCHER - CONT�
IMPORTANT: Review all
warnings on pages 3–6
before proceeding.
IMPORTANT: As a safety
feature, if the pitcher
and lid are not properly
installed, the timer will
display “--” and the motor
will be disabled. If this
happens, repeat step 5
on page 12. When the
pitcher and lid are properly
installed, the program
buttons will illuminate
steadily, indicating the
appliance is ready for use.
NOTE: Smart Vessel
Recognition can detect which
container is on the motor
base. Only the functions
available for a particular
container will illuminate on the
touchscreen.
6 If using an pre-set
program, first select the
program that best suits
your recipe. The pre-set
feature will automatically
stop the appliance at
the end of the program.
To pause the unit at any
time, press the currently
active button a second
time. Refer to page 10 for
program descriptions.
7 If not using pre-set and
ingredients have reached
your desired consistency,
stop the appliance by
releasing the manual
speed button, and wait for
the appliance to come to a
complete stop.
8 To remove the pitcher from
the motor base, turn the
pitcher counterclockwise
and then lift it.
9 To pour out thinner
mixtures, ensure the lid is
locked in place, then open
the pour spout cap.
10 For thicker mixtures that
cannot be emptied through
the pour spout, remove
the lid and Stacked Blade
Assembly before pouring.
To remove the lid, press
the RELEASE button and
lift the handle. To remove
the blade assembly,
carefully grasp it by the top
of the shaft. The pitcher
can then be emptied.
ENGLISH
11 Unplug the unit when
finished. To release the
motor base, place your
hands underneath both
sides of the motor base
and gently pull the unit
up and toward you. Refer
to page 19 for storing
instructions.
13 141-877- 646 -5 28 8 ninjakitchen.com
Page 9

USING YOUR SINGLE-SERVE CUP
IMPORTANT: Review all
warnings on pages 3–6
before proceeding.
TIP: To learn more about
the unit’s programs, refer
to page 10.
NOTE: Auto-iQ® programs
pause and change speeds
throughout the cycle.
ENGLISH
1 Place the unplugged motor
base on a clean, dry, and
level surface such as a
countertop or table. Press
downward on the motor
base to adhere the suction
cups to the work surface.
Plug the motor base into a
wall outlet.
15 161 -877-6 46-5288 ninjakitchen.com
2 Add ingredients to the
Single-Serve Cup. DO
NOT add ingredients past
the MAX LIQUID line on
the cup.
3 Install the Pro extractor blades™ Assembly
onto the top of the cup. Twist the lid
clockwise until it’s sealed tightly.
4 Turn the Single-Serve cup upside down
and install onto the motor base. Align the
tabs on the cup with the slots on the base,
then rotate cup clockwise until it clicks into
place. When the unit is connected to power
and the container is correctly locked onto
the motor base, press the Power symbol to
turn unit on. The available program buttons
will illuminate and the unit will be ready for
use.
Page 10

USING YOUR SINGLE-SERVE CUP - CONT�
IMPORTANT: Review all
warnings on pages 3–6
before proceeding.
NOTE: Smart Vessel
Recognition can detect which
container is on the motor
base.Only the functions
available for a particular
container will illuminate on
thetouchscreen.
ENGLISH
5 If using an pre-set
program, first select the
program that best suits
your recipe. The pre-set
feature will automatically
stop the appliance at
the end of the program.
To pause the unit at any
time, press the currently
active program a second
time. Refer to page 10 for
program descriptions.
17 181-877-646-52 88 ninjakitchen.com
6 To remove the cup from
the motor base, turn the
cup counterclockwise and
then lift it.
7 Remove the Pro extractor
blades™ Assembly by
twisting the cap counterclockwise. Do not store
blended contents with Pro
Extractor Blades Assembly
attached. Exercise care
when handling the blade
assembly, as the blades
are sharp.
8 Unplug the unit when
finished. To release the
motor base, place your
hands underneath both
sides of the motor base
and gently pull the unit up
and towards you. Refer
to page 19 for storing
instructions.
9 To enjoy your drink on the
go, place the Spout Lid
onto the Single-Serve cup
and twist lid clockwise until
firmly sealed. For storing
ingredients in the cup,
use only the Spout Lid to
cover.
Page 11

CARE & MAINTENANCE
TROUBLESHOOTING GUIDE
CLEANING
1 Separate all parts.
2 Wash all containers in warm, soapy water
with a soft cloth.
3 Hand Washing
Wash blade assemblies in warm, soapy
water using a dishwashing utensil with a
handle to avoid direct contact with the
blades. Exercise care when handling
blade assemblies as the blades are sharp.
Thoroughly rinse and air-dry all parts.
Dishwasher
All attachments are dishwasher safe. It is
recommended that the lids, containers,
and blade assemblies be placed on the
top rack of the dishwasher ONLY. Ensure
that blade assemblies are removed from
their containers before placing in the
dishwasher. Exercise care when handling
blade assemblies.
Motor Base
Turn off the unit and unplug the motor base
before cleaning. Wipe motor base with a
clean, damp cloth.
Clean the touchscreen with a soft cloth,
such as microfiber, to prevent scratching.
To remove residue from the touchscreen,
you may use an all-purpose cleaner.
NEVER spray the base or touchscreen
with water or other liquids.
DO NOT use abrasive cloths/pads/brushes
to clean the base or touchscreen
STORING
Wrap the power cord around the cord wrap
on the back of the motor base. Store the unit
upright and store all blade assemblies inside
or attached to their respective containers with
their lids locked into place.
DO NOT store blended or unblended
ingredients in the Single-Serve cup with the
Pro extractor blades™ assembly attached.
DO NOT stack items on top of the containers.
Store any remaining attachments alongside
the unit or in a cabinet where they will not be
damaged or create a hazard.
RESETTING THE MOTOR THERMOSTAT
This unit features a unique safety system
that prevents damage to the motor and drive
system should you inadvertently overload the
it. If the unit is overloaded, the motor will be
temporarily disabled. Should this occur, follow
the reset procedure below.
1 Unplug the unit from the electricaloutlet.
2 Allow the unit to cool for approximately 30
minutes.
3 Remove the container’s lid and blade
assembly. Empty the container and ensure
no ingredients are jamming the blade
assemblies.
IMPORTANT: Ensure that maximum
capacities are not exceeded. This is the
most typical cause of appliance overload.
If your unit needs servicing, please call
Customer Service at 1-877-646-5288.
ORDERING REPLACEMENT PARTS
To order additional parts and attachments,
please visit ninjaccessories.com or contact
customer service at 1-877-646-5288.
WARNING: To reduce the risk of shock and unintended operation, turn
power o and unplug unit before troubleshooting�
Unit doesn’t turn on�
• Make sure unit is plugged in.
• Display will read “--” once connected to power.
• Place container on base and rotate it clockwise until container clicks into place. Press the Power symbol
to turn unit on, and the available programs will illuminate indicating the unit is ready for use.
Unit doesn’t turn o�
• Remove container from base by rotating it counterclockwise and lifting it. Display should turn off. Unplug
the power cord from the outlet.
Lid/Pro extractor blades™ Assembly is hard to install on the cup�
• Set the cup on a level surface. Carefully place the lid or Pro Extractor Blades Assembly on the top of the
cup and align the threads so the lid/Pro Extractor Blades Assembly sits flat on the cup. Twist clockwise
until you have a tight seal.
Doesn’t mix well; ingredients get stuck�
• Using the pre-set programs is the easiest way to achieve great results. The pulses and pauses allow the
ingredients to settle toward the blade assembly. If ingredients are routinely getting stuck, adding some
liquid will usually help.
• When filling the cup, start with fresh fruit or veggies, then leafy greens or herbs. Next add liquids or yogurt,
then seeds, powders, or nut butters. Finally, add ice or frozen ingredients.
Motor base won’t stick to counter or tabletop�
• Make sure surface and suction feet are wiped clean. Suction feet will only stick to smooth surfaces.
• Suction feet WILL NOT stick on some surfaces such as wood, tile, and non-polished finishes.
• DO NOT attempt to use unit when the motor base is stuck to a surface that is not secure (cutting board,
platter, plates, etc.).
Unit is dicult to remove from counter for storage�
• Place your hands underneath both sides of the motor base and gently pull the unit up and towards you.
You get a blinking “- --” Message
• Smart Vessel Recognition can detect which container is on the motor base. You may be trying to use a
program that is not designed for the container you have installed. The programs will light up, indicating
which programs are available for each container.
You cannot create snow from solid ice�
• Do not use ice that has been sitting out or has started to melt. Use ice straight from the freezer.
• Start with a few pulses and then go to a continuous blending cycle.
ENGLISH
19 201- 877-64 6-5288 ninjakitchen.com
Page 12

NOTES
ONE (1) YEAR
LIMITED WARRANTY
ENGLISH
The 1-Year Limited Warranty applies to purchases made from authorized retailers of SharkNinja Operating
LLC. Warranty coverage applies to the original owner and to the original product only and is not transferable.
SharkNinja warrants that the unit shall be free from defects in material and workmanship for a period of 1
year from the date of purchase when it is used under normal household conditions and maintained according
to the requirements outlined in this instruction manual, subject to the following conditions and exclusions.
What is covered by my warranty?
1. The original unit and/or non-wearable components deemed defective, in SharkNinja’s sole discretion, will
be repaired or replaced for up to 1 year from the original purchase date.
2. In the rare event that a replacement unit is issued, the warranty coverage ends six months after the
receipt date of the replacement unit or the remainder of the existing warranty, whichever is greater. If the
unit is replaced, SharkNinja reserves the right to replace the unit with one of equal or greater value.
What is not covered by my warranty?
Our Customer Service and Product Specialists are available to provide all the warranty service options
available to you, including the possibility of upgrading to our VIP Warranty Service Options for select product
categories.
1. Normal wear and tear of wearable parts (including all blending vessels, lids, blades and blender base)
which require regular maintenance and/or replacement to ensure the proper functioning of your unit are
not covered by this warranty.
2. Any unit that has been tampered with or used for commercial purposes.
3. SharkNinja will cover the cost for the customer to send the unit to us for repair or replacement. A fee
of $19.95 for return shipping costs will be charged at the time of return shipment of the repaired or
replacement unit.
4. Damage caused by misuse, abuse, or negligent handling, or damage due to mishandling in transit.
5. Consequential and incidental damages.
6. Defects caused by or resulting from damages from shipping or from repairs, service, or alteration to the
product or any of its parts which have been performed by a repair person not authorized by SharkNinja.
7. Products purchased, used or operated outside of North America.
Problems with your unit/How to get service:
If your appliance fails to operate properly while in use under normal household conditions within the warranty
period, visit ninjakitchen.com for product care/maintenance self-help. Our Customer Service and Product
Specialists are also available at 1-877-646-5288 to assist with product support and warranty service options.
How to initiate a warranty claim:
You can call 1-877-646-5288 to have a Customer Service specialist assist you. Please note, you must call
1-877-646-5288 to initiate a warranty claim. Return and packing instruction information will be provided at
that time.
For Customer Service hours, visit ninjakitchen.com
Replacement parts are available for purchase at ninjaaccessories.com. For more information on what is
classified as wearable and non-wearable parts, please visit ninjakitchen.com/warranty
This warranty gives you specific legal rights, and you may also have other rights that vary from state to state.
Some states do not permit the exclusion or limitation of incidental or consequential damages, so the above
may not apply to you.
21 221- 877-64 6-5288 ninjakitchen.com
Page 13

MERCI
d’avoir acheté le système NinjaMD Intelli-SenseMC Mélangeur Duo
MC
TABLE DES MATIÈRES
FRANÇAIS
CONSEIL: Le numéro
de modèle et le numéro
de série apparaissent sur
l’étiquette de code QR qui
est située près de la plaque
signalétique.
ENREGISTREZ VOTRE ACHAT
registeryourninja.com
1877646-5288
Numérisez le code QR avec votre appareil mobile
INDIQUEZ LES RENSEIGNEMENTS CI-DESSOUS
Numéro de modèle: ���������������������������������
Numéro de série: ������������������������������������
Date d’achat (conservez le reçu): ����������������������
Magasin où l’appareil a été acheté: ��������������������
CARACTÉRISTIQUES TECHNIQUES
Tension électrique: 120V, 60Hz
Watts: 1200W
Importantes consignes de sécurité � � � � � � � � � � � � � � � � � � � � � 25
Familiarisez-vous avec votre système
MC
Ninja
Intelli-SenseMC Mélangeur DuoMC � � � � � � � � � � � � � � � � � 29
Avant la première utilisation � � � � � � � � � � � � � � � � � � � � � � � � � � 31
Caractéristiques � � � � � � � � � � � � � � � � � � � � � � � � � � � � � � � � � � � � � � 32
MD
Pichet Total Crushing
� � � � � � � � � � � � � � � � � � � � � � � � � � � � � � � � � 32
Gobelet à portion individuel � � � � � � � � � � � � � � � � � � � � � � � � � � � � � � 32
Utilisation du pichet Total Crushing � � � � � � � � � � � � � � � � � � � � 33
Utilisation du gobelet à portion individuel � � � � � � � � � � � � � � 37
Soins et entretien � � � � � � � � � � � � � � � � � � � � � � � � � � � � � � � � � � � � 41
Nettoyage � � � � � � � � � � � � � � � � � � � � � � � � � � � � � � � � � � � � � � � � � � � � � � �41
Rangement � � � � � � � � � � � � � � � � � � � � � � � � � � � � � � � � � � � � � � � � � � � � � �41
Réinitialisation du thermostat du moteur � � � � � � � � � � � � � � � � � � �41
Commande de pièces de rechange � � � � � � � � � � � � � � � � � � � � � � � �41
Guide de dépannage � � � � � � � � � � � � � � � � � � � � � � � � � � � � � � � � � � 42
Garantie � � � � � � � � � � � � � � � � � � � � � � � � � � � � � � � � � � � � � � � � � � � � � 46
VEUILLEZ LIRE LE PRÉSENT MODE D’EMPLOI
SOIGNEUSEMENT ET LE CONSERVER À TITRE
INFORMATIF�
Ces instructions ont été conçues pour vous aider à bien
comprendre le fonctionnement de votre nouveau système
Ninja Intelli-Sense Mélangeur Duo.
Pour toute question, veuillez communiquer avec le Service à
la clientèle au 1877646-5288.
23 241 -877-6 46-5288 ninjakitchen.com
Page 14

IMPORTANTES CONSIGNES DE SÉCURITÉ
VEUILLEZ LES LIRE ATTENTIVEMENT AVANT D’UTILISER L’APPAREIL • POUR UN USAGE DOMESTIQUE SEULEMENT
FRANÇAIS
AVERTISSEMENT
Lors de l’utilisation d’appareils électriques, des mesures de sécurité de base
doivent toujours être suivies, y compris les suivantes:
1 Lisez toutes les instructions avant d’utiliser
l’appareil et ses accessoires.
2 Respectez et suivez attentivement tous les
avertissements et toutes les instructions.
Cet appareil comporte des raccordements
électriques et des pièces amovibles
pouvant exposer l’utilisateur à certains
risques.
3 Ce produit est vendu avec un jeu de
lames superposées et un jeu de lames
de hachage. Faites toujours preuve de
prudence lorsque vous manipulez des
jeux de lames. Les jeux de lames sont
tranchants et NE SONT PAS fixés à leurs
contenants. Les jeux de lames sont conçus
pour être amovibles afin de faciliter le
nettoyage et le remplacement au besoin.
Saisissez le jeu de lames UNIQUEMENT
par le haut de la tige. La manipulation des
jeux de lames avec négligence se traduira
par un risque de lacération.
4 Soyez TOUJOURS prudent lorsque vous
manipulez le jeu de lames Pro Extractor
BladesMD. Les lames sont tranchantes.
Saisissez le jeu de lames Pro Extractor
Blades UNIQUEMENT par le bord
extérieur de la base du jeu de lames. Ne
pas faire preuve de prudence lors de la
manipulation du jeu de lames se traduira
par un risque de lacération.
5 Prenez votre temps et faites preuve
de prudence pendant le déballage et
l’installation de l’appareil. Cet appareil
contient des lames tranchantes et lâches
qui peuvent causer des blessures en cas
de mauvaise manipulation.
6 Faites l’inventaire de tout le contenu pour
vous assurer que vous avez toutes les
pièces nécessaires pour faire fonctionner
votre appareil correctement et en toute
sécurité.
7 Débranchez l’appareil de la prise électrique
lorsqu’il n’est pas utilisé, avant de monter
ou de démonter des pièces ainsi qu’avant
le nettoyage. Pour le débrancher, saisissez
le corps de la fiche et retirez celle-ci de la
prise électrique. Ne débranchez JAMAIS
l’appareil en tirant sur le cordon souple.
8 Avant la première utilisation, lavez toutes
les pièces qui peuvent entrer en contact
avec les aliments. Suivez les instructions
de nettoyage fournies dans ce guide
d’utilisation.
9 Pour éviter le risque de décharge
électrique, NE SUBMERGEZ PAS
l’appareil ou ne laissez pas le cordon
d’alimentation entrer en contact avec tout
type de liquide.
10 N’UTILISEZ PAS cet appareil à l’extérieur.
Il est conçu pour un usage domestique
intérieur uniquement.
11 Cet appareil est muni d’une fiche polarisée
(une broche est plus large que l’autre).
Pour réduire le risque de décharge
électrique, cette fiche sera insérée dans
une prise polarisée dans un seul sens. Si
la fiche ne s’insère pas entièrement dans
la prise, inversez-la. Si elle ne s’insère
toujours pas, communiquez avec un
électricien qualifié. NE MODIFIEZ PAS la
prise d’aucune façon.
12 N’UTILISEZ PAS un appareil si son
cordon ou sa fiche est endommagé, s’il ne
fonctionne pas bien ou s’il a été échappé
ou endommagé de quelque façon que
ce soit. Cet appareil ne comporte aucune
pièce qui peut être réparée par l’utilisateur.
S’il est endommagé, communiquez avec
SharkNinja concernant la réparation.
13 Des renseignements importants figurent
sur les broches de la fiche de cet
appareil. Le cordon d’alimentation ne
peut être remplacé. S’il est endommagé,
communiquez avec SharkNinja pour la
réparation afin de prévenir les dangers.
14 N’UTILISEZ PAS de rallonges avec cet
appareil.
15 NE PERMETTEZ PAS aux jeunes enfants
d’utiliser l’appareil ou de s’en servir
comme jouet. Une surveillance étroite est
nécessaire lorsqu’un appareil est utilisé en
présence d’enfants.
16 Cet appareil N’EST PAS prévu pour
être utilisé par des personnes (y
compris les enfants) avec des capacités
physiques, sensorielles ou mentales
réduites ou manquant d’expérience et
de connaissances, à moins qu’elles
soient supervisées ou aient été instruites
concernant l’utilisation de l’appareil par une
personne responsable de leur sécurité.
17 Avant chaque utilisation, inspectez
les jeux de lames pour la présence de
dommages. Si une lame est tordue ou
que vous soupçonnez des dommages,
communiquez avec SharkNinja pour
organiser le remplacement.
18 NE TENTEZ PAS d’aiguiser les lames.
19 NE LAISSEZ PAS le cordon pendre du
rebord des tables ou des comptoirs. Le
cordon peut être accroché et faire tomber
l’appareil de la surface de travail.
20 NE LAISSEZ PAS toute pièce de l’appareil
entrer en contact avec des surfaces
chaudes, y compris les poêles et d’autres
appareils de chauffage.
21 Utilisez TOUJOURS l’appareil sur une
surface plane et sèche.
22 Ne posez JAMAIS un jeu de lames sur
le bloc moteur sans l’avoir d’abord fixé à
son récipient correspondant (bol, pichet,
gobelet) et son couvercle.
23 Gardez les mains, les cheveux et les
vêtements hors du contenant lors du
chargement et du fonctionnement.
24 Utilisez SEULEMENT les accessoires qui
sont fournis avec le produit ou qui sont
recommandés par SharkNinja. L’utilisation
d’accessoires non recommandés ou non
vendus par SharkNinja peut causer des
incendies, des décharges électriques ou
des blessures.
25 Pendant le fonctionnement et la
manipulation de l’appareil, évitez tout
contact avec des pièces mobiles.
26 N’UTILISEZ PAS l’appareil avec un
contenant vide.
27 NE REMPLISSEZ PAS les contenants
au-delà des lignes MAX FILL (remplissage
max.) ou MAX LIQUID (liquide max).
SUITE À LA PAGE27
CONSERVEZ CES INSTRUCTIONS
25 261 -877-6 46-5288 ninjakitchen.com
Page 15

IMPORTANTES CONSIGNES DE SÉCURITÉ
VEUILLEZ LES LIRE ATTENTIVEMENT AVANT D’UTILISER L’APPAREIL • POUR UN USAGE DOMESTIQUE SEULEMENT
AVERTISSEMENT
Lors de l’utilisation d’appareils électriques, des mesures de sécurité de base
doivent toujours être suivies, y compris les suivantes:
FRANÇAIS
28 NE METTEZ PAS au four micro-ondes les
contenants ou les accessoires fournis avec
l’appareil.
29 N’EFFECTUEZ PAS de broyage avec
le gobelet à portion individuel et le jeu de
lames Pro Extractor BladesMD.
30 Avant d’utiliser l’appareil, assurez-vous
que tous les ustensiles sont enlevés
des contenants. Omettre de retirer
des ustensiles peut mener au bris des
contenants et potentiellement causer des
blessures et des dommages matériels.
31 Veuillez garder les mains et les ustensiles
hors du contenant lors du hachage afin de
réduire tout risque de blessures graves ou
de dommage au mélangeur ou hachoir. Un
grattoir peut être utilisé UNIQUEMENT
lorsque l’appareil n’est pas en marche.
Lors de l’utilisation du hachoir, utilisez
toujours le pilon fourni pour ajouter des
aliments. N’ajoutez JAMAIS d’aliments à
la main.
32 N’utilisez JAMAIS l’appareil sans les
couvercles et les bouchons en place.
NE TENTEZ PAS de contourner le
mécanisme de verrouillage. Assurez-vous
que le contenant et le couvercle sont
correctement installés avant l’utilisation.
33 N’EXPOSEZ PAS les contenants et les
accessoires à des changements extrêmes
de température. Ils pourraient subir des
dommages.
34 Ne laissez JAMAIS l’appareil en marche
sans surveillance.
35 N’OUVREZ PAS le couvercle du bec
verseur lorsque vous utilisez l’appareil.
36 NE MÉLANGEZ PAS de liquides chauds.
Cela peut entraîner une accumulation de
pression et une exposition à la vapeur
qui peut poser un risque de brûlure pour
l’utilisateur.
37 Si vous trouvez des ingrédients non
mélangés collés aux parois du pichet,
arrêtez l’appareil, retirez le couvercle
et utilisez une spatule pour déloger les
ingrédients. N’INSÉREZ JAMAIS vos
mains dans le pichet, car vous pourriez
toucher une des lames et subir une
lacération.
38 NE TENTEZ PAS d’enlever le contenant
et les couvercles du bloc moteur pendant
que le moteur et le jeu de lames tournent
encore. Laissez l’appareil s’arrêter
complètement avant de retirer les
couvercles et les contenants.
39 À la fin de l’opération, veillez à ce que le
jeu de lames soit retiré AVANT de vider
le contenu du contenant. Retirez le jeu
de lames en saisissant soigneusement
la partie supérieure de la tige et en le
soulevant du contenant. Si vous ne
retirez pas le jeu de lames avant de vider
le contenant, vous courrez le risque de
provoquer des lacérations.
40 Retirez le jeu de lames Pro Extractor
BladesMD du gobelet à portion individuel
après avoir mélangé les ingrédients.
N’ENTREPOSEZ PAS les ingrédients
avant ou après les avoir mélangés
dans le gobelet fixé au jeu de lames.
Certains aliments peuvent contenir des
ingrédients actifs ou libérer des gaz qui
prendront de l’expansion s’ils sont laissés
dans un récipient fermé, entraînant une
accumulation excessive de pression qui
peut poser un risque de blessure. Utilisez
seulement le couvercle à bec verseur pour
couvrir les ingrédients à entreposer dans le
gobelet.
41 En cas de surchauffe de l’appareil, un
thermocontacteur sera activé et arrêtera
temporairement le moteur. Pour le
réinitialiser, débranchez l’appareil et laissezle refroidir pendant environ 30minutes
avant de l’utiliser de nouveau.
42 La puissance nominale maximale pour
cet appareil est basée sur la configuration
du jeu de lames Pro Extractor Blades et
du gobelet à portion individuel. D’autres
configurations peuvent tirer moins de
puissance ou de courant.
43 NE MÉLANGEZ PAS les ingrédients
secs avant d’avoir ajouté du liquide dans
le gobelet à portion individuel. Le gobelet
à portion individuel n’est pas conçu pour
mélanger des ingrédients secs.
44 N’IMMERGEZ PAS le bloc moteur ou
l’écran tactile dans de l’eau ou dans un
autre liquide. NE PULVÉRISEZ PAS
de liquide sur le bloc moteur ou l’écran
tactile. Mettez le mélangeur hors tension et
débranchez-le avant de le nettoyer.
CONSERVEZ CES INSTRUCTIONS
27 281- 877-64 6-5288 ninjakitche n.com
Page 16

FAMILIARISEZ-VOUS AVEC VOTRE NINJAMD
SYSTÈME INTELLI-SENSEMC MÉLANGEUR DUO
BIENVENUE!
Félicitations pour votre achat.
Utilisez ce mode d’emploi pour
en apprendre davantage sur
les excellentes fonctionnalités
de votre système Ninja IntelliSense Mélangeur Duo. De
l’assemblage à l’utilisation,
en passant par l’entretien,
vous trouverez tous les
renseignements que vous
cherchez ici.
MC
FRANÇAIS
A
B
Plusieurs accessoires sont
compatibles avec cette série
de mélangeurs.
REMARQUE: Le rabat
de la boîte présente les
accessoires inclus avec
ce modèle�
Si vous avez des questions,
des préoccupations ou
des commentaires, nous
serions ravis de les entendre.
Appelez-nous au 18776465288 ou visitez le www.
ninjakitchen.com.
Pour trouver d’excellentes
recettes et acheter plus
d’accessoires (y compris
les disques de coupe pour
créer différents types de
nouilles), veuillez visiter
ninjaaccessories.com
* Capacité liquide maximale
de 1,9L (64oz)
UNITÉ PRINCIPALE
A Couvercle du pichet
MC
B Pichet Total Crushing
de 2,1L (72oz)*
C Jeu de lames superposées
D Bloc moteur avec reconnaissance intelligente du contenant
E Gobelet à portion individuel de 710ml (24oz)
F Couvercle du bec verseur
G Jeu de lames Pro Extractor Blades
MC
C
D
E
F
G
29 301- 87 7-64 6-5288 ninjakitchen.com
Page 17

AVANT LA PREMIÈRE UTILISATION
CARACTÉRISTIQUES
IMPORTANT: Examinez
tous les avertissements
des pages25à28 avant
de poursuivre.
LE SAVIEZ-VOUS?
• Vous pouvez emporter
vos boissons avec vous
en utilisant les couvercles
à bec verseur.
• Tous les contenants, jeux
de lames, disques de
coupe et couvercles sont
sans BPA et
être mis au lave-vaisselle.
peuvent tous
1 Retirez tous les matériaux d’emballage de l’appareil.
Soyez prudent lors du déballage des jeux de lames et des
disques de coupe. Tous les jeux de lames et les disques
de coupe sont tranchants.
2 Le jeu de lames de hachage et le jeu de lames
superposées NE SONT PAS verrouillés en place dans
leurs contenants respectifs. Manipulez le jeu de lames de
hachage et le jeu de lames superposées en saisissant la
partie supérieure de leurs tiges respectives.
3 Manipulez le jeu de lames Pro Extractor BladesMD en le
tenant par la circonférence extérieure de la base du jeu de
lames.
4 Lavez les contenants, les couvercles, les disques de coupe
et les jeux de lames dans de l’eau chaude savonneuse
à l’aide d’une brosse à vaisselle avec poignée ou de
la brosse de nettoyage fournie afin d’éviter le contact
direct avec les lames. Manipulez les jeux de lames avec
précaution, car les lames sont tranchantes.
5 Rincez à fond toutes les pièces et laissez-les sécher à l’air.
6 Tous les accessoires vont au lave-vaisselle. Nous vous
recommandons de placer les couvercles, les disques
de coupe et les jeux de lames dans le panier supérieur
du lave-vaisselle. Veillez à retirer les jeux de lames et les
disques de coupe des contenants avant de les placer dans
le lave-vaisselle. Soyez prudent lorsque vous manipulez
des jeux de lames ou des disques de coupe.
7 Essuyez l’écran tactile avec un chiffon doux. Laissez-le
sécher complètement avant l’utilisation.
PROGRAMMES INTELLIGENTES POUR
LE PICHET TOTAL CRUSHING
Appuyez sur le bouton Power et maintenez-le enfoncé pour mettre l’appareil en marche.
Les programmes intelligents préétablis combinent des caractéristiques uniques de
mélange et de pause qui font tout le travail pour vous. Lorsqu’un programme préétabli est
sélectionné, il démarrera immédiatement et s’arrêtera automatiquement lorsque le mélange
est terminé. Pour arrêter le mélange avant la fin du programme, appuyez de nouveau sur le
bouton actuellement actif.
SMOOTHIE (BOISSON FRAPPÉE)
Préparez de délectables boissons et laits
frappés très onctueux à partir de fruits frais ou
congelés, de lait, de liquides et de glace
ICE CREAM (CRÈME GLACÉE)
Préparez de délicieux desserts glacés faciles
à prendre à la cuillère comme de la crème
glacée ou du sorbet.
FROZEN DRINK (BOISSON GLACÉE)
Transformez de la glace et des fruits en
boissons glacées mélangées à la perfection.
MD
.
PROGRAMMES INTELLIGENTES POUR
LE GOBELET À PORTION INDIVIDUEL
SMOOTHIE (BOISSON FRAPPÉE)
Préparez de délectables boissons et laits
frappés très onctueux à partir de fruits frais ou
congelés, de lait, de liquides et de glace
REFRESHER (RAFRAÎCHISSEMENT)
Ajoutez des saveurs naturelles de légumes, de
fruits et d’herbes à votre eau.
EXTRACT (EXTRACTION)
Idéal pour les fruits et légumes entiers, feuillus
ou fibreux, y compris leurs peaux, graines et
tiges.
.
FRANÇAIS
SNOW CONE (CÔNE DE NEIGE)
Pulvérisez de la glace et obtenez des
créations glacées comme des cônes de neige,
des barbotines ou des granités.
LOW, HIGH et PULSE (FAIBLE, ÉLEVÉ et IMPULSION)
Lorsque sélectionné, chacun de ces programmes fonctionne de manière continue jusqu’à ce
qu’il soit arrêté. Ces fonctions ne sont pas disponibles avec les programmes Auto-iQ.
31 321- 87 7-64 6-5288 ninjakitchen.com
DRESSING (VINAIGRETTE)
Préparez des marinades, vinaigrettes et
sauces fraîches.
Page 18

UTILISATION DU PICHET TOTAL CRUSHING
MD
IMPORTANT: Examinez
tous les avertissements
des pages25à28 avant
de poursuivre.
CONSEIL: Si le jeu de
lames superposées n’est
pas bien enfoncé, vous
ne serez pas en mesure
d’installer et de verrouiller
le couvercle en place.
CONSEIL: Pour en
savoir davantage sur les
programmes de l’appareil,
consultez la page32.
REMARQUE: Les
programmes préétablis
effectuent des pauses et des
changements de vitesse tout
au long du cycle.
REMARQUE: N’AJOUTEZ
PAS les ingrédients avant
d’effectuer l’installation du jeu
de lames superposées.
REMARQUE: Le pichet peut
être installé dans une seule
orientation. La poignée doit
être positionnée dans le coin
avant droit du bloc moteur
pour que vous puissiez utiliser
l’appareil.
1
Placez le bloc moteur
débranché sur une surface
plane, propre et sèche
comme un comptoir ou
une table. Pressez le bloc
moteur vers le bas pour
fixer les ventouses sur la
surface de travail. Assurezvous que le bloc moteur
est connecté à une source
d’alimentation.
2
Placez le pichet du
mélangeur Total Crushing
sur le bloc moteur. La
poignée doit être alignée
légèrement vers la droite,
et le pichet doit être
orienté de manière à ce
que les symboles LOCK
(VERROUILLAGE) soient
visibles sur le bloc moteur.
Puis, faites tourner le
pichet dans le sens des
aiguilles d’une montre
jusqu’à ce que vous
entendiez un déclic vous
indiquant qu’il est bien en
place.
3 Avec prudence, en
tenant le jeu de lames
superposées par le
haut de la tige, placezle sur l’engrenage
d’entraînement à
l’intérieur du pichet.
Notez que le jeu de lames
s’adaptera de manière
lâche sur l’engrenage
d’entraînement.
FRANÇAIS
4 Ajoutez les ingrédients, en vous assurant qu’ils ne
dépassent pas la ligne Remplissage max. sur le côté du
pichet.
5 Placez le couvercle sur le pichet, en alignant le symbole de
triangle situé sur le couvercle avec le symbole de triangle situé
sur la poignée du pichet. Appuyez sur la poignée jusqu’à ce
que vous entendiez un déclic vous indiquant qu’elle est bien
en place. Les symboles de triangle DOIVENT être alignés
pour que le couvercle se verrouille en place et que l’appareil
fonctionne. Quand l’appareil est branché et que le contenant
est enclenché correctement dans le bloc moteur, appuyez
sur le bouton Power pour mettre l’appareil en marche. Les
boutons des programmes disponibles s’allument et l’appareil
est prêt à être utilisé.
33 341-877- 646 -528 8 ninja kitchen.com
Page 19

UTILISATION DU PICHET TOTAL CRUSHINGMD
(SUITE)
IMPORTANT: Examinez
tous les avertissements
des pages25à28 avant
de poursuivre.
IMPORTANT: Par
mesure de sécurité,
la minuterie affichera
«- --» et le moteur ne
fonctionnera pas si le
pichet et le couvercle
ne sont pas installés
correctement. Dans ce
cas, répétez l’étape5 à
la page34. Lorsque le
pichet et le couvercle sont
correctement installés, les
boutons du programme
resteront allumés, vous
signalant que l’appareil est
prêt à être utilisé.
FRANÇAIS
REMARQUE: La
reconnaissance intelligente
du contenant peut déterminer
quel contenant est sur le bloc
moteur. Seules les fonctions
disponibles pour un contenant
en particulier s’allumeront sur
l’écran tactile.
35 361 -877-6 46-5288 ninjakitchen.com
6 Si vous utilisez un
programme préétablis,
sélectionnez tout d’abord
celui qui convient le
mieux à votre recette. La
fonction préréglée arrêtera
l’appareil automatiquement
à la fin du programme.
Pour suspendre le
fonctionnement de
l’appareil à tout moment,
appuyez une seconde
fois sur la touche active.
Consultez la page32
pour les descriptions de
programmes.
7 Si vous n’utilisez pas de
programme et que les
ingrédients ont atteint la
consistance souhaitée,
arrêtez l’appareil en
relâchant le bouton
de vitesse manuelle et
attendez qu’il s’arrête
complètement.
8 Pour retirer le pichet du
bloc moteur, tournez-le
dans le sens antihoraire
et enlevez-le ensuite en le
soulevant.
9 Pour vider les mélanges
plus liquides, assurezvous que le couvercle est
verrouillé en place, puis
ouvrez le bec verseur.
10 Pour les mélanges plus
épais qui ne peuvent
pas être vidés par le
bec verseur, retirez le
couvercle et le jeu de
lames superposées avant
de verser. Pour retirer
le couvercle, appuyez
sur le bouton RELEASE
(DÉGAGEMENT) et
soulevez la poignée. Pour
retirer le jeu de lames,
tenez-le délicatement par
le haut de la tige. Le pichet
peut ensuite être vidé.
11 Débranchez l’appareil
lorsque vous avez
terminé. Pour dégager
le bloc moteur, placez
vos mains sous les deux
côtés du bloc moteur et
tirez doucement l’appareil
vers vous et vers le haut.
Consultez la page41
pour les instructions de
rangement.
Page 20

UTILISATION DU GOBELET À PORTION INDIVIDUEL
IMPORTANT: Examinez
tous les avertissements
des pages25à28 avant
de poursuivre.
CONSEIL: Pour en
savoir davantage sur les
programmes de l’appareil,
référez-vous à la page32.
REMARQUE: Les
programmes Auto-iQ
effectuent des pauses et des
changements de vitesse tout
au long du cycle.
FRANÇAIS
1 Placez le bloc moteur
débranché sur une surface
plane, propre et sèche
comme un comptoir ou
une table. Pressez le
bloc moteur vers le bas
pour fixer les ventouses
sur la surface de travail.
Branchez le bloc moteur
dans une prise électrique.
37 381- 87 7-646-528 8 ninjakitchen.com
2 Ajoutez les ingrédients
au gobelet à portion
individuel. N’AJOUTEZ
PAS d’ingrédients au-delà
de la ligne MAX LIQUID
(liquide max.) sur le
gobelet.
3 Installez le jeu de lames Pro Extractor
BladesMD sur le dessus du gobelet. Tournez
le couvercle dans le sens horaire jusqu’à ce
qu’il soit fermé hermétiquement.
4 Retournez le gobelet à portion individuel
et installez-le sur le bloc moteur. Alignez
les languettes du gobelet avec les fentes
du bloc moteur, puis tournez le gobelet
jusqu’à ce que vous entendiez un déclic
vous indiquant qu’il est bien en place.
Quand l’appareil est branché et que le
contenant est enclenché correctement
dans le bloc moteur, appuyez sur le
bouton Power pour mettre l’appareil en
marche. Les boutons des programmes
disponibles s’allument et l’appareil est prêt
à être utilisé.
Page 21

UTILISATION DU GOBELET À PORTION INDIVIDUEL
(SUITE)
IMPORTANT: Examinez
tous les avertissements
des pages25à28 avant
de poursuivre.
REMARQUE: La
reconnaissance intelligente
du contenant peut
déterminer quel contenant
est sur le bloc moteur.
Seules les fonctions
disponibles pour un
contenant en particulier
s’allumeront sur l’écran
tactile.
FRANÇAIS
5 Si vous utilisez un
programme
sélectionnez tout d’abord
celui qui convient le
mieux à votre recette. La
fonction préréglée arrêtera
l’appareil automatiquement
à la fin du programme.
Pour suspendre le
fonctionnement de
l’appareil à tout moment,
appuyez une seconde fois
sur le programme actif.
Consultez la page32
pour les descriptions de
programmes.
39 401-877- 646 -528 8 ninjakitchen.com
préétablis
6 Pour retirer le gobelet
,
du bloc moteur, tournez
le gobelet dans le sens
antihoraire, puis soulevezle.
7 Retirez le jeu de lames
Pro Extractor BladesMD
en tournant le couvercle
dans le sens antihoraire.
N’entreposez pas les
mélanges avec le jeu de
lames Pro Extractor Blades
fixé. Manipulez le jeu de
lames avec précaution, car
les lames sont tranchantes.
8 Débranchez l’appareil
lorsque vous avez
terminé. Pour dégager
le bloc moteur, placez
vos mains sous les deux
côtés du bloc moteur et
tirez doucement l’appareil
vers vous et vers le haut.
Consultez la page41
pour les instructions de
rangement.
9 Pour une boisson à
emporter, placez le
couvercle à bec verseur
sur le gobelet à portion
individuel et tournezle dans le sens horaire
jusqu’à ce qu’il soit fermé
hermétiquement. Utilisez
seulement le couvercle à
bec verseur pour couvrir
les ingrédients à entreposer
dans le gobelet.
Page 22

SOINS ET ENTRETIEN
GUIDE DE DÉPANNAGE
NETTOYAGE
1 Séparez toutes les pièces.
2 Lavez tous les contenants dans l’eau
chaude savonneuse avec un chiffon doux.
3 Nettoyage à la main
Lavez les jeux de lames et les disques de
coupe dans de l’eau chaude savonneuse
à l’aide d’une brosse à vaisselle avec
poignée afin d’éviter le contact direct
avec les lames. Manipulez les jeux de
lames avec précaution, car les lames sont
tranchantes. Rincez à fond toutes les
pièces et laissez-les sécher à l’air.
Lave-vaisselle
Tous les accessoires vont au lave-vaisselle.
Nous vous recommandons de placer les
couvercles, les contenants, les disques de
coupe et les jeux de lames dans le panier
supérieur du lave-vaisselle SEULEMENT.
Veillez à retirer les jeux de lames des
contenants avant de les placer dans le
lave-vaisselle. Soyez prudent lorsque vous
manipulez des jeux de lames.
Bloc moteur
Arrêtez l’appareil et débranchez le bloc
moteur avant le nettoyage. Essuyer le bloc
moteur avec un chiffon propre et humide.
Nettoyez l’écran tactile avec un chiffon
doux, comme de la microfibre, afin de
prévenir les égratignures. Pour éliminer les
résidus déposés sur l’écran tactile, vous
pouvez utiliser un nettoyant tout usage.
NE PULVÉRISEZ JAMAIS de l’eau de
tout autre liquide sur le bloc moteur ou
l’écran tactile.
N’UTILISEZ PAS de chiffons/tampons/
brosses d’abrasifs pour nettoyer le bloc
moteur ou l’écran tactile, étant donné qu’ils
peuvent abîmer ou égratigner la surface.
RANGEMENT
Enroulez le cordon autour du rembobineur à
l’arrière du bloc moteur. Rangez l’appareil en
position verticale et rangez tous les jeux de
lames à l’intérieur ou fixez-les à leurs contenants
respectifs avec leurs couvercles verrouillés en
place.
NE RANGEZ PAS les ingrédients avant ou après
le mélange dans le gobelet à portion individuel
avec le jeu de lames Pro Extractor Blades
MD
fixé.
N’EMPILEZ PAS d’articles sur les contenants.
Rangez tous les accessoires restants aux côtés
l’appareil
de
ou dans une armoire où ils ne seront
pas endommagés et ne poseront pas de danger.
RÉINITIALISATION DU
THERMOSTAT DU MOTEUR
Cet appareil est doté d’un système de sécurité
unique protégeant le moteur et le système
d’entraînement en cas de surcharge par
inadvertance. En cas de surcharge de l’appareil,
le moteur s’arrêtera temporairement. Dans ce
cas, suivez la procédure de réinitialisation cidessous.
1 Débranchez l’appareil de la prise électrique.
2 Laissez l’appareil refroidir pendant environ
30minutes.
Retirez le couvercle du contenant et le jeu de
3
lames. Videz le contenant et assurez-vous
qu’aucun aliment ne coince le jeu de lames.
IMPORTANT: Assurez-vous que les
capacités maximales ne sont pas dépassées.
C’est la cause la plus fréquente de surcharge
de l’appareil.
Si l’appareil a besoin d’être réparé, veuillez
communiquer avec le service à la clientèle en
composant le 1877646-5288.
COMMANDE DE PIÈCES DE RECHANGE
Pour commander des pièces et des
accessoires supplémentaires, veuillez visiter le
ninjaccessories.com ou communiquer avec le
service à la clientèle au 1877646-5288.
AVERTISSEMENT: Pour réduire les risques d’électrocution et de mise en
marche involontaire, éteignez et débranchez l’appareil avant tout dépannage�
L’appareil ne se met pas en marche�
• Assurez-vous qu’il est bien branché.
• L’affichage indique «- --» une fois connecté à l’alimentation électrique.
• Placez le contenant sur le bloc moteur et tournez-le dans le sens horaire jusqu’à ce que vous entendiez un
déclic vous indiquant qu’il est bien en place. Appuyez sur le bouton Power pour mettre l’appareil en marche;
les programmes disponibles s’allument, indiquant que l’appareil est prêt à être utilisé.
L’appareil ne s’éteint pas�
• Retirez le contenant du bloc moteur en le tournant dans le sens antihoraire et en le soulevant. L’écran devrait
s’éteindre. Débranchez le cordon d’alimentation de la prise.
Le couvercle/jeu de lames Pro Extractor BladesMD est dicile à installer sur le gobelet�
• Déposez le gobelet sur une surface plane. Déposez délicatement le couvercle ou le jeu de lames Pro Extractor
Blades sur la partie supérieure du gobelet et alignez les filatures de sorte que le couvercle et le jeu de lames
Pro Extractor Blades reposent à plat sur le gobelet. Tournez-le dans le sens horaire jusqu’à ce que le couvercle
soit bien scellé.
Les ingrédients ne se mélangent pas bien; les ingrédients restent coincés�
• L’utilisation des programmes préétablis est la meilleure façon d’obtenir d’excellents résultats. Les impulsions
et les pauses permettent aux ingrédients de se déposer sur le jeu de lames. Si les ingrédients se coincent
régulièrement, l’ajout d’un peu de liquide aidera généralement.
• Lors du remplissage du gobelet, commencez avec des fruits ou des légumes frais, puis ajoutez des légumes
verts ou feuillus. Ensuite, ajoutez des liquides ou des yaourts, puis des graines, des poudres ou des beurres de
noix. Enfin, ajoutez de la glace ou des ingrédients congelés.
Le bloc moteur ne colle pas au comptoir ou à la table�
• Assurez-vous que la surface et les ventouses sont propres. Les ventouses n’adhèrent qu’aux surfaces lisses.
• Les ventouses
polies.
• NE TENTEZ PAS d’utiliser l’appareil lorsque le bloc moteur est fixé à une surface non sécuritaire (planche à
découper, plateau, plaques, etc.)
L’appareil est dicile à retirer du comptoir pour le rangement�
• Placez vos mains sous les deuxcôtés du bloc moteur et tirez doucement l’appareil vers vous et vers le haut.
Un message «- --» clignotant s’achera�
• La reconnaissance intelligente du contenant peut déterminer quel contenant est sur le bloc moteur. Vous
essayez peut-être d’utiliser un programme qui n’a pas été conçu pour le contenant que vous avez installé. Les
programmes s’allument pour indiquer ceux qui sont offerts pour chaque contenant.
Les glaçons ne se transforment pas en neige�
• N’utilisez pas la glace qui a été laissée à la température de la pièce pendant un certain temps ou qui a
commencé à fondre. Utilisez de la glace provenant directement du congélateur.
• Commencez par quelques impulsions, puis passez à un cycle de mélange continu.
N’ADHÈRENT PAS sur certaines surfaces telles que le bois, les tuiles et les finitions non
FRANÇAIS
41 421-877-6 46-5288 ninjakitchen.com
Page 23

REMARQUES
REMARQUES
FRANÇAIS
43 441-877-6 46-5288 ninjakitchen.com
Page 24

REMARQUES
GARANTIE LIMITÉE
D’UN (1) AN
FRANÇAIS
La garantie limitée d’un an s’applique aux achats effectués auprès de détaillants autorisés de SharkNinja Operating
LLC. La garantie s’applique uniquement au premier propriétaire et au produit original et n’est pas transférable.
SharkNinja garantit ce produit contre toute défectuosité de matériau ou de main-d’œuvre pour une période de
1an à compter de la date d’achat, dans le cadre d’un usage domestique normal et si le produit est entretenu
conformément aux exigences décrites dans ce guide d’utilisation, sujet aux conditions, aux exclusions et aux
exceptions ci-dessous.
Que couvre ma garantie?
1. L’appareil d’origine ou les composants inusables considérés comme défectueux, à la seule discrétion de
SharkNinja, seront réparés ou remplacés pour 1an à compter de la date d’achat initiale.
2. Dans les rares cas où un appareil est remplacé, la garantie prendra fin sixmois après la date de réception
de l’appareil de remplacement ou le reste de la période de garantie existante, selon la période la plus
longue. Si l’appareil est remplacé, SharkNinja se réserve le droit de le remplacer par un appareil de valeur
égale ou supérieure.
Qu’est-ce qui n’est pas couvert par ma garantie?
Nos spécialistes de produits et du Service à la clientèle sont à votre disposition pour vous fournir toutes les options
du service de la garantie offertes, y compris la possibilité de l’améliorer et de choisir nos options de garantie de
service VIP disponibles pour certaines catégories de produits.
1. L’usure normale des pièces d’usure (y compris tous les contenants de mélange, les couvercles, les lames
et la base du mélangeur) qui nécessitent un entretien ou un remplacement périodique afin d’assurer le bon
fonctionnement de votre appareil n’est pas couverte par cette garantie.
2. La garantie ne s’applique pas aux appareils utilisés de façon abusive ou à des fins commerciales.
3. SharkNinja assumera les frais de retour de l’appareil à nos centres par le consommateur en vue de la
réparation ou du remplacement de l’appareil. Un montant de19,95USD pour les frais de retour de l’appareil
sera facturé au moment de l’expédition de l’appareil réparé ou remplacé.
4. Dommages causés par une mauvaise utilisation, des abus, de la négligence lors de la manipulation ou
dommages causés par une mauvaise manipulation pendant le transport.
5. Dommages indirects et accessoires.
6. Défectuosités causées par ou découlant de dommages lors de l’expédition ou des réparations, d’un
entretien ou d’une modification du produit ou de toute pièce de celui-ci, effectués par un réparateur non
autorisé par SharkNinja.
7. Produits achetés ou utilisés à l’extérieur de l’Amérique du Nord.
Problèmes avec l’appareil et réparations sous garantie:
Si votre appareil ne fonctionne pas comme il le devrait lors d’un usage domestique normal pendant la période de
garantie, visitez le www.ninjakitchen.com pour obtenir de l’information sur les soins et l’entretien du produit que
vous pouvez effectuer vous-même. Pour obtenir de l’assistance avec les options du service de la garantie ou avec
le produit, veuillez appeler notre Service à la clientèle et nos spécialistes de produits au 1877646-5288.
Comment présenter une demande de service sous garantie:
Vous pouvez composer le 1877646-5288 pour demander l’aide d’un spécialiste du Service à la clientèle. Veuillez
noter que vous devez composer le 1877646-5288 pour présenter une demande de service sous garantie. Les
directives d’emballage et de retour de l’appareil vous seront fournies à ce moment-là.
Pour connaître les heures d’ouverture du Service à la clientèle, visitez le www.ninjakitchen.com
Vous pouvez faire l’achat de pièces de rechange en visitant le ninjaaccessories.com. Pour obtenir plus de
renseignements sur ce qui est qualifié de pièces d’usure et de pièces inusables, veuillez visiter le www.ninjakitchen.
com/warranty.
Cette garantie vous confère des droits juridiques particuliers selon la loi; vous pouvez aussi bénéficier d’autres droits
qui varient d’une province ou d’un État à l’autre.
Certains États américains ou certaines provinces canadiennes n’acceptent pas l’exclusion ou la limitation de
dommages accessoires ou indirects; ce qui fait que cette disposition ne s’appliquerait peut-être pas.
45 461- 87 7-64 6-5288 ninjakitchen.com
Page 25

SharkNinja Operating LLC
US: Needham, MA 02494
CAN: Ville St-Laurent, QC H4S 1A7
1-877-646-5288
ninjakitchen�com
Illustrations may differ from actual product. We are constantly striving to
improve our products; therefore the specifications contained herein are
subject to change withoutnotice.
NINJA is a registered trademark of SharkNinja Operating LLC.
INTELLI-SENSE, BLENDER DUO, PRO EXTRACTOR BL ADES, and TOTAL
CRUSHING are trademarks of SharkNinja Operating LLC.
For SharkNinja U.S. Patent information, visit sharkninja.com/USPatents
SharkNinja Operating LLC
États-Unis: Needham, MA 02494
Canada: Saint-Laurent (Qc)H4S 1A7
1-877-646-5288
ninjakitchen�com
Les illustrations peuvent différer du produit réel. Nous tentons constamment
d’améliorer nos produits; par conséquent, les caractéristiques indiquées dans
le présent guide peuvent être modifiées sans préavis.
NINJA est une marque de commerce déposées de SharkNinja Operating
LLC.
INTELLI-SENSE, BLENDER DUO, PRO EXTRACTOR BLADES et TOTAL
CRUSHING sont des marques de commerce de SharkNinja Operating LLC.
Pour obtenir de l’information sur les brevets de SharkNinja aux É.-U., visitez le
www.sharkninja.com/USPatents.
© 2017 SharkNinja Operating LLC
CT640 C�IB�E�F�MP�170707
PRINTED IN CHINA / IMPRIMÉ EN CHINE
@ninjakitchen
 Loading...