

Ninja CM407, SPECIALTY CM400 Owner's Manual
ninjakitchen.com
CM407 Series
OWNER’S GUIDE
COFFEE MAKER
SPECIALTY
3ninjakitchen.com2
ninjakitchen.com
21 ALWAYS place a vessel beneath
the brew basket to receive the
brewed coee.
22 Scalding may occur if brew basket is
opened d uring a brew or clea n cycle.
23 DO NOT remove the vessel while the
appliance is running witho ut the Drip
Stop in the closed p osition. Return the
vessel quickly and open the D rip Stop to
continue the b rew.
24 DO NOT fill water reservoir with
anything other than water, as other
liquids may damage your brewer.
25 DO NOT overfill the water reservoir.
Fill water only to the Max Fill line.
26 DO NOT run the appliance witho ut water.
27 Exceeding maximum brew basket
capacity may cause overflow. DO NOT
use fine or espresso ground coee.
Thermal Carafe
28 The carafe is designed for use with this
appliance only. DO NOT place carafe on
or near a hot gas or electric al burner, or
in a heated oven.
29 DO N OT place carafe in dishwasher.
30 DO NOT use a ca rafe that has a loose or
weakened handle.
31 DO NOT clean carafe with abrasive
cleansers, steel wool pa ds, wire brushes,
or other abrasive materials.
32 DO NOT place carafe in microwave.
33 DO NOT drink directly from the c arafe.
Liquid from th e carafe may be ver y hot.
34 DO NOT use the carafe to store food
when not in use .
35 Ensure the carafe is completely empty
before star ting a cleaning or brewing
cycle. Starting a cycle with water or
coee in the carafe will cause
an overflow.
Care & Maintenance
36 Allow the appliance to cool before
removing any parts and before cleaning.
37 To prevent illness from bacterial growth
in the applia nce, follow all cleaning
instructions in the Care & Maintenance
section of this Owner’s Guid e.
38 Clean the system on a weekly basis.
39 If the product is not operating
properly, visit ninjakitchen.co m or
contact SharkNinja Op erating LLC for
examination , repair, or adjustment. Any
servicing needs shall be perform ed by
an authorized service provider.
40 Cleaning and user maintenance shall
not be made by children unless they
are older tha n 8 and super vised.
Cord Statement
41 A short power-supply cord is provided to
reduce the risks resulting from becoming
entangle d in or tripping over a longer cord.
42 DO NOT use extension cords with
this product.
IMPORTANT SAFEGUARDS
READ ALL INSTRUCTIONS BEFORE USE • HOUSEHOLD USE ONLY
Read all instructions before using your
NINJA® SPECIALTY COFFEE MAKER.
When using electrical appliances, basic safety precautions should always
be followed, including the following:
WARNING
To reduce the risk of fire, electric shock,
serious injury, death, or damage when using
this appliance, follow these b asic safety
precautions.
General Precautions
1 This applia nce can be used by children
aged from 8 yea rs and above and
persons with reduced physical,
sensory or mental capabilities or lack
of experience and knowledg e if they
have been given supervision o r
instruction concerning use of the
appliance in a safe way and understand
the hazards involve d.
2 To reduce the risk of electric shock, this
appliance has a polarized plug (one blade
is wider than the other). As a safety
feature, this plug will fit into a polarized
outlet only one way. If the plug does not
fit fully into the outlet, reverse the plug.
If it still does n ot fit, contact a qualified
electrician. DO NOT force into outlet or
try to modif y to fit.
3 Keep the appliance and its cord out of
reach of children less than 8 years.
4 To eliminate a choking haza rd for
young children, remove and disc ard the
protective cover fitted o n the power plug
of this appliance.
5 Children shall not play with the appliance.
6 To protect against fire, electric shock , and
injury to persons, DO NOT i mmerse cord,
plugs, or b ody of machine in water or
other liquid.
7 EVER carry the appliance by the p ower
cord or pull it to disconnect from
electric al socket; instead grasp the plug
and pull to disconnect.
8 DO NOT operate any appliance with
a damaged cord or plug, or af ter the
appliance malfunctions, or has been
dropped or damaged in any manner.
Contact SharkNinja Operating LLC
for service.
9 For household and work top use only.
DO NOT let the power cord hang over
the edge, or touch hot surfaces such
as the stove .
10 NEVER use socket below counter.
11 To avoid risk of fire, electric al shock,
or damage to the unit, DO NOT sto re
or use unit in an a ppliance garage or
under a wall c abinet.
12 Unplug from outlet when not in use and
before cleaning.
13 Turn o and allow to cool before putting
on or taking o parts, and before
cleaning the appliance.
Operating Notice
14 The use of an accessory not
recommended by the manufacturer may
create an overflow condition and scalding
hazard, or result in fire, electric shock, or
personal injury.
15 ALWAYS use appliance on a clean, dr y,
level surface.
16 DO NOT place on or near a hot gas o r
electric burner or in a heated oven.
17 DO NOT use this appliance for anything
other than its intended use.
18 DO N OT use outdoors.
19 DO NOT touch h ot surfaces . Use handles
or knobs.
20 To avoid contact with steam and h ot
surface s, DO NOT reach across top of
brewer to froth.
READ AND SAVE THESE INSTRUCTIONS
WARNING:
Risk of fire or electric shock.
Do not remove bottom cover
THIS BOOK COVERS MODEL NUMBER
CM407, CM407BRN
TECHNICAL SPECIFICATIONS
Voltage: 120V~ 60Hz.
Power: 1500 Watts
Water Reservoir
Capacity: 50 Ounces
Indicates to read and review
instructions to understand operation
and use of product.
Indicates the presence of a hazard that
can cause personal injury, death of substantial property damage if the warning
include with this symbol is ignored.
Indicates risk of fire or electric shock,
presence of live parts, dangerous voltage.
Take care to avoid contact with hot
surface. Always use hand protection
to avoid burns
For Indoor and household use only.
5
ninjakitchen.com
4
ninjakitchen.com
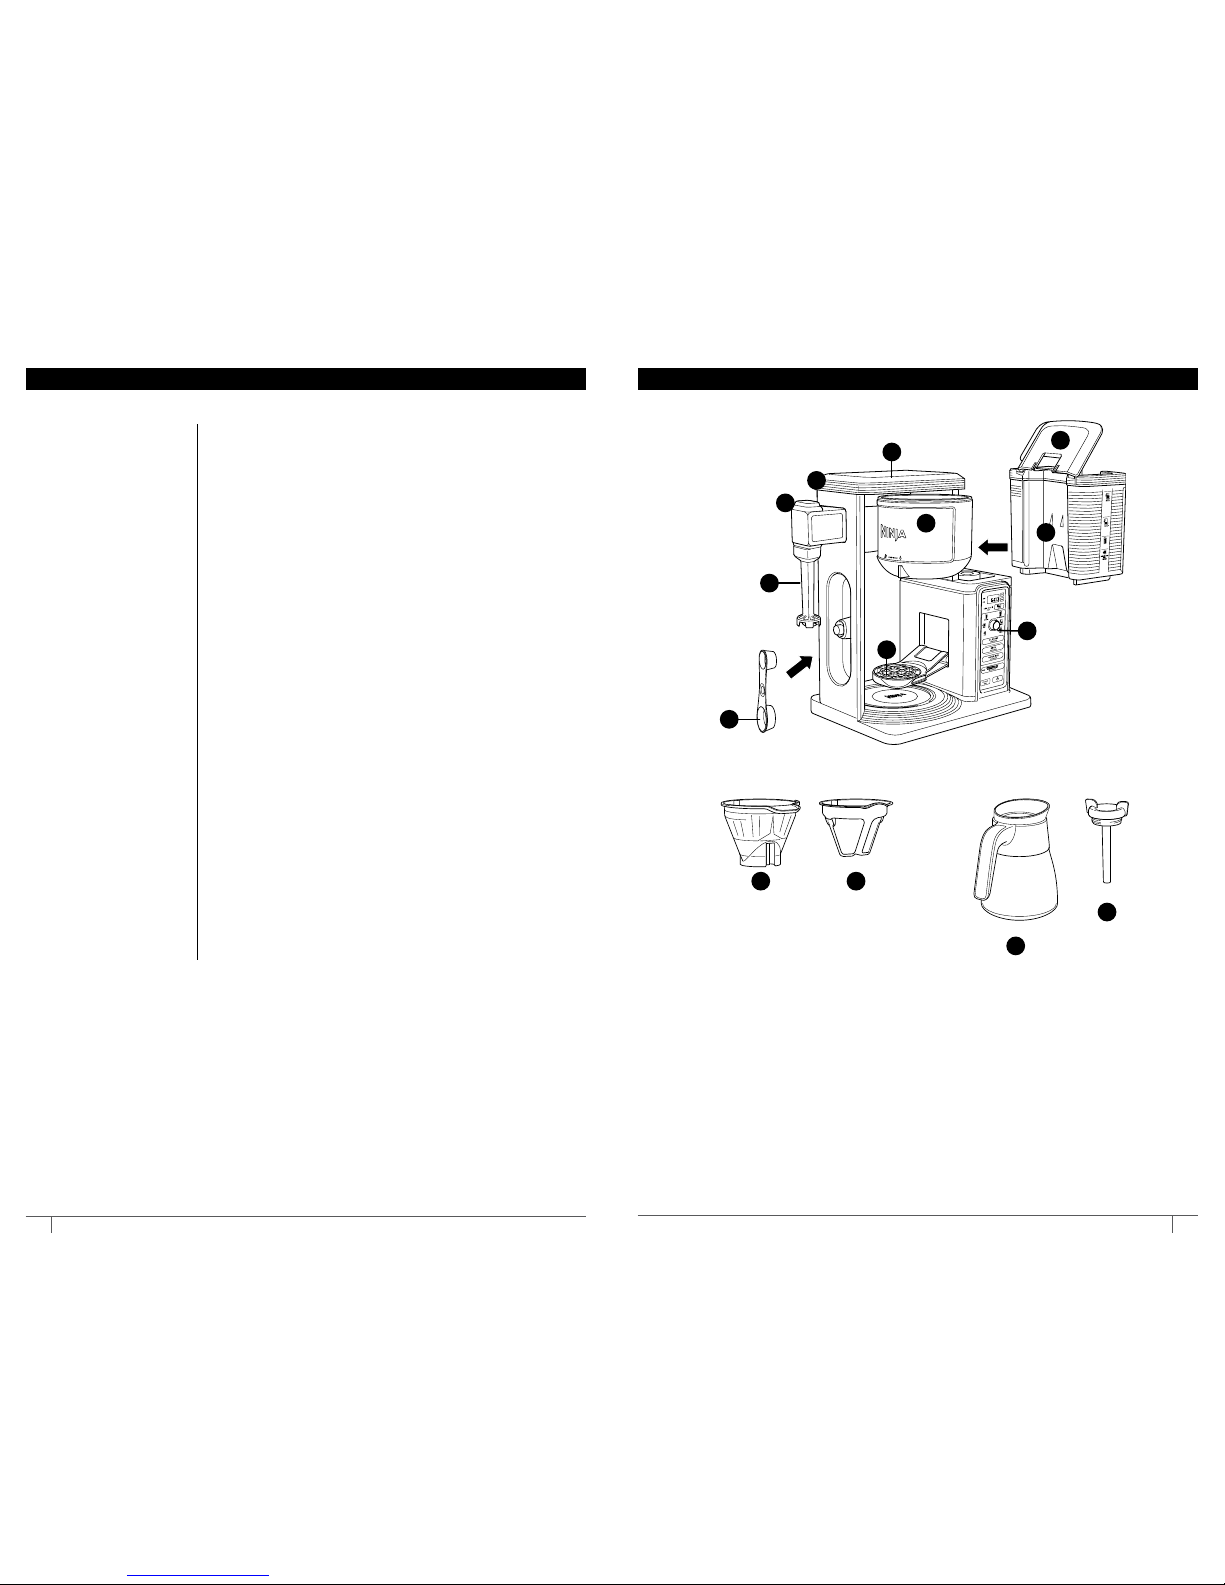
a Coee Maker
(power cord & storage not shown)
b Showerhead
c Integrated Froth er
d Frother Whisk
e Swinging Brew Basket
f Control Panel
g Single-Serve Cup Platform
h Ninja Sm art Scoop™
i Flip-Top Water Reservoir Lid
j Removable Water Reservoir
k Removable Filter Holder
l Permanent Filter
m Stainless Steel Thermal Carafe
n Brew-Through Lid
Thank you
for purchasing
the Ninja®
Specialty
Coee Maker.
Parts ................................................................................................................5
Control Panel .............................................................................................. 6
SCA Certification ...................................................................................... 6
Preparing Your Ninja Specialty Coee Maker for Use .................7
Setting the Clock ...................................................................................7
High-Altitude Calibration Brew .......................................................7
Priming Your Ninja Specialty Coee Maker ................................8
Brew Volumes & Measurements .......................................................... 9
How Much Do You Get in Your Cup? ............................................ 9
Measuring Your Coee Grounds .................................................... 9
Using the Brew Basket ..........................................................................10
Using the Drip Stop ................................................................................. 11
Can’t Wait for the First Cup? ........................................................... 11
Closing the Drip Stop After a Brew ..............................................11
Custom Brews ...........................................................................................12
Classic and Rich Brews ..........................................................................12
Over Ice Brew .......................................................................................12
Specialty Brew and Frothing Milk .....................................................13
Specialty Brew .....................................................................................13
Frothing Milk ......................................................................................... 13
Delay Brew .................................................................................................14
Care & Maintenance ................................................................................14
After Each Brew ...................................................................................14
Cleaning the Water Reservoir ........................................................14
Cleaning the Carafe ............................................................................14
Cleaning & Descaling ............................................................................. 15
Troubleshooting .......................................................................................16
Warranty ......................................................................................................17
Replacement Parts ...............................................................Back Cover
Product Registration ...........................................................Back Cover
g
f
a
k
m
n
l
b
e
c
h
i
PARTSCONTENTS
d
j
7
ninjakitchen.com
6
ninjakitchen.com
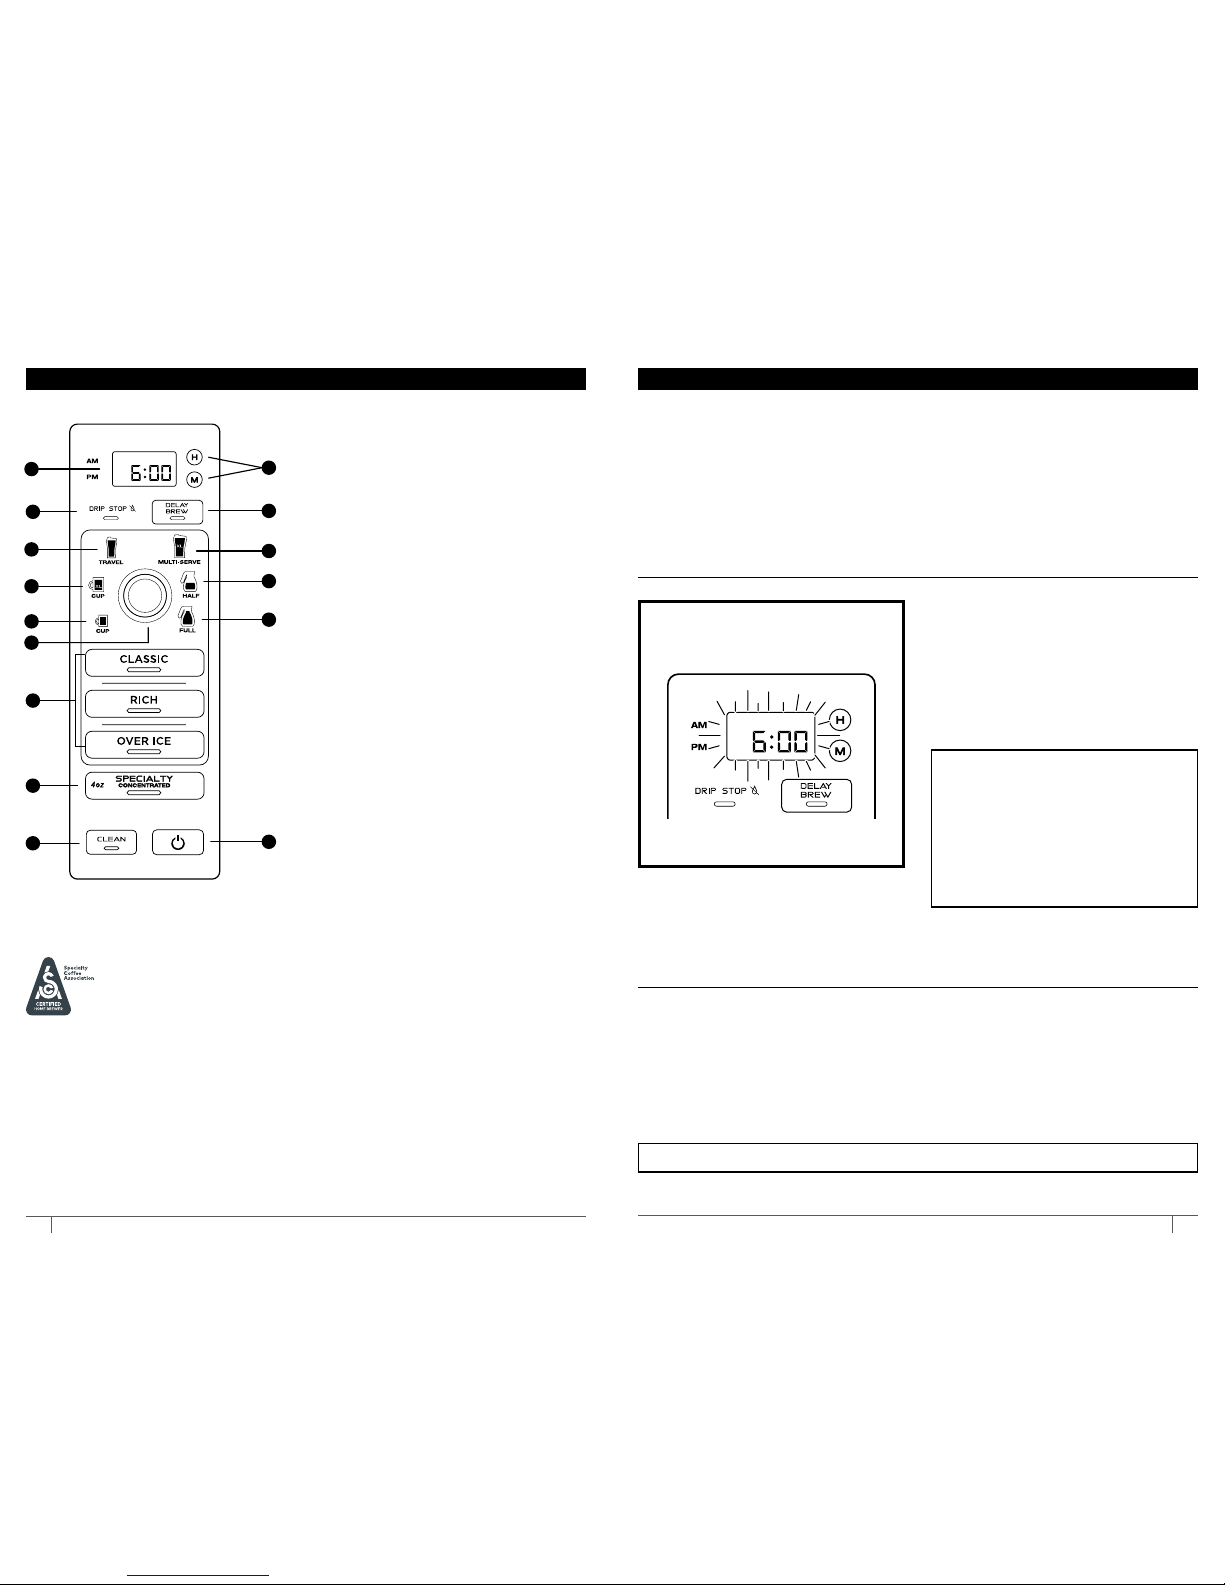
1 Programmable Digital Clock
2 Hour & Minute Buttons
3 Drip Stop Indicator
4 Delay Brew Button
5 Multi-Serve Dial
a Cup
b XL Cup
c Travel Mug
d XL Multi-Serve
e Half Carafe
f Full Carafe
6 Custom Brews
Classic Brew
Rich Brew
Over Ice Brew
7 Signature Brew
Specialty Brew
8 Intelligent Clean Cycle
Indic ator/Button
9 Power Button
Remove all packaging material a nd stickers from the coee maker.
Wash the water reservoir, carafe, removable filter holder, and permane nt filter in warm,
soapy water with a sof t cloth. Rinse parts and dry thoroughly.
Before first use, prime the system by running t wo Full Carafe, Classic brew cycles with
water only. After each cycle is complete, discard the water. For detailed instructions,
refer to the Priming Your Ninja Specialty Coee Maker section .
PLEASE KEEP THIS IMPORTANT SAFEGUARD IN M IND WHEN USING THE APPLIANCE :
DO NOT run the appliance without water.
PREPARING YOUR NINJA® SPECIALTY COFFEE MAKER FOR USECONTROL PANEL
SETTING THE CLOCK
HIGH-ALTITUDE CALIBRATION BREW
1 When the unit is plugged in , the clock
will flash on the control panel to indicate
that the time ha s not been set.
2 Press the hour (H) or minute (M) button
until you reach the current time. The AM or
PM indicator will illuminate on the left side
of the display as you are setting the tim e.
3 After 5 seconds, the clock will stop
flashing and the clock will be set.
(OPTIONAL, BUT RECOMMEND ED FOR USERS IN HIGH -ALTITUDE AREAS)
Because water boils at lower temperatures at higher altitudes, running a c alibration
cycle before your first brew allows the unit to detect the boiling point of water at your
location . Running a calibration cycle will help deliver a consistent brew each time.
1 Fill the water reservoir up to, but not exceeding , the Max Fill line.
2 Place the em pty filter hold er into the brew basket, and an empty vessel in the machine.
3 Press and hold both CLASSIC and OVER I CE until clock displays CAL.
4 A calibration cycle will begin. Wh en complete, th e unit will beep a nd End will appear
on the clock display. Discard the water in the vessel.
NOTE: If the clock stops flashing and
does not display the correct time of day,
pressing the hour (H) or minute (M) button
at any time will cause the clock to flash
again. You can now reprogram the correct
time by following th e previous steps .
NOTE: If you unplug the coee maker or
in the event of an extended power loss ,
you will need to reset the clock the next
time the coee maker is plugged in.
NOTE: Pressing the CLASSIC, OVER ICE, or Power button will cancel the calibration cycle.
4
5d
5f
5e
9
1
3
7
8
5a
5b
2
6
5c
5
SCA CERTIFIED HOM E BREWER
The Specialty Coee Association (SCA) reco gnizes home brewers that meet
their longstanding rigorous technical requirements. These requirements are
based on de cades of industry knowledge and research by the Coee Brewing
Center. All SCA Certified Home Brewers have met these requirements,
which are base d generally o n proper water temperature, brewing time,
and ability to brew within the SCA Golden Cup recommendations
If a brewer passes all of the tests in the certification procedure, as conducted by the SCA,
that brewer will be eligible to be recognized as an exemplar y home brewer and join the
short list of SCA Certified Home Brewers.
This coeemaker has been certified by the SCA to meet their Golden Cup Standard,
designed for optimal extraction and strength. SCA Cer tification testing was
performed using the Half Carafe and Full Carafe on Classic brew. Testing used the
following groun d coee measurements: 55 grams for a Half Carafe and 77 grams
for a Full Carafe. When using th e Ninja Smar t Scoop™, this would be 4 heaping
big scoops for a H alf Carafe and 6 heaping big scoops for a Full Carafe.
 Loading...