


POSEIDON 1-20 XT
Operating Instructions ...................................3-13
Betriebsanleitung ........................................14-26
Notice d’utilisation .......................................27-39
Gebruiksaanwijzing ..................................... 40-51
Istruzioni sull’uso .........................................52-62
Driftsinstruks ...............................................63-73
Bruksanvisning ............................................ 74-84
Driftsvejledning ............................................85-95
Käyttöohje .................................................96-107
Navodilo za uporabo .............................. 108-119
Uputstvo za rad .......................................120-130
Prevádzkový návod .................................131-141
Provozní návod .......................................142-152
Instrukcja obsługi ....................................153-165
Kezelési utasítás .....................................166-176
Руководство ...........................................177-188
Töö juhised ............................................. 189-199
Lietošanas instrukcijas ........................... 200-211
Eksploatacijos instrukcijos ..................... 212-223
Instrucciones de manejo ......................... 224-235
Instruções de operação ...........................236-247
Οδηγίες λειτουργίας ................................248-260
Ýþletme kýlavuzu ....................................261-272

Printed in China
Copyright © 2008 Nilfisk-ALTO
Index
1 Safety precautions and warnings .............................................3
2 Description ...............................................................................4
3 Before you start using your pressure washer ...........................5
4 Operating your pressure washer ..............................................6
5 After using your pressure washer .............................................9
6 Maintenance ...........................................................................10
7 Trouble Shooting ....................................................................11
8 Further information .................................................................12
9 EC Declaration of Conformity .................................................13
1 Safety Precautions and Warnings
Symbols used to mark instructions
Do not let children or people
who have not read the instruction manual ope rate the machine.
Before starting up your machine please check it carefully
for any defects. If you fi nd any,
do not start up your machine
and contact your Nilfi sk-ALTO
distributor.
Especially check:
The insulation of the electric
cable should be faultless
and without any cracks. If the
electric cable is damaged,
an authorized Nilfi sk-ALTO
distributor should replace it.
Before starting up
your high-pressure washer for
the fi rst time, this
instruction manual
must be read through carefully.
Save the instructions for later
use.
Safety instructions
marked with this
symbol must be
observed to pre-
vent danger to persons.
WARNING!
High pressure jets can be
dangerous. Never direct the
water jet at persons, pets,
live electrical equipment or
the machine itself.
Never try to clean clothes or
footwear on yourself or other
persons.
Hold the spray lance fi rmly
with both hands. The spray
lance is affected by a thrust
of up to 16.4 N during operation.
The operator and anyone in
the immediate vicinity of the
site of cleaning should take
action to protect themselves
from being struck by debris
dislodged during operation.
Wear goggles during operation.
This symbol is
used to mark
safety instruc-
tions that must
machine and its performance.
to simplify work and to ensure a
safe operation.
Never use the machine in
an environment where there
could be a danger of explosion. If any doubt arises,
please contact the local
authorities.
It is not allowed to clean
asbestos- containing surfaces
with high pressure.
This high pressure washer
must not be used at temperatures below 0°C.
Never let any persons stay
under the product when
stored on the wall.
WARNING!
Inadequate extension cables
can be dangerous. Cables on
drums should always be completely unwinded to prevent the
cable from overheating.
be observed to
prevent damage to the
This symbol
indicates tips
and instructions
3
Extension cables should be of
a watertight construction and
comply with the below-mentioned requirements for length
and cable dimensions.
1.0 mm² max. 12.5 m
1.5 mm² max. 20 m
2.5 mm² max. 30 m
Cable connections should be
kept dry and off the ground.
Mains power connection
The following should be observed when connecting the
high pressure washer to the
electric installation:
Only connect the machine to
an installation with earth connection.
The electric installation shall
be made by a certifi ed electrician.
It is strongly recommended
that the electric supply to this
machine should include a residual current device (GFCI).
Water connection
Connection to
the public mains
according to regu-
lations.
This high pressure washer is only allowed to
be connected with the drinking
water mains, when an appropriate backfl ow preventer has
been installed, Type BA according to EN 1717. The backfl ow
preventer can be ordered under
number 106411177. The length
of the hose between the backfl ow preventer and the high
pressure washer must be at
least 10 metres to absorb possible pressure peaks (min diameter ½ inch).
Operation by suction (for example from a rainwater vessel)
is carried out without backfl ow
preventer. Recommended suction set: 126411387.
As soon as water has fl own
through the BA valve, this water
is not considered to be drinking
water any more.
IMPORTANT! Only use water without any impurities. If
there is a risk of running sands
in the inlet water (i.e. from your
own well), an additional fi lter
should be mounted.
Repair and maintenance
WARNING! Always remove the
electric plug from the socket before carrying out maintenance
work on the machine.
Safety devices
Locking device on spray gun
(5a) (see foldout at the end of
this manual):
The spray gun features a locking device. When the pawl is
activated, the spray gun cannot
be ope rated.
Thermal sensor:
A thermal sensor protects the
motor against overloading. The
machine will restart after a few
minutes when the thermal sensor has cooled.
Pressure safety device
An integrated hydraulic safety
valve protects the system from
excessive pressure.
2 Description
2.1 Application
4
This high-pressure washer has
been developed for professional
use within:
- small craft industries
- building and construction
- auto and transport industries
- small sized agricultural sites
Only use the high-pressure
washer for purposes described
in this manual.
The safety precautions must be
observed to prevent damage
to the machine, the surface to
be cleaned or severe personal
injuries.
2.2 Operation elements
and model survey
See illustration at the end of
this manual.
1 Start/stop switch
2 Water inlet (with fi lter)
3 High pressure hose
4 Electric cable
5 Spray gun with lock (5a)
6 Flexopower 3000 nozzle
7 Turbohammer 3000 nozzle
8 Nozzle cleaning tool
9 Trolley handle (telescopic
handle)
10 Hose reel
11 Model tag
12 Quick coupling
13 Button for telescopic handle
14 Turnable cable hook
Specifi cations: See model tag
(11) of machine.
Sound pressure level measures in accordance with ISO
3744 EEC directive 2000/14/
EEC: L
dB(A).
We reserve the right to alter the
specifi cations.
pA
3 Before you start using your
pressure washer
= 69,9 dB(A), L
WA
= 84
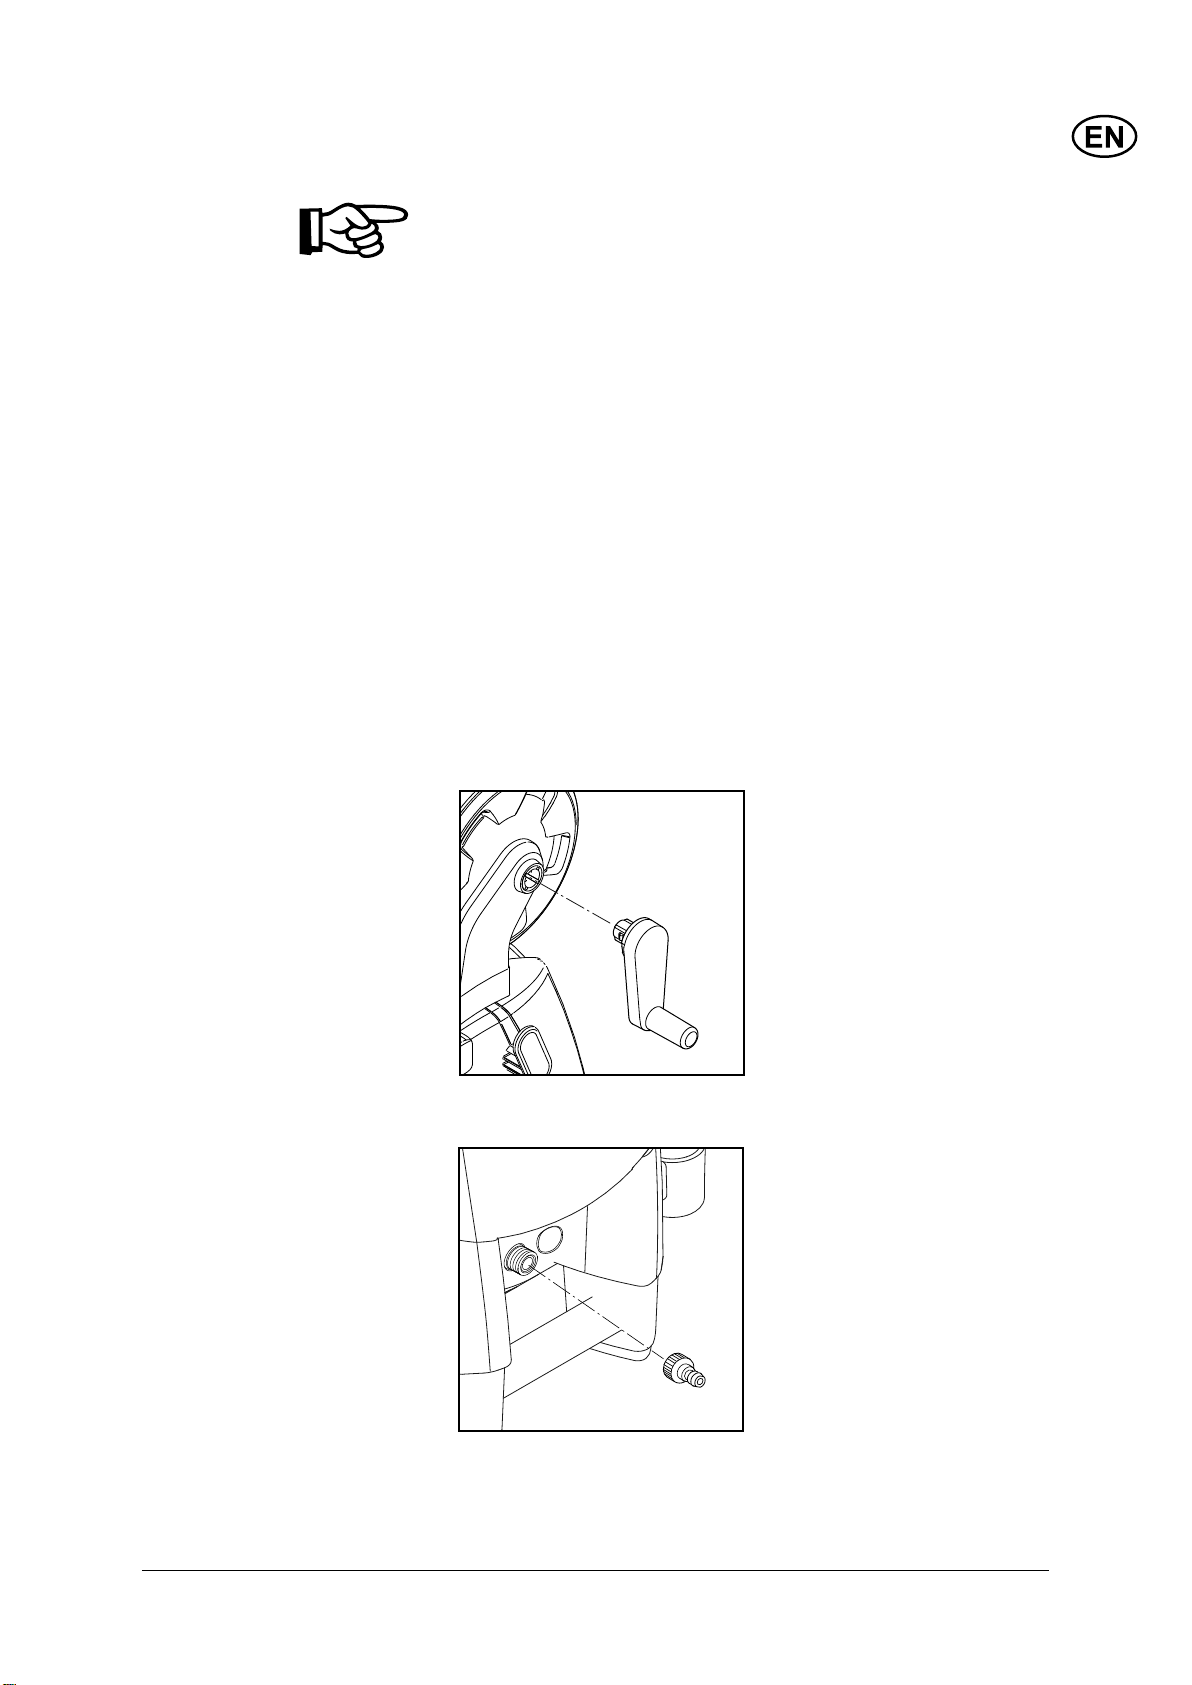
3.1 Mounting of hose reel
handle
3.2 Mounting of quick
coupling
1. Click the hose reel handle
on to the trolley handle (no
screws).
1. Screw the quick coupling (12)
tight on to the water inlet (2).
Note: The inlet fi lter must always be fi tted in the water inlet
pipe to fi lter out sand, lime stone
and other impurities as these
will damage the pump valves.
Caution: Failure
to fi t the fi lter will
invalidate the
guarantee.
5
4 Operating your pressure washer
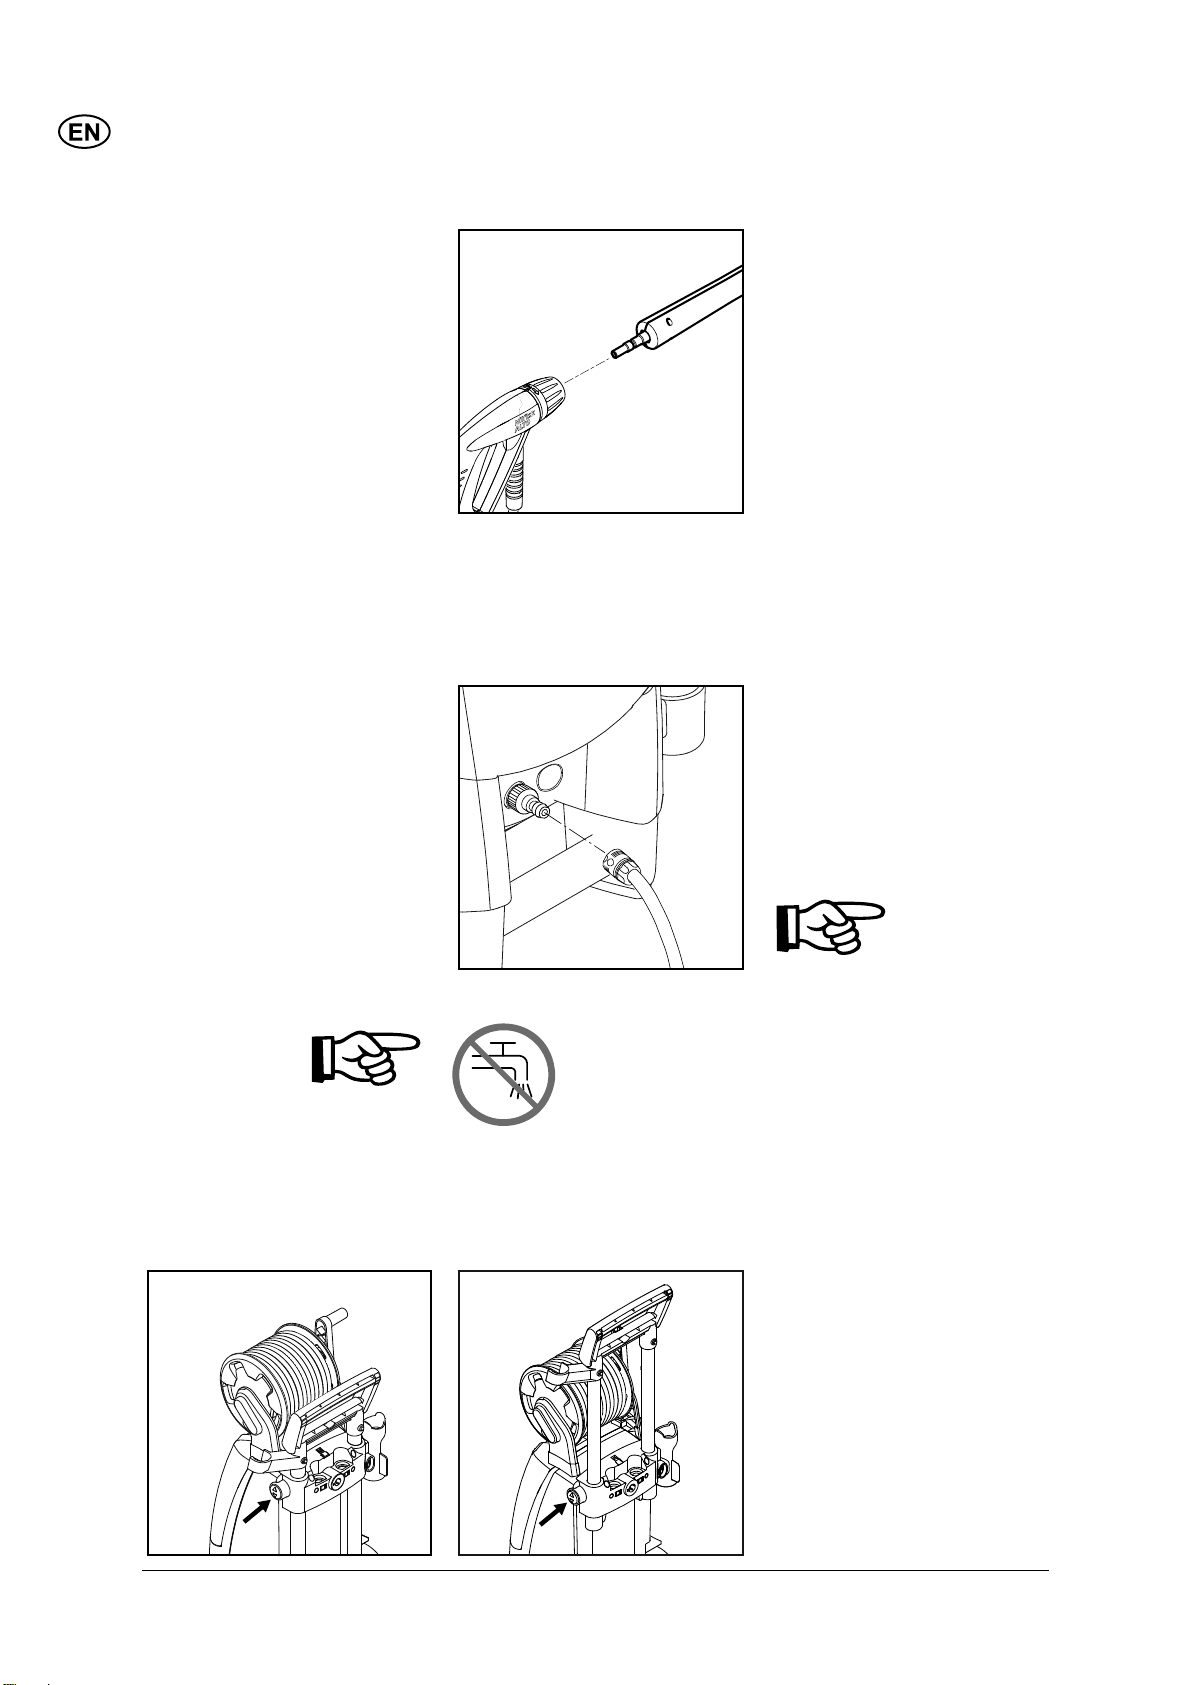
4.1 Mounting of spray
lance
1. Push the spray lance (3) into
the spray gun (5).
4.2 Water connection lations.
An ordinary 1/2" garden hose of
min. 10 m and max. 25 m will
be suitable.
NOTE: Connection
to the public mains
according to regu-
IMPORTANT! Only use water without any impurities. If
there is a risk of running sands
in the inlet water (i.e. from your
own well), an additional fi lter
should be mounted.
1. Let the water run through the
water hose before connecting
it to the machine to prevent
sand and dirt from penetrat-
inlet pipe and that it is not
clogged up.
2. Connect the water hose to
the water supply by means
of the quick connector (inlet
water, max. pressure: 10 bar,
max. temperature: 50°C).
ing the machine.
Note: Check
that the fi lter is
fi tted in the water
3. Turn on the water.
6
4.3 Telescopic handle
The machine features a telescopic handle. To raise or lower
the handle, press the knob (13)
and move the handle upwards
or downwards. When a click
is heard, the handle is in right
position.

4.4 Start and stop of the machine (when connected
to a water supply)
The spray lance is affected
by a thrust during operation - therefore always hold it
fi rmly with both hands. IMPOR-
TANT: Point the nozzle at the
ground.
1. Check that the machine is in
upright position.
NOTE: Do not place the ma-
chine in high grass!
2. Release the trigger lock.
3. Activate the trigger of the
spray gun and let the water
run until all air has escaped
from the water hose.
4. Turn the start/stop switch (1)
to position "I".
5. Activate the trigger of the
spray gun.
Always adjust the distance and
thus the pressure of the nozzle
to the surface, which is to be
cleaned.
Do not cover the machine
during operation.
Note: If the ma-
chine is left or not
used for 5 minutes, it must be
switched off on the start/stop
switch "O" (1):
1. Turn the start/stop switch to
position "O".
2. Disconnect the electrical plug
from the socket.
3. Shut off the water supply and
activate the trigger to relieve
the machine of pressure.
4. Lock the spray gun.
When releasing the trigger of
the spray gun, the machine
automatically stops. The machine will start again when you
re-activate the spray gun.
4.5 Start the machine (when
connected to open containers (suction mode))
4.6 Pressure regulation on
the Flexopower 3000
nozzle
The washer can take in water
from a rain water tank as an
example. The hose for the water
supply must not be too long,
approx. 5 m.
Make sure that the water tank is
not placed on a lower level than
the machine.
1. Place the other end of the
water hose in the water tank.
Use an external fi lter if the
Low pressure
water contains impurities.
2. Turn the start/stop switch to
position "I".
3. Activate the trigger of the
spray gun and let the water
run, until the air has escaped
from the water hose and the
pump.
4. Mount spray lance and
nozzle.
The pressure can be regulated
on the Flexopower nozzle.
High pressure
7
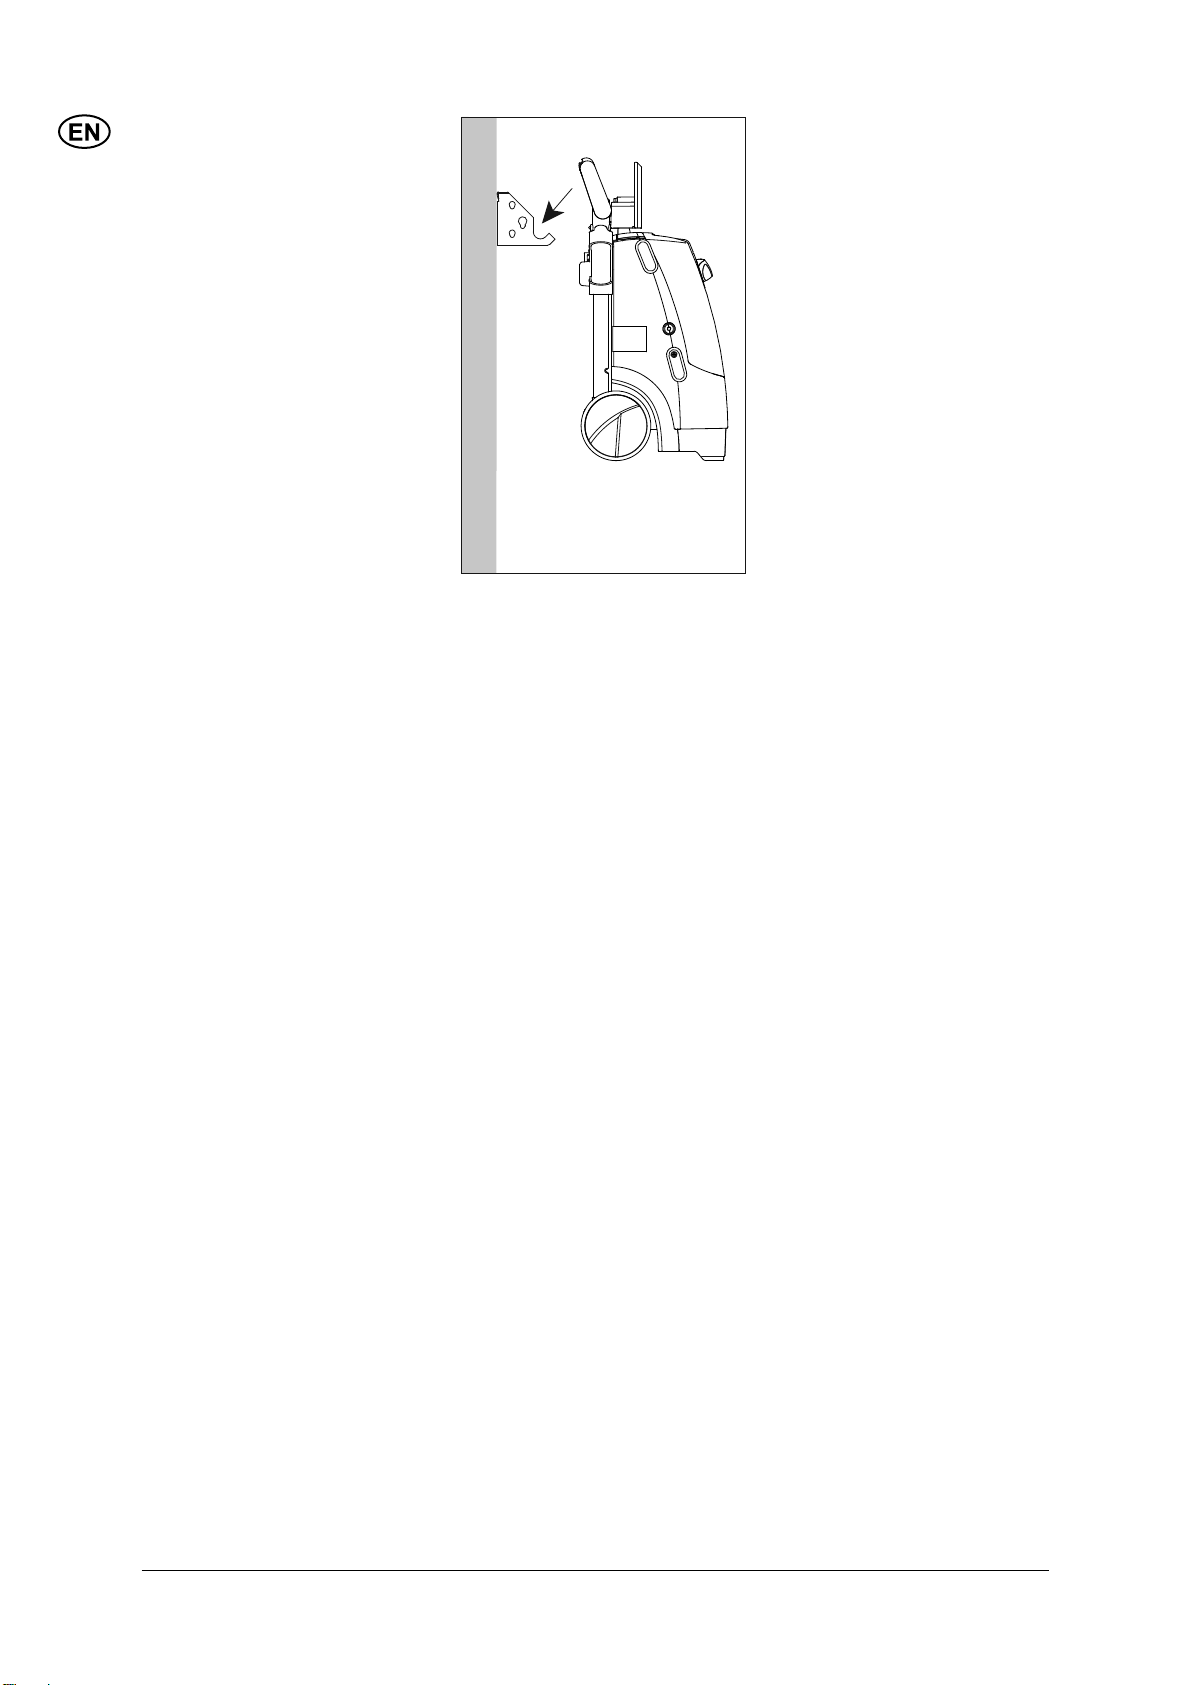
4.7 Stationary use If mounting a special wall hook
(not standard), the pressure
washer can be used as a stationary solution meaning that it
can be operated while hanging
on the wall.
Only mount the wall hook on a
sturdy wall. Adjust the length
of the screws and size of rawlplugs to the type of wall.
Important: The
bearing capacity
of the wall hook
is max. 30 kg.
8
5 After using your pressure washer
5.1 Storing the washer The machine should be sto-
red in a frost-free room!
Pump, hose and accessories
should always be emptied of
water prior to storing as follows:
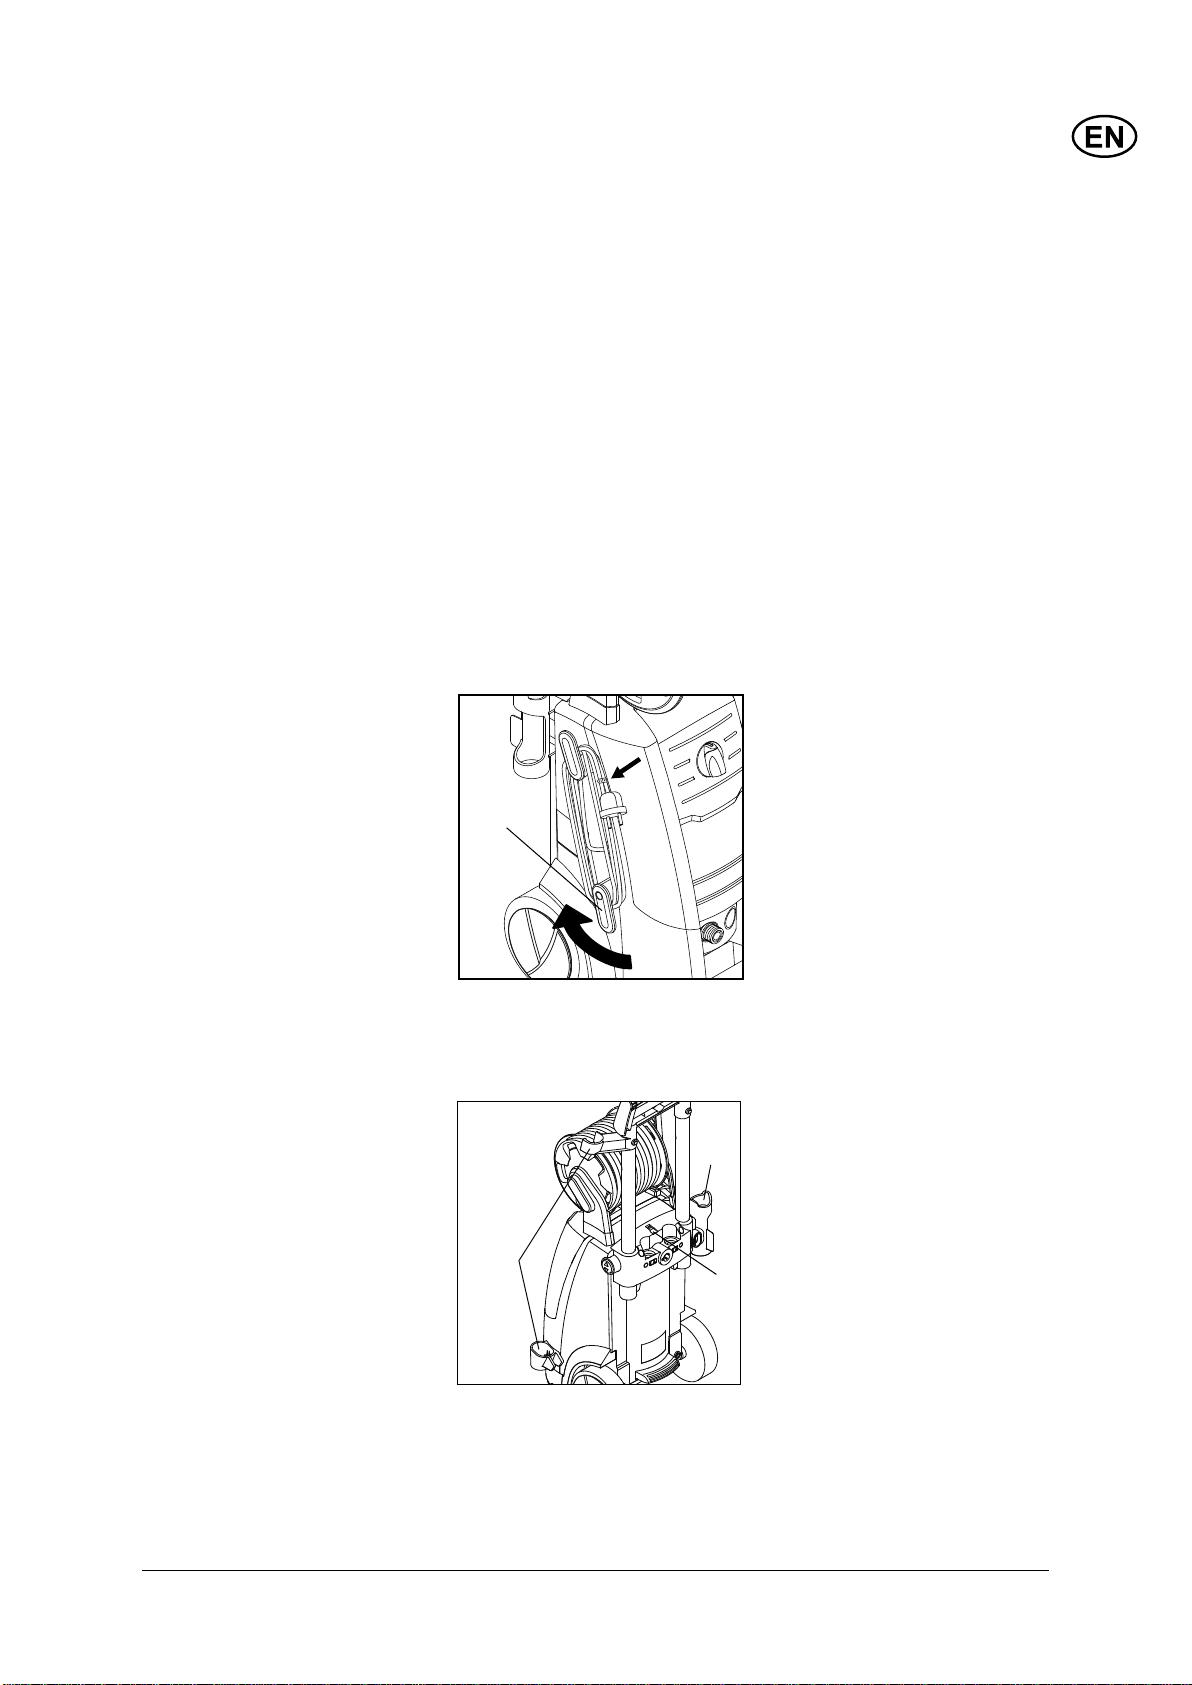
5.2 Winding up of electric
cable and high pressure
hose
1. Stop the machine (turn the
start/stop switch (1) to position “O” and detach water
hose and accessory.
2. Restart the machine and
activate the trigger. Let the
machine run until no more
water runs through the spray
gun.
14
3. Stop the machine, unplug
and wind up hose and cable.
4. Place spray handle, nozzles
and other accessories in the
holders of the machine.
Should the machine by mistake
be frozen, it will be necessary
to check it for damage.
NEVER START-UP A FROZEN
MACHINE.
Frost damages are not
covered by the guarantee!
To avoid accidents, the electric
cable and the high pressure
hose should always be winded
carefully up.
1. Wind up the electric cable on
the appropriate hooks. Builtin clip for good holding.
The lower hook (14) can be
turned to release the electric
cable.
2. Coil the high pressure hose
up on the hose reel (10).
5.3 Storage of accessories The standard accessories
6/7
6/7
(spray gun and spray lance
(6/7)) can be stored on the
pressure washer.
The nozzle cleaning tool (8) can
also be stored on the product.
8
9

6 Maintenance
6.1 Cleaning of water inlet
fi lter
WARNING! Always disconnect
the electrical plug from the
socket prior to maintenance or
cleaning.
To ensure a long and problem
free working life, please take
the following advice:
Wash out water hose, high
pressure hose, spray lance
and accessories before
mounting.
Clean the connectors of dust
and sand.
Clean the nozzles.
Any repair should always be
made in an authorized workshop with original spare parts.
Clean the water inlet fi lter regularly once a month or more frequently according to use. Carefully loosen the fi lter with a pair
of pliers and clean it. Check that
it is intact before re-mounting it.
The inlet fi lter must always be
fi tted inside the water inlet pipe
to fi lter out sand, limestone and
other impurities, as they will
damage the pump valves.
CAUTION: Failure to fi t the fi lter
will invalidate the guarantee.
6.2 Cleaning of nozzle A clogging up in the nozzle
causes a pump pressure which
is too high. This is why cleaning
is required immediately.
1. Stop the machine and disconnect the nozzle.
2. Clean the nozzle. IMPOR-
TANT: The cleaning tool (8)
should only be used when
the nozzle is detached!
3. Flush the nozzle backwards
with water.
6.3 Cleaning of machine
vents
6.4 Greasing of couplings
The machine should be kept
clean so as to let cooling air
To ensure an easy connection and that o-rings do not
pass freely through the machine vents.
dry up, the couplings should be
greased regularly.
10

8 Trouble-shooting
To avoid unnecessary disappointments, you should check the following before contacting the Nilfi skALTO service organization:
Symptom Cause Recommended action
Machine refuses to start Machine not plugged in Plug in machine.
Defective socket Try another socket.
Fuse has blown Replace fuse. Switch off other machines.
Defective extension cable Try without the extension cable.
Fluctuating pressure Pump sucking air Check that hoses and connections are air-
tight.
Valves dirty, worn out Clean and replace or refer to local Nilfi sk or stuck ALTO distributor
Pump seals worn out Clean and replace or refer to local Nilfi sk ALTO distributor.
Motor busses Low voltage or Activate the trigger of the spray gun.
low temperature
Machine stops Fuse has blown Replace fuse. Switch off other machines.
Incorrect mains voltage Check that the mains voltage corresponds
to specifi cation on the model tag.
Thermal sensor activated Leave the washer for 5 minutes to cool
down.
Nozzle partially blocked Clean the nozzle (see section 6.2)
Fuse blows Fuse too small Change to an installation higher than the
amp. consumption of the machine.
You may try without the extension cable.
Machine pulsating Air in inlet hose/pump Allow machine to run with open trigger until
regular working pressure resumes.
Inadequate supply of Check that the water supply corresponds to
mains water specifi cations required (see model tag)
NB! Avoid using long, thin hoses (min. 1/2")
Nozzle partially blocked Clean the nozzle (see section 6.2)
Water fi lter blocked Clean the fi lter (see section 6.1)
Hose kinked Straighten out hose.
Machine often starts Pump/spray gun is Contact your nearest Nilfi sk-ALTO Service
and stops by itself leaking Centre.
Machine starts, but Pump/hoses or accessory Wait for pump/hoses or accessory to thaw.
no water comes out frozen
No water supply Connect inlet water.
Water fi lter blocked Clean the fi lter (see section 6.1)
Nozzle blocked Clean the nozzle (see section 6.2)
In case problems other than the above occur, please contact your local Nilfi sk-ALTO distributor.
11

8 Further information
8.1 Recycling the washer Make the old cleaner unusable
immediately.
1. Unplug the cleaner and cut
the electric cable.
Do not discard electrical appliances with household waste.
8.2 Warranty conditions Nilfi sk-ALTO guarantees high
pressure washers for professional use for 1 year. If your
high pressure washer or ac ces so ries are handed in for repair,
a copy of the receipt must be
enclosed.
Guarantee repairs are being
made on the following con dit ions:
that defects are attributable
to fl aws or defects in materials or workmanship. (wear
and tear as well as misuse
are not covered by the gu a ran tee).
that the directions of this
instruction manual have been
thoroughly observed.
that repair has not been car-
ried out or attempted by other than Nilfi sk-ALTO-trained
service staff.
that only original accessories
have been applied.
that the product has not been
exposed to abuse such as
knocks, bumps or frost.
As specifi ed in European Directive 2002/96/EC on old electrical and electronic appliances,
used electrical goods must
be collected separately and
recycled ecologically.
Contact your local authorities or
your nearest dealer for further
information.
that only water without any
impurities has been used.
that the high pressure wash-
er has not been used for
rental nor used com mer cial ly
in any other way.
Repairs under this guarantee
include replacement of defective parts, exclusive of packing
and postage/carriage. Besides,
we refer to your national law of
sale.
The machine should be forwarded to one of the service
centres of the Nilfi sk-ALTO
organisation with description/
spe ci fi ca ti on of the fault.
Repairs not covered by the
guarantee conditions will be
invoiced. (I.e. malfunctions due
to Causes men ti o ned in section
Troubleshooting Chart of the
instruction manual).
12

9 EU Declaration of Conformity
EU Declaration of Conformity
Product:
Type:
Description:
The design of the unit corresponds to the following
pertinent regulations:
Applied harmonised standards:
Applied national standards and
technical specifi cations:
Anton Sørensen
V.P. Technical Operations Europe
High Pressure Washer
Nilfi sk-ALTO POSEIDON 1-20 XT
230 V 1~, 50 Hz - IP X5
EC Machine Directive 98/37/EC
EC Low-voltage Directive 73/23/EC
EC EMV Directive 2004/108/EC
EN 60335-2-79
IEC 60335-2-79
Nilfi sk-Advance A/S
Industrivej 1
DK-9560 Hadsund
Hadsund, 01.05.2008
13
POSEIDON 1-20 XT
Operating Instructions ...................................3-13
Betriebsanleitung ........................................14-26
Notice d’utilisation .......................................27-39
Gebruiksaanwijzing ..................................... 40-51
Istruzioni sull’uso ......................................... 52-62
Driftsinstruks ...............................................63-73
Bruksanvisning ............................................ 74-84
Driftsvejledning ............................................85-95
Käyttöohje .................................................96-107
Navodilo za uporabo .............................. 108-119
Uputstvo za rad .......................................120-130
Prevádzkový návod .................................131-141
Provozní návod .......................................142-152
Instrukcja obsługi ....................................153-165
Kezelési utasítás .....................................166-176
Руководство ...........................................177-188
Töö juhised ............................................. 189-199
Lietošanas instrukcijas ........................... 200-211
Eksploatacijos instrukcijos ..................... 212-223
Instrucciones de manejo ......................... 224-235
Instruções de operação ...........................236-247
Οδηγίες λειτουργίας ................................248-260
Ýþletme kýlavuzu ....................................261-272

Printed in China
Copyright © 2008 Nilfisk-ALTO

Satura rādītājs
1. Drošības prasības un brīdinājumi.........................................200
2. Apraksts ...............................................................................201
3. Pirms augstspiediena mazgātāja lietošanas uzsākšanas ....202
4. Augstspiediena mazgātāja lietošana ....................................203
5. Pēc iekārtas lietošanas ........................................................206
6. Tehniskā apkope ..................................................................207
7. Traucējumu noteikšana un novēršana .................................209
8. Cita informācija.....................................................................210
9. ES atbilstības deklarācija ..................................................... 211
1 Drošības prasības un brīdinājumi
Instrukcijā lietojamie simboli
Neļaujiet ierīci lietot bērniem
un cilvēkiem, kas nav izlasījuši
lietošanas instrukciju.
Pirms ierīces lietošanas
uzsākšanas rūpīgi pārbaudiet,
vai tai nav defektu. Ja jūs
esat atklājuši kādu defektu,
neuzsāciet ierīces lietošanu,
bet vērsieties pie Nilfi sk-ALTO
izplatītāja.
Īpaši jāpārbauda:
Vai elektriskā vada izolācija
nav bojāta, tai jābūt
nevainojamā kārtībā. Ja elektriskais vads ir bojāts, Nilfi sk-
ALTO pilnvarotā izplatītāja
pienākums ir to nomainīt.
BRĪDINĀJUMS!
Augstspiediena ūdens strūkla
Pirms augstspiediena mazgāšanas
ierīces pirmās
lietošanas
uzsākšanas
uzmanīgi izlasiet šo lietošanas
instrukciju. Saglabājiet šo instrukciju, lai jūs varētu tajā
ieskatīties vēlāk.
Drošības
norādījumi, kas ir
apzīmēti ar šādu
zīmi, jāievēro, lai
novērstu briesmas cilvēkiem.
var būt bīstama. Ūdens
strūklu nedrīkst novirzīt uz
cilvēkiem, mājdzīvniekiem,
elektroierīcēm un uz pašu
augstspiediena mazgāšanas
ierīci.
Nekad nemēģiniet tīrīt
apģērbus vai apavus sev un
citām personām mugurā vai
kājās.
Smidzināšanas pistole
jātur stingri ar abām rokām.
Ierīces darbības laikā
smidzinātājs ir pakļauts
atsitiena reakcijas spēka
iedarbībai līdz 16,4 N.
Ierīces darbības laikā opera-
toram un jebkurai citai personai, kas atrodas tīrīšanas
zonas tiešā tuvumā, jāveic
pasākumi, lai pasargātos no
gružiem, kas atdalās aug-
Drošības
norādījumi, kas ir
apzīmēti ar šādu
zīmi, jāievēro,
darbības traucējumiem.
norādījumi, kā vienkāršot darbu
un nodrošināt drošu ierīces
darbību..
stspiediena ūdens strūklas
ietekmē. Strādājot ar ierīci,
jālieto aizsargbrilles
Nedrīkst lietot augstspiedi-
ena mazgātāju tādā vidē,
kur pastāv vai var izcelties sprādziena briesmas.
Mazāko šaubu gadījumā
lūdzu vērsieties pie vietējā
pilnvarotā pārstāvja.
Ar augstspiediena strūklu
nedrīkst tīrīt azbestu
saturošas virsmas.
Šo augstspiediena
mazgāšanas iekārtu nedrīkst
lietot temperatūrā zemākā
par 0°C.
Sekojiet tam, lai neviens
cilvēks neatrastos zem
ierīces, kas ir piekārta pie
sienas.
lai izvairītos no
ierīces bojājumiem un
Ar šādu simbolu ir apzīmēta
informācija un
200

BRĪDINĀJUMS!
Nepiemērota pagarinātāja
lietošana var būt bīstama.
Ierīces darbības laikā elektriskajam vadam no spoles
jābūt pilnīgi notītam, lai
nepieļautu tā pārkaršanu.
Pagarinātāja konstrukcijai jābūt
ar aizsardzību pret ūdeni, bet
pagarinātāja vada garumam
un izmēriem jāatbilst zemāk
norādītajām prasībām.
1,0 mm² max. 12,5 m
1,5 mm² max. 20 m
2,5 mm² max. 30 m
Elektriskā vada savienojum-
iem vienmēr jābūt sausiem
un tie nedrīkst saskarties ar
zemi.
Pieslēgums pie elektrotīkla
Pieslēdzot augstspiediena mazgāšanas iekārtas pie
elektrotīkla, jāievēro sekojošas
prasības:
Pievienojiet iekārtu tikai
pie elektroinstalācijas ar
iezemējumu.
Elektroinstalācija jāierīko
sertifi cētam elektriķim.
Ir stingri ieteicams šo iekārtu
elektroenerģijas apgādes
sistēmā iekļaut automātisko
strāvas noplūdes atslēdzēju
(GFCI).
Ūdens pieslēgums
Pieslēgums pie
ūdensvada tīkla
jāveic saskaņā ar
noteikumiem.
Šo augstspiediena mazgātāju drīkst
pieslēgt dzeramā ūdens
sistēmai tikai, ja ir uzstādīts
atbilstošs pretplūsmas vārsts
(tips BA atbilstoši EN 1717).
Pretplūsmas vārsta pasūtīšanas
numurs ir 106411177. Šļūtenes
garumam starp pretplūsmas
vārstu un augstspiediena
mazgātāju jābūt vismaz 10
metri, lai tā varētu slāpēt spiediena kāpumus (min. diametrs
½ colla).
Ekspluatācija, sūknējot ūdeni
(piemēram, no lietus ūdens
rezervuāra), tiek veikta bez
pretplūsmas vārsta. Ieteicamais sūknēšanas komplekts:
126411387.
Tiklīdz ūdens ir iztecējis
caur BA vārstu, tas vairs nav
uzskatāms par dzeramo ūdeni.
SVARĪGI! Lietojiet tikai tīru
ū
deni bez piesārņojumiem. Ja
pastāv risks, ka ūdens padeves
šļūtenē kopā ar ūdeni var iekļūt
smiltis (t.i. ja ūdens tiek ņemts
no akas), jāuzstāda papildu
fi ltrs.
Remonts un tehniskā apkope
BRĪDINĀJUMS! Pirms iekārtas
tehniskās apkopes darbu
veikšanas vienmēr izņemiet
kontaktdakšu no rozetes.
Drošības ierīces
Smidzināšanas pistoles
bloķētājs (5a) (skat. lapu šīs
instrukcijas beigās):
Uz smidzināšanas pistoles
atrodas bloķētājs. Ja bloķētājs
ir ieslēgts, smidzinātāju nevar
iedarbināt.
Temperatūras devējs:
Temperatū
dzinēju no pārslodzes. Ierīce atjauno savu darbību pēc dažām
minūtēm, kad temperatūras
devējs atdziest.
Redukcijas vārsts:
Iebūvēts hidrauliskās drošības
vārsts pasargā sistēmu no
pārāk liela spiediena.
ras devējs pasargā
2 Apraksts
2.1 Pielietojums
Šis augstspiediena tīrītājs ir
radīts profesionālai lietošanai:
- smulkus verslas
- būvniecības nozarē
- automobiļu tīrīšanai
- lauksaimniecībā
Lietojiet šo augstspiediena
mazgātāju tikai tiem nolūkiem,
kādi ir aprakstīti šajā lietošanas
institūcijā.
Lai izvairītos no iekārtas un
tīrāmo virsmu bojājumiem, kā
arī no smagiem ievainojumiem
cilvēkiem, jāievēro drošības
prasības.
201

2.2 Ierīces vadības un
ekspluatācijas elementi
un modeļi
Skatiet attēlu šīs rokasgrāmatas
beigās.
1 Ieslēgšanas/izslēgšanas
slēdzis
2 Ūdens piegādes
šļūtenes pieslēguma
savienotājelements (ar fi l-
tru)
3 Augstspiediena šļūtene
4 Elektriskais vads
5 Smidzināšanas pistole ar
bloķētāju (5A)
6 Flexopower 3000
smidzināšanas uzgalis
7 Turbohammer 3000
smidzināšanas uzgalis
8 Smidzināšanas uzgaļu
tīrīšanas instruments
9 Transportēšanas rokturis
(teleskopisks rokturis)
10 Šļūtenes spole
11 Modeļa tehnisko raksturo-
jumu plāksnīte
13 Ātrā savienojuma elements
13 Teleskopiskā roktura poga
14 Pagriežams vada āķis
Specifi kācijas: Skat. ierīces
modeļa plāksnīti (11).
Skaņas spiediena līmenis,
noteikts saskaņā ar ISO 3744,
EEK Direktīvu 2000/14/EEK:
LpA=69,9dB(A), LWA= 84
dB(A).
Mēs paturam sev tiesības veikt
izmaiņas specifi kācijā.
3 Pirms augstspiediena mazgātāja
lietošanas uzsākšanas
3.1 Šļūtenes spoles roktura
uzstādīšana
1. Ieklikšķiniet šļūtenes spoles
uztīšanas rokturi atverē
transportēšanas rokturī (bez
skrūvēm).
202

3.2 Ātrā savienojuma elementa uzstādīšana
1. Cieši pieskrūvējiet ātrā
savienojuma uzgali
(12) pie ūdens padeves
šļūtenes pieslēguma
savienotājelementa (2).
Piezīme: Ūdens pade-
ves šļūtenes pieslēguma
savienotājelementā
vienmēr jābūt uzstādītam
ienākošā ūdens fi ltram
smilšu, kaļķakmens un citu
piesārņojumu fi ltrēšanai, jo tie
izraisa sūkņa vārstu bojājumus.
Brīdinājums:
Ja fi ltrs nav
uzstādīts, garan-
tija zaudē spēku.
4 Augstspiediena mazgātāja lietošana
4.1 Smidzināšanas caurules
uzstādīšana
1. Ielieciet smidzināšanas
cauruli (6/7) smidzināšanas
pistolē (5).
203

4.2. Ūdens pieslēgums pastāv risks, ka ūdens padeves
Ir piemērota parastā 1/2" min.
10 m un max. 25 m dārza
šļūtene.
PIEZĪME:
Pieslēgums pie
ūdensvada tīkla
jāveic saskaņā ar
noteikumiem.
SVARĪGI! Lietojiet tikai tīru
ūdeni bez piesārņojumiem. Ja
šļūtenē kopā ar ūdeni var iekļūt
smiltis (t.i. ja ūdens tiek ņemts
no akas), jāuzstāda papildu
fi ltrs.
1. Noteciniet ūdeni caur ūdens
padeves šļūteni pirms tās
pievienošanas pie augstspiediena mazgājamās ierīces,
lai novērstu smilšu un
netīrumu iekļūšanu ierīcē.
Piezīme: Pārbaudiet,
vai ūdens padeves
šļūtenes pieslēguma
savienotājelementā ir
uzstādīts fi ltrs un vai tas nav
aizsērējis.
2. Pievienojiet ūdens padeves
šļūteni pie ūdensvada ar
ātrā savienojuma palīdzību
(maksimālais ienākošā
ūdens spiediens: 10 bar,
maks. temperatūra: 50°C).
3. Ieslēdziet ūdeni.
4.3 Teleskopiskais rokturis
4.4 Mašīnas ieslēgšana un
izslēgšana (ja ūdens
piegāde ir pieslēgta)
Smidzinātājs ierīces darbības
laikā atrodas atsitiena reakcijas
spēka iedarbībā, tāpēc vienmēr
turiet smidzinātāju stingri ar
abām rokām. SVARĪGI! No-
virziet smidzināšanas uzgali
zemē.
1. Pārbaudiet, vai ierīce atrodas
vertikālā pozīcijā.
PIEZĪME: Nenovietojiet ierīci
augstā zālē!
2. Atbrīvojiet smidzinātāja
palaišanas sviras bloķētāju.
Ierīces rokturis ir teleskopisks.
Lai paceltu vai nolaistu rokturi,
nospiediet pogu un virziet rokturi uz augšu vai uz leju. Rokturis
ir pareizi nofi ksēts, kad atskan
klikšķis.
3. Iedarbiniet smidzināšanas
pistoles palaišanas sviru
un noteciniet ūdeni līdz no
ūdens padeves šļūtenes
iznāks viss gaiss.
4. Pagrieziet ieslēgšanas/
izslēgšanas slēdzi (1)
pozīcijā “I”.
5. Iedarbiniet smidzināšanas
pistoles palaišanas sviru.
Vienmēr noregulējiet attālumu
starp smidzināšanas uzgali un
tīrāmo virsmu tā, lai strūklas
204

spiediens būtu optimāls.
Neapsedziet ierīci darbības
laikā.
Piezīme: Ja ierīce netiek
lietota ilgāk nekā 5 minūtes,
tā jāizslēdz, nospiežot
ieslēgšanas/izslēgšanas slēdzi
(1) pozīcijā "O":
1. Pagrieziet ieslēgšanas/
izslēgšanas slēdzi (1)
pozīcijā “O”.
2. Izņemiet kontaktdakšu no
elektrotīkla ligzdas.
3. Aizveriet ūdens padevi un
iedarbiniet palaišanas sviru,
lai pazeminātu spiedienu
mazgātājā.
4. Nobloķējiet smidzinātāju ar
bloķētāju.
Atlaižot smidzinātāja
palaišanas sviru, mašīnas
ba automātiski apstājas.
darbī
Mazgātājs atsāk darbību, kad
tiek iedarbināta smidzināšanas
pistoles palaišanas svira.
4.5 Mašīnas Iedarbināšana
(pēc pievienošanas pie
vaļējās ūdens tvertnes
(iesūkšanas režīms))
4.6 Spiediena regulēšana
ar Flexopower 3000
smidzināšanas uzgali
Mašīnai var piegādāt ūdeni
piemēram no lietus ūdens mucas. Ūdens piegādes šļūtene
nedrīkst būt pārmērīgi gara, tai
jābūt aptuveni 5 m garai.
Pārliecinieties, ka ūdens muca
neatrodas zemākā līmenī nekā
pati mazgāšanas ierīce.
1. Iegremdējiet ūdens padeves
šļūtenes otro galu ūdens
tvertnē. Ja ūdens satur
piesārņojumus, lietojiet ārējo
fi ltru.
2. Pagrieziet ieslēgšanas/
izslēgšanas slēdzi (1)
pozīcijā “I”.
3. Iedarbiniet smidzināšanas
pistoles palaišanas sviru
un noteciniet ūdeni līdz no
ūdens šļūtenes un sūkņa tiks
izvadīts viss gaiss.
4. Uzlieciet smidzināšanas cau-
ruli un uzgali.
Spiedienu var regulēt ar Flexopower 3000 smidzināšanas
uzgali.Zems spiediens
Augsts spiediens
205

4.7 Stacionārā lietošana Ar speciālā sienas āķa
palīdzību (nav paredzēts visiem
modeļiem) augstspiediena
mazgāšanas iekārtu var izmantot kā stacionāro ierīci, t.i.
ar iekārtu var strādāt, kad tā ir
piekārta pie sienas.
Jums tikai jāpiestiprina āķis
pie attiecīgās izturīgas sienas.
Izvēlieties sienas veidam
piemērotā garuma un lieluma
tapskrūves.
Svarīgi! Sienas
āķis ir paredzēts
ne lielākam kā 30
kg svaram.
5 Pēc iekārtas lietošanas
5.1 Ierīces uzglabāšana Augstspiediena mazgāšanas
iekārtas jāuzglabā telpās ar
pozitīvu gaisa temperatūru!
Pirms ierīces novietošanas
uzglabāšanai, no sūkņa,
šļūtenēm un piederumiem
jāizvada ūdens sekojoši:
1. Apturiet mašīnu (pagrieziet
ieslēgšanas/izslēgšanas
slēdzi (1) pozīcijā “O”) un
atvienojiet ūdens padeves
šļūteni un aprīkojumu
2. Ieslēdziet mašīnu no jauna
un iedarbiniet palaišanas
sviru. Ļaujiet mašīnai darboties līdz no smidzinātāja
vairs nenāk ūdens.
3. Apturiet mašīnu, izslēdziet
to no elektrotīkla un satiniet
šļūteni un vadu.
4. Ievietojiet smidzināšanas
pistoli, smidzināšanas
uzgaļus un citus piederumus
attiecīgajos turētājos
Ja mašīna nejauši tika pakļauta
sala ietekmei, jāpārbauda, vai
tā nav bojāta.
NEKAD NEIEDARBINIET
SASALUŠU IERĪCI.
Bojājumi, kas ir radušies
sakarā ar ierīces sasalšanu,
garantijā nav iekļauti!
206

5.2 Elektriskā vada un
augstspiediena šļūtenes
satīšana
Lai izvairītos no nelaimes
gadījumiem, elektriskais vads
un augstspiediena šļūtene
vienmēr rūpīgi jāuztin.
14
5.3 Piederumu uzglabāšana Standarta piederumi
6/7
6/7
1. Uztiniet elektrisko vadu
uz atbilstošajiem āķiem.
Lebūvēta skava labākai
fi ksēšanai. Apakšējo āķi var
pagriezt, lai atbrīvotu elektrisko vadu.
2. Lai izvairītos no nelaimes
gadījumiem, augstspiediena šļūtene vienmēr rūpīgi
jāuztin.
(smidzināšanas pistole,
smidzināšanas caurule (6/7))
var tikt uzglabāti uz mašīnas
Smidzināšanas uzgaļu
tīrīšanas adata (8) tāpat var tikt
8
uzglabātas uz mazgātāja.
6 Tehniskā apkope
BRĪDINĀJUMS! Pirms
iekārtas apkopes vai tīrīšanas
veikšanas obligāti izņemiet
kontaktdakšu no elektrotīkla
ligzdas.
Lai nodrošinātu ilgu iekārtas
kalpošanas laiku bez
problēmām, lūdzu ievērojiet
sekojošus ieteikumus:
Izskalojiet ūdens padeves
šļūteni, augstspiediena
šļūteni, smidzinātāja cauruli un piederumus pirms to
uzstādīšanas.
Iztīriet smidzināšanas
uzgaļus.
Iekārtas remonts vienmēr jāveic
tikai autorizētā darbnīcā un tikai
izmantojot oriģinālās rezerves
daļas.
207

6.1 Ienākošā ūdens fi ltra
tīrīšana
Tīriet ienākošā ūdens fi ltru
regulāri vienu reizi mēnesī
vai biežāk, atkarībā no
mazgāšanas ierīces lietošanas
biežuma. Uzmanīgi atslābiniet
fi ltru ar knaiblēm un iztīriet
to. Pirms tā uzstādīšanas
pārliecinieties, ka tas nav
bojāts.
Ūdens padeves šļūtenes
pieslēguma savienotājelementā
vienmēr jābūt uzstādītam
ienākošā ūdens fi ltram
smilšu, kaļķakmens un citu
piesārņojumu fi ltrēšanai, jo tie
izraisa sūkņa vārstu bojājumus.
BRĪDINĀJUMS: Ja fi ltrs nav
uzstādīts, garantija zaudē
spēku.
6.2 Smidzināšanas uzgaļu
tīrīšana
6.3 Mašīnas vēdināšanas
atveru un kanālu tīrīšana
Smidzināšanas uzgaļa
aizsērēšana izraisa pārmērīgu
spiediena palielināšanos sūknī.
Šādā gadījumā smidzināšanas
uzgalis jāiztīra nekavējoties.
1. Apturiet mašīnu un atvieno-
jiet smidzināšanas uzgali.
2. Iztīriet smidzināšanas uzgali.
SVARĪGI! Tīrīšanas adata
(8) jāizmanto tikai tad, kad
smidzināšanas uzgalis ir
atvienots!
3. Izskalojiet smidzināšanas uz-
gali ar ūdens strūklu pretējā
virzienā.
Mašīna jāuztur tīrībā, lai gaiss
brīvi cirkulētu tās atverēs un
vēdināšanas kanālos.
6.4 Savienojumu un
savienotājelementu
ieziešana
208
Lai nodrošinātu savienojumu
vietu un savienotājelementu
pienācīgu drošību un
nepieļautu blīvgredzenu
sakalšanu, savienojumu vietas
un savienotājelementi regulāri
jāieziež.

7 Traucējumu noteikšana un
novēršana
Lai izvairītos no liekām nepatikšanām, pirms vērsties Nilfi sk-ALTO apkalpošanas iestādē, pamēģiniet
novērst problēmu, vadoties pēc norādījumiem, kas ir sniegti šajā tabulā:
Simptomi Cēlonis Leteicamās darbības
Mašīnu nevar ieslēgt Mašīna nav pieslēgta pie Pieslēdziet mašīnu pie elektrotīklā.
elektrotīklā
Bojāta elektrotīkla ligzda Izmēģiniet citu ligzdu.
Kūstošais drošinātājs ir Nomainiet kūstošo drošinātāju. Izslēdziet
sadedzis citas elektroierīces.
Pagarinātājs ir bojāts Izmēģiniet darbību bez pagarinātāja.
Spiediena svārstības Sūknis iesūc gaisu Pārbaudiet šļūteņu un savienojumu
hermētiskumu.
Vārsti ir kļuvuši netīri, Iztīriet vai nomainiet tos, vai vērsieties pie
nolietojušies vai iestrēguši vietējā Nilfi sk-ALTO izplatītāja.
Sūkņa blīvslēgi ir Iztīriet vai nomainiet tos, vai vērsieties pie
nolietojušies vietējā Nilfi sk-ALTO izplatītāja.
Dzinējs apstājas Zems spriegums vai zema Iedarbiniet smidzināšanas pistoles
temperatūra palaišanas sviru.
Mašīna pārtrauc darbību Kūstošais drošinātājs ir Nomainiet kūstošo drošinātāju. Izslēdziet
sadedzis citas elektroierīces.
Nepiemērots tīkla spriegums Pārbaudiet, vai tīkla spriegums atbilst
modeļa plāksnītē norādītajai specifi kācijai.
Ir ieslēdzies temperatūras Atstājiet mazgātāju uz 5 minūtēm lai
devējs atdziest.
Smidzināšanas uzgalis Iztīriet smidzināšanas uzgali (skat.
daļēji aizsērējis nodaļu 6.2)
Kūstošais drošinātājs Kūstošais drošinātājs nav Izvēlieties tādu elektroinstalāciju, kuras
sadedzis pietiekami jaudīgs jauda ir lielāka, nekā mašīnas patērējamā
elektroenerģija.
Izmēģiniet darbību bez pagarinātāja.
Mašīna pulsē Gaiss ūdens padeves Ļaujiet mašīnai darboties ar iedarbinātu
šļūtenē/sūknī palaišanas sviru līdz darba spiediens
nostabilizēsies.
Neregulāra ūdens padeve Pārbaudiet, vai ūdens padeve atbilst
no ūdensvada specifi kācijas prasībām (skat. modeļa tehni
sko raksturojumu plāksnīti). NB! Izvairieties
no garu un tievu šļūteņu lietošanas (min.
1/2")
Smidzināšanas uzgalis Iztīriet smidzināšanas uzgali (skat. nodaļu
daļēji aizsērējis 6.2)
Ūdens fi ltrs aizsērējis Iztīriet ūdens fi ltru (skat. nodaļu 6.1)
Šļūtene ir samezglojusies Iztaisnojiet šļūteni.
Mašīna bieži ieslēdzas Noplūde sūknī/smidzinātājā Vērsieties tuvākajā Nilfi sk-ALTO
un izslēdzas pati apkalpošanas centrā.
Mašīna ieslēdzas, bet Sūknis/šļūtenes vai Pagaidiet līdz sūknis/šļūtenes vai piederumi
ūdens nenāk ārā piederumi ir sasaluši atkusīs.
Nav ūdens padeves Pievienojiet ūdens padevi.
Ūdens fi ltrs aizsērējis Iztīriet ūdens fi ltru (skat. nodaļu 6.1)
Smidzināšanas uzgalis Iztīriet smidzināšanas uzgali (skat. nodaļu
aizsērējis 6.2)
Ja ir radušās citādas problēmas, nekā augstāk norādītās, lūdzu vērsieties pie jūsu vietējā Nilfi sk-ALTO
izplatītāja.
209

8 Cita informācija
8.1. Mazgāšanas iekārtu
utilizācija
Nolietojušos iekārtu
nekavējoties padariet par neizmantojamu.
1. Atvienojiet to no elektrotīkla
un nogrieziet elektrisko vadu.
Direktīvā 2002/96/EK, vecas
elektriskās un elektroniskās
ierīces, nolietojušies elektriskie izstrādājumi jāsavāc
atsevišķi un jāutilizē saskaņā ar
ekoloģijas prasībām.
Nedrīkst izmest elektroierīces
kopā ar citiem sadzīves atkritumiem.
Kā norādīts Eiropas Savienības
8.2. Garantijas noteikumi Nilfi sk-ALTO piešķir augstspie-
diena mazgāšanas sadzīves
iekārtām 1 gads garantiju. Ja
augstspiediena mazgātājs vai
tā palīgierīces tiek nodotas
remontā, jāpievieno pirkuma
čeka kopija. Garantijas remonts
tiek veikts uz sekojošiem noteikumiem:
ja ir noteikts, ka bojājums ir
radies sakarā ar materiālu
defektiem vai ražošanas
procesa nepilnībām. (nolietojuma un nepareizas
lietošanas rezultātā radušies
bojājumi netiek iekļauti
garantijā).
ja šīs lietošanas instrukcijas
norādījumi tika precīzi un
pilnībā ievēroti.
a neviena cita persona,
izņemot apmācītus Nilfi sk-
ALTO apkalpošanas darbiniekus, nav veikusi un nav
mēģinājusi veikt iekārtas
remontu.
a tika izmantoti tikai
oriģinālās iekārtas
palīgierīces.
ja izstrādājums nav ticis
pakļauts sitienu, grūdienu un
sala iedarbībai.
Lai saņemtu sīkāku informāciju,
lūdzu vērsieties vietējās
pilnvarotajās iestādēs vai pie
izplatītāja.
ja tika izmantots tikai tīrs
ūdens, bez piesārņojumiem.
ja augstspiediena mazgātājs
nav bijis izīrēts un citā veidā
netika izmantots komerciālos
nolūkos.
Remonta pakalpojumos,
kas tiek sniegti saskaņā ar
šo garantiju, ietilpst bojāto
daļu nomaiņa. Iepakojums,
nosūtīšana/pārvadāšana neietilpst. Turklāt mēs rīkojamies
saskaņā ar jūsu vietējo
tirdzniecības likumdošanu.
Mašīna jānogādā vienā no
Nilfi sk-ALTO organizācijas
apkalpošanas centriem
ar traucējuma aprakstu/
specifi kāciju.
Par remontu, kas nav iekļauts
garantijā, jāmaksā. (t.i.
darbības traucējumi, kuru cēloņi
ir norādīti šīs instrukcijas sadaļā
Traucējumu noteikšana un
novēršana).
210

9 ES atbilstības deklarācija
ES atbilstības deklarācija
Izstrādājums: Augstspiediena mazgāšanas iekārta
Veids:
Apraksts: 230 V 1~, 50 Hz - IP X5
Iekārtas ir izstrādātas un tiek
ražotas saskaņā ar sekojošu
normatīvo aktu prasībām:
Pielietojamie harmonizētie
standarti:
Pielietojamie nacionālie standarti un tehniskās specifi kācijas:
Anton Sørensen
Tehniskās ekspluatācijas Eiropas
nodaļas vadītājs
Nilfi sk-ALTO POSEIDON 1-20 XT
EK Mašīnu Direktīva 98/37/EK
EK Zemsprieguma Direktīva 73/23/EEK
EK Elektromagnētiskās
savietojamības Direktīva 89/336/EK
EN 60335-2-79
IEC 60335-2-79
Nilfi sk-ALTO
Nilfi sk-Advance A/S nodaļa
Industrivej 1
DK-9560 Hadsund
Hadsund, 01.05.2008
211

a

http://www.nilfi sk-alto.com
HEAD QUARTER
DENMARK
Nilfi sk-Advance Group
Sognevej 25
DK-2605 Brøndby
Tel.: +45 4323 8100
Fax: +45 4343 7700
E-mail: mail.com@nilfi sk-advance.dk
SALES COMPANIES
AUSTRALIA
Nilfi sk-ALTO
48 Egerton St.
P.O. Box 6046
Silverwater, N.S.W. 2128
Tel.: +61 2 8748 5966
Fax: +61 2 8748 5960
AUSTRIA
Nilfi sk-Advance GmbH
Nilfi sk-ALTO
Metzgerstrasse 68
5101 Bergheim/Salzburg
Tel.: +43 662 456 400-0
Fax: +43 662 456 400-34
E-mail: info@nilfi sk-alto.at
www.nilfi sk-alto.at
BELGIUM
Nilfi sk-ALTO
Division of Nilfi sk-Advance n.v-s.a.
Internationalelaan 55 (Gebouw C3/C4)
1070 Brussel
Tel.: +32 02 467 60 40
Fax: +32 02 466 61 50
E-mail: info.be@nilfi sk-alto.com
CANADA
Clarke Canada
Part of the Nilfi sk-Advance Group
4080 B Sladeview Crescent, Unit 1
Mississauga, Ontario L5L 5Y5
Tel.: +1 905 569 0266
Fax: +1 905 569 8586
CHINA
Nilfi sk-Advance (Shenzhen) Ltd.
Blok 3, Unit 130 1001 Honghua Road
Int. Commercial & Trade Center
Fuitian Free Trade Zone
518038 Shenzhen
Tel.: +86 755 8359 7937
Fax: +86 755 8359 1063
CZECH REPUBLIC
ALTO Ceská Republika s.r.o.
Zateckých 9
14000 Praha 4
Tel.: +420 24 14 08 419
Fax: +420 24 14 08 439
E-mail: info@alto-cz.com
DENMARK
Nilfi sk-ALTO
Division of Nilfi sk-Advance A/S
Industrivej 1
9560 Hadsund
Tel.: +45 7218 2100
Fax: +45 7218 2105
E-mail: salg@nilfi sk-alto.dk
E-mail: service@nilfi sk-alto.dk
www.nilfi sk-alto.dk
Nilfi sk-ALTO Food division
Division of Nilfi sk-Advance A/S
Blytækkervej 2
9000 Aalborg
Tel.: +45 7218 2100
Fax: +45 7218 2099
E-mail: scanio.technology@nilfi sk-alto.dk
FINLAND
Nilfi sk-Advance Oy Ab
Piispantilankuja 4
02240 Espoo
Tel.: +358 207 890 600
Fax: +358 207 890 601
E-mail: jukka.lehtonen@nilfi sk-alto.com
www.nilfi sk-advance.fi
FRANCE
Nilfi sk-ALTO
128303185 (05.2008)
ALTO France SAS
Aéroparc 1
19 rue Icare
67960 Entzheim
Tel.: +33 3 88 28 84 00
Fax: +33 3 88 30 05 00
E-mail: info@nilfi sk-alto.fr
www.nilfi sk-alto.com
GERMANY
Nilfi sk-ALTO
Division of Nilfi sk-Advance AG
Guido-Oberdorfer-Strasse 10
89287 Bellenberg
Tel.: +49 0180 5 37 37 37
Fax: +49 0180 5 37 37 38
E-mail: info@nilfi sk-alto.de
www.nilfi sk-alto.de
GREECE
Nilfi sk-Advance SA
8, Thoukididou str.
164 52 Argiroupolis
Tel.: +30 210 96 33443
Fax: +30 210 96 52187
E-mail: nilfi sk-advance@clean.gr
HOLLAND
Nilfi sk-ALTO
Division of Nilfi sk-Advance BV
Camerastraat 9
3322 BB Almere
Tel.: +31 36 546 07 60
Fax: +31 36 546 07 61
E-mail: info.nl@nilfi sk-alto.nl
www.nilfi sk-alto.nl
HONG KONG
Nilfi sk-Advance Ltd.
2001 HK Worsted Mills Ind’l Bldg.
31-39 Wo Tong Tsui St.
Kwai Chung
Tel.: +852 2427 5951
Fax: +852 2487 5828
HUNGARY
Nilfi sk-Advance Kereskedelmi Kft.
II. Rákóczi Ferenc út 10
2310 Szigetszentmiklos-Lakihegy
Tel: +36 2447 5550
Fax: +36 2447 5551
E-mail: info@nilfi sk-advance.hu
www.nilfi sk-advance.hu
ITALY
Nilfi sk-ALTO
Divisione di Nilfi sk-Advance A/S
Località Novella Terza
26862 Guardamiglio (LO)
E-mail: d.puglia@nilfi sk-advance.it
JAPAN
Nilfi sk-Advance Inc.
1-6-6 Kita-shinyokohama, Kouhoku-ku
Yokohama, 223-0059
Tel.: +8145 548 2571
Fax: +8145 548 2541
MALAYSIA
Nillfi sk-Advance Sdn Bhd
Sd 14, Jalan KIP 11
Taman Perindustrian KIP
Sri Damansara
52200 Kuala Lumpur
Tel.: +60 3 603 6275 3120
Fax: +60 3 603 6274 6318
MEXICO
Nilfi sk-Advance de Mexico, S. de R.L. de C.V.
Prol. Paseo de la Reforma 61, 6-A2
Col. Paseo de las Lomas
01330 Mexico, D.F.
Tel: +52 55 2591 1002 (switchboard)
Fax: +52 55 2591 1002 ext. 229
E-mail: info@advance-mx.com
www.nilfi sk-advance.com.mx
NEW ZEALAND
Nilfi sk-ALTO, Division of Nilfi sk-Advance NZ
Private Bag 92829
6 Rockridge Avenue
Penrose, Auckland
Tel: +64 9 525 0092
Fax: +64 9 525 6440
NORWAY
Nilfi sk-Advance AS
Bjørnerudveien 24
1266 Oslo
Tel.: +47 22 75 17 70
Fax: +47 22 75 17 71
E-mail: info@nilfi sk-alto.no
www.nilfi sk-alto.no
POLAND
Nilfi sk-Advance Sp. Z.O.O.
05-800 Pruszków
ul. 3-go MAJA 8
Tel.: +48 22 738 37 50
Fax: +48 22 738 37 51
E-mail: info@nilfi sk-alto.pl
www.nilfi sk-alto.pl
PORTUGAL
Nilfi sk-ALTO
Division of Nilfi sk-Advance Lda.
Sintra Business Park
Zona Industrial Da Abrunheira
Edifi cio 1, 1° A
P2710-089 Sintra
Tel.: +35 808 200 537
Fax: +35 121 911 2679
E-mail: mkt@nilfi sk-advance.es
RUSSIA
Nilfi sk-Advance LLC
Vyatskaya str. 27, bld. 7
127015 Moskow
Tel.: +7 495 783 96 02
Fax: +7 495 783 96 03
E-mail: info@nilfi sk-advance.ru
SINGAPORE
Nilfi sk-Advance Pte. Ltd.
Nilfi sk-ALTO Division
40 Loyang Drive
Singapore 508961
Tel.: +65 6 759 9100
Fax: +65 6 759 9133
E-mail: sales@nilfi sk-advance.com.sg
SPAIN
Nilfi sk-ALTO
Division of Nilfi sk-Advance S.A.
Torre D’Ara
Paseo del Rengle, 5 Pl. 10
08302 Mataró
Tel.: +3 4 902 200 201
Fax: +34 93 757 8020
E-mail: mkt@nilfi sk-advance.es
SWEDEN
ALTO Sverige AB
Member of Nilfi sk-Advance Group
Aminogatan 18, Box 4029
431 04 Mölndal
Tel.: +46 31 706 73 00
Fax: +46 31 706 73 40
E-mail: info@nilfi sk-alto.se
www.nilfi sk-alto.se
TAIWAN
Nilfi sk-Advance Taiwan Branch
No. 5, Wan Fang Road
Taipei
Tel.: +886 227 002 268
Fax: +886 227 840 843
THAILAND
Nilfi sk-Advance Co. Ltd.
89 Soi Chokechai-Ruammitr
Viphavadee-Rangsit Road
Ladyao, Jatuchak, Bangkok 10900
Tel.: +66 2 275 5630
Fax: +66 2 691 4079
TURKEY
Nilfi sk-Advance Profesional Temizlik
Ekipmanlari Tic. A/S.
Necla Cad. NI.: 48
Yenisahra / Kadiköy
Istanbul
Tel.: +90 216 470 08 - 60
E-mail: info.tr@nilfi sk-advance.com
www. nilfi sk-advance.com.tr
UNITED KINGDOM
Nilfi sk-ALTO
Division of Nilfi sk-Advance Ltd.
Bowerbank Way
Gilwilly Industrial Estate, Penrith
Cumbria CA11 9BQ
Tel.: +44 1 768 86 89 95
Fax: +44 1 768 86 47 13
E-mail: sales@nilfi sk-alto.co.uk
www.nilfi sk-alto.co.uk
USA
Nilfi sk-Advance Inc.
14600 21st Avenue North
Plymouth, MN 55447-3408
Tel.: +1 800 989 2235
Fax: +1 800 989 6566
E-mail: info@advance-us.com
www.advance-us.com
VIETNAM
Nilfi sk-Advance Representative Offi ce
No. 46 Doc Ngu Str.
Ba Dinh Dist.
Hanoi
Tel.: +84 4 761 5642
Fax: +84 4 761 5643
E-mail: nilfi sk@vnn.vn
 Loading...