

Page 1
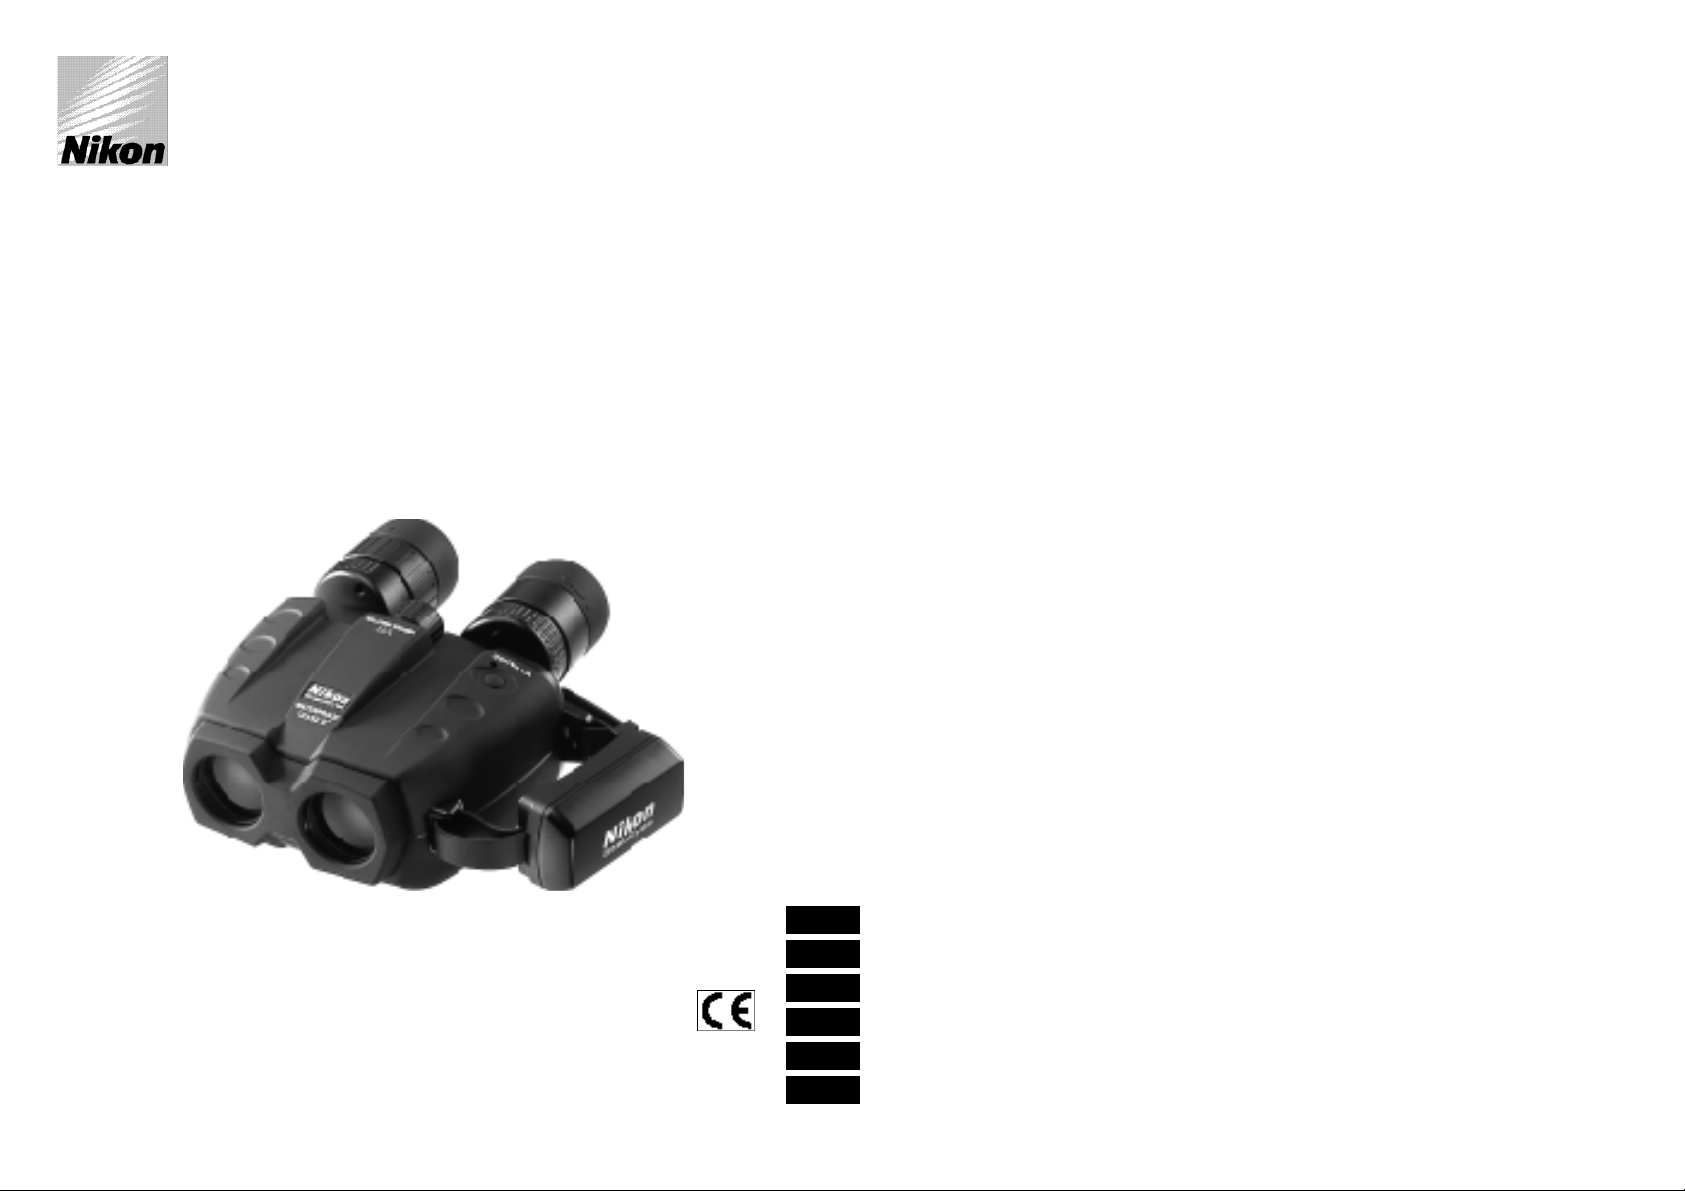
ニコン スタビライズ 12x32
Nikon StabilEyes 12x32
使用説明書
Instruction Manual
Bedienungsanleitung
Manuel d’utilisation
Manual de instrucciones
Manuale di istruzioni
Steadies your hands and stabilizes your view.
J
E
F
G
S
I
Page 2
この度は、ニコン スタビライズ 12x32をお買いあげいただきありがとうござい
ます。
ご使用になる前に、この使用説明書をお読みの上、正しくお使い下さい。
お読みになった後は、製品のそばなど、いつも手元に置いてお使い下さい。
この説明書には、あなたさまや他の方々への危害や財産への損害を未然に防ぎ、
本製品を安全にお使いいただくために、守っていただきたい事項を示しています。
内容をよく理解してから製品をお使い下さい。
・ 斬新なデザインと最先端の光学、エレクトロニクス技術、人間工学を組み合わ
せた高性能・高倍率の防振双眼鏡です。
・ 降雨中でも使用できる防水構造になっており、水に浮きます。
・ 手ぶれ補正機能により、高倍率でありながら、安定した観察像を得ることがで
きます。
・ 船舶、自動車、ヘリコプター等振動の多い乗り物でも、鮮明な像が得られる高
倍率防振双眼鏡です。
・ 防振機能作動時、『VRPAUSEボタン』を使って防振機能を一時的に中断するこ
とができます。視線の移動や移動目標観察時のパン等による不快な像の揺れが
軽減できます。
・ 全てのレンズはマルチコート、またダハプリズムには位相差補正コートが施さ
れているため、鮮明で明るい像が得られます。
はじめに 予防措置と安全上のご注意
w 注意
・この製品を不安定な場所に置かないでください。倒れ
たり落ちたりしてけがの原因となることがあります。
・この製品を歩行中に使用しないでください。衝突、
転倒し、けがの原因となることがあります。
・この製品のストラップを持って振り回さないでくださ
い。他人にあたり、けがの原因となることがあります。
・この製品の眼幅調整の際、指をはさみ、けがをする
ことがあります。
・この製品を直射日光の当たるところに置かないでく
ださい。日光が結像して火災の原因となることがあ
ります。
・ゴム製目当ての長期間使用により、ゴムの劣化で皮
膚に炎症を起こすことがあります。もし疑わしい状
態があらわれましたら、医師にご相談下さい。
・キャップなどお子さまが誤って飲むことがないよう
にしてください。万一お子さまが飲み込んだ場合、
ただちに医師に相談してください。
・ポリ袋(包装用)など小さいお子さまの手の届くと
ころに置かないでください。口にあて窒息の原因に
なることがあります。
・電池は火の中に投げ込んだり、ショート、加熱、分
解などしないでください。発火・破裂し、けがの原
因になることがあります。
・分解は絶対にしないで下さい。分解をされますと保
証期間内でも有償修理となります。
故障の際は当社CSセンター、あるいはニコンのサー
ビス機関までご連絡下さい。
お手入れは確実に
スタビライズは、防水構造になっていますが、水中で
は使用できません。水に落としても浮きますが、すぐ
に引き上げてください。また、水や汚れ(ほこり、砂、
その他)が付着したまま放置すると、機能に損傷を与
え、使えなくなることがあります。船の上などでご使
用になり、海水が付着した場合は、真水で洗い流して
ください。その際、直接電池ケースに水をかけると、
水圧により水が入ることがありますので注意してくだ
さい。
接点の汚れは厳禁
雨中や海のような湿度の高い場所や、ほこりの多い環
境の中では、電池ケースを開けないでください。接触
不良の原因となります。またそのような場所での電池
交換は行わないでください。故障の原因となります。
ロックは忘れずに確認を
電池ケースが正常な位置に取り付き、ロックされてい
ることを確認してください。
衝撃は厳禁
スタビライズは精密電子機器ですので、落としたり、
ぶつけて衝撃を与えたりしないでください。故障の原
因となります。このような使い方による故障は、1年
間保証の対象外となります。
保管は適した場所に
長期間ご使用にならない場合は、乾燥した涼しい場所
に保管するようにしてください。また保管の際は電池
を外してください。
急激な温度変化は大敵
激しい温度変化を避けてください。温度が急激に変化
しますと、レンズやプリズムが曇ることがあります。
寒い戸外から暖かい部屋へ入る時などは、特に気をつ
けてください。
w 警告
この表示を無視して、誤った取り扱いをすると、人が死亡または重傷を負う可能性が想定され
る内容を示しています。
w 注意
この表示を無視して誤った取り扱いをすると、人が傷害を負う可能性が想定される内容および
物的損害の発生が想定される内容を示しています。
w 警告
太陽を絶対に見ないでください。失明の原因となります。
構成
スタビライズ 12x32 ................ x1
ソフトケース ............................ x1
ネックストラップ (SAA).......... x1
接眼キャップ (EAP) ................ x1
単3アルカリ電池 .................... x2
Page 3
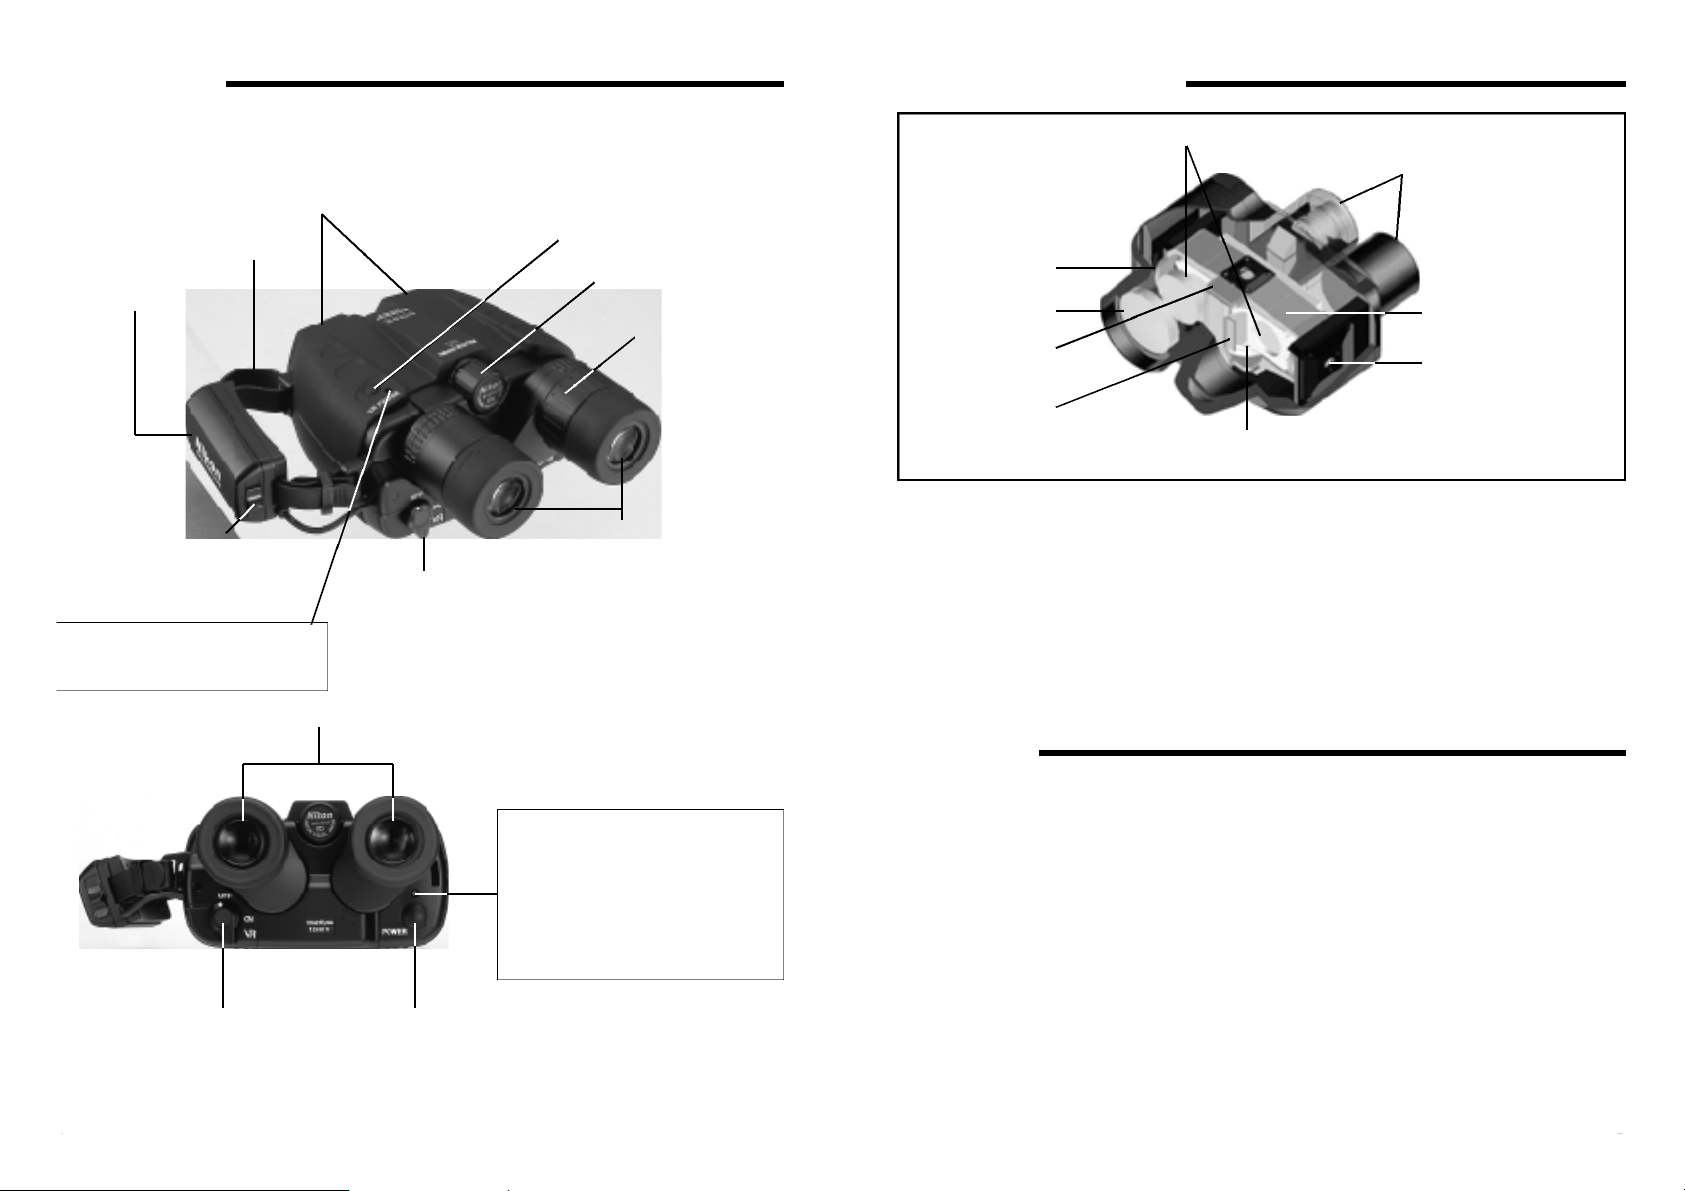
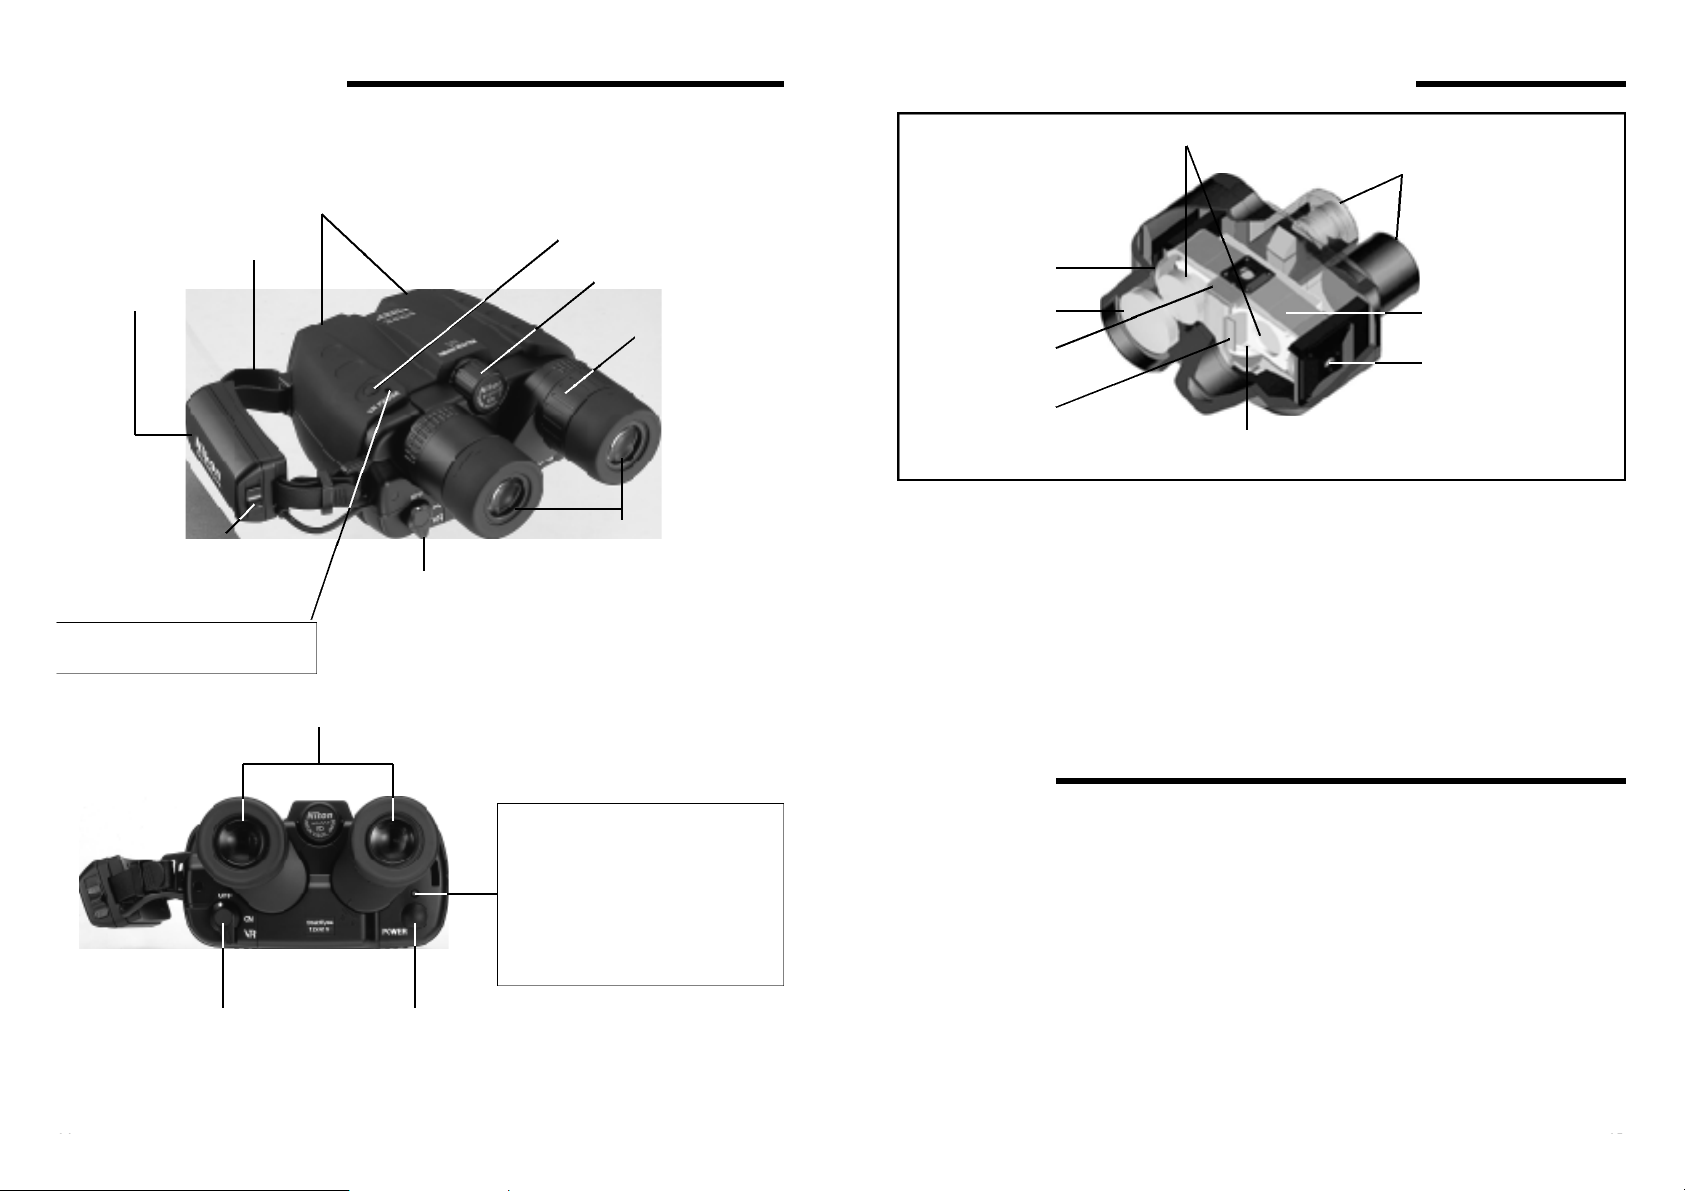
各部の名称
LEDII:VRPAUSEボタン右下LED
緑点灯:
VRPAUSEボタンON(防振機能一時中断)
ピント調整ノブ
接眼レンズ
対物レンズ
ハンドストラップ
電池ケース
(6)VRPAUSEボタン
(4)視度調整リング
1)電源(POWER)ボタン(1)を押します。電気システムが起動し、約5秒でスタンバイ状態になります。
2)接眼部(2)の間隔を変えて自分の眼幅に合わせます。
3)接眼部(2)の左側を左目で覗き、ピント調節ノブ(3)で目標にピントを合わせます。次に、接眼部(2)
の右側を右目で覗き、視度調整リング(4)を回転させて同じ目標にピントを合わせます(視度調整)。
視度調整のあとは、ピント調整ノブ(3)だけでピント合わせを行います。
4)防振レバー(5)をONにすると防振機能が作動します。VRPAUSEボタン(6)により、防振機能を中断
して、パンなどによる不快な揺れを軽減することが出来ます。
5)使用を終了する時は、防振レバー(5)をOFFにして、電源ボタン(1)を押して電源を切ります。
6)接眼キャップを取り付け、ソフトケースに収納します。
操作手順
スタビライズの構造
電池ケース着脱ツマミ
(5)防振レバー
(2)接眼部(眼幅調整)
正立プリズム
接眼レンズ
ポジションセンサ
対物レンズ
ポジションセンサ
圧電振動ジャイロ
水平ダイレクトモータ
ジンバル部
垂直ダイレクトモータ
・ 2つの圧電振動ジャイロとダイレクトモータによる制御により、ジンバル構造に組み込まれた正
立プリズムを常に安定した状態に保つため、乗り物などの振動がある場所でお使いになっても安
定した観察像が得られます。
・ ポジションセンサの働きにより、移動する目標にも対応します。
・ 光学系にはマルチコートが施され、明るい観察像が得られます。
・ ダハプリズムの位相差補正コートにより、コントラストの高いシャープな像が得られます。
・ 接眼部はロングアイレリーフの光学設計とターンスライド目当ての採用で、眼鏡をかけたままで
も観察できます。
・ 防水構造が外部からの浸水を防ぎ、内部に充填された乾燥窒素ガスが光学系の曇りを防ぎます。
(5)防振レバー
(1)電源(POWER)ボタン
LEDI:電源(POWER)ボタン上部LED
オレンジ点滅(電源ON後5秒間):
システムチェック
オレンジ点灯: 防振機能スタンバイ
緑点灯: 防振機能作動
緑・オレンジ点滅: 電池消耗
赤点灯: 電池交換
赤点滅: システム異常
消灯: 電源OFF
Page 4
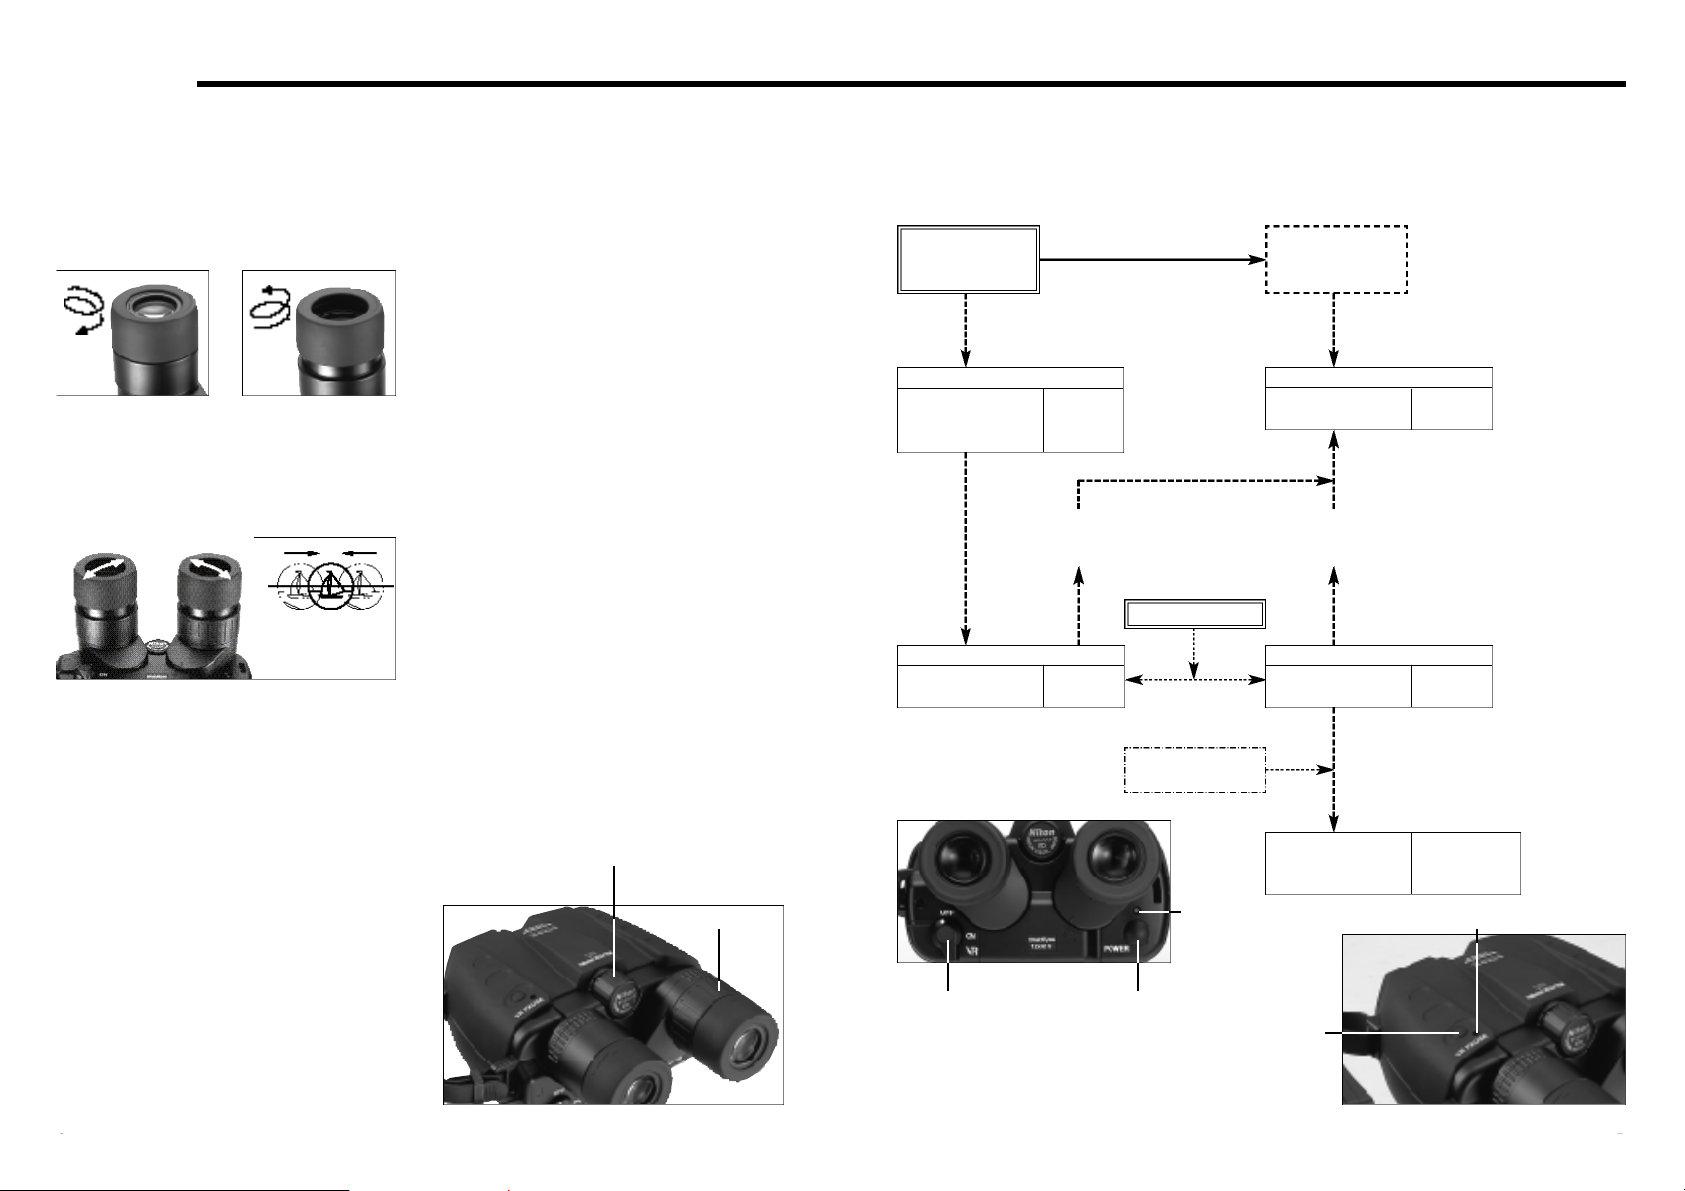
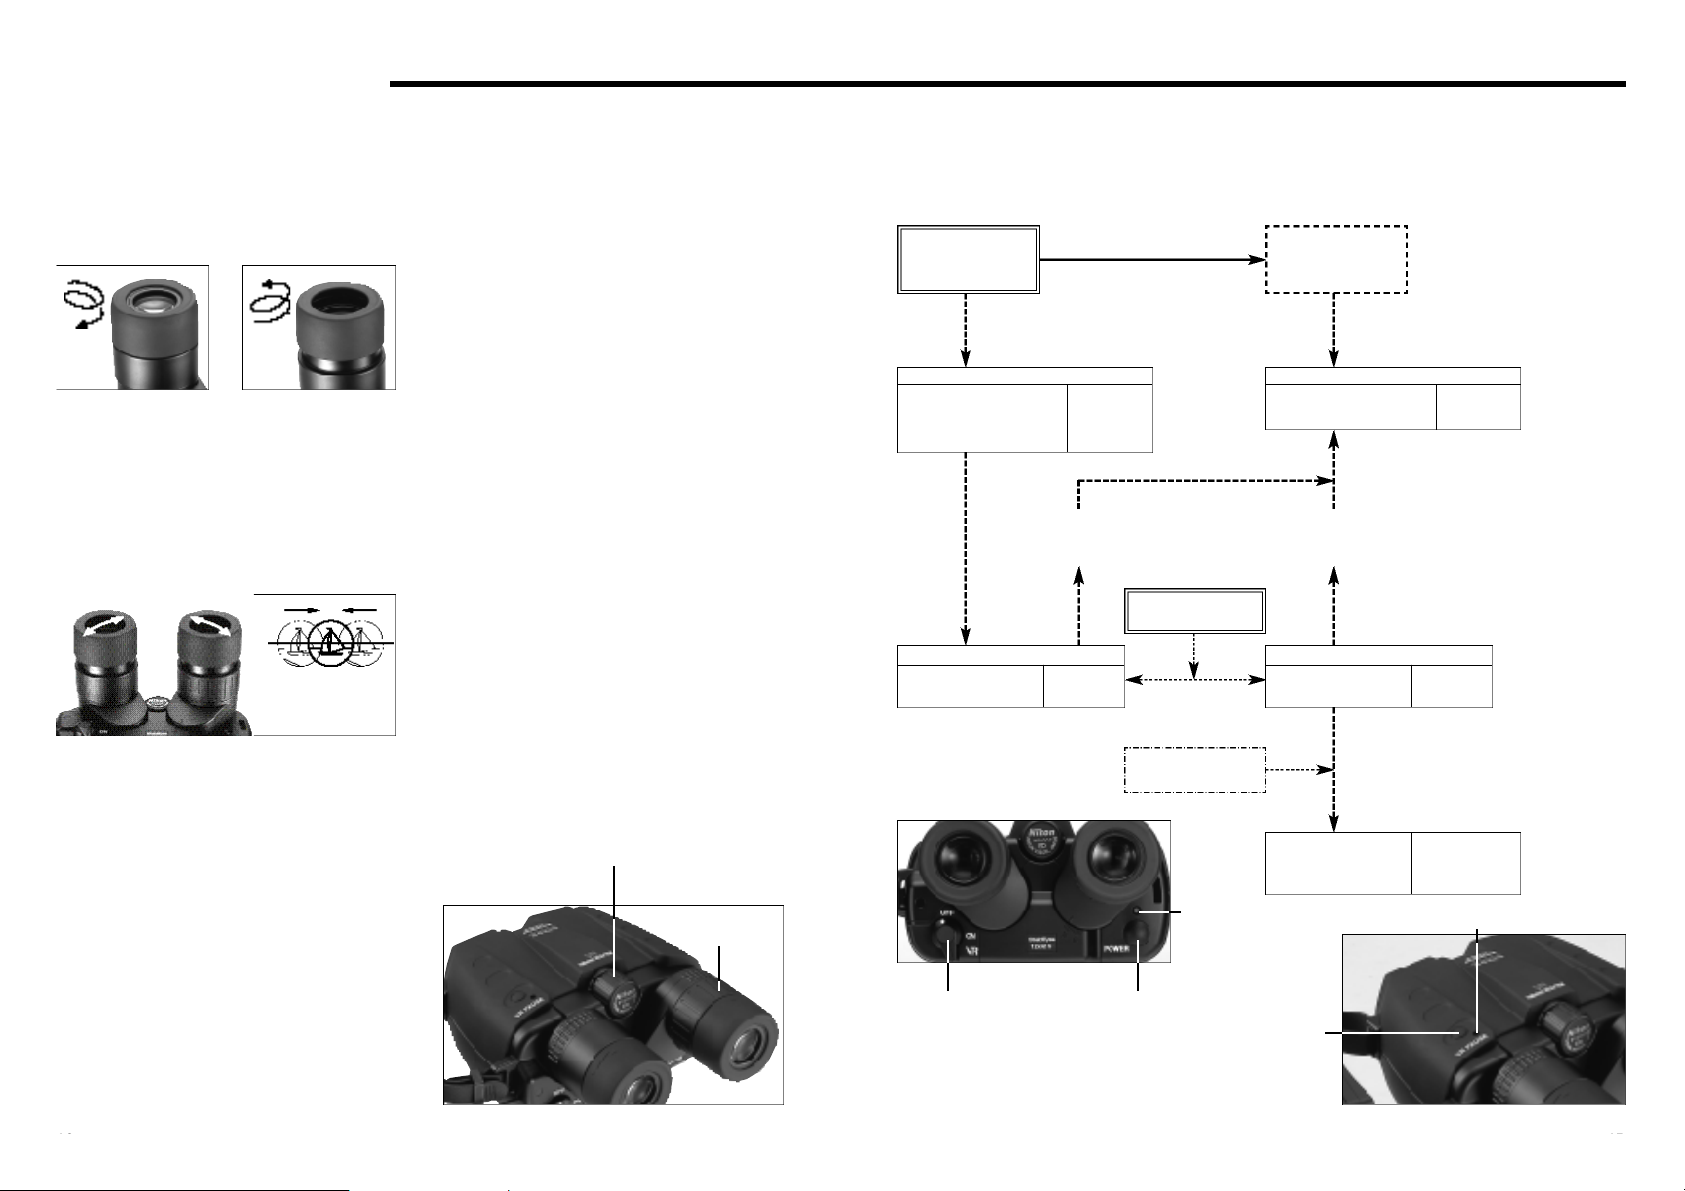
使い方
(1)目当て
ターンスライド目当ては回転することにより出
し入れすることができます。眼鏡を使用してい
る場合は収納状態に、使用していない時は出た
状態でお使い下さい。
(2)眼幅調整
接眼部に指をかけ、覗きながら左右の視界が丸
く一致するように、接眼部を開閉して接眼レン
ズの間隔を正しく調整してください。
(3)視度調整
最初に右目を閉じ、左目で左側の接眼レンズを
覗きます。そしてピント調整ノブを回転させ、
目標にピントを合わせてください。次に左目を
閉じ、右目で同じ目標がくっきり見えるように
なるまで右の接眼部の視度調整リングを回転さ
せてください。この時、ピント調整ノブは使わ
ないでください。
次に両方の眼を開きます。この時両目ともに目
標にピントがあっていなくてはなりません。
以後のピント合わせはピント調整ノブだけで行
います。
この操作は、電源のON/OFFに関係なく行うこ
とができます。
(4)防振機能
最初に電源(POWER)ボタンを押すと、起動に
要する約5秒間はLEDがオレンジ色に点滅し、
その後、点灯に変わりスタンバイ状態になりま
す。
次に防振レバーをONにすると、「防振状態」と
なり、LEDは緑になります。
この時、VRPAUSEボタンを押すと、防振機能
が中断されて、パンなどをした時の振動補正に
よる像の揺れが小さくなり、不快感を軽減しま
す。この機能は、VRPAUSEボタンを押してい
る間だけ有効です。双眼鏡を覗きながら目標物
を探す時などに有効な機能です。
防振レバーをOFFにすると、防振機能は停止し
てスタンバイ状態となり、LED表示はオレンジ
色に戻ります。
使用状態に合わせ、防振レバーを切り替えてく
ださい。
「スタンバイ」状態では、「防振」状態よりも電
池の消耗が少なくなります。
使用後は防振レバーをOFFにして、電源ボタン
を押して電源を切ってください。
また、数分間スタンバイ状態の場合、あるいは
防振機能が作動していても数分間振動がない場
合は、自動的に防振レバーがOFFになり、電源
がOFFになります。
眼鏡装用者 眼鏡非装用者
スタビライズ 12x32の機能図
* 電源のオフにより、防振レバーは「OFF」にリセットされます。
電源:POWER
ボタン押す
電源ONの状態
電源:POWER
ボタン押す
左右の視野を重ねて
一つの円になったら
止めます
ピント調整ノブ
視度調整リング
電源オン
防振機能 LED I
システムチェック オレンジ
所要5秒間 点滅
約5分間のスタンバイ状態、あるいは
防振機能作動時の約1分間の振動無入力で自動電源オフ
防振レバー:OFF
防振機能 LEDI
スタンバイ オレンジ
防振レバー
POWERボタン
防振レバー操作
VRPAUSEボタン
押す
LEDI
VRPAUSEボタン
電源オフ
防振機能 LED I
停止 消灯
防振レバー:ON
防振機能 LEDI
作動 緑
VRPAUSEボタンを押して
いる間だけ切り替わる
防振一時中断
LEDII
緑点灯
LEDII
Page 5

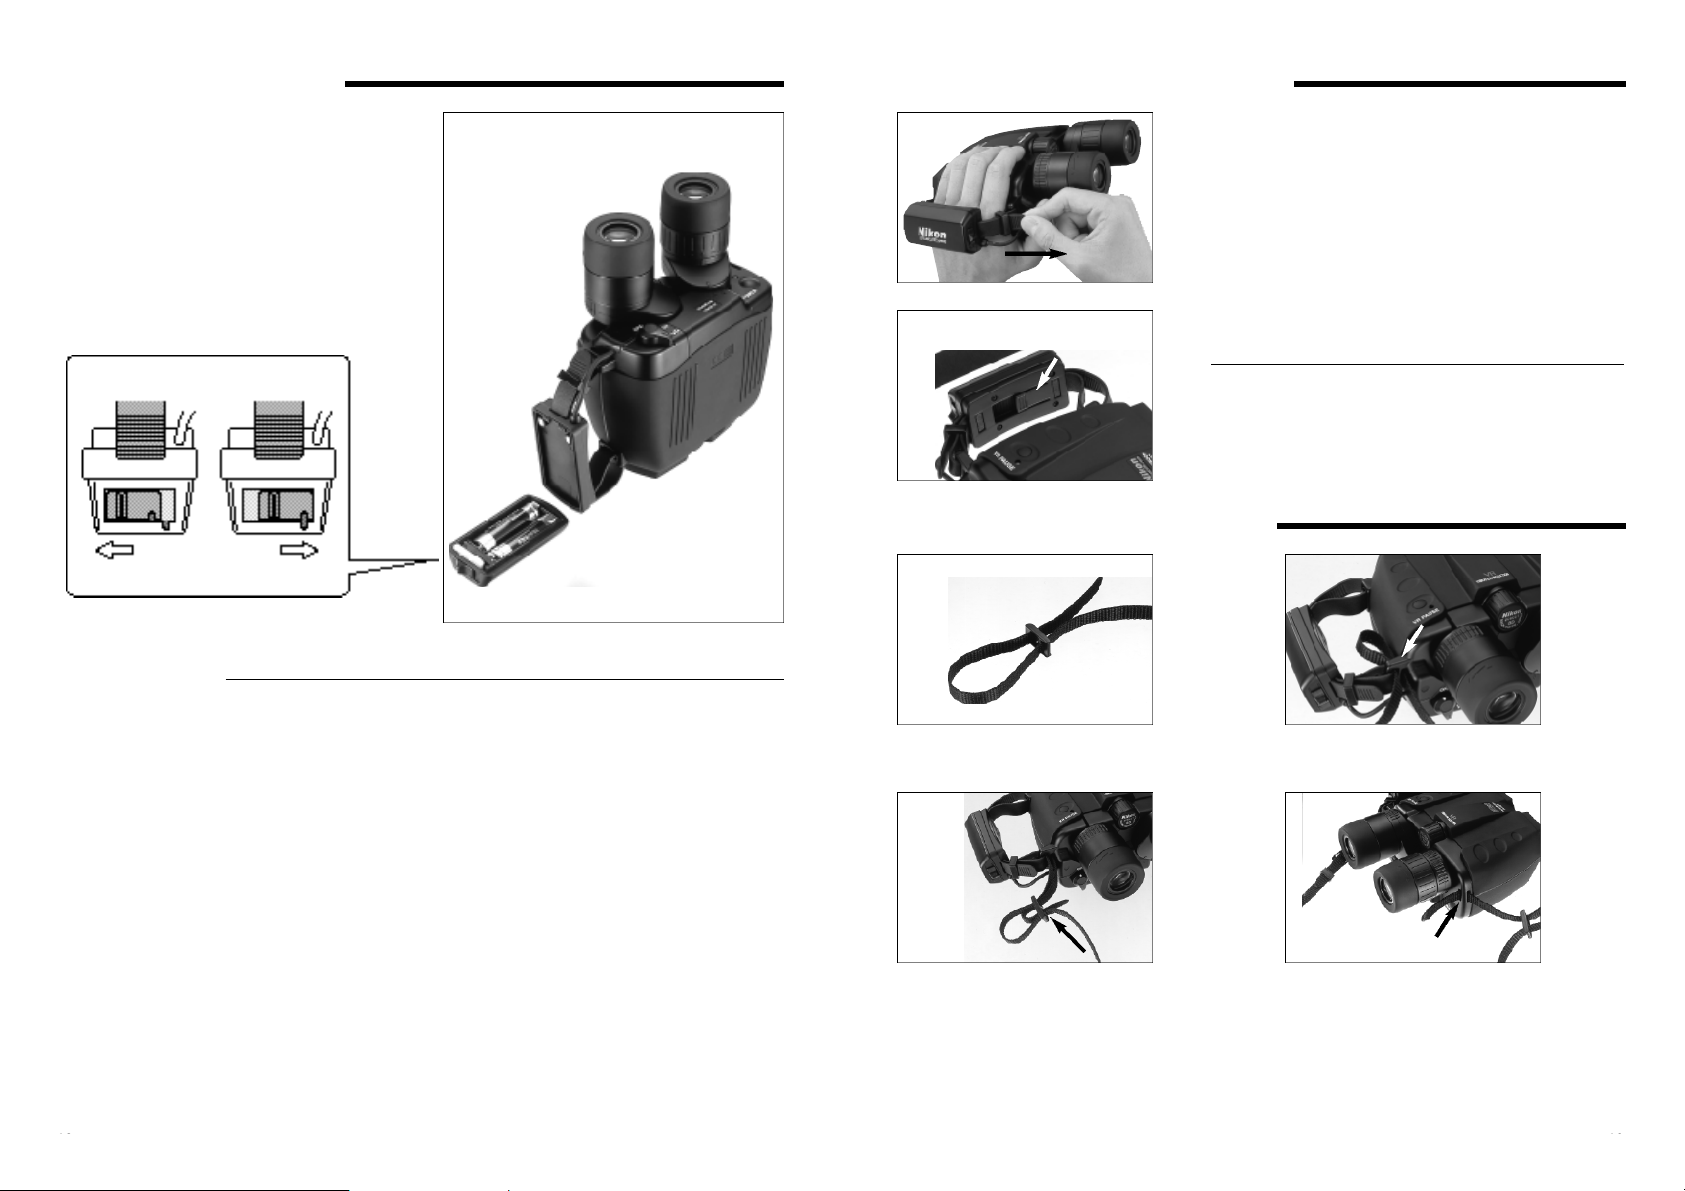
ハンドストラップの使い方
ハンドストラップに手を通すことで、双眼鏡をより確
実に保持することができます。
ハンドストラップに手を通し、ベルトの長さを調整し
ます。
締める時は、接眼側に出ているベルトを引きます。
ゆるめる時は、ハンドストラップの裏側にある爪を軽
く起こしてベルトをゆるめる方向に引っ張ってくださ
い。
w 注意
ハンドストラップは電池ケースを兼ねておりますの
で、無理な力を加えたり、双眼鏡本体から外したりし
ないでください。故障の原因となります。
電池の入れ方
1) ハンドストラップについている電池ケース
の着脱ツマミをスライドさせ、電池ケース
を取り外します。
2) 新しい単3アルカリ電池2本を、表示に従
い正しく入れてください。
3) 電池ケースをハンドストラップ本体に取り
付け、着脱ツマミをスライドさせて確実に
固定します。
w 注意
・ 種類の異なる電池や、新旧の電池を混在使用しないでください。液モ
レや破裂の恐れがあります。
・ 屋外で電池を交換する際は、電池ケースに水分が入らないように注意
してください。
・ 長時間使用しない時は、電池の自然放電や液モレを防止するために、
電池を取り外してください。
電池を抜いた時も内部の接点を保護するために、電池ケースをハンド
ストラップ本体に取り付けてください。
・ 接点に金属を触れさせないでください。故障の原因となります。
・ 電池が入っていない状態で防振レバーをONにしないでください。故障
の原因となります。
電池ケース着脱ツマミの開閉
開く
(電池ケースを外す)
閉じる
(電池ケースを固定)
ネックストラップの使い方
1)ネックストラップのリングに大きなたる
みを作ります。
3)ネックストラップの先端をリングの内側
から通し、たるみが無くなるように引っ
張ります。
2)ネックストラップの先端を、本体のスト
ラップフックの外側から通します。
4)反対側は、本体の穴を使って、同じ要領
で取り付けてください。
Page 6
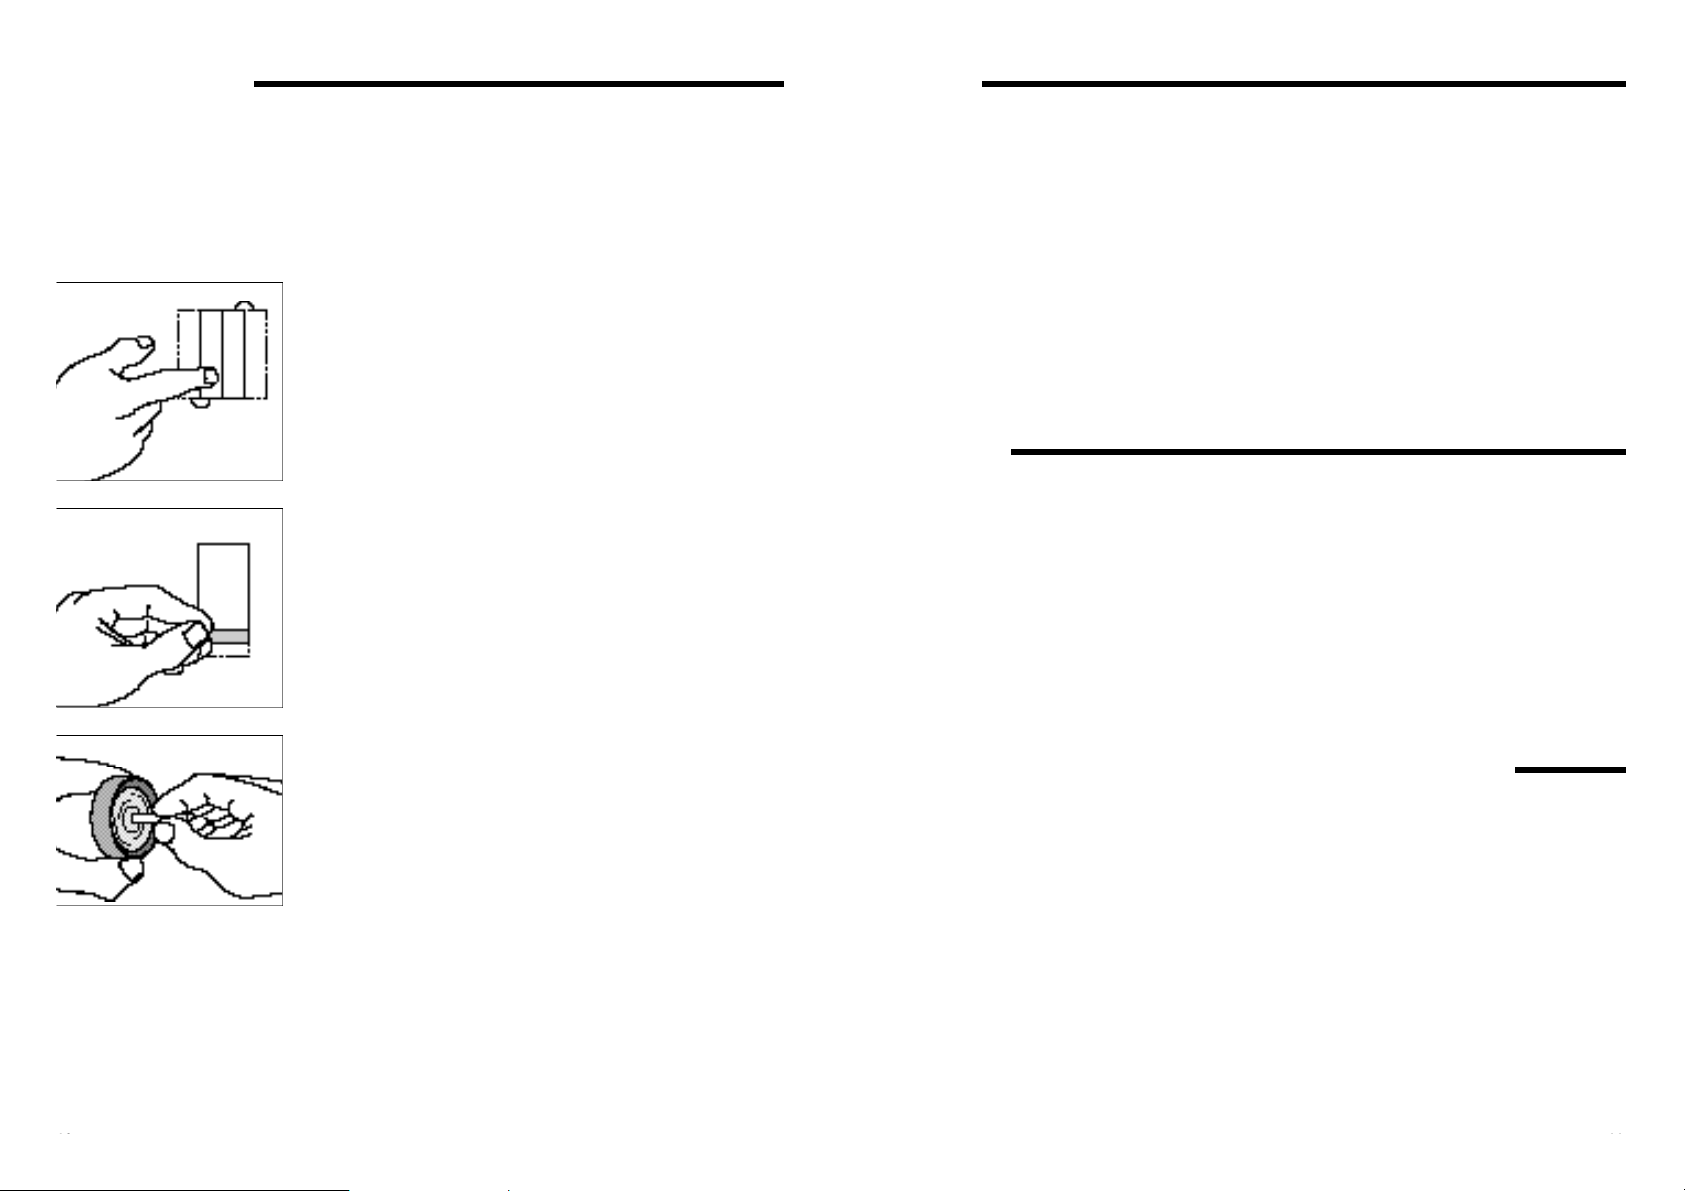
レンズの清掃
レンズペーパーなどの柔らかい清潔な紙を使います。レ
ンズペーパーの場合、2回ほど折ると使いやすくなりま
す。
それを、先のとがっていない細い棒などに巻き付け、先
端をレンズクリーニング液などで湿らせてください。
レンズの中央から外側に、だんだん輪を大きくするよう
に回転させながら汚れを拭き取ります。
ゴミや塩分、指紋などの油分の付着はレンズにとって大敵です。そのまま放置すると、コーテ
ィングなどが傷んでしまいます。カメラ店や眼鏡店で売られているレンズペーパー、レンズク
リーニング液をご使用になることをお奨めします。
常に最適の状態を維持するために、4カ所のレンズ表面全てを清掃してください。
まず、ゴミやほこりを吹き飛ばしてください。
拭き取りに使う紙は、1回ずつ新しいものに交換してください。汚れがきれいに落ちるまで、
その作業を繰り返してください。
仕様
倍率 .................................... 12倍
対物レンズ有効径 ................ 32mm
振動補償範囲 ...................... ±3°
アイレリーフ ...................... 15mm
視度調整範囲(右接眼部)....±3m
-1
実視界 .................................. 5°
1000mにおける視界 ............87m
最短合焦距離 ...................... 3.5m
射出瞳径 ..............................2.7mm
明るさ .................................. 7.3
眼幅調整範囲........................ 56〜72mm
防水...................................... WaterProof
(乾燥窒素ガス充填)
寸法:高さx幅 .................. 178x142mm
質量(重さ)........................ 1130g(電池含まず)
バッテリー寿命 .................. 約6時間
(単3形アルカリ
電池連続使用時:
常温20°C)
使用温度範囲 ...................... -10°C 〜 +50°C
製品仕様は改良のため予告なしに変更すること
があります。
テレビやラジオなどの受信障害防止について
この装置は、情報処理装置等電波障害自主規制協議会(VCCI)の基準に基づくクラスB
情報技術装置です。この装置は、家庭環境での使用を目的としていますが、この装置がラ
ジオやテレビジョン受信機に近接して使用されると、受信障害を引き起こすことがありま
す。使用説明書に従って、正しい取り扱いをしてください。
テレビやラジオなどの受信障害を防止するために、次のような項目にご注意下さい。
・テレビやラジオなどから、本装置を遠ざけてご使用下さい。
・テレビやラジオなどのアンテナを、受信障害が生じない位置や方向にしてください。
・アンテナ線は、同軸ケーブルを使用して下さい。
本装置がテレビやラジオなどの受信に影響をあたえているかどうかは、本装置の電源をオ
ン・オフすることで確認できます。
テレビやラジオなどに受信障害が生じている場合は、上記のような項目を再点検してくだ
さい。それでも改善されない場合は、当社CSセンターあるいはニコンのサービス機関、ま
たはご購入店にご相談下さい。
防水型
この製品は1mの水深に5分間水没させても内部光学系に異常がなく、観察に支障のない防水
設計になっています。
1 .雨風の当たる場所や、湿気の多い場所などの悪条件下で使用しても、内部機能を損ねること
がない。
2 .乾燥窒素の充填により、曇りやカビが生じにくい。
などの特徴がありますが、次の点にご注意の上、ご使用ください。
1 .密閉構造ではありませんので、水中での使用や強い水流で洗うことはおこなわないでくださ
い。
2 .本体可動部に水滴が付いたときは操作することをやめ、水滴を拭き取るようにしてください。
なお、防水性能を保持するために、定期的に点検を受けられることをおすすめします。
Page 7
Congratulations
Thank you for purchasing Nikon StabilEyes 12x32. Be sure to read this manual
thoroughly for proper use.
• The StabilEyes 12x32 uses advanced technology in optics, electronics, and
ergonomics.
• The StabilEyes 12x32 is waterproof, can be used in rainy weather, and floats
on water.
• The StabilEyes 12x32's stabilization feature cancels out the effects of external
vibration and shaking that occurs with hand-held use, for stable viewing
without a tripod.
• You can enjoy stable viewing and clear images even from a moving car,
sailboat, motorboat, or airplane.
• When stabilization is activated, you can pause it by pressing the "VR PAUSE"
button to minimize image instability while panning, shifting among objects in
view, or viewing moving objects.
• The lenses are multilayer-coated to give you a wide field of view and reduce
eye fatigue. The prisms are phase correction coated to provide sharp contrast
and bright images.
The StabilEyes 12x32 .............. 1
Soft case .................................. 1
Neckstrap (SAA) ...................... 1
Eyepiece cap (EAP) .................. 1
Size AA alkaline batteries ........ 2
Items Supplied
Precautions and Warnings
w WARNING:
High level warning against severe personal harm or serious product damage.
w CAUTION:
Precautions that should be followed in order to prevent damage to the product or injury to those
using it.
w WARNING:
Never look directly at the sun or any bright light through the binoculars. Serious
harm, including loss of vision, can result.
w CAUTION:
• StabilEyes binoculars are waterproof, but cannot
be used in water. Although they float on water,
you should pick them up as soon as possible if
they are dropped into water. They can be
damaged if water, dust, sand or other foreign
material get inside. Do not open the battery
compartment in a marine, high-humidity or dusty
environment, as the interior of the binoculars can
be compromised. Whether using internal batteries
or external power, make sure the O-ring and
battery holder or adapter are firmly seated, and
locked in position.
• Do not change batteries or power connections in
wet or dusty conditions.
• Confirm that the battery holder is correctly
attached in position and firmly locked.
• To help prevent impact damage from dropping or
falling, do not place the StabilEyes on slippery or
unstable surfaces. Also, be aware that damage
arising from abuse or misuse can void the
StabilEyes warranty.
• If you plan to leave the binoculars stored for long
periods of time, keep them in a cool, dry location
and remove the batteries or damage could result
from leakage.
• When batteries must be replaced, replace all at
the same time, using the same type and brand.
• Never attempt to burn batteries in a fire. An
explosion could result.
• While Ni-Cd batteries are rechargeable, never
attempt to recharge ordinary batteries, Never
short circuit the batteries.
• Avoid extreme hot and cold temperatures and
rapid changes. (For example, if the binoculars
have been used in very cold conditions,
bringing them into a heated environment could
cause condensation to build up. Allow time for
a gradual adjustment.)
• If you use the StabilEyes at sea, Nikon
recommends that you rinse them clean by
dipping them in fresh water, without pouring
water onto them directly, following exposure
to salt spray/salt air.
• Avoid leaving the binoculars unattended and
exposed to direct sunlight. Sunlight rays
passing through the lenses could cause a fire.
• Never try to walk and use the binoculars at the
same time; accident and injury could result.
• Do not swing the binoculars by the neckstrap;
the binoculars might strike and injure someone
or be damaged by hitting a solid object.
• Please dispose of any plastic bags that may
come with StabilEyes; such bags could
suffocate or choke a small child.
• Prolonged use with contact of the rubber
eyepieces against the skin can cause irritation.
If such a condition persists, consult you
doctor.
• If you experience any problem with your
StabilEyes binoculars, never attempt to repair
them yourself or have them repaired by
anyone other than NIKON VISION CO., LTD.
Return it to your local dealer or directly to
NIKON.
Page 8
Getting Acquainted
LED II:
Glows orange: VR PAUSE on
(stabilization is paused)
Focus control knob
Eyepiece lenses
Objective lens
Handstrap
Battery holder
(6) VR PAUSE button
(4) Diopter
adjustment ring
Battery holder lock lever
(5) Stabilization lever
(5) Stabilization lever
Fast Start
StabilEyes Digital Image Stabilizing
— Here's How It Works
• The piezo gyro vibration sensors and direct-drive motors work together to move a gimbaled
assembly with erecting prism to counteract vibration and keep the binoculars steady, which offers
shake-free viewing even from a moving vehicle.
• The position sensor activates the stabilization feature as it detects vertical and horizontal motion.
• The newly designed lenses are multicoated for bright images.
• The prisms have a special coating that gives sharper images than even before.
• The eyepieces incorporate advanced optical technology that offers a wide field of view and reduces
eye fatigue. They can be pivoted up and down for use with glasses.
• The StabilEyes 12x32 binoculars are waterproof and filled with dry nitrogen to prevent fogging of
the optical components.
1) Press the Power button (1) to turn on. The electronic system will start up, and the binoculars will go
to Standby mode after about five seconds.
2) Adjust the eyepiece span (2) to match the distance between your two eyes.
3) Use your left eye as you adjust the focus control knob (3). When the image becomes sharp, use
your right eye and turn the diopter adjustment ring (4) to focus for the right eye. Once you have
performed the diopter correction, use only the control knob (3) to check focus again.
4) Turn the stabilization lever (5) to the ON position to activate the stabilization feature. While
stabilization is activated, you can pause it by pressing the VR PAUSE button to minimize image
instability while panning, shifting among objects in view, or viewing moving objects.
5) When finished, turn the stabilization lever (5) to the OFF position and press the Power button (1) to
turn off.
6) Replace the lens caps, and return the binoculars to their case.
Prism Assembly
Eyepiece Lenses
(2) Eyepiece lenses
(1) Power button
LED I:
Flashing orange: Power is turned on and
the unit is in standby
Glows orange: Stabilization is in standby
Glows green: Stabilization is active
Flashing orange and green:
Weak batteries
Glowing red: Batteries are exhausted and
should be replaced
Flashing red: System problem
Turns off: Power is turned off
Position Sensor
Objective Lens
Position Sensor
Piezo Gyro Sensor
AZ Direct Motor
Gimbal Assembly
EL Direct Motor
Page 9
How to Use and Focus
(1) Eyepiece
If you wear glasses or sunglasses when using
StabilEyes binoculars, turn the turn-slide-type
eyecup to its fully retracted position. For users
with normal eyesight, turn the eyecup to its fully
extended position.
(2) Adjusting the interpupillary distance
Grasp either eyepiece and rotate it towards or
away from the center of the binocular (the other
eyepiece will move equally in the opposite
direction.)
Adjust the interpupillary distance to match the
distance between your eyes until you see just one
perfectly round image.
(3) Diopter adjustment
There are two steps to focusing: Close your right
eye and use only your left eye as you adjust the
focus control knob. When the image is sharp,
close your left eye and open your right eye. Twist
the right eyepiece, to focus for the right eye. Now
open both eyes and the binocular should be
perfectly focused. You can do this with the
StabliEyes turned on with stabilizing activated or
with the power off completely.
When you view a different subject, adjust the
focus control knob until you obtain a sharp image.
(4) Stabilization feature
When you press the Power button the first time,
the LED lights in orange, and the binoculars go to
Standby mode. Your StabilEyes binoculars go
through an internal system check and take about
five seconds to stabilize their performance.
Then, turn the stabilization lever to the ON
position. The LED turns green, indicating that the
stabilization feature is active.
As long as you keep the VR PAUSE button
pressed, stabilization is paused, so you can
minimize image instability while panning, switching
among objects in view, or viewing moving objects.
Use this function to search among objects using
the binoculars.
Setting the stabilization lever back to the OFF
position turns the stabilization feature off, and the
LED turns orange again, indicating Standby mode.
Set the stabilization lever as you wish.
Stand by mode conserves battery power.
When finished, turn the stabilization lever to the
OFF position and press the Power button to turn
off.
If you leave your StabilEyes binoculars in either
Standby or Stabilization mode for a few minutes
without using them, the stabilization lever will
return to the OFF position, and the binoculars will
shut off automatically.
Eyeglass wearer Non eyeglass wearer
Merge the two
circular viewfields
into one.
Operating System of StabilEyes
* When power is turned off, the vibration reduction mode resets automatically to "OFF".
LED I:
Flasshing
in orange
Power on
Use the
stabilization lever
Pressing the VR
PAUSE button
Press the Power
button
Stabilization is turned off LED I: off
Stabilization lever: ON
Stabilization LED I:
activated green
Pause stabilization as long as the
VR PAUSE button stays pressed.
Press the Power
button
Power on . Power off
The system powers up
and performs a
5-second system check
If StabilEyes is left in standby for about five minutes, or stabilization
mode, while activated, is not used for about one minute, they
automatically shut off.
Stabilization lever: OFF
Stabilization is LED I:
in standby orange
Focus control knob
Diopter
adjustment ring
Stabilization lever
Power button
LED I
VR PAUSE button
Stabilization paused
LED II
green
LED II
Page 10
Battery Installation
1) Slide the battery compartment release knob
on the handstrap to the Open position to
release the battery holder.
2) Insert two new size AA alkaline batteries.
3) Attach the battery holder to the handstrap
and slide the release knob to the locked
position to secure the compartment.
w WARNING
• Use the same type of batteries. Do NOT mix old and new batteries. Doing so can
cause leakage or rupture.
• When changing the batteries outdoors, be sure not to let any water get into the battery
compartment.
• If you plan to leave the binoculars stored for a prolonged period, remove the batteries
in order to prevent natural discharge and/or leakage.
When the batteries are removed, keep the battery holder attached to the handstrap to
protect the internal contact points.
• Keep the contact points away from any metal. Damage could result.
• NEVER slide the stabilization lever to the ON position if you do not have two batteries
installed. Damage could result.
Sliding the release knob
Open
(Remove the battery
holder.)
Close
(Secure the
battery holder.)
How to use the handstrap
The binoculars can be more securely held when you
slip your hand through the handstrap.
Slip your hand through the handstrap and adjust the
belt length.
To tighten the strap, pull the belt on the eyepiece end.
To loosen the strap, lift the buckle on the backside of
the handstrap and pull on the belt.
w WARNING
The handstrap also serves as the battery holder. Do
NOT apply strong force or remove the strap from the
binoculars. Damage could result.
Installing the Neckstrap
1) Make a large loop at each of the
neckstrap
3) Lead the strap inside the loop and
through the buckle and pull tight. Do the
same with the outer loop.
2) Insert strap through neckstrap bracket
4) Do the same with the opening in the
binoculars to attach the strap on the
other side.
Page 11

Keep Your Lenses Clean
Take a single lens tissue and fold it twice as shown.
Roll the tissue into a cylinder and moisten only one tip
with lens cleaning fluid.
Starting in the center of the lens, gently rub in a circular
motion from the center to the outside.
Dust, salt and oil left from fingerprint smudges should never be allowed to remain on the lenses
because they can harm the coatings applied to lens surfaces.
Use lens cleaning tissues and lens cleaning fluid. Both are usually available wherever cameras,
binoculars or eye glasses are sold. For best results, when you need to clean one lens, clean all four.
Start by blowing off any dust that may be on the lenses. Then, follow these steps...
Use each tissue only once. Sometimes, it may be necessary to repeat the process.
Magnification........................12x
Compensation Angle
(Stabilization Freedom) ........±3°
Objective Lens Diameter......32mm
Eye Relief ............................15mm
Angular field of view (real) ....5°
Field of View at 1,000m........87m
Close Focusing Distance ....3.5m
Exit Pupil ..............................2.7mm
Brightness ............................7.3
Interpupillary Distance Adjustment
............................................56~72mm
Structure ..............................Waterproof (dry
nitrogen purged)
Dimensions: L x W ..............178 x 142mm
Weight..................................1130g
(without batteries)
Battery Operating Life..........6 hours
(continuous
operation with four
AA-type alkaline
batteries: at 20°C)
Safe Ambient Temperature Range
............................................-10°C to 50°C
(14°F to 122°F)
Due to ongoing product improvement,
specifications may be subject to change without
notice.
Specifications
This equipment has been tested and found to comply with the limits for a Class B digital device, pursuant to
Part 15 of the FCC Rules and to EU EMC directive. These limits are designed to provide reasonable protection
against harmful interference in a residential installation. This equipment generates, uses and can radiate radio
frequency energy and, if not installed and used in accordance with the instructions, may cause harmful
interference to radio communications. However, there is no guarantee that interference will not occur in a
particular installation. If this equipment does cause harmful interference to radio or television reception, which
can be determined by turning the equipment off and on, the user is encouraged to try to correct the interference
by one or more of the following measures:
- Reorient or relocate the receiving antenna.
- Increase the separation between the equipment and receiver.
- Consult the dealer or an experienced radio/TV technician for help.
This Class B digital apparatus meets all requirements of the Canadian Interference-Causing Equipment
Regulations
This device complies with Part 15 of the FCC Rules. Operation is subject to the following two conditions: (1) This
device may not cause harmful interference, and (2) this device must accept any interference received, including
interference that may cause undesired operation.
The StabilEyes is waterproof, and will suffer no damage to the optical system if submerged or
dropped in water to a maximum depth of 1 meter for up to 5 minutes.
The StabilEyes offers the following advantages:
• Can be used in conditions of high humidity, dust and rain without risk of damage.
• Nitrogen-filled design makes it resistant to condensation and mold.
Observe the following when using the StabilEyes:
• As the unit does not have a perfectly sealed structure, it should not be operated nor held in running water.
• Any moisture should be wiped off before adjusting movable parts (focusing knob, eyepiece, etc.) of
the StabilEyes to prevent damage and for safety reasons.
To keep your StabilEyes in excellent condition, Nikon Vision recommends regular servicing by an
authorized dealer.
Waterproof models
Page 12

StabilEyes 12x32 ...................... 1
Etui souple ................................ 1
Bandoulière (SAA) .................... 1
Capuchons d'oculaire (EAP) .... 1
Piles alcalines de format AA .... 2
Elements fournis
Précautions et avertissements
w Attention:
avertissement sérieux contre les lésions corporelles graves ou les dégâts matériels importants.
w Avertissement:
précautions à prendre par les utilisateurs pour éviter les dégâts matériels ou les lésions
corporelles.
w Attention:
n'utilisez jamais les jumelles pour regarder directement le soleil ou toute lumière
intense. Des lésions importantes, dont la perte de la vue, pourraient en résulter.
w Avertissement:
• Les jumelles sont étanches, mais ne sont pas
utilisables dans l'eau. Bien qu'elles flottent sur l'eau,
il faut les récupérer le plus tôt possible si elles sont
tombées dans l'eau. Elles peuvent être
endommagées si de l'eau, de la poussière, du sable
ou des matières étrangères pénètrent à l'intérieur.
N'ouvrez pas le logement des piles dans un
environnement marin, à forte humidité ou
poussiéreux, parce que l'intérieur des jumelles
pourrait subir des dégâts. Que vous utilisiez des piles
internes ou une alimentation extérieure, vérifiez que
le joint torique et le support des piles ou l'adaptateur
sont fermement assis, et bloqués en place.
• Ne changez pas les piles ni les connecteurs
d'alimentation dans un milieu humide ou
poussiéreux.
• Confirmez que le support des piles est correctement
fixé en place et fermement bloqué.
• Pour éviter les chocs dus aux chutes, ne placez pas
le StabilEyes sur des surfaces glissantes ou
instables. Sachez aussi que tout dégât matériel
provenant d'un emploi abusif ou d'une mauvaise
utilisation peut annuler la garantie qui couvre le
StabilEyes.
• Si vous prévoyez de ne pas utiliser les jumelles
pendant une période de temps prolongée, rangez-les
à l'abri de la chaleur et de l'humidité et retirez les
piles pour éviter les risques de fuites.
• Remplacez toujours les piles en même temps et
utilisez toujours des piles de même type et de même
marque.
• Ne jetez jamais les piles dans un feu. Elles pourraient
exploser.
• Contrairement aux piles au nickel-cadmium (Ni-Cd),
les piles ordinaires ne sont pas rechargeables. Ne
court-circuitez jamais les piles.
• Evitez les variations importantes de températures.
(Par exemple, si les jumelles doivent être utilisées par
temps très froid, de la condensation peut se former
lorsqu'elles sont ramenées dans un milieu chauffé.
Prévoyez un certain temps d'adaptation.)
• Si vous utilisez les jumelles StabilEyes en mer, Nikon
recommande que vous les rinciez en les trempant dans
de l'eau fraîche, sans verser d'eau directement dessus,
après une exposition prolongée au milieu marin.
• En outre, il est préférable de ne pas laisser les
jumelles au soleil sans surveillance. La réflexion des
rayons solaires au travers des lentilles pourrait
provoquer un incendie.
• N'utilisez jamais les jumelles lorsque vous marchez;
des accidents et des lésions corporelles pourraient
en résulter.
• Ne laissez jamais les jumelles balancer au bout de la
bandoulière; elles pourraient blesser quelqu'un ou
heurter un objet dur.
• Jetez tous les sacs en plastique qui accompagnent le
StabilEyes; ils présentent des risques de suffocation
ou d'étouffement pour les jeunes enfants.
• Le contact prolongé des oculaires en caoutchouc
contre la peau peut provoquer des irritations. Si c'est
le cas, consultez un médecin.
• En cas de problème avec vos jumelles StabilEyes,
n'essayez jamais de les réparer vous-même ou de
les faire réparer par quiconque d'autre que NIKON
VISION CO., LTD. Rapportez-les chez votre
revendeur local ou renvoyez-les directement chez
NIKON.
Félicitations
Merci d’avoir porté votre choix sur les jumelles StabilEyes 12x32 de Nikon.
Veuillez lire attentivement ce mode d’emploi pour permettre leur emploi correct.
• Les StabilEyes 12x32 utilisent des technologies avancées dans les domaines
de l'optique, de l'électronique et de l'ergonomie.
• Les StabilEyes 12x32 sont imperméables à l'eau, utilisables par temps
pluvieux et flottent sur l'eau.
• Le système de stabilisation des StabilEyes 12x32 annule toute vibration de
l'extérieur et le bougé, qui survient à l'emploi tenu en main, offrant une vision
stabilisée sans trépied.
• Il est possible d’obtenir une vision stable et des images nettes même à partir
d’une voiture, d’un voilier ou bateau à moteur, ou d’un avion en mouvement.
• Quand la stabilisation est activée, vous pouvez faire une pause en appuyant
sur le bouton "VR PAUSE" pour minimiser l'instabilité d'image pendant un
panoramique, le passage entre des objets en vue, ou le visionnage d'objets
mobiles.
• Les lentilles sont multi-couches pour assurer un champ angulaire large et
réduire la fatigue des yeux. Les prismes sont revêtus en correction de phase
pour offrir des images lumineuses à fort contraste.
Page 13

Faisons connaissance
LED II:
S'allume en orange:
VR PAUSE activé (stabilisation en
pause)
Molette de mise au
point
Lentilles d'oculaire
Objectif
Dragonne
Support des piles
(6) Bouton VR PAUSE
(4) Bague
d'ajustement
dioptrique
Levier de blocage du
support des piles
Manette de stabilisation
(5) Manette de stabilisation
Démarrage rapide
• Les capteurs de vibrations piézoélectriques AZ (azimut) et EL (élévation) et les moteurs
d’entraînement direct travaillent ensemble pour déplacer l’ensemble suspendu à la cardan avec
prismes redresseurs pour contrecarrer la vibration et maintenir les jumelles stables, ce qui assure
une vision sans bougé même dans une véhicule en mouvement.
• Les capteurs de position activent le système de stabilisation en détectant un mouvement vertical
ou horizontal.
• Les lentilles de conception nouvelle sont multi-couches pour assurer des images lumineuses.
• Les prismes ont un revêtement spécial pour rendre les images plus nettes que jamais.
• Les oculaires incorporent une technologie optique avancée qui assure un champ angulaire large et
réduit la fatigue des yeux. Ils sont pivotables vers le haut ou le bas pour l’emploi avec des lunettes.
• Les jumelles StabilEyes 12x32 sont étanches et remplies d’azote sec pour éviter le brouillage des
composants optiques.
1) Appuyez sur le bouton d’alimentation (1) pour mettre en marche. Le système électronique démarre
et les jumelles passeront en mode de veille au bout de 5 secondes environ.
2) Réglez l’écart entre les oculaires (2) en fonction de la distance entre vos yeux.
3) Utilisez votre œil gauche pour ajuster la molette de mise au point (3). Quand l’image devient nette,
utilisez votre œil droit et tournez la bague d’ajustement dioptrique (4) pour la mise au point pour
l’œil droit.
Une fois la correction dioptrique effectuée, utilisez seulement la molette de mise au point (3) pour
recontrôler la mise au point.
4) Tournez la manette de stabilisation (5) à la position ON pour activer le système de stabilisation.
Quand la stabilisation est activée, vous pouvez la mettre en pause en appuyant sur le bouton VR
PAUSE pour minimiser l'instabilité d'image pendant un panoramique, le passage d'un objet en vue
à un autre ou le visionnage d'objets mobiles.
5) Ensuite, réglez la manette de stabilisation (5) à la position OFF et appuyez sur le bouton
d’alimentation (1) pour l’arrêt.
6) Remettez les protège-objectifs en place et rangez les jumelles dans leur boîtier.
StabilEyes D.I.S.
— Stabilisation numérique d'image — Fonctionnement
Dispositif à prismes
Lentilles oculaires
(2) Lentilles d'oculairea
(1) Bouton de mise
sous tension
LED I:
Clignote en orange:
L'appareil est sous tension
et en attente
S'allume en orange:
La stabilisation est en
attente
S'allume en vert: La stabilisation est activée
Clignote en orange et vert:
Piles affaiblies
S'allume en rouge:
Piles épuisées, qui doivent
être remplacées
Clignote en rouge:
Problème du système
S'éteint: L'appareil est hors tension
Capteur de position
Lentilles objectifs
Capteur position
Capteur de vibrations
piézo-gyroscopiques
Moteur direct AZ
Ensemble suspendu
au cardan
Moteur direct EL
Page 14

Mode d'emploi et mise au point
* A la mise hors tension, le mode de réduction des vibrations est automatiquement remis à "OFF".
Appuyez sur le
bouton de mise en
marche
Appuyez sur le
bouton de mise en
marche
Sous tension . Mise hors tension
Manette de stabilisation: DESACTIVEE
La stabilisation est LED I:
en attente orange
Si les StabilEyes sont laissées en attente environ cinq minutes, ou que
le mode de stabilisation, bien qu'activé, ne soit pas utilisé environ une
minute, elles se coupent automatiquement.
Sous tension
La pause de stabilisation se poursuit
tant que le bouton VR PAUSE reste
pressé.
Manette de stabilisation: ACTIVEE
Stabilisation activée LED I:
verte
Utilisez la manette
de stabilisation
Pause de stabilisation
LED II
verte
Pression du bouton
VR PAUSE
(1) Oculaire
Si vous portez des lunettes ou des lunettes de
soleil à l'utilisation des jumelles SyabilEyes,
mettez l'œilleton repliable en position entièrement
rétractée. Tournez l'œilleton à sa position
entièrement étendue si vous êtes un utilisateur à
vue normale.
(2) Ajustement de l'écart interpupillaire
Ajustement de l'écart interpupillaire
Saisissez un des oculaires et tournez-le vers ou
loin du centre des jumelles (l'autre oculaire pivote
de la même manière, mais le sens opposé).
Ajustez l'écart interpupillaire selon la distance
entre vos yeux jusqu'à ce que vous voyiez une
image parfaitement ronde.
(3) Ajustement dioptrique
Il y a deux étapes pour la mise au point: Fermez
l'œil droit et utilisez seulement votre œil gauche en
réglant la molette de mise au point. Lorsque
l'image est nette, fermez l'œil gauche et ouvrez
l'œil droit. Faites pivoter l'oculaire droit pour
effectuer la mise au point pour l'œil droit. Ouvrez
alors les deux yeux, les jumelles devraient être
parfaitement au point. Cette opération peut
s'effectuer avec le StabilEyes sous tension et la
stabilisation activée ou lorsqu'il est hors tension.
Pour visionner un sujet différent, ajustez le molette
de mise au point jusqu'à ce que l'image soit nette.
(4) Système de stabilisation
Lorsque vous appuyez pour la première fois sur le
bouton de mise sous tension, la LED s'allume en
orange, et les jumelles passent en mode d'attente.
Les jumelles StabilEyes sont soumises à un
contrôle du système interne et il faudra environ
cinq secondes pour que leurs performances se
stabilisent.
Puis remettez la manette de stabilisation en
position ON. La LED passe au vert, indiquant que
le système de stabilisation est actif. Tant que le
bouton VR PAUSE est pressé, la stabilisation est
en pause, ce qui permet de minimiser l'instabilité
d'image pendant un panoramique, le passage
d'un objet en vue à un autre, ou le visionnage
d'objets en mouvement. Utilisez cette fonction
pour chercher parmi plusieurs objets en utilisant
les jumelles. .
Régler la manette de stabilisation à la position
OFF désactive la stabilisation, et la LED repasse à
l’orange, indiquant le mode de veille.
Réglez la manette de stabilisation à votre guise. Le
monde de veille économise les piles.
A la fin de l’emploi, réglez la manette de
stabilisation à la position OFF et appuyez sur le
bouton d’alimentation pour l’arrêt.
Si vous laissez vos jumelles StabilEyes en mode
de veille ou de stabilisation quelques minutes sans
les utiliser, la manette de stabilisation reviendra à
la position OFF, et la mise hors tension se fera
automatiquement.
Porteur de lunettes Non porteur de lunettes
Fusionnez les deux
champs de visée
en un seul.
Molette de mise au point
Bague d'ajustement
dioptrique
Système d'exploitation de StabilEyes
Le système se met sous
tension et effectue un
auto-test de 5 secondes.
Manette de
stabilisation
LED I:
Clignote en
orange
bouton de mise
en marche
La stabilisation est
arrêtée
LED I
bouton VR PAUSE
LED I:
éteinte
LED II
Page 15

Mise en place de piles
1) Glissez le curseur de libération du logement
piles sur la dragonne à la position
d’ouverture pour libérer le support de piles.
2) Insérez deux piles alcalines de format AA
neuves.
3) Attachez le support de piles à la dragonne
et glissez le curseur de libération à la
position de verrouillage pour fixer le
logement.
w AVERTISSEMENT
• Utilisez le même type de piles. Ne mélangez PAS des piles neuve et ancienne. Cela
pourrait provoquer une fuite ou une rupture.
• En cas de remplacement des piles à l’extérieur, évitez toute pénétration d’eau dans le
logement piles.
• Si les jumelles doivent rester rangées pendant une période prolongée, retirez les piles
pour éviter la décharge naturelle et/ou la fuite.
Au retrait des piles, maintenez le support de piles fixé à la dragonne pour protéger les
points de contact internes.
• Maintenez les points de contact à l’écart de tout élément métallique. Des dommages
sont possibles.
• Ne glissez JAMAIS la manette de stabilisation à la position ON si deux piles ne sont
pas intallées. Des dommages sont possibles.
Glissement du curseur
Ouvert
(Retirez le support
de piles.)
Fermé
(Fixez le support
de piles.)
Utilisation de la dragonne
Vous pouvez maintenir les jumelles plus fermement si
vous passez votre main dans la dragonne.
Passez votre main dans la dragonne et ajustez la
longueur de la courroie. Pour serrer la dragonne, tirez
sur la courroie à l’extrémité de l’oculaire.
Pour desserrer la dragonne, soulevez la boucle à
l’arrière de la dragonne et tirez sur la courroie.
w AVERTISSEMENT
La dragonne sert également de support de piles.
N’exercez PAS une grande fource dessus et ne la
retirez pas des jumelles. Des dommages sont
possibles.
Fixation de la bandoulière
1) Faites une grande boucle à chaque
extrémité de la bondoulière.
3) Guidez la bande à l’intérieur de la
boucle, puis dans le passant, puis tirez.
Faites de même avec la boucle
extérieure.
2) Introduisez la bande dans le support de
la bandoulière.
4) Opérez de la même manière avec
l’ouverture dans les jumelles pour fixer la
dragonne de l’autre côté.
Page 16

Gardez vos lentilles propres
Prenez une feuille de papier à lentille et pliez-la deux fois,
comme indiqué.
Roulez la feuille en cylindre et humectez une des
extrémités seulement avec le liquide de nettoyage
optique.
En commencant au centre des lentilles, frottez
délicatement en effectuant un mouvement circulaire, du
centre vers l'extérieur.
Pour éviter d'abîmer les revêtements appliqués sur la surface des lentilles, nettoyez régulièrement la
poussière, le sel et l'huile laissée par les traces de doigt.
Utilisez du papier spécial pour lentille et un bon produit de nettoyage optique. Vous pourrez vous
procurer ces articles dans tout magasin d'appareils photos, de jumelles ou opticiens. Pour obtenir
des résultats optimaux, nettoyez toujours les quatre lentilles en même temps. Soufflez d'abord la
poussière qui pourrait être déposée sur les lentilles. Puis procédez comme suit…
Jetez la feuille de papier à lentilles après chaque usage. Il peut être nécessaire, parfois, de
recommencer l'opération.
Grossissement ................................................................12x
Angle de compensation (amplitude de stabilisation) ......±3°
Diamètre des lentilles des objectifs ................................32mm
Position de l'œil ..............................................................15mm
Champ angulaire de vision (réel) ....................................5°
Champ angulaire à 1000m ..............................................87m
Distance de mise au point ..............................................3,5m
Pupille de sortie ..............................................................2,7mm
Luminosité ......................................................................7,3
Ajustement de la distance interpupillaire ........................56~72mm
Structure..........................................................................Imperméable (purgé à l'azote sec)
Dimentions: Lo x La (mm)................................................178 x 142
Poids................................................................................1130g (sans piles)
Durée utile des piles ........................................................6 heures (fonctionnement continu avec
quatre piles alcalines de format AA; 20°C)
Plage de température ambiante recommandée ............-10°C à 50°C (14°F à 122°F)
Du fait de l'effort continu d'amélioration de nos produits, les caractéristiques techniques sont sujettes
à modification sans préavis.
Caractéristiques techniques
Les StabilEyes sont étanches, et ne subiront pas de dégâts si elles sont submergées ou laissées
tomber dans l'eau jusqu'à une profondeur maximale de 1 mètre jusqu'à 5 minutes.
Les StabilEyes ofrent les avantages suivants:
• Elles sont utilisables sous forte humidité, poussière et pluie sans risques de dommages.
• La conception à injection d'azote les rend résistantes à la condensation et aux moisissures.
Observez les règles suivantes à l'emploi des StabilEyes:
• Comme les jumelles n'ont pas une structure parfaitement étanche, elles ne doivent être tenues
dans l'eau courante.
• Toute humidité doit être essuyée avant d'ajuster les parties mobiles (bouton de mise au point,
oculaire, etc.) des StabilEyes pour éviter tout dégât et pour des raisons de sécurité.
Pour maintenir vos StabilEyes en excellent état, Nikon Vision recommande un entretien régulier par
un revendeur agréé.
Modèles étanches
Page 17

Herzlichen Glückwunsch!
StabilEyes 12x32 ...................... 1
Weichtasche ............................ 1
Tragriemens (SAA) .................... 1
Okulardeckel (EAP) .................. 1
Alkali-Mignonzellen (Typ AA) .... 2
Im Lieferumfang
Vorsichts- und Warnhinweise
w VORSICHT!
Besonders dringliche Warnung, die Sie auf eine ernste Gefährdung Ihrer Gesundheit oder des Gerätes
hinweist.
w ACHTUNG!
Vorsichtsmaßnahme, deren Missachtung zur Beschädigung des Gerätes oder zu Verletzungen des
Benutzers führen kann.
w VORSICHT!
Richten Sie das Fernglas nie auf die Sonne oder eine starke Lichtquelle, während Sie
hindurch schauen! Schwere Sehschäden bis hin zum Erblinden sind die möglichen
Folgen.
w A C H T U N G :
• StabilEyes-Ferngläser sind wasserdicht, können aber
nicht unter Wasser verwendet werden. Sie schwimmen zwar auf der Obefläche, sollten aber ggf.
schnellstmöglich aus dem Wasser herausgenommen
werden. Falls Wasser, Staub, Sand oder andere
Fremdkörper ins Innere eindringen, drohen Beschädigungen. Das Batteriefach darf nicht an Orten mit hoher
Feuchtigkeits- oder Staubbelastung geöffnet werden,
da sonst u.U. das Innere des Fernglases beeinträchtigt
wird. Unabhängig von der Stromversorgung (intern
oder extern) müssen O-Ring und Batteriegehäuse bzw.
Adapter festsitzen und in ihrer Lage gesichert sein.
• In nasser oder staubiger Umgebung sollten weder
Batterien gewechselt noch der Stromanschluss
geändert werden.
• Das Batteriegerhäuse muss sicher in der richtigen
Position angebracht sein.
• Stellen Sie das StabilEyes nicht auf schlüpfrigen oder
instabilen Flächen ab, da es sonst herunterfallen und
durch den Aufprall beschädigt werden kann. Bitte
bedenken Sie, dass Schäden, die durch Unachtsamkeit oder unsachgemäßen Umgang entstehen,
zum Verlust der StabilEyes-Garantie führen können.
• Wenn Sie beabsichtigen, das Fernglas längere Zeit
nicht zu benutzen, bewahren Sie es bitte an einem
kühlen, trockenen Ort auf, und entnehmen Sie die
Batterien, damit sie das Gerät nicht durch Auslaufen
beschädigen können.
• Bitte wechseln Sie stets alle Batterien gleichzeitig aus.
Verwenden Sie stets Batterien gleichen Typs und
gleicher Marke.
• Werfen Sie Batterien nie ins, Feuer, denn sie können
e x p l o d i e r e n !
• Nickel-Cadmium-Akkus sind aufladbar; versuchen Sie
jedoch nie, gewöhnliche Batterien wieder aufzuladen!
Schließen Sie die Batterien nie kurz!
• Setzen Sie das Fernglas keinen extremen
Temperaturen oder abrupten Temperaturänderungen
aus. (Wird das Fernglas beispielsweise bei sehr kalter
Temperatur benutzt und anschließend in beheizte
Räumlichkeiten gebracht, kann sich Feuchtigkeit auf
der Optik niederschlagen. Lassen Sie dem Fernglas
genügend Zeit, um sich zu akklimatisieren.)
• Wenn Sie das StabilEyes auf See oder am Meer
benutzen, sollten Sie es anschließend durch
Eintauchen in Süßwasser abspülen, ohne direkt
Wasser darauf zu gießen, um die Ablagerungen
aufgrund von Salzspritzwasser und salzhaltiger Luft zu
e n t f e r n e n .
• Lassen Sie das Fernglas nicht unbeaufsichtigt liegen.
Setzen Sie es keiner längeren direkten Sonnenbestrahlung aus. Sonnenstrahlen, die durch das
Fernglas hindurchtreten, können Feuer entfachen.
• Schauen Sie nie durchs Fernglas, während Sie gehen
— Unfallgefahr!
• Lassen Sie das Fernglas nicht am Tragriemen durch
die Luft schwingen, denn es könnte jemanden
verletzen oder auf einen harten Gegenstand auftreffen
und beschädigt werden.
• Bitte entsorgen Sie alle Kunststoffbeutel und Plastiktüten, in denen das StabilEyes eventuell verpackt war,
sofort, und halten Sie sie von Kleinkindern fern, die
damit spielen und ersticken könnten.
• Ein längerer Dauerkontakt der Gummi-Augenshalen
mit der Haut kann Hautreizungen verursachen. Sollten
hartnäckige Hautreizungen auftreten, wenden Sie sich
bitte an einen Arzt.
• Sollten Sie Probleme mit Ihrem StabilEyes haben,
versuchen Sie bitte nicht, es selbst zu reparieren oder
von Dritten reparieren zu lassen. Bringen Sie das
Fernglas zu Ihrem Fachhändler oder schicken Sie es
direkt an NIKON VISION CO., LTD.
Vielen Dank für das Vertrauen in unsere Produkte, das Sie uns mit dem Kauf des
Fernglases Nikon-Fernglas StabilEyes 12x32 erweitern haben. Machen Sie sich
bitte gründlich mit dem Inhalt dieser Anleitung vertraut, damit stets ein
einwandfreier Gebrauch gewährleistet ist.
• Das Fernglas StabilEyes 12x32 ist das Resultat fortgeschrittener Technologie
in Bezug auf Optik, Elektronik und Ergonomie.
• Das Modell StabilEyes 12x32 ist wasserdicht, sodass es sich auch bei
Regenwetter einsetzen lässt und auf dem Wasser schwimmt.
• Die Bildstabilisierungsfunktion des StabilEyes 12x32 kompensiert Vibrationen
von außen und das Verwackeln bei der Handhabung des Fernglases, sodass
stabiles Betrachten auch ohne Stativ möglich ist.
• Auch von einem Auto, Segel oder Motorboot oder einem Flugzeug in
Bewegung aus kommen Sie in den Genuss eines stabilen Blickfelds und klarer
Bilder.
• Die aktivierte Bildstabilisierung lässt sich durch Drücken der Taste VR PAUSE
auf Pause schalten, damit bei Fernglasschwenks, Wechseln zwischen
Beobachtungsobjekten oder Betrachten von Objekten in Bewegung das
Bildverwackeln minimiert wird.
• Im Interesse eines breiten Blickfelds und geringerer Augenermüdung sind die
Linsen mehrfach vergütet. Und die Phasenbeschichtung der Prismen sorgt für
scharfen Kontrast und helle Bilder.
Page 18

Die Bedienelemente
LED II:
Leuchtet orangerot:
Funktion VR PAUSE aktiviert
(Bildstabilisierung unterbrochen)
Mitteltrieb für
Fokussierung
Okulare
Objektiv
Handschlaufe
Batteriegehäuse
(6) VR PAUSE-Taste
(4) Dioptrien-
einstellring
Verriegelung für
Batteriegehäuse
(5) Stabilisierungsschalter
(5) Stabilisierungsschalter
Kurzanleitung
• Piezoelektrische Kreisel-Vibrationssensoren für AZ (Azimut) und EL (Elevation) sowie
Direktantriebsmotoren betätigen gemeinsam eine kardanisch aufgehängte Baugruppe mit
Bildumkehrprisma zum Ausgleich von Vibrationen und halten das Fernglas stabil, sodass auch aus
einem Fahrzeug in Bewegung verwacklungsfreies Beobachten garantiert ist.
• Der Positionssensor aktiviert die Stabilisierungsfunktion, sobald er Vertikal- und
Horizontalbewegungen erfasst.
• Die Linsen nach neuem Design sind im Interesse heller Bilder mehrfach vergütet.
• Die Prismen haben eine Spezialbeschichtung, die für schärfere Bilder als jemals zuvor sorgt.
• In die Okulare ist fortgeschrittene Optiktechnologie eingegangen, die ein breites Blickfeld bietet und
die Ermüdung der Augen reduziert. Für den Gebrauch von Brillenträgern sind sie nach oben und
unten schwenkbar.
• StabilEyes 12x32 ist wasserdicht und mit trockenem Stickstoffgas gefüllt, damit ein Beschlagen der
optischen Komponenten ausgeschlossen ist.
1) Die Betriebstaste (1) drücken, um die Stromversorgung einzuschalten. Daraufhin wird das
elektronische System aktiviert und das Fernglas schaltet nach etwa fünf Sekinden auf
Betriebsbereitschaft um.
2) Den Okularabstand (2) so einstellen, dass er Ihrem Augenabstand entspricht.
3) Die Scharfeinstellung mit dem Mitteltrieb (3) über das linke Auge vornehmen. Sobald das Bild
scharf wird, mit dem Dioptrieneinstellring (4) am rechten Okular die Scharfeinstellung für das rechte
Auge vorzunehmen.
Nach erfolgter Dioptrienkorrektur nur noch den Mitteltrieb (3) für weitere Fokussierung nutzen.
4) Den Stabilisierungsschalter (5) auf ON stellen, um die Bildstabilisierungsfunktion zu aktivieren. Die
aktivierte Bildstabilisierung lässt sich durch Drücken der Taste VR PAUSE auf Pausefunktion
schalten, damit bei Fernglasschwenks, Wechseln zwischen Beobachtungsobjekten oder
Betrachten von Objekten in Bewegung das Bildverwackeln minimiert wird.
5) Nach Gebrauch den Stabilisierungsschalter (5) auf OFF drehen und die Betriebstaste (1) drücken,
um die Stromversorgung auszuschalten.
6) Die Objektivdeckel wieder aufsetzen und das Fernglas in seinem Etui verstauen.
Wie funktioniert die digitale Bildstabilisierung
des StabilEyes?
Prismeneinheit
Okularlinsen
(2) Okulare
(1) Betriebstaste
LED I:
Blinkt orangerot: Einschalten der
Stromversorgung und
Bereitschaftsbetrieb
Leuchtet orangerot:
Bildstabilisierung im
Bereitschaftsbetrieb
Leuchtet grün: Bildstabilisierung aktiviert
Blinkt orangerot und grün:
Batterien erschöpft
Leuchtet rot: Batterien erschöpft und
müssen ausgestauscht
werden
Blinken rot: Systemproblem
Dunkel: Stromversorgung
ausgeschaltet
Kreiselsensor
Objektiv
Kreiselsensor
Piezoelektrischer
Vibrations
Positionssensor
AZ-Direktantriebsmotor
Kardanische Aufhängung
EL-Direktantriebsmotor
Page 19

Hinweise zum Gebrauch und zur Fokussierung
StabilEyes Betriebssystem
( 1 ) O k u l a r
Beim Tragen einer Brille oder Sonnenbrille
während des Gebrauchs von StabilEyesFerngläsern drehen Sie die Augenmuschel in ihre
volle Einrückposition. Bei normalsichtigen
Benutzern sind die Augenmuscheln in volle
Ausrückposition zu drehen.
(2) Einstellung des Pupillenabstands
Fassen Sie eines der beiden Okulare und drehen
Sie es zur Mittelachse des Fernglases hin oder
von ihr weg (gleichzeitig dreht sich das andere
Okular entsprechend in entgegengesetzter
Richtung). Stellen Sie den Pupillenabstand auf den
Abstand Ihrer Augen so ein, dass Sie nur noch ein
einziges kreisrundes Bildfeld sehen.
( 3 ) D i o p t r i e n e i n s t e l l u n g
Die Fokussierung erfolgt in zwei Schritten:
Schließen Sie Ihr rechtes Auge und blicken Sie bei
der Scharfeinstellung mit dem Mitteltrieb nur mit
dem linken Auge durch das Fernglas. Sobald das
Bild scharf eingestellt ist, schließen Sie das linke
Auge und öffnen das rechte. Drehen Sie das rechte
Okular so lange, bis die das rechte Auge fokussiert
ist. Öffnen Sie beide Augen; das Fernglas sollte
nun perfekt fokussiert sein. Sie können das
StabliEyes im eingeschalteten Zustand
fokussieren, sowohl bei aktivierter Stabilisierung
oder auch vollständig ausgeschaltet. Beim
Wechsel zu einem anderen Beobachtungsobjekt
stellen Sie dann durch Drehen des Mitteltriebs
wieder ein scharfes Bild ein.
(4) Bildstabilisierungsfunktion
Beim erstmaligen Drücken der Betriebstaste
leuchtet die LED orangerot auf und das Fernglas
schaltet auf Bereitschaftsbetrieb. Dabei führt das
StabilEyes-Fernglas eine Eigendiagnose aus und
braucht ungefähr fünf Sekunden bis zur
Leistungsstabilisierung.
Stellen Sie nun den Stabilisierungsschalter auf
ON. Daraufhin leuchtet die LED grün auf zur
Anzeige, dass die Bildstabilisierung aktiviert ist.
Solange die Taste VR PAUSE gedrückt bleibt,
lässt sich die Bildstabilisierung durch Drücken der
Taste VR PAUSE auf Pausefunktion schalten,
damit bei Fernglasschwenks, Wechseln zwischen
Beobachtungsobjekten oder Betrachten von
Objekten in Bewegung das Bildverwackeln
minimiert wird. Diese Funktion empfiehlt sich beim
Anvisieren von Beobachtungsobjekten mit dem
Fernglas.
Nach Gebrach drehen Sie zunächst den
Stabilisierungsschalter auf OFF und Betriebstaste
drücken, um die Stromversorgung auszuschalten.
Lässt man allerdings das StabilEyes einige
Minuten lang entweder im Bereitschafts- oder
Stabilisierungsbetrieb, ohne es zu benutzen, so
kehrt der Stabilisierungsschalter in Stellung OFF
zurück und das Fernglas schaltet sich automatisch
selbts ab.
Für Brillenträger Betrachtung ohne Brille
Die zwei kreisförmigen
Sehfelder in Über-
einstimmung bringen.
* Beim Ausschalten der Stromversorgung wird die Stabilisierungsfunktion automatisch deaktiviert.
Stromversorgung
Betriebstaste
drücken
Einschalten Power off
Das System wird
eingeschaltet und führt
eine 5-sekündige
Eigendiagnose aus.
Bleibt das eingeschaltete StabilEyes ca. fünf Minuten im
Bereitschaftsbetrieb oder Stabilisierungsmodus und wird dabei etwa eine
Minute lang nicht gebraucht, so wird es automatisch ausgeschaltet.
Stabilisierungsschalter: OFF
Bildstabilisierung im LED I:
Bereitschaftsbetrieb orangerot
eingeschaltet
LED I:
blinkt
orangerot
Stabilisierungsschalt
er betätigen
Drücken der Taste
VR PAUSE
Betriebstaste
drücken
Bildstabilisierung
ausgeschaltet
Stabilisierungsschalter: ON
Stabilisierung LED I:
aktiviert grün
Solange die Taste VR PAUSE gedrückt ist,
bleibt die Stabilisierung im Pausebetrieb.
LED I:
dunkel
Mitteltrieb für
Fokussierung
Dioptrieneinstellring
Stabilisierungs-
schalter
Betriebstaste
LED I
Taste VR PAUSE
Stabilisierung im LED II
Pausebetrieb grün
LED II
Page 20

Einsetzen der Batterien
1) Schieben Sie den Öffnungsknopf für den
Batteriebehälter an der Handschlaufe in die
Öffnungsposition, damit der Batteriehalter
freigegeben wird.
2) Setzen Sie zwei neue Alkali-Mignonzellen
(Format AA) ein.
3) Bringen Sie den Batteriehalter wieder an der
Handschlaufe an und schieben Sie den
Öffnungsknopf in die Schließposition, damit
der Halter sicher geschlossen ist.
w VORSICHT
• Verwenden Sie stets denselben Batterietyp. Mischen Sie KEINESFALLS alte und neue
Batterien. Andernfalls droht die Gefahr, dass die Batterien auslaufen oder bersten.
• Bei einem Batterieaustausch im Freien ist unbedingt zu vermeiden, das Wasser in den
Batteriehalter eindringt.
• Vor einem längeren geplanten Nichtgebrauch das Fernglases entnehmen Sie die
Batterien, damit sie sich nicht entladen bzw. auslaufen können. Nach der Entnahme
der Batterien lassen Sie den Batteriehalter an der Handschalufe befestigt, damit die
Kontakte im Inneren geschützt sind.
• Bringen Sie die Kontakte keinesfalls in Berührung mit Metallobjekten. Andernfalls
drohen Schäden.
• Drehen Sie den Stabilisierungsschalter UNBEDINGT nur dann auf ON, wenn zwei
Batterien in den Batteriehalter eingesetzt sind. Andernfalls drohen Schäden..
Verschieben des Öffnungsknopf
Öffnen
(Batteriehalter
abnehmen.)
Schließen
(Batteriehalter in
seiner Lage sichern.)
Gebrauch der Handschlaufe
Das Fernglas lässt sich sicher halten, wenn Sie die
Hand zwischen es und die Handschlaufe schieben.
Schieben Sie die Hand durch die Handschlaufe und
stellen Sie die Schlaufenlänge ein. Zum Straffziehen
der Schlaufe ziehen Sie an ihrem Okularende.
Zum Lockern der Schlaufe klappen Sie die Schnalle
an der Rückseite der Handschlaufe hoch und ziehen
an ihr.
w VORSICHT
Die Handschlaufe dient auch als Batteriehalter.
Behandeln Sie die Handschlaufe KEINESFALLS mit
übermäßigem Kraftaufwand und trennen Sie die
Schlaufe auch nicht vom Fernglas ab. Andernfalls
drohen Schäden.
Anbringen des Tragriemens
1) Bilden Sie mit einem Ende des
Tragriemens eine große Schlaufe.
3) Führen Sie den Riemen zur Innenseite
der Schlaufe und dann durch die
Schnalle. Ziehen Sie ihn fest. Verfahren
Sie mit der äußeren Schalufe ebenso.
2) Stecken Sie den Riemen durch die
hierfür vorgesehene Halterung.
4) Zum Anbringen der Schlaufe an der
anderen Seite gehen Sie ber der
Aussparung am Fernglas ebeso vor.
Page 21

Optik regelmäßig reinigen!
Nehmen Sie ein Linsenreinigungstuch, und falten Sie es
zweimal — siehe Abblildung.
Rollen Sie es dann zylinderförmig auf, und befeuchten Sie
ein Ende mit der Linsenreinigungsflüssigkeit.
Beginnen Sie in der Linsenmitte, und wischen Sie mit
kreisförmigen Bewegungen zum Rand hin.
Staub, Salz und Fingerabdrücke sollten nie längere Zeite auf den Linsen verbleiben, da sie die
Beschichtung auf den Linsen angreifen können. Zum Reinigen verwenden Sie ein
Linsenreinigungstuch und eine gute Spezialreinigungsflüssigkeit. Beides erhalten Sie in allen
Fachgeschäften, die Kameras, Ferngläser oder Brillen anbieten. Am besten reinigen Sie immer gleich
alle vier Linsen.
Benutzen Sie jedes Tuch nur einmal. Unter Umständen müssen Sie den Vorgang mehrmals
ausführen.
Vergrößerung ..................................................................12fach
Kompensationswinkel (Stabilisierfreiheit)........................±3°
Objektivdurchmesser ......................................................32mm
Augenanpassung ............................................................15mm
Sehfeld (objektiv) ............................................................5°
Sehfeld auf 1.000m..........................................................87m
Mindestdistanz ................................................................3,5m
Austrittspupille ................................................................2,7mm
Lichtstärke ......................................................................7,3
Pupillenabstand ..............................................................56~72mm
Bauart..............................................................................Wasserdicht
(mit trockenem Stickstoff gespült)
Abmessungen: L x B ......................................................178 x 142mm
Gewicht............................................................................1.130g (ohne Batterien)
Batterielebensdauar ........................................................6 Stunden (ununterbrochener Betrieb
mit vier Alkali-Mignonzellen, Typ AA; 20°C)
Umgebungstemperaturbereich für sicheren Betrieb ......-10 °C bis 50 °C
Änderungen der technischen Daten und des Designs jederzeit vorbehalten.
Technische Daten
StabilEyes sind wasserdicht und lassen sich bis zu einer Tiefe von maximal 1 Metern bis zu 5
Minuten lang im Wasser einsetzen, ohne dass die Optik beschädigt wird.
StabilEyes bieten die folgenden Vorteile:
• Einsatz unter hoher Luftfeuchtigkeit, Staub und Regen ohne Beschädigungsrisiko.
• Stickstofffüllung verhindert Kondensation und Schimmelbildung.
Bei Einsatz von StabilEyes zu beachten:
• Da das Produkt nicht hermetisch abgedichtet ist, darf es unter fließendem Wasser weder betrieben
noch gehalten werden.
• Zur Verhinderung von Schäden und aus Sicherheitsgründen dürfen die beweglichen Teile (z. B.
Fokussierring und Okular) von StabilEyes erst dann betätigt werden, wenn etwaige Feuchtigkeit
abgewischt ist.
Damit Sie viele Jahre ungetrübte Freude an Ihrem S t a b i l E y e s haben, empfiehlt Nikon Vision die
regelmäßige Wartung durch einen autorisierten Fachhändler.
Wasserdichte Modelle
Page 22

Felicitaciones Precauciones y advertencias
w ADVERTENCIA:
Advertencia de nivel elevado contra lesiones personales graves o daños importantes en el
producto.
w PRECAUCIONES:
Precauciones que se debe tener para prevenir daños al producto o lesiones para los que lo
usen.
w ADVERTENCIA:
No mire nunca directamente al sol ni a ninguna luz brillante a través de los
binoculares. Podría producirse una lesión grave, incluyendo la pérdida de la vista.
w PRECAUCIONES:
• Los binoculares StabilEyes son a prueba de agua,
pero no pueden utilizarse en el agua. A pesar de que
flotan en el agua, en caso de que caigan a la misma
debe recogerlos tan pronto como sea posible.
Pueden sufrir daños si les penetra agua, polvo, arena
u otras materias extrañas. No abra el compartimiento
de las baterías en un ambiente marino, muy húmedo
o polvoroso, porque puede dañarse el interior de los
binoculares. Lo mismo si se utilizan baterías internas
que alimentación externa, verifíquese que la junta
tórica y el depósito de pilas o el adaptador están
firmemente colocados, y asegurados en su posición.
• No cambie las baterías o las conexiones de
alimentación en condiciones húmedas o polvosas.
• Confirme que el depósito de pilas se halla en su
correspondiente posición y debidamente asegurado.
• Como ayuda para evitar los daños por impacto, al
caerse o desplomarse el dispositivo, no ponga los
binoculares StabilEyes en superficies resbaladizas ni
inestables. Asimismo, tome nota de que los daños
debidos a malos tratos o uso inadecuado pueden
cancelar la garantía de los StabilEyes.
• Si piensa dejar los binoculares almacenados durante
periodos prolongados, duárdelos en un lugar fresco
y seco y retire las batrías para evitar que se
produzcan daños por fugas.
• Cuando se deban cambiar las baterías, reemplace
todas al mismo tiempo, utilizando la misma marca y
el mismo tipo.
• No intente nunca quemar las baterías en una
hoguera. Podría producirse una explosión.
• Aunque las baterías NiCad son recargables, no
intente recargar nunca baterías ordinarias. No ponga
nunca las baterías en cortocircuito.
• Evite las temperaturas extremadamente altas y bajas
y los cambios rápidos (por ejemplo, si los
binoculares se han utilizado en condiciones muy
frías, el llevarlos a un ambienta con calefacción
podría hacer que se acumulara una condensación en
ellos. Deje que pase tiempo para un ajuste gradual.)
• Si usa los StabilEyes en el mar, Nikon recomienda
que se enjuaguen sumergiéndolos en agua dulce, sin
verter agua directamente sobre los mismos, después
de su exposición al aire salino y a las salpicaduras de
agua salada.
• No deje los binoculares sin atención y expuestos a
los rayos directos del sol. Al pasar por los lentes,
esos rayos podrían causar un incendio.
• No intente nunca caminar y usar los binoculares al
mismo tiempo. Podrían producirse accidentes ye
lesiones.
• No balancee los binoculares sujetándolos por la
correa para el cuello; podrían golpear y lastimar a
alguien o sufrir daños al chocar con algún objeto
sólido.
• Tenga la bondad de deshacerse de las bolsas de
plástico en las que se entreguen los binoculares
StabilEyes. Esas bolsas podrían asfixiar o ahogar a
un niño pequeño.
• El uso prolongado, con contacto de los oculares de
caucho con la piel, puede causar irritación. Si
persiste ese estado, consulte a su médico.
• Si tiene problemas con sus binoculares StabilEyes,
nunca trate de repararlos por su cuenta ni hágalos
reparar en otro lugar que no sea NIKON VISION CO.,
LTD. Devuélvalo a su concesionario local o
directamente a NIKON.
ACCESORIOS SUMINISTRADOS
Muchas gracias por la adquisición de los binoculares StabilEyes 12x32 de Nikon.
Para su debido uso, sírvase leer previamente las instrucciones.
• Los StabilEyes 12x32 utilizan avanzada tecnología en óptica, electrónica, y
ergonomía.
• Los StabilEyes 12x32 son a prueba de agua, pueden utilizarse en tiempo
lluvioso, y flotan en el agua.
• La característica de estabilización de los StabilEyes 12x32 elimina los efectos
de las vibraciones y sacudidas externas que ocurren cuando se sostienen con
las manos, permitiendo una visualización estable sin necesidad de trípode.
• Esto le facilitará su uso a bordo de embarcaciones, automóviles o aeronaves
en movimiento, con un mínimo de vibración.
• Cuando la estabilización está activada, es posible hacer pausa pulsando el
botón "VR PAUSE" para minimizar la inestabilidad de la imagen en
observaciones panorámicas, al cambiar de sujeto observado, o al observar
sujetos en movimiento.
• Los objetivos multi-revestidos le proporcionan un amplio campo visual y
menor fatiga visual. Los prismas con revestimiento para corrección de fase
permiten imágenes claras con alto grado de contraste.
StabilEyes 12x32 ...................... 1
Funda blanda .......................... 1
Banda para el cuello (SAA) ...... 1
Tapas de oculares (EAP) .......... 1
Pilas alcalinas de tipo AA ........ 2
Page 23

Conozca su dispositivo
LED II:
Luz anaranjada :
VR PAUSE activada (estabilización en
pausa)
Perilla de control de
enfoque
Lentes oculares
Lentes del objetivo
Banda de mano
Depósito de pilas
(6) Botón VR PAUSE
(4) Anillo regulador
de dioptrías
Palanquilla de bloqueo
del depósito de pilas
(5) Palanquilla de
estabilización
(5) Palanquilla de
estabilización
Comienzo rápido
• Su sistema de control de sensores giroestabilizadores de dos voltajes y motores de accionamiento
directo, mantiene constantemente la estabilidad de los prismas rectificadores incorporados en la
estructura cardánica. Debido a ello, le facilitará el uso de los binoculares en lugares expuestos a
las vibraciones.
• Sus transductores de posición mantendrán el sistema amortiguador de vibraciones en
funcionamiento, incluso al efectuar cambios en el campo visual.
• Todos los componentes ópticos se hallan revestidos, para poder observar las imágenes con
notable luminosidad.
• El prisma polarizador "roof" brinda imágenes nítidas con alto grado de contraste.
• Los visores de amplia visibilidad, diseñados para operaciones prolongadas con un mínimo de
fatiga visual, disponen de oculares de torsión, para facilitar su uso a través de gafas.
• Su estructura exterior de alta resistencia al agua y su interior dotado de deshidratantes de
nitrógeno, incrementan la protección de los elementos ópticos.
1) Oprímase el botón de conexión (1). El sistema eléctrico se conectará en unos 5 seg.
2) Regúlense los oculares (2) hasta la posición más adecuada.
3) Obsérvese a través del ocular izquierdo y regúlese la nitidez de la imagen con la perilla de control
de enfoque (3), luego obsérvese a través del ocular derecho y hágase girar el anillo regulador de
dioptrías (4), hasta obtener una imagen nítida. Después de haber efectuado estas operaciones
iniciales, se podrá enfocar la imagen pulsando simplemente la perilla de control de enfoque (c).
4) Muévase la palanquilla de estabilización (5) a la posición ON para activar la característica de
estabilización. Mientras la estabilización está activada, es posible hacer pausa pulsando el botón
"VR PAUSE" para minimizar la inestabilidad de la imagen en observaciones panorámicas, al
cambiar de sujeto observado, o al observar sujetos en movimiento.
5) Al acabar su uso, muévase la palanquilla de estabilización (5) hasta la posición OFF y
desconéctese oprimiendo el botón de conexión (1).
6) Tápense los oculares y guárdense los binoculares en su corresondiente estuche.
Estabilización de imagen digital StabilEyes
— Modo en que funciona
Conjunto de prisma
Lentes oculares
(2) Lentes oculares
(1) Botón de conexión
LED I:
Luz intermitente anaranjada:
La alimentación está
encendida y la unidad está
en espera.
Luz anaranjada: La estabilización está en
espera
Luz verde: La estabilización está
activada
Luz intermitente anaranjada o verde:
Pilas gastadas
Luz roja: Las pilas están agotadas y
deben reemplazarse
Luz intermitente roja:
Anomalía en el sistema
Luces apagadas: La alimentación está
apagada
Sensor de posición de
Lente objetivo
Sensor de posición de
Piezosensor de
posición de vibración
Motor de transmisión
directa AZ
Conjunto de
suspensión universal
Motor de transmisión
directa EL
Page 24

Cómo utilizarlo y enfocarlo
(1) Ocular
Si lleva gafas comunes o de sol al usar los
binoculares StabilEyes, haga girar el ocular tipo
“turn-slide” hasta su posición completamente
retraída. Con visión normal, haga girar el ocular
hasta su posición completamente extendida.
(2) Ajuste de la distancia entre pupilas
Tome cualquiera de los oculares y hágalo girar
acercándolo o alejándolo del centro de los
binoculares (el otro ocular se moverá en la misma
magnitud pero en la dirección opuesta). Ajuste la
distancia entre sus pupilas para que coincida con
la distancia entre sus dos ojos, de forma que vea
una sola imagen perfectamente redonda.
(3) Ajuste de dioptrías
Hay dos pasos para el enfoque: Cierre el ojo
derecho y use sólo el izquierdo al ajustar la perilla
de control de enfoque. Cuando la imagen sea
clara, cierre el ojo izquierdo y abra el ojo derecho.
Haga girar el ocular derecho, para enfocar el ojo
derecho. A continuación, abra ambos ojos y los
binoculares deben estar perfectamente
enfocados. Puede hacer esto con los binoculares
StabilEyes encendidos con la estabilización
activada o con la alimentación apagada por
completo.
Cuando esté observando un sujeto diferente,
ajuste la perilla de control de enfoque hasta que
obtenga una imagen clara.
(4) Característica de estabilización
Al pulsar el botón de conexión por primera vez, el
LED se enciende en anaranjado, y los binoculares
pasan al modo en espera. Los binoculares
StabilEyes hacen una comprobación del sistema
interno y la estabilización de su funcionamiento
demora unos cinco segundos.
A continuación, gire la palanquilla de
estabilización a la posición ON. El LED se
enciende en verde, indicando que la característica
de estabilización está activa.
Mientras tenga el botón VR PAUSE pulsado, la
estabilización estará en pausa, para que pueda
minimizar la inestabilidad de la imagen en
observaciones panorámicas, al cambiar de sujeto
observado, o al observar sujetos en movimiento.
Use esta función para buscar entre sujetos
usando los binoculares.
Después de uso, muévase la palanquila a la
posición OFF y oprímase el botón de conexión.
Si la palanquilla permanece en la posición de
espera por cierto tiempo, o la función de
estabilización no capta ninguna vibración durante
varios minutos, la palanquilla volverá
automáticamente a la posición OFF y se
desconectará el sistema electrónico.
Para los que usan gafas
Para los que no usan gafas
Una los dos visores
circulares en uno.
Sistema de operación del StabilEyes
* Cuando se apaga la alimentación, el modo de reducción de vibración se repone automáticamente a "OFF".
La alimentación está
Pulse el botón de
conexión
Alimentación encendida Alimentación apagada
El sistema se enciende y
se hace una
comprobación del
sistema de 5 segundos.
El StabilEyes se apaga automáticamente si se deja en espera durante
aproximadamente cinco minutos, o si el modo estabilización, cuando
está activado, no se usa durante aproximadamente un minuto.
Palanquilla de estabilización: OFF
La estabilización LED I: Luz
está en espera anaranjada
encendida
LED I: Luz
i n t e r m i t e n t e
a n a r a n j a d a
Use la palanquilla
de estabilización
Pulse el botón de
conexión
La estabilización está
apagada
Palanquilla de estabilización: ON
La estabilización LED I:
está activada Luz verde
LED I: Luz
apagada
Perilla de control
de enfoque
Anillo regulador
de dioptrías
Palanquilla de
estabilización
Pulsando el botón
VR PAUSE
Botón de conexión
LED I
Botón VR PAUSE.
La estabilización en pausa se
mantiene mientras se mantenga
pulsado el botón VR PAUSE.
Estabilización LED II
en pausa Luz verde
LED II
Page 25

Instalación de las baterías
1) El depósito de pilas se extrae accionando la
perilla de la banda de mano.
2) Introdúzcanse dos pilas alcailnas AA,
siguiendo las indicaciones impresas.
3) Colóquese el depósito de pilas a su
posición original y asegúrelo con la perilla.
w ADVERTENCIA
• No se deberán utilizar pilas de diferentes tipos, ni combinar pilas usadas con nuevas,
para evitar la fuga de ácidos.
• Al cambiar pilas al aire libre, evítese la introducción de humedad en el depósito de las
mismas.
• Si no se piensa utilizar los binoculares durante mucho tiempo, se recomienda extraer
las pilas, para evitar su desgaste así como la fuga de ácidos.
Aunque se hayan extraído las pilas, el depósito de las mismas deberá permanecer
dentro de la banda de mano.
• No se deberán tocar los contactos eléctricos con objetos metálicos.
• Evítese el accionamiento de la palanquilla de estabilización a la posición ON, cuando
el depósito de pilas esté vacío. Ello puede ocasionar serios daños.
Cómo utilizar la banda de mano
Los binoculares se podrán sostener con mayor
estabilidad, asegurando la muñeca con la banda de
mano. Regúlese la longitud de la banda de mano.
Para asegurar la banda de mano se tira del extremo
situado en el ocular.
Para desaflojar la banda de mano, se acciona
suavemente la perilla de su interior.
Cómo abrir y cerrar el
depósito de pilas
abrir
(Extraer el depósito
de pilas)
cerrar
(Asegurar el
depósito de pilas)
w ADVERTENCIA
Debido a que el depósito de pilas se halla en el
interior de la banda de mano, evítense los tratos
rudos así como su desacoplamiento, puesto que
pueden causar desperfectos.
Instalación de la banda para el cuello
1) Haga un lazo grande a cada extremo de
la banda para el cuello.
3) Empuje la banda al interior del lazo y a
través de la hebilla y tire de ella para
tensarla. Haga lo mismo con el otro lazo.
2) Inserte la banda por la ménsula
correspondiente.
4) Introdúzcase del mismo modo el
extremo opuesto en el agujero de la
parte lateral del armazón.
Page 26

Mantenga sus lentes limpios
No se deberá permitir que permanezcan sobre los lentes el polvo, la sal y el aceite que dejan los
dedos, porque pueden dañar los recubrimientos aplicados a las superficies de dichos lentes. Use
tejidos limpiadores de lentes y un buen fluido limpiador. Ambas cosas se encuentran disponibles por
lo común en los lugares en que se venden cámaras, binoculares o gafas. Para obtener los mejores
resultados, cuando deba quitar la suciedad de un lente, limpie los cuatro.
Use cada gasa una sola vez. En algunas ocasiones puede ser necesario repetir el procedimiento.
Tome una gasa simple para lentes y dóblela en dos,
como se muestra.
Enrolle la gasa para formar un cilindro y moje sólo una de
las puntas con fluido para limpiar lentes.
Parta del centro del lente, frote suavemente en forma
circular desde el centro hacia el exterior.
Aumento ..........................................................................12x
Ánglo de compensación (libertad de estabilización) ......±3°
Diámetro de lente objetivo ..............................................32mm
Resalto del ojo ................................................................15mm
Campo angular de visión (real)........................................5°
Campo de visión a 1.000m..............................................87m
Distancia de enfoque ......................................................3,5m
Pupila de salida ..............................................................2,7mm
Brillo ................................................................................7,3
Ajuste de distancia interpupilar ......................................56~72mm
Estructura ........................................................................A prueba de agua (purga de nitrógeno seco)
Dimensiones: L x A..........................................................178x142mm
Peso ................................................................................1.130g (sin pilas)
Duración funcional de la batería......................................6 horas (funcionamiento continuo
con 4 pilas alcalinas de tipo AA; 20°C)
Gama segura de temperaturas ambientales ..................-10 a 50°C (14 a 122°F)
Debido al proceso de mejoramiento continuo del producto, las especificaciones están sujetas a
cambios sin aviso previo.
Especificaciones
El StabilEyes es a prueba de agua y su sistema óptico no sufrirá daños si se sumerge o se deja caer
en el agua hasta una profundidad máxima de 1 metro durante un tiempo máximo de 5 minutos.
El StabilEyes ofrece las siguientes ventajas:
• Puede utilizarse en condiciones de alta humedad, polvo y lluvia sin peligro de dañarse.
• El diseño lleno de nitrógeno lo hace resistente a la condensación y al moho.
Observe lo siguiente cuando utilice el StabilEyes:
• Como la unidad no tiene una estructura perfectamente sellada, no debe manipularse ni colocarse
bajo el agua que sale del grifo.
• Para evitar daños, y por razones de seguridad, antes de ajustar las piezas móviles (perilla de
enfoque, ocular, etc.) del StabilEyes, debe eliminarse toda la humedad.
Para mantener su StabilEyes en excelentes condiciones, Nikon Vision recomienda un servicio regular
en un distribuidor autorizado.
Modelos a prueba de agua
Page 27

Congratulazioni
StabilEyes ................................ 1
Custodia morbida .................... 1
Tracolla (SAA) .......................... 1
Coperchi di oculari (EAP) .......... 1
Pile alcaline di tipo AA .............. 2
ARTICOLI FORNITI
Precauzioni e avvisi
w AVVISO:
Avviso molto serio per la protezione da infortuni a persone e danni al prodotto.
w ATTENZIONE:
Precauzioni che devono essere osservate per prevenire danni al prodotto o infortunio di chi lo
usa.
w AVVISO:
Non guardare mai con il binocolo direttamente il sole o altre sorgenti di luce molto
forte. Si rischierebbero infortuni molto gravi, inclusa la perdita della vista.
w A T T E N Z I O N E :
• Il binocolo StabilEyes è impermeabile all’acqua,
tuttavia non può essere utilizzato in acqua. Sebbene
galleggi, in caso di caduta in acqua, si consiglia di
raccoglierlo immediatamente. In caso di penetrazione
di acqua, polvere, sabbia o di altro materiale
estraneo, il binocolo potrebbe subire dei danni. Per
evitare di compromettere le parti interne del binocolo,
non aprire il vano in un luogo marittimo, molto umido
o polveroso. Sia si utilizzino pile interne, sia
un’alimentazione esterna, verificare che l’O-ring, il
contenitore delle pile o l’adattatore siano saldamente
in posizione.
• Si raccomanda di non sostituire le pile o i
collegamenti di alimentazione elettrica in ambienti
molto umidi o polverosi.
• Verificare nuovamente che il contenitore della pila sia
correttamente collegato e bloccato in posizione.
• Per evitare il rischio di danni per caduta e impatto
d’urto, non appoggiare il binocolo StabilEyes su
superfici scivolose o instabili. Inoltre, osservare che i
danni dovuti ad un utilizzo errato o non prescritto
potrebbero invalidare la garanzia del binocolo
S t a b i l E y e s .
• Se si pensa di non usare il binocolo per un periodo di
tempo piuttosto lungo, conservarlo in un posto
asciutto e fresco e rimuovere le pile per evitare i danni
derivati dalla perdita di elettrolito.
• Quando bisogna sostituire le pile, sostituirle tutte
insieme, con pile dello stesso tipo e della stessa
m a r c a .
• Assolutamente non provare a bruciare le pile.
Potrebbe essere causa di esplosione.
• A parte le pile al Ni-Cd che sono ricaricabili, non
tentare di ricaricare le pile comuni. Non
cortocircuitare i poli delle pile.
• Evitare posti estremamente caldi o freddi e i posti
dove la temperatura cambia rapidamente. (Per
esempio, se il binocolo è stato usato in posti molto
freddi, riportandolo in un ambiente riscaldato si può
notare la formazione di condensa. In questo caso,
lasciare che si ambienti gradualmente alla nuova
t e m p e r a t u r a . )
• Se si usa il binocolo StabilEyes al mare, dopo
un’esposizione ad acqua/aria salata, Nikon consiglia
di sciacquarlo immergendolo in acqua fresca, senza
tuttavia versarla direttamente sopra il binocolo.
• Evitare di lasciare il binocolo incustodito ed esposto
alla luce diretta del sole. I raggi del sole passano
attraverso le lenti e possono provocare un incendio.
• Non passeggiare e usare il binocolo
contemporaneamente; potrebbe essere causa
d’incidente e infortunio.
• Non roteare il binocolo tenendolo per la tracolla; il
binocolo potrebbe colpire e ferire qualcuno o
potrebbe danneggiarsi colpendo un oggetto solido.
• Gettare via le buste di plastica che accompagnano il
binocolo StabilEyes; quelle buste potrebbero
soffocare o strozzare un bambino piccolo.
• L’uso prolungato tenendo gli oculari di gomma contro
la pelle può essere causa d’irritazione. Se ciò dovesse
accadere, farsi visitare da un medico.
• In caso di problemi d’uso del binocolo StabilEyes,
non tentare di ripararli da soli o con l’aiuto di altri se
non il servizio di assistenza di NIKON VISION CO.,
LTD. Ritornarlo al rivenditore locale di propria fiducia
o direttamente a NIKON VISION CO., LTD.
Grazie per aver acquistato il binocolo StabilEyes Nikon 12x32. Ai fini di un
corretto utilizzo, leggere attentamente il presente manuale.
• StabilEyes 12x32 si basa su una tecnologia avanzata in termini di ottica,
elettronica ed ergonomica.
• StabilEyes 12x32 è impermeabile all’acqua, pertanto può essere utilizzato
sotto la pioggia ed é in grado di galleggiare sull’acqua.
• Grazie al suo sistema di stabilizzazione, StabilEyes 12x32, senza il sostegno di
un treppiedi, è in grado di annullare gli effetti delle vibrazioni e dei tremolii
esterni che si verificano durante l’utilizzo, a garanzia di immagini stabili.
• E’ possibile ottenere immagini stabili e chiare persino a bordo di un veicolo in
movimento, quale un’automobile, una barca a vela o a motore ed un aereo.
• Quando il sistema di stabilizzazione è attivato, è possibile sospenderlo
premendo il pulsante “VR PAUSE” al fine di ridurre l’instabilità dell’immagine
durante l’esecuzione di panoramiche, spostamenti tra oggetti all’interno del
campo visivo, oppure durante l’osservazione di oggetti in movimento.
• Le lenti presentano un multistrato che garantisce un ampio campo visivo e
riduce la stanchezza degli occhi. I prismi presentano un rivestimento con
correzione di fase, pertanto offrono contrasti nitidi ed immagini luminose.
Page 28

Conoscenza di base del prodotto
LED II:
Si accende in colore arancione Modalità:
VR PAUSE selezionata (il sistema di
stabilizzazione è sospeso)
Manopola di regolazione
della messa a fuoco
Lenti dell’oculare
Obiettivo
Cinghietta da polso
Contenitore pile
(6) Pulsante VR PAUSE
(4) Anello di
regolazione
diottrica
Leva di chiusura del
contenitore pile
(5) Leva del sistema
di stabilizzazione
(5) Leva del sistema
di stabilizzazione
Accensione rapida
• I sensori di vibrazione giro piezo ed i motori a presa diretta collaborano nello spostare il complesso
cardanico con prisma ad erezione al fine di annullare le vibrazioni e mantenere la stabilità del
binocolo, a garanzia di un utilizzo privo di tremolio, persino su di un veicolo in movimento.
• Non appena rileva un movimento in verticale e in orizzontale, il sensore di posizione attiva il sistema di
s t a b i l i z z a z i o n e .
• A garanzia di immagini luminose, i nuovi obiettivi sono a multistrato.
• I prismi hanno un rivestimento speciale che garantisce immagini più nitide rispetto alle versioni
p r e c e d e n t i .
• Grazie alla tecnologia ottica avanzata, gli oculari offrono un ampio campo visivo, riducendo l’affaticamento degli occhi. Se si indossano occhiali, è possibile ruotare gli oculari verso l’alto o verso il basso.
• I binocoli StabilEyes 12x32 sono impermeabili all’acqua e spurgati ad azoto secco, contro
l’offuscamento/annebbiamento dei componenti ottici.
1) Premere il pulsante Power (1) per attivarlo. Il sistema elettronico si avvierà ed il binocolo entrerà in
modalità di standby dopo circa cinque secondi.
2) Regolare l’ampiezza tra gli oculari (2) finché corrisponda alla distanza tra i propri occhi.
3) Per regolare la manopola di controllo della messa a fuoco, utilizzare l’occhio sinistro (3). Quando
l’immagine diventa nitida, utilizzare l’occhio destro e ruotare l’anello di regolazione diottrica (4) per
mettere a fuoco la lente di destra. Dopo aver effettuato le regolazioni diottriche, per controllare
nuovamente la correzione diottrica, utilizzare solamente la manopola di controllo (3).
4) Per attivare il sistema di stabilizzazione (5), ruotare la relativa manopola su ON. Per sospendere
tale sistema, premere il pulsante VR PAUSE al fine di ridurre l’instabilità dell’immagine durante
l’esecuzione di panoramiche, passaggi tra oggetti all’interno del campo visivo o durante
l’osservazione di oggetti in movimento.
5) Dopo ciò, ruotare la leva del sistema di stabilizzazione (5) su OFF, quindi premere il pulsante
Power (1) per disattivarlo.
6) Sostituire il coperchio dell’obiettivo e ricollocare il binocolo nell’apposito fodero.
Stabilizzazione dell’immagine digitale StabilEyes
— Ecco come funziona
Complesso prismatico
Lenti di oculari
(2) Lenti dell’oculare
(1) Pulsante Power
(di attivazione)
LED I:
Lampeggia in colore arancione:
L’alimentazione è disattivata e l’unità
è in modalità di standby
Si accende in colore arancione:
Il sistema di stabilizzazione è in
modalità di standby
Si accende in colore verde:
Il sistema di stabilizzazione è attivo
Lampeggia in colore arancione e verde:
Pile quasi scariche
Si accende in colore rosso:
Le pile sono scariche e devono essere
sostituite
Lampeggia in colore rosso:
Problemi a livello del sistema
Spento: Alimentazione disattivata
Sensore di posizione
Obiettivo
Sensore di posizione
Sensore giroscopico
di posizione
Motore diretto AZ
Complesso cardanico
Motore diretto EL
Page 29

Modalità di utilizzo e di messa a fuoco
(1) Oculare
Durante l’utilizzo di StabilEyes, se si indossano
occhiali da vista o da sole, ruotare la conchiglia
oculare modello scorrevole in posizione
completamente ritratta. Per gli utenti con una vista
normale, si raccomanda di estendere
completamente la conchiglia oculare.
(2) Regolazione della distanza interpupillare
Afferrare entrambi gli oculari e ruotarli in direzione
del (oppure allontanarli dal) centro del binocolo
(l’altro oculare si sposterà allo stesso modo nella
direzione opposta).
Regolare la distanza interpupillare finché
corrisponda alla distanza tra gli occhi, fino a
vedere un’immagine perfettamente rotonda.
(3) Regolazione diottrica
La messa a fuoco deve essere eseguita in due
passaggi: innanzitutto, mentre si utilizza la
manopola di regolazione della messa a fuoco,
chiudere l’occhio destro ed utilizzare solamente
quello sinistro. Quando l’immagine appare nitida,
chiudere l’occhio sinistro ed aprire quello destro.
Con un movimento di torsione dell’oculare destro,
mettere a fuoco anche la parte destra. A questo
punto, aprire entrambi gli occhi; il binocolo
dovrebbe essere perfettamente a fuoco. Questa
procedura può essere eseguita con il binocolo
StabilEyes acceso con il sistema di stabilizzazione
attivato o con il binocolo spento. Quando si passa
all’osservazione di un altro soggetto, regolare la
manopola di regolazione della messa a fuoco fino
ad ottenere un’immagine nitida.
(4) Sistema di stabilizzazione
Se si preme il pulsante Power per la prima volta, il
LED si accende in colore arancione ed il binocolo
entra in modalità standby. Ai fini della
stabilizzazione dell’immagine, StabilEyes è
soggetto ad un sistema interno di controllo di 5
secondi.
A questo punto, ruotare la leva del sistema di
stabilizzazione in posizione ON. Il LED si accende
in colore verde, ad indicazione che la
stabilizzazione è attivata.
Finché si tiene premuto il pulsante VR PAUSE, la
stabilizzazione resta disattivata, pertanto è
possibile ridurre l’instabilità dell’immagine durante
panoramiche, passaggi tra oggetti all’interno del
campo visivo ed osservazione degli oggetti in
movimento. Questa funzione è utile per la ricerca
tra oggetti con il binocolo. Per disattivare il
sistema di stabilizzazione, impostare la relativa
leva su OFF, quindi il LED si accende nuovamente
in colore arancione, ad indicazione della modalità
standby.
Impostare la leva del sistema di stabilizzazione
come si desidera.
Il ritorno in modalità di standby preserva la carica
delle pile. Ad utilizzo terminato, spostare la leva
del sistema di stabilizzazione in posizione OFF,
quindi disattivare il pulsante Power.
Se si lascia il binocolo StabilEyes o in modalità
standby o in modalità stabilization (di
stabilizzazione) per qualche minuto senza
utilizzarlo, la leva del sistema di stabilizzazione
ritorna in posizione OFF e il binocolo si spegne
automaticamente.
Adatto ai portatori
di occhiali
Adatto ai non portatori
di occhiali
Unificate i due campi
visivi circolari in uno
solo.
Manopola di regolazione
della messa a fuoco
Anello di
regolazione
diottrica
Sistema operativo dello StabilEyes
* In caso di spegnimento automatico, la modalità di riduzione delle vibrazioni ritorna
automaticamente in posizione “OFF”.
L’alimentazione
Premere il pulsante
Power
Alimentazione attivata Alimentazione disattivata
Il sistema si accende ed
esegue un controllo di
sistema per 5 secondi
Leva del sistema di stabilizzazione: OFF
Stabilizzazione LED I:
in modalità standby arancione
Leva del sistema di
stabilizzazione
viene attivata
LED I:
lampeggia
in arancione
Se il binocolo StabilEyes viene lasciato in modalità di standby o di
stabilizzazione per circa cinque minuti senza essere utilizzato, dopo
circa un minuto, si spegne automaticamente.
Utilizzare la leva del
sistema di stabilizzazione
Pressione del
pulsante VR PAUSE
LED I
Pulsante VR PAUSE
Pulsante VR PAUSE
Premere il pulsante
Power
La stabilizzazione viene
disattivata
Leva del sistema di stabilizzazione: ON
Sistema di stabili- LED I:
zzazione attivata verde
Finché il pulsante VR PAUSE rimane
premuto, la stabilizzazione resterà
sospesa.
La stabilizzazione LED II
viene sospesa verde
LED I:
spento
LED II
Page 30

Installazione delle pile
1) Per aprire il contenitore delle pile, far
scorrere la manopola di sgancio del vano
delle pile presente sulla cinghietta da polso
in posizione Open (aperto).
2) Inserire due nuove pile alcaline formato AA
3) Ricollegare il contenitore delle pile alla
cinghietta, quindi far scorrere la manopola
di sgancio in posizione di blocco, al fine di
chiudere il vano.
w AVVERTENZA
• Utilizzare pile dello stesso tipo. Per evitare perdite o rotture, NON mischiare pile
vecchie con pile nuove.
• Qualora si effettui la sostituzione delle pile all’esterno, fare attenzione che all’interno
del vano delle pile non penetri dell’acqua.
• Nel caso in cui si pensi di non utilizzare il binocolo per un periodo prolungato, al fine di
evitare perdite, rimuovere le pile.
A questo punto, per proteggere i punti di contatto interni, tenere il vano delle pile
collegato alla cinghietta da polso.
• Tenere i punti di contatto lontani da qualsiasi metallo; in caso contrario, potrebbero
verificarsi guasti.
• Se non sono state installate entrambe le pile, NON far scorrere la leva di
stabilizzazione in posizione ON, poiché potrebbe essere dannoso.
Scorrimento della manopola
(Per rimuovere il
contenitore delle pile)
di sgancio
Aperto
Chiuso
(Per chiudere il
contenitore delle pile)
Utilizzo della cinghietta da polso
Per un utilizzo sicuro del binocolo, indossare la
cinghietta da polso.
Infilare la mano nella cinghietta e regolare la
lunghezza del cinturino. Per stringere la cinghietta,
tirare il cinturino fino all’estremità dell’oculare.
Per allentarla, sollevare la fibbia presente sul retro
della cinghietta da polso e allargare il cinturino.
w AVVERTENZA
La cinghietta da polso serve anche da contenitore
delle pile. NON applicare forza eccessiva o rimuovere
la cinghietta dal binocolo; potrebbero verificarsi
danneggiamenti.
Installazione della tracolla
1) Fare un grande anello ai due capi della
tracolla
3) Guidare la cinghietta dentro l’anello e
attraverso la fibbia, quindi tirare e
stringere; fare lo stesso con l’anello
esterno.
2) Inserire la cinghietta attraverso la staffa
per tracolla
4) Ripetere l’operazione sull’altro lato con
l’apertura del binocolo per collegare la
cinghietta.
Page 31

Come mantenere pulite le lenti
Non lasciare che sulle lenti si accumuli polvere, sale o resti il grasso delle impronte digitali in quanto
queste sostanze possono rovinare i trattamenti antiriflettenti applicati sulle superfici delle lenti.
Usare fazzoletti per la pulizia delle lenti e liquido per la pulizia delle lenti. Solitamente, sono disponibili
entrambi dovunque si vendano fotocamere, binocoli o lenti da vista. Per ottenere i risultati migliori, è
bene pulire tutt’e Quattro le lenti anche se è necessario pulirne una sola.
Prima di tutto, soffiare via la polvere che potrebbe trovarsi sulle lenti. Ciò fatto, pulire facendo...
Usare ogni fazzoletto una sola volta. A volte potrebbe essere necessario ripetere l’operazione.
Prendere un solo fazzoletto per lenti e ripiegarlo due
volte, come mostrato.
Arrotolarlo a cilindro e bagnarlo su in una punta con del
liquido per la pulizia delle lenti.
Partendo dal centro delle lenti, strofinare con movimento
circolare, dal centro verso l’esterno.
Ingrandimento..................................................................12x
Angolo di compensazione (Libertà di stabilizzazione) ....±3°
Diametro obiettivo ..........................................................32mm
Accomodamento dell’occhio ..........................................15mm
Campo visivo angolare (reale) ........................................5°
Campo visivo a 1.000m ..................................................87m
Distanza di messa a fuoco ravvicinata ............................3,5m
Pupilla di uscita ..............................................................2,7mm
Luminosità ......................................................................7,3
Regolazione Distanza interpupillare ................................56~72mm
Struttura ..........................................................................Impermeabile (spurgata con azoto secco)
Dimensioni: Lu x La ........................................................178 x 142mm
Peso ................................................................................1130g (senza batterie)
Durata di vita utile delle pile ............................................6 ore (funzionamento ininterrotto
con quattro pile alcaline di tipo AA; 20°C)
Limiti di temperatura ambientale sicuri ..........................da –10 °C a 50 °C
Per la nostra politica di miglioramento continuo dei prodotti, i dati caratteristici possono essere
soggetti a modifiche senza preavviso.
Dati caratteristici
Il StabilEyes è impermeabile, quindi può essere usato sott’acqua ad una profondità massima di 1
metro per un massimo di 5 minuti senza che il sistema ottico si danneggi.
Il StabilEyes offre i seguenti vantaggi:
• Può essere usato in condizioni di molta umidità, polvere e pioggia senza rischio di danni.
• L’involucro saturo d’azoto lo rende resistente a condensazione e muffa.
Osservare con cura quanto segue nell’uso di StabilEyes:
• Poiché l’unità non ha una struttura completamente sigillata, non deve essere utilizzata né
mantenuta sotto l’acqua corrente.
• Prima di regolare le parti mobili (manopola di messa a fuoco, oculare, ecc.) del StabilEyes, per
evitare danni e ai fini della sicurezza, è necessario rimuovere qualsiasi traccia di umidità.
Per conservare il StabilEyes in condizioni ottimali, Nikon Vision consiglia una periodica revisione da
parte del servizio d’assistenza tecnica di un rivenditore autorizzato.
Modelli impermeabili
Page 32

Page 33

Printed in China (144K)/4DE
NIKON VISION CO., LTD.
Customer Service Department
3-25, Futaba 1-chome, Shinagawa-ku,
Tokyo 142-0043, Japan
Tel: +81-3-3788-7699 Fax: +81-3-3788-7698
CSセンター
住所:〒142-0043東京都品川区二葉1丁目3番25号
Tel:03-3788-7699Fax:03-3788-7692
• 仕様・外観などは改善のため予告な
しに変更する場合があります。
• 本取扱説明書に掲載されている文
章・イラスト等の無断転載を禁じま
す。
アフターサービスについて
お買い上げいただきましたニコン双眼
鏡を、安心してご愛用いただきますよ
う、次のとおり修理、アフターサービ
スを行っております。
• 本製品の補修用性能部品は、製造打
ち切り後も8年間を目安に保有して
おります。したがいまして、修理可
能期間は部品保有期間内とさせてい
ただきます。なお、ご使用いただい
ております製品が修理可能期間内で
あるかどうかにつきましては、当社
CSセンター、あるいはニコンのサー
ビス機関へお問い合わせください。
付記
水没、火災、落下等による故障または
破損で全損と認められる場合は、修理
が不可能となります。なお、この故障
または破損の程度の判定は当社CSセ
ンター、あるいはニコンのサービス機
関におまかせください。
消耗品について
• 目当て等の消耗品につきましては、
ご購入店、または当社CSセンター、
あるいはニコンのサービス機関にお
問い合わせください。
• Specifications and design are subject
to change without notice.
• No reproduction in any form of this
manual, in whole or in part (except
for brief quotation in critical articles
or reviews), may be made without
written authorization from NIKON
VISION CO., LTD.
• Änderungen der Konstruktion und der
technischen Daten bleiben
vorbehalten.
• Alle Rechte, auch die des
auszugsweisen Nachdrucks (mit
Ausnahme kurzer Zitate in
technischen Besprechungen), ohne
schriftliche Genehmigung durch
NIKON VISION CO., LTD bleiben
ausdrücklich vorbehalten.
• Les spécifications et la conception
sont sujettes à modification sans
préavis.
• Aucune reproduction totale ou
partielle, sous quelle que forme que
ce soit, (à l'exception de brèves
citations dans des magazines) ne
peut être faite sans autorisation écrite
de NIKON VISION CO., LTD.
•Las especificaciones y el diseño
están sujetos a cambios sin previo
aviso.
•Se prohibe la reproducción de este
manual en cualquier forma, ya sea en
su totalidad o en parte (excepto citas
breves en artículos críticos o
revisiones), sin la autorización escrita
de NIKON VISION CO., LTD.
•Design e dati caratteristici sono
soggetti a variazioni senza preavviso.
•Senza autorizzazione scritta di NIKON
VISION CO., LTD, non è possibile
riprodurre in nessun modo, in tutto o
in parte, il presente manuale (salvo
brevi citazioni in recensioni o articoli
critici).
 Loading...