

Page 1
Nikon
I
Instruction
Manual
Manual
de
instruccio
(Pages 2-37)
nes
(Paginas
38-
73)
I
Page 2
Your
The
symbol
new
Be
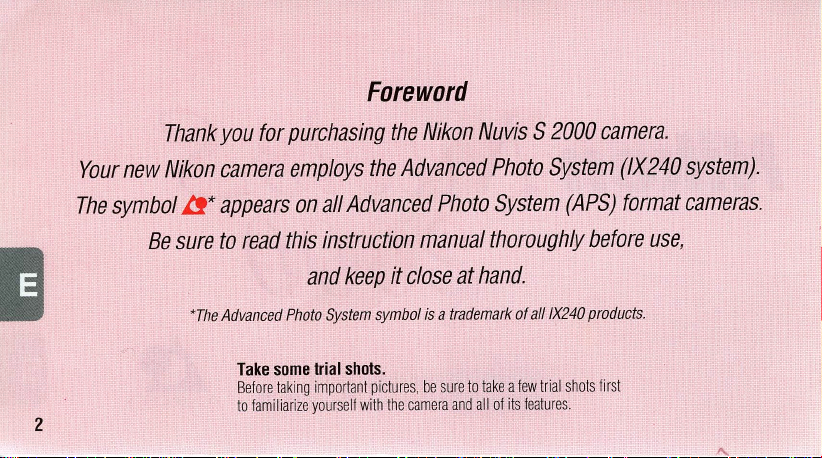
Thank
Nikon
sure
you
for
purchasing
camera
employs
/.!* appears
to
read
this
Foreword
the
on
all
Advanced
instruction
and
keep
the
Nikon
Advanced
Photo
manual
it
close
at
Nuvis S 2000
Photo
System
System
thoroughly
hand
(APS)
before
.
camera
(IX240
format
use
.
system)
cameras.
,
.
'The Advanced Photo System symbol
Take
some
trial
Before
taking
to
2
familiarize
shots.
important
yourself
with
is a trademark of all IX2
pictures,
be
sure
the
camera
to
and
take a few
all
of
its
40 products.
trial
shots
features.
first
Page 3
Accessories
Check that y
yo
ur camer
Optional
-
Came
(Remote
-
Remote control unit
ou have
a.
accessories
ra
case
control
unit
the item shown below
Neck
strap AN-L
CS-L24
can
be
stored inside
(1&
P
26)
16
pocket.)
before using
Attaching
Attach
length using the lug
the strap
the
by
strap
inserting
on
the
strap as
it
through
the
shown
strap
.
slot
and
adjust
the
II
3
Page 4
Your
Nikon
•
Choice
•
The
2x
•
Title
imp
•
When
•
Remote-controlled
• Photog
• A
slide
4
camera
of
three
power
zoom
print
P
-type
A
spect ratio
lens
features:
types
(
panoram
rinting (ex. "MERRY
the
available
light
is
operation
raphing
subjec
ts
as
cover
protects
the
(P,
H, C),
which
can
be
mixed
on
the
same
a)
= 1 : 3
covers
the
range
of
focal
CHRISTMAS" or "CONGRATULATIONS
low
or
the
subject
is
(optional)
close
lens, viewfinder
as
DAm
is
possible
(1.3
ft.)
window, and
H
-\ype
Aspect
lengths
backlit, the
.
~
is
possible.
(wide-vis
ratio
from
camera
26
~
LCD
panel
= 9 :
24mm
")
automatically
PP. 14
roll.
~
If.
ion) C
16
to
48mm.
on
the back
of
the
fires
16
27
when
the camera
14-15
-\ype
Aspect
ratio
I@':p
pictures.
the
flash.
is
not
(classic)
= 2 : 3
15
'-"""1.
in
use.
"""""''''
Page 5
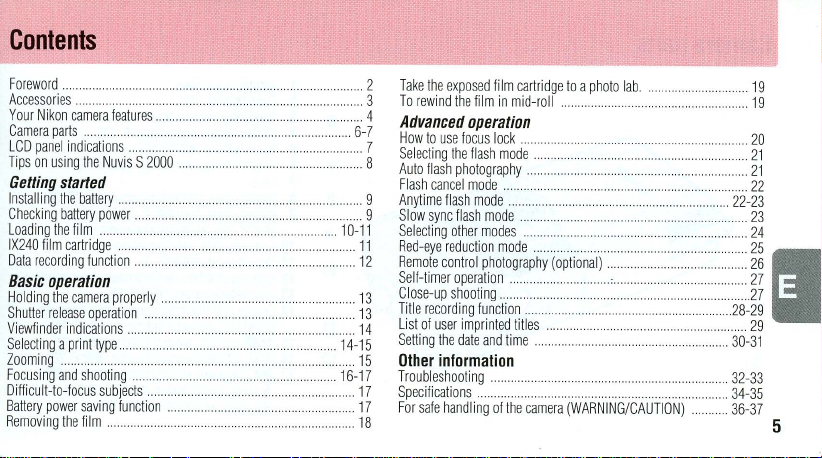
Contents
~w~..
Accessories
Your
Nikon
Camera
LCD
Tips on
Getting
In
Checking
Loading the film
IX240
Data
Basic
Holding
Shutter
Vi
Selecti
Zooming
Focusing
Difficult-to-focus
Batte
Removing
camera
parts
pan
el
indications
using
started
stalling
the
battery
film
cartridge
recording
operation
the
camera
release
ewfi
nder
indicatio
ng a
print
. .
and
ry
power
the
.
..
........................
features
...
.....
the
battery
function
operation
type
shooting.
saving
film
................................
.. .
...............
..
Nuvis S 2000
.........................................................................
power
...................................................
........................
. .
..
properly................................. ...
. .
ns
....................................................................
...........
......................
subjects
..
function
.....
......................................
.....................
............................
. .
..............
................................... 18
....................
.
............
...................
........................... 14-1
..........
.................
.................
.
..........
......... 9 Slow sync
...
.................. 11
. ....
.......
........
.................
...........
........
. ...
.
........
......
. 2
Take
the
exposed fi
lm
cartridge
to a photo
lab
3
rewind
the
film
in
mid-roll
To
4
Advanced
...
6-7
How
7
Selecting
.....
8
Auto
Flash
9
An
10-11
Selecting
Red-eye
12
Remote
13
. 13
!~~i~~~~~#i~~;~
14
Setting
5
. 15
Other
16-17
Troubl
17
Specifications.
17
For safe hand
operation
to
use
focus lock............................................
the
flash
flash
cancel mode
ytime
eshooting
mode ..............
photography.. .......................
flash
mode
flash
mode
other
modes
reduction
mode
control
photography
the
date
and
information
.....
ling
of the c
. . ..............
....................... ..........................
.....................
......................... .
..
..............
. .
(optional)
O
~ties
. .
time
. . ............
.......................
amera (WARNING/CAUT
.............................
........
..................
....................
..............
............. 22-23
...................
...............
........
..................
.................
.........•
.
•.•.•.•.•.•.•.•.•.•.•.•.•.•.•.•.•...•.....•.
........
....................
...............
...............
. ......
ION
..
19
..
19
20
21
......
..
21
22
.....
23
......
24
......
.........
25
E
..
26
·.·
.•.
·
.•.•.•.•.•.
2~~1!
30-31
.......
.....
32-33
34-35
) .......
.. 36-37
5
Page 6
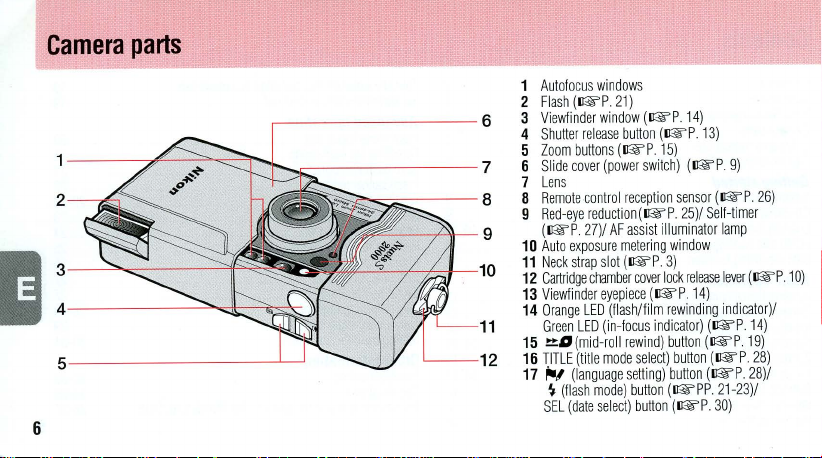
Camera
parts
2
5--------------------
6
.-
------------
~
-----
6
1
Autofocus windows
2
Flash
(I&'P.
3
Viewfinder
4
Shutter rel
5
Zoom
buttons
6
Slide
cover
7
Lens
8
Remote
9
10
11
12
13
14
15
16
17
control
Red-eye
reduction(I&'P.
(I&'P.
27)/
Auto
expos
Neck
strap
Cartridge
chamber
Vi
ewfinder
Orange
LED
Green
LED (in-focus
~D(mi
d-ro
TITLE (title mode sel
"'"
(language
~
(flash
mode) butt
SEL (date
21)
window
ease
button
(I&'P
(power
reception
AF
assist
ure
metering win
slot
(I&'P.
cover
eyepiece
(flash/fi
ll
rewind)
setting)
select)
button
(I&'P 1
(I&'P.
15)
switch)
sensor
25)/ Self
illuminator
3)
lock
(I&'P.
lm
rewinding i
indicato
button
ect)
button
but
on (I&'PP
(I&'P
4)
13)
(I&'P.9)
(I&'P.
lamp
dow
release
leve
14)
ndicator)/
r) (I&'P. 1
(I&'
(I&'
ton
(I&'P.
21-23)/
30)
-timer
r (I&'P.
P.
19)
P.
28)/
26)
10)
4)
28)
Page 7
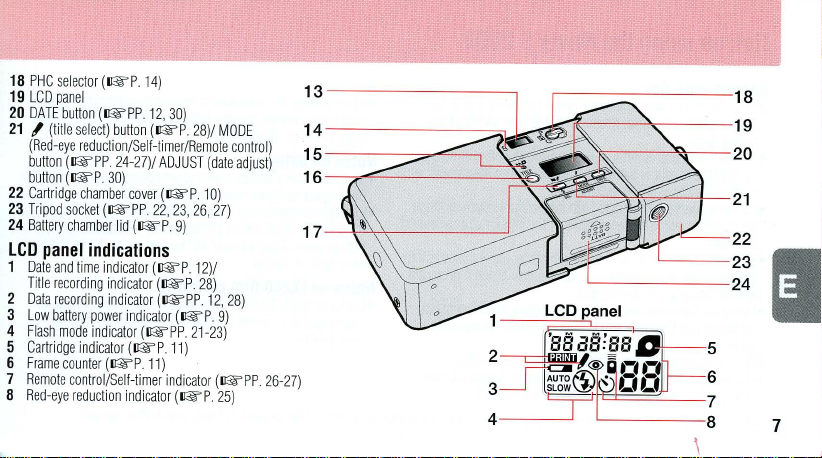
18
PHC selector
19
L
CD panel
20
DAT
E b
21
,
(title sel
(Red-eye reducti
butt
on (
button (I&P
22
Cartridge
23
Tri
pod
24
Battery chamb
LCD
panel
1 Date
and time indicator
Tit
le recor
2 D
ata
recording indicator
ow battery
3 L
4
Flas
h mode ind
5
Cartrid
Frame cou
6
Remote
7
eye reducti
8 Red-
(I&
P. 14)
utt
on
(I&P
P. 12,
ect) butt
on
(I&P
on/Self-timer
I&PP
24-27)/
ADJU
. 30)
chamber cover (I&
socket (I&
PP 22,23,26,
er lid
(I&
indications
ica
tor (
(I&P 11
(I&P.
on
indica
(I&P 12)/
(I&
(I&P
tor
I&PP
11)
tor
ding indicator
power indica
ge indicator
nter
control/Self-timer indi
30)
P.
9)
(I&P.
(I&
28)/ MO
/Remo
te control)
ST (date adj
P. 1
0)
27)
P.
28)
P. 12, 28)
9)
. 21-
23)
)
cator
(I&
P.
25)
DE
ust)
PP 26-27)
13----------------
17--~~
----------~~
~
.-
------
~
----
----
~~
-----19
,,
'k-
----~---20
--
- 18
7
Page 8
Tips
Camera
-
Close
This
battery
-
The
Nuvis S 2000
be
exposed
it
off
-Do
not
encountered
summer.
-Store
chemicals
during
-Firing
Allow
again
-
Do
not
-Use a dry, soft
brush
8
Nikon
on
using
care
the
slide
prevents
drain.
to
with a dry
subject
near a heater
the
camera
such
storage
the
flash
enough
drop
the
or
lens
cannot
be
the
tips
cover
to
turn
accidental
cleaner
release
is
not a waterproof
rain
or
saltwater.
cloth
immediately.
the
camera
in a cool, dry,
as
camphor
is
recommended.
repeatedly
time
for
them
camera
or
cotton
cloth
to
remove
held
responsible
Nuvis S 2000
the
camera
off
of
If
to
high
or
stove
clean
or
naphthalene.
makes
to
cool
hit
it
against a hard
or
commercially
dirt
for
when
the
shutter
and
and therefore
water
gets
on
temperatures
or
the
interior
place.
Do
Using a desiccant
the
battery
and
off
before
taking pictures
surface.
available
and
smudges
malfunctions
not
resulting
shou
the
camera,
such
of a car
not
expose
came
.
caused
in
use.
ld
not
as
those
during
ra
hot.
blower
by
wipe
it
to
using
-
When
Also
times
Notes
-
Be
Carry
-
Battery
DoC
battery
goes
Notes
-
Carrying
traveling
be
the
Nuvis
storing
the
once a month,
to
reform
on
battery
sure
to
check
spare
batteries
power
(32°F)
When
warm.
Battery
back
to
normal.
on
IX240
spare IX240
abroad
available.
52000
camera
insert a battery
its
capacitor.
battery
when
becomes
taking
power
film
film
where
the IX240
in
ways
not
for a long
power
when
traveling
less
when
pictures
will
recover when
cartridge
cartridges
film
specified
time, remove
and
taking
abroad.
the
temperature
at low
is recommended
cartridges
in
the
fire
the
flash
important
temperatures, keep
the
may
this
manual.
battery.
several
pictures
drops bel
temperatu
when
not
ow
the
re
Page 9
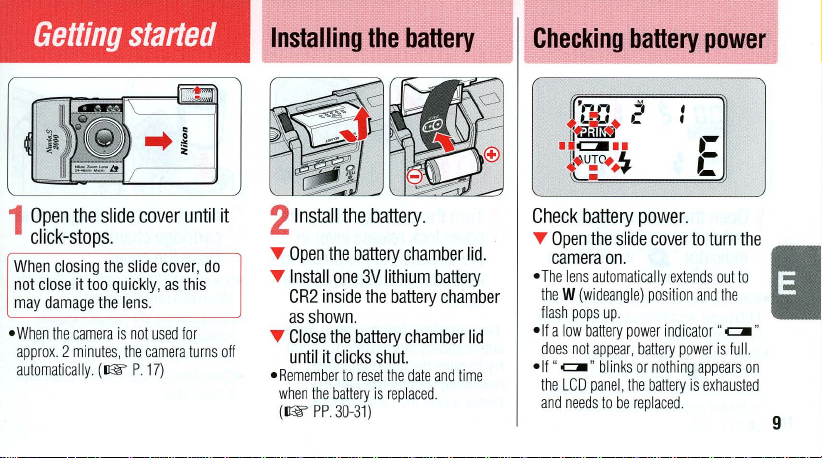
Getting
1
Open
the
click-stops.
Wh
en closing th
not close
may damage
e
it
too
the len
When the
came
approx. 2 minutes,
automatically.
(1&
started
slide
cover
e slide
cove
quickl
y,
as
s.
ra
is
not
used
the
camera
P
.17)
until
r,
do
thi
s
for
turns
it
off
Installing
2
Install
T
Open
Install
T
CR2 ins
as
T
Clo
until
e
Remember to
when the
(1&
the
the
battery chamber
one
3V
ide
sho
wn.
se
the
battery
it
click
s s
reset the
battery
PP.30-31)
the
the
battery
battery
lithium
battery
chamber
hut.
date
is
replaced.
.
battery
chamber
and
time
lid.
lid
Checking
Check
T
Open
camera
e T
he
lens
the W (wideangle)
flash
e
lf
a l
ow
does
e
lf
"
ClIIII
the LCD
and
needs
battery
the
on.
automatical
pops
up
battery
not
appear,
"
blinks
pane
to
battery
slide
power indicator
l, t
he
be replaced
power.
cover
ly
extends
position
battery
power
or
nothing
battery
power
..
-
C
to
turn
out
and
the
"
ClIIII
is ful
appears
is
exhausted
.
the
to
l.
on
I
"
9
Page 10
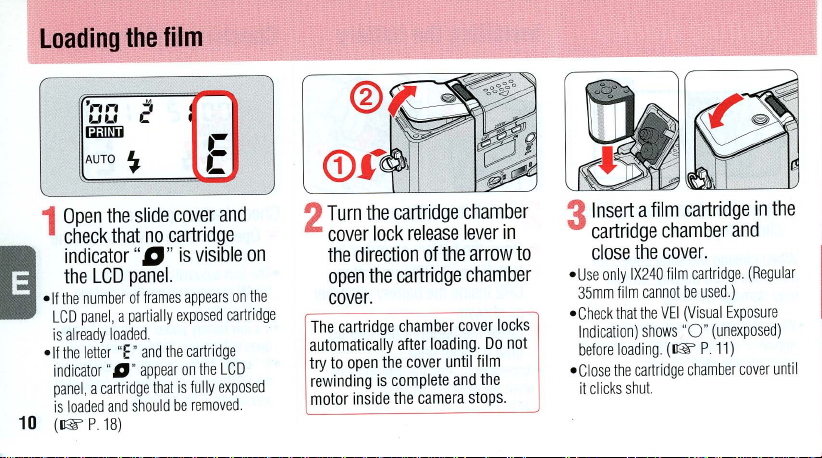
Loading
1
Open
check
indicator
the
E
-If the numb
LCD panel, a p
is alre
-If
th
i
ndi
pan
is l
10
(~P18)
the
'.-,.-,
.;
uu
C
IlmIill
AUTO
~
the
slide
that
no
"IJ"
LCD
panel.
er of frames
artially exposed ca
ad
y loaded.
e letter
T ' a
r" D " ap
nd the c
pea
uld
cato
el, a cartridge that
oa
ded and sho
film
..
-
c
cover
and
cartridge
is
visible
appears
artrid
ge
r on the L
is ful
ly expos
be rem
ove
on the
rtridg
CD
d.
on
ed
e
2
Th
utomaticall
a
try
rew
mo
Turn
the
cartridge
cover
lock
release
the
direction
open
cover
e cartri
to open the
inding is
tor inside the camer
the
cartridge
.
dge cham
y after loa
cover until
com
of
ber
plete and the
chamber
lever
the
arrow
chamber
cove
ding. Do
film
a s
top
in
to
r locks
not
s.
3
Insert a film
cartridge
close
the
- U
se
only I
X240 fi
35mm film
Check that the VEl (
I
ndicatio
bef
- Cl
it
n)
ore loadi
ose the ca
click
s shu
cann
shows
ng.
rtridg
t.
cartridge
chamber
cover
.
lm cartrid
ot be used.)
Vis
ual Exposure
"0
" (
unexp
(~
P 11)
e chamber
in
the
and
ge. (Regular
ose
d)
cover
unt
il
Page 11
',,"
LILI
Ii1illill
A
UTO
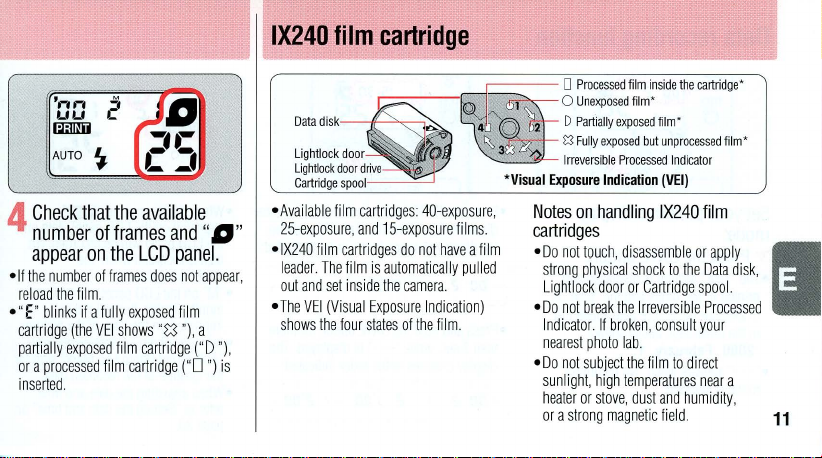
Check
4
-If t
reload the film.
-"
cartridge
pa
or
nserted.
i
that
number
appear
on
he number of frames
E"
blinks
if a f
(the VEl sh
rtial
ly
exposed
a pr
ocessed
,:5
~
the
available
of
frames
the
LCD
ully exposed
ows
film cartridge
film cartrid
IJ
and"
does
"83
ge
IJ"
panel.
not
appear
film
"),
a
("D
("0
")
"),
is
IX240
-
-I
,
-The VEl (Vi
film
cartridge
Da
ta
di
sk:---If-~~'
Lightl
ock doo
Li
Cartridge
Availab
2S-exposure,
X240
l
eader. Th
out and
shows
r
ghtl
ock
door drive
spoo
l
le
film cartridges: 40-exposure,
and 1S-exposure
film cart
ridges
e film is
set inside
sual Exposure Indicatio
the
four states
"
do not h
automatically p
the cam
ave a film
era.
of the film
0
Processed fil
0 Un
1
4 ) 0 •• 2 D P
.
~
•.••.
.••.•
~
'
Visual
fil
ms.
ull
ed
n)
.
exposed
artially exposed
~
>"" ""
, Irreversib
Exposure
Indication
Notes
on
handling
cartridges
-
Do
not
touch, disassemble
rong
physical
st
Lightl
ock door
-Do not break the
In
dicator.
If
n
earest
photo
-Do not subject the film to
light,
high temp
sun
eater or stove, dust a
h
st
rong m
or a
m i
nside
the cartrid
fil
m'
fil
m'
... 0"
"""
le
Processed Indicat
~.""
(VEl)
IX240
shock
to the Data
or Cartridge
Irr
eve
rsible P
broken, con
lab.
agnet
sult
direc
eratures nea
nd
humidity
ic field.
ge'
"'m'
or
film
or
app
spool.
rocessed
you
r
t
r a
ly
disk,
I
,
11
Page 12
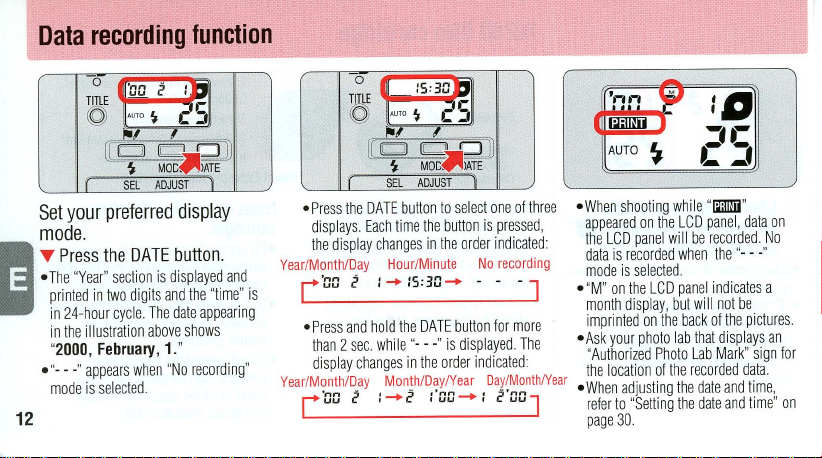
Data
recording
function
E
12
Set
your
mode
T
Press
-T
he "Year"
printed
in
24-hour
in
the
2000,
"
- "- - -"
mode is sel
o
(I
:"" 2 :
TITlE
uu
~
II
"TO
.,.,
rr
~ ~
~
SEL ADJUST
preferred
.
the
DATE
section
in
two
digits
cyc
le.
illustration
February, 1."
appea
rs
when
ected
.
11
11
:
~
c'sl
l
I
d]
MOC~)AT
E
1
display
button
.
is
displayed
and the "time" is
The
date
appea
above
show
s
"No
recording"
and
ring
0
! I
(\)
-
Press
the
displays.
the disp
Year/Month/Day
Year/Month/Day
lay
'n":5
r
uu
I:
-
Press
and hold
than 2 sec. while
display
changes
r
'nn:; ' _____
uu
c::
:5:3G
D ll
"TO
~
c'sll
,
I,
[r
a~
~
MOC~)AT
SEL
ADJUST
DATE button
Each
changes
I '5 '
•
I
to select
time
the
button
in
the ord
Hour/Minute
''"
-+
f •
~u
-+
the DATE butt
"- --" is
in
the
order
Month/DaylYear Day/
:5
,'
nn
~
C I
UU
~
E
"I
one
of three
is pressed
er
indi
cated
No
recording
- - - J
on
for
more
displayed. The
indicated
:
MonthlYear
I
5'n"
-..
I
I:
uu
J
-
,
:
- "
-
-
AUTO
~
When
shooting
appeared
on
the
data
mode
M"
month
imprinted
Ask
"
Authorized Photo
the locatio
When
r
efer
page
the
LCD
panel
is r
ecorded
is
selected.
on
the LCD
display,
on
the
your photo lab
n of the
adjusting the date
to "Setting
30.
whi
le "
LCD
will
be
when
panel
but will
back
that
Lab
recorded
the
1iilIlil
pane
l,
recorded.
the
"--
indicat
not
be
of
the
displays
Mark" sign
and
date and
"
data
on
No
-"
es
a
pictures.
an
for
data.
time
,
tim
e"
on
Page 13
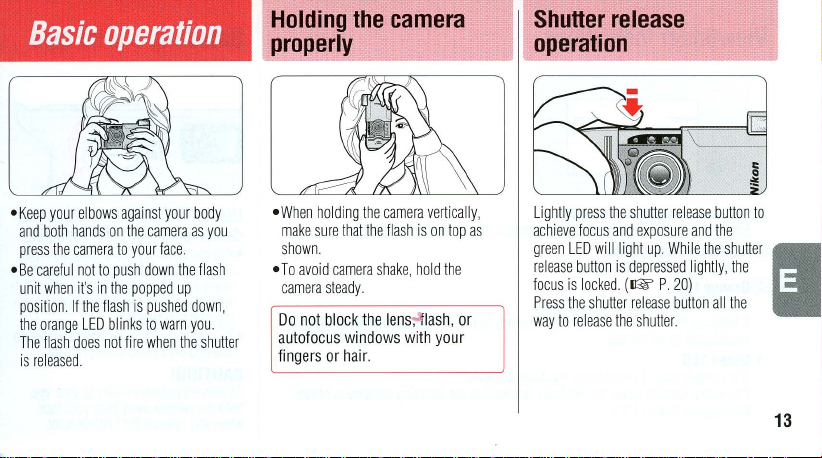
Basic
-Keep
your
and
both
press
the
-
Be
careful not to
unit
when
position.
the
orange
The
flash
is
released
operation
elbows
against
on
the
to
push
the
blinks
not
fire
your
camera
your
face.
down
popped
is
pushed
to
warn
when
the
up
hands
camera
it's
in
If
the
flash
LED
does
.
the
body
as
you
flash
down
you.
shutter
,
Holding
properly
-When
holding
make
sure
that
shown
.
To
avoid
camera
carnera
steady.
Do
not
block
autofocus windo
fingers
or
hair.
the
the
camera
the
shake, hold
the
ws with
camera
vertically,
flash
is
on
top
the
lens
;-i
lash,
your
or
as
Shutter
release
operation
Lightly
press
focus
LED
button
is
locked.
the
to
release
the
and
will
light
is
shutter
the
(~
achieve
green
release
focus
Press
way
shutter
release
exposure
up
While
depressed
P
20)
release
button
shutter.
button
and
the
the
shutter
lightly, the
all
the
to
II
13
Page 14
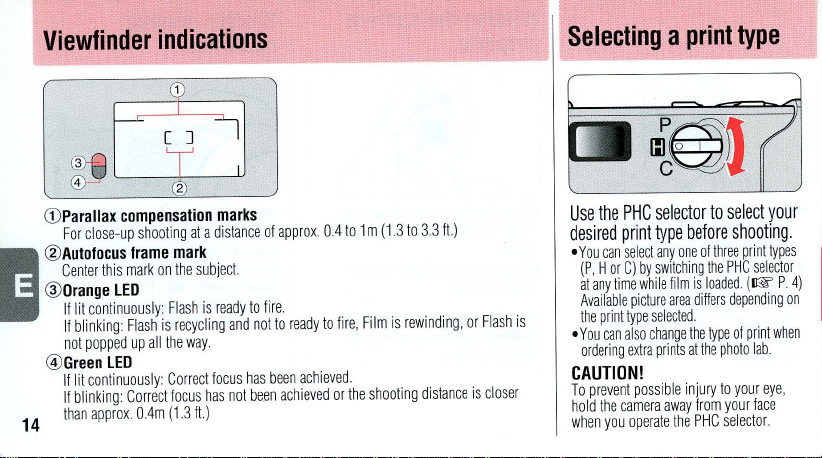
Viewfinder
G)
Paraliax
For
close-up
@
Autofocus
Center
this
@
Orange
If
lit
continuously
If blinking:
not
popped
@
Green
LEO
If
lit
continuously:
If
blinking:
14
than
approx
indications
compensation
shooting
at a distance
frame
mark
mark
on
the
Flash
is
recycling
the
way
Correct
focus
(1.3
ft)
subject.
LEO
Flash
up all
Correct
DAm
marks
is
ready
and
focus has
has
not
of
to
fire.
not
been
been
approx.
to
ready
achieved.
achieved
04
to fir
or
to
1 m
(1.3
e, Film is
the
shooti
to
3.3
tt)
rewinding, or
ng
distance
Flash
is
closer
Selecting a print
Use
the
PHC
desired
print
.
You
can sel
(P,
H or
C)
at
any
time
Available picture
the
is
print type sel
You
can
also
·
ordering
CAUTION!
To prevent
hold
the
came
when
you
selector
type
ect
anyone
by
switch
while film
ecte
change
extra
prints
possible
ra
away
operate
before
ing
area
d.
the
at
injury
the
PHC sel
to
of
three
the
is
loaded.
differs
type
the
photo
to
from
type
sele
ct y
our
shooting.
print
types
PHC
selec
tor
(~
P
depending
of
print
when
lab.
your
eye,
your
face
ector.
4)
on
Page 15
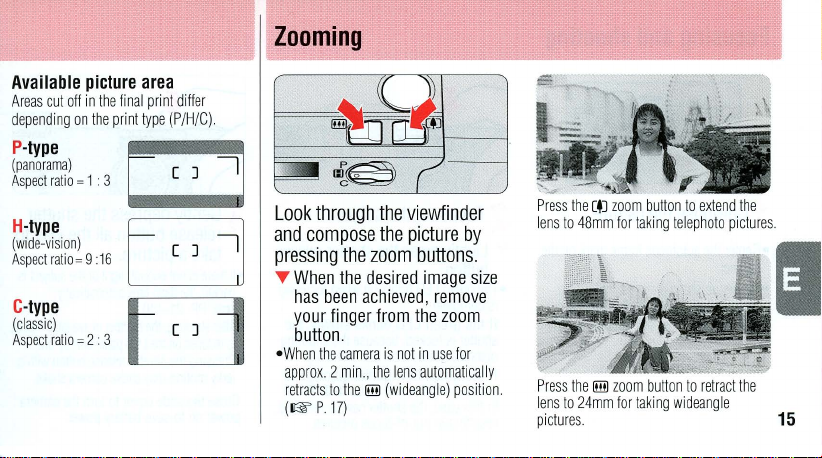
Zooming
Available
Areas
cut
aff
depending
P
(panarama)
Aspect
H
(wide-vision)
Aspect
(classic)
Aspect
-type
-type
C
-type
an
ratio
rat
io = 9 16
ratio
= 1 . 3
= 2
picture
area
in
the
final
print
the
print
type
C!:j
l
.
differ
(P/H/C)
]~
[ ]
l
Look
through
and
compose
pressing
T
When
has
been
your
finger
button
-
When
the
approx
2 min,
retracts
to. the
(I@)
P
17)
the
viewfinder
the
picture
the
zoom
buttons
the
desired
from
the
is
nat
in
the lens
autamatlcal
(wideangle)
image
use
achieved, remove
.
camera
Iilll
by
..
size
zoom
for
pasltlOn.
Press
the
ctJ
zoam
buttan
to.
extend
l
ens
to.
48mm
far
taking
telephata
the
pictures
II
ly
Press
the
Iilll
zaam
buttan
to.
retract
lens
pi
ctures.
to.
24mm
far
taking
wideangle
the
15
Page 16
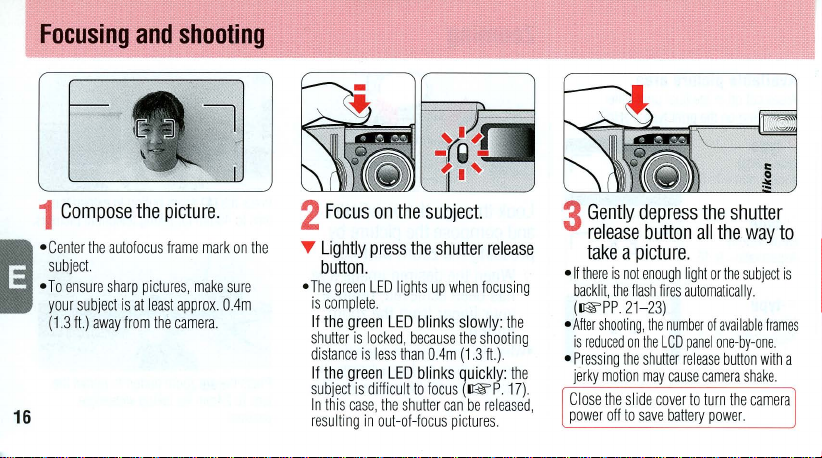
Focusing
1
Compose
-
Center the autofoc
subj
ect.
-To
ensure sharp
yo
ur sub
(1
.3
ft.)
16
and
the picture.
pic
ject
is
at
away from
shooting
us fra
me mark
tur
es, make sure
least approx.
the camer
a.
on
DAm
the
2
Focus
T
Lightly pr
butt
on.
-T
he green LED
is
complete.
If the green
tt
er
shu
dis
tan
ce
If the green
subject is
In
this
case
resulting
on
the
ess
the shutter
lights
LED
is
blink
locked, because
is
less than
LED
blin
difficult
to focus
, the shu
tter can be release
in out-of
-foc
subject.
up
when
s slowly: the
the shootin
DAm (1.3
ks quickl
(ItE
us
pictures.
relea
foc
usi
ft
.).
y:
P. 1
se
ng
the
7).
g
d,
3
Gently
release
take a picture
-If there
is not enough l
ack
lit
, the flash fir
b
(I&PP.21-
-
Afte
r shootin
is
reduced
ressing the s
-P
jer
ky mot
ion
Close the s
power off
to
depress
button
es automati
23)
g,
the
number
on t
he LCD
hutt
er rel
may cau
lide cover
save
battery
the
shutter
all
the
way
.
ight
or the sub
ject
cally
of
available frames
panel one-by-one
ease button
se camera shake.
to turn the
power.
with a
came
to
is
.
ra
Page 17
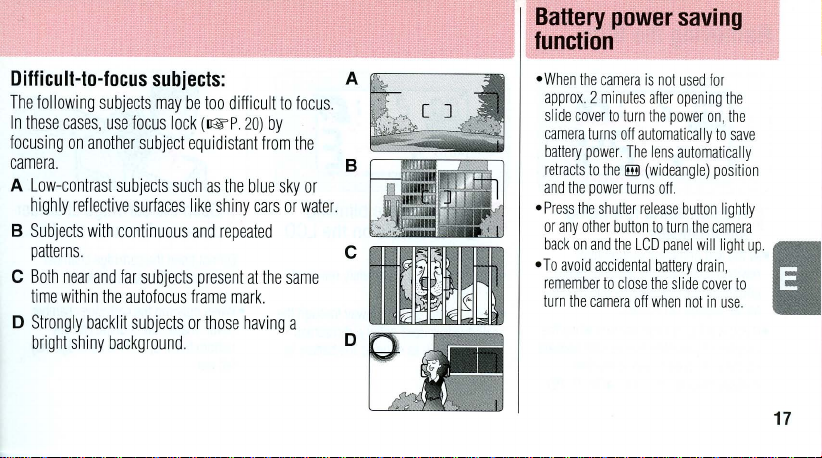
Difficult-to-focus
The fol
lowing subjects
In
these
cases, use
focusing
on
camera.
A Low-contra
high
ly
B
Subjects
patterns.
e Bo
th
near
time
within
o
Strongly
bright
focus
anoth
er subj
st s
ubjects
reflective sur
with
continuous
and
far
the
autofocus frame
backlit
subjects
shiny backg
subjects present at
round
subjects
may
be
too
lock
(~P.
ect
equidistant
such
as
faces like
and repeated
or
those
.
:
difficult
the
shiny
mark
to
20)
by
from
blu
e s
cars
the
.
having
focus
the
ky
or
or
water.
same
a
.
., . [J
A
~
, !
~
_
.. ~ _ __ •
B
' .
'
..
e
lm
C,'
o
~
.
J~'
.
Battery
power
function
-
When the came
app
rox
. 2 minutes
sli
de
cover
came
battery
re
and
-
Press the
or
back
-To
remember
turn
to
ra
turns
power.
tracts to
the
the power turns
shutter release butt
any
other button
on
and the
avo
id
accidental batt
to
the
camera off wh
saving
ra
is
not used
after opening
turn
the
power on, the
off automatical
The lens
automatically
IillI
(wideangle)
off.
to tu
rn
LCD
pan
el
ery
close
the sl
ide
en
not
for
ty
position
on
the
camera
will
drain,
cover
in
the
to
save
lig
htl
light up
to
use.
y
E
17
Page 18

Removing
the
film
1
The
automatically.
e
At
the
rewinds
E
counter
as
the
elf
you
n
umber of
on
the LCD
midway
18
'I-'I-'?
LILI
!:
Il1illm
AU
TO
~
film
starts
end
of
the roll
automatically
counts backwar
orange
LED
want
to
remove the film
available
panel
through
the
rewinding
of
film, film
and
the
ds
one
blinks.
frames still appe
, r
ewind
the film
roll.
(~
frame
by
one
while
P 1
the
ars
9)
Make
2
"f"
panel.
e
When
"E" bl
elf
fi
lm rewi
roll
au
tomatically
eplaced.
r
'1-'''''
LILI
Il1illm
is
th
e film
ink
s.
due
to a dead
.,
C
sure
the
blinking
visible
on
is
completely rewound,
nd
stops
midway through
battery,
as
soon
as the
the
it r
esumes
battery
LCD
the
is
3
Open
cover
Do
not
cover unti
e
When
cover,
bottom
fall
the
and
open the cartridg
l "E" st
ope
ning the
make sure
faces up,
out.
cartridge
remove
the
e c
hamb
arts blinking
car
tri
dge chamb
that the camera
or
the
cartridge
chamber
film
.
er
.
er
may
Page 19

Take
the
cartridge
-
We
recommend
cartridge
to a photo
"Authorized
above
-
Your
cartridge
-I
ndex
frame
supplied
-
For
photo lab
for
processing
negatives
for
prints
exposed
with
more
information,
.
Photo
easy
(sma
exposed
film
to a photo
bringing
your
lab
that
displays
Lab
Mark"
and
printing.
are
returned
inside
storage.
ll
images
on
the
of each
the
roll
of
negatives.
consu
film)
lt
lab.
film
sig
n
your
the
are
an
To
1
-
-
rewind
Press
the
the
Once
rewinding
to continue pressing
rewi
nd
When
blinking.
until
"E"
the
stud
on
point
of
button.
rewinding
Do
not
starts
the
~IJ
the
bali-point
starts, there
is
try
blinking.
film
button
strap
the mid-roll
complete
to
open
in
lug
pen
is
no
, "E"
the
cover
using
need
starts
mid-roll
2
or
Remove
T
.
Open
cove
T
Remove the
,-------
Once
mid-roll, it
the
the
r.
film
the
cartrid
has been
cannot
film
film
be
.
ge cha
.
removed
used
again.
mber
in
E
19
Page 20
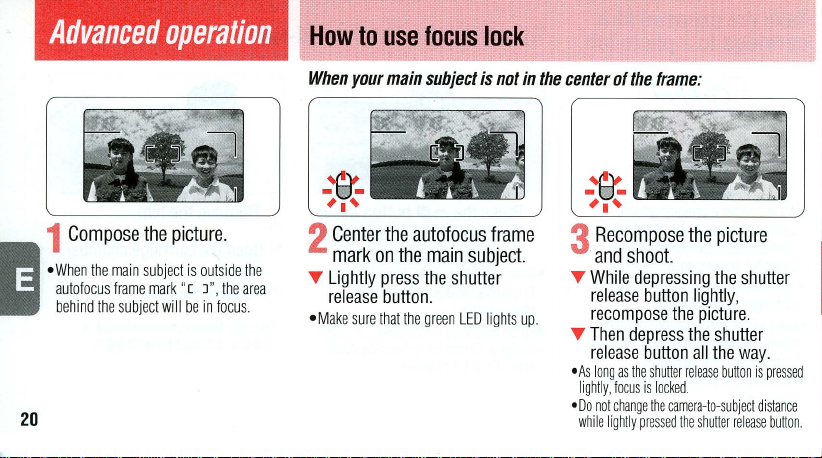
Advanced
1
Compose
-
When
the
main subject
a
utofo
cus
frame ma
behi
nd the subject wil
20
operation
the
picture.
is
outside
", the
ocus
the
area
.
rk" [ ]
l be in f
How
to
use
focus
When
your
main
subject
2
Center
the
autofocus
mark
on
the
main
T
Lightly
press
button
the
.
release
-Make sure that the gree
lock
is
subject.
shutter
n L
ED
lights up
not
in
frame
the
.
center
of
3
Recompose
and
T
While
release
recompo
T
Then
relea
se
o
As
l
ong
as
lightl
y, focus
000
not
change the
while
lightly
the
frame:
the
picture
shoot.
depressing
button
se
depre
button
the shutter release button
is l
pressed
the
lightly
the
picture.
ss
the
shutter
all
the way.
ocke
d.
camera-to-subject distance
the
shutter release button.
shutter
,
is pressed
Page 21
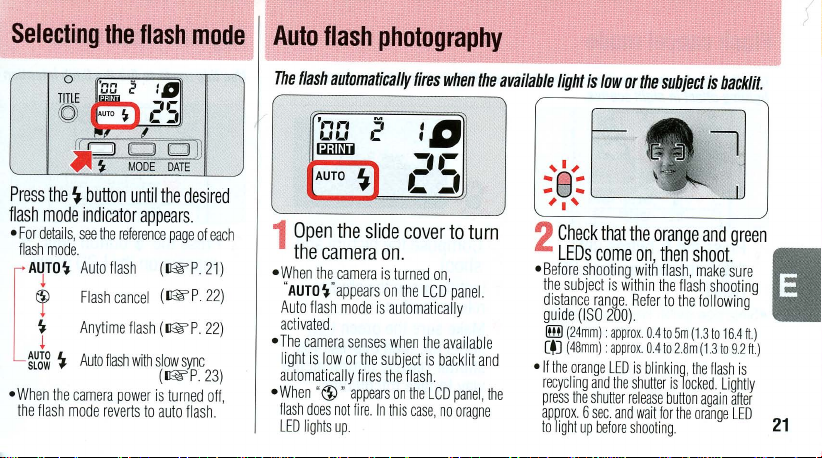
Selecting
Pre
ss
flash m
-
For
details,
fl
ash
A~TO~
,
~
l
~ ~
j~
When
the
flash
the
~
~
~
the ~ button
ode indicator
see
the
mode.
Auto flash
Flash
Anytime
~
Auto flash with
the
camera
mode reverts
flash
jg)
lbiI
MODE
DATE
until
the
desired
appear
flash
to
slow
is turned
s.
page
(I&P
(I&P 22)
sync
(I&P.23)
auto flash.
reference
cancel (I&P
power
mode
of
each
21)
22)
off,
Auto
The
flash
'r.r.
UL.I
IlmIill
AUTO
1
Open
the
-
When
the
"
AUTo
Auto
flash
activated.
-
The
came
l
ight
is
automat
-
When
"~"
flash
does
LED
lights
flash
photography
automatically
the sli
~
5
L.
)
de
fires
cover to
camera on.
camera
is
fappears
low
ica
on
mode
is
ra
senses when
or
the
subject
lly fi
res the
appears
not
fire.
In
up.
turned
the LCD
automatically
flash.
on
the
this
case, no
when
on,
the
available
is
backlit
LCD
the
turn
panel.
and
panel, the
oragne
available
:"
'."
2
-B
efore shoot
the
distance
guide
(ill]
C
+J
-
If
t
recycling
press
approx. 6 sec.
to
light
is
low
or
the
subject
F.-=ll
8
':
~
Check that
LEOs come
subject
(24mm) : approx. 0.4
(48mm) : approx.
he
light
range. Ref
(ISO
200)
orange
and
the
shutter
up
before
the
orange
on
then
ing
with flas
is
within
the
er
to
to
0.4
to 2.8m
LED
is
blinking, the
the
shutter
release
button
and wait for the
shooting.
flash
the
Sm
is locked.
is
and
shoot.
h,
make sure
shoot
following
(1.3
to
(1.3
flash
again
orange
backlit.
green
ing
16.4 ft.)
to
9.2
fl.)
is
Light
ly
aft
er
LED
E
21
Page 22
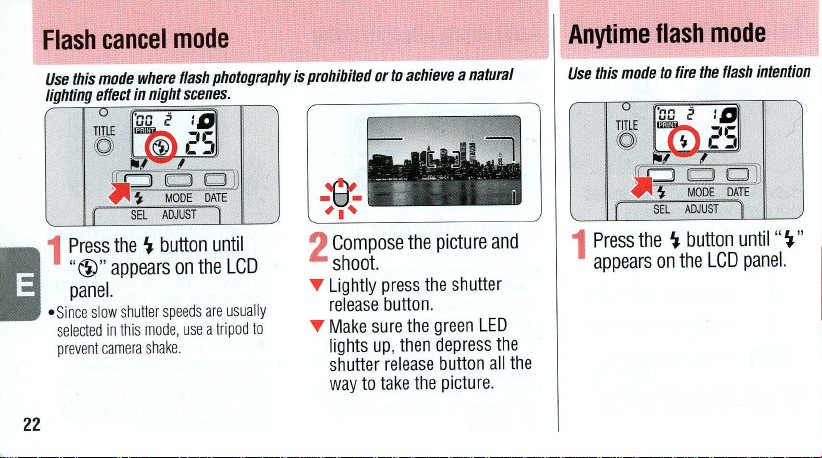
Flash
-
Since slow
selected
prevent
22
cancel
Press
"~"
appears
panel.
in this
camera shake.
mode
the ~ button
on
the
shutter
speeds
mode,
use
until
are
a Ir
ipod
LCD
usually
to
2
Compose
shoot.
T
Lightly
release
T
Make
lights up,
shutter
w
ay
sure
to
the
press
button.
the
then
relea
take
the
picture
the
green
depress
se
button
picture.
and
shutter
LED
all
the
the
Anytime
Use
this
1
Press
appears
flash
mode
the ~ button
on
to
fire
the
mode
the
flash
until
LCD
panel.
intention
'T '
Page 23
/ly
regardless
2
Compose
T
Lightly press
button
T
Make
LEOs
sh
way
-
If
the orange LED
press
affer
orange LED
of
the
the
.
sure
the
light up,
utter
release
to
take
the
the
shutter release
approx. 6 sec.
to
light
available
picture
the
shutt
orange
then
button
picture
is
bli
nking, lightly
button
and wait
up
before
and
er
and
depre
all
.
for
shooting.
light.
shoot.
release
green
ss
the
the
again
the
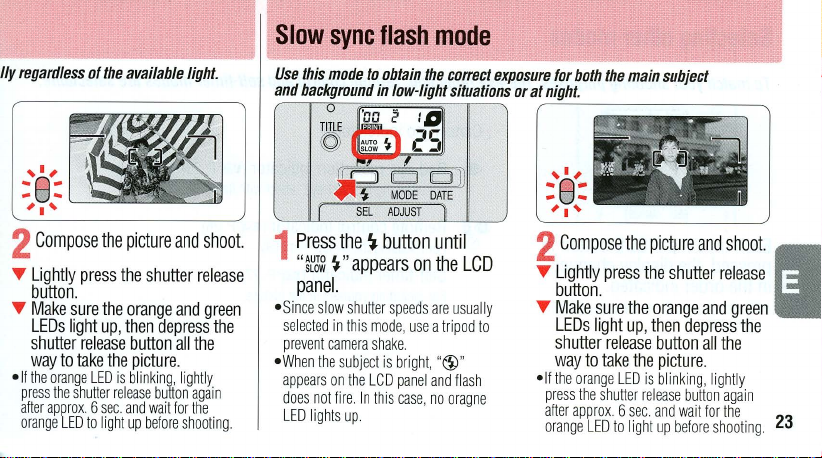
Slow
sync
Use
this
mode
and
background
1
Press
the ~ button
"~~J~
~"appears
panel.
-
Since
slow shu
selected
in
camera
subject
on
not
fire.
this
the LCD
up.
prevent
-
When the
appears
does
LED lights
flash
to
obtain
in
low-light
SEL
ADJUST
tter speeds
mode,
shake.
is bri
panel
In
this
case, no
mode
the
correct
until
on
the
are
use
a tr
ght,
"@"
and
exposure
situations
LCD
usually
ipod
to
flash
oragne
for
both
or
at
night.
~~--
2
Compose
T
Lightly press the
button.
T
Make
LEOs
s
hutter
way to
-If
the
press
after
approx. 6 sec.
orange
the
main
----------
the
sure
the
light up,
relea
se
take
the
orange LED
the
shutter
LED
to
lig
subject
picture
shutter
orange
then
button
picture.
is
blinking,
release
and
wait
ht
up
before
--~
and
shoot.
release
and
green
depress
all
the
lightly
button
again
for
the
shooting
E
the
23
Page 24

Selecting
To
match
Each
time
pressed, the
in
the
order
-F
or
details,
each
mode.
24
other
your
shooting
the
MODE
display
indicated.
see
the
modes
purposes,
button
changes
reference
page
is
for
red-eye
Cancel
<D>
<D>g
reduction,
(no
~
Red-eye
1 F
or
reducing the "r
Remote
~
For
rel
Self-timer
For
including
remote
indication)
reduction
control
easing
the
indicator
yoursel
control
indicator
ed-eye"
indicator
shutter
f in the
and
effect
remo
(~
picture.
self-timer
(~
with flash.
(~P
tel
y.
P
27)
P
26)
modes
25)
are
selectable.
Page 25

Red-eye
In
flash
photography, the
TILE
u
~~"
~
'",0
iiI 1
lL~rr:::I
~
S
I
1
Press
the
"
<0;>
"
appears
panel.
reduction
mode
subject's
uu
@
~.~
I
.::.
d
DE
button
on
DAT
the
J)
E
I
LCD
lO
EL ADJUST
MODE
eyes
until
may
sometimes
2
Compose
lightly
release
-
Because
the
lights
up
for a second before the fl
fi
res,
be
careful not
or let
the
subiect move
fi
res
.
-T
he red
-eye
recommended when
m
oving
subjects.
appear
the
press
button.
red-eye
reduction
bright
picture
the
shutter
reduction
to
move the
unt
mode
shooting
il
red.
and
lamp
the
is
not
fast
To
reduce
ash
camera
flash
-
the "red-eye" effect, use
3
Check
that
the
orange
LEOs
light
up
-
If
the
orange
the
shutter rel
approx. 6 sec.
to
lig
ht
up
To cancel
t
he
MODE
from
the LCD
be
canceled
-
Red-eye
can
be
set
red-eye
LED
ease
and
before
the red-eye
button
panel. This
by
turni
reduction
together, but
reduction
before
is bl
inking, light
button
wait
for
shooting
reduct
until
"0 "
ng
the
and
flash
in this
cannot
this
mode.
and
green
shooting
ly
aga
in
after
the
orange
.
ion m
ode,
disappears
mode
cannot
power off.
cancel modes
case
be
performed.
.
press
LED
press
II
25
Page 26

Remote
For
1
Place
or a secure
-
Remote
E
Sm
the
than
timer
-
If
the
exposed
strong
operate
26
control
releasing
(164
camera-to-subject
Sm (164 ft.)
mode.
reception
the
the
camera
flat
control extends
ft.)
while
facing the cam
away, use
(~P.
sensor
to
direct sunlight
light, the
remote control
properly.
photography
shutter
remotely:
on a tripod
surface.
up
to
approx.
era.
is
the self
came
other
wil
mor
-
ra
l not
If
e
is
distance
27)
on
the
or
(optional)
r-ro~~~~u-l
Press
the
2
until
the
-
Remote control
canceled
approx. 2 minut
closed.
minutes
can still
MODE
"<o>li0"
LCD
panel.
will
if
not use
d f
es
after
taking the
continue
or the s
to shoot
That means
button
appears
be
automatically
or more
than
lide cover
that
within
last shots, yo
remotely.
3
Compose
on
is
2
u
shoot.
..
Aim
the
release
-The
red-eye
approx. 2 sec.
-
If
the
shutter
remote
remote
approx.
deal
er
the
remote
camera
button
reduct
before
cannot
control,
change
control
unit. (The life
10
years.)
or
service
the
and
press
on
ion
the
be
Visit
center
picture
control
the
the
unit.
lamp
lights
shutter
released
with the
the
battery
of
the
an
authorized
to
change
and
unit
at
shutter
up
for
is
released.
inside
battery
Nikon
it.
the
is
Page 27

Self-timer
When
you
want
Pres
~
the
1
"
<D>g~
LCD panel.
-
Self-timer
canceled
2 minutes or
-
Placing
recommended.
MODE
"
appears
operation will
if
not
used
the
the
camera
operation
to
include
more
slide
cove
on a tripod
button
on
the
be
automatically
than
approx.
r is c
losed.
is
yourself
unt
il
in
the
r-----
2
Compose
depress
button
-The
red-
8
sec.,
the shutter
Self-timer
shooting.
-
To
cancel self-tim
the
slide
picture:
----------
the
the
all
the
eye reduction
then lights
is
released
operation
cover.
--
picture
shutter
release
way
.
lamp bli
up
for 2 sec.
.
is canceled
er
operation, close
--~
and
nks
for
before
alter
Close-up
For
taking
-
When
approx.
t
he
picture
mark
be cut
-
When
DAm (1.3
slow
-If the
bl
inks
released,
pic
tures
subjects
taking
DA
to
with
s.
The
area
off
in
the
subject
ft.),
ly
and
subject
qu
ickly
resulting
.
subjects
the
the
shooting
such
1m
in
IIII
final
the green
shutter
is
very
and
as
close-ups
within
the
(1.3
to
3.3
It),
the
parallax
compensation
as
shown above
print.
is
closer than
LED
is
locked.
close, the green
the
shutter
in
out-of-focus
of
flowers
range
of
compose
approx.
blinks
can
be
:
E
will
LED
27
Page 28

E
28
Title
recording
For
imprinting a title
1
Press
the
language
"/".
codes
appear
panel.
-3D
titl
es
are
selectab
TITLE
and
on
le
function
on
the
button
until
title
the
LCD
in
12 l
anguages.
back
of
pictures:
~~----~
T
Press
the
than 2 sec. The
code
starts
T
Press
the
language
button
to
Pressing
changes
TITLE
blinking.
1-,
code.
set
each
the
code
~
title
button
Press
the
title
button
button
~--
~
for
or
language
to
set
the
1
code
.
continuously
quickly
.
~
more
the
Set
3
codes
T
Press
preferred
and
Then
-
When
title
recording
the date
panel
the
language/title
.
the
TITLE
code
appears
shoot.
" I "
appears
is
display
by
pressing
button
stops
on
the
on
poss
ible
is
activated
the
DATE
and
blinking
LCD
the LCD
even when
on
button.
the
panel.
pane
l,
the LCD
Page 29

List
of
I
Language
Code
1
2
3
4
5
6
8
9
10
11
12
13
user
imprinted
provided
Language
Danish
Finnish
French
German
Italian
Japanes
e
Norwegian
Portuguese
Spanish
Swedish
Briti
sh
English
American
For
titles
~
____________
English
in
other
titles
I I
Code
01
02
03
04
05
06
07
08
09
10
11
12
13
14
15
languag
e,
~~
Titles
provided
Title
PARTY
BIRTHDAY
HAPPY
BIRTHDAY
FAMILY
FRIEN
DS
GRADUATION
THANK
YOU
CONGRATULATIONS
TRIP
VACATION
WEDDING
HONEYMOON
ANN
IVE
RSARY
THANKSGI
VING
S
EASON
' S
GREETINGS
see
the
attached "List
________________
for
American
of
Imprinted
Engli
Title
ode
ROSH HASHANAH
16
H
ANUKKA
17
18
EASTER
CHRISTMAS
19
20
MERRY
NEW
YEAR
21
HAPPY
22
23
HAPPY
24
FAT
HER
25
MOT
HER
INDEPENDEN
26
27
VALENTINE'S
28
VI
CTOR
29
CANADA DAY
30
HA
LLOWE
User
CHRISTMAS
NEW YEAR
HOLIDAY
'S
' S
IA
Titl
sh
H
'S
DAY
DAY
EN
e".
DAY
CE
DAY
DAY
~
________
•
To canc
press
"I "
disappeared. Th
for 2 sec.
r
eturni
el
the
title recording
the
TITLE button
and
language/title
on
the
ng
to
the
~
__________
and
codes
e l
ette
r "OFF"
LCD
panel before
date display
function
make
have
lights
J
,
sure
up
I
29
Page 30

Setting
1
Entering
T
Press
button
2
-
The
30
the
o
•• ~ • . .
~~
.:~~
TI
~ ~.
~
Ji?-
, T
SEl
r
the
the
for
seconds,
"year"
section
date
'
·D
- t 25
ICl
MODE
ADJUST
setting
SEL
(date
more
than
starts
blinking
and
Cl
J]
DATE
I
mode
select)
time
.
2
Setting
T
Press
adjust)
correct
-
Each
time
t
he
number
-
Pressing the
continuous
changes
the
"year"
the
ADJUST
button
year,
the
ADUST
increases
ADJUST button
ly
for
more
the
number
(date
to
set
button
by
one.
than 2 sec,
quickly.
the
is
pressed.
3
Setting
T
Press
the
"
month" section
T
Press
the
the
correct
T
Press
the
-R
epeat
procedures 2 and 3 to
hour
and
minu
the "month
SEL
button.
starts
ADJUST
SEL
button
month.
button
te,
"
The
blinking.
to
.
set
the
set
day
,
Page 31

4
Getting
out
mode
T
Press
the
panel.
button
the
data will
shows
SEL
date
date/time,
be
"
2001, April, 25.
corrected
LCD
e
lf
another
setting
set
e
The date appearing
ab
ove
of
button
appears
is
pressed whi
set
at
in the
the
setting
all the pr
this tim
illustration
and
on
evio
e.
le
the
the
usly
"
When
e Note
pa
nel
eN
o
data
appea
e R
epeat
date and
the
battery
that 00 0 00
when
the
will
be recorded
rs
on
the
procedures
time.
is
app
ears
battery
is repl
LCD
.
from 1 to 4 to
replaced
on
the
LCD
ace
d.
if
00 0 00
set
the
II
31
Page 32

Troubleshooting
Check
the
cause
of
the
Problem
The
shu
tter
cannot
not
fire
appe
the
print.
chamber
not
be
. -
ars
out
open.
32
released.
fl
ash
does
The su
bject
of
focus
in
The ca
rtridge
cover does
trouble
using
-
If
the
recycling
wa
it
the
orange
-If
the
that
are
If
the oran
recycling
wait
the orange
-
Check
the
-If
-
Clean
-
To
avoid
-
When
on
the
-T
he
film
in
mid-roll.
the
following
orange
LED
blinks
and the
for
green
for
"
shutter
approx. 6 seconds.
LED
lights
LED bli
nks
less
than
approx. D.4m
ge
LED
blinks
and
the
shutter
approx. 6 seconds.
LED
lights
battery
power
~
"mark
appears
the
autofocus
windows
camera
shake,
photographing
subject,
or use
is
not
completely
chart.
It
when
the shutter
is locked. Remove your
Then
lightly
up
befo
re
reshooting.
slowly,
the
camera
(1.3
ft.) from the
when
the shutter
is
locked. Remove
Then
lightly
up
befo
re resh
battery
on
the
LCD
if
dirty.
depress the shutt
lock.
exposed
ooting.
is
exhausted,
panel,
. T
ake
If
the
gently
difficult-to-focus
focus
may
save
Check
this
release
button
fing
press
the
is
too
close
camera.
rel
ease
button
your fin
press
the
replace the
the
flash
er
subjects, be
pictures
you a trip
is
pressed lightly,
er
from
the
shutter rel
ease
to
the
subject.
is
pressed
ger
from the
shutter release
battery
will
not
fire.
release
button.
sure
to center
up
to
the
end
of
to
your
shutter
button
Avoid
lightl
shutter
button
with a fre
the
autofocus
the
roll,
nearest
the
flash
relea
se
button
again and
shooting
y,
the
fla
relea
se
button
again and
sh one.
frame mark
or
rewind
Nikon
is
and
make sure
subjects 14,
sh
is
and
make
sure
the film
service
center.
Ref.
page
14,21
14,21
9
21-23
6,
13
13
17,20
18,19
16
Page 33

Problem
indicator
No
th
e L
s
~de
T
he shutter cannot
released
sh
the remo
is pressed.
A
In
If
because
s appear on -The
CD
pan
el when the
cov
er
is opened. -T
even
utter release
te
control unit -The batter
characteristic
rare
cases, when strong
th
is
happens,
settings
be
if the
button
of
remove
are erased
battery
(+)
and
he batt
-
If
no indicators
your
-
You
-If
the
on
the remote control.
but
go
-Pr
ess
controller
electronic
static electrici
the batt
ery. Please
when the batte
was
negative
ery
nearest
are
out
remote
y in the r
to a Nikon
the
MODE
is
camera
ty
not
(-) pol
is
exhausted
appear
Nikon
of
the
control is
service
button
not
used
or
the like
note
that
ry is
removed.
properly
es cor
or
after
dealer
remote
exposed
emo
te
once
for
is
the date
loaded
in
rectly.
no
batte
ry
installing a new
or a camera
control
working
to direct
control
is
exhausted.
center.
again unti
more
than
approx
applied
to
and time
(wP.
30)
Check
this
the
battery chamber.
is installed. Install a new
battery,
shop
for
repair.
range.
sunlight
Do
"
l "
<o>g0"
. 2
minutes.
the
came
ra, t
must be
the
camera
Move closer
or oth
er str
not
attem
pt
appears
he
camera
reset
when
Make
ong
on
sure
to
orient
battery
.
is
broken.
In
to
the
camera.
light,
change
to replace the batt
the
LCD
panel
may
not work
the batt
ery
is replaced
the
positive
this
case, contact
the
location
ery
yourself,
if
the
remote
properly
Ref
. pa
ge
9
9
-
26
of
26
-
26
.
,
33
Page 34

"7l
Specifications
Type
of
camera
IX240
(Advanced
Nikon
Usable film
IX240
Print
P,
Hand
lens
24mm
5
elements
Shutter
Programmed
speeds:
Viewfinder
Real-image
image
Viewfinder
P/H/C-type
frame, Orange
blinks
34
complete
Photo
Zoom
24-48mm
System (Advanced
aspect ratio
C-Iype
available
f/45-48mm
area;
quickly
in 5 groups
electronic
2.510
1/500
zoom
approx.
information
image
LED-Lights
(at 8 Hz):
of
focus
f/8.2
sec.
viewfinder;
0.32x
size
marks
operation;
System)
type
f/45-8.2
lens
Photo
Syslem)
(30mm-60mm
shutter;
also
serves
frame
coverage
magnification
with
parallax
up:
flash
flash
pops
up improperly, Green
blinks
slowly
autofocus
film
cartridge
converted
as
diaphragm
approx. 85%
at
24mm,
compensalion
ready; bli
nks
(at 2 Hz):
AE
lens-s
hutter
(16.7 x 30.2mm)
10
35mm
blades; Shutter
approx.
marks, Aulofocus
(at
4Hz):
LED-Lights
subject
type);
for
H-type
0.56x
flash
is
too
camera
printed
at
48mm;
is
recycling;
up
close
with
to
achieve
correct
Orange
LED-Blinks
Focusing
Wide-area
passive
button;
Distance
LED
(also
serves
Focus
tock
Focus
is
locked
Exposure
controt
Electronically
EV
I
ight is
Film
ISO
Film
Drop-in
chamber cover
Frame
Shown
Self-timer
Electronical
10
6-17
at
low.
speed
50,
100,200,400
operation
loading
counter
in
sec. dur
controlled
24mm,
the
LCD
ly
atio
focus; blinks
(at 4 Hz):
aulofocus; Activaled
range
from
OAm
as
red-eye
as
long
as
shutter
program
EV
6-18
setting
,800
system;
Wrong
lock
mechanism
pane
l;
Count-down
controlled;
Activated
n, bl
inking/
quickly
(at 8 Hz):
film
is
rewinding.
(1
.3
ft)
reduction
lamp)
button
AE;
Auto
at
48mm; Flash fir
film
loading
type
by
ligting
up
subject
by
lightly
to
infinity
is
lightly
exposure
es
prevention
depressing
in 2 steps
is
difficult
pressing
the
shutter release
; Wi
lh
AF
assist
pressed.
range
(ISO
automatically
mechanism;
shutter
release
to
focus,
illuminator
200):
if
the
available
Cartridge
button;
Page 35

Film
advance
Film
is
automatically
automatically
film
roll; Mid-roll
Remote
control
I
nfrared
wireless
canceled
after 2 min.
straight
in
front
Di
mensions
(W
Weight
(including
Built-in
flash
Four
flash
modes
sync
flash;
Flash
backlit;
Flash
approx.
0.4-28 m (1
locked
during
Red-eye
reduction
Red-eye
reduction lamp
Battery
life
Approx.
10 rolls of
thrust
advances
rewind
(optional)
remote
if
not
of
the
camera; Battery
x H x
D):
battery):
available:
automatical
shooti
ng
range:
.3-9.2
flash
charging;
mode
25-exposure
to
the
first
by
function
control; 2 sec. delay
lights
frame
one
frame
after
available
used; Effective
wil
approx.
60 x 27 x 10
approx.13g
Auto
flash, Flash can
ly fir
es
when
approx.
0.4-5m
ft.)
at
48mm
Recycling
up
for
approx. 1 sec. before
film
when
l l
(0.5 oz.)
(ISO
time
after
inserting
each
shot;
shutter
range
is
within
ast
for
approx. 10
mm
(2.4 x 1.1 x 0.4 in.);
cel,
ava
ilable light
(1.3-16.4
200);
approx. 6 sec.
flash
is
used
cartridge
Auto
rewind
at
release;
Automatically
approx.
5m
years;
Anytime
flash,
is
low
or
subject
ft.)
at
24
for
flash
half
mm,
fires
of
exposures.
Shutter release
Specifications
; Film
the
end
(16.4 ft.)
and
Slow
button is
apply
LCD
panel
Frame
counter,
Cartridge, Low
of
Power
source
One
3V
lithium
Data
recording
Magnet
ic
panel with
Day/Month/Year, Hour/Minute,
AM/PM;
auto
acc
ura
cy
within
T
itle
recording
can
be
is
when a fresh
printed
Dimensions
Approx.
89 x 60.5 x 29
Approx. 122.5 x 60.5 x 29
Weight
(without
Approx. 140g
battery
Specifications
(Power
Flash
battery
battery
function
recording
five
choices:
leap
±90
function: sel
on
the
(W
(4.9
oz.)
is
used
and
is
on)
mode,
Red-eye
reduction,
power, Ti
tle/Date/time,
CR2
system; Date/tit
Year/Month/Day, Month/Day/Year
ustment
sec
. a
month;
ectable
back
of
pictures.
D)
mm
(3.5 x 2.4 x 1.1 in.)
mm
(4.8 x 2.4 x 1.1
at
normal
are
or
subject
year adj
x H x
battery)
design
Self-timer/Remote
Data
le
setting;
Date
No
recording;
until
2039; Bui
Power
source
from
30
titles
(with
in)
temperature
to
change
(20°C
recording
displayed
24-hour
lt-in
clock
is
same
in
12
languages
sli
de
cover
(with slide
or
without
,
cycle
with
as
camera
cover
68
notice
control
on
LCD
with
timing
which
closed)
opened)
O
F).
.
no
body;
II
35
Page 36

For
safe
handling
WARNING
-
Do
not
attempt
yourself, as
electric
the
camera
-
If
the
exposed
which
the
came
-If
you det
imm
ediate
before
~
Nikon
-
Do
not
on
it,
-
Do
not
combustible
it
shock.
to
camera
interior
can
cause
ra
to your
ect
smoke comi
ly
and
removing
dealer
subme
as
this
may
operate
gas,
to
houses
Another
malfunction.
is
dropped
for
rge the
the
36
disassemble,
high-voltage
reason
and
parts,
shock.
local
Nikon
ng
from
the
camera
battery. Then
camera
an
electric
camera
in
may
damaged,
as
an
metal
an electric
turn
the
repair.
cause
as this
of
the
camera
repair, or
modify
which
actions
do
not
touch
high-voltage
the
battery
repair.
era, stop
the
camera
the
camera
allow wat
or
explosion.
the
can
operation
to
er
.
circuitry
is
that
these
it
houses
Remove
dealer
for
the cam
off.
Let
take
in
wate
r or
shock or a fire
environment containing a
cause
a fire
came
ra
cause
could
cause
any
circuitry
and
cool off
your local
to
splash
an
take
-
Do
not
look at
the
viewfinde
permanent
-
Do
not let the st
put
the
strap
suffocation.
-K
eep batte
acciden
tally
-N
ever
use thi
the camer
on fir
e,
or
the
sun
r,
as
this
eye
damage.
rap
around
ries
out
of
swallowed, cal
nner,
benzene,
a,
as
this
harm
your
or a strong lig
may
damage your retina, resulti
wind
around your
a c
hild
's
neck,
as
the
reach
of child
l a
doctor
or
damage
hea
lth
.
other
the
camera,
may
ht
source
neck.
this
ren.
immedi
active
directly through
In
particular, neve
may
cause
If
a
battery
ately.
agents
for cleaning
cause
it
to catch
ng
is
in
r
Page 37

CAUTION
-Do
not
operate
electric
shock.
-
Keep
the
camera
from
swallowing
-
To
prevent
from
your
-
Do
not fire
temporary
-
When
the
came
placing
it
in
may
cause the
-Do
not
carry
mi
ght
bump into some
the
camera
out
batteries
possib
le inju
face
when
the flash
blindness.
ra
is
direct
sunlight.
came
the
camera while
with
of reach
or
ry
to
you
ope
close
to a person's
not
in
use,
ra
to
catch
thing
wet
hands,
of
chi
ldr
en. This will prevent
sma
ll
accessories.
your
eye, hold
rate the
PHC
close
the slide cover and
Strong sunl
on
fire.
it's
mount
and inj
ure
as
this
the
came
selector.
eyes,
as
this
ight entering
ed
on a tripod,
yourself
or
may
cause
ra
away
may
the l
as
others.
an
them
cause
avoid
ens
you
-Do n
ot
walk
you
might
-Do
not
throw
d
isassemble, or
on
fire or explod
-Al
ways fol
pr
even
t t
-N
ever use
this
may
-
If
corrosive
clothes,
eyes,
wash
around
lose
you
used
heat
e.
low
the
hem
from
batteri
es
cause them
liquids seep
was
h i
mmed
immediat
while
looking
dow
on
fire or explod
spec
ifi
ed
generate
from the
with
with
water
through
n,
ctions
in
hea
battery
running
r step, fall
batteries into a fire.
the battery, as
warning instru
catc
hing
not
to
iately
ely
the
and
injure
Also
this
may
printed
this
instru
t or c
atch
and
wate
and
see a doctor.
viewfinder,
yourself.
do
not
short-circuit,
cause
it
on
batteries
ing.
ction
manual,
on
fir
e.
get
on
your sk
r. If
they get in your
to cat
as
ch
to
as
in
E
or
37
Page 38

Pro/ago
38
Muchas
Su
camaras
Lea
fntegramente
*
E/
s
fmbol
o del
gracias
nueva
camara
(sistema
primer a vez
sistema
par
IX240).
del
formato
el
foto
graf
Haga
algunas
Antes
de
para
familiarizarse
su
compra
Nikon
utiliza
EI
sfmbolo
APS
manual
, y
guardelo
ico avanzado
lolos
hacer fotograffas
de
con
de
la
camara
el
sistema
~
*
aparece
(sistema
de
instrucciones
es una mar
prueba
importantes
la
camara
fotografico
en
un
ca
registrada para todos los product
.
haga algunas
y t
odas
sus
Nuvis S 2000
fotografico
en
todas
avanzado).
antes
de
lugar a mana
de
prueba
caracteristicas.
de
Nikon.
avanzado
las
utilizar
par
.
os IX24
0.
Page 39

Accesorios
Compruebe
a
ntes
Accesorios
-Estu
(EI mando a distanc
-Ma
que
de
utilizar
che pa
ra
nda a distan
opcionales
tiene
el
item
su
camara
Correa
al
cuello
la camara CS-
ia p
uede
guardarse
cia (
1&
P
mostrado a continuaci6n
.
AN-L
16
L24
en
su
bolsil
lo interior
.)
62)
Colocacion
Coloq
ue
la corr
en
la
correa, como
ea
el
ojal
de
la
correa
pasiindola
en
por
la argolla y
la figura.
ajuste
su l
ongit
ud
con
39
Page 40

Funciones
•
Hay
•
EI
objetivo
•
Impre
•
Cuando
• Es
posible
•
Se
pueden
•
40
Una
cuando
tres
sion
hay
tapa
no
de
su
camara
tipos
de
impresion (P, H,
Tipo
P
Rela
ci6n = 1 : 3
zoom
electronico
de
tftulos
(ejemplo:
poca luz a
el
lotograffa
desliza
el
luncionamiento
objetos
nte
utili
protege
ze
la
se
(panoram
"FELIZ
suje
to
esta
camara.
Nikon:
C)
que
pueden
ico)
de
2x
tiene
una
gama
NAVIDAD
" a
"FELICIDADES")
iluminado par
por
mando a distancia
tan
cercanos
el
objetivo, ventanilla del
atras,
como
aprox.
mezclarse
Tipo
H
Relacion
de
distancias
en
la
camara
hace
(opcional).
0,4 m (1
visor y pantalia
en
un
(v
isi
on
ancha)
= 9 :
locales
la
parte
destellar
~p
,3
pies)
mismo
rollo.
16
de
24
mm a 48
trasera
de
sus
lotograffas.
automaticamente
,
62
I&.
PP
,
50,52
de cri
stal
lfquido
Tipo
Re
lacio
mm.
el
63
C
(clasico)
n = 2 : 3
flash
~e
~P.
.
~
64
P
51
57
Page 41

Indice
Prologo
. . .
Accesorios
Funciones
Partes
Indicaciones
Consejos
Para
Instalacion
Confirmacion
Colocacion
Cartucho
Funci6n
Funcionamiento
Sujetando
Fu
Indicaciones
Seleccion
Zoom
En
Sujetos
Funci6n
Pa
. .
de
su
camara Nikon
de
la
camara
..
de
pantalla
sobre
el
uso
empezar
de
la
pila
de
la
carga
de
la
pelfcula .....
de pelfcula IX240
de registro
ncionamiento
. . ...
foque
y t
diffciles
de
ra
saca
de
correctamente
del
obturador ..
en
el
visor
de
tipo
de impresi6n
omas
. .
de enfocar
ahor
ro
de pil
r la pel
fcu
la . . .
......................................................
. ..
de
cristalliquido
de
la
Nuvis S 2000
..
de
la pila ...........
. .
datos
... .
btisico
la
camara
................
. .
a . . ....
.........................................................
........
....
..................................
.. . ..........................
.
................
.........
.
................................
....................................
...............................................
..
.
...........
......................................
. .
............................................... 52-
.........
.............
...............
................
..............
....
..... 42-43
...........
.............
...........................
. ....
..
....
...........
..................
...................
38
Para
39
Pa
40
Funcionamiento
Ut
ili
43
Selecci6n
44
Fotograffa
Modo
45
Modo
. 45
Modo
46-
47
Seleccion
..
47
Modo
48
Fotograffa con mando a dis
Funcionam
T
omas
..
49
Fu
..
49
50
50-5
1
~
~~~~~
..
51
53
Localizacion
...
53
Espec
...
53
Pa
ra un
54
lIevar
el
cartucho
ra
rebobinar
zaci6n del bl
del
modo
con flash aut
de
cancelacion del flash
de flash
de flash
con sincronizacion lenta .......................................
de
otros
de
reduccion
ien
to
de
acercamiento
nci
on
de
grabacion
~:
I~~~~r
de
ifi
caciones
uso
segura
de
pelicula
la
permanente
con
averias
fotografiada a un
pelfcu
la a
medio rollo .....................................
avanzado
oqueo
de
enfoque
de
flash
omatico
modos
de
oj
autodisparado
de
;~~~
..
_
de
la
cama
.................................... ...........
...........................................
...............
...................................................
..................................... ...........
..........
.....................
os
rojos______________
tan
cia
(opcional)
r . ........
_________
..________________
tftu
los ................................. ..
del usu
ario _ ..
ra
(ADVERTENCINPRECAUCION)
laboratorio
de
fotograffa .... 55
...
...................................
.......
...
. _
_________
.
___
._
........
.........
________
.. _ ...........
...
....
......
.. _ .. _ ... __
.. _ .. _ .. _ .. _ ....................
..
__
.........
55
56
..
57
57
58
58-59
59
60
61
62
63
63
64-65
6668··-_~6~9
II
70-70
72-73
41
Page 42

Partes
42
de
la
camara
6
7
8
9
10
11
12
1
Ventanillas
2
Fl
3
Ventan
4
Boton
B
5
6 T
7
Objetivo
8
Sensor
9
Reduccion de
autodisparador
enfoque
10
Ventanilla de medicion
11
Argolla
12
Pal
13
Ocular
14
LED
15
Baton
16
B
17
Boto
bo
boton
ash
(~P.
illa del
de
disparo
otones
del,zoom
apa
deslizante
de
recepcion
automatico.
de
anca
de
del visor
naranj
L
ED
verde
~D
aton
T)TLE
n
r-I
ton ~ (modo
S
EL
de enfoque
la
correa
apertura
a (
(indicador
(rebobinado
(seleccion
(ajuste
(seleccion
automati
57)
viso
r
(~P.
del obturador
(~
(interrupt
del
mando a distancia
oj
os
rojos(~P
(~P.
de
al
cue
del cartu
(~P.
indi
cador de
de
de
modo
de i
dioma
de
flash)
de
co
50)
(~P.
P.
51)
or
prin
cipa
.
61)
63)
Iluz
para
exposicion
llo
(~P.
cho
50)
fla
sh/
enfocado)
de media
de
titulo)
)
(~P.
(~PP.
fecha)
(~
49)
l)
(~P.
(~P.
1
asistencia
automatica
39)
(~P.
46)
rebobinado)
(~P
.
(~P
(~P.
64
)!
57-59)1
P
66)
50)
rolla)
45)
1
.
64)
62)
de
55)
Page 43

18
Selector
19
20
21
22
23
24
PHC
Pantalla
de cristalliquido
Boton
de
DATE
Boton I (seleccion
MODE
(reduccion
mand
o a
distancia)
ADJUST
(ajuste
T
apa del
compartimiento del
Ro
sca
para tripode
Ta
pa
del
portap
Indicaciones
1
Ind
icador de fecha y hora
Ind
icador
de
2 Indi
3 I
ndicador
4 I
ndicador de
5
Indicad
6 Cont
7
Indi
8
Indicador
grabacion
cador
de
registr
de pila
modo de flash (I&PP.
or
de
cartucho
ador
de fotogram
cador
de
mando a di
de
reduccion
(I&
P.
50)
(I&P
P. 48,
66)
de
titulo)(I&P
de
ojos rojos/ autodisparador/
(I&PP.
fecha)
(I&PP.
(I&P.
de
o de
(I&P.
(I&
as
stancia/auto
de
60-63)1
(I&P 66)
cartucho
58, 59,
45)
de
(I&P
titu
los
datos
(I&PP.
45)
P. 4
(I&P
oj
os rojos (I&
de
ila
de
pantalla
baja
64) / boton
boton
(I&P.
46)
62,
63)
cristallfquido
48)1
(I&P.
64)
48,
64)
57-59)
7)
. 4
7)
disparad
or
(I&PP.
P 61)
13 -----------
14
-----------:
15 _
17
___
_
~~
62-63)
~~
_ _ _
----
::::;:;;')l",;k<
~
__
..J
_____
2
----c~~$
3
4-
.--
--------
.~
~--~---
'
'-------
Pantalla
--
-J
it<c---~o__
----
de
cristal Ifquido
.IL.I
rt--
--
1C±=====---
'-----
---
----
18
19
-
20
24
5
6
7
8
43
Page 44

Consejos
sobre
el
uso
de
la
Nuvis S 2000
Consejos
-
Cierre
la
tapa
la
uti lice. Evita
innecesar
-La Nuvis S 2000
la Iluvia a agua
inmediatamente
-
No
exponga
calefaccion a estufa a en
-
Guarde
la
exponga a productos
Se
recomienda
-
Si
utiliza
repetidamente
Deje
un
intervalo
de
segu
ir
-
No
deje
caer
44
Nikon
no
se
para
el
cuidado
deslizante
el
disparo
io
de
la pila.
no
es a prueba
del
mar.
can
un
la
cama
ra a
camara
en
un lugar
qufmicos
el
usa
de gel
de
tiempo
tomando
fotografias.
la
camara
ni
responsabiliza
de
para
desconectar
accidental
de
Si
pano
altas
el
agua y no
entra
agua
seco.
temperaturas; cerca
el interior de
fresco,
tales
desecante
flash
la
pila y la
suficiente
la gol
pee
contra
par
averfas
la
camara
la
camara
del
obturador y el
debe
en
la
camara
un
cache
en
seco,
limpi
como
provocadas
o.
alcanfor a naftalina.
para
el alm
cama
ra
para
que
se
una
superficie
cuando
no
consumo
exponerse
, li
de
verano.
No
acenamiento.
se
enfrfe
par
a
mpie
la
la
calentaran.
antes
dura.
ulilizar
la
-
Utilice
un
pane
soplador a limpiador
manchas.
-
Cuando
vaya a guardar
la pil
a.
Una
varias
veces
Notas
sobre
-
Compruebe
fotografias
cuando
salga
-
La
carga
de
baja
por
debajo
temperaturas, mantenga
recuperara
Notas
sobre
-
Se
recomienda Ilevar cartu
cuando sal
adq
uir
ir
cartuchos
Nuvis
52000
de
forma
suave y seco
vez
al
para
la
la car
de una
de
viaje.
la
pila
de 0 °C
cuando
el
ga
de
via
no
de cristal
la
camara
mes
coloque
mantener
el
pila
ga
de
la
pila
ocasion
importante. Lleve
se
reduce
(32°F)
la pila cali
vue
Iva a su
cartucho
chos
je a l
ugares
de
pelicu
la
especificada
de
algodo
n 0
es
para eli
minar
duran
te
la
pil
,a y
haga
condensador
cuando tenga
cuando
la
temperatura
Cuan
do
tome
ente.
La
temperatura
de
pelfcula
de
pelicula
donde puede
IX240.
en esle
manual.
un
cepil
lo
con
la
suciedad
mucho
tiempo,
des
tel
lar
en
carga
normal.
IX240
el flash
forma.
que tom
ar
pilas
de
repuesto
ambiente
fotografias a bajas
de
la
pila
IX240
de
repuesto
no
ser
posible
y
saque
se
Page 45

Para
1
Abra
su
tope.
Cuando cier
la
cierre
porque
·
Cuando
aprox
. 2 m
desactiva
(1&
P.53)
empezar
la
tapa
deslizante
re
la
tapa deslizante,
dem
asia
do
dafi
utilice
os,
rapidamente
ar
la
camara durante
la
camara
mente
puede
no
inut
automatica
el
objetivo.
.
se
hasta
no
Instalaci6n
2
Instale
T
Abra
T
Instale
3 V
dentro
como
Cierre
T
que
escuche
•
Recuerde
ho
ra
cada
(1&
PP
la
tapa
una
en
la
tapa
que
vez
66-67)
de
la
pila.
del
pila
del
la
figura
del
un
tiene que
que
camb
la
pila
portapilas.
de
litio
portapilas
.
portapilas
chasquido
ajustar
ie la
pila.
CR2
,
hasta
.
la fec
Confirmacion
de
la
Compruebe
T
Abra
• EI
·
· Si "
y
activar
objetivo
la
posicion W (gran
d
estella.
Si
no
aparece
"
CII
", la
CII
en
la
pantalla
se
ha
agotado y es
de
ha
pila
la
tapa
la
se
pila
"
de
de
la
carga
deslizante
camara
alarga autom
angu
el
indicador
esta carg
ste
lla
0 no
de
cristalliquido,
necesario
la
carga
de
la
.
aticamente
lar) y
de
pila
ada.
aparece
cambiarla.
pila
para
el
flash
baja
nada
la
pila
.
a
S
45
Page 46

Colocaci6n
'.-'1-'
uu
IlmIm
AU
TO
1
Abra
la
tapa
c
ompruebe
indi
cador
en
la
pantalla
-
Si
el
numero
pantalla
de
cartucho
aparece
cartucho
ya
sacarlo.
cristallfquido,
la
un
-
Si
de
cristallfquido, se
cartucho
46
debe
de
:5
L
~
deslizante
que
de
cartucho
de
de
fotogramas
parcial
mente
letra
"E" y
"D "
en
ha
expuesto
(1&
P.
cargado
la
pelicula
.-
C
y
no
aparece
el
"an
cristallfquido.
aparece
en
ha
cargado
indicador
de
un
la
y
se
expuesto
el
la
pantalla
completamente
54)
2
Gi
re
la palanca
del
cartucho
de
la
flecha
del
compartimiento
cartucho.
La
tapa
del
cartucho
despues
tapa
completamente
motor en
compartimiento
se
cierra
de
carga
hasta
haber rebobinado
el
interior
de apertura
en
el
sentido
para
abrir
la
del
del
automaticamente
r.
No
trate
de abr
la
pelfcula y se
de
la
camara.
pare
tapa
ir
la
el
3
Coloque
pelfcula
y
cierre
-Uti
lice
s610
(no
se
deben
de
35 mm.)
Compruebe
exposici6n
exponer)
-
Cierre
la
cartucho
chasquido
un
cartucho
en
el
compartimiento
la
tapa
.
cartuchos
utilizar
rallos
que el V
El
visual)
muestra
antes
de
colocar.
tapa
del
compartimiento
hasta
que
escuche
de
de
pelfcu
la I
X240.
de
pelfcula
(indicaci6n de
"0"
(sin
(1&
P.
del
un
47)
Page 47

'n.-,
uu
IlmIill
AU
TO
~
4
Compruebe
numero
de
disponibles y que
"D"
en
.
aparece
"E"
"~
mente
cho
de pelic
colocado.
la
el
destella
"),
expues
Ifquido
-
Si
no
vuelva a colocar
-La
letra
de
pelicula total
muestra
parcial
ca
rtu
ha sido
:I
c
IJ
que
aparece
fotogramas
aparece
pantalla
numero
la
mente
un
ula
de
pelicula.
cuan
do
expuesta (VEl
cart
ucho de
ta
("D
"), 0 un
procesada
de
fotogr
un
el
cristal
amas,
cart
ucho
pelicula
("0
")
Cartucho
Di
sco
Puerta a-----"
prueba
-
Cartuchos
peliculas
exposiciones y 15
-
Los
cart
tienen punta guia.
automaticamente y se
la
camara.
- La
VEl (indicacion
vi
sual) muest
la pelicula
de
de
datos
luz
de
uch
de
pelicu
40
os
ra l
de
--=
r-
'--.
"-
exposicion
de
os cuatro
pelicula
::;:==t-
-;:
-:-
la disponibles.
es,
exposiciones.
pelicula IX240
La pelicula
de
25
sale
ajusta
dentro
exposicion
estados
IX240
F:;;:==D
'"---_
no
de
0 Pelicu
""'. .. "i:3
ou_-Indi
•
Indicacion
Notas
los
-N
de
-No
-No exponga
D
el
luz 0 el
irrever
laborator
altas temperaturas
calefac
o a
Pelicula
procesada
la
no expu
Pelicu
la
parcial men
Pelicula
totalmente
cador
de
pro
de
exposicion
para
cartuchos
o toque,
desarme 0 golpee
disco
de datos,
car rete
rompa
el indi
sible.
io
de
cion 0 estufa,
un
campo
dentro
del cartucho
esta'
te
expuesta'
expuesta
pero
cesa
do
irreversible
visual
(VEl)
la
manipulacion
de
pelfcula
la
puerta a prueba
del cartu
cho
cador
de
Si
esta
roto, consulte
fotografia
mas cer
la pelic
ula
ala
cerca
polv
magnetico fuerte.
'
sin
procesar'
de
IX240
con
fuerza
.
procesado
con
cano.
luz
del
sol,
de
la
o y
humedad
su
de
S
47
Page 48

Funci6n
de
registro
de
datos
0
! I
tol
Seleccione
indicaci6n
T
Oprim
a
•
Aparece
la
expresa
como
un
cic
io
de
aparece
en
"1
de
febrero
•
Aparece " ••• " cuando
modo
"Sin registro
48
t:c:
2 :D II
'",
0
~
,
.,
11
C5J
~
~
MOG~)ATE
SEL
ADJUST
su
modo
preferido.
el
bat6n
DATE
seccion
del
dos cifras y la
24
horas.
La
la
figura
anterior
del
2000
".
csj
~
de
.
"Ana"
que
"hora"
fecha
muestra
".
se
selecciona
que
se
en
el
0
! I
tol
ll
·
Oprima
el
baton
una
de las tres
que
oprima
ca
Ano/Mes/Oia
r '
·
Mantenga
durante
"
..• " La indicacion
Ano/Mes/Oia
r
el
mbia
en
el
002 :-+
oprimido
mas
'OD
2 :-+ 2 :'00
:s:3a
D II
,",o~
L
_,
-"i
,
.,
~~~
~
MOG~)ATE
SEL
AOJUST
DATE para
indicaciones. Cada
baton,
la
ind
iente orden:
:5:30
-+
el
baton
mientras
cambia
-+
icacio
sigu
HoraiMinutos
de 2 seg.
Mes/OiaiAno
]
J
seleccionar
vez
n
Sin
registro
- - - ]
DATE
aparece
OiaiMes/Afio
: 2'00 ]
I
IlrnIm
AU
· Si
toma
fotografia
en
la
pantalla
la
pantalla
registran
modo " ...
•
"M"
en
la
in
dicaci6n
impr
imi
ra
•
Acuda a un
t
enga
el
simbo
otogra
ffa
f
l
os
datos registrados
•
Cuando
se
el
"Ajuste
-
J
TO
~
cuando
se
de
cris
talliquido es
embargo
io
de
fotograffa
"Marca
de
en
un lugar
la fecha y la
y
h~ra"
aparece
los
selecciona
de
las
laboratorio
que imprima
hora,
en
la
de cristalliquido
quedaran registrados.
datos
cuando
".
pantalla
det
mes, sin
en
la
parte trasera
laborator
lo
autorizado" y solicite
ajuste
de
la
fecha
"~"
datos
No
se
el
la
no
se
fot
ografias.
que
especifico
consulte
pagi
na
de
de
66.
Page 49

Funcionamiento
•
Mantenga
sus
manos
la
camara
cuidado
esta
parpadea
EI
flash
codas
sobre
de
no
am
bas
pr
esiona
•
Tenga
flash cuando
el flash,
avisarle.
el
obturador.
contra
la
camara
contra
su
no
bajar
la
emergido.
el
LED
naranja
destelia
basico
su
cuerpo
y
mientras
rostro.
unidad
de
Si
se
baja
para
allevantar
SUjetandocorrectamente
la
camara
·
Cuando
sujete
la
camara
compruebe
ar
rib
a,
como
·P
ara
evitar que
sostengala
No
tape
de enfoque
dedos
ni
que
en
firmemente
el o
bjetivo
auto
el
cabello.
el
flash
la
figura.
la
camara
.
, fl
ash 0 ventana
matico
verticalmente,
esta
hacia
vibre,
con
sus
Funcionamiento
ohturador
Oprima
del
exposicion;
Con
oprimido
bloqueado
Oprima
hasta
ligeramente
obturador para
se
encendera
el
boton
de
disparo del
parcial
mente, el
(1I@f' P 56)
el
boton
de dis
el
fondo
para
el
boton
ajustar
el
paro del
disparar
del
de
disparo
el
enfoque
LED
verde.
obturador
enfoque
obturador
el
obt
urador.
y la
queda
49
Page 50

Indicaciones
en
~
~4-J
G)
Marcas
de
Para
0,4 m aim
@
Marco
Apunte esta
@
LED
Si
Si
rebobinando 0 el flash
S
@
LEDverde
Si
50
correcto 0 la
compensacion
las
tomas
de
acercamiento
(1,3
pies a 3,3
de
enfoque
marca
sobre
naranja
esta encendido: Fla
parpadea:
Flash
esta
esta
encendido:
EI enfoque
distancia
automatico
el
sh
cargando y no
no
de
el
pies).
sujeto.
listo
ha
la
toma
visor
de
paralaje
can una
para
desteliar.
emergido
es
el
correcto.
es
de
distanc
ia
de
aprox.
puede
destellar,
completamente.
Si
parpadea:
men
os
de
aprox.
la
pelfcula
EI
enfoque
0,4 m (1,3
se
pies).
esta
no
es
Seleccion
de
tipo
de
impresion
Utilice
el
selector
PHC
para
seleccionar
el
lipo
de
impresion
deseado
anles
de
hacer
la
•
Se
puede sel
eccionar
uno
de
impresion
(P,
zona
de
ambien
ra
no
HoC)
con
la
de
imagen
impresion
puede
icite
de
fotografia.
tener
problemas
hacia
el
selector
siempre,
La
tipo
• T
cuando sol
laboratorio
iPRECAUCION!
Pa
la
el
camara
funcionar
conmutando
pelicula
colocada.
posible
es
seleccionado
cambiar
el tipo
impresiones
en
su
rostro
cuando
PHC.
los tres
diferente
adicionales
su
el
(Il@f
.
de
impresion
vista,
haga
lorna.
tipos
de
selector
P
40)
segOn
en
no
apunte
PHC
el
el
Page 51

Zona
de
partes
P
H
ion
ancha)
n = 9 : 16
C
imagen
cortadas
(P/H/C).
= 1 : 3
= 2 : 3
Las
final son diferentes
impresion
Tipo
(panoramico)
Relacion
Tipo
(vis
Relacio
Tipo
(clasico)
Relacion
posible
de
la
impresion
segun
Zoom
el
tipo
de
Oprima
el
boton
de
zoom
ctJ
par~
Mire
por
imagen
oprimiendo
del
zoom
T
Cuando
tamafio
retire
su
zoom.
-Cua
ndo
no
mas
de
aprox 2 minutos, el
r
et rae
automaticamente a la
(gran
angular).
el
visor y componga
los
botones
.
se
ha
obtenido
de
imagen
deseado
dedo
del
bot6n
S8
utili
za
la cam
ara
objetivo
P
posicion
53)
(1&
la
el
,
del
durante
se
Iilll
el
objetivo a 48
teleobjetivo.
Oprima
el
boton
el
objetivo a 24
gran
angUlar.
mm
para
de
zoom
mm para
alargar
fotograflas con
Iilll
par~
re
fotograflas
tra
con
er
51
Page 52

Enfoque y lomas
1
•
•
52
Apunte
en
Para
compruebe
0,4
Componga
el
el sui
que
m (1,3
la
marco
de
eto.
enfoque
las
fotografias sean nitidas
que
el
sujeto
pies)
de
la
imagen
auto
esta a aprox.
camara
.
.
matico
,
2
Enfoque
T
Oprima
disparo
•
EI
LED
l
ogrado
Si
el
el
obturador
distancia
la
(1,3
Si el
el
sujeto
(v:wP.
puede disparar
desenfocada.
sobre
ligeramente
del
obturador.
verde
se
enciende
enfocar.
LED verd
e parpad
esta bloqueado,
de
disparo
pies).
LED verde parpadea rapidament
no
Ruede
53).
enfocarse
En
este
caso,
produciendo
el
ea lent
es
menor
sujeto
el
boton
cuando
amente:
debido a qu
a
bien
el
obturador
una
.
de
se
ha
e
OAm
e:
imagen
Oprima
3
·
Si
tiene
destel
(V:WPP 57-5
•
Despu8s
fotogramas
~antalla
•
Si
con
Cierre
la
suavemente
dlsparo
del
fonda
para
no hay
suficiente
iluminaci6n
la
automaticamente.
de
se
de
cristallfquido.
oprime
el boton
fuerza
puede
la
tapa
camara y ahorrar
obturadar
tomar
luz 0 si
de
atras,
9)
la
toma, el
descuenta
de
disparo
hacer
que
deslizante
corriente
el
baton
hasta
una
fatograffa
el
objeto
el
flash
numero
en
uno
del
vibre
la
para
desactivar
de
de
el
.
de
en
la
obturador
camara.
la
pi
la.
Page 53

Sujetos
L
en
(Il§
distancia
A
diffciles
os
siguientes sujetos pued
focar.
En este
P.
56) enf
ocando otro su
de
la camar
Su
jet
os
de bajo contraste tal
az
ul 0 superfi
coches encerados
B S
ujetos con patron
C H
ay suj
etos cercan
tiempo den
au
D Su
f
ondo brillante.
tomatico.
jetos
con fuerte il
tro del mar
de
caso utili
a.
cie
que refleja
0 el agu
es continu
os y alejados
umi
enfocar
en ser d
ce
el bloqueo
jeto a la misma
es como el
n la l
a.
os
co
de enfoque
nacio
n de atras 0 con
:
iffcil
es
de enfoque
uz como
y rep
etidos
al
mis
mo
de
cie
lo
.
Funcion
-
Cuando
mas
abrir
la
p
EI obj
la
desconecta.
-
Oprima
obturado
boton
camara y encender
li
-
Para evit
accidental
deslizan
cuando
no
de
aprox
la
tapa
camara
se
ara ahorrar
etivo
pos
ici
on
el
boton de disparo
r l
para
quido
.
ar
mente, debe cerrar
te para
no
de
se uti
. 2
deslizante para
apaga aut
la
se ret rae
[ill)
igeramente 0 cua
co
nectar nuevamen
que
este
ahorro
liza
la
camara
minutos,
despues
omaticamente
carga
de
la
pila.
automaticamente
(gran angu
la
desconectar la
la
pila
en uso
lar) y
pantalla
se
descarg
.
de
pila
durante
conecta
se
del
lqu
ier
te la
de crista
ue
la
tapa
camara
de
rla,
a
otro
l
S
53
Page 54

Para
1
-AI
-Si
S
54
sacar
',-,.-,
L'LI
IlIIDill
AUTO
La
pelfcula
rebobinarse
final
del
se
contador
a
numero
apareciendo
liquido,
rollo.
rol
rebobina
automaticamente y el
de
fotogramas
uno y destella
desea
sacar
de
fotogramas
en
rebobine
(I@f'
P
la
pelicula
.='
~
empieza
a
automaticamente.
lo
de
pelicula,
la
pelicula
va
el LED
la
la
55)
baiando
naranja.
pelicula
cuando
sigue
pantalla
de
la
cristal
pelicula a medio
el
uno
",..,-
LlL' L
IlIIDill
2
Compruebe
"E
"esta
pantalla
-Cuando
se
completamente
parpadea.
-
Si
rollo
continuara
la
ha
el
rebobinado
porque
automaticamente
pila
~.::
que
visible
en
de
cristallfquido
rebobinado
la
pelicula,
se
detiene a medio
se
ha
agotado
el
destello
la
la
let
la
pila
al
cambiar
ra
,
.
"E"
3
Abra
la
del
cartucho y saque
No
abra
la
cartucho
hasta
destellar "E"
-Cuando
abra
del
cartucho,
inferior
de
o
el
cartucho
tapa
del
compartimiento
cubierta
de
la
que
empiece
la
tapa
del
compruebe
la
camara
mira
puede
caerse.
la
pelfcula
.
camara
del
a
compartimiento
que
la
parte
hacia
arriba,
Page 55

Para
lIevar
el
folograliada
Foto
-
Se
pelicula a un laboratorio
el simbolo "Marca
fotograffa aut
para
-
Sus
para
-
Se
imagenes
expuesto del
los negativos.
-
Para
laboratorio
cartucho
a
un
laboralorio
Se
rvici
o de
aca
bado
Ce
rtificado
recomienda Ilevar
de laboratorio
orizado"
su
procesado e impresio
negativos
se
que
entrega
mas infor
devuelven
pueda
guardarl
una impresion
pequefias
rollo
de
macion,
de
fotograffa.
de
pellcula
de
Se
rvicio
Fotogrilfi
-5
I'Ri~D
Certificado
el
cartucho
de
fotograffa con
que
se indica
n.
en
el
os
fac
ilment
indice
de
cada fotograma
pelicula) junto
consul
te con
folografia
co
de
de
arriba
cartucho
e.
(con
con
su
,
,
Para
1
-
-
rebobinar
Oprima
el
boton
utilizando
o
Cuando
necesario
de
rebobinado a medio rollo.
Cuando
rebobinado,
No
tra
empiece a parpadear
el
la
punta
de
empieza
seguir
se
ha
completa
empieza a parpadea
te
de
abrir la
ojal
un
el rebobinado
opr
imi
tapa
la
pelicula a medio
ttD
de
la
correa
bolfgrafo
endo
do
hasta
.
no
es
el
boton
el
r "E
".
que
"E"
2
Saque
T
Abra
la
del cartucho.
T Sa
que
Cuando
se
rolio,
no
10
~
rollo
la
pelicula
tapa
del
la
pelfcula
ha
sacado
podra
volver a utilizar.
compartimiento
.
la
pelicula a medio
~
I
55
Page 56

Funcionamiento
1
Componga
•
Cuando
el
sujeto
del marco
de
"[
J",
la
zona det
quedara enfocada.
avanzado
la
imagen
principal
automatico
ras
del
esta
sujeto
enfoque
fue
56
Utilizaci6n
Cuando
2
.
ra
Apunte
automatico
principal.
T
Oprima
disparo
•
Compruebe
verde.
del
el
sujeto
el
marco
al
ligeramente
del
obturador.
que
se
enciende
bloqueo
principal
sujeto
de
enfoque
el
boton
el
no
LED
de
enfoque
esta
en
3
T
de
T
o
Mientras
boton
permanece
o
No
mientras
de disparo
el
centro
del
marco
Vuelva a componer
imagen y tome
Mientras
mantiene
del
obturador ligeramente
vuel
va a
componer
Oprim
a a
disparo
del
mantenga
del disparador
bloqueado.
cambie
la
distancia
mant
iene
del
obturador.
el
la
fonda
el
obturador.
ligeramente
del
obturador,
de
la
oprimido
la
boton
camara
ligeramente
.
la
fotograffa
boton
de
oprimido
imagen
.
de
oprimido
el enf
al
sujeto
.
disparo
,
el
oque
el
boton
Page 57

Seleccion
·
Para
r
eferenc
A ~
l
• Cuan
de flash
mas
ia
TO~
r
Cancelaci6n
~
Flash
AJ
ro
~
SLOW
do
se
vuel
del
detalles, con
para
cada
Flash
auto
permanente
Flash
automatico
sincronizaci6n
desconec
ve
al flash aut
modo
de
sulte
la pagi
modo
de flash.
matico
(~P.
de
flash
(I&P
(I&P 58)
con
lenta
(I&P.
ta la cam
ara,
omatico.
flash
na
de
57)
58)
59)
el
modo
Fotografia
EI
flash
esta a contra/uz
'"....
IlmIm
AUTO
1
Abra
activar
• Cuan
do
"
AUTO~
Se
activa automaticamente
flash au
• La
cama
que
el sujeto esta a
aut
omaticamen
ando
· Cu
cristalliqu
caso
no
con
"
ciest~lIa
automaticamente
:;
LILI
C
~
l
la
tapa
deslizante
la
camara.
la
cama
ra esta
"
en
la
pantal
to mat
ico.
ra d
etecta
que h
te el flash.
aparece
"~"
ido,
el flash
se
enciende
el LED
activada,
la
de
ay
contral
en
no
destella.
flash
para
aparece
cristallfqui
el
modo
poca
luz
uz y destell
.
la
pan
tal
la
En
naranja
auto
do
de
0
a
de
este
matico
cuamio
hay
2
Compruebe
los
LED
tomar
•
Antes
de
compruebe que el suj
del
flash.
Iilll
(24
mm) : aprox
ctJ
(48
mm)
•
Si
el
LED
obturador
de disparo
aprox. 6 seg. y espere
encienda
antes
poca
/uz
0 e/
que
se
han
naranja y verde
la
fotograffa.
tomar una fotografia
eto
Consulte
naranja
se
bloquea
del
esta
la
siguien
te
0,4 a 5 m (1,3 a 16,4
aprox.
0,4a2,8m
parpadea,
el
flash
Oprima
hasta
tomar
ligeramen
que el
una
fotografia
obturador nuevamente
de
sujeto
encendido
antes
con
flas
h,
dentro del
alcance
guia (ISO
200
pies)
(1,3a
9,2
pies)
se
carga y el
te el
despues
LED naranja
de
).
boton
de
se
S
57
Page 58

M()do
1
•
Como
normal
lentas,
la
58
de
Oprima
el
aparezca
de cri
stallfquido.
este
modo sel
mente
velocidades
uti lice
ra
un
vibre
cama
cancelacion
boton ~ hasta
"
(i)
"
en
la
ecc
iona
de
tr[pode
para
.
del
que
pantalla
obturacion
evitar
que
flash
2
Componga
tome
T
Oprima
de
T
Compruebe
esta
boton
obturador
tomar
la
imagen
la
fotograffa.
ligeramente
disparo
del
obturador.
que
el
LED
encendido y oprima
de
disparo
del
hasta
el
la
fotograffa.
fondo
el
y
boton
verde
el
para
Modo
Utilice
este
I
TITlE
~
1
Oprima
aparezca
de
cristallfquido.
de
flash
modo
para
«:
~
0 D
~
~
MODE
SEL
ADJUST
el
boton ~ hasta
"~"
permanente
hacer
que
destelle
DATE
que
en
la
pantalla
Page 59

flash
sin
importar
2
Componga
tome
la
aranja y v
ro
tamar
el L
ED
naranja par
antes
fotografia
del
ebe
que
erde y oprima
del
obturador has
la
el
baton de
nuevamente
de
T
Oprima ligeramente
disparo
T
Compru
n
dispa
para
-
Si
ligeramente
aoturadar
6
seg y espere hasta
encienda
la
Iuz
ambiente.
la
imagen
obturador
se
encienden los
fotografia.
padea, apri
disparo
despues
que el
LED
tamar una fat
.
el
bot6n
.
el
bot6n
ta
el
ma
del
de
aprox
naran
agrafia.
y
LED
de
fonda
ja
se
de
Modo
Utilice
este
principal
Oprima
1
aparezca
pantalia
-
Como
este
normal
mente vel
lentas, uti
la
camara vibre.
-
Cuando
el sujeto
"G)"
en
no
destel
enciende
de
flash
modo
para
como
del
II
CJ
~
~
~
MOD
ADJUST
SEL
el
boton ~ hasta
"~~J£
de
cristalliquido.
modo sel
ocidades
lice
un tripode
esta
la
pantalla de
la
el flash.
el LED
naranja
con
obtener
fondo
en
condiciones
IQ
E DATE
~
"
en
ecciona
de
obturacion
para
evitar
brillante,
cristalliquido y
En este
caso
sincronizacion
la
exposicion
de
poca
que
la
aparece
no
que
se
2
T
T
-
Si
bolon
despu8s
naranja
lenta
correcta
tanto
luz 0 de
Componga
tome
la
Oprima
ligeramen
disparo
del
Compruebe
LED naranja
bot6n
de
disparo
el
fondo
para
el
LED
naranja
de
disparo
de
aprax 6 seg. y espere
se
encienda
del
sujeto
noche
.
la
imagen
fotografia
te
obturador.
que
se encienden
y v
erde y oprima el
del
obturador
tomar
la
parpadea,
oprima
del
obturador
antes
de
lamar
y
.
el
bot6n
de
los
hast
fotografia
.
ligeramente
hasta
que
una
folografia.
el
el
LED
nuevamente
S
a
59
Page 60

Seleccion
Para
hacer
de
ojos
de
coincidir
rojos, mando a dislancia
otros
los
objelivos
modos
de
sus
yaulodisparador.
lomas
folograficas,
se
pueden
~
seleccionar
la
reducci6n
60
Cada
vez
boton
MODE, la
cambia
·
Para mas
de
referencia
que
se
oprime
pantalia
en
el
orden
detalles. consult
para
cada
el
indicado
e la
pagina
modo
.
Cancelaci6n
(sin
indicaci6n)
~
<0>
Indicadar
1 Para
<O>g
Indicadar
~
Para d
.
Indicadar
Para incl
de
reducir
el
elec
de
isparar
el
de
uirse a sf mismo
reducci6n
to de
de
"oios
rajos" con flas
ajas
manda a distancia
obturador
a di
stancia
.
autadisparadar
en
la fotogr
(~
affa
rajas
(~P
P
63)
.
(~P.
h.
.
62)
61)
Page 61

Modo
En
la
/otogra/fa
u
~
!
!
1
Oprima
que
aparezca "0"
pantalla
de
reduccion
con
flash,
.
<I>
-,~
~
AUTO
c:.
.~
Il~_
~
rg
~
"
'ODE DAT
ADJUST
SEL
el
baton
MODE
de
cristallfquida.
los
ojos
:~
]
[Q J
E
I
hasta
en
la
de
del
ojos
sujeto
2
-
Como
ojos
que
mover
se
-No
toma
rapido
rojos
pueden
aparecer
Campanga
aprima
de
disparo
se
enciende
rajas
durante
destelle
el
la
camara a permitir
mueva
hasta
se
recomienda
reducci6n
de
una
fotografia
movimiento.
rojos.
Utilice
la
imagen
ligeramente
del
abturadar
la
luz
de
reducci6n
un
segundo antes de
flash,
tenga cui
que
que
destelle
el flash.
el
modo
rajas
de
de
cuando
sujetos
ojos
y
el
baton
dado
el
en
este
.
de
de
no
objeto
se
modo
3
-
-
-
Si
boton
despues
naranja
Para
oprima
en
cancelarse
Se
reduccion
en
para
reducir
Compruebe
los
LED
naranja
tomar
la
fotograffa.
el
LED
naranja
parpadea, oprima ligeramente
de
disparo
del
de
aprox. 6 seg. y espere
se
encienda
cancelar
el
modo
el
boton
MODE
la
pantalla
de
cristalliquido.
desactivando
pueden
ajustar
de
ojos
caso
no
se
rojos y cancelacion
produce
este
el
e/ecto
de
que
se
han
encendido
y v
erd
e a
obturador
nuevamente
de
tomar
de
reduccion
hasta
que
la
camara.
la
reducci6n
se
Este
hasta
una
de
apague
modo
los
antes
conjuntamente
"ojos
ntes
que
fotograffa.
ojos
rojas
"
no
modos
de
flash
de
ajos
rojos".
de
el
el
LED
,
<II>
"
puede
de
pero
rojos
.
1
61
Page 62

Fotografia
Para
un
disparo
1
1nstale
trfpode 0 sobre
superficie
•
EI
mando a distancia
una
distancia
desde
el
frente
distancia
de
de
5 m (1
6,4 pies),
autodisparador.
•
Si
el
sensor
recibe
62
los
a
una luz
no
funcionara
intensa, el
con
remoto
la
camara
plana
puede
de
hasta
5 m
de
la
camara.
la
camara
al
utilice e modo del
(~P.
de
recepcion
rayos del
solo
mando a distancia
correctamente.
mando a distancia
del
obturador.
'--TO--;r.=;;;;;;;;;;;;=~,,-,
2
en
una
firme
funcionar
(16,4
Si
sUI'eto
63)
de
la
esta
un
.
a
pies)
la
es
de
mas
cama
ra
expuesta
Oprima
hasta
"
Oi~
cristalilquido.
• EI
mando
a di
automaticamente
mas
de
unos
deslizante. Esto significa
seguir
tomando
distancia
hasta 2 mi
toma.
(opcional)
el
boton
que
"
stancia
2 mi
MODE
aparezca
en
la
pantalla
se
cancelara
si
no
10
utiliza
nutos 0 se
que
fot
ograffas
desde
nutos
desde
cierra
puede
de
durante
la
tapa
la
la
ultima
3
Componga
tome
la
fotograffa.
T
Apunte
el manda a distancia haci
la camara y aprima
disparo
del
•
La
luz
duran
•
Si
no
a
dislancia, cambie
(La
vida
con
servicio
abturadar
de
reducci6n
te
unos
2
seg.
puede
dispararse
de
la
pila
es
un
concesionario
de
Nikon
para
la
imagen
el
baton
en
de oios
antes
la
pila
de
autorizado 0 centro
que
el
roios
se
enciende
de
disparar
el
oblurador
con
del
mando a disiancia.
unos
10
arios.)
Ie
cambien
y
a
de
manda.
el
obturador.
el
mando
Consulle
de
la
pila
Page 63

Funcionamiento
con
autodisparador
Tomas
de
acercamiento
Cuando
1
desea
Oprima
ha
sta
que
"
~i~
cristallfquido.
-
EI
autodisparador
automaticamen
mas
de
unos
tapa
deslizante.
-
Se
recom
ien
un tri
pode.
participar
el
boton
aparezca
"
en
la
se
cancelara
te si
no
2 mi
nutos 0 se cierra
da instalar
MODE
pantalla
10
utiliza
durante
la
camara
en
de
la
sobre
/a
fotograffa.
~~
--------------
2
Componga
oprima
disparo
hasta
luz
de redu
la dur
sparar el
odisparador
ada
la
ara
cancelar
desl
el
obturado
fotografia
-
La
destel
enciende duran
di
-
EI aut
tom
-P
la tapa
la
imagen
el
boton
de
del
obturador
fondo
.
ccion
de
oj
os
ante 8 seg. y despues
te 2
el aut
izante.
rojos
seg. ant
es
r.
se cancela
.
odisparador
de
una
cier
y
se
vez
~
re
Para
tomar
sujetos
tales
como
-
Cuando
se toman fotografias
dentro
de
una
a 3,3
dentro
en
la
el
sujeto
sujeto
esta
parpadea
el obt
desenfocada
gama
pies), componga
de
de
paralaje.
figura
impresa.
esta a menos
el
muy
rapidamen
urador
,3 pies
(1
fotografia
compensacion
in
dicada
de
la fotografia
-
Cuando
0
,4 m (1,3 pies),
lentamente y se bloquea
-
Si
el
verde
disparar
quedara
flores
en
de
de
0,4
m a 1 m
las
marcas
La
queda
ra cort
LED ver
de
el
obturador.
cerca, el LED
te y
y la
fotografia
.
acercamiento
sujetos
la
de
zona
////
ada
de
parpadea
puede
63
Page 64

Funci6n
Para
1
Oprima
hasta
los
titulo
cristallfquido
e
se
pueden sel
idiomas.
64
de
imprimir
-0
el
boton
que
aparezcan
codigos
en
la
pantalla
eccionar
grabaci6n
un
titulo
en
de
la
TITLE
"I",
de
idioma
y
de
.
30
titul
os
en
tltulos
parte
trasera
2
Seleccion
...
Oprima
m
idiama
...
Oprima
codiga
I
Oprimiendo
baton
codigo.
de
las
fotografias.
~~rr:::l
~
~
de
idiomaJtltulo
el
baton
as
de 2 se
g.
camienza a parpadear.
el
baton
de
idiama. Oprima
para
ajustar
cantinuamente
para
cambiar
(g
•
lODE
DAT
los
codigos
.
TITLE
EI
codiga
r-I
para
el
codiga
rapidamente
durante
E
de
titulo
ajustar
el
baton
de
titula
cada
de
.
el
el
3
...
a
e C
-0
TITLE
~
?
~
lQ~-=(g~~(g=,""1
~
SEL
Ajuste
los
idiomaJtltulo
Oprima
el
boton
preferida
deja
en
el
panel
liquida. Des
uando
pantalla
graba
la
pantalla
pantal
presion
de pantalla
pues
aparece
de cristallfquido,
r el
titulo aun
de
fecha
la
de
cris
del bot
MODE
DATE
ADJUST
codigos
TITLE y el
de
"I "
tallf
on DATE
de
codiga
parpadear y aparece
de
cristal
tome
la
fotografia.
en
el
panel
es
posible
cua
ndo
esta act
en
el
pan
el
quido
de
median
.
1
de
ivada
te
una
la
Page 65

lista
Idi
C6digo
1
2
3 Fr
4
5
6
8
9
10
11
12
13
de
lItuios
oma
integr
Idioma
Danes
Finlandes
ances
Aleman
Italiano
Japones
Noruego
P
ort
ugu
Espanol
Sueco
Ingl
es
Ingles
P
ara
los
ado
es
britanic
o
americano
t~ul
os
en
impresos
del
I I
COOIQO
01
02
03
04
05
06
07
08
09
10
11
12
13
14
15
otros
idiomas,
usuario
Titulo
NAVIDAD
CU
MPLEANOS
VACACIONES
LUNA
DE
MIEL
BODA
FAMILIA
FI
ESTA
ANIVERSAR
AMIGOS
VIAJE
FELIZ
CUMPLEANOS
FELICIDADES
FELIZ
NAVIDAD
TOUR
ANO
NUEVO
vea
la "Usta
IO
de
Tft
tftulos
ulos
en E
COO
impresos para
spano
l
ioo
Titulo
16
FELIZ
17
DiA DEL
18
DiA
19
R
ECU
20
BAUTISMO
21
DiA
22
SEMANA
23
DiA
DE
CARNAVAL
24
25
V
ERBENA
26
SANTO
27
SALUDOS
28
fELIZ
NAVIDAD Y PROSPERO
DESPEDIDA
29
DESPEDIDA
30
el
usuario"
ANO
DEL
ERDO
DE
LA
LOS
NUE
VO
PADRE
LA
MADRE
S
REYES
SANTA
PRIMERA
DESDE
DE
SOLTERO
DE
SOLTERA
que
se
MAGOS
COMUNION
...
AND NUEVO
adjunta.
• P
ara
cancelar
de
tftulo
, oprima
compruebe
idiom
a/tftulo
palabra "OFF"
2
seg
en
liquido
antes
de
la fecha.
la
que"
se
se enciende
el
pan
de
funcion
el
boton TITLE
' " y
han
borrado
el
de
pantalla
volver
de
gra
bacion
y
los codigos
. La
durante
de cri
a la
indicacion
de
sta
l
I
65
Page 66

Ajusle
1
...
Oprima
(seleccion
mas
-La par
66
de
~§~~
o
••
TITlE
~.~-2~
o
J.!.
t=J
~
Entrada
del
el
de 2 segundos
te del
"ana"
la
lecha y hora
~
'nn.i' '"
,,,,
~
::l
,
r'll
!b:l
~
SE
boton
CJJ
MODE DATE
ADJUST
L
modo
de
SEL
de
fecha)
durante
.
empieza a parpadea
I
ajuste
r.
2
Selecci6n
...
Oprima
(ajuste
el
ano
-
Cada
vez
AD
JUS
unidad.
-Oprim
a c
durante mas
rapidamente
del "ana
el
boton
de
fecha)
correcto
que
se
oprime
T, el
numero
ontinu
amente el ba
de 2 seg. para cambi
el
numero.
ADJUST
para
.
el
baton
cambia
ton ADJU
"
ajustar
de a un
ar
3
Selecci6n
...
Oprima
del "mes" empieza
parpadear.
...
Oprima
s
a
ST
eleccionar
Oprima
...
-
Repita l
selecc
el
el
el
os
proced
ionar el
del
boton
boton
el
boton
imientos
dfa
, h
"mes
SEL. La
a
ADJUST
mes
correcto
SEL
.
2 y 3 para
ora y minu
"
parte
para
.
tos.
Page 67

4
Para
ajuste
T
Oprima
fecha
pantalia
eSi
se
oprime
ajus
ta la
aj
ustados ant
este
momento.
e
La
fecha
anterior mu
2001
~"
o 1
1'
TITLE
~
I,,"
iiI
lL
c:J
' h
SEL
II
salir
el
carregida
de
otro
fecha/hora,
eriormen
que
aparece
est
".
"' -<'5111
u.
'i
~
cos
I
P
MODE
ADJUST
del
modo
baton
SEL y la
aparece
cristal
Ifquida
boton
mientras
todos los dat
te
se aju
en
la
ra "
25' de
abril
l
~
DATE
1
figura
ll
de
en
.
se
stara
del
os
la
n en
Cuando
e
Aparecera
cristalliquido
eN
o h
abra
00000
eRepit
a l
os
selecciona
se
cambia
00 0 00
en
cuando
datos
registrados
en
la
pantalla
procedimientos
r la
fecha
la
la pant
cambie
de
y la
hora.
pila
si
crista
de
alla
de
la pil
aparece
lli
quido.
1 a 4
a.
para
I
67
Page 68

L
ocalizacion
Verifique
fa
Problema
EI
obturador
EI
flash
no
EI
sujeto
aparece
desenfocado
fotografia
.
La
tapa
del
del
cartucho
68
de
averias
causa
de
fa
averfa
en
no dis
para
.
-
Si
flash
espere duran
nu
-
Si
fotogr
destella.
en
la
compartimiento -La
no
se
abre.
-Si
flash
espere
nuev
-
Verifique
-
Si
-
Limpie
-
Para
Cuando
en
rebobine
ef
siguien
te
cuadro. Puede
el
LED
naranja
se
evamente
el
LED verde pa
afias
el
LED
se carg
amente y compruebe
aparece
que
foq
ue auto matico
peifcu
parpadea cuando se
carga y se
bloquea
te
aprox. 6 segundos.
y c
ompruebe
rpa
de
sujetos
naran
ja
parpadea
a y
se
durante
bloquea
aprox. 6 segundos.
la
carga
de
la
marca
las ventaniltas
la
camara
se
realizan
la
no
esta
la
pelfcula a medio roll
"1$1
no
fotogr
en
completamente
ahorrarfe
el
obturado
Despues oprim
que
se enci
dea
lentamente
que estan a men
cuando
se oprime el
el
obturador.
Despues
que
se
"en
de
enfoque
vibre,
afias
el suj
enciende
Si
la pila esta
la
pantal
automatico
oprima
de sujetos
eto 0 utilice
expuesta.
a.
la pila.
un
viaje a su
Inspeccione
oprime
el
bolon
r.
Suelte
su
la
luz
camara
as
de
aprox.
Suelte
oprima
la luz
sin car
de
cris
talifquido, el flash
si
dificiles
el bloqueo
Tome
a el
LED
esta
bot6n
su
LED antes
ga,
estan
el
de enfocar, apu
ende
, la
la
suavemente
de
disparo
dedo
del
baton
bot6n
antes
de
demasiado
0,4 m (1,3
de
disparo
dedo
del
bot6n
el
bot6n
de
cambie
sucias
bot6n
de
de enfoque
fotografias
centro
del
de
de
disparo
tomar una
cerca
pies)
de
del
de
de
disparo
tamar una
la
pila
par otra
no
.
disparo
nte
.
hasta
de servic
io
de
obt
urador ligeramente, el
disparo
del
obturador
del
obturador
vez
mas
la
ro
vez
del
mas
nueva.
del
fotografia.
Evite
a.
ligeramente
obtu
ador
la
fotografia.
ador.
de
la
marca
rolla
del sujeto.
la camar
obturador
dispa
del obtur
destellara.
del obtur
el centro
el
final
Nikon
mas
y
tamar
, el
rador
y
de
a
cercano
.
pag
.
ref
50,57
50,
52
50,57
45
57-59
42,49
49
53,56
54,55
.
Page 69

Problema
No
aparece
n l
indicador
de c
la tapa deslizant
EI
obturador
a pesar de
boton
obturador
di
sta
Una
En algunos
f
uncionar bien.
porque los ajustes
os
es
en la pantall
ri
stalliquido al a
no dis
oprimir
de dispa
ro
en
el mando
nci
a.
caracteristica
casas
En este
e
a
eLa pila
bri
r
e.
del
especiales, cuan
se
e
e Esta
para
el eSi el man
eLa
a
eOpri
de
las
caso, saque
borran
al
No
se
ha
cargado
positiv~
(+)
y
negativo
es
ta sin car
Si
no
aparecen
caso,
reparar
fuera
del alcance del
do
on del
en el
al
centro
ma
el
boton
se utitiza
cama
la
pila.
la pila.
los
hable
la
camara.
a distancia
man
mando
el
electronicas
ra r
Recuerde
(I&P
En
este
para
pos
ici
pila
solicite
si
no
camaras
do la
sacar
correctamente
(-).
ga 0 no
hay pil
indicadores
con
su
concesionario
mando
esta
expues
do a di
stancia.
a di
stanc
servicio
ecibe
66)
una
a di
una
que
ia
de
vez
stancia
fuerte car
debe
de
MODE
mando
Inspeccione
la pila
en
el
portapila.
a. Instale
despues
una
de instalar
de Nikon
a di
stancia. Acerquese a la
to a l
os
rayos
esta
sin
carga
Nikon
hasta
ra
No
que
se
10
que
aparezca
durant
e m
as
ga
de electricidad
volver a ajustar
Coloque correct
nueva
pila.
una nueva pil
mas
cercano 0 con
del
sol
u otra luz i
trate
de
cambie.
~
"
<a>
g
de 2 minutos.
la
fecha y hora
a,
camara.
camb
iar la pila
0"
en
la
estatica, la
amente los pol
la
camara
una
tienda
ntensa,
camb
por
pantalla
camara
al c
amb
esta
averiada.
de
ie la
si mismo;
de cri
stalliquido
puede
iar la
pita
os
camaras
no
pag
45
45
-
62
62
-
62
.
ref
.
I
69
Page 70

Especificaciones
Tipo
de
camara
Camara
de
tipo
IX240
(sistema
sistema IX240
P, H Y C
f/8,2
(equivalente a 30
en 5 grupos
programado;
2,5
rea
l;
cobertura
H;
aprox. 0,3
el
visor
de
imagen
enfoque
automatico,
el
flash
se
ra
incorrectame
fotografico
de
esta
objetivo
Pelicul
Cartucho
(1
6,7 x 30,2 mm)
Refacion
Puede
Objelivo
24
mm
35
mm); 5 elementos
Oblurador
Obturador
velocidades
Visor
Vi
sor
imagen imp
a48m
Informacion
Marcas
paralaje,
parpadea
(a
8 H
70
operaci6n
de
enfoque y exposici6n
as
ulilizables
de
pelicula del
de
impresion
seleccionar entre
f/4,5-48
mm
electronico
de
obturaci6n:
zoom de imagen
resa
en
m
en
de
tamano
marco
de
(a 4 Hz):
z):
el
flash dispa
de enf
oque; parpadea
de
avanzada)
automaticos y Nikon
(sistema
fotografico
mm--£O
sirve
como
a
1/500
2x
tipo
cargando;
len
hojas de
seg
. .
del
mar
co
de
LED
nte
(a
aprox.
con
marcas
naranja
parpadea
verde--se
2 H
z):
ampliacion a 24 mm, aprox
P/H/C
nte, LED
tame
con
obturador
Zoom
24-48
de
mm
en
una
diafragma;
85%
de
compensaci6n
-se
enciende: flash
rapidamente
enciende:
sUle
to
demas
en
el
mm
1/4,5-8,2
avanzada)
camara
de
para
la
, 0,
56x
listo;
Iinali
za
lad
o
cerca
como
sujeto
dificil
esta
rebobinando.
Enfoque
Enfoque
lige
ramente
infinito, con
s
irve
como luz
Bloqueo
EI
enfoque
bot6n
de
Confrol
Programa
de
exposicion automa
Flash
destella
Ajusle
Ajuste
automatico
Funcionamienfo
Sistema
carga
de
cartucho
Conlador
la
A
parece
para enfocar bien
de
enfocar , LED
automatico
con
el
de
se
disparo
de
de
de
sensibilidad
de
carga
peifcula; mecanisme
de
en
la
una
bot6n
de
disparo
el
LED iluminador
de
reducci6n
enfoque
bloquea
mientras
del
obturador.
exposicion
exposici6n
tica (ISO
automiiticamen
de
peifculas ISO
de
la
por
instalacion;
fologramas
pantalla
de cristallfquido;
automiitica
de
pelicula
el
objetivo;
parpadea
naranja -parpadea
gran
superlicie
del
obturador;
para
asistir
de ojos
rojos)
se
mantenga oprimido ligeramente
controlado
200)
EV
te
con
poca lUI.
la
pelicula
50, 100,200,400,800
mecanisme
del
seguro
rapidamente
(a 4 Hz):
pasiva;
activado
alcance
el
enfoque
automatico (tambien
electronicamente;
6-17 a 24 mm,
para evit
de
la
tapa
de
tipo cuenta regresiva
de
ar
la cam
la pelf
al
OAm
EV6-
errores
(a
8 H
cula
oprimir
(1
,3 p
alcance
18 a
48 mm;
en
ara
del
ies)
el
la
se
z):
a
Page 71

Autodisparador
Controlado electronicamente;
obturado
r;
duraci6n
de
10
Avance
de
La
avanza
auto
rollo.
Mando a distancia
Mando a distancia
de 2 seg.;
efectiva
Dimensiones
Peso
Flash
Tiene
si
con
0,4-5 m (1,3-16,4
(I
del
Modo
La
1
pelicula
pelicu
la
avanza
automaticamente
mat
ico
al final del rol
se
cancela
aaprox.
(An
(con
pila):
integrado
cuatro
mod
emp
re y
flash
poca luz 0 cuando
SO
200);
el
boton
flash
; ti
empo
de
reduccion
luz
de
reducci6n
seg.
antes
del
seg.,
al pri
mer
un
lo
de
(opcional
inalambr
ico
automaticamente
5 m
(16.4
pies)
. x
AI.
x
Prof.):
aprox.
13 g (0,5
os
de
flash:
cronizacion
el
pies) a 24
de
disparo del
de
rec
icl
de
de
oj
destello
Flash
sujeto
ado
oios
os
rajos
del flash
con sin
fotograma
fotograma
par
aprox
mm,
de
activado
al
oprimir
parpadea
pelicula, tambien
)
inf
rarrojos;
despues
delante
60 x 27 x 10
onzas)
.
auto
lenta;
esta a contraluz;
aprox. 0,4-2,8 m (1,3-9,2 pies) a 48
obturador
aprox. 6 seg.
roios
se
enciende
el boton de
en 2 intervalos
al col
ocar
el
despues
de
la
matico, cancelacion
el
cartucho;
de
cada
puede
rebobinar a medio
disparo
de
obturador
de 2 min.
si
camara;
flash
no
la
pila
dura
mm
(2,4
x 1
destella automaticamen
alcance
del
esta
blo
queado
durante
aprox.
loma;
se
,1 x 0,4 pulg.);
de
flash: aprox
durante
disparo
del
la
pelicula
rebobinado
con
retardo
utiliza;
gama
unos
10
anos;
flash,
flash
la
carga
Vida
util
Aprax.
de las
exposiciones.
Pantalia
Contador de
autodlsparador,
fecha/hora, registro
Alimentacion
Una pila
Funcion
Sistema
pantalla
mes/dia/ano, dia/mes/ano 0 Sin
aJ
uste
de
seg
por
gr
abacion
impr
te
mm
Las
imir
Dimensiones
Aprax.
89 x 60,5 x 29
aprox
122,5 x 60,5 x 29
Peso
(sin
Aprox
140 g (4,9
espedficaciones
de
la
pila
10
rallos
de
de
cristalliquido
fotogramas, modo
cartucho
eilictrica
de litio CR2
de
registro
de
registra
de
cristalliquido
ano bisies
mes;
la
alimentacion
de
titulo:
en
la
parte
(An. x AI. x Prof.)
pil
a)
onzas)
son
para
una
Las
especificaciones y el
25
exposiciones
de
mando a distancia, pila
de
datos
de
3 V
de
datos
magnetico:
en
cinco
to
hasta
2039;
electrica
puede
seleccionar entre
trasera
de
las imagenes
mm
(3,5 x 2,4 x 1,1 pulg.)
mm
(4,8 x 2,4
pila
nueva
utilizada a temperatura
cuando
(ac
tivado)
de
flash,
reduccion
Fecha/Tftulo;
modos
ano/mes/dia,
regislro;
cicio
reloj integrado
es
la
x 1,1
pulg.)(con
disefio
eslan
se
utiliza
el flash
de
oj
os rojos,
baja,
titulo,
aparece
la
fec
ha
hora/minutos,
de
24
horas
sin
con
precision
de
la
camara;
titu
los
en
(con
tapa
tapa
ambiente
funcion
12 idiomas
deslizante
deslizante
normal
30
sujelos a cambios
en
en
AM/PM;
de
(20
sin
previa
la
mitad
la
±90
de
a
cerrada)/
abierta)
'C
/68
"F).
aviso.
I
71
Page 72

Para
un
ADVERTENCIA
-
No
trate
de desarmar,
mismo
ya que
provocarle
una
averfa
-
Si
la
camara
metalicas
circuitos
de alta
electrica.
local
de
Nikon
sa
le
humo
-Si
desactive
pila. Lleve
reparacion
No sumerja
puede
provocar
72
uso
seguro
tiene
un cir
una
sac
udida
de
la
camara.
se
cayo a se
inter
iores
que
tension
Saque
la
pila y lIeve
para
su
de
la
camara,
la
camara.
la
cama
ra a
.
la
camara
una
sacudida electrica a un
de
repa
rar a
modificar
cuito
de
eillctrica.
dana,
no
quedaron
que
pueden
la
cama
reparacion.
deje
Oeje
en agua
de
enfriar
la
su
concesionario local
ni
permi
la
camara
la
camara
alta tension
Ademas esto p
toque
ninguna
expuestas,
provocarle
ra a su
.
utilizar inm
camara
antes
ta
que caiga agua
incendi
ya
conces
par
que
puede
uede
provoca
de
las
que
existen
una
sacudida
ion
ario
ediatamen
de
sacarle
de
Nikon
ya
o.
sf
piezas
te y
la
para
que
su
-
r
-
-
-
-
No haga funcionar la
comb
ustible
porque
No
mire
directamente hacia
tr
aves
del
visor
dana
No
enrolle
pase
Manten
accidental
No
util
I
impieza
un
incendio a afectar
ya
permanente
la
correa
par
el
cuello
ga las
pilas
mente
una
ice
diluyente,
de
la
camara
en
camara
en
puede
provocar
el
que puede
de
danar
su vision.
alrededor del
un nino
ya
lej
os
del alcance
pila, lIame
bencina u otros
ya
que
puede
su
salud.
un
lugar que
tiene
un
ince
ndio a explosion.
solo
una
fuente
Especial
puede
asfixiarl
de
los ninos.
agentes
danar
la
de
provocando
activos
camara,
su retina,
cuello.
que
inmediatamente a su
gas
luz
intensa
mente
o.
Si traga
medico.
para
provocar
no
a
un
la
la
Page 73

PRECAUCION
-
No
utilice
la
sacudida
puedan
evitar
lejos
haga
destellar
puede
no
dejar
objetivo
Ileve
la
camara
electrica.
la
camara
tragar las
que
pueda
de
su
el flash
provocarle
este
utilizando
lo bajo
los rayos del sol.
puede
hacer que
camara
contra
alga y provocar her
una
-
Mantenga
que
-
Para
camara
-
No
que
-
Cuando
evite
el
-
No
golpearla
can
las
manos
lejos
del
alcance
pilas a accesorios
recibir
heridas
rostro
cuando
mueva
cerca
de los
una
ceguera temporal.
la
camara, cierre la
la
camara
instalada
en
un
mojadas
de
los
pequefios.
en
su
ojo,
el
selector PHC.
ojos
de
Una
luz
fuerte
se
inc
endie.
tripode
ya
idas
en usted u otros.
ya
que
nifios.
sostenga
una
persona
tapa
deslizante
que entre par
que
puede
puede
Esto
evita
sufrir
la
ya
-
No
caerse y lastimarse.
-
No
caliente
-
Siga
evitar
No
instrucciones
produzca
y
Si
elliquido
-
o
ropa, lave
ojos, lave
camine
mientras
tire
las
pilas
la
pila
las
instrucciones
que
se
produ
utilice
pilas
ya que
un
incendio
corrosivo
inmediatamen
inmediatamente
mira
al
fuego.
ya
que
puede
de
zca
un
no
especificadas
puede
.
se
par
el
visor
ya
Tampoco
las
cortocircuite,
provocar
un
advertencia
incendio a explo
escapa
te
con
impresas
en
este
hacer
que
generen cal
de
la
bateria y mancha
en
agua
del
agua y consulte
que
puede
incend
ten
.
manual
grifo.
Si ent
perder
pie
desarme
io a explotar.
en
las pilas
para
de
or a se
su
piel
ra
en
sus
can
su
medico.
,
a
I
73
Page 74

Nota
=s
________________________________
~
____
__
Page 75

Page 76

No
reproduction
ar
ticles
or
Qu
eda
prohibida la repr
en
articulos 0 revi
rev
iews),
in
any form
may
be
oducci6n tota
stas
especializadas),
of
this
made
manual,
without
l 0
sin la
in
written
par
cial
autorizaci6n
who
de
le
or
in
part
escr
(except
ita
de NIKON
authorization from
este folleto (salvo
for
brief quotation
NIKON
CORPORATION.
en
10 q
ue
se reli
CORPORATION.
in critical
ere a citas breves
Nikon
NIKON
FUJI BLDG., 2-3, MARUNOUCHI 3-CHOME,
CHIYODA-KU, TOKYO 100-8331, JAPAN
CORPORATION
P
rin
ted
in
China
T9101
(23)
 Loading...