

Page 1
Nikon
Nuvis
mini
Nuvisminii
Instruction
Manual
de
Manual
instrucciones
(Pages
2-29)
(Paginas
30-57)
Page 2
FOREWORD
~~---
Thank
you
To obt
ain
instruction
This
compact
features:
-
Simp
le "
-
Three
diffe
-
Accidental
-
Convenient
2
for
purchasing
the
best
manual thoroughly.
camera
drop-in" film
rent
double
data
results
employs
print
exposure
printing
the
from
loading
aspect
Nikon
your new
the
ratios
prevention
(Nuvis
Nuvis
mini/Nuvis
camera, be
Advanced
on
the
mini i only)
Photo
same roll
mini
sure
System
of film
i.
to
read
(IX240
through
this
System) and
Note: Before
holiday, take
Nuvis mini i only: Setting
using
some
your
trial
Data
camera
shots
recording
to
the
for
an
important
familiarize
date
and
function
yourself
time
(page
occasion
(page
13)
with
12)
such
all
of
as a wedding
its
features
or
Page 3
I
WARNING:
Camera
body
•
Do
not
disassemble
which
can
not
not
it
not
you
the
touch
circuitry
look
may
damage
in
permanent
carry
detect
camera.
cause
inside
at
the
the
smoke
which
Let
•
Do
voltage
•
Do
as
result
•
Do
from a fall.
•
If
OFF
for
or
electric
metal
sun
or a strong
your
retina.
eye
camera
around
the
safe
modify
the
camera,
shocks.
portions
can
cause
electric
light
Looking
damage.
when
mounted
the
camera, immediately
came
ra
cool
handling
as
it
houses
of
the
flash
if
damaged, as
shocks.
source
directly
at
the
sun
directly
on
a tr
ipod, to
before
taking
it
to
of
through
stop
your
the
camera
high-voltage
it
houses
the
viewfinder,
through
the
avoid
injury
operation
local
Nikon
circuitry
high-
lens
may
resulting
and
turn
dealer
.
Built-in
flash
Do
not
fire
the
Battery
•
Do
not
throw
heat
the
•
Note: Nikon
Nuvis
battery:
Keep
battery
tery, call a doctor
cannot
mini/Nuvis
flash
used
out
mini i in
this
of
close
people's
batteries
into
may
cause
children's
immediately
be
held
responsible
ways
eyes,
the
it
reach.
.
not
specified
fire.
to
explode
If
someone
for
as
it
may
Do
not
resulting
malfunctrons
in
this
cause
visual
short
circuit,
injury.
accidentally
caused
manual.
FOREWORD
injury
disassemble
swallows a ba
by
uSing
or
t-
the
3
Page 4
CONTENTS
4
FOREWORD
WARNING:
CONTENTS
QUICK
CAMERA
LCD
PREPARATIONS
Attaching
In
stall
Checking
Setting
Data
Loading
BASIC
Holding the
Shu
tter
...........
for
safe
hand
...
.....................................................
GUIDE
....................................
PARTS
PANEL
..........................................
............................................................................................................................................ 9
.........................
the strap
battery
battery
date
rding fun
film
............................
leve
and time (N
ction (Nu
ing the
the
reco
the
OPERATION
camera
rel
ease
button
........................................................................
ling
of
the
came
ra
..................
l ......... ......
uvis
vis
mini
........
mini i only)
.....................
....
....
..................................................................................
........
..
................
.....
......
................
i on
ly)
.....
.........
..
..........
....................
......
..................................................................................... 8
.
.........
..
.......................
..........................
....................... ;
............
........................................
.......
....................
..........................................................................................................
.................
..
..................................
..................
........
...
. ................
......
.....
...
..
......
............
....
.............
...............
..........
....
....
..
........ 11
...
.
......... 13
....
...............
.
......
........
........ 3
..
10
....
12
14
17
17
17
2
4
6
10
10
Page 5
Print
aspect rati
nd
auto flas
the fil
sync
flash
mer .......
uction ..
h
l
o
...........
...
...
..
.
h
.. ..
...............
m
FUNCTIONS ......
......................
.. ..
....
.. .... ......
..
. .
ewfinder ...
Vi
Foc
us a
Usi
ng focus lock
Removing
ADVANCED
Red-eye red
Anytime flas
lash-cance
F
Slow
Self
-ti
MISCELLANEOUS ...................
For safe
handling
of
the
Specifications ....
... ...
camera
.....
........
.....................................................................................
..
.......
............
..
..................
..
...............
.................
......................
CONTENTS
..
.............
...............
...... . ....
...
...........
..
..........
..
...
.. 22
. 23
24
.
...
..
..
...
....
..
. ...
..
.....
27
. .
. .
..... 28
18
19
20
24
25
25
26
26
27
5
Page 6
QUICK
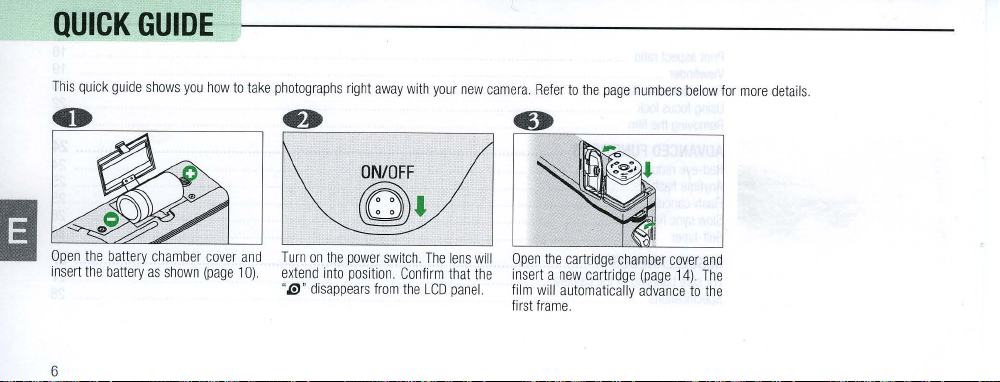
This
Open
insert
quick
the
the
GUIDE
guide
battery
batte
ry
6
shows
chamber
as
shown
you
how
cover
(page
to
take
and
10).
photographs
Turn
on
the
extend into
"
Il)
"
disappears
rig
ht
away with
ON/OFF
~
power
position.
from
your new
.
switch. The
Confirm
the
LCD
lens
that
pane
camera.
will
the
l.
Refer to
Open the
cartridge
insert a new
film
will
automatically
first
frame.
the
page
cartridge
numbers bel
chamber
(page
advance
cover
14). The
to
ow
and
the
for
more
details.
Page 7
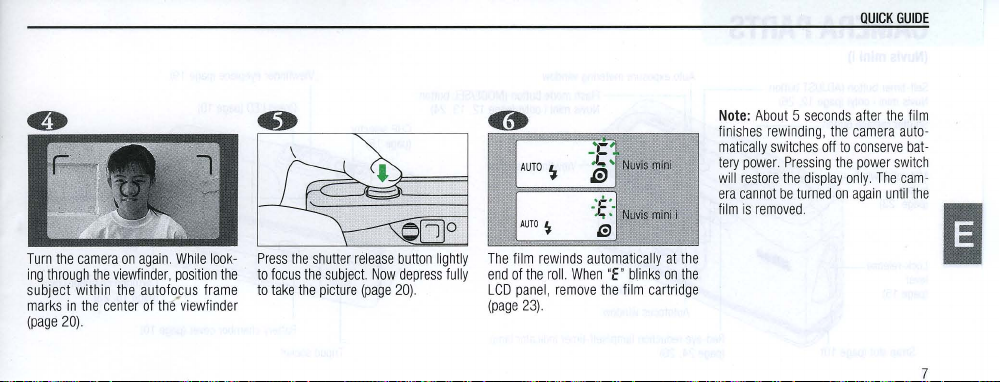
Turn
the
ing
through
subjeci
marks
(page
in
20).
within
camera
the
the
center
on
again.
viewfinder,
the
autofocus
of th{
While
look-
position
frame
viewfinder
the
Press
to
focus
to
take
the
the
shutter
the
picture
release
subject.
(page
Now
button
depress
20).
lightly
fully
The
end
LCD
(page
film
of
the
panel,
23)
rewinds
roll. When
remove
automatically
"E"
bl.inks
the
film
cartridge
at
on
the
the
Note:
About 5 seconds
finishes
rewinding,
matically
switches
tery
power.
will
restore
era
cannot
film
is
removed.
Pressing
the
display
be
turned
off
the
QUICK
after
camera
to
conserve
the
power
only.
on
again
the
The
until
GUIDE
film
auto-
bat-
switch
cam-
the
7
Page 8
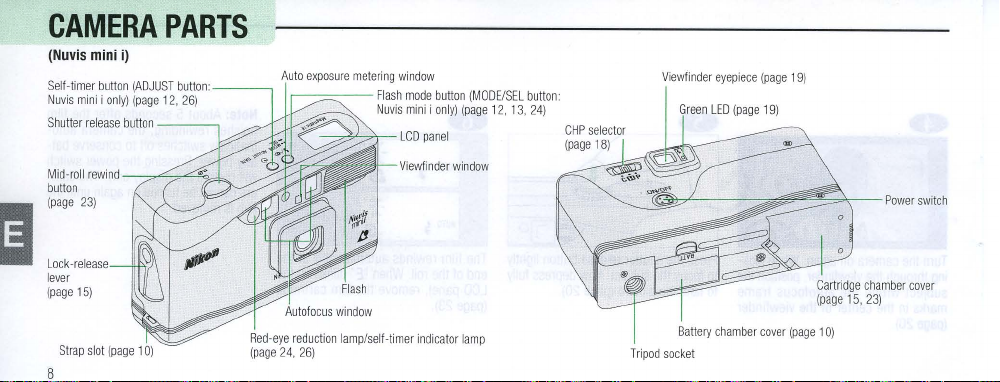
CAMERA
(Nuvis
mini
Self-timer
button
Nuvis
mini i only)
Shutter
release
Mid-roll
rewind
button
(
page 23)
Lock-release
lever
(page 15)
Strap
slot
PARTS
iJ
(ADJUST
(page
12,
button
- ""/"""""-_::';;c--L
(page
10)
8
button:
26)
____
Auto
Red-eye
(page
24,
exposure
-,
reduction
26)
metering
Flash
Nuvis
?3.Lo+-
-
lamp/self-timer
window
mode
button
panel
indicator
(MODEISEL
(page
lamp
mini i only)
LCD
Viewfinder window
12, 13,
button:
24)
Viewfinder
eyepiece (page 19)
~~
,L------::~~-~~<c--Power
Battery
chamber
cover
(page
10)
Tripod
socket
switch
Page 9
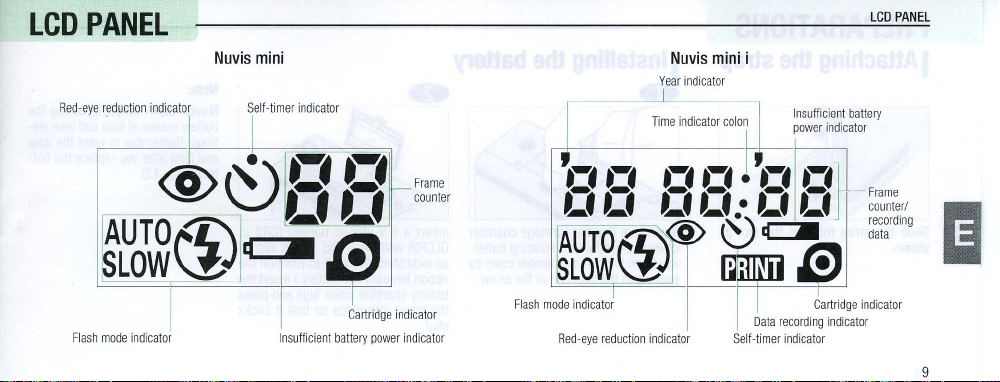
LCD
Red-eye
Flash
PANEL
Nuvis
min
i
reduction
indicator
.
J>~OO
AUTO
S
LOWCi.Ja~
mode
indicator
(D.
I
Se
lf-
timer
indicator
~f
Lf
Frame
counter
""',,,
LCD
PANEL
Nuvis
mini
i
Year
indicator
I
Time
indicator
colon
Insufficient battery
J
'._,.,
C.
~~~~@r
Red-eye
reduction
a
._,
._,
C.
C.:
't~~
indicator
l
,r:~:;'
a -
""
Self-timer
co'"'
Frame
~
:~:~~~,"'
indicator
9
Page 10
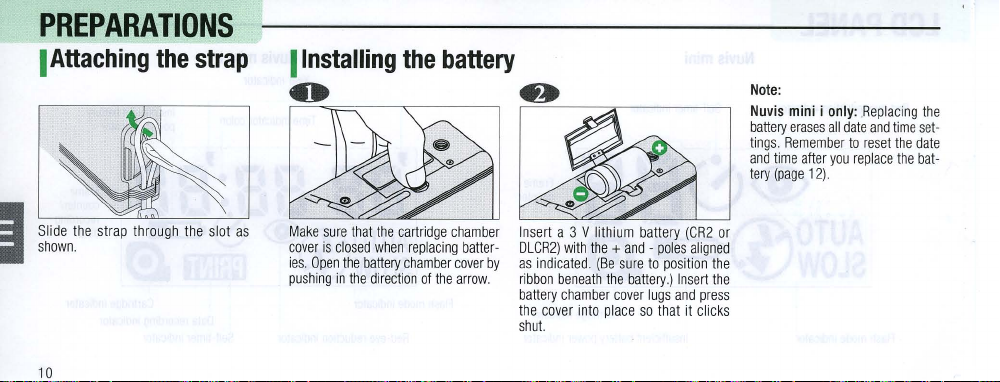
PREPARATIONS
I
Attaching
the
strap
I Installing
~
the
battery
~~=---
~----~
Note
:
Nuv
is
mini i only
battery erases
tings. Remembe
and
tery
time
after you
(page 12).
a
: .
Replacing
ll
date and ti
r to
reset
replace
me
the
the
the
setdate
bat-
Sl
ide the strap throug
show
n.
10
h t
he slot
as
Ma
ke sure that the
cove
r is close
ies.
Open th
pushing
in the
cartridge chambe
d when replacing batter-
e battery
cham
ber
of
the arrow
cover
direction
Insert a 3 V lit
r
DLCR2) with
as indicated.
by
ri
bbon ben
.
battery
the
shut.
the
(Be
eat
h the
chamber cover
cover in
to p
hium
battery
+ and -pol
sure
battery
lace
so
to
position
lugs
that
(CR2
es ali
.) Insert
and
it
clicks
or
gned
the
the
press
Page 11
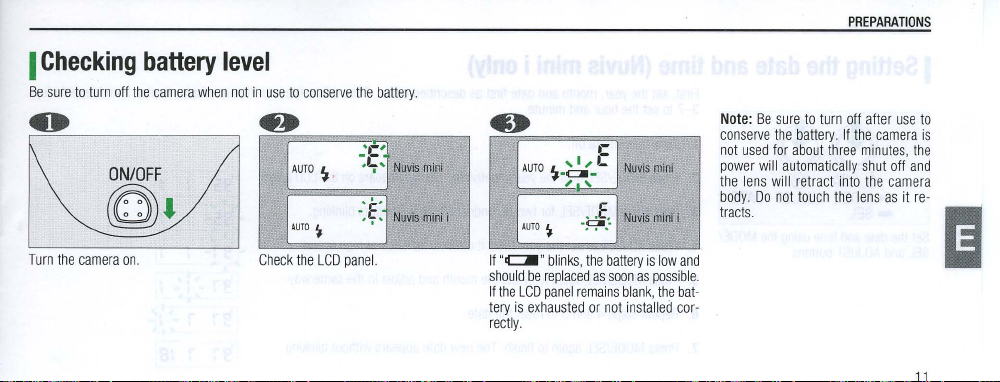
I
Checking
Be
sure
to
turn
off
ON/OFF
~
T
urn
the cam
era
battery
the
camera
.
on.
level
when n
ot
in u
se
to con
Check the LCD pane
serve
the
battery.
l.
If "c:::II" b
sh
ould
be rep
If t
he LCD pan
tery
is
exhausted
rectly.
links, the batt
laced as
soon as
el
remains blank
or
not installed
Nu
vis min
Nuvis mini
ery
is
low and
poss
, the
i
I
ibl
bat-
cor-
e.
Note
:
Be
conserve
not
used
power
will automatical
the
lens will
b
ody.
Do
tracts.
sure
the batt
for abou
retract
not
tou
PREPARATIONS
to turn
off
ery
.
If
t thr
ee minutes
ly
into
ch
the
after
the
shut off
the
lens
use
camera
, t
and
camera
as
it re-
he
11
to
is
Page 12
PREPARATIONS
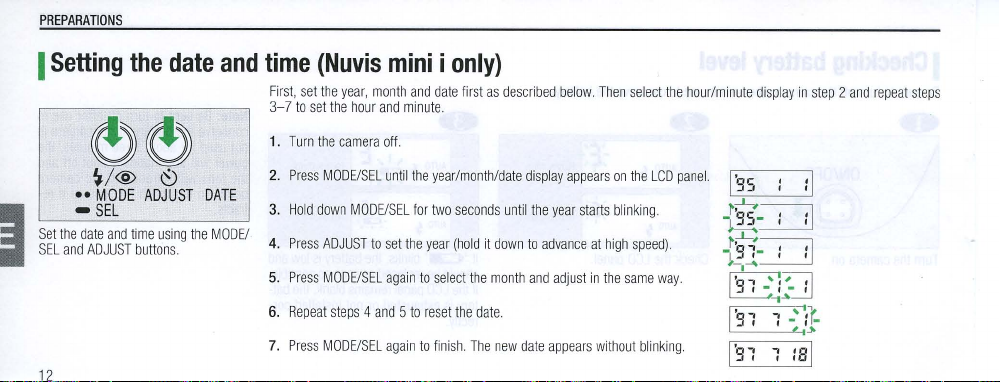
I
Setting
~e
V@
•• MODE
- S
the
and
EL
date
and
ADJUST
Set
SEL
12
the
date
~
ADJUST
time using the
buttons.
and
DATE
MODEl
time
First, set
3-7
to
1.
Turn
2.
Press
3.
Hold
4.
Press
5.
Press
6.
Repeat
7.
Press
(Nuvis
the
year, month
set
the
hour
the
camera
MODE/SEL
down
MODEISEL
ADJUST
to
MODE/SEL again
steps 4 and 5 to
MOD
EISEL
mini i only)
and
date
minute.
the
year/month/da
for
two
the
year
to
select
reset
to
finish.
first
seconds
(hold
the
the
date.
The
and
off.
until
set
again
as desc
until the
it
down
month
new
te
date
rib
ed
display
year
to
advance
and
adjust
appears wit
below. Th
appears
starts
at
in
en
select
on
the LCD
blinking.
high speed).
the
same
way.
hout
blinking.
the hour/minu
pane
L
te
display
in
step 2 and repeat
steps
Page 13
I
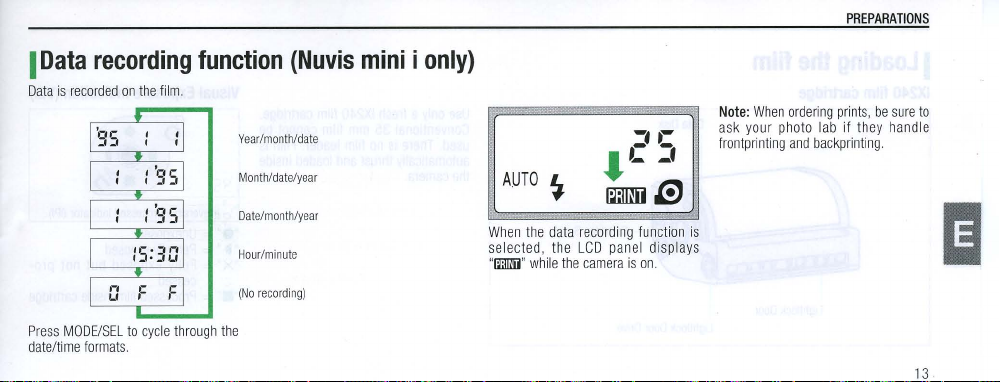
Data
Data
is
Press
MODE/SEL
date/time
recording
recorded
on
the
to
cycle
formats
.
function
film.
through
Year/month/date
Month/date/year
Date/month/year
Hour/minute
(No
recording)
the
(Nuvis
mini i only)
AUTO
When
the
selected,
"
ffiIIlil
"
while
~
data
the
the
recording
LCD
panel
came
ra
function
displays
is
on.
Not
ask
frontprinting
is
e:
your
When
ordering
photo
and
PREPARATIONS
prints,
be
lab
if
they
backprinting.
sure
handle
13
to
II
Page 14
PREPARATIONS
I
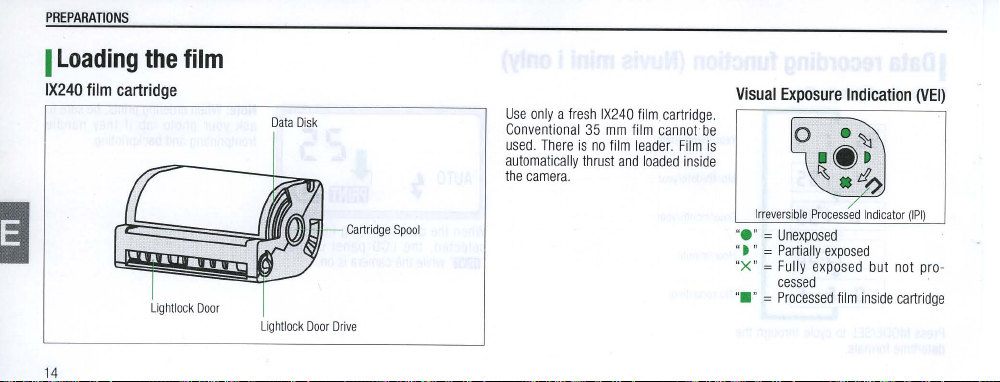
Lo
ading
IX240 film ca
14
the
rtridge
Lightlock
film
Door
Data
Lightlock
Disk
Door
Cartridge
Drive
Spool
Use only a
Conventional
used.
automatical
t
he
camera.
There
fresh
ly th
IX240 film
35
is
no
rust and
mm
film
film
leader.
loa
cartridge.
cannot be
Film
ded inside
is
Visual
Irreversible
". " =
" . " =
"X " =
". " =
Exposure
Processed
Unexposed
Partially
exposed
Ful
ly
exposed
cessed
Processed
Indication
Indicator
but
film
inside
(VE
(IPI)
not
pro
cartridge
l)
-
Page 15
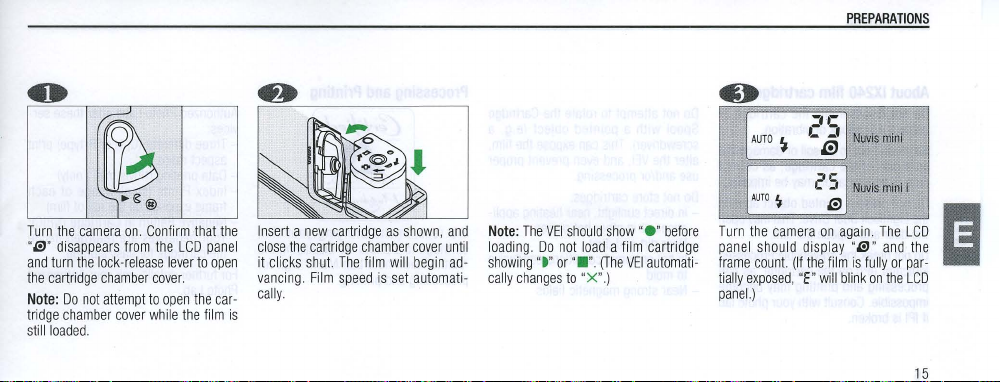
Turn
the
"S
"
disappears
and
turn
the
cartridge
Note: Do
tridge
chamber
still
loaded.
camera
the
lock-release
chamber
not
attempt
on.
from
cover
Confi
the
cover
to
open
while
rm
LCD
lever
.
the
that
to
the
the
panel
open
car
film
Inser
close
it
vancing. Film
cally
-
is
t a
clicks
.
new
the
cartridge
shut.
cartridge
chamber
The
film
speed
as
shown, and
will
is
set
cover
until
begin
ad-
automati-
Note:
The
loading.
showing
cally
changes
Do
"t "
VEl
not
or ".".
should
load a film
(The
to "X".
show
VEl
)
"e"
before
cartridge
automati
PREPARATIONS
Turn
the
camera
on
again.
The
LCD
panel
should display
frame
tially
panel.
count.
exposed,
)
-
(If
"f"
the film
will
"S"
is
blink
fully
on
and
or
the
the
par
LCD
15
-
II
Page 16
PREPARATIONS
About
IX240
film
cartridge
Do
nol
disasse
mbl
to shock
to
of
the cart
Door
PI)
on
ng
and
Consult with
e Ihe cartr
or vibration.
be
soil or
ridge, as
may
Drive.
ose
the film.
the
cartridge,
printing
damage
be
object against
This
may
your
subject
it
Be
careful not
data
disk
data
communication
Do not
press a pointed
the
Lightlock
the
door and exp
Do not break the Irreversible Pro
Indicato
r (I
proce
ssi
mpos
sible.
i
if
IPI
is
broken.
16
idge
the
correct
impaired.
may
open
cess
ed
as film
beco
me
photo
lab
Do
not
or
attempt
Spoo
l wi
th
screwdrive
r). Th
alter
the
VEl
use
and
/or
Do
not
store
-In
direct sunlight, near heating
ces
or in other h
an
- N
ear
dirt and dust
or humid condit
- In hot
to mold
Near
strong
-
to
rotate the
a point
ed object (e.
is
can
, and
even prevent
processing
cartridges:
magnetic
expose
.
ot places
ions
field
Cartridge
g.
the
film
proper
app
li-
conducive
s
Processing
a
,
We
recomme
cartridge
to a photo lab displaying the
"Authorized Photo Lab
processing
and Pri
nting
Gr
li/wd
-5
I'PY~"D
/~~:,,!:i
and printing
nd br
_
'
''1
inging
Mark"
.
your film
sign for
thorized
Au
vi
- T
-
- I
-
For
Pho
Photo
ces:
hree
different
aspe
ct
ratio
Data pri
nting
ndex Pri
nts (
frame
exposed
Negative
Return
You
r n
egatives
the cartridge for
further
details, ask
to
Lab
.
Labs
(C, H
s
(Nu
sma
on
offer
or
P-typ
vis
mini i onl
ll
image
the roll
in
Cart
rid
are
ret
urn
easy
storage.
your Authorized
these ser
e)
print
y)
of each
of
film
)
ge
(NRIC
ed
inside
-
):
Page 17
BASIC
I
Holding
OPERATION
the
camera
I
Shutter
release
button
BASIC
OPERATION
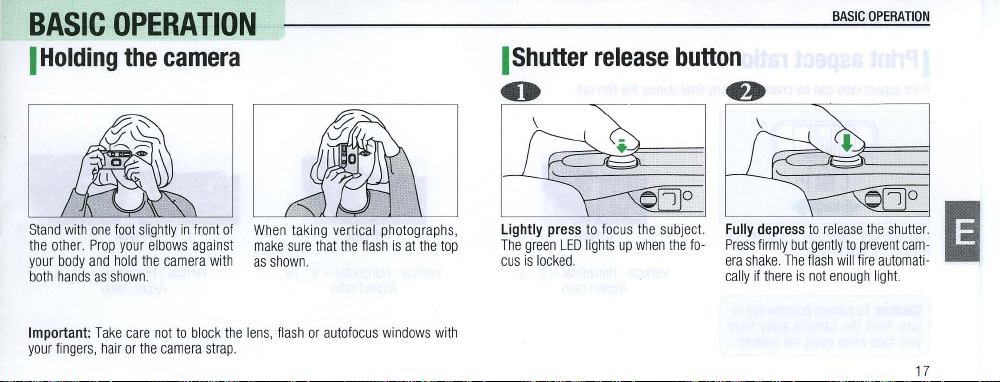
Stand
with
the
other. Prop
your
body
both
hands
Important:
your
fingers,
one
and
as
Take
hair
fool
slightly
your
hold
Ihe
shown.
care
or
the
elbows
camera
not
to
camera
in
front
against
block
of
wilh
the
strap.
When
taking
make
sure
as
shown.
lens, flash
vertical
that
or
pholographs,
the
flash
is
autofocus windows
at
the top
with
..
Lightly
The
green
cus
is
press
LED
locked.
to
focus
lights
up
the
when
subject.
the
fo-
r"=-
--~--
Fully
depress
firmly
if
there
but
The
is
to
gently
flash
not
Press
era
cally
shake.
release
to
will
enough
~
the
shutter.
prevent
fire
automati-
light.
cam-
17
B
.
Page 18
BASIC
I
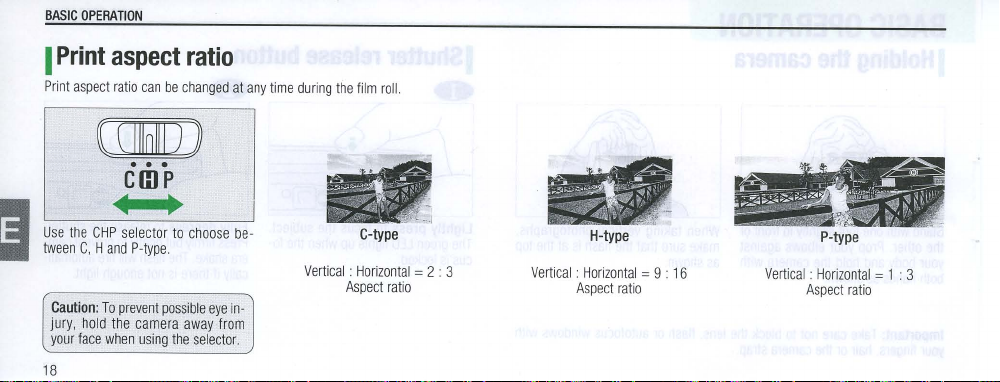
Print
Print
aspect ratio
OPERATION
aspect
can
be
c
(1110111))
...
CGJP
ratio
changed
at
any
time
during
the
film
roll.
Use
the
tween
Caution:
jury,
your
18
CHP
C, Ha
hold
face
• •
selector
nd P-type.
To
prevent
the
camera
when
using
to
choose
possible
away
the
selector.
eye
be-
in-
from
C-type
Vertical : Horizontal
Aspect
rat
io
= 2 : 3
H-type
Vertical . Horizontal
Aspect
ratio
= 9 :
16
Vertical:
P-type
Horizontal
Aspect
ratio
= 1 : 3
Page 19

I
Viewfinder
2
~lN·~
lbdj.
Th,,
;,wi;,
ies
example
te:
dec
of the
print
~nsdlcates
ab pect rat
ove
Correct
focus
when the
su
m/14b~ect
mode)
ar
The
No
teed
approx. 0.36
flash-cancel
C1
.
the boun
io (page 1
shows H type.
cannot
be
guaran
IS
closer than
t
(OA m/16
the camera.
o
..
in.
1.
Parallax
com
center
the
marks
0.
2.
Autolocus
tlOn
3
3.
Green
locus
d-
8)
.
-
in
s~~nsation
when
36
s lee!. within
m/14
in
hootmg
Ir~m
on
the
SUbj:C~arks-posi-
LED
(II
indicat~r)h
ready-light/in-
marks-
these
at
around
The
ose
cl
parallax
com
. w
C
range
.
pensallOn
marks
ow
sho h .
H
picture
BASIC
OPERATION
s·
.
Ize
IS
reduced
slight
ly
at
19
Page 20

BASIC
OPERATION
I
Focus
O
Turn
and
auto
~~~~~
the
camera
on.
?O
flash
The
auto
LCD
panel
fire
automatically
light
Make
subject
range.
For
ISO
used
within
Approx.
flash
symbol
indicates
if
sure
that
falls
within
200
film, the
the
following
0.36-4.2 m
that
there
the
the
flash
(14
"AUTO
~"
the flash
is
not
distance
flash
should
range.
in.-14
on
the
will
enough
to
the
shooting
be
ft.)
Position
focus
frame
viewfinde
the
r.
subject
marks
in
within
the
center
the
~Dm
auto·
Lightly
of
the
to
the
ject
focus
viewf
is
D
~
press
the
the
subject
inder
correctly
,.--
}~'r
~
,
~
~
shutter
release
green
when
button
LED
the
sub
in
·
lights
focused.
The
up
Page 21

Now
t
on
fully
wi
ll
frame
panel
depress
to
release
advance
and
the
will
decrease
the
shutter
the
shutter.
automatically
frame
count
by
one
release
The
to
the
on
the LCD
.
but-
film
next
Note:
The
minimum
of
the
Nikon
approx.
36 cm/
cannot
be
guaranteed
closer
than
the
camera.
flash-cancel
The
shutter-release
t
he
flash
is
seconds
between
focusing
Nuvis
mimi/Nuvis
14 in.
Correct
approx. 36 cm/
if
(approx. 40 cm/
mode)
button
charging.
Wait
photographs.
the
distance
mimi i is
subject
14
in.
16
locks
at
least
focus
from
in.
while
BASIC
OPERATION
is
in
4
21
Page 22

BA
SIC
OPE
RA liON
I
Using foc
..
When the
subject
autofocus
frame
era
focuses
on
Note:
Do not
alter
22
us
does
marks
the
background
the
lock
not
cover
"0", the
distance
the
cam
instead.
from
Position
-
"0" directly
press
cus.
cus
camera
The
is
to
subject
the
the
shutter
green
locked
autofocus
on
the
subject
release
LED
light up
at
this distance
once
the
frame
button
focus
marks
and lightly
to
and
the fo-
.
is
locked.
fo-
Keeping
your fin
lease
button, recompose
scene
in
the
fully
to
release
ger
on
viewfinder.
the
shutter.
the
Now
shutter
the
original
depress
Special
The
following
cult
to
•
Subjects too
autofocus
•
Dark
•
Glossy light-reflecting
as
Subjects
•
re-
candle
•
Secondary
camera than
In
the
focusing
from
dure
focusing
subjects
focus:
frame
subjects with
shi
ny
cars
without
flame,
subjects
above
cases,
on
another
the
camera
in
this
section
situations
may
small
to
ful
marks
no
reflection
surfaces, such
or
wate
r
solid
fireworks, etc.
are
the
main subject.
use
focus
subject
and fol
low
.
be
too
ly
cover
content (i.e
)
closer
to
lock
equidistant
the
proce-
diffi-
the
.,
the
by
Page 23

I
Removing
The
film
rewinds
end
of
the
roll.
blink
on
When
the LCD
will
the
film
automatically
fully
rewound,
panel.
at
the
"
E"
Open
the
cartridge
the
bottom
tioned upward
tridge
of
.
the
and
chamber
came
ra
remove
cover
body
the
with
posi
car-
BASIC
OPERATION
Note:
If
the
battery
fails
while
the
is
still
rewinding, replace
battery.
Rewinding
matically.
About 5 seconds
rewinding,
switches
off
Pressing
the
the
To
rewind
the
film
before
the
end
-
roll,
push
the
with a pen
you
cannot
have
been
mid-roll
or
similar
reuse
rewound
once
that
that
rewind
object.
film
cartridge
in
mid-roll.
of
button
Note
the
display
turned
moved
on
.
the
to
conserve
power
only.
again
will
after
camera
switch
The
camera
until
the
the
film
it
with a fresh
resume
auto
film
finishes
automatically
battery
power.
will
restore
cannot
film
is
re-
-
be
II
23
Page 24

ADVANCED
FUNCTIONS
I
Red-eye
reduction
i Q
When you
flash
Press
lowing
24
turn the
is automat
"~/<I>"
to
modes:
camera
ically sele
cycle
through the
cted.
on,
Auto
fol
-
Red-eye
Anytime
F
lash-cancel
Slow
Auto
flash
reduction
flash
sync
flash
AUTO
~
!
@
~
~
Ci)
~
AUTO
~
SL
OW
..
@
AUTO
~
...
AUTO
~
@
Press
'V<I>"
to
panel.
display
-,,-
e
25
I.!)
:.
Ii)
Nuvis mini
"<I>"
on
i
the LCD
~~~
--------~
Depress
the
shutter-
rel
ease
fully.
The red-eye red
up
for
approximately one
the
flash
fires.
make
sure
pos
ition.
Hold
that the
the
subject
uction
second
camera
button
lamp
light
before
still
remains in
s
and
Page 25

I
Anytime
flash
I
Flash-cancel
ADVANCED
FUNCTIONS
I t
Anytime
would
not
front
of
Anytime
..
-11-
~ c ~
2~
flash
mode
normally
the sun,
flash
mode
1
Nuvis min
1
Nuvis
mini
allows
you
fire, such as
is
indicated
i
i
to
use
when
by
"~"
the
the
on
flash
subject
the
LCD
in
situations
is
standing
panel.
where
in
the
the
shade
flash
or
in
Flash-cancel
the
flash
would
places
where
Flash-cancel
Note:
Flash-cancel
tripod
to
keep
:0:
L
_I
e
25
tFJ
mode
allows
normally
flash
photography
mode
the
camera
Nuvis
Nuvis
is
indicated
mode
min
i
min
i i
you
to
shoot
fire,
Use
is
by
uses
a slower shutter
steady
,
without
flash-cancel
prohibited,
"@"
on
the
flash
in
low-light situations where
mode
in
art
galleries
LCD
panel.
speed, For
best
and
other
results, use
a
25
Page 26

ADVANCED
I
Slow
FUNCTIONS
sync
flash
I Self-timer
•
AUTO
SLOW
•
t~J$
Slow
sync
sync
flash
low-light,
Slow
sync
Note:
Sl
a
tripod
26
~
~
flash
mode
outdoor
flash
ow
sync
to
keep
-'1-
C~
e
25
EJ
mode
to
make
flash
mode
flash
the
camera
Nuvismini
Nuvls
mloii
combines
the
background
photographs
is indicated
mode
uses a slower
steady.
the
flash
.
by
"tib'£
with a slower
appear
brighter
~
"
on
the
shutter
speed.
shutter
LCD
and
panel.
For
best
speed.
more
results, use
Use slow
natural
o~~~!
With
the
camera
in
play
"~
Note
:
To
cancel
..
on
the
Self-timer
self-timer
on,
LCD
press
mode
mode
Nuvismini
Nuvis
mini
"~"
panel.
is
automatically
before
i
to
dis-
tak
To
start
shutter
lamp
on the
8
seconds
onds
before
canceled
ing a picture,
the
timer, fully
release button. The
camera
and
the
after
the
turn
then
shutter
the
face
light
shutter
camera
depress
will blink
up
is
is
the
indicator
for 2 sec-
released.
released.
off.
for
Page 27

MISCELLANEOUS
I
For
safe
Camera
o
Turn
the
and
resulting
o
Avoid
leaving
a
beach
o
Allow
the
heat
in
o
The
camera
Keep
the
o
Do
not
precision
o
Prevent
sand
and
o
Use a blower
with
lens
o
Never
use
handling
care
tips
came
ra
OFF
battery drain
the
camera
or
near a heater.
camera
battery
to
and
may
not
camera
warm.
drop
or
hit
mechanism.
foreign
matter
dust
from
to
remove
cleaner. Clean
thinner, benzene
when
cool off
camera.
work
the
the
not
.
in
excessively
properly
camera
from
getting
camera
dust
from
the
autofocus
, or
after
of
the
in
use, to
avoid
hot places
continuous
at low
against a hard sur
inside
with a soft,
the
lens.
windows with a
other
active
camera
accidental
such
flash
firing.
temperatures
face
the
camera.
dry
cloth
.
If
necessary,
agents.
soft
release
of
as
the
interior
Overuse
(below
O°C
as
it
may
damage
Immediately
use a cloth
cloth.
the
shutter
of a car
generates
or
32l).
the
wipe
salt,
moistened
o
Store
the
camera
cals such
agent
during
o
If the
,
camera
and
fire the flash a few times
Notes
on
batteries
o
Battery
power
recover
when
pictures
at
o
Be
sure
to
important
For
Canada
This
digital
from
apparatus
digital
sions
Canadian Department
in a cool,
as
camphor
storage.
is
not
used
is
apt
to
taking
pictures
low
temperatures, keep
replace
batteries
pictures
.
does
apparatus
of
dry
place
and
naphthalene. We
for a long
time,
.
weaken
as
the
at
low
temperatu
the
with
fresh
not
exceed
set
out
Communications
in
to
prevent
mold.
recommend
take
it out
temperature
re
battery
warm.
ones
or
carry
the
(Class
the
Radio
Interference
.
Do
regularly,
drops
return
spare
B)
limits
below
to
MISCELLANEOUS
not
expose
it
to
using a desiccating
release
the shu
O°C (32l).
normal.
When
batteries
when taking
for
radio
noise
Regulations
chemi
tter
It will
taking
emis
of
the
-
Ei
-
27
Page 28

MISCELLANEOUS
I
Specifications
io
IX240
camera
(31
IX240
mm)
Optical
Magnetic
C,
25
groups
Opens/closes
Programmed
Infrared-active
shutter
Range
Focus
pressed
Type
of
camera
Usable
film
Information
sys
tem
ri
nt aspect
P
Lens
Lens
cover
Shutter
Focusing
28
exchange
rat
(Advanced
mm
(Advanced
Information
Hand
mm
release
from
is
with
Nikon
converted
Information
P-type
F/4 (31
automatically
electronic
autofocus
button
0.36
0.4 m (16
locked
Photo
25
to
35
Photo
Exchange
Exchange
available
mm
converted
m (
14 in.)
as
long
System)
type
mm
F/4
lens
mm
type)
System)
film
(Opt
(Mag.
to
35
with
power swit
shutler;
also
system; activated
to
infinity
in.)
to
inf
ini
ty
as
shutter release
autofocus
cartridge
(16.7
IX)
system
(Nuvis
IX)
system
mm
type); 3 elements
ch
ON/OFF
serves
as
diaphragm
by lightly
in
flash-cancel mode
button
lens-shutter
mm x 30.2
mini)
(Nuvis
mini
blades
pressing
is
lightly
Viewfinder
information
Viewfinder
i)
Exposure
control
Auto
Film
exposure
speed
setting
in
3
range
Real-image
printed
image
C/H/P-type
marks;
autofocus
Green
LED
(flash
Electronically
ISO
200:
EV7
(Nuvis
mini)
ISO
100
and
automatically
cally
set
to
ISO
(Nuvis
mini
ISO
100, 200, 400
automatically
ISO
800
viewfinder;
frame
area;
approx.
image
size
frame
ready-lighVin-focus
Lights
up:
subject
controlled
program
-15
200
film
automatically
set
to
ISO
100;
200
i)
and
800
set
to
ISO
100; ISO
coverage
0.28x
frames
focused, flash
more than
film
approx.
magnification
with
parallax
indicator)
AE
set;
less
ISO
200
automatically
1600 film
automatically
85%
for
compensation
ready
than
ISO
160 film
film
automati-
set;
ISO
H-type
50
film
set
to
Page 29

Film
Fr
ame c
Self-tim
Bu
ilt-in flas
Re
d-ey
mode
Battery
Pow
operation
ount
er
e reduction
life
er source
MISCELLANEOUS
Date
displaying
on
the
LCD
panel with
five
cycle
lt-in
clock
power
mm
mm
mini)
mini
i)
temperature
Day/
source
(2.3
(2.3
choices:
Month
/Year,
without
AM/PM;
with timing
is
the
same
in.) x 30
mm (1.2
in.) x 30
mm (1.2 in.)
(20
·C
Hour/
leap
accuracy
as
or 68·F).
the
in.
)
Drop
in
loading
system;
Double
Exposure
Prevention
automatically
film
wind
er
h
Shown
Electronically
button; 10
Four
Flash
flash
button
approx. 4 sec
Red-eye
fires
Approx.
exposures
One
advances
automatically
at
the
end
of
on
the
LCD
controlled;
seconds
flash
modes
and Slow
Sync
range
approx.
locks dur
.
reduction
18
rolls
3 V l
ithium
battery
to
the first
advances
one
film
roll;
mid-roll
panel;
count-down
activated
duration; one-shot
availab
le-Auto
Flash;
guide
0.36
m-4.2 m
ing
flash
battery
lamp
lights
up
of
25-exposure
(CR2
or
frame
frame
after
rewind
type
by
depressing
operation;
Flash,
number
(ISO
recharging;
for
approx. 1 sec.
film
with
DLCR2)
after
(DEP); film
inserting
each
shot;
function
shutter
cancelable
Flash-Cancel,
10 (ISO
200
200);
shutter
recycling
before
flash
for
cartridge
auto
release
Anytime
in
meter);
release
half
time
flash
of
;
re-
all
Data
recording
(Nuvis mini i only)
Dimensions
(WxH xD)
Weight
(without
battery)
Specif
icat
ions apply
Specifications
and des
functi
on
when a fresh
ign
Year/Month/Day,
Minute,
or
(No
year
adjustment
within
±90
seconds a month;
camera
body
Approx.
104.5
(Nuvis
mini)
Approx.
104.5
(Nuvis
mini
i)
Approx.
135 g (4.8
Approx.
135 g (4.8
battery
are
subject
to
Month/Day/Year,
recording);
until
2035; bui
mm
(4.1
mm
(4.1
oz.)
oz.)
is
used
at
change
without
24-hour
in.
) x
in.
) x
(Nuvis
(Nuv
an
normal
58
58
is
notice.
29
Page 30

INTRODUCCION
Gracias
par
adquirir
la
Nikon
Nuvis
mini/Nuvis
Para
obtener
los
mejores
resultados
de
su
el
Sistema
accidental
datos
can
(solo
nueva
solo
de
en
este
manual
Esta
camara
incorpora
-
Carga
-
Tres
pelicula
-
Prevencion
-
Util
sistema
30
de
compacta
las
siguientes
de
la
pelicula
formatos
de
de impresion
instrucciones.
emplea
funciones:
sin
problemas,
de
imagen
doble
exposicion
de
(relaciones
mini
i.
camara,
no deJe
Fotogriifico
Avanzado (Si
introducirla
aspecto) distintos
la
Nuvis
mini
i)
en
de
el
leer
integramente
stema
mismo
IX240)
rolio
de
Nota:
Antes
de
usar
la
camara
para
un
unas
vacaciones, haga
funciones.
S610
en
la
e
Nuvis
algunos disparos
mini
i:
AJuste
Funcion
acontecimiento
de
fecha y hora
de
registro
de
prueba
(pagina
de
datos
importante
para
familiarizarse
40)
(pagina
41)
como
can
una
tad
boda
as
las
.
0
Page 31

I
ADVERTENCIA:
Cuerpo
de
la
camara
•
No
desmontar
ni
modificar
alto
voltaje
•
No
tocar
circuito
•
No
mirar
lesionarse
lesiones
•
Para
tripode.
•
Si
se
apagarla.
local.
que
las
partes
de
alto
directamente
la
retina.
oculares
evitar
lesiones
ve
humo
Oejar
voltaje
alrede
puede
producir
metiilicas
que
al
solo a
Mirar
permanentes.
en
caso
dor
de
que
la
camara
la
puede
al
la
para
un
camara, ya
sol
que
producir
puntos
no
interrumpir
enfrie
en
electricas.
deillash
descargas
de
luz
transportar
antes
descargas
del
interior
directamente a traves
de
caida,
camara,
se
manejo
su
interior
se
si
se
averia,
electricas
intensa a traves
de obJ
la
camara
su
utilizacion
Ilevaria a un
concesionario
seguro
aloja
un
circuito
ya
que
contiene
..
del
visor;
etivo
pod
puede
causar
montada
en
inmediatamente
Nikon
de
de
un
ria
un
y
la
camara
Flash
No
disparar
oculares.
Pila
•
No
podrian
•
Mantener
de
Nota
mini/Nuvis
incorporado
el flash
arrojar
al
fuego
explotar y causar
las
pilas
una
pila,
avisar
: N
ikon
no
se
mini i de
cerca
de
los
ojos
las
pilas
usadas.
lesiones.
luera
del
alcance
inmediatamente a un
hace
responsable
forma
distinta a la
de
una
persona; podrian
No
cortocircuitarlas, abrirlas
de
los
ninos. En
medico.
de
las
averias
especificada
causadas
en
caso
este
INTRODUCCION
producirse
de
ingestion
por
el uso
manual.
lesiones
ni
calentarlas;
accidental
de
la
Nuvis
31
Page 32

INDICE
32
INTRODUCCION
ADVERTENCIA:
INDICE
GUIA
RAPIDA
ELEMENTOS
VENT
ANA
PREPARACION
Colocaci6n
Colocaci6n de
Comprobaci6n
Ajuste
de
Funci6n
Carga
de
MANEJO
Modo
de
Bot6n
de
.....
para
........
...............
...
...............
DE
LA
LCD .......................................
...
de
la
correa
la
pila
de
la
fecha y hora
de
regis
tro
de
la
pelicula
BASI
CO .................................................................................................
sostener
la
dlsparo
del
..................
un
manejo
CAMARA
............
...........................
...............
carga
(solo
datos
..
camara
obtu
......................
seguro
de
la
.......
......
...........
.....
..............................
de
la
pila
en
la
Nuvis
(so
lo
.
.......
....................................................
rado
r
camara
.......
........
...
...
....
...
.............
.......
.....
........
..
........
............
mini
i)
en
la Nuvis
...................................
.......................
....................................
.........
........
......
...
.......
..........
...
................................
........
........................................
........
...
...
................
.. . ..
mini
i)
..........
............
...
...............
.............................................
.... ..... ......
..
...
.........
..
.................
.......................
...
.....
.......................................................... 31
....
..................
....
...
.....
...............
..
.....................................................
..
......
.... .... ......
...................
.....................
.......................
.....
......
.............
....
....
....
..........
......................
.........
.. ..
...........
..........................
....................
......
............
...
......
.....
...
. ..........
...
............
...
.............
..........
..
..
...........
...
.....
............
. ...........
...
..
........
...
...
....................
.....
.... 34
..
..
.....
..
....
.......
.....
30
32
36
37
38
38
38
39
40
41
42
45
45
..
45
Page 33

Formato
de imagen
Visor
...................................... ..
Enfoque y flash
Uso
de
Extraccion
FUNCIONES
Reduccion
Flash
Cancelacion
Flash
Autodisparador
VARIOS
Manejo
Caracterist
automatico
la
congelacion
de
la
pelicula
AVANZADAS
de
ojo
de
de
rajo
toda
ocasion
del
flash ....
sincronizacion
........
...............................
segura
de
la
icas
tecnicas
(relacion
de
aspecto
) .
.........
...............
.................
........................ ......................................... . ............
de
enfoque
............................ . ..........................
..........
.................. .
....................
............
lenta..
.............. ......... .............
..
... .
.
....
...
....
..
..
.............•..
...............
............
....
...........................
camara..........
.....................
...............
......
.. ............................................ .
............................. . ..
............
......
...
...............
•..
............................
.............
...
...................................
. . .......................................
. ................................................
................................................ .
....
.....................
...
...
........................................
. ................................................
...
......
............................................
..........................
.......
.............
....
INDICE
...........
.......
.....
.
.....
. .....
......
..53
...
46
47
48
50
51
52
52
53
54
54
55
55
56
33
I!!I
iii
Page 34

GUIA
Esta
guia
rapida
Abrir
la
tapa
e introducir
(pagina
38).
34
RAPIDA
Ie
muestra
el
modo
del
compartimento
una
pila
como
se
de
de
empezar a hacer fotos
Accionar
la pila
objetlvo
Indica
fl
rmar
ventana
Que
LCD
el
se col
inmedlatamente
ON/OFF
~
inte
rruptor
ocara
el
signo
"
.
de
en
posicion
/.FJ
"
desaparece
con
encendldo.
Conde
su
nueva
camara.
Abrir
EI
la
la tapa del comparlimen
cartucho
(pagina
au
tomaticamente hasta
otograma
f
Para
mas detal
de
pelicula y colocar un
42).
La
pelicu
les
consultar las
cartucho
la
avanzara
el
primer
paginas
cuyos
numeros
se
indican.
to
del
Page 35

Encender
par
el
visor,
las
marcas
centro
del
de nuevo
encuadrar
de
autoenfoque
visor
(pagina
la
camara. Mirando
al sUJ
eto
dentro
situadas
48).
en
de
el
A
continuacion,
ba
ton
de
Par
ultimo,
foto
(pagina
pulsar
disparo
para
pulsar a fonda
48)
ligeramente
enfocar
para
al
sujeto.
tamar
el
la
La pelicula
al Ilegar
parpadee
sacar
el
cartucho
el
se
al
signa
rebobina
final
del
"E"
de
pelicula
automaticamen
rolla.
Cuando
en
la
ventana
(pagina
te
LCD,
51).
Nota:
Unos 5 segundos
terminar
el
camara
se
conservar
de
nuevo
el
se
restaura
puede
encenderse
se
saque
la
rebobinado
apaga
automaticamente
la
carga
de
interruptor
el
display.
de
pelicula.
de
la
pila
de
encendido
La
nuevo
GUIA
RAPIDA
despues
la
pelicula,
Si
se
camara
hasta
pulsa
que
de
la
para
solo
no
no
35
Page 36

ELEMENTOS
(Nuvis
mini
i)
Boton
del
autodisparador
mini:
boton
de
ADJUST)
Boton
de
disparo
Boton
de
- - - ""7''''-::,.-"'
rebobinado
antes
del
final
de
la
pelicula
(pagina
51)
Palanca
de
desbloqueo
(pagina
43)
Anilla
para
la
correa
(pagi
(solo
(pagina
na
38)
DE
en
40,
'-";,d-
la
54)
36
Nuvis
LA
CAMARA
Ventana
de
.-
----:=--
----,73~.>r_-
Lampara
de
indicadora
reduccion
del
autodisparador (pagina
medicion
de
de
exposicion
Boton
de
boton
de
Ventana
Ventana
ojo
rojo/lampara
automatica
modo
de
flash
LCD
del
(so
visor.
54)
MODE/SEL) (pagina
52,
Ocular
del
visor
(pa
gina
lo
en
la
Nuvis
mini
40,
41,52)
i:
'(E~
Rosca
LED
"L---
Tapa
para
tripode
verde (pagina
del
47)
47)
--::~~~~;;;'--
compartimento
de
Interruptor
de
encendidol
apagado
la
pila
(pagi
na
38)
Page 37

VENTANA
Indicador
LCD
de
reduccion
Nuvis
mini
I
ndicador
del aut
odisparador
Dos
Indicador
puntos
Nuvis
de
la
mini
i
de
ana
indicacion
Indicador
de
InSUflclente
VENTANA
carga
de
la
plla
LCD
"",oW
J>~
AUTO~
0 0
Lf
a
SLowtiJ
Indicador
del
modo
de
flash
• •
~""'"."'
Indicador
la
pila
Lf
de
carga
._,
.~
aria
._, ._,
Contador
de
exposiciones
..
"'~'""
Insuficiente
de
c.
C.
C. C ...
'"".""""'~~~~
Indicador
de
reduccion
tp
0
de
ojo
rOJo
f
,.-,
0
~
•.
CjI~
Indlcador
Indicador
del aut
._,
C.
de
~~;~:,~~n~~1
reglstro
de
"","::~""""
reglstro
de datos
odispardor
~
~
37
Page 38

PREPARACION
Colocacion
correa
I
Pasar
la
correa
indica.
38
por
la
de
anilla
la
como
se
I
Colocacion
Asegurarse
mento
se
compartimento
presion
de
que
del
cartucho
vaya a cambiar
en
la
direccion
la
de
la
este
tapa
pila.
la
de
del
cerrada
Abrir
pila
de
la
la
comparti-
cuando
la
tapa
haciendo
flecha.
pila
del
Colocar
DLCR2)
como
se
debajo
de
la
tapa
sobre
la
"clic
".
una
pila
de
con
indica
de
tapa
la
litio
las
polaridades
(pasar
siempre
pila). Introducir
del
compartimento y presionar
hasta
que
se cierre
de
+ y -
3 V
las
(CR2
orientadas
la
cinta
pestaiias
con
por
un
0
Not
a:
Solo
Nuvi
se
borran
hora.
Acordarse
fecha y la
pila
(pagina
s
mini
todos
hora
40).
i:
AI
los
ajustes
de vol
despues
cambiar
de
ver
a aj
de
cambiar
la
fecha
ustar
pila
y
la
la
Page 39

I
Comprobacion
Apagar siempre
la
camara
cuando
ON/OFF
~
.
Encender
la
camara.
de
no
la
se
este
carga
de
usando, para
Observar
conservar
AUTO
~
I
L..,-.."....,-~~~
I
AUT
O
~-t
la ven
lana
la
:
pila
',
:'.I.
t;
'l
j
LCD
la
carga
NUViS
Nu
vis mi
de
mini
ni
i
la pil
a.
Si
esta
antes
nece
colocada
parpadea
baja
de
posible
en
blanco
.
el
simbolo "c:JII
carga y hay
. Si la
pantalla
, la pi
la
Nuvis
Nuvi
que
cambiarla
LCD
esta
agolada 0 mal
s mi
mini
",
perma-
PREPARACION
Nota: Apaga
no
carga
durante
se
objetivo
camara.
ni
i
es
la
pila
10
se
apaga
ta ret
esle
de
la pila.
tres
se ret
No
rayendo
r si
empre
usando, pa
Si
no
minulos
de
modo
rae
hacia
tocar
el
objetivo
.
la cama
ra
cuando
ra
conservar
se
usa
la
camara
aproximadamente
automatico
el
cuerpo
de
mientras
y el
se
39
la
,
la
Page 40

PREPARACION
I
Ajuste
de
ee
V@
••
MODE
SEL
fecha y la
ADJUST
hora
-
Ajustar
la
MODE/SEL y ADJUST.
40
fecha y hora
Ajustar
y
1.
2. Pul
~
DATE
con los
botones
3.
4.
5.
6.
7.
(solo
en
primero
el
los
sar
pasos
la
camara.
el
boton
de
nuevo
antes.
los
de
nuevo
ano, el
3-7
MODE/SEL
pulsado
on
ADJUST
pasos
repetir
Apagar
Mantener
empiece a parpadeqr.
Pulsar el bot
rapidamente).
Pulsar
como
Repetir
Pulsar
parpadeo.
la
Nuvis
mes y el
para
el
boton
el
boton
4 y 5
el
baton
dia
aJustar
hasta
MODE/SEL
para
ajustar
MODE/SEL
para aju
star
MODE/SEL
mini
segun
la
hora
que
aparezca
el
ano
para
el dia.
para
i)
se
explica
y el
minuto.
el
duran
te
(mantenerlo
seleccionar
terminar.
mas
abajo.
ano/mes/dia
dos
segundos
pulsado
el
mes y realizar
La
nueva
Luego, sel
en
la
ventana
hasta
si
se
desea
fecha
eccionar
que
el
avanzar
el
aJuste
aparece
LCD.
ano
sin
la
visualizacion
de
hora/minuto
en
el
paso
2
Page 41

I
Funci6n
Los
datos
se
de
registran
registro
en
la
pelicula.
de
datos
Ano/mes/dia
(solo
en
la
Nuvis
mini
i)
Nota: AI
siempre
hacen
Impreslon
encargar
en
el
capias, preguntar
laboralorio
por las
dos car
PREPARACION
fologr31ico
as
sl
Pulsar
el
boton
los formatos
MODE/SEL
de
fecha y hora.
para
recorrer
Mes/dia/ano
Dia/mes/ano
Hora/minuto
(s
in r
egistro)
AUTO
Cuando
se sel
de
datos aparece
indicacion
esta
encendlda.
~
ecciona
en
"Imill" m
la
funcion
la
ventana
ient
ras
la
regist
LCD
cama
ro
la
ra
41
Page 42

PREPARACION
I
Carga
Cartucho
42
de
de
la
peHcula
Paraluz
pelicula
IX240
Disco
de
datos
Accionamiento
Carrete
del
paraluz
del
cartucho
Usar
unicamente
IX240 r
ecientes. No
pelicula
convencional de
pelicula
no
tiene
automaticamente
y
cargada
.
cartuchos
puede
tira
inicial.
al
interior
de
pelicula
utilizarse
35 mm.
Es
arrastrada
de
la
camara
La
Indicaci6n
". " = Sin
" • " =
"X " =
". " =
visual
procesar
Parcial
Totalmente
procesada
Pelicula
cartucho
de
mente
expuesta
procesada
exposici6n
expuesta
pero
dentro
(VEl)
no
del
Page 43

Encender
la
simbolo "1lJ" desaparece
LCD y girar
abrir
cartucho.
Nota:
compartimento
haya
camara. Confirmar
la
palanca
la
tapa
del
No
intentar abrir
una
pelicu
la
de
desbloqueo
compartimento del
del
cartucho
cargada
de
la
.
que
la
ventana
para
tapa del
mientras
el
Colocar
indica y cerrar
con
avanzar.
ajusta
un
cartucho
la
un
tapa
"clic"
La
pelicula
La
sensibilidad
automatlcamente.
nuevo
segun
del
compartimento
empieza
de
la
pelicu
PREPARACION
:11,:
I
L
-,
Nuvis
I
AUTO
~
t.!)
C 5 I
mini
Nuvis mini
i
BI
Encender
de
nuevo
la
camara.
En
se
Nota:
En
el
VEl
debera
aparecer
el
"e"
antes
de
la
a
cartucho
la
se
o ". "
(EI
"X"
).
de
pelicula
VEl
carga.
con
cambia
automaticamente
los
No
simbolo
cargar
simbolos
un
"t"
a
ventana LCD
"
1lJ
" y
el
contador
pelicula
ha sido
ex
pue
sta, en
indicaci6n
"E").
debera
aparecer
de
exposiclones
parcial 0 totalmente
la
ventana
LCD
el
simbolo
(si
parpadea
la
la
la
43
Page 44

PREPARACION
Not
as
sobre
No
abrir
el
cartucho
o
vibraciones.
Tener
cui
dado
disco
de
datos
podria
afectar a la
de
datos.
No
presionar
un
romper
se
rompe
objeto
la
(IPI
el
punzante;
pelicula.
el
indicador
)
del
revelar y ampliar
con
el
con
velarse
No
versible
imposible
Consultar
si
44
el
cartucho
ni
exponer
de
no
manchar
del
cartucho, ya
correcta
comunicacion
accionamiento
pod
de
procesado
cartucho, ya
el
laboratorio
indicador (IPI
).
de
lo a
ni
del
ria
abrirse
que
la
pelicula.
de
revelado
pelicula
golpes
daiiar
que
ello
paraluz
irre-
seria
IX240
No i
con
destornillador).
el
alterarse
y/o
No
expuestos a la
de
y
quier
-
cerca
-
en
favorezcan
-
cerca
ntentar girar
un
objeto
el VEl e incluso
procesado
dejar los
cartuchos
aparatos
lugar a alta
de
polvo 0 suciedad
condiciones
de
campos
el
car
punzante
Pod
ria
velarse
correctos
:
luz
solar
de
calefaccion 0 en
temp
de
calor 0 humedad
la
aparicion
magneticos
rete
del
cartucho
(por eJemplo, un
la
pelicula,
impedirse
el
.
directa, cerca
cual
eratura
que
de
moho
intensos
Revelado y copias
uso
Para
el
mienda
un
laboratorio
"L
aboratorio
.
Servicio
Fotoacabado
Certificado
revel ado y las
lIevar los
cartuchos
que
fotogratico
de
copias
de
ostente
autorizado"
se
reco-
pelicula
el
cartel
.
a
Los
siguientes
-
- I
-
- D
Para
laboratorio
laboratorios
serv
Tres
formatos
mpresion
de
mini
i)
Copias
indice (imagen
fotograma
pelicula)
evolucion
(NRIC) los
dentro
conservacion.
del negat
del
cartucho
mas
detalles, preguntar
autorizado.
autorizados
ici
os:
de
imagen (C, HoP)
datos
(solo
reducida
expuesto
ivo
negativos
para
ofrecen
en
del
rollo
en
cartucho
se
devuelven
su
la
de
mejor
en
los
Nuvis
cada
de
un
Page 45

MANEJO
I
Modo
BASICO
de
sostener
la
camara
I
Boton
de
disparo
del
obturador
MANEJO
BASleo
Colocar
Pegar
los
camara
Indica.
Important
con
los
un
pie
IIgeramente
cod
os
con
ambas
e:
Tener
dedos 0 el
adelantado.
al
cuerpo y sujetar
man
os
cuidado
de
pelo, 0 con
como
no
tapar
la
correa
se
la
el
de
AI
hacer
que
el
flash
como
se
objetivo, el
la
camara
fotos
quede
indica.
flash 0 la
.
verticales,
en
la
ventana
asegurarse
parte
superio
del
autofoco
de
..
Pulsarlo
sUJeto.
Cuando
enciende
ligeramente
el
LED
r,
se
congela
verde.
para
el
enfocar
enfoque
~~=-
al
PulsarJo a fondo
se
obturador.
sua
vi
dad
camara.
mente
--~----~
para
disparar
pero
de
aulomatica-
IUl.
con
45
el
la
si
EI
no
para
Pulsar
evitar
flash
hay
firmemenle
sacudidas
se
dispara
suficiente
Page 46

MANEJD
BASI
I
Formato
La
relacion
de
CD
de
aspecto
imagen
de
la
imagen
(relacion
puede
cambiarse
en
cualquier
de
aspecto)
momenta
en
el
mismo
rolla
de
pelicula.
(C 1110111
Usar
el
selector
C,
H Y
P.
Precauci6n:
lesiones
camara
alejada
usa
el
selector.
46
• • •
CCIP
• •
de
CHP
Para
en
los
alaS,
del
))
para
evitar
rostra
elegir
posibles
mantener
mientras
entre
la
se
Tipo
Relacion
de
aspecto
Vertical: Horizontal
C
de
= 2 . 3
la
imagen
Relacion
Vertical:
TipO
de
aspecto
Horizontal
H
de
la
= 9 :
imagen
16
Relacion
de
Vertical
TipO
P
aspecto
de
Horizontal
la
imagen
= 1 : 3
Page 47

I
Visor
2
rFf=1l1Il
~B
EI
visor
indica
los
de
46).
No
cuando
la
EI
puede
del
limites
imagen
ejemplo
garantizarse
el
flash) de
aspeclo
Ipagina
Nota:
correcto
una
distancia inferior a 0,
pulgadas 10.4 m/16
cancelaci6n
de
muestra
sujeto
pulgadas
la
en
el
se
encuentra
la
camara.
-
relaci6n
negalivo
el
tipo
el
enfoque
36 m/14
en
el
modo
de
H.
1.
Marcas
paralaje-centrar
de
m/
2. Marcas
foco-colocarlas
3
3.
LED
enfocado)
a
eslas
14
pulgadas
verde
de
compensacion
al
marcas
al
disparar
aproximadamenle.
de
encuadre
sobre
(indicador
.
sujelo
del
el
de
flash
denlro
a 0,
aulo-
sujelo
Las
marcas
de
de
36
lislo/
duce
compensacion
ligeramente
al
C H P
.
de
acercarse a coria
paralaje
muestran
distancia
del
como
sujelo.
D~~
D~0
el
tamano
MANEJO
de
la
foto
BASI
CO
se
re-
B
47
Page 48

MANEJO
BASICO
I
ENFOQUE V FLASH
..
-,.-
C
:,
I
Nuvis
B
Nuvis
mini
mini
AUTO
AUTO
Encender
48
~
~
la
camara.
B
25
AUTOMATICO
mbo
lo
de flash automatico
EI si
que
aparece
en
se
va a disparar
hay
suficiente luz.
la
distancia
de
pelicula
dentro
la ventana
al
disparo
ISO
de los
el
flash
si
no
que
los
i
limites
Con
usarse
0,36-4,2 m (14 pulgadas-14
aproximadamente.
LCD indica
automaticamente
Asegurarse
sujeto
queda
del flash
200
, el
flash
siguientes
"
AUTO
dentro
.
debera
limites
~
que
de
de
pies)
"
Colocar al
e
ncuadre
centro
sUJeto
del
del visor.
dentro
autofoco
de
sil
las
uadas
marcas
en
~Dm
~
de
Pulsar
el
ligeramente
para
enfoc
sor
se enciende cuando
vi
correctamente
D
ar
al sUJ
eto.
enfocado
2'~f
I, •
L..!...J
el
boton
EI
LED
el
.
r----
_
-::!
de
disparo
verde del
sujeto
esta
Page 49

\
A
contrnuacron, pulsar a fonda
dispara
r
el
obturador.
automaticamente
y
el
contador
ventana
LCD
de
reduce
La peli
al
siguien
te
exposicrones
la
cuenta
para
cula
avanza
fotograma
de
en
uno
Nota:
La
la
Nikon
cm/
14
pulgadas
puede gar
el sujeto
si
rnferior a
camara
cancelacion
EI
baton de
el
flash
menos 4 segundos ent
la
distancia
minima
Nuvis
mini/Nuv
aproximadamente
antizarse
un
se
encuen
tra a
36
cm/14
(40
cm/16
pulgadas
del
flash)
disparo
se
esta
cargandose Esperar
de enf
is
mini i es
enfoq
ue cor
una
dis
pulgadas
en
bloquea
re drsparos
oque
de
de
36
No
rec
tan
cia
de
el
modo
mientras
MANEJO
BASleD
to
la
al
49
Page 50

MANEJO
I
Uso
..
Cuando
el
encuadre
enfoca
el
Nota:
No
50
BASICO
de
sujelo
del
autofoco
fondo.
cambiar
la
congelacion
no
cubre
las
marcas
"0
",
la
camara
la
distancia
de
la
camara
de
enfoque
..----~--~
de
Colocar las
aulofoeo
sujeto y pulsar
disparo
verde y el
dislancia.
al
sujelo
marcas
"0 " directamen
ligeramente
para
enfocar.
enfoque
se
una
vez
eongelado
de
encuadre
Se
enciende
congela
te
el
el
enfoque
sobre
boton
el
en
del
el
de
LED
esa
.
Manteniendo
disparo,
recomponer
el
visor.
Entonces
de
disparo.
el
dedo
sobre
la
pulsar a fondo
escena
el
boton
original
el
de
en
boton
Sjtuacjones
Los
siguientes
dificiles
de
enfocar:
• Suj
elos
demasiado
totalmente
cubrir
marcas
de
Sujetos
oscuros
Superficies
como
coches
SUjetos
sin
ejemplo,
la
ar
tificiales,
Sujelos
secundarios
cerca
de
la
pal.
los
casos
enfoque
idi
slante
encuadre
brillantes
etc.)
camara
indicados, usar
enfocando a otro
de
•
•
•
•
En
de
equ
procedimiento
de
enfoque
especjales
sujetos
pueden
pequefios para
el
centro
del
aulofoco
sin
reflejos
que
reflejan
relucientes 0 agua
contenido
llama
desGrito
solido
de
una
vela,
situados
que
el
sujeto
la
congelacion
la
camara y seguir
en
esta
resultar
de
la
(por
luegos
mas
princi-
sujeto
seceion.
las
luz
,
el
Page 51

I
Extraccion
..
La
pelicula
al
final
total
la
ventana
AUTO
AUTO
del
mente,
~
~
se
rebobina
rollo.
Cuando
parpadea
LCD.
."1:
B f
-:~:
de
la
J
...
. 1
Nuvis mini
Nuvls mini i
automaticamente
se
ha
rebobinado
la
indicacion
pelicula
~~=-
Abrir
cartucho
"
E"
en
de
cartucho.
---------
la
tapa
del
la
camara
con
compartimento
la
parte
hacia
inferior
arriba, y sacar
del
del
cuerpo
el
Para rebobinar
del
boligrafo 0 un
rebobinado a mitad
cuenta
ha
sido
puede vol
rollo,
presionar
Que
rebobmado
ver a usarse.
la
objeto
un
cartucho
pelicula
con
similar
del
antes
antes
la
rollo.
de
del
punta
el
boton
Tener
pelicula
del
final
de
final
un
de
en
Que
no
Nota:
Si
falla
rebobinando
una
automaticamente.
Unos 5 segundos
rebobinado
apaga
carga
de
encendido, solo
La
camara
nuevo
la
la
nueva.
pelicula, sustituirla
EI
rebobinado
de
la
automaticamente
de
la
pila.
Si
no
puede
mientras
no
MANEJD
pila
mientras
despues
pelicula, la
para
se
pulsa
se
restaura
encenderse
se
extraiga
se
reanudara
de
terminar
camara
preservar
el
interruptor
el
la
BASleD
se
esta
por
el
se
la
display.
de
pelicula.
51
Page 52

FUNCIONES
Cuando
se
selecciona
automatico.
Pulsar
siguientes
52
enclende
automaticamente
el
boton
"
~
modos:
AVANZADAS
la
camara
@ "
para
pasar por l
I
Reduccion
de
ojo
rojo
o
AUTO
Flash
auto
matico
ReduCCIon
de
0)0
rojo
Flash
de
toda
de
sincronizaclon
ocaslon
flash
l
enta
se
el
flash
os
Cancelacion del
Flash
~
L
@
!
~
t
@
+
AUTO
L
SLOW'"
Pulsar el
el simbolo
boton
"@ "
"
~
@ "
pa
ra
que
en
la
ventana
aparezca
LCD.
Pulsa
r a
fondo
lampa
ra
de
ciende
duran
damente
antes
SUJetar bien
que
el sUJeto
el
boton
reduccion
te
la
permanezca
de
de
ojo
un
segundo
del dlspararse
camara y asegurarse
en
disparo
rajo
se en-
aproxima-
el
flash.
pos
icion.
La
de
Page 53

I
Flash
de
...
~
toda
-11-
C
dJ
ocasion
1
Nuvis
mini
I
Cancelacion
del
Nuvis
flash
mini
FUNCIONES
AVANZADAS
I t
EI
modo flash
normalmenle
el
sol
de
frente.
EI
modo
flash
(~
de
toda
no
se
de
toda
I
Nuvisminii
ocasion
dispararia,
ocaslon
permite utilizar
como
cuando
se
indica
con
el flash
el sUJeto
el
simbolo
en sit
se
encuentra
"~"
uaclones
en
la
en
sombra 0 con
ventana
en
LCD.
las
que
EI
modo
cancelacion
escasa
en
ar
te y otras
EI
modo
cancelacion
Nota:
En
lenta. A fin
camara
fija.
las
lugares
el
modo
de
del
que
el flash nor
donde
cancelacion
conseguir
del
flash
el
flash
los
permi
te
mal
mente
uso
del
se
ind
del
flash
mejores
disparar
sin
se
dispararia.
flash
no este permitido.
ica
con
el simbolo
se
emplea
resultados,
flash
una
usar
en
situaciones
Usar
este
"
11l
"
velocidad
un
tripode
en
modo
la
vent3na
de
obturacion
para
de
iluminacion
en
galerias
LCD.
mantener
de
mas
la
53
Page 54

FUNCIONES
I
EI
obturacion lenta.
natural
EI
LCD.
Nota: En
lenla
camara
54
Flash
i A! o
~
SLOW
~
l
:
H
modo
flash
en
lotografias
modo
flash
el
modo
. A
fin
de
fija.
AVANZADAS
de
de
sincronizacion
~'I-
I
c:,
Nuvl
s mi
I'
Nuvls mini
este
modo
con
flash
de
sincronizacion
los
mejores
ni
para
al
aire
lenta
i
lenta
hacer
libre y luz
se
resultados,
~
25
liJ
de
slncronlzaclon
Usar
sincronizacion
flash
conseguir
combina
que
indica
lenta
se
lenta
el
debil.
con
el
emplea
usar
el
flash
fondo
simbolo
un
con
aparezca
"
!~J~ ~"
una
velocidad
tripode
una
para
mas
velocidad
claro y mas
en
la
venlana
de
obturacion
mantener
de
la
I
Autodisparador
..
~:,,:
L
~
Nu
AUTO
~
AUTO ~ @
Con
la
camara
'\~)"
para
en
la
ventana
Not
a:
EI
modo
obturador.
~
t
encendida
que
aparezca
LCD.
de
Para
. 25
~
cancelarlo
vts
~
~
NUV
liJ
pulsar
el
simbolo
autodisparo
antes
min
i
Is
mini i
el
boton
se
cancela
de
Para
"~"
sar
el
piloto
camara
lue
go
antes
automaticamente
hacer
la
foto,
que
el
autodisparador
boton
de
indicador
parpadea
se
enciende
de
dispararse
apagar
funcione, pul-
disparo
{jel
obturador.
de
la
parte
frontal
durante 8 segundos
durante
dos
el
obturador.
despues
de
camara.
dispararse
la
EI
de
la
y
segundos
el
Page 55

VARIOS
I
Manejo
Consejos
•
Apagar
obturador
•
Procurar
de
automoviles
Dejar
•
rato. EI
La
camara
•
Mantener
•
No
dejar
su
mecanisme
•
Evitar
de
sal, arena 0 polvo
• Utiliz
un
pane
autofoco
•
No
usar
sobre
la
camara
con
no
que
la
uso
puede
la
caer
que
entren
ar
un
pincel
humedecido
con
nunca
seguro
el
conslguiente
dejar
aparcados
camara
excesivo
no
camara
la
camara
de
materias
neumatico
un
pane
disolvente,
de
el
cuidado
de
cuando
no
se
use,
la
precision.
gasto
camara
en
lugares a excesiva
al
sol, en
se
enfrie
despues
genera cal
or
funcionar
bien a bajas
templada.
ni
golpearla
extranas
con
un
pane
para
eliminar
con liquido limpiador
suave
.
gasolina u otros
la
camara
la
camara
para
evitar
que
de
la
la
playa 0 cerca
de
en
la
pila y en
contra
en
la
camara.
suave y seco.
el
se
pila.
temperatura,
de
disparar ininterrumpidamente
la
camara
temperaturas (por
superficies
duras,
Limpiar
polvo
del
objetivo. Si
de
objetivos. Limpiar
agentes
activ~s.
dispare
accidentalmente
como
aparatos
de
calefaccion
.
debajo
de
ya
que
pod
inmediatamente
es
necesario, usar
la
en
el
interior
durante
aoc 0
ria
danarse
la
camara
ventana
.
un
32°F).
del
•
Guardar
exponerla a productos
el
un
desecante
•
Si
la
camara
disparar
Notas
•
La
carga
Se
recupera
la
camara a bajas
•
Cambiar
fotos
importantes.
Para
Canada
Este
aparato
rad
io
procedentes
Interferencias
la
camara
varias
sobre
de
las
digital
de
en
mientras
permanece
veces
las
pilas
la
pila
puede
cuando
vuelve a usarse
temperaturas,
pilas
por
unas
no
sobrepasa
de
aparatos
Radio
del
un
lugar
quimicos
este
guardada.
mucho
el
obturador y el
debilitarse
nuevas 0 lIevar
Ministerio
fresco y seco
como
alcanfor 0 naftalina.
tiempo
sin
flash.
al
bajar
la
camara a temperatura
mantener
la
pilas
los
limites
(Clase
digitales
Que
de
Comunicaciones
para
evitar
ser
utilizada,
la
temperatura
pila
templada.
de repuesto
B)
de
se
establecen
la
aparicion
Se
sacarla
de
cuando
emision
de
Canada.
de
recomienda
penodicamente
aoc (
32°F).
normal.
Cuando
se
vayan a hacer
de
interferencias
en
las
Normas
VARIOS
moho.
el
uso
se
sobre
No
de
use
de
55
y
Page 56

VARIOS
I
CARACTERISTICAS
Camara
Tipo
de
Pelicu
la utilizable
Sistema
de
informacion
Relacion
la
imagen
Objetivo
Tapa del
Oblurador
Enloque
camara
de
intercambio
de
aspecto
objetivo
de
auloloeo
lologralieo
avanzado).
eonvertido a tipo
Cartueho
de
pelieula IX240
x
30,2
mm)
Sislema
oplieo
Sistema
magnetico
mini
i)
Tl
po
C,
H Y P
Objelivo
de
25
en 3
S8
Obturador
Sistema
boton
mm
grupos
abre/cierra automaticamente
electr6nico
de
autofoco
de
disparo
TECNICAS
con
oblurador
en
objelivo
(sislema
de
inform
mm
eonvertido
al
encenderse/apagarse
infrarrojos;
objelivo
Nikon
folografieo
de
actua
S8
35
mm)
de
inlereambio
de
114 (31
par
con
intercambio
programado;
acion
inf
ormacion
a Il
lambien
activa
, Ii
po
de
25
avanzado)
(Opt
po
35
al
pulsar
IX240
mm
1/4
IX)
(Nuvis
(Mag.
mm)
; 3 el
la
como
diafragma
ligeramente
(sislema
(31
(16.7
mini)
IX)
(Nuvis
ementos
camara
mm
mm
Campo:
de
0,36
01
(14 pulgadas)
0,4 m (16
del
EI
enfoque
81
visor
n
boton
Visor
zona
aprax
Encuadres
compensacion
LED
Programa
ISO
(Nuvis
Ajuste
se
se
Visor
Inform
acion
en
Control
de
exposicio
Umites de
exposicion
automatica
81
Ajuste
de
la sensibilidad
de
la
pelieula
flash
S8
congela
de
disparo
de
imagen
natural;
de imagen
con
para
farmatas
de
verde
(indieador de flash Ii
Encendido:
AE
control
200:
EV7
-15
mini)
automatieo
ajusta
automatieamente a ISO
ajusta
automatieamente a ISO
paralaje;
ado
con
a infi"'to
pulgadas) a infinito
mientras
S8
mantiene
cobertura
del
formato
de
imagen
de
imagen
encuadre
sto/enfoque)
sujeto enf
oeado, flash li
electr6nicamente
pelieula
ISO
100 Y 200;
100;
200
en
encuadre
tipo
tipos
de
autofoco
con
pelieula
el
modo
pulsado
ligeramenle
85%
aprox.
H;
ampliacion O,28x
C/H/P
con
sto
con
ISO
1600
ISO
200
eaneelaeion
para
la
marcas
de
inferior
superior
81
Page 57

Operacion
Contador
Autodi
spara
Flash inco
Modo Redu
roja
de petie uta
de
exposiciones
dor
rporado
ccion
de
aja
(Nuvis
mini
i)
Ajuste
automatico
tSO
50
se
ajusta
S8
ajusta
automaticamente
Sistema
de
carga
(
DEP
);
la
peticula
despues
de
colocar
despues
de
cada
pelicula; funci6n
Aparece
en
la
Controlado
electronic
duracion
10
se
Dispone
de cuat
flash,
flash
de !ada
guia
10 (ISO
200
(ISO
200);
el
recarga
de
la
La
lampara
de
aprox.
antes
de
con
pelicula
tSO
automaticamente a tSO
a
ISO
sin
lira
inicial;
avanza
automaticamente
el
cartucho;
disparo:
rebobinado
de
rebobinado
ventana
LCD;
tipo
amente;
s;
un
modos
ocasi6n y flash
en
metros); limites
de
disparo
del
flash;
de
dispararse
S8
disparo;
de
flash: flash
tiempo
ojo
el
flash
gundo
ro
boton
pila
reduccion
100, 200, 400 Y 800;
100;
con
800
prevencion
hasta
la
pelicula
avanza
automatico
antes
del
final
al
pulsar
cancelab
le
autornatico,
de
sincronizacion
del
flash
obturador
de
reeielado 4 seg.
se
enciende
de
0,36 m-4,2 m
se
sustractivo
activa
del
raja
con
peticula
tSO
de
doble
exposicion
el
primer
lotograma
aulomaticamente
al
final
del
la
pelicu
la
el bat
on
de disparo;
cancelaci6n
lenla; numero
bloQuea
durante
aprox.
durante
un
peticula
1600
rollo
de
del
aprox
segundo
Duracion
Aliment
Funci6n
dat
mini
Oimension
(aneho
Peso (sin
.
la
Especificaciones
Especificaciones y diseiio
os
aci6
i)
de
de
(solo
la pila
n
registro
en
es
x a
lto x fondo)
pita)
de
la
Nuv
aplicables
Aproximadamente
en
el
50%
Una
pila
Datos
que
is
Ano/mes/dia,
registro);
el
2035;
alimentacion
104,5
pulgadas) apr
104,5
pulgadas)
1
35 9 (4,8
1
35 9 (4,8
con
pita
nueva a temperatura
sujetos
a
modificacion
18
de los
disparos
de
litio
de
3 V (CR2 0 DLCR2)
aparecen
mes/dia/ano,
cicio
de
24
reloj incorporado
es
la
misma
mm
(4,1 pulgadas) x 58
ox. (Nuvis
mm
(4,1 pulgadas) x 58
apro
x.
(Nuvis
0
1)
aprox (Nuv
01)
aprox. (Nuvis mini
sin
rollos
de
petieula
de
25
en
la
ventana
LCD
con
cinco
dia/mes/aiio, hora/minuto, 0 (sin
horas
sin
AM/PM;
precision
la
i)
ni)
normal
aviso.
del
mm
mm
i)
ajuste
de ± 90
cuerpo
de
(2,3
pulgadas) x 30
(2,3 pulgadas) x 30
(20°C o 68°F).
con
que
mini)
mini
ls mi
previa
exposieiones
opciones:
de
aAo
bisiesto
segundos
la
camara.
VARIOS
con
flash
hasta
al
mes;
mm
(1,2
mm (1,2
57
la
Page 58

Page 59

Page 60

Nikon
No reproduction
in
part (except
reviews
),
from NIKON CORPORATION.
Queda prohibida
manual (salvo en
articulos 0 revistas especializadas),
de
escrita
in
any form
(or
may be made without written authorisation
brief quotation
la
reproduccion total 0 parcial
10
que
NIKON CORPORATION.
of
this manual, in whole
se
refiere a citas breves en
in
critical articles
sirlla
autorizacion
de
or
este
or
NIKON CORPORATION
FUJI BLDG., 2-3, MARUNOUCHI 3-CHOME
CHIYODA-KU, TOKYO 100, JAPAN
PHONE: 81-3-3214-5311 TELEX: NIKON J22601
FAX:
81-3-3201-5856
in
Japan
Printed
9H006-Bf11
@'
 Loading...