


Nikon NIKKOR Z 58mm f/0.95 S Noct User manual [el]

NIKKOR Z 58mm f/0.95 S Noct
User’s Manual (with Warranty)
Benutzerhandbuch (inkl. Garantiebeleg)
Manuel d’utilisation (avec garantie)
Gebruikshandleiding (met garantie)
Manuale d’uso (con garanzia)
Manual del usuario (con garantía)
Manual do Utilizador (com Garantia)
Instrukcja obsługi (wraz z gwarancją)
Használati útmutató (jótállási jeggyel)
Εγχειρίδιο οδηγιών χρήσης (με Εγγύηση)
Manualul utilizatorului (cu garanţie)
En
De
Fr
Nl
It
Es
Pt
Pl
Hu
Gr
Ro
1

2

AACare and Handling
Care and Handling
Opening the Trunk Case
The lens is a high-precision optical instrument. To ensure continued performance, avoid subjecting the product to physical shocks
during handling.
Before using this product, please read these instructions carefully. You
will also need to consult the camera manual.
• This lens is intended exclusively for use with mirrorless cameras featuring
a Nikon Z mount.
• This is a manual focus lens. Regardless of the focus mode selected
with the camera, focus must be adjusted manually while this lens is
attached.
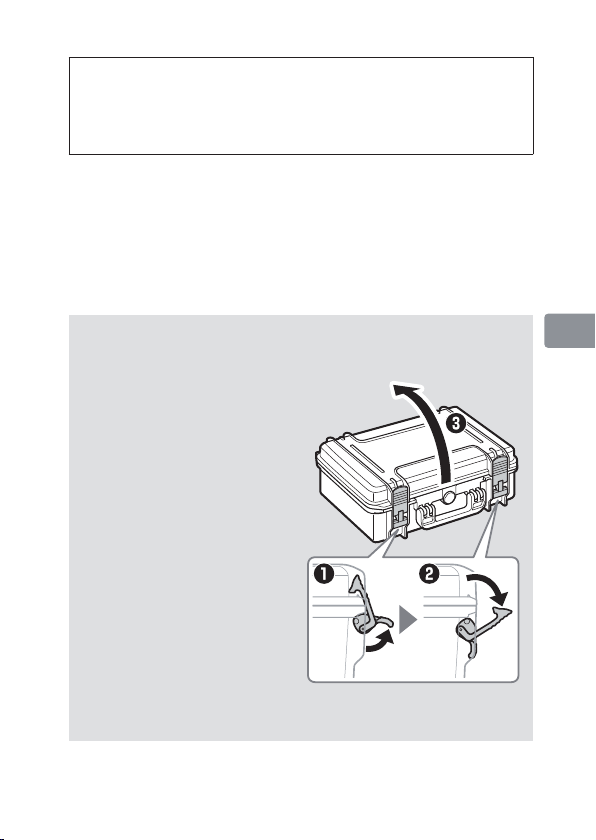
Opening the Trunk Case
To open the trunk case:
z Place the trunk case on a
stable surface.
x Release the latch safety locks
(q) and open the latches
(w).
c Open the lid (
• Open the lid slowly.
• Take care that your fi ngers
don’t get caught in the
case’s moving parts.
• The lid and body of the case
form a tight seal, and it may
sometimes be necessary to
grip the body securely while
opening the lid.
e
).
En
3

For Your Safety
For Your Safety
AAWARNING
• • Do not disassemble or modify this product.
Do not touch internal parts that become exposed as the result
of a fall or other accident.
• • Should you notice any abnormalities such as the product
producing smoke, heat, or unusual odors, immediately
disconnect the camera power source.
• • Keep dry.
Do not handle with wet hands.
• • Do not use this product in the presence of fl ammable dust or
gas such as propane, gasoline or aerosols.
• • Do not directly view the sun or other bright light source through the lens.
• • Keep this product out of reach of children.
To prevent damage to property or injury to yourself or to others, read
“For Your Safety” in its entirety before using this product.
Keep these safety instructions where all those who use this product
will read them.
A WARNING: Failure to observe the precautions marked with this
icon could result in death or severe injury.
A CAUTION: Failure to observe the precautions marked with this
icon could result in injury or property damage.
En
Do not disassemble or modify this product.
Do not touch internal parts that become exposed as the result
of a fall or other accident.
Failure to observe these precautions could result in electric shock or
other injury.
Should you notice any abnormalities such as the product
producing smoke, heat, or unusual odors, immediately
disconnect the camera power source.
Continued operation could result in fi re, burns or other injury.
Keep dry.
Do not handle with wet hands.
Failure to observe these precautions could result in fi re or electric shock.
Do not use this product in the presence of fl ammable dust or
gas such as propane, gasoline or aerosols.
Failure to observe this precaution could result in explosion or fi re.
Do not directly view the sun or other bright light source through the lens.
Failure to observe this precaution could result in visual impairment.
Keep this product out of reach of children.
Failure to observe this precaution could result in injury or product
malfunction. In addition, note that small parts constitute a choking
hazard. Should a child swallow any part of this product, seek
immediate medical attention.
WARNING
4

AAWARNING
WARNING
• • Do not handle with bare hands in locations exposed to
extremely high or low temperatures.
AACAUTION
• • Do not leave the lens pointed at the sun or other strong light sources.
• • Do not leave the product where it will be exposed to extremely
high temperatures, for an extended period such as in an
enclosed automobile or in direct sunlight.
• • Do not transport cameras or lenses with tripods or similar
accessories attached.
Notices for Customers in Europe
Do not handle with bare hands in locations exposed to
extremely high or low temperatures.
Failure to observe this precaution could result in burns or frostbite.
CAUTION
Do not leave the lens pointed at the sun or other strong light sources.
Light focused by the lens could cause fi re or damage to product’s
internal parts. When shooting backlit subjects, keep the sun well out
of the frame.
Do not leave the product where it will be exposed to extremely
high temperatures, for an extended period such as in an
enclosed automobile or in direct sunlight.
Failure to observe this precaution could result in fi re or product malfunction.
Do not transport cameras or lenses with tripods or similar
accessories attached.
Failure to observe this precaution could result in injury or product
malfunction.
Notices for Customers in Europe
This symbol indicates that electrical and electronic equipment is to be collected separately.
The following apply only to users in European countries:
• This product is designated for separate collection at an appropriate collection point. Do not dispose of as household
waste.
• Separate collection and recycling helps conserve natural resources
and prevent negative consequences for human health and the environment that might result from incorrect disposal.
• For more information, contact the retailer or the local authorities in
charge of waste management.
En
5

Using the Lens
Using the Lens
Parts of the Lens: Names and Functions
Parts of the Lens: Names and Functions
See below for the names and functions of the parts of the lens.
En
6

●
Focus ring Rotate to focus manually. —
●
●
●
●
●
●
●
●
●
●
●
q
●
Check the focus distance (the ap-
Focus distance
w
indicator
Focus distance
e
mark
proximate distance between the
image sensor and the subject).
• Note that the focus distance
indicator is intended only as a
guide and may not accurately
refl ect the distance to the subject. Due to depth of fi eld or
other factors, a focus distance
of ∞ may not be selected when
the camera is focused on a distant object.
—
En
Lens info panel
r
Lens rotation
t
index
Tripod collar
y
rotation index
Control ring
u
Lens mounting
i
mark
Rubber lens-
o
mount gasket
CPU contacts
!0
View focus distance, depth of
fi eld, and other information.
Use when rotating the camera
from landscape to portrait orientation or vice versa.
Rotate to adjust a setting such as
Aperture or Exposure compensation
assigned using the camera. For
more information, see the description of Custom control assign-
ment in the camera manual.
Use when mounting the lens on
the camera.
——
Used to transfer data to and from
the camera.
See B
(011),
(012)
C
See
(014)
—
See
(010)
—
D
A
7

En
8

●
●
Press to perform a function as-
●
●
●
●
●
●
●
●
●
●
signed using the camera. For
L-Fn button
●
!1
Display button
!2
Tripod collar
!3
ring
Lens rotation
!4
index (90°)
Tripod collar
rotation index
!5
(90°)
Tripod collar
ring attach-
!6
ment screw
Built-in
rotating tripod
!7
collar
Security slot
(for anti-theft
!8
cable)
Lens hood
!9
Front lens cap — —
@0
Rear lens cap — —
@1
more information, see the description of Custom control assign-
ment in the camera manual.
Save settings or choose the information shown in the lens info
panel.
——
Use when rotating the camera
from landscape to portrait orientation or vice versa.
Use when the camera is mounted on a tripod.
Third-party anti-theft cables can
be attached to this slot. For more
information, see the documentation provided with the cable.
Lens hoods block stray light that
would otherwise cause fl are or
ghosting. They also serve to protect the lens.
—
See B
(011),
(012)
C
See
(014)
—
See E
(015)
En
D
9

En
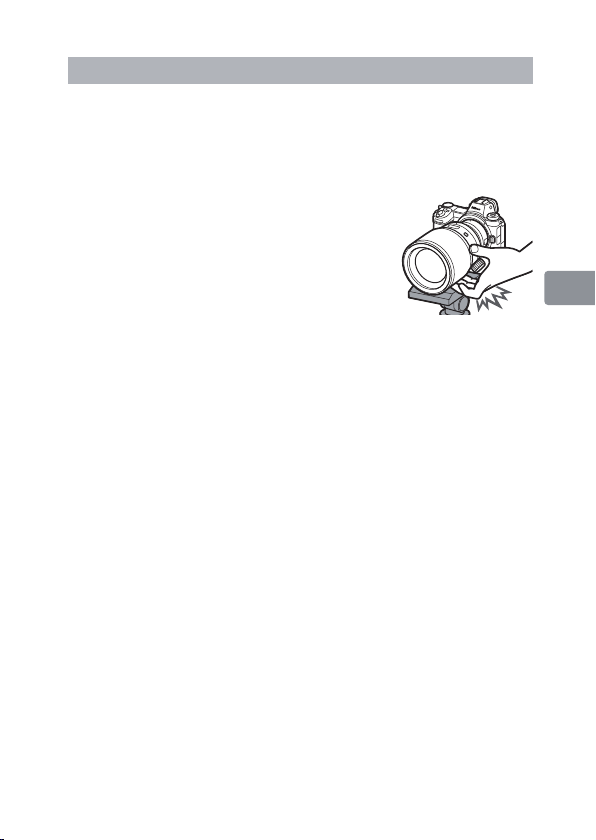
Attachment and Removal
Attachment and Removal
A
Attaching the Lens
Turn the camera off , remove the body cap, and detach the rear
z
lens cap.
Position the lens on the camera body, keeping the mount-
x
ing mark on the lens aligned with the mounting mark on
the camera body, and then rotate the lens counterclockwise
until it clicks into place.
• We recommend attaching the lens hood to protect the lens during use.
Removing the Lens
Turn the camera off .
z
Press and hold the lens release button while turning the lens
x
clockwise.
10

The Lens Info Panel
The Lens Info Panel
B
The lens info panel lights when the
lens is attached to a camera and the
camera is on.
Press the display button to cycle the display as
shown
:
Focus distance
Display
button
En
Depth of fi eld
* Aperture is displayed only when the
camera is in mode A or M. The display
for other modes is shown in the illustration.
• The panel turns off automatically when the camera standby timer
expires or if no lens operations are performed for about 10 seconds. Press the display button to reactivate the display.
The Lens Info Panel
A
The focus distance, depth of fi eld, and other information displayed in the lens info
panel are approximations only.
Irregular Bokeh
A
With fast shutter speeds and/or wide apertures, you may notice irregularities in how bokeh is
shaped. The eff ect can be mitigated by choosing slower shutter speeds and/or higher f-numbers.
Aperture *
11
En
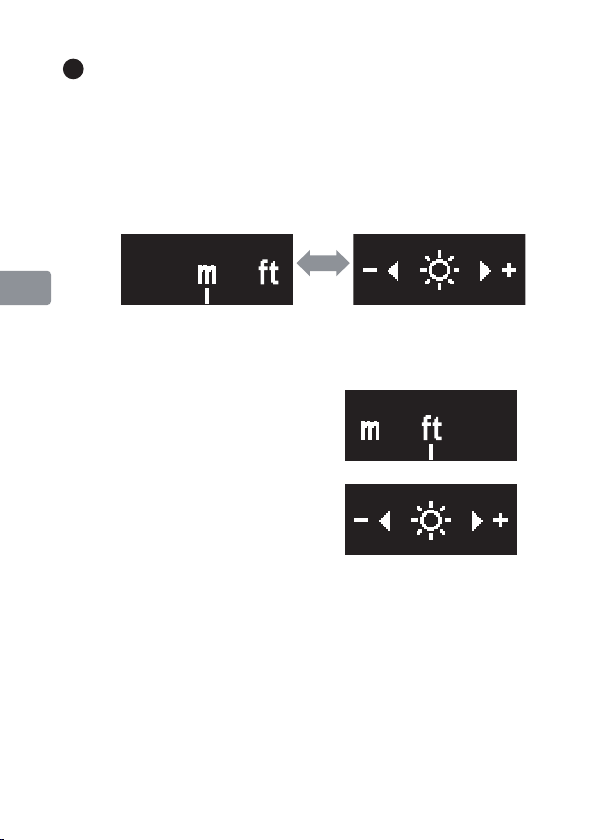
Panel Options
Panel Options
C
Follow the steps below to choose the units for focus distance from
meters (m) or feet (ft) or adjust the brightness of the lens info panel.
Press and hold the display button to view settings.
z
• Unit or brightness selection options will be displayed. The
currently selected item will fl ash.
• Press the display button to toggle between displays.
Units Brightness
Choose a setting using the lens control ring.
x
Units
- Rotate the control ring to
choose from meters (m) or
feet (ft).
Brightness
- Rotate the control ring in the
“+” (brighter) or “−” (darker)
direction.
- Choose from 6 levels of
brightness.
12

- To turn the lens info panel
off , rotate the ring in the “−”
direction until the icon
changes to .
• Press the display button to save changes and toggle the display.
• If no operations are performed using lens controls for about 5
seconds, panel options will clear from the display and changes will be canceled.
Press and hold the display button to return to the lens infor-
c
mation display.
• Choosing for brightness turns the lens info panel off . To
turn the display on again, press and hold the display button.
En
13
En
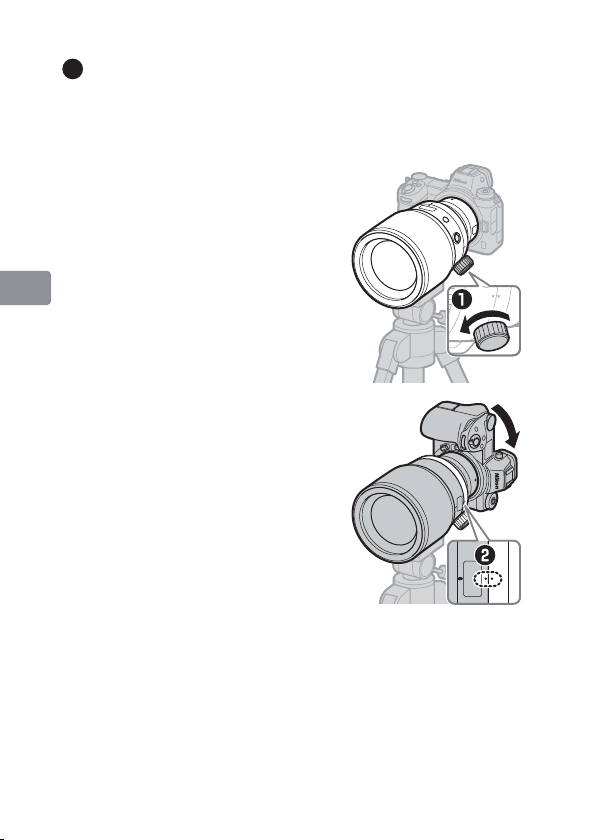
The Built-in Rotating Tripod Collar
The Built-in Rotating Tripod Collar
D
• Attach tripods to the built-in rotating tripod collar, not to the camera.
• Attaching tripods to the built-in rotating tripod collar rather than
to the camera allows the camera to be rotated as described below
while a tripod is attached.
z Loosen the tripod collar ring at-
tachment screw (q).
14
x Rotate the camera (
the lens rotation index with the
tripod collar rotation index that
matches the desired orientation
(landscape or portrait).
• When rotating the camera, care
may be needed to prevent the
hand holding the camera contacting the tripod.
w
) to align

c Tighten the tripod collar ring at-
Attaching and Removing the Lens Hood
tachment screw (e).
• For information on removing the built-in rotating tripod collar,
contact a Nikon-authorized service representative.
Attaching and Removing the Lens Hood
E
The lens hood screws directly into the threads in front of the lens. Do not
touch the glass surface of the lens or use excessive force.
• To remove the hood, unscrew it from the lens.
En
15
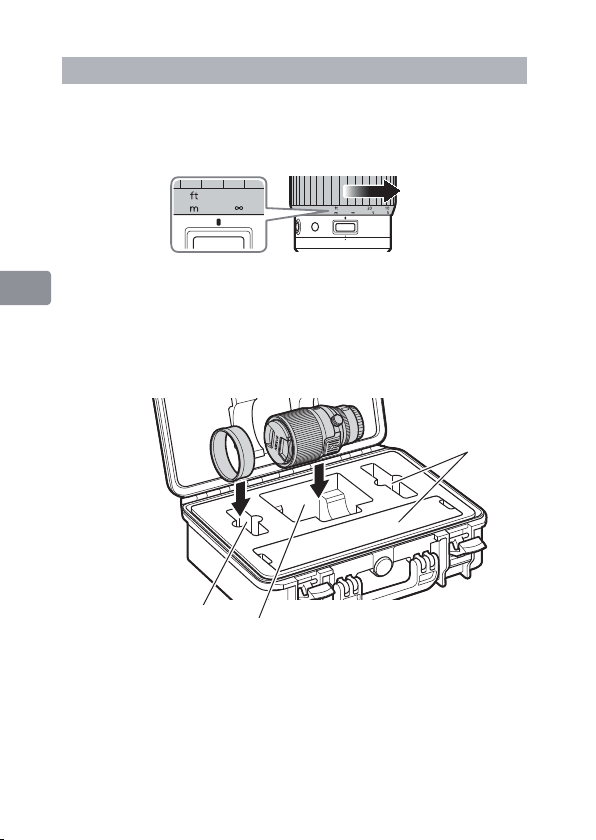
Placing the Lens in Its Case
Placing the Lens in Its Case
Follow the steps below to place the lens in its case.
z
Rotate the focus ring to the position shown.
• The lens cannot be placed in the case while extended.
x Confi rm that the front and rear lens caps are attached.
En
c Remove the lens hood.
v Place the lens and hood in the case as shown.
• Reverse the steps in “Opening the Trunk Case” (03) to close
and latch the lid. Be sure the safety locks are engaged.
Accessory com-
partment*
16
Hood compartment
* Items placed in the accessory compartment are not covered under
warranty.
Lens compartment
Precautions for Use
Precautions for Use
• Be sure to support the lens when holding the camera. Failure to observe this precaution could damage the camera lens mount.
• Do not pick up or hold the lens by its telescoping section.
• Do not pick up or hold the lens or camera using only the lens hood.
• Keep the CPU contacts clean.
• When using a tripod with a large pan head, be
careful when rotating the focus ring to avoid
injury caused by your fi ngers getting caught
between the ring and the pan head.
• Should the rubber lens-mount gasket be damaged, cease use immediately and take the lens to a Nikon-authorized service center for repair.
• Replace the front and rear lens caps when the lens is not in use.
• To protect the interior of the lens, store it out of direct sunlight.
• Do not leave the lens in humid locations or in locations in which it may
be exposed to moisture. Rusting of the internal mechanism can cause
irreparable damage.
• Do not leave the lens next to open fl ames or in other extremely hot
locations. Extreme heat could damage or warp exterior parts made
from reinforced plastic.
• Rapid changes in temperature may cause damaging condensation inside and outside the lens. Before taking the lens from a warm to a cold
environment or vice versa, place it in a bag or plastic case to slow the
change in temperature.
• Remove the lens from the camera and place it in the supplied case
for transport.
En
17

Lens Care
Lens Care
• Removing dust is normally suffi cient to clean the glass surfaces of the lens.
• The fl uorine-coated front lens element can be cleaned as described below.
- Smudges, fi ngerprints, and other oily stains can be removed using a
soft, clean cotton cloth or lens cleaning tissue; clean from the center
outwards using a circular motion.
- To remove stubborn stains, wipe gently using a soft cloth lightly
dampened with a small amount of distilled water, ethanol, or lens
cleaner.
- Any drop-shaped marks left from this process on the water- and oil-
En
repellent surface can subsequently be removed with a dry cloth.
• When cleaning the rear lens element, which is not fl uorine-coated, remove
smudges, fi ngerprints, and other oily stains using a soft, clean cotton
cloth or lens cleaning tissue lightly dampened with a small amount
of ethanol or lens cleaner. Wipe gently from the center outwards in a
circular motion, taking care not to leave smears or touch the lens with
your fi ngers.
• Never use organic solvents such as paint thinner or benzene to clean
the lens.
• Neutral Color (NC) fi lters (available separately) and the like can be used
to protect the front lens element. Remove the lens hood before attaching or removing fi lters.
• If the lens will not be used for an extended period, store it in a cool,
dry location to prevent mold and rust. Do not store in direct sunlight
or with naphtha or camphor moth balls.
18

Accessories
Accessories
Supplied Accessories
Supplied Accessories
• LC-82B 82 mm snap-on Front Lens Cap
• LF-N1 Rear Lens Cap
Using the Trunk Case
D
• Nikon assumes no liability in the event that damage to the case results in damage to its
contents.
• When storing the trunk case, close the
latch safetylocks. Confi rm that the latches
are securely closed as shown in the illustration.
• Do not leave the case for long periods in humid locations or in direct sunlight. Prolonged
exposure to damp or direct sunlight could cause the inner padding to harden or fade.
• Do not store the case in locations exposed to extreme temperatures. Failure to observe this
precaution could cause the inner padding to warp, shrink, or peel.
• Avoid directly touching the case after it has been exposed to extreme temperatures. Failure
to observe this precaution could result in burns, low-temperature burns, or frostbite.
• Do not sit or place heavy objects on the case.
• Keep the case and its accessories out of reach of small children.
• Keep your hands clear of moving parts when opening or closing the case.
• Do not leave the case in unstable locations or locations where it is likely to fall.
• Never use organic solvents such as alcohol, benzine, or thinner to clean the case.
• Do not scratch or rub the surface of the case with hard objects.
• Do not attempt to disassemble, repair, or modify the case.
• The pressure equalization valve does not rotate. Applying excessive force to the valve could cause injury or damage the
product.
• Do not drop the case, handle it with excessive force, or subject it to violent physical shocks or vibration.
• Nikon will not make repairs to the trunk case.
• HN-38 Screw-on Lens Hood
• CT-101 Trunk Case
Pressure equaliza-
tion valve
En
19

Specifi cations
Specifi cations
NIKKOR Z 58mm f/0.95 S Noct
Mount
Focal length
Maximum aperture
Lens construction
Angle of view
Focusing system
Minimum focus
distance
Maximum reproduc-
tion ratio
Diaphragm blades
Aperture range
Filter-attachment size
Dimensions
Weight
NIKKOR Z 58mm f/0.95 S Noct
Mount Nikon Z mount
Focal length 58 mm
Maximum aperture f/0.95
Lens construction 17 elements in 10 groups (including 4 ED elements,
Angle of view • FX format: 40°50c
En
Focusing system Front focusing system
Minimum focus
distance
Maximum reproduc-
tion ratio
Diaphragm blades 11 (rounded diaphragm opening)
Aperture range f/0.95 – 16
Filter-attachment size 82 mm (P = 0.75 mm)
Dimensions Approx. 102 mm/4.1 in. maximum diam-
Weight Approx. 2000 g (4 lb 6.6 oz)
3 aspherical elements, and elements with Nano Crystal and
ARNEO coats, and a fl uorine -coated front lens element)
• DX format: 27°20c
0.5 m (1.64 ft) from focal plane
0.19×
eter × 153 mm/6.1 in.
(distance from camera lens mount fl ange)
20

CT-101 Trunk Case
CT-101 Trunk Case
Type
External dimensions
Internal dimensions
Weight
Materials
Type Attaché-style case
External dimensions Approx. 464 mm × 366 mm × 176 mm (1 ft 6.3 in.
× 1 ft 2.5 in. × 7 in.)
Internal dimensions Approx. 426 mm × 290 mm × 159 mm (1 ft 4.8 in.
× 11.5 in. × 6.3 in.)
Weight Approx. 3040 g (6 lb 10.7 oz), including inner pad-
ding
Materials • Body: Polypropylene
• Latch: Nylon
Nikon reserves the right to change the appearance, specifi cations, and performance of this product at any time and without prior notice.
En
21

Warranty Terms
Your Nikon equipment is guaranteed against any manufacturing defects for one full year from the date of original purchase. If during this
period of guarantee the product proves defective due to improper material or workmanship, our authorized service network within the sales
territory of Nikon Europe B.V. will, without charge for labor and parts, repair the product in the terms and conditions set as below. Nikon
reserves the right (at its sole discretion) to replace or repair the product.
1. This warranty is only provided upon presentation of the completed warranty card and original invoice or purchase receipt indicating the
date of purchase, product type and dealer’s name, together with the product.
Nikon reserves the right to refuse free-of-charge warranty service if the above documents cannot be presented or if the information
contained in it is incomplete or illegible.
2. This warranty will not cover:
• necessary maintenance and repair or replacement of parts due to normal wear and tear.
• modifications to upgrade the product from its normal purpose as described in user manuals, without the prior written consent of Nikon.
• transport costs and all risks of transport relating directly or indirectly to the warranty of the products.
• any damage resulting from modifications or adjustments which may be made to the product, without the prior written consent of
Nikon, in order to comply with local or national technical standards in force in any other country than the ones for which the product
was originally designed and/or manufactured.
3. The warranty will not be applicable in the case of:
• damage caused by misuse including but not limited to failure to use the product for its normal purpose or according to the user
En
instructions on the proper use and maintenance, and to installation or use of the product inconsistent with the safety standards in
force in the country where it is used.
• damage caused by accidents including but not limited to lightning, water, fire, misuse or neglect.
• alteration, defacing, illegibility or removal of the model or serial number on the product.
• damage resulting from repairs or adjustments which have been conducted by unauthorized service organizations or persons.
• defects in any system into which the product is incorporated or with which it is used.
4. This service warranty does not affect the consumer’s statutor y rights under applicable national laws in force, nor the consumer’s right
against the dealer arising from their sales/purchase contract.
Notice: An overview of all authorized Nikon Service Stations can be found online by following this Link
https://www.europe-nikon.com/service/
22
AAPfl ege und Handhabung
Pfl ege und Handhabung
Öff nen des Objektivkoff ers
Das Objektiv ist ein hochpräzises optisches Gerät. Um die dauerhafte
Leistungsfähigkeit sicherzustellen, sollten Sie beim Gebrauch
Erschütterungen und Stöße vermeiden.
Bitte lesen Sie sorgfältig diese Anleitung, bevor Sie dieses Produkt
verwenden. Ziehen Sie außerdem das Kamerahandbuch zu Rate.
• Dieses Objektiv ist ausschließlich für den Gebrauch an spiegellosen
Kameras mit Nikon-Z-Bajonett vorgesehen.
• Dies ist ein Objektiv mit manueller Fokussierung. Unabhängig vom an der
Kamera gewählten Fokusmodus muss die Schärfe am montierten Objektiv
von Hand eingestellt werden.
Öff nen des Objektivkoff ers
So wird der Objektivkoff er geöff net:
z Legen Sie den Objektivkoff er
auf eine stabile Unterlage.
x Lösen Sie die
Sicherheitsverriegelung
(q) und öff nen Sie die
Schnappverschlüsse (w).
c
Öff nen Sie den Koff erdeckel (e).
• Öff nen Sie den Deckel langsam.
• Achten Sie darauf, dass Sie Ihre
Finger nicht in den beweglichen
Teilen des Koff ers einklemmen.
• Der Deckel und das Koff er-unterteil
bilden eine abgedichtete Einheit,
und es kann manchmal nötig sein,
das Koff ergehäuse beim Öff nen
des Deckels festzuhalten.
De
23

Sicherheitshinweise
Sicherheitshinweise
AAWARNUNG
• • Das Produkt nicht auseinandernehmen oder modifi zieren. Berühren Sie
keine Teile aus dem Geräteinnern, die infolge eines Sturzes oder eines
anderen Unfallereignisses freiliegen.
• • Sollte das Produkt qualmen, sich überhitzen oder ungewöhnliche Gerüche
absondern, trennen Sie sofort die Kamera-Stromversorgung.
• • Vor Nässe schützen. Nicht mit nassen Händen anfassen.
• • Verwenden Sie dieses Produkt nicht in der Gegenwart von entfl ammbarem
Staub oder Gas (wie z. B. Propangas, Benzin oder Aerosole).
• • Blicken Sie nicht durch das Objektiv direkt in die Sonne oder eine andere
sehr helle Lichtquelle.
• • Das Produkt von Kindern fernhalten.
Lesen Sie die Sicherheitshinweise vor der Inbetriebnahme dieses Produkts
vollständig durch, um Sach- oder Personenschäden zu verhüten.
Bewahren Sie diese Hinweise griff bereit für alle Personen auf, die das Produkt benutzen.
A WARNUNG: Das Missachten der Warnhinweise, die so gekennzeichnet sind,
könnte zu schweren Verletzungen oder zum Tod führen.
A VORSICHT: Das Missachten der Warnhinweise, die so gekennzeichnet sind,
könnte zu Sach- oder Personenschäden führen.
WARNUNG
Das Produkt nicht auseinandernehmen oder modifi zieren. Berühren Sie
keine Teile aus dem Geräteinnern, die infolge eines Sturzes oder eines
anderen Unfallereignisses freiliegen.
De
Das Missachten dieser Vorsichtsmaßnahmen kann einen Stromschlag oder andere
Verletzungen verursachen.
Sollte das Produkt qualmen, sich überhitzen oder ungewöhnliche Gerüche
absondern, trennen Sie sofort die Kamera-Stromversorgung.
Die fortgesetzte Verwendung kann Brandgefahr, Verbrennungen oder andere
Verletzungen zur Folge haben.
Vor Nässe schützen. Nicht mit nassen Händen anfassen.
Das Missachten dieser Vorsichtsmaßnahmen kann einen Brand oder Stromschlag
verursachen.
Verwenden Sie dieses Produkt nicht in der Gegenwart von entfl ammbarem
Staub oder Gas (wie z. B. Propangas, Benzin oder Aerosole).
Das Missachten dieser Vorsichtsmaßnahme kann eine Explosion oder einen Brand
verursachen.
Blicken Sie nicht durch das Objektiv direkt in die Sonne oder eine andere
sehr helle Lichtquelle.
Das Missachten dieser Vorsichtsmaßnahme kann bleibende Schäden am Auge verursachen.
Das Produkt von Kindern fernhalten.
Das Missachten dieser Vorsichtsmaßnahme kann zu Verletzungen oder zur
Beschädigung des Produkts führen. Beachten Sie außerdem, dass Kleinteile
ein Erstickungsrisiko darstellen. Sollte ein Kind irgendein Teil dieses Produkts
verschlucken, konsultieren Sie sofort einen Arzt.
24

AAWARNUNG
WARNUNG
• • An Orten mit extrem hohen oder niedrigen Temperaturen nicht mit bloßen
Händen handhaben.
AAVORSICHT
• • Das Objektiv nicht auf die Sonne oder andere sehr helle Lichtquellen
richten.
• • Bewahren Sie das Produkt nicht längere Zeit an Orten auf, an denen es
extrem hohen Temperaturen ausgesetzt ist, wie in einem geschlossenen
Auto oder direkt in der Sonne.
• • Tragen Sie Kameras oder Objektive nicht mit montierten Stativen oder
ähnlichem Zubehör umher.
Hinweise für Kunden in Europa
An Orten mit extrem hohen oder niedrigen Temperaturen nicht mit bloßen
Händen handhaben.
Das Missachten dieser Vorsichtsmaßnahme kann zu Verbrennungen oder
Erfrierungen führen.
VORSICHT
Das Objektiv nicht auf die Sonne oder andere sehr helle Lichtquellen
richten.
Das vom Objektiv gebündelte Licht kann einen Brand verursachen oder die
inneren Teile des Produkts beschädigen. Halten Sie die Sonne aus dem Bildfeld,
wenn Sie Motive im Gegenlicht fotografi eren.
Bewahren Sie das Produkt nicht längere Zeit an Orten auf, an denen es
extrem hohen Temperaturen ausgesetzt ist, wie in einem geschlossenen
Auto oder direkt in der Sonne.
Das Missachten dieser Vorsichtsmaßnahme kann einen Brand oder Produktschäden
verursachen.
Tragen Sie Kameras oder Objektive nicht mit montierten Stativen oder
ähnlichem Zubehör umher.
Das Missachten dieser Vorsichtsmaßnahme kann zu Verletzungen oder zur
Beschädigung des Produkts führen.
Hinweise für Kunden in Europa
Durch dieses Symbol wird angezeigt, dass elektrische bzw.
elektronische Geräte getrennt entsorgt werden müssen.
Folgendes gilt für Verbraucher in europäischen Ländern:
• Dieses Produkt muss an einer geeigneten Sammelstelle separat
entsorgt werden. Eine Entsorgung über den Hausmüll ist unzulässig.
• Durch getrennte Entsorgung und Recycling können natürliche Rohstoff e
bewahrt und die durch falsche Entsorgung verursachten, schädlichen
Folgen für die menschliche Gesundheit und Umwelt verhindert werden.
• Weitere Informationen erhalten Sie bei Ihrem Fachhändler oder bei den für
die Abfallentsorgung zuständigen Behörden bzw. Unternehmen.
De
25

Benutzen des Objektivs
Benutzen des Objektivs
Objektivteile: Namen und Funktionen
Objektivteile: Namen und Funktionen
Nachstehend sind die Bezeichnungen und Funktionen der Objektivteile
aufgeführt.
De
26

●
Fokussierring
●
●
●
●
●
●
●
●
●
●
●
q
●
Entfernungsskala
w
Markierung für
e
Entfernungseinstellung
Objektivinfo-Display
r
Positionsmarkierung
t
für Objektivdrehung
Drehindex des
y
Stativrings
Einstellring
u
Markierung für die
Ausrichtung des
i
Objektivs
Dichtungsmanschette
o
CPU-Kontakte
!0
Drehen für die manuelle Scharfeinstellung.
Für das Ablesen der eingestellten
Entfernung (der ungefähre Abstand
zwischen Bildsensor und Hauptobjekt).
• Beachten Sie, dass die Entfernungsskala
nur als Orientierungshilfe dient und
möglicherweise nicht den genauen
Objektabstand angibt. Wegen der
Tiefenschärfe und anderer Faktoren
wird nicht immer Unendlich (∞)
angezeigt, wenn mit der Kamera auf
ein fernes Objekt scharfgestellt wurde.
Zeigt die Entfernungseinstellung, den
Tiefenschärfebereich und weitere
Informationen an.
Ist beim Drehen der Kamera vom
Quer- ins Hochformat und umgekehrt
behilfl ich.
Drehen, um eine mittels Kamera
zugeordnete Einstellung wie
Blende oder Belichtungskorrektur
vorzunehmen. Nähere Angaben
dazu fi nden Sie bei der Beschreibung
von Benutzerdef. Funktionszuweis. im
Kamerahandbuch.
Hilft beim Ansetzen des Objektivs an
die Kamera.
——
Für die Datenübertragung zwischen
Objektiv und Kamera.
—
—
Siehe
(031),
C
(032)
Siehe
(034)
—
Siehe
(030)
—
B
De
D
A
27

De
28

●
●
Drücken, um eine mittels Kamera
●
●
●
●
●
●
●
●
●
●
Funktionstaste (L-Fn)
●
!1
Display-Taste
!2
Stativring — —
!3
Positionsmarkierung
für Objektivdrehung
!4
(90°)
Drehindex des
!5
Stativrings (90°)
Feststellschraube
!6
des Stativrings
Integrierter
!7
drehbarer Stativring
Sicherheitsöff nung (für
!8
Diebstahlschutzseil)
Gegenlichtblende
!9
Vorderer
@0
Objektivdeckel
Hinterer
@1
Objektivdeckel
zugeordnete Funktion auszuführen.
Nähere Angaben dazu fi nden Sie bei
der Beschreibung von Benutzerdef.
Funktionszuweis. im Kamerahandbuch.
Einstellungen speichern oder die vom
Objektivinfo-Display angezeigten
Informationen auswählen.
Ist beim Drehen der Kamera vom
Quer- ins Hochformat und umgekehrt
behilfl ich.
Für das Anbringen der KameraObjektiv-Kombination auf einem Stativ.
Sicherungsseile gegen Diebstahl (von
Drittanbietern) können an dieser
Öff nung angebracht werden. Nähere
Informationen fi nden Sie in den
Unterlagen zum Sicherungsseil.
Die Gegenlichtblende hält Seitenlicht
ab, das ansonsten zu Streulicht oder
Geisterbildern führen kann. Sie dient
zudem dem Schutz des Objektivs.
——
——
—
Siehe B
(031),
C
(032)
D
Siehe
(034)
—
Siehe
(035)
De
E
29

De
Ansetzen und Abnehmen
Ansetzen und Abnehmen
A
Ansetzen des Objektivs
Schalten Sie die Kamera aus, entfernen Sie den Gehäusedeckel
z
und nehmen Sie den hinteren Objektivdeckel ab.
Bringen Sie die Ausrichtungsmarkierungen an Objektiv
x
und Kameragehäuse in Übereinstimmung, setzen Sie das
Objektiv in das Kamerabajonett ein und drehen Sie das
Objektiv entgegen dem Uhrzeigersinn, bis es einrastet.
• Wir empfehlen das Anbringen der Gegenlichtblende, um das
Objektiv beim Benutzen zu schützen.
Abnehmen des Objektivs
Schalten Sie die Kamera aus.
z
Halten Sie die Objektiventriegelung gedrückt und drehen Sie
x
währenddessen das Objektiv im Uhrzeigersinn.
30