

Page 1
Nikon
Page 2
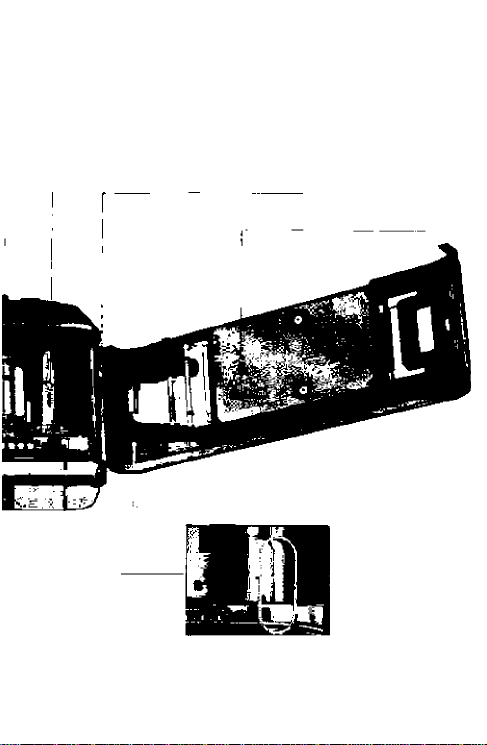
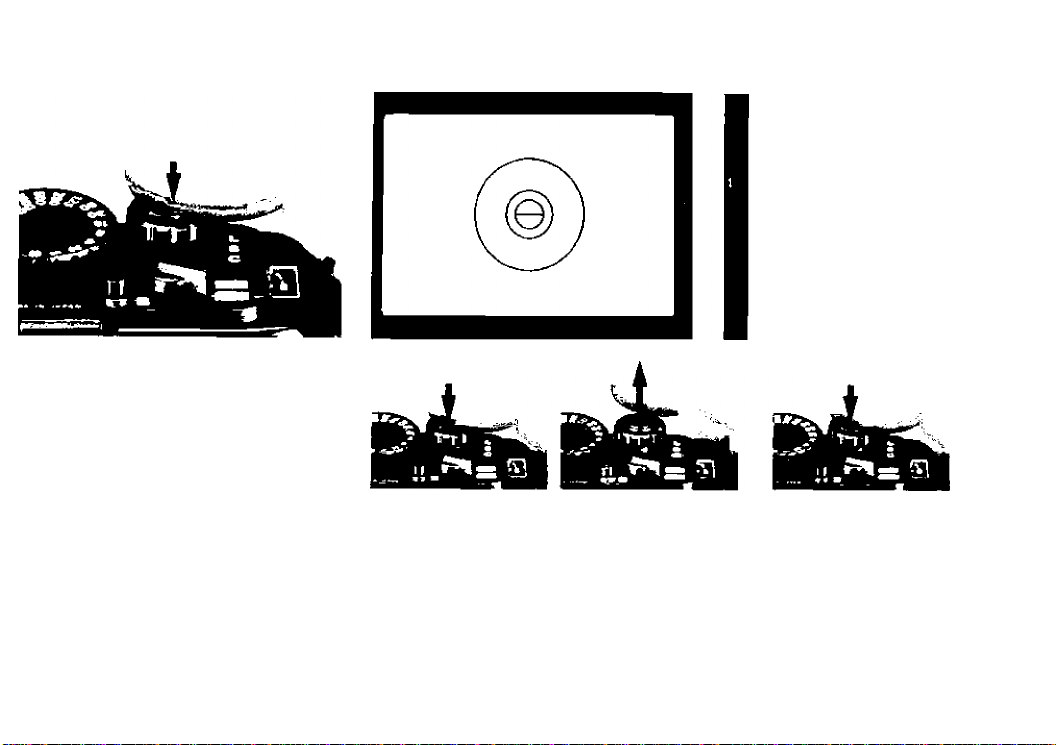
Film speed ring (iilt and turnl^Exposure compensation dial (push lock release
button and turn)
Exposure compensation settings
( + £to -2)
- tSO film speed scale (DX setting tor DX-coded film:
12 to 3200 for non-DX-coded film}
Exposure compensation dial lock
release button
Film rewind crank
,told out to rewind film)
Film cartridge window
Film plane indicator (exact distance from
lens mounting flange and fifm plane is
46.5 mm)
Red Indicator lamp Iblinks (1) when using
non-DX-coded film with film speed scale set at
DX, (2) when DX contacts require cleaning (3)
at end of film, (4) when shutter is releasedi
Page 3
Film advance mode selector (lift and turn)/Fingerguard
;—“ L to lock stiutter release, turn power off
S for single-frame shooting
C for continuous shooting
Shutter release button (to activate
exposure meter, lightly press to
fingerguard position; to release shutter,
depress fully)
Camera strap eyelet
Frame counter window
Film advance indicator (rotates to show
film is loaded and being acfvanced)
Accessory shoe
I
(for electronic flash: see page S6)
-Etectrical contacts
Film rewind
button
(press white sliding
lever)
Film rewind lever
(slide to right)
Page 4
Ey«piece cover (attaches to
viewlinder eyepiece to keep out stray
fight during self-timer and remote
control operation)
Viewfinder eyepiece
Film rewind fork
DX contacts (for automatic film
speed setting with DX-coded (iim; do
not touch; keep ciean)
Film cartridge chamber
Battery
hoider screw
Tripod socket (accepts oplionai
Nikon Tripod Adapter AH-3)
Shutter curtains (do not touch)
Page 5
Film sprocket
Film takeup spool
Camera back hinge release
(push clown to remove camera Pack)
Film pressure plate
(do not touch)
Camera back (interchangeable with
Nikon Multi Data Back MF-19)
Film leader index
AAA Battery holder MB-4 (remove to
change batteries; interchangeable with
AA Ballery Holder MB‘3 10 allow use of
A A-type batteries)
Page 6

r
FOREWORD^
Thank you for your kind patronage of Nikon. We hope the
N2000 will make photography a much bigger part of your life.
Get to know your N2000, but before using it, be sure to
read this manual well.
Jf
Page 7
BASIC OPERATION
MOUNTING THE LENS
Mount lens.
1,
For unusable lenses, turn to
page 36.
To remove
Page 8
Page 9
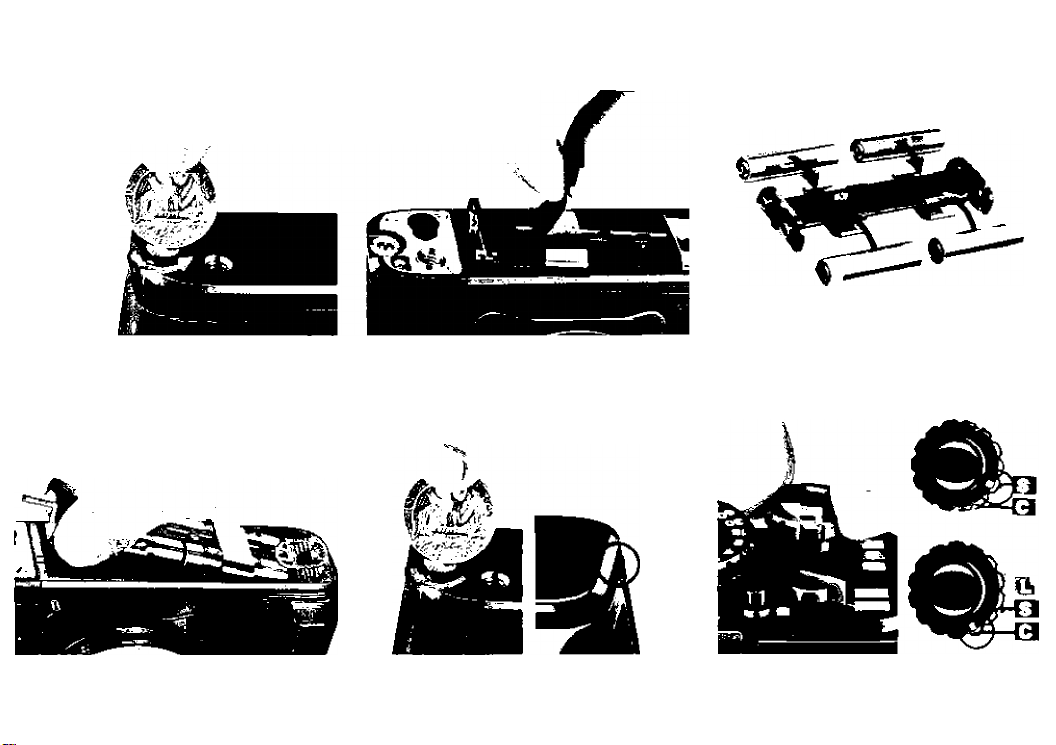
INSTALLING BATTERIES AND CHECKING POWER
.........
%
p Remove AAA battery
holder MB-4.
C Align the white dots and g Reattach battery holder.
' put back bracket.
Remove bracket.
3.
A Install four AAA-type
batteries.
y Set film advance mode
' selector.
Page 10
Q Lightly press shutter
■ release button to finger-
guard position and check
battery power by LED inside
viewfinder.
LED lights up if power is sufficient, and
stays on for 16 sec. after you take your
finger olf the button, unless you release
the shutter. When you release the shulter,
the LED turns off a second after you
remove your finger from the button.
For battery check, the shooting mode
dial may be set at any position
except B.
If LED goes off immediately after finger is removed
from the button, batteries are almost dead.
Lit-up LED
Battery p>ower is sufficient.
No LED
Dead batteries or improper battery
installation
Page 11
LOADING FILM
0 With DX-coded film, set film speed index at DX.
" Usable film speed range lor DX-coded film is ISO 25 to 4000.
With non-DX-coded film, sel to the appro
priate film speed.
The two dots between numbers stand for
intermediate settings.
HQ Set audible warning
switch to «)) position
Page 12
HH Open camera back. HO Position film cartridge. -tO Pull film leader out to red
‘ Pull up film rswind knob until back ' ’ index mark,
springs open.
Avoid loading or unloading film in direct
sunlight.
Page 13

HA Check film position and
' close camera back.
HC Depress shutter release button to automatically advance
film to frame “1”
Film advance indicator rotates to show proper film installation.
№
If audible warning bleeps and red indicator lamp biinks, check the following:
(1) Make sure you are using DX-coded film.
(2) Make sure DX contacts are dean. (See page 30.)
Page 14
SHOOTING IN P MODE
The Nikon N2000 lets you choose four ex
posure modes, the Dual Program modes
(P and PHI > and Aperture-Priority (A), plus
Manual (M). Of the four modes, P mode is
the easiest to use for most photography.
For details, refer to pages 19 to 22.
■1C Set shooting mode selector dial to P.
Turn the dial while pressing the lock
button.
■17 Set lens to its minimum
‘ aperture (largest
f/number).
Page 15

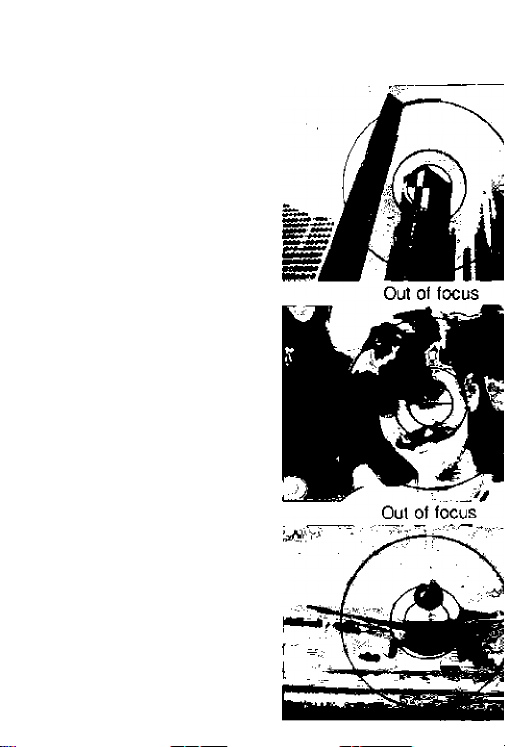
18. Compose and focus.
(A) Split-image focusing
For precise, pinpoint focusing of subjects with distinct contours,
turn the focusing ring until the sptit-image becomes whole,
(B) Microprism focusing
For rapid focusing and for subjects with indistinct outlines, turn
the focusing ring until the shimmering image becomes sharp,
(C) Matte field focusing
For close-up photography al high magnification, or when using a
telephoto lens with a maximum aperture ol approx, ffll or
smaller, the split-image may darken. Turn the focusing ring until
the image on the matte field appears sharp.
1. Split-image rangefinder
2. Microprism color
3. Matte field
4.12mm-dia. central area
Correct exposure is assured when
main subject is placed in this area.
Page 16
(A) Split-image
focusing
(B) Microprism
focusing
(C) Matte field
focusing
Out of focus
Page 17
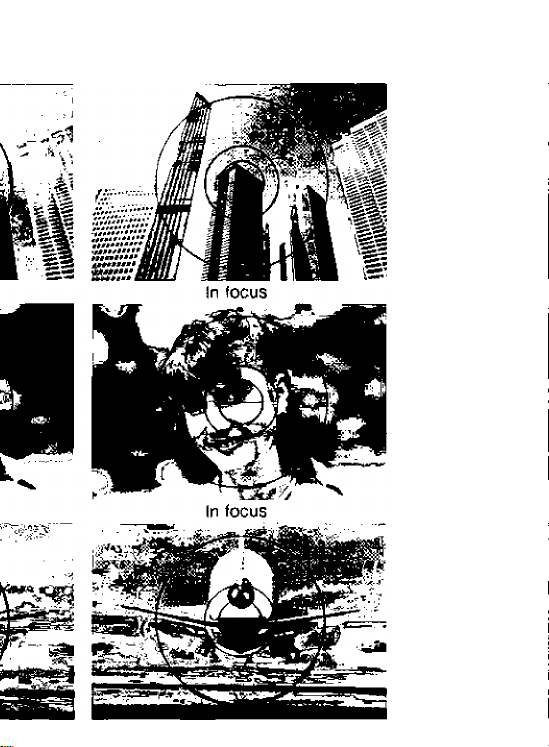
In focus
Page 18

19. Lightly press shutter release button.
It there is no warning bleep, you can take the picture.
it there is a warning bleep.
check the viewfinder LED
indicators for the
following:
(1 ) Picture blur possi
bility (1/30 sec. or
s lower t
Useairipod to avoid
camera shake, or use a Use a neolral
ttash to synchronize the density (ND) filter. Hash,
shutter speed at 1/125
sec
(2) Top LEO
triangleblinks—
overexposure
warning
(3) Bottom LED
triangle blinks—
underexposure
warning
Use electronic
Correct
exposure
is assured.
Both top and bottom LED triangle
blinks—wrong-aperture-set warning
Set lens to minimum aperture.
With an Al-rnodilied Nikkor
fens*, teleconverter, or PK ring,
there is no warning.
Two LEDs show
intermediate
shutter speed.
•Seepage 36.
Page 19

OQ Depress shutter release button to take
picture.
A1 S. depressing and releasing the shutter
release button aulomatically advances the
(ilm by one Irame.
s
At C, shots are continuously taken at up to 2,5
frames per second Ops) as long as the shutter
release button is depressed.
When finger is removed from the shutter release button, the
exposure meter and viewfinder LEDs stay on for a second—then
automatically turn off. To activafe the meter for the next shot,
press the shutter release button again—lightly—and it will
remain on tor 16 sec.
Page 20

REWINDING FILM
OH Film winding stops automatically at end of ^ *■ film.
When the shutter release button is depressed, there is a bleep
and the red indicator lamp blinks to tell you to rewind film.
Page 21

OO the film advance
■ mode selector to L.
25. Remove film cartridge.
22 While sliding film rewind
" lever, push film rewind
button.
24. Rewind film.
" Fold out film rewind crank and
rotate until the film advance indicator
slops moving.
Page 22

EXPOSURE--------------------------
PROGRAMMED EXPOSURE MODES
The N2000's microcomputer automatically sets the optimum
combination of shutter speed and lens aperture. Dual Program
lets you select two programmed automatic modes—normal (P)
and high-speed (P HI), If you require a high shutter speed, such
as when using a telephoto lens or for shooting a fast-moving
subject, select P HI. fSee pages 13 to 17 for operation of pro
grammed automatic exposure.)
Page 23

Dual program chart (50mm f/1.4, ISO 100)
This EV (exposure value) chart demonstrates the ditferertce
between the N2000’s Normal and High-Speed Programs, Just
look where either colored line intersects with a diagonal line.
This shows the combination ot aperture (horizontal line) and
shutter speed (vertical line). For example, at a brightness of EV
12, the N2000 selects f/4 and 1/250 sec, at "P HI"; f/5,6 and
1/125 sec, at "P" (with 50 mm f/1,4 lens at ISO 100),
Page 24

APERTURE-PRIORITY EXPOSURE MODE
Al A. the N2000's microcomputef automatically selects the
correct shutter speed to match the aperture you set. This is the
recommended mode when depth of field is your prime consider
ation. If you want to blur the background in portraitures, for in
stance, use wide apertures. To make everything come out sharp
in scenic photography, use small apertures,
Page 25

Correct
exposure
is assured.
Two LEDs show
intermediate
shutter speed.
1. Set shooting mode selector to A.
2. Set lens to desired ( number (engraved on aperture scale)
3. Look inside viewfinder and lightly press shutter release
button.
The LED shows the shutter speed selected by the camera for
correct exposure with the aperture you set. If there Is no
warning bleep, you can take the picture by depressing the
shutter release button.
Page 26

If ihere is a warning bleep, check
the viewfinder LEO indicators for ihe
following:
(l) Picture blur possibility
(1/30 sec. or slower)
Use e tripod to avoid camera
shake, or use a flash to
synchronize the shutter
speed at i/t25sec
Page 27

(2) Top LEO triangle blinks—
overexposure warning
Stop me iens down untii ttie
LED slops biinking, or use a
neutral density (ND)tiiter
(3) Bottom LEO triangle
blinks—underexposure
warning
Select a wider aperture or, II
necessary, use a Hash.
Page 28

MANUAL EXPOSURE MODE
Shutter speed (or
correct exposure
Shutter speed
set on dial
In (he M mode (l—1/2000 sec.), both shutter speed and aperture
can be set manually according to the effect desired. Use fast
shutter speeds to stop action, slower speeds to produce a de
liberate blur. Manual mode also allows control of depth of field.
1. Set shutter speed and aperture.
2. Look inside viewfinder and press shutter release button
lightly.
Non-blinking LED shows shutter speed set on the dial: a blink
ing LED indicates the shutter speed tor correct exposure.
With two blinking LEDs, the correct shutter speed is inter
mediate
Reset aperture and/or shutter speed so only one LED is
shown.
There is no audible warning in M mode.
Page 29

Adjust shutter speed and/or aperture
At B setting, shutter curtains remain open
as long as the shutter release button is
■>, "oW-
depressed. Although no LED appears
inside the viewfinder, the camera meter is
on at B.
Page 30

FOR SPECIAL EXPOSURE SITUATIONS
Auto exposure lock lever
In P. P Hi and A modes, to shoot a subject outside the i2mm dia.
circle, or when there is a substantial difference in brightness
between the main subject and the background (e,g„ a strongl/
backlit subject), use the auto exposure lock lever. Holding the
lever in locks the correct exposurevaiueon the principal subject
of your picture.
1. Center principal subject inside the viewfinder or move in
closer to the subject.
2. Lightly press shutter release button.
3. Turn auto exposure lock lever towards lens and hold it in.
4. Recompose and shoot.
When you recompose, in A mode, the LED that indícales the
shutter speed for the central I2mm-dia. circle area blinks. (See
example at right). Ignore the blinking LED. The shutter operates
at the speed indicated by the tivup LED (1/60 sec. in the
example). In P and P HI modes, only the iil-up LED is shown.
Page 31

60 = Shutter speed
for the girl's face
;250'= Shutter speed
f t For the background
Page 32

Suggested applications for
exposure compensation
+2 White background, snow scene
+1 White background occupying haif
of viewed area
-1 Spotiighted subject, biack
background occupying haif of
viewed area
-2 Bfack background
Exposure compensation dial
For unusual lighting situations—snowscapes, backiit subjects,
or when the main subject contrasts sharply with the back
ground—use the exposure compensation dial to prevent overor underexposure. -1 and
exposure; -kl and +2 Indicate one and two stops additionai
exposure. With film speed set at ISO 1600, compensation
extends to -1; at ISO 3200, you can rotate the dial only in the -h
direction. To operate, press the lock button and set the desired
compensation value. After use, reset the dial to 0.
~2 indicate one and two stops less
Page 33

Page 34

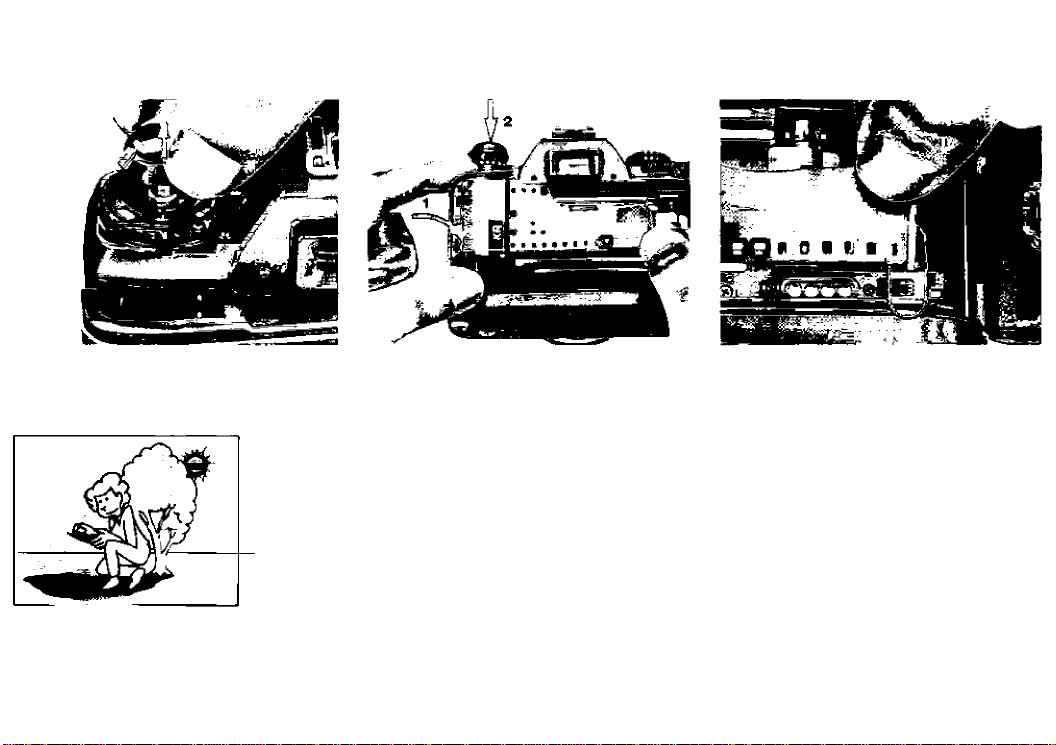
SELF-TIMER
Press the self-timer button. The self-timer lamp blinks and a bleep
sounds (it the audible warning switch is set at »n) position) tor
10 sec. before the shutter is released. During the final two
seconds, the warnings speed up, telling you to get ready. If you
want to cancel the self-timer after activating it. press the button a
second time.
Page 35

In the P, P HI or A mode, use the eyepiece cover to prevent stray
light from entering the viewfinder.
Regardless of the film advance mode selector setting, only
single-frame shooting is possible.
Page 36

FLASH PHOTOGRAPHY-
The N2000 accessory shoe allows direct mourning of Nikon
dedicated electronic flash units.
When the N2000 is set at A. P, P HI, or a manual setting of
1/250 sec. or higher, shutter speed automatically switches to
1/125 sec. for proper flash synchronization. When the N2000 is
set at a manual setting of 1/125 sec. or slower, shutter operates
at the speed set on the dial.
Ready-light indication in the viewfinder is also provided with
Nikon dedicated flash units. With the camera’s meter on, a
thunderbott-mark LED ready-light comes on to indicate the flash
is ready to fire. Warning indications are provided by a blinking
ready-light. Conditions represented by the warning vary between
flash unit models. For details, see your flash unit instruction
manual.
Use Nikon Speedlights only Other units may damage the
camera's electrical circuit.
Page 37

Nikon Speed light
Connection
Usable Flash Mode
programmed TTL
SB-15/SB-16B/
SB-18
Direct
auto*, TTL auto,
non-TTL auto,
manual
Via TTL Remote
Cord SC-23
SB-11/SB-14
Via Sensor Remote
Cord SC-13
SB-16A/3B-17
* Programmed TTL auto flash photography can only be performed with
Al-S type Nikkor and Nikon Series E lenses. For information on how
to recognize At-S type ierses refer to page 36.
Via Flash Unit
Coupler AS-6
Programmed TTL
auto*, TTL auto,
manual
Non-TTL auto,
manual
Non-TTL auto,
manual
The following instructions are for programmed TTL auto and TTL
auto flash shooting only. For non-TTL auto and nnanual flash
shooting, see your flash unit instruction manual.
Note that the film speed range for programmed TTL auto
and TTL auto flash photography is ISO 25 to 1000.
Page 38

PROGRAMMED TTL AUTO FLASH PHOTOGRAPHY IN P AND P HI MODES
Viewfinder indication
Flash sync speed
shutter operates
at 1i125 sec.
In programmed TTL auto flash photography, the camera selects the appropriate aper
ture. Note that only Al-S type lenses can be used.
Set the N2000 to P or P HI, and set lens to minimum aperture (largest (-number).
Set the flash unit’s mode selector to TTL, and turn the flash unit on. Look inside the
viewfinder and lightly press the shutter release button. With the ready-light on, as long
as you have none of the following warning indications, you can shoot.
Warning indication
If triangle-shaped top and bottom LEDs
blink, check your lens type (must be an
Al-S type), or reset lens to minimum
aperture.
Page 39

TTL AUTO FLASH PHOTOGRAPHY
Viewfinder indication
At A, Dr Manual setting
ot 1/250 sec. or faster
Flash sync speed
shutter operates
at 1/125 sec.
- Proper shutter speed for
shoolirtg without flash
unit
In TTL auto flash photography, select appropriate aperture.
Set the N2000 to A or one of the Manual settings. Determine aperture using the
flash unit exposure calculator diai. (Refer to flash unit instruction manual lor details.)
Set the flash unit mode selector to TTL and turn the flash unit on. Look inside the view
finder and lightly press the shutter release button When the ready-light comes on, you
can shoot.
At Manual setting of
1/125 sec. or slower
Shutter speed set on
/ the shooting mode
selector diai—shutter
operates a) 1/125 sec.
to 1 sec., as selected.
Proper shutter speed for
shooting without flash
unit.
Page 40

VIEWFINDER READY-LIGHT WARNINGS
In both programmed TTL auto and TTL aulo flash photography,
the viewfinder ready-light blinks to warn of improper film selec
tion, poor connection between camera and flash unit, or
underexposure possibility. To prevent the viewfinder ready-light
from blinking:
1 > Use film with ISO range of ISO 25 to 1000,
2) Keep flash unit and camera electrical connections clean.
3) Make sure the subject is within the automatic shooting
range’ and, if necessary, set lens to wider aperture.
'See your flash unit instruction manual.
Page 41

INFRARED PHOTOGRAPHY-
An appropriate filter is rieeded for infrared photography, such as
R60, etc.
1. Focus subject.
2. Note the focused distance on the lens that is aligned with the
distance index.
3. Then reset the focusing ring to align the focused distance
with the infrared focusing index.
Attach filter and take the shot.
Page 42

CAMERA CARE TIPS
1. Never loucfi the reflex mirror or focus
ing screen. Remove dusl with a blower
brush.
7. Clean glass surfaces such as the lens
or the viewfinder eyepiece with blower
brush; avoid using lens tissue as much
as possible. Wipe dirt and smudges,
using soft cotton moistened with pure
alcohol, in a spiral motion from center
2, Never touch the shutter curtains.
to periphery. Be careful not to leave
traces.
Cautfon
A spray gun-type blower may damage the
glass (especially when ED glass is used
for the front lens element) if used to clean
the lens. To avoid damage, hold blower
upright with the nozzle more than 30cm
{12 in.) away from the lens surface, and
keep the nozzle moving so the stream of
air is not concentrated in one spot.
3. Never touch the DX-contacIs. Keep
clean with blower brush.
8, Do not lubricate the camera.
Page 43

4. Do not leave your camera in an exces
sively hot place.
5. If the camera ts exposed to rain or
mist, or after shooting near the sea.
wipe with a clean, soft cloth.
6. If the camera malfunctions, take it im
mediately to an authorized Nikon
dealer or service center.
9. Store the camera in a cool, dry place
away from naphthalene or camphor
(moth repellents).
In humid environments, store camera
inside a vinyl bag with a desiccant to
keep out dust, moisture and salt.
Note, however, that storing the leather
case in a vinyl bag may cause the
leather to deteriorate.
Page 44

ABOUT BATTERIES
1. When not using the camera for a long 2. Battery power falls off in extremely 3. When replacing batteries, replace both
rtod. rcrnov© ^3tt0ri0S, iCl h I rtic
cold temperatures—if you want to use
the camera, use new batteries and
wrap the camera body in something
warm.
______________
if lirti ■ rt* tii-i ■ <A ^ n PWA t
at the same time. Always use fresh
batteries of the same brand.
---------
U
4. Never throw used batteries into a fire.
5. If the battery chamber is contaminated
by battery leakage, take the camera to
a Nikon dealer.
Page 45

SPECIFICATIONS-
Type of camera
Picture format
Lens mount
Lenses
Exposure
metering
Exposure meter
switch
Metering range
Exposure control
Dual Program
mode exposure
control
A (aperture-priority)
mode exposure
control
M (manual) mode
exposure control
Shutter
Shutter speeds
Integral-motor 35mm single-lens reflex
24mm X 36mm
(standard 35mm film format)
Nikon bayonet mount
More than 70 Nikkor and Nikon Series E
lenses available
Light intensity feed back measurement
(P, P HI, A), TTL full-aperture centerweighted exposure measurement (M);
employs one silicon photo diode (SPD)
Meier turns on when film advance mode
selector is set at S or C and shutter
release button is pressed lightly; stays on
for approx. 16 sec. after lifting finger
from button
EV1 to EV19 at ISO 100 with f/1,4 lens
Dual Program (normal and high-speed)
and A (aperture-priority) auto exposure
modes, and M (manual) exposure mode
Choice of normal or high-speed program;
both shutter speed and aperture are set
automatically
Shutter speed automatically set to match
manually set aperture
Both aperture and shutter speed are set
manually
Electronically controlled vertical-travel
focal-plane shutter
Stepless speeds from 1 to 1/2000 sec
on P, p HI and A auto exposure modes;
lithium niobate oscillator-controlled dis
crete speeds from i to 1/2000 sec, on
Page 46

Viewfinder
Eyepiece cover
Focusing screen
Viewfinder
information
manual; electronically controlled long
exposure at B (bulb) setting
Fixed eyelevel pentaprism type; 0.85X
magnification with 50mm lens set at
infinity, approx 92% frame coverage
Prevents stray light from entering
viewfinder
Fixed Nikon Type K2 BriteView screen
with central non-shading split-image
rangefinder circle, microprism collar and
matte/Fresnel outer field; I2mm-dia.
reference circle denotes centerweighted
metering area
Shutter speed LED: over- and under
exposure warning LEDs: ready-light
when used with Nikon dedicated
electronic Mash
P and P HI modes: LED shows shutter
speed selected by camera; top or bottom
warning LED blinks to indicate over- or
underexposure: top and bottom LEDs
blink to indicate incorrect aperture
setting
A mode: LED shows shutter speed auto
matically selected by camera; top or
bottom warning LED blinks to indicate
over- or underexposure
M mode; Non-blinking LED shows
shutter speed set on dial: blinking LED
shows shutter speed tor correct expo
sure: two blinking LEDs show inter
mediate shutter speed: no LED at B
(buib)
Page 47

Auto exposure lock
Exposure
compensation
Film speed range
Film speed setting
Film loading
Film advance
Frame counter
Film rewind
Remote control
Operates in P. P HI and A modes, holding
the fever in locks the exposure memory
±2 EV compensation (in one-third incre
ments) possible by using compensation
dial
ISO 25 to 4000 for DX-coded film, ISO 12
to 3200 for non-DX-coded film
Automatically set to ISO speed ol DXcoded film used: with non-DX-coded film,
ISO speed is set manually
Film automatically advances to first
frame when shutter release button is
depressed once: film advance indicator
rotates to show that film is loaded and
being advanced properly
Film automatically advances to frame
" 1 ■■ after depressing and releasing
shutter release button; a1 S (singleframe), film automaticaliy advances one
frame when shutter is released; at C
(continuous), shots are continuously
taken at 2.5 fps as long as the shutter
release button is depressed; stops auto
matically at end of film
Additive type: automatically reset when
camera back is opened
Manual
Use Nikon optional Remote Cord MC-12A
Page 48

Audible warning
alarm
Red indicator lamp Blinks (1) when using non-DX coded film
Self-timer
Reflex mirror
Camera back
Accessory shoe
Flash
synchronization
With switch on, bleeps (l) when using
non-DX-coded film with film speed scale
set at DX, (2) when DX contacts require
cleaning, (3) for over- or underexposure
and possible picture blur in auto exposure
modes. (4) at end of film (5) during self-
timer operation
with film speed scale set at DX, (2) when
DX contacts require cleaning. (3) at end
of film, (4) when shutter is released
Electronically controlled 10 sec. exposure
delay; blinking LED and bleep sound
indicate self-timer operation
Automatic, instant-return type
Hinged back with film cartridge confirma
tion window and film advance indicator;
swings open when film rewind knob is
pulled up; interchangeable with Nikon
Multi Data Back MF-19
Standard ISO-type with hot-shoe contact,
ready-light contact, TTL flash contact,
monitor contact
1M25 sec, or slower with electronic flasti;
with Nikon dedicated flash unit, automati
cally set to 1/125 sec. when camera is
set at P HI, P, A, or manual setting of
1/250 or higher; at slower manual speed,
shutter fires at speed set
Page 49

Flash ready-light Viewfinder thunderbolt LED lights up
when Nikon dedicated flash unit is ready
to fire
Power source Four 1.5V AAA-type batteries; with
optional Nikon AA Battery Holder MB-3,
tour 1.5 V AA-type batteries can be used
Number ot film rolls per set of fresh batteries fapprox.)
Baiteries
Al k a li n e-ma n ga nese
AAA-lype
AA-type
(LR03i
NiCd (KR-AAA)
Zinc-carbon (UM-4)
Alkaline-manganese
(LR6)
NiCd (KR-AA)
Zinc-carbon (SUM-3t
Dimensions
(WxHxO)
Weight (body oniy,
without batteries)
Wilh 24-exposure
film rolls
At 25-C
(77°F)
At -10*C
(14-F)
90 9 60 6
60
30 3
270 75
180 90
90 9
5,8x3.8x2 in.;
148,5x97.5x51 mm
Approx, 20.0 oz.;
approx, 570g
A1 25“C
30
With 36-exposure
film rolls
(yz^Ft
40 20
20 2
130 50
120 60
60 6
At -10“C
{14->F)
Page 50

Page 51

Lenses not listed below should not be used with the Nikon N2000
Al! Al-type Nikkor lenses (including Al-S type Nikkor lenses)
Alt Nikon Series E lenses
Medical-Nikkor 120mm f/4 IF
Reflex-Nikkor 500mm f/8
Reflex-Nikkor 1000mm f/11 (No. 143001 or larger)
Reflex-Nikkor 2000mm f/1l (No. 200311 or larger)
PC-Nikkor 28mm f/3.5
PC Nikkor 28mm f/4 (No. 180901 or larger)
PC-Nikkor 35mm f/2,8 (No, 851000 or smaller, or No. 906201
or larger)
Zoom-Nikkor l80-600mm f/8 ED (No, 174167 or larger)
Zoom-Nikkor 200-600mm f/9.5 (No. 300491 or larger)
Zoom-Nikkor 360-1200mm f/11 ED (No. 174088 or larger)
For A1-modification of most non-Al Nikkor lenses having both an
automatic diaphragm and meter coupling shoe, contact an
authorized Nikon dealer. Though Al-modified, the following
lenses cannot be used with the Nikon N2000: Nikkor 55 mm f/1.2
(No. 184711-400000), Nlkkor 28mm f/3.5 (No. 625611-999999)
and Nlkkor 35mm f/1.4 (No. 385001-400000)
Page 52

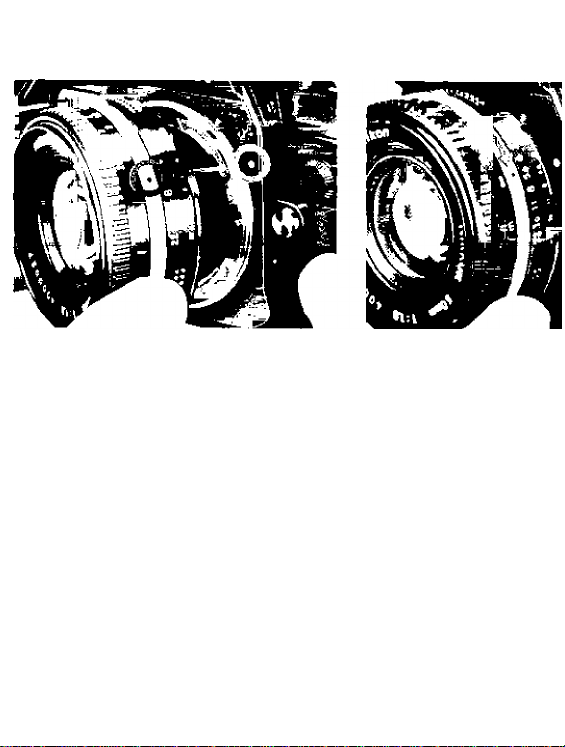
Al-Type Nikkor Lens
Note meter coupling ridge and meter coupling shoe with two
holes.
Al-S-type Nikon and Nikkor Lens
Al-S type Nikkor lenses are included among Al-type Nikkor
lenses. Note lens-type signal notch and orange minimum aper
ture scale. All Nikon Series E lenses are of the Al-S type.
Lens type signal notch
Minirrrum aperture
in orange
Page 53

Not*;
7. PC NMot and Medical Nikkor lenses cannot oe used in any auto expo
sure modes.
2. The totlowng tenses and accessories do not have an aperture coupling
device, and cannof be used in P or PHI modes.
Alt Reltex-Nikkor tenses
All PC-Nikkor fenses
Beltows attachment
Extension Ping Set K
3. In P and P HI modes. w*en using At modified Nikkor lenses witn a
maximum aperture smaller than //4.5, or re/econverfers or PK rings.
Shutter speeds are slower than indicated by the standard program lines
on page 19. Although actual shutter speed is indicated by the LED and
correci exposure is assured even In these cases, always check the
LED to avoid blurred fmages at slower shutter speeds
4. In P and P HI modes, when using Al modilied Nikkor lenses with a
maximum aperture larger than 1/2, the metering range tor higher EV
values will be reduced to a maximum of two EVs depending on the
aperture
5. In P and P HI modes, tPe following lenses may cause slower shutter
speeds than those indicated by the viewfinder LED. but you still get
correcf exposure.
Nikkor 50mm 1/1.2 (No. 250525 or smaller)
Noct Nikkor 56mm f/1.2(No. 775000 or sma//erj
Zoom Nikkor SO-300mm 1/4.5 (No. 179500 or smaller)
Al-modified Nikkor 85mm t/l 8
• Al-modified fvlicroNikkoi 105tnmf/4
At modi fled Zoom-Nlkkor 85-250mm 1/4
Page 54

When using Nikon Telecorverters: Depending on the lens in
use. ihe shutter speed in A mode may be faster than that
indicated in the viewfinder by one step or less, and in M mode
exposure compensation may be necessary. For details, see the
teleconverter’s instruction manual.
 Loading...