

Page 1

Micno-Niklor
200mm
f/4IF
Nikon INSTRUCTION MANUAL
\M
Page 2
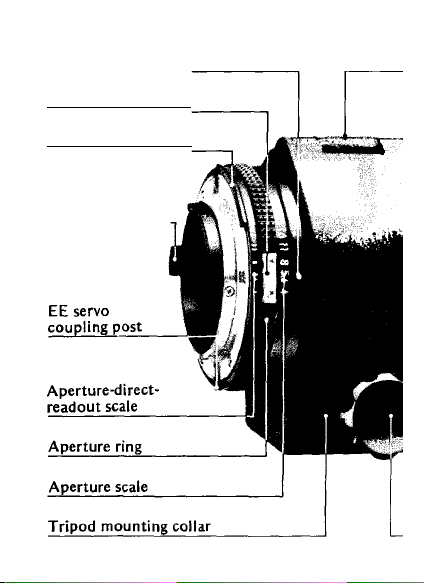
NOMENCLATURE
Aperture scale index dot
Meter coupling shoe
Meter coupling ridge
Aperture indexing
post for Nikon
SB-E Speediight
Page 3
Tripod collar alignment index dots
Depth-of-field indicators
Tripod collar locking screw
Page 4

Page 5

CONTENTS
NOMENCLATURE
FOREWORD .......................................................... 4
MOUNTING THE LENS
FOCUSING
Recommended Focusing Screens..................... 7
Focusing at a Predetermined Ratio
Reproduction Ratio
Depth of Field......................................................9
NOTES ON FOCUSING ..........................................9
DETERMINING EXPOSURE
With Built-In TTL Metering................................ 10
Without TTL Metering
CLOSE-UP TABLES
DEPTH-OF-FIELD TABLES
FEATURES/SPECIFICATIONS
--------------------------------------
...................................................
..........................................
..........................................................
...................
............................................
........................
......................................
.............................................
.........................
............................
10- 11
13-14
6-9
11
12
15
2
5
8
8
Page 6

FOREWORD
Representing a true breakthrough in lens
design, the Micro-Nikkor 200mm f/4 IF is the
world’s first 200mm “micro” lens. By utiliz
ing internal focusing (IF), a system in which
the lens elements move inside the lens, there
is absolutely no increase in the overall length
of the lens barrel as the lens is focused closer.
Therefore, it is extremely easy to handle.
At its closest focusing distance of 0.71m
(2.34 ft.), the lens produces a 1:2 reproduc
tion ratio. When the Nikon TC-301 Teleconvert
er is used, full life-size images (1:1) are possi
ble (with a decrease in the effective aperture to
f/8). This lens is very light-weight and has its
own built-in telescoping lens hood and detach
able tripod mounting collar.
Page 7

Because of its 200mm focal length, this lens
offers tremendous free-working distance, so
that you can take close-up shots of shy or
dangerous subjects, like butterflies or poison
ous snakes, and still keep your distance. Even
at 1:2 magnification, the free-working dis
tance is approximately 50cm (19.5 in.) be
tween the front of the lens and the subject.
It also focuses to infinity, making it perfect
for use as a regular 200mm telephoto lens.
In addition, NIC (Nikon Integrated Coating)
is applied to the air-to-glass surfaces of lens
elements to reduce ghost images and flare and
improve contrast.
Page 8
MOUNTING THE LENS
Page 9

Position the lens in the camera’s bayonet
mount, aligning the aperture scale index dot
on the lens with the lens mounting index on
the camera body. Twist the lens counter
clockwise until it clicks into place. To remove,
depress the lens release button on the camera
and twist the lens clockwise.
Note: When mounting the lens on a camera with a
meter coupling lever (Al type), make sure that the
camera’s meter coupling lever is correctly positioned;
when mounting on a camera without this lever (non-
Al type), “manual” maximum aperture indexing is
required. In both cases, refer to the camera’s instruc
tion manual.
Page 10

FOCUSING
Page 11

The fully automatic diaphragm of the MicroNikkor enables focusing with maximum image
brightness throughout the entire focusing range
of the lens. As the image is constantly viewed
at the maximum aperture setting (i.e., f/4),
the depth of field is minimized so that the
image snaps in and out of focus rapidly and
distinctly.
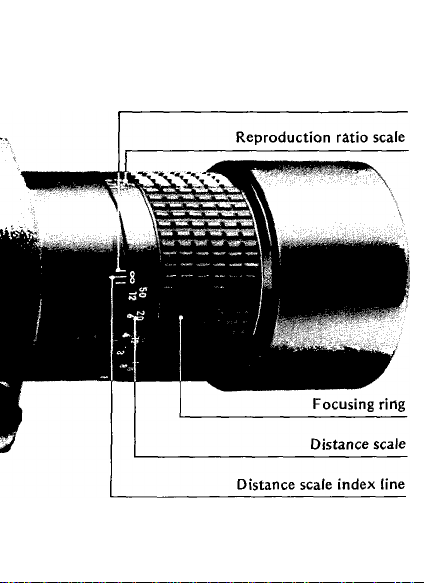
To focus, turn the focusing ring until the image
on the focusing screen appears sharp and crisp.
Via the special focusing helicoid, the Micro-
Nikkor operates continuously from infinity
(oo) to 0.71m (2.34 ft) for a reproduction
ratio of 1:2.
The distance scale on the focusing ring is
marked in both meters (white) and feet (yel
low). These figures indicate the distance from
the subject to the camera’s film plane.
Page 12

Recommended Focusing Screens
Various interchangeable focusing screens are
available for Nikon F3- and F2-series cameras
to suit any type of lens or picture-taking situa
tion. Those which are recommended for use
with this lens are listed below. For screens used
with Nikon cameras other than F3-and F2-series
cameras (e.g., Nikon FA, FE2, FM2 and FE), refer
to the columns for F3-series cameras. For the
K2, B2 and E2 focusing screens, refer to the
columns on the K, B and E screens, respective
ly. For details, also refer to the specific focus
ing screen's instruction sheet.
A/L B
F S
F2
c 0 c Gl G2 GS G4
© Oo o © O o 0 © © ©
© o
©
0 o
I When the Teleconverter TC-301 or TC-300 is attached
[°1I
HI
H4 J
H2 H3
1-^1
M R
K/P
T
©1©
© ©
©
(-°.l
to this lens, use the following table:
A/L B
F3
F2
c D E Gl G2 G3 G4
© o O© o • 9 9 9
©
m o
o o
HI
H2 H3
H4 J K/P M R T u
o 9 9 9
©
Page 13

I When the Teleconverter TC-14A is attached to this
lens, use the following table*:
D E 6|[G2 G3 G4 HI H2
A/L B c
F3 m © © © • © «
F2 • © © • ©
K/PMR T u
H4 J
H3
©
Slight vignetting may occur.
I When the Teleconverter TC-14B or TC-14 is attached
to this lens, use to following table:
A/L B c o E G1 G2G3G4 HI H2
F 3
• © 0 O© 0
F2
•
© 0 0©
[-3)
H3
© ©
H4 J
K/P
m © •
G • o
MRT
u
©
©= Excellent focusing
#= Acceptable focusing
The split-image rangefinder, microprism or cross
hair area is dim. Focus on the surrounding matte
area.
0= Acceptable focusing
Slight vignetting (or moire phenomenon, in the
case of the microprism) affects the screen image.
The image on the film, however, shows no trace
of this.
0- Indicates degree of exposure compensation.
Blank means inapplicable.
Page 14

FOCUSING — continued
Focusing at a Predetermined Ratio
Above the distance scales on the focusing ring
is the reproduction ratio scale inscribed in
orange. The scale, with figures from 1;10 to
1:2, represents the reproduction ratios ob
tained when the lens is used alone.
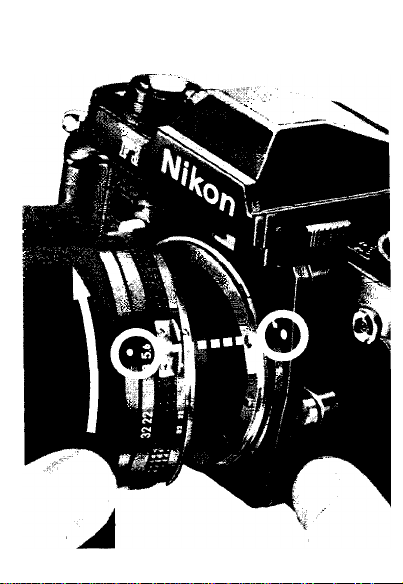
Using this scale, you can photograph at a pre
determined ratio without calculating the dis
tances required. To photograph at a reproduc
tion ratio of T.5, for example, just turn the
focusing ring until the orange-colored number
“5” is aligned with the distance scale index;
then aim at the subject and adjust your posi
tion (close to, or farther away from, the sub
ject) until the image appears sharp and crisp
on the focusing screen.
When the Nikon Teleconverter TC-301 is at
tached, the reproduction ratio increases to 1:1
and the automatic diaphragm still functions as
before.
Page 15

Reproduction Ratio
The reproduction ratio is the numerical ex
pression of the relationship between the image
size and the actual size of the subject. For
example, if the image on the focusing screen is
one-fifth the actual size of the subject, the
reproduction ratio is said to be 1:5, and is
indicated on the reproduction ratio scale of
the Micro-Nikkor 200mm f/4 by the number
“5.”
m 8 7 6
! 6 5
2 1.5
Page 16

Depth of Field
Depth of field refers to the zone of acceptable
focus extending in front of and behind the
plane of sharpest focus. As this zone is excep
tionally shallow at high reproduction ratios,
previewing is desirable before shooting. To pre
view, press the depth-of-field button on the
camera and the lens will close to the preselect
ed aperture to allow you to see how much
background and foreground is in focus. Depth
of field can also be observed by reading the
color-coded indicators inscribed on the lens
barrel. A pair of orange lines on either side
of the white distance scale index line corre
sponds to f/32 which is the same color on the
aperture scale. At close distance, so little is in
focus that the depth-of-field tables on pages
13 ~ 14 are more useful.
Page 17

NOTES ON FOCUSING
To avoid camera shake, close-up photog
raphy poses several problems not encoun
tered in general photography. One of these
is sensitivity to vibration: the magnifica
tion of the image on the film makes even
slight image displacement prominent and
results in a blurred image. Therefore, for
best results, mount the camera on a tripod
or on rigid supports, and use a cable release
to trip the shutter.
At extremely close working distances, depth
of field decreases to the actual focused
distance. This can be partially compensated
for by stopping down the lens. But at very
close distances an extremely narrow depth
of field is inevitable. Careful placement of
the subject, if it has depth, will be neces
sary to ensure that the important surfaces
will be in the same zone of sharpness.
Page 18

DETERMINING EXPOSURE
Camera
Al TC-301 Full-aperture
Al Bellows
non-AI TC-301
non-Al Bellows
10
Accessories Exposure measurement
Stop-down
Stop-down
Stop-down
Page 19

With Built-In TTL Metering
The Micro-Nikkor has an automatic diaphragm
with settings from f/4 to f/32 and couples to the
thru-the-lens meter of the Nikon F3, any Nikon
F2 Photomic or other Nikon/Nikkormat cameras
for full-aperture exposure measurement over the
entire range of aperture settings. Note that when
this lens is used with non-AI cameras, "manu
al" maximum aperture indexing is required.
When a teleconverter or bellows attachment is
used, the exposure measurement method is as
shown in the table on the left.
See the instruction manual supplied with your
camera for details.
Caution;
1) When the full-aperture method is used at smaller aper
tures than the lens maximum aperture of f/4 with the
lens set at the closest focus distance, make approx.
- 1/2 EV exposure compensation to prevent overex
posure.
2) When the stop-down method is used at small aper
tures, use a finder eyecup to ensure complete ex
clusion of stray light.
Page 20

without TTL Metering
At close ranges (reproduction ratios greater than
1:10), the amount of light reaching the film decreases
as the extension between the lens and film plane
increases. When non-TTL measurement is used for
this range, the result is underexposed photographs
unless compensation has been made for this decrease.
The table at the right gives the exposure factors (com
pensation values) with exposure increase in f/stop for
non-TTL measurement at reproduction ratios greater
than 1:10. The table at the right is for use when
various extension equipment is attached*.
To calculate the necessary correction in shutter speed
rather than in aperture value, multiply a given ex
posure factor by the exposure time. For instance,
if the normal exposure at a 1 ;4 reproduction ratio is
1/8 second, the correct shutter speed is 1/8 x 2 =
1 /4 second.
*When you use the lens by itself or attach a teleconverter, such
as the TC-301, exposure compensation is not necessary.
Page 21

Reproduction
ratio
1/10
1/8 1.5 1/2
1/7
1/6
1/5
1/4
1/3
1/2
1/1.8
1/1.6 4.3 2
1/1.4
1/1.2
1/1
1.2
1 .4
1.6
1.8
2 1 19.4 4-1/3
Exposure
factor
1.4 1/2
1.5
1.6
1.8 1
2.0 1
2.5 M/3
3.4 1-2/3
3.8 2
4.9 2-1/3
5.8 2-1/2
7.3 3
9.2 3-1/3
11.4 3-1/2
1 3.8 3-2/3
16.5 4
Exposure
increase
in f/stops
2/3
2/3
11
Page 22

CLOSE-UP TABLES
Lens in reverse position
Close-Up Lens
PN-Series Rini
Bellows PB-6
* The first values are for the K1 ring used alone and the second ones for ail five rings used together.
** The first values are for the PK-1 or PK-11/PK-l 1A ring used alone and the second ones for three rings (PK-1 ~ PK-3
or PK-1 l/PK-11A-PK-13) used together.
*** The reproduction ratio range of the PB-4 and PB-5 with the lens mounted in the reverse position is ob
tained when the BR-2 Ring is used in combination with the bellows unit.
**** The figures shown here represent the ranges obtained with the subject on the baseplate, using the lens
without any close-up attachment.
12
Lens in normal position Lens in reverse position
suW.ti «.la
Page 23

DEPTH-OF-FIELD TABLES
Focused
distance
0.71 0.709-0.71 1
0.80 0.799-0.801 0.799-0.801 0.798-0.802
0.90 0.899-0.901 0.898-0.902 0.897-0.903 0.896-0.904
1.0 0.998-1.00 0.997-1.00 0.996-1.00 0.995-1.01 0.993-1.01 0.990-1.01 0.986-1.01 1/3.4
1.2 1.20-1.20
1.5
2.0
3.0 2.98-3.03 2.97-3.04 2.95-3.05 2.93-3.07 2.90-3.10 2.87-3.14
4.0
6.0
12.0
f/4
1.49-1.51
1.99-2.01
3.95-4.05
5.89-6.11 5.85-6.16 5.79-6.23 5.71-6.32 5.59-6.48 5.45-6.68 5.24-7.04 1/28.4
11.6-12.5
300-«
f/5.6
0.709-0.71 1
1.20-1.20 1.19-1.21 1.19-1.21
1.49-1.51 1.49-1.51 1.49-1.51 1.48-1.52
1.99-2.01 1.98-2.02 1.97-2.03 1.96-2.04
3.94-4.07
11.4-12.7
215-«
f/8
0.709-0.711 0.708-0.712 0.707-0.713
3.91-4.10
11.1-13.0
ISO-« 109-« 75-« 55-« 38-«
Depth of field
f/n
0.797-0.803
3.88-4.13
10.9-13.4
f/16
0.796-0.804 0.795-0.805
0.895-0.905 0.893-0.908 0.889-0.911
1.19-1.21 1.18-1.22 1.18-1.22
3.82-4.20
10.4-14.2 9.9-15.2
f/22 f/32
0.706-0.714
1.47-1.53
1.95-2.06
3.76-4.28 3.66-4.42 1/18.4
0.705-0.715 1/1.99
0.792-0.808
1.46-1.54 1/5.9
1.92-2.08
2.81-3.22
9.2-17.4 1/58.4
Reproduction
ratio
1/2.44
1/2.94
1/4.4
1/8.4
1/13.4
1/.
(m)
13
Page 24

DEPTH-OF-FIELD TABLES — continued-
Depth of field
2’4”-
2’5-7/8”-
2’1M3/16”- 2'11-3/4”-
5'11-1/8”6’7/8”
7'10-5/16”-
11’7”-
44'-
359'-
14
Focused
distance
2.3
2.5
3.0
4.0
5.0
6.0
8.0
12.0
20.0
50.0
f/4
2’4”~
2'4-l/16”
2'5-l5/16”2’6” 2’6” 2’6-l/16” 2'6-l/16”
2’n-15/16”- 2’11-7/8”3'
3’ll-7/8”- 3’1M3/16”-
4’1/16” 4’l/8” 4’3/16” 4’5/16”
4’1 1-3/4'- 4’11-1 1/16”- 4'11-9/16”- 4’11-3/8”-
5’3/16"
5’11-5/8”-
6’5/16” 6’7/16”
7’ll-3/8”- 7’11-1/8”-
8’5/8”
iriO”- 11’9”12'1”
19’7”-
20’4”
47’7”-
52’6”
985’- 704’-
f/5.6
2'4”2’4-l/16”
2'5-15/16”-
3'1/16”
5’1/4”
5’1 M/2”-
8’7/8”
12’2”
19’5”-
20’6”
46’9”53’8”
oo « «
2’4”2’4-l/8” 2'4-l/8”
2’5-7/8”-
2’1 1-7/8”3’1/16” 3’l/8”
3’11-3/4”- 3'11-5/8”-
5’3/8” 5'9/16”
5’11-5/16”-
6'5/8”
7’10-3/4”-
8'l-l/4” 8’1-1 1/16”
1 1'9"-
12'3” 12’4”
19’3”- 19'- 18’7”-
20’9” 21'
45'6”-
55'5” 57’9”
493’-
f/8 f/n
f/16
2’3-15/16”- T3-1I8”-
2’4-l/8” 2'4-3l]6" 2’4-l/4”
2’5-13/16”- 2'5-13/16”- 2’5-ll/16”2'6-l/8” 2’6-1/8”
3’3/16”
3'1 M/2”- 3'11-5/16”- 3'1 M/16”-
4’7/16”
4’11-1/8”-
5’13/16”
5’10-11/16”-
6’l-5/16” 6’1-13/16”
7'9-9/16”-
8'2-9/16” 8’3-9/16”
H'6”-
12’6”
2V1"
4r9”- 39’5”62'3”
247'- 180’- 124’-
»
f/22
2’11-1 1/16”- 2’11-9/16”3’l/4”
4'5/8”
4'10-7/8”- 4-10-3/8”-
5'l-l/8” 5’M 1/16”
S’10-1/4”-
7’8-l 1/16”- 7’7-5/16”-
1 T4”12’8” 13’1”
18’1”- 17’5”-
22-3-
68’7” 82’10”
2'3-13/16”-
2’6-l/4”
3’7/16”
4’15/16”
5’9-l/2”6’2-l 1/16”
8’5-l/4”
11
23'6”
36’-
oo
f/32
Reproduction
ratio
1/2
1/2.3
1/3
1/4.5
1/6.1
1/7.6
1/10.6
1/16.7
1/28.9
1/74.6
M~
(fi)
Page 25

FEATURES/SPECIFICATIONS
Focal length: 200mm
Maximum aperture: f/4
Lens construction: 9 elements in 6 groups
Picture angle: 12°20’
Distance scale: Graduated in meters and feet
from 0.71m (2.34 ft) to infinity (°°)
Aperture scale: f/4 ~ f/32
Diaphragm: Fully automatic
Reproduction ratios: Scales provided 1:10 ~
1:2 (for lens only), down to 1:1 (when using
the Nikon Teleconverter TC-301)
Exposure measurement: Via full-aperture
method coupling ridge provided for Al cameras
and meter coupling shoe for non-AI cameras
Focusing system: Nikon Internal Focusing
(IF) system
Lens hood: Slip-out type built into front of
lens
Tripod mounting: Detachable tripod mount
Attachment size: 52mm (P = 0.75mm)
Dimensions: Approx. 66mm dia. x 172mm ex
tension from the camera's lens mounting flange;
overall length is approx. 180mm
---------
Page 26

Weight: Approx. 800g
Accessories: Front lens cap, rear lens cap LF-1,
Teleconverter TC-301, Teleconverter TC-14A,
Teleconverter TC-14B, 52mm screw-in filters,
hard lens case CL-36
75
Page 27

No reproduction in any form of this manual, in
whole or in part (except for brief quotation in critical
articles or reviews), may be made without written
authorization from NIKON CORPORATION.
Nikon
NIKON CORPORATION
FUJI BLDG., 2-3, MARUNOUCHI 3-CHOME, CHIYODA-KU, TOKYO 100, JAPAN
PHONE: 81-3-3214-5311 TELEX: NIKON J22601 FAX: 81-3-3201-5856
Printed in Japan 9&071-A08(S211)
 Loading...