

Professional
Setting Guide
— Movie Edition —
En

Table of Contents
Movie-Related Camera Controls ...................................... 4
Recording Movies ............................................................... 6
Before Recording ................................................................ 8
• Frame Size/Frame Rate ...................................................................8
• ISO Sensitivity Settings ................................................................10
• Set Picture Control ............................................11
• White Balance .................................................................................12
• Active D‑Lighting
• Microphone Sensitivity ................................................................13
• Frequency Response .....................................................................13
• Wind Noise Reduction ..................................................................14
More on Movies ................................................................. 15
• The Information Display...............................................................15
• Custom Control Assignments
• Electronic Vibration Reduction
• The Movie i‑Button Menu ..........................................................21
• White Balance .................................................................................22
• Choosing a Picture Control in Live View ..................................23
• Taking Photos
• Creating Stills from 4K UHD Movies ..........................................25
• HDMI Output ..................................................................................26
Time-Lapse Movies ...........................................................29
• Time‑Lapse Movie Techniques ...................................................29
• Table: Time‑Lapse Movie Techniques Compared ...................30
• Filming 4K UHD Time‑Lapse Movies .........................................31
..............................................13
........................17
......................20
....................................................24
2

Things to Note ...................................................................33
• Restrictions on Available Settings .............................................33
• Keeping the Camera Cool ............................................................33
• Image Artifacts ...............................................................................34
• Ending Recording ..........................................................................34
Movie Playback Tips and Tricks ......................................35
• Ten‑Second Advance/Rewind ....................................................35
• Skipping to an Index or the Last/First Frame ..........................35
• Slow Motion ....................................................................................35
• Using the Touch Screen ................................................................36
Joining Movie Files Together ................. 37
D500 Movie Specications .............................................. 39
3
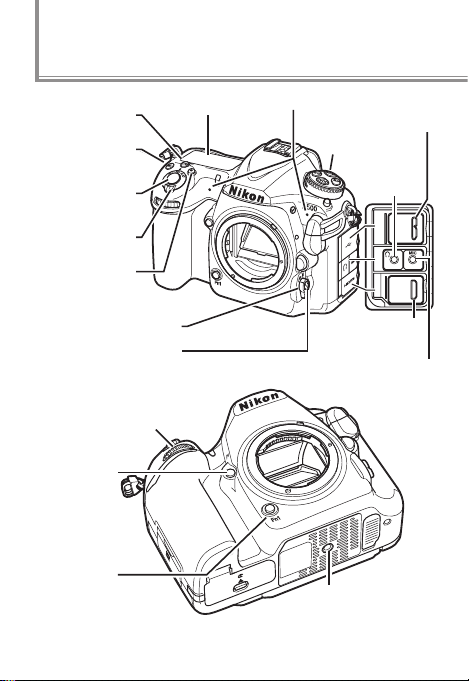
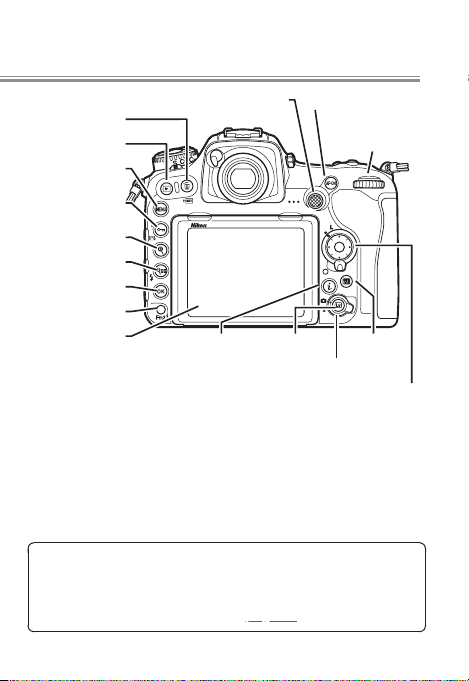
Movie-Related Camera Controls
S (Q)
button
E button
Shutter-
release
button
Power switch
Movie-record
button
Focus-mode selector
AF-mode button
Sub-command dial
Pv button
Fn1 button
4
Control panel
Connector for external microphone
Stereo microphone
Tripod socket
USB connector
MODE button
Headphone
connector
HDMI
connector
O (Q) button
K button
G button
L (Z/Q )
button
X button
W (M) button
J button
Fn2 button
Monitor
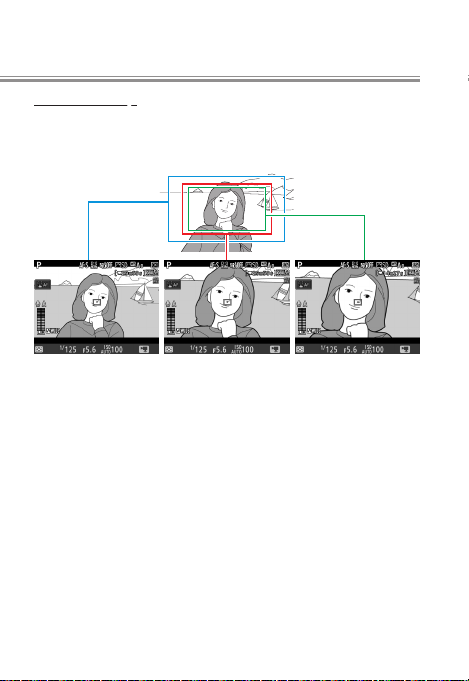
The monitor features touch-screen controls. In movie mode
(in live view or during recording), you can touch the monitor to focus on the selected point. Touch-screen controls can
also be used for movie playback (page 36).
Sub-selector AF-ON button
Main
command dial
a button
Live view selector
R buttoni button
Multi selector
5
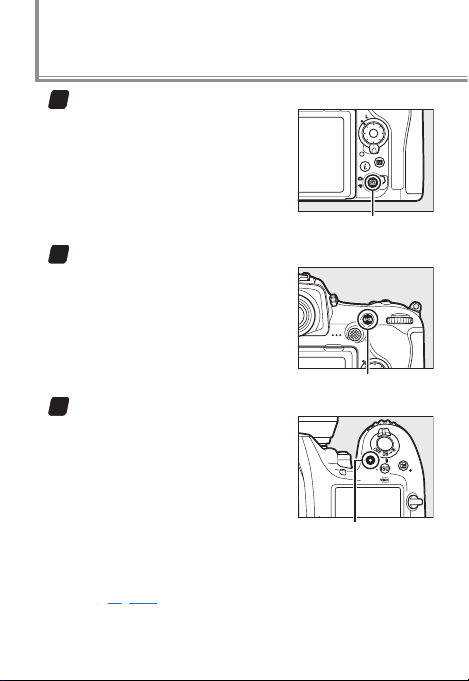
Recording Movies
Start movie live view.
1
Rotate the live view selector to
1 and press the a button.
a button
Focus.
2
Frame the opening shot and
press the AF-ON button or press
the shutter-release button halfway to focus.
AF-ON button
Start recording.
3
Press the movie-record button to start recording (audio is
also recorded; be careful not to
cover the built-in microphone).
A recording indicator and the
time available are displayed in
the monitor. The camera can be
refocused by pressing the AF-ON button, and exposure
can be locked by pressing the center of the sub-selector (page 19) or altered by up to ±3EV using exposure
compensation.
Movie-record button
6

End recording.
4
Press the movie-record button
again to end recording and
then press a to exit live view.
7
Before Recording
Before recording, adjust settings in
the movie shooting menu.
Frame Size/Frame Rate
l
Choose an option according to how you will use the movie.
r
s
t
y/y 1920× 1080; 60p
z/z 1920× 1080; 50p
1/1 1920× 1080; 30p
2/2 1920× 1080; 25p
3/3 1920× 1080; 24p
4/4 1280× 720; 60p
5/5 1280× 720; 50p
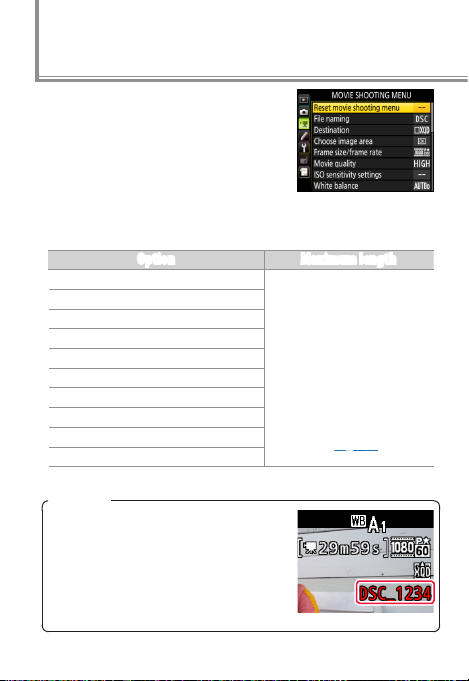
File Names
During recording, a new le is created when the current le reaches
4GB. Normally displayed in white, the
le name in the information display
ashes amber 30 s and turns red 10s
before a new le is created.
Option Maximum length
3840× 2160 (4K UHD); 30p
3840× 2160 (4K UHD); 25p
3840× 2160 (4K UHD); 24p
29min. 59s (recorded
across up to 8 files of up to
4GB each; the number and
length of the files varies
with Frame size/frame
rate and Movie quality;
files can be joined together
using ViewNX-i as described
on page 37).
8
The Movie Crop
The movie crop varies with frame size and, at frame sizes
of 1920 × 1080 and 1280 × 720, the option selected for
Choose image area in the movie shooting menu.
1920× 1080 or
1280× 720, DX
image area
1920× 1080 or
1280× 720,
1.3× image area
3840× 2160
(4K UHD)
9

ISO Sensitivity Settings
l
ISO sensitivity can be adjusted in
movie mode (in live view or during
recording).
• ISO sensitivity (mode M): Choose the ISO
sensitivity for exposure mode M from
values between ISO 100 and Hi 5. Auto
ISO sensitivity control is used in other exposure modes.
• Auto ISO control (mode M): Select On for auto ISO sensitivity control
in exposure mode M, O to use the value selected for ISO sen-
sitivity (mode M).
• Maximum sensitivity: Choose the upper limit for auto ISO sensitivity
control from values between ISO 200 and Hi 5. Auto ISO sensitivity control is used in exposure modes P, S, and A and when On is
selected for Auto ISO control (mode M) in exposure mode M.
Auto ISO Sensitivity Control
At high ISO sensitivities, the camera may have diculty focusing and noise (randomly-spaced bright pixels, fog, or lines)
may increase. This can be prevented by choosing a lower
value for ISO sensitivity settings > Maximum sensitivity.
10

Before Recording
Set Picture Control
l
Choose a Picture Control for movies.
• Same as photo settings: Use the Picture
Control settings currently selected in
the photo shooting menu.
• Q Standard: Standard processing for
balanced results. Recommended for
most situations.
• R Neutral: Minimal processing for natural results. Choose for
footage that you intend to process in post-production.
• S Vivid: Footage is enhanced for a vivid, photoprint effect with
emphasis on primary colors.
• T Monochrome: Film monochrome footage.
• o Portrait: Footage of portrait subjects is processed to give skin
a natural texture and rounded feel.
• p Landscape: Film vibrant landscapes and cityscapes.
• q Flat
range, from highlights to shadows, maximizing the potential for
tweaking in post-production. Use with highlight-weighted metering to minimize loss of detail in highlights.
: Details are preserved over a wide tone
11
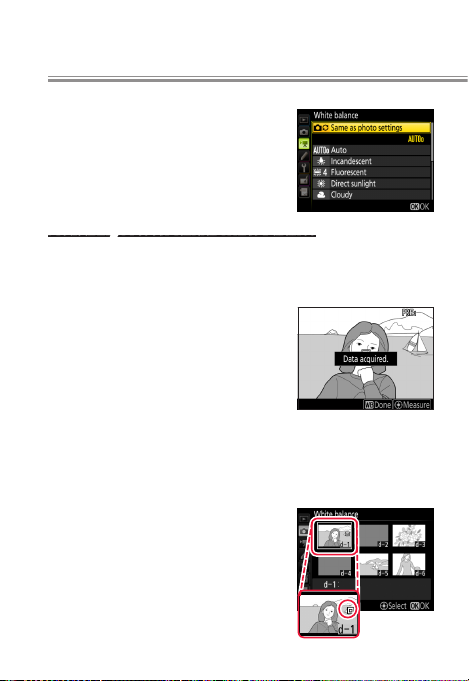
White Balance
l
Adjust white balance according to
lighting conditions. Choose Same
as photo settings to use the white
balance settings currently selected
in the photo shooting menu.
Measuring Preset Manual White Balance
Instead of using a specially-prepared reference object, you
can measure white balance from any white or grey object
in the frame.
When Preset manual is selected for
white balance, you can hold the U
button in live view to enter direct
measurement mode. L will ash
in the display; tap a white or grey
object to position the spot white
balance target (r) over the selected object and measure
white balance. To zoom in on the target for precise positioning, press the X button. Press the U button again to
exit direct measurement mode.
White balance presets d1–d6 can
be viewed by selecting Preset man-
ual for White balance in the movie
shooting menu. The white balance
target is shown on the preset.
12

Before Recording
Active D‑Lighting
l
Use Active D-Lighting to preserve
details in highlights and shadows
when lming high-contrast scenes,
for example when shooting through
a window or at the beach.
Matrix metering is recommended. Active D-Lighting does
not apply at high ISO sensitivities (Hi 0.3–Hi 5) or at a frame
size of 3840× 2160. If Same as photo settings is selected
for Active D-Lighting in the movie shooting menu and
Auto is selected in the photo shooting menu, movies will
be shot at a setting equivalent to Normal.
Microphone Sensitivity
l
Adjust settings for the built-in stereo microphone or
optional ME-1 stereo or ME-W1 wireless microphones.
Choose Auto sensitivity to adjust sensitivity automatically,
Microphone o to turn sound recording o. To select sensitivity manually, select Manual sensitivity and choose a
value between 1 and 20 (higher values indicate increased
sensitivity).
Frequency Response
l
If SWide range is selected, the built-in microphone will
respond to a wide range of frequencies, from music to the
bustling hum of a city street. Choose TVocal range to
bring out human voices.
13

Before Recording
Wind Noise Reduction
l
Select On to enable the low-cut lter for the built-in microphone (optional stereo microphones are unaected),
reducing noise produced by wind blowing over the microphone (note that other sounds may also be aected).
Wind-noise reduction for optional stereo microphones
that support this feature can be enabled or disabled using
microphone controls.
14

More on Movies
Read this section for information on functions you may
nd useful when lming movies.
The Information Display
l
To hide or display indicators in the monitor, press the R
button.
Information on Information o Framing guides
Virtual
horizon
Warnings
Temperature warning (displayed
in red 30s before live view ends)
Low battery
No memory card
Histogram
15

Indicators
The indicators at
right appear in
the information
display in movie
mode (in live
view and during
recording).
w
e
r
y
q u
t
“No movie” indicator: Indicates that movies can not be recorded.
q
Headphone volume: Volume of audio output to headphones. Dis-
w
played when third-party headphones are connected.
Microphone sensitivity: Microphone sensitivity.
e
Sound level: Sound level for audio recording. Displayed in red if
r
level is too high; adjust microphone sensitivity accordingly.
Frequency response: The current frequency response.
t
Wind noise reduction: Displayed when wind noise reduction is on.
y
Time remaining: The recording time available for movies.
u
Movie frame size: The frame size for movie recording.
i
Electronic VR indicator: Displayed when electronic vibration re-
o
duction is on.
File name: The file name for the current movie (page 8).
!0
Highlight display indicator: Appears when the highlight display is on.
!1
“No power aperture” indicator: Indicates that power aperture is
!2
unavailable.
16
i
o
!0
!1
!2

More on Movies
Custom Control Assignments
l
Use Custom Setting g1 (Custom control assignment) to
choose the roles played by camera controls during movie
recording.
Press
To choose the roles played by the following controls, highlight an option and press the center of the multi selector:
The functions that can be assigned to these controls are:
Pv button
0
Fn1 button
v
Fn2 button
x
Center of sub-selector
8
Shutter-release button
G
0 v x 8 G
t
Power aperture (open)
q
Power aperture (close) —
i
Exposure compensation +
h
Exposure compensation − —
r
Index marking
s
View photo shooting info
B
AE/AF lock — — —
C
AE lock only — — —
E
AE lock (Hold) — — —
F
AF lock only — — —
C
Take photos — — — —
1
Record movies — — — —
4
— — — —
4
4
4 4 4 4
4 4 4 4
— — —
— — — —
4
— — —
4
4
4
4
—
—
—
—
—
—
4
4
17

0 v x 8 G
None
Power Aperture
Power aperture is available only in exposure modes A and M
and can not be used while photo shooting info is displayed (a
6 icon indicates that power aperture can not be used). The
display may icker while aperture is adjusted.
Press + y
To choose the roles played by the following controls in
combination with the command dials, highlight an option
and press the center of the multi selector:
Choose from JChoose image area and None.
4 4 4 4
Pv button + y
1
Fn1 button + y
w
Center of sub-selector + y
9
18
—

More on Movies
Silent Exposure Compensation
At default settings, exposure compensation can be adjusted by pressing the E button and rotating the
main command dial. The sound of
the dial may however be audible
in the audio recorded with movies.
This can be prevented by using Custom Setting g1 (Cus-
tom control assignment) to assign Exposure compensation+ to the Pv button and Exposure compensation− to
the Fn1 button. Exposure compensation can then be adjusted by pressing and holding one or the other of these
buttons instead of rotating the main command dial.
Exposure Lock
To lock exposure when lming in P,
S, or A mode or when auto ISO sen-
sitivity control is enabled, assign
AE-L lock (Hold) to the center of
the sub-selector. Exposure will lock
when the center of the sub-selector
is pressed and remain locked until it
is pressed again. Exposure lock will
not be interrupted if the shutter-release button is pressed
all the way down to take photographs during lming.
Center of sub-
selector
19

Starting Recording with the Shutter-Release Button
If Record movies is assigned to the shutter-release button
and the live view selector is rotated to 1, you can start live
view by pressing the shutter-release button halfway and
start and end recording by pressing it all the way down. To
prevent camera shake, you can mount the camera on a tripod and start and end recording using an optional remote
cord (such as the MC-36A or MC-30A) or wireless remote
controller (such as the WR-R10/WR-T10).
To prevent unintended operation of the a button, select
Disable for Custom Setting f8 (Live view button options).
Electronic Vibration Reduction
l
To enable electronic vibration reduction in movie mode,
select On for Electronic VR in the movie shooting menu.
Electronic vibration reduction is best with hand-held cinematography; select O when the camera is on a tripod.
Note that if electronic vibration reduction is on and DX is
selected for Choose image area (page 9), the angle of view
will be reduced and the edges of the frame cropped out.
Electronic vibration reduction is not available at a frame
size of 3840× 2160 (page 8). Regardless of the option chosen for ISO sensitivity settings > ISO sensitivity (mode M)
in the movie shooting menu (page 10), the upper limit when
electronic vibration reduction is on is ISO 51200.
20

More on Movies
The Movie i‑Button Menu
l
Pressing the i button in movie mode
displays the following options:
• Choose image area: Choose an image area
for movie recording (page 9).
• Frame size/frame rate: Select a frame size
and rate (page 8).
• Active D‑Lighting: Adjust Active D-Lighting for movies recorded at
frame sizes other than 3840× 2160 (page 8).
• Movie quality: Choose movie quality.
• Microphone sensitivity: Press 1 or 3 to adjust microphone sensitivity (page 13).
• Frequency response: Control the frequency response of the built-in
microphone (page 13).
• Wind noise reduction: Enable or disable wind noise reduction using
the built-in microphone’s low-cut filter (page 14).
• Destination: When two memory cards are inserted, you can
choose the card to which movies are recorded.
• Monitor brightness: Press 1 or 3 to adjust monitor brightness (note
that this affects live view only and has no effect on photographs or
movies or on the brightness of the monitor for menus or playback).
• Multi‑selector power aperture: Select Enable to enable power aperture. Press 1 to widen the aperture, 3 to narrow the aperture.
• Highlight display: Choose whether the brightest areas of the frame
(highlights) are shown by slanting lines in the display.
• Headphone volume: Press 1 or 3 to adjust headphone volume.
• Electronic VR: Enable or disable electronic vibration reduction in
movie mode (page 20).
i button
21

White Balance
l
In movie mode, white balance can be set by pressing the
U button and rotating a command dial.
The Main Command Dial
Choose a white balance
option. The eect can be
previewed in the monitor.
The Sub-command Dial
Fine-tune white balance
on the amber (A)–blue (B)
axis in increments of 0.5.
If K (Choose color temp.) is selected
for white balance, you can choose a
color temperature by pressing the
U button and rotating the subcommand dial (adjustments are
made in mireds), or enter a color
temperature by pressing and holding the U button and
using 4 and 2 to highlight digits and 1 and 3 to edit.
22

If Preset manual is selected for
white balance, you can use the U
button and sub-command dial to
choose a preset.
Choosing a Picture Control in Live View
l
To choose a Picture Control in live
view, press the L (Z/Q) button.
The eect of the selected control
can be previewed in the monitor.
To modify the selected control, press
2.
More on Movies
23

Taking Photos
l
In movie mode, photos can be taken by keeping the shutter-release button pressed all the way down (note that
photos will not be taken if the camera is unable to focus).
If lming is in progress, recording will end and any footage
shot to that point will be saved. The photos will have an
aspect ratio of 16∶9; size varies with the option selected for
movie frame size and, in the case of photos taken at frame
sizes of 1920× 1080 and 1280× 720, with the image area
and the option selected for Image size> JPEG/TIFF in the
photo shooting menu.
Frame size Image area Image size Photo size (pixels)
3840× 2160 — 3840× 2160
DX
1920× 1080
1280× 720
1.3×
Large 5568× 3128
Medium 4176× 2344
Small 2784× 1560
Large 4272× 2400
Medium 3200× 1800
Small 2128× 1192
24

More on Movies
Creating Stills from 4K UHD Movies
l
During movie playback, you can use Save selected frame
to save selected frames of 4K UHD movies as JPEG images.
Pause playback on the desired frame.
1
Press 3 to pause playback.
Choose Save selected frame.
2
Press i or J, then highlight
Save selected frame and press
2.
Create a still copy.
3
Press 1 to create a ne★quality JPEG copy of the current
frame. A conrmation dialog
will be displayed; highlight Yes
and press J.
Save Selected Frame
Movie stills lack some photo information and can not be retouched.
25

HDMI Output
l
The camera can be connected to HDMI devices for highdenition movie playback and recording.
Connecting to an HDMI Device
The camera can be connected to high-denition video
devices using an optional High-Denition Multimedia Interface (HDMI) cable or a third-party type C HDMI cable.
Always turn the camera o before connecting or disconnecting the cable.
Connect to high-denition device (choose
cable with appropriate
connector)
Connect to camera
Tune the device to the HDMI input channel, then turn the
camera on and press the K button. During playback, images will be displayed on the television screen. Volume
can be adjusted using television controls; the camera controls can not be used.
If the camera is connected to a third-party HDMI video recorder, you can lm movies and save them directly to the
device even if no memory card is inserted in the camera.
26

More on Movies
The HDMI Cable Clip
When using the optional Nikon HDMI cable, attach the supplied clip as shown to prevent accidental disconnection. Do
not use cable clips with non-Nikon cables.
27

More on Movies
HDMI Options
The HDMI option in the setup menu controls output resolution and oers a variety of advanced HDMI options.
Output Resolution
Choose the format for images output to the HDMI device. If Auto is
selected, the camera will automatically select the appropriate format.
Advanced
Selecting Advanced displays the following options:
• Output range: Auto is recommended in most situations. If the
camera is unable to determine the correct setting, you can
choose an option based on the device’s video signal input color
range. If the input range is 16 to 235 or contrast is so high that
highlights are “washed out” (too bright) and shadows too dark,
choose Limited range. Choose Full range if the input range
is 0 to 255 or if contrast is so low that shadows are “washed out”.
• Output display size: Horizontal and vertical frame coverage for
HDMI output can be set to 95% or 100%. Choose 100% when
recording video to an external device.
• Live view on‑screen display: If O is selected, the external device will
not display shooting information during live view photography.
• Dual monitor: Choose On to mirror the HDMI display on the camera monitor, O to turn the camera monitor off to save power.
Dual monitor turns on automatically when Live view onscreen display is O.
28

Time-Lapse Movies
Time-lapse movies can be created from photos shot using
time-lapse photography, the interval timer, or unlimited
continuous release. In the rst case, the camera generates
the movie automatically, while the last two methods require third-party movie-editing software, a powerful computer, and advanced image-processing skills.
Time‑Lapse Movie Techniques
l
The three methods of creating time-lapse movies are compared below.
Interval-Timer Photography
In interval-timer photography, the camera takes photos at
preset intervals. Image quality, size, and other settings can
be adjusted for exactly the results you want, while shots
containing unwanted objects can be edited or deleted.
You can create frames for high-quality movies and even (in
NEF/RAW format) choose the color temperature.
Time-Lapse Photography
This is the least complicated method: the camera creates
movies from photos taken at preset intervals, sparing you
the task of splicing the shots together. You are however
limited to the frame sizes, bit rates, and quality options
available in the Frame size/frame rate and Movie quality
menus and can record movies in MOV format only. In addition, the individual frames that make up the movie are
not stored in separate les.
29

Unlimited Continuous Release
Selecting a shutter speed of 4 s or slower in exposure
mode S or M lets you take an unlimited number of photographs in continuous release mode (Cl, Ch, or Qc): shooting
can continue as long as the battery lasts and there is space
on the memory card, regardless of the option selected for
Custom Setting d2 (Max. continuous release). Although
the lack of shutter speeds faster than 4s limits your choice
of subjects, the interval between shots is as short as in
normal photography, producing smoother footage of subjects that require exposure times of 4 s or more, such as
stars or auroras.
Table: Time‑Lapse Movie Techniques Compared
l
Format
Max. frame size 5568× 3712 3840× 2160 5568× 3712
Time between
shots
Exposure time ⁄–30s 4–30s
Creates
Interval timer Time lapse Continuous
Stills NEF, JPEG, TIFF — NEF, JPEG, TIFF
Movies — MOV —
0.5s or more 1s or more
Material for
advanced time-
lapse movies and
film logs
Hassle-free
time-lapse
movies
Time selected in Cl
or Ch mode
Material for
time-lapse movies
featuring star trails
or auroras
30

Time-Lapse Movies
Filming 4K UHD Time‑Lapse Movies
l
Filming 4K UHD time-lapse movies is simple: just select a
frame size of 3840× 2160 for Frame size/frame rate in the
movie shooting menu and then follow the steps below.
The crop (page 9) is the same as for 4K UHD movies.
Adjust time-lapse movie settings.
1
Select Time-lapse movie in the movie shooting menu
and adjust the following settings:
• Interval: The interval (in minutes and seconds) should
be longer than the slowest anticipated shutter speed.
Highlight Interval and
press 2.
• Shooting time: The total shooting time (in hours and
minutes) can be up to 7 hours and 59 minutes.
Highlight Shooting time
and press 2.
Choose an interval and
press J.
Choose a shooting time
and press J.
31

Time-Lapse Movies
• Exposure smoothing: Select On to smooth abrupt changes in exposure in modes other than M (note that
exposure smoothing only takes eect in mode M if
auto ISO sensitivity control is enabled in the photo
shooting menu).
Highlight Exposure
smoothing and press 2.
Start shooting.
2
Highlight Start and press J. After about 3s, shooting will start
and the camera will take photographs at the selected interval
for the selected shooting time.
To end shooting early and create a time-lapse movie from the frames shot to that
point, highlight O in the time-lapse movie menu and
press J, or press J between frames or immediately
after a frame is recorded.
Highlight an option and
32
press J.

Things to Note
Some things to note when lming:
Restrictions on Available Settings
l
The exposure settings available in movie mode (in live view
or during recording) vary with the exposure mode selected.
Aperture Shutter speed ISO sensitivity
P, S — — —
A
M
4
4 4
— —
1. The upper limit for ISO sensitivity can be selected using the ISO
sensitivity settings> Maximum sensitivity option in the
movie shooting menu (
page 10).
2. The upper limit when On is selected for Electronic VR in the
movie shooting menu is ISO 51200.
3. If On is selected for ISO sensitivity settings> Auto ISO
control (mode M) in the movie shooting menu, the upper
limit for ISO sensitivity can be selected using the Maximum
sensitivity option.
Keeping the Camera Cool
l
If live view is used continuously for extended periods,
the camera’s internal temperature will rise, causing noise
(bright spots, randomly-spaced bright pixels, or fog) to
appear in images. Use live view only when taking pictures. Note that live view does not end when menus are
displayed; unless you intend to resume shooting immediately, exit live view before using the menus.
1, 2
1, 2
2, 3
4
33

Things to Note
Image Artifacts
l
Flicker, banding, or distortion may be visible in the monitor and in the nal movie under uorescent, mercury vapor, or sodium lamps, when power aperture is in use, or if
the camera is panned horizontally or an object moves at
high speed through frame. Jagged edges, color fringing,
moiré, and bright spots may also appear. Bright areas or
bands may appear with ashing signs and other intermittent light sources or if the subject is briey illuminated by
a strobe or other bright, momentary light source. Noise
(randomly-spaced bright pixels, fog, or lines) and unexpected colors may be more noticeable if you zoom in on
the view through the lens during live view.
The Flicker reduction option in the movie shooting menu
can be used to reduce icker under uorescent, mercury
vapor, or sodium lamps. The desired results may not be
obtained if the subject is very bright, in which case you
should try a smaller aperture (higher f-number).
Ending Recording
l
If the maximum length is reached, the memory card lls,
the battery runs low, the live view selector is rotated to C,
the lens is removed, or the camera overheats, lming will
end automatically and all footage shot to that point will be
saved. No movie will be recorded if the battery is removed
during lming.
34

Movie Playback Tips and Tricks
Some tips for viewing movies:
Ten‑Second Advance/Rewind
l
Rotate the main command dial one click to advance or rewind 10 seconds.
Skipping to an Index or the Last/First Frame
l
If you added index markers during recording, you can skip
to the next or previous index frame by rotating the subcommand dial during playback. If there are no intervening
index markers, the sub-command dial will take you to the
last or rst frame.
Slow Motion
l
Press 3 for slow-motion playback.
Index Marking
If Index marking is assigned to a control using Custom Setting g1 (Custom
control assignment, page 17), you can
press the selected control during recording to add indices that can be
used to locate frames during editing
and playback. Up to 20 indices can be added to each movie.
35

Movie Playback Tips and Tricks
Using the Touch Screen
l
The touch screen oers the following movie playback controls:
Play/Pause/Resume
Tap the a icon to start playback and
tap the monitor to pause or resume.
a icon
Skip
Tap the progress bar to skip to the
selected position and pause playback. You may nd this useful when
attempting to nd a specic scene
in a long movie.
Progress bar
Volume Control
Tap the W or X icon during playback to adjust the volume.
Volume control
36

Joining Movie Files Together
Each movie recorded with the D500 may consist of up to 8
les of up to 4GB in size. These les can be joined together
in ViewNX-i.
Select the les in the movie.
1
Right-click any of the les in the movie and choose Select Set of Continuous Movies to select all the movie’s
component les.
37

Joining Movie Files Together
Launch ViewNX-Movie Editor.
2
Click the (movie) button to launch ViewNX-Movie
Editor.
Click Combine movies.
3
The options at right will be
displayed. Click Combine
Movies.
Save the movie.
4
Choose a destination and
le name and click Out-
put.
38

D500 Movie Specications
Image sensor
Image sensor 23.5× 15.7mm CMOS sensor
Total pixels 21.51 million
Dust-reduction
system
Storage
Media XQD memory cards; SD (Secure Digital) and UHS-II compliant
Movies
Metering TTL exposure metering using main image sensor
Metering method Matrix, center-weighted, or highlight-weighted
Frame size (pixels)
and frame rate
Bit rate • 3840× 2160 (4K UHD): 144Mbps
Sampling rate • Internal storage: 4
Image sensor cleaning, Image Dust O reference data (Capture
NX-D software required)
SDHC and SDXC memory cards
• 3840× 2160 (4K UHD); 30p (progressive), 25p, 24p
• 1920× 1080; 60p, 50p, 30p, 25p, 24p
• 1280× 720; 60p, 50p
Actual frame rates for 60p, 50p, 30p, 25p, and 24p are
59.94, 50, 29.97, 25, and 23.976 fps respectively; ★ high
quality available at all frame sizes, normal quality available
at all sizes except 3840× 2160
• 1920× 1080 60p/50p ★ high: 48Mbps
• 1920× 1080 60p/50p normal: 24Mbps
• 1920× 1080 30p/25p/24p ★ high: 24Mbps
• 1920× 1080 30p/25p/24p normal: 12Mbps
• 1280× 720 ★ high: 24Mbps
• 1280× 720 normal: 12Mbps
∶2∶0, 8 bit
• HDMI output: 4∶2∶2, 8 bit
39

Movies
File format MOV
Video compression H.264/MPEG-4 Advanced Video Coding
Audio recording format 48kHz, 16-bit linear PCM
Audio recording
device
ISO sensitivity • Exposure mode M: Auto ISO sensitivity control (ISO 100
Active D-Lighting Can be selected from Same as photo settings, Extra high,
Other options Index marking, time-lapse movies, electronic vibration
White balance
Picture Control
Picture Control
System
Built-in stereo microphone; external microphone (impedance 2.2K ); sensitivity adjustable
to Hi 5) available with selectable upper limit; manual selection (ISO 100 to 51200 in steps of ⁄, ½, or 1 EV) with
additional options available equivalent to approximately
0.3, 0.5, 0.7, 1, 2, 3, 4, or 5 EV (ISO 1640000 equivalent)
above ISO 51200
• Exposure modes P, S, and A: Auto ISO sensitivity control
(ISO 100 to Hi 5) with selectable upper limit
High, Normal, Low, or O
reduction
Same as photo settings, auto (3 types), incandescent,
uorescent (7 types), direct sunlight, cloudy, shade, preset
manual (up to 6 values can be stored, spot white balance
measurement available during live view), choose color
temperature (2500K–10000K), all with ne-tuning.
Same as photo settings, Standard, Neutral, Vivid, Monochrome, Portrait, Landscape, Flat; selected Picture Control
can be modied; storage for custom Picture Controls
40

D500 Movie Specications
Monitor
Interface
USB SuperSpeed USB (USB 3.0 Micro-B connector); connection to
HDMI output Type C HDMI connector
Audio input Stereo mini-pin jack (3.5 mm diameter; plug-in power supported)
Audio output Stereo mini-pin jack (3.5mm diameter)
Power source
Battery One rechargeable Li-ion EN-EL15 battery
Battery pack Optional MB-D17 multi-power battery pack with one
AC adapter EH-5b AC adapter; requires EP-5B power connector (available
Tripod socket
8-cm/3.2-in., approx. 2359k-dot (XGA) tilting TFT touchsensitive LCD with 170 ° viewing angle, approximately 100%
frame coverage, and manual monitor brightness control
built-in USB port is recommended
rechargeable Nikon EN-EL18a or EN-EL18 Li-ion battery
(available separately), one rechargeable Nikon EN-EL15 Li-ion
battery, or eight AA alkaline, Ni-MH, or lithium batteries. A
BL-5 battery-chamber cover is required when using EN-EL18a
or EN-EL18 batteries.
separately)
¼in. (ISO 1222)
41

© 2016 Nikon Corporation
 Loading...