

Page 1

En
Network Guide
• Read this manual thoroughly before using the camera.
• After reading this manual, keep it in a readily accessible
place for future reference.
Page 2
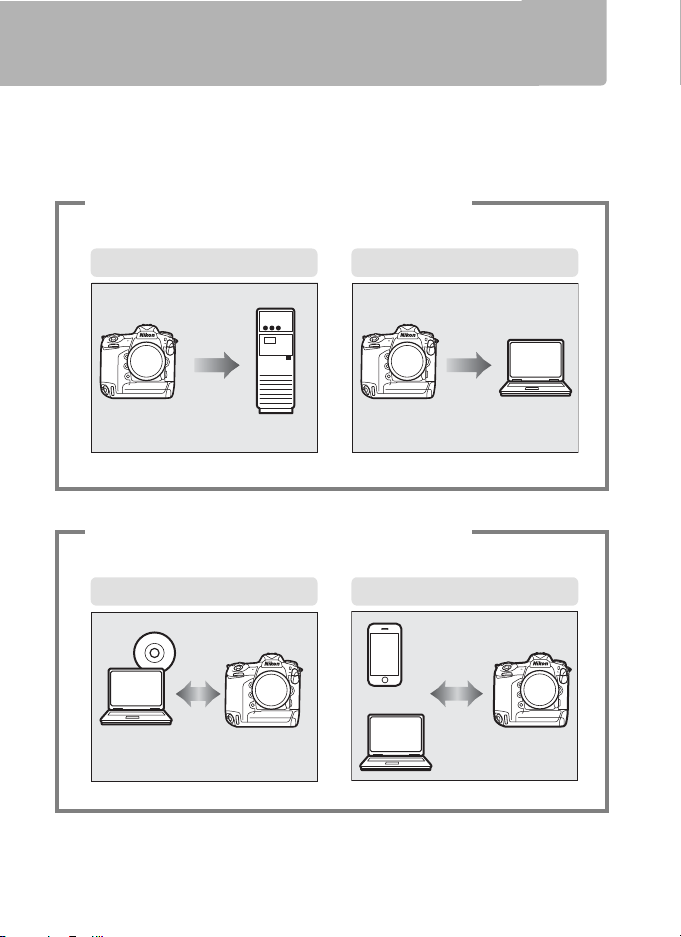
What Networks Can Do for You
FTP upload (045) Image transfer (014)
ftp server
Computer
Camera control (0 18) HTTP server (0 21)
Camera Control Pro 2
Smart device
Computer
This guide describes how to connect to a network, access the camera
remotely, and upload images to computers and ftp servers over Ethernet
connections. Once a connection has been established, you can:
Upload existing photos and movies
1
Take or browse photos remotely
2
ii
Page 3
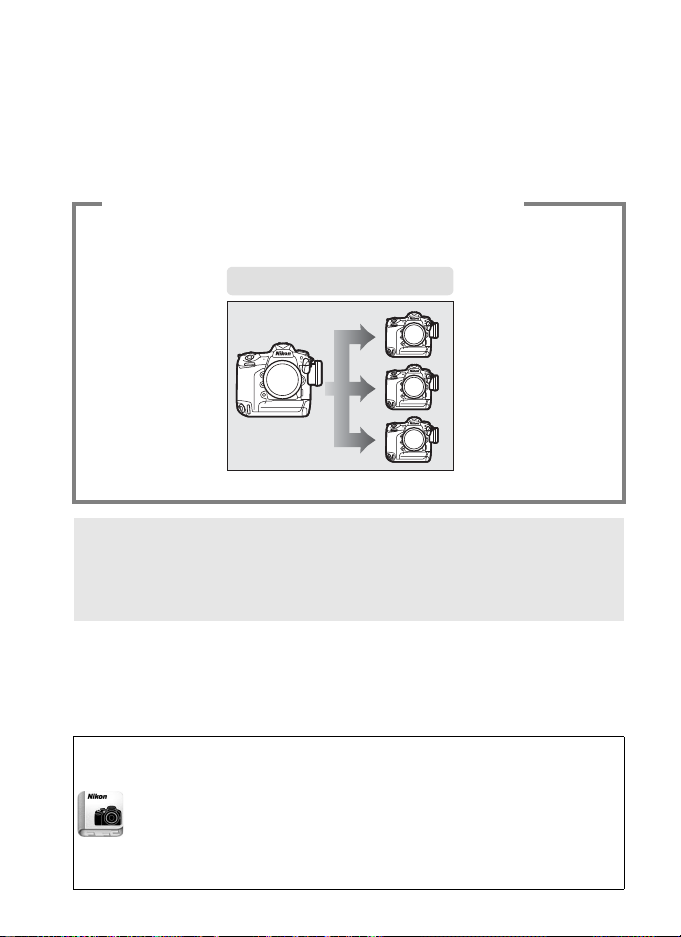
Control multiple cameras
Synchronized release (0 49)
3
(requires optional WT-6 or WT-5 wireless
transmitters)
A Tip
See page 5 for information on configuring the camera for connection to
a host computer, page 39 for information on configuring the camera for
connection to an ftp server.
Nikon Manual Viewer 2
Install the Nikon Manual Viewer 2 app on your smartphone or tablet
to view Nikon digital camera manuals, anytime, anywhere.
Manual Viewer 2 can be downloaded free of charge from the App
Store and Google Play.
manuals requires an Internet connection, for which fees may be
levied by your phone or Internet service provider.
Download of the app and any product
Nikon
iii
Page 4

Trademark Information
IOS is a trademark or registered trademark of Cisco Systems, Inc., in the
United States and/or other countries and is used under license. Windows
is either a registered trademark or a trademark of Microsoft Corporation in
the United States and/or other countries. Mac, OS X, iPhone, and iPad are
registered trademarks of Apple Inc. in the United States and/or other
countries. XQD is a trademark of Sony Corporation. CompactFlash is a
trademark of SanDisk Corporation. All other trade names mentioned in
this guide or the other documentation provided with your Nikon product
are trademarks or registered trademarks of their respective holders.
Memory Cards
This camera is available in XQD- and CompactFlash-compatible models.
The instructions in this guide assume an XQD memory card is used, but
the operations for both models are identical.
Apple Public Source License
This product includes Apple mDNS source code that is subject to the
terms of the Apple Public Source License located at URL
http://developer.apple.com/opensource/.
This file contains Original Code and/or Modifications of Original Code as
defined in and that are subject to the Apple Public Source License Version
2.0 (the ‘License’). You may not use this file except in compliance with the
License. Please obtain a copy of the License at
http://www.opensource.apple.com/license/apsl/ and read it before
using this file.
The Original Code and all software distributed under the License are
distributed on an ‘AS IS’ basis, WITHOUT WARRANTY OF ANY KIND, EITHER
EXPRESS OR IMPLIED, AND APPLE HEREBY DISCLAIMS ALL SUCH
WARRANTIES, INCLUDING WITHOUT LIMITATION, ANY WARRANTIES OF
MERCHANTABILITY, FITNESS FOR A PARTICULAR PURPOSE, QUIET
ENJOYMENT OR NON-INFRINGEMENT. Please see the License for the
specific language governing rights and limitations under the License.
iv
Page 5

Notices
• No part of this guide may be reproduced, transmitted, transcribed,
stored in a retrieval system, or translated into any language in any form,
by any means, without Nikon’s prior written permission.
• Nikon reserves the right to change the appearance and specifications of
the hardware and software described in this guide at any time and
without prior notice.
• Nikon will not be held liable for any damages resulting from the use of
this product.
• While every effort has been made to ensure that the information in this
guide is accurate and complete, we would appreciate it were you to
bring any errors or omissions to the attention of the Nikon
representative in your area (address provided separately).
Notice Concerning Prohibition of Copying or Reproduction
Note that simply being in possession of material that has been digitally
copied or reproduced by means of a scanner, digital camera, or other
device may be punishable by law.
• Items prohibited by law from being copied or reproduced
Do not copy or reproduce paper money, coins, securities, government
bonds, or local government bonds, even if such copies or reproductions
are stamped “Sample.”
The copying or reproduction of paper money, coins, or securities which
are circulated in a foreign country is prohibited.
Unless the prior permission of the government has been obtained, the
copying or reproduction of unused postage stamps or post cards issued
by the government is prohibited.
The copying or reproduction of stamps issued by the government and
of certified documents stipulated by law is prohibited.
v
Page 6

• Cautions on certain copies and reproductions
The government has issued cautions on copies or reproductions of
securities issued by private companies (shares, bills, checks, gift
certificates, etc.), commuter passes, or coupon tickets, except when a
minimum of necessary copies are to be provided for business use by a
company. Also, do not copy or reproduce passports issued by the
government, licenses issued by public agencies and private groups, ID
cards, and tickets, such as passes and meal coupons.
• Comply with copyright notices
Under copyright law, photographs or recordings of copyrighted works
made with the camera can not be used without the permission of the
copyright holder. Exceptions apply to personal use, but note that even
personal use may be restricted in the case of photographs or recordings
of exhibits or live performances.
Background Knowledge
This guide assumes basic knowledge of ftp servers, local area networks
(LANs), and wireless networks. For more information on installing,
configuring, and using the devices in a network, contact the manufacturer
or network administrator. Information on configuring computers for
connection to wireless networks may be found in the on-line help for the
Wireless Transmitter Utility.
Life-Long Learning
As part of Nikon’s “Life-Long Learning” commitment to ongoing product
support and education, continually-updated information is available online at the following sites:
• For users in the U.S.A.: http://www.nikonusa.com/
• For users in Europe and Afric a: http://www.europe-nikon.com/support/
• For users in Asia, Oceania, and the Middle East: http://www.nikon-asia.com/
Visit these sites to keep up-to-date with the latest product information,
tips, answers to frequently-asked questions (FAQs), and general advice on
digital imaging and photography. Additional information may be
available from the Nikon representative in your area. See the following
URL for contact information: http://imaging.nikon.com/
vi
Page 7

Illustrations
The appearance and content of the software and operating system
dialogs, messages, and displays shown in this guide may vary with the
operating system used. For information on basic computer operations,
see the documentation provided with the computer or operating system.
vii
Page 8

Table of Contents
What Networks Can Do for You.........................................................ii
Notices........................................................................................................v
Introduction 1
Network Options.....................................................................................2
The Wireless Transmitter Utility ........................................................4
Transfer, Control, and HTTP 5
Ethernet Connections ...........................................................................5
Step 1: Connecting an Ethernet Cable....................................... 6
Step 2: Enabling the Ethernet .......................................................8
Step 3: The Connection Wizard .................................................... 8
Step 4: Pairing...................................................................................12
For information on connecting to a wireless LAN using an
optional WT-6 or WT-5 wireless transmitter, see the manual
provided with the device.
Image Transfer...................................................................................... 14
Camera Control .................................................................................... 18
HTTP Server............................................................................................ 21
Computer and Android Web Browsers....................................27
iPhone Web Browsers ....................................................................34
viii
Page 9

FTP 39
Ethernet Connections ........................................................................ 39
Step 1: Connecting an Ethernet Cable .................................... 40
Step 2: Enabling the Ethernet..................................................... 41
Step 3: The Connection Wizard.................................................. 41
For information on connecting to a wireless LAN using an
optional WT-6 or WT-5 wireless transmitter, see the manual
provided with the device.
FTP Upload............................................................................................. 45
Synchronized Release 49
Selecting Wireless LAN for Synchronized Release.............. 50
Synchronized Release Options .................................................. 50
Taking Pictures................................................................................. 52
Menu Guide 55
Appendices 65
Creating Profiles on a Computer ................................................... 65
Creating an FTP Server ...................................................................... 67
Manual Profile Creation..................................................................... 75
Troubleshooting .................................................................................. 77
Index......................................................................................................... 78
ix
Page 10

x
Page 11

Introduction
D
This icon marks cautions, information that should be read before
use to prevent damage to the product.
A
This icon marks notes, information that should be read before
using the device.
0
This icon marks references to other pages in this guide.
This guide describes how to use the camera in (chiefly Ethernet)
network environments, including connecting to and operating the
camera in a network. Be sure to read this guide and the camera
manual thoroughly and to keep them where they will be read by
all those who use the product. Information on using optional WT-6
and WT-5 wireless transmitters can be found in the manuals for the
devices in question.
Symbols and Conventions
The following symbols and conventions are used throughout this guide:
Save where otherwise noted, it is assumed that default camera settings
are used.
1
Page 12

Network Options
The camera can be connected to Ethernet or wireless networks
using the built-in Ethernet port or an optional WT-6 or WT-5
wireless transmitter (note that an Ethernet cable — available
separately from commercial sources — is required for an Ethernet
connection). Choose from the following connection modes:
FTP upload
(045)
Image transfer
(014)
Camera control
(018)
HTTP server
(021)
Synchronized release
(wireless only; 049)
Upload existing photos and movies to a computer
or ftp server, or upload new photos as they are
taken.
Control the camera using optional
Camera Control Pro 2 software and save new
photos and movies directly to the computer.
View and take pictures remotely using a browserequipped computer or smart device.
Synchronize the shutter releases for multiple
remote cameras with a master camera.
A Ethernet Connection
Ethernet connections require no adjustments to wireless LAN settings.
A FTP Servers
Servers can be configured using standard ftp services available with
supported operating systems, such as IIS (Internet Information
Services). Internet ftp connections and connection to ftp servers
running third-party software are not supported.
A HTTP Sever Mode
Internet connections are not supported in http server mode.
2
Page 13

A Routers
Connection to computers on other networks via a router is not
supported.
A Firewall Settings
TCP ports 21 and 32768 through 61000 are used for ftp, TCP ports 22
and 32768 through 61000 for sftp, and TCP port 15740 and UDP port
5353 for connections to computers. File transfer may be blocked if the
server firewall is not configured to allow access to these ports.
3
Page 14

The Wireless Transmitter Utility
The Wireless Transmitter Utility is used for pairing in image transfer
and camera control modes (0 13) and can also help create
network profiles. You can install the utility after downloading it
from the following website:
http://downloadcenter.nikonimglib.com/
Be sure to use the latest versions of the Wireless Transmitter Utility
and the camera firmware.
4
Page 15
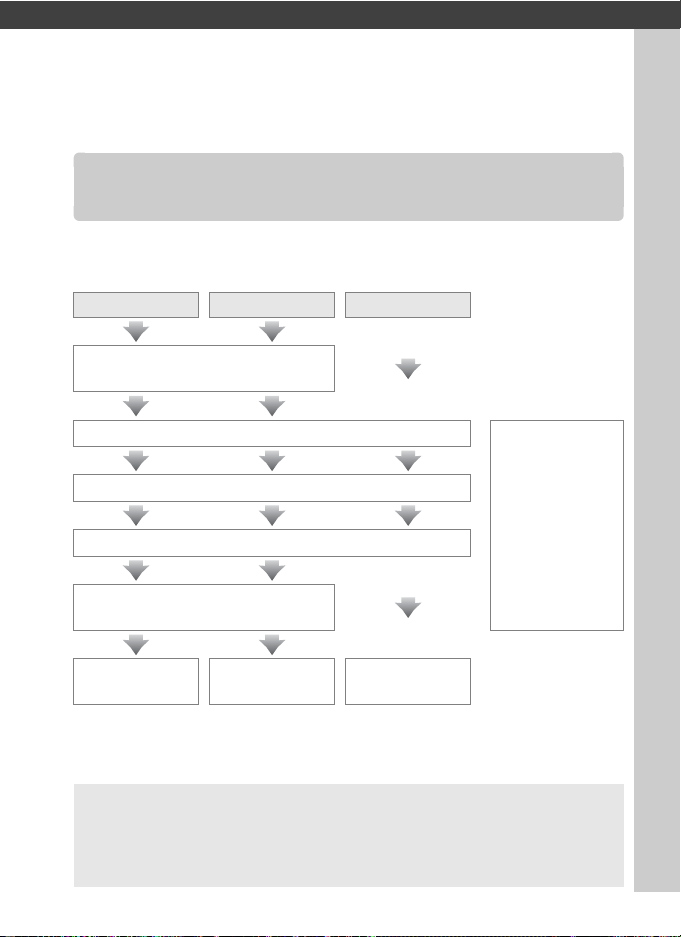
Transfer, Control, and HTTP
Ethernet Connections
Follow the steps below to connect to a computer in image transfer,
camera control, and http server modes.
Image transfer Camera control HTTP server
Install the Wireless Transmitter Utility
(04)
Step 1: Connect an Ethernet cable (06)
Step 2: Select Ethernet (08)
Step 3: Run the connection wizard (08)
Step 4: Pair the camera and computer
(012)
Transfer pictures
(014)
Control the
camera (018)
Access the camera
(021)
For information
on using the
WT-6 or WT-5 to
connect to
wireless
networks, see
the manual
provided with
the device.
D Choosing a Power Source
To prevent the camera powering off unexpectedly during setup or data
transfer, use a fully-charged battery or an optional AC adapter. For more
information, see the camera manual.
5
Page 16
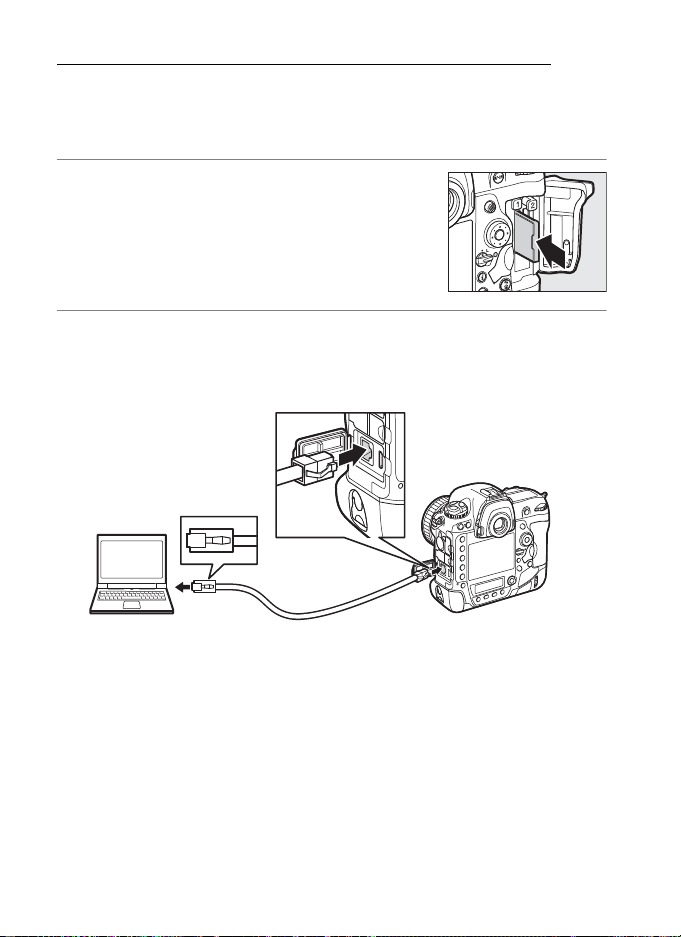
Step 1: Connecting an Ethernet Cable
After starting the computer and logging in, ready the camera as
described below. Do not turn the camera off or disconnect the
Ethernet cable while data are being transferred to the computer.
1 Insert a memory card.
Turn the camera off and insert a memory
card. This step can be omitted in camera
control mode (018).
2 Connect an Ethernet cable.
Connect the Ethernet cable as shown below. Do not use force
or insert the connectors at an angle.
6
Page 17
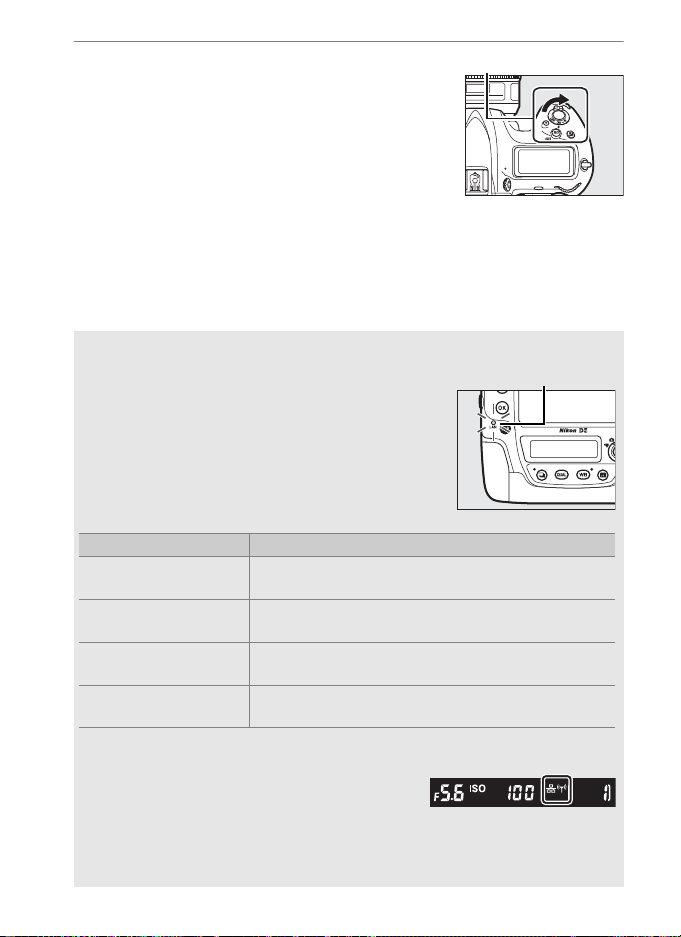
3 Turn the camera on.
Power switch
Network
indicator
Network indicator Status
●
(off)
Network functions disabled (0 55) or Ethernet
cable not connected.
K
(green)
Waiting to connect.
H
(flashes green)
Connected.
H
(flashes amber)
Error.
Rotate the power switch to turn the
camera on.
A Connection Status
Connection status is shown by the network
indicator.
A The Viewfinder Display
Connection status is also shown in the
camera viewfinder. T is displayed when the
camera is connected via Ethernet, U when it
is connected to a wireless network, and a
flashing when an error has occurred.
7
Page 18
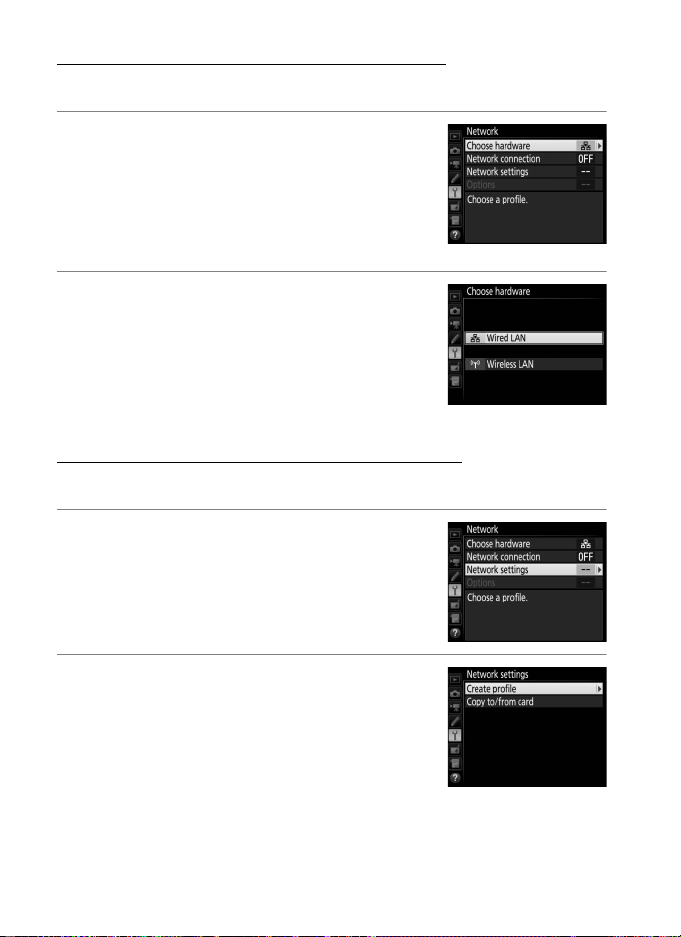
Step 2: Enabling the Ethernet
Select the Ethernet as the network device used by the camera.
1 Select Choose hardware.
In the setup menu, select Network, then
highlight Choose hardware and press 2.
The menu offers a choice of Wired LAN
and Wireless LAN.
2 Select Wired LAN.
Highlight Wired LAN and press J to
select the highlighted option and return
to the network menu.
Step 3: The Connection Wizard
Follow the on-screen instructions to create a network profile.
1 Display network profiles.
In the network menu, highlight Network
settings and press 2 to display the
profiles list and other network settings.
2 Select Create profile.
Highlight Create profile and press 2.
Note that if the list already contains nine
profiles, you will need to delete an
existing profile using the O (Q) button
before proceeding (057).
8
Page 19
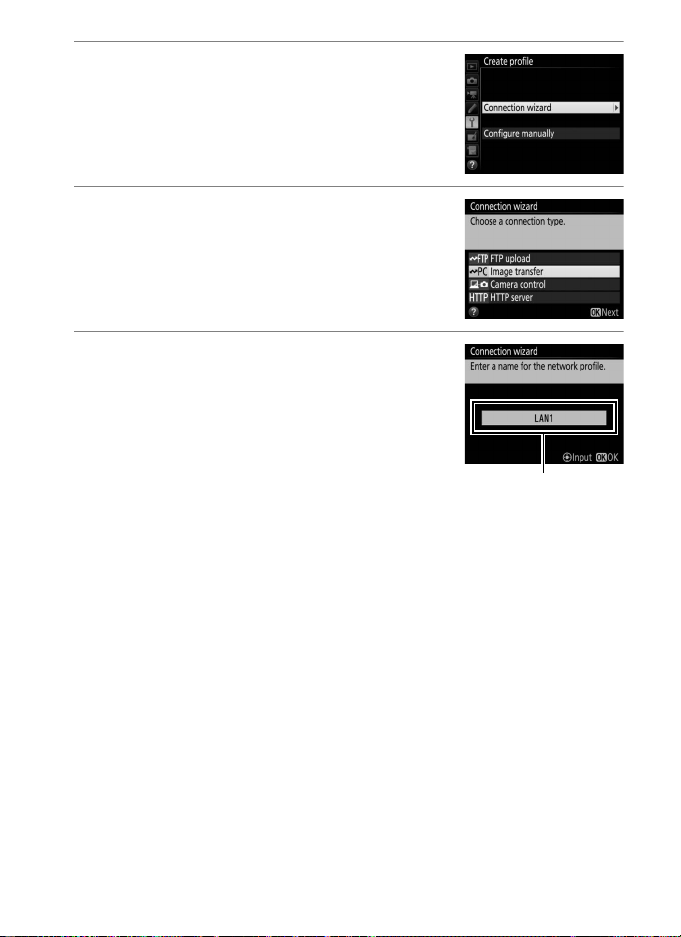
3 Start the connection wizard.
Profile name
Highlight Connection wizard and press
2 to start the connection wizard.
4 Choose a connection type (02).
Highlight Image transfer, Camera
control, or HTTP server and press J.
5 Name the new network profile.
A default profile name will be displayed;
to change the name as described in “Text
Entry” (0 10), press the center of the
multi selector. The profile name will
appear in the Network > Network
settings list in the camera setup menu.
Press J to proceed to the next step when
entry is complete.
9
Page 20

A Tex t Ent r y
Name area
Keyboard area
Keyboard selection
The following dialog is displayed when text entry is required.
To enter a new letter at the current cursor position, tap the letters on the
touch-screen keyboard (tap the keyboard selection button to cycle
through the upper-case, lower-case, and symbol keyboards). You can
also use the multi selector to highlight the desired character in the
keyboard area and press the center of the multi selector (note that if a
character is entered when the field is full, the last character in the field
will be deleted). To delete the character under the cursor, press the
O (Q) button. To move the cursor to a new position, tap the display or
hold the W (M) button and press 4 or 2.
To complete entry and return to the previous menu, press J. To exit to
the previous menu without completing text entry, press G.
10
Page 21
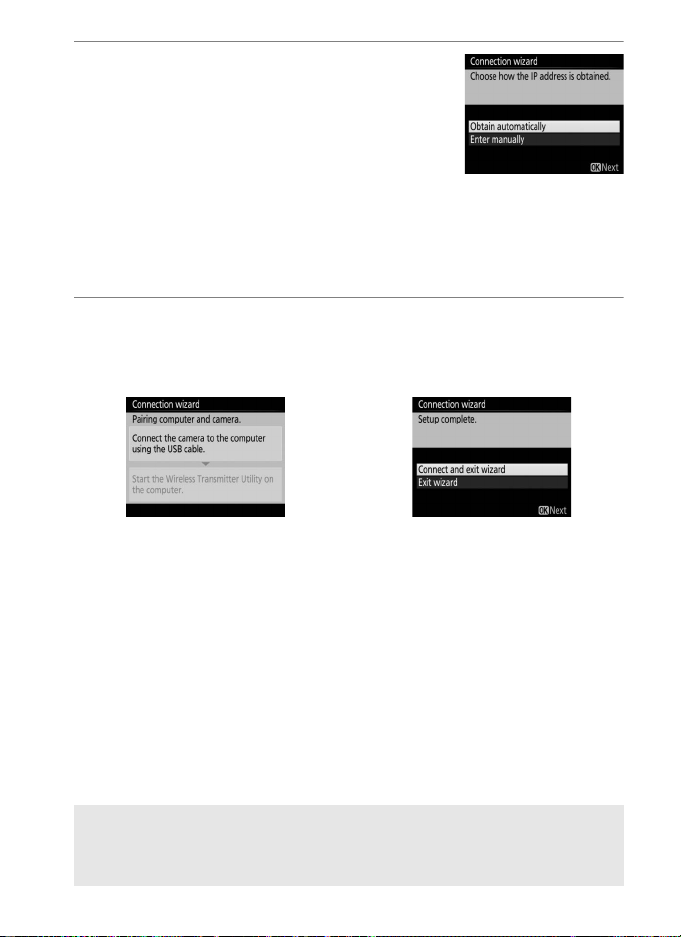
6 Obtain or select an IP address.
Highlight one of the following options
and press J.
• Obtain automatically: Select this option if
the network is configured to supply the
IP address automatically.
• Enter manually: When prompted, enter an IP address and
subnet mask by pressing 4 and 2 to highlight segments
and 1 and 3 to change. Press J to proceed when entry is
complete.
7 Choose your next step.
The IP address will be displayed; press J. Your next step
depends on the connection type selected in Step 4 on page 9:
If you chose Image transfer or Camera
control, pair the camera and computer as
described on page 12.
If you chose HTTP server, proceed to Step 8.
A Routers
Connection to computers on other networks via a router is not
supported.
11
Page 22
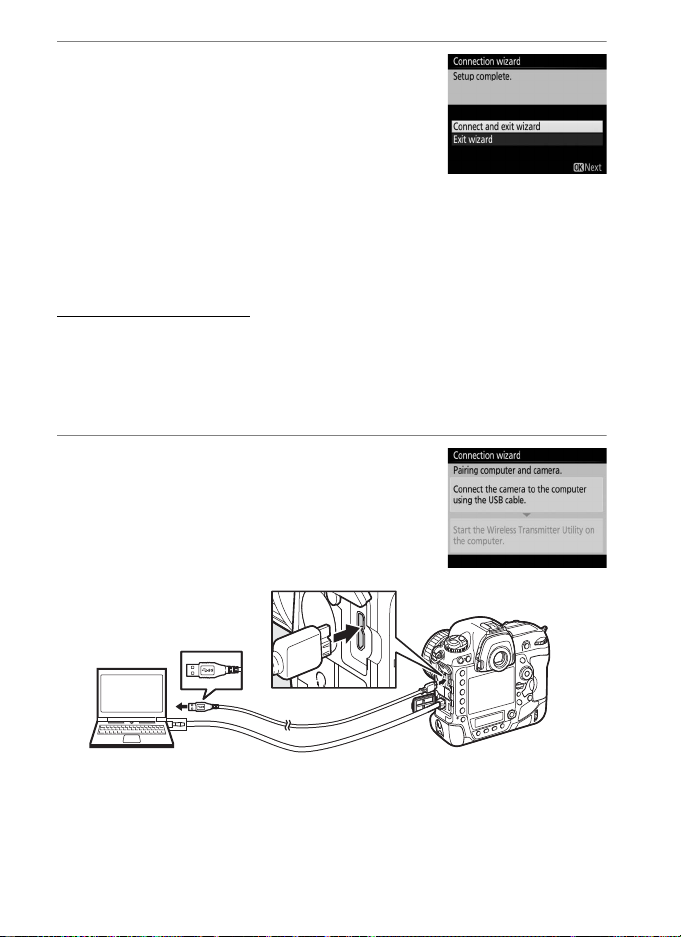
8 Exit the wizard.
Highlight one of the following options
and press J.
• Connect and exit wizard: Save the new
network profile and connect to the
server.
• Exit wizard: Save the new network profile and exit.
Proceed to “HTTP Server” (021).
Step 4: Pairing
If you selected Image transfer or Camera control in Step 4 of the
connection wizard (0 9), pair the camera with the computer as
described below. Pairing allows the computer to connect to the
camera.
1 Connect the camera to the
computer via USB.
When prompted, connect the camera to
the computer using the USB cable
supplied with the camera.
12
Page 23

2 Start the Wireless Transmitter Utility.
When prompted, start the copy of the
Wireless Transmitter Utility installed on
the computer. Pairing will begin
automatically.
3 Disconnect the camera.
The message at right will be displayed
when pairing is complete. Disconnect the
USB cable.
4 Exit the wizard.
Highlight one of the following options
and press J.
• Connect and exit wizard: Save the new
network profile and connect to the
server.
• Exit wizard: Save the new network profile and exit.
Proceed to “Image Transfer” (014) or “Camera Control” (018).
13
Page 24
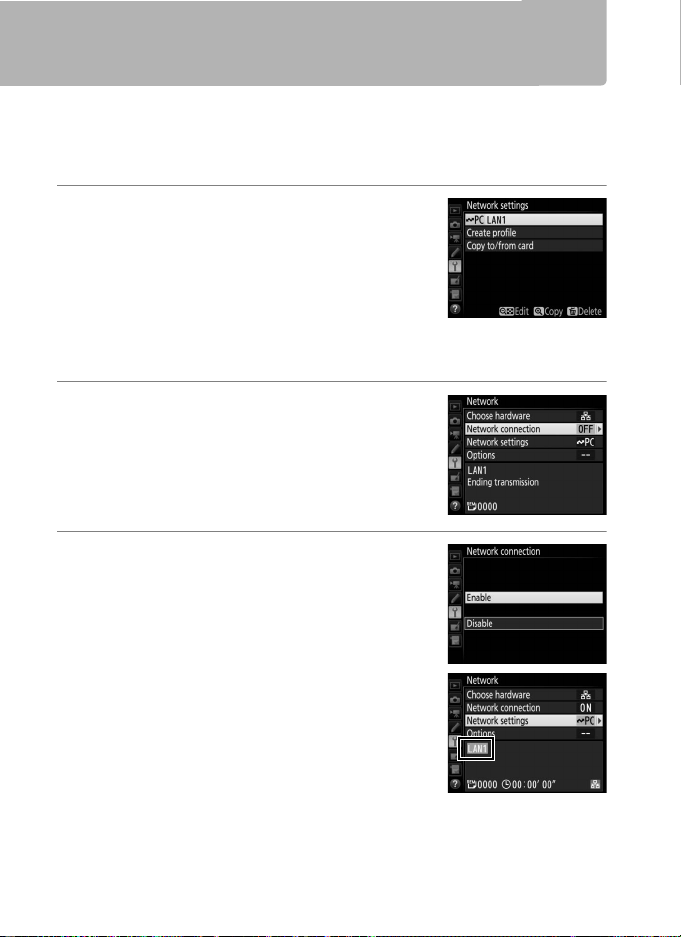
Image Transfer
Image transfer is used to upload photographs and movies to the
computer from a camera memory card. The explanation that
follows assumes that existing pictures are used.
1 Display network profiles.
In the setup menu, select Network >
Network settings to display the profiles
list. Image transfer profiles are indicated
by a K icon. Highlight a profile and
press J to select the highlighted profile
and return to the network menu.
2 Select Network connection.
Highlight Network connection and
press 2.
3 Select Enable.
Highlight Enable and press J to
connect to the network and return to
the network menu.
14
The profile name will be displayed in
green when a connection is established.
Page 25
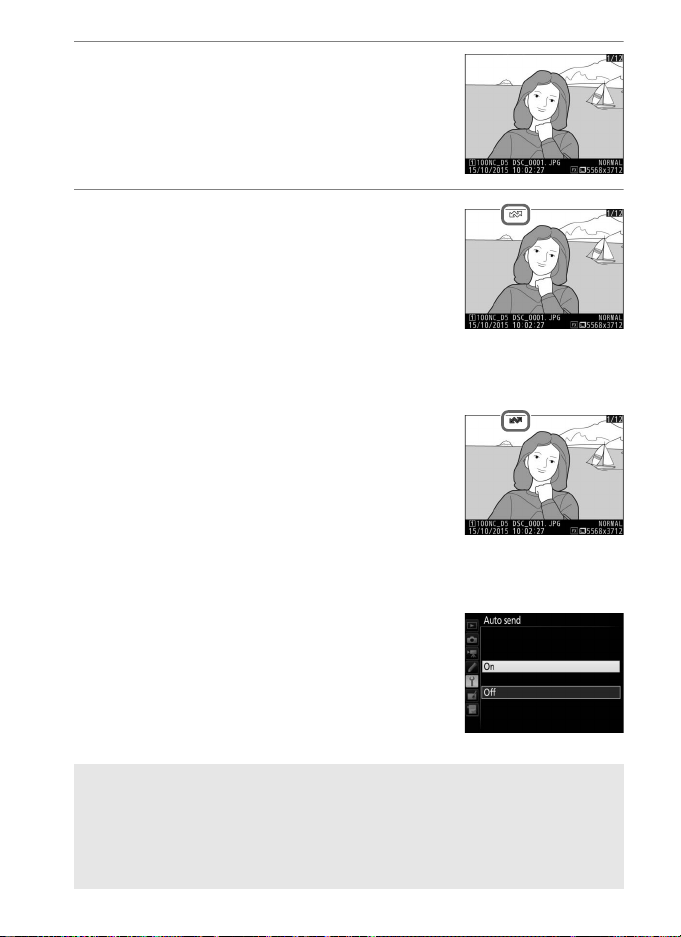
4 View pictures.
Press the K button to view pictures.
Display the first picture to be sent in
single-image playback or highlight it in
the thumbnail list.
5 Upload pictures.
Press J and the center of the multi
selector. A white transfer icon will appear
on the picture and upload will begin
immediately. The transfer icon turns
green during upload, and turns blue
when upload is complete. Additional pictures will be
uploaded in the order selected.
To upload a picture that has already been
uploaded once, press J and the center of
the multi selector once to remove the
blue transfer icon, and then press J and
the center of the multi selector again to
mark the image with a white transfer
icon.
Uploading New Photographs as They Are Taken
To upload new photographs as they are
taken, select On for Network > Options >
Auto send in the setup menu (0 61).
A Upload Marking
The image currently displayed full-frame or highlighted in thumbnail
playback can be marked for upload by pressing the i button,
highlighting Select/deselect for transfer in the i-button menu, and
pressing 2.
15
Page 26

Interrupting Transmission/Removing Transfer Marking
To cancel transmission of images marked with white or green
transfer icons, select the images during playback and press J and
the center of the multi selector. The transfer icon will be removed.
Any of the following actions will also interrupt transmission:
• Turning the camera off (transfer marking is saved, and transfer
will resume when the camera is next turned on)
• Selecting Ye s for Network > Options > Deselect all? (062; this
option also removes transfer marking from all images)
A Firewall Settings
TCP port 15740 and UDP port 5353 are used for host computer
connections. Computer firewalls must be configured to allow access to
these ports, as otherwise the computer may not be able to access the
camera.
A Interval Timer Photography
Upload will be interrupted if the standby timer expires while interval
timer photography is in progress. Choose a long standby time before
starting the interval timer.
A Voice Memos
Voice memos can not be uploaded separately, but will be included
when the associated pictures are transmitted.
A During Upload
Do not remove the memory card or disconnect the Ethernet cable
during upload.
A Loss of Signal
Wireless transmission may be interrupted if the signal is lost. Transmission
can be resumed by turning the camera off and then on again.
A Destination Folders
By default, images are uploaded to the following folders:
• Windows: \Users\(user name)\Pictures\Wireless Transmitter Utility
• Mac: /Users/(user name)/Pictures/Wireless Transmitter Utility
The destination folder can be selected using the Wireless Transmitter
Utility.
16
Page 27
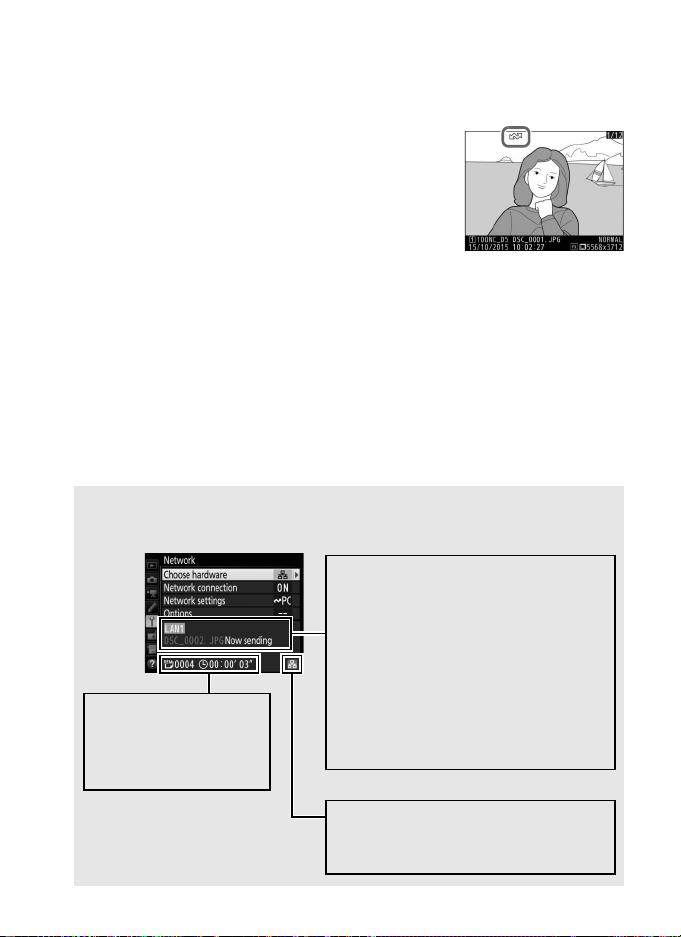
Transfer Status
Signal strength: Wireless signal
strength. Ethernet connections are
shown by d.
Status area: The status of the
connection to the host. The profile
name is displayed in green when a
connection is established. While files
are being transferred, the display
shows “Now sending” preceded by
the name of the file being sent.
Errors that occur during transfer are
also displayed here (077).
e, f: The number of
images remaining and
the estimated time
required to send them.
During playback, the status of images selected for upload is shown
as follows:
: “Send”
a
Images that have been selected for upload
are marked with a white transfer icon.
: “Sending”
b
A green transfer icon is displayed during
upload.
: “Sent”
c
Images that have been uploaded successfully are marked with a
blue transfer icon.
A Network Status
Network status can be viewed in the top level of the network menu.
17
Page 28
Camera Control
Select this option to control the camera from a computer running
Camera Control Pro 2 (available separately) and save photographs
directly to the computer hard disk instead of the camera memory
card (movies will still be saved to the camera memory card; insert a
memory card before shooting movies). Note that the camera
standby timer will not expire when the camera is in camera control
mode.
1 Display network profiles.
In the setup menu, select Network >
Network settings to display the profiles
list. Camera control profiles are indicated
by a L icon. Highlight a profile and
press J to select the highlighted profile
and return to the network menu.
2 Select Network connection.
Highlight Network connection and
press 2.
18
Page 29

3 Select Enable.
Highlight Enable and press J to
connect to the network and return to
the network menu.
The profile name will be displayed in
green when a connection is established.
4 Start Camera Control Pro 2.
Start the copy of Camera Control Pro 2 (available separately)
installed on the host computer. For information on using
Camera Control Pro 2, see the Camera Control Pro 2 manual
(pdf).
A Firewall Settings
TCP port 15740 and UDP port 5353 are used for host computer
connections. Computer firewalls must be configured to allow access to
these ports, as otherwise the computer may not be able to access the
camera.
A Ethernet Networks
Do not disconnect the Ethernet cable while the camera is on.
D Wireless Networks
Operations may take longer on wireless networks. If the signal is
disrupted while pictures are being transferred to Camera Control Pro 2,
the camera network indicator or the LED on the WT-5 will flash amber;
disable and re-enable the network connection (0 55). Transfer will
resume when the connection is re-established. Note that transfer can
not be resumed if you turn the camera off before transfer is complete.
19
Page 30

A Network Status
Signal strength: Wireless signal
strength. Ethernet connections are
shown by d.
Status area: The status of the
connection to the host. The profile
name is displayed in green when a
connection is established. Errors are
also displayed here (077).
Network status can be viewed in the top level of the network menu.
20
Page 31

HTTP Server
Select HTTP server to view the pictures on the camera memory
card or take photographs from the web browser on a computer or
smart device (see page 26 for system requirements). Up to five
users can access the camera at one time, although only one can
take photographs or edit text. Note that the standby timer will not
expire automatically when the camera is in http server mode.
1 Display network profiles.
In the setup menu, select Network >
Network settings to display the profiles
list. HTTP server profiles are indicated by
a M icon. Highlight a profile and press
J to select the highlighted profile and
return to the network menu.
2 Select Network connection.
Highlight Network connection and
press 2.
21
Page 32

3 Select Enable.
Highlight Enable and press J to
connect to the network and return to
the network menu.
The URL used for connection to the
camera is displayed when a connection
is established.
4 Launch the web browser.
Launch the web browser on the computer or smart device.
5 Enter the camera URL.
Enter the camera URL (“http://” followed
by the camera IP address, as shown in the
network menu) in the browser window
address field.
22
Page 33

6 Log in.
Enter your user name and password in the web browser login
dialog (the user name and password are set using Network >
Options > HTTP user settings in the network menu as
described on page 62; the default user name is “nikon” while
the default password is blank).
23
Page 34

7 Choose a language.
Click Language and choose the desired option.
8 Choose an operating mode.
Choose Shooting/Viewer to take pictures (027, 34) and
Shooting/Viewer or Viewer to view existing pictures (0 29,
36). To use the computer or smart device web browser to edit
image comments and copyright and IPTC information stored
on the camera, select Edit text (0 31, 38). Up to five users at a
time can connect using Viewer, but only one user at a time
can connect using Shooting/Viewer or Edit text (if another
user is already connected using Shooting/Viewer or Edit text,
these options will not be displayed and only four users will be
able to connect using Viewer).
24
Page 35

A Network Status
Signal strength: Wireless signal
strength. Ethernet connections are
shown by d.
Status area: The status of the
connection to the host. The camera
URL is displayed when a connection
is established. Errors are also
displayed here (077).
Network status can be viewed in the top level of the network menu.
25
Page 36

A HTTP Server System Requirements
Windows
OS Windows 10, Windows 8.1, Windows 7
Browser
•Windows 10: Microsoft Edge
•Windows 8.1: Internet Explorer 11
• Wind ows 7: Internet Explorer 10
Graphics
• Resolution: 1024 × 768 pixels (XGA) or more; 1280 × 1024
pixels or more recommended
• Col or: 24-bit color (True Color) or more
Mac
OS OS X version 10.10, 10.9, or 10.8
Browser
•OS X version 10.10: Safari 8
• OS X version 10.9: Safari 7
• OS X version 10.8: Safari 6
Graphics
• Resolution: 1024 × 768 pixels (XGA) or more; 1280 × 1024
pixels or more recommended
• Col or: 24-bit color (millions of colors) or more
Android OS
OS Android 5.0, 4.4
Browser Chrome
iOS
OS iOS 8, iOS 7
Browser The version of Safari included with the operating system
Operation has been confirmed with the following systems:
26
Page 37

Computer and Android Web Browsers
Display panel (028)
Camera settings (028)
Exposure mode
Tes t but ton (028)
Shutter button (028)
Still photography/movie button
Logout button
Home button (024)
Shoot button
Zoom buttons Focus buttons
Live view button
Viewfinder
View button (029)
Small
Large
This section describes the http server displays for computer and
Android web browsers (dialogs are shown with all buttons
displayed for explanatory purposes). Click or tap to adjust camera
settings. For information on the displays for iPhones, see page 34.
❚❚ The Shooting Window
The following controls can be accessed by selecting Shooting/
Viewer on the server home page. To display the view through the
camera lens in the viewfinder area, tap or click the live view
button. Tap or click the button again to exit live view.
A Focus Buttons
The size of the focus adjustment increases with
the distance of the button from the center of
the display.
27
Page 38

Display panel
Release mode
button
Camera settings
Shutter button
Test button
Contains the exposure indicator and shows the battery
level and number of exposures remaining.
Click or tap icons to adjust settings for photography or
movie recording. See the camera manual for details.
Take a photograph or start and end movie recording. To
focus, click or tap the desired subject in the viewfinder
area.
Take a test photo and display it in the viewfinder
without recording it to the camera memory card. Not
available in movie live view.
A Enabling Live View on the Camera
When the view through the camera lens is displayed in the viewfinder
area, pressing the camera a button will display the view through the
lens in the camera monitor. Press the button again to end live view on
the camera.
A The Release Mode Button
Rotating the camera release mode dial to S enables
the release mode button, which can be used to
choose from single-frame, high-speed continuous,
and low-speed continuous release modes. In highand low-speed continuous release modes, the camera
takes photographs while the shutter-release button is pressed.
28
Page 39

❚❚ The Viewer Window
Navigation controls
Thumbnails (click or tap
to view pictures full
frame). Movies are
indicated by 1; voice
memos are listed as
separate files.
Page number
Full-frame view (030)
Film-strip view (0 30)
Thumbnail view (029)
View most recent
picture in folder
Thumbnails per
page
Page controls
Folder selection
The viewer window can be accessed by selecting Viewer on the
server home page or by clicking or tapping the view button in the
shooting window. The viewer window offers a choice of
thumbnail, film-strip (030), and full-frame views (0 30).
Thumbnail View
View multiple small (“thumbnail”) images per page. The controls at
the top of the window can be used for navigation.
A Navigation Controls
29
Page 40

Film-Strip View
Current picture (click or tap H
or F to view additional
pictures)
Copy current pic ture to
computer or smart device
Thumbnails (click or tap to
select)
Current picture (click or tap
H or F to view additional
pictures)
Copy current pic ture to
computer or smart device
Choose the picture displayed from the thumbnails at the bottom
of the window.
Full-Frame View
View pictures full frame.
30
Page 41

❚❚ The Text Edit Window
Home button (0 24)
Image comment (0 32)
Copyright information (0 32)
IPTC information (0 33)
Clear button
Save button Logout button
The text edit window, which is used to edit image comments and
copyright and IPTC information stored on the camera, can be
accessed by selecting Edit text on the server home page.
D Saving Changes
Changes are not saved automatically. Click or tap the save button to
save changes.
D The Clear Button
Clicking or tapping the clear button immediately deletes the displayed
text, even if you exit without clicking the save button.
31
Page 42

Image Comment
Create a comment that can be appended to subsequent images.
Comments can be viewed as metadata in ViewNX-i or Capture NX-D.
The following options are available:
• Attach comment: Select this option to attach the comment to all
subsequent photographs.
• Input comment: Input a comment up to 36 characters long.
Copyright Information
Add copyright information to new photographs as they are taken.
Copyright information can be viewed as metadata in ViewNX-i or
in Capture NX-D. The following options are available:
• Attach copyright information: Select this option to attach copyright
information to all subsequent photographs.
• Artist/copyright: Enter a photographer name up to 36 characters
long and a copyright holder name up to 54 characters long.
Viewing Image Comments and Copyright Information on the
Camera
Image comments and copyright information can be viewed during
full-frame playback on the corresponding pages of the camera
photo information display.
A Copyright Information
To prevent unauthorized use of the artist or copyright holder names,
make sure that Attach copyright information is not selected and that
the Artist and Copyright fields are blank before lending or transferring
the camera to another person. Nikon does not accept liability for any
damages or disputes arising from the use of the Copyright
information option.
32
Page 43

IPTC Information
Embed IPTC presets in photographs as they are taken. The following
options are available:
• Auto embed during shooting: Selecting this tab displays a list of IPTC
presets; highlight a preset and press the save button to embed
the selected preset in all subsequent photographs. Select Off to
take photos with no IPTC presets.
• Select IPTC preset: Selecting this tab displays a list of IPTC presets.
Choose a preset to copy to the camera.
A IPTC Information
IPTC is a standard established by the International Press
Telecommunications Council (IPTC) with the intent of clarifying and
simplifying the information required when photographs are shared
with a variety of publications. Embedded IPTC information can be
viewed by selecting the IPTC page in the photo information display
during full-frame playback. See the camera manual for more
information.
33
Page 44

iPhone Web Browsers
Display panel (028)
Shutter button (028)
Logout button
Home button (024)
Shoot button
Exposure mode
View button (036)
Zoom buttons
Camera settings
(028)
Viewfinder (tap to
focus on selected
subject)
Camera settings
(028)
Live view button
This section describes the http server displays for iPhone web
browsers (dialogs are shown with all buttons displayed for
explanatory purposes). Tap to adjust camera settings. For
information on computer, Android, or iPad displays, see page 27.
❚❚ The Shooting Window
The following controls can be accessed by selecting Shooting/
Viewer on the server home page. Use the live view button to start
live view photography (C) or movie live view (1). The view
through the camera lens will be displayed in the viewfinder area.
To exit live view, use the live view button to turn live view off.
34
Page 45

A Enabling Live View on the Camera
Release mode
button
When the view through the camera lens is displayed in the viewfinder
area, pressing the camera a button will display the view through the
lens in the camera monitor. Press the button again to end live view on
the camera.
A The Release Mode Button
Rotating the camera release mode dial to S enables
the release mode button, which can be used to
choose from single-frame, high-speed continuous,
and low-speed continuous release modes. In highand low-speed continuous release modes, the
camera takes photographs while the shutter-release
button is pressed.
35
Page 46

❚❚ The Viewer Window
Thumbnails (tap to
view pictures full
frame). Movies are
indicated by 1; voice
memos are listed as
separate files.
Next page
Thumbnails per page
Page number
Previous page
View most recent
pictures in folder
Folder selection
The viewer window can be accessed by selecting Viewer on the
server home page or tapping the view button in the shooting
window. The viewer window for iPhone web browsers offers a
choice of thumbnail and full-frame views (037).
Thumbnail View
View multiple small (“thumbnail”) images per page.
36
Page 47

Full-Frame View
Current picture
Show next imageShow previous
image
View most recent picture in folderThumbnail view
View pictures full frame.
37
Page 48

❚❚ The Text Edit Window
Home button (0 24)
Image comment (0 32)
Copyright information (032)
Save button
Logout button
IPTC information (0 33)
Clear button
The text edit window, which is used to edit image comments and
copyright and IPTC information stored on the camera, can be
accessed by selecting Edit text on the server home page.
D Saving Changes
Changes are not saved automatically. Tap the save button to save
changes.
38
Page 49

FTP
Ethernet Connections
Follow the steps below to connect to an ftp server.
FTP server
Step 1: Connect an Ethernet cable (040) For information on
using the WT-6 or
Step 2: Select Ethernet (0 41)
Step 3: Run the connection wizard (041)
Transfer pictures (045)
D Choosing a Power Source
To prevent the camera powering off unexpectedly during setup or data
transfer, use a fully-charged battery or an optional AC adapter. For more
information, see the camera manual.
WT-5 to connect to
wireless networks,
see the manual
provided with the
device.
A FTP Servers
This guide assumes that you are connecting to an existing ftp server.
Servers can be configured using standard ftp services, such as IIS
(Internet Information Services), available with supported operating
systems (067). Internet ftp connections and connection to ftp servers
running third-party software are not supported.
39
Page 50

Step 1: Connecting an Ethernet Cable
Power switch
After starting the ftp server, connect the camera as described
below. Do not turn the camera off or disconnect the Ethernet
cable while data are being exchanged with the ftp server.
1 Insert a memory card.
Turn the camera off and insert a memory
card.
2 Connect an Ethernet cable.
Connect the camera to the ftp server as shown below. Do not
use force or insert the connectors at an angle.
3 Turn the camera on.
Rotate the power switch to turn the
camera on.
40
Page 51

Step 2: Enabling the Ethernet
Select the Ethernet as the network device used by the camera.
1 Select Choose hardware.
In the setup menu, select Network, then
highlight Choose hardware and press 2.
The menu offers a choice of Wired LAN
and Wireless LAN.
2 Select Wired LAN.
Highlight Wired LAN and press J to
select the highlighted option and return
to the network menu.
Step 3: The Connection Wizard
Follow the on-screen instructions to create a network profile.
1 Display network profiles.
In the network menu, highlight Network
settings and press 2 to display the
profiles list and other network settings.
2 Select Create profile.
Highlight Create profile and press 2.
Note that if the list already contains nine
profiles, you will need to delete an
existing profile using the O (Q) button
before proceeding.
41
Page 52

3 Start the connection wizard.
Profile name
Highlight Connection wizard and press
2 to start the connection wizard.
4 Choose a connection type.
Highlight FTP upload and press J.
5 Name the new network profile.
A default profile name will be displayed;
to change the name, press the center of
the multi selector (0 10). The profile
name will appear in the Network >
Network settings list in the camera
setup menu. Press J to proceed to the
next step when entry is complete.
6 Obtain or select an IP address.
Highlight one of the following options
and press J.
• Obtain automatically: Select this option if
the network is configured to supply the
IP address automatically. Press J to
proceed to Step 7.
• Enter manually: When prompted, enter an IP address and
subnet mask by pressing 4 and 2 to highlight segments
and 1 and 3 to change. Press J to exit when entry is
complete, then press J again to proceed to Step 7.
42
Page 53

7 Choose the server type.
Highlight FTP or SFTP (secure ftp) and
press J.
8 Enter the IP address.
Press the center of the multi selector,
enter the server URL or IP address (0 10)
and press J, and then press J to
connect.
9 Log in.
Highlight one of the following options
and press J.
• Anonymous login: Select this option if the
server does not require a user ID or
password.
• Enter user ID: Enter a user ID and password when prompted
and press J.
A Firewall Settings
Ports 21 and 32768 through 61000 are used for ftp, ports 22 and 32768
through 61000 for sftp. File transfer may be blocked if the server firewall
is not configured to allow access to these ports.
43
Page 54

10
Choose a destination folder.
Highlight one of the following options
and press J.
• Home folder: Select this option to upload
pictures to the server’s home folder.
• Enter folder name: Select this option to
upload pictures to another folder (the folder must already
exist on the server). Enter a folder name and path when
prompted and press J.
11
Exit the wizard.
Highlight one of the following options
and press J.
• Connect and exit wizard: Save the new
network profile and connect to the
server.
• Exit wizard: Save the new network profile and exit.
Proceed to “FTP Upload” (0 45).
44
Page 55

FTP Upload
Photos and movies can be uploaded from camera memory cards
to an ftp server as described below, or photos can be uploaded as
they are taken. For information on setting up an ftp server, see
page 67.
1 Display network profiles.
In the setup menu, select Network >
Network settings to display the profiles
list. FTP server profiles are indicated by a
N icon. Highlight a profile and press J
to select the highlighted profile and
return to the network menu.
2 Select Network connection.
Highlight Network connection and
press 2.
3 Select Enable.
Highlight Enable and press J to
connect to the network and return to
the network menu.
The profile name will be displayed in
green when a connection is established.
45
Page 56

4 View pictures.
Press the K button to view pictures.
Display the first picture to be sent full
frame or highlight it in the thumbnail list.
5 Upload pictures.
Press J and the center of the multi
selector. A white transfer icon will appear
on the picture and upload will begin
immediately. The transfer icon turns
green during upload, and turns blue
when upload is complete. Additional
pictures will be uploaded in the order
selected.
To upload a picture that has already been
uploaded once, press J and the center of
the multi selector once to remove the
blue transfer icon, and then press J and
the center of the multi selector again to
mark the image with a white transfer
icon.
46
Page 57

Uploading New Photographs as They Are Taken
To upload new photographs as they are
taken, select On for Network > Options >
Auto send in the setup menu (0 61).
Interrupting Transmission/Removing Transfer Marking
To cancel transmission of images marked with white or green
transfer icons, select the images during playback and press J and
the center of the multi selector. The transfer icon will be removed.
Any of the following actions will also interrupt transmission:
• Turning the camera off (transfer marking is saved, and transfer
will resume when the camera is next turned on)
•Selecting Yes for Network > Options > Deselect all? (0 62; this
option also removes transfer marking from all images)
D During Upload
Do not remove the memory card or disconnect the Ethernet cable
during upload.
A Interval Timer Photography
Upload will be interrupted if the standby timer expires while interval
timer photography is in progress. Choose a long standby time before
starting the interval timer.
A Voice Memos
Voice memos can not be uploaded separately, but will be included
when the associated pictures are transmitted.
A Loss of Signal
Wireless transmission may be interrupted if the signal is lost, but can be
resumed by turning the camera off and then on again.
47
Page 58

Transfer Status
Signal strength: Wireless signal
strength. Ethernet connections are
shown by d.
Status area: The status of the
connection to the host. The profile
name is displayed in green when a
connection is established. While files
are being transferred, the display
shows “Now sending” preceded by
the name of the file being sent.
Errors that occur during transfer are
also displayed here (077).
e, f: The number of
images remaining and
the estimated time
required to send them.
During playback, the status of images selected for upload is shown
as follows:
: “Send”
a
Images that have been selected for upload
are marked with a white transfer icon.
: “Sending”
b
A green transfer icon is displayed during
upload.
: “Sent”
c
Images that have been uploaded successfully are marked with a
blue transfer icon.
A Network Status
Network status can be viewed in the top level of the network menu.
48
Page 59

Synchronized Release
Synchronized release groups one master D5 camera with up to ten
remote cameras and synchronizes the shutters on the remote D5
camera with the release on the master camera. The master and
remote cameras must all be equipped with optional WT-6 or WT-5
wireless transmitters. Note that the standby timer will not expire
automatically when the camera is in synchronized release mode.
A D4S and D4 Cameras
Synchronized release can also be used with D4S or D4 cameras to which
WT-5 wireless transmitter have been connected.
49
Page 60

Selecting Wireless LAN for Synchronized Release
Select wireless LAN for all cameras that will be used in synchronized
release mode.
1 Select Choose hardware.
In the setup menu, select Network >
Choose hardware.
2 Select Wireless LAN.
Highlight Wireless LAN and press J to
return to the network menu.
Synchronized Release Options
The following options are available for synchronized release:
Group name, Master/remote, Remote camera check, and
Number of remote cameras. To view synchronized release
settings, select Network > Network settings in the setup menu,
highlight Synchronized release, and press W (M).
50
Page 61

❚❚ Master Camera
Configure the master camera as follows:
Group Name
Enter a group name of up to 16 characters
(010). The master and remote cameras must
all be in the same group.
Master/Remote
Select Master camera to designate the
current camera as the master camera. Each
group can have only one master; pressing the
shutter-release button on the master releases
the shutters on the remote cameras.
Remote Camera Check
Select On to check whether the remote
cameras are ready. The camera network
indicator (and the LED lamp on the WT-5, if
applicable) will flash amber to warn if the
number of cameras returning “ready” is less
than that selected for Number of remote
cameras.
Number of Remote Cameras
Enter the number (1–10) of remote cameras
in the group. This option is available only if
On is selected for Remote camera check.
51
Page 62

❚❚ Remote Cameras
Configure the remote cameras as follows:
Group Name
Enter a group name of up to 16 characters (010). The master and
remote cameras must all be in the same group.
Master/Remote
Select Remote camera to designate the current camera as a
remote camera. The shutters on the remote cameras will be
released when the shutter-release button on the camera selected
as the Master camera is pressed.
Taking Pictures
1 Display network settings.
In the setup menu, select Network >
Network settings.
2 Select Synchronized Release.
Highlight Synchronized release, press
W (M), and adjust the settings for master
and remote cameras as described on
pages 51 and 52. Press J to select
synchronized release and return to the
network menu.
52
Page 63

3 Select Network connection.
Highlight Network connection and
press 2.
4 Select Enable.
Highlight Enable and press J to
connect to the network and return to
the network menu.
5 Take pictures.
Pressing the shutter-release button on the master camera
releases the shutters on the remote cameras.
A Remote Camera Check
If remote camera check (0 51) is on, warnings will be displayed if any of
the remote cameras are not ready.
53
Page 64

54
Page 65

Menu Guide
This section describes the items in the
Network menu.
Choose Hardware
Choose the network type (wired or wireless
LAN, 0 2).
Network Connection
Choose Enable to enable the network
connection. Note that this increases the drain
on the battery; Disable is recommended
when the network is not in use.
B setup menu ➜ Network
B setup menu ➜ Network
55
Page 66

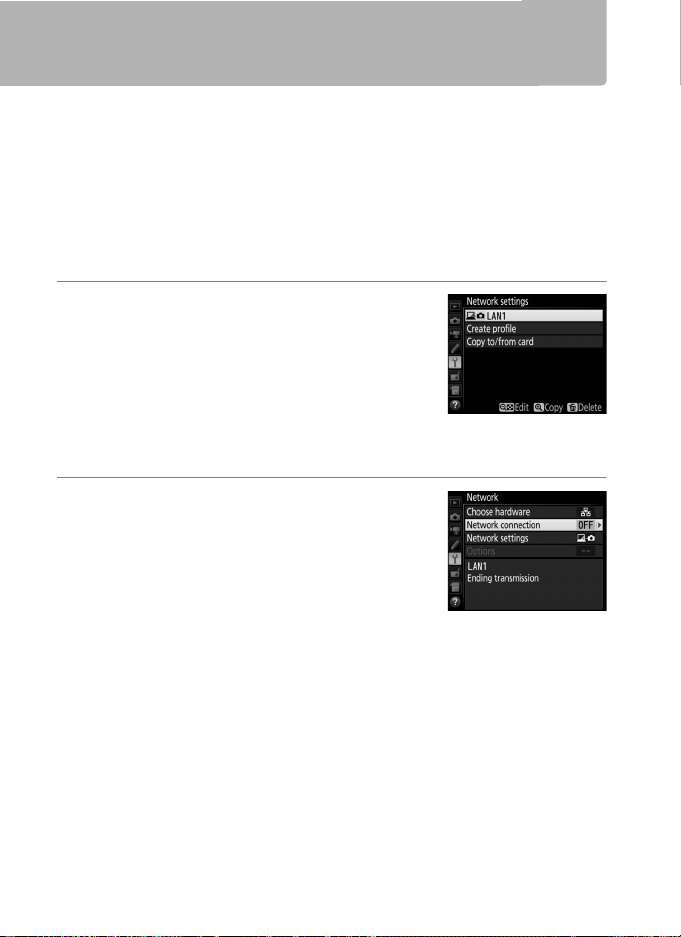
Network Settings
Connection type (09)
Profile name
(09, 42, 58)
SSID (wireless
connections only)
Communication
mode (0 59)
B setup menu ➜ Network
Highlight Network settings and press 2 to display the network
profiles list, where you can create new profiles or select an existing
profile.
❚❚ The Profile List
The camera can store up to nine network
profiles. Highlight a profile and press J to
connect to the highlighted host computer or
ftp server, or press O (Q) to delete the
highlighted profile (057). To view
information on the highlighted profile, press
L (Z/Q).
To edit the highlighted profile, press W (M) (058).
56
Page 67

❚❚ Create Profile
Choose Connection wizard to create network profiles with the
help of a wizard (08, 41), Configure manually to enter ftp and
http server settings manually (0 75).
❚❚ Copy to/from Card
This option is available only with ftp and http server connections.
Select Copy profile from card to copy profiles from the root
directory of the memory card to the profile list. Selecting Copy
profile to card displays the camera profile list; highlight a profile
and press J to copy the profile to the card (password-protected
profiles can not be copied; 058). If there are two memory cards
inserted in the camera, the card in the Slot 1 will be used for both
“copy from” and “copy to” operations.
❚❚ Deleting Network Profiles
Press O (Q) to delete the profile currently
highlighted in the profile list. A confirmation
dialog will be displayed; highlight Ye s and
press J.
57
Page 68

❚❚ Editing Network Profiles
To edit the profile currently highlighted in the
profile list, press W (M) and choose from the
following options:
General Edit the profile name and password (0 58).
Wireless
TCP/IP Edit TCP/IP settings (060).
FTP Edit ftp settings (060).
Edit wireless settings (wireless connections only;
059).
D Editing Profiles
If the shutter-release button is pressed while menus are displayed, the
monitor will turn off and any changes to the current profile will be lost.
General
Choose Profile name to edit the profile
name, Password protection to enter a profile
password and enable or disable password
protection. Enabling password protection
prevents others from viewing network
settings.
58
Page 69

Wireless
Edit the following wireless settings:
• SSID: Enter the name (SSID) of the network
on which the host computer or ftp server is
located.
• Communication mode: Select Infrastructure
for wireless communication via a wireless
network access point, Access point to use the camera as an
access point to connect to the ftp server or computer instead of
connecting via a wireless network access point.
• Channel: Select a channel (access point mode only; in
infrastructure mode, the channel will be selected automatically).
• Authentication: The authentication used on the network. Choose
from open system, shared key, WPA-PSK, and WPA2-PSK
(infrastructure) or open system and WPA2-PSK (access point
mode).
• Encryption: The encryption used on the network. The options
available depend on the authentication used:
Open: None; 64- or 128-bit WEP available when Infrastructure
is selected for Communication mode
Shared: 64- or 128-bit WEP
WPA-PSK: TKIP; AES
WPA2-PSK: AES
• Encryption key: If the network uses encryption, enter the network
key. The number of characters required depends on the type of
key used:
WEP (64-bit) WEP (128-bit) TKIP, AES
Number of characters (ASCII) 5 13 8–63
Number of characters (hex) 10 26 64
• Key index: If WEP64 or WEP128 is selected for Encryption in
infrastructure mode, choose a key index matching that used by
the access point or host computer. A key index is not required
when No encryption is selected.
59
Page 70

TCP/IP
If the network is configured to supply IP
addresses automatically, select Enable for
Obtain automatically. Otherwise select
Disable and enter the following information:
• Address/Mask: Enter an IP address and subnet
mask.
• Gateway: If the network requires a gateway address, select Enable
and enter the address supplied by the network administrator.
• Domain Name Server (DNS): If a Domain Name Server exists on the
network, select Enable and enter the address supplied by the
network administrator.
FTP
Edit the following ftp settings:
• Server type: Choose ftp or sftp and enter the
URL or IP address (required), destination
folder, and port number.
• PASV mode: Select Enable to enable PASV
mode.
• Anonymous login: Select Enable for anonymous login, or select
Disable to supply a User ID and Password.
• Proxy server: If a proxy server is required for ftp, select Enable and
enter the address and port number for the proxy server.
60
Page 71

Options
Edit the following settings.
B setup menu ➜ Network
❚❚ Auto Send
If On is selected for image transfer or ftp server connections,
photos will automatically be uploaded to the server as they are
taken (note, however, that photos can only be taken when a
memory card is inserted in the camera). Movies can not be
uploaded using this option; transfer movies during playback as
described on pages 14 and 45.
❚❚ Delete After Send
Select Ye s to delete photographs from the camera memory card
automatically once upload is complete (image transfer and ftp
server connections only; files marked for transfer before this
option is selected are unaffected). Sequential file numbering is
used while this option is in effect, regardless of the item selected
for Custom Setting d7 in the camera menus. Deletion may be
suspended during some camera operations.
❚❚ Send File As
When transferring NEF+JPEG images to a
computer or ftp server (image transfer and ftp
server connections only), choose whether to
upload both the NEF (RAW ) and J PEG files or
only the JPEG copy.
❚❚ Overwrite If Same Name
Choose Ye s to overwrite files with duplicate names during upload
to an ftp server, No to add numbers to the names of newly
uploaded files as necessary to prevent existing files being
overwritten.
61
Page 72

❚❚ Protect If Marked for Upload
Select Ye s to automatically protect files marked for upload to an
ftp server. Protection is removed as the files are uploaded.
❚❚ Send Marking (FTP Upload Mode Only)
Select On to add a timestamp to the pictures on the camera
memory card giving the time of upload. The timestamp can be
viewed using ViewNX-i or Capture NX-D. For more information, see
online help for the software in question or the Capture NX-D
manual.
❚❚ Send Folder
Select a folder for upload (image transfer and ftp server
connections only). All photos in the selected folder (including
those already marked as “sent”) will be uploaded, beginning
immediately. Movies can not be uploaded using this option;
transfer movies during playback as described on pages 14 and 45.
❚❚ Deselect All?
Select Ye s to remove transfer marking from all images selected for
upload to a computer or ftp server (image transfer and ftp server
connections only). Upload of images with a “sending” icon will
immediately be terminated.
❚❚ HTTP User Settings
Enter a user name and password for
connection to an http server (http server
connections only).
❚❚ MAC Address
Display the MAC address of the hardware selected for Choose
hardware (0 55). This option is available only when Enable is
selected for Network connection.
62
Page 73

❚❚ Power Saving
Choose
network speeds,
reduced power consumption.
network speed
remain active even when data are not being
exchanged with the server and allows Ethernet connections using
the high-speed 1000BASE-T standard.
limits Ethernet connections to 100BASE-TX and ensures that LAN
connections are terminated automatically when data transfer ends.
The camera network indicator will turn off (
Prioritize network speed
Prioritize power saving
Prioritize
ensures that LAN connections
for faster
for
Prioritize power saving
0
7).
63
Page 74

64
Page 75

Appendices
Power switch
Creating Profiles on a Computer
The Wireless Transmitter Utility (04) can be used to create
network profiles.
1 Connect the camera.
Start the computer and connect the camera using the
supplied USB cable as shown below.
2 Turn the camera on.
Rotate the power switch to turn the
camera on.
65
Page 76

3 Start the Wireless Transmitter Utility.
Double-click the Wireless Transmitter Utility icon on the
desktop (Windows) or click the Wireless Transmitter Utility
icon in the Dock (Mac).
4 Create a profile.
Follow the on-screen instructions to create a network profile.
66
Page 77

Creating an FTP Server
Images can be uploaded to ftp servers created using the standard
ftp services included with Windows 10 (Enterprise/Pro/Home),
Windows 8.1, Windows 8.1 (Enterprise/Pro), and Windows 7
(Professional/Enterprise/Ultimate). Under Windows, Internet
Information Services (IIS) are required to configure ftp servers
(installation instructions are available from Microsoft). Be sure to
use only characters that appear in the keyboard area of the camera
text-entry dialog (0 10) for such settings as user ID, password, and
folder names.
The following settings are used below for illustrative purposes:
IP address: 192.168.1.3
Subnet mask: 255.255.255.0
ftp server port: 21
ftp server
1 Go to Network and Sharing Center.
Select Network and Internet > Network and Sharing Center
in the Control Panel.
67
Page 78

2 Display the network adapter list.
Click Change adapter settings.
3 Open the network properties dialog.
If you are connecting via Ethernet, right-click Ethernet
(Windows 8.1) or Local Area Connection (Windows 7) and
select Properties. If you are connecting via a wireless LAN
adapter, right-click Wi-Fi (Windows 8.1) or Wireless Network
Connection (Windows 7) and select Properties.
68
Page 79

4 Display TCP/IP settings.
Select Internet Protocol Version 4 (TCP/IPv4) and click
Properties.
5 Enter an IP address and subnet mask.
Enter an IP address and subnet mask for the ftp server and
click OK.
69
Page 80

6 Close the network properties dialog.
Click Close.
7 Open Administrative Tools.
Select System and Security > Administrative Tools in the
Control Panel.
70
Page 81

8 Open the IIS manager.
Double-click Internet Information Services (IIS) Manager.
9 Select Add FTP Site….
Right-click the computer user name and select Add FTP
Site….
71
Page 82

10
Enter site information.
Name the site and choose the path to the folder that will be
used for ftp upload. Click Next to proceed.
A Anonymous Login
To allow anonymous login, select a folder in the user’s public folder
as the content directory.
72
Page 83

11
Choose binding and SSL options.
Select the IP address entered in Step 5, note the port number,
select Start FTP site automatically, and check No SSL. Click
Next to proceed.
73
Page 84

12
Choose authentication options.
Adjust settings as described below and click Finish.
• Authentication: Basic
• Allow access to: All users
• Permissions: Read/Write
74
Page 85

Manual Profile Creation
Follow the steps below to manually configure the camera for
connection to ftp and http servers. Note that changes to the
current profile will be lost if the camera is turned off during setup;
to prevent unexpected loss of power, use a fully-charged battery
or an optional AC adapter. If you are connecting to an ftp server
behind a firewall, you may also need to adjust firewall settings to
create exceptions for the ftp ports used by the camera (ports 21,
22, and 32768 through 61000).
1 Display network profiles.
Select Network in the setup menu, then
highlight Network settings and press 2
to display the profiles list and other
network settings.
2 Select Create profile.
Highlight Create profile and press 2.
Note that if the list already contains nine
profiles, you will need to delete an
existing profile using the O (Q) button
before proceeding (057).
3 Select Configure manually.
Highlight Configure manually and press
2.
75
Page 86

4 Select a connection type.
Highlight FTP upload or HTTP server
and press 2.
5 Adjust settings.
Adjust settings as described in “Editing
Network Profiles” (058).
D Editing Profiles
If the shutter-release button is pressed while menus are displayed, the
monitor will turn off and any changes to the current profile will be lost.
Choose a longer monitor off delay for Custom Setting c4 in the camera
menus.
76
Page 87

Troubleshooting
Problem Solution Page
Check settings for the host and/
or wireless LAN adapter and
adjust camera settings
appropriately.
The camera displays a TCP/
IP or ftp error.
“Connecting to PC” does
not clear from the camera
display.
The camera displays the
message, “Ethernet cable
is not connected”.
The camera displays a
memory card error.
Transfer is interrupted
before all photographs are
sent.
No connection is
established when the
camera URL is entered in a
web browser (http server
connections only).
Check firewall settings. 16, 19, 43
Confirm that you can write to the
destination folder on the ftp
server.
Change the current PASV mode
setting.
Check firewall settings. 16, 19, 43
Connect an Ethernet cable or
select Wireless LAN for Choose
hardware.
Confirm that the card is properly
inserted.
Transfer will resume if the
camera is turned off and then on
again.
Confirm that the browser is not
using a proxy connection.
8, 41, 58
74
60
6, 40
6, 40
16, 47
—
77
Page 88

Index
Symbols
a: “Send” ............................................17, 48
b: “Sending”......................................17, 48
c: “Sent”..............................................17, 48
A
Android OS .........................................26, 27
Authentication .........................................59
Auto send...................................................61
C
Camera control................................2, 5, 18
Camera Control Pro 2.............................18
Channel.......................................................59
Choose hardware........................8, 41, 55
Communication mode...................56, 59
Connection status.....................................7
Connection type.......................... 9, 42, 56
Connection wizard............................. 8, 41
Copy to/from card...................................57
Create profile ............................................57
D
Delete after send.....................................61
Deselect all? ..............................................62
DNS...............................................................60
Domain Name Server.............................60
E
Encryption .................................................59
Encryption key .........................................59
Errors...........................7, 17, 20, 25, 48, 77
Ethernet.............................................2, 8, 41
Ethernet cable .....................................6, 40
F
Firewall..................................... 3, 16, 19, 43
Folders...........................................16, 44, 72
FTP server......................... 2, 39, 60, 67, 75
FTP upload.....................................2, 39, 45
G
Gateway .....................................................60
Group name.......................................51, 52
H
HTTP server ........................2, 5, 21, 26, 75
HTTP user settings..................................62
I
Image transfer.................................2, 5, 14
iOS ................................................................26
IP address..................................... 11, 42, 60
iPhone......................................................... 34
K
Key index....................................................59
M
Mac............................................................... 26
MAC address............................................. 62
Master/remote.........................................51
Memory card .................................6, 40, 57
N
Network......................................................55
Network connection..............................55
Network indicator......................................7
Network settings...................8, 41, 56, 75
Network status....................17, 20, 25, 48
Number of remote cameras................ 51
O
Options.......................................................61
Overwrite if same name ....................... 61
78
Page 89

P
Pairing.........................................................12
Password protection..............................58
PASV mode ................................................60
Port number............. 3, 19, 43, 60, 73, 75
Power saving.............................................63
Profile name.......................................56, 58
Protect If marked for upload...............62
Proxy server...............................................60
R
Remote camera check...........................51
Routers................................................... 3, 11
S
Send file as.................................................61
Send folder................................................62
Send marking ...........................................62
Shooting window ............................27, 34
SSID.......................................................56, 59
Synchronized release.......... 2, 49, 50, 52
T
TCP/IP..........................................................60
Text edit window..............................31, 38
Text entry...................................................10
V
Viewer window.................................29, 36
W
Windows 10...............................................26
Windows 7.................................................26
Windows 8.1..............................................26
Wireless LAN........................................ 2, 59
Wireless Transmitter Utility...... 4, 13, 65
WT-5.............................................................49
WT-6.............................................................49
79
Page 90

80
Page 91

Page 92

En
Network Guide
• Read this manual thoroughly before using the camera.
• After reading this manual, keep it in a readily accessible
place for future reference.
SB5L01(11)
6MB29911-01
No reproduction in any form of this manual, in whole or in part (except for
brief quotation in critical articles or reviews), may be made without written
authorization from NIKON CORPORATION.
 Loading...