

Page 1
Professional
Technical Guide
— Useful Features —
Revision 2.0
En
Page 2

Table of Contents
Custom Controls 5
Custom Control Assignments .................... 6
Quick Menu Access ............................................................10
Custom Folders ................................................................... 12
Taking Pictures 15
Recalling Saved Exposure Settings ................................. 16
• Saved Settings .................................................................................16
• Saving Settings ................................................................................16
• Sample Applications ......................................................................19
White Balance Tips and Tricks .......................................... 24
• White Balance Options ..................................................................24
• Auto White Balance for Incandescent
Lighting .................................................................26
• Measuring Preset Manual White Balance ..................................27
AE with Constant Shutter Speed and Aperture ............28
Preserving Natural Contrast .............................................29
Multiple Exposure: Overlay Mode ...................................30
Burst Photography: Keeping Exposure Consistent......31
Flicker Reduction .......................................32
Muing the Shutter ..........................................................35
• “Quiet” Versus “Silent” ....................................................................35
• Quiet Shutter-Release Mode ........................................................36
• Silent Photography
• Movie Stills and Live Frame Grab ................................................37
Vibration Reduction: Sport Mode ...................................40
• What Makes Sport Mode Special ................................................41
• ”Sport” Versus “Normal” .................................................................42
............................................37
2
Page 3

Playback 43
Finding Pictures Quickly ................................................... 44
• Starting Playback with Your Right Hand ...................................45
• Finding Pictures Quickly
• Quick Focus Check ..........................................................................48
• Tagging Pictures ..............................................................................50
Upload 53
Quick Network Connection .............................................. 54
Checking Upload Status.................................................... 55
Adding Text to Pictures .....................................................56
• Editing Text in HTTP Server Mode ...............................................56
• IPTC Presets.......................................................................................57
Accessories 59
Synchronized Release........................................................60
• Configuring Cameras for Synchronized Release .....................60
• Uploading Photos ...........................................................................63
Appendix 65
The D5 Versus the D4S: Controls and Displays ............. 66
• Controls and Indicators..................................................................66
• Control Panels ..................................................................................70
...................................46
3
Page 4

4
Page 5

Custom Controls
As you will learn in this chapter, the D5
is crammed with features to make your
life easier, including custom control assignments, quick menu access, and the
ability to organize photos in folders.
5
Page 6
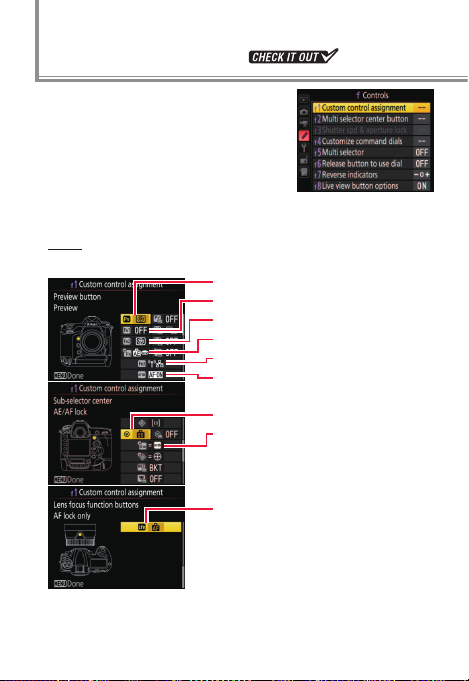
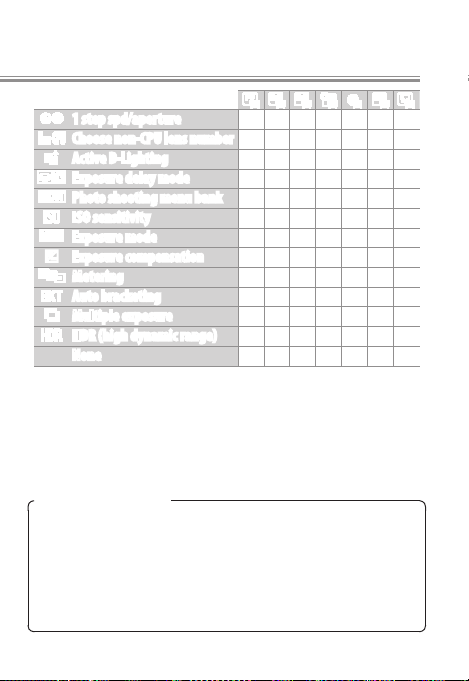
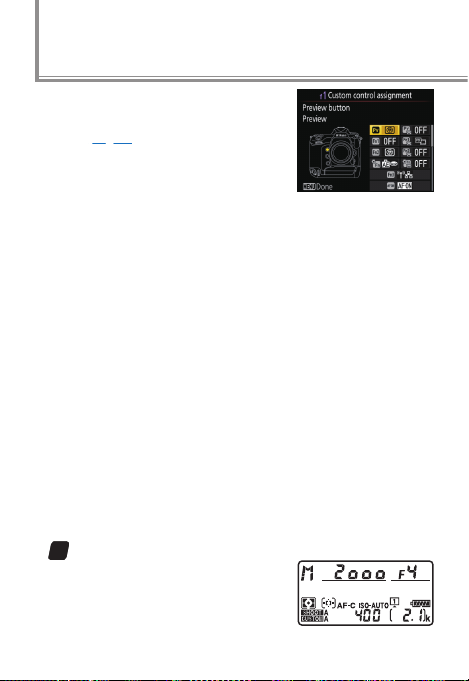
Custom Control Assignments
Custom Setting f1 (Custom control
assignment) is used to customize
camera controls, starting with the
function (Fn) buttons. Assigning
frequently-used settings to camera
controls lets you access them without using the menus.
Press
You can choose the roles played by the following controls:
Pv button
0
Fn1 button
v
Fn2 button
x
Fn button for vertical shooting
s
Fn3 button
z
AF‑ON button
V
Center of sub‑selector
8
AF‑ON button for vertical
l
shooting
Lens focus function buttons
S
(can be used for the assigned function only if the lens has a focus function selector and it is set to AF‑L)
6
Page 7
The functions that can be assigned to these controls are:
0 v x s z V 8 l S
A
Preset focus point
K
AF‑area mode
q
AF‑area mode + AF‑ON
q
Preview
r
FV lock
B
AE/AF lock
C
AE lock only
D
AE lock (Reset on release)
E
AE lock (Hold)
F
AF lock only
A
AF‑ON
h
I Disable/enable
1
Bracketing burst
4
+NEF (RAW)
L
Matrix metering
M
Center‑weighted metering
N
Spot metering
t
Highlight‑weighted metering
b
Viewnder grid display
!
Viewnder virtual horizon
u
14fps continuous (Mup)
c
Sync. release selection
%
MY MENU
3
Access top item in MY MENU
UT
Connect to network
4 4 4 4
4 4 4
4 4 4
4 4 4 4
4 4 4 4
4 4 4
4 4 4
4 4 4 4 —4 4 4
4 4 4 4 —4 4 4
4 4 4
4 4 4
4 4 4
4 4 4
4 4 4 4
4 4 4 4
4 4 4 4
4 4 4 4
4 4 4 4
4 4 4 4
4 4 4 4
4 4 4
4 4 4
4 4 4 4
4 4 4 4
4 4 4 —4
— —4—
4 4 4 4
— —
4 4 4 4
— —
— —4 — —
— —4 — —
4 4 4 4
— —
4 4 4 4
— —
4 4 4 4
— —
4 4 4 4
— —
— — —4 —
— — —4 — —
— —4 — —
— —4 — —
— —4 — —
— —4 — —
— —4 — —
— —4 — —
— —4 — —
— — —4 —
— — —4 —
— —4 — —
— —4 — —
— — — —
4
—
—
4
4
4
7
Page 8
Custom Controls
K
Playback
i
Recall shooting functions
b
Voice memo — — — —4 — — — —
c
Rating — — — —4 — — — —
J
Select center focus point — — — — — —4— —
G
Same as AF‑ON button — — — — — — —4 —
None
Press + y
To choose the roles played by the following controls in
combination with the command dials, highlight an option
and press the center of the multi selector:
The functions that can be assigned to these controls are:
4 4 4 4
4 4 4
4 4 4 4 4 4 4 4
Pv button + y
0
Fn1 button + y
v
Fn2 button + y
x
Fn button for vertical shoot‑
s
ing+ y
Center of sub‑selector + y
8
BKT button + y
n
Movie record button + y
Q
(applies when live view selector is
rotated to C)
— —4 — —
4 4 4 4
— —
1 w y t 9 n Q
0 v x s z V 8 l S
J
Choose image area
$
Shutter spd & aperture lock
4 4 4 4 4—4
4 4 4 4 4—4
8
—
Page 9
Custom Control Assignments
v
1 step spd/aperture
w
Choose non‑CPU lens number
y
Active D‑Lighting
z
Exposure delay mode
n
Photo shooting menu bank
9
ISO sensitivity — — —4 — — —
v
Exposure mode — — —4 — —
E
Exposure compensation — — —4 — — —
w
Metering — — —4 — — —
t
Auto bracketing — — — — —4 —
$
Multiple exposure — — — — —4 —
2
HDR (high dynamic range) — — — — —4 —
None
“Press” and “Press + y”
Certain roles can not be assigned simultaneously to both the
“press” and “press + y” functions for some controls. Assigning
such a role to “press” when it is already assigned to “press + y”
sets the “press + y” option None, while assigning such a role
to “press + y” when it is already assigned to “press” sets the
“press” option None.
4 4 4 4
4 4 4 4 4
4 4 4 4
4 4 4 4
4 4 4 4 4 —4
4 4 4 4 4 4 4
— — —
— —
— — —
— — —
4
1 w y t 9 n Q
9
Page 10
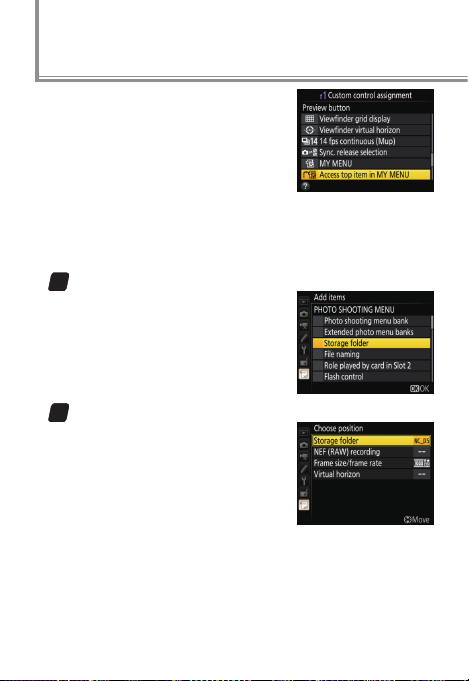
Quick Menu Access
If Access top item in MY MENU is
selected for Custom Setting f1 (Cus‑
tom control assignment)> 0Pre‑
view button, pressing the Pv button
will display the top item in My Menu,
letting you access functions that
cannot otherwise be assigned to a camera control. Here is
an example of how this could be used to congure the Pv
button to display the Storage folder menu.
Add Storage folder to My Menu.
1
In My Menu, select Add items>
PHOTO SHOOTING MENU and
then highlight Storage folder
and press J.
Move Storage folder to the top of My Menu.
2
Select Rank items and move
Storage folder to the top (you
can reorder the items as desired
at any time).
10
Page 11

Choose a control.
3
Choose Custom Setting f1 (Cus‑
tom control assignment) and
select 0Preview button.
Select Access top item in MY MENU.
4
You also have the option of assigning Access top item in MY
MENU to the Fn1 or Fn2 button,
the Fn button for vertical shooting, or the center of the subselector.
You can now view the Storage folder menu at any time by
pressing the selected button.
11
Page 12
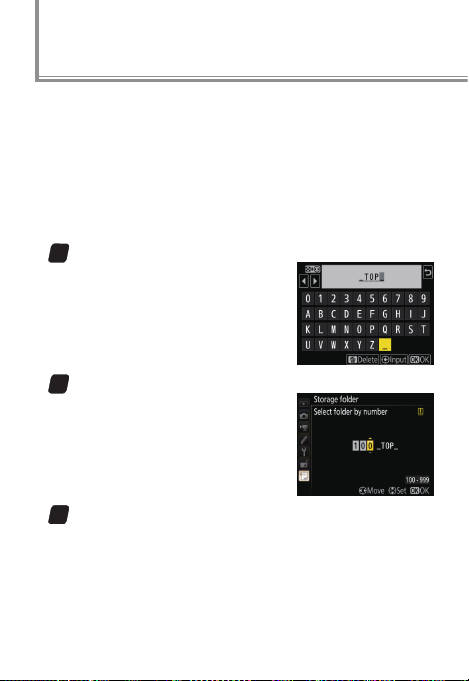
Custom Folders
Create folders before going on a shoot and use them to
organize photos by scene. If you’re photographing soccer
or baseball, you can create folders for each half or inning,
making photos easier to nd and organize later on.
Use the Storage folder > Rename and Select folder by
number options in the photo shooting menu to create
folders. To create folders for the rst inning at a ball game:
Enter a name for the tops of the innings.
1
Select Rename, enter an appropriate ve-character name (e.g.,
“_TOP_”), and press J.
Create a folder for the top of the rst inning.
2
Choose Select folder by num‑
ber and select folder number
100. Press J to create a folder
named “100_TOP_”.
Enter a name for the bottoms of the innings.
3
Select Rename, enter an appropriate name (e.g.,
“_BTM_”), and press J.
12
Page 13
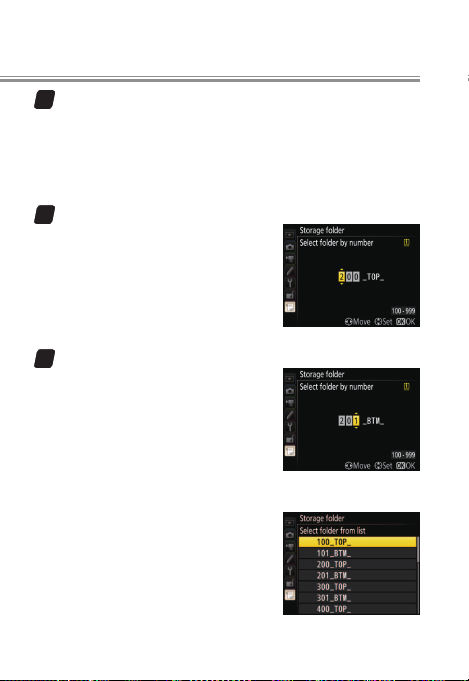
Create a folder for the bottom of the rst inning.
4
Each folder number can be used only once. Choose
Select folder by number and select folder number
101. Press J to create a folder named “101_BTM_”.
You can now create folders for the remaining innings:
Create a folder for the top of the second inning.
1
Choose Select folder from list,
select a folder named “_TOP_”,
then choose Select folder by
number and select folder number 200. Press J to create a
folder named “200_TOP_”.
Create a folder for the bottom of the second inning.
2
Choose Select folder from list,
select a folder named “_BTM_”,
then choose Select folder by
number and select folder number 201. Press J to create a
folder named “201_BTM_”. Repeat until you have created folders for all nine innings.
Before starting shooting at the top
and bottom of each inning, use Se‑
lect folder from list to choose the
appropriate folder.
13
Page 14

14
Page 15

Taking Pictures
This chapter covers information that
you may nd useful when taking photographs.
15
Page 16
Recalling Saved Exposure Settings
Holding a control to which Custom
Setting f1 (Custom control assign‑
ment, page 6)> Recall shooting func‑
tions is assigned recalls previously-
saved exposure settings, letting you
(for example) switch instantly between fast and slow shutter speeds.
Saved Settings
l
The camera stores the following exposure settings:
• Exposure mode
• Shutter speed (modes S and M)
• Aperture (modes A and M)
• Metering
• Exposure compensation
• ISO sensitivity, including auto ISO sensitivity control (if
auto ISO sensitivity control is on, the camera will also
store the options selected for ISO sensitivity settings>
Maximum sensitivity, Maximum sensitivity with M, and
Minimum shutter speed)
Saving Settings
l
To save exposure settings for later recall:
Adjust camera settings.
1
Choose an exposure mode and
adjust ISO sensitivity and other
exposure settings as desired.
16
Page 17
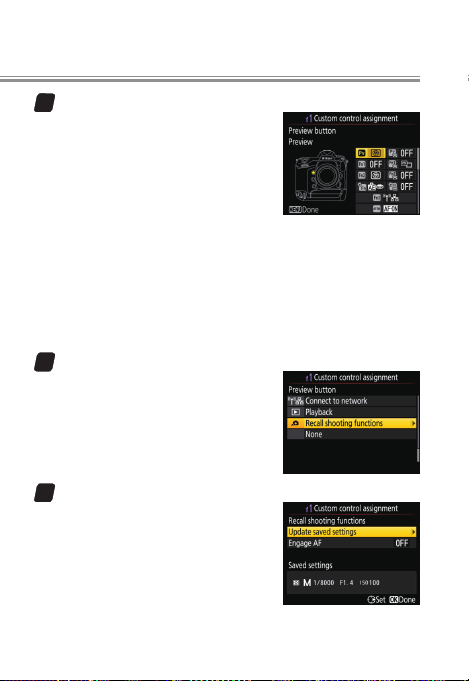
Choose a control.
2
In the Custom Settings menu,
select Custom Setting f1 (Cus‑
tom control assignment), then
highlight the desired control
and press J. Recall shoot‑
ing functions can be assigned
to the PV, Fn1, Fn2, or AF‑ON button, the center of the
sub-selector, the lens focus function buttons, or the
AF‑ON button for vertical shooting. Although Recall
shooting functions can be assigned simultaneously
to more than one control, the camera stores only one
group of settings at a time.
Select Recall shooting functions.
3
Highlight Recall shooting func‑
tions and press 2.
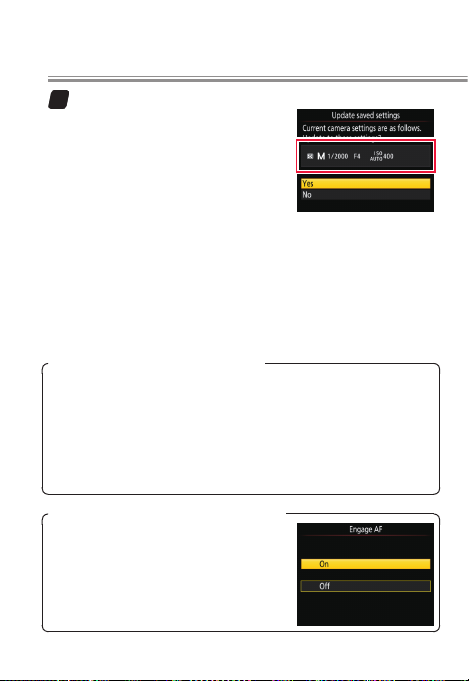
Select Update saved settings.
4
Highlight Update saved settings
and press 2.
17
Page 18
Taking Pictures
Save exposure settings.
5
A conrmation dialog will be
displayed; highlight Yes and
press J to save the settings in
eect in Step 4.
Editing Settings Before They Are Saved
Changes made while the conrmation dialog is displayed will
not be reected in the settings saved in Step 5. To edit the
settings before they are saved, highlight No and press J to
exit the conrmation dialog and return to Step 4, then make
the desired adjustments and select Update saved settings
again.
“Recall Shooting Functions”> “Engage AF”
If On is selected for Engage AF, the
camera will focus when you press the
selected control to recall the saved
exposure settings.
18
Page 19
Recalling Saved Exposure Settings
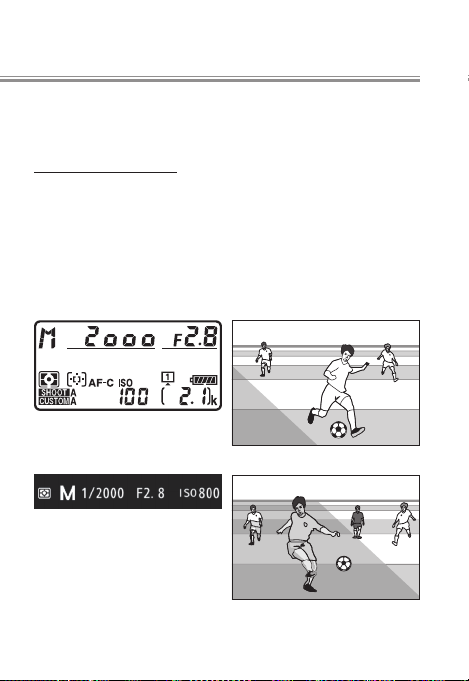
Sample Applications
l
You may nd instant exposure setting recall helpful in the
situations below.
Mixed Sun and Shade
In soccer stadiums, ballparks, and other outdoor venues
where some areas are sunlit and others are in the shade,
you may nd it convenient to save the settings for the latter as described in the preceding section. You can then
recall the settings at the touch of a button as your subject
passes from sunlight into shadow.
Sample Settings for Sunlit Subjects
Sample Settings for Subjects in the Shade
19
Page 20
Taking Pictures
Quick Shutter Speed Selection
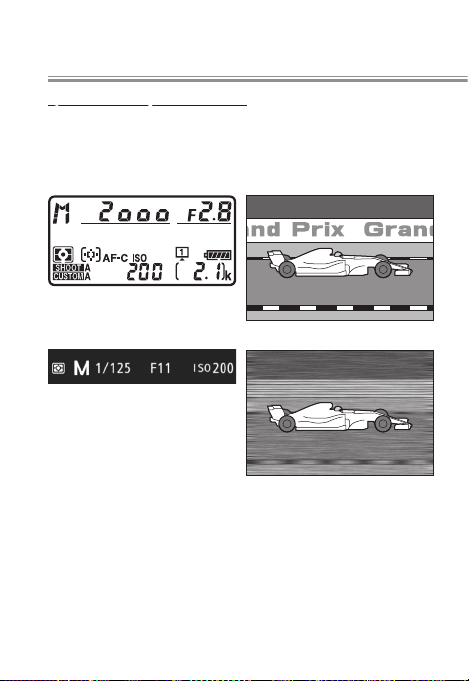
When photographing race cars, speed skaters, or other
fast-moving subjects speeding by, save a slow shutter
speed for instant recall during panning shots.
Sample Settings for Non-Panning Shots
Sample Settings for Panning Shots
20
Page 21
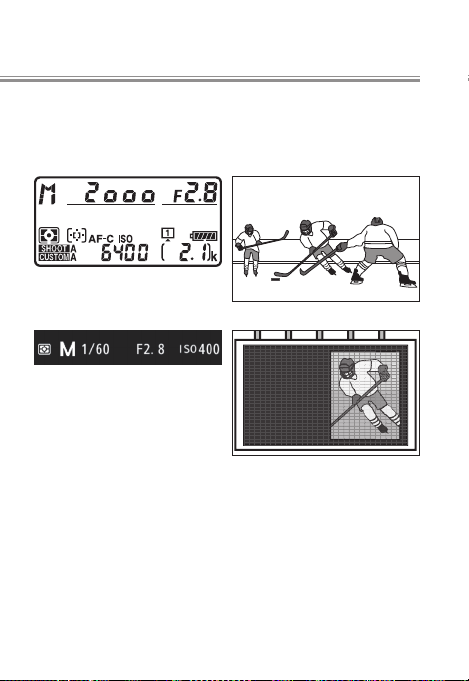
Recalling Saved Exposure Settings
At indoor events where you nd yourself frequently photographing a brightly-lit electronic scoreboard, you can a
save a slow shutter-speed setting for the scoreboard shots.
Sample Settings for Game Shots
Sample Settings for Scoreboard Shots
$
%
3
3
727
21
Page 22

Taking Pictures
Quick Silhouettes
For quick silhouettes, select highlight-weighted metering for the
saved set. You can then choose matrix metering for normal shots and
use the button to switch briey to
highlight-weighted metering for
silhouettes (sample settings shown).
Quick Exposure-Mode Selection
If you normally shoot in exposure mode M, adjusting settings as you go, but from time-to-time would like to briey
put the camera in charge, you can save settings with P, S,
or A selected for exposure mode and auto ISO sensitivity
control (page 28) enabled. You will then be prepared for unpredictable changes in exposure, such as those caused by
clouds blocking the sun or changes in interior lighting.
Using Two Lenses
If you frequently change between two lenses that require
dierent exposure settings, you may nd it convenient to
save the settings for the secondary lens.
Normal shots
Silhouettes
22
Page 23

Recalling Saved Exposure Settings
Aperture
If you switch lenses and then save exposure settings without rst changing the aperture, you may nd that the stored
value is not supported by the lens. For example, if you set
aperture to f/1.4, then attach a new lens with a maximum aperture of f/2.8 and save exposure settings without rst adjusting aperture, the saved settings will have an aperture value of
f/1.4. This is not a malfunction.
“Recall Shooting Functions”
With the exception of program shift, exposure settings cannot
be adjusted while the control selected for Recall shooting
functions is pressed. Saved settings cannot be recalled while
the self-timer is in use, live view, movie recording, bracketing,
or multiple exposure shooting is in progress, or the control to
which Preview has been assigned using Custom Setting f1
(Custom control assignment) is pressed. Exposure settings
cannot be saved or recalled if:
• A non-CPU lens or a PC micro 85 mm f/2.8D lens is attached
• A CPU lens with an aperture ring is attached and Aperture
ring is selected for Custom Setting f4 (Customize com‑
mand dials)> Aperture setting
• A CPU lens with an aperture ring is attached without rst
locking aperture at the minimum setting
Recall shooting functions can also be assigned to an optional wireless remote controller using the Assign remote
(WR) Fn button option in the setup menu.
23
Page 24

White Balance Tips and Tricks
Auto white balance is recommended with most light
sources. If the desired results can not be achieved with
auto white balance, choose an option from the list below
or use preset white balance.
White Balance Options
l
Choose from the following options:
Option K
v
Auto
Keep white (reduce
warm colors)
Normal
Keep warm lighting
colors
J
Incandescent 3000 Use under incandescent lighting.
I
Fluorescent
Sodium-vapor lamps 2700
Warm-white uorescent
White uorescent 3700
Cool-white uorescent 4200
Day white uorescent 5000
Daylight uorescent 6500
High temp. mercuryvapor
H
Direct sunlight 5200 Use with subjects lit by direct sunlight.
N
Flash 5400 Use with optional flash units.
*
White balance is adjusted automatically. Suitable for most light sources;
3500–
if an optional flash unit is used, white
8000
balance is adjusted to match. See
page 26 for more on v options.
Use with:
• Sodium vapor lighting (found in
sports venues)
• Warm white fluorescent lights
3000
• White fluorescent lights
• Cool-white fluorescent lights
• Daylight white fluorescent lights
• Daylight fluorescent lights
• High color temperature light sources
7200
(e.g., mercury-vapor lamps)
Description
24
Page 25

Option K
G
Cloudy 6000 Use in daylight under overcast skies.
M
Shade 8000
Choose color
K
temp.
L
Preset manual —
*
Description
Use in daylight with subjects in the
shade.
2500–
Choose a color temperature from a
10,000
list of values.
Use your subject or light source or an
existing photo as a reference (
page 27).
* Color temperature. All values are approximate and do not reflect
fine-tuning; colors can be fine-tuned if desired.
25
Page 26

Taking Pictures
Auto White Balance for Incandescent Lighting
l
v oers a choice of AUTO0 Keep
white (reduce warm colors), AUTO1
Normal, and AUTO2 Keep warm
lighting colors. The warm cast of
incandescent lighting can be eliminated by selecting Keep white (re‑
duce warm colors) or preserved by
selecting Keep warm lighting colors.
AUTO0 Keep white (reduce
warm colors), equivalent to
AUTO1 Normal on the D4S
AUTO1 Normal; no equiva‑
lent on the D4S
AUTO2 Keep warm light‑
ing colors, equivalent to
AUTO2 Keep warm lighting
colors on the D4S
26
Page 27

White Balance Tips and Tricks
Measuring Preset Manual White Balance
l
In live view, you can measure white balance from any
white or grey object in the frame.
When Preset manual is selected for
white balance, you can press the U
button to enter direct measurement
mode. L will ash in the display;
tap a white or grey object to position the spot white balance target
(r) over the selected object and measure white balance.
To zoom in on the target for precise positioning, press the
X button. Press the U button again to exit direct measurement mode.
White balance presets d1–d6 can be
viewed by selecting Preset manual
for White balance in the photo or
movie shooting menu. The white
balance target is shown on the preset.
In preset manual white balance mode, you can select a preset by pressing the U button and rotating the sub-command dial.
27
Page 28
AE with Constant Shutter Speed and Aperture
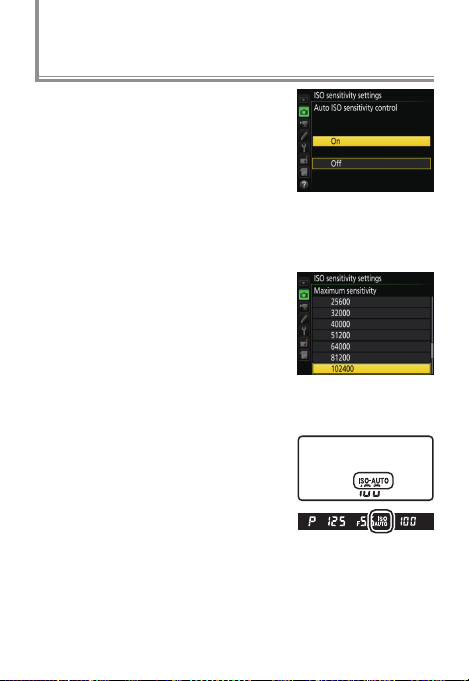
To vary ISO sensitivity automatically
when shooting in dappled sunlight
or in other situations in which the
subject or background vary in
brightness, select On for ISO sensi‑
tivity settings> Auto ISO sensitivi‑
ty control in the photo shooting menu. You’ll get optimal
exposure without having to adjust shutter speed or aperture, even in mode M.
To limit high sensitivity noise, select
a Maximum sensitivity between
ISO 200 and Hi 5 (the minimum is
the value currently selected for ISO
sensitivity unless this is higher than
the maximum, in which case Maxi‑
mum sensitivity will be set to the value currently selected
for ISO sensitivity).
To turn auto ISO sensitivity control
on or o, press the S button and
rotate the sub-command dial. The
current setting is shown in the viewnder and top control panel.
28
Page 29

Preserving Natural Contrast
Use Active D-Lighting to preserve
details in highlights and shadows
when photographing high-contrast
scenes, for example when shooting
through a window or at the beach.
Matrix metering is recommended. To let the camera adjust
Active D-Lighting automatically according to the scene,
choose Y Auto, but note that in exposure mode M,
YAuto is equivalent to QNormal.
Noise may be visible in photos taken at high ISO sensitivities. Active D-Lighting can not be used with movies.
Custom Control Assignment: Active D‑Lighting
If Active D‑Lighting is assigned to a camera control using
Custom Setting f1 (Custom control assignment), you can
select an option during shooting just by pressing the control
and rotating a command dial.
29
Page 30

Multiple Exposure: Overlay Mode
When shooting multiple exposures, choose an overlay
mode according to the situation and your creative intent.
• Add: Overlay exposures without modication.
+
• Average: Overall brightness is optimized by adjusting gain
according to the number of exposures.
+
• Lighten: The camera compares the pixels in each exposure
and chooses only the brightest.
+
• Darken: The camera compares the pixels in each exposure
and chooses only the darkest. Choose this option if your
subject contrasts strongly with the background.
+ + +
30
Page 31

Burst Photography: Keeping Exposure Consistent
When using a continuous release mode to photograph
subjects that are in motion or that vary in brightness, you
may notice that exposure changes between frames. For
consistent exposure, select mode M or:
• Turn face detection o: When Face de‑
tection on is selected for Custom
Setting b5 (Matrix metering), matrix metering will assign priority to
the faces of portrait subjects. Active subjects may, however, not
face the camera at all times, or may wear goggles or other
equipment that obscures their faces, producing inconsistent exposure when face detection fails. For consistent
results with matrix metering, select Face detection o.
• Enable burst mode exposure lock: Changes in the brightness of the subject
or background may result exposure changing during a burst. For
consistent exposure, select On
(burst mode) for Custom Setting
c1 (Shutter‑release button AE‑L) to lock exposure when
the shutter is released at the start of a burst instead of
when the shutter-release button is pressed halfway.
31
Page 32
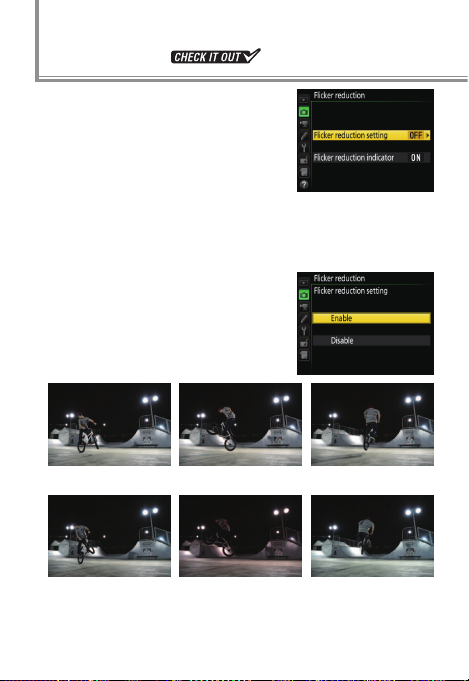
Flicker Reduction
When powered by alternating current, uorescent lamps and certain
other types of articial lighting
icker at a rate determined by the
frequency of the power supply,
which depending on the timing of
the shutter release may produce areas of uneven color or
exposure. Flicker reduction helps prevent this by matching
the timing of the shutter release to the icker rate.
To enable icker reduction, select
Enable for Flicker reduction> Flick‑
er reduction setting in the photo
shooting menu.
Flicker reduction enabled
Flicker reduction disabled
32
Page 33
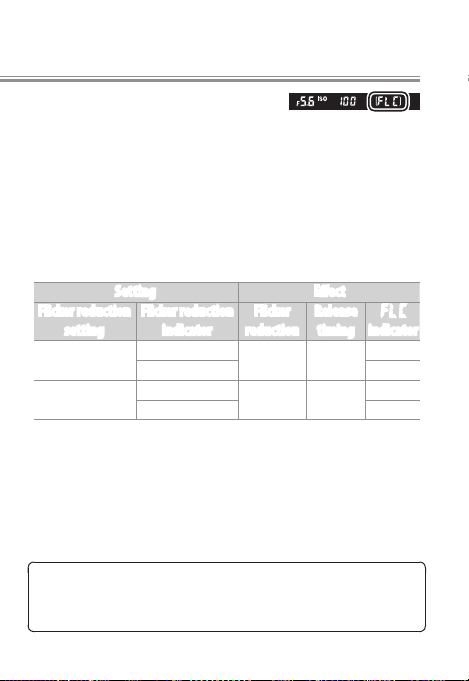
To display an indicator in the viewnder when icker is detected, select On for Flicker reduction indi‑
cator. u will be displayed in place
of the buer capacity if icker is
detected when the shutter-release
button is pressed halfway.
The eects of the dierent settings are summarized in the
following table.
Flicker reduction
Flicker reduction can be enabled for live view and movie
recording using the Flicker reduction option in the movie
shooting menu.
Setting Eect
setting
Disable
Enable
Flicker reduction
indicator
On
O Off
On
O Off
Flicker
reduction
Disabled
Enabled
Release
timingu indicator
Flashes
Not
affected
May be
delayed
On
33
Page 34

Flicker Reduction
The Photo Shooting Menu Flicker Reduction Option
Flicker reduction can detect icker at 100 and 120Hz (associated respectively with AC power supplies of 50 and 60Hz).
Flicker may not be detected or the desired results may not
be achieved with dark backgrounds, bright light sources, or
decorative lighting displays and other non-standard lighting. Depending on the light source, there may be a slight
delay before the shutter is released. During burst shooting,
the frame rate may slow or become erratic; in addition, the
desired results may not be achieved if the frequency of the
power supply changes during shooting.
Flicker detection will not take eect at shutter speeds slower
than 1/
s (including Bulb and Time) or when MUP or 14fps
100
(mirror up) is selected for release mode or exposure delay
mode is on. Flicker detection is available during ash photography but can not be used with remote wireless ash units.
34
Page 35

Muing the Shutter
You may nd it useful to mute the shutter at stage performances, during interviews, or for wildlife photography.
“Quiet” Versus “Silent”
l
The dierences between quiet shutter-release mode and
silent live view photography are summarized below.
Quiet shutter Silent photography
Shutter release Quiet
Frame advance rate (fps) Up to 3
Available image size/
quality options
1. For quieter photography, enable live view to eliminate the
sound of the mirror being raised.
2. Maximum 5s.
3. Size is determined by image area rather than option selected
for Image size:
• FX (36× 24) 1.0×: 2784× 1856 pixels
• 1.2× (30× 20) 1.2×: 2320× 1544 pixels
• DX (24× 16) 1.5×: 1824× 1216 pixels
• 5
∶4 (30× 24): 2320× 1856 pixels
1
• S: 1 • C
Silent
l: 15
2
• Ch: 30
All Small 3/JPEG fine ★
2
35
Page 36

Taking Pictures
Quiet Shutter-Release Mode
l
The mirror stays up while the shutter-release button is
pressed all the way down. The mirror is lowered (more
quietly than in single-frame mode) only when the shutterrelease button returns to the halfway position, allowing
you to control the timing of the click made by the mirror.
To choose quiet shutterrelease mode, press the release mode dial lock release
and rotate the dial to Q.
Quiet Shutter‑Release Mode Burst Photography
Quiet shutter-release mode oers a
choice between single-frame and a
burst mode with a frame rate of about
3fps. To switch from one to the other,
press the S button and rotate a command dial.
36
Page 37

Muing the Shutter
Silent Photography
l
In live view, you can take photos with
the shutter open and the mirror raised,
eliminating the sounds normally made
when a photo is taken. To enable silent
mode, press the i button in live view
and select On for Silent photography
(you can also enable silent mode using
the Silent live view photography op-
tion in the photo shooting menu).
Photos taken in silent mode are a maximum of 5 MB in size
(FX format) and are recorded at an image quality of JPEG
ne★, regardless of the options selected for image size and
quality in the photo shooting menu.
Movie Stills and Live Frame Grab
l
Movie stills and live frame grab can also be used for silent
photography.
Movie Stills
You can silently lm movies and later play the movie back
and use the Save selected frame option to create JPEG
stills from selected frames.
i button
37
Page 38
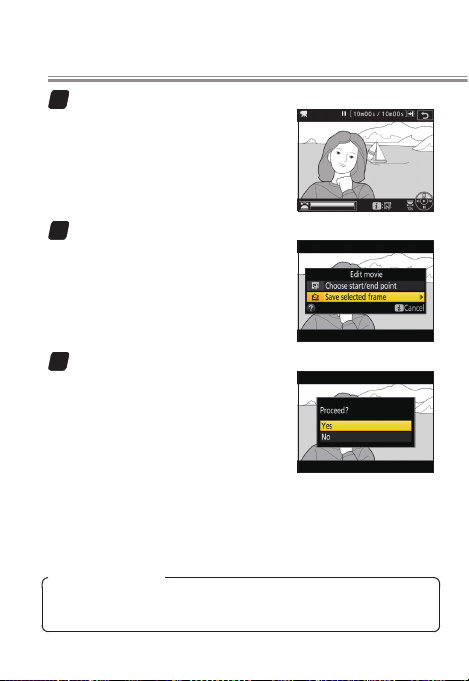
Taking Pictures
Pause playback on the desired frame.
1
Press 3 to pause playback.
Choose Save selected frame.
2
Press i or J, then highlight
Save selected frame and press
2.
Create a still copy.
3
Press 1 to create a ne★quality JPEG copy of the current
frame. A conrmation dialog
will be displayed; highlight Yes
and press J.
Save Selected Frame
Movie stills lack some photo information and can not be retouched.
38
Page 39

Muing the Shutter
Live Frame Grab
If Live frame grab is selected for
Custom Setting g1 (Custom con‑
trol assignment)> Shutter‑release
button, pressing the shutter-release
button all the way down during
lming will soundlessly take a photo
without ending recording.
Live Frame Grab
Photos are recorded at the current movie frame size and are
saved at an image quality of JPEG ne★. Only one photo is
taken each time the shutter-release button is pressed, regardless of release mode. Up to 50 shots can be taken with each
movie.
39
Page 40

Vibration Reduction: Sport Mode
Compared with earlier models, the viewnder oers improved stability in burst mode. This combines with the
SPORT setting available on some VR lenses to make subjects
even easier to track during high-speed burst photography.
Lenses with SPORT VR
As of March 2016, the following lenses featured SPORT VR:
• AF-S NIKKOR 600 mm f/4E FL ED VR
• AF-S NIKKOR 500 mm f/4E FL ED VR
• AF-S NIKKOR 400 mm f/2.8E FL ED VR
• AF-S NIKKOR 300 mm f/4E PF ED VR
• AF-S NIKKOR 200–500 mm f/5.6E ED VR
40
Page 41

What Makes Sport Mode Special
l
Sport mode limits vibration reduction to the minimum
needed for subjects that are moving quickly and unpredictably. When the camera is hand-held, the image in the
viewnder remains as stable and smooth as when the
camera is mounted on a monopod, making subjects easier
to track during panning and high-speed burst photography. When the lens is mounted on a D5, all of this can be
accomplished without reducing frame rate or increasing
shutter lag.
Sport mode: Image in viewnder is stable and smooth.
Normal mode: More powerful vibration reduction makes motion
in viewnder seem jerky and unnatural when lens is moved.
41
Page 42

Vibration Reduction: Sport Mode
”Sport” Versus “Normal”
l
Sport mode balances vibration reduction with smooth display when you are photographing sports, aircraft, birds, or
other moving subjects. Choose NORMAL for more powerful
vibration reduction when photographing landscapes and
other static subjects. The dierences between sport and
normal modes are summarized below.
Suited to Moving subjects Stationary subjects
Motion in viewnder Smooth Jerky
Burst performance Better Worse
SPORT NORMAL
42
Page 43

Playback
As you will learn in this chapter, the
touch screen and custom controls let
you quickly nd images and check focus one-handed. You can also use the
“protect” and “rate” features to tag photos for quick playback and later sorting.
43
Page 44
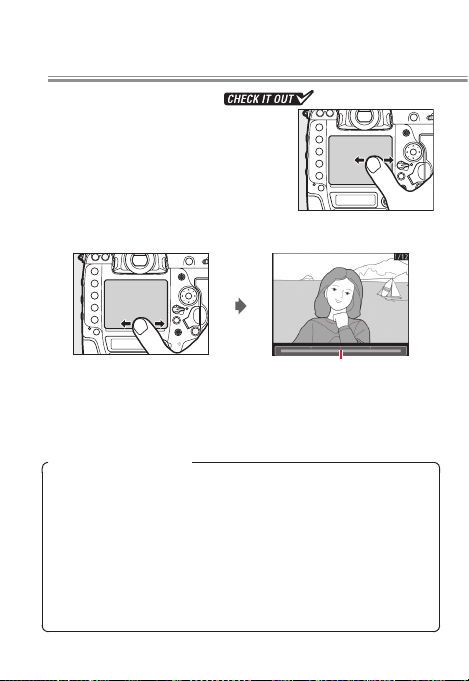
Finding Pictures Quickly
In addition to the multi selector and other controls used
for playback on earlier cameras, the D5 features a touch
screen. You can page through pictures by icking left or
right and zoom in by double-tapping the monitor, making
it faster to nd pictures and check focus. You can also protect or rate pictures to make them easier to nd.
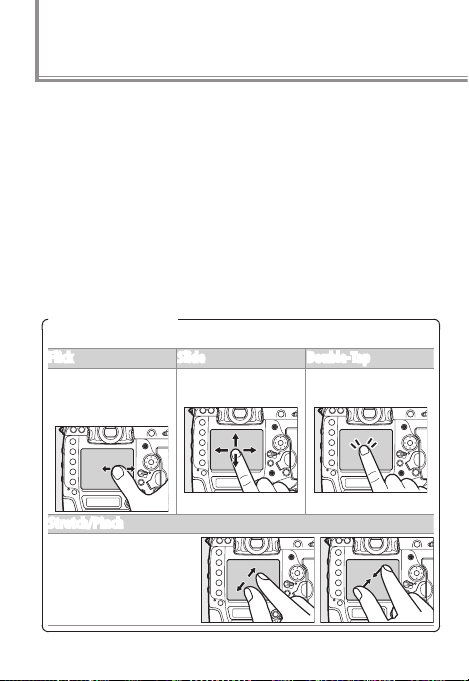
Using the Touch Screen
The touch screen supports the following gestures:
Flick Slide Double‑Tap
Flick a finger a short
distance left or right
across the monitor.
Stretch/Pinch
Place two fingers on
the monitor and move
them apart or pinch
them together.
Slide a finger over
the monitor.
Tap the monitor
twice quickly.
44
Page 45
Starting Playback with Your Right Hand
l
Using Custom Setting f1 (Custom
control assignment, page 6) to as-
sign Playback to the Fn1, Fn2, or Pv
button, the Fn button for vertical
shooting, or the center of the subselector lets you start and stop playback with your right hand while your left hand continues
to support the camera, ready for the next shot.
45
Page 46
Playback
Finding Pictures Quickly
l
Flick left or right or press 4 or 2 to
view additional images in full-frame
playback. To scroll quickly, keep the
multi selector pressed or touch the
bottom of the display to bring up
the frame advance bar and then
drag the slider left or right.
Frame advance bar
Using the Command Dials
To use the command dials to scroll through pictures in full
frame playback, select On for Custom Setting f4 (Customize
command dials)> Menus and playback. You can then use
Custom Setting f4 (Customize command dials)> Sub‑dial
frame advance to choose whether the sub-command dial is
used to select folders, to skip forward or back 10 or 50 frames
at a time, or to skip to the next or previous protected image,
photo, or movie.
46
Page 47

Finding Pictures Quickly
“After Burst, Show”
The After burst, show option in the playback menu controls
whether the photo displayed at the end of a burst of shots is
the rst or last in the burst. It takes eect only when Image
review is o.
DSC_0001.jpg DSC_0002.jpg DSC_0003.jpg DSC_0004.jpg DSC_0014.jpg DSC_0015.jpg
Last shots taken (burst)
Displayed if First image in
burst is selected
Displayed if Last image
in burst is selected
47
Page 48
Playback
Quick Focus Check
l
The following operations can be used to zoom in for a
quick focus check during playback.
• Press the center of the multi selector to zoom
in on the active focus point. Press again
to exit zoom.
• Double-tap the monitor to zoom in on the
selected location. Double-tap again to
exit zoom.
• Place two ngers on the monitor and stretch or
pinch to zoom in or out. To switch to a
thumbnail view, zoom out when the
image is displayed full frame.
• Press the X or W (M) button to zoom in or
out.
To view other images at the same zoom ratio, rotate the
main command dial or tap the e or f icon at the bottom
of the display.
48
Page 49

Finding Pictures Quickly
To choose the starting zoom ratio for double-tap zoom
or zoom using the center of the multi selector, go to Custom Setting f2 (Multi selector center button)> Playback
mode, highlight Zoom on/o, and press 2. Choose from
Low magnication (50%), 1 : 1 (100%), and High magni‑
cation (200%).
Viewing Faces
During playback zoom, faces detected by the camera are indicated
by white borders in the navigation
window. Tap the on-screen guide or
rotate the sub-command dial to view
faces in the order detected.
Displaying the Focus Point
If Focus point is selected for
Playback display options, the active
point (or the focus point selected by
the photographer when the photo
was taken) will be shown on pictures
during playback.
On‑screen guide
49
Page 50
Playback
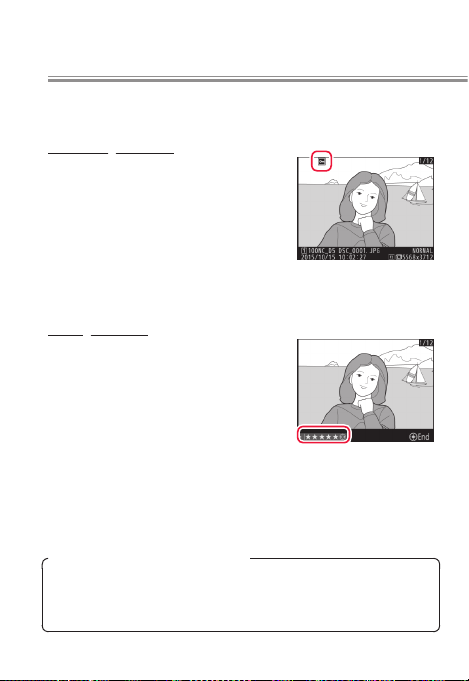
Tagging Pictures
l
Protect or rate pictures to make them easier to nd.
Protecting Pictures
Pressing the L (Z/Q) button
during playback tags the current
image with a P icon. If you select
Protect for Custom Setting f4 (Cus‑
tomize command dials)> Sub‑dial
frame advance, you can rotate the
sub-command dial to view only protected images.
Rating Pictures
Pictures that are not protected can
be given ratings of zero to ve stars
or marked as candidates for later
deletion by giving them a rating of
d. To rate pictures during playback,
press the i button and select Rat‑
ing.
Rating Pictures with the Fn3 Button
If Rating is selected for Custom Setting f1 (Custom control
assignment)> Fn3 button, pictures can be rated by press-
ing 4 or 2 while pressing the Fn3 button.
50
Page 51

Finding Pictures Quickly
Following transfer to a computer, pictures can be viewed
or sorted by rating in applications such as ViewNX-i or
Capture NX-D.
5
51
Page 52

52
Page 53

Upload
This chapter describes how to quickly
connect to networks, check whether
pictures have been uploaded to the
computer, and add comments, copyright information, and IPTC metadata
to images.
53
Page 54

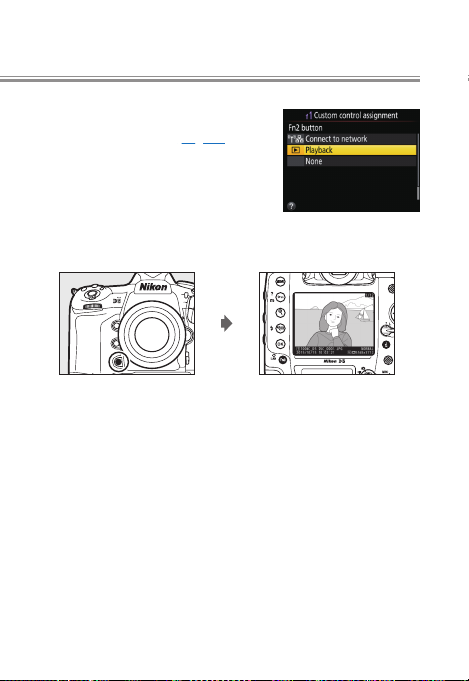
Quick Network Connection
If you have previously connected to
a network, you can disconnect or
reconnect at the push of a button
by using Custom Setting f1 (Custom
control assignment, page 6) to as-
sign Connect to network to the Fn1,
Fn2, Fn3, or Pv button. Pressing the selected button will display a network connection dialog.
The Network Indicator
Connection status is shown by the
network indicator on the back of the
camera. This contrasts with earlier
cameras, which showed connection
status in the network menu only.
Network indicator Status
K (lights green) Waiting for connection.
H (flashes green) Connected.
H (flashes amber) Network error.
I (off)
Network connection disabled or Ethernet cable
not connected.
54
Page 55

Checking Upload Status
While—at least in the case of images
uploaded to a ftp server via an Ethernet connection or a WT-6 or WT-5
wireless transmitter—the camera
indicates upload status by the color
of the transfer icon, transfer status
is not displayed when pictures are
viewed on a computer.
If On is selected for Network> Op‑
tions > Send marking in the camera setup menu, the date and time
of upload will be embedded in the
copies on the memory card.
If pictures taken at the above settings are later copied to a computer,
you can open them in the latest version of ViewNX-i or Capture NX-D
and check whether they have been
uploaded from the camera.
The date and time of upload are added to pictures after transfer and can not be viewed on the receiving device.
Transfer icon (blue)
55
Page 56

Adding Text to Pictures
Text can be embedded in pictures using the IPTC, Image
comment, and Copyright information options in the cam-
era setup menu.
Text can be entered using the touch
screen.
Editing Text in HTTP Server Mode
l
IPTC presets, image comments, and
copyright information can be created on a computer or Android or
iOS device using the “edit text” option in http server mode. Speakers
of Asian languages should note that
IPTC presets support double-byte
characters in most elds; these will not display properly on
the camera, but can be input and read on the computer.
56
Page 57

IPTC Presets
l
The IPTC presets stored on the camera can be viewed during playback by holding down the J button and pressing
3. To embed IPTC information in the current image, highlight a preset and press J.
Creating IPTC Presets on a Computer
IPTC Preset Manager software can
be used to create IPTC presets and
copy them to the camera memory
card. Speakers of Asian languages
should note that double-byte characters can be entered in most elds;
these will not display properly on
the camera, but can be read on the
computer.
IPTC Preset Manager is available
from the following website. For
more information, see the IPTC Preset Manager online help.
http://downloadcenter.nikonimglib.com/
57
Page 58

58
Page 59

Accessories
This chapter describes how the synchronized release feature on the optional WT-6 and WT-5 wireless transmitters and the WR-1 and WR-R10
wireless remote controllers can be used
to simultaneously release the shutters
on multiple remote cameras.
59
Page 60
Synchronized Release
Cameras equipped with
optional WT-6 or WT-5 wireless transmitters or WR-1
or WR-R10 wireless remote
controllers can be congured for synchronized release. One camera acts as a master controlling the shutters
on one or more remote cameras.
Matching wireless transmitters or wireless remote controllers
must be used on the master and remote cameras. A WR-A10
adapter is required when connecting the WR-R10 to the D5.
For more information on using wireless transmitters and
wireless remote controllers, see the documentation provided
with the devices.
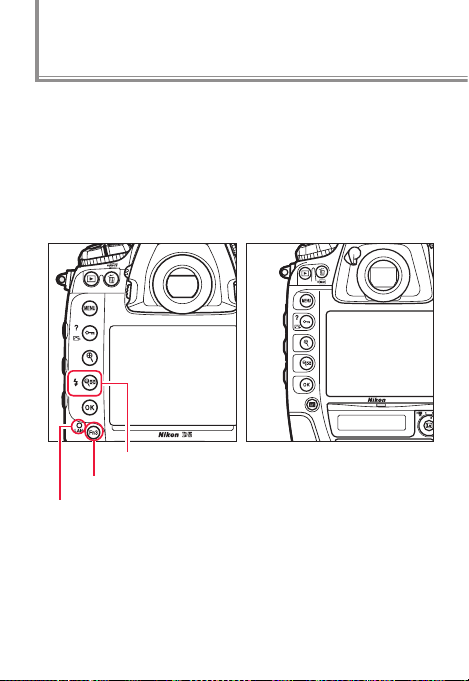
Conguring Cameras for Synchronized Release
l
Custom Setting d4 (Sync. release
mode options) controls whether
the master release also releases the
remote shutters. To switch quickly
between master and remote cameras or between synchronized and
remote release, use Custom Setting f1 (Custom control as‑
signment,
center of the sub-selector or to the Pv, Fn1, Fn2, or lens focus
function buttons. The options available vary with the option selected for Custom Setting d4.
page 6) to assign Sync. release selection to the
60
Page 61
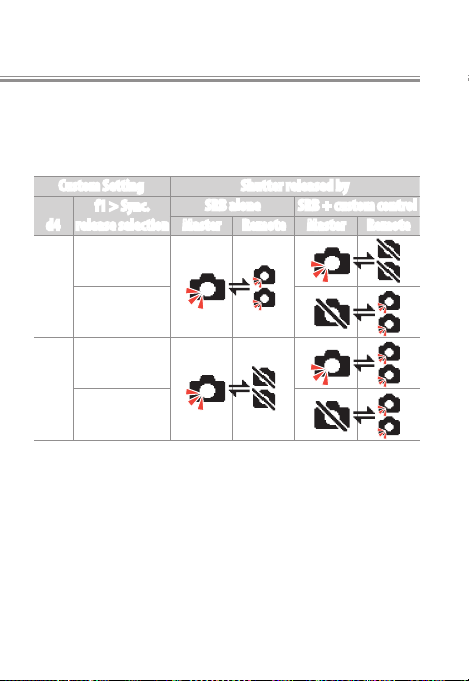
The following table shows how Custom Settings d4 and f1
combine for exible camera control using the shutter-release button (“SRB”) and the button to which Sync. release
selection has been assigned (“custom control”):
Custom Setting Shutter released by
f1> Sync.
d4
release selection
Master release
Sync
No
sync
only
Remote release
only
Synchronized
release
Remote release
only
SRB alone SRB+ custom control
Master Remote Master Remote
61
Page 62

Accessories
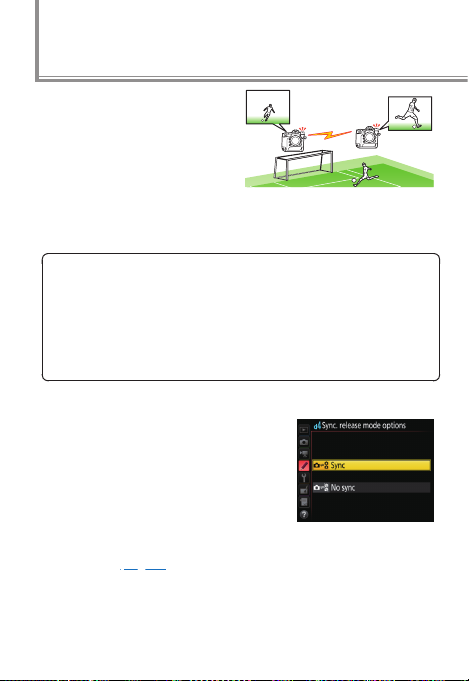
Here’s an example of how you can use two cameras to capture shots on goal in a soccer match. Custom Settings are
adjusted so that the shutter on the remote camera is released only when both the shutter-release button and the
center of the sub-selector are pressed:
• d4 Sync. release mode options: No sync
• f1 Custom control assignment>
selection: Synchronized release
To take photos with only the master camera, press the shutter-re-
lease button normally.
Sub-selec tor center> Sync. release
8
Master camera
No Image
Remote camera
To take pictures with both cameras, keep the center of the subselector pressed while pressing the shutter-release button.
Remote camera
Master camera
62
Page 63

Synchronized Release
Uploading Photos
l
If you are using WR-1 or WR-R10 wireless remote controllers for synchronized release, you can upload photos to
computer or ftp server using WT-6 or WT-5 wireless transmitters or the cameras’ built-in Ethernet connectors. The
cameras must be in ftp upload or image transfer mode.
If On is selected for Network> Options> Auto send in the
setup menu, photos will be uploaded as they are taken. Be
sure to enable this option when the camera is connected
to an Ethernet or wireless LAN.
63
Page 64

Synchronized Release
Synchronized Release Wireless Signal Range
Range varies with weather conditions and wireless signal
strength and may drop in crowds, in the presence of other
wireless signal sources, or if the remote camera is close to
the ground. Be sure the rmware for the WR-1 or WR-R10 has
been updated to the latest version; for more information, visit
the Nikon website for your area.
64
Page 65

Appendix
The D5’s controls and control panel displays dier from those for the D4S.
65
Page 66
The D5 Versus the D4S: Controls and Displays
Users upgrading from the D4S to the D5 may notice that
some of the controls and displays are in dierent locations,
while others have been added or removed.
Controls and Indicators
l
The layout of the controls and indicators to the left of the
monitor has changed.
Network indicator added.
D5 D4S
W button changed to W (M) button.
Now Fn3 button. R button moved below monitor.
66
Page 67

The controls below the monitor are now as follows.
Using the Fn3 Button as a H Button
If you use Custom Setting f1 (Custom control assignment)
to assign Voice memo to the Fn3 button, the button will per-
form the same role as the H button on the D4S.
D5 D4S
H button changed to R button.
Now S button. S button moved next to shutter‑
release button.
An i button has been added to the right of the monitor.
D5 D4S
67
Page 68
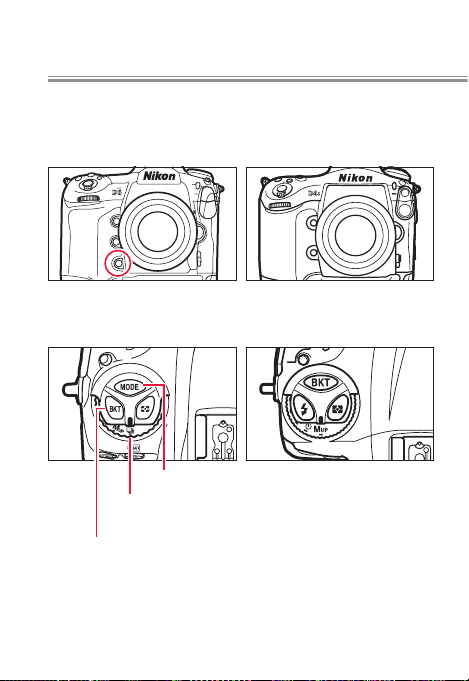
Appendix
An Fn2 button has been placed on the front of the D5, positioned for ease of access when the camera is rotated to
frame shots in portrait orientation.
The controls on the top left of the camera body are now
as shown below.
D5 D4S
D5 D4S
BKT button changed to MODE button.
S (quick release‑mode selection) position added
to release mode dial.
BKT button moved and M button assigned to W (M)
button to left of monitor.
68
Page 69

The D5 Versus the D4S: Controls and Displays
The S button has been moved next to the shutter-release button and the MODE button has been moved to the
top left side of the camera.
Using the Movie Record Button as a MODE Button
If you use Custom Setting f1 (Custom control assignment)
to assign Exposure mode to the Movie record button+ y,
you will be able to choose the exposure mode as you would
on the D4S, using only your right hand.
D5 D4S
69
Page 70

The D5 Versus the D4S: Controls and Displays
Control Panels
l
The D4S displayed ISO sensitivity in the viewnder and top
and rear control panels; the D5 displays ISO sensitivity only
in the viewnder and top control panel.
D5 D4S
Top control panel
Rear control panel
The displays showing the frame count and the number of
exposures remaining have switched positions in the top
control panel. The D5 shows the frame count only when o.
D5 D4S
Frame count
Number of exposures
70
remaining
Frame count
Number of exposures
remaining
 Loading...