

Page 1

Professional
Setting Guide
Page 2

Table of Contents
Taking Photographs
1
Taking Photographs
Improving Camera Response ........................................... 2
Settings by Subject ............................................................. 6
Matching Settings to Your Goal......................................12
Reducing Camera Blur: Vibration Reduction ..................12
•
Preserving Natural Contrast: Active D-Lighting ............13
•
Quick Setting Selection: Shooting Menu Banks ............14
•
Finding Controls in the Dark: Button Backlights ...........15
•
Reducing Noise at High ISO Sensitivities .........................15
•
Reducing Noise and Blur: Auto ISO Sensitivity Control.. 16
•
Reducing Shutter Noise: Quiet and Silent Release .......17
•
Optimizing White Balance .....................................................18
•
Varying White Balance: White Balance Bracketing .......22
•
Copying White Balance from a Photograph ...................26
•
Creating a Multiple Exposure ...............................................28
•
Choosing a Memory Card for Playback ............................30
•
Copying Pictures Between Memory Cards ......................31
•
Copying Settings to Other D4 Cameras ...........................31
•
Keeping the Camera Level: Virtual Horizon .................... 32
•
Composing Photographs: The Framing Grid .................. 34
•
Resizing Photographs for Upload: Resize ........................ 34
•
1
ii
Page 3

Autofocus Tips ...................................................................35
Movies 4
Focusing with the AF-ON Button ........................................35
•
Choosing the Number of Focus Points .............................35
•
AF-C Priority Selection ............................................................ 36
•
AF-Area Mode ............................................................................ 38
•
Focus Point Selection and Camera Orientation .............41
•
Adjusting Autofocus to the Lens: AF Fine-Tune ............ 42
•
Focus Tracking with Lock-On ............................................... 44
•
Movies 455
Before Filming ...................................................................46
•
Sound ............................................................................................ 46
•
Movie Settings ........................................................................... 47
•
Starting Movie Live View........................................................50
•
Exposure Mode .........................................................................51
•
White Balance ............................................................................51
•
Using Autofocus ........................................................................52
•
Lens Vibration Reduction (VR) .............................................54
•
Adjusting Settings During Live View .................................55
•
The Information Display .........................................................56
•
Checking Focus .........................................................................57
Filming Movies ..................................................................58
•
Starting and Ending Recording ........................................... 58
•
Editing Movies ........................................................................... 59
Time-Lapse Movies ........................................................... 60
•
Time-Lapse Movies ..................................................................60
HDMI Output ..................................................................... 64
iii
Page 4

Table of Contents
First-Time Users 6
First-Time Users 677
Customizing the Command Dials .......................................68
•
Reversing Indicators ................................................................ 68
•
Choosing the Primary Slot ....................................................69
•
Adjusting Monitor Brightness ..............................................69
•
Choosing the Monitor o Delay .......................................... 69
•
Metering ...................................................................................... 70
•
iv
Page 5

Taking Photographs
This chapter describes how the camera
can be con gured for improved shutter
response and settings adjusted for different subjects, and gives tips on using
autofocus.
1
Page 6
Improving Camera Response
Continuous-Servo AF (AF-C)
Dynamic-Area AF
This section introduces settings for reliably and quickly
photographing athletes and other moving subjects.
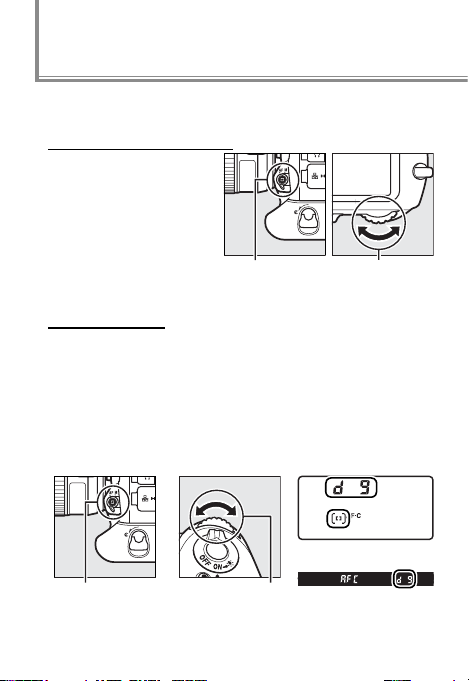
Continuous-Servo AF (AF-C)
Press the AF-mode button and rotate the main
command dial to select
AF-C. Focus is adjusted
continuously while the
shutter-release button is
pressed halfway or the
B button is pressed.
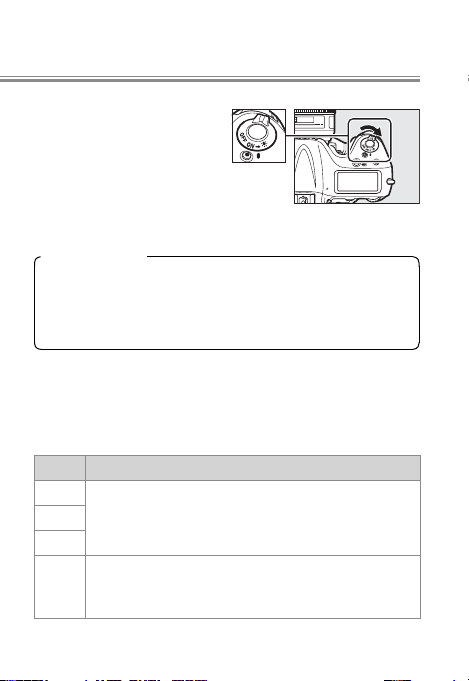
Dynamic-Area AF
Press the AF-mode button and rotate the sub-command
dial until dynamic-area AF is selected in the view nder
and top control panel. The focus point is selected manually prior to shooting, but if the subject brie y leaves the
selected focus point, the camera will focus based on data
from surrounding focus points (choose from 9, 21, and 51
points as described on page 38).
AF-mode
button
Main command
dial
Top control panel
AF-mode button Sub-command dial
2
View nder
Page 7
AA Custom Settings
Custom Settings
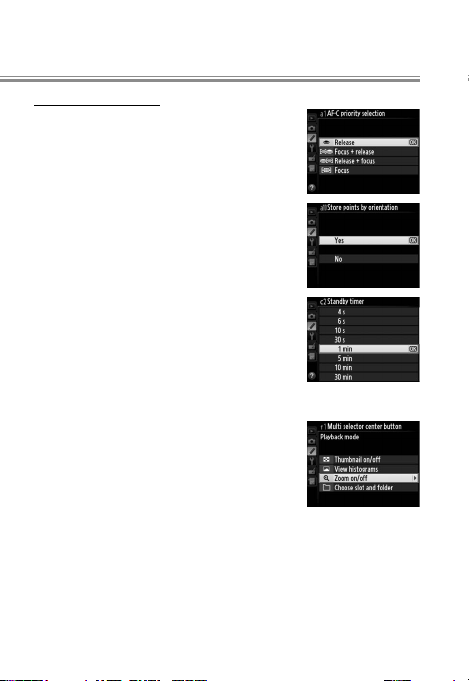
a1 AF-C priority selection > Release: The camera
gives priority to shutter release over focus, ensuring that you never miss a shot
(page 36).
a10 Store points by orientation > Yes: Select
separate focus points in landscape and
portrait orientations for quick framing
(page 41).
c2 Standby timer > 1 min: Reactivating the
exposure meters introduces a slight
delay. Choose settings around 1 min
according to your subject, but note that
longer times increase the drain on the
battery.
f1 Multi-selector center button > Playback mode >
Zoom on/o : Use the center of the multi se-
lector for close inspection of focus during
playback.
3
Page 8
Taking Photographs
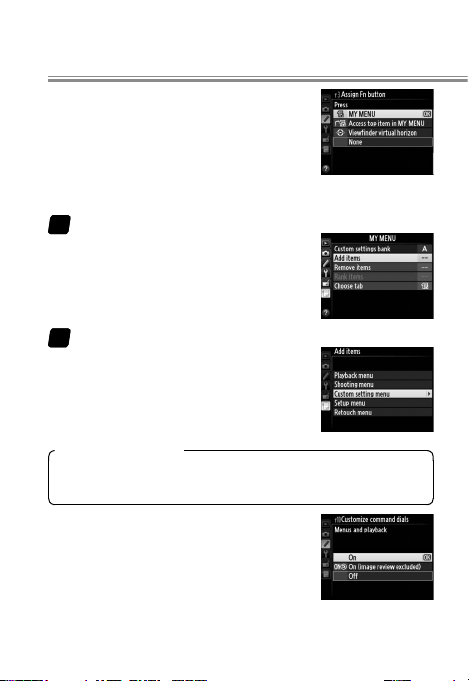
f3 Assign Fn button/f4 Assign preview button >
Press > MY MENU: Add Custom settings
bank to My Menu and then use the Fn
or Pv button to quickly select a bank according to the scene. To add items to
My Menu:
Select Add items.
11
In My Menu, highlight Add items
and press 2.
Add items.
22
Navigate to the item you wish to
add and press J, then position the
new item and press J again to add
it to My Menu.
Custom Settings Banks
Custom settings are stored in four banks (A, B, C, and D).
Changes to one bank have no e ect on the others.
f10 Customize command dials > Menus and playback > On: Use the main command dial to
scroll through pictures in full-frame playback without changing the zoom ratio, a
handy feature when you want to check
focus for multiple pictures.
4
Page 9
Improving Camera Response
Lens Vibration Reduction (VR)
DD Playback Menu
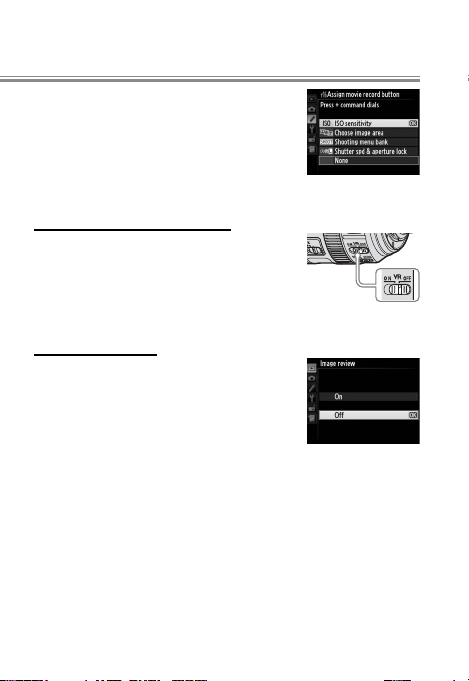
f16 Assign movie record button > Press + command
dial > ISO sensitivity: When taking photos,
use your right hand on the movie record
button and main command dial to set
ISO sensitivity without taking your eye
from the view nder.
Lens Vibration Reduction (VR)
Lens VR switch > OFF: Vibration is unlikely to
a ect photographs at shutter speeds of
⁄ s or faster. For accurate framing at
high shutter speeds, turn vibration reduction o .
Playback Menu
Image review > O : Turning image review
o improves shutter response during
burst photography. Pictures can be
viewed by pressing K.
5
Page 10
Situation
Settings by Subject
In addition to the changes described above under “Improving Camera Response”, you can ne-tune settings to
improve response for speci c subjects.
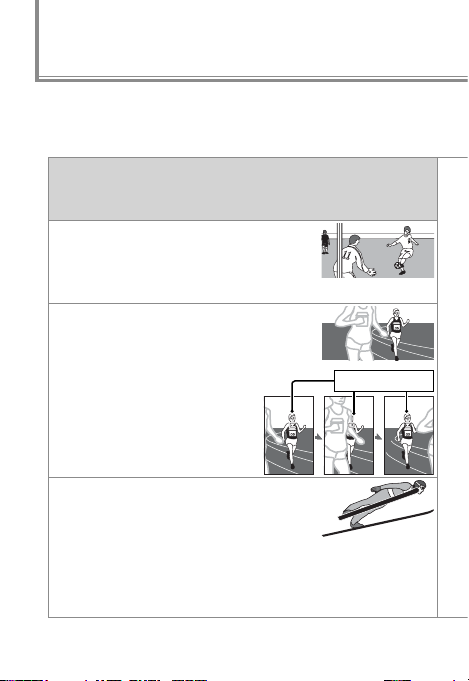
Situation
Most team sports (e.g., soccer/rugby). Choose these
basic settings if subjects are often partially obscured by other objects or focus shifts quickly
between nearby and distant subjects.
Subjects are often obscured by other athletes (e.g.,
track events). Select a long lock-on to maintain
focus on your subject.
Lock-on targetLock-on target
Subjects appear suddenly or are hard to track (e.g.,
diving/ski-jumping). Increasing number of dynam-
ic-area focus points ensures that camera will
focus based on information from surrounding
focus points if subject briefl y leaves selected
focus point. Most eff ective where there is separation between subject and background.
6
Page 11

AF-C priority
selection
(page
AF-area
mode
(page
Focus tracking
with lock-on
(page
See also
AF-C priority
selection
(page 3636))
AF-area
mode
(page 3838))
Focus tracking
with lock-on
(page 4444))
See also
Release
Release or
Focus +
release
Release
Dynamicarea AF (9
points)
Dynamic-
area AF (21
points)
3 (Normal)
3 (Normal) to
5 (Long)
3 (Normal)
High-contrast scenes,
backlighting: page 13
Focus tracking with
•
lock-on: page 44
AF-C priority selec-
•
tion: page 36
High-contrast scenes:
page 13
7
Page 12
Situation
Taking Photographs
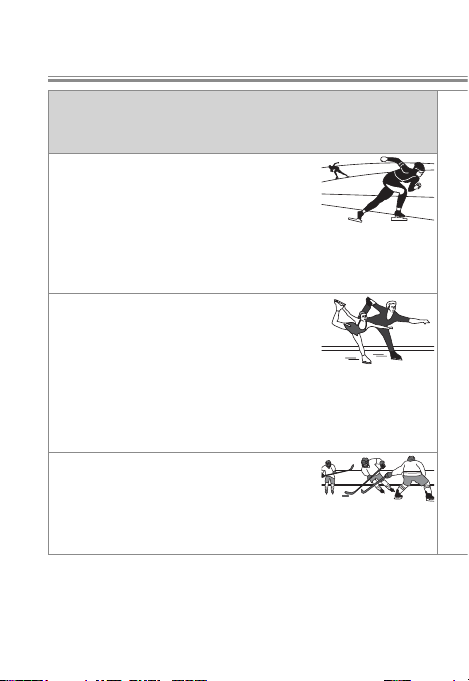
Situation
Outer focus points are used (e.g., speed skating). Increase number of dynamic-area focus points
by one level when framing pictures in “tall”
(portrait) orientation. Choose Focus + release
for improved focus when photographing
ball sports and in other situations in which
precise timing is not a priority.
Subjects move rapidly; camera orientation changes
often (e.g., gure skating). Increase number of
dynamic-area focus points. Increase lock-on
times for pairs events, where subjects are
often obscured by partner and camera may
focus background in gap between subjects.
For improved framing, choose Yes for Custom
Setting a10 (Store points by orientation).
Subjects move and/or change rapidly (e.g., hockey or
when alternately framing the pitcher and a runner
when shooting from the bench in baseball). Reduce
lock-on times for improved response in situations that call for rapid changes of subject.
8
Page 13

AF-C priority
selection
(page
AF-area
mode
(page
Focus tracking
with lock-on
(page
See also
AF-C priority
selection
(page 3636))
AF-area
mode
(page 3838))
Focus tracking
with lock-on
(page 4444))
Settings by Subject
See also
Focus +
release
Release
Release
Dynamic-
area AF (21
points)
Dynamic-
area AF (9 or
21 points)
Dynamicarea AF (9
points) or
single-point
AF
3 (Normal)
3 (Normal) or
5 (Long)
O or 1 (Short)
AF-C priority selection: page 36
AF-area mode:
•
page 38
Focus point selec-
•
tion and camera
orientation: page 41
Focus tracking with
•
lock-on: page 44
AF-area mode:
•
page 38
Focus tracking with
•
lock-on: page 44
9
Page 14

Taking Photographs
Situation
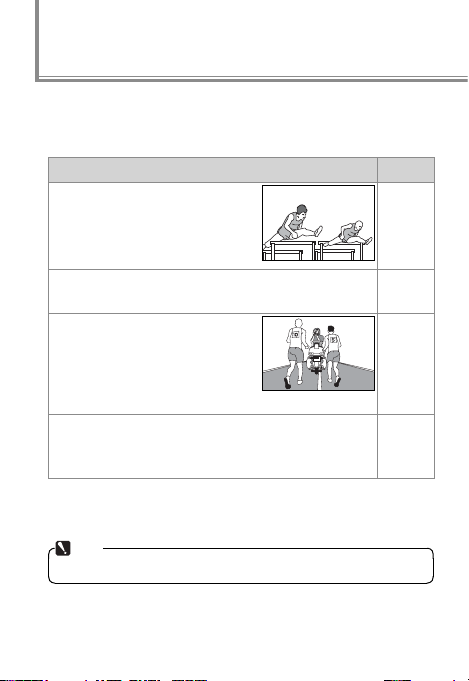
Situation
Time between focus and shooting is short and there are
obstacles between autofocus target and camera (e.g.,
volleyball or swimming). Use single-point AF to
prevent camera focusing on obstacles such
as volleyball net or splashes, and set standby
timer to 1 minute or longer for improved
shutter response.
If the camera has trouble focusing when high frame advance rates are selected in continuous release mode, try
lowering the frame rate.
10
Page 15

AF-C priority
selection
(page
AF-area
mode
(page
Focus tracking
with lock-on
(page
See also
AF-C priority
selection
(page 3636))
AF-area
mode
(page 3838))
Focus tracking
with lock-on
(page 4444))
Settings by Subject
See also
Release
Single-point
AF
3 (Normal)
The standby timer:
page 3
11
Page 16
Matching Settings to Your Goal
Situation
VR mode
Reducing Camera Blur: Vibration Reduction
●●
Vibration reduction (VR) is supported with VR lenses. To reduce camera blur, choose a setting suited to the subject.
Situation
Moving subjects shot at shutter speeds of
1⁄500 s or faster: Because blur is less
likely, OFF is recommended at fast
shutter speeds.
Stationary subjects; panning shots of moving subjects: Select ON
or NORMAL to reduce the eff ects of vibration.
Photos taken from cars, boats, helicopters, or other unstable platforms: Select
ACTIVE. Note that the image in the
viewfi nder may be aff ected by
panning or excessive vibration.
Photographs taken with a tripod: Select TRIPOD, but note that
NORMAL is suggested if the head is not fi xed or you are
using a monopod.
Note that depending on the lens, some of the above VR
modes may not be available.
Note
Frame rates may drop at settings other than OFF.
VR mode
NORMAL
TRIPOD
OFF
ON/
ACTIVE
12
Page 17
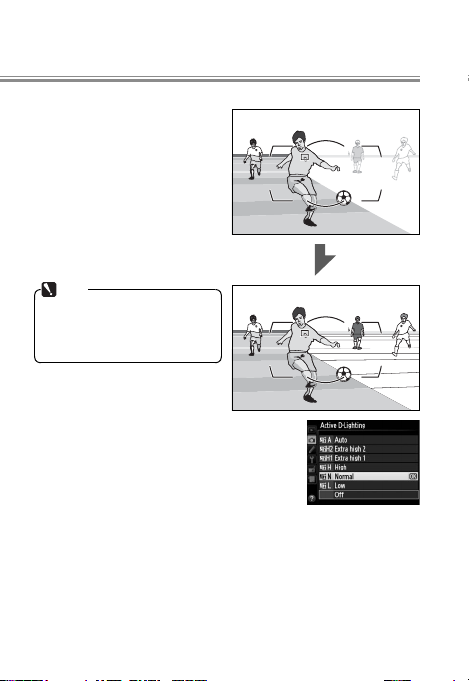
Preserving Natural Contrast: Active D-Lighting
●●
Active D-Lighting helps preserve details in highlights
and shadows. Use Active
D-Lighting for natural contrast when photographing
day matches in stadiums
and other venues that mix
sunlight and shade.
Note
Noise may appear when
Active D-Lighting is used at
high ISO sensitivities.
The following settings are suggested:
Active D-Lighting: Auto
•
Metering: Matrix
•
Exposure mode: e, f, or g
•
1
2
2
1 Choose Extra high 1 or 2 if Auto fails
to produce desired results, but note
that noise may increase.
2 Desired results may not be achieved with center-weight-
ed or spot metering or in exposure mode h.
13
Page 18
Shooting Menu Banks
Extended Menu Banks
Taking Photographs
Quick Setting Selection: Shooting Menu Banks
●●
Use the Shooting menu bank option in the shooting
menu when you need to switch rapidly from one group
of settings to another, for example when alternating between sunlight and shade.
Shooting Menu Banks
Shooting menu settings are stored in four banks (A, B, C,
and D). To store a particular combination of frequentlyused settings, select a bank using the Shooting menu
bank option in the shooting menu and set the camera
to the desired settings. The new settings will be restored
the next time the bank is selected. With some exceptions,
changes to one bank have no e ect on the others.
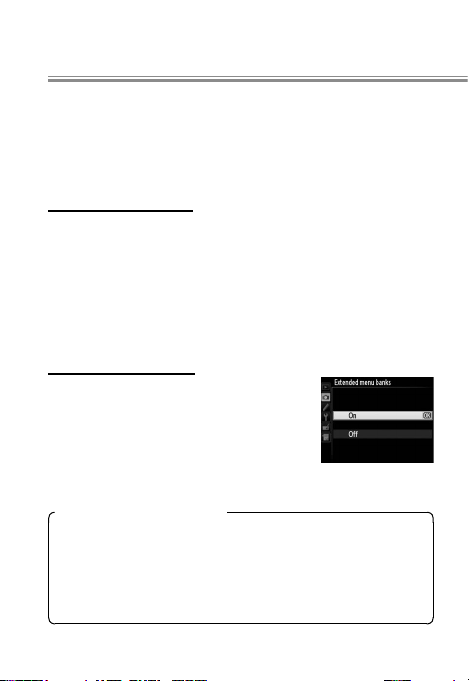
Extended Menu Banks
To include exposure mode, shutter
speed (modes f and h only), and aperture (modes g and h only) settings in
the shooting menu banks, select On for
Extended menu banks in the shooting
menu.
Shooting Menu Bank Selection
When shooting menu bank selection is assigned to the Fn
or Pv button using the Press + command dials option for
Custom Setting f3 (Assign Fn button) or f4 (Assign pre-
view button), menu banks can be selected by pressing the
button and rotating a command dial.
14
Page 19
Matching Settings to Your Goal
Option
Description
Finding Controls in the Dark: Button Backlights
●●
If you are having trouble
nding camera controls in
the dark, rotate the power
switch toward D to activate
the control panel and button backlights. The backlights remain on for 6 s after the switch is released.
The Standby Timer
If On is selected for Custom Setting d10 (LCD illumination), the control panel and button backlights will remain
on while the standby timer is active. Extend the timer to
keep the backlights lit longer.
Reducing Noise at High ISO Sensitivities
●●
Use the High ISO NR option in the shooting menu to reduce “noise” (randomly-spaced bright pixels or fog) at high
ISO sensitivities.
Option
High
Reduce noise, particularly in photographs taken at high
Normal
ISO sensitivities.
Low
Noise reduction is only performed at sensitivities of 3200
O
and higher. The amount of noise reduction is less than the
amount performed when Low is selected for High ISO NR.
Description
15
Page 20
Taking Photographs
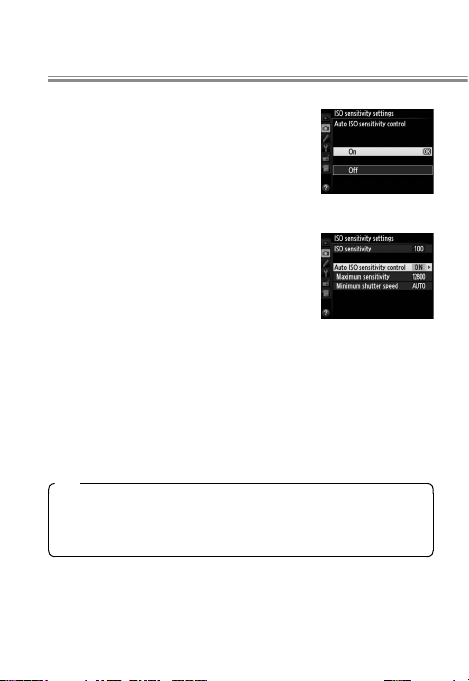
Reducing Noise and Blur: Auto ISO Sensitivity Control
●●
When On is selected for ISO sensitivity
settings > Auto ISO sensitivity control
in the shooting menu, the camera automatically adjusts ISO sensitivity if optimal exposure can not be achieved at
the value selected by the user.
Auto ISO sensitivity control can be netuned using the following options.
Maximum sensitivity: Choose the maxi-
•
mum value available for auto ISO sensitivity control (200–Hi 4). The minimum is ISO 100.
Minimum shutter speed: In exposure modes e and g, sensitiv-
•
ity will only be adjusted if shutter speed would otherwise
be slower than this value (¼ –1 s or Auto). If Auto is
selected, the camera will adjust the threshold for auto
ISO sensitivity control according to the focal length of
the lens.
Tips
We recommend that you use matrix metering (L) and
choose exposure mode e or g. Exposure compensation
can be used.
16
Page 21

Matching Settings to Your Goal
Release mode
View nder
Live view
JJ (Quiet)
Quiet
Silent
1
SShutter sound
Burst shooting
Reducing Shutter Noise: Quiet and Silent Release
●●
To reduce the amount of noise made by the shutter during
view nder photography, rotate the release mode dial to J.
In live view, shutter noise can be eliminated by selecting
Silent for Live view photography in the shooting menu
(note that while FX format pictures taken when Quiet is
selected for Live view photography are the same size as
those taken during view nder photography—about 16.2
megapixels—those taken when Silent is selected are only
about 2.5 megapixels in size). The e ects of these settings
are summarized below.
Release mode
View nder
(Quiet)
hutter sound Slight Slight
Burst shooting n/a Up to 11 fps Up to 24 fps
Quiet
2
Live view
Silent
None
1
2
1. JPEG only.
2. Mirror slap audible at start and end of live view.
3. Bursts may be up to 5 s long.
3
17
Page 22
Choosing a Setting
Taking Photographs
Optimizing White Balance
●●
If auto white balance does not produce the desired results,
you can try another setting, choose a color temperature, or
use preset manual white balance as described below.
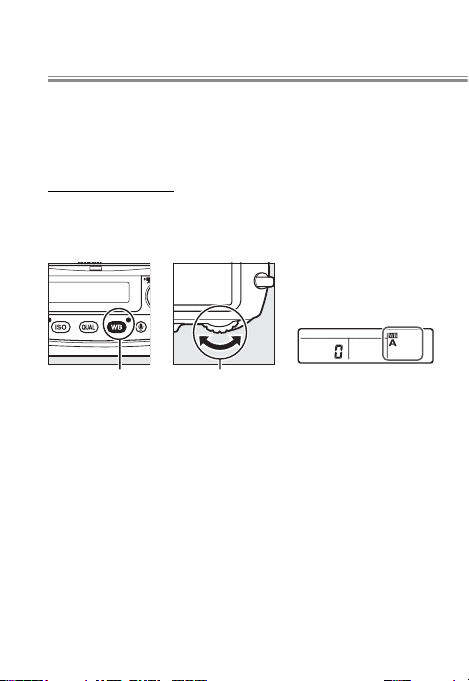
Choosing a Setting
Press the U button and rotate the main command dial
until the desired setting is displayed in the rear control
panel.
U button Main command dial Rear control panel
18
Page 23

Matching Settings to Your Goal
Choosing a Color Temperature
Choosing a Color Temperature
To choose a color temperature for the amber (A)–blue (B)
axis, select a white balance setting of K (Choose color
temp.) as described opposite and then press the U but-
ton and rotate the sub-command dial until the desired
value is displayed in the rear control panel.
U button Sub-command dial Rear control panel
To enter a value directly in increments
of 10 K, press the U button and use
the multi selector, pressing 4 or 2 to
highlight digits and 1 or 3 to change.
19
Page 24

Preset Manual White Balance
Taking Photographs
Preset Manual White Balance
To choose a white balance preset, select a white balance
setting of L (page 18) and then press the U button and
rotate the sub-command dial until the desired preset (d-1
to d-4) is displayed in the rear control panel.
U button Sub-command dial Rear control panel
To measure white balance for the selected preset, place a
neutral gray or white object under the lighting that will be
used in the nal photograph and follow the steps below.
Choose manual focus mode.
11
Rotate the focus-mode selector to M.
Note
The camera may be unable to measure white balance
at high ISO sensitivities. If the camera fails to measure
white balance, reduce ISO sensitivity and try again.
20
Page 25

Matching Settings to Your Goal
Select direct measurement mode.
22
Press the U button brie y and
then press the button until the L
icon in the rear control panel starts
to ash. A ashing D will also appear in the top control panel and
view nder. The displays will ash
for about 6 s.
Measure white balance.
33
Before the indicators stop ashing, frame the reference object so that it lls the view nder and press the
shutter-release button all the way down. The camera
will measure a value for white balance and store it in
the selected preset. No photograph will be recorded;
white balance can be measured accurately even when
the camera is not in focus.
Check the results.
44
If the camera was able to measure
a value for white balance, C will
ash in the control panels for about
6 s, while the view nder will show a
ashing a.
Choosing a White Balance Preset
Press the U button and rotate the sub-command dial to
select from presets d-1 to d-4.
21
Page 26

Taking Photographs
Varying White Balance: White Balance Bracketing
●●
Use bracketing if you have trouble adjusting white balance. Every time you take a photo, the camera will create
multiple copies, each with a di erent white balance.
Select white balance bracketing.
11
Select WB bracketing for Custom
Setting e6 (Auto bracketing set).
Note that white balance bracketing
is not available with NEF (RAW) image quality options.
Choose the number of copies.
22
Pressing the D button, rotate the main command
dial to choose the number of copies (up to 9).
Number of copies
Top control panel
D button Main command
dial
At settings other than 0, a W icon
and bracketing indicator appear in
the top control panel and M is dis-
played in the view nder.
White balance brack-
eting indicator
22
Page 27

Matching Settings to Your Goal
Control panel
No. of copies
Increment
Bracketing order
Select a bracketing increment.
33
Pressing the D button, rotate the sub-command dial
to choose an increment of 1 (5 mired), 2 (10 mired), or
3 (15 mired).
Bracketing increment
D button Sub-command
Programs with increments of 1 are shown below.
Control panel
No. of copies
dial
Increment
01 0
3 1 B 1 B / 0 / 2 B
3 1 A 1 A / 2 A / 0
2 1 B 0 / 1 B
2 1 A 0 / 1 A
3 1 A, 1 B 0 / 1 A / 1 B
5 1 A, 1 B 0 / 2 A / 1 A / 1 B / 2 B
7 1 A, 1 B
9 1 A, 1 B
Top control panel
Bracketing order
0 / 3 A / 2 A / 1 A /
1 B / 2 B / 3 B
0 / 4 A / 3 A / 2 A / 1 A /
1 B / 2 B / 3 B / 4 B
23
Page 28

Frame a photograph, focus, and shoot.
44
Each shot is processed to create the
selected number of copies; with
each copy, white balance is incremented by the selected amount,
starting from the value selected for
white balance ne-tuning.
If space is insu cient for all the
copies, n and the icon for the
a ected card will ash in the top
control panel, j will ash in the
view nder, and the shutter release
will be disabled. Shooting can begin when a new memory card is
inserted.
24
Page 29

Matching Settings to Your Goal
Cancelling Bracketing
Cancelling Bracketing
To cancel bracketing, press the D button and rotate the
main command dial until the number of copies is 0 (r)
and W is no longer displayed. The program last in effect will be restored the next time bracketing is activated.
Bracketing can also be cancelled by performing a two-button reset, although in this case the bracketing program will
not be restored the next time bracketing is activated.
White Balance Bracketing
White balance bracketing a ects color temperature (amber–blue) only. No adjustments are made on the green–
magenta axis.
In self-timer mode, the number of copies speci ed in the
white-balance program will be created each time the shutter is released, regardless of the option selected for Custom
Setting c3 (Self-timer) > Number of shots.
If the camera is turned o while the memory card access
lamp is lit, the camera will power o only after all copies
have been recorded.
25
Page 30

Taking Photographs
Copying White Balance from a Photograph
●●
Follow the steps below to copy a value for white balance
from an existing photograph to a selected preset.
Select preset manual white balance.
11
Press G and select White balance
in the shooting menu. Highlight
Preset manual and press 2.
Select a destination.
22
Highlight the destination preset
(d-1 to d-4) and press the center of
the multi selector.
Choose Select image.
33
Highlight Select image and press
2.
26
Page 31

Matching Settings to Your Goal
Highlight a source image.
44
Highlight the source image. To view
the highlighted image full frame,
press and hold the X button.
To view images in other locations,
press W and select the desired
card and folder.
Copy white balance.
55
Press J to copy the white balance value for the highlighted photograph to the selected preset.
Using the Copied Value
To set white balance to the copied value, press the U button and rotate the sub-command dial to select the preset
chosen in Step 2.
27
Page 32

Taking Photographs
Creating a Multiple Exposure
●●
Record from 2 to 10 exposures in a single photo.
Select Multiple exposure.
11
Select Multiple exposure in the
shooting menu.
Select a mode.
22
Highlight Multiple exposure mode
and press 2, then highlight one of
the following and press J to select
the highlighted option and return
to the multiple exposure menu.
0 On (series): Shoot a series of multiple exposures.
•
Multiple exposure shooting will continue until you
select O .
On (single photo): Take a single multiple exposure. Nor-
•
mal shooting resumes when the multiple exposure
has been recorded.
Choose the number of shots.
33
Highlight Number of shots and
press 2. Press 1 or 3 to choose
the number of exposures and press
J to return to the multiple exposure menu.
28
Page 33

Matching Settings to Your Goal
Adjust gain.
44
Select Auto gain and choose from
the following options.
On: Gain is adjusted according to
•
number of exposures actually recorded (gain for each exposure is
set to ½ for 2 exposures, ⁄ for 3
exposures, etc.).
O : Gain is not adjusted when a multiple exposure is
•
recorded. Recommended if background is dark.
Frame a photograph, focus, and shoot.
55
The multiple exposure icon (n)
will ash while multiple exposure
shooting is in progress. If On (sin-
gle photo) is selected for multiple
exposure mode, normal shooting will resume when a
multiple exposure is completed; otherwise, multiple
exposure mode will end only when O is selected.
The n icon clears from the display when multiple exposure shooting ends.
29
Page 34

Interrupting Multiple Exposures
Taking Photographs
Interrupting Multiple Exposures
To interrupt a multiple exposure before the speci ed number of exposures have been taken, select O for multiple
exposure mode. If shooting ends before the speci ed number of exposures have been taken, a multiple exposure will
be created from the exposures that have been recorded
to that point. If Auto gain is on, gain will be adjusted to
re ect the number of exposures actually recorded. Note
that shooting will end automatically if:
A two-button reset is performed
•
The camera is turned o
•
The battery is exhausted
•
Any of the individual exposures is deleted before shoot-
•
ing is complete
Choosing a Memory Card for Playback
●●
When two cards are inserted, you can
choose the card from which pictures are
played back by pressing J and 1 during playback, or by displaying 72 images in thumbnail view and pressing W.
A card selection menu will be displayed;
highlight the desired slot and press 2,
then highlight a folder and press J.
30
Page 35

Matching Settings to Your Goal
Copying Pictures Between Memory Cards
●●
When two memory cards are inserted, you can use the
options in the playback Copy image(s) menu to copy pic-
tures between the two cards (images will not be copied
if there is not enough space on the destination card or if
Enable is selected for Network > Network connection in
the setup menu).
Select source: Choose the source card.
•
Select image(s): Select the pictures to be copied.
•
Select destination folder: Choose the destination folder on the
•
remaining memory card.
Copy image(s): Copy the selected pictures to the speci ed
•
destination.
Copying Settings to Other D4 Cameras
●●
The Save/load settings option in the
setup menu can be used to share settings among D4 cameras. Select Save
settings to save settings to a memory
card (an error will be displayed if the
card is full), Load settings to load saved settings from a
memory card. Note that Save/load settings is only avail-
able when a memory card is inserted in the camera, and
that Load settings is only available if the card contains
saved settings.
31
Page 36

The Monitor
Taking Photographs
Keeping the Camera Level: Virtual Horizon
●●
Roll and pitch data from the camera tilt sensor can be displayed for assistance in levelling the camera on a tripod
and in other similar situations.
The Monitor
The Virtual horizon option in the setup menu is used to
display a virtual horizon in the monitor. The roll reference
line turns green if the camera is tilted neither left nor right,
while the pitch reference line turns green and a dot appears in the center of the display if the camera is tilted neither forward nor back. Each division is equivalent to 5°.
Camera level Camera tilted left
or right
In live view, you can display a virtual
horizon over the view in the monitor by
pressing the R button.
Tilt
The displays may not be accurate when the camera is tilted
at a sharp angle forward or back. Tilt will not be displayed if
the camera is unable to measure it.
Camera tilted
forward or back
32
Page 37

Matching Settings to Your Goal
The View nder
Camera tilted right
Camera horizontal
Camera tilted left
Camera tilted forward
Camera vertical
Camera tilted back
The View nder
When View nder virtual horizon is selected for Custom
Setting f3 (Assign Fn button) or f4 (Assign preview but-
ton) > Press, pressing the button displays pitch and roll
indicators in the view nder.
Roll
Camera tilted right
Pitch
Camera tilted forward
The roles of the indicators are reversed when the camera is
rotated to take pictures in “tall” (portrait) orientation.
Camera horizontal
Camera vertical
Camera tilted left
Camera tilted back
33
Page 38

Taking Photographs
Composing Photographs: The Framing Grid
●●
For help composing photographs, select On for Custom
Setting d6 (View nder grid
display) to display a framing
grid in the view nder.
Framing grid
Resizing Photographs for Upload: Resize
●●
Use the Resize option in the retouch menu to create small
copies of selected photographs.
Resized Copies
Playback zoom may not be available when resized copies
are displayed. Copies created from NEF (RAW), NEF (RAW) +
JPEG, or TIFF (RGB) photos have an image quality of JPEG
ne; copies created from JPEG photos have the same image quality as the original. Photos taken at an image area
of 5 : 4 (30 × 24) can not be resized.
34
Page 39

Autofocus Tips
Focusing with the AF-ON Button
●●
If AF-ON only is selected for Custom Setting a4 (AF activation), the B button
can be used to focus and the shutter-release button to release the shutter. To
lock focus or suspend autofocus when
an obstacle comes between you and
the subject, release the B button.
In the AF-ON position, the focus operation selection switch on some telephoto
lenses functions in the same way as the
B button.
Choosing the Number of Focus Points
●●
Custom Setting a7 (Number of focus points) can be used
to choose the focus points available for manual focus point
selection. Choose 11 points for faster focus point selection
when composing photographs.
B button
35
Page 40

Taking Photographs
AF-C Priority Selection
●●
Custom Setting a1 (AF-C priority selection) controls
whether the camera gives priority to focus or shutter release.
G Release: Pictures can be taken
whether or not the camera is in focus. Frame rates do not slow during
burst photography.
B Focus + release: In burst mode,
priority is given to focus for the fi rst
frame and to release for later frames.
Frame rates do not slow.
E Release + focus: In burst mode,
priority is given to release for the
fi rst frame and to focus for later
frames. Frame rates slow as needed
to allow camera to focus.
F Focus : Pictures can only be taken
when the camera is in focus.
36
Page 41

Autofocus Tips
: Subject not in focus
: Subject in focus
: Shutter released
37
Page 42

AF-area mode
Top control
panel
View nder
Sample focus-
point display
Taking Photographs
AF-Area Mode
●●
AF-area modes are described below.
AF-area mode
Top control
panel
Single-point AF
View nder
Sample focus-
point display
9-point dynamic-area AF
21-point dynamic-area AF
51-point dynamic-area AF
*
*
*
3D-tracking
Auto-area AF
* Only active focus point is displayed in viewfi nder. Remaining
points provide information to assist focus operation.
38
Page 43

Autofocus Tips
Description
The focus point is selected manually. The camera focuses on the
subject in the selected focus point only. Choose for subjects you
can keep framed in the selected focus point.
The focus point is selected manually. The
camera focuses on the subject in the selected
focus point when autofocus is initiated, but if
the subject later leaves the selected point for
brief periods, the camera will focus based on
information from surrounding points.
Choose for low-contrast subjects if the camera has diffi culty focusing or for active subjects that are hard to keep framed in a single
point, and increase the number of points if the subject is moving
unpredictably or occupies a large area of the frame. Choose a setting one level higher for subjects at the edge of the frame.
The initial focus point is selected manually. The camera uses color
information to track subjects that leave the selected focus point
and selects new focus points as required.
The camera automatically detects the subject and selects the focus
point.
39
Page 44

Taking Photographs
Focus Point Selection and Aperture
The focus points available vary with the maximum aperture
of the lens.
Maximum aperture f/5.6 or faster: Focus
point selection is supported with all
51 points: 15 cross sensors (
center of the display and 18 line sensors
( ) on either side.
Maximum aperture slower than f/5.6 but
faster than f/8 (e.g., a lens with a maxi-
mum aperture of f/4 on a TC-17E II
teleconverter): Focus point selection is
supported with 15 points: 9 cross sensors at the center of the display and 3
line sensors on either side.
Maximum aperture f/8 (e.g., a lens with a
maximum aperture of f/4 on a TC-20E III
teleconverter): Focus point selection is
supported with 11 points: a cross sensor at the center of the display, 4 line
sensors on either side, and 1 line sensor above and below. The four points
shown by symbols are available only
for dynamic-area AF.
) at the
40
Page 45

Autofocus Tips
Focus Point Selection and Camera Orientation
●●
When Ye s is selected for Custom Setting a10 (Store points
by orientation), separate focus points can be selected for
“wide” (landscape) orientation and for “tall” (portrait) orientation (camera rotated 90° clockwise or counterclockwise).
If No is selected, the same focus point will be used regardless of camera orientation.
41
Page 46

Option
Description
Taking Photographs
Adjusting Autofocus to the Lens: AF Fine-Tune
●●
If you nd that certain lenses do not produce the desired
results with autofocus, you can adjust focus for each lens
using the AF ne-tune > Saved value or Default options
in the setup menu (note that AF tuning may interfere with
normal focus; use only when required).
Option
AF ne tune
(On/O )
Saved value Tune AF for the current lens (CPU lenses only).
Default
List saved
values
On: Turn AF tuning on for all saved lenses.
•
O : Turn AF tuning off .
•
Choose the AF tuning value used if no previously saved
value exists for the current lens (CPU lenses only).
List previously saved AF tuning values. If you are using
more than one lens of the same type, you can add an
identifi er to the lens name (for example, the last two
digits of the lens serial number).
Description
42
Page 47

Autofocus Tips
Checking Focus
Checking Focus
Position a ruler at an angle so that one of the rules is at the
same distance from the camera as a vertical surface such as
the cover of a book stood upright. Using autofocus, focus
on the vertical surface and then photograph the selected
rule using focus lock.
The illustration below shows how to interpret the results.
Camera focuses in
front of selected
rule: adjust ne-
tuning upward.
Camera focuses
on selected rule:
no adjustment
required.
Camera focuses
behind selected
rule: adjust ne-
tuning downward.
43
Page 48

Taking Photographs
Focus Tracking with Lock-On
●●
By preventing the camera from refocusing when your subject is brie y obscured by another object, focus tracking
with lock-on ensures that the camera will continue to track
the main subject once the obstacle has moved away (continuous-servo AF only). Choose the length of time before
the camera refocuses from 5 (Long), 4, 3 (Normal), 2, and
1 (Short). To refocus before lock-on ends, press the B or
shutter-release button again.
Camera will wait before
refocusing on objects behind
the subject
Camera will track and focus on
objects the same distance from
the camera as the subject
Camera will wait before
refocusing on objects in front of
the subject
Note: Turn lock-on o for improved response when you
need to switch rapidly from
one subject to another and in
other similar situations.
44
Page 49

Movies
This chapter covers basic camera settings and tips and tricks you can use
when shooting movies, in the order you
will use them during lming.
45
Page 50

Before Filming
External Microphones
Headphones
Microphone Sensitivity
Before lming, ready the camera as described below.
Sound
●●
The D4 supports the following sound recording features.
External Microphones
The optional ME-1 stereo microphone can be used to record sound in stereo or to avoid recording lens noise during autofocus. To reduce low-frequency noise, including
that produced by the wind, rotate the low-cut lter switch
from FLAT to L-CUT. Note that noise from the switch may be
recorded if the control is operated during lming.
Headphones
Third-party headphones can be attached via the headphone
connector so that you can check sound during lming. Note
that headphone and microphone settings can not be adjusted during shooting; before recording, check headphone
volume in the live view display (page 55) and adjust headphone volume and microphone sensitivity as necessary.
Microphone Sensitivity
Microphone sensitivity can be adjusted before recording using the Movie
settings > Microphone option in the
shooting menu. If sound levels can be
predicted, adjust sensitivity manually so
that peak volume does not exceed 12 db. Choose Auto if
sound levels can not be predicted in advance.
46
Page 51

Movie Settings
Frame Size, Frame Rate, and Movie Quality
●●
In addition to microphone sensitivity, the following options can be adjusted using Movie settings.
Frame Size, Frame Rate, and Movie Quality
Frame size, frame rate, and movie quality can be chosen
using Frame size/frame rate and Movie quality. The camera o ers sizes of 1920 × 1080, 1280 × 720, and 640 × 424
pixels, rates of 60 (59.94), 50, 30 (29.97), 25, or 24 (23.976)
fps, and normal and high quality.
Frame size/frame rate Movie quality
47
Page 52

Movies
Image Area
Using an FX lens with movie live view gives you a choice of
two crops in addition to the standard FX-based format:
1. To record movies with a crop factor 2.7× that of an FX
format lens used with a non-DX image area, select a
“1920 × 1080 crop” option for Movie options > Frame
size/frame rate in the shooting menu. The e ective
lens focal length will increase by 2.7× for a telephoto effect and movies will be recorded at a higher quality than
when an FX-based movie format is used.
2. To record movies with a crop factor of 1.5×, select DX
for Image area > Choose image area in the shooting
menu. Note that movies recorded at this setting show a
slight drop in image-quality when compared to movies
recorded in an FX-based movie format.
48
FX-based movie
format
DX-based movie
format
Crop factor: 1.5× Crop factor: 2.7×
1920 × 1080
crop
Page 53

Before Filming
Destination
ISO Sensitivity Range
Destination
Choose the slot to which movies are
recorded. The menu shows the time
available on each card; recording ends
automatically when no time remains.
Live view can be used to record movies up to 29 minutes
59 seconds in length.
ISO Sensitivity Range
Choose the range of ISO sensitivities
available during recording in modes e,
f, and g. Note that because noise (randomly-spaced bright pixels, fog, and
lines) tends to increase at high ISO sensitivities, 200 to 12800 is recommended
in most situations.
49
Page 54

Movies
Starting Movie Live View
●●
Select movie live view.
11
Rotate the live view selector to 1.
Live view selector
Start live view.
22
Press the a button.
a button
The Shutter-Release Button
If Record movies is selected for Custom Setting g4 (Assign shutter button), you can press the shutter-release
button halfway once to start live view and then press it
halfway again to focus (autofocus only) or all the way down
to start recording (page 58). To end movie live view, press
the a button.
50
Page 55

Before Filming
Aperture
Shutter speed
ISO sensitivity
Exposure comp.
ee, , f
g
h
Exposure Mode
●●
Before recording, press the I (Q) button and rotate
the main command dial to choose an exposure mode. The
settings that can be adjusted in movie live view are determined by the exposure mode as shown below.
Aperture
f ———
g
h
✔
✔
Shutter speed
ISO sensitivity
——
*
✔
✔
Exposure comp.
✔
✔
—
* Slower speeds produce smoother results: at a frame rate of 30 fps,
for example, choose speeds between ⁄ s and ⁄ s. If fl ickering
lights cause fl icker or banding in the movie, change the shutter
speed and check the eff ect in the monitor. If the local power supply is 50 Hz, choose a shutter speed of ⁄ s.
White Balance
●●
Press the U button and rotate the main command dial
to choose a white balance option. Note that you must exit
live view to measure preset white balance (page 20).
U button Main command dial Rear control panel
51
Page 56

Choosing a Focus Mode
Movies
Using Autofocus
●●
To focus using autofocus,
rotate the focus-mode selector to AF and select autofocus and AF-area modes as
described below.
Choosing a Focus Mode
Press the AF-mode button and rotate the main command
dial until the desired mode is displayed in the monitor.
Focus-mode selector
AF-mode button Main command
Choose AF-S (single-servo AF) or AF-F (full-time servo AF):
AF-S: The camera focuses when the shutter-release but-
•
ton is pressed halfway. If the camera is able to focus, the
focus point will be displayed in green and focus will lock
while the shutter-release button is pressed halfway.
AF-F: The camera focuses continuously until the shutter-
•
release button is pressed halfway to lock focus. The focus
point is displayed in green when the camera focuses.
dial
Monitor
52
Page 57

Before Filming
Choosing an AF-Area Mode
!
5
6
&
Choosing an AF-Area Mode
Press the AF-mode button and rotate the sub-command
dial until the desired mode is displayed in the monitor.
AF-mode button Sub-command
Face-priority AF: Camera focuses on faces. If multiple faces (up
!
to 35) are detected, desired subject can be chosen with multi
selector.
Wide-area AF: For handheld shots of landscapes and other
5
subjects. Focus point can be positioned with multi selector.
Normal-area AF: Use multi selector to position focus point for
6
pin-point focus on selected spot in frame.
Subject-tracking AF: Position focus point over subject and press
&
center of multi selector to track subject as it moves through
frame. Press center of multi selector again to end tracking.
Note
The built-in microphone may record sounds made by the
lens during autofocus. An optional ME-1 external microphone can be used for reduced lens noise (page 46).
dial
Monitor
53
Page 58

Movies
Lens Vibration Reduction (VR)
●●
We recommend using VR lenses with
the vibration reduction ON/OFF switch
in the ON position.
If the lens has a vibration reduction mode switch, choose
NORMAL for hand-held photography or when using a monopod. Vibration reduction should generally be turned o
when the camera is on a tripod, although an exception
can be made for a lens such as the AF-S NIKKOR 200mm
f/2G ED VR II, which automatically detects tripod vibration. Vibration reduction should also be turned o if you
notice shake during lming when panning a camera that
is mounted on a tripod.
Tripod Mode
Some lenses, such as the AF-S NIKKOR
400 mm f/2.8G ED VR, o er vibration reduction with a TRIPOD option that is generally recommended when the camera
is mounted on a tripod. NORMAL is however preferred if the tripod head is not
xed or you are using a monopod.
54
Page 59

Before Filming
Adjusting Settings During Live View
●●
You can highlight the microphone sensitivity, headphone
volume, or monitor brightness indicator in the live view
display by holding W and pressing 4 or 2, and then adjust the highlighted setting by pressing 1 or 3.
Headphone
volume
Microphone
sensitivity
Sound level
Note that microphone sensitivity and headphone volume
can not be adjusted during recording, and that brightness
applies to the display in the monitor only and has no e ect
on movies.
Monitor
brightness
55
Page 60

Movies
The Information Display
●●
Press the R button to choose the information displayed
during movie live view.
Information on Information o Framing guides
Virtual horizon Histogram
Hide indicators when the camera is connected to an external recording device (page 64).
56
Page 61

Before Filming
Checking Focus
●●
If Zoom on/o is selected for Custom
Setting f1 (Multi selector center but-
ton) > Live view, you can press the
center of the multi selector to zoom in
on the current focus point. The initial
zoom setting can be selected from low,
medium, and high magni cation by
highlighting Zoom on/o option in the
multi selector center button menu and
pressing 2. Focus zoom is not available
during movie recording.
Subject Tracking
In subject-tracking AF, pressing the center of the multi selector locks tracking on the subject in the focus point (page
53). Press the X button to zoom in on your subject and
check focus.
Navigation
window
57
Page 62

Filming Movies
Starting and Ending Recording
●●
Press the movie-record button to start
recording. If Record movies is selected
for Custom Setting g4 (Assign shutter
button), you can start and end movie
recording by pressing the shutter-release button all the way down. If the
camera is mounted on a tripod, you
can reduce camera shake by using the
release on an optional MC-36 or MC-30
remote cord to start and end recording
(movie live view can also be started by
pressing the shutter-release button on
the remote cord halfway).
Taking Photographs
If Live frame grab is selected for Custom Setting g4 (Assign shutter button), you can press the shutter-release
button all the way down to take photographs without interrupting movie recording. The resulting photos are about
2.1 megapixels in size and have an aspect ratio of 16 : 9.
Recording
indicator
Time remaining
58
Page 63

Editing Movies
●●
The Edit movie option in the retouch
menu can be used to create edited copies of the movies on the memory card.
Select Choose start/end point to trim
unwanted footage in amounts as small
as 0.5 s, or Save selected frames to save
selected frames as JPEG stills.
Filming Movies
59
Page 64

Time-Lapse Movies
Time-Lapse Movies
●●
Follow the steps below to create silent time-lapse movies
from photos taken automatically at selected intervals. The
resulting movie is recorded at the settings currently selected for Movie settings in the shooting menu. We recommend that you connect the camera to an AC power supply
using an optional EH-6b AC adapter and EP-6 power connector to ensure that shooting is not interrupted.
Select Time-lapse photography.
11
Select Time-lapse photography in
the shooting menu.
Choose the interval.
22
The dialog at right will be displayed.
Choose an interval of from 1 s to
10 minutes (the selected setting is
shown in the bottom section of the
dialog) and press 2 to proceed to
the next step.
60
Page 65

Choose the shooting time.
33
Enter a shooting time of from
1 minute to 7 hours 59 minutes
(the selected setting is shown in
the bottom section of the dialog)
and press 2 to proceed.
Start shooting.
44
Highlight On and press J (to return
to the shooting menu without starting time-lapse photography, select
O ). Shooting will begin after 3 s.
Time-Lapse Movies
The length of the movie that will
be recorded at current settings and
the space available on the memory
card are shown at the bottom of the
time-lapse photography dialog.
Length recorded/
maximum length
Card status
Frame size/rate
61
Page 66

Interrupting Time-Lapse Photography
Movies
Interrupting Time-Lapse Photography
Time-lapse photography will end automatically if the battery is exhausted. The following will also end time-lapse
photography:
Selecting Start > O for Time-lapse photography
•
Pressing J between frames or immediately after a frame
•
is recorded
Turning the camera o
•
Removing the lens
•
Connecting a USB or HDMI cable
•
Inserting a memory card into an empty slot
•
Pressing the shutter-release button all the way down to
•
take a photograph
A movie will be created from the frames shot to the point
where time-lapse photography ended. Normal photography can be resumed once time-lapse photography ends.
Note that time-lapse photography will end and no movie
will be recorded if the power source is removed or disconnected or the destination memory card is ejected.
62
Page 67

Time-Lapse Movies
Time Lapse Photography
Time-lapse photography is not available in live view, at a
shutter speed of A or when bracketing, High Dynamic
Range (HDR), multiple exposure, or interval timer photography is active.
To record changes in brightness, use manual exposure; for
consistent framing, colors and focus, turn vibration reduction o , choose a white balance setting other than auto,
and use manual focus. When time-lapse photographs are
recorded with a “1920 × 1080 crop” option selected for
movie frame size, the area used for metering exposure,
ash level, and auto white balance is not the same as the
area in the nal photographs, with the result that optimal
results may not be achieved. Take test shots and check the
results in the monitor.
63
Page 68

HDMI Output
Output Resolution
Advanced
The camera can be connected to HDMI recording devices.
Connect to
HDMI device
The HDMI option in the setup menu controls HDMI output.
Output Resolution
Auto is recommended. Other settings
should be used only if Auto does not
produce the desired results.
Advanced
Adjust settings as follows:
Output range: Auto. Choose Limited range (16–235) or Fu ll
•
range (0–255) only if the camera is unable to detect the
correct RGB video signal output range.
Output display size: 100%
•
Live view on-screen display: O
•
64
Page 69

HDMI Recording
The D4 does not compress HDMI output, with the result
that the camera can be connected to an HDMI recording
device and movie footage recorded at a higher quality
than if it were saved to a memory card. Note that while
movies are being recorded with the camera, the camera
may output movie footage at a smaller frame size than that
selected for Frame size/frame rate.
65
Page 70

66
Page 71

First-Time Users
67
Page 72

Custom Setting f10: Customize Command Dials
Custom Setting f13: Reverse Indicators
First-Time Users
Customizing the Command Dials
●●
Custom Setting f10: Customize Command Dials
Reverse rotation: Reverse the direction of
rotation for the main and sub-command
dials when making adjustments to Ex-
posure compensation and/or Shutter
speed/aperture (these settings also ap-
ply to the command dials for vertical shooting). Highlight
options and press 2 to select or deselect, then highlight
Done and press J.
Change main/sub: If O is selected, the
main command dial controls shutter
speed and the sub-command dial controls aperture. If On is selected, the main
command dial will control aperture and
the sub-command dial shutter speed. If On (Mode A) is selected, the main command dial will be used to set aperture
in exposure mode g only. This setting also applies to the
command dials for vertical shooting.
Reversing Indicators
●●
Custom Setting f13: Reverse Indicators
If (V) is selected, the exposure indicators
in the top control panel and information display are displayed with positive values on the left and negative values
on the right. Select (W) to display nega-
tive values on the left and positive values on the right.
68
Page 73

First-Time Users
Option
Description
Custom Setting c4: Monitor o Delay
Choosing the Primary Slot
●●
When using two memory cards, you can
choose one as the primary card using
the Primary slot selection item in the
shooting menu.
Adjusting Monitor Brightness
●●
The Monitor brightness option in the setup menu can be
used to adjust monitor brightness for playback, menus,
and the information display.
Option
When the monitor is on, monitor brightness is automatically adjusted according to ambient lighting conditions.
Auto
Care should be taken not to cover the ambient brightness
sensor.
Press 1 or 3 to choose monitor brightness. Choose
Manual
higher values for increased brightness, lower values for
reduced brightness.
Choosing the Monitor o Delay
●●
Custom Setting c4: Monitor o Delay
Choose how long the monitor remains
on when no operations are performed.
Description
69
Page 74

First-Time Users
Metering
●●
To choose how the camera sets exposure, press the Y button and rotate the main command dial until the desired
metering option is displayed in the view nder and top
control panel. Choose from matrix (L), center-weighted
(M), and spot (N) metering.
Top control panel
Y button Main command dial
70
View nder
Page 75

71
Page 76

© 2012 Nikon Corporation
Printed in Japan
CS SB#### (11)
 Loading...