

Page 1
Quick Start Guide
Confirming the Package Contents 3
Basic Operations 4
First Steps 10
Shooting and Playback 17
Adding Comments to Images 24
Sharing Images 26
Using ViewNX 2 28
Other Functions 33
For Your Safety 36
En
Page 2

Thank you for purchasing a Nikon COOLPIX S810c digital camera.
This guide introduces the procedures necessary for first time use of
this camera.
To ensure proper use, please read and thoroughly understand the
information in “For Your Safety” (pages 36-39) before using the
camera.
For more detailed information, please refer to the digital Reference
Manual, which is located on the Nikon website. For information on
viewing the camera’s digital Reference Manual, see “Downloading the
“Reference Manual”” (page 3).
Should you need technical support, we offer a number of options.
Nikon User Support
Visit the site below to register your camera and keep up-to-date with
the latest product information. You will find answers to frequently
asked questions (FAQs) and can contact us for technical assistance.
http://www.europe-nikon.com/support
An Important Notice about Accessories
Nikon COOLPIX digital cameras are designed to meet the highest
standards and are equipped with complex electronic circuitry.
Only Nikon accessories, including chargers, batteries, Charging
AC Adapters, and AC adapters are certified by Nikon specifically
for use with your Nikon COOLPIX digital camera. These
accessories have been engineered and tested to operate within
the requirements of the electronic circuitry of our cameras.
2
Page 3
Confirming the Package Contents
In the event that any items are missing, please contact the store
where you purchased the camera.
COOLPIX S810c
Digital Camera
Charging AC Adapter
EH-71P*
Camera Strap Rechargeable
Li-ion Battery EN-EL23
(with Terminal Cover)
USB Cable UC-E21
• Quick Start Guide (this guide) • Warranty
* A plug adapter is included if the camera was purchased in a
country or region that requires a plug adapter. The shape of the
plug adapter varies with the country or region of purchase (A13).
NOTE: A microSDHC/microSDXC memory card, hereafter referred to
as a “memory card”, is not provided.
Downloading the “Reference Manual”
Refer to the COOLPIX S810c Reference Manual (PDF format) for more
detailed information.
The Reference Manual can be downloaded from the Nikon website.
http://nikonimglib.com/manual/
The Reference Manual can be viewed using Adobe Reader.
A
: This icon indicates that more information is available elsewhere in this guide.
Confirming the Package Contents
3
Page 4

Basic Operations
Parts of the Camera
9
10
8
1 211 3
4
5
6
7
1 Power switch/power-on lamp
2 Zoom control
3 Shutter-release button
4 d (menu) button
5 W (home) button
6 USB connector cover
4
Basic Operations
7 V (back) button
8 Battery-chamber cover
9 Monitor/touch panel
10 Headset connector
11 Memory card slot cover
Page 5

Using the Camera Buttons
Use the method described below.
d (menu) button
• Press the d button to display menus.
The shooting menu or playback menu is displayed when using the
camera, and the option menu is displayed when using Android™ OS. Tap a
menu option to select it.
W (home) button
• Press the W button to display the home screen.
• To display the list screen showing the most recently used applications,
press and hold the W button for a few seconds on the home screen.
• To turn on the camera and display the home screen, press and hold the W
button for a few seconds while the camera is off.
V (back) button
• Press the V button to return to the previous screen.
• The message Press again to exit. is displayed when you press the V
button on the shooting screen. To return to the shooting screen, press the
shutter-release button.
Basic Operations
5
Page 6
Operating the Touch Panel
The monitor on this camera is a touch panel display. Use the
methods described below.
Tapping
Tap the touch panel.
Use this operation to select a setting icon or image.
The shutter can also be released by tapping the
monitor.
Touching and Holding
Place your finger on an item or icon, and hold it
there for several seconds.
Use this operation to edit texts.
Flicking
Place your finger on the touch panel and quickly
move it up, down, right, or left and release it to
scroll.
Use this operation to switch the screen.
Dragging
Drag your finger across the touch panel and
remove it from the touch panel.
Use this operation to view the previous or next image
during playback.
Spreading/Pinching
Spread two fingers apart/pinch
two fingers together.
Place two fingers on the monitor
and spread them apart to zoom in
on an image in playback mode.
Pinch two fingers together to
zoom out or to display image thumbnails.
6
Basic Operations
Page 7
Entering Text
Enter text using the on-screen keyboard.
Using the Keyboard
Tap the on-screen keyboard to enter text.
• The keyboard is displayed whenever you tap a text input area such
as the search box. Press the V button to hide the on-screen
keyboard.
• See “Other Keyboard Operations” (A8) for more information.
Account setup
You can set up email for most accounts in just a few steps.
Email address
Password
Manual setup Next
15:30
Email address
q
we r t yu i o
asdfghj k
zxc v bnm
?123
@
Example of English Keyboard
C Changing the Type of Keyboard
While the keyboard is displayed, open the notification shade and tap Choose
input method to change the type of keyboard (language or input software).
• The options that can be selected depend on the Language & input
settings in the setting menu.
• You can download additional types of input software from the Google
Play™ Store.
15:30
Next
p
l
Next
.
Basic Operations
7
Page 8
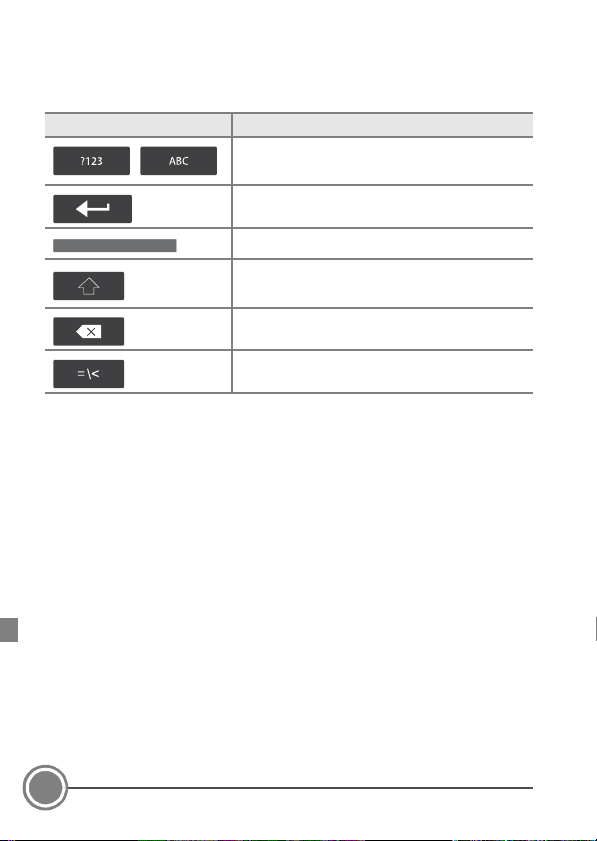
Other Keyboard Operations
Tap the keys listed below to perform operations such as changing character
types, deleting text, and inserting a space.
Key Description
/
* Displayed key varies depending on the current operating condition.
Switches the keyboard between alphabet
and numbers/symbols.
Inserts a line break.
*
Inserts a space.
Switches between upper case, lower case,
and symbols.
Deletes characters to the left of the cursor.
Displays additional symbols on the keyboard.
8
Basic Operations
Page 9

Editing Text
You can edit text using the operations listed below.
Operation Description
Move the cursor
Select the text
Cut/copy Select the text and tap CUT* or COPY*.
Paste
* This option is displayed above the text input area.
Tap the location where you want to insert the
cursor. Drag to move the cursor.
Touch and hold the desired text to select it. You
can also drag the text to select it. Drag or
to change the selection area.
To select all of the entered text, touch and hold
the text, and tap SELECT ALL*.
Move the cursor to the location where you want
to paste the text, tap , and then tap PA ST E*. If
you paste while text is selected, the selected
text is replaced by the pasted text.
Basic Operations
9
Page 10
First Steps
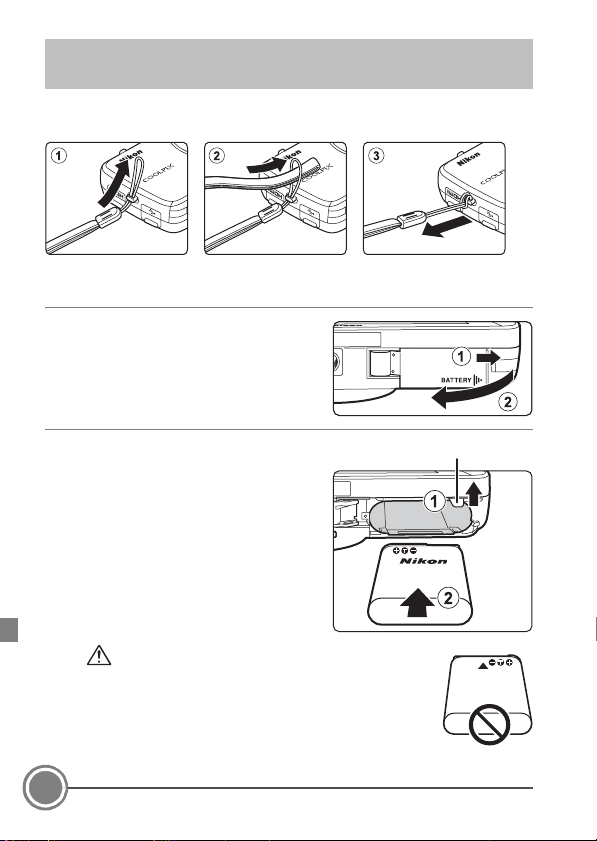
Step 1 Attach the Camera Strap
Step 2 Insert the Battery
2.
1 Open the battery-chamber
cover in the direction indicated
by the arrow (1) and open the
cover (2).
2.
2 Insert the battery.
• Push the orange battery latch in
the direction indicated by the
arrow (1), and fully insert the
battery (2).
• The battery locks into place
when inserted correctly.
Battery latch
Be Careful to Insert the Battery in Correct
Direction
Inserting the battery upside down or backwards
could damage the camera.
10
First Steps
Page 11
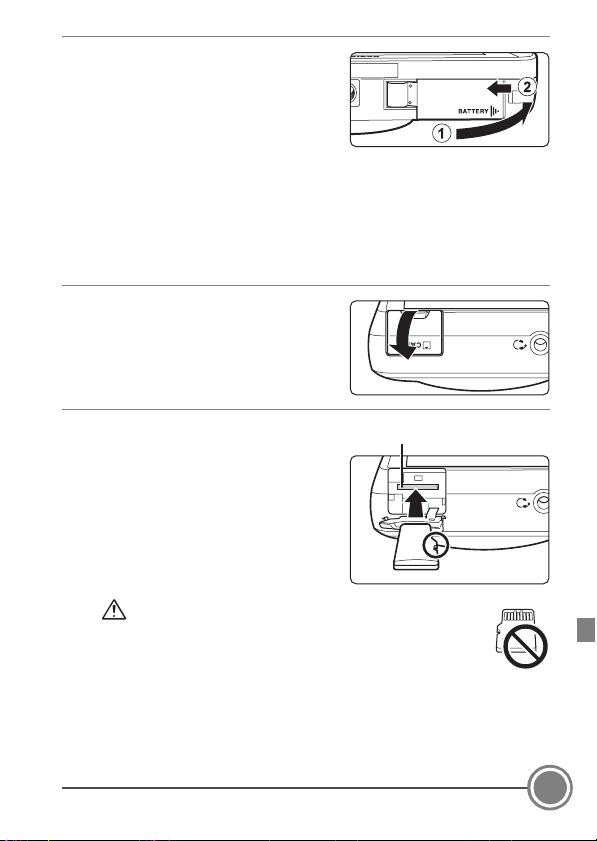
2.
3 Close the battery-chamber
cover.
Step 3 Insert a Memory Card
* I f a me mory car d i s in ser ted in the camera, image’s data is recorded
on the memory card. If no memory card is inserted in the camera,
the data is recorded to the camera’s internal memory.
3.
1 Open the memory card slot
cover.
3.
2 Insert the memory card.
• Slide the memory card in the
correct orientation until it clicks
into place.
Be Careful to Insert the Memory Card in Correct
Direction
Inserting the memory card upside down or backwards
could damage the camera or the memory card.
Memory card slot
First Steps
11
Page 12
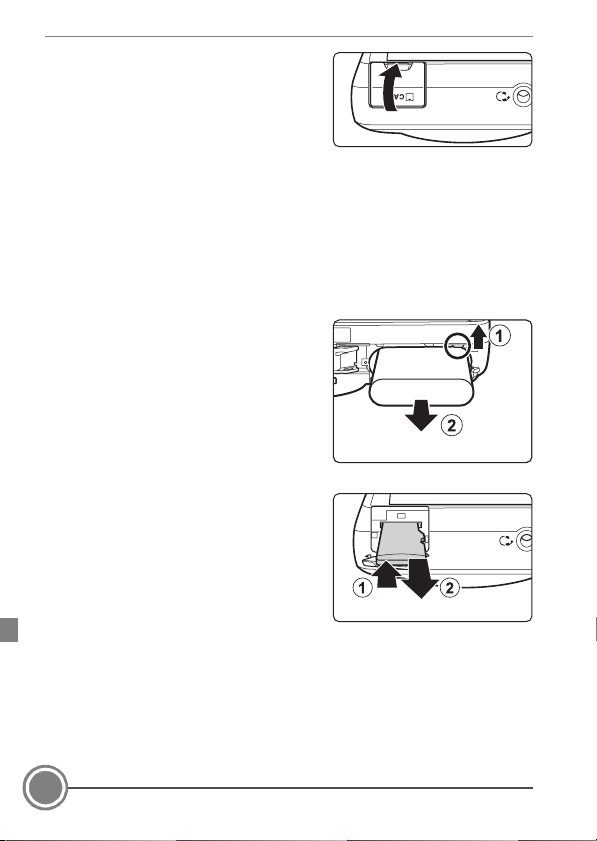
3.
3 Close the memory card slot
cover.
Removing the Battery and Memory Card
Turn the camera off and make sure that the power-on lamp and the monitor
have turned off, and then open the battery-chamber cover, or the memory
card slot cover.
• Note that the camera, battery, and memory card may become hot during
use; observe caution when removing the battery or memor y card.
Removing the Battery
Move the battery latch in the direction
indicated by the arrow (1), to eject the
battery (2).
Removing the Memory Card
Gently push the memory card into the
camera (1) to partially eject the card
(2).
12
First Steps
Page 13
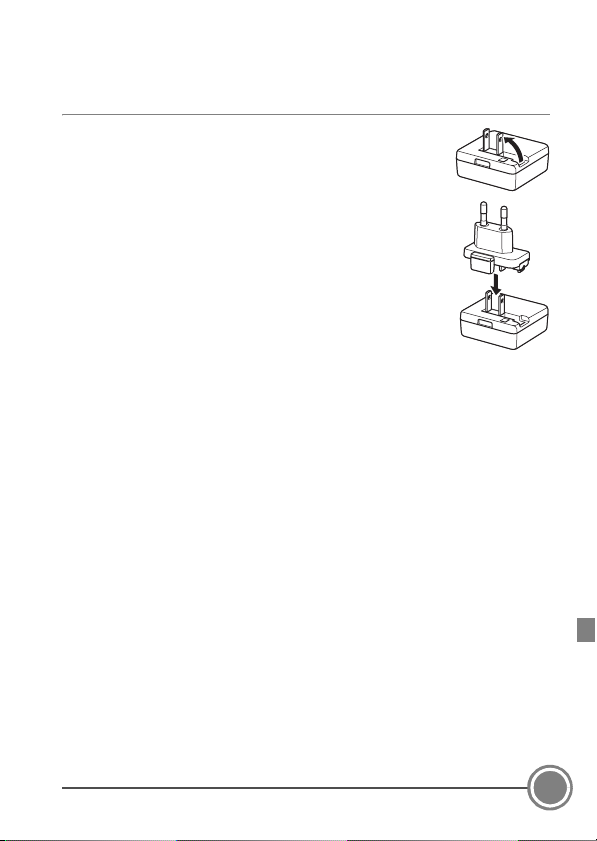
Step 4 Charge the Battery
Use the included Charging AC Adapter and USB cable to charge the
battery while it is in the camera.
4.
1 Prepare the included Charging AC Adapter.
If a pl ug ad apter* i s includ ed wi th the came ra, atta ch
the plug adapter to the plug on the Charging AC
Adapter. Push the plug adapter firmly until it is
securely held in place. Once the two are connected,
attempting to forcibly remove the plug adapter
could damage the product.
* The shape of the plug adapter varies according to
the country or region in which the camera was
purchased.
The Charging AC Adapter comes with the plug adapter attached in
Argentina and Brazil.
First Steps
13
Page 14

4.
2 Make sure the battery is installed in the camera, and then
connect the camera to the Charging AC Adapter in order of 1
to 3.
• Make sure that the plugs are properly oriented. Do not insert or
remove the plugs at an angle when connecting or disconnecting
them.
B Note
Do not use a USB cable other than the UC-E21. Using a USB cable other than
the UC-E21 could result in overheating, fire or electric shock.
.
Power-on lamp
Electrical outlet
USB cable (included)
• The power-on lamp slowly flashes orange to indicate that the
battery is charging.
4.
3 Disconnect the Charging AC Adapter from the electrical outlet,
and then disconnect the USB cable.
14
First Steps
Page 15
Step 5 Configuring Various Settings
When you turn on the camera for the first time after purchase, the
welcome screen is displayed. Follow the on-screen instructions to set
each option.
• Some settings require you to enter text. See “Entering Text” (A7)
for more information about entering text.
• To set up a Wi-Fi (wireless LAN) connection, you must have access
to a Wi-Fi (wireless LAN) network. Before configuring the Wi-Fi
(wireless LAN) settings on the camera, make sure that your Wi-Fi
(wireless LAN) network is set up and that you know your network
SSID and password.
• You can also configure each setting at a later time.
5.
1 Pres s the powe r swi tch to t urn on th e
camera.
• The monitor turns on, and th e welcome
screen is displayed.
5.
2 Select the language.
• Drag your finger up or down to scroll through the language list,
select the desired language, and tap Start.
5.
3 Configure the Wi-Fi (wireless LAN) settings.
• Tap the desired SSID (name of Wi-Fi (wireless LAN) network) in the
list of available networks, enter the password, and tap Connect.
• Tap Skip to configure the setting later.
• When the connection is established, you can configure a Google™
account. Follow the on-screen instructions to set up the account.
First Steps
15
Page 16

5.
4 Set the various options such as the date and time.
• Follow the on-screen instructions to set each option.
• If yz are displayed at the bottom of the monitor, tap z to display
the next screen and y to return to the previous screen.
• When the settings are complete, the Android OS home screen is
displayed. To begin shooting, activate the camera’s shooting
application by tapping (Shooting).
• If you exit without setting the date and time, O will flash when the
shooting screen is displayed. We recommend that you set the date
and time before shooting.
The next step explains basic shooting operations using A (auto)
mode.
16
First Steps
Page 17

Shooting and Playback
1910
Step 1 Check the Battery Level Indicator and
Number of Exposures Remaining
Battery level indicator
1910
1910
Number of exposures remaining*
Battery level indicator Description
D The battery level is high.
B
C The battery is charging.
P
Battery exhausted.
* When the camera’s internal memory is being used, IN appears.
Step 2 Hold the Camera and Frame a Picture
2.
1 Hold the camera steadily in both
hands.
• Keep fingers, hair, and other objects
away from the lens, flash, AF-assist
illuminator, microphone, and speaker.
The battery level is low. The indicator shows the
remaining battery level in six steps.
The camera cannot capture images. Recharge
the battery.
Shooting and Playback
17
Page 18

2.
1910
2 Frame the picture.
Using the Zoom
Move the zoom control.
• To zoom in closer to the subject, move the
zoom control toward g (telephoto).
• To zoom out and view a larger area, move the
zoom control toward f (wide-angle).
When the camera is turned on, the zoom
moves to the maximum wide-angle position.
1910
1910
18
Shooting and Playback
Page 19

Step 3 Focus and Shoot
1 / 250 F3.3
1 / 250 F3.3
3.
1 Press the shutter-release
button halfway.
• When the subject is in focus, the
focus area glows green
(multiple focus areas can glow
green).
• When digital zoom is used, the
focus area is not displayed and
the camera focuses in the
center of the frame. Once
focus is acquired, the focus
indicator glows green.
• When the camera is unable to
focus, the focus area or the
focus indicator flashes red.
Modify the composition and
try pressing the shutterrelease button halfway again.
The Flash Indicator
The status of the flash can be checked by pressing the shutter-release
button halfway.
On
The flash fires when an image is
taken.
Flashing The flash is charging.
Off
The flash does not fire. The flash
mode icon is not displayed.
Shutter
speed
Focus area
1 / 250 F3.3
1 / 250 F3.3
Flash indicator
Aperture
value
1 / 250
1 / 250
Shooting and Playback
19
Page 20

3.
1910
15/11/2013 15:30
0004. JPG
4444/
15/11/2013 15:30
0004. JPG
4444/
2 Without lifting your finger, press the shutter-release
button the rest of the way down to take the picture.
• The shutter is released and the image is saved to the
memory card or internal memory.
• Do not use force when pressing the shutter-release
button, as this may cause camera shake, resulting in blurred images.
C Touch Shooting
The active focus area can be changed when using touch shooting. At the
default setting, the shutter can be released by simply tapping a subject in the
monitor without pressing the shutter-release button.
Step 4 Playback Images
Tap the playback mode icon. The camera enters playback mode.
Shooting Playback
15/11/2013 15:30
15/11/2013 15:30
0004. JPG
0004. JPG
1910
1910
• The last image taken is displayed in fullframe playback mode.
• Previous or next images can be
displayed by dragging the current
image to the right or left.
• Tap the shooting mode icon (A)
displayed at the bottom right of the
monitor or press the shutter-release
button to switch to shooting mode.
15/11/2013 15:30
15/11/2013 15:30
0004. JPG
0004. JPG
/
/
20
Shooting and Playback
Page 21

Deleting Images
15/11/2013 15:30
0004. JPG
4444/
1 Display the image to delete, press the d button, and tap l.
2 Tap Current image.
3 Tap Yes in the delete confirmation dialog.
Playback menu
15/11/2013 15:30
15/11/2013 15:30
0004. JPG
0004. JPG
/
Delete
Slide show
Add/remove
(Timeline view)
Protect Print order
Erase location
data
• After tapping l, tap Select images
to select multiple images to be
deleted and tap I. Tap All images
to delete all images.
• Deleted images cannot be
recovered. To exit without deleting
the image, tap No in the
confirmation dialog.
Delete
Current image
Select
images
All images
Shooting and Playback
21
Page 22

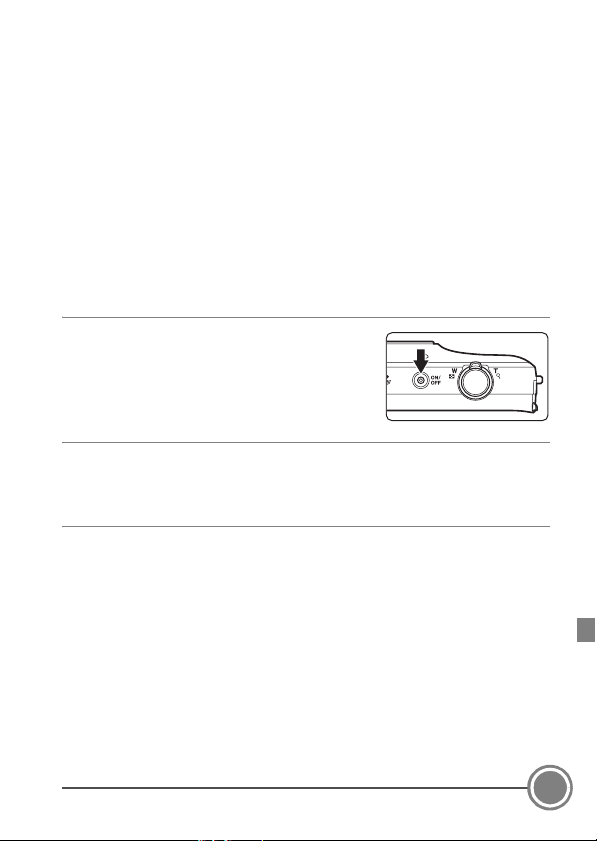
Step 5 Turn Off the Camera
1910
1910
5.
1 Press and hold the power switch for
several seconds.
• If the monitor is already off, the camera
has entered power saving mode
(A23). Before turning the camera off,
press the power switch once to exit
power saving mode and turn the monitor back on.
• If you press the power switch once without holding it down, the
camera enters stand by mode (A23), and the monitor turns off.
5.
2 Select how the camera turns
off.
• Prepare for quick start
(default setting): The status of
the camera is saved before
turning off. The camera starts
up quickly the next time you
turn it on.
• Quick power off: The camera turns off immediately.
5.
3 Ta p Power off.
• The camera turns off using the
option selected in step 2.
• If you tap Stand by on this
screen, the camera enters
stand by mode.
Power off
Prepare for quick start
Quick power off
Stand by
Reboot
Power off
Prepare for quick start
Quick power off
Stand by
Reboot
1910
1910
1910
1910
B Notes About Using Stand By Mode and Turning the Camera Off
• Unsaved data is lost when the camera turns off. Save the data that you
want to keep before the camera enters stand by mode, or before turning
off the camera.
• You cannot use stand by mode or turn off the camera while the USB
storage option is turned on (A30).
22
Shooting and Playback
Page 23

Power Saving Function
By default, the camera reduces power consumption by automatically
entering the modes listed below.
Mode Level Description
If no operations are performed for a while
when the camera is on, the monitor turns off
automatically and battery power
consumption is reduced.
Display off
Stand by
mode
Power off
1 You can change the amount of time that elapses before the camera enters
display off mode. The default setting is 1 minute.
2 The power-on lamp glows orange while the battery is charging.
3 The camera cannot enter stand by mode while the USB storage option is
turned on.
4 You can change the amount of time that elapses before the camera turns
off. The default setting is 1 hour. However, the camera ca nnot be turned off
while the battery is charging.
Medium
High
Maximum
glows green in this mode.
• To turn the monitor back on, press the
power switch, d button, W button or V
button.
• The camera enters stand by mode if no
further operations are performed for 1
3
minute.
Each function enters stand by mode and
battery power consumption is greatly
reduced. The power-on lamp flashes green in
this mode.
• To turn the camera back on, press the
• The camera turns off if no further operations
Almost no battery power is consumed, but it
takes a longer time to turn on the camera.
2
power switch.
are performed (Shut-down timer
1
The power-on lamp
2
4
).
Shooting and Playback
23
Page 24

Adding Comments to Images
Adding Comments when Shooting
You can add comments, such as your impressions or other information
about an image, immediately after the shutter is released. You can edit,
add, or delete comments on the playback screen (except for
continuous shooting).
1
Tap h on the screen that is
displayed immediately after
taking a picture.
• To return to shooting mode,
press the shutter-release
button or wait about five
seconds without performing
any operations.
2
Enter text using the onscreen keyboard.
• For more information about
using the keyboard, see
“Entering Text” (A7).
3
Tap F at the top left of the
screen to finish entering text.
• The comments are saved and
the shooting screen is
displayed.
24
Adding Comments to Images
Enter a comment.
q
we r t yu i o
asdfghj k
zxc v bnm
?
123
Number of input characters/
maximum number of input
characters
Beach
q
we r t yu i o
asdfghj k
zxc v bnm
?
123
15:30
0/400
p
l
.
15:30
5/400
p
l
.
Page 25

Viewing/Editing Comments
15/11/2013 1515
:3030
0004
. JPG
4444/
You can view or edit comments that were added to images during
shooting or playback.
1
View the image with comments in full-frame playback mode.
• Images that include comments are shown with part of the
comments displayed at the bottom of the image.
2
Tap the comment area.
• The entire comments are
displayed. If the full text does
not fit on the screen, drag the
comment area up or down to
display the hidden portion.
• Tap the comment area (or I
at the top of the comment
area) to return to full-frame playback mode.
3
Tap i or j to edit or delete
comments.
• i (Edit): Enter text in the
same way as when you added
the comments to the image,
tap F, and tap Yes on the
confirmation screen.
• j (Delete): Tap Yes on the confirma tion screen. Only the comments
are deleted.
15/11/2013
15/11/2013 15:30
0004
. JPG
0004
. JPG
Beach
Beach
/
B Notes About Entering Comments
The entered comments are not saved until you tap F. If you accidentally
press the shutter-release button, V button, or W button, the comments will
be canceled without being saved. If you press the W button while entering
comments in playback mode, you can select the playback application again
and return to the comment entry screen.
Adding Comments to Images
25
Page 26

Sharing Images
15/11/2013 15:30
0004. JPG
4444/
15/11/2013 1515
:3030
0004
. JPG
4444/
You can share images and movies with other applications.
For example, you can upload your images and movies to the Internet
if you share them with an application that provides online services.
• Some sharing applications require an Internet connection. Set up
your Wi-Fi (wireless LAN) network.
1
Display the image you want
to share in full-frame
playback mode, and tap A.
• The sharing function can be
used in timeline view.
• If the image has no
comments, proceed to step 3.
2
Select whether or not to
share comments.
• Image only: Share the image
only.
• Image and comment: Share
the image with comments.
3
Select the application for the
online service.
• If the application that you
want to use is not displayed,
download it from the Google
Play Store.
• For more information on how
to use a particular application, refer to the support for that
application.
15/11/2013 15:30
15/11/2013 15:30
0004. JPG
0004. JPG
15/11/2013
15/11/2013 15:30
0004
. JPG
0004
. JPG
Image only
Image and comment
Hangouts Picasa
/
/
Google+Gmail
26
Sharing Images
Page 27

Sharing Multiple Images Simultaneously
12
Tap A in thumbnail playback
mode to display the image
selection screen, and select
multiple images to share.
• Tap images to add n. To
deselect a selected image, tap
the image again to remove n.
• To change the number of images displayed, move the zoom
control or use your fingers to pinch or spread the screen, in the
same way as with thumbnail playback mode.
• Tap I to display the screen shown in step 3 of “Sharing Images”
(A26). For more information on how to use a particular
application, refer to the support for that application.
• If you want to share comments, follow the procedure for sharing
images in full-frame playback mode.
12
12
Sharing Images
27
Page 28

Using ViewNX 2
ViewNX 2 is an all-in-one software package which enables you to
transfer, view, edit and share images.
Your Imaging Toolbox ViewNX 2™
1 Installing ViewNX 2
Step
• An Internet connection is required.
• Refer to the Nikon website for details on system requirements,
including the latest information on operating system
compatibility.
28
Using ViewNX 2
Page 29

1
.1 Start the computer and download the ViewNX 2 installer from
the URL below.
• http://nikonimglib.com/nvnx/
1
.2 Double-click the installer file.
1
.3 Follow the on-screen instructions to install the software.
The following software is installed:
• ViewNX 2 (consisting of the three modules below)
- Nikon Transfer 2: For transferring images to the computer
- ViewNX 2: For viewing, editing, and printing transferred images
- Nikon Movie Editor: For basic editing of transferred movies
1
.4 Exit the install.
• Windows: Click Yes .
• Mac OS: Click OK.
Using ViewNX 2
29
Page 30

Step 2 Transferring Images to the Computer
2
.1 Choose how images will be copied to the computer.
Choose one of the following methods:
• Direct USB connection: Turn the camera on with the memory card
inserted, connect it to the computer using the included USB cable,
and tap Turn on USB storage on the camera screen.
• Memory card slot: If your computer is equipped with an memory
card slot, the card can be inserted directly in the slot.
• Memory card reader: Connect a card reader (available separately
from third-party suppliers) to the computer and insert the memory
card.
If a message is displayed prompting you to choose a program, select
NikonTransfer 2.
If the memory card contains a large number of images, it may take a
while for Nikon Transfer 2 to start. Wait until Nikon Transfer 2 starts.
B Connecting the USB Cable
The connection may not be recognized if the camera is connected to the
computer via a USB hub.
30
Using ViewNX 2
Page 31

2
.2 Transfer images to the computer.
• Confirm that the recording medium (memor y card or internal
memory) of the connected camera or removable disk is displayed as
the “Source” on the “Options” title bar of Nikon Transfer 2 (1).
- When the camera and computer are connected, select the
recording medium (memory card or internal memory) that
contains the images you want to transfer.
• Click Start Transfer (2).
- To transfer images saved on both recording media (memory card
and internal memory), uncheck Disconnect automatically after
transfer in Preferences, and then click Start Transfer.
1
2
• At default settings, all the images on the memory card will be copied
to the computer. Comments that have been added to images are
also transferred with the images.
- When the transfer of images from one recording medium is
completed while Disconnect automatically after transfer is
unchecked, Nikon Transfer 2 quits automatically and ViewNX 2
starts.
If you want to continue transferring images from another
recording medium, click Transfer on the ViewNX 2 toolbar, start
Nikon Transfer 2, and then import the images to the computer.
Using ViewNX 2
31
Page 32

2
.3 Terminate the connection.
• If the camera is connected to the computer, follow the procedure
below to disconnect it.
- On the computer, eject the removable disk.
-Tap Turn off USB sto rage on the camera screen. If Turn off US B
storage is not displayed, you can select it in the notification shade
on the home screen.
- Disconnect the included USB cable.
• If you are using a card reader or card slot, choose the appropriate
option in the computer operating system to eject the removable
disk corresponding to the memory card and then remove the card
from the card reader or card slot.
Step 3 Viewing Images
Start ViewNX 2.
• Images are displayed in
ViewNX 2 when transfer is
complete.
• Consult online help for more
information on using
ViewNX 2.
C Starting ViewNX 2 Manually
• Windows: Double-click the ViewNX 2 shortcut on the desktop.
• Mac OS: Click the ViewNX 2 icon in the Dock.
32
Using ViewNX 2
Page 33

Other Functions
1910
Basic Shooting Settings
You can set these functions by tapping the icons at the left of the
monitor. Available settings vary depending on the selected shooting
mode.
Each icon also indicates the current setting.
4
3
2
1
1 Flash mode
The flash modes available are a Auto (default setting), b Auto with
red-eye reduction, W Off, X Fill flash, and d Slow sync.
2
Self-timer
The camera is equipped with two and ten second timers.
3
Macro mode
Use for close-ups. The camera can focus at a closer distance when the
zoom is at a position where F and the zoom indicator glow green.
4 Exposure compensation
Exposure compensation is used to alter exposure from the value
suggested by the camera to make images brighter or darker.
1910
1910
Other Functions
33
Page 34

Operation in Playback Mode
15/11/2013 15:30
0004. JPG
4444/
The following operations are
available in full-frame playback
mode.
To Use Description
Place two fingers on the image currently
View
thumbnails
f (h)
displayed and pinch them together to
display thumbnails. You can also display
thumbnails by moving the zoom control
toward f (h).
Place two fingers on the image currently
displayed and spread them apart to
enlarge the view of the image. You can also
enlarge the image by moving the zoom
Zoom in
g (i)
control toward g (i) or double-tapping
the image.
Moving the zoom control toward f (h)
or double-tap an image to return to fullframe playback mode.
Play back
movies
Switch to
shooting
mode
R
Tap R to play back the movie currently
displayed.
Tap the shooting mode icon displayed at
the bottom right of the monitor or press
the shutter-release button.
Tap g to display images in timeline view.
Display multiple images and comments
Display
timeline view
g
(A24) in a timeline that resembles a scroll.
You can create a timeline for your favorite
images or for images from various
categories.
15/11/2013 15:30
15/11/2013 15:30
0004. JPG
0004. JPG
/
34
Other Functions
Page 35

Changing a Shooting Mode
1910
Tap the shooting mode icon during shooting to select a shooting
mode from G (easy auto), A (auto), C (scene), R (special effects),
F (smart portrait) and D (movie) modes.
When the shooting mode selection menu is displayed, tap the
desired shooting mode icon.
123
Shooting mode
1
G Easy auto mode
A Auto mode (A17)
2
3
C Scene mode
1910
1910
Easy auto mode
Auto mode Scene
Special effects
45 6
R Special effects
4
F Smart portrait mode
5
6
D Movie
Other Functions
MovieSmart portrait
35
Page 36

For Your Safety
To prevent damage to your Nikon product or injury to yourself or to
others, read the following safety precautions in their entirety before
using this equipment. Keep these safety instructions where all those who
use the product will read them.
The consequences that could result from failure to observe the
precautions listed in this section are indicated by the following symbol:
This icon marks warnings, information that should be read before
using this Nikon product, to prevent possible injury.
WARNINGS
Turn off in the event of malfunction
Should you notice smoke or an unusual smell coming from the camera
or Charging AC Adapter, unplug the Charging AC Adapter and remove
the battery immediately, taking care to avoid burns. Continued operation
could result in injury. After removing or disconnecting the power source,
take the equipment to a Nikon-authorized service representative for
inspection.
Do not disassemble
Touching the internal parts of the camera or Charging AC Adapter could
result in injury. Repairs should be performed only by qualified
technicians. Should the camera or Charging AC Adapter break open as
the result of a fall or other accident, take the product to a Nikonauthorized service representative for inspection, after unplugging the
product and/or removing the battery.
36
For Your Safety
Page 37

Do not use the camera or Charging AC Adap ter in the presence
of flammable gas
Do not use electronic equipment in the presence of flammable gas, as
this could result in explosion or fire.
Handle the camera strap with care
Never place the strap around the neck of an infant or child.
Keep out of reach of children
Particular care should be taken to prevent infants from putting the
battery or other small parts into their mouths.
Do not remain in contact with the camera, battery charger, or
AC adapter for extended periods while the devices are on or in
use.
Parts of the devices become hot. Leaving the devices in direct contact
with the skin for extended periods may result in low-temperature burns.
Do not leave the product where it will be exposed to extremely
high temperatures, such as in an enclosed automobile or in
direct sunlight
Failure to observe this precaution could cause damage or fire.
Observe caution when handling the battery
The battery may leak, overheat or explode if improperly handled.
Observe the following precautions when handling the battery for use in
this product:
• Before replacing the battery, turn the product off. If you are using the
Charging AC Adapter/AC adapter, be sure it is unplugged.
• Use only a Rechargeable Li-ion Battery EN-EL23 (included). Charge the
battery by using a camera that supports battery charging. To perform
this operation, use the Charging AC Adapter EH-71P (included) and
USB cable UC-E21 (included). The Battery Charger MH-67P (available
separately) is also available to charge the battery without using a
camera.
• When inserting the battery, do not attempt to insert it upside down or
backwards.
For Your Safety
37
Page 38

• Do not short or disassemble the battery or attempt to remove or break
the battery insulation or casing.
• Do not expose the battery to flame or excessive heat.
• Do not immerse in or expose to water.
• Replace the terminal cover before transporting the battery. Do not
transport or store with metal objects such as necklaces or hairpins.
• The battery is prone to leakage when fully discharged. To avoid
damage to the product, be sure to remove the battery when no
charge remains.
• Discontinue use immediately should you notice any change in the
battery, such as discoloration or deformation.
• If liquid from the damaged battery comes in contact with clothing or
skin, rinse immediately with plenty of water.
Observe the following precautions when handling the
Charging AC Adapter
• Keep dry. Failure to observe this precaution could result in fire or
electric shock.
• Dust on or near the metal parts of the plug should be removed with a
dry cloth. Continued use could result in fire.
• Do not handle the plug or go near the Charging AC Adapter during
lightning storms. Failure to observe this precaution could result in
electric shock.
• Do not damage, modify, forcibly tug or bend the USB cable, place it
under heavy objects, or expose it to heat or flames. Should the
insulation be damaged and the wires become exposed, take it to a
Nikon-authorized service representative for inspection. Failure to
observe these precautions could result in fire or electric shock.
• Do not handle the plug or Charging AC Adapter with wet hands.
Failure to observe this precaution could result in electric shock.
• Do not use with travel converters or adapters designed to convert
from one voltage to another or with DC-to-AC inverters. Failure to
observe this precaution could damage the product or cause
overheating or fire.
38
For Your Safety
Page 39

Use the appropriate power supply (battery, Charging AC
adapter, AC adapter, USB cable)
Using a power supply other than those provided or sold by Nikon could
result in damage or malfunction.
Use appropriate cables
When connecting cables to the input and output jacks, use only the
cables provided or sold by Nikon for the purpose, to maintain
compliance with product regulations.
Handle moving parts with care
Be careful that your fingers or other objects are not pinched by the lens
cover or other moving parts.
Using the flash close to your subject’s eyes could cause
temporary visual impairment.
The flash should be no less than 1 meter (3 ft 4 in.) from the subject.
Particular care should be observed when photographing infants.
Do not operate the flash with the flash window touching a
person or object
Failure to observe this precaution could result in burns or fire.
Avoid contact with liquid crystal
Should the monitor break, care should be taken to avoid injury caused by
broken glass and to prevent liquid crystal from the monitor touching the
skin or entering the eyes or mouth.
Turn the power off when using inside an airplane or the
hospital
Turn the power off while inside the airplane during take off or landing. Do
not use wireless network functions while in the air. Follow the
instructions of the hospital when using while in a hospital. The
electromagnetic waves given out by this camera may disrupt the
electronic systems of the airplane or the instruments of the hospital.
Do Not Use a Headset or Earphones While Driving or Walking
This may cause accidents.
For Your Safety
39
Page 40

Notices
Notices for Customers in Europe
CAUTIONS
RISK OF EXPLOSION IF BATTERY IS REPLACED BY AN INCORRECT
TYPE.
DISPOSE OF USED BATTERIES ACCORDING TO THE INSTRUCTIONS.
TO PREVENT POSSIBLE HEARING DAMAGE, DO NOT LISTEN
AT HIGH VOLUME LEVELS FOR LONG PERIODS.
This symbol indicates that electrical and electronic equipment
is to be collected separately.
The following apply only to users in European countries:
• This product is designated for separate collection at an
appropriate collection point. Do not dispose of as household
waste.
• Separate collection and recycling helps conserve natural resources
and prevent negative consequences for human health and the
environment that might result from incorrect disposal.
• For more information, contact the retailer or the local authorities in
charge of waste management.
This symbol on the battery indicates that the battery is to be
collected separately. The following apply only to users in
European countries:
• All batteries, whether marked with this symbol or not, are
designated for separate collection at an appropriate collection point.
Do not dispose of as household waste.
• For more information, contact the retailer or the local authorities in
charge of waste management.
40
For Your Safety
Page 41

Caring for the Camera
To ensure continued enjoyment of this Nikon product, observe the
precautions described below in addition to the warnings in “For Your
Safety“ (A36-39) when using or storing the device.
B Keep Dry
The device will be damaged if immersed in water or subjected to high
humidity.
B Do Not Drop
The product may malfunction if subjected to strong shock or vibration.
B Handle the Lens and All Moving Parts with Care
Do not apply force to the lens, lens cover, monitor, memory card slot or
battery chamber. These parts are easily damaged. Applying force to the lens
cover could result in camera malfunction or damage to the lens. Should the
monitor break, care should be taken to avoid injury caused by broken glass
and to prevent the liquid crystal from the display touching the skin or
entering the eyes or mouth.
B Do Not Point the Lens at Strong Light Sources for Extended Periods
Avoid pointing the lens at the sun or other strong light sources for extended
periods when using or storing the camera. Intense light may cause
deterioration of the image sensor, producing a white blur effect in
photographs.
B Keep Away from Strong Magnetic Fields
Do not use or store this device in the vicinity of equipment that generates
strong electromagnetic radiation or magnetic fields. Strong static charge or
the magnetic fields produced by equipment such as radio transmitters could
interfere with the monitor, damage data saved on the memory card, or affect
the product’s internal circuitry.
B Avoid Sudden Changes in Temperature
Sudden changes in temperature, such as when entering or leaving a heated
building on a cold day, can cause condensation to form inside the device. To
prevent condensation, place the device in a carrying case or a plastic bag
before exposing it to sudden changes in temperature.
For Your Safety
41
Page 42

B Turn the Product Off Before Removing or Disconnecting the Power
Source or Memory Card
Do not remove the battery while the product is on, or while images are
being saved or deleted. Forcibly cutting power in these circumstances could
result in loss of data or in damage to product memory or internal circuitry.
B Notes About the Monitor
• Monitors and electronic viewfinders are constructed with extremely high
precision; at least 99.99% of pixels are effective, with no more than 0.01%
being missing or defective. Hence while these displays may contain pixels
tha t are alway s lit (whi te, re d, blu e, or gre en) o r always off ( blac k), th is is not
a malfunction and has no effect on images recorded with the device.
• Images in the monitor may be difficult to see under bright lighting.
• The monitor is lit by an LED backlight. Should the monitor begin to dim or
flicker, contact your Nikon-authorized service representative.
B About the Manuals
Nikon will not be held liable for any damages resulting from the use of this
product.
42
For Your Safety
Page 43

Before Taking Important Pictures
Before taking pictures on important occasions (such as at weddings or
before taking the camera on a trip), take a test shot to ensure that the
camera is functioning normally. Nikon will not be held liable for damages
or lost profits that may result from product malfunction.
Disposing of Data Storage Devices
Please note that deleting images or formatting data storage devices such
as memory cards or built-in camera memory does not completely erase
the original image data. Deleted files can sometimes be recovered from
discarded storage devices using commercially available software,
potentially resulting in the malicious use of personal image data.
Ensuring the privacy of such data is the user’s responsibility. Before
discarding a data storage device or transferring ownership to another
person, erase all data using commercial deletion software, or format the
device and then completely refill it with images containing no private
information such as images of the sky or ground (with the Record
location data option set to Off). Care should be taken to avoid injury or
damage to property when physically destroying data storage devices.
For Your Safety
43
Page 44

Wi-Fi (Wireless LAN Network) Function
This product is controlled by the United States Export Administration
Regulations, and you are required to obtain permission from the United
States government if you export or re-export this product to any country
to which the United States embargoes goods. The following countries
were subject to embargo: Cuba, Iran, North Korea, Sudan, and Syria. Since
the target countries are subject to change, please contact the United
States Department of Commerce for the latest information.
Restrictions on Wireless Devices
The wireless transceiver included in this product conforms to wireless
regulations in the country of sale and is not for use in other countries
(products purchased in the EU or EFTA can be used anywhere within the
EU and EFTA). Nikon does not accept liability for use in other countries.
Users who are unsure as to the original country of sale should consult
with their local Nikon service center or Nikon-authorized service
representative. This restriction applies to wireless operation only and not
to any other use of the product.
Declaration of Conformity (Europe)
Hereby, Nikon Corporation, declares that COOLPIX S810c is in
compliance with the essential requirements and other relevant
provisions of Directive 1999/5/EC. The declaration of conformity may be
consulted at
http://imaging.nikon.com/support/pdf/DoC_S810c.pdf.
44
For Your Safety
Page 45

Precautions when Using Radio Transmissions
• Always keep in mind that radio transmission or reception of data is
subject to interception by third parties. Note that Nikon is not
responsible for data or information leaks that may occur during data
transfer.
• The operating frequency band of this equipment is used by industrial,
scientific, consumer and medical equipment including microwave
ovens, premises radio stations for identifying mobile units used in the
manufacturing lines of plants (radio stations requiring no license), and
amateur radio stations (hereinafter referred to as “another station”). 1.
Before using this equipment, confirm that another station is not being
operated nearby. 2. In the event of this equipment causing harmful
radio wave interference with another station, promptly change the
operating frequency or stop radio wave emission by turning off the
power, etc. 3. If you have further questions, contact a Nikon service
center or Nikon authorized service representative.
For Your Safety
45
Page 46

Precautions when Using the Wireless LAN Functions
• When using the LAN function of this product, the product will search
for wireless networks automatically. At this time, the product may
display wireless networks (SSIDs) for which you are not an authorized
user. Use of such a wireless network may be regarded as unauthorized
access. Never connect to an SSID that you are not authorized to use.
Personal Information Management and Disclaimer
• User information registered and configured on the product, including
wireless LAN connection settings and other personal information, is
susceptible to alteration and loss resulting from operational error,
static electricity, accident, malfunction, repair or other handling.
Always keep separate copies of important information. Nikon is not
responsible for any direct or indirect damages or lost profits resulting
from alteration or loss of content that is not attributable to Nikon.
• Before discarding this product or transferring it to another owner, it is
recommended that you apply the reset option from Factory data
reset in Backup & reset and Erase SD card in Storage in the Android
OS setting menu, to delete all user information registered and
configured with the product, including wireless LAN connection
settings and other personal information.
• Nikon is not responsible for any communication charges stemming
from unauthorized access to a public wireless LAN by third parties, or
any other damages resulting from theft of the product.
• Nikon is not responsible for any damages stemming from
unauthorized use of email addresses stored in the camera resulting
from theft of the product.
46
For Your Safety
Page 47

Notes About GPS
Notes About Personal Information
An individual may be identified from still images or movies that have
been recorded with location information. Observe caution when you
transfer still images or movies recorded with location information to a
third party or upload them to a network such as the Internet where the
public can view them. Be sure to read “Disposing of Data Storage
Devices” (A43).
Using the Camera Overseas
• Before taking the camera with GPS function overseas for travel, consult
your travel agency or embassy of the country you are visiting to
confirm whether there is any restriction on use.
• The GPS may not function properly in China and on the borders
between China and neighboring countries (as of Octorber 2013).
AVC Patent Portfolio License
This product is licensed under the AVC Patent Portfolio License for the
personal and non-commercial use of a consumer to (i) encode video in
compliance with the AVC standard (“AVC video”) and/or (ii) decode AVC
video that was encoded by a consumer engaged in a personal and noncommercial activity and/or was obtained from a video provider licensed
to provide AVC video. No license is granted or shall be implied for any
other use. Additional information may be obtained from MPEG LA, L.L.C.
See http://www.mpegla.com.
For Your Safety
47
Page 48

MPEG-4 Visual Patent Portfolio License
This product is licensed under the MPEG-4 Visual Patent Portfolio License
for the personal and non-commercial use of a consumer for (i) encoding
video in compliance with the MPEG-4 visual standard (“MPEG-4 video”)
and/or (ii) decoding MPEG-4 video that was encoded by a consumer
engaged in a personal and non-commercial activity and/or was obtained
from a video provider licensed by MPEG LA to provide MPEG-4 video. No
license is granted or shall be implied for any other use. Additional
information including that relating to promotional, internal and
commercial uses and licensing may be obtained from MPEG LA, L.L.C.
See http://www.mpegla.com.
About Open Source Software
This product includes certain open source or other software originating
from third parties that is subject to the GNU General Public License (GPL),
GNU Library/Lesser General Public License (LGPL) and different and/or
additional copyright licenses, disclaimers and notices. The exact terms of
GPL, LGPL and some other licenses, disclaimers and notices are available
on the menu “About device” in the product.
Nikon offers to provide source code of software licensed under the GPL
or LGPL or some other open source licenses allowing source code
distribution to you on a CD-ROM for a charge covering the cost of
performing such distribution, such as the cost of media, shipping and
handling, upon written request to Imaging Company, Niko n corporation,
Shin-Yurakucho Bldg., 12-1, Yurakucho 1-chome, Chiyoda-ku, Tokyo 1008331, Japan.
This offer is valid for a period of three (3) years from the date of the
distribution of this product by Nikon.
48
For Your Safety
Page 49

Trademark Information
• Microsoft, Windows and Windows Vista are either trademarks or
registered trademarks of Microsoft Corporation in the United States
and/or other countries.
• Macintosh and Mac OS are trademarks or registered trademarks of
Apple Inc., in the U.S. and other countries.
• Adobe and Acrobat are trademarks or registered trademarks of Adobe
Systems Inc.
• microSDHC logo and microSDXC logo are trademarks of SD-3C, LLC.
• HDMI, HDMI logo, and High-Definition Multimedia Interface are
trademarks or registered trademarks of HDMI Licensing LLC.
• Wi-Fi and the Wi-Fi logo are trademarks or registered trademarks of the
Wi-Fi Alliance.
• Google™, the Google logo, Android™, the Android logo, Google Play™,
the Google Play logo, Gmail™, Google Calendar™, Google Chrome™,
Google+™, Google Maps™, Google Latitude™, Picasa™ and YouTube™
are trademarks or registered trademarks of Google, Inc.
• All other trade names mentioned in this manual or the other
documentation included with your Nikon product are the trademarks
or registered trademarks of their respective holders.
For Your Safety
49
Page 50

Warranty Terms - Nikon
Europe Service Warranty
Dear Nikon Customer,
We thank you for your purchasing this Nikon product. Should your Nikon
product require warranty service, please contact the dealer from whom
it was purchased or a member of our authorized service network within
the sales territory of Nikon Europe BV (Europe/Africa and Russia).
In order to avoid any unnecessary inconvenience, we advise you to read
the user manuals carefully before contacting the dealer or our authorized
service network.
Your Nikon equipment is guaranteed against any manufacturing defects
for one full year from the date of original purchase. If during this period
of guarantee the product proves defective due to improper material or
workmanship, our authorized service network within the sales territory of
Nikon Europe BV will, without charge for labor and parts, repair the
product in the terms and conditions set as below. Nikon reserves the
right (at its sole discretion) to replace or repair the product.
1. This warranty is only provided upon presentation of the completed
warranty card and original invoice or purchase receipt indicating the
date of purchase, product type and dealer’s name, together with the
product. Nikon reserves the right to refuse free-of-charge warranty
service if the above documents cannot be presented or if the
information contained in it is incomplete or illegible.
2. This warranty will not cover:
• necessary maintenance and repair or replacement of parts due to
normal wear and tear.
• modifications to upgrade the product from its normal purpose as
described in user manuals, without the prior written consent of
Nikon.
• transport costs and all risks of transport relating directly or indirectly
to the warranty of the products.
50
Warranty Terms - Nikon Europe Service Warranty
Page 51

• any damage resulting from modifications or adjustments which
may be made to the product, without the prior written consent of
Nikon, in order to comply with local or national technical standards
in force in any other country than the ones for which the product
was originally designed and/or manufactured.
3. The warranty will not be applicable in the case of:
• damage caused by misuse includ ing but not limited to failure to use
the product for its normal purpose or according to the user
instructions on the proper use and maintenance, and to installation
or use of the product inconsistent with the safety standards in force
in the country where it is used.
• damage caused by accidents including but not limited to lightning,
water, fire, misuse or neglect.
• defacing, illegibility or removal of the model or serial number on the
product.
• damage resulting from repairs or adjustments which have been
conducted by unauthorized service organizations or persons.
• defects in any system into which the product is incorporated or with
which it is used.
4. This service warranty does not affect the consumer’s statutory rights
under applicable national laws in force, nor the consumer’s right
against the dealer arising from their sales/purchase contract.
Notice: An overview of all authorized Nikon Service Stations can be
found online by following this Link (URL = http://www.europenikon.com/service/ ).
Warranty Terms - Nikon Europe Service Warranty
51
Page 52

Convenient Features
1910
The COOLPIX S810c is equipped with a stand by mode that helps to
reduce battery power consumption. Select either power off or stand
by mode depending on the situation.
To display the selection screen, press and hold the power switch for
several seconds while the camera is on.
Power off
Prepare for quick start
Quick power off
Stand by
Reboot
Stand by
Select Stand by while shooting.
• When the camera is in stand by mode, press the power switch to
turn the monitor back on.
Off
Select Power off if you are not using the camera for a while. You can
select the options below to control how the camera turns off.
• Prepare for quick start (default setting): The status of the camera
is saved before turning off. The camera starts up quickly the next
time you turn it on.
• Quick power off: The camera turns off immediately.
1910
1910
B Note
When the use of electronic devices is prohibited or restricted, turn off the
camera.
YP3K01(11)
6MN28311-01
 Loading...