

Quick Start Guide
Introduction
First Steps
Taking Pictures
Other Functions
Installing Nikon Transfer
Transferring Pictures to a Computer
En
Introduction
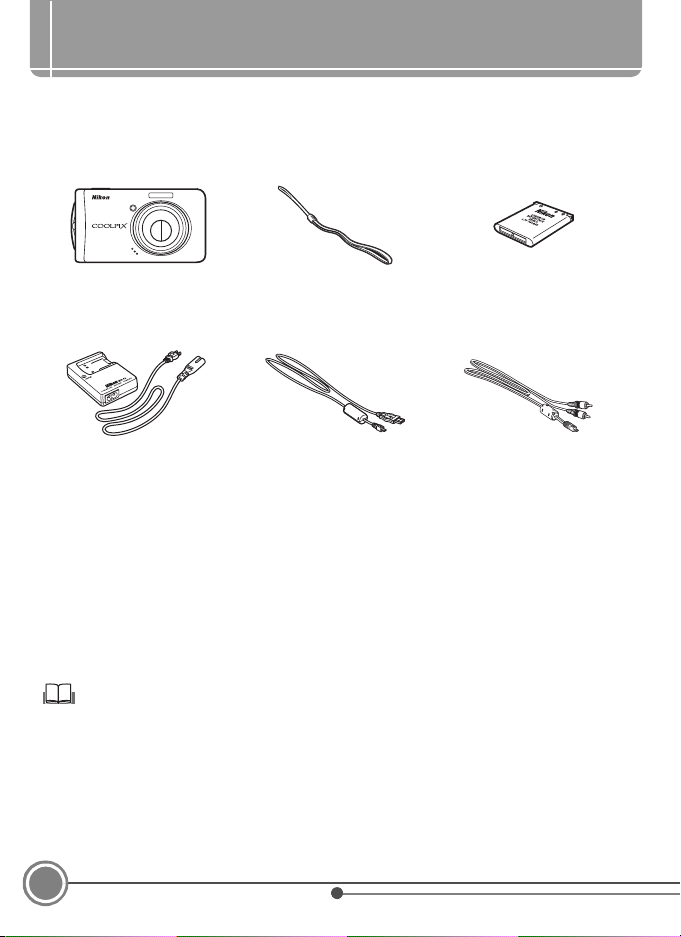
Package Contents
Remove the camera and accessories from the box and confirm that you have all the
items listed below.
COOLPIX S520
Digital Camera
Battery Charger MH-63
(with power cable)†
• Quick Start Guide (this guide)
• User’s Manual CD
Camera Strap Rechargeable Li-ion Battery
EN-EL10*
(with battery case)
USB Cable UC-E6 Audio Video Cable
EG-CP14
• Warranty
• Software Suite installer CD
* Charge the battery as shown on page 3.
† Shape of power cable depends on country of use.
NOTE: Memory card not provided. See page 121 of the User’s Manual for a list of
approved memory cards.
Viewing the Camera User’s Manual on CD
The User’s Manual can be viewed using Adobe Reader or Adobe Acrobat Reader 5.0 or later,
available for free download from the Adobe website.
1 Start the computer and insert the User’s Manual CD.
2 Double-click the CD COOLPIX S520 icon in Computer (Windows Vista) or My Computer
(Windows XP/2000), or on the desktop (Macintosh).
3 Double-click the INDEX.pdf icon to display a language selection screen.
Click a language and follow the links to view the User’s Manual.
2
Introduction
First Steps
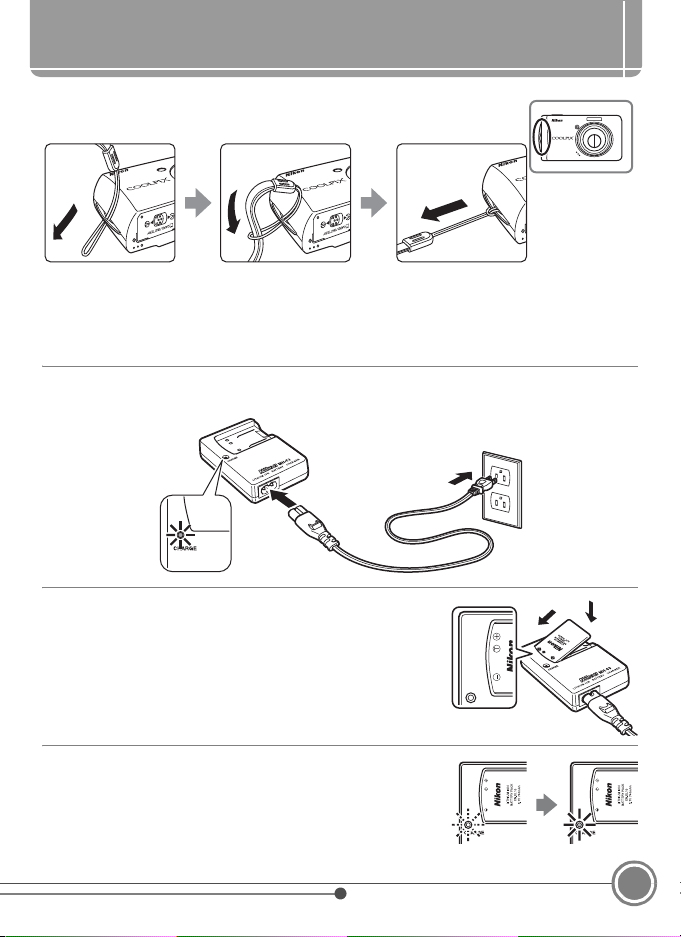
Step 1 Attach the Camera Strap
Attach the camera strap as shown.
Step
2 Charge the Battery
Charge the Rechargeable Li-ion Battery EN-EL10 (supplied) using the Battery
Charger MH-63 (supplied).
2.
1 Connect the power cable to the battery charger 1 and insert the wall plug
into a power outlet 2. The CHARGE lamp will light up 3.
2
3
2.
2 Push 1 and insert the battery in the battery
charger 2 as shown in the picture.
1
1
2
2.
3 The CHARGE lamp will start to blink. Charging is
complete when the CHARGE lamp stops blinking.
A fully exhausted battery will recharge in about
100 minutes.
First Steps
3
Step
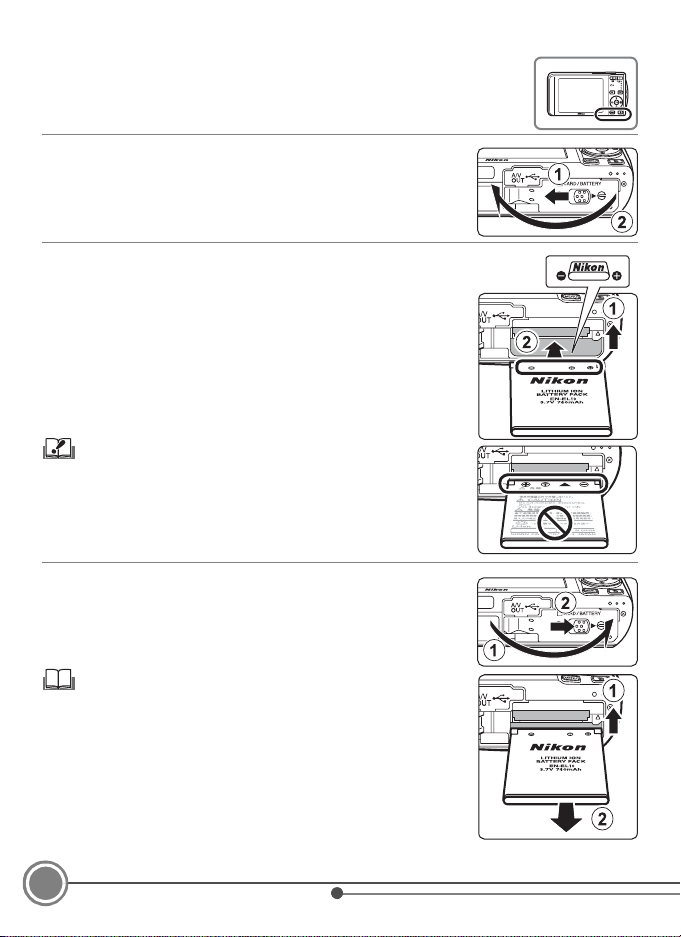
3 Insert the Battery
Insert the fully charged battery into the camera.
3.
1 Open the battery-chamber/memory card slot cover.
3.
2 Insert the battery. Use the battery to push the orange
battery latch up 1 as the battery is inserted 2. The
battery latch will spring back into place when the
battery is fully inserted.
Inserting the Battery
Inserting the battery upside down or backwards could damage
the camera. Check to be sure the battery is in the correct
orientation.
3.
3 Close the battery-chamber/memory card slot cover.
Removing the Battery
Turn the camera off before removing or inser ting batter y. To eject
the battery, open the battery-chamber/memory card slot cover
and slide the battery latch in the direction shown 1. The battery
can then be removed by hand 2.
Note that the battery may become hot during use; observe due
caution when removing the battery.
4
First Steps
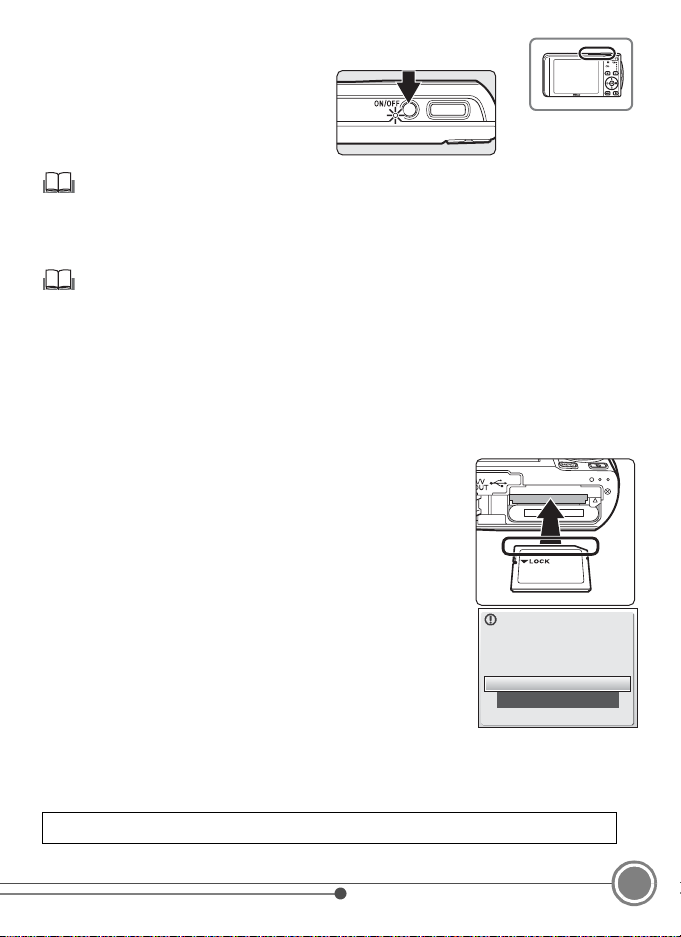
Step 4 Turn On the Camera
Press the power switch to turn on the
camera.
Pressing the power switch another time will
turn the power OFF.
Power Saving Function
If no operations are performed for about five seconds in shooting mode, the monitor will dim to save power.
Using any of the camera controls will reactivate the display. If no operations are performed for about a minute
in all modes, the monitor will turn off; after a further three minutes, the camera will turn off automatically.
Memory Cards
Pictures are stored in either the camera’s internal memory (approximately 23 MB) or a memory card. If a
memory card has been inserted into the camera, data will be recorded onto the memory card and
pictures on the memory card can be playbacked, deleted and transferred. Remove the memory card if
you want to use the camera's internal memory.
If desired, a removable Secure Digital (SD) memory card can be used for additional storage. Internal
memory is used for recording, deletion, and transfer only if no memory card is inserted.
To insert a memory card:
1
If the power-on lamp is lit, press the power switch to turn the camera off.
2
Open the battery-chamber/memory card slot cover as shown in Step
3.1 on the previous page and slide the memory card in until it clicks
into place. The camera and memory card may be damaged if the
memory card is inserted in the wrong way. After inserting the memory
card, close the battery-chamber/memory card slot cover as shown in
Step 3.3 on the previous page.
3
Turn the camera on. If the message shown at right is displayed in the monitor,
the memory card must be formatted before it can be used in the camera. Use
A
the multi selector (
6) to highlight
will be displayed. To start formatting, choose
formatting permanently deletes all pictures and other data on the
Note that
memory card.
Before formatting, be sure to make copies of any pictures you
Yes
and press k. The confirmation dialog
Format
and press k.
wish to keep.
Do not turn the camera off or remove the battery or memory card until formatting is complete.
To remove memory cards,
turn the camera off and confirm that the power-on lamp is off.
chamber/memory card slot cover and press the card in to partially eject the card. The card can then be
removed by hand.
A: This icon indicates that more information is available elsewhere in this guide.
Card is not formatted.
Format card?
No
Ye s
Open the battery-
First Steps
5
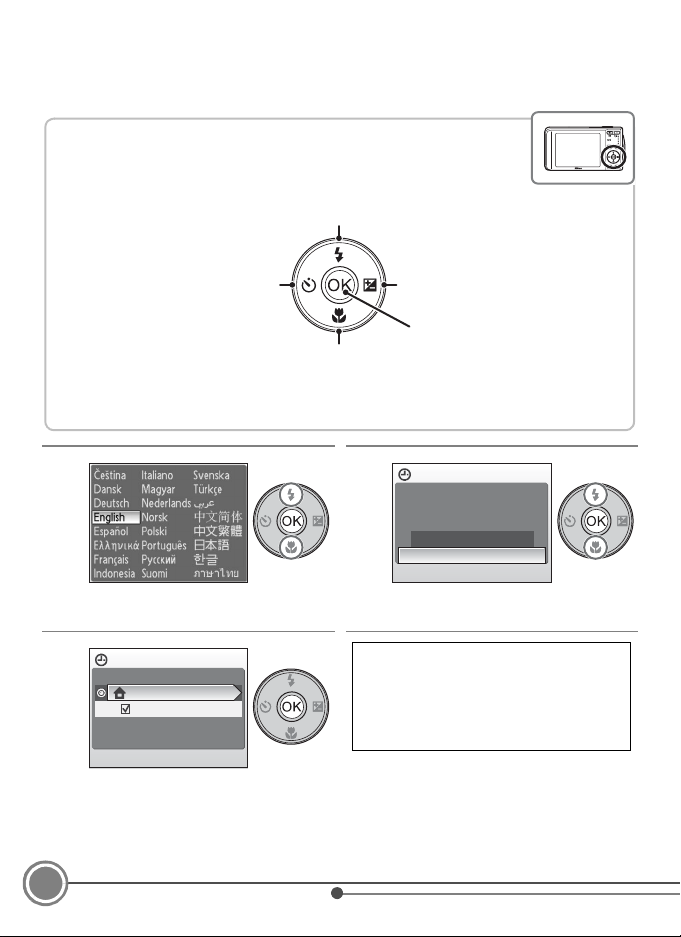
Step 5 Choose a Language and Set the Camera Clock
A language-selection dialog is displayed the first time the camera is turned on.
Follow the steps below to choose a language and set the time and date.
The Multi Selector
Use the multi selector to choose and apply settings. Operate the
multi selector by pressing it up, down, right, left, or by pressing k.
Move the highlight up.
Return to the previous screen
(move the highlight to the left).
Move the highlight down.
Advance to the next screen
(move the highlight to the right).
Apply selection.
In the descriptions that follow, buttons to be pressed are shown in gray.
5.
1
Choose the desired language and
press k.
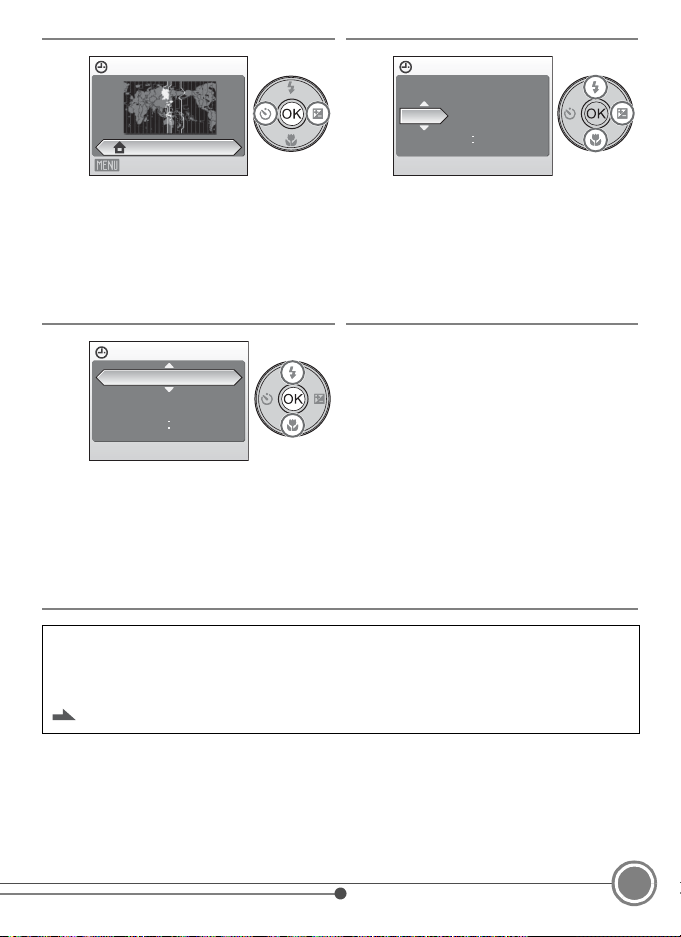
5.
3
Time zone
London,Casablanca
Daylight saving
Press k.
The home time zone menu is
displayed.
5.
2
Date
Set time and date?
No
Ye s
Choose Ye s and press k.
The time zone menu is displayed.
If daylight saving time is in effect, press
the multi selector down to highlight
Daylight saving and press k to select.
Press the multi selector up to return to
Step 5.3.
6
First Steps
5.
4
Home time zone
London,Casablanca
Back
Select your home tim e zone and press
k.
The date menu is displayed.
5.
6
Date
DMY
15
Choose the order in which the day,
month, and year are displayed and
press k.
• The settings are applied and
monitor display returns to shooting
mode.
• The lens will open at this time.
To change the current date and time, in the Setup Menu go into Date, choose Date and
change the settings there.
To change the settings for the time zone or daylight saving time go into Date, choose
Time zone and change the settings there.
Page 104, 107, 108 of the User’s Manual.
200805
1015
5.
5
Date
DMY
01
Edit the date.
Rotate the rotary multi selector, or
press up or down, to edit the
highlighted item.
Press right to move the cursor in the
following order.
D ->M ->Y ->Hour ->Minute ->D M Y
200801
0000
First Steps
7
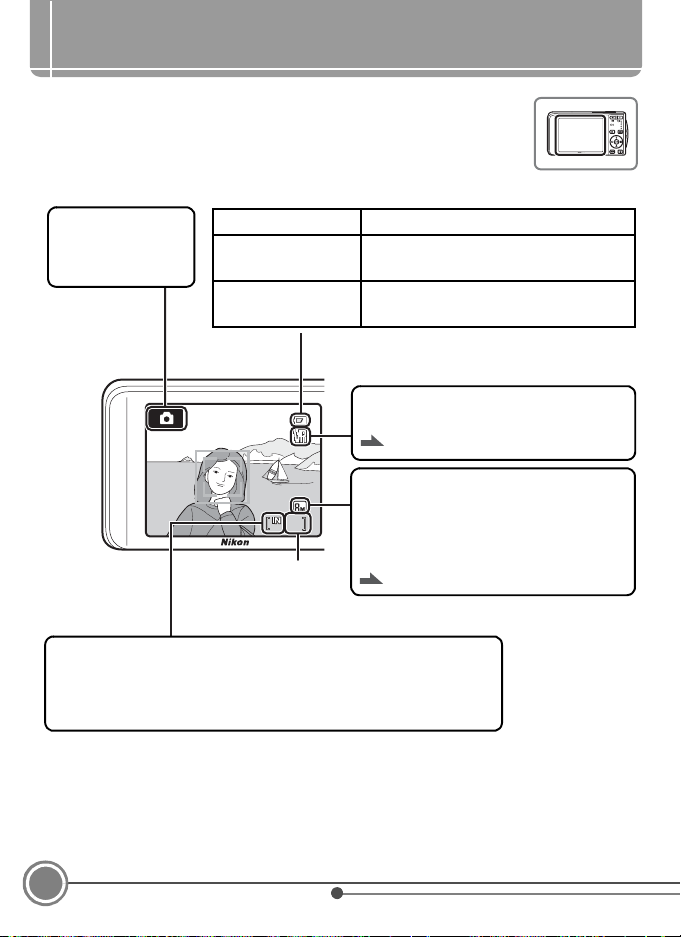
Taking Pictures
Step 1 Check Indicators in the Monitor
Check the battery level and number of exposures remaining.
Battery level indicator
Shooting mode
A is displayed in
A (auto) mode.
NO INDICATOR Battery fully charged.
B
N
Battery exhausted.
9 9 9
Number of exposures
remaining
Battery low; prepare to replace or charge
the battery.
Cannot take pictures. Recharge or
replace with a fully charged battery.
Vibration reduction (VR) icon
Reduce the effects of camera shake.
Image mode
Display image size and quality set in the
image mode menu.
The default setting is y Normal (3264 x
2448)
Page 113 of the User’s Manual
Page 87 of the User’s Manual
Internal memory indicator
Pictures will be recorded to in ternal memory (approximately 23 MB).
When a memory card is inserted, C is not displayed and pictures
will be recorded to memory card.
• Information that is displayed on the screen during shooting or playback will be turned off
after a few seconds.
8
Taking Pictures

Step 2 Ready the Camera
9
Hold the camera steadily in both hands, keeping your
fingers and other objects away from the lens, flash, selftimer lamp, microphone and speaker.
3 Frame a Picture
Step
When the came ra recognizes a face (front view), that face will be framed by a yellow
double border (by default). If more than one face is recognized, the face nearest to
the camera will be framed by a double border and the rest by a single border.
Focus area will not appear when shooting non-human subjects or when no faces are
recognized.
Modify composition by using the zoom buttons to zoom in for a close-up of the
subject, or zoom out to include more of the background.
Page 23 of the User’s Manual.
Focus area
The zoom buttons
Press g to zoom in on the subject
so that it fills a larger area of the
frame. Press f to zoom out,
increasing the area visible in the
frame.
9
Taking Pictures
9

Step 4 Focus and Shoot
F2.8
1/60
F2.8
1/60
4.
1 Press the shutter-release button halfway,
stopping when you feel resistance.
When people's faces (front
Flash lamp
view) are recognized:
Camera will focus on the face
surrounded by a double border.
Once focus has been locked the
double border will glow green.
F2.8
1/60
F2.81/60
When shooting non-human
Shutter
Speed
Aperture
subjects or when no faces are
recognized:
Camera automatically selects the
focus area (one of nine) containing
the subject closest to the camera.
When the subject is in focus, the
active focus area glow green.
Press the shutter-release button halfway to display the shutter speed and
Focus area
1/60
F2.8
F2.81/60
aperture.
Focus and exposure remains locked while the shutter-release button is
pressed halfway.
When the camera is unable to focus while the shutter-release button is
pressed halfway, either the double border for face priority will blink; or the
focus area or focus display will blink red. Change the composition and try
again. See “Autofocus” , page 25 of the User’s Manual.
10
Taking Pictures

With the shutter-release button pressed halfway, check flash.
Flash lamp
On Flash will fire when picture is taken.
Blinks Flash charging.*
Off Flash off or not required.
* If remaining battery level is low after using the flash to shoot, the monitor will
turn off and the flash lamp will blink until the flash has finished charging.
4.
2 Smoothly press the shutter-release button the rest of the way
down to take the picture.
Do not use force when pressing the shutter-release button, as this may
cause camera shake, resulting in blurred pictures.
Taking Pictures
11

Step 5View Pictures
4 4
/
0004.JPG
15/05/2008 15:30
Press c. The picture is displayed in the monitor in full-frame playback mode.
15/05/2008 15:30
15/05/2008 15:30
0004.JPG
0004.JPG
/
44
c
Use the multi selector to view other pictures. Press the
View previous picture
multi selector right or down to view pictures in the
order recorded, left or up to view pictures in reverse
order.
Rotating the multi selector also displays the previous
or next picture.
View next picture
Press c or the shutter-release button to switch to
shooting mode.
The following operations can be performed in full-frame playback mode.
To Use
Zoom in on displayed picture g (i)
Display groups of 4, 9, or 16 thumbnail images in the monitor
(thumbnail playback)
f (h)
Add current picture displayed to favorites k
Page 26 of the User’s Manual
Deleting Pictures
To delete the picture currently displayed
in the monitor, press l. When a
confirmation dialog is displayed, use the
multi selector to highlight Ye s . Press k
to delete the picture.
Once deleted, pictures cannot be
recovered.
If you do not wish to delete, choose No
k
before pressing
.
Erase 1 image?
No
Ye s
12
Taking Pictures

Other Functions
Flash mode, Self-timer, Macro Mode and
Exposure Compensation
Use the multi selector in shooting mode to apply the following
settings.
Flash
The flash modes available are U (auto), V (auto with red-eye
reduction), W (off), X (fill flash), and Y (slow sync) modes.
Page 28 of the User’s Manual
Exposure Compensation
Exposure compensation is used to alter
exposure from the value suggested by the
camera to make pictures brighter or darker.
When the picture is too dark: adjust the
exposure compensation to “+” side. When the
picture is too bright: adjust the exposure compensation to “-” side.
Page 32 of the User’s Manual
Macro Mode
Use for close-ups. When the F icon glows
green, the camera can focus at distances as
close as 15 cm (5.9 in.) from the lens.
Page 31 of the User’s Manual
Flash mode
Exposure compensation
Macro mode
Self-timer
The camera is equipped with ten- and two-second timers.
Page 30 of the User’s Manual
10s
2s
Self-timer
Other Functions
13

Switch to Shooting Mode/Playback Mode
Pressing r will display the favorites menu. Choose either shooting
mode or playback mode with the multi selector, and press k to
change to that mode.
Favorites Menu
Auto mode
Movie mode
Shooting
Favorites scene mode
(A 15)
Playback mode
Voice recording mode
Add a favorite
scene mode
Using d button
A variety of shooting and playback settings can be
adjusted from the camera menus. Press d to
display the menu for the current mode and use the
multi selector to select an option, as described on
page 6.
Press d again to exit the menu.
Page 10 of the User’s Manual
If is displayed at the lower right in the monitor, help for the
current menu item can be viewed by pressing g (j).
Press g (j) again to display the menu.
Page 11 of the User’s Manual
Scene mode (A 15)
Favorite pictures
playback mode
List by Date mode
Setup mode
Shooting menu
Image mode
White balance
Continuous
ISO sensitivity
Color options
Exit
14
Other Functions

Scene Modes
Choose a scene and camera settings will optimize automatically
for that scene. Shooting scene can be chosen from either the
Favorite Scene on the left side of the favorites menu, or from the
scene menu.
Scene
cene menu can be displayed by changing to scene mode,
S
C
choosing
from the favorites menu and pressing d.
Scene Menu
Food
Por trait
Landscape
Sports
Night portrait
Exit
Scene Description
u Food* For shooting cuisines.
b Portrait*
For clear portrait shots. Camera will auto focus on the subjects’
face once it recognizes people’s face.
c Landscape* For vivid landscapes and cityscapes.
d Sports For dynamic action shots.
For portraits with an evening or night landscape in the
e Night portrait
background. Camera will auto focus on the subjects’ face once it
recognizes people’s face.
f Party/indoor For parties and other indoor scenes.
g Beach/snow For brightly-lit expanses of water, sand or snow.
h Sunset For vivid sunsets and sunrises.
i Dusk/dawn
For low-light landscape shots taken in the pre-dawn or after sunset.
j Night landscape For night landscapes.
k Close up For close-ups.
l Museum For indoor shots where flash photograph is prohibited.
m Fireworks show For fireworks shots at slow shutter speeds.
n Copy For drawings, handwriting or printed text.
o Backlight For back-lit subjects.
p Panorama assist For panoramas.
* u Food, b Portrait and c Landscape has been set at the default setting for favorite scene in
favorite menu. Other settings can be selected in favorite scene.
Page 33 of the User’s Manual
Other Functions
15

Installing Nikon Transfer
Nikon Transfer can be used to copy (transfer) pictures to a computer for storage.
Install Nikon Transfer from the supplied Software Suite CD. For further information,
refer to the help information contained in the Software Suite CD or in Nikon Transfer.
Before You Begin: Nikon Transfer System Requirements
Confirm that your system meets the following requirements.
Windows Macintosh
PowerPC G4 or G5
CPU
1
OS
Hard disk space
RAM
Video resolution
Miscellaneous Only computers with built-in USB ports supported
1
Refer to the Nikon website for the latest information on operating system compatibility.
2
If your computer is running Windows 2000 Professional, the COOLPIX S520 cannot be
connected to the computer. Use a card reader or similar device to transfer pictures stored
on the memory card to the computer (A 23).
Intel Celeron, Pentium 4, or Core series
processor with a clock speed of 1 GHz or
faster recommended
Preinstall version of Windows Vista (32-bit
Home Basic/Home Premium/Business/
Enterprise/Ultimate editions), Windows XP
Service Pack 2 (Home Edition/Professional),
Windows 2000 Professional
60 MB required for installation, 1 GB required when Nikon Transfer is
running
Windows Vista: 512 MB or more with a minimum of 128 MB free
Windows XP, Windows 2000 Professional: 256 MB or more with a
minimum of 128 MB free
800 × 600 pixels or more (1,024 × 768 pixels or more recommended)
with 16-bit color or more
2
Service Pack 4
model or Intel Core or
Xeon (Universal
Binary) model with
built-in USB port
required
Mac OS X (Version
10.3.9, 10.4.11)
16
Installing Nikon Transfer

Before Installing
Exit all other applications and turn off any virus-checking software before beginning Nikon
Transfer installation.
When Installing, Using or Uninstalling Nikon Transfer
Log on to an account with administrator privileges.
NOTE: Depending on your operating system, the dialogs displayed during
installation may differ from those shown here. The illustrations in this guide
are from Windows Vista.
1
Turn the computer on and insert the Software Suite installer CD into the CDROM drive.
Windows Vista
Choose Run Welcome.exe in the AutoPlay dialog to start the install program.
Proceed to step 3.
Windows XP/2000
The Install Center program will start automatically. Proceed to step 3.
If the Install Center Program Does Not Start Automatically (Windows only)
Windows Vista/XP
Open Computer by selecting Computer from the Start menu (Windows Vista), open
My Computer by selecting My Computer from the Start menu (Windows XP), and
double-click the Software Suite CD icon.
Windows 2000 Professional
Double-click the My Computer icon on the desktop and then double-click the
Software Suite CD icon.
Mac OS X
The Software Suite folder will open automatically. Double-click the Welco me icon.
If the folder does not open automatically, double-click on the Software Suite CD icon
on the desktop.
2
Enter the administrator name and password, and then click OK (Macintosh
only).
Installing Nikon Transfer
17

3
Choose the language and click Next.
The Software Suite installer dialog will be displayed.
If Nikon Transfer is already installed
The Language Selection dialog will not be displayed if Nikon Transfer is installed. The
Install Center window is displayed in the language selected when Nikon Transfer was
first installed.
4
Click Nikon Standard Install.
Install Nikon Transfer and related software.
Other installation options
Custom Install: Install selected software.
Link to Nikon: Download trial versions of other Nikon software from a Nikon website or
visit Nikon technical support websites (Internet connection required).
Install Guide: View help information included on the Software Suite (CD).
18
Installing Nikon Transfer

5
Install Panorama Maker.
Windows
Click Next and follow the on-screen instructions to complete the installation.
Mac OS X
The license agreement will be displayed. After taking the time to read and understand
the contents of this agreement, click Accept and follow the on-screen instructions to
complete the installation. Proceed to step 7.
6
Click Yes to install QuickTime* (Windows only).
Installation may take several minutes on some systems.
* See the Appl e Inc. website for Windows Vista support information . Nikon recommends
downloading and installing the most up-to-date version of QuickTime for Windows
Vista.
7
Install Nikon Transfer.
Windows
Click Next. The license agreement will be displayed.
After taking the time to read and understand the
contents of this agreement, click Yes to accept its terms
and display the ReadMe file. After reviewing the
contents of this file, which may contain important
information that could not be included here, click
Continue and follow the on-screen instructions to
complete the installation. Proceed to step 9.
Mac OS X
The license agreement will be displayed. After taking the time to read and understand
the contents of this agreement, click Accept and follow the on-screen instructions to
complete the installation.
Installing Nikon Transfer
19

8
Activate the Auto-Launch setting (Macintosh only).
When the Auto-Launch setting dialog is displayed, click Ye s to have Nikon Transfer start
automatically whenever the camera is connected.
The Auto-Launch setting
The Auto-Launch option can also be enabled after installation of Nikon Transfer by
checking the Launch automatically when device is attached option in the transfer
options Preferences panel.
9
Click Finish (Windows) or Quit (Macintosh) and
follow the on-screen instructions to close the
Install Center Window.
If prompted to restart the computer, follow the onscreen instructions.
Windows XP/2000
If DirectX 9 is not already installed, a DirectX 9 installer dialog will be displayed. Follow
the on-screen instructions to install DirectX 9.
10
Remove the Software Suite installer CD from the CD-ROM drive.
This completes installation. Proceed to “Transferring Pictures to a Computer” (A 21).
20
Installing Nikon Transfer

Transferring Pictures to a Computer
Use a Reliable Power Source
Nikon recommends using a fully charged battery or the AC adapter EH-62D (sold separately)
to power the camera for extended periods. Do not use any other AC adapters as it will cause
the camera to heat up or malfunction.
If You Are Using Windows 2000 Professional
Use a card reader or similar device to transfer pictures stored on the memory card to the
computer (A 23).
1
Turn off the camera.
2
Connect the camera to the computer using the supplied USB cable.
Check to be sure that the connector is in the correct orientation and insert the plug
straight. Do not insert or disconnect it forcibly.
Transferring Pictures to a Computer
21

3
Turn on the camera.
The power-on lamp will light up.
Windows Vista
When the AutoPlay dialog is displayed, select Copy
pictures to a folder on my computer using Nikon
Transfer. To bypass this dialog in the future, check Always do this for this device: .
Nikon Transfer will start.
Windows XP
Wh en t he A uto Pla y di alo g is di spl ayed , se lec t Nikon Transfer Copy pictures to a folder
on my computer, and click OK. To bypass this dialog in the future, check Always use
this program for this action. Nikon Transfer will start.
Mac OS X
Nikon Transfer will start automatically if Ye s was selected in the Auto-Launch setting
dialog when Nikon Transfer was first installed.
4
Confirm that the source device is displayed in the transfer options Source
panel and click Start Transfer.
Start Transfer buttonSource device
At the Nikon Transfer default setting, all pictures are transferred to the computer.
22
Transferring Pictures to a Computer

At the Nikon Transfer default setting, the folder to which pictures are transferred is
automatically opened.
For more information on Nikon Transfer, refer to help information contained in Nikon
Trans fer.
5
Disconnect the camera.
Turn the camera off and disconnect the USB cable.
Pictures can be displayed in the viewer supplied with your operating system.
For Users of Windows 2000 Professional
Use a card reader or similar device to transfer the pictures stored on the memory card to
the computer. If the memory card has a capacity greater than 2 GB, or is SDHC-compliant,
the intended device must support these features of the memory card.
• At the Nikon Transfer default settings, Nikon Transfer will start automatically when a
memory card is inserted into the card reader or similar device. See step 4 of
“Transferring Pictures to a Computer” (A 22).
• Do not connect the camera to the computer. If the camera is connected to the
computer, the Found New Hardware Wizard dialog will be displayed. Select Cancel,
close the dialog, and disconnect the camera from the computer.
• To transfer pictures stored in the camera’s internal memory to the computer, the
pictures must first be copied to a memory card using the camera.
Page 72, 98 and 103 of the User’s Manual
Transferring Pictures to a Computer
23

Other Features of the COOLPIX S520
D Movies:
Record movies.
Page 63 of the User’s Manual
E Voice Recording:
Record sounds and voices.
Page 68 of the User’s Manual
h Favorite pictures playback:
Playback the chosen favorite pictures.
Page 57 of the User’s Manual
C List by Date:
Playback according to the shooting date.
Page 54 of the User’s Manual
c D-Lighting:
Bring out details in shadows and back-lit subjects.
Page 49 of the User’s Manual
PictBridge:
Print pictures directly from the camera.
Page 78 of the User’s Manual
Technical support information is available online at the following sites:
• For users in the USA: http://www.nikonusa.com/
• For users in Europe and Africa: http://www.europe-nikon.com/support/
• For users in Asia, Oceania, and the Middle East: http://www.nikon-asia.com/
FX8A01(11)
6MA36311-01
 Loading...