

Page 1
User’s Manual
Getting to Know Your Digital Camera
Get Ready 3
A Shoot 8
B View 10
Have More Fun 13
More Information 21
Page 2
Thank you for purchasing the Nikon COOLPIX S32 digital camera.
Read this manual carefully before using your camera and follow all instructions.
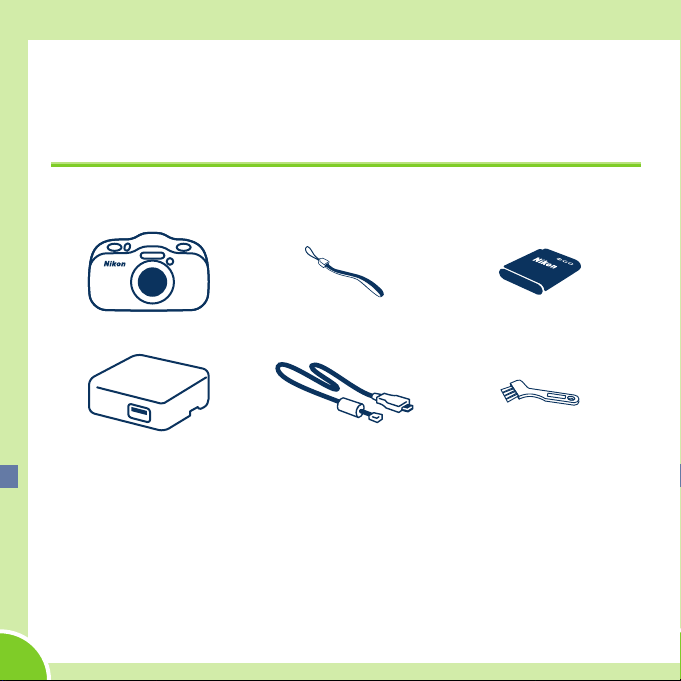
Conrming the Package Contents
In the event that any items are missing, please contact the store where you
purchased the camera.
COOLPIX S32 Digital Camera Camera Strap Rechargeable Li-ion Battery
Charging AC Adapter
EH-70P
1
USB Cable UC-E16 Brush
EN-EL19
• User’s Manual: Getting to Know Your Digital Camera (this guide) • Warranty
1
A plug adapter is included if the camera was purchased in a country or region
that requires a plug adapter. The shape of the plug adapter varies with the
country or region of purchase. The Charging AC Adapter comes with the plug
adapter attached in Argentina and Korea (page 6).
2
The brush is used for cleaning the waterproof packing.
NOTE: Accessories are not waterproof. A Secure Digital (SD) memory card,
hereafter referred to as a “memory card,” is not included with the camera.
2
2
Page 3
Get Ready
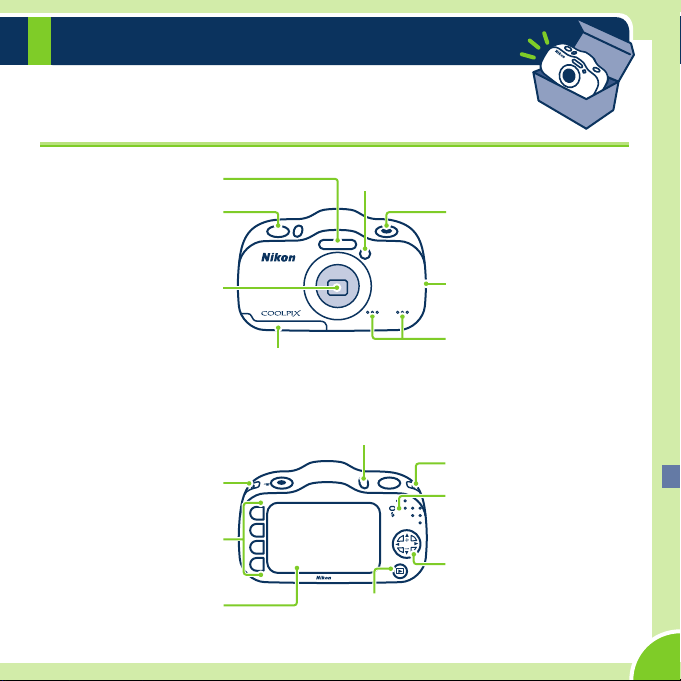
Parts of the Camera
Flash
Shutter-release button
Lens
Battery-chamber/memory card slot cover
Power switch/power-on lamp
Eyelet for camera strap
Flexible buttons
Monitor (Screen)
Self-timer lamp/AF-assist illuminator
b (e movie-record)
button
Speaker
Microphone
Eyelet for camera strap
Charge lamp/
m Flash lamp
Multi selector
c
(shooting/playback mode) button
3
Page 4
Get Ready
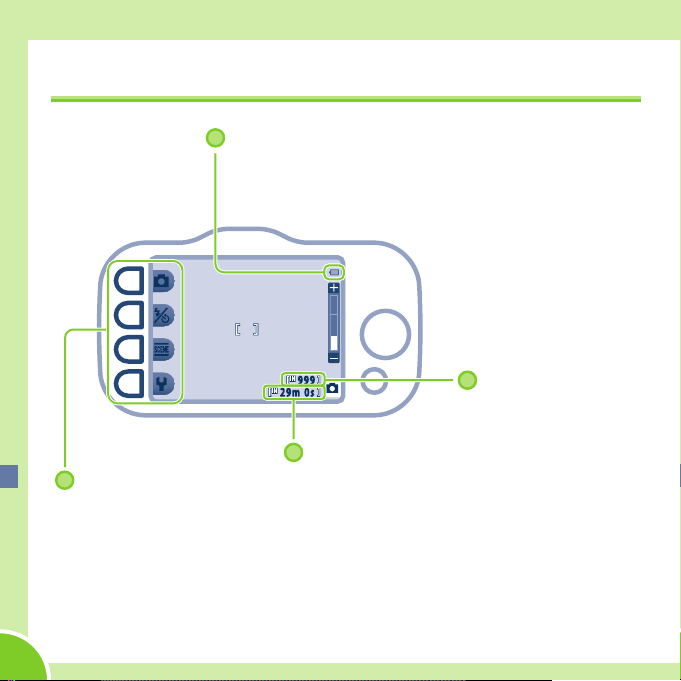
Using the Monitor
Battery level
• F: The battery has enough power remaining.
• G: The battery level is low.
9 99
2 9m 0 s
Number of
images that can
be taken
Maximum movie recording time
Flexible buttons
Press to select an item shown on the monitor.
B If “Battery exhausted.” Is Displayed
The battery is exhausted. Replace it with the battery that has ample power
remaining.
4
Page 5
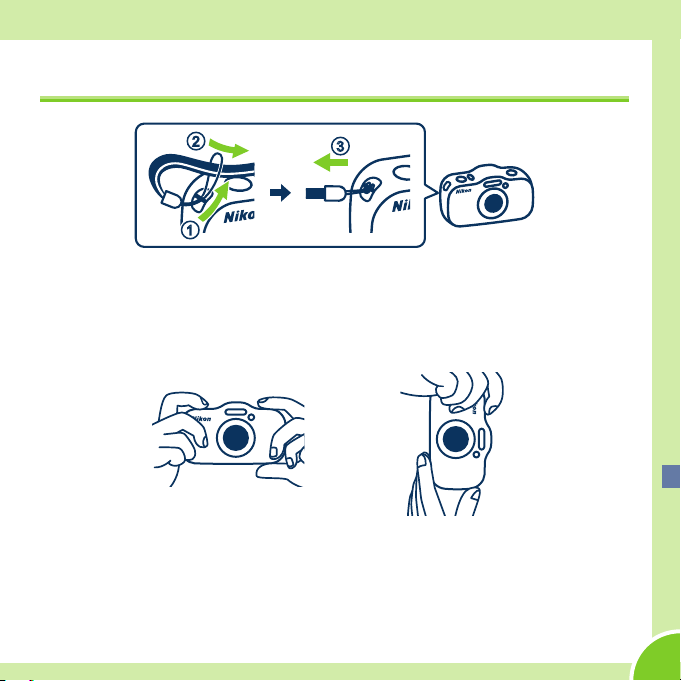
Attaching the Camera Strap
Get Ready
• Guide one hand through the camera strap and hold the camera steady with
both hands.
• When taking images, be careful not to cover the ash or lens with your
ngers.
B After Attaching the Strap
Do not swing the camera by the strap.
The camera could strike objects or people causing injury and damage to the camera.
5
Page 6
Get Ready
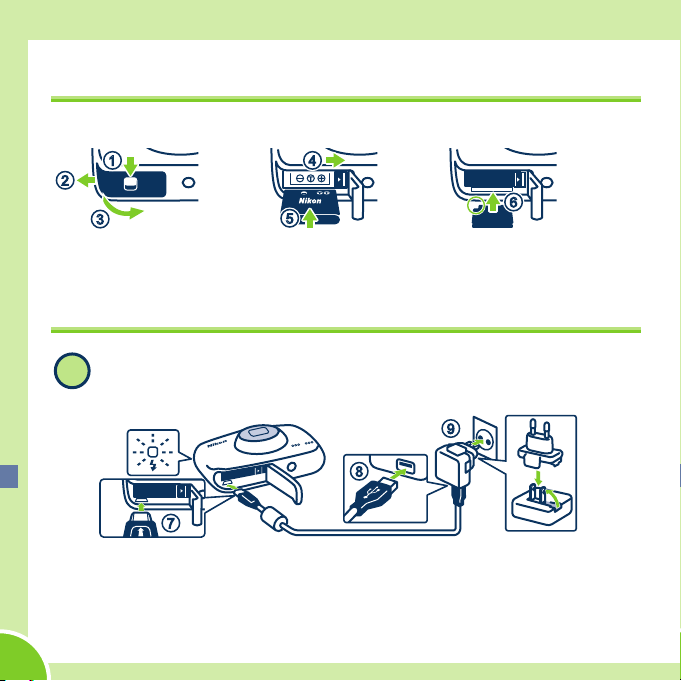
1
Inserting the Battery and Memory Card
Open the cover, and insert the battery and memory card.
• Look at the stickers and insert the battery and memory card the right way.
Charging the Battery
Connect the camera to the Charging AC Adapter and to the
electrical outlet.
9
8
7
If a plug adapter is included with your camera, attach the plug adapter to
the plug on the Charging AC Adapter. Push the plug adapter rmly until
it is securely held in place. Once the two are connected, attempting to
forcibly remove the plug adapter could damage the product.
6
Page 7

Get Ready
• The battery starts charging, and the charge lamp ashes.
• When the battery is fully charged, the charge lamp turns o.
• Disconnect the Charging AC Adapter from the electrical outlet and then
disconnect the cable.
Close the cover.
2
0
a
• Make sure that there is no debris, etc. inside.
• Lay the cover completely at in the direction indicated by the arrow 0,
and fully slide it in a.
• Read and follow the waterproong-related messages if they are
displayed when you turn on the camera.
B Notes About Charging and Replacing the Battery
• Only an adult should charge and replace the battery.
• Refer to the information in “For Your Safety” on page 23 and in “Caring for the
Product” in the Reference Manual.
• Make sure the camera and your hands are not wet.
• Turn o the camera and then turn the camera upside-down, being careful not
to let the battery and memory card fall out.
• Make sure that there is no debris, etc. inside the battery-chamber/memory card
slot cover.
• Make sure that the battery-chamber/memory card slot cover is rmly closed.
7
Page 8
A Shoot
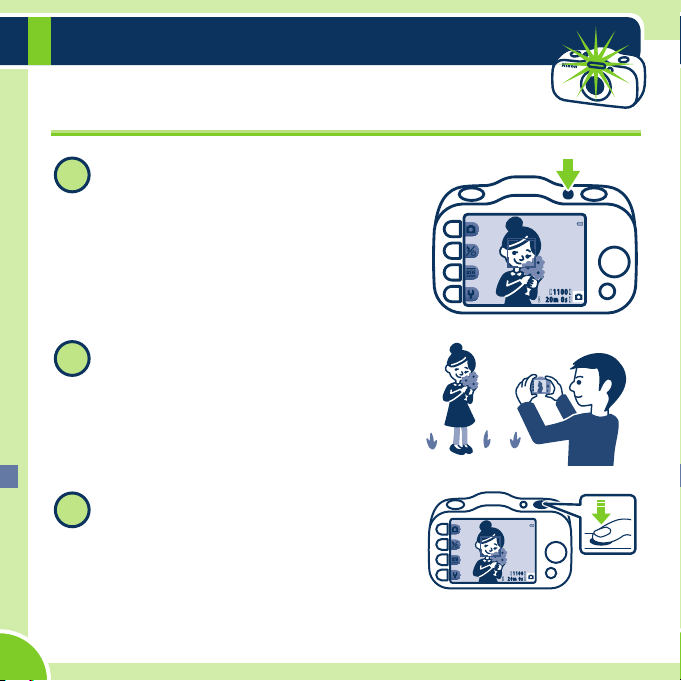
1
Taking Images
Press the power switch to turn on the
camera.
Hold the camera steady and aim
2
the camera so that you can see your
subject in the monitor.
Press the shutter-release button
3
slightly (halfway).
• The camera focuses.
11 0 0
20 m 0s
11 00
20 m 0 s
8
Page 9
A Shoot
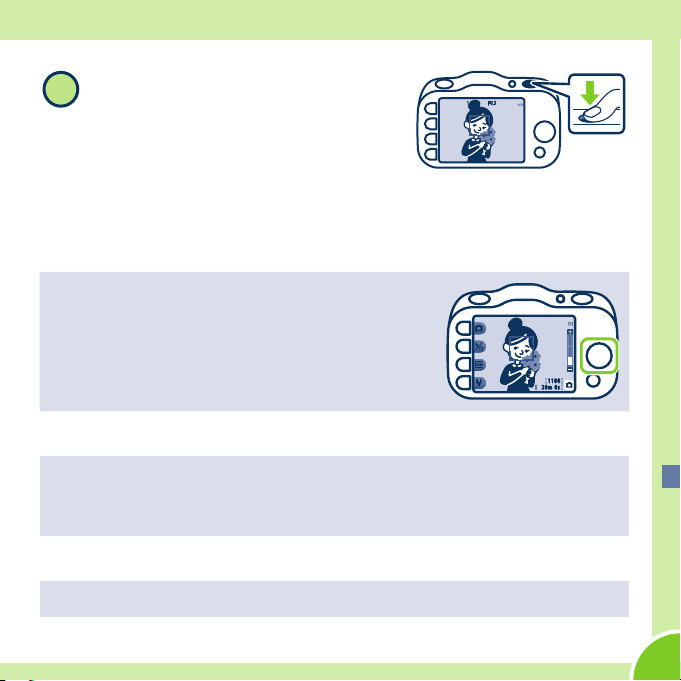
Press the shutter-release button the
4
1/ 25 0 F 3.3
rest of the way down.
• The camera takes an image.
• Record movies → page 13
• Take images underwater → page 14
Using the Zoom
H: Makes your subject bigger.
I: Captures a wider view.
11 0 0
20 m 0 s
Using the Self-timer
If you want to be in the picture, use the self-timer. The camera takes an image
about 10 seconds after you press the shutter-release button.
Press the exible buttons in the order of Z → i → j to set the self-timer.
Turning the Camera O
When you are nished taking images, press the power switch again.
9
Page 10
B View
Viewing Your Images
Press the c (shooting/playback
1
mode) button.
• B is displayed in the lower-right of the
monitor.
• The last image you took is displayed.
Use the multi selector to look through your images.
2
• If you press the c (shooting/playback mode) button again, A is
displayed in the lower-right of the monitor and the camera returns to
the shooting screen.
10
Current image
11 0 0
20 m 0s
Next imagePrevious image
Page 11

Deleting Images
3
When B is displayed in the lower-
1
right of the monitor, look through
your images and nd an image you
want to delete.
• Looking through your images → page
10 step 2
Press n.
2
Press n Erase this picture only.
• Press Q if you want to stop with
deleting the image.
B View
05 / 1 5 / 2 0 1 4 15 : 3 0
4
05 / 1 5 / 2 0 1 4 15 : 3 0
4
Er as e
Er as e t hi s pi ct ur e on ly
Er as e s el ec te d pi ct ur es
Er as e a ll p ic tu re s
11
Page 12
B View
Press R Yes.
4
• If you delete an image, you cannot
recover it.
• Press S No if you want to stop with
deleting the image.
Deleting Several Images at Once
1 Select o Erase selected pictures in step 3.
2 Press the multi selector J or K to select the
image to be deleted and press S.
- Press P to remove S.
3 Add S to all the images you want to delete
and press O.
- Follow the instructions displayed in the
monitor.
Deleting All Your Images
1 Select k Erase all pictures in step 3.
2 Press R Yes in step 4.
Er as e 1 p ic tu re ?
Yes
No
Er as e s el ec te d pi ct ur es
12
Page 13
Have More Fun
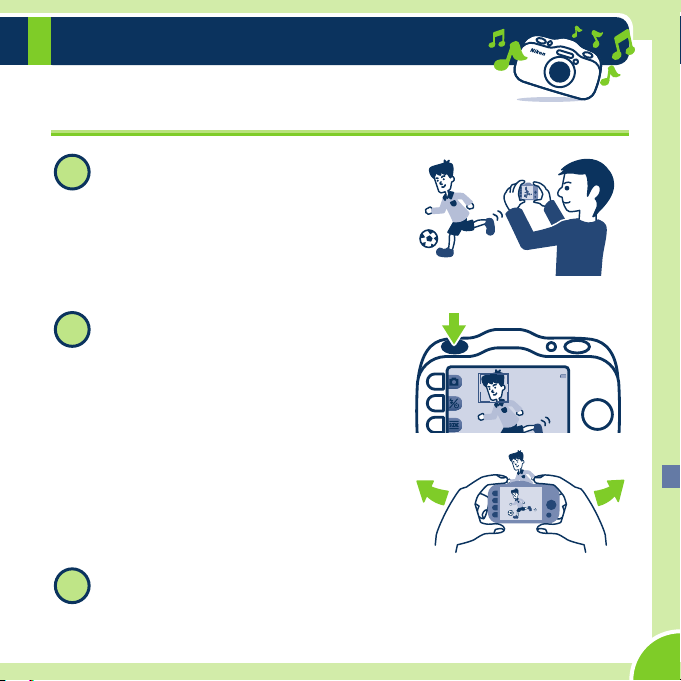
Recording Movies
While A is displayed in the lower-
1
right of the monitor, aim the camera
so that you can see your subject in
the monitor.
• Make sure you do not cover the
microphone.
Press the b (e movie-record)
2
button.
• The camera starts recording a movie.
• As your subject moves, move the
camera and make sure you can see
your subject in the monitor.
Press the b (e movie-record) button again.
3
• The camera stops recording the movie.
13
Page 14

Have More Fun
2
Taking Images Underwater
Before Using the Camera Underwater
1 Make sure there is no debris caught in the battery-chamber/memory card
slot cover.
If there is debris, blow it o with a blower*.
2 Make sure that the battery-chamber/memory card slot cover is rmly closed.
3 Do not open the battery-chamber/memory card slot cover underwater.
While A is displayed in the lower-
1
right of the monitor, press g.
11 0 0
20 m 0s
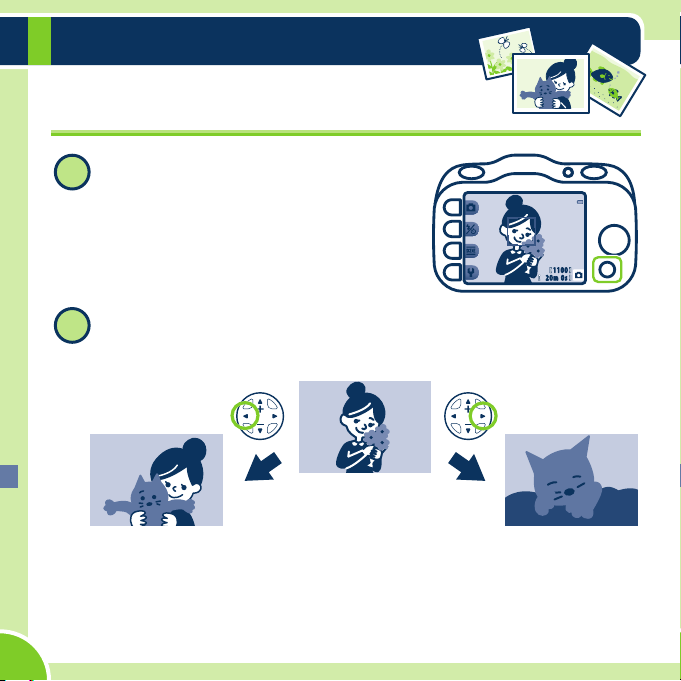
Press g Choose a style.
Mo re pi ct ur e op ti on s
Ch oo se a st yl e
De cor at e
Ch an ge co lo rs
* A tool that uses air to remove dust and debris.
14
Page 15

Have More Fun
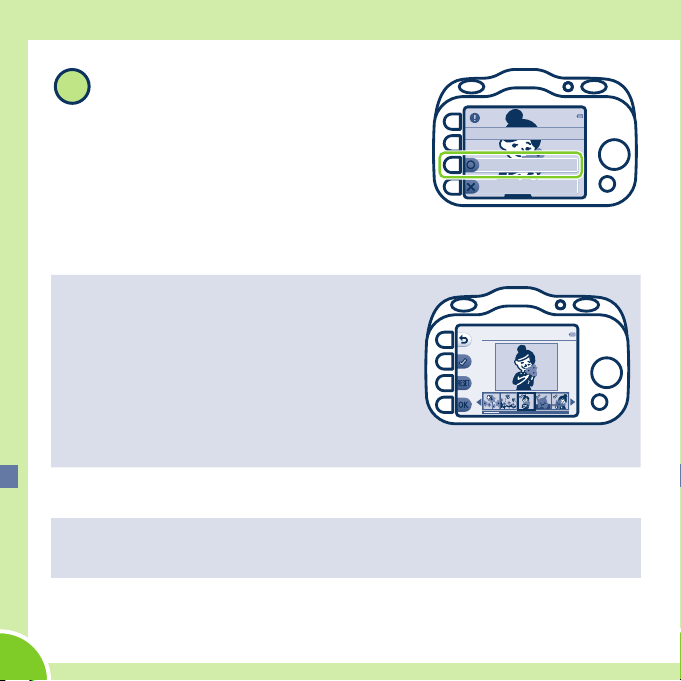
Press J or K, select J and press
3
O.
• The waterproong-related message is
displayed. Conrm the message and
press K to display the next message.
Press O to start shooting.
Press the shutter-release button.
4
Cleaning the Camera After Using It Underwater
1 Keep the battery-chamber/memory card slot cover closed and wash o the
camera with fresh water.
2 Wipe o any water droplets with a soft, dry cloth and allow the camera to
dry in the shade in a well-ventilated area.
- Place the camera on a dry cloth to dry it.
- Do not use a hair dryer or other appliance to dry the camera.
3 After you make sure it is dry, open the battery-chamber/memory card slot
cover, use a soft, dry cloth to remove any water inside, and remove any sand
inside using the blower.
Sh oo t u nd er w at er
15
Page 16

Have More Fun
3
Making Photo Albums
When B is displayed in the lower-
1
right of the monitor, press V.
Press V Picture play.
2
Press J or K to select D and press
O.
05 / 1 5 / 2 0 1 4 15 : 3 0
4
Ha ve fu n wi th p ic tu re s
Ex cha ng e me ss ag es
Pi ct ure p la y
Gr ad ing
Ma ke p hot o al bu ms
16
Page 17

Select images for a photo album.
4
• Press the multi selector J or K to select
the images you want to add to a photo
album and press S. Press O when you
are nished choosing your images.
• Press P to remove S.
Select a design for your photo album.
5
• Press the multi selector J or K to select
a design and press O to conrm your
selection.
• The photo album is displayed.
• You can view your albums later the same
way that you can view your images.
Have More Fun
Ma ke p hot o al bu ms
Ch oo se an a lb um d es ign
17
Page 18

Have More Fun
3
Adding Voice Messages to Your Images
When B is displayed in the lower-
1
right of the monitor, nd the image
you want to add a message to and
press V.
Press E Exchange messages.
2
Press q Record.
05 / 1 5 / 2 0 1 4 15 : 3 0
Ha ve fu n wi th p ic tu re s
Ex cha ng e me ss ag es
Pi ct ure p la y
Gr ad ing
Ex cha ng e me ss ag es
Re co rd
Pl ay re co rd ing s
Er ase r ec or di ng s
4
18
Page 19

Press I Leave a message.
4
• After you record a message, you can
select Leave a reply.
Record a message.
5
q: Press to start recording, and press again
to stop recording. You can record for up to
about 20 seconds.
A: Play back a message.
O: Save your message.
Play Recordings
• Select Play recordings in step 3 if you want
to play back your message.
• Adjust the volume by pressing the multi
selector H or I.
• Press Q to stop playback.
• A reply can be recorded.
Have More Fun
Re co rd
Le ave a m es sa ge
Le ave a r ep ly
20 s
10 s
19
Page 20

Other Things You Can Do With Your Camera
Shoot at intervals
O
Use when shooting
H
Shoot close-ups
X Photograph food
Y Use the smile timer
A
Decorate
Change sounds
u
Use after shooting
f Add starbursts
A Grade images
m Watch slide shows
Page 21

More Information
See the following pages for basic information not explained in the rst half of this
document, such as safety and battery information.
Downloading the “Reference Manual”
Refer to the Reference Manual (PDF format) for more detailed information.
The Reference Manual can be downloaded from the Nikon website.
http://nikonimglib.com/manual/
The Reference Manual can be viewed using Adobe Reader, available for free download from
the Adobe website.
21
Page 22

For Your Safety
To prevent damage to your Nikon product or injury to yourself or to others, read the
following safety precautions in their entirety before using this equipment.
Keep these safety instructions where all those who use the product will read them.
This icon marks warnings, information that should be read before using this
Nikon product, to prevent possible injury.
WARNINGS
Turn o in the event of malfunction
Should you notice smoke or an unusual smell
coming from the camera or Charging AC
Adapter, unplug the Charging AC Adapter
and remove the battery immediately, taking
care to avoid burns. Continued operation
could result in injury. After removing or
disconnecting the power source, take the
equipment to a Nikon-authorized service
representative for inspection.
Do not disassemble
Touching the internal parts of the camera
or Charging AC Adapter could result
in injury. Repairs should be performed
only by qualied technicians. Should
the camera or Charging AC Adapter
break open as the result of a fall or
For Your Safety
22
other accident, take the product to a
Nikon-authorized service representative
for inspection, after unplugging the
product and/or removing the battery.
Do not use the camera or Charging
AC Adapter in the presence of
ammable gas
Do not use electronic equipment in the
presence of ammable gas, as this could
result in explosion or re.
Handle the camera strap with care
Never place the strap around the neck of
an infant or child.
Keep out of reach of children
Particular care should be taken to prevent
infants from putting the battery, brush, or
other small parts into their mouths.
Page 23

Do not remain in contact with the
camera, Charging AC Adapter, or
AC adapter for extended periods
while the devices are on or in use
Parts of the devices become hot.
Leaving the devices in direct contact with
the skin for extended periods may result
in low-temperature burns.
Do not leave the product where
it will be exposed to extremely
high temperatures, such as in an
enclosed automobile or in direct
sunlight
Failure to observe this precaution could
cause damage or re.
Observe caution when handling
the battery
The battery may leak, overheat, or
explode if improperly handled. Observe
the following precautions when handling
the battery for use in this product:
• Before replacing the battery, turn
the product o. If you are using the
Charging AC Adapter/AC adapter, be
sure it is unplugged.
• Use only a Rechargeable Li-ion Battery
EN-EL19 (included). Charge the battery
by using a camera that supports battery
charging or by using a Battery Charger
MH-66 (available separately). To charge
the battery with the camera, use either
Charging AC Adapter EH-70P (included)
or the Charge by computer function.
• When inserting the battery, do not
attempt to insert it upside down or
backwards.
• Do not short or disassemble the battery
or attempt to remove or break battery
insulation or casing.
• Do not expose the battery to ame or to
excessive heat.
• Do not immerse in or expose to water.
• Put the battery in a plastic bag before
transporting it. Do not transport or store
with metal objects such as necklaces or
hairpins.
• The battery is prone to leakage when
fully discharged. To avoid damage to the
product, be sure to remove the battery
when no charge remains.
• Discontinue use immediately should
you notice any change in the battery,
such as discoloration or deformation.
• If liquid from the damaged battery
comes in contact with clothing or skin,
rinse immediately with plenty of water.
For Your Safety
23
Page 24

Observe the following precautions
when handling the Charging AC
Adapter
• Keep dry. Failure to observe this
precaution could result in re or electric
shock.
• Dust on or near the metal parts of the
plug should be removed with a dry
cloth. Continued use could result in re.
• Do not handle the plug or go near
the Charging AC Adapter during
lightning storms. Failure to observe this
precaution could result in electric shock.
• Do not damage, modify, forcibly
tug or bend the USB cable, place it
under heavy objects, or expose it to
heat or ames. Should the insulation
be damaged and the wires become
exposed, take it to a Nikon-authorized
service representative for inspection.
Failure to observe these precautions
could result in re or electric shock.
• Do not handle the plug or Charging
AC Adapter with wet hands. Failure to
observe this precaution could result in
electric shock.
• Do not use with travel converters or
adapters designed to convert from
one voltage to another or with DCto-AC inverters. Failure to observe this
precaution could damage the product
or result in overheating or re.
Use appropriate cables
When connecting cables to the input and
output jacks, use only the cables provided
or sold by Nikon for the purpose, to
maintain compliance with product
regulations.
Handle moving parts with care
Be careful that your ngers or other
objects are not pinched by the lens cover
or other moving parts.
Observe caution when using the
ash
Using the ash close to your subject’s
eyes could cause temporary visual
impairment. The ash should be no less
than 1 m (3 ft 4 in.) from the subject.
Particular care should be observed when
photographing infants.
24
For Your Safety
Page 25

Do not operate the ash with the
ash window touching a person or
object
Failure to observe this precaution could
result in burns or re.
Avoid contact with liquid crystal
Should the monitor break, care should be
taken to avoid injury caused by broken
glass and to prevent liquid crystal from the
monitor touching the skin or entering the
eyes or mouth.
Turn the power o when using
inside an airplane or the hospital
Turn the power o while inside the
airplane during take o or landing.
Follow the instructions of the hospital
when using while in a hospital.
The electromagnetic waves emitted by
this camera may disrupt the electronic
systems of the airplane or the instruments
of the hospital.
For Your Safety
25
Page 26

Notices
Notice for Customers in the
U.S.A.
IMPORTANT SAFETY INSTRUCTIONS -
SAVE THESE INSTRUCTIONS.
DANGER - TO REDUCE THE RISK OF
FIRE OR ELECTRIC SHOCK, CAREFULLY
FOLLOW THESE INSTRUCTIONS
For connection to a supply not in the
U.S.A., use an attachment plug adapter of
the proper conguration for the power
outlet if needed.
The power supply unit is intended to be
correctly orientated in a vertical or oor
mount position.
Federal Communications Commission
(FCC) Radio Frequency Interference
Statement
This equipment has been tested and
found to comply with the limits for a Class
B digital device, pursuant to Part 15 of
the FCC rules. These limits are designed
to provide reasonable protection against
harmful interference in a residential
installation. This equipment generates,
uses, and can radiate radio frequency
Notices
26
energy and, if not installed and used
in accordance with the instructions,
may cause harmful interference to
radio communications. However, there
is no guarantee that interference will
not occur in a particular installation.
If this equipment does cause harmful
interference to radio or television
reception, which can be determined
by turning the equipment o and on,
the user is encouraged to try to correct
the interference by one or more of the
following measures:
• Reorient or relocate the receiving
antenna.
• Increase the separation between the
equipment and receiver.
• Connect the equipment into an outlet
on a circuit dierent from that to which
the receiver is connected.
• Consult the dealer or an experienced
radio/television technician for help.
Page 27

CAUTIONS
Modications
The FCC requires the user to be notied
that any changes or modications made
to this device that are not expressly
approved by Nikon Corporation may
void the user’s authority to operate the
equipment.Interface Cables
Use the interface cables sold or provided
by Nikon for your equipment. Using other
interface cables may exceed the limits of
Class B Part 15 of the FCC rules.
Notice for customers in the State of
California
WARNING
Handling the cord on this product will
expose you to lead, a chemical known
to the State of California to cause birth
defects or other reproductive harm.
Wash hands after handling.
Nikon Inc.,
1300 Walt Whitman Road Melville,
New York 11747-3064 USA
Tel: 631-547-4200
Notice for customers in Canada
CAN ICES-3 B / NMB-3 B
Caring for the Camera
To ensure continued enjoyment of this
Nikon product, observe the precautions
described below in addition to the
warnings in “For Your Safety” (A22-
25) and “<Important> Shockproof,
Waterproof, Dustproof, Condensation”
in the Reference Manual when using or
storing the device.
B Do Not Drop
The product may malfunction if subjected
to strong shock or vibration. Additionally,
do not touch or apply force to the lens.
B Handle the Lens and All Moving
Parts with Care
Do not apply force to the lens, lens
cover, monitor, memory card slot,
or battery chamber. These parts are
easily damaged. Applying force to
the lens cover could result in camera
malfunction or damage to the lens.
Should the monitor break, care should
be taken to avoid injury caused by
broken glass and to prevent the liquid
crystal from the display touching the
skin or entering the eyes or mouth.
Notices
27
Page 28

B Do Not Allow Damp to Enter
Inside the Camera
This camera is provided with JIS/IEC
protection class 8 (IPX8) equivalent
waterproong. If water seeps inside the
camera, however, this could cause the
components to rust and result in a high
repair charge or the camera may not be
repairable.
After using the camera at the beach or
underwater, make sure that the batterychamber/memory card slot cover is
rmly closed, and then immerse the
camera in a shallow container lled
with freshwater for 10 minutes.
After using the camera underwater,
do not leave the camera wet for 60
minutes or more. This could cause
deterioration of the waterproong
performance.
B Prevent Water From Seeping
Inside the Camera
If the inside of the camera becomes
wet, this could result in camera
malfunction and the camera may not
be repairable. To prevent water seeping
(water submersion) accidents, be sure
to observe the following cautions when
using the camera.
• When the battery-chamber/memory
card slot cover is closed, make sure
that the camera strap, hair, lint,
dust, sand grains, other foreign
substances, or dirt are not attached
on the waterproong packing and
portions that make a contact with
the waterproong packing.
• Do not open or close the battery-
chamber/memory card slot cover in
areas exposed to water spray, high
winds, dust or sand.
28
Notices
Page 29

• When an external force is applied
on the camera, it could become
deformed or the airtight seals may
become damaged and cause water
to seep inside the camera. Do not
place a heavy object on the camera,
drop the camera, or apply excessive
force on the camera.
• If water seeps inside the camera,
immediately stop using the camera.
Wipe o moisture from the camera,
and at once take the camera to
your Nikon-authorized service
representative.
B Shock and Vibration
Do not drop the camera, strike it
against a hard object such as a rock, or
throw it at a water surface.
Do not leave the camera in an area
subject to vibration. If the camera is
subjected to excessive shock, this could
result in camera malfunction or damage.
B Maximum Depth
This camera is designed to withstand
water pressure up to a depth of
10m (33 ft) for approx. 60 minutes.
At greater depth, water could seep
inside the camera, resulting in camera
malfunction.
B Avoid Sudden Changes in
Temperature
• Sudden changes in temperature,
such as when entering or leaving a
heated building on a cold day, can
cause condensation to form inside
the device. To prevent condensation,
place the device in a carrying case
or a plastic bag before exposing it to
sudden changes in temperature.
• Do not expose the camera to high
temperatures by leaving it on the
beach or in direct sunlight before
entering the water.
Notices
29
Page 30

B Keep away from Strong
Magnetic Fields
Do not use or store this device in the
vicinity of equipment that generates
strong electromagnetic radiation or
magnetic elds. Strong static charge
or the magnetic elds produced by
equipment such as radio transmitters
could interfere with the monitor,
damage data saved on the memory
card, or aect the product’s internal
circuitry.
B Do Not Point the Lens at Strong
Light Sources for Extended
Periods
Avoid pointing the lens at the sun or
other strong light sources for extended
periods when using or storing the
camera. Intense light may cause
deterioration of the image sensor,
producing a white blur eect in
photographs.
B Turn the Product o Before
Removing or Disconnecting the
Power Source
Do not remove the battery while the
product is on, or while images are
being saved or deleted. Forcibly cutting
power in these circumstances could
result in loss of data or in damage to
product memory or internal circuitry.
B Notes About the Monitor
• Monitors and electronic viewnders
are constructed with extremely high
precision; at least 99.99% of pixels are
eective, with no more than 0.01%
being missing or defective. Hence
while these displays may contain
pixels that are always lit (white, red,
blue, or green) or always o (black),
this is not a malfunction and has no
eect on images recorded with the
device.
30
Notices
Page 31

• Images in the monitor may be
dicult to see under bright lighting.
• The monitor is lit by an LED backlight.
Should the monitor begin to dim or
icker, contact your Nikon-authorized
service representative.
B About the Manuals
Nikon will not be held liable for any
damages resulting from the use of this
product.
Before Taking Important
Pictures
Before taking pictures on important
occasions (such as at weddings or
before taking the camera on a trip), take
a test shot to ensure that the camera
is functioning normally. Nikon will
not be held liable for damages or lost
prots that may result from product
malfunction.
Disposing of Data Storage
Devices
Please note that deleting images or
formatting data storage devices such
as memory cards or built-in camera
memory does not completely erase
the original image data. Deleted les
can sometimes be recovered from
discarded storage devices using
commercially available software,
potentially resulting in the malicious
use of personal image data. Ensuring
the privacy of such data is the user’s
responsibility.
Before discarding a data storage device
or transferring ownership to another
person, erase all data using commercial
deletion software, or format the
device and then completely rell it
with images containing no private
information (for example, pictures of
empty sky). Care should be taken to
avoid injury or damage to property
when physically destroying data
storage devices.
Notices
31
Page 32

AVC Patent Portfolio License
This product is licensed under the
AVC Patent Portfolio License for the personal
and noncommercial use of a consumer to (i)
encode video in compliance with the AVC
standard (“AVC video”) and/or (ii) decode
AVC video that was encoded by a consumer
engaged in a personal and non-commercial
activity and/or was obtained from a video
provider licensed to provide AVC video. No
license is granted or shall be implied for any
other use.
Additional information may be obtained
from MPEG LA, L.L.C.
See http://www.mpegla.com.
Trademark Information
• Microsoft, Windows and Windows Vista
are either registered trademarks or
trademarks of Microsoft Corporation in
the United States and/or other countries.
• Mac and OS X are trademarks or
registered trademarks of Apple Inc. in the
U.S. and other countries.
• Adobe and Acrobat are registered
trademarks of Adobe Systems Inc.
• SDXC, SDHC and SD Logos are trademarks
of SD-3C, LLC.
• PictBridge is a trademark.
• HDMI, HDMI logo and
High-Denition Multimedia Interface are
trademarks or registered
trademarks of
HDMI Licensing LLC.
• All other trade names mentioned in this
manual or the other documentation
provided with your Nikon product are
trademarks or registered trademarks of
their respective holders.
FreeType License (FreeType2)
Portions of this software are copyright ©
2012 The FreeType Project (http://www.
freetype.org). All rights reserved.
MIT License (HarfBuzz)
Portions of this software are copyright ©
2014 The HarfBuzz Project (http://www.
freedesktop.org/wiki/Software/HarfBuzz). All
rights reserved.
32
Notices
Page 33

Battery
Be Careful to Insert the Battery and the Memory Card in Correct Direction
• Inserting the battery upside down or backwards could damage the camera.
• Inserting the memory card upside down or backwards could damage the camera and
the memory card.
B Removing the Battery and the Memory Card
Turn the camera o and make sure that the power-on lamp and the monitor have turned
o, and then open the battery-chamber/memory card slot cover.
B High Temperature Caution
The camera, battery, and memory card may be hot immediately after using the camera.
Observe caution when removing the battery or memory card.
Battery
33
Page 34

Using the Flexible Buttons
If you press a exible button while the shooting screen or playback screen
is displayed, the menu for the current mode is displayed. Once the menu is
displayed, you can change various settings.
In this document, the exible buttons are referred to as “exible button 1” through
“exible button 4”, in order from top to bottom.
Shooting mode
Flexible button 1
Flexible button 2
Flexible button 3
Flexible button 4
Playback mode
20 m 0s
11 0 0
Using the Flexible Buttons
34
Flexible button 1
Flexible button 2
Flexible button 3
Flexible button 4
05 / 1 5 / 2 0 1 4 1 5 : 3 0
4
Page 35

Setting the Display Language, Date, and Time
When the camera is turned on for the rst time, the language-selection
screen, the date and time setting screen for the camera clock, and the menu
background setting screen are displayed.
Step
1 Press the power switch to turn on the camera
Step 2 Select a language and set the camera clock
2.1
Press the multi selector JK to
display the desired language and
press exible button 4 (O).
La n gu a ge
2.2
Se t ti me a nd d ate ?
Yes
No
Press exible button 3 (R Yes).
Setting the Display Language, Date, and Time
35
Page 36

2.3
Da te f or mat
Yea r/ Mo nt h/ Da y
Mo nt h/ Da y/ Yea r
Da y/ Mo nt h/ Yea r
2.4
Da te a nd t ime
D h m
/
15
YM
16 30
20 1405
/
:
Use exible button 2, 3, or 4 to select
the date format.
2.5
05 /1 5/ 20 14 1 5: 30
Yes
No
OK ?
Press exible button 3 (R Yes).
Setting the Display Language, Date, and Time
36
Press HIJK to set the date and
time, select m and press exible
button 4 (O).
Page 37

Step
3 Select the background image
Press JK to select the background image and press exible button 4 (O).
Me nu b ac kg ro und
Step 4 Conrm the waterproong-related messages
4.1
Do n ot o pe n the c ov er s by
th e wa te r or in s an dy
lo ca ti on s, as f or ei gn ma tt er
co ul d en te r t he c am er a.
Conrm the waterproong-related
message and press K.
• There are six message screens.
4.2
Af te r dr yi ng t ho rou gh ly , use
a cl ot h to re mo ve a ny
dr op le ts r em ain in g on t he
ar ea s in dic at ed .
Conrm the message on the screen
shown above and press exible
button 4 (O).
• The monitor changes to the
shooting screen.
Setting the Display Language, Date, and Time
37
Page 38

Shooting Features
The following features are available in shooting mode.
1
1
2
3
4
1 10 0
2 0m 0s
g More picture options
Mo re p ic tu re op ti on s
Ch oo se a s ty le
1
De co ra te
2
Ch an ge c ol or s
3
l Settings
Se tt in gs
Ch an ge s ou nd s
1
Ch oo se a s iz e
2
Ca me ra s et ti ngs
3
Sets the shooting mode to A Point and shoot.
2 Allows you to set the ash mode or use the self-timer.
The camera’s self-timer can release the shutter about
ten seconds after you press the shutter-release
button. You can also set the smile timer.
3
Displays g More picture options menu.
4
Displays l Settings menu.
1 Selects scene settings and eects used for shooting.
2 Adds a frame around your images when taking
images. Nine dierent frames are available.
3 Changes color-related settings. Select
bBrighter/darker or cMore vivid/less vivid
from the menu, or use PHighlight colors to select
one color to keep in your images and turn the rest of
the colors to shades of black and white.
1 Changes the shutter and button sounds.
2 Changes the size of photos (still images) and movies.
3 Changes general settings.
Shooting Features
38
Page 39

Playback Features
Press the c (shooting/playback mode) button to switch between shooting and
playback modes.
If you press a exible button while the playback
screen is displayed, the menu for the mode is
displayed. You can use the following features.
Images Movies
1
2
3
4
1 Have fun with pictures
Press exible button 1 (V) to apply a variety
of eects to images, grade images, or attach
a voice message to the current image.
2 View
Press exible button 2 (Z) to view
images in a variety of ways.
3 Erase
Press exible button 3 (n) to delete images.
4 Settings
Press exible button 4 (l) to change a
number of general settings or specify
the image to be printed.
5 Play back movies
Select a movie, press exible button 2
(Z), and then press exible button 4
(G View movie).
5
Use the multi selector to perform the
following operations.
Press H to magnify the current image.
Press exible button 1 (S) to return to
full-frame playback mode.
Display the
previous
image: J.
Press I to display thumbnails. Press H
to return to full-frame playback mode.
Display
the next
image: K.
Playback Features
39
Page 40

Using ViewNX 2
Install ViewNX 2 to upload, view, edit, and share photos and movies.
Your Imaging Toolbox
ViewNX 2™
Installing ViewNX 2
An Internet connection is required.
For system requirements and other information, see the Nikon website for your region.
1 Download the ViewNX 2 installer.
Start the computer and download the installer from:
http://nikonimglib.com/nvnx/
2 Double-click the downloaded le.
3 Follow the on-screen instructions.
4 Exit the installer.
Click Yes ( Windows) or OK (Mac).
Using ViewNX 2
40
Page 41

Transferring Images to the Computer
1 Choose how images will be copied to the computer.
Choose one of the following methods:
• Direct USB connection: Turn the camera o and ensure that the memory card is
inserted in the camera. Connect the camera to the computer using the USB cable.
The camera automatically turns on.
To transfer images that are saved in the camera’s internal memory, remove the
memory card from the camera before connecting it to the computer.
• SD card slot: If your computer is equipped with an SD card slot, the card can be
inserted directly in the slot.
• SD card reader: Connect a card reader (available separately from third-party
suppliers) to the computer and insert the memory card.
If a message is displayed prompting you to choose a program, select Nikon Transfer 2.
Using ViewNX 2
41
Page 42

• When using Windows 7
If the dialog shown at right is displayed, follow
the steps below to select Nikon Transfer 2.
1 Under Import pictures and videos,
click Change program. A program
selection dialog will be displayed; select
Import File using Nikon Transfer 2 and
click OK.
2 Double-click Import File.
If the memory card contains a large number of images, it may take a while for
Nikon Transfer 2 to start. Wait until Nikon Transfer 2 starts.
B Connecting the USB Cable
The connection may not be recognized if the camera is connected to the computer via a USB hub.
2 Transfer images to the computer.
• Click Start Transfer.
Start Transfer
• At default settings, all the images on the memory card will be copied to the computer.
42
Using ViewNX 2
Page 43

3 Terminate the connection.
• If the camera is connected to the computer, turn the camera o and disconnect the
USB cable. If you are using a card reader or card slot, choose the appropriate option
in the computer operating system to eject the removable disk corresponding to
the memory card, and then remove the card from the card reader or card slot.
Viewing Images
Start ViewNX 2.
• Images are displayed in ViewNX 2 when
transfer is complete.
• Consult online help for more information on
using ViewNX 2.
C Starting ViewNX 2 Manually
• Windows: Double-click the ViewNX 2 shortcut icon on the desktop.
• Mac: Click the ViewNX 2 icon in the Dock.
Using ViewNX 2
43
Page 44

CT3L02(11)
6MN39311-02
 Loading...