

Nikon COOLPIX 5700 - Digital Camera - 5.0 Megapixel User Manual
The Guide to Digital Photography
with the
DIGITAL CAMERA
En
Using Your Camera — A Flowchart Guide
STEP 5—Enjoy your pictures
STEP 4—Install camera software
Get to know Nikon View 5
Nikon View 5 Reference
Manual (provided on CD)
Install software Quick Start Guide (provided)
—
—
STEP 2—Take pictures
Custom shots and movies Taking Pictures: The Details 47
Snapshots (auto mode) Basic Picture Taking 22
STEP 1—Ready the camera
View pictures on a television
screen
View pictures on a
TV / VCR
46
Transfer pictures Connecting to a Computer 38
Getting ready First Steps 13
Camera setup Using the SET-UP Menu 120
…and delete unwanted pictures…
…during playback Playing Back Your Pictures 83
…immediately
Keep or Delete: Picture Review
67
…while shooting Reviewing Your Pictures 31
Delete multiple pictures Using the PLAY BACK Menu 145
STEP 3—Play them back…
…after shooting… Playing Back Your Pictures 83
…while shooting… Reviewing Your Pictures 31
i
The documentation for this product
includes the manuals listed below.
Please be sure to read all instructions
thoroughly to get the most from your
camera.
Quick-Start Guide
The Quick-Start Guide takes you
through the process of unpacking
and setting up your Nikon digital
camera, taking your first photographs, and transferring them to
your computer.
Guide to Digital Photography
The Guide to Digital Photography
(this manual) provides complete
operating instructions for your
camera.
Nikon View 5 Reference Manual
The Nikon View 5 Reference
Manual can be found in electronic
format on the reference CD provided with your camera. For information on viewing the Reference
Manual, see “Connections” in this
manual.
Product Documentation
Overview and Symbols
Getting to Know the COOLPIX5700
First Steps
Basic Picture Taking
Reviewing Your Pictures
Connecting to a Computer
Viewing Pictures on a TV / VCR
Using the Camera Controls (All User Sets)
Choosing a User Set
Using the Camera Controls (User Sets 1, 2, 3)
Playing Back Your Pictures
List of Menu Options
Using the Menus
Using the SHOOTING Menu
Using the SET-UP Menu
Using the PLAY BACK Menu
Technical Notes
Index

ii
To prevent damage to your Nikon product or injury to yourself or to others,
read the following safety precautions in their entirety before using this equipment. Keep these safety instructions where all those who use the product will
read them.
The consequences that could result from failure to observe the precautions listed
in this section are indicated by the following symbol:
WARNINGS
Do not look at the sun through the
viewfinder
Viewing the sun or other strong light
source through the viewfinder could
cause permanent visual impairment.
Do not leave the viewfinder exposed to direct sunlight
If left in direct sunlight, the lens of the
viewfinder could concentrate sunlight
on the viewfinder’s LCD and cause
damage.
Turn off immediately in the event
of malfunction
Should you notice smoke or an unusual smell coming from the equipment or from the AC adapter (available separately), unplug the AC
adapter and remove the battery immediately, taking care to avoid burns.
Continued operation could result in
injury. After removing the battery,
take the equipment to a Nikon-authorized service center for inspection.
Do not use in the presence of flammable gas
Do not use electronic equipment in
the presence of flammable gas, as this
could result in explosion or fire.
Do not place strap around neck
Placing the camera strap around your
neck could result in strangulation.
Special care should be taken to avoid
placing the strap around the neck of
an infant or child.
Do not disassemble
Touching the product’s internal parts
could result in injury. In the event of
a malfunction, the product should be
repaired only by a qualified technician.
Should the product break open as the
result of a fall or other accident, remove the battery and/or AC adapter
and then take the product to a Nikonauthorized service center for inspection.
Observe proper precautions when
handling batteries
Batteries may leak or explode if improperly handled. Observe the following precautions when handling batteries for use in this product:
• Be sure the product is off before replacing the battery. If you are using an
AC adapter, be sure it is unplugged.
• Use only a rechargeable Nikon EN-EL1
lithium-ion battery (supplied) or a sixvolt 2CR5 (DL245) lithium battery
(available separately).
For Your Safety
This icon marks warnings, information that should be read before
using your Nikon product to prevent possible injury.

iii
• When inserting the battery, do not attempt to insert it upside down or
backwards.
• Do not short or disassemble the battery.
• Do not expose the battery to flame or
to excessive heat.
• Do not immerse in or expose to water.
• Do not transport or store with metal
objects such as necklaces or hairpins.
• Batteries are prone to leakage when
fully discharged. To avoid damage to
the product, be sure to remove the
battery when no charge remains.
• When the battery is not in use, attach
the terminal cover and store in a cool
place.
• Immediately after use, or when the
product is used on battery power for
an extended period, the battery may
be hot. Before removing the battery,
turn the camera off and allow the
battery to cool.
• Discontinue use immediately should
you notice any changes in the battery,
such as discoloration or deformation.
Use appropriate cables
When connecting cables to the input
and output jacks, use only the cables
provided or sold by Nikon for the purpose, to maintain compliance with
product regulations.
Keep out of reach of children
Particular care should be taken to prevent infants from putting the battery
or other small parts into their mouths.
Removing memory cards
Memory cards may become hot during use. Observe due caution when
removing memory cards from the
camera.
CD-ROMs
The CD-ROMs on which the software
and manuals are distributed should
not be played back on audio CD
equipment. Playing CD-ROMs on an
audio CD player could cause hearing
loss or damage the equipment.
Observe caution when operating
the flash
Using the flash close to your subject’s
eyes could cause temporary visual impairment. Particular care should be
observed if photographing infants,
when the flash should be no less than
one meter (39˝) from the subject.
When using the viewfinder
When operating the diopter adjustment dial with your eye to the
viewfinder, care should be taken not
to put your finger in your eye accidentally.
Avoid contact with liquid crystal
Should the monitor or viewfinder
break, care should be taken to avoid
injury due to broken glass and to prevent liquid crystal from the monitor
touching the skin or entering the eyes
or mouth.

iv
• No part of the manuals included with this product may be reproduced, transmitted, transcribed, stored in a retrieval system, or translated into any language in any form, by any means, without Nikon’s prior written permission.
• Nikon reserves the right to change the specifications of the hardware and
software described in these manuals at any time and without prior notice.
• Nikon will not be held liable for any damages resulting from the use of this
product.
• While every effort has been made to ensure that the information in these
manuals is accurate and complete, we would appreciate it were you to bring
any errors or omissions to the attention of the Nikon representative in your
area (address provided separately).
Notice for customers in Canada
CAUTION
This class B digital apparatus meets all requirements of the Canadian Interference Causing Equipment Regulations.
ATTENTION
Cet appareil numérique de la classe B respecte toutes les exigences du Règlement sur le matériel brouilleur du Canada.
Notices
A Note on Electronically-Controlled Cameras
In extremely rare instances, unusual characters may appear in the control panel
and the camera may stop functioning. In most cases, this phenomenon is
caused by a strong external static charge. Turn the camera off, remove and
replace the battery, and turn the camera on again, or, if you are using an AC
adapter (available separately), disconnect and reconnect the adapter and turn
the camera on again. In the event of continued malfunction, contact your
retailer or Nikon representative. Note that disconnecting the power source as
described above may result in loss of any data not recorded to the memory card
at the time the problem occurred. Data already recorded to the memory card
will not be affected.

v
Notice for customers in the U.S.A.
Federal Communications Commission (FCC) Radio Frequency Interference Statement
This equipment has been tested and
found to comply with the limits for a
Class B digital device, pursuant to Part
15 of the FCC rules. These limits are
designed to provide reasonable protection against harmful interference in a residential installation. This equipment generates, uses, and can radiate radio frequency energy and, if not installed and used in accordance with the instructions, may cause harmful interference to radio communications. However, there is no guarantee that interference will not occur in a particular installation. If this equipment does cause
harmful interference to radio or television reception, which can be determined
by turning the equipment off and on, the user is encouraged to try to correct
the interference by one or more of the following measures:
• Reorient or relocate the receiving antenna.
• Increase the separation between the equipment and receiver.
• Connect the equipment into an outlet on a circuit different from that to
which the receiver is connected.
• Consult the dealer or an experienced radio/television technician for help.
CAUTIONS
Modifications
The FCC requires the user to be notified that any changes or modifications made
to this device that are not expressly approved by Nikon Corporation may void
the user's authority to operate the equipment.
Interface Cables
Use the interface cables sold or provided by Nikon for your equipment. Using
other interface cables may exceed the limits of Class B Part 15 of the FCC rules.
Nikon Inc.,
1300 Walt Whitman Road, Melville, New York
11747-3064, U.S.A.
Tel.: 631-547-4200

vi
Notice Concerning Prohibition of Copying or Reproduction
Note that simply being in possession of material that has been digitally copied or reproduced by means of a scanner, digital camera or other device may be punishable by law.
• Items prohibited by law from being
copied or reproduced
Do not copy or reproduce paper money,
coins, securities, government bonds, or
local government bonds, even if such copies or reproductions are stamped
“Sample.”
The copying or reproduction of paper
money, coins, or securities which are circulated in a foreign country is prohibited.
Unless the prior permission of the government has been obtained, the copying or
reproduction of unused postage stamps
or post cards issued by the government is
prohibited.
The copying or reproduction of stamps
issued by the government and of certified
documents stipulated by law is prohibited.
• Cautions on certain copies and reproductions
The government has issued cautions on
copies or reproductions of securities issued by private companies (shares, bills,
checks, gift certificates, etc.), commuter
passes, or coupon tickets, except when a
minimum of necessary copies are to be
provided for business use by a company.
Also, do not copy or reproduce passports
issued by the government, licenses issued
by public agencies and private groups, ID
cards, and tickets, such as passes and meal
coupons.
• Comply with copyright notices
The copying or reproduction of copyrighted creative works such as books, music, paintings, woodcut prints, maps,
drawings, movies, and photographs is
prohibited except when it is done for personal use at home or for similar restricted
and non-commercial use.
Trademark Information
Apple, the Apple logo, Macintosh, Mac OS, PowerBook, and QuickTime are registered trademarks of
Apple Computer, Inc. Finder, iMac, and iBook are trademarks of Apple Computer, Inc. IBM and Microdrive
are registered trademarks of International Business Machines Corporation. Microsoft and Windows are
registered trademarks of Microsoft Corporation. Pentium is a trademark of Intel Corporation. Internet
is a trademark of Digital Equipment Corporation. CompactFlash is a trademark of SanDisk Corporation. Lexar Media is a trademark of Lexar Media Corporation. Adobe and Acrobat are registered trademarks of Adobe Systems Inc. Zip is a registered trademark of Iomega Corporation in the U.S. and other
countries. All other trade names mentioned in this manual or the other documentation provided with
your Nikon product are trademarks or registered trademarks of their respective holders.

vii
Table of Contents
Product Documentation ................................................................................ i
For Your Safety ............................................................................................. ii
Notices ......................................................................................................... iv
Getting Started .............................................................................................. 1
Overview and Symbols ................................................................................ 2
Overview ...................................................................................................... 2
Symbols ........................................................................................................ 3
Getting to Know the COOLPIX5700 ........................................................... 4
Parts of the COOLPIX5700 ............................................................................. 4
Camera Displays ........................................................................................... 6
Camera Parts—The Details ........................................................................... 9
First Steps ..................................................................................................... 13
Step 1—Attach the Camera Strap .................................................................. 13
Step 2—Insert the Battery ............................................................................. 14
Step 3—Insert the Memory Card .................................................................. 16
Step 4—Choose a Language ........................................................................ 18
Step 5—Set the Time and Date ..................................................................... 19
Taking and Reviewing Pictures ..................................................................... 21
Basic Picture Taking ...................................................................................... 22
Step 1—Ready the Camera ........................................................................... 22
Step 2—Select User Set A ............................................................................. 25
Step 3—Adjust Camera Settings (Optional) ................................................... 25
Step 4—Frame the Shot ............................................................................... 26
Step 5—Focus and Shoot ............................................................................. 28
Step 6—Put the Camera Away ..................................................................... 30
Reviewing Your Pictures ............................................................................... 31
Quick Review ................................................................................................. 32
Full-Screen Review ........................................................................................ 33
Thumbnail Review ........................................................................................ 35
Doing More with Your Digital Camera ......................................................... 37
Connecting to a Computer.......................................................................... 38
Before You Begin: Installing Nikon View 5 ..................................................... 38
Making the Connection: Connecting to Your Computer ............................... 40
Viewing Pictures on a TV / VCR .................................................................... 46

viii
Taking Pictures: The Details .......................................................................... 47
Using the Camera Controls (All User Sets) ................................................. 48
Making Effective Use of Memory: Image Quality and Size ............................. 48
Focus Mode: The Button ....................................................................... 53
Delaying Shutter Release: Self-Timer Mode ................................................... 58
Optical and Digital Zoom: The Button ................................................. 60
Flash Mode: The Button ........................................................................ 62
Exposure Compensation: The Button ..................................................... 66
Keep or Delete: Picture Review ..................................................................... 67
Choosing a User Set ...................................................................................... 68
Using the Camera Controls (User Sets 1,2,3) .............................................. 70
Controlling Shutter Speed and Aperture: Exposure Mode ............................. 70
Making Movies: Movie Mode ....................................................................... 77
Reacting Faster to Light: Sensitivity (ISO Equivalency) .................................... 78
Focusing by Hand: Manual Focus .................................................................. 80
Playing Back Your Pictures ............................................................................. 83
Full-Screen Playback ...................................................................................... 84
Thumbnail Playback ...................................................................................... 86
Taking a Closer Look: Playback Zoom ............................................................ 87
Viewing Image Information .......................................................................... 88
Movie Playback ............................................................................................. 90
Menu Guide ................................................................................................... 91
List of Menu Options ................................................................................... 92
Using the Menus .......................................................................................... 97
Using the SHOOTING Menu ........................................................................ 100
Keeping Colors True: White Balance ............................................................. 101
Measuring Light: Metering ........................................................................... 103
Making Movies and Taking Photographs in a Sequence: Continuous ..................
104
Getting Sharper Pictures: Best Shot Selector.................................................. 106
Adjusting Contrast and Brightness: Image Adjustment ................................... 107
Controlling Color: Saturation Control ........................................................... 108
Settings for Optional Converter Lenses: Lens ................................................ 109
Controlling Exposure: Exposure Options......................................................... 110
Controlling Focus: Focus Options .................................................................. 112
Making Edges More Distinct: Image Sharpening ............................................ 114
Varying Settings Automatically: Auto Bracketing ............................................ 115
Avoiding “Grainy” Pictures: Noise Reduction ................................................ 117
Restoring Default Settings: Reset All ............................................................. 118

ix
Using the SET-UP Menu ............................................................................... 120
Organizing Your Pictures: Folders .................................................................. 121
Adjusting Monitor Settings: Monitor Options ................................................ 126
Customizing Camera Controls: Controls ....................................................... 129
Controlling Zoom: Zoom Options .................................................................. 131
Conserving Battery Power: Auto Off ............................................................. 133
File Numbering: Seq. Numbers ...................................................................... 134
Formatting Memory Cards: CF Card Format .................................................. 135
Controlling the Flash: Speedlight Options ..................................................... 136
Audio Confirmation: Shutter Sound .............................................................. 140
Setting the Time and Date: Date .................................................................... 141
Storing Photo Info in a Separate File: info.txt ................................................ 141
Choosing a Video Standard: Video Mode....................................................... 142
Choosing a Language: Language .................................................................. 142
Choosing a USB Protocol: USB ...................................................................... 143
Using the PLAY BACK Menu ....................................................................... 145
Deleting Images: Delete ................................................................................ 145
Selecting a Folder for Playback: Folders ......................................................... 148
Automated Playback: Slide Show .................................................................. 149
Safeguarding Valuable Images: Protect ......................................................... 151
Hiding Images During Playback: Hide Image ................................................. 152
Ordering Prints: Print Set............................................................................... 153
Selecting Images for Transfer: Auto Transfer.................................................. 155
Technical Notes: Camera Care, Options, and Resources ............................. 157
Optional Accessories ...................................................................................... 158
Caring for the Camera and Battery ............................................................... 160
Web Resources ............................................................................................. 163
Troubleshooting ............................................................................................ 164
Specifications ............................................................................................... 171
Index ............................................................................................................... 175

x
1
Overview and
Symbols
2–3
Getting to Know
the COOLPIX5700
4–12
Getting
Started
First Steps
13–20
This chapter is divided into the following sections:
Overview and Symbols
Describes organization of, and the symbols used to
navigate through, this manual.
Getting to Know the COOLPIX5700
Introduces the various parts of the camera and
where to find additional information.
First Steps
Takes you through the basic steps required to get
your camera ready.
STEP 1
STEP 2
STEP 3
STEP 4
STEP 5
13
14–15
16–17
18–19
19–20
Attach the Camera Strap
Insert the Battery
Insert the Memory Card
Choose a Language
Set the Time and Date

Getting Started—Overview and Symbols
2
Overview and Symbols
Use Only Nikon Brand Electronic Accessories
Your Nikon COOLPIX digital camera is designed to the highest standards and
includes complex electronic circuitry. Only Nikon brand electronic accessories
(including battery chargers, batteries, and AC adapters) certified by Nikon specifically for use with your Nikon digital camera are engineered and proven to
operate within the operational and safety requirements of this electronic circuitry.
THE USE OF NON-NIKON ELECTRONIC ACCESSORIES COULD DAMAGE YOUR CAMERA AND MAY VOID
YOUR
NIKON WARRANTY.
For more information about Nikon brand accessories, contact your local authorized Nikon dealer.
Overview
Thank you for purchasing a COOLPIX5700 digital camera. This manual explains
the features of your camera and how to use it. The manual’s chapters are listed
below along with a brief description of what each chapter contains.
Getting Started: This chapter. Introduces the parts of your camera and the
first steps necessary to ready your camera for taking pictures.
Taking and Reviewing Pictures: Explains the basics of taking and reviewing
pictures.
Doing More with Your Digital Camera: Explains how to connect your camera to a computer and how to view your pictures on a TV or VCR.
Taking Pictures—The Details: Explains how to use the camera’s controls and
User Sets.
Playing Back Your Pictures: Explains how to play back your pictures and details on the image information displayed in the monitor or viewfinder in fullscreen playback mode.
Menu Guide: Describes how to operate the camera’s menus, and gives a full
explanation of all the menus in your camera.
Technical Notes: Describes how to care for your camera, optional accessories, additional resources and troubleshooting information, and lists your
camera’s specifications.
Getting Started—Overview and Symbols
3
Life-Long Learning
As part of Nikon’s “Life-Long Learning” commitment to ongoing product support and education, continually-updated information is available on-line at the
following sites:
•For users in the U.S.A.: http://www.nikonusa.com/
•For users in Europe: http://www.nikon-euro.com/
•For users in Asia, Oceania, the Middle East, and Africa:
http://www.nikon-asia.com/
Visit these sites to keep up-to-date with the latest product information, tips,
answers to frequently-asked questions (FAQs), and general advice on digital
imaging and photography. Additional information may be available from the
Nikon representative in your area. See the URL below for contact information:
http://www.nikon-image.com/eng/
Cautions: information you
should read before use to prevent damage to your camera.
Notes: information that you
should read before using your
camera.
See: additional information in
this manual.
Tips: helpful information for using your camera.
Symbols
To make it easier to find the information you need, the following symbols are
used:
Getting Started—Getting to Know the COOLPIX5700
4
Parts of the COOLPIX5700
The parts of the camera are identified below. For more information on the
function of each part, refer to the page numbers listed.
Getting to Know the COOLPIX5700
11 Power switch ........................ 22
12 Shutter-release button ......... 28
13 Eyelet for camera strap (x2) ... 13
14 Audio/video (A/V) out connector
(under cover) ........................ 46
15 DC-IN connector (under cover)
............................................ 15
16 USB connector (under cover). 41
17 Speaker ................................ 90
18
/ SIZE (Image Quality /Image
Size) button .................... 49, 51
1 Command dial
2 LCD illuminator button ........... 8
3 (Exposure compensation)
button .................................. 66
4
(Exposure mode) button ..
70
5 Accessory shoe ........... 138, 158
6 Built-in Speedlight .......... 27, 62
7 Photocell ...................... 26, 138
8 Lens .............................. 13, 162
9 Microphone .......................... 77
10 Self-timer/red-eye reduction/shot
confirmation lamp .. 58, 63, 137
Getting Started—Getting to Know the COOLPIX5700
5
A Mode selector ......................... 9
B / SEL button ....................... 9
C Electronic viewfinder ............. 10
D Monitor ................................ 10
E
(Function) button ........... 11
F Battery-chamber cover / Cou-
pling contacts cover .............. 12
G Diopter adjustment dial ........ 12
19
/ MF (Focus mode / Manual
Focus) button ................. 53, 80
20 (AE / AF Lock) button
.................................... 56, 131
21
/ ISO (Flash mode / Sensitiv-
ity) button ...................... 62, 78
22 Control panel.......................... 8
23 Zoom (
/ ) buttons
.................... 27, 35, 60, 86, 87
24 Memory card-slot cover ........ 16
25 Multi selector .................. 18, 99
26
(Delete) button ... 33, 67, 84
27 (Display) button .......... 6, 24
28 (Quick Review) button .... 31
29 (Menu) button ................ 97
30 Tripod socket
31 Battery-chamber cover latch . 14
Getting Started—Getting to Know the COOLPIX5700
6
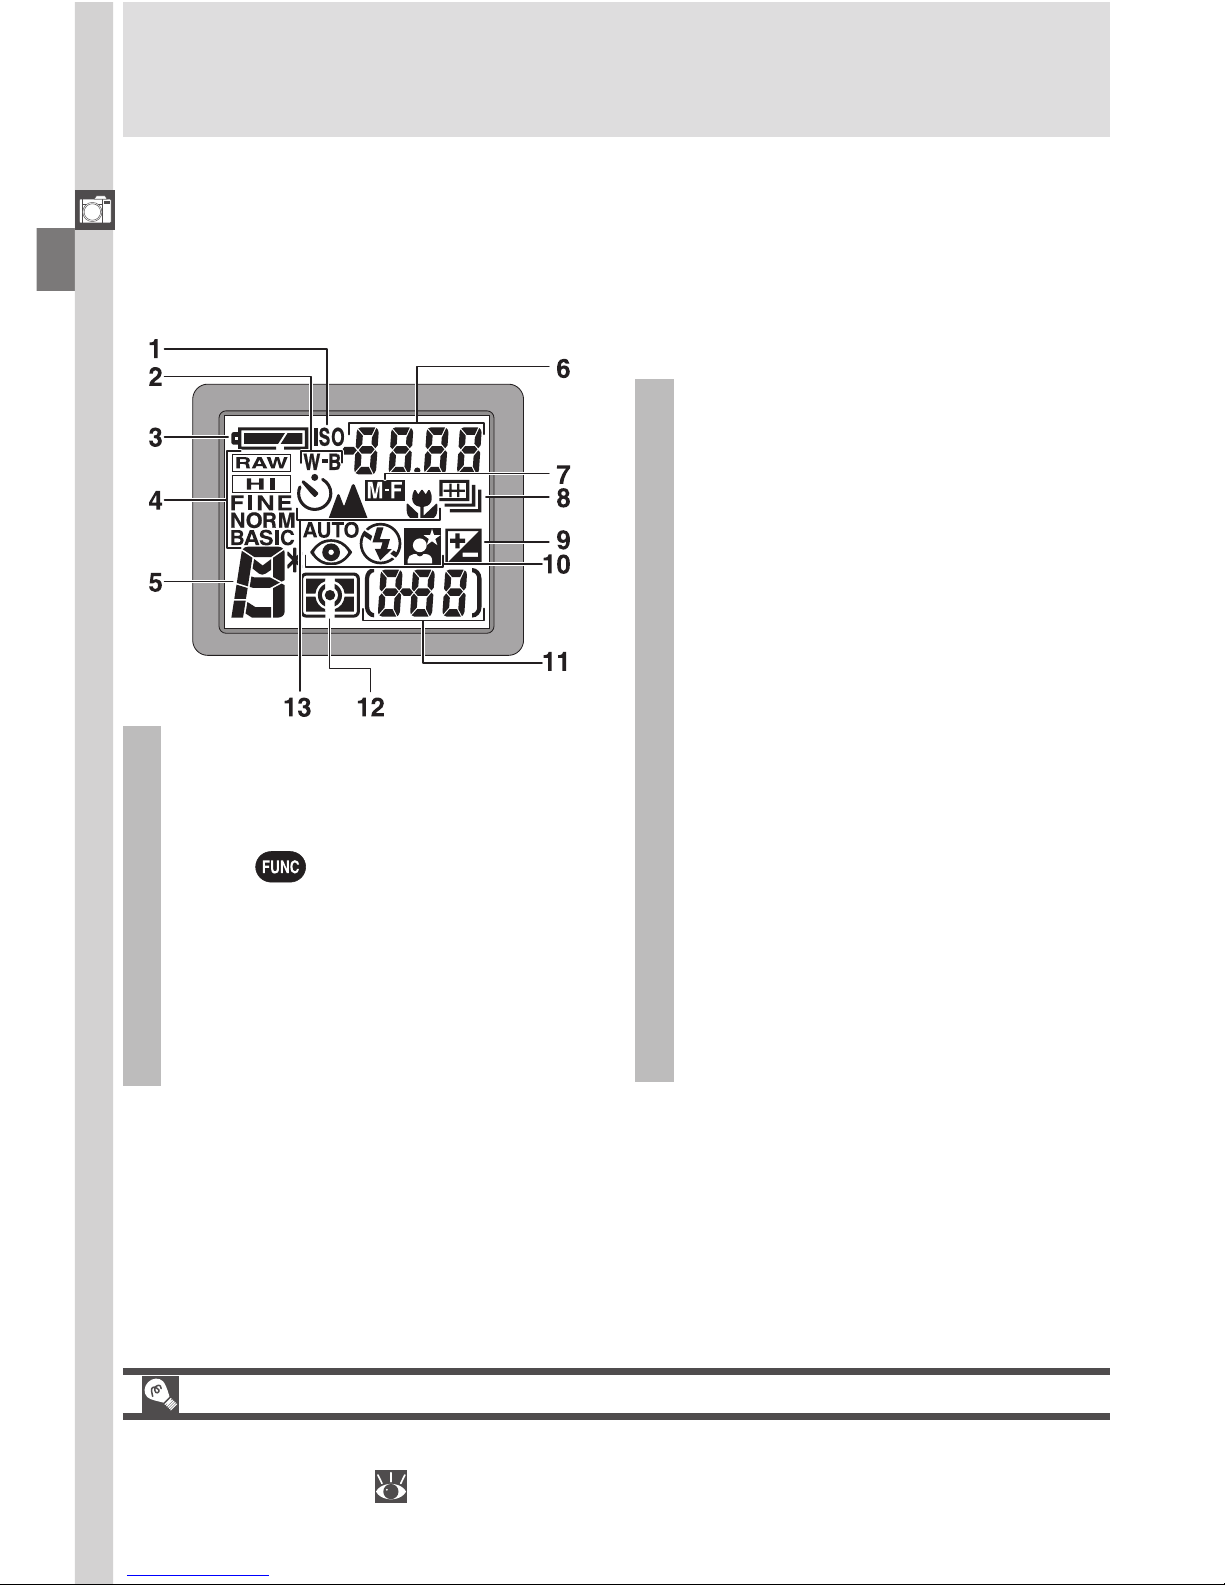
Camera Displays
Monitor or Viewfinder (Shooting Mode)
In (shooting mode), the icons in the monitor or viewfinder indicate the status of the following camera settings:
1 Digital zoom ......................... 60
2 Zoom indicator ............. 60, 105
3 Current folder..................... 125
4 Self-timer indicator ............... 58
5 Shutter speed ....................... 73
6 Exposure mode ..................... 70
7 Metering mode................... 103
8 Flash-ready indicator ............. 28
9 Flash mode ........................... 62
10 Battery level indicator ........... 23
11 ”Date not set“ icon .............. 20
12 Focus indicator ..................... 28
13 Focus mode .......................... 53
14 Image size ............................ 51
15 Image quality ........................ 49
16 Aperture ............................... 74
17 Exposure compensation ........ 66
18 Number of exposures remaining/
length of movie .............. 23, 77
1
2
3
Photo
information
displayed
Photo
information
hidden
The (Display) Button
To turn the display of camera settings or photo information in the monitor on
and off, press .
User Set A
8
9
10
11
12
13
14
15
16 17 18
1
2
3
4
5
6
7
1 Appears when battery is running low.
2 Appears when clock-calendar has not been set.
3 Appears when shutter-release button is pressed
halfway.

Getting Started—Getting to Know the COOLPIX5700
7
4
24 White balance lock ............. 110
25 Exposure lock........................ 56
26 White balance bracketing indica-
tor ...................................... 116
27
Continuous shooting mode ..
104
28 Manual focus indicator ......... 80
29 Image sharpening ............... 114
30 White balance .................... 101
31 Sensitivity (ISO equivalency) .. 78
32 Black-and-white mode indicator
.......................................... 108
33 Image adjustment ............... 107
34 Focus areas / metering areas
.......................................... 112
35 Spot metering target .......... 103
36 Bracketing indicator ............ 116
37 Exposure display ................... 75
4 Appears at sensitivity (ISO equivalency) setting oth-
er than AUTO. ISO displayed when sensitivity is
raised above ISO 100 in AUTO.
19 Progress bar (Ultra HS) ........ 105
20 User Setting No. (User Set) .... 68
21 Converter lens setting ......... 109
22 Best Shot Selector (BSS) ...... 106
23 Noise reduction................... 117
* Appears only when battery is running low.
Monitor or Viewfinder (Playback Mode)
In (playback mode), the icons in the monitor or viewfinder indicate the status of the following camera settings:
1 Date of recording.................. 19
2 Time of recording ................. 19
3 Image size ............................ 51
*
4 Image quality ........................ 49
5 Folder ........................... 88, 121
6 File number and type .......... 134
7 Battery level indicator ........... 23
8 Transfer icon ....................... 155
9 Print-order icon ................... 153
10 Protect icon ........................ 151
11 Current frame number/total
number of frames visible in
current folder
User Sets 1, 2, and 3
27
28
29
30
31
32
33
34
35
36
21
20
22
23
24
25
26
37
19
Getting Started—Getting to Know the COOLPIX5700
8
LCD Illuminator Button
The control panel can be illuminated for up to 8 seconds by pressing the LCD
illuminator button ( 4).
Control Panel
The indicators in the control panel show the status of the following camera
settings. To aid explanation, the control panel graphic below shows all icons,
unlike normal use.
1 Sensitivity (ISO equivalency)
indicator ............................... 78
2 White balance indicator (appears
when button is used to set
white balance; shutter-speed/aperture display shows white bal-
ance mode selected) ........... 130
3 Battery level indicator ........... 23
4 Image quality ........................ 49
5 Exposure mode ..................... 70
6
Shutter-speed .........................
73
Aperture ................................
74
Image size ............................ 51
Exposure compensation value ...
66
Sensitivity ...............................
78
White balance setting ...........
130
Image transfer status ..............
42
7 Manual focus........................ 80
8
Continuous shooting mode ..
104
9 Exposure compensation
indicator ............................... 66
10 Flash mode ........................... 62
11 Exposure count display.......... 23
Exposure indicator ................ 66
12 Metering mode ................... 103
13 Self-timer/Focus mode .......... 53
Getting Started—Getting to Know the COOLPIX5700
9
Using the Monitor
Do not apply excessive force to the monitor when folded out from the camera
body as this could damage the hinge that connects the monitor to the camera.
Closing the Monitor
Closing the monitor while in use will automatically turn off the monitor, and
turn on the viewfinder. Opening the monitor while the viewfinder is in use will
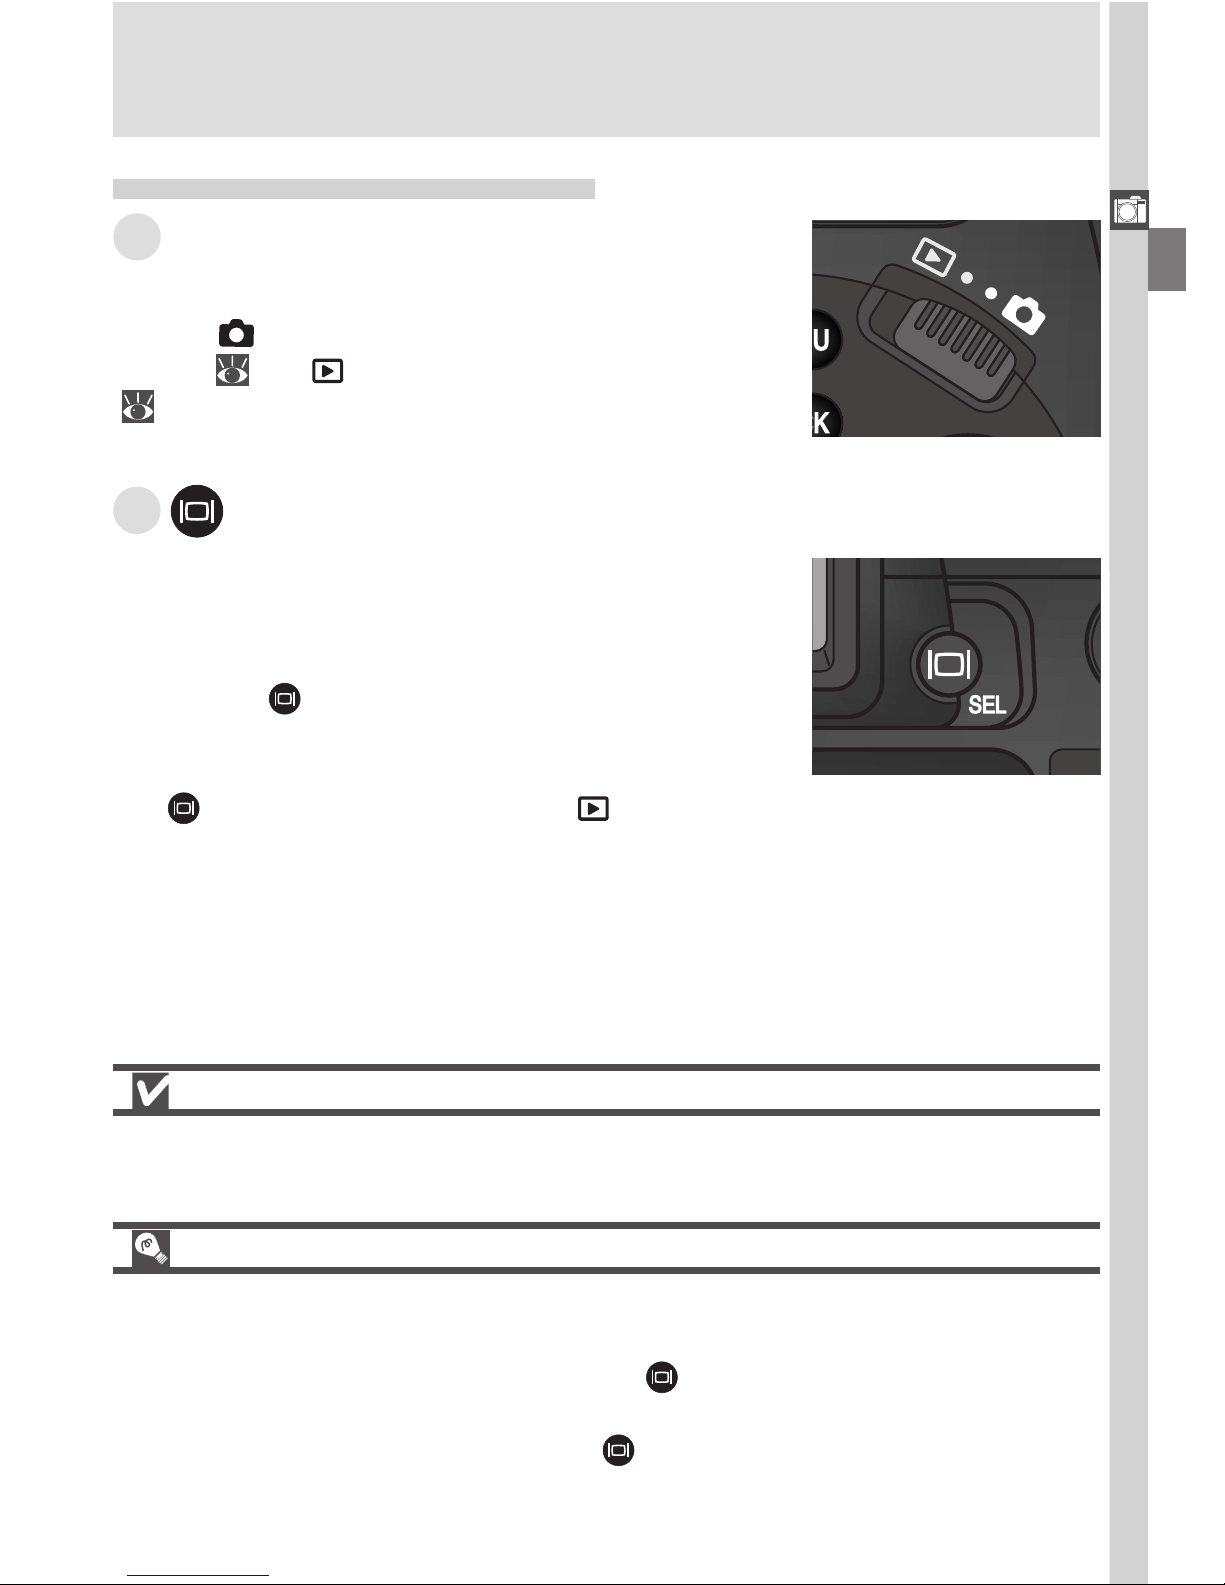
do the opposite. Note, if you press the / SEL button and switch to the
viewfinder before closing the monitor, the monitor will not turn on automatically when you open it again. Press the / SEL button after opening the monitor to turn it on.
B / SEL Button
Pictures can be framed in the monitor or viewfinder.
The monitor and viewfinder display the same contents.
Pressing the / SEL button will toggle between the
monitor and viewfinder (which cannot be used simultaneously) when the monitor is open. Note that
the / SEL button is disabled in (playback)
mode.
Camera Parts — The Details
A The Mode Selector
The mode selector selects the operating mode.
Choose (shooting mode) to take still pictures and
movies ( 22), (playback mode) to play them back
( 84).
Getting Started—Getting to Know the COOLPIX5700
10
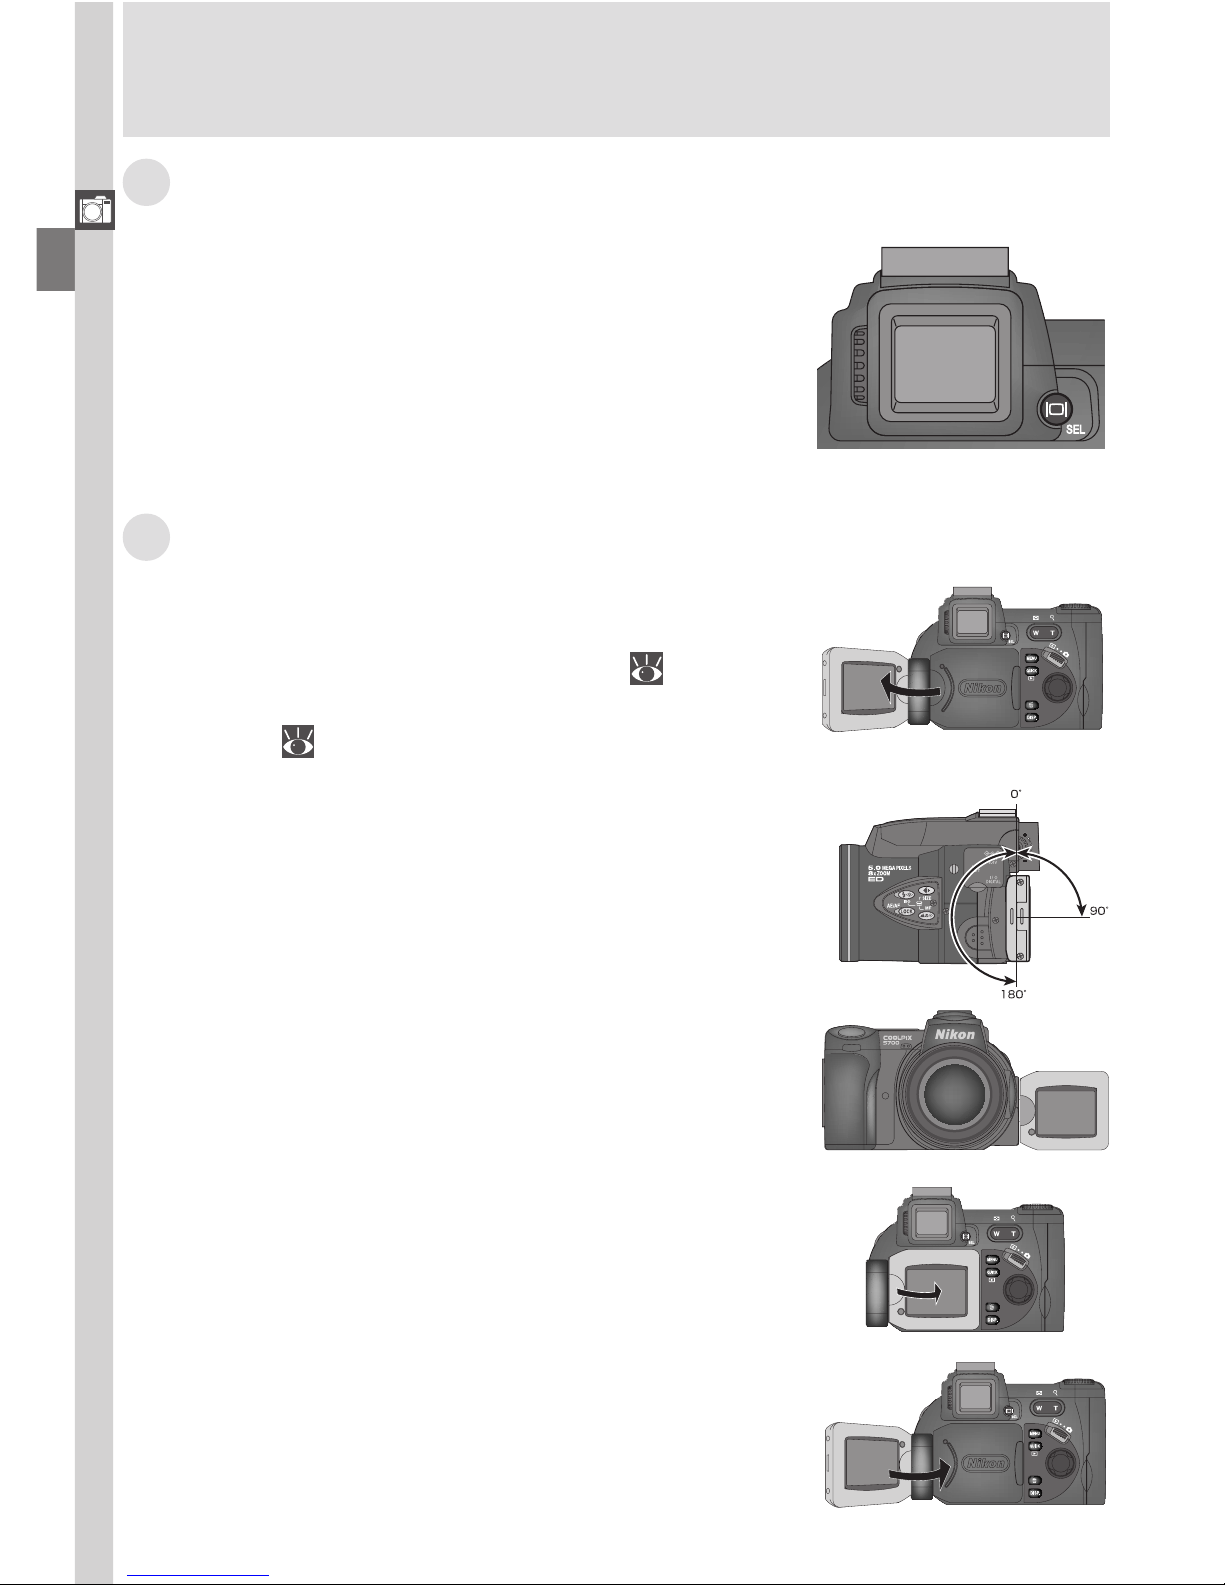
C The Electronic Viewfinder
The viewfinder is a smaller version of the monitor
and can be used when bright ambient lighting
conditions make the display in the monitor difficult to see.
D The Monitor
The monitor shows the view through the camera
lens together with icons indicating the status of
various camera settings during shooting ( 6). The
monitor is also used to review the pictures that you
have taken ( 31, 84).
When folded out as shown, the monitor can be
rotated forward 180°, and backward 90°.
When the monitor is not in use, you can fold it onto
the camera body as shown to protect it from dust
or fingerprints.
When the monitor is pointing in the same direction as the lens, it can be folded back onto the camera body for shooting or playback.
You can take self-portraits by rotating the monitor to point in the same direction as the lens; the
monitor will show a mirror image of the final picture.
Getting Started—Getting to Know the COOLPIX5700
11
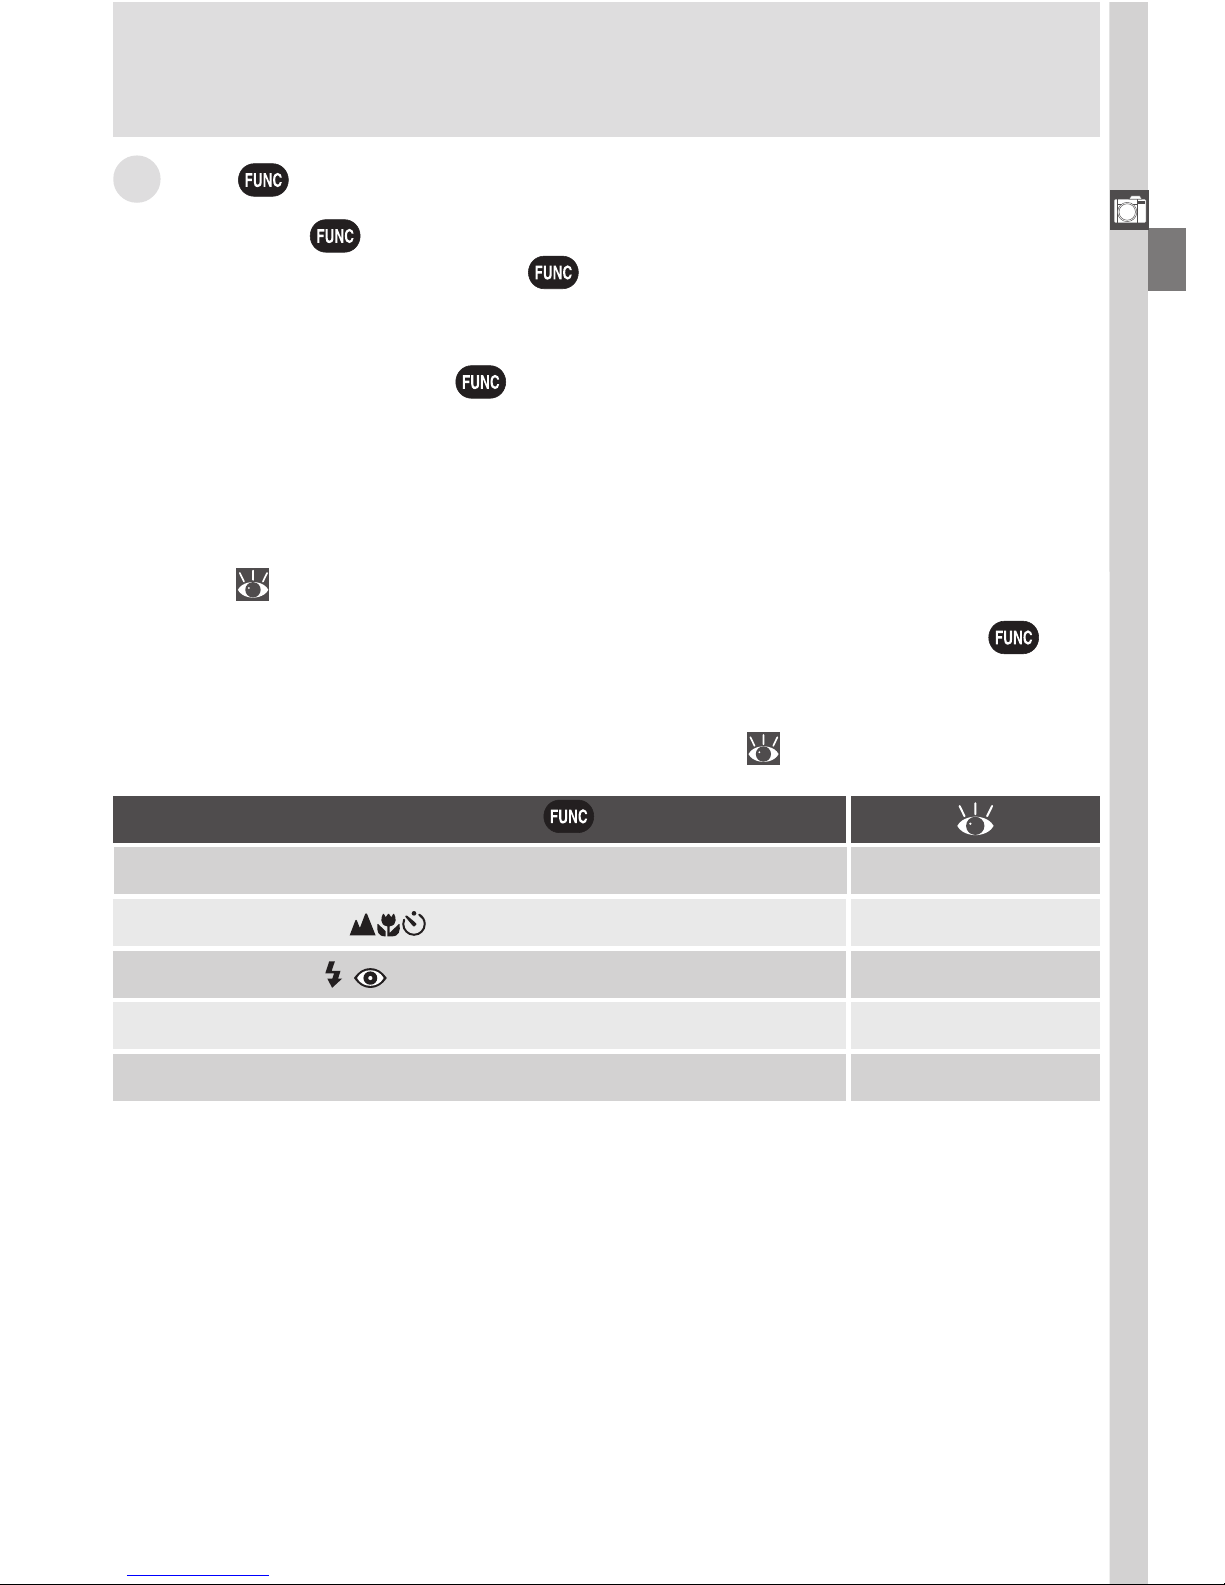
E The (Function) Button
By default, the button can be used to choose a User Set without accessing the camera menus. Press the button while rotating the command dial,
the selected User Set will appear in the top left of the monitor or viewfinder
(User Sets 1, 2, and 3 only). It will also appear in the control panel shutter-speed/
aperture display while the button is pressed.
By default, the camera is set to the automatic “point-and-shoot” mode, User
Set A. Menu settings for User Sets 1, 2, and 3 are stored separately. You can
create combinations of settings for User Sets 1, 2 and 3, and switch instantly
from one combination of settings to the other simply by selecting the desired
User Set ( 68).
In User Sets 1, 2, and 3, you can choose the function assigned to the button, making it possible to select the User Set or adjust white balance and
metering without accessing the camera menus, or to adjust flash and focus
mode without using the buttons on the camera ( 129).
Setting assigned to button
User Set (default setting) 68
(Speedlight Mode)
White Balance
Metering
62
101
103
(Focus Mode) 53
Getting Started—Getting to Know the COOLPIX5700
12
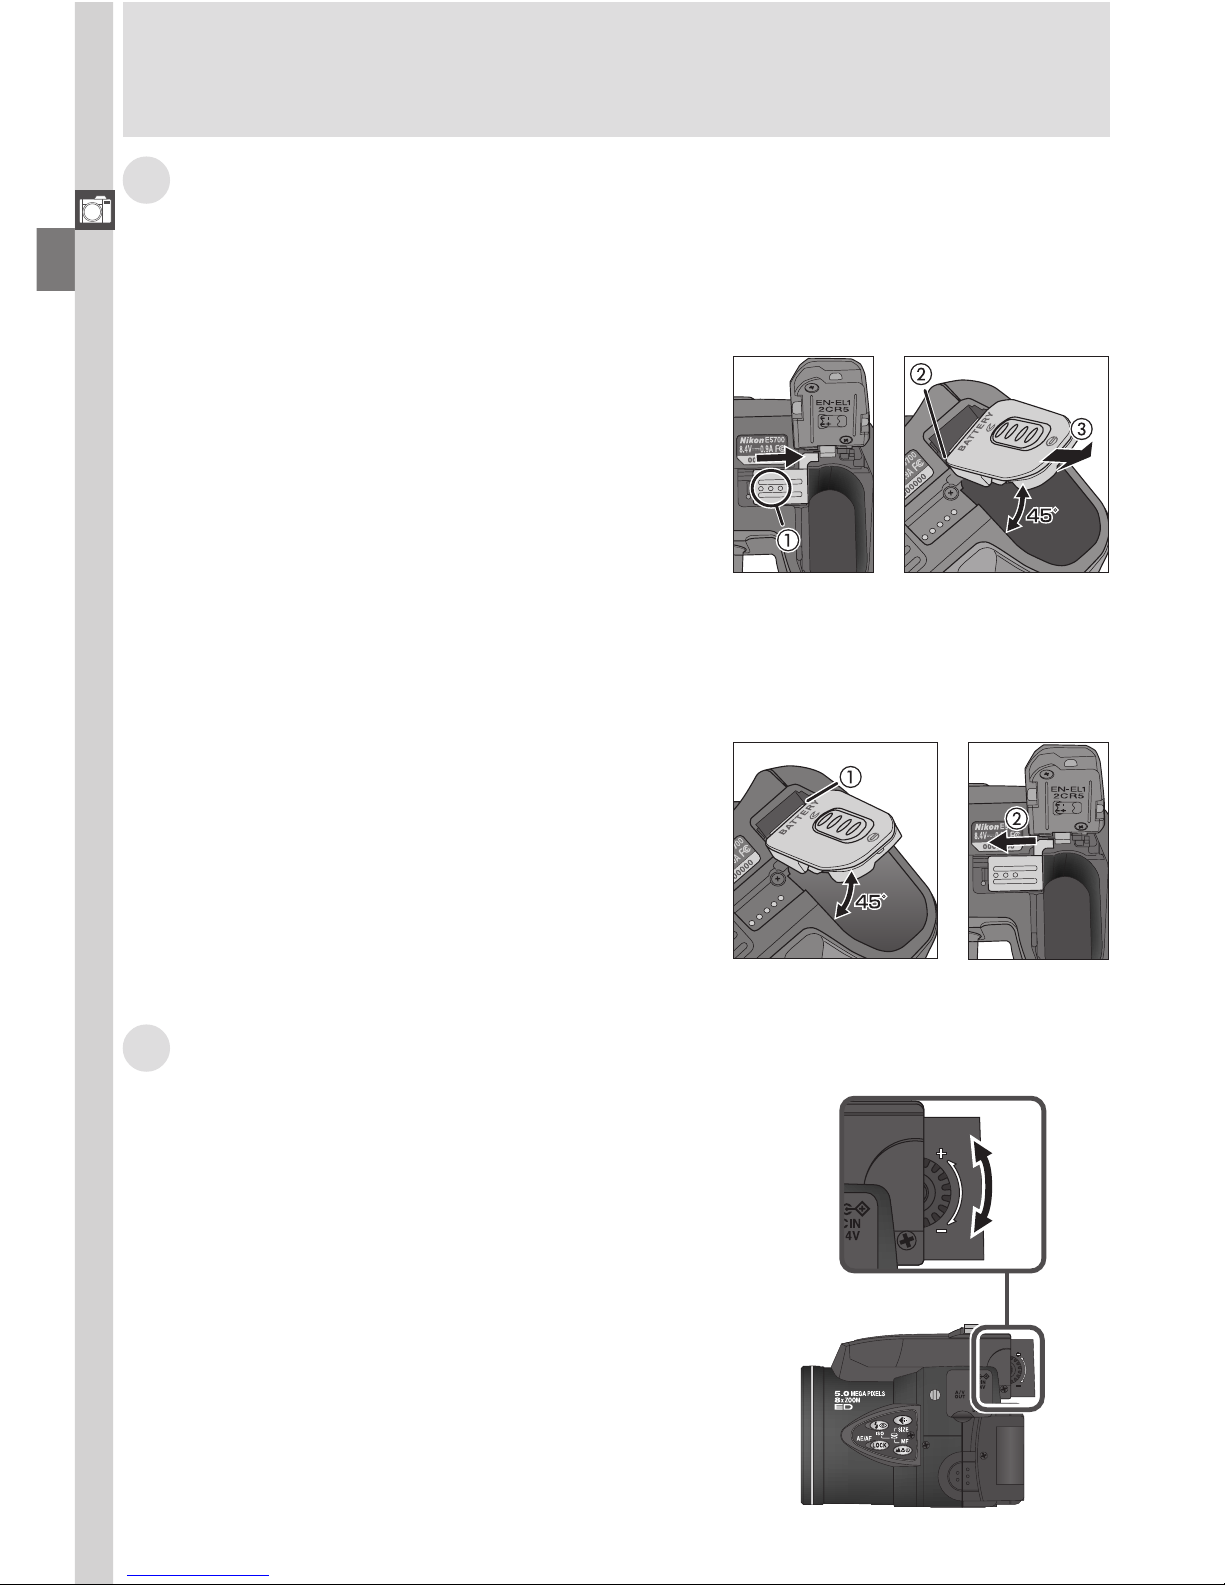
F The Battery-Chamber and Coupling Contacts Covers
The COOLPIX5700 can be equipped with the MB-E5700 battery pack (available separately) which takes six LR6 (AA) batteries. To attach the MB-E5700,
you must remove the coupling contacts and battery-chamber covers.
Open the battery-chamber cover. Remove
the coupling contacts cover by pushing it
down at A-햲 and sliding it out. Hold the
battery-chamber cover at about 45°, gently pull the cover in the direction of A-
햴
until the peg at A-햳 pulls free and remove
the cover. Do not attempt to remove the
battery-chamber cover before the coupling
contacts cover or you may damage the
camera.
To replace the battery-chamber cover, insert
the cover’s right peg into the hole at B-햲,
then slide the left peg (closest to the coupling contacts) into its slot. Slide the coupling contacts cover back into place (B-햳).
For more information, refer to the instruction manual included with the MB-E5700.
G The Diopter Adjustment Dial
If the view in the viewfinder appears blurred,
viewfinder focus can be adjusted using the diopter adjustment dial. Look through the
viewfinder, and rotate the adjustment dial until
the view is in focus.
When operating the diopter adjustment dial with
your eye to the viewfinder, care should be taken
to avoid accidentally putting your fingers or fingernails in your eye.
B
A
Getting Started—First Steps
13
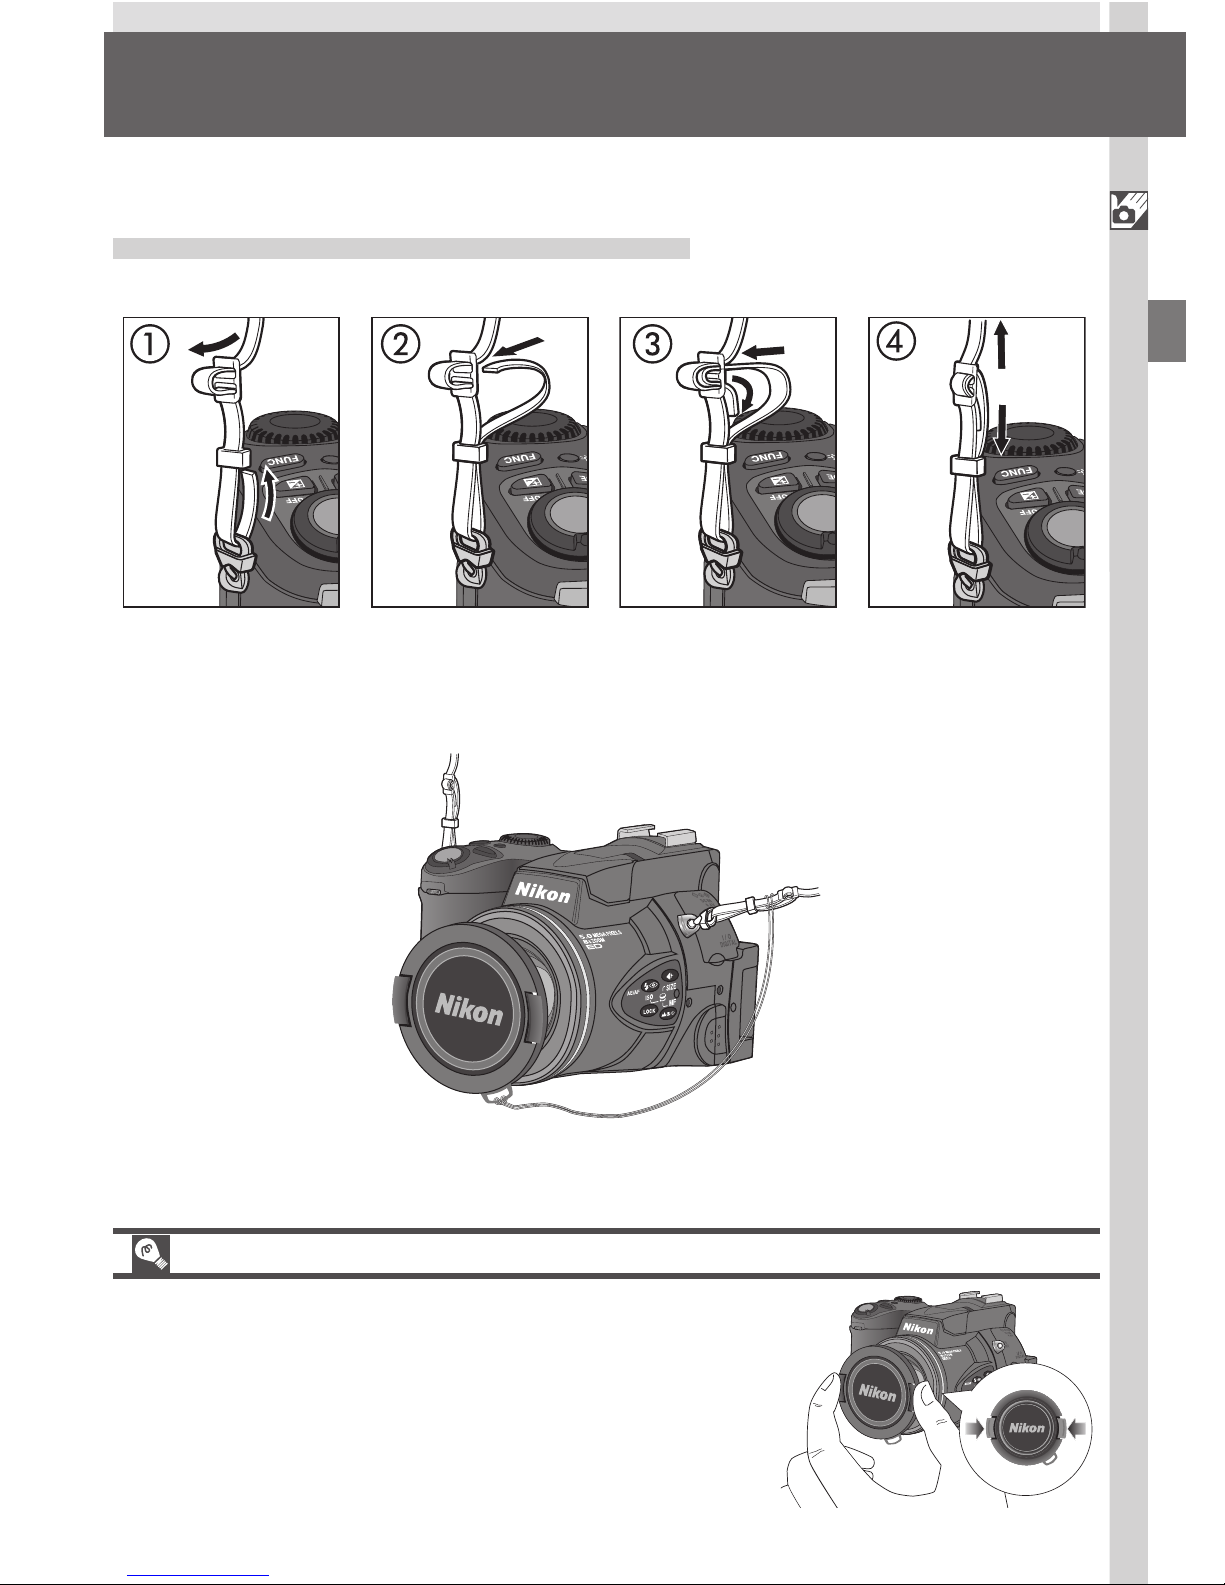
First Steps
Step 1—Attach the Camera Strap
Attach the strap to the two eyelets on the camera body as shown below.
To avoid losing the lens cap, use the cord provided to attach it to the camera
strap as shown.
Complete the steps in this section before using your camera for the first time.
Removing and Replacing the Lens Cap
Remove or replace the lens cap by pressing the tabs
on either side of the cap. Remove the lens cap before trying to take pictures.
Getting Started—First Steps
14
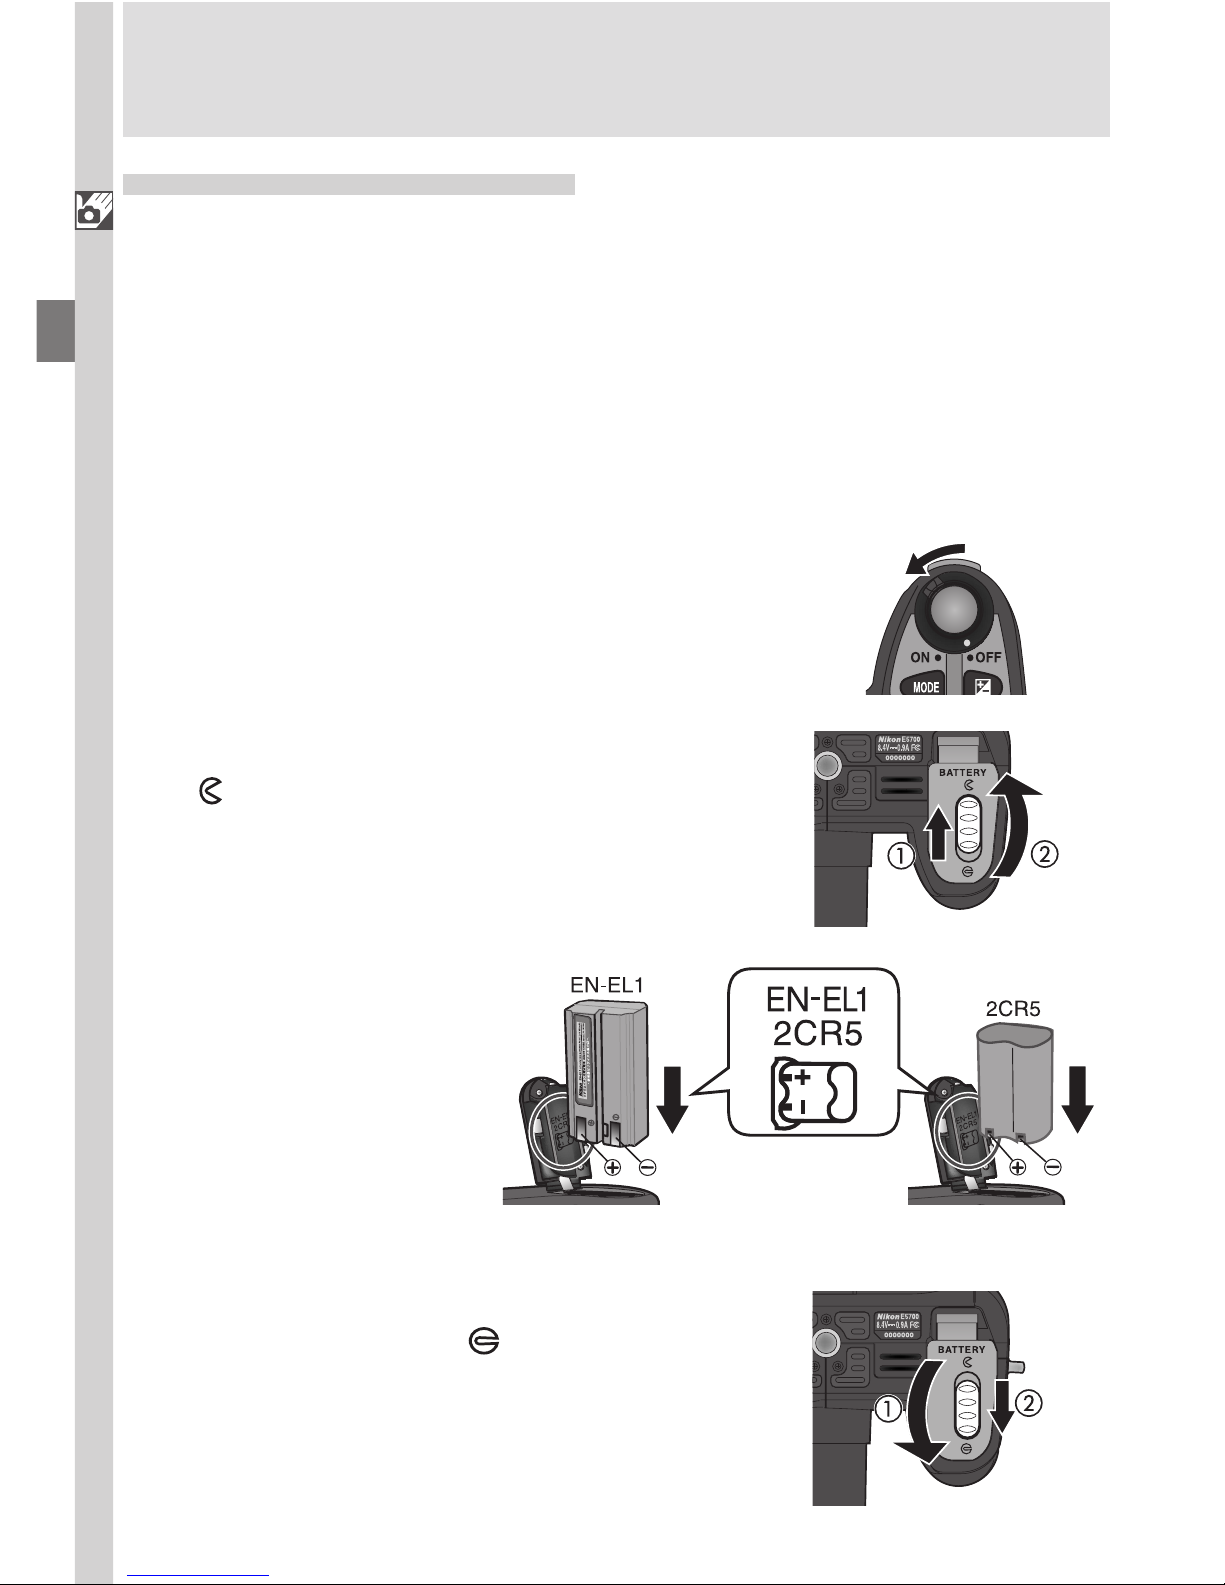
Step 2—Insert the Battery
Your camera is powered by a single rechargeable Nikon EN-EL1 lithium-ion
battery (provided) or a non-rechargeable 2CR5 (DL245) lithium battery (available separately).
2
.1 Charge the battery
The EN-EL1 is not fully charged at shipment. A battery charger is provided with the camera; we recommend that you charge the battery before use. Instructions for charging the battery are in the instruction
manual included with the charger.
2
.2 Turn the camera off
2
.4 Insert the battery
Insert a fully-charged
EN-EL1 or new 2CR5
(DL245) battery as
shown on the label on
the underside of the
battery-chamber cover.
2
.3 Open the battery-chamber cover
Slide the battery-chamber cover latch to the
position (1) and flip the cover open (2).
2
.5 Close the battery-chamber cover
Close the battery-chamber cover (1) and
slide the latch to the position (2). To prevent the battery being dislodged during
operation, be sure that the battery-chamber
cover is properly latched.
Getting Started—First Steps
15
Battery — Cautions
• When using the EN-EL1 rechargeable battery, read and follow all warning
and instructions supplied with the battery. When inserting the battery, be sure
to refer to “Caring for the Camera and Battery” ( 160).
• Note that on some occasions when an exhausted battery is reinserted into
the camera, the “battery exhausted” icon may fail to appear in the control
panel and monitor or viewfinder.
• The battery may be hot after use. Turn the camera off and wait for the battery to cool down before removing the battery.
• When using a tripod, the camera must be removed from the tripod before
the battery can be exchanged.
The Clock Battery
The camera’s internal clock-calendar is powered by a separate, rechargeable
power source, which is charged as necessary when the main battery is installed
or the camera powered by an AC adapter (available separately). After charging for about ten hours, this power source can provide roughly three days of
back-up power. If the main battery has been removed for an extended period,
or removed before charging is complete, a flashing icon may appear in the
monitor, indicating that the clock needs to be reset ( 20).
Removing the Battery
The battery can be removed without affecting pictures stored on the memory
card.
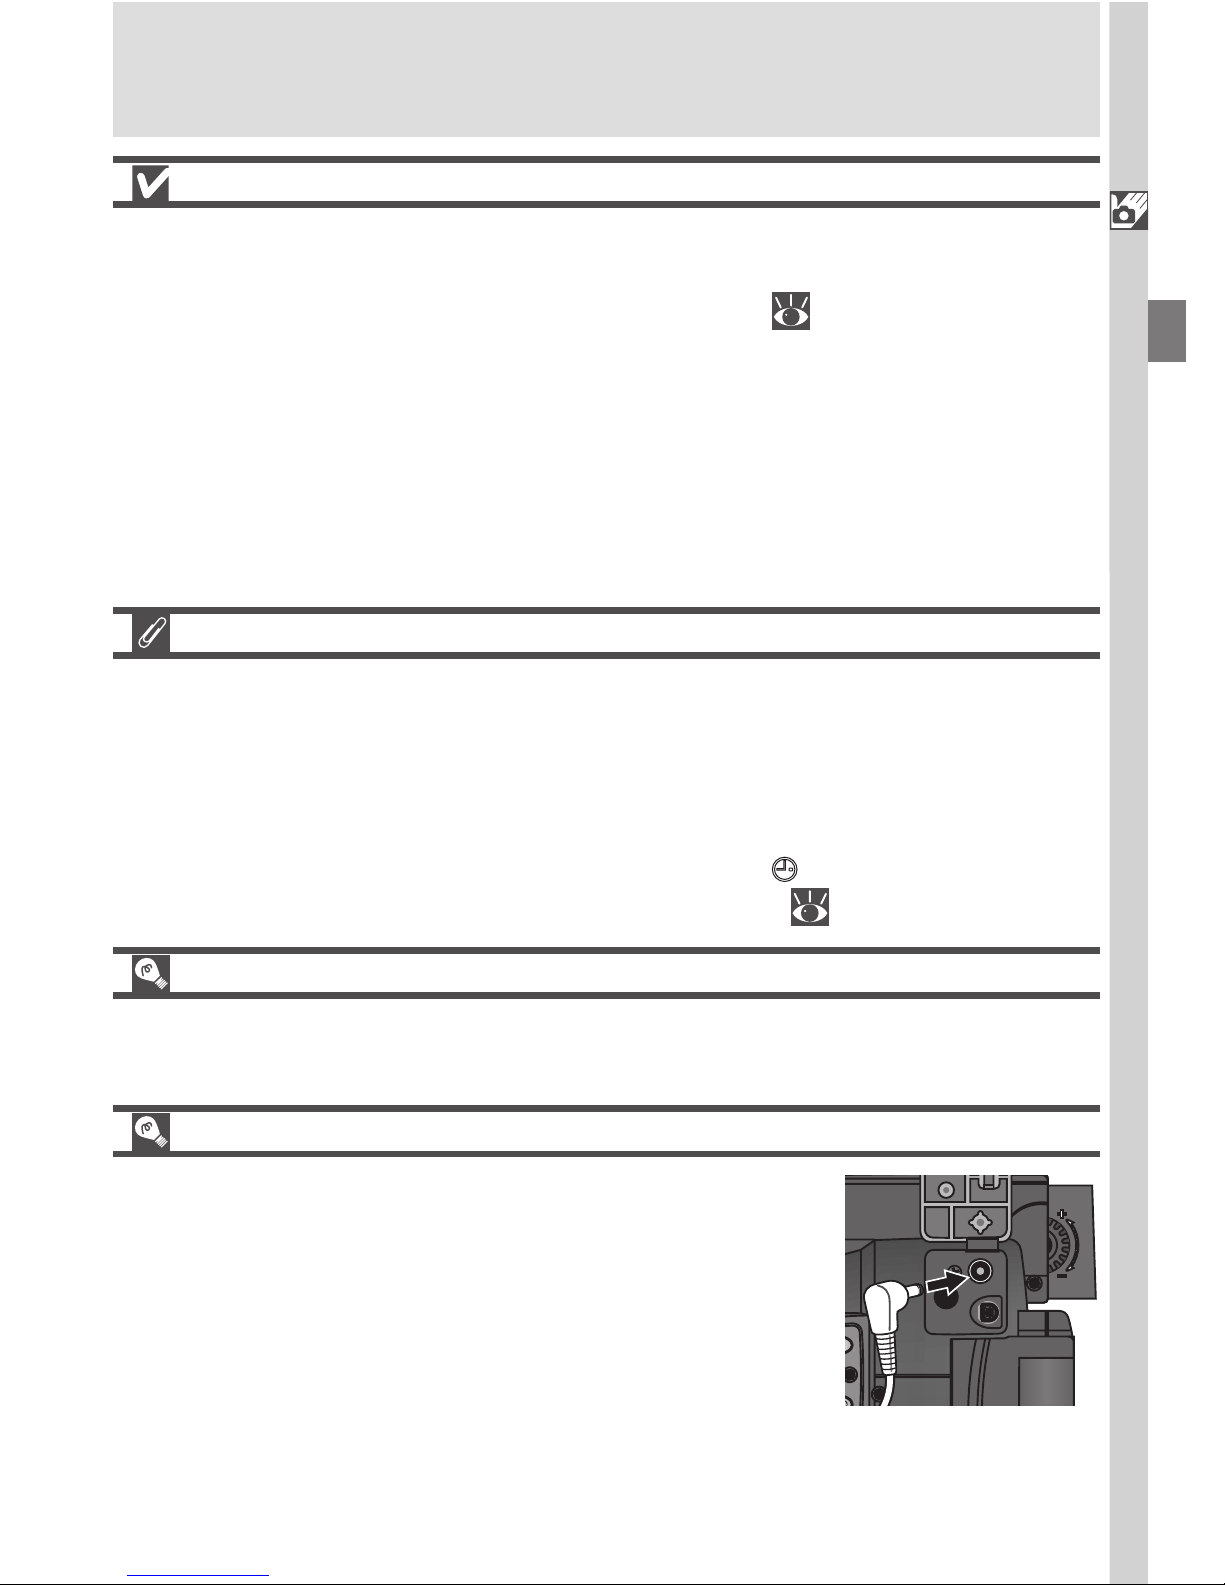
Alternative Power Sources
Besides the Nikon EN-EL1, the COOLPIX5700 can use
non-rechargeable 2CR5 (DL245) lithium batteries,
available at a variety of retail outlets. To power your
camera continuously for extended periods, use an EH53 AC adapter or EH-21 AC adapter/battery charger
(both available separately). The MB-E5700 battery
pack (available separately), which takes six ordinary
LR6 (AA) batteries, can also be used to power the camera for extended periods.
Connect AC adapter to
COOLPIX5700 DC-IN
connector
Getting Started—First Steps
16
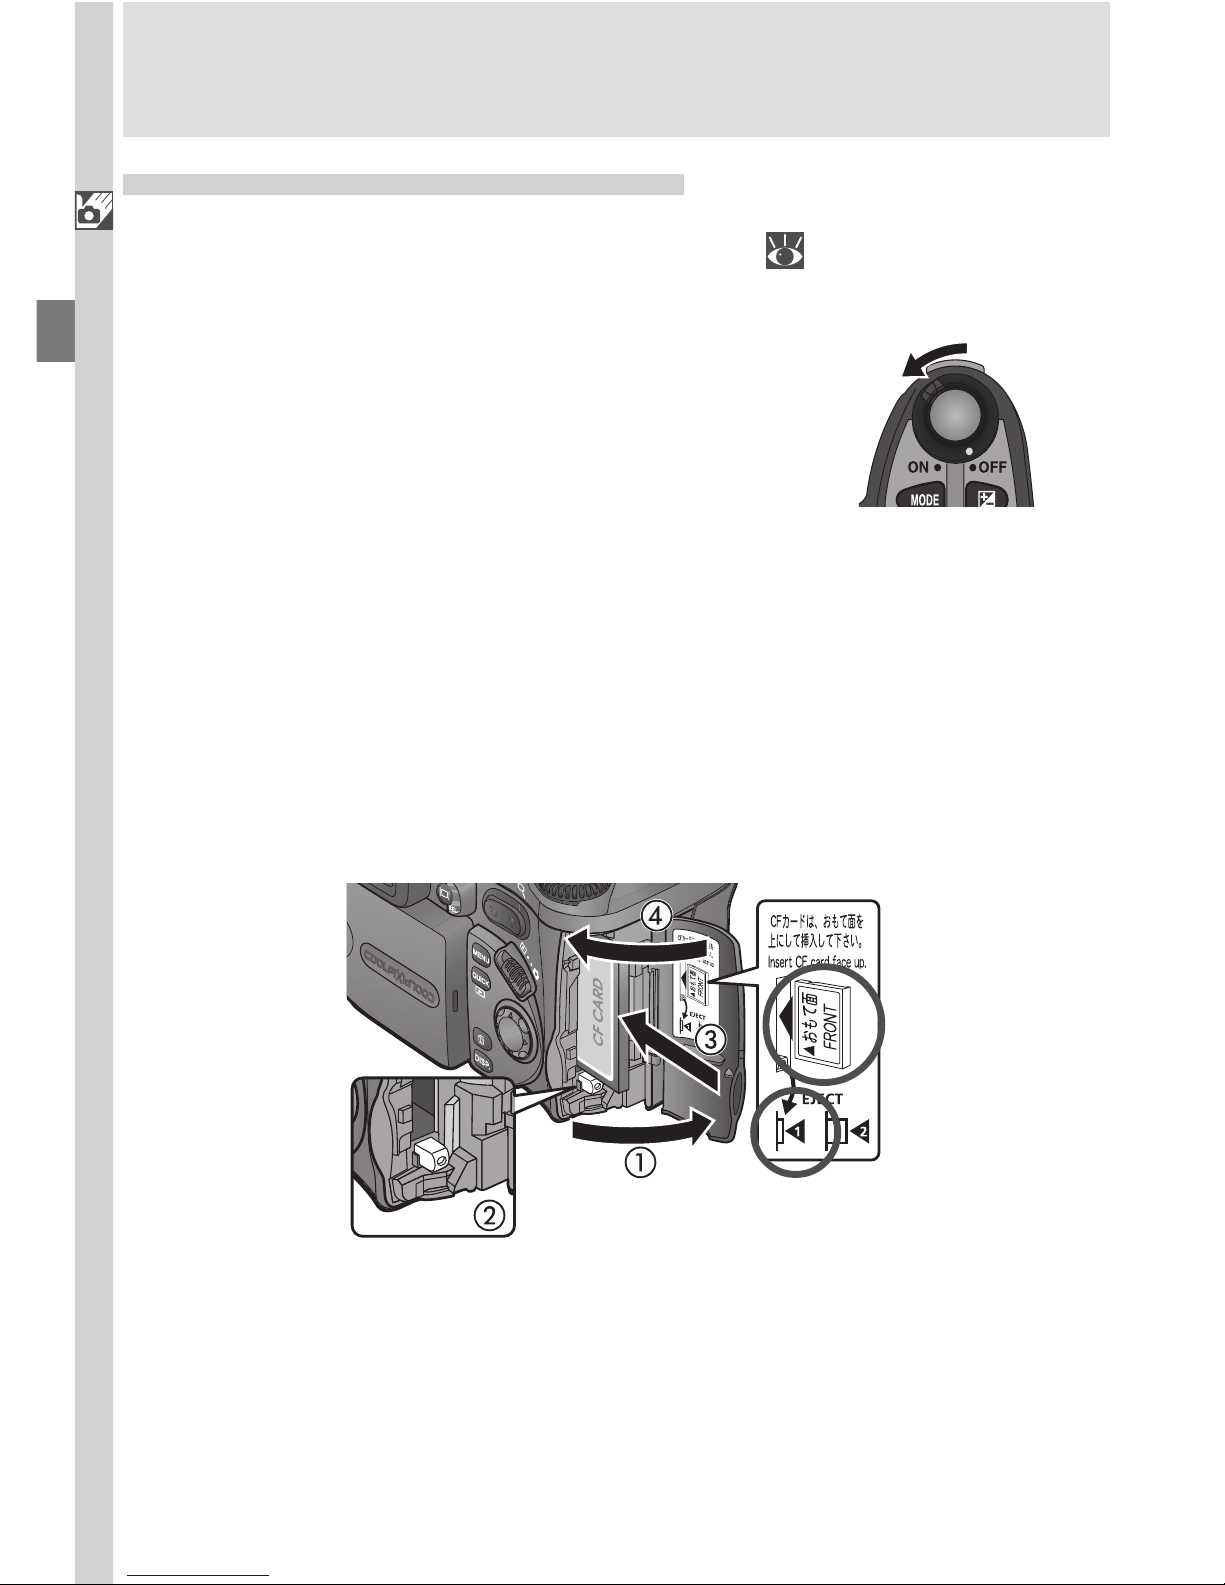
3
.2 Insert the memory card
Open the card-slot cover (1) and make sure the eject button is pressed all
the way down (2).
Memory cards are labeled with an arrow (▲) showing the direction of
insertion. With this label facing the back of the camera (the side with
the monitor), insert the card in the direction of the arrow (3), sliding it in
until it is firmly in place.
Close the card slot cover (4).
Step 3—Insert the Memory Card
Your Nikon digital camera uses CompactFlash™ (CF) memory cards (Type I or II)
or IBM Microdrive® memory cards to store pictures
( 159)
. Memory cards are
inserted as follows:
3
.1 Turn the camera off

Getting Started—First Steps
17
Inserting Memory Cards
• If the eject button is up when the card-slot
cover is closed, closing the cover will partially eject the memory card, causing errors when the camera is turned on. Be
sure the eject button is down (i.e., in position ) before inserting memory cards.
• Insert memory cards terminals (two rows
of small holes) first.
• Be sure the memory card is oriented correctly before trying to insert the card, otherwise you may damage the camera or
card.
Insert card terminals first with
front label facing camera back
Direction of
insertion
Front
label
Terminals
Formatting Memory Cards
While the memory card provided with your camera is formatted at shipment,
other memory cards must be formatted before first use. For more information on formatting cards, see “Formatting Memory Cards” ( 135).
Removing Memory Cards
Memory cards can be removed without loss of
data when the camera is off. To remove a
memory card, turn the camera off and open the
card-slot cover. Press the eject button to pop it
up
to position (1)
, and press it again to partially eject the card (2). Then remove the card by
hand.
Hot Memory Cards
Memory cards may become hot during use. Observe due caution when removing memory cards from the camera.
Getting Started—First Steps
18
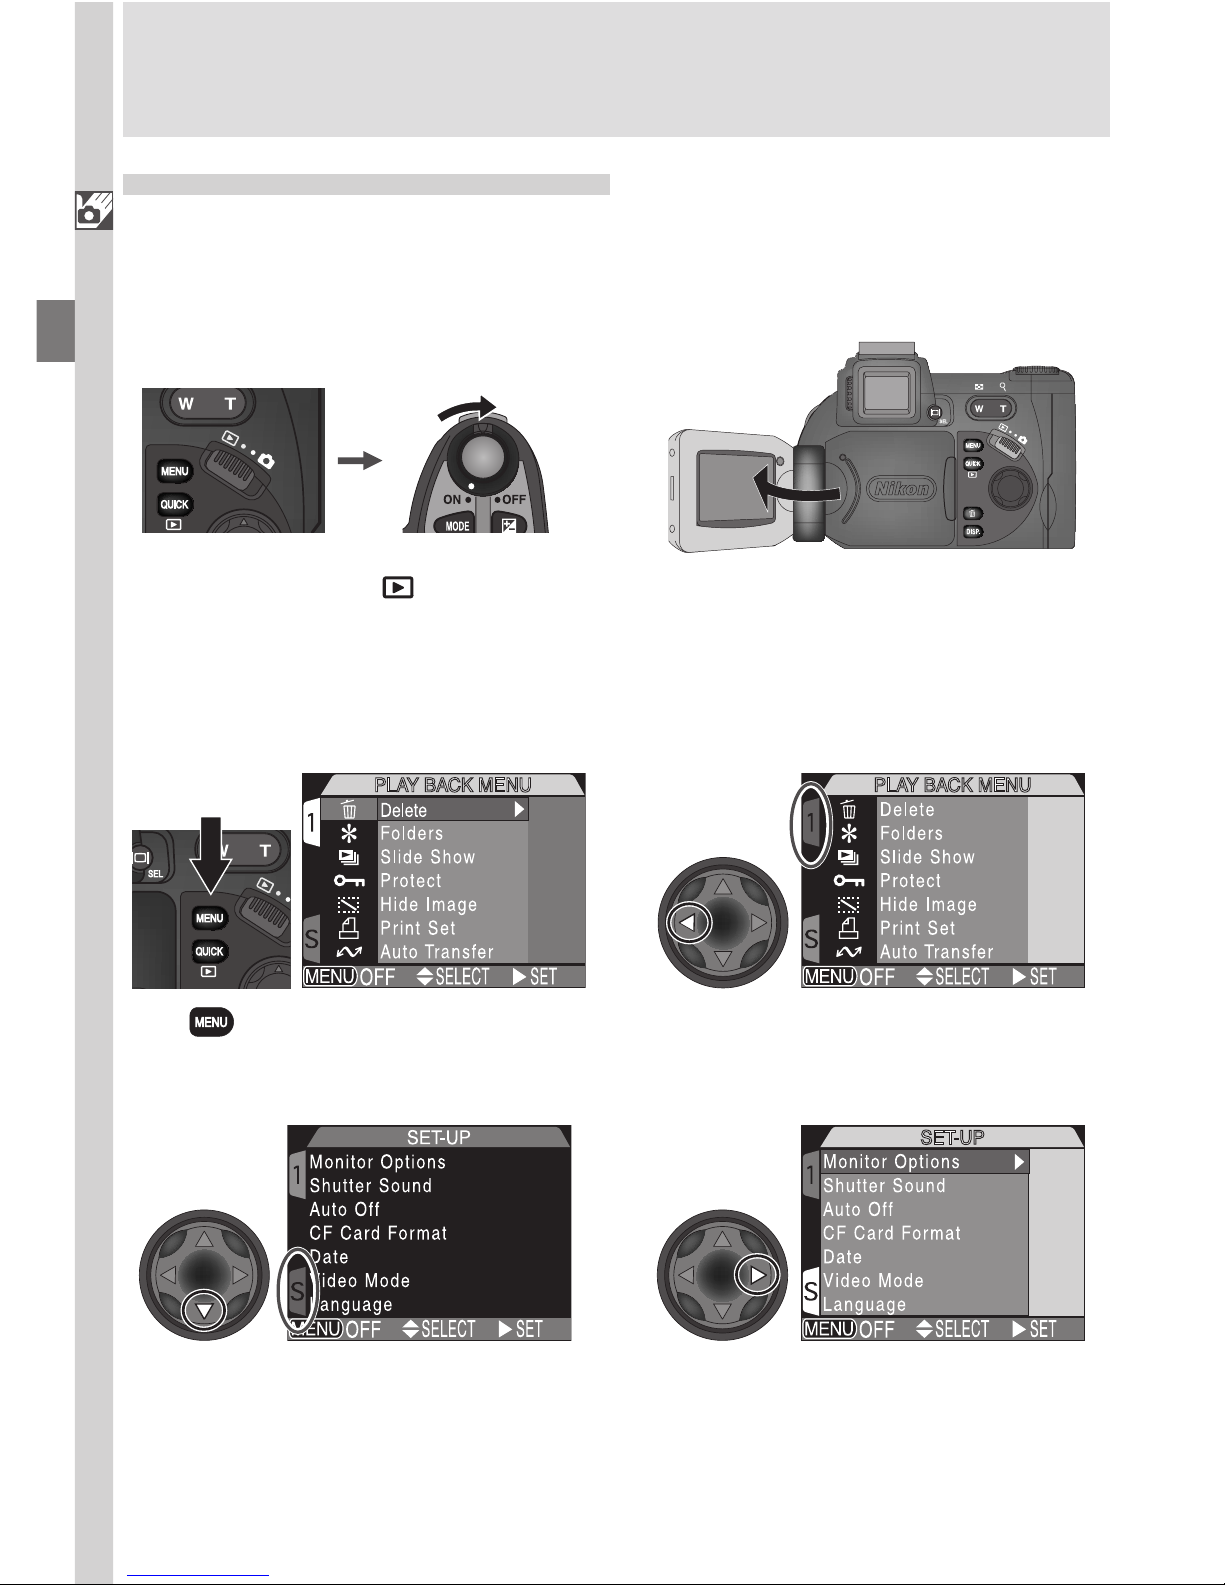
Step 4—Choose a Language
Menus and messages can be displayed in German, English, French, Japanese,
and Spanish.
Set mode selector to and turn camera on
4
.1
4
.2
4
.3
4
.4
4
.5
4
.6
Highlight SET-UP menu page tab (S)
Position cursor in SET-UP menu
Highlight page tab
Press button to display PLAY BACK
menu
Open the monitor. If no images exist on
memory card, “CARD CONTAINS NO
IMAGES” message will appear in monitor; ignore it and proceed to next step
 Loading...