

Nikon Coolpix 55200, Coolpix S5200 Quick Start Manual
Nikon
Quick Start Guide
Confirming
the
Package Contents 3
,,
>h~«-..-~-·-·····---v~~-~---~~~--·~·~-•~~~,..-~~~-"-'"~~-·-~d········•"'"'''''''···-•---····•·-···'-"''••"'''·'~"''"·····•·"'"'~--~"'"'"'""'"'~''''"'''
..
"'~''"'-~~.-.~~~-·-~~-.,.---
-
·-·~--~><···---~--~-~~-~-~~·~~-~~--~~·-~•~•~••~
First Steps 5
·~---~-·
~w·~~~-~----·•'>•"~•~~---~-·-·•·w"·-·--•--·~-·----·•""'''"'''~''''~'"'''''"
•
"'"'"'Mh>••"•"'•«••«>'·"'"~'""'"~'"'··--·~-·••"''''"'"'''~"'"'"'"'-''-"'"''"''._.,,
.. ._..,,,.,
....
,_~•-·-•··~~~~-·--···~~··--••••n~••••~•"''''~"'~'''"'"
Shooting
and Playback 14
Using ViewNX 2 20
Other
Functions 26
-~---···---~·~--~-~-~---~-~~-~'"'"'"'"'"'"~"''''"'"''"''~--m"''"'-''''''''"''"''"''"'''''"'"'"'"'-'"'"'''·~·-·-~m••·-·••>•W•>"'•'•'•"'•••••••••"'•••·•••.-
w • · <
-~···"'"""~"'·"'w•••••~"''~'<·~•~··~W~-·-·~~~-·~~~
-
D•-••<>••-••••,.>•D•~··••-·•~··<o··-····
..
~-~-~~~·-·-V~~·-
For Your Safety
32
)
Nikon
COOLPIX
'
COOLPIX
55200
I h
an
'\
you
for
pu
rchc1snq
:hP
\J
rk~m
LOOLD!:<
S>i
(;r
\
oic
:i
t
,-:
1
GW1~r
d
.
Th-:;
gur
oe
!n
ll"c
:t
rc
e':.
:he
:::;
r
oc<?dure'-
l'i
o?c
.
.:.s
<H
V
tor
fr
st
t
r'
1P
used
l1is
c
am
e
:"
a.
To e")vre
pr(
)
p
c~
rerv
J
t~nc
tho·o
uo
·I\
-'
I.Hl
d::r
q:r-'ri
t
he
inforn
\
'~
x:
rl
·
::
or
Yo.~
r
Sd
ft-ty
··
:
pr:
c.
w:.
hP
fcre
us
in
a t
'"
•e
cr
Jr
nPra
.
~
o
r
:11o
re
de:a r'ed
p
ea
se
teter thP
!
:
i
g
i
~
t
=:
l
··.·
·.;
h
it"
h
is
lo
c;:
ted n·1
the
ir',clu
de
d
c6
-
RO
tv··,
~n
r
rnformati
on
or·,
l'le camera
's
diq1t~•
l
i~>'fr'
:t·
'
!
lC:'
A·!O!!Ut:f.
Sho
uld
you
r1
eed te
chr1
ical
su
pport, vve
c~
f"'
c
r
d
II
LJrn
ber
c::f
opti
or
\)
Internet
Plea
se
visit the Ni
ko
n s
upp
ort ho
me
pdge.
whe
re
you ca
n:
Sea
rch Nikon's
connnuously
updated
Knowledqe DatJbdse for
thP ldteol tr'chni
cd
l
support
11
1f
or
rn
iltion.
Us
e
'
'Ask
~iko
n
d
Ow
..
'stion"'
:o
re
cci
W'
d
prurnpl r
eo
ly
fron'
,)
Nrkor\ rv
.:
Ji
e<:-.S
i
Ondl
(Hivi\Or
to
y
uu
r
(_'
flr()i
Down
oad the latest versrons
of
1\.
ikon so•t\
'..'2
'E-
or
firr
nw;
m
.:
~
J
f!d:1l
f:''
,
~
or
y
ou
r
p~·~
;
Juct.
r
e
qr~
~:e
1·
to
1·ecei
ve
t·).
m
~
1
t
l
n
ct
i
+i
cati
on
for
soft'.·
\' a
re
or firrn\vare updates
I
or
cust
ome
r:-
in
t11c
Un1
te
d
Sta
res
:
www.nikontechusa.com
~
o
r
customers
1
11
Car
\l
C:,
1:
help
..
nikon.ca
~
[
n
·q
ll
<;
h).
nikoncanada-fr.custhelp
..
com
t:...
I
,Hl'..,.,
~
i
c,
;
For
cus
t
ome
rs
in
tV
iexico:
nikon.com.mx/soporte
cor customers '"
~
ra
z
i
l :
http:
//
nikon.com.br
Telephone
Please
ca
ll
for
tec
hn
ic
al
support
ana
ot
her
produ
ct
as
sislance. Our p
ro
f
ess
ional
advisers
a
re
st
anding
by
ro help
wr
th
yo
u
r·
digi
tal
carwra
ncc
cL
For
c
u
s
~
orner
s
111
the
.Jr:ted
Ste
t e
o:
1-800-NIKON-
UX
(1-800-645-6689)
Fo·
cu
s:
omers
rn
1-877-
534
-
9910
co- custome
rs
111
Mr·xr
<
o:
001-888-565-5452
For customers
'" Rw ii: 0800-886-4566 (0800-88 NIKON)
IW
Viewing
the
"Reference
Manual
CD
"
The
RelerenrP
Mrmuui
ca
n
be
viewed
us
inq A
do
hP
Reader.
ava
ri
Jblc lor
rr<rr
• dcvvnload
rror
n I i
ll
' Ado[)('
web
>itc.
1 Start the
cvn
put
er
and
i%ert
ti
le
"fie!
ere
n
ee
Monuoi
ClY
2 Double-clrck
thP
CD
(COOLPIX 55200) icon
w
Computer
or
My
Computer
(
Wr
ndowsi or on tl1e d
esk
too
:M
ac
C
l',
i.
3
Doublc-cl
rck
the INDEX.pdf
ic
on to
dr
sp
iJ
y the language sele
c:or
·,
su
e-e
ll
.
C!
ick a
langua
ge
and
follow
the
lin
ks
to
\/ieV\1
:h
e
Re
fere:ice /v!onuol.
An
Important
Notice
about
Accessories
Ni
kon
COOL
PIX di
qiul
r:
drn
era
is
o
es
igncd
10
rli
c•
hry
hc
•sr
sta
ndar
ds
an
d
incl
urb
c
ornplex el
ect
IOnic
ci
rc
rr
irry
011y
N
'k
o11
acc
cs
soflcs
.
suc
h
as
ba:tcry clld
fCJC'S
,
ba
t:e·i
es
.
Uw
qr'K
J
N.'
Ac:iip\
('1
),
and
AC
iKI
"PI<'I
'I ,.,,. (
<'
r
ti
frcd
by
'l
i<On
spPci
'"
,j)ly
ror
yo
ur \
ik
on (
00
1 PIX
cam
era
and
ere
eng·n
ee
red
and
:
es:ed
tn
o
p
~)
r
ate
·,v
1th
in
the r
ec
u
rPP
1C
t'
t
:.
~
)f
t
~·
:
e
e:ec:ron
·c
C.
':·o
ri1
ry'
of
01.
:r
c
u
r":~e
:as.
THE
US
E
m
f\ON-NIKOt\
ACC
E
SS
O~
I
L
S
rvr;;v
U;
\~JlAGL
YO
U' (
,\
,'
c1LR
;\ M m WI
LL
VOilJ
YC
UH
N
I
~
U
t
-J
WAR
RAN
IY
Ge
nurne
Nikon
accessork
::.
s
are
availa
l.
-)IP
th
:-O
l
Jl~
h
yo
ur
1'\
rk
on
-a
uth
o
ri
?f-
CJ
c.ie
.1le
1.
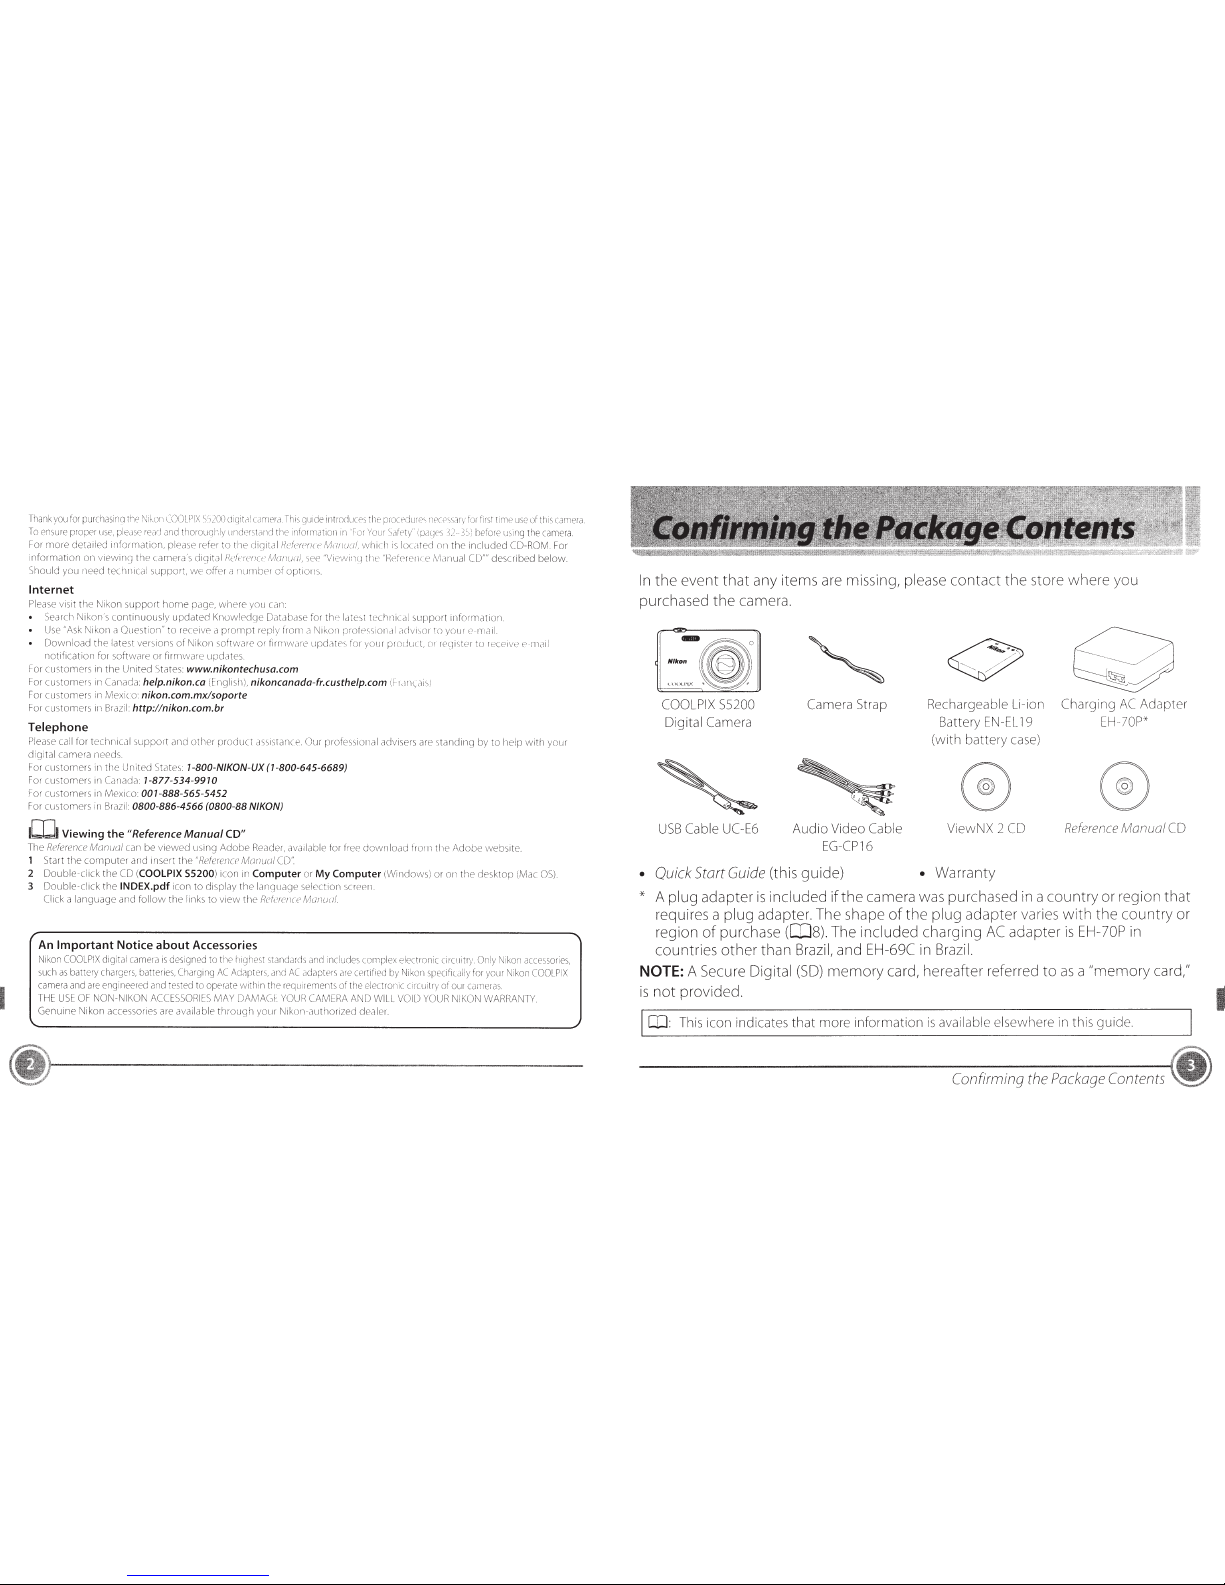
In
th
e event that
an
y i
te
ms are mi
ss
ing,
please
co
n
ta
ct the store
wh
ere you
purcha
se
d
the
came
ra.
COOL
PIX S5200
Digital
Cam
era
USB Cable UC-
E6
Ca
mera Strap
Audio Video
Cable
EG
-C
P
16
Rec
hargeable Li-ion
Ba
tt
ery
EN-EL
19
(with batter y
cas
e)
ViewNX 2
CD
Chargi
r1g
AC
Adapter
EH
-70P'
R
eference
Manual
CD
•
Qui
ck Start
Gu
ide
(this guid
e)
• Warr
an
ty
*
A
plug
adapter is
included
if
the camera was
pu
rc
h
as
ed in a co
un
try or regi
on
th
at
requir
es
a
plug
ada
pt
er. The
sh
ape of
th
e
plug
adapter vari
es
wi
th the co
unt
ry or
regi
on
of purchase
(
Q]
S) The inclu
de
d
ch
ar
ging
AC
adapter is
EH-70
P
in
count
ri
es
other
th
an
B
ra
zil,
and
EH
-69C in
Brazil.
NOTE:
A
Secure Digital
(SD)
memory card, hereaf
te
r referred
to
as
a
"memory card,"
is
not
provided.
[I
]:
This icon indicat
es
that rnore information is
available
else
where in th
is
guide
Confirming
the
Package
Conte
n
ts
~
I
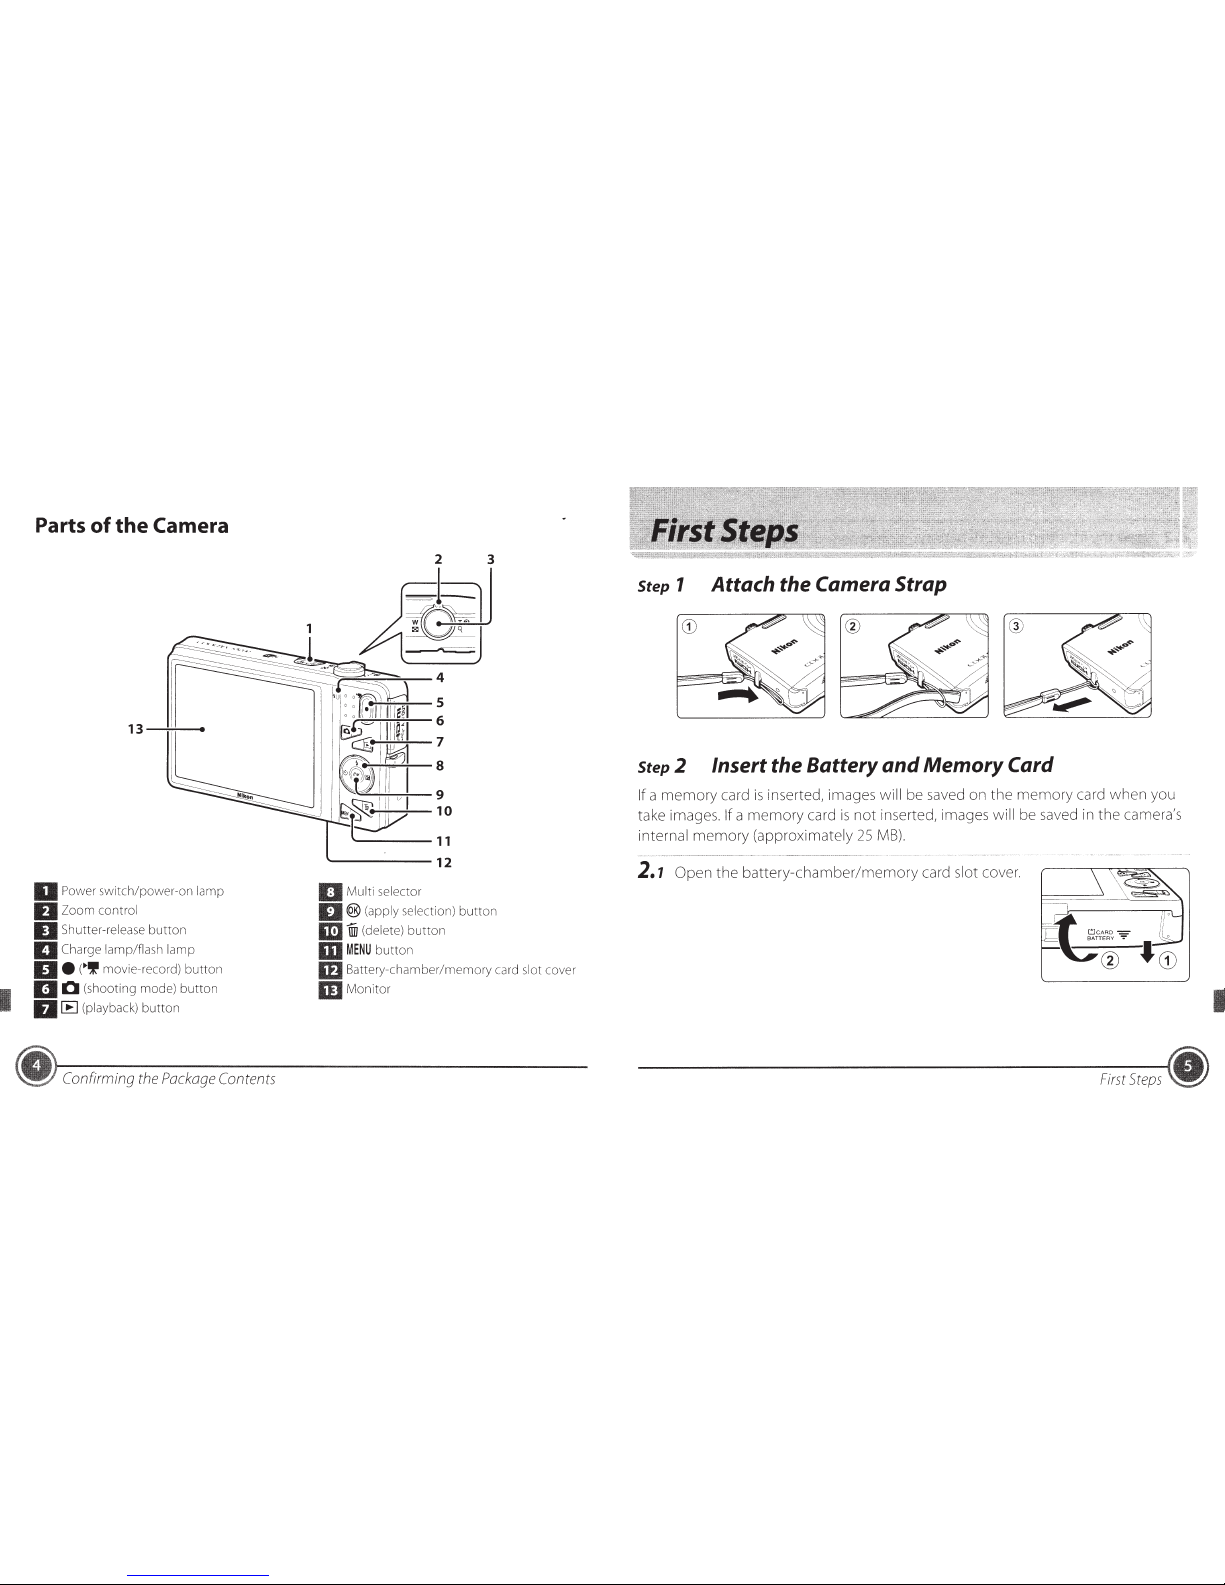
Parts
of
the
Camera
13-+-+--
IJ
Power switch/power-on lamp
IJ
Zoom control
D Shutter-release button
IJ
Charge lamp/flash lamp
IJ•
(~if
movie-record) button
IJ
0 (shooting mode) button
IJ
[E]
(playback) button
Confirming
the
Package
Contents
5
6
7
8
11
'-------12
B Multi selector
II®
(apply selection) button
m j (delete) button
m
MENU
button
m Battery-chamber/memory card slot cover
mMonitor
Step 1 Attach the Camera Strap
Step 2 Insert the Battery and Memory Card
If a
memory
card
is
inserted, images will be saved on the
memory
card when you
take images.
if a
memory
card
is
not
inserted, images will
be
saved
in
the camera's
internal
memory
(approximately
25
MB).
2.1
Open
the
battery-chamber/memory
card slot cover.
First
Steps
•
I
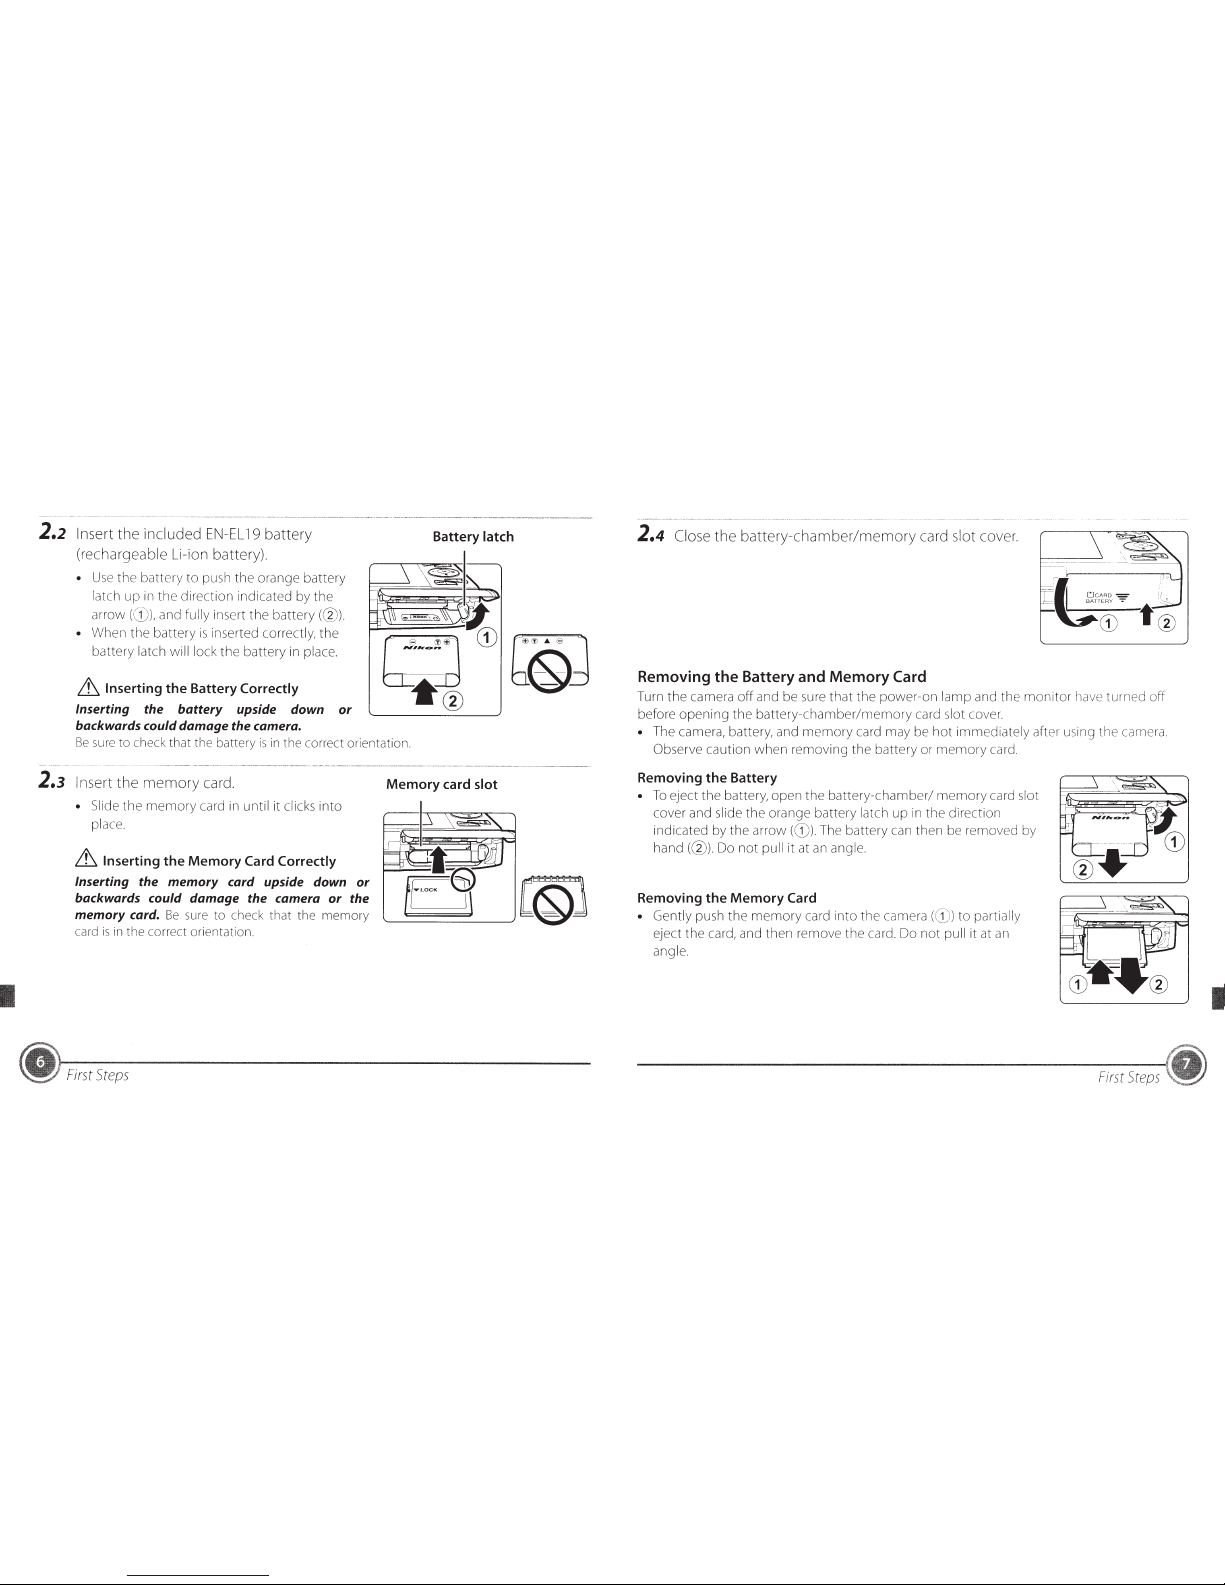
2.2
Insert
the
included
EN-EL
19
battery
(rechargeable Li-ion battery).
•
Use
the battery to push
the
orange battery
latch
up
tn
the
direction indicated by
the
arrow and fully
ir1sert
the
battery ((2)).
• When
the
battery
is
inserted correctly,
the
battery latch will lock the battery
in
place.
Lt, Inserting the Battery Correctly
Inserting the
battery
upside down or
backwards could damage the camera.
Battery latch
Be
sure
to check that the battery
is
in
the correct orientation.
2.3
Insert the
memory
card.
• Slide
the
memory
card itl until it clicks tnto
place.
Lt.
Inserting the Memory Card Correctly
Inserting the memory card upside down or
backwards could damage the camera
or
the
memory card.
Be
sure
to check that the memory
card
is
in
the correct orientation.
First
Steps
Memory
card slot
2.4
Close the
battery-chamber/memory
card slot cover.
Removing the Battery and Memory Card
Turn
the
camera
off
and
be
sure
that
the
power-on
lamp
and the
monitor
have turned off
before
opening
the
battery-chamber/memory
card slot cover.
• The camera, battery, and
memory
card may be
hot
immediately aftor ustng
the
camera.
Observe caution
when
removing
the
battery or
memory
card.
Removing
the
Battery
To
eJect
the
battery,
open
the
battery-chamber/
memory
card slot
cover and sltde
the
orange battery latch up
in
the
dtrection
indicated by
the
arrow ((D). The battery can
then
be removed by
hand(@)
Do
not
pull
it
at
an
angle.
Removing
the
Memory
Card
Gently push
the
memory
card
into
the
camera
to
parttally
eject the card, and then remove the card. Do
not
pull it at
a11
angle.
First
Steps
I
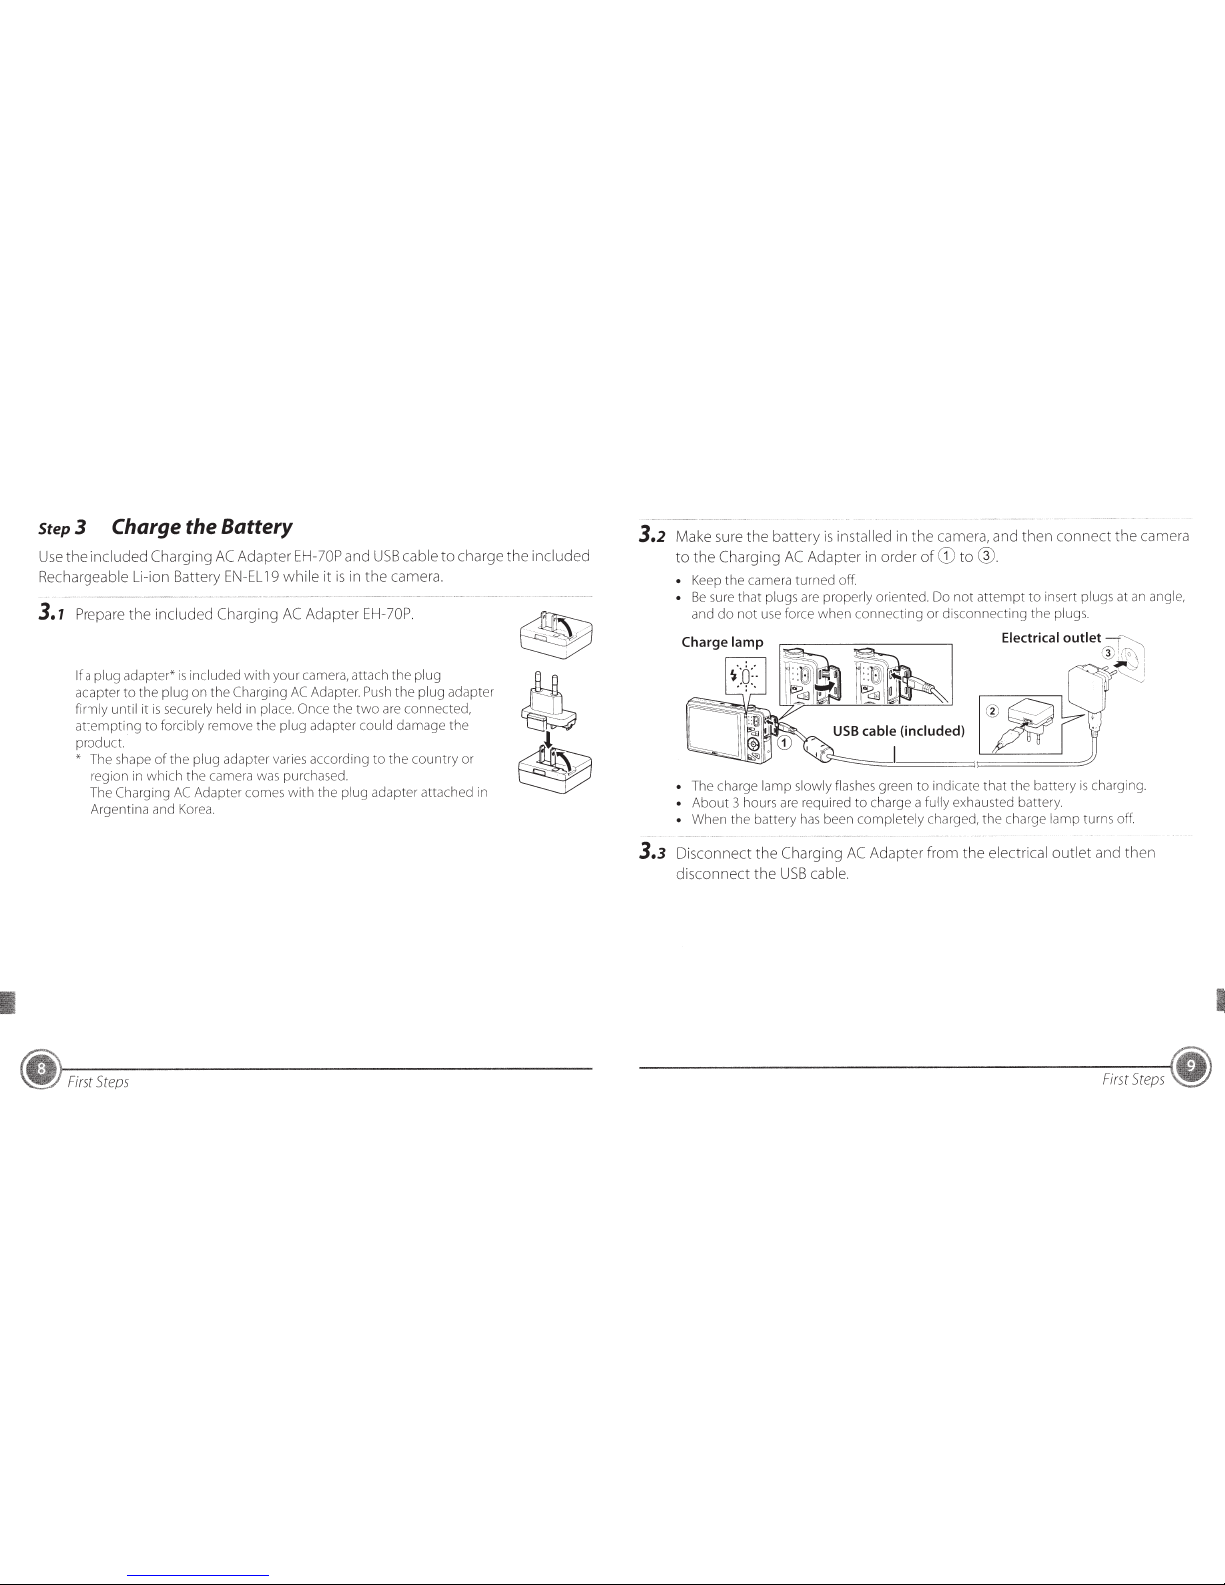
Step3
Charge the Battery
Use
th
e included Charging
AC
Ad
ap
ter
EH-7
0P
an
d U
SB
cable
to
charge the
inclu
ded
Rec
hargeable
Li
-ion
Ba
tt
ery EN
-EL
19
whi
le it
is
in
the
camera.
3.
7
Prepare
the
included Chargin g
AC
Adapter
EH
-7
0P.
If a plug
ad
apter*
is
included with your cam
era,
attach the plug
adapter
to
the plug
on
the Charging
AC
Adapter.
Push
the plug adapter
firmly
unt
il
it
is
sec
urely
he
ld
in place.
Once
the
tw
o are connected,
attempting to forcibly remove the pl
ug
adapter
co
uld damage the
product
•
The shape
of
the p
lu
g adapter vari
es
accord
in
g to the coun try
or
re
gion
in
wh
ich the
camera was
pur
ch
a
sed.
The
Ch
arging
AC
Adapter
com
es
with the plug adapter attached in
A
rg
entina and Korea.
~
First
Steps
3.2
Make su
re
the
battery is
installed
in the camera, and then connect
th
e
ca
me
ra
to
th
e Charging
AC
Adapter in order
of
CD
to@.
•
Kee
p
the
ca
m
era
turned off.
•
Be
sure
that
plugs are p
ro
perly oriented. Do
no
t
attempt
to in
se
rt plu
gs
at an
an
gle,
and
do
not
u
se
force when connecting or disconnectin g
th
e plu
gs
Electrical outlet
-r ,"
~
'
.
;
..
I
~
~
' , .
~
'
•
Th
e c
ha
rge lamp sl
ow
ly
fl
ashes
green
to
indicate that the battery is charging.
•
About
3 ho
urs
are required to charge a fully exhausted battery.
• When
the
ba
tter y
has
been co
mp
letely charged, the charge lamp tu
rns
of
f.
3.3
Disconnect t
he
Charging
AC
A
da
pte
r fr
om
the
elect
ri
ca
l o
ut
let and then
disconn
ect
the
USB
c
ab
l
e.
F
irst
Ste
ps
~
I
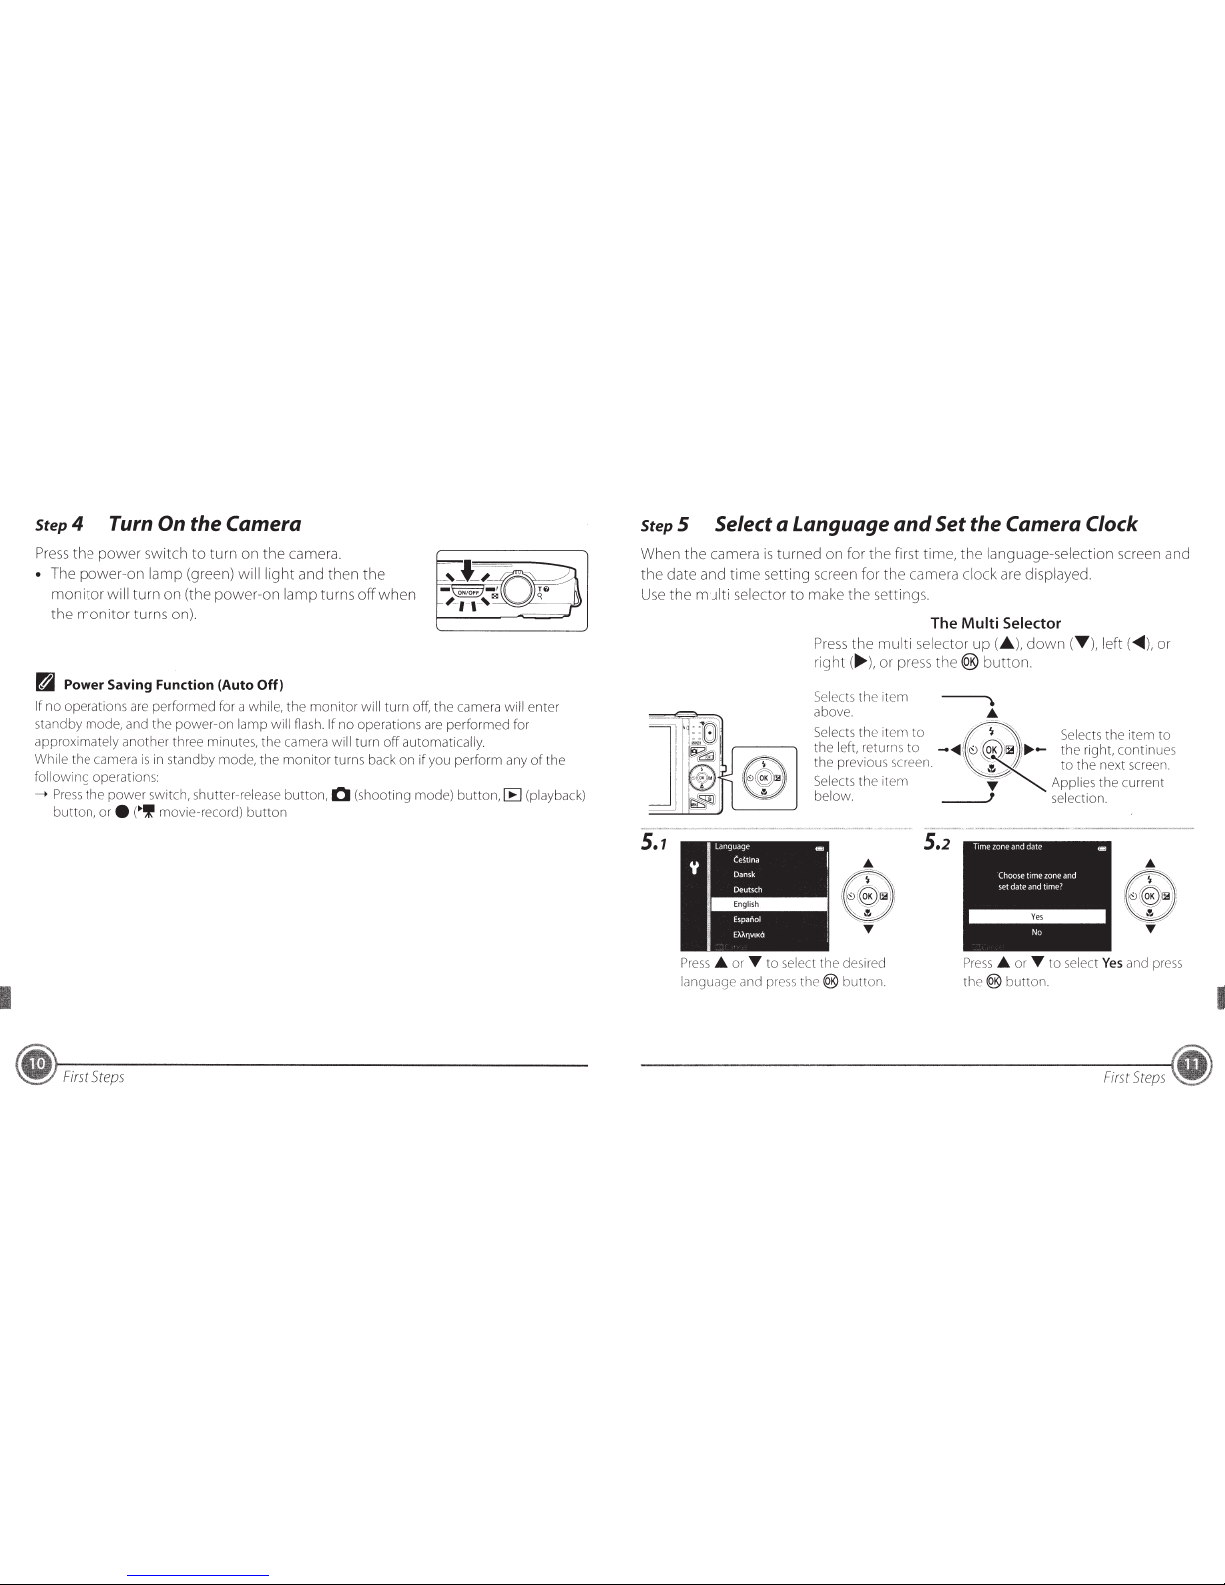
Step4
Turn On the Camera
Press
the
power
switch
to
turn on
the
camera.
• The power-on lamp (green) will
light
and then
the
monitor
will turn on (the power-on lamp turns
off
when
the
monitor
turns on).
~
Power Saving Function (Auto Off)
If no operations
are
performed for a while, the
monitor
will turn off,
the
camera will enter
standby mode, and
the
power-on
lamp will flash. If
no
operations
are
performed for
approximately another three minutes, the camera will turn
off
automatically.
While the camera
is
ir1
standby mode,
the
monitor
turns back on
if
you perform any
of
the
following operations:
--->
Press
the
power
switch, shutter-release button, Q (shooting mode) button, [E) (playback)
button,
ore
(~If
movie-record) buttor1
First
Steps
StepS
Select a Language
and
Set the Camera Clock
When the camera
is
turned on for
the
first time,
the
language-selection screen and
the
date and
time
setting screen for the camera clock are displayed.
Use
the
mJiti
selector
to
make
the
settings.
5.1
The Multi Selector
Press
the multi selector up(...._),
down
(T),
left
(<IIIII),
or
right(~),
or press
the®
button.
Selects the
1tcm
\
above.
.A
Selects the item
to
~
'\
Selects the
1tem
to
the
left
returns
to
-"ittl
~~
~121
)~--
the
nght
cont1nues
the
prev1ous screen.
l'J
to
the
next screen
Selects
the
1tem
T,
""""
Appl1es
the current
below.
J selection.
Press
.A.
or
"Y
to
select the deSired
language and press
the@
button.
5.2
f'ress
.A.
or
"Y
to select
Yes
a11d
press
the@
button.
First
Steps
I
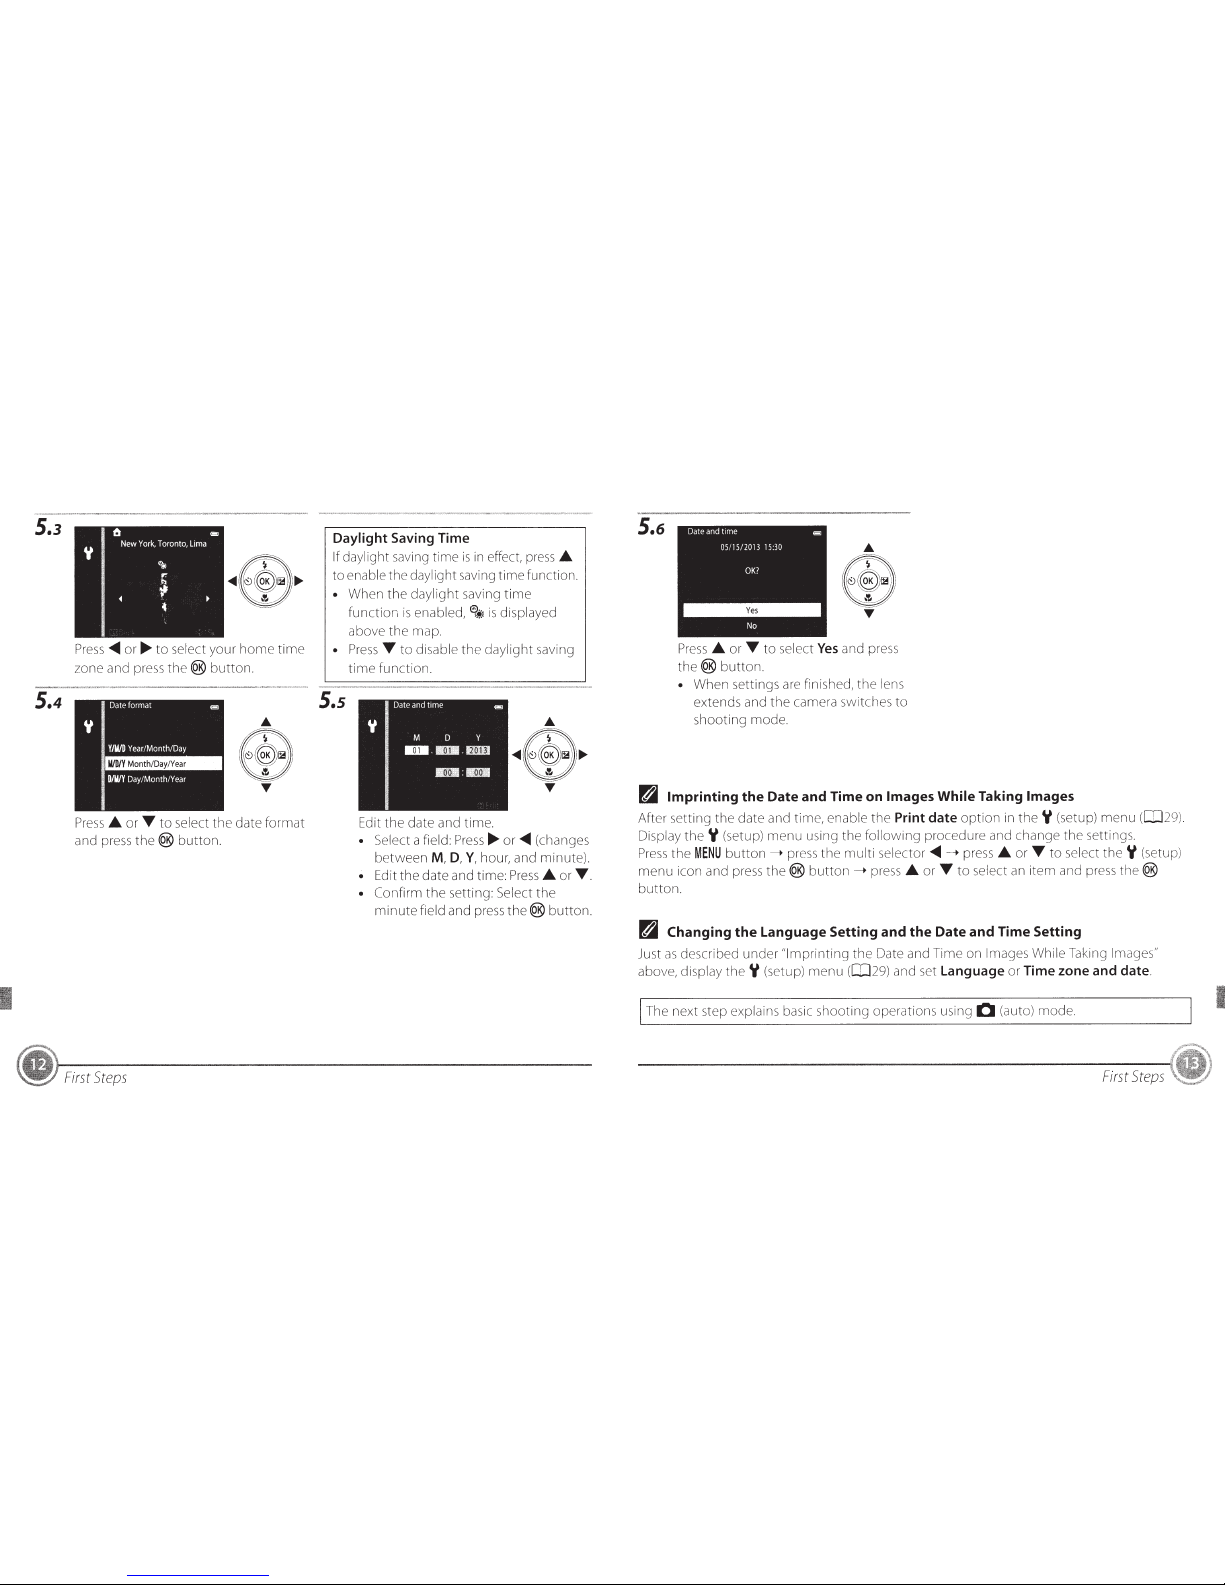
5.3
5.4
Press
<IIIII
or~
to
select your
home
trme
wne
and press
the®
button.
Press
_..
or T
to
select
the
date
format
amJ
press
the®
button.
First
Steps
Daylight Saving Time
If daylight saving time
is
in
effect, press_..
to
enable the daylight savirig time function
• When the daylight saving
time
function
is
enabled,
8
'*-'
is
drsplayed
above the rnap.
•
Press T to
disable
the
daylight saving
time
function.
5.s
Edit the date
arlCJ
time.
• Select a field
Press~
or
<IIIII
(changes
between
M,
D,
Y,
hour, and minute)
• Edit
the
date and time: Press_.. or T
• Confirm
the
setting: Select
the
minute
field and press
the®
button.
5.6
Press
_..
or T to select
Yes
and press
the®
button.
• When settings
are
firiished,
the
lens
extends and
the
camera switches
to
shooting mode.
fdj)
Imprinting the Date and Time
on
Images While Taking Images
After settir1g the date arid time, enable
the
Print date
option
in
theY
(setup) menu
(029)
Display
theY
(setup) menu using the
following
procedure and change the settrrigs.
Press
the
MENU
button---. press the rnulti selector
<IIIII
->press_.. or T
to
select
theY
(setup)
menu
icon and
press
the®
button
___.
press
_..
or T
to
select
an
item arid
press
the®
button.
fdj)
Changing
the
language
Setting and the Date and Time Setting
Just
as
described under "lmprintir1g
the
Date and Trme on Images While Takrng Images"
above, display
theY
(setup) menu
([029)
and set language
or
Time zone and date.
The next step explains basic shootir1g operations using 0 (auto) mode.
First
Steps
I
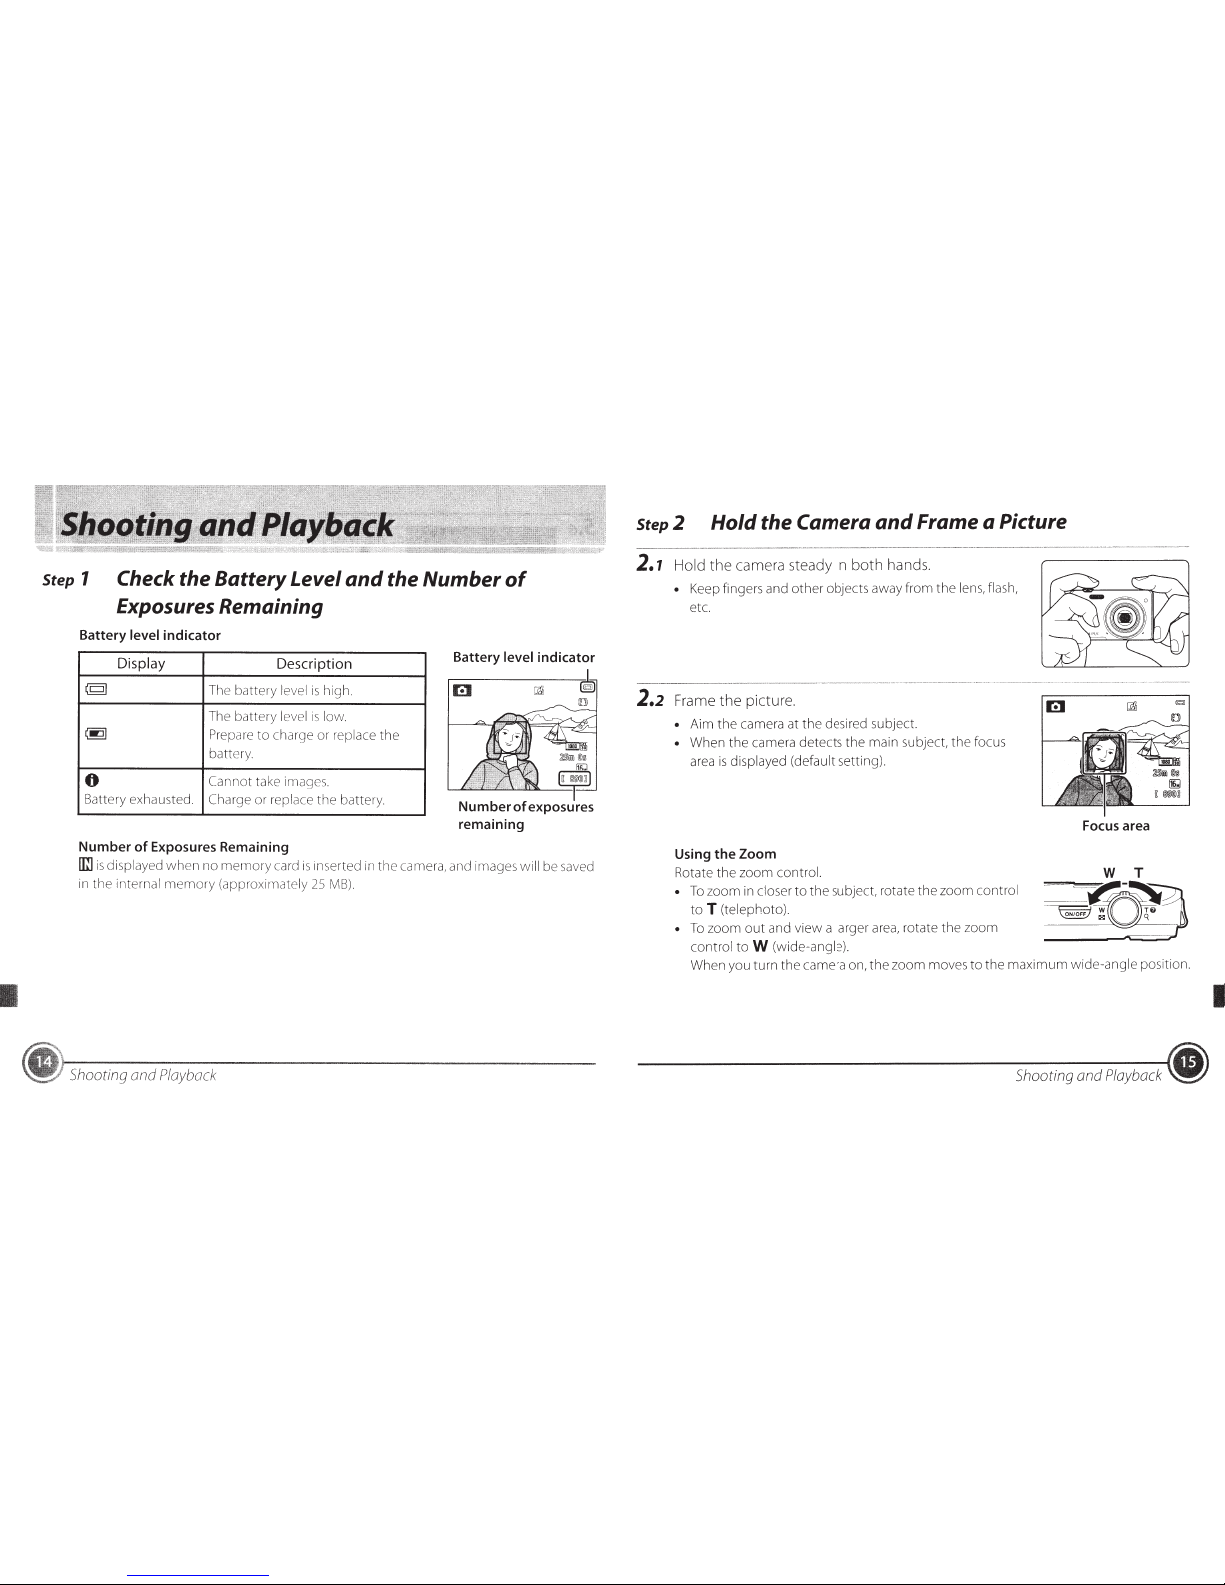
Step
1 Check the Battery Level
and
the
Number
of
Exposures Remaining
Battery
level
indicator
Display
Descr
i
ption
©1
The battery level is hig
h.
The battery level
is
l
ow
@)
Prepare to charge or repl
ac
e
the
battery
0
Carm
ot
ta
ke
image s.
Ba
tt
ery exhausted.
Cha
rge or replace
the
ba
tt
ery
Number
of
Exposures Remaining
Battery
level
indicator
'rn-.-
-
--
"2!!
--~
~
i]
@M
l1fQ
luj nl
Number
of
exposures
remaining
1m
is displayed
whe
n
no
mem
ory
card is inserted in
the came
ra
,
and
images will be
sa
ved
in
the
int
ernal
mem
ory (approximately
25
lv1
B)
~
Sho
oting and
Playback
Step2
Hold
the Camera
and
Frame
a
Picture
2.1
Hold
the
ca
mera steady in
both
hands.
•
Kee
p fingers and
ot
her
ob
jects away from
the
lens, flash,
et
c.
2.2
Fra
me
the pictur
e.
• Aim
the camera at the desired subj
ec
t.
•
When
the
camera
det
ects
th
e main
s
ub
jec
t,
the focus
ar
ea
is
di
splayed (default
se
tt
ing).
Using
the
Zoom
Ro
tate
th
e zoom con
tro
l.
• To zoom in clo
se
r
to
the subject, r
ot
ate the zoom
con
tro
l
to T (tele
photo
).
To zoom
out
and view a larger
area
, rotate the zoom
control
to
W (wide-angle).
Focus
area
When you
tum
the camera
on
, the zoom
mo
ves
to
the maxi
mu
m wide-angle positio
n.
Shooting and
Playbac
k
~
I
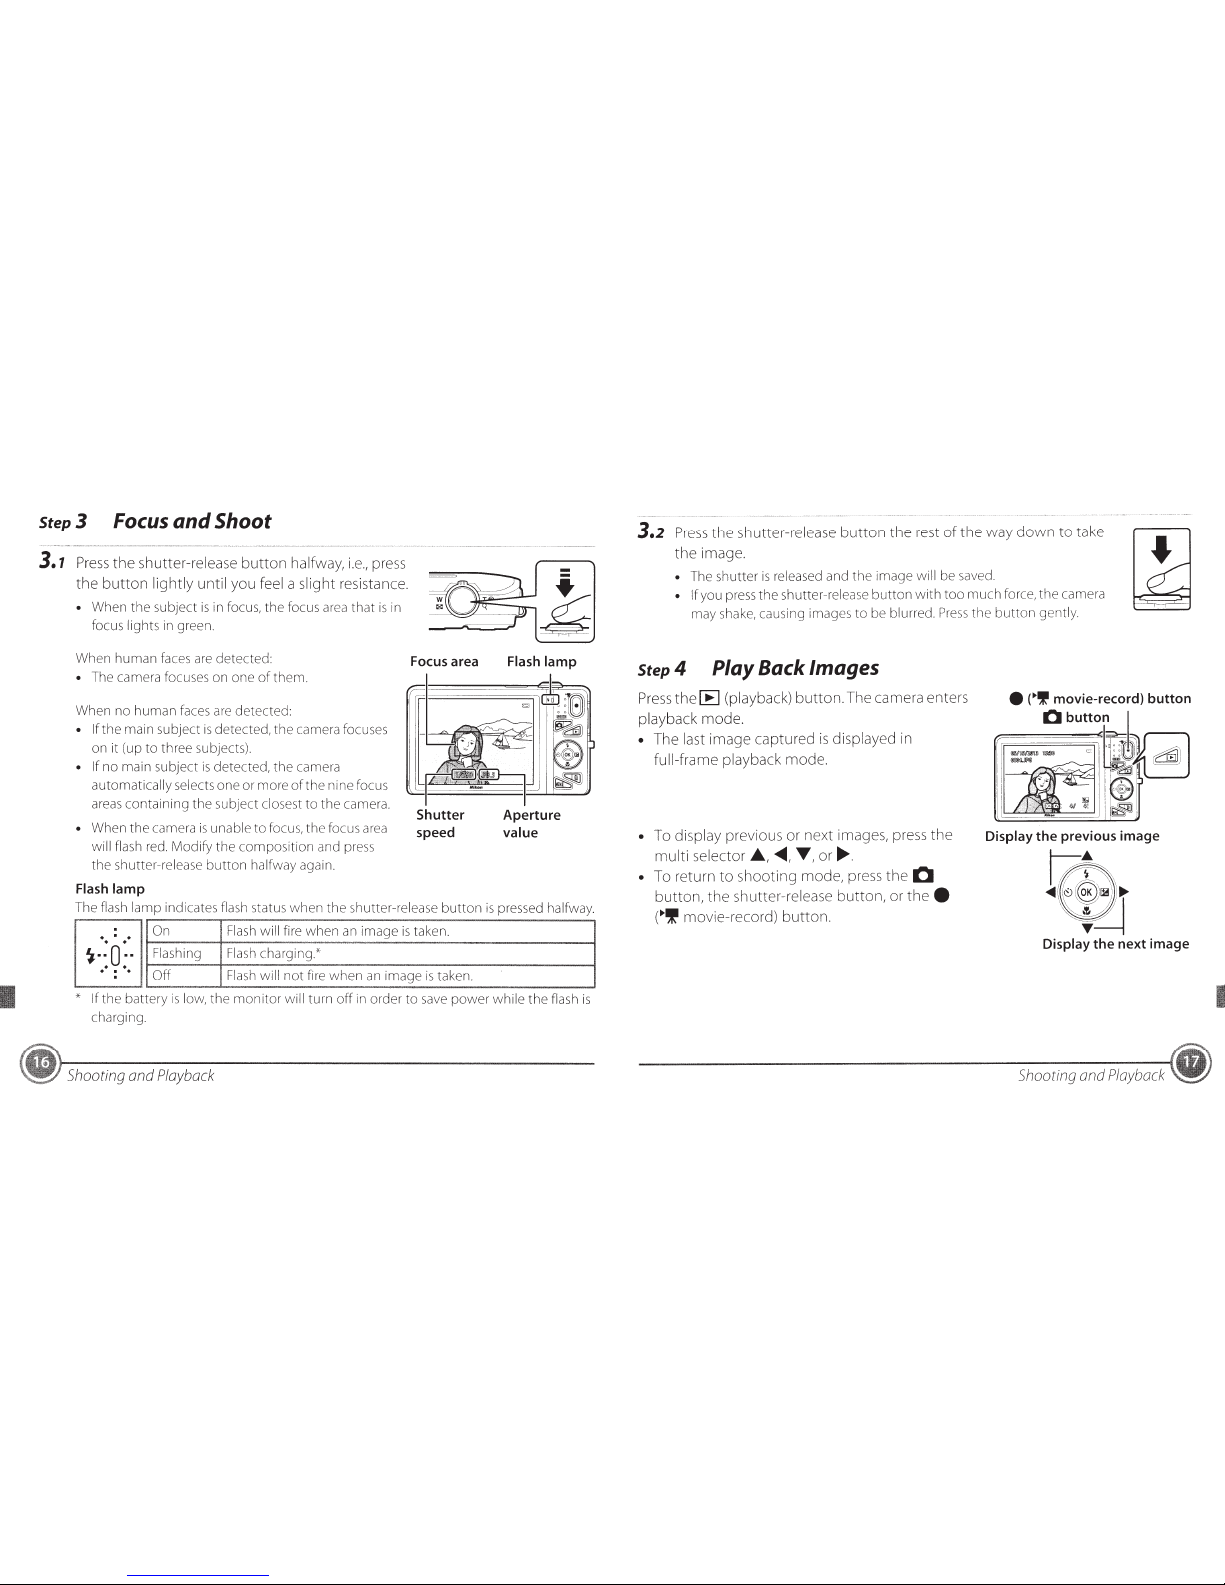
Step3
Focus
and Shoot
3.7
Press
the
shutter-release
button
halfway,
i.e.,
press
the
button
lightly until you feel a slight resistance.
When
the
subject
is
in focus, the focus
area
that
is
ir1
focus lights in green.
When
human
faces
are
detected
• The camera focuses on one
of
them.
When no
human
faces arc detected:
• If
the
main subject
is
detected,
the
camera focuses
on it (up
to
three subjects).
• If no main subject
is
detected, the camera
automatically selects
one
or more
of
the nine focus
areas
containing
the
subject closest
to
the
camera.
• When the camera
is
unable
to
focus, the focus
area
will flash
red.
Modify
the
composition
and press
the shutter-release
button
halfway again.
Flash lamp
Focus area
Shutter
speed
-
•
~
Flash lamp
Aperture
value
The flash lamp indicates flash status
when
the
shutter-release
button
is
pressed halfway.
~::
0
:·.
. .
.
. .
' If
the
battery
is
low,
the
monitor
will
tum
off
in order
to
save
power
while
the flash
is
charging
Shooting and
Playback
3.2
Press
the
shutter-release
button
the
rest
of
the
way
down
to
take
the
image.
The shutter
is
released and
the
image will be saved.
If you press
the
shutter-release
button
with
too
much
force, the camera
may shake, causing images
to
be blurred.
Press
the
button
gently
Step4
Play Back Images
Press
the
[E]
(playback) button. The camera enters
playback mode.
• The last image captured
is
displayed in
full-frame playback mode.
• To display previous or next images, press
the
multi selector
.A.,
......
T,
or~-
• To return
to
shooting mode, press
the
0
button,
the
shutter-release button, or
thee
(.,If
movie-record) button.
Display the previous image
...
· . .
L;\
...I\'~
(§_))l2)/
...
'~::~_::/
I
Display
the
next image
Shooting and
Playback
I
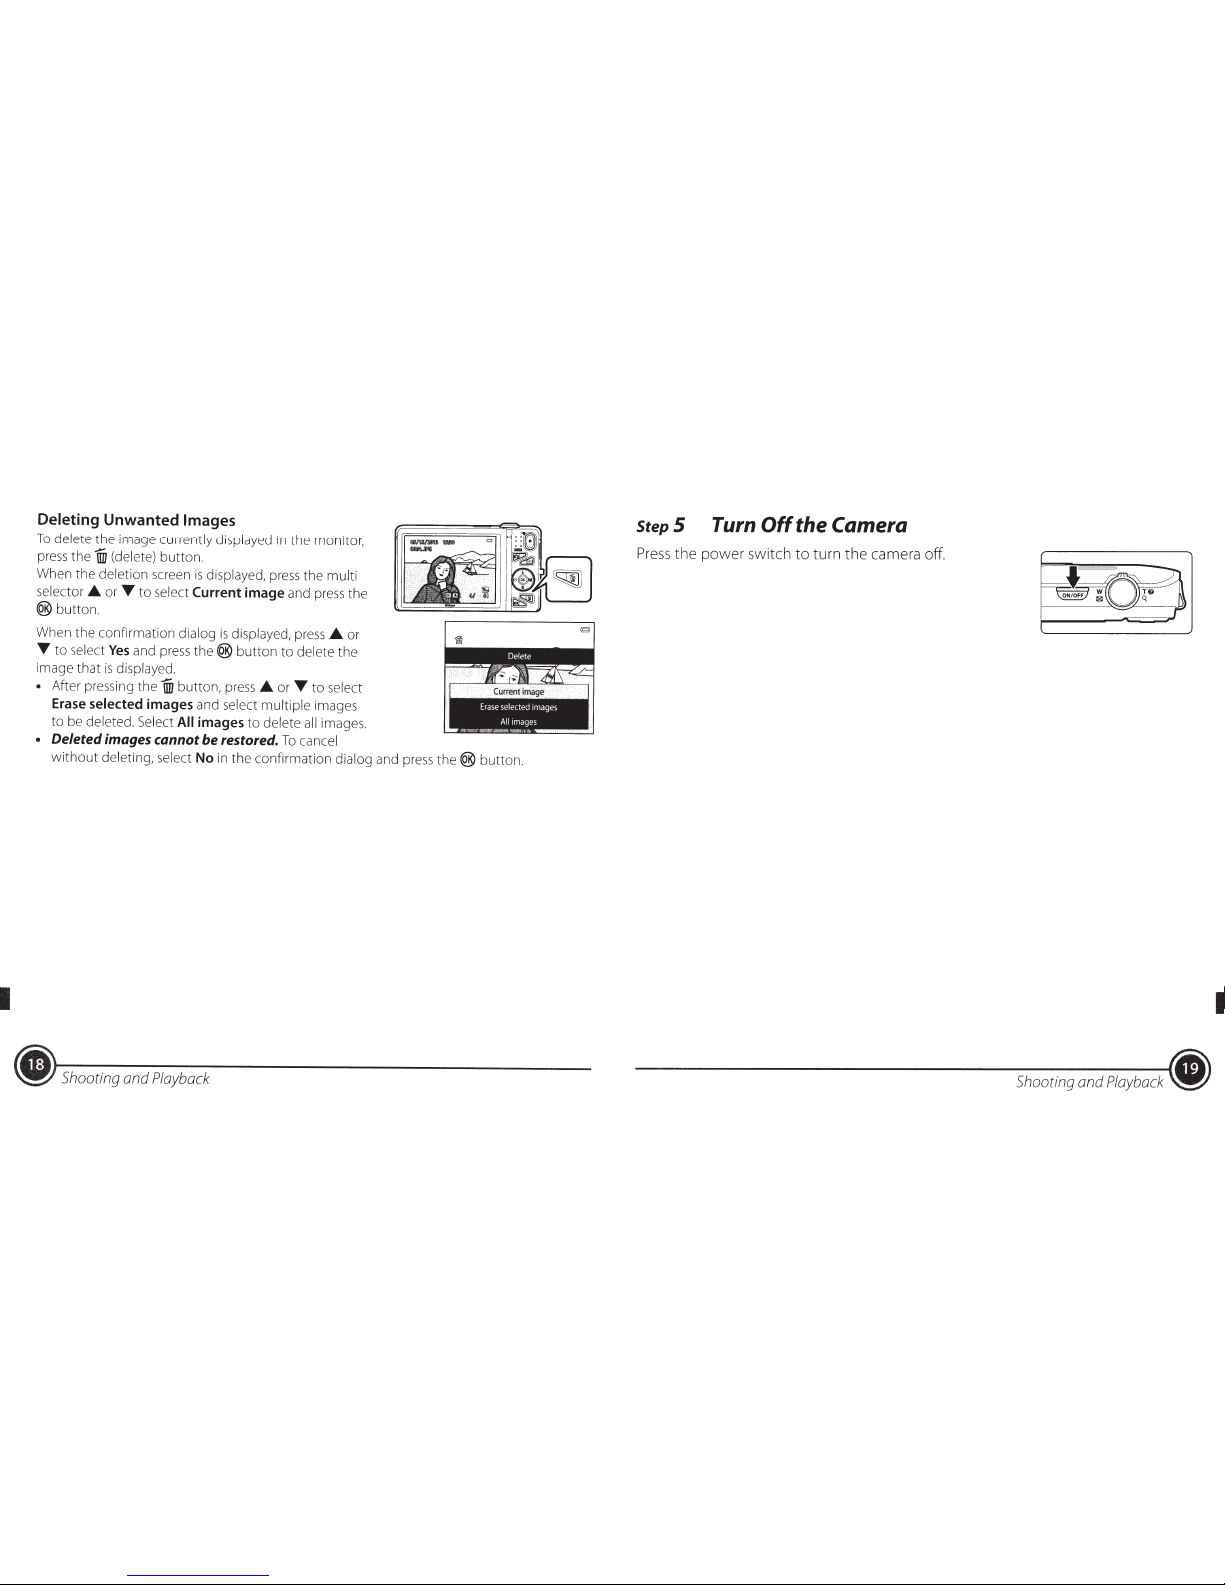
Deleting
Unwanted
Images
To
delete the image
currently displayed
in
the monitor,
press
the
1ID
(delete)
button
.
When the
deletion
screen
is
displayed,
press the
multi
selector
.A.
or
T
to
select
Current
image
and
press
the
®button.
When the confirmation
dialog
is
displayed,
press
.A.
or
T
to
select
Yes
and press
the®
button
to
delete
the
image
that
is
displayed.
•
After pressing the
1ID
button,
press
.A.
or
T
to
select
Erase selected images
and
select multiple
images
to
be
deleted. Select
All
images
to
delete
all
images.
•
Deleted images cannot
be
restored.
To
cancel
without
deleting, select
No
in
the confirmation
dialog and
press
the®
button.
.,
Shooting and
Playback
StepS
Turn
Off
the Camera
Press
the power switch to turn the camera
off.
I
Shooting and
Playback
•

ViewNX 2
is
an ail-in-one software package
which
enables
you
to
transfer, view,
edit
and share images. Install ViewNX 2 using
the
included
ViewNX 2 CD-ROM.
Step 1
Installing ViewNX 2
• An
Internet
connection
is
required.
Compatible Operating Systems
Windows
Windows
8,
Windows
7,
Windows
Vista,
Windows
XP
Macintosh
Mac
OS
X 1
0.6, 1 0.7,
10.8
Using
ViewNX
2
Refer
to
the
Nikon
website
for
details
on
system requirements,
including
the
latest
information
on
operating
system
compatibility.
1.1
Start
the
computer
and insert
the
ViewNX 2 CD-ROM
into
the
CD-ROM drive.
• Windows: If instructions for
operating
the
CO-ROM are displayed in
the
window,
follow
the
instructions
to
proceed
to
the
installation
window.
• Mac
OS:
When
the
ViewNX 2
window
is
displayed,
double-click
the
Welcome icon.
1.2
Select a
language
in
the
language
selection
dialog
to
open
the
installation
window.
• If
the
desired language
is
not
available, click Region Selection
to
choose a different
region and
then
choose
the
desired language (the Region Selection
button
is
not
available in
the
European release).
Click Next
to
display
the
installation
window.
Wf.lkome
to
the
world
ofN,~on
digi~&i
phologr;sphy
P~ease
~elect
your language (mrn
the
drop-doW'l
lnst
Using
ViewNX
2
I
1.3
Start
the
installer.
•
We
recommend
clicking
Installation
Guide
in
the
installation
window
to
check
the
installation
help
information
and system requirements before installing ViewNX
2.
• Click
Typical Installation
(Recommended)
in
the
installation
window.
1.4
Download
the
software.
•
When
the
Software
Download
screen
is
displayed,
click
I
agree-
Begin
download.
• Follow
the
on-screen instructions
to
install
the
software.
1.5
Exit
the
installer
when
the
installation
completion
screen
is
displayed.
•
Windows:
Click
Yes.
• Mac
OS:
Click
OK.
The
following
software
is
installed:
• ViewNX 2 (consisting
of
the
three
modules
below)
Nikon Transfer
2:
For transferring images
to
the
computer
- ViewNX
2:
For viewing,
editing,
and
printing
transferred images
- Nikon
Movie
Editor: For basic
editing
of
transferred movies
• Panorama
Maker (for creating a single panorama
image
of
a landscape, etc.
from
a
series
of
images
that
each capture a separate
portion
of
the
subject)
1.6
Remove
the
ViewNX 2 CD-ROM
from
the
CD-ROM
drive.
~
Using
ViewNX
2
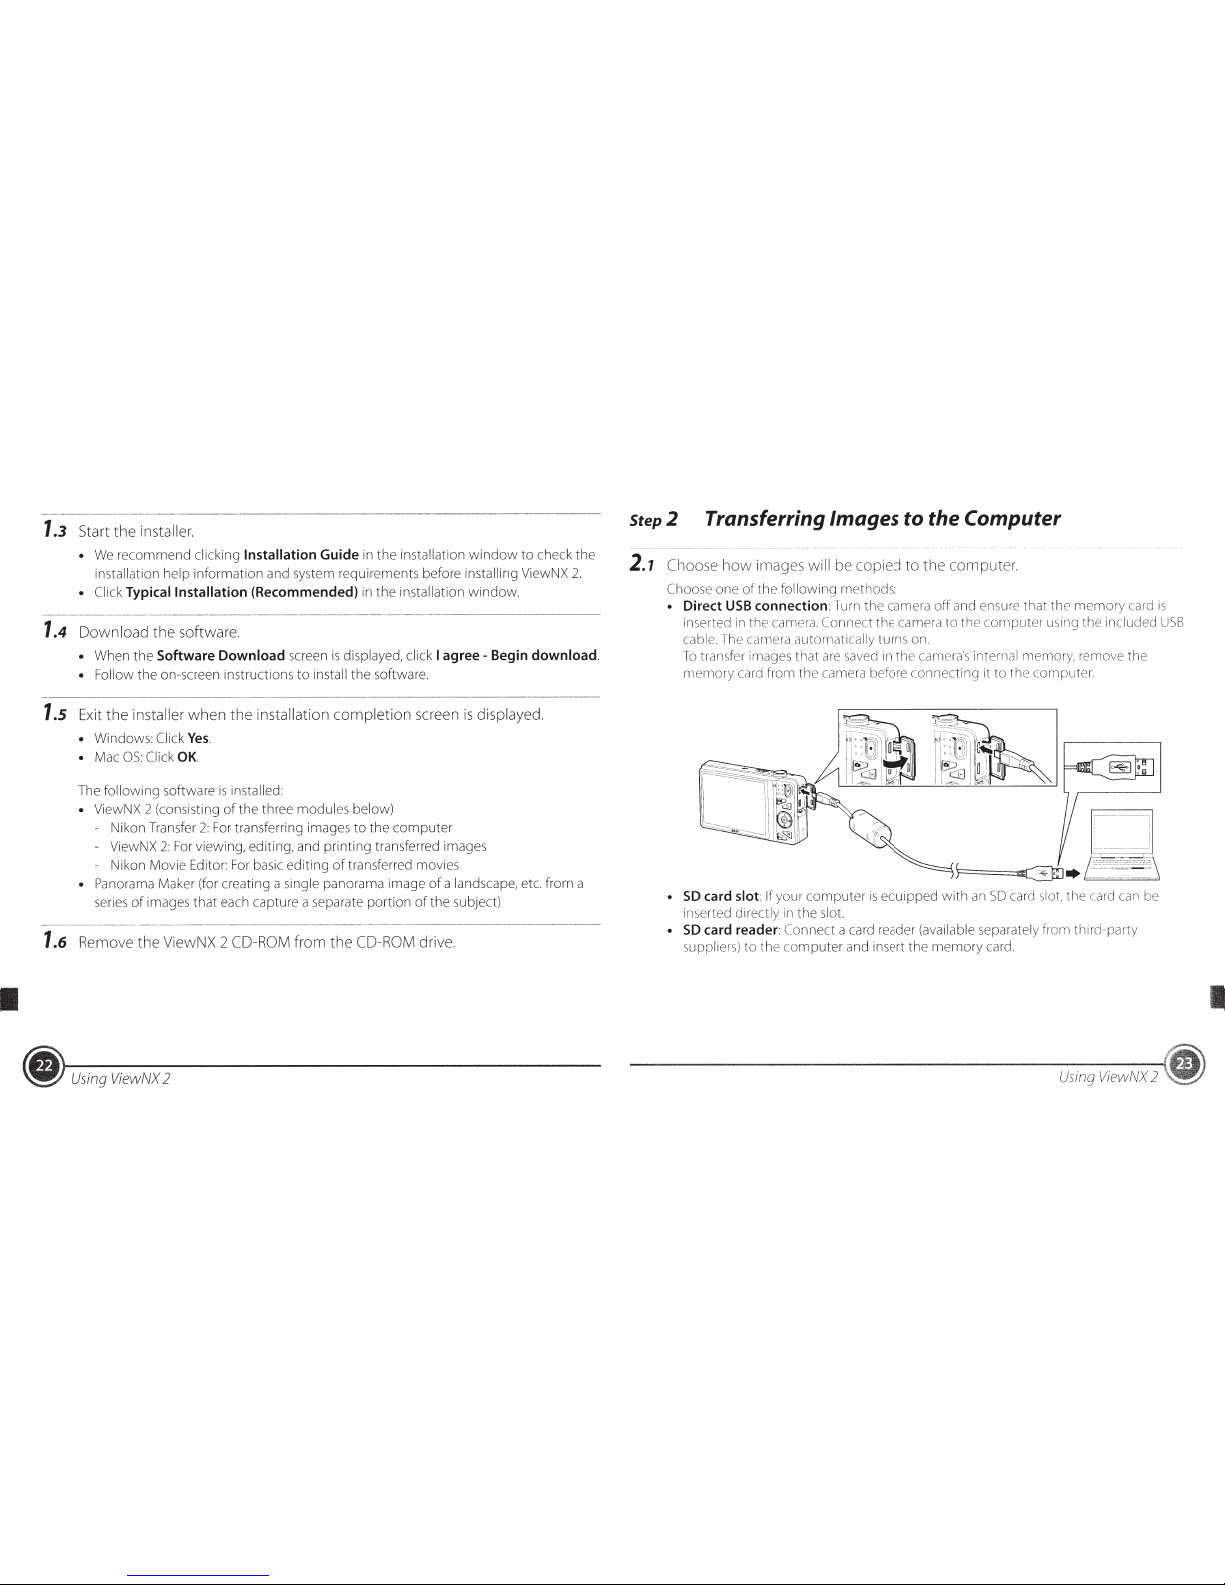
Step2
Transferring Images to the Computer
2.1
Choose
how
images
will
be copied
to
the
computer.
Choose
one
of
the
following
methods:
• Direct
USB
connection:
Turn
th
e
ca
mera
off
a
nd
ensure
that
th
e
memor
y card
is
inserted in
the
ca
mera.
Co
nne
ct
the
camera
to
the
co
mputer
using
the
included
USB
cable. The camera
automati
ca
lly turns on.
To
transfer images
that
are saved in
the
came
ra'
s internal memory, remove
the
memory
card
from
the
camera before
connecting
it
to
the
comput
er.
~-~
•
SO
card
slot:
If
your
computer
is
equipped
with
an
SO
card slot,
the
card
can be
inserted directly in
the
slot.
•
SO
card reader:
Connect
a card reader (available separately
from
third-party
suppliers)
to
the
computer
and insert
the
memory
card.
Using
ViewNX
2
I
If
a message
is
displayed
prompting
you
to
choose a
program,
select
Nikon Transfer
2.
•
When using Windows 7
If
the
dialog
shown
at
right
is
displayed,
follow
the
steps
below
to
select
Nikon Transfer
2.
1
Under
Import
pictures and videos,
click
Change
program.
A
program
selection
dialog will
be displayed;
select
Import
File
using Nikon Transfer 2
and
click
OK.
2
Double-click
Import
File.
_I~-·
____
r
·
If
the
memory
card contains a
large
number
of
images,
it
may take a
while
for Nikon
Transfer 2
to
start. Wait
until
Nikon Transfer 2 starts.
~
Connecting the
USB
Cable
The connection may
not
be recognized if the camera
is
connected
to
the computer
via
a
USB
hub.
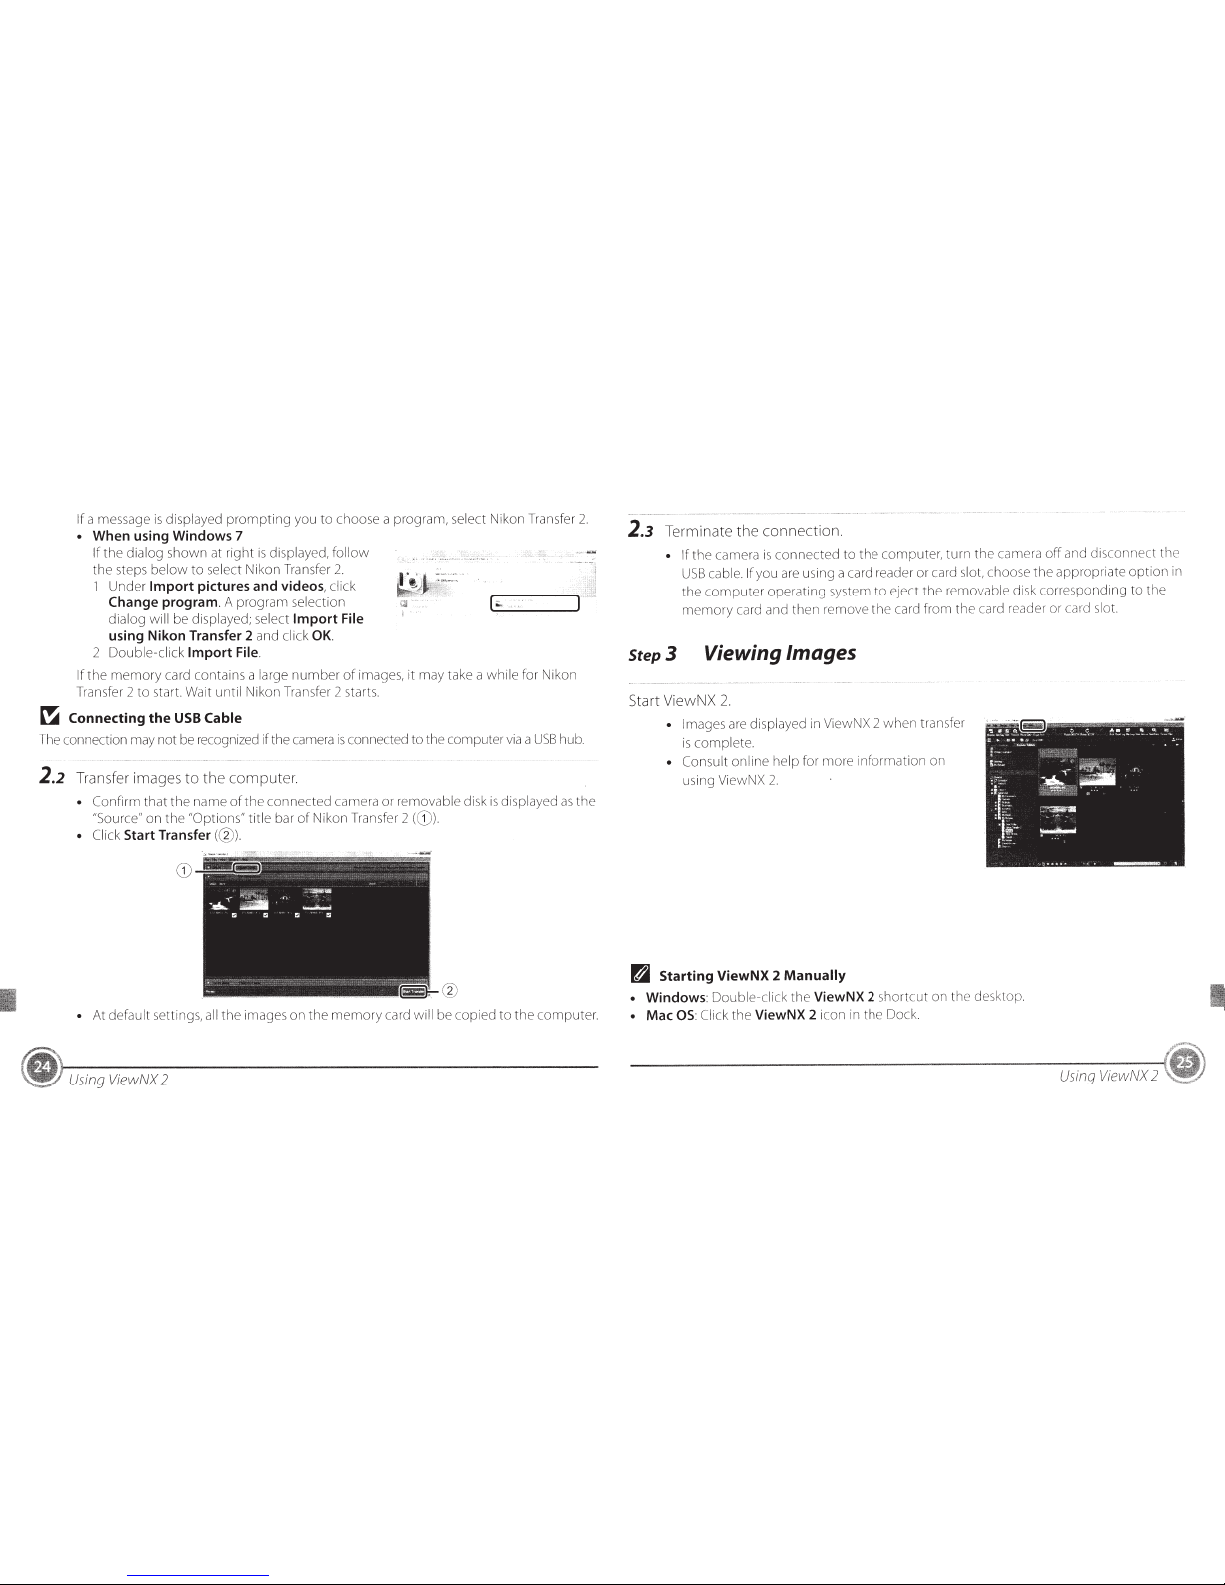
2.2
Transfer images
to
the
computer.
• Confirm
that
the
name
of
the
connected
camera
or
removable
disk
is
displayed
as
the
"Source"
on
the
"Options"
title
bar
of
Nikon Transfer 2
(
G)
).
• Click
Start Transfer(@).
@
•
At
default
settings,
all
the
images
on
the
memory
card
will
be
copied
to
the
computer.
Using
ViewNX
2
2.3
Terminate
the
connection.
• If
the
camera
is
connected
to
the
computer,
turn
the
camera
off
and
disconnect
th
e
USB
cable.
If
you are using a card reader or card slot, choose
the
appropriate
option
in
the
c
omputer
operating
system
to
eject
the
removable disk
corresponding
to
the
memory
card and
then
remove
th
e card
from
the
card reader or card
slot.
Step3
Viewing Images
Start ViewNX
2.
• Images are displayed in ViewNX 2
when
transfer
is
complete.
• Consult
online
help
for
more
information
on
using ViewNX
2.
B
Starting
ViewNX
2
Manually
•
Windows:
Double-click
the
ViewNX 2
shortcut
on
the
desktop.
•
Mac
OS:
Click
the
ViewNX 2
icon in
th
e Dock.
Using
ViewNX
2
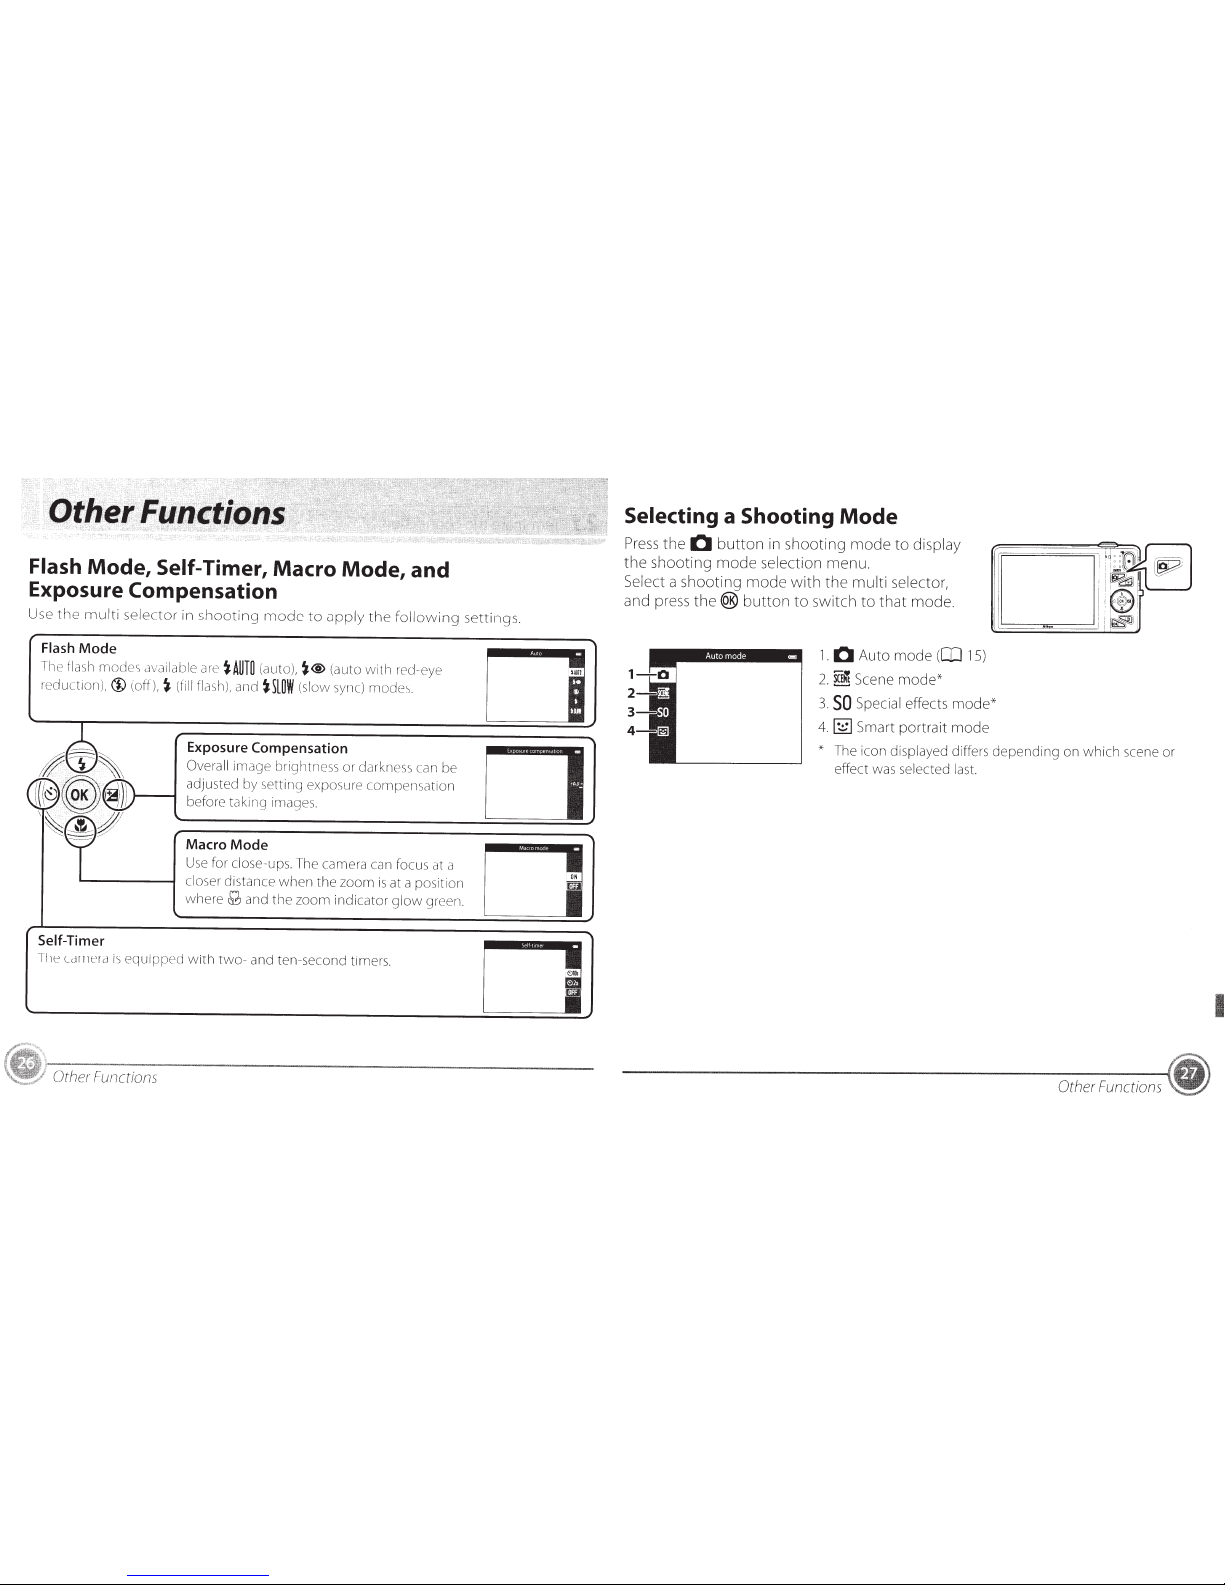
Flash
Mode, Self-Timer, Macro Mode, and
Exposure Compensation
Us
e the
multi
selector in s
hooting
mode
to
apply
the
following
settings.
Flash
Mode
The flash
modes
av
ail
able
are
~AUTO
(a
ut
o),
~®
(a
ut
o
with
re
d-
eye
redu
ct
ion)
,(})
(off)
,~
(fi
ll
f
la
sh)
, and
~~lOW
(slow
sy
n
c)
modes.
Self-Timer
Exposure
Compensation
Overall ima
ge
brigh
tn
e
ss
or
darkness can be
adjusted
by
s
etting
exp
os
ure
comp
e
ns
a
tion
before tak ing
im
ag
es
.
Macro
Mode
Use
for
close -ups. The camera can
focu
s at a
closer distance
when
the
zoom
is at a p
os
itio n
where
&2J
and
th
e
zoom
indicator
glow
green.
The
ca
me
ra
is
equ
ip
ped
w
ith
two-
and
ten-second
timers.
Other Functions
D
.
D
N
D
D
I
Selecting
a
Shooting
Mode
Press
the
0
button
in
shooting
mode
to
display
the
shooting
mode
selection menu.
Select
a
shooting
mode
with
the
multi
selector,
and press
the(@
button
to
switch
to
that
mode.
1.
0
Auto mode
(OJ
15)
2.
scEft
Scene
mode*
3.
SO
Special
effects mode*
4.
[;ill
Smart portrait mode
*
The
icon
displayed differs
depending
on
which
scene
or
effect
was selected
la
s
t.
Other Functions
I
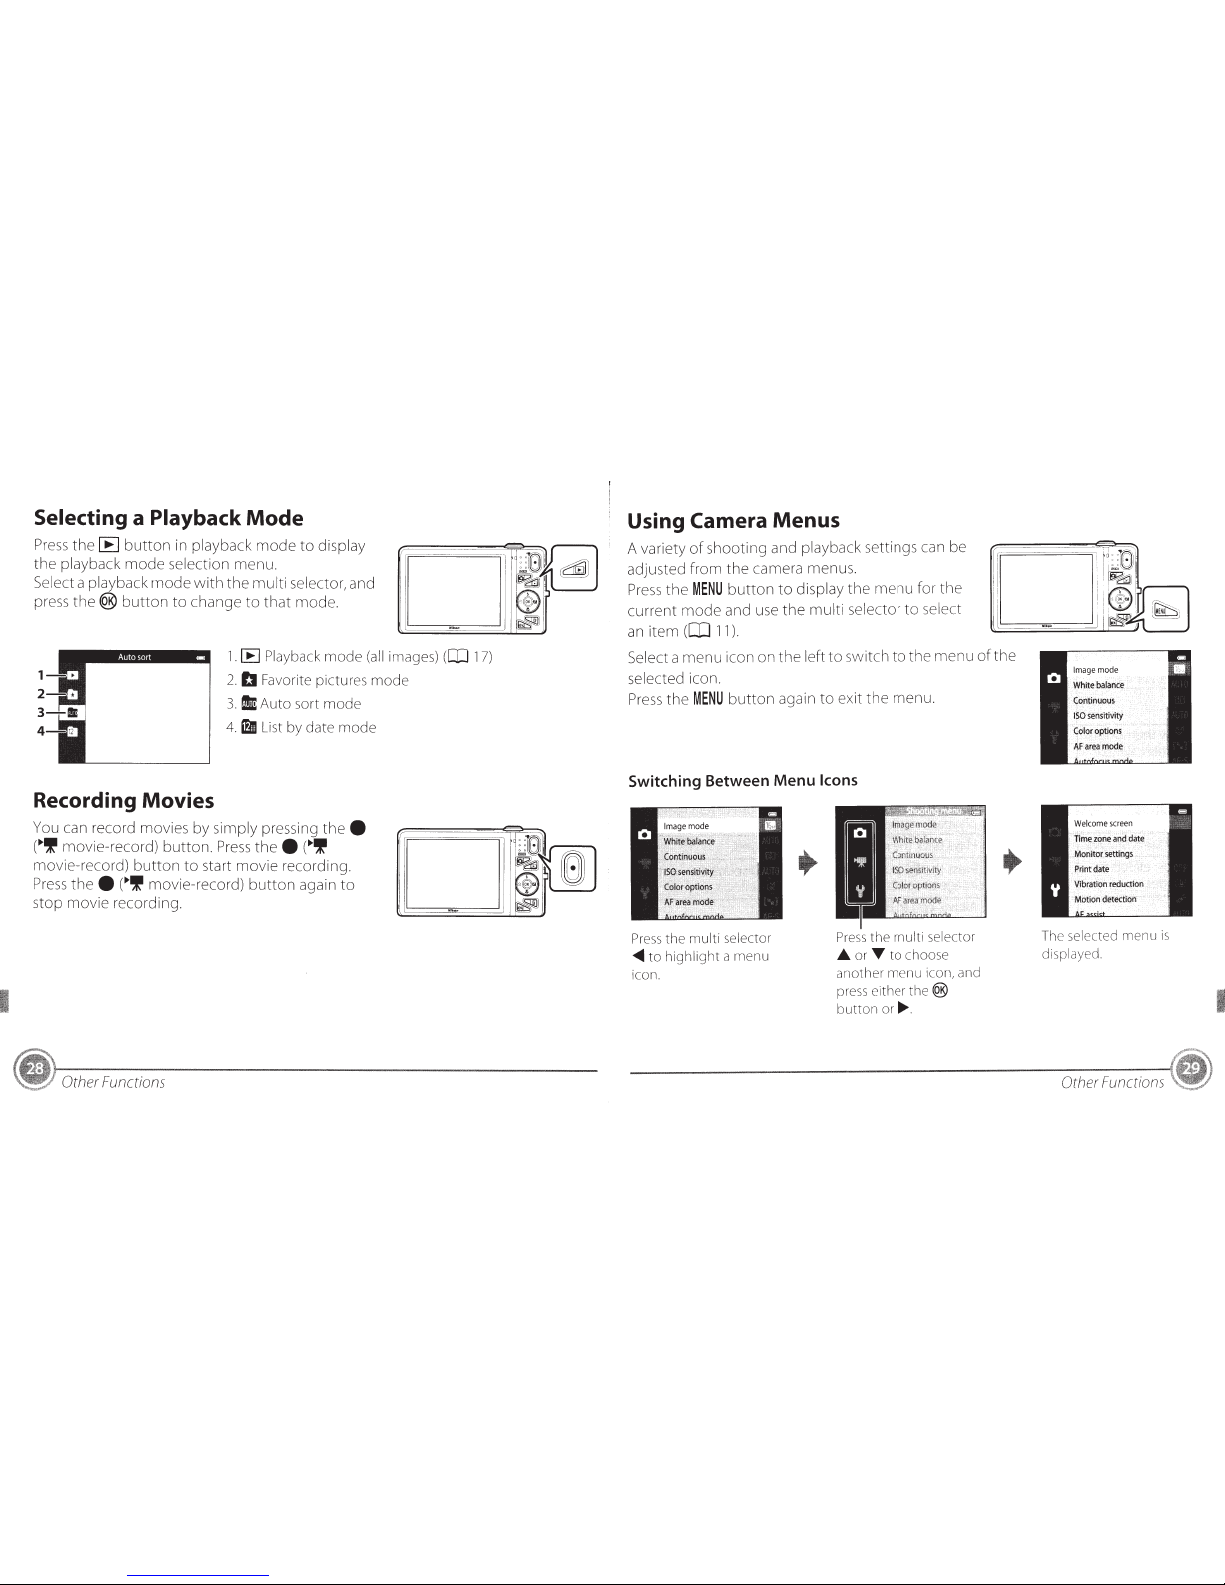
Selecting a Playback
Mode
Press
the
[E)
button
in
playback
mode
to
display
the
playback
mode
selection
menu.
Select
a
playback
rnode
with
the
multi
selector,
and
press
the®
button
to
change
to
that
mode.
Recording Movies
1.
[E
Playback
mode
(all
images)
([Il
17)
2.
b
Favorite pictures mode
3.
1m
Auto sort mode
4.lfl
List
by date mode
You can record movies by
simply
pressing
thee
(.,'!movie-record)
button.
Press
thee
(.,If
movie-record)
button
to
start
movie
recording.
Press
thee
(.,'!
movie-record)
button
again
to
stop
movie
recording.
Other Functions
Using
Camera
Menus
A
variety
of
shooting
and
playback
settings can be
adjusted
from
the
camera menus.
Press
the
MENU
button
to
display
the
menu
for
the
current
mode
and use
the
multi
selector
to
select
an
item
(1:0
11).
Select
a
menu
icon on
the
left
to
switch
to
the
menu
of
the
selected
icon.
Press
the
MENU
button
again
to
exit
the
menu.
Switching Between Menu Icons
Press
the
multi
selector
~to
highlight
a
menu
icon.
Press
the
multi
selector
..&.
or
T
to
choose
another
menu icon, and
press e
ither
the
®
butt
on
or
.......
The
selec
ted
menu
is
displayed
.
Other Functions
I
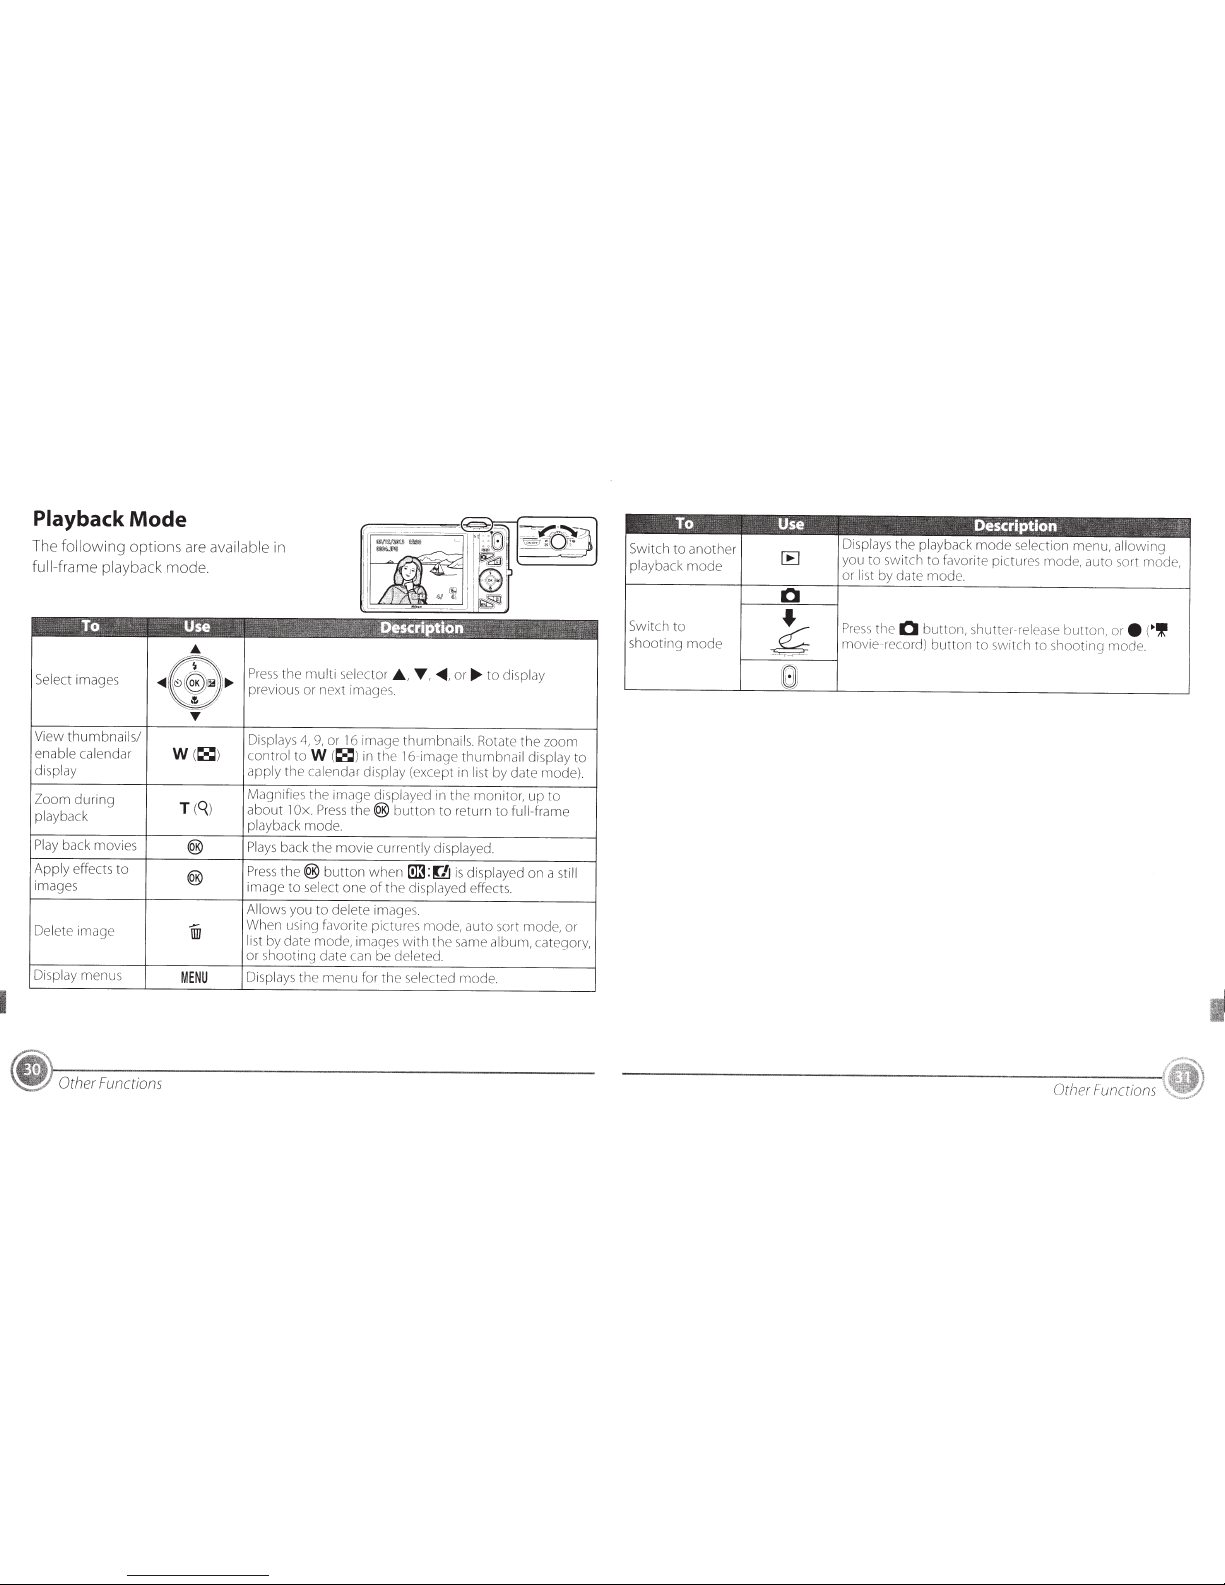
Playback
Mode
The
following
options
are
available
in
full-frame playback mode.
..
Select
image
s
~
~(~~
)
) .,...
Press
the
multi
selector
.A.
,
T ,
<411111,
or
....
to
display
~
h;
previous
or
next
im
ages.
View
thumbnails/
enable calendar
display
Zoom
during
playback
Play
back movies
Apply
effects
to
images
Delete
im
age
Di
sp
lay
menus
Other Functions
'~
:5/
T
W
(
~
)
MENU
Displays
4,
9,
or 16
image
thumbnails. Rotate
the
zoom
contro
l
toW
(
~
)in
the
16-image
thumbnail
display
to
apply
the
calendar display
(except in
list
by date mode).
Magnifies
the
image
displayed
in
the
monitor,
up
to
about
1
Ox.
Press
the(@
button
to
return
to
full-frame
playback
mode.
Plays
back
the
movie
currently displayed.
Press
the(@
button
when
[illi:
Ul
is
displayed
on
a still
image
to
select
one
of
th
e
displayed effects.
Allows you
to
delete
images.
When using favorite pictures mode,
auto
sort mode,
or
list
by date
mode,
image
s
with
the
same
album,
category,
or
s
ho
ot
ing
date
can be
deleted.
Displays
th
e
menu
for
th
e
se
le
cted
mode.
Switch
to
another
playback
mode
Switch
to
shooting
mode
Displays
the
playback
mode
se
lectio n
menu,
all
owi
ng
you
to
switch
to
favorite pictures mode,
auto
sort
mode
,
or
li
st
by date
mode.
Pr
ess
the
0
butt
o
n,
shutter-release
button,
ore
(
~If
mo
vie- record)
button
to
swit ch
to
shooting
mod
e.
Other Functions
To
prevent
damage
to
your
Nikon
product
or
injury
to
yourself
or
to
others, read
the
following
safety
precautions
in
their
entirety
before
using this
equipment.
Keep these
safety
instructions
where
all
those
who
use
the
product
will
read
them.
The
consequences
that
could
result
from
failure
to
observe
the
precautions
listed in this
section are
indicated
by
the
following
symbol:
.....
This icon marks warnings, information
that
should
be read before using this Nikon product,
~
to
prevent possible
injury.
WARNINGS
~
Turn
off
in
the
event
of
malfunction
Should you notice smoke or
an
unusual smell
coming
from
the
camera or
Charging
AC
Adapter, unplug the
Charging
AC
Adapter
and remove the battery immediately, taking
care
to
avoid burns.
Continued
operation
could result
in
injury. After removing or
disconnecting the
power
source, take the
equipment
to
a Nikon-authorized service
representative for inspection.
~
Do not
disassemble
Touching the internal parts
of
the camera or
Charging
AC
Adapter could result
in
injury.
For
Your
Safety
Repairs should be performed only by
qualified technicians. Should
the
camera or
Charging
AC
Adapter break open
as
the
result
of
a
fall
or other accident, take
the
product
to
a Nikon-authorized service representative for
inspection, after
unplugging
the
product
and/or
removing the battery.
~
Do not use the camera or
Charging
AC
Adapter
in
the presence
of
flammable
gas
Do
not
use
electronic
equipment
in
the
presence
of
flammable
gas,
as
this
could
result in
explosion
or
fire.
~
Handle
the
camera strap with care
Never place
the
strap
around
the
neck
of
an
infant
or
child
.
~
Keep out
of
reach
of
children
Particular care
should
be
taken
to
prevent
infants
from
putting
the
battery
or
other
small
parts
into
their
mouths.
~
Do not remain
in
contact with
the
camera, battery charger, or
AC
adapter for extended periods
while
the devices are on or
in
use
Parts
of
the
devices
become
hot. Leaving
the
devices in
direct
contact
with
the
skin
for
extended
periods
may
result
in
low-
temperature
burns.
~
Observe caution when
handling
the battery
The
battery
may
leak, overheat,
or
explode
if
improperly
handled. Observe
the
following
precautions
when
handling
the
battery
for use in this
product:
• Before replacing
the
battery,
turn
the
product
off.
If
you
are using
the
Charging
AC
Adapter/
AC
adapter, be
sure
it
is
unplugged.
•
Use
only
a Rechargeable Li-ion Battery
EN-EL
19
(included).
Charge
the
battery
by using a camera
that
supports
battery
charging
or
by
using a Battery Charger
MH-66
(available separately). To charge
the
battery
with
the
camera, use
either
Charging
AC
Adapter
EH-70P
(inc luded)
or
the
Charge
by computer
function.
•
When
inserting
the
battery,
do
not
attempt
to
insert it upside
down
or
backwards.
•
Do
not
short
or
disassemble
the
battery
or
attempt
to
remove
or break
the
battery
insulation or casing.
•
Do
not
expose
the
battery
to
flame
or
to
excessive heat.
•
Do
not
immerse
in
or
expose
to
water
.
• Put
the
battery
in
the
battery
case before
transporting
it.
Do
not
transport
or
store
with
metal
objects
such
as
necklaces
or
hairpins.
•
The
battery
is
prone
to
leakage
when
fully discharged. To avoid
damage
to
the
product,
be
sure
to
remo
ve
the
battery
when
no
charge remains.
For
Your
Safety
•
Discontinue use
immediately
should
you
notice
any change in
the
battery,
such
as
discoloration
or
deformation.
• If
liquid
from
the
damaged
battery
comes in
contact
with
clothing
or skin,
rinse
immediately
with
plenty
of
water.
A
Observe
the
following
precautions
when
handling
the
Charging
AC
Adapter
• Keep dry. Failure
to
observe this
precaution
could
result in fire or electric
shock.
•
Dust
on
or near
the
metal
parts
of
the
plug
should be removed
with
a dry
cloth.
Continued
use
could
result in fire.
•
Do
not
handle
the
plug
or
go
near
the
Charging
AC
Adapter
during
lightning
storms. Failure
to
observe this
precaution
could
result in electric shock.
•
Do
not
damage, modify, forcibly
tug
or
bend
the
USB
cable,
place
it
under
heavy
objects, or expose it
to
heat or flames.
Should
the
insulation be
damaged
and
the
wires
become
exposed, take it
to
a
Nikon-authorized service representative
for inspection. Failure
to
observe these
~
For
Your
Safety
precautions
could
result in fire
or
electric
shock.
•
Do
not
handle
the
plug
or
Charging
AC
Adapter
with
wet
hands. Failure
to
observe this precaution
could
result in
electric shock.
•
Do
not
use
with
travel converters
or
adapters designed
to
convert
from
one
voltage
to
another
or
with
DC
-to-AC
iQverters. Failure
to
observe this
precaution
could
damage
the
product
or cause overheating
or
fire.
A
Use
appropriate
cables
When
connecting
cables
to
the
input
and
output
jacks, use
only
the
cables
provided
or sold
by
Nikon for
the
purpose,
to
maintain
compliance
with
product
regulations.
A
Handle
moving parts with care
Be
careful
that
your
fingers
or
other
objects
are
not
pinched
by
the
lens cover
or
other
moving
parts.
A
CO-ROMs
The
CO-ROMs
included
with
this device
should
not
be played back on audio
CD
equipment.
Playing CO-ROMs
on
an
audio
CD
player
could
cause hearing
loss
or
damage
the
equipment.
A
Observe
caution when using the
flash
Using
the
flash close
to
your
subject's eyes
could cause
temporary
visual impairment.
Particular care
should
be observed
if
photographing
infants,
when
the
flash
should be
no
less
than
1
m
(3ft
4
in.)
from
the subject.
A
Do not operate the
flash
with
the
flash
window
touching a person or
object
Failure
to
observe this precaution
could
result in burns
or
fire.
A
Avoid contact with
liquid crystal
Should
the
monitor
break, care should be
taken
to
avoid injury caused
by
broken
glass and
to
prevent
liquid crystal
from
the
monitor
touching
the
skin or entering
the
eyes
or
mouth.
A
Turn
the
power off when using
inside an
airplane
or the
hospital
Turn
the
power
off
while
inside
the
airplane
during
take
off
or
landing.
Follow
the
instructions
of
the
hospital
when
using
while
in a hospital. The electromagnetic
waves given
out
by this camera may
disrupt
the
electronic systems
of
the
airplane or
the
instruments
of
the
hospital.
Remove
the
Eye-Fi
card,
which
can be
the
cause
of
the
disruption, beforehand if
inserted in
the
camera.
A
3D
Images
Do
not
continuously
view
30
images
recorded
with
this device for extended
periods,
whether
on
·a
television, monitor,
or
other
display.
In
the
case
of
children whose visual
systems are
still
maturing, consult a
pediatrician or
ophthalmologist
prior
to
use and
follow
their instructions.
Prolonged
viewing
of
30
images may
cause eye strain, nausea, or discomfort.
Cease
use
should
any
of
these
symptoms
occur
and consult a physician
if
necessary.
For
Your
Safety
I
Notices for
Customers
in
the
U.S.A.
IMPORTANT
SAFETY
INSTRUCTIONS-
SAVE THESE
INSTRUCTIONS.
DANGER-
TO
REDUCE
THE
RISK OF
FIRE
OR ELECTRIC SHOCK, CAREFULLY
FOLLOW
THESE
INSTRUCTIONS
For
connection
to
a supply
not
in
the
U.S
.A.,
use an
attachment
plug
adapter
of
the
proper
configuration
for
the
power
outlet
if
needed.
The
power
supply
unit
is
intended
to
be
correctly
orientated
in a vertical
or
floor
mount
position.
Federal
Communications
Commission
(FCC)
Radio
Frequency
Interference
Statement
This
equipment
has
been tested and
found
to
comply
with
the
limits for a
Class
B
digital device,
pursuant
to
Part
15
of
the
FCC
rules.
These
limits
are designed
to
provide
reasonable
protection
against
Notices
harmful
interference in a residential
installation. This
equipment
generates,
uses, and can radiate radio
frequency
energy
and,
if
not
installed
and used in
accordance
with
the
instructions,
may
cause harmful interference
to
radio
communications.
However,
there
is
no
guarantee
that
interference
will
not
occur
in a particular
installation. If
this
equipment
does cause harmful
interference
to
radio or
television
reception,
which
can be
determined
by
turning
the
equipment
off
and on,
the
user
is
encouraged
to
try
to
correct
the
interference by
one
or
more
of
the
following
measures:
•
Reorient
or
relocate
the
receiving
antenna.
• Increase
the
separation
between
the
equipment
and receiver.
•
Connect
the
equipment
into
an
outlet
on
a circuit
different
from
that
to
which
the
receiver
is
connected.
• Consult
the
dealer
or
an experienced
radio/television
technician
for
help.
CAUTIONS
Modifications
Nikon
COOLPIX
S5200
The
FCC
requires
the
user
to
be
notified
that
any changes
or
modifications
made
to
this device
that
are
not
expressly
appro
ved
by Nikon
Corporation
may void
the
user's
authority
to
operate
the
equipment.
Interface
Cables
Use
the
interface cables sold
or
provided
by Nikon
for
your
equipment.
Using
other
interface
cables
may
exceed
the
limits
of
Class
B
Part
15
of
the
FCC
rules.
Notice
for
customers in
the
State
of
California
WARNING
Handling
the
cord
on
this
product
will
expose you
to
lead, a chemical know n
to
the
State
of
California
to
cause birth defects
or
other
reproductive
harm.
Wash hands
after
handling.
Nikon
Inc.,
1300 Walt
Whitman
Road
Melville,
New
York 11747-3064
USA
Tel: 631-547-4200
Notice
for
customers in
Canada
CAUTION
This
Cla
ss
B digital apparatus complies
with
Canadian ICES-003.
ATTENTION
Cet
appareil
numerique
de
Ia
c
lasse
Best
conforme
a
Ia
norme
NMB-003
du
Canada.
Notices
I
Caring for
the
Camera
To ensure
continued
enjoyment
of
this
Nikon
product,
observe
the
precautions
described
below
in
addition
to
the
warnings in "For Your Safety" (CIJ32-35)
when
using or storing
the
device.
~
Do Not Drop
The
product
may
malfunction
if
subjected
to
strong shock
or
vibration.
~
Handle the
Lens
and All Moving
Parts with Care
Do
not
apply
force
to
the
lens, lens cover,
monitor,
memory
card slot, or
battery
chamber. These parts are easily damaged.
Applying
force
to
the
lens cover
could
result in camera
malfunction
or
damage
to
the
lens. Should
the
monitor
break, care
should be taken
to
avoid
injury
caused by
broken glass and
to
prevent
the
liquid
crystal from
the
display
touching
the
skin
or
entering
the
eyes or
mouth.
~
KeepDry
The device will be
damaged
if
immersed in
water
or subjected
to
high
humidity.
Notices
~
Avoid Sudden Changes in
Temperature
Sudden changes in temperature, such
as
when
entering
or leaving a heated
building
on
a cold day, can cause
condensation
to
form
inside
the
device.
To
prevent condensation, place
the
device in
a carrying case
or
a plastic bag before
exposing it
to
sudden changes in
temperature.
~
Keep away from Strong Magnetic
Fields
Do
not
use
or
store this device in
the
vicinity
of
equipment
that
generates
strong
electromagnetic
radiation
or
magnetic
fields. Strong static charge or
the
magnetic
fields
produced
by
equipment
such
as
radio transmitters
could
interfere
with
the
monitor,
damage
data saved on
the
memory
card, or affect
the
product's
i nterna I circuitry.
~
Do Not Point
the
Lens
at Strong
Light Sources for Extended
Periods
Avoid
pointing
the
lens at
the
sun or
other
strong
light
sources for
extended
periods
when
using or storing
the
camera. Intense
light
may
cause
deterioration
of
the
image
sensor,
producing a white
blur
effect
in
photographs.
~
Turn
the
Product
off
Before
Removing or Disconnecting the
Power Source
Do
not
remove
the
battery
while
the
product
is
on, or
while
images are being
saved
or
deleted. Forcibly
cutting
power
in
these circumstances
could
result in
loss
of
data
or
in
damage
to
product
memory
or
internal circuitry.
~
Notes About the
Monitor
•
Monitors
and electronic viewfinders are
constructed
with
extremely high
precision; at least
99.99o/o
of
pixels are
effective,
with
no
more
than
0.01
°/o
being
missing or defective. Hence
while
these displays may contain pixels
that
are always lit (white, red, blue, or green)
or always
off
(black), this
is
not
a
malfunction
and
has
no
effect on
images recorded
with
the
device.
• Images in
the
monitor
may be
difficult
to
see
under
bright
lighting.
• The
monitor
is
lit by
an
LED
backlight.
Should
the
monitor
begin
to
dim
or
flicker,
contact
your
N ikon-authorized
service representative.
Notices
I
Wi-Fi (Wireless LAN
Network)
This
product
is
controlled
by
the
United
States Export
Administration
Regulations,
and you are required
to
obtain
permission
from
the
United
States
government
if
you
export
or
re-export this
product
to
any
country
to
which
the
United
States
embargoes
goods
. The
following
countries
were
subject
to
embargo:
Cuba, Iran,
North
Korea, Sudan, and Syria. Since
the
target
countries are
subject
to
change, please
contact
the
United
States
Department
of
Commerce
for
the
latest
information.
Restrictions on Wireless
Devices
The wireless transceiver
included
in this
product
conforms
to
wireless regulations
in
the
country
of
sale and
is
not
for use in
other
countries
(products
purchased in
the
EU
or
EFTA
can be used
anywhere
within
the
EU
and
EFTA).
Nikon does
not
accept
liability
for
use in
other
countries. Users
who
are unsure
as
to
the
original
country
of
sale should
consult
with
their
local Nikon
service
center
or
Nikon-authorized
service
Notices
representative. This restriction applies
to
wireless
operation
only
and
not
to
any
other
use
of
the
product.
Notice for Customers in
the
U.S.A. and
Canada
Federal
Communications Commission
(FCC)
and Industry
of
Canada
(IC)
Declaration
of
Conformity
This device
complies
with
Part
15
of
FCC
Rules and
Industry Canada
licence-exempt
RSS
standard(s).
Operation
is
subject
to
the
following
two
conditions:
(1)
this device
may
not
cause interferen c
e,
and
(2)
this
device
must
accept
any interference,
including
interference
that
may
cause
undesired
operation
of
this device.
FCC/IC
RF
Exposure Statement
This
transmitter
must
not
be
co-located
or
operated
in
conjunction
with
any
other
antenna
or
transmitter.
The available scientific
evidence
does
not
show
that
any health
problems
are
associated
with
using
low
power
wireless
devices. There
is
no
proof, however,
that
these
low
power
wireless devices are
absolutely safe.
Low
power
wireless
devices
emit
low
levels
of
radio
frequency
energy
(RF)
in
the
microwave
range
while
being
used. Whereas
high
levels
of
RF
can
produce
health effects (by
heating
tissue),
exposure
of
low-level
RF
that
does
not
produce
heating
effects causes
no
known
adverse health effects.
Many
studies
of
low-
level
RF
exposures have
not
found
any
biological effects.
Some
studies have
suggested
that
some biological effects
might
occur,
but
such
findings
have
not
been
confirmed
by
additional
research.
COOLPIX S5200
(FCC
ID:CGJ6149EB/
IC
ID:4634A-6149EB) has been tested and
found
to
comply
with
FCC/IC
radiation
exposure limits set
forth
for
an
uncontrolled
environment
and meets
th
e
FCC
radio
frequency
(RF)
Exposure
Guidelines in
Supplement
C
to
OET65 and
RSS-1
02
of
the
IC
radio
frequency
(RF)
Exposure rules. Please refer
to
the
SAR
test
report
that
was
uploaded
to
FCC
website.
Precautions
when
Using Radio
Transmissions
•
Always keep in
mind
that
radio
transmission
or
reception
of
data
is
subject
to
interception
by
third
parties.
Note
that
Nikon
is
not
responsible
for
data
or
information
leaks
that
may
occur
during
data transfer.
•
The
operating
frequency
band
of
this
equipment
is
used
by
industrial,
scientific,
consumer
and medical
equipment
including
microwave
ovens,
premises radio stations for
identifying
mobile
units used in
the
manufacturing
lines
of
plants (radio stations requiring
no
license), and
amateur
radio stations
(hereinafter referred
to
as
"another
station").
1.
Before using this
equipment
,
confirm
that
another
station
is
not
being
operated
nearby.
2.
In
the
event
of
this
equipment
causing
harmful
radio wave
interference
with
another
station,
promptly
change
the
operating
frequency
or
stop
radio wave emission
by
turning
off
the
power, etc.
3.
If
you
have
further
questions,
contact
a Nikon
Notices
I
service center
or
Nikon authorized
service representative.
Personal Information
Management
and
Disclaimer
• User
information
registered and
configured on
the
product,
including
wireless
LAN
connection
settings and
other
personal information,
is
susceptible
to
alteration and
loss
resulting
from
operationa I error, static
electricity, accident, malfunction, repair
or
other
handling. Always keep separate
copies
of
important
information. Nikon
is
not
responsible for any direct
or
indirect damages or lost profits resulting
from
alteration
or
loss
of
content
that
is
not
attributable
to
Nikon.
• Before discarding this
product
or
transferring it
to
another
owner, perform
Reset all in
the
setup
menu
([029)
to
delete
all
user
information
registered
and configured
with
the
product,
including wireless
LAN
connection
settings and
other
personal information.
Notices
I
Notices
Image
editing
effects
that
are fun and easy
to
apply
while
shooting
~
Quick effects
Create
images w
ith
effects in three easy steps,
simp
ly
by
shooting,
se
lecting, and saving.
Thirty effects are available. Just
as
with
a
smartphone
application, you can
preview
the
results
of
each effect
on
the
image
and choose
your
favorite
one
to
suit
the
scene
or
your
mood.
You
can also
apply
effects
to
images later
by
pressing
the(@
button
during
playback.
Autofocus
function
that
automatically
determines
the
subject
[•.]
Target finding
AF
The
Target finding
AF
function
allows
the
camera
to
determine
the
main subject
of
the
im age, such
as
a person, flower,
or
small
object. The camera
automatically
focuses
on
the
subject,
letting
you freely
compose
the
image
without
worrying
about
the
focus.
In
addition,
the
camera
automat
ically adjusts
the
focus area
to
match
the
size
of
the
subject,
ensuring a sharp focus on
the
intended
subject.
Remotely
control
ling
the
camera using a smart device
Wi-Fi
{wireless LAN) function
The camera's built-in Wi-Fi (wirel
ess
LAN)
fun ction*
al
lows
you
to
remotely release the shutter
of
the camera by operating a smart device that
is
wirelessly connected
to
the camera.
The camera's
monitor
view
is
displayed on the screen
of
the wirel
essly
connected smart device,
enabling you
to
remotely zoom the camera
in
or
out
on the subject. You
can
also
transfer saved
images from the camera
to
the smart device.
* To use
the
Wi-Fi (wirel
ess
LAN) function, Wireless
Mobile
Utility
must
be
installed
on
the
smart device.
NIKON CORPORATION
©
2013 Nikon Corporation
YP2L01
(11)
6MN 11111-01

Dear Nikon
Customer,
Thank you for choosing Nikon.
Included
in
this package you
will
find a printed Quick
Start
Guide in
multiple
languages.
This
guide
contains basic information
so
you can
quickly
sta
rt using your Nikon camera.
The enclosed CD-ROM
contains a
detailed
Reference
Manual
(in
multiple
languages)
saved
as
a
PDF
file
We
ha
ve found that
this
environmentally-f riendly
so
lution
also
meets
the
multiple
language needs
of
our customer
s.
Your Nikon camera
will provide you years
of
photographic
enjoyment. If
you require assistance,
please
cont
act Nikon Tech
support
in your coun try. Thank you
I
../
r
"'
Cher client
Nikon,
Nous vous remercions d'avoir
cho
isi
un
appareil
photo
Nikon. Vous trouverez dans
Ia
boite
un Guide
de
demarrage rapide
multilingue
sous
forme
imprime
e.
Ce
guide
contient
des
information
s de base qui vous
permettront
de
commencer
rapidement
a utiliser
votre
appareil
photo
Nikon.
Le
CD-ROM inclus
contient
un
Manuel
de
reference detaille (da
ns
plusieurs langue
s)
enregistre
so
us
forme
de
fichier
PDF.
Nous avons
estime
que
cette solution
respectueuse
de
l'environnement
repondait
egalement
aux besoins de nos
clients
de
dispo
se
r
d'une
documentation
multilingue.
Votre
appareil
photo
Nikon vous fera profiter des
plaisirs
de
Ia
photographie
pendant
de
longues annees.
Si
vous avez besoin
d'assistance, n'hesitez pas
a
contacter
vot
re
s
upport
t
ec
hnique
Nikon
local.
Merci
I
'
"'
Estimado
cliente
de
Nikon:
gracias
por
elegir
un
producto
Nikon.
En
este
paquete
encontrara una Gufa de inicio
rapido
impresa en varios idiomas.
Esta
gufa
contiene
inf
ormacion
basica para
que
pueda empezar a
utilizar
rapidamente
su
camara Nikon.
El
CD-ROM
ac::IJunto
contiene
un Manual
de referencia
detallado
(en varios idiomas )
guardado
como
un archivo
PDF.
Creemos
que
esta
soluci6n
es
respetuosa con
el
medio
ambiente
y
al
mismo
tiempo
tam bien satisface
las
necesidades
multilingulsticas
de nuestros clientes.
Su
camara
Nikon
le
permitira disfrutar de
Ia fotografla
durante a nos.
En
caso
de
necesitar soporte
tecnico,
p6ngase en
'
contacto
con
el
servicio
de
soporte
tecnico
de
Nikon
de
su
pals. iGraciasl
1111111111111111111111
Ill
Y-
VG0692232G90090
NIKON CORPORATION
Printed
in
China
©
2013 Nikon Corporation
CE
YP2L01
(30)
6MN11130-07
DIGITAL CAMERA
Reference Manual
En

Highlight Features of the COOLPIX S5200
Image editing effects that are fun and easy to apply while shooting
p Quick effects ..................................................... A30, 39
Create images with effects in three easy steps, simply by shooting, selecting, and saving.
Thirty effects are available. Just as with a smartphone application, you can preview the results
of each effect on the image and choose your favorite one to suit the scene or your mood.
You can also apply effects to images later by pressing the k button during playback (A33).
Autofocus function that automatically determines the subject
M Target finding AF................................................. A75
The Target finding AF function allows the camera to determine the main subject of the
image, such as a person, flower, or small object. The camera automatically focuses on the
subject, letting you freely compose the image without worrying about the focus.
In addition, the camera automatically adjusts the focus area to match the size of the subject,
ensuring a sharp focus on the intended subject.
Remotely controlling the camera using a smart device
Wi-Fi (wireless LAN) function................................... A107
The camera’s built-in Wi-Fi (wireless LAN) function* allows you to remotely release the shutter
of the camera by operating a smart device that is wirelessly connected to the camera.
The camera’s monitor view is displayed on the screen of the wirelessly connected smart
device, enabling you to remotely zoom the camera in or out on the subject. You can also
transfer saved images from the camera to the smart device.
* To use the Wi-Fi (wireless LAN) function, Wireless Mobile Utility must be installed on the smart
device (A108).

i
Introduction
Parts of the Camera
The Basics of Shooting and Playback
Shooting Features
Playback Features
Recording and Playing Back Movies
General Camera Setup
Using the Wi-Fi (Wireless LAN) Feature
Reference Section
Technical Notes and Index

ii
Introduction
Introduction
Read This First
Thank you for purchasing the Nikon COOLPIX S5200 digital camera. Before using the camera,
please read the information in “For Your Safety” (Aviii-x) and familiarize yourself with the
information provided in this manual. After reading, please keep this manual handy and refer
to it to enhance your enjoyment of your new camera.

iii
Introduction
About This Manual
If you want to start using the camera right away, see “The Basics of Shooting and Playback”
(A13).
To learn about the parts of the camera and information that is displayed in the monitor, see
“Parts of the Camera” (A1).

iv
Introduction
Oth
er Information
• Symbols and Conventions
To make it easier to find the information you need, the following symbols and
conventions are used in this manual:
• SD and SDHC/SDXC memory cards are referred to as “memory cards” in this manual.
• The setting at the time of purchase is referred to as the “default setting.”
• The names of menu items displayed in the camera monitor, and the names of buttons or
messages displayed on a computer monitor appear in bold.
• In this manual, images are sometimes omitted from monitor display samples so that
monitor indicators can be more clearly shown.
• Illustrations and monitor content shown in this manual may differ from the actual
product.
Symbol Description
B
This icon indicates cautions and information that should be read before using
the camera.
C
This icon indicates notes and information that should be read before using the
camera.
A/E/F
These icons indicate other pages containing relevant information;
E: “Reference Section”, F: “Technical Notes and Index.”
 Loading...