

O
N
I
K
K
O
R
FUNC.
Quick Start
W
T
CF
Quick Start
Guide
O
M
N
I
K
K
O
K
R
7
.
1
-
2
1
.
4
m
m
1
:
2
8
-
4
W
T
W
T
A
FUNC.
FUNC.
Quick Start
Guide
Guide
M
O
N
O
I
K
Z
K
O
R
8
DIGITAL CAMERA
.
4
-
8
.
2
:
7
.
1
-
2
1
.
4
1
m
m
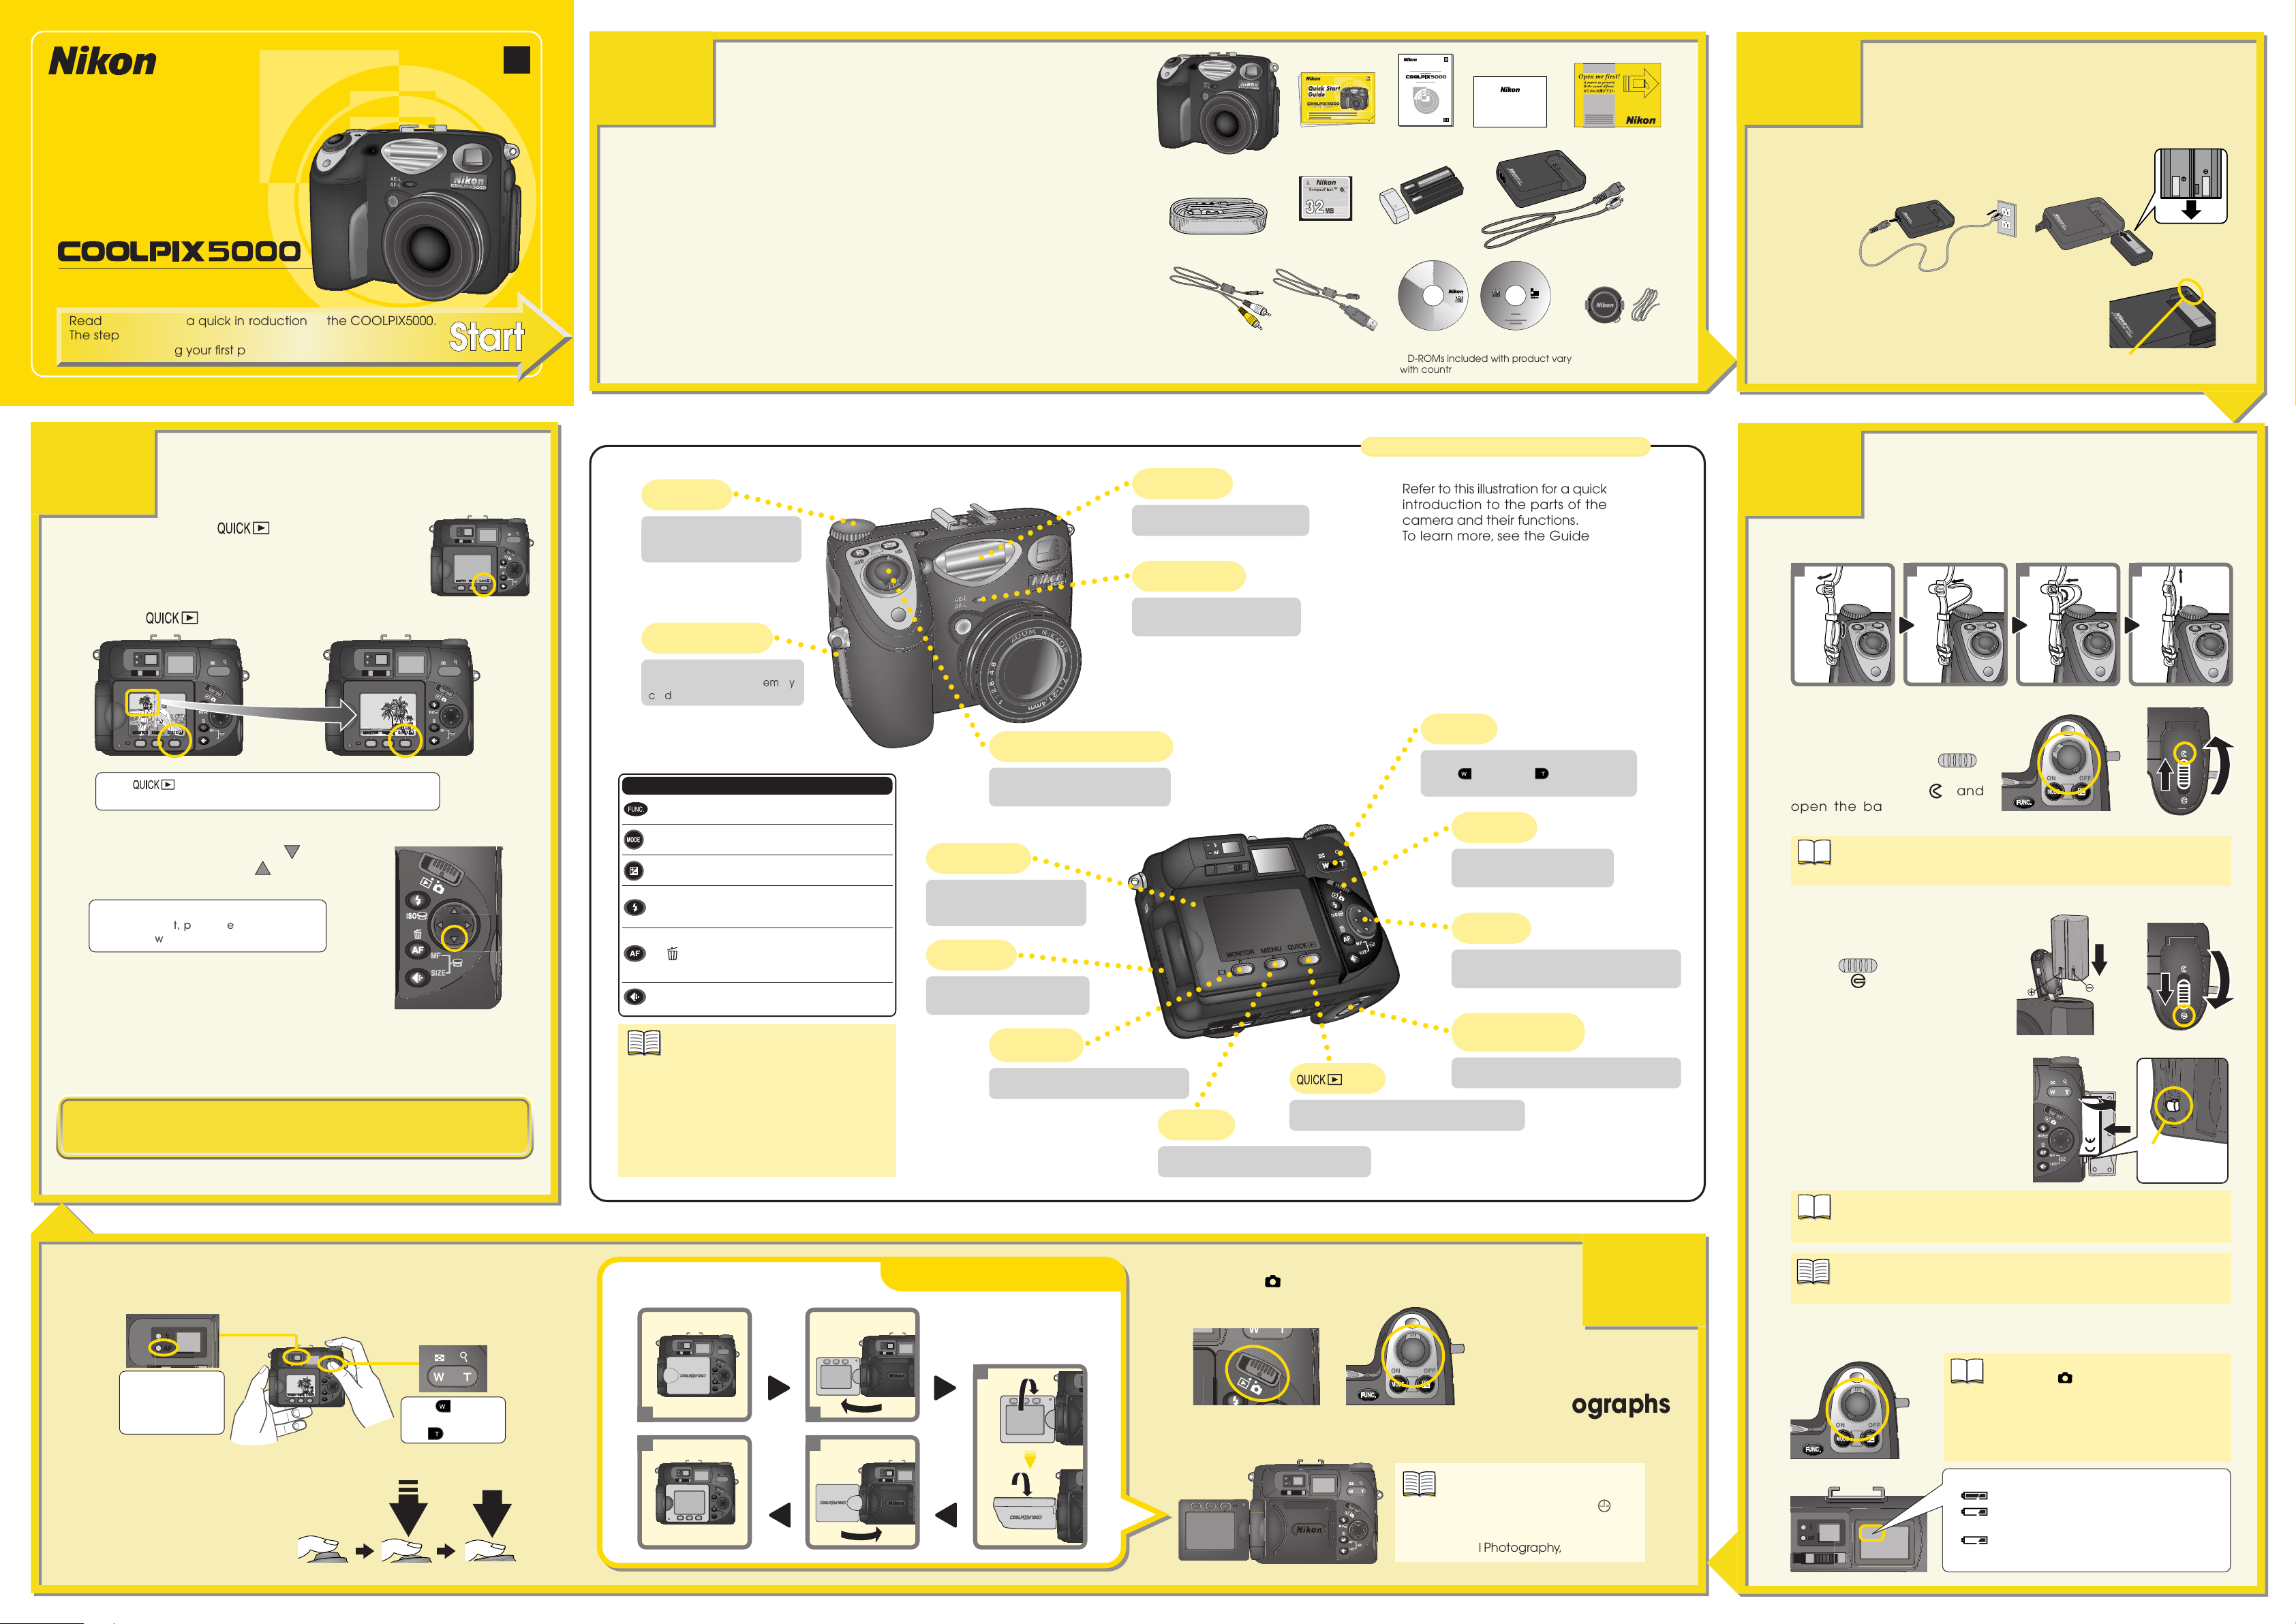
Read this guide for a quick introduction to the COOLPIX5000.
The steps that follow take you from setting up your camera to
taking and viewing your first photos.
Step
Check the results
Check the results
5
The (Quick Review) button
next to the monitor is used to review
photos after shooting.
Press the button.
1
AF
W
T
AF
Press
SIZE
once
Press button once to display photos in top left corner
of monitor, twice to view photos full screen.
Press the multi selector down ( ) to
2
view photos in order, or up ( ) to view
photos in reverse order.
To end review and focus the camera for
your next shot, press the shutter-release
button halfway.
When you have finished taking pictures, turn the camera off. This com-
3
pletes our overview of basic camera operations.
For information on viewing your photos on a television or computer, see
the reverse side of this sheet. To make the most of all the features of your
Nikon digital camera, be sure to read the Guide to Digital Photography.
AF
AF
W
T
AF
SIZE
En
W
T
AF
SIZE
Press
twice
Step
1
Unpack the
Unpack the
camera
camera
Command dial
Use by itself or in combination
with other buttons to adjust
camera settings (pg.13).
Memory card-slot cover
Opening the cover reveals the
slot where you insert memory
cards (pg.36).
Other Camera Controls
Button
Button
Button
/ISO Button
/MF/ Button
/SIZE Button
* About the Built-in
Note
Microphone and Speaker
The COOLPIX5000 can record movies up to sixty seconds in length
(pg.109). Sound is automatically recorded with the built-in microphone
when you make a movie, and played
back over the built-in speaker when
the movie is viewed.
Take the camera and accessories out of the box.
Check that you have all the items listed below.
쐃 COOLPIX5000 digital camera
쐇 Quick Start Guide (this guide)
쐋 Guide to Digital Photography
쐏 Guarantee
쐄 “Open me first!” envelope
쐂 Camera strap
쐆 CompactFlash™ memory card
쐊 Rechargeable EN-EL1 battery with terminal cover
쐎 MH-52 battery charger
쐅 Audio/video cable
쐈 USB interface cable
쐉 Nikon View 4 CD-ROM
씈 Nikon View 4 Reference Manual CD-ROM
씉 Lens cap and cap string
○○○○○○○○○○○○
○○○○○○○○○○○○○○○○○○○
○○○○○○
Set the Func. button as desired to control
frequently used settings (pg.15).
Press while turning command dial to select one of four exposure modes (pg.15).
Press while turning command dial to alter
default exposure value (pg.15).
Use to change the flash setting, or use together with command dial to set ISO value
(pg.16).
Press to select focus mode, press while turning command dial to set focus distance.
Can also be used to delete unwanted images (pg.16).
Use to set image quality, or together with
command dial to set image size (pg.17).
○○○○○○○○○○○○○○○○
○○○○○○○○○○○○○○
Power switch/shutter-release button
The shutter-release button is on the
power switch (pg.12).
Vari-angle monitor
○○○○○○○○○○○○○○○○
Monitor can be rotated through
270° to frame shots at different
angles (Step 4–This guide).
Built-in speaker*
○○○○○○○○○○○○○○
Used for audio playback when
you view movies (pg.164).
MONITOR button
Turns the monitor on and off (pp.18, 47).
M
O
N
O
I
K
Z
K
O
R
8
.
4
-
-
8
.
2
2
1
:
.
4
1
m
m
쐃
쐂
Built-in Speedlight
Your camera's built-in flash (pg.82).
Built-in microphone*
Records sound when you make
movies (pg.109).
m
o
C
s
d
o
r
T
a
I
d
d
F
e
n
F
t
a
s
O
t
a
S
T
R
C
O
C
E
F
IN
M
O
E
0
D
H
0
A
0
M
0
0
0
5
E
0.8A
V
○○○○○○○○○○○○○○○○
MENU button
Press to display camera menus (pp.19, 21).
6
○○○○○○○○○○○○○○○
Step
Charge the battery
Guarantee
7
.
1
쐇쐋쐏 쐄
2
Charge the battery
Connect the supplied power cable to the MH-52 battery
1
charger and plug the charger into the AC power source.
Charging will begin when the EN-EL1 rechargeable bat-
EC-32
Nikon View 4
쐊쐆
Nikon View 4
Version 4.3
Macintosh and Windows
Jp
DeFr
En
Macintosh and Windows
EsNl It
Reference Manual
Shape of cable
쐎
depends on country
or region of purchase
tery is inserted.
The red CHARGE lamp on the charger will
2
glow while the battery charges. Charging is
Insert in direction
of arrow
Enlarged view
of terminals
(Reverse view)
complete when the CHARGE lamp turns off.
쐈쐅
CD-ROMs included with product vary
with country or region of purchase
Parts of the COOLPIX5000
Parts of the COOLPIX5000
씈쐉
씉
*
An exhausted battery can be fully recharged
in approximately 2 hours.
CHARGE Lamp
Step
Ready the camera
Refer to this illustration for a quick
introduction to the parts of the
3
camera and their functions.
To learn more, see the Guide to
Digital Photography.
Attach the strap to both sides of the camera as shown.
1
1
After checking that the camera
Zoom button
2
is off and that the lens cap has
been removed, slide the battery-
Use to adjust the lens focal length from wide
angle
to telephoto
, or to zoom in on
photos during playback (pp.13, 69).
chamber cover latch ( )
on the bottom of the camera to
the open position ( ) and
open the battery-chamber
Mode selector
○○○○○○○○○○○○○○○
○○○○○○○○○○○
○○○○○○○○
Switch between shooting and
playback modes (pg.12).
Multi selector
○○○○○○○○○○
Use for navigating the menus and selecting
photos for viewing during playback (pg.18).
h
t
i
W
y
l
p
R
E
O
S
F
U
E
C
N
PA
A
J
0
0
0
○○○○○○○○○○
Battery-chamber cover/
battery-chamber lock
cover as shown at right.
!!
Important
Insert the EN-EL1 rechargeable
3
battery, then close the batterychamber cover and return the
latch ( ) to the locked
position ( ), as shown right.
Open the memory card slot
button
Open the cover to insert the battery (pg.34).
4
cover on the side of the camera and press the eject button
Use to display photos after shooting (pp.19, 56).
down, then slide the memory
card into place. Once the
card is fully inserted, close the
card slot cover.
Ready the camera
2
When you insert a battery for the first time or after the camera has
been left unused for an extended period, the lens will extend even
if the camera is off.
3 4
MODE
FUNC.
Press button down
before inserting
card.
After framing your photograph in the monitor or viewfinder,
3
press the shutter-release button halfway and check that the
camera is in focus.
Zoom Button
AF
W
T
Green lamp next
to viewfinder lights
when camera is in
focus.
AF
SIZE
Press T on zoom
button to zoom
out,
Press the shutter-release button
4
the rest of the way down to
take the photograph.
to zoom in.
Insert the memory card with the Nikon CompactFlash™ label facing
!!
the front of the camera (the side with the lens). Make sure to insert the
edge with the contact points (two rows of small holes) into the camera.
The memory card provided with your camera is formatted at shipment. Other memory cards must however be formatted before first
Note
use. See the Guide to Digital Photography, pages 37-38.
Using the vari-angle monitor
Using the vari-angle monitor
Slide the mode selector on the rear of the
1
camera to (shooting mode) and check
that the camera is on.
Important
Step
4
AF
W
T
AF
SIZE
1
5
2
4
AF
3
FUNC.
MODE
Take
Take
photographs
photographs
Open the monitor.
2
AF
W
T
AF
SIZE
AF
The first time you use the camera,
the date and time will not be set,
Note
and a flashing clock icon (
) will
appear in the monitor. For more
information, see the Guide to
Digital Photography, pages 42-43.
Turn the camera on and check the battery level indicator in the control
5
panel.
When the camera is turned on in shoot-
!!
Important
ing mode (
lens starts to extend when the lens cap is
), the lens will extend. If the
still in place, an error message will appear
in the monitor. Turn the camera off and
FUNC.
MODE
remove the lens cap before turning the
camera on again.
Battery level is shown in the control panel as follows:
[ ]
[ ]
[ ]
Flashes
on and off
Battery fully charged.
Low battery. If possible, ready a fully charged
spare battery.
Battery exhausted. No photos can be taken until
the battery has been recharged or replaced.

C
k
FUNC.
FUNC.
Viewing y our
FUNC.
Viewing y our
pictures
pictures
Transfer to
computer
View on TV
Turn the camera off.
1
MODE
FUNC.
Use the audio/video cable included with the camera to connect the
2
camera to the television as shown in the illustration.
Step
Installing the software
1
To Users of Windows 2000 Professional, Windows XP Home Edition, and
!!
Important
Windows XP Professional
When installing, uninstalling or using Nikon View 4, log on as the Administrator
(Windows 2000 Professional) or Computer administrator (Windows XP Home
Edition/Windows XP Professional).
Installing Nikon View 4
To transfer pictures from the camera to the computer using the USB cable
provided, it is first necessary to install Nikon View 4.
Turn on and start up the computer.
1
Insert the Nikon View 4 CD-ROM
2
into the CD-ROM drive.
●
To help keep track of your pictures, install the image database software included with Nikon View 4. Depending on where you purchased your camera, the COOLPIX5000 comes with Canto Cumulus
(for Windows and Macintosh), iView Media Pro (for Macintosh), or
FotoStation Easy (for Windows and Macintosh) image database software. If using Cumulus or iView Media Pro, they should be installed
before installing Nikon View 4. If using FotoStation Easy, it should be
installed after installing Nikon View 4. Note that Cumulus and iView
Media Pro are not supplied to users in Europe. For further details see
the Nikon View 4 Reference Manual CD-ROM, or the image database software instruction manual.
The Install Center welcome window will be displayed on screen.
3
Click on the Nikon View 4 button and install Nikon View 4 following the
4
on-screen instructions.
Step
Transferring images to the computer
2
Transferring images to the computer
Insert a memory card containing
1
image data into the camera (To insert the memory card, refer to Step
3.4 on the front side of this Quick
Start Guide). Remember to press
the eject button down before inserting the card.
Connect the camera to the computer using the USB interface cable.
2
Insert the A plug into the computer's USB socket, which can be recognized by the same icon as is found on the plug. Insert the B plug
into the camera's Digital I/O socket (see below).
Turn the camera mode dial to (playback mode) and turn the
3
camera on.
FUNC.
MODE
Press button down
before inserting
card.
a
Press the Transfer button (see below) to transfer all images to the com-
4
puter. The progress indicator (see below) will be appear, indicating
that the images are being transferred to the computer.
●
If image database software is installed in the computer together with
Nikon View 4, then both Nikon View 4 and the image database software will start up when images are transferred to the computer.
Transfer button
b
If you want to transfer only selected images to
4
the computer, click the Thumbnail button (
right
) to display the Thumbnail List window.
Select the desired images and click the Transfer button; the progress indicator (see below)
will appear, indicating that the images are being transferred to the computer. Refer to the
Nikon View 4 Reference Manual CD-ROM for
further details.
see
Thumbnail button
Transfer button
L R
VIDEO AUDIO
Insert a memory card containing
3
image data into the camera (To insert the memory card, refer to Step
3.4 on the front side of this Quick
Start Guide). Remember to press
the eject button down before inserting the card.
Switch your television to the video channel.
4
● For information on how to switch the television to the video channel
see the manual provided with the television.
Turn the camera mode dial to (playback mode) and turn the cam-
5
era on.
When the camera is turned on in shooting mode ( ), the lens will
!!
Important
When the camera is turned on, the last picture
6
taken will be displayed on the television screen;
the image is identical to the image in the camera monitor. (If the monitor is rotated to face the
same direction as the lens or stowed face up on
the camera body, the image in the monitor will
be inverted. The image on the television screen
will not be affected.) Press the multi selector down
(
photos in reverse order.
extend. If the lens starts to extend when the lens cap is still in place,
an error message will appear in the monitor. Turn the camera off
and remove the lens cap before turning the camera on again.
) to view photos in order, or up ( ) to view
Make sure you connect the black plug to the camera, and the yellow plug to the television Video-in
socket, and the white plug to the television Audioin socket.
Press button down
before inserting
card.
MODE
FUNC.
lic
When the installation is complete, leave the CD-ROM in the
5
CD-ROM drive and restart the computer.
Installing FotoStation Easy
Click on the Install FotoStation Easy button in the Welcome window
1
and install FotoStation Easy according to the on-screen instructions.
Installation of FotoStation Easy includes installation of QuickTime Player.
Once FotoStation Easy is installed, it will start up automatically when-
2
ever Nikon View 4 starts. You can also start FotoStation Easy at any
time by clicking on the FotoStation Easy icon (Macintosh) or selecting FotoStation Easy from the Program menu (Windows).
Nikon View 4
○○○○○○○○○○○○○○○○○○○○○○○○○○○○○○○○○○○○○○○○○
Nikon View 4 allows you to use the computer to display pictures recorded on the
camera's memory card. Nikon View 4 can also be used to transfer pictures from
the memory card to the computer. Nikon View 4 cannot be used to view images
after they have been transferred to the computer. To view images stored on the
computer, use the image database software included with Nikon View 4 (or
your own choice of image database software). Refer to the Nikon View 4 Reference Manual CD-ROM for further details.
FotoStation Easy
○○○○○○○○○○○○○○○○○○○○○○○○○○○○○○○○○○○○○○○○○
FotoStation Easy is image database software, designed for use together with
Nikon View 4 and your COOLPIX camera. While Nikon View 4 allows you to select and transfer pictures from your camera to your computer, FotoStation Easy
allow you to organize and view your pictures after they have been transferred
to your computer. This is not possible using Nikon View 4 alone. Once FotoStation
Easy is installed, images transferred to the computer will automatically be displayed in the FotoStation Easy window. FotoStation Easy allows you to sort your
pictures by folder, filename or text label. FotoStation Easy also allows you to
enhance and resize your pictures.
FotoShare
○○○○○○○○○○○○○○○○○○○○○○○○○○○○○○○○○○○○○○○○○
If your computer is connected to the internet you can upload pictures from
FotoStation Easy to Nikon FotoShare, Nikon’s on-line photo album service. You can
register for FotoShare when you first start up FotoStation Easy after installation, or at
anytime later using the FotoStation Easy links menu. Refer to the instruction manual
provided (which is contained on the CD-ROM ) for detailed instructions.
*FotoStation is only available
for users in Europe.
When the camera is turned on in shooting mode ( ), the lens will
!!
Important
●
Notice for users of Windows XP Home Edition / Windows XP Professional
○○○○○○○○○○○○○○○○○○○○○○○○○○○○○○○○○○○○○○
extend. If the lens starts to extend when the lens cap is still in place,
an error message will appear in the monitor. Turn the camera off
and remove the lens cap before turning the camera on again.
When you turn the camera on, the camera monitor will remain blank.
Nikon View 4 will automatically detect the camera; the Nikon View 4
Image Transfer (Image Xfer) window will appear on the computer screen.
When using the COOLPIX5000 with a computer running Windows, you must “register” the camera with Windows the first
Note
time the camera is connected to the computer.
Windows Millennium Edition (Me) / Windows 2000 Professional /
Windows XP Home Edition / Windows XP Professional
Registration will take place automatically when the camera
is connected to the computer. You may be asked to restart
the computer.
Windows 98 / Windows 98 Second Edition (SE)
Follow the on screen instructions to register the camera.
Refer to the Nikon View 4 Reference Manual CD-ROM for further details.
When a camera connected to the computer via a USB cable is switched
on, the Removable Disk (Auto Play) window will appear on the computer screen. Select “Copy pictures to a folder on my computer using
Nikon View 4”, then click OK. Nikon View 4 will start and the Image
Transfer (Image Xfer) window will appear. If the “Always do the selected
action” box is checked, then Nikon View 4 will start automatically the
next time the camera is connected to the computer and turned on.*
Select
Nikon View 4
Check box
* Note that if the camera is reconnected to the computer via a different
USB port, the Removable Disk (Auto Play) window may appear again.
Either recheck the “Always do the selected action” box, or reconnect
the camera using the original USB port.
The images recorded on the memory card have now been trans-
5
ferred to the computer. When you want to disconnect the camera
from the computer, follow the instructions below before turning the
camera off and disconnecting the USB interface cable.
● Disconnect the camera from the computer.
Windows Millennium Edition (Me) / Windows 2000 Professional
Windows XP Home Edition / Windows XP Professional
Click the “Unplug or eject hardware” button and select Stop
USB Disk from the menu that appears.
Windows 98 / Windows 98 Second Edition (SE)
Double click the My Computer icon, and right click the
removable disk corresponding to the camera. Select Eject
from the menu that appears.
Macintosh
Drag the untitled icon on the desktop (which represents the
camera) to the Trash.
Printed in Japan
S1K2100201 (11)
6MAA0711-02
 Loading...