

Page 1

Quick Start
Guide
Quick Start
Quick Start
Guide
Guide
En
Shoot
Take pic tures fo r a ny occasion — j ust
point and shoot!
Review
View your pictures at a touch of a
button.
Transfer
Copy pictures to your computers
quickly and easily using Nikon View.
For information on installing
Nikon View, see pages 11–20.
pp. 1 – 8
pg. 9
pp. 10 – 27
Page 2

Quick Start
Guide
Check the package contents
Check that you have all the items listed below.
COOLPI X 210 0 digital
CompactFlash™
memory card
Rechargeable EN- MH1
batteries (× 2)
Camera strap
camera
En
Quick Start
Quick Start
Guide
Shoot
pp. 1 – 8
Take pictures for any occasion — just
point and shoot!
Review
pg. 9
View your picturesat a touch of a
button.
Transfer
pp. 10– 27
Copy pictures to your computers
quickly and easily using Nikon View.
For information on installing
Nikon View, see pages 11–20.
USB interface
cable
Guide to Digital
Photography with
the COOLPIX 2100
Video cable MH-70 battery charger
with power cable
Warranty
Warranty “Important Infor-
mation” envelope
Nikon View
Nikon View
CD-ROM
Quick Start Guide
(this guide)
Macintosh and Windows
Macintosh and Windows
Nikon View
Reference Manual
CD-ROM
Nikon View
Reference Manual
Jp
DeFr
En
EsNl It
Use Only Nikon Brand Electronic Accessories
You r N iko n COO LPI X digital camera is designed to the highest standards and includes complex
electronic circuitry. Only Nikon brand electronic accessories (including AC adapters) certifi ed
by Nikon specifi cally for use with your Nikon digital camera are engineered and proven to operate within the operational and safety requirements of this electronic circuitry.
T
HE USE OF NON -NIKON ELEC TRONIC ACCESSO RIES CO ULD DAMA GE YOUR CAMERA AND MAY VOID YO UR NIKON
WARR ANT Y.
For more information about Nikon brand accessories, contact your local authorized Nikon
dealer.
Page 3
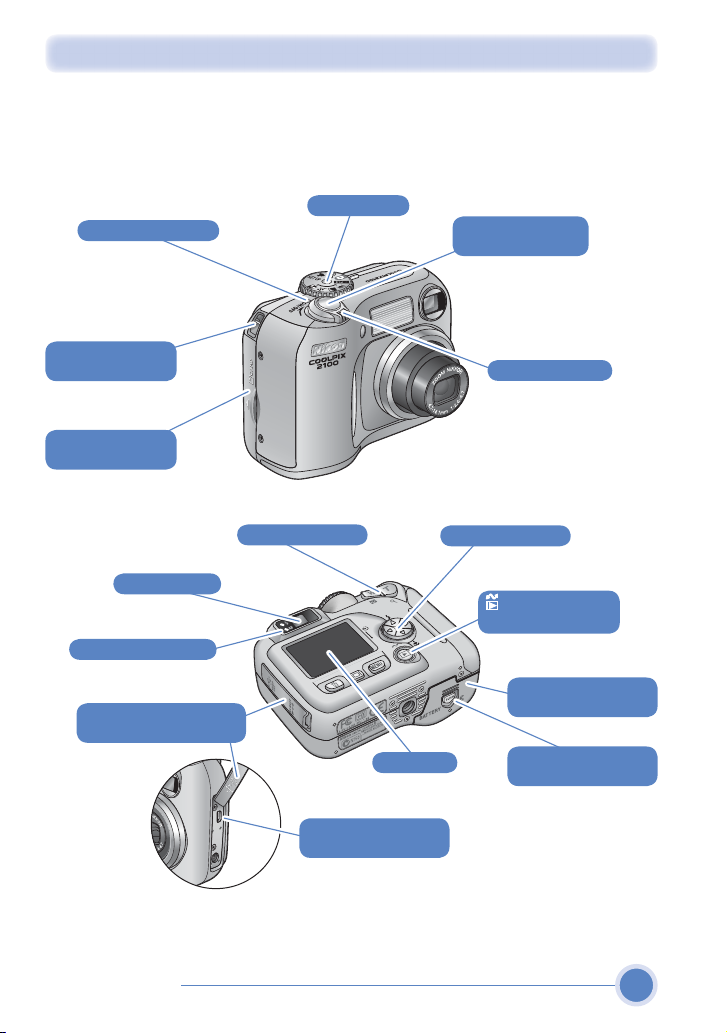
Parts of the Camera
The principle camera parts are listed below. See the Nikon Guide to Digital Photography with the COOLPIX 2100 for more information.
Mode dial
Power-on lamp
Eyelet for
camera strap
Memory card
slot cover
Shutter-release
button
Power switch
Viewfi nder
Green (AF) lamp
Interface connector
cover
Parts of the camera
Zoom buttons
USB/video - out
connector
00
1
2
Monitor
Multi selector
(play/transfer)
button
Battery - chamber
cover
Battery - chamber
cover latch
1
Page 4
Taking Pic tures
1
4
3
2
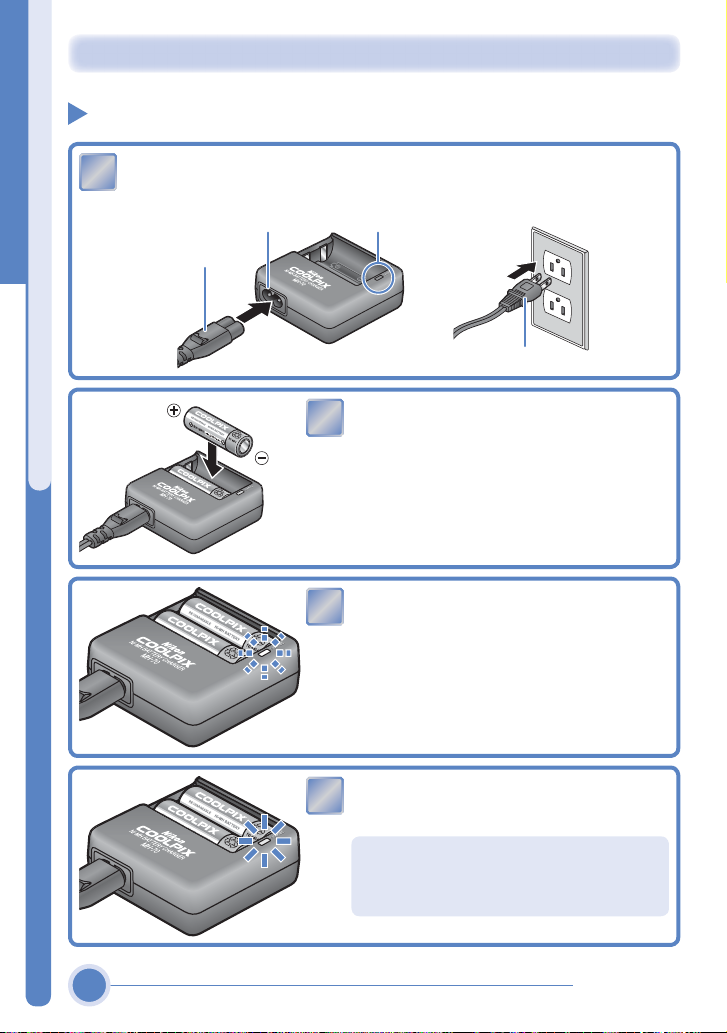
Step 1 Charge the batteries
Plug the AC adapter plug into the battery charger. Plug the wall plug
1
into a power outlet. The CHARGE lamp will light.
AC inlet CHARGE lamp
AC adapter plug
2
Charge the batteries
3
Wall plug
Insert a pair of EN-MH1 batteries as indi cated on the charger.
The CHARGE lamp will start to blink.
Charging is complete when the CHARGE
4
lamp stops blinking.
It takes about two and a half hours to
charge a pair of batteries once they are
fully discharged.
2
Tak in g P ictu re s
Page 5
Replacing Batteries
Tur n th e camera off and make sure that the power-on lamp has gone
out before removing or inserting batteries.
Read Battery Warnings
Read and follow all warnings and instructions supplied by the
battery manufacturer.
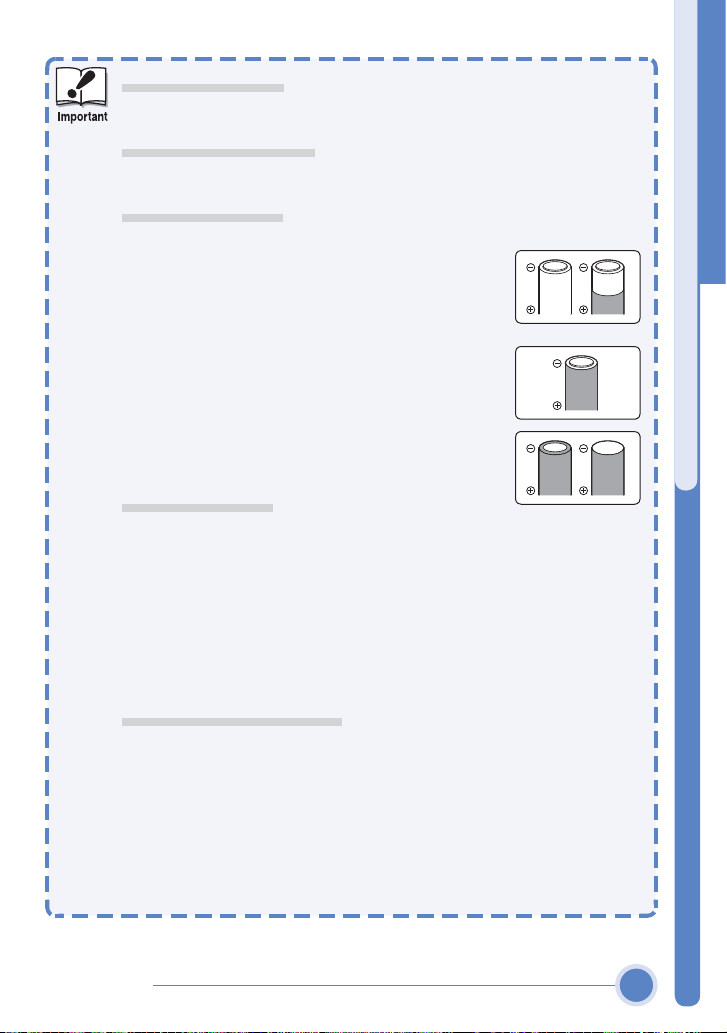
Damaged Batteries
The following batteries can not be used:
• Batteries with peeling or damaged insulation.
Using batteries with damaged insulation could
result in leakage, overheating, or rupture. Note
that due to manufacturing defects even new batteries may have faulty insulation.
• Batteries with insulation that covers only the sides
of the battery and not the area around the negative terminal.
• Batteries with a fl at negative terminal. Do not use
such batteries even if the insulation adequately
covers the area around the negative terminal.
EN- MH1 Batteries
Using an MH-70 battery charger, charge EN-MH1 batteries before fi rst
use. Charge each pair of batteries at the same time—do not charge
batteries one at a time or mix batteries with different charges. Note
that EN- MH1 batteries may discharge quickly immediately after purchase or after the batteries have been left unused for an extended
period. This is normal, and the batteries will retain a charge for longer
periods after being used and recharged several times. For more information on charging batteries, see the documentation provided with
the MH-70.
Alternative Power Sources
•
To power t he camera continuously for extended periods, use a Nikon EH61 AC ada pter (available separately; see the Guide to Digital Photography
with the COOLPIX 2100 ). Do not, under any circumstances, use an -
other make or model of AC adapter. Failure to observe this precaution
could result in overheating or in damage to the camera.
• We recommend that you buy CRV3 lithium batteries as a back- up
power source.
• The camera can also be used with a pair of ZR6 (AA) nickel-manganese batteries or FR6/L91 (AA) lithium batteries.
Charge the batteries
Tak in g P ictu re s
3
Page 6
2
1
3
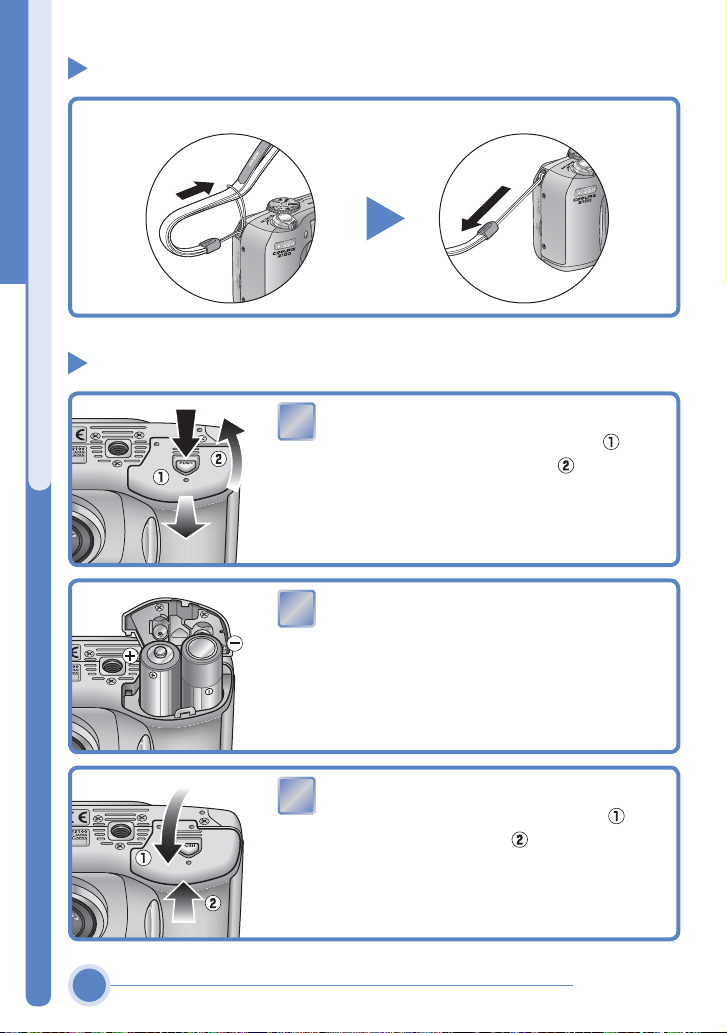
Step 2 Attach the camera strap
Attach the camera strap.
Step 3 Insert the batteries
Open the battery-chamber cover
1
Pressing the battery-chamber latch ( ), slide
the cover out and fl ip it open (
Attach the camera strap / Insert the batteries
Insert the batteries
2
Insert the batteries as shown in the label inside the battery chamber.
).
Close the battery - chamber cover
3
Close the battery- chamber cover (
slide it in until it latches (
battery-chamber cover is properly latched.
4
). Be sure that the
) and
Tak in g P ictu re s
Page 7
1
2
3
4
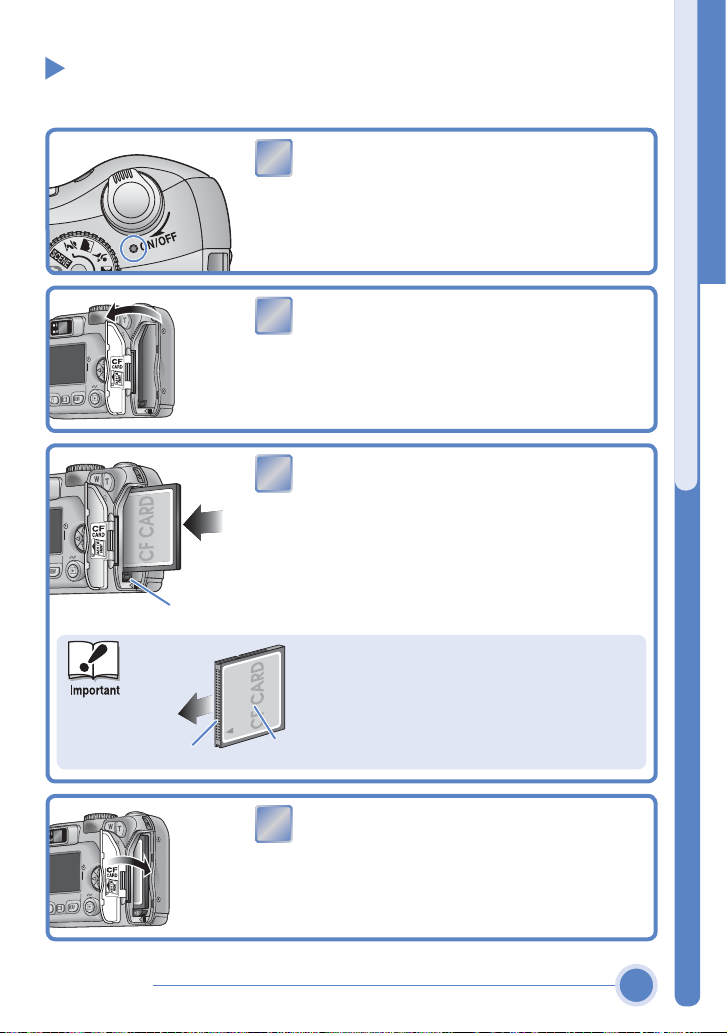
Step 4 Insert the memory card
You r Nikon digital camera stores pictures on CompactFlash
Confi rm that the camera is off
1
The power-on lamp should be off.
Open the memory card slot cover
2
Insert the memory card
3
Insert the memory card in the direction of the
arrow as shown in the label on the underside
of the memory card slot cover. The memory
card is fully inserted when the eject button is
Eject button
level with the top of the memory card.
™
memory cards.
Insert the memory card
Direction of
Tak in g P ictu re s
insertion
Termi na ls
Insert the memory card terminals fi rst.
Inserting the card upside down or backwards could damage the camera or the
card. Check to be sure the card is in the
correct orientation.
Front
Close the memory card slot cover
4
5
Page 8
1
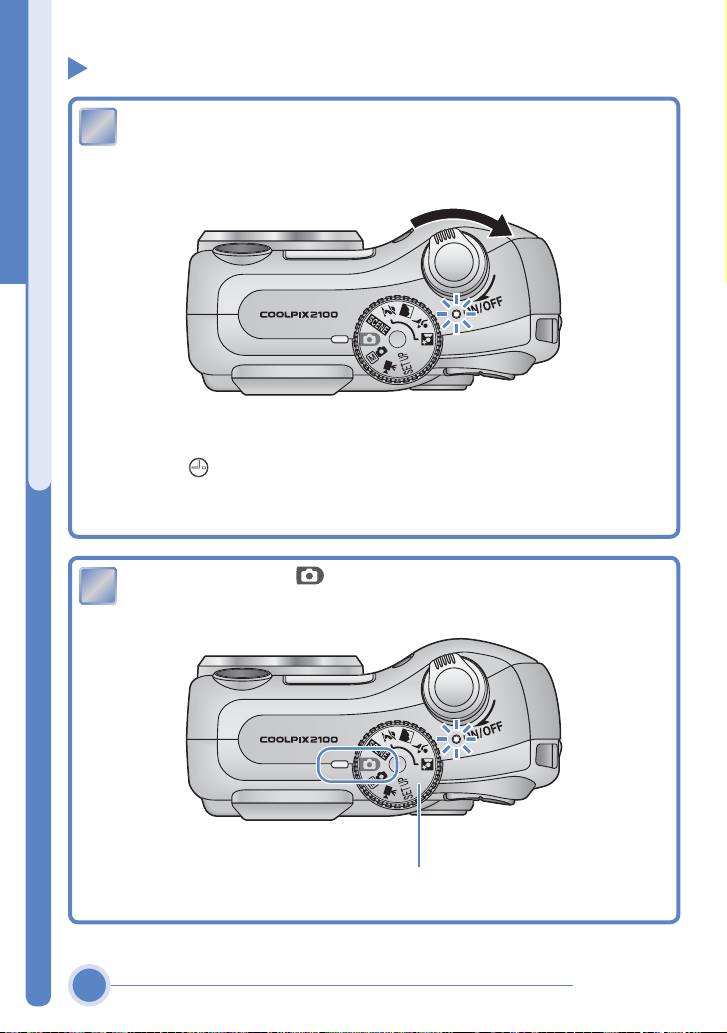
Step 5 Take pictures
2
Turn the came ra on. The power-on lamp will light, and a welcome
1
message will be displayed. The camera is ready to shoot when the view
through the lens is displayed in the camera monitor.
The fi rst time you use the camera, the date and time will not be set,
and the
Take p ictur es
monitor.
Turn the mode dial to and confi rm that the camera is on.
2
(“date not set”) icon will blink in the top right corner of the
Mode dial
6
Tak in g P ictu re s
Page 9
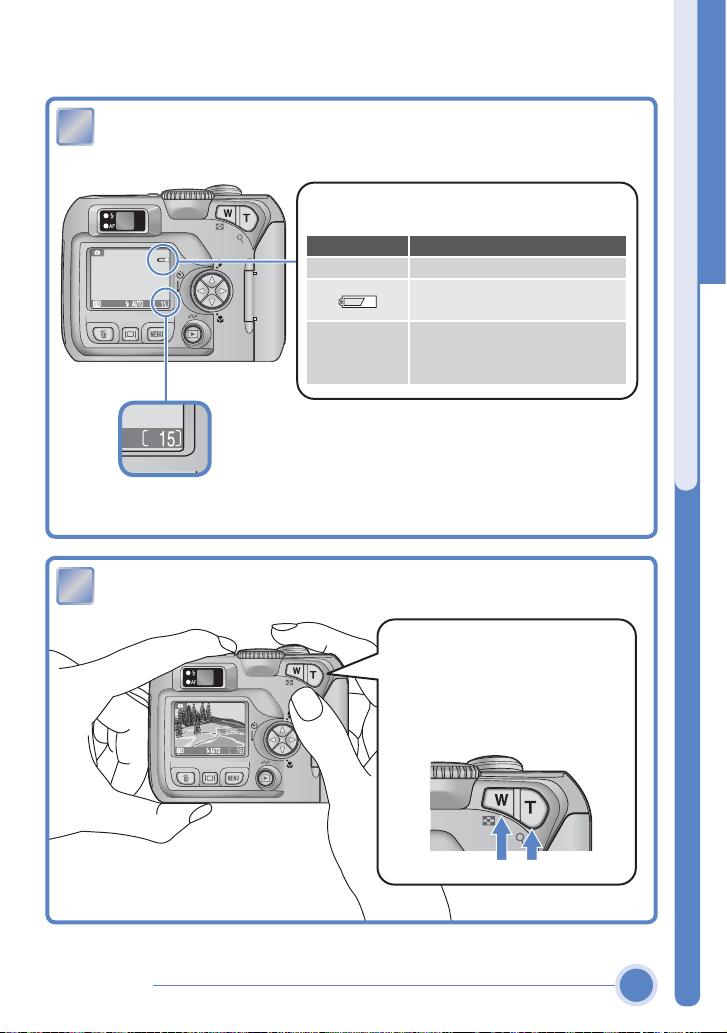
3
Check indicators in the monitor.
4
3
The level of the batteries is shown in the monitor as follows:
Display Camera status
NO ICON Camera functions normally.
WARNING ! !
BATTERY
EXHAUSTED
Number of exposures
remaining
Frame your subject in the center of the monitor.
4
Recharge or replace batteries
without delay.
Batteries exhausted. Replace
with fresh or fully charged
batteries.
Take p ictur es
Zoom buttons
Press T to zoom in on your subject so
that it fi lls a larger area of the frame.
Press W to zoom out, increasing the
area visible in the frame.
Tak in g P ictu re s
Zoom out Zoom in
7
Page 10
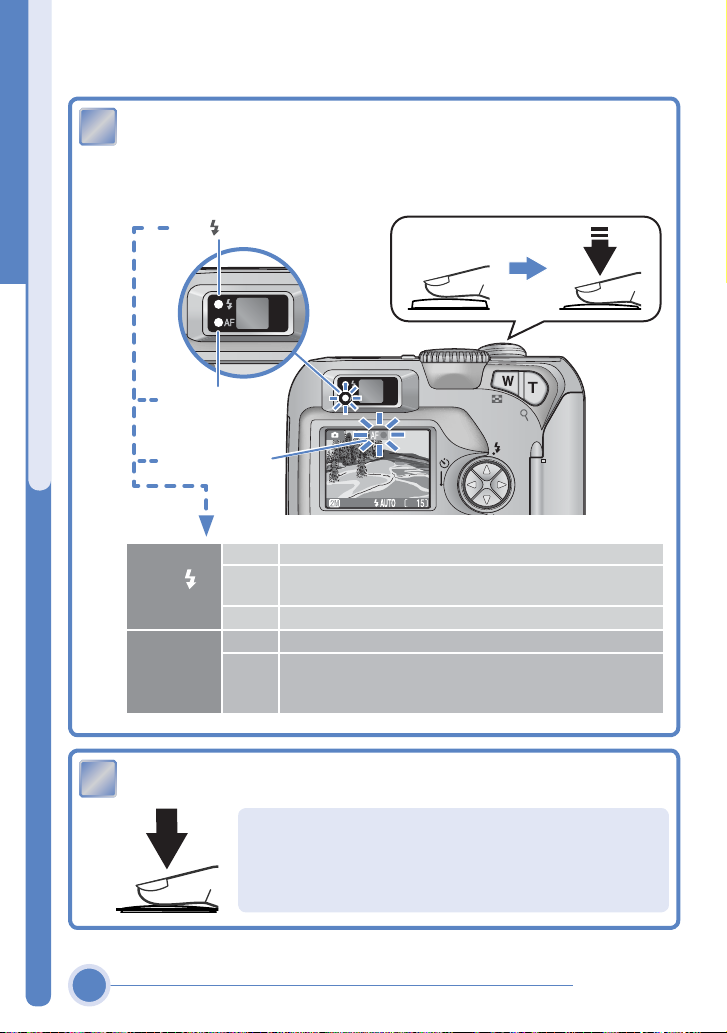
5
When the camera focuses, the green (AF) lamp next to the viewfi nder
6
5
and the focus indicator in the monitor will light. If the lamp fl ickers, the
camera is unable to focus on the subject in the center of the monitor.
Change your composition and try again.
) lamp
Red (
Green (AF) lamp
Focus indicator
Take p ictur es
On Flash will fi re when picture is taken.
Red ( )
lamp
Green (AF)
lamp/focus
indicator
Flash charging. Remove fi nger briefl y from shutter- re-
Blinks
lease button, then try again.
Flash off or not required.
Off
Subject in focus.
On
Camera unable to focus on subject at center of frame.
Flashes
Using focus lock, focus on another subject at same distance, then recompose picture and shoot.
Press the shutter-release button the rest of the way down to shoot.
6
The COOLPIX 2100 has a two-stage shutter- release
button. Pressing the shutter- release button halfway
focuses the camera. Pressing it the rest of the way
down releases the shutter to record a picture.
8
Tak in g P ictu re s
Page 11

1
2
3
Step 6 View your pictures
Press the button.
1
Press 왓/컄 to cycle through your pictures in
2
the order recorded. Press 왕 /컅 to view pic-
tures in reverse order.
To return to shooting mode, press the
button again.
When you have fi nished taking pictures,
3
turn the camera off.
View your pictures
Now that you’ve taken a few pictures, you can transfer (copy) them to a computer, where you can view, edit, and organize them.
Tak in g P ictu re s
9
Page 12

Installing Nikon View and Transferring Pictures
Step 1
Step 2
Install Nikon View
Windows
Supported Operating Systems:
• Windows XP Home Edition/ Windows XP Professional
• Windows 2000 Professional
• Windows Millennium Edition (Me)
• Windows 98 Second Edition (SE)
* Preinstalled versions only
* Only computers with built- in USB ports supported
Macintosh
Supported Operating Systems:
• Mac OS X (10.1.2 or later)
• Mac OS 9.0–9.2
* Only computers with built- in USB ports supported
* See the back cover for detailed
system requirements.
Transfer pictures
pg. 12
pg. 17
pg. 21
10
Installing Nikon View and Transferring Pictures
Page 13

Step 1 Install Nikon View
Before Installing Nikon View:
• Turn off any virus- checking software
• Exit all other applications that may be running
Uninstall Existing Versions of Nikon View and Nikon Capture Version 1.x
Before installing Nikon View, you will need to uninstall Nikon Capture version 1.x (if
installed) and any earlier versions of Nikon View.
Install Nikon View
Windows XP Home Edition, Windows XP Professional, Windows
2000 Professional, Mac OS X
When installing, using, or uninstalling Nikon View, log on as the “Computer administrator” (Windows XP Home Edition, Windows XP Professional), “Administrator” (Windows 2000 Professional) or “Admin” ( Mac
OS X).
Connecting the Camera to a Computer
Be sure to install Nikon View before connecting the camera to your
computer. If the Add New Hardware Wizard is displayed when the
camera is connected, click Cancel to exit the wizard.
Installing Nikon View and Transferring Pictures
11
Page 14

1
Installing Nikon View (Windows)
2
3
Turn the computer on and wait for Windows to start up.
1
Insert the Nikon View installer CD -ROM
2
into the CD-ROM drive. The Install Center
program will launch automatically and a
language selection dialog will be displayed.
Select a language and click Next.
If the Language Selection Dialog Is Not Displayed
Select My Computer from the Start menu (Windows XP Home Edition/
Windows XP Professional; in other versions of Windows, double - click the My
Computer icon on the desktop) and double- click the CD - ROM (NKVIEW6)
icon in the My Computer window.
Install Nikon View
Click Easy Install. The standard install
3
includes:
• PTP driver (Windows XP only)
Coolpix Camera Drivers (Mass Storage driver)
•
(Windows 98 SE only)
• Panorama Maker
(Windows)
• Quick Time 5
• Nikon View
12
Installing Nikon View and Transferring Pictures
Page 15

4
The fi rst components to be installed are the camera drivers. What drivers
5
5
4
are installed depends on your computer’s operating system.
Windows XP Home Edition/Professional
Follow the on-screen instructions to install the PTP driver. On some systems a Microsoft Wizard may install the PTP driver. Click “Finish” or “OK”
after the installation of the PTP driver.
Windows 2000 Professional/Windows Millennium Edition (Me)
5
No drivers are installed. Proceed to Step
Windows 98 Second Edition (SE)
Follow the on -screen instructions to install the Coolpix Camera Drivers.
.
Windows
Install Nikon View
Installation of Panorama Maker opens with
5
a language selection dialog. Choose a language and click OK.
Installing Nikon View and Transferring Pictures
(Windows)
13
Page 16

Install Nikon View
6
7
8
9
Windows
The opening dialog of the Panorama
6
Maker install wizard will be displayed;
click Next.
After reading the license agreement,
7
click Yes to accept the agreement and
proceed with installation.
The destination folder for Panorama
8
Maker will be displayed under “Destination Folder”. Click Next to install
Panorama Maker to this folder, or click
Browse to select another destination.
(Windows)
Click Next to install Panorama Maker.
9
14
Installing Nikon View and Transferring Pictures
Page 17

13
12
11
10
Click Finish to exit the Panorama Maker
10
install wizard.
Windows
Installation will continue with Quick Time 5.
11
No registration number is required; leave
the registration information blank and
click Next.
The Nikon View setup program will now
12
start. After reading the license agreement, click Yes to accept the agreement
and proceed with installation.
The destination folder for Nikon View
13
will be displayed under “Destination
Folder”. Click Next to install Nikon
View to this folder, or click Browse to
select another destination.
Install Nikon View
(Windows)
Installing Nikon View and Transferring Pictures
15
Page 18

Install Nikon View
16
15
14
18
17
(Windows)
Windows
Click Ye s to create the destination folder.
14
Click Ye s to create a shortcut to Nikon
15
View on the desktop, No to proceed without creating a desktop shortcut.
Click Finish to exit the Nikon View in-
16
staller.
Click Ye s to restart your computer.
17
After the computer restarts, remove the Nikon View installer CD-ROM
18
from the CD- ROM drive.
If the “Select Language” dialog is displayed after the
computer restarts, click Quit to close the dialog and then
remove the Nikon View installer CD-ROM from the CDROM drive.
16
Installing Nikon View and Transferring Pictures
Page 19

1
Installing Nikon View (Macintosh)
3
2
Turn the computer on and wait for it to start up.
1
Insert the Nikon View installer CD- ROM into the CD- ROM drive.
2
Mac OS X
After inserting the Nikon View installer CDROM into the CD- ROM drive, double - click
the CD- ROM (Nikon View 6) icon on the
desktop and then double- click the Welcome
icon. A language-selection dialog will be dis played; select a language and click Next.
Mac OS 9
The language-selection dialog will be dis played automatically when you insert the
Nikon View installer CD-ROM.
CarbonLib (Mac OS 9 Only)
CarbonLib 1.5 or later is required to install this
Nikon software. If the installer detects an earlier
version of CarbonLib, a message will be displayed.
Click Install to upgrade to CarbonLib 1.6.
Once installation is complete, be sure to restart the computer before going
on to install Nikon software.
Click Easy Install to begin installation
3
of the following software:
• Panorama Maker
• Nikon View
• Quick Time 5 (Mac OS 9 only)
Installing Nikon View and Transferring Pictures
Install Nikon View
(Macintosh)
17
Page 20

Macintosh
5
6
7
8
8
4
Install Nikon View
(Macintosh)
Installation of Panorama Maker opens
4
with a license agreement. Click Accept
to accept the agreement and proceed
with installation.
Click Install to install Panorama
5
Maker.
Click OK to complete installation of
6
Panorama Maker.
Enter your administrator name and
7
password.
Mac OS X
Enter your administrator name and
password and click OK.
Mac OS 9
The Authenticate dialog will not be
displayed. Proceed to Step
8
.
18
The Nikon View license agreement
8
will be displayed. After reading the
license agreement, click Accept to accept the terms and conditions of the
agreement and view the ReadMe fi le.
Take a few moments to read this fi le,
which may contain important information that could not be included in this
manual. After viewing the ReadMe
fi le, click Continue… to proceed with
installation.
Installing Nikon View and Transferring Pictures
Page 21

Macintosh
9
10
11
Click Install to install Nikon View.
9
Add Nikon View to the Dock or create an
10
alias on the desktop.
Mac OS X
Click Yes to add Nikon View to the Dock,
No to proceed without adding Nikon View
to the Dock.
Mac OS 9
Click Ye s to create a alias for Nikon View
on the desktop, No to proceed without
creating an alias.
Click Quit to complete installation of
11
Nikon View.
Install Nikon View
Installing Quick Time 5 (Mac OS 9 Only)
Under Mac OS 9, installation of Quick Time 5
will begin when installation of all other
software is complete. Follow the on- screen
instructions to complete installation. When
the Registration dialog is displayed, click
Continue. Do not supply registration information.
Installing Nikon View and Transferring Pictures
(Macintosh)
19
Page 22

Macintosh
12
13
Install Nikon View
Click Restart to restart your computer.
12
After the computer restarts, remove the Nikon View installer CD-ROM
13
from the CD- ROM drive.
If the “Select Language” dialog is displayed
after the computer restarts, click Quit to close
the dialog and then remove the Nikon View
installer CD-ROM from the CD-ROM drive.
(Macintosh)
20
Installing Nikon View and Transferring Pictures
Page 23

Step 2 Transfer Pictures
1
Use a Reliable Power Source
When transferring pictures between the camera and the computer, use a fresh
CRV3 battery or fully charged EN-MH1 batteries. If in doubt, charge EN-MH1
batteries before beginning transfer or use an EH - 61 AC adapter (available separately). Do not, under any circumstances, use another make or model of
AC adapter.
Turn the came ra of f and insert a memory card as described on page 5.
1
The memory card should contain at least one picture.
Mac OS X (Version 10.1.2–10.1.5)
Select None
Select None
and close the Image Capture dialog. If you install Apple iPhoto software after
you install Nikon View, repeat this step to prevent both iPhoto and Nikon
View from starting when you connect your camera.
Mac OS X (Version 10.2 or later)
Select No application
Before connecting the camera, select
Applications from the Finder Go menu
and double-click the Image Capture
icon. The Image Capture dialog will be
displayed. Select None from the Auto-
matic Task and Hot Plug Action menus
Before connecting the camera, select
Applications from the Finder Go menu
and double-click the Image Capture
icon. The Image Capture dialog will be
displayed. Select Preferences… from
the Image Capture menu to display the
Image Capture Preferences dialog.
the “Camera Preferences” area, select
No application from the “When a cam era is connected, open” menu.
In
Transfer Pictures
Installing Nikon View and Transferring Pictures
21
Page 24

2
Turn the com puter on and wait for the operating system to start up. Con-
3
2
nect the camera to the computer as shown in the illustration, using the
USB cable provided.
UC-E6 USB cable
USB Hub
The camera may not function as expected when connected via a USB
hub or keyboard.
Turn the camera on.
3
Windows
The camera will automatically be recognized and registered as a new de vice. Once the camera has been registered, the Nikon Transfer component
Transfer Pictures
of Nikon View will be displayed in the computer monitor. The camera
monitor will remain blank.
AutoPlay (Windows XP Home Edition/Professional)
A dialog similar to that shown at left will be
displayed when the camera is turned on (if the
Select Copy pictures to a
folder on my computer
using Nikon View 6
USB option in the camera setup menu is set to
Mass Storage, a “Removable Disk” dialog will
be displayed; otherwise the dialog will show
the camera name). Select Copy pictures to
a folder on my computer using Nikon
View 6 and click OK to start Nikon View.
To bypass this dialog in the future, check
Always do the selected action.
See “Troubleshooting” in the Nikon View Reference Manual for information on what to do if Nikon Transfer fails to start automatically.
Macintosh
The Nikon Browser component of Nikon View will start, followed by Nikon
Transfer. The camera monitor will remain blank.
22
Installing Nikon View and Transferring Pictures
Page 25

4
Click the button in the Nikon Transfer window. All pictures on the
4
memory card will be transferred to your computer.
Windows
Macintosh
The Camera (Play/Transfer) Button
Pictures can also be transferred using the cam era
button.
Mac OS X 10.1.2
The camera
button can not be used to
transfer pictures under Mac OS X 10.1.2.
If you will be using the camera button to transfer pic ture s under M ac OS X ,
complete the following steps.
SET-UP
Welcome screen
Language
En
Date
Rotate the mode dial on top of the
camera to and turn the camera
on. The SET-UP menu will be displayed
in the monitor.
SET
Highlight USB.
SET-UP
CF card format
SET
Video mode
Transfer Pictures
Installing Nikon View and Transferring Pictures
23
Page 26

USB
USB
PTP
Mass Storage
When the
Mass Storage
Display options. Highlight PTP. Press multi selector to
SET
right to complete operation and return
to SET- UP menu.
button is pressed, the following messages will be displayed
in the camera monitor.
Transfer Pictures
PREPARING TO TRANSFER
During Transfer
TRANSFERING IMAGES
TO COMPUTER
TRANSFER COMPLETED
While transfer is in progress, the message “Transferring images” will be
displayed in the camera monitor. Do not:
• Disconnect the USB cable
• Turn the camera off
• Remove the memory card
Failure to observe this precaution could interfere with normal functioning
of both the camera and the computer.
PTP
SET
24
Installing Nikon View and Transferring Pictures
Page 27

5
Once transfer is complete, your pictures will be displayed in the Nikon
5
Browser component of Nikon View.
Windows
The default destination folder for transferred pictures is the My Pictures
or My Documents folder. Pictures will have fi le names of the form
“Imgnnnn”, wh ere “nnnn” is a four-digit number assigned automatically
in ascending order by Nikon View, starting from 0001.
Macintosh
The default destination folder for transferred pictures is the Pictures folder
(Mac OS X) or the Documents folder (Mac OS 9). Pictures will have fi le
names of the form “Imgnnnn”, wh ere “nnnn” is a four-digit number as-
signed automatically in ascending order by Nikon View, starting from
0001.
Installing Nikon View and Transferring Pictures
Transfer Pictures
25
Page 28

6
Disconnect the camera
6
Once your pictures are displayed in Nikon Browser, transfer is complete
and you can disconnect the camera.
If PTP is selected in the USB menu
Turn the camera off and disconnect the USB cable.
If you have not changed the USB setting from its default setting of
Mass Storage
Before turning the camera off or disconnecting the USB cable, remove the
camera from the system as described below.
Windows XP Home Edition/Windows XP Professional
Click the “Safely Remove Hardware” icon ( )
in the taskbar and select Safely remove USB
Mass Storage Device from the menu that
appears.
Windows 2000 Professional
Click the “Unplug or Eject Hardware” icon ( )
Transfer Pictures
Windows Millennium Edition (Me)
in the taskbar and select Stop USB Mass Stor age Device from the menu that appears.
Click the “Unplug or Eject Hardware” icon (
in the taskbar and select Stop USB Disk from
the menu that appears.
)
Windows 98 Second Edition (SE)
26
In My Computer, click with the right mouse
button on the removable disk corresponding
to the camera and select Eject from the menu
that appears.
Installing Nikon View and Transferring Pictures
Page 29

Mac OS X
Mac OS 9
Drag the “NO_NAME” camera volume into the Trash.
Drag the “untitled” camera volume into the Trash.
Transfer Pictures
Installing Nikon View and Transferring Pictures
27
Page 30

Nikon View
Nikon View is made up of four components: Nikon Transfer, Nikon Browser,
Nikon Viewer, and Nikon Editor. More information on Nikon View can be
found using on-line help or by reading the Nikon View Reference Manual
included on the reference CD- ROM provided with your camera.
Nikon Transfer
Nikon Transfer is used to transfer (copy) to your computer the
pictures stored on the camera
memory card.
Nikon Browser
Nikon Browser lists the pictures on your
computer as thumbnail images (appearance of Nikon Browser window may differ
slightly in some areas).
Nikon View
E-mail Upload
Print
*
* Not available in some areas.
Page 31

The Nikon View Reference Manual is distributed in Adobe Portable Document Format (PDF) and can be viewed using Adobe Acrobat Reader 4.0 or
later. Windows users who have not already installed this application can
install the copy of Adobe Acrobat Reader 5 included on the reference CDROM (the Macintosh version of Adobe Acrobat Reader is not included).
* Illustrations are for Windows XP.
Nikon Editor
Use Nikon Editor to edit your
pictures.
Nikon Viewer
Use Nikon Viewer to inspect
your pictures in detail.
Find pictures
Slide show
HTML Output
Organize pictures
Page 32

System Requirements for Nikon View
Windows
CPU Pentium 300MHz or better
Windows XP Home Edition, Windows XP Professional,
OS
Windows 2000 Professional, Windows Millennium Edition (Me),
Windows 98 Second Edition (SE)
60 MB required for installation, with additional free disk space of
Hard disk space
10 MB plus double the capacity of the camera memory card available on the system disk when Nikon View is running.
RAM Free memory of 64MB or more
Video resolution 800 × 600 or more with sixteen - bit color (High Color) or higher
• CD- ROM drive required for installation
Miscellaneous
• Internet connection required for upload to the Web
• e-mail program required when sending pictures by e -mail
Macintosh
Models
OS Mac OS X (version 10.1.2 or later), Mac OS 9.0–9.2
Hard disk space
RAM
Video resolution
Miscellaneous
iMac, iMac DV, Power Macintosh G3 (Blue &White),
Power Mac G4 or later, iBook, PowerBook G3 or later
60 MB required for installation, with additional free disk space of
10 MB plus double the capacity of the camera memory card available on the start-up disk when Nikon View is running.
• Mac OS X: 64MB or more of free memory
• Mac OS 9: 32MB or more of free memory (42MB or more recommended)
800 × 600 or more with sixteen- bit color (thousands of colors) or
higher
• CD- ROM drive required for installation
• Internet connection required for upload to the Web
• e-mail program required when sending pictures by e -mail
Printed in Japan
SB3D10000401 (11)
6MAA5511-A
 Loading...