


En
The 

 Guide to Digital Photography with the
DIGITAL CAMERA
En
Trademark Information
Apple, the Apple logo, Macintosh, Mac OS, Power Macintosh, PowerBook, and Quick Time are registered trademarks of Apple Computer, Inc. Finder, Power Mac, iMac, and iBook are trademarks of Apple Computer, Inc. Microsoft and Windows are registered trademarks of Microsoft Corporation. Internet is a trademark of Digital Equipment Corporation. CompactFlash is a trademark of SanDisk Corporation. Lexar Media is a trademark of Lexar Media Corporation. Adobe and Acrobat are registered trademarks of Adobe Systems Inc. All other trade names mentioned in this manual or the other documentation provided with your Nikon product are trademarks or registered trademarks of their respective holders.
For Your Safety
To prevent damage to your Nikon product or injury to yourself or to others, read the following safety precautions in their entirety before using this equipment. Keep these safety instructions where all those who use the product will read them.
The consequences that could result from failure to observe the precautions listed in this section are indicated by the following symbol:
This icon marks warnings, information that should be read before using your Nikon product to prevent possible injury.
WARNINGS
Turn off immediately in the event of malfunction
Should you notice smoke or an unusual smell coming from the equipment or from the AC adapter (available separately), unplug the AC adapter and remove the batteries immediately, taking care to avoid burns. Continued operation could result in injury. After removing the batteries, take the equipment to a Nikon-authorized service center for inspection.
Do not use in the presence of flammable gas
Do not use electronic equipment in the presence of flammable gas, as this could result in explosion or fire.
Observe caution when using the camera strap
Never place the strap around the neck of an infant or child.
Do not disassemble
Touching the product’s internal parts could result in injury. In the event of malfunction, the product should be repaired only by a qualified technician. Should the product break open as the result of a fall or other accident, take the product to a Nikon-authorized service center for inspection after unplugging the AC adapter and removing the batteries.
Observe proper precautions when handling batteries
Batteries may leak or explode if improperly handled. Observe the following precautions when handling batteries for use in this product:
•Before replacing the batteries, turn the camera off and make sure the power-on lamp has gone out. If you are using an AC adapter, be sure it is unplugged.
•Use a pair of rechargeable Nikon EN-MH1 NiMH batteries, one CRV3 lithium battery, two ZR6 (AA) nickel manganese batteries, or two FR6/L91 (AA) lithium batteries. Do not use other types of battery. Do not mix batteries of different types.
•When inserting batteries, do not attempt to insert them upside down or backwards.
•Do not short or disassemble batteries.
i

For Your Safety
•Do not expose batteries to flame or to excessive heat.
•Do not immerse in or expose to water.
•Do not transport or store with metal objects such as necklaces or hairpins.
•Batteries are prone to leakage when fully discharged. To avoid damage to the product, be sure to remove the batteries when no charge remains.
•Immediately after use, or when the product is used on battery power for an extended period, the batteries may become hot. Before removing the batteries, turn the camera off and allow the batteries to cool.
•Discontinue use immediately should you notice any changes in the batteries, such as discoloration or deformation.
Use appropriate cables
When connecting cables to the input and output jacks, use only the cables provided or sold by Nikon for the purpose, to maintain compliance with product regulations.
Keep out of reach of children
Particular care should be taken to prevent infants from putting the batteries or other small parts into their mouths.
Removing memory cards
Memory cards may become hot during use. Observe due caution when removing memory cards from the camera.
CD-ROMs
The CD-ROMs on which the software and manuals are distributed should not be played back on audio CD equipment. Playing CD-ROMs on an audio CD player could cause hearing loss or damage the equipment.
Observe caution when operating the flash
Using the flash close to your subject’s eyes could cause temporary visual impairment. Particular care should be observed if photographing infants, when the flash should be no less than one meter (39˝) from the subject.
Avoid contact with liquid crystal
Should the monitor break, care should be taken to avoid injury due to broken glass and to prevent liquid crystal from the monitor touching the skin or entering the eyes or mouth.
ii

Cautions
To ensure continued enjoyment of your Nikon product, observe the following precautions when storing or using the device:
Keep dry
The device will be damaged if immersed in water or subjected to high levels of moisture.
Handle the lens and all moving parts with care
Do not apply force to the lens or lens cover, or to the connector, card slot, or battery chamber covers. These parts are especially susceptible to damage.
Turn the product off before removing or disconnecting the power source
Do not unplug the product or remove the batteries while the product is on, or while images are being recorded or deleted. Forcibly cutting power in these circumstances could result in loss of data or in damage to product memory or internal circuitry. To prevent an accidental interruption of power, avoid carrying the product from one place to another while the AC adapter (available separately) is connected.
Do not drop
The product may malfunction if subjected to strong shocks or vibration.
Keep away from strong magnetic fields
Do not use or store this device in the vicinity of equipment that generates strong electromagnetic radiation or magnetic fields. Strong static charges or the magnetic fields produced by equipment such as radio transmitters could interfere with the monitor, damage data stored on the memory card, or affect the product’s internal circuitry.
Avoid sudden changes in temperature
Sudden changes in temperature, such as occur when entering or leaving a heated building on a cold day, can cause condensation inside the device. To prevent condensation, place the device in a carrying case or a plastic bag before exposing it to sudden changes in temperature.
iii

Notices
•No part of the manuals included with this product may be reproduced, transmitted, transcribed, stored in a retrieval system, or translated into any language in any form, by any means, without Nikon’s prior written permission.
•Nikon reserves the right to change the specifications of the hardware and software described in these manuals at any time and without prior notice.
Notice for customers in the U.S.A.
•Nikon will not be held liable for any damages resulting from the use of this product.
•While every effort has been made to ensure that the information in these manuals is accurate and complete, we would appreciate it were you to bring any errors or omissions to the attention of the Nikon representative in your area (address provided separately).
Federal Communications Commission (FCC) Radio Frequency Interference Statement
This equipment has been tested and found to comply with the limits for a Class B digital device, pursuant to Part 15 of the FCC rules. These limits are designed to provide reasonable protection against harmful interference in a residential installation. This equipment generates, uses, and can radiate radio frequency energy and, if not installed and used in accordance with the instructions, may cause harmful interference to radio communications. However, there is no guarantee that interference will not occur in a particular installation. If this equipment does cause harmful interference to radio or television reception, which can be determined by turning the equipment off and on, the user is encouraged to try to correct the interference by one or more of the following measures:
•Reorient or relocate the receiving antenna.
•Increase the separation between the equipment and receiver.
•Connect the equipment into an outlet on a circuit different from that to which the receiver is connected.
E2100
•Consult the dealer or an experienced radio/ television technician for help.
CAUTIONS
Modifications
The FCC requires the user to be notified that any changes or modifications made to this device that are not expressly approved by Nikon Corporation may void the user’s authority to operate the equipment.
Interface Cables
Use the interface cables sold or provided by Nikon for your equipment. Using other interface cables may exceed the limits of Class B Part 15 of the FCC rules.
Notice for customers in the State of California
WARNING: Handling the cord on this product will expose you to lead, a chemical known to the State of California to cause birth defects or other reproductive harm. Wash hands after handling.
Nikon Inc.,
1300 Walt Whitman Road, Melville, New York
11747-3064, U.S.A.
Tel.: 631-547-4200
iv

Notice for customers in Canada
CAUTION
This class B digital apparatus meets all requirements of the Canadian Interference Causing Equipment Regulations.
ATTENTION
Cet appareil numérique de la classe B respecte toutes les exigences du Règlement sur le matériel brouilleur du Canada.
Notice Concerning Prohibition of Copying or Reproduction
Note that simply being in possession of material that has been digitally copied or reproduced by means of a scanner, digital camera or other device may be punishable by law.
•Items prohibited by law from being copied or reproduced
Do not copy or reproduce paper money, coins, securities, government bonds, or local government bonds, even if such copies or reproductions are stamped “Sample.”
The copying or reproduction of paper money, coins, or securities which are circulated in a foreign country is prohibited.
Unless the prior permission of the government has been obtained, the copying or reproduction of unused postage stamps or post cards issued by the government is prohibited.
The copying or reproduction of stamps issued by the government and of certified documents stipulated by law is prohibited.
•Cautions on certain copies and reproductions
The government has issued cautions on copies or reproductions of securities issued by private companies (shares, bills, checks, gift certificates, etc.), commuter passes, or coupon tickets, except when a minimum of necessary copies are to be provided for business use by a company. Also, do not copy or reproduce passports issued by the government, licenses issued by public agencies and private groups, ID cards, and tickets, such as passes and meal coupons.
•Comply with copyright notices
The copying or reproduction of copyrighted creative works such as books, music, paintings, woodcut prints, maps, drawings, movies, and photographs is governed by national and international copyright laws. Do not use this product for the purpose of making illegal copies or to infringe copyright laws.
Safety Your For / Notices
v

Notices
Before Taking Important Pictures
Before taking pictures on important occasions (such as at weddings or before taking the camera with you on a trip), take a test shot to ensure that the camera is functioning normally. Nikon will not be held liable for damages or lost profits that may result from product malfunction.
Use Only Nikon Brand Electronic Accessories
Your Nikon COOLPIX camera is designed to the highest standards and includes complex electronic circuitry. Only Nikon brand electronic accessories (including battery chargers, batteries, and AC adapters) certified by Nikon specifically for use with your Nikon digital camera are engineered and proven to operate within the operational and safety requirements of this electronic circuitry.
THE USE OF NON-NIKON ELECTRONIC ACCESSORIES COULD DAMAGE YOUR CAMERA AND MAY VOID YOUR
NIKON WARRANTY.
For more information about Nikon brand accessories, contact your local authorized
Nikon dealer.
vi

Table of Contents
For Your Safety ................................................................................................ |
|
i |
Cautions .......................................................................................................... |
|
iii |
Notices ............................................................................................................ |
|
iv |
Before You Begin .............................................................................................. |
|
1 |
Introduction ..................................................................................................... |
|
1 |
Parts of the Camera |
......................................................................................... |
2 |
The Monitor..................................................................................................... |
|
4 |
The Mode Dial ................................................................................................. |
|
6 |
Navigating the Menus...................................................................................... |
7 |
|
The Shutter-Release Button .............................................................................. |
7 |
|
First Steps .......................................................................................................... |
|
8 |
Inserting Batteries ............................................................................................ |
|
8 |
Inserting Memory Cards................................................................................... |
10 |
|
Checking the Battery Level ............................................................................... |
12 |
|
Basic Setup ...................................................................................................... |
|
14 |
Basic Photography ............................................................................................ |
|
16 |
Step 1—Select |
Mode................................................................................ |
16 |
Step 2—Frame the Picture ............................................................................... |
18 |
|
Step 3—Focus and Shoot................................................................................. |
20 |
|
Step 4—View the Results................................................................................. |
22 |
|
More on Photography ...................................................................................... |
24 |
|
When Lighting Is Poor: Using the Flash............................................................. |
24 |
|
Taking a Self-Portrait: Using the Self-Timer ....................................................... |
26 |
|
Easy Close-ups: Macro Close-up Mode............................................................. |
27 |
|
Assist and Scene Modes................................................................................... |
28 |
|
Framing Assist.................................................................................................. |
|
29 |
Scene Mode ............................................................................................ |
|
34 |
More on Playback ............................................................................................. |
|
38 |
Viewing Pictures on the Camera....................................................................... |
38 |
|
The Picture Enhance Menu ........................................................................... |
40 |
|
Retouching Pictures .................................................................................. |
41 |
|
Small Picture............................................................................................. |
|
42 |
Cropping Pictures ..................................................................................... |
43 |
|
Viewing Pictures on TV..................................................................................... |
44 |
|
Viewing Pictures on a Computer ...................................................................... |
45 |
|
Printing Pictures ............................................................................................... |
|
48 |
Movies ............................................................................................................... |
|
51 |
Recording Movies ....................................................................................... |
51 |
|
Viewing Movies ............................................................................................... |
|
53 |
Editing Movies ................................................................................................. |
|
54 |
vii

Table of Contents |
|
|
|
The Shooting Menu .......................................................................................... |
|
56 |
|
Using the Shooting Menu ................................................................................ |
56 |
||
Image Quality/Size |
............................................................................................ |
|
58 |
White Balance ( |
|
Only) ............................................................................... |
60 |
Exp. +/– ........................................................................................................... |
|
|
62 |
Date Imprint .................................................................................................... |
|
|
63 |
Continuous ( ................................................................................... |
Only) |
64 |
|
Best Shot Selector ..........................................................................( |
Only) |
65 |
|
Image Sharpening .........................................................................( |
Only) |
66 |
|
CF Card Format................................................................................................ |
|
|
67 |
The Playback Menu........................................................................................... |
|
68 |
|
Using the Playback .................................................................................Menu |
68 |
||
Slide Show....................................................................................................... |
|
|
69 |
Delete.............................................................................................................. |
|
|
72 |
Protect ............................................................................................................. |
|
|
74 |
Auto Transfer ................................................................................................... |
|
|
75 |
The Setup Menu................................................................................................ |
|
|
77 |
Using the Setup Menu ..................................................................................... |
77 |
||
Welcome Screen .............................................................................................. |
|
|
78 |
Brightness........................................................................................................ |
|
|
79 |
Volume ............................................................................................................ |
|
|
79 |
Auto Off .......................................................................................................... |
|
|
79 |
Video Mode..................................................................................................... |
|
|
80 |
Reset All .......................................................................................................... |
|
|
80 |
Technical Notes.................................................................................................. |
|
|
81 |
Optional Accessories ........................................................................................ |
|
81 |
|
Caring for Your Camera ................................................................................... |
82 |
||
Error Messages................................................................................................. |
|
|
84 |
Troubleshooting ............................................................................................... |
|
|
87 |
Specifications................................................................................................... |
|
|
90 |
Index ................................................................................................................. |
|
|
92 |
viii
Introduction
Thank you for your purchase of a Nikon COOLPIX 2100 digital camera. This manual has been written to help you enjoy taking pictures with your Nikon digital camera. Read this manual thoroughly before use, and keep it handy when using the product.
To make it easier to find the information you need, the following symbols and conventions are used:
This icon marks cautions, informa- |
This icon marks tips, additional |
tion you should read before use to |
information you may find helpful |
prevent damage to your camera. |
when using your camera. |
This icon marks notes, information |
This icon indicates that more infor- |
that you should read before using |
mation is available elsewhere in this |
your camera. |
manual or in the Quick Start Guide. |
 Life-Long Learning
As part of Nikon’s “Life-Long Learning” commitment to ongoing product support and education, continually-updated information is available on-line at the following sites:
•For users in the U.S.A.: http://www.nikonusa.com/
•For users in Europe: http://www.nikon-euro.com/
•For users in Asia, Oceania, the Middle East, and Africa: http://www.nikon-asia.com/ Visit these sites to keep up-to-date with the latest product information, tips, answers to frequently-asked questions (FAQs), and general advice on digital imaging and photography. Additional information may be available from the Nikon representative in your area. See the URL below for contact information:
http://www.nikon-image.com/eng/
Begin You Before
1

Parts of the Camera
Mode dial ( 6)
6)
Power-on lamp ( 12)
12)
Shutter-release button ( 7)
7)
Eyelet for camera strap
Memory card slot cover ( 10)
10)
Power switch ( 12)
12)
Self-timer lamp ( 26) Built-in Speedlight (
 24)
24)
Viewfinder ( 18)
18)
Lens ( 18)
18)
Attaching the Camera Strap
2
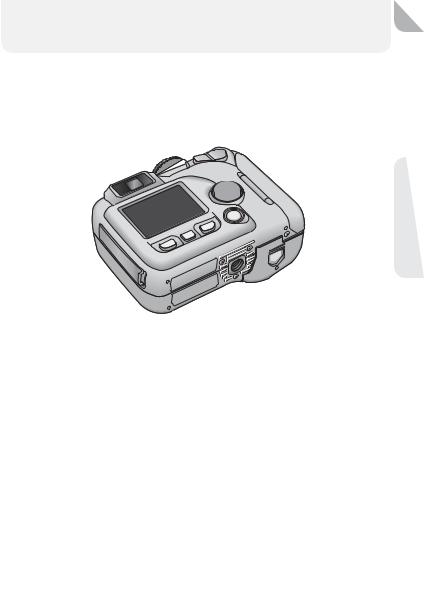
Zoom ( /
/ ) buttons (
 18)
18)
Viewfinder ( 18)
18)
Red ( ) lamp (
 20)
20)
Green (AF) lamp ( 20)
20)
Monitor (
( 5, 18)
 (delete) button (
 22, 23)
Interface connector cover


 (monitor) button (
 5)
5)
Multi selector( |
/ / |
) |
|
( |
7) |
|
|
|
(play/transfer) |
||
|
button ( |
22, 45) |
|
|
Battery- |
|
|
|
chamber |
|
|
|
cover |
|
|
|
( 8) |
|
|
|
Battery-chamber |
||
00 |
cover latch ( |
8) |
|
21 |
|
|
|
Tripod socket |
|
|
|
( |
25, 26) |
|
|
(menu) button |
|
|
|
( |
56) |
|
|
Begin You Before


 Interface connector cover
USB ( 46)/
46)/
Video-out ( 44) connector
 DC-in connector (
 9)
9)
3

The Monitor
Shooting |
|
|
|
|
|
|
|
|
|
|
2 |
|
|
|
|
|
|
|
|
||
|
|
|
|
|
|
|
|
|
|
|
|
|
|
|
|
|
|
|
|
||
|
|
|
|
|
|
|
|
|
|
|
|
|
|
|
|
|
|
|
|
||
|
|
|
|
|
|
1 |
|
|
|
3 4 5 |
|
|
|
|
|
||||||
|
|
19 |
|
|
|
|
|
|
|
|
|
|
|
|
|
|
|
|
|
|
|
|
|
|
|
|
|
|
|
|
|
|
|
|
|
|
|
|
|
|
|
|
|
|
|
18 |
|
|
|
|
|
|
|
|
|
|
|
|
|
|
|
|
6 |
|
|
|
|
|
|
|
|
|
|
|
|
|
|
|
|
|
|
|
|
|
|||
15 |
17 |
|
|
|
|
|
|
|
|
|
|
|
|
|
|
|
|
|
|
|
|
|
|
|
|
|
|
|
|
|
|
|
|
|
|
|
|
|
|
|
|||
|
|
16 |
|
|
|
|
|
|
|
|
|
|
|
|
|
|
|
|
|
|
|
|
|
14 |
|
|
|
|
|
|
|
|
|
|
|
|
|
|
|
|
7 |
|
|
|
|
|
|
|
|
|
|
|
|
|
|
|
|
|
|
|
|
|
|||
|
|
|
|
|
|
|
|
|
|
|
|
|
|
|
|
|
|
||||
|
|
13 |
|
|
|
|
|
|
|
|
|
|
|
|
|
|
|
8 |
|
||
|
|
|
|
|
|
|
|
|
|
|
|
|
|
|
|
|
|
||||
|
|
12 |
|
|
|
|
|
|
|
|
|
|
|
|
|
|
|
|
|||
|
|
|
|
|
|
|
|
|
|
|
|
|
|
|
|
|
|
|
|
|
|
|
|
|
|
|
|
|
|
|
15 |
|
|
|
|
|
|||||||
|
|
|
|
|
|
|
|
|
|
|
|
|
|
|
|
||||||
|
|
|
|
|
|
|
|
|
|
|
|
|
|
|
|
|
|
|
|||
|
|
11 |
|
10 |
9 |
|
|
|
|
|
|
||||||||||
1 Zoom indicator1 ...................... |
18 |
|
10 Flash mode ............................. |
24 |
|||||||||||||||||
2 Focus indicator........................ |
20 |
|
11 Image quality/size indicator |
.....58 |
|||||||||||||||||
3 Recording indicator ................. |
21 |
|
12 Exposure compensation .......... |
62 |
|||||||||||||||||
4 “Date not set” icon2 ............... |
15 |
|
13 Sensitivity gain indicator5......... |
25 |
|||||||||||||||||
5 Camera shake icon3 ................ |
25 |
|
14 Continuous shooting mode..... |
64 |
|||||||||||||||||
6 Battery level indicator4 |
.............12 |
|
15 Best Shot Selector (BSS)........... |
65 |
|||||||||||||||||
7 Self-timer indicator.................. |
26 |
|
16 White balance......................... |
60 |
|||||||||||||||||
8 Date imprint indicator ............. |
63 |
|
17 Macro close-up mode ............. |
27 |
|||||||||||||||||
9 Number of exposures remaining/ |
|
18 Image sharpening ................... |
66 |
||||||||||||||||||
length of movie........... |
16, 17, 51 |
|
19 Shooting mode |
6, 16 |
|||||||||||||||||
|
|
|
|
|
|
|
|
|
|||||||||||||
1 Displayed when zoom buttons are pressed.
2 Appears when camera clock has not been set.
3 Appears at slow shutter speeds to warn that pictures may be blurred.
4 Appears when batteries are running low.
5 Indicates that camera has raised sensitivity automatically.
4
Playback |
|
|
|
|
|
|
|
|
|
|
||
10 |
|
|
2003.03.06 |
100NIKON |
|
1 |
|
|||||
|
|
|
|
|||||||||
9 |
|
|
14:20 |
|
0012.JPG |
|
|
2 |
|
|||
|
|
|
|
|
|
|||||||
8 |
|
|
|
|
|
|
|
|
|
3 |
|
|
|
|
|
|
|
|
|
|
|
|
|||
|
|
|
|
|
|
|
|
|
|
|
|
|
|
|
|
|
|
|
|
|
|
|
|
||
7 |
|
|
|
|
|
|
|
|
|
|
|
|
|
|
|
|
|
|
|
|
|
|
|
||
6 |
|
|
|
|
|
12/ 15 |
|
|
4 |
|
||
|
|
|
|
|
|
|
||||||
|
|
|
|
|
|
|
|
|
||||
|
|
|
|
|
|
|
|
|
||||
|
|
|
|
|
|
|
|
|
|
|
|
|
|
|
|
5 |
|
|
|
|
|
|
|
|
|
1 Current folder ......................... |
|
|
23 |
6 Protect icon............................. |
|
|
|
74 |
||||
2 File number and type .............. |
23 |
7 Print-order icon |
|
|
....................... |
48 |
||||||
3 Battery level indicator1............. |
12 |
8 Transfer icon ........................... |
|
|
|
75 |
||||||
4 Current frame number/ |
|
9 Time of recording.............. |
14–15 |
|||||||||
total number of frames ........... |
22 |
10 Date of recording |
14–15 |
|||||||||
|
|
|
|
|
|
|||||||
5 Image quality/size indicator ..... |
58 |
|
|
|
|
|
|
|
||||
1 Appears when batteries are running low.
 Controlling the Monitor
To hide or display indicators in the monitor, press the  button. In
  and
and  modes, you can also use the

 button to turn the monitor off.
Monitor shows view through lens only
15
Monitor shows current settings and
view through lens 

Monitor off  and
and
modes only)
Begin You Before
5

The Mode Dial
Using the mode dial, you can select from eight shooting modes and setup mode. Choose a shooting mode according to shooting conditions.
To select a mode, align the mode icon with the “ ” mark next to the mode dial.
 Manual (
 17, 56)
In addition to the shoot- ing-menu options available in auto mode, you have access to such menu items as white balance and image sharpening.
 Movie (
 51–52)
Make silent movies up to 15 s in length.

 Setup (
 77)
77)
Choose this mode to display the setup menu, where you can perform such tasks as setting the camera clock and adjusting monitor brightness.
 Auto (
 16)
16)
A simple “point-and-shoot” mode in which the majority  of camera settings are controlled by the camera. Recommended for first-time us-
ers of digital cameras.
 Scene (
 28, 34–37)
Choose from ten “scenes” suited to different subjects or shooting conditions and let the camera do the rest.
 Portrait Assist
 Landscape Assist
 Sports Assist
 Night Portrait Assist
 Use framing assist to help compose pictures suited to a particular type of subject (
 28–33).
6
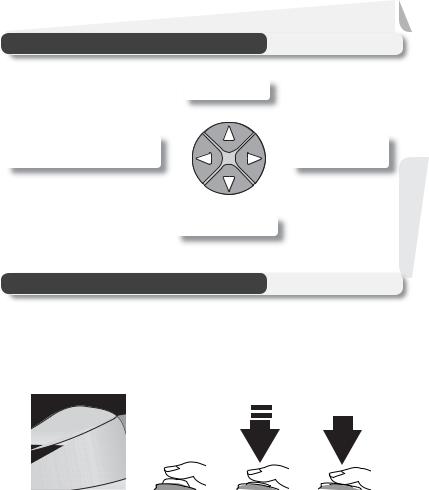
Navigating the Menus
The multi selector is used to navigate through the camera menus.
Move cursor up
Cancel and return to previous |
Make selection or |
menu, or move cursor left |
move cursor right |
Move cursor down
The Shutter-Release Button
Your camera has a two stage shutter-release button. The camera sets focus and exposure when the button is pressed halfway. The green (AF) lamp next to the viewfinder will light when the focus operation is complete. Focus and exposure will remain locked while the shutter-release button is pressed halfway. To take the picture, press the shutter-release button the rest of the way down.
Begin You Before
7
Inserting Batteries
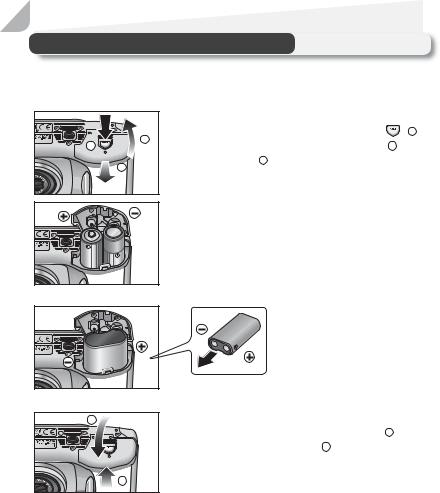
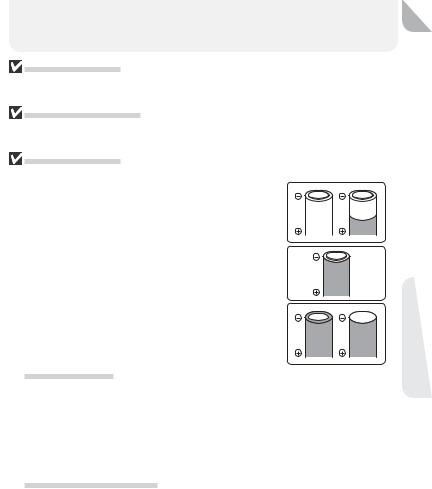
Your camera uses:
• Nikon EN-MH1 rechargeable nickel-metal hydride (NiMH) batteries (× 2), or
• non-rechargeable CRV3 lithium batteries (× 1)
|
Open the battery-chamber cover |
|
3 |
1 Pressing the battery-chamber latch ( |
; 1 ), |
1 |
slide the battery-chamber cover out ( 2 ) and |
|
2 |
flip it open ( 3 ). |
|
|
|
|
2 Insert the batteries
Insert the batteries as shown in the label inside the battery chamber.
EN-MH1/AA |
CRV3 |
1 |
3 Close the battery-chamber cover
Close the battery-chamber cover ( 1 ) and slide it in until it latches ( 2 ). Be sure that the battery-chamber cover is properly latched.
2
8
Replacing Batteries
Turn the camera off and make sure that the power-on lamp has gone out before removing or inserting batteries.
Read Battery Warnings
Read and follow all warnings and instructions supplied by the battery manufacturer.
Damaged Batteries
The following batteries can not be used:
• Batteries with peeling or damaged insulation. Using batteries with damaged insulation could result in leakage, overheating, or rupture. Note that due to manufacturing defects even new batteries may have faulty insulation.
•Batteries with insulation that covers only the sides of the battery and not the area around the negative terminal.
•Batteries with a flat negative terminal. Do not use
such batteries even if the insulation adequately covers the area around the negative terminal.
 EN-MH1 Batteries
Using an MH-70 battery charger, charge EN-MH1 batteries before first use. Charge each pair of batteries at the same time—do not charge batteries one at a time or mix batteries with different charges. Note that EN-MH1 batteries may discharge quickly immediately after purchase or after the batteries have been left unused for an extended period. This is normal, and the batteries will retain a charge for longer periods after being used and recharged several times. For more information on charging batteries, see the documentation provided with the MH-70.
 Alternative Power Sources
•To power the camera continuously for extended periods, use an EH-61 AC adapter
( 81). Do not, under any circumstances, use another make or model of AC adapter. Failure to observe this precaution could result in overheating or in damage to the camera.
•We recommend that you buy CRV3 lithium batteries as a back-up power source.
•The camera can also be used with a pair of ZR6 (AA) nickel-manganese batteries or FR6/L91 (AA) lithium batteries.
•Alkaline batteries can not be used.
Steps First
9

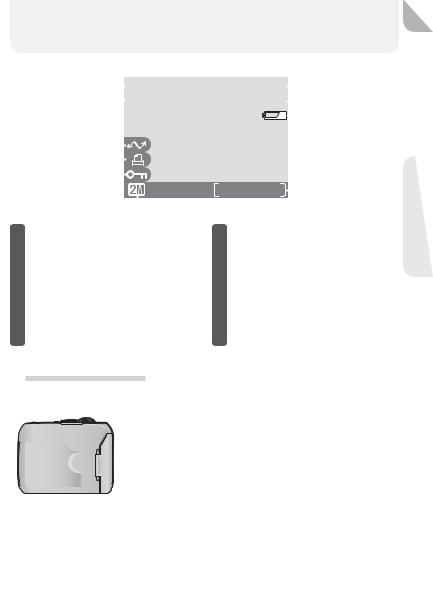
Inserting Memory Cards
Your Nikon digital camera stores pictures on CompactFlash™ memory cards.

 1
1
2
Confirm that the camera is off
The power-on lamp should be off.
Open the memory card slot cover
Front |
Direction of 
insertion
Terminals 

3 Insert the memory card
Insert the memory card in the direction of the arrow as shown in the label on the underside of the memory card slot cover. The memory card is fully inserted when the eject button is level with the top of the memory card.
 Inserting Memory Cards
Insert the memory card terminals first. Inserting the card upside down or backwards could damage the camera or the card. Check to be sure the card is in the correct orientation.
4 Close the memory card slot cover
10
 Formatting Memory Cards
The memory card supplied with your camera is formatted at shipment. Other memory cards must be formatted before first use. For information on formatting memory cards, see “The Shooting Menu: CF Card Format” ( 67).
67).
 Removing Memory Cards
Memory cards can be removed without loss of data when the camera is off. To remove memory cards, turn the camera off and open the card slot cover ( 1 ). Press the eject button to partially eject the card ( 2 ) and then remove the card by hand. Note that memory cards may become hot during use; observe due caution when removing memory cards.
1 |
2 |
 Approved Memory Cards
In addition to the card provided with your camera, the following memory cards have been tested and approved for use with your Nikon digital camera:
Nikon |
EC-CF |
All capacities |
|
|
SanDisk |
SDCFB |
32 MB, 64 MB, 128 MB, 256 MB, 512 MB, 1 GB |
|
|
SDCFH Ultra |
128 MB, 192 MB, 256 MB, 384 MB, 512 MB |
First |
||
|
||||
|
4× USB |
16 MB, 32 MB, 64 MB, |
||
|
|
|||
|
8× USB |
128 MB, 256 MB, 512 MB |
Steps |
|
Lexar |
12× USB |
|
||
|
|
|
||
Media |
16× USB |
|
|
|
24× USB |
64 MB, 128 MB, 256 MB, 512 MB |
|
||
|
|
|||
|
(including cards with |
|
|
|
|
Write Acceleration) |
|
|
|
Hitachi |
|
|
|
|
(Renesas |
Compact FLASH HB28 |
128 MB, 256 MB, 512 MB |
|
Technology)
Operation is not guaranteed with other makes of memory card. For more details on the above cards, please contact the manufacturer.
11

Checking the Battery Level
Turn the camera on |
|
||
1 Rotate the power switch until it stops, then |
|||
gently release the switch. The power-on |
|||
lamp will light. Rotate the mode dial to a |
|||
setting other than |
. |
|
|
2 Check the battery level in the monitor |
|||
Display |
|
Meaning |
|
NO ICON |
Batteries fully charged. |
||
|
Low battery. |
Fewer shots |
|
15 |
can |
be taken |
consecutively |
in |
“continuous” mode; if |
||
|
flash fires, monitor will turn |
||
|
off while flash recharges. |
||
|
Ready spare batteries. |
||
WARNING ! ! Batteries exhausted. Replace
BATTERY
EXHAUSTED with fully-charged batteries.
The red ( ) and green (AF) lamps will blink when the “battery exhausted” warning is displayed.
 The
The  Button
The camera can also be turned on by pressing the  most recent picture will be displayed in the monitor (
button for about a second. Your  22).
22).
12

Turning the Camera Off
To turn the camera off when the power-on lamp is lit, rotate the power-on switch. Do not remove the batteries or disconnect the AC adapter until the power-on lamp has gone out.
 Auto Power Off (Standby Mode)
If no operations are performed for thirty seconds (three minutes when menus are displayed), the monitor will turn off automatically and the camera will enter standby mode to reduce the drain on the batteries (when the camera is powered by an AC adapter, the monitor will turn off after thirty minutes). While the camera is in standby mode, the power-on lamp will blink. The camera will be reactivated when you:
•Rotate the power-on switch
•Press 
 or press the shutter-release button halfway
•Press the  button to view the last picture taken
•Press the MENU button to display the menu for the current mode
•Rotate the mode dial to select a new mode
The length of time before the camera enters standby mode can be changed using the Auto off option in the setup menu (

 79).
79).
If no operations are performed for three minutes after the camera enters standby mode, the camera will turn off automatically and the power-on lamp will go out.
The Power-on Lamp |
|
When the power-on lamp is |
The camera is |
On |
On |
Blinking |
In standby mode |
Off |
Off |
Steps First
13

Basic Setup
Before using your camera for the first time, choose a language for camera menus and messages and set the camera clock to the correct time and date.
1 |
SET-UP |
|
 Welcome screen
SET
En Language
 Date
Date
Rotate the mode dial to 

 and turn camera on.
3 |
LANGUAGE |
|
De Deutsch
 En English
SET
Fr Français
Display options.
2 |
SET-UP |
|
 Welcome screen
En Language
SET
 Date
Date
Highlight Language.
4 |
LANGUAGE |
|
De Deutsch |
||
|
 En English
SET
Fr Français
Choose language from Deutsch (German), English, Français (French),  (Japanese), or Español (Spanish).
5 |
SET-UP |
6 |
SET-UP |
|
Welcome screen |
Welcome screen |
|||
|
|
|||
|
En Language |
|
En Language |
|
|
SET |
|
SET |
|
|
Date |
|
Date |
|
|
Return to setup menu. |
|
Highlight Date. |
 The
The  Icon
Icon
If the  (“date not set”) icon (
 4) flashes in the top right corner of the monitor when the camera is in shooting mode, the date and time have not been set or the clock battery is exhausted. Set the camera clock as described above. Any pictures taken before the clock has been set will have a time stamp of “0000.00.00 00:00.”
14

7 |
DATE |
8 |
DATE |
|
Y M D |
Y M D |
|||
|
|
|||
|
|
|
|
|
Display DATE menu. |
|
Edit Year. |
|
9 |
DATE |
10 |
DATE |
|
Y M D |
Y M D |
|||
|
|
SET
|
En Language |
|
Date |
Choose order in which Year, Month, |
Return to setup menu. |
and Day will be displayed. |
Highlight Y M D. |
Select Month. Repeat steps 8–9 to |
|
edit remaining items. |
|
11 |
DATE |
|
12 |
SET-UP |
|
D M |
Y |
Welcome screen |
|||
|
|
SET
SET
 The Clock Battery
When the main batteries are installed or the camera is powered by an AC adapter, the clock battery will charge in about ten hours. When fully charged, the clock battery can provide several days of back-up power.
 Setting the Clock from Nikon View (Windows XP/Mac OS X Only)
If the camera is connected with the USB option set to PTP ( 45), Nikon View (version 6.0.0 or later) can be used to set the camera clock to the same time and date as the computer. See the Nikon View Reference Manual for details.
Steps First
15

Step 1—Select  Mode
Mode
This section details the basic steps involved in taking pictures in  (auto) mode. In this automatic, “point-and-shoot” mode, the majority of camera settings are controlled by the camera in response to shooting conditions, producing optimal results in most situations.
1 Rotate the mode dial to 
2 Turn the camera on
The power-on lamp will light and the monitor will display a welcome screen ( 78). The camera is ready to shoot when the monitor shows the view through the camera lens.
Shooting mode  indicates auto mode.
Image quality/size
Choose from four options depending on how you plan to use the picture ( 58). The default setting is .
15
Flash mode
Choose from four modes depending on lighting and your creative intent ( 24). The default setting is
 (auto).
Number of exposures remaining
The number of pictures that can be stored on a memory card depends on the capacity of the card and the option chosen for Image quality/ size ( 59).
59).
16

 Number of Exposures Remaining
If the number of exposures remaining is zero, the message “OUT OF MEMORY” will be displayed in the monitor. No further pictures can be taken until you:
•choose a lower Image quality/size setting ( 58)
58)
•insert a new memory card ( 10)
10)
•delete some pictures ( 22–23, 72–73)

 Mode
Mode
 (manual) mode provides additional menu options that give you full control over such settings as white balance and image sharpening. See “The Shooting Menu” (
 56).
56).
Photography Basic
17

Step 2—Frame the Picture
A
B
Zoom out Zoom in
15
Indicator in monitor shows amount of zoom when either button is pressed
15
Digital zoom
1 Ready the camera
Hold the camera steadily in both hands. Photographs can be framed in the monitor A or the viewfinder B .
 Don’t Block the Shot
To avoid dark or partially obscured pictures, keep your fingers and other objects away from the lens and flash window.
2 Frame your subject
Your Nikon digital camera is equipped with two types of built-in zoom: optical zoom, in which the camera’s telescoping lens can be used to magnify the subject up to 3 ×, and digital zoom, in which digital processing is used to further magnify the image up to 4 ×, for a total of 12 ×. Use the zoom buttons to frame your subject in the center of the monitor:
•Press the W button to zoom out from your subject, increasing the area visible in the frame.
•Press the T button to zoom in on your subject so that it fills a larger area of the frame.
•When the camera is zoomed in to maximum magnification, holding the T button down for about two seconds will trigger digital zoom. The zoom indicator will turn yellow, and the green (AF) lamp next to the viewfinder will blink. Use the T and W buttons to adjust zoom in the digital zoom range. To cancel digital zoom, press W until the zoom indicator turns white.
18

 Digital Zoom
In digital zoom, data from the camera’s image sensor are processed digitally, enlarging the center portion of the picture to fill the frame. Unlike optical zoom, digital zoom does not increase the amount of detail visible in the picture. Instead, details visible at maximum optical zoom are simply enlarged, producing a slightly “grainy” image. Note that the effects of digital zoom are not visible in the viewfinder—use the monitor when framing pictures with digital zoom. Digital zoom is not available when the monitor is off or when Multi-Shot 16-1 or Multi-Shot 16-2 is selected in the CONTINUOUS menu ( 64).
64).
 When Lighting Is Poor
When lighting is poor, sensitivity is raised to compensate and the image in the monitor may be slightly mottled. This is normal and does not indicate a malfunction.
 Monitor or Viewfinder?
Use the monitor to confirm camera settings at a glance while at the same time viewing an image that shows how the final picture will appear. This is particularly useful when the image in the viewfinder does not accurately reflect what will appear in the final picture, for example when:
•your subject is less than a meter (3´3˝) from the camera
•digital zoom is in effect
Use the viewfinder when you want to save power by turning the monitor off ( 5), or when bright ambient lighting makes it difficult to see the display in the monitor.
Photography Basic
19

Step 3—Focus and Shoot
Red ( ) lamp
Green (AF) lamp
Focus indicator
15 |
1 Focus
Press the shutter-release button halfway to set focus and exposure. In  mode, the camera will automatically focus on the subject at the center of the frame. Focus and exposure will lock while the shutter-release button is pressed halfway.
With the shutter-release button pressed halfway, check focus and flash. Focus is indicated by the green AF (autofocus) lamp next to the viewfinder and by the focus indicator in the monitor. Flash status is indicated by the red  (flash-ready) lamp next to the viewfinder.
(Red |
On |
Flash will fire when picture |
|||||
is taken. |
|
|
|||||
|
|
|
|||||
|
|
|
|
|
|||
|
|
|
|
|
|
||
) |
|
Flash |
charging. |
Briefly lift |
|||
Blinks |
finger |
from shutter-release |
|||||
lamp |
|||||||
|
button, then try again. |
||||||
|
|
|
|||||
|
|
Off |
Flash off or not required. |
||||
focus |
Green |
On |
Subject in focus. |
|
|||
|
Camera unable to focus on |
||||||
|
|
|
|||||
indicator |
lamp/(AF) |
|
subject at center of frame. |
||||
|
picture and shoot. |
||||||
|
|
Flashes |
Using focus lock, focus on |
||||
|
|
|
another |
subject |
at same |
||
|
|
|
distance, |
then |
recompose |
||
|
|
|
|
|
|
|
|
2 Take the picture
Press the shutter release button the rest of the way down to take the picture. To prevent blur, press the shutter-release button down smoothly.
20
 Loading...