Page 1
Introduction Viewing Pictures Filters Image Adjustment Other Features Menu Guide
Capture NX-D Reference Manual for Version 1.4.3
Introduction
What CaptureNX-D Can Do for You ......................... 2
Hiding Changes Made in Capture NX/Capture NX 2
The CaptureNX-D Window ......................................... 5
Palettes ............................................................................... 6
The Toolbar .......................................................................8
The Status Bar ..................................................................9
The Menu Bar ................................................................... 9
... 4
Viewing Pictures
Viewing Pictures ...........................................................10
Side-by-Side Comparison ..........................................13
Save where otherwise stated, illustrations are from Windows 10. Default camera and software settings are assumed.
The links at the top of each page can be used for chapter navigation. Click to return to this page.
Filters
Rating ................................................................................15
Labelling ..........................................................................16
Filtering ............................................................................17
Image Adjustment
The Edit Palette .............................................................18
Exposure Compensation (RAW Images) ...............20
White Balance (RAW Images) ...................................21
Picture Control (RAW Images) ..................................22
Tone/Tone (Detail) ........................................................24
Tool Buttons ...................................................................25
Copying Adjustments .................................................33
File Format ......................................................................36
Other Features
Cropping Pictures .........................................................37
Removing Dust and Scratches .................................39
Batch Processing ...........................................................40
Printing Pictures ............................................................42
Printing Image Information ......................................43
Index Prints .....................................................................44
Preferences .....................................................................45
Menu Guide
Menu Guide ....................................................................49
Notices
• No part of the manuals associated with this product may be reproduced, transmitted, transcribed, stored in a retrieval system, or translated into any language in any form, by any means,
without Nikon’s prior written permission.
• Nikon reserves the right to change the specications of the hardware and software described in
these manuals at any time and without prior notice.
• Nikon will not be held liable for any damages resulting from the use of this product.
• While every eort has been made to ensure that the information in this manual is accurate and
complete, we would appreciate it were you to bring any errors or omissions to the attention of
the Nikon representative in your area (address provided separately).
En
CaptureNX-D Reference Manual
Trademark Information
Microsoft, Windows, and Windows Vista are either registered trademarks, or trademarks of
Microsoft Corporation in the United States and/or other countries. Mac and OS X are registered
trademarks of Apple Inc. in the United States and/or other countries. All other trade names mentioned in this manual or the other documentation provided with your Nikon product are trademarks or registered trademarks of their respective holders.
1
Page 2
Introduction Viewing Pictures Filters Image Adjustment Other Features Menu Guide
What CaptureNX-D Can Do for You
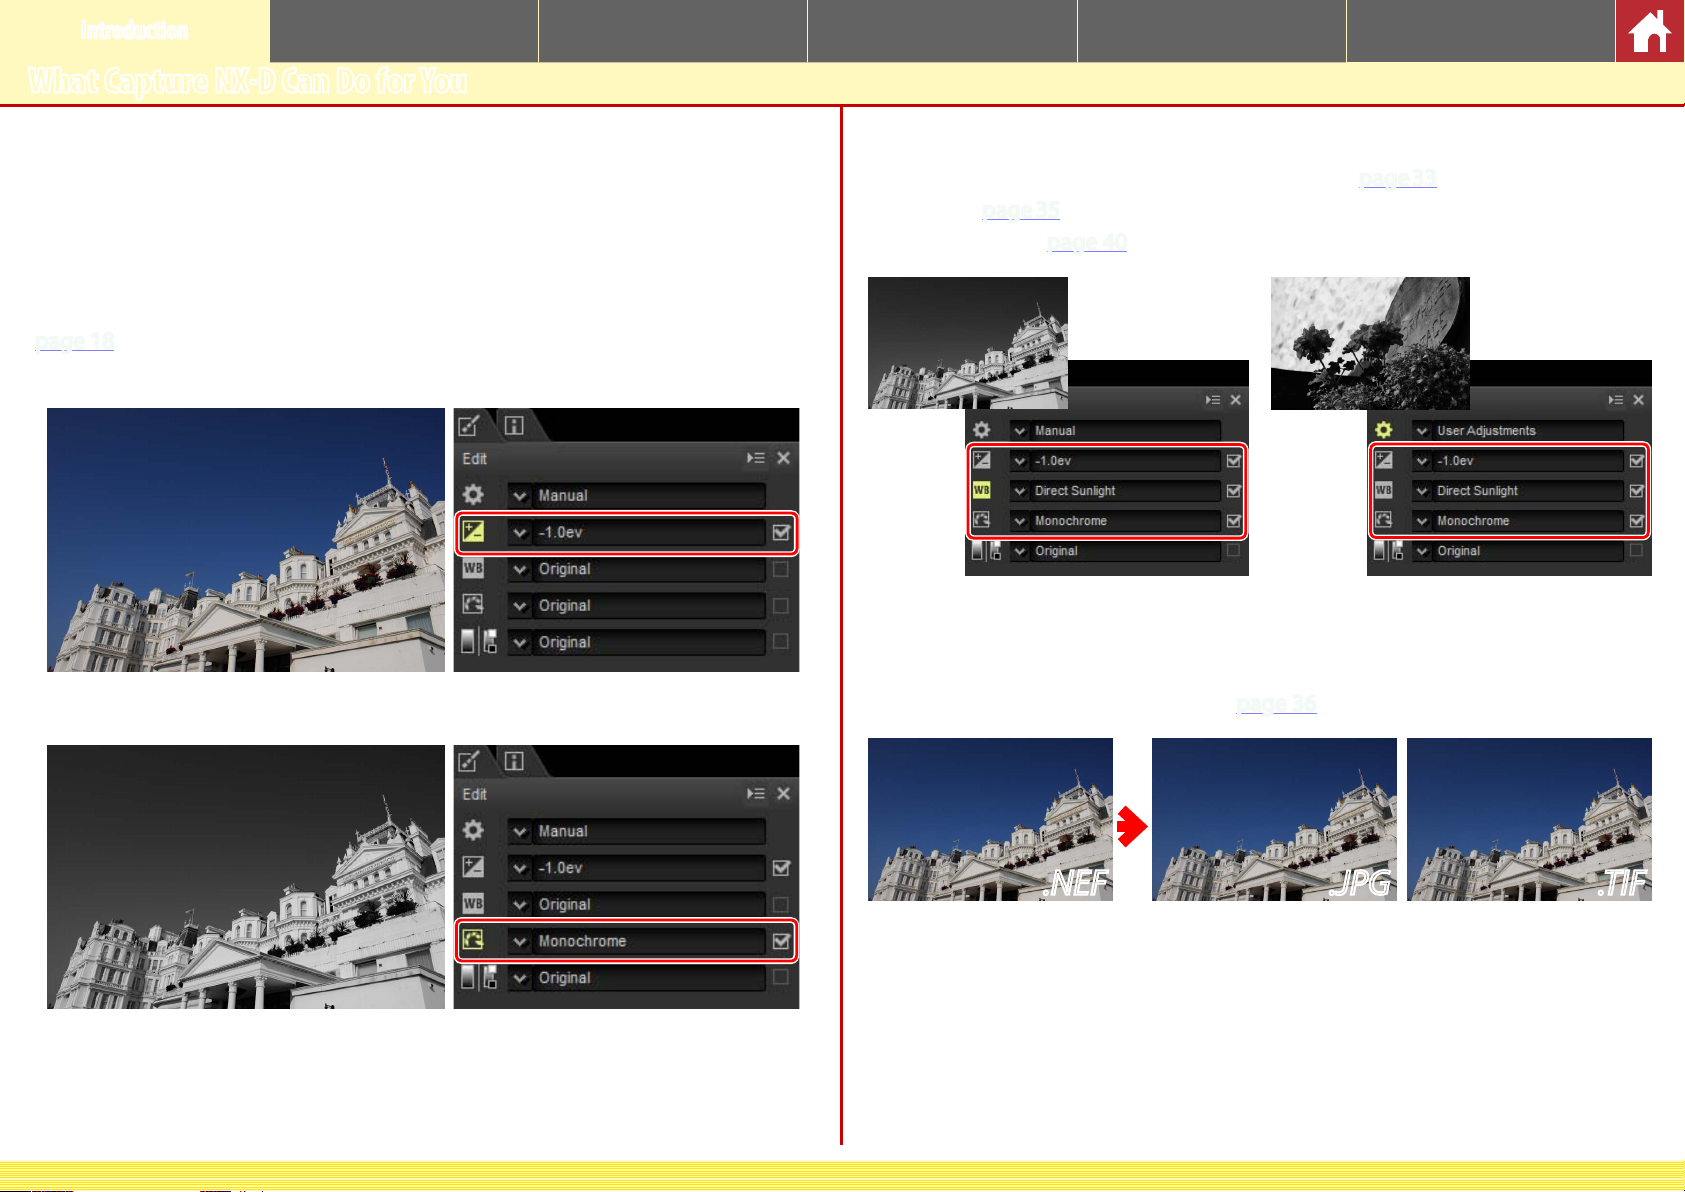
CaptureNX-D lets you ne-tune pictures by, for example, adjusting brightness
and hue, and can also be used to edit RAW images taken with Nikon digital cameras and save them in other formats.
Fine-Tune Pictures
With CaptureNX-D, it’s easy to adjust such settings as brightness and white balance
(
page 18). Certain settings, such as exposure compensation and PictureControls,
are available only with RAW images.
Copy Adjustments
Save adjustments and apply them to other images (page 33) or copy them to other
computers (
batch processing (
page 35). Saved adjustments can be applied to multiple images using
page 40).
Save Pictures in Other Formats
Fine-tuned or processed RAW (NEF/NRW) images can be saved in JPEG or TIFF
formats for use in other applications (
page 36).
CaptureNX-D Reference Manual
.NEF .JPG .TIF
2
Page 3
Introduction Viewing Pictures Filters Image Adjustment Other Features Menu Guide
What CaptureNX-D Can Do for You
Fine-Tuning Pictures in CaptureNX-D
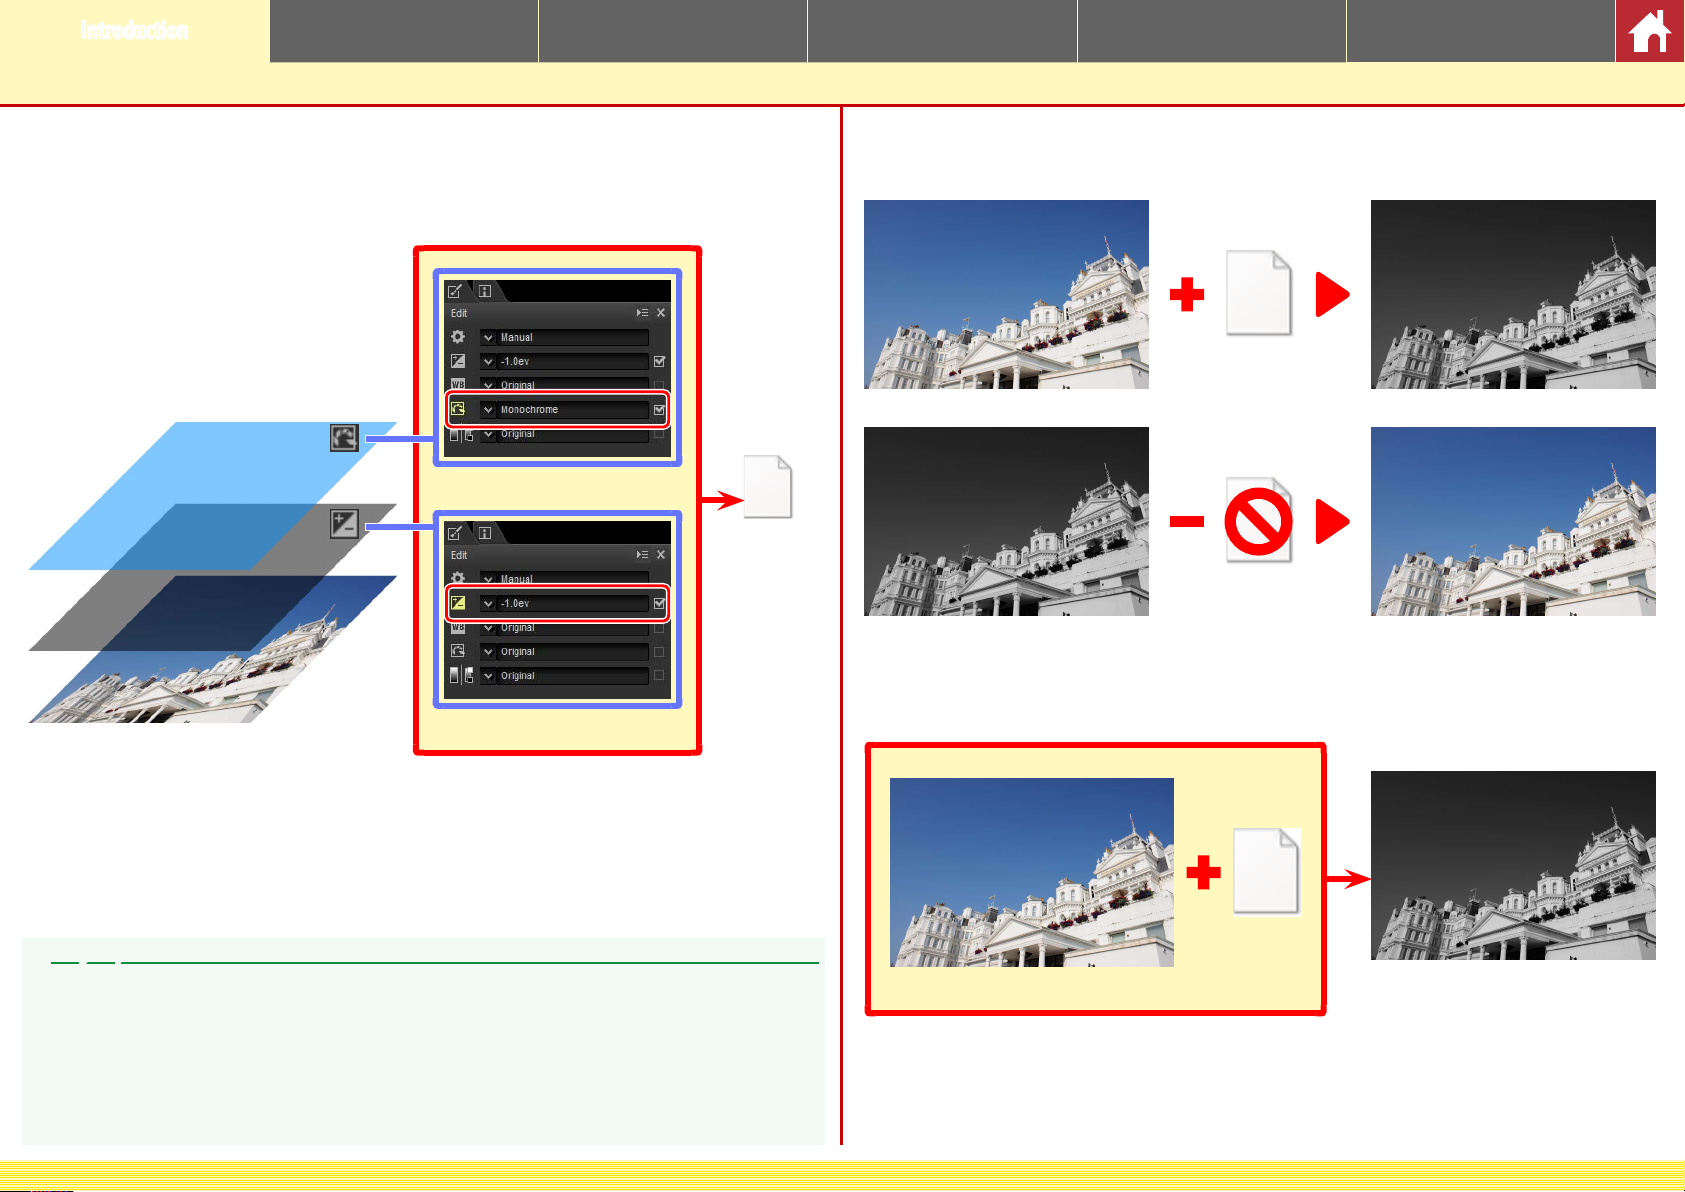
CaptureNX-D stores image adjustments in a separate “sidecar” le that is updated automatically as settings are changed.
Picture Control settings
Settings le
Exposure compensation
Image data
Because changes to settings are stored separately from the original image data,
the original picture can be restored at any time with no drop in quality.
Settings
Original image
Settings le deleted or
settings reset
Fine-tuning preview
Fine-tuning preview
Original image
When les are converted to JPEG or TIFF, the changes are applied to the image as
it is saved to create a new, modied image data le.
Image Adjustments
Image adjustments are stored in a “NKSC_PARAM” folder in the same folder as the original image. All
changes will be lost if this folder or the image adjustment le is deleted; similarly, because the image
and the image adjustment le are linked via the le name, changes will be lost or applied to another
image if the image adjustment le is renamed.
When opening images modied in ViewNX-i, CaptureNX-D also reads the associated settings les
and preserves the adjustments they contain.
CaptureNX-D Reference Manual
Original image
Settings
JPEG or TIFF le
3
Page 4
Introduction Viewing Pictures Filters Image Adjustment Other Features Menu Guide
Hiding Changes Made in Capture NX/Capture NX 2
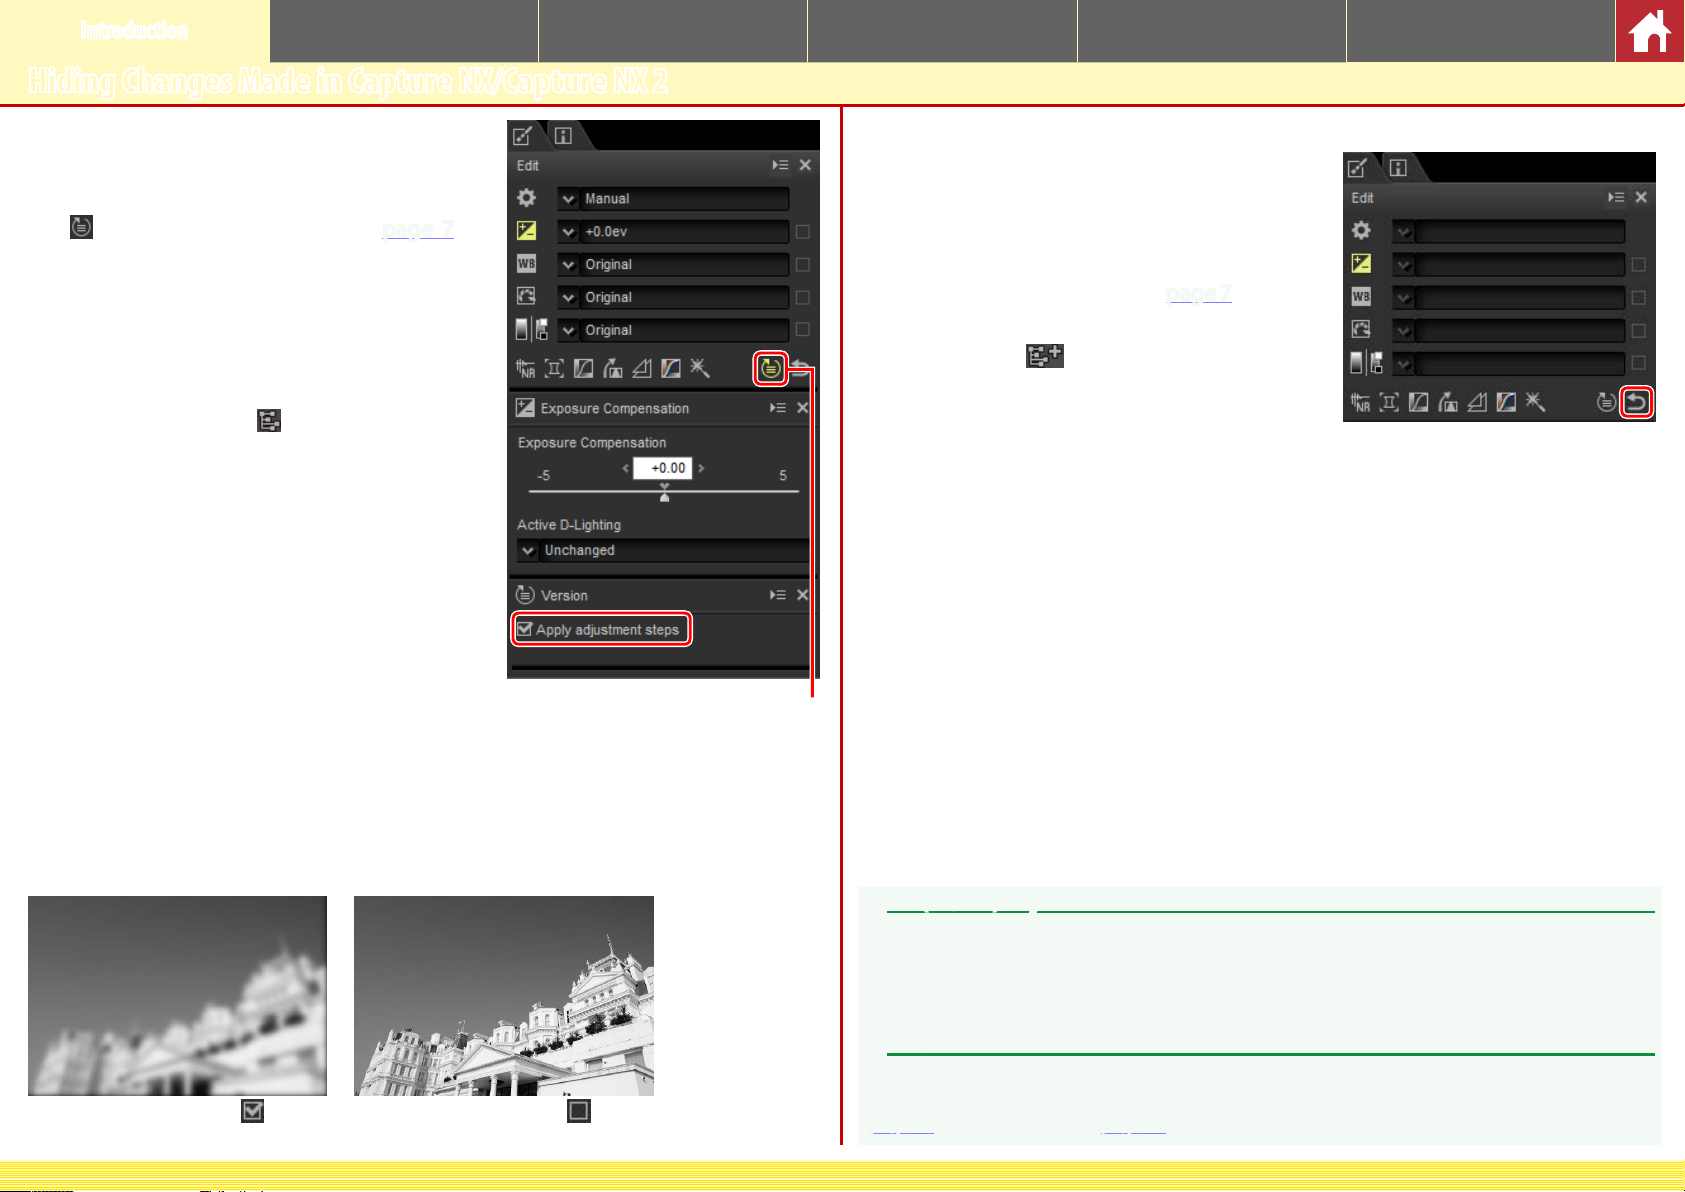
Capture NX-D can be used in combination with
Capture NX and Capture NX 2. To hide changes
made using Capture NX or Capture NX 2, click
the
button in the edit palette (page 7) to
display the Version tool and deselect Apply
adjustment steps. This applies only to modications made using the tools in the “Enhancement Steps” (Capture NX) or “Adjust” section
(Capture NX 2); images modied using these
tools are indicated by
icons in the thumb-
nail list.
Version
nApply History Setting
The image below has been modied using the Picture Control tool in the
“Develop” section and the Gaussian Blur tool in the “Adjust” section of
CaptureNX2. Deselecting Apply adjustment steps in Capture NX-D hides only
the eects of the “Gaussian Blur” tool.
nUnsupported Images
Images that have been modied using the
Color Efex Pro plugin for Capture NX or
Capture NX 2 can be ne-tuned in Capture
NX-D by rst resetting all changes using the revert button in the edit palette (
page 7). Pictures
that have been modied using ColorEfexPro
are indicated by
icons in the thumbnail list.
Revert button
Apply adjustment steps: Apply adjustment steps:
CaptureNX-D Reference Manual
RAW (NEF/NRW) Images
Changes made to RAW (NEF/NRW) images in Capture NX-D, including those made using the revert button, are not reected in Capture NX or Capture NX 2. RAW (NEF/NRW) images opened in Capture NX or
Capture NX 2 will be restored to the state they were in when they were last saved in these applications,
regardless of any changes made in the interim using Capture NX-D.
NEF Conversion
JPEG or TIFF images converted to NEF in Capture NX or Capture NX 2 are treated as JPEG or TIFF
images in Capture NX-D and can not be modied using options such as exposure compensation
(
page 20) and white balance (page 21) that apply only to RAW (NEF/NRW) images.
4
Page 5

Introduction Viewing Pictures Filters Image Adjustment Other Features Menu Guide
The CaptureNX-D Window
Menu bar: Access the menus (page 9).
q
Toolbar: Choose a view and access image ad-
w
justment tools (
Folder palette: Select a folder to display its con-
e
tents in the image area (
Image area: View the images in the current
r
folder.
Selected image: Selected images are high-
t
lighted in gray, with images that have been
modied indicated by a
corner of the thumbnail. Double-click to preview (
page 10).
Histogram palette: View the tone distribution
y
for the selected image (
Edit/metadata palettes: Fine-tune images using
u
the tools in the edit palette or switch to the
metadata palette to view image information
(
page 7).
Status bar: View information on the selected
i
image (
page 9).
page 8).
e
q
t
r
w
y
u
i
page 6).
icon at the top left
page 6).
The Navigation Palette
A navigation (bird’s eye) palette (page 6) appears when a preview is displayed by double-clicking a thumbnail in the image area.
CaptureNX-D Reference Manual
5
Page 6
Introduction Viewing Pictures Filters Image Adjustment Other Features Menu Guide
Palettes
CaptureNX-D oers the following palettes.
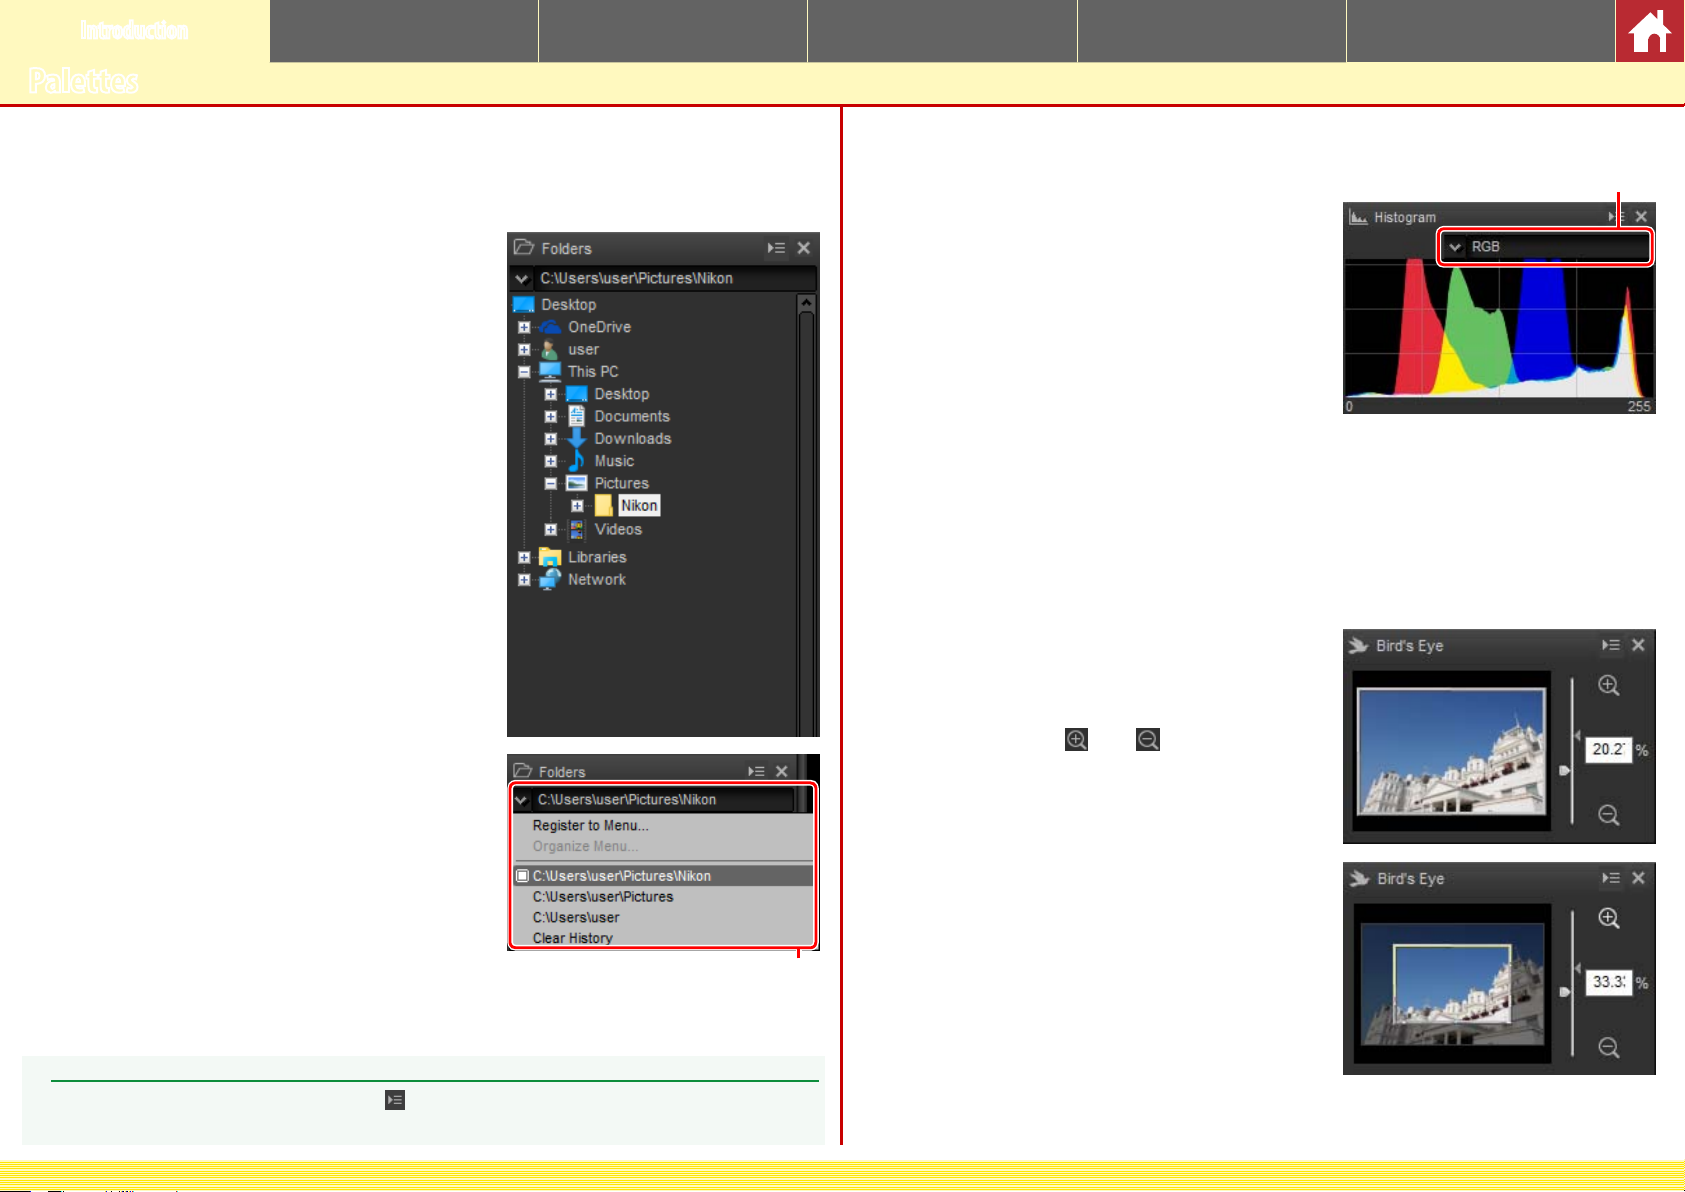
The Folder Palette
The folder palette lists the folders in the computer’s storage system. Click a folder to view
the images it contains in the image area or preview display.
The folder palette menu gives access to recent
folders. Frequently-used folders can be added
to and then accessed from this menu.
The Histogram Palette
The histogram palette provides a constantlyupdated histogram for the selected thumbnail
or the image in the preview display. The histogram shows the tone distribution for the color
channel selected in the channel menu. Choose
RGB to view overlapping distributions for the
red, green, and blue channels: tone ranges in
which the distributions for red and green overlap are shown in yellow, those in which red and
blue overlap in magenta, those in which green
and blue overlap in cyan, and those in which all
three colors overlap in white.
The Navigation (Bird’s Eye) Palette
The navigation palette is displayed above the
folder palette when you double-click a thumbnail to display a preview. To zoom the preview
in and out, click the
slider, or enter the desired zoom ratio in the
text box.
and buttons, use the
Channel menu
Folder palette menu
Palette Menus
To access the palette menu, click the triangle (
to open the palette in a oating window that can be moved freely about the display.
CaptureNX-D Reference Manual
) at the top right corner of the palette. Select Undock
When the preview is zoomed in, the frame
in the navigation palette shows the area currently displayed. Drag the frame to view other
areas of the preview.
6
Page 7
Introduction Viewing Pictures Filters Image Adjustment Other Features Menu Guide
Palettes
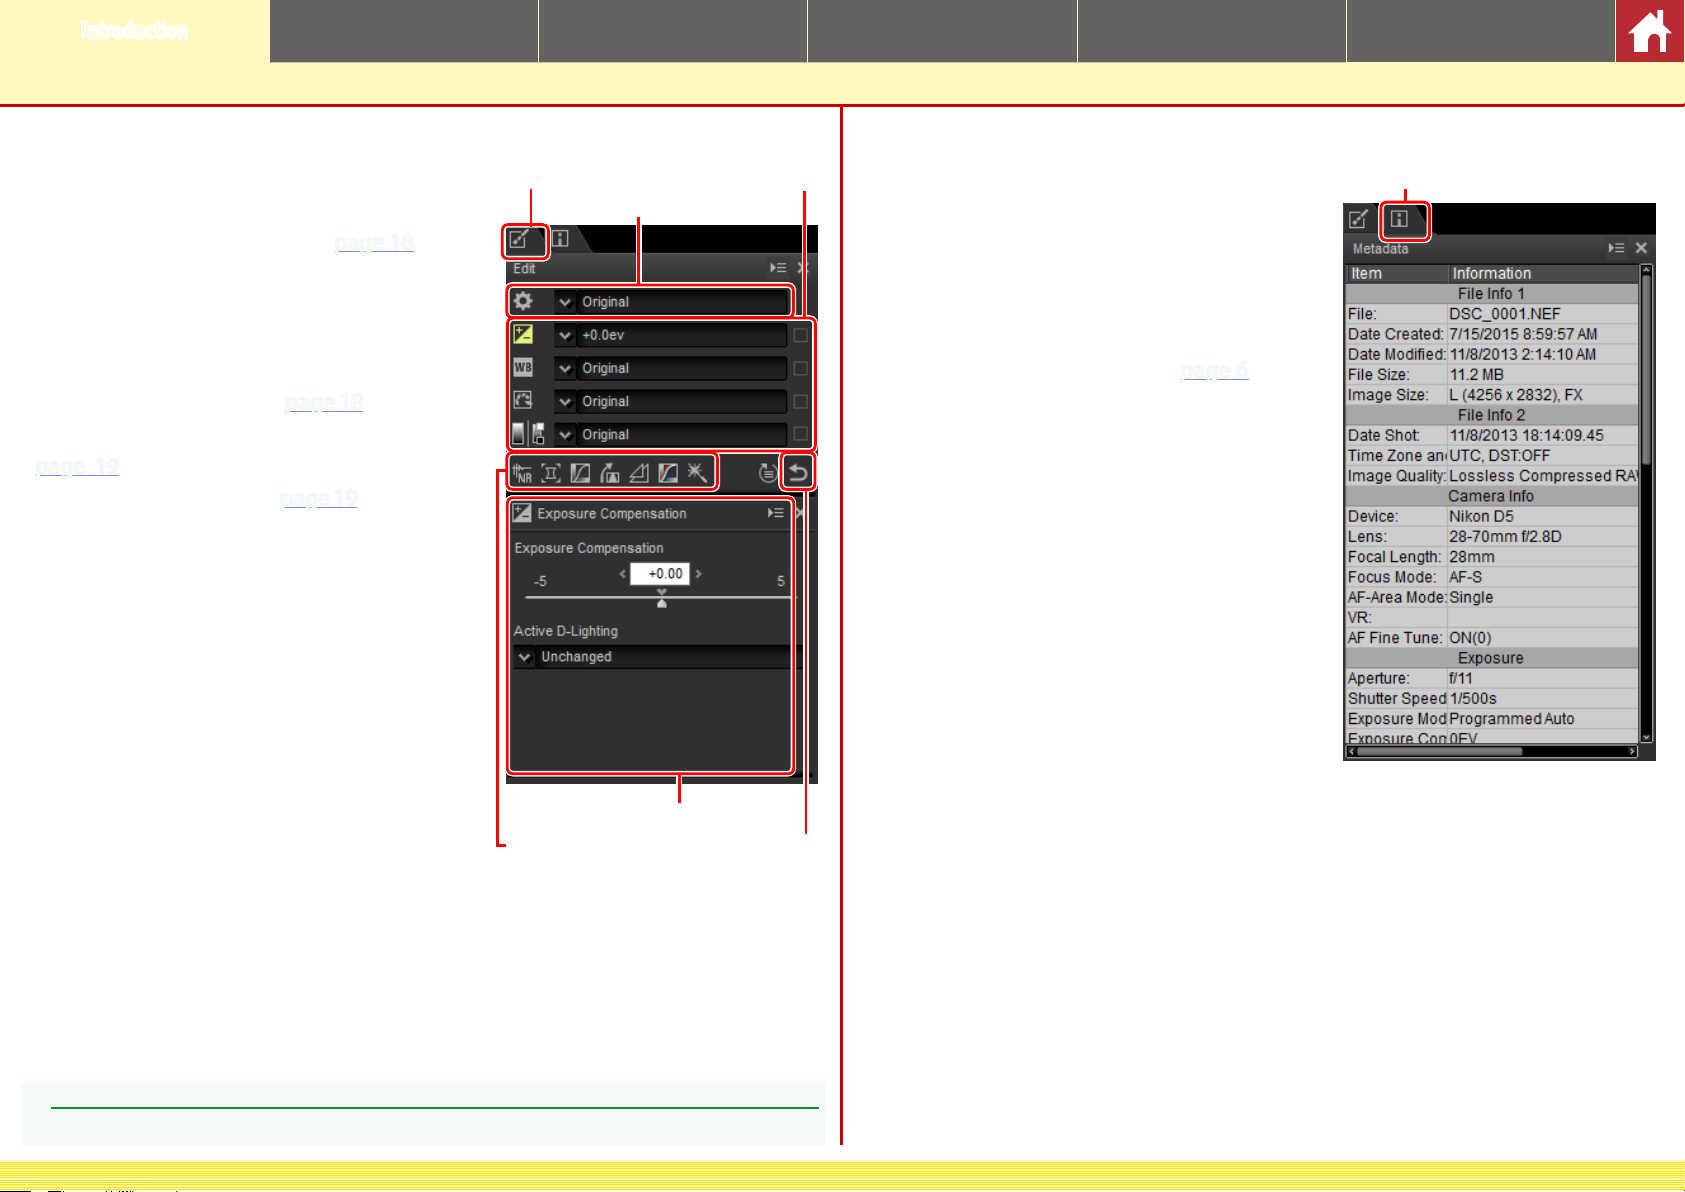
The Edit Palette
Use the tools in the edit palette to adjust
the image currently selected or previewed
in the image area. The tool list (
Exposure Compensation, White Balance,
Picture Control, and Tone/Tone (Detail) tools
that can be accessed via pull-down menus or
by clicking the tool icon and adjusting settings
in the adjustments palette (
tools can be accessed using the tool buttons
(
page 19) at the bottom of the palette. The
adjustment manager tool (
to copy adjustments to other images or save
current settings for later use. To reset all tools
and restore the image to the state it was in
when rst opened in CaptureNX-D, click the
revert button (note that any changes made to
JPEG and TIFF images in other applications
since they were last opened in CaptureNX-D
will not be reset).
page 18) oers
page 18). Additional
page 19) can be used
Adjustment manager
The Metadata Palette
Tool listEdit tab
The metadata palette lists information on the
image currently selected or previewed in the
image area, including exposure, the model of
camera used to record the picture, and the
date and time of recording. The metadata palette can be displayed in the position normally
occupied by the folder palette (
page 6) by se-
lecting Dock to Left in the palette menu.
Metadata tab
Adjustments palette
Tool buttons
The Edit and Metadata Palettes
Use the tabs at the top left corner to switch between the edit and metadata palettes.
CaptureNX-D Reference Manual
Revert button
7
Page 8
Introduction Viewing Pictures Filters Image Adjustment Other Features Menu Guide
The Toolbar
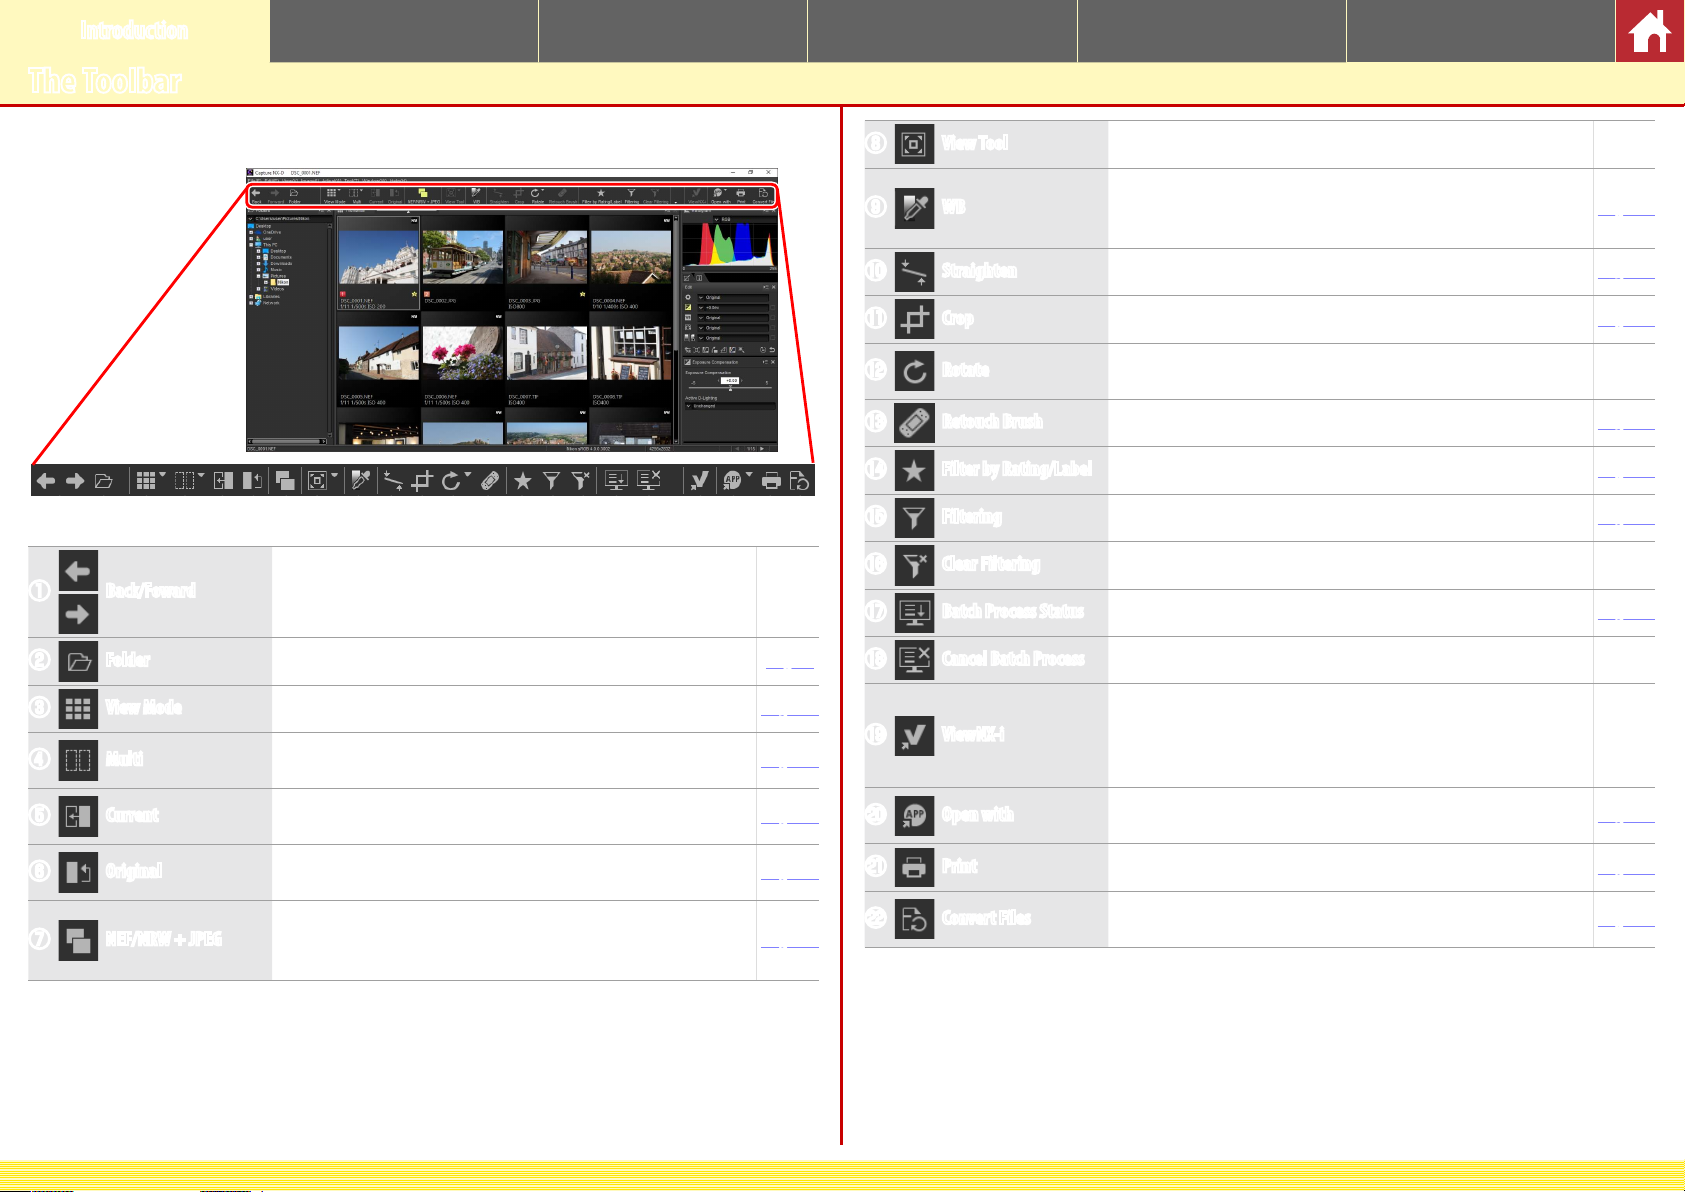
Use the toolbar to choose a view and access image adjustment tools.
q w e r tyui o!0!1!2 !3!4!5!6!7!8 !9@0 @1@2
q
w
e
r
t
y
u
Back/Foward Select the folder before or after the current folder. —
Folder Display a dialog where you can navigate to and open a folder. Page 6
View Mode Choose a view mode for the image area. Page 10
Multi
Current
Original
NEF/NRW + JPEG
View images side-by-side. Choose from Compare Before and
After Images and 2 Images.
Apply current adjustments to the “before” image for use as a reference when making further modifications.
Restore the “before” image to the state it was in before any adjustments were made.
If the folder contains images shot at image quality settings of “RAW
+ JPEG”, select this option to list the RAW and JPEG copies separately.
Page 13
Page 13
Page 13
Page 10
i
o
!0
!1
!2
!3
!4
!5
!6
!7
!8
!9
@0
@1
@2
View Tool Access the fit, image viewer, zoom, and hand tools. —
Click a point in the preview to adjust white balance so that the
WB
Straighten Straighten images. Page 30
Crop Crop images. Page 37
Rotate
Retouch Brush Remove dust and scratches (auto retouch brush). Page 39
Filter by Rating/Label Filter images by rating or label. Page 17
Filtering Filter images by rating, label, or camera settings. Page 17
Clear Filtering End filtering and view all images. —
Batch Process Status View batch process status. Page 40
Cancel Batch Process Cancel batch processing. —
ViewNX-i
Open with
Print Print the image currently selected or previewed in the image area. Page 42
Convert Files
sampled point takes on a neutral gray color (gray point sample
tool).
Rotate images 90°. The direction of rotation can be selected by
keeping the button pressed.
View the current image or images in ViewNX-i. The images are displayed in their current state including any changes made using
CaptureNX-D and, in the case of NEF/NRW (RAW ) images, without
conversion to TIFF.
Open images in an application and format previously selected using the Open With Application option.
Save images in JPEG or TIFF format. Adjustments are applied before the image is saved.
Page 21
—
—
Page 47
Page 36
CaptureNX-D Reference Manual
8
Page 9
Introduction Viewing Pictures Filters Image Adjustment Other Features Menu Guide
The Status Bar
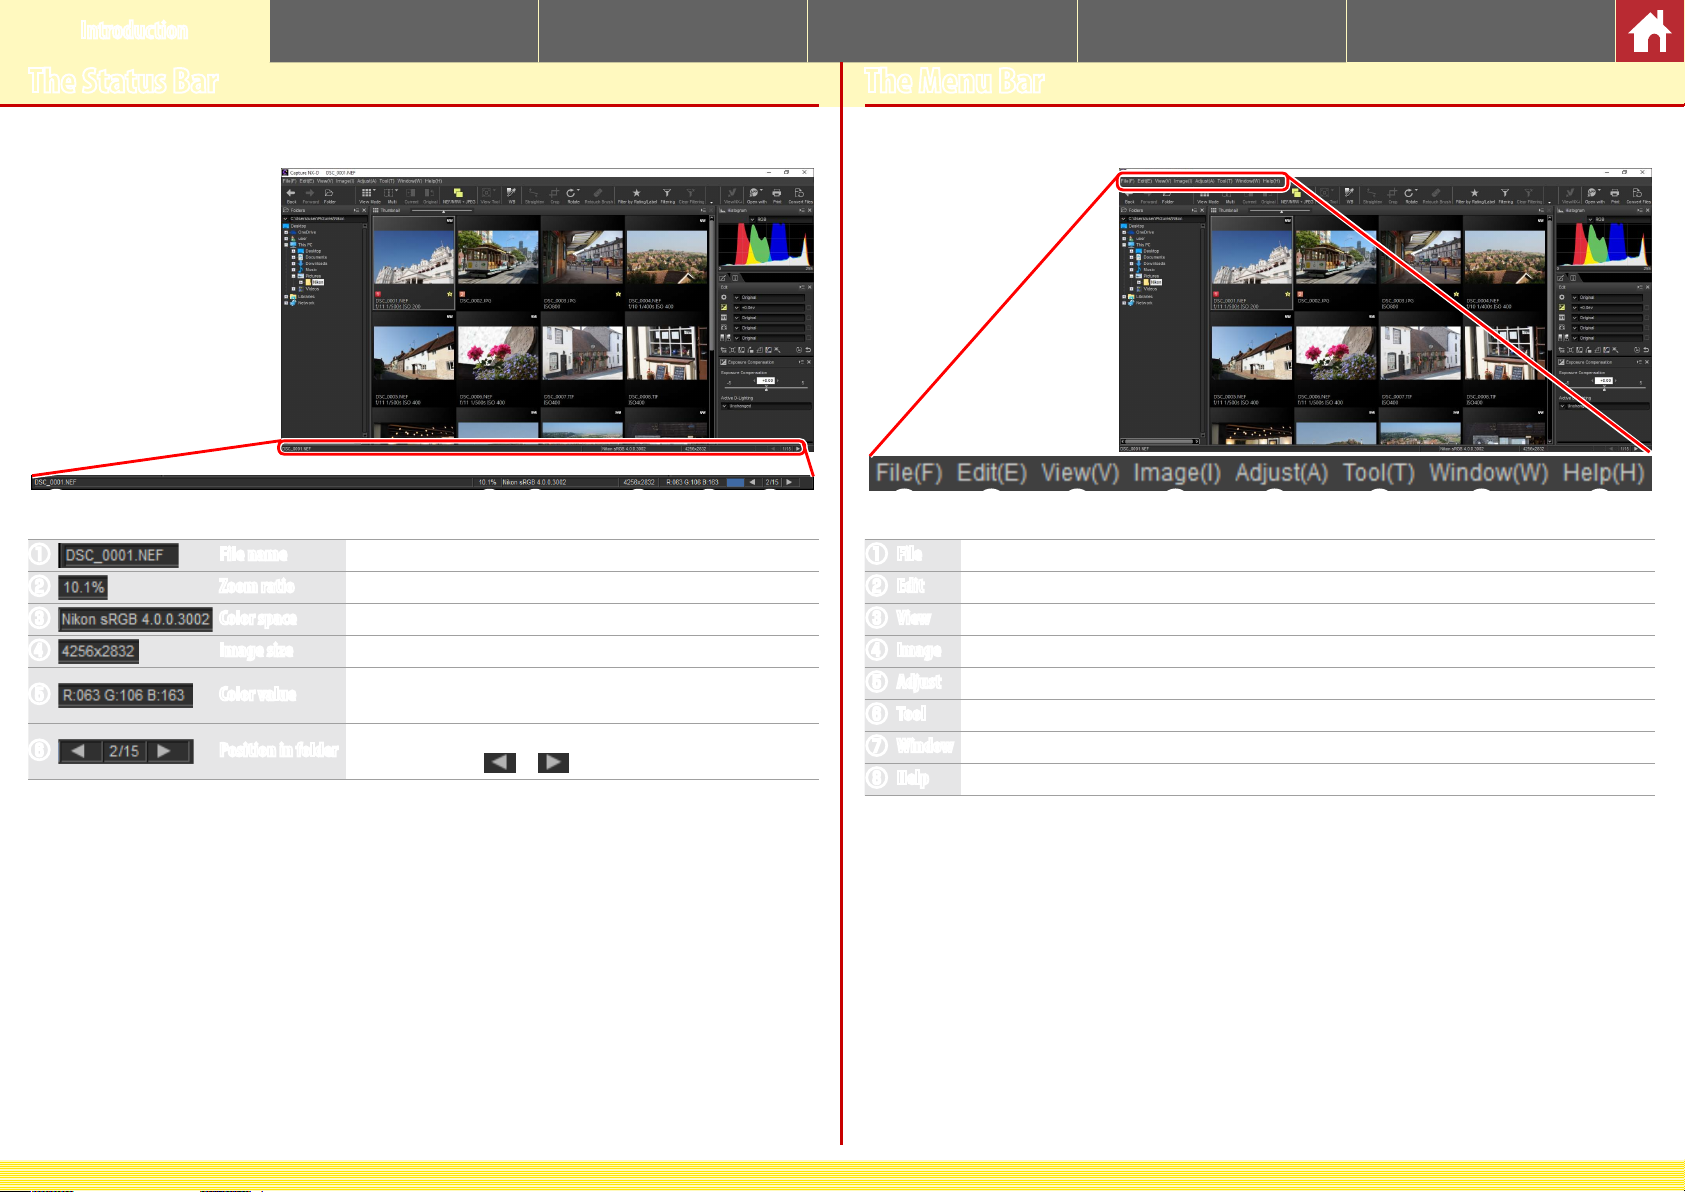
View information on the image selected or previewed in the image area.
q w e r t y
q
w
e
r
t
y
File name The file name.
Zoom ratio The zoom ratio at which the preview is currently displayed.
Color space The color space of the image in the preview display.
Image size The size (in pixels) of the image in the preview display.
Color value
Position in folder
The color of the pixel under the cursor in the preview and image
viewer displays.
The position of the current image and the total number of images
in the folder. Click or to view other images.
The Menu Bar
Access image adjustment tools or save images in other formats.
q w e r t y u i
File Convert files to other formats, run batch processes, and print and rename files.
q
Edit Select, copy, paste, and delete images.
w
View Choose a view mode, adjust zoom, and sort and select images.
e
Image Rotate, rate, and label images or display a grid or the focus point, shadows, or highlights.
r
Adjust Copy, paste, save, and load image adjustment settings.
t
Tool Access image adjustment tools.
y
Window View and hide palettes.
u
Help View online help. In Windows, this option also displays the current software version number.
i
CaptureNX-D Reference Manual
9
Page 10
Introduction Viewing Pictures Filters Image Adjustment Other Features Menu Guide
Viewing Pictures
CaptureNX-D oers the following viewing options.
Thumbnails
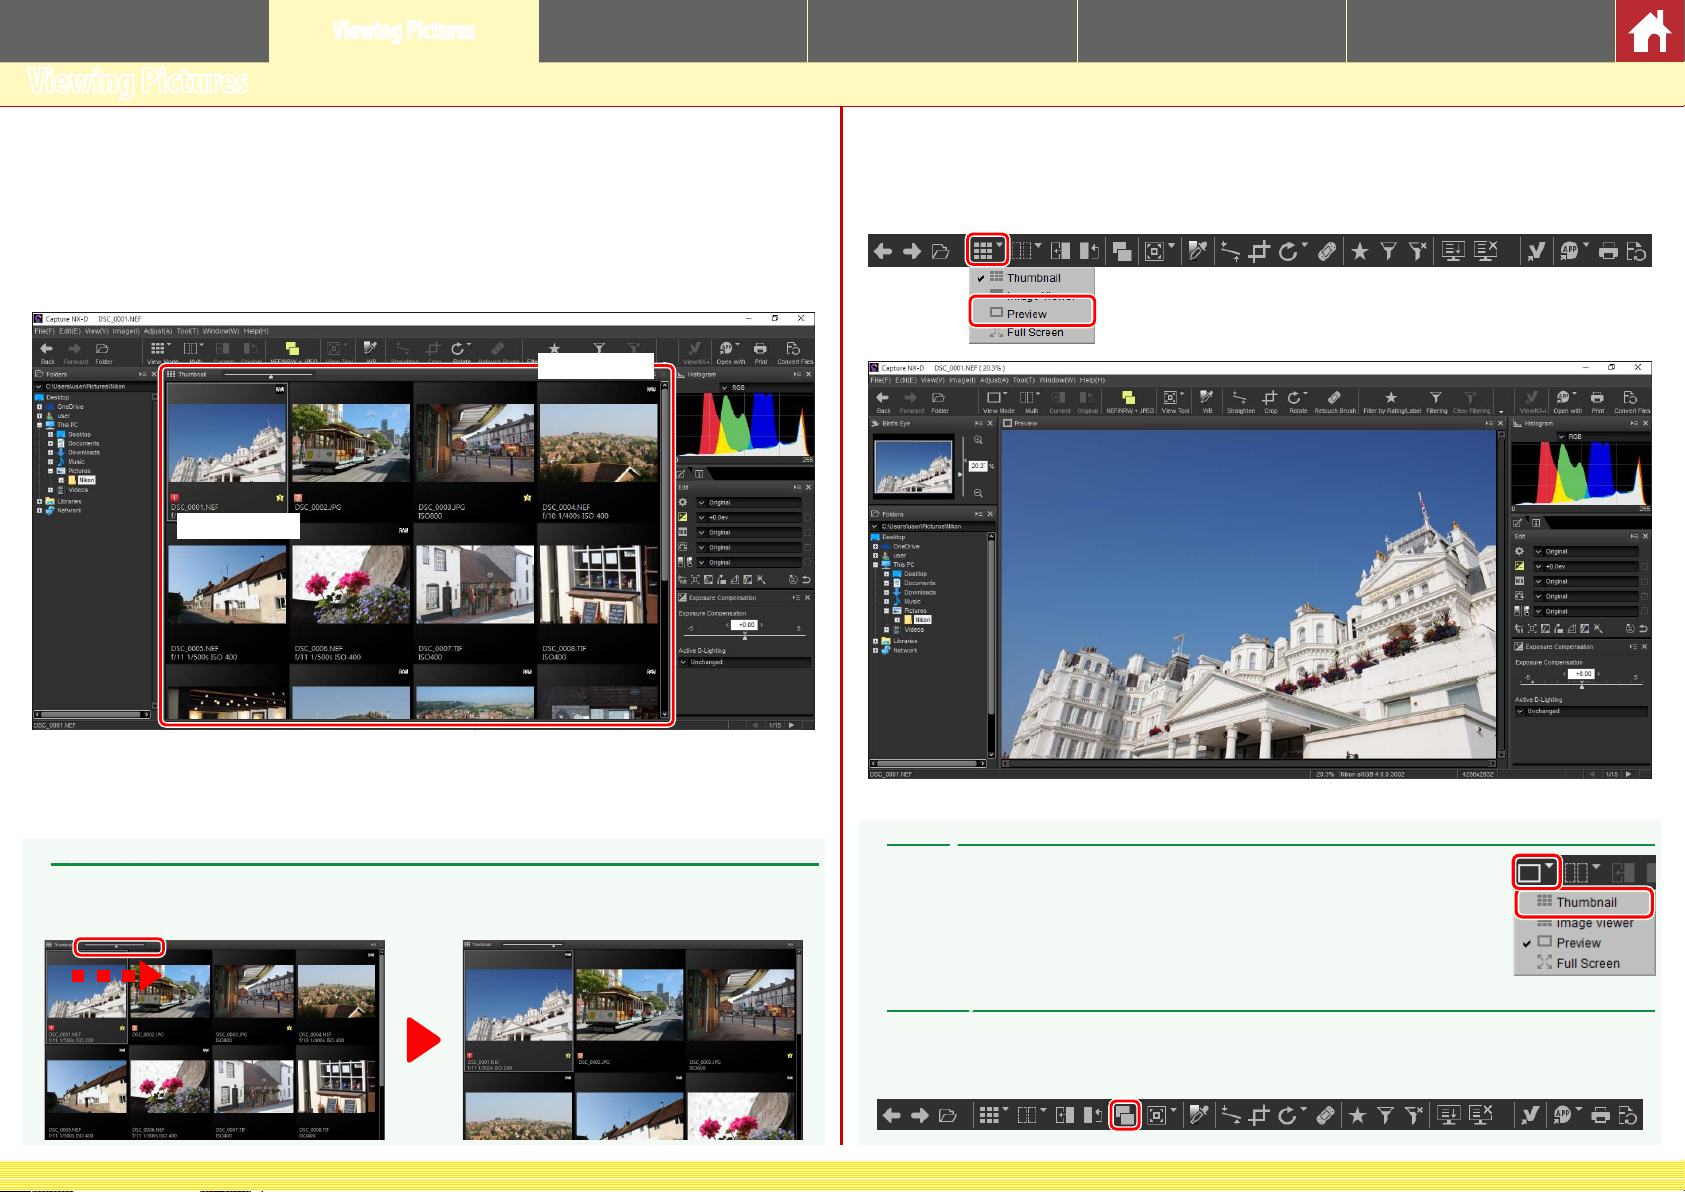
At default settings, CaptureNX-D lists the images in the current folder as thumbnails. Selected images are highlighted in gray.
Thumbnail list
Selected image
Previews
To display a preview, double-click a thumbnail, or select a thumbnail and then
click the view mode button in the toolbar and select Preview.
Thumbnail Size
Use the slider above the image area to choose the thumbnail size.
Slider
CaptureNX-D Reference Manual
Returning to the Thumbnail View
To return to the thumbnail view, click the view mode button in the toolbar and
select Thumbnail.
Same Name, Dierent Extension
If the folder contains pairs of images with the same le names but dierent extensions (for example,
RAW and JPEG images recorded at image quality settings of “RAW + JPEG”), only one copy of each pair
will be displayed when NEF/NRW + JPEG is on. To view all images, turn NEF/NRW + JPEG o.
10
Page 11
Introduction Viewing Pictures Filters Image Adjustment Other Features Menu Guide
Viewing Pictures
The Image Viewer
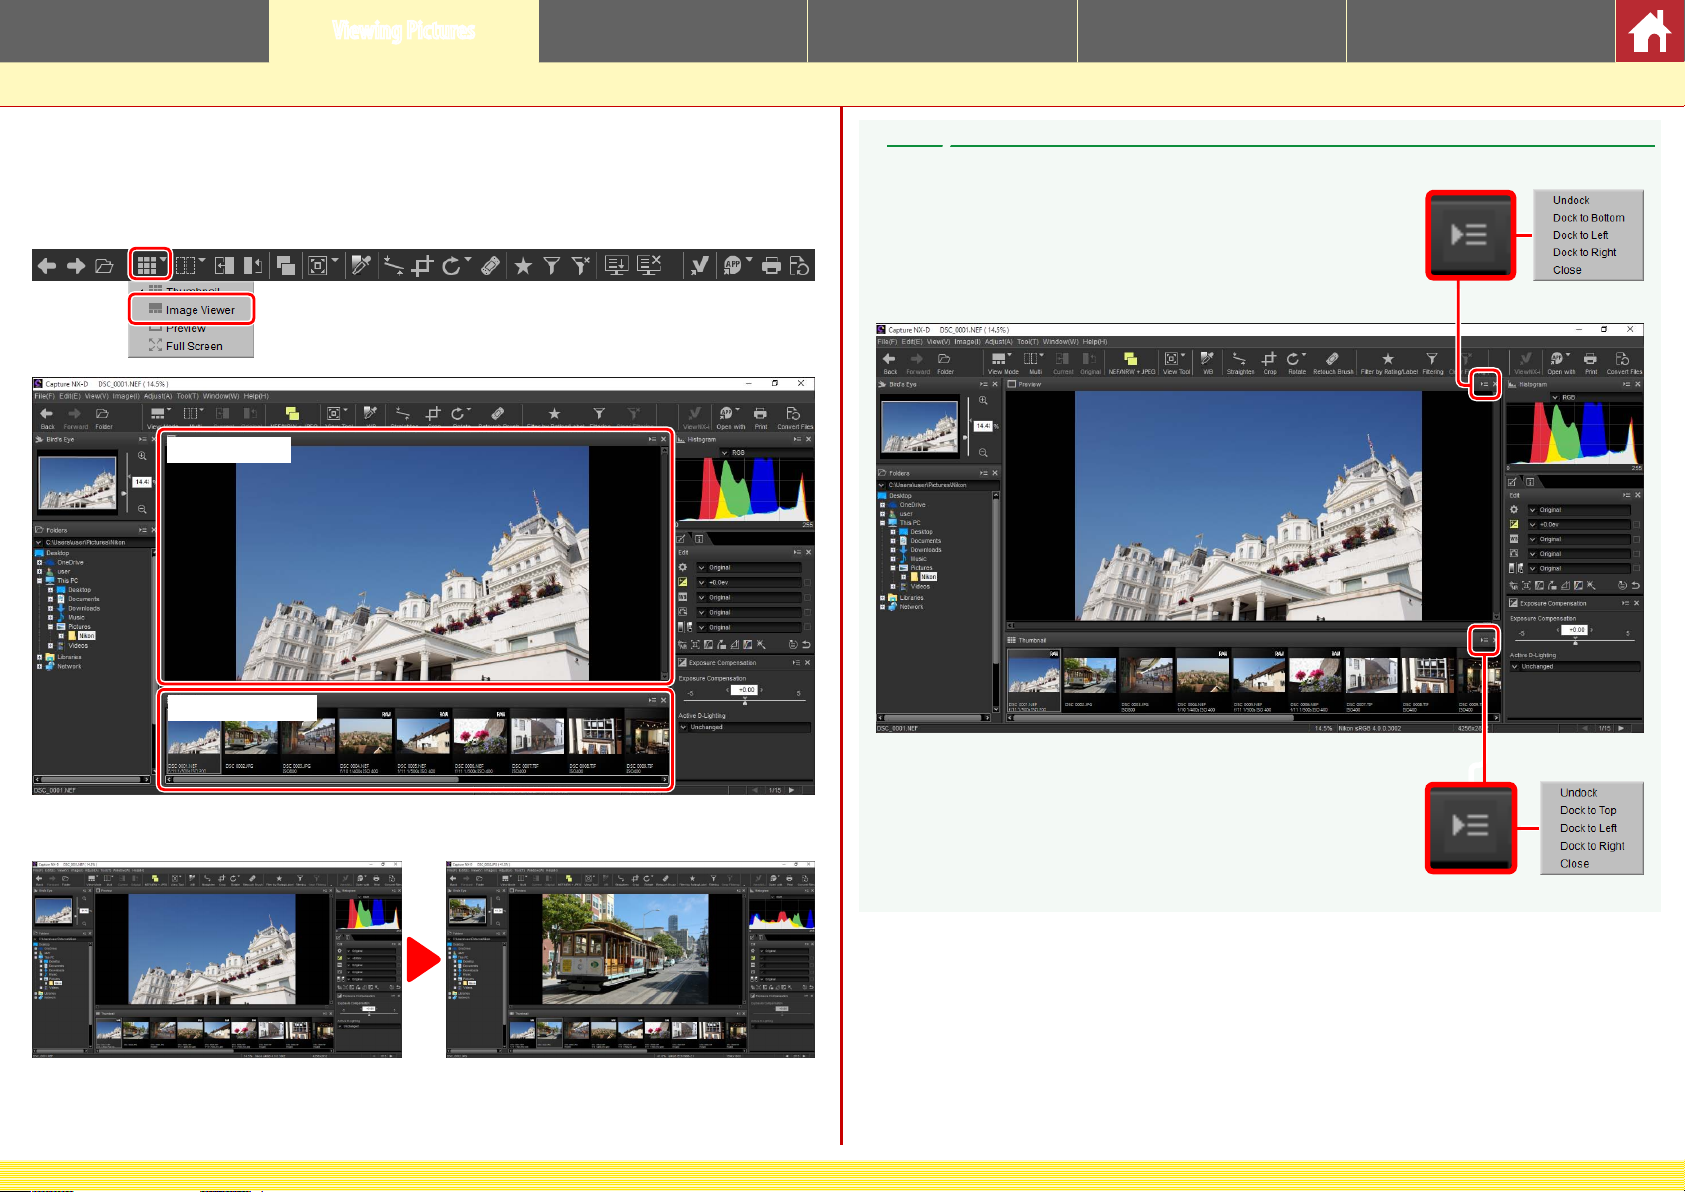
To preview the current image with thumbnails above, below, or to one side, click
the view mode button in the toolbar and select Image Viewer.
Preview palette
Thumbnail palette
Choosing the Location of the Preview and Thumbnail Palettes
The locations of the preview and thumbnail palettes can be selected from the palette menus.
Preview palette menu
Click thumbnails to preview other images.
CaptureNX-D Reference Manual
Thumbnail palette menu
11
Page 12
Introduction Viewing Pictures Filters Image Adjustment Other Features Menu Guide
Viewing Pictures
Viewing Images Full Screen
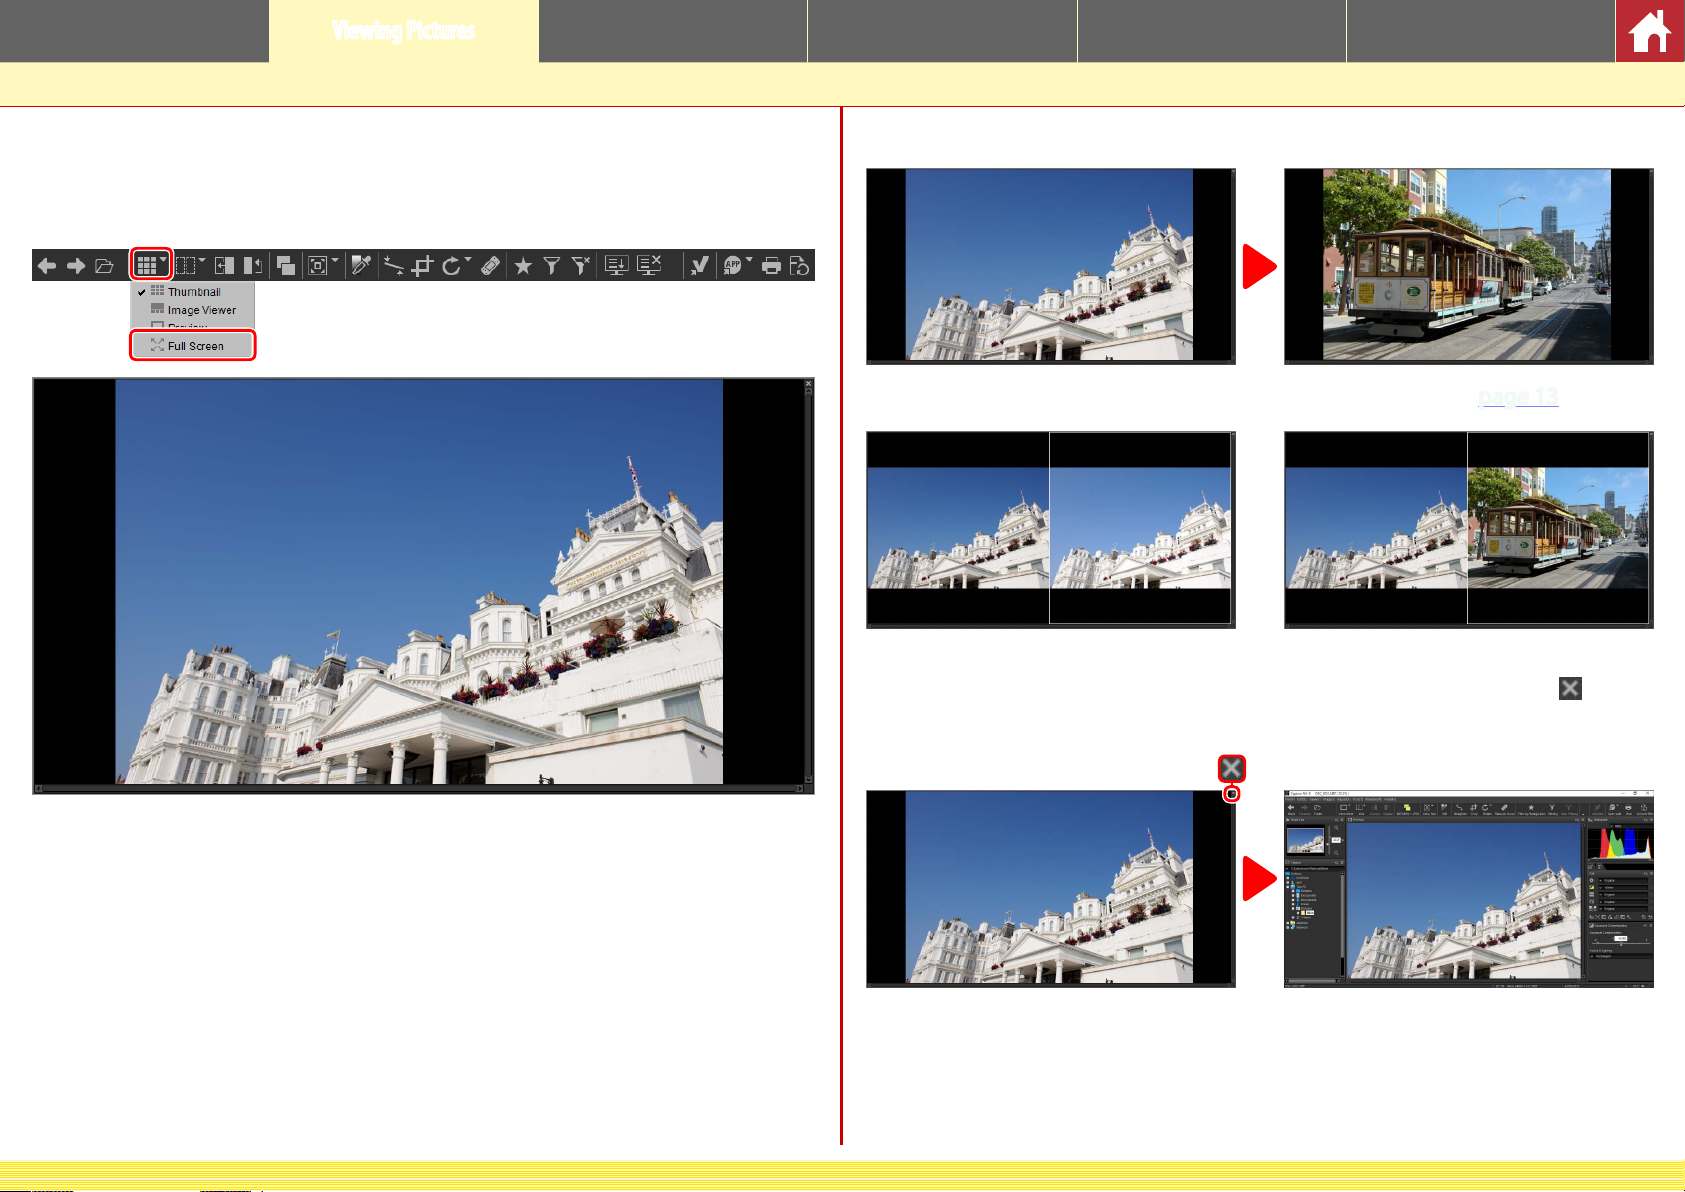
To hide the menus, toolbar, and palettes and view the current image full screen,
click the view mode button in the toolbar and select Full Screen.
Use the left and right arrow keys on the keyboard to view additional images.
Full-screen display is also available in the multi-preview view (page 13).
Compare before and after images 2 Images
To exit the full-screen display and return to the previous view, click the button
or press the Esc key.
CaptureNX-D Reference Manual
12
Page 13
Introduction Viewing Pictures Filters Image Adjustment Other Features Menu Guide
Side-by-Side Comparison
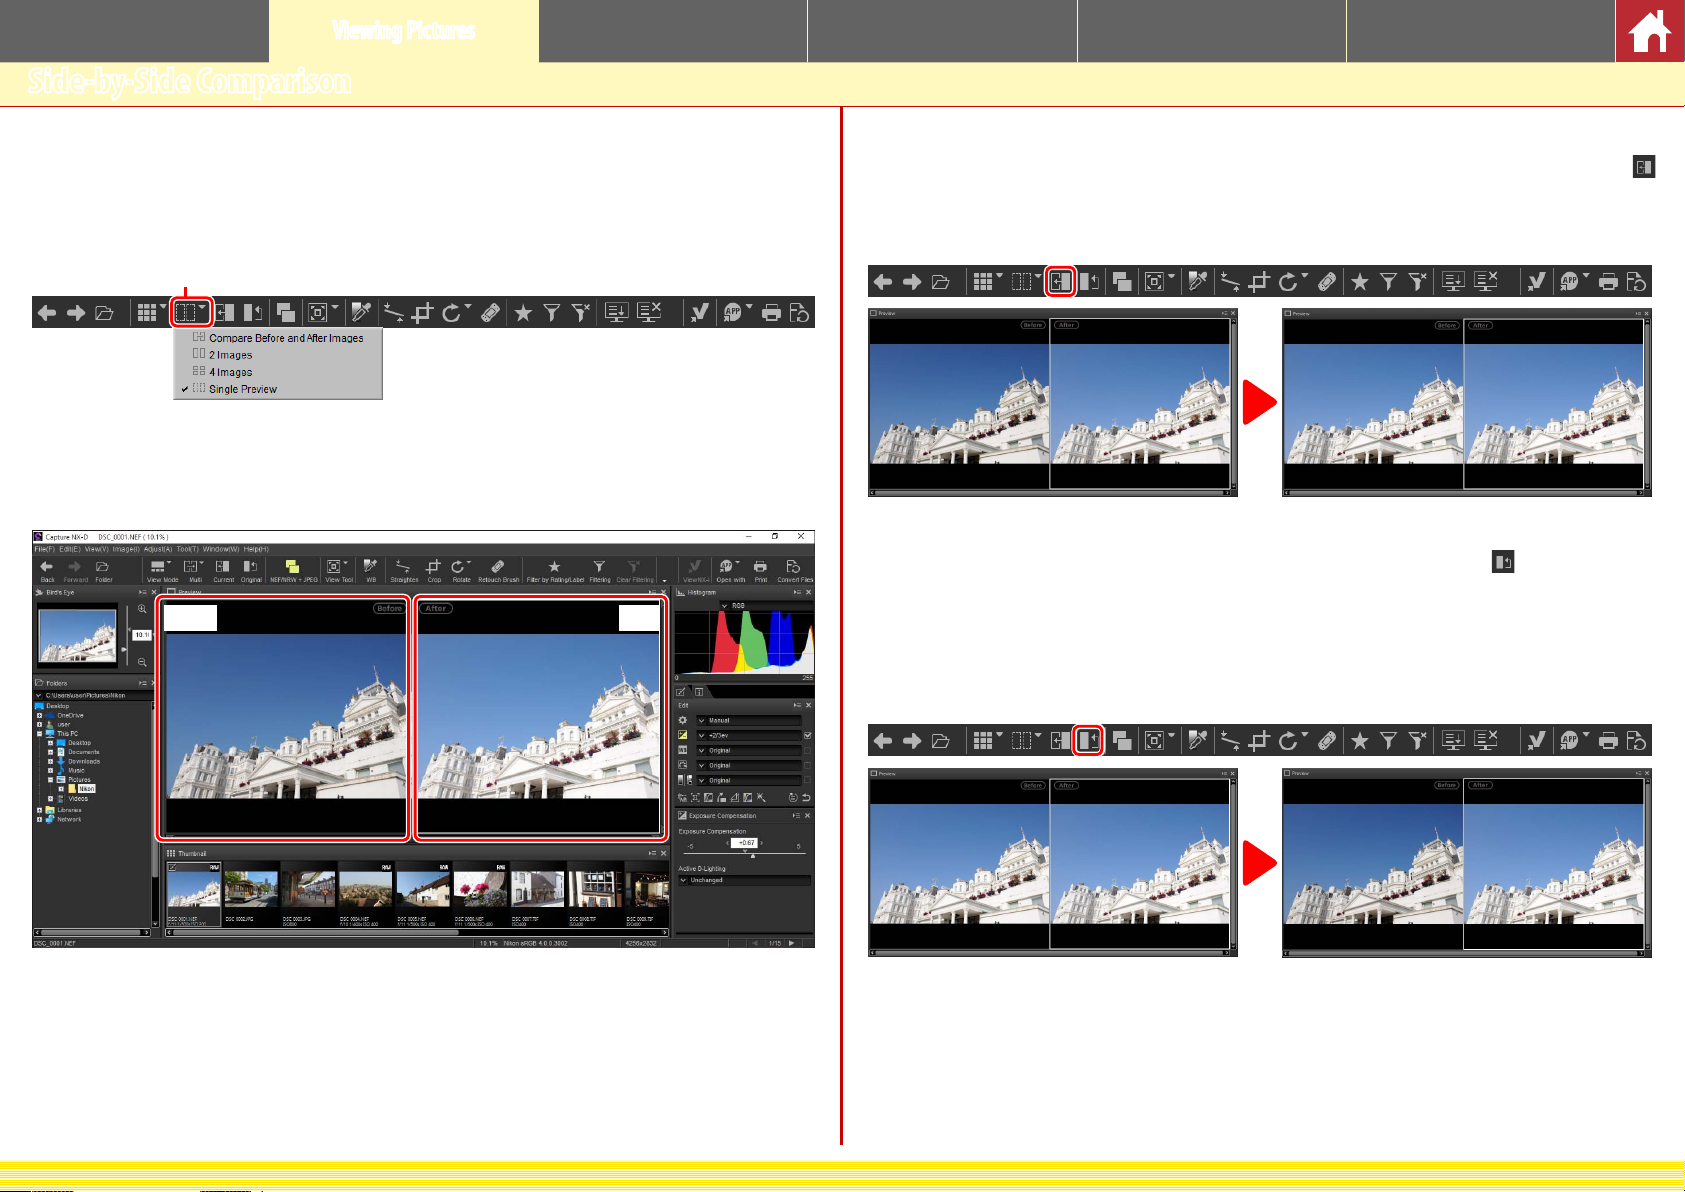
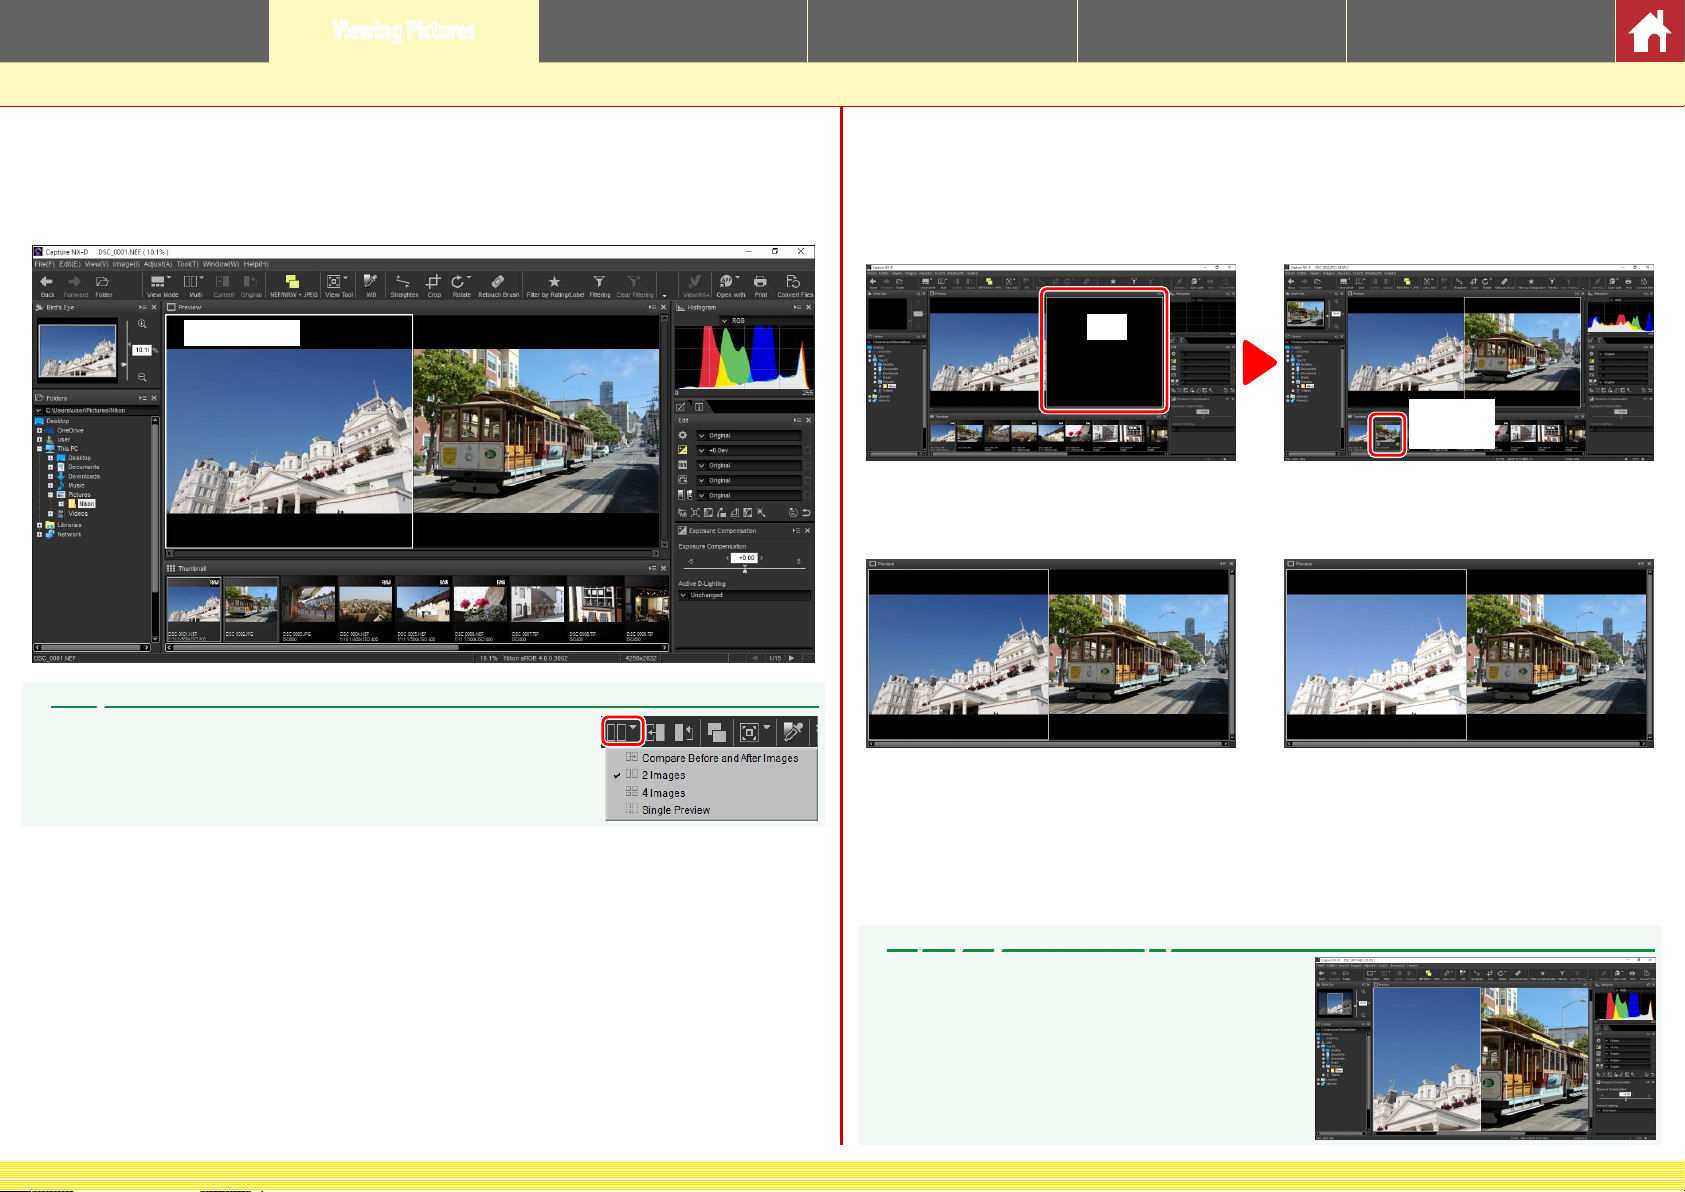
To compare images, use the “multi” tool in the toolbar. Choose Compare Before and
After Images to compare before and after views of a single image, or 2 Images to
compare multiple images side-by-side. To exit the side-by-side comparison display,
select Single Preview.
Multi
Compare Before and After Images
Compare before and after views of the current image.
Before After
nUpdating the “Before” Image
To update the “before” image to reect current image adjustments, click the
button in the toolbar. The “before” image can then be used as a reference for
subsequent changes to image adjustment settings.
nRestoring the “Before” Image
To restore the “before” image to its unadjusted state, click the
toolbar. The “before” image will be restored to the state the image was in when
rst opened in CaptureNX-D (note that any changes made to JPEG and TIFF images in other applications since they were last opened in CaptureNX-D will not
be reset).
button in the
CaptureNX-D Reference Manual
13
Page 14
Introduction Viewing Pictures Filters Image Adjustment Other Features Menu Guide
Side-by-Side Comparison
“2 Images”
Compare images side-by-side. When either image is zoomed or scrolled, the
other will be zoomed or scrolled to match.
Current image
“2 Images”
Computers with at least 4 GB of memory and 64-bit operating systems
oer a choice of two- and four-image displays. The “2 images” feature
on computers running 32-bit editions of Windows oers only a twoimage display.
When you click the “multi” button and select 2 Images, the current image will be
displayed on the left. To select images for display, click the desired preview box
and then click a thumbnail. Only images in the same folder can be selected for
side-by-side comparison.
Click
Click a
thumbnail
The selected preview is highlighted in white. Image adjustments apply only to
the selected preview, as do the histogram and navigation palette displays.
No adjustment Exposure compensation set to +1.0EV
CaptureNX-D Reference Manual
Comparing Images in the Preview Display
To open the images side-by-side in the preview display,
click the view mode button in the toolbar and select
Preview.
14
Page 15
Introduction Viewing Pictures Filters Image Adjustment Other Features Menu Guide
Rating
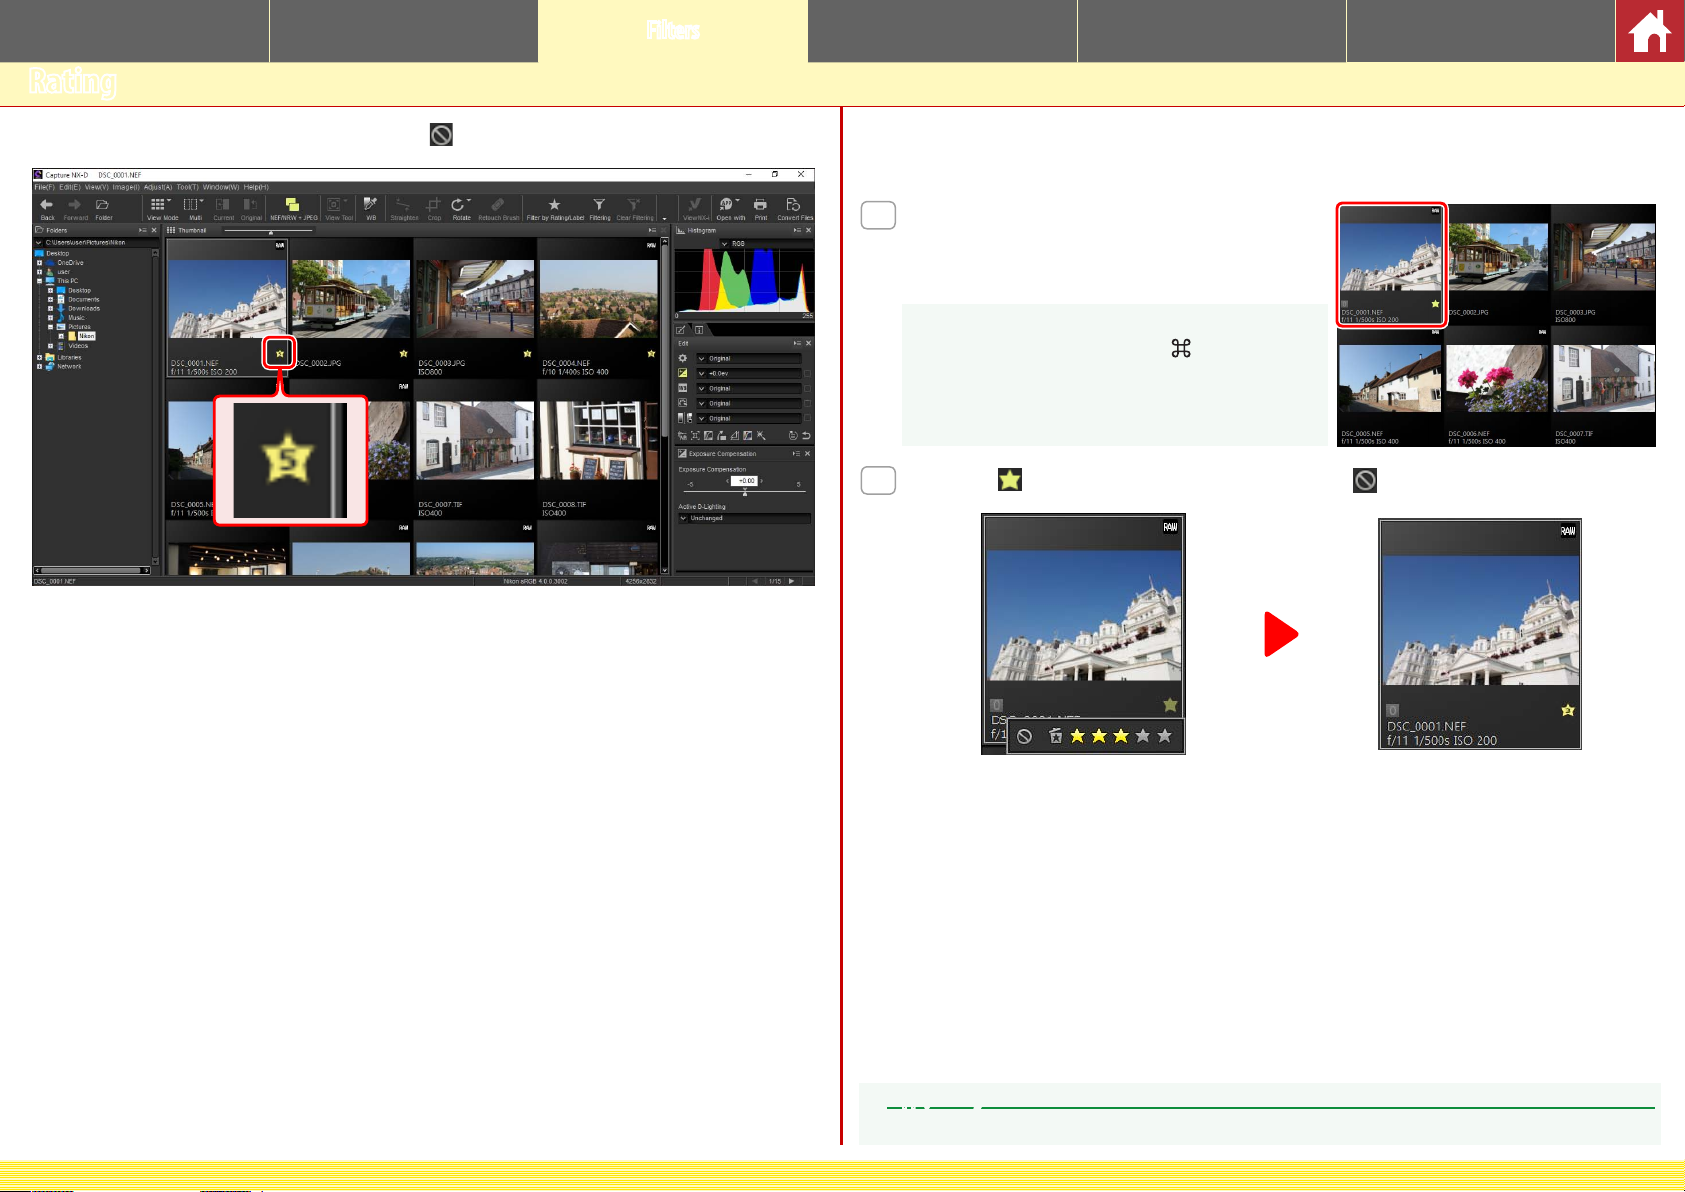
Pictures can be assigned ratings of from (no rating) to ve stars.
Ratings are assigned using the thumbnail rating icons or the Apply Ratings option in the Image menu.
Select pictures.
1
To select multiple pictures, keep the Ctrl key
(or on Mac computers, the
pressed while clicking each image in turn. To select two pictures and all images between them,
click the pictures while pressing Shift.
Click the icon and choose a rating of from (no rating) to ve stars.
2
/command key)
CaptureNX-D Reference Manual
To assign the picture a three-star rating,
click the third star from the left. The rst
three stars will be highlighted in yellow.
“Apply Ratings”
Selected les can also be rated using the Apply Ratings option in the Image menu.
15
Page 16
Introduction Viewing Pictures Filters Image Adjustment Other Features Menu Guide
Labelling
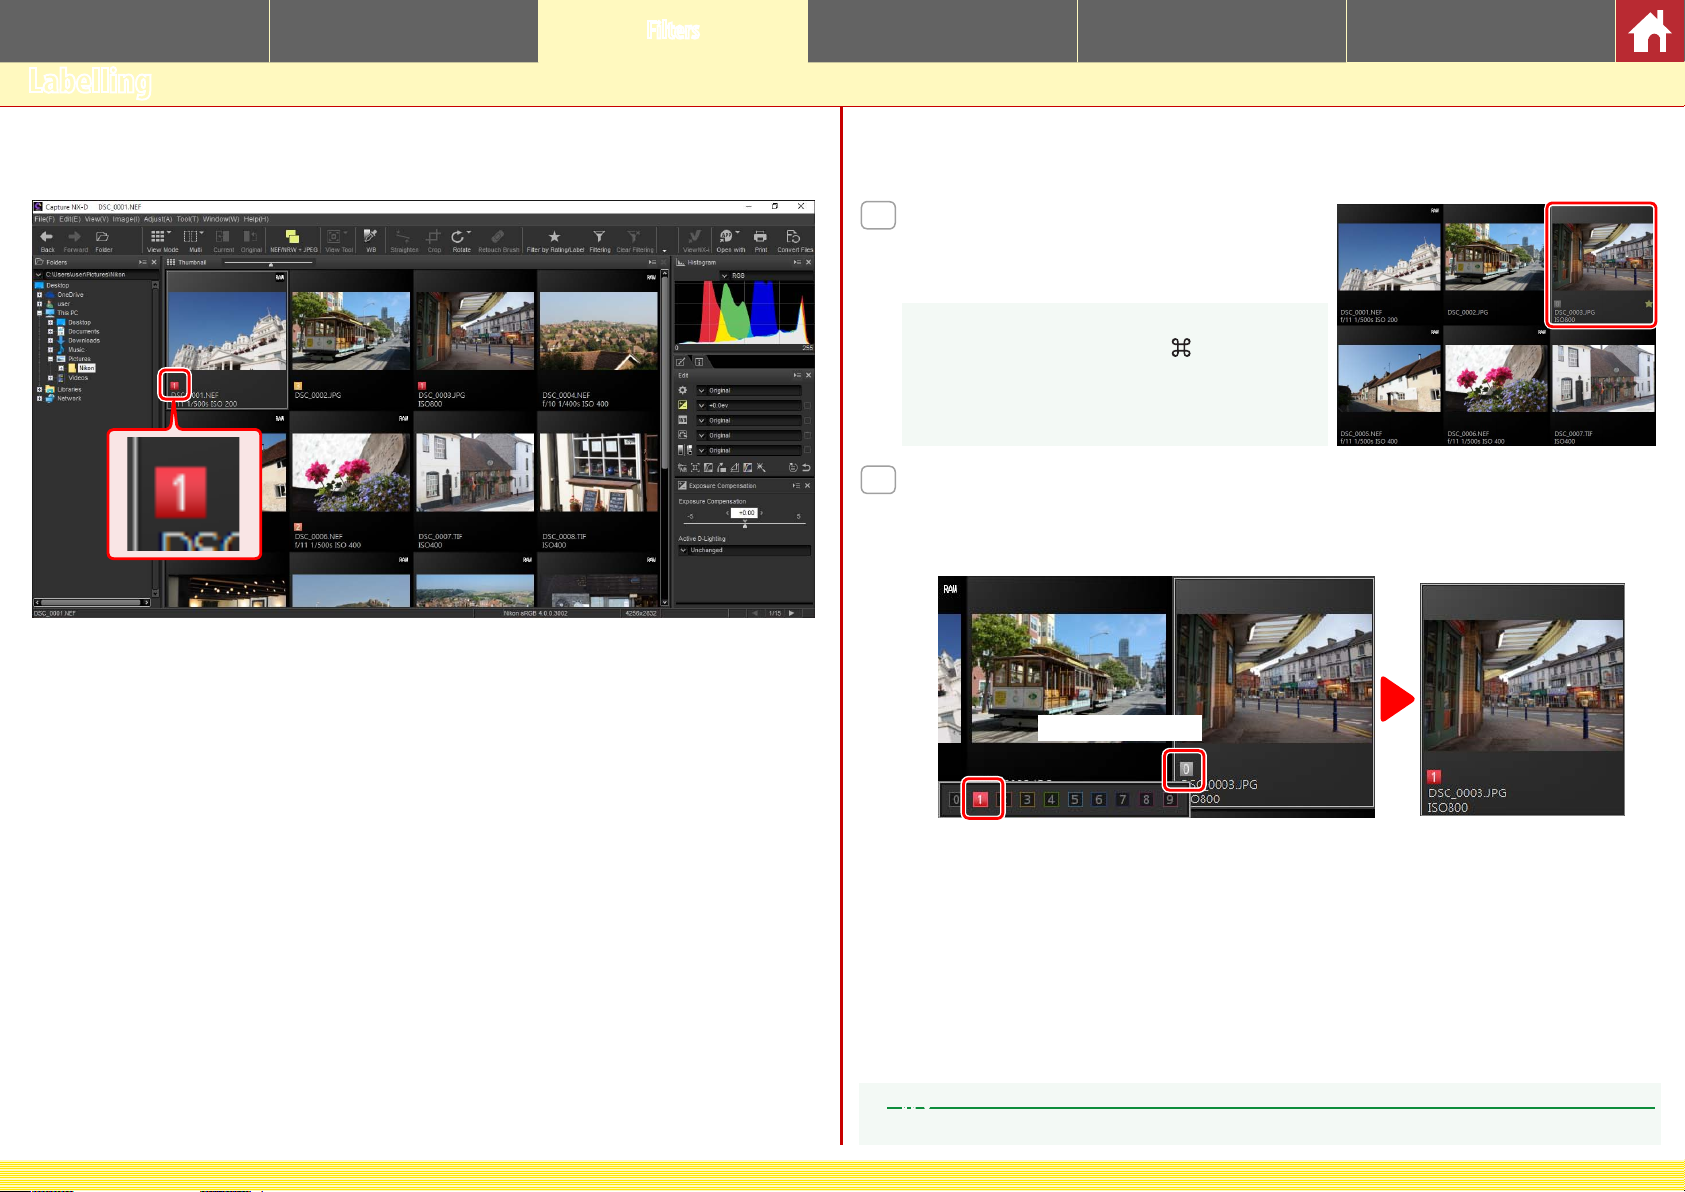
To make pictures easier to sort and locate, you can assign them labels of from “0”
(no label) through “9”, each with its own unique color.
Ratings are assigned using the thumbnail label icons or the Apply Labels option
in the Image menu.
Select pictures.
1
To select multiple pictures, keep the Ctrl key
(or on Mac computers, the
pressed while clicking each image in turn. To select two pictures and all images between them,
click the pictures while pressing Shift.
Click a label (q; in the case of unlabelled images, the label “0” only appears
2
/command key)
when the cursor is over the picture) and choose a label of from “0” (no label)
through “9” (
w
).
CaptureNX-D Reference Manual
Click a label icon.
q
Click a label.
w
“Apply Labels”
Selected les can also be rated using the Apply Labels option in the Image menu.
16
Page 17

Introduction Viewing Pictures Filters Image Adjustment Other Features Menu Guide
Filtering
To lter pictures using criteria such as ratings, labels, and photo information,
click the
button in the toolbar.
A dialog will be displayed where you can select
lters. Only pictures that match at least one of the
selected criteria will appear in the thumbnail list.
Quick Filters
Use the button in the toolbar to quickly lter pictures by rating and label.
Click the button to display the lter bar.
1
Filter bar
Choose a lter or lters from the options in the lter bar.
2
If you select multiple ratings, all pictures with ratings in the selected range will be displayed.
For example, selecting ratings of three and ve stars displays pictures with ratings of three,
four, and ve stars.
Only pictures that match at least one of
the selected criteria will appear in the
thumbnail list.
Filters
The options for the Model, Focal Length, Shutter Speed,
FNumber, and ISO Sensitivity lters are restricted to values
found in the images in the current folder.
CaptureNX-D Reference Manual
Viewing All Pictures
To cancel ltering and display all pictures in the current folder, click the
button in the toolbar.
17
Page 18

Introduction Viewing Pictures Filters Image Adjustment Other Features Menu Guide
The Edit Palette
Most image adjustments are performed using
the edit palette, which consists of a tool list, an
adjustments palette, and tool buttons.
The Tool List
The tool list contains the items listed below.
All but Tone/Tone (Detail) apply exclusively to
RAW (NEF/NRW) images.
Exposure Compensation Page 20
White Balance Page 21
Picture Control Page 22
Tone/Tone (Detail) Page 24
Settings for these tools can be selected from
the pull-down menus. Selecting Original restores settings to the values in eect when
the image was rst opened in CaptureNX-D.
At other settings, a check (
box to the right of the pull-down menu, and
changes can be hidden by removing the check
from the box (
).
) appears in the
Tool list
Adjustment palette
The Adjustment Palette
Use the adjustment palette to make detailed adjustments. Clicking a tool button
or an icon in the tool list displays settings for the selected item.
Tools that have been modied using the adjustment palette are identied by the
label Manual in the tool list pull-down menus.
CaptureNX-D Reference Manual
18
Page 19

Introduction Viewing Pictures Filters Image Adjustment Other Features Menu Guide
The Edit Palette
Tool Buttons
The following tools can be accessed using the
tool buttons at the bottom of the edit palette.
Note that some of these tools can be used only
with RAW (NEF/NRW) images; for information,
see the section for each tool.
Noise Reduction
Camera and
Lens Corrections
LCH Page 28
Straighten and
Perspective
Control
Unsharp Mask Page 31
Levels & Curves Page 32
Retouch Page 39
These tools are accessed by clicking the buttons and adjusting settings in the adjustment
palette. The buttons for tools that have been
modied from default values are highlighted
in yellow (e.g.,
).
Page 25
Page 26
Page 30
Tool buttons
The Adjustment Manager Tool
Use the adjustment manager tool to copy adjustments to other images or save current settings for later use (
page 34).
Adjustment manager
The Revert Button
Click the revert (“Revert to Original State”)
button to reset all tools and restore the image to the state it was in when rst opened in
Capture NX-D (note that any changes made
to JPEG and TIFF images in other applications
since they were last opened in CaptureNX-D
will not be reset).
CaptureNX-D Reference Manual
Revert button
Fine-Tuning Multiple Images
Image adjustments apply simultaneously to all the images currently selected in the thumbnail list.
19
Page 20

Introduction Viewing Pictures Filters Image Adjustment Other Features Menu Guide
Exposure Compensation (RAW Images)
Adjust overall exposure, making images lighter
or darker.
The pull-down menu in the tool list can be used to choose from values between
+1.0 and –1.0EV.
+1.0EV
For values between +5.0 and –5.0 EV,
incremented in steps of 0.01 EV, use the
Exposure Compensation control in the image
adjustment palette.
The image adjustment palette also oers an Active D-Lighting menu that can
be used to bring out details in highlights and shadows.
Low Normal
–1.0EV
CaptureNX-D Reference Manual
High Extra high
Active D-Lighting
Active D-Lighting is available only with RAW images taken using cameras that support Active
D-Lighting.
20
Page 21

Introduction Viewing Pictures Filters Image Adjustment Other Features Menu Guide
White Balance (RAW Images)
Adjust white balance.
The pull-down menu in the tool list oers a choice of preset values.
Incandes-
cent
White balance can be ne-tuned using the
Color Temperature and Tint controls in the im-
age adjustment palette. Tint can be set to values between –12 and +12: choose lower values for less green and more magenta, higher
values for the opposite eect. The range of values available for Color Temperature vary with
the option selected for white balance.
Gray point sample tool
White balance can also be set by sampling the image: click the (Gray Point
Sample Tool) button and click anywhere in the image to sample a single pixel,
or drag the cursor over the image to use the average color value for the selected
area. White balance for the entire image will be adjusted so that selected pixel
or area takes on a neutral gray color.
Cloudy
CaptureNX-D Reference Manual
Blue area sampled White balance adjusted to give blues a gray
cast and the overall image a “warm” cast
21
Page 22

Introduction Viewing Pictures Filters Image Adjustment Other Features Menu Guide
Picture Control (RAW Images)
Adjust Picture Control settings.
The pull-down menu in the tool list oers a
choice of preset Picture Controls.
The controls in the image adjustment palette
Color reproduction process
can be used to choose a color reproduction
process, perform quick adjustments to the selected control, or ne-tune individual Picture
Control parameters.
Selected Picture Control
Quick Adjust
nColor Reproduction Process
Choose one of the following options:
• Latest Picture Control: Colors are processed using the Picture Controls for the latest
Nikon cameras.
• Camera compatible: Colors are processed using the Picture Controls for the cam-
era that took the picture.
CaptureNX-D Reference Manual
nQuick Adjust
Drag the slider left or right to mute or heighten the eect of the selected Picture
Control, or click Reset to reset the slider to zero. Quick adjust aects all Picture
Control settings simultaneously and cancels any changes made separately to
the individual parameters. It is not available with neutral, at, or monochrome
Picture Controls.
22
Page 23

Introduction Viewing Pictures Filters Image Adjustment Other Features Menu Guide
Picture Control (RAW Images)
nPicture Control Parameters
Fine-tune individual Picture Control parameters, including sharpening, clarity,
contrast, and saturation, or select Auto to let Capture NX-D adjust settings automatically (note that Auto produces results that may vary with exposure and
the position and size of the subject in the frame). What parameters are available
depends on whether a monochrome Picture Control is selected.
• Sharpening: Control the sharpness of outlines.
Choose higher values for more sharpening.
• Clarity: Adjust clarity (requires Latest Picture
Control or a picture taken with a camera that
supports the Clarity parameter).
• Contrast: Adjust contrast. Choose lower values
for less contrast, higher values for more contrast.
• Brightness: Adjust brightness without losing
detail in highlights and shadows.
• Saturation (non-monochrome only): Control the vividness of colors. Choose lower values for less
saturation, higher values for more saturation.
• Hue (non-monochrome only): Adjust hue.
• Filter Eect (monochrome only): Simulate the eects
of color lters on monochrome photographs.
• Toning (monochrome only): Choose the tint used in
monochrome photographs.
• Toning Saturation (monochrome only): Choose the
saturation of the tint used in monochrome
pictures. Does not apply to black-and-white
images.
Note that Contrast and Brightness can not be adjusted if Camera compatible is
selected for pictures taken with Active D-Lighting or a Picture Control that uses
a custom curve.
CaptureNX-D Reference Manual
23
Page 24

Introduction Viewing Pictures Filters Image Adjustment Other Features Menu Guide
Tone/Tone (Detail)
Adjust overall brightness and contrast, or make adjustments that aect only
highlights and shadows.
Tone
Clicking the icon shown in the illustration displays the following controls in the image adjustment palette:
• Brightness: Adjust overall brightness. Choose
from values between –100 and +100: the
higher the value, the brighter the result.
• Contrast: Adjust overall contrast. Choose from
values between –100 and +100: the higher
the value, the greater the contrast.
• Saturation: Control the vividness of colors.
Choose from values between –100 and +100:
the higher the value, the more vivid (saturated) the result.
Tone (Detail)
Clicking the icon shown in the illustration displays the following controls in the image adjustment palette:
• Highlight Protection: Preserve details in highlights. Values range from 0 to 100: choose
higher values to reduce brightness in highlights.
• Shadow Protection: Preserve details in shadows.
Values range from 0 to 100: choose higher
values to increase brightness in shadows.
• D-Lighting HS: Brighten shadows in backlit or
poorly-lit pictures or reduce loss of detail in
highlights. Higher values reduce the contrast
between shadows and highlights.
CaptureNX-D Reference Manual
24
Page 25

Introduction Viewing Pictures Filters Image Adjustment Other Features Menu Guide
Tool Buttons
Use the tool buttons for access to tools not in the tool list.
Noise Reduction
Selecting this tool displays the following controls in the image adjustment palette:
• Noise Reduction: Enable or disable noise
reduction.
• Method: Select Faster for faster processing,
Better Quality or Better Quality 2013 for
more accurate noise reduction. Selecting
Better Quality 2013 allows separate
Intensity and Sharpness adjustments for
Luminance and Color (RAW images only).
• Intensity: Choose from values between 0 and
100. The higher the value, the smoother
the image and the less visible the artifacts
caused by image “noise”.
• Sharpness: Choosing high values for Intensity
may smooth the image to the point that
details are lost; this can be countered by increasing Sharpness.
• Edge Noise Reduction (RAW images only): Make outlines more distinct by reducing the occurrence of noise artifacts around edges.
• Astro Noise Reduction (RAW images only): Reduce the occurrence of randomly-spaced
bright pixels in long exposures.
Better Quality 2013
Better Quality 2013 excels in reducing color noise at short wavelengths and over evenly-colored
areas of the image.
CaptureNX-D Reference Manual
25
Page 26

Introduction Viewing Pictures Filters Image Adjustment Other Features Menu Guide
Tool Buttons
Camera and Lens Corrections
Selecting this tool displays the following controls in the image adjustment palette:
• Color Moiré Reduction (RAW images only): To reduce
color moiré (an image artifact visible where
regular patterns overlap), select this item and
choose an option from the menu.
• Image Dust O (regular- or large-size RAW images only):
Compare photos with reference data recorded
using the camera to mitigate the eect of
dust on the low-pass lter. Click Change…
to choose the NDF le containing the desired
data. For more information on recording
reference data, see the camera manual.
• Lateral Color Aberration: Reduce lateral color aberration (colored fringes and halos) in RAW
images. At default settings, this option is not
applied to JPEG and TIFF images.
• Axial Color Aberration: Reduce blurred colors
caused by axial color aberration. Choose
from values between 0 and 100: the higher
the value, the greater the eect.
• Auto Distortion Control: This option uses the lens
information recorded with photographs to
reduce the barrel distortion associated with wide-angle lenses and the pincushion distortion associated with telephoto lenses. Auto distortion control
can be turned on or o from the pull-down menu; if the photograph was taken
with an advanced camera with interchangeable lens tted with a waterproof
lens, you will also be oered an On (underwater) option for reducing pin-cush-
ion distortion in photos taken underwater.
• Auto Red-Eye: Automatically detect and remove “red-eye”.
• Vignette Control: Adjust for variations in peripheral illumination that occur with
some lenses. Choose from values between –100 and +200: the higher the value, the greater the increase in brightness at the edges of the image.
• PF Flare Control: Reduce ring are, circular are, and other are eects caused by
bright light sources in the frame.
• Fisheye: Process photos taken with sheye lenses so that they appear to have
been taken with a wide-angle rectilinear lens. If Include areas where there is
no image data is selected, the resulting image will not be cropped; instead, the
areas with no data will be lled with a solid color (
page 27).
CaptureNX-D Reference Manual
26
Page 27

Introduction Viewing Pictures Filters Image Adjustment Other Features Menu Guide
Tool Buttons
nImage Dust O
Follow the steps below to perform Image Dust O.
Click Change…. If the current folder contains an Image Dust O reference
1
le, a message will be displayed; proceed to Step 2. If no message is displayed, proceed to Step 3.
To perform Image Dust O using the le in the current folder, select Yes.
2
Otherwise, select No and proceed to Step 3.
Select a reference le and click OK to perform Image Dust O.
3
nFisheye
Select Fisheye to process photos taken with sheye lenses so that they appear
to have been taken with a wide-angle rectilinear lens. The area at the vertical and
horizontal center of the image is cropped to match the camera picture angle;
unless Include areas where there is no image data is selected, areas without
image data will be cropped out. If Include areas where there is no image data
is selected, the image will not be cropped; instead, sections of the image will be
bent. The bends contain no image data and are lled with the color selected in
the Fill color menu.
Original image
Image Dust O
Dust changes position from day to day; if possible, use reference data recorded in the last 24 hours.
If the camera oers image sensor cleaning, use only data recorded after the most recent cleaning, as
cleaning can change the position of the dust.
CaptureNX-D Reference Manual
Fisheye selected
Fisheye
Fisheye correction is available only with photos taken using AF DX Fisheye-Nikkor ED 10.5mm f/2.8G
or AF Fisheye-Nikkor ED 16mm f/2.8D lenses.
Include areas where there is no
image data selected
27
Page 28

Introduction Viewing Pictures Filters Image Adjustment Other Features Menu Guide
Luminosity curve: The slope and shape of the curve determines the lightness of
LCH
The LCH color space models color using values
for lightness (a property similar but not identical to brightness or luminance), chroma (color
saturation), and hue. These parameters can
be accessed via the channel menu in the image adjustment palette when the LCH tool is
selected.
nMaster Lightness
Adjust overall lightness without aecting
chroma or hue.
Auto Contrast: Increase contrast by setting
q
the white and black points to exclude
a set proportion of the brightest and
darkest pixels in the image.
Add Anchor Point: Click this button and
w
then click the image in the preview palette to add a point to the curve corresponding to the lightness of the pixel
under the cursor.
Reset Current Channel: Reset the master
e
lightness curve to linear.
Reset All Channel: Reset the master light-
r
ness, color lightness, chroma, and hue
curves to linear.
White-point output-level slider: Choose the
t
maximum output level (white point).
Histogram: The histogram shows how the pixels in the image are distributed
y
with respect to lightness. The horizontal axis corresponds to lightness (in the
range 0–255), the vertical axis to the number of pixels.
t
y
u
i
o
qwer
!0
!1
u
the image in the corresponding portion of the tone range.
Black-point output-level slider: Choose the minimum output level (black point).
i
Black-point input slider: Choose the minimum (black point) input level.
o
Gamma: Choose the midpoint (gamma value).
!0
White-point input slider: Choose the maximum (white point) input level.
!1
nColor Lightness
Adjust the lightness of selected colors
without aecting chroma or hue. This can
be used, for example, to brighten the blue
of a dark skies.
Add Anchor Point: Click this button and
q
then click the image in the preview palette to add a point to the curve corresponding to the value for the pixel under the cursor.
Reset Current Channel: Reset the color light-
w
ness curve to linear.
Reset All Channel: Reset the master light-
e
ness, color lightness, chroma, and hue
curves to linear.
Color lightness curve: Moving a point on
r
the curve upwards makes colors in
the aected portion of the color range
brighter, while moving it downward makes the aected colors darker.
Width slider: Adjust the width of the curve that passes through the selected
t
point, increasing or decreasing the range of colors aected by the change.
r
t
Tool Buttons
qwe
CaptureNX-D Reference Manual
28
Page 29

Introduction Viewing Pictures Filters Image Adjustment Other Features Menu Guide
Tool Buttons
nChroma
Increase or decrease color saturation over
the entire image or a portion of the color
range, making colors more or less vivid.
Add Anchor Point: Click this button and
q
then click the image in the preview
palette to add a point to the curve corresponding to the chroma of the pixel
under the cursor.
Reset Current Channel: Reset the chroma
w
curve to linear.
Reset All Channel: Reset the master light-
e
ness, color lightness, chroma, and hue
curves to linear.
Chroma curve: Moving a point on the
r
curve upwards makes colors in the affected portion of the color range more
vivid, while moving it downward makes
the aected colors less vivid (grayer).
Output slider: Increase or decrease the saturation of all colors in the image.
t
Width slider: Adjust the width of the curve that passes through the selected
y
point, increasing or decreasing the range of colors aected by the change.
Exclude Gray: Increasing chroma may make neutral colors (grays) seem over-
u
saturated. Select this option to increase chroma without aecting grays.
r
t
y
u
qwe
nHue
Map selected colors in the original (input)
image to a specic range of colors in the nal (output) image. One application might
be to deepen the colors in a pale blue sky.
Add Anchor Point: Click this button and
q
then click the image in the preview palette to add a point to the curve corresponding to the hue of the pixel under
the cursor.
Reset Current Channel: Reset the hue curve
w
to linear.
Reset All Channel: Reset the master light-
e
ness, color lightness, chroma, and hue
curves to linear.
Scale: Click to change the vertical scale
r
from 60 ° through 120 ° to 180 ° and
back again (in this case the degrees refer to a 360° color wheel). Increasing the scale increases the range of hues
visible in the display, while decreasing the scale increases precision.
Hue curve: Select a point on the curve that corresponds to the desired input
t
color and drag it up or down until it intersects with the desired output color.
Output slider: Modify the hue of all colors in the image.
y
Width slider: Adjust the width of the curve that passes through the selected
u
point, increasing or decreasing the range of colors aected by the change.
r
t
y
u
qwe
CaptureNX-D Reference Manual
29
Page 30

Introduction Viewing Pictures Filters Image Adjustment Other Features Menu Guide
Tool Buttons
Straighten and Perspective Control
Straighten pictures or correct for the effects of
perspective.
nStraighten
Straighten pictures by up to ±10°. Choose
lower values to rotate the picture to the left,
higher values to rotate it to the right. To hide
the eects of straightening, remove the check
from the Straighten checkbox.
To straighten pictures manually, click the
straighten tool in the image adjustment palette and drag the cursor parallel to a line in
the preview (this option can not be used with
thumbnails;
page 10). The image will be rotat-
ed by up to ±10 ° to make the reference line
horizontal or vertical, and the degree of rotation will be displayed in the text box in the image adjustment window. Unless Include areas
without image data is selected, the image will automatically be cropped to remove any empty corners.
Straighten tool
nInclude Areas Without Image Data
Select this option to fill empty corners with black.
Drag cursor parallel to reference line Image rotated to make reference line horizontal
and with empty corners lled in black
nPerspective Control
Correct the effect of perspective on, for example, photos taken with the camera
angled up to frame a tall building. Perspective can be adjusted vertically and
horizontally by up to ±20.
Drag cursor parallel to reference line Image rotated to make reference line horizontal
and cropped to remove empty corners
CaptureNX-D Reference Manual
Vertical: 20 Horizontal: 20
nShow Grid
Select this option to display a grid. The grid
color and spacing can be selected in the
“View” tab of the preferences dialog (
page 46).
30
Page 31

Introduction Viewing Pictures Filters Image Adjustment Other Features Menu Guide
Radius: The greater the radius, the wider the edges in the sharpened image
Unsharp Mask
Increase sharpness by making edges more distinct. The contrast of edges is increased while
other areas are left untouched.
Delete: Delete the currently-selected
q
mask from the unsharp mask list.
Move Up/Move Down: Move the currently-
w
selected mask up or down in the unsharp mask list.
Unsharp mask list: A list of unsharp masks,
e
identied by color channel, intensity,
halo width, and threshold (e.g., “Red,
50%, 10%, 0”). Masks apply in the order
listed; to change the order, use the up/
down buttons.
Color: Choose the color channel to which
r
the unsharp mask applies.
Intensity: The amount edge contrast will
t
be increased.
q
e
r
t
y
u
w
y
will appear.
Threshold: The limit at which sharpening will be applied. If the threshold is
u
zero, sharpening will apply to all pixels in the image. Increasing the threshold
increases the amount of contrast that must be present between pixels before
the mask will be applied, with the result that only more distinctly contrasting
edges will be aected.
Tool Buttons
CaptureNX-D Reference Manual
31
Page 32

Introduction Viewing Pictures Filters Image Adjustment Other Features Menu Guide
Reset All Channel: Reset all curves to linear.
Levels & Curves
Adjust contrast, tone (brightness), and color
balance. Adjustments can be made over the
entire image or to specic portions of the tone range (for example, the gamut of
a specic printer, monitor, or other output device), allowing enhancements to be
made without sacricing detail.
Channel: The current color channel.
q
Auto Contrast: Increase contrast by set-
w
ting the white and black points to exclude a set proportion of the brightest
and darkest pixels in the image, creating a curve that makes optimal use of
the output tone range while preserving details in shadows and highlights.
Set Black Point: Click this button and then
e
click the image in the preview palette
to set the black point for the red, green,
and blue channels to the value for the
pixel under the cursor.
Set Neutral Point: Click this button and
r
then click the image in the preview
palette to set the midpoint for the red,
green, and blue channels to the value
for the pixel under the cursor.
Set White Point: Click this button and then click the image in the preview pal-
t
ette to set the white point for the red, green, and blue channels to the value
for the pixel under the cursor.
Add Anchor Point: Click this button and then click the image in the preview area
y
to add a point to the curve corresponding to the value of the pixel under the
cursor.
Reset Current Channel: Reset the curve for the current channel to linear.
u
q
o
!0
!1
!2
!3
!4
!5
wert
iyu
i
White-point output-level slider: Choose the maximum output level (white point).
o
Dragging the slider down lowers the brightness of the brightest pixels.
Histogram: The histogram shows how the pixels in the image are distributed
!0
with respect to brightness. The horizontal axis corresponds to brightness (in
the range 0–255), the vertical axis to the number of pixels.
Tone curve: The slope and shape of the curve determines the brightness of the
!1
image in the corresponding portion of the tone range.
Black-point output-level slider: Choose the minimum output level (black point).
!2
Dragging the slider up increases the brightness of the darkest pixels.
Black-point input slider: Any pixels in the portion of the tone range to the left of
!3
the black point are output at the minimum output level. Dragging the slider
to the right steepens the curve and enhances contrast but may cause loss of
details in shadows.
Gamma: Dragging the slider to the left increases the brightness of mid-tones,
!4
while dragging it to the right makes mid-tones darker.
White-point input slider: Any pixels in the portion of the tone range to the right
!5
of the white point are output at the maximum output level. Dragging the
slider to the left steepens the curve and enhances contrast but may cause
loss of details in highlights.
Sampling the Current Channel
By default, the black point, white point, add anchor point, and auto contrast controls respectively set
the black point, anchor points, white point, and contrast for all channels. To apply these controls only
to the current channel, press Ctrl (or on Mac computers, the option key) while clicking the control.
Tool Buttons
CaptureNX-D Reference Manual
32
Page 33

Introduction Viewing Pictures Filters Image Adjustment Other Features Menu Guide
Copying Adjustments
Image adjustments can be copied and applied to other pictures, speeding the
process of enhancing pictures taken under similar conditions.
Adding Adjustments to the Tool List
Current settings can be added to the menus in the tool list.
Select a tool from the tool list and adjust
1
settings in the adjustment palette. Here
we have set exposure compensation
(
page 20) to +1.50.
Select Register Adjustments from the
2
pull-down menu in the tool list.
Enter a name for the new setting and click
3
OK. In this example, we have named the
setting +1.5.
The new setting is added to the pull-down
menu and can now be applied to other
pictures.
CaptureNX-D Reference Manual
Selecting Edit Registered Adjustments from
the pull-down menu displays a dialog where you
can rename or delete previously-saved settings.
33
Page 34

Introduction Viewing Pictures Filters Image Adjustment Other Features Menu Guide
Copying Adjustments
The Adjustment Manager Tool
The adjustment manager can be used to apply multiple adjustments simultaneously.
• Copy Updated Adjustments: Copy all adjustments
that have been changed since the current
folder was selected.
• Copy All Adjustments: Copy all adjustments.
• Paste Adjustments: Apply adjustments copied
using Copy Updated Adjustments or Copy
All Adjustments to the currently-selected
image or images.
• Save Updated Adjustments: Save all adjustments
that have been changed since the current
folder was selected.
• Save All Adjustments: Save all adjustments.
• Load Adjustments: Select an adjustments le
saved using Save Updated Adjustments or
Save All Adjustments and apply it to the currently-selected image or images.
• Register Updated Adjustments: Any adjustments
that have been changed since the current
folder was selected are saved and added as
an option to the adjustment manager pulldown menu.
• Register All Adjustments: All current adjustments are saved and added as an op-
tion to the adjustment manager pull-down menu.
• Edit Registered Adjustments: Reorder, rename, or delete adjustments previously
added to the adjustment manager pull-down menu.
nCopying Adjustments to Other Pictures
Follow the steps below to copy adjustments and apply them to other images.
Adjust settings in the edit palette. Here we have set exposure compensation
1
(
page 20) to –½EV and selected the Vivid Picture Control (page 22).
Click the adjustment manager icon
2
and select Copy Updated Adjustments or
Copy All Adjustments from the options in
the adjustment palette. Here we have selected Copy All Adjustments.
Select images. In this example, the selected image has already been ad-
3
justed using the exposure compensation (
tools.
page 20) and white balance (page 21)
CaptureNX-D Reference Manual
34
Page 35

Introduction Viewing Pictures Filters Image Adjustment Other Features Menu Guide
Copying Adjustments
Click the adjustment manager icon and
4
select Paste Adjustments from the options in the adjustment palette.
The adjustments copied in Step 2 are applied to the images selected in
Step3. Because we selected Copy All Adjustments in Step 2, exposure com-
pensation changes to –½EV while white balance reverts to Original.
Had we selected Copy Updated Adjustments in Step 2, the exposure compensation and
Picture Control for the selected image would have been set to the values selected in Step1,
while white balance would have remained at the value selected in Step 3.
nCopying Adjustments to Other Computers
The Save Updated Adjustments and Save All
Adjustments options save image adjustments
to a le which can be copied to other computers.
The adjustments can then be applied to selected
pictures on the other computers using Load
Adjustments.
nAdding Adjustments to the Adjustment Manager
Use the Register Updated Adjustments and Register All Adjustments options
to add adjustments to the adjustment manager pull-down menu.
CaptureNX-D Reference Manual
Copying Adjustments from RAW to JPEG or TIFF Images
When adjustments are copied from RAW (NEF/NRW) to JPEG or TIFF images, exposure compensation, Picture Controls, and other settings that are available only with RAW images will not be applied.
35
Page 36

Introduction Viewing Pictures Filters Image Adjustment Other Features Menu Guide
File Format
To save RAW (NEF/NRW) images in JPEG or TIFF format, click the button in the
toolbar.
A dialog will be displayed where you can choose a le format and adjust such
settings as compression and image size. Click Start to copy the le or les in the
selected folder.
q
w
e
r
t
y
u i
o
!0
Use LZW compression(TIFF only): Compress TIFF les using “lossless” LZW compres-
e
sion.
LZW compression may sometimes increase le size when applied to 16-bit images.
Resolution: Select this option to choose the output resolution.
r
Embed ICC prole: Select this option to embed the current color prole in the
t
image.
Specify size: Select this option to resize pictures saved in the new format. The
y
new size can be entered in pixels, centimeters, or inches. When you enter a
value for either Long edge or Short edge, the remaining value will automati-
cally be adjusted to maintain the original aspect ratio.
Use source folder: Save copies in the same folders as the originals.
u
Use source le name: Save copies under the same le names as the originals.
i
Two-digit numbers will automatically be added in ascending order to the le
names if les with the same names as the original already exist in the selected
folder.
Save in: If Use source folder is not selected, click Browse... to select a destina-
o
tion folder.
File name: If Use source le name is not selected, click Edit... to name the cop-
!0
ies using selected prexes, suxes, and sequential numbering.
File format: Choose from JPEG, TIFF (8 Bit), and TIFF (16 Bit).
q
Quality (JPEG only): Use the slider or pull-down menu to choose a value between
w
0 and 100. The higher the value, the lower the compression ratio and the
higher the image quality; the lower the value, the higher the compression
ratio and the smaller the le size.
CaptureNX-D Reference Manual
36
Page 37

Introduction Viewing Pictures Filters Image Adjustment Other Features Menu Guide
Cropping Pictures
To crop unwanted areas from images, click the button in the toolbar.
The crop palette will be displayed. Follow the steps below to crop images.
q
w
e
r
yt u
Aspect Ratio The crop aspect ratio. Choose Free Crop to select a crop with no fixed aspect ratio.
q
Custom
w
Aspect Ratio
Rotate Crop Rotate the crop 90°.
e
Show Grid Display an evenly-spaced 3 × 3 grid inside the crop.
r
Reset Crop Reset the current crop.
t
Cancel Cancel the current crop.
y
Apply Ratio Apply the current crop.
u
For custom aspect ratios not listed in the aspect ratio menu, select Custom and enter the
desired aspect ratio.
Choose an aspect ratio in the crop palette (to select a free crop with no xed
1
aspect ratio, choose Free Crop).
The aspect ratio can be changed after you have resized and positioned the crop.
Drag the cursor over the image to select the crop. The area outside the crop
2
is shown in gray.
CaptureNX-D Reference Manual
37
Page 38

Introduction Viewing Pictures Filters Image Adjustment Other Features Menu Guide
Cropping Pictures
Drag the corners of the crop to resize it without changing the aspect ratio.
3
To reset the crop, click Reset Crop.
Double-click inside the crop or click the Apply Ratio button in the toolbar to
4
crop the image.
Crop
Crops are not applied to the original image data and can be changed at any time by clicking the
button in the toolbar. This also applies in the case of images cropped using ViewNX 2 or ViewNX-i.
Crops are applied when images are converted to JPEG or TIFF (page 36). When NEF/NRW (RAW) images cropped in Capture NX 2 are opened in Capture NX-D, the crop is treated as the entire image;
to select a crop that extends outside these bounds, click the revert button (
original image and then select the desired crop.
page 19) to restore the
CaptureNX-D Reference Manual
38
Page 39

Introduction Viewing Pictures Filters Image Adjustment Other Features Menu Guide
Removing Dust and Scratches
Dust and scratches can be removed using the retouch brush tool.
Clicking the button in the toolbar displays the retouch brush palette.
Choose the brush size.
1
Keeping the mouse button pressed, drag the brush over the defect. The af-
2
fected area is shown by a translucent red line; continue until the defect is
completely covered.
Release the mouse button to apply the tool to the aected area.
3
Brush Size
A brush larger than the defect you are attempting to correct may aect neighboring areas of the
image.
CaptureNX-D Reference Manual
The Auto Retouch Brush
The retouch brush copies data from surrounding areas of the image automatically and pastes it over
the defect. It may not produce the desired results if defects are widespread, the tool is dragged a
long distance, or the aected is very large. The time required to complete processing varies with the
image.
The Retouch Palette
Clicking the
ton in the edit palette displays the retouch palette. Select
or deselect Auto Retouch Brush to show or hide the
eects of the retouch brush, or undo the eects of the
brush by clicking Clear.
button in the toolbar or the tool but-
39
Page 40

Introduction Viewing Pictures Filters Image Adjustment Other Features Menu Guide
Batch Processing
The File> Run Batch Process option can be used to perform the same image
adjustments on all pictures in a selected folder and then export the processed
images in a selected le format. Batch processing options are shown below.
q
w
e
r
t
y
u
i
o
Quality (JPEG only): Use the slider or pull-down menu to choose a value between
r
0 and 100. The higher the value, the lower the compression ratio and the
higher the image quality; the lower the value, the higher the compression
ratio and the smaller the le size.
Use LZW compression (TIFF only): Compress TIFF les using “lossless” LZW compres-
t
sion.
LZW compression may sometimes increase le size when applied to 16-bit images.
Resolution: Select this option to choose the output resolution.
y
Embed ICC prole: Select this option to embed the current color prole in each
u
image.
Specify size: Select this option to resize pictures saved in the new format. The
i
new size can be entered in pixels, centimeters, or inches. When you enter a
value for either Long edge or Short edge, the remaining value will automati-
cally be adjusted to maintain the original aspect ratio.
Destination: Select Use source folder to save the processed les to the current
o
folder. To choose a dierent folder, remove the check from this option and
click Browse. To save the processed les under the same names as the originals, select Use source le name (if a le with the same name and extension
already exists in the current folder, the processed le will be renamed by adding a number to the le name); to choose dierent names, remove the check
from this option and click Edit.
Source folder: Click Browse to choose a source folder. To include all images in
q
sub-folders under the selected folder, select Include subfolders.
Adjustments: Select Apply current adjustments to process the images using
w
the adjustments for the current image. To apply adjustments previously
saved from the adjustment manager, choose Adjustments to apply and click
Browse to choose an adjustments le. To export the images in the selected
folder in another format without changing the settings currently selected for
each image, choose Apply adjustments already in les.
File format: Select the format in which the processed les will be saved. Choose
e
from JPEG, TIFF 8 bit, and TIFF 16 bit.
CaptureNX-D Reference Manual
40
Page 41

Introduction Viewing Pictures Filters Image Adjustment Other Features Menu Guide
Batch Processing
Clicking Start starts processing and displays a progress dialog. Progress can be
viewed in the Queued and Finished tabs.
q
w
Queued Finished
Source: A list of the les that are awaiting processing or have been processed.
q
Automatically Show/Hide: Removing the check from this option hides the prog-
w
ress dialog. The progress dialog can be displayed by clicking the
the toolbar.
e
w
q
e
r
button in
Color Efex Pro
If the source contains les modied using the Color Efex Pro plug-in for CaptureNX2 or CaptureNX, a
message will be displayed and the images will not be processed.
File Conversion
If multiple les are selected when the button in
the toolbar is used to export les in another format
(
page 36), the les will be exported as a batch process.
Adjust settings as described for items
on
page 40.
through o
e
Delete: Click to remove the le selected in the Queued tab from the queue, or
e
to delete the log for the le selected in the Finished tab.
View folder: Open the destination folder in the operating system le browser.
r
CaptureNX-D Reference Manual
41
Page 42

Introduction Viewing Pictures Filters Image Adjustment Other Features Menu Guide
Printing Pictures
To print pictures on a printer connected to the computer, select the pictures and
choose Print in the File menu. The “Print” dialog will be displayed.
Adjust settings as described on the following page and click Print to print the
picture as shown in the preview.
The “Print” Dialog
• Full Page: Print one picture per page.
Print Type
Printer Click Settings to choose the printer and paper size and adjust other printer settings.
Printer Setup
Printer Type Choose Inkjet when printing on an inkjet printer.
Print Priority
Copies Choose the number of copies of each page printed.
Rotate to t Rotate pictures to print them at the largest possible size.
Crop images
to t
Background
Color
Border width
Page Layout
Copies of
each image
Print
Information
Use thumb-
nail data
(draft mode)
Specify color
prole
• Index Print: Print multiple images per page (page 44).
• Standard Photo Sizes: Print pictures at a standard photo size. CaptureNX-D automatically
chooses the number of pictures printed on each page.
When printing NEF/NRW (RAW) pictures, choose Speed to use the preview data embedded in the image for faster printing, or Quality to use the original image data for higher
quality output.
Pictures are enlarged to fill the print area. Portions that do not fit in the print area are
cropped out.
Choose the background color. Choose White to print with no background.
Choose the width of the borders printed around the image (the color of the borders varies
with the background color). Choose 0 to print without borders.
Choose the number of copies of each photo printed.
Print the file name, date of recording, or photo information under each picture (page 43).
Print using thumbnail data. Images print faster, but at lower quality. Some images will print
using the original file data even when this option is selected.
Click Settings... to select the color profile used for printing (Prole) and choose an
Intent from Perceptual and Relative colorimetric (page 45).
Notes on Printing
To print to a JPEG le, click File Output.
The most recently-used settings are recalled when the print dialog is next displayed.
CaptureNX-D Reference Manual
42
Page 43

Introduction Viewing Pictures Filters Image Adjustment Other Features Menu Guide
Printing Image Information
To choose the information printed under each picture, select Print Information
in the “Print” dialog (
page 42), click Settings, and adjust the settings described on
the following page.
Advanced Print Information Settings
Date/Time Shot and Comment
Date Shot Print the date of recording in the position selected for Position.
Time Shot Print the time of recording together with the date.
User Comment Print the comment entered in the text box.
Font Settings
Metadata
Header/Footer
Font Settings
Header
Page
Number
Footer
Choose the font, style, font point size, and color used to print the date/time stamp. The
results can be previewed in the “Sample” area.
Choose the file and photo information printed with each picture. The font, style, and font
point size can be selected in the “Font Settings” area and previewed in the “Sample” area.
Enter the text and choose the alignment for the header that will be printed at the top of
each page.
Choose whether to print the page number and the total number of pages and select the
position and alignment. The page number can be positioned at the page Top (in the
header) or Bottom (in the footer).
Enter the text and choose the alignment for the footer that will be printed at the bottom
of each page.
Choose a font, style, and font point size for the header, footer, and page number. The
results can be previewed in the “Sample” area.
Print Information
Print information is not rotated when Rotate to t is selected in the “Print” dialog. Metadata that
does not t in the print area will be omitted.
CaptureNX-D Reference Manual
43
Page 44

Introduction Viewing Pictures Filters Image Adjustment Other Features Menu Guide
Index Prints
To print multiple images per page, select Index Print for “Print Type” in the “Print”
dialog (
page 42). The options in the “Page Layout” area will change; choose the
number of pictures printed per page.
Layout
Choose a layout.
nStandard
Choose the number of pictures per page from a list
box. The size of the pictures is automatically adjusted
according to the option selected.
nImage Size
Pictures are printed at the size entered for “Width” and
“Height” (the minimum size is 20.0mm × 20.0 mm
and the maximum the same as the page size). The
number of pictures per page is automatically adjusted according to the size selected.
Pictures printed at 50mm× 50mm
nColumn and Row
Choose the number of columns and rows printed per
page (the minimum is 1 and the maximum 10). The
size of the pictures is automatically adjusted according to the options selected.
A 3× 3 layout
nImages Per Page
Choose the number of images printed per page. The
images will automatically be resized according to the
number selected.
CaptureNX-D Reference Manual
A 2× 4 layout
An 8 × 8 layout
Margins
Choose the width of the margins.
44
Page 45

Introduction Viewing Pictures Filters Image Adjustment Other Features Menu Guide
Preferences
To modify the default behavior of Capture NX-D, select Preferences… in the Edit
menu (or on Mac computers, the Capture NX-D menu).
General
q
w
e
r
t
y
Clear Cache: Clear the cache.
q
Maximum capacity: Select a cache size.
w
Specify cache folder: Select this option to choose a cache folder using the
e
Browse… button. Use the Existing cache handling menu to choose what to
do with the existing cache.
Display preview image faster: If this option is selected, Capture NX-D will generate
r
preview data as modications are made for faster preview display.
Maximum thumbnail width: Choose the maximum thumbnail width, in pixels
t
(
page 10).
Restore Defaults: Reset all items in the “General” tab to their default values.
y
Color Management
q
w
Default RGB color space: Choose the default RGB color space for image display.
q
Use this prole when printing: Select this option to choose a color prole for print-
w
ing from the Prole menu. Choose the Intent from Perceptual and Relative
colorimetric.
CaptureNX-D Reference Manual
Intent
Perceptual maintains the relations between colors to produce results that seem natural to the human eye. The colors may however not be true to the original image data. Relative colorimetric
maps colors not in the selected prole to the nearest available color. All colors in the gamut of the
printer will be reproduced accurately.
45
Page 46

Introduction Viewing Pictures Filters Image Adjustment Other Features Menu Guide
Preferences
Levels & Sampling
q
w
e
Auto-contrast clip: The levels and curves auto contrast option (page 32) increases
q
contrast by setting the white and black points to exclude a set proportion of
the brightest and darkest pixels in the image. Choose the percentage of pixels excluded by the new Black and White points.
Dropper sample size: Select the size of the area sampled by the gray point (page 21)
w
and levels and curves (
(a single pixel), 3×3 Average (the average of an area 3 pixels square) and 5×5
Average (the average of an area 5 pixels square).
Restore Defaults: Reset all items in the “Levels & Sampling” tab to their default
e
values.
page 32) sampling controls. Choose from Point sample
View
q
w
e
r
t
Size of Text and Icon: Choose the size of the letters and icons in the user interface.
q
Color: Choose a color for the reference grid.
w
Gridline every: Choose the grid spacing.
e
Subdivisions: Choose the number of subdivisions in each square.
r
Restore Defaults: Reset all items in the “View” tab to their default values.
t
CaptureNX-D Reference Manual
46
Page 47

Introduction Viewing Pictures Filters Image Adjustment Other Features Menu Guide
Preferences
NEF (RAW) Processing
q
w
e
r
Color Space for Color Reproduction: Choose the color space used for adjustments to
q
RAW (NEF/NRW) images.
Sizes Medium/Small for NEF (RAW) Images: Select this option for optimal processing
w
when editing small and medium RAW (NEF/NRW) images.
D1X RAW Default: Choose the default display size for RAW (NEF) photos taken
e
with the D1x. Choose from 6MP (3008 × 1960) and 10MP (4016 × 2616).
Color Reproduction Process: Choose a color reproduction process (page 22).
r
Open with Application
q
w
Open With Application: Edit the list of applications that can be accessed via the
q
Open With option in the File menu (
bit), TIFF (8-bit), or JPEG) used when images are opened in other applica-
tions.
Folder to Place Open With le: Before being opened in other applications, images
w
are converted to the format selected using Open With Application. Use this
option to choose where the converted les are stored.
page 49) and choose the format (TIFF (16-
CaptureNX-D Reference Manual
47
Page 48

Introduction Viewing Pictures Filters Image Adjustment Other Features Menu Guide
Dialog/Alert
q
Dialog Windows: Click Reset to reset the “Don’t show this dialog again” check
q
boxes for all dialogs.
Preferences
CaptureNX-D Reference Manual
48
Page 49

Introduction Viewing Pictures Filters Image Adjustment Other Features Menu Guide
Menu Guide
The CaptureNX-D Menu (Mac Only)
• About Capture NX-D: Display the product version
number.
• Preferences: Open the CaptureNX-D preferences
dialog (
• Quit CaptureNX-D: Quit CaptureNX-D.
page 45).
The File Menu
• New Folder: Create a new sub-folder in the
current folder.
• Rename Folder: Rename the current folder.
• Launch Camera Control Pro 2: Launch
Camera Control Pro 2.
• Synchronize Edits: Select this option to apply current settings to any images subsequently added to the current folder.
• Open with ViewNX-i: View the current image
or images in ViewNX-i. The images are displayed in their current state including any
changes made using CaptureNX-D and, in
the case of NEF/NRW (RAW) images, without conversion to TIFF. This option is only
available if ViewNX-i is installed.
• Open With: Open the current image in another application. Use the Open With
Application option to add applications to the menu (
• Open in Explorer (Windows)/Show in Finder (Mac): Open the current folder in the operat-
ing system le browser.
page 47).
• Launch Picture Control Utility 2: Launch Picture Control Utility 2.
• Rename: Rename the current image.
• Convert Files: Convert the currently-selected image or images to JPEG or TIFF for-
mat (
page 36).
• Run Batch Process: Perform batch processing (
• Page Setup: Adjust printer settings.
• Print: Print images (
• Exit (Windows only): Exit CaptureNX-D.
page 42).
page 40).
The Edit Menu
• Undo: Undo the most recent operation.
• Redo: Redo an operation after performing Undo.
• Cut/Copy/Paste: Cut, copy, or paste the current selec-
tion.
• Delete: Delete the current selection.
• Select All: Select all images in the current folder.
• Select Inverse: Select all images in the current folder
that are not currently selected and deselect any images that are currently selected.
• Deselect: Deselect all images.
• Select File: Select all les in the current folder that
match the criteria chosen in the Select File submenu.
• Preferences (Windows only): Open the CaptureNX-D preferences dialog (
page 45).
CaptureNX-D Reference Manual
49
Page 50

Introduction Viewing Pictures Filters Image Adjustment Other Features Menu Guide
Menu Guide
The View Menu
• Go: Navigate the folder hierarchy.
• Thumbnail/Image Viewer/Preview/Full Screen:
Choose how images are displayed
(
page 10).
• Compare Before and After Images/2 Images/
4 Images: Compare images (
4 Images option is available only on a
computer with a 64-bit operating system and at least 4 GB of memory.
• Thumbnail Size: Choose the thumbnail size
(
page 10).
• Sort Thumbnails by: Sort thumbnails.
• Filter: Filter images according to selected
criteria (
• Zoom In/Zoom Out/Fit to Screen/View at 25%/
View at 50%/View at 100%/View at 200%/View
at 400%: Zoom the preview in or out.
page 17).
page 13). The
The Image Menu
• Next Image/Previous Image: View the next or previ-
ous image in the current folder.
• Rotate: Rotate the current image 90 or 180 de-
grees.
• Show Grid: Display a grid over the preview.
CaptureNX-D Reference Manual
• Show Focus Point: Show the focus point in the pre-
view display.
50
Page 51

Introduction Viewing Pictures Filters Image Adjustment Other Features Menu Guide
Menu Guide
• Show Lost Highlights: View areas of the image
with the maximum value for brightness and in
which details may have been lost to overexposure (“washed out”). A dierent color is used to
show the lost highlights for each of the RGB, red,
green, and blue channels.
• Show Lost Shadows: View areas of the image with
the minimum value for brightness and in which
details may have been lost to underexposure. A
dierent color is used to show the lost shadows
for each of the RGB, red, green, and blue channels.
• Apply: Label (page 16) or rate (page 15) selected images.
The Adjust Menu
• Revert to Original State: Reset all image ad-
justments and restore the picture to its
original state.
• Revert to Last Saved State: Initialize the set-
tings le (
made in Capture NX-D.
• Copy Updated Adjustments: Copy only those ad-
justments that have been changed since the
current folder was last opened.
• Copy All Adjustments: Copy all adjustments.
• Paste Adjustments: Apply to the current image adjustments copied using Copy
Updated Adjustments or Copy All Adjustments.
• Save Updated Adjustments: Create a le containing only those adjustments that
have been changed since the current folder was last opened.
• Save All Adjustments: Save all adjustments to a le.
• Load Adjustments: Load adjustments from a le created with Save Updated
Adjustments or Save All Adjustments and apply them to the current image.
page 3), cancelling all changes
CaptureNX-D Reference Manual
Using “Revert to Original State” with Images Modied in Other Applications
In the case of JPEG and TIFF images modied in Capture NX 2 or ViewNX 2, Revert to Original State
reverts the image to its last saved state.
51
Page 52

Introduction Viewing Pictures Filters Image Adjustment Other Features Menu Guide
Menu Guide
The Tool Menu
• Fit: Double-click the display to alternately zoom the
preview to t the palette and zoom to a 100% view.
• Combination Tool: As above, except that the preview
can be scrolled by dragging the cursor.
• Zoom Tool: Click to zoom in. To zoom out, click while
pressing the Alt key (or on Mac computers, the
option key).
• Hand Tool: Drag to scroll the preview.
• Gray Point Sample Tool: Set white balance by sampling the preview (
• Crop Tool: Crop the preview (
• Straighten Tool: Straighten the image in the preview palette (
• Auto Retouch Brush Tool: Remove dust and scratches (
page 37).
page 30).
page 39).
page 21).
The Window Menu
• Histogram/Edit/Metadata/Bird’s Eye/Folders: View or hide
the selected palette.
• Show Tool Bar: View or hide the toolbar.
• Show Status Bar: View or hide the status bar.
• Show Pallets: View or hide all palettes.
• Customize Toolbar: Customize the toolbar (
page 8).
The Help Menu
• CaptureNX-D Help: View online help.
• Check for Updates: Check for updates to CaptureNX-D.
• About CaptureNX-D (Windows only): Display the product version number.
CaptureNX-D Reference Manual
52
 Loading...