

Page 1
En
User’s Manual
Page 2

Notices
• No part of the manuals included with this prod uct may be reproduced, trans mit ted, tran scribed,
stored in a re triev al system, or trans lat ed into any
lan guage in any form, by any means, with out
Nikon’s prior writ ten per mis sion.
• Nikon reserves the right to change the spec i fi ca tions of the hardware and soft ware de scribed
in these manuals at any time and without prior
no tice.
• Nikon will not be held liable for any dam ag es
re sult ing from the use of this prod uct.
• While every effort has been made to en sure that
the information in these man u als is ac cu rate and
com plete, we would ap pre ci ate it were you to
bring any er rors or omis sions to the at ten tion
of the Nikon rep re sen ta tive in your area (ad dress
pro vid ed sep a rate ly).
Package Contents
Before using this product, check that the package contains the items listed below. Contact your retailer
or local Nikon representative should you fi nd that any of these items are missing or damaged.
• Nikon Capture 4 installer CD
• Nikon Capture 4 Install Guide
• Nikon Capture 4 User’s Manual (this manual)
• User registration card (USA only)
Trade mark I nformatio n
Apple, the Apple logo, Macintosh, Mac OS, Pow er Macintosh, PowerBook, and FireWire are reg is tered
trade marks of Apple Computer, Inc. Power Mac, iMac, iBook, and Finder are trade marks of Ap ple
Com put er, Inc. Microsoft and Win dows are reg is tered trade marks of Microsoft Cor po ra tion. Internet
Explorer is a product of Microsoft Corporation. MMX and Pentium are trade marks of Intel Cor po ra tion. Digital DEE is a trademarked technology developed by Applied Science Fiction. CompactFlash
is a trade mark of SanDisk Cor po ra tion. Photoshop is a trademark of Adobe Systems Inc. Internet is a
trade mark of Digital Equip ment Cor po ra tion. Netscape and Netscape Navigator are reg is tered trade marks of Netscape Com mu ni ca tions Cor po ra tion. All oth er trade names men tioned in this man u al or
the oth er doc u men ta tion pro vid ed with your Nikon prod uct are trade marks or reg is tered trade marks of
their re spec tive hold ers.
WARNING!
Do not play the Nikon Capture 4 installer CD on audio CD equip ment. Play ing a CD - ROM on
an audio CD play er could cause hear ing loss or dam age the equip ment.
Page 3

Table of Contents
Introduction: Before You Begin.......................................................................................................1
Overview: About This Manual ........................................................................................................2
The Five Components of Nikon Capture 4: About This Product .................................................. 4
System Requirements: What You Need to Run Nikon Capture 4 ................................................6
Installation........................................................................................................................................7
Workfl ow: Using Nikon Capture 4 .................................................................................................. 8
Workfl ow 1: Field Photography ........................................................................................................8
Workfl ow 2: Studio Photography...................................................................................................... 9
Workfl ow 3: Batch Processing (Existing Images) .............................................................................10
Workfl ow 4: Batch Processing (Studio Photography)....................................................................... 11
Nikon Transfer: Copying Pictures to Your Computer................................................................... 13
The Nikon Transfer Window: Getting to Know Nikon Transfer ................................................. 14
Starting Nikon Transfer ...................................................................................................................15
Exiting Nikon Transfer.....................................................................................................................16
Restarting Nikon Transfer................................................................................................................ 18
Transferring Images: Using Nikon Transfer..................................................................................20
The File Destination and Naming Dialog .........................................................................................24
Transfer Options .............................................................................................................................29
IPTC Information............................................................................................................................. 33
Nikon Browser: Browsing Pictures after Trans fer........................................................................35
The Nikon Browser Window: Getting to Know Nikon Browser................................................. 36
Starting Nikon Browser...................................................................................................................38
Exiting Nikon Capture 4 Browser ....................................................................................................40
Using Nikon Browser: Browser Window Operations ..................................................................41
Working with Folders ..................................................................................................................... 41
Working with Thumbnails...............................................................................................................48
Displaying Shooting Data................................................................................................................ 55
Finding Images ...............................................................................................................................56
Viewing File Information ................................................................................................................. 58
Deleting Image Files........................................................................................................................60
Displaying Images ........................................................................................................................... 61
Playing Sound Files .........................................................................................................................67
Editing Image Files ..........................................................................................................................68
Printing Images ............................................................................................................................... 71
Creating a Photo CD (Windows XP) ................................................................................................75
Creating a Photo CD or DVD (Mac OS X 10.2.3 or Later) ................................................................78
Creating JPEG Copies......................................................................................................................80
Slideshows......................................................................................................................................82
Sending Images by E-Mail ..............................................................................................................86
Uploading Images...........................................................................................................................89
Creating HTML Albums...................................................................................................................98
Nikon Browser Preferences : Fine -Tuning Nikon Browser .........................................................103
The General Tab (Macintosh Only) ................................................................................................104
The Auto Launch Tab.................................................................................................................... 105
The Thumbnails Tab...................................................................................................................... 106
The Still Image Tab........................................................................................................................108
The Movie Tab.............................................................................................................................. 109
The Sound Tab (Windows Only).................................................................................................... 111
The Color Management Tab (Windows) ....................................................................................... 112
The Color Management Tab (Macintosh) ...................................................................................... 114
The Publish to NikonNet or PDA Tab (Americas Only).................................................................... 117
i
Page 4

Nikon Viewer: Viewing Pictures ..................................................................................................119
The Nikon Viewer Window: Getting to Know Nikon Viewer .................................................. 120
Starting Nikon Viewer................................................................................................................... 122
Exiting Nikon Viewer .................................................................................................................... 123
Using Nikon Viewer: Taking a Closer Look ................................................................................124
Viewing the Entire Image.............................................................................................................. 125
Zooming image in and out............................................................................................................ 125
Editing Image Files ........................................................................................................................ 127
Tagging Images ............................................................................................................................ 128
Printing Images ............................................................................................................................. 128
Viewing a Slideshow..................................................................................................................... 129
Sending Messages by E- Mail ........................................................................................................ 129
Uploading Images (Amercias Only) ............................................................................................... 129
Displaying Shooting Data.............................................................................................................. 130
Viewing File Information ............................................................................................................... 130
Opening the Current Folder in Nikon Browser .............................................................................. 131
Window Menu Options in Nikon Browser and Nikon Viewer ........................................................131
Deleting Image Files...................................................................................................................... 133
Nikon Viewer Preferences: Fine -Tuning Nikon Viewer............................................................. 134
Nikon Capture 4 Editor: Image Adjustment ...............................................................................135
The Editor Window: Getting to Know Nikon Capture 4 Editor ............................................... 136
Starting Nikon Capture 4 Editor.................................................................................................... 138
Exiting Nikon Capture 4 Editor......................................................................................................140
Opening Image Files ..................................................................................................................... 141
The Bird's Eye Palette....................................................................................................................144
Rotating and Flipping Images........................................................................................................ 145
The Information Palette ................................................................................................................146
Selecting a Crop ........................................................................................................................... 149
Image Adjustment: Enhancing Images ...................................................................................... 150
White Balance .............................................................................................................................. 153
Advanced RAW ............................................................................................................................159
Image Dust Off .............................................................................................................................162
Vignette Control........................................................................................................................... 166
Curves ..........................................................................................................................................168
Color Balance ............................................................................................................................... 178
Unsharp Mask .............................................................................................................................. 181
Noise Reduction ...........................................................................................................................184
Digital DEE.................................................................................................................................... 186
Fisheye Lens: Fisheye-to-Rectilinear Image Transformation for Use with DX 10.5 mm Fisheye Lenses ...
Output Size and Resolution .......................................................................................................... 192
Saving and Loading Image Adjustment Settings ...........................................................................195
Saving Images............................................................................................................................... 196
Printing Images .............................................................................................................................200
Batch Processing ........................................................................................................................... 201
Nikon Capture 4 Editor Preferences: Fine-Tuning Nikon Capture 4 Editor.............................206
The General Tab ...........................................................................................................................207
The Temporary Files Tab................................................................................................................209
The Advanced Color Tab............................................................................................................... 210
The Grid Lines Tab ........................................................................................................................ 211
The Color Management Tab (Windows) ....................................................................................... 211
The Color Management Tab (Macintosh) ...................................................................................... 213
190
ii
Page 5

Nikon Capture 4 Camera Control: Capturing Photographs ......................................................215
The Camera Control Window: Getting to Know Nikon Capture 4 Camera Control ..............216
Starting Nikon Capture 4 Camera Control ....................................................................................218
Exiting Nikon Capture 4 Camera Control ......................................................................................221
Capturing Photographs to Disk ..................................................................................................... 222
Processing Photographs as They Are Captured .............................................................................226
Time Lapse Photography ..............................................................................................................230
The Nikon Capture 4 Camera Control Window.............................................................................233
Custom Settings ...........................................................................................................................246
Nikon Capture 4 Camera Control Preferences: Fine-Tuning Nikon Capture 4 Camera Control
The General Tab ...........................................................................................................................260
The Temporary Files Tab................................................................................................................ 261
The Color Management Tab .........................................................................................................261
Appendices: Technical Notes .......................................................................................................263
Appendix A: Supported Color Profi les .......................................................................................264
1. St andard RGB Profi les Supported in Nikon Capture 4................................................................264
2. Technical Data for RGB Profi les Supported in Nikon Capture 4 ................................................. 266
Appendix B: Color Matching in Adobe Photoshop (Version 7.0 or Later) ..............................267
Step 1—Choosing a Monitor Profi le .............................................................................................267
Step 2—Adjusting Settings in Adobe Photoshop ..........................................................................270
Appendix C: Troubleshooting .....................................................................................................272
Appendix D: Glossary................................................................................................................... 274
Index...............................................................................................................................................280
...259
iii
Page 6

iv
Page 7

Introduction
Before You Begin
Read this chapter before in stall ing and using Nikon Capture 4.
Overview
Read this section for a description of how this man u al is
or ga nized and for an ex pla na tion of the symbols and con ven tions used.
The Five Components of Nikon Capture 4
This section describes the components that make up Nikon
Capture 4 and introduces some of its more notable features.
System Requirements
Before installing Nikon Capture 4, check that your computer
system meets the requirements listed in this section.
Workfl ow
This section explains how Nikon Capture’s various com po nents work together when processing photographs taken in
the fi eld or in a studio setting, and how batch pro cess ing can
be used to edit multiple images.
1
Page 8
Overview
Overview
About This Manual
This man u al has been written to help you take advantage of the many features included
in Nikon Capture 4. This chapter introduces you to Nikon Capture’s fi ve components and
ex plains how they can be used as part of different workfl ows. Each of these components is
described in greater detail in the chapters that follow. The fi nal chapter, “Tech ni cal Notes,”
includes information on how Nikon Capture can be used with other ap pli ca tions that support
color management, together with troubleshooting in struc tions and a glossary of terms.
Before using Nikon Capture 4, you should know how Nikon Capture fi ts into your particular
workfl ow, and what components and functions you will need. You can then refer to the
chapters on the relevant functions as needed to complete each task.
Symbols and Conventions
The following symbols and conventions are used in this manual:
This icon marks cautions, in for ma tion that
you should read be fore use to prevent possible dam age to your camera or computer.
This icon marks tips, ad di tion al in for ma tion
you may fi nd help ful when using this software.
Menu items and button names are shown in bold.
Life- Long Learning
As part of Nikon’s “Life-Long Learning” commitment to ongoing prod uct sup port and ed u ca tion, con tin u al ly-updated in for ma tion is avail able on-line at the fol low ing sites:
•For users in the U.S.A.: http://www.nikonusa.com/
•For us ers in Europe: http:/ /www.europe-nikon.com/support
•For users in Asia, Oceania, the Middle East, and Africa: http:/ /www.nikon-asia.com/
Visit these sites to keep up -to-date with the latest product in for ma tion, tips, an swers to fre quent lyasked ques tions (FAQs), and gen er al advice on digital im ag ing and pho tog ra phy. Ad di tion al in for ma tion may be available from the Nikon rep re sen ta tive in your area.
This icon marks notes, in for ma tion that you
should read be fore using this software.
This icon indicates that more in for ma tion is
avail able else where in this manual.
2
Page 9

About This Manual
Background Knowledge
This manual assumes knowledge of operations common to Windows and Macintosh en vi ron ments. Refer to the documentation provided with your computer for more in for ma tion
on op er a tions specifi c to your operating system.
Illustrations
This manual is for use with both Windows and Macintosh versions of Nikon Capture 4. While
the majority of the illustrations in this manual show the Windows versions, save where oth er wise noted the operations described apply to both operating systems. Depending on the
operating system used, di a logs and menus may differ slightly from those shown here.
The ReadMe File
Be sure to read the ReadMe fi le on the Nikon Capture 4 installer CD, as it may contain im por tant information that could not be included in this manual.
Camera Control for D100 Cameras (Macintosh)
Before using Nikon Capture 4 Camera Control with a D100 digital camera under Mac OS 9 or Mac OS X,
confi rm that the camera fi rmware is version 2.00 or later. Users of earlier versions will need to upgrade
the camera fi rmware before using Nikon Capture 4 Camera Control. Contact a Nikon-authorized service representative for information on fi rmware upgrades.
Windows XP Home Edition/Professional, Windows 2000 Professional, Mac OS X
Installing and using Nikon Capture 4 under a multi-user operating system requires Administrator priv i leg es. When using Nikon Capture 4, log in as:
Windows XP Home Edition/Professional Computer administrator
Windows 2000 Professional Administrators
Mac OS X Admin
3
Page 10
The Five Components of Nikon Capture 4
The Five Components of Nikon Capture 4
About This Product
Thank you for your purchase of Nikon Capture 4 software for Nikon digital cameras. The
Nikon Capture 4 CD contains both Nikon View 6 and Nikon Capture 4. Nikon View 6 is comprised of three components: Nikon Transfer, which is used to copy pictures from the cam era
memory card to the computer hard disk; Nikon Browser, which is used to browse images
after they have been transferred to your computer, and Nikon Viewer, which is used to view
images. Nikon Capture 4 contains an additional two components: Nikon Capture 4 Editor,
which is used to enhance photographs after shooting, and Nikon Capture 4 Camera Control,
which is used to control D1-series, D100, or D2H digital cameras remotely while they are
connected to the computer. Using these fi ve components, you can transfer pictures to your
computer, view and edit them, and print them all in a single process.
Nikon Transfer
Existing pictures
D1- series, D100, or
D2H camera connected
to computer
4
Starts automatically when a sup port ed Nikon
dig i tal cam era is connected, or a memory card
from a supported Nikon digital camera inserted
in a card reader or PC card slot. Use to trans fer
pic tures from the cam era to your com put er hard
disk. Once trans ferred, pictures can be pre viewed in Nikon Browser.
Nikon Capture 4 Camera Control
Use with a Nikon D1, D1X, D1H, D100, or D2H
digital cam era to control the camera from your
com put er and save photos directly to disk as
they are taken.
Page 11
About This Product
Data fl ow
Nikon Browser
Nikon Browser comes into play after you have
trans ferred pictures to your com put er hard disk
using Nikon Transfer or Nikon Capture 4 Camera
Control. Use to or ga nize pictures into folders
and se lect pic tures for view ing in Nikon Viewer
or ed it ing in Nikon Capture 4 Editor.
Nikon Viewer
Use to view and print pictures.
Nikon Capture 4 Editor
Use to enhance pho to graphs taken with Nikon
digital cameras.
5
Page 12
System Requirements
System Requirements
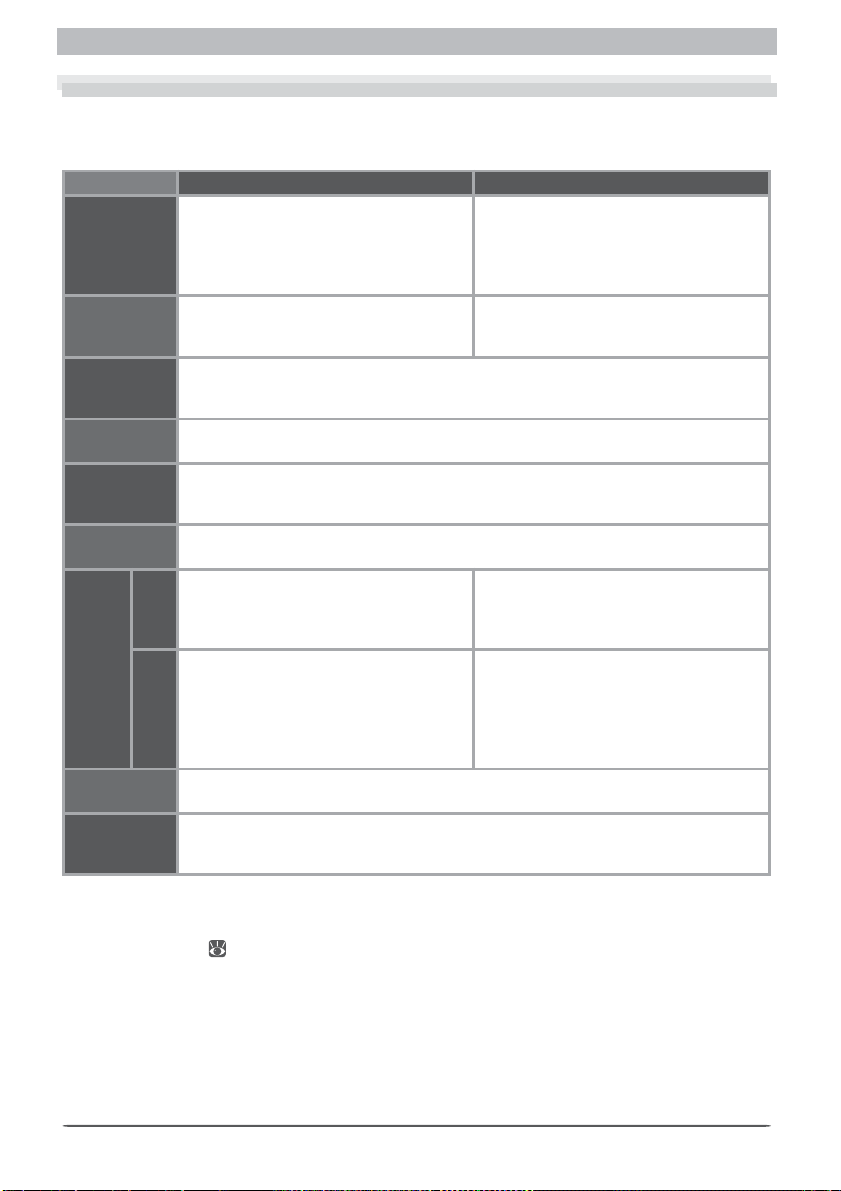
What You Need to Run Nikon Capture 4
Before installing Nikon Capture 4, make sure that your system satisfi es the following re quire ments:
Windows Macintosh
Pre-installed versions of Windows XP
OS
Home Edition, Windows XP Pro fes sion al,
Win dows 2000 Professional, Windows
Millennium Edition (Me), Win dows 98
Mac OS 9.0.4
sion 10.1.5 or later)
Second Edition (SE)
iMac, iMac DV, Power Mac G3 (Blue &
CPU/Model 300 MHz Pentium or better
White), Pow er Mac G4 or later, iBook,
Pow er Book G3 or later
RAM
(Nikon
Capture 4)
RAM
(Nikon View 6)
Hard- disk
space
Video
resolution
•Windows, Mac OS X: 128 MB (256 MB or more recommended)
•Mac OS 9: memory allocation of 32 MB or more to Nikon Capture 4 Camera Control,
256 MB or more to Nikon Capture 4 Editor
64 MB (128 MB with RAW images) or more recommended.
200 MB required for installation, with additional free disk space of 10 MB plus an
amount equal to double the capacity of camera mem o ry card avail able on sys tem disk
when Nikon Capture 4 is running.
800 × 600 pixels or more with 16-bit color (High Color/thousands of colors). 24-bit
color (True Color/millions of colors) recommended.
Open Host- Controller Interface (OHCI)
In ter face
Supported
cameras
compliant IEEE 1394 in ter face board or
IEEE
†
‡
required for con nec tion to D1, D1X,
card
1394
and D1
H
Built-in USB interface required for connection to D100, D2H, and COOLPIX-series
**
USB
cam er as with USB interface. Direct connection to other COOLPIX-series cameras
not supported.
•All functions, including Camera Control: D1, D1
•All functions except Camera Control: USB - equipped COOLPIX cam er as
Built-in IEEE 1394 (FireWire) interface re quired for connection to D1, D1
RATOC REX-PCIU3 USB interface board
(USB 2.0; Mac OS X only) or built-in USB
interface required for connection to D100,
D2H, and COOLPIX-series cam er as with
USB interface. Direct connection to other
COOLPI X- series cameras not supported.
•CD-ROM drive required for installation
Other
•Internet connection required for upload to the Web; e- mail program required when
sending pictures by e-mail
* With CarbonLib version 1.6 or later.
† The camera may not function as expected when connected to an IEEE 1394 hub.
‡ A list of boards and cards that have been tested and approved for use with the D1, D1x, and D1H is
available on-line ( 2).
** The camera may not function as expected when connected to a USB hub or keyboard.
†† Camera fi rmware version 2.00 or later.
*
, 9.1*, 9.2*, Mac OS X (ver-
X, D1H, D100
††
, and D2H
X, and D1H
6
Page 13

What You Need to Run Nikon Capture 4
Installation
For information on installing Nikon Capture 4, see the Nikon Capture 4 Install Guide.
Windows XP Home Edition/Professional, Windows 2000 Professional, Mac OS X
Installing and using Nikon Capture 4 under a multi-user operating system requires Administrator priv i leg es. When using Nikon Capture 4, log in as:
Windows XP Home Edition/Professional Computer administrator
Windows 2000 Professional Administrators
Mac OS X Admin
Mac OS 9.0
If you are using Mac OS 9.0, use the Software Update control panel to update to the lat est ver sion of
CarbonLib before beginning installation.
7
Page 14
Workfl ow
Workfl ow
Using Nikon Capture 4
How you will use Nikon Capture’s various components depends on whether you are tak ing
photographs in the fi eld or in a studio with a D1, D1
com put er. Regardless of where you take your photographs, Nikon Capture 4’s batch option
can be used to process multiple images automatically.
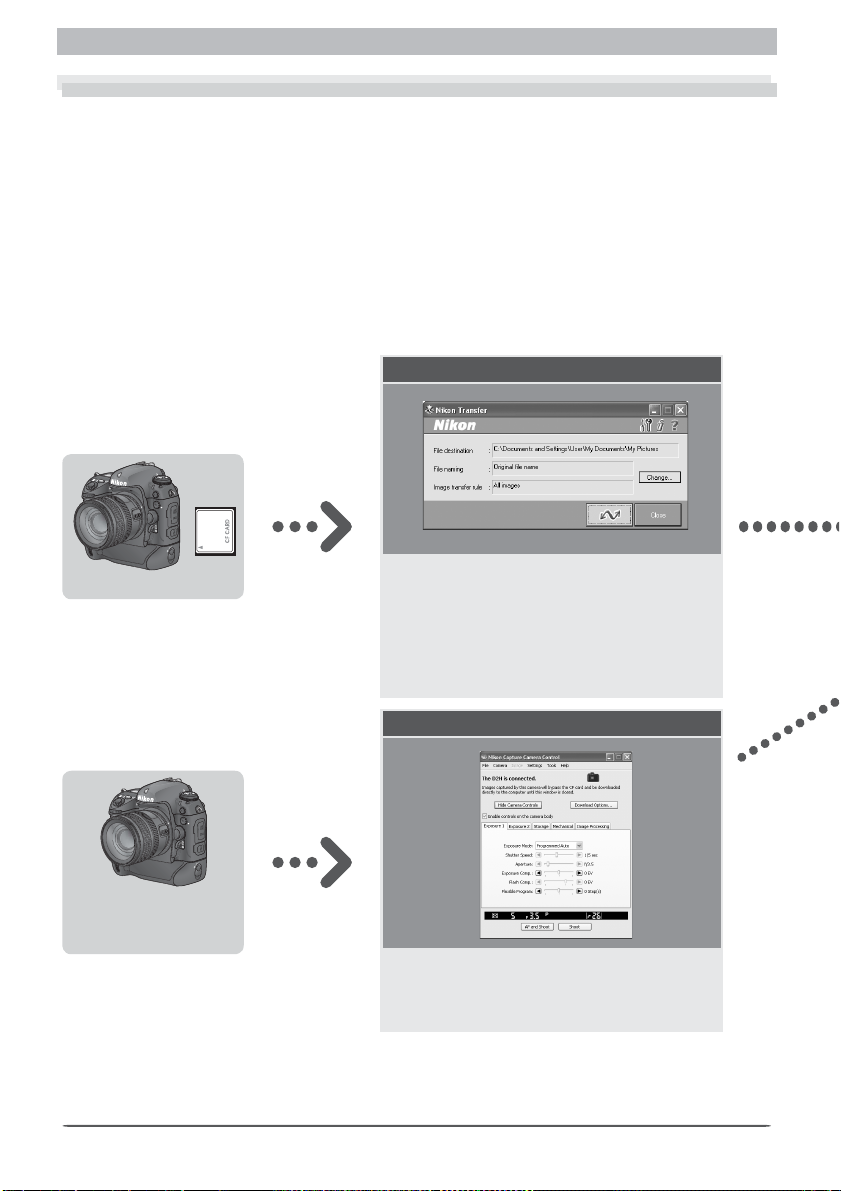
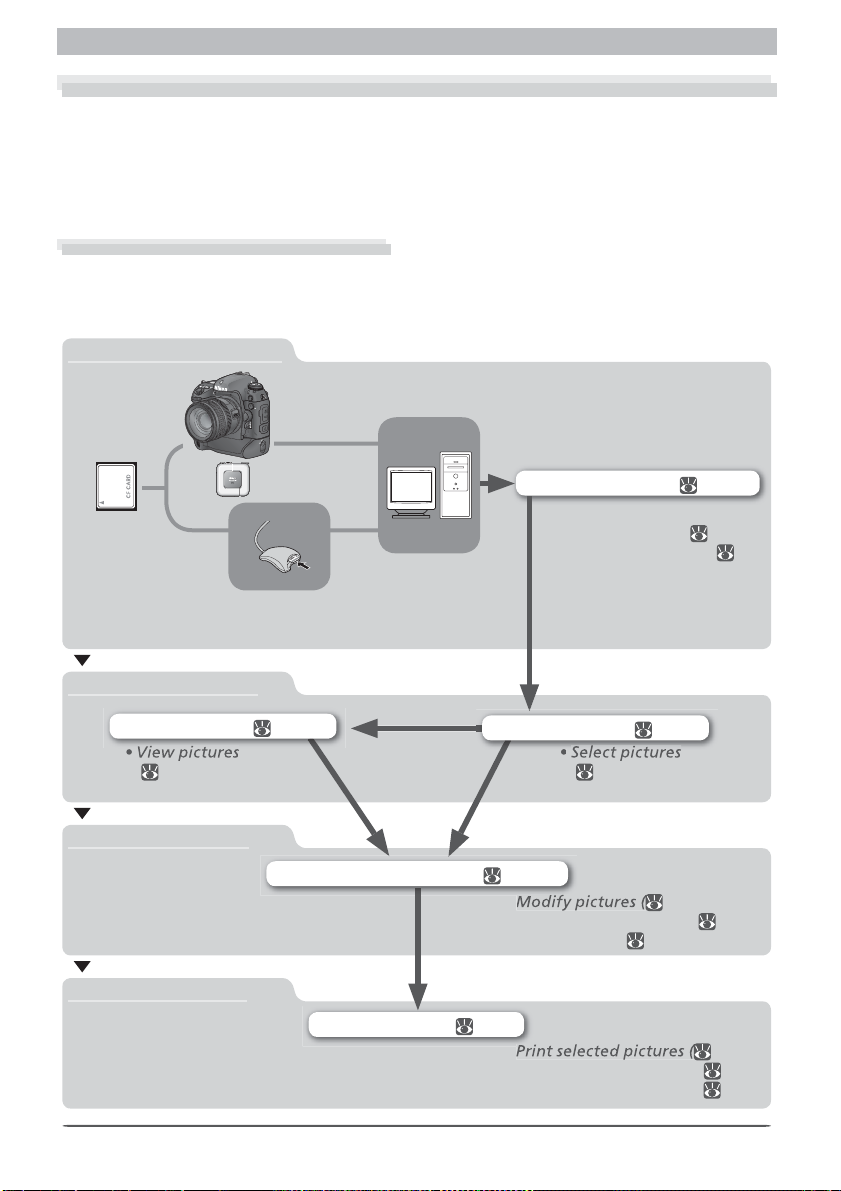
Workfl ow 1: Field Photography
This workfl ow is for users of D1-series, D100, D2H, or COOLPIX cameras taking photographs
in the fi eld, away from their computers.
Step 1—Transfer pic tures
Camera
Interface cable
Memory card
Computer
Card reader
or
PC card slot
X, D1H, D100, or D2H connected to a
Nikon Transfer ( 13 )
•Select type of pictures to
be transferred ( 28)
•Select destination (
24 )
Step 2—View pic tures
Nikon Viewer ( 119 )
Step 3—Edit pictures
Step 4—Use pictures
8
Nikon Browser ( 35)
Nikon Capture 4 Editor ( 135)
• 150 )
•Save modifi ed pictures (
•Print pictures (
Nikon Browser ( 35)
• 71)
•Send pictures by e-mail ( 86)
•Upload pictures to web ( 89)
( 51)( 12 4 )
19 6 )
200)
Page 15

Using Nikon Capture 4
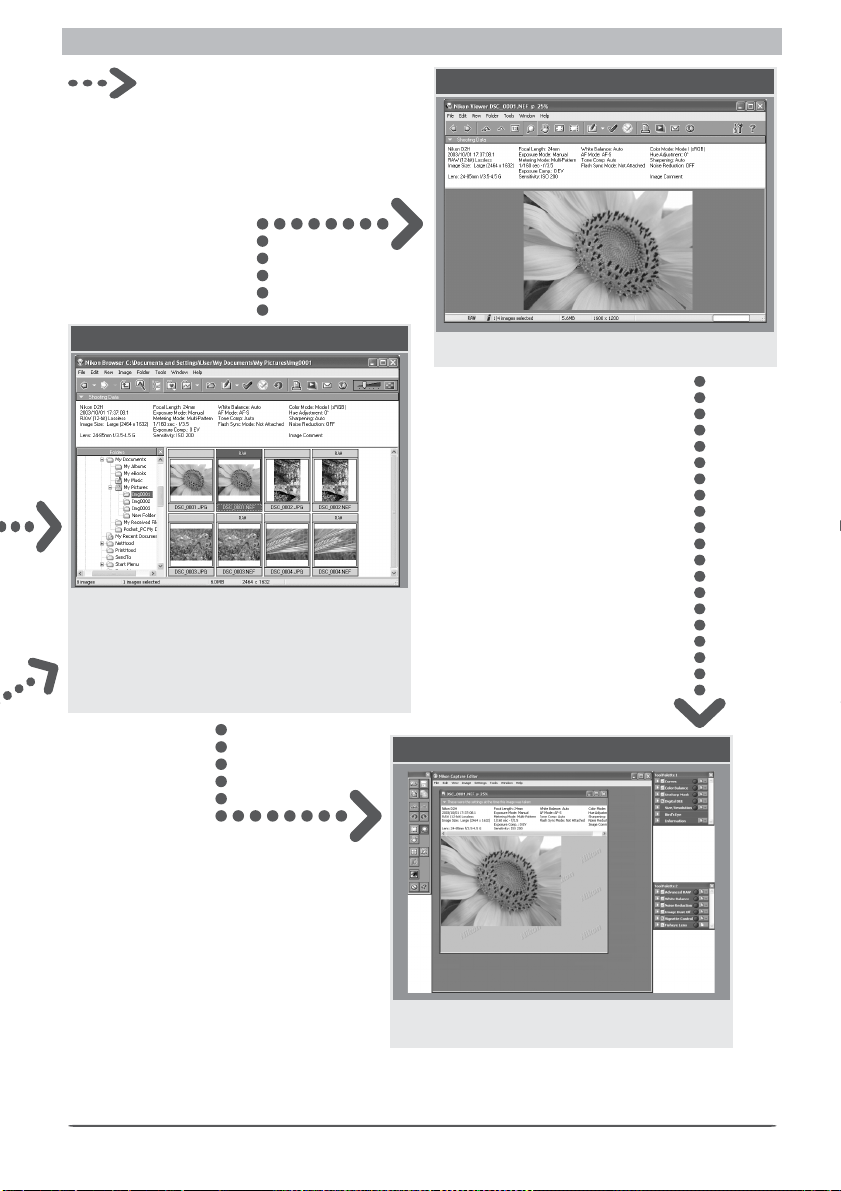
Workfl ow 2: Studio Photography
This workfl ow is for users of D1-series, D100, or D2H cameras who want to capture pho to graphs directly to their computer as they are taken.
Step 1— Connect the cam era
•If Nikon Transfer
starts, click Close
to exit
Interface cable
D1- series, D100,
or D2H camera
Step 2—Start Nikon Capture 4 Cam era Con trol
Nikon Capture 4 Camera Control ( 215)
Step 3—Take pictures
Nikon Capture 4 Camera Control ( 215)
Computer
•Take pictures directly using con trols
on camera body
•Take pictures from
Camera Control
Step 4—View pictures
Nikon Viewer ( 119 )
•View pictures
(
12 4 )
Step 5—Edit pictures
Nikon Browser ( 35)
Nikon Capture 4 Editor ( 135)
•Modify pictures (
•Save modifi ed pictures (
•Print pictures ( 200)
•Adjust settings in Camera
Control ( 233)
•Time lapse pho tog ra phy
( 230)
•Photos saved directly to
disk ( 222)
• 51)
150 )
19 6 )
9
Page 16
Workfl ow
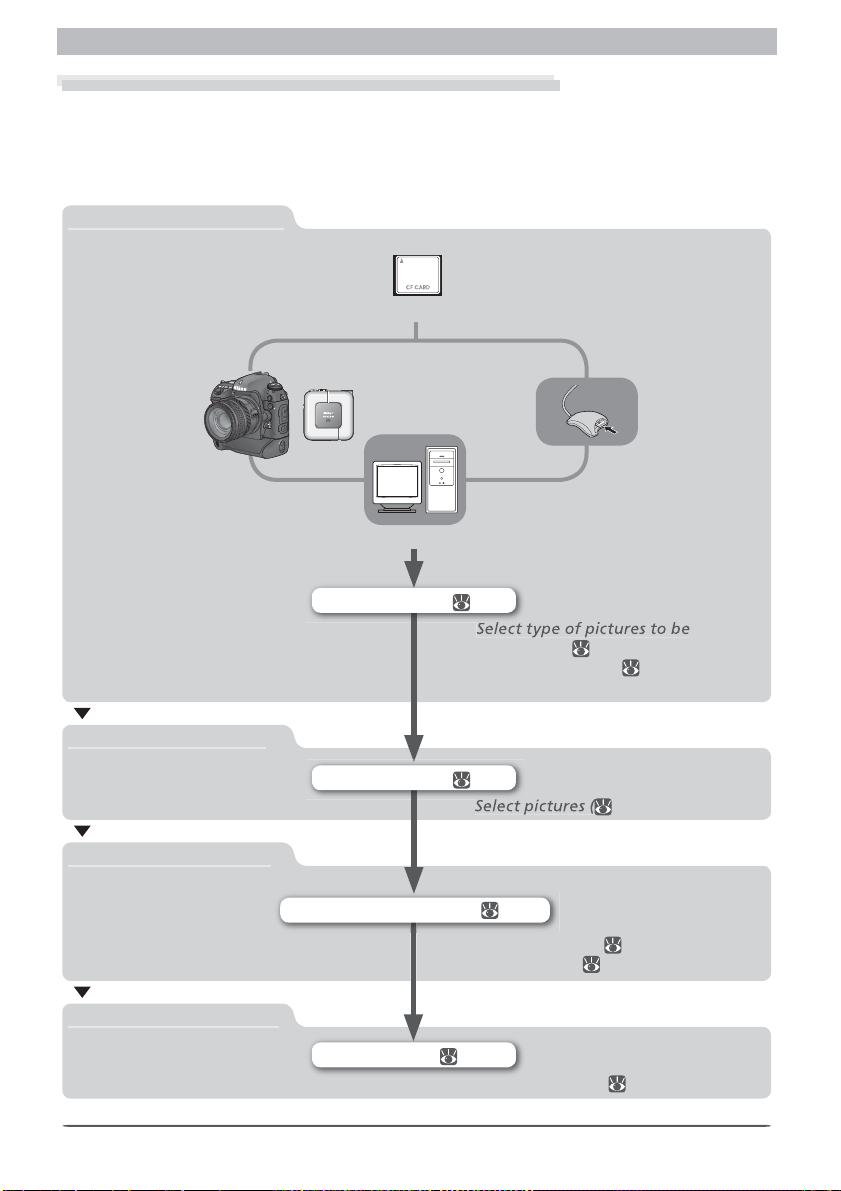
Workfl ow 3: Batch Processing (Existing Images)
Nikon Capture 4 includes a batch option for automatic processing of multiple images, either
as they are captured from a D1-series, D100, or D2H camera (see Workfl ow 4), or after they
have been saved to disk using Nikon Transfer or Nikon Capture 4 Camera Control. To process
images after they have been saved to disk:
Step 1—Transfer pictures
Memory card
Camera
Interface cable
Step 2—Select pic tures
Step 3—Adjust set tings
Computer
Nikon Transfer ( 13 )
•
transferred ( 28)
•Select destination (
Nikon Browser ( 35)
•
Nikon Capture 4 Editor ( 135)
•Modify pictures (
•Save settings ( 195)
Card reader
or
PC card slot
24 )
51)
150 )
Step 4—Process pic tures
10
Batch dialog ( 201)
•Process pictures (
201)
Page 17
Using Nikon Capture 4
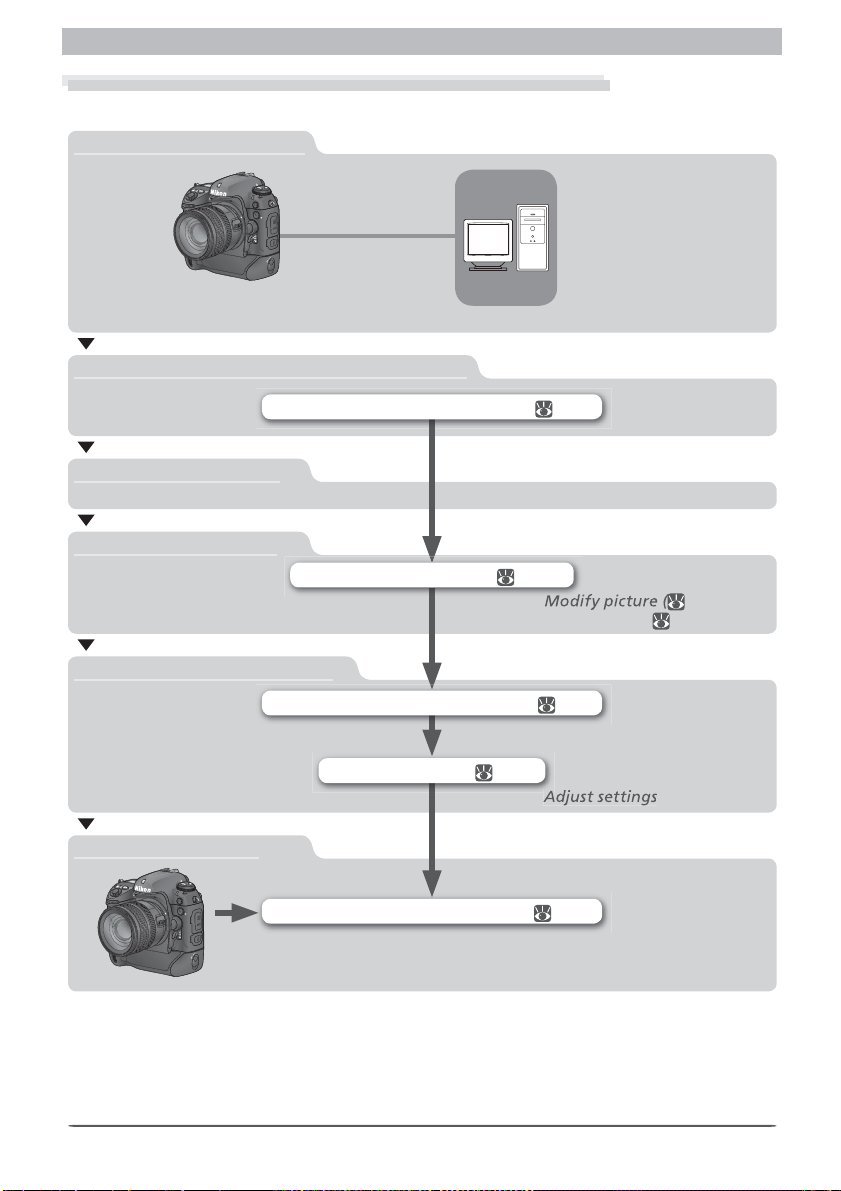
Workfl ow 4: Batch Processing (Studio Photography)
To process photographs automatically as they are captured from the camera (“live batch”):
Step 1— Connect the cam era
•If Nikon Transfer
starts, click Close
to exit
Interface cable
D1- series, D100,
or D2H camera
Step 2—Start Nikon Capture 4 Cam era Con trol
Nikon Capture 4 Camera Control ( 215)
Step 3—Take a test shot
Step 4—Adjust settings
Nikon Capture 4 Editor ( 135)
Computer
• 150 )
•Save settings ( 195)
Step 5—Choose batch op tions
Nikon Capture 4 Camera Control ( 215)
Step 6 —Take pictures
Nikon Capture 4 Camera Control ( 215)
Live Batch dialog ( 226)
•
11
Page 18

12
Page 19

Nikon Transfer
Copying Pictures to Your Computer
Nikon Transfer is used to transfer (copy) pictures from the
cam era mem o ry card to your computer. When transferring
pic tures, Nikon Transfer allows you to se lect the type of im ag es to be trans ferred, choose transfer options, specify the
des ti na tion fold er for trans ferred images, and choose how
trans ferred images will be named on the computer.
This chapter is divided into the following two sections:
The Nikon Transfer Window
This section outlines the controls and displays in the Nikon
Trans fer window, and describes how to start, exit, and re start Nikon Transfer.
Transfer ring Imag es
Read this section for instructions on transferring images from
a camera memory card to a folder of your choice on your
computer.
13
Page 20
The Nikon Transfer Window
The Nikon Transfer Window
Getting to Know Nikon Transfer
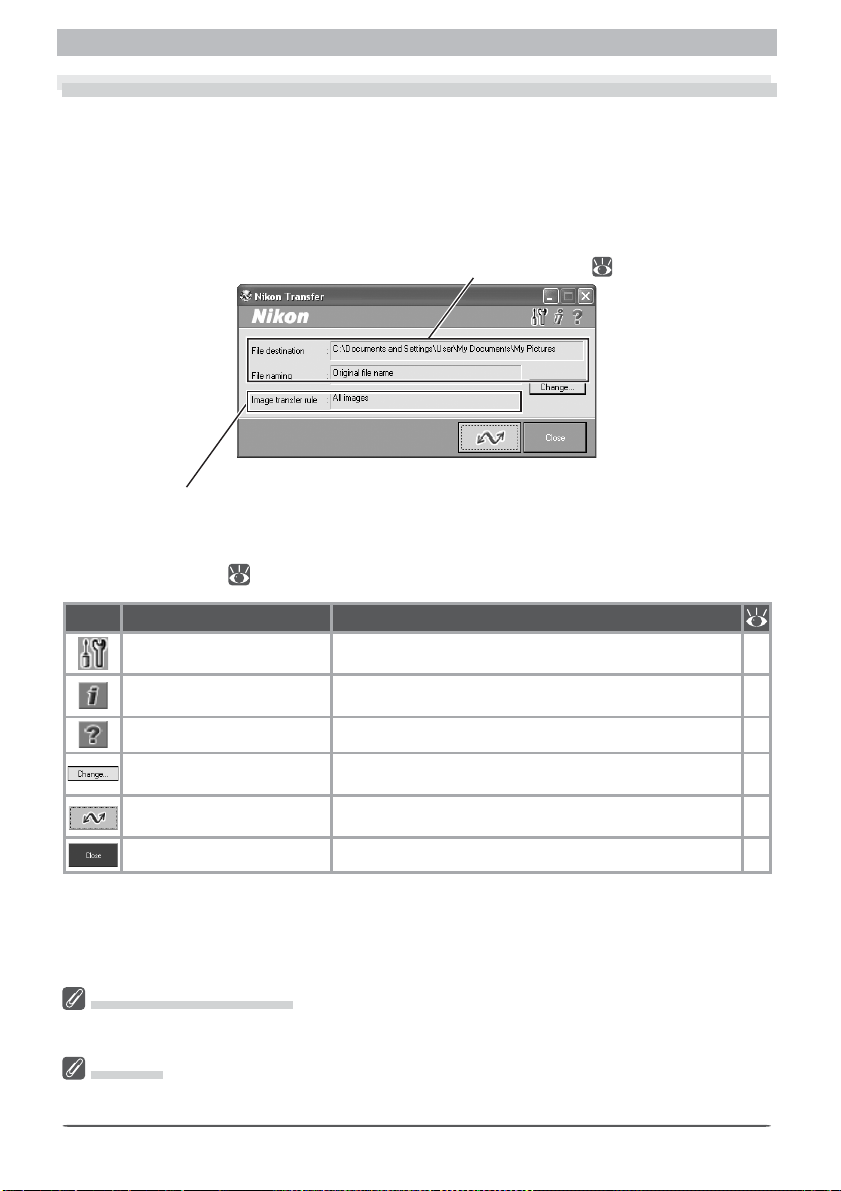
The main parts of the Nikon Transfer window are identifi ed below.
File destination and naming
The destination fold er and fi le nam ing meth od for trans ferred images are
dis played in this area. To change the
des ti na tion and fi le naming op tions,
click Change... (
Image Transfer rule
Specifi es the type of pictures that will
be transferred from the memory card
currently inserted in the camera, card
reader or PC card slot ( 28).
24 ).
Button
Add additional in for ma tion
The Menu Bar (Macintosh)
The Macintosh version has a menu bar containing commands that replicate the functions of the buttons
in the Nikon Transfer window. No menus are available in the Windows version.
Mac OS X
Before connecting the camera for the fi rst time, change Image Capture settings as described on page
115 of the Nikon Capture 4 Install Guide.
Name Function
Transfer options
(IPTC fi eld) to images
Help View help. —
Change…
Transfer
Close
Specify the actions to be per formed when pic tures are
transferred.
Specify the information that will be add ed to pic tures as
they are trans ferred.
Choose the type of pictures to be transferred and change
fi le destination and naming.
Trans fer to the computer all pic tures of the type se lect ed in
the Image trans fer rule menu.
Close the Nikon Transfer window. 16
29
33
24
22
14
Page 21
Getting to Know Nikon Transfer
Starting Nikon Transfer
Nikon Transfer starts automatically when a supported camera is connected or a memory card
from a supported camera is inserted in a card reader or PC card slot.
Connect the camera or insert the memory card
Connect a camera containing a memory card from a supported camera, or insert a mem-
1
o ry card from a supported camera in a card reader or PC card slot. For more information,
see the Nikon Capture 4 Install Guide.
Nikon Transfer will start automatically
2
Auto Launch
Nikon Transfer will only start automatically if Auto launch when connected to a camera or a card
(the default option) is selected in the “Auto Launch” tab of the Nikon Browser or Nikon Viewer Preferences dialog ( 105).
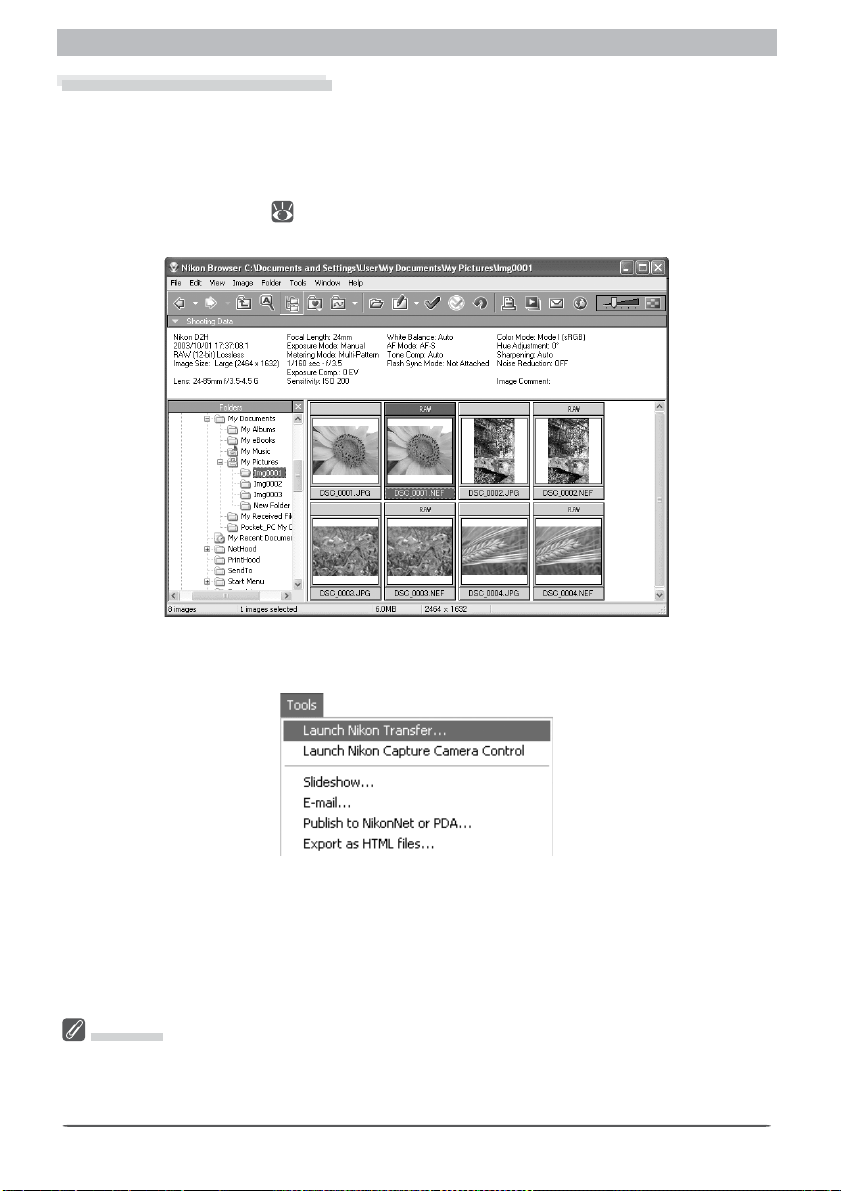
Starting Nikon Transfer from Nikon Browser
Nikon Transfer can also be started by selecting Launch Nikon Transfer… from the Tool s menu in
Nikon Browser.
Starting Nikon Transfer on a Macintosh
When Nikon Transfer is started by connecting a camera or inserting a memory card in a card reader or
PC card slot, Nikon Browser will also start automatically.
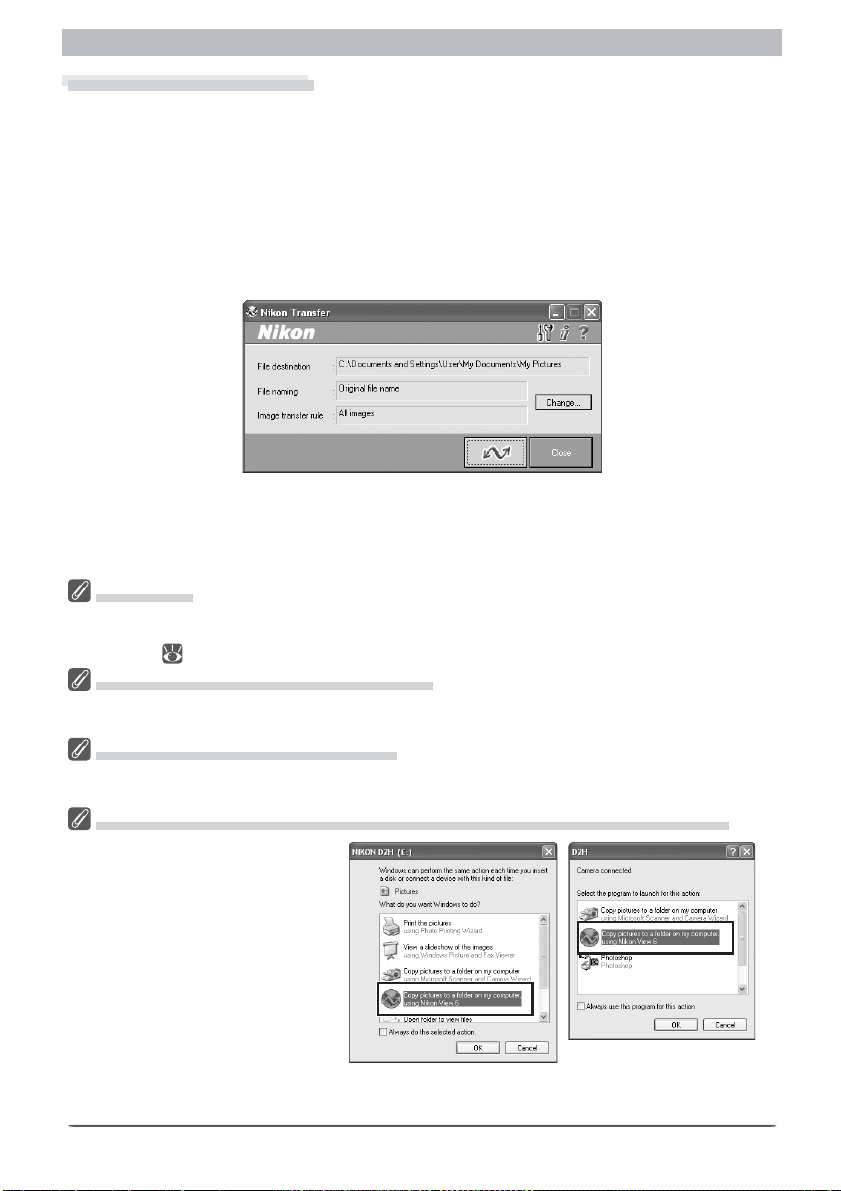
The Removable Disk Dialog (Win dows XP Home Edition/Windows XP Professional)
When a camera is con nect ed to a
computer run ning Win dows XP Home
Edition or Windows XP Professional,
or a memory card is inserted in a card
read er or card slot con nect ed to a
computer run ning Win dows XP Home
Edition or Windows XP Pro fes sion al,
a Removable Disk dialog may be
dis played. Select Copy pic tures to
a fold er on my com put er us ing
Nikon View 6 and click OK to display
the Nikon Trans fer win dow. For more
in for ma tion on the Re mov able Disk
di a log, see pages 30–31 of the Nikon
Capture 4 In stall Guide.
Mass Storage
PTP
15
Page 22
The Nikon Transfer Window
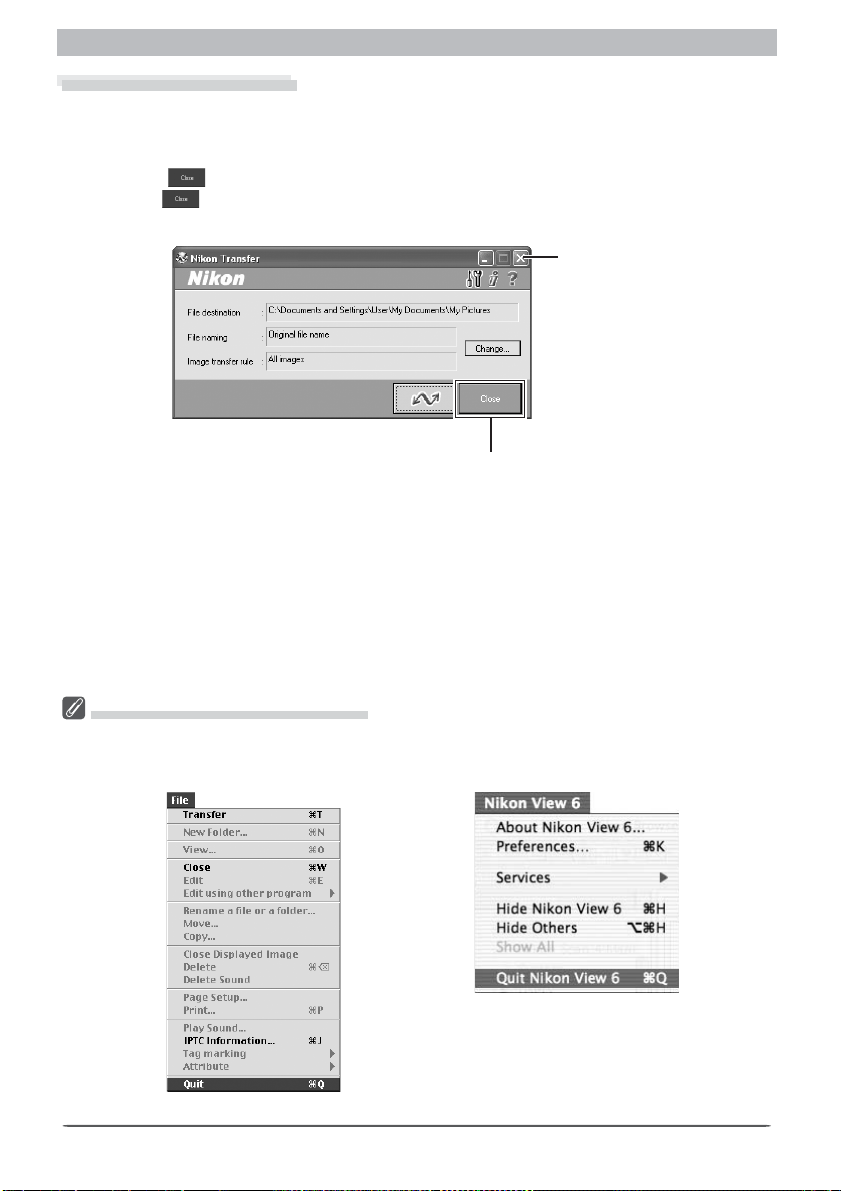
Exiting Nikon Transfer
The Nikon Transfer window will close automatically when transfer is complete, and the Nikon
Brows er window will be displayed. To close the Nikon Transfer window without transferring
pictures:
Click the button or click the close box
Click the
1
at the top of the window.
The Nikon Browser window will be displayed
2
Closing the Nikon Transfer window starts Nikon Browser (Windows) or activates the
Nikon Brows er window (Macintosh).
button in the Nikon Transfer window, or click the close box in the title bar
Close box
Close button
Quitting Nikon Transfer (Macintosh)
The Macintosh version of Nikon View 6, you can quit Nikon Transfer from the program menus. In Mac
OS 9, select Quit from the File menu. In Mac OS X, select Quit Nikon View 6 from the ap pli ca tion
menu.
Mac OS X
Mac OS 9
16
Page 23
Getting to Know Nikon Transfer
Disconnecting the Camera
For information on disconnecting the camera, see the Nikon Guide to Digital Photography or User's
Man u al provided with your camera.
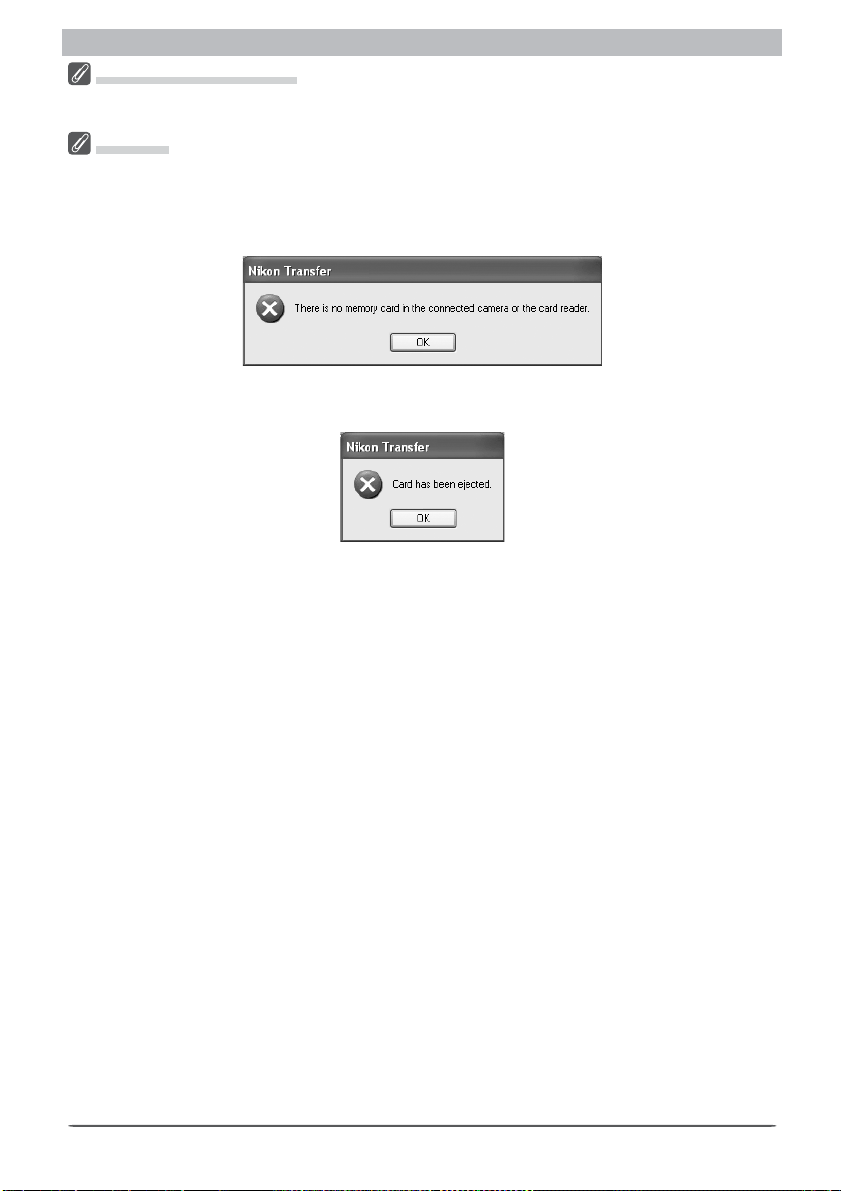
Warnings
If you perform the following actions when Nikon Transfer is running, a warning will be displayed. Click
OK to exit Nikon Transfer.
The following warning will be displayed if you disconnect the camera or card reader or turn the camera
off while Nikon Transfer is running:
The following warning will be displayed if you remove the memory card from the card reader or card
slot while Nikon Transfer is running:
17
Page 24
The Nikon Transfer Window
Restarting Nikon Transfer
How you can restart Nikon Transfer after exiting depends on whether the camera is still con nect ed and powered on and/or the memory card still inserted in the camera, card read er, or
PC card slot.
If the camera is still connected and/or the memory card in place:
Start Nikon Browser ( 38)
1
Select Launch Nikon Transfer… from the Tools menu
2
Mac OS X
Users of Mac OS X will not be able to transfer pictures if Nikon Transfer is started by selecting Launch
Nikon Transfer… from the Tools menu in Nikon Browser. To start Nikon Transfer when the camera is
still connected, turn the camera off and then on again. If you are using a card reader or PC card slot,
remove and reinsert the memory card.
18
Page 25

Getting to Know Nikon Transfer
If the camera has been turned off:
Turn the camera on.
If the camera has been disconnected:
Reconnect the camera and turn the camera on.
If the memory card has been removed from the camera:
Reinsert the memory card and turn the camera on.
If the memory card has been removed from the card reader or PC card slot :
Reinsert the memory card.
Nikon Transfer will start automatically.
19
Page 26
Transferring Images
Transferring Images
Using Nikon Transfer
This section describes how Nikon Transfer can be used to transfer pictures to your com put er
from a memory card inserted in a camera, card reader, or PC card slot.
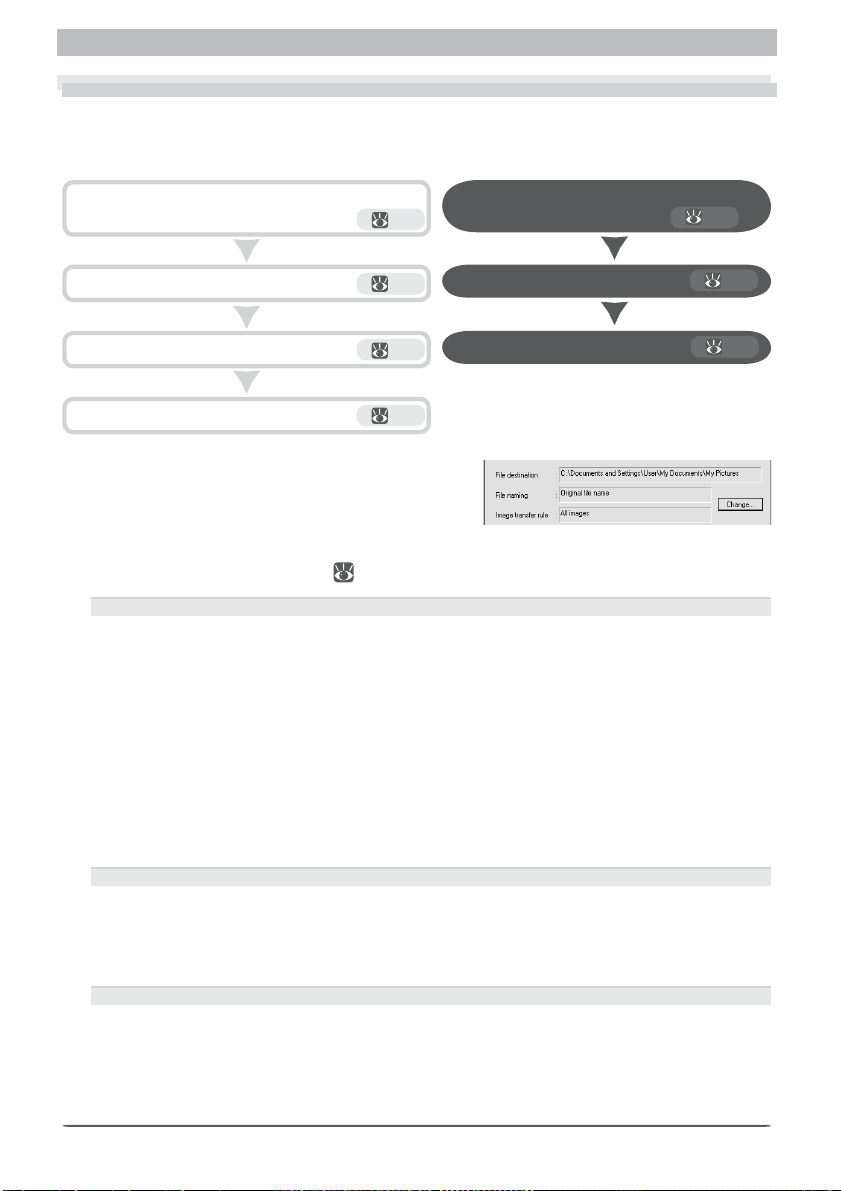
Choose the type of pictures to be transferred and
change fi le destination and naming.
Choose image transfer options.
Add fi le information.
Trans fer pic tures.
Choose the type of picture to be trans-
1
ferred, the destination, and naming rules
Before transferring pictures, click Change… to
choose the type of picture to be transferred, the
folder in which pictures will be stored, and how
transferred fi les will be named ( 24).
File destination
This text box lists the current destination for transferred pictures. The default folder at
installation is:
Windows
…\My Documents\ My Pic tures
(If the My Documents folder does not contain a My Pictures folder, pictures will be
trans ferred to My Documents.)
Mac OS 9
Documents
Mac OS X
Pictures
File naming
You can choose either to transfer pictures to the computer using the fi le names orig i nal ly
assigned by the camera (“Original fi le name”) or to assign pictures a new, au to mat i cal ly
gen er at ed name as they are transferred (“Automatically gen er at ed name”). By default,
pictures will keep the fi le name originally assigned by the camera.
Image transfer rule
Choose the type of pictures to be transferred. At default settings, all pictures will be
transferred.
24
29
33
22
Open the File Destination and
Naming dialog
Open the Transfer Options dialog
Open the IPTC Information dialog
“File destination and naming” area
24
29
33
20
Page 27

Using Nikon Transfer
Choose image transfer options
By default, the folder containing the transferred images will automatically be displayed
2
in Nikon Browser when transfer is complete. Nikon View allows you to display images
in a dif fer ent ap pli ca tion, choose an image database application for cataloging images
as they are trans ferred, and adjust transfer settings. Changes to these transfer options
are made in the Transfer Options dialog. To display the Transfer Options dialog, click the
Trans fer Op tions but ton in the Nikon Trans fer win dow before trans fer. For more in for ma tion, see “Transfer Op tions” (
Add fi le information
3
By default, information on camera settings at the time the image was created is included with each image transferred to your computer. If desired, you can specify
additional information to be included with all transferred images. To do so, select
Add additional information (IPTC fi eld) to all fi les in the Transfer tab of the
Transfer Options dialog ( s ee Step 2) and then click the Add additional in for ma tion
(IPTC fi eld) to images button in the Nikon Transfer dialog. For more information, see
“IPTC Information” (
33).
29).
Transfer Options button
Add additional in for ma tion
(IPTC fi eld) to images
Files with the Same Name
If you attempt to transfer pictures with the same names as fi les already present in the destination folder,
the new fi les will be renamed by adding numbers sequentially before the period that sep a rates the fi le
name and the extension.
but ton
21
Page 28
Transferring Images
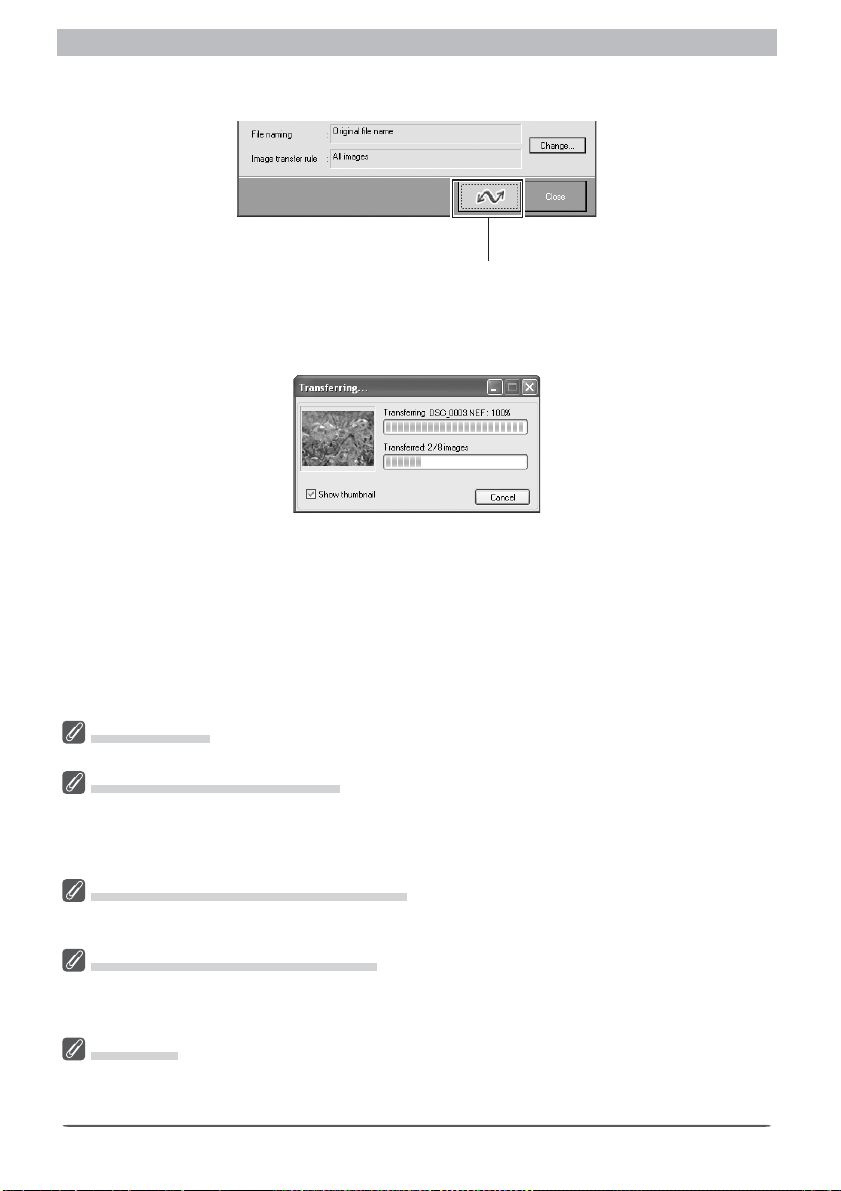
Transfer image fi les
4
Click the Transfer button to start transfer at the selected settings.
Transfer button
A progress dialog is displayed during transfer, showing a thumbnail preview of the fi le
currently being transferred. Thumbnails will not be displayed if the Show thumb nail
box is not checked.
During Transfer
You cannot perform any other operation in Nikon Capture 4 while the progress dialog is displayed.
Auto Image Rotation ( D2H Only)
If On (the default setting) is selected for Auto image rotation in the camera setup menu, “tall” (portrait-orientation) photographs taken with the D2H in the vertical shooting position will automatically
be rotated as they are transferred. Select Off to record all images in landscape orientation regardless
of how the camera is held.
COOLPIX Cameras with a Transfer Button
If your camera is equipped with a transfer button, you can use this button to transfer pictures to your
computer. See the documentation provided with your camera for details.
Transfer Marking (COOLPIX Cameras)
Pictures can be marked for transfer using the camera transfer button or the Tra nsf er or Auto Transfer
options in the camera menus. Some cameras do not support transfer marking; see the documentation
provided with your camera for details.
Sound Files
Only voice memos appended to photographs using the camera voice memo option (supported with
cameras such as the D2H and COOLPIX 5400) will be copied to the computer. Other sound fi les will
not be transferred.
22
Page 29
Using Nikon Transfer
Cancelling Transfer
To cancel transfer of the image fi les, click Cancel or press Escape. When you are trans-
fer ring multiple image fi les, the images that have already been trans ferred at the time
trans fer is cancelled are saved in the des ti na tion fold er.
After Transfer
When transfer is completed, Nikon View will perform the action specifi ed in the General
tab ( 30) of the Trans fer Options dialog. By default, transferred images will be dis played in Nikon Browser.
23
Page 30
Transferring Images
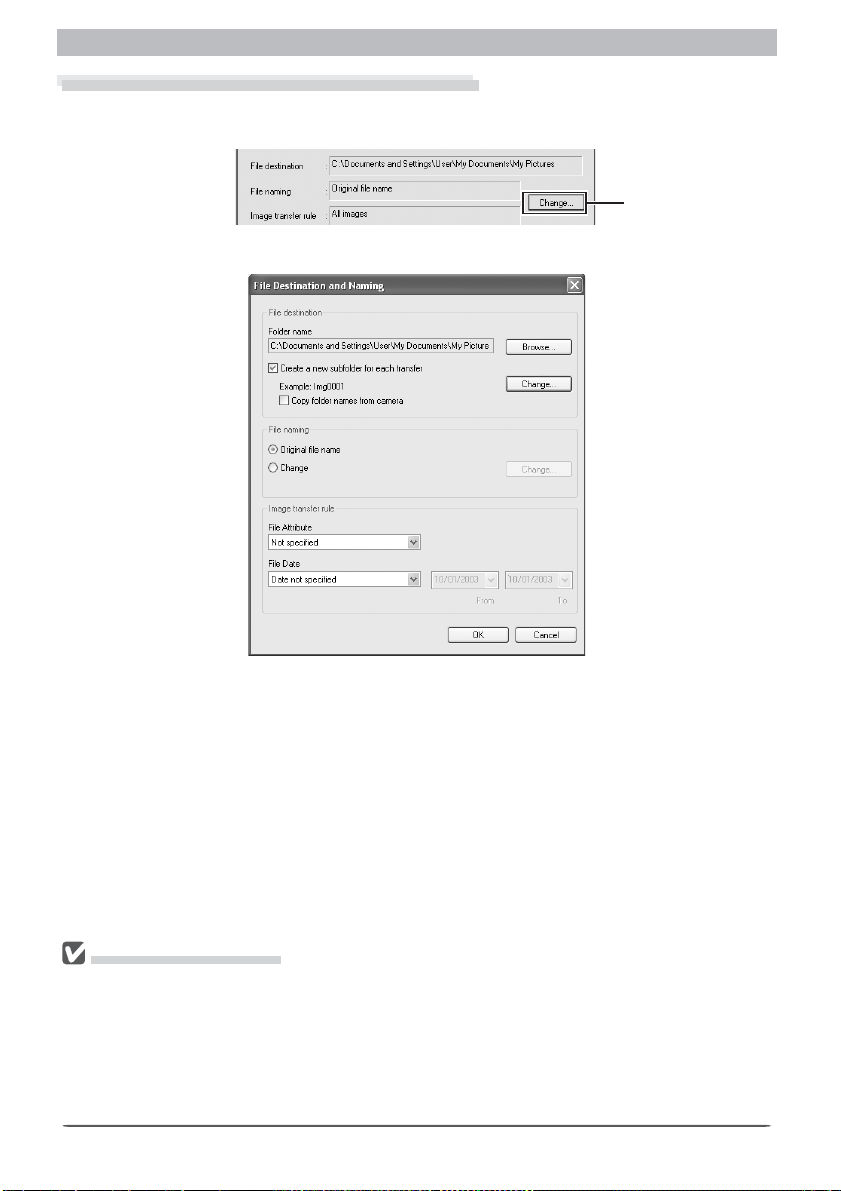
The File Destination and Naming Dialog
To choose a destination folder and fi le naming method for images before transfer, click the
Change… button in the “File destination and naming” area of the Nikon Transfer dialog.
Change button
The File Destination and Naming dialog will be displayed.
Any changes made in the File Destination and Naming dialog will be refl ected in the “File
des ti na tion and naming” area of the Nikon Transfer window.
File Naming Conventions
Windows: In environments that do not support long fi le names, the maximum length is eight char-
ac ters; fi le names may not contain spaces, quotes, or any of the following characters: “\\” “/” “:” “.”
“;” “*” “?” “<“ “>” and “|”.
Where long fi le names are supported, the maximum length is 255 characters; fi le names may not contain quotes or any of the following characters: “\\” “/” “:” “.” “;” “*” “?” “<“ “>” and “|”.
Macintosh: The maximum length for Macintosh fi le names is thirty- one characters. Co lons (“:”) are
not al lowed.
24
Page 31

Using Nikon Transfer
The “Folder” Area
The “Folder” area of the File Destination and
Naming dialog lists the folder in which pic tures will be stored after transfer.
Folder name
This text box lists the current destination fold er. To select a different folder, click Browse…
and navigate to the desired folder.
Create a new subfolder for each transfer
Check this option to store images in a new sub-folder with each transfer. The sub-folder
will be created under the folder listed in the “Transfer” text box and named as shown in the
“Example” fi eld. For information on chang ing how sub-folders are named, see “Sub-folder
Naming” below.
Copy folder names from camera
This check box is enabled when Create a new sub-folder for each transfer is checked.
Check this option to transfer pictures using the folder hierarchy and folder names (e.g.,
“100ND10 0”) used on the camera memory card.
Subfolders
If this option is not checked, all images will be transferred to the same folder. When this option is
checked, a new folder will be created for each transfer, making it easier to keep track of photographs.
Panorama Assist/Ultra HS (COOLPIX Cameras)
If you are using a Nikon camera equipped with a "Panorama Assist" scene mode or a "Continuous"
setting of "Ultra HS," be sure to check Copy folder names from camera before transferring pictures
to ensure that each sequence of pictures taken at these settings will be transferred a separate folder on
the computer. These folders will appear as sub-folders in the Nikon Browser thumbnail list and folder
view.
Folder viewThumbnail list
Other
pictures
Panorama
Assist
Ultra HS
25
Page 32

Transferring Images
Sub Folder Naming
Click ing Change… in the Folder area dis plays the
“Sub Folder Nam ing” dialog.
Folder names consist of a prefi x, identifi er, and suffi x,
where the identifi er is a unique num ber, date, or date
and time, depending on the option se lect ed in the Be-
tween Prefi x and Suffi x menu.
Prefi xIdentifi er Suffi x
Prefi x
The characters appended to the beginning of the folder name.
Suffi x
The characters appended to the end of the folder name.
Between Prefi x and Suf fi x
Select the iden ti fi er from this menu. Choose
from Use se quen tial number, Use shoot-
ing date, or Use shooting date & time.
The op tions available depend on the iden ti fi er se lect ed.
Use se quen tial number
When you select Use sequential num ber, iden ti fi ers will consist of num bers
as signed in as cend ing or der. You can
spec i fy the start ing num ber and num ber
of dig its.
Use shooting date/Use shooting date & time
Select Use shooting date to use the
date of trans fer as the identifi er. Select
Use shooting date & time to use the
date and time of transfer as the identifi er. The date and time is of the form
YYYY-MM-DD-HH-MM-SS-NN, where
YYYY de notes the year, MM the month,
DD the day of the month, HH the hour,
MM the minute, SS the second, and NN
the serial number added if the selected
folder name al ready exists. The characters that will separate the year, month,
and day and hour, minute, and second
Use shooting date & time
can be entered in the Year, month, day
separator and Hour, minute, second
separator text boxes.
Use shooting date
26
Page 33

Using Nikon Transfer
The “File Naming” Area
You can choose how fi les will be named in the
“File naming” area of the File Des ti na tion and
Nam ing dialog.
Original fi le name
Select this option to save transferred im ag es using the fi le names orig i nal ly as signed by the
camera when the pictures were taken.
Change
Select this option to save the trans ferred fi les under an automatically generated fi le name.
File Naming
When Change is selected in the “File nam ing”
area, clicking the Change… button will dis play
the “File Nam ing” dialog.
File names consist of a prefi x, iden ti fi er, suffi x,
and extension, where the identifi er is a unique
num ber, date, or date and time, depending on
the option se lect ed in the Be tween Prefi x and
Suffi x menu.
Prefi xIdentifi er Suffi x Ex ten sion
Prefi x
Select Original fi le name to append the fi le name assigned by the cam era to the begin-
ning of the transferred fi le name. Select Other to append char ac ters of your choice to the
be gin ning of the fi le name.
Suffi x
Select Original fi le name to append the fi le name assigned by the cam era to the end of the
transferred fi le name. Select Other to add other characters to the end of the fi le name.
Be tween prefi x and suffi x
Select the iden ti fi er from this menu as described under “Sub- Folder Naming,” op po site.
If Use sequential number is selected when Reset the starting number to 1 for each
download is checked, fi le numbering will be reset to the selected start number with each
transfer.
Extensions
Trans ferred fi les are automatically assigned an ex ten sion based on fi le type:
Ex ten sion File type Ex ten sion File type
.JPG Photograph (JPEG) .MOV Movie
.TIF Photograph (TIFF) .WAV Sound (voice memo)
.NEF Photograph (RAW)
.NDF Dust Off Ref Photo
27
Page 34

Transferring Images
The “Image Transfer Rule” Area
The options selected in the “Image transfer
rule” area of the File Destination and Naming dialog determine which pictures are
transferred to the computer.
File Attribute
Choose the type of picture to be transferred:
Option Description
Not specifi ed Pictures of all types are transferred.
Marked for transfer
Marked for protection Only protected pictures are transferred.
Unmarked for protection Only pictures that have not been protected are transferred.
*Hidden images will only be transferred if Copy all images marked as “hidden” is checked in the
Trans fer tab of the Transfer options dialog ( 31). If the camera is connected using PTP, all images
will be transferred, regardless of whether Copy all images marked as “hidden” is selected.
Only pictures marked for transfer using camera transfer marking function
are transferred.
*
File Date
Pictures can be selected for transfer based on the date of recording:
Option Description
Date not specifi ed Trans fer all pictures of the selected type.
Tod ay onl y Trans fer only p ictures taken today.
Within a week Trans fer only p ictures taken in the past week.
Within a month Trans fer only p ictures taken in the past month.
Within a year Trans fer only p ictures taken in the past year.
Specify dates Transfer only pic tures t aken on the selected date.
User defi ned Trans fer only p ictures taken in the selected range of dates.
When Specify dates is selected, clicking
the date will display a calendar. Select the
desired date. If User defi ned is selected,
the starting ( From) and ending (To) dates
can be selected in the same way.
Mac OS X
Under Mac OS X, fi les of all types will be transferred, regardless of the option selected in the File Attribute menu.
File Date
File dates will not be correct if the camera clock was not set correctly at the time of recording.
Transferring All Pictures
To trans fer all pictures on the memory card, select Not specifi ed for File Attribute and Date not
specifi ed for File Date.
28
Page 35

Using Nikon Transfer
Transfer Options
Clicking the Trans fer Options button in the Nikon Transfer window displays the Transfer
Op tions dialog.
Transfer Options button
The Transfer Options dialog contains the following tabs:
Tab Descript ion
General Specify the actions that will be performed once transfer is com plete. 30
Trans fer Specify what actions will be performed during transfer. 31
Creator
(Macintosh version only)
Choose the applications that will be associated with trans ferred pho tographs, movies, and sound fi les.
32
After changing transfer options, click OK to save changes and return to the Nikon Trans fer
window. Click Cancel to cancel any changes to settings and return to the Nikon Transfer
window.
29
Page 36

Transferring Images
The General Tab
The General tab contains the following options:
Start Nikon Browser
Select this option to start Nikon Browser af ter
the image fi les are trans ferred. Se lect ing this option enables the Upload all images to Nikon-
Net check box.
Upload all images to NikonNet (North, South,
and Central America only)
Check this box to upload all the trans ferred image fi les to NikonNet, a free on-line photo album
service available to cus tom ers resident in the
United States of America (
89). This option is
not available outside the Americas.
Do nothing
Select this option if you want Nikon View 6 to do nothing after the transfer of the image fi les
is complete. On a Macintosh, the thumbnail display in Ni kon Browser will not be updated
when the images are transferred to your computer.
Set Camera Date and Time
Check Set the Camera Date and Time to your computer clock when you connect
your camera to set the synchronize the camera clock with the computer at the start of each
transfer session. If the camera is connected when the Transfer Options dialog is displayed,
the clock can be synchronized by clicking the Synchronize date and time now button.
Set Camera Date and Time
This option is available only with cameras that support IEEE 1394 (D1-series cameras) or PTP. M or e
information may be available from the web sites listed on page 2 of this manual. Before synchronizing
the camera clock, be sure that the computer is set to the correct date and time.
30
Page 37

Using Nikon Transfer
The Transfer Tab
This tab allows you to adjust settings for the images about to be transferred. Note that there
are some differences between the Windows and Macintosh versions of this tab.
Windows Macintosh
Delete original fi les after transfer is completed
Check this option to delete the image fi les from the memory card after they are trans ferred to
your computer. Files that are not trans ferred are not de let ed. In Windows and Mac OS 9, protected fi les will not be deleted. Protected fi les will be deleted in Mac OS X. If this box is not
checked, the original fi les on the camera memory card will be left un touched after trans fer.
Add thumb nail icon (Macintosh only)
Check this option to add thumbnail icons to the transferred image fi les.
Copy all images marked as “hidden” (Windows only)
Check this option to transfer all the image fi les that are marked as “hidden.” Hidden fi les are not
transferred if the box is not checked (this option has no effect if fi les are transferred using PTP).
Embed ICC color profi le during transfer
If this option is selected, embedded ICC profi les will be included when images taken with D1series cameras or D100 cameras are transferred. This option only takes effect with the D1,
which uses the NTSC color space, and images taken in Color Mode II (Adobe RGB) with the
X
D1
(fi rmware version 1.00 or earlier), and D1H (fi rmware version 1.00 or earlier). The following cameras automatically embed ICC profi les for images taken in Color Mode II even when
Embed ICC color profi le during transfer is not selected: D1
X
and D1H (fi rmware version
1.10 or later), D100 (fi rmware version 2.00 or later), and the D2H. Color profi le information
is not included with pictures taken in color modes I or III (optimized for sRGB) or with images
transferred from COOLPIX cameras.
Embed a preview image in NEF fi les (D2H only)
If this option is checked when pictures taken at an image quality of “NEF+JPEG” are transferred, the JPEG fi le will be embedded in the NEF fi le as a large preview. This increases transfer times but reduces the amount of time needed to display NEF images in Nikon Viewer.
Add additional information (IPTC fi eld) to all fi les
Check this option to add the fi le information specifi ed in the IPTC In for ma tion dialog (
33)
to the transferred image fi les. Selecting this option enables the Copy Shooting data (Shut-
ter speed etc.…) to the IPTC caption fi eld check box.
Copy Shooting data (Shutter speed etc.…) to the IPTC cap tion fi eld
Check this option to copy shooting data to the caption fi eld of images as they are transferred.
31
Page 38

Transferring Images
The Creator Tab (Macintosh Only)
This tab (available only in the Macintosh
sion) al lows you to specify the pro grams
that will be associated with transferred
fi les. Dou ble- clicking a fi le after transfer
will open it in the as so ci at ed program.
Still image (Exif format)
Lists the application associated with
“.J PG” and “.TIF” image fi les.
Still image (NEF format)
Lists the application associated with
“.N EF ” image fi les.
Movie
Lists the application associated with “.MOV” movie fi les.
Sound
Lists the application associated with “.WAV” sound fi les.
Use the Change… buttons to specify application associated with each format.
ver-
32
Page 39

Using Nikon Transfer
IPTC Information
Clicking the (
Transfer dialog displays the IPTC In for ma tion di a log, where you can specify additional fi le
in for ma tion, such as captions and key words, that can be added to im ag es as they are transferred. This information can be viewed in Nikon Browser ( 58), Nikon Viewer ( 130) , or
Nikon Capture 4 Editor after transfer.
The IPTC Information dialog offers simple and detail views.
Add additional in for ma tion (IPTC fi eld) to images
Add additional in for ma tion
(IPTC fi eld) to images
) button in the Nikon
but ton
Simple view
Detail view
To switch from the simple to the detail view, click the Detail… button. Click Sim ple… to
switch back.
Adding File Information
The information in the IPTC Information dialog will be added to photographs if the Add additional
in for ma tion (IPTC fi eld) to all fi les option is checked in the Transfer tab of the Transfer options dialog
( 31) when the pictures are transferred. IPTC information will not be added to movie fi les.
33
Page 40

Transferring Images
Caption
The caption entered in this text box will be
added to photographs if the Add ad di -
tion al in for ma tion (IPTC fi eld) to all fi les
option is checked in the Trans fer tab of the
Transfer options dialog (
tures are trans ferred. In the detail view, you
can add in for ma tion in the Caption Writer,
Head line, and In struc tions fi elds.
Keywords
Keywords entered in this area can be added
to pho to graphs if the Add additional in-
for ma tion (IPTC fi eld) to all fi les option
is checked in the Trans fer tab of the Transfer
options di a log (
trans ferred. To add key words to the list in
the Re cord ed Key words text box, click Add.
Up to twenty key words can be recorded.
Categories (de tail view only)
Choose a cat e go ry and urgency level. Cat e go ries can be cre at ed in the same manner
as key words.
31) when the pictures are
31) when the pic-
Credit (de tail view only)
Enter in for ma tion for Author, Author’s
Position, Credit, Source, and Copy right
Notice.
Origin (de tail view only)
Enter in for ma tion for City, State/Prov ince,
Country, Title(Object Name), Date Cre -
at ed, and Transmi s sion Reference.
To save IPTC in for ma tion in a separate fi le, click Save…. Pre vi ous ly saved in for ma tion can be
loaded by clicking Load….
34
Page 41

Nikon Browser
Browsing Pictures after Trans fer
Nikon Browser is used to browse thumbnail images of the
pic tures and folders that have been transferred to your
com put er. You can also use the browser to view photo
in for ma tion, rotate images, or dis play pictures automated
slide shows.
This chapter is divided into the following sections:
The Nikon Browser Window
This section outlines the controls and displays in the Nikon
Browser window, and describes how to start and exit Nikon
Browser.
Using Nikon Browser
This section details how Nikon Browser can be used to
browse fi les af ter trans fer, to manage fi les by moving them
into dif fer ent folders and organizing folders into favorites, to
view and print images, and how to distribute images by email or up load them to the Web.
Nikon Browser Preferences
Read this section for information on fi ne-tuning settings for
Nikon Browser and Nikon Viewer.
35
Page 42

The Nikon Browser Window
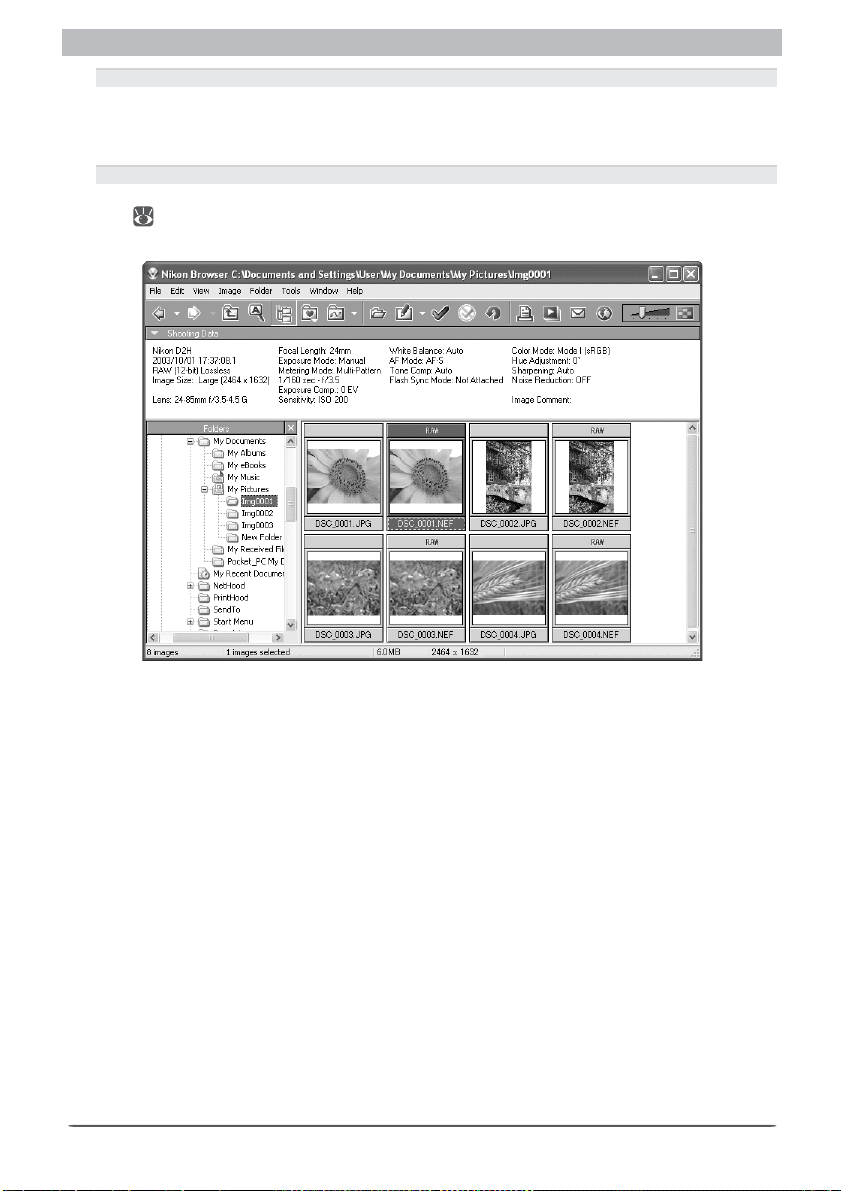
The Nikon Browser Window
Getting to Know Nikon Browser
The main parts of the Nikon Browser window are identifi ed below.
Title bar
Displays the name of the cur rent
folder.
Navigation area
Shows the folder tree (a list
of drives and folders; 41) or
a search control ( 56). The
search control can be used to
search for pictures according
to user- specifi ed conditions. To
switch between the folder tree
and search control, click the
buttons in the toolbar.
and
Menu bar
Contains commands for a variety
of browser operations.
Toolb ar
Contains the buttons listed in
the table opposite.
Shooting data area
Displays photo information for
pic ture currently selected in the
thumb nail list (
Thumbnail list
The images in the current folder
are dis played as small thumbnail
im ag es ( 41).
Status bar
Displays such information as the
number of images in the selected
folder and the number of items
selected in the thumbnail list.
55).
Menu Commands and Tool Buttons
Although the majority of operations can be performed using both menu commands and the buttons in
the toolbar, the explanations in this manual give priority to operations performed using tool buttons.
36
Page 43

Getting to Know Nikon Browser
The names and functions of the buttons in the Nikon Browser window are shown in the fol low ing table:
But ton Name Func tion Shortcut
Back
Forward
Up One Level
Search
Folders
Favorites
Transfer
Destination
View
Edit
Add Tag Mark
Remove Tag
Mark
Rotation
Print
Slideshow
E-mail
Publish to
NikonNet or
PDA
Thumbnail
slider
Preferences
Help
* Windows keyboard shortcuts are listed fi rst, Macintosh shortcuts second.
Return to the folder that was displayed im me di ate ly be fore you selected the current folder.
Return to the folder displayed immediately be fore you clicked the Back button.
Takes you up one level in the folder hierarchy.
Display the search control.
Display the folder tree.
Add the current folder to your list of favorites or
se lect a folder from your favorites.
Display a list of the ten most recent destination
fold ers for images transferred from memory
cards using Nikon Transfer or captured using
Nikon Capture 4 Cam era Control. Choos ing a
folder from the list se lects it in the folder tree
area.
View the pictures currently selected in the
thumb nail list.
Open the pictures currently selected in the
thumb nail list in the application selected for
editing.
Tag sele c ted imag es.
Remove tags from selected images.
Rotate all still images in the current selection.
Print all still images in the current selection.
View the images in the current selection in an
au to mat ed slideshow.
Append the selected images to an e-mail message.
Upload all images in the current selection to the
Web (residents of the USA only) or a Pocket PC
or Palm hand-held device. This button is only
available in the version of Nikon View released
in the Americas.
Adjust the display size of thumbnails. — 50
Display the Nikon View 6 Preferences dialog.
View help.
— / cmd+O 61
Ctrl+Shift+M /
shift+cmd+M
*
Alt+
/
cmd+[
Alt+➝ /
cmd+]
Ctrl+U/
cmd+U
Ctrl+F/
cmd+F
Ctrl+T/
cmd+T
—46
—42
Ctrl+E/
cmd+E
Ctrl+M/
cmd+M
Ctrl+R/
cmd+R
Ctrl+P/
cmd+P
—82
—86
—89
Ctrl+K/
cmd+K
F1/
cmd+?
42
42
42
56
56
68
53
53
54
71
103
—
37
Page 44

The Nikon Browser Window
Starting Nikon Browser
Nikon Browser can be started from the Start menu (Windows) or by double-clicking the
Nikon View application icon.
Windows
Turn th e computer on
1
Turn the computer on and wait for the operating system to start up.
Start Nikon Brows er
2
From the Start menu, select All Programs > Nikon
View 6 > Nikon View 6 (Windows XP Home Edition/
Windows XP Professional) or Programs > Nikon
View 6 > Nikon View 6 (other Win dows ver sions).
Nikon Browser will start.
Starting Nikon Browser from Nikon Transfer
Nikon Browser will be displayed automatically when the Nikon Transfer window closes after trans fer.
Starting Nikon Browser from Nikon Capture 4 Editor
Nikon Browser can also be started by selecting Show current folder in Nikon View from the Too ls
menu in Nikon Capture 4 Editor.
38
Page 45

Getting to Know Nikon Browser
Macintosh
Tur n the computer on
1
Double- click the Nikon View 6 icon
2
Open the folder to which you installed Nikon View 6 and double-click the Nikon View 6
icon.
Other Ways of Starting Nikon Browser
Nikon Browser can be started by double-clicking the Nikon View 6 icon
stalled Nikon View 6 (Windows, Mac OS 9). If Nikon View 6 was added to the Dock during installation,
Mac OS X users will be able to start Nikon Browser by clicking the Nikon View 6 icon
i n the fold er to which you in-
in the Dock.
39
Page 46

The Nikon Browser Window
Exiting Nikon Capture 4 Browser
To exit Nikon Browser, open the File menu and select Exit (Windows) or Quit (Mac OS 9).
In Mac OS X, select Quit Nikon View 6 from the application menu.
Windows
40
Mac OS X
Mac OS 9
Page 47

Browser Window Operations
Using Nikon Browser
Browser Window Operations
Working with Folders
When the folder tree is displayed in the navigation area and a folder is selected, the images
it contains will be displayed in the thumbnail list. To close the folder tree, click the close box
in its upper right corner. To view the folder tree again, select View Folders (Windows) or
Show folder tree (Macintosh) in the View > Navigation menu.
Close box
Folder tree
Navigation Area
Supported File Formats
Nikon Browser can be used to view fi les created with sup port ed cameras and images pre vi ous ly saved
using Nikon View 6 Ed i tor or Nikon Capture version 4 or earlier. For in for ma tion on the fi le formats supported, see “Opening Image Files” in “Nikon Capture 4 Editor: The Editor Win dow” ( 141).
Keyboard Shortcuts
In Windows, you can select folders with the following keyboard shortcuts:
• HOME: Selects the Desktop icon displayed at the root of the folder tree.
• END: Selects the folder or drive displayed at the bottom of the folder tree area.
• BACKSPACE: Selects the folder one level higher than the current folder in the folder tree.
Thumbnail list
41
Page 48

Using Nikon Browser
Choosing a Folder
The folder tree area displays drives and folders in your computer as a tree from the desktop
down. In the folder tree area, you can only select one folder at a time.
Back button
Up One Level button
Forward button
Transfer Destination but ton
You can go back to the previous folder by clicking the Back button in the toolbar. You can
also select from up to ten previous folders by clicking the drop-down arrow on the right.
Use the Forward button to go back to where you were when you clicked the Back button.
You can also select from up to ten folders by clicking the drop-down arrow on the right.
Click the Up One Level button to select a folder one level higher than the current folder in
the folder hierarchy.
Click the Transfe r Destination button to view a list of the ten most recent des ti na tion fold ers for image fi les that were transferred using Nikon Trans fer. When you select a folder from
the list, the folder will be selected in the folder tree area.
Creating a New Folder
To create a new sub -folder under the folder currently se lect ed in the folder tree or thumb nail list, select New Folder
from the File menu.
Opening Folders in the Explorer or the Finder
In Windows, you can open a folder in Explorer by selecting a folder and choosing Open with Ex plor er
from the Folder menu. In Macintosh, you can open a folder in Finder by selecting a folder and choosing
Open in Finder from the Folder menu.
Deleting Folders
To delete a fol der, select the folder one level higher than the fold er you want to delete. The folder you
want to delete will be displayed in the thumb nail list area. Select the folder, then choose Delete from
the File menu. Deleting a folder also deletes all fi les it contains.
42
Page 49

Browser Window Operations
Renaming Images and Folders
Images or folders selected in the thumbnail list can be renamed individually, or multiple images or folders can be selected and renamed according to a user-specifi ed rule.
Renaming Individual Images and Folders
To rename an image or folder, select it in the thumbnail list and
choose Rename a fi le or a folder in the File menu. In Windows,
the new name can be entered directly in the thumbnail list. On the
Macintosh, a dialog will be displayed where the image or folder can
be renamed.
Renaming Multiple Images and Folders
Select multiple items in the thumbnail list and select Rename a fi le or a folder (Windows)
or Rename automatically (Macintosh) in the File menu. The following dialog will be displayed.
Macintosh
Windows
Add suffi x to the original fi le name
Select this option to append the characters in the Suffi x text box to the end of the original
fi le name.
Rename with new numerical sequence
Select this option to assign all the selected items a new fi le name consisting of a user-specifi ed prefi x followed by numbers assigned automatically in ascending order according to the
order in which the images are sorted in the thumbnail list area. Enter the prefi x in the Prefi x
text box and choose the number of digits using the Number of digits slider.
Click Start to rename the selected items.
Selecting Multiple Folders
Multiple folders can not be selected in the folder tree. Select folders in the thumbnail list.
43
Page 50

Using Nikon Browser
Moving and Copying Images
Images can be moved or copied between folders by drag and drop or using the Move… and
Copy… options in the File menu.
Moving and Copying Files by Drag and Drop
Images can be moved or copied by dragging and dropping thumbnails from the thumbnail
list to a folder in the folder tree.
Drag and drop
To Wi ndows Ma cin tos h
Move a fi le to another lo ca tion on
the same drive
Copy a fi le to another lo ca tion on
the same drive
Move a fi le to another drive
Copy a fi le to another drive Use drag and drop Use drag and drop
Use drag and drop Use drag and drop
Press the CTRL key while drag-
ging the fi le
Press the SHIFT key while drag -
ging the fi le
Press the option key while drag-
ging the fi le
—
NEF+JPEG Images with Voice Memos ( D2H Only)
If a voice memo has been recorded for an NEF+JPEG image, moving either the JPEG or NEF fi le will also
move the associated voice memo and delete the link between the sound fi le and the remaining fi le.
44
Page 51

Browser Window Operations
Using the Move… and Copy… Options
These options can be used to move, copy, or rename selected fi les
and folders. Select one or more items in the thumbnail list and select
Move… in the File menu to display the “Move fi le(s)” dialog, or
Copy… to display the “Copy fi le(s)” dialog.
“Move fi le(s)” dialog “Copy fi le(s)” dialog
Choose a destination folder and renaming options and described below.
Destination folder
This text box lists the current destination folder. To choose a new folder, click Browse… and
navigate to the desired location.
Rename fi le(s)
When this option is selected, moved or copied items will be saved under new names in the
destination folder. In Windows, this option is not available if the current selection contains
both fi les and folders. Clicking the Change… button displays the “Rename fi le(s)” dialog,
where a naming rule can be selected ( 43).
Selecting Multiple Folders
Multiple folders can not be selected in the folder tree. Select folders in the thumbnail list.
Voice Memos
If voice memos are associated with the selected fi les, the number of items selected in the thumbnail list
will differ from the number of items listed in the rename, move, copy, and delete dialogs. Voice memos
are included in the number of items listed in these dialogs, but not in the thumbnail list.
45
Page 52

Using Nikon Browser
Adding Folders to Your List of Favorites
In Nikon Browser, you can add folders containing transferred images to your list of favorites.
Fold ers to be added to this list can be selected using either the Favorites tool button or the
Fa vor ites option in the Folder menu. Up to thirty folders can be listed.
The “Add to Favorites” Dialog
To add a folder to your list of favorites, use the folder tree area to select the desired folder,
then click the Fa vor ites button in the toolbar or select Fa vor ites > Add to Fa vor ites from
the Fold er menu. The Add to Fa vor ites dialog will be dis played.
Name
Displays the name of the folder to be added to your list of favorites.
Folder location
Displays the location of the folder to be added to your list of favorites. If you want to specify
a different folder, click Browse…. The name of the new folder will be displayed automati-
cally under “Name.“ Click OK to add the se lect ed folder to your list of favorites.
46
Page 53

Browser Window Operations
The “Organize Favorites” Dialog
To organize folders within your list
of favorites, click the Favorites but-
ton in the toolbar, or se lect Fa vor -
ites > Or ga nize Fa vor ites from
the Fold er menu. The Or ga nize
Fa vor ites di a log will be displayed.
List Favorites
Lists the folders that have been added to your favorites.
Move up / Move down
Click to move the selected folder up or down in the Favorites list. The fold ers in the Fold er >
Fa vor ites sub -menu will be displayed in the specifi ed order.
Add
Click to display the Add to Favorites dialog, where you can add folders to your favorites.
Change
Click to display the Change Favorites
di a log, where you can change the
name under which fold ers are listed in
the Fa vor ites list with out changing the
name of the orig i nal folder.
Delete
Click to remove the selected folder from your list of favorites. The original fold er is not de leted from your com put er.
47
Page 54

Using Nikon Browser
Working with Thumbnails
The thumbnail list area displays thumbnails for all images stored in the selected folder.
Thumb nail list
Note also that a folder icon is displayed in the thumbnail list area if the current folder contains
sub-folders.
Folder icon
To display the contents of the folder in the thumbnail list area, se lect the folder icon in the
thumb nail list area and click the View button in the toolbar. The folder will be se lect ed in
the folder tree area.
Auto Image Rotation ( D2H Only)
“Tall” (portrait-orientation) photographs taken with On (the default setting) selected for Auto image
rotation in the camera setup menu will be displayed in portrait orientation. Photographs taken with
the D2H in the horizontal shooting position or with Off selected for Auto image rotation will be displayed in “wide” (landscape) orientation.
Creating Thumbnails (Windows)
In the Windows version of Nikon View 6, thumbnails will be created automatically when no thumb nail
data are present in the image fi le.
48
Page 55

Browser Window Operations
Creating Thumbnails (Macintosh)
Sometimes, a generic fi le icon is displayed instead of a thumbnail in the thumbnail list area. This is because some image editing programs remove the thumbnail data appended to the image fi le.
If this happens, select the generic thumbnails in the thumbnail list and choose Create thumbnails
from ac tu al im age data from the View menu. The new thumbnail will be displayed in the thumbnail
list area.
You can also create thumbnails by checking Re - create thumbnails from actual image data in the
Thumb nails tab (
106) of the Preferences dialog.
49
Page 56

Using Nikon Browser
Changing Thumbnail Size
The size of the thumbnails displayed in the thumbnail list can be changed using the slider in
the toolbar or by selecting the desired size using the View Size option in the View menu.
Slid er
The following fi ve sizes are available:
Minimum
Small
Normal
Large
Maximum
64 × 64 pixels
96 × 96 pixels
128 × 128 pi xels
192 × 192 pixels
256 × 256 pixels
Thumbnail Size
Images created with certain cameras, such as the D1, include only one thumbnail 160 × 120 pi xels in
size. If a larger size is selected, the existing thumbnail data will be enlarged to display at the selected
size. To create a less ragged thumbnail, select Re -create thumbnails from actual image data in the
Thumb nails tab of the Nikon Browser Preferences dialog ( 106). This is not necessary when displaying
pictures created with cam er as such as the D1X, D1H, D100, D2H, E5000, and the E5700, which include
larger thumb nails with the original image.
50
Page 57

Browser Window Operations
Selecting Thumbnails
Thumbnail previews of the images in the selected folder are shown in the thumbnail list area.
Click a thumbnail to select it. To select multiple thumbnails, hold down the CTRL key (Win dows) or the Com mand key (Macintosh) while clicking on each of the thumbnails. You can
also select multiple thumbnails by dragging the mouse.
Selected thumb nails
Selecting Images
To sel ect all images and folders in the thumbnail list, choose Select All in the Edit menu. To select all
images without selecting folders, choose Select All in the Edit > Select Image(s) sub-menu. The Se -
lect Image(s) sub-menu can also be used to select only those images that satisfy a chosen criterion.
51
Page 58

Using Nikon Browser
Thumbnail Attributes
Thumbnails are marked by icons indicating image attributes.
Attribute icon
There are eleven different attributes:
Icon
Tagged imag e
Protected image
Hidden image (will not be displayed in Windows Explorer)
Unedited RAW image (note that images rotated in Nikon Browser
are considered to be unedited images)
Unedited RAW image with large preview created in Nikon NEF
Preview Creator
NEF (RAW) image edited in Nikon Capture
NEF (RAW) image edited in Nikon Capture with large preview cre-
ated in Nikon NEF Preview Creator
Small JPEG image (less than 640 pixels on longest dimension)
Movie
Image fi le with associated voice memo
Image fi le with IPTC fi le information
Description
You can also protect (Windows and Macintosh) or hide (Windows only) images as so ci at ed
with the selected thumbnail by selecting Attribute from the File menu. Protecting an image
prevents it from being deleted accidentally. Hidden images will not be shown in Windows
Explorer.
52
Page 59

Browser Window Operations
Playing Voice Memos
To play a voice memo, select an image marked with the voice
memo icon, and select Play Sound from the File menu. Un der
Win dows, the voice memo will be played back in the ap pli ca tion
spec i fi ed in the Sound tab (
Play
button
111) of the Pref er enc es di a log.
Windows
Macintosh
On a Macintosh, click the play button to start play back.
Tag ging Images
To tag the images selected in the thumbnail list, click the Add
Tag Mark button in the toolbar or select Add Tag Mark in
the File > Tag m arking menu. The selected thumbnails will be
marked with a tagged image attribute icon. Tags can be removed
by clicking the Remove Tag Mark button or selecting Remove
Tag Mark in the File > Tag m arking menu.
Tag g ed i mage icon
Add Tag mark button Remove Tag mark button
Tag ged Images
Tagged imag es can be selected by choosing Image with tag marked in the Edit > Select Images sub-
menu or by selecting Search only fi les with tag mark on in the search control.
53
Page 60

Using Nikon Browser
Rotating Thumbnails
In the thumbnail list area, you can rotate selected thumbnails. The rotation applied to a
thumbnail is also refl ected in the associated image fi le. Use the Rotate Image(s) dialog to
rotate thumbnails. To display the Rotate Image(s) dialog, click the Rotate button in the
toolbar, or select Rotate from the Image menu.
In the Rotate Image(s) dialog, click CCW 90º to rotate the thumb nail 90 degrees coun ter clock wise or CW 90º to rotate 90 degrees clock wise. Click the same button twice if you
want to rotate the thumbnail 180 de grees. You can check the results in the preview area.
When One Thumbnail Is Selected
Click Apply to rotate both the thumbnail and the associated image fi le and then close the
dialog.
When Multiple Thumbnails Are Selected
Click Apply to rotate both the thumbnail and the associated image fi le and then display the
next thumbnail. To display the next thumbnail without rotating the current thumbnail, click
Skip. Click Apply to all to apply the orientation of the current thumbnail to all the selected
thumb nails and the associated image fi les. Rotation is not ap plied to the hidden fi les and fi les
that have already been rotated.
Rotating JPEG Images
Nikon Browser rotates and fl ips JPEG images without decompressing them fi rst, and no drop in image
quality results. We recommend that you fl ip or rotate JPEG images in Nikon Browser before opening
them in Nikon Capture 4 Editor or another application. NEF and TIFF images do not degrade when
rotated or saved.
Do not resize JPEG images before rotation. Rotating a resized image may result in a drop in quality at
the edges of the picture.
Rotating Movies
Movies cannot be rotated. If a movie fi le is included among the selected thumb nails, the movie fi le will
not be displayed in the Rotate Image(s) dialog.
54
Page 61

Browser Window Operations
Displaying Shooting Data
When you select a single thumbnail, shooting data is displayed in the Shoot ing Data area.
No shooting data is displayed if no thumbnails are selected or if multiple thumbnails are
selected.
You can show or hide the shooting data by selecting View Shooting Data from the View
menu. You can also expand or collapse the Shooting Data area by clicking the toggle button
(a small triangle) in the upper left corner.
Tog gle button
Shooting Data area expanded
Shooting Data area collapsed
The information displayed includes the following items. The information available varies ac cord ing to the model of camera.
Camera Name / Date and Time / Image Quality /
Image Size / Color / Converter Lens / Lens / Focal Length /
Exposure Mode (Scene Mode)/ Metering Mode /
Shutter Speed, Aperture / Exposure Compensation /
Sensitivity / White Balance / AF Mode / Tone Compensation /
Flash Sync Mode / Flash Mode / Auto Flash Comp. /
Digital Zoom Ratio / Saturation Control / Color Mode / Hue
Ad just ment / Image Sharp en ing /
Noise Reduction / Image Comment /
Latitude (GPS) / Longitude (GPS) / Altitude (GPS)
Shooting Data
Depending on the application and the fi le format used, shooting data may be lost when pictures created
with the camera are opened and saved from a third-party imaging application.
55
Page 62

Using Nikon Browser
Finding Images
To view the search control, click the Search button in the toolbar or select Show search
control in the View > Navigation menu. The search control will be displayed in the naviga-
tion area.
Search button
Folders button
After specifying the search conditions in the search control, click Search. All fi les meeting
the selected criteria will be displayed in the thumbnail list.
The Folder Tree
To view the folder tree after displaying the search control, click the Folders button in the toolbar or
select Show folder tree in the View > Navigation menu.
56
Page 63

Browser Window Operations
The following search criteria are supported:
By fi le name
Find images with the specifi ed characters in their fi le names. Wildcard characters (“*” or
“?”) can be used.
By scene mode
Find images taken at the selected scene mode setting. Note that not all cameras support
scene mode: to determine whether a picture was taken in scene mode, view the shooting
data.
By date
Find images created or modifi ed in the specifi ed date range.
Folder(s) to be searched
Find images in the specifi ed location.
Additional settings
The following additional criteria can be used to narrow or
widen the search:
Search inside of all sub folders
Search all sub-folders under the selected location.
Search only fi les with tag mark on
Confi ne search to tagged fi les.
Search only fi les with hidden attribute (Windows
only)
Confi ne search to hidden fi les.
57
Page 64

Using Nikon Browser
Viewing File Information
In Nikon Browser, you can use the IPTC Information dialog to view the fi le in for ma tion added
to an image fi le during transfer.
Displaying the IPTC Information Dialog
To open the I P TC Information dialog, select a thumbnail in the thumb nail list and select IPTC
Information from the File menu.
Simple view
Shooting data added to the image fi le during transfer are displayed in the lower part of the
Caption area in the IPTC Information dialog.
Adding Shooting Data to Images
Shooting data is added to the image fi le during transfer when Copy Shoot ing data (Shutter speed
etc.…) to the IPTC caption fi eld is checked in the Transfer tab of the Transfer op tions dialog ( 31).
58
Page 65

Browser Window Operations
IPTC Information can be displayed in Simple or Detail views.
Click the Simple… / Detail… button to toggle between Simple and Detail views.
Detail view
For more information on the IPTC Information dialog, see “IPTC Information” in “Nikon
Transfer” ( 33) .
File Information from Nikon Browser
IPTC information displayed in Nikon Browser cannot be edited. Note that fi le in for ma tion is not attached to movies.
59
Page 66

Using Nikon Browser
Deleting Image Files
To delete im age fi les in Nikon Browser, select the associated
thumbnails in the thumbnail list area and select Delete from
the File menu. You can attain the same results by pressing
the DELETE key (Windows) or COMMAND + DELETE keys
(Macintosh).
A confi rmation dialog will be displayed. Click Yes to proceed with deletion.
If there are any protected images among the images selected for deletion, the dialog shown
below will appear. Click Yes to proceed with deletion.
If a folder thumbnail is selected in the thumbnail list, the above operation will delete the
folder and all its con tents .
Deleted Image Files
Deleted image fi les are moved to the Recycle Bin (Windows) or the Trash (Macintosh). To cancel deletion, open the Recycle Bin or the Trash and return the deleted fi les to their original location. In Win dows, if you delete image fi les from a memory card inserted in the camera, card slot, or card reader, or
from a network folder, the image fi les are permanently erased and cannot be re cov ered.
60
Page 67

Browser Window Operations
Displaying Images
When you select a thumbnail in the thumbnail list area, still images are displayed in Nikon
Viewer while movie fi les are played back in the program selected in the Movie Tab of the
Preferences dialog ( 109).
Viewing Still Images
To view a still image, double click its thumbnail in the thumbnail list area. Nikon View er will
open with the image displayed. NEF and RAW images will display faster if the Nikon NEF
Preview Creator has been used to create large previews (
64).
Too lbar
Status bar
Other Ways to View Images
You can also open an image in Nikon Viewer by:
•selecting its thumbnail, and clicking the View but ton on the toolbar or selecting View from the File
menu.
•selecting its thumbnail and pressing the ENTER key (Windows) or the RETURN key (Macintosh).
61
Page 68

Using Nikon Browser
Displaying Images in Nikon Viewer
Images opened in Nikon Viewer can only be displayed one at a time. If multiple thumbnails
are opened, only one image will be displayed. Use the Next Image Selected and Previous
Image Selected buttons to display the other images.
You can use the Nikon Viewer status bar to check the number of opened images and the
status of the currently displayed image.
You can view other images using the Next Image Selected and Previous Image Selected
but tons in the Nikon View er toolbar.
Previous Image Selected button
Next Image Selected button
In Windows, even if you open only one thumbnail in the thumbnail list area, you can browse
through all the still images stored in the same folder as the selected image by using the Next
Image Selected and Previous Image Selected buttons.
Image Editing Programs
To edit a still image, select its thumbnail and click the Edit button in the toolbar or select Edit from the
File menu. This will launch the image editing program selected in the “Still image” tab (
Pref er enc es dialog.
Dust Off Reference Photos
Thumbnails with an “. N DF” ex t e nsion are Dust Off reference photos created
for use with the Image Dust Off option in Nikon Capture 4 Editor ( 162) .
They can not be displayed in Nikon Viewer.
108) of the
62
Page 69

Browser Window Operations
Window Menu Options in Nikon Browser and Nikon Viewer
The options in the Window menu can be
used to organize the display in Nikon Browser and Nikon Viewer.
Cascade
Arrange Nikon Browser and Nikon Viewer in
overlapping windows.
Horizontal
Arrange Nikon Browser and Nikon Viewer one above the other in non-overlapping windows.
Vertical
Arrange Nikon Browser and Nikon Viewer side-by-side in non-overlapping windows.
Display one-line of thumbnails at top
The Nikon Browser window is adjusted to display a single horizontal line of thumbnails above
the Nikon Viewer window.
Display one-line of thumbnails at side
The Nikon Browser window is adjusted to display a single vertical line of thumbnails to the
left of the Nikon Viewer window.
One line of thumbnails at top
One line of thumbnails at side
When both Nikon Browser and Nikon Viewer are open, clicking a thumbnail once in Nikon
Browser will display the selected image in Nikon Viewer.
Viewing the Nikon Browser Toolbar and Navigation Area
When Display one-line of thumbnails at top or Display one-line of thumbnails at side is selected, the selected item is checked and the toolbar and navigation area are hidden. To view the toolbar
and navigation area, select the checked option to cancel the thumbnail-only display.
63
Page 70

Using Nikon Browser
Creating Large Previews for RAW (NEF) Images
When a large preview (1,600 pixels in the longest dimension) is embedded in a RAW (NEF)
photograph taken with a Nikon digital camera, the image will scale rapidly to fi t in the Viewer
window, reducing display times. To embed large previews in selected RAW (NEF) images:
Start the Nikon NEF Preview Creator
After selecting one or more RAW (NEF) images in Nikon Browser, click the triangle to the
1
right of the
Large Preview Generator for NEF fi le from the File > Edit using other programs
menu. The following dialog will be displayed.
Adjust settings
2
The following options are available:
Process read- only fi les (Windows) / Process locked fi les (Macintosh)
Select this option to embed large previews in read- only (locked) fi les. Files on write-protected or read-only media such as CD- ROMs are not affected.
Create previews using the sharpening setting from each fi le
Select this option to process large previews to refl ect the sharpening setting in effect in
the source fi le.
Notify when completed
If this option is selected, a message will be displayed when processing is complete.
Show this dialog every time
Select this option to display the dialog shown in Step 1 the next time the Nikon NEF Preview Creator starts. If this option is not selected, this dialog will not be displayed the next
time the Nikon NEF Preview Creator starts. Instead, the selected images will be processed
at the settings in effect the last time the dialog was displayed.
button and select Large Preview Generator for NEF fi le, or select
The Nikon NEF Preview Creator
The Nikon NEF Preview Creator can only be used with RAW (NEF) fi les.
64
Page 71

Browser Window Operations
Click Start
3
The following dialog will be displayed during processing. To interrupt processing and
return to the dialog shown in Step 1, click Settings.
Exit the Nikon NEF Preview Creator
4
A log will be displayed when processing is complete. Click OK to exit the Nikon NEF
Preview Creator.
Camera Playback
The large previews created with the Nikon NEF Preview Creator replace the thumbnails embedded in the
images when they were taken. The resulting images can no longer be viewed on the camera.
65
Page 72

Using Nikon Browser
Playing Movies Back (COOLPIX Cameras)
To play back a movie, double click its thumbnail in the thumbnail list. The application spec i fi ed in the Movie tab ( 109 ) of the Pref er enc es dialog will launch and play the movie
back.
Installing QuickTime
In Windows, you cannot use Windows Media Player to play back movies recorded with
COOLPIX series digital cameras. If a movie player pro gram is not installed, install the version
of QuickTime bun dled with Nikon View 6 (COOLPIX series only). For more information on
installation, see the Nikon Capture 4 Install Guide.
Other Ways to Play Movies
You can also play movies back by:
•selecting its thumbnail, and clicking View button in the toolbar, or se lect View from the File menu.
•selecting the thumbnail and pressing the ENTER key (Windows) or the RETURN key (Macintosh).
Editing Movies
To edit a movie, select its thumbnail and click the Edit button on the toolbar or select Edit from the
File menu. This will launch the movie editing program selected in the “Movie” tab ( 109 ) of the
Pref er enc es dialog.
66
Page 73

Playing Sound Files
Selecting Play Sound from the File menu when a voice
memo is selected in the thumb nail area opens the selected
memo for audio play back. In the Win dows version of
Nikon Capture 4, the ap pli ca tion used for audio playback
can be se lect ed in the Sound tab of the Preferences dialog
(
111) . If Use Nikon View is selected, play back will be-
gin au to mat i cal ly.
In the Macintosh ver sion, playback is controlled using the
but tons in the window shown below.
Windows
Play
but ton
Macintosh
On a Macintosh, click the play button to start play back.
Browser Window Operations
67
Page 74

Using Nikon Browser
Editing Image Files
Select a thumbnail, then click the button in the toolbar, or select Edit from the File menu
to dis play the selected image in the editing pro gram spec i fi ed in the Pref er enc es dialog.
Edit button
The editing programs listed are those selected in the Still Image ( 108) and Movie tabs (
109) of the Pref er enc es dialog. If Nikon Capture 4 Editor is selected as the editor for still images, Nikon Capture 4 Editor will start ( 135) . If you have not yet specifi ed or reg is tered an
image editing pro gram, the Add/Re move Editing Pro gram dialog will appear au to mat i cal ly.
To open the dialog on sub se quent occasions, see the in struc tions below.
Registering Image Editing Programs
The Add/Re move Editing Program dialog is used to register
(and also to remove) the image editing pro grams of your
choice. Click Add to reg is ter an image ed it ing program.
Registering additional editing pro grams al lows you to use an
editing application other than the pro gram spec i fi ed in the
Pref er enc es dialog. Open registered editing pro grams using
the Edit but ton pull down menu, or by select ing Edit using
other pro gram from the File menu.
Displaying the “Add/Remove Editing Program” Dialog
To display the “Add/Remove editing program” dialog, select Edit using other program > Add/Remove editing
program… from the File menu, or click the triangle to right
of the button and select Add/Remove editing pro-
gram… from the menu that appears.
68
Page 75

Browser Window Operations
The “Add/Remove Editing Program” Dialog
Program list
The registered programs are displayed in the list.
Move up / Move down
Click to move the program selected in the program list up and down. This changes the
order in which programs dis played when the Edit tool button is clicked or Edit using other
pro grams selected from the File menu.
Add
Click to display the Add Program dialog, where you can select and register pro grams.
Change
Click to display the Change Program dialog, where you can change the name of the reg is tered pro grams.
Delete
Click to remove the selected program from the program list. Note that the pro gram itself is
not deleted.
69
Page 76

Using Nikon Browser
The “Add Program” Dialog
Name
You can assign a name to the program selected in “executable fi le” text box. The pro gram is added to the program list with this name instead of the actual pro gram name.
Executable fi le
Displays the path and fi le name of the program that will be added. To add a different
program to the program list, click Browse… and select the pro gram you want to add.
Click OK to add the selected program to the program list.
The “Change Program” Dialog
In the Change Program dialog, you can change the name of the pro gram that appears in
the Edit tool button pull down menu, and in the Edit using other programs sub-menu.
This does not affect the name of the orig i nal pro gram.
70
Page 77

Browser Window Operations
Printing Images
To print one or more still pictures, select the thumbnails in the thumbnail list and click the
button in the toolbar, or select Print from the File menu. The “Print Layout” dialog will
be displayed.
After adjusting settings (see below), click Print to start printing. Clicking Cancel closes the
Print Layout dialog without printing.
Printer / Paper / Print able area
These text boxes display current printer settings. To change printer settings, click the Page
Setup… button (see below).
Printer Displays the currently selected printer.
Paper Displays the current paper size.
Printable area
Displays the maximum dimensions of the area that can be print ed per sheet at current
printer and paper size settings.
Print preview
Check this option to display a preview of how the images will print on the currently selected
printer. Click the next page button to page through the selected images.
Printing with Color Management
The printer profi le used when printing from Nikon Browser or Nikon Viewer can be selected from the
Color Management tab of the Preferences dialog in Nikon Browser ( 112,114) , N ikon Viewer, Nikon
Capture 4 Editor ( 211, 213) , or Nikon Capture 4 Camera Control.
71
Page 78

Using Nikon Browser
Copies (Windows only)
Choose the number of copies that will be printed. You can print anywhere from 1 to 100
copies.
In the Macintosh version, the number of copies is not displayed in the Print Layout dialog. To
specify the number of copies, click Print. A confi rmation dialog will be displayed; click Yes
to proceed with printing and specify the number of copies.
Page Setup…
Click to display a Printer Settings dialog in which you can mod i fy the printer and paper set tings. If you are using a Macintosh, the appearance of this dialog depends on the printer in
use. The chang es made are re fl ect ed in the “Printer,” “Paper,” and “Printable area” fi elds.
Meta Data…
To choose the information to be included
with each print, click Meta Data…. The
“Meta data print setup” dialog will be displayed; adjust the following settings and
click OK to return to the “Print layout”
dialog.
Depth level
Put a check in the box next to the level of
information you want included with your
prints. Choose from:
• Basic: fi le name and date and time of
recording
• Additional information: camera model,
shutter speed, aperture (f/-number), image size, exposure mode, and white balance
• Detail information: metering mode,
exposure compensation, focal length,
autofocus mode, and sensitivity (ISO
equivalency)
To change the font used to print shooting
information, click Change.
Imprint capture date over image
Select Date only to print the date of recording on the image, or Date and Time to print
the date and time of recording. To choose the font used to print the date or date and time,
click Change.
Use output resolution
Check this option to print the image at its native resolution and dimensions. In Nikon Capture 4, this is the size and res o lu tion se lect ed in the Nikon Capture 4 Editor Size/Res o lu tion
palette (
printer and paper size settings when you click the Print button to begin printing, a mes sage
will be dis played warning that the image will be cropped to fi t the print able area. Choose a
larger paper size or reduce the size of the image using the Size/Resolution palette.
Use output resolution is not available when multiple images are selected.
192) . If the image will not fi t in the print able area (see above) at the current
72
Page 79

Browser Window Operations
Page Layout
Choose from Select layout and Select picture size and adjust options as described be-
low.
Select layout
When this option is selected, you can choose the number of images that will be printed from
a drop-down menu.
Page orientation
Option
1 Up One image printed in center of page One image printed in center of page
2 Up
2 × 2 Up
2 × 4 Up
4 × 4 Up
5 × 5 Up
5 × 8 Up
Image
information
list
Four pictures printed in two rows of two
Eight pictures printed in four rows of two
Sixteen pictures printed in four rows of
Twenty - fi ve pictures printed in fi ve rows of
Forty pictures printed in eight rows of fi ve
Print page consisting solely of the following information for the selected images: fi le
name, camera make and model, exposure program, date and time of creation, shutter
speed, aperture, and white balance.
Portrait Landscape
Two pictures printed
one above the other
columns each
columns each
four columns each
fi ve columns each
columns each
Two pictures printed side-by- side
Four pictures printed in two rows of two
Eight pictures printed in two rows of four
Sixteen pictures printed in four rows of
Twenty - fi ve pictures printed in fi ve rows of
Forty pictures printed in fi ve rows of eight
columns each
columns each
four columns each
fi ve columns each
columns each
The size of the images is automatically adjusted according to the layout. Select Rotate imag-
es to fi t to rotate images to print at the largest size that will fi t on the selected paper size.
Select picture size
When this option is selected, you can choose
print size from a drop-down list.
Rotate image(s) to fi t
Check this option to automatically rotate each image so as to minimize the unused space
inside each image frame.
Print a picture multiple times
To print multiple copies of each image, check this option and select a num ber from be tween
two and ten from the pull down menu. Select The whole page to print enough copies of
the image to fi ll the whole page at the selected size.
Borderless print (Windows) / Eliminate white border (Macintosh)
Check this option to adjust the image size so that it fi ts exactly inside the red border, without
leaving any white space. If the as pect ratio of the box and the image differ, part of the image
may not be printed.
73
Page 80

Using Nikon Browser
Use thumbnail data
Check this option to print the pictures at draft resolution using thumbnail data. Recommended for draft prints only.
Printer type
Choose from Inkjet printer or All other
types.
Inkjet printer
We recommend this option when printing on inkjet or color laser printers. The selected
images will be printed at high quality and speed at the highest resolution supported by
the printer (if the printer supports resolutions higher than 360 dpi, the images will print at
360 dpi).
All other types
Select this option when printing in color on devices that use dye-sublimation or pho to graph ic
processes. The selected images will be printed at the highest resolution sup port ed by the
printer. Print speed may drop if you choose this option when using an inkjet print er.
Normal Print / Save [Print Image] as fi le
Select whether to print images on a printer,
or to save the page as an image fi le.
Normal Print
Outputs the selected images to a printer.
Save [Print Image] as fi le (Windows) / Save image fi les (Macintosh)
Saves the page as a JPEG fi le using the layout spec i fi ed in the “Page Layout” dialog. When
this option is selected, the Print button in the “Page Layout” dialog will change to Save.
Click ing the Save button dis plays the “Save Image(s)” dialog, where you can choose a des ti -
na tion folder and fi le name and select Quality (JPEG compression) from Max i mum, High,
Me di um, or Low. Each page is saved as a separate fi le.
74
Page 81

Browser Window Operations
Creating a Photo CD (Windows XP)
If the computer is equipped with a CD-R or CD-RW drive, images selected in Nikon Browser
can be copied to CD.
Select images in the thumbnail list.
1
Drag the selected thumbnails over the CD-R or CD-RW drive icon in the folder tree and
release the mouse button.
2
Viewing the File List
To list the fi les that will be copied to CD, Click the CD-R or CD-RW drive
icon once to select it and choose Display fi le list for CD writing...
in the File menu, or click the CD- R drive icon with the right mouse
button and select Display fi le list for CD writing... in the menu that
appears.
75
Page 82

Using Nikon Browser
Click the CD- R or CD-RW drive icon once to select it and
3
choose Write to CD... in the File menu, or click the CD-R
drive icon with the right mouse button and select Write to
CD... in the menu that appears. The “CD Writing Wizard”
will be displayed.
After making sure that a CD-R or CD-RW disk is inserted in the drive, enter a volume
4
name for the new CD and click Next to begin copying fi les.
76
Page 83

Browser Window Operations
The following dialog will be displayed when all fi les have been copied. Click Finish.
5
Before Copying Files
If the computer is equipped with multiple CD-R or CD-RW drives, only one can be used for creating
CDs. To enable the write option for a selected drive, open the “Properties” dialog to the “Write” panel
and select Enable CD write.
The drive used for temporary storage during the write operation must have suffi cient free space to store
the temporary fi les. The drive used for temporary storage can be selected in the “Write” panel of the
“Properties” dialog for the CD- R or CD - RW drive.
Make sure that the CD-R or CD- RW disk used has enough free space to store the selected fi les.
77
Page 84

Using Nikon Browser
Creating a Photo CD or DVD (Mac OS X 10.2.3 or Later)
If the computer is equipped with a CD-R/W or DVD-R/W drive, images selected in Nikon
Browser can be copied to a CD or DVD.
Select images in the thumbnail list.
1
Drag the selected thumbnails over the “Disc Burner Folder” icon in the folder tree and
release the mouse button. The selected fi les will be copied to the “Disc Burner” folder.
2
The name assigned to the “Disc Burner” folder will be copied to the volume label for the
3
new CD or DVD. To choose a new name for the “Disc Burner” folder, select it and choose
Rename a fi le or folder from the File menu.
With the “Disc Burner” folder selected, choose Burn Disc…
4
from the File menu. The “Burn Disc” dialog will be displayed.
78
Page 85

Browser Window Operations
Insert a disk in the CD-R/W or DVD - R/W drive and click Burn. The following dialog will
5
be displayed while fi les are copied.
Once all the fi les have been copied, the disk will be ejected automatically.
To copy the same fi les to another disk, repeat steps 3–5. Otherwise delete the contents
6
of the “Burn Disc” folder.
Inserting a Disk
Wait until the “Burn Disc” dialog is displayed before inserting a disk.
Disk Space
A disk can not be created if the size of the “Burn DIsc” folder exceeds the capacity of the disk. The
size of the “Burn Disc” folder can be viewed in the status bar when the “Burn Disc” folder is selected
in the folder tree.
79
Page 86

Using Nikon Browser
Creating JPEG Copies
The Copy and Resize as JPEG fi le(s) option in the Tool s menu can be used to create JPEG
copies of selected TIFF and NEF (RAW) at a specifi ed size compression rate (image quality), or
to create resized copies of JPEG images at a new compression rate. Select the images in the
thumbnail list and select Copy and Resize as JPEG fi le(s) option in the Tools menu. The
following dialog will be displayed.
Image size
Choose a size for the new JPEG copies from the following options:
Keep the original size
The JPEG copies will be the same size as the originals.
Fit to the new fi xed frame size
Choose a size using the slider. Options range from Small (16 0 × 120 pixels) to Large
(1600 × 1200 pixels).
Apply a fi xed reduction ratio to all images
Copies will be reduced by the specifi ed amount. Choose from options ranging from
Small (½
5) to Large (¼) using the slider.
80
Page 87

Browser Window Operations
Destination folder
The current destination for JPEG copies is displayed in this text box. To choose a new location, click Browse… and navigate to the desired drive and folder.
Rename fi le(s)
Select this option to save the copies
under new names assigned automatically according to user-specifi ed rules.
Click Change… to display the “Rename
fi le(s)” dialog, where a naming rule can
be chosen (
43).
Quality settings
Choose an image quality (JPEG compression ratio) using the slider. Options range from Low
(high compression ratio, small fi le size) to High (low compression ratio, large fi le size). The
lower the compression ratio, the better the quality and the larger the fi le size. Note that the
quality of JPEG images can not be increased by saving the copy at a lower compression ratio
than the original.
Click Start to copy the selected images. An ICC profi le will be embedded in all copies created using this option.
sRGB
If Convert image(s) to sRGB color space... is selected in the “Color Management” tab of the Nikon
Browser “Preferences” dialog ( 112,114) , copies will be converted to the sRGB color space ( 264).
81
Page 88

Using Nikon Browser
Slideshows
In Nikon Browser, you can view the image fi les associated with the selected thumbnails as a
slideshow.
Displaying the Slideshow Properties Dialog
To view a slideshow, select the thumbnails of the image fi les you want to view in the thumb nail list area, then click the Slideshow button in the tool bar or select Slideshow from the
Too ls menu.
Slideshow but ton
The slideshow window is displayed with the Slideshow Properties dialog displayed in front of
the slides. You can change the slideshow set tings using this Slideshow Properties dialog.
You can show or hide the Slideshow Properties dialog by press ing the TAB key.
When a Single Thumbnail is Selected
If only one thumbnail is selected in the thumbnail list, the slideshow will include all images in the current folder.
Slideshow
Slideshow technology licensed from iView Multimedia Ltd .2002.
82
Page 89

The Slideshow Options Dialog
The Files Tab
Displays a list of fi le names (and in Windows,
fi le paths) of the image fi les that are currently
dis played in the slideshow.
The Options Tab
This tab controls how slides are displayed.
Play movies to end
Check this option to play movies to the end be fore showing the next slide. If this option is not
checked, the next slide will be shown after the
spec i fi ed interval whether or not the mov ie has
fi nished.
Play sound for all movies
Check this option to play back sound with all the
movie fi les in clud ed in the slideshow.
Display fi le Info
Check this option to display the fi le location, size,
and zoom ratio under each slide.
Enable margin between grid cells
If you selected a stage grid option that displays
multiple slides at the same time, checking this option leaves margins between slides. If this op tion
is not checked, no margins will be displayed.
Grid style
Select the format and number of slides to display at the same time.
Browser Window Operations
83
Page 90

Using Nikon Browser
The Toolbar
The toolbar has buttons to control the playback of the slideshow, and but tons to specify
how the slides are displayed.
Play/Pause
button
Back
button
Fade button
Forward
button
Resize
button
Tog gle
button
Play mode
button
Exit
button
Togg l e
Toggles between the slides and the options tab.
Exit
Exits the slideshow
Play mode
Use this button to specify how the slideshow will be played back. Select Click to ad vance to switch slides in ter ac tive ly by clicking the mouse button, Continuous to play
the slideshow again after the last slide is displayed, or Random to play the slideshow in
random order.
Back
Displays the previous slide.
Play / Pause
Pauses the slideshow when playing or starts it again when paused. When you select
Click to ad vance using the play mode button, the button icon takes the shape of a
computer mouse, on which you can click to display the next slide.
Mouse icon
Forward
Displays the next slide.
Fade
Use this button to select how one slide fades into or out of another.
Resize
Use this button to select the zoom ratio of the slides. You can also adjust the aspect ratio,
or adjust the size of the slides to fi t the screen.
84
Page 91

Browser Window Operations
The Status Bar
You can control the sound volume on the status bar. You can also check the number of
the remaining slides and the total number of slides, and specify the interval between slide
changes, in the range of 1 to 60 seconds.
Volume control Time display control
Changing the Size of the Slideshow Properties Dialog
You can expand or collapse the Slideshow Properties dialog by clicking the toggle button
in the toolbar.
Slideshow Prop er ties
dialog (collapsed)
Tog gle but ton
Interval
The interval between slide changes may vary depending on the fi le size of the images displayed.
85
Page 92

Using Nikon Browser
Sending Images by E-Mail
Images displayed in the thumbnail list area can be appended to e-mail messages. To send
im ag es, click the button in the tool bar or select E-mail from the Too ls menu.
E-mail button
Settings, including the size of the image to be e-mailed, can be adjusted in the “E-mail”
dialog.
sRGB
If Convert image(s) to sRGB color space... is selected in the “Color Management” tab ( 112, 114 )
of the Nikon Browser “Preferences” dialog, images sent by e-mail will be converted to the sRGB color
space ( 264).
Using E-mail
In order to use the e -mail option in Nikon View 6, your computer must be cor rect ly con fi g ured to send
e-mail. Note that you may incur charges from your Internet service provider and telephone com pa ny
when you send e-mail.
Voice Memos
Voice memos attached to Exif fi les can not be sent by e -mail.
86
Page 93

Browser Window Operations
Current e- mail program
When you click Send (see following page), your e-mail will be sent using the application
shown here.
Send image(s) as attachments
Choose whether to send the selected images as individual fi les or in “contact sheets” containing multiple images.
Send image(s) as individual attachments
Select Resize to small pictures to send (Original pictures will be untouched) to
create small copies of the selected images to attach to an e-mail message, or Keep the
original sizes (the fi les may be very large) to create copies the same size as the
selected images. When Resize to small pictures to send (Original pictures will be
untouched) is selected, the attachments can be resized using the slider. Seven different
sizes are available.
Send image(s) as contact sheet (Put multiple images in one sheet as attachment)
Choose this option to create attachments consisting of one or more “contact sheets,”
each of which contains multiple images displayed together in a single image fi le. Specify
the size of the contact sheet using the Size of the page of contact sheet(s) slider (fi ve
sizes are available) and choose how the pictures in each contact sheet will be arranged
using the Number of column(s) control. The current background color for all contact
sheets is shown next to Background color box; to select a new color, click Choose. If
Print fi le name as title is selected, fi le names will appear on the images in the contact
sheet.
Quality settings
This slider controls how much the copies will be compressed. Five settings are available; the
lower the compression ratio, the better the quality and the larger the fi le size. Note that if
Keep the original sizes is selected when fi les are sent as image attachments, the existing
compression ratios of any JPEG images in the selection will not be changed if:
• The Convert image(s) to sRGB color space... check box in the “Color Management”
panel of the Nikon Browser or Nikon Viewer Preferences dialog is off, or
• No ICC profi le is embedded in the image or the picture was recorded in the sRGB color
space (i.e., the picture was taken with a COOLPIX camera or with a D1x, D1H, 100 or D2H
camera in color mode I or III, which are optimized for the sRGB color space).
E-mail Applications
The following e-mail applications are supported:
• Windows
Outlook Express, Outlook, Eudora (Eudora is not supported under Windows XP Home Edition or
Win dows XP Professional)
• Macintosh OS 9.0, 9.1, 9.2
Outlook Express, Eudora, Entourage
• Macintosh OS X
Outlook Express, Entourage X, Mail
The application used is that currently selected as the default e- mail program for your operating system.
The default program can be changed using the Internet settings in the Con trol Panel (Win dows), Con trol Panels (Mac OS 9), or System Pref er enc es (Mac OS X).
87
Page 94

Using Nikon Browser
Send
Click this button to start the e-mail application listed next to Current e-mail program. If
you selected Resize to small pictures to send or are sending TIFF or NEF (RAW) images,
the following dialog will be displayed, informing you that copies of the se lect ed images will
be created in com pressed JPEG for mat. It is these copies that will be attached to the e-mail
mes sage; the orig i nal images are not affected. Click OK to close the dialog and send the
images.
88
Page 95

Browser Window Operations
Uploading Images
Customers in some areas can use Nikon View 6 to upload still images to free on-line photo
al bums at Nikon-sponsored web sites. At the time of writ ing, this ser vice was available to
cus tom ers in the United States of America. To use this service, American users must register
with NikonNet (http://www.nikonnet.com/). More information on on-line photo al bums and
other services available through NikonNet.
Uploading Images to NikonNet (American Customers Only)
Select images for upload
1
In the thumbnail list area, select one or more image fi le thumbnails to upload.
Click
2
Click the button in the Nikon Browser toolbar, or select Pub lish to NikonNet or
PDA from the Tools menu.
Publish to NikonNet or PDA button
Transferring Images to a Palm Organizer1 (North, South, and Central America Only)
Nikon Browser can be used to transfer images to a Palm organizer if Palm Desk Top2 and Photobase for
Palm2 were already installed when you installed Nikon View 6. To transfer images:
•Select Pho to Base for Palm Sync. from the Service Choice pull-down menu in Step 3 of “Uploading
Images to NikonNet.” Af ter makin g sure that your Palm is inserted in the cradle, and the cradle is con nect ed cor rect ly, click OK.
•To transfer the images, press the Hot Sync.® but ton on the cradle. Once transferred, images can be
viewed on the device’s screen.
You do not need to follow the rest of the steps in the Uploading image fi les section.
1
For in struc tions on synchronization, refer to the documentation pro vid ed with your hand -held de vice.
2
For instructions on installing and using this application, refer to the software documentation.
Transferring Images to a Pocket PC1 (Windows Only; Not Available Outside the Americas)
Nikon Browser can be used to transfer images to a Pocket PC if Active Sync.
2
PC
were already installed when you installed Nikon View 6. To transfer images:
•Select Pho to Base for Pocket PC from the Service Choice pull-down menu in Step 3 of “Uploading
Images to NikonNet.” Af t er making sure that your Pocket PC is con nect ed cor rect ly, click OK.
•Use Microsoft Active Sync to transfer the images to your Pocket PC. Once transferred, images can be
viewed on the device’s screen.
You do not need to follow the rest of the steps in the Uploading image fi les section.
1
For in struc tions on synchronization, refer to the documentation pro vid ed with your hand -held de vice.
2
For instructions on installing and using this application, refer to the software documentation.
Hot Sync
Hot Sync is a registered trademark of Palm Inc.
2
and Photobase for Pocket
89
Page 96

Using Nikon Browser
Choose whether to upload images to NikonNet or a hand - held device
3
If a hand-held device (PDA) is connected to your computer, the Mod ule Se lec tion dialog
will be dis played. If there are no hand-held devices connected to your computer, proceed
to Step 4.
To upload images to NikonNet, select Nikon.net Uploader from the Ser vice Choice
pull- down menu, en ter your NikonNet user name and password, and click OK. For
more information on transferring images to a hand-held device, see the notes on these
pages. Ad di tion al information on the options available in the Module Selection dialog is
provided in “The Mod ule Se lec tion Di a log” (
Choose upload options
4
The Upload Preview dialog will be displayed. After adding in for ma tion to the image fi les
or resizing the images, click OK to continue. For more information, see “The Upload
Pre view Dialog” (
94).
92).
RAW (NEF) and TIFF Images
RAW (NEF) and TIFF images are converted to JPEG before upload.
90
Page 97

Browser Window Operations
If the Module Se lec tion dialog was not displayed in Step 3, the NikonNet User In for ma tion
dialog will appear prompting you to enter your NikonNet user name and pass word.
Choose an album
5
In the “Choose Album” dialog, select the album to add the images to, or create a new
album. For more information, see “The Choose Album Dialog” ( 96).
Publishing to NikonNet
An Internet connection is required to publish your images to NikonNet. Note that tele phone charg es
and fees charged by your Internet Service Provider (ISP) may apply. When registering for NikonNet, you
must have an address in the USA with a valid Zip code.
Uploading Images
Nikon View will not disconnect after uploading images via a modem or ISDN terminal adapter. Terminate the connection manually.
sRGB
If Convert image(s) to sRGB color space... is selected in the “Color Management” tab of the Nikon
Browser “Preferences” dialog ( 112, 114), images will be converted to the sRGB color space as they
are uploaded to NikonNet ( 264).
91
Page 98

Using Nikon Browser
Click OK
6
The images will be uploaded to the selected album.
Uploader Dialogs (North, South, and Central America Only)
This section describes options available in the dialogs displayed when you upload images to
NikonNet using the Upload to NikonNet or PDA option in Nikon Browser. This option is avail able only in the Americas.
The Module Selection Dialog
This dialog is where you choose whether to upload images to NikonNet or to a hand-held
device. This dialog is not displayed if a hand-held device is not currently connected to
your computer.
Click OK to close this dialog and upload the selected images. Click Cancel to exit with-
out uploading the selected images.
92
Page 99

Browser Window Operations
Service Choice
Choose Nikon.net Uploader to upload images to an on-line photo album on NikonNet
(this service is restricted to customers in the USA). If you have installed Palm Desk Top
and Photobase for Palm, you can also choose Photo Base for Palm Sync. to upload
images to your Palm organizer (
installed on your computer, you can upload images to a Pocket PC using the Photo Base
for Pocket PC option (
User Name
If you selected Nikon.net Uploader from the Service Choice menu, enter your NikonNet
user name in this text box.
Don't show this dialog again
Check this option to skip the Module Selection dialog the next time you upload images.
To display the dialog again, click Clear in the Publish to NikonNet or PDA tab of the Preferences dialog ( 117 ).
Password
If you selected Nikon.net Uploader from the Service Choice menu, enter your NikonNet
password in this text box.
Remember Password
If this option is checked, your password will automatically be entered for you the next
time the Module Selection dialog is displayed.
New Member?
Click to display the NikonNet user registration page in your Web browser. If you are not
yet a member, click this button to register.
Forgot Password?
Click to display the NikonNet password assistance page in your Web brows er. If you forget your pass word, click this button and supply the necessary information.
89).
89). If Active Sync. and Photobase for Pocket PC are
93
Page 100

Using Nikon Browser
The Upload Pre view Dialog
In the Upload Pre view dialog, you can resize the images uploaded to the album and add
a cap tion, key words, and description.
When multiple images are selected for upload, you can use the Next and Previous
buttons under the pre view to display additional images. Click OK to close this dialog
and upload the se lect ed im ag es at the spec i fi ed set tings. Click Can cel to exit without
up load ing the se lect ed images.
94
 Loading...