

Page 1
Ver. 4.4
En
User’s Manual
Page 2

Notices
• No part of the manuals included with this prod uct may be reproduced, trans mit ted, tran scribed,
stored in a re triev al system, or trans lat ed into any
lan guage in any form, by any means, with out
Nikon’s prior writ ten per mis sion.
• Nikon reserves the right to change the spec i fi ca tions of the hardware and soft ware de scribed
in these manuals at any time and without prior
no tice.
• Nikon will not be held liable for any dam ag es
re sult ing from the use of this prod uct.
• While every effort has been made to en sure that
the information in these man u als is ac cu rate and
com plete, we would ap pre ci ate it were you to
bring any er rors or omis sions to the at ten tion
of the Nikon rep re sen ta tive in your area (ad dress
pro vid ed sep a rate ly).
Package Contents
Before using this product, check that the package contains the items listed below. Contact your retailer
or local Nikon representative should you fi nd that any of these items are missing or damaged.
• Nikon Capture 4 installer CD
• Nikon Capture 4 Install Guide
• Nikon Capture 4 User’s Manual (this manual)
• User registration card (USA only)
Trademark Information
Macintosh and Mac OS are trade marks of Apple Computer, Inc. Microsoft and Win dows are reg is tered
trade marks of Microsoft Cor po ra tion. Pentium is a trade mark of Intel Cor po ra tion. Adobe and Photoshop are trademarks of Adobe Systems Inc. All oth er trade names men tioned in this man u al or in the
oth er doc u men ta tion pro vid ed with your Nikon prod uct are trade marks or reg is tered trade marks of their
re spec tive hold ers.
Make Backup Copies
Make backup copies of important pictures before processing. Nikon will not be held liable for damages
or lost profi ts that may result from product malfunction.
WARNING!
Do not play the Nikon Capture 4 installer CD on audio CD equip ment. Play ing a CD - ROM on
an audio CD play er could cause hear ing loss or dam age the equip ment.
Page 3

Table of Contents
Before You Begin: Introduction........................................................................................................ 1
Overview: About This Manual ......................................................................................................... 2
Principal Features: Features Available in Nikon Capture 4............................................................ 3
Nikon Capture 4 Editor ......................................................................................................................3
Nikon Capture 4 Camera Control....................................................................................................... 3
System Requirements: What You Need to Run Nikon Capture 4 ................................................. 5
Installation......................................................................................................................................... 5
Image Adjustment : Nikon Capture 4 Editor .................................................................................... 7
The Editor Window: Getting to Know Nikon Capture 4 Editor .................................................... 8
Starting Nikon Capture 4 Editor....................................................................................................... 10
Exiting Nikon Capture 4 Editor......................................................................................................... 12
Opening Image Files ........................................................................................................................ 13
Zoom............................................................................................................................................... 18
The Bird’s Eye Palette ....................................................................................................................... 19
Rotating and Flipping Images........................................................................................................... 20
Selecting a Crop .............................................................................................................................. 22
The Information Palette ...................................................................................................................23
The Histogram Palette ..................................................................................................................... 26
The Markers Palette......................................................................................................................... 27
Show Focus Area .............................................................................................................................28
Color Aberration Control................................................................................................................. 28
Image Adjustment: Enhancing Images ......................................................................................... 29
White Balance ................................................................................................................................. 33
Advanced RAW ...............................................................................................................................39
Image Dust Off................................................................................................................................ 42
Vignette Control .............................................................................................................................. 46
Curves .............................................................................................................................................48
The LCH Editor................................................................................................................................. 57
Color Booster .................................................................................................................................. 63
Photo Effects ...................................................................................................................................64
Color Balance .................................................................................................................................. 66
Unsharp Mask ................................................................................................................................. 68
Noise Reduction .............................................................................................................................. 71
D-Lighting ....................................................................................................................................... 73
Red eye Correction .......................................................................................................................... 75
Fisheye Lens (Fisheye -to - Rectilinear Transform for DX 10.5 mm Fisheye Lenses) .............................. 77
Output Size and Resolution ............................................................................................................. 79
Saving and Loading Image Adjustment Settings .............................................................................. 82
Saving Images.................................................................................................................................. 83
Printing Images................................................................................................................................ 88
Batch Processing.............................................................................................................................. 92
Nikon Capture 4 Editor Preferences : Fine -Tuning Nikon Capture 4 Editor................................ 97
The General Tab .............................................................................................................................. 98
The Performance Tab..................................................................................................................... 100
The Temporary Files Tab................................................................................................................. 101
The Advanced Color Tab................................................................................................................ 102
The Grid Lines Tab......................................................................................................................... 103
The Color Management Tab (Windows) ........................................................................................ 104
The Color Management Tab (Macintosh) ....................................................................................... 105
i
Page 4

Capturing Photographs: Nikon Capture 4 Camera Control ....................................................... 107
The Camera Control Window: Getting to Know Nikon Capture 4 Camera Control ............... 108
Starting Nikon Capture 4 Camera Control ......................................................................................110
Exiting Nikon Capture 4 Camera Control ........................................................................................ 111
Capturing Photographs to Disk.......................................................................................................112
Processing Photographs as They Are Captured ...............................................................................116
Time Lapse Photography................................................................................................................ 120
The Nikon Capture 4 Camera Control Window.............................................................................. 123
Custom Settings ............................................................................................................................ 135
Nikon Capture 4 Camera Control Preferences: Fine-Tuning Nikon Capture 4 Camera Control
The General Tab ............................................................................................................................ 137
The Temporary Files Tab................................................................................................................. 138
The Color Management Tab .......................................................................................................... 138
Technical Notes: Appendices ........................................................................................................ 139
Appendix A: Supported Color Profi les ........................................................................................ 140
1. Standard RGB Profi les Supported in Nikon Capture 4................................................................. 140
2. Technical Data for RGB Profi les Supported in Nikon Capture 4 .................................................. 142
Appendix B: Color Matching in Adobe Photoshop ( Version 7.0 or Later) ...............................143
Step 1—Choosing a Monitor Profi le .............................................................................................. 143
Step 2—Adjusting Settings in Adobe Photoshop ........................................................................... 144
Appendix C: The Nikon NEF Plug - in ............................................................................................ 145
Appendix D: Troubleshooting...................................................................................................... 147
Appendix E: Glossary ....................................................................................................................149
Index ............................................................................................................................................... 155
... 137
ii
Page 5

Introduction
Before You Begin
Read this chapter before in stall ing and using Nikon Capture 4.
Overview
Read this section for a description of how this man u al is
or ga nized and for an ex pla na tion of the symbols and con ven tions used.
Principal Features
Read this section for an overview of the options available in
Nikon Capture 4.
System Requirements
Before installing Nikon Capture 4, check that your computer
system meets the requirements listed in this section.
1
Page 6
Overview
Overview
About This Manual
This man u al has been written to help you take advantage of the many features included in
Nikon Capture 4 (Ver. 4.4). Be sure to read this manual thoroughly, and to keep it handy when
using Nikon Capture 4.
Symbols and Conventions
The following symbols and conventions are used in this manual:
This icon marks cautions, in for ma tion that you
should read be fore use to prevent possible
dam age to your camera or computer.
This icon marks tips, ad di tion al in for ma tion
you may fi nd help ful when using this software.
Menu items and button names are shown in bold.
This icon marks notes, in for ma tion that you
should read be fore using this software.
This icon indicates that more in for ma tion is
avail able else where in this manual.
Background Knowledge
This manual assumes knowledge of operations common to Windows and Macintosh en vi ron ments. Refer to the documentation provided with your computer for more in for ma tion on
op er a tions specifi c to your operating system.
Illustrations
This manual is for use with both Windows and Macintosh versions of Nikon Capture 4. While
the majority of the illustrations in this manual show the Windows versions, save where oth er wise noted the operations described apply to both operating systems. Depending on the
operating system used, di a logs and menus may differ slightly from those shown here.
The ReadMe File
Be sure to read the ReadMe fi le on the Nikon Capture 4 installer CD, as it may contain im por tant information that could not be included in this manual.
Life- Long Learning
As part of Nikon’s “Life -Long Learning” commitment to ongoing product support and education, continually-updated information is available on-line at the following sites:
• For users in the U.S.A.: http://www.nikonusa.com/
• For users in Europe and Africa: http://www.europe -nikon.com/support
• For users in Asia, Oceania and the Middle East: http://www.nikon- asia.com/
Visit these sites to keep up-to -date with the latest product information, tips, answers to frequently-asked
questions (FAQs), and general advice on digital imaging and photography. Additional information may
be available from the Nikon representative in your area. See the URL below for contact information:
http://nikonimaging.com/
2
Page 7
Features Available in Nikon Capture 4
Principal Features
Features Available in Nikon Capture 4
Nikon Capture 4 is for use exclusively with Nikon digital cameras. It consists of two major
components: Nikon Capture 4 Editor and Nikon Capture 4 Camera Control.
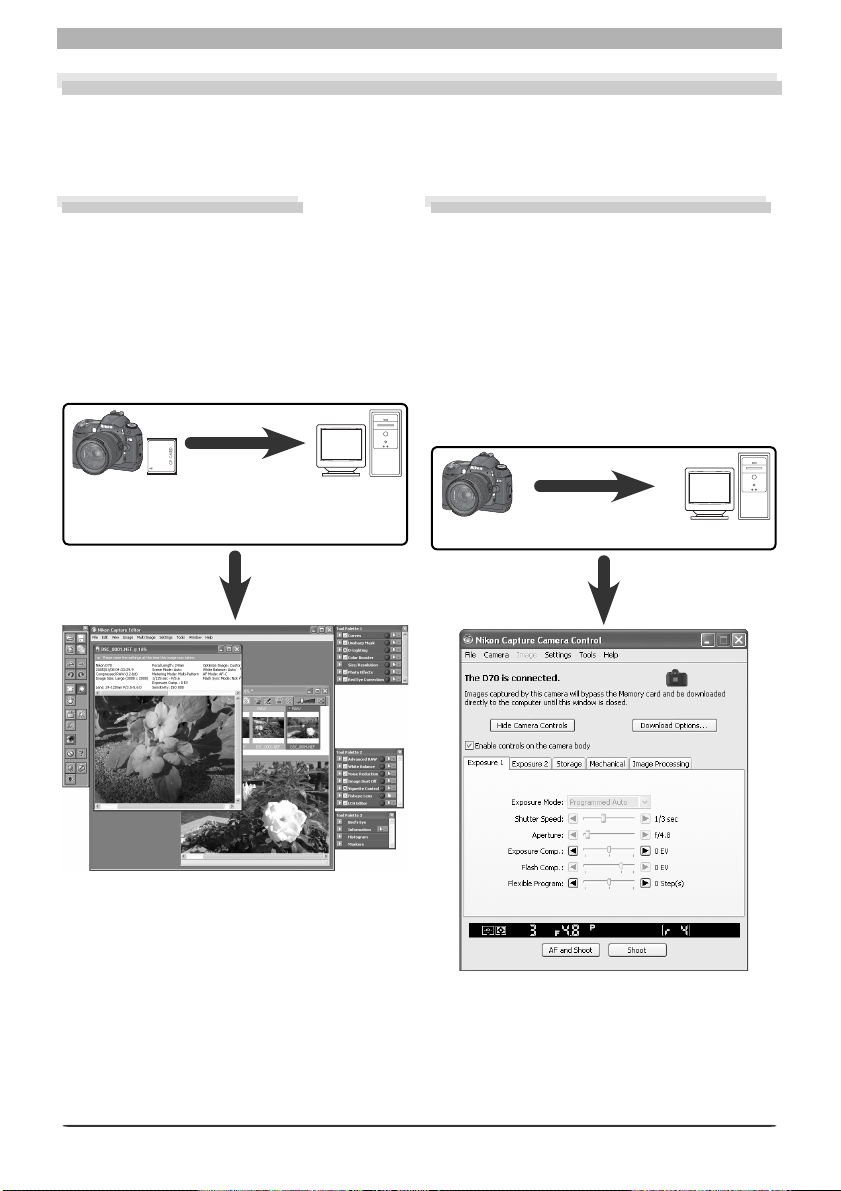
Nikon Capture 4 Editor
Nikon Capture 4 Editor is used to enhance
photographs taken with Nikon digital cameras after they have been transferred to
the computer using PictureProject or Nikon
View. Nikon Capture 4 Editor supports batch
processing and can be used to adjust RAW
images in ways not supported by other
software.
Photographs
on camera
memory card
Transfer to computer
using PictureProject or
Nikon View
Nikon Capture 4 Camera Control
When a D2- or D1-series, D200, D100, D70s,
D70, or D50 camera is connected to a computer running Nikon Capture 4 Camera Control, photographs can be recorded directly to
the computer hard disk as they are taken. The
controls in the Nikon Capture 4 Camera Control window can be used to release the shutter or adjust camera settings, or to perform
interval timer photography not otherwise
supported on some models.
Connect camera and computer
Nikon Capture 4 Editor
Nikon Capture 4 Camera Control
3
Page 8
Principal Features
Automatic Update
Nikon Capture 4 is equipped with an automatic update function known as Nikon Message
Center. Nikon Message Center checks for updates to a variety of Nikon digital products, including Nikon software. At default settings, Nikon Message Center will automatically check
for updates if the computer is connected to the Internet when Nikon Capture 4 starts. If an
update is available, the Nikon Message Center window will be displayed. Click Available
Messages to view the updates available for your Nikon digital products and software, then
click Install to download and install the desired updates. To personalize your list of Nikon
digital products or to view a list of the installed software supported under Nikon Message
Center, click My Products.
Mac OS 9
Nikon Message Center is not available in Mac OS 9.
Notice to Users in Europe and the U. S. A.
To activate Nikon Message Center, users in Europe and the U. S. A. must have an account with their
regional Nikon Support Center. The fi rst time a program equipped with the Nikon Message Center auto
update feature starts, a license agreement will be displayed. After reading the agreement, click Accept
to accept its terms and display an account activation dialog.
• If you already have an account with your regional Nikon Support Center, enter the supplied user ID and
password and the e-mail address you used to register. After confi rming that the computer is connected
to the Internet, click Activate Nikon Message Center. A dialog allowing you to opt in or out of Nikon
mailings will be displayed.
• If you do not have an account or have forgotten your password, confi rm that the computer is con nected to the Internet and click Visit Nikon Support Center. After obtaining the required account
information, enter the details in the account activation dialog and click Activate Nikon Message
Center. A dialog allowing you to opt in or out of Nikon mailings will be displayed.
The Opt- in / Opt- out Dialog
The fi rst time Nikon Message Center starts, a dialog allowing you to opt in or out of Nikon mailings will
be displayed. Select the desired options and click OK to display the Nikon Message Center window.
Downloading Updates
An Internet connection is required to download updates. The user bears all applicable fees charged by
the phone or cable company or Internet service provider.
Dial- up Connections
When using a dial- up connection, be aware that the connection is not automatically terminated when
download is complete. Be sure to terminate the connection manually.
Privacy
Information provided by the user as part of this service will not be given to third parties without the
user’s permission.
Checking for Updates Manually
To check for updates manually, select Check for updates… from the Help menu.
4
Page 9
What You Need to Run Nikon Capture 4
System Requirements
What You Need to Run Nikon Capture 4
Before installing Nikon Capture 4, make sure that your system satisfi es the following re quire ments:
Windows Macintosh
Pre-installed versions of Windows XP
OS
CPU/Model 300 MHz Pentium equivalent or better Built-in USB or FireWire port required
RAM
Hard - disk space 200 MB required for installation
Video
resolution
In ter face
Supported cameras
(Camera Control)
* With CarbonLib version 1.6 or later.
† Connect the camera directly to the computer. The camera may not function as expected when con-
nected via a hub, extension cable, or keyboard.
‡ See the websites listed on page 2 for the latest information on boards that have been tested and ap-
proved for use.
†
Other
Home Edition, Windows XP Pro fes sion al,
Win dows 2000 Professional, Windows
Millennium Edition (Me), Win dows 98
Second Edition (SE)
• Windows, Mac OS X: 256 MB (768 MB or more recommended)
• Mac OS 9: memory allocation of 64 MB or more to Nikon Capture 4 Camera
Control, 512 MB or more to Nikon Capture 4 Editor
800 × 600 pixels or more with 16-bit color (High Color/thousands of colors). 24-bit
color (True Color/millions of colors) recommended.
Open Host- Controller Interface (OHCI)
IEEE
compliant IEEE 1394 in ter face board or
1394
card‡ required for con nec tion to D1series cameras
USB Built-in USB interface
D2-series, D1-series, D200, D100, D70s, D70, and D50
• CD -ROM drive required for installation
• Internet connection required for some options
Mac OS 9.0.4–9.2.2
sion 10.1.5 or later). Note that Dutch,
Italian, Korean, and Swedish versions of
Nikon Capture 4 are not available for
Mac OS 9.
Built-in IEEE 1394 (FireWire) interface
re quired for connection to D1-series
cameras
• Built-in USB interface
• RATOC REX-PCIU3U USB interface
board (USB 2.0; for use only with D2series cameras under Mac OS X)
*
, Mac OS X (ver-
Installation
For information on installing Nikon Capture 4, see the Nikon Capture 4 Install Guide.
Windows XP Home Edition/Professional, Windows 2000 Professional, Mac OS X
When installing, using, or uninstalling Nikon Capture 4 under the above operating systems, log on to an
account with administrator privileges.
Camera Control for D100 Cameras (Macintosh)
Before using Nikon Capture 4 Camera Control with a D100 digital camera, Macintosh users will need to
upgrade the camera fi rmware to version 2.00 or later. Contact a Nikon-authorized service representative
for information on fi rmware upgrades.
Third- Party Plug- Ins
Nikon Capture 4 supports third-party nik Color Efex Pro 2.0 plug- ins that add a fi lter palette to Tool
Palette 2. More information is available on -line ( 2).
5
Page 10

6
Page 11

Nikon Capture 4 Editor
Image Adjustment
Nikon Capture 4 editor component contains a variety of
tools for enhancing images, including the Curves, LCH
Editor, Color Booster, Photo Effects, Unsharp Mask, Noise
Reduction, D-Lighting, Red Eye Correction, and Fisheye
Lens tools. With RAW (NEF) images, it can be used to adjust
white balance and tone compensation, to reduce the effects
of dust on the camera image sensor, including color moiré
(Image Dust Off), and to correct for chromatic (color) aberration and the slight darkening at the margins of an image
(vignetting) particular to the fi eld of view of a given lens.
When RAW im ag es are saved in NEF for mat, im age en hance ment settings are saved sep a rate ly from the orig i nal image
data, allowing you to mod i fy set tings re peat ed ly with out
de grad ing the qual i ty of the orig i nal im age. Nikon Capture
4 Editor is also equipped with a batch option for au to mat ed
pro cess ing of multiple im ag es.
This chapter details the operations that can be performed
us ing Nikon Capture 4 Editor. It is divided into the following
sections:
The Editor Window
Read this section for an overview of the controls in the Nikon
Capture 4 Editor window.
Image Adjustment
Read this section for instructions on enhancing images us ing
Nikon Capture 4 Editor.
Nikon Capture 4 Editor Preferences
Read this section for information on fi ne-tuning settings in
the Nikon Capture 4 Editor window.
7
Page 12
The Editor Window
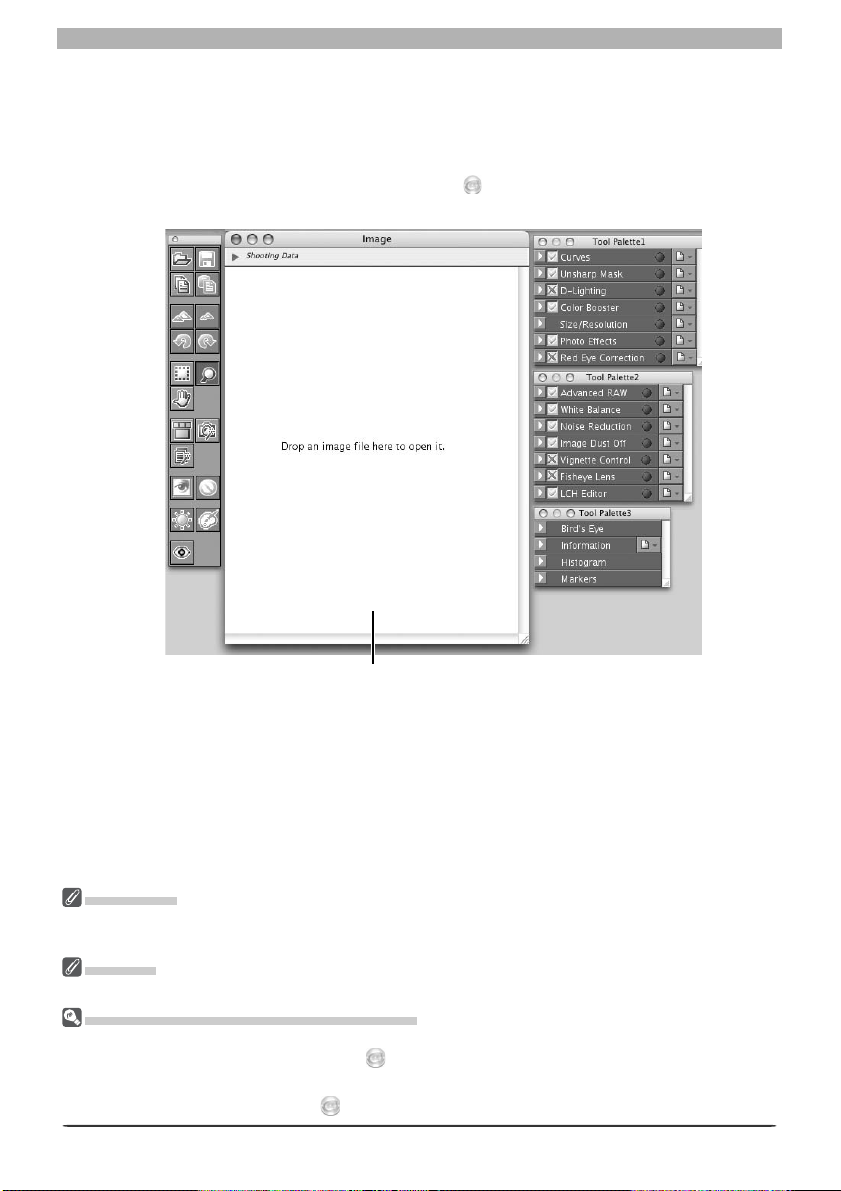
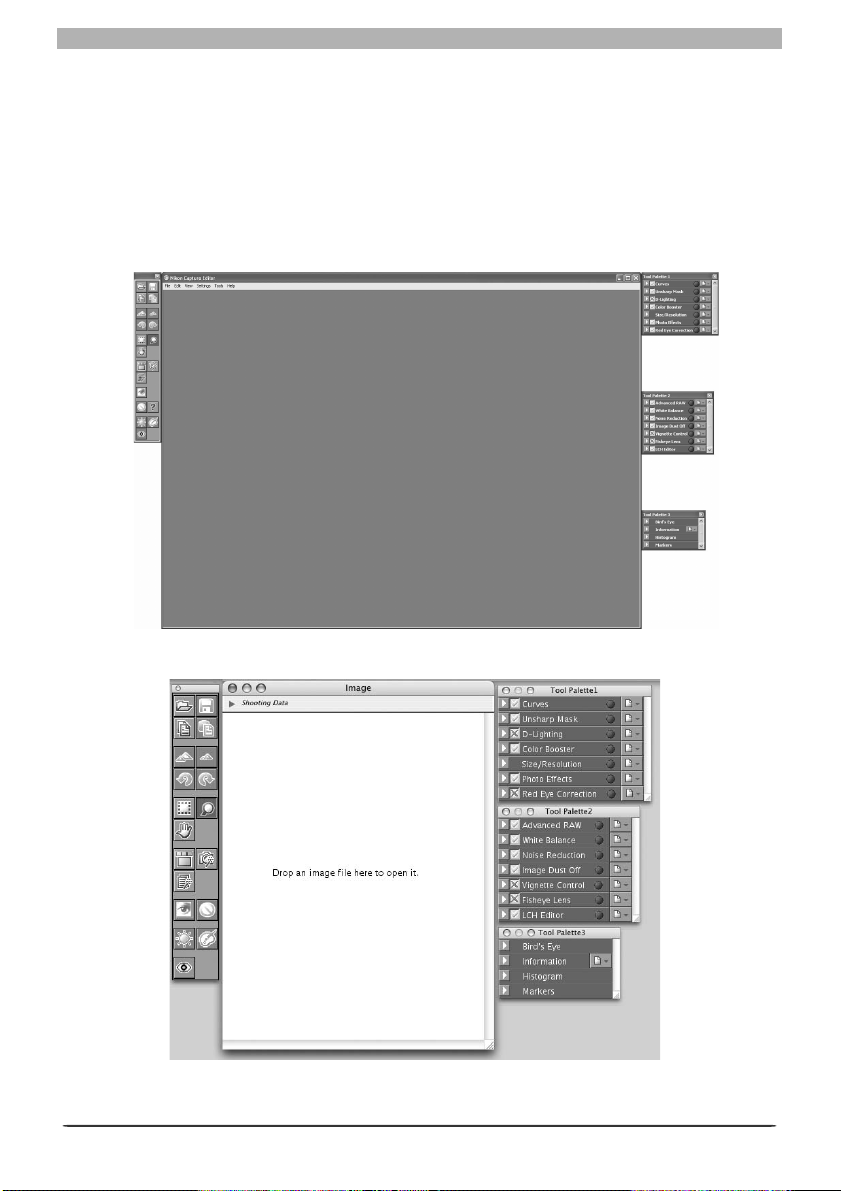
The Editor Window
Getting to Know Nikon Capture 4 Editor
The main parts of the Nikon Capture 4 Editor window are identifi ed below.
Menu bar
Contains the menus for
Nikon Capture 4 Ed i tor.
Quick Tools palette
Contains tool but tons
for Nikon Capture 4
Editor (
9).
Title bar
Shows the fi le name of
the im age dis played and
the current zoom ratio.
Image window
Displays images cur rent ly opened for
ed it ing. Any num ber of im age win dows can be open si mul ta neous ly.
Shooting data area
Gives photo in for ma tion on the im age
dis played.
Tool palettes
These palettes are
used for im age en hance ment ( 29).
Application window
(Windows only)
The Menu Bar and Quick Tools
Although many operations can be performed using both menu commands and the buttons in the Quick
Tools palette, the explanations in this manual give priority to operations performed using tool buttons.
Hiding the Tool Palettes and Quick Tools Palette
Press tab to hide or display the tools and Quick Tools palettes.
Image area
Shows the image cur rent ly
being edited.
Multi -Image window
Lists the images in the current
folder as thumbnail previews
15).
(
8
Page 13
Getting to Know Nikon Capture 4 Editor
Quick Tools
The Quick Tools palette contains buttons that replicate commonly-used menu commands.
But ton Name Func tion Shortcut
Open Click to open an image fi le for editing.
Save
Copy Image
Adjustments
Paste
Zoom In Zoom in on the image in the active window.
Zoom Out Zoom out from the image in the active window.
Rotate 90 CCW
Rotate 90 CW
Crop Cursor
Zoom Cursor
Hand Cursor
Open Multi- Image
Window
Show Nikon Capture
Camera Control
Batch
Open with
Photoshop
Show Original
Image Data
Help
(Windows only)
Auto Brightness
Auto Color Boost
Auto Red Eye
Correction
* Windows keyboard shortcuts are listed fi rst, Macintosh shortcuts second.
Save changes to the image in the active image
win dow.
Copy current image -adjustment settings to the
clip board.
Paste the contents of the clipboard to image en hance ment settings in the active win dow.
Rotate the image in active window ninety de grees
counter-clockwise.
Rotate the image in active window ninety de grees
clock wise.
Use this tool to select the portion of the image in the
active window that will be saved.
Use to zoom the image in the active window in and
out.
Use to view portions of the image not currently vis i ble in the active window.
Open the Multi- Image window, where images in the
selected folder can be previewed.
Launch Nikon Capture 4 Camera Control. — 107
Open the Batch dialog, where you can se lect a folder
of images for batch processing.
Open the image in the active window in Photoshop.
Hide the effects of changes to image adjustment
set tings. This button can not be used with RAW images taken with COOLPIX-series cameras.
Display menu of help options. F1/— —
Performs the same function as the Auto button in
the Photo Effects palette.
Performs the same function as the Auto button in
the Color Booster palette.
Perform automatic red - eye correction on image in
active window
Ctrl+Shift+R/
shift+cmd+R
*
Ctrl + 0/
cmd + 0
Ctrl + S/
cmd + S
— 82
Ctrl + V/
cmd + V
Ctrl + +/
cmd + +
Ctrl + –/
cmd + –
Ctrl + R/
cmd + R
C/C 22
Z/Z 18
H/H 18
Ctrl + T/
cmd + T
— 92
— —
— —
— 64
— 63
— 75
13
83
—
—
—
20
20
15
9
Page 14
The Editor Window
Starting Nikon Capture 4 Editor
Nikon Capture 4 Editor can be started from the Start menu (Win dows) or double-click ing the
ap pli ca tion icon (Macintosh).
Windows
Turn the computer on
1
Turn the computer on and wait for the operating system to start up.
Start Nikon Capture 4 Editor
2
From the Start menu, select All Programs > Nikon Capture 4 > Nikon Capture 4
Editor (Windows XP Home Edition/Windows XP Professional) or Pro grams > Nikon
Capture 4 > Nikon Capture 4 Ed i tor (other versions of Win dows).
Oth er Ways of Starting the Editor (Windows)
Nikon Capture 4 Editor can be started by double-clicking the Nikon Capture 4 icon ( ) in the folder to
which Nikon Capture 4 was installed. If a shortcut to Nikon Capture 4 was created on the desktop during
installation, the Editor can also be started by double-clicking the shortcut icon ( ) on the desktop.
10
Page 15
Getting to Know Nikon Capture 4 Editor
Macintosh
Turn the computer on
1
Turn the computer on and wait for the operating system to start up.
Start Nikon Capture 4 Editor
2
Double-click the Nikon Capture 4 Editor icon ( ) in the folder to which you installed
Nikon Capture 4.
No image displayed in image win dow
Prod uct Key
If prompt ed to supply a product key when starting Nikon Capture 4 Editor or Nikon Capture 4 Camera
Control, en ter the product key supplied on the Nikon Capture 4 CD case.
Mac OS 9
Dutch, Italian, Korean, and Swedish versions of Nikon Capture 4 are not available for Mac OS 9.
Oth er Ways of Starting the Editor (Mac OS)
Mac OS 9 : If an alias for Nikon Capture 4 was created on the desktop during installation, the Editor can
also be started by double- clicking the alias ( ).
Mac OS X: If Nikon Capture 4 was reg is tered in the Dock during installation, the Editor can also be started
by clicking the Nikon Capture 4 icon ( ) in the Dock.
11
Page 16
The Editor Window
Exiting Nikon Capture 4 Editor
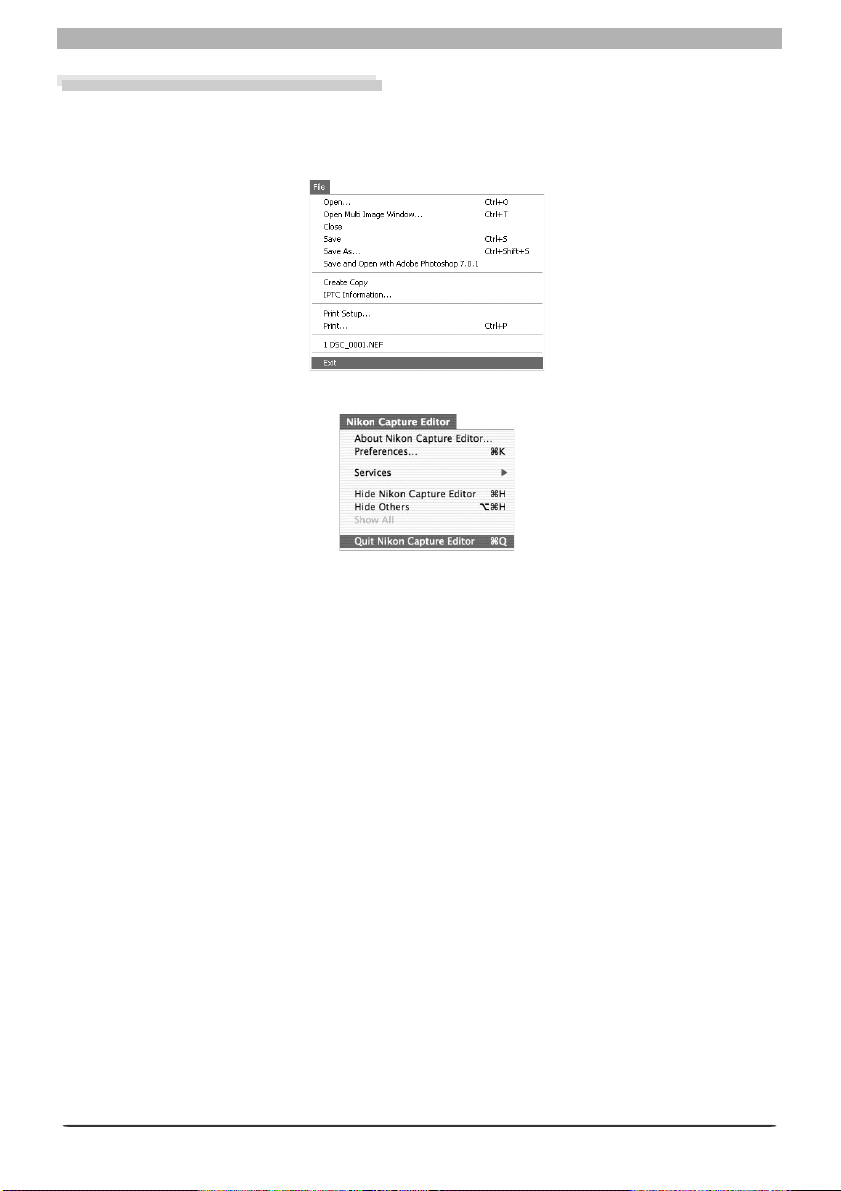
To close the Nikon Capture 4 Editor window and exit Nikon Capture 4, open the File menu
and choose Exit (Windows) or Quit (Mac OS 9). In Mac OS X, select Quit Nikon Capture
Editor from the application menu.
Windows
Mac OS X
12
Page 17

Getting to Know Nikon Capture 4 Editor
Opening Image Files
Nikon Capture 4 Editor can be used to open images created with Nikon digital cameras and
images previously saved using Nikon Capture.
Original image/saved image Format Ex ten sion
RAW
Image saved in NEF
RGB-TIFF
YCbCr TIFF
16-bit TIFF (RGB)
8-bit TIFF (RGB)
EXTRA
FINE
NORMAL
BASIC
JPEG
(Nikon Electronic Format)
Files in the above formats can be opened using the Open… command or by drag and drop.
Using the “Open...” Command
Click the button or se lect Open… from the File menu
The standard Open dialog for your op er at ing sys tem will be dis played.
1
Open but ton
NEF
TIFF (RGB) .TIF 83
JPEG .JPG 83
.NEF 83
Preview of selected image displayed
TIFF (CMYK) Images
Images saved in TIFF (CMYK) format can not be reopened in Nikon Capture 4 Editor.
NEF Files (Nikon Capture 3 or Earlier)
NEF fi les created with Nikon Capture 4 can not be opened in earlier versions of Nikon Capture.
RAW Images Created with the D1X
The default size for RAW images created with the D1x when opened in Nikon Capture 4 Editor can be
chosen using the By default, a D1X RAW fi le will be option in the General tab of the Nikon Capture 4
Editor Preferences dialog ( 98). Choose from six megapixels (3,008 × 1,960 pixels) and ten megapixels
(4,016 × 2,616).
13
Page 18
The Editor Window
Locate the image fi le
2
Navigate to the drive (volume) and folder containing the fi le you wish to open.
Click Open
3
Double-click the fi le or select it from the fi les listed and click Open. The selected fi le will
be opened in an image window in Nikon Capture 4 Editor.
Using Drag and Drop
Images can also be opened by dragging them into the application window (Windows) or image window (Macintosh).
14
Win dows
Macintosh
Page 19
Getting to Know Nikon Capture 4 Editor
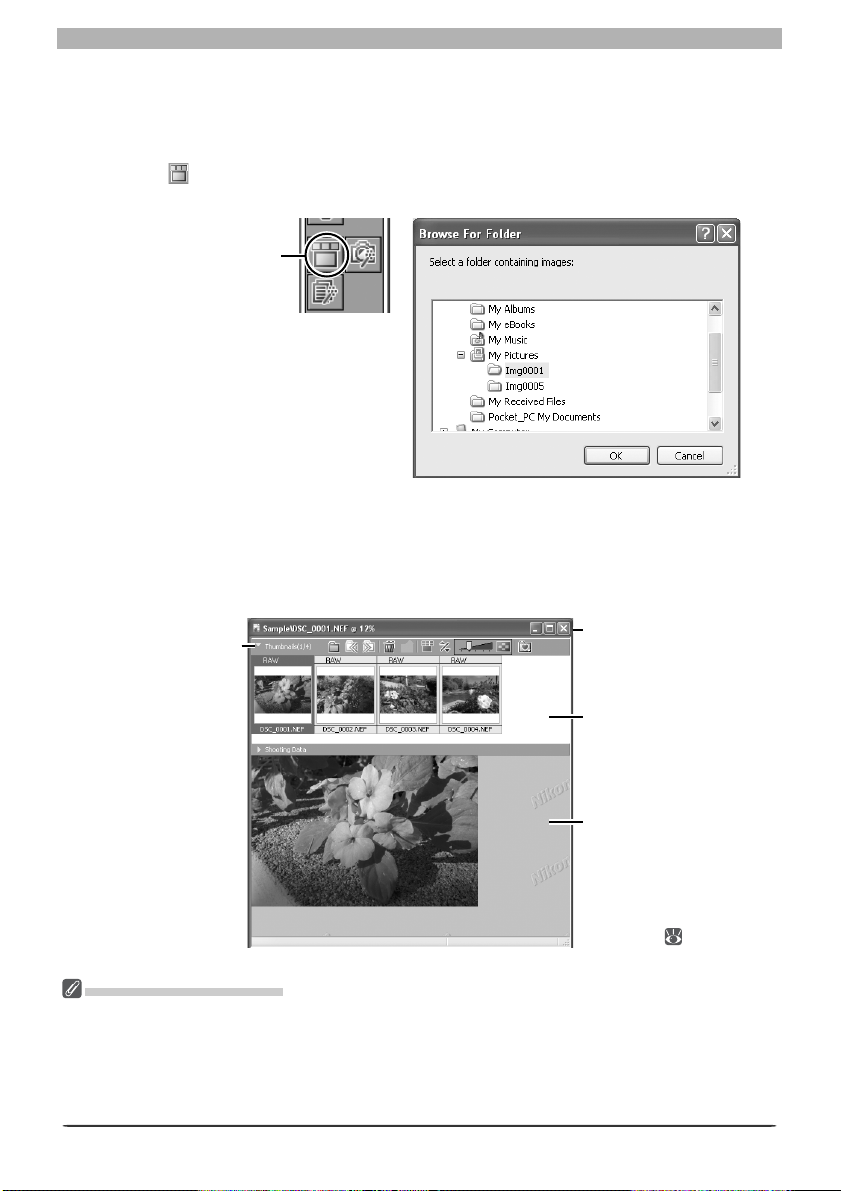
Opening the Multi-Image Window
The Multi-Image window shows the images in the selected folder as small thumbnail previews. Use the Multi-Image window to view other images while making adjustments to the
current image, or to select multiple images for editing, saving, or printing.
Click the button or select Open Multi - Image Window from the File menu
The Browse For Folder dialog will be displayed.
1
Open Multi- Image
Window button
Select a folder
2
Select the folder containing images you want to view or edit.
Click OK
3
The Multi- Image window will open, with the images in the selected folder displayed as
thumbnails.
Click to hide or
view the thumb nail area.
Multi -Image window
Lists the images
in the selected
folder.
Thumbnail area
Displays the images in the selec ted
folder as thumbnail previews.
Image area
Shows the image
currently being
edited. Images are
edited in the same
way as in image
windows (
29).
The Multi-Image Window
The Multi Image window can be used to display multiple images without opening them in separate image windows, reducing the amount of memory required. No more than one Multi-Image window can
be open at a time. Before opening a folder in the Multi-Image window, make sure that none of the
images in the selected folder are open in image windows. If the user attempts to open one of the images in the thumbnail list in an image window, it will be opened in the image area of the Multi- Image
window instead.
15
Page 20
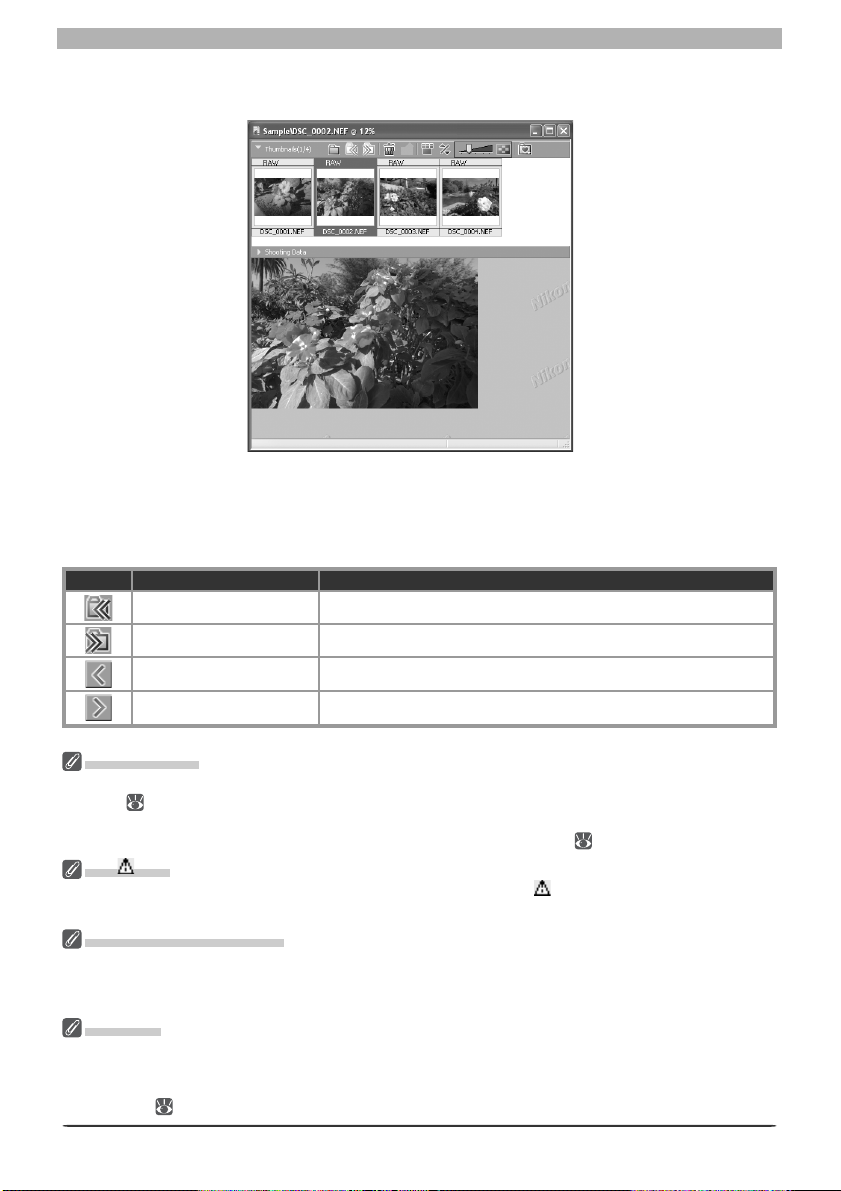
The Editor Window
Select a thumbnail
4
The corresponding image will be displayed in the image area.
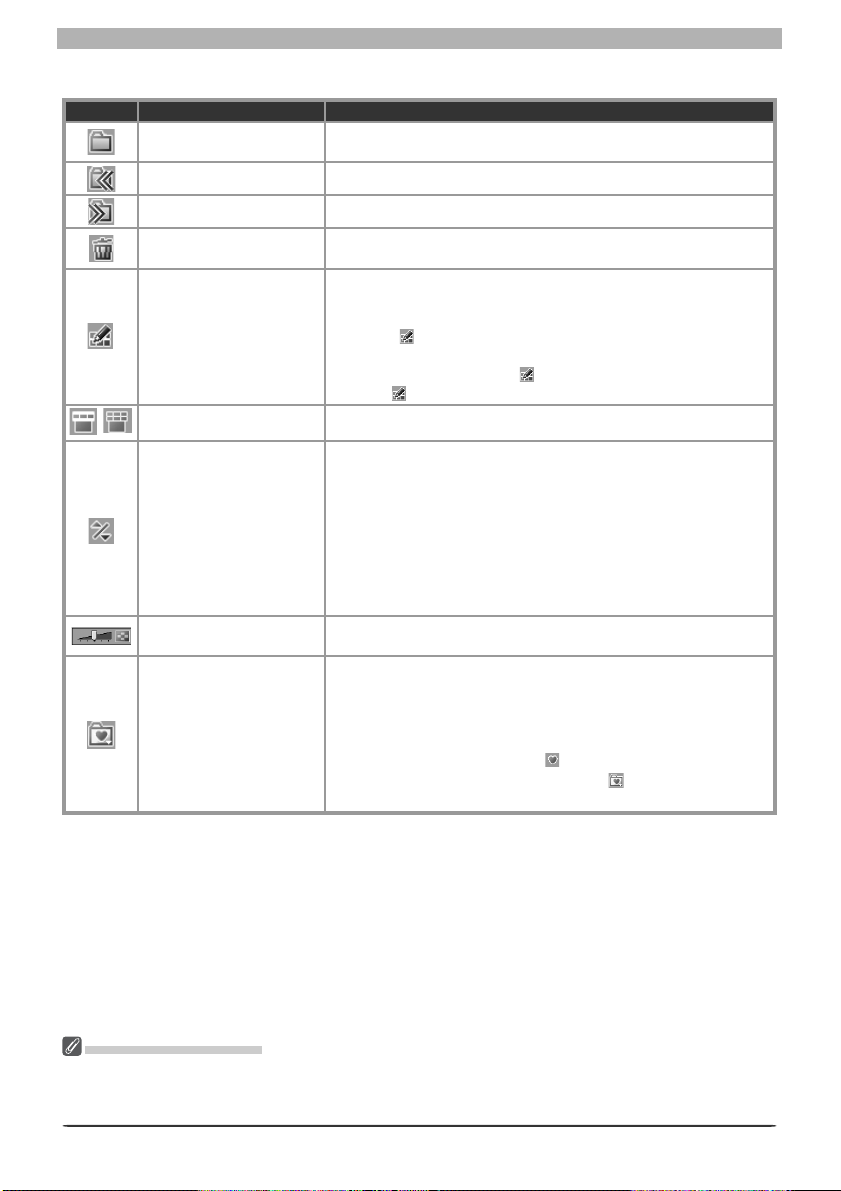
Multi-Image Window Buttons
The names and functions of the buttons in the Multi-Image window are shown in the following table:
When the thumbnail area is closed:
But ton Name Func tion
Back to previous folder Return to the previous folder.
Forward to next folder Open the next folder.
Previous Image Display the previous image in the image area.
Next Image Display the next image in the image area.
Editing Images
The image displayed in the image area can be edited in the same way as an image displayed in an image
window ( 29). Modifi ed images are indicated by an asterisk in the thumbnail list. An asterisk will also
appear next to images that have been automatically modifi ed via the Enable Color Aberration Control
option in the “Performance” tab of the “Options” (“Preferences”) dialog (
The Icon
Images to which changes have not been applied are indicated by an icon. The icon disappears when
the image is displayed in the image area or is saved at the new settings.
Selecting Multiple Images
To select multiple images for printing or to save under another name, click the thumbnails while pressing
the Ctrl (Windows) or command (Macintosh) key, or use the Select All Images or Select All Unsaved
Images options in the Multi- Image menu. No image will be displayed in the image area.
“Save As”
Even if the image in the Multi- Image window is saved under another name using the Save As… option,
the original will still be displayed in the image area. If this image is saved using the Save option, any
changes will be applied to the original, and the unmodifi ed image will be lost. See “Options for Saving
Image Files” ( 84) for more information.
100).
16
Page 21
Getting to Know Nikon Capture 4 Editor
When the thumbnail area is open:
But ton Name Func tion
Select Folder
Back to previous folder Return to the previous folder.
Forward to next folder Open the next folder.
Remove selected
image (s)
Match Settings
Switch thumbnail list Toggle between single - and multi -line thumbnail displays.
/
Sort
Change Thumbnail Size
Favorite Folder
Open the Browse For Folder dialog to select a folder for display
in the Multi-Image window.
Delete the images selected in the thumbnail area.
Apply the settings for the selected image to other images. After
selecting a source image, select the target images with the shift
key or with the Ctrl (Windows) or command (Macintosh) key and
then click
the remaining images. To edit multiple images simultaneously,
select the images and click . Changes to tool palette settings
after the is clicked will apply to all the selected images.
A menu of sort options will be displayed. Choose Sort Key to
sort images by File Name, Date of Recording, Date Modifi ed,
File Name and Type, File Type and Date of Recording, or
File Type and Date Modifi ed (if File Type and Date of Re cording, or File Type and Date Modifi ed is selected, images
will be sorted by fi le type in the order NEF, JPEG, and TIFF, with
images of the same fi le type sorted by date of recording or date
of modifi cation). Choose Sort Order to sort images in ascending or descending order.
Adjust the size of the thumbnails displayed in the Multi-Image
window in fi ve steps.
To add the current folder to your list of favorites, click this button and select Add Favorites from the menu that appears and
enter a name for the folder (this name will appear only in your
list of favorites; the actual folder name will not change and will
continue to be displayed in the “Organize Favorites” dialog). To
access your favorites, click the
ganize, rename, or delete favorites, click
Favorites....
. The settings for the fi rst image will be applied to
button in the toolbar. To or-
and select Organize
The Multi-Image Menu
Although many operations can be performed using both the buttons in the Multi- Image window and
the options in the Multi- Image menu, the explanations in this manual give priority to operations performed using the buttons in the Multi - Image window.
17
Page 22
The Editor Window
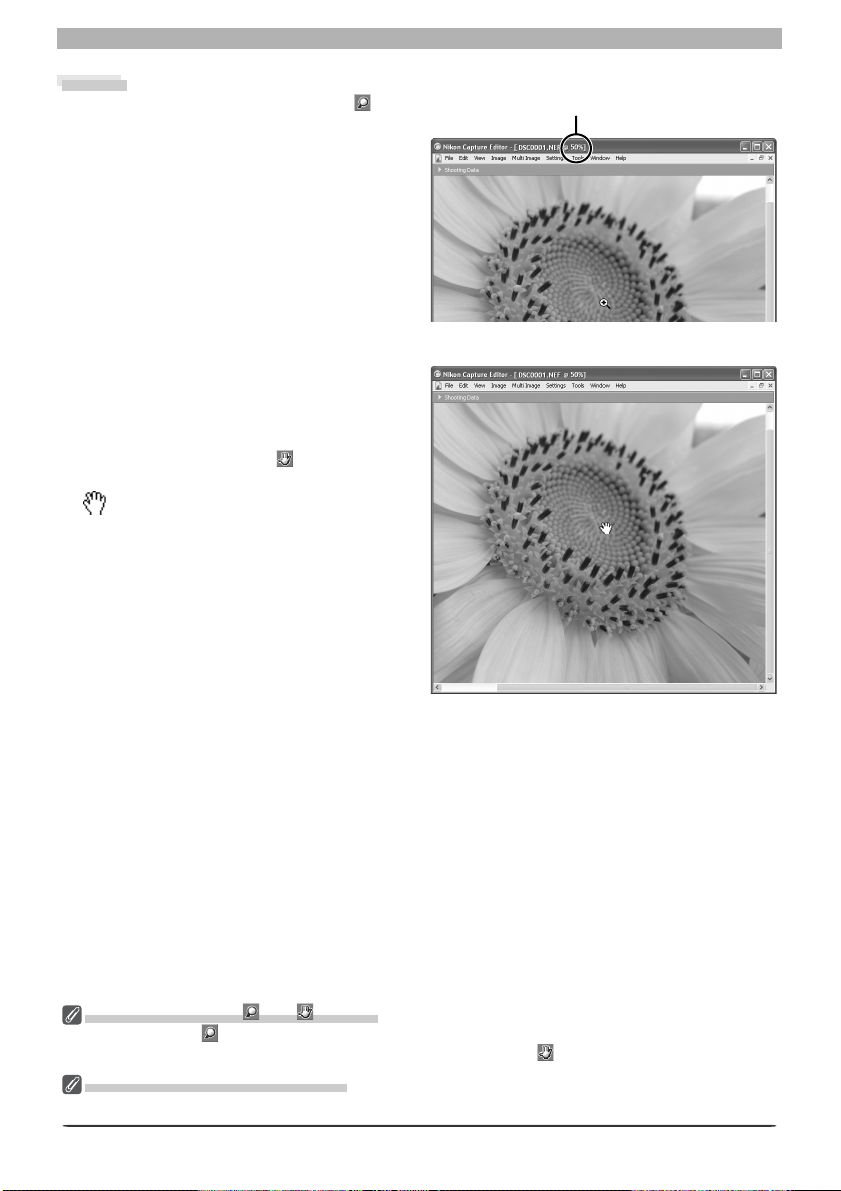
Zoom
To zoom images in and out, click the button. The mouse point er will change to a
mag ni fy ing glass with a “+” sign in its center.
Position the zoom cursor over the current image and click the mouse to zoom in one step.
To zoom out one step, hold down Alt (Windows) or option (Macintosh). A “–” sign will
appear in the center of the zoom cursor; click
the mouse to zoom out one step. The image
will be centered on the point clicked. The
current zoom ratio is displayed in the title
bar.
Scrolling the Image
If the entire image is not visible at the current
zoom ratio, the hand cursor can be used to
view other areas of the image. To activate
the hand cursor, click the
tool palette. The mouse point er will change
to
; to scroll the im age, drag the mouse in
the di rec tion you want to go. You can also
scroll the image using the scroll bars.
button in the
Zoom ratio
Double-Clicking the and Buttons
Double-clicking the
(Windows) or display the entire image (Macintosh), double-click the
The Hand, Zoom and Crop Cursors
The hand, zoom, and crop cursors can not be used at the same time.
button displays the image at a zoom ratio of 1 : 1. To fi t the image to the window
18
button.
Page 23

Getting to Know Nikon Capture 4 Editor
The Bird’s Eye Palette
The Bird’s Eye palette shows the position of the portion of the image visible in the active image window. To display or hide the Bird’s Eye palette, click the triangle in the Bird’s Eye palette
title bar ( 29). By default, the Bird’s Eye palette is in Tool Palette 3.
The portion of the image visible in the active image window is indicated by a red outline.
Red outline dis played
When the mouse pointer is moved over the red outline, it changes to a cursor. Drag the
red outline over the area of the image you would like to view. The selected area will be displayed in the active image window.
19
Page 24
The Editor Window
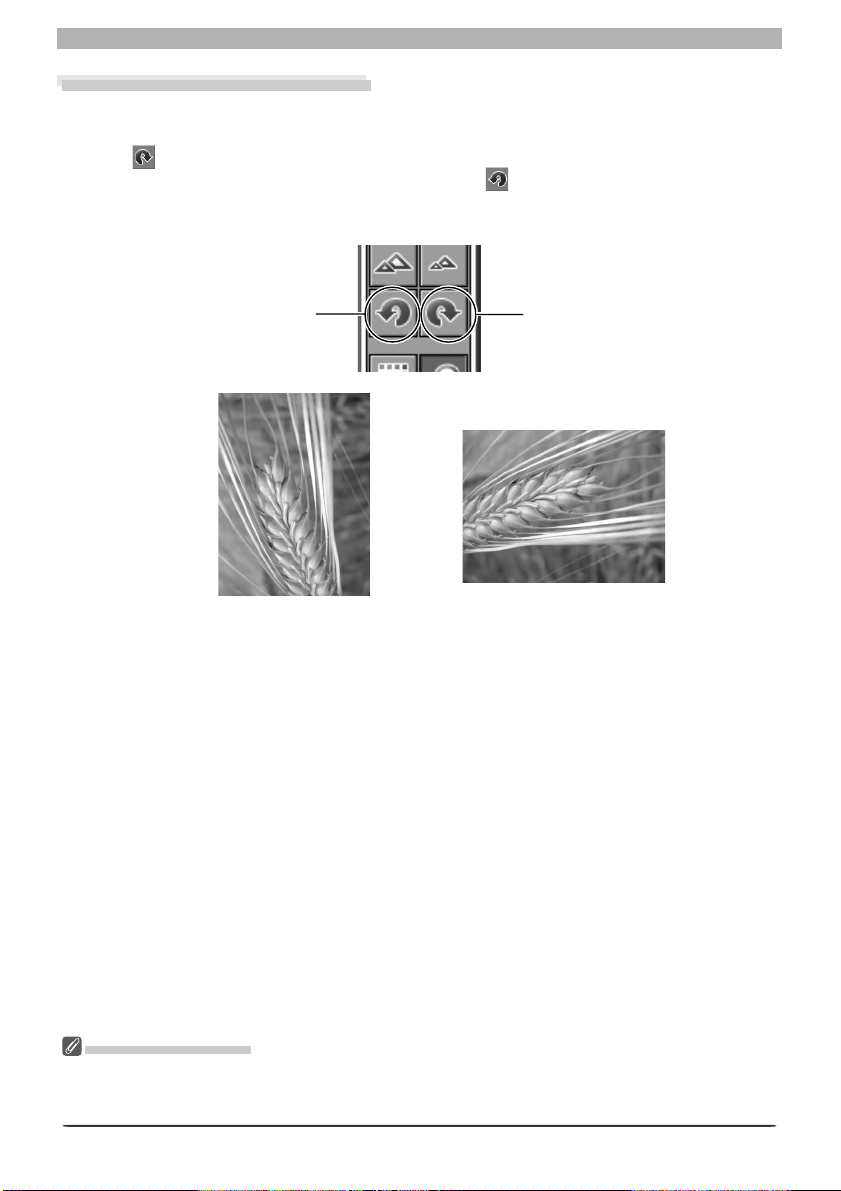
Rotating and Flipping Images
The image in the active image window can be rotated or fl ipped as described below.
Rotating Images
Click the button or select 90 degrees CW from the Rotate sub-menu to rotate the image
in the active window 90 degrees to the right. Click the button or select 90 degrees CCW
from the Rotate sub-menu to rotate the image in the active window 90 degrees to the left.
To rotate the image 180 degrees, select 180 degrees from the Rotate sub-menu.
Rotate 90 CCW but ton Rotate 90 CW but ton
Image before rotation
Image rotated ninety
de grees clockwise
Flipping Images
Use the commands in the Flip sub -menu to fl ip the image in the active window horizontally
or ver ti cal ly.
Rotating JPEG Images
Image fi les must be opened in Nikon Capture 4 Editor before being rotated. To save the changes, the
image must then be saved to disk. If the image is in JPEG format, it will be compressed when saved, with
a corresponding drop in image quality.
20
Page 25
Getting to Know Nikon Capture 4 Editor
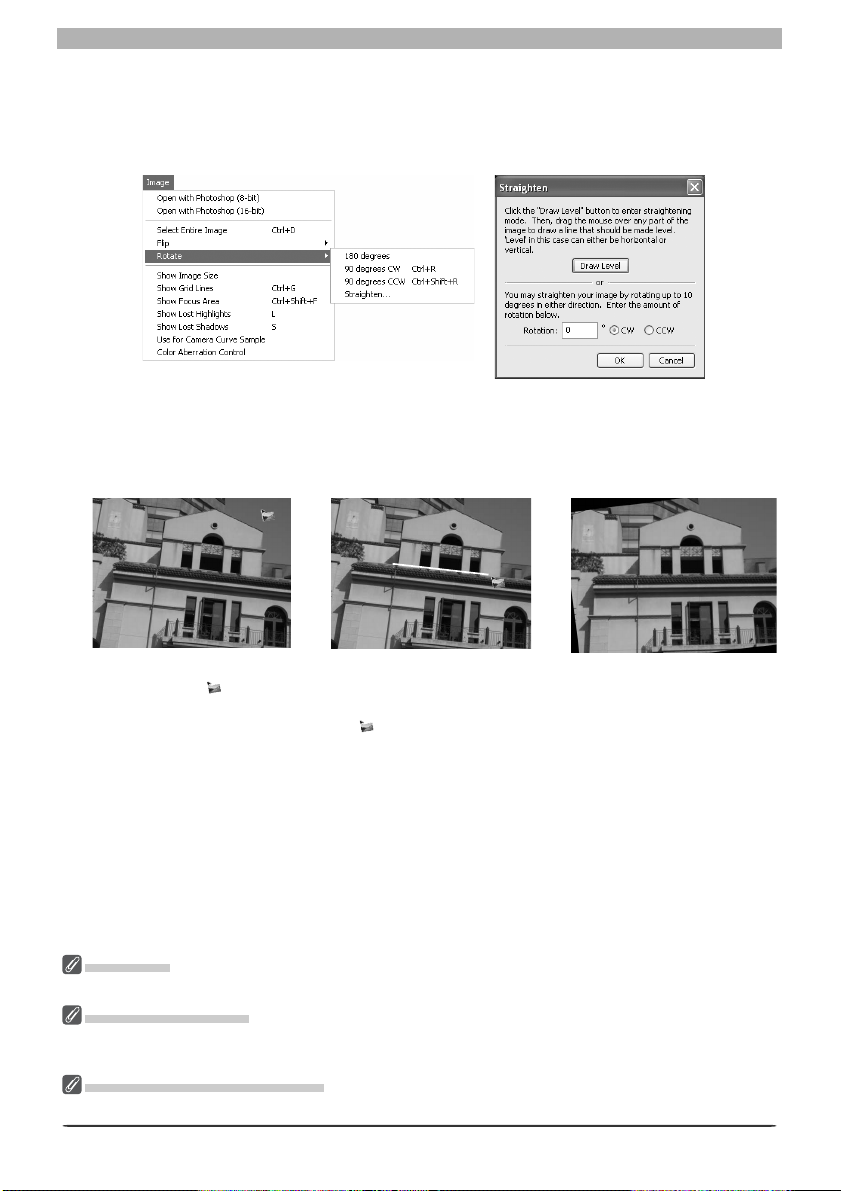
Straightening Images
To straighten the image in the active image window:
Select Straighten… from the Rotate sub-menu
1
The Straighten dialog will be displayed.
Straighten the image
Straighten the image using the Draw Level button or by entering the desired rotation in
2
the Rotation text box.
The Draw Level Button
Click Draw Level. The cursor changes to
The Rotation Text Box
Choose CW (clockwise) or CCW (counter-clockwise) and enter the degree of rotation in
the text box. The image can be rotated up to 10 °.
Click OK
.
Choose a line in the image
that should be either horizontal or vertical and drag
cursor parallel to the
the
chosen reference line.
The image will be rotated
up to 10 ° to make the reference line horizontal or vertical. The degree of rotation
is displayed in the Rotation
text box.
3
Draw Level
If a message is displayed stating that the reference line is too short, draw a longer reference line.
Straightening Images
Straightening does not change the dimensions of the image. Any portions of the image that do not fi t in
its original dimensions are trimmed, while areas that have been added to the image are fi lled in black.
Restoring the Unrotated Image
To restore the unrotated image, enter a value of 0 in the Rotation text box.
21
Page 26
The Editor Window
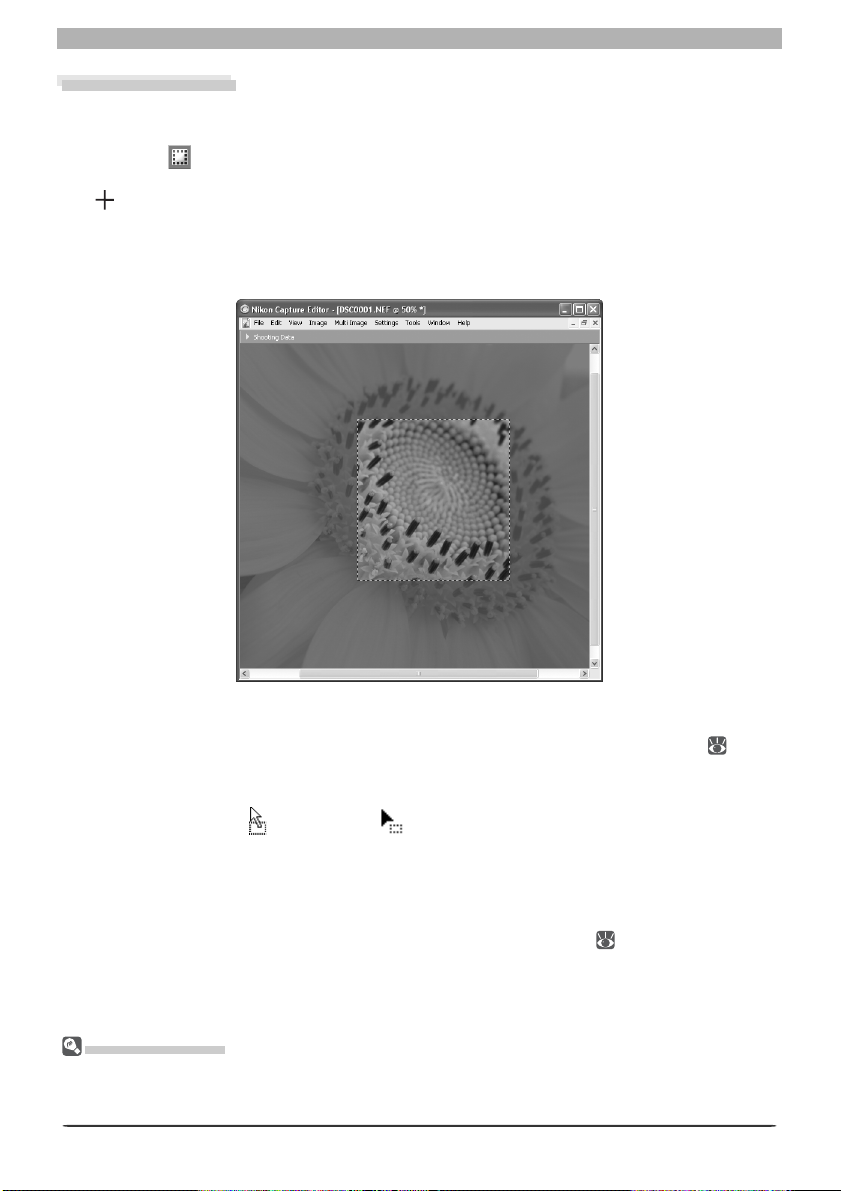
Selecting a Crop
Using the crop tool, you can select a portion of an image to be saved in a separate fi le. If no
selection is made, the entire image will be saved.
Click the button or select Crop Cursor from the View menu
1
When the mouse is moved over the image area in the active window, it will change to
(
).
Make a selection
2
Drag the mouse over the image in the active window to make a selection. The area outside the selection will be masked to show that it will be cropped.
Cancelling the Current Crop
To cancel the current crop, double-click anywhere in the image window. The selection may
( 79)
not be cancelled if Keep the output size is selected in the Size / Resolution palette
Moving the Crop
To move the crop over a different part of the image, move the pointer over the crop. The
pointer will change to a (Windows) or cursor (Macintosh). Drag the crop to move it to
a new position.
Changing the Size of the Crop
To change the size of the current crop, move the pointer over the borders of the crop. The
pointer will change to a double arrow. Drag the borders of the crop to adjust its size. The size
of the cropped image can be adjusted in the Size/Resolution palette
Saving a Selection
Unless the image is saved in NEF format, only the selected portion of the image will be saved. Anything
not included in the current crop will be deleted. In NEF format, the entire image is saved together with
in for ma tion about the location of the current crop.
( 79)
.
.
22
Page 27
Getting to Know Nikon Capture 4 Editor
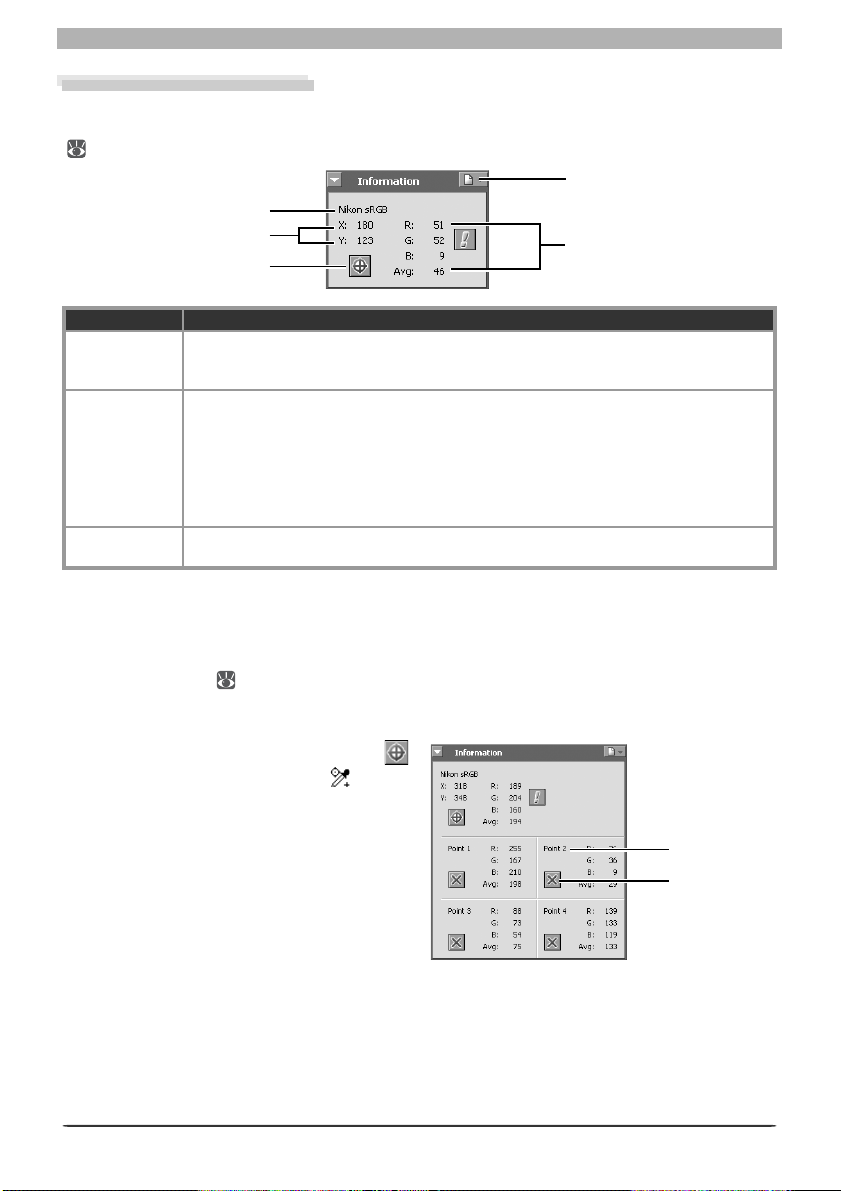
The Information Palette
The information palette shows the position and color of the pixel under the mouse pointer.
To display or hide the Information palette, click the triangle in the Information palette title bar
( 29). By default, the Information palette is in Tool Palette 3.
Settings button
Color space
x-y coordinates
Watch Point button
Information Description
Color space
R, G, B, Avg
x-y coordinates
The working color space for the image in the active image window is dis played at the
top of the in for ma tion palette. This information is embedded in the fi le when the
image is saved.
The values for each of the red, green, and blue el e ments of the pixel under the cursor
and the average of the three, weighted according to the prop er ties of hu man color
perception (the weighted average is cal cu lat ed as (Red × 0.299) + (Green × 0.587) +
(Blue × 0.114)). Depending on the se lect ed color space, the average may not refl ect
the actual luminance of the pixel under the cursor, but it can be used as a rough guide
to bright ness. Values for R, G, B, and the average of the three range from 0 to 255,
with values for sixteen- and twelve-bit images being scaled to fi t in this range.
The position of the cursor in the image win dow, mea sured in pixels from the top left
corner of the image.
Monitoring Watch Points
The Information palette can be used to continually monitor the red, green, blue, and average
values (R, G, B, Avg) for up to four selected pixels (“watch points”). The size of the watch
points can be set using the Dropper sample size option in the Advanced Color tab of the
Preferences dialog (
102), which can be displayed by clicking the Settings button in the
Information palette and selecting Advanced Color Preferences….
Selecting Watch Points
To select a pix el to monitor, click the
but ton. The cur sor will change to
. Move
the mouse over the de sired pixel and click.
The selected pixel will be add ed to the list of
watch points in the In for ma tion pal ette.
Red, Green, Blue,
Av er age
Point number
Delete but ton
23
Page 28
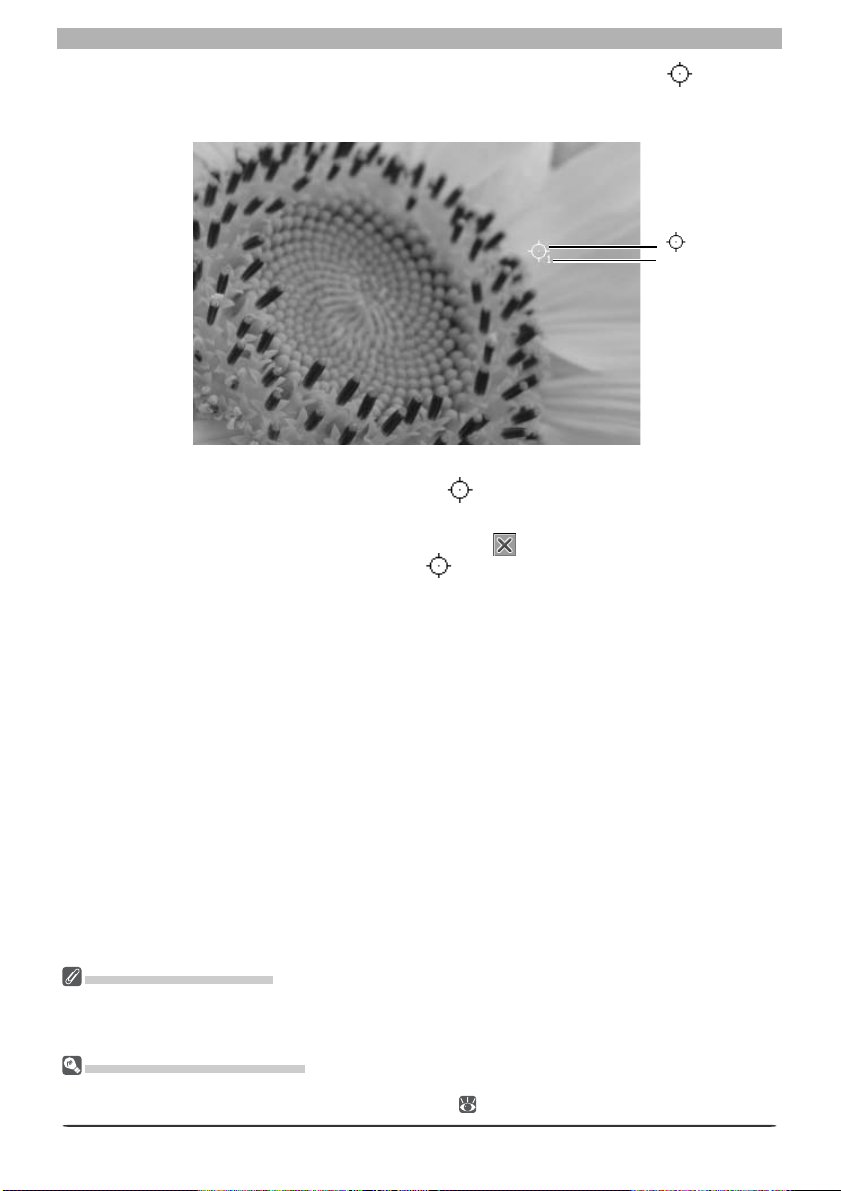
The Editor Window
The pixels currently being monitored in the Information palette are shown by a
icon in the
image window. Each point is identifi ed by a num ber cor re spond ing to the point num ber listed
in the In for ma tion palette. You can monitor up to four pix els at a time.
icon
Point number
Moving a Watch Point
To move the watch point to a new pixel, drag the icon in the image window.
Deleting a Watch Point
To remove a pixel from the list of watch points, click the button next to the cor re spond ing
listing in the In for ma tion palette, or drag the
icon out of the image window. The re -
main ing points will be re num bered to refl ect the change.
RGB and Average Values
A warning button will be displayed in the information palette at zoom ratios of less than 100%. Clicking
this button will display a dialog stating that accurate RGB and average values can not obtained at the
current zoom ratio; click Yes to view the image full size.
Preferences : Advanced Color
Clicking the icon at the right end of the Information palette tool bar displays a menu from which you can
access the Advanced Color tab of the Preferences dialog ( 102).
24
Page 29
Getting to Know Nikon Capture 4 Editor
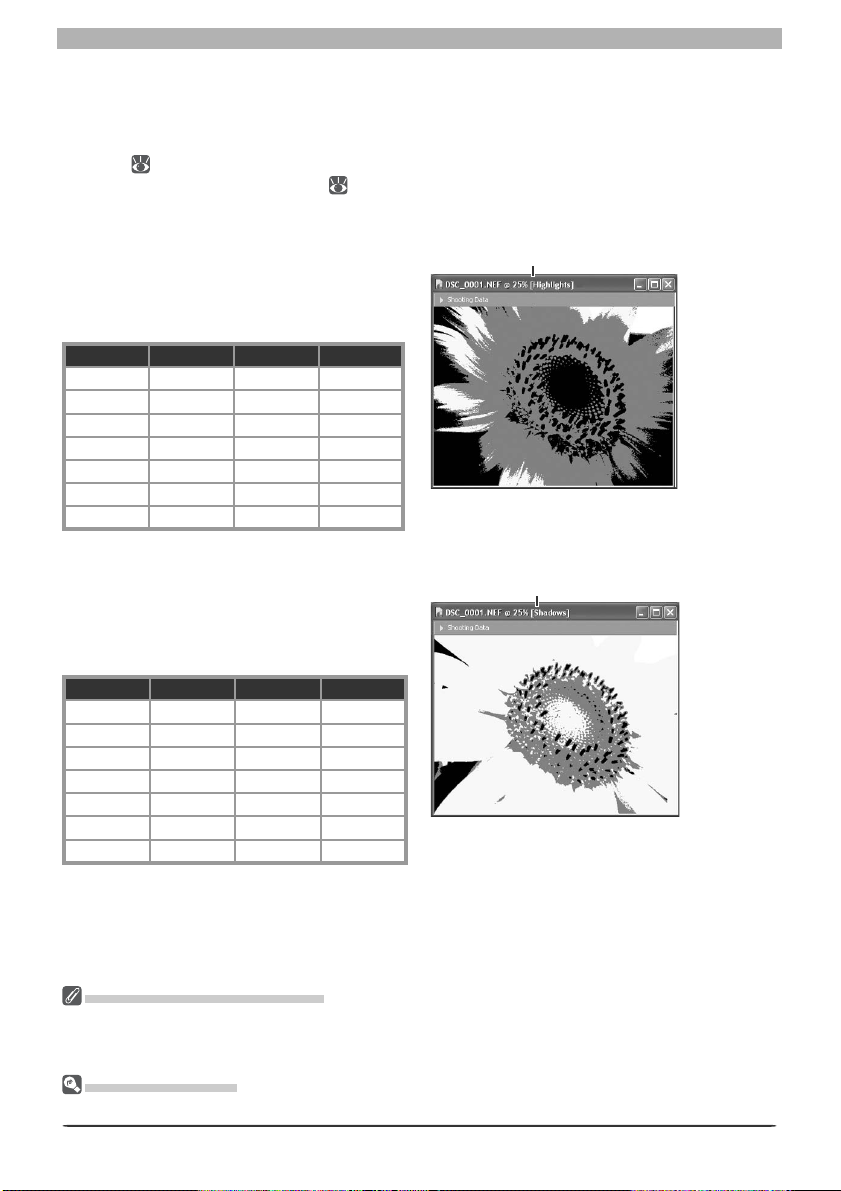
Lost Highlights and Shadows
Areas of the image in which details in the high end or low ends of the tone range may have
been lost (“lost” highlights or shadows) can be identifi ed by locating pixels with the maximum
or minimum value for one or more channel. This information can be used when using color
balance (
66) or adjusting the white point or black point to capture the optimal amount of
detail without sacrifi cing contrast ( 51).
Show Lost Highlights
When Show Lost Highlights is selected in
the Image menu, “lost” highlights (pixels
“Highlights” displayed in image
window title bar
with a value of 255 for one or more channel)
are shown in color (see table below). Other
pixels are shown in black.
R G B Shown in
“Lost” “Lost” “Lost” White
“Lost” “Lost” Not “lost” Yellow
“Lost” Not “lost” “Lost” Magenta
Not “lost” “Lost” “Lost” Cyan
“Lost” Not “lost” Not “lost” Red
Not “lost” “Lost” Not “lost” Green
Not “lost” Not “lost” “Lost” Blue
Show Lost Shadows
When Show Lost Shadows is selected in
the Image menu, “lost” shadows (pixels
“Shadows” displayed in image
window title bar
with a value of 0 for one or more channel)
are shown in color (see table below). Other
pixels are shown in white.
R G B Shown in
“Lost” “Lost” “Lost” Black
“Lost” “Lost” Not “lost” Blue
“Lost” Not “lost” “Lost” Green
Not “lost” “Lost” “Lost” Red
“Lost” Not “lost” Not “lost” Cyan
Not “lost” “Lost” Not “lost” Magenta
Not “lost” Not “lost” “Lost” Yellow
“Lost” Highlights and Shadows
Before saving images in a format other than NEF, adjust settings to avoid “losing” highlights or shadows
in large areas of the image. Information lost through editing can not be recovered once an image is
saved in a format other than NEF.
Keyboard Shortcuts
Press L to view or hide lost highlights, S to view or hide lost shadows.
25
Page 30
The Editor Window
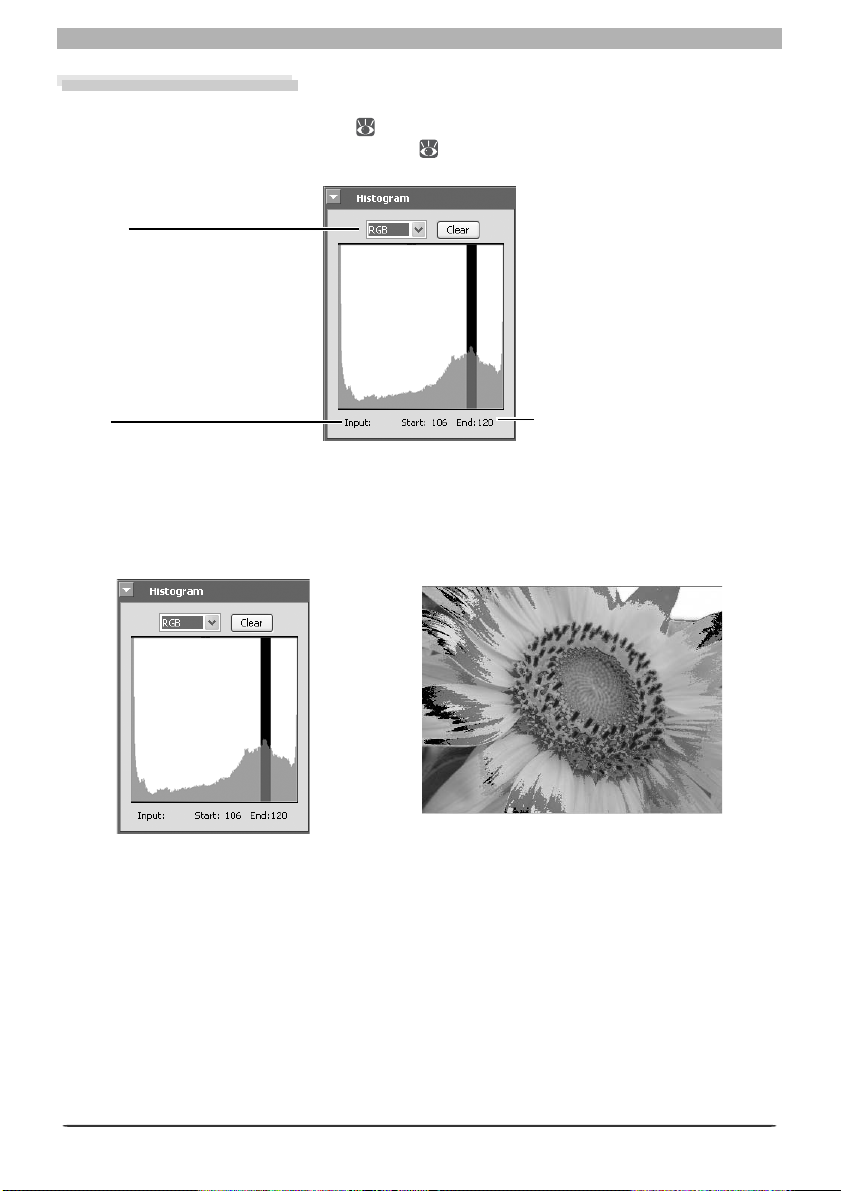
The Histogram Palette
The histogram palette shows the level distribution for the image in the active window or, if a
crop is selected, for the current crop ( 22). To display or hide the Histogram palette, click
the triangle in the Histogram palette title bar ( 29). By default, the Histogram palette is in
Tool Palette 3.
Channel
View the histogram for the
entire image or selected channels.
Input
The level (brightness) of the
point under the cursor.
Start / End
The range of values selec ted in
the histogram display.
To select an area of the histogram, drag the mouse over the histogram display. The pixels
with values in the selected range will blink in the image window. Click Clear to cancel the
current selection.
26
Page 31

Getting to Know Nikon Capture 4 Editor
The Markers Palette
Changes to pictures can be recorded using the Markers palette. To display or hide the Markers palette, click the triangle in the Markers palette title bar (
palette is in Tool Palette 3. To add a marker:
Click Add
After editing a picture, open the markers
1
palette and click Add.
Enter a marker name
Enter a marker name and click OK. The new marker will be added to the markers pal-
2
ette.
29). By default, the Markers
Selecting the marker in the markers palette will now restore the picture to the state it was
in when the marker was created. Preset markers are available for restoring pictures to their
original or current state or to the state they were in when last saved.
To delete a marker, select it in the markers palette and click Delete.
Markers
Markers for NEF images are saved with the image and recalled whenever the image is opened in Nikon
Capture 4 Editor. Markers for JPEG and TIFF images are lost when the image window is closed.
27
Page 32

The Editor Window
Show Focus Area
To show the focus area used when the image
in the active window was taken, select Show
Focus Area from the Image menu.
The focus area is shown by red
focus brackets.
Color Aberration Control
To reduce lateral chromatic aberration (colored fringes or halos) in RAW images taken
with Nikon digital SLR cameras, select Color
Aberration Control in the Image menu.
This option is not available with multiple
exposures or images created with image
overlay (D2X/D200).
Show Focus Area
The focus area will not be displayed if the image was created using a COOLPIX-series camera, a non- CPU
lens, or manual focus.
Lateral Chromatic Aberration
The refractive index of the lens varies slightly with the wavelength (color) of light. This results in changes
in image magnifi cation towards the edges of the image, producing a phenomenon known as lateral (or
transverse) chromatic aberration.
28
Page 33

Enhancing Images
Image Adjustment
Enhancing Images
Before they will be ready for display or output on a monitor or printer, images captured from
the camera will usually need to be adjusted to a size and resolution appropriate to the task at
hand. Other settings, such as white balance, contrast, sharpness, luminosity, color brightness,
chroma, and hue, Photo Effects, Image Dust Off, D- Lighting, Red eye correction, fi sheye lens
settings, and automatic color settings for portraits or landscapes, may also require adjustment. These ad just ments are performed using the image adjustment tool palettes.
Using the Tool Palettes
To display the default tool palettes, select Show Tool Palette 1, Show Tool Palette 2,
Show Tool Palette 3, or Color Balance Palette from the View menu.
Displaying the Contents of a Tool Palette
To display or hide the contents of a tool palette, click the triangle to the left of the palette
title.
Edit Indicator
This indicator turns
green if palette settings
have been modifi ed for
the image in the active
window.
Apply Button
Changes to settings only take effect
when the palette Apply button is
checked
ing, vignette control, and fi sheye
lens palettes, the Apply button is
checked by default). If the Apply
button is crossed out
of the settings in the palette will
not be visible in the image win dow.
(except in the D-Light-
, the effects
Changing Palette Order
To change the order of palettes in the tool
palette window, click a tool palette title bar
and drag it into a new position.
Settings Menu Button
Click this button to display the settings submenu, where palette
settings can be saved,
loaded, or reset.
Title bar
The Size / Resolution Palette
The Size / Resolution palette does not have an Apply button. Changes to settings in the Size / Resolution
palette are always visible in the active window.
Third- Party Plug- Ins
Nikon Capture 4 supports third-party nik Color Efex Pro 2.0 plug- ins that add a fi lter palette to Tool
Palette 2. More information is available on -line ( 2).
29
Page 34

Image Adjustment
Opening Tool Palettes in Separate Windows
Tool palettes can be opened in a separate
window by clicking the palette title and dragging it outside the current window to create
a new tool palette window con tain ing only
the selected palette.
Tools can be added to the new window by
drag ging in ad di tion al palettes. The new
window will be added to the View menu in
Nikon Capture 4 Editor. If you close the new
window by click ing the win dow close box,
you can open it again by se lect ing the desired
palette from the View menu.
The Edit Indicator
The edit indicator turns green if palette settings have been adjusted since the image in
the active window was created (NEF) images
or last saved (other images), making it clear
at a glance which palettes have been used.
Finding Tools
To display a complete list of the tools available
in Nikon Capture 4 Editor, select Find Tool
from the View menu. Tools can be opened
from the list by selecting the tool name and
clicking Go to tool. Click Name to sort tools
in ascending or descending order by name or
Location to sort tools according to the tool
palette window in which they can be found.
A bright green dot next to the tool name
indicates that it has been modifi ed from its
original settings.
Indicator
Indicator turns
green when settings
are adjusted
“Undo” and “Redo”
The Undo and Redo options in the Edit menu are used to undo and redo the effects of the last op eration. The number of consecutive operations that can be undone is limited only by the amount of
memory available. Operations can not be undone after you have closed the active window or exited
Nikon Capture.
Resetting the Tool Palettes
To restore the tool palettes to their default positions, select Reset Tool Positions in the View menu.
30
Page 35

Enhancing Images
The settings that can be adjusted depend on the image quality setting in effect when the
photograph was recorded. Photographs taken at an image- quality setting of RAW can be
processed to adjust white balance, reduce the effects of dust, perform vignette control, or to
alter exposure com pen sa tion, im age sharp en ing, tone compensation, color mode, and hue
ad just ment from the set tings in effect at the time the photograph was taken. All images can
be processed using the tools in the Curves, Color Balance, LCH Editor, Color Booster, Photo
Effects, Unsharp Mask, Noise Reduction, D-Lighting, Red Eye Correction, and Size/Resolution
palettes. Images taken with an AF DX 10.5 mm f2.8G fi sheye Nikkor lens can also be processed to reduce distortion.
Image quality Process Palette
Adjust white balance. White Balance 33
RAW
RAW
RGB-TIFF
YCbCr-TIFF
JPEG (EXTRA,
FINE,
NORMAL,
BASIC)
Choose new settings for exposure com pen sa tion, im age sharp en ing,
tone com pen sa tion, color mode, hue adjustment, and saturation.
Reduce effects of dust on the low- pass fi lter protecting the camera
image sensor.
Compensate for drop in marginal lumination caused by char ac ter is tics of camera lens.
Adjust tone, color balance, and contrast. There are two distinct
tools for this task: the Curves palette, which provides precise con trol
over tone, and the Color Balance pal ette, which features simpler
con trols.
Adjust luminosity (master lightness), color brightness, chroma (color
saturation, or vividness), and hue.
Adjust color automatically according to the subject. Color Booster 63
Convert images to black and white, sepia, or to other tints or ad-
just the brightness of the cyan / red, magenta / green, or yellow / blue
channels.
If the image lacks defi nition, you can sharpen out lines using the controls in the Unsharp Mask pal ette. Unsharp mask only be ap plied at
the last step, after all other adjustments have been made.
Reduce the noise common to pictures tak en with digital cameras.
Nikon Capture sup ports color noise reduction, edge noise reduction,
and moiré reduction (RAW images only).
Increase detail in shadows or highlights. D-Lighting 73
Correct “red-eye” in portraits.
Process pictures taken with an AF DX 10.5 mm f2.8G fi sheye Nikkor
lens to reduce distortion at the edges of the frame, making them
look like images taken with a wide-angle lens.
Adjust the size and resolution of the image for out put on a particular
device.
Advanced
RAW
Image Dust
Off
Vignette
Control
Curves 48
Color Balance 66
LCH Editor 57
Photo Effects 64
Unsharp Mask 68
Noise
Reduction
Red Eye
Correction
Fisheye Lens 77
Size/
Resolution
39
42
46
71
75
79
The Curves Tool and the LCH Editor
The Curves tool controls the distribution of tones in the red, green, and blue channels and in the RGB
master channel, and provides visual feedback on the amount of tone information lost through editing.
The LCH Editor is a better tool for making fi ne adjustments to luminosity (brightness), color saturation,
and hue; note, however, that changes to these settings may produce results that exceed the dynamic
range of the RGB channels.
31
Page 36

Image Adjustment
Suggested steps for processing images are shown below.
RAW Images
Use the Advanced RAW and White Balance tools to adjust the originals.
The LCH Editor can then be used to adjust luminosity, saturation, and hue, the Curves
tool to fi ne -tune the distribution of tones in the red, green, blue, and master channels.
TIFF and JPEG Images
Use the LCH Editor and the Curves tool to
fi ne-tune luminosity, saturation, hue, and
tone distribution.
32
Use the Color Balance, Color Booster, or
Photo Effects tool for quick visual adjustments to color.
Page 37

Enhancing Images
White Balance
The tools in the White Balance palette are used to adjust white balance for RAW images.
Using these tools, not only can you correct white balance when the setting chosen with the
camera failed to produce the desired effect, you can also deliberately alter white balance to
introduce a cold or warm cast into the image. Users of D2-series, D200, D70s, D70, and D50
cameras can copy white-balance settings to the camera or memory card (
ance can be adjusted by specifying the desired color temperature or by sampling the image
for the gray point.
Specifying a Color Temperature
Display the White Balance palette
Select the tool palette containing the White Balance palette from the View menu (the
1
default location for the White Balance palette is Tool Palette 2) and click the triangle at the
top left corner of the palette.
36). White bal-
Apply button
Slider
If the Apply button is off ( ) , turn it on ( )
2
If the Apply button is off, the image in the active image window will refl ect the white
balance settings in effect at the time the photograph is taken.
Select Set Color Temperature
3
Select Set Color Temperature from the pop-up menu at the top of the palette.
White Balance
White balance can be performed on RAW images only. If the image in the active window is JPEG or TIFF,
the Apply button in the White Balance palette will be grayed out and inactive.
“Mired”
Any given change in color temperature produces a greater dif fer ence in color at low color tem per a tures
than it would at higher color temperatures. For example, at a color tem per a ture of 6000 K, a change
of 1000 K pro duc es al most no change in color, while a change of the same amount at 3000 K would
produce a large dif fer ence in color. Mired, calculated by
multiplying the in verse of the color tem per a ture by 10
measure of color tem per a ture that takes such variation into
account, and as such is the unit used in color-tem per a ture
com pen sa tion fi lters.
6
, is a
Change in Color Temp.
4000 K – 3000 K = 1000 K
7000 K – 6000 K = 1000 K
Settings menu
Pop-up menu
Color
temperature
Mired
83 mired
24 mired
33
Page 38

Image Adjustment
Adjust white balance using the options in the White Balance palette
4
Camera WB : Shows the white balance setting in effect at the time the pho to graph was
taken and the amount of fi ne -tuning performed.
New WB: The white balance setting to be applied to the cap tured image can be chosen
from the options listed in the table below. When Day light, Stan dard Flu o res cent, or
High Col or Rendering Flu o res cent is se lect ed, white balance can be fi ne -tuned by
se lect ing an option from the sub-menu.
Option
Use Gray Point — —
Recorded
Value
Calculate
Automatically
Incandescent — 3,000 K
Daylight
Standard
Fluorescent
High Color
Rendering
Fluorescent
Flash — 5,400 K Suited to photos taken with Nikon Speed lights.
* Not available with RAW images taken with COOLPIX-series cameras. May not produce desired
results with all images; if necessary, use another white balance setting, adjust white balance using
fi ne adjustment, or sample image for grey point (
Sub -menu
option
— —
— —
*
Di rect sun light
Cloudy 6,000 K Suited to photos taken under over cast skies.
Shade 8,000 K Suited to photos taken in the shade on sun ny days.
Warm White
(3000K)
3700K 3,700 K
Cool White
(4100K)
5000K 5,000 K
Daylight
(6500K)
Color
temperature Description
White balance is set to the value cho sen in the graypoint se lec tion di a log (
White balance is set to the value re cord ed when
the picture was tak en (note that choosing another
white-balance option with the same color temperature may not produce the same results).
White balance is ad just ed au to mat i cal ly based on
the white bal ance of the orig i nal im age.
Suited to photos taken under in can des cent light ing.
5,200 K Suited to photos taken in di rect sun light.
3,000 K
Suited to fl uorescent lighting, in clud ing light ing
4,100 K
6,500 K
with a noticeable color cast. The type of bulb can
be chosen from a sub- menu of fi ve options.
35).
35).
Fine Adjustment: Color temperature can be fi ne-tuned using this slider. This option
is not available when Use Gray Point or Recorded Value is se lect ed for New WB.
Color temperature can be ad just ed by ±50 mired. Note that color temperature can not
be raised above 9090 K, and that a setting of Flash can be fi ne-tuned in the range of
4255K–7407 K.
COOLPIX Cameras
The dialog similar to that shown at right may be displayed after
adjustments to the white balance of RAW images taken with
COOLPIX-series cameras. Click Update Display to view the effects
of the new white balance settings.
34
COOLPIX 8800
Page 39

Enhancing Images
Sampling the Image for Gray Point
Select Set Gray Point
1
Select Set Gray Point from the pop-up menu at the top of the White Balance palette.
If the Apply button is off ( ) , turn it on ( )
2
Apply button
Pop-up menu
Reset button
Sliders
Sample the image to choose a reference point for white balance
White balance can be defi ned using a single pixel or the average of the values for all pixels
3
in a selected area.
Using a Single Point to Defi ne White Balance
After selecting Use a single point, click Start. The cursor will take the shape of an
eyedropper (
would like to appear a neutral gray color in the fi nal image. The new value for white balance will be refl ected in the image in the active window.
Using the Average of the Area Sampled to Defi ne White Balance
After selecting Marquee Sample, click Start. The cursor will take the shape of an areaselection eyedropper (
mouse over the image to select an area. White balance will be set to the average for the
selected areas, and the image in the active window will be updated to refl ect the new
value for white balance.
) when moved over the image in the active window. Click a point that you
) when moved over the image in the active window; drag the
Gain values
Sample Size
The size of the area sampled with the eyedropper cursor can be set using the Dropper sample size
option in the Advanced Color tab of the Pref er enc es dialog.
35
Page 40

Image Adjustment
Gain for the red and blue channels will be
adjusted based on the points sampled,
chang ing the slope of the red and blue
tone curves and the position of the red
and blue sliders.
White balance can also be adjusted by moving the red and blue sliders or by entering a
value from 0.1 to 10 in the text boxes to their right.
Reset : Click this button to reset the red and blue curves to the default value for gain
(1.0).
Red slider/Blue slider: Adjust gain by moving these sliders or entering a value from 0.1 to
10 in the text boxes to their right.
Copying White Balance to the Camera (D2-Series/D200/D70s/D70/D50 Only)
If the image in the active window is a RAW image taken with a D2-series, D200, D70s, D70,
or D50 camera, the new white-balance value can be copied directly to one of the camera’s
white-balance presets or recorded to the camera memory card. Before copying a value to
the camera, make sure the camera is connected and turned on. Before copying a value to
the memory card, remove the card from the camera and insert it in a memory card reader or
card slot.
Select Write settings to camera… from the white balance settings menu
The dialog shown at right will be dis-
1
played. Enter a descriptive comment of
up to thirty-six characters (D2 series and
D200 only) and click OK.
D2-series/ D200
D70
Choosing a Value for Gain
Very large and small values for gain can result in a drop in image quality.
Copying White Balance to the Camera (D2-Series/D200/D70s/D70 D50 Only)
Nikon Capture 4 Editor supports a wider range of values for gain than do D2-series, D200, D70s, D70,
and D50 cameras. When white-balance settings are copied to the camera, values that exceed the range
of these cameras will automatically be adjusted to values supported by the camera. Choose values be tween 0.1 and 2 when using the Write setting to camera option.
Gain
The values for red and blue gain chosen in the White Balance palette are multiples of the value set for
gain when the photograph was taken.
36
Page 41

Choose an option
2
The dialog shown at right will be displayed. Click Write to camera, Write
to card, or Cancel.
Enhancing Images
Write to camera : Copy white balance
from the White Balance palette to the
camera. If a D2-series or D200 camera
is connected, the dialog shown at right
will be displayed. Choose a preset from
the pop-up menu and click OK. The new
value for the selected preset can be confi rmed from the camera or Nikon Capture
4 Camera Control.
Write to card: The dialog shown at right
will be displayed. Choose the drive containing the camera memory card from
the pop-up menu and click OK to copy
the new white-balance value to the camera memory card. A dialog showing the
name of the new fi le will be displayed;
click OK to close the dialog.
Cancel : Exit without copying white bal-
ance to the camera or memory card.
White balance preset menu
Existing comment for selected preset
D2-series/ D200
D70s/ D70/D50
“Write to Camera”
Before connecting the camera to the computer, set the USB option in the camera setup menu to PTP.
“Write to Card”
Nikon Capture 4 writes the new value for white balance to the folder with the highest folder number. If
this folder already contains 999 images, the camera may not recognize the fi le containing the new value
for white balance.
Reading White Balance from the Memory Card
For information on reading white balance values from the memory card, see the camera Guide to Digital
Photography.
Comments (D2-Series / D200 Only)
In addition to letters and numbers, comments can contain quotes, apostrophes, spaces, and any of the
following characters: “,” “.” “!” “?” “#” “$” “%” “&” “(” “)” “[” “]” “{” “}” “*” “+” “-” “/” “:” “;”
“<” “=” “>” “_” and “@”.
37
Page 42

Image Adjustment
The White Balance Settings Menu
Clicking the icon in the White Bal ance palette dis plays the White Balance
Settings menu.
Option Description
Copy to Clip board Copy current white balance settings to the clipboard.
Select this item to restore white balance to settings saved us ing the Save… op -
Load…
Save…
Reset to Recorded
Value
Write settings to
camera…
Recent fi les
Ad vanced Color
Preferences…
tion (see below). A di a log will be displayed where you can navigate to the drive
(volume) and di rec to ry con tain ing the de sired settings fi le (only fi les with the
extension “.nwb” will be dis played). The set tings in the White Balance palette will
in stant ly revert to the saved settings.
Select this item to save current white balance settings to a named fi le. These settings can later be recalled using the Load… option. Choosing Save… dis plays
a dialog where you can choose a des ti na tion and fi le name for the current white
balance settings. White balance set tings are saved with the extension “.nwb”.
Selecting this item restores the value for white balance in ef fect at the time the
photograph was taken.
If the image in the active window was taken with a D2-series, D200, D70s, D70,
or D50 camera, select this option to copy white balance to a white-balance preset
or the camera memory card (
Recent white balance settings fi les (up to four) are listed at the end of the settings
menu. Selecting a fi le from the list sets the controls in White Balance palette to
the saved settings.
Open the Nikon Capture 4 Editor Preferences dialog to the Ad vanced Color tab
102), where you can adjust the gray point sample size ( 35).
(
36).
The Set tings Menu
The White Bal ance Settings menu can also be displayed by se lect ing White Bal ance from the Set tings
menu.
38
Page 43

Enhancing Images
Advanced RAW
The options in the Advanced RAW palette are used to alter exposure compensation, image
sharpening, tone compensation, color mode, and hue ad just ment from the settings in effect
at the time the pho to graph was taken.
Display the Advanced RAW palette
Select the tool palette containing the Advanced RAW palette from the View menu (the
1
default location for the Advanced RAW palette is Tool Palette 2) and click the triangle at
the top left corner of the palette.
If the Apply button is off ( ) , turn it on ( )
2
Adjust Advanced RAW settings
3
Exp Comp: Choose a value from –2 to +2 EV using the slider or enter a value in the text
box to its right. Choose 0 to perform no compensation.
Sharpening: Adjust the sharpness of outlines in the image according to the scene or your personal preference. Choose from Unchanged, None, Low, Medium Low, Normal, Medium
High or High. In the case of photographs taken with D1, Normal is equivalent to None.
The Warning Button
A warning button appears if the image in the active window is displayed at a zoom ratio too low to allow
the effects of Advanced Raw settings to be displayed. Click the button to view the warning.
Advanced RAW
Advanced RAW can be performed on RAW images only. If the image in the active window is JPEG or
TIFF, the Apply button in the Advanced Raw palette will be grayed out and inactive.
COOLPIX Cameras
Tone Comp > User-Defi ned Custom Curve and the Medium
Low and Medium High options for Sharpening and Tone Comp
are not available in the case of RAW images taken with COOLPIXseries cameras. A dialog like that shown at right may be displayed
after adjustments to exposure compensation, sharpening, and tone
compensation. Click Update Display to view the effects of the
new settings.
COOLPIX 8800
39
Page 44

Image Adjustment
Tone Comp: Adjust image contrast. Choose from Unchanged, Low Contrast, Medium
Low, Normal, Medium High, High Contrast, or User-Defi ned Custom Curve. Be cause the D1 does not store cus tom curves in the image fi le, set tings of User- Defi ned
Custom Curve are equiv a lent to Normal when se lect ed with pho to graphs taken with
the D1. With D2-series, D1
X, D1H, D200, D100, D70s, D70, and D50 cameras, selecting
User-Defi ned Custom Curve re stores the tone curve in effect at the time the pho to graph was taken.
Color Mode: Choose a color mode for fi ne control over chroma, brightness, and color
gamut, much as you would choose different kinds of color fi lm for different scenes.
Choose from Unchanged, Mode I, Mode II, Mode III, Mode Ia, Mode IIIa, or B&W.
In the case of images taken with the D1, Un changed is equiv a lent to D1 Mode (NTSC).
Color mode selection is available only in the case of RAW images taken with D2-series,
D1-series, D200, D100, D70s, D70 or D50 cameras.
Saturation: Adjust the vividness of colors without affecting hue. Choose from Unchanged, Moderate, Normal, or Enhanced.
Hue Adjustment
: Adjusts hue without affecting brightness or saturation. Hue can be adjusted in the range –9 ° to 9 ° in seven steps of 3 °. If red is taken as the start ing color, raising
hue above 0 ° (the de fault setting, at which hue is un changed) would in tro duce a yel low cast,
mak ing col ors that would be red at a setting of 0 ° ap pear in creas ing ly or ange. Low er ing hue
be low 0 ° would in tro duce a blue cast, mak ing col ors that would be red at a setting of 0 ° appear in creas ing ly purple (in the case of the D1
X and D1H, –9 ° is equiv a lent to a camera hue set-
ting of 0, 0 ° to a setting of 3, and 9 ° to a setting of 6). To use the value for hue ad just ment
in effect at the time the photograph was taken, turn the Hue Ad just ment check box off.
Sharpening, Tone Comp., Color Mode, and Saturation
In the case of images taken with D2-series, D1-series, D200, D100, D70s, D70, or D50 cameras, the
sharpening, tone compensation, color mode, and saturation settings in effect at the time the photograph was taken are marked with an asterisk (no asterisk will be displayed if “Auto” was selected for
sharpening, tone compensation or saturation). Choose Unchanged for results identical to those obtained with the camera; other settings may not produce the same results.
Color Mode
If Use this instead of an embedded profi le when opening fi les is selected for Default RGB color
space in the “Color Management” tab of the “Options” (“Preferences”) dialog (
RGB color profi le will be used as the working color space for all images, regardless of the mode selected.
If Use this instead of an embedded profi le when opening fi les is not selected, Adobe RGB will auto-
matically be chosen as the working color space for Mode II images. The working color space for Mode I,
Ia, III, and IIIa images will either be the color space selected with the camera (D2X and D200 only) or sRGB
(all other cameras). The working color space for NTSC images (D1 only) will be NTSC. Modes I and Ia,
which are adapted to the sRGB color space, are suited to portraits that will be printed or used “as is” with
little or no mod i fi ca tion. Mode II is adapted to the Adobe RGB color space. This color space is capable
of expressing a wider gamut of colors than sRGB, making it the pre ferred choice for pictures that will be
extensively processed or retouched. Modes III and IIIa, which are adapted to the sRGB color space, are
suited to nature or land scape shots that will be printed or used “as is” with little or no modifi cation.
When B&W is selected for Color Mode, photos taken with the D200 are processed in the same way
as photographs taken with Black-and -white selected in the camera Optimize Image menu. Photos
taken with other cameras are processed in the same way as images converted to black-and-white using
the Effect > Black and White option in the “Photo Effects” palette (
64).
104, 105), the default
40
Page 45

The Advanced RAW Settings Menu
Clicking the button in the Advanced
RAW palette displays the Advanced RAW
settings menu.
Option Description
Copy to Clip board Copy current Advanced RAW settings to the clipboard.
Select this item to restore Advanced RAW settings to settings saved using the
Load…
Save…
Reset to Neutral
Recent fi les
Save… option (see below). A dialog will be displayed where you can navigate
to the drive (volume) and di rec to ry con tain ing the desired settings fi le (only fi les
with the ex ten sion “.nar” will be displayed). The settings in the Advanced RAW
palette will instantly revert to the saved settings.
Select this item to save current Advanced RAW set tings to a named fi le. These
settings can later be recalled using the Load… option. Choos ing Save… displays
a di a log where you can choose a destination and fi le name for the current white
balance settings. Advanced RAW set tings are saved with the extension “.nar”.
Selecting this item restores the settings in effect at the time the pho to graph was
taken.
Recent Advanced RAW settings fi les (up to four) are listed at the end of the settings menu. Selecting a fi le from the list sets the controls in Advanced RAW
palette to the saved settings.
Enhancing Images
Exposure Compensation
Highlights in images saved in Nikon Capture 4.3 or earlier with a negative value selected for exposure
compensation may display differently when opened in Nikon Capture 4 Editor Ver. 4.4 or later.
The Settings Menu
The Advanced RAW Settings menu can also be displayed by selecting Ad vanced RAW from the Set-
tings menu.
41
Page 46

Image Adjustment
Image Dust Off
Image Dust Off compares RAW photographs with a reference image created with the same
camera to reduce the effects of any dust that may be present on the low-pass fi lter protecting
the camera’s imaging sensor.
Before Image Dust Off
Image Dust Off
Image Dust Off only affects relatively featureless areas of the image.
Display the Image Dust Off palette
1
Select the tool palette containing the Image Dust Off palette from the View menu (the
default location for the Image Dust Off palette is Tool Palette 2) and click the triangle at
the top left corner of the palette.
Turn the Apply button on ( )
2
Turn the Apply button on ( ) to enable Image Dust Off.
Click Change...
3
Click Change... to select a reference image for Image Dust Off. Image Dust Off will be
performed when the image is selected. The date of creation of the selected fi le will be
displayed under “Dust Off ref photo was taken at” in the Image Dust Off tool palette.
Image Dust Off
Image Dust Off can be performed on RAW images only. If the image in the active window is JPEG or TIFF,
the Apply button in the Image Dust Off palette will be grayed out and inactive.
Cameras That Support Image Dust- Off
The following cameras support Image Dust Off: D2-series cameras, D1X / D1H (fi rmware version 1.10 or
later), D200, D100, D70s, D70, and D50. Image Dust Off is not supported with COOLPIX cameras, D1
cameras, or with earlier versions of the camera fi rmware for the D1
Reference Images
The position and amount of dust on the low -pass fi lter may change. If possible, take reference images
regularly and use a reference image taken within one day of the selected photograph.
After Image Dust Off
Settings menuApply button
X and D1H.
42
Page 47

Enhancing Images
Images Taken with D2-Series, D200, D70s, D70, or D50 Cameras
If the current image was created with a D2series, D200, D70s, D70 or D50 camera, Nikon
Capture 4 Editor will search for reference fi les
created with the camera Image Dust Off option
(extension “.ndf”). If it fi nds a reference fi le in
the same folder as the current image, a message
will be displayed. Click Yes to use this fi le as a
reference.
If the folder contains more than one reference
fi le, clicking Yes will display the dialog shown at
right. Select a fi le for use with Image Dust Off.
If the user clicks No or the current folder does
not contain an image created with the camera
Image Dust Off option, a folder selection dialog
will be displayed. Select a folder containing Image Dust Off reference data.
Images Taken with Other Cameras
If the image in the active window was not created with a D2-series, D200, D70s, D70, or
D50 camera, a folder selection dialog will be displayed. Select the folder containing the
desired Image Dust Off reference photo and click OK.
The message shown at right will be displayed.
Click Yes to search for a suitable reference fi le.
If more than one fi le is found, a fi le-selection
dialog will be displayed (see above). Select a
reference fi le for Image Dust Off.
Clicking No will display a list of all Dust Off ref
photos. Select the fi le that will be used as a reference for processing the current image.
Excessive Dust
If a large amount of dust is detected in the current image, Nikon Capture 4 Editor will display a warning
stating that the results of Image Dust Off can not be guaranteed. Click Yes to proceed.
No Suitable Images Found
If none of the Image Dust Off reference fi les found is suitable for use with the image in the active
window, Nikon Capture 4 Editor will display a message to this effect and offer to use the most suitable
reference image. Clicking Yes displays a list of the most suitable reference images; select a reference fi le
to process the image in the active window to reduce the effects of dust.
43
Page 48

Image Adjustment
Creating Dust Off Ref Photos
To create a Dust Off ref photo for cameras other than the D2 series, D200, D70s, D70, or
D50:
Select a CPU lens
Mount a CPU lens on the camera. We recommend using a lens with a focal length of at
1
least 50 mm. If using a zoom lens, zoom in to the maximum telephoto position.
Adjust camera settings
2
Choose the following settings in the order shown below:
1 Sensitivity (ISO equivalency): choose the minimum setting
2 Image quality: choose NEF (RAW)
3 Exposure mode: choose aperture-priority auto (A)
4 Aperture: choose the minimum aperture (largest f/-number)
5 Focus: choose manual focus and set focus to infi nity
Take a photograph
3
With the lens about 10 cm from a featureless white object, such as a wall, frame the object
so that it fi lls the viewfi nder and take a photograph. The resulting Dust Off ref photo will
be recorded as an NEF (RAW) image.
Transfer the photograph to the computer
4
Creating Dust Off Ref Photos (D1-Series and D100 Cameras)
In addition to D2-series, D200, D70s, D70, and D50 cameras, Dust Off ref photos can be taken with the
D1X / D1H (fi rmware version 1.10 or later), and D100. Dust Off ref photos can not be created with the D1
or with earlier versions of the camera fi rmware for the D1
D100, D1
A slight amount of blurring caused by camera shake will not affect Dust Off ref photos.
44
X, or D1H have the extension “.nef”; do not change this extension.
Camera Shake
X and D1H. Dust Off ref photos taken with the
Page 49

The Image Dust Off Settings Menu
Clicking the button in the Image Dust
Off palette displays the Image Dust Off Settings menu.
Option Description
Copy to Clip board Copy current Image Dust Off settings to the clipboard.
Select this item to load Image Dust Off settings pre vi ous ly saved using the Save…
Load…
Save…
Reset to Neutral
Recent fi les
op tion (see be low). A dialog will be displayed where you can navigate to the drive
(vol ume) and di rec to ry con tain ing the desired settings fi le (only fi les with the extension “.ndr” will be dis played). The set tings in the Image Dust Off palette will
instantly re vert to the saved settings.
Select this item to save Image Dust Off settings to a named fi le. These settings
can later be re called using the Load… option. Choos ing Save… displays a dialog
where you can choose a destination and fi le name for the current Image Dust Off
settings. Image Dust Off set tings are saved with the ex ten sion “.ndr”.
Clears the name of the current Image Dust Off reference fi le from the Image Dust
Off palette.
Recent Image Dust Off settings fi les (up to four) are listed at the end of the settings menu. Selecting a fi le from the list sets the controls in Image Dust Off
palette to the saved settings.
Enhancing Images
Reusing Image Dust Off Settings
Before pasting or loading Image Dust Off settings into the Image Dust Off palette for another image, be
sure that the image was created with the same camera used to record the Image Dust Off reference fi le.
If the reference fi le was created with a different camera, a warning will be displayed.
The Set tings Menu
The Image Dust Off Settings menu can also be displayed by selecting Image Dust Off from the Set tings menu.
45
Page 50

Image Adjustment
Vignette Control
The Vignette Control palette is used to correct for loss of marginal lumination, a phe nom e non
as so ci at ed with camera lenses that causes a drop in brightness at the edges of a photograph.
Vignette Control is most effective when performed on images taken at maximum aperture. If
the picture in the active image window is a RAW image taken with a lens equipped to transmit dis tance in for ma tion (i.e., a type G or D lens) mounted on a camera that can record this
in for ma tion, Nikon Capture 4 will use the lens information recorded with the im age to au to mat i cal ly select an optimal value for Vignette Control. Where lens information is not available,
Vignette Control will be based on default lens characteristics. To determine whether a given
com bi na tion of lens and cam era will record distance information, see the table below.
Camera Type G or D lens Other lens
D2 series, D200, D100, D70s, D70, D50 Recorded Not recorded
X/D1H (fi rmware version 1.10 or later) Recorded Not recorded
D1
D1X /D1H (fi rmware version 1.01 or earlier)
D1 Not recorded Not recorded
To use Vignette Control:
Display the Vignette Control palette
Select the tool palette containing the Vignette Control palette from the View menu (the
1
default location for the Vignette Control palette is Tool Palette 2) and click the triangle at
the top left corner of the palette.
Apply
button
Not recorded Not recorded
Settings
menu
Turn the Apply button on ( )
2
Turn the Apply button on ( ) to enable Vignette control.
Adjust intensity
3
Vignette control can be performed manually by dragging the Intensity slider or entering
a value in the text box to its right. Choose a value between –100 and +200 ac cord ing to
the drop in marginal lumination exhibited by the lens in use. The default value is 80; if 0
is selected, no vignette control will be performed.
Vignette Control
The controls in the Vignette Control palette are only available if the image in the active window is a RAW
(NEF) pho to graph taken with a D2-series, D1-series, D200, D100, D70s, D70, or D50 camera. If the image
is JPEG or TIFF, the Apply button in the Vignette Control palette will be grayed out and inactive. Vignette
control can not be used to correct vignetting caused by PC Nikkor lenses or Speedlight photography.
Where Distance Information Is Not Available
Vi gnette Con trol for photographs taken with lenses or cameras that do not support distance in for ma tion
is based on default lens characteristics. Care may be required to prevent over- cor rec tion.
Neutral.set
At factory defaults (the default settings stored in the fi le “Neutral.set”), the Apply button is off ( ) and
Intensity is set to 80.
46
Page 51

The Vignette Control Settings Menu
Clicking the
icon in the Vignette Control palette dis plays the Vignette Control
Settings menu.
Option Description
Copy to Clip board Copy current Vignette Control settings to the clipboard.
Select this item to restore settings saved us ing the Save… op tion (see below).
Load…
Save…
Reset to Default Restores default settings. Intensity will be set to 80.
Recent fi les
A di a log will be displayed where you can navigate to the drive (volume) and di rec to ry con tain ing the de sired settings fi le (only fi les with the extension “.nvc”
will be dis played). The set tings in the Vignette Control palette will in stant ly re vert
to the saved settings.
Select this item to save current settings for the Vignette Con trol pal ette to a
named fi le. These settings can later be re called using the Load… op tion. Choos-
ing Save… dis plays a di a log where you can choose a des ti na tion and fi le name
for the current Vignette Control settings. Vignette Control settings are saved
with the extension “.nvc”.
Recent Vignette Control settings fi les (up to four) are listed at the end of the
settings menu. Selecting a fi le from the list sets the controls in Vignette Control
palette to the saved settings.
Enhancing Images
The Set tings Menu
The Vignette Control menu can also be displayed by se lect ing Vignette Con trol from the Set tings
menu.
47
Page 52

Image Adjustment
Curves
Although your Nikon digital camera will reproduce colors accurately if settings have been
ad just ed appropriately, it will usually be necessary to adjust contrast, tone (brightness) levels,
and color balance to make maximum use of the tone range and color gamut offered by a
particular output device, such as a printer or monitor. Nikon Capture offers two tools for
performing these tasks: the Color Balance palette (see “Color Balance” later in this chapter)
and the Curves palette. Of the two, the Curves palette offers the more precise control. The
Color Balance palette is useful when, for example, you want to adjust brightness or color
balance for all pixels in the image. The Curves palette, in contrast, allows adjustments to be
made to specifi c por tions of the tone range, making it possible to enhance the image while
preserving detail.
Curves—an Overview
To view the Curves palette, select the tool palette containing the Curves palette from the
View menu (the default location for the Curves palette is Tool Palette 1) and click the triangle
at the top left corner of the palette. To enable the tools in the Curves palette, turn the Apply
button on (
).
Apply button
Curve edit display
Current channel
Histogram button
Auto Contrast button
White Point button
Midpoint button
Black Point button
Tone Curve Point button
Reset Active Curve
Reset All Curves
The main editing tool in the Curves palette is the curve edit display, which contains a curve
showing the relationship between input (the tones in the original image) and output (how
the tones in the input will be represented in the fi nal image). Separate curves control the
re la tion ship between input and output for the image as a whole (the “master curve”) and for
each of the red, green, and blue color com po nents, or “channels.” The default curve in each
case is linear, meaning that tones will be output exactly as they are input.
Opening NEF Files Saved in Nikon Capture 3.5x or Earlier
In Nikon Capture 4, changes to color balance apply before changes to curves In earlier versions of Nikon
Capture, changes to curves applied before changes to color balance, with the result that settings may
change when the images saved in Nikon Capture 3.5x or earlier are opened in Nikon Capture 4.
Preferences > Advanced Color
Auto contrast, shadow, and highlight settings can be adjusted in the Advanced Color tab of the Preferences dialog.
48
Page 53

Enhancing Images
Input is plotted along the horizontal axis, with shadows (the dark areas of the image) to the
left, high lights (the bright areas of the image) to the right, and mid-tones in between. The
left end of the axis marks the minimum possible value for colors in the selected channel (zero,
or no color), the right end the maximum value. In the case of the master curve, the minimum
value represents areas of the input image that are a true black; the maximum value represents
areas that are a true white. Output is plotted along the vertical axis, with the minimum possible output value (again, zero, or no color) at the bottom and the maximum output value at
the top.
Shadows
High lights
Brightness of point
under cursor
Input /output display
When the cursor is moved over an image or over the curve edit display, the input and output
values for the point under the cursor are shown in the input/output display. The input value
represents the level of the pixel in the original image, the output value the level of the pixel
after any changes to the curve have been applied.
The Curve Edit Display
Although values for input and output in the Curves palette range from zero to 255 (eight- bit pre ci sion,
familiar to users of other image editing software), the results of any changes to curves are calculated at
a precision of sixteen bits. This allows twelve-bit RAW data to be modifi ed without lowering the quality
of the output.
49
Page 54

Image Adjustment
Viewing the Histogram
The fi rst step in adjusting tone levels and color balance in the Curves palette is to view the
histogram displayed in the background of the curve edit display. The histogram tells you what
tones are present in the original image and in what amounts, information that you will use
when setting the black point and white point and editing curves. The histogram takes the
form of a bar graph. The horizontal axis gives the tone level, with shadows to the left and
highlights to the right. The vertical axis gives the number of pixels of each tone level found in
the image, scaled to fi t in the curve edit display.
Histogram button
By assigning the darkest tones in the image an output value of zero and the brightest tones
in the image an output value of 255, blacks will be output as blacks and whites as whites,
making the most effective use of the dynamic range of the output device.
To view the distribution of tones in the fi nal, output image after changes to curves, click and
hold the Histogram button
.
Channel Selection
You can modify tones for all colors in the
image using the master curve, or select any
of the red, green, and blue curves for editing using the channel menu. The histogram
shows tone levels for the selected chan nel
only. When the master curve is selected, the
auto-contrast but ton and white-point and black-point eye drop per tools apply simultaneously
to all of the red, green, and blue curves (the master curve is un af fect ed). When one of the
red, green, and blue curves is selected, these controls can be used to edit the se lect ed curve
only.
The Histogram (RAW / 16-Bit TIFF Images Only)
To reduce display times when dealing with large amounts of image data, Nikon Capture 4 may display a
histogram containing vertical lines.
Channel Selection Shortcuts
The current channel can also be selected using the following shortcuts:
• Ctrl ~ (Windows)/ ~ (Macintosh) • Ctrl 1 (Windows)/ 1 (Macintosh)
Master channel (RGB) Red channel
• Ctrl 2 (Windows) / 2 (Macintosh) • Ctrl 3 (Windows)/ 3 (Macintosh)
Green channel Blue channel
50
Page 55

Enhancing Images
Setting the White Point and Black Point
The endpoints of the curve are referred to as the “white point” and the “black point.” The
black point for a given channel represents the darkest shade (minimum value) for that color,
the white point, the brightest shade (maximum value). By default, the input and output
values for the black point are zero. The darkest shade in the input image may however be
greater than zero, with the result that a portion of the curve is dedicated to reproducing
tones not actually present in the image. Increasing the input value for the black point until
it matches the darkest shade in the image will steepen the curve, en hanc ing overall contrast
without causing a corresponding loss of detail in shadows. Similarly, if the original image
does not actually contain shades corresponding to the maximum value, the white point can
be lowered to match the brightest shade in the image.
There are two steps to selecting a white point and black point for the fi nal image: choosing
the white-point and black-point input levels, and selecting out put levels.
White - Point and Black- Point Input Levels
Input levels for the white point and black point can be set using any of the following three
methods:
• automatic contrast adjustment
• white-point and black-point sliders
• direct sampling using the white -point and black-point eyedropper tools
Automatic Contrast Adjustment
In automatic contrast adjustment, Nikon Capture automatically selects white and black points
that exclude a certain percentage of the brightest and darkest pixels in the image, steepening
curves for enhanced contrast (the exact percentage of pixels excluded can be specifi ed in the
Preferences dialog;
producing a curve that makes optimal use of the output tone range while preserving details
in shadows and highlights.
To perform an auto contrast operation, click the Auto Contrast button
black points for each of the red, green, and blue channels will be modifi ed simultaneously and
the master curve will be displayed in the Curves palette (the master curve itself is unaffected
by this operation). Clicking the button with the Ctrl (Win dows) or option (Macintosh) key
held down adjusts contrast only for the channel cur rent ly se lect ed in the channel menu.
102). By default, 0.5% of the brightest and darkest pixels are excluded,
. The white and
51
Page 56

Image Adjustment
White-Point and Black-Point Sliders
The white-point and black- point sliders can
be used to match the white and black points
to the his to gram displayed in the curve edit
display. While these sliders can be used to
edit curves for any channel, the best results
are usually obtained when they are used to
modify the master curve.
To edit the white point or black point, click
the corresponding slider once to activate it,
then drag it to the right or left (a value can
also be entered directly in the text box underneath the slider). Matching the black-point
slider with the lowest input value displayed
Black- point slider
White - point slider
in the histogram will set the minimum output
value for the selected channel to the darkest pixel actually present in the image, steepening
the curve and enhancing contrast without sacrifi cing detail in shad ows. Similarly, matching
the white-point slider with the highest input value displayed in the histogram will set the
maximum output value for the selected channel to the brightest pixel present in the image,
enhancing contrast without loss of detail in highlights. Any changes are applied instantly to
the active image.
Sampling the Image for White Point or Black Point
The white point or black point can be set by directly sampling the image, allowing you to
choose the pixels that will be used to set the maximum (white point) or minimum (black point)
output value. This makes it possible to set the black point by matching it to a pixel in the
darkest part of the image containing detail you want to preserve, eliminating details in darker
areas that are not important to the fi nal image. Similarly, you can match the white point to a
pixel in the brightest area of the image containing details important to the fi nal image. While
direct sampling can be used with any channel, it is most effective when used with the master
curve. When the master curve is selected, sampling will set the white or black point for red,
green, and blue curves simultaneously; the master curve itself is unaffected.
To sample the white point, click the White Point button
. When the cursor is moved over
the active image, it will take the shape of an eyedropper. Move the cursor over the image to
fi nd the pixel that you want to use to set the white point, keeping an eye on pixel level display
in the Information palette to identify pixels with high input values. With the cursor over the
target pixel, click the mouse button. The input value for the selected pixel will be used as the
input value for the white point. The cursor will return to its original shape, and the image will
automatically be altered to refl ect the new value for white point.
To sample the image for the black point, click the Black Point button
and move the
eye drop per cursor over the image until you fi nd the point that you want to use to set the
min i mum input value, then click the mouse button to select the black point.
52
Page 57

Enhancing Images
White Point and Black Point Output Levels
Once you have set the input level for the black point and white point, output levels can be
altered to refl ect the actual shade of the darkest and brightest pixels in the image. If the
darkest shade in the image represents a true black, for example, the output level for the black
point can be left at zero. If, however, darkest shade present in the image is a lighter color, the
output level for the black point can be raised to achieve more natural coloration.
The output levels for the white point and black point are set using the white-point and blackpoint output sliders on the left side of the curve edit display.
White - point output
Black- point output
slider
slider
To set the output level, click the slider once to activate it, then drag it up or down until you
have found the desired output level (the output level can also be set by entering a value directly in the text box to the left of the slider). The effects of the change will be refl ected in
the active image.
Sampling White Point or Black Point for the Current Channel
By default, sampling sets the white point or black point for all channels and displays the master channel. To set the white or black point for the current channel only, sample the image while pressing Ctrl
(Win dows) or option (Macintosh). Midpoint can not be sampled for a single channel; regardless of the
channel currently selected, sampling the image for midpoint always sets the mid point for all chan nels
and dis plays the master chan nel.
53
Page 58

Image Adjustment
Setting the Midpoint
The point midway between the maximum and minimum input values is known as the “mid point,” which represents a neutral shade corresponding to an output level of 128. The
mid point is controlled by a midpoint slider at the bottom of the curve edit display. Moving
the midpoint slider to the left increases the brightness of mid-tones without “washing out”
high lights. Moving the slider to the right darkens mid-tones without obliterating detail in
shad ows.
The midpoint can be set using the midpoint slider or by directly sampling the image using the
midpoint eyedropper tool.
The Midpoint Slider
The midpoint slider is located at the bottom
of the curve edit display.
After clicking the slider once to activate it,
move it to the left to increase the brightness of mid-tones in the selected channel, or
move it to the right to decrease brightness.
Al ter na tive ly, you can enter a value for gamma directly in the text box under the slider.
The effects of changes to the midpoint can
be seen in the active image.
Midpoint slider
Sampling the Image for Midpoint
The midpoint can also be set by direct sampling. Regardless of the channel currently selected
in the channel menu, sampling simultaneously defi nes the midpoint for each of the red,
green, and blue chan nels while leaving the midpoint for the master curve unchanged.
To sample the midpoint, click the Midpoint button
. When the cursor is moved over the
active image, it will take the shape of an eyedropper. Move the cursor over the image to fi nd
the pixel that you want to use to set the midpoint, keeping an eye on the pixel level display
in the Information palette to identify pixels with a neutral input value (look for pixels that you
think should be a neutral gray color in the fi nal image). With the cursor over the target pixel,
click the mouse button. The input value for the selected pixel will be used as the reference
value for the midpoint. The cursor will return to its original shape, and the image will au to mat i cal ly be altered to refl ect the new value for midpoint.
Gamma
Gamma (also written “γ”) is a fundamental property of video systems which determines the in ten si ty of
the output signal relative to the input. When calculating gamma, the maximum possible input intensity is
assigned a value of one, and the minimum possible intensity (no input) is assigned a value of zero. Output is calculated by raising input to a power that is the inverse of the gamma value (output = input
In practical terms, raising the gamma value has the same effect as moving the midpoint slider to the left,
raising mid-tone output values and brightening the image while leaving the maximum and minimum
values untouched. Lowering the gamma value has the same effect as moving the midpoint slider to the
right, lowering mid-tone output values and darkening the image. The de fault value for gamma is one,
which produces a linear curve in which input and output values are the same. Gamma can be set to any
value between 0.05 and 6.00.
(1/γ)
54
).
Page 59

Enhancing Images
Editing Curves Directly
Fine adjustments can be made to brightness and contrast in specifi c portions of the tone range
by adding additional points to the curves for each channel. These points can be freely ad just ed by drag ging them into new positions, changing the shape of the curve. Steepening the
slope in a given portion of the curve will enhance contrast in that portion of the tone range.
Changing the curve so that input levels in a given portion of the tone range are mapped to
higher output levels will brighten tones in the affected tone range; similarly, chang ing the
curve to map input levels to lower output levels will darken tones in the affected range.
Adding New Points to the Curve
Move the cursor over the curve edit display and click once to enter curve edit mode. Move
the cursor to the position where you would like to add a new point, then click. A new point
will be added at this position and the curve will automatically be adjusted to pass through this
point. A point corresponding to a selected location in the active image can be added by clicking the
the point can be adjusted by dragging it to a new location within the curve edit display. The
image in the active window will automatically be adjusted to refl ect changes to the curve.
Removing Points from the Curve
Points can be removed from the curve by dragging them out of the curve window.
Resetting the Active Curve to Linear
The default linear curve for the current channel can be restored by clicking the
the Curves palette.
Resetting All Curves to Linear
To reset all curves to linear, click the
channel will be displayed in the Curve palette.
button and then clicking in the desired area in the image window. The position of
button in
button. All curves will be reset and the RGB master
55
Page 60

Image Adjustment
The Curves Settings Menu
Clicking the button in the Curves palette displays the Curves Settings menu.
Option Description
Copy to Clip board Copy current Curves settings to the clipboard.
Select this item to load curves previously saved using the Save… option (see
Load…
Save…
Reset to Neutral Reset all curves to linear.
Advanced Color
Preferences…
Recent fi les
be low). A dialog will be displayed where you can navigate to the drive (volume)
and di rec to ry con tain ing the desired settings fi le (only fi les with the extension
“.ncv” will be dis played). The settings in the Curves palette will in stant ly revert
to the saved settings.
Select this item to save curves for all channels to a named fi le. These settings can
later be recalled using the Load… option. Choosing Save… displays a dialog
where you can choose a destination and fi le name for the current curves. Curves
are saved with the ex ten sion “.ncv”.
Open the Nikon Capture 4 Editor Preferences dialog to the Ad vanced Color tab,
where you can adjust auto contrast, shadows, and highlights (
Recent Curves settings fi les (up to four) are listed at the end of the settings menu.
Selecting a fi le from the list sets the controls in Curves palette to the saved settings.
102).
The Set tings Menu
The Curves Settings menu can also be displayed by selecting Curves from the Set tings menu.
56
Page 61

Enhancing Images
The LCH Editor
The LCH Editor models color using Luminosity (master lightness), Chroma (color saturation, or
vividness), and Hue. A separate Color Lightness channel is available for adjusting the brightness of selected colors. To use the LCH Editor:
Display the LCH Editor
Select the tool palette containing the LCH
1
Editor from the View menu (the default
location for the LCH Editor is Tool Palette
2) and click the triangle at its top left
corner.
If the Apply button is off ( ) , turn it
on (
2
3
)
Select a channel
Select the desired channel from the channel menu.
Apply button
Settings button
Show
Original
Image
Data
Channel
menu
Curve
Point
Reset
Active
Channel
Reset All Channels
Adjust settings
4
Adjust settings for the selected channel as described on the following pages.
Channel Selection Shortcuts
The channel can also be selected using the following shortcuts:
• Ctrl Shift ~ (Windows)/ option ~ (Macintosh): master lightness channel
• Ctrl Shift 1 (Windows)/ option 1 (Macintosh): color lightness channel
• Ctrl Shift 2 (Windows)/
• Ctrl Shift 3 (Windows)/ option 3 (Macintosh): hue channel
Input and Output (Intensity) Displays and the Curve Point Button
When the cursor is moved over an image or over the edit window in the LCH Editor, input and output
levels for the pixel under the cursor are shown on the curve and in the input and output displays for the
current channel. Clicking the Curve Point button when the cursor is over the image in the active window
adds a point corresponding to the area under the cursor to the active curve.
“Show Original Image Data,” “Reset Active Channel,” and “Reset All Channels”
To hide the effects of changes to the active curve, click and hold the Show Original Image Data button.
Click the Reset Active Channel button to reset the active curve to linear. Click the Reset All Channels
button to reset all curves in the LCH Editor to linear.
Preferences > Advanced Color
Auto contrast, shadow, and highlight settings can be adjusted in the Advanced Color tab of the Preferences dialog.
option 2 (Macintosh): chroma channel
57
Page 62

Image Adjustment
The Master Lightness Channel
Although it affects brightness rather than color, editing luminosity has a similar effect to editing the master curve in the Curves palette.
White - point output
level slider
Black- point output
level slider
Black- point
input slider
Mid-point
slider
White - point
input slider
Show Histogram button
Auto Contrast button
Luminosity curve
Histogram
Luminosity curve: Maps luminosity in the original image (input) to the luminosity of the image
after editing (output). Any portion of the curve can be edited as described in “Curves” (
48); steepening the curve increases the difference between light and dark areas of the image,
increasing contrast.
Histogram: Shows the distribution of pixels of different luminosities in the input. The horizontal axis corresponds to luminosity (in the range 0–255), the vertical axis to the number of
pixels.
Output level sliders : Choose the maximum (white point) and minimum (black point) values
for output.
Input level sliders: Choose the maximum (white point) and minimum (black point) input
levels.
Mid-point slider: Set the mid-point (gamma value). Moving the mid-point alters the brightness of mid-tones while preserving detail in highlights and shadows.
Show Histogram button: Click to view the luminosity distribution for the fi nal image. Click
again to view the input luminosity distribution.
Auto Contrast button: Set the maximum and minimum input levels to exclude values for 0.5%
of the brightest and darkest pixels in the crop. The percentage of pixels excluded can be adjusted in the Advanced Color tab in the Preferences dialog.
58
Page 63

Enhancing Images
The Color Lightness Channel
The Color Lightness channel controls the brightness of colors without affecting chroma or
hue. It can be used, for example, to brighten the blue of a dark sky.
Color lightness curve
(vertical axis corresponds to
brightness, horizontal axis
to chroma)
Width slider
IntensityInput display
Color lightness curve: Maps the brightness of colors in the original image (input) to the
brightness of colors after editing (output). Moving a point on the curve upward makes colors
in the affected portion of the color range more brighter, while moving it downward makes
the affected colors darker.
Width slider: Adjust the width of the curve that passes through the selected point, increasing
or decreasing the range of colors affected by the change.
Intensity: The amount by which the brightness of colors under the selected point will be
increased or decreased in the output image.
59
Page 64

Image Adjustment
The Chroma Channel
The Chroma editor is useful tool for adjusting color saturation.
Chroma curve
Output slider
Exclude Gray checkbox
Width slider
IntensityInput display
Chroma curve: Maps chroma in the original image (input) to the chroma of the image after
editing (output). Moving a point on the curve upward makes colors in the affected portion
of the color range more vivid, while moving it downward makes the affected colors less vivid,
or grayer.
Width slider: Adjust the width of the curve that passes through the selected point, increasing
or decreasing the range of colors affected by the change.
Exclude Gray: Neutral colors (grays) may seem over saturated when chroma is raised. Check
this option to increase chroma without affecting grays. This option has no effect when
chroma is reduced below the value in the original image.
Output slider: Moving the slider affects the saturation of all colors in the image.
Intensity: The amount by which the saturation of the selected point will be increased or de -
creased in the output image.
60
Page 65

Enhancing Images
The Hue Channel
The hue editor is used to map selected colors in the original (input) image to a specifi c range
of colors in the fi nal (output) image. This can be used, for example, to make all reds in the
image slightly more orange, or even green or blue.
Hue curve
Output slider
Width slider
Input / output display
Scale button
Hue curve: Maps hue in the original image (input) to the hue of the image after editing (output). Select a point on the curve that corresponds to the desired input color and drag it up
and down until it intersects with the desired output color.
Width slider: Adjust the width of the curve that passes through the selected point, increasing
or decreasing the range of hues affected by the change.
Output slider: Moving the slider affects the hue of all colors in the image.
Scale button: Click to change the vertical scale from 60 ° through 120 ° to 180 ° and back
again (the degrees in this scale refer to 360 ° color wheel). Increasing the scale increases the
range of hues visible in the display, while decreasing the scale increases precision.
61
Page 66

Image Adjustment
The LCH Editor Settings Menu
Clicking the triangle
in the top right
corner of the LCH Editor displays the LCH Editor settings menu.
Option Description
Copy to Clip board Copy current LCH Editor settings to the clipboard.
Select this item to load settings previously saved using the Save… option (see
Load…
Save…
Reset to Neutral Reset all curves to linear.
Advanced Color
Preferences...
Recent fi les
be low). A dialog will be displayed where you can navigate to the drive (volume)
and di rec to ry con tain ing the desired settings fi le (only fi les with the extension
“.nlv” will be dis played). The settings in the LCH Editor will in stant ly revert to the
saved settings.
Select this item to save settings for all channels to a named fi le. These settings
can later be recalled using the Load… option. Choosing Save… displays a dialog
where you can choose a destination and fi le name for the current LCH Editor settings. LCH Editor settings are saved with the ex ten sion “.nlv”.
Open the Nikon Capture 4 Editor Preferences dialog to the Ad vanced Color tab,
where you can adjust auto contrast, shadows, and highlights (
Recent LCH Editor settings fi les (up to four) are listed at the end of the settings
menu. Selecting a fi le from the list sets the controls in LCH Editor to the saved
settings.
102).
The Set tings Menu
The LCH Editor Settings menu can also be displayed by selecting LCH Editor from the Set tings menu.
62
Page 67

Enhancing Images
Color Booster
The Color Booster is used to enhance overall color saturation (vividness) according to the type
of subject (portrait or landscape).
Display the Color Booster palette
1
Select the tool palette containing the
Color Booster from the View menu (the
default location for the Color Booster palette is Tool Palette 1) and click the triangle
at the top left corner of the palette.
If the Apply button is off ( ) , turn it
2
on ( )
Adjust settings
3
Target Type : Select People to adjust saturation without affecting skin tones, Nature to
adjust saturation for all colors in the image.
Level: Use the slider to adjust saturation, or a enter a value between 0 and 100 in the text
box to its right.
Auto: Optimize saturation to suit the selected subject type.
The Color Booster Settings Menu
Clicking the triangle
corner of the Color Booster palette displays
the Color Booster settings menu.
in the top right
Apply button Settings button
Option Description
Copy to Clip board Copy current Color Booster settings to the clipboard.
Select this item to load settings previously saved using the Save… option (see
Load…
Save…
Reset to Neutral Reset Color Booster settings to default values.
Recent fi les
The Set tings Menu
The Color Booster Settings menu can also be displayed by selecting Color Booster from the Set tings menu.
be low). A dialog will be displayed where you can navigate to the drive (volume)
and di rec to ry con tain ing the desired settings fi le (only fi les with the extension
“.ncb” will be dis played). The settings in the Color Booster palette will in stant ly
revert to the saved settings.
Select this item to save Color Booster settings to a named fi le. These settings can
later be recalled using the Load… option. Choosing Save… displays a dialog
where you can choose a destination and fi le name for current Color Booster settings. Color Booster settings are saved with the ex ten sion “.ncb”.
Recent Color Booster settings fi les (up to four) are listed at the end of the settings
menu. Selecting a fi le from the list sets the controls in Color Booster palette to
the saved settings.
63
Page 68

Image Adjustment
Photo Effects
The Photo Effects palette is used to convert pictures to black-and-white, sepia, or another
monochrome tint, or to adjust the brightness of the cyan / red, magenta / green, and yellow /
blue channels.
Display the Photo Effects palette
Select the tool palette containing the Pho-
1
to Effects palette from the View menu
(the default location is Tool Palette 1) and
click the triangle at the top left corner of
the palette.
If the Apply button is off ( ) , turn it
on (
2
3
)
Adjust settings
Effect: Choose Black and White to convert the image in the active window to black and
white, Sepia to convert the image to sepia, or Tinted to convert the image to another
monochrome tint by dragging the balance sliders. Select None to use the balance sliders
to adjust the brightness and contrast of the cyan / red, magenta / green, and yellow / blue
channels in the original image.
Brightness / contrast slider: Drag the slider to the right to increase overall brightness and
contrast, to the left to reduce brightness and contrast, or enter a value between –100 and
+100 directly in the text box to the right of the slider.
Enhance Dark Tones: Select this option to bring out details in shadows.
Auto: Click this button to optimize brightness and contrast without affecting color bal-
ance. Enhance Dark Tones is automatically selected.
Balance sliders: Use these sliders to adjust the brightness and contrast of the cyan / red,
magenta / green, and yellow / blue channels, or enter a value between –100 and +100 directly in the text boxes to their right. If the image has been converted to black-and-white
or sepia, only the brightness of shades originally in the selected channels will be affected.
If Tinted is selected, the balance sliders control the choice of monochrome tint.
Apply button
Balance sliders
Settings button
Effect menu
Brightness / contrast
Enhance Dark Tones
Auto button
Cyan / red
Magenta / green
Yellow / blue
64
Page 69

The Photo Effects Settings Menu
Clicking the triangle
in the top right corner
of the Photo Effects palette displays the Photo
Effects settings menu.
Option Description
Copy to Clip board Copy current Photo Effects settings to the clipboard.
Select this item to load settings previously saved using the Save… option (see
Load…
Save…
Reset to Neutral Reset Photo Effects settings to default values.
Recent fi les
be low). A dialog will be displayed where you can navigate to the drive (volume)
and di rec to ry con tain ing the desired settings fi le (only fi les with the extension
“.npe” will be dis played). The settings in the Photo Effects palette will in stant ly
revert to the saved settings.
Select this item to save Photo Effects settings to a named fi le. These settings can
later be recalled using the Load… option. Choosing Save… displays a dialog
where you can choose a destination and fi le name for current Photo Effects settings. Photo Effects settings are saved with the ex ten sion “.npe”.
Recent Photo Effects settings fi les (up to four) are listed at the end of the settings
menu. Selecting a fi le from the list sets the controls in Photo Effects palette to
the saved settings.
Enhancing Images
The Set tings Menu
The Photo Effects Settings menu can also be displayed by selecting Photo Effects from the Set tings
menu.
65
Page 70

Image Adjustment
Color Balance
The Color Balance palette offers simple controls for adjusting overall brightness, contrast, and
color balance for the entire image. Unlike the controls in the Curves palette, however, the
Color Balance palette does not allow you to make changes that affect only a portion of the
tone range. After making broad adjustments to color balance in the Color Balance palette,
examine the histogram in the Curves palette and make fi ne adjustments as needed.
Adjusting Brightness, Contrast, and Color Balance
Display the Color Balance palette
1
Select the tool palette containing the
Color Balance palette from the View
menu (the default location is the Color
Balance Palette) and click the triangle at
the top left corner of the palette.
If the Apply button is off ( ) , turn it
2
on ( )
Adjust brightness, contrast, and color balance
Adjust brightness, contrast, and color balance using the options in the Color Bal ance
3
palette.
Adjusting Overall Brightness
The brightness slider adjusts brightness for the entire image. Dragging the brightness
slider in the + direction brightens all the colors in the image, making the image as a whole
more white. Dragging the slider in the – direction darkens all the colors in the image,
making the image as a whole darker and less distinct. Unlike adjustments to the midpoint
in the Curves palette, this setting applies equally to shad ows and highlights, producing a
fl at, low -contrast image. A value for brightness between –100 and +100 can be entered
directly in the text box to the right of the slider.
Adjusting Image Contrast
Dragging the contrast slider in the + direction heightens the difference between high lights
and shadows in the image, increasing contrast. Dragging the slider in the – di rec tion de creases the difference be tween light and dark portions of the image, lowering contrast.
A value for contrast between –100 and +100 can be entered in the text box to the right
of the slider.
Adjusting Color Balance
While the brightness slider adjusts brightness for the image as a whole, the three colorbalance controls allow the user to adjust brightness for each color individually. For ex am ple, dragging the red slider in the + direction brightens the red portions of the image,
making the image as a whole more red. Dragging it in the – direction dims the red ele ments in the image, bringing out the remaining colors. A value between –100 and +100
can be entered for each color in the text box to the right of the slider.
Brightness
Apply button
Contrast
Red
Green
Blue
66
Page 71

The Color Balance Settings Menu
Clicking the
button in the Color Balance palette displays the Color Balance Settings menu.
Option Description
Copy to Clip board Copy current Color Balance settings to the clipboard.
Select this item to load brightness, contrast, and color bal ance settings previously
Load…
Save…
Reset to Neutral Resets all brightness, contrast, and color balance set tings to zero.
Recent fi les
saved using the Save… op tion (see be low). A dialog will be displayed where you
can nav i gate to the drive (vol ume) and di rec to ry con tain ing the de sired settings fi le
(only fi les with the extension “.nca” will be dis played). The set tings in the Color
Balance palette will in stant ly re vert to the saved settings.
Select this item to save brightness, contrast, and color bal ance settings to a
named fi le. These settings can later be recalled using the Load… option. Choos-
ing Save… dis plays a dialog where you can choose a destination and fi le name
for the current Color Balance settings. Color Balance set tings are saved with the
ex ten sion “.nca”.
Recent Color Balance settings fi les (up to four) are listed at the end of the settings
menu. Selecting a fi le from the list sets the controls in Color Balance palette to
the saved settings.
Enhancing Images
Displaying the Color Balance Palette
The default tool palette window for the Color Balance palette is not displayed the fi rst time Nikon
Capture 4 Editor starts. To display Color Balance Palette, select Show Color Balance Palette from the
View menu.
Opening NEF Files Saved in Nikon Capture 3.5x or Earlier
In Nikon Capture 4, changes to color balance apply before changes to curves. In earlier versions of Nikon
Capture, changes to curves applied before changes to color balance, with the result that settings may
change when the images saved in Nikon Capture 3.5x or earlier are opened in Nikon Capture 4.
Nikon Capture 3.5 or Earlier
A value of +50 in Nikon Capture 3.5 or earlier corresponds to a value of +100 in Nikon Capture 4.
The Set tings Menu
The Color Bal ance Settings menu can also be displayed by selecting Color Balance from the Set tings
menu.
67
Page 72

Image Adjustment
Unsharp Mask
Using Unsharp Mask, the user can increase the sharpness of photographs by making edges
more dis tinct. Unsharp Mask works by increasing the contrast of the edges in the image while
leaving other areas untouched. The amount of sharpness is determined by three factors: in ten si ty, halo width, and threshold.
Creating Unsharp Masks
Display the Unsharp Mask palette
1
Select the tool palette containing the Unsharp Mask palette from the View menu (the
default location for the Unsharp Mask palette is Tool Palette 1) and click the triangle at the
top left corner of the palette.
Apply button
Unsharp mask list
Color
If the Apply button is off ( ) , turn it on ( )
2
Delete button
Up/down arrows
Warning button
The Warning Button
A warning button appears if the image in the active window is displayed at a zoom ratio too low to allow
the effects of Unsharp Mask to be displayed. Click the button to view the warning.
68
Page 73

Enhancing Images
Create an Unsharp Mask
3
Unsharp Mask can be applied to all the colors in the image or selectively to any com bi na tion of red, green, and blue channels. Select a combination of colors from the Color
pop-up menu. The Unsharp Mask you create will be applied only to edges in the selected
colors.
Select values for intensity, halo width, and threshold
4
Intensity: The amount the contrast of edges will be increased. Too great an intensity will
degrade your image rather than sharpening it.
Halo Width : The size of the areas that will be affected. The greater the halo width, the
wider the edges in the sharpened image will appear. Too large a value for halo width will
produce a “halo” along edges in the image.
Threshold: The limit at which sharpening will be applied. If the threshold is zero, sharpening will apply to all pixels in the image. Increasing the threshold in creas es the amount of
contrast that must be present between pixels before Unsharp Mask will be applied, with
the result that only more distinctly contrasting edges will be affected.
Create additional masks
5
The con trols in the Unsharp Mask palette allow you to select multiple combinations of
colors that can be sharpened to different degrees. Repeat steps 1–4 to create additional
masks for different color combinations. As new masks are created, they will be added to
the end of the Unsharp Mask list. Masks apply in the order listed. To change the order in
which masks apply, select a mask in the Unsharp Mask list and click the up arrow to move
it up in the list, or the down arrow to move it down. To delete an Unsharp Mask from the
list, select it and click the Delete button.
Unsharp Mask
Unsharp Mask sharpens edges without affecting color balance by making adjustments only to lu mi nos i ty
(brightness). The effect is the same as performing Unsharp Mask with the Luminosity channel selected
in the Adobe Photoshop Lab color model. If Unsharp Mask is applied to a single channel, such as red,
the values for ab (chrominance) are used to determine what points in the image are red, and Unsharp
Mask ing applied to the Luminosity channel for those points only. An intensity of around 20% in Nikon
Capture 4 is roughly equivalent to 100% in Adobe Photoshop.
No sharpening will be applied if Intensity is set to zero. Intensity must be set to at least 1% if sharpening
is to apply.
69
Page 74

Image Adjustment
The Unsharp Mask Settings Menu
Clicking the button in the Unsharp
Mask palette displays the Unsharp Mask Settings menu.
Option Description
Copy to Clip board Copy current Unsharp Mask settings to the clipboard.
Select this item to load Unsharp Masks previously saved us ing the Save… op -
Load…
Save…
Reset to Neutral Deletes all Unsharp Masks currently displayed in the Unsharp Mask palette.
Recent fi les
tion (see be low). A dialog will be dis played where you can navigate to the drive
(vol ume) and di rec to ry con tain ing the desired settings fi le (only fi les with the
extension “.num” will be dis played). The set tings in the Unsharp Mask palette
will instantly re vert to the saved set tings.
Select this item to save Unsharp Mask settings to a named fi le. These settings
can later be recalled using the Load… option. Choos ing Save… displays a dialog
where you can choose a destination and fi le name for the current Unsharp Mask
settings. Unsharp Mask settings are saved with the ex ten sion “.num”.
Recent Unsharp Mask settings fi les (up to four) are listed at the end of the settings
menu. Selecting a fi le from the list sets the controls in Unsharp Mask palette to
the saved settings.
The Set tings Menu
The Unsharp Mask Settings menu can also be displayed by selecting Unsharp Mask from the Set tings
menu.
70
Page 75

Enhancing Images
Noise Reduction
This palette can be use to mitigate the effects of noise that sometimes appears in images
taken with digital cameras.
Reducing Noise
Display the Noise Reduction palette
Select the tool palette containing the Noise Reduction
1
palette from the View menu (the default location for
the Noise Reduction palette is Tool Palette 2) and click
the triangle at the top left corner of the palette.
If the Apply button is off ( ) , turn it on ( )
Apply button Settings menu
2
Adjust noise reduction options
3
Intensity: To reduce noise (a mottling phenomenon that occurs principally in photographs
taken at high sensitivities), drag the slider to select a value from 0 (no noise reduction
performed) to 100 (max i mum noise reduction).
Sharpness: High levels of noise reduction may result in loss of defi nition. To increase
sharpness, drag the slider to select a value from 0 (no sharpening performed) to 10 (max i mum sharpness).
Method: Choose Faster for faster processing, Better quality for increased precision.
Edge Noise Reduction
outlines more dis tinct.
Color Moire Reduction (RAW images only): Color moiré (color interference caused by
regular overlapping patterns) can be reduced using this option. Choose the amount of
compensation performed from Off, Low, Medium, or High.
View the results
4
Confi rm the effects of noise reduction on the entire image and adjust settings as necessary.
: Check this box to re duce noise along edg es in the photo, making
71
Page 76

Image Adjustment
The Noise Reduction Settings Menu
Clicking the
button in the Noise Re duc tion palette displays the Noise Reduction
Set tings menu.
Option Description
Copy to Clip board Copy current Noise Reduction settings to the clip board.
S
elect this item to load Noise Reduction settings pre vi ous ly saved using the Save…
Load…
Save…
Reset to Neutral Resets Noise Reduction settings to their default val ues.
Recent fi les
op tion (see be low). A dialog will be displayed where you can navigate to the drive
(vol ume) and di rec to ry con tain ing the desired settings fi le (only fi les with the extension “.nnr” will be dis played). The set tings in the Noise Reduction pal ette will
instantly re vert to the saved set tings.
Select this item to save Noise Reduction settings to a named fi le. These settings
can later be recalled using the Load… option. Choos ing Save… displays a dialog
where you can choose a destination and fi le name for the current Noise Reduction settings. Noise Reduction settings are saved with the ex ten sion “.nnr”.
Recent Noise Reduction settings fi les (up to four) are listed at the end of the
settings menu. Selecting a fi le from the list sets the controls in Noise Reduction
palette to the saved settings.
The Set tings Menu
The Noise Reduction Settings menu can also be displayed by selecting Noise Reduction from the Set tings menu.
72
Page 77

Enhancing Images
D-Lighting
D-Lighting reveals details in shadows and highlights, correcting for underexposure in back-lit
subjects or shaded areas of images and for overexposure in brightly lit areas.
Display the D - Lighting palette
1
Select the tool palette containing the
D-Lighting palette from the View menu
(the default location for the D - Lighting
palette is Tool Palette 1) and click the
triangle at the top left corner of the
palette.
Turn the Apply button on ( )
Turn the Apply button on (
2
D-Lighting.
Adjust settings
3
Method
Choose Faster (HS) for high-speed processing, Better Quality (HQ) for separate control
of shadow and highlight adjustment.
Faster (HS)
The following options are available when Faster (HS) is selected:
• Adjustment: Drag the slider to the right to enhance details in shadows and to reveal
highlights where the subject is much brighter than the background or the background
much brighter than the subject. An adjustment value between 0 and 100 can also be
entered directly in the text box (the default setting is 25).
• Color Boost: Drag the slider to the right to increase color saturation, or enter a value
between 0 and 100 directly in the text box to its right.
Better Quality (HQ)
Selecting Better Quality (HQ) displays
the options shown at right.
• Shadow Adjustment : Drag the slider
to the right to enhance details in shadows, or enter a value between 1 and
100 directly in the text box to its right
(the default setting is 50).
• Highlight Adjustment : Drag the slider
to reveal highlights where the subject is much brighter than the background or the
background much brighter than the subject. An adjustment value between 1 and 100
can also be entered directly in the text box (the default setting is 1).
• Color Boost: Drag the slider to the right to increase color saturation, or enter a value
between 0 and 100 directly in the text box to its right.
) to enable
Apply button Settings menu
73
Page 78

Image Adjustment
The D-Lighting Settings Menu
Clicking the button in the D-Lighting palette displays the D-Lighting Settings
menu.
Option Description
Copy to Clip board Copy current D-Lighting settings to the clipboard.
Select this item to load D-Lighting settings pre vi ous ly saved using the Save…
Load…
Save…
Reset to Default Reset D- Lighting settings to default values.
Recent fi les
op tion (see be low). A dialog will be displayed where you can navigate to the
drive (vol ume) and di rec to ry con tain ing the desired settings fi le (only fi les with
the extension “.ndl” will be dis played). The set tings in the D -Lighting palette will
instantly re vert to the saved settings.
Select this item to save D-Lighting settings to a named fi le. These settings can
later be re called using the Load… option. Choos ing Save… displays a dialog
where you can choose a destination and fi le name for the current D- Lighting settings. D-Lighting set tings are saved with the ex ten sion “.ndl”.
Recent D- Lighting settings fi les (up to four) are listed at the end of the settings
menu. Selecting a fi le from the list sets the controls in D - Lighting palette to the
saved settings.
Digital DEE
D-Lighting replaces the Digital DEE tool available in earlier versions of Nikon Capture 4. Note that Digital
DEE settings are ignored when joint settings fi les created with earlier versions of Nikon Capture 4 are
loaded into Nikon Capture 4 Ver. 4.2 or later, while Digital DEE settings saved with NEF images in earlier
versions of Nikon Capture 4 are lost when these images are opened in Nikon Capture 4 Ver. 4.2 or later.
Digital DEE settings fi les (extension “.ndd”) can not be loaded into Nikon Capture 4 Ver. 4.2 or later.
The Set tings Menu
The D-Lighting Settings menu can also be displayed by selecting D - Lighting from the Set tings menu.
74
Page 79

Enhancing Images
Red eye Correction
To correct red- eye in portrait subjects:
Display the Red Eye Correction palette
1
Select the tool palette containing the Red Eye Correction palette from the View menu (the default
location is Tool Palette 1) and click the triangle at
the palette’s top left corner.
Turn the Apply button on ( )
2
Turn the Apply button on ( ) to enable red-eye
correction.
Choose a red - eye correction method
3
Off
No red-eye correction performed.
Automatic
Nikon Capture will automatically detect and correct red-eye. This option is automatically
selected if red-eye has already been corrected using the Red Eye Correction button in the
Quick Tools palette.
Click on eyes
If auto red-eye correction fails to produce the desired results, red-eye can be corrected
manually by selecting this option and clicking Start. The cursor will change to
the cursor over the image in the active window until it blinks red. If the area under the
cursor is affected red-eye, click to correct red-eye in the affected area. Click Stop when
all affected areas have been corrected (additional corrections can be performed by clicking Resume or Start and repeating the process described above).
Reset
Undo all changes made using automatic and manual red-eye correction.
Apply button Settings menu
; move
Confi rmation Dialogs
If Click on eyes is selected after automatic
red-eye correction has been performed, the
dialog shown at right will be displayed. Click
Yes to keep the changes made with automatic red- eye correction, No to discard the
changes before making manual corrections.
If the image in the active window is displayed at less than 100%, the dialog shown
at right appear when Click on eyes is selected. Click Yes to display the image at full
size (recommended).
75
Page 80

Image Adjustment
The Red Eye Correction Settings Menu
Clicking the button in the Red Eye Correction palette displays the red-eye correction
Settings menu.
Option Description
Copy to Clip board
Reset to Default Reset red-eye correction settings to default values.
If Auto is selected, this option can be used to copy this setting to the clipboard
and apply auto red - eye correction to other images.
The Set tings Menu
The red-eye correction Settings menu can also be displayed by selecting Red Eye Correction from the
Set tings menu.
76
Page 81

Enhancing Images
Fisheye Lens (Fisheye-to-Rectilinear Transform for DX 10.5 mm Fisheye Lenses)
The tools in the Fisheye Lens palette modify images taken with an AF DX 10.5 mm f2.8G
Nikkor fi sheye lens to resemble images taken with a normal wide-angle lens. This option is
not available with other lenses.
Display the Fisheye Lens palette
Select the tool palette containing the Fisheye Lens palette from the View menu (the de-
1
fault location for the Fisheye Lens palette is Tool Palette 2) and click the triangle at the top
left corner of the palette.
Settings menuApply button
Include areas where
Fill color menu
Turn the Apply button on ( )
2
Turn the Apply button on ( ) to enable the Fisheye Lens. The image in the active window
will be trimmed around a vertical area in the center of the image that has been processed
to compensate for fi sheye distortion, and the Include areas where there is no image
data check box will be enabled.
there is no image data
check box
Adjust settings
Check Include areas where there is no image data to trim the image in the active
3
area around a horizontal area in the center of the image that has been processed to compensate for fi sheye distortion and fi ll areas where there are no image data with the color
selected in the Fill color menu.
Image created with
suppor ted fi sheye lens
Apply button on
(vertical compensation)
Include areas where there
is no image data selected
(horizontal compensation)
Areas without image data
fi lled in white, light gray, dark
gray, black, red, green, blue,
cyan, magenta, or yellow
77
Page 82

Image Adjustment
The Fisheye Lens Settings Menu
Clicking the
button in the Fisheye Lens
palette displays the Fisheye Lens Settings
menu.
Option Description
Copy to Clip board Copy current Fisheye Lens settings to the clipboard.
Select this item to load Fisheye Lens settings pre vi ous ly saved using the Save…
Load…
Save…
Reset to Default Reset Fisheye Lens settings to default values.
Recent fi les
op tion (see be low). A dialog will be displayed where you can navigate to the drive
(vol ume) and di rec to ry con tain ing the desired settings fi le (only fi les with the
extension “.nfe” will be dis played). The set tings in the Fisheye Lens palette will
instantly re vert to the saved settings.
Select this item to save Fisheye Lens settings to a named fi le. These settings can
later be re called using the Load… option. Choos ing Save… displays a dialog
where you can choose a destination and fi le name for the current Fisheye Lens
settings. Fisheye Lens set tings are saved with the ex ten sion “.nfe”.
Recent Fisheye Lens settings fi les (up to four) are listed at the end of the settings
menu. Selecting a fi le from the list sets the controls in Fisheye Lens palette to the
saved settings.
The Set tings Menu
The Fisheye Lens Settings menu can also be displayed by selecting Fisheye Lens from the Set tings
menu.
78
Page 83

Enhancing Images
Output Size and Resolution
The Size/Resolution palette is where you specify the fi nal (“output”) size of the portion of the
image that will be saved when Save or Save as… is selected from the File menu. The choice
of settings in the Size/Resolution palette depends on how you intend to use the image and
the amount of storage space you have available. Some examples are given below.
If the image will be used in printing or desktop publishing…
…size and resolution will be dictated by the resolution of the output device and the physical
size of the image when printed, measured in centimeters or points rather than pixels.
If you intend to use the image on a web page…
…specify output size in pixels, keeping fi le size to a minimum for rapid downloads. Res o lu tion
in this case is not an issue.
Adjusting Size and Resolution
Display the Size/Resolution palette
Select the tool palette containing the
1
Size/Resolution palette from the View
menu (the default location for the Size/
Resolution palette is Tool Palette 1) and
click the triangle at the top left corner of
the palette.
Make changes to options as described below
2
Keep the crop: When Keep the crop is selected, you can use the mouse to adjust the size
and position of the current crop as desired. If you enter a new value for height or width in
the Size/Resolution palette, the remaining dimension changes au to mat i cal ly to maintain
a con stant height-width aspect ratio, and scale is adjusted to refl ect the new di men sions
(scale can not be increased beyond 200%). If the image can not be output at the current resolution using the new dimensions, resolution will au to mat i cal ly be adjusted to an
ap pro pri ate value. This option is useful when you want to specify height and width after
selecting a crop.
RAW Image Size (D1X Only)
The D1x is designed to record images at 3,008 × 1,960 pixels (six megapixels). Image quality will not
necessarily increase when RAW images are output at a size of 4,016 × 2,616 pixels (ten megapixels,
equivalent to the dimensions of the CCD).
NEF Images
When an image is saved in NEF format, the entire image will be saved together with information on
resolution and the size and dimensions of the current crop.
79
Page 84

Image Adjustment
Keep the output size: Locks output dimensions and fi le size at their current val ues, set-
ting the aspect ratio of the current crop according to the dimensions input in the Size/
Res o lu tion palette. This height-width aspect ratio will be main tained when you adjust
the size of the crop in the active window, and scale will be ad just ed to refl ect changes to
the size of the crop (scale can not be increased beyond 200%). If the image can not be
output at the current resolution using the new dimensions, resolution will automatically
be adjusted to an appropriate value. This option is useful when you want to set the output
di men sions and fi le size of the fi nal image before selecting a crop.
Width /Height: The out put dimensions for
the current crop can be entered in these
text box es. The units used to describe
output di men sions can be cho sen from the
menu to the right of the text boxes.
at: The at text box is where you enter the
output res o lu tion. This text box is not active
if the unit chosen for output size is “pixels,” when res o lu tion is fi xed at 300 ppi.
The value cho sen at other set tings should
re fl ect the res o lu tion of the out put de vice
on which the fi nal image is to be printed.
The units for resolution can be selected
from the res o lu tion menu, which offers a
choice of pixels per inch (ppi) or pixels per
cen ti me ter (ppcm). The default res o lu tion
is 300 ppi.
Confi rm the fi nal size
3
To view the fi nal size of the image in pixels,
select Show Image Size from the Image
menu. The Image Size dialog shows the size
of the original (input) image in pixels; if the
output size has been changed, the dialog
will also list the fi nal (output) size of the
image in pixels.
Scale/File Size
Scale (output size as a percentage of input size, maximum 200%) is displayed at the bottom of the
Size/Res o lu tion pal ette, to geth er with the uncompressed fi le size of the image that would be cre at ed at
current set tings. File size depends on the color model (RGB or CMYK) and, in the case of RGB images,
on the pixel bit-depth that will be used when the image is saved. Separate uncompressed fi le sizes are
shown for CMYK and for eight-bit and sixteen-bit RGB.
80
Page 85

The Size/Resolution Settings Menu
Clicking the button in the Size/
Resolution palette displays the Size/
Resolution Settings menu.
Option Description
Copy to Clip board Copy current Size/Resolution settings to the clipboard.
Select this item to load size and resolution settings pre vi ous ly saved using the
Load…
Save…
Reset to D1X 6MP
Reset to 100%
Recent fi les
Save… op tion (see be low). A dialog will be displayed where you can navigate
to the drive (vol ume) and di rec to ry con tain ing the desired settings fi le (only fi les
with the extension “.nsr” will be dis played). The set tings in the Size/Resolution
palette will instantly re vert to the saved settings.
Select this item to save size and resolution settings to a named fi le. These settings can later be re called using the Load… option. Choos ing Save… displays
a dialog where you can choose a destination and fi le name for the current size
and res o lu tion settings. Size and resolution set tings are saved with the ex ten sion
“.nsr”.
Reduces RAW images created with the D1
mega pixels). Se lect Re set to 100% to re store the image to 4,016 × 2,616 pixels.
This op tion is only available with RAW images taken using the D1
Enlarges the crop to include the entire image. Res o lu tion will be reset to the
default value of 300 ppi (118.11 ppcm).
Recent Size / Resolution settings fi les (up to four) are listed at the end of the
settings menu. Selecting a fi le from the list sets the controls in Size / Resolution
palette to the saved settings.
X by 74.9% to 3,008 × 1,960 pix els (six
Enhancing Images
X.
The Set tings Menu
The Size/Res o lu tion Settings menu can also be displayed by selecting Size/Resolution from the Set-
tings menu.
81
Page 86

Image Adjustment
Saving and Loading Image Adjustment Settings
Image adjustment settings for all tool palettes (including the status of the Apply button for each pal ette) can be copied to the
clip board and saved in com bined settings
fi le. When the com bined settings are pasted
or read into the Nikon Capture 4 Editor, they
will apply to all palettes simultaneously. These operations are performed using the commands
in the Settings > Image Adjustments menu, which also con tains an option for restoring all
tool palettes to default settings.
Option Description
Copy to
Clip board
Load…
Save Selected
Adjustments…
Save All
Adjustments…
Reset to User
Default
Reset All
Adjustments to
Neutral
Recent fi les
All image adjustment settings for the image in the ac tive window are copied to the
clip board. You can paste them into the tool palettes for another window by se lect ing
Paste from the Edit menu when the window is active.
Select this item to load settings previously saved using the Save… op tion (see be low). A dialog will be displayed where you can navigate to the drive (vol ume) and
di rec to ry con tain ing the desired settings fi le (only fi les with the ex ten sion “.set” will
be dis played). The set tings in the Nikon Capture 4 Editor tool palettes will instantly
re vert to the saved settings.
Choosing Save Selected Adjustments… displays the Copy Image Adjustment
dialog. Check the adjustments you want to save and click Copy to display a dialog
where you can choose a destination and fi le name for the selected settings. The settings are saved with the extension “.set” and can later be recalled with the Load…
option. If this fi le is later se lect ed for batch pro cess ing, im ag es will be pro cessed ac cord ing to the set tings in the fi le (
Select this item to save settings to a named fi le. These set tings can lat er be re called
using the Load… option. Choos ing Save… dis plays a dialog where you can choose a
des ti na tion and fi le name for the cur rent settings. If this fi le is later se lect ed for batch
pro cess ing, im ag es will be pro cessed ac cord ing to the set tings in the fi le (
Com bi na tion settings fi les are saved with the extension “.set”.
Select this option to restore the default settings selected for “User default” image
adjustments in the General tab of the Nikon Capture 4 Ed i tor Pref er enc es dialog (
)
. In the case of the default settings fi le (“Neutral.set”), RAW im ag es tak en with
98
the D1X will be scaled to 100% (4,016 × 2,616 pixels).
Resets all tool palettes to the settings in the default settings fi le (“Neutral.set”). Image adjustment settings in PictureProject will also be reset to defaults.
Recent image adjustment settings fi les (up to four) are listed at the end of the settings menu. Selecting a fi le from the list restores the saved settings.
92, 116).
92, 116).
82
Page 87

Enhancing Images
Saving Images
Images displayed in Nikon Capture can be saved in a variety of fi le formats. Hints for choosing
a suitable fi le format may be found on the pages that follow.
Choosing a File Type
Nikon Capture 4 supports the following fi le types when saving images:
File type Compression Extension
(Nikon Electronic Format)
NEF
16-bit TIFF (RGB)
8-bit TIFF (RGB)
TIFF (CMYK) Uncompressed
JPEG All images compressed; amount can be selected .JPG
Nikon Electronic Format (NEF)
Images saved in NEF format maintain the high quality of the original photograph; ad just ments
to set tings are not applied to the original image data, but are in stead saved separately in the
same fi le. NEF images can later be opened in Nikon Cap ture and saved again in a format that
can be opened in other applications. As changes to settings are only applied to the original
image data when the image is saved in another for mat, this min i miz es any loss of image quality that may be produced when the image is edited. Save images in NEF when ev er you are
unsure of how they will be used or when you want to process the original image in a number
of different ways.
NEF images created in Nikon Capture 4 can only be opened in Nikon Capture 4, or in Adobe
Photoshop 6.0 or later using the Nikon NEF fi lter supplied with this product. Photographs
recorded at an image quality setting of uncompressed NEF (RAW) can be compressed when
saved in NEF format (compressed RAW images are automatically saved in compressed NEF
format, and can not be saved in uncompressed NEF format).
TIFF
Use TIFF when saving images for high-quality output or publishing. Images can be compressed using LZW, a “lossless” algorithm that preserves image quality while reducing fi le
size for most images (results vary with the type of subject; note that LZW compression may
occasionally result in increased fi le size). TIFF also preserves the ICC profi le and caption information. This format is supported by a wide variety of applications on a variety of platforms.
JPEG
This fi le type is adequate for images that will be output at low resolution or distributed in
elec tron ic form. Compression allows more images to be saved in the same amount of disk
space while preserving the ICC profi le and caption information. Note, however, that JPEG
compression results in loss of image information that can not afterwards be restored. Save
fi les at the lowest com pres sion ratio possible; if necessary, they can always be saved again at
a lower compression ratio.
Available .NEF
Available (LZW)
.TIF
83
Page 88

Image Adjustment
Options for Saving Image Files
Nikon Capture offers two options for saving fi les: Save and Save as…. The Save option saves
the image in the same location as the original without changing the fi le name or format. The
Save as… option lets you choose a location, fi le name, and format. When the Multi -Image
window is active, only the images selected in the thumbnail area are saved.
Using the “Save” Command
Click the button or se lect Save from the File menu
1
The ex ist ing fi le will be over writ ten. If the
image is in JPEG format, a dialog will be
displayed where the compression ratio can
be selected from “Highest Compression
Ratio,” “Good Compression Ratio,” “Good
Balance,” “Good Quality,” and “Excellent
Quality.”
Confi rm progress in the Save Progress window ( 87)
If the Use Save Progress Window option is not selected in the Performance tab of the
2
Preferences dialog (
dow will not be displayed. The Save Progress window is not available in Windows 98 SE,
Windows Me, or Mac OS 9.
Using the “Save as…” Command
Select Save As… from the File menu
The standard Save dialog for your op er -
1
at ing sys tem will be dis played.
100), fi les will be saved immediately, and the Save Progress win-
Save button
Save button
Images Saved in Nikon Capture 4
Images saved in Nikon Capture 4 can not be viewed on a camera.
The Button
Clicking the button saves any changes to the current fi le, overwriting the original image. The Save
dialog is not displayed.
84
Page 89

Enhancing Images
Choose a location
2
Navigate to the desired drive (volume) and folder.
Choose a fi le type
3
Choose a fi le type (fi le format) from the pop-up menu. See “Choosing a File Type” (
83) for more information.
Adjust compression settings
The type of compression available depends on the fi le type selected in Step 3:
4
• NEF: Images that are not already compressed can be saved using a nearly lossless compression algorithm by selecting Use Compression (D2-series, D200, D100, and D1series cameras only). This check box is automatically enabled when a compressed RAW
image is saved; compressed RAW images can not be saved in uncompressed format.
• TIFF: Select Use Compression to compress images using the LZW algorithm.
• JPEG: Use Compression is automatically selected when images are saved in JPEG format. The compression ratio can be selected from “Highest Compression Ratio,” “Good
Compression Ratio,” “Good Balance,” “Good Quality,” and “Excellent Quality.”
Enter a name for the fi le
5
The default fi le name appears in the File name text box. A new fi le name can be entered
if desired.
Click Save
6
If the Use Save Progress Window option is selected in the Performance tab of the Preferences dialog (
tion can be viewed while other operations are performed. If this option is not selected,
fi les will be saved immediately, and no progress dialog will be displayed. The Save Progress
window is not available in Windows 98 SE, Windows Me, or Mac OS 9.
100), a window will be displayed where the progress of the save opera-
File Naming Conventions
Windows : In environments that do not support long fi le names, the maximum length is eight char-
ac ters; fi le names may not contain spaces, quotes, or any of the following characters: “ \\” “/” “:” “.”
“;” “*” “?” “<“ “>” and “|”.
Where long fi le names are supported, fi le names may not contain quotes or any of the following characters: “\\” “/” “:” “.” “;” “*” “?” “<“ “>” and “|”.
Macintosh: The maximum length for Macintosh fi le names is thirty- one characters. Colons (“:”) are
not allowed.
NEF
NEF fi les created with Nikon Capture 4 can not be opened in earlier versions of Nikon Capture. Nikon
Capture 4 can however be used to open NEF images created with earlier versions of Nikon Capture.
JPEG
Image quality may drop when images are saved in JPEG format. No drop in image quality occurs when
images are saved in NEF.
Error Messages
If an invalid fi le name or other error is identifi ed in the Save dialog, a message will be dis played. Adjust
settings as directed.
85
Page 90

Image Adjustment
Save Options
In addition to the settings listed above, the following
options are available in the Save dialog:
Embed ICC Profi le
Bit depth
Open with
Bit depth : The bit depth (the number of bits of color information per channel for each pixel in
the image) at which the image will be saved. Bit depth can only be selected if the selected fi le
type is TIFF (RGB) and the original image has a bit depth of over eight bits.
Embed ICC Profi le: Select this option to embed a specifi ed ICC profi le when the image is
saved. This option is the default selection for images that already have an embedded ICC
profi le, and also for photographs that were not edited previously. It is not available with NEF
fi les.
Open with : If Open saved images with is selected in the General tab of the Pref er enc es dia-
log, the name of the se lect ed application (e.g., Adobe Photoshop 7.0) will be dis played. This
option can not be selected if the chosen fi le format is NEF. If this check box is on, the image
will au to mat i cal ly be opened in the selected application after being saved to disk.
File Names…: If multiple images are selected in the Multi-Image window, a File Names...
button will be displayed. Click this button to view or modify fi le-naming rules (
113).
The Multi-Image Window
If the image in the Multi- Image window is saved under another name using the Save As… option, the
original image will still be displayed in the image area.
Image selected in
thumbnail list is displayed in image area.
If image is edited,
asterisk (“*”) appears
in title bar.
If changes to the originals have not been saved using the Save option, the dialog shown at right will
be displayed when you exit Nikon Capture 4 Editor
or close the Multi Image Window. Click Yes or Yes
to All to save the changes under the original fi le
names.
If image is saved to
current folder under
new name, modifi ed
image appears in
thumbnail list, but
original is still displayed in image area.
86
Page 91

Enhancing Images
The Save Progress Window (Windows 98 SE/Windows Me/Mac OS 9 Excluded)
If the Use Save Progress Window option
is selected in the Performance tab of the
Preferences dialog (
100), the Save Prog ress window will be displayed while images
are saved (the Save Progress window is not
available in Windows 98 SE, Windows Me, or
Mac OS 9). The Save Progress window shows
all save operations currently in progress, and
can be used to pause, restart, or cancel the
current task. If the Save Progress window
is displayed, other operations can be performed while images are saved.
Close when done
If this option is selected, the Save Progress window will close automatically when all images
have been saved.
Show fi le paths
Check this option to display fi le paths (volume and folder names) in the Save Progress dialog.
If this option is not selected, only fi le names will be displayed.
Saves
This tab lists the names and status of fi les that have yet to be saved.
Progress Log
Lists warnings, errors, and completed or cancelled tasks.
Pause, restart, or cancel the selected operation.
Reopen (Progress Log tab)
Reopen the selected fi le in an image window.
Show only errors and warnings (Progress Log tab)
Check this option to display only warnings and errors in the Progress Log tab. If this option is
not selected, the Progress Log tab will also list completed operations.
Clear (Progress Log tab)
Clear the list of warnings, errors and completed or cancelled tasks from the Progress Log
tab.
The Save Progress Window
The following operations can not be performed while a save is in progress:
• Opening the “Preferences” dialog
• Exiting Nikon Capture 4 Editor.
Memory Requirements
Using the Save Progress window on computers with less than 512 MB of RAM may increase the time
required to save images.
87
Page 92

Image Adjustment
Printing Images
Images can be printed directly from Nikon Capture 4 Editor to test the effects of image ad just ments.
Open the image
1
Be sure the image you wish to print is open in Nikon Capture 4 Editor.
Select Print… from the File menu
The Print Layout dialog will be displayed.
2
Print the image
3
Adjust settings as described below and click Print to print the image. Click Cancel to exit
without printing.
Printer / Paper / Printable area
These text boxes display current printer settings. To change printer settings, click Print
Setup… (see below).
Printer Displays the currently selected printer.
Paper Displays the current paper size.
Printable area
Print preview
Check this option to display a preview of how the images will print on the currently selected printer. Click the next page button to page through the selected images.
Copies (Windows only)
Choose the number of copies that will be printed. Up to 100 copies can be printed.
In the Macintosh version, the number of copies is not displayed in the Print Layout dialog.
To specify the number of copies, click Print. A confi rmation dialog will be displayed; click
Yes to proceed with printing and specify the number of copies.
Displays the maximum dimensions of the area that can be print ed per sheet at current printer and paper size settings.
88
Page 93

Enhancing Images
Print Setup…
Click to display a Printer Settings dialog in
which you can mod i fy the printer and paper set tings. If you are using a Macintosh,
the appearance of this dialog depends on
the printer in use. The chang es made are
re fl ect ed in the “Printer,” “Paper,” and
“Printable area” fi elds.
Meta Data…
To choose the information to be included
with each print, click Meta Data…. The
“Meta data print setup” dialog will be
displayed; adjust the following settings
and click OK to return to the “Print layout”
dialog.
Depth level: Put a check in the box next to
the level of information you want included
with your prints. Choose from:
• Basic: fi le name and date and time of
recording
• Additional information: camera mod el, shutter speed, aperture (f/-number),
image size, exposure mode, and white
balance
• Detail information: metering mode,
exposure compensation, focal length,
autofocus mode, and sensitivity (ISO
equivalency)
To change the font used to print shooting information, click Change.
Imprint capture date over image: Select Date only to print the date of recording on
the image, or Date and Time to print the date and time of recording. To choose the font
used to print the date or date and time, click Change.
Use output resolution
Check this option to print the image at its native resolution and dimensions. In Nikon
Capture 4, this is the size and res o lu tion se lect ed in the Nikon Capture 4 Editor Size/
Res o lu tion palette (
current printer and paper size settings when you click the Print button to begin printing,
a mes sage will be dis played warning that the image will be cropped to fi t the print able
area. Choose a larger paper size or reduce the size of the image using the Size/Resolution
palette.
Use output resolution is not available when multiple images are selected.
79). If the image will not fi t in the print able area (see above) at the
89
Page 94

Image Adjustment
Page Layout
Choose from Select layout and Select picture size and adjust options as described
below.
Select layout: When this option is selected, you can choose the number of images that
will be printed from a drop-down menu.
Option
1 Up One image printed in center of page One image printed in center of page
2 Up
2 × 2 Up
2 × 4 Up
4 × 4 Up
5 × 5 Up
5 × 8 Up
Image
information
list
Four pictures printed in two rows of two
Eight pictures printed in four rows of
Sixteen pictures printed in four rows of
Twenty-fi ve pictures printed in fi ve rows
Forty pictures printed in eight rows of
Print page consisting solely of the following information for the selected images:
fi le name, camera make and model, exposure program, date and time of creation,
shutter speed, aperture, and white balance.
Portrait Landscape
Two pictures printed
one above the other
columns each
two columns each
four columns each
of fi ve columns each
fi ve columns each
Page orientation
Two pictures printed side- by-side
Four pictures printed in two rows of two
columns each
Eight pictures printed in two rows of
four columns each
Sixteen pictures printed in four rows of
four columns each
Twenty-fi ve pictures printed in fi ve rows
of fi ve columns each
Forty pictures printed in fi ve rows of
eight columns each
The size of the images is automatically adjusted according to the layout. Select Rotate
images to fi t to rotate images to print at the largest size that will fi t on the selected
paper size.
Select picture size: When this option is
selected, you can choose print size from a
drop-down list.
Rotate image (s) to fi t: Check this option to automatically rotate each image so as to
minimize the unused space inside each image frame.
Print a picture multiple times: To print multiple copies of each image, check this option
and select a num ber from be tween two and ten from the pull down menu. Select The
whole page to print enough copies of the image to fi ll the whole page at the selected
size.
Borderless print (Windows) / Eliminate white border (Macintosh): Check this option
to adjust the image size so that it fi ts exactly inside the red border, without leaving any
white space. If the as pect ratio of the box and the image differ, part of the image may
not be printed.
90
Page 95

Enhancing Images
Use thumbnail data
Check this option to print the pictures at draft resolution using thumbnail data. Recommended for draft prints only.
Printer type
Choose from Inkjet printer or All other
types.
Inkjet printer: We recommend this option when printing on inkjet or color laser printers.
The selected images will be printed at high quality and speed at the highest resolution
supported by the printer (if the printer supports resolutions higher than 360 dpi, the images will print at 360 dpi).
All other types: Select this option when printing in color on devices that use dye-sublimation or pho to graph ic processes. The selected images will be printed at the highest
resolution sup port ed by the printer. Print speed may drop if you choose this option when
using an inkjet print er.
Normal Print / Save [Print Image] as fi le
Select whether to print images on a printer,
or to save the page as an image fi le.
Normal Print: Outputs the selected images to a printer.
Save [Print Image] as fi le (Windows) / Save image fi les (Macintosh): Saves the page
as a JPEG fi le using the layout spec i fi ed in the “Page Layout” dialog. When this option is
selected, the Print button in the “Page Layout” dialog will change to Save. Click ing the
Save button dis plays the “Save Image(s)” dialog, where you can choose a des ti na tion
folder and fi le name and select Quality (JPEG compression) from Max i mum, High, Me-
di um, or Low. Each page is saved as a separate fi le.
Setting up Your Printer
Note that the printer must be properly connected and the printer drivers correctly installed.
Printing with Color Management
The printer profi le can be selected in the Color Management tab of the Preferences dialog in Nikon
Capture 4 Editor ( 104, 105) or Nikon Capture 4 Camera Control. Note that changes to color management settings in PictureProject and Nikon View also apply to Nikon Capture 4.
“Use Output Resolution”
To print images at the size and resolution selected in the Nikon Capture 4 Editor Size/Resolution palette,
select Use output resolution.
91
Page 96

Image Adjustment
Batch Processing
Nikon Capture 4 supports automated processing of multiple images (batch processing). Batch
pro cess ing is used to automate image processing, capturing images, applying pre-defi ned
image adjustment settings, and saving images to disk automatically. It is most effective when
applied to a series of pho to graphs taken under identical conditions. Images are processed in
the order taken.
When using batch processing, we recommend that you open one of the images to be pro cessed in Nikon Capture 4 and edit image adjustment settings to produce the de sired result.
You can then save these settings in a joint settings fi le using the Save Selected Adjustments
or Save All Adjustments option in the Settings > Image Adjustment menu (
se lect ing the re sult ing settings fi le in the Batch dialog, you can per form the same ad just ments
on all the images processed. In studio settings where a variety of shooting con di tions can be
rep li cat ed with ease, you can create separate settings fi les for commonly en coun tered con di tions and use these settings to automate repetitive image enhancement op er a tions.
82). By
Click the button or select Batch from the
Tools menu.
Choose folder containing images for batch
processing.
Choose how images will be pro cessed.
Choose a fi le naming method and fi le for mat
for processed images.
Click Start to begin processing.
Click Batch Complete when processing is
com plete.
93
93
94
95
96
96
Open the Batch dialog
Open the Batch progress dialog
Close the Batch progress dialog
Before Using Batch Processing
Batch processing is used to perform the operations specifi ed in the Image Adjustments section of the
Batch dialog on all fi les in a selected folder. To ensure that desired results are achieved, we rec om mend
pro cess ing a test image before beginning batch processing. Batch processing can not be used to adjust
settings separately for each image; instead, the images must be opened one at a time in the order taken
and separate ad just ments made manually for each image.
92
Page 97

Enhancing Images
This section describes how to use batch processing with fi les that have already been saved
to the computer’s hard disk. For in for ma tion on batch processing of images captured directly
from the cam era, see “Nikon Capture 4 Camera Control” (
Display the Batch dialog
Click the
1
button or select Batch from the Tools menu to display the Batch dialog.
116).
Source section
Choose a source folder (
Image Adjustments section
Choose the operations that will be performed on each image (
Destination section
Choose a destination folder (
Save Progress section
Choose a name for the batch process displayed in the Save Progress window.
Choose a source folder
2
In the Source section, choose the folder containing the images to be processed. The current folder is listed in the text box. To choose a new folder, click the Browse... button and
navigate to the desired location.
Include subfolders: Check this option to process all images in any sub-folders under the
specifi ed fold er. Folders with the same names will be created in the destination folder.
Periodically check for new fi les in this folder: When this option is checked, Nikon
Capture 4 will check for new images in the specifi ed folder once every ten seconds. This
option is not available when Include subfolders is checked or when Use save progress
window is selected in the Performance tab of the Preferences dialog.
Delete fi les from this folder after they are processed: Check this option to delete image
fi les from the selected folder after processing. A warning dialog will be displayed before
batch processing begins. This option is not available when Use source fi le name is se-
lected in the Destination section or when Use Save Progress Window is selected in the
Performance tab of the Preferences dialog.
93).
94).
95).
Selecting Folders for Batch Processing
For improved effi ciency, create two folders that are used only for batch processing, one for the originals
and the other for processed images.
93
Page 98

Image Adjustment
Specify how images will be processed
3
In the Image Adjustments section, specify the operations to be performed on each im age.
Apply current settings: Select this option to process the images in the selected folder using the settings cur rent ly in effect in Nikon Capture 4 Editor.
To change settings before beginning batch
processing, click Change Settings…. A
dialog will be displayed where an image
can be opened to assist with the process of
adjusting settings. Click No to adjust settings without opening an image.
To open the fi rst image in the source folder,
click Load First Image. To select another
image from the source folder, click Choose
Image…. The dialog shown at right will be
displayed; select an image and click OK.
A pause dialog will be displayed; adjust
settings as desired and then click Resume
Batch to return to the batch processing
dialog.
Apply settings in: Select this option to process the images in the selected folder using
joint settings cre at ed using the Save Selected Adjustments or Save All Adjustments
option in the Settings > Image Adjustment menu (
tomatically is selected for white balance in the settings fi le, the recorded value will be
used when images are processed). When this option is se lect ed, a joint settings fi le can be
selected by clicking the Browse button to its right.
Apply settings already in fi les: Check this option to apply settings previously saved with
NEF fi les. If this item is not checked, the saved settings will be re plac ing with the set tings
chosen in the Image Adjustments sec tion.
Auto Brightness: Select Always to apply auto brightness and contrast, or Only when re-
lated settings are neutral to adjust contrast and brightness only if they have not already
been adjusted manually using Photo Effects, Tone Curves, or Color Balance.
Auto Color Boost: Select For People - Always or For Nature - Always to apply the ef-
fects of the Auto button in the Color Booster palette, or For people - only when re -
lated settings are neutral or For nature - only when related settings are neutral to
apply this effect only if Color Booster settings have not already been adjusted manually.
82; note that if Calculate Au-
Orientation
Images processed using the batch option are saved in their original orientation. When Apply cur rent
settings is selected, images will not be rotated or fl ipped, regardless of whether fl ips or rotations have
been applied to the image in the active image window.
94
Page 99

Enhancing Images
Choose a destination for the processed images
4
In the Destination section, choose options for saving the processed images.
Use source folder: When this option is selected, processed images will be saved to the
same folder as the original.
Use source fi le name: When this option is selected, processed images will be saved under
the same name and in the same location as the original images, although the fi le extension will change if the chosen fi le format differs from the original. A warning will be displayed if the fi le name already exists. This option can not be selected at the same time as
Delete fi les from this folder after they are processed.
Save to: This text box shows the folder to which the images will be saved after processing. To choose a new folder, click the Browse... button to the right of the text box and
navigate to the desired location. This option is not available when Use source folder is
se lect ed. A folder with the same name will be created in the destination folder.
Next fi le name: This text box shows a sample of the fi le names that will be used when saving the images after processing. Click Edit... to modify fi le naming rules (
113).
Save as type: Choose the fi le format that will be used to save the processed images. The
following formats are available: Use source fi le type, NEF (Nikon Electronic Format),
TIFF Format (RGB), TIFF Format (CMYK), and JPEG Format. When NEF or TIFF (RGB) is
selected, compression can be chosen from a pull-down menu. When JPEG is selected, the
compression ratio can be chosen from “Highest Compression Ratio,” “Good Compression
Ratio,” “Good Balance,” “Good Quality,” and “Excellent Quality.” For more in for ma tion
on the options available, see “Saving Images” (
83).
Bit Depth : The bit depth (the number of bits of color information per channel for each
pixel in the image) at which the image will be saved. Bit depth can only be selected if the
selected fi le type is TIFF (RGB) and the original image has a bit depth of over eight bits.
Embed ICC Profi le: Select this option to embed an ICC profi le in each image.
File Naming Conventions
Windows : In environments that do not support long fi le names, the maximum length is eight char-
ac ters; fi le names may not contain spaces, quotes, or any of the following characters: “ \\” “/” “:” “.”
“;” “*” “?” “<“ “>” and “|”.
Where long fi le names are supported, fi le names may not contain quotes or any of the following characters: “\\” “/” “:” “.” “;” “*” “?” “<“ “>” and “|”.
Macintosh: The maximum length for Macintosh fi le names is thirty- one characters. Colons (“:”) are
not allowed.
Size/Resolution
If Keep the crop is selected, all images will be rescaled before they are saved. Otherwise images will be
saved at the selected size. If the height : width ratio of the original is larger than that of the selected output dimensions, the right edge of the image will be trimmed; if smaller, the bottom will be trimmed.
Existing Image Adjustment Settings
If the Apply settings already in fi les option is not checked, any changes to set tings stored with fi les
saved in NEF format will be ignored, and the settings in the selected settings fi le applied. If you have
pro cessed a series of NEF images separately and want to save them all as sixteen- bit TIFF, you can check
this option and use batch processing to save all the images to a single folder in sixteen- bit TIFF format.
95
Page 100

Image Adjustment
Begin processing
5
Click Start to put the selected settings into effect and begin processing. A batch progress
dialog will be displayed (except in Windows 98 SE, Windows Me, or Mac OS 9, the Save
Progress window will be displayed if Use Save Progress Window is selected in the Performance tab of the Preferences dialog;
Stop Batch
Click this button to stop batch processing before all images have been processed.
Only show warnings and errors
Check this option to display only warnings and errors in the log area. If this option is not
checked, the log will also show the names and locations of the original images, captured
photographs, and processed images.
Show fi le paths
Select this option to show the source and destination fi le paths. File paths are not displayed if Only show warnings and errors is checked.
Exit the batch processing dialog
6
When batch processing is complete, the Stop Batch button will change to Batch Com plete. Click Batch Complete to exit the batch processing dialog.
100).
Minimize button
Log area
The Log Area
If an error occurs during processing, a description will be displayed in the log area of the batch dialog.
Error Messages
If an invalid fi le name or other error is identifi ed in the batch processing dialog, a message will be dis played. Return to the batch processing dialog and adjust settings as directed in the message.
The Minimize Button (Windows )
Clicking the minimize button in the batch processing dialog minimizes Nikon Capture 4 Editor.
96
 Loading...