

Camera Control
Contents
Notices
About This Manual
Welcome to Nikon Capture!
Principle Features
Basic Operation
Before Starting Nikon Capture
Starting Nikon Capture
Quitting Nikon Capture
Using Nikon Capture
Software for the Nikon D1
Nikon Capture
Reference Manual
Capturing and Deleting Photographs
Capturing Photos as They Are Taken
Loading Images from the Camera
Adjusting White Balance for RAW Images
Deleting Camera Images
Formatting the Camera Memory Card
Accessing Memory Cards Directly
The Disk Space Indicator (Windows Only)
- 1 -
Working with Images
Image Windows
Creating a Copy of an Image
Opening an Image File
Selecting a Crop
Zoom
Rotating and Flipping Images
The Information Window
The Bird’s Eye Window
Image Adjustment
Output Size and Resolution
Curves
Color Adjustment
Unsharp Mask
Camera Operation
Camera Control
Time Lapse Photography
Custom Settings
Preferences
The General Tab
The File Locations Tab
The Thumbnails Tab
The Curves Tab
The Grid Lines Tab
The CMS Tab
Reference
Appendix A: Troubleshooting
Saving Images
File Formats
Save Original Image…
Save Final Image…
Saving Multiple Images
Saving Photographs Directly to Disk
Contents
Appendix B: Glossary
- 2 -
Notices
Concerning the Manuals Provided with This Product
• Reproduction, in whole or in part, of any of the manuals provided with
your Nikon product requires prior permission from Nikon.
• The information contained in these manuals is subject to change without
notice.
• While Nikon has made every effort to produce perfect manuals, we
appreciate any opportunity for improvement. Should you find any
mistakes, we would be grateful if you were to kindly let us know. The
address of Nikon’s representative in your area is provided separately.
Disclaimer of Liability
• Nikon does not accept liability for damages resulting from the use of this
product.
Warning!
Do not play the installer or reference CD-ROMs provided with this
product on an audio CD player or other device not intended for CDROMs. Playing the CD-ROM on an audio CD player could damage the
speakers or result in hearing loss.
Trademark Information
Adobe and Acrobat are registered trademarks, and Photoshop is a
trademark, of Adobe Systems Inc.
Apple, the Apple logo, Macintosh, and FireWire are registered trademarks of Apple Computer, Inc. Finder and Power Macintosh are
trademarks of Apple Computer, Inc.
CompactFlash is a trademark of SanDisk Corporation.
i486 and Pentium are trademarks of Intel Corporation.
IBM and IBM PC/AT are registered trademarks of International Business
Machines Corporation.
Internet is a trademark of Digital Equipment Corporation.
Netscape and Netscape Navigator are registered trademarks of
Netscape Communications Corporation.
Windows and MS-Windows are trademarks of Microsoft corporation.
Internet Explorer is a product of Microsoft corporation.
All other brand or product names mentioned in this manual are the
trademarks or registered trademarks of their respective holders.
Notices
- 3 -
About This Manual
Welcome to Nikon Capture, the camera control software for
the Nikon D1 digital camera. Nikon Capture makes it possible
to view and edit photographs containing “raw” image data
captured directly from the D1’s image-sensing CCD (chargecoupled device) at settings of HI-RAW (see the D1 User’s
Manual). With the camera connected to a computer via an
IEEE 1394 cable, you can also use Nikon Capture to take photographs from the computer, copy the contents of the camera’s
memory to the computer, and capture images to disk. The
capacity to manipulate highly versatile, twelve-bit RAW data
makes it possible to exploit the potential of your D1 to the full.
Read these instructions thoroughly to ensure that you get the
most from this software.
The documentation provided on this CD-ROM is composed of
two parts: a Quick Start manual in HTML format that guides you
step-by-step through the process of installation, and this reference manual, which provides detailed operating instructions.
Note
On the illustrations in this manual
This manual is for use with both the Macintosh and Windows versions of
this product. While the majority of the illustrations in this manual are taken
from the Windows version, the operations described apply to both the
Macintosh and Windows versions. Depending on your operating system,
however, some of the dialogs and menus may differ slightly from those
shown in the illustrations. For information on operations specific to your
OS, refer to the documentation provided with your operating system.
About This Manual
Note
This manual assumes familiarity with operations common to the Macintosh
and Windows operating systems. Refer to the documentation provided
with your operating system for more information.
- 4 -
This manual consists of the following main chapters:
Welcome to Nikon Capture!
Introduces the chief features of this software.
Basic Operation
Describes basic operations and introduces you to the tasks that
can be performed using Nikon Capture. Tasks are introduced in
the order they are typically performed, making this a perfect
introduction for first-time users.
Saving Images
Lists the options available when saving images to disk.
Camera Operation
Describes how to take photographs and make changes to
camera settings from Nikon Capture.
Preferences
Details the options available in Nikon Capture’s Preferences
dialog.
Capturing and Deleting Images
Explains how to load images from the camera and how to
delete those that are no longer needed. It also describes how
to save images to disk as they are taken.
Working with Images
Introduces basic operations that can be performed on images
captured from the camera or read from disk.
Image Enhancement
Details the image enhancement operations that can be performed using Nikon Capture before images are saved in their
final form.
Note
Be sure to read the README file provided on the Nikon Capture installer
disk, as it may contain information that could not be included in this manual.
Reference
A quick guide to menu options.
Appendix A: Troubleshooting
Offers advice on dealing with common problems.
Appendix B: Glossary
Definitions of some of the technical terms used in this manual.
About This Manual
- 5 -

Welcome to Nikon Capture!
Principle Features
Nikon Capture not only makes it possible to load photographs
from your Nikon D1 digital camera and save them in a variety
of commonly used image file formats, but it also allows you to
control the camera directly from your computer and capture
images as they are taken. With its comprehensive tools and
simple, speedy interface, Nikon Capture brings out the full
potential of your camera.
The main advantages offered by Nikon Capture are listed below.
Support for RAW Image File Format
In addition to JPEG and TIFF images created by the camera,
Nikon Capture can be used to edit RAW image data from the
camera’s CCD. RAW image data can not be opened in any
other application.
Support for IEEE 1394
Photographs taken with the D1 can be loaded into the computer for editing or to be saved to disk in one of a variety of image
formats. The high-speed IEEE 1394 interface allows even largevolume, high-quality images to be loaded quickly. Photographs
loaded from the camera are displayed as thumbnail previews,
allowing you to easily choose the image you want.
Welcome to Nikon Capture: Principle Features
- 6 -

Camera Control Function
Nikon Capture can be used to control the camera remotely
while it is connected to the computer. Photographs can be
displayed on your computer monitor immediately after they are
taken, making Nikon Capture an invaluable tool in studio photography. Nikon Capture’s Camera Control supports operations
such as time lapse photography that can not be performed with
the camera alone. Photographs taken using the Camera Control function are saved directly to the computer’s hard disk,
without being stored in the camera’s memory card.
Support for a Variety of Image File Formats
Nikon Capture allows you to choose an image file format suited
to the task at hand. Twelve-bit, uncompressed RAW images
can be saved without change in Nikon Electronic Image Format
(NEF). Any enhancements made by the user are not applied to
the image but are saved separately in the same file, leaving the
original data untouched. Once saved, NEF images can be
opened and saved in a format supported by other imaging
applications. This makes it possible to process a single image in
a number of different ways without any loss in image quality.
Image Enhancement
Nikon Capture offers tools for adjusting white balance (RAW
images only), brightness, contrast, color balance, tone curves,
and sharpness, allowing images to be optimized for the task at
hand before they are saved in a format supported by other
applications. The Curves window offers precise control over
tone levels, while a separate Color Adjustment window provides simple controls for adjusting brightness, contrast, and color
balance.
Saved Settings
Camera control and image enhancement settings can be saved
and recalled as desired.
Auto Save Mode
Using Nikon Capture, you can convert photographs to any of
the supported formats and save them directly to disk as they
are taken. Photographs are not saved to the camera’s memory
card, making it possible to take an almost unlimited number of
photographs.
On-line Help
Interactive, on-line help provides you with the answers you
need, instantly.
Welcome to Nikon Capture: Principle Features
- 7 -
Basic Operation
Before Starting Nikon Capture
This chapter explains the basic operation of the Nikon Capture
software. After installing Nikon Capture, please read this chapter
thoroughly to ensure proper usage, as well as to maximize all of
the benefits Nikon Capture has to offer when used with a D1
digital camera.
The section “Using Nikon Capture” introduces and explains
basic operating procedures for using Nikon Capture. By following the procedures as explained, the user will quickly master the
basics of Nikon Capture. For more information regarding the
D1’s buttons, functions and settings, please refer to the camera
User’s Manual.
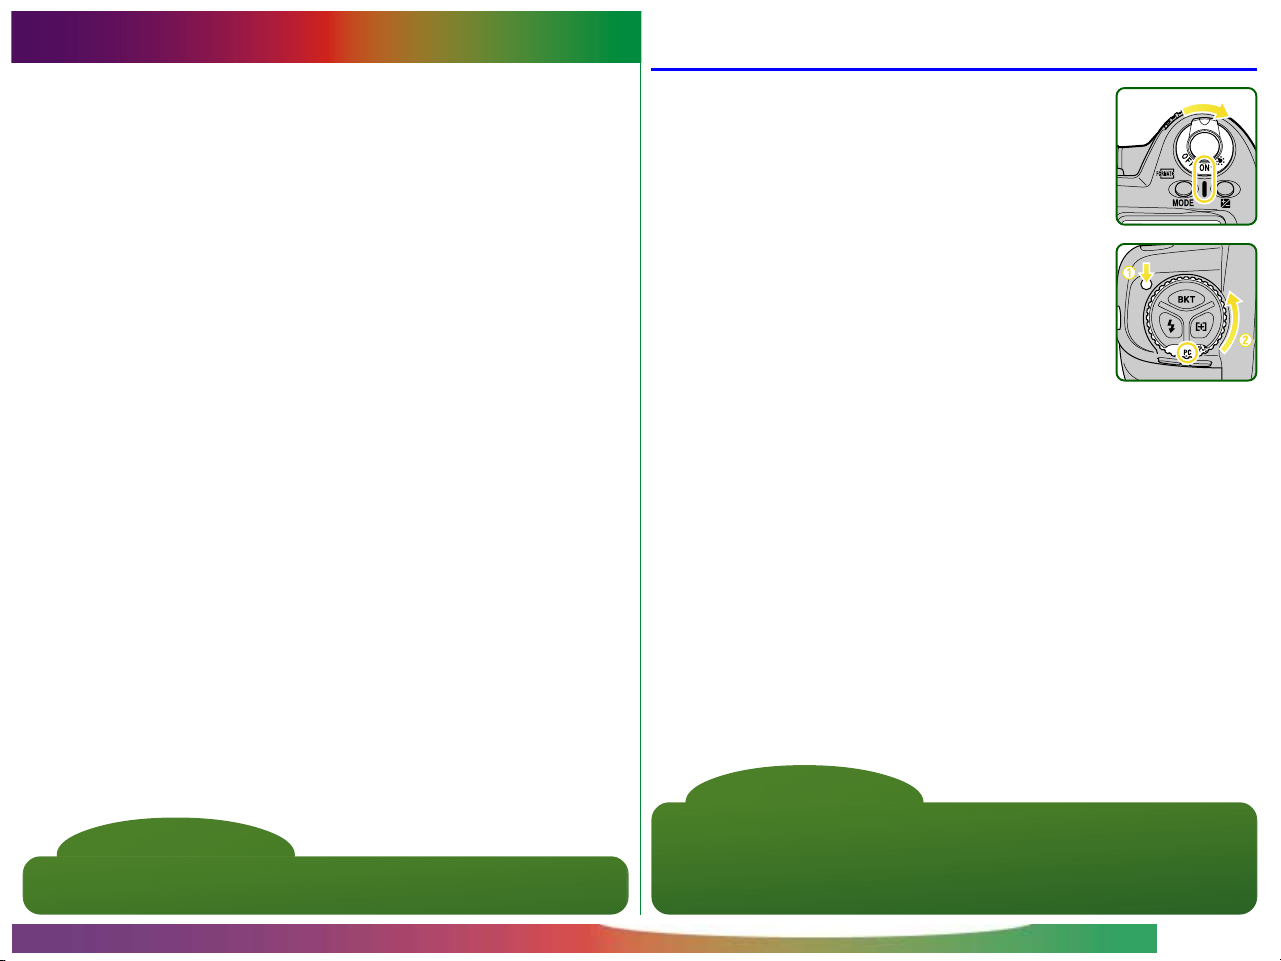
Turn the camera on.
1
Turn the mode dial on the camera to “PC”
2
(PC mode).
PC mode allows communication between
the camera and your computer. Communication is not possible with the mode dial set
to any other setting.
Connect the camera to the computer via its IEEE 1394
3
interface (see the camera User’s Manual or the documentation provided with your computer for more information).
Note
It is recommended that the camera be powered by an EH-4 AC adapter
(available separately) while connected to a computer.
Basic Operation: Before Starting Nikon Capture
Note
It is recommended that you connect the cable after turning the camera on.
As some time is required for a connection to be established after the cable
has been connected or disconnected, allow a brief pause before beginning
operations. Unplug the cable before turning the camera off.
- 8 -

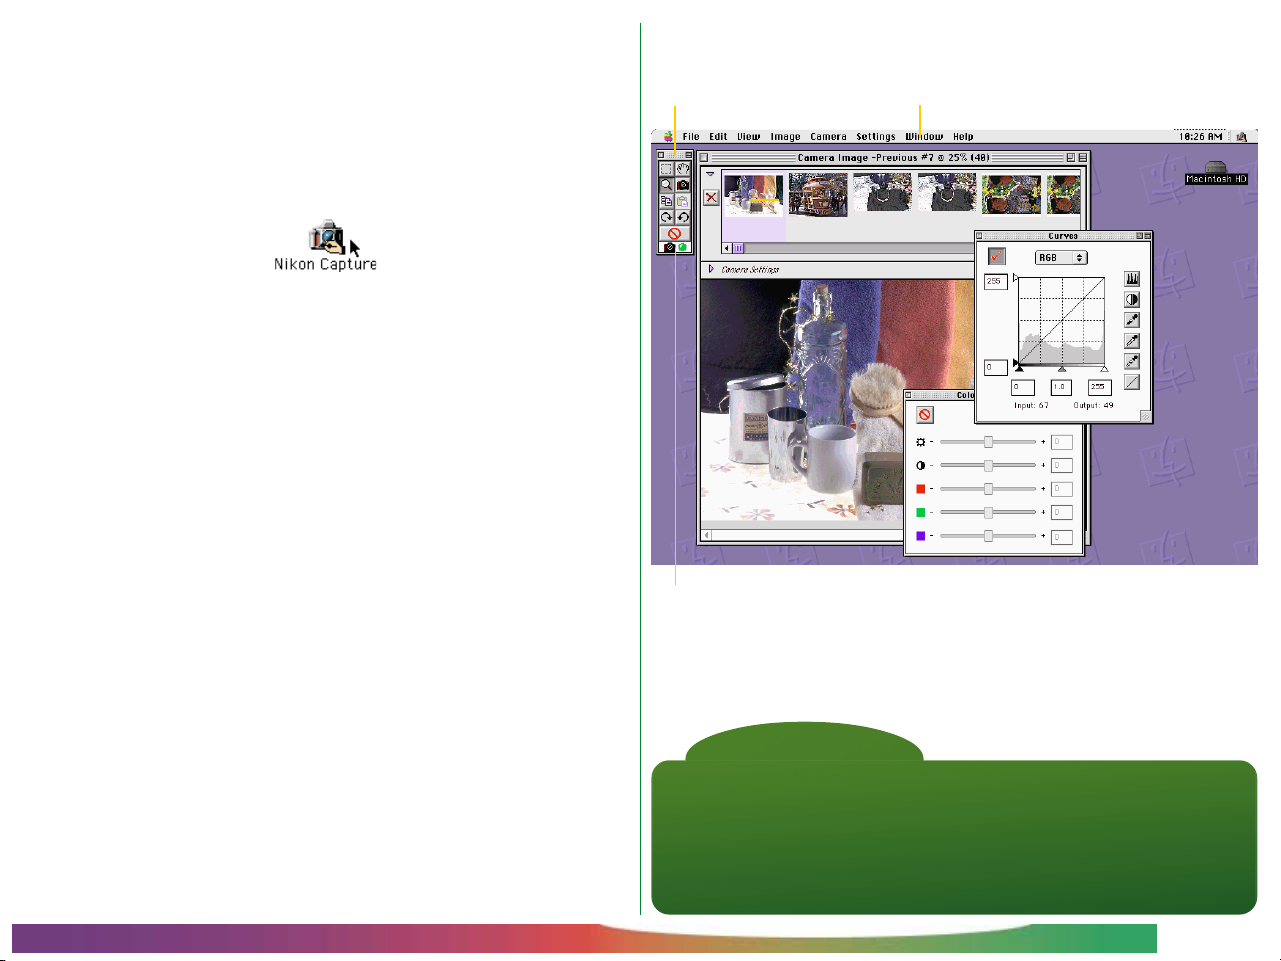
Starting Nikon Capture
Windows
The Nikon Capture window will open on the desktop.
Nikon Capture
window
Turn on the computer and start Windows.
1
Select Nikon Capture from: Start menu > Programs >
2
Nikon Capture.
Note
If Nikon Capture is started with the camera connected and camera Custom
Setting item 28 (“Save Raw Images”) set to “0” (“RAW data format not
available”), a warning will be displayed. Click OK in the warning dialog to
change the setting to “1” (“RAW data format available”). You will then be
able to take photographs at a setting of HI-RAW (a high-quality format that
stores photographs as “raw,” twelve-bit data taken directly from the
camera’s CCD), which can be viewed and edited in Nikon Capture.
Menu bar
Toolbar
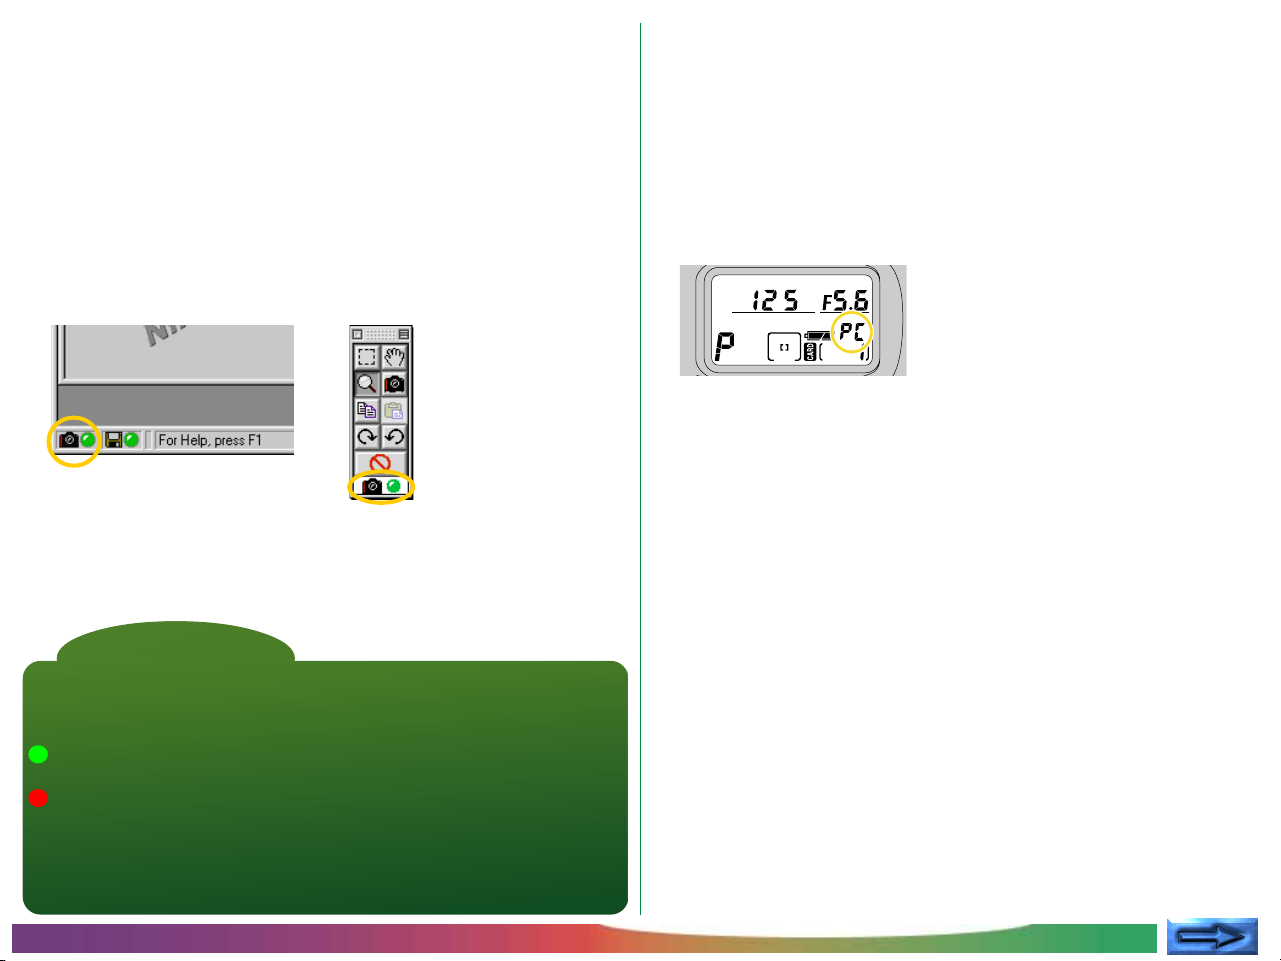
Connection status
indicator
Disk space indicator (see “Capturing
and Deleting Photographs”)
Note
In addition to the Nikon Capture window, any other windows that were
open the last time you quit Nikon Capture will also be displayed when the
program starts up (when you first start the program after installation, the
Camera Image, Curves, Unsharp Mask, and Size/Resolution windows will
be displayed). If images remained in the Camera Image window when you
last quit Nikon Capture, the Camera Image window will also be displayed.
Status bar (displays
interactive help messages)
Basic Operation: Starting Nikon Capture
- 9 -
Macintosh
Start your computer.
1
Open the Nikon Capture folder (located in the folder to
2
which you installed Nikon Capture) and double click the
Nikon Capture application icon.
The application menu bar and tool palette will be displayed.
Menu barTool palette
Connection status
indicator
Basic Operation: Starting Nikon Capture
Note
In addition to the Nikon Capture window, any other windows that were
open the last time you quit Nikon Capture will also be displayed when the
program starts up (when you first start the program after installation, the
Camera Image, Curves, Unsharp Mask, and Size/Resolution windows will
be displayed). If images remained in the Camera Image window when you
last quit Nikon Capture, the Camera Image window will also be displayed.
- 10 -
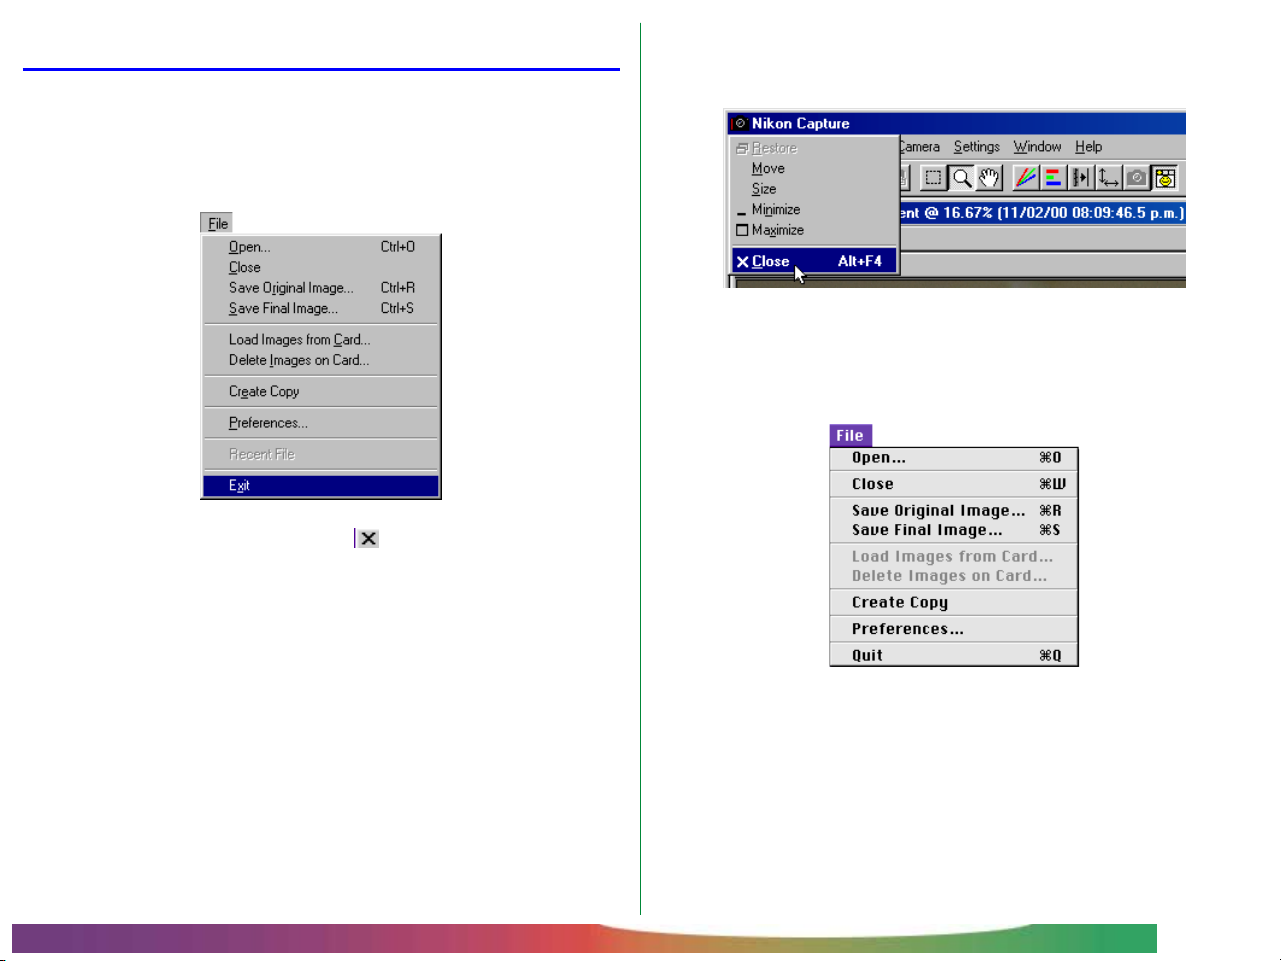
Quitting Nikon Capture
Windows
In Windows there are three options:
• Select Exit from the File menu
• Click on the Close tool button ( ) in the upper right
corner of the Nikon Capture window
• Select Close from the Control menu in the title bar of the
Nikon Capture window
Macintosh
On a Macintosh there is only one option:
• Select Quit from the File menu
Basic Operation: Quitting Nikon Capture
- 11 -

Using Nikon Capture
Step 1—Capturing Images to the Computer
With the camera connected to your computer in a studio
setting, you can use Nikon Capture to take photographs and
save them to disk. Nikon Capture can also be used to view the
contents of the camera’s memory on your computer’s monitor,
where you can select images to be captured, edit images, and
save them to disk as outlined in this chapter. For details on the
operations described here, see “Capturing and Deleting Photographs.”
Images can be captured from the camera using one of the
following two methods:
Capturing Photographs as They Are Taken (Studio
Photography)
With the camera connected and set to PC mode, photographs
can be taken and transferred to your computer’s hard disk
over the IEEE 1394 interface, without being saved to the
camera’s memory card. The camera can be controlled directly
or with Nikon Capture’s Camera Control function. Photographs taken in Auto Save mode are similarly not recorded to
the camera’s memory card, but are instead saved directly to a
user-specified folder on the computer.
Loading Images from the Camera
Images saved on the camera’s memory card can be loaded
into Nikon Capture’s Camera Image window via the IEEE 1394
interface, or you can read images directly from the card using a
CompactFlash card reader or a PC card adapter and a
PCMCIA Type II card slot.
CONCEPT
Basic Operation: Using Nikon Capture
- 12 -
This section outlines how to take photographs and capture
them to your computer in real time. Details may be found in
the following chapter, “Capturing and Deleting Photographs.”
Check the status of the connection between the camera and
1
the computer. If the two are properly connected, the con-
PRACTICE
nection status indicator at the bottom left corner of the
Nikon Capture window (Windows) or tool palette
(Macintosh) will be green.
Connection status is also displayed in the control panel on
top of the camera. If Nikon Capture is started with the
camera connected, the number of remaining exposures will
show PC. While this indicator is displayed, photographs
taken by the camera will not be saved to the camera’s
memory card; instead, they will be recorded directly to the
computer.
Adjust camera settings, frame a photograph, and focus (see
2
the D1 User’s Manual for information on camera settings).
E
C
TI
C
PRA
Tip
The connection status indicator
The color of the connection status indicator shows the status of the
connection between the computer and the camera.
Normal connection. The camera is ready to transfer data or data are
being transferred.
No connection. Either the camera is not connected, or the connection
is not functioning properly. See “Troubleshooting” for more informa-
tion.
Clicking the connection status indicator displays a message detailing
connection status.
Basic Operation: Using Nikon Capture
- 13 -
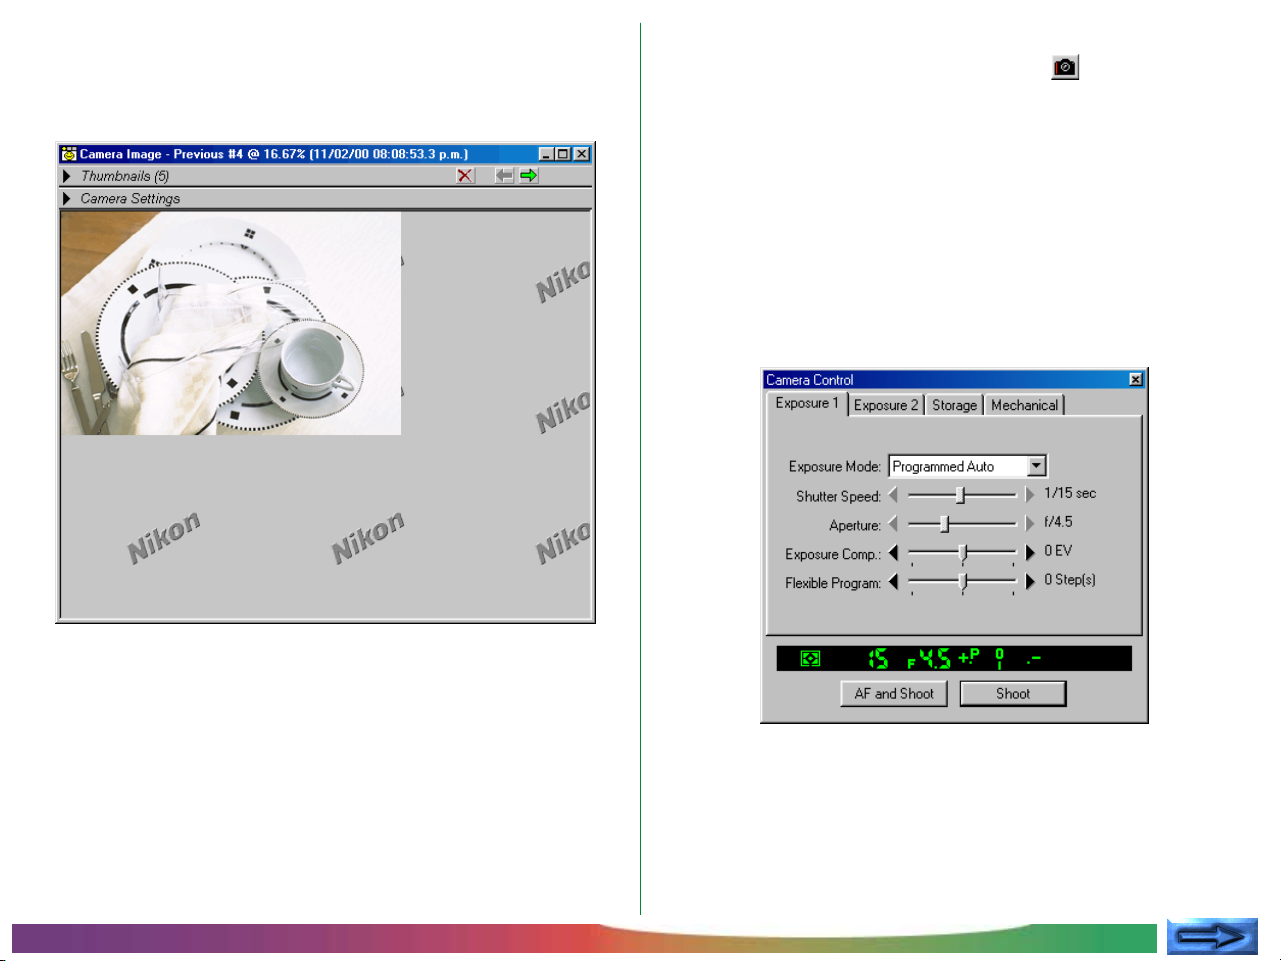
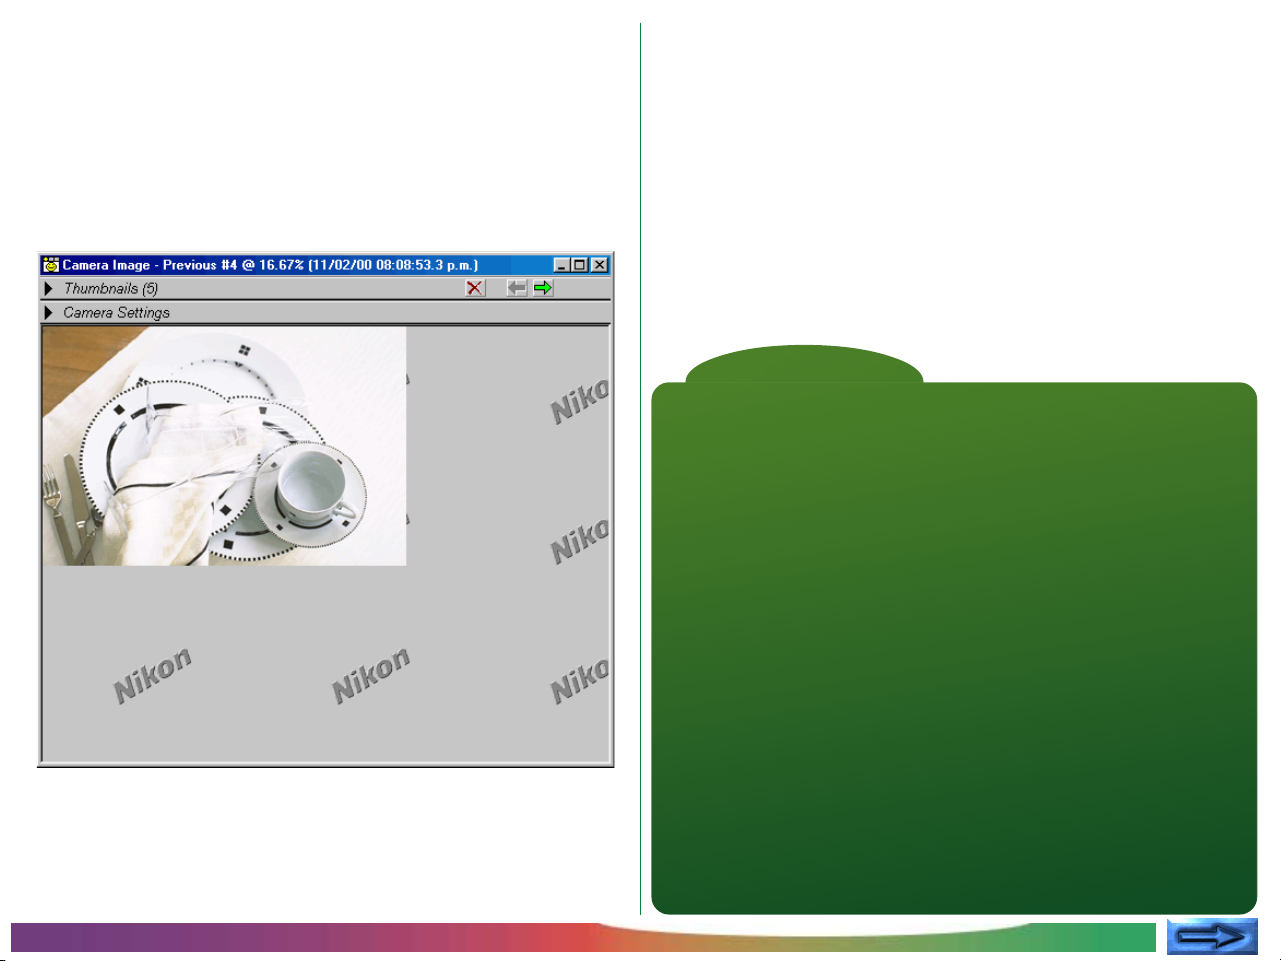
Press the shutter-release button all the way down to take a
3
picture. The photograph will be transferred to the computer
and displayed in the Camera Image window.
PRACTICE
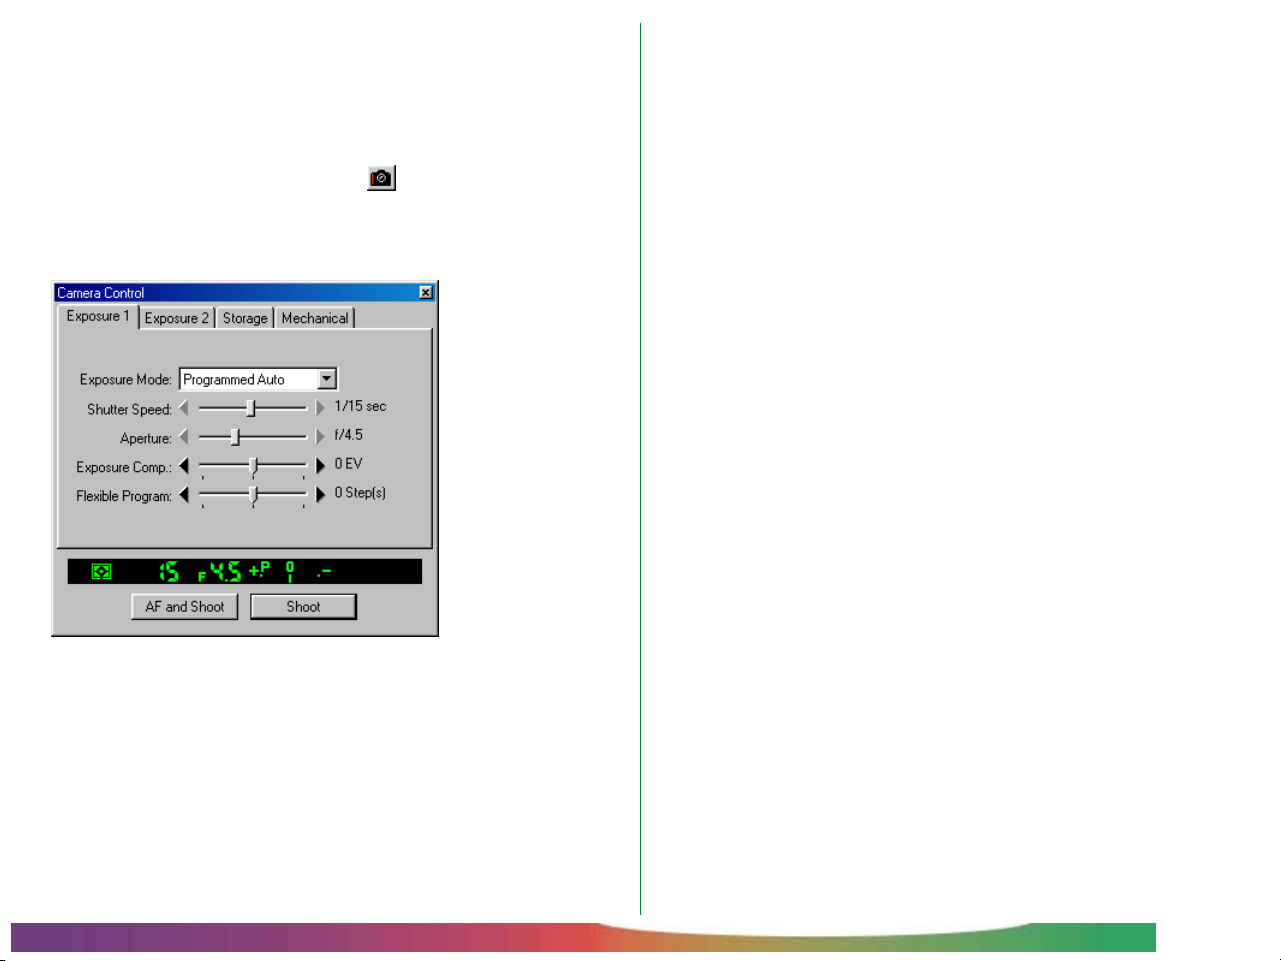
The Camera Control Window
Clicking the Camera Control tool button ( ) opens the Camera Control window, where you can view the camera settings
currently in effect or confirm changes (any changes to settings
made from the camera are reflected instantly in the display in
the Camera Control window). The Camera Control window
can also be used to make changes to settings and take photographs remotely. Photographs taken when the Shoot button is
pressed are captured and displayed in the Camera Image window.
E
C
TI
C
PRA
Each time you press the shutter-release button, the resulting
photograph will be transferred to the computer and displayed in the Camera Image window.
Basic Operation: Using Nikon Capture
See “Camera Control” for details of the options available in the
Camera Control window.
- 14 -
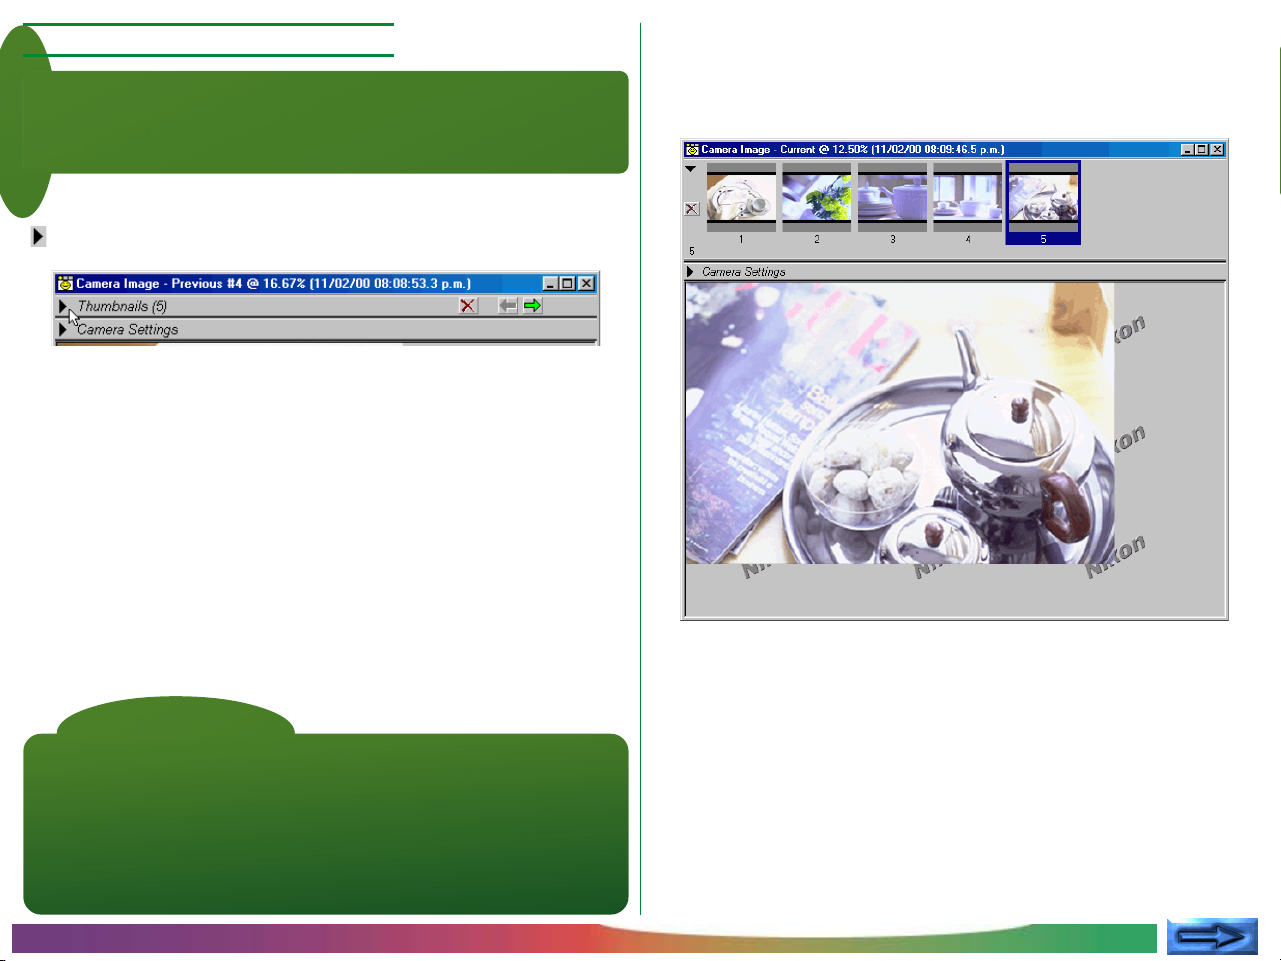
Step 2—Viewing Thumbnails
Using thumbnails (small previews of your photographs), it is
possible to view at a glance all photographs that have been
captured to your computer.
CONCEPT
In the Camera Image window, click the Thumbnails arrow
( ) to open the Thumbnails section.
The Thumbnails section will open, with all recently captured
images visible. Any previously captured images that have not
been deleted are also visible.
E
C
TI
C
PRA
Note
Images that have been captured to the computer are stored at full size in
a thumbnail folder. The images you see in the Thumbnails section are the
images in that folder. If thumbnails are deleted from the Thumbnails
section, the full-sized image will also be deleted from the thumbnail folder.
The thumbnail folder is that designated in the File Locations tab of the
Preferences dialog (by default, the folder “Thumb” in the directory to
which Nikon Capture was installed).
Basic Operation: Using Nikon Capture
- 15 -
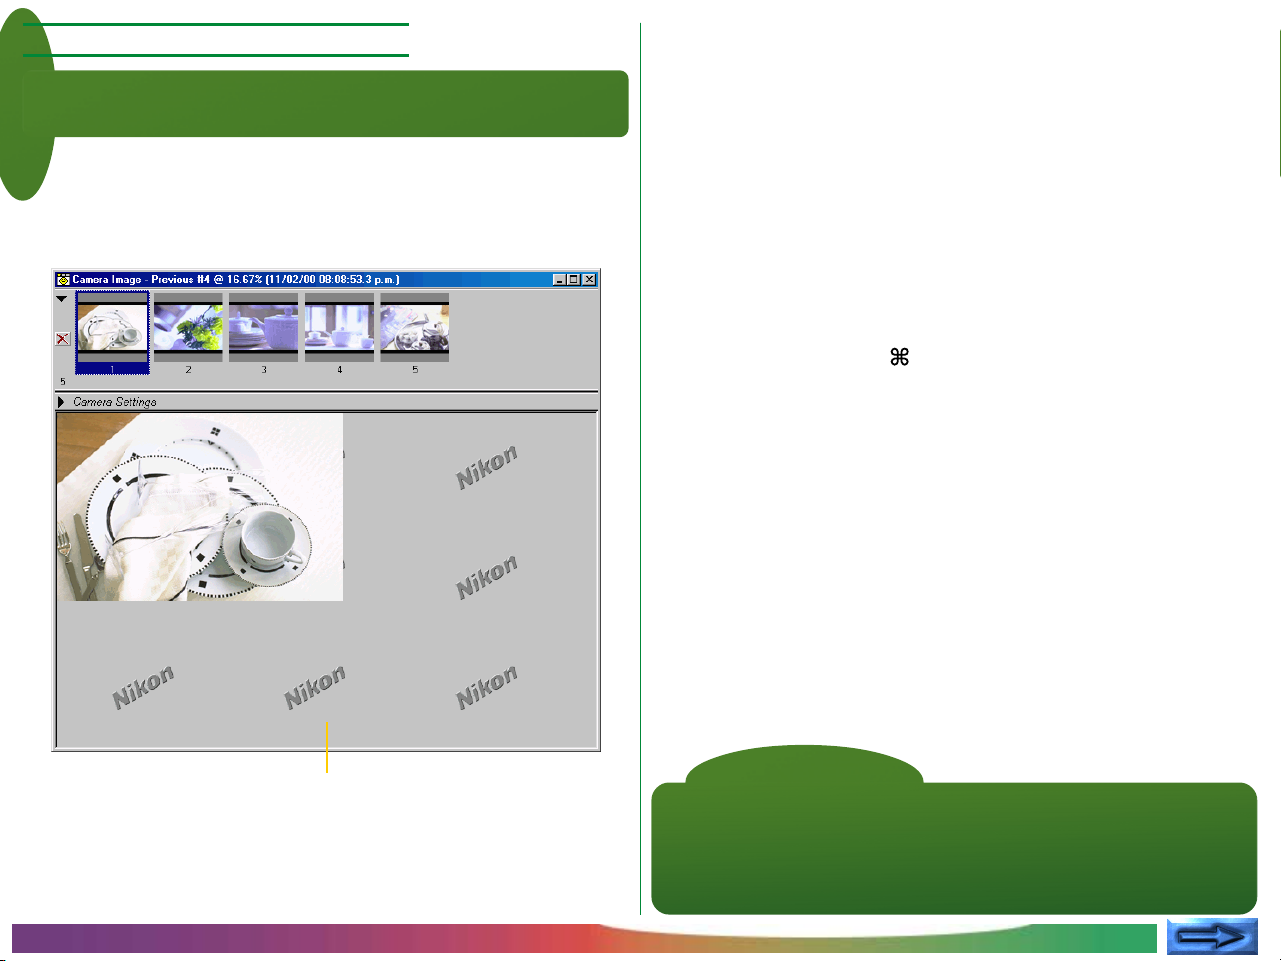
Step 3—Selecting Thumbnails
Select previews from the Thumbnails section when you want
to view, edit, or save a photo.
CONCEPT
Click on the thumbnail of the image you want to work with.
The thumbnail you selected will be highlighted with a colored
border and the image will appear in the Preview section.
Selecting Multiple Thumbnails
You can also select multiple images from the Thumbnails section.
Windows
Hold the Ctrl key while clicking, one at a time, the images you
want to work with, or, if you want to work with several successive images, click on the first and last image while holding the
Shift key.
Macintosh
Hold the command key ( ) while clicking, one at a time, the
images you want to work with, or, if you want to work with
several successive images, click on the first and last image while
holding the Shift key.
To Select All Thumbnails
Choose Select All Thumbnails from the Image menu.
E
C
TI
C
PRA
Preview section
Basic Operation: Using Nikon Capture
Note
Although selecting several, or all, thumbnails is convenient when saving or
deleting images, when more than one thumbnail is selected, no image will
be displayed in the Preview section of the Camera Image window. When
you want to edit an image, select only that image from the Thumbnails
section.
- 16 -
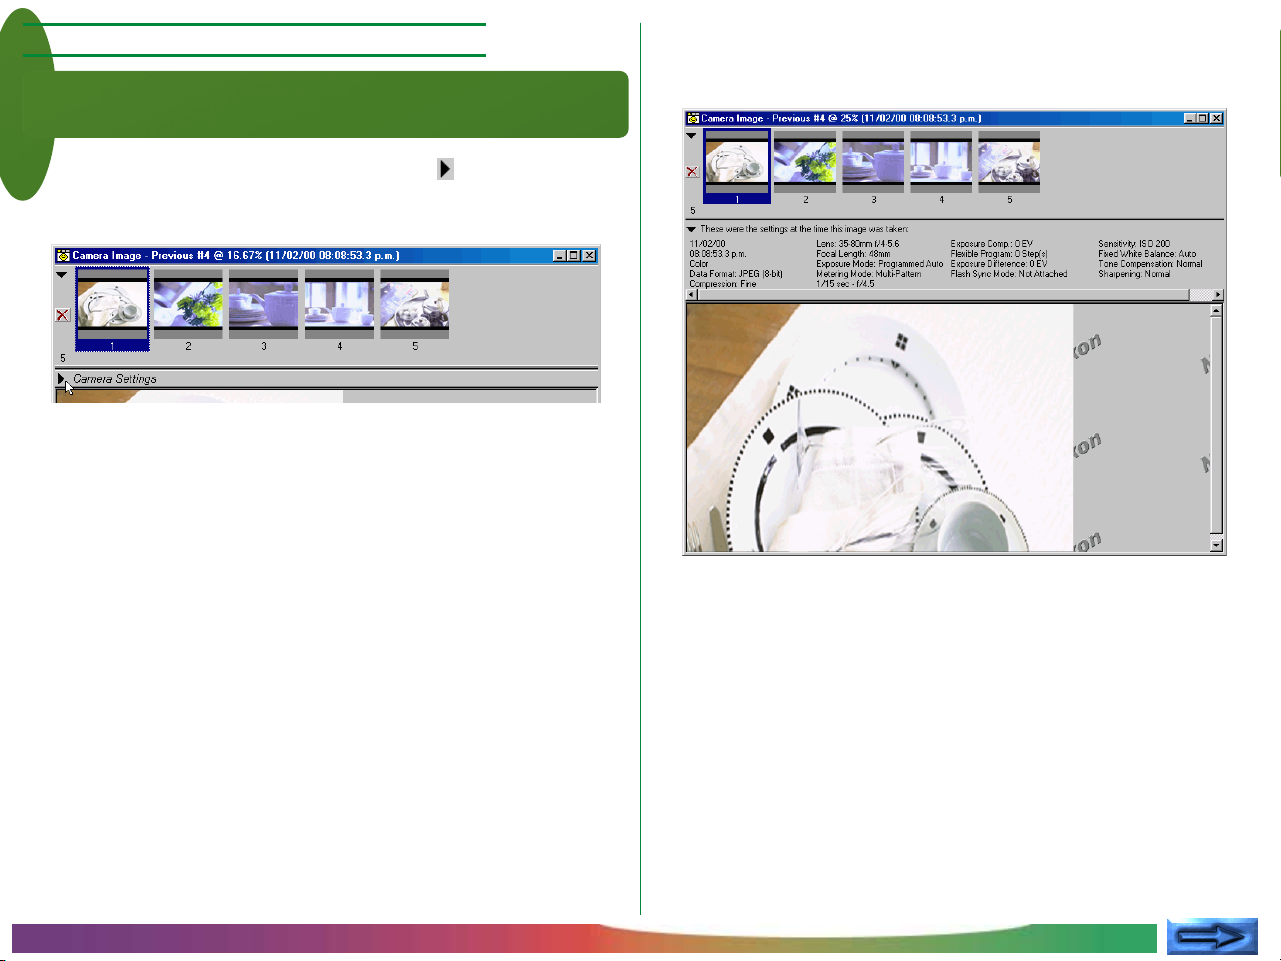
Step 4—Viewing Photo Information
While a photograph is displayed, it is possible to view the
settings in effect at the time the photograph was taken.
CONCEPT
Click on the Camera Settings arrow ( ), located just
1
below the Thumbnails section, to display camera settings.
The Camera Settings section will show the date of recording
and camera settings for the image currently selected.
Click the Camera Settings arrow (▼) a second time to
2
close the Camera Settings section.
Basic Operation: Using Nikon Capture
- 17 -
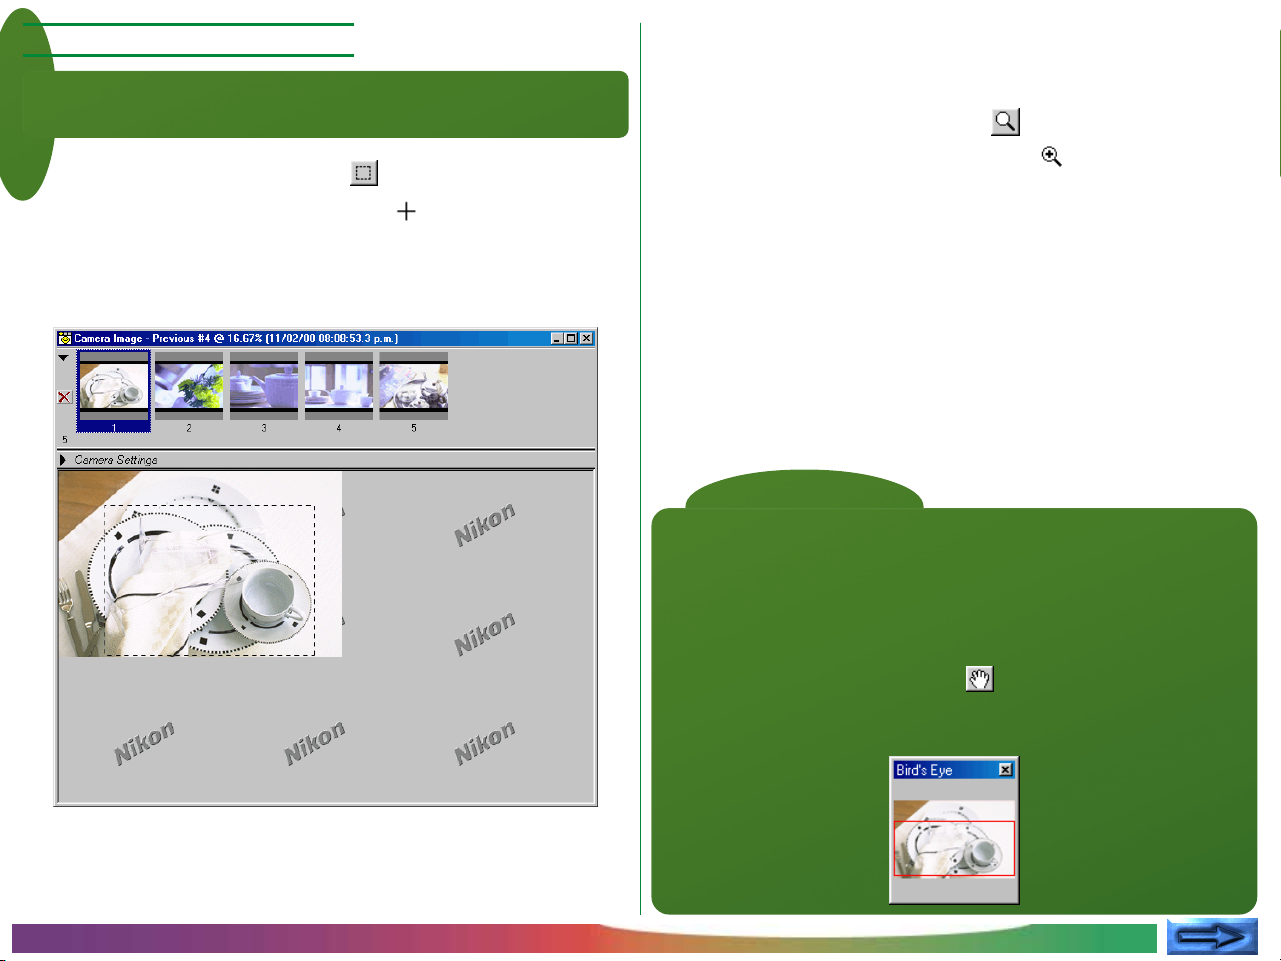
Step 5—Cropping Images
Using the Crop tool, you can select a portion of the image to
be saved in a format that can be read by other programs.
CONCEPT
Click on the Crop tool button ( ). The mouse pointer will
1
take the form of a selection cursor ( ).
Drag the cursor diagonally across the image to select a
2
rectangular crop.
After you have selected the portion of the image you wish to
work with, you can zoom in on the crop.
Click on the Zoom Cursor tool ( ). The mouse pointer
3
will take the shape of a zoom cursor ( ).
4 Click the zoom cursor in the middle of the area to be
zoomed in.
Tip
When viewing an image at a size that makes it larger than can be displayed
in the Preview section, it is possible to call up a smaller copy of the image
to use as a guide. This function is called “Bird’s Eye.” Select Bird’s Eye
from the View menu to display the Bird’s Eye window.
The Bird’s Eye window will show a red box around the area presently visible
in the Preview section. The portion of the image being viewed may be
adjusted by using either the Grab tool ( ) and adjusting the view from the
Preview section, or by dragging the red box in the Bird’s Eye image to a new
location (see “Working with Images: The Bird’s Eye Window”).
Basic Operation: Using Nikon Capture
Red box marks area
visible in Preview section
- 18 -
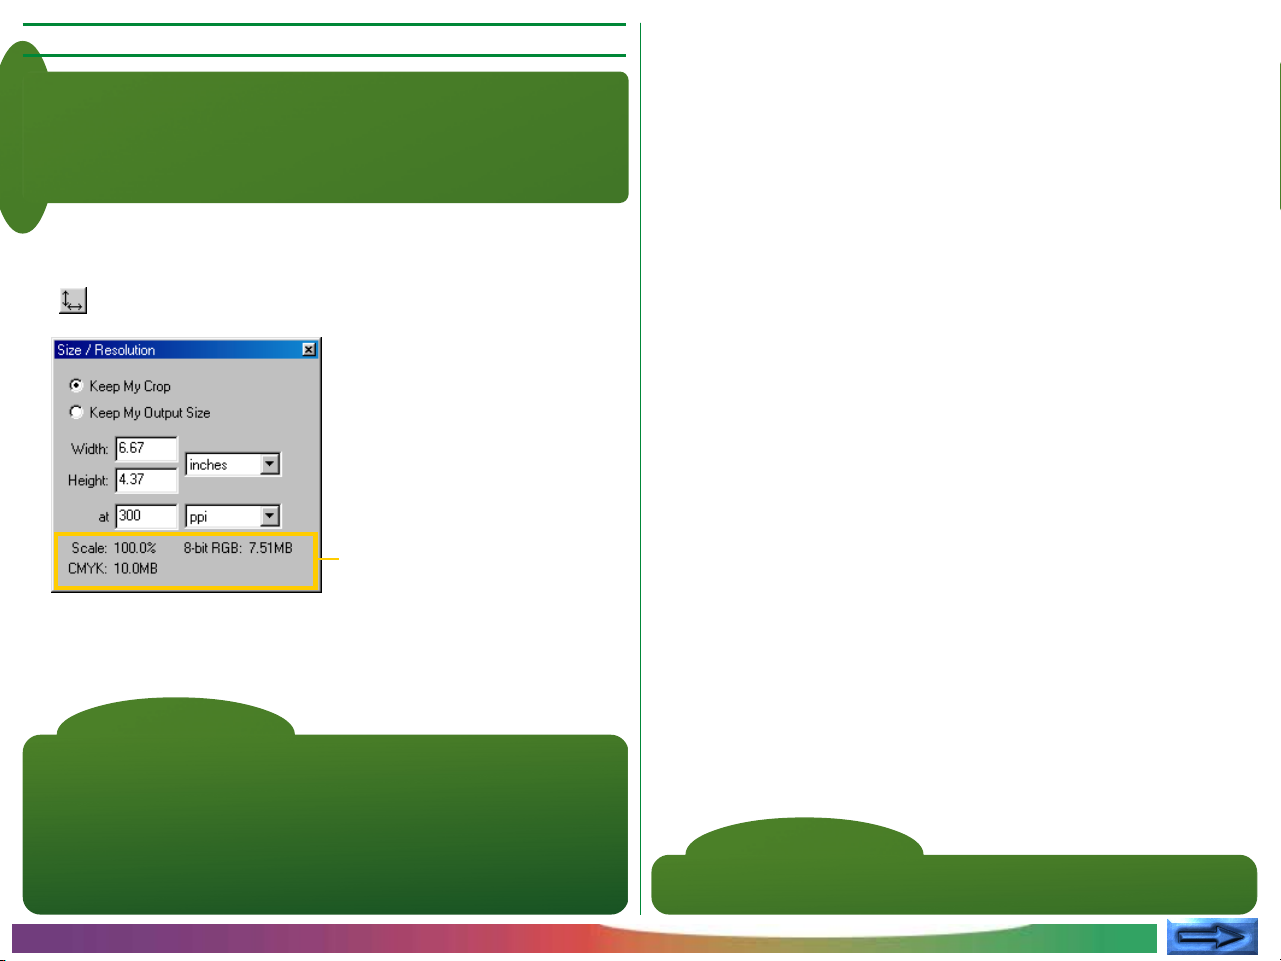
Step 6—Determining Image Size and Resolution
You can adjust the size and resolution of the final image from
the Size/Resolution window to suit the task at hand. The
output size gives the dimensions of the cropped section when
output on a printer or monitor at the specified resolution.
CONCEPT
Select Size/Resolution from the View menu (in Win-
1
dows, you can also click on the Size/Resolution tool button
( ) in the toolbar).
Output scale and file size
Adjust the size (in pixels, inches, millimeters, etc.) and the
2
resolution to meet your specific requirements. Any changes
will be reflected in the Scale display, which shows the output
size of the image as a percentage of the input size.
E
C
TI
C
PRA
Note
The Settings for Next Camera Image option in the General tab of the
Preferences dialog specifies whether the settings used for the size and
resolution of an image when captured to your computer are the default
settings, or the settings applied the last time images were captured from the
camera (see “Preferences: The General Tab”). Size/Resolution settings can
be saved and recalled using the options available in the Settings menu. See
“Image Adjustment” for more information.
Basic Operation: Using Nikon Capture
Note
When the unit selected for measuring height and width is pixels, resolution
can not be changed.
- 19 -

Step 7—Image Enhancement
Color Adjustment
Nikon Capture is not a photo retouch program; rather, it serves
to provide access to the full potential of the Nikon D1 digital
camera system. It does, however, allow some manipulation of
captured images with its Color Adjustment, Curves, and
Unsharp Mask functions. It also provides a choice of file
CONCEPT
formats which can then be opened and edited with any
dard third-party imaging software, such as Adobe Photoshop,
stan-
or
uploaded directly to a web page. One of Nikon Capture’s
most notable features is that it permits direct manipulation of
RAW image data—twelve-bit image data from the camera’s
CCD. When RAW images are saved in Nikon Electronic
Image Format, or NEF, adjustments made using Nikon Cap-
ture’s image enhancement functions are not applied directly to
the image data but are saved separately in the same file, so
that the original image data are always available for editing.
Adjustments to an image’s brightness, contrast and/or color
balance can be made from the Curves window or the Color
Adjustment window.
From the Curves window, adjustments can be made to the
tone curves that map the correspondence between input and
output tones, correcting or changing tone levels. Curves are a
convenient tool for users with some knowledge of tone
curves, white point, black point, contrast, and gamma, or for
those who wish to make precise adjustments to a portion of
the tone curves.
The Color Adjustment window is, in comparison to the
Curves window, much less complex and has fewer functions.
Simple adjustments to brightness, contrast, and color balance
can be made from this window. It is suited to users who are
new to image retouching or to those who want to make
adjustments that affect the entire image in a uniform way.
Basic Operation: Using Nikon Capture
Note
Changes to Curves and Color Adjustment can not be applied simultaneously to a single image. Given that only one of these tools can be used
for any given image, you should choose the tool you want according to the
task at hand and your knowledge of image editing techniques.
- 20 -
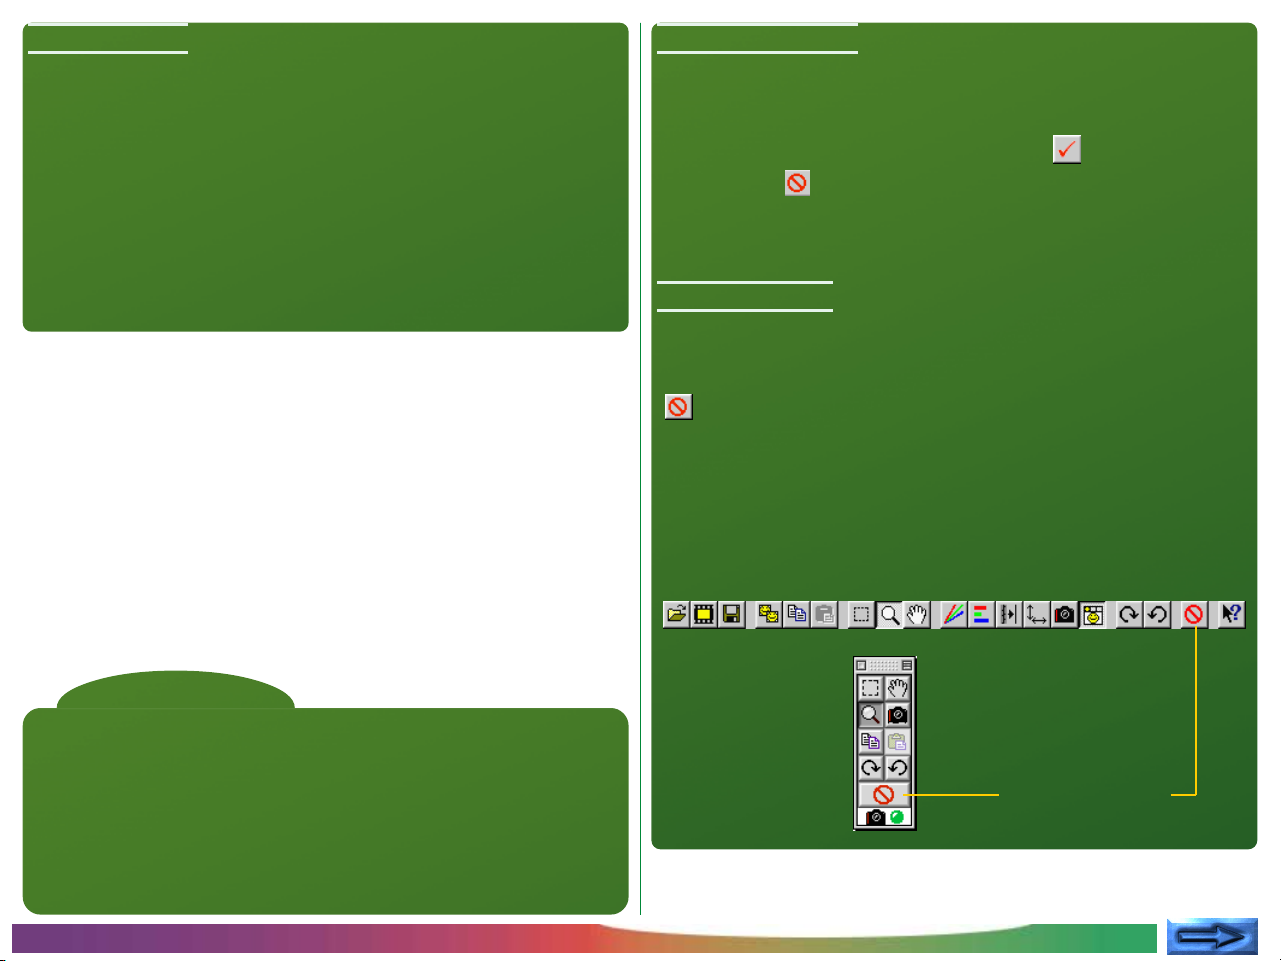
Unsharp Mask
Applying Changes
For photos that lack sharpness, Nikon Capture’s Unsharp Mask
function is ideal for sharpening outlines of an image. Because
the Unsharp Mask function applies to information gathered
from the Size/Resolution, Curves, and Color Adjustment
windows, the user should adjust Unsharp Mask last. When
viewing the effects of Unsharp Mask in the monitor, it is recommended that you set the zoom ratio in the active window
to 1:1 (100%).
The settings in the Curves, Color Adjustment, and Unsharp
Mask windows can only be adjusted and applied when the
Apply button for the window is checked ( ). If the Apply
button is off ( ), clicking on it once will turn it on. Note that
Curves and Color Adjustment settings can not be applied
simultaneously to a single image.
Hiding Changes
Changes to the image in the active window can be hidden by
clicking and holding the Show Original Image Data tool button
( ) in the toolbar (Windows) or tool palette (Macintosh).
The original image will be displayed only while the button is
held down, making possible quick “before-and-after” comparisons that help you decide whether image enhancement is
having the desired effect.
Windows Toolbar
Tip
As with image Size/Resolution, the Curves, Color Adjustment, and Unsharp
Mask settings that apply when an image is first loaded into Nikon Capture are
determined using the Settings for Next Camera Image option in the
General tab of the Preferences dialog. With each window, you have the
choice of capturing images with default settings, or the settings applied the
last time an image was captured. Also, like Size/Resolution, a variety of
options are available in the Settings menu for saving, loading and changing
defaults to the Curves, Color Adjustment and Unsharp Mask functions.
Basic Operation: Using Nikon Capture
Macintosh Tool
Palette
“Show Original
Image Data” tool
button
- 21 -
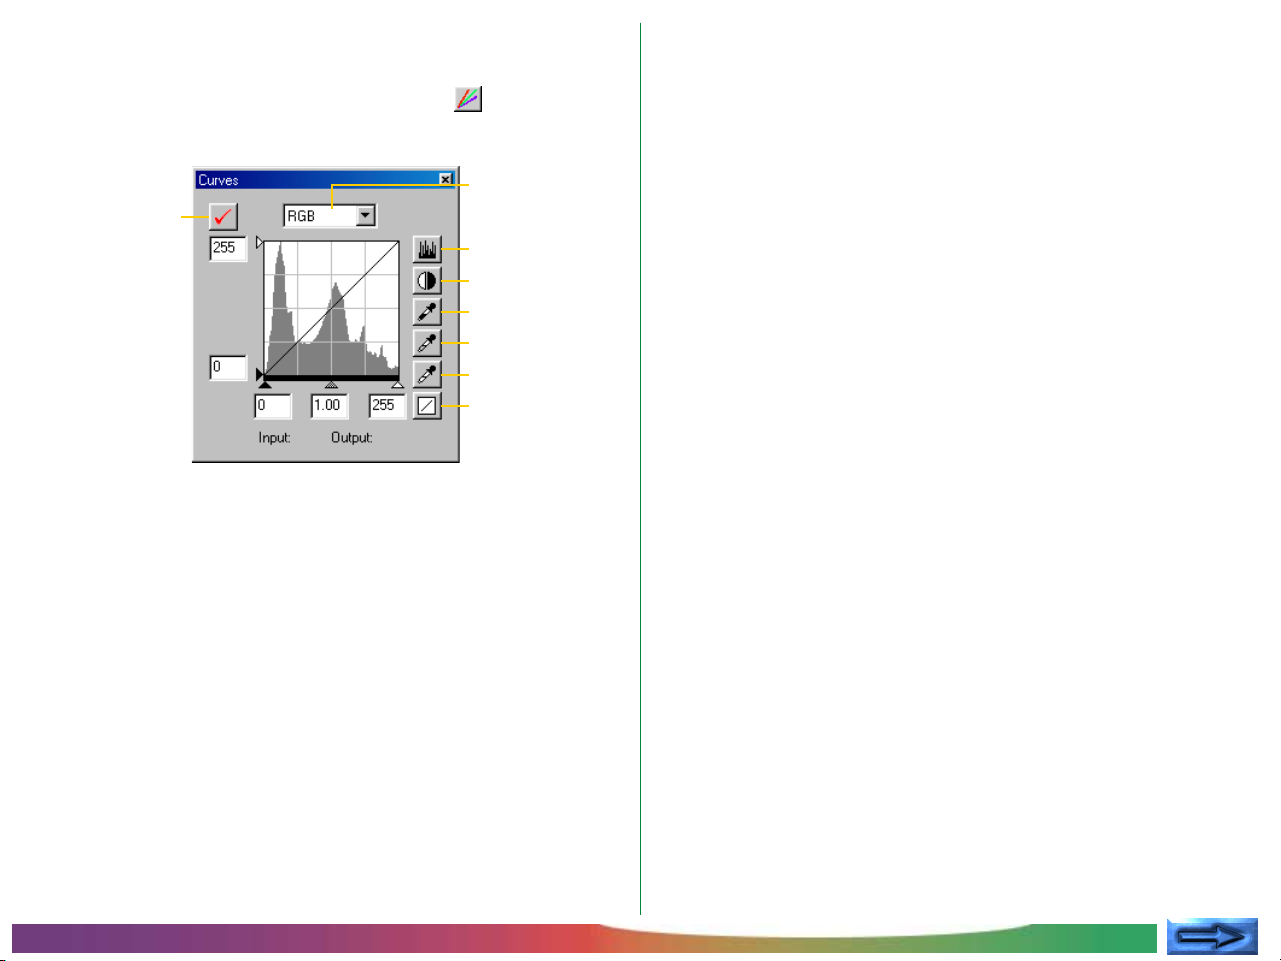
The Curves Window
To display the Curves window, select Curves from the View
menu (in Windows, you can also click on the tool button in
the toolbar).
PRACTICE
Apply button
Current
channel
View edited
histogram
Auto contrast
Black point
Midpoint
White point
Reset all curves
to linear
When the Apply button in the Curves window is on, the Apply
button in the Color Adjustment window automatically turns off.
It is not possible to apply changes to both Curves and Color
Adjustment simultaneously to a single image.
Tone curves for each of the red, green, and blue channels, and
for the master RGB channel, can be selected from the pop-up
menu at the top of the window. The sliders at the bottom and
left side of the histogram control the black point, midpoint, and
white point. Complex adjustments to tones can be made by
adding and moving points on the curves. The histogram shows
the distribution of tones in the original image and, when the
View Edited Histogram button is held down, the distribution of
tones after curves have been edited. With reference to this
tool, and by observing the effects of changes on the image in
the Preview section, you can make changes to curves that
enhance the color balance, brightness, and contrast of the
image.
E
C
TI
C
PRA
Basic Operation: Using Nikon Capture
- 22 -
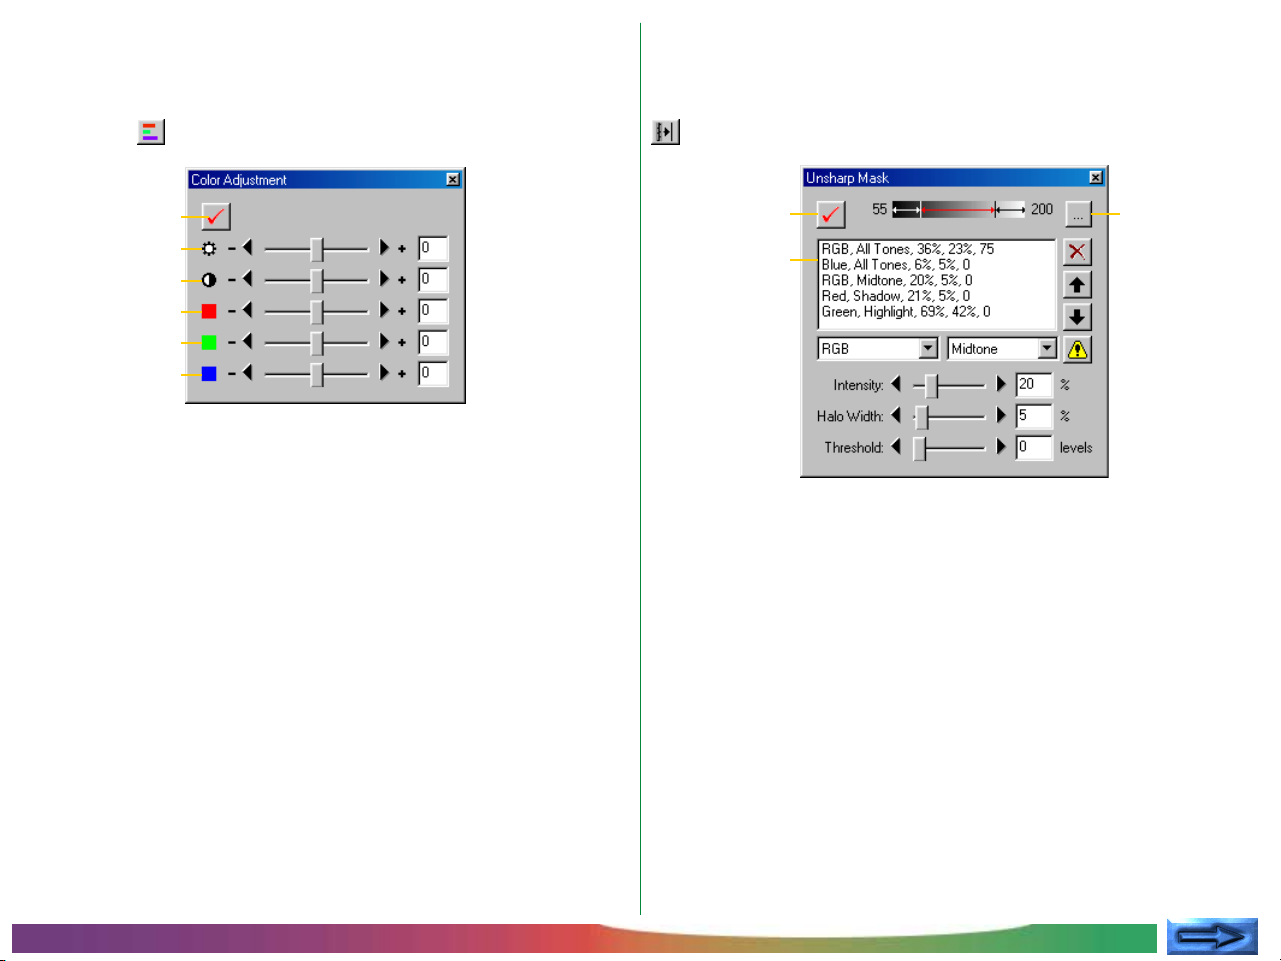
The Color Adjustment Window
To display the Color Adjustment window, select Color Adjustment from the View menu (in Windows, you can also
click on the tool button in the tool bar).
The Unsharp Mask Window
To display the Unsharp Mask window, select Unsharp Mask
from the View menu (in Windows, you can also click on the
tool button in the toolbar).
E
C
TI
C
PRACTICE
Apply button
Brightness
Contrast
Red
Green
Blue
When the Apply button in the Color Adjustment window is
checked, the Apply button in the Curves window automatically
turns off. Adjustments can be made to brightness, contrast, and
color balance using the sliders or by entering values directly in
the text boxes.
Apply button Define tone
ranges (shad-
Unsharp Mask
list
ows, midtones,
and highlights)
Unsharp masks can be applied selectively to different color
channels and tone ranges. The effects of Unsharp Mask, modified for any changes to settings in the Curves or Color Adjustment windows, are visible in the image in the Preview section.
PRA
Basic Operation: Using Nikon Capture
- 23 -

Step 8—Saving Images
Save Final Image…
Once all necessary editing for size, resolution, tone, color, and
sharpness has been completed, you should save the image to a
folder on your computer. Photographs can be saved in NEF
format using the Save Original Image… option, or saved in
a standard image format such as JPEG or TIFF using the Save
CONCEPT
Final Image… option.
Save Original Image…
Use this option to save the image in NEF format. Although
the original image data from the camera are saved without
modification, information about changes to size, resolution,
curves, color adjustment, and sharpness are saved separately in
the same file. This file can be opened later using Nikon Cap-
ture and saved again in a format that can be opened by third
party applications such as Adobe Photoshop or Internet Explorer.
This option saves the image in a format, chosen by the user,
which can be read by third party applications such as Adobe
Photoshop and Internet Explorer. The image can, however, no
longer be opened with Nikon Capture. For more information
on file formats, see “Saving Images: File Formats”.
Basic Operation: Using Nikon Capture
- 24 -
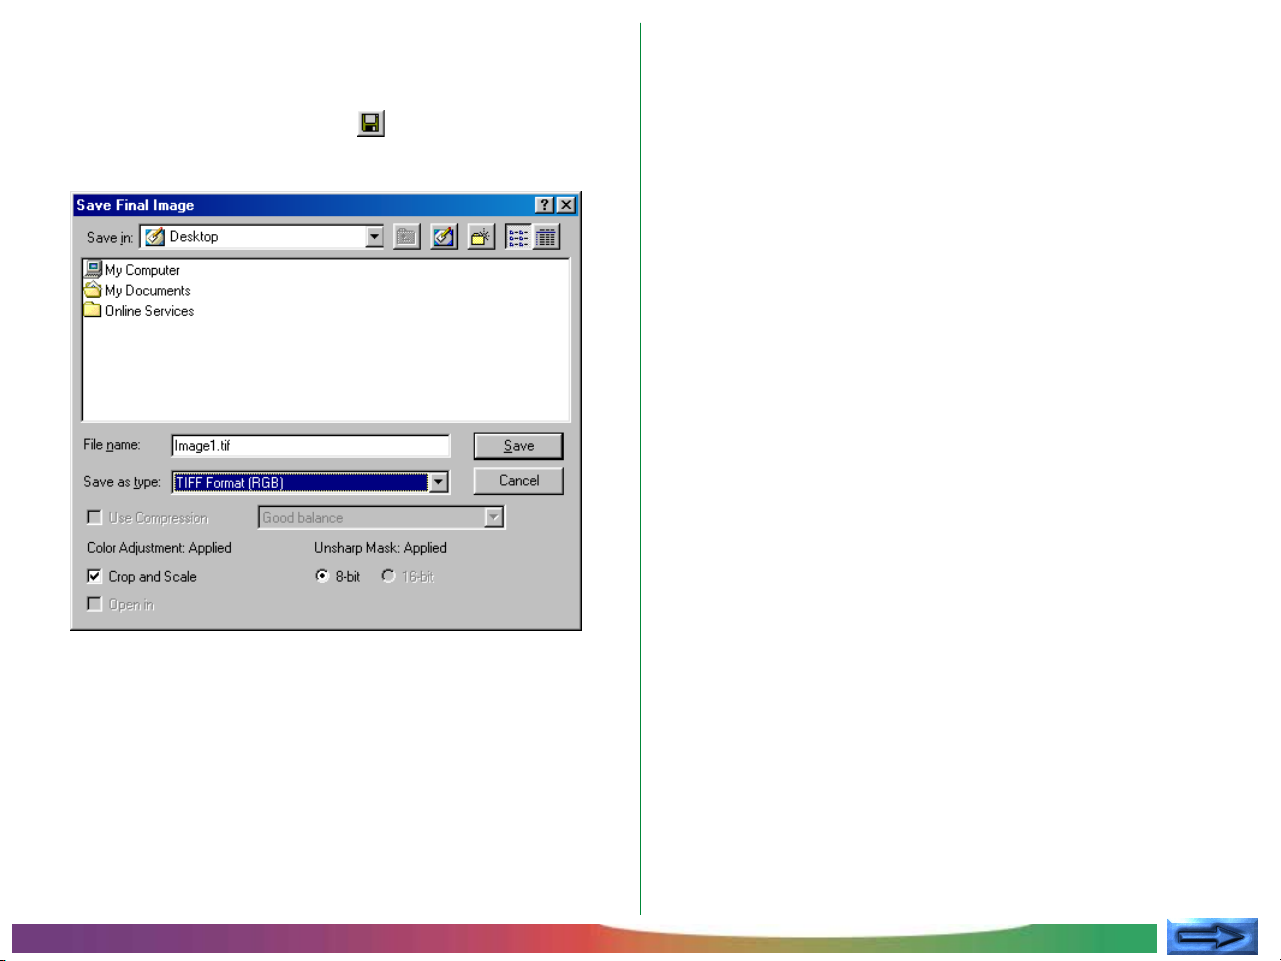
Follow these steps to save an image in TIFF (RGB) format.
Navigate to the folder to which the image is to be saved.
2
1 Select Save Final Image… from the File menu (in Win-
dows, you may also click on the tool button in the toolbar). A dialog similar to that shown below will appear:
PRACTICE
Select a file type (format) of TIFF (RGB).
3
Name the image.
4
Click Save.
5
E
C
TI
C
PRA
Basic Operation: Using Nikon Capture
- 25 -
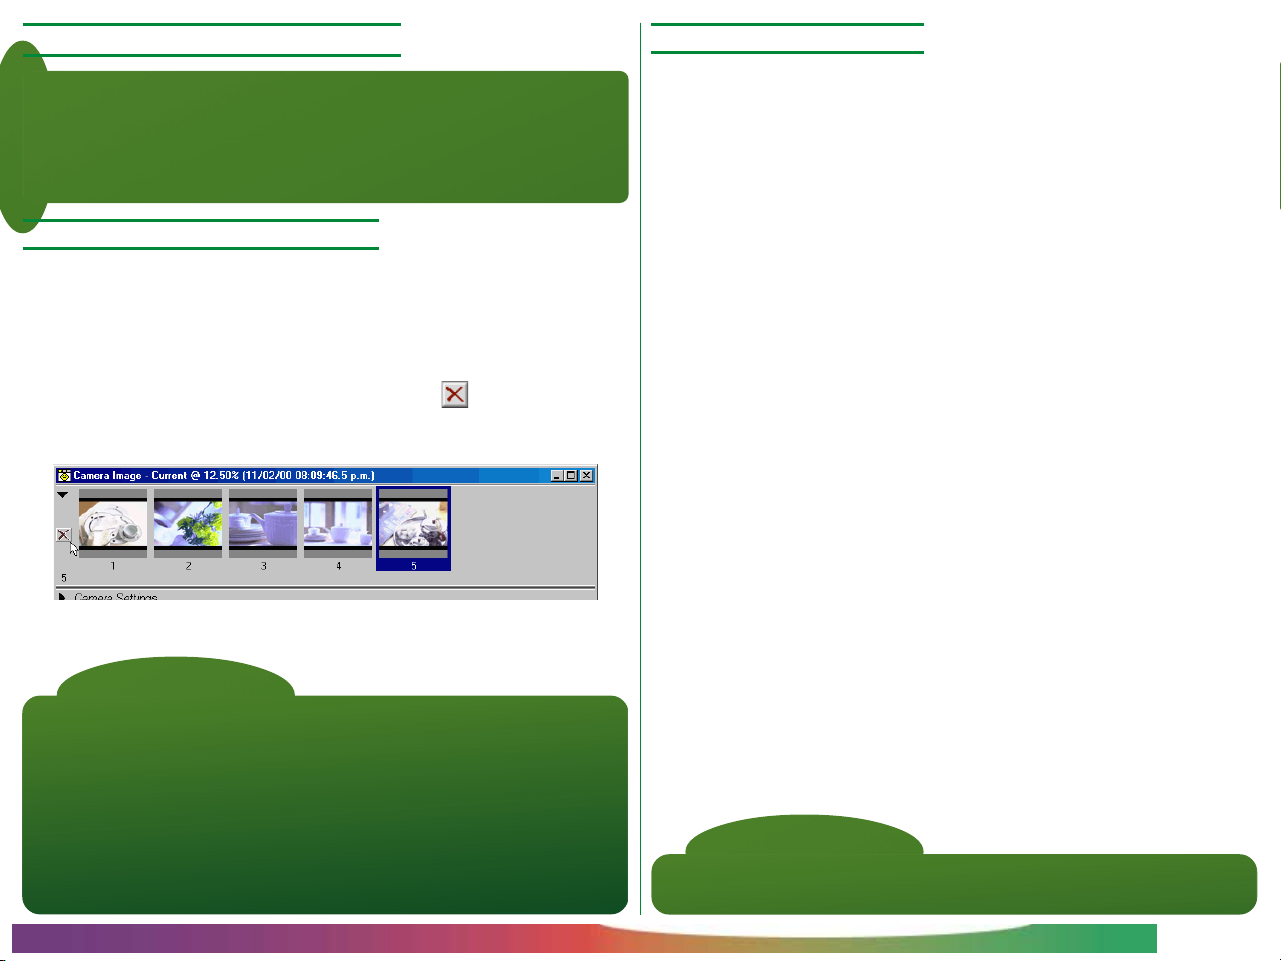
Step 9—Deleting Thumbnails
Deleting All Thumbnails
As the images in the temporary thumbnails folder occupy a
considerable amount of disk space, it is recommended that
you empty the temporary thumbnails folder when they are no
longer needed.
CONCEPT
Deleting Selected Thumbnail(s)
Select the thumbnail(s) you want to delete from the Thumb-
1
nails section (the selected image(s) will be highlighted).
Choose Remove Selected Thumbnails from the
2
Image menu or click the delete button ( ) in the Thumb-
nails section.
• Select Remove All Thumbnails from the Image menu
to remove all thumbnails from the Camera Image window
and delete all image files in the thumbnail folder.
E
C
TI
C
PRA
Tip
Two options for removing thumbnails automatically are available in the
Thumbnails tab of the Preferences dialog.
Clear Camera Image Window on Exit
If this box is checked, a confirmation dialog will be displayed when you
exit Nikon Capture, where you can opt to delete all thumbnails.
Auto-Remove Thumbnail after Save
If this box is checked, the associated thumbnail will be removed when
the image is saved.
Basic Operation: Using Nikon Capture
Note
Once deleted, thumbnail image data can not be restored. Be sure that the
data are no longer required before deleting thumbnail images.
- 26 -

Capturing and Deleting Photographs
Capturing Photos as They Are Taken
Using Nikon Capture, you can view or delete photographs
already stored in your camera’s memory, or capture photographs for display and editing on your computer as they are
taken. This chapter covers the following topics:
• Saving photographs directly to your computer’s hard disk as
they are taken
• Reading photographs already stored in the camera
• Deleting photographs from the camera’s memory
• Formatting the camera’s memory card from the computer
• Reading images directly from the memory card using a card
reader or PCMCIA adapter
When the D1 is connected in PC mode and Nikon Capture is
running, you can save photographs directly to your computer’s
hard disk as they are taken, rather than to the camera’s memory card. You can operate the camera directly or make changes
to settings and release the shutter remotely using Nikon Cap-
ture’s Camera Control window, where you can confirm changes to settings as they are made.
CONCEPT
Caution
When you are capturing or deleting photographs from the camera, or
formatting memory cards for use in the camera, the camera must be
connected to your computer in PC mode. Do not disconnect the camera or
turn the camera off while data transfer is in progress or while formatting memory
cards. This could result in data corruption or software malfunction.
Capturing Photographs: Capturing Photos
Tip
Using Auto Save, photographs can be saved to a specified folder on your
computer’s hard disk without being displayed in the Camera Image
window. See “Saving Images: Saving Photographs Directly to Disk”.
- 27 -
Taking Photographs from the Camera
Adjust camera settings, frame a photograph, and check focus
1
(see the D1 User’s Manual for detailed instructions).
Press the shutter-release button all the way down to take a
2
photograph. The photograph will be captured and displayed
PRACTICE
in the Camera Image window.
Each time you release the shutter, the resulting photograph
will be displayed in the Camera Image window.
E
C
TI
C
PRA
Tip
“Continuous shooting” and “single-frame shooting” in PC mode
• In PC mode, you can choose between continuous and single-frame
shooting using Custom Setting item 30 (see “Custom Settings” in the
camera User’s Manual). This setting can also be changed from the
“Mechanical” tab of the Camera Control window.
In continuous shooting mode, photographs will be taken one after
another as long as the shutter-release button on the camera is held
down. The Shoot and AF and Shoot buttons in the Camera Control
window function as they do in single-frame shooting mode, with one
photograph being taken each time either button is clicked.
Photographs taken in continuous shooting mode are stored in a
temporary buffer in the camera’s memory, making it possible to take a
picture while the previous photograph is being transferred to the
computer. If Custom Setting 26 (“Maximum Number of Consecutive
Shots in Continuous Shooting Mode”) is set to “1” when the camera is
in continuous shooting mode, although only one photograph will be
taken each time the shutter-release button is pressed, you will be able
to take the next photograph without waiting for the preceding picture
to be transferred to the computer.
• Images are not displayed in the camera’s LCD monitor in Capture
Preview or Record-and-Review modes when the camera is in PC mode.
Capturing Photographs: Capturing Photos
- 28 -
Taking Photographs from the Camera Control Window
Photographs can be taken from the computer using the controls in the Camera Control window.
Click the camera control button ( ) or select Camera
1
PRACTICE
Controls from the View menu to open the Camera
Control window.
Adjust camera settings using the four tabs (see “Camera
2
Controls” for more information).
Click AF and Shoot or Shoot to take a picture. The
3
resulting photograph will be displayed in the Camera Image
window.
E
C
TI
C
PRA
Current camera settings are displayed in the Camera Control
window’s Exposure 1, Exposure 2, Storage, and Mechanical
tabs and in the Viewfinder panel at the bottom of the window. The Exposure 1 tab is shown above.
Capturing Photographs: Capturing Photos
- 29 -
Loading Images from the Camera
While the D1 is connected to your computer, you can load
photographs previously taken with the camera into the Camera Image window in Nikon Capture. Follow these steps:
CONCEPT
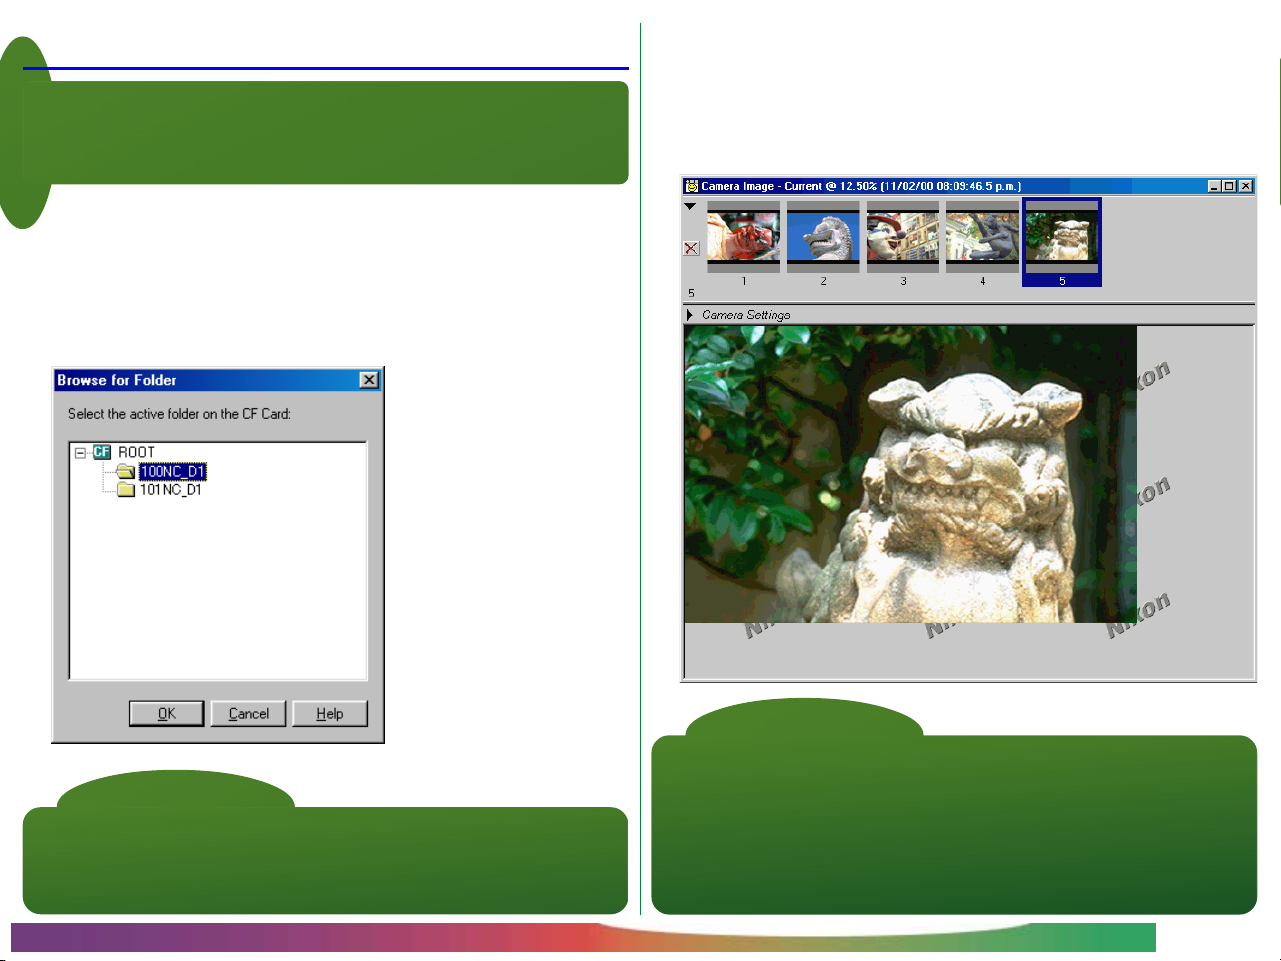
Select Set Camera Card Folder… from the Camera
1
menu.
From the Browse for Folder dialog, choose the folder con-
2
taining the photographs you want to view, then click OK.
Select Load Images from Camera from the Camera
3
menu. The images in the camera will be loaded into Nikon
Capture and the most recent image will be displayed in the
Camera Image window.
E
C
TI
C
PRA
Tip
Images loaded from the camera are stored in the thumbnail folder specified
in the File Locations tab of the Preferences dialog (see “Preferences: The
File Locations Tab”). Any changes made in Nikon Capture apply only to the
copies in the thumbnail folder; the originals in the camera are not affected.
Capturing Photographs: Loading Images
Tip
Photographs taken with the D1 are stored in folders on the memory card,
each containing up to 999 photographs. Folder names consist of a threedigit number, assigned in ascending order starting from 100, followed by the
letters “NC_D1”. New folders are created when the maximum of 999
photographs is reached or when the user selects NEW from the FOLDERS
submenu in the camera playback menu. See the camera User’s Manual for
more information.
- 30 -

Adjusting White Balance for RAW Images
The human eye is able to adapt to changes in lighting, and
consequently to humans a white object will still look white
whether viewed in sunlight or under overcast skies, or indoors
under incandescent or fluorescent lighting. A digital camera, in
contrast, must adjust colors according to lighting in order that
CONCEPT
colors that appear white when viewed directly also appear
white in the final photograph. This adjustment is called “white
balance.”
Nikon Capture is equipped with white balance adjustment for
modifying RAW images captured or copied from the camera
on those occasions when you are unable to achieve the desired results using the camera’s menu of white balance options.
This white balance adjustment functions in a fashion similar to
the D1’s preset white balance. When preset white balance is
measured with the D1, a white object is used as a reference
point. In the case of the white balance adjustment window,
white balance is set by sampling a point or points that under
normal lighting would be white or close to white. Nikon
Capture uses this information to adjust the slope of the red
and blue tone curves to produce a white balance appropriate
to the image.
Capturing Photographs: Adjusting White Balance for RAW Images
Note
White balance adjustment can be performed on RAW images only. The
Adjust White Balance… option in the Image menu is not available
when the image in the active window is JPEG or TIFF.
- 31 -

Adjusting White Balance
Select Adjust White Balance… from the Image menu.
1
The White Balance Adjustment window will be displayed.
PRACTICE
Using the radio buttons listed below, select the images to
2
which white balance adjustment will apply.
Define Adjustment for this image only
When this option is selected, white balance will be adjusted
for the active image only; subsequent images captured or
loaded from the camera will not be affected.
Define Adjustment for this and all new RAW images
Select this option to use the point or points sampled for the
active image as the reference for white balance both for the
current image and for all RAW images subsequently captured or loaded from the camera. This option is useful when
the current image is the first of a series of photographs that
will be taken under the same lighting.
E
C
TI
C
PRA
Capturing Photographs: Adjusting White Balance for RAW Images
- 32 -

Sample the image to choose a reference value for white
3
balance. You can define white balance using a single point or
the average of several points.
Using a Single Point to Define White Balance
Click the Use a single point radio button, then click the
PRACTICE
Start button. The cursor will take the shape of an eyedropper when moved over the image in the active window. To
adjust white balance, click a point in the image that would be
white under normal lighting.
Using the Average of Several Points to Define
White Balance
Click the Average several points radio button, then click
the Start button. The cursor will take the shape of an
eyedropper when moved over the image in the active
window. You can then sample points in the image that
would be white under normal lighting by clicking. If you
select more than one point, the average will be used to
determine white balance. When you have sampled all the
desired points, click Stop to end sampling.
The effects of white balance adjustment on the red and blue
tone curves are visible in the graph at the top right corner of
the window.
Click OK to apply the results of white balance adjustment to
4
the selected image.
E
C
TI
C
PRA
Capturing Photographs: Adjusting White Balance for RAW Images
- 33 -

Canceling White Balance Adjustment
Select Adjust White Balance… from the Image menu.
1
The White Balance Adjustment window will be displayed.
Using the radio buttons listed below, choose whether to
2
cancel white balance for the current image only or for both
the current image and all subsequent RAW images captured
or loaded from the camera.
E
C
TI
C
PRACTICE
Cancel Adjustment for this image only
Select this option to cancel white balance adjustment for the
image in the active window only.
Cancel Adjustment for this and all new RAW images
Select this option to cancel white balance adjustment both
for the image in the active window and for all subsequent
RAW images captured or loaded from the camera. This
option is not available if Define Adjustment for this
image only was selected for the last adjustment performed.
Click OK to complete the operation.
3
PRA
Tip
To determine whether or not white balance adjustment is currently in
effect, check the Adjust White Balance… item in the Image menu. A
checkmark appears next to this item when white balance adjustment is in
effect.
Capturing Photographs: Adjusting White Balance for RAW Images
- 34 -

Deleting Camera Images
Using Nikon Capture, you can delete all photographs from a
specified folder on the memory card currently inserted in the
camera (photos can not be deleted individually). Only folders
conforming to the Design Rule for Camera File Systems can be
selected. Once deleted, photographs can not be recovered;
CONCEPT
be sure to back up any photographs you would like to keep.
Select Set Camera Card Folder… from the Camera
1
menu.
Choose the folder containing the photographs you want to
2
delete, then click OK.
Select Delete Images in Camera from the Camera
3
menu.
Click OK in the confirmation dialog that appears.
4
All images in the selected folder will be deleted.
E
C
TI
C
PRA
Deleting Photographs: Deleting Camera Images
Tip
The Delete Images in Camera option can only be used to delete all
photographs in a folder. To delete individual photographs, use the
procedures described in the D1 User’s Manual. Nikon View DX software
(available separately) can also be used to delete selected images.
- 35 -

Formatting the Camera Memory Card
Accessing Memory Cards Directly
Using Nikon Capture, you can format the card currently inserted in the camera. Note that formatting the memory card per-
manently erases any images it may contain. Be sure to back up
any photographs you would like to keep before formatting the
CONCEPT
memory card.
Select Format Card in Camera from the Camera
1
menu.
Select Yes in the confirmation dialog that appears to format
2
the memory card.
The memory card can be removed from the camera and used
as a disk on your computer. Images stored on the card can be
loaded into the camera image window or deleted using Nikon
Capture. To use the card as a disk, you will need a CompactFlash card reader or an EC-AD1 PC card adapter and a computer equipped with a PCMCIA Type II card slot.
CONCEPT
Deleting Photographs: Formatting the Camera Memory Card
Tip
While the memory card is mounted as a disk, any image files it may contain
can be handled as you would any other file, without using Nikon Capture.
Files can be opened, copied, or deleted in My Computer (Windows
operating systems), the Windows Explorer, or the Macintosh Finder. You
can also use Nikon View DX (available separately) to work with the images
on the card. Nikon Capture is however required to handle RAW images,
while YCbCr-TIFF images can only be read with Nikon Capture or Nikon
View DX.
- 36 -

Mounting the Memory Card as a Disk
The steps below describe how to read memory cards using the
EC-AD1 PC card adapter. For information on using a CompactFlash card reader, consult the manual provided by the
manufacturer.
PRACTICE
Remove the memory card from the D1 and insert it in the
1
PC card adapter.
TM
TM
Card
EC-AD1
CompactFlash
PC Card Adapter
Insert the PC card adapter in your computer’s PC card slot
2
(see the manual provided with your computer for details).
M
T
rd
a
C
EC-AD1
h
s
la
tF
c
a
p
m
o
C
ADAPTER
m
o
C
M
T
rd
a
C
h
s
la
EC-64CF
tF
c
a
p
B
M
If the computer is on, the CompactFlash card will be mounted
as a disk.
E
C
TI
C
PRA
Capturing and Deleting Photographs: Accessing Memory Cards
Note
Depending on your setup, it may be necessary to install drivers or register
the card with your system before you can use it. See the documentation
provided with your computer for details.
- 37 -

Reading Images from the Memory Card
Deleting Images from the Card
Choose Load Images from Card… from the File menu.
1
In the dialog that appears, choose the folder containing the
2
photographs you want to view and click OK (Windows) or
PRACTICE
Select (Macintosh). Images will be loaded from the card,
and the most recent image will be displayed in the Preview
section of the Camera Image window.
Choose Delete Images on Card… from the File menu.
1
In the dialog that appears, choose the folder containing the
2
photographs you want to delete and click OK (Windows)
or Select (Macintosh).
In the confirmation dialog that appears click Yes to delete all
3
images in the selected folder.
All images in the selected folder will be deleted.
E
C
TI
C
PRA
Macintosh Users Please Note:
Before using Load Images from Card… to load RAW images, open the
File Exchange control panel to the PC Exchange tab and add an association
linking the PC extension “.nef” with Nikon Capture’s NEF format. If you
mount the memory card using Nikon View DX (available separately), the
extension “.nef” will automatically be associated with Nikon Capture.
Capturing and Deleting Photographs: Accessing Memory Cards
Note
Once deleted from the memory card, images can not be recovered. Be sure
to back up any images you would like to keep.
- 38 -

The Disk Space Indicator (Windows Only)
Checking the Amount of Space Remaining
In the Windows version of Nikon Capture, an indicator showing the amount of space remaining on the volume or volumes
used for storage of thumbnails and other temporary data is
displayed at the bottom left corner of the Nikon Capture
window.
Disk space indicator
Click the disk space indicator. The following dialog will
1
appear, showing the amount of space remaining on the
volume or volumes containing the thumbnail folder and the
folder for temporary items.
Click OK to close the dialog box.
2
Tip
The color of the disk space indicator shows how much space is left on the
drives (volumes) Nikon Capture uses to store images copied from the
camera and other temporary data.
More than 200 MBs available on both the volume used for temporary
storage and on the volume used to store thumbnails.
Less than 200 MBs remaining on one or both volumes.
Less than 100 MBs remaining on one or both volumes. Choose a
different volume from the File Locations tab of the Preferences dialog,
or free space by deleting unnecessary files.
Capturing and Deleting Photographs: The Disk Space Indicator
- 39 -

Working with Images
Image Windows
Using Nikon Capture, you can perform a variety of operations
on images that have been loaded into the Camera Image window before saving them to disk. You can also open for editing
images that have previously been saved in the Nikon Electronic
Image Format (NEF).
Thumbnail
section
Number of
images
Camera
Settings
section
Images can be edited in the Camera Image window or in
separate image windows.
CONCEPT
The Camera Image Window
In the Camera Image window, you can view thumbnail previews
of the images transferred from the camera or memory card and
display selected images for preview or editing.
ThumbnailTitle bar
Working with Images: Image Windows
Preview
section
To open or close the Camera Image window, select Camera
Image from the View menu (in the Windows version of the
program, you can perform the same operation by clicking the
button in the toolbar).
- 40 -

The Title Bar
The title bar gives information about the selected image.
Thumbnail index If the most recent image is selected, the
thumbnail index will show “Current.” When
PRACTICE
the second most recent image is selected, the
thumbnail index shows “Previous #1,” when
the third most recent image is selected,
“Previous #2,” and so on.
Zoom ratio The amount the image in the Preview section
is zoomed in or out. The zoom ratio reflects
the number of pixels in the image and the
resolution of the monitor rather than the
physical dimensions of the image when printed.
Thumbnail Section
Thumbnail previews are displayed in order of recording.
Thumbnail Click on a thumbnail to display the image in
the Camera Image window. The number
displayed below each thumbnail is the thumbnail ID assigned by Nikon Capture. This
number can be reset to one in the Thumbnails tab of the Preferences dialog (see
“Preferences: The Thumbnails Tab”).
Click to delete the selected image.
The Thumbnail section can be displayed or hidden by clicking
the triangle at the top left corner, or by selecting Thumbnail
Section from the View menu.
E
C
TI
C
PRA
Date and time Depending on the option chosen in the
Thumbnails tab of the Preferences dialog (see
“Preferences: The Thumbnails Tab”), the title
bar will show either the date and time the
selected image was recorded or the thumbnail ID assigned by Nikon Capture.
Working with Images: Image Windows
Tip
When the Thumbnail section is hidden…
…images can be deleted or selected for display in the Camera Image
window.
Click to open the Thumbnail section Number of images
Click to delete the image displayed in the Camera Image window.
Click to select the image recorded immediately prior to the image
currently displayed in the Camera Image window.
Click to select the image recorded immediately following the image
currently displayed in the Camera Image window.
- 41 -

Camera Settings Section
The date and time of recording and the camera settings used to
record the selected image are displayed in this area. The Camera Settings section can be displayed or hidden by clicking the
triangle at the top left corner, or by selecting Camera Set-
PRACTICE
tings Section from the View menu.
Preview Section
The selected image is previewed in this area. Any changes
made during editing are reflected in the preview image. No
preview is displayed when more than one thumbnail is selected.
Image Windows
Images are opened in separate image windows when a copy is
made of the image selected in the Camera Image window or
when an image is opened by choosing Open… from the File
menu. Images in image windows can be edited in the same way
you would edit images in the Camera Image window. Any
number of image windows can be opened simultaneously.
Title bar
Camera
Settings
section
E
C
TI
C
PRA
Tip
Right-button menu (Windows)
Clicking on the Preview section, or on the image in an image window, with
the right mouse button displays a menu of options identical to the Image
menu.
Working with Images: Image Windows
- 42 -

Title Bar
The title bar provides the following image information:
Source image ID If the image is a copy of a photograph in the
Camera Image window, the source image ID
PRACTICE
Zoom ratio The amount the image in the Preview section
* (image not saved indicator)
shows the thumbnail ID of the original image.
In the case of images read from a file, the file
name is displayed (the Windows version of
the program shows the full path name).
is zoomed in or out. The zoom ratio reflects
the number of pixels in the image and the
resolution of the monitor rather than the
physical dimensions of the image when printed.
This indicator appears in the title bar when
the image has not been saved.
Creating a Copy of an Image
Copies of images selected in the Thumbnails section of the Camera Image window can be opened in separate image windows.
To open a copy of the image in a separate image window,
either:
• double-click a thumbnail in the Camera Image window, or
• select a thumbnail and either click the tool button or
choose Create Copy from the File menu.
CONCEPT
The Camera Settings section shows the same information as is
displayed in the Camera Image window Camera Settings section
(see “The Camera Image Window,” above).
Working with Images: Image Windows
- 43 -

A copy of the image will be opened in a separate image window.
Although any changes to settings in effect at the time the copy
was made will be reflected in the copy, subsequent changes
made to the copy have no effect on the original image in the
Camera Image window; similarly, changes to the original do not
affect the copy. This makes it possible to apply one set of
image enhancement operations to the copy and compare them
with the effects of a different set of operations applied to the
original.
If an image window is active, further copies of the image it
contains are created when Create Copy is selected from the
File menu or the tool button is clicked.
Working with Images: Creating a Copy of an Image
- 44 -

Opening an Image File
Images saved in Nikon Electronic Image Format (NEF) using
the Save Original Image… command can be opened in
image windows within Nikon Capture. You can also open
unedited images in JPEG, TIFF, and NEF format created with
the D1.
CONCEPT
Images saved using the Save Final Image… command can
not be opened in Nikon Capture.
Select Open… from the File menu (in the Windows
1
version of the program, files can also be opened by clicking
the tool button).
Navigate to the desired drive and folder.
2
Double-click on the file you wish to open. The image will be
3
opened in an image window within Nikon Capture.
E
C
TI
C
PRA
Working with Images: Opening an Image File
Tip
Opening files by drag and drop
Files can also be opened by dragging the file icon into the Nikon Capture
window.
Opening files in a third-party application
By default, when you attempt to open a file which was not created by the
D1, or which you have already edited and saved in JPEG or TIFF format,
Nikon Capture will display a message stating that it can not open the file. If
the Open Final Image in External Application box in the File
Locations tab of the Preferences dialog is checked, however, Nikon Capture
will instead display the message “Open file in external application?” allowing
you to open the file in a specified program.
- 45 -

Selecting a Crop
In an image window or the Preview section of the Camera
Image window, you can select a portion of the image to be
saved when Save Selection Only or Crop and Scale is
chosen in the save dialog (if no selection is made, the entire
CONCEPT
image will be saved).
Select the tool button or choose Crop Cursor from
1
the View menu. The mouse pointer will change to a crop
cursor ( ) when moved over the image in the active window.
Drag the mouse over the image to select a crop. Your
2
selection will be marked by a dotted line.
E
C
TI
C
PRA
Tip
Saving the crop to a separate file
When saving images, you can choose whether to save the entire image or
only the portion in the current crop. In the Save Original Image dialog,
check Save Selection Only. In the Save Final Image dialog, check Crop
and Scale.
Working with Images: Selecting a Crop
- 46 -

To Select the Entire Image…
…click outside the current crop or choose Select Entire
Image from the Image menu. You can not select the entire
image when Keep My Output Size is selected in the Size/
Resolution window.
PRACTICE
To Move the Crop…
…move the cursor over the crop, where the pointer will
change to a (Windows) or cursor (Macintosh). Drag the
crop to move it over a different part of the image.
To Change the Size of the Crop…
…drag the edges or corners of the crop. The pointer will take
the form of a double arrow.
Zoom
You can zoom the active window in or out using the tool
button or the zoom commands in the View menu (this does
not affect the physical size of the image). The window title bar
will show the zoom ratio.
To zoom the image in, either…
• …select the tool or choose Zoom Cursor from the
View menu, then click on the part of the image that is at the
center of the area you want to zoom in (the zoom ratio will
be further increased each time you click), or
• select Zoom In from the View menu.
To zoom the image out, either…
• …select the tool or choose Zoom Cursor from the
View menu and then, holding down the Ctrl key (Win-
dows) or option key (Macintosh), click on the part of the
image that is at the center of the area you want to zoom out
(the zoom ratio will be further reduced each time you click), or
CONCEPT
Working with Images: Selecting a Crop
• select Zoom Out from the View menu.
- 47 -

Rotating and Flipping Images
The Information Window
Images in the active window can be rotated or flipped using
the buttons in the toolbar or tool palette or the commands in
the Image menu.
CONCEPT
Rotating Images
Click the tool or select 90 degrees CW from the Rotate
submenu to rotate the image in the active window 90° to the
right. Click the tool or select 90 degrees CCW from the
Rotate submenu to rotate the image in the active window 90°
to the left.
Flipping Images
Use the commands in the Flip submenu to flip the image in the
active image window horizontally or vertically.
The Information window shows the position and color of the
pixel under the mouse pointer.
To display or hide the Information window, select Informa-
tion from the View menu.
x-y coordinates The position of the cursor in the image
window, measured in pixels from the top left
corner of the image.
CONCEPT
Working with Images: Rotating and Flipping Images
- 48 -

R, G, B, Avg The values for each of the red, green, and
blue elements of the pixel under the cursor
and the average of the three, weighted according to the properties of human color
perception (the formula for the weighted
PRACTICE
average is (Red ×0.299) + (Green × 0.587)
+ (Blue × 0.114)). Depending on the color
space, the average may not reflect the actual
luminance of the pixel under the cursor, but it
can be used as a rough guide to brightness.
Values range from 0 to 255, values for
twelve-bit images being scaled to fit in this
range. The number on the left shows the
input value, or value for the color in the
original image. The value on the right is the
output value, or value after any changes made
in the Curves or Color Adjustment windows
have been applied.
The Bird’s Eye Window
The Bird’s Eye window shows the position of the part of the
image that is visible in the active image window. This can be
useful if only a portion of the image will fit in the window at
the current zoom ratio, when the Bird’s Eye window can be
used to view different portions of the image without zooming
the image out.
CONCEPT
Working with Images: The Information Window
- 49 -

To display or hide the Bird’s Eye window, select Bird’s Eye
from the View menu.
PRACTICE
The portion of the image that is visible in the active window is
indicated by a red outline.
Navigating to Other Areas of the Image
When the mouse pointer is moved over the red outline, it
changes to a cursor. Drag the red outline to cover an area
of the image you would like to view. The active window will
show the portion of the image inside the red outline.
E
C
TI
C
PRA
Working with Images: The Bird’s Eye Window
Tip
Changing the size of the Bird’s Eye window
The size of the Bird’s Eye window can be changed by dragging its borders
(Windows) or by dragging the handle at the lower right corner of the
window (Macintosh).
- 50 -

Image Adjustment
Before they will be ready for display or output on a monitor or
printer, images captured from the camera will usually need to
be adjusted to a size and resolution appropriate to the output
device and the task at hand. Images may also need to be
processed for enhanced contrast or sharpness or to achieve a
color balance suited to your printer or monitor. In general,
such image adjustment involves the following four processes:
Process See
When the edited image is saved to disk using the Save Final
Image… command, you can choose the color model (RGB or
CMYK) and bit depth (eight or sixteen bits) for the final image
(see “Saving Images”). If Save Original Image… is used, the
image will be saved exactly as recorded by the camera. Any
changes to curves, color balance, and other settings made after
the image was recorded will be saved separately in the same
file.
Select the portion of the image you want to
work with.
Adjust the size and resolution of the image
for output on a particular device.
Adjust tone information, color balance, and
contrast. There are two distinct tools for this
task: the Curves window, which offers precise
control over tones, and the Color Adjustment window, which features simpler controls.
If the image still lacks sharpness, you can
sharpen outlines using the controls in the
Unsharp Mask window. Unsharp Mask
settings should always be applied after
changes to size, resolution, tone curves, color
balance, brightness, and contrast.
Image Adjustment
“Working with Images:
Selecting a Crop”
“Image Adjustment:
Output Size and
Resolution”
“Image Adjustment:
Curves”
“Image Adjustment:
Color Adjustment”
“Image Adjustment:
Unsharp Mask”
- 51 -

Output Size and Resolution
To adjust size and resolution:
The Size/Resolution window is where you specify the final
(“output”) size of the portion of the image that will be captured when Save Selection Only or Crop and Scale is
chosen from Save Original Image or Save Final Image dialog.
The choice of settings in the Size/Resolution window depends
CONCEPT
on how you intend to use the image and the amount of
storage space you have available. Some examples are given
below.
If the image will be used in printing or desktop publishing…
…size and resolution will be dictated by the resolution of the
output device and the physical size of the image when printed,
measured in centimeters or points rather than pixels.
If you intend to use the image on a web page…
…specify output size in pixels, keeping file size to a minimum
for rapid downloads. Resolution in this case is not an issue.
Select Size/Resolution from the View menu (in Win-
1
dows, you can also click the tool button in the toolbar).
Make changes to the options described below.
2
E
C
TI
C
PRA
Image Adjustment: Output Size and Resolution
- 52 -

Keep My Crop
When Keep My Crop is selected, you can use the mouse to
adjust the size and position of the current crop as desired. If
you enter a new value for height or width in the Size/Resolution
window, the remaining dimension changes automatically to
PRACTICE
maintain a constant height-width aspect ratio, and scale is
adjusted to reflect the new dimensions (scale can not be increased beyond 200%). If the image can not be output at the
current resolution using the new dimensions, resolution will
automatically be adjusted to an appropriate value. This option
is useful when you want to specify height and width after selecting a crop.
Keep My Output Size
Keep My Output Size locks output dimensions and file size
at their current values, setting the aspect ratio of the current
crop according to the dimensions input in the Size/Resolution
window. This height-width aspect ratio will be maintained
when you adjust the size of the crop in the active window, and
scale will be adjusted to reflect changes to the size of the crop
(scale can not be increased beyond 200%). If the image can not
be output at the current resolution using the new dimensions,
resolution will automatically be adjusted to an appropriate value.
This option is useful when you want to set the output dimensions and file size of the final image before selecting a crop.
E
C
TI
C
PRA
Tip
To display the Size/Resolution window, select Size/Resolution from the
View menu.
Image Adjustment: Output Size and Resolution
- 53 -

Width/Height
The output dimensions for the current crop can be
entered in these text boxes. The units used to
describe output dimensions can be chosen from the
menu to the right of the text boxes (shown above
PRACTICE
at right).
At
The At text box is where you enter the output
resolution. This text box is not active when the unit
chosen for output size is “pixels.” The value chosen
at other settings should reflect the resolution of the output
device on which the final image is to be printed. The units for
resolution can be selected from the resolution menu (shown
above at right), which offers a choice of pixels per inch (ppi) or
pixels per centimeter (ppcm). The default resolution is 300 ppi.
Scale/File Size
Scale is displayed at the bottom of the Size/Resolution window,
together with the uncompressed file size of the image that
would be created at current settings. File size depends on the
color model (RGB or CMYK) and, in the case of RGB images,
on the pixel bit-depth that will be used when the image is
saved. Separate file sizes are shown for CMYK and for eight-bit
and sixteen-bit RGB.
E
C
TI
C
PRA
Image Adjustment: Output Size and Resolution
- 54 -

The Size/Resolution Settings Menu
The Size/Resolution submenu in the Settings menu can be
used to save and recall size and resolution settings or to restore
settings to initial or default values. The information saved
includes the size and location of the current crop. The options
PRACTICE
available in the Size/Resolution submenu are detailed below.
Load…
Select this item to load size and resolution settings previously
saved using the Save… option (see below). The standard file
open dialog for your operating system will be displayed; navigate to the drive (volume) and directory containing the desired
settings and open the settings file (in Windows, only files with
the extension “.nsr” will be displayed). The settings in the Size/
Resolution window will instantly revert to the saved settings.
Save…
Select this item to save the resolution, size, and position of the
current crop in a named file. These settings can later be recalled using the Load… option. Choosing Save… displays the
standard file save dialog for your operating system. After navigating to the destination drive (volume) and folder, save the
settings under the name of your choice (in Windows, size and
resolution settings are saved with the extension “.nsr”).
E
C
TI
C
PRA
Tip
Right-button menu (Windows)
The Size/Resolution submenu can be displayed by right-clicking in the
Size/Resolution window.
Image Adjustment: Output Size and Resolution
- 55 -

Save as Default
Select this option to save the resolution, size, and position of
the current crop as the defaults for size and resolution. These
settings will be restored when Reset to Default is selected
from the size/resolution settings menu. If Use Default Set-
PRACTICE
tings is selected for Settings for Next Camera Image in
the General tab of the Preferences dialog, the default settings
will also be restored whenever an image is captured. Only one
set of default settings can exist at any one time; previous defaults are automatically overwritten when new default settings
are created. Default settings are stored in the same folder as
Nikon Capture.
Reset to Default
Selecting this item restores the settings in the Size/Resolution
window to the defaults created using the Save as Default
option. If no default settings exist, a crop that includes the
entire image will be selected and scale will be restored to 100%.
Reset to 100%
When this item is selected, the crop will be enlarged to include
the entire image and scale will be restored to 100%. Resolution
will be restored to the default value of 300ppi (118.11ppcm).
E
C
TI
C
PRA
Note
The units for size and resolution are not saved when Save… or Save as
Default is chosen from the Size/Resolution submenu.
Image Adjustment: Output Size and Resolution
- 56 -

Curves
Curves—an Overview
Although your Nikon digital camera will reproduce colors
accurately if settings have been adjusted appropriately, it will
usually be necessary to adjust contrast, tone (brightness) levels,
and color balance to make maximum use of the tone range
and color gamut offered by a particular output device, such as
CONCEPT
a printer or monitor. Nikon Capture offers two tools for
performing these tasks: the Color Adjustment window (see
“Color Adjustment” later in this chapter) and the Curves
window. Of the two, the Curves window offers the more
precise control. The Color Adjustment window is useful
when, for example, you want to adjust brightness or color
balance for all pixels in the image. This kind of adjustment
may, however, result in loss of detail in portions of the tone
range. The Curves window, in contrast, allows adjustments to
be made to specific portions of the tone range, making it
possible to enhance the image while preserving detail.
The main editing tool in the Curves window is the curve edit
display, which contains a curve showing the relationship between input (the tones in the original image) and output (how
the tones in the input will be represented in the final image).
Separate curves control the relationship between input and
output for the image as a whole (the “master curve”) and for
each of the red, green, and blue color components, or “channels.” The default curve in each case is linear, meaning that
tones will be output exactly as they are input.
Current channel
Curve edit
display
VERVIEW
O
Note
Color adjustment and curves can not be used together. If the controls in
the Curves window are active, the controls in the Color Adjustment
window are disabled. If the Color Adjustment controls are active, the
controls in the Curves window are disabled. Only one of color adjustment
or curves can be applied when a modified image is saved.
Image Adjustment: Curves
Tip
To open the Curves window, choose Curves from the View menu (in
Windows, you can also click on the tool button in the toolbar).
- 57 -

Input is plotted along the horizontal axis, with shadows (the
dark areas of the image) to the left, highlights (the bright areas
of the image) to the right, and mid-tones in between. The left
end of the axis marks the minimum possible value for colors in
the selected channel (zero, or no color), the right end the
OVERVIEW
maximum value. In the case of the master curve, the minimum
value represents areas of the input image that are a true black;
the maximum value represents areas that are a true white.
Output is plotted along the vertical axis, with the minimum
possible output value (again, zero, or no color) at the bottom
and the maximum output value at the top.
Input
When the cursor is moved over the curve edit display, the
input and output values for the point under the cursor are
shown in the input/output display. The input value represents
the level of the pixel in the original image, the output value the
level of the pixel after any changes to the curve have been
applied.
VERVIEW
O
Shadows
Output
Note
Although values for input and output in the Curves window range from
zero to 255 (eight-bit precision, familiar to users of other image editing
software), the results of any changes to curves are calculated at a precision
of sixteen bits. This allows modifications to twelve-bit RAW data to be
performed without lowering the quality of the output.
Midtones
Highlights
Input/output
display
Image Adjustment: Curves
Tip
Changes to curves are only possible when the Apply check-box at the top
left of the Curves window is checked. When this box is checked, changes
to curves will be visible in the image being edited. The box can be checked
and unchecked for a quick “before-and-after” comparison, allowing you to
see whether changes to curves are having the desired effect. The same
effect can be achieved using the Apply Curves item in the Image menu.
- 58 -

Step 1—Viewing the Histogram
Step 2—Channel Selection
The first step in adjusting tone levels and color balance in the
Curves window is to view the histogram displayed in the background of the curve edit display. The histogram tells you what
tones are present in the original image and in what amounts,
PRACTICE
information that you will use when setting the black point and
white point and editing curves. The histogram takes the form of
a bar graph. The horizontal axis gives the tone level, with
shadows to the left and highlights to the right. The vertical axis
gives the number of pixels of each tone level found in the
image, scaled to fit in the curve edit display.
To view the distribution of tones in the final, output image after
changes to curves, click and hold the histogram button ( ).
You can modify tones for all colors in the image
using the master curve, or select any of the red,
green, and blue curves for editing using the channel
menu (see right). The histogram shows tone levels
for the selected channel only. When the master curve is selected, the auto-contrast button and white-point and blackpoint eyedropper tools (see below) apply simultaneously to all
of the red, green, and blue curves (the master curve is unaffected). When one of the red, green, and blue curves is selected, these controls can be used to edit the selected curve
only.
E
C
TI
C
PRA
Image Adjustment: Curves
- 59 -

Step 3—Setting the White Point and Black Point
White-Point and Black-Point Input Levels
The endpoints of the curve are referred to as the “white point”
and the “black point.” The black point for a given channel
represents the darkest shade (minimum value) for that color,
the white point, the brightest shade (maximum value). By
PRACTICE
default, the input and output values for the black point are zero.
The darkest shade in the input image may however be greater
than zero, with the result that a portion of the curve is dedicated to reproducing tones not actually present in the image.
Increasing the input value for the black point until it matches the
darkest shade in the image will steepen the curve, enhancing
overall contrast without causing a corresponding loss of detail in
shadows. Similarly, if the original image does not actually contain shades corresponding to the maximum value, the white
point can be lowered to match the brightest shade in the image.
There are two steps to selecting a white point and black point
for the final image: choosing the white-point and black-point
input levels, and selecting output levels.
Input levels for the white point and black point can be set using
any of the following three methods:
• automatic contrast adjustment
• white-point and black-point sliders
• direct sampling using the white-point and black-point eyedropper tools
E
C
TI
C
PRA
Image Adjustment: Curves
- 60 -

Automatic Contrast Adjustment
In automatic contrast adjustment, Nikon Capture automatically
selects white and black points that exclude a certain percentage
of the brightest and darkest pixels in the image, steepening
curves for enhanced contrast (the exact percentage of pixels
excluded can be specified in the Preferences dialog; see “Preferences,” below). By default, 0.5% of the brightest and darkest
pixels are excluded, producing a curve that makes optimal use
of the output tone range while preserving details in shadows
and highlights.
To perform an auto contrast operation, click the auto contrast
button ( ). The white and black points for each of the red,
green, and blue channels will be modified simultaneously (the
master curve is unaffected). Clicking the button with the Ctrl
(Windows) or option (Macintosh) key held down adjusts
contrast only for the channel currently selected in the channel
menu.
Image Adjustment: Curves
- 61 -

White-Point and Black-Point Sliders
The white-point and black-point sliders can be used to match
the white and black points to the histogram displayed in the
curve edit display. While these sliders can be used to edit
curves for any channel, the best results are usually obtained
PRACTICE
when they are used to modify the master curve.
To edit the white point or black point, click the corresponding
slider once to activate it, then drag it to the right or left (a value
can also be entered directly in the text box underneath the
slider). Matching the black-point slider with the lowest input
value displayed in the histogram will set the minimum output
value for the selected channel to the darkest pixel actually
present in the image, steepening the curve and enhancing
contrast without sacrificing detail in shadows. Similarly, matching the white-point slider with the highest input value displayed
in the histogram will set the maximum output value for the
selected channel to the brightest pixel present in the image,
enhancing contrast without loss of detail in highlights. Any
changes are applied instantly to the active image.
Black-point
slider
Black-point
input value
E
C
TI
C
PRA
White-point
slider
White-point
input value
Image Adjustment: Curves
- 62 -

Sampling the Image for White Point or Black Point
The white point or black point can be set by directly sampling
the image, allowing you to choose the pixels that will be used
to set the maximum (white point) or minimum (black point)
output value. This makes it possible to set the black point by
PRACTICE
matching it to a pixel in the darkest part of the image containing
detail you want to preserve, eliminating details in darker areas
that are not important to the final image. Similarly, you can
match the white point to a pixel in the brightest area of the
image containing details important to the final image. While
direct sampling can be used with any channel, it is most effective
when used with the master curve. When the master curve is
selected, sampling will set the white or black point for red,
green, and blue curves simultaneously; the master curve itself is
unaffected.
To sample the white point, click the white-point button ( ).
When the cursor is moved over the active image, it will take
the shape of an eyedropper. Move the cursor over the image
to find the pixel that you want to use to set the white point,
keeping an eye on pixel level display in the Information window
to identify the pixel with the highest input value. With the
cursor over the target pixel, click the mouse button. The input
value for the selected pixel will be used as the input value for
the white point. The cursor will return to its original shape, and
the image will automatically be altered to reflect the new value
for white point.
To sample the image for the black point, click the black-point
button ( ) and move the eyedropper cursor over the image
until you find the point that you want to use to set the minimum input value, then click the mouse button to select the
black point.
E
C
TI
C
PRA
Image Adjustment: Curves
Tip
Setting the white point/black point for the current channel
By default, sampling sets the white point or black point for all channels. To
set the white point or black point for the current channel only, sample the
image while holding down the Ctrl key (Windows) or option key
(Macintosh) on the keyboard.
- 63 -

White Point and Black Point Output Levels
Once you have set the input level for the black point and white
point, output levels can be altered to reflect the actual shade of
the darkest and brightest pixels in the image. If the darkest
shade in the image represents a true black, for example, the
PRACTICE
output level for the black point can be left at zero. If, however,
darkest shade present in the image is a lighter color, the output
level for the black point can be raised to achieve more natural
coloration.
The output levels for the white point and black point are set
using the white-point and black-point output sliders on the left
side of the curve edit display.
White-point output slider
To set the output level, click the slider once to activate it, then
drag it up or down until you have found the desired output
level (the output level can also be set by entering a value directly in the text box to the left of the slider). The effects of
the change will be reflected in the active image.
E
C
TI
C
PRA
Black-point output slider
Tip
Default values for the white-point and black-point output levels can be set
in the Preferences dialog. See “Preferences.”
Image Adjustment: Curves
- 64 -

Step 4—Setting the Midpoint
The point midway between the maximum and minimum input
values is known as the “midpoint,” which represents a neutral
shade corresponding to an output level of 128. The midpoint is
controlled by a midpoint slider at the bottom of the curve edit
PRACTICE
display. Moving the midpoint slider to the left increases the
brightness of mid-tones without “washing out” highlights. Moving the slider to the right darkens mid-tones without obliterating
detail in shadows.
The Midpoint Slider
The midpoint slider is located at the bottom of the curve edit
display.
E
C
TI
C
PRA
The midpoint can be set using the midpoint slider or by directly
sampling the image using the midpoint eyedropper tool.
Gamma
Gamma (also written “ γ ”) is a fundamental property of video systems
which determines the intensity of the output signal relative to the input.
When calculating gamma, the maximum possible input intensity is assigned
a value of one, and the minimum possible intensity (no input) is assigned a
value of zero. Output is calculated by raising input to a power that is the
inverse of the gamma value (output = input
the gamma value has the same effect as moving the midpoint slider to the
left, raising mid-tone output values and brightening the image while leaving
the maximum and minimum values untouched. Lowering the gamma value
has the same effect as moving the midpoint slider to the right, lowering midtone output values and darkening the image. The default value for gamma
is one, which produces a linear curve in which input and output values are
the same. Gamma can be set to any value between 0.05 and 6.00.
(1/γ)
). In practical terms, raising
Midpoint slider
Gamma value
After clicking the slider once to activate it, move it to the left to
increase the brightness of mid-tones in the selected channel, or
move it to the right to decrease brightness. Alternatively, you
can enter a value for gamma directly in the text box under the
slider. The effects of changes to the midpoint can be seen in
the active image.
Image Adjustment: Curves
- 65 -

Sampling the Image for Midpoint
The midpoint can also be set by direct sampling. No matter
what channel is currently selected in the channel menu, sampling simultaneously defines the midpoint for each of the red,
green, and blue channels while leaving the midpoint for the
PRACTICE
master curve unchanged.
To sample the midpoint, click the midpoint button ( ). When
the cursor is moved over the active image, it will take the shape
of an eyedropper. Move the cursor over the image to find the
pixel that you want to use to set the midpoint, keeping an eye
on the pixel level display in the Information window to identify
pixels with a neutral input value (look for pixels that you think
should be a neutral gray color in the final image). With the
cursor over the target pixel, click the mouse button. The input
value for the selected pixel will be used as the reference value
for the midpoint. The cursor will return to its original shape,
and the image will automatically be altered to reflect the new
value for midpoint.
E
C
TI
C
PRA
Image Adjustment: Curves
- 66 -

Step 5—Editing Curves Directly
Fine adjustments can be made to brightness and contrast in
specific portions of the tone range by adding additional points
to the curves for each channel. These points can be freely
adjusted by dragging them into new positions, changing the
PRACTICE
shape of the curve. Steepening the slope in a given portion of
the curve will enhance detail in that portion of the tone range.
Changing the curve so that input levels in a given portion of the
tone range are mapped to higher output levels will brighten
tones in the affected tone range; similarly, changing the curve to
map input levels to lower output levels will darken tones in the
affected range.
Adding New Points to the Curve
Move the cursor over the curve edit display and click once to
enter curve edit mode. Move the cursor to the position where
you would like to add a new point, then click. A new point will
be added at this position and the curve will automatically be
adjusted to pass through this point. The position of the point
can be adjusted by dragging it to a new location within the
curve edit display. The image in the active window will automatically be adjusted to reflect changes to the curve.
Removing Points from the Curve
Points can be removed from the curve by dragging them out of
the curve window.
Resetting Curves to Linear
The default linear curve for all channels can be restored by
clicking the button in the Curves window. To return only
the active curve to linear, hold down the Ctrl (Windows) or
option (Macintosh) key on the keyboard while clicking the
button.
E
C
TI
C
PRA
Tip
The Curves window can be resized by dragging its borders (Windows) or
by dragging the handle at the lower right corner of the window (Macintosh).
The curves edit display changes with the size of the window, allowing you
to enlarge the display to a maximum of 256 × 256 pixels. At this size, each
of the 256 points on the curve is represented by a separate pixel, granting
maximum precision when editing curves.
Image Adjustment: Curves
- 67 -

The Curves Settings Menu
The Curves submenu in the Settings menu can be used to
save and recall tone adjustment settings or to restore settings to
initial or default values. The options available in the Curves
submenu are detailed below.
PRACTICE
Load…
Select this item to load curves previously saved using the
Save… option (see below). The standard file open dialog for
your operating system will be displayed; navigate to the drive
(volume) and directory containing the desired settings and open
the settings file (in Windows, only files with the extension
“.ncv” will be displayed). The settings in the Curves window
will instantly revert to the saved settings.
Save…
Select this item to save curves for all channels to a named file.
These settings can later be recalled using the Load… option.
Choosing Save… displays the standard file save dialog for your
operating system. After navigating to the destination drive
(volume) and folder, save the settings under the name of your
choice (in Windows, curves are saved with the extension
“.ncv”).
E
C
TI
C
PRA
Tip
Right-button menu (Windows)
The Curves submenu can be displayed by right-clicking in the Curves
window.
Image Adjustment: Curves
- 68 -

Save as Default
Select this option to save the current curves as the defaults for
the Curves window. These curves will be restored when
Reset to Default is selected from the curves settings menu.
If Use Default Settings is selected for Settings for Next
Camera Image in the General tab of the Preferences dialog,
the default curves will also be restored whenever an image is
captured. Only one set of default settings can exist at any one
time; previous defaults are automatically overwritten when new
default settings are created. Default settings are stored in the
same directory as Nikon Capture.
Reset to Default
Selecting this item restores curves to the defaults created using
the Save as Default option. If no default settings exist, all
curves will be returned to linear.
Reset to Neutral
When this item is selected, all curves are returned to linear.
Image Adjustment: Curves
- 69 -

Color Adjustment
The Color Adjustment window offers simple controls for
adjusting overall brightness, contrast, and color balance for the
entire image. Unlike the controls in the Curves window,
however, the Color Adjustment window does not allow you
CONCEPT
to make changes that affect only a portion of the tone range.
The controls available in the Color Adjustment window are
detailed below.
(Brightness)
The brightness slider adjusts brightness for the entire image.
Dragging the brightness slider in the + direction brightens all
the colors in the image, making the image as a whole more
white. Dragging the slider in the – direction darkens all the
colors in the image, making the image as a whole darker and
less distinct. Unlike adjustments to the midpoint in the
Curves window, this setting applies equally to shadows and
highlights, producing a flat, low-contrast image. A value for
brightness between –50 and +50 can be entered directly in
the text box to the right of the slider.
(Contrast)
Dragging the contrast slider in the + direction heightens the
difference between highlights and shadows in the image,
increasing contrast. Dragging the slider in the – direction
decreases the difference between light and dark portions of
the image, lowering contrast. A value for contrast between
–50 and +50 can be entered in the text box to the right of
the slider.
E
C
TI
C
PRA
Note
Color adjustment and curves can not be used together. If the controls in
the Curves window are active, the controls in the Color Adjustment
window are disabled. If the Color Adjustment controls are active, the
controls in the Curves window are disabled. Only one of color adjustment
or curves can be applied when a modified image is saved.
Image Adjustment: Color Adjustment
Tip
To open the Color Adjustment window, choose Color Adjustment
from the View menu (in Windows, you can also click on the tool button
in the toolbar).
- 70 -

■ (Color Balance)
■
While the brightness slider adjusts brightness for the image
■
as a whole, the three color-balance controls allow the user
to adjust brightness for each color individually. For example,
dragging the red slider in the + direction brightens the red
PRACTICE
portions of the image, making the image as a whole more
red. Dragging it in the – direction dims the red elements in
the image, bringing out the remaining colors. Color balance
can also be set by entering values directly in the text boxes
to the right of the sliders.
Tip
Changes to brightness, contrast, and color balance are only possible when
the Apply check-box at the top left of the Color Adjustment window is
checked. When this box is checked, changes will be visible in the image
being edited. The box can be checked and unchecked for a quick “beforeand-after” comparison, allowing you to see whether color adjustment is
having the desired effect. The same effect can be achieved using the Apply
Color Adjustment item in the Image menu.
The Color Adjustment Settings Menu
The Color Adjustment submenu in the Settings menu can
be used to save and recall color adjustment settings or to
restore settings to initial or default values. The options available
in the Color Adjustment submenu are detailed below.
Load…
Select this item to load brightness, contrast, and color balance
settings previously saved using the Save… option (see below).
The standard file open dialog for your operating system will be
displayed; navigate to the drive (volume) and directory containing the desired settings and open the settings file (in Windows,
only files with the extension “.nca” will be displayed). The
settings in the Color Adjustment window will instantly revert to
the saved settings.
Tip
Right-button menu (Windows)
The Color Adjustment submenu can be displayed by right-clicking in the
Color Adjustment window.
E
C
TI
C
PRA
Image Adjustment: Color Adjustment
- 71 -

Save…
Select this item to save brightness, contrast, and color balance
settings in a named file. These settings can later be recalled
using the Load… option. Choosing Save… displays the
standard file save dialog for your operating system. After navi-
PRACTICE
gating to the destination drive (volume) and folder, save the
settings under the name of your choice (in Windows, color
adjustment settings are saved with the extension “.nca”).
Save as Default
Select this option to save the current brightness, contrast, and
color balance settings as the defaults for color adjustment.
These settings will be restored when Reset to Default is
selected from the color adjustment settings menu. If Use
Default Settings is selected for Settings for Next Camera Image in the General tab of the Preferences dialog, the
default settings will also be restored whenever an image is
captured. Only one set of default settings can exist at any one
time; previous defaults are automatically overwritten when new
default settings are created. Default settings are stored in the
same directory as Nikon Capture.
Reset to Default
Selecting this item restores brightness, contrast, and color
balance settings to the defaults created using the Save as
Default option. If no default settings exist, all settings will be
returned to zero.
Reset to Neutral
When this item is selected, brightness, contrast, and color
balance will be restored to zero.
E
C
TI
C
PRA
Image Adjustment: Color Adjustment
- 72 -

Unsharp Mask
Using Unsharp Mask, the user can increase the sharpness of
photographs by making edges more distinct. Unsharp Mask
works by increasing the contrast of the edges in the image
while leaving other areas untouched. The amount of sharpness is determined by three factors: intensity, halo width, and
CONCEPT
threshold.
Intensity is the amount the contrast of edges will be increased. Too great an intensity will degrade your image
rather than sharpening it.
Halo width controls the size of the areas that will be affected. The greater the halo width, the wider the edges in
the sharpened image will appear. Too large a value for halo
width will produce a “halo” along edges in the image.
Threshold defines the limit at which sharpening will be
applied. If the threshold is zero, sharpening will apply to all
pixels in the image. Increasing the threshold increases the
amount of contrast that must be present between pixels
before Unsharp Mask will be applied, with the result that
only more distinctly contrasting edges will be affected.
Unsharp Mask can be applied to all the colors in the image or
selectively to any combination of the red, green, and blue color
channels. You can also control whether Unsharp Mask applies
to all tones in the image or selectively to highlights, mid-tones,
or shadows. The controls in the Unsharp Mask window allow
you to select multiple combinations of color channels and tone
ranges that can be sharpened to different degrees.
Creating Unsharp Masks
If the Unsharp Mask window is not already open, open the
1
window by selecting Unsharp Mask from the View menu
(in Windows, you can also click on the tool button in the
toolbar).
E
C
TI
C
PRA
Image Adjustment: Unsharp Mask
Tip
The amount of Unsharp Mask you will need depends on the size and
resolution of the final image. The larger the image, the greater the amount
of Unsharp Mask you will need to achieve the same degree of apparent
sharpness. Before applying an Unsharp Mask, scale the image to the desired
size and resolution. See “The Size/Resolution Window” in this chapter.
- 73 -

Select a combination of colors from the channel pop-up
2
menu (A) and choose a tone range from the tone pop-up
menu (B). The Unsharp Mask you create will be applied
only to edges in the selected tone range and colors.
PRACTICE
E
F
D
B
A
G
C
Select a value for intensity using the Intensity slider (C), or
3
enter a value directly in the text box to the right of the
slider. The selected combination of colors, tone range, and
intensity will appear in the Unsharp Mask list (D). Entries in
the list show, in order, the color, tone range, intensity, halo
width, and threshold.
Tip
The warning button
The warning button (G) appears when the zoom factor of the image is too
low to ensure that Unsharp Mask will have the desired effect. Clicking the
button displays a warning.
Select values for halo width and threshold. To compare the
4
effects of the Unsharp Mask with the original image, click the
Apply button (E) to turn Unsharp Mask on or off.
Repeat steps 1–4 to create additional unsharp masks for
5
different color combinations and tone ranges. As new masks
are created, they are added to the end of the Unsharp Mask
list. Masks will apply in the order listed. To change the
order in which the masks apply, select a mask in the Unsharp
Mask list and click the up arrow to move it up in the list, or
the down arrow to move it down. To delete an Unsharp
Mask from the list, select it and click the delete button (F).
Tip
Unsharp Mask can only be used when the Apply button at the top left of
the window is checked. When this button is checked, any unsharp masks
will be applied immediately to the image being edited. The button can be
checked and unchecked for a quick “before-and-after” comparison, allowing you to see whether Unsharp Mask is having the desired effect. The same
effect can be achieved using the Apply Unsharp Mask item in the Image
menu.
E
C
TI
C
PRA
Image Adjustment: Unsharp Mask
- 74 -

Defining Shadows, Mid-tones, and Highlights
The Unsharp Mask Settings Menu
To define the tone ranges affected by Unsharp Masks that apply
to shadows, mid-tones, and highlights, click the ( ) button.
The following dialog will be displayed.
PRACTICE
The complete tone range, including shadows, mid-tones, and
highlights, is mapped to values between zero (black) and 255
(white). To set the boundary between shadows and midtones,
drag the shadow slider to the desired position, or enter a value
directly in the text box to the left of the tone range display.
The boundary between midtones and highlights is set by dragging the highlight slider or entering a value in the text box to
the right of the display. These settings apply to Unsharp Mask
calculations for all images.
The Unsharp Mask submenu in the Settings menu can be
used to save and recall unsharp masks or to restore settings to
initial or default values. The options available in the Unsharp
Mask submenu are detailed below.
Load…
Select this item to load unsharp masks previously saved using
the Save… option (see below). The standard file open dialog
for your operating system will be displayed; navigate to the
drive (volume) and directory containing the desired settings and
open the settings file (in Windows, only files with the extension
“.num” will be displayed). The settings in the Unsharp Mask
window will instantly revert to the saved settings.
E
C
TI
C
PRA
Image Adjustment: Unsharp Mask
Tip
Right-button menu (Windows)
The Unsharp Mask submenu can be displayed by right-clicking in the
Unsharp Mask window.
- 75 -

Save…
Select this item to save the current Unsharp Mask settings in a
named file. These settings can later be recalled using the
Load… option. Choosing Save… displays the standard file
save dialog for your operating system. After navigating to the
PRACTICE
destination drive (volume) and folder, save the settings under
the name of your choice (in Windows, unsharp masks are saved
with the extension “.num”).
Save as Default
Select this option to save the current Unsharp Mask settings as
the default for Unsharp Mask. These settings will be restored
when Restore to Default is selected from the Unsharp Mask
settings menu. If Use Default Settings is selected for Set-
tings for Next Camera Image in the General tab of the
Preferences dialog, the default settings will also be restored
whenever an image is captured. Only one set of default settings
can exist at any one time; previous defaults are automatically
overwritten when new default settings are created. Default
settings are stored in the same directory as Nikon Capture.
Restore to Default
Selecting this item restores Unsharp Mask settings to the defaults created using the Save as Default option. If no default
settings exist, all the unsharp masks displayed in the Unsharp
Mask dialog will be deleted.
Restore to Neutral
When this item is selected, all the unsharp masks currently
displayed in the Unsharp Mask dialog are deleted. The settings
in the tone range dialog are not affected.
E
C
TI
C
PRA
Image Adjustment: Unsharp Mask
- 76 -

Saving Images
Nikon Capture supports a variety of image file formats. Images
loaded from the camera can be saved in a format suited to the
task at hand. For information on choosing an appropriate file
format, see “File Formats,” below.
File Formats
File Format and Image Quality
The relationship between the camera image quality setting and
the file format used by the camera is shown in the following
table:
NEF, YCbCr TIFF
NEF
The sixteen-bit NEF format is used to save “raw,” unmodified twelvebit image data from the CCD when shooting at an image quality of HIRAW. This file type can only be read using Nikon Capture.
YCbCr TIFF
Photographs taken at an image quality of HI-YCbCr are saved in an
uncompressed TIFF format that models color using measures of luminance (Y) and chrominance (Cb, Cr). This file type can be read using
Nikon View DX or Nikon Capture.
Image Quality
Setting
HI-RAW
HI-RGB TIFF
HI-YCbCr TIFF
FINE
NORMAL
BASIC
Camera File Format Compression
(Nikon Electronic Image Format)
TIFF Uncompressed
JPEG (DCF†)
Uncompressed
Low
Medium
High
Image
Quality
HighNEF
Low
When saving images captured from the camera, choose a file
type that reflects the format used in the camera. The image
quality of photographs that have been compressed by the
camera will not improve if the images are saved in uncompressed form using Nikon Capture. When a JPEG-compressed
image is saved in TIFF format, for example, image quality will be
more or less the same as the original JPEG image.
† DCF (Design rule for Camera File systems): an industry-wide standard
for digital camera file systems.
Saving Images: File Formats
- 77 -

Saving Image Files
Nikon Capture offers two options for saving files: saving in Nikon
Capture’s NEF format, and saving in standard image file formats.
Save Original Image…
Choose this option to save RAW images in the Nikon Electronic Image Format (NEF) directly to disk as NEF files, without
changing the file format (NEF images have the extension
“.nef”). Files saved in NEF format can only be opened with
Nikon Capture. If the file was originally a JPEG or TIFF image
created with the camera, it will be saved in eight-bit, uncompressed RGB format, unmodified for any changes to settings
made in Nikon Capture.
Images saved in NEF format maintain the high image quality of
the original photograph; image enhancement settings (Curves,
Color Adjustment, Unsharp Mask, and output size and resolution) are not applied, but are saved separately in the same file.
These images can later be opened in Nikon Capture and converted to a format that can be read by other applications using
the Save Final Image… command. Image enhancement
settings are applied when Save Final Image… is used, allowing you to create copies of the image that preserve most of the
details in the original photograph even when image enhancement is used. Save images in NEF format using the Save
Original Image… command when you are unsure of how
they will be used or when you want to save an image that will
later be processed in a number of different ways.
Saving Images: File Formats
- 78 -

Save Final Image…
This option is used to save files in a format that can be read by
other applications. The following file types are available:
ExtensionCompressionFile Type
16-bit TIFF (RGB)
8-bit TIFF (RGB)
Choice of compressed
or uncompressed
.TIFUncompressed
.TIFUncompressedTIFF (CMYK)
.JPGCompressedJPEG (EXIF-compliant)
.JPGJPEG (JFIF-compliant) Compressed
.BMPBMP (Windows only) Uncompressed
.PICPICT (Macintosh only)
The file type selected depends on how the image will be used:
TIFF Use TIFF when saving images for high-quality output or
publishing. Although the lack of compression will result in
larger files, a high level of image quality will be maintained.
This file type is supported by a wide variety of applications on a variety of computer platforms.
JPEG This file type is adequate for images that will be output at
low resolution or distributed in electronic form. Compression allows more images to be saved in the same
amount of disk space. Note, however, that JPEG compression results in loss of information that can not afterwards be restored. Save files at the lowest compression
ratio possible; if necessary, you can always save them
again later at a higher compression ratio.
BMP This is the generic format used on Windows systems, and
is available only in the Windows version of Nikon Capture.
Most Windows users will be able to view files of this type.
Saving Images: File Formats
PICT This is the generic format used on the Macintosh, and is
available only in the Macintosh version of Nikon Capture.
Unlike BMP, PICT supports compression. Most
Macintosh users will be able to view files of this type.
- 79 -

Save Original Image…
This section describes how to save images in Nikon Electronic
Image Format (NEF). NEF files can only be opened in Nikon
Capture. Curves, Color Adjustment, Unsharp Mask, and output
size and resolution settings do not apply to images saved in NEF
format, but are saved separately in the same file.
Select Save Original Image… from the File menu (or, in
1
the Windows version of the program, click the tool
button). A dialog like that shown below will appear.
Navigate to the desired drive and folder.
2
If desired, enter a name for the file. If no name is entered,
3
the file will be saved under a default file name.
To save only the portion of the image in the current crop,
4
check Save Selection Only. If this box is not checked,
the entire image will be saved.
Click the Save button to save the file under the specified
5
name.
Saving Images: Save Original Image…
- 80 -

Save Final Image…
This section details how to save selected images in a format that
can be read by other applications. Files saved using the Save
Final Image… option can not be reopened in Nikon Capture.
Select Save Final Image… from the File menu (or, in the
1
Windows version of the program, click the tool button).
A dialog like that shown below will appear.
Navigate to the desired drive and folder.
2
Choose a file type (file format) from the pop-up menu. See
3
“File Formats,” above, for details.
If the selected file type is PICT (only available in the
4
Macintosh version of the program), you can choose whether
or not to compress the image. The image will be compressed when Use Compression is checked.
If you have chosen a file type that supports compression
3
(PICT or JPEG), you can choose a compression ratio from
“Highest Compression Ratio,” “Good Compression Ratio,”
“Good Balance,” “High Quality,” and “Excellent Quality.”
If desired, enter a name for the file. If no name is entered,
6
the file will be saved under a default file name.
Click the Save button to save the file under the specified
7
name.
Saving Images: Save Final Image…
- 81 -

Save Options
In addition to the settings listed above, the following options are
available in the Save Final Image… dialog:
Save crop only
Color correction
indicator
Unsharp Mask indicator
Unsharp Mask
Shows whether the settings in the Unsharp Mask window will
be applied to the saved image.
Crop and Scale
Check this box to save only the portion of the image in the
current crop. The image will be saved at the output size and
resolution specified in the Size/Resolution window.
Open saved files in third-party application
Bit-depth selector
Color Correction
Shows whether Curves or Color Adjustment will be applied
when the image is saved.
Curves: Applied
This appears when the checkbox in the Curves window is on
when Save Final Image… is selected. Curves will be
applied to the saved image; Color Adjustment will not.
Color Adjustment: Applied
This appears when the checkbox in the Color Adjustment
window is on when Save Final Image… is selected.
Color Adjustment will be applied to the saved image; Curves
will not.
No Color Correction
This appears when neither Curves nor Color Adjustment is
checked when Save Final Image… is selected. The saved
image will not be modified for tone curves or color adjustment.
Pixel Bit-Depth
Shows the pixel bit-depth at which the image will be saved.
16-bit will only be available if the format selected is TIFF
(RGB) and if the image was originally taken at an image quality
setting of HI-RAW (12 bit). At other settings, bit-depth is
restricted to 8-bit.
Open in
Shows the application (for example, Photoshop 5.0) specified in
the Open Final Image in External Application area of
the File Locations tab of the Preferences dialog. If this check
box is on, the image will automatically be opened in the specified application after it has been saved.
Saving Images: Save Final Image…
- 82 -

Saving Multiple Images
This section describes how to save multiple images simultaneously using either Save Original Image… or Save Final
Image….
In the Camera Image window, select the thumbnails of the
1
images you want to save, then choose Save Original
Image… or Save Final Image… from the File menu. A
dialog like that shown below will appear (the dialog below is
that which appears in the Windows version of the program
when Save Original Image… is selected).
Click the File Names… button. The following dialog will
2
be displayed.
Saving Images: Saving Multiple Images
- 83 -

Enter a prefix, suffix, sequence length, and starting sequence
3
start number, referring to the Sample area for an example
of how the final file names will appear at current settings.
Prefix/Suffix
Enter the prefix and/or suffix of your choice (up to forty
letters each; in the case of the Macintosh, however, the total
length can not exceed thirty-one characters).
Sequence Length
Using the slider, choose the number of digits to be used in
the sequential file number. File numbers can be from two to
eight digits long.
Starting Sequence Number
Image files will be assigned sequential file numbers in ascending order, starting from this number.
Click OK to return to the save dialog.
4
Choose a destination folder and set other options as de-
5
scribed in the preceding sections; then click the Save button
to save the images to the specified location.
Note
File Naming Conventions
Macintosh: The maximum length for Macintosh file names is thirty-one
characters. Colons (“:”) are not allowed.
Windows: In environments that do not support long file names, the maximum
length is eight characters; file names may not contain spaces, quotes, or any
of the following characters: “\\” “/” “:” “,” “;” “*” “<“ “>” and “|”.
Where long file names are supported, the maximum length is 255 characters.
File names may not contain quotes or any of the following characters: “\\”
“/” “:” “,” “;” “*” “<“ “>” and “|”.
Saving Images: Saving Multiple Images
- 84 -

Saving Photographs Directly to Disk
Using the Auto Save function, photographs can be saved
directly to disk as they are taken, without being displayed in
the Camera Image window. Photographs can be processed
according to specified settings before being saved in the folder
designated by the user. Images saved in Nikon Electronic
CONCEPT
Image Format (NEF) can afterward be opened for editing in
Nikon Capture.
Select Auto Save from the Camera menu to display the
1
Auto Save dialog.
E
C
TI
C
PRA
Note
The Camera Control window can not be used to take photographs while
Auto Save is in effect. Photographs can only be taken using the camera’s
shutter-release button.
Saving Images: Saving Photographs Directly to Disk
Tip
Before saving photographs with Auto Save, you will need to decide what
settings you will use to process the images as they are saved. These settings
will apply to all photographs taken while Auto Save is in effect. If you want
to edit each image separately, capture the images one at a time into the
Camera Image window and adjust settings for each image.
- 85 -

The path in which photographs will be saved is shown under
2
Save all incoming images to…. Click the icon
(Windows) or Choose… button (Macintosh) to select a
different folder.
In the File Name panel, enter the prefix and suffix that will
PRACTICE
3
be used in naming files created with Auto Save. File names
are distinguished by numbers assigned sequentially in ascending order; choose the number of digits (sequence length) and
the starting sequence number.
Prefix/Suffix
Enter the prefix and/or suffix of your choice (up to forty
letters each; in the case of the Macintosh, however, the total
length can not exceed thirty-one characters).
Sequence Length
Choose the number of digits to be used in the sequential file
number using the slider. File numbers can be from two to
eight digits.
Choose a file type from the Save as Type menu (see
4
“Saving Images: File Formats”).
If the selected file type is PICT, you can choose whether or
5
not the file will be compressed (Macintosh only).
If the selected file type is JPEG or compressed PICT, choose
6
a compression setting from the menu to the right of the
Use Compression check box.
E
C
TI
C
PRA
Starting Sequence Number
Photographs saved using Auto Save will be assigned sequential file numbers in ascending order, starting from this number.
Saving Images: Saving Photographs Directly to Disk
Note
File Naming Conventions
Macintosh: The maximum length for Macintosh file names is thirty-one
characters. Colons (“:”) are not allowed.
Windows: In environments that do not support long file names, the maximum
length is eight characters; file names may not contain spaces, quotes, or any
of the following characters: “\\” “/” “:” “,” “;” “*” “<“ “>” and “|”.
Where long file names are supported, the maximum length is 255 characters.
File names may not contain quotes or any of the following characters: “\\”
“/” “:” “,” “;” “*” “<“ “>” and “|”.
- 86 -

Specify the image enhancement settings that will be applied
7
to photographs as they are saved.
Color Correction
Check this box to apply one of the following to photographs
captured using Auto Save:
PRACTICE
Apply Curves
Photographs are modified according to the settings in
effect in the Curves window.
Apply Color Adjustment
Photographs are modified according to the settings in
effect in the Color Adjustment window.
Apply Unsharp Mask
When this box is checked, photographs are modified according to the settings in effect in the Unsharp Mask window.
Scale
Photographs are saved at the resolution and scale specified
in the Size/Resolution window.
Click OK. While Auto Save is in effect, the Auto Save
8
Mode Active dialog will be displayed.
No other operations can be performed until Stop Auto
Save is clicked to end Auto Save.
Take photographs using the camera. Photographs will be
9
saved directly to the specified folder. The number of photos
taken will appear in the Auto Save Mode Active dialog.
When you finish shooting, click Stop Auto Save in the
10
Auto Save Mode Active dialog to end Auto Save.
E
C
TI
C
PRA
Pixel Bit-Depth
Choose a pixel bit-depth of eight bits (256 tone levels) or
sixteen bits (approximately 32,000 tone levels). The options
available for pixel bit depth depend on the file type chosen
in the Save as Type menu.
Saving Images: Saving Photographs Directly to Disk
Notes
If an invalid file name or other error is identified when the OK button is
clicked to start Auto Save, a message will be displayed. Return to the Auto
Save dialog and adjust settings as the message directs.
If an error occurs while Auto Save is active, an error log window will be
displayed when Auto Save ends, showing the time of occurrence and the
result of the error. Click OK to close the error log window.
- 87 -

Camera Operation
Camera Control
When the D1 is connected to a Windows or Macintosh
computer via its IEEE 1394 interface, Nikon Capture’s Camera Control and Custom Settings windows give the user
control over the majority of camera settings.
Tip
Verifying that the camera is connected
The color of the connection status indicator at the bottom left corner of
the Nikon Capture window (Windows) or the bottom of the tool palette
(Macintosh) shows the status of the connection between the computer and
the camera.
Normal connection. The camera is ready to transfer data or data are
being transferred.
No connection. Either the camera is not connected, or the connection
is not functioning properly. See “Troubleshooting” for more information.
To adjust camera settings from the Camera Control window,
choose Camera Control from the View menu, or click on
the Nikon Capture camera tool button ( ) in the toolbar
(Windows) or tool palette (Macintosh).
Camera Control page selection tabs
Simulated LCD panel
Shoot buttons
Note
Changes made to settings in the Camera Control window only apply to
photographs taken after the changes are made, not to photographs that
have already been taken.
Camera Operation: Camera Control
- 88 -

Page Selection Tabs
The Camera Control window has four tabs: Exposure 1, Exposure 2, Storage, and Mechanical, which may be opened by
clicking on the tab name.
Simulated LCD Panel
At the bottom of the window is a simulated LCD panel which
shows the same information as that displayed in the camera’s
viewfinder, with the exception of camera errors. You can also
use the simulated LCD panel to choose the setting you want to
change by clicking on that area in the panel. When you click on
a particular user-adjustable area, the corresponding tab sheet
opens in the Camera Control window.
Tip
Some camera settings can not be adjusted using Nikon Capture. Follow the
instructions in the D1 User’s Manual when you want to:
• take consecutive photographs in continuous shooting mode
• use continuous servo autofocus
• lock shutter speed, aperture, or autoexposure
• use autofocus lock
• use autofocus to check focus without taking a photograph
• adjust aperture manually using the lens aperture ring
• wake the camera up from sleep mode
• use capture preview, record-and-review, or autobracketing
The following settings are displayed in the Camera Control window but can
not be adjusted using Nikon Capture:
• focus mode
• metering
Shoot Buttons
Beneath the simulated LCD panel are the AF and Shoot
(autofocus and shoot) button and the Shoot button, either of
which can be selected to take a photo after the settings have
been adjusted. The Shoot button is the button you will probably use most often. Use the AF and Shoot button when
autofocus is not activated, but you want the camera to autofocus before releasing the shutter (note that an autofocus operation will not be performed when the camera is in manual focus
mode). If the focus mode is single-servo AF, the camera will
focus before releasing the shutter even when the Shoot button
is pressed.
Tip
“Continuous shooting” and “single-frame shooting” in PC mode
In PC mode, you can choose between continuous and single-frame
shooting using Custom Setting item 30 (see “Custom Settings” in the
camera User’s Manual). In continuous shooting mode, photographs will be
taken one after another as long as the shutter-release button on the camera
is held down. The Shoot and AF and Shoot buttons in the Camera
Control window function as they do in single-frame shooting mode, with
one photograph being taken each time either button is clicked.
Camera Operation: Camera Control
- 89 -

Exposure 1
From the Exposure 1 tab, changes can be made to the following
settings:
Exposure Mode:
The following four options are available:
Manual
User controls both aperture and shutter speed.
Aperture Priority
User sets the aperture and the camera automatically adjusts
the shutter speed. This setting is useful when you want to
give priority to depth of field: small apertures can bring
background and foreground into focus, while wide apertures
can be used to blur the background.
Speed Priority
User sets the shutter speed and the camera automatically
adjusts the aperture. High shutter speeds can be used to
freeze motion, while low shutter speeds can blur moving
objects.
Programmed Auto
User can select combinations of aperture and shutter speed
pre-programmed into the camera for various lighting conditions.
Camera Operation: Camera Control
- 90 -

Shutter Speed:
Shutter speed can only be adjusted in Manual and Speed
Priority modes, when it can be set to values between Bulb
and 1/
16,000
sec. (1/
sec. when using a Speedlight). At a setting
500
of Bulb, the shutter remains open for as long as the shutterrelease button is held down.
Aperture:
Aperture can only be adjusted in Manual and Aperture
Priority modes, when it can be set to values between f/4.0
and f/22.0 (small apertures have high f-numbers, wide apertures
low f-numbers; the actual apertures available depend on the
lens used). Aperture can not be controlled from Nikon Capture
when Custom Setting 22 has been set to allow aperture to be
adjusted manually using the lens aperture ring.
Exposure Compensation:
Exposure compensation is useful when shooting subjects containing sharp lighting contrasts, or on other occasions when you
want to modify the exposure value determined by the camera.
Exposure compensation can be set to values between –5EV
and +5EV (in increments of 1 EV, 1/2 EV, or 1/3 EV, as specified
in Custom Setting12). Exposure compensation is available in all
exposure modes.
Flexible Program:
Flexible program can only be used in Program Mode, when it
allows you to choose from predetermined combinations of
shutter speed and aperture appropriate to current lighting
conditions. Twenty-one steps from –10 to +10 are available
(one step may be equivalent to I EV 1/2 EV or 1/3EV, depending
on the option chosen for Custom Setting 12).
Tip
When you attach a Speedlight to the camera, Shutter Speed can be set
to values from Bulb to 1/
Because the Bulb setting requires that the shutter-release button be held
down, you must use the shutter-release button on the camera to take
photos at this setting. The shutter-release button can not be held down
in Nikon Capture.
sec or 1/
500
250
sec.
Camera Operation: Camera Control
- 91 -

Exposure 2
From the Exposure 2 tab, changes can be made to the following
settings:
Focus Area:
The focus area can not be selected at an AF area mode setting
of Closest Subject Priority (see “Camera Operation:
Custom Settings”). At other autofocus settings, the focus area
can be selected using the arrow buttons. With the AF Area
mode set to Single Area AF, the user may select one of five
focus sensors, which the camera will use to determine the
autofocus target. In Dynamic AF, the user designates the
primary sensor, then, if the target moves, dynamic autofocus
automatically shifts sensors to track the subject, keeping it
focused. The plus pattern displayed to the right of the arrows
indicates the active sensor.
Note
See the Mechanical page later in this chapter for information on AF area
mode and focus mode settings.
Camera Operation: Camera Control
- 92 -

Metering Mode
The camera’s metering mode setting is displayed; however,
adjustments to the metering mode can not be made from
Nikon Capture. The following three settings are available using
the camera’s metering selector:
Multi-Pattern
Metering is performed by a CCD sensor with 1,005 (67
vertical × 15 horizontal) metering pixels, which sets exposure
using a selection of data from all areas of the frame. This
system is particularly effective with brightly-colored (white or
yellow) or dark-colored (black or dark green) subjects that
occupy a substantial portion of the frame, producing photographs closer to what is seen by the naked eye.
Center-Weighted
The camera measures light in the entire frame, but assigns
the greatest weight to a circular area in the center of the
viewfinder 8mm (0.31˝) in diameter (the size of the area can
be changed using Custom Setting 14). This setting can be
used to preserve background details while letting lighting
conditions at the center of the frame define exposure.
Spot
The camera measures light only in a 4mm circle (0.15˝)
centered on the current focus area. This setting is useful
with backlit subjects or on other occasions when the background is much darker or much brighter than your subject.
Camera Operation: Camera Control
- 93 -

Flash Sync Mode:
When taking photographs with a Speedlight, you can choose a
flash setting from the following options:
Front Curtain
This mode is recommended in most situations. When using
the SB-26, SB-25, or SB-24, set the sync-mode selector on
the Speedlight to NORMAL.
Rear Curtain
Use this mode to suggest motion by creating a stream of
light that appears to follow moving objects. When this
mode is combined with programmed auto or aperturepriority auto, shutter speed is slowed to achieve the same
effect as slow sync. When using the SB-26, SB-25, or SB-24,
set the Speedlight’s sync mode selector to REAR.
Slow Sync
A lower shutter speed is used in programmed auto and
aperture-priority auto exposure modes to bring out background details.
Red Eye Reduction
In this mode, a red-eye reduction pre-flash lights for approximately one second before the main flash, causing the pupils
in your subjects’ eyes to contract and reducing the “red-eye”
effect a flash can sometimes cause.
Red Eye Slow
This mode combines red-eye reduction with slow sync
(available only with SB-28DX, SB-28, SB-27, and SB-26). Set
the exposure mode to programmed auto or aperturepriority auto.
Tip
When shooting in low light conditions, or when shutter speed is slowed,
use of a tripod is recommended to prevent blurring caused by camera
shake.
Camera Operation: Camera Control
- 94 -

Sensitivity
Sensitivity (ISO equivalency) can be set higher than the default
setting (ISO 200 equivalent) when taking photographs in low
light conditions. By default, four settings (ISO 200, 400, 800,
and 1,600 equivalent) are available; sensitivity can be increased
by +1 or +2 EV over ISO 1,600 equivalent using Custom
Setting 31 (see the camera User’s Manual for details).
Fixed White Balance
White balance is used to ensure that colors which appear white
when viewed directly are white in the final photograph. The
following settings are available:
Auto The 1,005-pixel CCD adjusts white balance
automatically.
Preset White balance can be set using a white object
as a reference point.
Note
The default sensitivity setting of ISO 200 is recommended in most
circumstances. Photographs taken at other settings may include a slight
amount of noise.
Direct Sunlight
Use this setting when taking photographs in
direct sunlight.
Shade Use this setting when taking photographs in
the shade in sunny weather.
Overcast Use this setting when taking photographs
under overcast skies.
Incandescent Use this setting when taking photographs
indoors under incandescent light.
Fluorescent Use this setting when taking photographs
indoors under fluorescent light.
Flash Use this setting with Nikon Speedlights.
Note
Fixed White Balance Adjustment (following) can be used to help
compensate for unusual crossover lighting or to produce an intentionally
unbalanced rendering of a scene.
Camera Operation: Camera Control
- 95 -

Fixed White Balance Adjustment
Click the button (Windows) or the Choose… button
(Macintosh) to make fine adjustments to the white balance
settings chosen in the white-balance pop-up menu.
balance can be adjusted from –3 to +3 in increments of 1.
White
Adjustments made using the sliders apply to the associated
white balance setting. Clicking the Reset button returns all
values to defaults. Click OK to apply the current settings to the
camera, or click Cancel to discard any changes and return to
the Camera Control window.
Camera Operation: Camera Control
- 96 -

Storage
From the Storage tab, changes can be made to the following
settings:
Color Mode
Color mode can only be adjusted at a pixel bit depth (data
format) of eight bits, when the user can choose from Color
and Black and White.
Data Format
Data formats of RAW (16-bit), TIFF-RGB (8-bit), TIFFYCbCr (8-bit), and JPEG (8-bit) are available (because
black-and-white is not available when shooting RAW images,
the Color Mode menu is disabled at a setting of RAW (16-
bit)).
Compression
At a Data Format setting of JPEG (8-bits), you can set image
quality (JPEG compression) to FINE, NORMAL, or BASIC.
Note
File size, memory, and hard disk requirements are the same for color and
for black-and-white images.
Uncompressed images range in size from approximately 4 MB to 7.8 MB.
While file size can be reduced using compression, compressed images may
show some loss in image quality.
Camera Operation: Camera Control
Note
A Color Mode setting of Black and White is available only in JPEG and
TIFF data formats.
- 97 -

Mechanical
From the Mechanical tab, changes can be made to the following
settings:
Shooting Mode
Sets the shooting mode for PC mode to Single (single-frame
shooting) or Continuous (continuous shooting). At a setting
of Continuous, photographs will be taken as long as the
camera’s shutter-release button is held down. The advance rate
can be set in the Custom Settings window (see “Custom Settings,” later in this chapter). Changes to this setting are applied
to Custom Setting 30 in the camera’s memory.
AF Area Mode
The following options are available:
Single Area AF
The camera focuses on the subject in the area selected for
autofocus. This mode is useful when focusing on subjects
that are relatively stationary.
Dynamic AF
The camera first focuses on the subject in the area selected
for autofocus. If the subject moves to another focus area,
the camera will automatically shift the focus area to follow it
(the focus area shown in the viewfinder will not, however,
change). This makes it possible to focus on subjects that are
moving irregularly.
Camera Operation: Camera Control
- 98 -

Focus Mode
The autofocus mode setting is displayed. While adjustments to
autofocus mode can not be made from Nikon Capture, the
following settings are available on the camera:
Single Servo
The shutter can only be released when the in-focus indicator
(●) appears in the simulated LCD panel in the Camera
Control window or in the camera’s viewfinder.
Continuous Servo
The camera will focus continuously as long as the shutterrelease button on the camera is held down. The shutter can
be released even when the camera is not in focus.
Manual
Use in situations where autofocus may not work as expected
or a lens other than an AF Nikkor is attached.
Lens
Displays the focal length and maximum aperture of the lens
currently attached to the camera. Depending on the lens type,
some information may not be displayed.
Main Battery Level
Displays the level of the main camera battery, the power source
for all primary camera functions, including metering and autofocus. When the indicator drops to one third or less, replace the
battery pack with a fully charged spare battery pack or use an
EH-4 AC adapter (available separately).
Clock Battery Level
Displays the level of the camera’s clock battery, which powers
the D1’s internal clock and internal memory when the camera is
turned off and/or the main battery is removed.
Camera Operation: Camera Control
- 99 -

Saving and Loading Camera Control Settings
Using Nikon Capture, it is possible to save Camera Control
settings as well as to load and apply previously saved settings.
Select Camera Control from the Settings menu.
Load
After selecting the Load… command, an “Open” dialog will
appear, asking you to choose the Camera Control settings file
you want to open. Navigate to the directory where the file is
saved (the default is the folder to which Nikon Capture was
installed) and open the file (Windows users should look for the
“.ncc” extension on Camera Control settings files). The current settings in the Camera Control window will change to
those of the file you just opened.
Save…
After making all of the necessary adjustments to the Camera
Control window and selecting the Save… command from
Settings > Camera Control, use the “Save As” dialog to
name the file and determine where it is to be saved (the default
is the folder to which Nikon Capture was installed). Windows
users will see the extension “.ncc” added to the file name.
Tip
Right-button menu (Windows)
The Camera Control submenu can be displayed by right-clicking in
the Camera Control window.
Camera Operation: Camera Control
- 100 -
 Loading...