

Page 1
AF-S NIKKOR 200-400mm f/4G ED VR
Ⅱ
P. 2
P.16
S.34
P.48
P.62
S.76
CTP.90
P.104
P.118
STR.132
STR. 146
P.160
P.182
P.196
Sc
Tc
Page 2
安全上のご注意
警告
ご使用の前に「安全上のご注意」をよくお読みのうえ、正しくお使いください。この「安
Jp
全上のご注意」は製品を安全に正しく使用していただき、あなたや他の人々への危害や
財産への損害を未然に防止するために、重要な内容を記載しています。お読みになった
後は、お使いになる方がいつでも見られる所に必ず保管してください。
表示について
表示と意味は次のようになっています。
この表示を無視して、誤った取り扱いをすると、人が死亡また
は重傷を負う可能性が想定される内容を示しています。
この表示を無視して、誤った取り扱いをすると、人が傷害を負
う可能性が想定される内容および物的損害の発生が想定される
内容を示しています。
お守りいただく内容の種類を、次の絵表示で区分し、説明しています。
絵表示の例
記号は、注意(警告を含む)を促す内容を告げるものです。図の中や近
△
くに具体的な注意内容(左図の場合は感電注意)が描かれています。
記号は、禁止の行為(してはいけないこと)を告げるものです。図の中
や近くに具体的な禁止内容(左図の場合は分解禁止)が描かれています。
記号は、行為を強制すること(必ずすること)を告げるものです。図の
●
中や近くに具体的な強制内容(左図の場合は電池を取り出す)が描かれて
います。
分解禁止
接触禁止
修理依頼
2
すぐに
分解したり、修理や改造をしないこと
感電したり、異常動作をしてケガの原因となります。
落下などによって破損し、内部が露出したときは、露出部に手を
触れないこと
感電したり、破損部でケガをする原因となります。カメラの電池を抜いて、
販売店またはニコンサービス機関に修理を依頼してください。
を
Page 3
警告
電池を取る
注意
すぐに
修理依頼を
水かけ禁止
使用禁止
見ないこと
熱くなる、煙が出る、こげ臭いなどの異常時は、速やかにカメラ
の電池を取り出すこと
そのまま使用すると火災、やけどの原因となります。電池を取り出す際、
やけどに充分注意してください。電池を抜いて、販売店またはニコンサー
ビス機関に修理を依頼してください。
水につけたり、水をかけたり、雨にぬらしたりしないこと
発火したり感電の原因となります。
引火、爆発のおそれのある場所では使用しないこと
プロパンガス・ガソリンなど引火性ガスや粉塵の発生する場所で使用する
と、爆発や火災の原因となります。
レンズまたはカメラで直接太陽や強い光を見ないこと
失明や視力障害の原因となります。
Jp
En
De
Fr
Es
Se
Ru
Nl
It
感電注意
放置禁止
使用注意
保管注意
移動注意
放置禁止
ぬれた手でさわらないこと
感電の原因になることがあります。
製品は幼児の手の届かないところに置くこと
ケガの原因になることがあります。
逆光撮影では、太陽を画角から充分にずらすこと
太陽光がカメラ内部で焦点を結び、火災の原因になることがあります。画
角から太陽をわずかに外しても火災の原因になることがあります。
使用しないときは、レンズにキャップをつけるか太陽光のあたら
ない所に保管すること
太陽光が焦点を結び、火災の原因になることがあります。
三脚にカメラやレンズを取り付けたまま移動しないこと
転倒したりぶつけたりしてケガの原因になることがあります。
窓を閉め切った自動車の中や直射日光が当たる場所など、異常に
温度が高くなる場所に放置しないこと
内部の部品に悪い影響を与え、火災の原因となることがあります。
Ck
Ch
Kr
3
Page 4
このたびはニッコールレンズをお買い上げくださいまして、誠にありがとうございます。
ご使用の前に、この使用説明書をよくお読みの上、正しくお使いください。
Jp
また、カメラの使用説明書もご覧ください。
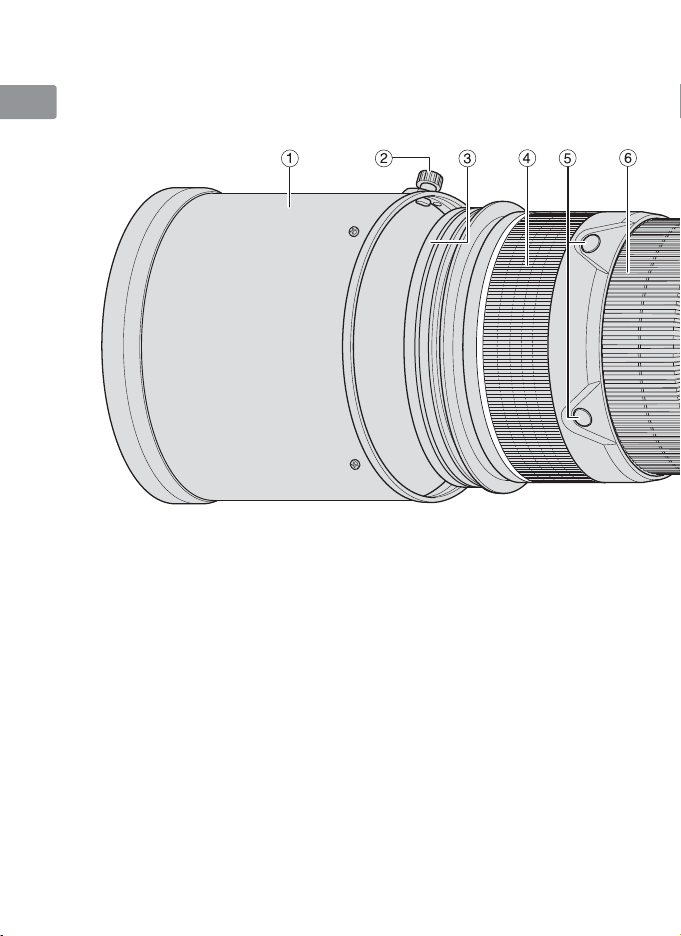
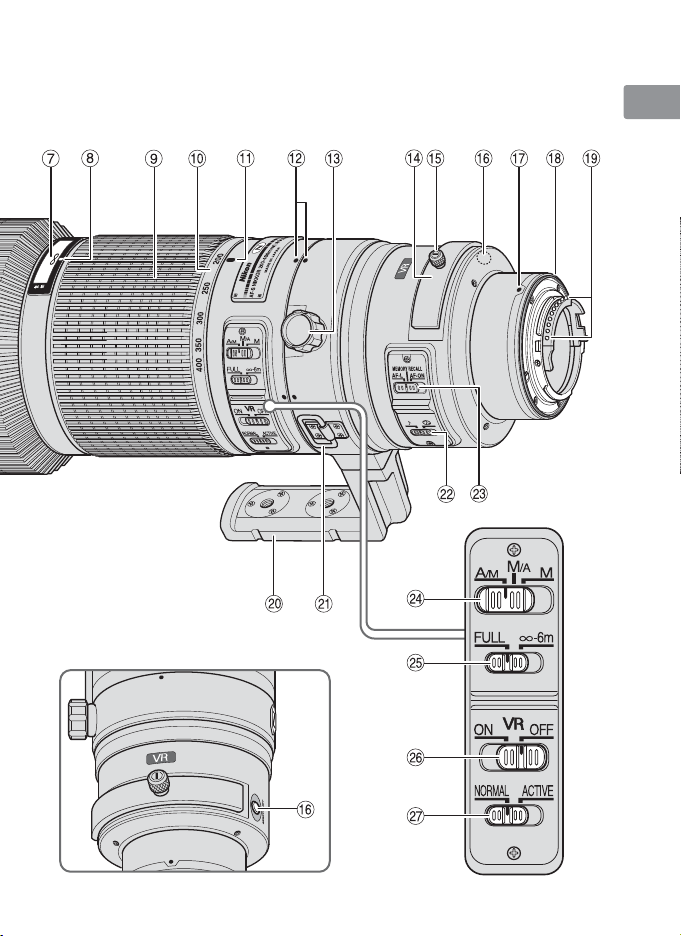
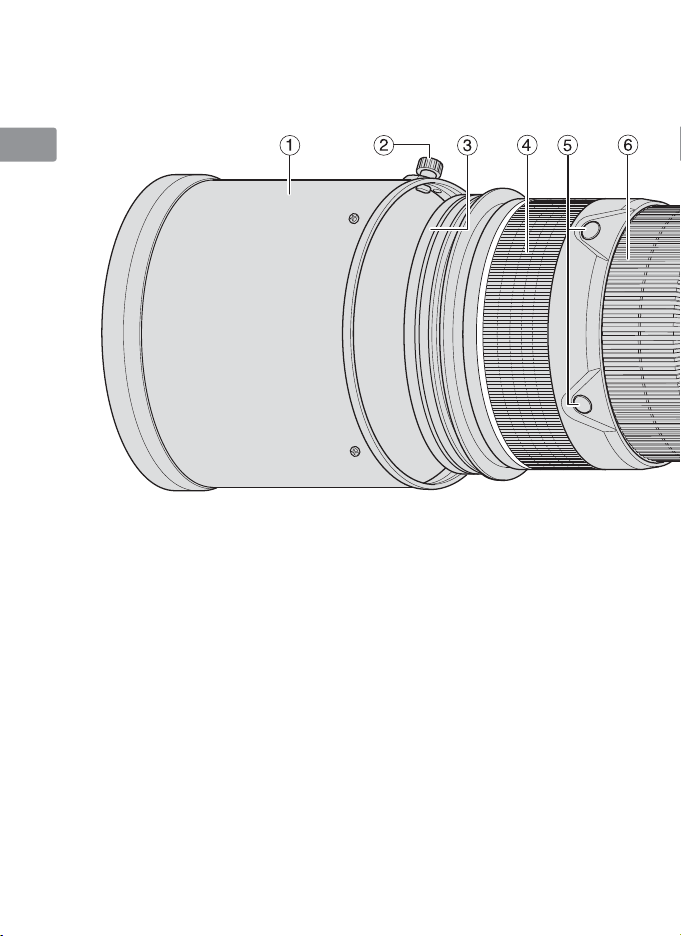
■各部の名称
En
De
Fr
Es
Se
Ru
Nl
It
Ck
Ch
1フード(P.11)
2クランプノブ(P.11)
3保護ガラス(レンズ本体に装着済み)
Kr
(P.12)
4すべり止めゴム
5フォーカス作動ボタン
(フォーカスロック/メモリーリコール/
AF 作動)(P.8)
6フォーカスリング(P.7)
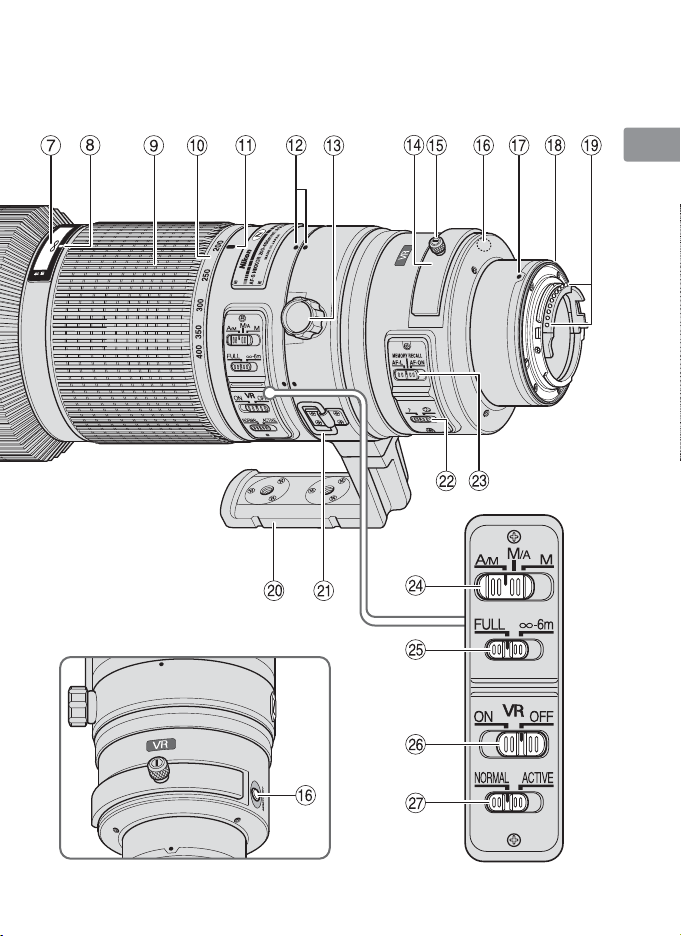
7距離目盛(P.11)
8距離目盛基準線
9ズームリング(P.11)
0焦点距離目盛
!焦点距離目盛基準線
@レンズ回転位置指標(P.11)
#三脚座リング止めネジ(P.11)
$組み込み式フィルターホルダー(P.12)
%組み込み式フィルターホルダーつまみ
(P.12)
^メモリーセットボタン(P.8)
&レンズ着脱指標
*レンズマウントゴムリング(P.14)
(CPU 信号接点(P.14)
)組み込み式回転三脚座(P.11)
q吊り金具
w電子音スイッチ(P.8)
eフォーカス作動設定スイッチ
(フォーカスロック/メモリーリコール/
AF 作動)(P.8)
rフォーカスモード切り換えスイッチ(P.7)
tフォーカス制限切り換えスイッチ(P.7)
y手ブレ補正スイッチ(P.10)
u手ブレ補正モード切り換えスイッチ(P.10)
( ):参照頁
4
Page 5
Jp
En
De
Fr
Es
Se
Ru
Nl
It
Ck
Ch
Kr
5
Page 6

■主な特長
●
ナノクリスタルコート(NanoCrystal Coat)を一部のレンズに施したことにより、
Jp
強い太陽光が当たる屋外撮影から、スポットライトのある室内撮影まで、クリアーで
抜けの良い画像を提供します。
En
●
レンズ側でフォーカスロックができる機能(AF-L)、AF(オートフォーカス)を作動
できる機能(AF-ON)、およびあらかじめ記憶させたピント位置を瞬時に呼び出せる
De
機能(MEMORYRECALL)を装備しています。
●
手ブレ補正機能(VRⅡ)を使用すると、使わないときと比べ 3 段分※1シャッタース
Fr
ピードを遅くして撮影できるため、シャッタースピードの選択範囲が広がり、幅広い
領域で手持ち撮影が可能です。(※ 1 CIPA 規格準拠。ただし、FX フォーマット対応
Es
レンズは FX フォーマットデジタル一眼レフ使用時、DX レンズは DX フォーマット
デジタル一眼レフ使用時。ズームレンズは最も望遠側で測定。)
Se
ご注意
●
DX フォーマットのニコンデジタル一眼レフカメラ(D300 シリーズ、D7000 など)
Ru
に装着すると、対角線画角は 8°―4°となり、35mm 判換算では焦点距離約 300mm
―600mm 相当のレンズになります。
Nl
■使用できる機能
It
カメラによって、使用できる機能には制限・制約がありますので、カメラの使用説明書
でもご確認ください。
Ck
Ch
FX フォーマット /DX フォーマットの
Kr
ニコンデジタル一眼レフカメラ、
F6、F5、F100、F80 シリーズ、
ニコン U2、ニコン U
プロネア 600i、プロネア S
F4 シリーズ、F90X シリーズ、
F90 シリーズ、F70D
ニコン Us、F60D、F50D、
F-401 シリーズ
F-801 シリーズ、F-601M × × × × × ○ ○ × ×
F3AF、F-601、F-501、
MF カメラ(F-601M を除く)
※1:PにはAU T O(オート)モード、イメージプログラムモード(シーンモード)を含みます。
※2:Mモードの設 定はありません。
※3:フォーカス作 動設定スイッチが[A F - O N]の場 合、A F(オートフォーカス)動作さ せるに
※4:
カメラ
○:使用可 △:制限あり ×:使用不可 VR:手ブレ補正 AF:オートフォーカス
はシャッターボタン半押し状 態で、フォーカス作動ボタンを 押します。
シャッターボタン半 押し状態 で、メモリーセットボタンやフォーカス作 動ボタンを押しま す。
VR
○○ ○ ○ ○ ○○○○
※2
×○ ○ ○ ○ ○○○○
×○
×× × × × ○○○○
×× × × × ××××
機 能 露出(撮影)モード
フォーカス
メモリー
AF
ロック
※3
○○※4△※3○○××
リコール
レンズ側
P※1SAM
での AF
6
Page 7
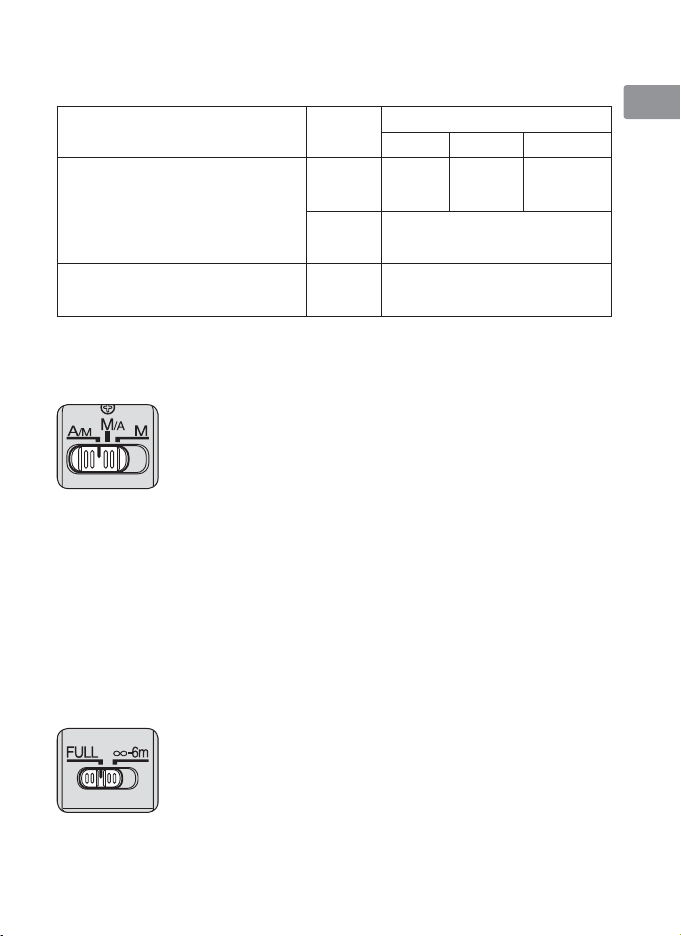
■ピント合わせの方法
ご使用のカメラや撮影目的によって、下表のようなピント合わせが選択できます。
カメラ
FX フォーマット/DX フォーマットの
ニコンデジタル一眼レフカメラ、
F6、F5、F4 シリーズ、F100、
F90X シリーズ、F90 シリーズ、
F80 シリーズ、F70D、ニコン U2、
ニコン U、プロネア 600i、プロネア S
ニコン Us、F60D、F50D、
F-801 シリーズ、F-401 シリーズ、
F-601M
カメラの
フォーカス
モード
AF
MF
AF
MF
AF:オートフォーカス MF:マニュアルフォーカス
A/M(オート優先オートフォーカスモード)と
M/A(マニュアル優先オートフォーカスモード)の使い方
M/A:フォーカスリングを回転させると、瞬時に MF(マニュアルフ
ォーカス)撮影が行えます。
A/M:フォーカスリングを回転させても、瞬時には MF(マニュアル
フォーカス)に切り換わりません。AF(オートフォーカス)を
優先させたい時にご使用ください。
a
フォーカスモード切り換えスイッチを[A/M]または[M/A]にセットします。
b
AF(オートフォーカス)撮影時、カメラのシャッターボタンを半押ししたまま、あ
るいはカメラの AF 作動(AF-ON)ボタンまたはレンズのフォーカス作動ボタン
(フォーカス作動設定スイッチ:AF-ON)を保持したまま、フォーカスリングを手で
回転させると、MF(マニュアルフォーカス)撮影が行えます。
c
カメラのシャッターボタンの半押しやカメラの AF 作動(AF-ON)ボタンまたはレン
ズのフォーカス作動ボタンを再度操作すると AF(オートフォーカス)で撮影が可能
となります。
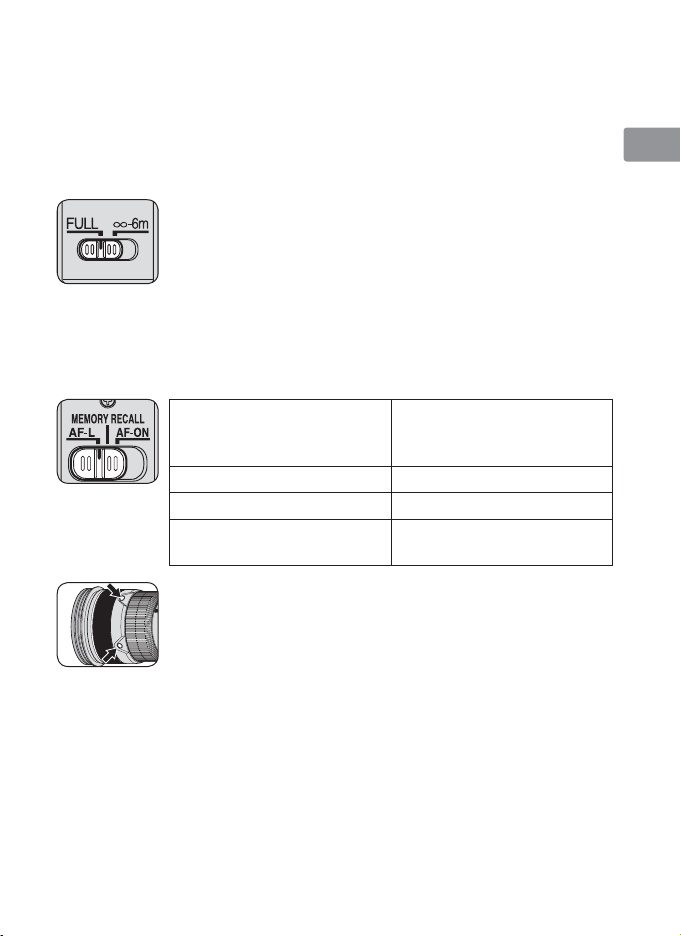
フォーカス制限切り換えスイッチの使い方
AF(オートフォーカス)で撮影する場合に使える機能です。
FULL:撮影距離が 6m 未満を含む場合にセットします。
∞―6m:撮影距離が常に 6m 以上の場合にセットします。ピント合
わせの時間を短縮できます。
レンズのフォーカスモード
A/M M/A M
オート
優先 AF
マニュアル
優先 AF
(フォーカスエイド可)
F-601M を除き
(
フォーカスエイド可
MF
MF
フォーカス
(
エイド可
MF
)
Jp
En
De
)
Fr
Es
Se
Ru
Nl
It
Ck
Ch
Kr
7
Page 8
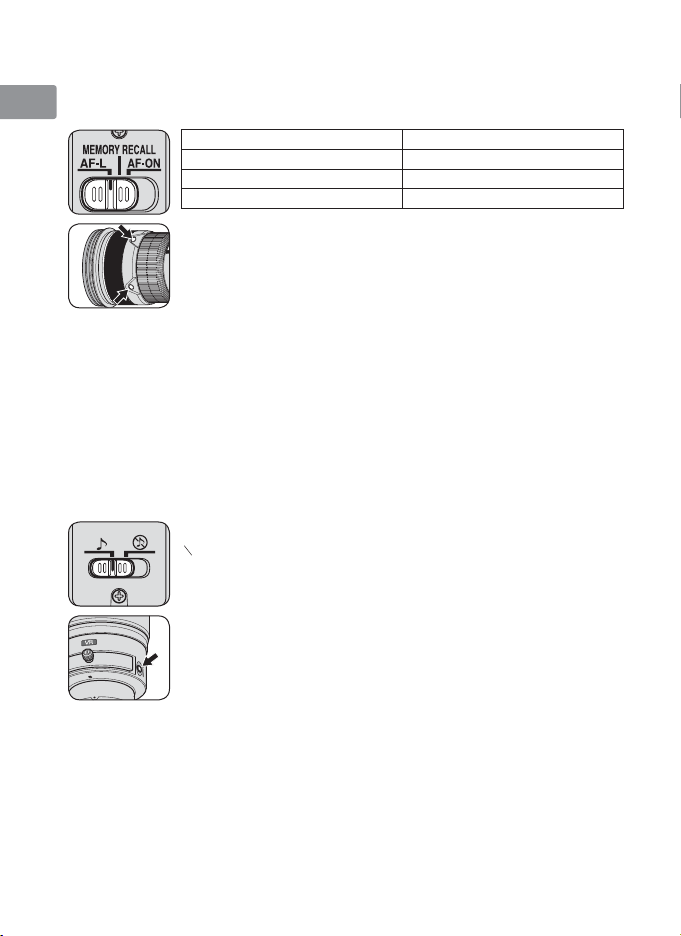
■フォーカス作動設定スイッチとフォーカス作動ボタンの使い方
(対応カメラは、P.6 参照)
Jp
フォーカス作動設定スイッチで、フォーカス作動ボタンの機能を次のように設定できます。
En
De
Fr
Es
Se
フォーカスロック(AF-L)
AF(オートフォーカス)で撮影する場合に使える機能です。
Ru
a
フォーカスモード切り換えスイッチを[A/M]または[M/A]にセットします。
b
Nl
Ck
フォーカス作動設定スイッチを[AF-L]にセットします。
c
AF(オートフォーカス)中にフォーカス作動ボタンを押し、フォーカスをロックし
て撮影します。
It
●
フォーカス作動ボタンを押している間、ピントが固定されます。
●
フォーカスロックはカメラ側でも行えます。
メモリーリコール(MEMORYRECALL)
Ch
Kr
●
ピント位置の記憶は、フォーカスモードやフォーカス作動設定スイッチ等の設定にか
かわらず可能です。
●
カメラの電源を OFF にしたり、レンズをカメラから取り外してもピント位置を記憶
しています。
フォーカス作動設定スイッチ フォーカス作動ボタンの機能
AF-L フォーカスロック
MEMORYRECALL メモリーリコール
AF-ON AF(オートフォーカス)作動
●
フォーカス作動ボタンは、4 個の内いずれかを押すと機能します。
●
フォーカス作動ボタンは、ご希望の位置に改造(回転)できます。
詳しくは、ニコンサービス機関へお問い合わせください。
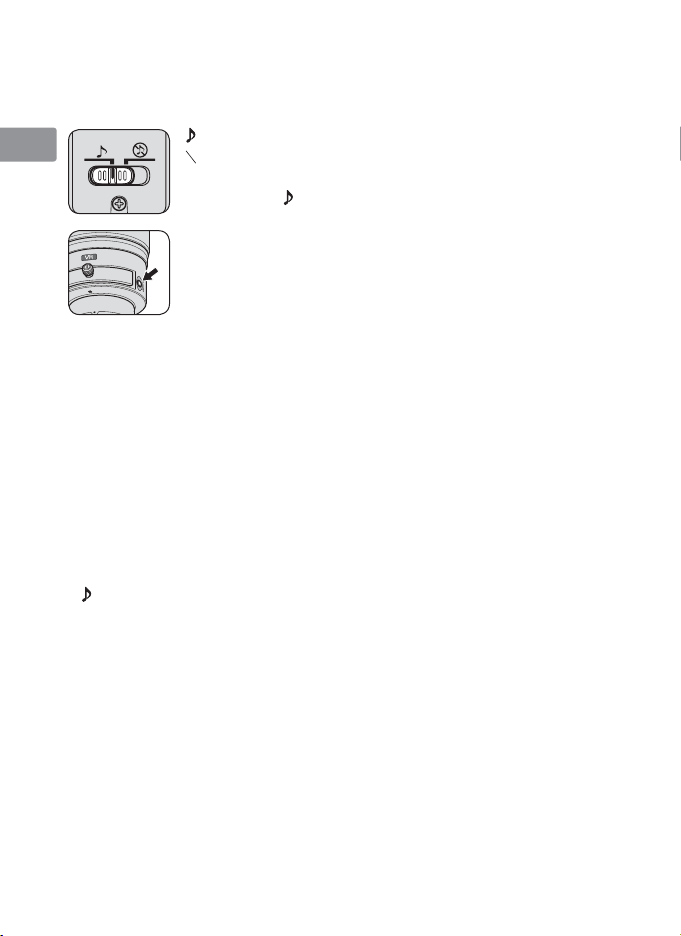
♪:メモリーリコールの操作時に、電子音が鳴ります。
♪
○
:メモリーリコールの操作時に、電子音が鳴りません。
以下の手順は、電子音を[♪]にセットした場合の説明です。
a
被写体にピントを合わせメモリーセットボタンを押し、レンズに
ピント位置を記憶させます。
●
正しく記憶された場合は、ピッと鳴ります。
●
正しく記憶されなかった場合は、ピッピーピーピーと鳴り、距離目
盛が左右に 10 回程度振れます。もう一度ピント位置を記憶させて
ください。
8
Page 9

●
メモリーセット時とは異なる焦点距離でメモリーリコールを行った場合、微妙にピン
ト位置がずれることがあります。特に、メモリーセットした焦点距離よりもテレ側で
メモリーリコールをするときに注意してください。(電子音スイッチを♪に設定してい
る場合は、警告音が鳴ります。)なるべく、メモリーセット時と同じ焦点距離でメモリ
ーリコールを行うことをおすすめします。
a
フォーカス作動設定スイッチを[MEMORYRECALL]にセットします。
b
フォーカス作動ボタンを押し、ピピッと鳴ったら撮影します。
●
シャッターボタンを半押ししていても、フォーカス作動ボタンを押すと記憶させた
ピント位置にセットされます。
●
フォーカス作動ボタンは、シャッターがきれるまで押し続けてください。
●
フォーカス作動ボタンから指を離すと、通常の AF(オートフォーカス)または MF(マ
ニュアルフォーカス)に戻ります。
AF(オートフォーカス)作動(AF-ON)
a
フォーカスモード切り換えスイッチを[A/M]または[M/A]にセットします。
b
フォーカス作動設定スイッチを[AF-ON]にセットします。
c
フォーカス作動ボタンを押してピントを合わせ、撮影します。
●
フォーカス作動ボタンを押している間は AF(オートフォーカス)が作動します。
●
AF(オートフォーカス)作動はカメラ側でも行えます。
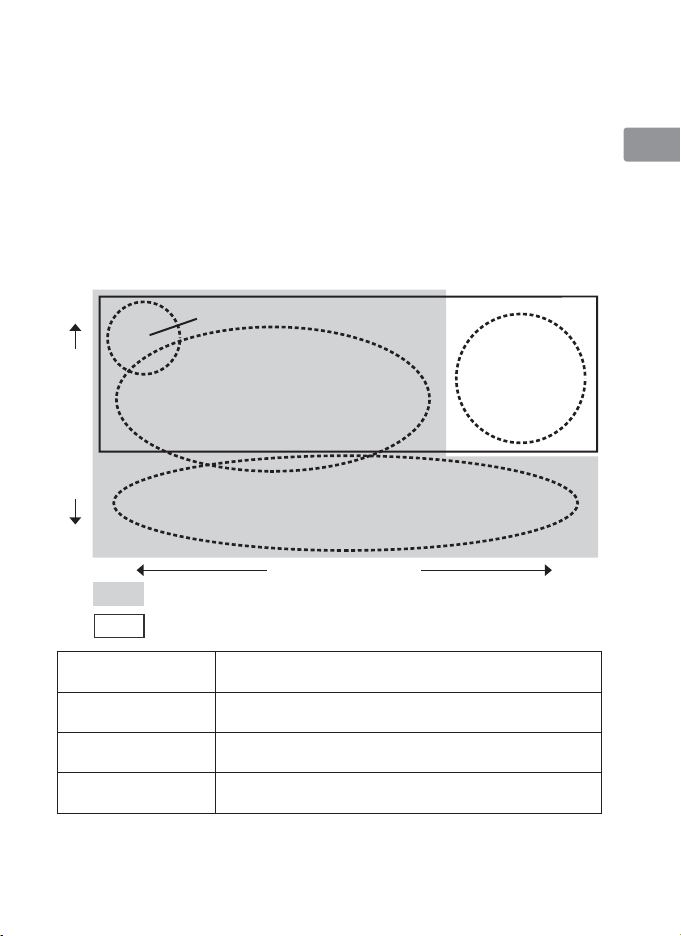
■手ブレ補正機能(VRⅡ)
手ブレ補正機能の概念図
高
三脚使用時のブレ
Jp
En
De
Fr
Es
Se
Ru
Nl
It
Ck
Ch
激しい揺れ
周
波
数
手ブレ
例)乗り物等
での揺れ
流し撮り(パンニング)
低
NORMALモードで対応
手ブレ補正 NORMAL モードまたは ACTIVE モードで対応
流し撮りでの手ブレ補正 NORMAL モードで対応
激しい揺れでの手ブレ補正 ACTIVE モードで対応
三脚使用時のブレ補正 NORMAL モードまたは ACTIVE モードで対応
振 幅
ACTIVEモードで対応
Kr
大小
9
Page 10
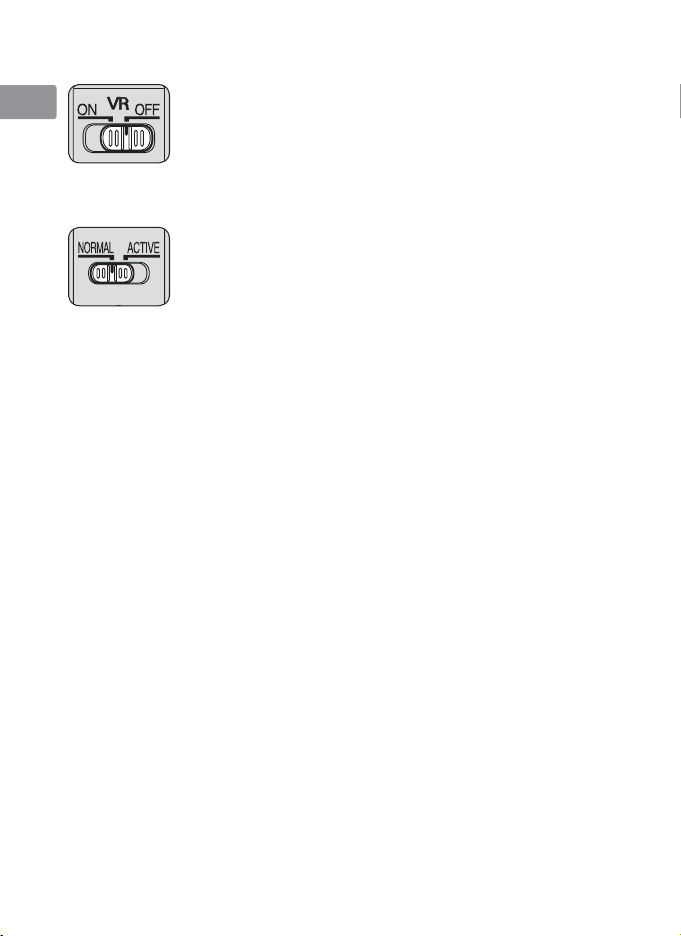
手ブレ補正スイッチの使い方
Jp
En
手ブレ補正モード切り換えスイッチの使い方
De
手ブレ補正スイッチを[ON]にし、手ブレ補正モード切り換えスイッチを設定します。
Fr
Es
Se
手ブレ補正使用時のご注意
Ru
●
手ブレ補正が使用できないカメラ(P.6)では、必ず、手ブレ補正スイッチを[OFF]
にしてください。特にプロネア 600i では、このスイッチを[ON]にしたままにすると、
Nl
電池の消耗が早くなることがありますのでご注意ください。
●
シャッターボタンを半押し後、ファインダー像が安定してから撮影することをおすす
It
めします。
●
手ブレ補正の原理上、シャッターレリーズ後にファインダー像がわずかに動くことが
Ck
ありますが、異常ではありません。
●
流し撮りする場合は、必ず NORMAL モードにしてください。NORMAL モードでは、
Ch
流し撮りなどでカメラの向きを大きく変えた場合、流した方向の手ブレ補正は機能し
ません。例えば、横方向に流し撮りすると、縦方向の手ブレだけが補正されます。
Kr
●
手ブレ補正中にカメラの電源を OFF にしたり、レンズを取り外したりしないでくだ
さい。(その状態でレンズを振るとカタカタ音がすることがありますが、故障ではあり
ません。カメラの電源を再度 ON にすれば、音は消えます。)
●
内蔵フラッシュ搭載のカメラで、内蔵フラッシュ充電中は、手ブレ補正は行いません。
●
三脚撮影時に手ブレ補正スイッチを[ON]にすると、三脚ブレを軽減します。また、
三脚を使っても雲台を固定しないときや一脚を使用する場合は、スイッチを[ON]に
することをおすすめします。ただし、ブレ量が小さい撮影条件下で撮影を行った場合は、
VR の[ON]と[OFF]で効果が逆転する場合があります。その場合は、VR を[OFF]
にしてご使用ください。
ON: シャッターボタンを半押しすると、手ブレを補正します。フ
ァインダー像のブレも補正するため、ピント合わせが容易で、
フレーミングしやすくなります。
OFF: 手ブレを補正しません。
NORMAL:主に、通常の手ブレを補正します。流し撮りでも手ブレ
を補正します。
ACTIVE:乗り物に乗っている等、揺れの激しい条件でのブレから
通常の手ブレまで補正します。このモードでは流し撮り
自動検出は行いません。
■絞り値の設定
絞り値は、カメラ側で設定してください。
10
Page 11
■ズーミングと被写界深度
撮影を行う場合は、ズームリングを回転させ(焦点距離が変化します)構図を決めてから、
ピント合わせを行ってください。プレビュー(絞り込み)機構を持つカメラでは、撮影
前にファインダー内で被写界深度を確認できます。
●
このレンズは IF(ニコン内焦)方式を採用しています。IF 方式は、撮影距離が短くな
るにしたがって焦点距離が短くなります。
●
距離目盛は目安であり、被写体までの距離を保証するものではありません。また、遠
景撮影でも被写界深度などの影響により∞マークに届かない位置でピントが合う場合
があります。
●
詳しい被写界深度は、被写界深度表(P.210)をご覧ください。
■組み込み式回転三脚座の使い方
三脚は、カメラ側ではなくレンズ側の三脚座に取り付けてください。
●
三脚の形状によっては、カメラのグリップを握った状態でカメラを回転した際、三脚
に手がぶつかることがありますので、ご注意ください。
●
三脚座の座部の止めネジを外すことによって、座部を取り外すことができます。詳し
くは、ニコンサービス機関へお問い合わせください。
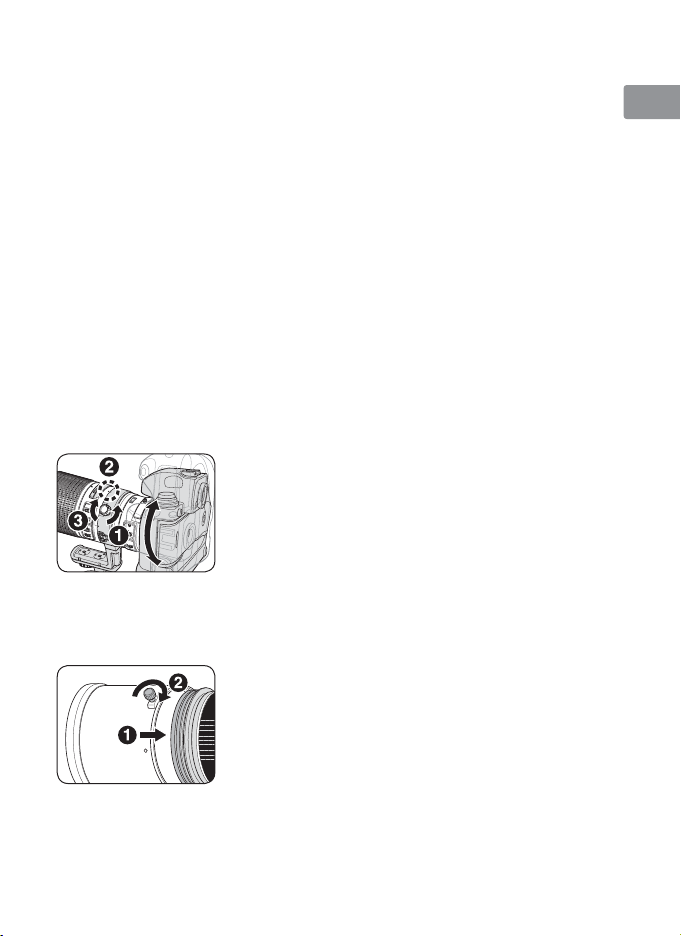
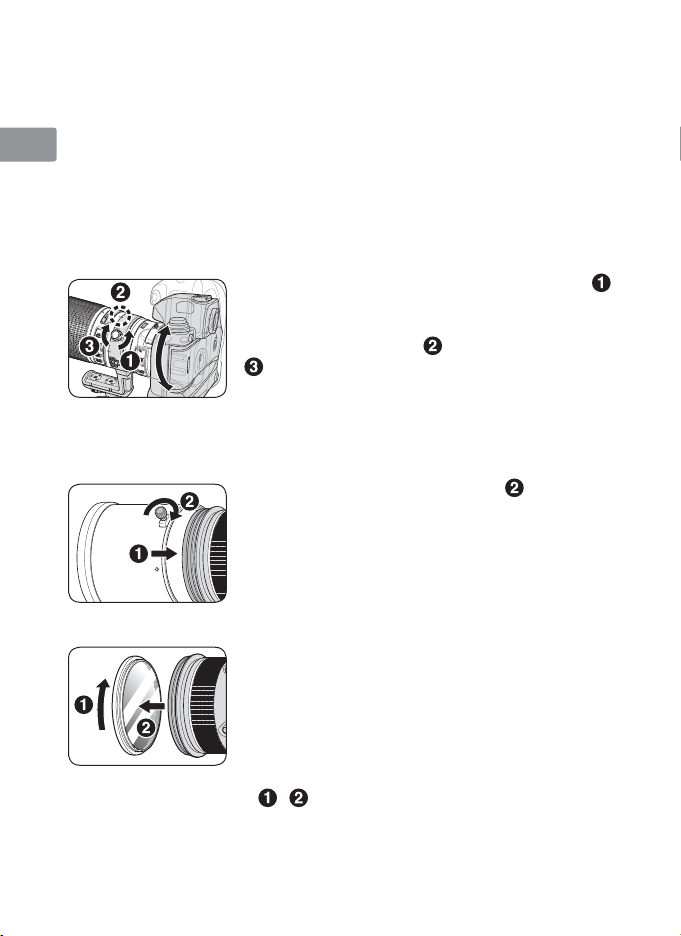
カメラ位置の変更
レンズの三脚座リング止めネジを少し緩め(❶)、カメラ位置
(縦 / 横)に応じてレンズ回転位置指標を合わせ(❷)、三脚
座リング止めネジを締めて固定します(❸)。
■フードの使い方
画像に悪影響を及ぼす光線をカットし、レンズ面の保護にも役立ちます。
取り付け方
●
クランプノブをしっかり締めてください(❷)。
●
フードが正しく取り付けられないと撮影画面にケラレを生
じますのでご注意ください。
●
収納時はフードを逆向きにしてレンズに取り付けられます。
Jp
En
De
Fr
Es
Se
Ru
Nl
It
Ck
Ch
Kr
11
Page 12
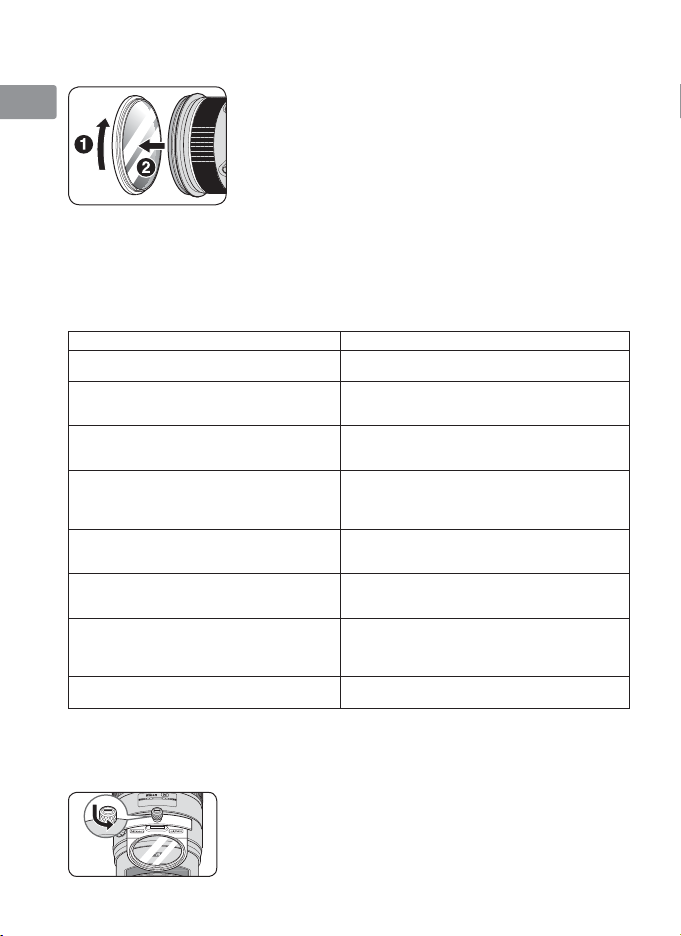
■保護ガラスについて
Jp
En
De
Fr
■カメラの内蔵フラッシュ使用時のご注意
ケラレを防止するために、レンズのフードは取り外して使用してください。
Es
●
このレンズをカメラに取り付けたときのケラレの最新情報は、カメラの使用説明書でご確
認ください 。
Se
カメラ ケラレなく撮影できる焦点距離と撮影距離
Ru
D90、D80、D50
D70 シリーズ
Nl
It
D5300
Ck
D5200、D5100、D5000、D3200、
D3100、D3000、D60、D40 シリーズ
Ch
D3300
Kr
F80 シリーズ
二コン U2、F70D
二コン U、二コン Us、F60D、F50D、
F-401 シリーズ、プロネア 600i、プロネア S
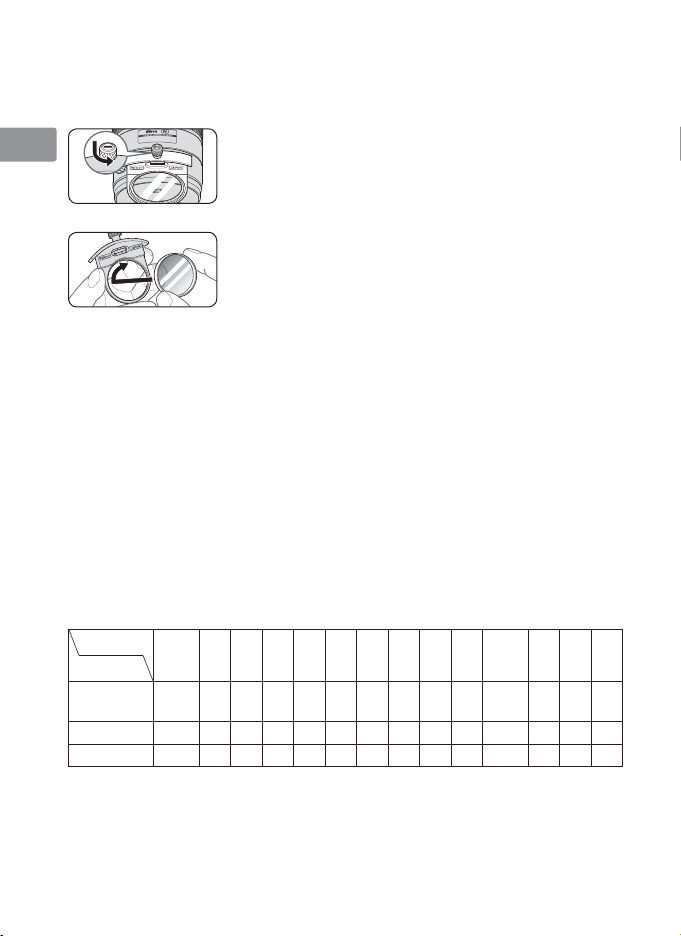
レンズ保護のために、保護ガラスを装着した状態でのご使用をお
すすめします(お買い上げ時は、保護ガラスが装着されています)。
●
画面内に強い光源がある場合は、この保護ガラスを取り外す
ことでゴーストを軽減できることがあります。保護ガラス周
囲のゴム部を回して(❶)、取り外すことができます(❷)。
●
取り外した保護ガラスは、破損防止のために、同梱してある保
護ガラス用専用ケースに入れておくことをおすすめします。
●
焦点距離 200mm では撮影距離 3m 以上
●
焦点距離 250mm 以上は制約なし
●
焦点距離 200mm では撮影距離 4m 以上
●
焦点距離 250mm では撮影距離 2.5m 以上
●
焦点距離 300mm 以上は制約なし
●
焦点距離 200mm では撮影距離 5m 以上
●
焦点距離 250mm では撮影距離 3m 以上
●
焦点距離 300mm 以上は制約なし
●
焦点距離 200mm では撮影距離 5m 以上
●
焦点距離 250mm では撮影距離 3m 以上
●
焦点距離 300mm では撮影距離 2.5m 以上
●
焦点距離 350mm 以上は制約なし
●
焦点距離 200mm では撮影距離 4m 以上
●
焦点距離 250mm では撮影距離 3m 以上
●
焦点距離 300mm では撮影距離 2.5m 以上
●
焦点距離 200mm では撮影距離 3m 以上
●
焦点距離 250/300mm では撮影距離 2.5m 以上
●
焦点距離 350mm 以上は制約なし
●
焦点距離 250mm では撮影距離 5m 以上
●
焦点距離 300mm では撮影距離 4m 以上
●
焦点距離 350mm では撮影距離 3m 以上
●
焦点距離 400mm では制約なし
すべての撮影距離でケラレが発生します
■組み込み式フィルターホルダー
撮影の際は、必ずフィルターを装着してください(お買い上げ時は、NC フィルターが装
着されています)。
a
組み込み式フィルターホルダーつまみを押し込みながら、
まみの白い指標が組み込み式フィルターホルダーと平行
つ
になるよう反時計方向に回します。
b
組み込み式フィルターホルダーを抜き取ります。
12
Page 13

c
装着されているフィルターを外します。
d
52mm ネジ込み式フィルターを、NikonJAPAN の表示
がある面よりねじ込みます。
●
組み込み式フィルターホルダーは、カメラ側または被写体側
のどちらの側に向けて取り付けても、撮影に影響はありません。
組み込み式円偏光フィルター C-PL1L(別売)
●
ガラスなどの非金属面や水面の反射光をカットする場合におすすめします。
●
距離目盛は正常な位置からずれ、最至近がわずかに長くなります。
●
ズーミングすることによってピント位置がずれます。必ずズーミング後にピントを確認
してから撮影してください。
●
メモリーリコール(P.8)を使用する場合は、ピントを記憶させるときから装着してく
ださい。
■ファインダースクリーンとの組み合わせ
スクリーン
カメラ
F6
F5+DP-30 ◎◎
F5+DA-30 ◎◎
ABCE
◎
◎◎ ◎
(−0.5)
構図の決定やピント合わせの目的には
◎ :好適です。
○ :視野の一部が多少見にくくなりますが、撮影結果には全く影響がありません。
:
各カメラに存在しないファインダースクリーンです。
()
:中央部重点測光時の補正値です。F6 カメラの場合、測光値の補正は、カメラの
カスタムメニュー「b6:スクリーン補正」を「BorE 以外」にセットして行います。
B 型および E 型以外を使用する場合は、補正量が 0 でも、「BorE 以外」にセット
してください。F5 カメラの場合は、カスタムセッティング No.18 の設定で測光
値の補正を行います。詳しくはカメラの使用説明書をご覧ください。
空欄:使用不適当です。ただし、M スクリーンの場合、撮影倍率 1/1 倍以上の近接撮影
に用いるため、この限りではありません。
ご注意
●
F5 カメラの場合、マルチパターン測光は、EC-B、E C- E、B、E、J、A、L スクリーン
のみ可能です。
EC-B
EC-E
○
◎◎
○
◎◎
FG1G2G3G4 J K L M P U
◎
(−0.5)
○
◎◎ ◎
○
◎◎ ◎
◎
Jp
En
De
Fr
Es
Se
Ru
Nl
It
Ck
Ch
Kr
13
Page 14

■
レンズのお手入れと取り扱い上のご注意
●
レンズをカメラに装着した状態で、カメラだけを持たないでください。カメラ(マウ
Jp
ント部分)破損の恐れがありますので、必ずレンズも持ってください。
●
フードをレンズに装着した状態で、フードだけを持たないでください。
En
●
CPU 信号接点は汚さないようにご注意ください。
●
レンズマウントゴムリングが破損した場合は、そのまま使用せず販売店またはニコン
De
サービス機関に修理を依頼してください。
●
レンズ面の清掃は、ホコリを拭う程度にしてください。指紋がついたときは、柔らかい
Fr
清潔な木綿の布に無水アルコール(エタノール)または市販のレンズクリーナーを少量
湿らせ、レンズの中心から外周へ渦巻状に、拭きムラ、拭き残りのないように注意して
Es
拭いてください。
●
シンナーやベンジンなどの有機溶剤は絶対に使用しないでください。
Se
●
レンズをケースに入れるときは、必ずレンズキャップと裏ぶたを取り付けてください。
●
レンズを長期間使用しないときは、カビやサビを防ぐために、高温多湿のところを避
Ru
けて風通しのよい場所に保管してください。また、直射日光のあたるところ、ナフタ
リンや樟脳のあるところも避けてください。
Nl
●
レンズを水に濡らすと、部品がサビつくなどして故障の原因となりますのでご注意く
ださい。
It
●
ストーブの前など、高温になるところに置かないでください。極端に温度が高くなると、
外観の一部に使用している強化プラスチックが変形することがあります。
Ck
■付属アクセサリー
Ch
●
かぶせ式レンズキャップ
●
かぶせフード HK-30
Kr
●
組み込み式フィルターホルダー
●
保護ガラス(レンズ本体に装着済み)●保護ガラス用専用ケース
●
ストラップ LN-1
ご注意
●
組み込み式フィルターホルダーは、付属の 52mm ネジ込み式フィルター等を取り付
け、必ず装着して撮影してください。
●
裏ぶた
●
セミソフトケース C L-L 2(専用ケース内装材付き)
●
52mm ネジ込み式 NC フィルター
■別売アクセサリー
●
52mm ネジ込み式フィルター(円偏光フィルターⅡを除く)
●
組み込み式円偏光フィルター C-PL1L
●
AF-S テレコンバーター TC-14E Ⅱ /TC-17E Ⅱ※/TC-20E Ⅲ
(※オートフォーカスが F8対応のカメラに装着した場合を除き、オートフォーカス不可)
※
14
Page 15

■仕 様
型式:
焦点距離: 200−400mm
最大口径比: 1:4
レンズ構成: 17 群 24 枚(ED レンズ 4 枚、ナノクリスタルコート)、
画角: 12°20′−6°10′(35mm 判 一眼レフカメラ、
焦点距離目盛: 200、250、300、350、400mm
撮影距離情報: カメラへの撮影距離情報を出力可能
ズーミング: ズームリングによる回転式
ピント合わせ: IF(ニコン内焦)方式、超音波モーターによるオートフォーカス、
手ブレ補正: ボイスコイルモーター(VCM)によるレンズシフト方式
撮影距離目盛: ∞〜 2m(7ft 併記)
最短撮影距離: 撮像面から 2m(ズーム全域、オートフォーカス時)、
絞り羽根枚数: 9 枚(円形絞り)
絞り方式: 自動絞り
絞りの範囲
測光方式: CPU 連動方式のカメラでは開放測光
フォーカス制限:
切り換えスイッチ
三脚座: 位置指標(90°)付きの 360°回転三脚座リング、三脚座のみ着脱可能
寸法: 約 124mm(最大径)× 365.5mm(バヨネットマウント基準面
質量: 約 3,360g(保護ガラス取り付け時)、
※仕様、外観の一部を、改善のため予告なく変更することがあります。
ニコン F マウント CPU 内蔵 G タイプ、AF-S ズームレンズ
他に着脱可の保護ガラス 1 枚
F X フォーマットのデジタル一眼レフカメラ)
8°−4°(DX フォーマットのデジタル一眼レフカメラ)
9°50′−5°(IX240 カメラ)
マニュアルフォーカス可能
撮像面から 1.95 m(ズーム全域、マニュアルフォーカス時)
: f/4−32
FULL(∞〜 2m)と∞− 6m の 2 段切り換え
からレンズ先端まで)(保護ガラス取り付け時)、
約 124mm(最大径)× 358.5mm(バヨネットマウント基準面
からレンズ先端まで)(保護ガラスなし)
約 3,240g(保護ガラスなし)
Jp
En
De
Fr
Es
Se
Ru
Nl
It
Ck
Ch
Kr
15
Page 16

Notes on Safety Operations
Jp
En
De
Fr
CAUTION
Do not disassemble
Touching the internal parts of the camera or lens could result in injury.
Repairs should be performed only by qualified technicians. Should the
camera or lens break open as the result of a fall or other accident, take
the product to a Nikon-authorized service representative for inspection
after unplugging the product and/or removing the battery.
Es
Turn off immediately in the event of malfunction
Se
Should you notice smoke or an unusual smell coming from the camera
or lens, remove the battery immediately, taking care to avoid burns.
Ru
Continued operation could result in injury.
Nl
After removing or disconnecting the power source, take the product to
a Nikon-authorized service representative for inspection.
It
Do not use the camera or lens in the presence of
Ck
flammable gas
Operating electronic equipment in the presence of flammable gas could
Ch
result in an explosion or fire.
Kr
Do not look at the sun through the lens or viewfinder
Viewing the sun or other strong light sources through the lens or
viewfinder could cause permanent visual impairment.
Keep out of reach of children
Particular care should be taken to prevent infants from putting the
batteries or other small parts into their mouths.
16
Page 17

Observe the following precautions when handling the
camera and lens
• Keep the camera and lens unit dry. Failure to do so could result in fire
or electric shock.
• Do not handle or touch the camera or lens unit with wet hands.
Failure to do so could result in electric shock.
• When shooting with back-lighting, do not point the lens at the sun
or allow sunlight to pass directly down the lens as this may cause the
camera to overheat and possibly cause a fire.
• When the lens will not be used for an extended period of time, attach
both front and rear lens caps and store the lens away from direct
sunlight. Failure to do so could result in a fire, as the lens may focus
sunlight onto a flammable object.
Jp
En
De
Fr
Es
Se
Ru
Nl
It
Ck
Ch
Kr
17
Page 18
Thank you for purchasing the AF-S NIKKOR 200-400mm f/4G ED VRⅡ
lens. Before using this lens, please read these instructions and refer to
Jp
your camera's user's manual.
■ Nomenclature
En
De
Fr
Es
Se
Ru
Nl
It
Ck
1
Ch
Kr
Lens hood (P. 28)
2
Lens hood screw (P. 28)
3
Lens protective glass (attached to
the lens) (P. 28)
4
Rubber grip
5
Focus operation button (Focus Lock/
Memory recall/AF Start) (P. 23)
6
Focus ring (P. 22)
7
Distance scale (P. 27)
8
Distance index line
9
Zoom ring (P. 27)
0
Focal length scale
!
Focal length scale index line
@
Lens rotating position index (P. 28)
#
Tripod collar ring fastening screw
(P. 28)
$
Slip-in filter holder (P. 30)
18
%
Slip-in filter holder knob (P. 30)
^
Memory set button (P. 24)
&
Mounting index
*
Lens mount rubber gasket (P. 31)
(
CPU contacts (P. 31)
)
Built-in rotating tripod collar (P. 28)
q
Strap eyelet
w
Sound monitor switch (P. 24)
e
Focus operation selection switch
(AF-L/MEMORY RECALL/AF-ON)
(P. 23)
r
Focus mode switch (P. 22)
t
Focusing limit switch (P. 23)
y
Vibration reduction ON/OFF switch
(P. 26)
u
Vibration reduction mode switch
(P. 26)
( ): reference page
Page 19
Jp
En
De
Fr
Es
Se
Ru
Nl
It
Ck
Ch
Kr
19
Page 20

■ Major features
• The Nano Crystal Coat deposited on some of the lens elements
ensures that fine, clear images can be reproduced under various
Jp
shooting conditions, from the sunny outdoors to spotlighted interior
scenes.
En
• This lens features AF-L, which locks focus during autofocus, AF-ON,
which activates autofocus, and MEMORY RECALL, which saves and
De
recalls selected focus distances.
• By enabling vibration reduction (VRⅡ), slower shutter speeds
Fr
(3stops*) can be used, thus increasing the range of usable shutter
speeds and zoom positions, particularly when hand-holding the
Es
camera. (*The effects of VR on shutter speed are measured according
to Camera and Imaging Products Association (CIPA) standards;
Se
FX-format lenses are measured using FX-format digital cameras,
DX-format lenses using DX-format cameras. Zoom lenses are
Ru
measured at maximum zoom.)
Important
Nl
• When mounted on Nikon DX format digital SLR cameras, such as the
D300-Series and D7000, the lens’ picture angle becomes 8°-4° and its
It
35mm equivalent focal length is approx. 300-600mm.
■ Usable cameras and available functions
Ck
There may be some restrictions or limitation for available functions.
Refer to camera's user's manual for details.
Ch
Kr
Cameras
Nikon digital SLR (Nikon
FX/DX format) cameras,
F6, F5, F100,
F80-Series/N80-Series*,
F75-Series/N75-Series*,
F65-Series/N65-Series*
Pronea 600i/6i*,
Pronea S*
F4-Series, F90X/N90s*,
F90-Series/N90*,
F70-Series/N70*
VR AF
✓ ✓ ✓ ✓ ✓ ✓✓✓✓
2
—
—
✓*
Function
Focus
Memory
lock
✓ ✓ ✓ ✓ ✓✓✓✓
3
✓
recall
✓*
AF start on
4
the lens
✓*3*
5
Exposure
(shooting)
mode
P*1SAM
✓✓
——
20
Page 21

Exposure
Function
Cameras
Focus
VR AF
F60-Series/N60*,
F55-Series/N55-Series*,
F50-Series/N50*,
F-401x/N5005*,
F-401s/N4004s*,
F-401/N4004*
F-801s/N8008s*,
F-801/N8008*,
F-601
M/N6000*
F3AF, F-601/N6006*,
F-501/N2020**, Nikon
MF cameras (except
F-601
M/N6000*)
✓: Possible —: Not possible VR: Vibration reduction AF: Autofocus
*Sold exclusively in the USA
**Sold exclusively in the USA and Canada
*1: P includes AUTO and Vari-Program System (Scene modes).
*2: Manual (M) is not available.
*3: When the focus operation selection switch is set to AF-ON,
autofocus begins as soon as the focus operation button is pressed
while the shutter-release button pressed halfway.
*4: Press the memory set button or a focus operation button while
pressing the shutter release button halfway.
*5: Possible, with limited restrictions
—— — — —
—— — — —
— — — — — ————
Memory
lock
recall
AF start on
the lens
(shooting)
mode
P*1SAM
✓✓✓✓
✓✓
——
Jp
En
De
Fr
Es
Se
Ru
Nl
It
Ck
Ch
Kr
21
Page 22

■ Focusing
Set your camera’s focus mode according to the chart below:
Jp
En
Nikon digital SLR (Nikon
De
FX/DX format) cameras,
F6, F5, F4-Series, F100,
F90X/N90s*, F90-Series/N90*,
Fr
F80-Series/N80-Series*,
F75-Series/N75-Series*,
Es
F70-Series/N70*,
F65-Series/N65-Series*,
Se
Pronea 600i/6i*, Pronea S
F60-Series/N60*,
Ru
F55-Series/N55-Series*,
F50-Series/N50*,
Nl
F-801s/N8008s*, F-801/N8008*,
F-601
It
F- 401s/N4004s*, F-401/N4004*
Cameras
M/N6000*, F-401x/N5005*,
Ck
Ch
A/M (Autofocus with manual override. AF priority) mode and
M/A (Autofocus with manual override. MF priority) mode
Kr
a
Set the focus mode switch to A/M or M/A.
b
Autofocus can be manually overridden by rotating the focus ring
while pressing the shutter release button halfway, pressing the
AF-ON button on the camera or pressing a focus operation button
(with focus operation set to AF-ON) on the lens.
M/A: Autofocus can be overridden by manually focusing
with the focus ring.
A/M: Autofocus can be overridden by manually focusing
with the focus ring, but focus ring detection
sensitivity is lower than in M/A mode. Use this
mode to avoid canceling the AF setting by
unintentionally moving the focus ring.
Camera
focus
mode
MF
MF
Lens’ focus mode switch
A/M M/A M
Autofocus
with manual
AF
override
(AF priority)
(Electronic rangefinder can be
AF
(Electronic rangefinder can be
*Sold exclusively in the USA
AF: Autofocus MF: Manual focus
Autofocus
with manual
override
(MF priority)
Manual focus
used.)
Manual focus
used, except with the
F-601
M/N6000*.)
Manual focus
(Electronic
rangefinder
can be used.)
22
Page 23
c
Pressing the shutter release button halfway, pressing the AF-ON
button on the camera again or pressing a focus operation button
on the lens again will cancel manual override and return the lens to
autofocus mode.
To limit the range of autofocus
This function is only available with autofocus.
FULL: If the subject is sometimes closer than 6 m
(19.7 ft), set the switch to FULL.
∞–6m: If the subject is always 6 m (19.7 ft) or more
away, set the switch to ∞– 6m to reduce
focusing time.
■ Focus operation selection switch and focus operation
button (See p. 20 for compatible cameras.)
Use the focus operation selection switch to choose a function of the
focus operation buttons.
Position of focus
operation selection
switch
AF-L Focus lock
MEMORY RECALL Memory recall
AF-ON
• Press one of four focus operation buttons to activate
each function.
• The focus operation button positions can be changed
to suit individual user preferences. For more details
on this, contact your nearest Nikon service center or
representative office.
Focus lock (AF-L)
This function is only compatible with autofocus.
a
Set the focus mode switch to A/M or M/A.
b
Set the focus operation selection switch to AF-L.
c
During autofocus mode, focus can be locked by pressing one of the
focus operation buttons.
• Focus remains locked while a focus operation button is pressed and
held down.
Focus operation button
function
AF start (AF-ON) on the
lens
Jp
En
De
Fr
Es
Se
Ru
Nl
It
Ck
Ch
Kr
23
Page 24
• The AF-L function can be engaged either from the camera or from
the lens.
Jp
Memory recall (MEMORY RECALL)
En
De
: The lens beeps when memory recall is operated.
: Memory recall operates without the beep sound.
♪
○
The following operation is with the sound monitor
switch set to
.
Fr
Es
Se
Ru
Nl
• Memory set is possible regardless of the setting of the focus mode or
focus operation selection switch.
It
• The focus distance is saved even when the camera is turned off or the
lens is detached from the camera.
Ck
• When performing memory recall at a focal length setting different
from the original setting, the focused distance may be slightly off.
Ch
Special care should be taken when performing memory recall at
longer focal length settings. When the sound monitor switch is set to
Kr
, it will beep a warning. It is recommended to perform memory recall
as often as possible at the same focal length to which the memory
has been set.
b
Set the focus operation selection switch to MEMORY RECALL.
c
Press a focus operation button. After the lens beeps twice, fully
press the shutter release button to take the picture.
• The saved focus distance is recalled when a focus operation button is
pressed even when the shutter release button is pressed halfway.
• To take pictures at the saved focus distance, hold the focus operation
button down and fully press the shutter release button.
• The lens reverts from memory recall to autofocus or manual focus
when the focus operation button is released.
a
Focus on a subject and press the memory set button
to save the focus distance.
• The lens will beep when the focused distance is
correctly saved.
• When the focus distance is not correctly saved, the
distance scale ring will revolve back and forth some
10 times, while the lens will emit one short and three
long beeps. In this case, repeat procedure to save
focus distance.
24
Page 25
Autofocus (AF) start on the lens (AF-ON)
a
Set the focus mode switch to A/M or M/A.
b
Set the focus operation selection switch to
c
Press a focus operation button to focus on the subject.
• Autofocus is activated while a focus operation button is pressed and
held down.
• The AF-ON function can be engaged either from the camera or from
the lens.
AF-ON.
■ Vibration reduction mode (VRⅡ)
Basic concept of vibration reduction
Jp
En
De
Fr
Es
High
Number of vibrations
Low
Weak
Set the vibration reduction mode switch to NORMAL.
Set the vibration reduction mode switch to ACTIVE.
When taking pictures
When taking panning
shots
When taking pictures
from a moving vehicle
When taking pictures
using a tripod
Camera shake when using a tripod
Strong
camera shake when
Camera shake
Panning shots
Strength of vibrations
Set the vibration reduction mode switch to either
NORMAL or ACTIVE.
Set the vibration reduction mode switch to NORMAL.
Set the vibration reduction mode switch to ACTIVE.
Set the vibration reduction mode switch to either
NORMAL or ACTIVE.
taking pictures
from a moving
vehicle
Strong
Se
Ru
Nl
It
Ck
Ch
Kr
25
Page 26

Setting the vibration reduction ON/OFF switch
Jp
En
De
Setting the vibration reduction mode switch
Fr
Set the vibration reduction ON/OFF switch to
reduction mode with the vibration reduction mode switch.
Es
Se
Ru
Nl
It
Ck
Notes on using vibration reduction
Ch
• If this lens is used with cameras that do not have the vibration
reduction function (p. 20), set the vibration reduction ON/OFF switch
Kr
to OFF. With the Pronea 600i/6i camera, in particular, battery power
may become quickly depleted if this switch is left ON.
• After pressing the shutter-release button halfway, wait until the
image in the viewfinder stabilizes before pressing the shutter-release
button the rest of the way down.
• Due to the characteristics of the vibration reduction mechanism, the
image in the viewfinder may be blurred after the shutter is released.
This is not a malfunction.
• When taking panning shots, be sure to set the vibration reduction
mode switch to NORMAL. If the camera is panned in a wide arc,
compensation for camera shake in the panning direction is not
performed. For example, only the effects of vertical camera shake is
reduced with horizontal panning.
ON: The effects of camera shake are reduced while the
shutter-release button is pressed halfway and also at
the instant the shutter is released. Because vibration
is reduced in the viewfinder, auto/manual focusing
and exact framing of the subject are easier.
OFF: The effects of camera shake are not reduced.
ON and choose a vibration
NORMAL: The vibration reduction mechanism primarily
reduces the effects of camera shake. The
effects of camera shake are also reduced
with horizontal and vertical panning.
ACTIVE: The vibration reduction mechanism reduces
the effects of camera shake, such as that
which occurs when taking pictures from
a moving vehicle, whether it be normal
or more intense camera shake. In this
mode, camera shake is not automatically
distinguished from panning motion.
26
Page 27

• Do not turn the camera off or remove the lens from the camera while
vibration reduction is operating. Failure to observe this note could
result in the lens sounding and feeling as if an internal component is
loose or broken when it is shaken. This is not a malfunction. Turn the
camera on again to correct this.
• With cameras featuring a built-in flash, vibration reduction does not
function while the built-in flash is charging.
• When using a tripod, set the vibration reduction ON/OFF switch to
ON to reduce the effect of camera shake. Nikon recommends the
switch be set to ON when using the camera on an unsecured tripod
head or with a monopod. But when camera shake is very slight, the
vibration reduction function may conversely increase the effect of
camera shake by the movement of the system. In such a case, set the
vibration reduction ON/OFF switch to OFF.
■ Setting the aperture
Use the camera to adjust the aperture setting.
■ Focusing, zooming, and depth of field
Before focusing, rotate the zoom ring to adjust the focal length until
the desired composition is framed. If your camera has a depth-of-field
preview (stop-down) button or lever, depth of field can be previewed
through the camera viewfinder.
• This lens is equipped with the Internal Focusing (IF) system. As the
shooting distance decreases, the focal length also decreases.
• The distance scale does not indicate the precise distance between the
subject and the camera. Values are approximate and should be used
only as a general guide. When shooting distant landscapes, depth of
field may influence operation and the subject may appear in focus at
a position that is closer than infinity.
• For more information, see p. 210.
Jp
En
De
Fr
Es
Se
Ru
Nl
It
Ck
Ch
Kr
27
Page 28
■ Using a built-in rotating tripod collar
When using a tripod, attach it to the lens’ tripod collar instead of the
Jp
camera.
• When holding the camera by its handgrip and rotating the camera
En
with the lens in its tripod collar, your hand may bump into the tripod,
depending on the tripod in use.
De
• It’s possible to detach the tripod collar by removing the tripod collar
lock screw. For details on this procedure, contact your nearest Nikon
service center or representative office.
Fr
Changing the camera position
Es
Loosen the tripod collar ring fastening screw ( ).
Se
Ru
Nl
■ Using the lens hood
Lens hoods minimise stray light and protect the lens.
It
Attaching the hood
Ck
Ch
Kr
Depending on camera position (vertical or
horizontal), turn the lens to an appropriate lens
rotating position index (
).
(
• Fully tighten the lens hood screw ( ).
• If the lens hood is not correctly attached,
vignetting may occur.
• To store the lens hood, attach it in the
reverse position.
) and tighten the screw
■ Lens protective glass
This lens is available with a lens protective glass
attached. Keeping this glass on the lens is
recommended at all times.
• If the picture you want to take includes a bright
light source, removing this glass may reduce
ghost images. To detach the glass, unscrew by
rotating the rubber ring around the glass
, ).
(
• Store the glass in the dedicated lens protective
glass case provided.
28
Page 29

■ The built-in flash and vignetting
To prevent vignetting, do not use the lens hood.
• For the latest information on vignetting with this lens, see the camera
manual.
Cameras
D90, D80, D50
D70-Series
D5300
D5200, D5100, D5000, D3200,
D3100, D3000, D60, D40-Series
D3300
F80-Series/N80-Series*
F75-Series/N75-Series*,
F70-Series/N70*
F65-Series/N65-Series*,
F60-Series/N60*,
F55-Series/N55-Series*,
F50-Series/N50*, F-401/N4004*,
F-401x/N5005*, F-401s/N4004s*,
Pronea 600i/6i*, Pronea S
Supported focal length/Shooting
distance
• 200mm/3 m (9.8 ft) or greater
• 250mm or longer/No restriction
• 200mm/4 m (13.1 ft) or greater
• 250mm/2.5 m (8.2 ft) or greater
• 300mm or longer/No restriction
• 200mm/5 m (16.4 ft) or greater
• 250mm/3 m (9.8 ft) or greater
• 300mm or longer/No restriction
• 200mm/5 m (16.4 ft) or greater
• 250mm/3 m (9.8 ft) or greater
• 300mm/2.5 m (8.2 ft) or greater
• 350mm or longer/No restriction
• 200mm/4 m (13.1 ft) or greater
• 250mm/3 m (9.8 ft) or greater
• 300mm/2.5 m (8.2 ft) or greater
• 200mm/3 m (9.8 ft) or greater
• 250mm or 300mm/2.5 m (8.2 ft)
or greater
• 350mm or longer/No restriction
• 250mm/5 m (16.4 ft) or greater
• 300mm/4 m (13.1 ft) or greater
• 350mm/3 m (9.8 ft) or greater
• 400mm/No restriction
Vignetting occurs at any shooting
distance.
*Sold exclusively in the USA
Jp
En
De
Fr
Es
Se
Ru
Nl
It
Ck
Ch
Kr
29
Page 30
■ Slip-in filter holder
Always use a (52mm screw-on) filter. A 52mm Screw-on NC Filter is
Jp
attached to the filter holder when shipped from the factory.
En
De
Fr
Es
Se
Slip-in Circular Polarizing Filter C-PL1L (optional)
Ru
• Blocks reflections from nonmetallic surfaces such as glass and water.
• When a Slip-in Circular Polarizing Filter C-PL1L is attached, the focus
Nl
distance is different from when a 52mm screw-on filter is attached.
The distance scale is shifted from the correct position. The closest
It
focused distance is extended slightly.
• The memory set position may change slightly when using focus
Ck
preset.
• Attach the C-PL1L filter before using the memory set function.
Ch
■ Recommended focusing screens
Various interchangeable focusing screens are available for certain
Kr
Nikon SLR cameras to suit any picture-taking situation. The ones
recommended for use with this lens are:
Screen
Camera
F6
F5+DP-30
F5+DA-30
: Excellent focusing
◎
: Acceptable focusing
○
Slight vignetting or moiré patterns appear in the viewfinder, but not on
the film.
—
: Not available
◎
(–0.5)
◎◎○◎◎
◎ ◎○◎◎
a Press down on the slip-in filter holder knob, and
turn counterclockwise until the white line on the
knob is at a right angle to the axis of the lens.
b Pull the slip-in filter holder from the lens body
c Detach the attached filter from the filter holder.
d Screw a filter onto the side of the filter holder
marked with the words “Nikon” and “JAPAN”.
• The slip-in filter holder can be attached with the
“Nikon” and “JAPAN” facing either the lens or
camera side without any effect on your pictures.
G1
F
G4 J K L M P U
G2
G3
————
—
—
◎
—
(–0.5)
○◎—◎
○◎—◎
—
EC-B
◎
ABCE
◎
EC-E
◎
30
—
—
—
◎
◎
◎
Page 31

( ) : Indicates degree of exposure compensation needed (center-
weighted metering only). For F6 cameras, compensate by selecting
“Other screen“ in Custom Setting “b6: Screen comp.“ and setting
the EV level to -2.0 to +2.0 in 0.5 EV steps. When using screens
other than type B or E, “Other screen“ must be selected even
when the required compensation value is “0“ (no compensation
required). For F5 cameras, compensate using Custom Setting #18 on
the camera body. See user’s manual of the camera body for more
details.
Blank box means not applicable. Since type M screen can be used for
both macro photography at a magnification ratio of 1:1 or above and for
photomicrography, it has different applications than other screens.
Important
• For F5 cameras, only EC-B, EC-E, B, E, J, A, L focusing screens are
usable in Matrix Metering.
■ Lens care
•
Be careful not to hold the camera body when the lens is attached, as
this may cause damage to the camera (lens mount). Be sure to hold
both the lens and camera when carrying.
• When the lens is mounted on a camera, do not pick up or hold the
camera and lens by the lens hood.
• Be careful not to allow the CPU contacts to become dirty or
damaged.
• If the lens mount rubber gasket is damaged, be sure to visit the
nearest Nikon-authorized service representative for repair.
• Clean lens surfaces with a blower brush. To remove dirt and smudges,
use a soft, clean cotton cloth or lens tissue moistened with ethanol
(alcohol) or lens cleaner. Wipe in a circular motion from the center to
outer edge, taking care not to leave traces or touch other parts of the
lens.
• Never use organic solvent such as thinner or benzene to clean the
lens.
• When storing the lens in its case, attach both the front and rear lens
caps.
• When the lens will not be used for an extended period of time, store
it in a cool, dry place to prevent mold and rust. Be sure to store the
lens away from direct sunlight or chemicals such as camphor or
naphthalene.
Jp
En
De
Fr
Es
Se
Ru
Nl
It
Ck
Ch
Kr
31
Page 32

• Do not get water on the lens or drop it in water as this will cause it to
rust and malfunction.
Jp
• Reinforced plastic is used for certain parts of the lens. To avoid
damage, never leave the lens in an excessively hot place.
En
■ Standard accessories
• Slip-on front lens cap
De
• Rear Lens Cap
• Lens Hood HK-30
Fr
• Semi-soft Case CL-L2 (with dedicated interior cushioning material)
• Dedicated slip-in filter holder
Es
• 52mm Screw-on NC Filter
• Dedicated lens protective glass (attached to the lens)
Se
• Dedicated lens protective glass case
• Strap LN-1
Ru
Important
• The slip-in filter holder, with a 52mm screw-on filter attached, should
Nl
be inserted in the lens at all times.
■ Optional accessories
It
• 52mm screw-on filters (except circular polarizing filterⅡ)
• Slip-in Circular Polarizing Filter C-PL1L
Ck
• AF-S Teleconverters TC-14EⅡ/TC-17EⅡ*/TC-20EⅢ*
(*Autofocus is available only with cameras that offer f/8 support.)
Ch
■ Specifications
Kr
Type of lens: G-type AF-S Zoom-NIKKOR lens with built-in
Focal length:
Maximum
aperture:
Lens construction: 24 elements in 17 groups (4 ED and some Nano
Picture angle:
Focal length scale: 200, 250, 300, 350, 400mm
CPU and Nikon bayonet mount
200-400mm
f/4
Crystal Coat-deposited lens elements), as well as
1 detachable protective glass
12°20´-6°10´ with 35mm (135) format Nikon
film SLR cameras and Nikon FX format digital
SLR cameras
8°-4° with Nikon DX format digital SLR cameras
9°50´-5° with IX240 system cameras
32
Page 33

Distance
information:
Zoom control:
Focusing:
Vibration
reduction:
Shooting distance
scale:
Closest focusing
distance:
No. of diaphragm
blades:
Diaphragm: Fully automatic
Aperture range:
Exposure
measurement:
Focusing limit
switch:
Tripod collar: Rotatable through 360°, lens rotating position
Dimensions:
Weight: Approx. 3,360 g (7.4 lbs) with lens protective
Specifications and designs are subject to change without any notice or
obligation on the part of the manufacturer.
Output to camera
Manually via separate zoom ring
Nikon Internal Focusing (IF) system, autofocus
using a Silent Wave Motor; manually via
separate focus ring
Lens-shift method using voice coil motors
(VCMs)
Graduated in meters and feet from 2 m (7 ft) to
infinity (∞)
2 m (6.6 ft) with autofocus, from focal plane at
all zoom positions
1.95 m (6.4ft) with manual focus, from focal
plane at all zoom positions
9 pcs. (rounded)
f/4 to f/32
Via full-aperture method with cameras with
CPU interface system
Provided; two ranges available: FULL (∞–2 m),
or ∞–6 m
index at 90°, only tripod collar detachable
Approx. 124 mm dia. x 365.5 mm (extension
from the camera’s lens-mount flange with lens
protective glass attached)
Approx. 124 mm dia. x 358.5 mm (extension
from the camera’s lens-mount flange without
lens protective glass)
glass
Approx. 3,240 g (7.1 lbs) without lens protective
glass
Jp
En
De
Fr
Es
Se
Ru
Nl
It
Ck
Ch
Kr
33
Page 34

Hinweise für sicheren Betrieb
Jp
En
De
Fr
Es
Se
Ru
Nl
Ck
Ch
Kr
ACHTUNG
Keinesfalls zerlegen.
Beim Berühren der Innenteile von Kamera oder Objektiv droht
Verletzungsgefahr. Überlassen Sie Reparaturen unbedingt ausschließlich
qualifizierten Technikern. Kommt es durch einen heftigen Stoß (z.B. Fall auf den
Boden) zu einem Bruch von Kamera oder Objektiv, so trennen Sie zunächst das
Produkt vom Stromnetz bzw. entnehmen die Batterie(n) und geben es dann an
eine autorisierte Nikon-Servicestelle zur Überprüfung ab.
Bei einer Störung sofort die Stromversorgung ausschalten.
Bei Entwicklung von Rauch oder ungewöhnlichem Geruch durch Kamera oder
Objektiv entnehmen Sie sofort die Batterie(n); dabei vorsichtig vorgehen,
denn es besteht Verbrennungsgefahr. Bei einem Weiterbetrieb unter diesen
Umständen droht Verletzungsgefahr.
Nach dem Abtrennen von der Stromversorgung geben Sie das Gerät an eine
autorisierte Nikon-Servicestelle zur Überprüfung ab.
It
Kamera oder Objektiv keinesfalls bei Vorhandensein von
brennbarem Gas einsetzen.
Wird elektronisches Gerät bei brennbarem Gas betrieben, so droht u.U.
Explosions- oder Brandgefahr.
Keinesfalls durch Objektiv oder Sucher in die Sonne blicken.
Beim Betrachten der Sonne oder anderer starker Lichtquellen durch Objektiv
oder Sucher droht eine permanente Schädigung des Sehvermögens.
Dem Zugriff von Kindern entziehen.
Es ist unbedingt dafür zu sorgen, dass Kleinkinder keine Batterien oder andere
Kleinteile in den Mund nehmen können.
34
Page 35

Beim Umgang mit Kamera und Objektiv unbedingt die
folgenden Vorsichtmaßnahmen beachten:
• Schützen Sie die Kamera und das Objektiv vor Feuchtigkeit. Andernfalls droht
Brand- oder Stromschlaggefahr.
• Handhaben oder berühren Sie die Kamera bzw. das Objektiv keinesfalls mit
nassen Händen. Andernfalls droht Stromschlaggefahr.
• Bei Gegenlichtaufnahmen nicht das Objektiv gegen die Sonne richten oder
das Sonnenlicht direkt durch das Objektiv eintreten lassen. Dies könnte eine
Überhitzung der Kamera verursachen und ein Brand könnte die Folge sein.
• Vor einem längeren Nichtgebrauch des Objektivs bringen Sie den vorderen
und hinteren Deckel an und bewahren das Objektiv geschützt vor direkter
Sonnenlichteinwirkung auf. Andernfalls droht Brandgefahr wegen möglicher
Fokussierung von Sonnenlicht durch das Objektiv auf brennbare Gegenstände.
Jp
En
De
Fr
Es
Se
Ru
Nl
It
Ck
Ch
Kr
35
Page 36

Wir danken Ihnen für das Vertrauen, das Sie Nikon mit dem Kauf des
AF-S NIKKOR 200-400mm 1:4G ED VRⅡ entgegenbringen. Machen
Sie sich bitte vor dem Gebrauch dieses Objektivs mit dem Inhalt dieser
Jp
Bedienungsanleitung und dem Benutzerhandbuch Ihrer Kamera vertraut.
En
Nomenklatur
De
Fr
Es
Se
Ru
Nl
It
Ck
1 Gegenlichtblende (S. 43)
Ch
2 Halteschraube der Gegenlichtblende
Kr
(S. 43)
3 Objektiv-Schutzscheibe (am Objektiv
angebracht) (S. 44)
4 Gummigriff
5 Fokus-Betriebstaste (Fokussperre/
Speicheraufruf/AF Start) (S. 40)
6 Entfernungseinstellring (S. 39)
7 Entfernungsskala (S. 43)
8 Entfernungsindexlinie
9 Zoomring (S. 43)
0 Brennweitenskala
! Brennweitenskala-Indexlinie
@
Positionsindex für Objektivdrehung (S. 43)
# Stativanschlussring-
Befestigungsschraube (S. 43)
$ Einsetzbarer Filterhalter (S. 44)
36
% Knopf für einsetzbaren Filterhalter
(S. 44)
^ Speichertaste (S. 40)
& Montagemarkierung
* Dichtungsmanschette (S. 46)
( CPU-Kontakte (S. 46)
) Eingebauter Stativanschluss (S. 43)
q Ösen für den Schulterriemen
w Ton-Monitorschalter (S. 40)
e Fokus-Betriebswahlschalter (AF-L/
MEMORY RECALL/AF-ON) (S. 40)
r Fokussierschalter (S. 39)
t Fokussier-Begrenzungsschalter
(S. 34)
y Bildstabilisator-Schalter ON/OFF
(S. 42)
u Bildstabilisatorschalter (VR) (S. 42)
( ): Seitennummer
Page 37

Jp
En
De
Fr
Es
Se
Ru
Nl
It
Ck
Ch
Kr
37
Page 38

Die wichtigsten Merkmale
• Die Nanokristallvergütung einiger Linsen sorgt für klare Bilder in den
unterschiedlichsten Aufnahmesituationen, von Außenaufnahmen bei hellem
Jp
Sonnenschein bis hin zu Innenaufnahmen bei grellem Scheinwerferlicht.
• Dieses Objektiv verfügt über die Funktionen AF-L zur Fokussperre im
En
Autofokusbetrieb, AF-ON zur Aktivierung des Autofokus und MEMORY
RECALL zum Speichern und erneuten Aufrufen ausgewählter Brennweiten.
• Bei eingeschaltetem Bildstabilisator (VR
De
(3 Stufen*) verwendet werden. Auf diese Weise kann mit längeren
Belichtungszeiten fotografiert werden, insbesondere bei Freihandaufnahmen
Fr
mit längeren Brennweiten. (*Die Wirkung des Bildstabilisators (VR) auf
die Belichtungszeit wird gemäß CIPA-Standards ermittelt (Camera and
Imaging Products Association); FX-Objektive werden an FX-Format-Kameras
Es
gemessen, DX-Objektive an DX-Format-Kameras. Zoomobjektive werden bei
der längsten Brennweiteneinstellung gemessen.)
Se
Wichtige Hinweise
• Bei Verwendung des Objektivs an einer digitalen Nikon-Spiegelreflexkamera
Ru
mit DX-Format, wie der D300-Serie oder der D7000 beträgt der Bildwinkel
8° bis 4° und der Brennweitenbereich entspricht 300-600mm beim
Nl
Kleinbildformat.
Verwendbare Kameras und verfügbare Funktionen
It
Möglicherweise gibt es hinsichtlich der verfügbaren Funktionen Einschränkungen.
Informationen hierzu finden Sie im Benutzerhandbuch Ihrer Kamera.
Ck
Ch
Kr
Nikon Digital-SLR-Kameras (Nikon
FX/DX-Format), F6, F5, F100,
F80-Serie, F75-Serie, F65-Serie
Pronea 600i, Pronea S*
F4-Serie, F90X, F90-Serie, F70-Serie
F60-Serie, F55-Serie, F50-Serie,
F-401x, F-401s, F-401
F-801s, F-801, F-601
F3AF, F-601, F-501,
Nikon MF Kameras (außer F-601
*1 : P schließt die Automatik (AUTO) und Motivprogramme mit ein.
*2 : Manuelle Belichtungssteuerung (M) nicht möglich.
*3 : Befindet sich der Fokus-Betriebswahlschalter in Stellung AF-ON, so wird der Autofokus
aktiviert, sobald bei angetipptem Auslöser die Fokus-Betriebstaste gedrückt wird.
*4 : Drücken Sie bei angetipptem Auslöser die Speichertaste oder eine Fokus-Betriebstaste.
*5 : Möglich mit bestimmen Einschränkungen
38
Kameras
2
M
M)
: Möglich —: Nicht möglich VR: Bildstabilisator AF: Autofokus
Ⅱ) können längere Belichtungszeiten
AF-Start
am
Objektiv
*
*
3
5
Belichtungssteuerung
(Aufnahmebereitschaft)
P
Funktion
Fokus-
3
sperre
Speicher-
aufruf
4
*
VR AF
—
—
*
—— — — —
—— — — —
— — — — — ————
*1
SAM
——
——
Page 39

Fokussierung
Stellen Sie den Fokusmodus Ihrer Kamera entsprechend der nachstehenden
Tabelle ein.
Kameras
Nikon Digital-SLR-Kameras (Nikon
FX/DX-Format), F6, F5, F4-Serie,
F100, F90X, F90-Serie, F80-Serie,
F75-Serie, F70-Serie, F65-Serie,
Pronea 600i, Pronea S
F60-Serie, F55-Serie, F50-Serie,
F-801s, F-801, F-601
F-401s, F-401
A/M-Modus (Autofokus mit manueller Einstellmöglichkeit bei
Priorität des Autofokus) und M/A-Modus (Autofokus mit manueller
Einstellmöglichkeit bei Priorität der manuellen Einstellung)
a
Stellen Sie den Fokussierschalter auf A/M oder M/A ein.
b
Der Autofokus wird durch Drehen des Entfernungseinstellrings
bei angetipptem Auslöser, durch Drücken der AF-ON-Taste an der
Kamera oder die Betätigung einer Fokus-Betriebstaste (bei FokusBetriebswahlschalterstellung AF-ON) am Objektiv außer Kraft gesetzt.
c
Durch erneutes Drücken der AF-ON-Taste an der Kamera bei angetipptem
Auslöser oder erneute Betätigung einer Fokus-Betriebstaste am Objektiv wird
der manuelle Betrieb aufgehoben und der Autofokusmodus des Objektivs
wiederhergestellt.
Begrenzung des Autofokusbereichs
Diese Funktion ist nur bei Kameras mit Autofokus verfügbar.
M, F-401x,
M/A: Der Autofokus wird durch manuelles Fokussieren mit
A/M: Der Autofokus wird durch manuelles Fokussieren
FULL: Wählen Sie FULL, wenn Ihr Motiv möglicherweise
∞–6m: Ist das Motiv immer 6 m oder weiter entfernt, stellen
Fokussteuerung
(Kamera)
AF
MF
AF
MF
dem Einstellring außer Kraft gesetzt.
mit dem Entfernungseinstellring außer Kraft gesetzt,
die Empfindlichkeit bei der Einstellringerkennung ist
jedoch wesentlich geringer als in der Betriebsart M/A.
Verwenden Sie diesen Modus, wenn Sie darauf achten
müssen, die AF-Einstellung nicht versehentlich durch
Berühren des Entfernungseinstellring zu ändern.
näher als 6 m sein könnte.
Sie den Schalter auf ∞ –6m, um die Fokussierzeit zu
verkürzen.
Fokussteuerung (Objektiv)
A/M M/A M
Autofokus
mit manueller
Einstellmöglichkeit
bei Priorität des
Autofokus
(Elektronische Einstellhilfe verfügbar.)
(Elektronische Einstellhilfe verfügbar,
AF: Autofokus MF: Manuelle Fokussierung
Autofokus
mit manueller
Einstellmöglichkeit
bei Priorität
der manuellen
Einstellung
Manueller Fokus
Manueller Fokus
außer bei F-601M.)
Manueller Fokus
(Elektronische
Einstellhilfe
verfügbar.)
Jp
En
De
Fr
Es
Se
Ru
Nl
It
Ck
Ch
Kr
39
Page 40

Fokus-Betriebswahlschalter und Fokus-Betriebstaste
(Eine Liste kompatibler Kameras finden Sie auf S. 38.)
Wählen Sie mit Hilfe des Fokus-Betriebswahlschalters eine Funktion der Fokus-
Jp
Betriebstasten.
En
De
Fr
Es
Se
Ru
Fokussperre (AF-L)
Diese Funktion ist nur bei Kameras mit Autofokus verfügbar.
Nl
a
Stellen Sie den Fokussierschalter auf A/M oder M/A ein.
b
Stellen Sie den Fokus-Betriebswahlschalter auf AF-L ein.
It
c
Im Autofokus-Modus kann die Fokussperre durch Drücken einer der Fokus-
Betriebstasten aktiviert werden.
• Die Fokussperre bleibt aktiv, solange eine der Fokus-Betriebstasten gedrückt
Ck
gehalten wird.
• Die AF-L-Funktion kann entweder über die Kamera oder das Objektiv aktiviert
Ch
werden.
Speicheraufruf (MEMORY RECALL)
Kr
• Bei korrekter Speicherung der Brennweite gibt das Objektiv
der Entfernungseinstellring ca. 10-mal hin- und her, während das Objektiv
einen kurzen und drei lange Pieptöne von sich gibt. Wiederholen Sie in diesem
Fall den Vorgang, um die Brennweite zu speichern.
• Die Brennweitenspeicherung ist unabhängig von der Einstellung des FokusModus oder des Fokus-Betriebswahlschalters möglich.
• Die Brennweite wird auch dann gespeichert, wenn die Kamera ausgeschaltet
oder das Objektiv nicht auf der Kamera angebracht ist.
FokusBetriebswahlschalterposition
AF-L Fokussperre
MEMORY RECALL Speicheraufruf
AF-ON AF-Start (AF-ON) am Objektiv
• Drücken Sie eine der vier Fokus-Betriebstasten, um die
einzelnen Funktionen zu aktivieren.
• Die Fokus-Betriebstastenpositionen können nach den
Vorlieben des Benutzers individuell eingestellt werden.
Weitere Informationen hierzu erhalten Sie bei der NikonServicestelle oder dem Nikon-Vertreter in Ihrer Nähe.
♪: Bei Betätigung des Speicheraufrufs gibt das Objektiv einen
Piepton von sich.
♪
: Während des Speicheraufrufs ertönt kein Piepton.
○
Für das nachfolgende Beispiel muss der Ton-Monitorschalter
eingestellt sein.
auf
a
Fokussieren Sie ein Motiv und drücken Sie die Speichertaste,
um die Brennweite zu speichern.
einen Piepton von sich.
• Wurde die Brennweite nicht korrekt gespeichert, dreht sich
40
FokusBetriebstastenfunktion
Page 41

• Bei Speicheraufruf mit einer anderen Brennweiteneinstellung als der
Stärke der Vibrationen
Stark
Schwach
Einstellung des VR-Schalters
auf NORMAL
Kameraschwenks
Kamera-Verwacklung
Einstellung des VR-Schalters
auf ACTIVE
Frequenz der Vibrationen
Niedrig
Hoch
Starke
Kamera-Verwacklung
bei Aufnahmen aus
einem fahrenden
Fahrzeug
Bei normalen Aufnahmen
Bei Schwenkaufnahmen
Bei Aufnahmen aus einem
Fahrzeug in Bewegung
Bei Stativaufnahmen
Den VR-Schalter auf NORMAL oder ACTIVE stellen.
Den VR-Schalter auf NORMAL stellen.
Den VR-Schalter auf ACTIVE stellen.
Den VR-Schalter auf NORMAL oder ACTIVE stellen.
Kamera-Verwacklung bei Verwendung eines Stativs
ursprünglichen Einstellung kann der fokussierte Abstand geringfügig abweichen.
Bei Durchführung eines Speicheraufrufs mit größeren Brennweiteneinstellungen ist
besondere Vorsicht geboten. Wenn der Ton-Monitorschalter für
ertönt ein Warnton. Es wird empfohlen, den Speicheraufruf so oft wie möglich mit
der gleichen Brennweite durchzuführen, auf die der Speicher eingestellt wurde.
b
Stellen Sie den Fokus-Betriebswahlschalter auf MEMORY RECALL ein.
c
Drücken Sie eine Fokus-Betriebstaste. Drücken Sie, nachdem das Objektiv zwei
Pieptöne von sich gegeben hat, den Auslöser, um die Aufnahme zu machen.
• Die gespeicherte Brennweite wird selbst bei angetipptem Auslöser bei
Betätigung einer Fokus-Betriebstaste aufgerufen.
• Um Fotos mit der gespeicherten Brennweite zu machen, halten Sie die FokusBetriebstaste gedrückt und betätigen Sie den Auslöser.
• Wenn die Fokus-Betriebstaste losgelassen wird, kehrt das Objektiv
vom Speicherabrufmodus in den Autofokusmodus oder den manuellen
Fokussiermodus zurück.
Aktivierung des Autofokus (AF) am Objektiv (AF-ON)
a
Stellen Sie den Fokussierschalter auf A/M oder M/A ein.
b
Stellen Sie den Fokus-Betriebswahlschalter auf AF-ON ein.
c
Betätigen Sie eine Fokus-Betriebstaste, um auf das Motiv scharfzustellen.
• Der Autofokus ist aktiviert, wenn eine Fokus-Betriebstaste gedrückt gehalten wird.
• Die AF-ON-Funktion kann sowohl an der Kamera als auch am Objektiv
eingeschaltet werden.
eingestellt ist,
Bildstabilisator (VRⅡ)
Grundlegende Funktionsweise des Bildstabilisators
Jp
En
De
Fr
Es
Se
Ru
Nl
It
Ck
Ch
Kr
41
Page 42

Einstellen des Bildstabilisator-Schalter ON/OFF
ON:
Der Effekt von Kamera-Verwacklungen wird bei Betätigung
Jp
En
De
Stellungen des Bildstabilisatorschalters (VR)
Stellen Sie den Bildstabilisator-Schalter ON /OFF auf ON ein und wählen Sie mit Hilfe des
Fr
Bildstabilisatorschalters einen Bildstabilisatormodus.
Es
Se
Ru
Nl
Hinweise zur Verwendung des Bildstabilisators
•
Wird dieses Objektiv bei Kameras verwendet, die nicht mit dem Bildstabilisator
It
kompatible sind (S. 38), ist die Funktion des Bildstabilisators zu deaktivieren
(Bildstabilisator-Schalter ON/OFF auf OFF). Insbesondere bei der Kamera Pronea 600i
Ck
wird die Batterie u.U. schnell erschöpft, wenn dieses Schalter auf ON bleibt.
•
Tippen Sie den Auslöser an, warten Sie, bis sich das Bild im Sucher stabilisiert hat, und
drücken Sie erst dann den Auslöser ganz nach unten.
Ch
•
Aufgrund der Eigenschaften des Bildstabilisierungsmechanismus erscheint das Bild im Sucher
nach dem Auslösen unter Umständen verschwommen. Dies ist jedoch keine Fehlfunktion.
Kr
•
Bei Kameraschwenks muss der Bildstabilisatorschalter auf NORMAL gesetzt sein.
Wenn Sie die Kamera bei einem Schwenk in einem weiten Bogen bewegen, so
wird Kamera-Verwacklung in Richtung dieser Bewegung nicht ausgeglichen. Bei
horizontalen Schwenkbewegungen werden z.B. nur die Effekte der vertikalen KameraVerwacklungen verringert.
•
Schalten Sie die Kamera nicht aus und nehmen Sie auch nicht das Objektiv von der
Kamera ab, solange der Bildstabilisator arbeitet. Andernfalls kann beim Schütteln des
Objektivs ein Geräusch zu hören sein, als seien innere Bauteile lose oder gebrochen.
Dies ist jedoch keine Fehlfunktion. Schalten Sie einfach die Kamera wieder ein, um das
Problem zu beheben.
•
Bei Kameras mit integriertem Blitzgerät funktioniert der Bildstabilisator nicht, solange
das integrierte Blitzgerät geladen wird.
•
Bei Verwendung eines Stativs stellen Sie den Bildstabilisator-Schalter auf ON, um die
Wirkung von Kamera-Verwacklung zu reduzieren. Nikon empfiehlt, bei Verwendung nicht
arretierten Stativkopfs oder eines Einbeinstativs den Bildstabilsator auf ON zu stellen. Wenn
die Kamera-Verwacklung jedoch nur sehr gering ist, kann die Bildstabilisierungsfunktion
dagegen die Wirkung der Kamera-Verwacklung durch die Bewegung des Systems
verstärken. Stellen Sie in einem solchen Fall den Biststabilisator-Schalter ON/OFF auf OFF.
des Auslösers bis zum ersten Druckpunkt und zum Zeitpunkt
des Auslösens verringert. Da die Vibrationen bereits im Sucher
verringert werden, gestalten sich automatisches/manuelles
Scharfstellen und die exakte Ausrichtung des Motivs einfacher.
OFF:
Die Effekte von Kamera-Verwacklungen werden nicht verringert.
NORMAL:
ACTIVE:
Der Bildstabilisatormechanismus verringert primär die
Effekte von Kamera-Verwacklungen. Die Effekte von
Kamera-Verwacklungen werden auch bei horizontalen
und vertikalen Schwenkaufnahmen verringert.
Der Bildstabilisatormechanismus verringert die Effekte von
normalen und stärkeren Kamera-Verwacklungen, wie sie
z.B. bei Aufnahmen aus fahrenden Fahrzeugen auftreten.
In diesem Modus werden Kamera-Verwacklungen nicht
automatisch von Schwenkbewegungen unterschieden.
42
Page 43

Blendeneinstellung
Stellen Sie die Blende an der Kamera ein.
Fokussierung, Zoom und Tiefenschärfe
Stellen Sie vor dem Scharfstellen mit dem Zoomring die Brennweite so ein, dass Sie im
Sucher den gewünschten Bildausschnitt sehen. Bei Kameras, die mit einer Abblendtaste
ausgestattet sind, kann die Tiefenschärfe vor dem Auslösen im Sucher beurteilt werden.
•
Diese Objektiv ist mit einer Innenfokussierung (IF; internal focusing) ausgestattet. Bei
niedrigen Entfernungseinstellungen nimmt auch die Brennweite ab.
•
Die Entfernungsskala zeigt nicht die exakte Entfernung zwischen Objekt und Kamera
an. Die Werte dienen lediglich als Anhaltspunkte. Bei Aufnahmen weite entfernter
Motive kann die Tiefenschärfe Einfluss auf die Funktion haben und das Motiv erscheint
scharf, obwohl die Entfernungsskala einen geringeren Wert als Unendlich zeigt.
•
Weitere Informationen finden Sie auf S. 210.
Verwendung einer integrierten rotierbaren Stativmanschette
Wenn Sie ein Stativ verwenden, bringen Sie dieses nicht an der Kamera, sondern am
Stativanschluss des Objektivs an.
•
Wenn die Kamera am Handgriff gehalten und die Kamera mit Objektiv auf der
Stativmanschette gedreht wird, kann die Hand bei manchen Stativarten an das Stativ
stoßen.
•
Die Stativmanschette lässt sich durch Lösen der Feststellschraube des Stativanschlusses
entfernen. Weitere Informationen zu diesem Vorgang erhalten Sie bei der NikonServicestelle oder dem Nikon-Vertreter in Ihrer Nähe.
Ändern der Kameraposition
Lösen Sie die Stativanschlussring-Befestigungsschraube
Wählen Sie durch Drehen des Objektivs entsprechend der
Kameraposition (senkrecht oder waagrecht) einen geeigneten
Positionsindex für Objektivdrehung
Schraube
(3 )
an.
(2 )
und ziehen Sie die
(1 ).
Verwendung der Gegenlichtblende
Die Gegenlichtblende wirkt Streulicht und Kontrastverlust entgegen und schützt die
Frontlinse.
Anbringen der Gegenlichtblende
• Ziehen Sie die Halteschraube der Gegenlichtblende
(2 ) fest an.
•
Wenn die Gegenlichtblende nicht richtig angebracht
ist, schattet sie u.U. einen Teil des Motivs ab.
•
Die Gegenlichtblende kann zum Verstauen in
umgekehrter Position an das Objektiv angesetzt
werden.
Jp
En
De
Fr
Es
Se
Ru
Nl
It
Ck
Ch
Kr
43
Page 44

Objektiv-Schutzscheibe
Jp
En
De
diese durch Drehen des Gummirings rund um die Scheibe ab (1, 2).
• Bewahren Sie die Scheibe im mitgelieferten Etui für die Objektiv-Schutzscheibe auf.
Fr
Dieses Objektiv ist mit einer aufgesetzten
Objektiv-Schutzscheibe erhältlich. Es wird empfohlen,
diese Scheibe immer auf dem Objektiv zu belassen.
•
Wenn zu dem Bild, das Sie aufnehmen wollen, eine
helle Lichtquelle gehört, kann durch Abnehmen dieser
Scheibe das Auftreten von Geisterbildern reduziert
werden. Zum Abnehmen der Scheibe schrauben Sie
Integriertes Blitzgerät und Abschattung
Verwenden Sie beim Fotografieren mit Einsatz des integrierten Blitzgeräts keine
Es
Gegenlichtblende.
• Aktuelle Angaben zur Verschattung mit diesem Objektiv finden Sie im
Se
Kamerahandbuch.
Ru
Nl
It
Ck
Ch
Kr
Kameras
D90, D80, D50
D70-Serie
D5300
D5200, D5100, D5000, D3200,
D3100, D3000, D60, D40-Serie
D3300
F80-Serie
F75-Serie, F70-Serie
F65-Serie, F60-Serie, F55-Serie,
F50-Serie, F-401, F-401x, F-401s,
Pronea 600i, Pronea S
Einstellbare Brennweite/Aufnahmedistanz
• 200 mm/3 m oder weiter
• 250 mm oder länger/keine Einschränkungen
• 200 mm/4 m oder weiter • 250 mm/2,5 m oder weiter
• 300 mm oder länger/keine Einschränkungen
• 200 mm/5 m oder weiter • 250 mm/3 m oder weiter
• 300 mm oder länger/keine Einschränkungen
• 200 mm/5 m oder weiter • 250 mm/3 m oder weiter
• 300 mm/2,5 m oder weiter
• 350 mm oder länger/keine Einschränkungen
• 200 mm/4 m oder weiter • 250 mm/3 m oder weiter
• 300 mm/2,5 m oder weiter
•
200 mm/3 m oder weiter • 250 mm oder 300 mm/2,5 m oder weiter
• 350 mm oder länger/keine Einschränkungen
• 250 mm/5 m oder weiter • 300 mm/4 m oder weiter
• 350 mm/3 m oder weiter • 400 mm/keine Einschränkungen
Vignettierung tritt bei allen Aufnahmeentfernungen auf.
Einsetzbarer Filterhalter
Verwenden Sie stets einen (52-mm-Schraub-) Filter. Im Lieferumfang ist ein in
den Filterhalter eingesteckter 52-mm-NC-Schraubfilter enthalten.
44
a
Drücken Sie den Knopf für den Einsetzbaren
Filterhalter nieder und drehen Sie ihn gegen den
Uhrzeigersinn, bis die weiße Linie am Knopf in einem
rechten Winkel zur Objektivachse steht.
b Ziehen Sie den Einsetzbaren Filterhalter aus dem
Objektivkörper heraus.
c
Nehmen Sie den angebrachten Filter vom Filterhalter ab.
d
Schrauben Sie einen neuen Filter an der Seite des
Filterhalters ein, die mit den Wörtern „Nikon” und
„JAPAN” markiert ist.
• Der Einsetzbare Filterhalter kann mit der Aufschrift
„Nikon“ und „JAPAN“ der Objektiv- oder der
Page 45

Kameraseite zugewandt angebracht werden, ohne dass dies Auswirkungen
auf Ihre Aufnahmen hat.
Zirkularer Einsteck-Polfilter C-PL1L (optional)
• Blendet Spiegelungen nicht metallischer Oberflächen wie Glas oder Wasser aus.
• Wenn ein zirkularer Einsteck-Polfilter C-PL1L angebracht wird,
unterscheidet sich der Fokus-Abstand von dem eines 52-mm-Schraubfilters.
Die Entfernungsskala ist aus der korrekten Position verschoben. Der
Mindestfokussierabstand vergrößert sich geringfügig.
• Bei der Verwendung der Fokusvoreinstellung kann sich die Speicherposition
geringfügig verändern.
• Setzen Sie den C-PL1L-Filter vor Verwendung der Speicherfunktion ein.
Empfohlene Einstellscheiben
Für bestimmte Nikon-Kameras stehen verschiedene auswechselbare
Einstellscheiben zur Verfügung, um jeder Aufnahmesituation gerecht zu
werden. Die für dieses Objektiv empfohlenen werden in der Tabelle aufgeführt:
Einstellscheibe
Kamera
F6
F5+DP-30
F5+DA-30
: Hervorragende Scharfeinstellung
◎
: Akzeptable Scharfeinstellung
○
Das Sucherbild vignettiert leicht. Die Aufnahme selbst bleibt hiervon
unberührt.
—
: Nicht verfügbar
( ) : Zeigt den Betrag zusätzlich erforderlicher Belichtungskorrektur ( Nur
mittenbetonte Belichtungsmessung). Bei der Nikon F6 korrigieren Sie
durch Wahl von ”Andere” in der Individualfunktion “b6: Einstellscheibe”
und Einstellen des LW-Werts im Bereich zwischen –2,0 und +2,0 in
0,5-LW-Schritten. Bei Gebrauch von anderen Scheiben als B oder E, ist
“Andere” auch dann zu wählen, wenn der erforderliche Korrekturwert
“0” beträgt (keine Korrektur nötig). Zur Einstellung des Korrekturwerts
an der F5 dient die Individualfunktion Nr. 18. Näheres hierzu finden Sie im
Benutzerhandbuch des Kameragehäuses.
Ein Leerfeld bedeutet: unbrauchbar. Da die Einstellscheibe M sowohl für
Makrofotografie bis zum Abbildungsmaßstab 1:1 oder höher als auch für
Mikrofotografie eingesetzt werden kann, unterscheidet sich ihr
Anwendungsbereich von den anderen Einstellscheiben.
Wichtige Hinweise
• Bei der F5 können die Einstellscheiben EC-B, EC-E, B, E, J, A, L nur mit
Matrixmessung verwendet werden.
ABCE
◎
◎
(–0,5)
◎◎○◎◎
◎◎○◎◎
EC-B
FG1G2G3G4 J K L M P U
EC-E
—
————◎—
◎
—
—
○
◎
○
◎
◎
(–0,5)
—
◎
—
◎
—
◎
—
◎
—
◎
Jp
En
De
Fr
Es
Se
Ru
Nl
It
Ck
Ch
Kr
45
Page 46

Pflege des Objektivs
• Achten Sie darauf, die Kamera bei aufgesetztem Objektiv nicht ausschließlich
am Kamerabody zu halten, da dies die Bajonettfassung der Kamera
Jp
beschädigen könnte. Stützen Sie stets sowohl den Body als auch das Objektiv.
• Halten oder heben Sie das Objektiv oder die Kamera nicht an der angesetzten
En
Gegenlichblende.
• Halten Sie die CPU-Kontakte stets sauber und schützen Sie sie vor Beschädigung.
De
• Bei einer Beschädigung der Dichtungsmanschette sollten Sie das Objektiv
beim nächsten eine autorisierte Nikon-Servicestelle zur Reparatur abgeben.
• Säubern Sie Glasflächen mit einem Blasepinsel. Staub und Flecken entfernen
Fr
Sie mit einem sauberen, weichen Baumwolltuch oder Optik-Reinigungspapier,
das Sie mit Ethanol (Alkohol) oder Optikreinigungsflüssigkeit anfeuchten.
Es
Wischen Sie in kreisförmigen Bewegungen von der Mitte nach außen, ohne
dass Wischspuren zurückbleiben oder Sie andere Teile des Objektivs berühren.
• Verwenden Sie niemals organische Lösungsmittel wie Verdünner oder Benzin
Se
zum Reinigen des Objektivs.
• Beim Verstauen des Objektivs in seinem flexiblen Etui müssen der vordere und
Ru
der hintere Deckel aufgesetzt sein.
• Bei längerer Nichtbenutzung sollte das Objektiv an einem kühlen, trockenen
Nl
Ort aufbewahrt werden, um Schimmelbildung und Korrosion zu vermeiden.
Halten Sie das Objektiv von direkter Sonneneinstrahlung oder Chemikalien
wie Kampfer oder Naphthalin fern.
It
• Halten Sie das Objektiv von Wasser fern, das zur Korrosion und zu
Betriebsstörungen führen kann.
Ck
• Einige Teile des Objektivs bestehen aus verstärktem Kunststoff. Lassen Sie das
Objektiv deshalb nie an übermäßig heißen Orten liegen!
Ch
Im Lieferumfang enthaltenes Zubehör
• Vorderer Aufsteckobjektivdeckel
Kr
• Hinterer Objektivdeckel
• Gegenlichtblende HK-30
• Objektivbeutel CL-L2 (mit weichem Innenfutter)
• Zugehöriger Filterhalter
• 52-mm-NC-Schraubfilter
• Zugehörige Objektiv-Schutzscheibe (am Objektiv angebracht)
• Zugehöriges Etui für die Objektiv-Schutzscheibe
• Schulterriemen LN-1
Wichtig
• Der Einsetzbare Filterhalter mit eingesetztem 52-mm-Schraubfilter sollte
immer am Objektiv angebracht sein.
Optionales Zubehör
• 52-mm-Schraubfilter (ausgenommen des Zirkular-PolfiltersⅡ)
• Zirkularer Einsteck-Polfilter C-PL1L
• AF-S Telekonverter TC-14EⅡ/TC-17EⅡ*/TC-20EⅢ* (*Der Autofokus ist nur mit
Kameras verfügbar, die eine 1 : 8-Unterstützung anbieten.)
46
Page 47

Technische Daten
Objektivtyp: AF-S Zoom-NIKKOR-Objektiv Typ G mit integrierter
Brennweite: 200-400mm
Lichtstärke: 1:4
Optischer Aufbau: 24 Linsen in 17 Gruppen (4 Linsen aus ED-Glas
Bildwinkel:
Brennweitenskala: 200, 250, 300, 350, 400 mm
Entfernungsdaten:
Zoomen: Manuell über separaten Zoomring
Scharfeinstellung: Innenfokussierung (IF, Nikon Internal Focusing
Bildstabilisator: Optischer Bildstabilisator mit beweglicher
Entfernungsskala:
Naheinstellgrenze: 2 m mit Autofokus, von der Sensorebene gemessen,
Blende: Irisblende mit 9 gerundeten Lamellen
Blendensteuerung: Vollautomatisch
Blendenbereich: 4 bis 32
Belichtungsmessung: Offenblendenmessung bei Kameras mit elektronischer
FokussierBegrenzungsschalter:
Stativanschluss : Drehbar um 360°, Positionsindex für Objektivdrehung
Abmessungen:
Gewicht: ca. 3.360 g mit Objektiv-Schutzscheibe
Änderungen von technischen Daten und Design durch den Hersteller ohne
Ankündigung und ohne Verpflichtungen irgendeiner Art vorbehalten.
CPU und Nikon-Bajonettfassung
und einige Linsen mit Nanokristallvergütung) sowie
1 abnehmbare Objektiv-Schutzscheibe
Analoge Nikon-Spiegelreflexkameras für das Kleinbildformat
und digitale Nikon Spiegelreflexkameras mit FX -Format:
12°20´ bis 6°10´
Digitale Nikon-Spiegelreflexkameras mit DX-Format: 8° bis 4°
Nikon-Spiegelreflexkameras für das IX240-System: 9°50´ bis 5°
Übermittlung an die Kamera
System), Autofokus mit Silent Wave Motor, manuell
über separaten Entfernungseinstellring
Linsengruppe; Antrieb durch Schwingspulenmotoren
Unterteilt in Meter und Fuß; 2 m bis Unendlich (∞)
bei allen Zoompositionen
1,95 m mit manueller Fokussierung, von der
Sensorebene gemessen, bei allen Zoompositionen
Blendenübermittlung
Vorhanden; zwei Wählbereiche: FULL (∞ –2 m) oder
–6 m
∞
bei 90°, nur Stativanschluss abnehmbar
ca. 124 mm (Durchm.) x 365,5 mm (Länge ab
Bajonettauflage mit angebrachter Objektiv-Schutzscheibe)
ca. 124 mm (Durchm.) x 358,5 mm (Länge ab
Bajonettauflage ohne Objektiv-Schutzscheibe)
ca. 3.240 g ohne Objektiv-Schutzscheibe
47
Jp
En
De
Fr
Es
Se
Ru
Nl
It
Ck
Ch
Kr
Page 48

Remarques concernant une utilisation en toute sécurité
Jp
En
De
Fr
Es
Se
Ru
Nl
Ck
Ch
Kr
ATTENTION
Ne pas démonter
Le fait de toucher aux pièces internes de l’appareil ou de l’objectif pourrait
entraîner des blessures. Les réparations doivent être effectuées par des
techniciens qualifiés. Si l’appareil ou l’objectif est cassé suite à une chute ou un
autre accident, apportez le produit dans un centre de service agréé Nikon pour
le faire vérifier après avoir débranché le produit et retiré les piles.
En cas de dysfonctionnement, éteignez l’appareil
immédiatement
Si vous remarquez de la fumée ou une odeur inhabituelle se dégageant de
l’appareil photo ou de l’objectif, retirez immédiatement les piles, en prenant
soin de ne pas vous brûler. Continuer d’utiliser son matériel peut entraîner des
blessures. Après avoir retiré ou débranché la source d’alimentation, confiez le
produit à un centre de service agréé Nikon pour le faire vérifier.
It
N’utilisez pas l’appareil photo ou l’objectif en présence de
gaz inflammable
L’utilisation de matériel électronique en présence de gaz inflammable risquerait
de provoquer une explosion ou un incendie.
Ne regardez pas le soleil dans l’objectif ou le viseur
Regarder le soleil ou toute autre source lumineuse violente dans l’objectif ou le
viseur peut provoquer de graves lésions oculaires irréversibles.
Tenir hors de portée des enfants
Faites extrêmement attention à ce que les enfants ne mettent pas à la bouche
les piles ou d’autres petites pièces.
48
Page 49

Observez les précautions suivantes lorsque vous manipulez
l’appareil et l’objectif
• Maintenez l’appareil photo et l’objectif au sec. Le nonrespect de cette
précaution peut provoquer un incendie ou une électrocution.
• Ne manipulez pas et ne touchez pas l’appareil photo ou l’objectif avec les
mains humides. Le non-respect de cette précaution peut provoquer une
électrocution.
• Lors d’une prise de vue à contre-jour, ne dirigez pas l’objectif vers le soleil
et évitez que les rayons du soleil pénètrent dans l’objectif ; l’appareil photo
pourrait chauffer à l’excès, ce qui risquerait de provoquer un incendie.
• Lorsque vous n’utilisez pas l’objectif pendant une période prolongée, fixez
les bouchons avant et arrière, et rangez l’objectif à l’abri de la lumière directe
du soleil. Le non-respect de cette précaution peut provoquer un incendie, car
l’objectif peut concentrer la lumière du soleil sur un objet inflammable.
Jp
En
De
Fr
Es
Se
Ru
Nl
It
Ck
Ch
Kr
49
Page 50

Nous vous remercions d’avoir choisi l’objectif AF-S NIKKOR 200-400mm
f/4G ED VRⅡ. Avant d’utiliser cet objectif, veuillez lire ces instructions et
vous reporter au manuel d’utilisation de votre appareil photo.
Jp
Nomenclature
En
De
Fr
Es
Se
Ru
Nl
It
Ck
1
Ch
Kr
Parasoleil (p. 57)
2
Vis du parasoleil (p. 57)
3
Verre de protection de l’objectif
(fixé sur l
’objectif
4
Poignée en caoutchouc
5 Bouton de mise au point (Mémorisation
de la mise au point /Rappel mémoire/
Départ AF) (p. 54)
6
Bague de mise au point (p. 53)
7
Échelle des distances (p. 57)
8
Ligne de repère de la distance
9 Bague de zoom (p. 57)
0 Échelle des focales
! Ligne d’index d’échelle de focale
Index de position de rotation de l’objectif
@
(p. 57)
#
Vis de blocage de la bague du collier
du trépied (p. 57)
$
Support de filtre à insérer (p. 58)
) (p. 58)
50
% Bouton du support de filtre à insérer (p. 58)
^
Bouton mémoire (p. 54)
&
Repère de montage
*
Joint en caoutchouc de l’objectif (p. 60)
(
Contacts électroniques (p. 60)
)
Collier de trépied rotatif intégré (p. 57)
q
Oeilleton de bandoulière
w
Interrupteur de contrôle sonore (p. 54)
e Commutateur de sélection de mise au point
(AF-L/MEMORY RECALL/AF-ON) (p. 54)
r Commutateur de mode de mise au
point (p. 53)
t
Commutateur limiteur de mise au point
(p. 53)
y
Commutateur ON/OFF (marche/arrêt) de
réduction de la vibration (p. 56)
u
Commutateur de mode de réduction de
la vibration (p. 56)
( ): Page de référence
Page 51

Jp
En
De
Fr
Es
Se
Ru
Nl
It
Ck
Ch
Kr
51
Page 52

Principales caractéristiques
• Le traitement nanocrystal sur certaines lentilles permet d’assurer une image
nette dans toutes les conditions de prise de vue, des extérieurs ensoleillés aux
Jp
scènes en intérieur sous les spots.
• Cet objectif est doté des fonctions suivantes: AF-L, qui verrouille la mise au
En
point pendant l’autofocus, AF-ON, qui active l’autofocus et MEMORY RECALL,
qui enregistre et rappelle les distances de mise au point sélectionnées.
• Lorsque vous activez la réduction de vibration (VR
De
prendre des photos à des vitesses d’obturation réduites (3 valeurs inférieures
à celles normalement utilisées*). Vous augmentez ainsi la plage des vitesses
Fr
d’obturation et des positions de zoom disponibles, notamment lorsque vous
tenez l’appareil photo en main. (*Les effets de la fonction VR sur la vitesse
d’obturation sont mesurés selon les normes de la CIPA (Camera and Imaging
Es
Products Association) ; les mesures des objectifs de format FX sont effectuées
avec des appareils photo numériques de format FX, celles des objectifs de
Se
format DX avec des appareils photo de format DX. Les zooms sont réglés sur
leur focale maximale lorsque les mesures sont effectuées.)
Important
Ru
• Lorsqu’il est monté sur les reflex numériques Nikon au format DX comme
la série D300 et D7000, le champ angulaire de l’objectif devient 8°-4° et la
Nl
focale équivalente en 24 x 36 mm est d’environ 300-600mm.
Appareils utilisables et fonctions disponibles
It
Il peut y avoir des restrictions et des limites pour les fonctions disponibles.
Consultez le manuel d’utilisation de l’appareil pour obtenir les détails.
Ck
Ch
Kr
Reflex numériques Nikon
(format Nikon FX/DX), F6, F5,
F100, série F80, série F75, série F65
Pronea 600i, Pronea S*
Série F4, F90X, série F90, série F70—*
Série F60, série F55, série F50,
F-401x, F-401s, F-401
F-801s, F-801, F-601
F3AF, F-601, F-501, appareils
MF Nikon (sauf F-601
*1: P inclut AUTO et le système Vari-programme (modes scène).
*2: Manuel (M) n’est pas disponible.
*3: Lorsque le commutateur de sélection de mise au point est placé sur AF-ON,
Appareil
VR AF
2
M
M)
: Possible —: Impossible VR: Réduction de la vibration AF: Autofocus
l’autofocus commence dès que vous appuyez sur le bouton de mise au point tout en
enfonçant à mi-course le déclencheur.
—
—— — — —
—— — — —
— — — — — ————
Fonction
Mémorisation
de la mise au
point
3
52
Ⅱ
), il est possible de
Départ AF
Rappel
(AF- ON) sur
mémoire
l’objectif
4
*
*
*
3
5
Mode
d’exposition
(mode de prise
de vue)
*1
P
SAM
——
——
Page 53

*4: Appuyez sur le bouton mémoire ou sur le bouton de mise au point tout en enfonçant à
mi-course le déclencheur.
*5: Possible, avec des restrictions limitées
Mise au point
Réglez le mode de mise au point de l’appareil photo conformément au tableau
ci-dessous.
Mode de
Appareil
Reflex numériques Nikon
(format Nikon FX/DX), F6,
F5, série F4, F100, F90X,
série F90, série F80,
série F75, série F70, série F65,
Pronea 600i, Pronea S
Série F60, série F55,
série F50, F-801s, F-801,
M, F-401x, F-401s, F-401
F-601
Mode A/M (Autofocus avec commande manuelle. Priorité AF) et
mode M/A (Autofocus avec commande manuelle. Priorité MF)
M/A: L’autofocus peut être débrayé pour effectuer la mise au
A/M: L’autofocus peut être débrayé pour effectuer la mise au
a
Placez le commutateur de mode de mise au point sur A/M ou M/A.
b
Il est possible de passer outre l’autofocus manuellement en tournant la bague
de mise au point tout en enfonçant le déclencheur à mi-course, en appuyant
sur le bouton AF-ON de l’appareil photo ou sur le bouton de mise au point
(avec la mise au point réglée sur AF-ON) de l’objectif.
c
Si vous enfoncez à nouveau à mi-course le déclencheur, appuyez sur le
bouton AF-ON de l’appareil photo ou appuyez sur le bouton de mise au point
de l’objectif, la commande manuelle s’annule et le mode autofocus est rétabli.
Pour limiter la gamme d’autofocus
Cette fonction n’est disponible qu’en mode autofocus.
FULL: Si le sujet se trouve parfois à moins de 6 m, réglez le
∞–6m: Si le sujet se trouve toujours à 6 m ou plus de distance,
mise au
point de
l’appareil
AF
MF
AF
MF
point manuellement via la bague de mise au point.
point manuellement via la bague de mise au point, mais
la sensibilité au réglage manuel de la bague est inférieure
à celle en mode M/A. Utilisez ce mode pour éviter de
dérégler la mise au point automatique accidentellement
en touchant la bague de mise au point.
commutateur sur FULL.
réglez le commutateur sur ∞ –6m pour réduire le délai
de mise au point.
Mode de mise au point de l’objectif
A/M M/A M
Autofocus avec
commande
manuelle
(priorité AF)
(Le télémètre électronique peut être utilisé.)
(Le télémètre électronique peut être utilisé,
AF: Autofocus MF: Mise au point manuelle
Autofocus avec
commande
manuelle
(priorité MF)
Mise au point manuelle
Mise au point manuelle
sauf sur le F-601M.)
Mise au point
manuelle
(Le télémètre
électronique
peut être utilisé.)
53
Jp
En
De
Fr
Es
Se
Ru
Nl
It
Ck
Ch
Kr
Page 54

Commutateur de sélection de mise au point et bouton
de mise au point (voir p. 52 pour les appareils photo
Jp
En
De
Fr
Es
Se
Ru
Nl
Ck
Ch
Kr
compatibles.)
Utilisez le commutateur de sélection de mise au point pour choisir une fonction
parmi les boutons de mise au point.
Position du commutateur de
sélection de mise au point
AF-L Mémorisation de la mise au point
MEMORY RECALL Rappel mémoire
AF-ON Départ AF (AF-ON) sur l’objectif
• Appuyez sur l’un des quatre boutons de mise au point pour
activer chaque fonction.
• Il est possible de modifier les positions des boutons de
mise au point selon les préférences personnelles de chaque
utilisateur. Pour en savoir plus, prenez contact avec le SAV
Nikon ou le bureau de représentation le plus proche.
Mémorisation de la mise au point (AF-L)
Cette fonction n’est compatible qu’avec le mode autofocus.
a
Placez le commutateur de mode de mise au point sur A/M ou M/A.
b
Placez le commutateur de sélection de mise au point sur AF-L.
It
c
En mode autofocus, il est possible de verrouiller la mise au point en appuyant
sur l’un des boutons de mise au point.
• La mise au point reste verrouillée tant que vous maintenez enfoncé le bouton
de mise au point.
• La fonction AF-L peut être activée soit depuis l’appareil photo, soit depuis
l’objectif.
Rappel mémoire (MEMORY RECALL)
♪: L’objectif émet un bip lorsque le rappel mémoire entre
sonore placé sur
• L’objectif émet un bip lorsque la distance de mise au point
d’échelle des distances tourne d’avant en arrière pendant
10 fois, tandis que l’objectif émet un bip court, puis trois bips longs. Le cas
échéant, répétez la procédure pour enregistrer la distance de mise au point.
• La mise en mémoire est possible quelque soit le réglage du mode de mise au
point ou du commutateur de sélection de mise au point.
• La distance de mise au point est enregistrée même lorsque l’appareil photo
est éteint ou que l’objectif n’est pas monté sur l’appareil.
en action.
♪
: Le rappel de la mémoire entre en action sans bip sonore.
○
Les opérations suivantes ont lieu avec l’interrupteur de contrôle
a
Faites la mise au point sur un sujet et appuyez sur le bouton
mémoire pour enregistrer la distance de mise au point.
est correctement enregistrée.
• Si la distance de mise au point est mal enregistrée, la bague
.
Fonction du bouton de mise
au point
54
Page 55

•
Lors de l’utilisation du rappel mémoire à un réglage de focale différent du réglage original, il
se peut que la distance de mise au point soit légèrement décalée. Redoublez de précaution
lors de l’utilisation du rappel mémoire à des réglages de focale plus longs. Lorsque
l’interrupteur de contrôle sonore est réglé sur
d’utiliser autant que possible le rappel mémoire à la même focale que celle mémorisée.
b
Placez le commutateur de sélection de mise au point sur MEMORY RECALL.
c
Appuyez sur un bouton de mise au point. Après que l’objectif émet deux bips, enfoncez
complètement le déclencheur pour prendre la photo.
•
La distance de mise au point enregistrée est rappelée lorsque vous appuyez sur le bouton de
mise au point même avec le déclencheur enfoncé à mi-course.
•
Pour photographier à la distance de mise au point enregistrée, maintenez enfoncé le bouton
de mise au point et enfoncez complètement le déclencheur.
•
L’objectif quitte le rappel mémoire pour passer au mode autofocus ou mise au point
manuelle lorsque vous relâchez le bouton de mise au point.
Départ autofocus (AF) sur l’objectif (AF-ON)
a
Placez le commutateur de mode de mise au point sur A/M ou M/A.
b
Placez le commutateur de sélection de mise au point sur AF-ON.
c
Appuyez sur un bouton de mise au point pour effectuer la mise au point sur le sujet.
•
L’autofocus reste verrouillé tant que vous maintenez enfoncé le bouton de mise au point.
•
La fonction AF-ON peut être activée soit depuis l’appareil photo, soit depuis l’objectif.
, il émet un avertissement. Il est recommandé
Mode réduction de la vibration (VRⅡ)
Concept de base de la réduction de la vibration
Élevé
Bougé de l’appareil en utilisant un trépied
lors de la prise de vue
Bougé de l’appareil
depuis un véhicule en
Bougé de
l’appareil important
mouvement
Jp
En
De
Fr
Es
Se
Ru
Nl
It
Ck
Ch
Kr
Nombre de vibrations
Faible
Faible
Placez le commutateur de
mode de réduction de
vibration sur NORMAL.
Pendant la prise de vue
Lors de la prise de vue de
panoramiques
Lors de la prise de vue depuis un
véhicule en mouvement
Lors de la prise de vue à l’aide
d’un trépied
Panoramiques
Force des vibrations
Placez le commutateur de
mode de réduction de
vibration sur ACTIVE.
Réglez le commutateur de mode de réduction de
vibration soit sur NORMAL soit sur ACTIVE.
Réglez le commutateur de mode de réduction
de vibration sur NORMAL.
Réglez le commutateur de mode de réduction
de vibration sur ACTIVE.
Réglez le commutateur de mode de réduction de
vibration soit sur NORMAL soit sur ACTIVE.
Forte
55
Page 56

Réglage du commutateur ON/OFF (marche/arrêt) de réduction de la
vibration
Jp
En
De
Réglage du commutateur de mode de réduction de la vibration
Placez le commutateur ON/OFF (marche/arrêt) de réduction de la vibration sur
Fr
ON et sélectionnez un mode de réduction des vibrations avec le commutateur
de mode de réduction de vibration.
Es
Se
Ru
Nl
It
Ck
Remarques relatives à l’utilisation du mode de réduction de vibration
• Si vous utilisez cet objectif avec des appareils photo non compatibles avec la réduction
Ch
de la vibration (p. 52), mettez le commutateur ON/OFF (marche/arrêt) de réduction de la
vibration sur OFF. Avec le Pronea 600i, en particulier, la batterie peut se vider rapidement si
l’interrupteur est sur ON.
Kr
• Sollicitez légèrement le déclencheur, puis attendez que l’image affichée dans le viseur se
stabilise avant d’appuyer à fond sur le déclencheur.
• En raison des caractéristiques du mécanisme de réduction des vibrations, l’image affichée
dans le viseur peut être floue lorsque vous relâchez le déclencheur. Il ne s’agit pas d’un
dysfonctionnement.
• Lorsque vous prenez des panoramiques, vérifiez que vous avez bien placé le mode de
réduction de la vibration sur NORMAL. Si vous déplacez l’appareil photo en arc de cercle,
la correction du bougé de l’appareil ne s’effectue pas dans le sens du panoramique. Par
exemple, seuls les effets du bougé vertical de l’appareil photo sont réduits lorsque vous faites
un panoramique horizontal.
• N’éteignez pas l’appareil photo ou ne retirez pas l’objectif de l’appareil lorsque le mode
de réduction de vibration est actif. Si vous ne respectez pas cette consigne, l’objectif peut
émettre un son et donner l’impression qu’un composant interne est détaché ou cassé. Il ne
s’agit pas d’un dysfonctionnement. Allumez à nouveau l’appareil pour résoudre cet incident.
• Avec des appareils photo équipés d’un flash intégré, la réduction de vibration ne fonctionne
pas lorsque ce dernier se recharge.
• Lorsque vous utilisez un trépied, réglez le commutateur ON/OFF (marche/arrêt) de réduction
de la vibration sur ON pour réduire l’effet du bougé d’appareil photo. Nikon recommande
ON: Les effets du bougé de l’appareil photo sont réduits
lorsque le déclencheur est enfoncé à mi-course ainsi qu’au
moment où il est relâché. Comme la vibration est réduite
dans le viseur, cela facilite la mise au point automatique/
manuelle et le cadrage précis du sujet.
OFF:
Les effets du bougé de l’appareil photo ne sont pas réduits.
NORMAL: Le mécanisme de réduction de vibration réduit
ACTIVE: Le mécanisme de réduction de vibration réduit les
principalement les effets du bougé de l’appareil
photo. Les effets du bougé de l’appareil sont
également réduits en cas de prise de vue
panoramique horizontale et verticale.
effets du bougé de l’appareil photo qui surviennent
notamment lors de la prise de vue à partir d’un
véhicule en mouvement, que le bougé soit
normal ou plus intense. Dans ce mode, le bougé
de l’appareil photo n’est pas automatiquement
différencié du mouvement de panoramique.
56
Page 57

de régler le commutateur sur ON lorsque vous utilisez l’appareil photo sur la tête d’un
trépied instable ou avec un monopied. Toutefois, si le bougé de l’appareil photo est très
peu, la fonction de réduction de vibration risque plutôt de renforcer l’effet du bougé
d’appareil photo par le mouvement du système. Dans un tel cas, réglez le commutateur
ON/OFF (marche/arrêt) de réduction de la vibration sur OFF.
Réglage de l’ouverture
Utilisez l’appareil photo pour régler l’ouverture.
Mise au point, zoom et profondeur de champ
Avant de mettre au point, faites pivoter la bague de zoom pour régler la longueur focale
jusqu’à ce que la composition souhaitée soit cadrée. Si votre appareil photo est doté d’une
commande ou d’un levier d’aperçu de la profondeur de champ (stop-down), la profondeur de
champ peut être prévisualisée à travers le viseur.
• Cet objectif est équipé du système de mise au point interne (IF). Si la distance de prise de
vue diminue, la longueur focale diminue également.
• L’échelle des distances n’indique pas la distance précise entre le sujet et l’appareil photo.
Les valeurs sont approximatives et devraient uniquement être utilisées comme repères
généraux. Lors de la prise de vue de paysages éloignés, la profondeur de champ peut
influencer le fonctionnement de l’appareil et le sujet peut sembler net dans une position
plus proche de l’infini.
• Pour plus d’informations, consultez la p. 210.
Utilisation du collier de trépied rotatif intégré
Lorsque vous utilisez un trépied, fixez-le au collier pour trépied de l’objectif au lieu de l’appareil.
•
Lorsque vous tenez l’appareil photo par sa poignée et le faites tourner avec l’objectif sur son
collier de trépied, il se peut que votre main cogne contre le trépied selon le trépied utilisé.
•
Vous pouvez retirer le collier de trépied en enlevant la vis de verrouillage du collier de
trépied. Pour en savoir plus sur cette procédure, prenez contact avec le SAV Nikon ou le
bureau de représentation le plus proche.
Changement de position de l’appareil photo
Desserrez la vis de blocage de la bague du collier du trépied
(
1
). Selon la position de l’appareil photo (verticale ou
horizontale), tournez l’objectif sur un index de position de
rotation de l’objectif adéquat (
2
) et serrez la vis (3).
Jp
En
De
Fr
Es
Se
Ru
Nl
It
Ck
Ch
Kr
Utilisation du parasoleil
Le parasoleil réduit au minimum la lumière parasite et protège l’objectif.
Fixation du parasoleil
•
Serrez à fond la vis du parasoleil (2).
•
Si le parasoleil n’est pas correctement fixé, il risque d’entraîner
du vignettage.
•
Avant de ranger l’objectif, fixez le parasoleil à l’envers.
57
Page 58

Verre de protection de l’objectif
Jp
En
De
• Rangez le verre dans l’étui du verre de protection de l’objective exclusif fourni.
Fr
Flash intégré et vignettage
Pour éviter le vignettage, n’utilisez pas le parasoleil.
• Pour obtenir les dernières informations sur le vignettage avec cet objectif,
Es
reportez-vous au manuel de l’appareil photo.
Se
Ru
Nl
It
Appareils
D90, D80, D50 • 200mm/3 m ou plus • 250mm ou plus/aucune restriction
Série D70
D5300
D5200, D5100, D5000, D3200,
D3100, D3000, D60, série D40
D3300
Ck
Série F80
Ch
Série F75, série F70
Série F65, série F60, série F55,
Kr
série F50, F-401, F-401x, F-401s,
Pronea 600i, Pronea S
Cet objectif est fourni avec un verre de protection
de l’objectif en place. Il est recommandé de garder
constamment ce verre sur l’objectif.
•
Si la photo que vous souhaitez prendre contient une source
lumineuse intense, le retrait du verre peut aider à diminuer
les images fantômes. Pour retirer le verre, dévissez-le en
tournant la rondelle de caoutchouc qui l’entoure (1, 2).
Longueur focale/Distance de prise de
vue prises en charge
• 200mm/4 m ou plus • 250mm/2,5 m ou plus
• 300mm ou plus/aucune restriction
• 200mm/5 m ou plus • 250mm/3 m ou plus
• 300mm ou plus/aucune restriction
• 200mm/5 m ou plus • 250mm/3 m ou plus
• 300mm/2,5 m ou plus • 350mm ou plus/aucune restriction
• 200mm/4 m ou plus • 250mm/3 m ou plus
• 300mm/2,5 m ou plus
• 200mm/3 m ou plus • 250mm ou 300mm/2,5 m ou plus
• 350mm ou plus/aucune restriction
• 250mm/5 m ou plus • 300mm/4 m ou plus
• 350mm/3 m ou plus • 400mm/aucune restriction
Le vignettage se produit à n’importe quelle distance de prise de
vue.
Support de filtre à insérer
Utilisez toujours un filtre vissable de 52mm. Un filtre NC vissable de 52mm est
fixé au support de filtre à la sortie d’usine.
58
a
Appuyez sur le bouton du support de filtre à insérer,
et tournez dans le sens inverse des aiguilles d’une
montre jusqu’à ce que la ligne blanche sur le bouton
soit à angle droit par rapport à l’axe de l’objectif.
b Tirez sur le support de filtre à insérer pour l’extraire du
corps de l’objectif.
c
Détachez le filtre attaché au support de filtre.
d
Vissez un filtre sur le côté du support de filtre portant
les mots « Nikon » et « JAPAN ».
• Le support de filtre à insérer peut être fixé avec les
mots « Nikon » et « JAPAN » faces à l’objectif ou à
l’appareil photo sans incidence sur les photos.
Page 59

Filtre polarisant circulaire à insérer C-PL1L (en option)
• Bloque les réflexions des surfaces non métalliques, comme le verre ou l’eau.
• Lorsqu’un filtre polarisant circulaire à insérer C-PL1L est fixé, la distance de
mise au point est différente de celle avec un filtre vissable de 52mm fixé.
L’échelle des distances est décalée par rapport à la bonne position. La distance
de mise au point la plus proche est légèrement étendue.
• La position mémorisée peut varier légèrement si vous utilisez la préselection
de mise au point.
• Fixez le filtre C-PL1 avant d’utiliser la fonction de mémorisation.
Verres de visée recommandés
Divers verres de visée sont disponibles pour certains appareils photo reflex Nikon
qui s’adaptent à toutes les conditions de prise de vue. Les verres recommandés
avec cet objectif sont listés ci-dessous:
Verre
Appareil
F6
F5+DP-30
F5+DA-30
: Mise au point excellente
◎
: Mise au point passable
○
Un vignetage ou un effet de moiré affecte l’image de visée. L’image sur le
film n’est cependant pas affectée par ces phénomènes.
—
: Non disponible.
( ) : Indique la compensation de l’exposition additionnelle requise (Mesure
pondérée centrale uniquement). Pour les appareils F6, corrigez en
sélectionnant “Activ.: autre” dans le réglage personnalisé “b6: Plage visée”
et en réglant le niveau IL de -2,0 à +2,0 par pas de 0,5 IL. Lorsque vous
utilisez des verres autres que ceux de type B ou E, il faut sélectionner “Activ.:
autre” même lorsque la valeur de correction est de “0” (pas de correction
nécessaire). Pour les appareils F5, compenser en utilisant le réglage
personnalisé n° 18 sur l’appareil. Voyez le manuel d’utilisation de l’appareil
photo pour plus de détails.
Un blanc indique aucune application. Étant donné que le verre M peut être
utilisé pour la macrophotographie à un rapport d’agrandissement 1:1 ou plus
et pour la photomicrographie, il a des applications différentes de celles des
autres verres.
Important
• Pour les appareils F5, seuls les verres de mise au point EC-B, EC-E, B, E, J, A, L
peuvent être utilisés avec la mesure matricielle.
ABC E
◎
◎◎◎
(–0,5)
◎◎○◎◎
◎◎○◎◎
EC-B
FG1G2G3G4 J K L M P U
EC-E
◎
○
○
(–0,5)
◎◎ ◎
◎◎ ◎
◎
Jp
En
De
Fr
Es
Se
Ru
Nl
It
Ck
Ch
Kr
59
Page 60

Entretien de l’objectif
•
Prenez soin de ne pas tenir le boîtier de l’appareil avec l’objectif en place, sous
peine d’endommager l’appareil (monture d’objectif). Pensez à tenir à la fois
Jp
l’objectif et l’appareil lorsque vous le transportez.
•
Lorsque l’objectif est installé sur un appareil photo, ne saisissez et ne tenez pas
En
l’appareil photo ainsi quel’objectif par le parasoleil.
•
Il est important de nettoyer régulièrement les contacts électriques CPU et de ne
pas les endommager.
De
•
Si le joint en caoutchouc de l’objectif est endommagé, rendez-vous dans un centre
de service agréé Nikon le plus proche pour réaliser les réparations nécessaires.
Fr
•
Nettoyer la surface de l’objectif avec une soufflette ou une brosse de nettoyage.
Pour enlever les poussières ou les traces, utiliser de préférence un tissu de coton
doux, ou un tissu optique, légèrement humidifié avec de l’alcool éthylique
Es
(éthanol). Procédez par légers mouvements circulaires en partant du centre
vers l’extérieur, en prenant soin de ne pas laisser de traces et de ne pas toucher
Se
d’autres zones de l’objectif.
•
N’utilisez jamais de solvants organiques, tels que diluant ou benzène, pour
nettoyer l’objectif.
Ru
•
Lorsque vous rangez l’objectif dans son boîtier, mettez les bouchons d’objectif
avant et arrière en place.
Nl
•
Si vous n’utilisez pas l’objectif pendant une période prolongée, rangez-le dans un
endroit sec et frais afin d’éviter la formation de moisissure ou de rouille. Veillez
à tenir le matériel éloigné des sources de lumière et des produits chimiques
It
(camphre, naphtaline, etc.).
•
Éviter les projections d’eau ainsi que l’immersion, qui peuvent provoquer la
Ck
formation de rouille et des dommages irréparables.
•
Certaines pièces de l’objectif sont en plastique renforcé. Pour éviter tout
problème, ne pas soumettre l’objectif à de fortes chaleurs.
Ch
Accessoires fournis
• Bouchon d’objectif avant à glisser
Kr
• Bouchon arrière de l’objectif
• Parasoleil HK-30
• Étui semi-souple CL-L2 (avec tissus de rembourrage intérieur exclusif)
• Support de filtre exclusif
• Filtre NC vissable de 52mm
• Verre de protection de l’objectif exclusif (fixé sur l’objectif)
• Étui du verre de protection de l’objectif exclusif
• Dragonne LN-1
Important
• Le support de filtre à insérer, avec le filtre vissable de 52mm en place, doit être
inséré dans l’objectif en tout temps.
Accessoires en option
• Filtres vissables de 52mm (sauf le filtre polarisant circulaireⅡ)
• Filtre polarisant circulaire à insérer C-PL1L
• Téléconvertisseurs AF-S TC-14E
disponible qu’avec les appareils photo prenant en charge l’ouverture f/8.)
Ⅱ
/TC-17EⅡ*/TC-20EⅢ* (*L’autofocus n’est
60
Page 61

Caractéristiques
Type d’objectif : Objectif à Zoom NIKKOR AF-S de type G avec CPU
Focale: 200-400mm
Ouverture maximale: f/4
Construction
optique:
Angle de champ: 12°20´-6°10´ avec les reflex argentique 24x36 Nikon
Échelle des focales: 200, 250, 300, 350, 400mm
Informations de
distance:
Commande de zoom:
Mise au point:
Réduction de
vibration:
Echelle des distances
de prise de vue:
Distance minimale de
mise au point:
Nb. de lamelles du
diaphragme:
Diaphragme: Entièrement automatique
Plage des ouvertures:
Mesure de
l’exposition:
Commutateur limiteur
de mise au point:
Collier du trépied:
Dimensions: Env. 124 mm diam. x 365,5 mm (à partir du plan
Poids: Env. 3.360 g avec verre de protection de l’objectif
Les caractéristiques et la conception sont susceptibles d’être modifiés sans préavis ni
obligation de la part du fabricant.
intégré et monture baïonnette Nikon
24 éléments en 17 groupes (4 verres ED et plusieurs
lentilles à couche déposée de nanocristal), ainsi qu’un
verre de protection de l’objectif amovible
et reflex numériques Nikon au format FX
8°-4° avec les reflex numériques Nikon au format DX
9°50´-5° avec les appareils photo IX240
Communiquée à l’appareil photo
Manuellement via une bague de zoom séparée
Système de mise au point interne Nikon (IF),
autofocus avec moteur silencieux, manuellement via
une bague de mise au point indépendante
VR optique utilisant des moteurs à bobine acoustique
(VCM)
Graduée en mètres et pieds de 2 m à l’infini (∞)
2 m avec autofocus, à partir du plan focal quel que
soit le réglage du zoom
1,95 m avec mise au point manuelle, à partir du plan
focal quel que soit le réglage du zoom
9 (circulaires)
f/4 à f/32
Via méthode pleine ouverture avec les appareils avec
système d’interface CPU
Fourni; deux plages disponibles: FULL (∞ –2 m), ou
–6 m.
∞
Pivote à 360°, index de position de rotation de l’objectif
à 90°, collier de trépied uniquement détachable
d’appui de la monture d’objectif de l’appareil avec
verre de protection de l’objectif)
Env. 124 mm diam. x 358,5 mm (à partir du plan
d’appui de la monture d’objectif de l’appareil sans
verre de protection de l’objectif)
Env. 3.240 g sans verre de protection de l’objectif
61
Jp
En
De
Fr
Es
Se
Ru
Nl
It
Ck
Ch
Kr
Page 62

Notas sobre un uso seguro
Jp
En
De
Fr
Es
Se
Ru
Nl
Ck
Ch
Kr
PRECAUCIÓN
No desarme el equipo
El contacto con las piezas internas de la cámara o del objetivo puede provocar
lesiones. Las reparaciones solamente deben ser ejecutadas por técnicos
cualificados. Si a causa de un golpe u otro tipo de accidente la cámara o el
objetivo se rompen y quedan abiertos, desenchufe el producto y/o retire la
batería, y a continuación lleve el producto a un centro de servicio técnico
autorizado Nikon para su revisión.
Apague inmediatamente el equipo en caso de funcionamiento
defectuoso
Si observa que sale humo o que la cámara o el objetivo desprenden un olor
extraño, retire la batería inmediatamente, con cuidado de no quemarse. Si sigue
utilizando el equipo corre el riesgo de sufrir lesiones.
Una vez extraída o desconectada la fuente de alimentación, lleve el producto a
un centro de servicio técnico autorizado Nikon para su revisión.
It
No utilice la cámara ni el objetivo en presencia de gas inflamable
La utilización de equipos electrónicos en presencia de gas inflamable podría
producir una explosión o un incendio.
No mire hacia el sol a través del objetivo ni del visor
Mirar hacia el sol u otra fuente de luz potente a través del objetivo o del visor
podría producirle daños permanentes en la vista.
Mantener fuera del alcance de los niños
Se debe tener especial cuidado en evitar que los niños se metan en la boca pilas
u otras piezas pequeñas.
62
Page 63

Adopte las siguientes precauciones al manipular la cámara y
el objetivo
• Mantenga la cámara y el objetivo secos. De no hacer esto podría producirse
un incendio o una descarga eléctrica.
• No manipule ni toque la cámara ni el objetivo con las manos húmedas. De lo
contrario podría recibir una descarga eléctrica.
• En disparos a contraluz, no apunte el objetivo hacia el sol ni deje que la luz
solar pase directamente por él, ya que podría sobrecalentar la cámara y,
posiblemente, causar un incendio.
• Cuando el objetivo no vaya a utilizarse por un período de tiempo prolongado,
colóquele la tapa frontal y guárdelo alejado de la luz solar directa. De no
hacer esto podría producirse un incendio, ya que el objetivo podría enfocar la
luz solar directa sobre un objeto inflamable.
Jp
En
De
Fr
Es
Se
Ru
Nl
It
Ck
Ch
Kr
63
Page 64

Le agradecemos la compra del objetivo AF-S NIKKOR 200-400mm
f/4G ED VRⅡ. Antes de utilizar este objetivo, lea estas instrucciones y
consulte el manual del usuario de la cámara.
Jp
Nomenclatura
En
De
Fr
Es
Se
Ru
Nl
It
Ck
1
Visera del objetivo (p. 71)
2
Ch
Kr
Tornillo de la visera del objetivo (p. 71)
3
Cristal protector del objetivo (colocado
en el objetivo) (p. 72)
4
Empuñadura de goma
5 Botón de enfoque (Bloqueo del
enfoque/ Recuperación de la memoria /
Inicio de autofoco) (p. 68)
6
Anillo de enfoque (p. 67)
7
Escala de distancias (p. 71)
8
Línea indicadora de distancias
9
Anillo del zoom (p. 71)
0
Escala de la distancia focale
!
Línea de índice de escala de distancia
focal
@
Indices de posición de rotación del
objetivo (p. 71)
#
Tornillo de fijación del anillo del collar
del trípode (p. 71)
$
Soporte del filtro deslizante (p. 72)
64
%
Perilla del soporte del filtro deslizante
(p. 72)
^
Botón memoria (p. 68)
&
Indice de monturas
* Junta de goma de montaje del objetivo
(p. 74)
(
Contactos CPU (p. 74)
)
Collar del trípode rotatorio integrado
(p. 71)
q
Ojillos para la correa
w
Interruptor de control acústico (p. 68)
e
Interruptor de selección de la función de
enfoque (AF-L/MEMORY RECALL /
AF-ON) (p. 68)
r
Interruptor de modo de enfoque (p. 67)
t
Interruptor de límite de enfoque (p. 67)
y
Interruptor ON /OFF de reducción de
vibración (p. 70)
u
Interruptor de modo de reducción de la
vibración (p. 70)
( ): Página de referencia
Page 65

Jp
En
De
Fr
Es
Se
Ru
Nl
It
Ck
Ch
Kr
65
Page 66

Principales funciones
• El recubrimiento de nanocristales de algunas lentes garantiza imágenes nítidas
en diversas condiciones de disparo, desde exteriores soleados a escenas de
Jp
interior con iluminación artificial de gran potencia.
• Este objetivo cuenta con AF-L, que bloquea el enfoque durante el autofoco,
En
AF-ON, que activa el autofoco, y MEMORY RECALL (Recuperación de
memoria), que guarda y recupera las distancias de enfoque seleccionadas.
•
Si activa la reducción de la vibración (VRⅡ), podrá utilizar velocidades de
De
obturación más lentas (3 pasos*). De este modo, aumenta el rango de velocidades
de obturación y posiciones de zoom posibles, especialmente si sujeta la cámara
Fr
con la mano. (*Los efectos de la VR en la velocidad de obturación se miden según
los estándares de Camera and Imaging Products Association (CIPA); los objetivos
de formato FX se miden mediante el uso de cámaras digitales de formato FX,
Es
los objetivos de formato DX, mediante el uso de cámaras de formato DX. Los
objetivos con zoom se miden con el zoom máximo.)
Se
Importante
•
Cuando se monta en las cámaras SLR digitales con formato DX de Nikon como las
de la Serie D300 y la D7000, el ángulo de imagen del objetivo se vuelve de 8°-4°
Ru
y su distancia focal equivalente a 35mm es de aproximadamente 300-600mm.
Cámaras que puede utilizar y funciones disponibles
Nl
Puede haber algunas restricciones o limitaciones para las funciones disponibles.
Para más detalles, consulte el manual del usuario de la cámara.
It
Ck
Ch
Cámaras SLR digitales Nikon (formato Nikon
FX/DX), F6, F5, F100, Serie F80 /Serie N80*,
Serie F75/Serie N75*, Serie F65/Serie N65*
Kr
Pronea 600i/6i*, Pronea S*
Serie F4, F90X/N90s*, Serie F90/N90*,
Serie F70/N70*
Serie F60/ N60*, Serie F55/Serie N55*,
Serie F50 /N50*, F-401x/N5005*,
F-401s/N4004s*, F-401/N4004*
F-801s/N8008s*, F-801/N8008*,
F-601
F3AF, F-601/N6006*, F-501/N2020**, Nikon
MF cámaras (excepto F-601
*De venta exclusiva en los EE.UU.
**De venta exclusiva en los EE.UU. y Canadá.
*1: P incluye AUTO y sistema de programa variable (modos de escena).
*2: No puede utilizar el manual (M).
*3: Cuando el interruptor de selección de la función de enfoque se ajusta en AF-ON, el
66
Cámaras
2
M /N6000*
M/N6000*)
: Posible —: Imposible VR: Reducción de vibración AF: Autofoco
autofoco comienza en cuanto se pulsa el botón de la función de enfoque, mientras se
pulsa el botón del disparador a la mitad.
VR AF
—
—
*
—— — — —
—— — — —
— — — — — ————
Función
Bloqueo
Recuperación
del
enfoque
memoria
3
de la
*
4
Inicio de
autofoco en
el objetivo
3
*
5
*
Modo de exposición
(modo de disparo)
*1
P
SAM
——
——
Page 67

*4: Pulse el botón de ajuste de la memoria o un botón de la función de enfoque mientras
pulsa el botón del disparador a la mitad.
*5: Posible, con ciertas restricciones
Enfoque
Ajuste el modo de enfoque de la cámara de acuerdo con el cuadro de abajo.
Cámaras
Cámaras SLR digitales Nikon (formato
Nikon FX /DX), F6, F5, Serie F4, F100,
F90X /N90s*, Serie F90 /N90*,
Serie F80/Serie N80*,
Serie F75/Serie N75*, Serie F70/ N70*,
Serie F65/Serie N65*,
Pronea 600i/6i*, Pronea S
Serie F60/ N60*, Serie F55/Serie N55*,
Serie F50/N50*, F-801s/N8008s*,
F-801/N8008*, F-601
F-401x/N5005*, F-401s/N4004s*,
F-401/N4004*
*De venta exclusiva en los EE.UU. AF: Autofoco MF: Enfoque manual
Modo A/M (autofoco con prioridad manual, prioridad AF) y
modo M/A (autofoco con prioridad manual, prioridad MF).
a
Coloque el interruptor de modo de enfoque en A/M o M/A.
b
El autofoco puede anularse manualmente girando el anillo de enfoque
mientras pulsa el botón del disparador a la mitad, pulsando el botón AF-ON
en la cámara o pulsando el botón del enfoque (con la función de enfoque
ajustada a AF-ON) en el objetivo.
c
Si se pulsa el botón del disparador a la mitad, se pulsa el botón AF-ON de la
cámara de nuevo o se pulsa el botón de la función de enfoque en el objetivo
de nuevo se cancelará la anulación manual y devolverá el objetivo al modo de
autofoco.
Para limitar el rango del autofoco
Esta función solo esta disponible con el autofoco.
M /N6000*,
M/A: El autofoco se anula al enfocar manualmente con el anillo
de enfoque.
A/M: El autofoco se anula y se enfoca manualmente con el
anillo de enfoque, pero la sensibilidad de detección del
anillo de enfoque es inferior a la del modo M/A. Utilice
este modo para evitar que, de forma no intencionada, el
ajuste de AF se anule al mover el anillo de enfoque.
FULL:
Si el elemento está a veces más cerca de 6 m, ajústelo a
FULL (completo).
∞–6m:
Si el elemento está siempre a una distancia de 6 m o
superior, ajuste el interruptor a ∞ –6m para reducir el
tiempo de enfoque.
Modo de
enfoque de
la cámara
AF
MF
AF
MF
Modo de enfoque del objetivo
A/M M/A M
Autofoco con
prioridad
manual
(prioridad AF)
(Puede utilizarse un telémetro electrónico.)
Enfoque manual (Puede utilizarse
un telémetro electrónico, excepto
Autofoco con
prioridad
manual
(prioridad MF)
Enfoque manual
con la F-601
Enfoque manual
(Puede utilizarse
un telémetro
electrónico.)
M/N6000*.)
67
Jp
En
De
Fr
Es
Se
Ru
Nl
It
Ck
Ch
Kr
Page 68

Interruptor de selección de la función de enfoque
y botón de enfoque (Véase pág. 66 para cámaras
Jp
En
De
Fr
Es
Se
Ru
Nl
Ck
Ch
Kr
compatibles.)
Utilice el interruptor de selección de la función de enfoque para seleccionar una
función de los botones de la función de enfoque.
Posición del interruptor de
selección de la función de
enfoque
AF-L Bloqueo del enfoque
MEMORY RECALL Recuperación de la memoria
AF-ON
• Pulse uno de los cuatro botones de la función de enfoque
para activar cada función.
• Las posiciones del botón de la función de enfoque pueden
cambiarse para ajustarse a las preferencias de cada usuario.
Para más información, póngase en contacto con su centro de
servicios o la oficina representante de Nikon más cercana.
Bloqueo del enfoque (AF-L)
Esta función sólo está compatible con autofoco.
It
a
Ajuste el interruptor del modo de enfoque a A/M o M/A.
b
Ajuste el interruptor de selección de la función de enfoque a AF-L.
c
Durante el modo de autofoco, el enfoque puede bloquearse
pulsando uno de los botones de la función de enfoque.
• El enfoque permanece bloqueado cuando se mantiene pulsado el
botón de enfoque.
• La función AF-L puede activarse desde la cámara o desde la objetivo.
Recuperación de la memoria (MEMORY RECALL)
♪: El objetivo emite un bip cuando se opera la recuperación
ajustado en
• El objetivo emitirá un bip cuando la distancia enfocada esté
la rueda de escala de distancia girará hacia atrás y hacia
delante unas 10 veces y el objetivo emitirá un bip corto y tres bips largos. En
este caso, repita el procedimiento para guardar la distancia de enfoque.
• Puede ajustarse la memoria independientemente del ajuste del interruptor de
selección del modo de enfoque o de la función de enfoque.
• La distancia de enfoque se guarda incluso cuando la cámara está apagada o el
objetivo está quitada de la cámara.
de memoria.
♪
: La recuperación de memoria se opera sin el bip.
○
La siguiente función es con el interruptor de control de sonido
a
Enfoque un elemento y pulse el botón de ajuste de la
memoria para guardar la distancia de enfoque.
guardada correctamente.
• Cuando la distancia de enfoque no se guarde correctamente,
.
68
Función del botón de
enfoque
Inicio de autofoco (AF-ON) en
el objetivo
Page 69

•
Al realizar la recuperación de la memoria a un ajuste de distancia focal diferente
del ajuste original, la distancia enfocada puede irse ligeramente. Debe tenerse
especial cuidado al realizar una recuperación de la memoria a un ajuste de distancia
focal superior. Cuando el interruptor de control acústico está ajustado en , sonará
un bíp de advertencia. Se recomienda realizar una recuperación de la memoria
frecuentemente a la misma distancia focal a la que se haya ajustado la memoria.
b
Ajuste el interruptor de selección de la función de enfoque a MEMORY RECALL.
c
Pulse un botón de la función de enfoque. Cuando el objetivo emita dos bips, pulse
completamente el botón disparador para hacer la foto.
•
La distancia de enfoque guardada se recupera cuando se pulsa un botón de función de
enfoque incluso cuando el botón disparador se pulsa hasta la mitad.
•
Para hacer fotos a la distancia de enfoque guardada, mantenga el botón de la función
de enfoque pulsado y presione completamente el botón disparador.
•
El objetivo pasa de la función de recuperación de memoria al autofoco o al enfoque
manual cuando se suelta el botón de la función de enfoque.
Inicio de autofoco (AF) en el objetivo (AF-ON)
a
Ajuste el interruptor del modo de enfoque a A/M o M/A.
b
Ajuste el interruptor de selección de la función de enfoque a AF-ON.
c
Pulse el botón de la función de enfoque para enfocar el sujeto.
•
El autofoco se activa cuando se mantiene pulsado el botón de la función de enfoque.
• La función AF-ON puede activarse desde la cámara o desde el objetivo.
Modo de reducción de la vibración (VRⅡ)
Conceptos básicos sobre la reducción de la vibración
Alto
Sacudidas de la cámara al utilizar el trípode
sacudidas de la
cámara al tomar
Sacudidas de la cámara
fotografías desde
un vehículo en
Fuertes
movimiento
Jp
En
De
Fr
Es
Se
Ru
Nl
It
Ck
Ch
Kr
Número de vibraciones
Bajo
Ligera
Ponga el interruptor del modo
de reducción de vibración en
la posición NORMAL.
Cuando se toman fotografías
Cuando se toman fotografías
panorámicas
Cuando se toman fotografías desde
un vehículo en movimiento
Cuando se toman fotografías
usando un trípode
Fotografías panorámicas
Fuerza de las vibraciones
Fuerte
Ponga el interruptor del modo
de reducción de vibración en
la posición ACTIVE.
Ponga el interruptor del modo de reducción de
vibración en la posición NORMAL o ACTIVE.
Ponga el interruptor del modo de reducción de
vibración en la posición NORMAL.
Ponga el interruptor del modo de reducción de
vibración en la posición ACTIVE.
Ponga el interruptor del modo de reducción de
vibración en la posición NORMAL o ACTIVE.
69
Page 70

Ajuste del interruptor ON/OFF de reducción de vibración
ON:
Jp
En
Ajuste del interruptor de modo de reducción de la vibración
De
Ajuste del interruptor ON/OFF de reducción de vibración a ON y seleccione un modo de
reducción de la vibración con el interruptor del modo de reducción de la vibración.
Fr
Es
Se
Ru
Nl
Notas sobre el uso de la reducción de la vibración
•
Si se utiliza este objetivo con cámaras no compatibles con reducción de vibración (p. 66),
It
coloque el interruptor ON/OFF de reducción de vibración en OFF. En especial con la
cámara Pronea 600i/6i, si este interruptor se deja en ON puede agotarse rápidamente
Ck
la energía de la pila.
•
Tras pulsar el disparador a medio recorrido, espere a que se estabilice la imagen que
aparece en el visor antes de pulsar por completo el disparador.
Ch
•
Debido a las características del mecanismo de reducción de la vibración, la imagen del
visor puede aparecer borrosa después de soltar el disparador. No se trata de un mal
Kr
funcionamiento.
•
Cuando tome panorámicas, asegúrese de que el interruptor de modo de reducción de
vibración está en posición NORMAL. Si la cámara realiza un barrido formando un arco
amplio, no se realiza compensación para las sacudidas de la cámara en la dirección
del barrido. Por ejemplo, sólo los efectos de las sacudidas verticales de la cámara se
reducen con barrido horizontal.
•
No apague la cámara ni retire el objetivo de la cámara mientras esté activado el modo
de reducción de la vibración. Si no se adopta esta medida, podría producirse un sonido
y tacto en el objetivo similar a cuando un componente interno está suelto o roto al
moverse. No se trata de un mal funcionamiento. Vuelva a encender la cámara para
corregirlo.
•
En cámaras con flash incorporado, la reducción de la vibración no funciona cuando se
está cargando el flash incorporado.
•
Cuando utilice un trípode, ajuste del interruptor ON/OFF de reducción de vibración a
ON para reducir los efectos de las sacudidas de la cámara. Nikon recomienda ajustar
el interruptor a ON cuando utilice la cámara en un cabezal de trípode sin fijar o con
un monopodio. Pero cuando las sacudidas de la cámara son muy ligeras, la función
Los efectos de las sacudidas de la cámara se reducen cuando se
pulsa el disparador a medio recorrido y también en el momento
de soltarlo. Como la vibración se reduce en el visor, el autofoco/
manual y el encuadre exacto del sujeto resultan más sencillos.
OFF:
No se reducen los efectos de las sacudidas de la cámara.
NORMAL:
ACTIVE:
El mecanismo de reducción de la vibración
fundamentalmente reduce los efectos de las sacudidas
de la cámara. Los efectos de las sacudidas de la cámara
también se reducen con barrido horizontal y vertical.
El mecanismo de reducción de la vibración reduce los
efectos de las sacudidas de la cámara, como los que
se producen al hacer fotografías desde un coche en
movimiento, ya sean estas sacudidas más o menos
intensas. En este modo, las sacudidas de la cámara no se
diferencian automáticamente del movimiento de barrido.
70
Page 71

de reducción de la vibración puede aumentar el efecto de las sacudidas de la cámara
mediante el movimiento del sistema. En tal caso, ajuste el interruptor de reducción de
la vibración ON /OFF en OFF.
Jp
Ajuste de abertura
Utilice la cámara para ajustar el diafragma.
En
Enfoque, zoom y profundidad de campo
Antes de enfocar, gire el anillo del zoom para ajustar la distancia focal hasta encuadrar
la composición que desee. Si su cámara dispone de un botón o una palanca de vista
previa de profundidad de campo (parada), puede previsualizar la profundidad de campo
a través del visor de la cámara.
•
Este objetivo dispone del sistema de enfoque interno (IF). A medida que disminuye la
distancia de disparo, lo hace también la distancia focal.
•
La escala de la distancia no indica la distancia exacta entre el sujeto y la cámara. Los
valores son aproximados y solo deben emplearse como orientación general. Cuando se
apunta a paisajes lejanos, la profundidad de campo puede influir en la operación y el
sujeto puede aparecer enfocado en una posición más cercana que el infinito.
•
Consulte más información en la p. 210.
De
Fr
Es
Se
Ru
Utilización de un cuello del trípode giratorio incorporado
Cuando utilice un trípode, instálelo en el collar del trípode del objetivo en lugar de en la cámara.
•
Cuando sujete la cámara por su agarre y gire la cámara con el objetivo en su cuello de
trípode, la mano podría chocarse con el trípode, dependiendo del trípode que se utilice.
•
Se puede quitar el cuello del trípode eliminando el tornillo de bloqueo del cuello del
trípode. Para más información sobre este procedimiento, póngase en contacto con su
centro de servicios o la oficina representante de Nikon más cercano.
Cambiar la posición de la cámara
Afloje el tornillo de fijación del anillo del collar del trípode
(1). Dependiendo de la posición de la cámara (vertical u
horizontal), gire el objetivo a un índice de posición de
rotación del objetivo adecuado (2) y apriete el tornillo (3).
Nl
It
Ck
Ch
Kr
Utilización de la visera
Las tapas de la lente minimizan la luz directa y protege la lente.
Instalación de la visera
• Apriete completamente el tornillo de la visera del
objetivo (2).
• Si la visera del objetivo no está correctamente colocado,
podría producirse viñeteo.
•
Para guardar la visera del objetivo, instálela en la
posición inversa.
71
Page 72

Cristal protector del objetivo
Este objetivo está disponible con un cristal protector del
Jp
En
De
•
Guarde el cristal en la funda de cristal protector del objetivo dedicada proporcionada.
Fr
Flash incorporado y viñeteado
Para evitar el viñeteado, no utilice el parasol del objetivo.
• Para obtener la información más reciente sobre la aparición de viñeteado con
Es
este objetivo, consulte el manual de la cámara.
Se
Ru
Nl
It
Ck
Ch
Kr
Cámaras
D90, D80, D50
Serie D70
D5300
D5200, D5100, D5000, D3200,
D3100, D3000, D60, serie D40
D3300
Serie F80/serie N80*
Serie F75/serie N75*,
serie F70/N70*
Serie F65/serie N65*, serie F60/
N60*, serie F55/serie N55*,
serie F50/N50*, F-401/N4004*,
F-401x/N5005*, F-401s/N4004s*,
Pronea 600i/6i*, Pronea S
objetivo. Se recomienda dejar el cristal en el objetivo en
todo momento.
•
Si la imagen que desea tomar incluye una fuente de luz
brillante, al retirar este cristal pueden reducirse las imágenes
fantasma. Para quitar el cristal, desenrosque girando la anilla
de goma que está alrededor del cristal (
Distancia focal/distancia de disparo admitida
• 200mm /3 m o superior • 250mm o superior/sin restricciones
• 200mm /4 m o superior • 250mm/2,5 m o superior
• 300mm o superior/sin restricciones
• 200mm /5 m o superior • 250mm/ 3 m o superior
• 300mm o superior/sin restricciones
• 200mm /5 m o superior • 250mm/ 3 m o superior
• 300mm/2,5 m o superior • 350mm o superior/sin restricciones
• 200mm /4 m o superior • 250mm/3 m o superior
• 300mm/2,5 m o superior
• 200mm /3 m o superior • 250mm o 300mm/2,5 m o superior
• 350mm o superior/sin restricciones
• 250mm/5 m o superior • 300mm/4 m o superior
• 350mm/3 m o superior • 400mm/sin restricciones
El viñeteado se presenta a cualquier distancia de fotografía.
*De venta exclusiva en los EE.UU.
1, 2
Soporte del filtro deslizante
Utilice siempre un filtro (52mm de rosca). En fábrica se coloca un filtro NC de
rosca de 52mm en el soporte del filtro.
72
a
Pulse el botón de soporte del filtro deslizante y gire
en dirección contraria a las agujas del reloj hasta que
la línea blanca del botón esté a un ángulo recto del
eje del objetivo.
b Tire del soporte del filtro deslizante del cuerpo del
objetivo.
c
Suelte el filtro del soporte del filtro.
d
Enrosque un filtro en el lado del soporte del filtro
marcado con las palabras “Nikon“ y “JAPAN”.
• El soporte del filtro deslizante puede colocarse con las
palabras “Nikon” y “JAPAN” mirando hacia el objetivo
o hacia la cámara sin que afecte a las fotos.
).
Page 73

Filtro de polarización circular deslizante C-PL1L (opcional)
• Bloquea el reflejo de superficies no metálicas como cristal y agua.
• Cuando se coloca un filtro de polarización circular deslizante C-PL1L, la
distancia focal es diferente de cuando se coloca un filtro a rosca de 52mm.
La escala de distancia se desplaza de la posición correcta. La distancia de
enfoque más cercana se amplía ligeramente.
• La posición de ajuste de la memoria puede cambiar ligeramente cuando se
utiliza el enfoque preajustado.
• Coloque el filtro C-PL1L antes de utilizar la función de ajuste de la memoria.
Pantallas de enfoque recomendadas
Hay diferentes pantallas de enfoque intercambiables para algunas cámaras SLR
de Nikon apropiados para cualquier situación fotográfica. Las recomendadas
para utilizar con este objetivo son las que aparecen en la lista a continuación:
Pantalla
Cámara
F6
F5+DP-30
F5+DA-30
: Enfoque excelente
◎
: Enfoque aceptable
○
Ligero viñeteo que afecta la imagen de la pantalla, pero la imagen de la
película no es afectada por esto.
—
: No existe.
( ) : Indica la cantidad de compensación adicional necesaria (Solamente
medición ponderada central). Para las cámaras F6, compense seleccionando
”Otra pantalla” en el ajuste personal del usuario “b6: Compens pantalla”
y ajustando el nivel EV a -2,0 a +2,0 en pasos de 0,5 EV. Cuando se utilice
una pantalla que no sea de tipo B o E, debe seleccionarse “Otra pantalla”
incluso cuando el valor de compensación requerido sea “0” (no se requiere
compensación). Para las cámaras F5 compense usando el ajuste personal
del usuario No.
manual del usuario de la cámara.
Las celdas en blanco significan que no es aplicable. Como la pantalla de tipo M
se usa tanto para macrofotografía a una razón de aumento de 1:1 o más como
para microfotografía, sus aplicaciones son distintas a las de las demás pantallas.
Importante
• Para las cámaras F5, únicamente pueden utilizarse pantallas de enfoque EC-B,
EC-E, B, E, J, A, L en medición de matriz.
ABC E
◎
◎◎◎
(–0,5)
◎◎○◎◎
◎◎○◎◎
18 en el cuerpo de la cámara. Para más detalles, consulte el
EC-B
FG1G2G3G4 J K L M P U
EC-E
◎
○
○
(–0,5)
◎◎ ◎
◎◎ ◎
◎
Forma de cuidar el objetivo
• Tenga cuidado de no sujetar la cámara por el cuerpo principal con el objetivo
instalado, puesto que esto podría dañar la cámara (montaje del objetivo).
Asegúrese de sujetar tanto la cámara como el objetivo cuando la transporte.
• Cuando el objetivo esté montado en una cámara, no sostenga ni levante la
cámara y el objetivo por la visera del objetivo.
73
Jp
En
De
Fr
Es
Se
Ru
Nl
It
Ck
Ch
Kr
Page 74

• Es importante mantener limpios los contactos de CPU y evitar que se dañen.
• Si la junta de goma de montaje del objetivo se daña, asegúrese de ir a un
centro de servicio técnico autorizado Nikon para que lo reparen.
Jp
• Limpiar la superficie del objetivo con un cepillo soplador. Para eliminar la
suciedad o las huellas, utilizar un trapo de algodón suave y limpio o papel
especial para objetivos humedecido en etanol (alcohol) o limpiador de
En
objetivos. Limpiar describiendo un movimiento circular del centro hacia fuera,
teniendo cuidado de no dejar restos ni tocar otras partes del objetivo.
De
• No utilizar nunca productos orgánicos, como disolventes o benceno, para
limpiar el objetivo.
• Cuando guarde el objetivo en su funda, coloque las tapas delantera y trasera
Fr
del objetivo.
• Si no se va a utilizar el objetivo durante un periodo largo de tiempo, guardarlo
Es
en un lugar fresco y seco para evitar la formación de moho y óxido. Asegúrese
de guardar el objetivo, además, lejos de la luz solar directa o de productos
químicos tales como alcanfor o naftalina.
Se
• No mojar el objetivo ni dejarlo caer al agua, ya que se oxidaría y no
funcionaría bien.
Ru
• Algunas partes del objetivo son de plástico reforzado. Para evitar daños, no
dejarlo nunca en un lugar excesivamente caliente.
Nl
Accesorios estándar
• Tapa del objetivo delantera deslizante
It
• Tapa trasera del objetivo
• Visera del objetivo HK-30
• Estuche semiblando CL-L2 (con material de amortiguación interna dedicado)
Ck
• Soporte de filtro dedicado
• Filtro NC a rosca de 52mm
Ch
• Cristal protector del objetivo dedicado (colocado en el objetivo)
• Funda de cristal protector del objetivo dedicada
• Cinta LN-1
Kr
Importante
• El soporte del filtro deslizante, con filtro a rosca de 52mm, debe introducirse
en el objetivo en cualquier momento.
Accesorios opcionales
• Filtros a rosca de 52mm (salvo filtro de polarización circularⅡ)
• Filtro de polarización circular deslizante C-PL1L
• Teleconvertidores AF-S TC-14EⅡ/TC-17EⅡ*/TC-20EⅢ* (*Autofoco está
disponible únicamente con cámaras que sean compatibles con f/8.)
Especificaciones
Tipo de objetivo: Objetivo AF-S Zoom-NIKKOR tipo G con CPU
Distancia focal: 200-400mm
Abertura máxima: f/4
74
incorporada y montaje de bayoneta Nikon
Page 75

Estructura del
objetivo:
Ángulo de imagen: 12°20’-6°10’ para las cámaras SLR de película con
Escala de distancias focales:
Información de distancia:
Control de zoom: Manual, a través de anillo de zoom separado
Enfoque: Sistema de enfoque interno (IF) de Nikon, sistema
Reducción de
vibraciones:
Escala de distancias
de la toma:
Distancia de enfoque
más cercana:
No. de láminas del
diafragma:
Diafragma: Totalmente automático
Gama de aberturas: f/4 hasta f/32
Medición de
exposición:
Conmutador de
límite de enfoque:
Collar del trípode: Girable 360°, índices de posición de giro del objetivo a
Dimensiones: Aprox. 124 mm de diám. x 365,5 mm (extensión de
Peso: Aprox. 3.360 g con cristal protector del objetivo
Las especificaciones y los diseños están sujetos a cambio sin previo aviso ni obligación por
parte del fabricante.
24 elementos en 17 grupos (4 lentes ED y algunas de
cristal con recubrimiento de nanocristal depositado),
así como 1 cristal protector del objetivo extraíble
formato de 35mm (135) de Nikon y para las cámaras
SLR digitales con formato FX de Nikon
8°-4° para las cámaras SLR digitales con formato DX
de Nikon
9°50’-5° para las cámaras del sistema IX240
200, 250, 300, 350, 400mm
Salida al cuerpo de la cámara
de autofoco con motor Silent Wave; manualmente
mediante anillo de enfoque separado
Método de desplazamiento del objetivo mediante
motores de bobina de voz (VCM)
Calibrado en metros y pies desde 2 m a infinito (∞)
2 m con autofoco, a partir del plano focal en todas las
posiciones de zoom
1,95 m con enfoque manual, a partir del plano focal
en todas las posiciones de zoom
9 piezas (redondeadas)
Método de abertura total con cámaras con sistema de
interfase CPU
Instalado; hay dos posiciones: FULL (∞–2 m) o ∞–6 m
90°, collar del trípode únicamente desmontable
la brida de la montura del objetivo de la cámara con
cristal protector del objetivo colocado)
Aprox. 124 mm de diám. x 358,5 mm (extensión de
la brida de la montura del objetivo de la cámara sin
cristal protector del objetivo )
Aprox. 3.240 g sin cristal protector del objetivo
Jp
En
De
Fr
Es
Se
Ru
Nl
It
Ck
Ch
Kr
75
Page 76

Att notera för en säker hantering
Jp
En
De
Fr
Es
Sv
Ru
Nl
Ck
Ch
Kr
SE UPP!
Montera inte isär kameran
Om du rör vid delarna inne i kameran eller objektivet kan du skada dig.
Reparationer ska endast utföras av kvalificerade tekniker. Om kameran eller
objektivet skulle brytas upp efter att de tappats i marken eller stötts till, ska du
efter att den kopplats bort från nätströmmen och/eller batteriet lossats, lämna
in produkten till ett auktoriserat Nikonservicecenter för inspektion.
Stäng genast av kameran om den slutar att fungera korrekt
Om det kommer rök eller någon ovanlig lukt från kameran eller objektivet ska
du genast ta bort batteriet. Var försiktig så att du inte bränner dig. Fortsatt
användning kan medföra personskada. När du har avlägsnat eller kopplat bort
strömkällan bör du ta utrustningen till ett auktoriserat Nikon-servicecenter
för kontroll.
Använd inte kameran eller objektivet i närheten av
It
lättantändlig gas
Hantering av elektrisk utrustning i närheten av lättantändlig gas kan
resultera i explosion eller brand.
Titta inte in i solen genom objektivet eller sökaren
Om du tittar in i solen eller någon annan stark ljuskälla genom objektivet eller
sökaren kan ögonen skadas permanent.
Förvara utom räckhåll för barn
Var försiktig och förvara produkten utom räckhåll för barn så att de inte stoppar
batterier eller andra smådelar i munnen.
76
Page 77

Observera följande försiktighetsåtgärder när du hanterar
kameran och objektivet
• Håll kameran och objektivet torra. Underlåtenhet att följa denna anvisning
kan resultera i brand eller elektrisk stöt.
• Hantera eller rör inte kameran eller linsen med våta händer. Underlåtenhet att
följa dessa anvisningar kan resultera i elektrisk stöt.
• När du fotograferar i motljus ska du tänka på att inte rikta objektivet mot
solen och inte heller låta solstrålar gå rakt in i objektivet. Annars kan kameran
bli överhettad och kanske orsaka brand.
• När objektivet inte ska användas under en längre tidsperiod ska både främre
och bakre objektivlock sättas fast och objektivet placeras på en plats skyddad
mot direkt solljus. Underlåtenhet att följa denna anvisning kan orsaka brand,
eftersom objektivet kan fokusera solljuset mot ett lättantändligt objekt.
Jp
En
De
Fr
Es
Sv
Ru
Nl
It
Ck
Ch
Kr
77
Page 78

Tack för att du köpte objektivet AF-S NIKKOR 200-400mm f/4G ED VRⅡ.
Innan du använder objektivet ska du läsa de här instruktionerna och
Jp
kamerans användarhandbok.
Terminologi
En
De
Fr
Es
Sv
Ru
Nl
It
Ck
1 Motljusskydd (s. 85)
Ch
2 Skruv för motljusskydd (s. 85)
3 Skyddsglas för objektiv (fäst till
Kr
objektivet) (s. 86)
4 Gummigrepp
5 Knapp för fokusfunktion (Fokuslås/
Minnesåterkallning/AF-start) (s. 82)
6 Fokusring (s. 81)
7 Avståndsskala (s. 85)
8 Distansindikeringslinje
9 Zoomring (s. 85)
0 Brännviddsskala
! Indikeringslinje för brännviddsskala
@ Markering för objektivrotationsläge
(s. 85)
# Fästskruv till stativring (s. 85)
$ Instickshållare för filter (s. 86)
78
%
Knapp på instickshållare för filter (s. 86)
^ Minnesinställningsknapp (s. 82)
& Monteringsindikering
* Gummipackning för montering av
objektiv (s. 88)
( CPU-kontakter (s. 88)
) Inbyggt roterande stativfäste (s. 85)
q Fäste för rem
w Väljare för ljudmonitor (s. 82)
e Väljare för fokusfunktion (AF-L/
MEMORY RECALL/AF-ON) (s. 82)
r Brytare för fokuslägesväljare (s. 81)
t Väljare för fokuseringsgräns (s. 81)
y Brytare för vibrationsreducering
ON/OFF (s. 84)
u Lägesbrytare för
vibrationsreducering (s. 84)
( ): Referenssida
Page 79

Jp
En
De
Fr
Es
Sv
Ru
Nl
It
Ck
Ch
Kr
79
Page 80

Huvudfunktioner
• Nanokristallbeläggningen på några av linselementen garanterar att fina, klara
bilder kan reproduceras under alla fotograferingsförhållanden, från soliga
Jp
utomhus- till spotlightbelysta inomhusmotiv.
• Denna objektivet har AF-L, som låser fokus under autofokus, AF-ON, som
En
aktiverar autofokus och MEMORY RECALL, som sparar och återkallar valda
fokusavstånd.
De
• Med vibrationsreduktionen (VRⅡ) aktiverad kan längre slutartider användas
(3 steg*). Därmed ökar antalet slutartider och zoompositioner som kan
användas, särskilt på en handhållen kamera. (*Effekterna av VR på slutartiden
Fr
mäts i enlighet med standarden från Camera and Imaging Products
Association (CIPA); Objektiv med FX-format mäts med digitalkameror i
Es
FX-format, och objektiv med DX-format med kameror med DX-format.
Zoomobjektiv mäts vid maximal zoom.)
Sv
Viktigt
• När den monteras på en Nikons digitala SLR-kameror i DX-format, som
D300-serien och D7000 blir objektivvinkeln 8°-4° och dess motsvarande
Ru
fokallängd vid 35mm är ungefär 300-600mm.
Nl
Användbara kameror och tillgängliga funktioner
Det kan finnas några begränsningar i de tillgängliga funktionerna. Se kameran
användarhandbok för mer information.
It
Ck
Ch
Nikon digital SLR-kamera (Nikon
FX/DX-format), F6, F5, F100,
Kr
F80-serien, F75-serien, F65-serien
Pronea 600i, Pronea S*
F4-serien, F90X, F90-serien,
F70-serien
F60-serien, F55-serien, F50-serien,
F-401x, F-401s, F-401
F-801s, F-801, F-601M
F3AF, F-601, F-501,
Nikon MF kameror (utom F- 601
*1 : P inkluderar AUTO och Vari-Programsystem (motivtyper).
*2 : Manuell (M) är inte tillgängligt.
*3 : När väljare för fokusfunktion är ställd till AF-ON, börjar autofokus då snartknapp för
*4 : Tryck på minnesinställningsknappen eller en knapp för fokusfunktion medan du
*5 : Möjligt, med vissa begränsningar
Kameror
VR AF
2
: Möjligt —: Ej möjligt VR: Vibrationsreducering AF: Autofokus
fokusfunktion trycks in medan slutaren trycks ner halvvägs.
trycker ner slutaren halvvägs.
—
—
—— — — —
—— — — —
—— — — — ——— —
M)
80
Funktion
Fokus-
Minnesåter-
lås
kallning
objektivet
*
3
*
4
(fotograferingsläge)
AF-start
på
P
3
*
5
*
Exponeringsläge
*1
SA M
——
——
Page 81

Fokusering
Ställ in kamerans fokusläge enligt denna tabell:
Kameror
Nikon digital SLR-kamera
(Nikon FX/DX-format), F6, F5,
F4-serien, F100, F90X,
F90-serien, F80-serien,
F75-serien, F70-serien,
F65-serien, Pronea 600i,
Pronea S
F60-serien, F55-serien,
F50-serien, F-801s, F-801,
F-601
M, F-401x, F-401s, F-401
A/M-läge (Autofokus med möjlighet till manuell fokusering. AF-prioritet) och
M/A-läge (Autofokus med möjlighet till manuell fokusering. MF-prioritet)
M/A: Du kan koppla ur autofokusfunktionen genom att
A/M: Du kan koppla ur autofokusfunktionen genom att
a
Ställ in brytaren för fokuslägesväljare på A/M eller M/A.
b
Autofokus kan åsidosättas manuellt genom att rotera fokusringen medan
du trycker ner slutaren halvvägs, trycker på AF-ON-knappen på kameran
eller trycker på en knapp för fokusfunktion (med fokus inställt till AF-ON) på
objektivet.
c
Genom att trycka ner slutaren halvvägs, trycka ner AF-ON-knappen på
kameran eller trycka på en knapp för fokusfunktion på objektivet igen
avbryter du den manuella åsidosättningen och objektivet återställs till
autofokusläge.
Begränsa autofokusområde
Den här funktionen är endast tillgänglig med autofokus.
FULL: Om motivet är något närmre än 6 m, ställ in till FULL.
∞–6m: Om motivet alltid är 6 m eller längre bort, stall in till
Kamerans
fokusläge
AF
(AF-prioritet)
MF
AF
MF
fokusera manuellt med fokusringen.
fokusera manuellt med fokusringen, men fokusringens
känslighet är lägre än i M/A-läget. Använd detta läge
om du vill undvika att ändra AF-inställningen genom att
oavsiktligt röra fokusringen.
∞–6m för att minska fokuseringstiden.
Objektivets fokusläge
A/M M/A M
Autofokus
med
möjlighet
till manuell
fokusering
(Elektronisk avståndsmätare kan användas.)
(Elektronisk avståndsmätare kan användas,
Autofokus
med
möjlighet
till manuell
fokusering
(MF-prioritet)
Manuell fokusering
Manuell fokusering
utom med F- 601
AF: Autofokus MF: Manuell fokusering
Manuell
fokusering
(Elektronisk
avståndsmätare
kan användas.)
M.)
Jp
En
De
Fr
Es
Sv
Ru
Nl
It
Ck
Ch
Kr
81
Page 82

Väljare för fokusfunktion och knapp för fokusfunktion
(se sid. 80 för kompatibla kameror).
Använd väljare för fokusfunktion för att välja en funktion för knapp för
Jp
fokusfunktion.
En
De
Fr
Es
Sv
Ru
Fokuslås (AF-L)
Denna funktion är endast kompatibel med autofokus.
Nl
a
Ställ in brytare för fokuslägesväljare till A/M eller M/A.
b
Ställ in väljare för fokusfunktion till AF-L.
It
c
Under autofokusläge kan fokus låsas genom att trycka in en av knapparna
Ck
Ch
Kr
för fokusfunktion.
• Fokus förblir låst medan en knapp för fokusfunktion trycks ner och hålls nere.
• AF-L-funktionen kan aktiveras antigen från kameran eller från objektivet.
Minnesåterkallning (MEMORY RECALL)
♪: Objektivet piper när minnesåterkallningen utförs.
Position för väljare för
fokusfunktion
AF-L Fokuslås
MEMORY RECALL Minnesåterkallning
AF-ON AF-start (AF-ON) på objektivet
• Tryck på en av fyra knappar för fokusfunktion för att aktivera
varje funktion.
• Knapp för fokusfunktionens position kan ändras för att
passa enskilda användares preferenser. För mer information
om detta, kontakta ditt närmaste Nikon-servicecenter eller
återförsäljare.
♪
: Minnesåterkallningen är aktiv utan pipljudet.
○
Följande funktion är aktiv då väljare för ljudmonitor är
ställd till .
Knappfunktion för fokus
• Objektivet kommer att pipa när fokusavståndet är
• Minnesinställning går att göra oavsett inställning på fokusläget eller väljare för
fokusfunktion.
• Fokusavståndet sparas även när kameran stängs av eller när objektivet tas
bort från kameran.
a
Fokusera på ett motiv och tryck ner minnesinställningsknappen
för att spara fokusavståndet.
korrekt sparat.
• När fokusavståndet inte har sparats korrekt, kommer
distansringen att rotera fram och tillbaka ungefär 10 gånger
medan objektivet kommer att sända ut ett kort och tre långa
pip. Om detta händer, upprepa proceduren för att spara
fokusavståndet.
82
Page 83

• När du utför minnesåterkallning vid inställningar med annan brännvidd än
i originalinställningarna, kan fokusavståndet vara frånkopplat. Var speciellt
noggrann när minnesåterkallning utförs vid inställningar med längre
brännvidd. När väljare för ljudmonitor är inställd till , kommer ett varningspip
att låta. Det rekommenderas att minnesåterkallning så ofta som möjligt utförs
vid samma brännvidd som till vilken minnet har ställts in.
b
Ställ in väljare för fokusfunktionläges till MEMORY RECALL.
c
Tryck på en knapp för fokusfunktion. Efter att objektivet har pipit två gånger,
tryck ner slutaren halvvägs för att ta bilden.
• Det sparade fokusavståndet återkallas när en knapp för fokusfunktion trycks
ner, även när slutaren trycks ner halvvägs.
• För att ta en bild vid sparat fokusavstånd, håll nere knappen för fokusfunktion
och tryck ner slutaren helt.
• Objektivet återgår från minnesåterkallning till autofokus eller manuellt fokus
när knapp för fokusfunktion släpps upp.
Autofokus (AF)-start på objektivet (AF-ON)
a
Ställ in brytare för fokuslägesväljare till A/M eller M/A.
b
Ställ in väljare för fokusfunktion till AF-ON.
c
Tryck på en knapp för fokusfunktion för att fokusera på motivet.
• Autofokus är aktivt medan en knapp för fokusfunktion trycks ner och hålls nere.
• AF-ON-funktionen kan aktiveras antigen från kameran eller från objektivet.
Läge för vibrationsreduktion (VRⅡ)
Grundläggande koncept bakom vibrationsreduktion
Hög
Kameraskakning vid bruk av ett stativ
Kameraskakning
Kraftig
kameraskakning
vid fotografering
från fordon i
rörelse
Jp
En
De
Fr
Es
Sv
Ru
Nl
It
Ck
Ch
Kr
Antal vibrationer
Låg
Svag
Ställ in lägesbrytaren för
vibrationsreducering på NORMAL.
Vid fotografering
Vid panoreringsfotografering
Vid fotografering från ett fordon i rörelse
Vid fotografering med hjälp av ett
stativ
Panoreringsbilder
Vibrationsstyrka
Ställ in lägesbrytaren för
vibrationsreducering på ACTIVE.
Ställ in lägesbrytaren för vibrationsreducering
på NORMAL eller ACTIVE.
Ställ in lägesbrytaren för vibrationsreducering på NORMAL.
Stäl
l in lägesbrytaren för vibrationsreducering på ACTIVE.
Ställ in lägesbrytaren för vibrationsreducering
på NORMAL eller ACTIVE.
Kraftig
83
Page 84

Ställ in brytare för vibrationsreducering ON/OFF
ON: Effekterna av kameraskakning reduceras när du trycker
Jp
En
De
Ställa in lägsbrytaren för vibrationsreducering
Ställ in brytare för vibrationsreducering ON/OFF till ON och välj ett
Fr
vibrationsreduceringsläge med lägesbrytare för vibrationsreducering.
Es
Sv
Ru
Nl
Att notera om vibrationsreducering
It
• Om objektivet ska användas på en kamera som inte är kompatibel med
vibrationsreducering (sid. 80) ställer du brytare för vibrationsreducering ON/
Ck
OFF på OFF. I synnerhet när du använder Pronea 600i-kameran kan batteriet
snabbt laddas ur om denna omkopplare står kvar i läget ON.
Ch
• Tryck först ned avtryckaren halvvägs och vänta sedan tills bilden i sökaren
stabiliseras innan du trycker ned avtryckaren helt.
• På grund av vibrationsreduceringens mekaniska egenskaper kan bilden i
Kr
sökaren bli suddig efter att avtryckaren släppts. Detta är inte något fel.
• När du tar panoreringsbilder ska du tänka på att ställa in lägesbrytaren
för vibrationsreducering på NORMAL. Om du flyttar kameran i en vid
båge när du panorerar, kompenserar den inte för kameraskakning i
panoreringsriktningen. Till exempel reduceras endast effekterna av vertikal
kameraskakning vid horisontell panorering.
• Stäng inte av kameran och lossa inte objektivet från kameran när
vibrationsreduceringen är aktiverad. Om detta inte efterföljs kan det låta och
kännas som en invändig del är lös eller trasig i objektivet när du skakar på det.
Detta är inte något fel. Starta kameran igen för att korrigera detta.
• För kameror som har inbyggd blixt, fungerar inte vibrationsreduceringen när
den inbyggda blixten laddas.
• När du använder ett stativ, ställ in brytare för vibrationsreducering ON/OFF
till ON för att reducera effekten av kameraskakning. Nikon rekommenderar
att brytaren ställs till ON när du använder kameran på ett osäkrat stativhuvud
eller med en monopod. Men när kameraskakningen är väldigt liten, kan
vibrationsreducering omvänt öka effekten på kameraskakning med systemets
rörelse. Om detta händer, ställ brytare för vibrationsreducering ON/OFF till OFF.
ned avtryckaren halvvägs samt vid det ögonblick då bilden
tas. Eftersom vibrationer reduceras i sökaren, underlättas
den automatiska eller manuella fokuseringen och själva
komponeringen av motivet i sökaren blir lättare.
OFF: Effekterna av kameraskakning reduceras inte.
NORMAL: Vibrationsreduktionen reducerar huvudsakligen
effekten av kameraskakningar. Effekten av
kameraskakningar reduceras också vid horisontella
eller vertikala panoreringar.
ACTIVE: Vibrationsreduktionen reducerar effekten av
kameraskakningar vid till exempel fotografering från
ett fordon i rörelse. Både normala och kraftigare
kameraskakningar reduceras. I det här läget görs
ingen automatisk skillnad mellan kameraskakningar
och panorering.
84
Page 85

Ställa in bländaren
Använd kameran för att justera bländarinställningen.
Ställa in fokus, zoom och skärpedjup
Innan du ställer in fokus roterar du på zoomringen för att justera brännvidden
så att du får med den önskade kompositionen. Om kameran har funktioner
för förhandsgranskning av skärpedjupet kan du förhandsgranska skärpedjupet
genom kamerans sökare.
• Det här objektivet är utrustat med ett system för innerfokusering (IF). Om
fotograferingsavståndet minskar, minskar också brännvidden.
• Avståndsskalan visar inte exakt avstånd mellan motiv och kamera. Värdena är
ungefärliga och ska användas som en allmän vägledning. Vid fotografering av
avlägsna landskap kan skärpedjupet påverka funktionen och motivet kan vara
i fokus på ett avstånd närmare än oändligt.
• För vidare information, se sid. 210.
Använda en inbyggd roterande stativring
Om du använde stativ, fäst det vid objektivets stativfäste i stället för kamerans.
• När du håller kameran i handtaget och roterar den med objektivet i stativringen,
kan din hand stöta i stativet beroende på vilket stativ som används.
• Det går att koppla ifrån stativringen genom att skruva ur låsskruv till
stativkrage. För information om denna procedur, kontakta ditt närmaste
Nikon-servicecenter eller återförsäljare.
Ändra kamerapositionen
Lossa på fästskruv till stativring (1). Beroende på
kameraposition (vertikal eller horisontal), vrid objektivet
till ett lämpligt markering för objektivrotationsläge (2)
och dra åt skruven (3).
Jp
En
De
Fr
Es
Sv
Ru
Nl
It
Ck
Ch
Använda motljusskyddet
Motljusskydd minimerar ströljus och skyddar objektivet.
Att fästa motljusskyddet
• Dra helt åt skruv för motljusskydd (2 ).
• Om motljusskyddet inte sitter korrekt kan
vinjettering uppstå.
• Ta bort det tvärtom innan du lagrar det.
Kr
85
Page 86

Skyddsglas för objektiv
Det här objektivet är tillgängligt med ett skyddsglas för
Jp
En
De
• Förvara skyddsglaset i fodral till dedicerat skyddsglas för objektiv.
Inbyggd blixt och vinjettering
Fr
För att undvika vinjettering, använd inte motljusskydd.
• För den senaste informationen om vinjettering med detta objektiv, se
Es
kamerans handbok.
Sv
Ru
Nl
It
Ck
Ch
Kr
Kameror
D90, D80, D50
D70-serien
D5300
D5200, D5100, D5000, D3200,
D3100, D3000, D60, D40-serien
D3300
F80-serien
F75-serien, F70-serien
F65-serien, F60-serien,
F55-serien, F50-serien, F-401,
F-401x, F-401s, Pronea 600i,
Pronea S
objektiv. Det rekommenderas att detta glas behålls på
objektivet vid alla tillfällen.
• Om bilden du vill ta har en stark ljuskälla, kan
spökbildseffekten minskas om du tar bort glaset. För att
ta bort glaset skruvar du bort gummiringen runt glaset
(1, 2).
•
200mm/3 m eller större • 250mm eller större/ingen begränsning
• 200mm/4 m eller större • 250mm/2,5 m eller större
• 300mm eller större/ingen begränsning
• 200mm/5 m eller större • 250mm/3 m eller större
• 300mm eller större/ingen begränsning
• 200mm/5 m eller större • 250mm/3 m eller större
• 300mm/2,5 m eller större
• 350mm eller större/ingen begränsning
• 200mm/4 m eller större • 250mm/3 m eller större
• 300mm/2,5 m eller större
• 200mm/3 m eller större
• 250mm eller 300 mm/2,5 m eller större
• 350mm eller större/ingen begränsning
• 250mm/5 m eller större • 300mm/4 m eller större
• 350mm/3 m eller större • 400mm/ingen begränsning
Vinjettering inträffar på alla fotograferingsavstånd.
Brännvidd/avstånd
Instickshållare för filter
Använd alltid ett (52mm påskruvbart) filter. Ett 52mm påskruvbart NC-filter är
fäst till hållaren för filter när den levereras från fabriken.
86
a
Tryck ner knapp på instickshållare för filter och vrid
moturs tills den vita linjen på ratten är med rät vinkel
till objektivets axel.
b Dra instickshållare för filter från objektivkroppen.
c Ta loss filtret från hållaren för filter.
d
Skruva på ett filter på sidan av hållaren för filter
markerad med orden ”Nikon” och ”JAPAN”.
• Instickshållaren för filter kan fästas med ”Nikon” och
”JAPAN” antingen riktad mot objektivet eller
kamerasidan utan att dina bilder påverkas av detta.
Page 87

C-PL1L Snäpp fast cirkulärt polariseringsfilter (tillval)
• Blockerar reflektioner från icke-metalliska ytor såsom glas och vatten.
• När ett Snäpp fast polariseringsfilter C-PL1L fästs, skiljer sig fokusavståndet
från då ett 52mm påskruvbart filter fästs. Avståndsskalan växlas från korrekt
position. Närmaste fokusavstånd förlängs något.
• Minnesinställningspositionen kan ändras något när du använder förinställd
fokus.
• Fäst C-PL1L-filtret innan du använder minnesinställningsfunktionen.
Rekommenderade mattskivor
Det finns olika utbytbara mattskivor för vissa SLR-kameror från Nikon till olika
fotograferingssituationer. Till detta objektiv rekommenderas följande:
Skärm
Kamera
F6
F5+DP-30
F5+DA-30
: Utmärkt fokusering
◎
: Acceptabel fokusering
○
En lätt vinjettering eller moirémönster syns i sökaren, men inte på filmen.
—
: Inte tillgängligt
( ) : Anger graden av exponeringskompensation som krävs (endast centrumvägd
mätning) För F6-kameror kompenserar du genom att välja ”Other screen”
(Annan skiva) i Custom setting (Anpassad inställning) ”b6: Screen comp.”
(Mattskivekomp.) och ställa EV-nivån på –2,0 till +2,0 i steg om 0,5 EV.
När du använder en annan mattskiva än typ B eller E måste du välja ”Other
screen” (Annan skiva), även om kompensationsvärdet som krävs är ”0”
(ingen kompensation krävs). På F5-kameror kompenserar du med ”Custom
setting #18” (Anpassad inställning nr 18) på kamerahuset. Mer information
finns i användarhandboken för kamerahuset.
En tom ruta innebär att det inte är tillämpligt. Eftersom skärmtyp M kan
användas för både makrofotografering vid en förstoringsgrad på 1:1 och högre
och för fotomikrografi, har den andra tillämpningar än andra skärmar.
Viktigt
• För F5-kameror är endast mattskivorna EC-B, EC-E, B, E, J, A, L tillgängliga i
matrismätning.
ABCE
◎
◎―◎――――◎―
(-0,5)
◎◎○◎◎― ○◎―◎ ―◎
◎◎○◎◎― ○◎―◎ ―◎
EC-B
FG1G2G3G4 J K L M P U
EC-E
◎
(-0,5)
―◎
Jp
En
De
Fr
Es
Sv
Ru
Nl
It
Ck
Ch
Kr
87
Page 88

Vård av objektivet
• Håll inte i kamerahuset när objektivet är monterat. Detta kan orsaka skada på
kameran (objektivfästet). Håll i både kameran och objektivet när du bär dem.
Jp
• När objektivet är monterat på kameran bör du inte lyfta eller hålla kameran
och objektivet i motljusskydd.
En
• Var försiktig så att inte CPU-kontakterna blir smutsiga eller skadas.
• Om gummipackningen för monteringen av objektivet skadats, besök hos
De
närmaste auktoriserade återförsäljare eller ditt servicecenter för reparation.
• Rengör objektivets ytor med en blåsborste. Använd en mjuk, ren bomullsduk
eller linsduk fuktad med etanol (alkohol) eller linsrengöringsmedel, för att ta
Fr
bort smuts och fettfläckar. Torka i en cirkulär rörelse från mitten och utåt.
Lämna inte kvar några spår av rengöringsmedlet och rör inga andra delar av
Es
objektivet.
• Rengör aldrig objektivet med organiska lösningsmedel som thinner eller bensen.
Sv
• När du förvarar objektivet i dess fodral, fäst både det främre och bakre
objektivlocket.
• Om objektivet inte ska användas under en längre tidsperiod ska det förvaras
Ru
svalt och torrt så att mögel och rost kan undvikas. Förvara det också skyddat
mot direkt solljus och kemikalier såsom kamfer och naftalen.
Nl
• Se till att det inte kommer vatten på objektivet och tappa det inte i vatten,
eftersom det då kommer att rosta och sluta fungera.
• Förstärkt plast används i vissa av objektivets delar. Lämna aldrig objektivet på
It
en alltför varm plats för att undvika skador.
Ck
Standardtillbehör
• Snäpp på främre objektivlock
• Bakre objektivlock
Ch
• Motljusskydd HK-30
• Objektivfodral CL-L2 (med dedicerat inre stoppningsmaterial)
Kr
• Dedicerad filterhållare
• 52mm påskruvbart NC-filter
• Dedicerat skyddsglas för objektiv (fäst till objektivet)
• Fodral till dedicerat skyddsglas till objektiv
• Rem LN-1
Viktigt
• Instickshållare för filter med ett 52mm påskruvbart filter fäst, ska alltid sättas
in i objektivet.
Extra tillbehör
• 52mm påskruvbara filter (utom cirkulärt polariseringsfilterⅡ)
• Snäpp fast cirkulärt polariseringsfilter C-PL1L
• AF-S telekonvertrar TC-14EⅡ/TC-17EⅡ*/TC-20EⅢ* (*Autofokus är endast
tillgängligt med kameror med stöd för f/8.)
88
Page 89

Specifikationer
Typ av objektiv: G-typ AF-S NIKKOR zoomobjektiv med inbyggd CPU
Fokallängd: 200-400mm
Maximal bländare: f/4
Linskonstruktion: 24 element i 17 grupper (4 ED och några
Bildvinkel: 12°20’-6°10’ med 35mm-format (135) Nikon film
Brännviddsskala: 200, 250, 300, 350, 400mm
Avståndsinformation:
Zoomkontroll: Manuellt via separat zoomring
Fokusering: Nikon-system för innerfokusering (IF), autofokus med
Vibrationsreducering:
Skala för
fotograferingsavstånd:
Kortaste
fokuseringsavstånd:
Antal slutarblad: 9 st. (rundade)
Bländarle: Helautomatisk
Bländarskala: f/4 till f/32
Exponeringsmätning:
Väljare för
fokuseringsgräns:
Stativkrage: Vridbar 360°, objektivets vridningsindikering vid 90°,
Mått:
Vikt: Ungefär 3360 g med skyddsglas för objektiv
Specifikationer och utförande kan ändras när som helst, utan att tillverkaren meddelar
detta och utan någon skyldighet för densamme.
och Nikons bajonettkoppling
nanokristallbelagda linselement) samt ett avtagbart
skyddsglas
SLR-kameror och Nikon FX-format digitalkameror
8°-4° med Nikons digitala SLR-kameror i DX-format
9°50’-5° med IX240 systemkameror
Visas i kamerahuset
en fokuserande Silent Wave-motor, manuellt med
separat fokusring
Objektivbyte med VCM-motorer (voice coil)
Graderad i meter och fot från 2 m till oändligt
avstånd (∞ )
2 m med autofocus, från skärpeplanet vid alla
zoompositioner
1,95 m med manuell fokus, från skärpeplanet vid alla
zoompositioner
Full bländaröppning på kameror med CPU-gränssnitt
Två områden: FULL (∞–2 m) eller ∞–6 m
endast borttagbar stativkrage
Ungefär 124 mm diameter x 365,5 mm (utstick från
objektivets monterade fläns med skyddsglas för objektiv
fäst)
Ungefär 124 mm diameter x 358,5 mm (utstick från
objektivets monterade fläns utan skyddsglas för objektiv)
Ungefär 3240 g utan skyddsglas för objektiv
89
Jp
En
De
Fr
Es
Sv
Ru
Nl
It
Ck
Ch
Kr
Page 90

Примечания по безопасности использования
Jp
En
De
Fr
Es
Se
Ru
Nl
Ck
Ch
Kr
ПРЕДУПРЕЖДЕНИЕ
Не разбирайте фотокамеру
Прикосновение к внутренним частям фотокамеры или объектива
может привести к получению травм. Ремонт должен производиться
только квалифицированными специалистами. В случае повреждения
корпуса фотокамеры или объектива в результате падения или другого
происшествия отключите сетевой блок питания и/или извлеките батарею
и доставьте изделие для проверки в авторизованный сервисный центр
Nikon.
В случае неисправности немедленно выключите
фотокамеру
При появлении дыма или необычного запаха, исходящего из фотокамеры
или объектива, немедленно извлеките батареи, стараясь не допустить
ожогов. Продолжение работы с устройством может привести к
получению травм. После извлечения батареи или отключения источника
It
питания доставьте изделие для проверки в ближайший авторизованный
сервисный центр компании Nikon.
Не пользуйтесь фотокамерой или объективом при наличии
в воздухе легковоспламеняющихся газов
Работа с электронным оборудованием при наличии в воздухе
легковоспламеняющихся газов может привести к взрыву или пожару.
Не смотрите на солнце через объектив или видоискатель
Если смотреть на солнце или другие источники яркого света через
объектив или видоискатель, то это может вызвать необратимое
ухудшение зрения.
Храните в недоступном для детей месте
Примите особые меры предосторожности во избежание попадания
батарей и других небольших предметов детям в рот.
90
Page 91

Соблюдайте следующие меры предосторожности во
время эксплуатации фотокамеры и объектива
• Не допускайте попадания воды на фотокамеру и объектив.
Несоблюдение этого требования может привести к пожару или
поражению электрическим током.
• Не прикасайтесь к фотокамере или объективу мокрыми руками.
Несоблюдение этого требования может привести к поражению
электрическим током.
• При съемке с задним освещением не направляйте объектив на солнце,
а также не допускайте попадания солнечного света в объектив, так как
это может привести к перегреву фотокамеры и ее возгоранию.
• Если объектив не будет использоваться в течение длительного
времени, прикрепите переднюю и заднюю крышки объектива
и не оставляйте объектив под прямыми солнечными лучами.
Несоблюдение этого условия может привести к возгоранию, поскольку
объектив может сосредоточить солнечные лучи на каком-либо
легковоспламеняющемся предмете.
Jp
En
De
Fr
Es
Se
Ru
Nl
It
Ck
Ch
Kr
91
Page 92

Благодарим за приобретение объектива AF-S NIKKOR 200-400mm
f/4G ED VRⅡ. До использования этого объектива ознакомьтесь с
данными инструкциями и прочитайте pуководство пользователя.
Jp
Компоненты
En
De
Fr
Es
Se
Ru
Nl
It
Ck
1
Ch
Бленда (стр. 99)
2
Винт бленды объектива (стр. 99)
3
Защитное стекло объектива (прикрепляется к
Kr
объективу) (стр. 100)
4
Резиновое кольцо
5
Кнопка управления фокусировкой (блокировка
фокуса/Вызов даннвых из памяти/запуск AF)
(стр. 96)
6
Фокусировочное кольцо (стр. 95)
7
Шкала расстояния (стр. 99)
8
Указатель расстояния
9 Кольцо зуммирования (стр. 99)
0 Шкала фокусного расстояния
! Указатель шкалы фокусного расстояния
@
Метка положения при повороте объектива
(стр. 99)
#
Крепежный винт кольца переходника для
крепления на штативе (стр. 99)
$
Выдвижной держатель фильтра (стр. 100)
%
Рукоятка выдвижного держателя фильтра
(стр. 100)
^
Кнопка Memory Set (стр. 96)
&
Установочна я метка
*
Резиновый уплотнитель крепления объектива
(стр. 102)
(
Контакты микропроцессора (стр. 102)
)
Встроенный поворотный переходник для
крепления на штативе (стр. 99)
q
Проушина для ремня
w
Переключатель управления звуком (стр. 86)
e
Переключатель выбора режима фокусировки
(AF-L/MEMORY RECALL/AF-ON) (стр. 96)
r
Переключатель режимов фокусировки (стр. 95)
t
Ограничитель фокусировки (стр. 95)
y Переключатель подавления вибраций ON/OFF
(стр. 98)
u
Переключатель режимов подавления
вибраций (стр. 98)
( ): справочная страница
92
Page 93

Jp
En
De
Fr
Es
Se
Ru
Nl
It
Ck
Ch
Kr
93
Page 94

Основные возможности
• Нанокристаллическое покрытие, нанесенное на некоторые элементы объектива,
гарантирует получение четких снимков отличного качества в любых условиях – от
Jp
съемки при солнечном освещении до съемки в помещениях при свете прожекторов.
• В данном объективе используется телеконвертор AF-L, фиксирующий фокус во
En
время автофокусировки, функция AF-ON, активирующая автофокусировку, и
MEMORY RECALL, сохраняющая и активирующая избранные фокусные расстояния.
•
При включении функции подавления вибраций (VRⅡ) можно использовать
De
более длительные выдержки (3 ступени*), тем самым увеличивая диапазон
значений выдержки и зума (особенно при ручной съемке). (*
Fr
выдержку измеряется в соответствии со стандартами Camera and Imaging Products
Влияние VR на
Association (CIPA; Ассоциация производителей фотокамер и устройств обработки
изображений); объективы формата FX измеряются с помощью цифровых фотокамер
Es
формата FX, объективы формата DX измеряются фотокамерами формата DX. Зумобъективы измеряются при максимальном увеличении
Se
Внимание
• При присоединении объектива к цифровой зеркальной фотокамере Nikon
Ru
формата DX, например, к фотокамере cерия D300 и D7000, угол зрения
.)
объектива становится равным 8°-4°, а фокусное расстояние (в эквиваленте для
35мм пленочной фотокамеры) становится приблизительно равным 300-600 мм.
Nl
Совместимые фотокамеры и доступные функции
It
Использование доступных функций объектива может быть связано с некоторыми
ограничениями. Подробные сведения см. в pуководствe пользователя фотокамеры.
Ck
Ch
Фотокамеры
Цифровой зеркальной фотокамере
Nikon формата FX/DX, F6, F5, F100,
Kr
cерия F80, cерия F75, cерия F65
Pronea 600i, Pronea S*
Серия F4, F90X, cерия F90, cерия F70
Серия F60, cерия F55, cерия F50,
F-401x, F-401s, F-401
F-801s, F-801, F-601
F3AF, F-601, F-501,
камеры Nikon MF (кроме F-601м)
: Возможно —: Невозможно VR: Подавление вибраций AF: Авто- фокус
Режим P включает в себя режим AUTO и систему с варипрограммой (сюжетные режимы).
*1:
*2:
Ручной режим (M) недоступен.
*3:
В случае установки переключателя выбора режима фокусировки на AF-ON,
автофокусировка начинается сразу же после нажатия кнопки управления фокусировки с
одновременным полунажатием кнопки спуска затвора.
*4:
Нажмите кнопку Memory Set или кнопку управления фокусировки, одновременно до
половины нажимая кнопку спуска затвора.
*5:
Возможно, но с некоторыми ограничениями.
VR AF
2
M
—
—
—— — — —
—— — — —
—— — — — ————
Функция
Блоки-
Вызов
ровка
даннвых
фокуса
из памяти
*3*
4
Запуск
AF на
объективе
3
*
5
*
Режим экспозиции
(режим съёмки)
P*1SAM
——
——
94
Page 95

Фокусировка
Устан овите селектор режима фокусировки камеры в соответствии с
нижеприведённой таблицей.
Фотокамеры
Цифровой зерка
фотокамере Nikon формата
FX/DX, F6, F5, cерия F4, F100,
F90X, cерия F90, cерия F80,
cерия F75, cерия F70,
cерия F65, Pronea 600i,
Pronea S
Серия F60, cерия F55,
cерия F50, F-801s, F-801,
F-601
M, F-401x, F-401s, F-401
Режим A/M (Автоматическая фокусировка с возможностью коррекции вручную.
Приоритет режима автофокусировки) и pежим М/А (Автоматическая фокусировка
с возможностью коррекции вручную. Приоритет ручного режима фокусировки).
режиме ниже, чем в режиме M/A. Используйте этот режим во избежание отмены режима
автофокусировки из-за непреднамеренного поворота фокусировочного кольца.
a
Переместите переключатель режимов фокусировки в положение A/M или M/A.
b
Автофокус можно переустановить вручную, поворачивая фокусировочное кольцо,
одновременно до половины нажимая кнопку спуска затвора, нажимая на камере
кнопку AF-ON или нажимая кнопку управления фокусировки (если фокусировка
установлена на AF-ON) на объективе.
c
Нажатие кнопки спуска затвора до половины, повторное нажатие кнопки AF-ON на
камере или повторное нажатие кнопки управления фокусировки на объективе
отменяет ручную переустановку и снова переводит объектив в режим
автофокусировки.
Ограничение диапазона автофокусировки
Данная функция доступна только при использовании автофокусировки.
льной
Режим M/A: Режим автофокусировки можно отменить, настраивая
Режим A/M: Режим автофокусировки можно отменить, настраивая
FULL:
Если иногда объект приближается на расстояние ближе 6 м,
установите его в положение FULL.
∞―6m:
Если при съёмке объект всегда находится на расстоянии
свыше 6 м, установите ограничитель фокусировки в
положение ∞–6m, чтобы сократить время фокусировки.
Режим
фокусировки
фотокамеры
AF: ав
фокус вручную с помощью фокусировочного кольца.
фокус вручную с помощью фокусировочного кольца,
однако чувствительность фокусировочного кольца в этом
Переключатель режимов фокусировки объектива
A/M M/A M
Автоматический
с возможностью
AF
коррекции вручную
(приоритет режима
автофокусировки)
(Может использоваться электронный
MF
AF
(Может использоваться электронный
MF
дальномер, функция недоступна в
тофокусировка MF: фокусировка вручную
Автоматический
с возможностью
коррекции вручную
(приоритет
ручного режима
фокусировки)
Ручной фок
дальномер.)
Ручной фок
фотокамере F-601M.)
Ручной фокус
использоваться
ус
ус
(Может
электронный
дальномер.)
Jp
En
De
Fr
Es
Se
Ru
Nl
It
Ck
Ch
Kr
95
Page 96

Переключатель выбора режима фокусировки и
кнопка управления фокусировки (совместимые
Jp
En
De
Fr
Es
Se
Ru
Nl
Ck
Ch
Kr
камеры указаны на стр. 94)
Переключатель выбора режима фокусировки используется для выбора функций кнопок
управления фокусировки.
Положение переключателя
выбора режима фокусировки
AF-L Блокировка фокуса
MEMORY RECALL Вызов даннвых из памяти
AF-ON
•
Для активации каждой функции нажмите одну из четырёх кнопок
управления фокусировки.
•
Положения кнопок управления фокусировки можно менять в
соответствии с предпочтениями конкретного пользователя. Для
получения дополнительной информации обратитесь в ближайший
сервисный центр или представительство Nikon.
Блокировка фокуса (AF-L)
Данная функция совместима только с автофокусом.
a
Устан овите переключатель режим фокусировки на A/M или M/A.
It
b
Устан овите переключатель выбора режима фокусировки в положение AF-L.
c
В режиме автофокусировки фокус можно зафиксировать, нажав одну из кнопок
управления фокусировки.
•
Фокус остаётся зафиксированным, пока кнопка фокусировки нажата и удержив ается.
•
Функция AF-L может активироваться либо с камеры, либо с объектива.
Вызов даннвых из памяти (MEMORY RECALL)
♪:
•
раз, а объектив издаст один короткий и три длинных сигнала. В таком случае
повторите процедуру сохранения фокусного расстояния.
•
Устан овка памяти может выполняться независимо от настройки режима фокусировки
или переключателя выбора режима фокусировки.
•
Фокусное расстояние сохраняется даже при выключении камеры или отсоединении
объектива от камеры.
При работе функции вызова даннвых из памяти объектив подаёт
звуковой сигнал.
♪
Функция вызова даннвых из памяти выполняется без звукового
:
○
сигнала.
Дальнейшее функционирование выполняется при переключателем
управления звуком в положении
a
Сфокусируйтесь на объекте и нажмите кнопку Memory Set, чтобы
сохранить фокусное расстояние.
При корректном сохранении фокусного расстояния объектив
подаст звуковой сигнал.
•
В случае некорректного сохранения фокусного расстояния кольцо
шкалы расстояний повернётся в одну и в другую сторону около 10
Функция кнопки управления
фокусировки
Автозапуск камеры
(AF-ON) на объективе
.
96
Page 97

•
При выполнении вызова данных из памяти при фокусном расстоянии, отличном от
исходной настройки, расстояние фокусировки может быть несколько смещенным.
Особое внимание следует уделит ь вызову данных из памяти при большем фокусном
расстоянии. При установке переключателя управления звуком в положение вы
услышите звуковой сигнал. Рекомендуется выполнять вызов данных из памяти как
можно чаще при фокусном расстоянии, на которое была настроена память.
b
Устан овите переключатель выбора режима фокусировки в положение MEMORY RECALL.
c
Нажмите кнопку управления фокусировки. После двойного звукового сигнала до
упора нажмите кнопку спуска затвора, чтобы сделать снимок.
•
Сохранённое фокусное расстояние вызывается нажатием кнопки управления
фокусировки даже при полунажатии кнопки спуска затвора.
•
Для выполнения съёмки на сохранённом фокусном расстоянии удерживайте кнопку
управления фокусировки нажатой и до упора нажмите кнопку спуска затвора.
•
Объектив вернётся из режима вызова даннвых из памяти в режим автофокусировки
или ручной фокусировки, когда вы отпустите кнопку управления фокусировки.
Запуск автофокусировки (AF) на объективе (AF-ON)
a
Устан овите переключатель режим фокусировки на A/M или M/A.
b
Устан овите переключатель выбора режима фокусировки в положение AF-ON.
c
Нажмите кнопку управления фокусировки, чтобы сфокусироваться на объекте.
•
Автофокус остаётся активированным, пока кнопка управления фокусировки нажата и
удержив ается.
•
Функция AF-ON может активироваться либо с камеры, либо с объектива.
Режим подавления вибраций (VRⅡ)
Основное понятие подавления вибраций
Дрожание фотокамеры при использовании штатива
Высокая
Дрожание фотокамеры
Сильное
дрожание
фотокамеры при
съемке с
движущегося
автомобиля
Jp
En
De
Fr
Es
Se
Ru
Nl
It
Ck
Ch
Kr
Частота вибраций
Слабая
Низкая
Установите переключатель
режима подавления вибраций
в положение NORMAL.
При съемке изображений
При съемке панорамных снимков
При съемке изображений с
движущегося автомобиля
При съемке изображений с
использованием штатива
Интенсивность вибраций
Панорамные снимки
Сильная
Установите переключатель
режима подавления вибраций
в положение ACTIVE.
Установите переключатель режима подавления вибраций
в положение NORMAL или ACTIVE.
Установите переключатель режима подавления вибраций
в положение NORMAL.
Установите переключатель режима подавления вибраций
в положение ACTIVE.
Установите переключатель режима подавления вибраций
в положение NORMAL или ACTIVE.
97
Page 98

Настройка переключатель подавления вибраций ON/OFF
Jp
ON (ВКЛ.):
En
De
Уст ановк а переключателя режима подавления вибраций
Устан овите переключатель подавления вибраций ON/OFF в положение ON и выберите
режим подавления вибрации переключателем режимов подавления вибрации.
Fr
OFF (ВЫКЛ.): Эффект дрожания фотокамеры не уменьшается.
NORMAL:
Es
Se
ACTIVE: Механизм подавления вибраций уменьшает эффект дрожания
Ru
Nl
Примечания по использованию подавления вибрации
It
•
Если этот объектив используется с фотокамерами, не совместимыми с системой подавления
вибраций (стр. 94), установите переключатель подавления вибраций ON/OFF в положение OFF.
Если этот переключатель находится в положении ON, батарея фотокамеры может очень быстро
Ck
разряжаться (особенно это относится к фотокамере Pronea 600i).
•
После нажатия спусковой кнопки затвора наполовину необходимо дождаться стабилизации
Ch
изображения в видоискателе перед тем, как нажать спусковую кнопку затвора до конца.
•
Вследствие особенностей характеристик механизма подавления вибраций после того, как будет
отпущена кнопка спуска затвора, изображение в видоискателе может оказаться смазанным.
Kr
• При съемке панорамных снимков не забудьте установить переключатель режима подавления
вибраций в положение NORMAL. При съемке панорамы по широкой траектории подавление дрожания
фотокамеры в направлении съемки панорамы не будет выполняться. Например, при горизонтальном
панорамировании уменьшается только эффект вертикального дрожания фотокамеры.
•
Не выключайте фотокамеру и не снимайте с фотокамеры объектив при работе в режиме
подавления вибраций. Если пренебречь этим примечанием, то при сотрясении объектива может
послышаться звук, как при отсоединении или поломке внутренних компонентов. Это не является
неисправностью. Для устранения этой ситуации снова включите фотокамеру.
•
При использовании моделей фотокамер, оснащенных встроенной вспышкой, при заряде вспышки
функция подавления вибраций не работает.
• В случае использования штатива для снижения эффекта дрожания фотокамеры установите
переключатель подавления вибраций ON/OFF в положение ON. Nikon рекомендует устанавливать
переключатель в положение ON при использовании камеры с незафиксированной головкой
штатива или с моноподом. При едва заметного дрожания фотокамеры функция подавления
вибрации может наоборот повысить дрожание фотокамеры в результате движения системы. В
таком слу
чае установите переключатель подавления вибраций ON/OFF в положение OFF.
Эффект дрожания фотокамеры уменьшается при нажатии
спусковой кнопки затвора наполовину и в момент спуска
затвора. Снижение уровня вибраций в видоискателе облегчает
выполнение автоматической и ручной фокусировки, а также
точного кадрирования объекта съемки.
Механизм подавления вибраций уменьшает в основном
эффект дрожания фотокамеры. Эффект дрожания фотокамеры
уменьшается также при горизонтальном и вертикальном
панорамировании.
фотокамеры, например, при съемке из движущегося автомобиля,
и подавляет дрожание фотокамеры обычного или более высокого
уровня. В этом режиме фотокамера не может автоматически
отличить дрожание фотокамеры от перемещения камеры при
панорамировании.
98
Page 99

Установка диафрагмы
На фотокамере можно настроить параметры диафрагмы.
Фокусировка, зуммирование и глубина резко
изображаемого пространства
Перед фокусировкой поверните кольцо зуммирования для настройки фокусного
расстояния, пока не будет достигнута требуемая компоновка кадра. Если фотокамера
оборудована кнопкой или рычагом предварительного просмотра глубины резко
изображаемого пространства, то глуб ину резко изображаемого пространства можно
проверить через видоискатель фотокамеры.
•
Этот объектив оборудован системой внутренней фокусировки (IF). По мере
уменьшения расстояния съемки также уменьшается фокусное расстояние.
•
Шкала расстояния не показывает точное расстояние между объектом и фотокамерой.
Значения показываются приблизительно, и их следует использовать только в качестве
общих ориентиров. При съемке удаленных пейзажей, глубина резкости может влиять
на работу, и объект может казаться сфокусированным в положении, которое ближе,
чем бесконечность.
•
Дополнительные сведения см. на стр. 210.
Использование встроенного поворотного кольца
для крепления к штативу
При использовании штатива его следует присоединить к переходнику объектива для
крепления на штативе, а не к фотокамере.
•
Уд ержи в а я камеру за рукоятку и поворачивая камеру с объективом в её кольце для
крепления к штативу, вы можете задеть рукой штатив.
•
Кольцо для крепления можно снять, выкрутив фиксирующий винт кольца. Для
получения дополнительной информации обратитесь в ближайший сервисный центр или
представительство компании Nikon.
Изменение положения камеры
Ослабьте крепежный винт кольца переходника для крепления
на штативе (1). В зависимости от положения камеры
(вертикальное или горизонтальное), поверните объектив к
соответствующему поворотному указателю объектива (2) и
затяните винт (3).
Jp
En
De
Fr
Es
Se
Ru
Nl
It
Ck
Ch
Kr
Использование бленды
Бленда минимизирует рассеянный свет и защищает объектив.
Присоединение бленды
•
До упора затяните винт бленды объектива (2).
•
Если бленда установлена на объектив ненадлежащим
образом, может возникнуть эффект виньетирования.
•
Для хранения бленды присоединяйте ее в обратном
положении.
99
Page 100

Защитное стекло объектива
В данном объективе предусматривается защитное стекло.
Jp
En
De
Храните стекло в cпециальньом чехлe защитного стекла объектива.
•
Встроенная вспышка и виньетирование
Fr
Во избежание виньетирования не используйте бленду объектива.
• Для получения последней информации о виньетировании с данным
Es
объективом см. руководство к фотокамере.
Se
Ru
Nl
It
Ck
Ch
Kr
Фотокамеры
D90, D80, D50 •
Серия D70
D5300
D5200, D5100, D5000, D3200,
D3100, D3000, D60, cерия D40
D3300
Серия F80
Серия F75, cерия F70
Серия F65, cерия F60, cерия
F55, cерия F50, F-401, F-401x,
F-401s
, Pronea 600i, Pronea S
Данное стекло не рекомендуется снимать с объектива.
•
Если вы хотите сфотографировать объект, включающий
источник яркого света, снимите данное стекло, чтобы
избежать появления ложных изображений. Для того чтобы
отсоединить стекло, отвинтите его, повернув резиновое
кольцо вокруг стекла
Поддерживаемое фокусное расстояние/
200 мм/3 м или больше
• 200 мм/4 м или больше • 250 мм/2,5 м или больше
• 300 мм или больше/без ограничений
• 200 мм/5 м или больше • 250 мм/3 м или больше
• 300 мм или больше/без ограничений
• 200 мм/5 м или бо
• 300 мм/2,5 м или больше
• 350 мм или больше/без ограничений
• 200 мм/4 м или больше • 250 мм/3 м или больше
• 300 мм/2,5 м или больше
• 200 мм/3 м или бо
• 250 мм или 300 мм/2,5 м или больше
• 350 мм или больше/без ограничений
• 250 мм/5 м или больше • 300 мм/4 м или больше
• 350 мм/3 м или больше • 400 мм/без ограничений
Виньетирование возникает на любом расстоянии до
объекта съёмки.
(1, 2).
Расстояние съемки
•
250 мм или больше/без ограничений
льше • 250 мм/3 м или больше
льше
Выдвижной держатель фильтра
Всегда используйте фильтр (52-мм ввинчивающееся крепление). 52-мм
ввинчивающийся фильтр NC на момент отгрузки производителем
крепится к держателю фильтра.
100
a
Нажмите рукоятка выдвижного держателя
фильтра и поверните его против часовой
стрелки так, чтобы белая линия на ручке
оказалась под нужным углом к оси объектива.
b Снимите выдвижной держатель фильтра с
корпуса объектива.
c
Снимите закреплённый на держателе фильтра фильтр.
d
Закрепите фильтр со стороны выдвижной держатель
фильтра, помеченной словами «Nikon» и «JAPAN».
•
Держатель вставного фильтра может крепиться
таким образом, чтобы слова «Nikon» и «JAPAN»
были напротив либо объектива, либо камеры, что
никак не повлияет на создаваемые вами снимки.
 Loading...