


NEXCOM International Co., Ltd.
Mobile Computing Solutions
MVS 5200/5210/5210-R & NANO 1190
NVR User Manual
NEXCOM International Co., Ltd.
Published December 2016
www.nexcom.com

Contents
Contents
Preface: Quick Installation Guide ........................... 1
System Configuration: .....................................................................1
Playback: .........................................................................................3
Chapter 1: Main Console ........................................ 4
1. System Information ..................................................................... 5
2. Screen Division: ...........................................................................5
3. Sub-screen: .................................................................................6
4. Snapshot: ...................................................................................6
5. Audio Volume Control: ...............................................................6
6. System Setting: ...........................................................................7
6.1 Camera Page at System Setup Dialog: ....................................7
6.1.1 Auto Setting .....................................................................8
6.1.2 Template Setting: ..............................................................9
6.1.3 Camera List: ...................................................................10
6.1.4 Camera Setting: .............................................................. 11
6.1.5 Search Camera: ..............................................................14
6.2 Recording Page at System Setup Dialog: ...............................15
6.3 Network page at System setup dialog: .................................. 17
6.4 System Page at System Setup Dialog: ...................................19
6.5 User Page at System Setup Dialog: .......................................22
6.6 Motion Detection Page at System Setup Dialog: ...................24
7. System Management: ...............................................................26
7.1 System Management: ........................................................... 26
7.2 Disk Management: ...............................................................33
7.3 Snapshot: ............................................................................. 34
7.4 Event Snapshot: ...................................................................35
8. Event Setting: ...........................................................................37
8.1 Add a New Event: ................................................................37
8.2 Modify Existing Event Schedule or Action: ............................39
8.3 Delete Existing Event Schedule or Action: .............................39
8.4 Action Types: ........................................................................40
9. Log Viewer: ..............................................................................42
Copyright © 2016 NEXCOM International Co., Ltd. All Rights Reserved. MVS 5200/5210/MVS 5210-R Series & NANO 1190 NVR User Manual
ii

Contents
9.1 System Log: .......................................................................... 42
9.2 Event Log: ............................................................................43
9.3 Bit-rate Log: .........................................................................44
10. Schedule Monitor: ..................................................................45
10.1 Two-way Audio: .................................................................45
10.2 Audio Volume Adjustment: ................................................45
10.3 PTZ Control: .......................................................................45
10.4 E-map: ...............................................................................47
Chapter 2: Playback .............................................. 49
1. Search History Record Data: ......................................................50
2. Playback Control Button(s): .......................................................52
3. Convert to AVI file: ...................................................................54
4. Backup: ....................................................................................54
5. Playback Status: ........................................................................55
6. Sequential Search: ....................................................................55
Chapter 3: Remote Service ................................... 57
1. Installation: ............................................................................... 57
2. Login: .......................................................................................57
3. Live Preview: .............................................................................58
4. Playback: ..................................................................................60
4.1 Search History Recorded File(s): .............................................61
4.1.1 Search history file(s) dialog: .............................................61
4.1.2 Select a day to search history file(s): ................................62
4.1.3 Select record mode(s) / Event Type: .................................62
4.1.4 Start search:....................................................................63
4.1.5 Review history record file(s) in search period: ..................63
4.1.6 Assign time period of search result: .................................63
4.1.7 Select the camera(s) to playback: ....................................64
4.1.8 Start playback history file(s): ............................................ 64
4.2 Playback Control Button(s): ..................................................65
4.3 Playback Speed Control: .......................................................65
4.4 Division Control Buttons: ......................................................66
4.5 Convert to AVI file: ...............................................................66
4.5.1 Convert file dialog: .........................................................67
4.5.2 Select a day to convert history file(s): ..............................67
4.5.3 Assign time slice to convert job: ...................................... 68
Copyright © 2016 NEXCOM International Co., Ltd. All Rights Reserved. MVS 5200/5210/MVS 5210-R Series & NANO 1190 NVR User Manual
iii

Contents
4.5.4 Select cameras to convert job: ........................................68
4.5.5 Select a folder to save converted file: ..............................68
4.5.6 Start converting job: .......................................................68
4.6 Backup: ................................................................................ 69
4.6.1 Backup file dialog: ..........................................................69
4.6.2 Select a day to backup: ................................................... 70
4.6.3 Assign time slice to backup job: ......................................70
4.6.4 Select cameras to backup job: ......................................... 70
4.6.5 Select a folder to save backup file(s): ............................... 70
4.6.6 Start backup job: ............................................................70
4.7 Switch Audio Play Mode: ...................................................... 71
4.8 Playback Setting: ..................................................................71
4.9 Snapshot Dialog: ..................................................................72
4.9.1 Snapshot all dialog: ........................................................72
4.9.2 Select snapshot image: ...................................................72
4.9.3 Select snapshot folder: .................................................... 73
4.9.4 Select file format: ...........................................................73
4.9.5 Save snapshot images: .................................................... 73
4.9.6 Saved image file name: ................................................... 73
4.10 Playback Status: .................................................................74
4.11 Operation With Sub-screen: ...............................................74
4.11.1 Define display camera(s) sequence: ...............................74
4.11.2 Digital zoom at sub-screen: ...........................................75
4.11.3 Switch to Fullscreen: .....................................................75
4.11.4 Snapshot of sub-screen: ................................................75
4.11.5 Motion Search: .............................................................77
4.11.6 Sequential Search: ........................................................78
4.11.6.1 Define search time period: .........................................79
4.11.6.2 Start search and rollback: ...........................................80
4.11.6.3 Detail window for snapshots: ..................................... 81
4.11.6.4 Preview mode of search result: ...................................81
5. Remote System Setting: ............................................................82
5.1 Camera Setting: ...................................................................82
5.2 Schedule Setting: .................................................................85
5.3 Network Setting: ..................................................................87
5.4 System Setting: ....................................................................89
5.5 User Setting: ........................................................................91
5.6 Motion Config: ....................................................................93
Copyright © 2016 NEXCOM International Co., Ltd. All Rights Reserved. MVS 5200/5210/MVS 5210-R Series & NANO 1190 NVR User Manual
iv

Contents
6. Remote System Management: ..................................................95
6.1 Maintenance: .......................................................................95
7. Remote Event Setting: ............................................................... 97
7.1 Add a New Event: ................................................................98
7.2 Modify Existing Event Schedule or Action: ............................99
7.3 Delete Existing Event Schedule or Action: ...........................100
7.4 Action Types: ...................................................................... 100
Chapter 4: Utility ................................................. 103
1. Event File Viewer .....................................................................103
Copyright © 2016 NEXCOM International Co., Ltd. All Rights Reserved. MVS 5200/5210/MVS 5210-R Series & NANO 1190 NVR User Manual
v

Preface: Quick Installation Guide
PrefaCe: QuiCk installation Guide
System Configuration:
1. Power on the MVS 52 series/NANO 1190 and wait until the system boots.
2. Login to the NVR system, default username is “admin” without
password.
3. Click to enter system setting pages.
4. Click “Auto Setting” button at Camera’s setting page, the system
will automatically insert camera from the intranet or camera
connected to the NVR’s switch.
Copyright © 2016 NEXCOM International Co., Ltd. All Rights Reserved. MVS 5200/5210/MVS 5210-R Series & NANO 1190 NVR User Manual
1

Preface: Quick Installation Guide
5. Configure each camera’s parameters for streaming.
6. Configure each camera’s recording schedule at “Recording” page.
7. Click the “OK” button to save settings and start recording jobs.
Copyright © 2016 NEXCOM International Co., Ltd. All Rights Reserved. MVS 5200/5210/MVS 5210-R Series & NANO 1190 NVR User Manual
2

Preface: Quick Installation Guide
Playback:
1. Click to enter the playback page.
2. Click to enter the record data search dialog.
3. Select a playback date on calendar control, and click the “Search”
button to start searching record data.
4. Select cameras and playback time period on search result by
dragging a time bar on the timeline or via date-time picker control.
5. Click the “OK” button to prepare playback data and return to the
playback main page.
6. Click to start playback.
Copyright © 2016 NEXCOM International Co., Ltd. All Rights Reserved. MVS 5200/5210/MVS 5210-R Series & NANO 1190 NVR User Manual
3

Chapter 1: Main Console
ChaPter 1: Main Console
This is the main control panel of the system. It provides live stream preview,
system setup, two-way audio, playback, volume control, snapshot, start or
stop monitor, and PTZ controls.
System
information
Display
preview
Divide buttons Login/
Logout
Function
buttons
PTZ
buttons
Copyright © 2016 NEXCOM International Co., Ltd. All Rights Reserved. MVS 5200/5210/MVS 5210-R Series & NANO 1190 NVR User Manual
4

Chapter 1: Main Console
1. System Information
System Information
Date
Time
Weekday
Schedule Recording
Event alarm status
HDD available space
Login/Logout:
Logout current user
Display version number
2. Screen Division:
Configure the preview screen to a particular layout division by clicking
these buttons.
Button Description
Switch to Division 1
Switch to Division 4
Switch to Division 9
Switch to full screen. Right click the mouse button
to cancel full screen mode.
Copyright © 2016 NEXCOM International Co., Ltd. All Rights Reserved. MVS 5200/5210/MVS 5210-R Series & NANO 1190 NVR User Manual
5

Chapter 1: Main Console
3. Sub-screen:
Digital Zoom
Sub-screen window supports digital zoom, the operation steps are as
follows:
1. Click on preview image to switch current focus channel.
2. Scroll the mouse wheel, forward for digital zoom-in, and backward
for zoom-out.
3. Switch division mode will reset digital zoom status to default.
Popup Menu
Right click the mouse button, select an option from the popup menu.
1. Change current channel display camera.
2. Change current division mode.
3. Switch current channel display ratio mode.
4. Switch to Full Screen mode / Cancel Full Screen mode.
5. Reset all channels to default camera list.
6. Snapshot current display.
7. Enable / Disable Auto Switch.
4. Snapshot:
Click to take a snapshot to the hard disk drive, you can manage
snapshots at the system management “snapshot” page.
5. Audio Volume Control:
Click to switch between mute or unmute.
Status Description
System is on unmute mode.
System is on mute mode.
Copyright © 2016 NEXCOM International Co., Ltd. All Rights Reserved. MVS 5200/5210/MVS 5210-R Series & NANO 1190 NVR User Manual
6

Chapter 1: Main Console
6. System Setting:
Click setup button and select “System Setting” from the pop-up
menu to enter the System Setting dialog.
6.1 Camera Page at System Setup Dialog:
Copyright © 2016 NEXCOM International Co., Ltd. All Rights Reserved. MVS 5200/5210/MVS 5210-R Series & NANO 1190 NVR User Manual
7

Chapter 1: Main Console
6.1.1 Auto Setting
Click the “Auto Setting” button to automatically add
cameras to the system. Maximum number of cameras
supported depends on NVR’s model.
After clicking the button, the system will show the fuzzy
search filter dialog, you can filter the search by model name,
IP address or MAC address, or you can keep them empty to
search all cameras.
Auto setting can insert intranet’s cameras, even ones located
behind several switch hubs. Alternatively, you can directly
insert cameras on the NVR’s switch hub, then click the
“Auto Setting“ button to add them into the system.
Using the “Auto Setting“ function, you won’t need to keyin any network IP or subnet mask parameters, you only need
to click “Auto Setting“ button to add IP cameras.
Copyright © 2016 NEXCOM International Co., Ltd. All Rights Reserved. MVS 5200/5210/MVS 5210-R Series & NANO 1190 NVR User Manual
8

Chapter 1: Main Console
6.1.2 Template Setting:
When you use “Auto Setting” to add a new camera,
the system will use the camera template from “Template
Setting” to set the camera parameters.
After you confirm the template, in most cases, you will no
longer need to set camera’s parameters again.
You can configure the quick template from the camera
setting page, in most cases you only need to set the
camera’s resolution and frames per second.
If you need to set a more detailed template, please click the
“Advanced” button to enter the template setting dialog.
Resolution:
The new camera will try to fit the selected resolution, if you
select “Max”, camera will use the maximum resolution, or
you could select another resolution, in which the system will
choose the next closest supported resolution of the camera.
Copyright © 2016 NEXCOM International Co., Ltd. All Rights Reserved. MVS 5200/5210/MVS 5210-R Series & NANO 1190 NVR User Manual
9

Chapter 1: Main Console
FPS:
Set the frames per second of camera, system will try to set a
near or equal FPS to camera.
Rate Control:
Set the rate control algorithm of the new camera.
Quality:
If you select EVBR for new cameras, you can set the VBR
quality here.
Account:
Setup the default login camera user account.
Password:
Setup the default login camera password.
6.1.3 Camera List:
List all the inserted IP camera’s name, click the row of
camera to display detailed information and live stream video.
Tick the check box to enable the camera, otherwise the
camera will be disabled.
This camera is enabled.
This camera is disabled.
Copyright © 2016 NEXCOM International Co., Ltd. All Rights Reserved. MVS 5200/5210/MVS 5210-R Series & NANO 1190 NVR User Manual
If the camera is disabled, NVR will not connect to it. This will
keep the camera settings stored in the system without using
any system performance and won’t add any error messages.
10

Chapter 1: Main Console
Switch Camera Sequential:
Right click on the camera, and select another camera in the
popup menu, the system will switch these two camera’s
setting.
Quick Setup:
1. Select a camera
2. Click the “Quick Setup” button.
3. Select a action:
i. Copy to:
Copy selected camera’s setting to all channels or a
single channel
ii. Switch To:
Switch selected camera and target camera sequential
position.
iii. Remove all:
Remove all camera setting.
6.1.4 Camera Setting:
Key-in or modify camera’s information here.
Vendor:
Select camera’s vendor or use ONVIF protocol.
Detect:
Check available cameras and respective model names.
Copyright © 2016 NEXCOM International Co., Ltd. All Rights Reserved. MVS 5200/5210/MVS 5210-R Series & NANO 1190 NVR User Manual
Camera Name:
Key in camera name here.
11

Chapter 1: Main Console
IP Address:
Key in camera’s IP address.
HTTP port:
Set camera’s HTTP port, default is 80.
RTSP port:
Set camera’s RTSP port for TCP streaming, default is 554.
ONVIF Authentication:
Select connect to camera with WSSE authentication or
without authentication.
User Name:
Set the Username for camera login.
Password:
Set the Password for camera login.
Copyright © 2016 NEXCOM International Co., Ltd. All Rights Reserved. MVS 5200/5210/MVS 5210-R Series & NANO 1190 NVR User Manual
12

Chapter 1: Main Console
Set Parameter:
Select stream profile / resolution for preview and recording.
Select the FPS of the display and recording frame rate.
Enable Audio to receive audio stream, enable it when you
need live audio and record audio to files.
Enable Audio Record to record audio to files.
Enable Two Way Audio when you need to send voice data
to the IP camera.
Adjust Input and Output Gain value with IP camera.
• The parameter dialogs are different with each
vendor, depending on the camera’s capability.
Add Camera:
1. Click “Search” and wait till search completes.
2. Select a camera on the search result list.
3. Preview live stream video at the preview window to
confirm current camera.
4. Click “Add” to add selected camera into system.
Copyright © 2016 NEXCOM International Co., Ltd. All Rights Reserved. MVS 5200/5210/MVS 5210-R Series & NANO 1190 NVR User Manual
13

Chapter 1: Main Console
Delete Camera:
1. Select a camera from installed camera list.
2. Click “Delete” to remove the selected camera from the
list.
Update Camera Setting:
1. Select a camera from the installed camera list.
2. Modify camera’s setting at each setting field.
3. Click “Update” to save the modified result.
• Updated settings will write to disk after clicking “OK” at
the bottom of the page. If you click “Cancel” to leave
the setting page, the system will discard all your modified
settings.
Clear Button:
Clear all setting fields.
6.1.5 Search Camera:
Click “Search” button, system will list all the cameras
detected in the “Search List”, you can click on each row to
preview live video stream.
You can click on the header column to sort the current row
data.
Copyright © 2016 NEXCOM International Co., Ltd. All Rights Reserved. MVS 5200/5210/MVS 5210-R Series & NANO 1190 NVR User Manual
14

Chapter 1: Main Console
6.2 Recording Page at System Setup Dialog:
The system supports weekly schedule recording, you can define
different schedules for each camera and each weekday here.
Configure recording schedule steps:
1. Select a camera:
Click on camera list to select a
camera to configure.
2. Select a weekday:
Click on a weekday bar, system
will list time periods for this
weekday.
3. Configure time period:
Add new period:
Drag the mouse cursor on a
blank area, or click the “Insert”
button.
Copyright © 2016 NEXCOM International Co., Ltd. All Rights Reserved. MVS 5200/5210/MVS 5210-R Series & NANO 1190 NVR User Manual
15

Chapter 1: Main Console
Configure period setting:
After a new period has been inserted, a pop-up period setting
dialog will appear. Fill the start time and end time, and select
pre-alarm and post-alarm time if you want to set this period to
motion detection record mode.
Pre-alarm or post-alarm maximum value is 60 seconds.
4. Select a record mode:
Select a record mode ranging from “Round the clock“ or
“Motion detection”, “DI detection” or “Event Detection”
for this period.
If you select the “DI detection” mode, you should select a DI
input source and define alarm condition.
5. Modify exist record schedule period:
Click a period from the weekday bar or select a period from the
list, then click the “Configure” button.
6. Remove a record schedule period:
Select a period from the weekday bar or list, then click the
“Delete” button.
7. Copy a period to all:
Select a period from then weekday bar or list, then click the
“Copy” button, system will copy the selected weekday’s periods
to all weekdays.
Copyright © 2016 NEXCOM International Co., Ltd. All Rights Reserved. MVS 5200/5210/MVS 5210-R Series & NANO 1190 NVR User Manual
16

Chapter 1: Main Console
6.3 Network page at System setup dialog:
DHCP setting:
Check the “Obtain IP address automatically (DHCP)” to enable
automatic IP retrieval from DHCP server.
MAC address:
Display MAC address of this NVR.
Fixed IP setting:
When DHCP is disabled, you should key in IP settings here. Click
the “Test” button to detect any IP conflict.
DNS setting:
Check “Obtain DNS from DHCP” to retrieve DNS settings from
DHCP server, it only works when DHCP is enabled.
If “Obtain DNS from DHCP” is disabled, you can key in the DNS
server IP address in the text box.
PPPOE Setting:
Copyright © 2016 NEXCOM International Co., Ltd. All Rights Reserved. MVS 5200/5210/MVS 5210-R Series & NANO 1190 NVR User Manual
Enable / Disable:
Check or uncheck the checkbox to enable or disable PPPoE
function.
17

Chapter 1: Main Console
User Name:
Key in the username to login PPPoE server here.
Password:
Key in the login PPPoE server password here.
IP address:
Display the current IP address retrieved from the PPPoE server.
Subnet Mask:
Display the current subnet mask retrieved from the PPPoE server.
Gateway:
Display the current gateway IP address retrieved from the PPPoE
server.
Status:
Display PPPoE status.
UPNP Setting:
Display UPnP friend name on network.
UPnP Traversal Setting:
Enable UPnP Traversal to automatically request port mapping with
router. Define the maximum and minimum port value here.
Server Setting:
Enable HTTP and RTSP server. After remote service starts, users can
connect to the remote service through a web browser.
HTTP Port:
Set HTTP service port here.
RTSP Port:
Set RTSP service port here.
Copyright © 2016 NEXCOM International Co., Ltd. All Rights Reserved. MVS 5200/5210/MVS 5210-R Series & NANO 1190 NVR User Manual
RTSP over HTTP:
Enable RTSP over HTTP function, the remote live stream will use
HTTP protocol and HTTP port.
18
Chapter 1: Main Console
DDNS:
1. Tick DDNS check box.
2. Select a DDNS server.
3. Key in DDNS domain name.
4. Key in DDNS service’s login account and password.
5. Click the “test” button to connect to the DDNS service. The
system will display current public IP with domain name later.
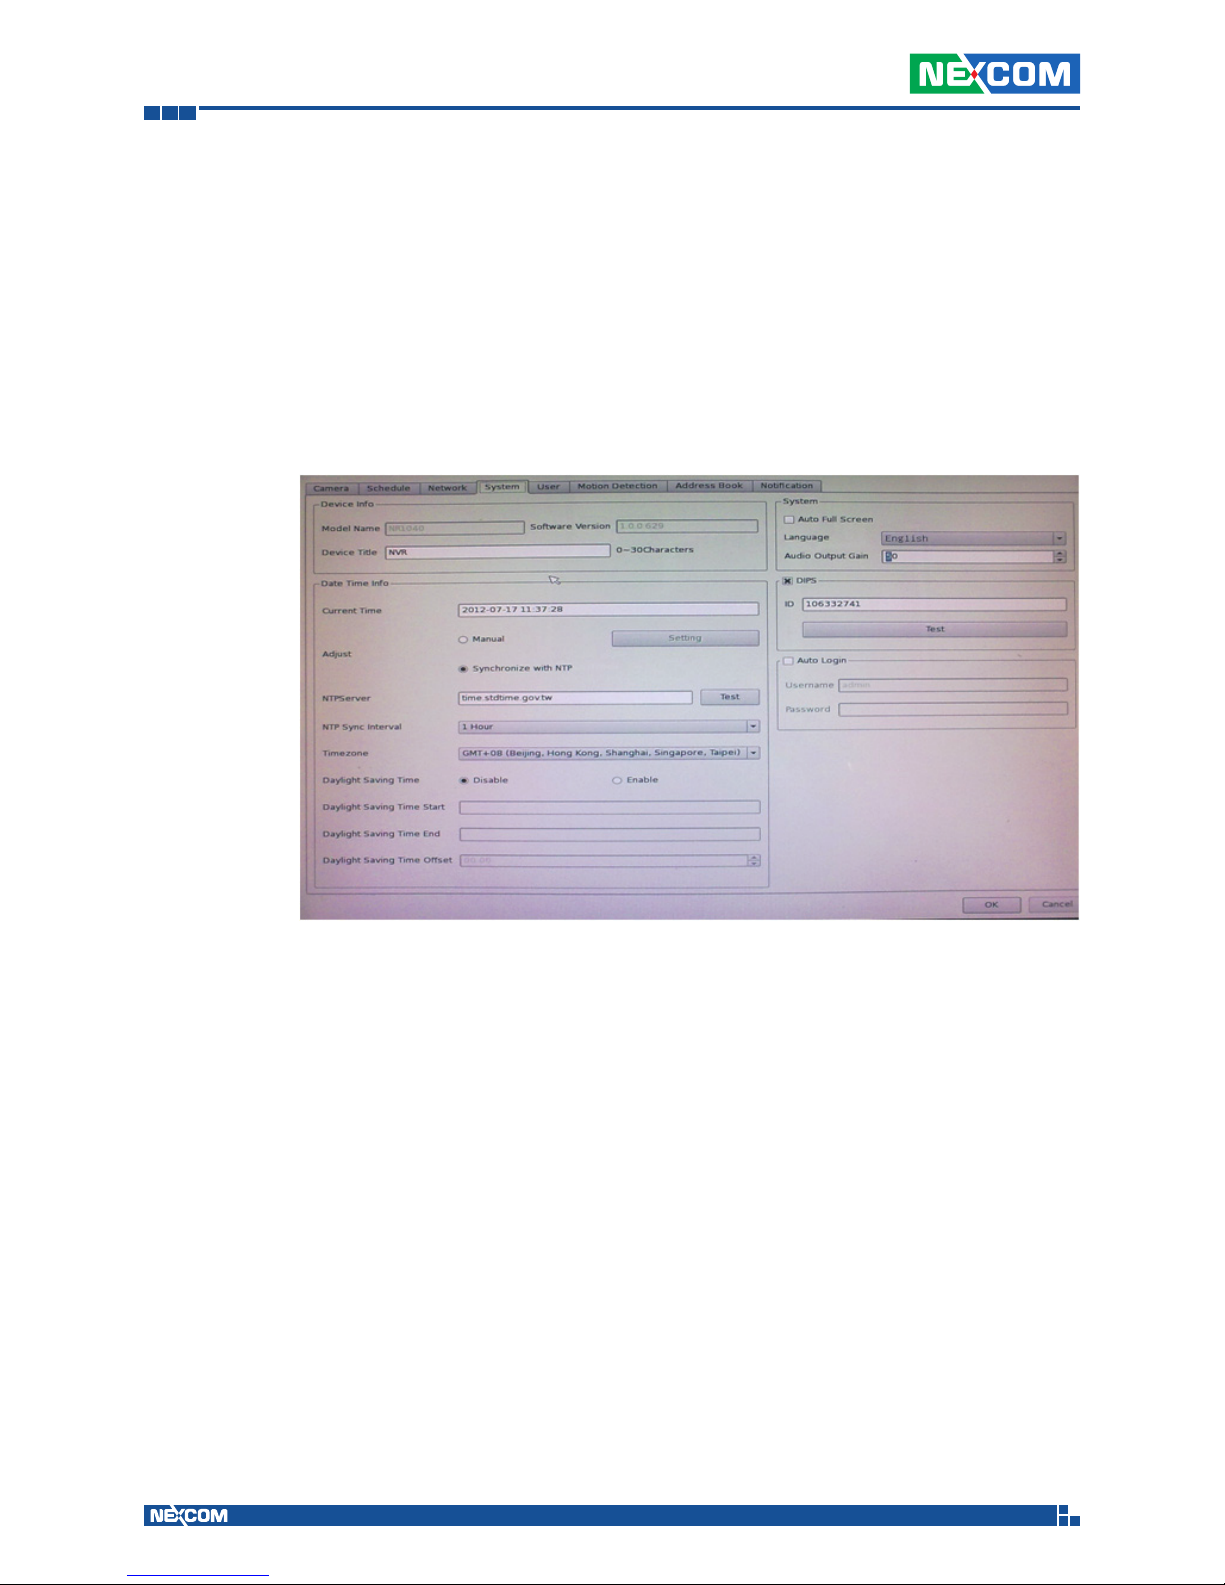
6.4 System Page at System Setup Dialog:
Device Info:
Date Time:
Copyright © 2016 NEXCOM International Co., Ltd. All Rights Reserved. MVS 5200/5210/MVS 5210-R Series & NANO 1190 NVR User Manual
Model Name:
Display Model Name.
Device Title:
Key in device title here.
Software version:
Display current firmware version.
Server Date & Time:
Display current system date-time.
19

Chapter 1: Main Console
Adjust:
Manual Setting:
Click setting to enter the date-time setting dialog, and select
current date and time now, click “OK” to change system
time or click “Cancel” button to abort configuration.
Synchronize with NTP:
Enable date-time synchronization with NTP service.
NTP Server:
Key in NTP server IP or domain name, if you use the domain
name to connect NTP server, the DNS service must be enabled.
NTP Sync Interval:
Select a value to set the interval of each time synchronization
with NTP service.
Time Zone:
Select the time zone of the NVR location.
Daylight saving:
Enable or disable daylight saving mode.
Daylight saving Start Time:
Configure daylight saving start time, it works with daylight
saving mode enabled.
Daylight saving End Time:
Configure daylight saving end time, it works with daylight
saving mode enabled.
Daylight saving Offset:
Configure daylight saving offset time with current time, it works
with daylight saving mode enabled.
Copyright © 2016 NEXCOM International Co., Ltd. All Rights Reserved. MVS 5200/5210/MVS 5210-R Series & NANO 1190 NVR User Manual
20

Chapter 1: Main Console
Auto Login:
Enable auto login mode to login with the defined user name and
password when system boots up.
User:
Key in auto login username.
Password:
Key in auto login password.
System Setting:
Enable “Auto full screen” to switch to full screen mode when
system boots up.
Change display language from language combo box.
Adjust Auto switch interval seconds.
DIPS
Display device DIPS ID.
Click the “Test” button to test connection with DIPS server.
Recycle Days:
Select log keep days.
Copyright © 2016 NEXCOM International Co., Ltd. All Rights Reserved. MVS 5200/5210/MVS 5210-R Series & NANO 1190 NVR User Manual
21

Chapter 1: Main Console
6.5 User Page at System Setup Dialog:
You can manage user accounts and permit which functions are
accessible. This can prevent users without permission to use certain
functions when logging to the system through user account.
User Config:
User:
Edit username here.
Password / Confirm Password:
Edit user login password here.
Group:
Select user’s login group.
Description:
Key in description of this user.
Monitor:
Select which camera live streams that the current user can preview.
Copyright © 2016 NEXCOM International Co., Ltd. All Rights Reserved. MVS 5200/5210/MVS 5210-R Series & NANO 1190 NVR User Manual
22

Chapter 1: Main Console
Playback:
Select which cameras that the current user can playback history
record data.
Record:
Enable this user to start and stop record job.
Setting:
Enable this user to access system setting function.
PTZ:
Enable this user with operator PTZ functions.
Two-way audio:
Enable this user to start and stop two-way audio.
Add User:
After entering user information, click the “Add” button to insert
the new user account into the system.
Modify User:
Select a user first then modify user information. You must click the
“Modify” button to make the changes take effect.
Delete User:
Select a user first then click the “Delete” button to remove the
selected user from the system.
Copyright © 2016 NEXCOM International Co., Ltd. All Rights Reserved. MVS 5200/5210/MVS 5210-R Series & NANO 1190 NVR User Manual
23

Chapter 1: Main Console
6.6 Motion Detection Page at System Setup Dialog:
You can set each camera’s motion detection at this page.
Select a camera:
Click on the camera list to select a camera to manage motion
detection setting.
Add a new motion detection:
Click the “Add” button to insert a new motion window, the new
window will be placed on the upper left corner.
Enable motion window:
Check the window name to enable motion detection.
Modify motion detection area:
Move the mouse cursor to the motion window border, and drag to
resize motion window.
Drag the mouse cursor on motion window to re-position the
motion window.
Remove motion window:
Click on the motion window or window’s name to select the
window, then click the “Delete” button to remove it.
Copyright © 2016 NEXCOM International Co., Ltd. All Rights Reserved. MVS 5200/5210/MVS 5210-R Series & NANO 1190 NVR User Manual
24

Chapter 1: Main Console
Modify motion parameter:
Click on the motion window or window’s name to select the
window, then edit it’s motion parameters. You must click the
“Update” button to save the modified values, or the settings will
be lost.
Name:
Key in the motion window’s name.
Include / Exclude:
Include: The system will detect motion inside of window area.
Exclude: The system will detect motion outside of window area.
Object Size:
Set motion detection object size value between 0 and 100,
bigger value means motion alarm will be harder to trigger.
Sensitivity:
Set motion detection sensitivity value between 0 and 100,
bigger value means motion alarm will be easier to trigger.
Copyright © 2016 NEXCOM International Co., Ltd. All Rights Reserved. MVS 5200/5210/MVS 5210-R Series & NANO 1190 NVR User Manual
25

Chapter 1: Main Console
7. System Management:
Click the setup button and select “System Management” from the
pop-up menu to enter the System Management dialog.
7.1 System Management:
Copyright © 2016 NEXCOM International Co., Ltd. All Rights Reserved. MVS 5200/5210/MVS 5210-R Series & NANO 1190 NVR User Manual
26

Chapter 1: Main Console
Resolution:
Change the current display resolution of the monitor, please
confirm change result, or the system will revert to the old
resolution after 15 seconds.
Style:
Select Main page display style, the style will change after clicking
the “OK” button.
Normal Style:
User-friendly GUI interface.
Copyright © 2016 NEXCOM International Co., Ltd. All Rights Reserved. MVS 5200/5210/MVS 5210-R Series & NANO 1190 NVR User Manual
27

Chapter 1: Main Console
Simple Style:
Simple style will display the maximum viewing area possible for
the live stream images.
Professional Style:
DI Tree List:
Display local and all camera’s DI status, if the camera does not
have DI, it will not be added to the DI list.
DO Tree List:
Display and control local and camera’s DO status, if the camera
does not have DO, it will not be added to the DO list.
Copyright © 2016 NEXCOM International Co., Ltd. All Rights Reserved. MVS 5200/5210/MVS 5210-R Series & NANO 1190 NVR User Manual
28

Chapter 1: Main Console
PTZ Control Panel:
Preset Combo box:
Select a preset for the focus camera, camera will go to the
preset position.
Delete Button:
Remove the current selected preset record.
Preset Add:
Key in the preset name and click the “Add” button to add a
new preset position record for the focus camera.
PTZ control buttons:
Click PTZ direction buttons to control camera pan, tilt and
home positions.
Group Preview:
Switch current live division to a specific group division.
E-Map:
Display camera’s position.
Copyright © 2016 NEXCOM International Co., Ltd. All Rights Reserved. MVS 5200/5210/MVS 5210-R Series & NANO 1190 NVR User Manual
29

Chapter 1: Main Console
Advanced Style:
Based on the professional style with added event log and system
log viewer, these controls will display the newest record in log.
Button Description
Switch division buttons
Reset division to default
Full Screen
Auto Switch
Snapshot
Change display ratio
Copyright © 2016 NEXCOM International Co., Ltd. All Rights Reserved. MVS 5200/5210/MVS 5210-R Series & NANO 1190 NVR User Manual
30

Chapter 1: Main Console
Event Log:
Display the 5 newest records in event log.
Start Time:
Display the start time of the event.
End Time:
Display the end time of the event, if the event is not closed,
this field will be kept empty.
Log Type:
Display the Event Type.
Device:
Local: NVR’s event.
CXXX: Camera’s event.
Input:
Display events triggered by DI input, -1 means it is not a DI
event.
Key:
Display event Key string.
System Log:
Time:
Log Time.
Log Type:
Log type string.
Remark:
Extra log description.
Copyright © 2016 NEXCOM International Co., Ltd. All Rights Reserved. MVS 5200/5210/MVS 5210-R Series & NANO 1190 NVR User Manual
31

Chapter 1: Main Console
Image:
Adjust monitor Brightness, Contrast, Saturation, Sharpness, Hue
values, to get the best display quality.
Maintenance:
Default Setting:
Reset all settings to factory default value.
Backup Setting:
Export backup setting file to a removable storage device.
Restore Setting:
Restore a backup setting file from a removable storage
device.
Firmware Upgrade:
Select a firmware file from a removable storage device, then
click “Firmware Upgrade” to begin firmware update.
System Restart:
Restart the NVR system.
Audio:
Adjust audio input or output gain value.
Copyright © 2016 NEXCOM International Co., Ltd. All Rights Reserved. MVS 5200/5210/MVS 5210-R Series & NANO 1190 NVR User Manual
32

Chapter 1: Main Console
7.2 Disk Management:
You can manage all storage devices here.
Device list:
Display all devices detected on the NVR and their information.
Partition Button:
Select a storage device and click the “Partition” button, system
will remove all the data and partitions on selected device, and
create a new partition.
Mount / Un-Mount button:
Mount or unmount a USB stick.
S.M.A.R.T button:
Display the Hard Disk S.M.A.R.T status.
Partition list:
Display all the partitions of selected device and their information.
Click the “Format” button to format selected partition to “ext4”
format, all data will be lost.
Copyright © 2016 NEXCOM International Co., Ltd. All Rights Reserved. MVS 5200/5210/MVS 5210-R Series & NANO 1190 NVR User Manual
33

Chapter 1: Main Console
7.3 Snapshot:
Manage all snapshots on the hard disk and removable device,
including the backup of snapshot image to a removable device.
Source Snapshot List:
Search snapshot image:
1. Select a hard disk path.
2. Select a time period.
3. Click the “search” button.
4. The search result will be displayed in the list box.
5. Select a snapshot file name, the snapshot image will be
displayed on the right.
Copy:
Click the “Copy” button to copy selected snapshot files to a
removable device.
Delete:
Click the “Delete” button to delete selected snapshot file.
Copyright © 2016 NEXCOM International Co., Ltd. All Rights Reserved. MVS 5200/5210/MVS 5210-R Series & NANO 1190 NVR User Manual
Destination Snapshot List:
1. Select a removable device path.
2. System will show snapshot file’s name of selected folder
3. Select a snapshot file name, the snapshot image will be
displayed on the right.
Delete:
Click the “Delete” button to delete selected snapshot file.
34

Chapter 1: Main Console
7.4 Event Snapshot:
Manage event snapshot files here.
Event Snapshot:
Search:
Device:
Select the Snapshot device ID.
Event Type:
Select trigger snapshot event type.
Input:
Select DI input port number.
Time:
Select search time period.
Result table:
Time:
Event Time
Copyright © 2016 NEXCOM International Co., Ltd. All Rights Reserved. MVS 5200/5210/MVS 5210-R Series & NANO 1190 NVR User Manual
Event Type:
Triggered Event Type.
Input:
Event DI port number, if it is not a DI event -1 will be
displayed.
35

Chapter 1: Main Console
Device:
Event triggered device ID.
Snapshot Viewer:
Select an event from the search result table and click the
“Play” button, the snapshot video will be displayed on the
right.
Next frame:
Click “>“ to move to the next frame.
Pre frame:
Click “<“ to move to the previous frame.
Information:
Display snapshot video information.
Snapshot button:
Click the “Snapshot” button to snapshot the current
image to a removable device.
Backup button:
Click the “Backup” button to backup this event video
to a removable device.
Copyright © 2016 NEXCOM International Co., Ltd. All Rights Reserved. MVS 5200/5210/MVS 5210-R Series & NANO 1190 NVR User Manual
36

Chapter 1: Main Console
8. Event Setting:
Manage all events from the “Event Setting” page, including add,
modify, remove events, event’s schedule and the actions to take when
event is triggered.
8.1 Add a New Event:
1. Select a camera or local device from the tree list.
2. Click the “Add” button below the device list.
3. Select an Event from the table.
Motion Alarm:
Camera’s motion detection, you must set the camera motion first.
Disconnect Alarm:
The camera connected is disconnected.
Copyright © 2016 NEXCOM International Co., Ltd. All Rights Reserved. MVS 5200/5210/MVS 5210-R Series & NANO 1190 NVR User Manual
37

Chapter 1: Main Console
Camera Tamper:
Dependent on the camera’s capability.
Audio Detection:
Dependent on the camera’s capability.
Schedule Trigger:
Trigger by schedule settings.
HDD Error Alarm:
Trigger alarm when recording fails, only local devices have this
event.
4. Click the “Add” button below Event Schedule List table.
5. Select the weekdays and time period to monitor for the event.
6. Set Alarm detailed parameters.
Copyright © 2016 NEXCOM International Co., Ltd. All Rights Reserved. MVS 5200/5210/MVS 5210-R Series & NANO 1190 NVR User Manual
A. Alarm trigger condition by event type:
i. Motion event, true means alarm triggered by motion, false
means alarm triggered by no motion.
ii. Schedule trigger, true for alarms triggered in schedule
periods, false for alarms not triggered in schedule periods.
B. Select Post-Alarm seconds.
C. Merge seconds is set for merging two same alarms between
setting seconds.
38

Chapter 1: Main Console
7. Click the “Add” button below Action list table.
8. Select an action for the system to execute when event is
triggered.
8.2 Modify Existing Event Schedule or Action:
Modify Event Schedule:
1. Select an event from the event list.
2. Select a schedule from Event schedule list.
3. Click the “Modify” button.
4. Modify setting values from schedule setting dialog.
5. Click the “OK” button when modification is done.
Modify Action:
1. Select an event from the event list.
2. Select a schedule from Event schedule list.
3. Select an action from “Action List”.
4. Click the “Modify” button.
5. Modify setting values from each Action setting dialog.
6. Click the “OK” button to close dialog.
8.3 Delete Existing Event Schedule or Action:
Delete Event:
1. Select an Event from “Event List”.
2. Click the “Delete” button below the “Event List”.
Copyright © 2016 NEXCOM International Co., Ltd. All Rights Reserved. MVS 5200/5210/MVS 5210-R Series & NANO 1190 NVR User Manual
39

Chapter 1: Main Console
Delete Event Schedule:
1. Select an event from “Event List”.
2. Select an event schedule from “Event Schedule List”.
3. Click the “Delete” button below “Event Schedule List”.
Delete Action:
1. Select an event from “Event List”.
2. Select an event schedule from “Event Schedule List”.
3. Select an Action from “Action List”.
4. Click the “Delete” button below “Action List”.
• When Add / Modify / Delete job is complete, you must click the
“OK” button to leave Event Setting page, otherwise all setting
values will be rolled back.
8.4 Action Types:
Display On Channel:
When event is triggered, the system will display OSD string on
selected channels.
Record:
When event is triggered, the system will force recording of selected
channels.
1. System must switch “Schedule Monitor” to on when event is
triggered.
2. The selected channels must have “Recording schedule”
enabled when event is triggered.
Snapshot:
The system will snapshot images of selected channels, and save
the snapshots to the event snapshot folder automatically. You
can search them in the “Event Snapshot” page in “System
Management”.
Copyright © 2016 NEXCOM International Co., Ltd. All Rights Reserved. MVS 5200/5210/MVS 5210-R Series & NANO 1190 NVR User Manual
40

Chapter 1: Main Console
TCP:
Send notification TCP sockets to TCP server when event is
triggered.
HTTP:
Send notification to HTTP server when event is triggered.
FTP:
1. Select channels to take snapshot or record to a file when event
is triggered.
2. Select Snapshot or Record trigger action, recording will record a
period of the channel.
3. Setup Pre-Alarm and Post-Alarm seconds for the recording file.
System will upload the file to FTP server when event is triggered.
Navigation:
Go to camera’s preset position.
Popup:
Switch live division to a specific group division.
Copyright © 2016 NEXCOM International Co., Ltd. All Rights Reserved. MVS 5200/5210/MVS 5210-R Series & NANO 1190 NVR User Manual
41

Chapter 1: Main Console
9. Log Viewer:
9.1 System Log:
Log Type:
Select a log type to filter data.
Time:
Setup search logs in time periods.
Limit Record:
Setup the maximum number of records of search result.
Click the “Search” button to start search, the search result will be
displayed in the table below it.
Copyright © 2016 NEXCOM International Co., Ltd. All Rights Reserved. MVS 5200/5210/MVS 5210-R Series & NANO 1190 NVR User Manual
42

Chapter 1: Main Console
9.2 Event Log:
Device:
Select a Device for search filter.
Log Type:
Select a log type to filter data.
Input:
Setup DI input port search filter, only works for searching DI event.
Time:
Setup search logs in time periods.
Limit Record:
Setup the maximum number of records of search result.
Click the “Search” button to start search, the search result will be
displayed in the table below it.
Preview Event Images:
Select an event log from the log table, event image will be
displayed in the window, you can click the play control buttons to
preview event images.
Copyright © 2016 NEXCOM International Co., Ltd. All Rights Reserved. MVS 5200/5210/MVS 5210-R Series & NANO 1190 NVR User Manual
43

Chapter 1: Main Console
Change Display Channel:
Select another camera ID from the combo box, the system will
display selected channel image in event time.
Snapshot:
Insert a USB dongle to the NVR first, and click the Snapshot button
to save it.
9.3 Bit-rate Log:
You can search bit-rate log in the bit-rate log page, the days that
have logs will be displayed with blue background in the calendar.
Select a date:
Click on the days in the calendar with blue background.
Bit-rate table:
The system will display the bit-rate log in the table.
Copyright © 2016 NEXCOM International Co., Ltd. All Rights Reserved. MVS 5200/5210/MVS 5210-R Series & NANO 1190 NVR User Manual
Blue:
Bit-rate is very low.
44

Chapter 1: Main Console
Green:
Bit-rate is fine.
Yellow:
Bit-rate is a little high.
Orange:
Bit-rate is very high.
Red:
Bit-rate is over limit.
10. Schedule Monitor:
Click to enable or disable Schedule job, if it is disabled,
recording will be stopped.
10.1 Two-way Audio:
Click to start or stop two-way audio of focus channel.
10.2 Audio Volume Adjustment:
Move the thumb to left to make volume lower, or right to make
volume higher.
10.3 PTZ Control:
Pan/Tilt
Move the PTZ camera direction by clicking the direction buttons.
Copyright © 2016 NEXCOM International Co., Ltd. All Rights Reserved. MVS 5200/5210/MVS 5210-R Series & NANO 1190 NVR User Manual
45

Chapter 1: Main Console
Click to make the camera return to home position.
Move the thumb to the left to make it move slower, or to the
right to make it move faster.
Tour:
Select a tour setting from the combo box, and click the “Go”
button to start tour, click the “Stop” button to stop tour.
Preset:
Select a preset position from the combo box, camera will move
to preset position when clicked.
Add Preset:
Move the camera then key in new preset name, click the
“Add” button.
Remove Preset:
Select a preset then click the “Delete” button.
IRIS:
Adjust camera’s IRIS setting, or set it to auto.
Focus:
Adjust camera’s focus setting, or set it to auto.
Copyright © 2016 NEXCOM International Co., Ltd. All Rights Reserved. MVS 5200/5210/MVS 5210-R Series & NANO 1190 NVR User Manual
46

Chapter 1: Main Console
Zoom:
Zoom-in or zoom-out camera focus.
Pan:
Begin or stop camera auto pan.
10.4 E-map:
Copyright © 2016 NEXCOM International Co., Ltd. All Rights Reserved. MVS 5200/5210/MVS 5210-R Series & NANO 1190 NVR User Manual
Switch to “Professional” or “Advance” style, and add E-Map
to primary or secondary toolbox.
Add image and camera into E-Map, E-Map can display camera’s
position and record status.
Double click on the camera icon, live preview division will switch
to selected camera.
E-Map Setting:
Click “Setup” button on upper left corner to launch the E-Map
setting dialog.
47

Chapter 1: Main Console
Change Map:
Click the “Change Map” button, and select a map image
from a removable device.
Add Camera:
Enable camera’s checkbox, camera will be displayed on the
upper left corner. Drag the camera to the current position on
map.
Remove Camera:
Disable camera’s checkbox.
Rotate Camera:
Click the right mouse button on the camera icon.
Switch Live Preview:
Double click on the camera icon.
Copyright © 2016 NEXCOM International Co., Ltd. All Rights Reserved. MVS 5200/5210/MVS 5210-R Series & NANO 1190 NVR User Manual
48

Chapter 2: Playback
ChaPter 2: PlaybaCk
Playback provides history record file(s)’s search, playback, and file format
convert functions. User can find out critical images in minutes using playback
tools, and backup these images to a USB Flash with user selected period and
length.
Click from main page to enter the playback page.
When you enter the playback page, the system will automatically playback
recent video history. You can drag the time bar to change current playback
time.
Copyright © 2016 NEXCOM International Co., Ltd. All Rights Reserved. MVS 5200/5210/MVS 5210-R Series & NANO 1190 NVR User Manual
49

Chapter 2: Playback
1. Search History Record Data:
Click to enter the search dialog.
Normal Search:
1. Select playback date:
If there is record history data, the system will set the calendar’s day to
blue to identify which days has record files.
2. Begin search:
Click the “Search” button to start searching for record file in selected
date, the system will draw search result in the grid.
3. Select playback camera and time period:
Select cameras from the list, and drag on the search result or edit
start/end time from the date-time picker control to define playback
period.
4. Begin playback:
Confirm the playback camera and period then click the “OK” button
to begin playback.
Copyright © 2016 NEXCOM International Co., Ltd. All Rights Reserved. MVS 5200/5210/MVS 5210-R Series & NANO 1190 NVR User Manual
50

Chapter 2: Playback
Change display range:
You can drag the thumb on the lower left corner to re-arrange
display accuracy.
Simple Search:
Select playback period from date controls directly, and select which
cameras will be played back.
Click the “OK” button when you finish setting the search rules.
Copyright © 2016 NEXCOM International Co., Ltd. All Rights Reserved. MVS 5200/5210/MVS 5210-R Series & NANO 1190 NVR User Manual
51

Chapter 2: Playback
Search by Event:
Input search filter first, click the “Search” button, the search result
will be displayed on the list as below.
Select a log that you need to playback, the system will fill the event
period automatically, and select which cameras you need playback
together.
Click the “OK” button when you finish setting the search rules.
2. Playback Control Button(s):
Button Description
Play video forward.
Pause playing video.
Stop playing video.
Play video backward.
Copyright © 2016 NEXCOM International Co., Ltd. All Rights Reserved. MVS 5200/5210/MVS 5210-R Series & NANO 1190 NVR User Manual
Seek to previous frame when on
pause mode.
Seek to next frame when on pause
mode.
52

Chapter 2: Playback
Button Description
Close playback and return to main
page.
Change playback speed.
Adjust playback audio volume.
Switch display mode to full screen,
right click to return to normal mode.
Take a snapshot to hard disk.
Select audio playback method:
1. Mute: Mute sound output.
2. Live Audio: Play live focus channel
sound.
3. Playback Audio: Play playback
sound.
Select “Playback control Pad” from pop-up menu, the mini control pad
will be displayed on top, you can use it to control play status.
The mini control pad can move to any position that you need in the
screen.
Copyright © 2016 NEXCOM International Co., Ltd. All Rights Reserved. MVS 5200/5210/MVS 5210-R Series & NANO 1190 NVR User Manual
53

Chapter 2: Playback
3. Convert to AVI file:
1. Click to enter the search dialog.
2. Select convert camera and time periods as playback search steps.
3. Select destination folder for converted files.
4. Wait till the convert finishes or abort by clicking the cancel
button.
4. Backup:
1. Click to enter the backup dialog.
2. Select backup cameras and time periods as playback search steps.
3. Select destination folder for backup.
4. Wait till the convert finishes or abort by clicking the cancel button.
Copyright © 2016 NEXCOM International Co., Ltd. All Rights Reserved. MVS 5200/5210/MVS 5210-R Series & NANO 1190 NVR User Manual
54

Chapter 2: Playback
5. Playback Status:
Playback
Status
Current Time:
Current local time of NVR.
Playback Time:
The video playback time.
Play Status:
Display playback status and speed.
6. Sequential Search:
Right click on the playback channel, and select “Sequential Search”
from the pop-up menu, the system will enter the Sequential search
dialog.
Copyright © 2016 NEXCOM International Co., Ltd. All Rights Reserved. MVS 5200/5210/MVS 5210-R Series & NANO 1190 NVR User Manual
55

Chapter 2: Playback
You can click on the image to select the search begin time and end
time, and then click the search button to list the images in the selected
period.
Display Periods:
The upper left corner will show the image periods.
Show Information:
Display image’s time or not.
Split:
Select display division mode.
Pre-Search:
Reverse last search result.
Search:
Search images within the selected period.
Seek To:
Seek all channels to the selected image’s time.
Cancel:
Cancel Sequential search.
Copyright © 2016 NEXCOM International Co., Ltd. All Rights Reserved. MVS 5200/5210/MVS 5210-R Series & NANO 1190 NVR User Manual
56

Chapter 3: Remote Service
ChaPter 3: reMote serviCe
Remote Service provides live stream preview and system status through a
web browser. The user interface of remote service is basically very similar to
the local MVS 52/NANO 1190 NVR system.
1. Installation:
If this is your first time to access the remote service, the Internet
Explorer (IE) browser will show a notification to confirm the ActiveX
component installation. Please click “Install ActiveX Control” to allow
this installation.
Remote Service is supported on Internet Explorer 6, 7 and later.
2. Login:
Once you have connected to the remote service, IE will pop up a login
window. Please key in valid username account and password.
Each user account’s privilege is defined at MVS 52/NANO 1190. Please
make sure to login with the correct account.
Copyright © 2016 NEXCOM International Co., Ltd. All Rights Reserved. MVS 5200/5210/MVS 5210-R Series & NANO 1190 NVR User Manual
57

Chapter 3: Remote Service
3. Live Preview:
Operation of the live preview page is the same as local; therefore, only
different topics will be listed here.
1. Setting page not available.
2. Schedule monitor not available to prevent wrong operation.
3. Additional division window operation.
Additional division window operation:
Right click the mouse button to enter the pop-up menu.
Show Live Camera:
Select the display of live preview camera on this window.
Remove Camera display:
Remove display at this window.
Copyright © 2016 NEXCOM International Co., Ltd. All Rights Reserved. MVS 5200/5210/MVS 5210-R Series & NANO 1190 NVR User Manual
58

Chapter 3: Remote Service
Digital Zoom:
Enable or disable digital zoom mode, when digital zoom is enabled, you
can change zoom status by scrolling the mouse wheel.
Snapshot:
Enter the snapshot dialog to adjust and save images.
Full Screen:
Switch display mode between normal and full screen.
Restore division default:
Reset division mode to default.
Copyright © 2016 NEXCOM International Co., Ltd. All Rights Reserved. MVS 5200/5210/MVS 5210-R Series & NANO 1190 NVR User Manual
59

Chapter 3: Remote Service
4. Playback:
Playback includes search, playback, and convert file format for history
recorded file(s) functions.
User can find out critical images in minutes using playback tools, and
backup these images to a user assigned storage with selected period
and length.
Click the Exit button to return to live preview page.
Copyright © 2016 NEXCOM International Co., Ltd. All Rights Reserved. MVS 5200/5210/MVS 5210-R Series & NANO 1190 NVR User Manual
60

Chapter 3: Remote Service
4.1 Search History Recorded File(s):
Click the Search button on the Playback page.
4.1.1 Search history file(s) dialog:
Select the time period and camera(s) within the search
dialog.
Copyright © 2016 NEXCOM International Co., Ltd. All Rights Reserved. MVS 5200/5210/MVS 5210-R Series & NANO 1190 NVR User Manual
61

Chapter 3: Remote Service
4.1.2 Select a day to search history file(s):
Click , buttons to select the month which you want to
search history file(s).
Click on the date to choose a day to search.
4.1.3 Select record mode(s) / Event Type:
Check the modes which you want to search. System will
search recorded files within these modes only.
Check the Event types you want to display. System will
display event triggered based on the selected date and type.
Copyright © 2016 NEXCOM International Co., Ltd. All Rights Reserved. MVS 5200/5210/MVS 5210-R Series & NANO 1190 NVR User Manual
You can define display color for each record mode and event
through the color select dialog.
Click button to enter the color select dialog.
62

Chapter 3: Remote Service
4.1.4 Start search:
Click the “Search” button to start the search procedure.
Please wait a moment for the search to complete. The result
will appear on the list control.
4.1.5 Review history record file(s) in search period:
The list control will display the result of the search procedure.
Blue section: Round the clock recorded file(s).
Green section: Motion detection recorded file(s).
Red section: Alarm recorded file(s).
4.1.6 Assign time period of search result:
1. You can drag the mouse cursor on the list control to
assign a time period to playback.
2. Choose a time period by setting the begin time and end
time manually.
The selected time period will be displayed as blue section on
the list control.
Copyright © 2016 NEXCOM International Co., Ltd. All Rights Reserved. MVS 5200/5210/MVS 5210-R Series & NANO 1190 NVR User Manual
63

Chapter 3: Remote Service
4.1.7 Select the camera(s) to playback:
Select the camera(s) which you want to playback.
The system can select a maximum of 8 camera(s) to playback
at once.
4.1.8 Start playback history file(s):
Click the “OK” button to finish the search procedure and
start playback, or click the “Cancel” button to abort and
return to the Playback main page.
Copyright © 2016 NEXCOM International Co., Ltd. All Rights Reserved. MVS 5200/5210/MVS 5210-R Series & NANO 1190 NVR User Manual
64

Chapter 3: Remote Service
4.2 Playback Control Button(s):
These buttons are used to control playback including start, pause,
backward and other operations. Users can control playback
functions through these buttons.
Button Description
Play Button:
Click play button to play the selected
history file(s).
Pause Button:
Click pause button to pause playback
stream. Some operations must enter
pause mode first.
Backward Play Button:
Click backward play button to playback
stream direction in backward mode.
Stop Button:
Click stop button to stop playback
stream and return to the beginning
position of stream.
Next Frame Button:
When playback is in pause mode, click
the next frame button to seek next
frame.
Previous Frame Button:
When playback is in pause mode, click
the previous frame button to seek
previous frame.
4.3 Playback Speed Control:
Turn the speed button to select the playback speed.
1X: Normal speed.
2X: Double of normal speed.
4X: 4X normal speed.
8X: 8X normal speed.
16X: 16X normal speed.
32X: 32X normal speed.
1/2X: Half of normal speed.
1/4X: Quarter of normal speed.
Copyright © 2016 NEXCOM International Co., Ltd. All Rights Reserved. MVS 5200/5210/MVS 5210-R Series & NANO 1190 NVR User Manual
65

Chapter 3: Remote Service
4.4 Division Control Buttons:
Button Description
Divide to 1 screen.
Divide to 4 screen(s).
Divide to 6 screen(s).
Divide to 9 screen(s).
Divide to 16 Screen(s)
Full screen mode.
4.5 Convert to AVI file:
Click the Convert file button to enter the Convert file dialog.
Copyright © 2016 NEXCOM International Co., Ltd. All Rights Reserved. MVS 5200/5210/MVS 5210-R Series & NANO 1190 NVR User Manual
66

Chapter 3: Remote Service
4.5.1 Convert file dialog:
Select time slice and camera to convert to AVI file. The AVI
file can be played on most PC with the most current codecs
installed.
4.5.2 Select a day to convert history file(s):
Click , buttons to select the month which you want to
convert history file(s).
Click on the date to choose a day to convert file(s).
Copyright © 2016 NEXCOM International Co., Ltd. All Rights Reserved. MVS 5200/5210/MVS 5210-R Series & NANO 1190 NVR User Manual
67

Chapter 3: Remote Service
4.5.3 Assign time slice to convert job:
Choose a time slice by the Start time and End time picker
control, or drag the mouse cursor on the record list to define
the convert period.
4.5.4 Select cameras to convert job:
Check the camera’s IDs from list to convert job.
4.5.5 Select a folder to save converted file:
Click the browse button to select a folder to save the
converted file.
4.5.6 Start converting job:
Click the “OK” button to start the convert. When
converting completes, the system will generate a file into
the assigned folder.
Click the “Cancel” button to abort conversion.
The naming rule of the converted file is as below:
CHXXXYYYYMMDDHHmmssnnn.avi
XXX: Camera ID.
YYYY: Execute convert year.
MM: Execute convert month.
DD: Execute convert day.
HH: Execute convert hour.
mm: Execute convert minute.
ss: Execute convert second.
nnn: Execute convert million-second.
Ex:
CH00220090914140253150.avi
Copyright © 2016 NEXCOM International Co., Ltd. All Rights Reserved. MVS 5200/5210/MVS 5210-R Series & NANO 1190 NVR User Manual
68

Chapter 3: Remote Service
4.6 Backup:
Click the “Backup” file button to enter the Backup file dialog.
4.6.1 Backup file dialog:
Select time period and camera to backup. The backup files
will be saved to the assigned path, and you can play these
backup files with playback applications on your PC.
Copyright © 2016 NEXCOM International Co., Ltd. All Rights Reserved. MVS 5200/5210/MVS 5210-R Series & NANO 1190 NVR User Manual
69

Chapter 3: Remote Service
4.6.2 Select a day to backup:
Click , buttons to select the month which you want to
backup file(s).
Click on the date to choose a day to backup file(s).
4.6.3 Assign time slice to backup job:
Choose a time period by the Start time and End time picker
control, or drag the mouse cursor on the record list to define
the backup period.
4.6.4 Select cameras to backup job:
Check camera’s IDs from the list to backup.
4.6.5 Select a folder to save backup file(s):
Click the browse button to select a folder to save the
backup files.
4.6.6 Start backup job:
Click the “OK” button to start the backup. When backup
completes, the system will save the backup files into the
assigned folder.
Copyright © 2016 NEXCOM International Co., Ltd. All Rights Reserved. MVS 5200/5210/MVS 5210-R Series & NANO 1190 NVR User Manual
Click the “Cancel” button to abort backup job.
• Do not modify the filename or placement in the
backup files folder, if the files are modified, the
playback application will fail to playback.
70

Chapter 3: Remote Service
4.7 Switch Audio Play Mode:
Click the Audio mode button to view the pop-up menu of
audio mode.
Select the audio mode from the pop-up menu. The checked item
means the current mode of audio playback now.
Mute: No audio data will be played.
Live: Plays the live audio stream.
Playback: Plays the playback audio stream.
4.8 Playback Setting:
Click the Setting button to view the pop-up menu of
playback setting.
Check the item(s) to change OSD status on the image while the
recorded file is playing back.
Display Date: Displays the date of the recorded file on the image.
Display Time: Displays the time of the recorded file on the image.
Display camera name: Displays the camera name on the image.
Copyright © 2016 NEXCOM International Co., Ltd. All Rights Reserved. MVS 5200/5210/MVS 5210-R Series & NANO 1190 NVR User Manual
71

Chapter 3: Remote Service
4.9 Snapshot Dialog:
Click the snapshot button to enter the snapshot dialog.
This function is used to take a snapshot of the history file played.
4.9.1 Snapshot all dialog:
The snapshot all dialog will display all snapshot images on
the dialog. You can choose which image will be saved and
assign the file format and folder.
4.9.2 Select snapshot image:
Copyright © 2016 NEXCOM International Co., Ltd. All Rights Reserved. MVS 5200/5210/MVS 5210-R Series & NANO 1190 NVR User Manual
The dialog displays all snapshot images with the camera ID,
resolution, and camera name.
Tick the checkbox if you want to save this image.
72

Chapter 3: Remote Service
4.9.3 Select snapshot folder:
Click the browse button to select a folder to save snapshot
images.
4.9.4 Select file format:
Select the image file format in the combo box.
4.9.5 Save snapshot images:
Click the “OK” button to save all the selected images or
click the “Cancel” button to abort the snapshot process.
4.9.6 Saved image file name:
The naming rule of the saved file is as below:
CamXXX_NNNNNN_YYYYMMDDHHmmssnnn.jpg
XXX: Camera ID.
NNNN: Camera name.
YYYY: The image’s year of date.
MM: The image’s month of date.
DD: The image’s day of date.
HH: The image’s hour of time.
mm: The image’s minute of time.
ss: The image’s second of time.
nnn: The image’s million-second of time.
Ex:
Cam000_AM3220 192.168.0.143_20090908111559901.jpg
Copyright © 2016 NEXCOM International Co., Ltd. All Rights Reserved. MVS 5200/5210/MVS 5210-R Series & NANO 1190 NVR User Manual
73

Chapter 3: Remote Service
4.10 Playback Status:
Current Time: System current time.
Playback Time: The video playback time.
Playback Status: Displays playback status and speed.
4.11 Operation With Sub-screen:
4.11.1 Define display camera(s) sequence:
1. To switch display sequence in sub-screen(s), press and
hold the left mouse button on the source sub-screen,
and then drag to target sub-screen and release the
mouse button.
2. To switch current sub-window to another camera, click
the right mouse button on the sub-screen, and then
choose the preferred playback camera.
Copyright © 2016 NEXCOM International Co., Ltd. All Rights Reserved. MVS 5200/5210/MVS 5210-R Series & NANO 1190 NVR User Manual
74

Chapter 3: Remote Service
4.11.2 Digital zoom at sub-screen:
1. Click the right mouse button on the sub-screen, and
then check the Digital Zoom option.
2. Move the mouse cursor to the position where you
want to do digital zoom.
3. Move mouse wheel forward to zoom in the image.
4. Move mouse wheel backward to zoom out the image.
5. Press and hold the left mouse button and drag the
image at the sub-screen to the position where you
need.
6. To cancel the digital zoom mode, click the right mouse
button and uncheck the Digital Zoom option.
4.11.3 Switch to Fullscreen:
1. Click the right mouse button and check the Fullscreen
option on the pop-up menu to switch to Fullscreen
mode.
2. Click the “Esc” button or uncheck “Fullscreen” mode
on the pop-up menu to return to normal display mode.
4.11.4 Snapshot of sub-screen:
Copyright © 2016 NEXCOM International Co., Ltd. All Rights Reserved. MVS 5200/5210/MVS 5210-R Series & NANO 1190 NVR User Manual
1. Click the right mouse button and choose Snapshot on
the pop-up menu.
2. Configure the image in the Snapshot dialog.
3. Click the “Save” button and choose the folder which
you want to save the snapshot.
75

Chapter 3: Remote Service
Snapshot dialog:
Bright:
50 = Maximum brightness, -50 = Maximum darkness
Contrast:
50 = Maximum value of contrast, -50 = Minimum value
of contrast.
Grayscale:
Click to switch image to grayscale mode.
Sharp:
Click Sharp to increase image sharpness level.
Soft:
Click Soft to increase image softness level.
Reset:
Click Reset to restore image to original image.
Print:
Click Print to print out image to printer.
Copyright © 2016 NEXCOM International Co., Ltd. All Rights Reserved. MVS 5200/5210/MVS 5210-R Series & NANO 1190 NVR User Manual
Save:
Click Save and then choose the folder and filename to
save the snapshot.
Exit:
Close Snapshot dialog.
76

Chapter 3: Remote Service
4.11.5 Motion Search:
Click the right mouse button on the channel which you
want to do motion search, and then select “Motion
Search” from the pop-up menu.
Copyright © 2016 NEXCOM International Co., Ltd. All Rights Reserved. MVS 5200/5210/MVS 5210-R Series & NANO 1190 NVR User Manual
Define motion search area:
Add: Click the “Add” button then drag a rectangle area
for the motion search area. The search area will overlay a
transparent red mask.
Delete: Define a rectangle area on the image first, then
click the “Delete” button to remove the region defined.
Default: Click the “Default” button to select the entire
image for motion detection.
Check the “Show Search Image” option to display the
searching video sequence or uncheck this box to show
only the image once the event has been found.
77

Chapter 3: Remote Service
Check the “Show Detect Mark” option to display the
detected result on the image in pink rectangles.
Select the “Sensitivity” option to define the sensitivity of
detection. Higher value means the event will be triggered
more easily.
Select the “Detect Interval” option to define the interval
of motion detection. Longer value means the system will
use less computing power to check motion detection.
When the event has been triggered, the window on the
right side will display the triggered image. If the event
does not match your expectation, click the “Continue”
button to search the next event.
If you have found the matching event, click the “OK”
button to return to the playback panel, and all playing
channels will be synchronized to the same timestamp of
the event.
Click the “Cancel” button to abort this motion search
job.
4.11.6 Sequential Search:
Click the right mouse button on the channel which
you want to do sequential search, and then select the
“Sequential Search” option from the pop-up menu.
Copyright © 2016 NEXCOM International Co., Ltd. All Rights Reserved. MVS 5200/5210/MVS 5210-R Series & NANO 1190 NVR User Manual
78

Chapter 3: Remote Service
Sequential Search Window:
Quick start with sequential search:
1. Choose sequential search channel and time period.
2. Select two images from these sequential pictures by
clicking on the images, and then click the “Search”
button.
3. Repeat this procedure until time period turns into one
second resolution.
4. Click the “Detail picture” button to enter the
snapshot images dialog.
5. Select these snapshot images, and save them to an
assigned folder.
4.11.6.1 Define search time period:
We need to define time period for the sequential search
task. We can define time period in two ways and the
selected time period will be displayed on the upper left
corner.
Copyright © 2016 NEXCOM International Co., Ltd. All Rights Reserved. MVS 5200/5210/MVS 5210-R Series & NANO 1190 NVR User Manual
79

Chapter 3: Remote Service
1. Select two images from these sequential pictures
to define search time period. Click on the image to
select it and click it again to deselect it.
Selected
Deselected
2. Or drag on the timeline to define the search time
period directly.
Start time End time
Blue bar:
The time period of the selected images for sequential
search.
Green transparent bar:
New time period to be searched.
4.11.6.2 Start search and rollback:
After defining search time period, click the “Search”
button to display the next search result.
Copyright © 2016 NEXCOM International Co., Ltd. All Rights Reserved. MVS 5200/5210/MVS 5210-R Series & NANO 1190 NVR User Manual
Click the “Pre search” button to rollback to previous
search result.
80

Chapter 3: Remote Service
4.11.6.3 Detail window for snapshots:
The dialog will display small snapshot images of search
result. In case you need a bigger image of snapshots,
you can enable “Show Detail Window” to get a
resizable window for displaying the snapshot.
You can move the detail window and resize it to get a
bigger preview image size.
4.11.6.4 Preview mode of search result:
You can define the preview mode of search result by
these parameters below.
Time Split:
Define the number to divide the search time period
equally, and take a snapshot at beginning of each part.
Division:
Select the display division mode of search result.
Switch page buttons:
In cases where the search result can not be displayed
within one page, then these buttons will be enabled.
Click these buttons to switch the pages of snapshot.
Copyright © 2016 NEXCOM International Co., Ltd. All Rights Reserved. MVS 5200/5210/MVS 5210-R Series & NANO 1190 NVR User Manual
81

Chapter 3: Remote Service
5. Remote System Setting:
5.1 Camera Setting:
Camera list:
List all the cameras that was added, select a camera from the list to
modify the camera’s information.
Copyright © 2016 NEXCOM International Co., Ltd. All Rights Reserved. MVS 5200/5210/MVS 5210-R Series & NANO 1190 NVR User Manual
Camera Config:
Vendor:
Select camera’s Vendor ID.
82

Chapter 3: Remote Service
Model:
Display camera’s model name.
Camera Name:
Key in camera’s name here.
IP:
Key in camera’s IP address here.
Port:
Key in camera’s HTTP port here.
User:
Key in login username here.
Password:
Key in login password here.
Add Button:
Add a camera into the camera list.
Delete Button:
Remove the selected camera from the camera list.
Edit Button:
Update modified camera’s information onto the list.
Clear Button:
Clear all the fields of camera’s information.
Auto Detect Button:
Detect selected camera, and automatically update camera’s
information.
Copyright © 2016 NEXCOM International Co., Ltd. All Rights Reserved. MVS 5200/5210/MVS 5210-R Series & NANO 1190 NVR User Manual
Config Detail Button:
Connect to camera’s web page for detailed configuration.
Camera Parameter Button:
Enter the camera’s parameter setting page.
83

Chapter 3: Remote Service
Camera Parameter Setting Page:
Video Setting:
Video codec:
Select the video codec for streaming.
Resolution:
Select the streaming resolution.
Network Setting:
Protocol:
Select the streaming network protocol.
RTSP Port:
Define the RTSP streaming port of the camera.
Audio Setting:
Enable Audio:
Enable audio streaming from the camera.
Enable Audio Record:
Enable recording of audio data.
Copyright © 2016 NEXCOM International Co., Ltd. All Rights Reserved. MVS 5200/5210/MVS 5210-R Series & NANO 1190 NVR User Manual
84

Chapter 3: Remote Service
5.2 Schedule Setting:
Camera and Weekday list:
List all the cameras and weekdays. Select a weekday for scheduling
the configuration.
Schedule management:
Add a new schedule:
1. Select a weekday for the camera first.
2. Drag the mouse cursor onto an empty area.
3. Or enter the start time and end time then click Add.
Edit a exist schedule:
Double click on a schedule window, or click on a schedule window
then click Edit.
Copyright © 2016 NEXCOM International Co., Ltd. All Rights Reserved. MVS 5200/5210/MVS 5210-R Series & NANO 1190 NVR User Manual
85

Chapter 3: Remote Service
Delete an existing schedule:
Select a schedule window then click Delete.
Schedule setting:
Select a record mode ranging from “Round the Clock”, “Motion
detection” or “Alarm Record”.
If you select “Motion Detection” or “Alarm Record”, you can
define the Pre-Alarm and Post-Alarm record seconds when alarm is
triggered.
Copyright © 2016 NEXCOM International Co., Ltd. All Rights Reserved. MVS 5200/5210/MVS 5210-R Series & NANO 1190 NVR User Manual
86

Chapter 3: Remote Service
5.3 Network Setting:
DHCP setting:
Check the “Obtain IP address automatically(DHCP)” to enable
automatic IP retrieval from DHCP server.
MAC address:
Display MAC address of this NVR.
Fixed IP setting:
When DHCP is disabled, you should key in IP settings here. Click
the “Test” button to detect any IP conflict.
DNS setting:
Check “Obtain DNS from DHCP” to retrieve DNS settings from
DHCP server, it only works when DHCP is enabled.
If “Obtain DNS from DHCP” is disabled, you can key in the DNS
server IP address in the text box.
PPPOE Setting:
Copyright © 2016 NEXCOM International Co., Ltd. All Rights Reserved. MVS 5200/5210/MVS 5210-R Series & NANO 1190 NVR User Manual
Enable / Disable:
Check or uncheck the checkbox to enable or disable PPPoE
function.
87

Chapter 3: Remote Service
User Name:
Key in the username to login PPPoE server here.
Password:
Key in the login PPPoE server password here.
IP address:
Display the current IP address retrieved from the PPPoE server.
Subnet Mask:
Display the current subnet mask retrieved from the PPPoE server.
Gateway:
Display the current gateway IP address retrieved from the PPPoE
server.
Status:
Display PPPoE status.
UPNP Setting:
Display UPnP friend name on network.
UPnP Traversal Setting:
Enable UPnP Traversal to automatically request port mapping with
router. Define the maximum and minimum port value here.
Server Setting:
Enable HTTP and RTSP server. After remote service starts, users can
connect to the remote service through a web browser.
HTTP Port:
Set HTTP service port here.
RTSP Port:
Set RTSP service port here.
Copyright © 2016 NEXCOM International Co., Ltd. All Rights Reserved. MVS 5200/5210/MVS 5210-R Series & NANO 1190 NVR User Manual
RTSP over HTTP:
Enable RTSP over HTTP function, the remote live stream will use
HTTP protocol and HTTP port.
88

Chapter 3: Remote Service
5.4 System Setting:
Device Info:
Model Name:
Display Model Name.
Device Title:
Key in device title here.
Software version:
Display current firmware version.
Date Time:
Server Date & Time:
Display current system date-time.
Adjust:
Manual Setting:
Click setting to enter the date-time setting dialog, and select
current date and time now, click “OK” to change system
time or click “Cancel” button to abort configuration.
Copyright © 2016 NEXCOM International Co., Ltd. All Rights Reserved. MVS 5200/5210/MVS 5210-R Series & NANO 1190 NVR User Manual
Synchronize with NTP:
Enable date-time synchronization with NTP service.
89

Chapter 3: Remote Service
NTP Server:
Key in NTP server IP or domain name, if you use the domain
name to connect NTP server, the DNS service must be enabled.
NTP Sync Interval:
Select a value to set the interval of each time synchronization
with NTP service.
Time Zone:
Select the time zone of the NVR location.
Daylight saving:
Enable or disable daylight saving mode.
Daylight saving Start Time:
Configure daylight saving start time, it works with daylight
saving mode enabled.
Daylight saving End Time:
Configure daylight saving end time, it works with daylight
saving mode enabled.
Daylight saving Offset:
Configure daylight saving offset time with current time, it works
with daylight saving mode enabled.
Auto Login:
Enable auto login mode to login with the defined user name and
password when system boots up.
User:
Key in auto login username.
Password:
Key in auto login password.
Copyright © 2016 NEXCOM International Co., Ltd. All Rights Reserved. MVS 5200/5210/MVS 5210-R Series & NANO 1190 NVR User Manual
90

Chapter 3: Remote Service
System Setting:
Auto Full-Screen:
Enable “Auto full screen” to switch to full screen mode when
system boots up.
Language:
Change display language from language combo box.
Audio Output Gain:
Adjust output gain value between 0 to 100.
DIPS
Display device DIPS ID.
Click the “Test” button to test connection with DIPS server.
5.5 User Setting:
User:
Edit username here.
Password / Confirm Password:
Edit user login password here.
Group:
Select user’s login group.
Copyright © 2016 NEXCOM International Co., Ltd. All Rights Reserved. MVS 5200/5210/MVS 5210-R Series & NANO 1190 NVR User Manual
91

Chapter 3: Remote Service
Description:
Key in description of this user.
Monitor:
Select which camera live streams that the current user can preview.
Playback:
Select which cameras that the current user can playback history
record data.
Record:
Enable this user to start and stop record job.
Setting:
Enable this user to enter system setting function.
PTZ:
Enable this user with operator PTZ functions.
Two-way audio:
Enable this user to start and stop two-way audio.
Add User:
After entering user information, click the “Add” button to insert
the new user account into the system.
Modify User:
Select a user first then modify user information. You must click the
“Modify” button to make the changes take effect.
Delete User:
Select a user first then click the “Delete” button to remove the
selected user from the system.
Copyright © 2016 NEXCOM International Co., Ltd. All Rights Reserved. MVS 5200/5210/MVS 5210-R Series & NANO 1190 NVR User Manual
92

Chapter 3: Remote Service
5.6 Motion Config:
Setup each camera’s motion detection here.
Add a new motion detection window:
1. Select a camera from the camera list.
2. Click the “Add” button to add a new motion detection
window.
3. Move the new motion window to the place where you need
to detect.
4. Modify the motion window name.
5. Select detect area as “include” or “exclude” motion
window.
6. Define the motion detection object size.
7. Define the motion detection sensitivity.
8. Click the “Update” button to transform the new settings to
the camera.
Modify a motion detection window:
1. Select a camera from the camera list.
2. Select a motion window from the motion window list.
3. Move the motion window to the place where you need to
detect.
4. Modify the motion window name.
5. Select detect area as “include” or “exclude” motion
window.
Copyright © 2016 NEXCOM International Co., Ltd. All Rights Reserved. MVS 5200/5210/MVS 5210-R Series & NANO 1190 NVR User Manual
93

Chapter 3: Remote Service
6. Define the motion detection object size.
7. Define the motion detection sensitivity.
8. Click the “Update” button to transform the new settings to
the camera.
Delete a motion detection window:
1. Select a camera form the camera list.
2. Select a motion window from the motion window list.
3. Click the “Delete” button to remove the selected motion
window.
Copyright © 2016 NEXCOM International Co., Ltd. All Rights Reserved. MVS 5200/5210/MVS 5210-R Series & NANO 1190 NVR User Manual
94

Chapter 3: Remote Service
6. Remote System Management:
6.1 Maintenance:
Style:
Resolution:
Select the NVR’s resolution from the combo list.
Maintenance:
Copyright © 2016 NEXCOM International Co., Ltd. All Rights Reserved. MVS 5200/5210/MVS 5210-R Series & NANO 1190 NVR User Manual
Backup Setting:
Export backup setting file to a removable storage device.
95
 Loading...