


SUPERCHARGER INSTALLATION INSTRUCTIONS
PLEASE READ CAREFULLY BEFORE YOU BEGIN!
THIS SUPERCHARGER KIT IS FOR:
2002-UP VOLKSWAGEN GOLF IV AND JETTA IV 2.0L 8V ENGINES WITH A/C
FOR DRIVE-BY-WIRE VEHICLES ONLY
As soon as you receive your NEUSPEED Supercharger Kit, please check the Kit Contents to be sure you have
all parts before starting installation. Notify us immediately if you are missing something. Also, send us your
ECU (along with a copy of your receipt) ASAP (see LOCATION AND REMOVAL OF ECU Page 15 and 16),
so that we can install our custom P-Chip program, which is required before starting engine. SAVE SPECIAL
SUPERCHARGER SHIPPING CONTAINER – SEE WARRANTY.
KIT CONTENTS:
1 – SUPERCHARGER/MANIFOLD ASSEMBLY (EGR plate, by-pass valve to Supercharger vacuum hose installed).
2 – SUPERCHARGER REAR SUPPORT BRACKETS (driver side rod end and jam nut installed).
1 – SUPERCHARGER HEAD STAY BRACKET
1 – SUPERCHARGER BELT
5 – SUPERCHARGER/MANIFOLD MOUNTING BOLTS – 3-25mm, 2-95mm.
5 – STAINLESS STEEL/NEOPRENE BACKED MOUNTING WASHERS
1 – NEUSPEED SPECIAL UNDER-WASHER LUBRICATING GREASE
1 – IDLER PULLEY MOUNT AND BELT ADJUSTER WITH PULLEY (installed).
1
1 –
/2” HOSE CLAMP
1 – AIR FILTER BOX COVER
1 – ALUMINUM HEAT SHIELD
1 – COOLANT HOSE SUPPORT BRACKET
1 – VITON INTAKE MANIFOLD GASKET
1 – THROTTLE BODY GASKET
1 – COMBI-VALVE GASKET
4 – IRIDIUM SPARK PLUGS
1 – 4-BAR FUEL PRESSURE REGULATOR
1 – CHECK VALVE
8 – VARIOUS ASSEMBLY BOLTS
1 – EVAP PURGE HOSE
1 – THROTTLE BODY TO COOLANT TANK HOSE
1 – BRAKE BOOSTER HOSE
5
1 –
/16” STRAIGHT HOSE BARB
5
1 –
/16” ‘T’ HOSE BARB
5
/16” X 28”
3
/8” X 12”
5
/16” X 20”
2 – HOSE CLIPS
1 – LOCTITE 262
1 – NEUSPEED SUPERCHARGER BADGE
1 – CARB EXEMPTION PLATE – 50-STATE LEGAL
2 – PREMIUM FUEL ONLY DECALS – ONE FOR GAS GAUGE, ONE FOR FUEL DOOR
1 – BELT PATH ROUTING DECAL
1 – WARRANTY CARD – FILL OUT IMMEDIATELY WITH SERIAL NUMBER AND RETURN
Page 1

TOOLS REQUIRED:
• INCH AND FOOT LBS TORQUE WRENCH, METRIC SOCKET, HEX KEY, TORX, OPEN END
WRENCHES, SCREW DRIVERS – PHILLIPS AND BLADE, PLIERS, HAMMER AND KNIFE, #8
TRIPLE SQUARE (12-POINT).
SPECIAL ITEMS RECOMMENDED:
• PENCIL AND PAPER FOR NOTES.
• MASKING TAPE TO COVER INTAKE PORTS, LABEL PARTS REMOVED AND THEIR
CONNECTIONS.
• A CLEAN WORK BENCH.
• A PARTS TRAY.
• CLEAN RAGS OR SHOP TOWELS.
PREPARATION:
• BEFORE YOU BEGIN: ENGINE SHOULD BE CHECKED WITH A VAG SCAN TOOL OR
EQUIVALENT TO MAKE SURE THERE ARE NO STORED FAULTS. ANY FAULTS SHOULD
BE REPAIRED AND CLEARED, i.e. VW DEALER.
• FILL GAS TANK WITH PREMIUM FUEL.
• THOROUGHLY CLEAN THE ENGINE AND ENGINE COMPARTMENT.
• ENGINE SHOULD BE COLD BEFORE YOU BEGIN.
• TO MAKE INSTALLATION EASIER, DRAW DIAGRAMS AND LABEL YOUR ENGINE’S
CABLE ROUTING, AND VARIOUS HOSES, ETC. THESE WILL BE REROUTED AND
RECONNECTED IN DIFFERENT PLACES. NOTE: SOME HOSES LOOK ALIKE AND ARE THE
SAME SIZE. IT IS IMPERATIVE THAT THEY BE RECONNECTED CORRECTLY!
• THE NEUSPEED SUPERCHARGER KIT HAS BEEN DESIGNED TO REUSE MANY OF THE
STOCK COMPONENTS. WE HIGHLY SUGGEST THAT AS YOU REMOVE THEM, KEEP THEM
WITH THEIR COMPONENTS AND LABEL THEM.
• READ ALL INSTRUCTIONS BEFORE STARTING INSTALLATION!
1. See section on LOCATION AND REMOVAL of ECU on Page 15 and 16. Send us your ECU as soon as possible.
2. Make note of Supercharger serial number before installation. Bar code label with correct number (consisting of three letters
followed by four numbers) is located on bottom of front drive. NOTE: You will NOT be able to read the serial number once the
Supercharger has been installed! Send Warranty Card in promptly in case we need to notify you of any updates.
3. Disconnect negative battery cable, and remove upper strut tie-bar if equipped.
4. ENGINE COVER/COWL REMOVAL: Remove plastic
engine cover by removing dipstick, lifting up on front corners,
then pull cover forward to slide off rear mount. Replace dip stick.
Page 2
5. AIR CLEANER ASSEMBLY REMOVAL: Disconnect air
intake hose from throttle body, electrical connector from PCV
valve, and MAF (mass air flow) sensor, fuel injector vacuum
hose and air pump hose from air cleaner top. Unscrew upper air
cleaner lid from lower housing and remove assembly.
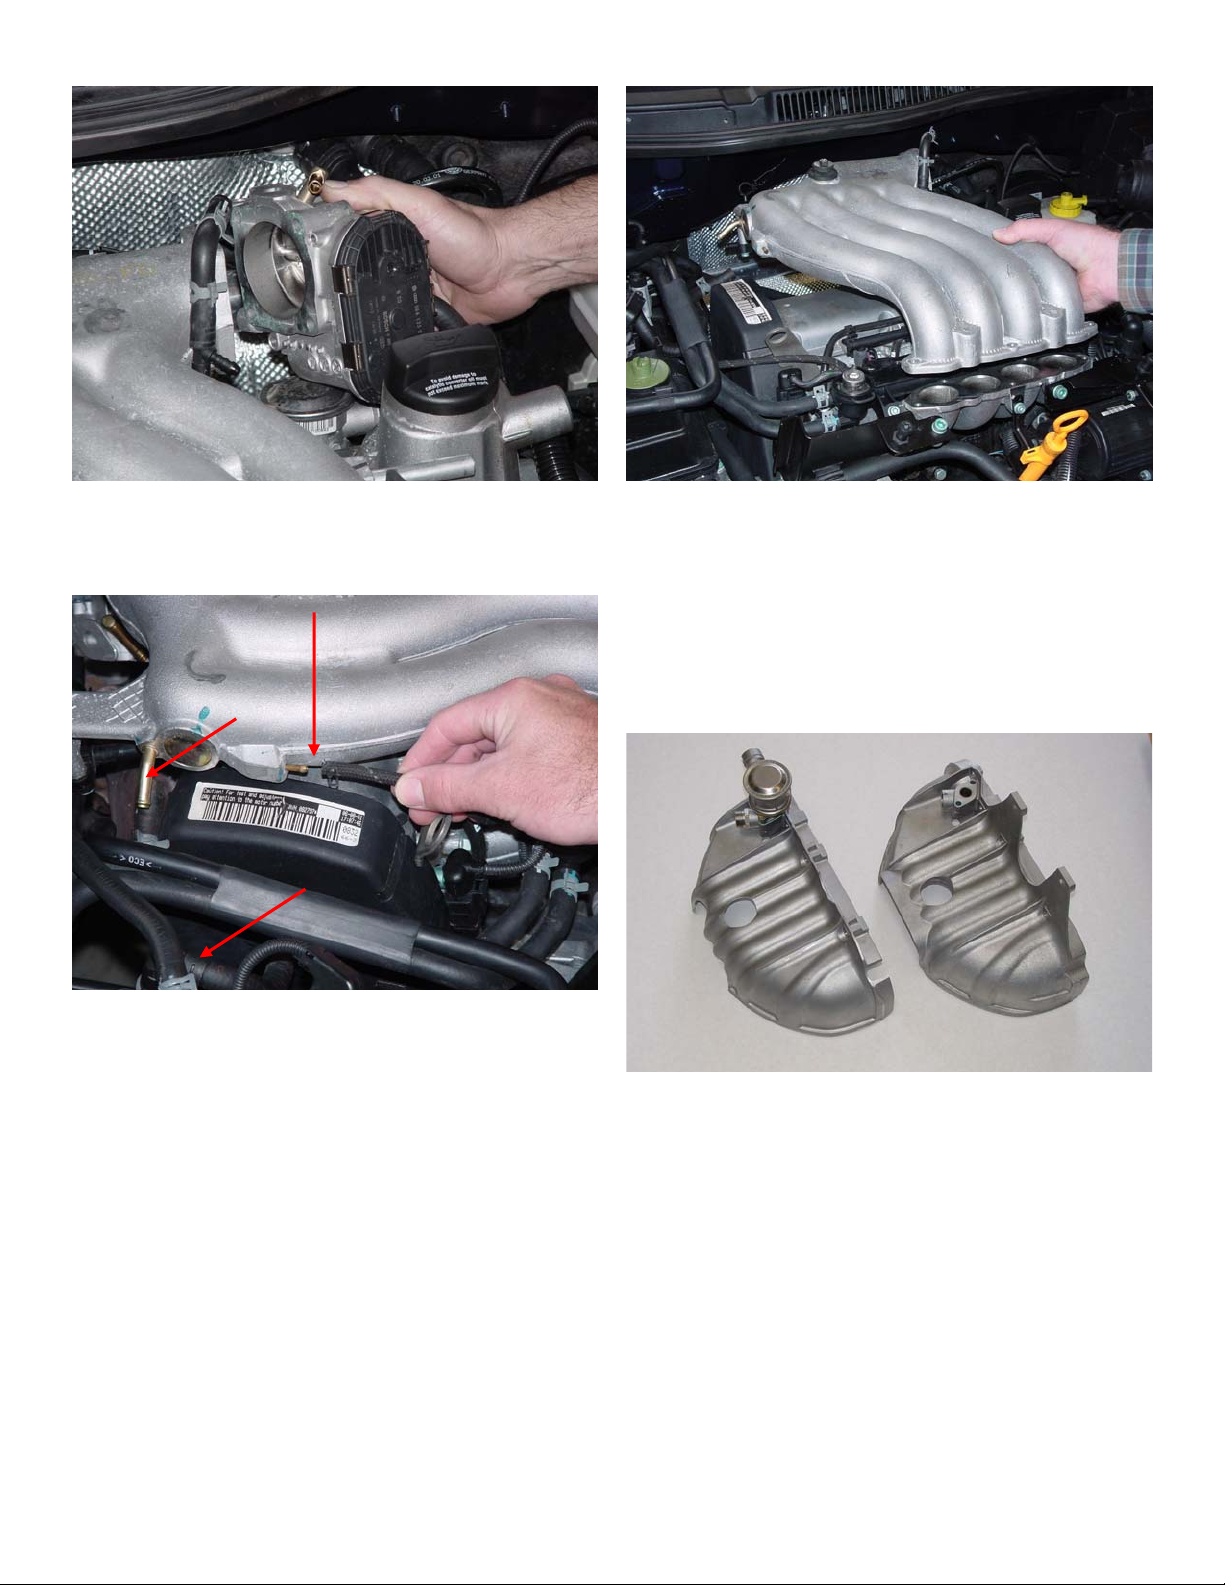
6. THROTTLE BODY REMOVAL: Disconnect electrical
harness from throttle position sensor, vacuum hose from EVAP
canister purge valve, and coolant hoses. Remove four bolts using
#8 triple square driver, and lift off throttle body – move aside.
8. Remove the two rear bolts on back side of intake manifold to
heat-shield/support using a 6mm hex driver, and five bolts
holding upper intake manifold to lower intake runner using a
5mm hex driver. Carefully separate, and remove gasket. Clean
off any remaining gasket material. Immediately cover intake
runner ports with masking tape. Now is a good time to install the
new hi-performance Denso Iridium spark plugs. NOTE: Spark
plugs are pre-gapped. NOTE: Before removing old spark plugs,
use compressed air to blow out around plug recesses so that any
dirt will not fall into cylinder. Put anti-seize on threads!
7. MANIFOLD REMOVAL: Disconnect brake servo vacuum
hose by cutting crimp-clamp, leak detection pump vacuum hose
from white plastic fitting, EVAP purge valve hose, and fuel
pressure regulator vacuum hose.
Page 3
9. HEAT-SHIELD REMOVAL/ASSEMBLY: Disconnect hard
plastic air pump hose and secondary metal air pipe flare nut from
combi-valve. Loosen lower flange nut so that you can push pipe
out of fitting and rotate pipe towards driver side of vehicle to
allow removal. Remove three bolts using a 6mm hex driver and
one bolt using a 5mm hex driver – lift heat shield, and remove O
sensor. The heat shield can now be removed. Remove combivalve assembly using a 5mm hex driver. Remove combi-valve
gasket using a scraper or knife. Use new gasket supplied, and
transfer assembly to the new supplied heat-shield. Torque
combi-valve bolts to 7ft. lbs. Re-install heat shield, hoses, and
metal pipe in reverse of disassembly with factory bolts. Torque
heat-shield bolts to 18ft. lbs. Use Loctite on all bolts.
2
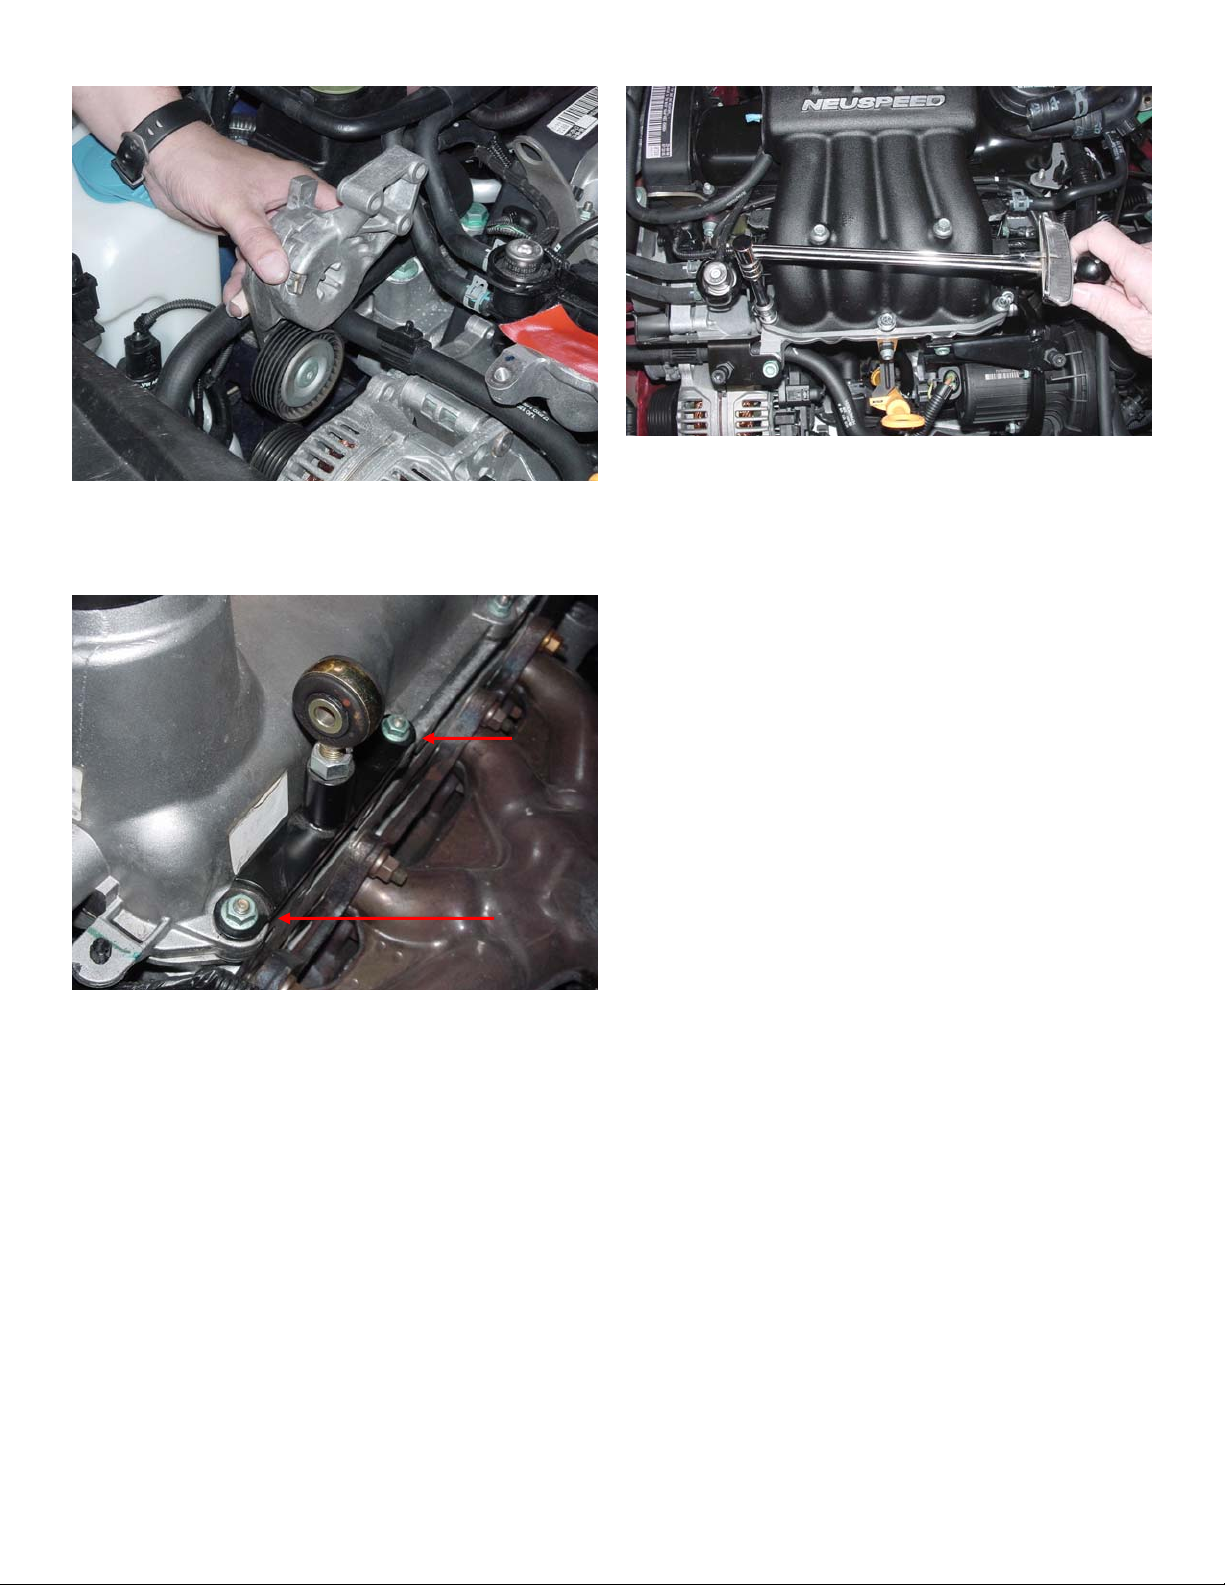
10. BELT TENSIONER REMOVAL: Using a 15mm open-end
wrench, rotate tensioner to release tension on belt and remove the
ribbed V-belt. Remove the three 13mm tensioner mounting bolts
and remove tensioner assembly.
11. DRIVER SIDE REAR SUPERCHARGER SUPPORT
BRACE INSTALLATION: We have assembled (mounting
bracket, insulated rod end, jam nut) to its approximate length.
Remove the two rear driver side valve cover nuts (10mm hex)
from area shown. Install bracket on valve cover studs with rod
end leaning forward. Install nuts. Torque to 7ft. lbs.
12. SUPERCHARGER INSTALLATION: First assemble the
supplied new stainless steel/neoprene backed washers on the
supplied new (3) M6X25mm and (2)M6X95mm intake manifold
bolts. Ensure that the steel side of the washers are in contact with
the heads of the bolts, and apply a small amount of NEUSPEED
special grease to the neoprene side. With the Supercharger on the
bench, and the mounting flange vertical, position the intake
manifold gasket on the inlet runner flange and align ports. Be
very careful here because the gasket only fits one-way – double
check alignment of ports and bolt mounting holes! Insert bolts
into proper holes to hold gasket in place. Remove tape covering
lower intake ports, and lower Supercharger onto lower intake
runners. Carefully support backside of Supercharger until
you have run mounting bolts down and torqued to 44inch lbs.
(3.6 ft. lbs.). Now you must check to see if the Driver Side Rear
Support Bracket is in alignment with threaded hole on
Supercharger. Bolt MUST align perfectly with hole. If not,
determine amount of adjustment (up-or-down) to properly
position rod end. You will need to remove Supercharger, make
adjustment, re-torque bolts and try again. NOTE: Supercharger
MUST be torqued to proper setting BEFORE
checking/installing bolt! When you have a perfect fit, apply
Loctite and torque Supercharger Rear Support bolt M8X35mm to
15ft. lbs, and tighten jam nut on rod end if you made an
adjustment. NOTE: This step is very important – you MUST
take time to do it right!
NOTE: The by-pass valve has been pre-installed and adjusted –
DO NOT change adjustment!
Page 4
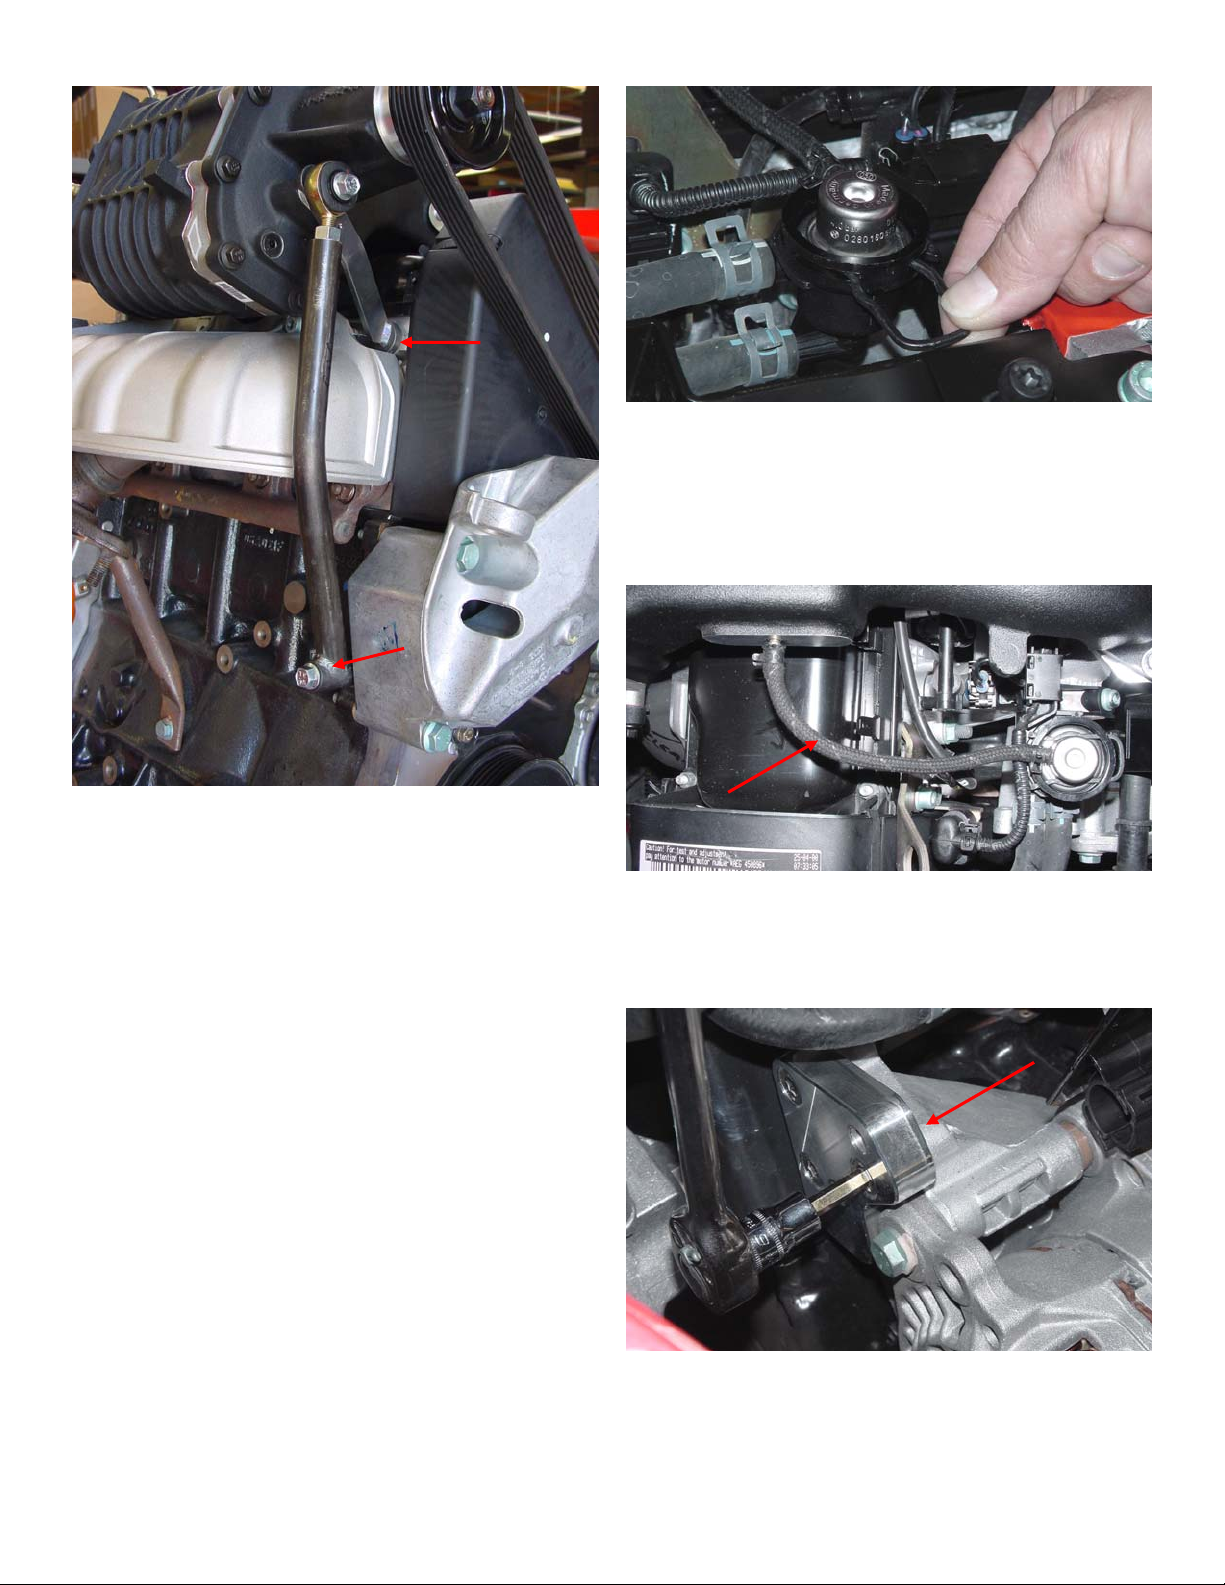
13. PASSENGER SIDE REAR SUPERCHARGER SUPPORT
BRACE INSTALLATION: Insert the supplied new
8X1.25X40mm bolt through lower boss of the support brace –
align with threaded boss on engine block and tighten by hand.
Now check to see that rod end aligns with hole on boss on
Supercharger (you can rotate this support on lower mounting bolt
away from Supercharger to turn rod end) – make adjustment (inor-out) for perfect alignment. Position Head Stay bracket by
inserting button end into the hole located in the lower right-hand
corner of cylinder head. Insure that the slot on the bracket aligns
with the threaded boss of the Supercharger, then the rod end.
Apply Loctite and insert supplied M8X35 bolt through assembly.
Push and hold the Head Stay firmly against head as you torque
bolt to 18ft. lbs. Now tighten jam nut, and torque lower support
rod to 18ft. lbs. With the Supercharger supports properly in
place and tightened, remove one manifold mounting bolt at a
time – apply Loctite #262 (supplied) to each bolt and re-torque.
14. FUEL PRESSURE REGULATOR REMOVAL: NOTE: Dirt
can accumulate around fuel pressure regulator. Use air pressure
to clean out around regulator so that any dirt will not fall into
fuel rail. Remove vacuum hose from regulator, pull out retaining
clip. Cover regulator with an absorbent twoel or shop rag, and
carefully lift out regulator. Use caution when removing regulator,
as fuel will spray from the pressurized line – NO SMOKING!
15. 4-BAR FUEL PRESSURE REGULATOR
INSTALLATION: Lube O-ring and install supplied new 4-bar
regulator into bore. Push down on regulator and install factory
retaining clip. Connect vacuum hose from regulator to
Supercharger plenum port.
16. BELT TENSIONER MOUNTING PLATE
INSTALLATION: Remove factory engine cover/coolant hose
mounting bracket. Position new mounting plate as shown using
supplied new 6mm hex socket bolts, apply Loctite and torque to
18ft. lbs.
Page 5

17. BELT TENSIONER ARM, PULLEY AND BELT
INSTALLATION: Pulley has been pre-installed on arm. Install
tensioner arm with pulley, and tighten supplied 13mm bolts hand
tight. Install new supplied belt according to Belt Path diagram.
Double check to be sure that the belt is properly seated into ALL
the grooves on each pulley.
BELT PATH
18. BELT TENSIONING: Using a 1/
”
drive torque wrench,
2
tension belt to 35ft. lbs. Now tighten tensioner arm bolts to 18ft.
lbs.
Page 6
19. THROTTLE BODY INSTALLATION: Using the M6X100
(black) bolt supplied, insert into hose barb and rotate the 90degree vacuum port fitting approximately 45-degrees as shown.
Install throttle body with supplied gasket using factory bolts.
Torque bolts to 7ft. lbs. Reconnect electrical connector to throttle
position sensor.

21. In order to obtain peak performance from the Supercharger
Kit, the O.E. intake baffle MUST be removed from the Golf IV
and Jetta IV. Modify the air duct as follows:
20. Remove coolant hose connecting throttle body to expansion
tank. Cut hose 6” from end as shown, insert supplied hose barb
5
/
fitting, and connect supplied
x 20” hose. Position clamps as
16”
shown. Connect new coolant hose to throttle body and opposite
end to expansion tank. Install supplied hose clips (2) on firewall
studs and secure hose with clips.
21A. Remove air box assembly from vehicle, (2) M6 (10mm
hex) bolts. Pull air box up and out as shown.
21B. Release screws, open air box and remove air filter element.
Remove baffle by releasing clip securing baffle to bottom of air
box.
Page 7

21C. Remove air duct by removing M6 nut (10mm hex) and
sliding duct up and out towards windshield.
22. MAF AND AIR BOX COVER INSTALLATION: Remove
O-ring from factory air box cover, lubricate, and transfer to new
air box cover. Install MAF on new air box cover using factory
screws. Now install air box cover to lower half using factory
screws from stock cover. Snap on air pump hose, and re-install
throttle body to air filter air intake hose. NOTE: If you do not
have an air pump, you should have been provided a plain air box
cover without a hole or fitting.
21D. Disassemble air duct by removing two (2) Phillips screws.
21E. Locate mesh screen and cut around perimeter of air duct to
remove. (Mesh screen has already been removed from picture).
Page 8
23. Install new supplied coolant hose mounting bracket. Transfer
factory hose clamp by snapping into hole and slot – clamp hose.
NOTE: Threaded insert is for the factory engine cover post.

24. Using factory clamps, install supplied PCV hose as shown.
25. CHECK VALVE INSTALLATION: Cut fuel injector
vacuum line halfway between fuel rail and air intake hose –
insert new check valve supplied. Check valve MUST be
installed with conical end (red dot) facing engine!
26. Remove section of brake booster hose between manifold port
and check valve. This may require cutting the hose as shown to
remove. Connect one end of supplied 3/8” X 12” brake booster
vacuum hose to check valve and the other end to the 90-degree
hose barb located on rear of Supercharger housing. Use supplied
1
/2” hose clamp to secure hose.
Page 9

27A. Cut hose leading from intake manifold to EVAP purge
valve in area shown (arrow) and pull hose through heat-shrink
5
sheathing and remove. Insert
and connect new EVAP hose supplied (
/16” T-fitting to remaining hose
5
/16” X 28”) to opposite
end of T-fitting – route hose under Supercharger plenum. Cut off
an 8” section of hose and use this to connect from leak detection
pump fitting (white plastic line) to new T-fitting.
28. Reconnect battery. Re-install upper front strut tie-bar.
29. Clean front plastic radiator cover, and apply your
NEUSPEED Exemption Plate, and Belt Path routing decal. Then
apply the supplied Premium Fuel Only decals to fuel door and
over factory lettering on fuel gauge.
30. Clean area, align carefully and apply NEUSPEED
Supercharger badge to rear hatch, trunk lid or your preference.
31. When you receive your ECU, re-install in reverse of
disassembly, and reconnect battery cable. DO NOT START
ENGINE YET! Turn ignition key to ON position, wait for 30seconds and then you can start engine. The throttle body
MUST be given time to adapt to the ECU.
32. Double-check complete installation, tightness of all nuts and
bolts, and TEST DRIVE CAREFULLY!
33. NOTE: If you do not have a full tank of premium fuel, drive
under very low boost until your tank is just about empty and fill
with premium fuel. Maximum boost can now be used.
27B. Remove stock T-fitting and 90° rubber hose found on
underside of intake manifold. Connect T-fitting to EVAP hose
and 90° rubber hose to throttle body. Cut small PCV vacuum
hose to length and connect to T-fitting.
Page 10
ENGINE COVER MODIFICATION/INSTALLATION: If you
want to use the factory engine cover, it’s easy to modify and
install on the Golf and Jetta as shown. The special NEUSPEED
bracket that mounts the factory coolant hose also has a special
threaded insert installed where the factory engine cover mount
would normally screw into. The Golf and Jetta use the factory
ball mount as shown. It’s easy to trim the plastic cover with a
hacksaw, and then file the edges round and smooth. Follow the
shape as shown in the photo. The cover can be used in the factory
finish, or painted to match using standard finishing procedures
for ABS plastic

LEAK DETECTION
PUMP
BYPASS
VALVE
CHECK VALVE
EVAP CANISTER
PURGE VALVE
BRAKE BOOSTER
THROTTLE BODY
AIR INTAKE HOSE
MASS AIR FLOW
SENSOR
AIR BOX
5/16 T-FITTING
FUEL PRESSURE
REGULATOR
PCV HEATING
ELEMENT
CHECK VALVE
FUEL INJECTION AIR ASSIST
AIR PUMP
VACUUM SCHEMATIC
EXPANSION TANK
TO HEATER
COOLANT SCHEMATIC
AIR INTAKE HOSE
MASS AIR FLOW
SENSOR
AIR BOX
Page 11

GOLF IV & JETTA IV
NEUSPEED Supercharger installation shown with optional P-Flo, Upper Strut
Tie Bar, and various Billet Engine Dress-up Items.
Page 12

GOLF IV, JETTA IV
LOCATION AND REMOVAL OF ECU
1. Open engine hood. ECU is located under plastic cover at base of windshield.
2. Remove four T-20 Torx or Phillips head screws on the passenger side and remove plastic cover.
3. Remove the plastic caps that cover the nuts on the windshield wiper arms.
4. Remove the 13mm nuts that hold on the windshield wipers. Lift wipers up and wiggle to remove.
5. Starting on the passenger side, lift plastic cover perpendicular from the glass to release cover out of its
locking groove. Continue toward driver’s side to fully remove cover.
6. The ECU is located in the middle Remove the two electrical connectors by firmly holding the slide clip
and pulling it out toward the side of the car. This action will unlock the connector and release it from
the ECU. DO NOT try to force the connector off the ECU. Just pull the locking slid outward from the
connector sideways. Then pull the connector away from the ECU.
7. On the passenger side of the ECU, there is a metal clip. Take a flat screwdriver and pry outwards to
unlock the ECU. Now pull ECU out.
8. When sending your ECU to NEUSPEED®, wrap it carefully in bubble wrap or equivalent, package
securely, include your receipt for correct program, and send next day air insured for full value…
$1,200.00 to: NEUSPEED®, 3300 Corte Malpaso, Camarillo, CA 93012. MARK BOX: ATTN: CHIP
9. We will receive your ECU the following business day, perform the NEUSPEED® P-Chip installation,
and ship it back to you the same day.
10. Upon return of your ECU, reinstall in reverse of disassembly. IMPORTANT! SEE STEP #32.
Page 13

SUPERCHARGER FACTS:
The NEUSPEED Supercharger has been designed for stock engines in good mechanical condition. Engine
recalibration devices that modify fuel delivery and spark curve are NOT recommended, and may cause engine
damage or failure! Volkswagen engines, along with our custom programmed P-Chip have sufficient fuel system
capacity to deliver the additional fuel to match the additional air induced by the Supercharger.
What about aftermarket parts – camshaft, adjustable pulley, exhaust system? Can they be used with my
Supercharger?
Yes. If you already have them on your engine, no problem. However, the camshaft should be a very mild grind
like our 256-degree, and the cam gear should be set to ‘O’. If you do not have the NEUSPEED® hi-
performance exhaust, or a P-Flo they may be added at any time for additional power.
Does a Supercharger cause engine ping?
Your custom P-Chip has been programmed to provide sufficient fuel delivery and correct spark advance, so that
you should not have engine ping. In addition, your engine has an anti-knock device to bring the spark advance
back slightly so that does not happen. In any case, never allow your engine to ping any longer than it takes to
initially hear the ping.
What kind of fuel should I use?
Only use PREMIUM FUEL!
What kind of air filter does NEUSPEED recommend?
For the best overall driving conditions with the Supercharger, we recommend the stock air filter. That is why we
have included in our kit a new custom air box cover. This design also makes for a very easy installation and a
clean factory-look. A K&N stock replacement filter can also be used. If your stock air filter is dirty, replace it or
clean your K&N at this time. A new Stainless Steel P-Flo is now available for Golf IV, Jetta IV, and Beetle
NEUSPEED® Supercharged cars. Call for details.
Does is matter if my transmission is manual or automatic?
No. The NEUSPEED Supercharger will work properly regardless of transmission type.
How much boost should the NEUSPEED Supercharger make?
The NEUSPEED Supercharger comes with one pulley size only! It is designed to deliver approximately 5-7 psi
of boost pressure. The pulley size affects the drive ratio between the Supercharger and the engine. Increasing
the speed of the Supercharger relative to the engine will raise the boosted manifold pressure, but not the actual
torque and horsepower of the engine. NEUSPEED has conducted hundreds of hours of dyno testing to find the
best level of boost with available gasoline octane. In many cases, raising the boost level will actually decrease
engine performance. Timing advance and available gasoline octane are critical elements. The pulley size, and
boost level of the Supercharger has been designed to achieve the best combination of performance, efficiency
and overall long-term reliability. Changing or altering the pulley WILL VOID THE WARRANTY ON THE
SUPERCHARGER.
How to contact us:
NEUSPEED®
3300 Corte Malpaso
Camarillo, CA 93012
805.388.7171
805.388.0030 Fax
info@neuspeed.com
Page 14

NEUSPEED® SUPERCHARGER
LIMITED WARRANTY
Automotive Performance Systems Inc., d.b.a. NEUSPEED and Neumann Distributing, located at 3300 Corte Malpaso, Camarillo, California 93012,
warrants all new NEUSPEED Supercharger Kits against defects in material and workmanship. Please take a moment to fill out your NEUSPEED
Warranty Registration Card immediately and return it by mail to NEUSPEED’s offices.
WHAT IS WARRANTED
• The Eaton rotor group, the Supercharger pulley, and the external bypass valve are warranted against defective materials or workmanship for up
to three (3) years from the date of purchase, or up to 36,000 miles of use, whichever comes first. The Eaton rotor group includes all parts
contained inside the Supercharger housing (bearings, rotors, seals.)
• The serpentine drive belt is warranted against defective materials or workmanship for ninety (90) days from the date of purchase.
• All other components included in the NEUSPEED Supercharger Kit are warranted against defective materials or workmanship for one (1) year
from the date of purchase.
WHO IS COVERED BY WARRANTY
The original purchaser of a NEUSPEED Supercharger Kit who has returned a warranty registration card to NEUSPEED and provided all the
request information.
WHAT IS NOT WARRANTED
• Any NEUSPEED Supercharger Kit that has been used off-road for racing or for any other driving competition.
• Any NEUSPEED Supercharger Kit that has been installed on a vehicle other than the model specifically designated by NEUSPEED.
• Any NEUSPEED Supercharger that has had its drive pulley and/or front cover removed for any reason.
• Any NEUSPEED Supercharger Kit that has been incorrectly installed, or has been modified from the original NEUSPEED specification, or
has been used with components not specifically approved by NEUSPEED.
WHAT VOIDS THE WARRANTY
• Any attempt to remove the drive pulley and/or the front cover from the Supercharger housing.
• Any modification of the NEUSPEED Supercharger Kit from its original specifications.
• Use of components not specifically approved by NEUSPEED.
• Improper or incomplete installation of the NEUSPEED Supercharger Kit.
• No Warranty Registration Card on file or no proof of purchase.
HOW TO SUBMIT A WARRANTY CLAIM
In the event of defect, malfunction or failure of the NEUSPEED Supercharger Kit to conform to this warranty, the original purchaser must notify
NEUSPEED immediately by phone at (805)388-7171, by fax at (805)388-0030, or by email at
info@neuspeed.com
of purchase available. DO NOT OPERATE THE VEHICLE UNTIL YOU HAVE CONTACTED NEUSPEED FOR TECHNICAL SUPPORT.
After reviewing your information, a NEUSPEED technical service representative may advise you to remove the NEUSPEED Supercharger Kit
from the vehicle, repackage all components in the original shipping carton, and return the Supercharger Kit to NEUSPEED for examination,
repair, or replacement. Alternately, NEUSPEED may, at its sole discretion, elect to send you replacement component(s) in exchange for the
defective unit(s). All returned items MUST be shipped in their original cartons, especially the Supercharger housing, which is packaged in a
custom Styrofoam and cardboard container.
NEUSPEED will not pay for the removal of any defective components from the vehicle. NEUSPEED will not pay for the installation of new or
repaired components and the cost of postage and return shipping costs shall be prepaid by the original purchaser. NEUSPEED is not responsible for
items lost or damaged during shipping. Customers are responsible for purchasing insurance from their designated shipping company to cover
loss or damage incurred during transit.
EXTENT OF WARRANTY
THIS WARRANTY IS LIMITED SOLELY TO THE ABOVE AND THIS WARRANTY WILL APPLY ONLY FOR THE TERM STATED
ABOVE.
AUTOMOTIVE PERFORMANCE SYSTEMS INC. WILL NOT BE LIABLE FOR ANY LOSS, DAMAGE, INCIDENTAL OR
CONSEQUENTIAL DAMAGES OF ANY KIND WHETHER BASED UPON WARRANTY, CONTRACT OR NEGLIGENCE AND ARISING
IN CONNECTION WITH THE SALE, USE OR REPAIR OF THE PRODUCT.
SOME STATES DO NOT ALLOW LIMITATIONS ON HOW LONG AN IMPLIED WARRANTY LASTS, OR EXCLUSIONS OR
LIMITATION OF INCIDENTAL OR CONSEQUENTIAL DAMAGES, SO THE ABOVE LIMITATIONS OR EXCLUSIONS MAY NOT APPLY
TO YOU. THIS WARRANTY GIVES YOU SPECIFIC LEGAL RIGHTS, AND YOU MAY HAVE OTHER RIGHTS THAT VARY FROM
STATE TO STATE. UNLESS CONTRARY TO THE STATE LAW GOVERNING THE PURCHASE, THE WARRANTOR’S LIABILITY
SHALL NOT IN ANY CASE EXCEED THE CONTRACT PRICE FOR THE PRODUCT CLAIMED TO BE DEFECTIVE OR UNSUITABLE.
©Copyright 2002, NEUSPEED®. All rights reserved. Reproduction in whole or in part prohibited.
DOC.49.10.95 Rev. 10.03.02
. Please have your original proof
Page 15
 Loading...