

Page 1

User Manual
Insight Instant AirBridge WBC502
NETGEAR, Inc.
350 E. Plumeria DriveApril 2020
San Jose, CA 95134, USA202-12051-03
Page 2

Insight Instant AirBridge WBC502 User Manual
Support and Community
Visit netgear.com/support to get your questions answered and access the latest
downloads.
You can also check out our NETGEAR Community for helpful advice at
community.netgear.com.
Regulatory and Legal
Si ce produit est vendu au Canada, vous pouvez accéder à ce document en français
canadien à https://www.netgear.com/support/download/.
(If this product is sold in Canada, you can access this document in Canadian French at
https://www.netgear.com/support/download/.)
For regulatory compliance information including the EU Declaration of Conformity, visit
https://www.netgear.com/about/regulatory/.
See the regulatory compliance document before connecting the power supply.
For NETGEAR’s Privacy Policy, visit https://www.netgear.com/about/privacy-policy.
By using this device, you are agreeing to NETGEAR’s Terms and Conditions at
https://www.netgear.com/about/terms-and-conditions. If you do not agree, return the
device to your place of purchase within your return period.
Trademarks
© NETGEAR, Inc., NETGEAR, and the NETGEAR Logo are trademarks of NETGEAR, Inc.
Any non-NETGEAR trademarks are used for reference purposes only.
Revision History
CommentsPublish DatePublication Part
Number
April 2020202-12051-03
Throughout the manual, we added information that you cannot
use NETGEAR Insight to configure and manage the AirBridge
if the operation mode is access point or client bridge.
We revised Change the management mode to NETGEAR Insight
Mode or Standalone Mode on page 111 and added two
subsections: Change the management mode to NETGEAR
Insight Mode on page 112 and Change the management mode
to Standalone Mode on page 113.
We made multiple refinements, adjustments, and corrections.March 2020202-12051-02
First publication.February 2020202-12051-01
2
Page 3

Contents
Chapter 1 Access the AirBridge and Use the Easy Setup Method
Related documentation.......................................................................8
Overview................................................................................................8
About NETGEAR Insight......................................................................9
AirBridge label....................................................................................10
Operation mode: AirBridge Master, AirBridge Satellite, Access Point,
or Client Bridge...................................................................................10
AirBridge mode..................................................................................12
Access the AirBridge for initial configuration.................................14
Connect over WiFi using the NETGEAR Insight app on an iOS or
Android mobile device.................................................................15
Connect over the Internet using the NETGEAR Insight Cloud
portal...............................................................................................17
Connect over WiFi using a WiFi-enabled computer or mobile
device..............................................................................................18
Connect over Ethernet using a computer connected to the same
network............................................................................................23
Connect over Ethernet using a directly connected computer..28
Operation mode and default settings after the Day Zero Easy Setup
configuration.......................................................................................33
Log in to the AirBridge after initial setup........................................34
Change the language of the local browser UI................................35
Chapter 2 Manually Configure or Change the Operation Mode
Recommendations for configuration...............................................38
Configure the AirBridge as a master in a point-to-point or
point-to-multipoint setup..................................................................38
Configure the AirBridge as a satellite in a point-to-point setup....40
Configure the AirBridge as an access point....................................42
Configure the AirBridge as a client bridge.....................................45
Chapter 3 Manage the Wired Network Settings
Specify a static IPv4 address for the AirBridge...............................50
Specify a link-local IPv6 address for the AirBridge.........................51
Reenable the DHCP client of the AirBridge....................................52
Manage the STP settings...................................................................53
3
Page 4

Insight Instant AirBridge WBC502 User Manual
Chapter 4 Manage the WiFi and Radio Features
Recommended configuration order................................................57
Change the device name of the AirBridge......................................57
Change the country and region of operation.................................58
Change the AirBridge mode.............................................................59
Scan for neighboring access points.................................................62
Specify the approximate distance for the WiFi connection..........64
Manage the 5 GHz SSIDs and WiFi security....................................65
Change the 5 GHz SSID or WiFi security mode for a satellite...67
Change or configure a new 5 GHz SSID for a master with the
AirBridge mode enabled..............................................................68
Change or configure a new 5 GHz SSID for a master with the
AirBridge mode disabled.............................................................71
Change the 5 GHz SSID or WiFi security mode for a client
bridge..............................................................................................75
Change or configure a 5 GHz SSID for an access point............76
Configure a guest network on an access point..........................80
Set up WPA2-Enterprise security on a master or access point.81
Set up WPA2-Enterprise security on a satellite or client
bridge..............................................................................................84
Manage the settings for the 2.4 GHz management SSID..............86
Change the passphrase for the 2.4 GHz management SSID....86
Disable the idle time-out for the 2.4 GHz management SSID...87
Disable the 2.4 GHz management SSID.....................................88
Chapter 5 Manage Advanced WiFi and Radio Features
Recommended configuration order................................................91
Manage the channel high throughput mode.................................91
Manage the channel or channels.....................................................92
Manage the radio transmit power....................................................94
Change the bit rate............................................................................95
Manage client limits...........................................................................96
Manage time slot assignments to satellites.....................................98
Manage the satellite priority.............................................................99
Set up a WiFi on/off schedule for a 5 GHz SSID...........................100
Set up a MAC filter for a 5 GHz SSID..............................................102
Set up a RADIUS accounting server on a master or access point.104
Manually block a WiFi client or connection from a 5 GHz SSID..105
Configure traffic shaping for a 5 GHz SSID...................................106
Change the DHCP server settings for a guest WiFi network......108
4
Page 5

Insight Instant AirBridge WBC502 User Manual
Chapter 6 Maintain the AirBridge
Change the management mode to NETGEAR Insight Mode or
Standalone Mode.............................................................................111
Change the management mode to NETGEAR Insight Mode.112
Change the management mode to Standalone Mode..........113
Upgrade the firmware on the AirBridge.......................................113
Reboot the AirBridge from the local browser UI..........................115
Schedule the AirBridge to reboot..................................................116
Manage the configuration file of the AirBridge............................117
Back up the AirBridge configuration settings..........................117
Restore the AirBridge configuration settings...........................118
Reset the AirBridge to factory default settings.............................119
Manage the date and time settings...............................................120
Configure and view the logs...........................................................122
View and manage the system log..............................................122
Set up a remote log server.........................................................124
Set up email alerts............................................................................125
Manage access security settings....................................................127
Change the local login password..............................................127
Manage the HTTPS settings.......................................................128
Manage the SSH settings............................................................129
Specify a management VLAN.........................................................130
Chapter 7 Monitor the AirBridge and its Network Connections
View the device status and other information..............................133
View the 5 GHz WiFi connections..................................................137
View the CPU load on the AirBridge..............................................139
View the 5 GHz WiFi and LAN traffic load.....................................140
Chapter 8 Perform Diagnostics and Troubleshooting
Send a ping.......................................................................................142
Send a traceroute request...............................................................143
Send a name server lookup request..............................................144
Perform a speed test........................................................................145
Quick tips for troubleshooting.......................................................146
Troubleshoot with the LEDs............................................................149
Power LED remains off................................................................150
WLAN LED is off...........................................................................150
A LAN LED is off while a device is connected..........................151
Troubleshoot the WiFi connectivity...............................................152
Troubleshoot the WiFi connectivity between a satellite and a
master............................................................................................152
5
Page 6

Insight Instant AirBridge WBC502 User Manual
Troubleshoot the WiFi connectivity between a client bridge and
an access point.............................................................................153
Troubleshoot the WiFi connectivity between a WiFi client and a
master or access point................................................................154
You cannot log in to the AirBridge over a LAN connection.......155
Changes are not saved....................................................................156
Troubleshoot your network using your computer ping utility....156
Test the LAN path from your computer to the AirBridge.......156
Test the path from your computer to a remote device...........157
Appendix A Factory Default Settings and Technical Specifications
Factory default settings...................................................................159
Technical specifications...................................................................161
6
Page 7

1
Access the AirBridge and Use the Easy Setup Method
This user manual is for the NETGEAR Insight Instant Wireless AirBridge WBC502, in this
manual, referred to as the AirBridge.
The AirBridge can provide an outdoor, long-distance, WiFi connection in a
master–satellite configuration that lets you extend your main network to a detached
site. You can also use the AirBridge as a long-range, point-to-point access point or client
bridge.
This user manual complements the installation guide that came with your AirBridge and
the hardware installation guide, which you can download by visiting
netgear.com/support/download/. This chapter describes how you can access the
AirBridge and configure the operation mode for your selected setup. The chapter
includes the following sections:
• Related documentation
• Overview
• About NETGEAR Insight
• AirBridge label
• Operation mode: AirBridge Master, AirBridge Satellite, Access Point, or Client Bridge
• AirBridge mode
• Access the AirBridge for initial configuration
• Operation mode and default settings after the Day Zero Easy Setup configuration
• Log in to the AirBridge after initial setup
• Change the language of the local browser UI
Note: For more information about the topics that are covered in this manual, visit the
support website at netgear.com/support/.
Note: Firmware updates with new features and bug fixes are made available from time
to time at netgear.com/support/download/. You can check for and download new
firmware manually. If the features or behavior of your product does not match what is
described in this manual, you might need to update the firmware.
7
Page 8

Insight Instant AirBridge WBC502 User Manual
Related documentation
The following related AirBridgedocumentation is available at
netgear.com/support/download/:
Installation guide
•
Hardware installation guide
•
Data sheet
•
For information about the NETGEAR Insight app and the Insight Cloud portal, visit
insight.netgear.com and see the NETGEAR knowledge base at
netgear.com/support/product/insight.aspx.
Overview
The AirBridge is intended for environments where you need to extend your network to
another building or across a large outdoor campus or yard while no wired network
infrastructure is available.
The AirBridge can provide a long-distance, high performance, IEEE 802.11ac WiFi
connection in the following setups:
Single master to single satellite. Point-to-point setup between two AirBridges in
•
a configuration with a single master and single satellite with a long-distance reach
of 1.8 miles (3 km) or more. This setup requires a line of sight between the main and
detached sites.
Single master to multiple satellites. Point-to-multipoint setup between multiple
•
AirBridges in a configuration with a single master and up to four satellites with a
long-distance reach of 1.8 miles (3 km) or more. This setup requires a line of sight
between the main and detached sites.
Outdoor access point. A setup that allows for a long-range WiFi reach in which an
•
AirBridge functions as an access point that provides connections to WiFi clients,
client bridges, or both.
Outdoor client bridge. A setup in which an AirBridge functions as a client bridge,
•
providing a network connection to a wired device, such as an IP surveillance camera.
The client bridge connects to the main network through a backhaul WiFi connection
to a WiFi access point.
For information about application examples, see the hardware installation guide, which
you can download from netgear.com/support/download/.
User Manual8Access the AirBridge and Use
the Easy Setup Method
Page 9

Insight Instant AirBridge WBC502 User Manual
You can mount the AirBridge outside to a wall or pole and provide power to the
AirBridge through an Ethernet cable that is connected to the provided power adapter,
which must be installed indoors. The AirBridge integrates a high-gain directional antenna
for a line of sight connection to other AirBridges or WiFi clients.
The AirBridge provides two 10/100/1000BASE-T RJ-45 LAN ports for network
connections. One LAN port must be connected to the provided power adapter. Use
Category 5e (Cat 5e) or higher-rated Ethernet cables terminated with RJ-45 connectors
to make Gigabit connections.
For more information about the hardware, see the hardware installation guide.
The AirBridge provides administrative management options that let you configure,
monitor, and control the AirBridge and the WiFi network:
Using the local browser user interface (UI) you can configure the AirBridge and set
•
up a WiFi connection between two or more units in any of the supported operation
modes. This manual (the user manual) describes the options that are available to
you when you use the local browser UI.
Using NETGEAR Insight, you can set up a pair or a group of AirBridges, with one
•
AirBridge functioning as the master and one or more other AirBridges functioning
as satellites.
For more information about NETGEAR Insight, visit netgear.com/insight and see the
NETGEAR knowledge base articles at netgear.com/support.
About NETGEAR Insight
To configure and manage the AirBridge as a master or satellite in a point-to-point or
point-to-multipoint setup, you can use NETGEAR Insight app on your iOS or Android
mobile device and connect to the Insight cloud-based management platform. For Insight
Premium and Insight Pro subscribers, the AirBridge also supports the Insight Cloud
portal, which is the website that provides access to the Insight cloud-based management
platform.
Note: At this time, NETGEAR Insight does not support the access point and client
bridge operation modes. To configure and manage the AirBridge as an access point
or client bridge, you first must change the management mode to Standalone Mode,
and then use the local browser UI. For more information, see Change the management
mode to NETGEAR Insight Mode or Standalone Mode on page 111.
This user manual describes the local browser UI. For more information about NETGEAR
Insight, visit insight.netgear.com and see the NETGEAR knowledge base at
netgear.com/support/product/insight.aspx.
User Manual9Access the AirBridge and Use
the Easy Setup Method
Page 10

Insight Instant AirBridge WBC502 User Manual
If you install the AirBridge as a NETGEAR Insight managed device, the settings for
features that you can manage through the Insight app and Insight Cloud portal are
masked out in the local browser UI. However, using the local browser UI, you can still
manage the settings for certain features that are not yet supported in Insight. For more
information, visit the NETGEAR knowledge base at
netgear.com/support/product/insight.aspx and search for What is Hybrid Management
Mode.
AirBridge label
The label on the back panel of the AirBridge shows the serial number, MAC address,
default management WiFi network name (SSID), network key (password), and default
login information of the AirBridge.
Operation mode: AirBridge Master, AirBridge Satellite, Access Point, or Client Bridge
The AirBridge can function in one of the following operation modes: AirBridge Master,
AirBridge Satellite, Access Point, or Client Bridge.
With a WiFi link partner such as another AirBridge, you can provide network and Internet
connectivity to a detached site where no wired infrastructure is available.
Note: Closely related to the AirBridge operation mode is the AirBridge mode (that is,
without the term operation). If the operation mode for the AirBridge is AirBridge Master
or AirBridge Satellite, you can enable or disable the AirBridge mode. For more
information, see AirBridge mode on page 12.
The AirBridge can function in one of the following operation modes:
AirBridge Master. The AirBridge functions as a master in a point-to-point setup or
•
point-to-multipoint setup. You install the master at a main site to provide long-distance
network and Internet connectivity to a satellite at one or more detached sites. This
setup requires a line of sight between the main site and each detached site. By
default, the AirBridge mode is enabled, which is the setting that we recommend for
a master-to-satellite setup. Depending on your network situation, your WiFi
requirements, and your understanding of the consequences, you can disable the
AirBridge mode.
the Easy Setup Method
User Manual10Access the AirBridge and Use
Page 11

Insight Instant AirBridge WBC502 User Manual
Note: We do not recommend that you use a master and several satellites to create
a multi-building campus network backbone.
AirBridge Satellite. The AirBridge functions as a satellite in a master-to-satellite
•
setup. You install the satellite at a detached site. The master provides long-distance
network and Internet connectivity to the satellite. This setup requires a line of sight
between the detached site and main site. By default, the AirBridge mode is enabled,
which is the setting that we recommend for a master-to-satellite setup. However, the
AirBridge mode must be the same as on the master with which the satellite associates.
If the AirBridge mode is disabled on the master, you must also disable it on the
satellite.
Access Point. The AirBridge functions as a regular WiFi access point to provide
•
network and Internet connectivity to any of the following types of WiFi link partners:
-
An AirBridge that functions as a client bridge
- WiFi clients at an extended range
-
Another type of access point
Note: To configure and manage the AirBridge as an access point, you first must
change the management mode to Standalone Mode, and then use the local browser
UI. For more information, see Change the management mode to NETGEAR Insight
Mode or Standalone Mode on page 111. At this time, NETGEAR Insight does not
support the access point operation mode.
Client Bridge. The AirBridge functions as a client bridge at a detached site to provide
•
network and Internet connectivity to a wired device such as an IP surveillance camera.
The client bridge connects to a WiFi access point at the main site. This access point
can be an AirBridge or another type of access point.
Note: To configure and manage the AirBridge as a client bridge, you first must
change the management mode to Standalone Mode, and then use the local browser
UI. For more information, see Change the management mode to NETGEAR Insight
Mode or Standalone Mode on page 111. At this time, NETGEAR Insight does not
support the operation mode.
For information about configuring the operation mode, see Access the AirBridge for
initial configuration on page 14 and Manually Configure or Change the Operation Mode
on page 37.
The following table shows the features that are determined by the operation mode that
you select. For the AirBridge Master and AirBridge Satellite operation modes, the table
User Manual11Access the AirBridge and Use
the Easy Setup Method
Page 12

Insight Instant AirBridge WBC502 User Manual
also shows the features that are determined by whether the AirBridge mode is enabled
or disabled.
Table 1. Features determined by the operation mode and the AirBridge mode
Client BridgeAccess PointAirBridge SatelliteAirBridge MasterFeature
AirBridge
mode
enabled
WiFi range
WiFi link
partners
5 GHz SSIDs
Management
option
1. The AirBridge mode setting on the satellite must be the same as the one on the master.
2. Reliable long-distance WiFi connection of 1.8 miles (3 km) or more for a limited number of satellites.
3. Powerful antenna for a reliable extended-range WiFi connection for multiple individual WiFi clients.
Long
distance
AirBridge
satellite only
Standalone
Mode4or
NETGEAR
Insight
2
AirBridge
mode
disabled
Extended
3
range
AirBridge, any
WiFi AP, and
WiFi clients
Standalone
Mode4or
NETGEAR
Insight
AirBridge
mode
enabled
Long
distance
AirBridge
master only
Standalone
Mode4or
NETGEAR
Insight
2
1
AirBridge
mode
disabled
Extended
3
range
AirBridge
master only
Standalone
Mode4or
NETGEAR
Insight
AirBridge
mode N/A
1
Extended
range
WiFi clients,
AirBridge AP,
and any WiFi
AP
Standalone
Mode4only
3
AirBridge
mode N/A
Extended
range
N/AN/AN/ARequiredN/ARequiredLine of sight
AirBridge AP
or any WiFi AP
181141Number of
Standalone
Mode4only
3
4. Standalone Mode lets you use all options of the local browser UI.
AirBridge mode
The AirBridge mode specifies the type of multiple access method that the AirBridge
uses.
Note: Closely related to the AirBridge mode is the AirBridge operation mode (that is,
with the term operation). For more information, see Operation mode: AirBridge Master,
AirBridge Satellite, Access Point, or Client Bridge on page 10.
You can select the AirBridge mode only if the operation mode of the AirBridge is
AirBridge Master or AirBridge Satellite. In a master-to-satellite setup, you must either
enable or disable the AirBridge mode on both the master and the satellite. (Do not
enable it on one and disable it on the other.)
User Manual12Access the AirBridge and Use
the Easy Setup Method
Page 13

Insight Instant AirBridge WBC502 User Manual
The AirBridge mode determines the following characteristics on the AirBridge:
AirBridge mode enabled:
Highly reliable connections for a limited number of WiFi devices. Provides
•
reliable point-to-point connections between a master and a satellite and
point-to-multipoint connections between a master and a limited number of satellites.
Best suited for long distance for a limited number of WiFi devices. A master can
•
connect over a long distance of 1.8 miles (3 km) or more to a satellite at a detached
site.
Single 5 GHz SSID. A single 5 GHz SSID provides the backhaul WiFi connection
•
between the master and the satellites.
No individual WiFi clients supported. Other than the satellites, individual WiFi
•
clients cannot connect to the 5 GHz SSID. However, by connecting a switch and a
WiFi access point to the satellite, you can support multiple WiFi clients at the detached
site.
Another AirBridge as a link partner only. An AirBridge and one or more other
•
AirBridges can establish WiFi connections. You cannot use any other types of access
points as link partners.
AirBridge mode disabled:
Reliable connections for multiple WiFi devices. Provides reliable
•
point-to-multipoint connections between an access point and multiple individual
WiFi clients.
Best suited for extended range for multiple WiFi devices. The powerful antenna
•
of the AirBridge supports a WiFi range that extends beyond the range of most access
points.
Multiple 5 GHz SSIDs. Multiple 5 GHz SSIDs can support satellites, client bridges,
•
and individual WiFi clients.
Individual WiFi clients supported. Individual WiFi clients can connect to the
•
AirBridge.
Any access point as a link partner. Any access point, including third-party access
•
points, can establish a WiFi connection with an AirBridge.
Note: For information about configuring the AirBridge mode, see Manually Configure
or Change the Operation Mode on page 37, and Change the AirBridge mode on page
59.
the Easy Setup Method
User Manual13Access the AirBridge and Use
Page 14

Insight Instant AirBridge WBC502 User Manual
Access the AirBridge for initial configuration
Depending on your network situation, setup, and preference, you can use different
management options to connect to the AirBridge for initial configuration.
Table 2. Operation mode and management mode options
Operation Mode
point-to-multipoint setup
or point-to-multipoint
1. Standalone Mode lets you use all options of the local browser UI.
2. NETGEAR Insight Mode lets you use the Insight app or Cloud Portal.
Management Mode
Standalone Mode
1
Management Mode
NETGEAR Insight Mode
SupportedSupportedAirBridge Master, point-to-point or
SupportedSupportedAirBridge Satellite, point-to-point
Not supportedSupportedAccess Point
Not supportedSupportedSatellite
2
Depending on the operation mode (see Change the management mode to NETGEAR
Insight Mode or Standalone Mode on page 111), you can access and configure the
AirBridge by using the NETGEAR Insight app on an iOS or Android mobile device, by
using the Insight Cloud portal, or by using the local browser UI. You cannot combine
Insight management with management over the local browser UI. These types of
management are mutually exclusive. However, even if you use Insight management,
you can still access the local browser UI for a limited number of options.
The Insight app and the Insight Cloud portal provide ease of access and let you configure
most features that are available on the AirBridge, except for the access point and client
bridge operation modes. However, the local browser UI lets you configure all features
that are available on the AirBridge, including the access point and client bridge operation
modes.
CAUTION: This device must be professionally installed. It is the installer’s responsibility
to follow local country regulations, including operations within legal frequency channels,
output power, and DFS requirements. The vendor, reseller, or distributor is not
responsible for illegal wireless operations. For more details, see the device’s terms and
conditions.
User Manual14Access the AirBridge and Use
the Easy Setup Method
Page 15

Insight Instant AirBridge WBC502 User Manual
Determine your access and configuration method and then see the information in the
relevant section in this manual:
Insight app or the Insight Cloud portal. If you use the Insight app or the Insight
•
Cloud portal to access and configure the AirBridge as a master or satellite, see one
of the following sections:
- Connect over WiFi using the NETGEAR Insight app on an iOS or Android mobile
device on page 15
- Connect over the Internet using the NETGEAR Insight Cloud portal on page 17
Local browser UI. If you use the local browser UI to access and configure the
•
AirBridge in any operation mode, see one of the following sections:
- Connect over WiFi using a WiFi-enabled computer or mobile device on page 18
- Connect over Ethernet using a computer connected to the same network on
page 23
- Connect over Ethernet using a directly connected computer on page 28
Connect over WiFi using the NETGEAR Insight app on an iOS or Android mobile device
You can install the NETGEAR Insight app on an iOS or Android mobile device to
configure and manage the AirBridge as a master or satellite.
Note: At this time, the NETGEAR Insight app does not support the access point and
client bridge operation modes. To configure and manage the AirBridge as an access
point or client bridge, you first must change the management mode to Standalone
Mode, and then use the local browser UI. For more information, see Change the
management mode to NETGEAR Insight Mode or Standalone Mode on page 111.
IMPORTANT: If you add the AirBridge to a NETGEAR Insight network location and
manage the AirBridge through the Insight app or Insight Cloud portal, the local device
password for the AirBridge changes. That is, the Insight network password for that
location replaces the local device password. To access the local browser UI, you must
then enter the Insight network password and not the local device password. If you later
decide to remove the AirBridge from the Insight network location or change the
management mode to Standalone Mode (see Change the management mode to
Standalone Mode on page 113), you must continue to use the Insight network password
to access the local browser UI until you manually change the local device password on
the AirBridge.
the Easy Setup Method
User Manual15Access the AirBridge and Use
Page 16

Insight Instant AirBridge WBC502 User Manual
For more information about the Insight app, visit insight.netgear.com and see the
NETGEAR knowledge base at netgear.com/support/product/insight.aspx.
To connect to the AirBridge over WiFi using an iOS or Android mobile device:
1.
On your iOS or Android mobile device, go to the app store, search for NETGEAR
Insight, and download the latest version of the Insight app.
2.
For initial discovery and configuration, connect your mobile device to the WiFi
network that is connected to the same network to which the AirBridge is connected.
Note: For initial discovery and configuration, do not connect your smartphone to
the default management SSID of the AirBridge.
3. Open the Insight app.
4.
If you did not set up a NETGEAR account, tap Create NETGEAR Account and follow
the onscreen instructions.
5.
Enter the email address and password for your account and tap LOG IN.
After you log in to your account, the IP address of the AirBridge displays in the device
list.
6. Write down the AirBridge IP address.
You can use the IP address to connect to the local browser UI of the AirBridge using
an Ethernet connection when your computer is connected to the same network as
the AirBridge. For more information, see Connect over Ethernet using a computer
connected to the same network on page 23.
7.
To use the Insight app (instead of the local browser UI) to configure and manage
the AirBridge, tap the AirBridge, and follow the prompts to register the AirBridge
and add it to an Insight network location.
the Easy Setup Method
User Manual16Access the AirBridge and Use
Page 17

Insight Instant AirBridge WBC502 User Manual
Connect over the Internet using the NETGEAR Insight Cloud portal
The Insight Cloud portal is available for Insight Premium or Insight Pro subscribers. To
use the NETGEAR Insight Cloud portal to configure and manage the AirBridge as a
master or satellite, the AirBridge must already be connected to the Internet.
Note: At this time, the NETGEAR Insight Cloud portal does not support the access
point and client bridge operation modes. To configure and manage the AirBridge as
an access point or client bridge, you first must change the management mode to
Standalone Mode, and then use the local browser UI. For more information, see Change
the management mode to NETGEAR Insight Mode or Standalone Mode on page 111.
IMPORTANT: If you add the AirBridge to a NETGEAR Insight network location and
manage the AirBridge through the Insight app or Insight Cloud portal, the local device
password for the AirBridge changes. That is, after you add the AirBridge to an Insight
network location, the Insight network password for that location replaces the local device
password. To access the local browser UI, you must then enter the Insight network
password and not the local device password. If you later decide to remove the AirBridge
from the Insight network location or change the management mode to Web-browser
mode (see Change the management mode to Standalone Mode on page 113), you must
continue to use the Insight network password to access the local browser UI until you
manually change the local device password on the AirBridge.
For more information about the Insight Cloud portal and the configuration and
management options that are available through the Insight Cloud portal, visit
insight.netgear.com and see the NETGEAR knowledge base at
netgear.com/support/product/insight.aspx.
To connect to the AirBridge over the Internet through the Insight Cloud portal:
1. Visit insight.netgear.com.
The NETGEAR Account Login page displays.
2. Enter your Insight email address and password.
If you do not own an Insight account, you can create one.
3. Click the Login button.
After you log in, you can do the following:
Add the AirBridge to the Cloud portal by entering its serial number.
•
Add the AirBridge to an Insight network location.
•
Configure and manage the AirBridge.
•
the Easy Setup Method
User Manual17Access the AirBridge and Use
Page 18
Insight Instant AirBridge WBC502 User Manual
Connect over WiFi using a WiFi-enabled computer or mobile device
This section describes how to connect to the AirBridge for the first time over WiFi using
a WiFi-enabled computer or mobile device (without using the NETGEAR Insight app).
For this procedure, do not connect the AirBridge to a network with a DHCP server,
otherwise you cannot access the AirBridge at its default IP address of 192.168.0.100.
To connect to the AirBridge over WiFi using a WiFi-enabled computer or mobile
device:
1. From your computer or mobile device, connect over WiFi to the AirBridge’s
management WiFi network.
The management SSID is on the AirBridge label on the bottom of the AirBridge and
is shown in the format NETGEARxxxxxx-SETUP, where xxxxxx is the last six
hexadecimal digits of the AirBridge’s MAC address. The default password is
sharedsecret.
2. On the computer or mobile device, open a web browser and, in the address bar,
enter https://192.168.0.100.
When the AirBridge is not connected to a network with a DHCP server, the default
IP address of the AirBridge is 192.168.0.100.
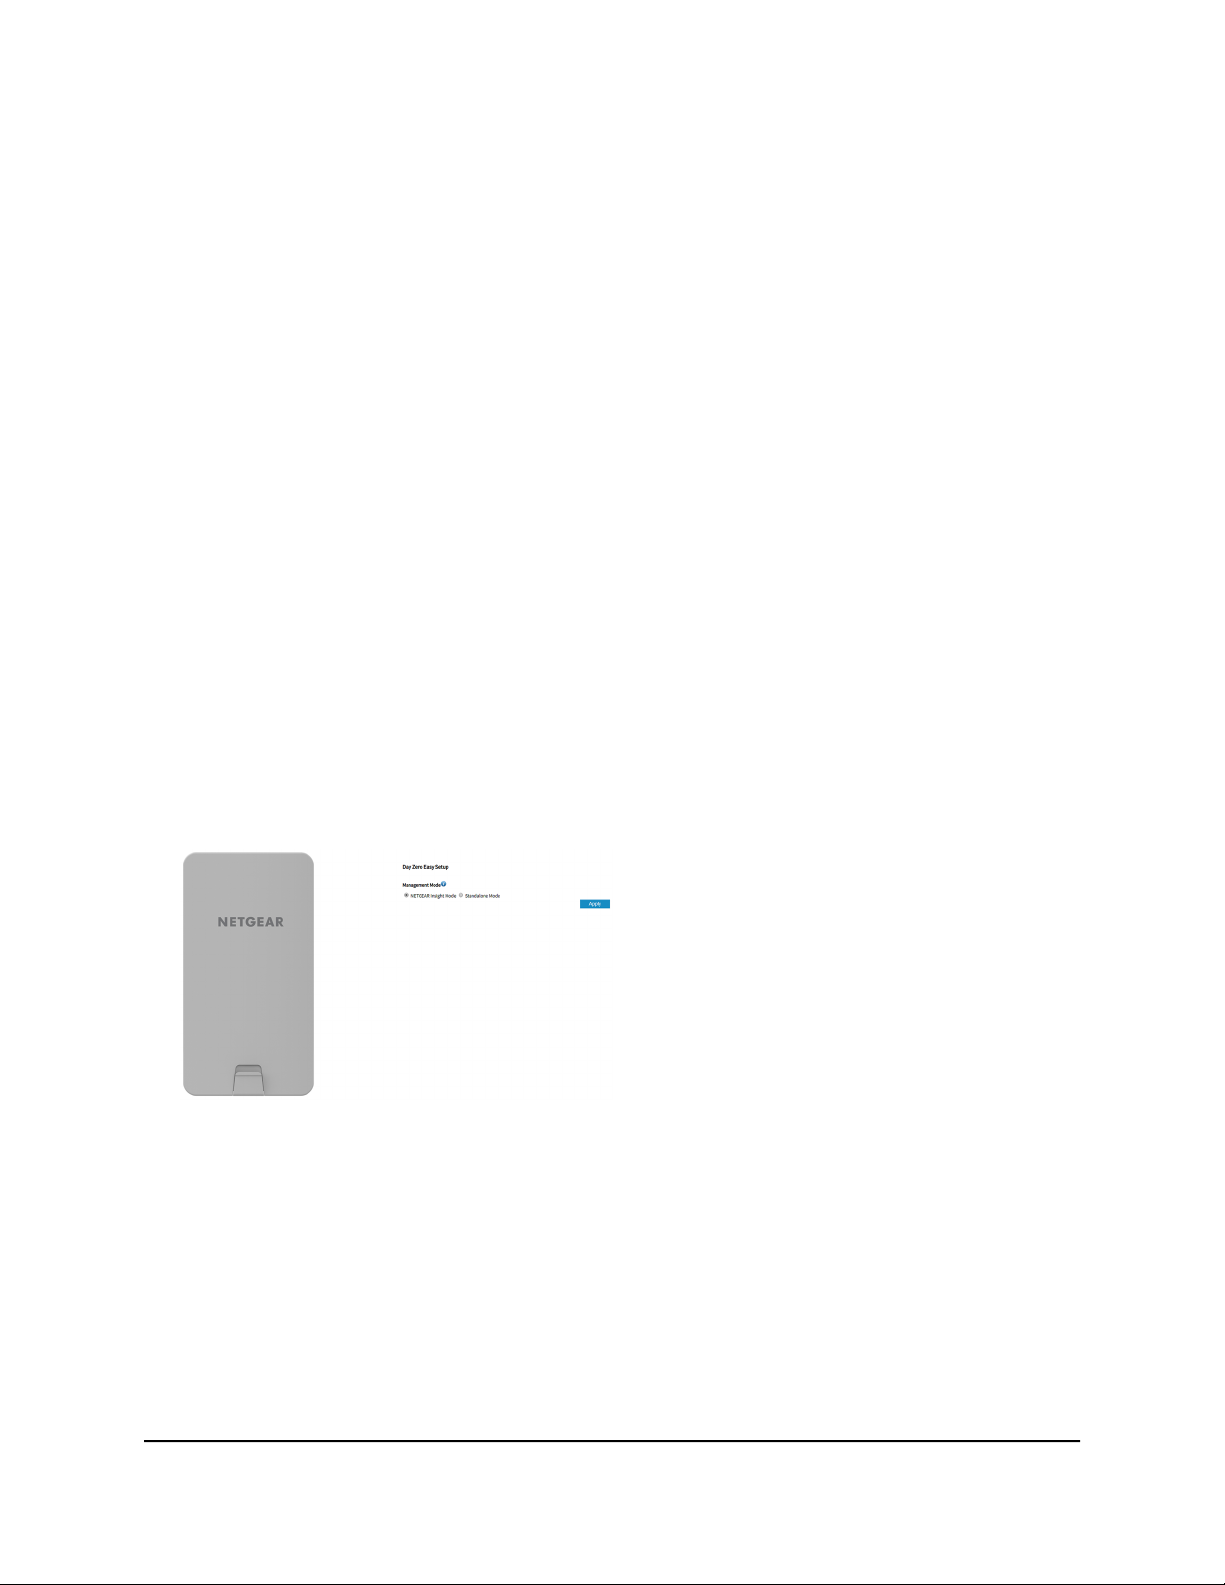
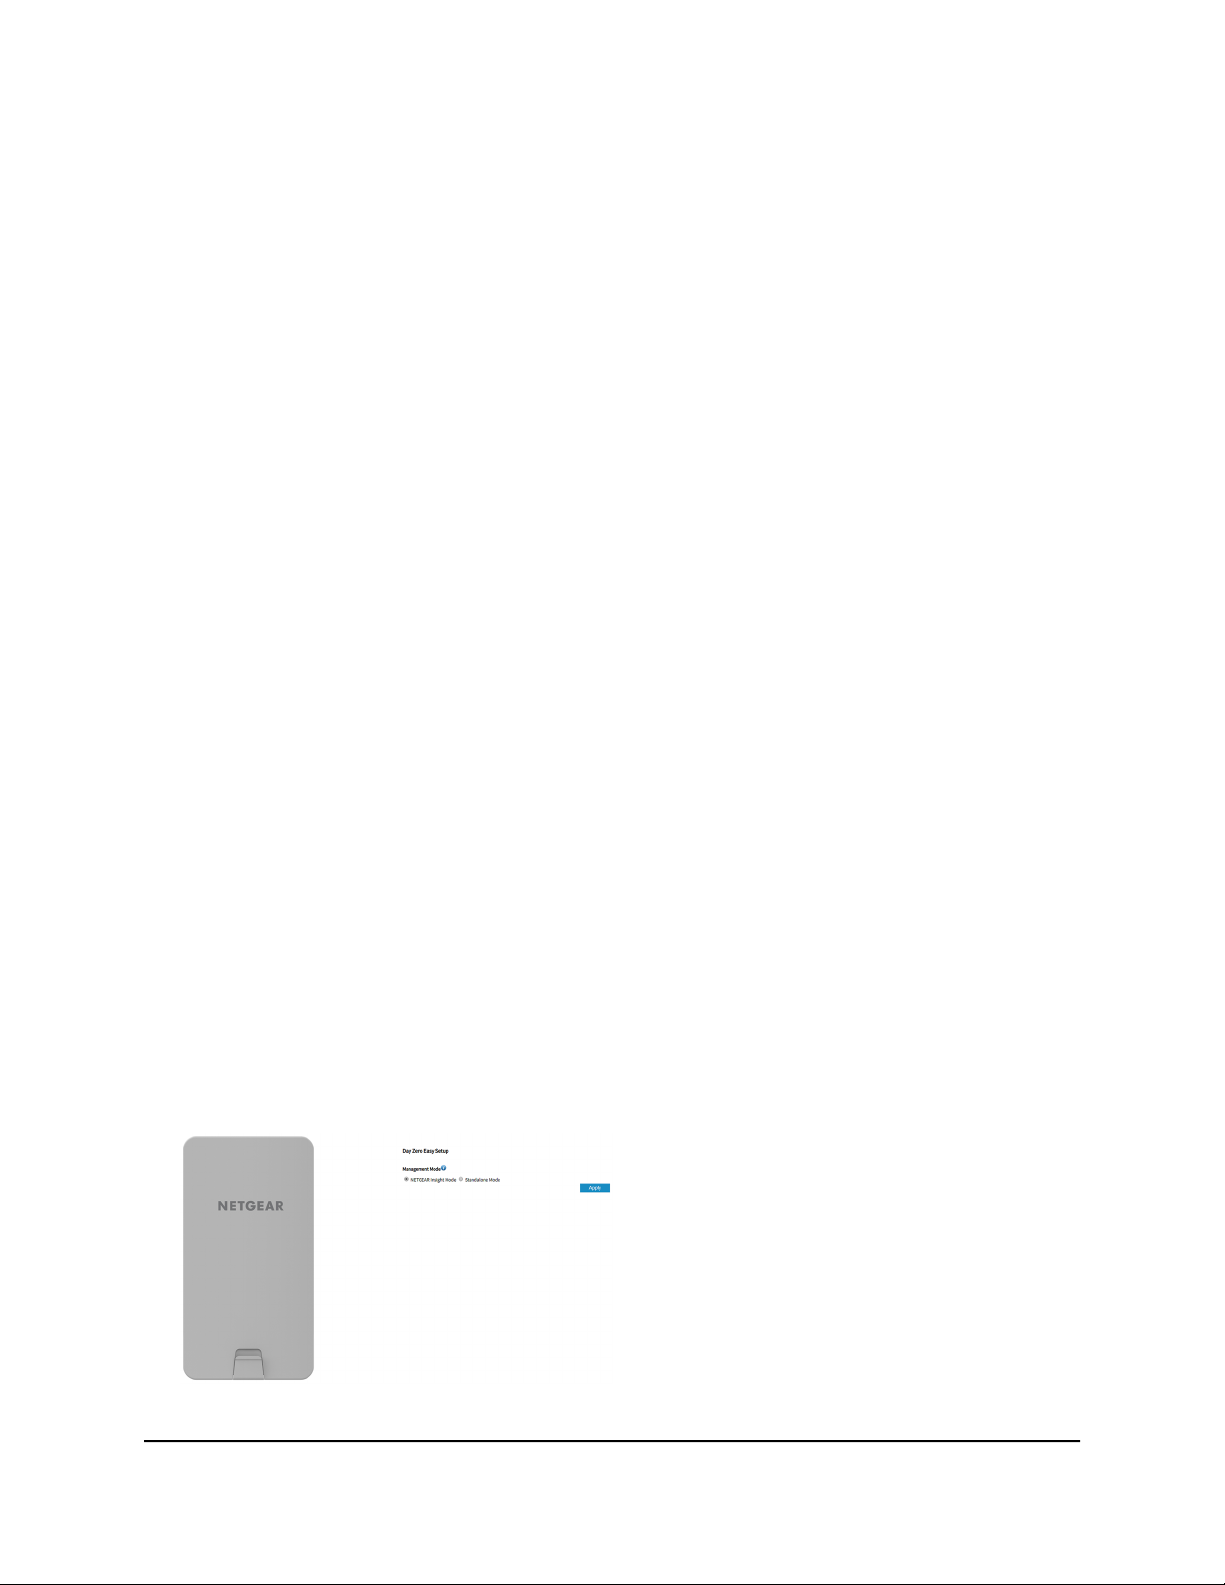
The Day Zero Easy Setup page displays.
3.
If your browser does not open the Day Zero Easy Setup page but displays a security
message and does not let you proceed, do one of the following:
Google Chrome. If Google Chrome displays a Your connection is not private
•
message, click the ADVANCED link. Then, click the Proceed to 192.168.0.100
(unsafe) link.
Apple Safari. If Apple Safari displays a This connection is not private message,
•
click the Show Details button. Then, click the visit this website link. If a warning
pop-up window opens, click the Visit Website button. If another pop-up window
the Easy Setup Method
User Manual18Access the AirBridge and Use
Page 19
Insight Instant AirBridge WBC502 User Manual
opens to let you confirm changes to your certificate trust settings, enter your Mac
user name and password and click the Update Setting button.
Mozilla Firefox. If Mozilla Firefox displays a Your connection is not secure
•
message, click the ADVANCED button. Then, click the Add Exception button.
In the pop-up window that opens, click the Confirm Security Exception button.
Microsoft Internet Explore. If Microsoft Internet Explorer displays a There is a
•
problem with this website’s security certificate message, click the Continue to
this website (not recommended) link.
Microsoft Edge. If Microsoft Edge displays a There is a problem with this website’s
•
security certificate message or a similar warning, select Details > Go on to the
webpage.
4. Select the Standalone Mode radio button.
Note: After you save the basic settings that are shown on the page, the Day Zero
Easy Setup page no longer displays when you log in. Instead, a login window opens.
After you log in, the Dashboard page displays.
5.
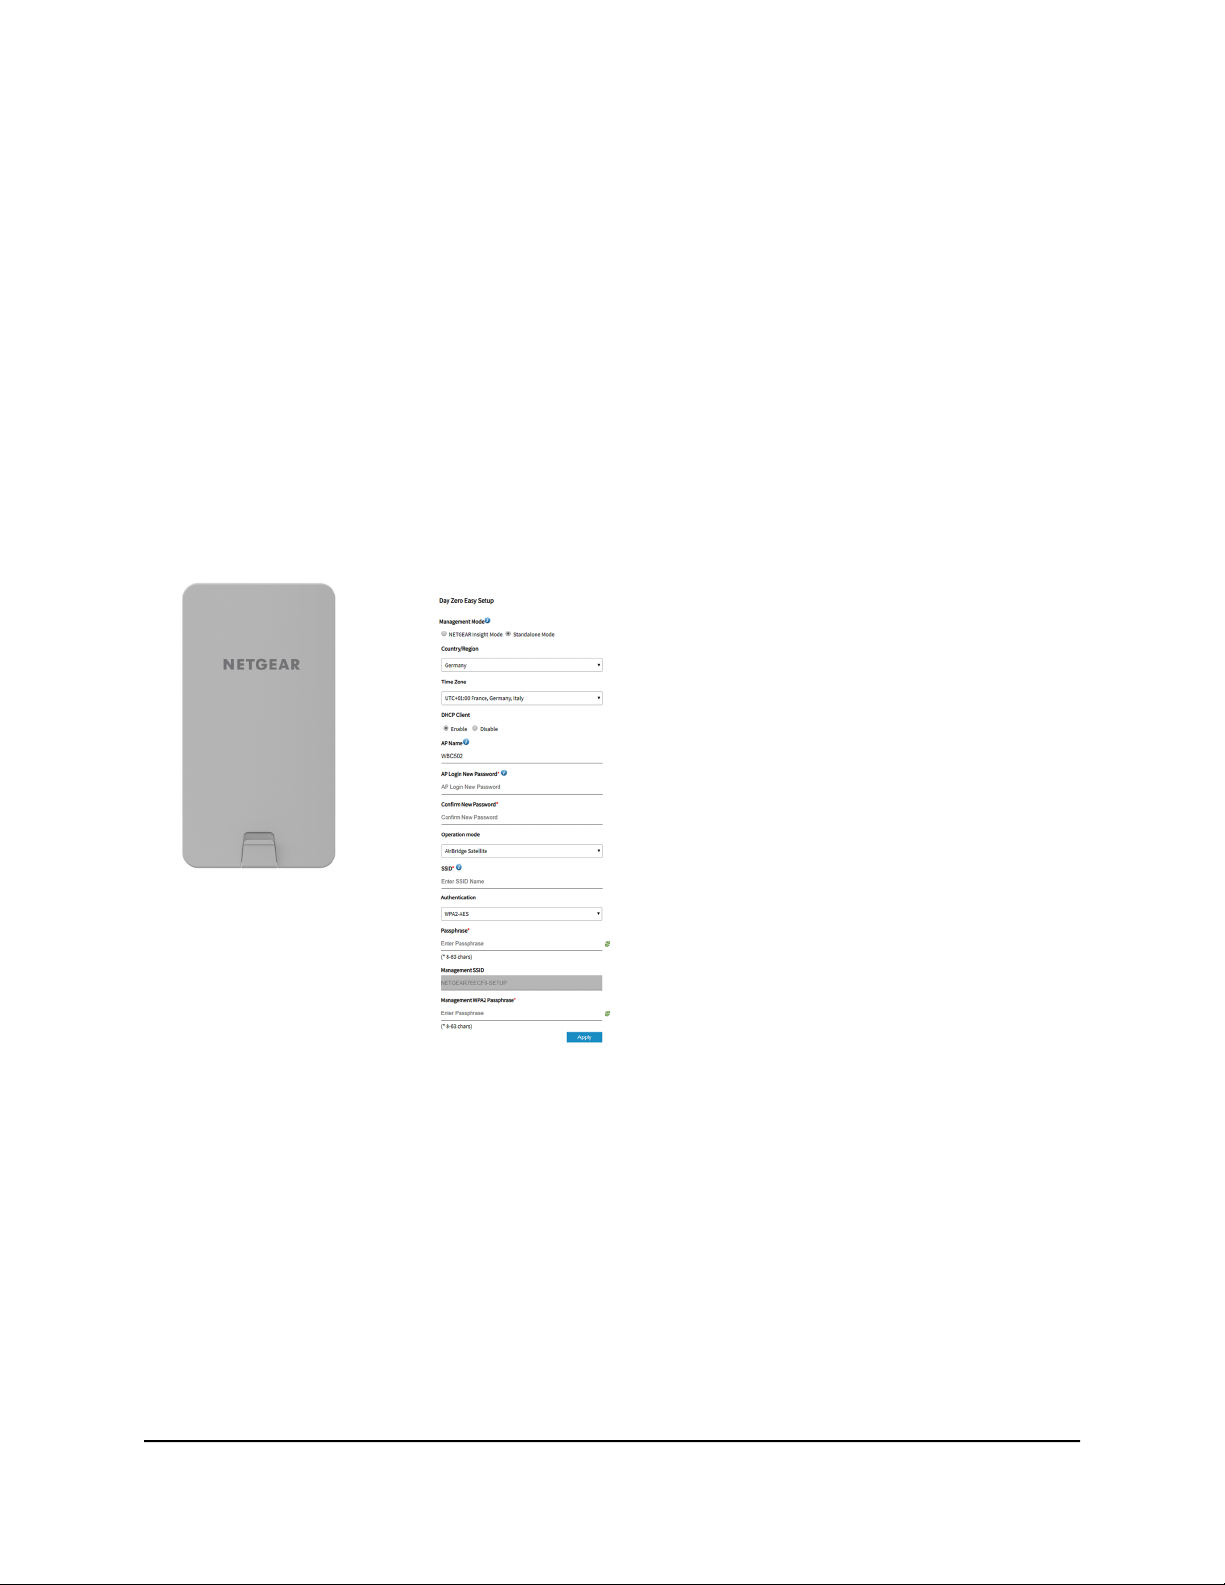
Enter the settings that are described in the following table.
User Manual19Access the AirBridge and Use
the Easy Setup Method
Page 20

Insight Instant AirBridge WBC502 User Manual
DescriptionSetting
Country/Region
Time Zone
DHCP Client
AP Name
From the menu, select the country and region in which the AirBridge is operating.
Note: Make sure that the country is set to the location where the device is operating. You
are responsible for complying with the local, regional, and national regulations that are
set for channels, power levels, and frequency ranges.
Note: It might not be legal to operate the AirBridge in a region other than the regions
listed in the menu. If your country or region is not listed, check with your local government
agency.
From the menu, select the time zone for the country and region in which the AirBridge is
operating.
By default, the DHCP client of the AirBridge allows the AirBridge to receive an IP address
from a DHCP server (or router that functions as a DHCP server) in your network.
To set up the AirBridge with a static (fixed) IP address, do the following:
a. Select the Disable radio button.
Additional fields display.
b. Specify the IP address, IP subnet mask, IP address of the default gateway, and IP address
of the DNS server.
As an option, enter a new device name for the AirBridge. The name must contain
alphanumeric characters, cannot be longer than 15 characters, and cannot contains spaces.
The name can contain hyphens, but cannot start or end with a hyphen.
By default, the device name is WBC502, which is the AirBridge’s model number.
AP Login New
Password
Password
the Easy Setup Method
Enter a new local device password. This is the password that you must use to log in to the
AirBridge’s local browser UI. (It is not the password that you use for WiFi access.)
The password must be 8 to 32 characters in length and must contain at least one uppercase
letter, one lowercase letter, and one number. The following special characters are allowed:
! @ # $ % ^ & * ( )
Write down and save the password for future use.
Enter exactly the same password that you entered in the AP Login New Password field.Confirm New
User Manual20Access the AirBridge and Use
Page 21

(Continued)
Insight Instant AirBridge WBC502 User Manual
DescriptionSetting
Operation Mode
SSID
From the menu, select the operation mode that the AirBridge must function in:
AirBridge Master
•
AirBridge Satellite
•
Access Point
•
Client Bridge
•
For information about the operation modes, see Operation mode: AirBridge Master,
AirBridge Satellite, Access Point, or Client Bridge on page 10 and Operation mode and
default settings after the Day Zero Easy Setup configuration on page 33.
Enter a name for the 5 GHz SSID. You can use a maximum of 32 characters with a
combination of alphanumeric and special characters, except for quotation marks (") and
a backslash (\).
The function of the 5 GHz SSID depends on the operation mode:
AirBridge master and satellite. The 5 GHz SSID is the backhaul WiFi connection
•
between the master and the satellite.
Access point. The 5 GHz SSID is the WiFi network that the access point broadcasts.
•
Client bridge. The 5 GHz SSID is the WiFi extension between the client bridge and the
•
base station.
Authentication
Passphrase
the Easy Setup Method
From the menu, select one of the following authentication types for the 5 GHz SSID:
Open. Authentication is not required and data encryption is not supported. This setting
•
does not provide any security and is not appropriate for most situations.
WPA2-AES. This option allows the 5 GHz SSID to be secured with a WPA2 passphrase.
•
This option uses AES encryption. All devices that use the 5 GHz SSID must be capable
of supporting WPA2-AES.
After you complete the setup process, you can set up WPA2 Enterprise security with
RADIUS servers. For more information, see Set up WPA2-Enterprise security on a master
or access point on page 81 or Set up WPA2-Enterprise security on a satellite or client
bridge on page 84.
Unless you selected Open from the Authentication Type menu, enter a new passphrase
(network key or WiFi password) for the 5 GHz SSID.
The length of the passphrase must be from 8 to 63 characters.
User Manual21Access the AirBridge and Use
Page 22

(Continued)
Insight Instant AirBridge WBC502 User Manual
DescriptionSetting
Management
SSID
Management
WPA2
Passphrase
The management SSID lets you connect from your WiFi-enabled computer or mobile
device to the AirBridge to configure and manage the it. This management SSID is not
used for backhaul or regular WiFi client connections.
For more information, see Manage the settings for the 2.4 GHz management SSID on
page 86.
Enter a new passphrase (network key or WiFi password) for the management SSID. This
passphrase replaces the default passphrase (sharedsecret).
The length of the passphrase must be from 8 to 63 characters.
6. Click the Apply button.
Your settings are saved.
After about one minute the AirBridge is back online.
This process takes about one minute.
7. Reconnect over WiFi to the AirBridge’s management SSID using the new passphrase
that you just defined on the Day Zero Easy Setup page.
8.
In the web browser, enter https://192.168.0.100.
If you assigned a static IP address to the AirBridge, enter that IP address.
The login page displays.
9.
If your browser does not display the login page but displays a security message and
does not let you proceed, see the information in Step 3.
10. Enter the AirBridge user name and local device password.
The user name is admin. The local device password is the one that you just defined
on the Day Zero Easy Setup page. The user name and password are case-sensitive.
11. In the TERMS OF USE section, click the NETGEAR’s Terms and Conditions link, and
read the terms of use.
12.
If you agree, select the check box to acknowledge that you read and agree with the
terms of use.
You need to select this check box only once. Subsequent times that you log in, the
check box is preselected.
13. Click the Login button.
The Device Status page displays the Device Information section and other sections.
You can now customize the AirBridge settings for your network environment.
the Easy Setup Method
User Manual22Access the AirBridge and Use
Page 23
Insight Instant AirBridge WBC502 User Manual
Connect over Ethernet using a computer connected to the same network
The following procedure assumes that your network includes a DHCP server (or router
that functions as a DHCP server) and that the AirBridge and the computer are on the
same network. By default, the AirBridge functions as a DHCP client. If you want to set
up the AirBridge with a static (fixed) IP address, see Connect over Ethernet using a
directly connected computer on page 28.
To connect to the AirBridge using a computer that is connected to the same network
as the AirBridge:
1. To determine the IP address that the DHCP server assigned to the AirBridge, use
one of the following methods:
Windows-based computer. If you use a Windows-based computer, open
•
Windows Explorer, and click the Network link. If prompted, enable the Network
Discovery feature. Under Network Infrastructure, locate the WBC502 (assuming
that you did not change the device name), and double-click WBC502.
DHCP server. Access the DHCP server in your network and open the page the
•
shows the network connections.
IP network scanner. Use an IP network scanner to scan for the IP address that
•
is assigned to the AirBridge.
NETGEAR Insight app. Use the NETGEAR Insight app to discover the IP address
•
that is assigned to the AirBridge. For more information, see Connect over WiFi
using the NETGEAR Insight app on an iOS or Android mobile device on page
15.
2. On the computer, open a web browser and, in the address bar, enter the IP address
that is assigned to the AirBridge.
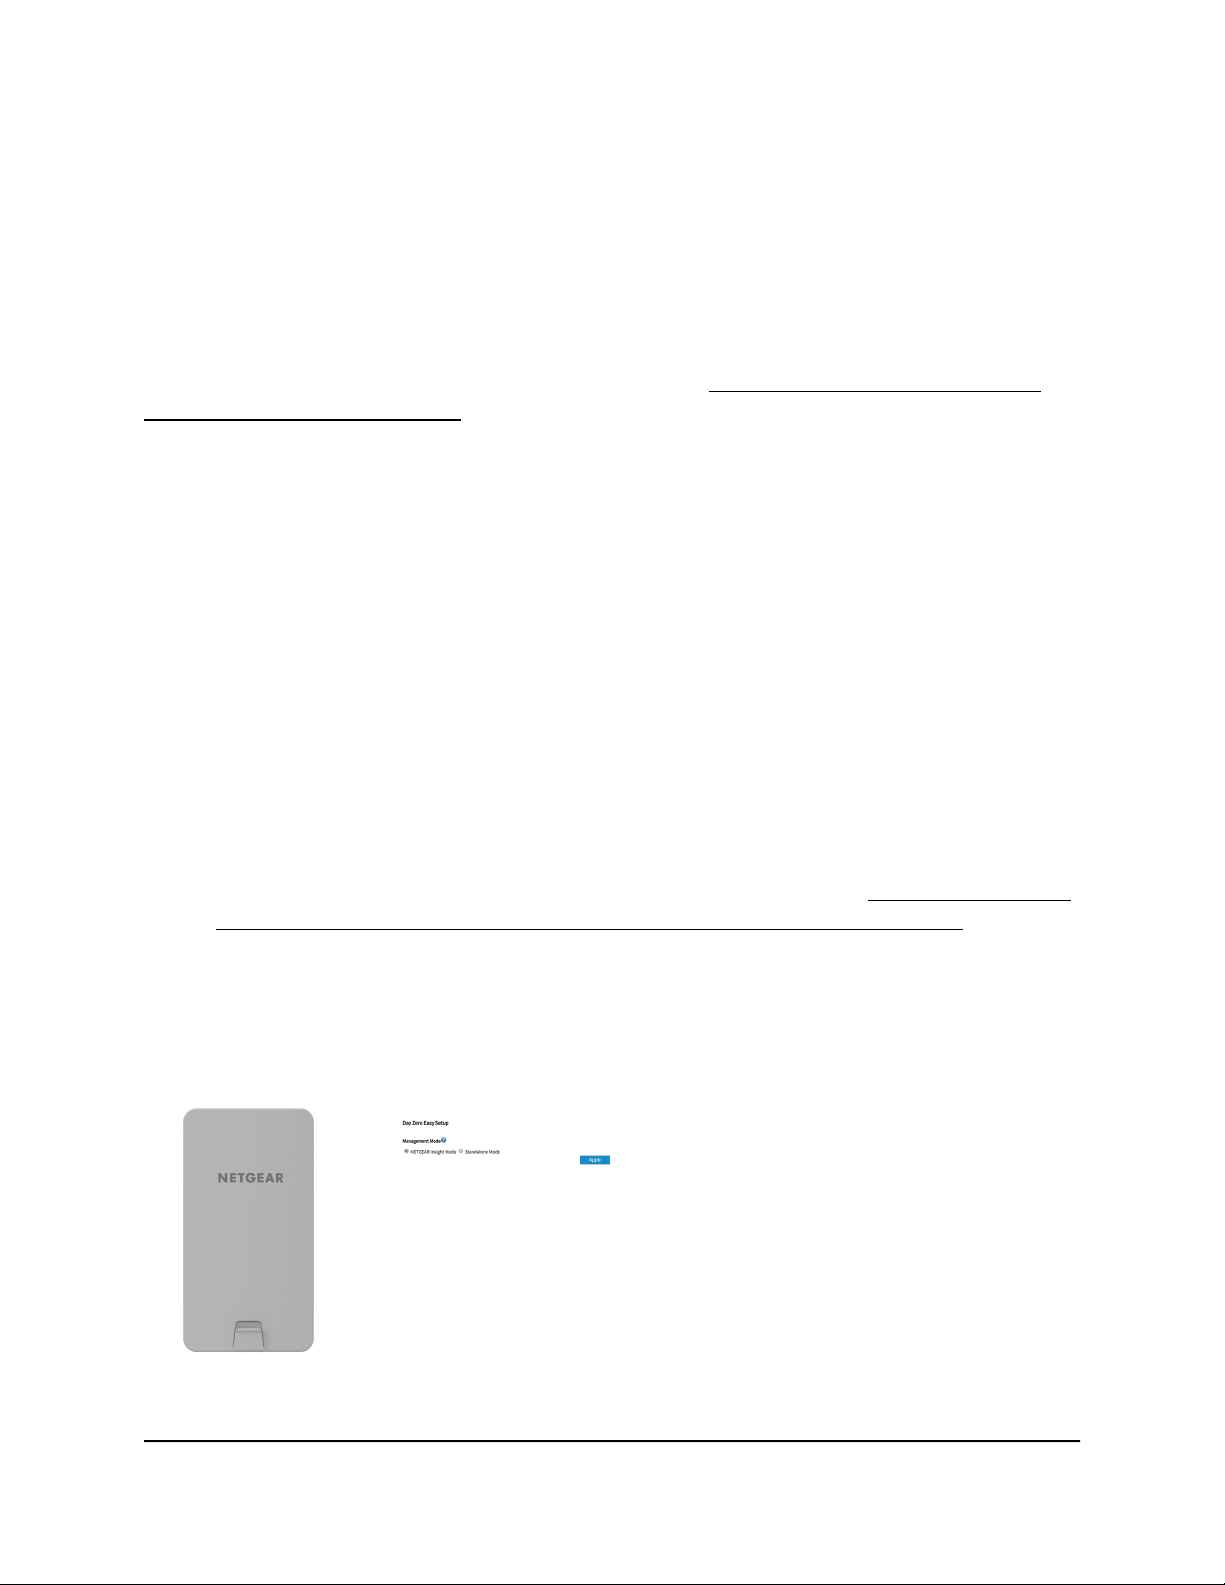
The Day Zero Easy Setup page displays.
the Easy Setup Method
User Manual23Access the AirBridge and Use
Page 24
Insight Instant AirBridge WBC502 User Manual
3.
If your browser does not open the Day Zero Easy Setup page but displays a security
message and does not let you proceed, do one of the following:
Google Chrome. If Google Chrome displays a Your connection is not private
•
message, click the ADVANCED link. Then, click the Proceed to x.x.x.x (unsafe)
link, in which x.x.x.x represents the IP address of the AirBridge.
Apple Safari. If Apple Safari displays a This connection is not private message,
•
click the Show Details button. Then, click the visit this website link. If a warning
pop-up window opens, click the Visit Website button. If another pop-up window
opens to let you confirm changes to your certificate trust settings, enter your Mac
user name and password and click the Update Setting button.
Mozilla Firefox. If Mozilla Firefox displays a Your connection is not secure
•
message, click the ADVANCED button. Then, click the Add Exception button.
In the pop-up window that opens, click the Confirm Security Exception button.
Microsoft Internet Explore. If Microsoft Internet Explorer displays a There is a
•
problem with this website’s security certificate message, click the Continue to
this website (not recommended) link.
Microsoft Edge. If Microsoft Edge displays a There is a problem with this website’s
•
security certificate message or a similar warning, select Details > Go on to the
webpage.
4. Select the Standalone Mode radio button.
Note: After you save the basic settings that are shown on the page, the Day Zero
Easy Setup page no longer displays when you log in. Instead, a login window opens.
After you log in, the Dashboard page displays.
User Manual24Access the AirBridge and Use
the Easy Setup Method
Page 25

Insight Instant AirBridge WBC502 User Manual
5.
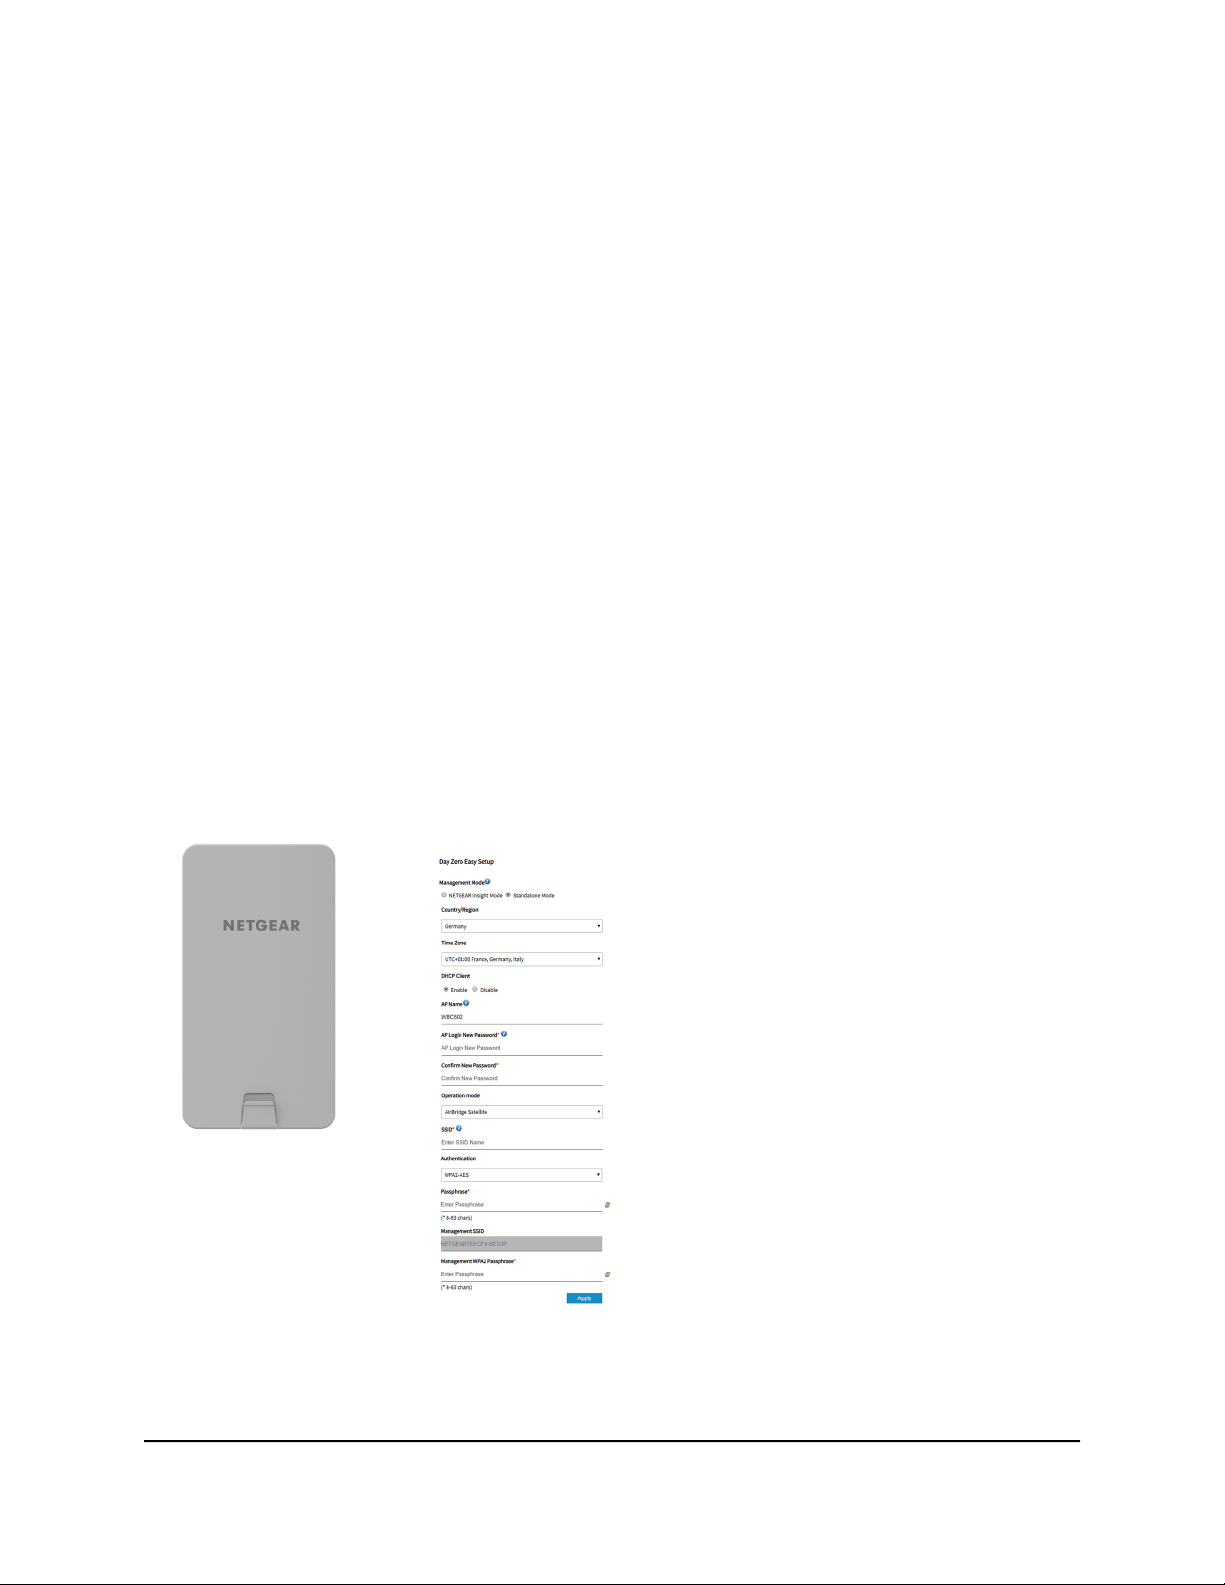
Enter the settings that are described in the following table.
DescriptionSetting
Country/Region
Time Zone
DHCP Client
AP Name
From the menu, select the country and region in which the AirBridge is operating.
Note: Make sure that the country is set to the location where the device is operating. You
are responsible for complying with the local, regional, and national regulations that are
set for channels, power levels, and frequency ranges.
Note: It might not be legal to operate the AirBridge in a region other than the regions
listed in the menu. If your country or region is not listed, check with your local government
agency.
From the menu, select the time zone for the country and region in which the AirBridge is
operating.
By default, the DHCP client of the AirBridge allows the AirBridge to receive an IP address
from a DHCP server (or router that functions as a DHCP server) in your network.
To set up the AirBridge with a static (fixed) IP address, do the following:
a. Select the Disable radio button.
Additional fields display.
b. Specify the IP address, IP subnet mask, IP address of the default gateway, and IP address
of the DNS server.
As an option, enter a new device name for the AirBridge. The name must contain
alphanumeric characters, cannot be longer than 15 characters, and cannot contains spaces.
The name can contain hyphens, but cannot start or end with a hyphen.
By default, the device name is WBC502, which is the AirBridge’s model number.
AP Login New
Password
Password
the Easy Setup Method
Enter a new local device password. This is the password that you must use to log in to the
AirBridge’s local browser UI. (It is not the password that you use for WiFi access.)
The password must be 8 to 32 characters in length and must contain at least one uppercase
letter, one lowercase letter, and one number. The following special characters are allowed:
! @ # $ % ^ & * ( )
Write down and save the password for future use.
Enter exactly the same password that you entered in the AP Login New Password field.Confirm New
User Manual25Access the AirBridge and Use
Page 26

(Continued)
Insight Instant AirBridge WBC502 User Manual
DescriptionSetting
Operation Mode
SSID
From the menu, select the operation mode that the AirBridge must function in:
AirBridge Master
•
AirBridge Satellite
•
Access Point
•
Client Bridge
•
For information about the operation modes, see Operation mode: AirBridge Master,
AirBridge Satellite, Access Point, or Client Bridge on page 10 and Operation mode and
default settings after the Day Zero Easy Setup configuration on page 33.
Enter a name for the 5 GHz SSID. You can use a maximum of 32 characters with a
combination of alphanumeric and special characters, except for quotation marks (") and
a backslash (\).
The function of the 5 GHz SSID depends on the operation mode:
AirBridge master and satellite. The 5 GHz SSID is the backhaul WiFi connection
•
between the master and the satellite.
Access point. The 5 GHz SSID is the WiFi network that the access point broadcasts.
•
Client bridge. The 5 GHz SSID is the WiFi extension between the client bridge and the
•
base station.
Authentication
Passphrase
the Easy Setup Method
From the menu, select one of the following authentication types for the 5 GHz SSID:
Open. Authentication is not required and data encryption is not supported. This setting
•
does not provide any security and is not appropriate for most situations.
WPA2-AES. This option allows the 5 GHz SSID to be secured with a WPA2 passphrase.
•
This option uses AES encryption. All devices that use the 5 GHz SSID must be capable
of supporting WPA2-AES.
After you complete the setup process, you can set up WPA2 Enterprise security with
RADIUS servers. For more information, see Set up WPA2-Enterprise security on a master
or access point on page 81 or Set up WPA2-Enterprise security on a satellite or client
bridge on page 84.
Unless you selected Open from the Authentication Type menu, enter a new passphrase
(network key or WiFi password) for the 5 GHz SSID.
The length of the passphrase must be from 8 to 63 characters.
User Manual26Access the AirBridge and Use
Page 27

(Continued)
Insight Instant AirBridge WBC502 User Manual
DescriptionSetting
Management
SSID
Management
WPA2
Passphrase
The management SSID lets you connect from your WiFi-enabled computer or mobile
device to the AirBridge to configure and manage the it. This management SSID is not
used for backhaul or regular WiFi client connections.
For more information, see Manage the settings for the 2.4 GHz management SSID on
page 86.
Enter a new passphrase (network key or WiFi password) for the management SSID. This
passphrase replaces the default passphrase (sharedsecret).
The length of the passphrase must be from 8 to 63 characters.
6. Click the Apply button.
Your settings are saved.
After about one minute the AirBridge is back online.
The login page displays.
7.
If the login page does not display automatically, take one of the following actions:
If you assigned a static IP address to the AirBridge, enter that IP address in the
•
address bar of the web browser.
If you did not assign a static IP address, reenter the IP address that is displayed
•
in the address bar of the web browser. If that does not work, write down the IP
address, close the web browser, reopen the web browser, and then reenter the
IP address in the address bar of the web browser.
If you did not assign a static IP address and you closed the page so that you
•
cannot see the IP address of the AirBridge, use an IP scanner tool, use a network
discovery tool, or access the DHCP server to discover the IP address of the
AirBridge in your network. Then, open a browser and enter the IP address in the
address bar of the web browser.
If your browser does not open the login page but displays a security message
•
and does not let you proceed, see the information in Step 3.
8. Enter the AirBridge user name and local device password.
The user name is admin. The local device password is the one that you just defined
on the Day Zero Easy Setup page. The user name and password are case-sensitive.
9. In the TERMS OF USE section, click the NETGEAR’s Terms and Conditions link, and
read the terms of use.
User Manual27Access the AirBridge and Use
the Easy Setup Method
Page 28
Insight Instant AirBridge WBC502 User Manual
10.
If you agree, select the check box to acknowledge that you read and agree with the
terms of use.
You need to select this check box only once. Subsequent times that you log in, the
check box is preselected.
11. Click the Login button.
The Device Status page displays the Device Information section and other sections.
You can now customize the AirBridge settings for your network environment.
Connect over Ethernet using a directly connected computer
If your network does not include a DHCP server (or router that functions as a DHCP
server), you can use a computer that is connected through an Ethernet cable to the LAN
port of the AirBridge.
To connect to the AirBridge using a computer that is connected to a LAN port of
the AirBridge:
1.
Record the IP address and subnet mask of your computer so that you can reinstate
these IP address settings later.
2. Temporarily change the IP address on your computer to 192.168.0.210 with
255.255.255.0 as the subnet mask.
(You can actually use any IP address in the 192.168.0.2–192.168.0.254 range, with
the exception of IP address 192.168.0.100, which is the default IP address of the
AirBridge.)
For more information about changing the IP address on your computer, see the help
or documentation for your computer.
3. Use an Ethernet cable to connect your computer to the LAN2 port on the AirBridge.
4. On the computer, open a web browser and enter 192.168.0.100 in the address
bar.
The Day Zero Easy Setup page displays.
the Easy Setup Method
User Manual28Access the AirBridge and Use
Page 29

Insight Instant AirBridge WBC502 User Manual
5.
If your browser does not open the Day Zero Easy Setup page but displays a security
message and does not let you proceed, do one of the following:
Google Chrome. If Google Chrome displays a Your connection is not private
•
message, click the ADVANCED link. Then, click the Proceed to 192.168.0.100
(unsafe) link.
Apple Safari. If Apple Safari displays a This connection is not private message,
•
click the Show Details button. Then, click the visit this website link. If a warning
pop-up window opens, click the Visit Website button. If another pop-up window
opens to let you confirm changes to your certificate trust settings, enter your Mac
user name and password and click the Update Setting button.
Mozilla Firefox. If Mozilla Firefox displays a Your connection is not secure
•
message, click the ADVANCED button. Then, click the Add Exception button.
In the pop-up window that opens, click the Confirm Security Exception button.
Microsoft Internet Explore. If Microsoft Internet Explorer displays a There is a
•
problem with this website’s security certificate message, click the Continue to
this website (not recommended) link.
Microsoft Edge. If Microsoft Edge displays a There is a problem with this website’s
•
security certificate message or a similar warning, select Details > Go on to the
webpage.
6. Select the Standalone Mode radio button.
Note: After you save the basic settings that are shown on the page, the Day Zero
Easy Setup page no longer displays when you log in. Instead, a login window opens.
After you log in, the Dashboard page displays.
User Manual29Access the AirBridge and Use
the Easy Setup Method
Page 30

Insight Instant AirBridge WBC502 User Manual
7.
Enter the settings that are described in the following table.
DescriptionSetting
Country/Region
Time Zone
DHCP Client
AP Name
From the menu, select the country and region in which the AirBridge is operating.
Note: Make sure that the country is set to the location where the device is operating. You
are responsible for complying with the local, regional, and national regulations that are
set for channels, power levels, and frequency ranges.
Note: It might not be legal to operate the AirBridge in a region other than the regions
listed in the menu. If your country or region is not listed, check with your local government
agency.
From the menu, select the time zone for the country and region in which the AirBridge is
operating.
By default, the DHCP client of the AirBridge allows the AirBridge to receive an IP address
from a DHCP server (or router that functions as a DHCP server) in your network.
To set up the AirBridge with a static (fixed) IP address, do the following:
a. Select the Disable radio button.
Additional fields display.
b. Specify the IP address, IP subnet mask, IP address of the default gateway, and IP address
of the DNS server.
As an option, enter a new device name for the AirBridge. The name must contain
alphanumeric characters, cannot be longer than 15 characters, and cannot contains spaces.
The name can contain hyphens, but cannot start or end with a hyphen.
By default, the device name is WBC502, which is the AirBridge’s model number.
AP Login New
Password
Password
the Easy Setup Method
Enter a new local device password. This is the password that you must use to log in to the
AirBridge’s local browser UI. (It is not the password that you use for WiFi access.)
The password must be 8 to 32 characters in length and must contain at least one uppercase
letter, one lowercase letter, and one number. The following special characters are allowed:
! @ # $ % ^ & * ( )
Write down and save the password for future use.
Enter exactly the same password that you entered in the AP Login New Password field.Confirm New
User Manual30Access the AirBridge and Use
Page 31

(Continued)
Insight Instant AirBridge WBC502 User Manual
DescriptionSetting
Operation Mode
SSID
From the menu, select the operation mode that the AirBridge must function in:
AirBridge Master
•
AirBridge Satellite
•
Access Point
•
Client Bridge
•
For information about the operation modes, see Operation mode: AirBridge Master,
AirBridge Satellite, Access Point, or Client Bridge on page 10 and Operation mode and
default settings after the Day Zero Easy Setup configuration on page 33.
Enter a name for the 5 GHz SSID. You can use a maximum of 32 characters with a
combination of alphanumeric and special characters, except for quotation marks (") and
a backslash (\).
The function of the 5 GHz SSID depends on the operation mode:
AirBridge master and satellite. The 5 GHz SSID is the backhaul WiFi connection
•
between the master and the satellite.
Access point. The 5 GHz SSID is the WiFi network that the access point broadcasts.
•
Client bridge. The 5 GHz SSID is the WiFi extension between the client bridge and the
•
base station.
Authentication
Passphrase
the Easy Setup Method
From the menu, select one of the following authentication types for the 5 GHz SSID:
Open. Authentication is not required and data encryption is not supported. This setting
•
does not provide any security and is not appropriate for most situations.
WPA2-AES. This option allows the 5 GHz SSID to be secured with a WPA2 passphrase.
•
This option uses AES encryption. All devices that use the 5 GHz SSID must be capable
of supporting WPA2-AES.
After you complete the setup process, you can set up WPA2 Enterprise security with
RADIUS servers. For more information, see Set up WPA2-Enterprise security on a master
or access point on page 81 or Set up WPA2-Enterprise security on a satellite or client
bridge on page 84.
Unless you selected Open from the Authentication Type menu, enter a new passphrase
(network key or WiFi password) for the 5 GHz SSID.
The length of the passphrase must be from 8 to 63 characters.
User Manual31Access the AirBridge and Use
Page 32

(Continued)
Insight Instant AirBridge WBC502 User Manual
DescriptionSetting
Management
SSID
Management
WPA2
Passphrase
The management SSID lets you connect from your WiFi-enabled computer or mobile
device to the AirBridge to configure and manage the it. This management SSID is not
used for backhaul or regular WiFi client connections.
For more information, see Manage the settings for the 2.4 GHz management SSID on
page 86.
Enter a new passphrase (network key or WiFi password) for the management SSID. This
passphrase replaces the default passphrase (sharedsecret).
The length of the passphrase must be from 8 to 63 characters.
8. Click the Apply button.
Your settings are saved.
After about one minute the AirBridge is back online.
The login page displays.
9.
If the login page does not open automatically, enter 192.168.0.100 in the address
bar of your browser.
If you changed the IP address (that is, you specified a static IP address), enter the
new IP address.
10.
If your browser does not display the login page but displays a security message and
does not let you proceed, see the information in Step 5.
11. Enter the AirBridge user name and local device password.
The user name is admin. The local device password is the one that you just defined
on the Day Zero Easy Setup page. The user name and password are case-sensitive.
12. In the TERMS OF USE section, click the NETGEAR’s Terms and Conditions link, and
read the terms of use.
13.
If you agree, select the check box to acknowledge that you read and agree with the
terms of use.
You need to select this check box only once. Subsequent times that you log in, the
check box is preselected.
14. Click the Login button.
The Device Status page displays the Device Information section and other sections.
You can now customize the AirBridge settings for your network environment.
the Easy Setup Method
User Manual32Access the AirBridge and Use
Page 33

Insight Instant AirBridge WBC502 User Manual
15.
After you complete the setup process, or both the setup process and your
configurations, you can change the computer back to its original IP address settings.
Operation mode and default settings after the Day Zero Easy Setup configuration
After you complete the Day Zero Easy Setup configuration and specify the AirBridge to
function in one of four operation modes, the default settings are as stated in the following
table.
Note: In some countries and regions, the default settings might differ from the settings
that are stated in the following table.
Table 3. Operation mode default settings after the Day Zero Easy Setup configuration
Client BridgeAccess PointAirBridge SatelliteAirBridge MasterDefault Setting
N/AN/AEnabledEnabledAirBridge mode
EnabledEnabledEnabledEnabledAuto RF
N/A40 MHzN/A40 MHzChannel HT mode
N/A32N/AN/AClient Limit
1 km (0.6 miles)1 km (0.6 miles)1 km (0.6 miles)1 km (0.6 miles)Distance
N/AN/AN/AAutoMaster Time Slot
N/AN/AHighN/ASatellite Priority
Note: For information about manually configuring the operation mode, see Manually
Configure or Change the Operation Mode on page 37.
the Easy Setup Method
User Manual33Access the AirBridge and Use
Page 34

Insight Instant AirBridge WBC502 User Manual
Log in to the AirBridge after initial setup
After initial setup, the AirBridge is ready for use and you can change the settings and
monitor traffic.
When you access the local browser UI of the AirBridge, your browser might display a
security message. You can either ignore this message or install the AirBridge’s security
certificate. Consider the following examples:
Google Chrome. If Google Chrome displays a Your connection is not private
•
message, click the ADVANCED link. Then, click the Proceed to x.x.x.x (unsafe)
link, in which x.x.x.x represents the IP address of the AirBridge.
Apple Safari. If Apple Safari displays a This connection is not private message, click
•
the Show Details button. Then, click the visit this website link. If a warning pop-up
window opens, click the Visit Website button. If another pop-up window opens to
let you confirm changes to your certificate trust settings, enter your Mac user name
and password and click the Update Setting button.
Mozilla Firefox. If Mozilla Firefox displays a Your connection is not secure message,
•
click the ADVANCED button. Then, click the Add Exception button. In the pop-up
window that opens, click the Confirm Security Exception button.
Microsoft Internet Explore. If Microsoft Internet Explorer displays a There is a
•
problem with this website’s security certificate message, click the Continue to this
website (not recommended) link.
Microsoft Edge. If Microsoft Edge displays a There is a problem with this website’s
•
security certificate message or a similar warning, select Details > Go on to the
webpage.
To log in to the AirBridge’s local browser UI:
1.
Open a web browser from a computer that is connected to the same network as the
AirBridge or directly to the AirBridge through an Ethernet cable or WiFi connection.
2. Enter the IP address that is assigned to the AirBridge.
The login page displays.
If your browser does not display the login page but displays a security message and
does not let you proceed, see the information in the introduction of this task.
3. Enter the AirBridge user name and local device password.
The user name is admin. The local device password is the one that you specified
the first time that you logged in. The user name and password are case-sensitive.
If you previously managed the AirBridge through the NETGEAR Insight app or Insight
Cloud portal, enter the Insight network password for that location (see Connect over
User Manual34Access the AirBridge and Use
the Easy Setup Method
Page 35

Insight Instant AirBridge WBC502 User Manual
WiFi using the NETGEAR Insight app on an iOS or Android mobile device on page
15).
The Device Status page displays the Device Information section and other sections.
The following figure shows the Device Status page and the Device Information
section.
For more information about the sections on the Device Status page, see View the
device status and other information on page 133.
Change the language of the local browser UI
You can change the language of the local browser UI.
To change the language of the local browser UI:
1.
Open a web browser from a computer that is connected to the same network as the
AirBridge or directly to the AirBridge through an Ethernet cable or WiFi connection.
2. Enter the IP address that is assigned to the AirBridge.
The login page displays.
If your browser does not display the login page but displays a security message and
does not let you proceed, see Log in to the AirBridge after initial setup on page 34.
3. Enter the AirBridge user name and local device password.
The user name is admin. The local device password is the one that you specified
the first time that you logged in. The user name and password are case-sensitive.
the Easy Setup Method
User Manual35Access the AirBridge and Use
Page 36

Insight Instant AirBridge WBC502 User Manual
If you previously managed the AirBridge through the NETGEAR Insight app or Insight
Cloud portal, enter the Insight network password for the Insight network location to
which the AirBridge was assigned (see Connect over WiFi using the NETGEAR Insight
app on an iOS or Android mobile device on page 15).
The Device Status page displays the Device Information section and other sections.
4.
From the menu at the top right of the page, select another language.
After a few seconds, the language changes.
the Easy Setup Method
User Manual36Access the AirBridge and Use
Page 37

2
Manually Configure or Change the Operation Mode
When you access the AirBridge for the first time, you must select an operation mode
on the Day Zero Easy Setup page. After you do so, you can also manually change the
operation mode and settings.
This chapter describes how you can manually configure the operation mode of the
AirBridge and the settings that are associated with the selected operation mode. For
an overview of the operation modes, see Operation mode: AirBridge Master, AirBridge
Satellite, Access Point, or Client Bridge on page 10.
The chapter includes the following sections:
• Recommendations for configuration
• Configure the AirBridge as a master in a point-to-point or point-to-multipoint setup
• Configure the AirBridge as a satellite in a point-to-point setup
• Configure the AirBridge as an access point
• Configure the AirBridge as a client bridge
CAUTION: This device must be professionally installed. It is the installer’s responsibility
to follow local country regulations, including operations within legal frequency channels,
output power, and DFS requirements. The vendor, reseller, or distributor is not
responsible for illegal wireless operations. For more details, see the device’s terms and
conditions.
37
Page 38

Insight Instant AirBridge WBC502 User Manual
Recommendations for configuration
For a master-to-satellite, site-to-site setup, we recommend that you complete the initial
pairing of the AirBridges at a staging area with easy access to the network that is to
supply connectivity to the master and access point. For information about the hardware
setup, see the hardware installation manual, which you can download by visiting
netgear.com/support/download/.
We recommend the following configuration order:
If you manually configure AirBridges in a master-to-satellite setup (or change such
•
an existing configuration), we recommend that you first configure the satellite and
then configure the master. After you complete the configurations, the WiFi backhaul
connection between the master and satellite is automatically established.
Note: If you first configure the master and then configure the satellite, the WiFi
backhaul connection between the master and satellite is not (or no longer)
operational, and you might not be able to access the satellite.
Similarly, if you manually configure an AirBridge as a client bridge in an access
•
point-to-client bridge setup (or change such an existing configuration), we
recommend that you first configure the client bridge and then configure the access
point. (The access point can be an AirBridge or another type of access point.) After
you complete the configurations, the WiFi backhaul connection between the access
point and client bridge is automatically established.
Note: If you first configure the access point and then configure the client bridge,
the WiFi backhaul connection between the access point and client bridge is not (or
no longer) operational, and you might not be able to access the client bridge.
Configure the AirBridge as a master in a point-to-point or point-to-multipoint setup
You can configure the AirBridge as a master in a point-to-point or point to-multipoint
setup. You install the master at a main site to provide network and Internet connectivity
to one or more satellites at detached sites where no wired infrastructure is available.
This setup requires a line of sight between the main site and each detached site.
Note: We do not recommend that you use a master and several satellites to create a
multi-building campus network backbone.
User Manual38Manually Configure or Change
the Operation Mode
Page 39

Insight Instant AirBridge WBC502 User Manual
To configure the AirBridge as a master in a point-to-point or point-to-multipoint
setup:
1.
Open a web browser from a computer that is connected to the same network as the
AirBridge or directly to the AirBridge through an Ethernet cable or WiFi connection.
2. Enter the IP address that is assigned to the AirBridge.
The login page displays.
If your browser does not display the login page but displays a security message and
does not let you proceed, see Log in to the AirBridge after initial setup on page 34.
3. Enter the AirBridge user name and local device password.
The user name is admin. The local device password is the one that you specified
the first time that you logged in. The user name and password are case-sensitive.
If you previously managed the AirBridge through the NETGEAR Insight app or Insight
Cloud portal, enter the Insight network password for the Insight network location to
which the AirBridge was assigned (see Connect over WiFi using the NETGEAR Insight
app on an iOS or Android mobile device on page 15).
The Device Status page displays the Device Information section and other sections.
4. Under Network, select Wireless.
The Wireless Settings page displays.
5. From the Operation Mode menu, select AirBridge Master.
6. Select the AirBridge Enable radio button.
By default, the AirBridge mode is enabled, which is the setting that we recommend
for a master-to-satellite setup. Depending on your network situation, your WiFi
requirements, and your understanding of the consequences, you can disable the
AirBridge mode.
Note: For information about optional advanced settings that display on the page,
such as changing the Auto RF mode (so that you can set a specific transmission
power), channel HT mode, channel, bit rate, and master time slot, see Manage
Advanced WiFi and Radio Features on page 90. We recommend that you do not
change these advanced settings while you perform the current task.
7.
In the Distance field, enter the approximate distance at which the satellite or satellites
are located.
Enter the distance in km. (1 km is 0.6 miles.) For example, if the distance is 2 km
(1.2 miles), enter 2.
the Operation Mode
User Manual39Manually Configure or Change
Page 40

Insight Instant AirBridge WBC502 User Manual
Note: For information about changing the name or security settings of the
5 GHz backhaul SSID to which the satellite or satellites must connect, see Manage
the 5 GHz SSIDs and WiFi security on page 65.
8. Click the Save button.
Your settings are saved but not yet applied.
A pop-up window opens. The window shows the number of changes to be applied.
9. In the pop-up window, click the Apply button.
Your changes are applied. If the WiFi link must be reestablished, the page displays
the number of seconds before the AirBridge is back online.
Configure the AirBridge as a satellite in a point-to-point setup
You can configure the AirBridge as a satellite in a point-to-point setup with an AirBridge
master that is located at a main site. You install the satellite at a detached site, where
no wired infrastructure is available. This setup requires a line of sight between the
detached site and the main site.
To configure the AirBridge as a satellite:
1.
Open a web browser from a computer that is connected to the same network as the
AirBridge or directly to the AirBridge through an Ethernet cable or WiFi connection.
2. Enter the IP address that is assigned to the AirBridge.
The login page displays.
If your browser does not display the login page but displays a security message and
does not let you proceed, see Log in to the AirBridge after initial setup on page 34.
3. Enter the AirBridge user name and local device password.
The user name is admin. The local device password is the one that you specified
the first time that you logged in. The user name and password are case-sensitive.
If you previously managed the AirBridge through the NETGEAR Insight app or Insight
Cloud portal, enter the Insight network password for the Insight network location to
which the AirBridge was assigned (see Connect over WiFi using the NETGEAR Insight
app on an iOS or Android mobile device on page 15).
The Device Status page displays the Device Information section and other sections.
4. Under Network, select Wireless.
The Wireless Settings page displays.
User Manual40Manually Configure or Change
the Operation Mode
Page 41

Insight Instant AirBridge WBC502 User Manual
5. From the Operation Mode menu, select AirBridge Satellite.
6. Select the AirBridge Enable radio button.
By default, the AirBridge mode is enabled, which is the setting that we recommend
for a master-to-satellite setup. Depending on your network situation, your WiFi
requirements, and your understanding of the consequences, you can disable the
AirBridge mode.
Note: For information about optional advanced settings that display on the page,
such as changing the Auto RF mode (so that you can set a specific transmission
power), bit rate, and satellite priority, see Manage Advanced WiFi and Radio Features
on page 90. We recommend that you do not change these advanced settings while
you perform the current task.
7.
In the Distance field, enter the approximate distance at which the master is located.
Enter the distance in km. (1 km is 0.6 miles.) For example, if the distance is 2 km
(1.2 miles), enter 2.
8. In the Wireless Settings - 5GHZ section, click the Edit button.
A new page opens.
IMPORTANT: The first time that you set up a satellite to connect to a master, the
master must be offline to prevent a network loop. Therefore, you must enter the
5 GHZ SSID backhaul settings manually (see the next step). For more information
about the master-to-satellite hardware setup that we recommend, see the hardware
installation guide.
Tip: If you are changing an existing 5 GHZ SSID backhaul setting for a satellite, the
master might already be online, allowing you to use the AP detection scanning
function to scan for a master (see Scan for neighboring access points on page 62).
9.
To manually configure the 5 GHZ SSID backhaul settings, specify the following
settings:
a.
To enter the basic service set ID (BSSID) of one particular master, select the
Preferred SSID check box, and enter the MAC addresses of the 5 GHZ radio of
the AirBridge master.
This option is useful if your network includes more than one master. If your network
includes a single master, you can skip this option.
b.
In the SSID field, enter the name of the 5 GHZ SSID of the master with which you
want the satellite to connect.
c.
From the Security Mode menu, select the type of security, if any, for the
connection to the selected SSID.
the Operation Mode
User Manual41Manually Configure or Change
Page 42

Insight Instant AirBridge WBC502 User Manual
d.
If the type of security is WPA2-PSK, in the Passphrase field, enter the WiFi
passphrase (also referred to as WiFi password or network key).
If the type of security is WPA2-Enterprise, see Set up WPA2-Enterprise security
on a satellite or client bridge on page 84.
e. Click the Save button.
Your settings are saved but not yet applied. The page closes. The Wireless Settings
page displays again.
A pop-up window opens. The window shows the number of changes to be applied.
10. Click the Apply button.
Your settings are saved and applied. The WiFi connection is reestablished. The page
displays the number of seconds before the AirBridge is back online.
Configure the AirBridge as an access point
You can configure the AirBridge as an access point that can support multiple
5 GHZ SSIDs. You install the access point at a main site to provide network and Internet
connectivity to individual WiFi clients, client bridges, other access point that extend the
WiFi network, or a combination of these. This setup does not require a line of sight
between the access point and the WiFi clients, client bridge, or other access point. The
powerful antenna of the AirBridge allows for an extended WiFi range.
To configure the AirBridge as an access point:
1.
Open a web browser from a computer that is connected to the same network as the
AirBridge or directly to the AirBridge through an Ethernet cable or WiFi connection.
2. Enter the IP address that is assigned to the AirBridge.
The login page displays.
If your browser does not display the login page but displays a security message and
does not let you proceed, see Log in to the AirBridge after initial setup on page 34.
3. Enter the AirBridge user name and local device password.
The user name is admin. The local device password is the one that you specified
the first time that you logged in. The user name and password are case-sensitive.
If you previously managed the AirBridge through the NETGEAR Insight app or Insight
Cloud portal, enter the Insight network password for the Insight network location to
which the AirBridge was assigned (see Connect over WiFi using the NETGEAR Insight
app on an iOS or Android mobile device on page 15).
The Device Status page displays the Device Information section and other sections.
4. Under Network, select Wireless.
User Manual42Manually Configure or Change
the Operation Mode
Page 43

Insight Instant AirBridge WBC502 User Manual
The Wireless Settings page displays.
5. From the Operation Mode menu, select Access Point.
Note: For information about optional advanced settings that display on the page,
such as changing the Auto RF mode (so that you can set a specific transmission
power), channel HT mode, channel, and bit rate, see Manage Advanced WiFi and
Radio Features on page 90. We recommend that you do not change these advanced
settings while you perform the current task.
6.
To limit the number of clients that can connect to the AirBridge, keep the Clients
Limits Enable radio button selected and enter a number in the Client Limits field.
By default, the limit is 32 clients. You can specify a lower or higher number of
maximum WiFi clients. The range is from 1 to 32. The maximum number applies to
all clients connected to all 5 GHZ SSIDs on the AirBridge. You can disable client
limits entirely by selecting the Clients Limits Disable check box.
7.
To scan for neighboring access points, click the AP Detection Scan button.
A new page opens. For more information, see Scan for neighboring access points
on page 62.
8.
In the Distance field, enter the approximate distance at which most WiFi devices or
client bridges are located.
Enter the distance in km. (1 km is 0.6 miles.) For example, if the distance is 2 km
(1.2 miles), enter 2.
9.
In the Wireless Settings - Access Point section, do one of the following:
To change the default 5 GHZ SSID or another previously enabled 5 GHZ SSID,
•
click the Edit button for the 5 GHZ SSID.
To enable and configure a new 5 GHZ SSID, select the Enabled check box for a
•
disabled 5 GHZ SSID, and then click the Edit button for the 5 GHZ SSID.
A new page opens.
10.
To configure the 5 GHZ SSID settings, specify the settings that are described in the
following table:
DescriptionSetting
Wireless Setting - Access Point 5GHz
This check box is selected, otherwise you cannot configure the SSID settings.Enable
the Operation Mode
User Manual43Manually Configure or Change
Page 44

(Continued)
Insight Instant AirBridge WBC502 User Manual
DescriptionSetting
SSID
Hidden SSID
Client Isolation
VLAN Isolation
L2 Isolation
The service set ID (SSID), which is the name for the WiFi network with which WiFi clients
can connect.
To hide the WiFi network name and prevent it from displaying in the scanning list of a WiFi
client, select the Enable radio button. To connect to the WiFi network, a user must know
the WiFi network name.
By default, the Disable radio button is selected.
To prevent WiFi clients that are associated with the same or different WiFi networks on the
access point from communicating with each other, select the Enable radio button. If you
enable client isolation, WiFi clients can still communicate with each other over the Internet.
When the AirBridge mode is disabled, by default, the Disable radio button is selected.
To prevent clients on different VLANs from communicating with each other, select the
Enable radio button, and enter the VLAN ID in the ID field. This VLAN ID must already be
defined in your network. The default VLAN ID is 1. The range is from 1 to 4094.
If you enable VLAN isolation, clients can still communicate with each other over the Internet.
By default, the Disable radio button is selected.
To prevent WiFi and LAN clients on the same access point from communicating with each
other, select the Enable radio button. If you enable L2 isolation, clients can still communicate
with each other over the Internet.
By default, the Disable radio button is selected.
Wireless Security
Security Mode
Passphrase
the Operation Mode
From the Security Mode menu, select WPA2-PSK or WPA2-Enterprise for the connection
to the selected SSID.
For information about WPA2-Enterprise, see Set up WPA2-Enterprise security on a master
or access point on page 81.
Note: We recommend that you set up security, although in certain situations, and if you
are aware of the risks, you can select None.
This field is fixed at AES. You cannot select another option.Encryption
If you select WPA2-PSK from the Security Mode menu, enter a passphrase (network key
or WiFi password) that WiFi clients must enter to connect to the SSID.
The length of the passphrase must be from 8 to 63 characters.
User Manual44Manually Configure or Change
Page 45

(Continued)
Insight Instant AirBridge WBC502 User Manual
DescriptionSetting
Group Key
Update Interval
Fast Roaming
Status
The period in seconds that the group key changes. The period can be from 30 to 3600
seconds. The default period is 3600 seconds (1 hour).
If you enter 0, the update interval is disabled and the group key is not changed. For greater
security, we recommend that you do not disable the update interval so that the group key
can be changed automatically.
To enable fast roaming, select the Enable radio button. By default, the Disable radio button
is selected.
If your network includes WiFi clients that must be able to roam from one access point to
another, enable fast roaming so that certain client applications can quickly reassociate with
a new access point.
Fast roaming is not available if you select None from the Security Mode menu.
For information about other WiFi features such as setting up a MAC filter and traffic
shaping, see Manage Advanced WiFi and Radio Features on page 90.
11. Click the Save button.
Your settings are saved but no yet applied. The page closes. The Wireless Settings
page displays again.
A pop-up window opens. The window shows the number of changes to be applied.
12. To enable the guest network on an SSID, in the Wireless Settings - Access Point
section, select the Guest Network check box for the SSID.
13. Click the Save button.
Your settings are saved but not yet applied.
14. Click the Apply button.
Your settings are saved and applied. The WiFi connection is reestablished. The page
displays the number of seconds before the AirBridge is back online.
Configure the AirBridge as a client bridge
You can configure the AirBridge as a client bridge. You install the client bridge at a
detached site to provide network and Internet connectivity to a single wired device that
is not WiFi-capable on its own. For example, you could connect a pan-tilt-zoom (PTZ)
camera to a client bridge.
the Operation Mode
User Manual45Manually Configure or Change
Page 46

Insight Instant AirBridge WBC502 User Manual
This setup does not require a line of sight between the access point at the main site and
the client bridge. The access point with which the client bridge associates can be either
another AirBridge or a different model access point.
To configure the AirBridge as a client bridge:
1.
Open a web browser from a computer that is connected to the same network as the
AirBridge or directly to the AirBridge through an Ethernet cable or WiFi connection.
2. Enter the IP address that is assigned to the AirBridge.
The login page displays.
If your browser does not display the login page but displays a security message and
does not let you proceed, see Log in to the AirBridge after initial setup on page 34.
3. Enter the AirBridge user name and local device password.
The user name is admin. The local device password is the one that you specified
the first time that you logged in. The user name and password are case-sensitive.
If you previously managed the AirBridge through the NETGEAR Insight app or Insight
Cloud portal, enter the Insight network password for the Insight network location to
which the AirBridge was assigned (see Connect over WiFi using the NETGEAR Insight
app on an iOS or Android mobile device on page 15).
The Device Status page displays the Device Information section and other sections.
4. Under Network, select Wireless.
The Wireless Settings page displays.
5. From the Operation Mode menu, select Client Bridge.
Note: For information about optional advanced settings that display on the page,
such as changing the Auto RF mode (so that you can set a specific transmission
power) and bit rate, see Manage Advanced WiFi and Radio Features on page 90.
We recommend that you do not change these advanced settings while you perform
the current task.
6. Click the AP Detection Scan button.
A new page opens. After the AirBridge completes its scan for neighboring access
points, the page displays (for each detected access point) the information that is
described in the following table.
the Operation Mode
User Manual46Manually Configure or Change
Page 47

Insight Instant AirBridge WBC502 User Manual
DescriptionSetting
BSSID
SSID
Signal Level
The basic service set ID (BSSID) in the format of a MAC address.
This is usually the MAC address of the radio on the AirBridge master or access point that
broadcasts the SSID.
The service set ID (SSID), which is the name for the WiFi network with which the AirBridge
satellite, client bridge, or access point can connect.
The radio channel on which the SSID is being broadcast.Channel
The strength of the WiFi signal that is being broadcast, expressed in –dBm.
A lower value means a stronger signal. For example, –40 dBm indicates a stronger signal
than –60 dBm.
The type of security that is configured for the SSID.Security
The operation mode of the detected access point.Mode
7. Select the access point with which you want the client bridge to associate by clicking
the row for the access point.
The page changes.
8.
To select the BSSID of the selected access point as the preferred BSSID, select the
check box.
After you select the BSSID, in most situations, you do not need to change the detected
SSID, security mode, and encryption.
9.
If the security mode is WPA2-PSK, in the Passphrase field, enter the passphrase that
is required to connect to the SSID.
If the type of security is WPA2-Enterprise, see Set up WPA2-Enterprise security on
a satellite or client bridge on page 84.
10. Click the Save button.
Your settings are saved but not yet applied. The page closes. The Wireless Settings
page displays again.
A pop-up window opens. The window shows the number of changes to be applied.
11.
In the Distance field, enter the approximate distance at which the access point is
located.
Enter the distance in km. (1 km is 0.6 miles.) For example, if the distance is 2 km
(1.2 miles), enter 2.
12. Click the Save button.
the Operation Mode
User Manual47Manually Configure or Change
Page 48

Insight Instant AirBridge WBC502 User Manual
Your settings are saved but not yet applied. The pop-up window shows the number
of changes to be applied.
13. In the pop-up window, click the Apply button.
Your changes are applied. If the WiFi link must be reestablished, the page displays
the number of seconds before the AirBridge is back online.
the Operation Mode
User Manual48Manually Configure or Change
Page 49

3
Manage the Wired Network Settings
This chapter describes how you can manage the wired network settings of the AirBridge.
The chapter includes the following sections:
• Specify a static IPv4 address for the AirBridge
• Specify a link-local IPv6 address for the AirBridge
• Reenable the DHCP client of the AirBridge
• Manage the STP settings
49
Page 50

Insight Instant AirBridge WBC502 User Manual
Specify a static IPv4 address for the AirBridge
By default, the DHCP client of the AirBridge is enabled, allowing a DHCP server (usually,
a router) in your network to assign an IPv4 address to the AirBridge. You can disable
the DHCP client and specify static (fixed) IP address settings for the AirBridge.
To specify static IPv4 address settings for the AirBridge:
1.
Open a web browser from a computer that is connected to the same network as the
AirBridge or directly to the AirBridge through an Ethernet cable or WiFi connection.
2. Enter the IP address that is assigned to the AirBridge.
The login page displays.
If your browser does not display the login page but displays a security message and
does not let you proceed, see Log in to the AirBridge after initial setup on page 34.
3. Enter the AirBridge user name and local device password.
The user name is admin. The local device password is the one that you specified
the first time that you logged in. The user name and password are case-sensitive.
If you previously managed the AirBridge through the NETGEAR Insight app or Insight
Cloud portal, enter the Insight network password for the Insight network location to
which the AirBridge was assigned (see Connect over WiFi using the NETGEAR Insight
app on an iOS or Android mobile device on page 15).
The Device Status page displays the Device Information section and other sections.
4. Under Network, select Basic.
The page that displays shows the IPv4 Settings, IPv6 Settings, and Spanning Tree
Protocol (STP) Settings sections.
5. In the IPv4 Settings section, select the Static IP radio button.
The IPv4 address fields display.
6.
Specify the static IPv4 address, subnet mask, gateway IPv4 address, and primary and
secondary DNS addresses.
7. Click the Save button.
Your settings are saved but not yet applied.
A pop-up window opens. The window shows the number of changes to be applied.
8. In the pop-up window, click the Apply button.
Your changes are applied. If the WiFi link must be reestablished, the page displays
the number of seconds before the AirBridge is back online.
User Manual50Manage the Wired Network
Settings
Page 51

Insight Instant AirBridge WBC502 User Manual
Note: To log back in to the AirBridge, you now must use the static IP address that you
assigned.
Specify a link-local IPv6 address for the AirBridge
By default, the DHCP client of the AirBridge is enabled, allowing a DHCPv6 server
(usually, a router) in your network to assign an IPv6 address to the AirBridge. You can
disable the DHCP client and specify link-local IPv6 address settings for the AirBridge.
To specify link-local IPv6 address settings for the AirBridge:
1.
Open a web browser from a computer that is connected to the same network as the
AirBridge or directly to the AirBridge through an Ethernet cable or WiFi connection.
2. Enter the IP address that is assigned to the AirBridge.
The login page displays.
If your browser does not display the login page but displays a security message and
does not let you proceed, see Log in to the AirBridge after initial setup on page 34.
3. Enter the AirBridge user name and local device password.
The user name is admin. The local device password is the one that you specified
the first time that you logged in. The user name and password are case-sensitive.
If you previously managed the AirBridge through the NETGEAR Insight app or Insight
Cloud portal, enter the Insight network password for the Insight network location to
which the AirBridge was assigned (see Connect over WiFi using the NETGEAR Insight
app on an iOS or Android mobile device on page 15).
The Device Status page displays the Device Information section and other sections.
4. Under Network, select Basic.
The page that displays shows the IPv4 Settings, IPv6 Settings, and Spanning Tree
Protocol (STP) Settings sections.
5. In the IPv4 Settings section, select the Static IP radio button.
The IPv4 address fields display.
6. In the IPv6 Settings section, clear the Link-local Address check box.
The IPv6 address fields display.
7.
Specify the static IPv6 address, subnet prefix length, IPv6 gateway address, and
primary and secondary DNS addresses.
8. Click the Save button.
Settings
User Manual51Manage the Wired Network
Page 52

Insight Instant AirBridge WBC502 User Manual
Your settings are saved but not yet applied.
A pop-up window opens. The window shows the number of changes to be applied.
9. In the pop-up window, click the Apply button.
Your changes are applied. If the WiFi link must be reestablished, the page displays
the number of seconds before the AirBridge is back online.
Note: To log back in to the AirBridge, you now must use the IPv6 address that you
assigned.
Reenable the DHCP client of the AirBridge
If you disabled the DHCP client of the AirBridge, you can reenable it.
To reenable the DHCP client of the AirBridge:
1.
Open a web browser from a computer that is connected to the same network as the
AirBridge or directly to the AirBridge through an Ethernet cable or WiFi connection.
2. Enter the IP address that is assigned to the AirBridge.
The login page displays.
If your browser does not display the login page but displays a security message and
does not let you proceed, see Log in to the AirBridge after initial setup on page 34.
3. Enter the AirBridge user name and local device password.
The user name is admin. The local device password is the one that you specified
the first time that you logged in. The user name and password are case-sensitive.
If you previously managed the AirBridge through the NETGEAR Insight app or Insight
Cloud portal, enter the Insight network password for the Insight network location to
which the AirBridge was assigned (see Connect over WiFi using the NETGEAR Insight
app on an iOS or Android mobile device on page 15).
The Device Status page displays the Device Information section and other sections.
4. Under Network, select Basic.
The page that displays shows the IPv4 Settings, IPv6 Settings, and Spanning Tree
Protocol (STP) Settings sections.
5. In the IPv4 Settings section, select the DHCP radio button.
The IPv4 address fields no longer display.
6. Click the Save button.
Your settings are saved but not yet applied.
Settings
User Manual52Manage the Wired Network
Page 53

Insight Instant AirBridge WBC502 User Manual
A pop-up window opens. The window shows the number of changes to be applied.
7. In the pop-up window, click the Apply button.
Your changes are applied. If the WiFi link must be reestablished, the page displays
the number of seconds before the AirBridge is back online.
Note: To log back in to the AirBridge, you now must use the IP address that is assigned
by the DHCP (or DHCPv6) server in your network.
To determine the IP address that the DHCP server assigned to the AirBridge, use one
of the following methods:
Windows-based computer. If you use a Windows-based computer, open Windows
•
Explorer, and click the Network link. If prompted, enable the Network Discovery
feature. Under Network Infrastructure, locate the WBC502 (assuming that you did
not change the device name), and double-click WBC502.
DHCP server. Access the DHCP server in your network and open the page the shows
•
the network connections.
IP network scanner. Use an IP network scanner to scan for the IP address that is
•
assigned to the AirBridge.
NETGEAR Insight app. Use the NETGEAR Insight app to discover the IP address
•
that is assigned to the AirBridge. For more information, see Connect over WiFi using
the NETGEAR Insight app on an iOS or Android mobile device on page 15.
Manage the STP settings
By default, Spanning Tree Protocol (STP) is enabled on the AirBridge.
You can change the settings for STP, or disabled it entirely. However, we recommend
that you keep STP enabled because it helps to prevent network loops.
To manage the STP settings:
1.
Open a web browser from a computer that is connected to the same network as the
AirBridge or directly to the AirBridge through an Ethernet cable or WiFi connection.
2. Enter the IP address that is assigned to the AirBridge.
The login page displays.
If your browser does not display the login page but displays a security message and
does not let you proceed, see Log in to the AirBridge after initial setup on page 34.
3. Enter the AirBridge user name and local device password.
The user name is admin. The local device password is the one that you specified
the first time that you logged in. The user name and password are case-sensitive.
User Manual53Manage the Wired Network
Settings
Page 54

Insight Instant AirBridge WBC502 User Manual
If you previously managed the AirBridge through the NETGEAR Insight app or Insight
Cloud portal, enter the Insight network password for the Insight network location to
which the AirBridge was assigned (see Connect over WiFi using the NETGEAR Insight
app on an iOS or Android mobile device on page 15).
The Device Status page displays the Device Information section and other sections.
4. Under Network, select Basic.
The page that displays shows the IPv4 Settings, IPv6 Settings, and Spanning Tree
Protocol (STP) Settings sections.
5.
In the Spanning Tree Protocol (STP) Settings section, specify the settings that are
described in the following table:
DescriptionSetting
Status
Hello Time
Max Age
Forward Delay
Priority
Select one of the following radio buttons:
Enable. STP is enabled. This is the default setting.
•
Disable. STP is disabled.
•
The interval in seconds between handshake packets the AirBridge sends to
communicate information about the topology throughout the entire bridged LAN.
The range is 1–10 seconds. The default is 2 seconds.
The period in seconds within which the AirBridge must receive a hello packet from
another device in the spanning tree before the AirBridge assumes that the device is
inactive.
The range is 6–40 seconds. The default is 20 seconds.
The period in seconds that a device spends in each of the listening and learning
states before entering the forwarding state. This delay is provided so that when a
new device enters a busy network, the device analyzes data traffic before participating
in the network.
The range is 4–30 seconds. The default is 15 seconds.
The priority of the AirBridge in the spanning tree. A smaller number means a higher
priority.
The range is 0–65535. The default is 32768.
6. Click the Save button.
Your settings are saved but not yet applied.
A pop-up window opens. The window shows the number of changes to be applied.
7. In the pop-up window, click the Apply button.
User Manual54Manage the Wired Network
Settings
Page 55

Insight Instant AirBridge WBC502 User Manual
Your changes are applied. If the WiFi link must be reestablished, the page displays
the number of seconds before the AirBridge is back online.
Settings
User Manual55Manage the Wired Network
Page 56

4
Manage the WiFi and Radio Features
This chapter describes how you can manage the WiFi and radio settings of the AirBridge.
For information about advanced WiFi and radio settings, see Manage Advanced WiFi
and Radio Features on page 90.
The chapter includes the following sections:
• Recommended configuration order
• Change the device name of the AirBridge
• Change the country and region of operation
• Change the AirBridge mode
• Scan for neighboring access points
• Specify the approximate distance for the WiFi connection
• Manage the 5 GHz SSIDs and WiFi security
• Manage the settings for the 2.4 GHz management SSID
CAUTION: This device must be professionally installed. It is the installer’s responsibility
to follow local country regulations, including operations within legal frequency channels,
output power, and DFS requirements. The vendor, reseller, or distributor is not
responsible for illegal wireless operations. For more details, see the device’s terms and
conditions.
56
Page 57

Insight Instant AirBridge WBC502 User Manual
Recommended configuration order
We recommend the following configuration order:
If you change an existing configuration for AirBridges in a master-to-satellite setup,
•
we recommend that you first change the satellite and then change the master. After
you complete the configurations, the WiFi backhaul connection between the master
and satellite is automatically reestablished.
Note: If you first change the master and then change the satellite, the WiFi backhaul
connection between the master and satellite is no longer operational, and you might
not be able to access the satellite.
Similarly, if you change an existing configuration for an AirBridge that functions as
•
a client bridge in an access point-to-client bridge setup, we recommend that you
first change the client bridge and then change the access point. (The access point
can be an AirBridge or another type of access point.) After you complete the
configurations, the WiFi backhaul connection between the access point and client
bridge is automatically reestablished.
Note: If you first change the access point and then change the client bridge, the
WiFi backhaul connection between the access point and client bridge is no longer
operational, and you might not be able to access the client bridge.
Change the device name of the AirBridge
The device name is also referred to as the AP name or system name. It is the AirBridge
name that displays in the network. By default, the device name is WBC502, which is the
AirBridge’s model number. You can change this name.
To change the name of the AirBridge:
1.
Open a web browser from a computer that is connected to the same network as the
AirBridge or directly to the AirBridge through an Ethernet cable or WiFi connection.
2. Enter the IP address that is assigned to the AirBridge.
The login page displays.
If your browser does not display the login page but displays a security message and
does not let you proceed, see Log in to the AirBridge after initial setup on page 34.
3. Enter the AirBridge user name and local device password.
Features
User Manual57Manage the WiFi and Radio
Page 58

Insight Instant AirBridge WBC502 User Manual
The user name is admin. The local device password is the one that you specified
the first time that you logged in. The user name and password are case-sensitive.
If you previously managed the AirBridge through the NETGEAR Insight app or Insight
Cloud portal, enter the Insight network password for the Insight network location to
which the AirBridge was assigned (see Connect over WiFi using the NETGEAR Insight
app on an iOS or Android mobile device on page 15).
The Device Status page displays the Device Information section and other sections.
4. Under Network, select Wireless.
The Wireless Settings page displays.
5.
In the AP Name field, enter a new name.
The name must contain alphanumeric characters, cannot be longer than 15 characters,
and cannot contains spaces. The name can contain hyphens, but cannot start or end
with a hyphen.
6. Click the Save button.
Your settings are saved but not yet applied.
A pop-up window opens. The window shows the number of changes to be applied.
7. In the pop-up window, click the Apply button.
Your changes are applied. If the WiFi link must be reestablished, the page displays
the number of seconds before the AirBridge is back online.
Change the country and region of operation
After initial configuration, you can change the country and region of operation of the
AirBridge.
WARNING: Make sure that the country is set to the location where the device is
operating. You are responsible for complying with the local, regional, and national
regulations that are set for channels, power levels, and frequency ranges.
WARNING: It might not be legal to operate the AirBridge in a region other than the
regions listed in the menu. If your country or region is not listed, check with your local
government agency.
Features
User Manual58Manage the WiFi and Radio
Page 59

Insight Instant AirBridge WBC502 User Manual
To change the country and region of operation of the AirBridge:
1.
Open a web browser from a computer that is connected to the same network as the
AirBridge or directly to the AirBridge through an Ethernet cable or WiFi connection.
2. Enter the IP address that is assigned to the AirBridge.
The login page displays.
If your browser does not display the login page but displays a security message and
does not let you proceed, see Log in to the AirBridge after initial setup on page 34.
3. Enter the AirBridge user name and local device password.
The user name is admin. The local device password is the one that you specified
the first time that you logged in. The user name and password are case-sensitive.
If you previously managed the AirBridge through the NETGEAR Insight app or Insight
Cloud portal, enter the Insight network password for the Insight network location to
which the AirBridge was assigned (see Connect over WiFi using the NETGEAR Insight
app on an iOS or Android mobile device on page 15).
The Device Status page displays the Device Information section and other sections.
4. Under Network, select Wireless.
The Wireless Settings page displays.
5.
From the Country / Region menu, select the country and region in which the
AirBridge is operating.
6. Click the Save button.
Your settings are saved but not yet applied.
A pop-up window opens. The window shows the number of changes to be applied.
7. In the pop-up window, click the Apply button.
Your changes are applied. If the WiFi link must be reestablished, the page displays
the number of seconds before the AirBridge is back online.
Change the AirBridge mode
You can select the AirBridge mode only if the operation mode of the AirBridge is
AirBridge Master or AirBridge Satellite. In a master-to-satellite setup, you must either
enable the AirBridge mode on both the master and the satellite or disable it on both
the master and the satellite. That is, do not enable it on the master and disable it on the
satellite, or the other way around.
Features
User Manual59Manage the WiFi and Radio
Page 60

Insight Instant AirBridge WBC502 User Manual
The AirBridge mode specifies the type of multiple access method that the AirBridge
uses.
AirBridge mode enabled. The characteristics of the AirBridge are as follows:
•
-
Highly reliable connections for a limited number of WiFi devices. Provides
reliable point-to-point connections between a master and a satellite and
point-to-multipoint connections between a master and a limited number of
satellites.
-
Best suited for long distance for a limited number of WiFi devices. A master
can connect over a long distance of 1.8 miles (3 km) or more to a satellite at a
detached site.
- Single 5 GHz SSID. A single 5 GHz SSID provides the backhaul WiFi connection
between the master and the satellites.
- No individual WiFi clients supported. Other than the satellites, individual WiFi
clients cannot connect to the 5 GHz SSID. However, by connecting a switch and
a WiFi access point to the satellite, you can support multiple WiFi clients at the
detached site.
- Another AirBridge as a link partner only. An AirBridge and one or more other
AirBridges can establish WiFi connections. You cannot use any other types of
access points as link partners.
AirBridge mode disabled. The characteristics of the AirBridge are as follows:
•
-
Reliable connections for multiple WiFi devices. Provides reliable
point-to-multipoint connections between an access point and multiple individual
WiFi clients.
-
Best suited for extended range for multiple WiFi devices. The powerful
antenna of the AirBridge supports a WiFi range that extends beyond the range
of most access points.
- Multiple 5 GHz SSIDs. Multiple 5 GHz SSIDs can support satellites, client bridges,
and individual WiFi clients.
- Individual WiFi clients supported. Individual WiFi clients can connect to the
AirBridge.
- Any access point as a link partner. Any access point, including third-party access
points, can establish a WiFi connection with an AirBridge.
By default, the AirBridge mode is enabled, which is the setting that we recommend for
a master-to-satellite setup. Depending on your network situation, your WiFi requirements,
and your understanding of the consequences, you can disable the AirBridge mode.
User Manual60Manage the WiFi and Radio
Features
Page 61

Insight Instant AirBridge WBC502 User Manual
CAUTION: The behavior of the AirBridge changes when you disable the AirBridge
mode. Change the AirBridge mode only if you understand the consequences.
To change the AirBridge mode:
1.
Open a web browser from a computer that is connected to the same network as the
AirBridge or directly to the AirBridge through an Ethernet cable or WiFi connection.
2. Enter the IP address that is assigned to the AirBridge.
The login page displays.
If your browser does not display the login page but displays a security message and
does not let you proceed, see Log in to the AirBridge after initial setup on page 34.
3. Enter the AirBridge user name and local device password.
The user name is admin. The local device password is the one that you specified
the first time that you logged in. The user name and password are case-sensitive.
If you previously managed the AirBridge through the NETGEAR Insight app or Insight
Cloud portal, enter the Insight network password for the Insight network location to
which the AirBridge was assigned (see Connect over WiFi using the NETGEAR Insight
app on an iOS or Android mobile device on page 15).
The Device Status page displays the Device Information section and other sections.
4. Under Network, select Wireless.
The Wireless Settings page displays.
5.
Select one of the following AirBridge radio buttons:
Enable. The AirBridge is enabled.
•
This is the default setting.
Disable. The AirBridge mode is disabled.
•
6. Click the Save button.
Your settings are saved but not yet applied.
A pop-up window opens. The window shows the number of changes to be applied.
7. In the pop-up window, click the Apply button.
Your changes are applied. If the WiFi link must be reestablished, the page displays
the number of seconds before the AirBridge is back online.
Features
User Manual61Manage the WiFi and Radio
Page 62

Insight Instant AirBridge WBC502 User Manual
Scan for neighboring access points
Scanning for neighboring access points is useful if you want to connect to another
device. Scan if you want to connect a satellite to a master or a client bridge to an access
point.
Note: In this task, a neighboring access point can function either as a master or as an
access point.
To scan for neighboring access points:
1.
Open a web browser from a computer that is connected to the same network as the
AirBridge or directly to the AirBridge through an Ethernet cable or WiFi connection.
2. Enter the IP address that is assigned to the AirBridge.
The login page displays.
If your browser does not display the login page but displays a security message and
does not let you proceed, see Log in to the AirBridge after initial setup on page 34.
3. Enter the AirBridge user name and local device password.
The user name is admin. The local device password is the one that you specified
the first time that you logged in. The user name and password are case-sensitive.
If you previously managed the AirBridge through the NETGEAR Insight app or Insight
Cloud portal, enter the Insight network password for the Insight network location to
which the AirBridge was assigned (see Connect over WiFi using the NETGEAR Insight
app on an iOS or Android mobile device on page 15).
The Device Status page displays the Device Information section and other sections.
4. Under Network, select Wireless.
The Wireless Settings page displays.
5. Click the AP Detection Scan button.
A new page opens. After the AirBridge completes its scan for neighboring access
points, the page displays (for each detected access point) the information that is
described in the following table.
Features
User Manual62Manage the WiFi and Radio
Page 63

Insight Instant AirBridge WBC502 User Manual
DescriptionSetting
BSSID
SSID
Signal Level
The basic service set ID (BSSID) in the format of a MAC address.
This is usually the MAC address of the radio on the AirBridge master or access point
that broadcasts the SSID.
The service set ID (SSID), which is the name for the WiFi network with which the
AirBridge satellite, client bridge, or access point can connect.
The radio channel on which the SSID is being broadcast.Channel
The strength of the WiFi signal that is being broadcast, expressed in –dBm.
A lower value means a stronger signal. For example, –40 dBm indicates a stronger
signal than –60 dBm.
The type of security that is configured for the SSID.Security
The operation mode of the detected access point.Mode
6. Either select the master with which you want the satellite to associate or the access
point with which you want the client bridge to associate by clicking the row for the
master or access point.
The page changes.
7.
To select the BSSID of the selected master or access point as the preferred BSSID,
select the check box.
After you select the BSSID, in most situations, you do not need to change the detected
SSID, security mode, and encryption.
8.
If the security mode is WPA-PSK or WPA2-PSK, in the Passphrase field, enter the
passphrase that is required to connect to the SSID.
If the type of security is WPA2-Enterprise, see Set up WPA2-Enterprise security on
a satellite or client bridge on page 84.
9. Click the Save button.
Your settings are saved but not yet applied. The page closes. The Wireless Settings
page displays again.
A pop-up window opens. The window shows the number of changes to be applied.
10. In the pop-up window, click the Apply button.
Your changes are applied. If the WiFi link must be reestablished, the page displays
the number of seconds before the AirBridge is back online.
Features
User Manual63Manage the WiFi and Radio
Page 64

Insight Instant AirBridge WBC502 User Manual
Specify the approximate distance for the WiFi connection
You can specify the approximate distance at which a master, satellite, client bridge, or
access point is located. Depending on your site, network setup, and network
configuration, an AirBridge can support a long distance WiFi connection of 3 km
(1.8 miles) or more to another AirBridge. The powerful antenna of the AirBridge also
supports WiFi connections over an extended (longer) range than most access points.
Setting the approximate distance configures the signal sensitivity of the AirBridge,
specifically the Layer 2 acknowledgement time-out period.
Round to the nearest km. For example, if the distance between a master and a satellite
is 600 meters (1,968 ft), round to 1 km (0.6 mile). However, if the distance is less than
500 meters (1,640 ft), enter 0.
In a point-to-multipoint setup with one master and multiple satellite, enter the distance
between the master and the satellite that is located the furthest away.
To specify the approximate distance for the WiFi connection between two
AirBridges:
1.
Open a web browser from a computer that is connected to the same network as the
AirBridge or directly to the AirBridge through an Ethernet cable or WiFi connection.
2. Enter the IP address that is assigned to the AirBridge.
The login page displays.
If your browser does not display the login page but displays a security message and
does not let you proceed, see Log in to the AirBridge after initial setup on page 34.
3. Enter the AirBridge user name and local device password.
The user name is admin. The local device password is the one that you specified
the first time that you logged in. The user name and password are case-sensitive.
If you previously managed the AirBridge through the NETGEAR Insight app or Insight
Cloud portal, enter the Insight network password for the Insight network location to
which the AirBridge was assigned (see Connect over WiFi using the NETGEAR Insight
app on an iOS or Android mobile device on page 15).
The Device Status page displays the Device Information section and other sections.
4. Under Network, select Wireless.
The Wireless Settings page displays.
5.
In the Distance field, enter the approximate distance which a master, satellite, client
bridge, or access point is located or at which most WiFi clients are located
User Manual64Manage the WiFi and Radio
Features
Page 65

Insight Instant AirBridge WBC502 User Manual
Enter the distance in km. (1 km is 0.6 miles.) For example, if the distance is 2 km (1.2
miles), enter 2.
6. Click the Save button.
Your settings are saved but not yet applied.
A pop-up window opens. The window shows the number of changes to be applied.
7. In the pop-up window, click the Apply button.
Your changes are applied. If the WiFi link must be reestablished, the page displays
the number of seconds before the AirBridge is back online.
Manage the 5 GHz SSIDs and WiFi security
The following table lists the number of 5 GHz SSIDs that the AirBridge can support,
depending on the operation mode and the AirBridge mode. In addition, the table lists
the possible link partners with which you can establish a WiFi connection on the SSIDs.
Table 4. 5 GHz SSIDs on the AirBridge
WiFi Link PartnersNumber of
AirBridge only1EnabledMaster
AirBridge, any WiFi AP, and WiFi clients4Disabled
AirBridge master only1Enabled or disabled (must
WiFi clients, AirBridge, and any WiFi AP8N/AAccess Point
AirBridge or any WiFi AP1N/AClient Bridge
Mode
Satellite
AirBridge ModeOperation
5 GHz SSIDs
follow the mode on the master)
The number of 5 GHz SSIDs that you can configure depends on the following settings:
Operation mode (see Operation mode: AirBridge Master, AirBridge Satellite, Access
•
Point, or Client Bridge on page 10)
AirBridge mode (see Change the AirBridge mode on page 59)
•
Features
User Manual65Manage the WiFi and Radio
Page 66

Insight Instant AirBridge WBC502 User Manual
The AirBridge supports the following WiFi security:
For an individual 5 GHz SSID, you can configure WPA2-PSK or WPA2-Enterprise
•
security. For more information on configuring WPA2-PSK security, see one of the
following sections:
-
Change the 5 GHz SSID or WiFi security mode for a satellite on page 67
-
Change or configure a new 5 GHz SSID for a master with the AirBridge mode
enabled on page 68
-
Change or configure a new 5 GHz SSID for a master with the AirBridge mode
disabled on page 71
-
Change the 5 GHz SSID or WiFi security mode for a client bridge on page 75
-
Change or configure a 5 GHz SSID for an access point on page 76
For more information on configuring WPA2-Enterprise security with a RADIUS
authentication server, see Set up WPA2-Enterprise security on a satellite or client
bridge on page 84 or Set up WPA2-Enterprise security on a master or access point
on page 81.
Note: In addition to WPA2-Enterprise security with a RADIUS authentication server,
you can set up a RADIUS accounting server, which you also can use with WPA2-PSK.
That is, the WiFi security can be WPA-PSK and you can use a RADIUS accounting
server.
Depending on the operation mode and AirBridge mode, you can configure security
•
settings such as a hidden SSID, client isolation, VLAN isolation, an L2 isolation, and
you can entirely disable a 5 GHz SSID that is not the default 5 GHz SSID.
For more information, see on of the following sections:
-
Change or configure a new 5 GHz SSID for a master with the AirBridge mode
enabled on page 68
-
Change or configure a new 5 GHz SSID for a master with the AirBridge mode
disabled on page 71
-
Change or configure a 5 GHz SSID for an access point on page 76
Depending on the operation mode, you can enable and configure a guest network.
•
For more information, see Configure a guest network on an access point on page
80.
Depending on the operation mode and AirBridge mode, you can set up a WiFi MAC
•
filter.
For more information, see Set up a MAC filter for a 5 GHz SSID on page 102.
User Manual66Manage the WiFi and Radio
Features
Page 67

Insight Instant AirBridge WBC502 User Manual
Change the 5 GHz SSID or WiFi security mode for a satellite
Use this task if the operation mode of the AirBridge is AirBridge Satellite.
When you performed the initial configuration on the Day Zero Easy Setup page, you
were required to change the name of the default 5 GHz SSID. If you kept WPA2-PSK as
the WiFi security mode, you were also required to change the passphrase.
You can manually change the default 5 GHz SSID or WiFi security mode again.
Note: For information about scanning for neighboring access points and selecting a
preferred BSSID and SSID, which is a method to automatically change the SSID, see
Scan for neighboring access points on page 62.
To manually change the default 5 GHz SSID or WiFi security mode for a satellite:
1.
Open a web browser from a computer that is connected to the same network as the
AirBridge or directly to the AirBridge through an Ethernet cable or WiFi connection.
2. Enter the IP address that is assigned to the AirBridge.
The login page displays.
If your browser does not display the login page but displays a security message and
does not let you proceed, see Log in to the AirBridge after initial setup on page 34.
3. Enter the AirBridge user name and local device password.
The user name is admin. The local device password is the one that you specified
the first time that you logged in. The user name and password are case-sensitive.
If you previously managed the AirBridge through the NETGEAR Insight app or Insight
Cloud portal, enter the Insight network password for the Insight network location to
which the AirBridge was assigned (see Connect over WiFi using the NETGEAR Insight
app on an iOS or Android mobile device on page 15).
The Device Status page displays the Device Information section and other sections.
4. Under Network, select Wireless.
The Wireless Settings page displays.
5.
In the Wireless Settings - 5GHz section, click the Edit button for the 5 GHz SSID.
A new page opens.
6.
To configure the 5 GHz SSID settings, specify the settings that are described in the
following table:
User Manual67Manage the WiFi and Radio
Features
Page 68

Insight Instant AirBridge WBC502 User Manual
DescriptionSetting
BSSID
SSID
Security Mode
Encryption
Passphrase
If you want the satellite to connect to a particular master, select the Preferred BSSID check
box and enter the basic service set ID (BSSID) of the master in the format of a MAC address.
The BSSID is usually the MAC address of the radio on the AirBridge master that broadcasts
the SSID.
In the SSID field, enter the service set ID (SSID), that is, the name of the WiFi network on
the AirBridge master with which the satellite must connect.
From the Security Mode menu, select the same security mode that is defined on the
AirBridge master. You can select WPA2-PSK or WPA2-Enterprise for the connection to
the selected SSID.
For information about WPA2-Enterprise, see Set up WPA2-Enterprise security on a satellite
or client bridge on page 84.
If you select WPA2-PSK from the Security Mode menu, this field is fixed at AES. You cannot
select another option.
If you select WPA2-PSK from the Security Mode menu, enter the passphrase (network
key or WiFi password). The length of the passphrase must be from 8 to 63 characters.
You must enter the same passphrase that is defined on the AirBridge master so that the
satellite can connect to the master.
7. Click the Save button.
Your settings are saved but not yet applied. The page closes. The Wireless Settings
page displays again.
A pop-up window opens. The window shows the number of changes to be applied.
8. In the pop-up window, click the Apply button.
Your changes are applied. If the WiFi link must be reestablished, the page displays
the number of seconds before the AirBridge is back online.
Change or configure a new 5 GHz SSID for a master with the AirBridge mode enabled
Use this task if the operation mode of the AirBridge is AirBridge Master and the AirBridge
mode is enabled.
When you performed the initial configuration on the Day Zero Easy Setup page, you
were required to change the name of the default 5 GHz SSID. If you kept WPA2-PSK as
the WiFi security, you were also required to change the passphrase.
Features
User Manual68Manage the WiFi and Radio
Page 69

Insight Instant AirBridge WBC502 User Manual
If the AirBridge mode is enabled, the master supports a single 5 GHz SSID. You can
change this default 5 GHz SSID again.
CAUTION: If you change the 5 GHz SSID to which satellite connects, we recommend
that you first change the satellite and then change the master so that the WiFi backhaul
connection between the master and satellite can be automatically reestablished. If you
first change the master and then change the satellite, the WiFi backhaul connection
between the master and satellite is no longer operational, and you might not be able
to access the satellite.
To change a 5 GHz SSID or enable and configure a new 5 GHz SSID for a master
with the AirBridge mode enabled:
1.
Open a web browser from a computer that is connected to the same network as the
AirBridge or directly to the AirBridge through an Ethernet cable or WiFi connection.
2. Enter the IP address that is assigned to the AirBridge.
The login page displays.
If your browser does not display the login page but displays a security message and
does not let you proceed, see Log in to the AirBridge after initial setup on page 34.
3. Enter the AirBridge user name and local device password.
The user name is admin. The local device password is the one that you specified
the first time that you logged in. The user name and password are case-sensitive.
If you previously managed the AirBridge through the NETGEAR Insight app or Insight
Cloud portal, enter the Insight network password for the Insight network location to
which the AirBridge was assigned (see Connect over WiFi using the NETGEAR Insight
app on an iOS or Android mobile device on page 15).
The Device Status page displays the Device Information section and other sections.
4. Under Network, select Wireless.
The Wireless Settings page displays.
5. Go to the Wireless Settings - Access Point section.
The following information displays:
A single 5 GHz SSID only is supported.
•
The Enabled check box is selected. You cannot clear the check box, which means
•
that you cannot disable the SSID.
The SSID field shows the name for the WiFi network to which satellites can connect.
•
You can change the SSID name.
6.
Click the Edit button for the default 5 GHz SSID.
Features
User Manual69Manage the WiFi and Radio
Page 70

Insight Instant AirBridge WBC502 User Manual
A new page opens.
7.
To configure the 5 GHz SSID settings, specify the settings that are described in the
following table:
DescriptionSetting
Wireless Setting - AirBridge Access Point 5GHz
Hidden SSID
Client Isolation
VLAN Isolation
L2 Isolation
To hide the WiFi network name and prevent it from displaying in the scanning list of a WiFi
client, select the Enable radio button. To connect to the WiFi network, a user must know
the WiFi network name.
By default, the Disable radio button is selected.
To prevent WiFi clients that are associated with the same or different WiFi networks on the
master from communicating with each other, select the Enable radio button. If you enable
client isolation, WiFi clients can still communicate with each other over the Internet.
By default, the Disable radio button is selected.
If L2 isolation is enabled, the Client Isolation radio buttons are disabled.
To prevent clients on different VLANs from communicating with each other, select the
Enable radio button, and enter the VLAN ID in the ID field. For the first 5 GHz SSID, the
default VLAN ID is 1, for the second 5 GHz SSID, the default VLAN ID 2, for the third
5 GHz SSID, the VLAN ID is 3, and so on. The range is from 1 to 4094.
If you enable VLAN isolation, clients can still communicate with each other over the Internet.
By default, the Disable radio button is selected.
To prevent WiFi and LAN clients on the same AirBridge from communicating with each
other, select the Enable radio button. If you enable L2 isolation, clients can still communicate
with each other over the Internet.
By default, the Disable radio button is selected.
Wireless Security
Security Mode
Encryption
Features
From the Security Mode menu, select WPA2-PSK or WPA2-Enterprise for the connection
to the selected SSID.
For information about WPA2-Enterprise, see Set up WPA2-Enterprise security on a master
or access point on page 81.
Note: We recommend that you set up security, although in certain situations, and if you
are aware of the risks, you can select None.
If you select WPA2-PSK from the Security Mode menu, this field is fixed at AES. You cannot
select another option.
User Manual70Manage the WiFi and Radio
Page 71

(Continued)
Insight Instant AirBridge WBC502 User Manual
DescriptionSetting
Passphrase
Group Key
Update Interval
If you select WPA2-PSK from the Security Mode menu, enter a passphrase (network key
or WiFi password). The length of the passphrase must be from 8 to 63 characters.
You must enter the same passphrase on a satellite that must connect to the master.
The period in seconds that the group key changes. The period can be from 30 to 3600
seconds. The default period is 3600 seconds (1 hour).
If you enter 0, the update interval is disabled and the group key is not changed. For greater
security, we recommend that you do not disable the update interval so that the group key
can be changed automatically.
For information about other WiFi features such as setting up a RADIUS accounting
and a MAC filter, see Manage Advanced WiFi and Radio Features on page 90.
8. Click the Save button.
Your settings are saved but not yet applied. The page closes. The Wireless Settings
page displays again.
A pop-up window opens. The window shows the number of changes to be applied.
9. In the pop-up window, click the Apply button.
Your changes are applied. If the WiFi link must be reestablished, the page displays
the number of seconds before the AirBridge is back online.
Change or configure a new 5 GHz SSID for a master with the AirBridge mode disabled
Use this task if the operation mode of the AirBridge is AirBridge Master and the AirBridge
mode is disabled.
When you performed the initial configuration on the Day Zero Easy Setup page, you
were required to change the name of the default 5 GHz SSID. If you kept WPA2-PSK as
the WiFi security, you were also required to change the passphrase.
If the AirBridge mode is disabled, the master can support up to four 5 GHz SSIDs. In
that situation, you can enable and configure a new 5 GHz SSID, or change such a
5 GHz SSID if you previously enabled it.
User Manual71Manage the WiFi and Radio
Features
Page 72

Insight Instant AirBridge WBC502 User Manual
CAUTION: If you change the 5 GHz SSID to which satellite connects, we recommend
that you first change the satellite and then change the master so that the WiFi backhaul
connection between the master and satellite can be automatically reestablished. If you
first change the master and then change the satellite, the WiFi backhaul connection
between the master and satellite is no longer operational, and you might not be able
to access the satellite.
To change a 5 GHz SSID or enable and configure a new 5 GHz SSID for a master
with the AirBridge mode disabled:
1.
Open a web browser from a computer that is connected to the same network as the
AirBridge or directly to the AirBridge through an Ethernet cable or WiFi connection.
2. Enter the IP address that is assigned to the AirBridge.
The login page displays.
If your browser does not display the login page but displays a security message and
does not let you proceed, see Log in to the AirBridge after initial setup on page 34.
3. Enter the AirBridge user name and local device password.
The user name is admin. The local device password is the one that you specified
the first time that you logged in. The user name and password are case-sensitive.
If you previously managed the AirBridge through the NETGEAR Insight app or Insight
Cloud portal, enter the Insight network password for the Insight network location to
which the AirBridge was assigned (see Connect over WiFi using the NETGEAR Insight
app on an iOS or Android mobile device on page 15).
The Device Status page displays the Device Information section and other sections.
4. Under Network, select Wireless.
The Wireless Settings page displays.
5. Go to the Wireless Settings - 5G section.
The following information displays:
Up to four 5 GHz SSIDs are available.
•
The Enabled check box is selected for the enabled SSIDs and cleared for the
•
disabled SSIDs. You can either enable or disable SSIDs.
The SSID fields shows the names for the WiFi networks to which satellites and
•
WiFi clients can connect. You can change the SSID names.
Features
User Manual72Manage the WiFi and Radio
Page 73

Insight Instant AirBridge WBC502 User Manual
6.
Do one of the following:
To change the default or another previously enabled 5 GHz SSID, click the Edit
•
button for the 5 GHz SSID.
To enable and configure a new 5 GHz SSID, select the Enabled check box for a
•
disabled 5 GHz SSID, and then click the Edit button for the 5 GHz SSID.
A new page opens.
7.
To configure the 5 GHz SSID settings, specify the settings that are described in the
following table:
DescriptionSetting
Wireless Setting - AirBridge Access Point 5GHz
Hidden SSID
Client Isolation
VLAN Isolation
L2 Isolation
To hide the WiFi network name and prevent it from displaying in the scanning list of a WiFi
client, select the Enable radio button. To connect to the WiFi network, a user must know
the WiFi network name.
By default, the Disable radio button is selected.
To prevent WiFi clients that are associated with the same or different WiFi networks on the
master from communicating with each other, select the Enable radio button. If you enable
client isolation, WiFi clients can still communicate with each other over the Internet.
By default, the Disable radio button is selected.
If L2 isolation is enabled, the Client Isolation radio buttons are disabled.
To prevent clients on different VLANs from communicating with each other, select the
Enable radio button, and enter the VLAN ID in the ID field. For the first 5 GHz SSID, the
default VLAN ID is 1, for the second 5 GHz SSID, the default VLAN ID 2, for the third
5 GHz SSID, the VLAN ID is 3, and so on. The range is from 1 to 4094.
If you enable VLAN isolation, clients can still communicate with each other over the Internet.
By default, the Disable radio button is selected.
To prevent WiFi and LAN clients on the same AirBridge from communicating with each
other, select the Enable radio button. If you enable L2 isolation, clients can still communicate
with each other over the Internet.
By default, the Disable radio button is selected.
Wireless Security
Security Mode
Features
From the Security Mode menu, select WPA2-PSK or WPA2-Enterprise for the connection
to the selected SSID.
For information about WPA2-Enterprise, see Set up WPA2-Enterprise security on a master
or access point on page 81.
Note: We recommend that you set up security, although in certain situations, and if you
are aware of the risks, you can select None.
User Manual73Manage the WiFi and Radio
Page 74

(Continued)
Insight Instant AirBridge WBC502 User Manual
DescriptionSetting
Encryption
Passphrase
Group Key
Update Interval
Fast Roaming
Status
If you select WPA2-PSK from the Security Mode menu, this field is fixed at AES. You cannot
select another option.
If you select WPA2-PSK from the Security Mode menu, enter a passphrase (network key
or WiFi password). The length of the passphrase must be from 8 to 63 characters.
You must enter the same passphrase on a satellite that must connect to the master.
The period in seconds that the group key changes. The period can be from 30 to 3600
seconds. The default period is 3600 seconds (1 hour).
If you enter 0, the update interval is disabled and the group key is not changed. For greater
security, we recommend that you do not disable the update interval so that the group key
can be changed automatically.
To enable fast roaming, select the Enable radio button. By default, the Disable radio button
is selected.
If your network includes WiFi clients that must be able to roam from one AirBridge to
another AirBridge or access point, enable fast roaming so that certain client applications
can quickly reassociate with a new AirBridge or access point.
Fast roaming is not available if you select None from the Security Mode menu.
For information about other WiFi features such as setting up a RADIUS accounting,
a MAC filter, and traffic shaping, see Manage Advanced WiFi and Radio Features
on page 90.
8. Click the Save button.
Your settings are saved but not yet applied. The page closes. The Wireless Settings
page displays again.
A pop-up window opens. The window shows the number of changes to be applied.
9. In the pop-up window, click the Apply button.
Your changes are applied. If the WiFi link must be reestablished, the page displays
the number of seconds before the AirBridge is back online.
Features
User Manual74Manage the WiFi and Radio
Page 75

Insight Instant AirBridge WBC502 User Manual
Change the 5 GHz SSID or WiFi security mode for a client bridge
Use this task if the operation mode of the AirBridge is Client Bridge.
When you performed the initial configuration on the Day Zero Easy Setup page, you
were required to change the name of the default 5 GHz SSID. If you kept WPA2-PSK as
the WiFi security mode, you were also required to change the passphrase.
You can manually change the default 5 GHz SSID or WiFi security mode again.
Note: For information about scanning for neighboring access points and selecting a
preferred BSSID and SSID, which is a method to automatically change the SSID, see
Scan for neighboring access points on page 62.
To manually change the default 5 GHz SSID or WiFi security mode for a client
bridge:
1.
Open a web browser from a computer that is connected to the same network as the
AirBridge or directly to the AirBridge through an Ethernet cable or WiFi connection.
2. Enter the IP address that is assigned to the AirBridge.
The login page displays.
If your browser does not display the login page but displays a security message and
does not let you proceed, see Log in to the AirBridge after initial setup on page 34.
3. Enter the AirBridge user name and local device password.
The user name is admin. The local device password is the one that you specified
the first time that you logged in. The user name and password are case-sensitive.
If you previously managed the AirBridge through the NETGEAR Insight app or Insight
Cloud portal, enter the Insight network password for the Insight network location to
which the AirBridge was assigned (see Connect over WiFi using the NETGEAR Insight
app on an iOS or Android mobile device on page 15).
The Device Status page displays the Device Information section and other sections.
4. Under Network, select Wireless.
The Wireless Settings page displays.
5.
In the Wireless Settings - 5GHz section, click the Edit button for the 5 GHz SSID.
A new page opens.
6.
To configure the 5 GHz SSID settings, specify the settings that are described in the
following table:
User Manual75Manage the WiFi and Radio
Features
Page 76

Insight Instant AirBridge WBC502 User Manual
DescriptionSetting
BSSID
SSID
Security Mode
Encryption
Passphrase
If you want the client bridge to connect to a particular access point, select the Preferred
BSSID check box and enter the basic service set ID (BSSID) of the access point in the format
of a MAC address. (The access point can be an AirBridge or another type of access point.)
The BSSID is usually the MAC address of the radio on the access point that broadcasts the
SSID.
In the SSID field, enter the service set ID (SSID), that is, the name of the WiFi network with
which the client bridge must connect.
From the Security Mode menu, select the same security mode that is defined on the access
point. You can select WPA2-PSK or WPA2-Enterprise for the connection to the selected
SSID.
For information about WPA2-Enterprise, see Set up WPA2-Enterprise security on a satellite
or client bridge on page 84.
If you select WPA2-PSK from the Security Mode menu, this field is fixed at AES. You cannot
select another option.
If you select WPA2-PSK from the Security Mode menu, enter the passphrase (network
key or WiFi password). The length of the passphrase must be from 8 to 63 characters.
You must enter the same passphrase that is defined on the access point so that the client
bridge can connect to the access point.
7. Click the Save button.
Your settings are saved but not yet applied. The page closes. The Wireless Settings
page displays again.
A pop-up window opens. The window shows the number of changes to be applied.
8. In the pop-up window, click the Apply button.
Your changes are applied. If the WiFi link must be reestablished, the page displays
the number of seconds before the AirBridge is back online.
Change or configure a 5 GHz SSID for an access point
Use this task if the operation mode of the AirBridge is Access Point.
When you performed the initial configuration on the Day Zero Easy Setup page, you
were required to change the name of the default 5 GHz SSID. If you kept WPA2-PSK as
the WiFi security, you were also required to change the passphrase.
The access point can support up to eight 5 GHz SSIDs. You can enable and configure
a new 5 GHz SSID, or change such a 5 GHz SSID if you previously enabled it.
Features
User Manual76Manage the WiFi and Radio
Page 77

Insight Instant AirBridge WBC502 User Manual
CAUTION: If you change the 5 GHz SSID to which a client bridge connects, we
recommend that you first change the client bridge and then change the access point
so that the WiFi backhaul connection between the access point and client bridge can
be automatically reestablished. If you first change the access point and then change
the client, the WiFi backhaul connection between the access point and client bridge is
no longer operational, and you might not be able to access the client bridge.
CAUTION: If you change the 5 GHz SSID or associated security settings, existing WiFi
connections to clients are terminated. For a WiFi client to reconnect, the client must be
configured with the new SSID, security settings, or both.
To change a 5 GHz SSID or enable and configure a new 5 GHz SSID for an access
point:
1.
Open a web browser from a computer that is connected to the same network as the
AirBridge or directly to the AirBridge through an Ethernet cable or WiFi connection.
2. Enter the IP address that is assigned to the AirBridge.
The login page displays.
If your browser does not display the login page but displays a security message and
does not let you proceed, see Log in to the AirBridge after initial setup on page 34.
3. Enter the AirBridge user name and local device password.
The user name is admin. The local device password is the one that you specified
the first time that you logged in. The user name and password are case-sensitive.
If you previously managed the AirBridge through the NETGEAR Insight app or Insight
Cloud portal, enter the Insight network password for the Insight network location to
which the AirBridge was assigned (see Connect over WiFi using the NETGEAR Insight
app on an iOS or Android mobile device on page 15).
The Device Status page displays the Device Information section and other sections.
4. Under Network, select Wireless.
The Wireless Settings page displays.
5. Go to the Wireless Settings - Access Point section.
The following information displays:
Up to eight 5 GHz SSIDs are available.
•
•
•
Features
The Enabled check box is selected for the enabled SSIDs and cleared for the
disabled SSIDs. You can either enable or disable SSIDs.
The SSID fields shows the names for the WiFi networks to which client bridges
and WiFi clients can connect. You can change the SSID names.
User Manual77Manage the WiFi and Radio
Page 78

Insight Instant AirBridge WBC502 User Manual
Note: For information about guest networks, see Configure a guest network on an
access point on page 80.
6.
Do one of the following:
To change the default 5 GHz SSID or another previously enabled 5 GHz SSID,
•
click the Edit button for the 5 GHz SSID.
To enable and configure a new 5 GHz SSID, select the Enabled check box for a
•
disabled 5 GHz SSID, and then click the Edit button for the 5 GHz SSID.
A new page opens.
7.
To configure the 5 GHz SSID settings, specify the settings that are described in the
following table:
DescriptionSetting
Wireless Setting - Access Point 5GHz
5G
SSID
Hidden SSID
Client Isolation
VLAN Isolation
The 5G check box is selected for an enabled SSID and cleared for an disabled SSID. You
can either enable or disable the SSID.
Note: The 5G check box serves the same purpose as the Enabled check box (see Step 5).
The SSID field shows the name for the WiFi network to which client bridges and WiFi clients
can connect. You can change the name.
Note: The 5G check box serves the same purpose as the Enabled check box (see Step 5).
To hide the WiFi network name and prevent it from displaying in the scanning list of a WiFi
client, select the Enable radio button. To connect to the WiFi network, a user must know
the WiFi network name.
By default, the Disable radio button is selected.
To prevent WiFi clients that are associated with the same or different WiFi networks on the
access point from communicating with each other, select the Enable radio button. If you
enable client isolation, WiFi clients can still communicate with each other over the Internet.
By default, the Disable radio button is selected.
If L2 isolation is enabled, the Client Isolation radio buttons are disabled.
To prevent clients on different VLANs from communicating with each other, select the
Enable radio button, and enter the VLAN ID in the ID field. For the first 5 GHz SSID, the
default VLAN ID is 1, for the second 5 GHz SSID, the default VLAN ID 2, for the third
5 GHz SSID, the VLAN ID is 3, and so on. The range is from 1 to 4094.
If you enable VLAN isolation, clients can still communicate with each other over the Internet.
By default, the Disable radio button is selected.
Features
User Manual78Manage the WiFi and Radio
Page 79

(Continued)
Insight Instant AirBridge WBC502 User Manual
DescriptionSetting
L2 Isolation
Wireless Security
Security Mode
Encryption
Passphrase
To prevent WiFi and LAN clients on the same AirBridge from communicating with each
other, select the Enable radio button. If you enable L2 isolation, clients can still communicate
with each other over the Internet.
By default, the Disable radio button is selected.
If you enable L2 isolation, to exclude a device from L2 isolation, enter the MAC address of
the device in a Whitelist field.
From the Security Mode menu, select WPA2-PSK or WPA2-Enterprise for the connection
to the selected SSID.
For information about WPA2-Enterprise, see Set up WPA2-Enterprise security on a master
or access point on page 81.
Note: We recommend that you set up security, although in certain situations, and if you
are aware of the risks, you can select None.
If you select WPA2-PSK from the Security Mode menu, this field is fixed at AES. You cannot
select another option.
If you select WPA2-PSK from the Security Mode menu, enter a passphrase (network key
or WiFi password). The length of the passphrase must be from 8 to 63 characters.
You must enter the same passphrase on a client bridge that must connect to the access
point. WiFi clients must enter the same passphrase enter to connect to the SSID.
Group Key
Update Interval
Fast Roaming
Status
The period in seconds that the group key changes. The period can be from 30 to 3600
seconds. The default period is 3600 seconds (1 hour).
If you enter 0, the update interval is disabled and the group key is not changed. For greater
security, we recommend that you do not disable the update interval so that the group key
can be changed automatically.
To enable fast roaming, select the Enable radio button. By default, the Disable radio button
is selected.
If your network includes WiFi clients that must be able to roam from one AirBridge to
another AirBridge or access point, enable fast roaming so that certain client applications
can quickly reassociate with a new AirBridge or access point.
Fast roaming is not available if you select None from the Security Mode menu.
For information about other WiFi features such as setting up a RADIUS accounting
server, a MAC filter, and traffic shaping, see Manage Advanced WiFi and Radio
Features on page 90.
User Manual79Manage the WiFi and Radio
Features
Page 80

Insight Instant AirBridge WBC502 User Manual
8. Click the Save button.
Your settings are saved but not yet applied. The page closes. The Wireless Settings
page displays again.
A pop-up window opens. The window shows the number of changes to be applied.
9. In the pop-up window, click the Apply button.
Your changes are applied. If the WiFi link must be reestablished, the page displays
the number of seconds before the AirBridge is back online.
Configure a guest network on an access point
If the operation mode of the AirBridge is Access Point, you can configure one or more
5 GHz SSIDs as guest networks.
For information about changing the DHCP server settings for the guest networks, see
Change the DHCP server settings for a guest WiFi network on page 108.
To configure a guest network when the AirBridge functions as an access point:
1.
Open a web browser from a computer that is connected to the same network as the
AirBridge or directly to the AirBridge through an Ethernet cable or WiFi connection.
2. Enter the IP address that is assigned to the AirBridge.
The login page displays.
If your browser does not display the login page but displays a security message and
does not let you proceed, see Log in to the AirBridge after initial setup on page 34.
3. Enter the AirBridge user name and local device password.
The user name is admin. The local device password is the one that you specified
the first time that you logged in. The user name and password are case-sensitive.
If you previously managed the AirBridge through the NETGEAR Insight app or Insight
Cloud portal, enter the Insight network password for the Insight network location to
which the AirBridge was assigned (see Connect over WiFi using the NETGEAR Insight
app on an iOS or Android mobile device on page 15).
The Device Status page displays the Device Information section and other sections.
4. Under Network, select Wireless.
The Wireless Settings page displays.
If the AirBridge mode is disabled, eight 5 GHz SSIDs are available for an access point.
5.
In the Wireless Settings - Access Point section, do one of the following:
To change an existing 5 GHz SSID (one that is already enabled and configured)
•
into a guest network, select the Guest Network check box for the 5 GHz SSID.
User Manual80Manage the WiFi and Radio
Features
Page 81

Insight Instant AirBridge WBC502 User Manual
To enable and configure a new 5 GHz SSID as a guest network, do the following:
•
a.
Select the Enabled check box for the 5 GHz SSID.
b.
Select the Guest Network check box for the 5 GHz SSID.
c.
Click the Edit button for the 5 GHz SSID.
A new page opens.
d.
Configure the settings for the 5 GHz SSID.
For more information, see Change or configure a 5 GHz SSID for an access
point on page 76.
e. Click the Save button.
Your settings are saved but not yet applied. The page closes. The Wireless
Settings page displays again.
A pop-up window opens. The window shows the number of changes to be applied.
6. Click the Apply button.
Your settings are saved and applied. The WiFi connection is reestablished. The page
displays the number of seconds before the AirBridge is back online.
Set up WPA2-Enterprise security on a master or access point
Use this task if the operation mode of the AirBridge is AirBridge Master or Access Point.
When you set up WPA2-Enterprise security on a master or access point, you must specify
the RADIUS authentication server settings. As an option, you can also specify a RADIUS
accounting server, or you can set up a RADIUS accounting server separate from
WPA2-Enterprise security (see Set up a RADIUS accounting server on a master or access
point on page 104).
The link partner or partners of the master or access point must use the same RADIUS
authentication server settings.
To set up WPA2-Enterprise security on a master or access point:
1.
Open a web browser from a computer that is connected to the same network as the
AirBridge or directly to the AirBridge through an Ethernet cable or WiFi connection.
2. Enter the IP address that is assigned to the AirBridge.
The login page displays.
If your browser does not display the login page but displays a security message and
does not let you proceed, see Log in to the AirBridge after initial setup on page 34.
3. Enter the AirBridge user name and local device password.
User Manual81Manage the WiFi and Radio
Features
Page 82

Insight Instant AirBridge WBC502 User Manual
The user name is admin. The local device password is the one that you specified
the first time that you logged in. The user name and password are case-sensitive.
If you previously managed the AirBridge through the NETGEAR Insight app or Insight
Cloud portal, enter the Insight network password for the Insight network location to
which the AirBridge was assigned (see Connect over WiFi using the NETGEAR Insight
app on an iOS or Android mobile device on page 15).
The Device Status page displays the Device Information section and other sections.
4. Under Network, select Wireless.
The Wireless Settings page displays.
5.
In either the Wireless Settings - Access Point section or, if the AirBridge mode is
disabled on a master, the Wireless Settings - 5GHz section, do one of the following:
To configure WPA2-Enterprise security for the default 5 GHz SSID or another
•
previously enabled 5 GHz SSID, click the Edit button for the 5 GHz SSID.
To enable and configure WPA2-Enterprise security for a new 5 GHz SSID, select
•
the Enabled check box for a disabled 5 GHz SSID, and then click the Edit button
for the 5 GHz SSID.
A new page opens.
6.
Wireless Security section, from the Security Mode menu, select WPA2-Enterprise.
Additional fields display.
7.
In the Wireless Security section, configure the WPA2-Enterprise and RADIUS
authentication server settings as described in the following table.
DescriptionSetting
This field is fixed at AES. You cannot select another option.Encryption
Group Key Update
Interval
The period in seconds that the group key changes. The period can be from 30 to
3600 seconds. The default period is 3600 seconds (1 hour).
If you enter 0, the update interval is disabled and the group key is not changed. For
greater security, we recommend that you do not disable the update interval so that
the group key can be changed automatically.
Radius Server
Features
Enter the IPv4 address of the RADIUS authentication server. The AirBridge must be
able to reach this IP address.
User Manual82Manage the WiFi and Radio
Page 83

(Continued)
Insight Instant AirBridge WBC502 User Manual
DescriptionSetting
Radius Port
Radius Secret
8.
To specify a RADIUS accounting server, in the Radius Accounting section, configure
Enter the number of the UDP port on the AirBridge that is used to access the RADIUS
authentication server. The default port number is 1812.
Enter the password (shared key) that is used between the AirBridge and the RADIUS
authentication server during the authentication process.
the settings as described in the following table.
DescriptionSetting
Radius Accounting
Radius Accounting
Server
Radius Accounting
Port
Radius Accounting
Secret
To enable RADIUS accounting, select the Enable radio button.
By default, the Disable radio button is selected.
Enter the IPv4 address of the RADIUS accounting server. The AirBridge must be able
to reach this IP address.
Enter the number of the UDP port on the AirBridge that is used to access the RADIUS
accounting server. The default port number is 1813.
Enter the password (shared key) that is used between the AirBridge and the RADIUS
accounting server during the authentication process.
Interim Accounting
Interval
Enter the period in seconds between each accounting update message that the
AirBridge sends to the RADIUS accounting server. The default period is 600 seconds.
9. Click the Save button.
Your settings are saved but not yet applied. The page closes. The Wireless Settings
page displays again.
A pop-up window opens. The window shows the number of changes to be applied.
10. In the pop-up window, click the Apply button.
Your changes are applied. If the WiFi link must be reestablished, the page displays
the number of seconds before the AirBridge is back online.
Features
User Manual83Manage the WiFi and Radio
Page 84

Insight Instant AirBridge WBC502 User Manual
Set up WPA2-Enterprise security on a satellite or client bridge
Use this task if the operation mode of the AirBridge is AirBridge Satellite or Client Bridge.
When you set up WPA2-Enterprise security on a satellite or client bridge, you must
specify the same RADIUS server authentication settings that you specify on the master
or access point.
Note: For a client bridge, you can also set up WPA-Enterprise if the link partner is not
an AirBridge functioning as an access point but another type of access point that supports
WPA-Enterprise.
To set up WPA2-Enterprise security on a satellite or client bridge:
1.
Open a web browser from a computer that is connected to the same network as the
AirBridge or directly to the AirBridge through an Ethernet cable or WiFi connection.
2. Enter the IP address that is assigned to the AirBridge.
The login page displays.
If your browser does not display the login page but displays a security message and
does not let you proceed, see Log in to the AirBridge after initial setup on page 34.
3. Enter the AirBridge user name and local device password.
The user name is admin. The local device password is the one that you specified
the first time that you logged in. The user name and password are case-sensitive.
If you previously managed the AirBridge through the NETGEAR Insight app or Insight
Cloud portal, enter the Insight network password for the Insight network location to
which the AirBridge was assigned (see Connect over WiFi using the NETGEAR Insight
app on an iOS or Android mobile device on page 15).
The Device Status page displays the Device Information section and other sections.
4. Under Network, select Wireless.
The Wireless Settings page displays.
5.
In the Wireless Settings - 5GHz section, click the Edit button for the 5 GHz SSID.
A new page opens.
6. From the Security Mode menu, select WPA2-Enterprise.
Additional fields display.
Note: For a client bridge, you can also select WPA-Enterprise. Use that option only
if the link partner is not an AirBridge functioning as an access point but another type
of access point that supports WPA-Enterprise.
User Manual84Manage the WiFi and Radio
Features
Page 85

Insight Instant AirBridge WBC502 User Manual
7.
Configure the WPA2-Enterprise settings as described in he following table.
The settings that you must enter depend on the configuration of the master or access
point and the RADIUS server.
DescriptionSetting
EAP Method
EAP Authentication
Authentication Identity
Authentication
Password
From the EAP Method menu, select one of the following Extensible Authentication
Protocol (EAP) methods:
TTLS. Tunneled Transport Layer Security.
•
PEAP. Protected Extensible Authentication Protocol.
•
From the EAP Authentication menu, select one of the following EAP authentication
methods:
MSCHAP. Microsoft Challenge-Handshake Authentication Protocol version 1
•
(MS-CHAPv1).
MSCAPV2. Microsoft Challenge-Handshake Authentication Protocol version 2
•
(MS-CHAPv2).
Enter the user name that is required for the AirBridge to access the authentication
RADIUS server during the authentication process.
Enter the password (shared key) that is required for the AirBridge to access the
authentication RADIUS server during the authentication process. This password must
be the same as the one that is configured on the master or satellite.
8. Click the Save button.
Your settings are saved but not yet applied. The page closes. The Wireless Settings
page displays again.
A pop-up window opens. The window shows the number of changes to be applied.
9. In the pop-up window, click the Apply button.
Your changes are applied. If the WiFi link must be reestablished, the page displays
the number of seconds before the AirBridge is back online.
User Manual85Manage the WiFi and Radio
Features
Page 86

Insight Instant AirBridge WBC502 User Manual
Manage the settings for the 2.4 GHz management SSID
You can use the 2.4 GHz management SSID only to access the local browser UI of the
AirBridge from a WiFi device for management purposes.
The 2.4 GHz SSID cannot be used for backhaul WiFi connections or for regular WiFi
clients connections to the AirBridge. For these types of connections, use a 5 GHz SSID.
Note: The SSID (the name of the management WiFi network) is
NETGEARXXXXXX-SETUP, in which XXXXXX represents the last six digits of the MAC
address of the LAN interface of the AirBridge. You cannot change this name.
Change the passphrase for the 2.4 GHz management SSID
Other than the passphrase (WiFi password or network key), you cannot change the
settings for the 2.4 GHz management SSID.
When you performed the initial configuration on the Day Zero Easy Setup page, you
were required to change the passphrase for the 2.4 GHz management SSID. You can
change the passphrase again.
To change the passphrase for the 2.4 GHz management SSID:
1.
Open a web browser from a computer that is connected to the same network as the
AirBridge or directly to the AirBridge through an Ethernet cable or WiFi connection.
2. Enter the IP address that is assigned to the AirBridge.
The login page displays.
If your browser does not display the login page but displays a security message and
does not let you proceed, see Log in to the AirBridge after initial setup on page 34.
3. Enter the AirBridge user name and local device password.
The user name is admin. The local device password is the one that you specified
the first time that you logged in. The user name and password are case-sensitive.
If you previously managed the AirBridge through the NETGEAR Insight app or Insight
Cloud portal, enter the Insight network password for the Insight network location to
which the AirBridge was assigned (see Connect over WiFi using the NETGEAR Insight
app on an iOS or Android mobile device on page 15).
The Device Status page displays the Device Information section and other sections.
4. Under Network, select Wireless.
The Wireless Settings page displays.
User Manual86Manage the WiFi and Radio
Features
Page 87

Insight Instant AirBridge WBC502 User Manual
5.
In the Management Interface - 2.4G section, click the Edit button.
A new page opens.
6.
In the Passphrase field, enter a new passphrase (network key or WiFi password) that
you must enter to connect to local browser UI of the AirBridge.
The length of the passphrase must be from 8 to 63 characters.
7. Click the Save button.
Your settings are saved but not yet applied. The page closes. The Wireless Settings
page displays again.
A pop-up window opens. The window shows the number of changes to be applied.
8. In the pop-up window, click the Apply button.
Your changes are applied. If the WiFi link must be reestablished, the page displays
the number of seconds before the AirBridge is back online.
Disable the idle time-out for the 2.4 GHz management SSID
By default, the idle time-out for the 2.4 GHz management SSID is 15 minutes. That is, if
no WiFi client is connected to the 2.4 GHz management SSID for 15 minutes, the 2.4 GHz
management SSID is turned off.
Only after you reboot the AirBridge can you reconnect to the 2.4 GHz management
SSID. However, you can disable the idle time-out so that the 2.4 GHz management SSID
stays always on.
To disable the idle time-out for the 2.4 GHz management SSID:
1.
Open a web browser from a computer that is connected to the same network as the
AirBridge or directly to the AirBridge through an Ethernet cable or WiFi connection.
2. Enter the IP address that is assigned to the AirBridge.
The login page displays.
If your browser does not display the login page but displays a security message and
does not let you proceed, see Log in to the AirBridge after initial setup on page 34.
3. Enter the AirBridge user name and local device password.
The user name is admin. The local device password is the one that you specified
the first time that you logged in. The user name and password are case-sensitive.
If you previously managed the AirBridge through the NETGEAR Insight app or Insight
Cloud portal, enter the Insight network password for the Insight network location to
which the AirBridge was assigned (see Connect over WiFi using the NETGEAR Insight
app on an iOS or Android mobile device on page 15).
User Manual87Manage the WiFi and Radio
Features
Page 88

Insight Instant AirBridge WBC502 User Manual
The Device Status page displays the Device Information section and other sections.
4. Under Network, select Wireless.
The Wireless Settings page displays.
5.
In the Management Interface - 2.4G section, select the Always on radio button.
By default, the Turn off if idle in 15 minutes radio button is selected.
6. Click the Save button.
Your settings are saved but not yet applied.
A pop-up window opens. The window shows the number of changes to be applied.
7. In the pop-up window, click the Apply button.
Your changes are applied. If the WiFi link must be reestablished, the page displays
the number of seconds before the AirBridge is back online.
Disable the 2.4 GHz management SSID
As a security measure, you can entirely disable the 2.4 GHz management SSID. If you
do so, access to the AirBridge local browser UI is possible only over a wired connection.
To disable the 2.4 management SSID:
1.
Open a web browser from a computer that is connected to the same network as the
AirBridge or directly to the AirBridge through an Ethernet cable or WiFi connection.
2. Enter the IP address that is assigned to the AirBridge.
The login page displays.
If your browser does not display the login page but displays a security message and
does not let you proceed, see Log in to the AirBridge after initial setup on page 34.
3. Enter the AirBridge user name and local device password.
The user name is admin. The local device password is the one that you specified
the first time that you logged in. The user name and password are case-sensitive.
If you previously managed the AirBridge through the NETGEAR Insight app or Insight
Cloud portal, enter the Insight network password for the Insight network location to
which the AirBridge was assigned (see Connect over WiFi using the NETGEAR Insight
app on an iOS or Android mobile device on page 15).
The Device Status page displays the Device Information section and other sections.
4. Under Network, select Wireless.
The Wireless Settings page displays.
User Manual88Manage the WiFi and Radio
Features
Page 89

Insight Instant AirBridge WBC502 User Manual
5.
In the Management Interface - 2.4G section, clear the Enabled check box.
6. Click the Save button.
Your settings are saved but not yet applied.
A pop-up window opens. The window shows the number of changes to be applied.
7. In the pop-up window, click the Apply button.
Your changes are applied. If the WiFi link must be reestablished, the page displays
the number of seconds before the AirBridge is back online.
Features
User Manual89Manage the WiFi and Radio
Page 90

5
Manage Advanced WiFi and Radio Features
This chapter describes how you can manage advanced WiFi and radio settings. For
other WiFi and radio settings, see Manage the WiFi and Radio Features on page 56.
The settings that are described in this chapter apply to the 5 GHz radio and 5 GHz SSIDs,
because you can use the 2.4 GHz radio and 2.4 GHz SSID only for management of the
AirBridge.
The chapter includes the following sections:
• Recommended configuration order
• Manage the channel high throughput mode
• Manage the channel or channels
• Manage the radio transmit power
• Change the bit rate
• Manage client limits
• Manage time slot assignments to satellites
• Manage the satellite priority
• Set up a WiFi on/off schedule for a 5 GHz SSID
• Set up a MAC filter for a 5 GHz SSID
• Set up a RADIUS accounting server on a master or access point
• Manually block a WiFi client or connection from a 5 GHz SSID
• Configure traffic shaping for a 5 GHz SSID
• Change the DHCP server settings for a guest WiFi network
CAUTION: This device must be professionally installed. It is the installer’s responsibility
to follow local country regulations, including operations within legal frequency channels,
output power, and DFS requirements. The vendor, reseller, or distributor is not
responsible for illegal wireless operations. For more details, see the device’s terms and
conditions.
90
Page 91

Insight Instant AirBridge WBC502 User Manual
Recommended configuration order
We recommend the following configuration order:
If you change an existing configuration for AirBridges in a master-to-satellite setup,
•
we recommend that you first change the satellite and then change the master. After
you complete the configurations, the WiFi backhaul connection between the master
and satellite is automatically reestablished.
Note: If you first change the master and then change the satellite, the WiFi backhaul
connection between the master and satellite is no longer operational, and you might
not be able to access the satellite.
Similarly, if you change an existing configuration for an AirBridge that functions as
•
a client bridge in an access point-to-client bridge setup, we recommend that you
first change the client bridge and then change the access point. (The access point
can be an AirBridge or another type of access point.) After you complete the
configurations, the WiFi backhaul connection between the access point and client
bridge is automatically reestablished.
Note: If you first change the access point and then change the client bridge, the
WiFi backhaul connection between the access point and client bridge is no longer
operational, and you might not be able to access the client bridge.
Manage the channel high throughput mode
The channel high throughput (HT) mode is also referred to as the channel width.
By default, the channel width is 40 MHz for the 5 GHz radio on the AirBridge. The other
options are 20 MHz and 80 MHz.
The wider the channel, the better the performance (that is, the greater the transmission
quality and speed), but the fewer channels are available for use. Before you change the
channel width, consider your network conditions and the applications that must be
supported.
To manage the channel HT mode:
1.
Open a web browser from a computer that is connected to the same network as the
AirBridge or directly to the AirBridge through an Ethernet cable or WiFi connection.
2. Enter the IP address that is assigned to the AirBridge.
The login page displays.
Radio Features
User Manual91Manage Advanced WiFi and
Page 92

Insight Instant AirBridge WBC502 User Manual
If your browser does not display the login page but displays a security message and
does not let you proceed, see Log in to the AirBridge after initial setup on page 34.
3. Enter the AirBridge user name and local device password.
The user name is admin. The local device password is the one that you specified
the first time that you logged in. The user name and password are case-sensitive.
If you previously managed the AirBridge through the NETGEAR Insight app or Insight
Cloud portal, enter the Insight network password for the Insight network location to
which the AirBridge was assigned (see Connect over WiFi using the NETGEAR Insight
app on an iOS or Android mobile device on page 15).
The Device Status page displays the Device Information section and other sections.
4. Under Network, select Wireless.
The Wireless Settings page displays.
5.
From the Channel HT Mode menu, select 20MHz, 40MHz (the default setting), or
80MHz.
6. Click the Save button.
Your settings are saved but not yet applied.
A pop-up window opens. The window shows the number of changes to be applied.
7. In the pop-up window, click the Apply button.
Your changes are applied. If the WiFi link must be reestablished, the page displays
the number of seconds before the AirBridge is back online.
Manage the channel or channels
By default, a WiFi channel is automatically assigned for the 5 GHz radio on the AirBridge.
The channels that are available depend on the country and region that you selected for
the AirBridge.
You do not need to change the channel unless you experience interference (which is
indicated by lost connections).
If you use multiple access points, you can reduce interference by selecting different
channels for adjacent access points. We recommend a channel spacing of four channels
between adjacent access points (for example, use channels 44 and 60, or 112 and 128).
WARNING: Make sure that the country is set to the location where the device is
operating (see Change the country and region of operation on page 58). You are
responsible for complying with the local, regional, and national regulations that are set
for channels, power levels, and frequency ranges.
User Manual92Manage Advanced WiFi and
Radio Features
Page 93

Insight Instant AirBridge WBC502 User Manual
To manage the channels:
1.
Open a web browser from a computer that is connected to the same network as the
AirBridge or directly to the AirBridge through an Ethernet cable or WiFi connection.
2. Enter the IP address that is assigned to the AirBridge.
The login page displays.
If your browser does not display the login page but displays a security message and
does not let you proceed, see Log in to the AirBridge after initial setup on page 34.
3. Enter the AirBridge user name and local device password.
The user name is admin. The local device password is the one that you specified
the first time that you logged in. The user name and password are case-sensitive.
If you previously managed the AirBridge through the NETGEAR Insight app or Insight
Cloud portal, enter the Insight network password for the Insight network location to
which the AirBridge was assigned (see Connect over WiFi using the NETGEAR Insight
app on an iOS or Android mobile device on page 15).
The Device Status page displays the Device Information section and other sections.
4. Under Network, select Wireless.
The Wireless Settings page displays.
5.
Click the Channel Configuration button.
A new page opens,
6.
Do one of the following:
To select a specific channel, click the button for the channel and frequency.
•
To enable automatic channel allocation, click the All button.
•
Note: The None button lets you reset all channels before you select one or more
specific channels. The U-NNI buttons lets you select specific groups of channels.
7. Click the Save button.
Your settings are saved but not yet applied. The page closes. The Wireless Settings
page displays again.
A pop-up window opens. The window shows the number of changes to be applied.
8. In the pop-up window, click the Apply button.
Your changes are applied. If the WiFi link must be reestablished, the page displays
the number of seconds before the AirBridge is back online.
User Manual93Manage Advanced WiFi and
Radio Features
Page 94

Insight Instant AirBridge WBC502 User Manual
Manage the radio transmit power
By default, the transmit power for the 5 GHz radio on the AirBridge is automatically
assigned.
You can disable automatic assignment and set a specific transmit power. However, note
the following:
If you set the transmit power too high, the AirBridge might not be able to connect
•
to another WiFi device such as a master or access point.
If you set the transmit power too low, WiFi clients might not be able to connect to
•
the AirBridge.
Make sure that you comply with the regulatory requirements for total radio frequency
(RF) output power in your country.
WARNING: Make sure that the country is set to the location where the device is
operating (see Change the country and region of operation on page 58). You are
responsible for complying with the local, regional, and national regulations that are set
for channels, power levels, and frequency ranges.
To manage the radio transmit power:
1.
Open a web browser from a computer that is connected to the same network as the
AirBridge or directly to the AirBridge through an Ethernet cable or WiFi connection.
2. Enter the IP address that is assigned to the AirBridge.
The login page displays.
If your browser does not display the login page but displays a security message and
does not let you proceed, see Log in to the AirBridge after initial setup on page 34.
3. Enter the AirBridge user name and local device password.
The user name is admin. The local device password is the one that you specified
the first time that you logged in. The user name and password are case-sensitive.
If you previously managed the AirBridge through the NETGEAR Insight app or Insight
Cloud portal, enter the Insight network password for the Insight network location to
which the AirBridge was assigned (see Connect over WiFi using the NETGEAR Insight
app on an iOS or Android mobile device on page 15).
The Device Status page displays the Device Information section and other sections.
4. Under Network, select Wireless.
The Wireless Settings page displays.
Radio Features
User Manual94Manage Advanced WiFi and
Page 95

Insight Instant AirBridge WBC502 User Manual
5.
Do one of the following:
Clear the Auto RF check box.
•
Automatic transmit power is disabled. You can now specify a specific transmit
power (see the next step).
Select the Auto RF check box.
•
Automatic transmit power is enabled. This is the default setting.
6.
If you cleared the Auto RF check box, from the Transmit Power menu, select the
transmit power.
The transmit power is expressed in dBm.
7. Click the Save button.
Your settings are saved but not yet applied. The page closes. The Wireless Settings
page displays again.
A pop-up window opens. The window shows the number of changes to be applied.
8. In the pop-up window, click the Apply button.
Your changes are applied. If the WiFi link must be reestablished, the page displays
the number of seconds before the AirBridge is back online.
Change the bit rate
If the AirBridge functions as a master or access point, by default, data is automatically
sent at the lowest effective bit rate. We recommend that you do not manually change
the bit rate.
If you understand the consequences, you can manually select a higher bit rate. Client
devices must either use the selected bit rate or a higher bit rate. You cannot manually
set the bit rate for an AirBridge that functions as a satellite or client bridge.
WARNING: Be careful changing the bit rate. If you set the bit rate too high, some WiFi
devices might no longer be able to connect to the AirBridge.
To change the bit rate:
1.
Open a web browser from a computer that is connected to the same network as the
AirBridge or directly to the AirBridge through an Ethernet cable or WiFi connection.
2. Enter the IP address that is assigned to the AirBridge.
The login page displays.
If your browser does not display the login page but displays a security message and
does not let you proceed, see Log in to the AirBridge after initial setup on page 34.
User Manual95Manage Advanced WiFi and
Radio Features
Page 96

Insight Instant AirBridge WBC502 User Manual
3. Enter the AirBridge user name and local device password.
The user name is admin. The local device password is the one that you specified
the first time that you logged in. The user name and password are case-sensitive.
If you previously managed the AirBridge through the NETGEAR Insight app or Insight
Cloud portal, enter the Insight network password for the Insight network location to
which the AirBridge was assigned (see Connect over WiFi using the NETGEAR Insight
app on an iOS or Android mobile device on page 15).
The Device Status page displays the Device Information section and other sections.
4. Under Network, select Wireless.
The Wireless Settings page displays.
5.
Click the Bit Rate Configuration button.
A new page opens.
6. Write down the current bit rate.
After you change the bit rate, if WiFi devices can no longer connect to the AirBridge,
you can reset the bit rate to the old value.
7. On the blue bar, select a new bit rate by clicking the white dot that represents the
bit rate.
The bit rate is expressed in Mbps.
8. Click the Save button.
Your settings are saved but not yet applied. The page closes. The Wireless Settings
page displays again.
A pop-up window opens. The window shows the number of changes to be applied.
9. In the pop-up window, click the Apply button.
Your changes are applied. If the WiFi link must be reestablished, the page displays
the number of seconds before the AirBridge is back online.
Manage client limits
If the AirBridge functions as a master with the AirBridge mode disabled or as an access
point, by default, a maximum of 32 WiFi client can associate with the AirBridge.
You can specify a lower or higher number of maximum WiFi clients. The range is from
1 to 32. The maximum number applies to all clients connected to all 5 GHz SSIDs on
the AirBridge. You cannot set client limits for individual 5 GHz SSIDs.
User Manual96Manage Advanced WiFi and
Radio Features
Page 97

Insight Instant AirBridge WBC502 User Manual
You can also disable client limits entirely, allowing an unlimited number of clients to
associate with the AirBridge.
To manage client limits:
1.
Open a web browser from a computer that is connected to the same network as the
AirBridge or directly to the AirBridge through an Ethernet cable or WiFi connection.
2. Enter the IP address that is assigned to the AirBridge.
The login page displays.
If your browser does not display the login page but displays a security message and
does not let you proceed, see Log in to the AirBridge after initial setup on page 34.
3. Enter the AirBridge user name and local device password.
The user name is admin. The local device password is the one that you specified
the first time that you logged in. The user name and password are case-sensitive.
If you previously managed the AirBridge through the NETGEAR Insight app or Insight
Cloud portal, enter the Insight network password for the Insight network location to
which the AirBridge was assigned (see Connect over WiFi using the NETGEAR Insight
app on an iOS or Android mobile device on page 15).
The Device Status page displays the Device Information section and other sections.
4. Under Network, select Wireless.
The Wireless Settings page displays.
5.
Do one of the following:
Set client limits. Set client limits by doing the following:
•
a. Select the Clients Limits Enable check box.
By default, client limits are enabled.
b.
In the Client Limits field, enter a number from 1 to 32.
The default is 32.
Disable client limits. Disable client limits by selecting the Clients Limits Disable
•
check box.
By default, client limits are enabled.
6. Click the Save button.
Your settings are saved but not yet applied.
A pop-up window opens. The window shows the number of changes to be applied.
7. In the pop-up window, click the Apply button.
Your changes are applied. If the WiFi link must be reestablished, the page displays
the number of seconds before the AirBridge is back online.
User Manual97Manage Advanced WiFi and
Radio Features
Page 98

Insight Instant AirBridge WBC502 User Manual
Manage time slot assignments to satellites
If the AirBridge functions as a master with the AirBridge mode enabled, by default, the
AirBridge automatically assigns time slots to each satellite so that each satellite receives
equal opportunity. We recommend that you keep automatic time slot assignments. If
you understand the consequences, you can manually set the time slot to a value from
2 to 7. For example if you divide 1 second into 10 time slots, each time slot is 100 ms.
If you set the time slot to 3, each satellite receives 300 ms on a rotating basis.
Note: By default, each satellite receives the same number of time slots. However, the
higher the satellite priority that you set for a for a satellite (see Manage the satellite
priority on page 99), the more time slots the AirBridge assigns to the satellite.
To manage time slots on a master:
1.
Open a web browser from a computer that is connected to the same network as the
AirBridge or directly to the AirBridge through an Ethernet cable or WiFi connection.
2. Enter the IP address that is assigned to the AirBridge.
The login page displays.
If your browser does not display the login page but displays a security message and
does not let you proceed, see Log in to the AirBridge after initial setup on page 34.
3. Enter the AirBridge user name and local device password.
The user name is admin. The local device password is the one that you specified
the first time that you logged in. The user name and password are case-sensitive.
If you previously managed the AirBridge through the NETGEAR Insight app or Insight
Cloud portal, enter the Insight network password for the Insight network location to
which the AirBridge was assigned (see Connect over WiFi using the NETGEAR Insight
app on an iOS or Android mobile device on page 15).
The Device Status page displays the Device Information section and other sections.
4. Under Network, select Wireless.
The Wireless Settings page displays.
5.
From the Master Time Slot menu, select Auto, or a value from 2 to 7.
By default, the selection is Auto. We recommend that you keep the selection at Auto.
6. Click the Save button.
Your settings are saved but not yet applied.
A pop-up window opens. The window shows the number of changes to be applied.
User Manual98Manage Advanced WiFi and
Radio Features
Page 99

Insight Instant AirBridge WBC502 User Manual
7. In the pop-up window, click the Apply button.
Your changes are applied. If the WiFi link must be reestablished, the page displays
the number of seconds before the AirBridge is back online.
Manage the satellite priority
If the AirBridge functions as a master with the AirBridge mode enabled, by default, the
AirBridge assigns time slots for the traffic to each satellite (see Manage time slot
assignments to satellites on page 98). By default, each satellite receives the same number
of time slots, that is, the same amount of time to transmit and receive. By default, the
priority for each satellite is set to High, but you can prioritize one satellite over another
and assign a lower priority to another satellite, causing the satellite to be assigned a
smaller number of time slots by the master.
You can assign a high, middle, or low satellite priority. The high priority receives 10
times as much time as the low priority. The middle priority receives 5 times as much
time as the low priority. (The relationship is 10:5:1.)
As a general guideline, give a higher priority to a satellite with a good WiFi connection
to the master (that is, a high-quality signal between the devices) and a lower priority to
a satellite with a poor WiFi connection to the master. A higher satellite priority means
that the satellite can perform better than a satellite with a lower satellite priority.
To manage the satellite priority:
1.
Open a web browser from a computer that is connected to the same network as the
AirBridge or directly to the AirBridge through an Ethernet cable or WiFi connection.
2. Enter the IP address that is assigned to the AirBridge.
The login page displays.
If your browser does not display the login page but displays a security message and
does not let you proceed, see Log in to the AirBridge after initial setup on page 34.
3. Enter the AirBridge user name and local device password.
The user name is admin. The local device password is the one that you specified
the first time that you logged in. The user name and password are case-sensitive.
If you previously managed the AirBridge through the NETGEAR Insight app or Insight
Cloud portal, enter the Insight network password for the Insight network location to
which the AirBridge was assigned (see Connect over WiFi using the NETGEAR Insight
app on an iOS or Android mobile device on page 15).
The Device Status page displays the Device Information section and other sections.
4. Under Network, select Wireless.
The Wireless Settings page displays.
User Manual99Manage Advanced WiFi and
Radio Features
Page 100

Insight Instant AirBridge WBC502 User Manual
5. From the Satellite Priority menu, select High, Middle, or Low.
The default selection is High.
6. Click the Save button.
Your settings are saved but not yet applied.
A pop-up window opens. The window shows the number of changes to be applied.
7. In the pop-up window, click the Apply button.
Your changes are applied. If the WiFi link must be reestablished, the page displays
the number of seconds before the AirBridge is back online.
Set up a WiFi on/off schedule for a 5 GHz SSID
If the operation mode of the AirBridge is AirBridge Master or Access Point, you can set
up a WiFi on/off schedule. Scheduling a 5 GHz SSID to be turned off is a green feature
that allows you to turn off WiFi during scheduled vacations, office shutdowns, on
evenings, or on weekends. If more than one 5 GHz SSID is available, you can set up and
manage a WiFi on/off schedule for each 5 GHz SSID.
Before you enable and set up a WiFi on/off schedule, make sure that the time zone
settings are synchronized with your local time. For more information, see Manage the
date and time settings on page 120.
To set up a WiFi on/off schedule for a 5 GHz SSID:
1.
Open a web browser from a computer that is connected to the same network as the
AirBridge or directly to the AirBridge through an Ethernet cable or WiFi connection.
2. Enter the IP address that is assigned to the AirBridge.
The login page displays.
If your browser does not display the login page but displays a security message and
does not let you proceed, see Log in to the AirBridge after initial setup on page 34.
3. Enter the AirBridge user name and local device password.
The user name is admin. The local device password is the one that you specified
the first time that you logged in. The user name and password are case-sensitive.
If you previously managed the AirBridge through the NETGEAR Insight app or Insight
Cloud portal, enter the Insight network password for the Insight network location to
which the AirBridge was assigned (see Connect over WiFi using the NETGEAR Insight
app on an iOS or Android mobile device on page 15).
User Manual100Manage Advanced WiFi and
Radio Features
 Loading...