

Page 1
User Manual
Insight Managed WiFi 6 AX6000
Tri-band Multi-Gig Access Point
WAX630
NETGEAR, Inc.
350 E. Plumeria DriveJune 2021
San Jose, CA 95134, USA202-12194-01
Page 2

Insight Managed WiFi 6 AX6000 Tri-band Multi-Gig Access Point Model WAX630
Support and Community
Visit netgear.com/support to get your questions answered and access the latest
downloads.
You can also check out our NETGEAR Community for helpful advice at
community.netgear.com.
Regulatory and Legal
Si ce produit est vendu au Canada, vous pouvez accéder à ce document en français
canadien à https://www.netgear.com/support/download/.
(If this product is sold in Canada, you can access this document in Canadian French at
https://www.netgear.com/support/download/.)
For regulatory compliance information including the EU Declaration of Conformity, visit
https://www.netgear.com/about/regulatory/.
See the regulatory compliance document before connecting the power supply.
For NETGEAR’s Privacy Policy, visit https://www.netgear.com/about/privacy-policy.
By using this device, you are agreeing to NETGEAR’s Terms and Conditions at
https://www.netgear.com/about/terms-and-conditions. If you do not agree, return the
device to your place of purchase within your return period.
Do not use this device outdoors. The PoE port is intended for intra building connection
only.
Trademarks
© NETGEAR, Inc., NETGEAR, and the NETGEAR Logo are trademarks of NETGEAR, Inc.
Any non-NETGEAR trademarks are used for reference purposes only.
Revision History
CommentsPublish DatePublication Part
Number
First publication.June 2021202-12194-01
2
Page 3

Contents
Chapter 1 Introduction
Additional documentation...................................................................9
About NETGEAR Insight......................................................................9
Chapter 2 Hardware Overview
Unpack the access point....................................................................11
Top panel with LEDs...........................................................................11
Hardware interfaces...........................................................................14
Access point label..............................................................................15
Safety instructions and warnings for an indoor access point........16
Chapter 3 Install the Access Point in Your Network and Access It
for Initial Configuration
Position your access point for best performance...........................19
Set up and connect the access point to your network...................20
Connect to the access point for initial configuration.....................22
Connect over WiFi using the NETGEAR Insight app.................22
Connect over the Internet using the NETGEAR Insight Cloud
portal...............................................................................................24
Connect over WiFi to the local browser UI for initial
configuration..................................................................................25
Connect over the LAN to the local browser UI for initial
configuration..................................................................................30
Configure the access point offline using a directly connected
computer.........................................................................................35
Log in to the access point after initial setup....................................41
Dismiss a browser security warning.................................................42
Chapter 4 Install the Access Point in an Insight Instant Mesh WiFi
Network
What are a root access point and an extender access point?......44
What is an Insight Instant Mesh WiFi network?...............................45
Requirements for placing an extender access point in a mesh WiFi
network................................................................................................46
Install the NETGEAR Insight app to manage an Insight Instant Mesh
WiFi network.......................................................................................47
3
Page 4

Insight Managed WiFi 6 AX6000 Tri-band Multi-Gig Access Point Model WAX630
Connect the access point as an extender to a root access point..48
Connect over the Internet using the NETGEAR Insight Cloud
portal....................................................................................................51
Chapter 5 Manage the Basic WiFi Features for a WiFi network
Set up an open or secure WiFi network..........................................53
View or change the settings of a WiFi network...............................61
Remove a WiFi network.....................................................................62
Hide or broadcast the SSID for a WiFi network..............................63
Change the VLAN ID for a WiFi network.........................................64
Change the authentication and encryption for a WiFi network....65
Enable or disable PMF for a WiFi network......................................69
Disable or enable a WiFi network or set up a WiFi activity
schedule..............................................................................................70
Enable or disable band steering with 802.11k RRM and 802.11v
WiFi network management...............................................................72
Chapter 6 Manage the Basic Radio Features
Manage the basic WiFi settings for the radios................................75
Turn a radio on or off.........................................................................78
Change the WiFi mode for a radio...................................................79
Change the channel width for a radio.............................................81
Change the guard interval for a radio.............................................83
Change the output power for a radio..............................................84
Change the channel for a radio........................................................85
Manage Quality of Service for a WiFi radio.....................................86
Chapter 7 Set Up and Manage a Captive Portal
Set up a click-through captive portal for a WiFi network..............89
Set up an external captive portal for a WiFi network.....................92
Register and configure Facebook Wi-Fi for the access point.......95
Set up a Facebook Wi-Fi captive portal for a WiFi network..........97
Unregister the access point from Facebook Wi-Fi.........................98
Chapter 8 Manage Access and Security
Block specific URLs and keywords for Internet access................101
Manage user accounts.....................................................................103
Add a user account......................................................................103
Change the time-out period for a user session.......................104
Change the settings for a user account....................................105
Remove a user account...............................................................106
Manage local MAC access control lists.........................................107
Manually set up a MAC access control List...............................108
Import an existing MAC access control list..............................111
4
Page 5

Insight Managed WiFi 6 AX6000 Tri-band Multi-Gig Access Point Model WAX630
Manage neighbor AP detection.....................................................114
Enable neighbor access point detection and move access points
to the Known AP List....................................................................115
Import an existing neighbor access point list in the Known AP
List..................................................................................................117
Set up RADIUS servers.....................................................................120
Chapter 9 Manage the Local Area Network and IP Settings
Disable the DHCP client and specify a fixed IP address..............124
Enable the DHCP client...................................................................125
Set the 802.1Q VLAN and management VLAN............................127
Set an existing domain name..........................................................129
Enable or disable Spanning Tree Protocol...................................130
Enable or disable the network integrity check function..............131
Enable or disable IGMP snooping.................................................132
Enable or disable Ethernet LLDP....................................................133
Enable or disable UPnP...................................................................134
Manage the link aggregation capability........................................135
Enable link aggregation for the LAN 2 port.............................136
Disable link aggregation for the LAN 2 port............................137
Chapter 10 Manage and Maintain the Access Point
Change the management mode to NETGEAR Insight or
Web-browser....................................................................................140
Change the country or region of operation..................................142
Change the admin user account password..................................143
Change the system name................................................................144
Specify a custom NTP server...........................................................145
Set the time zone..............................................................................146
Manage the syslog settings.............................................................147
Manage the firmware of the access point.....................................148
Let the access point check for new firmware and update the
firmware........................................................................................149
Manually download firmware and update the access point...150
Revert to the backup firmware...................................................152
Use an SFTP server to update the access point.......................153
Manage the configuration file of the access point.......................155
Back up the access point configuration....................................155
Restore the access point configuration.....................................156
Reboot the access point from the local browser UI.....................158
Schedule the access point to reboot.............................................159
Return the access point to its factory default settings.................160
Use the Reset button to reset the access point........................160
Use the local browser UI to reset the access point..................161
5
Page 6

Insight Managed WiFi 6 AX6000 Tri-band Multi-Gig Access Point Model WAX630
Enable SNMP and manage the SNMP settings............................162
Manage the LEDs.............................................................................164
Chapter 11 Monitor the Access Point and the Network
Display the access point Internet, IP, and system settings..........167
Display the WiFi radio settings.......................................................170
Display unknown and known neighbor access points................174
Display client distribution, connected clients, and client trends.175
View WiFi and Ethernet traffic, traffic and ARP statistics, and channel
utilization...........................................................................................179
View or download tracked URLs.....................................................181
View, save, download, or clear the logs........................................183
View a WiFi bridge connection.......................................................185
View alarms and notifications.........................................................186
Chapter 12 Manage the Advanced WiFiFeatures for a WiFi network
Enable or disable client isolation for a WiFi network...................189
Enable or disable URL tracking for a WiFi network......................191
Change the format of the DHCP offer messages in a WiFi
network..............................................................................................192
Select a MAC ACL for a WiFi network...........................................193
Set bandwidth rate limits for a WiFi network................................195
Configure advanced rate selection for a WiFi network...............196
Chapter 13 Set up a WiFi Bridge
WiFi base station, WiFi repeater, and WiFi bridge requirements.202
Set up a WiFi bridge between access points................................203
Chapter 14 Manage the Advanced Radio Features
Manage the advanced WiFi settings for the radios.....................208
Manage the maximum number of clients for a radio..................211
Manage the broadcast and multicast settings for a radio...........212
Manage load balancing for the radios..........................................214
Manage sticky clients.......................................................................216
Manage the ARP proxy....................................................................218
Manage the amount of broadcast traffic.......................................219
Chapter 15 Diagnostics and Troubleshooting
Perform a ping test...........................................................................222
Check the Internet speed................................................................223
Quick tips for WiFi troubleshooting...............................................224
Troubleshoot with the LEDs............................................................225
Power/Cloud LED remains off....................................................226
Power/Cloud LED remains solid amber...................................227
6
Page 7

Insight Managed WiFi 6 AX6000 Tri-band Multi-Gig Access Point Model WAX630
Power/Cloud LED is blinking amber slowly, continuously.....227
The access point functions as a PoE PD and the Power/Cloud
LED remains solid amber............................................................228
Power/Cloud LED does not light blue in the NETGEAR Insight
management mode.....................................................................228
Power/Cloud LED does not stop blinking amber, green, and
blue................................................................................................229
2.4G or 5G WLAN LED is off.......................................................230
The extender access point and root access point cannot
connect..............................................................................................230
Troubleshoot WiFi connectivity for a WiFi client device.............232
Troubleshoot Internet browsing.....................................................233
You cannot log in to the access point over a LAN connection....233
Changes are not saved....................................................................234
You enter the wrong password and can no longer log in to the
access point.......................................................................................234
Troubleshoot your network using the ping utility........................235
Test the LAN path to your access point....................................236
Test the path from your computer to a remote device...........236
Appendix A Factory Default Settings and Technical Specifications
Factory default settings...................................................................239
Technical specifications...................................................................243
Appendix B Mount the Access Point to a Wall or Ceiling
Mounting parts.................................................................................246
Mount the access point on a wall...................................................247
Mount the access point to a T-bar..................................................248
Unmount the access point...............................................................251
7
Page 8

1
Introduction
This manual is for the NETGEAR Insight Managed WiFi 6 AX6000 Tri-band Multi-Gig
Access Point model WAX630.
Model WAX630, in this manual referred to as the access point, supports IEEE 802.11ax,
twelve (4+4+4) streams of WiFi 6, and tri-band concurrent operation at 2.4 GHz, 5 GHz
low band, and 5 GHz high band. The combined throughput is 6000 Mbps: 1200 Mbps
at 2.4 GHz, 2400 Mbps at 5 GHz low band, and 2400 Mbps at 5 GHz high band.
The access point functions as a Power over Ethernet plus (PoE++) powered device (PD)
in an existing network connected to a PoE++ switch that provides 802.3bt power (60W
PoE++ power on the port that is connected to the access point). The access point also
supports a power adapter for connection to a regular switch. Model WAX630 ships
without a power adapter, and model WAX630PA ships with a power adapter. If you
ordered model WAX630 but prefer to use the access point without a PoE++ connection,
you can order a power adapter separately.
The PoE++ Ethernet port supports a high speed up to 2.5 Gbps. A second Ethernet
LAN port supports a speed of 1 Gbps for a link aggregation (LAG) connection.
This chapter contains the following sections:
• Additional documentation
• About NETGEAR Insight
Note: For more information about the topics that are covered in this manual, visit the
support website at netgear.com/support/.
Note: Firmware updates with new features and bug fixes are made available from time
to time at netgear.com/support/download/. You can check for and download new
firmware manually. If the features or behavior of your product does not match what is
described in this manual, you might need to update the firmware.
Note: In this manual, WiFi network means the same as SSID (service set identifier or
WiFi network name) or VAP (virtual access point). That is, when we refer to a WiFi network
we mean an individual SSID or VAP.
8
Page 9

Insight Managed WiFi 6 AX6000 Tri-band Multi-Gig Access Point Model WAX630
Additional documentation
The following documents are available at netgear.com/support/download/:
Installation guide
•
Data sheet
•
For information about the NETGEAR Insight app and the Insight Cloud portal, visit
insight.netgear.com and see the NETGEAR knowledge base at
netgear.com/support/product/insight.aspx.
About NETGEAR Insight
For NETGEAR Insight Premium and Insight Pro subscribers, the access point supports
the NETGEAR Insight Cloud portal and Insight app:
Insight Cloud portal: Lets you configure and manage the access point through the
•
portal of the Insight cloud-based management platform.
Insight app: Lets you configure and manage the access point from your iOS or
•
Android mobile device and connects to the Insight cloud-based management
platform.
This user manual describes the local browser user interface (UI). For more information
about NETGEAR Insight, visit insight.netgear.com and see the NETGEAR knowledge
base at netgear.com/support/product/insight.aspx.
If you install the access point as a NETGEAR Insight managed device, the settings for
features that you can manage through the Insight Cloud portal and Insight app are
masked out in the local browser UI. However, using the local browser UI, you can still
manage the settings for certain features that might not yet be supported in Insight. For
more information, visit the NETGEAR knowledge base at
netgear.com/support/product/insight.aspx and search for What is Hybrid Management
Mode.
User Manual9Introduction
Page 10

2
Hardware Overview
The NETGEAR Insight Managed WiFi 6 AX6000 Tri-band Multi-Gig Access Point model
WAX630 is an indoor access point.
The chapter contains the following sections:
• Unpack the access point
• Top panel with LEDs
• Hardware interfaces
• Access point label
• Safety instructions and warnings for an indoor access point
10
Page 11
Insight Managed WiFi 6 AX6000 Tri-band Multi-Gig Access Point Model WAX630
Unpack the access point
The package contains the following items:
NETGEAR WAX630 access point
•
Mounting plate
•
Metal bracket with T-bar, lock screw, and 4 short screws
•
3 tall screws and anchors for wall mounting
•
Installation guide
•
Note: Model WAX630 ships without a power adapter. Model WAX630PA ships with a
power adapter (the type of power adapter varies by region). If you ordered model
WAX630 but prefer to use the access point without a PoE++ connection, you can order
a power adapter separately.
For information about the mounting options, see Mount the Access Point to a Wall or
Ceiling on page 245.
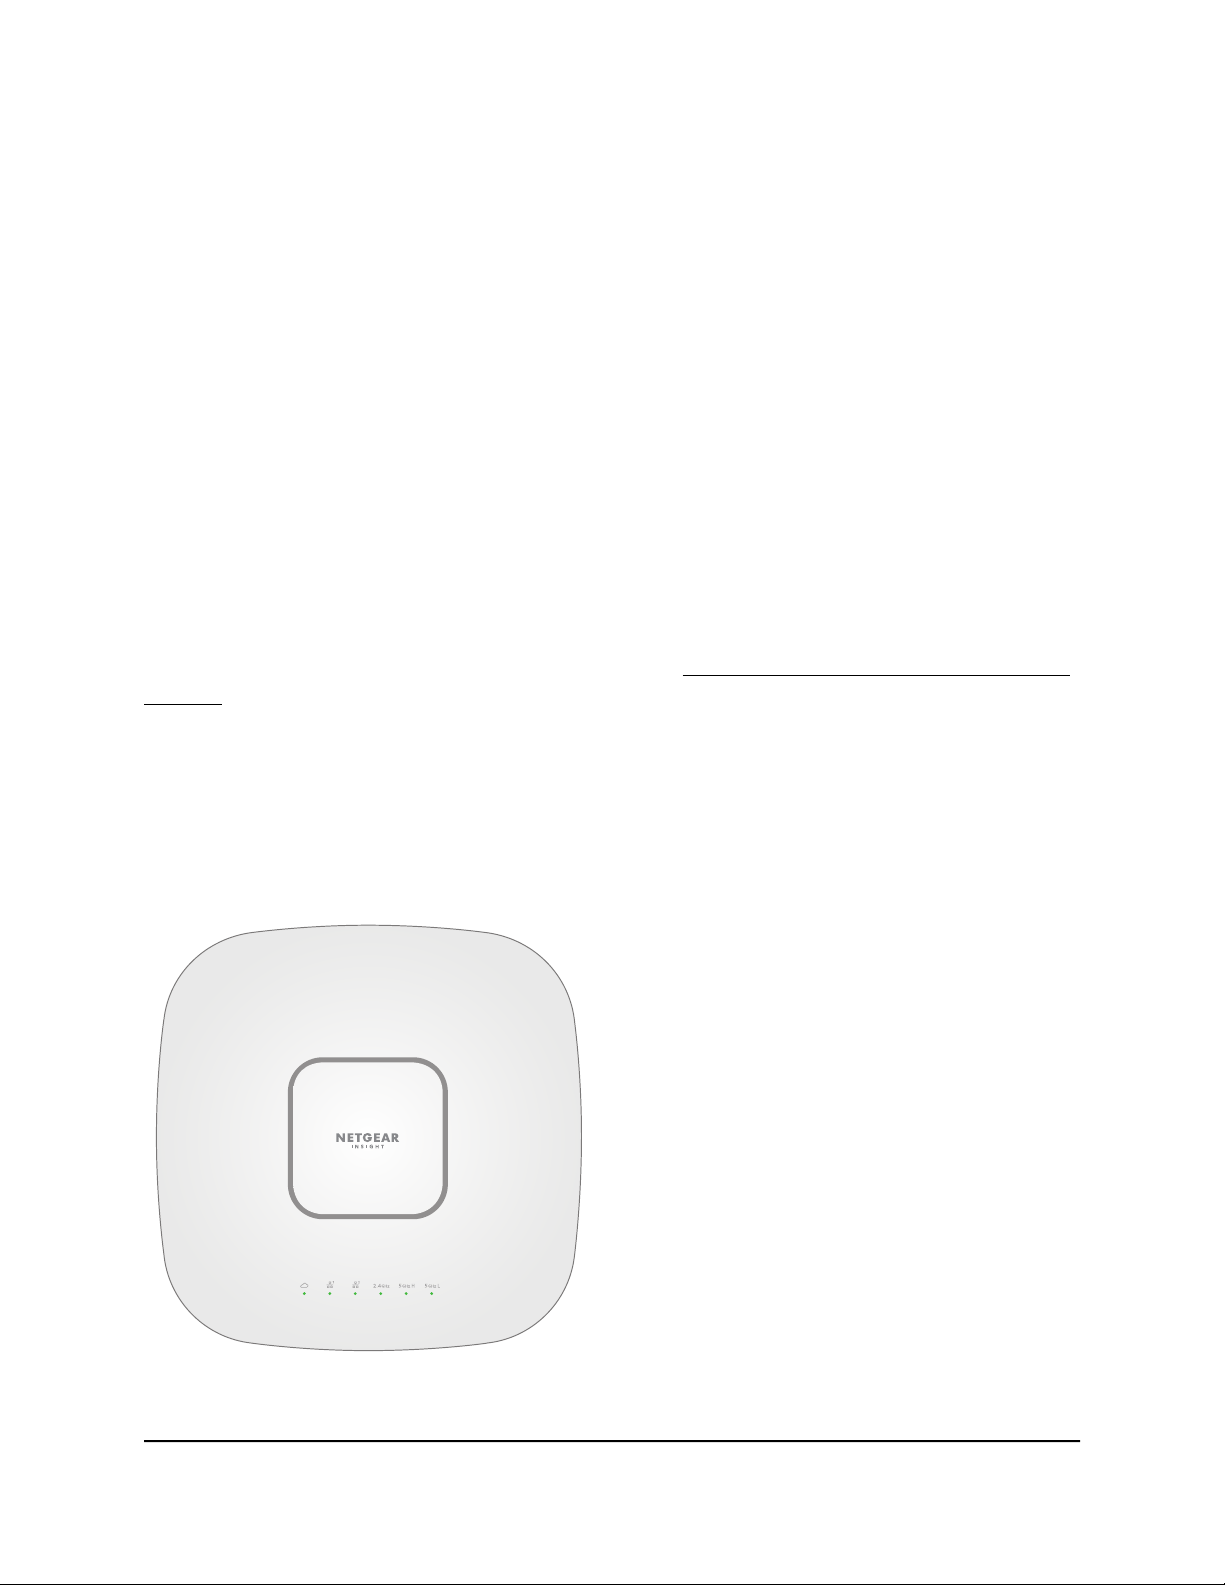
Top panel with LEDs
The LEDs that provide the status of the access point are located on the top panel of the
access point.
Figure 1. Top panel with LEDs
User Manual11Hardware Overview
Page 12

Insight Managed WiFi 6 AX6000 Tri-band Multi-Gig Access Point Model WAX630
Table 1. LED descriptions
DescriptionColorLED Icon
Power/Cloud LED
Solid amber initially and then blinking amber slowly: The access
point is starting or in the process of getting an IP address.
Solid green: The access point started up and functions either as a
standalone access point or as an Insight discovered access point that
is not connected to the Insight cloud-based management platform.
Solid blue: The access point functions in Insight mode and is
connected to the Insight cloud-based management platform.
Blinking amber fast: The access point is updating firmware or is
being reset to factory default settings.
Blinking multicolor: The access point is functioning in extender mode
and the mesh setup is in progress.
Solid amber during operation: The PoE power that the access point
received is not at the 802.3bt (PoE++) level.
Off: No power is supplied to the access point.
Solid green: A 2.5 Gbps Ethernet link is detected on the LAN 1 port.LAN 1 LED
Blinking green: 2.5 Gbps traffic activity is detected on the LAN 1
port.
Solid amber: An Ethernet link at a speed lower than 2.5 Gbps is
detected on the LAN 1 port.
Blinking amber: Traffic activity at a speed lower than 2.5 Gbps is
detected on the LAN 1 port.
Off: Either no Ethernet device is connected to the LAN 1 port or no
Ethernet link is detected.
Solid green: A 1 Gbps Ethernet link is detected on the LAN 2 port.LAN 2 LED
Blinking green: 1 Gbps traffic activity is detected on the LAN 2 port.
Solid amber: An Ethernet link at a speed lower than 1 Gbps is
detected on the LAN 2 port.
Blinking amber: Traffic activity at a speed lower than 1 Gbps is
detected on the LAN 2 port.
Off: Either no Ethernet device is connected to the LAN 1 port or no
Ethernet link is detected.
User Manual12Hardware Overview
Page 13
Insight Managed WiFi 6 AX6000 Tri-band Multi-Gig Access Point Model WAX630
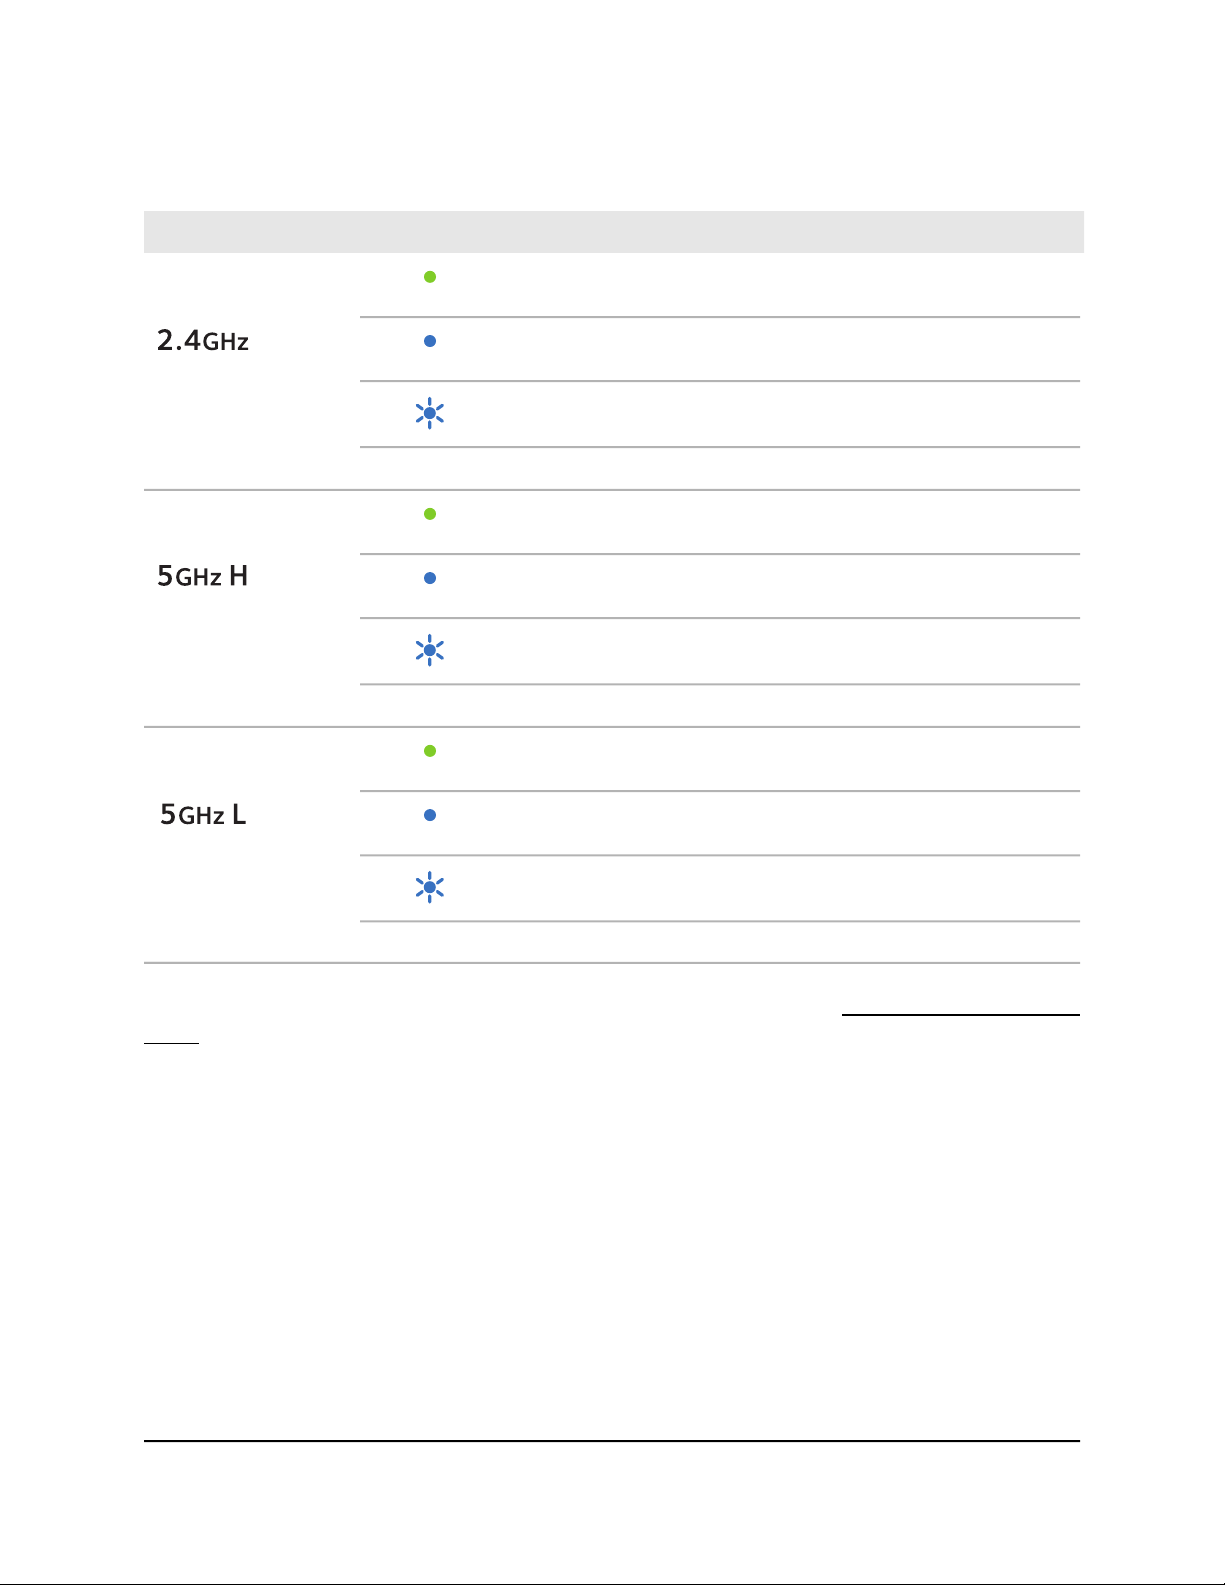
Table 1. LED descriptions (Continued)
DescriptionColorLED Icon
2.4G WLAN LED
5G H WLAN LED
5G L WLAN LED
Solid green: The 2.4 GHz WiFi radio is on but no clients are
connected.
Solid blue: One or more WLAN clients are connected to the 2.4 GHz
WiFi radio.
Blinking blue: Traffic is detected on the 2.4 GHz WiFi radio.
Off: The 2.4 GHz WiFi radio is off.
Solid green: The 5 GHz high band WiFi radio is on but no clients are
connected.
Solid blue: One or more WLAN clients are connected to the 5 GHz
high band WiFi radio.
Blinking blue: Traffic is detected on the 5 GHz high band WiFi radio.
Off: The 5 GHz high band WiFi radio is off.
Solid green: The 5 GHz low band WiFi radio is on but no clients are
connected.
Solid blue: One or more WLAN clients are connected to the 5 GHz
low band WiFi radio.
Blinking blue: Traffic is detected on the 5 GHz low band WiFi radio.
Off: The 5 GHz low band WiFi radio is off.
Note: For information about troubleshooting with the LEDs, see Troubleshoot with the
LEDs on page 225.
User Manual13Hardware Overview
Page 14
Insight Managed WiFi 6 AX6000 Tri-band Multi-Gig Access Point Model WAX630
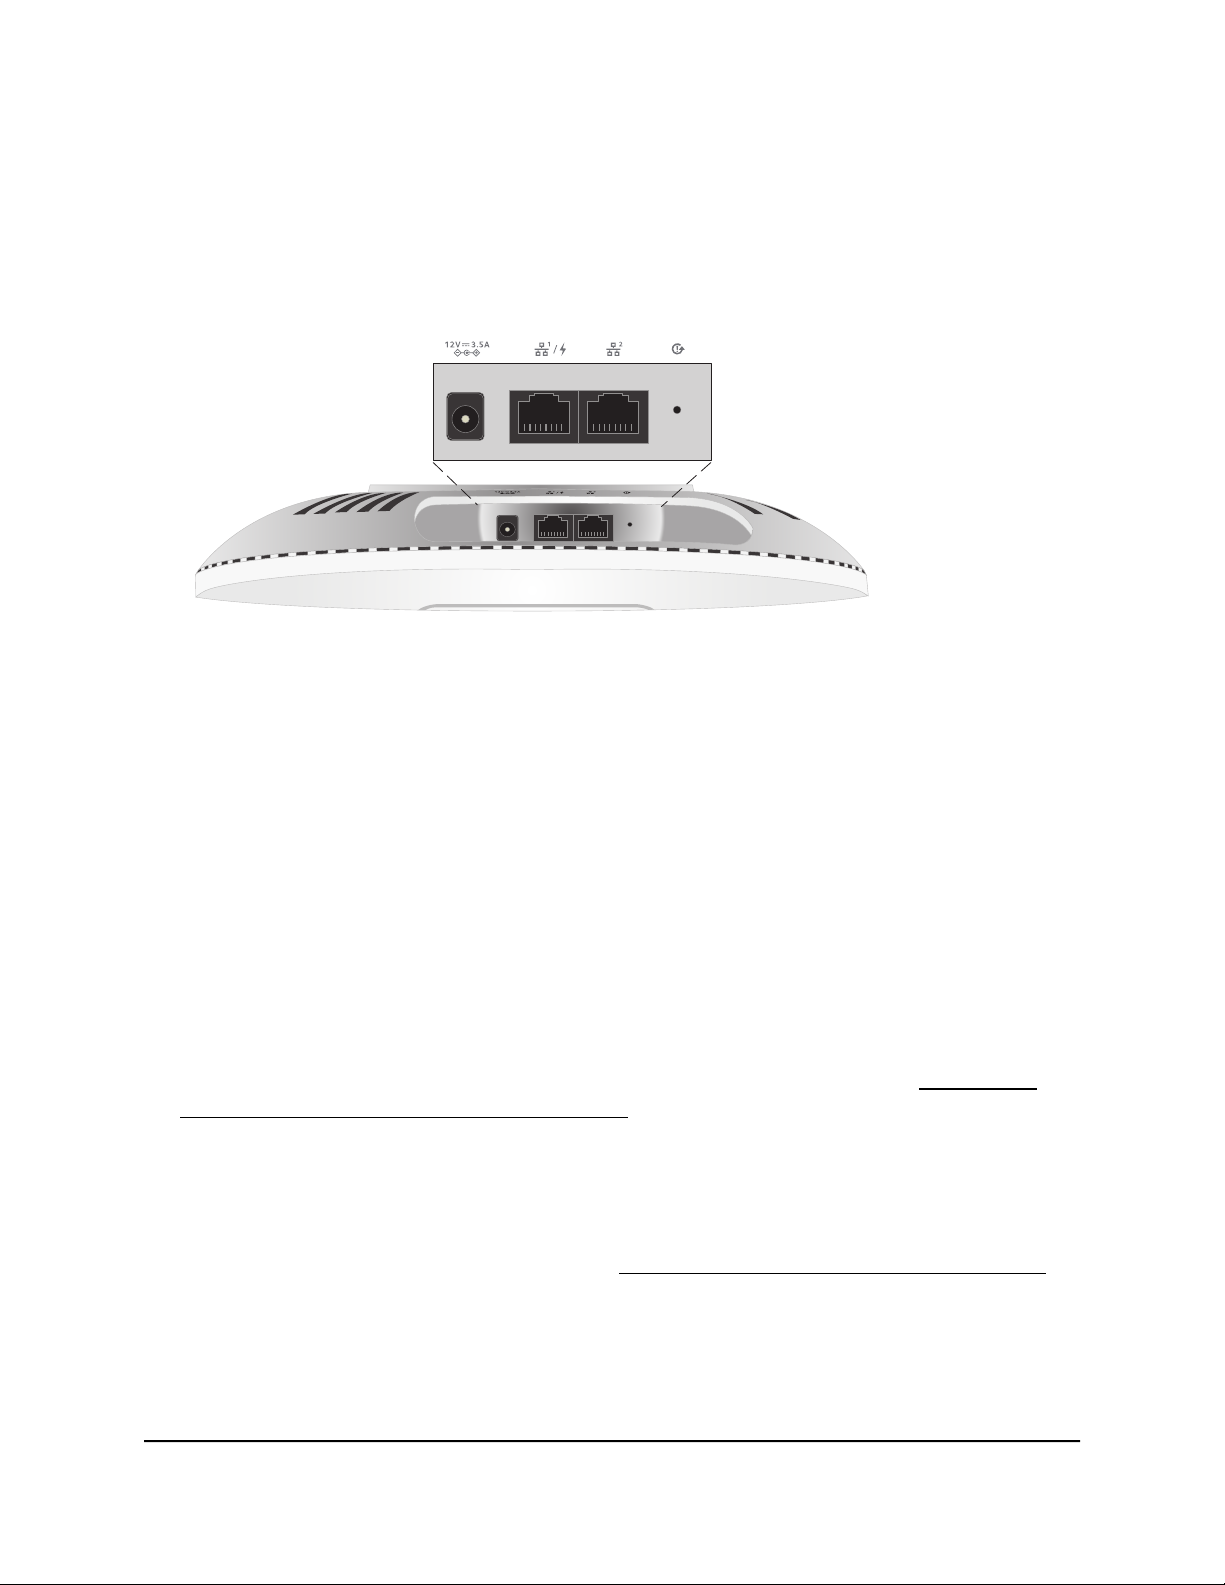
Hardware interfaces
The bottom panel of the access point provides the DC power connector for an optional
power adapter, LAN 1/PoE++ port, LAN 2 port, and Reset button.
Figure 2. Hardware interfaces
The bottom panel contains the following components:
DC power connector: If you do not use a PoE++ switch to provide power to the
•
access point, connect an optional power adapter to the DC power connector.
LAN 1/PoE++ port: Use the LAN 1/PoE++ Gigabit Ethernet RJ-45 LAN port to
•
connect the access point to a PoE++ switch, or if you use an optional power adapter,
to a non-PoE switch. You must use the LAN 1/PoE++ port for the access point network
connection. (Do not use the LAN 2 port for the network connection.)
The LAN 1/PoE++ port supports Ethernet speeds up to 2.5 Gbps when connected
to 2.5 Gbps equipment. Your Internet connection, modem, and switch all need to
support a speed of 2.5 Gbps. If one of these components supports only 1 Gbps
(which is a common speed), the access point LAN 1/PoE++ connection functions at
1 Gbps.
For more information about the LAN 1/PoE++ port connection, see Set up and
connect the access point to your network on page 20.
LAN 2 port: The LAN 2 port is a Gigabit Ethernet RJ-45 port that you can use to
•
connect the access point to the same switch as the LAN 1 port for a link aggregation
(LAG) connection. The switch must be capable of supporting a LAG connection,
which you must configure on the switch. For more information about setting up and
enabling a LAG on the access point, see Manage the link aggregation capability on
page 135.
Reset button: You can use the Reset button to restart the access point or to reset
•
the access point to its factory default settings. To restart the access point, press the
Reset button for about two seconds. To reset the access point to factory default
settings, press the Reset button for 10 seconds or longer.
User Manual14Hardware Overview
Page 15
Insight Managed WiFi 6 AX6000 Tri-band Multi-Gig Access Point Model WAX630
Note: If you added the access point to a NETGEAR Insight network location, you
must first use the Insight app or Insight Cloud portal to remove the access point from
your Insight network location before the factory default settings function of the Reset
button is available. For more information, see Use the Reset button to reset the
access point on page 160.
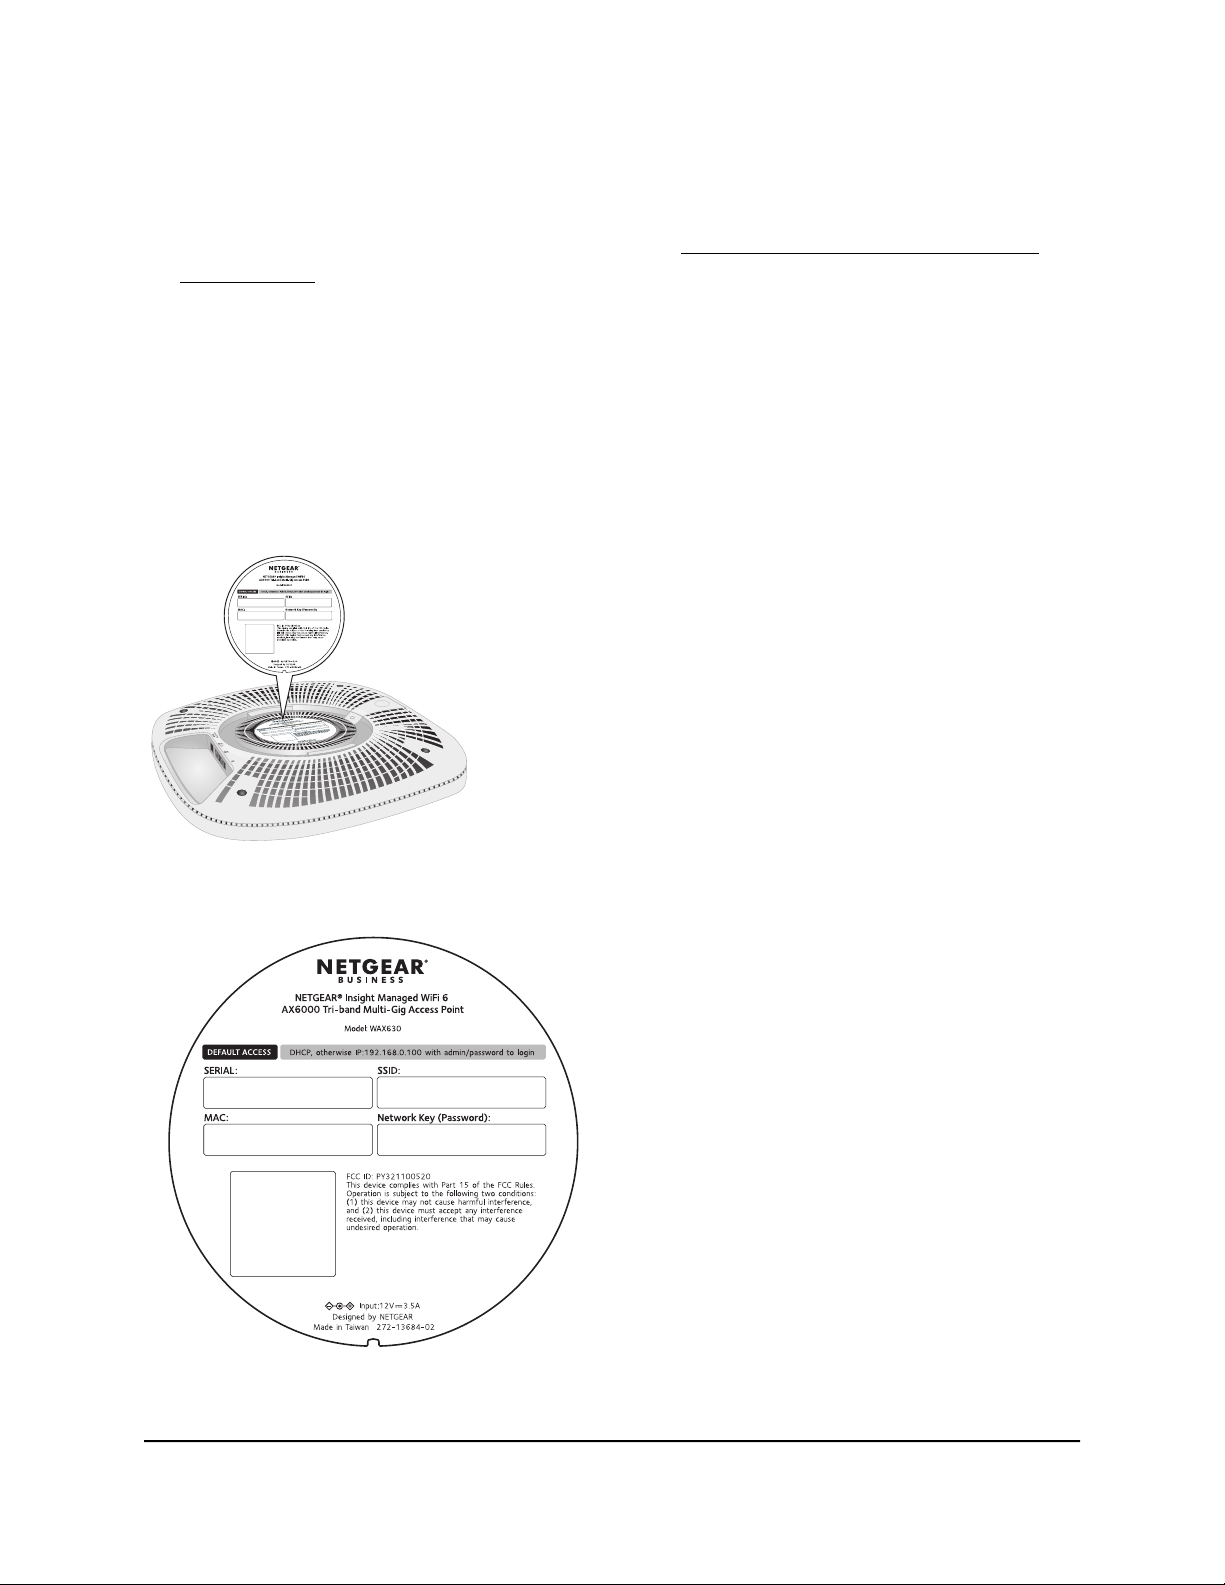
Access point label
The access point label on the bottom panel shows the QR code, serial number, MAC
address, default WiFi network name (SSID), and network key (password) of the access
point.
Figure 3. Access point label location
Figure 4. Access point label
User Manual15Hardware Overview
Page 16

Insight Managed WiFi 6 AX6000 Tri-band Multi-Gig Access Point Model WAX630
Safety instructions and warnings for an indoor access point
Use the following safety guidelines to ensure your own personal safety and to help
protect your system from potential damage.
To reduce the risk of bodily injury, electrical shock, fire, and damage to the equipment,
observe the following precautions:
This product is designed for indoor use only in a temperature-controlled and
•
humidity-controlled environment. Note the following:
-
For more information about the environment in which this product must operate,
see the environmental specifications in the appendix or the data sheet.
-
If you want to connect the product over an Ethernet cable to a device located
outdoors, the outdoor device must be properly grounded and surge protected,
and you must install an Ethernet surge protector inline between the indoor
product and the outdoor device. Failure to do so can damage the product.
-
Before connecting the product to outdoor cables or wired outdoor devices, see
https://kb.netgear.com/000057103 for additional safety and warranty information.
Failure to follow these guidelines can result in damage to your NETGEAR product,
which might not be covered by NETGEAR’s warranty, to the extent permissible by
applicable law.
Do not service the product except as explained in your product documentation.
•
Some devices should never be opened.
If any of the following conditions occur, unplug the product from its power source,
•
and then replace the part or contact your trained service provider:
- Depending on your product, the power adapter, power adapter cable, power
adapter plug, or PoE Ethernet cable is damaged.
-
An object fell into the product.
- The product was exposed to water.
- The product was dropped or damaged.
-
The product does not operate correctly when you follow the operating
instructions.
Keep the product away from radiators and heat sources. Also, do not block cooling
•
vents.
User Manual16Hardware Overview
Page 17

Insight Managed WiFi 6 AX6000 Tri-band Multi-Gig Access Point Model WAX630
Do not spill food or liquids on your product components, and never operate the
•
product in a wet environment. If the product gets wet, see the appropriate section
in your troubleshooting guide, or contact your trained service provider.
Do not push any objects into the openings of your product. Doing so can cause fire
•
or electric shock by shorting out interior components.
Use the product only with approved equipment.
•
If applicable to your product, allow the product to cool before removing covers or
•
touching internal components.
Be sure that devices that are attached over Ethernet cables are electrically rated to
•
operate with the power available in your location.
Depending on your product, use only the supplied power adapter or an Ethernet
•
cable that provides PoE.
If your product uses a power adapter:
-
If you were not provided with a power adapter, contact your local NETGEAR
reseller.
-
The power adapter must be rated for the product and for the voltage and current
marked on the product electrical ratings label.
To help prevent electric shock, plug any system and peripheral power cables into
•
properly grounded power outlets.
If applicable to your product, the peripheral power cables are equipped with
•
three-prong plugs to help ensure proper grounding. Do not use adapter plugs or
remove the grounding prong from a cable. If you must use an extension cable, use
a three-wire cable with properly grounded plugs.
Observe extension cable and power strip ratings. Make sure that the total ampere
•
rating of all products plugged into the extension cable or power strip does not
exceed 80 percent of the ampere ratings limit for the extension cable or power strip.
To help protect your system from sudden, transient increases and decreases in
•
electrical power, use a surge suppressor, line conditioner, or uninterruptible power
supply (UPS).
Position system cables, power adapter cables, and PoE Ethernet cables carefully.
•
Route cables so that they cannot be stepped on or tripped over. Be sure that nothing
rests on any cables.
Do not modify power adapters, power adapter cables, or plugs. Consult a licensed
•
electrician or your power company for site modifications.
Always follow your local and national wiring rules.
•
User Manual17Hardware Overview
Page 18

3
Install the Access Point in Your Network and Access It for Initial Configuration
This chapter describes how you can install and access the access point in your network.
The chapter contains the following sections:
• Position your access point for best performance
• Set up and connect the access point to your network
• Connect to the access point for initial configuration
• Log in to the access point after initial setup
• Dismiss a browser security warning
IMPORTANT: This device must be professionally installed. It is the installer’s
responsibility to follow local country regulations, including operations within legal
frequency channels, output power, and DFS requirements. The vendor, reseller, or
distributor is not responsible for illegal wireless operations. For more details, see the
device’s terms and conditions.
18
Page 19

Insight Managed WiFi 6 AX6000 Tri-band Multi-Gig Access Point Model WAX630
Position your access point for best performance
Before you install and mount your access point as described in the installation guide or
an appendix to this manual, consider how you can position the access point for best
performance.
If you are within the access point WiFi range, you can connect any of your WiFi devices
to your WiFi network. The WiFi range can vary significantly depending on the physical
placement of your access point. For example, the thickness and number of walls the
WiFi signal passes through can limit the range.
Additionally, other WiFi devices in and around your office, home, yard, or campus, might
affect your access point’s signal. WiFi devices can be other access point, routers,
repeaters, WiFi range extenders, and any other devices that emit WiFi signals for network
access.
Tips for positioning your access point:
Place your access point near the center of the area where your computers and other
•
devices operate.
A line of sight between the access point and your WiFi devices is not required for
good performance.
If you use a power adapter, make sure that the access point is within reach of an AC
•
power outlet.
Place the access point in an elevated location, minimizing the number walls and
•
ceilings between the access point and your other devices.
Place the access point away from electrical devices such as these:
•
-
Ceiling fans
- Home security systems
- Microwaves
- Computers
-
Bases of cordless phones
- 2.4 GHz and 5.8 GHz cordless phones
Place the access point away from large metal surfaces, large glass surfaces, insulated
•
walls, and items such as these:
- Solid metal doors
- Aluminum studs
User Manual19Install the Access Point in Your
Network and Access It for Initial
Configuration
Page 20

Insight Managed WiFi 6 AX6000 Tri-band Multi-Gig Access Point Model WAX630
- Fish tanks
- Mirrors
- Brick
- Concrete
If you are using adjacent access points, use different radio frequency channels to reduce
interference.
Set up and connect the access point to your network
You can connect the access point to a Power over Ethernet plus (PoE++) switch in your
network. The switch must be connected to a network router that is connected to the
Internet. If you use a PoE++ connection, the access point does not require a power
adapter.
Note: Depending on the product ordered, the package might not include a power
adapter. You power up the access point by connecting it to a PoE++ switch. If you
ordered a package without a power adapter but do not want to use a PoE++ connection,
you can still order a power adapter as an option.
The access point LAN 1/PoE++ port supports Ethernet speeds up to 2.5 Gbps. The
following figure shows a NETGEAR MS510TXUP switch, which supports speeds of
2.5 Gbps and higher and can supply PoE++. To allow for this speed, your Internet
connection, modem, and switch all need to support a speed of 2.5 Gbps. If one of these
components supports only 1 Gbps (which is a common speed), the LAN connection
functions also at 1 Gbps.
Network and Access It for Initial
Configuration
User Manual20Install the Access Point in Your
Page 21
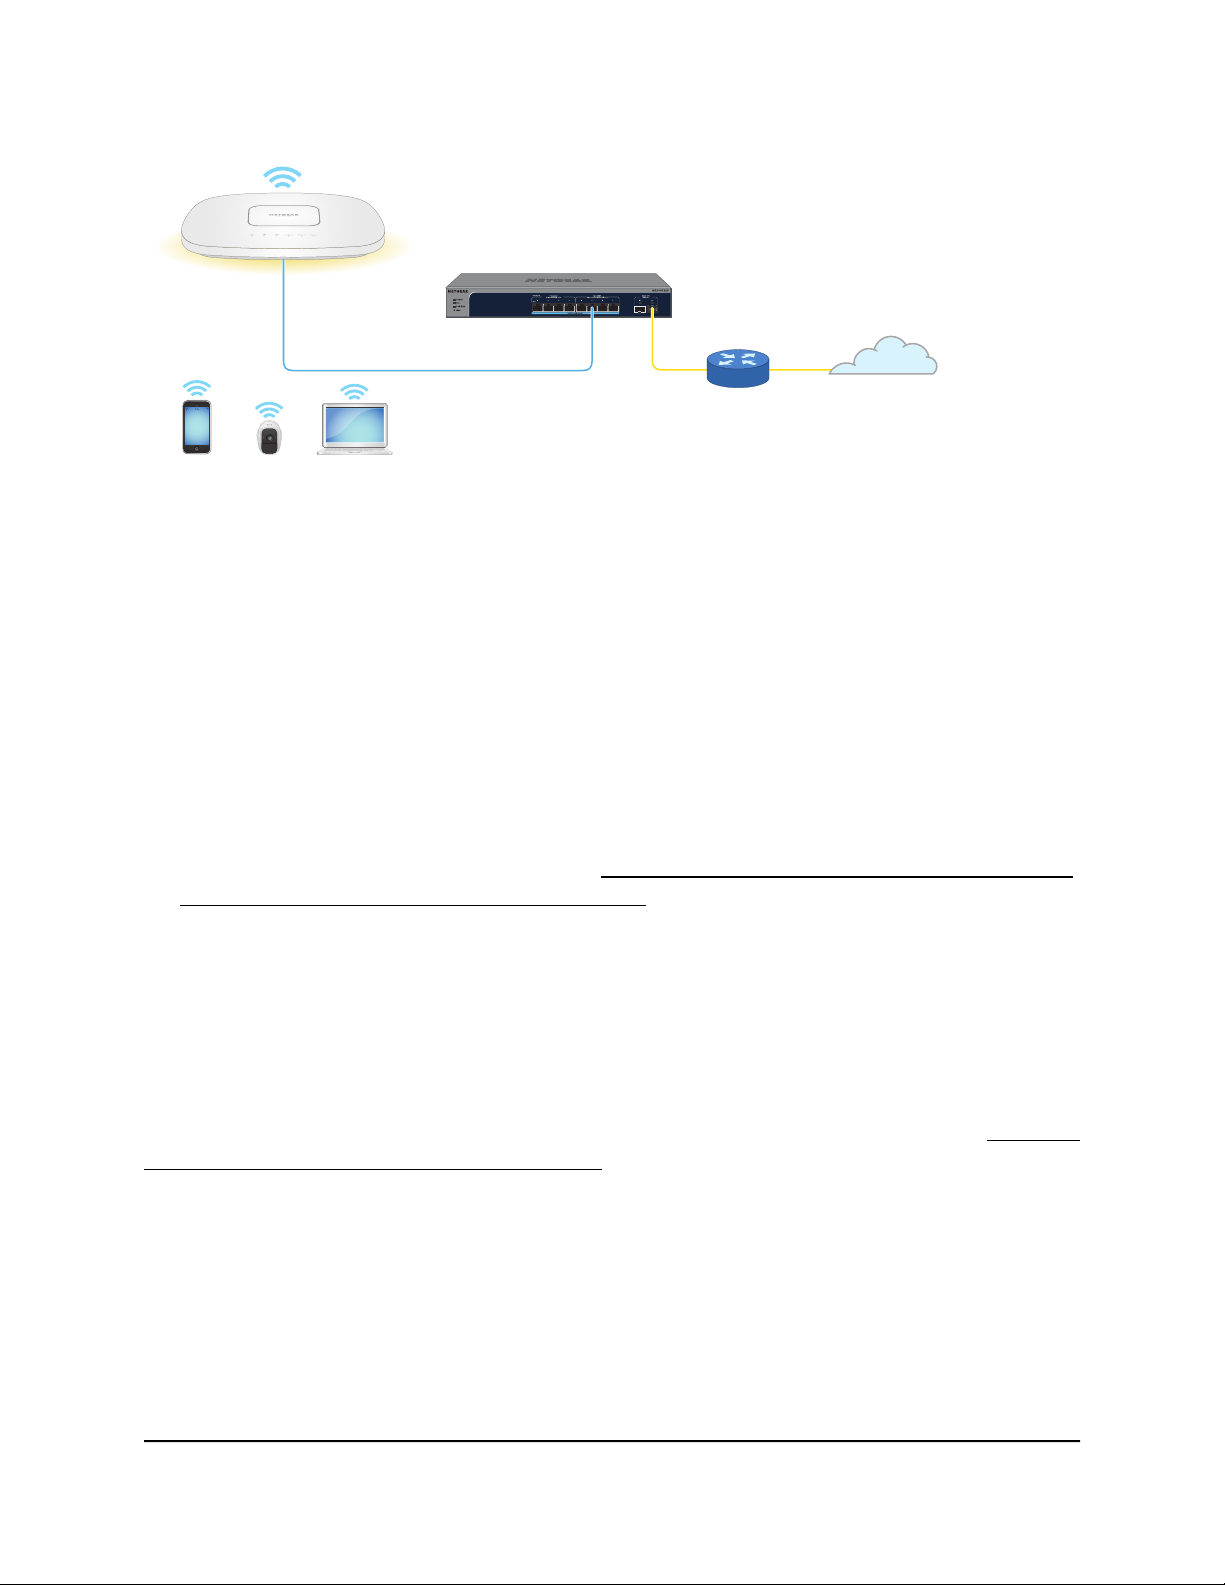
Insight Managed WiFi 6 AX6000 Tri-band Multi-Gig Access Point Model WAX630
Figure 5. Set up the access point with a PoE++ connection to your network
To set up the access point with an Ethernet connection to your network:
1. Connect an Ethernet cable to the LAN 1/PoE++ port on the access point.
2.
Connect the other end of the Ethernet cable to a port on a switch that is connected
to your network and to the Internet.
If you use a PoE++ switch, the switch port that is connected to access point must be
able to supply 60W PoE++ power. The access point requires 802.3bt (PoE++) input.
Note: For optimal functioning, make sure that you use an 802.3bt (PoE++) switch
and not an 802.3at (PoE+) or 802.3af (PoE) switch. If the Power LED remains solid
amber after the access point started up, the access point might receive insufficient
PoE power. For more information, see The access point functions as a PoE PD and
the Power/Cloud LED remains solid amber on page 228.
While the access point is starting or in the process of getting an IP address from a
DHCP server (or router functioning as a DHCP server) in your network, the
Power/Cloud LED initially lights solid amber and then blinks amber slowly. After
about two minutes, the Power/Cloud LED turns solid green or solid blue and the
access point is ready for you to perform the initial configuration.
For information about accessing the access point for initial configuration, see Connect
to the access point for initial configuration on page 22.
Network and Access It for Initial
Configuration
User Manual21Install the Access Point in Your
Page 22

Insight Managed WiFi 6 AX6000 Tri-band Multi-Gig Access Point Model WAX630
Connect to the access point for initial configuration
After you set up the access point, you can use several methods to connect to it for initial
configuration.
You can use the NETGEAR Insight app on an iOS or Android mobile device, or use the
Insight Cloud portal or the local browser UI.
The Insight app and the Insight Cloud portal provide ease of access and let you configure
most features that are available on the access point. The local browser UI lets you
configure all features.
For information about using the Insight app or the Insight Cloud portal, see one of the
following sections:
Connect over WiFi using the NETGEAR Insight app on page 22
•
Connect over the Internet using the NETGEAR Insight Cloud portal on page 24
•
For information about using the local browser UI, see one of the following sections:
Connect over WiFi to the local browser UI for initial configuration on page 25
•
Connect over the LAN to the local browser UI for initial configuration on page 30
•
Note: If your network does not include a DHCP server (or a router that functions as a
DHCP server) and you do not perform the initial configuration of the access point as
described in one of these sections, you can connect only five clients to the access point
and the access point can provide an IP address to only five clients. To prevent this
situation, make sure that you perform the initial configuration of the access point.
Connect over WiFi using the NETGEAR Insight app
You can install the NETGEAR Insight app on an iOS or Android mobile device and set
up the access point (and perform many other tasks as well).
Network and Access It for Initial
Configuration
User Manual22Install the Access Point in Your
Page 23

Insight Managed WiFi 6 AX6000 Tri-band Multi-Gig Access Point Model WAX630
IMPORTANT: If you add the access point to a NETGEAR Insight network location and
manage the access point through the Insight app or Insight Cloud portal, the admin
password for the access point changes. That is, the Insight network password for that
location replaces the admin password. To access the local browser UI, you must then
enter the Insight network password and not the admin password. If you later decide to
remove the access point from the Insight network location or change the management
mode to Web-browser mode (see Change the management mode to NETGEAR Insight
or Web-browser on page 140), you must continue to use the Insight network password
to access the local browser UI until you manually change the admin password on the
access point.
For more information about the Insight app, visit insight.netgear.com and see the
NETGEAR knowledge base at netgear.com/support/product/insight.aspx.
To connect to the access point over WiFi using an iOS or Android mobile device:
1.
On your mobile device, go to the app store, search for NETGEAR Insight, and
download the Insight app.
2.
Connect your mobile device to the WiFi network of the access point.
The default SSID is on the access point label on the bottom of the access point and
is shown in the format NETGEARxxxxxx-SETUP, where xxxxxx is the last six
hexadecimal digits of the access point’s MAC address. The default password is
sharedsecret.
3. Launch the Insight app.
4.
If you do not have a NETGEAR account, tap Create NETGEAR Account and follow
the onscreen instructions.
5.
Enter the email address and password for your account and tap LOG IN.
After you log in to your account, the IP address of the access point displays in the
device list.
6.
Write down the access point IP address and save it for later use.
7.
To use the Insight app to configure and manage the access point, tap the access
point and follow the prompts to register the access point and add it to an Insight
network location.
Network and Access It for Initial
Configuration
User Manual23Install the Access Point in Your
Page 24

Insight Managed WiFi 6 AX6000 Tri-band Multi-Gig Access Point Model WAX630
Connect over the Internet using the NETGEAR Insight Cloud portal
The Insight Cloud portal is available for Insight Premium or Insight Pro subscribers. To
use the NETGEAR Insight Cloud portal to configure and manage the access point, the
access point must already be connected to the Internet.
IMPORTANT: If you add the access point to a NETGEAR Insight network location and
manage the access point through the Insight app or Insight Cloud portal, the admin
password for the access point changes. That is, after you add the access point to an
Insight network location, the Insight network password for that location replaces the
admin password. To access the local browser UI, you must then enter the Insight network
password and not the admin password. If you later decide to remove the access point
from the Insight network location or change the management mode to Web-browser
mode (see Change the management mode to NETGEAR Insight or Web-browser on
page 140), you must continue to use the Insight network password to access the local
browser UI until you manually change the admin password on the access point.
For more information about the Insight Cloud portal and the configuration and
management options that are available through the Insight Cloud portal, visit
insight.netgear.com and see the NETGEAR knowledge base at
netgear.com/support/product/insight.aspx.
To connect to the access point over the Internet through the Insight Cloud portal:
1. Visit insight.netgear.com.
The NETGEAR Account Login page displays.
2. Enter your Insight email address and password.
If you do have an Insight account, you can create one.
3. Click the Login button.
You can now add the access point to an Insight network location so that you can
configure and manage the access point.
Network and Access It for Initial
Configuration
User Manual24Install the Access Point in Your
Page 25
Insight Managed WiFi 6 AX6000 Tri-band Multi-Gig Access Point Model WAX630
Connect over WiFi to the local browser UI for initial configuration
This section describes how to connect to the access point for the first time over WiFi
using a WiFi-enabled computer or mobile device (without using the NETGEAR Insight
app) and complete the initial configuration.
To connect over WiFi to the local browser UI for initial configuration:
1.
From your computer or mobile device, connect over WiFi to the access point’s default
WiFi network.
The default SSID is on the access point label on the bottom of the access point and
is shown in the format NETGEARxxxxxx-SETUP, where xxxxxx is the last six
hexadecimal digits of the access point’s MAC address. The default password is
sharedsecret.
2. On the computer or mobile device, launch a web browser and, in the address bar,
enter http://aplogin.net.
Note: You can use http://aplogin.net only during initial setup of the access point.
IMPORTANT: If your browser does not display the Day Zero login page, see the
following step.
3.
If your browser displays a security warning, dismiss the warning by doing one of the
following:
Google Chrome: Click the ADVANCED link. Then, click the Proceed to x.x.x.x
•
(unsafe) link, in which x.x.x.x represents the domain name or IP address of the
device.
Apple Safari: Click the Show Details button. Then, click the visit this website
•
link. If a warning pop-up window displays, click the Visit Website button. If
another pop-up window displays to let you confirm changes to your certificate
trust settings, enter your Mac user name and password and click the Update
Setting button.
Network and Access It for Initial
Configuration
User Manual25Install the Access Point in Your
Page 26
Insight Managed WiFi 6 AX6000 Tri-band Multi-Gig Access Point Model WAX630
Mozilla Firefox: Click the ADVANCED button. Then, click the Add Exception
•
button. In the pop-up window that displays, click the Confirm Security Exception
button.
Microsoft Edge: Select Details > Go on to the webpage.
•
Microsoft Internet Explorer: Click the Continue to this website (not
•
recommended) link.
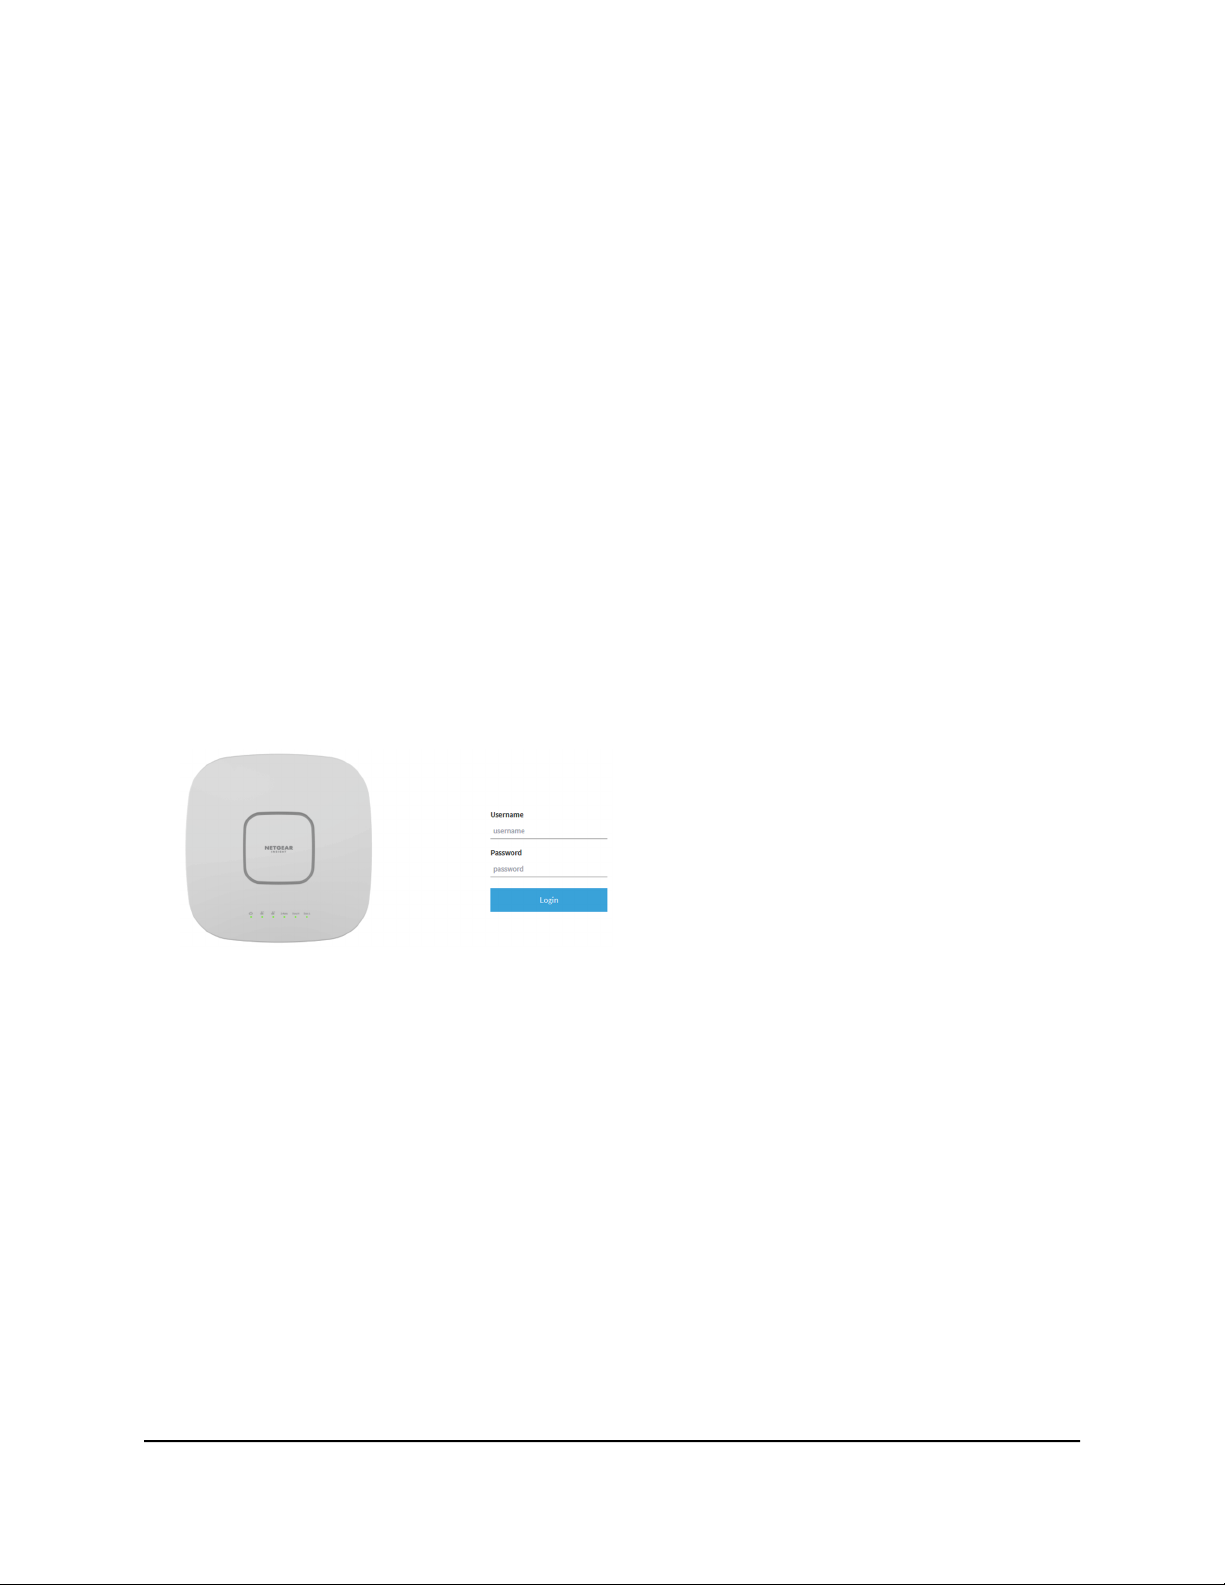
4.
Enter the access point user name and default password.
The user name is admin. The default password is password. The user name and
password are case-sensitive.
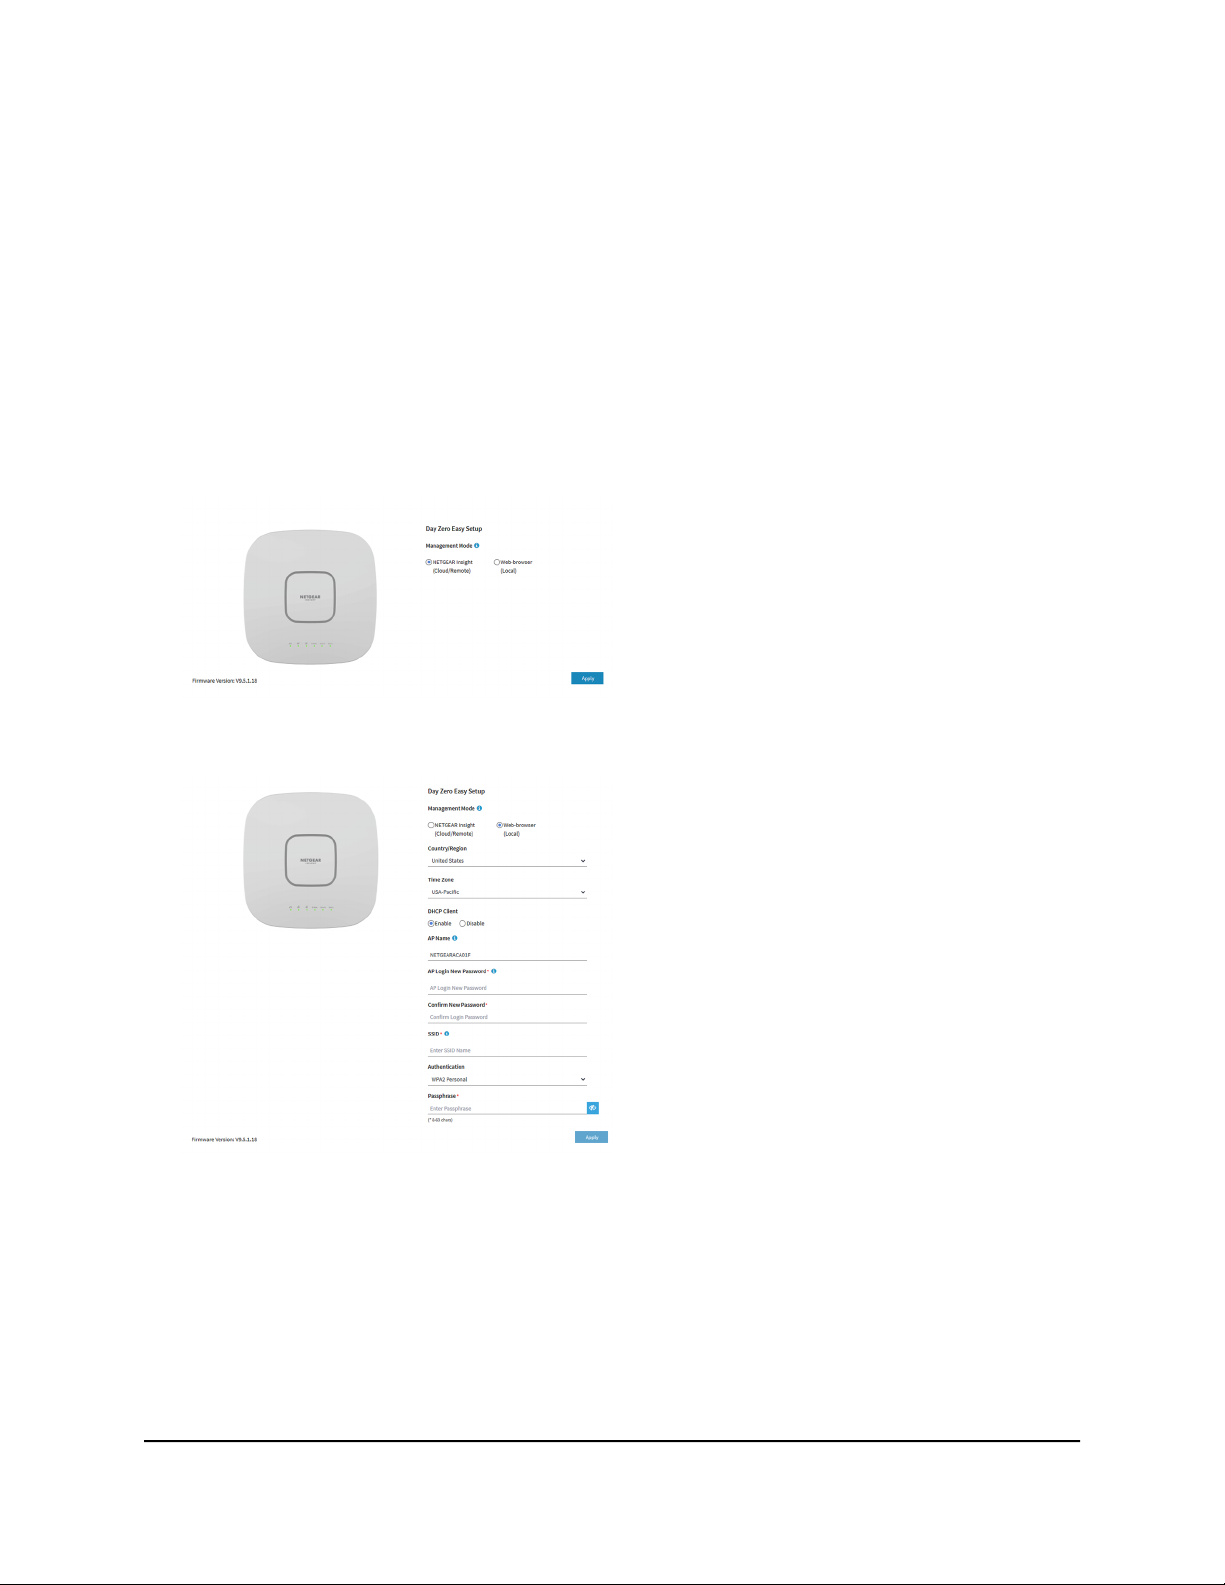
5. Select the Web-browser radio button.
Note: After you save the basic settings that are shown on the page, the Day Zero
Easy Setup page no longer displays when you log in. Instead, a login window displays.
After you log in, the Dashboard page displays.
6.
Enter the settings that are described in the following table.
Network and Access It for Initial
Configuration
User Manual26Install the Access Point in Your
Page 27

Insight Managed WiFi 6 AX6000 Tri-band Multi-Gig Access Point Model WAX630
DescriptionSetting
Country/Region
Time Zone
DHCP Client
AP Name
From the menu, select the country and region in which the access point is operating.
Note: Make sure that the country is set to the location where the device is operating. You
are responsible for complying with the local, regional, and national regulations that are
set for channels, power levels, and frequency ranges.
Note: It might not be legal to operate the access point in a region other than the regions
listed in the menu. If your country or region is not listed, check with your local government
agency.
From the menu, select the time zone for the country and region in which the access point
is operating.
By default, the DHCP client of the access point allows the access point to receive an IP
address from a DHCP server (or router that functions as a DHCP server) in your network.
To set up the access point with a static (fixed) IP address, do the following:
a. Select the Disable radio button.
Additional fields display.
b. Specify the IP address, IP subnet mask, IP address of the default gateway, and IP address
of the DNS server.
As an option, enter a new name for the access point. The name must contain alphanumeric
characters, must contain at least one alphabetical character, cannot be longer than 15
characters, and can contain hyphens but cannot start or end with a hyphen.
By default, the access point name is Netgearxxxxxx, in which xxxxxx represents the last six
hexadecimal digits of the access point’s MAC address.
AP Login New
Password
Enter a new admin password. This is the password that you must use to log in to the access
point’s local browser UI. (It is not the password that you use for WiFi access.)
The password must be 8 to 63 characters in length and must contain at least one uppercase
letter, one lowercase letter, and one number. The following special characters are allowed:
! @ # $ % ^ & * ( )
Save the password for future use.
Network and Access It for Initial
Configuration
User Manual27Install the Access Point in Your
Page 28

Insight Managed WiFi 6 AX6000 Tri-band Multi-Gig Access Point Model WAX630
(Continued)
DescriptionSetting
Enter exactly the same password that you entered in the AP Login New Password field.Confirm New
Password
SSID
7.
From the Authentication menu, select one of the following authentication types for
You cannot use the default SSID for regular operation. The default SSID is for setup only.
Enter a new name with a maximum of 32 characters. You can use a combination of
alphanumeric and special characters, except for quotation marks (") and a backslash (\).
the WiFi network, and, if applicable, set a new passphrase (network key or WiFi
password) for the WiFi network:
Open: Clients are not authenticated, traffic is not encrypted, and 802.11w (PMF)
•
is automatically disabled. This setting does not provide any security and is not
appropriate for most situations.
If you select Open from the menu, the Enhanced Open check box displays and
the Allow Devices to Connect with Open check box can display:
-
Enhanced Open: If you select the Enhanced Open check box, the WiFi
enhanced open feature is enabled. This feature is based on opportunistic
wireless encryption (OWE). The encryption is set to CCM mode protocol
(CCMP) and 802.11w (PMF) is automatically set to mandatory.
- Allow Clients to Authenticate using Legacy Open (OWE Transition Mode):
If you select the Enhanced Open check box, the Allow Clients to
Authenticate using Legacy Open (OWE Transition Mode) check box
displays. If you select this check box, the WiFi network can accept both clients
that support the WiFi enhanced open feature and clients that do not. For
clients that do not support the WiFi open enhanced feature, traffic is not
encrypted. If you do not select this check box, the WiFi network can only
accept clients that support the WiFi enhanced open feature.
WPA2 Personal: This option allows only WiFi clients that support WPA2 to
•
connect to the SSID. Select this option if all WiFi clients are capable of supporting
WPA2. This option uses AES encryption. In the Passphrase field, enter a new
passphrase for the WiFi network.
WPA2/WPA Personal: This option allows both WPA and WPA2 WiFi clients to
•
connect to the SSID. This option uses TKIP and AES encryption. Broadcast packets
use TKIP. For unicast (that is, point-to-point) transmissions, WPA clients use TKIP
and WPA2 clients use AES. In the Passphrase field, enter a new passphrase for
the WiFi network.
Network and Access It for Initial
Configuration
User Manual28Install the Access Point in Your
Page 29

Insight Managed WiFi 6 AX6000 Tri-band Multi-Gig Access Point Model WAX630
WPA3 Personal: This option allows only WiFi clients that support WPA3 to
•
connect to the SSID. Select this option if all WiFi clients are capable of supporting
WPA3. This option uses SAE encryption. In the Passphrase field, enter a new
passphrase for the WiFi network.
WPA3/WPA2 Personal: This option allows both WPA2 and WPA3 WiFi clients
•
to connect to the SSID. This option uses AES and SAE encryption. WPA2 clients
use AES and WPA3 clients use SAE. In the Passphrase field, enter a new
passphrase for the WiFi network.
Note: After you complete the setup process, you can set up WPA2 Enterprise or
WPA3 Enterprise security with RADIUS servers. For more information, see Change
the authentication and encryption for a WiFi network on page 65.
8. Click the Apply button.
Your settings are saved. A pop-up window displays the IP address and the new WiFi
network and password (passphrase).
If you specified a static IP address, save the IP address information because you must
enter the IP address when you log in again.
You are disconnected from the access point. If you changed the default country, the
access point restarts.
9. Reconnect over WiFi to the access point’s WiFi network using the new SSID and
passphrase that you just defined on the Day Zero Easy Setup page.
10.
Enter the access point IP address in the address bar of your browser.
If you changed the IP address, enter the IP address that you specified in Step 6.
A login window displays.
11.
If your browser displays a security warning, dismiss the warning.
For more information, see Step 3.
12. Enter the access point user name and password.
The user name is admin. The password is the one that you just defined on the Day
Zero Easy Setup page. The user name and password are case-sensitive.
The Dashboard page displays. You can now customize the access point settings for
your network environment.
Network and Access It for Initial
Configuration
User Manual29Install the Access Point in Your
Page 30

Insight Managed WiFi 6 AX6000 Tri-band Multi-Gig Access Point Model WAX630
Connect over the LAN to the local browser UI for initial configuration
The following procedure assumes that your network includes a DHCP server (or router
that functions as a DHCP server) and that the access point and your computer are on
the same LAN. By default, the access point functions as a DHCP client.
To connect over the LAN to the local browser UI for initial configuration:
1. To determine the IP address that the DHCP server assigned to the access point,
access the DHCP server or use an IP network scanner.
If you use a Windows-based computer, launch File Explorer (or Windows Explorer),
select Network from the Navigation pane, right-click the access point device icon,
and select Properties to display the IP address.
Note: You can also use the NETGEAR Insight app to discover the IP address that is
assigned to the access point. For more information, see Connect over WiFi using
the NETGEAR Insight app on page 22.
2. On the computer, launch a web browser and, in the address bar, enter the IP address
that is assigned to the access point.
IMPORTANT: If your browser does not display the Day Zero login page, see the
following step.
3.
If your browser displays a security warning, dismiss the warning by doing one of the
following:
Google Chrome: Click the ADVANCED link. Then, click the Proceed to x.x.x.x
•
(unsafe) link, in which x.x.x.x represents the domain name or IP address of the
device.
Apple Safari: Click the Show Details button. Then, click the visit this website
•
link. If a warning pop-up window displays, click the Visit Website button. If
another pop-up window displays to let you confirm changes to your certificate
trust settings, enter your Mac user name and password and click the Update
Setting button.
Network and Access It for Initial
Configuration
User Manual30Install the Access Point in Your
Page 31

Insight Managed WiFi 6 AX6000 Tri-band Multi-Gig Access Point Model WAX630
Mozilla Firefox: Click the ADVANCED button. Then, click the Add Exception
•
button. In the pop-up window that displays, click the Confirm Security Exception
button.
Microsoft Edge: Select Details > Go on to the webpage.
•
Microsoft Internet Explorer: Click the Continue to this website (not
•
recommended) link.
4.
Enter the access point user name and default password.
The user name is admin. The default password is password. The user name and
password are case-sensitive.
5. Select the Web-browser radio button.
Note: After you save the basic settings that are shown on the page, the Day Zero
Easy Setup page no longer displays when you log in. Instead, a login window displays.
After you log in, the Dashboard page displays.
6.
Enter the settings that are described in the following table.
Network and Access It for Initial
Configuration
User Manual31Install the Access Point in Your
Page 32

Insight Managed WiFi 6 AX6000 Tri-band Multi-Gig Access Point Model WAX630
DescriptionSetting
Country/Region
Time Zone
DHCP Client
AP Name
From the menu, select the country and region in which the access point is operating.
Note: Make sure that the country is set to the location where the device is operating. You
are responsible for complying with the local, regional, and national regulations that are
set for channels, power levels, and frequency ranges.
Note: It might not be legal to operate the access point in a region other than the regions
listed in the menu. If your country or region is not listed, check with your local government
agency.
From the menu, select the time zone for the country and region in which the access point
is operating.
By default, the DHCP client of the access point allows the access point to receive an IP
address from a DHCP server (or router that functions as a DHCP server) in your network.
To set up the access point with a static (fixed) IP address, do the following:
a. Select the Disable radio button.
Additional fields display.
b. Specify the IP address, IP subnet mask, IP address of the default gateway, and IP address
of the DNS server.
As an option, enter a new name for the access point. The name must contain alphanumeric
characters, must contain at least one alphabetical character, cannot be longer than 15
characters, and can contain hyphens but cannot start or end with a hyphen.
By default, the access point name is Netgearxxxxxx, in which xxxxxx represents the last six
hexadecimal digits of the access point’s MAC address.
AP Login New
Password
Enter a new admin password. This is the password that you must use to log in to the access
point’s local browser UI. (It is not the password that you use for WiFi access.)
The password must be 8 to 63 characters in length and must contain at least one uppercase
letter, one lowercase letter, and one number. The following special characters are allowed:
! @ # $ % ^ & * ( )
Save the password for future use.
Network and Access It for Initial
Configuration
User Manual32Install the Access Point in Your
Page 33

Insight Managed WiFi 6 AX6000 Tri-band Multi-Gig Access Point Model WAX630
(Continued)
DescriptionSetting
Enter exactly the same password that you entered in the AP Login New Password field.Confirm New
Password
SSID
7.
From the Authentication menu, select one of the following authentication types for
You cannot use the default SSID for regular operation. The default SSID is for setup only.
Enter a new name with a maximum of 32 characters. You can use a combination of
alphanumeric and special characters, except for quotation marks (") and a backslash (\).
the WiFi network, and, if applicable, set a new passphrase (network key or WiFi
password) for the WiFi network:
Open: Clients are not authenticated, traffic is not encrypted, and 802.11w (PMF)
•
is automatically disabled. This setting does not provide any security and is not
appropriate for most situations.
If you select Open from the menu, the Enhanced Open check box displays and
the Allow Devices to Connect with Open check box can display:
-
Enhanced Open: If you select the Enhanced Open check box, the WiFi
enhanced open feature is enabled. This feature is based on opportunistic
wireless encryption (OWE). The encryption is set to CCM mode protocol
(CCMP) and 802.11w (PMF) is automatically set to mandatory.
- Allow Clients to Authenticate using Legacy Open (OWE Transition Mode):
If you select the Enhanced Open check box, the Allow Clients to
Authenticate using Legacy Open (OWE Transition Mode) check box
displays. If you select this check box, the WiFi network can accept both clients
that support the WiFi enhanced open feature and clients that do not. For
clients that do not support the WiFi open enhanced feature, traffic is not
encrypted. If you do not select this check box, the WiFi network can only
accept clients that support the WiFi enhanced open feature.
WPA2 Personal: This option allows only WiFi clients that support WPA2 to
•
connect to the SSID. Select this option if all WiFi clients are capable of supporting
WPA2. This option uses AES encryption. In the Passphrase field, enter a new
passphrase for the WiFi network.
WPA2/WPA Personal: This option allows both WPA and WPA2 WiFi clients to
•
connect to the SSID. This option uses TKIP and AES encryption. Broadcast packets
use TKIP. For unicast (that is, point-to-point) transmissions, WPA clients use TKIP
and WPA2 clients use AES. In the Passphrase field, enter a new passphrase for
the WiFi network.
Network and Access It for Initial
Configuration
User Manual33Install the Access Point in Your
Page 34

Insight Managed WiFi 6 AX6000 Tri-band Multi-Gig Access Point Model WAX630
WPA3 Personal: This option allows only WiFi clients that support WPA3 to
•
connect to the SSID. Select this option if all WiFi clients are capable of supporting
WPA3. This option uses SAE encryption. In the Passphrase field, enter a new
passphrase for the WiFi network.
WPA3/WPA2 Personal: This option allows both WPA2 and WPA3 WiFi clients
•
to connect to the SSID. This option uses AES and SAE encryption. WPA2 clients
use AES and WPA3 clients use SAE. In the Passphrase field, enter a new
passphrase for the WiFi network.
Note: After you complete the setup process, you can set up WPA2 Enterprise or
WPA3 Enterprise security with RADIUS servers. For more information, see Change
the authentication and encryption for a WiFi network on page 65.
8. Click the Apply button.
Your settings are saved. A pop-up window displays the IP address and the new WiFi
network and password (passphrase).
If you specified a static IP address, save the IP address information because you must
enter the IP address when you log in again.
If you changed the default country, the access point restarts.
Note: Do not close the page!
After a short period, the Dashboard page displays automatically. If the Dashboard
page does not display, for example, because you assigned a static IP address, see
the next step.
You can now customize the access point settings for your network environment.
Network and Access It for Initial
Configuration
User Manual34Install the Access Point in Your
Page 35

Insight Managed WiFi 6 AX6000 Tri-band Multi-Gig Access Point Model WAX630
9.
If the Dashboard does not display automatically, do the following:
a.
Take one of the following actions:
If you assigned a static IP address to the access point, enter the IP address
•
that you specified in Step 6 in the address bar of the web browser.
If you did not assign a static IP address, reenter the IP address that is displayed
•
in the address bar of the web browser. If that does not work, write down the
IP address, close the web browser, launch the web browser again, and then
reenter the IP address in the address bar of the web browser.
If you did not assign a static IP address and you closed the page so that you
•
cannot see the IP address of the access point, use an IP scanner tool, use a
network discovery tool, or access the DHCP server to discover the IP address
of the access point in your network.
Note: You can also use the NETGEAR Insight app to discover the IP address
that is assigned to the access point. For more information, see Connect over
WiFi using the NETGEAR Insight app on page 22.
Then, launch a browser and enter the IP address in the address bar of the
web browser.
A login window displays.
b.
If your browser displays a security warning, dismiss the warning.
For more information, see Step 3.
c. Enter the access point user name and password.
The user name is admin. The password is the one that you just defined on the
Day Zero Easy Setup page. The user name and password are case-sensitive.
The Dashboard page displays. You can now customize the access point settings
for your network environment.
Configure the access point offline using a directly connected computer
You can take the access point offline (that is, disconnect it from your network), connect
a computer through an Ethernet cable to the LAN 2 of the access point, and connect
to the access point over its default IP address so that you can configure it offline. After
you complete the configuration, you can bring the access point online.
Note: After you complete the offline configuration and install the access point in your
network, make sure that you use the LAN 1/PoE++ port for your network connection.
Even if you use a power adapter and therefore do not need a PoE++ connection to the
access point, you must use the LAN 1/PoE++ port for your network connection.
User Manual35Install the Access Point in Your
Network and Access It for Initial
Configuration
Page 36

Insight Managed WiFi 6 AX6000 Tri-band Multi-Gig Access Point Model WAX630
To connect to the access point using a computer that is connected to a LAN 1/PoE++
port of the access point:
1.
Record the IP address and subnet mask of your computer so that you can reinstate
these IP address settings later.
2. Temporarily change the IP address on your computer to 192.168.0.210 with
255.255.255.0 as the subnet mask.
(You can actually use any IP address in the 192.168.0.2–192.168.0.254 range, with
the exception of IP address 192.168.0.100, which is the default IP address of the
access point.)
For more information about changing the IP address on your computer, see the help
or documentation for your computer.
3. Use an Ethernet cable to connect your computer to a LAN 1/PoE++ port on the
access point.
4. On the computer, launch a web browser and enter 192.168.0.100 in the address
bar.
IMPORTANT: If your browser does not display the Day Zero login page, see the
following step.
5.
If your browser displays a security warning, dismiss the warning by doing one of the
following:
Google Chrome: Click the ADVANCED link. Then, click the Proceed to x.x.x.x
•
(unsafe) link, in which x.x.x.x represents the domain name or IP address of the
device.
Apple Safari: Click the Show Details button. Then, click the visit this website
•
link. If a warning pop-up window displays, click the Visit Website button. If
another pop-up window displays to let you confirm changes to your certificate
trust settings, enter your Mac user name and password and click the Update
Setting button.
Mozilla Firefox: Click the ADVANCED button. Then, click the Add Exception
•
button. In the pop-up window that displays, click the Confirm Security Exception
button.
User Manual36Install the Access Point in Your
Network and Access It for Initial
Configuration
Page 37

Insight Managed WiFi 6 AX6000 Tri-band Multi-Gig Access Point Model WAX630
Microsoft Edge: Select Details > Go on to the webpage.
•
Microsoft Internet Explorer: Click the Continue to this website (not
•
recommended) link.
6.
Enter the access point user name and default password.
The user name is admin. The default password is password. The user name and
password are case-sensitive.
7. Select the Web-browser radio button.
Note: After you save the basic settings that are shown on the page, the Day Zero
Easy Setup page no longer displays when you log in. Instead, a login window displays.
After you log in, the Dashboard page displays.
8.
Enter the settings that are described in the following table.
Network and Access It for Initial
Configuration
User Manual37Install the Access Point in Your
Page 38

Insight Managed WiFi 6 AX6000 Tri-band Multi-Gig Access Point Model WAX630
DescriptionSetting
Country/Region
Time Zone
DHCP Client
AP Name
From the menu, select the country and region in which the access point is operating.
Note: Make sure that the country is set to the location where the device is operating. You
are responsible for complying with the local, regional, and national regulations that are
set for channels, power levels, and frequency ranges.
Note: It might not be legal to operate the access point in a region other than the regions
listed in the menu. If your country or region is not listed, check with your local government
agency.
From the menu, select the time zone for the country and region in which the access point
is operating.
By default, the DHCP client of the access point allows the access point to receive an IP
address from a DHCP server (or router that functions as a DHCP server) in your network.
To set up the access point with a static (fixed) IP address, do the following:
a. Select the Disable radio button.
Additional fields display.
b. Specify the IP address, IP subnet mask, IP address of the default gateway, and IP address
of the DNS server.
As an option, enter a new name for the access point. The name must contain alphanumeric
characters, must contain at least one alphabetical character, cannot be longer than 15
characters, and can contain hyphens but cannot start or end with a hyphen.
By default, the access point name is Netgearxxxxxx, in which xxxxxx represents the last six
hexadecimal digits of the access point’s MAC address.
AP Login New
Password
Enter a new admin password. This is the password that you must use to log in to the access
point’s local browser UI. (It is not the password that you use for WiFi access.)
The password must be 8 to 63 characters in length and must contain at least one uppercase
letter, one lowercase letter, and one number. The following special characters are allowed:
! @ # $ % ^ & * ( )
Save the password for future use.
Network and Access It for Initial
Configuration
User Manual38Install the Access Point in Your
Page 39

Insight Managed WiFi 6 AX6000 Tri-band Multi-Gig Access Point Model WAX630
(Continued)
DescriptionSetting
Enter exactly the same password that you entered in the AP Login New Password field.Confirm New
Password
SSID
9.
From the Authentication menu, select one of the following authentication types for
You cannot use the default SSID for regular operation. The default SSID is for setup only.
Enter a new name with a maximum of 32 characters. You can use a combination of
alphanumeric and special characters, except for quotation marks (") and a backslash (\).
the WiFi network, and, if applicable, set a new passphrase (network key or WiFi
password) for the WiFi network:
Open: Clients are not authenticated, traffic is not encrypted, and 802.11w (PMF)
•
is automatically disabled. This setting does not provide any security and is not
appropriate for most situations.
If you select Open from the menu, the Enhanced Open check box displays and
the Allow Devices to Connect with Open check box can display:
-
Enhanced Open: If you select the Enhanced Open check box, the WiFi
enhanced open feature is enabled. This feature is based on opportunistic
wireless encryption (OWE). The encryption is set to CCM mode protocol
(CCMP) and 802.11w (PMF) is automatically set to mandatory.
- Allow Clients to Authenticate using Legacy Open (OWE Transition Mode):
If you select the Enhanced Open check box, the Allow Clients to
Authenticate using Legacy Open (OWE Transition Mode) check box
displays. If you select this check box, the WiFi network can accept both clients
that support the WiFi enhanced open feature and clients that do not. For
clients that do not support the WiFi open enhanced feature, traffic is not
encrypted. If you do not select this check box, the WiFi network can only
accept clients that support the WiFi enhanced open feature.
WPA2 Personal: This option allows only WiFi clients that support WPA2 to
•
connect to the SSID. Select this option if all WiFi clients are capable of supporting
WPA2. This option uses AES encryption. In the Passphrase field, enter a new
passphrase for the WiFi network.
WPA2/WPA Personal: This option allows both WPA and WPA2 WiFi clients to
•
connect to the SSID. This option uses TKIP and AES encryption. Broadcast packets
use TKIP. For unicast (that is, point-to-point) transmissions, WPA clients use TKIP
and WPA2 clients use AES. In the Passphrase field, enter a new passphrase for
the WiFi network.
Network and Access It for Initial
Configuration
User Manual39Install the Access Point in Your
Page 40

Insight Managed WiFi 6 AX6000 Tri-band Multi-Gig Access Point Model WAX630
WPA3 Personal: This option allows only WiFi clients that support WPA3 to
•
connect to the SSID. Select this option if all WiFi clients are capable of supporting
WPA3. This option uses SAE encryption. In the Passphrase field, enter a new
passphrase for the WiFi network.
WPA3/WPA2 Personal: This option allows both WPA2 and WPA3 WiFi clients
•
to connect to the SSID. This option uses AES and SAE encryption. WPA2 clients
use AES and WPA3 clients use SAE. In the Passphrase field, enter a new
passphrase for the WiFi network.
Note: After you complete the setup process, you can set up WPA2 Enterprise or
WPA3 Enterprise security with RADIUS servers. For more information, see Change
the authentication and encryption for a WiFi network on page 65.
10. Click the Apply button.
Your settings are saved. A pop-up window displays the IP address and the new WiFi
network and password (passphrase).
If you specified a static IP address, save the IP address information because you must
enter the IP address when you log in again.
You are disconnected from the access point. If you changed the default country, the
access point restarts.
11.
After a few minutes, if the login window does not display automatically, enter
192.168.0.100 in the address bar of your browser.
If you changed the IP address, enter the IP address that you specified in Step 8.
A login window displays.
12.
If your browser does not display the login window but displays a security warning,
dismiss the warning.
For more information, see Step 5.
13. Enter the access point user name and password.
The user name is admin. The password is the one that you just defined on the Day
Zero Easy Setup page. The user name and password are case-sensitive.
The Dashboard page displays. You can now customize the access point settings for
your network environment.
14.
After you complete the setup process, or both the setup and customization process,
you can change the computer back to its original IP address settings.
Network and Access It for Initial
Configuration
User Manual40Install the Access Point in Your
Page 41

Insight Managed WiFi 6 AX6000 Tri-band Multi-Gig Access Point Model WAX630
Log in to the access point after initial setup
After initial setup, the access point is ready for use and you can change the settings and
monitor the traffic.
To log in to the access point’s local browser UI:
1.
Launch a web browser from a computer that is connected to the same network as
the access point or directly to the access point through an Ethernet cable or WiFi
connection.
2. Enter the IP address that is assigned to the access point.
A login window displays.
If your browser does not display the login window but displays a security warning,
dismiss the warning. For more information, see Dismiss a browser security warning
on page 42.
3. Enter the access point user name and password.
The user name is admin. The password is the one that you specified. The user name
and password are case-sensitive.
If you previously added the access point to a NETGEAR Insight network location and
managed the access point through the Insight app or Insight Cloud portal, enter the
Insight network password for that location. For more information, see Connect over
WiFi using the NETGEAR Insight app on page 22.
The Dashboard page displays.
The following figure shows the upper part of the Dashboard page.
Network and Access It for Initial
Configuration
User Manual41Install the Access Point in Your
Page 42

Insight Managed WiFi 6 AX6000 Tri-band Multi-Gig Access Point Model WAX630
The Dashboard page displays various panes that let you see the status of your access
point at a glance. For more information about the Dashboard page and its various
panes, see Monitor the Access Point and the Network on page 166.
Dismiss a browser security warning
When you enter the IP address that is assigned to the access point in the address field
of your browser, a security warning can display. This is normal. You can just dismiss the
security warning.
To dismiss a browser security warning:
Google Chrome: Click the ADVANCED link. Then, click the Proceed to x.x.x.x
•
(unsafe) link, in which x.x.x.x represents the domain name or IP address of the device.
Apple Safari: Click the Show Details button. Then, click the visit this website link.
•
If a warning pop-up window displays, click the Visit Website button. If another
pop-up window displays to let you confirm changes to your certificate trust settings,
enter your Mac user name and password and click the Update Setting button.
Mozilla Firefox: Click the ADVANCED button. Then, click the Add Exception button.
•
In the pop-up window that displays, click the Confirm Security Exception button.
Microsoft Edge: Select Details > Go on to the webpage.
•
Microsoft Internet Explorer: Click the Continue to this website (not
•
recommended) link.
Network and Access It for Initial
Configuration
User Manual42Install the Access Point in Your
Page 43

4
Install the Access Point in an Insight Instant Mesh WiFi Network
In addition to functioning as a regular standalone access point, the access point can
function in an Insight Instant Mesh WiFi network as either a root access point or an
extender access point.
This chapter describes how you can use the NETGEAR Insight app to connect the access
point to a root access point and let it function as an extender access point in an Insight
Instant Mesh WiFi network. The NETGEAR Insight app is available for Insight Premium
and Insight Pro subscribers.
IMPORTANT: To set up the extender access point in a NETGEAR Insight Instant Mesh
WiFi network with a connection to a root access point, you must use the NETGEAR
Insight app. You cannot use the local browser UI to set up a mesh WiFi connection to
a root access point.
For information about how you can manage and monitor the extender access point with
the NETGEAR Insight app and Insight Cloud portal, visit netgear.com/insight and
netgear.com/support/product/Insight.aspx. For knowledge base articles about NETGEAR
Insight, visit netgear.com/support.
The chapter contains the following sections:
• What are a root access point and an extender access point?
• What is an Insight Instant Mesh WiFi network?
• Requirements for placing an extender access point in a mesh WiFi network
• Install the NETGEAR Insight app to manage an Insight Instant Mesh WiFi network
• Connect the access point as an extender to a root access point
• Connect over the Internet using the NETGEAR Insight Cloud portal
43
Page 44

3
3
4
5
1
2
1
2
3
Insight Managed WiFi 6 AX6000 Tri-band Multi-Gig Access Point Model WAX630
What are a root access point and an extender access point?
The access point can function in an Insight Instant Mesh WiFi network as a root access
point or and extender access point:
Root access point: A mesh-capable access point that is set up with a wired
•
connection to your network and functions as a gateway to another mesh-capable
access point that functions as an extender. On the root access point, use the Ethernet
port for the connection to your network. A root access point can service multiple
extender access points simultaneously.
Extender access point: A mesh-capable access point that functions as an extender
•
access point with a WiFi backhaul connection to a root access point that provides
Internet connectivity. The extender access point is not connected to your network
over a wired connection but over a WiFi connection.
Figure 6. Mesh network with an extender access point and a wired root access point
Number or Icon and Description
A root access point that is connected over Ethernet to a network switch.
An extender access point that is connected over a 5 GHz backhaul WiFi connection to the root access point.
A mobile phone with the Insight app or either a computer or a tablet with access to the Insight Cloud portal.
The Insight app or Insight Cloud portal let you configure and manage the extender access point in the Insight
Instant Mesh WiFi network.
Insight Instant Mesh WiFi
Network
User Manual44Install the Access Point in an
Page 45

4
5
Insight Managed WiFi 6 AX6000 Tri-band Multi-Gig Access Point Model WAX630
(Continued)
Number or Icon and Description
A network switch.
A network router that is connected to the Internet.
Broadcast in the 2.4 GHz radio band.
Broadcast in the 5 GHz high or low radio band.
What is an Insight Instant Mesh WiFi network?
A mesh WiFi network consists of at least one mesh-capable root access point and one
or more extender access points that connect to the root access point over WiFi (see
What are a root access point and an extender access point? on page 44). The root access
point is connected over Ethernet to a router or Internet gateway and provides Internet
access to its extender access points. The root access point and extender access points
work together to cover a potentially large area with WiFi network, which is the mesh
network.
A mesh network can be a good solution if you want to bring WiFi to the following
environments:
Nearby rooms where cabling is not available (in line of sight and in range of the
•
current WiFi reception)
Neighboring office buildings (in line of sight and in range of the current WiFi
•
reception)
Any environment in which you cannot run cables
•
In the mesh WiFi network, the extender access point connects to the root access point
over a WiFi connection and broadcasts (extends) the WiFi network to the WiFi clients:
Backhaul connection. The WiFi connection between the root access point and the
•
extender access point is referred to as the backhaul connection.
Fronthaul connection. The WiFi connection between the extender access point
•
and its WiFi clients is referred to as the fronthaul connection.
User Manual45Install the Access Point in an
Insight Instant Mesh WiFi
Network
Page 46

Insight Managed WiFi 6 AX6000 Tri-band Multi-Gig Access Point Model WAX630
In a NETGEAR Insight Instant Mesh WiFi network, you must use the Insight app to set
up the mesh WiFi connection between the root access point and the extender access
point. That is, you cannot do so through the local browser UI of either the root access
point or the extender access point. In a network with multiple root access points,
NETGEAR Insight automatically connects the extender access point to the root access
point with the strongest WiFi signal.
Although the extender access point broadcasts the same WiFi network or networks as
the root access point, you can also set up a WiFi network on the extender access point,
which then can be broadcast by the root access point and other extender access points
in the mesh network.
The access point can broadcast on the 5 GHz high and low bands (the preferred bands
for the backhaul connection) and the 2.4 GHz band. Depending on the WiFi capability
of the WiFi client, any band can provide the fronthaul connection.
Requirements for placing an extender access point in a mesh WiFi network
The following are the requirements for placing an extender access point in an Insight
Instant Mesh WiFi network:
The existing WiFi network must include at least one mesh-capable access point that
•
runs the latest firmware version. On the root access point, use one Ethernet port for
the connection to your network.
The extender access point must be within range of the WiFi signal of a root access
•
point so that it can sync with the root access point. For a reliable WiFi connection,
place the extender access point less than 25 feet (7.5 m), in a line of sight with minimal
obstacles from the closest root access point.
You must use the NETGEAR Insight app to install the extender access point in the
•
existing WiFi network.
The following NETGEAR access point models can function either as a root access point
or as an extender access point:
WAX610
•
WAX610Y (Although this model can function as an extender access point, you can
•
power it through PoE only.)
WAX620
•
WAX630
•
Insight Instant Mesh WiFi
Network
User Manual46Install the Access Point in an
Page 47

Insight Managed WiFi 6 AX6000 Tri-band Multi-Gig Access Point Model WAX630
WAC564
•
WAC540
•
Note: In a mesh WiFi network with WAX610, WAX610Y, WAX620, or WAX630 models
and WAC564 or WAC540 models, the WAC564 and WAC540 models must run firmware
version 9.0 or a later version.
In the near future, more NETGEAR models might be added to the previous list.
Install the NETGEAR Insight app to manage an Insight Instant Mesh WiFi network
Before you can add the access point to an Insight Instant Mesh WiFi network, you must
install the NETGEAR Insight app on an iOS or Android mobile device. The NETGEAR
Insight app is available for Insight Premium and Insight Pro subscribers.
For more information about the Insight app, visit netgear.com/insight and
netgear.com/support/product/Insight.aspx. For knowledge base articles about NETGEAR
Insight, visit netgear.com/support.
To install the Insight app:
1.
On your mobile device, go to the app store, search for NETGEAR Insight, and
download the Insight app.
2. Launch the Insight app.
3.
If you do not have a NETGEAR account, tap Create NETGEAR Account and follow
the onscreen instructions.
4.
Enter the email address and password for your account and tap LOG IN.
You can now set up the access point mesh WiFi connection (see Connect the access
point as an extender to a root access point on page 48).
Insight Instant Mesh WiFi
Network
User Manual47Install the Access Point in an
Page 48

3
3
4
5
1
2
1
2
3
4
5
Insight Managed WiFi 6 AX6000 Tri-band Multi-Gig Access Point Model WAX630
Connect the access point as an extender to a root access point
Use the NETGEAR Insight app to connect the access point as an extender to a root
access point. The root access point must be set up with a wired connection to a router
or Internet gateway so that the root access point can provide Internet connectivity to
the extender access point.
Figure 7. Connect the extender access point to a wired root access point
Number or Icon and Description
A root access point that is connected over Ethernet to a network switch.
An extender access point that is connected over a 5 GHz backhaul WiFi connection to the root access point.
A mobile phone with the Insight app or either a computer or a tablet with access to the Insight Cloud portal.
The Insight app or Insight Cloud portal let you configure and manage the extender access point in the Insight
Instant Mesh WiFi network.
A network switch.
A network router that is connected to the Internet.
Insight Instant Mesh WiFi
Network
User Manual48Install the Access Point in an
Page 49

Insight Managed WiFi 6 AX6000 Tri-band Multi-Gig Access Point Model WAX630
(Continued)
Number or Icon and Description
Broadcast in the 2.4 GHz radio band.
Broadcast in the 5 GHz high or low radio band.
The extender access point can use any band to establish the backhaul connection to
the root access point and the fronthaul connection to WiFi clients. However, after the
backhaul connection is established, the extender access point automatically switches
to the 5 GHz band as the preferred band for its backhaul connection. Using the NETGEAR
Insight app, you can change the preferred band for the backhaul connection.
To use the NETGEAR Insight app to connect the extender access point to a root
access point in an existing WiFi network:
1.
For a reliable WiFi connection, place the extender access point less than 25 feet
(7.5 m), in a line of sight with minimal obstacles from the closest root access point.
2. Connect the extender access point to a power source.
The Power/Cloud LED of the extender access point lights amber and then lights
green.
IMPORTANT: To prevent a network loop, connect the extender access point to a
PoE++ switch that is not connected to the same network as the root access point or
to the Internet. You can also use an optional power adapter.
3. Connect your smartphone to the existing WiFi network that includes one or more
root access points.
4. Launch the Insight app and sign in to your NETGEAR account.
In most situations, the Insight app detects the extender access point automatically.
This process might take a few minutes.
5.
Do one of the following:
Automatically detected: If the Insight app detects the extender access point
•
automatically, tap the extender access point and follow the onscreen instructions
Insight Instant Mesh WiFi
Network
User Manual49Install the Access Point in an
Page 50

Insight Managed WiFi 6 AX6000 Tri-band Multi-Gig Access Point Model WAX630
to add the extender access point to your Insight account and to an Insight network
location.
Not automatically detected: If the Insight app does not detect the extender
•
access point automatically, do the following:
a. Tap + in the upper-right corner.
b.
Manually add the extender access point to the Insight app using one of the
following options:
- Scan the QR code.
- Scan the serial number bar code.
- Type in the serial number.
c. Follow the onscreen instructions to add the extender access point to your
Insight account and to an Insight network location.
The extender access point attempts to detect and connect to the root access point
that provides the strongest WiFi signal in the Insight Instant Mesh WiFi network.
Note: The initial connection and configuration process might take up to 10 minutes.
The extender access point might restart during the configuration process.
6.
Wait for the extender access point to go through the initial connection and
configuration process and for the Power/Cloud LED to stop blinking amber, green,
and blue and to light solid blue.
Note: The initial connection and configuration process might take up to 10 minutes.
The extender access point might restart during the configuration process.
The Power/Cloud LED lights as follows during the initial connection and configuration
process:
Blinking green: The extender access point is attempting to detect a root access
•
point.
Solid green: The extender access point is making its first connection with the
•
root access point that provides the strongest WiFi signal.
Blinking amber slowly: The extender access point is contacting the network
•
router or DHCP server to receive an IP address.
If the Power/Cloud LED does not stop blinking amber, see Power/Cloud LED is
blinking amber slowly, continuously on page 227.
Blinking amber, green, and blue: The extender access point is being configured
•
as a managed device in the Insight Instant Mesh WiFi network.
Insight Instant Mesh WiFi
Network
User Manual50Install the Access Point in an
Page 51

Insight Managed WiFi 6 AX6000 Tri-band Multi-Gig Access Point Model WAX630
If the Power/Cloud LED does not stop blinking amber, green, and blue, see
Power/Cloud LED does not stop blinking amber, green, and blue on page 229.
When the configuration is complete, the Power/Cloud LED lights as follows:
Solid blue: The configuration is complete and the extender access point is ready
•
for operation. The extender access point functions in the Insight Instant Mesh
WiFi network and is connected to the Insight cloud.
The extender access point is automatically configured to broadcast (extend) the root
access point’s WiFi network.
If you are experiencing difficulty connecting the extender access point with a root access
point, see The extender access point and root access point cannot connect on page
230.
For information about accessing, managing, and monitoring the extender access point
with the NETGEAR Insight app and Insight Cloud portal, visit netgear.com/insight and
netgear.com/support/product/Insight.aspx. For knowledge base articles about NETGEAR
Insight, visit netgear.com/support.
Connect over the Internet using the NETGEAR Insight Cloud portal
The NETGEAR Insight Cloud portal is available for Insight Premium and Insight Pro
subscribers.
After you install the access point in an Insight Instant Mesh WiFi network, you can use
the Insight Cloud portal to configure, manage, and monitor the access point.
For more information about the Insight Cloud portal and the configuration and
management options that are available through the Insight Cloud portal, visit
netgear.com/insight and netgear.com/support/product/Insight.aspx. For knowledge
base articles about NETGEAR Insight, visit netgear.com/support.
To connect to the access point over the Internet through the Insight Cloud portal:
1. Visit insight.netgear.com.
The NETGEAR Account Login page displays.
2. Enter your Insight email address and password.
If you do not own an Insight account, you can create one.
3. Click the Login button.
You can now configure, manage, and monitor the access point.
Insight Instant Mesh WiFi
Network
User Manual51Install the Access Point in an
Page 52

5
Manage the Basic WiFi Features for a WiFi network
The access point can support eight WiFi networks, each with its own unique WiFi settings,
including WiFi security. This chapter describes how you can manage the basic WiFi
features for a WiFi network.
For information about the advanced WiFi features for a WiFi network, see Manage the
Advanced WiFi Features for a WiFi network on page 188.
Note: In this manual, WiFi network means the same as SSID (service set identifier or
WiFi network name) or VAP (virtual access point). That is, when we refer to a WiFi network
we mean an individual SSID or VAP.
The chapter includes the following sections:
• Set up an open or secure WiFi network
• View or change the settings of a WiFi network
• Remove a WiFi network
• Hide or broadcast the SSID for a WiFi network
• Change the VLAN ID for a WiFi network
• Change the authentication and encryption for a WiFi network
• Enable or disable PMF for a WiFi network
• Disable or enable a WiFi network or set up a WiFi activity schedule
• Enable or disable band steering with 802.11k RRM and 802.11v WiFi network
management
Tip: If you want to change the settings of a WiFi network on the access point, use a
wired connection to avoid being disconnected when the new WiFi settings take effect.
52
Page 53

Insight Managed WiFi 6 AX6000 Tri-band Multi-Gig Access Point Model WAX630
Set up an open or secure WiFi network
The access point provides one default SSID that is enabled by default and that broadcasts
on the 2.4 GHz band, 5 GHz high band, and 5 GHz low band. This is the SSID that you
were required to rename when you logged in to the access point for the first time. You
can add more SSIDs: The access point can support a total of eight SSIDs.
The access point can simultaneously support the 2.4 GHz band for 802.11b/g/n/ax WiFi
devices and the 5 GHz high and low bands for 802.11a/na/ac/ax WiFi devices.
SSID stands for service set identifier, which is the WiFi network name. When you create
a new SSID, you are defining the settings for a new WiFi network or virtual access point
(VAP). That means that the access point supports up to eight WiFi networks or VAPs.
If you plan to use WPA2 Enterprise security or WPA3 Enterprise security for your WiFi
network, first set up RADIUS servers (see Set up RADIUS servers on page 120).
To set up a WiFi network:
1.
Launch a web browser from a computer that is connected to the same network as
the access point or directly to the access point through an Ethernet cable or WiFi
connection.
2. Enter the IP address that is assigned to the access point.
A login window displays.
If your browser does not display the login window but displays a security warning,
dismiss the warning. For more information, see Dismiss a browser security warning
on page 42.
3. Enter the access point user name and password.
The user name is admin. The password is the one that you specified. The user name
and password are case-sensitive.
If you previously added the access point to a NETGEAR Insight network location and
managed the access point through the Insight app or Insight Cloud portal, enter the
Insight network password for that location. For more information, see Connect over
WiFi using the NETGEAR Insight app on page 22.
The Dashboard page displays.
4.
Select Management > Configuration > Wireless > Basic.
The page that displays lets you select and add an SSID.
for a WiFi network
User Manual53Manage the Basic WiFi Features
Page 54

Insight Managed WiFi 6 AX6000 Tri-band Multi-Gig Access Point Model WAX630
5.
Click the + button to the left of Add SSID.
The previous figure shows SSID2 as an example.
6.
Specify the WiFi network name (SSID), select whether the SSID is broadcast, and
specify the VLAN ID as described in the following table.
DescriptionSetting
Wireless
Network Name
(SSID)
Broadcast SSID
VLAN ID
The SSID is the WiFi network name of the VAP. Enter a name for the SSID with a maximum
of 32 characters. You can use a combination of alphanumeric and special characters, except
for quotation marks (") and a backslash (\).
For a WiFi device to be able to connect to the VAP, the SSID on the WiFi device must match
the SSID of the VAP.
By default, the VAP broadcasts its SSID so that WiFi clients can detect the SSID in their
scanned network lists. To turn off the SSID broadcast, select the No radio button.
Turning off the SSID broadcast provides additional WiFi security, but users must know the
SSID to be able to join the VAP.
You can enter the VLAN ID that must be associated with the VAP. By default, the VLAN ID is
1.
This VLAN ID is not the same as the 802.1Q VLAN ID that is used for the wired network (see
Set the 802.1Q VLAN and management VLAN on page 127).
for a WiFi network
User Manual54Manage the Basic WiFi Features
Page 55

Insight Managed WiFi 6 AX6000 Tri-band Multi-Gig Access Point Model WAX630
7.
Specify the WiFi security by selecting an option from the Authentication menu and,
if applicable, by specifying a passphrase in the Passphrase field or selecting an
option from the Encryption menu:
Open: A legacy open WiFi network does not provide any security. Any WiFi
•
device can join the network. We recommend that you do not use a legacy open
WiFi network but configure WiFi security. However, a legacy open network might
be appropriate for a WiFi hotspot.
If you select Open from the Authentication menu, the Enhanced Open check
box displays.
- Enhanced Open check box cleared: The WiFi network is a legacy open
network without any security. This is the default option for an open network.
Clients are not authenticated, traffic is not encrypted, and 802.11w (PMF) is
automatically disabled (see Step 9).
-
Enhanced Open check box selected: The WiFi enhanced open feature is
enabled. This feature is based on opportunistic wireless encryption (OWE).
The encryption is set to CCM mode protocol (CCMP) and 802.11w (PMF) is
automatically set to mandatory (see Step 9). If you select the Enhanced Open
check box, the Allow Devices to Connect with Open check box displays.
If you select the Allow Devices to Connect with Open check box, the WiFi
network can accept both clients that support the WiFi enhanced open feature
and clients that do not. For clients that do not support the WiFi open enhanced
feature, traffic is not encrypted.
If you clear the Allow Devices to Connect with Open check box, the WiFi
network can only accept clients that support the WiFi enhanced open feature.
WPA2 Personal: This option, which is the same as WPA2-PSK, is the default
•
setting and uses AES encryption. This type of security enables only WiFi devices
that support WPA2 to join the VAP.
WPA2 provides a secure connection but some legacy WiFi devices do not detect
WPA2 and support only WPA. If your network includes such older devices, select
WPA2/WPA Personal authentication.
In the Passphrase field, enter a phrase of 8 to 63 characters. To join the VAP, a
user must enter this passphrase. To view the passphrase in clear text, click the
eye icon.
WPA2/WPA Personal: This option, which is the same as WPA2-PSK/WPA-PSK,
•
enables WiFi devices that support either WPA2 or WPA to join the VAP. This
option uses AES and TKIP encryption.
WPA-PSK (which uses TKIP) is less secure than WPA2-PSK (which uses AES) and
limits the speed of WiFi devices to 54 Mbps.
In the Passphrase field, enter a phrase of 8 to 63 characters. To join the VAP, a
user must enter this passphrase. To view the passphrase in clear text, click the
eye icon.
for a WiFi network
User Manual55Manage the Basic WiFi Features
Page 56

Insight Managed WiFi 6 AX6000 Tri-band Multi-Gig Access Point Model WAX630
WPA2 Enterprise: This enterprise-level security uses RADIUS for centralized
•
Authentication, Authorization, and Accounting (AAA) management. For WPA2
Enterprise security to function, you must set up RADIUS servers (see Set up RADIUS
servers on page 120).
From the Encryption menu, select the data encryption mode:
-
TKIP + AES. This type of data encryption enables WiFi devices that support
either WPA or WPA2 to join the access point’s WiFi network. This is the default
mode.
-
AES. This type of data encryption provides a secure connection but some
older WiFi devices do not detect WPA2 and support only WPA. Therefore, if
your network includes such older devices, select TKIP + AES encryption.
When you select WPA2 Enterprise authentication, the Dynamic VLAN radio
buttons display:
-
Enable: The RADIUS server can assign a VLAN ID to clients. If the RADIUS
server does not do so, the clients are automatically assigned the VLAN ID that
you configured for the SSID.
-
Disable: The clients are assigned the VLAN ID that you configured for the
SSID. This is the default setting.
WPA3 Personal: This option is the most secure personal authentication option.
•
WPA3 uses SAE encryption and enables only WiFi devices that support WPA3
to join the VAP. If you select this option, 802.11w (PMF) is automatically set to
mandatory (see Step 9).
WPA3 provides a secure connection but some legacy WiFi devices do not detect
WPA3 and support only WPA2. If your network also includes WPA2 devices,
select WPA3/WPA2 Personal authentication.
In the Passphrase field, enter a phrase of 8 to 63 characters. To join the VAP, a
user must enter this passphrase. To view the passphrase in clear text, click the
eye icon.
WPA3/WPA2 Personal: This option, which is the same as WPA3/WPA2-PSK,
•
enables WiFi devices that support either WPA3 or WPA2 to join the VAP. This
option uses SAE and AES encryption.
WPA2-PSK (which uses AES) is less secure than WPA3 (which uses SAE).
In the Passphrase field, enter a phrase of 8 to 63 characters. To join the VAP, a
user must enter this passphrase. To view the passphrase in clear text, click the
eye icon.
WPA3 Enterprise: This enterprise-level security uses RADIUS for centralized
•
Authentication, Authorization, and Accounting (AAA) management. For WPA3
Enterprise security to function, you must set up RADIUS servers (see Set up RADIUS
for a WiFi network
User Manual56Manage the Basic WiFi Features
Page 57

Insight Managed WiFi 6 AX6000 Tri-band Multi-Gig Access Point Model WAX630
servers on page 120). If you select this option, 802.11w (PMF) is automatically set
to mandatory (see Step 9).
When you select WPA3 Enterprise security, the encryption is automatically set to
GCMP256, which is a 256-bit encryption protocol.
When you select WPA3 Enterprise authentication, the Dynamic VLAN radio
buttons display:
-
Enable: The RADIUS server can assign a VLAN ID to clients. If the RADIUS
server does not do so, the clients are automatically assigned the VLAN ID that
you configured for the SSID.
-
Disable: The clients are assigned the VLAN ID that you configured for the
SSID. This is the default setting.
8. Optionally, disable the WiFi broadcast or set up a WiFi activity schedule by selecting
one of the following radio buttons:
Always ON: When you set up an SSID, you are creating a new VAP. By default,
•
the new VAP is enabled and the Always ON radio button is selected.
Always OFF: Select this radio button to set up the SSID but temporarily disable
•
the VAP.
Custom: Select this radio button to set up a broadcast schedule. An icon displays
•
to the right of the radio button. Do the following:
a. Click the icon next to the radio button.
A pop-up window displays.
b.
Either select a predefined time from the Preset menu or select custom time
blocks by clicking the time blocks.
A blue color for a time block indicates that the VAP will be enabled (on). A
gray color for a time block indicates that the VAP will be disabled (off).
c. Click the Done button.
The pop-up window closes.
For each SSID, you can create a single custom schedule. In that schedule, for
each day from 12:00 a.m. to 11:59 p.m., you specify the time or times that the
VAP is disabled.
9. Optionally, enable 802.11w Protected Management Frames (PMF).
Protected Management Frames (PMF), according to the 802.11w standard, is a
security feature that protects unicast and multicast management frames from being
intercepted and changed for malicious purposes. The type of authentication that
for a WiFi network
User Manual57Manage the Basic WiFi Features
Page 58

Insight Managed WiFi 6 AX6000 Tri-band Multi-Gig Access Point Model WAX630
you select determines if this feature is mandatory, optional, disabled. You can also
set it manually.
Mandatory: This option requires devices to use PMF. Devices that do not support
•
PMF cannot connect to the WiFi network. If you select Enhanced Open
authentication, WPA3 Personal authentication, or WPA3 Enterprise authentication,
the radio button for PMF is set to Mandatory, and you cannot change it.
Optional: This option lets the access point automatically activate PMF based on
•
whether devices can support PMF. If you select WPA3/WPA2 Personal
authentication, the radio button for PMF is set to Optional, but you can change
it.
Disable: This option disables PMF. If you select Open, WPA2 Personal,
•
WPA2/WPA Personal, or WPA2 Enterprise authentication, the radio button for
PMF is set to Disabled, but you can change it (except for Open authentication).
10. Optionally, select a single radio band only.
Select a radio button for a single band (2.4 GHz or 5 GHz) or keep the default
selection. By default, the Both radio button is selected, which lets the access point
broadcast the SSID on the 2.4 GHz band and both 5 GHz bands (the high band and
the low band).
11. Optionally, enable band steering with 802.11k radio resource management (RRM)
and 802.11v WiFi network management.
By default, band steering with 802.11k RRM and 802.11v WiFi network management
is disabled for the VAP.
To enable band steering with 802.11k RRM and 802.11v WiFi network management,
select the Enable radio button. Doing so allows the access point, under certain
channel conditions, to steer WiFi devices that are dual-band capable to the 2.4 GHz
band or 5 GHz bands of the VAP. Compared to the 2.4 GHz band, generally more
channels and bandwidth are available in the 5 GHz bands, causing less interference
and allowing for a better user experience.
802.11k RRM and 802.11v WiFi network management affect the network in the
following ways:
802.11k RRM: This feature lets the access point and 802.11k-aware clients
•
dynamically measure the available radio resources. In an 802.11k-enabled
network, access points and clients can send neighbor reports, beacon reports,
and link measurement reports to each other, allowing 802.11k-aware clients to
automatically select the best access point for initial connection or for roaming.
802.11v WiFi network management: This feature lets the access point steer
•
its WiFi clients to the 2.4 GHz band or 5 GHz bands, based on the access point’s
channel load.
for a WiFi network
User Manual58Manage the Basic WiFi Features
Page 59

Insight Managed WiFi 6 AX6000 Tri-band Multi-Gig Access Point Model WAX630
The access point sets the received signal strength indicator (RSSI) threshold
automatically. (That is, you cannot configure the RSSI threshold manually.)
12.
To configure client isolation, configure URL tracking, configure if a DHCP Offer
message is unicast or broadcast, or do all of this, scroll down and click the >
Advanced tab.
13.
Optionally, configure WiFi client isolation.
By default, client isolation is disabled for the VAP, and the Disable radio button is
selected. To block communication between WiFi clients that are associated with the
same SSID or different SSIDs on the access point, select the Enable radio button.
When you select the Enable radio button, the following check boxes display:
Allow Access to AP UI: If the management VLAN and WiFi network VLAN are
•
identical (by default, both are VLAN 1) and you enable client isolation, the Allow
Access to AP UI check box displays. By default, this check box is selected, allowing
an admin user to access the local browser UI over the WiFi network. If you clear
the Allow Access to AP UI check box, an admin user cannot access the local
browser UI over the WiFi network.
If the management VLAN and WiFi network VLAN are identical (which they are
by default), an admin user can always access the local browser UI over a wired
network connection.
Allow access to devices listed below: You can specify static IP addresses or
•
domains (that resolve to static IP addresses) of network devices that are exempt
from isolation so that clients are allowed to reach them. For more information,
see Enable or disable client isolation for a WiFi network on page 189.
14. Optionally, enable URL tracking.
By default, URL tracking is disabled, and the Disable radio button is selected. To
enable URL tracking for all URLs that are requested by WiFi clients that are connected
to the SSID, select the Enable radio button.
User Manual59Manage the Basic WiFi Features
for a WiFi network
Page 60

Insight Managed WiFi 6 AX6000 Tri-band Multi-Gig Access Point Model WAX630
For information about how to view the tracked URLs per SSID or per WiFi client, see
View or download tracked URLs on page 181.
15.
Optionally, change the DHCP Offer message settings.
When a device tries to associate with the WiFi network and negotiates an IP address,
the access point converts the broadcast DHCP offer message that it receives from
the DHCP server to a unicast message, and forwards it to the device. This is the
default option (that is, the Enable radio button is selected). To disable this option
so that the access point does not convert the broadcast DHCP offer messages to
unicast messages, select the Disable radio button.
16.
To configure a captive portal, a MAC ACL, and bandwidth rate limits, see the
information in the following sections:
Set Up and Manage a Captive Portal on page 88
•
Manage local MAC access control lists on page 107 and Select a MAC ACL for a
•
WiFi network on page 193
Set bandwidth rate limits for a WiFi network on page 195
•
Although you could also configure these features while you set up a WiFi network,
these features are more complicated and therefore described separately.
17.
To configure advance rate selection, see Configure advanced rate selection for a
WiFi network on page 196.
18. Click the Apply button.
Your settings are saved.
19. Make sure that you can connect to the new WiFi network.
If you cannot connect to the new WiFi network, check the following:
•
If your WiFi-enabled computer or mobile device is already connected to another
WiFi network in your area, disconnect it from that WiFi network and connect it to
the correct WiFi network. Some WiFi devices automatically connect to the first
open network without WiFi security that they discover.
•
If your WiFi-enabled computer or mobile device is trying to connect to your
network with its old settings (before you changed the settings), update the WiFi
network selection in your WiFi-enabled computer or mobile device to match the
current settings for your network.
• Does your WiFi device display as a connected client? (See Display client
distribution, connected clients, and client trends on page 175.) If it does, it is
connected to the network.
• Are you using the correct WiFi network name (SSID) and password?
for a WiFi network
User Manual60Manage the Basic WiFi Features
Page 61

Insight Managed WiFi 6 AX6000 Tri-band Multi-Gig Access Point Model WAX630
•
If the WiFi authentication and encryption is set to WPA3 Personal, make sure that
the WiFi adapter device driver is updated to the latest version on your
WiFi-enabled computer or mobile device.
View or change the settings of a WiFi network
You can view or change the settings of the default WiFi network (SSID or VAP) or any
custom WiFi network.
To view or change the settings of a WiFi network:
1.
Launch a web browser from a computer that is connected to the same network as
the access point or directly to the access point through an Ethernet cable or WiFi
connection.
2. Enter the IP address that is assigned to the access point.
A login window displays.
If your browser does not display the login window but displays a security warning,
dismiss the warning. For more information, see Dismiss a browser security warning
on page 42.
3. Enter the access point user name and password.
The user name is admin. The password is the one that you specified. The user name
and password are case-sensitive.
If you previously added the access point to a NETGEAR Insight network location and
managed the access point through the Insight app or Insight Cloud portal, enter the
Insight network password for that location. For more information, see Connect over
WiFi using the NETGEAR Insight app on page 22.
The Dashboard page displays.
4.
Select Management > Configuration > Wireless > Basic.
The page that displays lets you select an SSID.
5.
Click the > button to the left of the SSID.
The settings for the selected SSID display.
6.
Change the settings of the WiFi network as needed.
For detailed descriptions of the settings, see Set up an open or secure WiFi network
on page 53.
7.
If you made changes, click the Apply button.
User Manual61Manage the Basic WiFi Features
for a WiFi network
Page 62

Insight Managed WiFi 6 AX6000 Tri-band Multi-Gig Access Point Model WAX630
Your settings are saved.
8.
If you made changes, make sure that you can reconnect over WiFi to the network
with its new settings.
If you cannot connect over WiFi, check the following:
•
If your WiFi-enabled computer or mobile device is already connected to another
WiFi network in your area, disconnect it from that WiFi network and connect it to
the correct WiFi network. Some WiFi devices automatically connect to the first
open network without WiFi security that they discover.
•
If your WiFi-enabled computer or mobile device is trying to connect to your
network with its old settings (before you changed the settings), update the WiFi
network selection in your WiFi-enabled computer or mobile device to match the
current settings for your network.
• Does your WiFi device display as a connected client? (See Display client
distribution, connected clients, and client trends on page 175.) If it does, it is
connected to the network.
• Are you using the correct WiFi network name (SSID) and password?
Remove a WiFi network
You can remove a custom WiFi network (SSID or VAP) that you no longer need. You
cannot remove the default WiFi network.
To remove a WiFi network:
1.
Launch a web browser from a computer that is connected to the same network as
the access point or directly to the access point through an Ethernet cable or WiFi
connection.
2. Enter the IP address that is assigned to the access point.
A login window displays.
If your browser does not display the login window but displays a security warning,
dismiss the warning. For more information, see Dismiss a browser security warning
on page 42.
3. Enter the access point user name and password.
The user name is admin. The password is the one that you specified. The user name
and password are case-sensitive.
If you previously added the access point to a NETGEAR Insight network location and
managed the access point through the Insight app or Insight Cloud portal, enter the
Insight network password for that location. For more information, see Connect over
WiFi using the NETGEAR Insight app on page 22.
for a WiFi network
User Manual62Manage the Basic WiFi Features
Page 63

Insight Managed WiFi 6 AX6000 Tri-band Multi-Gig Access Point Model WAX630
The Dashboard page displays.
4.
Select Management > Configuration > Wireless > Basic.
The page that displays lets you select an SSID.
5.
Click the trash can icon to the right of the SSID.
A warning pop-up window displays.
6. Click the Delete button.
The pop-window closes and the WiFi network is removed.
Hide or broadcast the SSID for a WiFi network
By default, a WiFi network (SSID or VAP) broadcasts its network name (also referred to
as the SSID) so that WiFi clients can detect the SSID in their scanned network lists. For
additional security, you can turn off the SSID broadcast and hide the SSID so that users
must know the SSID to be able to join the WiFi network.
Note: If you set up a wireless distribution system (WDS; see Set up a WiFi Bridge on
page 201), you must keep the SSID broadcast enabled.
To hide or broadcast the network name for a WiFi network:
1.
Launch a web browser from a computer that is connected to the same network as
the access point or directly to the access point through an Ethernet cable or WiFi
connection.
2. Enter the IP address that is assigned to the access point.
A login window displays.
If your browser does not display the login window but displays a security warning,
dismiss the warning. For more information, see Dismiss a browser security warning
on page 42.
3. Enter the access point user name and password.
The user name is admin. The password is the one that you specified. The user name
and password are case-sensitive.
If you previously added the access point to a NETGEAR Insight network location and
managed the access point through the Insight app or Insight Cloud portal, enter the
Insight network password for that location. For more information, see Connect over
WiFi using the NETGEAR Insight app on page 22.
User Manual63Manage the Basic WiFi Features
for a WiFi network
Page 64

Insight Managed WiFi 6 AX6000 Tri-band Multi-Gig Access Point Model WAX630
The Dashboard page displays.
4.
Select Management > Configuration > Wireless > Basic.
The page that displays lets you select an SSID.
5.
Click the > button to the left of the SSID.
The settings for the selected SSID display.
6.
Under Broadcast SSID, select one of the following radio buttons:
No: The SSID is hidden for the WiFi network.
•
Yes: The SSID is broadcast for the WiFi network.
•
7. Click the Apply button.
Your settings are saved.
Change the VLAN ID for a WiFi network
The VLAN ID for a WiFi network is not the same as the 802.1Q VLAN ID that is used for
the wired network (see Set the 802.1Q VLAN and management VLAN on page 127).
CAUTION: Before you change the VLAN ID, be sure that the VLAN is configured on
the network switch and the DHCP server and that the access point and its clients can
get IP addresses over the new VLAN.
To change the VLAN ID for a WiFi network:
1.
Launch a web browser from a computer that is connected to the same network as
the access point or directly to the access point through an Ethernet cable or WiFi
connection.
2. Enter the IP address that is assigned to the access point.
A login window displays.
If your browser does not display the login window but displays a security warning,
dismiss the warning. For more information, see Dismiss a browser security warning
on page 42.
3. Enter the access point user name and password.
The user name is admin. The password is the one that you specified. The user name
and password are case-sensitive.
If you previously added the access point to a NETGEAR Insight network location and
managed the access point through the Insight app or Insight Cloud portal, enter the
User Manual64Manage the Basic WiFi Features
for a WiFi network
Page 65

Insight Managed WiFi 6 AX6000 Tri-band Multi-Gig Access Point Model WAX630
Insight network password for that location. For more information, see Connect over
WiFi using the NETGEAR Insight app on page 22.
The Dashboard page displays.
4.
Select Management > Configuration > Wireless > Basic.
The page that displays lets you select an SSID.
5.
Click the > button to the left of the SSID.
The settings for the selected SSID display.
6.
In the VLAN ID field, enter a ID (that is, a number).
By default, the VLAN ID for a WiFi network is 1.
7. Click the Apply button.
Your settings are saved.
Change the authentication and encryption for a WiFi network
You can change the authentication and encryption of the default WiFi network (SSID or
VAP) or any custom WiFi network.
Before you change the authentication and encryption, consider the types of clients that
must be able to connect to the WiFi network. WPA3 provides a more secure connection
than WPA2, but many WiFi devices might not yet detect WPA3 and support only WPA2.
Similarly, WPA2 provides a more secure connection than WPA, but some legacy WiFi
devices do not detect WPA2 and support only WPA.
If you plan to use WPA2 Enterprise security or WPA3 Enterprise security for your WiFi
network, first set up RADIUS servers (see Set up RADIUS servers on page 120).
To change the authentication and encryption for a WiFi network:
1.
Launch a web browser from a computer that is connected to the same network as
the access point or directly to the access point through an Ethernet cable or WiFi
connection.
2. Enter the IP address that is assigned to the access point.
A login window displays.
If your browser does not display the login window but displays a security warning,
dismiss the warning. For more information, see Dismiss a browser security warning
on page 42.
User Manual65Manage the Basic WiFi Features
for a WiFi network
Page 66

Insight Managed WiFi 6 AX6000 Tri-band Multi-Gig Access Point Model WAX630
3. Enter the access point user name and password.
The user name is admin. The password is the one that you specified. The user name
and password are case-sensitive.
If you previously added the access point to a NETGEAR Insight network location and
managed the access point through the Insight app or Insight Cloud portal, enter the
Insight network password for that location. For more information, see Connect over
WiFi using the NETGEAR Insight app on page 22.
The Dashboard page displays.
4.
Select Management > Configuration > Wireless > Basic.
The page that displays lets you select and add an SSID.
5.
Click the + button to the left of Add SSID.
The settings for the selected SSID display.
6.
From the Authentication menu, select one of the following authentication types for
the WiFi network, and, if applicable, set a new passphrase (network key or WiFi
password) in the Passphrase field or select an option from the Encryption menu:
Open: A legacy open WiFi network does not provide any security. Any WiFi
•
device can join the network. We recommend that you do not use a legacy open
WiFi network but configure WiFi security. However, a legacy open network might
be appropriate for a WiFi hotspot.
If you select Open from the Authentication menu, the Enhanced Open check
box displays:
- Enhanced Open check box cleared: The WiFi network is a legacy open
network without any security. This is the default option for an open network.
Clients are not authenticated, traffic is not encrypted, and 802.11w (PMF) is
automatically disabled (see Enable or disable PMF for a WiFi network on page
69).
-
Enhanced Open check box selected: The WiFi enhanced open feature is
enabled. This feature is based on opportunistic wireless encryption (OWE).
The encryption is set to CCM mode protocol (CCMP) and 802.11w (PMF) is
automatically set to mandatory (see Enable or disable PMF for a WiFi network
on page 69).
If you select the Enhanced Open check box, the Allow Devices to Connect
with Open check box displays.
If you select the Allow Devices to Connect with Open check box, the WiFi
network can accept both clients that support the WiFi enhanced open feature
and clients that do not. For clients that do not support the WiFi open enhanced
feature, traffic is not encrypted.
If you clear the Allow Devices to Connect with Open check box, the WiFi
network can only accept clients that support the WiFi enhanced open feature.
for a WiFi network
User Manual66Manage the Basic WiFi Features
Page 67

Insight Managed WiFi 6 AX6000 Tri-band Multi-Gig Access Point Model WAX630
WPA2 Personal: This option, which is the same as WPA2-PSK, is the default
•
setting and uses AES encryption. This type of security enables only WiFi devices
that support WPA2 to join the VAP.
WPA2 provides a more secure connection than WPA but some legacy WiFi devices
do not detect WPA2 and support only WPA. If your network includes such older
devices, select WPA2/WPA Personal authentication.
In the Passphrase field, enter a phrase of 8 to 63 characters. To join the VAP, a
user must enter this passphrase. To view the passphrase in clear text, click the
eye icon.
WPA2/WPA Personal: This option, which is the same as WPA2-PSK/WPA-PSK,
•
enables WiFi devices that support either WPA2 or WPA to join the VAP. This
option uses AES and TKIP encryption.
WPA-PSK (which uses TKIP) is less secure than WPA2-PSK (which uses AES) and
limits the speed of WiFi devices to 54 Mbps.
In the Passphrase field, enter a phrase of 8 to 63 characters. To join the VAP, a
user must enter this passphrase. To view the passphrase in clear text, click the
eye icon.
WPA2 Enterprise: This enterprise-level security uses RADIUS for centralized
•
Authentication, Authorization, and Accounting (AAA) management. For WPA2
Enterprise security to function, you must set up RADIUS servers (see Set up RADIUS
servers on page 120).
From the Encryption menu, select the data encryption mode:
-
TKIP + AES: This type of data encryption enables WiFi devices that support
either WPA or WPA2 to join the access point’s WiFi network. This is the default
mode.
-
AES: This type of data encryption provides a secure connection but some
older WiFi devices do not detect WPA2 and support only WPA. Therefore, if
your network includes such older devices, select TKIP + AES encryption.
When you select WPA2 Enterprise authentication, the Dynamic VLAN radio
buttons display:
-
Enable: The RADIUS server can assign a VLAN ID to clients. If the RADIUS
server does not do so, the clients are automatically assigned the VLAN ID that
you configured for the SSID.
-
Disable: The clients are assigned the VLAN ID that you configured for the
SSID. This is the default setting.
WPA3 Personal: This option is the most secure personal authentication option.
•
WPA3 uses SAE encryption and enables only WiFi devices that support WPA3
for a WiFi network
User Manual67Manage the Basic WiFi Features
Page 68

Insight Managed WiFi 6 AX6000 Tri-band Multi-Gig Access Point Model WAX630
to join the VAP. If you select this option, 802.11w (PMF) is automatically set to
mandatory (see Enable or disable PMF for a WiFi network on page 69).
WPA3 provides a more secure connection than WPA2 but many WiFi devices
might not yet detect WPA3 and support only WPA2. If your network also includes
WPA2 devices, select WPA3/WPA2 Personal authentication.
In the Passphrase field, enter a phrase of 8 to 63 characters. To join the VAP, a
user must enter this passphrase. To view the passphrase in clear text, click the
eye icon.
WPA3/WPA2 Personal: This option, which is the same as WPA3/WPA2-PSK,
•
enables WiFi devices that support either WPA3 or WPA2 to join the VAP. This
option uses SAE and AES encryption.
WPA2-PSK (which uses AES) is less secure than WPA3 (which uses SAE).
In the Passphrase field, enter a phrase of 8 to 63 characters. To join the VAP, a
user must enter this passphrase. To view the passphrase in clear text, click the
eye icon.
WPA3 Enterprise: This enterprise-level security uses RADIUS for centralized
•
Authentication, Authorization, and Accounting (AAA) management. For WPA3
Enterprise security to function, you must set up RADIUS servers (see Set up RADIUS
servers on page 120). If you select this option, 802.11w (PMF) is automatically set
to mandatory (see Enable or disable PMF for a WiFi network on page 69).
When you select WPA3 Enterprise security, the encryption is automatically set to
GCMP256, which is a 256-bit encryption protocol.
When you select WPA3 Enterprise authentication, the Dynamic VLAN radio
buttons display:
-
Enable: The RADIUS server can assign a VLAN ID to clients. If the RADIUS
server does not do so, the clients are automatically assigned the VLAN ID that
you configured for the SSID.
-
Disable: The clients are assigned the VLAN ID that you configured for the
SSID. This is the default setting.
7. Click the Apply button.
Your settings are saved.
8. Make sure that you can connect to the new WiFi network.
If you cannot connect to the new WiFi network, check the following:
•
If your WiFi-enabled computer or mobile device is already connected to another
WiFi network in your area, disconnect it from that WiFi network and connect it to
the correct WiFi network. Some WiFi devices automatically connect to the first
open network without WiFi security that they discover.
•
If your WiFi-enabled computer or mobile device is trying to connect to your
network with its old settings (before you changed the settings), update the WiFi
for a WiFi network
User Manual68Manage the Basic WiFi Features
Page 69

Insight Managed WiFi 6 AX6000 Tri-band Multi-Gig Access Point Model WAX630
network selection in your WiFi-enabled computer or mobile device to match the
current settings for your network.
• Does your WiFi device display as a connected client? (See Display client
distribution, connected clients, and client trends on page 175.) If it does, it is
connected to the network.
• Are you using the correct WiFi network name (SSID) and password?
•
If you changed the WiFi authentication and encryption to WPA3 Personal, make
sure that the WiFi adapter device driver is updated to the latest version on your
WiFi-enabled computer or mobile device.
Enable or disable PMF for a WiFi network
Protected Management Frames (PMF), according to the 802.11w standard, is a security
feature that protects unicast and multicast management frames from being intercepted
and changed for malicious purposes. The type of authentication that you select
determines if this feature is mandatory, optional, disabled. You can also set it manually.
To enable or disable PMF for a WiFi network:
1.
Launch a web browser from a computer that is connected to the same network as
the access point or directly to the access point through an Ethernet cable or WiFi
connection.
2. Enter the IP address that is assigned to the access point.
A login window displays.
If your browser does not display the login window but displays a security warning,
dismiss the warning. For more information, see Dismiss a browser security warning
on page 42.
3. Enter the access point user name and password.
The user name is admin. The password is the one that you specified. The user name
and password are case-sensitive.
If you previously added the access point to a NETGEAR Insight network location and
managed the access point through the Insight app or Insight Cloud portal, enter the
Insight network password for that location. For more information, see Connect over
WiFi using the NETGEAR Insight app on page 22.
The Dashboard page displays.
4.
Select Management > Configuration > Wireless > Basic.
The page that displays lets you select an SSID.
5.
Click the > button to the left of the SSID.
for a WiFi network
User Manual69Manage the Basic WiFi Features
Page 70

Insight Managed WiFi 6 AX6000 Tri-band Multi-Gig Access Point Model WAX630
The settings for the selected SSID display.
6.
Under 802.11w (PMF), select one of the following radio buttons:
Mandatory: Requires devices to use PMF. Devices that do not support PMF
•
cannot connect to the WiFi network. If you select Enhanced Open authentication,
WPA3 Personal authentication, or WPA3 Enterprise authentication, the radio
button for PMF is set to Mandatory, and you cannot change it.
Optional: Lets the access point automatically activate PMF based on whether
•
devices can support PMF. If you select WPA3/WPA2 Personal authentication, the
radio button for PMF is set to Optional, but you can change it.
Disable: PMF is disabled for the WiFi network. If you select Open, WPA2 Personal,
•
WPA2/WPA Personal, or WPA2 Enterprise authentication, the radio button for
PMF is set to Disabled, but you can change it (except for Open authentication).
7. Click the Apply button.
Your settings are saved.
Disable or enable a WiFi network or set up a WiFi activity schedule
You can temporarily disable a WiFi network (SSID or VAP), you can reenable the WiFi
network, or you can set up a schedule that specifies when the WiFi network is active.
Scheduling a WiFi network a green feature that allows you to turn off the WiFi network
during scheduled vacations, office shutdowns, on evenings, or on weekends.
For each WiFi network, you can create a single custom schedule. In that schedule, for
each day from 12:00 a.m. to 11:59 p.m., you specify the time or times that the VAP is
disabled.
To disable or enable a WiFi network or set up a WiFi activity schedule:
1.
Launch a web browser from a computer that is connected to the same network as
the access point or directly to the access point through an Ethernet cable or WiFi
connection.
2. Enter the IP address that is assigned to the access point.
A login window displays.
If your browser does not display the login window but displays a security warning,
dismiss the warning. For more information, see Dismiss a browser security warning
on page 42.
User Manual70Manage the Basic WiFi Features
for a WiFi network
Page 71

Insight Managed WiFi 6 AX6000 Tri-band Multi-Gig Access Point Model WAX630
3. Enter the access point user name and password.
The user name is admin. The password is the one that you specified. The user name
and password are case-sensitive.
If you previously added the access point to a NETGEAR Insight network location and
managed the access point through the Insight app or Insight Cloud portal, enter the
Insight network password for that location. For more information, see Connect over
WiFi using the NETGEAR Insight app on page 22.
The Dashboard page displays.
4.
Select Management > Configuration > Wireless > Basic.
The page that displays lets you select an SSID.
5.
Click the > button to the left of the SSID.
The settings for the selected SSID display.
6.
Under Schedule, select one of the following radio buttons:
Always ON: The WiFi network is enabled.
•
Always OFF: The WiFi network is disabled.
•
Custom: The WiFi network is enabled or disabled according to a schedule that
•
you must set up.
An icon displays to the right of the radio button.
7.
If you selected Custom in the previous step, do the following:
a. Click the icon next to the radio button.
A pop-up window displays.
b.
Either select a predefined time from the Preset menu or select custom time
blocks by clicking the time blocks.
A blue color for a time block indicates that the WiFi network will be enabled (on).
A gray color for a time block indicates that the WiFi network will be disabled (off).
c. Click the Done button.
The pop-up window closes.
8. Click the Apply button.
Your settings are saved.
for a WiFi network
User Manual71Manage the Basic WiFi Features
Page 72

Insight Managed WiFi 6 AX6000 Tri-band Multi-Gig Access Point Model WAX630
Enable or disable band steering with 802.11k RRM and 802.11v WiFi network management
Band steering lets the access point identify the WiFi devices that are dual-band capable
and steer those devices to the 2.4 GHz or or 5 GHz bands of a WiFi network (SSID or
VAP). Compared to the 2.4 GHz band, generally more channels and bandwidth are
available in the 5 GHz bands, causing less interference and allowing for a better user
experience. Band steering includes 802.11k radio resource management (RRM) and
802.11v WiFi network management. By default, band steering is disabled.
802.11k RRM and 802.11v WiFi network management affect the network in the following
ways:
802.11k RRM: This feature lets the access point and 802.11k-aware clients
•
dynamically measure the available radio resources. In an 802.11k-enabled network,
access points and clients can send neighbor reports, beacon reports, and link
measurement reports to each other, allowing 802.11k-aware clients to automatically
select the best access point for initial connection or for roaming.
802.11v WiFi network management: This feature lets the access point steer its
•
WiFi clients to the 2.4 GHz band or 5 GHz bands, based on the access point’s channel
load. In an environment with multiple access points, 802.11v WiFi network
management helps WiFi clients that are roaming to select the best access point.
The access point sets the received signal strength indicator (RSSI) threshold automatically.
(That is, you cannot configure the RSSI threshold manually.)
To enable or disable band steering with 802.11k RRM and 802.11v WiFi network
management for a WiFi network:
1.
Launch a web browser from a computer that is connected to the same network as
the access point or directly to the access point through an Ethernet cable or WiFi
connection.
2. Enter the IP address that is assigned to the access point.
A login window displays.
If your browser does not display the login window but displays a security warning,
dismiss the warning. For more information, see Dismiss a browser security warning
on page 42.
3. Enter the access point user name and password.
The user name is admin. The password is the one that you specified. The user name
and password are case-sensitive.
If you previously added the access point to a NETGEAR Insight network location and
managed the access point through the Insight app or Insight Cloud portal, enter the
User Manual72Manage the Basic WiFi Features
for a WiFi network
Page 73

Insight Managed WiFi 6 AX6000 Tri-band Multi-Gig Access Point Model WAX630
Insight network password for that location. For more information, see Connect over
WiFi using the NETGEAR Insight app on page 22.
The Dashboard page displays.
4.
Select Management > Configuration > Wireless > Basic.
The page that displays lets you select an SSID.
5.
Click the > button to the left of the SSID.
The settings for the selected SSID display.
6.
Under Band Steering / 802.11 k/v, select one of the following radio buttons:
Disable: Band steering is disabled for the VAP. This is the default setting.
•
Enabled: Under certain channel conditions, the access point steers WiFi devices
•
that are dual-band capable to the 2.4 GHz band or 5 GHz bands of the VAP.
7. Click the Apply button.
Your settings are saved.
for a WiFi network
User Manual73Manage the Basic WiFi Features
Page 74

6
Manage the Basic Radio Features
This chapter describes how you can manage the basic radio features of the access point.
For information about the advanced radio features, see Manage the Advanced Radio
Features on page 207.
CAUTION: If you change a radio feature on the 2.4 GHz radio, the change affects all
WiFi networks that broadcast on the 2.4 GHz radio. Similarly, if you change a radio
feature on a 5 GHz radio (you can configure the 5 GHz high band and 5 GHz low band
separately), the change affects all WiFi networks that broadcast on the 5 GHz high band
or low band radio. If the change is not specific to one radio, the change affects all WiFi
networks on the access point.
The chapter includes the following sections:
• Manage the basic WiFi settings for the radios
• Turn a radio on or off
• Change the WiFi mode for a radio
• Change the channel width for a radio
• Change the guard interval for a radio
• Change the output power for a radio
• Change the channel for a radio
• Manage Quality of Service for a WiFi radio
Tip: If you want to change the radio settings, use a wired connection to avoid being
disconnected when the new radio settings take effect.
74
Page 75

Insight Managed WiFi 6 AX6000 Tri-band Multi-Gig Access Point Model WAX630
Manage the basic WiFi settings for the radios
The basic WiFi settings for each radios apply to all WiFi networks (VAPs or SSIDs) that
are configured on the radio. You can specify the radio settings for the 2.4 GHz, 5 GHz
high band, and 5 GHz low band radios individually.
To manage the basic WiFi settings for the radios:
1.
Launch a web browser from a computer that is connected to the same network as
the access point or directly to the access point through an Ethernet cable or WiFi
connection.
2. Enter the IP address that is assigned to the access point.
A login window displays.
If your browser does not display the login window but displays a security warning,
dismiss the warning. For more information, see Dismiss a browser security warning
on page 42.
3. Enter the access point user name and password.
The user name is admin. The password is the one that you specified. The user name
and password are case-sensitive.
If you previously added the access point to a NETGEAR Insight network location and
managed the access point through the Insight app or Insight Cloud portal, enter the
Insight network password for that location. For more information, see Connect over
WiFi using the NETGEAR Insight app on page 22.
The Dashboard page displays.
Features
User Manual75Manage the Basic Radio
Page 76

Insight Managed WiFi 6 AX6000 Tri-band Multi-Gig Access Point Model WAX630
4.
Select Management > Configuration > Wireless > Basic > Wireless Settings.
The following descriptions apply to all radios, but you can specify the radio settings
for the 2.4 GHz, 5 GHz high band, and 5 GHz low band radios individually.
5.
Configure the following settings:
Turn Radio On: By default, the Turn Radio On check box is selected and the
•
radio broadcasts. Turning off a radio disables WiFi access for the band, which
can be helpful during configuration, network tuning, or troubleshooting.
Wireless Mode:
•
Select one of the following wireless modes (WiFi modes) for the 2.4 GHz radio:
- 11ax: 802.11ax, 802.11ng, 802.11bg, and 802.11b WiFi clients can connect
to the access point. This is the default setting.
- 11ng: 802.11ax, 802.11ng, 802.11bg, and 802.11b WiFi clients can connect
to the access point. However, the speed of 802.11ax clients is limited to the
maximum speed that is supported by 802.11ng (about 400 Mbps).
- 11bg: 802.11ax, 802.11ng, 802.11bg, and 802.11b WiFi clients can connect
to the access point. However, the speed of 802.11ax and 802.11ng clients is
limited to the maximum speed that is supported by 802.11bg (about 54 Mbps).
Features
User Manual76Manage the Basic Radio
Page 77

Insight Managed WiFi 6 AX6000 Tri-band Multi-Gig Access Point Model WAX630
- 11b: 802.11ax, 802.11ng, 802.11bg, and 802.11b WiFi clients can connect
to the access point. However, the speed of 802.11ax, 802.11n, and 802.11bg
clients is limited to the maximum speed that is supported by 802.11b (about
11 Mbps).
Select one of the following wireless modes (WiFi modes) for a 5 GHz radio:
- 11ax: 802.11ax, 802.11ac, 802.11na, and 802.11a WiFi clients can connect
to the access point. This is the default setting.
- 11ac: 802.11ax, 802.11ac, 802.11na, and 802.11a WiFi clients can connect
to the access point. However, the speed of 802.11ax clients is limited to the
maximum speed that is supported by 802.11ac (about 867 Mbps).
- 11na: 802.11ax, 802.11ac, 802.11na, and 802.11a WiFi clients can connect
to the access point. However, the speed of 802.11ax and 802.11ac clients is
limited to the maximum speed that is supported by 802.11na (about 450
Mbps).
- 11a: 802.11ax, 802.11ac, 802.11na, and 802.11a WiFi clients can connect to
the access point. However, the speed of 802.11ax, 802.11ac, 802.11na clients
is limited to the maximum speed that is supported by 802.11a (up to about
54 Mbps).
Channel Width: From the menu, select the channel width for the radio. Your
•
selection from the Wireless Mode menu determines if you can set the channel
width, and if so, which channel widths are available.
Use the following guidelines:
-
A wider channel improves the performance (no or minimal interference and
better data rates).
-
The 802.11n specification allows a 40 MHz–wide channel in addition to the
legacy 20 MHz channel that is available with other modes.
-
The 802.11ac specification allows an 80 MHz–wide channel in addition to the
20 MHz and 40 MHz channels that are available with other modes.
-
The 40 MHz and 80 MHz channels enable higher data rates but leave fewer
channels available for use.
For more information, see Change the channel width for a radio on page 81.
Guard Interval: From the menu, select the transmission power of the radio. You
•
can select 100%(Max), 50%, 25%, 12.5%, or 4%(Min). The default is 100%(Max).
Features
User Manual77Manage the Basic Radio
Page 78

Insight Managed WiFi 6 AX6000 Tri-band Multi-Gig Access Point Model WAX630
Note: If two or more access points are operating in the same area and on the
same channel, interference can occur. In this a situation, you might want to
decrease the output power for the access point. Make sure that you comply with
the regulatory requirements for total radio frequency (RF) output power in your
country.
Channel: From the menu, select the WiFi channel for the radio. The available
•
WiFi channels and frequencies depend on the country that you selected for the
access point and on the radio. The default is Auto, which enables a radio to
automatically select the most suitable channel.
Note: You do not need to change the WiFi channel unless you experience
interference (which is indicated by lost connections).
Note: If you use multiple access points, reduce interference by selecting different
channels for adjacent access points. We recommend a channel spacing of four
channels between adjacent access points (for example, in the 2.4 GHz band, use
channels 1 and 5, or 6 and 10).
6. Click the Apply button.
A warning pop-up window displays.
7. Click the OK button.
The pop-up window closes and your settings are saved. The radio or radios restart
and WiFi clients might need to reconnect.
Turn a radio on or off
By default, the 2.4 GHz, 5 GHz high band, and 5 GHz low band radios broadcast. Turning
off a radio disables WiFi access for the associated band, which affects all WiFi networks
(VAPs or SSIDs) in that band. Turning off a radio can be helpful during configuration,
network tuning, or troubleshooting.
To turn a radio on or off:
1.
Launch a web browser from a computer that is connected to the same network as
the access point or directly to the access point through an Ethernet cable or WiFi
connection.
2. Enter the IP address that is assigned to the access point.
A login window displays.
Features
User Manual78Manage the Basic Radio
Page 79

Insight Managed WiFi 6 AX6000 Tri-band Multi-Gig Access Point Model WAX630
If your browser does not display the login window but displays a security warning,
dismiss the warning. For more information, see Dismiss a browser security warning
on page 42.
3. Enter the access point user name and password.
The user name is admin. The password is the one that you specified. The user name
and password are case-sensitive.
If you previously added the access point to a NETGEAR Insight network location and
managed the access point through the Insight app or Insight Cloud portal, enter the
Insight network password for that location. For more information, see Connect over
WiFi using the NETGEAR Insight app on page 22.
The Dashboard page displays.
4.
Select Management > Configuration > Wireless > Basic > Wireless Settings.
The Wireless Settings page displays.
5.
Take one of the following actions:
Turn a radio on: Select the Turn Radio ON check box for the radio.
•
Turn a radio off: Clear the Turn Radio ON check box for the radio.
•
6. Click the Apply button.
A warning pop-up window displays.
7. Click the OK button.
The pop-up window closes and your settings are saved. The radio or radios restart
and WiFi clients might need to reconnect.
Change the WiFi mode for a radio
By default, all types of WiFi clients can access a WiFi network on the access point, that
is, the WiFi modes on the access point support 802.11ax, 802.11ac, 802.11na, 802.11ng,
802.11bg, 802.11b, and 802.11a clients. You can change the WiFi modes to limit access
to certain types of clients.
To change the WiFi mode for a radio:
1.
Launch a web browser from a computer that is connected to the same network as
the access point or directly to the access point through an Ethernet cable or WiFi
connection.
2. Enter the IP address that is assigned to the access point.
A login window displays.
User Manual79Manage the Basic Radio
Features
Page 80

Insight Managed WiFi 6 AX6000 Tri-band Multi-Gig Access Point Model WAX630
If your browser does not display the login window but displays a security warning,
dismiss the warning. For more information, see Dismiss a browser security warning
on page 42.
3. Enter the access point user name and password.
The user name is admin. The password is the one that you specified. The user name
and password are case-sensitive.
If you previously added the access point to a NETGEAR Insight network location and
managed the access point through the Insight app or Insight Cloud portal, enter the
Insight network password for that location. For more information, see Connect over
WiFi using the NETGEAR Insight app on page 22.
The Dashboard page displays.
4.
Select Management > Configuration > Wireless > Basic > Wireless Settings.
The Wireless Settings page displays.
5.
Select the WiFi mode for the radio:
2.4 GHz radio: Select one of the following WiFi modes for the 2.4 GHz radio:
•
- 11ax: 802.11ax, 802.11ng, 802.11bg, and 802.11b WiFi clients can connect
to the access point. This is the default setting.
- 11ng: 802.11ax, 802.11ng, 802.11bg, and 802.11b WiFi clients can connect
to the access point. However, the speed of 802.11ax clients is limited to the
maximum speed that is supported by 802.11ng (about 400 Mbps).
- 11bg: 802.11ax, 802.11ng, 802.11bg, and 802.11b WiFi clients can connect
to the access point. However, the speed of 802.11ax and 802.11ng clients is
limited to the maximum speed that is supported by 802.11bg (about 54 Mbps).
- 11b: 802.11ax, 802.11ng, 802.11bg, and 802.11b WiFi clients can connect
to the access point. However, the speed of 802.11ax, 802.11n, and 802.11bg
clients is limited to the maximum speed that is supported by 802.11b (about
11 Mbps).
5 GHz radio: Select one of the following WiFi modes for a 5 GHz radio:
•
- 11ax: 802.11ax, 802.11ac, 802.11na, and 802.11a WiFi clients can connect
to the access point. This is the default setting.
Features
- 11ac: 802.11ax, 802.11ac, 802.11na, and 802.11a WiFi clients can connect
to the access point. However, the speed of 802.11ax clients is limited to the
maximum speed that is supported by 802.11ac (about 867 Mbps).
- 11na: 802.11ax, 802.11ac, 802.11na, and 802.11a WiFi clients can connect
to the access point. However, the speed of 802.11ax and 802.11ac clients is
User Manual80Manage the Basic Radio
Page 81

Insight Managed WiFi 6 AX6000 Tri-band Multi-Gig Access Point Model WAX630
limited to the maximum speed that is supported by 802.11na (about 450
Mbps).
- 11a: 802.11ax, 802.11ac, 802.11na, and 802.11a WiFi clients can connect to
the access point. However, the speed of 802.11ax, 802.11ac, 802.11na clients
is limited to the maximum speed that is supported by 802.11a (up to about
54 Mbps).
6. Click the Apply button.
A warning pop-up window displays.
7. Click the OK button.
The pop-up window closes and your settings are saved. The radio or radios restart
and WiFi clients might need to reconnect.
Change the channel width for a radio
Use the following guidelines when you determine the channel width for a radio:
A wider channel generally improves the performance (no or minimal interference
•
and better data rates).
A narrower channel generally results in lower throughput but might provide a more
•
stable connection in a demanding situation, such as an environment with a long
distance between the access point and WiFi clients and more than normal
interference.
The 802.11n specification allows a 40 MHz–wide channel in addition to the legacy
•
20 MHz channel that is available with other WiFi modes.
The 802.11ac specification and the 802.11ax specification for the 5 GHz band allow
•
an 80 MHz–wide channel in addition to the 20 MHz and 40 MHz channels that are
available with other WiFi modes.
The 40 MHz and 80 MHz channels enable higher data rates but leave fewer channels
•
available for use.
Note: We recommend that leave the default options (20 MHz for the 2.4 GHz radio
and 40 MHz for the 5 GHz radios).
The WiFi mode (see Change the WiFi mode for a radio on page 79) determines if you
can set the channel width, and if so, which channel widths are available.
User Manual81Manage the Basic Radio
Features
Page 82

Insight Managed WiFi 6 AX6000 Tri-band Multi-Gig Access Point Model WAX630
To change the channel width for a radio:
1.
Launch a web browser from a computer that is connected to the same network as
the access point or directly to the access point through an Ethernet cable or WiFi
connection.
2. Enter the IP address that is assigned to the access point.
A login window displays.
If your browser does not display the login window but displays a security warning,
dismiss the warning. For more information, see Dismiss a browser security warning
on page 42.
3. Enter the access point user name and password.
The user name is admin. The password is the one that you specified. The user name
and password are case-sensitive.
If you previously added the access point to a NETGEAR Insight network location and
managed the access point through the Insight app or Insight Cloud portal, enter the
Insight network password for that location. For more information, see Connect over
WiFi using the NETGEAR Insight app on page 22.
The Dashboard page displays.
4.
Select Management > Configuration > Wireless > Basic > Wireless Settings.
The Wireless Settings page displays.
5.
From the Channel Width menu for the radio, select one of the following settings.
20 MHz: This is the default setting for the 2.4 GHz radio.
•
40 MHz: This is the default settings for a 5 GHz radio.
•
80 MHz: This selection is available only for a 5 GHz radio.
•
Dynamic 20 / 40 MHz. This selection is available only for the 2.4 GHz radio.
•
Dynamic 20 / 40 / 80 MHz. This selection is available only for a 5 GHz radio.
•
6. Click the Apply button.
A warning pop-up window displays.
7. Click the OK button.
The pop-up window closes and your settings are saved. The radio or radios restart
and WiFi clients might need to reconnect.
Features
User Manual82Manage the Basic Radio
Page 83

Insight Managed WiFi 6 AX6000 Tri-band Multi-Gig Access Point Model WAX630
Change the guard interval for a radio
From the menu, select the guard interval, which protects radio transmissions from
interference. The WiFi mode (see Change the WiFi mode for a radio on page 79)
determines if you can set the guard interval, and if so, which guard intervals are available.
For the 11a, 11b, and 11bg WiFi modes, you cannot set the guard interval at all.
Use the following guidelines:
A shorter guard interval supports more throughput in an environment in which WiFi
•
devices operate at a shorter distance from the access point.
A longer guard interval works well in an environment with multiple SSIDs and WiFi
•
devices that operate at a longer distance from the access point.
Some legacy devices can operate with a long –800ns guard interval only.
•
To change the guard interval for a radio:
1.
Launch a web browser from a computer that is connected to the same network as
the access point or directly to the access point through an Ethernet cable or WiFi
connection.
2. Enter the IP address that is assigned to the access point.
A login window displays.
If your browser does not display the login window but displays a security warning,
dismiss the warning. For more information, see Dismiss a browser security warning
on page 42.
3. Enter the access point user name and password.
The user name is admin. The password is the one that you specified. The user name
and password are case-sensitive.
If you previously added the access point to a NETGEAR Insight network location and
managed the access point through the Insight app or Insight Cloud portal, enter the
Insight network password for that location. For more information, see Connect over
WiFi using the NETGEAR Insight app on page 22.
The Dashboard page displays.
4.
Select Management > Configuration > Wireless > Basic > Wireless Settings.
The Wireless Settings page displays.
5.
From the Guard Interval menu for the radio, select one of the following settings:
Auto: The guard interval is set automatically by the access point. This option is
•
not available in the 11ax WiFi mode.
User Manual83Manage the Basic Radio
Features
Page 84

Insight Managed WiFi 6 AX6000 Tri-band Multi-Gig Access Point Model WAX630
Long-800 ns: This option is available in the 11ax, 11ac, 11na, and 11ng modes.
•
In the 11ax WiFi mode, this option is the default setting.
Double Long-1600 ns: This option is available only in the 11ax WiFi mode.
•
Quadruple Long-3200 ns: This option is available only in the 11ax WiFi mode.
•
6. Click the Apply button.
A warning pop-up window displays.
7. Click the OK button.
The pop-up window closes and your settings are saved. The radio or radios restart
and WiFi clients might need to reconnect.
Change the output power for a radio
By default, the output power of the access point is set at the maximum. If two or more
access points are operating in the same area and on the same channel, interference
can occur. In such a situation, you might want to decrease the output power for the
access point. Make sure that you comply with the regulatory requirements for total radio
frequency (RF) output power in your country.
To change the output power for a radio:
1.
Launch a web browser from a computer that is connected to the same network as
the access point or directly to the access point through an Ethernet cable or WiFi
connection.
2. Enter the IP address that is assigned to the access point.
A login window displays.
If your browser does not display the login window but displays a security warning,
dismiss the warning. For more information, see Dismiss a browser security warning
on page 42.
3. Enter the access point user name and password.
The user name is admin. The password is the one that you specified. The user name
and password are case-sensitive.
If you previously added the access point to a NETGEAR Insight network location and
managed the access point through the Insight app or Insight Cloud portal, enter the
Insight network password for that location. For more information, see Connect over
WiFi using the NETGEAR Insight app on page 22.
The Dashboard page displays.
User Manual84Manage the Basic Radio
Features
Page 85

Insight Managed WiFi 6 AX6000 Tri-band Multi-Gig Access Point Model WAX630
4.
Select Management > Configuration > Wireless > Basic > Wireless Settings.
The Wireless Settings page displays.
5.
From the Output Power menu for the radio, select 100%(Max), 50%, 25%, 12.5%,
or 4%(Min).
The default is 100%(Max).
6. Click the Apply button.
A warning pop-up window displays.
7. Click the OK button.
The pop-up window closes and your settings are saved. The radio or radios restart
and WiFi clients might need to reconnect.
Change the channel for a radio
The available WiFi channels and frequencies depend on the country that you select for
the access point and the radio. The default is Auto, which enables a radio to automatically
select the most suitable channel.
Note: You do not need to change the WiFi channel unless you experience interference
(which is indicated by lost connections).
Note: If you use multiple access points, reduce interference by selecting different
channels for adjacent access points. We recommend a channel spacing of four channels
between adjacent access points (for example, in the 2.4 GHz band, use channels 1 and
5, or 6 and 10).
To change the channel for a radio:
1.
Launch a web browser from a computer that is connected to the same network as
the access point or directly to the access point through an Ethernet cable or WiFi
connection.
2. Enter the IP address that is assigned to the access point.
A login window displays.
If your browser does not display the login window but displays a security warning,
dismiss the warning. For more information, see Dismiss a browser security warning
on page 42.
3. Enter the access point user name and password.
The user name is admin. The password is the one that you specified. The user name
and password are case-sensitive.
User Manual85Manage the Basic Radio
Features
Page 86

Insight Managed WiFi 6 AX6000 Tri-band Multi-Gig Access Point Model WAX630
If you previously added the access point to a NETGEAR Insight network location and
managed the access point through the Insight app or Insight Cloud portal, enter the
Insight network password for that location. For more information, see Connect over
WiFi using the NETGEAR Insight app on page 22.
The Dashboard page displays.
4.
Select Management > Configuration > Wireless > Basic > Wireless Settings.
The Wireless Settings page displays.
5.
From the Channel menu for the radio, select a channel.
The default is Auto. When you select a particular channel, the channel selection
becomes static.
6. Click the Apply button.
A warning pop-up window displays.
7. Click the OK button.
The pop-up window closes and your settings are saved. The radio or radios restart
and WiFi clients might need to reconnect.
Manage Quality of Service for a WiFi radio
You can specify the Quality of Service (QoS) setting for the 2.4 GHz and 5 GHz radios
separately. These settings are enabled by default for each radios. Disabling QoS for a
radio might impact the throughput and speed of WiFi traffic on the access point.
To manage the QoS settings for a WiFi radio:
1.
Launch a web browser from a computer that is connected to the same network as
the access point or directly to the access point through an Ethernet cable or WiFi
connection.
2. Enter the IP address that is assigned to the access point.
A login window displays.
If your browser does not display the login window but displays a security warning,
dismiss the warning. For more information, see Dismiss a browser security warning
on page 42.
3. Enter the access point user name and password.
The user name is admin. The password is the one that you specified. The user name
and password are case-sensitive.
If you previously added the access point to a NETGEAR Insight network location and
managed the access point through the Insight app or Insight Cloud portal, enter the
User Manual86Manage the Basic Radio
Features
Page 87

Insight Managed WiFi 6 AX6000 Tri-band Multi-Gig Access Point Model WAX630
Insight network password for that location. For more information, see Connect over
WiFi using the NETGEAR Insight app on page 22.
The Dashboard page displays.
4.
Select Management > Configuration > Wireless > Basic > QoS Settings.
The QoS Settings page displays.
5.
Enable or disable the following features for the radio by selecting the applicable
Enable or Disable radio buttons:
Wi-Fi Multimedia (WMM): WiFi Multimedia (WMM) is a subset of the 802.11e
•
standard. Time-dependent information such as video or audio is given higher
priority than normal traffic. For WMM to function correctly, WiFi clients must also
support WMM. By enabling WMM, you allow WMM to control upstream traffic
flowing from WiFi devices to the access point and downstream traffic flowing
from the access point to WiFi devices. WMM defines the following four queues
in decreasing order of priority:
- Voice: The highest priority queue with minimum delay, which makes it very
suitable for applications such as VoIP and streaming media.
- Video: The second highest priority queue with low delay. Video applications
are routed to this queue.
-
Best effort: The medium priority queue with medium delay. Most standard
IP applications use this queue.
- Background: The low priority queue with high throughput. Applications such
as FTP that are not time-sensitive but require high throughput can use this
queue.
WMM Powersave: Enabling the WMM Powersave feature saves power for
•
battery-powered devices and fine-tunes power consumption.
6. Click the Apply button.
A warning pop-up window displays.
7. Click the OK button.
The pop-up window closes and your settings are saved. The radio or radios restart
and WiFi clients might need to reconnect.
Features
User Manual87Manage the Basic Radio
Page 88

7
Set Up and Manage a Captive Portal
This chapter describes how you can set up and manage a captive portal on the access
point.
A captive portal is a web page that users see when they attempt to connect to a WiFi
network. A captive portal includes a splash page and usually requires some form of
authentication for the user. The access point supports three types of captive portals:
Click-through captive portal: A basic portal for which the splash page is stored on
•
the access point. For each WiFi network, you can set up a unique click-through
captive portal.
External captive portal: A portal that is hosted by an external captive portal vendor.
•
You can apply an external captive portal to multiple WiFi networks or you can apply
a unique external captive portal to each WiFi network.
Facebook Wi-Fi captive portal: A Facebook business page that serves as a portal.
•
You can configure a single Facebook Wi-Fi captive portal on the access point but
you can apply it to multiple WiFi networks.
The chapter includes the following sections:
• Set up a click-through captive portal for a WiFi network
• Set up an external captive portal for a WiFi network
• Register and configure Facebook Wi-Fi for the access point
• Set up a Facebook Wi-Fi captive portal for a WiFi network
• Unregister the access point from Facebook Wi-Fi
88
Page 89

Insight Managed WiFi 6 AX6000 Tri-band Multi-Gig Access Point Model WAX630
Set up a click-through captive portal for a WiFi network
A click-through captive portal is a basic portal for which the splash page is stored on
the access point, that is, it is not an external captive portal. Use a click-through captive
portal to welcome or instruct WiFi users and limit their sessions. You can require users
to agree to an end user license agreement (EULA) and redirect them a specific website.
A click-through captive portal is specific to the WiFi network (SSID) on which you set it
up.
To set up a click-through captive portal for a WiFi network:
1.
Launch a web browser from a computer that is connected to the same network as
the access point or directly to the access point through an Ethernet cable or WiFi
connection.
2. Enter the IP address that is assigned to the access point.
A login window displays.
If your browser does not display the login window but displays a security warning,
dismiss the warning. For more information, see Dismiss a browser security warning
on page 42.
3. Enter the access point user name and password.
The user name is admin. The password is the one that you specified. The user name
and password are case-sensitive.
If you previously added the access point to a NETGEAR Insight network location and
managed the access point through the Insight app or Insight Cloud portal, enter the
Insight network password for that location. For more information, see Connect over
WiFi using the NETGEAR Insight app on page 22.
The Dashboard page displays.
4.
Select Management > Configuration > Wireless > Basic.
The page that displays lets you select an SSID.
5.
Click the > button to the left of the SSID.
The settings for the selected SSID display.
6. Scroll down and click the > Advanced tab.
The page expands.
7. Select the Captive Portal check box.
The page adjusts. By default, the Click Through radio button is selected.
Portal
User Manual89Set Up and Manage a Captive
Page 90

Insight Managed WiFi 6 AX6000 Tri-band Multi-Gig Access Point Model WAX630
8.
Specify the click-through settings as described in the following table.
DescriptionSetting
Session Timeout (in
min)
Redirect URL
Title
Message
Enter the number of minutes from 1 to 1440 after which a WiFi session is terminated
and a user must log in again. The default is 60 minutes.
To redirect a user to a specific website after login, select the Redirect URL check box
and enter the URL. If the Redirect URL check box is cleared, a user is directed to the
default web page.
Enter the title that is displayed on the captive portal login page. If you do not
customize the title, the default title displays on the captive portal login page.
Enter a message to the user. This message is displayed on the captive portal login
page. If you do not customize the message, the default message displays on the
captive portal login page.
Portal
User Manual90Set Up and Manage a Captive
Page 91

Insight Managed WiFi 6 AX6000 Tri-band Multi-Gig Access Point Model WAX630
(Continued)
DescriptionSetting
JPEG/JPG Image
(Max 500 KB)
EULA (Max 1 KB)
To customize the image that is displayed on the captive portal login page, click the
Browse button and navigate to and select an image. If you do not customize the
image, the default image displays on the captive portal login page.
The field includes a default end user license agreement (EULA). You can enter or
copy custom text into the field. To show the EULA on the captive portal login page,
select the EULA check box.
9. To preview the captive portal login page, click the Preview button.
The following figure shows an example (that is, the figure does not show the default
captive portal but a customized one).
10. Click the Apply button.
Your settings are saved. WiFi clients attempting to connect to the SSID are presented
with the captive portal login page.
Note: An HTTPS session is blocked until after the captive portal authentication
occurs.
User Manual91Set Up and Manage a Captive
Portal
Page 92

Insight Managed WiFi 6 AX6000 Tri-band Multi-Gig Access Point Model WAX630
Set up an external captive portal for a WiFi network
An external captive portal is a portal that is hosted by an external captive portal vendor.
That is, this type of portal is not stored on the access point. For an external captive portal,
you generally must register your devices with and purchase licenses from the vendor.
You can apply an external captive portal to multiple WiFi networks or you can apply a
unique external captive portal to each WiFi network
To set up an external captive portal for a WiFi network:
1.
Launch a web browser from a computer that is connected to the same network as
the access point or directly to the access point through an Ethernet cable or WiFi
connection.
2. Enter the IP address that is assigned to the access point.
A login window displays.
If your browser does not display the login window but displays a security warning,
dismiss the warning. For more information, see Dismiss a browser security warning
on page 42.
3. Enter the access point user name and password.
The user name is admin. The password is the one that you specified. The user name
and password are case-sensitive.
If you previously added the access point to a NETGEAR Insight network location and
managed the access point through the Insight app or Insight Cloud portal, enter the
Insight network password for that location. For more information, see Connect over
WiFi using the NETGEAR Insight app on page 22.
The Dashboard page displays.
4.
Select Management > Configuration > Wireless > Basic.
The page that displays lets you select an SSID.
5.
Click the > button to the left of the SSID.
The settings for the selected SSID display.
6. Scroll down and click the > Advanced tab.
The page expands.
7. Select the Captive Portal check box.
The page adjusts. By default, the Click-Through radio button is selected.
Portal
User Manual92Set Up and Manage a Captive
Page 93

Insight Managed WiFi 6 AX6000 Tri-band Multi-Gig Access Point Model WAX630
8. Click the External Captive Portal radio button.
9.
In the Splash Page URL field, enter the URL that is provided by the vendor.
This URL redirects a user to the splash page on the website that hosts the captive
portal.
10.
Select one of the following Captive Portal Authentication Type radio buttons:
Web/HTTP: Authentication for access to the splash page occurs on the access
•
point using the HTTPS protocol. Specify the following settings:
- Web Authentication URL: Enter the web authentication URL that is provided
by the vendor.
-
Key: Enter the key credential that is provided by the vendor. This field is
optional and depends on the authentication requirements of the vendor.
-
Secret: Enter the secret credential that is provided by the vendor. This field
is optional and depends on the authentication requirements of the vendor.
Radius: Authentication for access to the splash page occurs on an external RADIUS
•
authentication server. The vendor might also require an accounting RADIUS
Portal
User Manual93Set Up and Manage a Captive
Page 94

Insight Managed WiFi 6 AX6000 Tri-band Multi-Gig Access Point Model WAX630
server. Specify the following settings for each RADIUS server, as directed by the
vendor:
-
IPv4 Address: Enter the IP address of the server. The IP address is provided
by the vendor.
- Port: Enter the port number that is used by the server. The IP port number is
provided by the vendor. By default, an authentication server uses port number
1812; an accounting server uses port number 1813.
-
Password: Enter the password (shared secret) for interaction with the server.
The password is provided by the vendor.
11.
Select one of the following FailSafe buttons to specify if users are allowed to reach
the splash page and access the Internet if authentication is not possible:
Enable: If authentication is not possible—for example, because captive portal
•
servers do not respond—users are still allowed to access the Internet for a period
of 30 minutes.
Disable: This is the default setting. If authentication is not possible, users cannot
•
reach the splash page and cannot access the Internet. Instead, they get a message
Oops. Something went wrong. Please try after some time.
12.
Select one of the following Allow HTPPS buttons to specify when secure HTTP
(HTTPS) traffic is allowed to pass through:
Enable: Before authentication occurs, HTTPS traffic is allowed to pass through.
•
Disable: This is the default setting. HTTPS traffic is allowed only after
•
authentication occurs.
13.
Configure the walled garden settings.
The walled garden specifies the external applications and sites that a user can access
from the captive portal. Generally, the vendor provides information about the
applications and sites. The vendor splash page, domain name, and authentication
servers must also be included in the walled garden. Follow the directions of the
vendor.
You can do the following to configure the walled garden:
Add a single URL: In the right field, type the URL, press Enter, and click the Move
•
button.
•
•
Portal
Add multiple URLs: In the right field, paste a list of URLs, and click the Move
button.
Remove one or more URLs: Select the check boxes for URLs, and click the
Remove button.
User Manual94Set Up and Manage a Captive
Page 95

Insight Managed WiFi 6 AX6000 Tri-band Multi-Gig Access Point Model WAX630
Remove all URLs: Select the Select All check box, and click the Remove button.
•
14. Click the Apply button.
Your settings are saved. WiFi clients attempting to connect to the SSID are presented
with the captive portal login page.
Register and configure Facebook Wi-Fi for the access point
Before you can set up Facebook Wi-Fi on the access point so that you can provide
customers WiFi access by letting them check in to an existing Facebook business page
(see Set up a Facebook Wi-Fi captive portal for a WiFi network on page 97), you must
register the access point with Facebook and configure the Facebook settings. By default,
the capability to register is disabled.
To register and configure Facebook Wi-Fi for the access point:
1.
Launch a web browser from a computer that is connected to the same network as
the access point or directly to the access point through an Ethernet cable or WiFi
connection.
2. Enter the IP address that is assigned to the access point.
A login window displays.
If your browser does not display the login window but displays a security warning,
dismiss the warning. For more information, see Dismiss a browser security warning
on page 42.
3. Enter the access point user name and password.
The user name is admin. The password is the one that you specified. The user name
and password are case-sensitive.
If you previously added the access point to a NETGEAR Insight network location and
managed the access point through the Insight app or Insight Cloud portal, enter the
Insight network password for that location. For more information, see Connect over
WiFi using the NETGEAR Insight app on page 22.
The Dashboard page displays.
4.
Select Management > Configuration > Wireless > Basic > Facebook Wi-Fi.
The Facebook Wi-Fi page displays.
5. Select the Register with Facebook Wi-Fi Yes radio button.
The capability to register is enabled. By default, this capability is disabled.
Portal
User Manual95Set Up and Manage a Captive
Page 96

Insight Managed WiFi 6 AX6000 Tri-band Multi-Gig Access Point Model WAX630
6. Click the Apply button.
Your settings are saved and the Add Page button displays.
7. Click the Add Page button.
A browser page launches and displays the Facebook Login page.
8. Log in to the Facebook account with which the Facebook business page is associated.
9. From the Select a Page menu, select the Facebook business page.
10.
Select one of the following bypass mode options:
To allow customers to skip check-in, select the Skip check-in link radio button.
•
If you enable this option, users can either check in to the selected Facebook
business page or skip the check-in.
To require users to enter a WiFi code before they can gain WiFi access, select
•
the Require Wi-Fi code radio button and type a WiFi code in the field that
displays.
If you enable this option, users can either check in to the selected Facebook
business page or skip the check-in by using the WiFi code.
11.
From the Session Length menu, select the period after which users are automatically
logged out.
12.
To add terms of service to the Facebook check-in page, select the Terms of Service
check box and type or copy the terms of service.
13. Click the Save Settings button.
The Facebook Wi-Fi settings are saved.
Portal
User Manual96Set Up and Manage a Captive
Page 97

Insight Managed WiFi 6 AX6000 Tri-band Multi-Gig Access Point Model WAX630
The name of the selected Facebook business page displays on the Facebook Wi-Fi
configuration page, along with the Change Page button, which lets you replace the
selected Facebook business page with another one.
14. To allow clients that are connected to the Facebook captive portal to establish a
secure HTTP (HTTPS) session before the captive portal authentication occurs, select
the Allow HTTPS Enable radio button.
By default, the Allow HTTPS Disable radio button is selected and clients that are
connected to the Facebook captive portal cannot establish an HTTPS session until
after the captive portal authentication occurs.
15. Click the Apply button.
Your settings are saved.
Set up a Facebook Wi-Fi captive portal for a WiFi network
You can provide customers WiFi access by letting them check in to a Facebook business
page. Before you can do so, you must register the access point with Facebook Wi-Fi
(see Register and configure Facebook Wi-Fi for the access point on page 95).
To set up a Facebook Wi-Fi captive portal for a WiFi network:
1.
Launch a web browser from a computer that is connected to the same network as
the access point or directly to the access point through an Ethernet cable or WiFi
connection.
2. Enter the IP address that is assigned to the access point.
A login window displays.
If your browser does not display the login window but displays a security warning,
dismiss the warning. For more information, see Dismiss a browser security warning
on page 42.
3. Enter the access point user name and password.
The user name is admin. The password is the one that you specified. The user name
and password are case-sensitive.
If you previously added the access point to a NETGEAR Insight network location and
managed the access point through the Insight app or Insight Cloud portal, enter the
Insight network password for that location. For more information, see Connect over
WiFi using the NETGEAR Insight app on page 22.
The Dashboard page displays.
User Manual97Set Up and Manage a Captive
Portal
Page 98

Insight Managed WiFi 6 AX6000 Tri-band Multi-Gig Access Point Model WAX630
4.
Select Management > Configuration > Wireless > Basic.
The page that displays lets you select an SSID.
5.
Click the > button to the left of the SSID.
The settings for the selected SSID display.
6. Scroll down and click the > Advanced tab.
The page expands.
7. Select the Captive Portal check box.
The page adjusts. By default, the Click Through radio button is selected.
8. Select the Facebook Wi-Fi radio button.
The page adjusts again because you do not need to specify any further settings on
the page.
Customers receive WiFi access by checking in to a Facebook business page. To use
this option, first register the access point with Facebook Wi-Fi and configure the
Facebook settings (see Register and configure Facebook Wi-Fi for the access point
on page 95).
9. Click the Apply button.
Your settings are saved. WiFi clients attempting to connect to the SSID are presented
with the Facebook business page.
Note: When you set up a captive portal with Facebook Wi-Fi, you can configure the
option to allow clients that are connected to the Facebook captive portal to establish
a secure HTTP (HTTPS) session before the captive portal authentication occurs (see
Register and configure Facebook Wi-Fi for the access point on page 95).
Unregister the access point from Facebook Wi-Fi
If the access point is registered with Facebook Wi-Fi but you no longer want to use that
option for a captive portal or you want to use another Facebook account, you can
unregister the access point from Facebook Wi-Fi and remove the access point’s entry.
Portal
User Manual98Set Up and Manage a Captive
Page 99

Insight Managed WiFi 6 AX6000 Tri-band Multi-Gig Access Point Model WAX630
To unregister the access point from Facebook Wi-Fi and remove the access point’s
entry:
1.
Launch a web browser from a computer that is connected to the same network as
the access point or directly to the access point through an Ethernet cable or WiFi
connection.
2. Enter the IP address that is assigned to the access point.
A login window displays.
If your browser does not display the login window but displays a security warning,
dismiss the warning. For more information, see Dismiss a browser security warning
on page 42.
3. Enter the access point user name and password.
The user name is admin. The password is the one that you specified. The user name
and password are case-sensitive.
If you previously added the access point to a NETGEAR Insight network location and
managed the access point through the Insight app or Insight Cloud portal, enter the
Insight network password for that location. For more information, see Connect over
WiFi using the NETGEAR Insight app on page 22.
The Dashboard page displays.
4.
Select Management > Configuration > Wireless > Basic > Facebook Wi-Fi.
The Facebook Wi-Fi page displays.
5. Select the No radio button.
The capability to register is disabled. However, the access point’s entry on the
Facebook business page is not yet removed.
6. Click the Apply button.
Your settings are saved.
7. Go to the Facebook business page and log in to your account.
8.
Select the check box for the access point’s entry.
9. Click the Delete button.
The access point’s entry is removed.
Portal
User Manual99Set Up and Manage a Captive
Page 100

8
Manage Access and Security
This chapter describes how you can manage access and security features and user
accounts.
The chapter includes the following sections:
• Block specific URLs and keywords for Internet access
• Manage user accounts
• Manage local MAC access control lists
• Manage neighbor AP detection
• Set up RADIUS servers
Note: For information about essential WiFi security (network authentication and
encryption), see Set up an open or secure WiFi network on page 53.
100
 Loading...